peoplesoft introduction to financial reporting
TRANSCRIPT

Introduction to Financials Reporting
Copyright © 2013 University of Alberta
All rights reserved.
The information contained in this manual is proprietary and confidential to the University of Alberta. No part of this manual may be reproduced or transmitted in any form or by any means, electronic or mechanical, including photocopying, recording, or by any information storage and retrieval system, without express written permission from the University of Alberta. Every effort has been made to make this manual as complete and as accurate as possible. The University of Alberta shall accept neither liability nor responsibility to any person or entity with respect to any loss or damages in connection with or arising from the information contained in this manual. The names of software products referred to in this manual are claimed as trademarks or registered trademarks of their respective companies.
Revision Control Table
Introduction to Financial Reporting - Published
Revision Date Version Summary Contributor(s) Dept/Faculty
May 16, 2011 1 First Publication Elly Ducharme, Chandra Wanigaratne
SLD , FS
July 25, 2011 2 Update new logo Elly Ducharme SLD
November 2, 2011
3 Updated program name and website url
Kim MacLock SLD
May 1, 2012 4 Update to Intro page Kim MacLock OLE
Sept 11, 2012 5 Update footer format Kristin Klatchuk OLE
July 25, 2013 6 Update contact info p.27 Elly Ducharme FS

Table of Contents
FN.02 LG v6 Last updated July 25, 2013 Page 1
INTRODUCTION ................................................................................................ 2
Learning Objectives ..................................................................................................... 3 1 nVision Reports .................................................................................................... 3
2 Create efficiency with nVision reporting ............................................................... 3 3 PS Query ............................................................................................................. 3 4 Use Inquiry Pages to Retrieve Data ..................................................................... 3 5 Other reports used in Financials .......................................................................... 3
PRE-ASSESSMENT ........................................................................................... 4
CONCEPT 1: USING NVISION REPORTS .............................................................. 5
1.1 Explain the naming convention for an nVision report description ..................... 5 1.2 Describe the role of trees with nVision reports ................................................. 7
1.3 Generate nVision Reports ................................................................................ 8
1.4 Describe the purpose of nVision Drills ............................................................ 13 1.5 Briefly describe the four types of nVision Drills: .............................................. 14
1.6 Process an nVisionDrill................................................................................... 14
CONCEPT 2: CREATE EFFICIENCY WITH NVISION REPORTING ............................ 19
2.1 Generate a Report Book................................................................................. 19
2.2 Distribute nVision reports and Report Books .................................................. 26
CONCEPT 3: UTILIZING PS QUERY .................................................................. 31
3.1 Analyze the name of a query .......................................................................... 31
3.2 Run a query .................................................................................................... 33 3.3 Schedule a query ........................................................................................... 37
CONCEPT 4 - USE INQUIRY PAGES TO RETRIEVE DATA ..................................... 42
CONCEPT 5 – BRIEFLY DESCRIBE OTHER REPORTS USED IN FINANCIALS .......... 46
CONCLUSION - ACCESSING PEOPLESOFT FINANCIALS ...................................... 47
RESOURCES ................................................................................................. 48
APPENDIX A: KEEPING CURRENT ................................................................... 49
Introduction
FN.02 LG v6 Last updated July 25, 2013 Page 2
Introduction
Purpose and Outcomes This course provides an opportunity for participants to learn about the basic financial reporting practices and tools used at the U of A. By the end of this course, participants will know when and how to extract financial data from PeopleSoft Financials, by:
Generating nVision reports and drills
Running queries
Using inquiry pages
Audience
This course is intended for staff who use PeopleSoft Financials to access basic financial information on a regular basis, using either reports or queries.
Pre-Requisites
It is important that participants have completed the following PeopleSoft User Training Program courses (or have equivalent knowledge and experience) prior to attending the Introduction to Financials Reporting course:
PeopleSoft Overview
Financial Basics (FN.01)
It is also highly recommended that participants:
Review information about the Chart of Accounts (available via the Financial Services website under the Guide to Financial Management section).
Be experienced Microsoft Excel users, with the ability to sort data, filter information, format a spreadsheet, freeze panes (titles of rows and columns), create formulas, and use subtotals to analyze data.
Courses on Excel are available on campus from the Technology Training Centre.1
About the Learning Guide
This Learning Guide is a document for learners to use in the classroom. It outlines the learning objectives for the course, the supporting information for the objectives (identified as Concepts), and hands-on learning activities. The Instructor will lead the class and bring his/her own package of tools and resources to help learners meet the learning objectives.
1 For users interested in receiving basic financial accounting training, courses are available from the Faculty of Extension

Learning Objectives
FN.02 LG v6 Last updated July 25, 2013 Page 3
Learning Objectives
Upon completion of the training, learners will be able to utilize the PS Financial application to:
1 nVision Reports
1.1 Explain what is an nVision report
1.2 Analyze the naming convention for an nVision report description
1.3 Describe the roles of trees with nVision reports
1.4 Generate nVision reports
1.5 Describe the purpose of nVision drills
1.6 Briefly describe the four types of nVision Drills
1.7 Process an nVision drill
2 Create efficiency with nVision reporting
2.1 Generate a Report Book
2.2 Distribute nVision reports and Report Books
3 PS Query
3.1 Analyze the name of a query
3.2 Run a query
3.3 Schedule a query
4 Use Inquiry Pages to Retrieve Data
5 Other reports used in Financials
Unitized Endowment Pool (UEP)
HR Operational Reports

Pre-Assessment
FN.02 LG v6 Last updated July 25, 2013 Page 4
Pre-assessment
1. Do you have any experience with the PeopleSoft Financials Application
a. Have you used any specific functionality in the financials modules (example Travel and Expense)?
b. Are you familiar with the accounting structure used at the U of A?
2. Has anyone run an nVision report?
a. Have you run drilldowns?
b. Have you accessed any reports?
c. What format was used in the report? (example PDF, Excel)
d. Were these reports run by yourself or distributed to you?
3. Are you familiar with the term query?
a. Have you used this functionality in any of the other PeopleSoft applications?
4. Have you used an online inquiry page within the PeopleSoft Application?

Concept 1 – Using nVision Reports
FN.02 LG v6 Last updated July 25, 2013 Page 5
Concept 1: Using nVision Reports nVision is a PeopleSoft reporting tool that uses Microsoft Excel spreadsheets to generate financial reports to assist users in reviewing and verifying financial transactions. nVision reports are created by Financial Services for each reporting unit (department, faculty, or Central Unit) at the University. Units can run the reports but cannot change the layout of the report. On an nVision report, data is initially displayed in a spreadsheet at a summary level, but if detailed information is required, users are able to use DrillDown2.
1.1 Explain the naming convention for an nVision report description
The first step in running a report is to select the correct report to run. The type of report is dependent on the information contained in the Description field on the Report Request page in PeopleSoft Financials. Each description will include a Department Identifier (for the department or range of departments), a Layout ID, and a minimum of one Chartfield Combination. Breaking down the description highlights the type of data the user can expect to see on the report. Here is an example of a Report Request Description.
200400_FSGLV12_FP_DD
Dept Identifier Layout ID CC1 CC2
Department Identifier If the report is based on one department ID (Dept ID), then the Dept ID will be the identifier. If the report is based on numerous departments, then a Tree Node3 is used. Layout ID Layout ID represents a report based on a fund or group of funds which have similar activities. For example, the reports based on funds 100, 210, and 310 would include budgets. These reports can be used with any combination of chartfields, such as Department ID and Program.
2 DrillDown provides underlying details from source tables and is useful when reports are based on
summary ledgers. Refer to section 2.5 for more information. 3 Refer to section 2.3 for more information about reporting trees.

Concept 1 – Using nVision Reports
FN.02 LG v6 Last updated July 25, 2013 Page 6
Chartfield Combination
This segment of the report description (identified in the example as CC1, CC2), specifies pairs of letters that indicate the chartfield combinations upon which the report will be based and how the chartfield values are defined. Only the first character in each pair will be addressed in this guide. The first letter in each combination represents the following chartfields:
In analyzing the elements of the previous example for a Report Request Description,
200400_FSGLV12_FP_DD
This report will extract data for department 200400 using the FSGLV12 layout ID for operating funds100, 210, and 310.
1st letter
Chartfield
F Fund
D Department
P Program
C Class
J Project
A Account

Concept 1 – Using nVision Reports
FN.02 LG v6 Last updated July 25, 2013 Page 7
1.2 Describe the role of trees with nVision reports
A tree is like an organization chart. It is a visual representation of a set of values that are related to each other for the purpose of summarizing and security. A tree is made up of parent and child nodes4. An example of a parent node is the ENGINEERING node where department IDs (child nodes) roll up to the faculty node (parent). One benefit of using trees in reporting is that it helps to create consistency between reports when a number of reports based on the same tree node include the same department IDs. For example, a FSGLV12 report for the ENGINEERING node would include the same departments as the FSFLEX based on the ENGINEERING node.
Analyzing the elements for the Report Request Description utilizing a tree node,
ENGINEERIN5_FSGLV12_FP_DD, Data would be extracted for each department and fund code combination under the tree node ENGINEERING.
4 http://dylanwan.blogspot.com/2008/05/peoplesoft-tree-manager-3-terminology.html
5 Reports based on a range of departments (or a faculty) rather than one department, are identified by the first 10 characters of the
node name in the Report Request Description.

Concept 1 – Using nVision Reports
FN.02 LG v6 Last updated July 25, 2013 Page 8
1.3 Generate nVision Reports
There are four steps to generate an nVision report. The details of each step are outlined in the pages that follow.
Step 1. Select a report request. Step 2. Enter required parameters for running an nVision report. Step 3. Run the report using the Process Scheduler. Step 4. Review the output using Report Manager.
Step 1. Select a Report Request
a. Navigate to the Report Request page:
Reporting Tools/PS/nVision/Define Report Request b. On the Find an Existing Value tab, enter an appropriate value (e.g. the user`s
DeptID) in the Description field.
Refer to Section 1.1 for more information about Report Request descriptions.
c. Click the Search button to produce search results. d. In the Search Results section, click on the correct report selection to open the
nVision Report Request page.
The letters of the steps (a, b, c, d, etc.) match the letters on the related screen shot.
Concept 1 – Using nVision Reports
FN.02 LG v6 Last updated July 25, 2013 Page 9
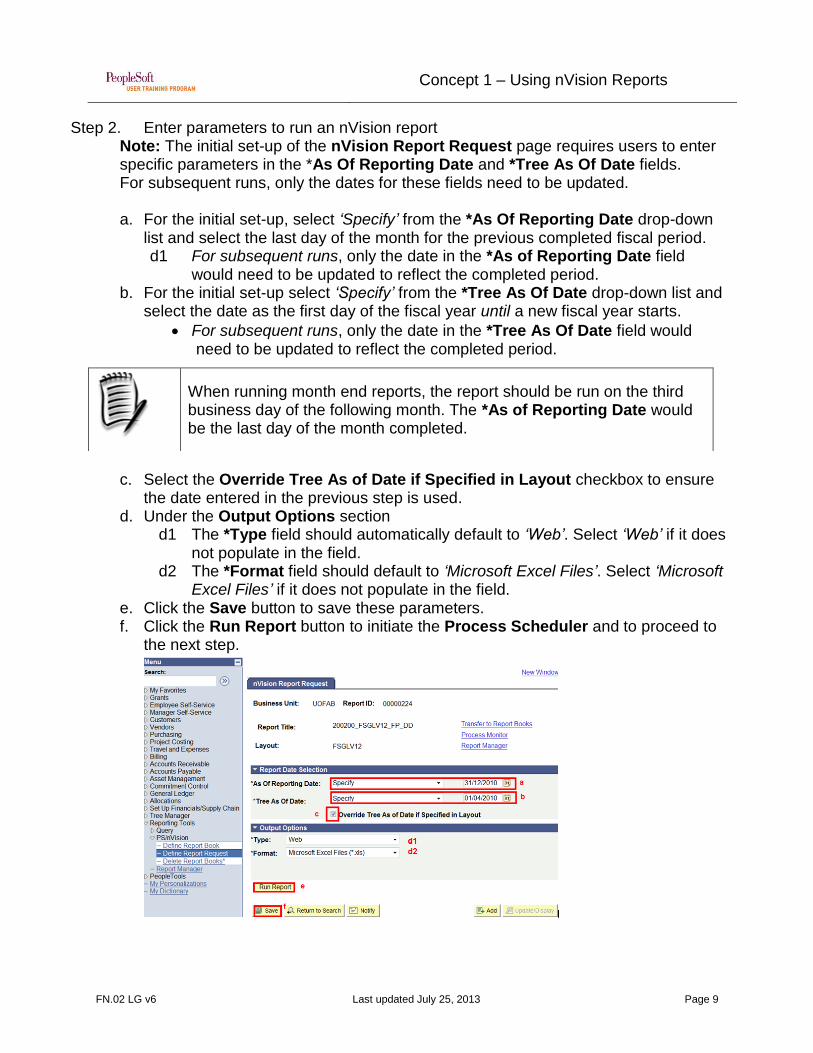
Step 2. Enter parameters to run an nVision report Note: The initial set-up of the nVision Report Request page requires users to enter specific parameters in the *As Of Reporting Date and *Tree As Of Date fields. For subsequent runs, only the dates for these fields need to be updated. a. For the initial set-up, select ‘Specify’ from the *As Of Reporting Date drop-down
list and select the last day of the month for the previous completed fiscal period. d1 For subsequent runs, only the date in the *As of Reporting Date field
would need to be updated to reflect the completed period. b. For the initial set-up select ‘Specify’ from the *Tree As Of Date drop-down list and
select the date as the first day of the fiscal year until a new fiscal year starts.
For subsequent runs, only the date in the *Tree As Of Date field would need to be updated to reflect the completed period.
c. Select the Override Tree As of Date if Specified in Layout checkbox to ensure
the date entered in the previous step is used. d. Under the Output Options section
d1 The *Type field should automatically default to ‘Web’. Select ‘Web’ if it does not populate in the field.
d2 The *Format field should default to ‘Microsoft Excel Files’. Select ‘Microsoft Excel Files’ if it does not populate in the field.
e. Click the Save button to save these parameters. f. Click the Run Report button to initiate the Process Scheduler and to proceed to
the next step.
When running month end reports, the report should be run on the third business day of the following month. The *As of Reporting Date would be the last day of the month completed.
Concept 1 – Using nVision Reports
FN.02 LG v6 Last updated July 25, 2013 Page 10
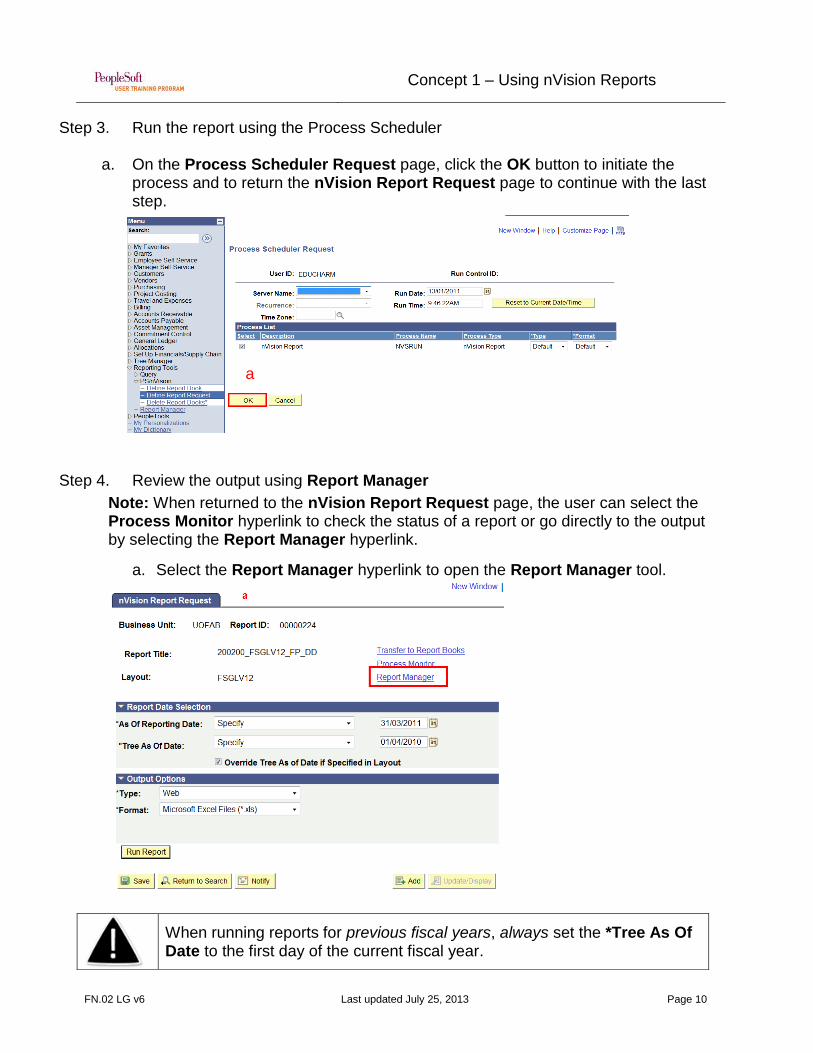
Step 3. Run the report using the Process Scheduler
a. On the Process Scheduler Request page, click the OK button to initiate the process and to return the nVision Report Request page to continue with the last step.
Step 4. Review the output using Report Manager
Note: When returned to the nVision Report Request page, the user can select the Process Monitor hyperlink to check the status of a report or go directly to the output by selecting the Report Manager hyperlink.
a. Select the Report Manager hyperlink to open the Report Manager tool.
When running reports for previous fiscal years, always set the *Tree As Of Date to the first day of the current fiscal year.
a a

Concept 1 – Using nVision Reports
FN.02 LG v6 Last updated July 25, 2013 Page 11
b. Click on the Administration tab to view reports run by the user.
Note: Some reports may take time to generate. If the report does not appear in the Report List section on the Report Manager, click the Refresh button.
c. Select the hyperlinked name of the report under the Description column (in the Report List section) to start a download of the Excel file.
d. Select Open when prompted to Open or Save the file to open the report in an Excel spreadsheet.
Occasionally reports do not appear in the Report Manager. The Process Monitor tool can be used to determine why the report is not listed.
For more information about the Process Monitor, refer to the Learning Resource called: Running a PeopleSoft Report.
Concept 1 – Using nVision Reports
FN.02 LG v6 Last updated July 25, 2013 Page 12
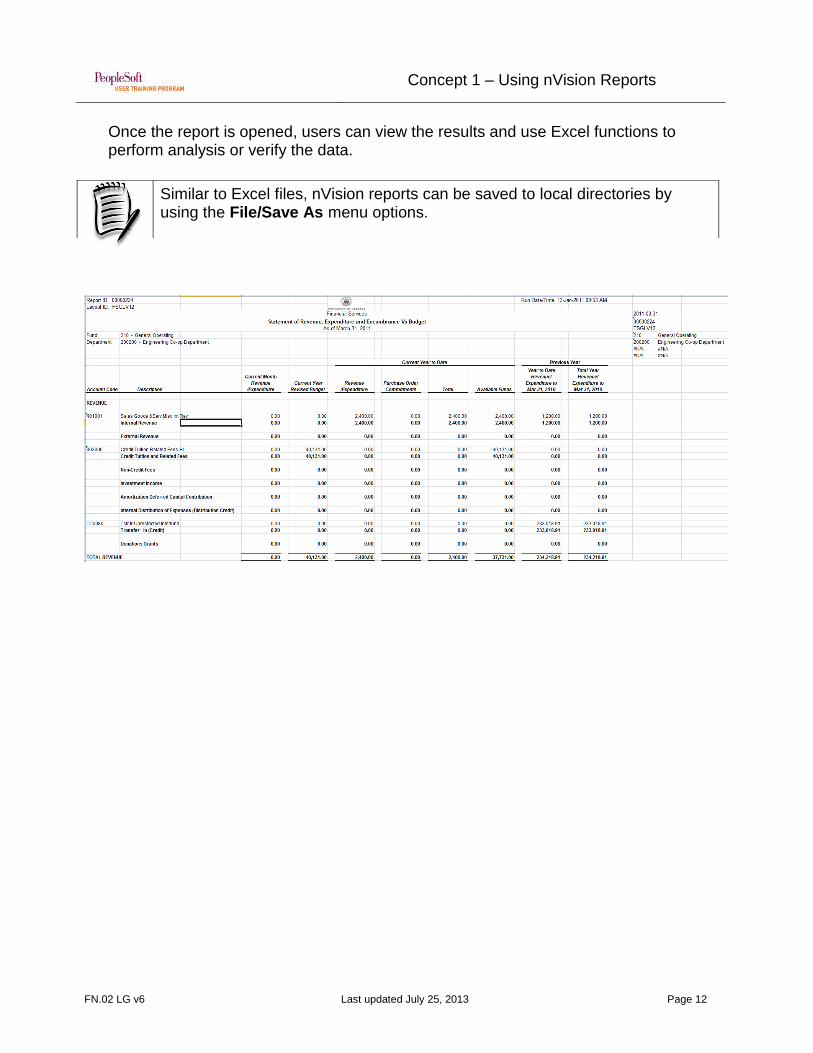
Once the report is opened, users can view the results and use Excel functions to perform analysis or verify the data.
Similar to Excel files, nVision reports can be saved to local directories by using the File/Save As menu options.
Concept 1 – Using nVision Reports
FN.02 LG v6 Last updated July 25, 2013 Page 13
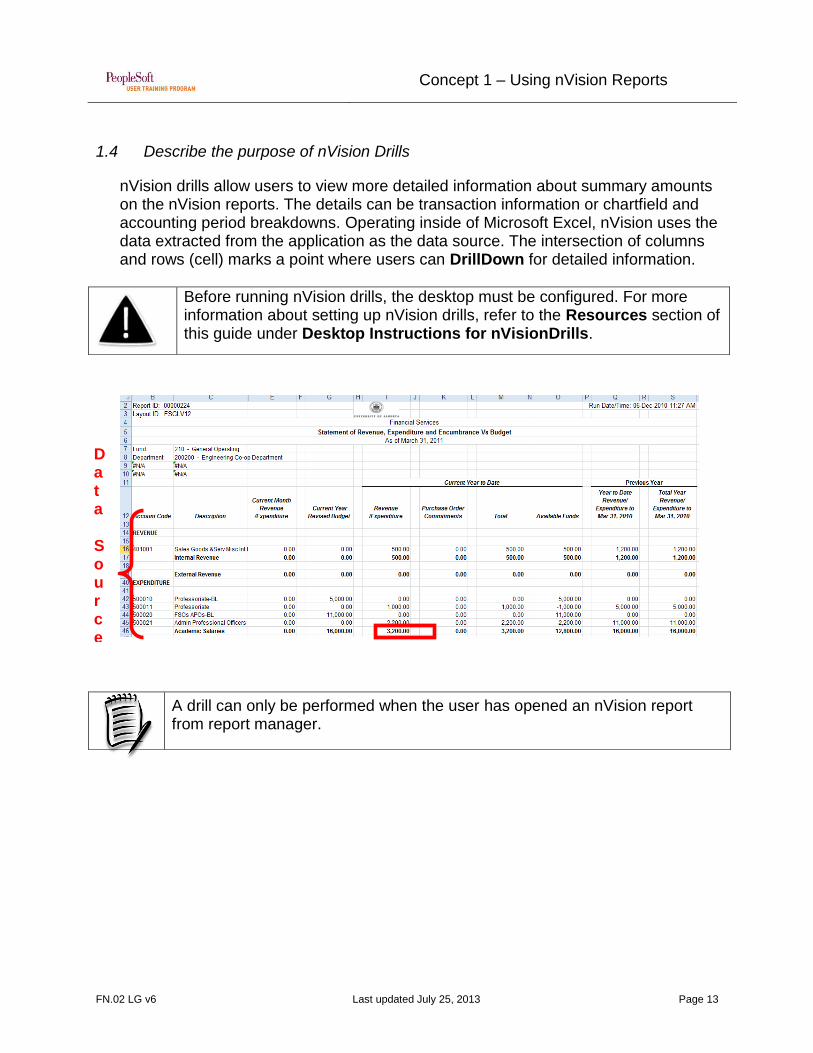
1.4 Describe the purpose of nVision Drills
nVision drills allow users to view more detailed information about summary amounts on the nVision reports. The details can be transaction information or chartfield and accounting period breakdowns. Operating inside of Microsoft Excel, nVision uses the data extracted from the application as the data source. The intersection of columns and rows (cell) marks a point where users can DrillDown for detailed information.
Before running nVision drills, the desktop must be configured. For more information about setting up nVision drills, refer to the Resources section of this guide under Desktop Instructions for nVisionDrills.
A drill can only be performed when the user has opened an nVision report from report manager.
Data Source

Concept 1 – Using nVision Reports
FN.02 LG v6 Last updated July 25, 2013 Page 14
1.5 Briefly describe the four types of nVision Drills:
1. Actual to Budget Variance Drills are used to compare actual transactions to a budget.
2. Chartfield by Period Drills break down the amount on the nVision report by accounting period and a chartfield value.
3. Two Chartfield Matrix Drills break down the amount on the nVision report by two chartfields. These drills are useful to obtain more information when a unit has a number of chartfield values such as multiple programs or classes.
4. Transaction Drills are used to verify or view actual transactions from all PeopleSoft Financials modules. This is the most detailed level for an nVision report. The first three types of drills listed above allow users to perform additional drills within a drill and users can continue to run drills until a Transaction drill is run.
1.6 Process an nVisionDrill
Users can drill on any intersection in an nVision report that shows a value (not a formula) in a cell. To obtain this granular level of information, the following steps are required:
a. Highlight an intersection upon which to drill down. b. Select Add-Ins from the Excel menu to open the Excel ribbon.
Payroll information is always summarized in the General Ledger. To get detailed data, HCM offers HR Operational Reports. More information about this can be found in the Resources section at the end of this guide.

Concept 1 – Using nVision Reports
FN.02 LG v6 Last updated July 25, 2013 Page 15
c. Select nVisionDrill, then, Drill on the Excel ribbon to open the Run Drilldown page.
d. On the Run Drilldown page, select an option from the *Type field. There are two options for the *Type field when running a drill:
Window: The drill displays immediate results to the screen.
Web: The drill sends the report to the Report Manager.
e. Select the drill type under the Description column by clicking on the related Run Drilldown button.

Concept 1 – Using nVision Reports
FN.02 LG v6 Last updated July 25, 2013 Page 16
Depending on whether the *Type chosen is ‘Web’ or ‘Window’, the resulting data will be displayed differently.
Concept 1 – Using nVision Reports
FN.02 LG v6 Last updated July 25, 2013 Page 17
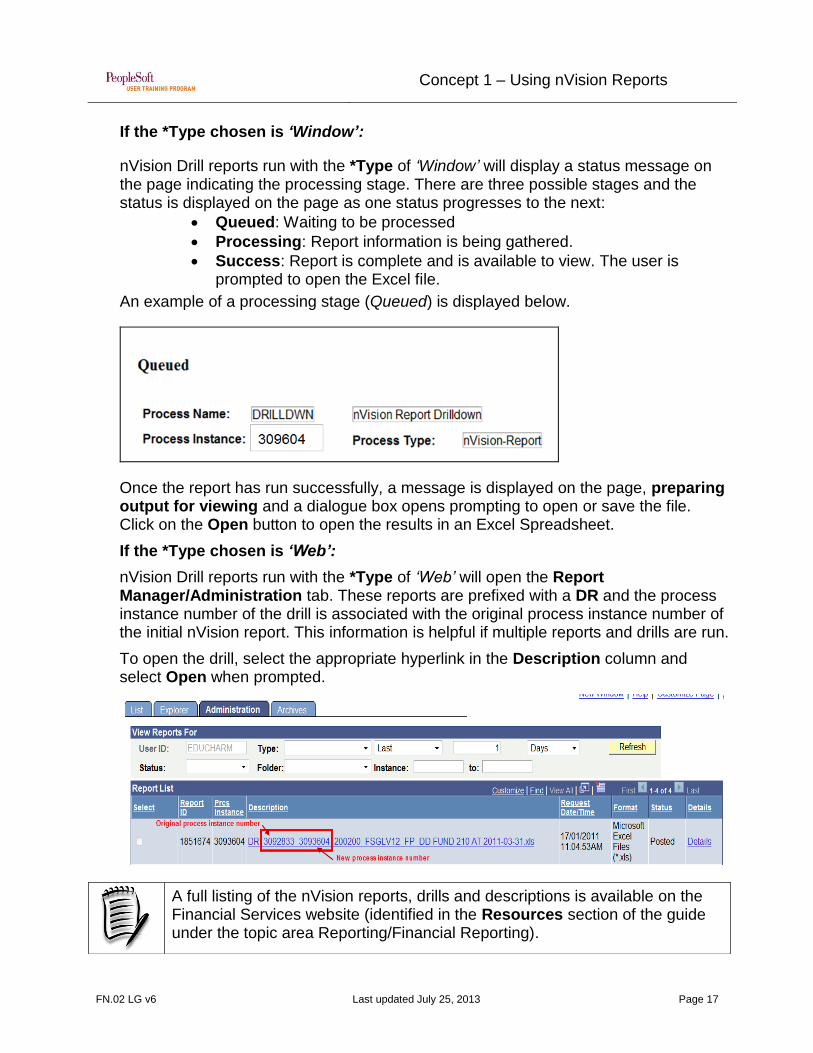
If the *Type chosen is ‘Window’:
nVision Drill reports run with the *Type of ‘Window’ will display a status message on the page indicating the processing stage. There are three possible stages and the status is displayed on the page as one status progresses to the next:
Queued: Waiting to be processed
Processing: Report information is being gathered.
Success: Report is complete and is available to view. The user is prompted to open the Excel file.
An example of a processing stage (Queued) is displayed below.
Once the report has run successfully, a message is displayed on the page, preparing output for viewing and a dialogue box opens prompting to open or save the file. Click on the Open button to open the results in an Excel Spreadsheet.
If the *Type chosen is ‘Web’:
nVision Drill reports run with the *Type of ‘Web’ will open the Report Manager/Administration tab. These reports are prefixed with a DR and the process instance number of the drill is associated with the original process instance number of the initial nVision report. This information is helpful if multiple reports and drills are run.
To open the drill, select the appropriate hyperlink in the Description column and select Open when prompted.
A full listing of the nVision reports, drills and descriptions is available on the Financial Services website (identified in the Resources section of the guide under the topic area Reporting/Financial Reporting).

Concept 1 – Using nVision Reports
FN.02 LG v6 Last updated July 25, 2013 Page 18
Written Activity
Hands-On Activity
1. Decipher the name of the report request and list which chartfields will be summarized on the report:
a. 720350_FSGLV12_FP_DD
b. 720350_FLGLV25_FD_DD
2. What is the advantage of using a tree node for an nVision report?
3. What are the four types of drills?
a. Provide an example of each and when it would be most useful.
Refer to PeopleSoft Function Exercise handout: PeopleSoft Function Exercise 1 – Generate nVision Reports
Concept 2 - Create Efficiency with nVision Reporting
FN.02 LG v6 Last updated July 25, 2013 Page 19
Concept 2: Create Efficiency with nVision Reporting PeopleSoft offers methods that allow users to run multiple report requests using one Run Control ID and also distribute the output to multiple users. The following explains these methods and how they can be applied to enable users to work more effectively.
2.1 Generate a Report Book
Generating Report Books is a method of grouping a number of nVision report requests to run in one step. Report(s) will be generated for each nVision Report Request but the user will only need to submit one request to run all of the reports. It would be practical to set up a Report Book for running multiple nVision report requests for some or all departments at one time. Each Report Book is defined by the user. This is started by setting up a Run Control ID on the Report Book Definition page and then adding specific parameters to determine the date of the reports and the effective date of the tree, and to identify which reports to include. There are four steps to define a Report Book. The details of each step are outlined on the pages that follow. Step 1. Select a report book. Step 2. Enter required parameters for running an nVision report book Step 3. Run the Report Book using the Process Scheduler Step 4. Review the output using Report Manager
Concept 2 - Create Efficiency with nVision Reporting
FN.02 LG v6 Last updated July 25, 2013 Page 20
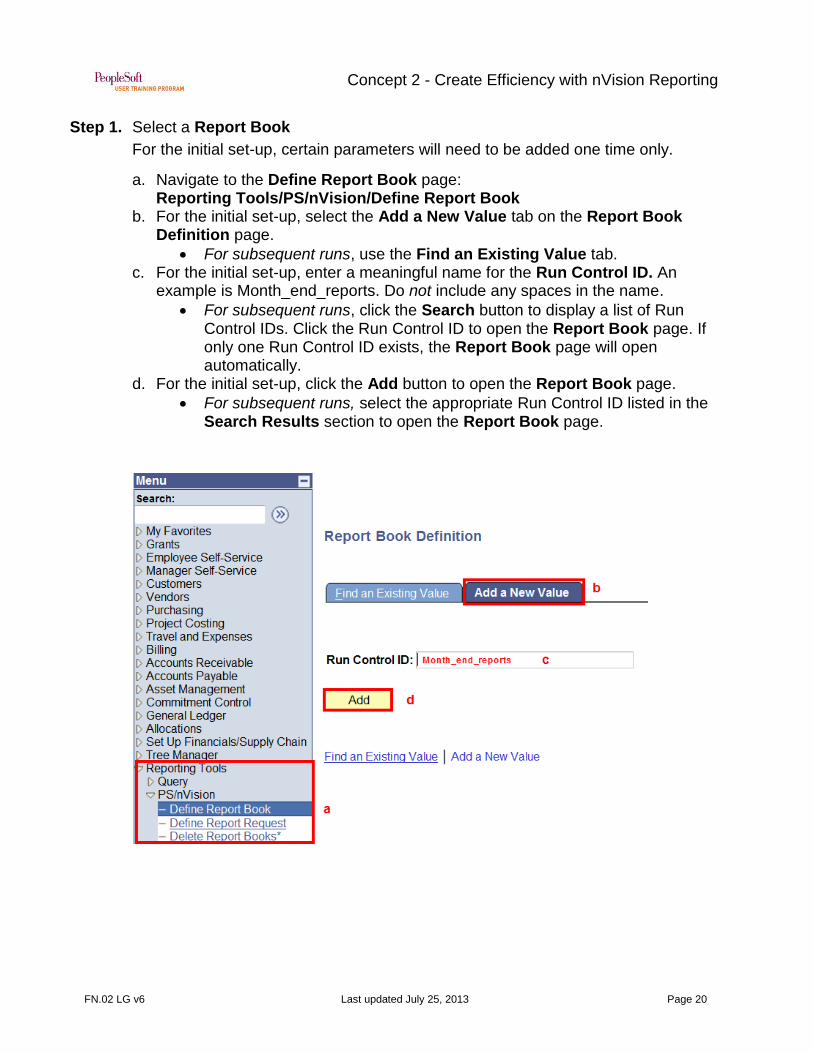
Step 1. Select a Report Book
For the initial set-up, certain parameters will need to be added one time only.
a. Navigate to the Define Report Book page: Reporting Tools/PS/nVision/Define Report Book
b. For the initial set-up, select the Add a New Value tab on the Report Book Definition page.
For subsequent runs, use the Find an Existing Value tab. c. For the initial set-up, enter a meaningful name for the Run Control ID. An
example is Month_end_reports. Do not include any spaces in the name.
For subsequent runs, click the Search button to display a list of Run Control IDs. Click the Run Control ID to open the Report Book page. If only one Run Control ID exists, the Report Book page will open automatically.
d. For the initial set-up, click the Add button to open the Report Book page.
For subsequent runs, select the appropriate Run Control ID listed in the Search Results section to open the Report Book page.
Concept 2 - Create Efficiency with nVision Reporting
FN.02 LG v6 Last updated July 25, 2013 Page 21
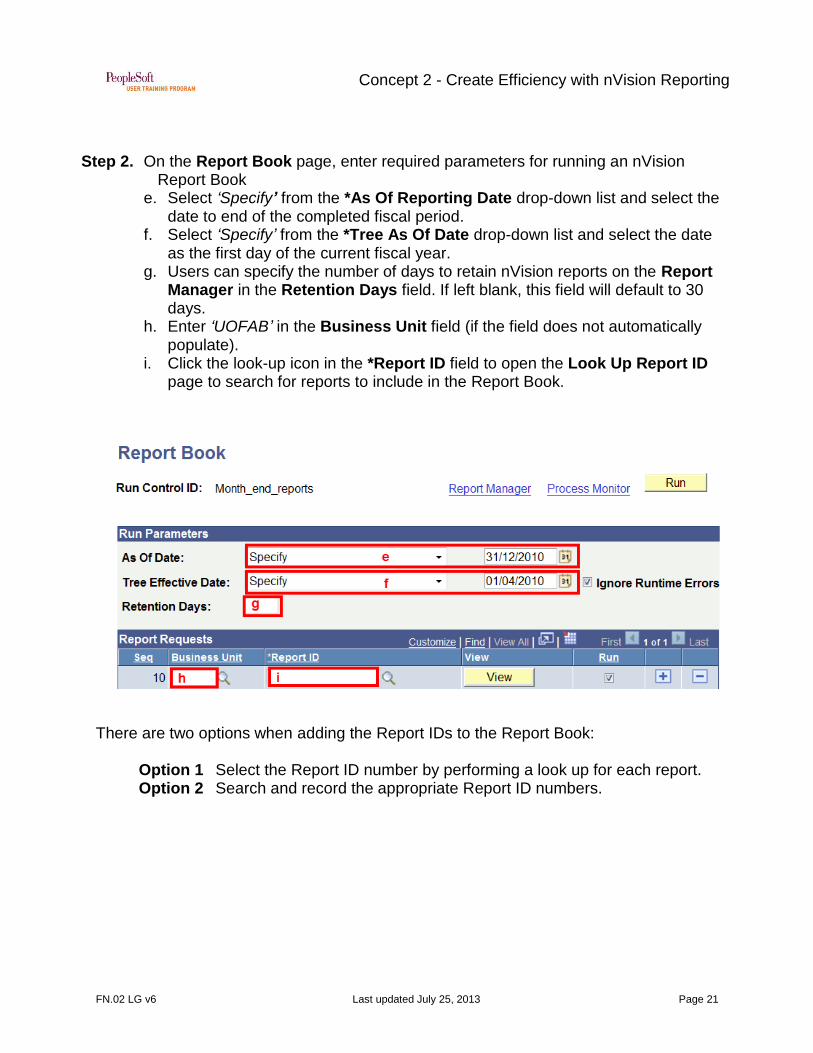
Step 2. On the Report Book page, enter required parameters for running an nVision Report Book
e. Select ‘Specify’ from the *As Of Reporting Date drop-down list and select the date to end of the completed fiscal period.
f. Select ‘Specify’ from the *Tree As Of Date drop-down list and select the date as the first day of the current fiscal year.
g. Users can specify the number of days to retain nVision reports on the Report Manager in the Retention Days field. If left blank, this field will default to 30 days.
h. Enter ‘UOFAB’ in the Business Unit field (if the field does not automatically populate).
i. Click the look-up icon in the *Report ID field to open the Look Up Report ID page to search for reports to include in the Report Book.
There are two options when adding the Report IDs to the Report Book:
Option 1 Select the Report ID number by performing a look up for each report. Option 2 Search and record the appropriate Report ID numbers.

Concept 2 - Create Efficiency with nVision Reporting
FN.02 LG v6 Last updated July 25, 2013 Page 22
Option 1 – Select Report IDs by performing a look up for each report
On the Look Up Report ID page, select the Advanced Lookup hyperlink to open more look up options
j. In the Description field, enter an appropriate value, such as the first few characters of DeptID. Then click the Look Up button to produce search results.
k. From the list of reports displayed, select the appropriate report by clicking on the report description. Repeat steps j – k until all reports are added.
Concept 2 - Create Efficiency with nVision Reporting
FN.02 LG v6 Last updated July 25, 2013 Page 23
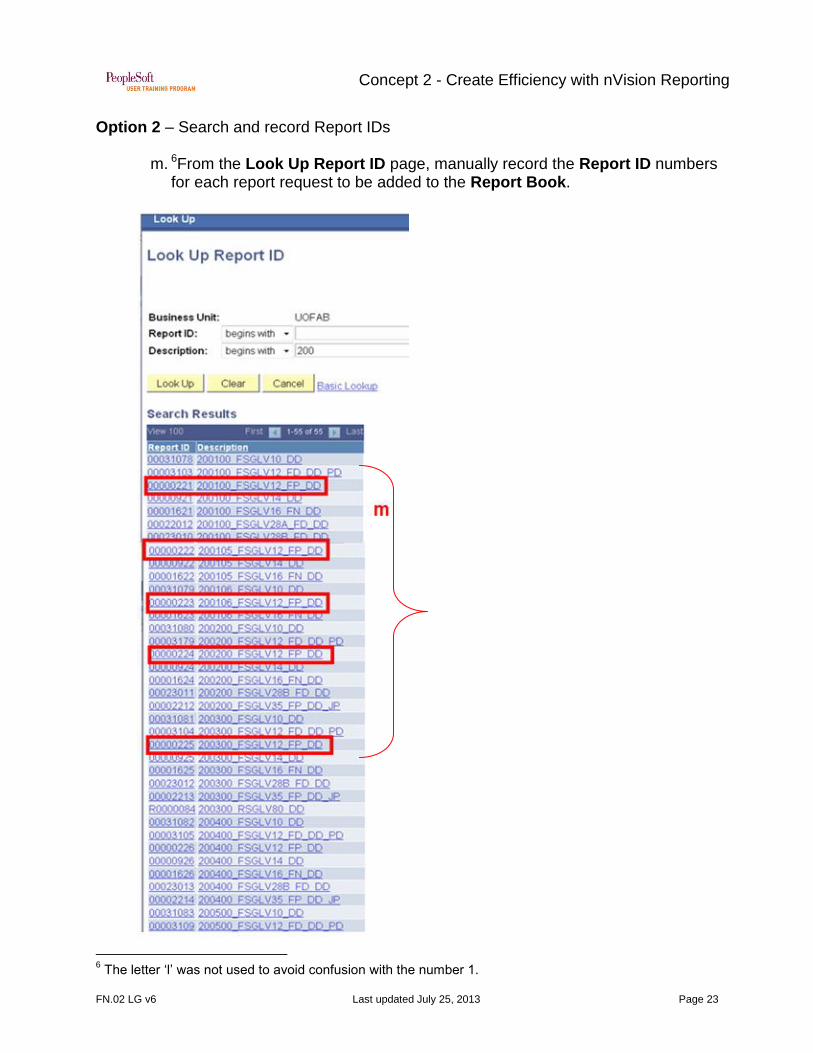
Option 2 – Search and record Report IDs
m. 6From the Look Up Report ID page, manually record the Report ID numbers for each report request to be added to the Report Book.
6 The letter ‘l’ was not used to avoid confusion with the number 1.

Concept 2 - Create Efficiency with nVision Reporting
FN.02 LG v6 Last updated July 25, 2013 Page 24
n. Then, on the Report Book page, enter each Report ID number by adding new rows in the Report Requests section. Note: Additional rows can be added by using the add row functionality (‘+’).
o. To run specific Reports Requests in the Report Books, select the checkbox in the Run column next to the relevant Report ID.
p. Once all the Report IDs have been entered in the Report Requests section, click the Save button to save all changes.
q. Click the Run button to open the Process Scheduler page to run the Report Book.
o
p
q
Concept 2 - Create Efficiency with nVision Reporting
FN.02 LG v6 Last updated July 25, 2013 Page 25
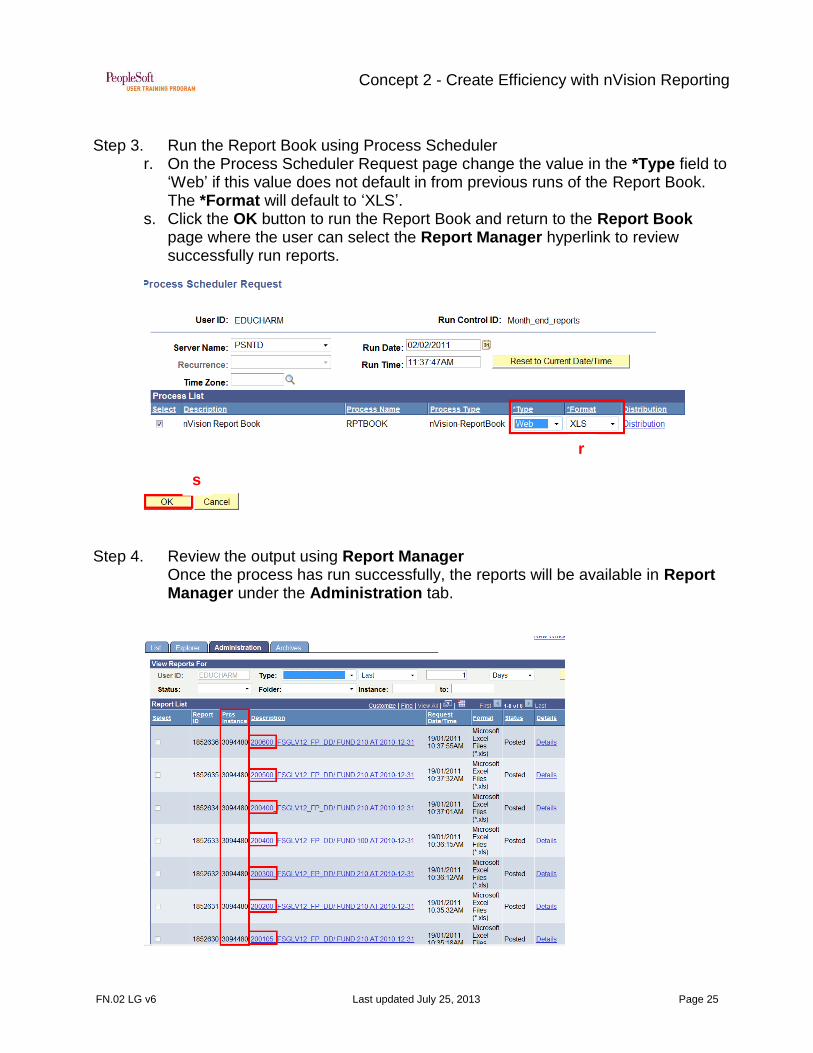
Step 3. Run the Report Book using Process Scheduler
r. On the Process Scheduler Request page change the value in the *Type field to ‘Web’ if this value does not default in from previous runs of the Report Book. The *Format will default to ‘XLS’.
s. Click the OK button to run the Report Book and return to the Report Book page where the user can select the Report Manager hyperlink to review successfully run reports.
Step 4. Review the output using Report Manager Once the process has run successfully, the reports will be available in Report Manager under the Administration tab.
r
s

Concept 2 - Create Efficiency with nVision Reporting
FN.02 LG v6 Last updated July 25, 2013 Page 26
2.2 Distribute nVision reports and Report Books
Distribution of nVision reports may vary on campus. Some units print the reports, some save reports in directories (network or local), and others email the reports or distribute them to the Report Manager via the Process Scheduler, which will be explained below. Once the user has selected the Run button on the Report Request page or Report Book page, the Process Scheduler Request page will be displayed.
a. Select either ‘Email’ or ‘Web’ as the *Type option. The value in the *Format field will automatically change to ‘XLS’ and the Distribution link will be displayed.
b. Click the Distribution hyperlink to open the Distribution Detail page.
Concept 2 - Create Efficiency with nVision Reporting
FN.02 LG v6 Last updated July 25, 2013 Page 27
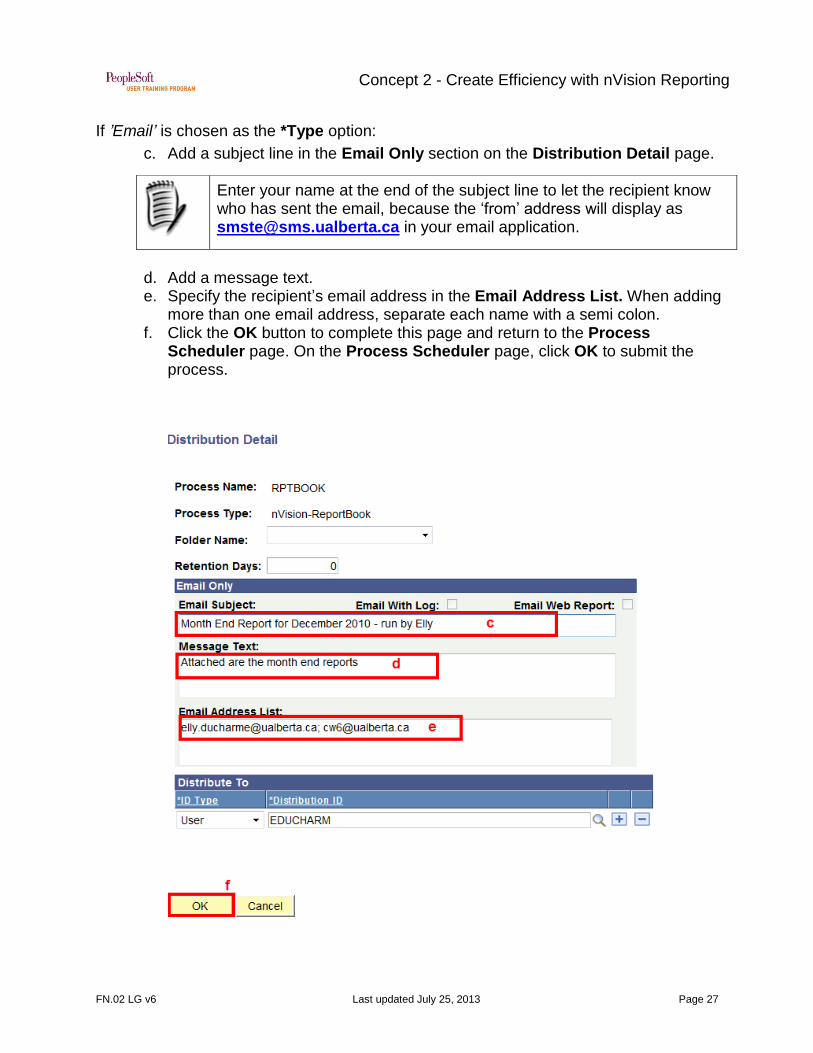
If ’Email’ is chosen as the *Type option:
c. Add a subject line in the Email Only section on the Distribution Detail page.
d. Add a message text. e. Specify the recipient’s email address in the Email Address List. When adding
more than one email address, separate each name with a semi colon. f. Click the OK button to complete this page and return to the Process
Scheduler page. On the Process Scheduler page, click OK to submit the process.
Enter your name at the end of the subject line to let the recipient know who has sent the email, because the ‘from’ address will display as [email protected] in your email application.
Concept 2 - Create Efficiency with nVision Reporting
FN.02 LG v6 Last updated July 25, 2013 Page 28
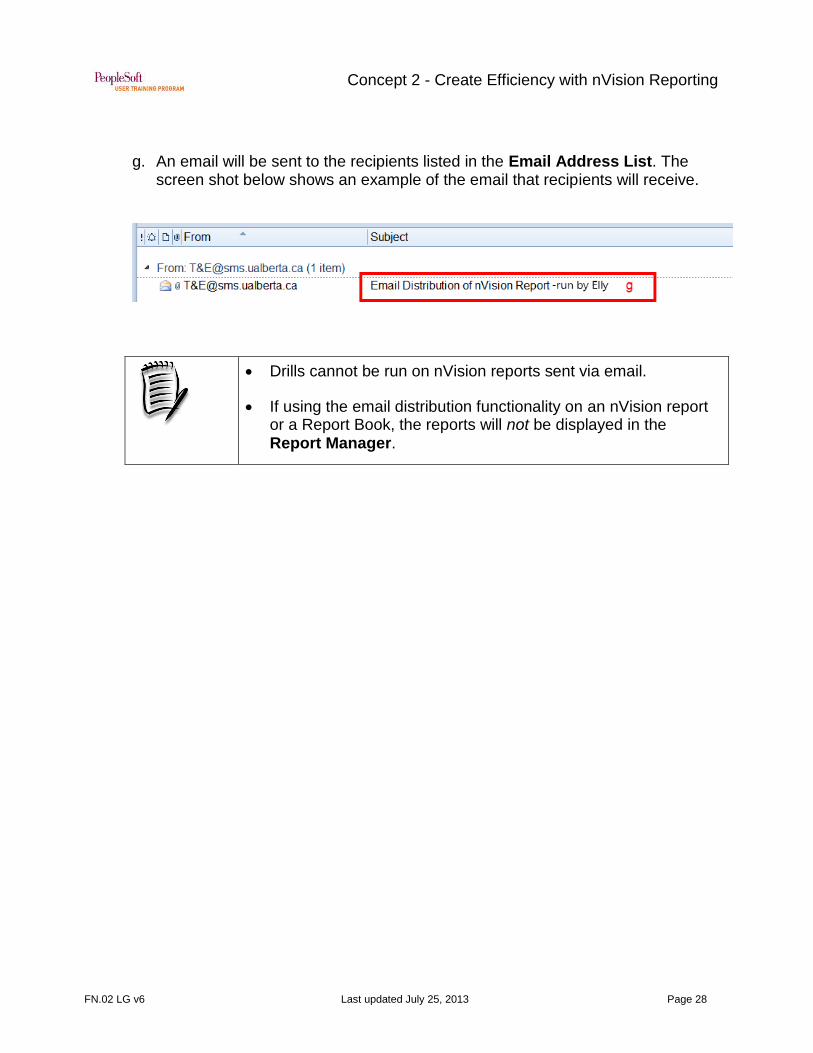
g. An email will be sent to the recipients listed in the Email Address List. The screen shot below shows an example of the email that recipients will receive.
Drills cannot be run on nVision reports sent via email.
If using the email distribution functionality on an nVision report or a Report Book, the reports will not be displayed in the Report Manager.
Concept 2 - Create Efficiency with nVision Reporting
FN.02 LG v6 Last updated July 25, 2013 Page 29
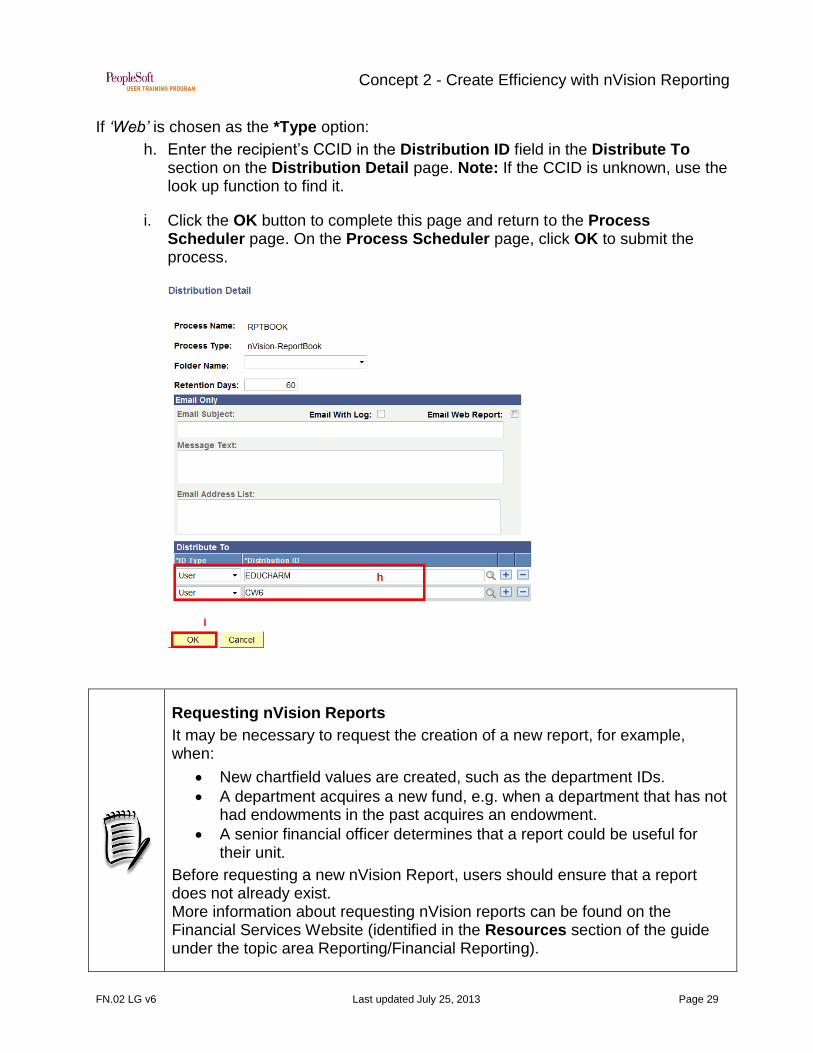
If ‘Web’ is chosen as the *Type option:
h. Enter the recipient’s CCID in the Distribution ID field in the Distribute To section on the Distribution Detail page. Note: If the CCID is unknown, use the look up function to find it.
i. Click the OK button to complete this page and return to the Process Scheduler page. On the Process Scheduler page, click OK to submit the process.
Requesting nVision Reports
It may be necessary to request the creation of a new report, for example, when:
New chartfield values are created, such as the department IDs.
A department acquires a new fund, e.g. when a department that has not had endowments in the past acquires an endowment.
A senior financial officer determines that a report could be useful for their unit.
Before requesting a new nVision Report, users should ensure that a report does not already exist. More information about requesting nVision reports can be found on the Financial Services Website (identified in the Resources section of the guide under the topic area Reporting/Financial Reporting).

Concept 2 - Create Efficiency with nVision Reporting
FN.02 LG v6 Last updated July 25, 2013 Page 30
Hands-on Activity
Refer to PeopleSoft Function Exercise handout: PeopleSoft Function Exercise 2 – Create efficiency with nVision reporting.
Concept 3 – Utilizing PS Query
FN.02 LG v6 Last updated July 25, 2013 Page 31
Concept 3: Utilizing PS Query The PS Query allows users to extract information at a transactional or detail level. Queries can be as simple or as complex as needed and can be one-time queries or saved queries used repeatedly. Financials Services has developed several queries for the various modules in PS Financials to help units inquire on financial transactions.
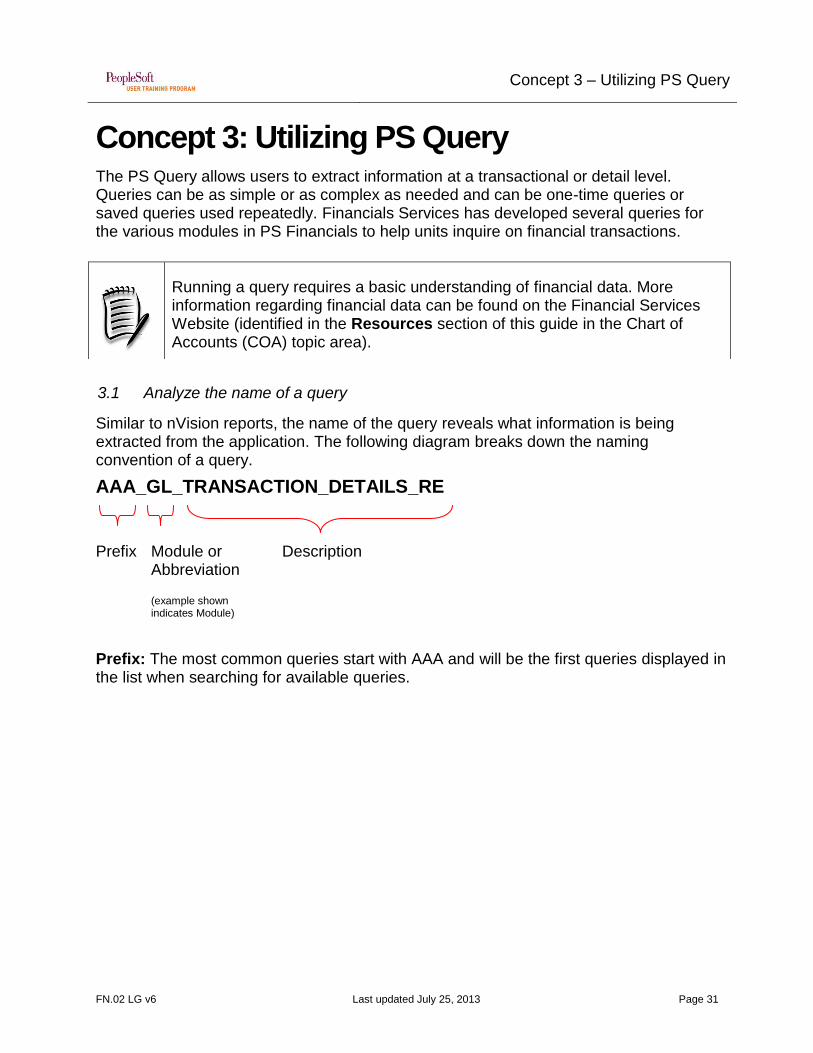
3.1 Analyze the name of a query
Similar to nVision reports, the name of the query reveals what information is being extracted from the application. The following diagram breaks down the naming convention of a query.
AAA_GL_TRANSACTION_DETAILS_RE
Prefix Module or Abbreviation
(example shown indicates Module)
Description
Prefix: The most common queries start with AAA and will be the first queries displayed in the list when searching for available queries.
Running a query requires a basic understanding of financial data. More information regarding financial data can be found on the Financial Services Website (identified in the Resources section of this guide in the Chart of Accounts (COA) topic area).

Concept 3 – Utilizing PS Query
FN.02 LG v6 Last updated July 25, 2013 Page 32
Module/Abbreviation: Two characters are used to define either a Financials module or an abbreviation of information provided by the query. Description: Refers to the information being extracted.
The following table lists the two character combinations used in the naming convention of the query.
Two Characters Module/Abbreviation Description
AM Asset Management
AP Accounts Payable
AR Accounts Receivable
BI Billing
CS Cashier
CF * Chartfield
EX Travel and Expense
GL General Ledger
JL * Journal Line
PO Purchasing Orders
PC Project Costing
PG * Project Chartfield
RE * Revenue and Expenses
*Represents an abbreviation
In deciphering the name of the query in the example on the previous page,
AAA_GL_TRANSACTION_DETAILS_RE
the query will extract transaction details from the General Ledger for Revenue and Expenses; it is a common query as indicated by the AAA.

Concept 3 – Utilizing PS Query
FN.02 LG v6 Last updated July 25, 2013 Page 33
3.2 Run a query
Most queries are developed by Financial Services and users are able to select and run queries from a list displayed on the Query Viewer page.
The following diagram represents the steps for extracting data. The details will be explained on the following pages.
7
To run a query, navigate to Reporting Tools/Query/Query Viewer. This will open the query viewer page where the user is able to enter criteria in order to search for a query.
Extensible Markup Language (XML) is a set of rules for encoding documents in machine-readable form. Using this format is not covered in the learning guide.
Select the query
from the search
results to either:
Search for
Query
Run to Excel
Run to HTML
CSV / Text File /
XML
Excel Spreadsheet
Specify Criteria Step 1
Specify Criteria
Step 2
Run to XML

Concept 3 – Utilizing PS Query
FN.02 LG v6 Last updated July 25, 2013 Page 34
Step 1: Search for a Query
a. Select an appropriate value in the Search By field. To list the most commonly run queries, enter AAA_ in the ‘begins with’ field next to the Search By field.
b. Click the Search button to produce search results.
c. In the Search Results, highlight the query and select the hyperlink for Run to HTML (to display results on the page) or Run to Excel (to display results in an Excel spreadsheet). Examples of each option are shown on the following pages. Selecting either of these hyperlinks will open a series of edit fields to specify criteria.

Concept 3 – Utilizing PS Query
FN.02 LG v6 Last updated July 25, 2013 Page 35
Step 2: Specify Criteria
d. Enter data in the edit fields to narrow down the results if searching for specific information. Each field must be populated with either an appropriate value or a wildcard character.
a. Click the View Results button to display the query results.
Queries are generic and can be run for many units on campus; therefore it is important to specify data in the prompt fields to narrow down the results returned when the query is run.
Concept 3 – Utilizing PS Query
FN.02 LG v6 Last updated July 25, 2013 Page 36
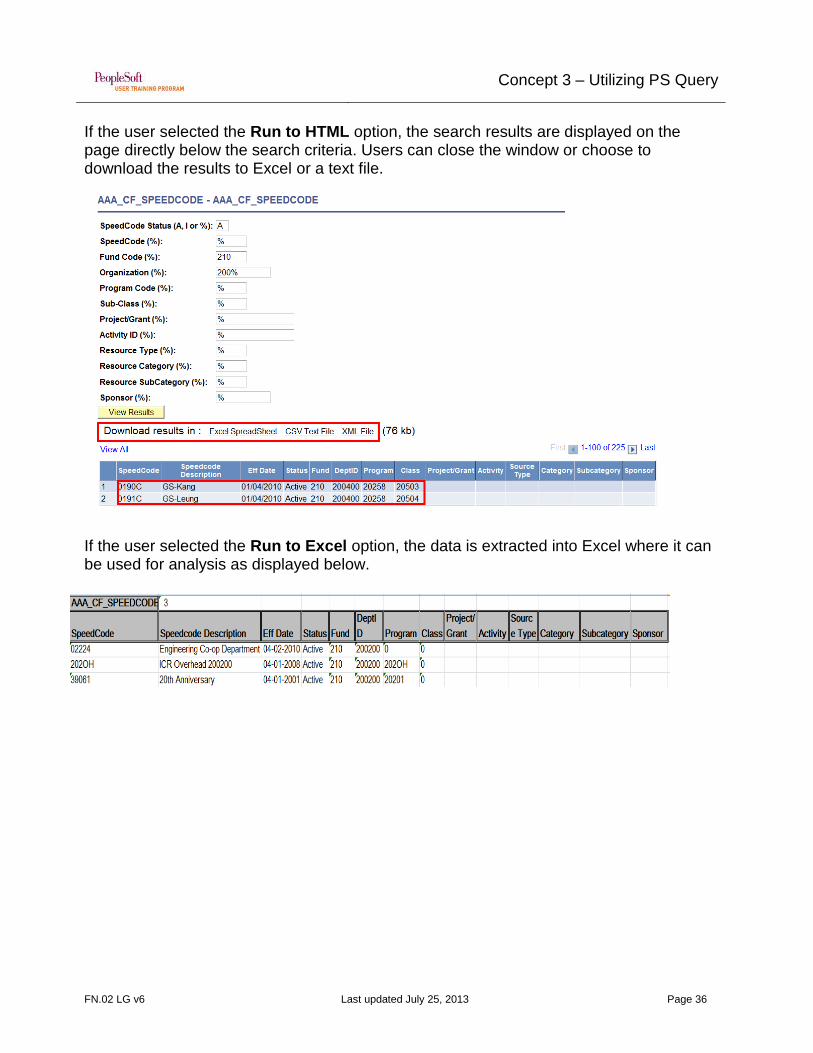
If the user selected the Run to HTML option, the search results are displayed on the page directly below the search criteria. Users can close the window or choose to download the results to Excel or a text file.
If the user selected the Run to Excel option, the data is extracted into Excel where it can be used for analysis as displayed below.
Concept 3 – Utilizing PS Query
FN.02 LG v6 Last updated July 25, 2013 Page 37
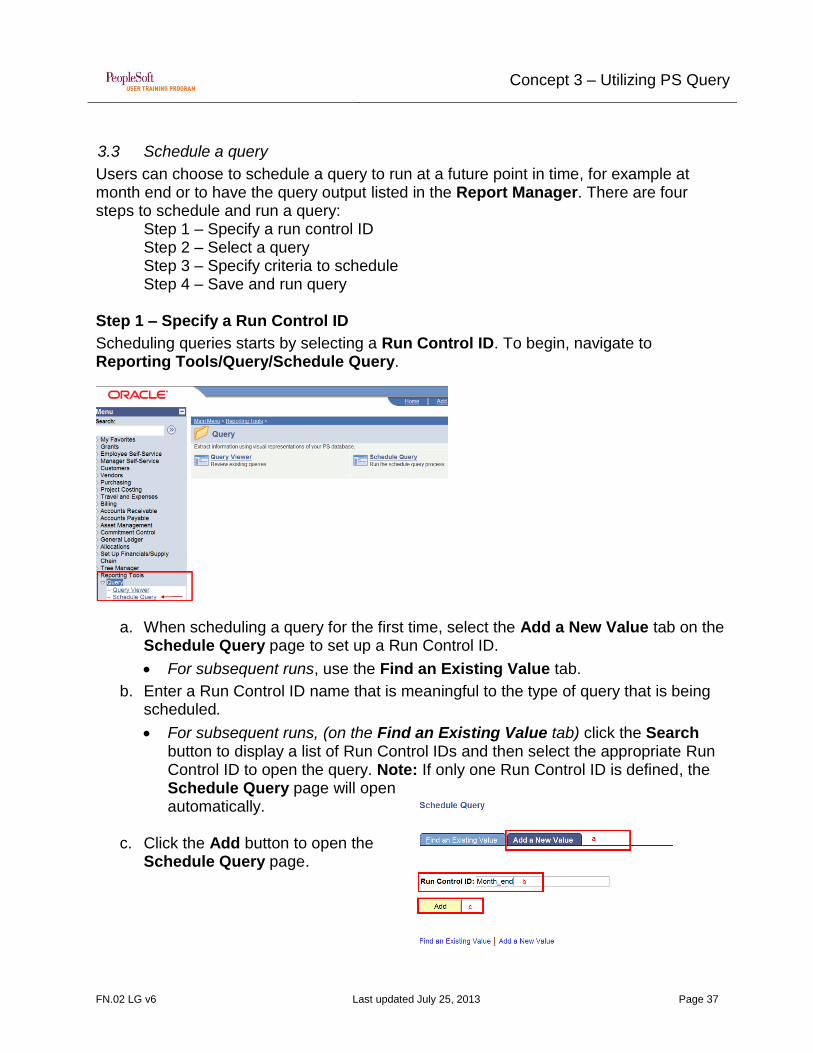
3.3 Schedule a query
Users can choose to schedule a query to run at a future point in time, for example at month end or to have the query output listed in the Report Manager. There are four steps to schedule and run a query:
Step 1 – Specify a run control ID Step 2 – Select a query Step 3 – Specify criteria to schedule Step 4 – Save and run query
Step 1 – Specify a Run Control ID
Scheduling queries starts by selecting a Run Control ID. To begin, navigate to Reporting Tools/Query/Schedule Query.
a. When scheduling a query for the first time, select the Add a New Value tab on the Schedule Query page to set up a Run Control ID.
For subsequent runs, use the Find an Existing Value tab.
b. Enter a Run Control ID name that is meaningful to the type of query that is being scheduled.
For subsequent runs, (on the Find an Existing Value tab) click the Search button to display a list of Run Control IDs and then select the appropriate Run Control ID to open the query. Note: If only one Run Control ID is defined, the Schedule Query page will open automatically.
c. Click the Add button to open the Schedule Query page.

Concept 3 – Utilizing PS Query
FN.02 LG v6 Last updated July 25, 2013 Page 38
Step 2 - Select the query to schedule
Once the Run Control ID is added, a query must be selected. This query will be associated with the Run Control ID.
o For subsequent runs, the query will open when the Run Control ID is selected and the user will have an opportunity to update and save parameters.
d. On the Schedule Query page, enter the first few characters in the Query Name field to reduce the number of queries displayed.
e. Click the Search button to display the list of available queries.
f. Select the appropriate query from the list of queries displayed. This will enable the user to specify scheduling criteria for the query.

Concept 3 – Utilizing PS Query
FN.02 LG v6 Last updated July 25, 2013 Page 39
Step 3 - Specify criteria to schedule a query
g. Most queries contain edit fields where a value must be entered. If the value is
known, enter the full value. Partial values may be added by using the first few characters and adding a wild card. The following diagram shows examples of scheduling criteria using:
Eg 1. A full value.
Eg 2. A partial value followed by a wildcard.
Eg 3. A wildcard value only.
h. Click the OK button when all fields are populated to return to the Schedule Query page to save and run the query.
Concept 3 – Utilizing PS Query
FN.02 LG v6 Last updated July 25, 2013 Page 40
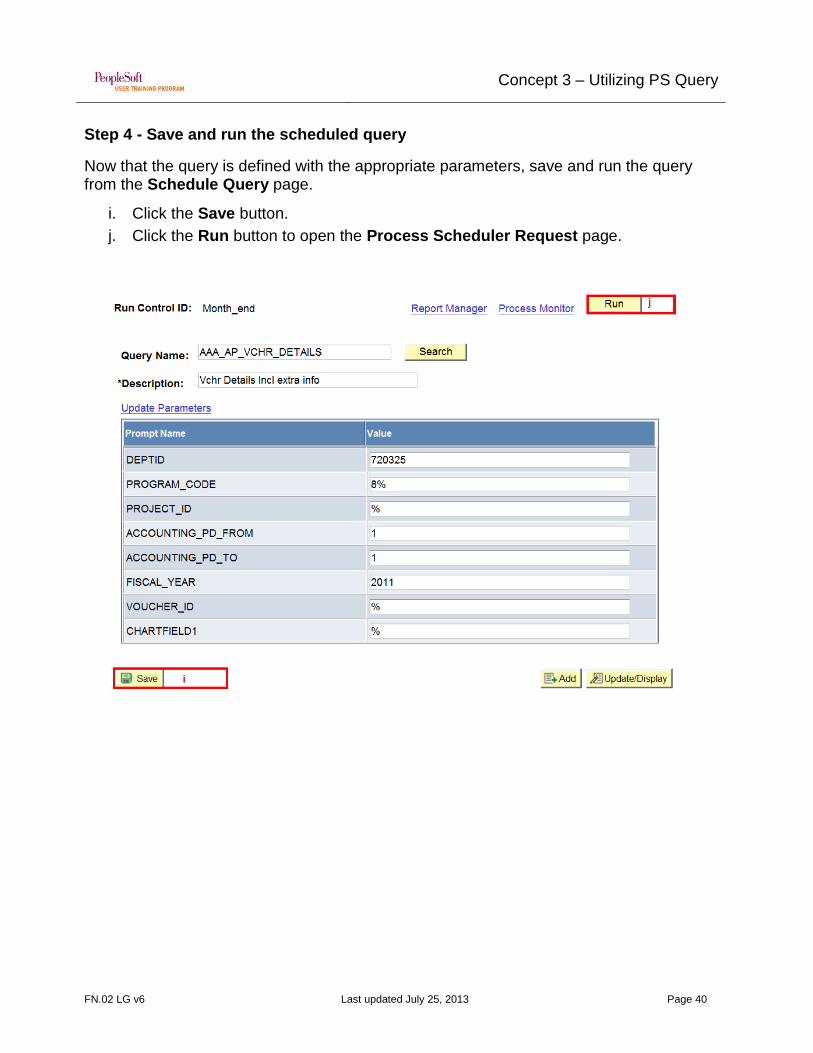
Step 4 - Save and run the scheduled query
Now that the query is defined with the appropriate parameters, save and run the query from the Schedule Query page.
i. Click the Save button.
j. Click the Run button to open the Process Scheduler Request page.
Concept 3 – Utilizing PS Query
FN.02 LG v6 Last updated July 25, 2013 Page 41
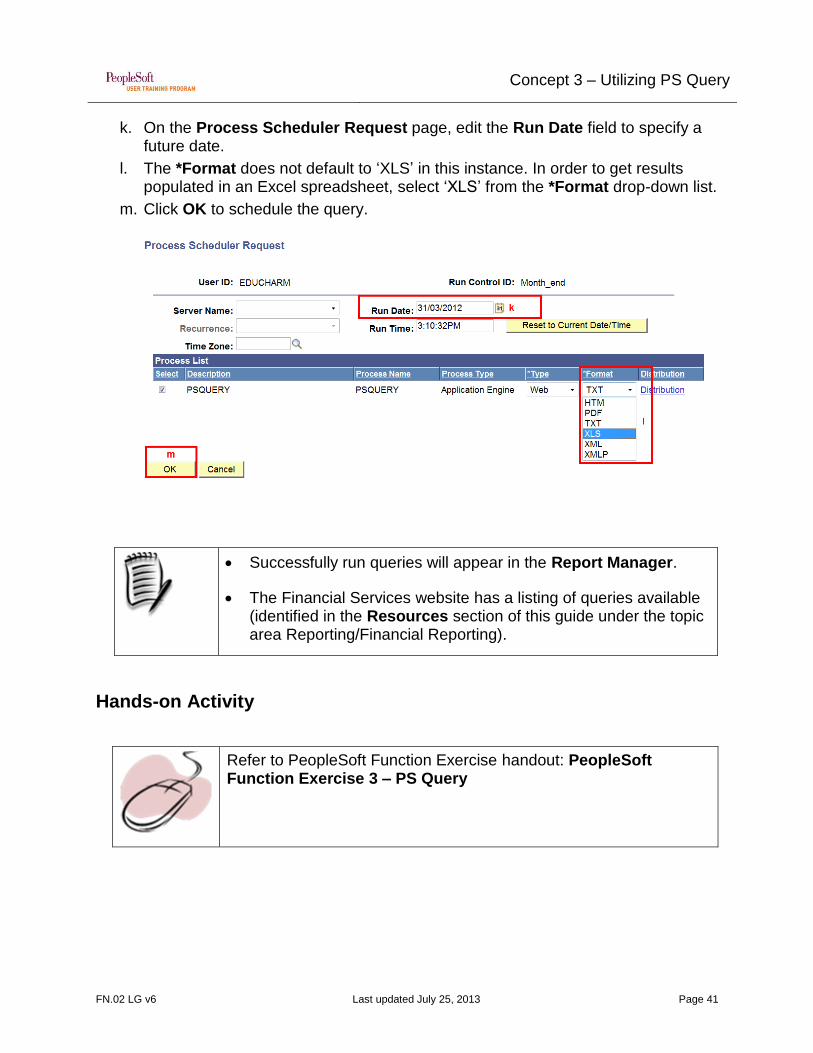
k. On the Process Scheduler Request page, edit the Run Date field to specify a future date.
l. The *Format does not default to ‘XLS’ in this instance. In order to get results populated in an Excel spreadsheet, select ‘XLS’ from the *Format drop-down list.
m. Click OK to schedule the query.
Hands-on Activity
Refer to PeopleSoft Function Exercise handout: PeopleSoft Function Exercise 3 – PS Query
Successfully run queries will appear in the Report Manager.
The Financial Services website has a listing of queries available (identified in the Resources section of this guide under the topic area Reporting/Financial Reporting).

Concept 4 - Use Inquiry Pages to Retrieve Data
FN.02 LG v6 Last updated July 25, 2013 Page 42
Concept 4 - Use Inquiry Pages to Retrieve Data
In addition to nVision and query, online inquiry pages can be used to extract data. Most online pages are available for users to view single or multiple transactions with more specialized information. Data is retrieved online by entering values into the prompt fields listed on the page. This type of data retrieval is often used for gathering ad hoc information or when looking for very specific information.
As with the other reporting options, adding criteria narrows down the results returned.
The following is an example of retrieving specific Billing data (i.e. information related to a particular invoice) using an online search page.
a. Navigate to Billing/Review Billing Information/Summary to open the Bill Summary Information pages 1 and 2.
b. Specify the Limit the number of results to return.8 c. Enter a value in the Invoice edit field to narrow down the results returned.
In the example below, a value of UA%3681 is entered to look for invoices that begin with UA and include a value of 3681.
d. Click the Search button to produce a list of values that match the search criteria entered.
8`Users can enter a lower value in the Limit the number of results to field on the search page to further reduce the number of search
results. If the search retrieves more than the maximum number of listings, the Search Results grid displays only the number of results requested in the Limit the number of results to setting` PeopleBooks Home/PeopleBooks/ PeopleTools 8.51 PeopleBook: Using PeopleSoft Applications /Using Keys and Search Pages.

Concept 4 - Use Inquiry Pages to Retrieve Data
FN.02 LG v6 Last updated July 25, 2013 Page 43
e. Select an invoice by clicking on the invoice number. This will open online pages that provide additional information related to the invoice.
Concept 4 - Use Inquiry Pages to Retrieve Data
FN.02 LG v6 Last updated July 25, 2013 Page 44
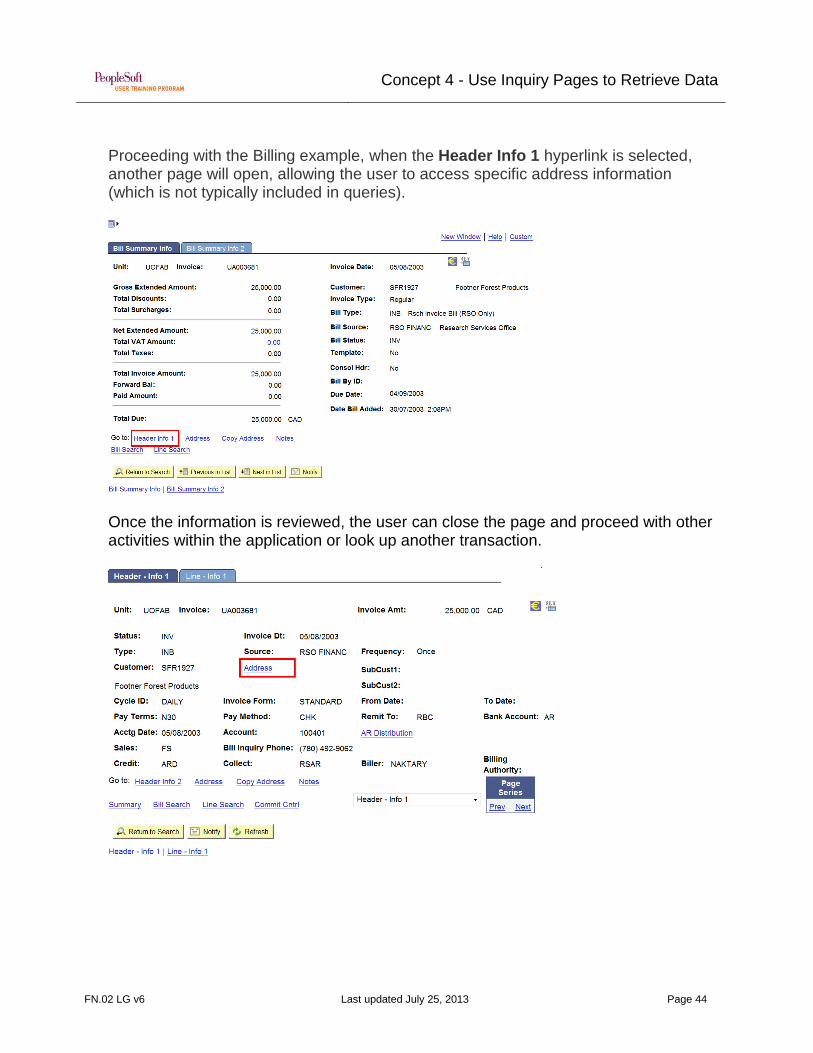
Proceeding with the Billing example, when the Header Info 1 hyperlink is selected, another page will open, allowing the user to access specific address information (which is not typically included in queries).
Once the information is reviewed, the user can close the page and proceed with other activities within the application or look up another transaction.

Concept 4 - Use Inquiry Pages to Retrieve Data
FN.02 LG v6 Last updated July 25, 2013 Page 45
Hands-on Activity
Refer to PeopleSoft Function Exercise handout: PeopleSoft Function Exercise 4 – PS Use Inquiry Pages to Retrieve Data
Concept 5 – Briefly Describe Other Reports Used in Financials
FN.02 LG v6 Last updated July 25, 2013 Page 46
Concept 5 – Briefly Describe Other Reports Used in Financials
There are other financial reports generated within the PeopleSoft Human Capital Management (HCM) application and outside of PeopleSoft that provide useful information for users on campus. A brief description of these reports is listed below.
UEP (Unitized Endowment Pool)
Financial Services generates UEP reports that contain an endowment's principal book value, market value, units, and spending allocation amounts. As this information does not reside in PeopleSoft, it is generated in-house by Financial Services and can be opened with Excel. This report is generally available by the 15th of the upcoming month and resides on the Samba directory, accessed via the following path:
\\samba\win2000\rptbooks\Reports - Non - PeopleSoft\Uep\<applicable Department ID>
HR Operational Reports
Human Resource Services offers a number of financial-related HR Reports that can be run on the PeopleSoft HCM database. Information such as salaries, commitments, position, and budget data are an example of some of the information available on these reports.
nVision drills cannot be performed on the UEP reports!
For a full listing of financial related HR Operational reports, refer to the Financial Services website (identified in the Resources section of this guide).

Conclusion - Accessing PeopleSoft Financials
FN.02 LG v6 Last updated July 25, 2013 Page 47
Conclusion - Accessing PeopleSoft Financials
Access to the information presented in this learning guide must be requested. Authorized Approvers within each unit are required to complete a Request for Access Form requesting access and ensuring the roles requested are consistent with the employee’s role within the unit.
9UAPPOL - Administration Information System Access and Maintenance Procedure – Definition of Authorized Approver
http://www.conman.ualberta.ca/stellent/groups/public/@finance/documents/procedure/pp_cmp_057473.hcsp
Authorized Approvers9
Certain person(s) of authority within a faculty/department/unit who have been identified to AIS as having the power to approve both user access to the University’s AIS applications and specifically what processes that user is to be allowed to do.
Obtaining Access
Request for Access forms can be found on the AIS website.
A listing of PeopleSoft Financial Roles is also available on the AIS website.
More information on getting access can be found in the Resources section of this guide.

Resources
FN.02 LG v6 Last updated July 25, 2013 Page 48
Resources
Information regarding Process Monitor can be found in the Learning Resource: Running a PeopleSoft Report located on the PeopleSoft User Training Program Website (http://www.psutp.ualberta.ca/) under the section Learning Resources/General PeopleSoft Resources.
The AIS website, http://ais-web.srv.ualberta.ca/ has the following information:
Request for Access Forms – positioned on the home page under the section Other Links/Forms Cabinet
The following two items require users to sign into the AIS Support Site from the left menu.
A listing of PeopleSoft Financials Roles – found in the section Security.
nVision settings to be applied to a user’s desktop – located in the Downloads section
nVision may require settings to be applied to a user’s desktop. The user’s LAN administrator can access instructions for desktop settings on the AIS website at http://ais-web.srv.ualberta.ca/. This website requires users to sign into the AIS Support Site from the left menu and then click on the LAN Administrator Information under the Downloads section.
The Financial Services website / Guide to Financial Management (http://www.financial.ualberta.ca/ ) is a great resource for information regarding the following topics:
Reporting/Financial Reporting – Chapter 5 o nVision Report Directory – includes commonly used reports and
examples of each report. o nVision Drill Directory – includes examples of each type of drill. o Query Directory – includes commonly used queries and queries used for
specific modules. o Managing nVision Reports and Queries – includes information on Report
Books and scheduling and distribution of reports and queries. o nVision Reports - Requesting Reports from Existing Report Templates. o Salary and Benefit Financial Reporting
Salary and Benefit Financial Report Directory - provides examples of the reports in the HCM application.(HR Operational reports)
General Financial Information o Financial Bulletins
Appendix A: Keeping Current
FN.02 LG v6 Last updated July 25, 2013 Page 49
Appendix A: Keeping Current It is important to stay up-to-date with changes regarding financial information. The Financial Services website offers users an opportunity to subscribe to email list services and websites that provide information to keep administrators current regarding news and information about financial processes. The monthly bulletins and websites provide information, such as:
Processing Deadline Extension, for example, during the Christmas vacation when the processing of month-end is extended an extra day due to the holidays.
Changes to Financial Services website, including items such as: Improved search capabilities Updates to the Guide to Financial Management.
Introduction of new nVision reports.
Information related to travel such as the UNIGLOBE Geo Relationship Rewards Program for employee staff members.
Information regarding HR Operations.
For more information about subscribing to the email list services, refer to the Financial Services website (identified in the Resources section of this guide) under the topic General Financial Information.