perforce 2000.1 system administrator’s guide · you may also wish to consult the perforce...
TRANSCRIPT

PERFORCE 2000.1System Administrator’s Guide
Manual 2000.1.sa.3October 11, 2000

This manual copyright 1999, 2000 PERFORCE Software.
All rights reserved.
PERFORCE software and documentation is available from http://www.perforce.com. You may download and use PERFORCE programs, but you may not sell or redistribute them. You may download, print, copy, edit, and redistribute the documentation, but you may not sell it, or sell any documentation derived from it. You may not modify or attempt to reverse engineer the programs.
PERFORCE programs and documents are available from our Web site as is. No warranty or support is provided. War-ranties and support, along with higher capacity servers, are sold by PERFORCE Software.
PERFORCE Software assumes no responsibility or liability for any errors or inaccuracies that may appear in this book.
By downloading and using our programs and documents you agree to these terms.
PERFORCE and Inter-File Branching are trademarks of PERFORCE Software. PERFORCE software includes software devel-oped by the University of California, Berkeley and its contributors.
All other brands or product names are trademarks or registered trademarks of their respective companies or organi-zations.

Preface About This Manual
This is the Perforce 2000.1 System Administrator’s Guide.
It describes the installation, configuration, and operation of a PERFORCE server from an administrator’s perspective. This includes the set of tasks typically performed by a “system administrator” (i.e. installa-tion and configuration of the software, as well as ensuring uptime and data integrity), as well as those performed by a “PERFORCE administrator”, including setting up PERFORCE users, setting PERFORCE depot access controls, resetting PERFORCE user passwords, and so on.
Since PERFORCE requires no special system permissions, the PERFORCE administrator typically does not require root-level access. Depending on your site’s needs, your PERFORCE administrator need not be your system administrator.
Both the UNIX and NT versions of the PERFORCE server are administered from the command line. If you are unfamiliar with the command line interface to PERFORCE, you will find the Perforce Command Refer-ence, which describes the PERFORCE command line interface in detail, to be a good companion to this guide.
Although this guide will teach you how to administer a PERFORCE server, it won’t teach you the basics of actually using PERFORCE. You may also wish to consult the Perforce User’s Guide for more information on PERFORCE from a user’s perspective.
All our documentation is available from our web site at http://www.perforce.com.
New 2000.1 FeaturesThe features new to PERFORCE 2000.1 have been marked with changebars in the right margin. The release notes provide more detailed information and are available at our web site: http://www.perforce.com.
Please Give Us FeedbackWe are interested in receiving opinions on it from our users. In particular, we’d like to hear from users who have never used PERFORCE before. Does this guide teach the topic well? Please let us know what you think; we can be reached at [email protected].
PERFORCE 2000.1 System Administrator’s Guide 1

Preface: About This Manual
PERFORCE 2000.1 System Administrator’s Guide 2

Table of Contents
Preface About This Manual ............................................... 1New 2000.1 Features.....................................................................................1Please Give Us Feedback .............................................................................1
Table of Contents ................................................... 3
Chapter 1 Welcome to PERFORCE: Installing and Upgrading...................................... 9
Installing PERFORCE on UNIX......................................................................9Creating a PERFORCE server root directory.................................................9Telling the PERFORCE server which port to listen to .................................10Telling PERFORCE clients which port to talk to .........................................10Starting the PERFORCE server ...................................................................11Stopping the PERFORCE server .................................................................. 11
Installing PERFORCE on NT ........................................................................ 11Terminology note: NT services and servers............................................... 11Starting and stopping PERFORCE on NT ..................................................12
Upgrading a PERFORCE Server ..................................................................12UNIX Upgrades ........................................................................................12
Upgrading from UNIX Release 98.2 or later ....................................12Upgrading from UNIX Release 98.1.................................................13Upgrading from UNIX Release 97.3.................................................13Upgrading from a pre-97.3 UNIX release .........................................14
NT upgrades ..............................................................................................14Installation and Administration Tips.......................................................14
Release and license information.................................................................14Observe proper backup procedures ............................................................15Use separate filesystems for server root and journal .................................15Use protections and passwords..................................................................15Allocate diskspace for anticipated growth .................................................15Managing disk space after installation......................................................15Large filesystem support ............................................................................16UNIX: Install servers on non-NFS filesystems ........................................16NT: Username and password required for networked drives ....................17UNIX and NT: Run P4D as a non-privileged user....................................17
PERFORCE 2000.1 System Administrator’s Guide 3
Table of Contents
Logging errors............................................................................................17Case-sensitivity issues ...............................................................................17Tune for performance .................................................................................17
Chapter 2 Supporting PERFORCE: Backup and Recovery........................................... 19
Backup and Recovery Concepts ...............................................................19Checkpoint files..........................................................................................20
Creating a Checkpoint .......................................................................20Journal files ................................................................................................21
Enabling Journaling ..........................................................................21Disabling Journaling .........................................................................22
Versioned files ............................................................................................22Versioned File Formats ......................................................................22Back up after checkpointing...............................................................22
Backup Procedures .....................................................................................22Recovery Procedures ..................................................................................24
Database corruption, versioned files unaffected ........................................24To recover the database.......................................................................24Check your system .............................................................................25Your system state ...............................................................................25
Both database and versioned files lost or damaged ....................................25To recover the database.......................................................................25To recover your versioned files...........................................................26Check your system .............................................................................26Your system state ...............................................................................26
Ensuring system integrity after any restoration .......................................26
Chapter 3 Administering PERFORCE: Superuser Tasks ................................................... 29
Basic PERFORCE Administration................................................................29Resetting user passwords...........................................................................29Creating new users ....................................................................................29Preventing creation of new users...............................................................30Reverting files opened by obsolete users ....................................................30Reclaiming diskspace by obliterating files .................................................30Deleting changelists and editing changelist descriptions..........................31File verification by signature .....................................................................31
Verifying during server upgrades......................................................31Defining filetypes with p4 typemap...........................................................32Forcing operations with the -f flag.............................................................32
Advanced PERFORCE Administration.......................................................33Running PERFORCE through a firewall .....................................................33
Secure shell ........................................................................................33Solving the problem ...........................................................................34
Specifying IP addresses in P4PORT .........................................................35Running from inetd on UNIX...................................................................35Case-sensitivity and multi-platform development ....................................36
PERFORCE server on UNIX ...............................................................36
PERFORCE 2000.1 System Administrator’s Guide 4

Table of Contents
PERFORCE server on NT ....................................................................36PERFORCE server trace flags ......................................................................36
Migrating to a new machine......................................................................37Moving your versioned files and PERFORCE database...............................37
Between machines of the same architecture: ......................................37Between different architectures using the same text format:.............38Between NT and UNIX:....................................................................38
Changing the IP address of your server.....................................................38Changing the hostname of your server ......................................................38
Using Multiple Depots ...............................................................................39Remote depot notes ....................................................................................39
When and when not to use remote depots .........................................40Restrictions on remote depots: ...........................................................40
Defining new depots ..................................................................................40Define the default depot .....................................................................40Defining local depots .........................................................................41Defining remote depots......................................................................41The Map: field ....................................................................................41
Other depot operations...............................................................................42Naming depots...................................................................................42Listing depots.....................................................................................42Deleting depots ..................................................................................42
Limiting access from other servers ............................................................42Users working with multiple depots..........................................................42
Chapter 4 Administering PERFORCE: Protections ........................................................... 43
When Should Protections Be Set? .............................................................43Setting Protections with “p4 protect” ......................................................43
The Permission Lines’ Five Fields .............................................................43Access Levels..............................................................................................44Which Users Should Receive Which Permissions? ...................................45Default Protections ....................................................................................45Interpreting Multiple Permission Lines....................................................45Exclusionary Protections...........................................................................46
Granting Access to Groups of Users ........................................................46Creating and Editing Groups ....................................................................46Groups and Protections .............................................................................47Deleting Groups ........................................................................................47
How Protections are Implemented...........................................................47Access Levels Required by PERFORCE Commands.................................48
Chapter 5 Customizing PERFORCE: Job Specifications .................................................51
The Default PERFORCE Job Template ........................................................51The Job Template’s Fields ..........................................................................52
The Fields: Field.........................................................................................52Caveats, Recommendations, and Warnings ......................................53
The Preset-fieldname: Fields ......................................................................54
PERFORCE 2000.1 System Administrator’s Guide 5

Table of Contents
The Values-fieldname: Fields .....................................................................54The Comments: Field .................................................................................55
Example: PERFORCE’s Custom Template..................................................55Integrating with Other Defect Tracking Systems ...................................57Caveats, Warnings and Recommendations.............................................57
Chapter 6 Scripting PERFORCE: Daemons and Triggers ......................................... 59
Triggers .........................................................................................................59Using triggers............................................................................................60Triggers and security .................................................................................61
Daemons.......................................................................................................61PERFORCE’s change review daemon...........................................................62Creating other daemons .............................................................................62Commands used by daemons .....................................................................63Daemons and counters ..............................................................................63Scripting and buffering .............................................................................63
Chapter 7 Tuning PERFORCE for Performance..................... 65Tuning for Performance .............................................................................65
Memory......................................................................................................65Filesystem performance .............................................................................65Diskspace allocation...................................................................................66Network .....................................................................................................66CPU ...........................................................................................................66
Diagnosing Slow Response Times............................................................67Hostname vs. IP address............................................................................67Try p4 info vs. P4Win................................................................................67Windows wildcards....................................................................................67DNS lookups and the hosts file..................................................................68Location of the “p4” executable .................................................................68
Preventing Server Swamp .........................................................................68Using tight views.......................................................................................68Assigning protections ................................................................................69Limiting “maxresults” ..............................................................................69
Maxresults for users in multiple groups ...........................................70Scripting efficiently ...................................................................................70
Iterating through files ........................................................................70Using list input files ..........................................................................71Using branch views ...........................................................................71Limiting label references ....................................................................71The temporary client trick .................................................................71
Checkpoints for Database Tree Rebalancing...........................................72
Chapter 8 PERFORCE and NT............................................... 73Using the PERFORCE installer .....................................................................73
Upgrade notes ............................................................................................73
PERFORCE 2000.1 System Administrator’s Guide 6

Table of Contents
Installation options ....................................................................................73User install ........................................................................................73Administrator typical ........................................................................74Administrator custom .......................................................................74Uninstall PERFORCE..........................................................................74
NT services vs. NT servers ........................................................................74Starting and stopping the PERFORCE NT service .....................................75Starting and stopping the PERFORCE NT server.......................................75Installing the PERFORCE NT service on a network drive ..........................75
Multiple PERFORCE services under NT.....................................................76NT configuration parameter precedence.................................................77Resolving NT-related instabilities ............................................................77Users having trouble with P4EDITOR or P4DIFF..................................78
Appendix A PERFORCE Server (p4d) Reference ....................... 79Synopsis .....................................................................................................79Syntax........................................................................................................79Description ................................................................................................79Exit Status .................................................................................................79Options ......................................................................................................79Usage Notes ...............................................................................................80Related Commands ....................................................................................80
Appendix B Glossary ............................................................... 81
Index ....................................................................87
PERFORCE 2000.1 System Administrator’s Guide 7

Table of Contents
PERFORCE 2000.1 System Administrator’s Guide 8

Chapter 1 Welcome to PERFORCE: Installing and Upgrading
This chapter will describe how to install a PERFORCE server or upgrade an existing installation.
A short checklist of things to consider at installation time is offered, along with some basic security and administration tips. More detailed notes on administrative tasks are found in later chapters.
Installing PERFORCE on UNIXPERFORCE operation requires two executables: the server (p4d), and any of the PERFORCE client programs (e.g. p4 on UNIX, p4.exe or p4win.exe on NT). If you haven’t already downloaded these, they may be retrieved from the Downloads page on the PERFORCE web site.
Although p4 and p4d can be installed in any directory, on UNIX the PERFORCE client program typically resides in /usr/local/bin, and the PERFORCE server is usually located either in /usr/local/bin or in its own server root directory. PERFORCE client programs can be installed on any machine that has TCP/IP access to the p4d host.
To limit access to the PERFORCE server files, it is recommended that p4d be owned and run by a PERFORCE user account that has been created for that purpose.
Only a few additional steps need to be performed before p4 and p4d can be run. They are described in detail in the following sections. Briefly:
• Create a root directory for the PERFORCE files,
• Provide a TCP/IP port to p4d,
• Provide the name of the PERFORCE server and the p4d port number to the PERFORCE client program(s),
• Start the PERFORCE server (p4d).
Creating a PERFORCE server root directoryPERFORCE stores all of its data in files and subdirectories of its own root directory, which can reside any-where on the server system. This directory is called the server root. This directory should be owned by the account that runs p4d, and can be named anything at all. The only necessary permissions are read, write, and execute for the user who invokes p4d.
95/98/NT Windows administrators will note that many of the examples in this book are based on the UNIX version of the PERFORCE server. In almost all cases, they are common to both Windows and UNIX installations; PERFORCE’s behavior is generally the same regardless of whether executed in a UNIX shell or from the MS-DOS command line.
Where the UNIX and NT versions of PERFORCE differ, a note to that effect will be made. For NT-specific information, see “Perforce and NT” on page 73.
PERFORCE 2000.1 System Administrator’s Guide 9

Chapter 1: Welcome to PERFORCE: Installing and Upgrading
Since PERFORCE will store all submitted files under this directory, the size of the directory can become quite large. Disk space management is touched on in “Installation and Administration Tips” on page 14 and described in more detail in “Diskspace allocation” on page 66.
For security purposes, read and write access to the server root should be restricted to prevent anyone but the account owner from reading, modifying or even listing the actual depot files. To ensure that tem-porary files cannot be read by unauthorized users, set the umask(1) file creation-mode mask of the account owner to a value that will not permit other users to read the contents of the server root directory or its files.
You are strongly advised not to run p4d as root or any other privileged user. For more information, see the section entitled “UNIX and NT: Run p4d as a non-privileged user” on page 17.
The environment variable P4ROOT should be set to point to the server root. Alternatively, the -r root_dir flag can be provided when p4d is started to specify a server root directory. The PERFORCE cli-ent programs never use this directory directly, and do not need to know the value of P4ROOT; the p4d server is the only process which uses the P4ROOT environment variable.
Unlike P4ROOT, the environment variable P4PORT is used by both the PERFORCE server and PERFORCE cli-ents, and should be set on both. Its use is discussed in the next two sections.
Telling the PERFORCE server which port to listen toThe p4d server and PERFORCE client programs communicate with each other via TCP/IP. When p4d starts, it will (by default) listen on port 1666. The PERFORCE client will (also by default) assume that its p4d server is located on host perforce, listening on port 1666.
If p4d is to listen on a different port, the port can be specified with the -p port_num flag when starting p4d (e.g. p4d -p 1818), or the port can be set with the P4PORT environment or registry variable.
Telling PERFORCE clients which port to talk toPERFORCE client programs need to know the TCP/IP port on which the p4d server program is listening. The easiest way to do this under UNIX is to set each PERFORCE user’s P4PORT environment variable to host:port#, where host is the name of the machine on which p4d is running, and port# is the port on which p4d is listening.
Examples:
The definition of P4PORT can be shortened if the PERFORCE client is running on the same host as p4d. In this case, only the p4d port number need be provided to the client. If p4d is running on a host named or aliased perforce, listening on port 1666, the definition of P4PORT for the client can be dispensed with altogether.
Examples:
If your p4d host is not named perforce, you can choose to simplify life somewhat for your PERFORCE users by setting perforce as an alias to the true host name in their workstations’ /etc/hosts files, or by doing so via Sun’s NIS or Internet DNS. NT administrators can do the same thing with NT’s DNS capabili-ties or the %SystemRoot%\system32\drivers\etc\hosts file.
If P4PORT is... Then...
dogs:3435 The client will use the p4d server on host dogs listening at port 3435.
x.com:1818 The client will use the p4d server on host x.com listening at port 1818.
If P4PORT is... Then...
3435 The client will use the p4d server on its local host listening at port 3435.
<not set> The client will use the p4d server on the host named or aliased perforce listen-ing on port 1666.
PERFORCE 2000.1 System Administrator’s Guide 10

Chapter 1: Welcome to PERFORCE: Installing and Upgrading
Starting the PERFORCE serverAfter p4d’s P4PORT and P4ROOT environment variables have been set, p4d can be run in the background with the command:
p4d &
Although this command is sufficient to run p4d, other flags, (e.g., those that control such things as error logging, checkpointing, and journaling), can be provided.
Example: Starting a PERFORCE server
P4PORT can be overridden by starting p4d with the -p flag, and P4ROOT can be overridden by starting p4d with the -r flag. A journal file may be specified with the -J flag, and errors may be logged to a file specified with a -L flag. The startup command would then have this form:
p4d -r /usr/local/p4root -J /var/log/journal -L /var/log/p4errors -p 1818 &
These flags (and others) are discussed in “Supporting Perforce: Backup and Recovery” on page 19. A complete list of server flags appears in the “Perforce Server (p4d) Reference” on page 79.
Stopping the PERFORCE serverIf you are running PERFORCE 99.2, use the command
p4 admin stop
to shut down the PERFORCE server. Only a PERFORCE superuser may use this command.
If you are running an earlier version of PERFORCE, you’ll have to find the process ID of the p4d server and kill it manually from the UNIX shell. The use of kill -15 (SIGTERM) is preferable to kill -9 (SIGKILL), as the database could be left in an inconsistent state if p4d happened to be in the middle of updating a file when a SIGKILL signal was received.
With the appearance of p4 admin stop in Release 99.2, the practice of manually killing the p4d server has become obsolete.
Installing PERFORCE on NTInstallation of PERFORCE on NT is handled by the installer. You can get the NT installer by downloading it from the Downloads page of the PERFORCE web site.
The PERFORCE installer (perforce.exe) allows you to:
• Install PERFORCE client software (“User install”).
This option allows for the installation of p4.exe (the PERFORCE command line client), p4win.exe (P4WIN, the PERFORCE Windows GUI), and p4scc.dll (PERFORCE’s implementation of the Microsoft common SCM interface).
• Install PERFORCE as either an NT server or service as appropriate. (“Administrator typical” and “Administrator custom” install).
These options allow for the installation of both the PERFORCE client software as well as the PERFORCE NT server (p4d.exe) and NT service (p4s.exe) executables.
You can also use either of these options to automatically upgrade an existing PERFORCE server or ser-vice running under NT.
• Uninstall PERFORCE: remove the PERFORCE server, service, and client executables, registry keys, and service entries. The database and depot files in your server root, however, will be preserved.
For more about the PERFORCE NT installer, see “Using the Perforce installer” on page 73.
Terminology note: NT services and serversIn most cases, it makes no difference whether PERFORCE was installed on UNIX, as an NT service, or as an NT server. Consequently, the terms “PERFORCE server” and “p4d”, are used interchangeably to refer to
PERFORCE 2000.1 System Administrator’s Guide 11
Chapter 1: Welcome to PERFORCE: Installing and Upgrading
“the process which handles requests from PERFORCE clients”. In cases where the distinction between an NT server and an NT service are important, the distinction will be made.
On UNIX systems, there is only one PERFORCE “server” program (p4d) responsible for this back-end task. On NT, however, this back-end program can be started either as an NT service (p4s.exe), which can be set to run at boot time, or as an NT server (p4d.exe), which is invoked from an MS-DOS prompt.
The PERFORCE service (p4s.exe) and the PERFORCE server (p4d.exe) executables are copies of each other; they are identical apart from their filenames. When run, they use the first three characters of the name with which they were invoked (i.e. either p4s or p4d) to determine their behavior. (i.e. invoking copies named p4smyservice.exe or p4dmyserver.exe will invoke a service and a server, respectively.)
In most cases, you will want to install PERFORCE as a service, not a server. For a more detailed discussion of the distinction between the two options, see “NT services vs. NT servers” on page 74.
Starting and stopping PERFORCE on NTIf you’re running PERFORCE as a service under NT, it will be started when the machine boots. You can configure it within the Services applet in the Control Panel.
If you’re running Perforce as a server under NT, invoke it from an MS-DOS command prompt. The flags under NT are the same as those under UNIX.
If you are running PERFORCE 99.2, whether as a service or a server under NT, use the commandp4 admin stop
to shut down a 99.2 NT service or server. Only a PERFORCE superuser may use this command.
For older revisions of PERFORCE, you’ll have to shut down NT services by using the Services applet in the Control Panel., and servers running in MS-DOS windows by typing Ctrl-C in the window or clicking on the icon to Close the window.
While these options will work with both Release 99.2 and earlier versions of PERFORCE, they are not nec-essarily “clean”, in the sense that the server or service is shut down abruptly. With the availability of the p4 admin stop command in 99.2, their use is no longer recommended.
Upgrading a PERFORCE Server
UNIX UpgradesTo upgrade your current PERFORCE server to a newer version, your PERFORCE license file must be current. Expired licenses will not work with upgraded servers. (This is not a problem if you are running a two-user installation with no license.)
In addition to the steps described below, it is a good idea to run p4 verify as part of your upgrade. See “Verifying during server upgrades” on page 31 for details.
Whenever upgrading, it’s wise to save your current p4d executable (and a copy of your old database, as stored in a checkpoint) rather than overwriting it with the new one; this will give you a quick, easy way to back out the upgrade should the need arise. For details, see “Backup Procedures” on page 22.
Upgrading from UNIX Release 98.2 or later
If you have a valid license (or require no license) and are upgrading from Release 98.2 or later, upgrading your PERFORCE server is as simple as:
1. Downloading the new p4d executable for your platform,
2. Stopping the current instance of p4d,
3. Making a checkpoint and backing up your old installation,
4. Installing the new p4d in the desired location,
5. Restarting the new p4d with your site’s usual parameters.
Your users should then be able to use the new server.
PERFORCE 2000.1 System Administrator’s Guide 12

Chapter 1: Welcome to PERFORCE: Installing and Upgrading
Upgrading from UNIX Release 98.1
To upgrade from Release 98.1 or later, use the following procedure:
1. Download the new p4d executable for your platform.
2. Stop the current instance of p4d.
3. Make a checkpoint and back up your old installation.
4. Install the new p4d in the desired location.
5. Restart p4d with your site’s usual parameters.
6. Reindex the jobs tables with:p4 jobs -R
Pre-98.1 PERFORCE client programs (p4, p4.exe, p4win.exe, and p4scc.dll) generally work with newer server versions with no trouble, although some features in a new server release will require a client upgrade as well. In general, users with older client programs will still be able to use features available from the PERFORCE server at the client’s release level, but will not be able to use the new server features offered by subsequent server upgrades. PERFORCE’s remote depot support is an exception: remote depot support is not guaranteed to work unless all of your PERFORCE servers are at or above Release 98.2.
If you have any questions or difficulties during an upgrade, contact PERFORCE technical support.
Upgrading from UNIX Release 97.3
To upgrade from Release 97.3, use the following procedure:
1. Stop the current instance of p4d.
2. Create a checkpoint file using:p4d -r $P4ROOT -jc
3. Make a complete backup of everything in your P4ROOT (server root) directory.
4. Install the new p4d.
5. Remove the existing db.* files from your P4ROOT directory.
6. Create new db.* files from the checkpoint using:p4d -r $P4ROOT -jr checkpoint.n
where n is the numeric suffix appended to the name of the checkpoint file.
7. Restart p4d with your site’s usual parameters.
8. Reindex the jobs tables with:p4 jobs -R
If you have any questions or difficulties during an upgrade, contact PERFORCE technical support.
Note Reindexing the jobs tables for releases prior to 98.2 is required because of a change made in the database structure between 98.1 and 98.2 to facilitate fast keyword searching of jobs.
!Warning! Upgrades from releases prior to 98.1 require more work: there was a change in database support in 98.1 which made it impossible to read database files from pre-98.1 (97.3 and earlier) servers.
The 98.1 and later servers can, however, read 97.3 checkpoint files. Check-point files contain a plain text representation of all the data in the database files.
Note Reindexing the jobs tables for releases prior to 98.2 is required because of a change made in the database structure between 98.1 and 98.2 to facilitate fast keyword searching of jobs.
PERFORCE 2000.1 System Administrator’s Guide 13
Chapter 1: Welcome to PERFORCE: Installing and Upgrading
Upgrading from a pre-97.3 UNIX release
To upgrade to the current release from a version earlier than Release 97.3, you must first make a check-point using the 97.3 server. Use the following procedure:
1. Stop the current instance of p4d.
2. Download the 97.3 version of p4d and name it p4d.973.
3. Create a checkpoint using the 97.3 server using:p4d.973 -r $P4ROOT -jc
4. Make a complete backup of everything in P4ROOT.
5. Download the new p4d and install it in the desired location.
6. Remove the existing db.* files from P4ROOT.
7. Create new db.* files from the checkpoint using:p4d -r $P4ROOT -jr checkpoint.n
8. Restart p4d with your site’s usual parameters.
9. Reindex the jobs tables with:p4 jobs -R
If you have any questions or difficulties during an upgrade, contact PERFORCE technical support.
NT upgradesOn NT, all of the special requirements required when upgrading between older PERFORCE UNIX releases and the present release are handled automatically by the PERFORCE Windows installer. Simply download the installer (perforce.exe) and follow the installation dialog.
The upgrade process on NT is extremely conservative; if any error condition occurs during the upgrade, you will always be able to revert to using your pre-upgrade PERFORCE server or service.
If you have any questions or difficulties during an upgrade, contact PERFORCE technical support.
Installation and Administration Tips
Release and license informationPERFORCE servers are licensed according to how many users they will support.
This licensing information lives in a file called license in the server root directory. It is a plain text file supplied by PERFORCE Software. Without the license file, the PERFORCE server will limit itself to two users and two client workspaces.
!Warning! Upgrades from releases prior to 98.1 require more work: there was a change in database support in 98.1 which made it impossible to read database files from pre-98.1 (97.3 and earlier) servers.
The 98.1 and later servers can, however, read 97.3 checkpoint files. Check-point files contain a plain text representation of all the data in the database files.
!Warning! If you’re upgrading from Release 97.3 or earlier to the current release, you’ll need to make an interim checkpoint.
Note Reindexing the jobs tables for releases prior to 98.2 is required because of a change made in the database structure between 98.1 and 98.2 to facilitate fast keyword searching of jobs.
PERFORCE 2000.1 System Administrator’s Guide 14

Chapter 1: Welcome to PERFORCE: Installing and Upgrading
Current licensing information may be viewed by invoking p4d -V from the server root directory or by specifying the server root directory either on the command line (p4d -V -r server_root) or in the P4ROOT environment variable.
When the server is running, the license information may also be viewed with p4 info.
Version information will be displayed when invoking p4d -V or p4 -V.
Observe proper backup proceduresRegular backups of your PERFORCE data are vital. The key concepts are:
• Make sure journaling is active,
• Create checkpoints regularly,
• Use p4 verify regularly.
See “Supporting Perforce: Backup and Recovery” on page 19 for a full discussion of backup and restora-tion procedures.
Use separate filesystems for server root and journalWhether installing on UNIX or NT, it is usually advisable to have your P4ROOT directory (i.e. your data-base and versioned files) on a different physical volume than your journal file.
By moving the journal to a separate volume, if a disk failure corrupts the volume containing the files in P4ROOT, you can be reasonably sure that it will not have affected your journal file. The journal file can then be used to restore any lost or damaged data. Further details are available in “Supporting Perforce: Backup and Recovery” on page 19.
Use protections and passwordsUntil you define a PERFORCE superuser, every PERFORCE user is a PERFORCE superuser, and can run any PERFORCE command on any file. The administrator who installs PERFORCE should use:
p4 protect
to define a PERFORCE superuser as soon as possible after installing the PERFORCE server. For more infor-mation, see “Administering Perforce: Protections” on page 43
Furthermore, until your users have passwords defined, any user will be able to impersonate any other PERFORCE user, either with the -u flag or by setting P4USER to a PERFORCE user’s username. Proper use of PERFORCE passwords (as described in the Perforce User’s Guide) can protect against this. See the Perforce User’s Guide for details.
To set (or reset) a user’s password, use p4 passwd username (as a PERFORCE superuser), and enter the new password for the user, or invoke p4 user -f username (also while as a PERFORCE superuser) and enter the new password into the user specification form. The former command will only work in release 99.1 or later; the latter command will work under all releases from 97.3 onwards.
The security-conscious PERFORCE superuser should use p4 protect to make sure that no access higher than list is granted to *, and require that each user have a PERFORCE password.
Allocate diskspace for anticipated growthIn general, you’ll need sufficient space in your P4ROOT directory to hold your depot files (i.e. the files cre-ated by your users), and an additional 0.5K per user per file to hold the data describing the files, their status, and their histories. As a rule of thumb, you also probably want at least enough diskspace to hold three times the size of your present collection of versioned files.
For a more detailed example of a disk sizing estimate, see “Diskspace allocation” on page 66.
Managing disk space after installationAll of p4d’s versioned files reside in subdirectories of the server root, as do its database files, and (by default) the checkpoints and journals. The stored versioned file depots are grow-only, and this can
PERFORCE 2000.1 System Administrator’s Guide 15

Chapter 1: Welcome to PERFORCE: Installing and Upgrading
clearly present disk space problems on high use systems. The following approaches may be used to rem-edy this:
• Tell PERFORCE to store the journal file on a separate physical disk, using the P4JOURNAL environment variable or the -J flag to p4d.
• Checkpoint on a daily basis to keep the journal file short.
• Compress checkpoints, or use the -z option to tell p4d to compress them while creating them.
• Use the -jc prefix option with the p4d command to write the checkpoint to a different disk. Alter-nately, use the default checkpoint files, but back up your checkpoints and then delete them from the root directory. Old checkpoints are needed when recovering from a crash, and if your checkpoint and journal files reside on the same disk as your depot, a hardware failure could leave you without the ability to restore your database.
• On UNIX systems, some or all of the depot directories may be relocated to other disks by using sym-bolic links. Creation of symbolic links and movement of depot files to other volumes should be done only while the PERFORCE server is not running. (Remember, however, that the storage of PERFORCE ver-sioned files on NFS-mounted disks is not recommended; this solution is intended to be implemented by linking to directories on other volumes which are also on drives local to the machine running p4d.)
• Due to the nature of the implementation of their access methods, the database files themselves may become internally unbalanced, resulting in them taking up more space than necessary. The database files can sometimes be reduced in size by recreating them from a checkpoint. This should be done only if the database files are more than about 10 times the size of the checkpoint in total. See “Checkpoints for Database Tree Rebalancing” on page 72.
Large filesystem supportEarlier versions of the PERFORCE server, as well as some operating systems, limit PERFORCE database files (i.e. the db.* files in the P4ROOT directory which contain your metadata) to 2GB in size.
The db.have file, which holds label contents and the list of files currently opened in client workspaces, tends to grow the most quickly. If you anticipate your PERFORCE database files growing beyond the 2GB level, you should ensure that you are installing on a platform with support for large files.
As of this writing, the following combinations of operating system and PERFORCE server revision will support database files larger than 2GB:
UNIX: Install servers on non-NFS filesystemsPerforce expects to have fast access to its database; both for performance reasons (on all platforms), and certain issues involving NFS filesystems and file locking (particularly on Linux and FreeBSD), we recom-mend that you not store your journal, log, depot, or db.* files on an NFS-mounted filesystem.
PERFORCE uses a client-server architecture; this means that PERFORCE clients never directly access the files in P4ROOT, and the only process needing access to P4ROOT is the p4d server itself. It is almost always pref-erable to ensure that the files used by PERFORCE are local to the machine running p4d.
Operating System OS version: PERFORCE Server Revision
Tru64 UNIX (a.k.a. Digital UNIX, OSF/1)
All versions 98.2/5713 or higher
FreeBSD All versions 98.2/5713 or higher
Windows NT All versions, SP5 recommended
98.2/8127 or higher
SGI IRIX 6.2 All versions 98.2/5713 or higher
SGI IRIX 5.3 Only with the SGI-sup-plied xfs upgrade
98.2/5713 or higher
xfs upgrade required at OS level
Solaris 2.6 and higher 98.2/7488 compiled for 2.6 or higher
PERFORCE 2000.1 System Administrator’s Guide 16

Chapter 1: Welcome to PERFORCE: Installing and Upgrading
NT: Username and password required for networked drivesBy default, the PERFORCE service runs under the NT local System account. Since NT machines require a real account name and password to access files on a network drive, if PERFORCE is installed as a service under NT with P4ROOT pointing to a network drive, the installer will query for an account name and a password. The PERFORCE service will be configured with the supplied data and run as the specified user instead of System. (This account must have Administrator privileges on the machine.)
Although PERFORCE will operate reliably with its root directory on a network drive, it will do so at a sub-stantial performance penalty, as all writes to the database will have to be performed over the network. For optimal performance, it is still best to install the NT service to use local drives rather than networked drives.
For more information, see “Installing the Perforce NT service on a network drive” on page 75.
UNIX and NT: Run P4D as a non-privileged userWhile it is possible to run the PERFORCE server as root, it is highly inadvisable to do so. Sound adminis-tration practice demands that processes which don’t require root access should never be run as root. In the case of PERFORCE, the owner of the p4d process should never be a privileged account.
A good way to manage a PERFORCE installation on UNIX is to create a UNIX userid for it (e.g., “per-force”) and (optionally) a UNIX group for it (e.g., “p4admin”). The umask(1) command can be used to ensure that the server root (P4ROOT) and all files and directories beneath it are created as writable only by the UNIX user perforce, and (optionally) readable by members of the UNIX group p4admin.
The PERFORCE server (p4d), running as UNIX user perforce, can write to files in the server root, but none of your users will be able to overwrite its files. Access to read the files in the server root (e.g. depot files, checkpoints, journals) can be granted to trusted users by making them members of the UNIX group p4admin.
Logging errorsThe PERFORCE server’s error output file can be specified with the -L flag to p4d, or can be defined in the environment variable P4LOG. If no error output file is defined, errors are dumped to p4d’s standard error.
Although p4d tries to ensure that all error messages reach the user, if an error occurs and the client pro-gram disconnects before the error is received, p4d will also log these errors to its error output.
The PERFORCE server also has trace flags used for debugging purposes. See “Perforce server trace flags” on page 36 for details.
Case-sensitivity issuesWhether your PERFORCE server is running on NT or UNIX, if your site is involved in cross-platform devel-opment (i.e. PERFORCE clients on both NT and UNIX machines), your users will still need to be made aware of certain details regarding case-sensitivity issues. See “Case-sensitivity and multi-platform devel-opment” on page 36 for details.
Tune for performancePERFORCE is a relatively light consumer of network traffic and CPU power. The most important variables determining performance will be the efficiency of your server’s disk I/O subsystem and the number of files referenced in any given user-originated PERFORCE operation.
For more detailed performance tuning information, see “Tuning Perforce for Performance” on page 65.
95/98/NT On NT, directory permissions are set securely by default; when running as a server, the PERFORCE server root will be accessible only to the user who invoked the server from the MS-DOS command line. When installed as an NT service, the files will be owned by the LocalSystem account, and will be accessible only to those with Administrator access.
PERFORCE 2000.1 System Administrator’s Guide 17

Chapter 1: Welcome to PERFORCE: Installing and Upgrading
PERFORCE 2000.1 System Administrator’s Guide 18

Chapter 2 Supporting PERFORCE: Backup and Recovery
The PERFORCE server stores two kinds of data: versioned files and metadata. Both are stored in the server’s root directory.
• Versioned files are files submitted by PERFORCE users. Versioned files are stored in directory trees called depots. There will be one subdirectory under the server’s root directory for each depot in your PER-FORCE installation. The versioned files for a given depot will be stored in a tree of directories beneath this subdirectory.
• Database files store metadata, including changelists, opened files, client specs, branch specs, and other data concerning the history and present state of the versioned files. Database files appear as db.* files in the top level of the server root directory. Each db.* file contains a single, binary-encoded database table.
Backup and Recovery ConceptsDisk space shortages, hardware failures, and system crashes can corrupt any of the PERFORCE server’s files. That’s why the entire PERFORCE root directory structure - your versioned files and your database - should be backed up regularly.
As mentioned earlier, versioned files are stored in subdirectories beneath your PERFORCE server root, and can be restored directly from backups without any loss of integrity.
The files making up the PERFORCE database, on the other hand, may not have been in a state of transac-tional integrity at the moment they were copied to the system backups. Restoring the db.* files from sys-tem backups may result in an inconsistent database. The only way to guarantee the integrity of the database after it’s been damaged is to reconstruct the db.* files from PERFORCE checkpoint and journal files.
• A checkpoint is just a snapshot or copy of the database at a particular moment in time.
• A journal is a log that records updates made to the database since the last snapshot was taken.
The checkpoint file is often much smaller than the original database, and can be made smaller still by compressing it. The journal file, on the other hand, can grow quite large; it is truncated whenever a checkpoint is made, and the older journal is renamed. The older journal files can then be backed up offline, freeing up more space locally.
Both the checkpoint and journal are text files, and have the same format. A checkpoint and, if available, its subsequent journal, can restore the PERFORCE database.
Because the information stored in the PERFORCE database is as irreplaceable as your versioned files, checkpointing and journaling are an integral part of administering a PERFORCE server, and should be per-formed regularly.
!Warning! Checkpoints and journals archive only the PERFORCE database files, not the files in the depot directories! You must always back up the depot files (your versioned files) with the standard OS backup commands after checkpointing.
PERFORCE 2000.1 System Administrator’s Guide 19

Chapter 2: Supporting PERFORCE: Backup and Recovery
Checkpoint filesA checkpoint is a file that contains all information necessary to recreate the metadata in the PERFORCE database. When you create a checkpoint, the PERFORCE database is locked, allowing you to take an inter-nally-consistent snapshot of that database.
Versioned files are backed up separately from checkpoints. This means that a checkpoint does not con-tain the contents of versioned files, and as such, you cannot restore any versioned files from a check-point. You can, however, restore all changelists, labels, jobs, etc., from a checkpoint.
To guarantee database integrity upon restoration, the checkpoint must be as old as, or older than, the versioned files in the depot. This means that the database should be checkpointed, and the checkpoint generation must be complete, before the backup of the versioned files starts.
Regular checkpointing is important to keep the journal from getting too long. Making a checkpoint immediately before backing up your system is good practice.
Creating a Checkpoint
Checkpoints are not created automatically; someone or something must run the checkpoint command on the PERFORCE server machine. You can create a checkpoint by invoking the p4d program with the -jc (journal-create) flag:
p4d -r root -jc
This can be run while the PERFORCE server (p4d) is running.
To make the checkpoint, p4d locks the database and then dumps its contents to a file named check-point.n, where n is a sequence number. Before it unlocks the database, p4d also copies the journal file to a file named journal.n-1, and then truncates the current journal. This guarantees that the last checkpoint (checkpoint.n) combined with the current journal (journal) will always reflect the full contents of the database at the time the checkpoint was created.
(The sequence numbers reflect the roll-forward nature of the journal; to restore databases to older check-points, match the sequence numbers. That is, the database reflected by checkpoint.6 can be restored by restoring the database stored in checkpoint.5 and rolling forward the changes recorded in journal.5. In most cases, you’re only interested in restoring the current database, which is reflected by the highest-numbered checkpoint.n rolled forward with the changes in the current journal.)
You can specify a prefix for the checkpoint and journal filename by using the -jc option. That is, if you create a checkpoint with:
p4d -jc prefix
your checkpoint and journal files will be named prefix.ckp.n, or prefix.jnl.n respectively, where prefix is as specified on the command line and n is a sequence number. If no prefix is specified, the default filenames checkpoint.n and journal.n will be used.
As of Release 99.2, if you need to take a checkpoint but are not on the machine running the PERFORCE server, you can create a checkpoint remotely with the p4 admin command. Use
p4 admin checkpoint [prefix]
to take the checkpoint and optionally specify a prefix to the checkpoint and journal files. (You must be a PERFORCE superuser to use p4 admin.)
A checkpoint file may be compressed, archived, or moved onto another disk. At that time or shortly thereafter, the files in the depot subdirectories should be archived as well.
When recovering, the checkpoint must be at least as old as the files in the depots. (i.e. the versioned files can be newer than the checkpoint, but not the other way around.) As you might expect, the shorter this time gap, the better.
Note The treatment of the argument to -jc has changed in Release 99.2!
Prior to Release 99.2, the files created with p4d -jc prefix would have been prefix.n (for the checkpoint) and journal.n (for the old journal).
The behavior in 99.2 is a change from that in previous releases; if you have scripts which rely on the old behavior, you may have to modify them.
PERFORCE 2000.1 System Administrator’s Guide 20

Chapter 2: Supporting PERFORCE: Backup and Recovery
You can set up an automated program to create your checkpoints on a regular schedule. Be sure to always check the program’s output to ensure that the checkpoint creation was successful. The first time you need a checkpoint is not a good time to discover your checkpoint program wasn’t working.
If the checkpoint command itself fails, contact PERFORCE Technical Support immediately. Checkpoint failure is usually a symptom of a resource problem (disk space, permissions, etc.) that can put your data-base at risk if not handled correctly.
Journal filesThe journal is the running transaction log that keeps track of all database modifications since the last checkpoint. It’s the bridge between two checkpoints. If you have Monday’s checkpoint and the journal that was collected from then until Wednesday, those two files (Monday’s checkpoint plus the accumu-lated journal) contain the same information as a checkpoint made Wednesday. If a disk crash were to cause corruption in your PERFORCE database on Wednesday at noon, for instance, you could still restore the database even though Wednesday’s checkpoint hadn’t yet been made.
To restore your database, you only need to keep the most recent journal file accessible, but it doesn’t hurt to archive old journals with old checkpoints, should you ever need to restore to an older checkpoint.
Enabling Journaling
For NT, if you used the installer (perforce.exe) to install a PERFORCE server or service, journaling will be turned on for you.
For UNIX PERFORCE server installations, or if you installed the server manually on NT, journaling will not be automatically enabled. In these cases, you should make a checkpoint soon after installing the PER-FORCE server so that journaling is turned on as soon as possible. To enable journaling on such an installa-tion, do one of the following:
• Create an empty file in the server root named journal in the server root directory, then start p4d, or:
• Set the P4JOURNAL environment variable to point to the desired location of the file, create an empty file with this name, then start p4d, or:
• Start p4d with the -J journalfile flag and ensure that subsequent checkpoints specify the same journalfile.
Be sure to create a new checkpoint with p4d -jc (and -J journalfile if required) immediately after enabling journaling. Once journaling is enabled, you’ll need to start making regular checkpoints to con-trol the size of the journal file. An extremely large current journal is a sign that a checkpoint is needed.
Every checkpoint after your first checkpoint starts a new journal file and renames the old one. The old journal is renamed to journal.n, (or prefix.jnl.n for Release 99.2 or later) where n is a sequence number, and a new journal file is created.
By default, the journal is written to the file journal in the server root directory (P4ROOT). Since there is no sure protection against disk crashes, the journal file and the PERFORCE server root should be located on different filesystems, ideally on different physical disk drives. The name and location of the journal can be changed by specifying the name of the journal file in the environment variable P4JOURNAL, or by providing the -J filename flag to p4d.
!Warning! By default, the current journal file name is journal and it resides in the P4ROOT directory. However, if a disk failure corrupts that root directory, your journal file will be inaccessible too.
We strongly recommend that you set up your system so that the journal is written to a filesystem other than the P4ROOT filesystem. You can specify this from the command line, or set P4JOURNAL before starting the PERFORCE server to tell it where to write the journal.
!Warning! If you create a journal file with the -J filename flag, make sure that subse-quent checkpoints use the same file, or the journal will not be properly renamed.
PERFORCE 2000.1 System Administrator’s Guide 21

Chapter 2: Supporting PERFORCE: Backup and Recovery
Whether you use P4JOURNAL or the -J journalfile option to p4d, the journal file name can be provided either as an absolute path, or as a path relative to the server root.
Disabling Journaling
To disable journaling, stop the server, remove the existing journal file (if it exists), unset the environment (or registry, for NT) variable P4JOURNAL, and restart p4d without the -J flag.
Versioned filesYour checkpoint and journal files are used to reconstruct the PERFORCE database files only. Your ver-sioned files are stored in directories under the PERFORCE server root, and must be backed up separately.
Versioned File Formats
Versioned files are stored in subdirectories beneath your server root. Text files are stored in RCS format, with filenames of the form filename,v. There is generally one RCS-format (,v) file per text file. Binary files are stored in full in their own directories named filename,d. Depending on the PERFORCE file type selected by the user storing the file, there may be one or more archived binary files in each filename,d directory. If more than one file resides in a filename,d directory, each one refers to a different revision of the binary file, and is named 1.n, where n is the revision number.
As of Release 99.2, PERFORCE also supports the AppleSingle file format for Macintosh. On the server, these files are stored in full, compressed, just like other binary files. They are stored in the Mac’s AppleS-ingle file format; if need be, these files can be copied directly from the server root, uncompressed, and used as-is on a Macintosh.
Because PERFORCE uses compression in the depot files, a system administrator should not rely on the compressibility of the data when sizing backup media. Both text and binary files are either compressed by the PERFORCE server (denoted by the .gz suffix) before storage, or are stored uncompressed. At most installations, if any binary files in the depot subdirectories are being stored uncompressed, they were probably incompressible to begin with. (e.g., images stored in a compressed format, video streams, etc.)
Back up after checkpointing
In order to ensure that the versioned files reflect all the information in the database after a post-crash res-toration, the db.* files must be restored from a checkpoint that is at least as old as (or older than) your versioned files. For this reason, you should create the checkpoint before backing up the versioned files in the depot directory or directories.
While your versioned files can be newer than the data stored in your checkpoint, it is in your best inter-est to keep this difference to a minimum; in general, you’ll want your backup script to back up your ver-sioned files immediately after successfully completing a checkpoint.
Backup ProceduresTo back up your PERFORCE server, perform the following steps as part of your nightly backup procedure:
1. Verify the integrity of your server and add file signatures to any new files: p4 verify //...p4 verify -u //...
You may wish to pass the -q (quiet) option to p4 verify. If called with the -q option, p4 verify will produce output only when errors are detected.
The first command (p4 verify) will recompute the MD5 signatures of all of your archived files and compare them with those stored when p4 verify -u was first run on them. It will also ensure that all files known to PERFORCE actually exist in the depot subdirectories; a disk-full condition that results in corruption of the database or archived files during the day can be detected by examining the output of these commands.
The second command (p4 verify -u) will update the database with MD5 signatures for any new file revisions for which checksums have not yet been computed.
PERFORCE 2000.1 System Administrator’s Guide 22

Chapter 2: Supporting PERFORCE: Backup and Recovery
By running p4 verify -u before the backup, you ensure that you create and store checksums for any files new to the depot since your last backup, and that these checksums are stored as part of the backup you’re about to take.
The use of p4 verify is optional, but is good practice not only because it allows you to spot any server corruption before a backup is made, but it also gives you the ability, following a crash, to detect whether or not the files restored from your backups are in good condition.
2. Make a checkpoint by invoking p4d with the -jc (journal-create) flag, or by using the p4 admin command. Use one of:
p4d -jc
or (as of Release 99.2 or higher)p4 admin checkpoint
Because p4d locks the entire database when making the checkpoint, you do not generally have to stop your PERFORCE server during any part of the backup procedure.
If you are using the -z flag to create a gzip-compressed checkpoint, the checkpoint file will be named as specified. If you want the compressed checkpoint file to end in .gz, you should explicitly specify the .gz on the command line.
3. Ensure that the checkpoint has been created successfully before backing up any files. (After a disk crash, the last thing you want to discover is that the checkpoints you’ve been backing up for the past three weeks were incomplete!)
You can tell that the checkpoint command has completed successfully by examining the error code returned from p4d -jc, or by observing the truncation of the current journal file.
4. Once the checkpoint has been created successfully, back up the checkpoint file, the old journal file, and your versioned files.
(If you don’t require an audit trail, you don’t actually need to back up the journal. It is, however, usually good practice to do so.)
Note If your site is very large, p4 verify may take some time to run; you may wish to perform this step on a weekly basis rather than on a daily basis. For more about the p4 verify command, see “File verification by signature” on page 31
Note If your site is very large (e.g. several GB of .db files), creating a checkpoint may take a considerable length of time. Under such circumstances, you may wish to defer checkpoint creation and journal truncation until times of low system activity. You might, for instance, archive only the journal file in your nightly backup, and only create checkpoints and roll the journal file on a weekly basis.
Note There are rare instances (e.g., users obliterating files during backup, or sub-mitting files on Windows NT during the file backup portion of the process) in which your depot files may change during the interval between the time the checkpoint was taken and the time at which the depot files get backed up by the backup utility.
Most sites will not be affected by these issues; having the PERFORCE server available on a 24/7 basis is generally a benefit worth this minor risk, especially if backups are being performed at times of low system activity.
If, however, the reliability of every backup is of paramount importance, con-sider stopping the PERFORCE server before checkpointing, and restarting it after the backup process has completed. Doing so will eliminate all risk of the system state changing during the backup process.
PERFORCE 2000.1 System Administrator’s Guide 23

Chapter 2: Supporting PERFORCE: Backup and Recovery
You never need to back up the db.* files. Your latest checkpoint and journal contain all the informa-tion necessary to re-create them. More significantly, a database restored from db.* files is not guar-anteed to be in a state of transactional integrity; a database restored from a checkpoint is.
Recovery ProceduresIf the database files become corrupted or lost, either because of disk errors, a hardware failure such as a disk crash, the database can be recreated with your stored checkpoint and journal.
There are many ways in which systems can fail; while this guide cannot deal with all of them, it can at least provide a general guideline for recovery from the two most common situations, specifically:
• corruption of your PERFORCE database only, without damage to your versioned files, and
• corruption to both your database and versioned files.
The recovery procedures for each failure are slightly different, and are discussed separately in the fol-lowing two sections.
If you suspect corruption in either your database or versioned files, contact PERFORCE technical support.
Database corruption, versioned files unaffectedIf only your database has been corrupted, (e.g. your db.* files were on a disk volume that crashed, but you were using symbolic links to store your versioned files on a separate physical disk), you need only re-create your database.
You will need:
• The last checkpoint file, which should be available from the latest P4ROOT directory backup.
• The current journal file - which should be on a separate filesystem from your P4ROOT directory, and which should therefore have been unaffected by any damage to the filesystem where your P4ROOT directory was held.
You will not need:
• Your backup of your versioned files; if they weren’t affected by the crash, they’re already up to date.
To recover the database
1. Stop the current instance of p4d: p4 admin stop
(You must be a PERFORCE superuser to use p4 admin.)
2. Rename (or move) the corrupt database (“db.”) files:mv your_root_dir/db.* /tmp
The corrupt db.* files aren’t actually used in the restoration process, but it’s safe practice not to delete them until you’re certain your restoration was successful.
NT On Windows NT, if you make your system backup while the PERFORCE server is running, you must ensure that your backup program doesn’t attempt to back up the db.* files.
If you try to back up the db.* files with a running server, NT will lock them while the backup program backs them up. During this brief period, the PER-FORCE server will be unable to access the files; if a user attempts to perform an operation that would update the file, the server may fail.
If your software doesn’t allow you to exclude the db.* files from the backup process, you should stop the server with p4 admin stop before backing up, and restart the server after the backup process.
PERFORCE 2000.1 System Administrator’s Guide 24

Chapter 2: Supporting PERFORCE: Backup and Recovery
3. Invoke p4d with the -jr (journal-restore) flag, specifying your most recent checkpoint and current journal. If you explicitly specify the server root ($P4ROOT), the -r $P4ROOT argument must precede the -jr flag:
p4d -r $P4ROOT -jr checkpoint_file journal_file
This will recover the database as it existed when the last checkpoint was taken, and then apply the changes recorded in the journal file since the checkpoint was taken.
Check your system
Your restoration is complete. See “Ensuring system integrity after any restoration” on page 26 to make sure your restoration was successful.
Your system state
The database recovered from your most recent checkpoint, after you’ve applied the accumulated changes stored in the current journal file, will be up to date as of the time of failure.
After recovery, both your database and versioned files should reflect all changes made up to the time of the crash; no data should have been lost.
Both database and versioned files lost or damagedIf both your database and your versioned files were corrupted, you need to restore both the database and your versioned files, and you’ll need to ensure that the versioned files are no older than the restored database.
You will need:
• The last checkpoint file, which should be available from the latest P4ROOT directory backup.
• Your versioned files, which should be available from the latest P4ROOT directory backup.
You will not need:
• Your current journal file. The journal contains a record of changes to the metadata and versioned files that occurred between the last backup and the crash; because you’ll be restoring a set of versioned files from a backup taken before that crash, the checkpoint alone contains the metadata useful for the recov-ery, and the information in the journal is of limited or no use.
To recover the database
1. Stop the current instance of p4d: p4 admin stop
(You must be a PERFORCE superuser to use p4 admin.)
2. Rename (or move) the corrupt database (“db.”) files:mv your_root_dir/db.* /tmp
The corrupt db.* files aren’t actually used in the restoration process, but it’s safe practice not to delete them until you’re certain your restoration was successful.
Note If you’re using the -z (compress) option to compress your checkpoints upon creation, you’ll have to restore the uncompressed journal file separately from the compressed checkpoint.
That is, instead of using:p4d -r $P4ROOT -jr checkpoint_file journal_file
you’ll use two commands:p4d -r $P4ROOT -jr -z checkpoint_file.gz p4d -r $P4ROOT -jr journal_file
You must explicitly specify the .gz extension yourself when using the -z flag, and ensure that the -r $P4ROOT argument precedes the -jr flag.
PERFORCE 2000.1 System Administrator’s Guide 25

Chapter 2: Supporting PERFORCE: Backup and Recovery
3. Invoke p4d with the -jr (journal-restore) flag, specifying only your most recent checkpoint: p4d -r $P4ROOT -jr checkpoint_file
This will recover the database as it existed when the last checkpoint was taken, but not apply any of the changes in the journal file. (The -r $P4ROOT argument must precede the -jr flag.)
The database recovery without the roll-forward of changes in the journal file will bring the database up to date as of the time of your last backup. In this scenario, you do not want to apply the changes in the journal file, because the versioned files you restored reflect only the depot as it existed as of the last checkpoint.
To recover your versioned files
4. After recovering the database, you will then need to restore the versioned files according to your system’s restoration procedures (e.g. the UNIX restore(1) command) to ensure that they are as new as the database.
Check your system
Your restoration is complete. See “Ensuring system integrity after any restoration” on page 26 to make sure your restoration was successful.
Note that files submitted to the depot between the time of the last system backup and the disk crash will not be present in the depot.
Your system state
After recovery, your depot directories may not contain the newest versioned files (i.e., files submitted after the last system backup but before the disk crash may have been lost).
• In most cases, the latest revisions of such files can be restored from the copies still residing in your users’ client workspaces.
• In a case where only your versioned files (i.e., and not the database, which may have resided on a sep-arate disk unaffected by the crash) were lost, you may also be able to make a separate copy of your database and apply your journal to it in order to examine recent changelists to track down files sub-mitted between the last backup and the disk crash.
In either case, contact PERFORCE technical support for further assistance.
Ensuring system integrity after any restorationAfter any restoration, it’s wise to run p4 verify to ensure the versioned files are at least as new as the database:
p4 verify -q //...
This command will verify the integrity of the versioned files. Because the -q (quiet) option has been selected, the only output will be error conditions. Ideally, this command should produce no output.
If any versioned files are reported as MISSING by the p4 verify command, you’ll know that there is information in the database concerning files that didn’t get restored. The usual cause is that you restored from a checkpoint and journal made after the backup of your versioned files. (i.e. that your backup of the versioned files was older than the database.)
Note Although “new” files (submitted to the depot but not yet backed up) will not appear in the depot after restoration, it’s possible (indeed, highly probable!) that at one or more of your users will have up-to-date copies of such files present in their client workspaces.
Your users can find such files by using PERFORCE to examine how files in their client workspaces differ from those in the depot. If they run:p4 diff -se
...they’ll be provided with a list of files in their workspace which differ from the files PERFORCE believes them to have. After verifying that these files are indeed the files you wish to restore, you may wish to have one of your users open these files for edit and submit them to the depot in a changelist.
PERFORCE 2000.1 System Administrator’s Guide 26

Chapter 2: Supporting PERFORCE: Backup and Recovery
If (as recommended) you’ve been using p4 verify -u to generate and store MD5 signatures for your versioned files as part of your backup routine, you can run p4 verify on the server after restoration to reassure yourself that your restoration was successful.
If you have any difficulties restoring your system after a crash, contact PERFORCE Technical Support for assistance.
PERFORCE 2000.1 System Administrator’s Guide 27
Chapter 2: Supporting PERFORCE: Backup and Recovery
PERFORCE 2000.1 System Administrator’s Guide 28

Chapter 3 Administering PERFORCE: Superuser Tasks
This chapter describes both basic tasks associated with day-to-day PERFORCE administration as well as setting up advanced PERFORCE configurations, dealing with cross-platform development issues, migrat-ing PERFORCE servers from one machine to another, and setting up remote and local depots.
Each of the tasks described in this chapter requires that you be a PERFORCE superuser as defined in the PERFORCE protections table. For more about controlling PERFORCE superuser access, and protections in general, see “Administering Perforce: Protections” on page 43.
Basic PERFORCE AdministrationThe following tasks commonly performed by PERFORCE administrators are covered:
• user operations, including resetting passwords, creating new users, disabling the automatic creation of new users, and cleaning up files left open by former users,
• administrative operations, including obliterating files to reclaim disk space, editing previously-sub-mitted changelists, verifying server integrity, defining filetypes to fine-tune PERFORCE’s file type detec-tion mechanism, and the use of the -f flag to force operations.
Resetting user passwordsFrom time to time, it is inevitable that users will forget PERFORCE passwords. A PERFORCE superuser can set a new password for any user with:
• Release 99.1 and later:p4 passwd username
(PERFORCE will prompt the superuser for a new password for user username.)
• Pre-99.1 releases:p4 user -f username
(The user specification form for username will appear, and the new password may be entered.)
Creating new usersBy default, PERFORCE creates a new user in its database whenever a command is issued by a username it hasn’t seen before. You can use the -f (force) flag to create a new user as follows:
p4 user -f username
Fill in the form fields with the information for the user you wish to create.
The p4 user command also has an option (-i) to take its input from the standard input instead of the forms editor; if you wish to create a large number of new users at once, you could write a script which creates output in the same format as that used by the forms editor and then pipes each pre-generated “form” to p4 users -i -f username, where the username is also specified by a variable within your calling script.
PERFORCE 2000.1 System Administrator’s Guide 29

Chapter 3: Administering PERFORCE: Superuser Tasks
Preventing creation of new usersAs mentioned, PERFORCE’s default behavior is to create a new user in its database whenever a command is issued by a username it hasn’t seen before. As of Release 98.2, PERFORCE groups can be used to control user access. Using groups, a PERFORCE superuser can disable the automatic creation of new users by assigning all authorized users to a group, and denying write access to users not in the authorized group.
You can create a PERFORCE group by using:p4 group groupname
and adding users in the Users: field of the resulting form, one per line.
To grant write access to only those users in the newly-created group, use p4 protect and edit the pro-tections table. The relevant line of the default protections table looks like this:
write user * * //...
It grants write permission to all users in all areas of the depot. After using p4 group groupname to cre-ate the PERFORCE group groupname, use p4 protect to change the protections table to read:
write group groupname * //...
This will restrict write access only to users who are part of the PERFORCE group groupname. Other users will not be able to automatically create new PERFORCE users until they have been added to this group. For a more in-depth treatment of PERFORCE protections, see “Administering Perforce: Protections” on page 43.
Reverting files opened by obsolete usersIf files have been left open by a nonexistent or obsolete username (e.g., an ex-employee), a PERFORCE superuser can revert the files by deleting the client spec in which they were opened.
For example, if the output of p4 opened shows://depot/main/code/file.c#8 - edit default change (txt) by jim@stlouis
the “stlouis” client spec can be deleted with:p4 client -d -f stlouis
Deleting a client spec reverts all files opened by that client, and removes that client’s “have list”. Note that it does not affect any files in the workspace actually used by that client; the files can still be accessed by other employees.
Reclaiming diskspace by obliterating filesThe depot is always growing; this is not always desirable: a submit might have been performed incor-rectly, creating hundreds of unneeded files, or perhaps there are simply a lot of old files around that are no longer being used.
Because p4 delete merely marks files as deleted in their head revisions, it can’t be used to free up diskspace. This is where p4 obliterate can be useful. p4 obliterate filename can be used by supe-rusers to remove all traces of a file from a depot, making the file indistinguishable from one that never existed in the first place.
In fact, p4 obliterate is so destructive that we haven’t even told you how it really works yet. By default, p4 obliterate filename does nothing; it merely reports on what it will do; to actually destroy the files, use p4 obliterate -y filename.
There is an additional flag to p4 obliterate; the -z flag. When you branch a file from one area of the depot into another, a “lazy copy” is created - the file itself isn’t copied, only a record that the branch has occurred. If, for some reason, you wish to undo the “lazy copy” and create a new copy of the branched
Note The purpose of a software configuration management system is to allow your site to maintain a history of which operations were performed on which files. The p4 obliterate command defeats this purpose; as such, it is only intended to be used when cleaning up messes in the depot; not as part of your normal software development process.
PERFORCE 2000.1 System Administrator’s Guide 30

Chapter 3: Administering PERFORCE: Superuser Tasks
file’s contents in your depot subdirectories, you could “obliterate” the lazy copy and create a new one by using p4 obliterate -z filename. Unlike the -y flag, the -z flag increases diskspace usage by remov-ing the lazy copies. It’s generally not a flag you’ll use often; its only use is to undo lazy copies in order to allow you to manually remove archive files without breaking any linked metadata pointing to the deleted files.
If a user sees the following error message while trying to access files:Operation:user-syncLibrarian checkout path failed
where path is the path of a previously-obliterated file, odds are the user has encountered a problem that resulted from an earlier use of p4 obliterate from an older (pre-98.2/10314) PERFORCE server. Contact PERFORCE technical support for a workaround.
Deleting changelists and editing changelist descriptionsThe -f (force) flag can be used with p4 change to change the description or username of a submitted changelist. The syntax is p4 change -f changenumber; this presents the standard changelist form, in which the change time, description, and/or username may be edited.
The -f flag can also be used to delete any submitted changelists that have been emptied of files with p4 obliterate. The full syntax is p4 change -d -f changenumber.
Example: Updating changelist 123 and deleting changelist 124
Use p4 change with the -f (force) flag: p4 change -f 123p4 change -d -f 124
The User: and Description: fields for change 123 will be edited, and change 124 will be deleted.
File verification by signatureThe p4 verify filenames command can be used to generate 128-bit MD5 signatures of each revision of the named files. A list of signatures stored by p4 verify -u can later be used to confirm proper recovery in case of a crash: if the signatures of the recovered files match the previously saved signatures, the files were recovered accurately.
To generate signatures and store them in the PERFORCE database, use the -u flag. Subsequent verifica-tions will be compared against the stored signatures; if a new signature does not match the signature in the PERFORCE database for that file revision, PERFORCE adds the characters BAD! after the signature.
If you ever see a BAD! signature during a p4 verify command, your database or versioned files may have been corrupted, and you should contact PERFORCE Technical Support.
Because subsequent verifications can only be performed against previously stored signatures, the p4 verify -u command should be used regularly. A good strategy, for instance, might be to run p4 verify on a nightly basis before performing your system backups, proceeding with the backup only if the p4 verify reports no corruption. Generation and storage of new checksums (p4 verify -u) following a successful p4 verify could be performed nightly, or even weekly.
Verifying during server upgrades
It is also good practice to use p4 verify during server upgrades:
1. Before the upgrade, run: p4 verify -qu //...
to generate the new checksums.
2. Take a checkpoint and copy the checkpoint and your versioned files to a safe place.
3. Perform the server upgrade.
4. After the upgrade, run: p4 verify -q //...
to verify the integrity of your system.
PERFORCE 2000.1 System Administrator’s Guide 31

Chapter 3: Administering PERFORCE: Superuser Tasks
Defining filetypes with p4 typemapAs of Release 2000.1, PERFORCE supports a new command: p4 typemap.
In previous releases, PERFORCE automatically determined if a file was of type text or binary based on an analysis of the first 1024 bytes of a file. If the high bit was clear in each of the first 1024 bytes, PERFORCE assumed it to be text; otherwise, it was binary. Although this default behavior could be overridden by the use of the -t filetype flag, it was easy to overlook this, particularly in cases where files’ types were usually (but not always!) detected correctly.
The p4 typemap command solves this problem by allowing system administrators to set up a table that links PERFORCE file types with file name specifications. If an entry in the typemap table matches an entry in the table, it will override the file type that would otherwise have been assigned by the PERFORCE cli-ent.
One common use for p4 typemap is for users dealing with Adobe PDF (Portable Document Format) files. Some PDF files start with a series of comment fields and textual data, and if the comments are sufficiently long, the files will be erroneously detected by PERFORCE as being of type text. Similarly, files in RTF (Rich Text Format) format may sometimes be erroneously detected as text.
PERFORCE superusers may use p4 typemap to tell the PERFORCE server to regard all such files as binary by modifying the typemap table as follows:
The first three periods (“...”) in the specification are a PERFORCE wildcard specifying that all files beneath the root directory are to be included as part of the mapping. The fourth period and the file exten-sion specify that the specification applies to files ending in “.pdf” (or “.rtf”)
For more information, see the p4 typemap page in the Command Reference.
Forcing operations with the -f flagCertain commands allow the superuser to use the -f flag to force certain operations unavailable to ordi-nary users. This flag can be used with p4 branch, p4 change, p4 client, p4 job, p4 label, and p4 user. The usages and meanings of this flag are as follows:
Typemap: binary //....pdf binary //....rtf
Command Syntax Function
p4 branch p4 branch -f branchname Allows the modification date to be changed while editing the branch specification
p4 branch -f -d branchname Deletes the branch, ignoring ownership
p4 change p4 change -f [changelist#] Allows the modification date to be changed while editing the changelist specification
p4 change -f changelist# Allows the description field and username in a committed changelist to be edited
p4 change -f -d changelist# Deletes empty, committed changelists
p4 client p4 client -f clientname Allows the modification date to be changed while editing the client specification
p4 client -f -d clientname Deletes the client, ignoring ownership, even if the client has opened files
p4 job p4 job -f [jobname] Allows the manual update of read-only fields
p4 label p4 label -f labelname Allows the modification date to be changed while editing the label specification
p4 label -f -d labelname Deletes the label, ignoring ownership
p4 user p4 user -f username Allows the update of all fields, ignoring own-ership
p4 user -f -d username Deletes the user, ignoring ownership.
PERFORCE 2000.1 System Administrator’s Guide 32

Chapter 3: Administering PERFORCE: Superuser Tasks
Advanced PERFORCE Administration
Running PERFORCE through a firewallPERFORCE clients communicate with a PERFORCE server using TCP/IP. The server listens for connections at a specified port on the machine on which it’s running, and clients make connections to that port.
The port on which the server listens is specified when the server is started. The number is arbitrary, so long as it does not conflict with any other networking services and is greater than 1024. The port number on the client machine is dynamically allocated.
A firewall is a network element which prevents any packets from outside a local (trusted) network from reaching that local network. This is done at a low level in the network protocol; any packets not coming from a trusted IP address are simply ignored.
In the following diagram, the PERFORCE client is on an untrusted part of the network. None of its connec-tion requests will reach the machine with the PERFORCE server. Consequently, the user running the client through the firewall is unable to use PERFORCE.
Secure shell
To solve this problem, you have to make the connection to the PERFORCE server from within the trusted network. This can be done securely using a package called secure shell (ssh).
Secure shell (ssh) is meant to be a replacement for the UNIX rsh (remote shell) command, which allows you to log into a remote system and execute commands on it. The “secure” part of “secure shell” comes from the fact that the connection is encrypted, so none of the data is visible while it passes through the untrusted network. With simple utilities like rsh, all traffic - even passwords - is unencrypted and visible to all intermediate hosts, creating an unacceptable security hazard.
Secure shell is available for free in source form for a multitude of UNIX platforms from http://www.ssh.org. This page also links to ports of ssh for OS/2 and Amiga, as well as commercial implementations for Windows and Macintosh from Data Fellows (http://www.datafellows.com). More information can be found at the Open SSH page (http://www.openssh.org).
The ssh FAQ (Frequently Asked Questions) list can also be found online, either at the main site (http://www.uni-karlsruhe.de/~ig25/ssh-faq), or at the FAQ archive at MIT: (ftp://rtfm.mit.edu/pub/usenet/news.answers/computer-security/ssh-faq).
the network3710
(arbitrary port)
p4dboxuserbox
P4PORT=p4dbox:3710
3710
p4dboxfirewall
local, trustednetwork
big, bad,untrustednetwork
“I’m listening, but nobody’s talking”
userbox
“Hey, where’d p4dbox go?”
PERFORCE 2000.1 System Administrator’s Guide 33

Chapter 3: Administering PERFORCE: Superuser Tasks
Solving the problem
Once you’ve got ssh up and running, the simplest thing to do is to use it to log into the firewall machine and run the PERFORCE client from the firewall. While it has the advantage of simplicity, it’s a poor solu-tion: you typically want your client files accessible on your local machine, and of course, there’s no guar-antee that your firewall machine will match your development platform.
A good solution takes advantage of ssh’s ability to forward arbitrary TCP/IP connections. By using ssh, you can make your PERFORCE client appear as though it’s connecting from the firewall machine over the local (trusted) network. In reality, your client remains on your local machine, but all packets from your local machine are first sent to the firewall through the secure channel set up by ssh:
Suppose the PERFORCE server is on p4dbox.bigcorp.com, and the firewall machine is called fire-wall.bigcorp.com. In our example, we’ll arbitrarily choose local port 4242, and assume that the PER-FORCE server is listening on port 3710.
Packets ultimately destined for your client’s port 4242 are first sent to the firewall, and ssh forwards them securely to your client. Likewise, connections made to port 4242 of the firewall machine will end up being routed to port 3710 of the PERFORCE server.
On UNIX, the ssh command on our own machine to set up and forward the TCP/IP connection would be:
ssh -L 4242:p4dbox.bigcorp.com:3710 firewall.bigcorp.com
At this point, it may be necessary to provide a password to log into firewall.bigcorp.com. Once the connection is established, ssh will listen at port 4242 on the local machine, and forward anything it is told over its encrypted connection to firewall.bigcorp.com, and the firewall will then forward them by normal channels to port 3710 on p4dbox.bigcorp.com
All that remains is to tell the PERFORCE client to use port 4242 by setting the environment variable P4PORT to 4242.
Normally, setting P4PORT=4242 would normally indicate that we are trying to connect to a PERFORCE server on the local machine listening at port 4242. In this case, ssh takes the role of the PERFORCE server. Anything a client sends to port 4242 of the local machine is forwarded by ssh to the firewall, which passes it to the real PERFORCE server at p4dbox.bigcorp.com. Since all of this is transparent to the PER-FORCE client, it doesn’t matter whether the client is talking to an instance of ssh that’s forwarding traffic from port 4242 of the local machine, or if it’s talking to a real PERFORCE server residing on the local machine.
The only glitch is that there’s a login session you don’t normally want on the firewall machine. This can be solved by running
ssh -n -L 4242:p4dbox.bigcorp.com:3710 firewall.bigcorp.com sleep 9999999 &
on the remote system.
This tells ssh on firewall.bigcorp.com to run the sleep command for a very long time. The -n flag tells ssh not to read from stdin, and the & tells the OS to run the process in the background. Effectively, this sets up the ssh link and keeps it up; there is no login session to terminate.
Finally, ssh can be configured to “do the right thing” so that it is unnecessary to type such a long com-mand with each session. The Windows version of ssh, for instance, has a GUI to configure this.
One final concern: with port 4242 on the local machine now forwarded to a supposedly-secure server, your local machine is part of the trusted network; it is prudent to make sure the local machine really is
3710
p4dboxfirewall
local, trustednetwork
ssh-basedencryptedconnection
userbox
4242
“Something at 4242 looks“userbox:4242 <-> p4dbox:3710” “There’s a client at 3710!”like a PERFORCE server to me”
PERFORCE 2000.1 System Administrator’s Guide 34

Chapter 3: Administering PERFORCE: Superuser Tasks
secure! The Windows version of ssh has an option to only allow local connections to the forwarded port, which is a wise precaution; your machine will be able to use port 4242, but a third party’s machine will be ignored.
Specifying IP addresses in P4PORTUnder most circumstances, your PERFORCE server’s P4PORT setting will consist solely of a port number.
If, however, you specify both an IP address and a port number in P4PORT when starting p4d, the PER-FORCE server will take the IP address into account, ignoring requests from any IP addresses other than the one specified in P4PORT.
Although this isn’t the default behavior, it can be useful, for instance, if you want to tell p4d to listen only to a specific network interface or IP address. For instance, by setting P4PORT=localhost:port, you can make your PERFORCE server ignore all non-local connection requests.
Running from inetd on UNIXUnder a normal installation, the PERFORCE server is run on UNIX as a background process which waits for connections from clients. It is possible, however, to have p4d start up only when connections are made to it, using inetd and p4d -i.
If you wish to do this, add the following line to /etc/inetd.conf:p4dservice stream tcp nowait username /usr/local/bin/p4d p4d -i -rp4droot
and add the following to /etc/services:p4dservice nnnn/tcp
where:
• p4dservice is the service name you choose for this PERFORCE server
• /usr/local/bin is the directory holding your p4d binary
• p4droot is the root directory (P4DROOT) to use for this PERFORCE server (e.g., /usr/local/p4d)
• username is the UNIX user name to use for running this PERFORCE server
• nnnn is the port number for this PERFORCE server to use
Note the “extra” p4d on the /etc/inetd.conf line must be there; inetd passes this to the OS as argv[0]. The first argument, then, is the -i flag, which causes p4d not to run in the background as a daemon, but rather to serve the single client connected to it on stdin/stdout. (This is the convention used for services started by inetd.)
This method is an alternative to running p4d from a startup script. It can also be useful for providing spe-cial services; for example, at PERFORCE, we have a number of test servers running on UNIX, each defined as an inetd service with its own port number.
There are caveats with this method:
• inetd may disallow excessive connections, so a script which invokes several thousand p4 commands, each of which spawns an instance of p4d via inetd may cause inetd to temporarily disable the ser-vice. Depending on your system, you may need to configure inetd to ignore or raise this limit.
• There is no easy way to disable the server, since the p4d executable is run each time; disabling the server requires modifying /etc/inetd.conf and restarting inetd.
PERFORCE 2000.1 System Administrator’s Guide 35

Chapter 3: Administering PERFORCE: Superuser Tasks
Case-sensitivity and multi-platform developmentEarly (pre-97.2) releases of the PERFORCE server treated all filenames, pathnames, and database entity names with case significance, whether the server was running on UNIX or NT. For example, //depot/main/foo.c and //depot/MAIN/FOO.C were treated as two completely different files. This caused problems where users on UNIX were connecting to a PERFORCE server running on NT, because the filesystem underlying the server could not store files with the case-variant names submitted by UNIX users. (If you are running a pre-97.2 server on NT, please contact [email protected] to discuss upgrading your server and database.) As of Release 97.3, this was changed; only the UNIX server sup-ports case-sensitive names. However, there are still some case-sensitivity problems which users can run into when sharing development projects across UNIX and NT.
To summarize: the PERFORCE server on UNIX supports case-sensitive names. The PERFORCE server on NT ignores case differences. Case is always ignored in keyword-based job searches:
Users can run p4 info to find out what platform their PERFORCE server runs on.
PERFORCE server on UNIX
If your PERFORCE server is on UNIX, and you have users on both UNIX and Windows, your UNIX users must be very careful not to submit files whose names differ only by case. Although the UNIX server can support these files, when Windows users sync their workspaces, they’ll find files overwriting each other.
Conversely, Windows users will have to be careful to use case consistently in file and path names when adding new files. They may not realize that files added as //depot/main/foo.c and //depot/MAIN/bar.c will appear in two different directories in a UNIX user’s workspace.
The UNIX PERFORCE server always respects case in client names, label names, branch view names, etc. Windows users connecting to a UNIX server should be aware that the lowercased workstation names are used as the default names for new client workspaces. For examples, if a new user creates a client spec on an NT workstation named ROCKET, his client workspace will be named rocket by default. If he later sets P4CLIENT to ROCKET (or Rocket), PERFORCE will tell him his client is undefined. He must set P4CLIENT to rocket (or unset it) to use the client workspace he defined.
PERFORCE server on NT
If your PERFORCE server is running on NT, your UNIX users must be aware that their PERFORCE server will store case-variant files in the same namespace. For example, users who try something like this:
p4 add foo/file1p4 add foo/file2p4 add FOO/file3
should be aware that all three files will be stored in the same depot directory. The depot path and filena-mes assigned to the NT server will be those first referenced. (in this case, the depot path name would be foo, and not FOO.
PERFORCE server trace flagsYou can turn on command tracing in the PERFORCE server by adding the -v server=1 flag to the p4d startup command. Use P4LOG or the -L logfile flag to name a log file. For example:
p4d -r /usr/perforce -v server=1 -p 1666 -L /usr/perforce/logfile
Case-sensitive UNIX server NT server
Pathnames and filenames Yes No
Database entities (clients, labels, etc.) Yes No
Job search keywords No No
PERFORCE 2000.1 System Administrator’s Guide 36

Chapter 3: Administering PERFORCE: Superuser Tasks
Trace output will appear in the specified log file, and will show the date, time, username, IP address, and command for each request processed by the server. You should make that you have adequate diskspace before turning on logging.
In most cases, the PERFORCE server trace flags are useful only to administrators working with PERFORCE Technical Support to diagnose or investigate a problem.
Migrating to a new machineThe procedure for moving an existing PERFORCE installation from one machine to another depends on whether or not you’re moving between machines
• of identical architecture,
• different architectures using the same text file (CR/LF) format, or
• between machines of different architecture and different text file format.
There are also additional considerations if the new machine has a different IP address or hostname.
The PERFORCE server stores two types of data under the PERFORCE root directory: versioned files and a database containing metadata describing those files. Your versioned files are the ones created and main-tained by your users, and your database is a set of PERFORCE-maintained binary files holding the history and present state of the versioned files. In order to move a PERFORCE server to a new machine, both the versioned files and the database must be successfully migrated from the old machine to the new machine.
For more about the distinction between versioned files and database, as well as for an overview of the backup and restore procedure in general, see “Backup and Recovery Concepts” on page 19.
Moving your versioned files and PERFORCE databaseBetween machines of the same architecture:
If the architecture of the two machines is the same (e.g., Solaris/Solaris, NTx86/NTx86, or even SunOS 4.x/Solaris), the versioned files and database can be copied directly between the machines, and you need only move the server root directory tree to the new machine. You can use tar, cp, xcopy.exe, or any other method. Copy everything in and under the P4ROOT directory - the db.* files (your database) as well as the depot subdirectories (your versioned files).
1. On the old machine, stop p4d.
2. Copy the contents of your old server root (P4ROOT) and all its subdirectories on the old machine into the new server root directory on the new machine.
3. Start p4d on the new machine with the desired flags.
95/98/NT Prior to Release 98.1, you could not set this trace flag when running PER-FORCE as an NT service; you could set this flag on NT only when running p4d.exe a server process from the MS-DOS command line.
As of Release 98.1, you can use the p4 set command to set P4DEBUG as a registry variable to “server=1” and thereby use this trace flag with PER-FORCE installed as a service on NT.
Prior to Release 97.3, the server trace flag was unavailable on any server plat-form.
PERFORCE 2000.1 System Administrator’s Guide 37

Chapter 3: Administering PERFORCE: Superuser Tasks
Between different architectures using the same text format:
If the internal data representation (big-endian vs. little-endian) convention differs between the two machines (e.g., HP/Sun, NT-on-Alpha/NTx86), but their operating systems use the same CR/LF text file conventions, you can still simply move the server root directory tree to the new machine.
While the versioned files are portable across architectures, the database, as stored in the db.* files, is not. To overcome this problem, create a checkpoint of your PERFORCE server database and use that check-point to recreate the database on the new machine. The checkpoint is a text file which can be read by a PERFORCE server on any architecture. For more details, see “Creating a Checkpoint” on page 20.
After creating the checkpoint, you can use tar, cp, xcopy.exe, or any other method to copy the check-point file and the depot directories to the new machine. (You won’t need to copy the db.* files, because they will be recreated from the checkpoint you took.)
1. On the old machine, stop p4d.
2. On the old machine, create a checkpoint: p4d -jc checkpointfile
3. Copy the contents of your old server root (P4ROOT) and all its subdirectories on the old machine into the new server root directory on the new machine.
(To be precise, you don’t need to copy the db.* files, just the checkpoint and the depot subdirecto-ries. The db.* files will be recreated from the checkpoint. If it’s more convenient to copy everything, copy everything.)
4. On the new machine, if you copied the db.* files, be sure to remove them from the new P4ROOT before continuing.
5. Recreate a new set of db.* files suitable for your new machine’s architecture from the checkpoint you created:
p4d -jr checkpointfile
6. Start p4d on the new machine with the desired flags.
Between NT and UNIX:
In this case, both the architecture of the system and the CR/LF text file convention are different. You will still have to create a checkpoint, copy it, and recreate the database on the new platform, but when you move the depot subdirectories containing your versioned files, you will also have to deal with the differ-ing linefeed convention between the two platforms.
Depot subdirectories can contain both text and binary files. The text files (in RCS format, ending with “,v”) and binary files (directories of individual binary files, each directory ending with “,d”) will need to be transferred differently in order to translate the line endings on the text files while leaving the binary files unchanged.
Contact PERFORCE Technical Support for assistance when migrating a PERFORCE server from NT to UNIX or vice-versa.
Changing the IP address of your serverIf the IP address of the new machine is not the same as that of the old machine, you may need to update IP-address-based protections in your protections table. See “Administering Perforce: Protections” on page 43 for information on setting protections for your PERFORCE server.
If you are a licensed PERFORCE customer, you will also need to get a new license file to reflect the new IP address. Contact PERFORCE technical support to obtain an updated license.
Changing the hostname of your serverIf the hostname of the new machine serving PERFORCE is different from that of its predecessor, your users will need to change their P4PORT settings. If the old machine is being retired or renamed, consider setting an alias for the new machine to match that of the old machine, so that your users won’t have to change their P4PORT settings.
PERFORCE 2000.1 System Administrator’s Guide 38
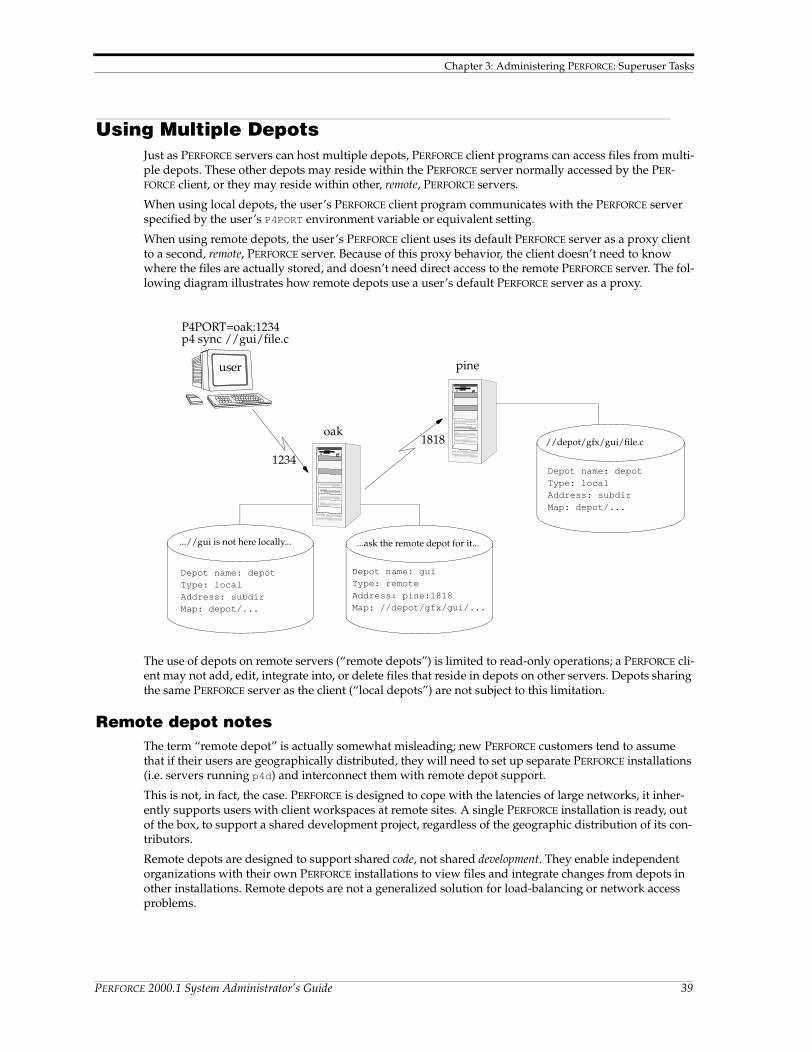
Chapter 3: Administering PERFORCE: Superuser Tasks
Using Multiple DepotsJust as PERFORCE servers can host multiple depots, PERFORCE client programs can access files from multi-ple depots. These other depots may reside within the PERFORCE server normally accessed by the PER-FORCE client, or they may reside within other, remote, PERFORCE servers.
When using local depots, the user’s PERFORCE client program communicates with the PERFORCE server specified by the user’s P4PORT environment variable or equivalent setting.
When using remote depots, the user’s PERFORCE client uses its default PERFORCE server as a proxy client to a second, remote, PERFORCE server. Because of this proxy behavior, the client doesn’t need to know where the files are actually stored, and doesn’t need direct access to the remote PERFORCE server. The fol-lowing diagram illustrates how remote depots use a user’s default PERFORCE server as a proxy.
The use of depots on remote servers (“remote depots”) is limited to read-only operations; a PERFORCE cli-ent may not add, edit, integrate into, or delete files that reside in depots on other servers. Depots sharing the same PERFORCE server as the client (“local depots”) are not subject to this limitation.
Remote depot notesThe term “remote depot” is actually somewhat misleading; new PERFORCE customers tend to assume that if their users are geographically distributed, they will need to set up separate PERFORCE installations (i.e. servers running p4d) and interconnect them with remote depot support.
This is not, in fact, the case. PERFORCE is designed to cope with the latencies of large networks, it inher-ently supports users with client workspaces at remote sites. A single PERFORCE installation is ready, out of the box, to support a shared development project, regardless of the geographic distribution of its con-tributors.
Remote depots are designed to support shared code, not shared development. They enable independent organizations with their own PERFORCE installations to view files and integrate changes from depots in other installations. Remote depots are not a generalized solution for load-balancing or network access problems.
P4PORT=oak:1234
1234
1818oak
pine
Depot name: depotType: localAddress: subdirMap: depot/...
Depot name: guiType: remoteAddress: pine:1818Map: //depot/gfx/gui/...
Depot name: depotType: localAddress: subdirMap: depot/...
//depot/gfx/gui/file.c
...ask the remote depot for it......//gui is not here locally...
p4 sync //gui/file.c
user
PERFORCE 2000.1 System Administrator’s Guide 39

Chapter 3: Administering PERFORCE: Superuser Tasks
When and when not to use remote depots
If you’re doing distributed development, you probably want to use a single PERFORCE installation, with all code in depots managed by one PERFORCE server. Partitioning joint development projects into sepa-rate PERFORCE installations will not improve throughput, and usually only complicates administration.
If, however, you’re regularly importing works from other organizations as part of your own organiza-tion’s body of software, you may wish to consider using PERFORCE’s remote depot features. This is what remote depots were designed for: facilitating the sharing of code, not development, across organizations.
Restrictions on remote depots:
Users of remote depots will encounter several restrictions:
• Access is restricted to read-only operations. You cannot submit files into a remote depot. You cannot edit files in remote depots. You can, however, create a branch in a local depot from files in a remote depot, and then integrate changes from the remote depot into the local branch. This integration is a one-way operation; you cannot make changes in the local branch and integrate them back into the remote depot.
• Remote depots may be accessed only by PERFORCE servers running at the same release levels.
• NT and UNIX servers are incompatible; you’ll get unpredictable results accessing remote depots on NT from a UNIX server or vice versa.
• A PERFORCE server’s metadata (i.e. information about client workspaces, changelists, labels, etc.) can-not be accessed using remote depots. Commands like p4 client will only return specifications of entities defined in the local server’s metadata.
In general, most of the restrictions associated with remote depots are either insignificant (e.g., lack of remote access to metadata) or beneficial (e.g., read-only access) if you’re using remote depots for their intended purpose: the sharing of code, not development, between separate organizations.
Defining new depotsNew depots (local or remote) in a server namespace are defined with the command p4 depot depot-name.
Define the default depot
As of Release 99.2, if you wish to create a new depot and have not already defined the default depot, you must first define the default depot to tell PERFORCE to set up its metadata for use with multiple depots.
To define the default depot, run p4 depot with the default depotname of depot. The p4 depot command will bring up the following form:
When p4 depot depot is invoked, the form is filled in with values representing the state of the default depot. Its name is depot. It resides in the local PERFORCE server namespace; so its type is local, (as opposed to remote). The Map: field indicates the location of the depot subdirectory relative to the root directory of the PERFORCE server; in this default case, the depot called depot starts in the depot subdirec-tory directly underneath the server root. (i.e. $P4ROOT/depot)
Now that you’ve defined the default depot, you can define other depots as you require.
Note If you don’t define the default depot before attempting to create a new depot, Perforce will attempt to overwrite the default depot’s metadata with that of your new depot; this is generally not the desired behavior!
Depot: depotType: localAddress: subdirMap: depot/...
PERFORCE 2000.1 System Administrator’s Guide 40

Chapter 3: Administering PERFORCE: Superuser Tasks
Defining local depots
To define a new local depot (that is, a new depot in the current PERFORCE server namespace), p4 depot is called with the new depot name, and only the Map: field in the resulting form need be changed. For example, to create a new depot called book with the files stored in the local PERFORCE server namespace in a root subdirectory called book (i.e., $P4ROOT/book), the command p4 depot book would be typed, and the resulting form would be filled in as follows:
Although you can set the Map: field to point to a depot directory other than one matching the depot name, there is rarely any advantage to be had by doing so, and it can make life confusing should you (as an administrator) ever need to work with the directories in the server root.
Defining remote depots
Defining a new depot on a remote PERFORCE server is only slightly more complicated. The Type: is remote; the server address must be provided in the Address: field, and the Map: field must be given a mapping into the remote depot namespace.
Example: Defining a remote depot
Lisa is working on a GUI porting project. She and Ed are using different PERFORCE servers; his is on host pine, and it’s listening on port 1818. Lisa wants to grab Ed’s GUI routines for her own use; she knows that Ed’s color routine files are located on his PERFORCE server’s single depot under the subdirectory graph-ics/GUI.
Lisa’s first step towards accessing Ed’s files is to create a new depot. She’ll call this depot gui; she’d type p4 depot GUI and fill in the form as follows:
This creates a remote depot called gui on Lisa’s PERFORCE server; this depot (gui) maps to Ed’s depot’s namespace under its graphics/gui subdirectory.
The Map: field
The Map: field is analogous to a client’s view, except that the view may contain multiple mappings and the Map: field always contains a single mapping. This single client mapping format changes depending on whether the depot being defined is local or remote:
• For local depots, the mapping should contain a subdirectory relative to the file space of the PERFORCE server root directory. For example, graphics/gui/... maps to the graphics/gui subdirectory of the server root.
• For remote depots, the mapping should contain a subdirectory relative to the remote depot namespace. For example, //depot/graphic/gui/... would map to the graphic/gui subdirectory of the remote server depot named depot.
Note that the mapping subdirectory must always contains the “...” wildcard on its right side.
If you are unfamiliar with client views and mappings, please consult the Perforce User’s Guide for general information about how PERFORCE mappings work.
Depot: bookType: localAddress: subdirMap: book/...
Depot: guiType: remoteAddress: pine:1818Map: //depot/graphics/gui/...
PERFORCE 2000.1 System Administrator’s Guide 41

Chapter 3: Administering PERFORCE: Superuser Tasks
Other depot operationsNaming depots
Depot names share the same namespace as branches, clients, and labels. For example, //foo refers uniquely to one of the depot foo, the client foo, the branch foo, or the label foo; you can’t simulta-neously have both a depot and a label named foo.
Listing depots
All depots known to the current PERFORCE server can be listed with the p4 depots command.
Deleting depots
Depots may be deleted with p4 depot -d depotname.
Limiting access from other serversRemote depots are always accessed by a virtual user named remote. which does not consume a PER-FORCE license. By default, all the files on any PERFORCE server may be accessed remotely.
To limit or eliminate remote access to a particular server, use p4 protect to set permissions for user remote on that server. For example, to eliminate remote access to all files in all depots on a particular server, set the following permission on that server:
read user remote * -//...
Since remote depots can only be used for read access, it is not necessary to remove write or super access.
Users working with multiple depotsIf your users will be using remote depots as well as local depots, they should be aware of certain caveats regarding the behavior of files in remote depots as opposed to local depots, as described in the preceding sections.
The Perforce User’s Guide contains detailed information of interest to users who will be working with more than one depot.
PERFORCE 2000.1 System Administrator’s Guide 42

Chapter 4 Administering PERFORCE: Protections
PERFORCE provides a protection scheme to prevent unauthorized or inadvertent access to the depot. The protections determine which PERFORCE commands can be run, on which files, by whom, and from which host. Protections are set with the p4 protect command.
When Should Protections Be Set?Before p4 protect is run, every PERFORCE user is a superuser, and can access and change anything in the depot. The first time protect is invoked, a protections table is created that gives the invoking user supe-ruser access from all hosts, and lowers everyone else’s access level to write permission on all files from all hosts. Therefore, protect should be run as the concluding step of all new PERFORCE installations; the superuser can change the access levels as needed at any time.
The PERFORCE protections are stored in the db.protect file in the server root directory; if p4 protect is first run by an unauthorized user (or if you accidentally lock yourself out!) the depot can be brought back to its unprotected state by removing this file.
Setting Protections with “p4 protect”The p4 protect form contains a single form field called Protections: that consists of multiple lines. Each line in Protections: contains subfields; the contents look something like this:
Example: A sample protections table:
(The five fields may not line up vertically on your screen; they are aligned here for ease of reading).
The Permission Lines’ Five FieldsEach line specifies a particular permission; each permission is always described by five fields.
Protections:read user emily * //depot/elm_proj/...write group devgrp * //...write user * 195.3.24.* -//...write user joe * -//...write user lisag * -//depot/...write user lisag * //depot/doc/...super user edk * //...
PERFORCE 2000.1 System Administrator’s Guide 43

Chapter 4: Administering PERFORCE: Protections
The meanings of these fields are:
Access LevelsThe access level is described by the first value on each line. The six access levels are:
Each PERFORCE command is associated with a particular minimum access level; for example, to run p4 sync on a particular file, the user must have been granted at least read access on that file. The access level required to run a particular command can usually be reasoned from knowledge of what the com-mand does; for example, it is somewhat obvious that p4 print would require read access. For a full list of the minimum access levels required to run each PERFORCE command, see “How Protections are Imple-mented” on page 47.
Field Meaning
Access Level Which access level is being granted: list, read, open, write, review, or super. These are described below.
User/Group Does this protection apply to a user or a group? The value must be user or group.
Name The user or group whose protection level is being defined. This field can contain the “*” wildcard: “*” by itself would grant this protection to everyone; “*e” would grant this protection to every user (or group) whose username ends with an “e”.
Host The TCP/IP address of the host being granted access. This must be provided as the numeric address of the host in dotted quad notation (e.g. 206.14.52.194).
This field may contain the “*” wildcard. A “*” by itself means that this protec-tion is being granted for all hosts. The wildcard can be used as in any string, so “127.30.41.*” would define access to any subnet within 127.30.41, and “*3*” would refer to any IP address with a “3” in it.
Since the client’s IP address is provided by the Internet Protocol itself, this field provides as much security as is provided by the network.
Files A file specification representing the files in the depot on which permissions are being granted. PERFORCE wildcards can be used in the specification.
“//...” means all files in all depots.
Access Level Meaning
list Permission is granted to run PERFORCE commands that display file metadata, (e.g. p4 filelog). No permission is granted to view or change the contents of the files.
read The user(s) can run those PERFORCE commands that are needed to read files, such as p4 client and p4 sync. The read permission includes list access.
open Grants permission to read files from the depot into the client workspace, and gives permission to open and edit those files. This permission does not allow the user to write the files back to the depot. open is similar to write, except that with open permission, users are not allowed to run p4 submit or p4 lock.
The open permission includes read and list access.
write Permission is granted to run those commands that edit, delete, or add files. The write permission includes read, list, and open access.
This permission allows use of all PERFORCE commands except protect, depot, obliterate, and verify.
review A special permission granted to review daemons. It includes list and read access, plus use of the p4 review command. It is needed only by review dae-mons.
super For PERFORCE superusers; grants permission to run all PERFORCE commands. Provides write and review access plus the added ability to edit protections, create depots, obliterate files, and verify files.
PERFORCE 2000.1 System Administrator’s Guide 44

Chapter 4: Administering PERFORCE: Protections
Which Users Should Receive Which Permissions?The simplest method of granting permissions is to give write permission to all users who don’t need to manage the PERFORCE system, and give super access to those who do, but there are times when this sim-ple solution isn’t sufficient.
Read access to particular files should be granted to users who don’t ever need to edit those files. For example, an engineer might have write permission for source files, but have only read access to the doc-umentation; managers might be granted only read access to all files.
Because open access allows local editing of files, but doesn’t allow these files to be written to the depot, open access is usually granted only in unusual circumstances. Choose open access over write access when users will be testing their changes locally, but when these changes should not be seen by other users. For instance, bug testers may want to change code in order to test theories as to why particular bugs occur, but these changes would be for their own use, and would not be written to the depot. Per-haps a codeline has been frozen, and local changes are to be submitted to the depot only after careful review by the development team. In these cases, open access would be granted until the code changes have been approved; after which time the protection level would be upgraded to write and the changes submitted.
Default ProtectionsBefore p4 protect is invoked, every user has superuser privileges. When p4 protect is first run, two permissions are set by default. The default protections table looks like this:
This indicates that write access is granted to all users, on all hosts, to all files. Additionally, the user who first invoked p4 protect (in this case, edk) is granted superuser privileges.
Interpreting Multiple Permission LinesThe access rights granted to any user are defined by the union of mappings in the protection lines that match her user name and client IP address. (This behavior is slightly different when exclusionary protec-tions are provided; this is described in the next section).
Example: Multiple Permission Lines
Lisa, whose PERFORCE username is lisag, is using a client with the IP address 195.42.39.17. The protec-tions file reads as follows:
The union of the first three permissions apply to Lisa. Her username is lisag, and she’s currently using a cli-ent workspace on the host specified in lines 1 and 2. Thus, she can write files located in the depot’s doc subdi-rectory, but can only read other files. Lisa tries the following:
She types p4 edit //lisag/doc/elm-help.1, and is successful.
She types p4 edit //lisag/READ.ME, and is told that she doesn’t have the proper permission. She is trying to write a file that she only has read access to. She types p4 sync //lisag/READ.ME, and this command succeeds; only read access is needed, and this is granted to her on line 1.
Lisa later switches to another machine with IP address 195.42.39.13. She types p4 edit //lisag/doc/elm-help.1, and the command fails; when she’s using this host, only the third permission applies to her, and she only has read privileges.
write user * * //...super user edk * //...
read user * 195.42.39.17 //...write user lisag 195.42.39.17 //depot/elm_proj/doc/...read user lisag * //...super user edk * //...
PERFORCE 2000.1 System Administrator’s Guide 45

Chapter 4: Administering PERFORCE: Protections
Exclusionary ProtectionsA user can be denied access from particular files by prefacing the fifth field in a permission line with a minus sign (“-”). This is useful for giving most users access to a particular set of files, while denying access to the same files to only a few users.
To use exclusionary mappings properly, it is necessary to understand some peculiarities associated with them:
• When an exclusionary protection is included in the protections table, the order of the protections is rel-evant: the exclusionary protection is used to remove any matching protections above it in the table.
• No matter what access level is provided in an exclusionary protection, all access levels for the match-ing files and IP addresses are denied. The access levels provided in exclusionary protections are irrele-vant. The reasons for this seemingly strange behavior are described in the section “How Protections are Implemented” on page 47.
Example: Exclusionary protections.
Ed has used p4 protect to set up protections as follows:
The first permission seemingly grants write access to all users to all files in all depots, but this is overruled by later exclusionary protections for certain users.
The third permission denies Joe permission to access any file from any host. No subsequent lines grant Joe any further permissions; thus, Joe has been effectively locked out of PERFORCE.
The fourth permission denies Lisa all access to all files on all hosts, but the fifth permission gives her back write access on all files within a specific directory. If the fourth and fifth lines were switched, Lisa would be unable to run any PERFORCE command.
Granting Access to Groups of UsersPERFORCE groups simplify maintenance of the protections table. The names of users with identical access requirements can be stored in a single group; the group name can then be entered in the table, and all the users in that group will receive the specified permissions.
Groups are maintained with p4 group and their protections assigned with p4 protect. Only PERFORCE superusers may use these commands.
Creating and Editing GroupsIf p4 group groupname is called with a non-existent groupname, a new group named groupname will be created. Calling p4 group with an existing groupname allows editing of the user list for this group.
The command p4 group groupname displays a form with two fields: Group: and Users:. The Group: field stores the group name, and cannot be edited; Users: is empty when the group is first created, and must be filled in. User names are entered under the Users: field header; each user name must be typed on its own line, and should be indented. A single user may be listed in any number of groups.
As of Release 99.2, groups can contain other groups, not just users. To add all users in a previously-defined group to the group you’re presently working with, include the group name in the Subgroups: field of the p4 group form. User and group names occupy separate namespaces; thus, groups and users can have the same names.
write user * * //...read user emily * //depot/elm_proj/...super user joe * -//...list user lisag * -//...write user lisag * //depot/elm_proj/doc/...
PERFORCE 2000.1 System Administrator’s Guide 46

Chapter 4: Administering PERFORCE: Protections
Groups and ProtectionsTo use a group with the p4 protect form, specify a group name instead of a user name in any line in the protections table, and set the value of the second field on the line to group instead of user. All the users in that group will be granted the specified access.
Example: Granting access to PERFORCE groups.
This protections table grants list access to all members of the group devgrp, and super access to user edk:
If a user belongs to multiple groups, one permission may override another, but the actual permissions granted to a specific user can be determined by replacing the names of all groups that a particular user belongs to with the user’s name within the protections table, and applying the rules described earlier in this chapter.
Deleting GroupsTo delete a group, invoke
p4 group -d groupname
Alternately, invoke p4 group groupname and delete all the users from the group in the resulting editor form. The group will be deleted when the form is closed.
How Protections are ImplementedThis section describes the algorithm that PERFORCE follows to implement its protection scheme. Protec-tions can be used properly without reading this section; the material here is provided to explain the logic behind the behavior described above.
Users’ access to files is determined by the following steps:
• The command is looked up in the command access level table in “Access Levels Required by Perforce Commands” on page 48 to determine the minimum access level needed to run that command. In our example, p4 print is the command, and the minimum access level required to run that command is read.
• PERFORCE makes the first of two passes through the protections table. Both passes move up the protec-tions table, bottom to top, looking for the first relevant line.
The first pass is used to determine whether or not the user is allowed to know whether or not the file exists. This search simply looks for the first line encountered that matches the user name, host IP address, and file argument. If the first matching line found is an inclusionary protection, then the user has permission to at least list the file, and PERFORCE proceeds to the second pass. Otherwise, if the first matching protection found is an exclusionary mapping, or if the top of the protections table is reached without a matching protection being found, then the user has no permission to even list the file, and will receive a message like File not on client.
Example: Interpreting the order of mappings in the protections table.
Suppose that our protections table is set as follows:
list group devgrp * //...super user edk * //...
write user * * //...read user edk * -//...read user edk * //depot/elm_proj/...
PERFORCE 2000.1 System Administrator’s Guide 47

Chapter 4: Administering PERFORCE: Protections
If Ed runs p4 print //depot/foo, PERFORCE examines the protections table bottom to top, and first encounters the last line. The files specified there don’t match the file that Ed wants to print, so this line is irrel-evant. The second-to-last line is examined next; this line matches Ed’s user name, his IP address, and the file he wants to print; since this line is an exclusionary mapping, Ed isn’t allowed to even list the file.
• If the first pass is successful, a second pass is made at the protections table, again reading bottom to top; this pass is the same as the first, except that access level is now taken into account.
If an inclusionary protection line is the first line encountered that matches the user name, IP address, file argument, and has an access level greater than or equal to the access level required by the given command, then the user is given permission to run the command.
If an exclusionary mapping is the first line encountered that matches according to the above criteria, or if the top of the protections table is reached without finding a matching protection, then the user has no permission to run the command, and will receive the message “You don’t have permission for this operation”.
Access Levels Required by PERFORCE CommandsThe following table lists the minimum access level required to run each command. For example, since p4 add requires at least open access, p4 add can be run if open, write or super protections are granted.
Command Access Level Command Access Level
add open integrate d open
admin super integrated list
branch open job b open
branches list jobs a list
change open jobspec a b super
changes a list label a open
client list labels a b list
clients list labelsync open
counter c review lock write
counters list obliterate super
delete open opened list
depot a b super passwd list
depots a list print read
describe read protect a super
describe -s list reopen open
diff read resolve open
diff2 read resolved open
dirs list revert open
edit open review a review
filelog list reviews a list
files list set list
fix a open submit write
fixes a list sync read
fstat list triggers super
group a b super typemap super
PERFORCE 2000.1 System Administrator’s Guide 48

Chapter 4: Administering PERFORCE: Protections
a This command doesn’t operate on specific files. Thus, permission is granted to run the command if the user has the specified access to at least one file in the depot.
b The -o flag to this command, which allows the form to be read but not edited, requires only list access.c list access is required to view an existing counter’s value; review access is required to change a counter’s
value or create a new counter. d To run p4 integrate, the user needs open access on the target files and read access on the donor files.
Those commands that list files, such as p4 describe, will only list those files to which the user has at least list access. Some of these commands take a -f flag which can only be run by PERFORCE superus-ers. See “Forcing operations with the -f flag” on page 32 for details.
groups a list unlock open
have list user a b list
help none users a list
info none verify review
where a none
Command Access Level Command Access Level
PERFORCE 2000.1 System Administrator’s Guide 49

Chapter 4: Administering PERFORCE: Protections
PERFORCE 2000.1 System Administrator’s Guide 50

Chapter 5 Customizing PERFORCE: Job Specifications
PERFORCE’s jobs feature allows changelists to be linked to enhancement requests, problem reports, and other user-defined tasks. The PERFORCE user’s use of p4 job is discussed in the Perforce User’s Guide. This chapter covers superuser modification of the jobs system.
PERFORCE’s default jobs template has five fields for tracking jobs. These fields may be sufficient for small-scale operations, but as projects managed by PERFORCE grow, the information stored in these fields may be insufficient. The p4 jobspec command, which is available only to the PERFORCE superuser, can be used to add, delete, and change fields in the job template.
This chapter discusses the mechanics of altering the PERFORCE job template. Certain changes to the tem-plate are forbidden. Others are permissible, but are not recommended.
The Default PERFORCE Job TemplateTo understand how PERFORCE jobs are specified, we will examine the default PERFORCE job template. The examples which follow in this chapter will be based upon modifications to this default PERFORCE job template.
A job created with the default PERFORCE job template has this format:
Warning! Improper modifications to the PERFORCE job template can lead to corruption of your server’s database. Recommendations, caveats, and warnings about changes to job templates are summarized at the end of this chapter.
# A Perforce Job Specification.## Job: The job name. ‘new’ generates a sequenced job number.# Status: Either ‘open’, ‘closed’, or ‘suspended’. Can be changed.# User: The user who created the job. Can be changed.# Date: The date this specification was last modified.# Description: Comments about the job. Required.Job: newStatus: openUser: edkDate: 1998/06/03 23:16:43Description: <enter description here>
PERFORCE 2000.1 System Administrator’s Guide 51

Chapter 5: Customizing PERFORCE: Job Specifications
The template from which this job was created can be viewed and edited with p4 jobspec. The default job specification template looks like this:
The Job Template’s FieldsThere are six fields and field types in the p4 jobspec form. These fields define the template for all PER-FORCE jobs on your server. The fields and field types are:
The Fields: FieldThe p4 jobspec field Fields: lists the fields to be tracked by your jobs. The default Fields: field lists these fields:
# A Perforce Job Specification.## Updating this form can be dangerous!# See ‘p4 help jobspec’ for proper directions.Fields: 101 Job word 32 required 102 Status select 10 required 103 User word 32 required 104 Date date 20 once 105 Description text 0 requiredComments: # A Perforce Job Specification. # # Job: The job name. ‘new’ generates a sequenced job number. # Status: Either ‘open’, ‘closed’, or ‘suspended’. Can be changed. # User: The user who created the job. Can be changed. # Date: The date this specification was last modified. # Description: Comments about the job. Required.Values-Status: open/suspended/closedPreset-Status: openPreset-User: $userPreset-Date: $nowPreset-Description: $blank
Field / Field Type Meaning
Fields: A list of fields to be included in each job. Each field consists of an ID#, a name, a datatype, a length, and a setting.
Required: A list of those fields in which values must be entered.
Readonly: A list of fields, the default values of which cannot be changed by the user. Each field in this list requires a corresponding Preset-fieldname entry in the job specification.
Values-fieldname: List of possible values for any select fields (defined below)
Preset-fieldname: A default value for field fieldname.
Comments: The comments that will appear at the top of the p4 job form.
Fields: 101 Job word 32 required 102 Status select 10 required 103 User word 32 required 104 Date date 20 once 105 Description text 0 required
PERFORCE 2000.1 System Administrator’s Guide 52

Chapter 5: Customizing PERFORCE: Job Specifications
Each field must be listed on a separate line, and is comprised of five separate descriptors:
The five field datatypes are:
Caveats, Recommendations, and Warnings
• Once a field has been created and jobs have been entered, do not change the field’s ID#. Any data entered in that field through p4 job will be inaccessible.
• Field names may be changed at any time. When changing a field’s name, be sure to also change the fieldname in other p4 jobspec fields that reference this fieldname. For example, if you create a new field 106 named severity and subsequently rename it to bug-severity, then the jobspec’s Preset-severity: field will have to be changed to Preset-bug-severity: to reflect the change.
Field Descriptor
Meaning
ID# A unique integer identifier by which this field is indexed. Once a field has been cre-ated and jobs have been entered into the system, the name of this field can change, but data will be inaccessible if the ID number changes.
ID numbers must be between 101 and 199.
Name The name of the field as it should appear on the p4 job form.
Data Type One of five datatypes, described in the next table.
Length The recommended size of the field’s text box as displayed in P4WIN, the PERFORCE GUI client. A value of 0 will display a text box with room for multiple lines of input; a nonzero value will display a single line with room for length characters.
The value of this field has no effect on jobs edited from p4, and is not related to the actual length of the values stored by the server.
Persistence Determines whether a field is read-only, contains default values, etc. The valid val-ues for this field are:
• optional: field can take any value or can be deleted. • default: a default value is provided; it can be changed or erased. • required: a default is given; it can be changed but the field can’t be left empty. • once: read-only; the field is set once to a default value and is never changed. • always: read-only; the field value is reset to the default value when the job is
saved. Useful only with the $now variable to change job modification dates, and with the $user variable to change the name of the user who last modified the job.
In version 98.2 of PERFORCE, a field’s persistence was specified in a very different way. If you have upgraded from 98.2, no conversion need be done; the old persis-tences will appear in the p4 jobspec form in the new template.
Field Type Explanation Example
word A single word A userid: edk
text A block of text that may span multiple lines A job’s description
line One line of text A user’s real name: Ed K.
select One of a set of values. Must have a correspond-ing Values-Fieldname: field entered into the job specification
A job’s status. One of: open/suspended/closed
date A date value The date and time of job creation: 1998/07/15:13:21:46
PERFORCE 2000.1 System Administrator’s Guide 53

Chapter 5: Customizing PERFORCE: Job Specifications
• Field ID# 101, the job’s name, is required by PERFORCE and must not be deleted. As is true for all fields, its name may be changed.
• Field ID# 102, the job’s status, may be deleted; however, PERFORCE will be unable to update the status of jobs linked to particular changelists. If this field is present, PERFORCE will always set the value of this field to closed when a changelist containing this job is submitted, even if closed has been deleted from the list of possible values within the jobspec.
• Field ID# 105 is assumed to be a job description. If present, it will be used by p4 change and p4 sub-mit to describe the jobs fixed by the changelist.
• We strongly recommend leaving the default fields 101 to 105 in the jobs system, using p4 jobspec only to add new fields to your jobs. Do not change the names or types of these fields for any reason!
• The comments that you write in the Comments: field are the only way to let your users know the requirements for each field. Please make these comments understandable and complete. These com-ments are treated specially in P4WIN, the PERFORCE Windows GUI; for P4WIN ToolTip compatibility, make sure that the first line of each field’s comment can be read on its own.
The Preset-fieldname: FieldsAll fields with a persistence of anything other than optional require default values. To assign a default value to a field, create a field in the jobspec form called Preset-fieldname:, where fieldname is the field name to which you’re assigning the default value. Any single-line string may be used as a default value.
Three variables are available for use as default values:
The Preset-fieldname: fields and values for the standard jobs template are
In version 98.2 of PERFORCE, the Preset-fieldname fields were called Default-fieldname.
The Values-fieldname: FieldsThe set of possible values for any field of datatype select are provided in a Values-fieldname: field. The values are entered on single line, separated by slashes. In the default PERFORCE job specification, only the Status: field is a select field; its possible values have been set with:
Variable Value
$user The PERFORCE user creating the job, as specified by the P4USER environment or registry variable, or as overridden with p4 -u username job.
$now The date and time at the moment the job is saved.
$blank The text <enter description here>.
When users enter jobs, any fields in your jobspec with a preset of $blank must be filled in by the user before the job will be added to the system.
Preset-Status: openPreset-User: $userPreset-Date: $nowPreset-Description: $blank
Values-Status: open/suspended/closed
PERFORCE 2000.1 System Administrator’s Guide 54

Chapter 5: Customizing PERFORCE: Job Specifications
The Comments: FieldThe Comments: field supplies the comments that will appear at the top of the p4 job form. Since p4 job will not automatically tell your users the valid values of select fields, which fields are required, etc., it is important that your comments tell your users everything they need to know about each field.
Each line of the Comments: field must be indented by at least one tab stop from the left margin, and must begin with the comment character #. The comments for the default p4 job template appear as:
P4WIN, the PERFORCE Windows GUI client, displays these comments in two ways:
• When the P4WIN user creates or edits a job and presses the Form Info button in the job dialog box, a popup window displays the comments.
• Administrators of PERFORCE servers accessed by P4WIN users should take extra care while writing comments.
As the cursor moves over each field, the first line of the comment that correspond to that field is dis-played in a ToolTip. P4WIN constructs ToolTips by parsing the comments, looking for lines that start with a single word followed by a colon (:). The remainder of each of these lines is displayed as the ToolTip for the field that matches the first word of the line. Only the first line of the comment is dis-played; if P4WIN encounters the jobspec comments above, the ToolTip for the Status: field will read:
Either ‘open’, ‘closed’, or ‘suspended’. Can be changed.
Example: PERFORCE’s Custom TemplateWe designed our jobs system to meet our own evolving needs, and ended up modifying our own job template accordingly.
Our own internal job specification and the job form it uses are provided here as a second example of the relationship between the p4 jobspec template and the p4 job template.
Running p4 jobspec at PERFORCE displays the following template:
Comments:# A Perforce Job Specification.## Job: The job name. ‘new’ generates a sequenced job number.# Status: Either ‘open’, ‘closed’, or ‘suspended’. Can be changed.# User: The user who created the job. Can be changed.# Date: The date this specification was last modified.# Description: Comments about the job. Required.
# A Perforce Job Specification.## Updating this form can be dangerous!# See ‘p4 help jobspec’ for proper directions.Fields: 101 Job word 32 required 106 Type select 10 required 102 Status select 10 required 108 Priority select 10 required 107 Subsystem select 10 required 109 Owned_By word 32 optional 103 Reported_By word 32 required 104 Reported_Date date 20 once 110 Modification_Date date 20 always 112 Call_Numbers word 64 optional 111 Customers text 0 optional 105 Description text 0 required
PERFORCE 2000.1 System Administrator’s Guide 55

Chapter 5: Customizing PERFORCE: Job Specifications
Running p4 job at PERFORCE displays this job form:
Comments:# Perforce Jobs at Perforce:## Job: Job number# Type: The type of the job. Acceptable values are# “bug”, “sir”, “problem” or “unknown”# Status: Has the job been fixed: Acceptable values are# “open”, “closed”, or “suspended”# Priority: How soon should this job be fixed?# Values are “a”, “b”, “c”, or “unknown”# Subsystem: One of p4/gui/doc/mac/misc/unknown# Owned_by: Who’s fixing the bug# Reported_by: Who reported the bug# Reported_date: When the bug was first entered# Mod_date: Last time the bug was updated# Call_Numbers: If from calltrack, the call numbers# Customers: Email addresses of customers, one per line# Description: Textual description of the bug Values-Type: bug/sir/problem/unknownPreset-Type: unknownValues-Status: open/suspended/closedPreset-Status: openValues-Priority: A/B/C/unknownPreset-Priority: unknownValues-Subsystem: p4/gui/doc/mac/misc/unknownPreset-Subsystem: unknownPreset-Owned_By: unownedPreset-Reported_By: $userPreset-Reported_Date: $nowPreset-Modification_Date: $nowPreset-Call_Numbers: nonePreset-Customers: internal
# Perforce Jobs at Perforce:## Job: Job number# Type: The type of the job. Acceptable values are# “bug”, “sir”, “problem” or “unknown”# Status: Has the job been fixed: Acceptable values are# “open”, “closed”, or “suspended”# Priority: How soon should this job be fixed?# Values are “a”, “b”, “c”, or “unknown”# (This is NOT the same as severity!)# Subsystem: One of p4/gui/doc/mac/misc/unknown# Owned_by: Who’s fixing the bug# Reported_by: Who reported the bug# Reported_date: When the bug was first entered# Mod_date: Last time the bug was updated# Call_Numbers: If from calltrack, the call numbers# Customers: Email addresses of customers, one per line# Description: Textual description of the bug Job: newType: unknownStatus: openPriority: unknownSubsystem: unknownOwned_By: unownedReported_By: edkReported_Date: 1998/06/04 02:13:10Modification_Date: 1998/06/04 02:13:10Call_Numbers: none Customers: internalDescription: <enter description here>
PERFORCE 2000.1 System Administrator’s Guide 56
Chapter 5: Customizing PERFORCE: Job Specifications
Observe that he order of the listing under Fields: in the p4 jobspec form determines the order in which the fields appear to users in job forms; fields need not be ordered by numeric identifier.
At PERFORCE, for instance, the field displayed following the job name is Type:, even though its numeric identifier is 106, not 102.
Integrating with Other Defect Tracking SystemsIf PERFORCE’s built-in “jobs” feature doesn’t satisfy your defect tracking needs, you can still use it as the interface between PERFORCE and your preferred defect tracking system. Depending on the application, the interface you set up will consist of one or more of the following:
• A trigger or script on the defect tracking system side that adds, updates, or deletes a job in PERFORCE every time a bug is added, updated, or deleted in the defect tracking system.
That is, the third-party system should generate the data and then pass it to a script which reformats the data to resemble the form used by a manual (interactive) invocation of p4 job. The script can then pipe the generated form to a the standard input of a p4 job -i command.
(The -i flag to p4 job allows p4 job to read a job form directly from the standard input, rather than using the interactive “form-and-editor” approach typical of user operations. Further information on automating PERFORCE with the -i option is available in the Perforce Command Reference.)
• A trigger on the PERFORCE side that checks changelists being submitted for any necessary bug fix information.
• A PERFORCE review daemon which checks successfully-submitted changelists for job fixes, and issues the appropriate commands to update the corresponding data in your defect tracking system.
For more about triggers and review daemons, including examples, see “Scripting Perforce: Daemons and Triggers” on page 59.
PERFORCE customers currently integrate PERFORCE with their own home-grown defect tracking systems, and with third-party systems such as Remedy, Scopus, and ClearTrack.
If you are interested in seeing what other PERFORCE users have done, visit the PERFORCE web site and examine the perforce-user mailing list archives, which are available under our Documentation page. You may also wish to consider posting to perforce-user to ask if anyone has integrated PERFORCE with the third-party tool you’re interested in -- someone may have already done all the setup work required to work with your system.
Caveats, Warnings and RecommendationsAlthough the material in this section has already been presented elsewhere in this chapter, it is important enough to bear repeating. Please follow the guidelines presented here when editing job specifications with p4 jobspec.
• Once a field has been created and jobs have been entered, do not change the field’s ID#. Any data entered in that field through p4 job will be inaccessible.
• Field names may be changed at any time. When changing a field’s name, be sure to also change the fieldname in other p4 jobspec fields that reference this fieldname. For example, if you create a new field 106 named severity and subsequently rename it to bug-severity, then the jobspec’s Preset-severity: field will have to be changed to Preset-bug-severity: to reflect the change.
• Field ID# 101, the job’s name, is required by PERFORCE and must not be deleted. As is true for all fields, its name may be changed.
!Warning! Please read and understand the material in this section before attempting to edit a job specification!
PERFORCE 2000.1 System Administrator’s Guide 57

Chapter 5: Customizing PERFORCE: Job Specifications
• Field ID# 102, the job’s status, may be deleted; however, PERFORCE will be unable to update the status of jobs linked to particular changelists. If this field is present, PERFORCE will always set the value of this field to closed when a changelist containing this job is submitted, even if closed has been deleted from the list of possible values within the jobspec.
• Field ID# 105 is assumed to be a job description. If present, it will be used by p4 change and p4 sub-mit to describe the jobs fixed by the changelist.
• We strongly recommend leaving the default fields 101 to 105 in the jobs system, using p4 jobspec only to add new fields to your jobs. Do not change the names or types of these fields for any reason!
• The comments that you write in the Comments: field are the only way to let your users know the requirements for each field. Please make these comments understandable and complete. These com-ments are treated specially in P4WIN, the Perforce Windows GUI; for P4WIN ToolTip compatibility, make sure that the first line of each field’s comment can be read on its own.
PERFORCE 2000.1 System Administrator’s Guide 58

Chapter 6 Scripting PERFORCE: Daemons and Triggers
User-written scripts can enhance PERFORCE’s functionality. There are three primary methods of scripting PERFORCE:
• Wrappers are scripts that call PERFORCE commands. Wrappers can be written in any scripting language, are usually tailored to your own site’s needs, and are not discussed here.
• Daemons run at predetermined times, looking for changes to the PERFORCE metadata. When a daemon determines that the state of the depot has changed in some useful way, it runs other commands. For example, a daemon might look for newly submitted changelists and send email to users who have pre-viously updated the files that were submitted in those changelists. PERFORCE provides a number of tools that make daemon-writing easier.
• Pre-submit triggers are scripts that PERFORCE runs whenever users attempt to submit files. A trigger script returns a value to PERFORCE that determines whether or not the submit should succeed. For example, you might write a script that watches for a particular executable file to be submitted; when this file is submitted, the trigger script might tell the submit to fail if the release notes file has not been updated within the same changelist.
This chapter assumes that you know how to write scripts.
Triggers
A pre-submit trigger is a script called by PERFORCE when files that you’ve specified have been submitted. If the script returns a value of 0, the submit continues. If it returns any other value, the submit fails. In the event of failure, the script’s standard output will be displayed as part of the error message returned to the user by the failed submit.
Triggers can be useful in many situations; consider the following common uses:
• to validate submits above and beyond the PERFORCE protections mechanism; for example, it might ensure that Ed isn’t allowed to submit file foo until Courtney has submitted file bar.
• to tell the submit to fail if file foo is not submitted in the same changelist as file bar.
• to ensure that every submit to a particular codeline fixes at least one job.
Triggers are created and edited with p4 triggers; only the PERFORCE superuser can run this command. The p4 triggers form looks like this:
!Warning! Although PERFORCE commands that only read data from the depot can be called in a trigger script, running PERFORCE commands that write data to the depot is dangerous and should be avoided! In particular, do not run p4 submit from within a trigger script.
Triggers: relnotes_check //depot/bld/... “perl relcheck.pl %user%” verify_jobs //depot/... “python /usr/bin/job.py %change%”
PERFORCE 2000.1 System Administrator’s Guide 59

Chapter 6: Scripting PERFORCE: Daemons and Triggers
Each line in the trigger table has three fields:
Example: Creating a trigger
The development group wants to make sure that whenever a .exe file is submitted to the depot that the release notes for the program are submitted at the same time.
You write a trigger script that takes a changelist number as its only argument, does a p4 opened on the changelist, parses the results to find the files included in the changelist, and ensures that for every executable file that’s been submitted, a RELNOTES file in the same directory has been submitted. If the changelist includes a RELNOTES file, the script exits with 0; otherwise it exits with 1.
The script written, you add it to the trigger table by editing the form displayed by p4 trigger:
Whenever an .exe file is submitted, this trigger is run. If the script fails, it returns a nonzero value to PER-FORCE, and the submit is aborted.
Using triggersTriggers are run in the order entered in the triggers table.
If you have multiple triggers associated with a file pattern, each will be run in the order in which it appears in the triggers table. If one of these triggers fails, no further triggers will be executed.
Example: Multiple triggers on the same file:
All *.c files must pass through the scripts check1.sh, check2.sh, and check3.sh:
If any trigger fails (e.g., check1.sh), the submit will fail and none of the subsequent triggers (e.g., check2.sh and check3.sh) will be called. If a trigger succeeds, the next matching trigger will be run.
If you have multiple filepatterns triggering the same script, you should create multiple triggers with sep-arate names pointing to the same script. This is due to a limitation of PERFORCE.
Field Meaning
Trigger Name The name of the trigger. The name can be any arbitrary string.
File Specification A file specification in depot syntax. If a changelist contains any files that match this specification, the script will be run.
Multiple file specifications can be linked to the same trigger by listing the trig-ger multiple times in the trigger table.
Script The command that PERFORCE should run when a matching file is submitted.
The submit will continue if the trigger script returns a 0, and fail otherwise.
The script must be specified in a way that allows the PERFORCE server account to find the file. You can place the directory of the script in the PATH of the envi-ronment in which p4d is running, or specify the full path name of the script within the trigger table.
This command should be quoted, and can take any or all of a number of vari-ables as parameters. The most useful of these variables are:
• %user%, which provides the PERFORCE name of the user who submitted the changelist;
• %change%, the number of the changelist that’s being submitted; and• %client%, the name of the client workspace from which the submit was run.
Triggers: relnotes //depot/....exe “/usr/bin/relnotestest.pl %change%”
Triggers: check1 //depot/src/*.c “/usr/bin/check1.sh %change%” check2 //depot/src/*.c “/usr/bin/ch3ck2.sh %change%” check3 //depot/src/*.c “/usr/bin/check3.sh %change%”
PERFORCE 2000.1 System Administrator’s Guide 60

Chapter 6: Scripting PERFORCE: Daemons and Triggers
Example: A limitation: activating the same trigger for multiple filespecs:
In this case, the detection of foo.c in a changelist will cause subsequent triggers with the same name (e.g., the one intended for bar.h) to be ignored. The checkit.pl script will only be run for *.c files. The *.h files and *.cpp files will not have the trigger applied.
The workaround is to specify separately-named triggers for each filespec: *.c, *.h, and *.cpp
In this case, the bugcheck1 trigger will run on the *.c files, the bugcheck2 trigger will run for the *.h files, and bugcheck3 will run on the *.cpp files.
Some trigger scripts will need to know the files that are included in the changelist. Since p4d can only pass 1K of data to a trigger script, the file list can’t be passed via the trigger. Use p4 opened -ac changelist# in your trigger scripts to get the list of files for the changelist number provided as an argu-ment. The actual contents of the files are not accessible from within the trigger script, since the files are not stored in the depot until the submit completes.
Before p4 submit calls the trigger script, it creates the changelist, assigns it a number, and locks the files in the changelist. After the trigger script is run, p4 submit may run subsequent trigger scripts that cause the submit to fail. For this reason, trigger scripts should not take any actions that assume the submit will succeed. Trigger scripts are meant primarily for changelist validation; if you need to take particular actions based on the success of a submit, use a daemon.
Triggers and security
DaemonsDaemons are processes that are called periodically or run continuously in the background. Daemons that use PERFORCE usually work by examining the server metadata as often as needed and taking action as often as necessary. Typical daemon applications include:
• A change review daemon that up every ten minutes to see if any changelists have been submitted to the production depot. If any changelists have been submitted, the daemon sends email to those users who have “subscribed” to any of the files included in those changelists. The message informs them that the files they’re interested in have changed.
• A jobs daemon that generates a report at the end of each day to create a report on open jobs; it shows the number of jobs in each category, the severity each job, and more. The report is mailed to all inter-ested users.
• A Web daemon that looks for changes to files in a particular depot subdirectory. If new file revisions are found there, they are synced to a client workspace that contains the live web pages.
Triggers: bugcheck //depot/*.c “/usr/bin/checkit.pl %change%” bugcheck //depot/*.h “/usr/bin/checkit.pl %change%” bugcheck //depot/*.cpp “/usr/bin/checkit.pl %change%”
Triggers: bugcheck1 //depot/*.c “/usr/bin/checkit.pl %change%” bugcheck2 //depot/*.h “/usr/bin/checkit.pl %change%” bugcheck3 //depot/*.cpp “/usr/bin/checkit.pl %change%”
Note In order to use triggers, the server (p4d) must be able to “fork”, or spawn off processes to run the triggers. This is the default configuration of PERFORCE.
If you invoke p4d with the -f (run in foreground without forking) option, however, you will not be able to use triggers until you restart the server with-out the -f option.
Warning Because triggers are spawned by the p4d process, it is strongly recommended that p4d never be run as root on UNIX systems.
PERFORCE 2000.1 System Administrator’s Guide 61

Chapter 6: Scripting PERFORCE: Daemons and Triggers
Daemons can be used for almost any task that needs to occur when PERFORCE metadata has changed. Unlike triggers, which are used primarily for submission validation, daemons can also be used to write information (i.e. submit files) to a depot.
PERFORCE’s change review daemonThe change review daemon described above can be downloaded from http://www.perforce.com/per-force/loadsupp.html. It runs under Python, which can be retrieved from http://www.python.org/. Before running the script, please be sure to read and follow the configuration instructions included in the script itself.
The change review daemon looks at the files included in each newly-submitted changelist and emails those users who have “subscribed” to any of the files included in the changelist, letting those users know that the file(s) they’re interested in have changed. Users subscribe to files by calling p4 user and enter-ing filepatterns in the Reviews: field of the resulting form:
Users should enter their email addresses in the Email: field, and enter any number of filepatterns corre-sponding to the files in which they’re interested into the Reviews: field. The daemon will report changes to these files to the users.
The change review daemon implements the following scheme:
1. p4 counter is used to read and change a variable, called a counter, in the PERFORCE metadata. The counter used by this daemon, review, stores the number of the latest changelist that’s been reviewed.
2. The PERFORCE depot is polled for submitted, unreviewed changelists with p4 review -t review;
3. p4 reviews is used to generate a list of reviewers for each of these changelists;
4. The Python mail module is used to email the p4 describe changelist description to each reviewer;
5. The first three steps are repeated every three minutes; this value can be changed when the review daemon is installed.
The command used in the fourth step (p4 describe) is a straightforward reporting command. The other commands (p4 review, p4 reviews, and p4 counter) are used almost exclusively by review daemons.
Creating other daemonsYou can use p4review.py as a starting point to create your own daemons, changing it as needed. As an example, another daemon might upload PERFORCE job information into an external bug tracking system after changelist submission. It would use the p4 review command with a new review counter to list new changelists, and use p4 fixes to get the list of jobs fixed by the newly submitted changelists. This infor-mation might then be fed to the external system, notifying it that certain jobs have been completed.
If you do write a daemon of your own, and would like to share it with other users, you can submit it into the PERFORCE Public Depot. For more information, go to http://www.perforce.com and follow the “PERFORCE Public Depot” link.
User: sarahmEmail: [email protected]: 04/29/1997 11:52:08Access: 04/29/1997 11:52:08FullName: Sarah MacLonnoganReviews: //depot/doc/... //depot.../README
PERFORCE 2000.1 System Administrator’s Guide 62

Chapter 6: Scripting PERFORCE: Daemons and Triggers
Commands used by daemonsCertain PERFORCE commands will be used almost exclusively by review daemons. These commands are:
Daemons and countersIf you’re writing a change review daemon or other daemon that deals with submitted changelists, you will likely want to keep track of the changelist number of the last submitted changelist, which is obtain-able as the second field of the output of a p4 changes -m 1 -s submitted command.
This is not the same as the output of p4 counter change. The last changelist number known to the PER-FORCE server (the output of p4 counter change) includes pending changelists created by users, but not yet submitted to the depot.
Scripting and bufferingDepending on your platform, the output of individual p4 commands may be fully-buffered (output flushed only after a given number of bytes generated), line-buffered (as on a tty, one line sent per line-feed), or unbuffered.
In general, stdout to a file or pipe is fully-buffered, and stdout to a tty is line-buffered. If your trigger or daemon requires line-buffering (or no buffering), you can disable buffering by supplying the -v0 debug flag to the p4 command in question.
If you’re using pipes to transfer standard output from a PERFORCE command (with or without the -v0 flag), you may also experience buffering issues introduced by the kernel; the -v0 flag can only unbuffer the output of the command itself.
Command Usage
p4 counter name [value] When the value argument is not included, p4 counter will return the value of the variable name.
When the value argument appears, p4 counter sets the value of the variable name to value.
Requires at least review access to run.
WARNING: The review counters named journal, job, and change are used internally by PERFORCE; use of any of these three names as review numbers could cor-rupt the PERFORCE database!
For Release 99.2 and above, PERFORCE will not let you change the values of journal, job, and change.
p4 counters List all counters and their values.
p4 review -c changelist# For all changelists between changelist# and the latest submitted changelist, this command lists the change-lists’ numbers, creators, and creators’ email addresses.
Requires at least review access to run.
p4 reviews -c changelist# filespec Lists all users who have subscribed to review the named files or any files in the specified changelist.
It is hard to imagine any use for this command outside of our own change review daemon.
p4 changes -m 1 -s submitted Output a single line showing the changelist number of the last submitted changelist, as opposed to the high-est changelist number known to the PERFORCE server.
PERFORCE 2000.1 System Administrator’s Guide 63

Chapter 6: Scripting PERFORCE: Daemons and Triggers
PERFORCE 2000.1 System Administrator’s Guide 64

Chapter 7 Tuning PERFORCE for Performance
Your PERFORCE server should normally be a light consumer of system resources. As your installation grows, however, you may wish to revisit your system configuration to ensure that it is configured for optimal performance.
The following chapter briefly outlines some of the factors that can affect the performance of a PERFORCE server, provides a few tips on diagnosing network-related difficulties, and offers some suggestions on decreasing server load for larger installations.
Tuning for PerformanceThe following variables can affect the performance of your PERFORCE server.
MemoryServer performance is highly dependent upon having sufficient memory. Two bottlenecks are relevant: the first can be avoided by ensuring that the server doesn’t page when running large queries, and the second by ensuring that the db.rev table can fit in the system’s buffer cache.
• Determining memory requirements for large queries is fairly straightforward: the server requires about 1KB/file of RAM to avoid paging; 10,000 files will require 10MB of RAM.
• To cache db.rev, the size of the db.rev file in an existing installation can be observed and used as an estimate. New installations of PERFORCE can expect db.rev to require about 150-200 bytes per revision, and roughly 3 revisions per file, or about 0.5KB of RAM per file.
Thus, if there is 1.5KB of RAM available per file, or 150MB for 100,000 files, the server will not page, even when performing an operation involving all files. It is still possible that multiple large operations will be performed simultaneously and thus require more memory to avoid paging. On the other hand, the vast majority of operations will only involve a small subset of files.
For most installations, a system with enough RAM for 1.5KB per file in the depot will suffice.
Filesystem performancePERFORCE is judicious with regards to its use of disk I/O; its metadata is well-keyed and accesses are mostly sequential scans of limited subsets of the data.
The only disk-intensive activity is file check-in, where the PERFORCE server must write and rename files in the archive. Server performance is heavily-dependent upon the operating system’s filesystem imple-mentation, and in particular, whether directory updates are synchronous.
Although PERFORCE does not recommend any specific filesystem, Linux servers are generally fastest, (owing to Linux’s asynchronous directory updating), but may have poor recovery if power is cut at the wrong time. The BSD filesystem (also used in Solaris) is relatively slow, but much more reliable. NTFS performance falls somewhere in between these two ranges. The filesystems used by IRIX and OSF have demonstrated an excellent combination of both speed and robustness.
PERFORCE 2000.1 System Administrator’s Guide 65

Chapter 7: Tuning PERFORCE for Performance
Issues with NFS file locking may arise if a PERFORCE server’s database and versioned files are stored on an NFS-mounted volume. Database updates over NFS can be a problem, and file locking is generally slow; if the journal is NFS-mounted, all operations will be slower. Consequently, we strongly recommend that the PERFORCE database, depot, and journal files be stored on disks local to the machine running the PERFORCE server process.
Diskspace allocationPERFORCE diskspace usage is a function of three variables:
• Number and size of client workspaces
• Size of server database
• Size of server’s archive of all versioned files
All three variables depend on the nature of your data and how heavily you use PERFORCE.
The client file space required is the size of the files that your users will need in their client workspaces at any one time.
The server’s database size can be calculated with a fair level of accuracy; as a rough estimate, it will require 0.5KB per user per file. (i.e. A system with 10,000 files and 50 users will require 250M of diskspace for the database). The database can be expected to grow over time as histories of the individ-ual files grow.
The size of the server’s archive of versioned files will depend on the size of the original files stored and will grow as revisions are added. For most sites, allocate at least three times the size of the original files.
If you anticipate your database growing into the gigabyte range, you should ensure that your platform has adequate support for large filesystems. See “Allocate diskspace for anticipated growth” on page 15.
The db.have file holds label contents and the list of files opened in client workspaces, and tends to grow the faster than other files in the database. If you are experiencing issues related to the size of your db.have file and are unable to quickly switch to a server with adequate support for large files, deleting unused clients and labels and reducing the scope of client views can help alleviate the problem.
NetworkPERFORCE can run over any TCP/IP network. Although we have not yet seen network limitations, the more bandwidth the better. Presumably FDDI would be better than 10Mb/s Ethernet, but some users have reported that using a T1 (1.5 Mb/s) provides response times comparable to using PERFORCE locally. PERFORCE employees work successfully over ISDN (64 Kb/s) lines.
Perforce uses a TCP connection for each client interaction with the server. The server’s port address is defined by P4PORT, but the TCP/IP implementation picks a client port number. After the command com-pletes and the connection is closed, the port is left in a state called TIME_WAIT for two minutes. While the port number ranges from 1025 to 32767, generally only a few hundred or thousand can be in use simul-taneously. It is therefore possible to occupy all available ports by invoking a PERFORCE client command many times in rapid succession, such as with a script.
Before release 99.2, both the server and client side of the connection remained in TIME_WAIT, which meant that a script running on one user’s machine could deprive other users of service by tying up all available ports on the server side. As of Release 99.2, only the client side goes into TIME_WAIT, leaving the PERFORCE server free to handle other clients.
CPUPERFORCE is based on a client/server architecture. Both the client and server are lightweight in terms of CPU resource consumption. By way of example, a server supporting 80 users on a low-end (140 MHz) SPARC Ultra server can use as little as 7 CPU-minutes per day, or about 0.5% of available processing power. Weighting this for peak use and headroom, such a server could support upwards of 800 users.
In general, CPU power is not a major consideration when determining the platform on which to install a PERFORCE server.
PERFORCE 2000.1 System Administrator’s Guide 66

Chapter 7: Tuning PERFORCE for Performance
Diagnosing Slow Response TimesPERFORCE is normally a light user of network resources. While it is possible that an extremely large user operation could cause the PERFORCE server to respond slowly, consistently slow responses to p4 com-mands are usually caused by network problems. Any of the following may cause slow response times:
1. misconfigured domain name system (DNS)
2. misconfigured Windows networking
3. difficulty accessing the p4 executable on a networked file system
A good initial test is to run p4 info. If this does not respond immediately, then there is a network prob-lem. Although solving network problems is beyond the scope of this manual, here are some suggestions for troubleshooting them:
Hostname vs. IP addressOn a client machine, try setting P4PORT to the server’s IP address instead of its hostname. For example, instead of using
P4PORT=host.domain:1666
try using:P4PORT=1.2.3.4:1666
with your site-specific IP address and port number.
On most systems, you can determine the IP address of a host by invoking: ping hostname
If p4 info responds immediately when you use the IP address, but not when you use the hostname, the problem is likely related to DNS.
Try p4 info vs. P4WinIf you are using P4WIN on a Windows client, you can compare the response of P4WIN’s “Show Connec-tion Info” (Help -> Show Connection Info) with the response from the command-line p4 info.
If the former is fast and the latter is slow, you have a DNS-related problem. (When the PERFORCE server receives a p4 info request, it does a reverse name lookup in order to send back the client and server hostnames along with other configuration information. When it receives a P4WIN “Show Connection Info” request, however, it simply returns the IP addresses.)
Windows wildcardsIn some cases, p4 commands using unquoted filepatterns with a combination of depot syntax and wild-cards, e.g.
p4 files //depot/*
can result in a delayed response on Windows. You can prevent the delay by putting double quotes around the file pattern, like so:
p4 files “//depot/*”
The cause of the problem is the p4 command’s use of a Windows function to expand wildcards. When quotes are not used, the function interprets //depot as a networked computer path and spends time in a futile search for a machine on the network named depot.
Note This test is only valid for Release 99.1 and newer servers. In releases prior to 99.1, the server always did a reverse name lookup, whether the request was coming from p4 info or P4win
PERFORCE 2000.1 System Administrator’s Guide 67

Chapter 7: Tuning PERFORCE for Performance
DNS lookups and the hosts fileOn Windows NT, the %SystemRoot%\system32\drivers\etc\hosts file can be used to hardcode IP address-hostname pairs. You may be able to work around DNS problems by adding entries to this file.
The corresponding UNIX file is /etc/hosts.
Location of the “p4” executableIf none of the above diagnostic steps explains the sluggish response time, it’s possible that the p4 execut-able itself is on a networked file system which is performing very poorly. To check this, try running:
p4 -V
This merely prints out the version information, without attempting any network access. If you get a slow response, network access to the p4 executable itself may be the problem. Copying or downloading a copy of p4 onto a local filesystem should improve response times.
Preventing Server SwampGenerally, PERFORCE’s performance depends on the number of files a user tries to manipulate in a single command invocation, not the size of the depot. That is, syncing a client view of 30 files from a 3,000,000-file depot should not be much slower than syncing a client view of 30 files from a 30-file depot.
The number of files affected by a single command is largely determined by:
• p4 command line arguments (or selected folders in the case of GUI operations).
Without arguments, most commands will operate on, or at least refer to, all files in the view.
• Client views, branch views, label views, and protections.
Because commands without arguments operate on all files in the view, it follows that the use of unre-stricted views and unlimited protections can result in commands operating on all files in the depot.
When the server answers a request, it locks down the database for the duration of the computation phase. For normal operations, this is a successful strategy, as it can “get in and out” quickly enough to avoid a backlog of requests. Abnormally large requests, however, can take seconds, sometimes even minutes. If frustrated users hit CTRL-C and retry, the problem gets even worse; the server consumes more memory and responds even more slowly.
At sites with very large depots, unrestricted views and unqualified commands will make a PERFORCE server work much harder than it needs to. Users and administrators can ease load on their servers by:
• Using “tight” views
• Assigning protections
• Limiting maxresults
• Writing efficient scripts
Using tight viewsThe following “loose” view is trivial to set up but could invite trouble on a very large depot:
In the loose view, the entire depot was mapped into the client workspace; for most users, this can be “tightened” considerably. The following view, for example, is restricted to specific areas of the depot:
//depot/... //workspace/...
//depot/main/srv/devA/... //workspace/main/srv/devA/...//depot/main/drv/lport/... //workspace/main/dvr/lport/...//depot/rel2.0/srv/devA/bin/... //workspace/rel2.0/srv/devA/bin/...//depot/qa/s6test/dvr/... //workspace/qa/s6test/dvr/...
PERFORCE 2000.1 System Administrator’s Guide 68

Chapter 7: Tuning PERFORCE for Performance
Client views, in particular, but also branch views and label views, should also be set up to give users just enough scope to do the work they need to do.
Client, branch, and label views are set by the PERFORCE superuser or by individual users with the p4 client, p4 branch, and p4 label commands respectively.
Two of the techniques for script optimization (i.e. “Using branch views” on page 71 and “The temporary client trick” on page 71) rely on similar techniques. By limiting the size of the view available to the com-mand, fewer commands need to be run, and those that are run require fewer resources.
Assigning protectionsProtections (see “Administering Perforce: Protections” on page 43) are, in fact, another type of PERFORCE view. Protections are set with the p4 protect command, and control which depot files can be affected by commands run by users.
Unlike client, branch, and label views, however, the views used by protections can be set only by PER-FORCE superusers. (Protections also control read and write permission to depot files, but the permission levels themselves have no impact on server performance.) By assigning protections in PERFORCE, a PER-FORCE superuser can effectively limit the size of a user’s view, even if the user is using “loose” client specifications.
Protections can be assigned to either users or groups. For example:
PERFORCE groups are created by superusers with the p4 group command. Not only do they make it eas-ier to assign protections, but they provide a useful fail-safe mechanism called maxresults, described in the next section.
Limiting “maxresults”Each PERFORCE group has a maxresults value associated with it. The default is “unlimited”, but a supe-ruser can use p4 group to limit it for any given group. Users in those groups will be unable to run any commands which affect more database rows than the group’s maxresults limit. (For most commands, the number of database rows affected is roughly equal to the number of files affected.)
To set this limit, fill in the Maxresults: field in the p4 group form. The number in this field specifies the maximum number of rows of data that can be operated on by a single command.
If a user is listed in multiple groups, the highest of the maxresults limits (but not including the default “unlimited” setting!) for those groups is taken as the user’s maxresults value.
Example: Effect of setting maxresults:
As an administrator, you wish members of the group rocketdev to be limited to operations of 20,000 files or less:
Suppose that Ruth has an unrestricted (“loose”) client view. When she types: p4 sync
her sync command will be rejected if the depot contains more than 20,000 files. She can work around this lim-itation either by restricting her client view, or, if she needs all of the files in the view, by syncing smaller sets of files at a time, e.g.:
p4 sync //depot/projA/...p4 sync //depot/projB/...
Either way, she’ll get her files, but without tying up the server to process a single extremely large command.
write user sam * //depot/admin/...write group rocketdev * //depot/rocket/main/...write group rocketrel2 * //depot/rocket/rel2.0/...
Group: rocketdevMaxresults: 20000Users: bill ruth sandy
PERFORCE 2000.1 System Administrator’s Guide 69

Chapter 7: Tuning PERFORCE for Performance
To leave unlimited the number of result lines processed for a particular group, set the Maxresults: value for that group to unlimited.
Since maxresults values can make life difficult for your users, do not use them unless you find that cer-tain operations are slowing down your server. The Maxresults: value should never be less than 10,000, since certain operations performed by P4WIN, the PERFORCE Windows GUI, may require a Maxresults: value of between 5,000 and 8,000.
For more information, including a comparison of PERFORCE commands and the number of files they affect, type:
p4 help maxresults
from the command line.
Maxresults for users in multiple groups
As mentioned earlier, if a user is listed in multiple groups, the highest maxresults limit of all the groups a user belongs to is the limit that affects the user. The default maxresults value of “unlimited” is not a limit; if a user is in a group where maxresults is set to “unlimited”, he or she will still be limited by the highest maxresults limit of the other groups of which he or she is a member. A user’s commands are truly unlimited only when the user belongs to no groups, or when all of the groups of which the user is a member have their maxresults set to “unlimited”
A side effect of this is that you can’t create a group that assigns “unlimited” maxresults values to supe-rusers, because if any of the users in it also belonged to another group, the limit in that group would also apply to them. You can get around this by assigning a very high maxresults limit to your superusers group. For example:
Scripting efficientlyThe PERFORCE command-line interface, p4, allows you to do anything in a script that you can do interac-tively. The PERFORCE server can process commands far faster than users can issue them, so in an all-inter-active environment, response time is excellent. However, p4 commands issued by scripts -- triggers, review daemons, or command wrappers, for example -- can cause performance problems if you haven’t paid attention to their efficiency. This is not because p4 commands are inherently inefficient, but because the way one invokes p4 as an interactive user isn’t necessarily suitable for repeated iterations.
This section points out some common efficiency problems and solutions.
Iterating through files
Each PERFORCE command issued causes a connection thread to be created and a p4d subprocess to be started. Reducing the number of PERFORCE commands your script runs is the first step to making it more efficient.
To this end, scripts should never iterate through files running PERFORCE commands when they can accomplish the same thing by running one PERFORCE command on a list of files and iterating through the command results.
For example, consider an approach like this:for i in `p4 diff2 path1/... path2/...`do [process diff output]done
Instead of this:for i in `p4 files path1/...`do p4 diff2 path1/$i path2/$i [process diff output]done
Group: superusersMaxresults: 10000000
PERFORCE 2000.1 System Administrator’s Guide 70

Chapter 7: Tuning PERFORCE for Performance
Using list input files
Any PERFORCE command that accepts a list of files as a command line argument can also read the same argument list from a file. Scripts can make use of the list input file feature by building up a list of files first, then passing the list file to p4 -x.
For example, if your script currently does something like:for components in foo bar olado p4 edit ${component}.hdone
a more efficient alternative would be:for components in foo bar olado echo ${component}.h >> LISTFILEdonep4 -x LISTFILE edit
The -x flag instructs p4 to read arguments, one per line, from the named file. If the file is named “-” (i.e., a dash), the standard input is read.
Using branch views
Branch views can be used with p4 integrate or p4 diff2 to reduce the number of PERFORCE command invocations. For example, if your script currently does this:
p4 diff2 pathA/src/... pathB/src/...p4 diff2 pathA/tests/... pathB/tests/...p4 diff2 pathA/doc/... pathB/doc/...
you can make it more efficient by creating a branch view that looks like this:
and running this p4 command instead:p4 diff2 -b pathA-pathB
Limiting label references
Repeated references to large labels can be particularly costly. Commands that refer to files using labels as revisions will scan the whole label once for each file argument. To keep from hogging the PERFORCE server, your script should get the labeled files from the server, then scan the output for the files it needs.
For example, this:p4 files path/...@label | egrep “path/foo.h|path/bar.h|path/ola.c”
will impose a lighter load on the PERFORCE server than either this:p4 files path/foo.h@label path/bar.h@label path/ola.h@label
or this:p4 files path/foo.h@labelp4 files path/bar.h@labelp4 files path/ola.h@label
The “temporary client” trick described below may also reduce the number of times you have to refer to files by label.
The temporary client trick
Most PERFORCE commands can process all the files in the current client view with a single command line argument. By making use of a temporary client view that contains the files on which you want to work, you may be able to reduce the number of commands you have to run, and/or to reduce the number of file arguments you need to give each command.
Branch: pathA-pathBView: pathA/src/... pathB/src/... pathA/tests/... pathB/tests/... pathA/doc/... pathB/doc/...
PERFORCE 2000.1 System Administrator’s Guide 71
Chapter 7: Tuning PERFORCE for Performance
For instance, suppose your script runs these commands:p4 sync pathA/src/...@labelp4 sync pathB/tests/...@labelp4 sync pathC/doc/...@label
You can combine the command invocations and reduce the three label scans to one by using a client spec that looks like:
and running:p4 -c XY-temp sync @label
Checkpoints for Database Tree RebalancingPERFORCE’s internal database stores its data in structures called Bayer trees, more commonly referred to as B-trees. While B-trees are a very common way to structure data for rapid access, over time the process of adding and deleting elements to and from the trees can eventually lead to imbalances in the data structure.
Eventually, the tree may become sufficiently unbalanced that performance is negatively affected. The PERFORCE checkpoint and restore processes will re-create the trees in a balanced manner; consequently, you may see some increase in server performance following a restoration from a checkpoint.
Rebalancing the trees is normally only useful if the database files have become more than about 10 times the size of the checkpoint. Given the length of time required for the trees to become unbalanced during normal PERFORCE use, we expect that the majority of sites will never need to restore the database from a checkpoint (i.e. rebalance the trees) for performance reasons.
Client: XY-tempView: pathA/src/... //XY-temp/pathA/src/... pathB/tests/... //XY-temp/pathB/tests/... pathC/doc/... //XY-temp/pathC/doc/...
PERFORCE 2000.1 System Administrator’s Guide 72

Chapter 8 PERFORCE and NT
This chapter describes certain information of specific interest to administrators who set up and maintain PERFORCE servers on Windows NT.
Using the PERFORCE installerThe PERFORCE installer program, perforce.exe, gives you the option to install either as a user (the PER-FORCE client), a typical administrator (PERFORCE installed as an NT service), a custom administrator (PER-FORCE installed as a service with additional customization options), or to uninstall PERFORCE from your system.
If you have Administrator privileges, it is usually best to install PERFORCE as a service. If you don’t, install it as a server.
Upgrade notesThe PERFORCE installer will also automatically upgrade all types of PERFORCE servers (or services), even versions prior to 97.3. The upgrade process is extremely conservative; if anything fails at any step in the upgrade process, the installer will stop the upgrade, and you will still be able to use your old server (or service).
Installation optionsWhen you invoke the installer, it will present an initial screen that lists the revisions of the Perforce soft-ware you’re about to install. You are offered the choice between performing:
• a user install,
• a typical Administrator install,
• a customized Administrator install, or
• deinstallation of PERFORCE.
User install
The “user install” installs only the PERFORCE command-line client, Windows GUI, and (optionally) the third-party SCM plugin. If you are running on Windows 95 or Windows 98, this will be the only installa-tion option available to you.
You will be prompted to specify the location of the client executables, the port (P4PORT) on which the cli-ent should attempt to contact the PERFORCE server , the default editor, and the default username.
When specifying the port for the client to use, don’t forget to include the hostname in the form host-name:port. See “Telling Perforce clients which port to talk to” on page 10 for details on P4PORT.
If the installer detects older versions of PERFORCE client or server software on the machine, you will be given the option to rename the old executables to prevent PATH-dependent conflicts.
PERFORCE 2000.1 System Administrator’s Guide 73

Chapter 8: PERFORCE and NT
Administrator typical
The “typical administrator install” allows the installation of both client and server software for PER-FORCE.
You will be prompted to specify the directory for the client and server executables, the port on the local machine where the PERFORCE server or NT service will listen to client requests (P4PORT), the default edi-tor, and the default username.
The installer will select default locations for the P4LOG error log file and the journal file. If an earlier ver-sion of PERFORCE was installed on the machine, these locations will be based on those already in use.
If you have Administrator privileges, the installer will install PERFORCE and configure it to run as an auto-starting NT service. The service will be set up and started after the installation is complete, and will automatically restart whenever the machine is rebooted. If you do not have Administrator privileges, a shortcut to run PERFORCE as a server will be placed into your Start menu.
If the installer detects older versions of PERFORCE client or server software on the machine, you will be given the option to rename the old executables to prevent PATH-dependent conflicts.
Administrator custom
The “custom administrator install” allows the installation of both client and server software for PER-FORCE.
As with the typical administrator install, you will be prompted to specify the location of client and server executables, the port on the local machine where the PERFORCE server or NT service will listen to client requests, the default editor, and the default username.
Unlike the typical administrator install, you will be allowed to optionally specify separate directories for the client and server executables, as well as server root, server port, and whether to set up PERFORCE as an auto-starting (or non-auto-starting) NT service or server process. The locations of any existing P4LOG file and journal file are displayed for reference, and may be changed later using p4 set.
If you try to install a PERFORCE service while another PERFORCE server is running, you will see the error message:
Setup has determined that a Perforce Server could be running. Please shut down all Perforce Servers before continuing the installation.
Failure to shut down the running PERFORCE server(s) will result in conflicts between the newly-installed service and the existing server.
As with the other installation options, if the installer detects older versions of PERFORCE client or server software on the machine, you will be given the option to rename the old executables to prevent PATH-dependent conflicts.
Uninstall PERFORCE
Should you wish to remove PERFORCE from an NT machine, select the Uninstall option.
The uninstall procedure removes everything except your server data; the PERFORCE server, service, and client executables, registry keys, and service entries will all be deleted. The database and depot files in your server root, however, will be preserved.
NT services vs. NT serversTo run any task as an NT server, a user account must be logged in, as shortcuts in a user’s Startup folder cannot be run until that user logs in. An NT service, on the other hand, is invoked automatically at boot time, and runs regardless of whether or not a user is logged in to the NT machine.
Throughout most of the documentation set, the terms “PERFORCE server” or “p4d” are used to refer to “the process at the back end that manages the database and responds to requests from PERFORCE clients”. Under NT, this can lead to ambiguity; the back-end process can run as either an NT service (p4s.exe, which runs as a thread) or as an NT server (p4d.exe, which runs as a regular process). From an NT administrator’s point of view, these are important distinctions; consequently, the terminology used in this chapter uses the more precise definitions.
PERFORCE 2000.1 System Administrator’s Guide 74

Chapter 8: PERFORCE and NT
The PERFORCE service (p4s.exe) and the PERFORCE server (p4d.exe) executables are copies of each other; they are identical apart from their filenames. When run, they use the first three characters of the name with which they were invoked (i.e. either p4s or p4d) to determine their behavior. For example, invoking copies named p4smyserver.exe or p4dmyservice.exe will invoke a service and a server, respectively.
Starting and stopping the PERFORCE NT serviceIf PERFORCE was installed as an NT service, a user with Administrator privileges can start and stop it using the Services applet in the Control Panel.
If you are running at Release 99.2 or above, you can also use the command:p4 admin stop
to stop the PERFORCE NT service.
Starting and stopping the PERFORCE NT serverIf PERFORCE was installed as a server, there should be a “PERFORCE Server” shortcut in your Start menu. To start the server, double-click on the shortcut. To stop the server, right-click on the “PERFORCE Server” button in the taskbar and select “Close”.
You can also start the Perforce server manually from an MS-DOS window. The server executable, p4d.exe, is normally found in your P4ROOT directory. To start the server, first make sure your current P4ROOT, P4PORT, P4LOG, and P4JOURNAL settings are correct, then run: %P4ROOT%\p4d
If you want to start a server using settings different than those set by P4ROOT, P4PORT, P4LOG, or P4JOURNAL, you can use p4d command line flags. For example:
c:\test\p4d -r c:\test -p 1999 -L c:\test\log -J c:\test\journal
will start a PERFORCE server process with a root directory of c:\test, listening to port 1999, logging errors to c:\test\log, and with a journal file of c:\test\journal.
Note that p4d command line flags are case-sensitive.
If you are running at Release 99.2 or above, use the command:p4 admin stop
to stop the PERFORCE NT server.
Installing the PERFORCE NT service on a network driveBy default, the PERFORCE NT service runs under the local System account. Because the System account has no network access, a real userid and password are required in order to make the PERFORCE NT ser-vice work if the metadata and depot files are stored on a network drive.
If you are installing your server root on a network drive, the PERFORCE installer (perforce.exe) will request a valid combination of userid and password at the time of installation. This user must have administrator privileges. (The service will also run as this user, rather than System)
While the PERFORCE NT service will run reliably using a network drive as the server root, there is still a marked performance penalty due to of increased network traffic and slower file access; for this reason, we recommend that the depot files and PERFORCE database be on a drive local to the machine on which the PERFORCE NT service is running.
Note If you are running Release 99.1 or earlier, type Ctrl-C in the MS-DOS win-dow, or simply Close the MS-DOS window.
While this will work in all versions of PERFORCE, this method of shutting down the server is not necessarily “clean”, and with the availability of the p4 admin stop command in 99.2, is no longer recommended.
PERFORCE 2000.1 System Administrator’s Guide 75
Chapter 8: PERFORCE and NT
Multiple PERFORCE services under NTBy default, the PERFORCE installer for Windows NT installs a single PERFORCE server as a single NT ser-vice. If you wish to host more than one PERFORCE installation on the same machine (e.g., one for produc-tion and one for testing), then the additional PERFORCE servers must be started manually.
You can, however, install additional NT services to start up additional PERFORCE servers (i.e. as NT ser-vices) automatically.
If your intent is to set up multiple services to increase the number of users you support without purchas-ing more user licenses, you are violating the terms of your PERFORCE License Agreement.
Before you begin, you should read and understand “NT configuration parameter precedence” on page 77. Once you understand the precedence of environment variables in determining PERFORCE con-figuration, you’ll find setting up multiple PERFORCE NT services to be straightforward. To add a new ser-vice, you need only:
1. Create a new directory for the PERFORCE NT service.
2. Copy the server executable, service executable, and your license file into this directory.
3. Create the new PERFORCE service using the svcinst.exe utility, as described in the example below.
4. Set up the environment variables and start the new service.
We recommend that you install your first PERFORCE NT service using the PERFORCE installer. This first service will be called “Perforce” and its server root directory will contain a few files which are required for the other PERFORCE NT services.
Example: Adding a second PERFORCE service.
You wish to create a second PERFORCE service with a root in C:\p4root2 and a service name of “Perforce2”. You’re running Release 99.1/10994 or greater, and the svcinst executable is in the server root of his first PERFORCE NT service, which is in C:\perforce.
Verify that your p4d.exe executable is at Release 99.1/10994 or greater:p4d -V
(We’ll assume the revision level is correct; if not, you’d have to download a newer version from http://www.perforce.com and upgrade the server before continuing.)
Create a P4ROOT directory for the new service:mkdir c:\p4root2
Copy the server executables - both p4d.exe (the server) and p4s.exe (the service) - and your license file into the new directory:
copy c:\perforce\p4d.exe c:\p4root2copy c:\perforce\p4d.exe c:\p4root2\p4s.execopy c:\perforce\license c:\p4root2\license
Use svcinst.exe, (the service installer) to create the “Perforce2” service:svcinst create -n Perforce2 -e c:\p4root2\p4s.exe -a
After the “Perforce2” service has been created, set the service parameters for the “Perforce2” service:p4 set -S Perforce2 P4ROOT=c:\p4root2p4 set -S Perforce2 P4PORT=1667p4 set -S Perforce2 P4LOG=log2p4 set -S Perforce2 P4JOURNAL=journal2
Finally, use the service installer to start the “Perforce2” service:svcinst start -n Perforce2.
The second service is now running, and both services will be started automatically when you next reboot NT.
Note You must download PERFORCE 99.1/10994 or a later release in order to use this procedure.
PERFORCE 2000.1 System Administrator’s Guide 76

Chapter 8: PERFORCE and NT
NT configuration parameter precedenceUnder NT, PERFORCE configuration parameters may be set in many different ways. When a PERFORCE cli-ent program (e.g. p4 or P4WIN), or a PERFORCE server program (p4d) starts up, it reads its configuration parameters according to the following precedence:
1. The program’s command line flags have the highest precedence.
2. The P4CONFIG file, if P4CONFIG is set.
3. User environment variables.
4. System environment variables.
5. The PERFORCE user registry (p4 set).
6. The PERFORCE system registry (p4 set -s).
As of Release 99.1/10994, when a Perforce NT service (p4s) starts up, it reads its configuration parame-ters from the environment according to the following precedence:
1. NT service parameters (p4 set -S servicename) have the highest precedence.
2. System environment variables.
3. The PERFORCE system registry.
User environment variables can be set with any of the following:
• The MS-DOS set command,
• The AUTOEXEC.BAT file,
• Control Panel -> System -> Environment -> User Variables
System environment variables can be set with:
• Control Panel -> System -> Environment -> System Variables
Resolving NT-related instabilitiesThere are many large sites running PERFORCE on Windows NT without incident. There are also sites in which PERFORCE service or server installation appears to be unstable; the server dies mysteriously, the service can’t be started, and in extreme cases the system crashes. In most of these cases, this is an indica-tion of recent changes to the machine or a corrupted operating system.
While not all PERFORCE failures are caused by OS-level problems, a number of symptoms may indicate the OS is at fault. Examples include: the system crashing, the PERFORCE server exiting without any error in its log and without Windows indicating that the server crashed, or the PERFORCE NT service not start-ing properly.
Many of these problems may be resolved by installing NT Service Packs. A machine running NT 4.0 with Service Pack 6 and a plain VGA video driver is very stable.
In particular, PERFORCE support personnel have also found that many NT sites have been able to reduce or eliminate OS-level instability problems by re-installing NT Service Pack 6; consequently, we recom-mend that SP6 be installed on any Windows NT system running the PERFORCE server or service.
In some cases, installing third-party software after installing an NT Service Pack can overwrite critical files installed by the service pack; reinstalling your last-installed service pack will often correct these problems. If you’ve installed another application after your last service pack, and server stability appears affected since the installation, consider reinstalling the service pack.
As a last resort, it may pay to install PERFORCE on another system to see if the same failures occur, or even to reinstall the OS and PERFORCE on the faulty system.
PERFORCE 2000.1 System Administrator’s Guide 77

Chapter 8: PERFORCE and NT
Users having trouble with P4EDITOR or P4DIFFYour NT 4.0 users may experience difficulties using the command line version of the PERFORCE client (p4.exe) if they use the P4EDITOR or P4DIFF environment variables.
The reason for this is that PERFORCE clients sometimes use the DOS shell (cmd.exe) to start programs such as user-specified editors or diff utilities. Unfortunately, the DOS shell knows that when a Windows command is run (e.g. a GUI-based editor like notepad.exe), it doesn’t have to wait for the command to complete before terminating. When this happens, the PERFORCE client then mistakenly believes that the command has finished, and attempts to continue processing, often deleting the temporary files that the editor or diff utility had been using, leading to errors about temporary files not being found, or other strange behavior.
You can get around this problem in two ways:
• Unset the environment variable SHELL. PERFORCE clients under NT only use cmd.exe when SHELL is set, otherwise they call spawn() and wait for the Windows programs to complete.
• Set the P4EDITOR or P4DIFF variable to the name of a DOS batch file, whose contents are the command:start /wait program %1 %2
where program is the name of the editor or diff utility you wish to invoke. The /wait flag instructs the system to wait for the editor or diff utility to terminate, and the PERFORCE client will then behave prop-erly.
Some Windows editors (most notably, Wordpad) do not behave properly, even when instructed to wait. There is presently no workaround for such programs.
PERFORCE 2000.1 System Administrator’s Guide 78

Appendix A PERFORCE Server (p4d) Reference
SynopsisInvoke the PERFORCE server or perform checkpoint/journaling (system administration) tasks.
Syntaxp4d [ options ]p4d.exe [ options ]p4s.exe [ options ]p4d -j [ -z ] [ args ... ]
DescriptionThe first three forms of the command invoke the PERFORCE background process (“PERFORCE server”). The fourth form of the command is used for system administration tasks.
On UNIX, the executable is p4d.
On NT, the executable is p4d.exe (running as a server) or p4s.exe (running as a service).
Exit StatusAfter successful startup, p4d does not normally exit. On failed startup, p4d returns a nonzero error code. If invoked with any of the -j journalling flags, p4d exits with a nonzero error code if any error occurs.
OptionsFlag Meaning
-d Run as a daemon (in the background)
-f Run as a single-threaded (non-forking) process
-i Run from inetd on UNIX
-q Run quietly (no startup messages)
-s Run p4d.exe as an NT service (equivalent to running p4s.exe)
-jc [ prefix ] Journal-create; checkpoint and save/truncate journal
-jd [ file ] Journal-checkpoint; create checkpoint without saving/truncating journal
-jj [ prefix ] Journal-only; save and truncate journal without checkpointing
-jr file Journal-restore; restore metadata from a checkpoint and/or journal file
-z Compress (in gzip format) checkpoints and journals. This flag must pre-cede the -jc, -jd, or -jj options.
-h, -? Print help message
PERFORCE 2000.1 System Administrator’s Guide 79

Appendix A: PERFORCE Server (p4d) Reference
Usage Notes• On NT installs, journaling is enabled by default. UNIX installations must manually activate journaling.
• Take checkpoints and truncate the journal often, preferably as part of your nightly backup process.
• Checkpointing and journaling preserve only your PERFORCE metadata (data about your stored files). The stored files themselves (i.e., your source code) reside under P4ROOT and must be also be backed up as part of your regular backup procedure!
• If your users are using triggers, don’t use the -f (non-forking mode) flag; the PERFORCE server needs to be able to spawn copies of itself (“fork”) in order to run trigger scripts.
• After a hardware failure, the flags required for restoring your metadata from your checkpoint and journal files may vary, depending on whether or not data was corrupted.
• Because restorations from backups involving loss of files under P4ROOT often require the journal file, we strongly recommend that the journal file reside on a separate filesystem from P4ROOT. This way, in the event of corruption the filesystem containing P4ROOT, the journal is likely to remain accessible.
Related Commands
-V Print server version
-J journal Specify a journal file. Overrides P4JOURNAL setting. Default is journal
-L log Specify a log file. Overrides P4LOG setting. Default is stderr
-p port Specify a port to listen to. Overrides P4PORT. Default 1666
-r root Specify the server root directory. Overrides P4ROOT. Default is current working directory
-v debuglevel Set server trace flags. Overrides value P4DEBUG setting. Default is null.
To start the server, listening to port 1999, with journaling enabled
p4d -d -p 1999 -J journalfile
To create a compressed checkpoint from a server with files in directory P4ROOT
p4d -r $P4ROOT -jc -z
To restore metadata from a checkpoint named checkpoint.3 for a server with root directory P4ROOT
p4d -r $P4ROOT -jr checkpoint.3
To restore metadata from a compressed check-point named checkpoint.3.gz for a server with root directory P4ROOT
p4d -r $P4ROOT -jr -z checkpoint.3.gz
Flag Meaning
PERFORCE 2000.1 System Administrator’s Guide 80

Appendix B Glossary
Term Definition
access level A permission assigned to a user to control which PERFORCE commands the user can execute. See protections.
atomic change transaction
Grouping operations affecting a number of files in a single transaction. If all operations in the transaction succeed, all the files are updated. If any operation in the transaction fails, none of the files are updated.
base The file revision that two newer, conflicting file revisions were commonly based on.
binary file A non-text file.
branch (noun) A codeline created by copying another codeline, as opposed to a codeline that was created by adding original files. branch is often used as a synonym for branch view.
(verb) To create a codeline branch with p4 integrate.
branch form The PERFORCE form you use to modify a branch.
branch view A specification of the branching relationship between two codelines in the depot. Each branch view has a unique name, and defines how files are mapped from the originating codeline to the target codeline. See branch.
build The process of turning source code into product.
change (obsolete) In previous versions of PERFORCE, a changelist.
changelist An atomic change transaction in PERFORCE.
changelist form The PERFORCE form you use to modify a changelist.
changelist number
The unique numeric identifier of a changelist.
change review The process of sending email to users who have registered their interest in changes made to specified files in the depot.
checkpoint A copy of the underlying server metadata at a particular moment in time. See metadata.
CLI Command line interface. The PERFORCE p4 command, which enables you to perform operations from the operating system command line.
client form The PERFORCE form you use to define a client workspace.
client name A name that uniquely identifies the current client workspace.
client root The root directory of a client workspace.
client side The right-hand side of a mapping within a client view, specifying where the corresponding depot files are located in the client workspace.
PERFORCE 2000.1 System Administrator’s Guide 81

Appendix B: Glossary
client view A set of mappings that specifies the correspondence between file locations in the depot and the client workspace.
client workspace
Directories on the client computer where you work on file revisions that are managed by PERFORCE.
codeline A set of files that evolve collectively. One codeline can be branched from another, allowing each set of files to evolve separately.
conflict See file conflict.
counter A numeric variable used by PERFORCE to track changelist numbers in con-junction with the review feature.
daemon A program running in the background.
database Files in a PERFORCE server used to store the server metadata. See also meta-data.
default changelist The changelist used by PERFORCE commands, unless a numbered change-list is specified.
default depot The depot name that is assumed when no name is specified. The default depot name is depot.
deleted file In PERFORCE, a file with its head revision marked as deleted. Older revi-sions of the file are still available.
delta The differences between two files.
delta storage See reverse delta storage.
depot A file repository on the PERFORCE server. It contains all versions of all files ever submitted to the server. There can be multiple depots on a single server.
depot root The root directory for a depot.
depot side The left side of any client view mapping, specifying the location of files in a depot.
depot syntax PERFORCE syntax for specifying the location of files in the depot.
detached A client computer that cannot connect to a PERFORCE server.
digest, MD5 See MD5 checksum.
donor file The file from which changes are taken when propagating changes from one file to another.
exclusionary mapping A view mapping that excludes specific files.
exclusionary access A permission that denies access to the specified files.
file conflict In a three-way file merge, a situation in which two revisions of a file differ from each other and from their base file.
Also: an attempt to submit a file that is not an edit of the head revision of the file in the depot; typically occurs when another user opens the file for edit after you have opened the file for edit.
file pattern PERFORCE command line syntax that enables you to specify files using wild-cards.
file repository The master copy of all files; shared by all users. In PERFORCE, this is called the depot.
file revision A specific version of a file within the depot. Each revision is assigned a number, in sequence. Any revision can be accessed in the depot by its revi-sion number, like foo#3.
file tree All the subdirectories and files under a given root directory.
Term Definition
PERFORCE 2000.1 System Administrator’s Guide 82

Appendix B: Glossary
file type An attribute that determines how PERFORCE stores and diffs a particular file. Examples of file types are text and binary.
fix A job that has been linked to a changelist.
form Screens displayed by certain PERFORCE commands. For example, you use the PERFORCE change form to enter comments about a particular changelist and to verify the affected files.
full-file storage
The method by which PERFORCE stores revisions of binary files in the depot: every file revision is stored in full. Contrast this with reverse delta storage, which PERFORCE uses for text files.
get An obsolete PERFORCE term; replaced by sync.
group A list of PERFORCE users.
have list The list of file revisions currently in the client workspace.
head revision The most recent revision of a file within the depot. Since file revisions are numbered sequentially, this will also be the highest-numbered revision of that file.
integrate To compare two sets of files (e.g., two codeline branches) and
• determine which changes in one set are applicable to the other;• determine whether those changes have already been propagated; and• propagate outstanding changes.
Inter-File Branching
PERFORCE’s proprietary branching mechanism.
job A user-defined unit of work tracked by PERFORCE.
job specification A specification containing the fields and valid values stored for a PERFORCE job.
job view A string used to find jobs that match particular criteria.
journal A file containing a record of every change made to the PERFORCE server’s metadata since the time of the last checkpoint.
journaling The process of recording changes made to the PERFORCE server’s metadata.
label A named list of user-specified file revisions.
label view The view that specifies which file names in the depot can be stored in a par-ticular label.
lazy copy A method used by PERFORCE to make internal copies of files without dupli-cating file content in the depot. Lazy copies minimize the consumption of disk space by storing references to the original file instead of copies of the file.
license file Ensures that the number of PERFORCE users on your site does not exceed the number for which you have paid.
list access A protection level that enables you to run reporting commands but pre-vents access to the contents of files.
local depot Any depot located on the current PERFORCE server.
local syntax The operating-system-specific syntax for specifying a file name.
lock A PERFORCE file lock prevents other clients from submitting the locked file.
log Error output from the PERFORCE server. By default, error output is written to standard error. To specify a log file, set the P4LOG environment variable, or use the p4d -L flag.
Term Definition
PERFORCE 2000.1 System Administrator’s Guide 83

Appendix B: Glossary
mapping A single line in a view, consisting of a left side and a right side that specify the correspondences between files in the depot and files in a client, label, or branch. The left side specifies the depot file and the right side specifies the client files.
(See also client view, branch view, label view).
MD5 checksum The method used by PERFORCE to verify the integrity of archived files.
merge The process of combining the contents of two conflicting file revisions into a single file.
merge file A file generated by PERFORCE from two conflicting file revisions.
metadata The data stored by the PERFORCE server that describes the files in the depot, the current state of client workspaces, protections, users, clients, labels, and branches. Metadata includes all the data stored in the server except for the actual contents of the files.
modification time The time a file was last changed.
nonexistent revision
A completely empty revision of any file. Syncing to a nonexistent revision of a file removes it from your workspace. An empty file revision created by 'p4 delete' and the #none revision specifier are examples of nonexistent file revisions.
numbered changelist A pending changelist to which PERFORCE has assigned a number.
open file A file that you are changing in your client workspace.
owner The PERFORCE user who created a particular client, branch, or label.
p4 The PERFORCE command line interface program, and the command you issue to execute PERFORCE commands from the operating system command line.
p4d The program on the PERFORCE server that manages the depot and the meta-data.
pending changelist A changelist that has not been submitted.
PERFORCE server See server.
pre-submit trigger See trigger.
protections The permissions stored in the PERFORCE server’s protections table.
RCS format Revision Control System format. Used for storing revisions of text files. RCS format uses reverse delta encoding for file storage. PERFORCE uses RCS for-mat to store text files. See also reverse delta storage.
read access A protection level that enables you to read the contents of files managed by PERFORCE.
remote depot A depot located on a server other than the current PERFORCE server.
reresolve The process of resolving a file after the file is resolved and before it is sub-mitted
resolve The process you use to reconcile the differences between two revisions of a file.
resource fork One fork of a Macintosh file. (Macintosh files are composed of a resource fork and a data fork.) You can store resource forks in PERFORCE depots as part of an AppleSingle file by using PERFORCE’s apple file type. (In pre-99.2 PERFORCE, use the resource file type).
reverse delta storage
The method that PERFORCE uses to store revisions of text files. PERFORCE stores the changes between each revision and its previous revision, plus the full text of the head revision.
revert To discard the changes you have made to a file in the client workspace.
Term Definition
PERFORCE 2000.1 System Administrator’s Guide 84

Appendix B: Glossary
review access A special protections level that includes read and list accesses, and grants permission to run the review command.
review daemon Any daemon process that uses the p4 review command. See also change review.
revision See file revision.
revision number A number indicating which revision of the file is being referred to.
revision range A range of revision numbers for a specified file, specified as the low and high end of the range. For example, foo#5,7 specifies revisions 5 through 7 of file foo.
revision specification
A suffix to a filename that specifies a particular revision of that file. Revi-sion specifiers can be revision numbers, change numbers, label names, date/time specifications, or client names.
SCM Acronym for “software configuration management.”
server The PERFORCE depot and metadata on a central host. Also the program that manages the depot and metadata.
server root The directory in which the server program stores its metadata and all the shared files. To specify the server root, set the P4ROOT environment vari-able.
software configuration management
Software for version control, concurrent development, release manage-ment, build management, and change review.
status For a changelist, a value that indicates whether the changelist is new, pend-ing or submitted. For a job, a value that indicates whether the job is open, closed, or suspended. You can customize job statuses.
submit To send a pending changelist and changed files to the PERFORCE server for processing.
subscribe To register to receive email whenever changelists that affect particular files are submitted.
super access An access level that gives the user permission to run every PERFORCE com-mand, including commands that set protections, obliterate files, verify files with an MD5 signature, and set up connections to remote depots.
sync To copy a file revision (or set of file revisions) from the depot to a client workspace.
target file The file that receives the changes from the donor file when you are integrat-ing changes between a branched codeline and the original codeline.
text file A file that contains only ASCII text. See also binary file.
theirs When you resolve a file conflict, the revision in the depot with which the client file is merged. When you are working with branched files, theirs is the donor file.
three-way merge The process of combining three file revisions. During a three-way merge, you can identify where conflicting changes have occurred and specify how you want to resolve the conflicts.
tip revision In PERFORCE, the head revision. Tip revision is a term used by some other SCM systems.
trigger A script automatically invoked by the PERFORCE server when changelists are submitted.
two-way merge The process of combining two file revisions. In a two-way merge, you can see differences between the files but cannot see conflicts.
typemap A PERFORCE table in which you assign PERFORCE file types to files.
Term Definition
PERFORCE 2000.1 System Administrator’s Guide 85

Appendix B: Glossary
user The identifier that PERFORCE uses to determine who is performing an oper-ation.
version control The tracking of each revision and variant of every file managed by an SCM system.
view A description of the relationship between two sets of files. See client view, label view, branch view.
wildcard A special character used to match other characters in strings. PERFORCE wildcards are:
• * matches anything except a slash• ... matches anything including slashes• %d used for parameter substitution in views.
workspace See client workspace.
write access A protection level that enables you to run commands that alter the contents of files in the depot. Write access includes read and list accesses.
yours The edited version of a file in the client workspace, when you resolve a file. Also, the target file when you integrate a branched file.
Term Definition
PERFORCE 2000.1 System Administrator’s Guide 86
Index
Aaccess level 81
and protections 44access levels 44administrator
privilege required 75allocating diskspace 15AppleSingle 22arguments
passing to triggers 61atomic change transaction 81automated checkpoints 21automating PERFORCE 29Bbacking up 22backup
procedures 22recovery procedures 24
base 81branch 81branch view 81branches
namespace 42buffering
of input/output in scripts 63Ccan 75case-sensitivity
and cross-platform development 17UNIX and NT 17, 36
caveatsand NFS 16
changepending 84
change review 61, 81changelist
default 82changelist number 81changelist numbers
pending vs. submitted changelists 63changelists
deleting 31
editing 31subscribing 85validating 59
changesatomic 81
checkpointas part of backup script 23creating 20creation of, automating 21defined 20ensuring completion of 23failed 21introduced 19managing diskspace 16when to call support 21
checkpointscreating with p4 admin 20, 23
clientand port 10
client root 81client view 82client workspace 82clients
namespace 42codeline 82commands
forcing 32conflict
file 82counter 82CPU
and performance 66CR/LF conversion 38creating a journal 21creating checkpoints 20creating users 29creation of users
preventing 30cross-platform development
and case sensitivity 17Ddaemon 82
PERFORCE 2000.1 System Administrator’s Guide 87

Index
change review 61daemons 59, 61–62
changelist numbers 63creating 62
database filesdefined 19introduced 37where stored 19
database integrityand NFS 66
db.* files 19debugging
with server tracing 36default changelist 82default depot 82defect tracking
integrating with PERFORCE 57deleting
changelists 31depots 42files, permanently 30user groups 47
delta 82delta storage 84depot 82
and Mac file formats 22default 82local 83remote 84
depot filessee versioned files 22
depot syntax 82depots
defined 19defining 40deleting 42listing 42local 41mapping field 41multiple 39namespace 42remote 39, 42remote, defining 41
detached 82disabling journaling 22disk
performance 65sizing 66
diskspaceallocating 15and server trace flags 37freeing up 30
DNSand performance 67, 68
donor file 82
Eediting
changelists 31editor
Wordpad, limitation 78email notification 81enabling journaling 21error logging 17error messages
and p4 verify 31exclusionary mapping 82exclusionary mappings
and protections 46Ffields
of job template 52file
donor 82merge 84target 85theirs 85yours 86
file conflict 82file format
RCS 84file formats
AppleSingle 22file names
mapping to file types 32file repository 82file revision 82file specification
and protections 44file types
mapping to file names 32files
access to, limiting 46database 19left open by users, reverting 30matching PERFORCE file types to file names 32permanent deletion of 30subscribing to 62text 85verification of 31versioned 19
filesystemeffect on performance 65
filesystemsand db.*and journal file 15large 16NFS-mounted, caveats 16separating server root and journal 15
firewalldefined 33running PERFORCE through 33
PERFORCE 2000.1 System Administrator’s Guide 88

Index
fix 83flags
-f to force 32server, listed 79
Ggroups
and protections 44, 47and subgroups 46deleting 47editing 46of users 46
Hhave list 83head revision 83hostname
changing your server’s 38hosts
and protections 44hosts file
on NT and UNIX 68I-i
and inetd 35automating job submissions 57automating user creation 29
inetd 35, 79installing
on NFS filesystems 16on NT 11on NT network drives 75on NT networked drives 17on UNIX 9
integrate 83lazy copy 83
Inter-File Branching 83IP address
changing your server’s 38IP addresses
servers and P4PORT 35IP forwarding
and ssh 34Jjob fields
data types 53job specification 83job specifications 51–58
and comments 55and superusers 51default format 51defining fields 52extended example 55warnings 57
job templatefields of 52
job view 83
jobscomments in 55other defect tracking systems 57
jobs templateviewing 52
journalcreating 21defined 21introduced 19managing size of 16where to store 16
journal filespecifying 80
journalingdisabling 22enabling 21
Llabel 83label view 83labels
namespace 42lazy copy
and integration 83level
access 81licensing information 14limitation
Wordpad 78limitations
on information passed to triggers 61triggers, workaround for 60
list access level 44listing
depot names 42local depots 41local syntax 83lock 83log file
specifying 80MMac
and file formats 22Macintosh
resource fork 84mapping 84
client-side 81depot-side 82exclusionary 82
mappingsand depots 41
maxresultsand multiple groups 70and P4Win 70and performance 69
maxresults
PERFORCE 2000.1 System Administrator’s Guide 89

Index
use of 69MD5 signatures 31memory
and performance 65requirements 65
merge 84three-way 85two-way 85
merge file 84metadata 84
see database files 19, 37moving servers 37
across architectures 38between NT and UNIX 38new hostname 38new IP address 38same architecture 37
multiple depots 39and users 42
multiple triggerson one file 60
Nnaming
depots 42network
and performance 66, 67problems, diagnosing 67
network interfacedirecting server to listen to specific 35
networked drivesand NT 17
NFSand installation 16and performance 66
non-forking 79NT
and case-sensitivity 17, 36and p4 admin 12and server upgrade 14hosts file 68installer 11installing on network drive 75installing on networked drive 17server 12service, setting variables in 77stopping server 75
Oobliterating files 30open access level 44operating systems
and large filesystem support 16Pp4 admin
and NT 12, 75creating checkpoints 20, 23
stopping server with 11, 24, 25p4 jobspec
warnings 57p4 set -s
setting variables for NT services 77p4 triggers
form 59p4 typemap 32p4 verify 31
use of 22p4d 85
-f option, and triggers 61flags, listed 79security 17, 61specifying journal file 80specifying log file 80specifying port 80specifying server root
80specifying trace flags
80p4d.exe 12P4DEBUG 80P4JOURNAL 80P4LOG 80P4PORT
and client 10and server 10, 80IP addresses and your server 35
P4ROOT 10, 80p4s.exe 12passwords
setting 15, 29PDF files
and p4 typemap 32pending change 84PERFORCE clients
and P4PORT 10PERFORCE server 85
and P4PORT 10and triggers 60installing under NFS 16moving to another machine 37NT networked drives 17running from inetd 35UNIX upgrade 12upgrading 12upgrading under NT 14verifying 31vs. service 12
PERFORCE servicevs. server 12
perforce.exe 11performance
and memory 65
PERFORCE 2000.1 System Administrator’s Guide 90

Index
and NFS 66and scripts 70and wildcards under NT 67CPU 66network 66preventing server swamp 68slow, diagnosing 67
permissions 81see protections 45
portfor client 10for server 10specifying 80
portsrunning out of TCP/IP 66
pre-submit trigger 85pre-submit triggers
see triggers 59privileges
administrator 75protections 43–48
algorithm for applying 47and commands 48and groups 47and performance 69and superusers 43commands affected by 48default 45exclusionary 46multiple 45schemes for defining 45
protections table 43python 62RRAM
see memory 65RCS format 84read access level 44recovery
procedures 24remote depot 84remote depots 39
and virtual users 42defining 41
repositoryfile 82
resetting passwords 29resolve 84resource fork 84reverse delta storage 84revert 84review access level 44revision
base 81file 82
head 83tip 85
revision number 85revision range 85revision specification 85rich text
and p4 typemap 32root
must not run p4d 17, 61SSCM 85scripting
buffering standard in/output 63guidelines for efficient 70with -i 29
scripting PERFORCE 59–62secure shell 33security
and passwords 15p4d must have minimal privileges 17, 61preventing user impersonation 15
serverand triggers 60backing up 22forking, and triggers 61licensing 14NT 12PERFORCE 85port 10recovery 24root, specifying 80running from inetd 35running in background 79running single-threaded 79specifying journal file 80specifying log file 80specifying port 80stopping on NT 75stopping with p4 admin 11, 24, 25trace flags 36upgrading 12verifying 31vs. service 12
server flagslisted 79
server rootand P4ROOT 10creating 9defined 9specifying 80
server upgradeNT 14UNIX 12UNIX 97.3 13UNIX 98.1 or 98.2 13
PERFORCE 2000.1 System Administrator’s Guide 91

Index
UNIX pre-97.3 14servers, migrating 37setting passwords 15, 29single-threaded 79Software Configuration Management 85specification
revision 85ssh 33standard input/output
buffering 63stopping server
on NT 75with p4 admin 11, 24, 25
storagefull-file vs. delta 83reverse delta 84
subgroupsand groups 46
submission, validating 59submit 85subscribe
to changelist 85super access level 44superuser
and triggers 59force flag 32PERFORCE, defining 15
superusersand job specifications 51and protections 43
symbolic linksand diskspace 16
syntaxdepot 82local 83
system administrationcheckpoint 81groups 83journal 83
Ttarget files 85TCP/IP
and port number 10running out of ports 66
technical supportwhen to call 21
template, job, defaultjob template, default 51
text files 85the 11theirs 85three-way merge 85tip revision 85trace flags
specifying 80
trigger 85triggers 59–61
arguments, passing to 61defined 59form 59limitation 60multiple, on one file 60naming 60ordering 60script, specifying arguments to 60security and p4d 17, 61server must be able to fork 61single, on multiple filespecs 61
troubleshootingslow response times 67
two-way merge 85type mapping 32Uumask(1) 10UNIX
/etc/hosts file 68and case-sensitivity 17, 36upgrading a server 12
upgradingserver 12
usersaccess control by groups 46and multiple depots 42and protections 44creating 29files, limiting access to 46nonexistent 30preventing creation of 30preventing impersonation of 15resetting passwords 29virtual, and remote depots 42
Vvalidation, of changelists 59variables
setting for an NT service 77verifying server integrity 31version control 86version information
clients and servers 15versioned files
defined 19format and location of 22introduced 19, 37where stored 19
view 86branch 81client 82job 83label 83
views
PERFORCE 2000.1 System Administrator’s Guide 92

Index
and performance 68Wwarnings
and job specifications 57security and p4d 17, 61
wildcardsand protections 44NT
wildcards and performance 67Wordpad
limitation 78working offline 82workspace
client 82wrappers 59write access level 44Yyours 86
PERFORCE 2000.1 System Administrator’s Guide 93