ph60 series premium ph testers - hogentogler
TRANSCRIPT

PH60 Series Premium pH Testers
Instruction Manual
PH60 pH Tester
PH60S Spear pH Tester
PH60F Flat pH Tester
APERA INSTRUMENTS, LLC
www.aperainst.com

1
Thank you for purchasing the Apera Instruments PH60 Series Premium pH Tester. Please
read this manual thoroughly before use in order to properly use the instrument and have a
reliable testing experience. Apera Instruments reserves the rights to update the information
of this manual without giving prior notices.
For video tutorials, please go to support.aperainst.com
Table of Contents 1. Battery Installation ...................................................................................................................... 2
2. Keypad Functions....................................................................................................................... 2
3. Complete Kit ............................................................................................................................ 3
4. Preparation Before Use .............................................................................................................. 3
5. pH Calibration ............................................................................................................................ 4
6. pH Measurement ........................................................................................................................ 5
7. Parameter Setting ...................................................................................................................... 7
8. ORP Measurement ..................................................................................................................... 8
9. Technical Specifications .............................................................................................................. 9
10. Other Specifications ................................................................................................................. 9
11. Probe Replacement ................................................................................................................. 9
12. Warranty .............................................................................................................................. 10

2
1. Battery Installation
Please install batteries according to the following steps. *Please note direction of batteries:
All POSITIVE SIDES (“+”) FACING UP. (Wrong installation of batteries will cause
damage to the tester and potential hazards)
2. Keypad Functions
Short press: < 2 seconds
Long press: > 2 seconds
1. Short press to turn on the tester and long press
to turn off the tester.
2. When turned off, long press to enter parameter
setting.
3. In measurement mode, short press to turn on
backlight.
1. In measurement mode, short press to switch
parameter pH→ORP
2. In mode setting, short press to change
parameter (Unidirectional).
1. Long press to enter calibration mode;
2. In calibration mode, short press to confirm
calibration;
3. When measured value is locked, short press
to unlock.
+ +
﹣﹣
+ +
﹣ ﹣
① Pull the battery cap up
② Slide the battery cap along to the direction of arrow
③ Open the battery cap
④ Insert the batteries (ALL POSITIVE SIDES FACING UP) (see graph)
⑤ Close the battery cap
⑥ Slide and lock the battery cap along to the direction of arrow
⑦ Fit the tester’s cap while making sure to push all the way down. The tester’s
waterproof design may be compromised if the cap is not fitted correctly.

3
3. Complete Kit
4. Preparation Before Use
4.1 PH60 and PH60F: If it is first-time use or the tester hasn’t been used for over 30 days, pour
certain amount (about a quarter of the probe cap) of 3M KCL solution in the probe cap, and soak
the probe for about 3 to 15 minutes. The black fill line on the cap does NOT indicate how much
the KCL soaking solution should be poured in. The volume of KCL solution for soaking the probe
should be less than that. The black fill line indicates the minimum volume for sample testing in
the probe cap. Users can store the KCL solution in the probe cap when the tester is not in use to
keep the sensor’s accuracy.
To achieve maximum accuracy, we recommend soaking the probe for one night (12
hours) to activate the glass membrane thoroughly.
4.2 PH60S: Do not keep the spear probe in a dry condition. The spear probe should always be
stored in the soaking solution. If the soaking solution was contaminated, please replace with new
ones timely.
4.3 The soaking solution is 3M KCL. One bottle of 10mL soaking solution comes with the tester
kit. Users can make this solution by themselves. Preparation: Dissolve 25g KCl in 100ml of
pure water.

4
5. pH Calibration
5.1 Rinse the probe in pure water and dry it.
5.2 Pour certain amount (about half volume of calibration bottles) of pH7.00 pH and pH 4.00
buffer solutions in separate calibration bottles.
5.3 Long press to enter calibration mode; Short press to exit.
5.4 Dip the probe in pH 7.00 buffer solution, stir gently, and allow it to stand
still in the buffer solution until a stable reading is reached. When stable icon
comes up and stays on the LCD screen (as shown in Diagram 2), short
press to complete 1-point calibration and the tester will return to
measurement mode. Indication Icon will appear on the bottom left of
the LCD screen.
5.5 Rinse the probe in pure water and dry it. Dip the probe into pH 4.00 buffer solution, follow the
steps in 5.1~5.4 to complete 2-point calibration. Indication icons will appear on the
bottom left of the LCD screen. If necessary, dip the probe into pH 10.01 buffer solution, follow
the steps in 5.1~5.4, to complete 3-point calibration. Indication icon will appear
on the bottom left of the LCD screen.
5.6 Notes
a) Tester can perform 1~3 points automatic calibration. *Please note that pH 7.00 or pH 6.86
buffer solution must be used to conduct 1st point calibration. Then use other buffer solution
to conduct 2nd or 3rd point calibration. Tester will recognize 5 kinds of pH buffer solutions.
For details, please refer to the following chart:
Calibration USA Series NIST Series Indication icon Recommended
1-point 7.00 pH 6.86 pH
Accuracy ≥ 0.1 pH
2-point
7.00 pH, 4.00 pH or 1.68 pH
6.86 pH, 4.01 pH or 1.68 pH
Range < 7.00 pH
7.00 pH, 10.01 pH or 12.45 pH
6.86 pH, 9.18 pH or 12.45 pH
Range <7.00 pH
3-point 7.00 pH, 4.00 or 1.68
pH, 10.01 or 12.45 pH
6.86 pH, 4.01 or 1.68 pH, 9.18 pH or 12.45 pH
Range: 0 to 14.00 pH
5
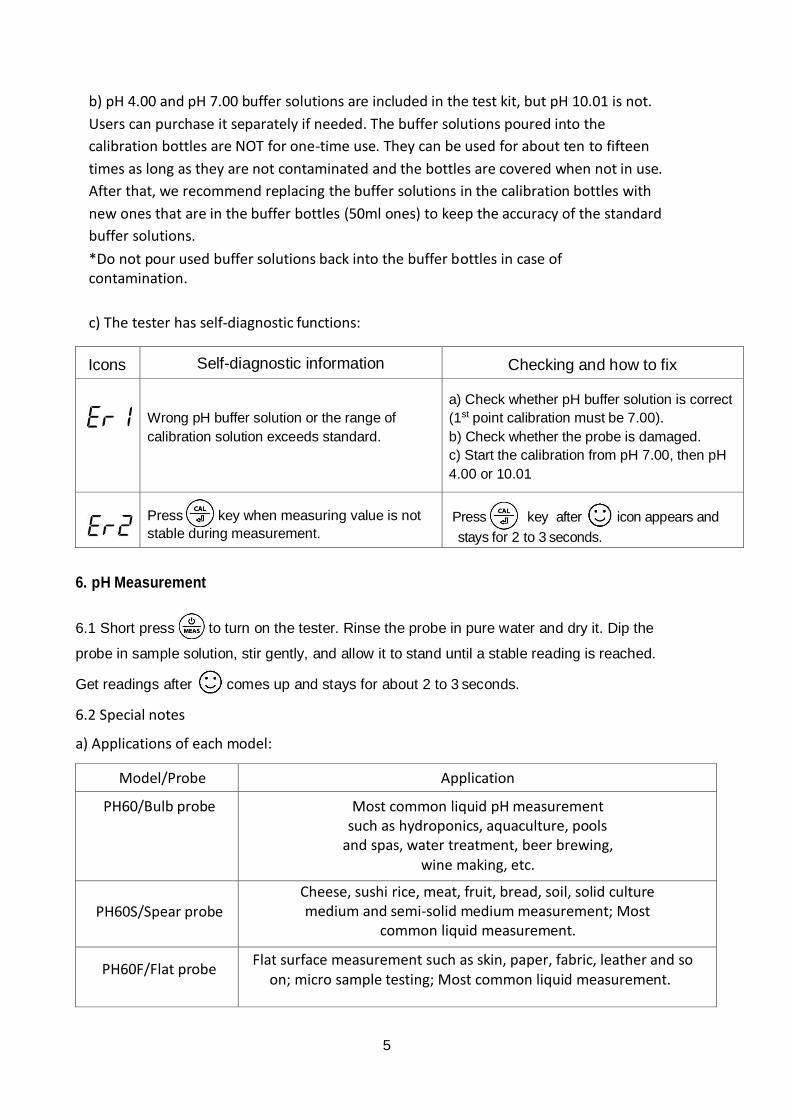
b) pH 4.00 and pH 7.00 buffer solutions are included in the test kit, but pH 10.01 is not.
Users can purchase it separately if needed. The buffer solutions poured into the
calibration bottles are NOT for one-time use. They can be used for about ten to fifteen
times as long as they are not contaminated and the bottles are covered when not in use.
After that, we recommend replacing the buffer solutions in the calibration bottles with
new ones that are in the buffer bottles (50ml ones) to keep the accuracy of the standard
buffer solutions.
*Do not pour used buffer solutions back into the buffer bottles in case of contamination.
c) The tester has self-diagnostic functions:
Icons Self-diagnostic information Checking and how to fix
Wrong pH buffer solution or the range of
calibration solution exceeds standard.
a) Check whether pH buffer solution is correct
(1st point calibration must be 7.00).
b) Check whether the probe is damaged.
c) Start the calibration from pH 7.00, then pH
4.00 or 10.01
Press key when measuring value is not
stable during measurement. Press key after icon appears and
stays for 2 to 3 seconds.
6. pH Measurement
6.1 Short press to turn on the tester. Rinse the probe in pure water and dry it. Dip the
probe in sample solution, stir gently, and allow it to stand until a stable reading is reached.
Get readings after comes up and stays for about 2 to 3 seconds.
6.2 Special notes
a) Applications of each model:
Model/Probe Application
PH60/Bulb probe Most common liquid pH measurement such as hydroponics, aquaculture, pools
and spas, water treatment, beer brewing, wine making, etc.
PH60S/Spear probe
Cheese, sushi rice, meat, fruit, bread, soil, solid culture medium and semi-solid medium measurement; Most
common liquid measurement.
PH60F/Flat probe Flat surface measurement such as skin, paper, fabric, leather and so
on; micro sample testing; Most common liquid measurement.

6
b) PH60S Spear probe testers are widely used for solids containing water or semi-solid
medium. When conducting such tests, pay attention to insert probe evenly, and be careful to
prevent probe from damage. If the medium is too hard (such as meat or fruits), please bore a
small hole with a knife before inserting the probe.
c) PH60F Flat probe testers are mostly for flat surface sample test.
■ For skin test: skin should be without sweat or dirt, nor be overly cleaned (do not use
facewash products before testing) to avoid affecting measurement results, dampen skin with
some distilled water, slightly force flat probe onto the skin, get readings after value stabilized.
■ For paper, fabric and leather test: add 1~2 drops of distilled water on surface, then perform
measurements.
■ For meat and fruit test: use a clean knife to cut the sample open, then perform measurements.
■ For micro sample testing, use a container with an inner diameter<=19mm and a flat bottom.
The tester can test volume >=0.5ml.
6.3 The probe must be cleaned thoroughly after each use. If used to test meat, soapy water
should be used to clean the grease.
6.4 Special notes:
1) For pH measurement of any cooked food (such as sushi, cheese, etc.), it should
be a sampling test. That means test samples will no longer be edible.
2) The instruments will NOT give accurate and stable pH readings when testing distilled
or deionized water. This because distilled and deionized water do not have enough ions
present for the electrode to function properly. To measure distilled or deionized water’s
pH, users need to use a specialized electrode.
3) Do not store probe in distilled water or deionized water because they will cause
damage to the glass membrane of the pH probe. The probe should be stored in 3M KCL
solution for best accuracy or stored without any liquid.

7
7. Parameter Setting 7.1 Setup Menu
Symbol Contents Parameter Factory Default
P1 Select pH buffer solution USA – NIST USA
P2 Low value measurement alarm setting 0 ~ 14.00pH 0
P3 High value measurement alarm setting 0 ~ 14.00pH 14.00
P4 Select automatic lock Off – On Off
P5 Select backlight Off - 1 - On 1
P6 Select temperature unit ℃ - ℉ ℃
P7 Restore to factory default No – Yes No
7.2 Parameter setup method
When turned off, long press to enter parameter setting→Short press to switch P1-P2-
…P7→Short parameter flashing→Short press to choose parameter→Short press
to confirm→Long press to switch off.
7.3 Parameter setting instruction
a) Select standard pH buffer solution (P1):
There are two options of standard buffer solutions: USA series and NIST series. Factory
default is USA series, for details see clause 4.7.
b) Heads-Up Function
(P2&P3)
For example, the following
■ Alarm when measured value ≥ 3.20 pH:
Preset lowest value (P2) = 3.20 pH, highest value (P3) = 14.00 pH, when measured value ≥
3.20 pH (stable displays on LCD); LCD displays red backlight.
■ Alarm when measured value ≤ 8.60 pH:
Preset highest value (P3) = 8.60 pH, lowest value (P2) = 0.00 pH, when measured value ≤ 8.60

8
pH (stable displays on LCD); LCD displays red backlight.
■ Alarm when measured value in range of 6.50 pH and 7.20 pH:
Preset lowest value (P2) = 6.50 pH, highest value (P3) = 7.20 pH, when measured value in
range of 6.50 pH and 7.20 pH (stable displays on LCD); LCD displays red backlight alarm.
c) Automatic Lock (P4)
Select “On” to activate auto lock function. When reading is stable for more than 10
seconds, the tester will lock the value automatically, and HOLD icon will display on LCD.
Press key to cancel reading hold.
d) Backlight (P5)
“Off”-turn off backlight, “On”-always turn on backlight, “1”- backlight will last for 1 minute.
e) Temperature Unit (P5) Select C˚ or F˚, the factory default is ˚C.
f) Factory default setting (P7)
Select “Yes” to recover instrument calibration to the theoretical value (pH value in zero
potential is 7.00pH, slope is 100%), parameter setting return to initial value. This function
can be used when instrument does not work properly in calibration or measurement.
Calibrate and measure again after recovering the instrument to factory default status.
8. ORP Measurement
Refer to Clause 11 to replace OPR probe (to be purchased separately), press key to
enter ORP mode. Rinse the probe in pure water and dry it. Dip the probe in sample solution,
stir gently, and allow it to stand still until a stable reading is reached. Get readings after
comes up and stays.

9
9. Technical Specifications
pH
Measuring Range -2.00 ~ 16.00pH
Resolution 0.01pH
Accuracy ±0.01pH
Calibration Points 1 ~ 3 points
Automatic temperature compensation 0 ~ 50℃
ORP (mV)
Measuring Range ± 1000mV
Resolution 1mV
Accuracy ±0.2% F.S
Temp.
Measuring Range 0 ~ 50℃
Resolution 0.1℃
Accuracy ±0.5℃
10. Other Specifications
LCD
Clear LCD screen, 180°Viewing angle
Blue: Measurement; Green: Calibration; Red: Heads-Up Mode
Reading Lock HOLD
Low-Voltage Warning Flashing, reminder of battery replacement
Auto. Power-Off In 8 minutes without operation
Water Proof Rating IP67, floats on water
Power DC3V, AAA batteries×4
Battery Life Continuous operation>2000 hours
Dimension/Weight Tester: 40×40×178mm/133g; Case: 255×210×50mm/700g;
11. Probe Replacement 11.1 Twist off the probe ring, unplug the probe, plug in new probe (pay attention to probe’s
position), and twist on the probe ring.
11.2 The model numbers of replacement probes that are compatible with the tester are:
PH60-E (Regular pH glass bulb probe)
PH60S-E (Spear pH probe for solids/semi-solids pH testing)
PH60F-E (Flat pH probe for surface pH testing)
ORP60-E (ORP probe)

10
12. Warranty
We warrant this instrument to be free from defects in material and workmanship and agree to repair
or replace free of charge, at option of APERA INSTRUMENTS, LLC, any malfunctioned or damaged
product attributable to responsibility of APERA INSTRUMENTS, LLC for a period of two years from
the delivery (a six-month limited warranty applies to probes). This warranty does not apply to defects
resulting from actions such as misuse (violation of the instructions in this manual or operations in the
manner not specified in this manual), improper maintenance, or unauthorized repairs. Warranty
period is the time limit to provide free service for the products purchased by customers, not the
service life of the tester or probe.

11
APERA INSTRUMENTS, LLC
Address: 977 Old Henderson Rd, Columbus, Ohio 43220
Tel: 1-614-285-3080
Email: [email protected]
Website: www.aperainst.com