seca 777 - hogentogler
TRANSCRIPT
seca 777
Instructions for use and warranty . . . . . . . . . . . . . . . . . . . . 3
Mode d'emploi et garantie . . . . . . . . . . . . . . . . . . . . . . . . . 32
Instrucciones de uso y garantía . . . . . . . . . . . . . . . . . . . . 61
GB
FR
ES

Contents • 3
English
17
-10
-07
-65
1-1
00/0
4-2
01
9S
EnglishCONTENTS1. Description of device . . . . . . . . . . . . . . . . . . . . . . . . 4
1.1 Intended use . . . . . . . . . . . . . . . . . . . . . . . . . . . . 4
1.2 Description of function . . . . . . . . . . . . . . . . . . . . 4
Measuring station . . . . . . . . . . . . . . . . . . . . . . 4
USB interface . . . . . . . . . . . . . . . . . . . . . . . . . . 4
1.3 User qualification . . . . . . . . . . . . . . . . . . . . . . . . . 4
Assembly . . . . . . . . . . . . . . . . . . . . . . . . . . . . . 4
Operation . . . . . . . . . . . . . . . . . . . . . . . . . . . . . 4
2. Safety information . . . . . . . . . . . . . . . . . . . . . . . . . . . 4
2.1 Safety precautions in these instructions for
use . . . . . . . . . . . . . . . . . . . . . . . . . . . . . . . . . . . 4
2.2 Basic safety precautions . . . . . . . . . . . . . . . . . . . 5
Handling the device . . . . . . . . . . . . . . . . . . . . . 5
Preventing electric shock . . . . . . . . . . . . . . . . . 6
Preventing injuries and infections . . . . . . . . . . . 6
Preventing damage to device . . . . . . . . . . . . . . 7
Handling measuring results . . . . . . . . . . . . . . . 7
Handling packaging material . . . . . . . . . . . . . . 8
Handling batteries and rechargeable
batteries . . . . . . . . . . . . . . . . . . . . . . . . . . . . . . 8
3. Overview . . . . . . . . . . . . . . . . . . . . . . . . . . . . . . . . . . . 9
3.1 View of device . . . . . . . . . . . . . . . . . . . . . . . . . . . 9
3.2 Display unit controls . . . . . . . . . . . . . . . . . . . . . 10
3.3 Symbols in the display . . . . . . . . . . . . . . . . . . . 11
3.4 Markings on the device and on the type
plate . . . . . . . . . . . . . . . . . . . . . . . . . . . . . . . . . 11
3.5 Markings on the packaging . . . . . . . . . . . . . . . . 12
4. Start up device . . . . . . . . . . . . . . . . . . . . . . . . . . . . . 13
4.1 Scope of delivery . . . . . . . . . . . . . . . . . . . . . . . 13
4.2 Assembling the device . . . . . . . . . . . . . . . . . . . 13
Tools required . . . . . . . . . . . . . . . . . . . . . . . . 14
Fitting the measuring rod . . . . . . . . . . . . . . . . 14
Fitting the column . . . . . . . . . . . . . . . . . . . . . 15
Fitting the display head . . . . . . . . . . . . . . . . . 16
Switching the positions of the display unit
and the battery compartment . . . . . . . . . . . . . 17
Setting up the device . . . . . . . . . . . . . . . . . . . 19
Disinfecting the device . . . . . . . . . . . . . . . . . . 19
4.3 Transporting the device . . . . . . . . . . . . . . . . . . . 19
4.4 Establishing the power supply . . . . . . . . . . . . . . 20
Inserting batteries . . . . . . . . . . . . . . . . . . . . . 20
Connecting the plug-in power supply unit
(optional) . . . . . . . . . . . . . . . . . . . . . . . . . . . . 20
5. Operation . . . . . . . . . . . . . . . . . . . . . . . . . . . . . . . . . 21
5.1 Switching the device on and off . . . . . . . . . . . . 21
Switching on the device . . . . . . . . . . . . . . . . . 21
Switching off the device . . . . . . . . . . . . . . . . . 21
5.2 Switching units of measurement (depends
on variant) . . . . . . . . . . . . . . . . . . . . . . . . . . . . . 21
5.3 Measuring weight . . . . . . . . . . . . . . . . . . . . . . . 22
Weighing . . . . . . . . . . . . . . . . . . . . . . . . . . . . 22
Taring off additional weight (Tare) . . . . . . . . . . 22
Display weight permanently (Hold) . . . . . . . . . 23
5.4 Measuring height . . . . . . . . . . . . . . . . . . . . . . . 23
Measuring heights < 1.22 m . . . . . . . . . . . . . 23
Measuring heights > 1.22 m . . . . . . . . . . . . . 24
5.5 Calculating and displaying body mass index
(BMI) . . . . . . . . . . . . . . . . . . . . . . . . . . . . . . . . .25
6. Hygiene treatment . . . . . . . . . . . . . . . . . . . . . . . . . .26
6.1 Cleaning . . . . . . . . . . . . . . . . . . . . . . . . . . . . . .26
6.2 Disinfecting . . . . . . . . . . . . . . . . . . . . . . . . . . . .26
6.3 Sterilizing . . . . . . . . . . . . . . . . . . . . . . . . . . . . . .27
7. Function check . . . . . . . . . . . . . . . . . . . . . . . . . . . . .27
8. Troubleshooting . . . . . . . . . . . . . . . . . . . . . . . . . . . .28
9. Servicing . . . . . . . . . . . . . . . . . . . . . . . . . . . . . . . . . .28
10. Technical data . . . . . . . . . . . . . . . . . . . . . . . . . . . . .29
10.1 General technical data . . . . . . . . . . . . . . . . . . .29
10.2 Weighing data . . . . . . . . . . . . . . . . . . . . . . . . .29
11. Optional accessories . . . . . . . . . . . . . . . . . . . . . . .30
12. Disposal . . . . . . . . . . . . . . . . . . . . . . . . . . . . . . . . . .30
12.1 Device . . . . . . . . . . . . . . . . . . . . . . . . . . . . . . .30
12.2 Batteries and rechargeable batteries . . . . . . . .30
13. Warranty . . . . . . . . . . . . . . . . . . . . . . . . . . . . . . . . .30
14. Declarations of conformity . . . . . . . . . . . . . . . . . .31
14.1 For Europe . . . . . . . . . . . . . . . . . . . . . . . . . . . .31
14.2 For USA and Canada . . . . . . . . . . . . . . . . . . . .31
17-1
0-0
7-6
51-1
00/0
4-2
019S
1. DESCRIPTION OF DEVICE
1.1 Intended use
The seca 777 measuring station is used in accordance with national regula-
tions primarily in hospitals, medical practices and in-patient care facilities.
The seca 777 measuring station is for conventional determination of weight
and height and for determining the general state of nutrition; it supports the
attending physician in making a diagnosis or deciding on a course of treat-
ment.
To make an accurate diagnosis, however, the physician needs to commission
other specific examinations and take their results into account, in addition to
determining weight and height.
1.2 Description of function
Measuring station On the seca 777 measuring station, weight is recorded by four load cells.
Height is recorded with the integrated measuring rod.
Body mass index (BMI) can be calculated automatically from the measuring
results.
USB interface The USB interface allows the seca 777 measuring station to be connected to
a PC by means of a suitable USB cable (USB 2.0, mini USB type B, max.
cable length: 1.80 m). This makes it possible to process the weight values
displayed using the customer’s own software solution.
1.3 User qualification
Assembly Devices that are shipped partially assembled may only be mounted by suffi-
ciently qualified persons such as specialist dealers, hospital technicians or
seca Service technicians.
Operation The device may only be operated by healthcare professionals.
2. SAFETY INFORMATION
2.1 Safety precautions in these instructions for use
DANGER!Used to identify an extremely hazardous situation. If you fail to take note of this information, serious irreversible or fatal injuries will occur.
WARNING!Used to identify an extremely hazardous situation. If you fail to take note of this information, serious irreversible or fatal injuries may result.
CAUTION!Used to identify a hazardous situation. If you fail to take note of this information, minor to moderate injuries may result.
4 •
English
17
-10
-07
-65
1-1
00/0
4-2
01
9S
NOTICE!Used to identify possible incorrect usage of the device. If you fail to take note of this information, you may damage the device, or the measured results may be incorrect.
NOTEIncludes additional information about use of the device.
2.2 Basic safety precautions
Handling the device Please take note of the information in these instructions for use.
Keep the instructions for use in a safe place. The instructions for use are a component of the device and must be available at all times.
DANGER!Risk of explosionDo not use the device in an environment in which one of the following gases has accumulated:
– oxygen
– flammable anesthetics
– other flammable substances/air mixtures
CAUTION!Patient hazard, damage to device
Additional devices which are connected to electrical medical devices must provide evidence of compliance with the relevant IEC or ISO standards (e.g. IEC 60950 for data-processing devices). Furthermore, all configurations must comply with the requirements of standards for medical systems (see IEC 60601-1-1 or Section 16 of the 3rd edition of IEC 60601-1 respectively). Anyone connecting additional devices to electrical medical devices is considered a system configurer and is therefore responsible for ensuring that the system complies with the requirements of standards for systems. This also applies to additional devices recommended by seca. Your attention is drawn to the fact that local laws take precedence over the above-mentioned requirements of standards. In the event of any queries, please contact your local specialist dealer or Technical Service.
Have servicing carried out regularly as described in the relevant section of this document.
Technical modifications may not be made to the device. The device does not contain any parts for servicing by the user. Only have servicing and repairs performed by an authorized seca Service partner. You can find service partners in your area at www.seca.com or by sending an e-mail to [email protected].
Only use original seca accessories and spare parts, otherwise seca will not grant any warranty.
CAUTION!Patient hazard, malfunction
Keep other electrical medical devices, e.g. high-frequency surgical devices, a minimum distance of approx. 1 meter away to prevent incorrect measurements or wireless transmission interference.
Keep HF devices such as cell phones a minimum distance of approx. 1 meter away to prevent incorrect measurements or wireless transmission interference.
The actual transmission output of HF equipment may require minimum distances of more than 1 meter. Details can be found at www.seca.com.
Safety information • 5
17-1
0-0
7-6
51-1
00/0
4-2
019S
Preventing electric shock WARNING!Electric shock
Set up the device so that the power supply socket is easy to reach and the device can be disconnected from the power supply quickly.
Ensure that your local power supply matches the information on the power supply unit.
Do not touch the power supply unit with wet hands.
Do not use extension cables or power strips.
Make sure that cables are not pinched or damaged by sharp edges.
Make sure that cables do not come into contact with hot objects.
Do not operate the device at an altitude of more than 3000 m above sea level.
Preventing injuries and infections WARNING!Injury from falls
Ensure that the device is positioned firmly and level.
Route connecting cables (if present) in such a way that neither user nor patient can trip over them.
The device is not designed as a standing aid. Assist people with limited motor skills when they are getting up, e.g. from a wheelchair.
Make sure that the patient does not step onto and off the weighing platform right at the edges.
Make sure that the patient steps onto and off the weighing platform slowly and safely.
WARNING!Danger of slipping
Ensure that the weighing platform is dry before the patient steps onto it.
Ensure that the patients feet are dry before he or she steps onto the weighing platform.
Make sure that the patient steps onto and off the weighing platform slowly and safely.
WARNING!Risk of infection
Before and after every measurement, wash your hands to reduce the risk of cross-contamination and nosocomial infections.
Hygienically reprocess the scale regularly as described in the respective section in this document.
Make sure that the patient has no infectious diseases.
Make sure that the patient has no open wounds or infectious skin alterations, which may come into contact with the device.
6 •
English
17
-10
-07
-65
1-1
00/0
4-2
01
9S
Preventing damage to device NOTICE!Damage to device
Ensure that no liquids enter the device. They can damage the electronics.
Switch off the device before disconnecting the power supply unit from the mains socket.
For devices with power supply operation: Disconnect the power supply unit from the mains socket if you intend to not use the device for a longer period of time. Only this way it can be ensured that the device is de-energized.
For devices with battery or rechargeable battery operation: If you do not use the device for an extended period of time, remove batteries or rechargeable batteries. Only this way it can be ensured that the device is de-energized.
Make sure not to drop the device.
Do not expose the device to any impacts or vibrations.
Perform function controls regularly as described in the relevant section in this document. Do not operate the device if it is damaged or not working properly.
Ensure that there is no heat source in the immediate vicinity. Do not expose to direct sunlight. The excessive temperature could damage the electronics.
Avoid rapid temperature fluctuations. When the device is transported so that a temperature difference of more than 20 °C occurs, it must stay turned off for at least 2 hours before it can be turned on again. Otherwise, condensation water will form which can damage the electronics.
Use the device only in the intended ambient conditions.
Store the device only in the intended storage conditions.
Do not use aggressive or abrasive cleaning agents.
Do not use organic solvents (e.g. white spirit or petroleum spirit).
Handling measuring results CAUTION!Patient hazardIn order to avoid misinterpretations, measuring results for medical use must be displayed and used in SI units (weight: kilogrammes, length: metres) only. Some devices offer the ability to display measuring results in other units. This is only an additional function.
Use the results exclusively in SI units.
The use of measurement results in non-SI units is the sole responsibility of the user.
NOTICE!Inconsistent measuring results
Before you electronically save measurement values determined using this device and use them further (e.g. in seca PC software or in an EMR system), make sure that the measurement values are plausible.
If measurement values are transmitted to seca PC software or an EMR system, make sure prior to further use that the measurement values are plausible and are assigned to the correct patient.
Safety information • 7
17-1
0-0
7-6
51-1
00/0
4-2
019S
Handling packaging material WARNING!Risk of suffocationPackaging material made of plastic foil (bags) is a choking hazard.
Keep packaging material out of reach of children.
In the event that the original packing material may not be available anymore, only use plastic bags with security holes in order to reduce the risk of suffocation. Use recyclable materials if possible.
NOTEKeep the original packing material for future use (e.g. returning for ser-vicing).
Handling batteries and rechargeable batteries
WARNING!Personal injury as a result of improper handlingBatteries and rechargeable batteries contain harmful substances which may explode if not handled properly.
Do not try to recharge batteries.
Do not expose (rechargeable) batteries to heat.
Do not burn (rechargeable) batteries.
If acid is leaking out, avoid contact with the skin, eyes and mucous membranes. Rinse affected areas with plenty of clean water and seek medical help at once.
NOTICE!Damage to device and malfunctions with improper handling
Only use the type of (rechargeable) battery specified in this document.
When replacing (rechargeable) batteries, always replace a complete set at a time.
Do not short-circuit (rechargeable) batteries.
If you do not use the device for a long period of time, remove the batteries (incl. rechargeable batteries). This prevents acid from leak-ing into the device.
If acid leaked into the device, discontinue use. Have the device checked by an authorised seca Service partner and repaired if necessary.
8 •
English
17
-10
-07
-65
1-1
00/0
4-2
01
9S
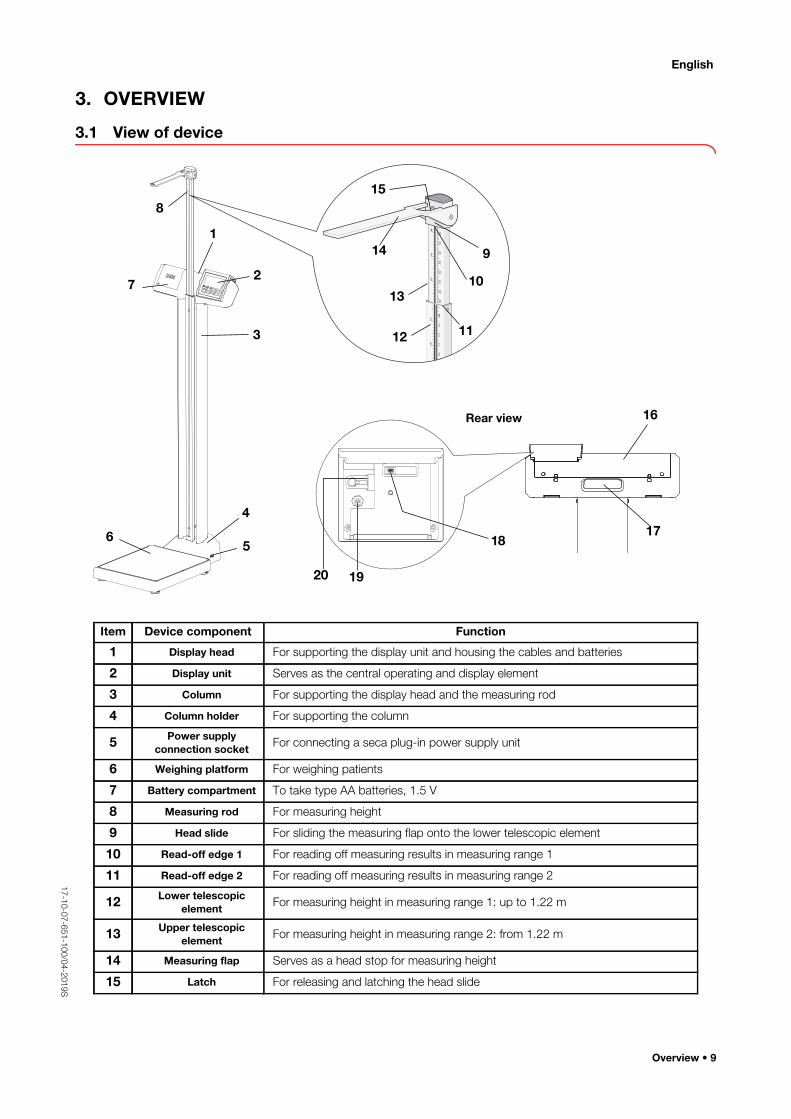
3. OVERVIEW
3.1 View of device
1
2
3
4
56
7
8
9
10
1112
13
14
15
Rear view 16
1718
1920
Item Device component Function
1 Display head For supporting the display unit and housing the cables and batteries
2 Display unit Serves as the central operating and display element
3 Column For supporting the display head and the measuring rod
4 Column holder For supporting the column
5 Power supply connection socket For connecting a seca plug-in power supply unit
6 Weighing platform For weighing patients
7 Battery compartment To take type AA batteries, 1.5 V
8 Measuring rod For measuring height
9 Head slide For sliding the measuring flap onto the lower telescopic element
10 Read-off edge 1 For reading off measuring results in measuring range 1
11 Read-off edge 2 For reading off measuring results in measuring range 2
12 Lower telescopic element For measuring height in measuring range 1: up to 1.22 m
13 Upper telescopic element For measuring height in measuring range 2: from 1.22 m
14 Measuring flap Serves as a head stop for measuring height
15 Latch For releasing and latching the head slide
Overview • 9
17-1
0-0
7-6
51-1
00/0
4-2
019S
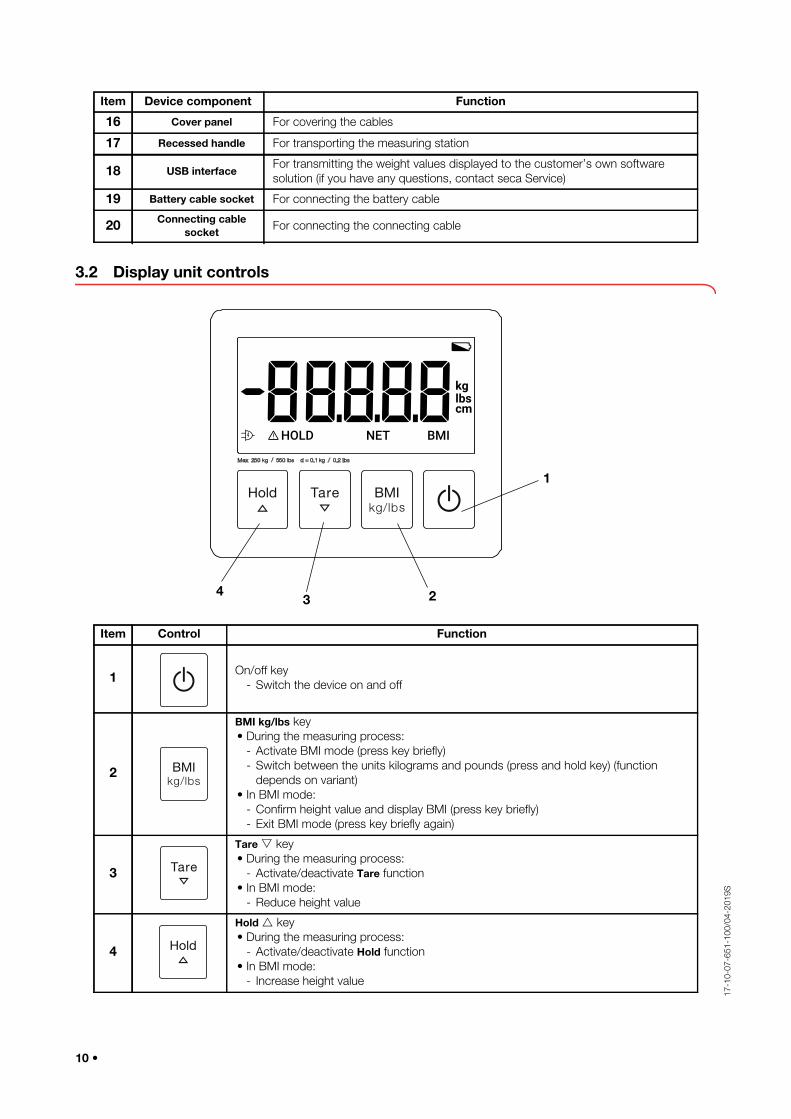
3.2 Display unit controls
1
234
16 Cover panel For covering the cables
17 Recessed handle For transporting the measuring station
18 USB interfaceFor transmitting the weight values displayed to the customer’s own software
solution (if you have any questions, contact seca Service)
19 Battery cable socket For connecting the battery cable
20 Connecting cable socket For connecting the connecting cable
Item Device component Function
Item Control Function
1 On/off key
- Switch the device on and off
2
BMI kg/lbs key
• During the measuring process:
- Activate BMI mode (press key briefly)
- Switch between the units kilograms and pounds (press and hold key) (function
depends on variant)
• In BMI mode:
- Confirm height value and display BMI (press key briefly)
- Exit BMI mode (press key briefly again)
3
Tare key
• During the measuring process:
- Activate/deactivate Tare function
• In BMI mode:
- Reduce height value
4
Hold key
• During the measuring process:
- Activate/deactivate Hold function
• In BMI mode:
- Increase height value
10 •
English
17
-10
-07
-65
1-1
00/0
4-2
01
9S
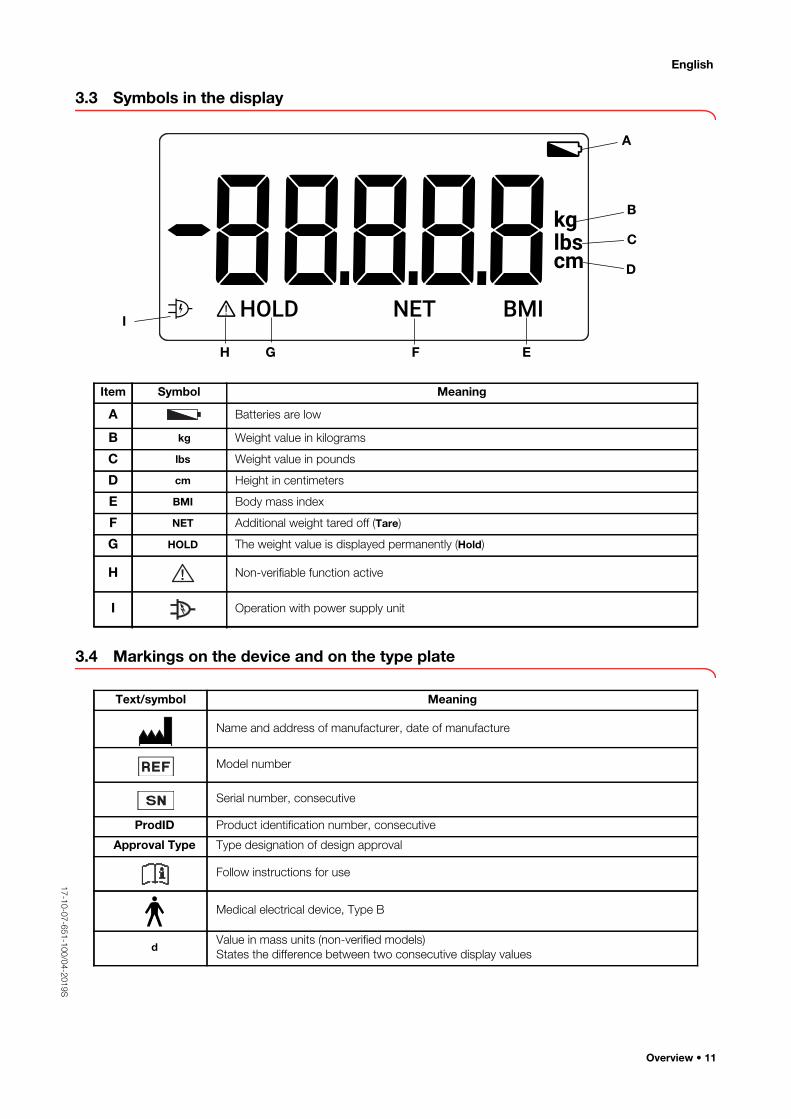
3.3 Symbols in the display
I
D
EFGH
B
A
C
3.4 Markings on the device and on the type plate
Item Symbol Meaning
A Batteries are low
B kg Weight value in kilograms
C lbs Weight value in pounds
D cm Height in centimeters
E BMI Body mass index
F NET Additional weight tared off (Tare)
G HOLD The weight value is displayed permanently (Hold)
H Non-verifiable function active
I Operation with power supply unit
Text/symbol Meaning
Name and address of manufacturer, date of manufacture
Model number
Serial number, consecutive
ProdID Product identification number, consecutive
Approval Type Type designation of design approval
Follow instructions for use
Medical electrical device, Type B
dValue in mass units (non-verified models)
States the difference between two consecutive display values
Overview • 11
17-1
0-0
7-6
51-1
00/0
4-2
019S
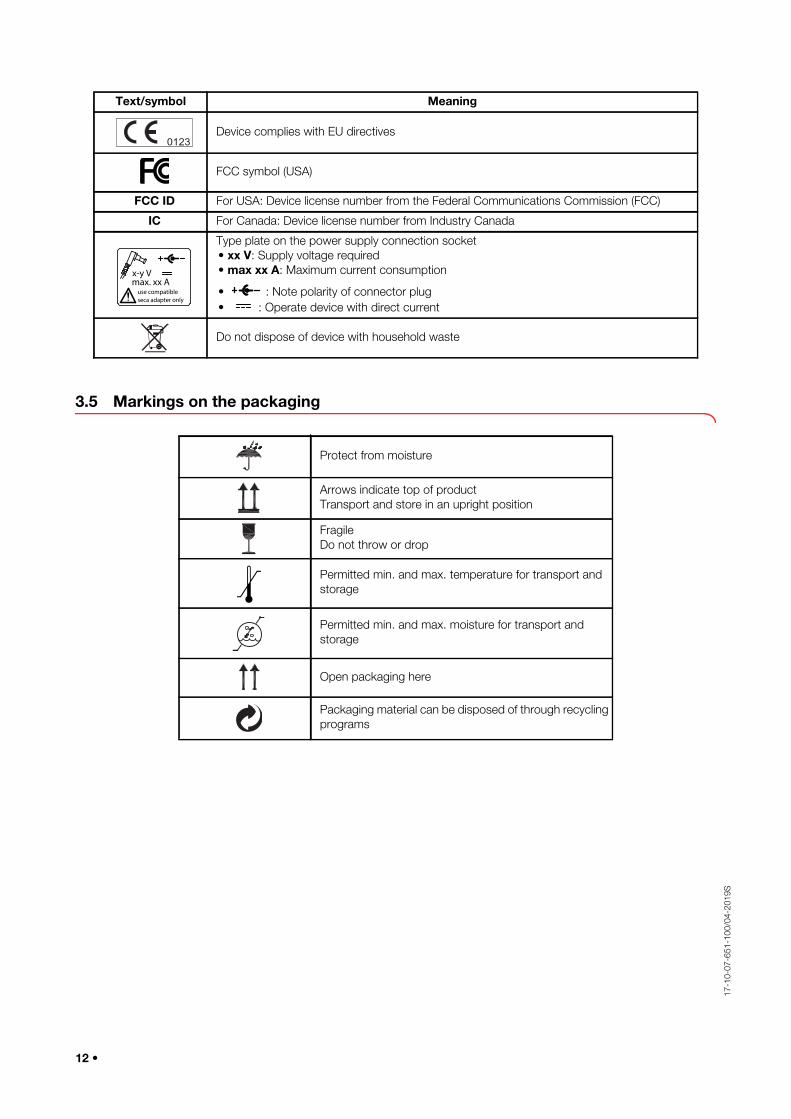
3.5 Markings on the packaging
Device complies with EU directives
FCC symbol (USA)
FCC ID For USA: Device license number from the Federal Communications Commission (FCC)
IC For Canada: Device license number from Industry Canada
Type plate on the power supply connection socket
• xx V: Supply voltage required
• max xx A: Maximum current consumption
• : Note polarity of connector plug
• : Operate device with direct current
Do not dispose of device with household waste
Text/symbol Meaning
0123
use compatibleseca adapter only
x-y V max. xx A
Protect from moisture
Arrows indicate top of product
Transport and store in an upright position
Fragile
Do not throw or drop
Permitted min. and max. temperature for transport and
storage
Permitted min. and max. moisture for transport and
storage
Open packaging here
Packaging material can be disposed of through recycling
programs
12 •
English
17
-10
-07
-65
1-1
00/0
4-2
01
9S
4. START UP DEVICE
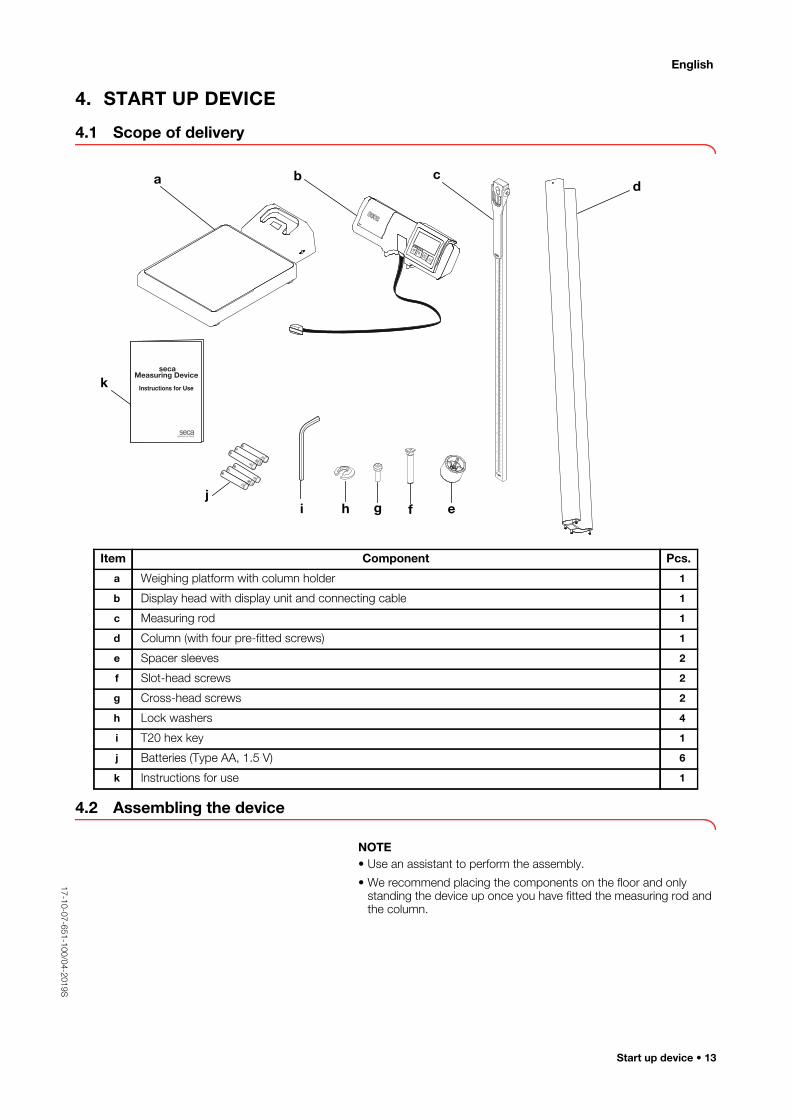
4.1 Scope of delivery
4.2 Assembling the device
NOTE• Use an assistant to perform the assembly.
• We recommend placing the components on the floor and only standing the device up once you have fitted the measuring rod and the column.
Item Component Pcs.
a Weighing platform with column holder 1
b Display head with display unit and connecting cable 1
c Measuring rod 1
d Column (with four pre-fitted screws) 1
e Spacer sleeves 2
f Slot-head screws 2
g Cross-head screws 2
h Lock washers 4
i T20 hex key 1
j Batteries (Type AA, 1.5 V) 6
k Instructions for use 1
Instructions for Use
secaMeasuring Device
a b cd
efghij
k
S
tart up device • 13
17-1
0-0
7-6
51-1
00/0
4-2
019S
Tools required In addition to the scope of delivery, you require the following tools:
Fitting the measuring rod Proceed as outlined below to fit the measuring rod to the column.
1. Lie the column down on the floor.
2. Place the spacer sleeves on the bores in the column.
3. Extend the upper telescopic element far enough to expose the lower
assembly bore in the lower telescopic element.
4. Position the measuring rod on the spacer sleeves as shown in the
diagram.
5. Place a slot-head screw in the lower assembly bore and the spacer sleeve
underneath it.
6. Tighten the slot-head screw.
7. Extend the upper telescopic element far enough to expose the upper
assembly bore in the lower telescopic element.
Tool SizeSlot-head screwdriver 1x5.5 mm
Cross-head screwdriver PH 2
14 •
English
17
-10
-07
-65
1-1
00/0
4-2
01
9S
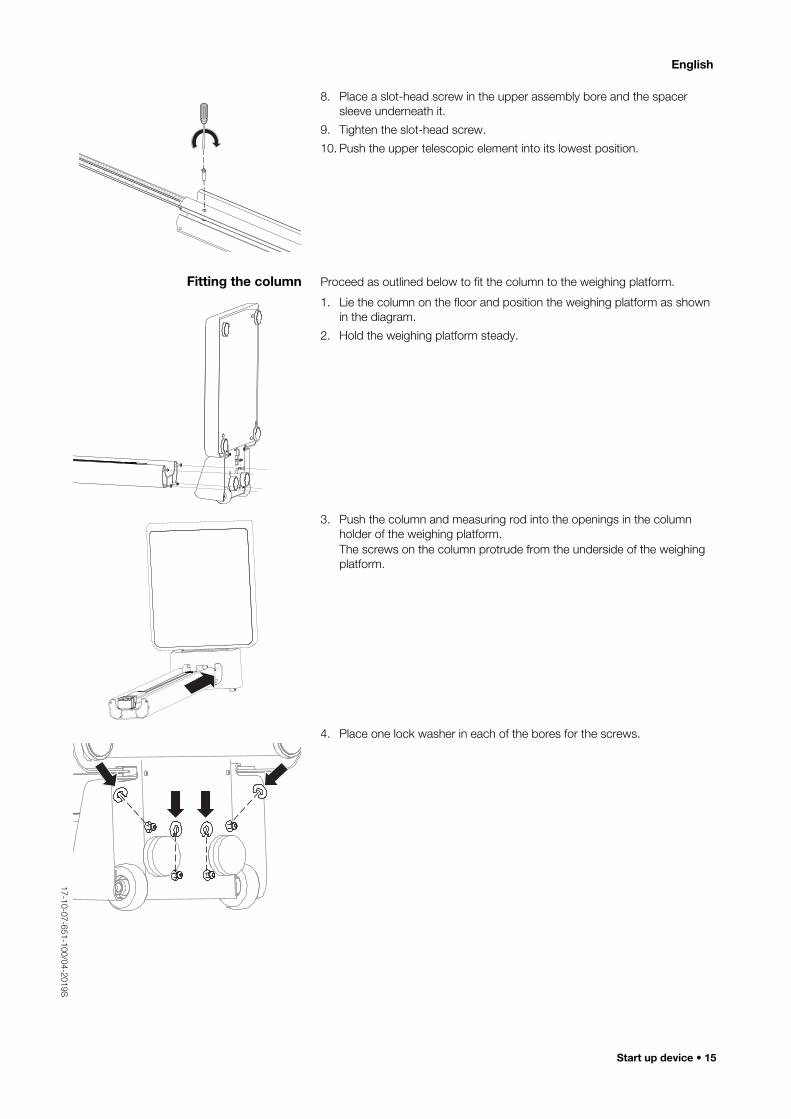
8. Place a slot-head screw in the upper assembly bore and the spacer
sleeve underneath it.
9. Tighten the slot-head screw.
10. Push the upper telescopic element into its lowest position.
Fitting the column Proceed as outlined below to fit the column to the weighing platform.
1. Lie the column on the floor and position the weighing platform as shown
in the diagram.
2. Hold the weighing platform steady.
3. Push the column and measuring rod into the openings in the column
holder of the weighing platform.
The screws on the column protrude from the underside of the weighing
platform.
4. Place one lock washer in each of the bores for the screws.
Start up device • 15
17-1
0-0
7-6
51-1
00/0
4-2
019S
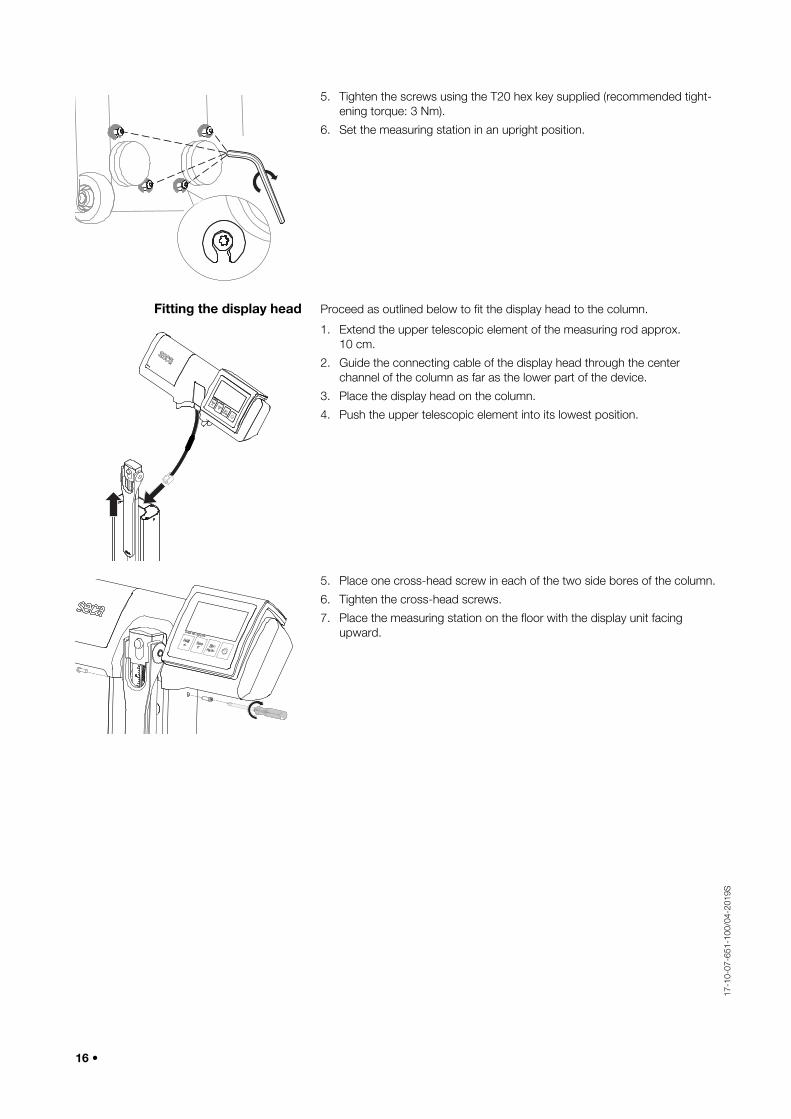
5. Tighten the screws using the T20 hex key supplied (recommended tight-
ening torque: 3 Nm).
6. Set the measuring station in an upright position.
Fitting the display head Proceed as outlined below to fit the display head to the column.
1. Extend the upper telescopic element of the measuring rod approx.
10 cm.
2. Guide the connecting cable of the display head through the center
channel of the column as far as the lower part of the device.
3. Place the display head on the column.
4. Push the upper telescopic element into its lowest position.
5. Place one cross-head screw in each of the two side bores of the column.
6. Tighten the cross-head screws.
7. Place the measuring station on the floor with the display unit facing
upward.
16 •
English
17
-10
-07
-65
1-1
00/0
4-2
01
9S
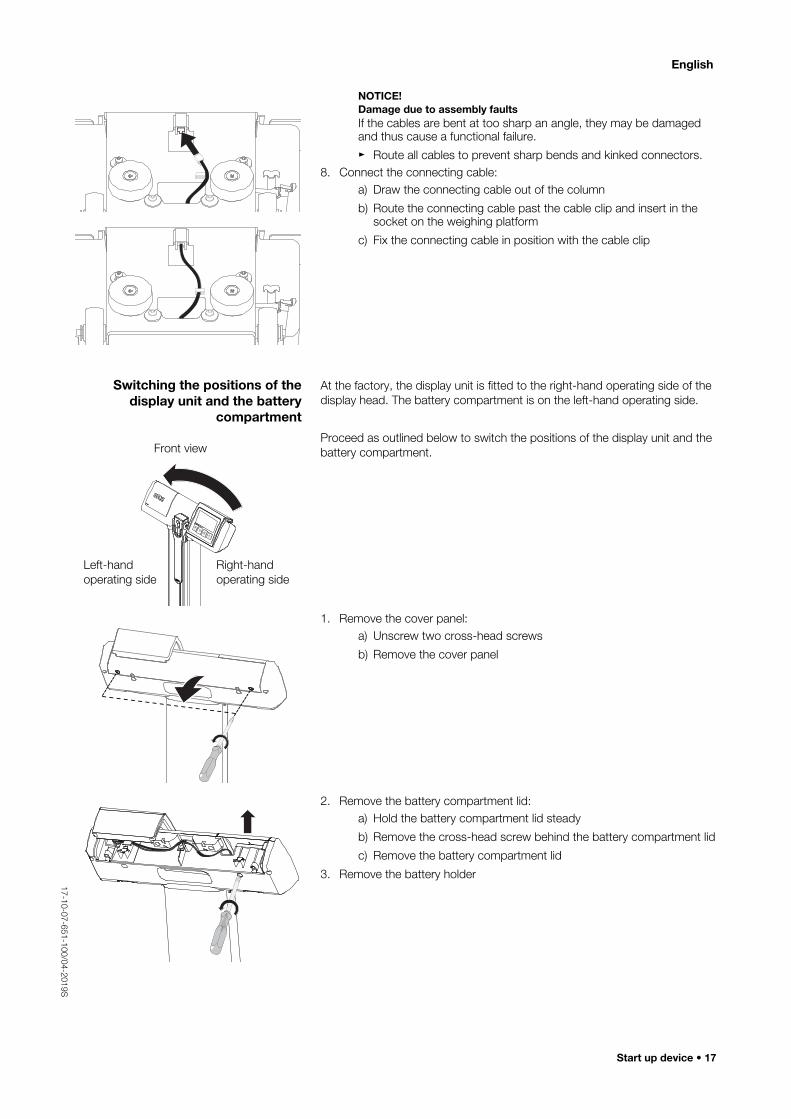
NOTICE!Damage due to assembly faultsIf the cables are bent at too sharp an angle, they may be damaged and thus cause a functional failure.
Route all cables to prevent sharp bends and kinked connectors.
8. Connect the connecting cable:
a) Draw the connecting cable out of the column
b) Route the connecting cable past the cable clip and insert in the socket on the weighing platform
c) Fix the connecting cable in position with the cable clip
Switching the positions of the display unit and the battery
compartment
At the factory, the display unit is fitted to the right-hand operating side of the
display head. The battery compartment is on the left-hand operating side.
Proceed as outlined below to switch the positions of the display unit and the
battery compartment.
1. Remove the cover panel:
a) Unscrew two cross-head screws
b) Remove the cover panel
2. Remove the battery compartment lid:
a) Hold the battery compartment lid steady
b) Remove the cross-head screw behind the battery compartment lid
c) Remove the battery compartment lid
3. Remove the battery holder
Right-hand
operating side
Left-hand
operating side
Front view
Start up device • 17
17-1
0-0
7-6
51-1
00/0
4-2
019S
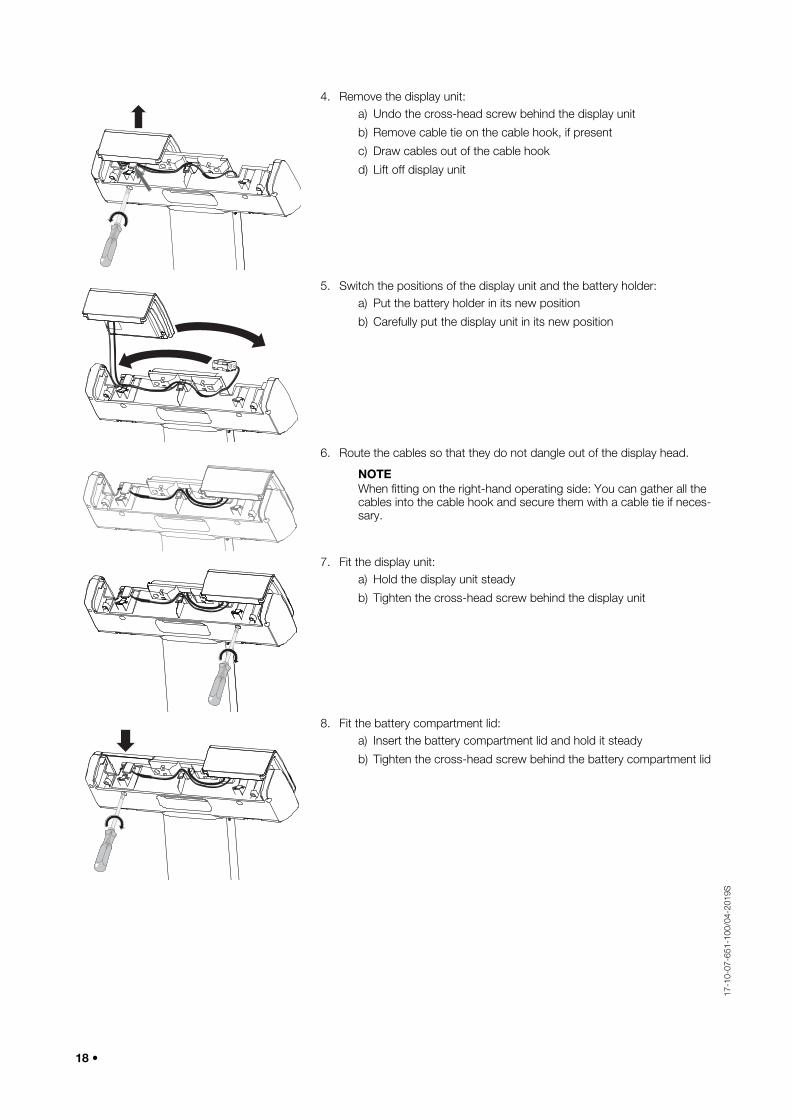
4. Remove the display unit:
a) Undo the cross-head screw behind the display unit
b) Remove cable tie on the cable hook, if present
c) Draw cables out of the cable hook
d) Lift off display unit
5. Switch the positions of the display unit and the battery holder:
a) Put the battery holder in its new position
b) Carefully put the display unit in its new position
6. Route the cables so that they do not dangle out of the display head.
NOTEWhen fitting on the right-hand operating side: You can gather all the cables into the cable hook and secure them with a cable tie if neces-sary.
7. Fit the display unit:
a) Hold the display unit steady
b) Tighten the cross-head screw behind the display unit
8. Fit the battery compartment lid:
a) Insert the battery compartment lid and hold it steady
b) Tighten the cross-head screw behind the battery compartment lid
18 •
English
17
-10
-07
-65
1-1
00/0
4-2
01
9S
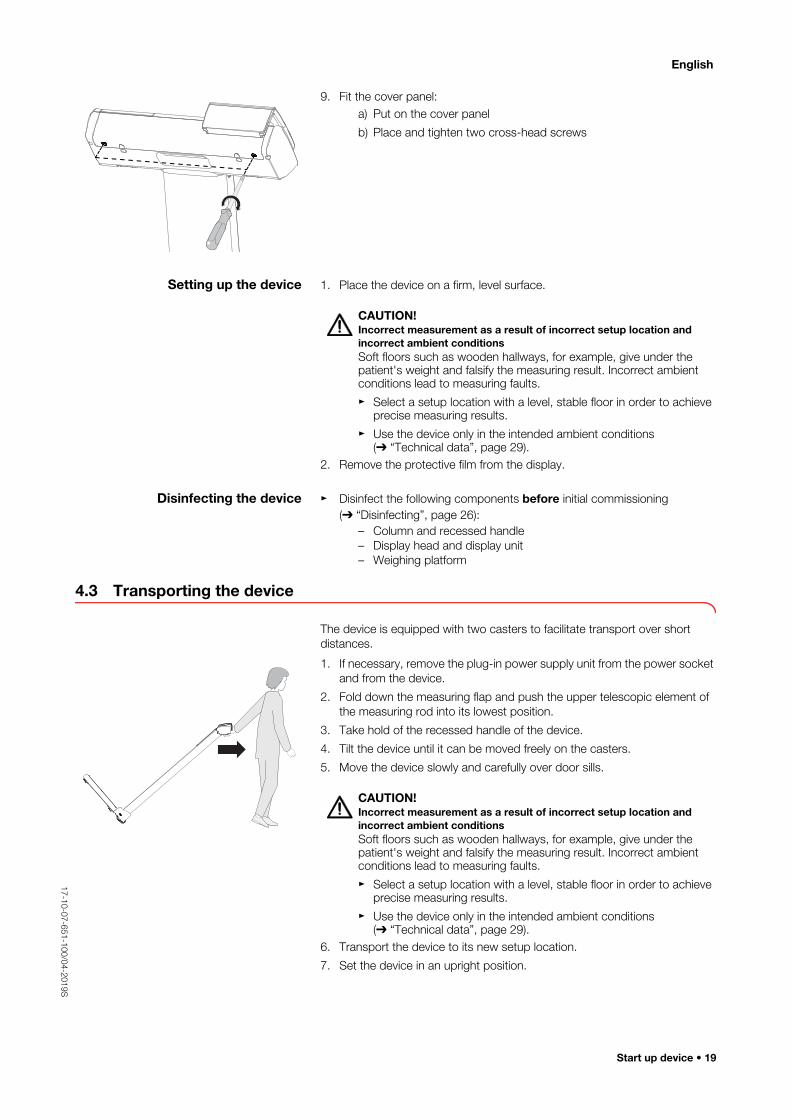
9. Fit the cover panel:
a) Put on the cover panel
b) Place and tighten two cross-head screws
Setting up the device 1. Place the device on a firm, level surface.
CAUTION!Incorrect measurement as a result of incorrect setup location and incorrect ambient conditionsSoft floors such as wooden hallways, for example, give under the patient's weight and falsify the measuring result. Incorrect ambient conditions lead to measuring faults.
Select a setup location with a level, stable floor in order to achieve precise measuring results.
Use the device only in the intended ambient conditions ( “Technical data”, page 29).
2. Remove the protective film from the display.
Disinfecting the device Disinfect the following components before initial commissioning
( “Disinfecting”, page 26):
– Column and recessed handle
– Display head and display unit
– Weighing platform
4.3 Transporting the device
The device is equipped with two casters to facilitate transport over short
distances.
1. If necessary, remove the plug-in power supply unit from the power socket
and from the device.
2. Fold down the measuring flap and push the upper telescopic element of
the measuring rod into its lowest position.
3. Take hold of the recessed handle of the device.
4. Tilt the device until it can be moved freely on the casters.
5. Move the device slowly and carefully over door sills.
CAUTION!Incorrect measurement as a result of incorrect setup location and incorrect ambient conditionsSoft floors such as wooden hallways, for example, give under the patient's weight and falsify the measuring result. Incorrect ambient conditions lead to measuring faults.
Select a setup location with a level, stable floor in order to achieve precise measuring results.
Use the device only in the intended ambient conditions ( “Technical data”, page 29).
6. Transport the device to its new setup location.
7. Set the device in an upright position.
Start up device • 19
17-1
0-0
7-6
51-1
00/0
4-2
019S
8. If necessary, plug the plug-in power supply unit into the device and into
the power socket ( “Connecting the plug-in power supply unit
(optional)”, page 20).
4.4 Establishing the power supply
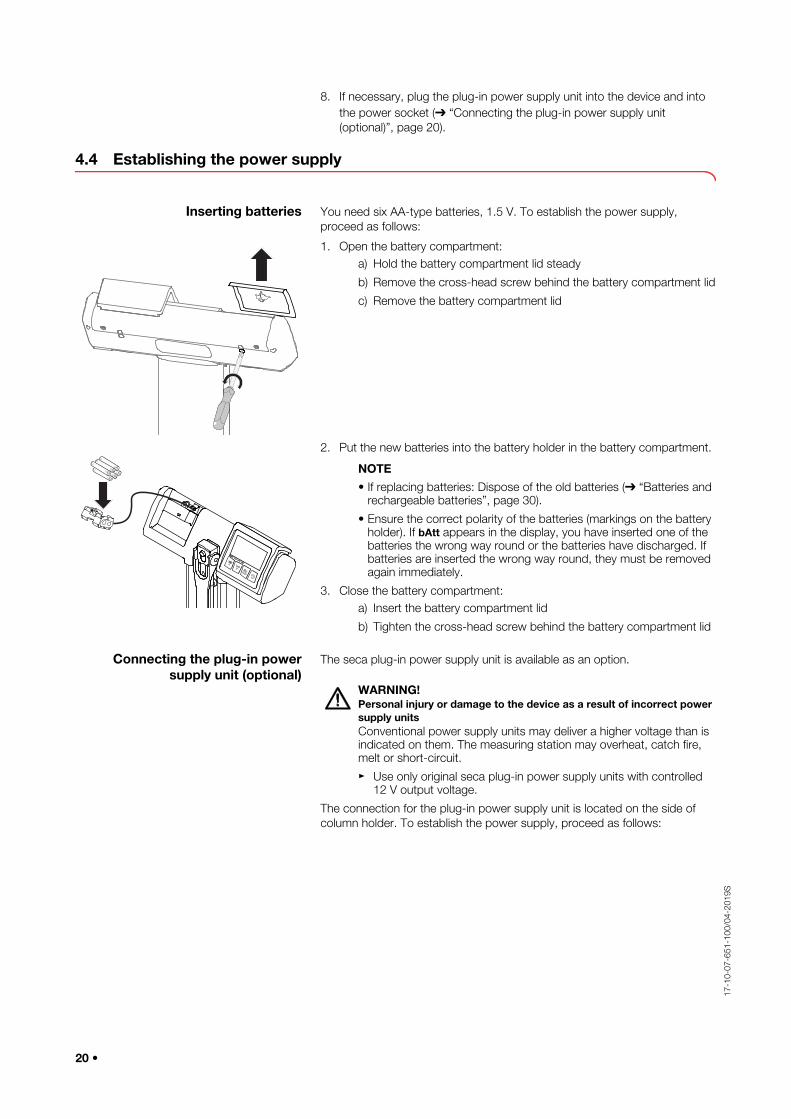
Inserting batteries You need six AA-type batteries, 1.5 V. To establish the power supply,
proceed as follows:
1. Open the battery compartment:
a) Hold the battery compartment lid steady
b) Remove the cross-head screw behind the battery compartment lid
c) Remove the battery compartment lid
2. Put the new batteries into the battery holder in the battery compartment.
NOTE• If replacing batteries: Dispose of the old batteries ( “Batteries and
rechargeable batteries”, page 30).
• Ensure the correct polarity of the batteries (markings on the battery holder). If bAtt appears in the display, you have inserted one of the batteries the wrong way round or the batteries have discharged. If batteries are inserted the wrong way round, they must be removed again immediately.
3. Close the battery compartment:
a) Insert the battery compartment lid
b) Tighten the cross-head screw behind the battery compartment lid
Connecting the plug-in power supply unit (optional)
The seca plug-in power supply unit is available as an option.
WARNING!Personal injury or damage to the device as a result of incorrect power supply unitsConventional power supply units may deliver a higher voltage than is indicated on them. The measuring station may overheat, catch fire, melt or short-circuit.
Use only original seca plug-in power supply units with controlled 12 V output voltage.
The connection for the plug-in power supply unit is located on the side of
column holder. To establish the power supply, proceed as follows:
20 •
English
17
-10
-07
-65
1-1
00/0
4-2
01
9S
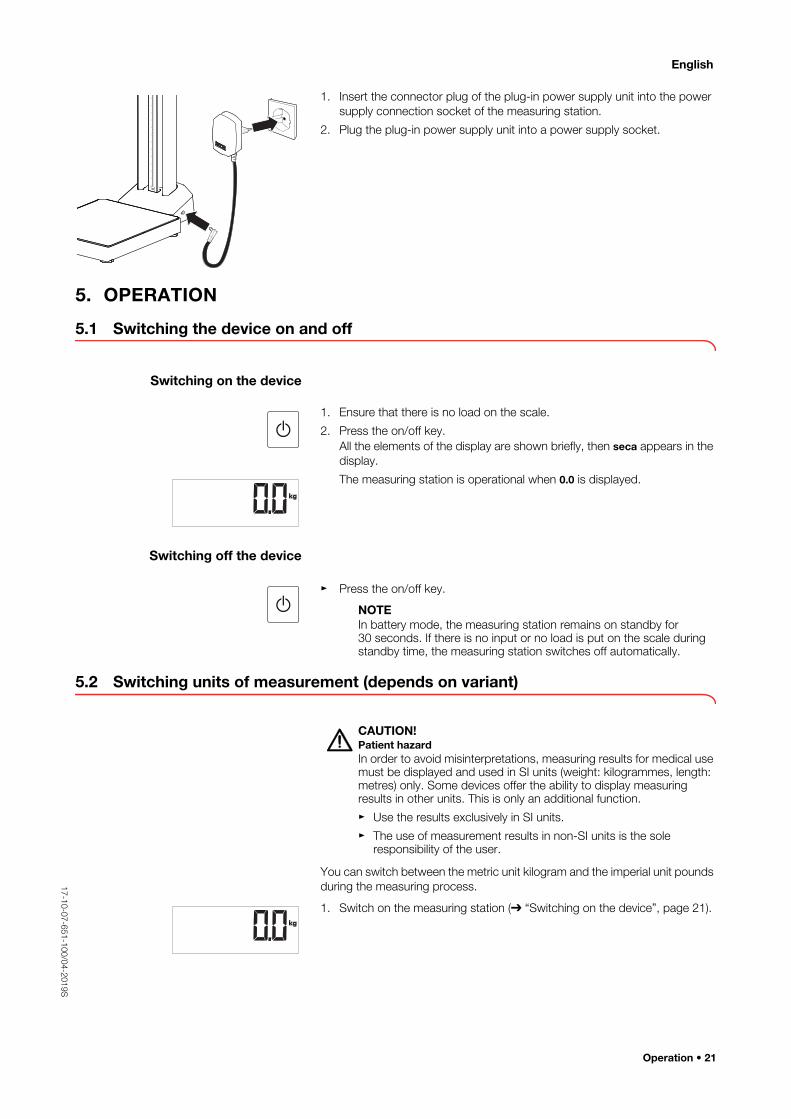
1. Insert the connector plug of the plug-in power supply unit into the power
supply connection socket of the measuring station.
2. Plug the plug-in power supply unit into a power supply socket.
5. OPERATION
5.1 Switching the device on and off
Switching on the device
1. Ensure that there is no load on the scale.
2. Press the on/off key.
All the elements of the display are shown briefly, then seca appears in the
display.
The measuring station is operational when 0.0 is displayed.
Switching off the device
Press the on/off key.
NOTEIn battery mode, the measuring station remains on standby for 30 seconds. If there is no input or no load is put on the scale during standby time, the measuring station switches off automatically.
5.2 Switching units of measurement (depends on variant)
CAUTION!Patient hazardIn order to avoid misinterpretations, measuring results for medical use must be displayed and used in SI units (weight: kilogrammes, length: metres) only. Some devices offer the ability to display measuring results in other units. This is only an additional function.
Use the results exclusively in SI units.
The use of measurement results in non-SI units is the sole responsibility of the user.
You can switch between the metric unit kilogram and the imperial unit pounds
during the measuring process.
1. Switch on the measuring station ( “Switching on the device”, page 21).
Operation • 21
17-1
0-0
7-6
51-1
00/0
4-2
019S
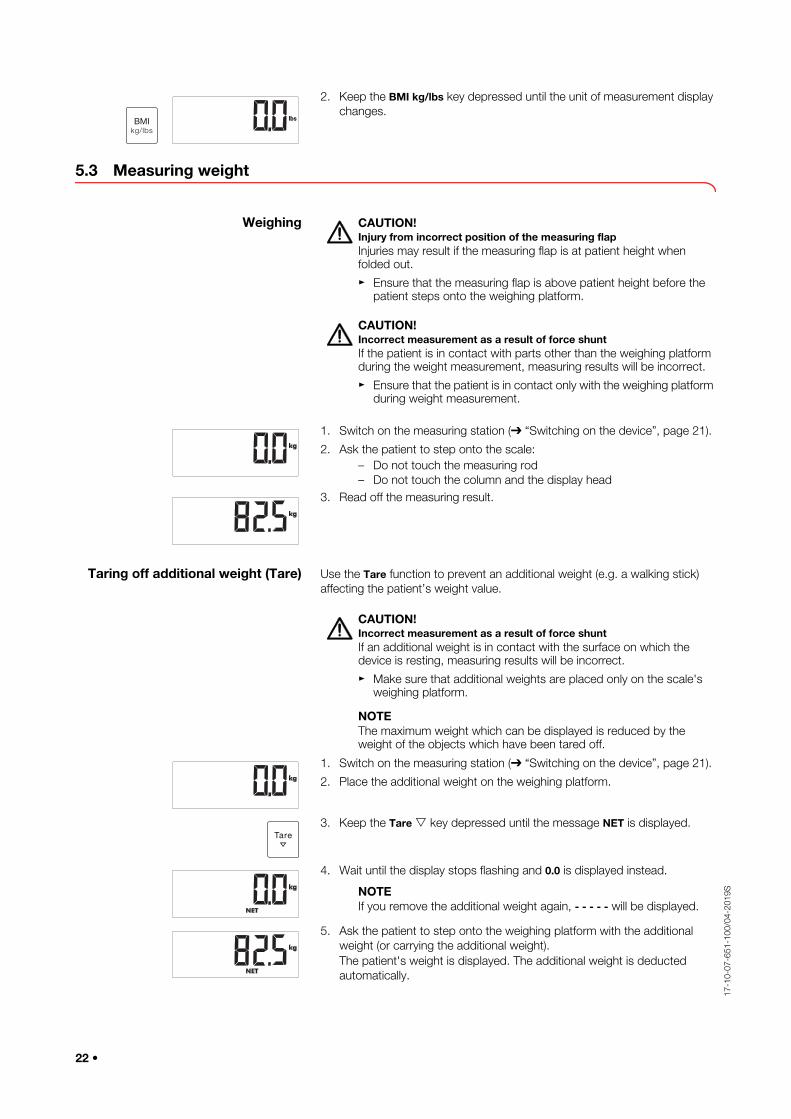
2. Keep the BMI kg/lbs key depressed until the unit of measurement display
changes.
5.3 Measuring weight
Weighing CAUTION!Injury from incorrect position of the measuring flapInjuries may result if the measuring flap is at patient height when folded out.
Ensure that the measuring flap is above patient height before the patient steps onto the weighing platform.
CAUTION!Incorrect measurement as a result of force shuntIf the patient is in contact with parts other than the weighing platform during the weight measurement, measuring results will be incorrect.
Ensure that the patient is in contact only with the weighing platform during weight measurement.
1. Switch on the measuring station ( “Switching on the device”, page 21).
2. Ask the patient to step onto the scale:
– Do not touch the measuring rod
– Do not touch the column and the display head
3. Read off the measuring result.
Taring off additional weight (Tare) Use the Tare function to prevent an additional weight (e.g. a walking stick)
affecting the patient’s weight value.
CAUTION!Incorrect measurement as a result of force shuntIf an additional weight is in contact with the surface on which the device is resting, measuring results will be incorrect.
Make sure that additional weights are placed only on the scale's weighing platform.
NOTEThe maximum weight which can be displayed is reduced by the weight of the objects which have been tared off.
1. Switch on the measuring station ( “Switching on the device”, page 21).
2. Place the additional weight on the weighing platform.
3. Keep the Tare key depressed until the message NET is displayed.
4. Wait until the display stops flashing and 0.0 is displayed instead.
NOTEIf you remove the additional weight again, - - - - - will be displayed.
5. Ask the patient to step onto the weighing platform with the additional
weight (or carrying the additional weight).
The patient's weight is displayed. The additional weight is deducted
automatically.
22 •
English
17
-10
-07
-65
1-1
00/0
4-2
01
9S
6. Read off the measuring result.
7. To deactivate the Tare function, keep the Tare key depressed until the
message NET is no longer displayed.
NOTEWhen you switch off the measuring station, the Tare function is deactivated automatically.
Display weight permanently (Hold) If you activate the Hold function, the weight value is displayed permanently.
1. Press the Hold key.
The display flashes until a stable weight is measured. The weight value is
displayed permanently. The message HOLD is displayed.
2. Read off the measuring result.
3. To deactivate the Hold function, press the Hold key.
5.4 Measuring height
You can measure height using the integrated measuring rod.
CAUTION!Injury from incorrect position of the measuring flapInjuries may result if the measuring flap is at patient height when folded out.
Ensure that the measuring flap is above patient height before the patient steps onto the weighing platform.
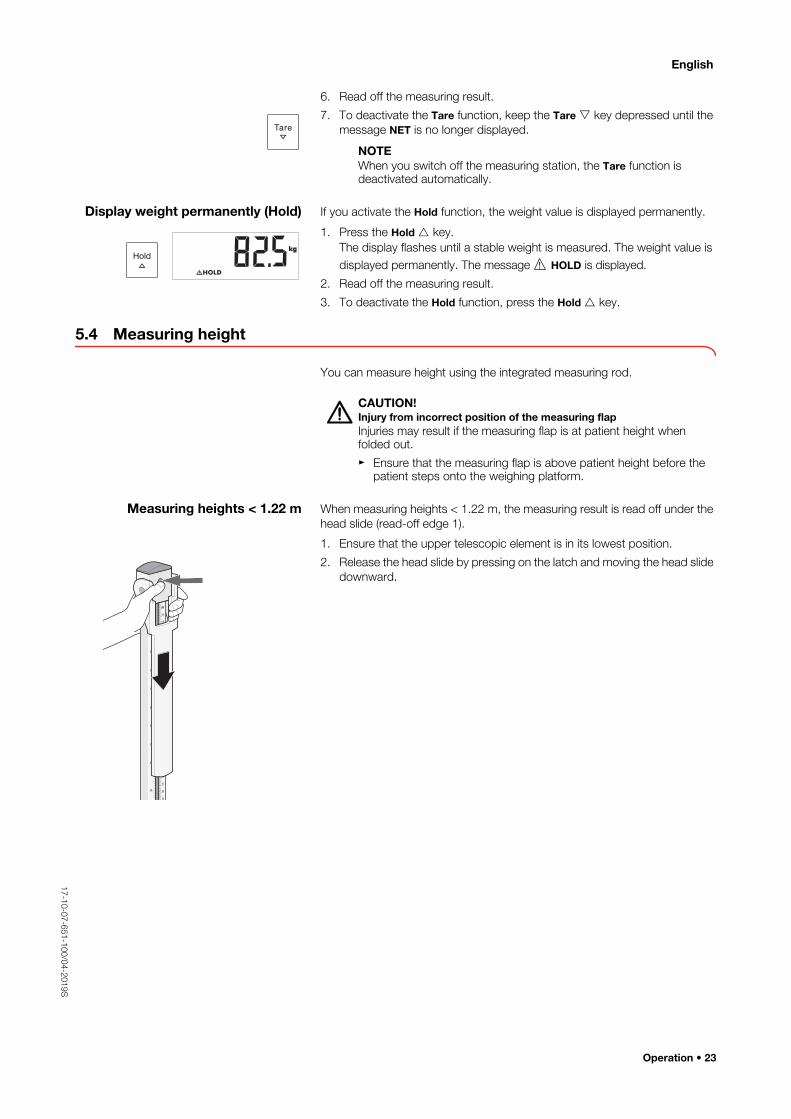
Measuring heights < 1.22 m When measuring heights < 1.22 m, the measuring result is read off under the
head slide (read-off edge 1).
1. Ensure that the upper telescopic element is in its lowest position.
2. Release the head slide by pressing on the latch and moving the head slide
downward.
Operation • 23
17-1
0-0
7-6
51-1
00/0
4-2
019S
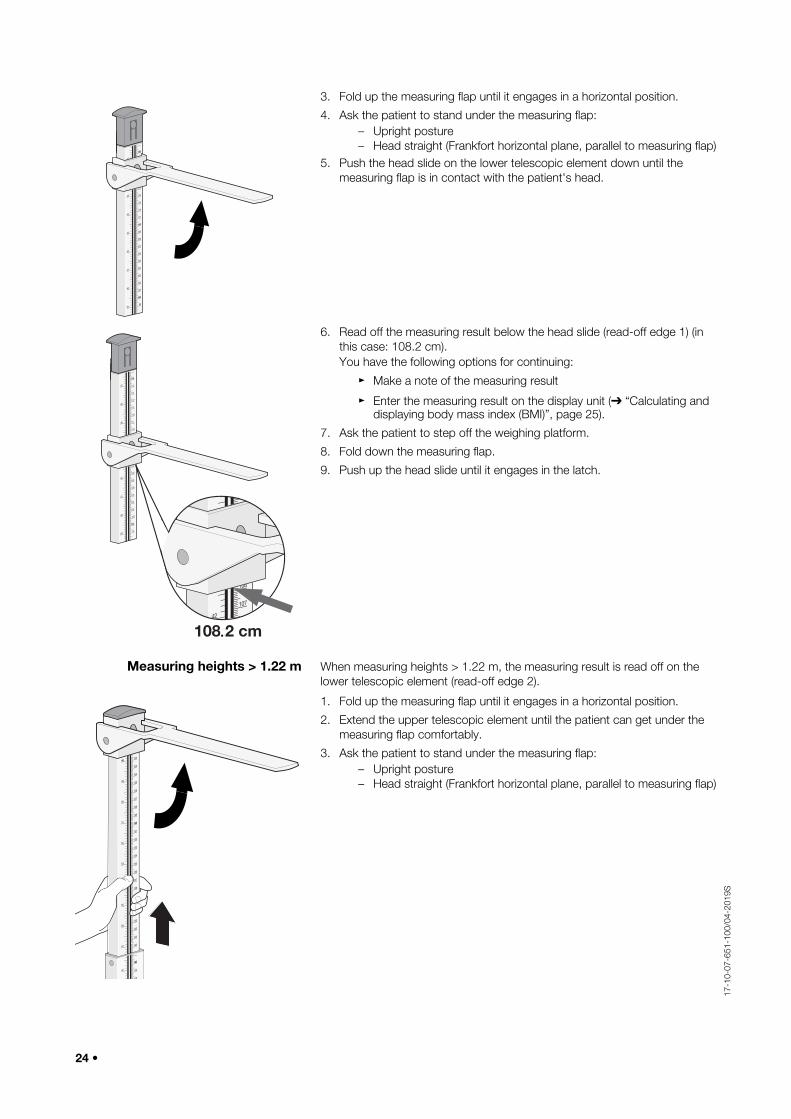
3. Fold up the measuring flap until it engages in a horizontal position.
4. Ask the patient to stand under the measuring flap:
– Upright posture
– Head straight (Frankfort horizontal plane, parallel to measuring flap)
5. Push the head slide on the lower telescopic element down until the
measuring flap is in contact with the patient's head.
6. Read off the measuring result below the head slide (read-off edge 1) (in
this case: 108.2 cm).
You have the following options for continuing:
Make a note of the measuring result
Enter the measuring result on the display unit ( “Calculating and displaying body mass index (BMI)”, page 25).
7. Ask the patient to step off the weighing platform.
8. Fold down the measuring flap.
9. Push up the head slide until it engages in the latch.
Measuring heights > 1.22 m When measuring heights > 1.22 m, the measuring result is read off on the
lower telescopic element (read-off edge 2).
1. Fold up the measuring flap until it engages in a horizontal position.
2. Extend the upper telescopic element until the patient can get under the
measuring flap comfortably.
3. Ask the patient to stand under the measuring flap:
– Upright posture
– Head straight (Frankfort horizontal plane, parallel to measuring flap)
108,2 cm.
24 •
English
17
-10
-07
-65
1-1
00/0
4-2
01
9S
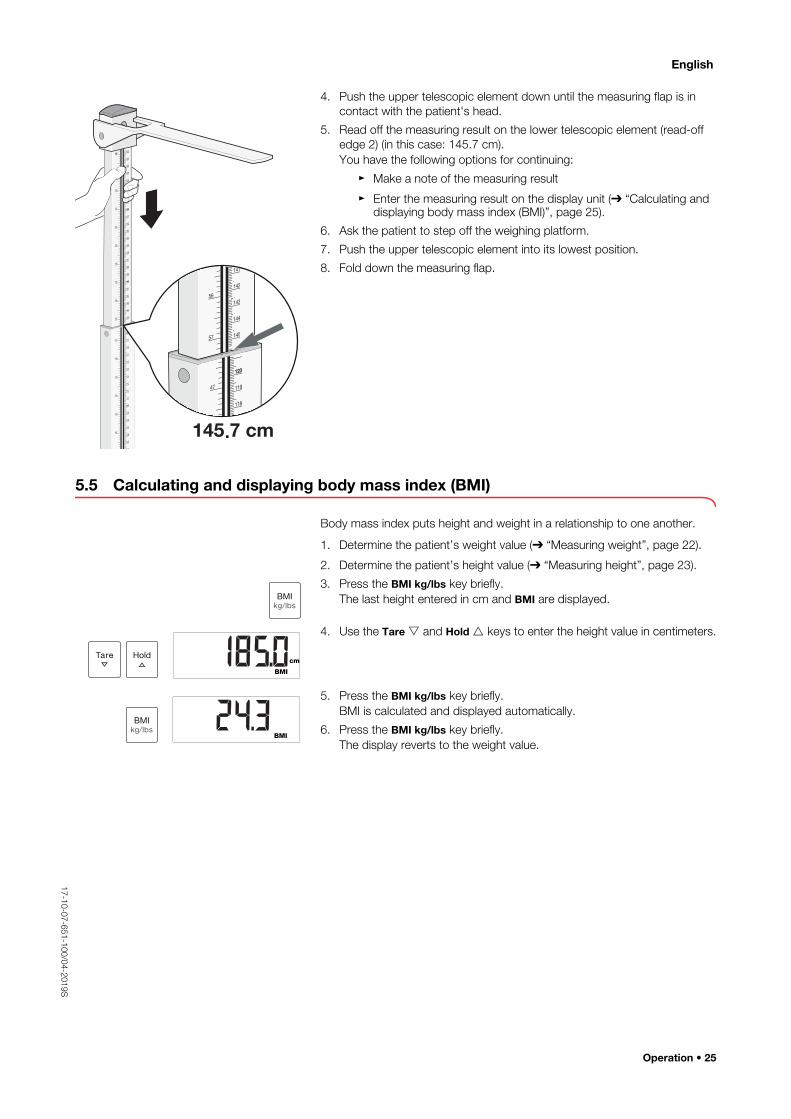
4. Push the upper telescopic element down until the measuring flap is in
contact with the patient's head.
5. Read off the measuring result on the lower telescopic element (read-off
edge 2) (in this case: 145.7 cm).
You have the following options for continuing:
Make a note of the measuring result
Enter the measuring result on the display unit ( “Calculating and displaying body mass index (BMI)”, page 25).
6. Ask the patient to step off the weighing platform.
7. Push the upper telescopic element into its lowest position.
8. Fold down the measuring flap.
5.5 Calculating and displaying body mass index (BMI)
Body mass index puts height and weight in a relationship to one another.
1. Determine the patient’s weight value ( “Measuring weight”, page 22).
2. Determine the patient’s height value ( “Measuring height”, page 23).
3. Press the BMI kg/lbs key briefly.
The last height entered in cm and BMI are displayed.
4. Use the Tare and Hold keys to enter the height value in centimeters.
5. Press the BMI kg/lbs key briefly.
BMI is calculated and displayed automatically.
6. Press the BMI kg/lbs key briefly.
The display reverts to the weight value.
145,7 cm.
BMI
BMI
Operation • 25
17-1
0-0
7-6
51-1
00/0
4-2
019S
6. HYGIENE TREATMENT
WARNING!Electric shockThe device is not de-energized when the on/off key is pressed and the display goes out. Use of fluids on the device may cause electric shock.
Ensure that the device is switched off before performing any hygiene treatment.
Disconnect the power supply connector before performing any hygiene treatment.
Before each hygiene treatment, take the rechargeable battery out of the device (if present and removable).
Ensure that no fluids penetrate the device.
NOTICE!Damage to deviceInappropriate detergents and disinfectants may damage the sensitive surfaces of the device.
Do not use caustic or abrasive detergents.
Do not use organic solvents (e.g. white spirit or petroleum spirit).
6.1 Cleaning
Use a soft cloth dampened with mild soapsuds to clean the surfaces of
the device.
6.2 Disinfecting
1. Disinfect the device with an alcohol-based disinfectant at regular intervals.
2. Follow the instructions for use for the disinfectant.
3. Disinfect the device:
Moisten a soft cloth with disinfectant and wipe down the device with it.
Comply with the intervals: see table.
Interval Component
Before
every
measurement
• Weighing platform
• Head slide with measuring flap
After every
measurement
• Weighing platform
• Head slide with measuring flap
As required
• Column and display head of measuring
station
• Telescopic elements of the measuring rod
• Recessed handle
26 •
English
17
-10
-07
-65
1-1
00/0
4-2
01
9S
6.3 Sterilizing
This device may not be sterilised.
7. FUNCTION CHECKPerform a function check prior to each use.
A complete function check includes:
• Visual inspection for mechanical damage
• Checking the alignment of the device
• Visual and function check of the display elements
• Function check of all the controls shown in the section entitled
“Overview”
• Function check of optional accessories
If you notice any faults or deviations during the function check, first try to
resolve the error with the aid of the section entitled “Troubleshooting” in this
document.
CAUTION!Personal injuryIf you notice any faults or deviations during the function check which cannot be resolved with the aid of the section entitled “Troubleshoot-ing” in this document, you may not use the device.
Have the device repaired by seca Service or by an authorized service partner.
Follow the section entitled “Servicing” in this document.
Function check • 27
17-1
0-0
7-6
51-1
00/0
4-2
019S
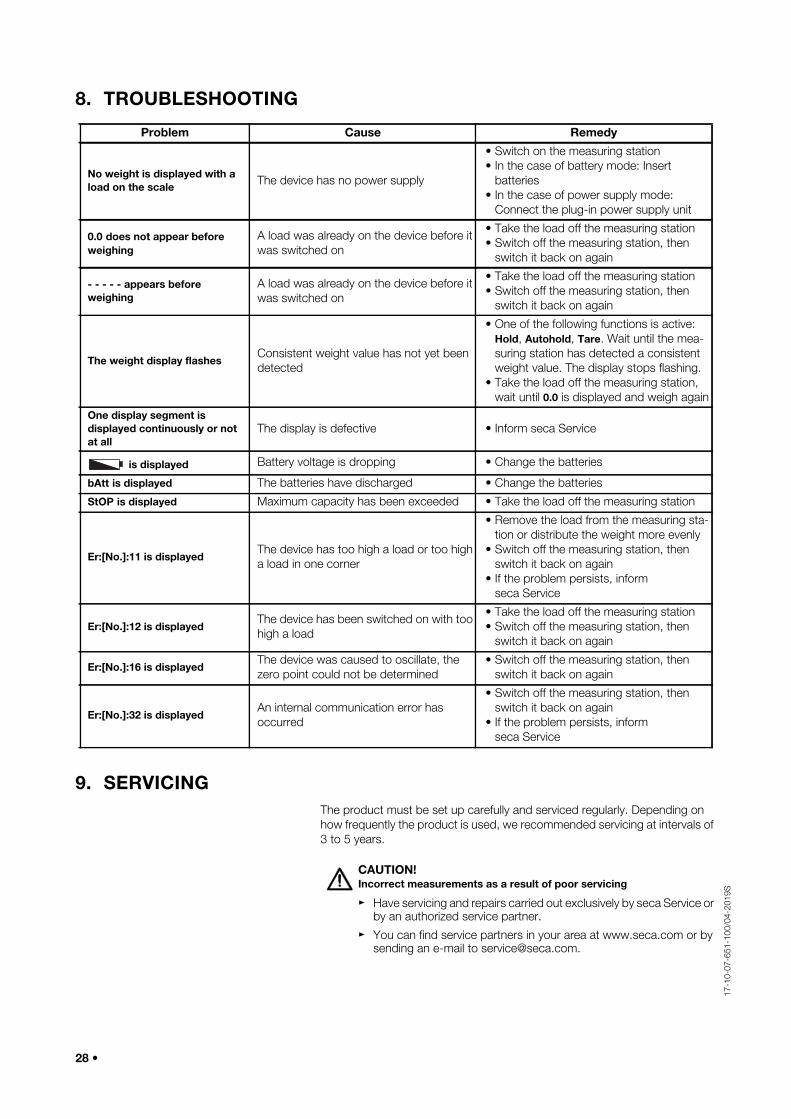
8. TROUBLESHOOTING
9. SERVICINGThe product must be set up carefully and serviced regularly. Depending on
how frequently the product is used, we recommended servicing at intervals of
3 to 5 years.
CAUTION!Incorrect measurements as a result of poor servicing
Have servicing and repairs carried out exclusively by seca Service or by an authorized service partner.
You can find service partners in your area at www.seca.com or by sending an e-mail to [email protected].
Problem Cause Remedy
No weight is displayed with a load on the scale The device has no power supply
• Switch on the measuring station
• In the case of battery mode: Insert
batteries
• In the case of power supply mode:
Connect the plug-in power supply unit
0.0 does not appear before weighing
A load was already on the device before it
was switched on
• Take the load off the measuring station
• Switch off the measuring station, then
switch it back on again
- - - - - appears before weighing
A load was already on the device before it
was switched on
• Take the load off the measuring station
• Switch off the measuring station, then
switch it back on again
The weight display flashesConsistent weight value has not yet been
detected
• One of the following functions is active:
Hold, Autohold, Tare. Wait until the mea-
suring station has detected a consistent
weight value. The display stops flashing.
• Take the load off the measuring station,
wait until 0.0 is displayed and weigh again
One display segment is displayed continuously or not at all
The display is defective • Inform seca Service
is displayed Battery voltage is dropping • Change the batteries
bAtt is displayed The batteries have discharged • Change the batteries
StOP is displayed Maximum capacity has been exceeded • Take the load off the measuring station
Er:[No.]:11 is displayedThe device has too high a load or too high
a load in one corner
• Remove the load from the measuring sta-
tion or distribute the weight more evenly
• Switch off the measuring station, then
switch it back on again
• If the problem persists, inform
seca Service
Er:[No.]:12 is displayedThe device has been switched on with too
high a load
• Take the load off the measuring station
• Switch off the measuring station, then
switch it back on again
Er:[No.]:16 is displayedThe device was caused to oscillate, the
zero point could not be determined
• Switch off the measuring station, then
switch it back on again
Er:[No.]:32 is displayedAn internal communication error has
occurred
• Switch off the measuring station, then
switch it back on again
• If the problem persists, inform
seca Service
28 •
English
17
-10
-07
-65
1-1
00/0
4-2
01
9S
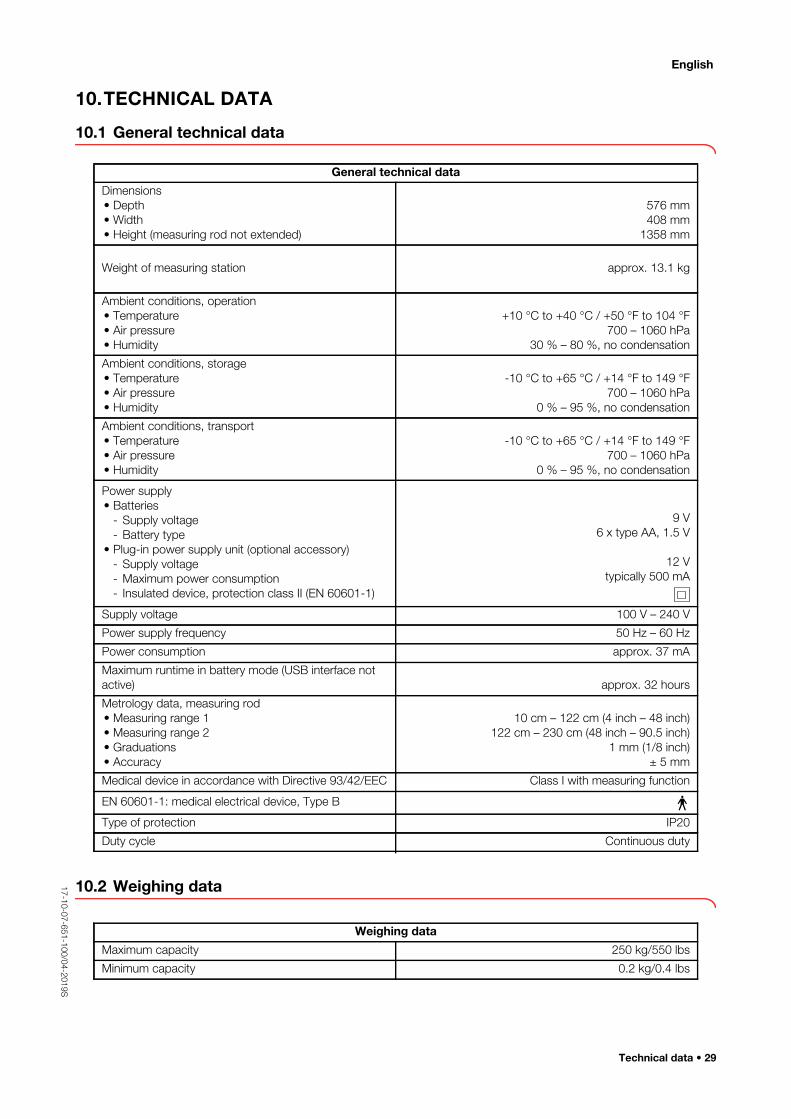
10.TECHNICAL DATA
10.1 General technical data
10.2 Weighing data
General technical data
Dimensions
• Depth
• Width
• Height (measuring rod not extended)
576 mm
408 mm
1358 mm
Weight of measuring station approx. 13.1 kg
Ambient conditions, operation
• Temperature
• Air pressure
• Humidity
+10 °C to +40 °C / +50 °F to 104 °F
700 – 1060 hPa
30 % – 80 %, no condensation
Ambient conditions, storage
• Temperature
• Air pressure
• Humidity
-10 °C to +65 °C / +14 °F to 149 °F
700 – 1060 hPa
0 % – 95 %, no condensation
Ambient conditions, transport
• Temperature
• Air pressure
• Humidity
-10 °C to +65 °C / +14 °F to 149 °F
700 – 1060 hPa
0 % – 95 %, no condensation
Power supply
• Batteries
- Supply voltage
- Battery type
• Plug-in power supply unit (optional accessory)
- Supply voltage
- Maximum power consumption
- Insulated device, protection class II (EN 60601-1)
9 V
6 x type AA, 1.5 V
12 V
typically 500 mA
Supply voltage 100 V – 240 V
Power supply frequency 50 Hz – 60 Hz
Power consumption approx. 37 mA
Maximum runtime in battery mode (USB interface not
active) approx. 32 hours
Metrology data, measuring rod
• Measuring range 1
• Measuring range 2
• Graduations
• Accuracy
10 cm – 122 cm (4 inch – 48 inch)
122 cm – 230 cm (48 inch – 90.5 inch)
1 mm (1/8 inch)
± 5 mm
Medical device in accordance with Directive 93/42/EEC Class I with measuring function
EN 60601-1: medical electrical device, Type B
Type of protection IP20
Duty cycle Continuous duty
Weighing data
Maximum capacity 250 kg/550 lbs
Minimum capacity 0.2 kg/0.4 lbs
Technical data • 29
17-1
0-0
7-6
51-1
00/0
4-2
019S
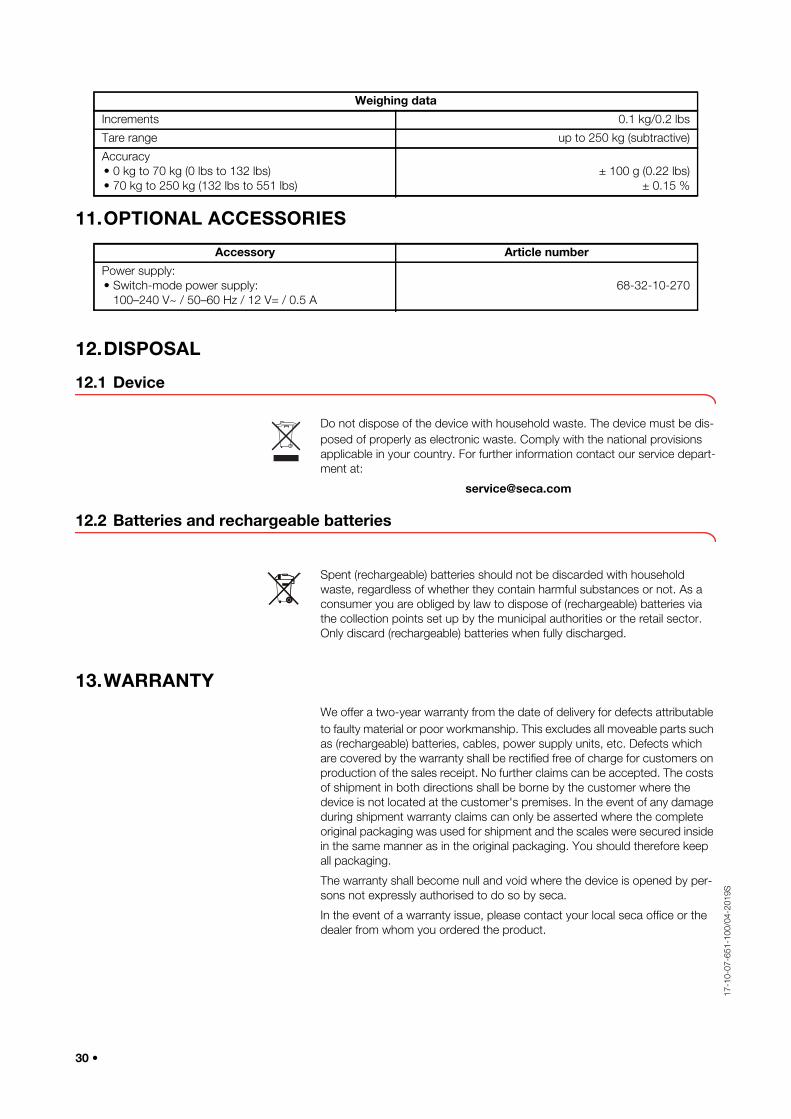
11.OPTIONAL ACCESSORIES
12.DISPOSAL
12.1 Device
Do not dispose of the device with household waste. The device must be dis-
posed of properly as electronic waste. Comply with the national provisions
applicable in your country. For further information contact our service depart-
ment at:
12.2 Batteries and rechargeable batteries
Spent (rechargeable) batteries should not be discarded with household
waste, regardless of whether they contain harmful substances or not. As a
consumer you are obliged by law to dispose of (rechargeable) batteries via
the collection points set up by the municipal authorities or the retail sector.
Only discard (rechargeable) batteries when fully discharged.
13.WARRANTY
We offer a two-year warranty from the date of delivery for defects attributable
to faulty material or poor workmanship. This excludes all moveable parts such
as (rechargeable) batteries, cables, power supply units, etc. Defects which
are covered by the warranty shall be rectified free of charge for customers on
production of the sales receipt. No further claims can be accepted. The costs
of shipment in both directions shall be borne by the customer where the
device is not located at the customer's premises. In the event of any damage
during shipment warranty claims can only be asserted where the complete
original packaging was used for shipment and the scales were secured inside
in the same manner as in the original packaging. You should therefore keep
all packaging.
The warranty shall become null and void where the device is opened by per-
sons not expressly authorised to do so by seca.
In the event of a warranty issue, please contact your local seca office or the
dealer from whom you ordered the product.
Increments 0.1 kg/0.2 lbs
Tare range up to 250 kg (subtractive)
Accuracy
• 0 kg to 70 kg (0 lbs to 132 lbs)
• 70 kg to 250 kg (132 lbs to 551 lbs)
± 100 g (0.22 lbs)
± 0.15 %
Accessory Article number
Power supply:
• Switch-mode power supply:
100–240 V~ / 50–60 Hz / 12 V= / 0.5 A
68-32-10-270
Weighing data
30 •
English
17
-10
-07
-65
1-1
00/0
4-2
01
9S
14.DECLARATIONS OF CONFORMITY
14.1 For Europe
seca gmbh & co. kg hereby declares that the product meets the terms of the
applicable European directives. The unabridged declaration of conformity can
be found at: www.seca.com.
14.2 For USA and Canada
NOTEThis device complies with Part 15 of the FCC Rules and with RSS-210 of Industry Canada. Operation is subject to the following two conditions:
• This device may not cause harmful interference.
• This device must accept any interference received, including interference that may cause undesired operation.
NOTEChanges or modifications made to this equipment not expressly approved by seca may void the FCC authorization to operate this equipment.
NOTERadiofrequency radiation exposure information:This equipment complies with FCC radiation exposure limits set forth for an uncontrolled environment. This equipment should be installed and operated with minimum distance of 1 m between the radiator and your body. This transmitter must not be co-located or operating in conjunction with any other antenna or transmitter.
0123
Declarations of conformity • 31
17
-10
-07
-65
1-1
00
/04
-20
19
S