phaser 6115mfp multifunction product user...
TRANSCRIPT
BetjeningsvejledningAnvändarhandbok
GebruikershandleidingGuia do Usuário
Guía del usuarioBenutzerhandbuch
Guida dell'utenteGuide d’utilisation
User Guide
www.xerox.com/support
Phaser® 6115MFP
multifunction product
Unpublished rights reserved under the copyright laws of the United States. Contents of this publication may not be reproduced in any form without permission of Xerox Corporation.
Copyright protection claimed includes all forms of matters of copyrightable materials and information now allowed by statutory or judicial law or hereinafter granted, including without limitation, material generated from the software programs which are displayed on the screen such as styles, templates, icons, screen displays, looks, etc.
XEROX®, CentreWare®, ControlCentre®, Phaser®, Scan to PC Desktop®, and Walk-Up® are trademarks of Xerox Corporation in the United States and/or other countries.
Adobe® and PostScript® are trademarks of Adobe Systems Incorporated in the United States and/or other countries.
Apple®, Bonjour®, ColorSync®, EtherTalk®, Macintosh®, and Mac OS® are trademarks of Apple Computer, Inc. in the United States and/or other countries.
Microsoft®, Vista™, Windows®, and Windows Server™ are trademarks of Microsoft Corporation in the United States and/or other countries.
As an ENERGY STAR® partner, Xerox Corporation has determined that this product meets the ENERGY STAR guidelines for energy efficiency. The ENERGY STAR name and logo are registered U.S. marks.
Phaser® 6115MFP Multifunction Producti
Contents1 Product Information
User Safety . . . . . . . . . . . . . . . . . . . . . . . . . . . . . . . . . . . . . . . . . . . . . . . . . . . . . . . . . . . . . . 1-2Electrical Safety . . . . . . . . . . . . . . . . . . . . . . . . . . . . . . . . . . . . . . . . . . . . . . . . . . . . . 1-2Maintenance Safety. . . . . . . . . . . . . . . . . . . . . . . . . . . . . . . . . . . . . . . . . . . . . . . . . . . 1-4Laser Safety. . . . . . . . . . . . . . . . . . . . . . . . . . . . . . . . . . . . . . . . . . . . . . . . . . . . . . . . . 1-4Operational Safety. . . . . . . . . . . . . . . . . . . . . . . . . . . . . . . . . . . . . . . . . . . . . . . . . . . . 1-5Symbols Marked on Product. . . . . . . . . . . . . . . . . . . . . . . . . . . . . . . . . . . . . . . . . . . . 1-6
Regulatory Information . . . . . . . . . . . . . . . . . . . . . . . . . . . . . . . . . . . . . . . . . . . . . . . . . . . . . 1-7
Copy Regulations . . . . . . . . . . . . . . . . . . . . . . . . . . . . . . . . . . . . . . . . . . . . . . . . . . . . . . . . . 1-9
Fax Regulations . . . . . . . . . . . . . . . . . . . . . . . . . . . . . . . . . . . . . . . . . . . . . . . . . . . . . . . . . . 1-12
Product Specifications . . . . . . . . . . . . . . . . . . . . . . . . . . . . . . . . . . . . . . . . . . . . . . . . . . . . . 1-17
Material Safety Data Sheet . . . . . . . . . . . . . . . . . . . . . . . . . . . . . . . . . . . . . . . . . . . . . . . . . 1-19
Product Recycling and Disposal . . . . . . . . . . . . . . . . . . . . . . . . . . . . . . . . . . . . . . . . . . . . . 1-20All Countries . . . . . . . . . . . . . . . . . . . . . . . . . . . . . . . . . . . . . . . . . . . . . . . . . . . . . . . 1-20European Union . . . . . . . . . . . . . . . . . . . . . . . . . . . . . . . . . . . . . . . . . . . . . . . . . . . . 1-20North America. . . . . . . . . . . . . . . . . . . . . . . . . . . . . . . . . . . . . . . . . . . . . . . . . . . . . . 1-21Other Countries . . . . . . . . . . . . . . . . . . . . . . . . . . . . . . . . . . . . . . . . . . . . . . . . . . . . . 1-21
2 Product Features
Product Tour . . . . . . . . . . . . . . . . . . . . . . . . . . . . . . . . . . . . . . . . . . . . . . . . . . . . . . . . . . . . . 2-2Front View . . . . . . . . . . . . . . . . . . . . . . . . . . . . . . . . . . . . . . . . . . . . . . . . . . . . . . . . . 2-2Open View . . . . . . . . . . . . . . . . . . . . . . . . . . . . . . . . . . . . . . . . . . . . . . . . . . . . . . . . . 2-3Back View. . . . . . . . . . . . . . . . . . . . . . . . . . . . . . . . . . . . . . . . . . . . . . . . . . . . . . . . . . 2-3
Product Configurations . . . . . . . . . . . . . . . . . . . . . . . . . . . . . . . . . . . . . . . . . . . . . . . . . . . . . 2-4Standard Features . . . . . . . . . . . . . . . . . . . . . . . . . . . . . . . . . . . . . . . . . . . . . . . . . . . . 2-4Available Configurations . . . . . . . . . . . . . . . . . . . . . . . . . . . . . . . . . . . . . . . . . . . . . . 2-5Options . . . . . . . . . . . . . . . . . . . . . . . . . . . . . . . . . . . . . . . . . . . . . . . . . . . . . . . . . . . . 2-5
Print and Scan Drivers. . . . . . . . . . . . . . . . . . . . . . . . . . . . . . . . . . . . . . . . . . . . . . . . . . . . . . 2-6Computer System Requirements. . . . . . . . . . . . . . . . . . . . . . . . . . . . . . . . . . . . . . . . . 2-6
Control Panel . . . . . . . . . . . . . . . . . . . . . . . . . . . . . . . . . . . . . . . . . . . . . . . . . . . . . . . . . . . . . 2-7Control Panel Features . . . . . . . . . . . . . . . . . . . . . . . . . . . . . . . . . . . . . . . . . . . . . . . . 2-7Control Panel Layout . . . . . . . . . . . . . . . . . . . . . . . . . . . . . . . . . . . . . . . . . . . . . . . . . 2-7Display Indicators . . . . . . . . . . . . . . . . . . . . . . . . . . . . . . . . . . . . . . . . . . . . . . . . . . . 2-11
Contents
Phaser® 6115MFP Multifunction Productii
Control Panel Menus . . . . . . . . . . . . . . . . . . . . . . . . . . . . . . . . . . . . . . . . . . . . . . . . . . . . . . 2-12Printing a Configuration Page. . . . . . . . . . . . . . . . . . . . . . . . . . . . . . . . . . . . . . . . . . 2-12Printing a Menu Map . . . . . . . . . . . . . . . . . . . . . . . . . . . . . . . . . . . . . . . . . . . . . . . . 2-12Checking Product Status and Settings on the Control Panel . . . . . . . . . . . . . . . . . . 2-13
Control Panel Menu Structure . . . . . . . . . . . . . . . . . . . . . . . . . . . . . . . . . . . . . . . . . . . . . . . 2-15
More Information . . . . . . . . . . . . . . . . . . . . . . . . . . . . . . . . . . . . . . . . . . . . . . . . . . . . . . . . 2-18Resources . . . . . . . . . . . . . . . . . . . . . . . . . . . . . . . . . . . . . . . . . . . . . . . . . . . . . . . . . 2-18
3 Product Management
Product Management Overview . . . . . . . . . . . . . . . . . . . . . . . . . . . . . . . . . . . . . . . . . . . . . . 3-2
CentreWare Internet Services . . . . . . . . . . . . . . . . . . . . . . . . . . . . . . . . . . . . . . . . . . . . . . . . 3-3Creating an Administrative Password. . . . . . . . . . . . . . . . . . . . . . . . . . . . . . . . . . . . . 3-3
MFP ControlCentre (Windows Only with USB Connection) . . . . . . . . . . . . . . . . . . . . . . . . 3-4Using the MFP ControlCentre . . . . . . . . . . . . . . . . . . . . . . . . . . . . . . . . . . . . . . . . . . 3-4
Configuring the Product . . . . . . . . . . . . . . . . . . . . . . . . . . . . . . . . . . . . . . . . . . . . . . . . . . . . 3-5User Setup . . . . . . . . . . . . . . . . . . . . . . . . . . . . . . . . . . . . . . . . . . . . . . . . . . . . . . . . . . 3-5Setting the Auto Panel Reset. . . . . . . . . . . . . . . . . . . . . . . . . . . . . . . . . . . . . . . . . . . . 3-6Changing the Energy Save Mode . . . . . . . . . . . . . . . . . . . . . . . . . . . . . . . . . . . . . . . . 3-7Setting the LCD Contrast . . . . . . . . . . . . . . . . . . . . . . . . . . . . . . . . . . . . . . . . . . . . . . 3-7Setting the Control Panel Language . . . . . . . . . . . . . . . . . . . . . . . . . . . . . . . . . . . . . . 3-8Setting the Scanner Lamp Off Time . . . . . . . . . . . . . . . . . . . . . . . . . . . . . . . . . . . . . . 3-9Setting the Speaker Volume . . . . . . . . . . . . . . . . . . . . . . . . . . . . . . . . . . . . . . . . . . . . 3-9Setting the Control Panel Default Mode . . . . . . . . . . . . . . . . . . . . . . . . . . . . . . . . . . 3-10Setting the Toner Out Action . . . . . . . . . . . . . . . . . . . . . . . . . . . . . . . . . . . . . . . . . . 3-11Setting the Media Mismatch Behavior . . . . . . . . . . . . . . . . . . . . . . . . . . . . . . . . . . . 3-12Calibrating the Product . . . . . . . . . . . . . . . . . . . . . . . . . . . . . . . . . . . . . . . . . . . . . . . 3-13Paper Source Setup Menu . . . . . . . . . . . . . . . . . . . . . . . . . . . . . . . . . . . . . . . . . . . . . 3-14
4 Network Basics
Networking Protocols . . . . . . . . . . . . . . . . . . . . . . . . . . . . . . . . . . . . . . . . . . . . . . . . . . . . . . 4-2Network Connection Overview . . . . . . . . . . . . . . . . . . . . . . . . . . . . . . . . . . . . . . . . . 4-4
Methods of Setting the Product’s IP Address . . . . . . . . . . . . . . . . . . . . . . . . . . . . . . . . . . . . 4-6Automatically Setting the Product’s IP Address. . . . . . . . . . . . . . . . . . . . . . . . . . . . . 4-7Manually Setting the Product’s IP Address . . . . . . . . . . . . . . . . . . . . . . . . . . . . . . . . 4-8
5 Using Printer Driver Options
Accessing the Printer Driver Settings . . . . . . . . . . . . . . . . . . . . . . . . . . . . . . . . . . . . . . . . . . 5-2Setting the Default Printer Driver Settings (Windows) . . . . . . . . . . . . . . . . . . . . . . . 5-2Configuring Options . . . . . . . . . . . . . . . . . . . . . . . . . . . . . . . . . . . . . . . . . . . . . . . . . . 5-3
Contents
Phaser® 6115MFP Multifunction Productiii
Using the Windows Printer Driver . . . . . . . . . . . . . . . . . . . . . . . . . . . . . . . . . . . . . . . . . . . . 5-4Create or Delete a Saved Settings File . . . . . . . . . . . . . . . . . . . . . . . . . . . . . . . . . . . . 5-4Add, Edit, or Delete Custom Paper Sizes . . . . . . . . . . . . . . . . . . . . . . . . . . . . . . . . . . 5-5Pages per Sheet . . . . . . . . . . . . . . . . . . . . . . . . . . . . . . . . . . . . . . . . . . . . . . . . . . . . . . 5-6Booklet Printing . . . . . . . . . . . . . . . . . . . . . . . . . . . . . . . . . . . . . . . . . . . . . . . . . . . . . 5-7Poster Printing. . . . . . . . . . . . . . . . . . . . . . . . . . . . . . . . . . . . . . . . . . . . . . . . . . . . . . . 5-8Add, Edit, or Delete an Overlay . . . . . . . . . . . . . . . . . . . . . . . . . . . . . . . . . . . . . . . . . 5-9Add, Edit, or Delete a Watermark. . . . . . . . . . . . . . . . . . . . . . . . . . . . . . . . . . . . . . . 5-10
Using the Macintosh Printer Driver. . . . . . . . . . . . . . . . . . . . . . . . . . . . . . . . . . . . . . . . . . . 5-12Selecting Print Options . . . . . . . . . . . . . . . . . . . . . . . . . . . . . . . . . . . . . . . . . . . . . . . 5-12Specifying Page Setup Settings. . . . . . . . . . . . . . . . . . . . . . . . . . . . . . . . . . . . . . . . . 5-12Custom Paper Size Options. . . . . . . . . . . . . . . . . . . . . . . . . . . . . . . . . . . . . . . . . . . . 5-12
Specifying Print Settings . . . . . . . . . . . . . . . . . . . . . . . . . . . . . . . . . . . . . . . . . . . . . . . . . . . 5-13Copies and Pages . . . . . . . . . . . . . . . . . . . . . . . . . . . . . . . . . . . . . . . . . . . . . . . . . . . 5-13Layout . . . . . . . . . . . . . . . . . . . . . . . . . . . . . . . . . . . . . . . . . . . . . . . . . . . . . . . . . . . . 5-14Scheduler. . . . . . . . . . . . . . . . . . . . . . . . . . . . . . . . . . . . . . . . . . . . . . . . . . . . . . . . . . 5-14Duplex (2-Sided Printing) . . . . . . . . . . . . . . . . . . . . . . . . . . . . . . . . . . . . . . . . . . . . . 5-14Paper Handling . . . . . . . . . . . . . . . . . . . . . . . . . . . . . . . . . . . . . . . . . . . . . . . . . . . . . 5-15ColorSync . . . . . . . . . . . . . . . . . . . . . . . . . . . . . . . . . . . . . . . . . . . . . . . . . . . . . . . . . 5-15Cover Page . . . . . . . . . . . . . . . . . . . . . . . . . . . . . . . . . . . . . . . . . . . . . . . . . . . . . . . . 5-15Paper Feed. . . . . . . . . . . . . . . . . . . . . . . . . . . . . . . . . . . . . . . . . . . . . . . . . . . . . . . . . 5-15
6 Printing Basics
Supported Paper and Media . . . . . . . . . . . . . . . . . . . . . . . . . . . . . . . . . . . . . . . . . . . . . . . . . 6-2
Output Bin . . . . . . . . . . . . . . . . . . . . . . . . . . . . . . . . . . . . . . . . . . . . . . . . . . . . . . . . . . . . . . . 6-3
Loading Media. . . . . . . . . . . . . . . . . . . . . . . . . . . . . . . . . . . . . . . . . . . . . . . . . . . . . . . . . . . . 6-5Loading Plain Paper . . . . . . . . . . . . . . . . . . . . . . . . . . . . . . . . . . . . . . . . . . . . . . . . . . 6-6Card Stock. . . . . . . . . . . . . . . . . . . . . . . . . . . . . . . . . . . . . . . . . . . . . . . . . . . . . . . . . 6-10Thick Card Stock . . . . . . . . . . . . . . . . . . . . . . . . . . . . . . . . . . . . . . . . . . . . . . . . . . . 6-10Loading Envelopes . . . . . . . . . . . . . . . . . . . . . . . . . . . . . . . . . . . . . . . . . . . . . . . . . . 6-11Labels . . . . . . . . . . . . . . . . . . . . . . . . . . . . . . . . . . . . . . . . . . . . . . . . . . . . . . . . . . . . 6-18Letterhead . . . . . . . . . . . . . . . . . . . . . . . . . . . . . . . . . . . . . . . . . . . . . . . . . . . . . . . . . 6-19Transparency. . . . . . . . . . . . . . . . . . . . . . . . . . . . . . . . . . . . . . . . . . . . . . . . . . . . . . . 6-20Glossy Stock . . . . . . . . . . . . . . . . . . . . . . . . . . . . . . . . . . . . . . . . . . . . . . . . . . . . . . . 6-21Loading Specialty Media . . . . . . . . . . . . . . . . . . . . . . . . . . . . . . . . . . . . . . . . . . . . . 6-21
Guaranteed Imageable (Printable) Area . . . . . . . . . . . . . . . . . . . . . . . . . . . . . . . . . . . . . . . 6-24
Options. . . . . . . . . . . . . . . . . . . . . . . . . . . . . . . . . . . . . . . . . . . . . . . . . . . . . . . . . . . . . . . . . 6-25Loading Paper in Tray 2 . . . . . . . . . . . . . . . . . . . . . . . . . . . . . . . . . . . . . . . . . . . . . . 6-252-Sided Printing (Duplexing) . . . . . . . . . . . . . . . . . . . . . . . . . . . . . . . . . . . . . . . . . . 6-28
Contents
Phaser® 6115MFP Multifunction Productiv
7 Copying
Basic Copying . . . . . . . . . . . . . . . . . . . . . . . . . . . . . . . . . . . . . . . . . . . . . . . . . . . . . . . . . . . . 7-2Loading Originals . . . . . . . . . . . . . . . . . . . . . . . . . . . . . . . . . . . . . . . . . . . . . . . . . . . . 7-2
Adjusting Copy Options . . . . . . . . . . . . . . . . . . . . . . . . . . . . . . . . . . . . . . . . . . . . . . . . . . . . 7-3Setting the Original Document Type . . . . . . . . . . . . . . . . . . . . . . . . . . . . . . . . . . . . . 7-3Setting the Copy Quality. . . . . . . . . . . . . . . . . . . . . . . . . . . . . . . . . . . . . . . . . . . . . . . 7-4Setting the Copy Density . . . . . . . . . . . . . . . . . . . . . . . . . . . . . . . . . . . . . . . . . . . . . . 7-4Collating Copies . . . . . . . . . . . . . . . . . . . . . . . . . . . . . . . . . . . . . . . . . . . . . . . . . . . . . 7-5Selecting Paper Priority . . . . . . . . . . . . . . . . . . . . . . . . . . . . . . . . . . . . . . . . . . . . . . . 7-6Specifying a Zoom Ratio . . . . . . . . . . . . . . . . . . . . . . . . . . . . . . . . . . . . . . . . . . . . . . 7-7
Advanced Copying . . . . . . . . . . . . . . . . . . . . . . . . . . . . . . . . . . . . . . . . . . . . . . . . . . . . . . . . 7-8Setting 2in1 Copying . . . . . . . . . . . . . . . . . . . . . . . . . . . . . . . . . . . . . . . . . . . . . . . . . 7-8ID Card Copying. . . . . . . . . . . . . . . . . . . . . . . . . . . . . . . . . . . . . . . . . . . . . . . . . . . . . 7-9Printing 2-Sided Copies . . . . . . . . . . . . . . . . . . . . . . . . . . . . . . . . . . . . . . . . . . . . . . 7-10
8 Scanning
Basic Scanning via USB . . . . . . . . . . . . . . . . . . . . . . . . . . . . . . . . . . . . . . . . . . . . . . . . . . . . 8-2
Scan to Email (Network Only) . . . . . . . . . . . . . . . . . . . . . . . . . . . . . . . . . . . . . . . . . . . . . . . 8-3Setting up the SMTP Server . . . . . . . . . . . . . . . . . . . . . . . . . . . . . . . . . . . . . . . . . . . . 8-3Scan to Email Using the ADF. . . . . . . . . . . . . . . . . . . . . . . . . . . . . . . . . . . . . . . . . . . 8-5Scan to Email Using the Document Glass . . . . . . . . . . . . . . . . . . . . . . . . . . . . . . . . . 8-7Specifying a Recipient . . . . . . . . . . . . . . . . . . . . . . . . . . . . . . . . . . . . . . . . . . . . . . . . 8-8Changing the Scan Mode Settings . . . . . . . . . . . . . . . . . . . . . . . . . . . . . . . . . . . . . . . 8-9Changing the Scanned Image Size . . . . . . . . . . . . . . . . . . . . . . . . . . . . . . . . . . . . . . . 8-9
9 Faxing
Managing Fax Functions . . . . . . . . . . . . . . . . . . . . . . . . . . . . . . . . . . . . . . . . . . . . . . . . . . . . 9-2Fax Mode Control Panel . . . . . . . . . . . . . . . . . . . . . . . . . . . . . . . . . . . . . . . . . . . . . . . 9-2Fax Mode Display . . . . . . . . . . . . . . . . . . . . . . . . . . . . . . . . . . . . . . . . . . . . . . . . . . . . 9-3Fax Control Panel Symbols. . . . . . . . . . . . . . . . . . . . . . . . . . . . . . . . . . . . . . . . . . . . . 9-3Managing Fax Settings . . . . . . . . . . . . . . . . . . . . . . . . . . . . . . . . . . . . . . . . . . . . . . . . 9-4
Sending Faxes . . . . . . . . . . . . . . . . . . . . . . . . . . . . . . . . . . . . . . . . . . . . . . . . . . . . . . . . . . . . 9-8Sending a Fax from the Automatic Document Feeder (ADF) . . . . . . . . . . . . . . . . . . 9-8Sending a Fax from the Document Glass . . . . . . . . . . . . . . . . . . . . . . . . . . . . . . . . . . 9-9Sending a Fax to Multiple Recipients . . . . . . . . . . . . . . . . . . . . . . . . . . . . . . . . . . . . 9-10Sending a Fax at a Specified Time . . . . . . . . . . . . . . . . . . . . . . . . . . . . . . . . . . . . . . 9-11Canceling a Document Queued in Memory for Transmission . . . . . . . . . . . . . . . . . 9-11
Receiving Faxes. . . . . . . . . . . . . . . . . . . . . . . . . . . . . . . . . . . . . . . . . . . . . . . . . . . . . . . . . . 9-12Receiving Faxes Automatically . . . . . . . . . . . . . . . . . . . . . . . . . . . . . . . . . . . . . . . . 9-12Receiving Faxes Manually . . . . . . . . . . . . . . . . . . . . . . . . . . . . . . . . . . . . . . . . . . . . 9-12
Contents
Phaser® 6115MFP Multifunction Productv
Registering Recipients. . . . . . . . . . . . . . . . . . . . . . . . . . . . . . . . . . . . . . . . . . . . . . . . . . . . . 9-13Using the Phone Book. . . . . . . . . . . . . . . . . . . . . . . . . . . . . . . . . . . . . . . . . . . . . . . . 9-13Entering Text on the Control Panel. . . . . . . . . . . . . . . . . . . . . . . . . . . . . . . . . . . . . . 9-14Adding One-Touch Dial Entries . . . . . . . . . . . . . . . . . . . . . . . . . . . . . . . . . . . . . . . . 9-15Editing or Deleting a One-Touch Entry . . . . . . . . . . . . . . . . . . . . . . . . . . . . . . . . . . 9-16Adding Speed Dial Entries . . . . . . . . . . . . . . . . . . . . . . . . . . . . . . . . . . . . . . . . . . . . 9-17Editing or Deleting Speed Dial Entries. . . . . . . . . . . . . . . . . . . . . . . . . . . . . . . . . . . 9-18Adding Group Dial Entries . . . . . . . . . . . . . . . . . . . . . . . . . . . . . . . . . . . . . . . . . . . . 9-19Editing or Deleting Group Dial Entries . . . . . . . . . . . . . . . . . . . . . . . . . . . . . . . . . . 9-20
Fax Reports . . . . . . . . . . . . . . . . . . . . . . . . . . . . . . . . . . . . . . . . . . . . . . . . . . . . . . . . . . . . . 9-21Product Counters. . . . . . . . . . . . . . . . . . . . . . . . . . . . . . . . . . . . . . . . . . . . . . . . . . . . 9-21Printing Reports . . . . . . . . . . . . . . . . . . . . . . . . . . . . . . . . . . . . . . . . . . . . . . . . . . . . 9-22
Solving Fax Problems . . . . . . . . . . . . . . . . . . . . . . . . . . . . . . . . . . . . . . . . . . . . . . . . . . . . . 9-23Problems Sending Faxes . . . . . . . . . . . . . . . . . . . . . . . . . . . . . . . . . . . . . . . . . . . . . . 9-24Problems Receiving Faxes . . . . . . . . . . . . . . . . . . . . . . . . . . . . . . . . . . . . . . . . . . . . 9-25Error Messages . . . . . . . . . . . . . . . . . . . . . . . . . . . . . . . . . . . . . . . . . . . . . . . . . . . . . 9-25
10 Product Maintenance
Maintenance and Cleaning . . . . . . . . . . . . . . . . . . . . . . . . . . . . . . . . . . . . . . . . . . . . . . . . . 10-2General Precautions . . . . . . . . . . . . . . . . . . . . . . . . . . . . . . . . . . . . . . . . . . . . . . . . . 10-2
Moving the Product . . . . . . . . . . . . . . . . . . . . . . . . . . . . . . . . . . . . . . . . . . . . . . . . . . . . . . . 10-4Cleaning the Exterior . . . . . . . . . . . . . . . . . . . . . . . . . . . . . . . . . . . . . . . . . . . . . . . . 10-5Cleaning the Original Glass and Cover Pad . . . . . . . . . . . . . . . . . . . . . . . . . . . . . . . 10-6Cleaning the Media Feed Roller and Laser Lens . . . . . . . . . . . . . . . . . . . . . . . . . . . 10-7Cleaning the Duplex Feed Rollers . . . . . . . . . . . . . . . . . . . . . . . . . . . . . . . . . . . . . 10-11Cleaning the Tray 2 Feed Rollers . . . . . . . . . . . . . . . . . . . . . . . . . . . . . . . . . . . . . . 10-12Cleaning the ADF Feed Rollers . . . . . . . . . . . . . . . . . . . . . . . . . . . . . . . . . . . . . . . 10-14
Ordering Supplies . . . . . . . . . . . . . . . . . . . . . . . . . . . . . . . . . . . . . . . . . . . . . . . . . . . . . . . 10-15Consumables . . . . . . . . . . . . . . . . . . . . . . . . . . . . . . . . . . . . . . . . . . . . . . . . . . . . . . 10-15Routine Maintenance Items . . . . . . . . . . . . . . . . . . . . . . . . . . . . . . . . . . . . . . . . . . 10-15When to Order Supplies . . . . . . . . . . . . . . . . . . . . . . . . . . . . . . . . . . . . . . . . . . . . . 10-16Recycling Supplies . . . . . . . . . . . . . . . . . . . . . . . . . . . . . . . . . . . . . . . . . . . . . . . . . 10-16

Contents
Phaser® 6115MFP Multifunction Productvi
11 Troubleshooting
Preventing Paper Jams. . . . . . . . . . . . . . . . . . . . . . . . . . . . . . . . . . . . . . . . . . . . . . . . . . . . . 11-2Understanding the Media Path . . . . . . . . . . . . . . . . . . . . . . . . . . . . . . . . . . . . . . . . . 11-3
Clearing Paper Jams . . . . . . . . . . . . . . . . . . . . . . . . . . . . . . . . . . . . . . . . . . . . . . . . . . . . . . 11-4Clearing Paper Jams Inside the Product . . . . . . . . . . . . . . . . . . . . . . . . . . . . . . . . . . 11-4Clearing Paper Jams from Tray 1 . . . . . . . . . . . . . . . . . . . . . . . . . . . . . . . . . . . . . . . 11-9Clearing Paper Jams from Tray 2 . . . . . . . . . . . . . . . . . . . . . . . . . . . . . . . . . . . . . . 11-11Clearing Paper Jams in the Duplex Unit . . . . . . . . . . . . . . . . . . . . . . . . . . . . . . . . . 11-13Clearing Paper Jams in the ADF. . . . . . . . . . . . . . . . . . . . . . . . . . . . . . . . . . . . . . . 11-14Solving Problems with Paper Jams. . . . . . . . . . . . . . . . . . . . . . . . . . . . . . . . . . . . . 11-17
Product Troubleshooting . . . . . . . . . . . . . . . . . . . . . . . . . . . . . . . . . . . . . . . . . . . . . . . . . . 11-19General Troubleshooting. . . . . . . . . . . . . . . . . . . . . . . . . . . . . . . . . . . . . . . . . . . . . 11-19Duplex Problems. . . . . . . . . . . . . . . . . . . . . . . . . . . . . . . . . . . . . . . . . . . . . . . . . . . 11-21Driver Problems . . . . . . . . . . . . . . . . . . . . . . . . . . . . . . . . . . . . . . . . . . . . . . . . . . . 11-21Product Management Software Problems. . . . . . . . . . . . . . . . . . . . . . . . . . . . . . . . 11-22
Print-Quality Problems . . . . . . . . . . . . . . . . . . . . . . . . . . . . . . . . . . . . . . . . . . . . . . . . . . . 11-23Controlling the Quality of Your Prints . . . . . . . . . . . . . . . . . . . . . . . . . . . . . . . . . . 11-23Selecting a Resolution. . . . . . . . . . . . . . . . . . . . . . . . . . . . . . . . . . . . . . . . . . . . . . . 11-23Adjusting Color. . . . . . . . . . . . . . . . . . . . . . . . . . . . . . . . . . . . . . . . . . . . . . . . . . . . 11-24Troubleshooting Print-Quality Problems . . . . . . . . . . . . . . . . . . . . . . . . . . . . . . . . 11-25
Status, Error, and Service Messages . . . . . . . . . . . . . . . . . . . . . . . . . . . . . . . . . . . . . . . . . 11-33Status Messages . . . . . . . . . . . . . . . . . . . . . . . . . . . . . . . . . . . . . . . . . . . . . . . . . . . 11-33Error Messages . . . . . . . . . . . . . . . . . . . . . . . . . . . . . . . . . . . . . . . . . . . . . . . . . . . . 11-34Service Messages . . . . . . . . . . . . . . . . . . . . . . . . . . . . . . . . . . . . . . . . . . . . . . . . . . 11-37
Getting Help . . . . . . . . . . . . . . . . . . . . . . . . . . . . . . . . . . . . . . . . . . . . . . . . . . . . . . . . . . . 11-38
Index
Phaser® 6115MFP Multifunction Product1-1
This chapter includes:
■ User Safety on page 1-2■ Regulatory Information on page 1-7■ Copy Regulations on page 1-9■ Fax Regulations on page 1-12■ Product Specifications on page 1-17■ Material Safety Data Sheet on page 1-19■ Product Recycling and Disposal on page 1-20
Product Information
User Safety
Phaser® 6115MFP Multifunction Product1-2
User SafetyThis section includes:
■ Electrical Safety on page 1-2■ Maintenance Safety on page 1-4■ Laser Safety on page 1-4■ Operational Safety on page 1-5■ Symbols Marked on Product on page 1-6
Your product and the recommended supplies have been designed and tested to meet strict safety requirements. Attention to the following information ensures the continued safe operation of your product.
Electrical Safety■ Use the power cord supplied with your product.■ Plug the power cord directly into a properly grounded electrical outlet. Make sure each
end of the cord is securely connected. If you do not know if an outlet is grounded, ask an electrician to check the outlet.
■ Do not use a ground adapter plug to connect the printer to an electrical outlet that does not have a ground connection terminal.
■ Do not use an extension cord or power strip.■ Verify that the product is plugged into an outlet that is capable of providing the correct
voltage and power. Review the product’s electrical specification with an electrician if necessary.
Warning: Avoid the potential of electrical shock by ensuring that the product is properly grounded. Electrical products may be hazardous if misused.
■ Do not place the product in an area where people might step on the power cord.■ Do not place objects on the power cord.■ Do not block the ventilation openings. These openings are provided to prevent overheating
of the product.■ Do not drop paper clips or staples into the product.
Warning: Do not push objects into slots or openings on the product. Making contact with a voltage point or shorting out a part could result in fire or electrical shock.
User Safety
Phaser® 6115MFP Multifunction Product1-3
If you notice unusual noises or odors:
1. Turn off the product immediately.
2. Disconnect the power cord from the electrical outlet.
3. Call an authorized service representative to correct the problem.
The power cord is attached to the product as a plug-in device on the back of the product. If it is necessary to disconnect all electrical power from the product, disconnect the power cord from the electrical outlet.
Warning: Do not remove the covers or guards that are fastened with screws unless you are installing optional equipment and are specifically instructed to do so. Power should be OFF when performing these installations. Disconnect the power cord when removing covers and guards for installing optional equipment. Except for user-installable options, there are no parts that you can maintain or service behind these covers.
The following are hazards to your safety:
■ The power cord is damaged or frayed.■ Liquid is spilled into the product.■ The product is exposed to water.
If any of these conditions occur, do the following:
1. Turn off the product immediately.
2. Disconnect the power cord from the electrical outlet.
3. Call an authorized service representative.
Caution: To reduce the risk of fire, use only No. 26 American Wire Gauge (AWG) or larger telecommunication line cord.
User Safety
Phaser® 6115MFP Multifunction Product1-4
Maintenance Safety■ Do not attempt any maintenance procedure that is not specifically described in the
documentation supplied with your product.■ Do not use aerosol cleaners. The use of supplies that are not approved may cause poor
performance and could create a hazardous condition.■ Do not burn any consumables or routine maintenance items. For information on Xerox
supplies recycling programs, go to www.xerox.com/gwa.
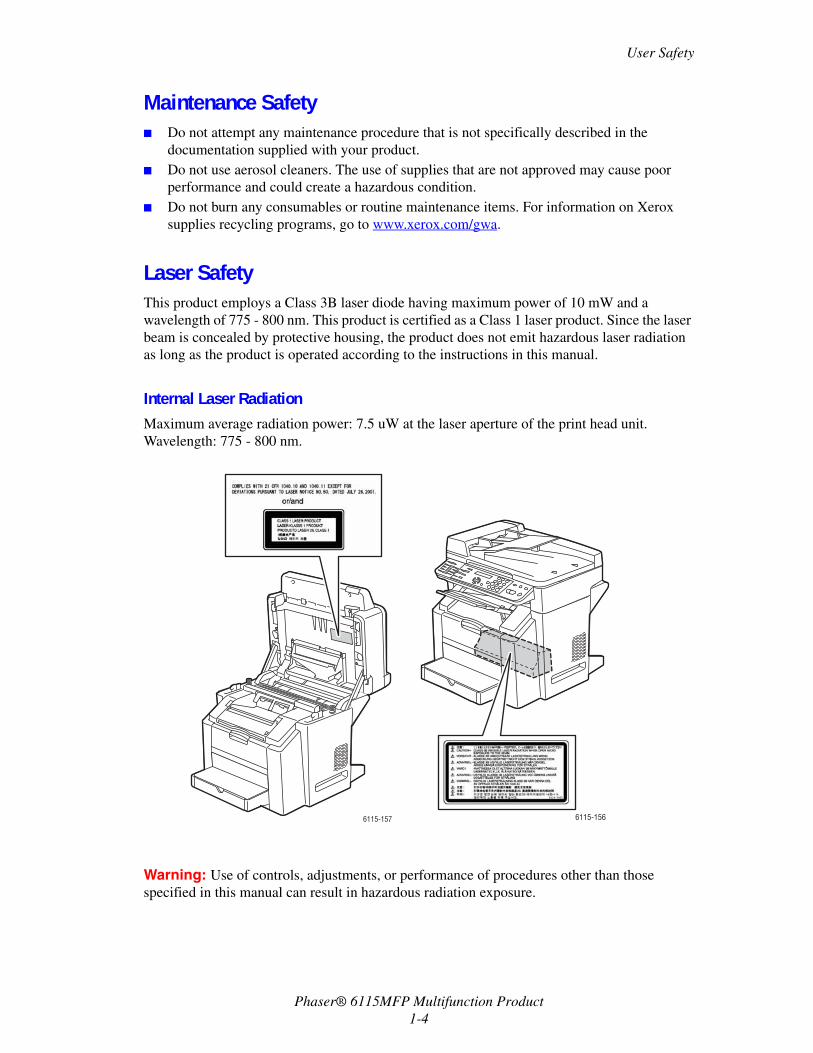
Laser SafetyThis product employs a Class 3B laser diode having maximum power of 10 mW and a wavelength of 775 - 800 nm. This product is certified as a Class 1 laser product. Since the laser beam is concealed by protective housing, the product does not emit hazardous laser radiation as long as the product is operated according to the instructions in this manual.
Internal Laser RadiationMaximum average radiation power: 7.5 uW at the laser aperture of the print head unit. Wavelength: 775 - 800 nm.
Warning: Use of controls, adjustments, or performance of procedures other than those specified in this manual can result in hazardous radiation exposure.
6115-1566115-157

User Safety
Phaser® 6115MFP Multifunction Product1-5
Operational SafetyYour product and supplies were designed and tested to meet strict safety requirements. These include safety agency examination, approval, and compliance with established environmental standards.
Your attention to the following safety guidelines helps to ensure the continued, safe operation of your product.
Product Location
■ Place the product in a dust-free area within a temperature range of 50° F to 90° F (10° C to 32° C) and a relative humidity range of 15 percent to 80 percent.
■ Place the product in an area where there is adequate space for ventilation, operation, and servicing.
■ Do not place the product on a carpeted location such as a carpeted floor. Airborne carpet fibers can be pulled into the product and cause print- and copy-quality problems.
■ Do not place the product near a heat source.■ Do not place the product in direct sunlight to avoid exposure to light-sensitive
components.■ Do not place the product where it is directly exposed to the cold air flow from an air
conditioning product.
Operational Guidelines■ Do not block or cover the slots and opening on the product. The product may overheat
without adequate ventilation.■ Place the product on a level, solid non-vibrating surface with adequate strength to hold the
weight of the product. The base product weight without any packaging materials is approximately 33 kg (72.8 lb.).
Printing Safety Guidelines
■ Keep hands, hair, neckties, etc., away from the exit and feed rollers.■ Do not remove the paper source tray that you selected in either the printer driver or control
panel.■ Do not open the doors when the product is printing.■ Do not move the product when it is printing.

User Safety
Phaser® 6115MFP Multifunction Product1-6
Product Supplies
■ Use the supplies specifically designed for your product. The use of unsuitable materials may cause poor performance and a possible safety hazard.
■ Follow all warnings and instructions marked on, or supplied with, the product, options, and supplies.
Caution: Use of non-Xerox supplies is not recommended. The Xerox Warranty, Service Agreements, and Total Satisfaction Guarantee do not cover damage, malfunction, or degradation of performance caused by use of non-Xerox supplies, or the use of Xerox supplies not specified for this product. The Total Satisfaction Guarantee is available in the United States and Canada. Coverage may vary outside these areas; please contact your local representative for details.
Symbols Marked on Product
Warning or Caution:
Ignoring this warning could cause serious injury or even death.
Ignoring this caution could cause injury or damage to the property.
Hot surface on or in the product. Use caution to avoid personal injury.
Do not touch components with this symbol as personal injury could result.
Do not burn the item.
Regulatory Information
Phaser® 6115MFP Multifunction Product1-7
Regulatory InformationXerox has tested this product to electromagnetic emission and immunity standards. These standards are designed to mitigate interference caused or received by this product in a typical office environment.
United States (FCC Regulations)This equipment has been tested and found to comply with the limits for a Class B digital device, pursuant to Part 15 of the FCC Rules. These limits are designed to provide reasonable protection against harmful interference when the equipment is operated in a residential environment. This equipment generates, uses, and can radiate radio frequency energy. If it is not installed and used in accordance with these instructions, it may cause harmful interference to radio communications. However, if this equipment does cause harmful interference to radio or television reception, which can be determined by turning the equipment off and on, the user is encouraged to try to correct the interference by one or more of the following measures:
■ Reorient or relocate the receiver.■ Increase the separation between the equipment and receiver.■ Connect the equipment into an outlet on a circuit different from that to which the receiver
is connected.■ Consult the dealer or an experienced radio/television technician for help.
Any changes or modifications not expressly approved by Xerox could void the user's authority to operate the equipment. To ensure compliance with Part 15 of the FCC rules, use shielded interface cables.
Canada (Regulations)This Class B digital apparatus complies with Canadian ICES-003.
Cet appareil numérique de la classe B est conforme à la norme NMB-003 du Canada.
Regulatory Information
Phaser® 6115MFP Multifunction Product1-8
European Union
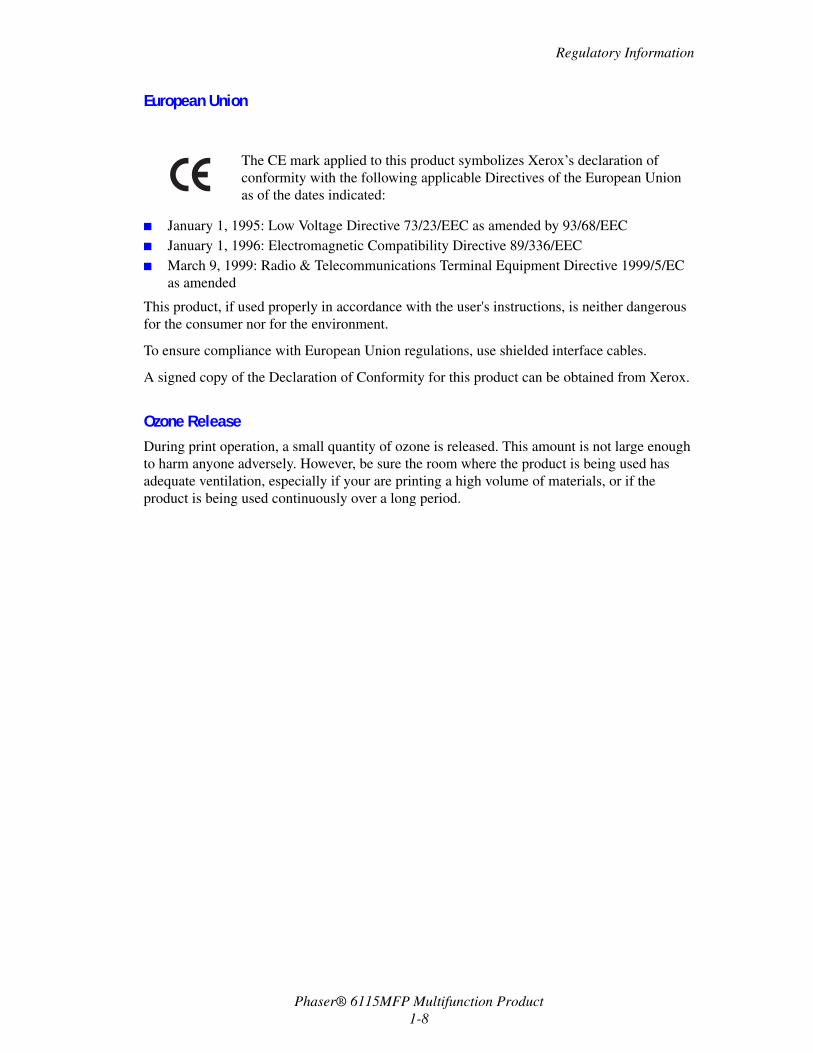
■ January 1, 1995: Low Voltage Directive 73/23/EEC as amended by 93/68/EEC■ January 1, 1996: Electromagnetic Compatibility Directive 89/336/EEC ■ March 9, 1999: Radio & Telecommunications Terminal Equipment Directive 1999/5/EC
as amended
This product, if used properly in accordance with the user's instructions, is neither dangerous for the consumer nor for the environment.
To ensure compliance with European Union regulations, use shielded interface cables.
A signed copy of the Declaration of Conformity for this product can be obtained from Xerox.
Ozone ReleaseDuring print operation, a small quantity of ozone is released. This amount is not large enough to harm anyone adversely. However, be sure the room where the product is being used has adequate ventilation, especially if your are printing a high volume of materials, or if the product is being used continuously over a long period.
The CE mark applied to this product symbolizes Xerox’s declaration of conformity with the following applicable Directives of the European Union as of the dates indicated:
Copy Regulations
Phaser® 6115MFP Multifunction Product1-9
Copy Regulations
United StatesCongress, by statute, has forbidden the reproduction of the following subjects under certain circumstances. Penalties of fine or imprisonment may be imposed on those guilty of making such reproductions.
1. Obligations or Securities of the United States Government, such as:
2. Adjusted Compensation Certificates for Veterans of the World Wars.
3. Obligations or Securities of any Foreign Government, Bank, or Corporation.
4. Copyrighted materials, unless permission of the copyright owner has been obtained or the reproduction falls within the “fair use” or library reproduction rights provisions of the copyright law. Further information of these provisions may be obtained from the Copyright Office, Library of Congress, Washington, D.C. 20559. Ask for Circular R21.
5. Certificate of Citizenship or Naturalization. Foreign Naturalization Certificates may be photographed.
6. Passports. Foreign Passports may be photographed.
7. Immigration papers.
8. Draft Registration Cards.
Certificates of Indebtedness National Bank Currency
Coupons from Bonds Federal Reserve Bank Notes
Silver Certificates Gold Certificates
United States Bonds Treasury Notes
Federal Reserve Notes Fractional Notes
Certificates of Deposit Paper Money
Bonds and Obligations of certain agencies of the government, such as FHA, etc.
Bonds (U.S. Savings Bonds may be photographed only for publicity purposes in connection with the campaign for the sale of such bonds.)
Internal Revenue Stamps. If it is necessary to reproduce a legal document on which there is a canceled revenue stamp, this may be done provided the reproduction of the document is performed for lawful purposes.
Postage Stamps, canceled or uncanceled. For philatelic purposes, Postage Stamps may be photographed, provided the reproduction is in black and white and is less than 75% or more than 150% of the linear dimensions of the original.
Postal Money Orders
Bills, Checks, or Draft of money drawn by or upon authorized officers of the United States.
Stamps and other representatives of value, of whatever denomination, which have been or may be issued under any Act of Congress.
Copy Regulations
Phaser® 6115MFP Multifunction Product1-10
9. Selective Service Induction papers that bear any of the following Registrant’s information:
■ Earnings or Income■ Court Record■ Physical or mental condition■ Dependency Status■ Previous military service
Exception: United States military discharge certificates may be photographed.
10. Badges, Identification Cards, Passes, or Insignia carried by military personnel, or by members of the various Federal Departments, such as FBI, Treasure, etc. (Unless photograph is ordered by the head of such department or bureau.)
Reproducing the following is also prohibited in certain states:
■ Automobile Licenses■ Drivers’ Licenses■ Automobile Certificates of Title
The above list is not all inclusive, and no liability is assumed for its completeness or accuracy. In case of doubt, consult your attorney.
CanadaParliament, by stature, has forbidden the reproduction of the following subjects under certain circumstances. Penalties of fine or imprisonment may be imposed on those guilty of making such reproductions.
1. Current bank notes or current paper money.
2. Obligations or securities of a government or bank.
3. Exchequer bill paper or revenue paper.
4. The public seal of Canada or of a province, or the seal of a public body or authority in Canada, or of a court of law.
5. Proclamations, orders, regulations or appointments, or notices thereof (with intent to falsely cause same to purport to have been printed by the Queens Printer for Canada, or the equivalent printer for a province).
6. Marks, brands, seals, wrappers or designs used by or on behalf of the Government of Canada or of a province, the government of a state other than Canada or a department, board, Commission or agency established by the Government of Canada or of a province or of a government of a state other than Canada.
7. Impressed or adhesive stamps used for the purpose of revenue by the Government of Canada or of a province or by the government of a state other than Canada.
8. Documents, registers or records kept by public officials charged with the duty of making or issuing certified copies thereof, where the copy falsely purports to be a certified copy thereof.
9. Copyrighted material or trademarks of any manner or kind without the consent of the copyright or trademark owner.
The above list is provided for your convenience and assistance, but it is not all-inclusive, and no liability is assumed for its completeness or accuracy. In case of doubt, consult your solicitor.
Copy Regulations
Phaser® 6115MFP Multifunction Product1-11
Other CountriesCopying certain documents may be illegal in your country. Penalties of fine or imprisonment may be imposed on those found guilty of making such reproductions.
■ Currency notes■ Bank notes and cheques■ Bank and government bonds and securities■ Passports and identification cards■ Copyright material or trademarks without the consent of the owner■ Postage stamps and other negotiable instruments
This list is not inclusive and no liability is assumed for either its completeness or accuracy. In case of doubt, contact your legal counsel.

Fax Regulations
Phaser® 6115MFP Multifunction Product1-12
Fax Regulations
United States
Fax Send Header Requirements
The Telephone Consumer Protection Act of 1991 makes it unlawful for any person to use a computer or other electronic device, including a fax machine, to send any message unless such message clearly contains in a margin at the top or bottom of each transmitted page or on the first page of the transmission, the date and time it is sent and an identification of the business or other entity, or other individual sending the message and the telephone number of the sending machine or such business, other entity or individual. The telephone number provided may not be a 900 number or any other number for which charges exceed local or long distance transmission charges.
In order to program this information into your machine, refer to customer documentation and follow the steps provided.
Data Coupler Information
This equipment complies with Part 68 of the FCC rules and the requirements adopted by the Administrative Council for Terminal Attachments (ACTA). On the cover of this equipment is a label that contains, among other information, a product identifier in the format US:AAAEQ##TXXXX. If requested, this number must be provided to the Telephone Company.
A plug and jack used to connect this equipment to the premises wiring and telephone network must comply with the applicable FCC Part 68 rules and requirements adopted by the ACTA. A compliant telephone cord and modular plug is provided with this product. It is designed to be connected to a compatible modular jack that is also compliant. See installation instructions for details.
You may safely connect the machine to the following standard modular jack: USOC RJ-11C using the compliant telephone line cord (with modular plugs) provided with the installation kit. See installation instructions for details.
Fax Regulations
Phaser® 6115MFP Multifunction Product1-13
The Ringer Equivalence Number (REN) is used to determine the number of devices that may be connected to a telephone line. Excessive RENs on a telephone line may result in the devices not ringing in response to an incoming call. In most but not all areas, the sum of RENs should not exceed five (5.0). To be certain of the number of devices that may be connected to a line, as determined by the total RENs, contact the local Telephone Company. For products approved after July 23, 2001, the REN for this product is part of the product identifier that has the format US:AAAEQ##TXXXX. The digits represented by ## are the REN without a decimal point (e.g., 03 is a REN of 0.3). For earlier products, the REN is separately shown on the label.
If this Xerox equipment causes harm to the telephone network, the Telephone Company will notify you in advance that temporary discontinuance of service may be required. But if advance notice is not practical, the Telephone Company will notify the customer as soon as possible. Also, you will be advised of your right to file a complaint with the FCC if you believe it is necessary.
The Telephone Company may make changes in its facilities, equipment, operations or procedures that could affect the operation of the equipment. If this happens, the Telephone Company will provide advance notice in order for you to make necessary modifications to maintain uninterrupted service.
If trouble is experienced with this Xerox equipment, for repair or warranty information, please contact the appropriate service center; details of which are displayed either on the machine or contained within the User Guide. If the equipment is causing harm to the telephone network, the Telephone Company may request that you disconnect the equipment until the problem is resolved.
Repairs to the machine should be made only by a Xerox Service Representative or an authorized Xerox Service provider. This applies at any time during or after the service warranty period. If unauthorized repair is performed, the remainder of the warranty period is null and void. This equipment must not be used on party lines. Connection to party line service is subject to state tariffs. Contact the state public utility commission, public service commission or corporation commission for information.
If your office has specially wired alarm equipment connected to the telephone line, make sure that the installation of this Xerox equipment does not disable your alarm equipment.
If you have questions about what will disable alarm equipment, consult your Telephone Company or a qualified installer.
Fax Regulations
Phaser® 6115MFP Multifunction Product1-14
Canada
Note: The Industry Canada label identifies certified equipment. This certification means that the equipment meets certain telecommunications network protective, operational and safety requirements as prescribed in the appropriate Terminal Equipment Technical Requirements document(s). The Department does not guarantee the equipment will operate to the user’s satisfaction.
Before installing this equipment, users must make sure that it is permissible to be connected to the facilities of the local telecommunications company. The equipment must also be installed using an acceptable method of connection. The customer should be aware that compliance with the above conditions may not prevent degradation of service in some situations.
Repairs to certified equipment should be coordinated by a representative designated by the supplier. Any repairs or alterations made by the user to this equipment, or equipment malfunctions, may give the telecommunications company cause to request the user to disconnect the equipment.
Users should make sure for their own protection that the electrical ground connections of the power utility, telephone lines and internal metallic water pipe systems, if present, are connected together. This precaution may be particularly important in rural areas.
Caution: Users should not attempt to make such connections themselves, but should contact the appropriate electric inspection authority, or electrician, as appropriate.
The Ringer Equivalence Number (REN) assigned to each terminal device provides an indication of the maximum number of terminals allowed to be connected to a telephone interface. The termination on an interface may consist of any combination of devices subject only to the requirement that the sum of the Ringer Equivalent Numbers of all of the devices does not exceed 5. For the Canadian REN value, please see the label on the equipment.
Fax Regulations
Phaser® 6115MFP Multifunction Product1-15
Europe
Radio Equipment & Telecommunications Terminal Equipment Directive
The Facsimile has been approved in accordance with the Council Decision 1999/5/EC for pan-European single terminal connection to the public switched telephone network (PSTN). However, due to differences between the individual PSTNs provided in different countries, the approval does not, of itself, give an unconditional assurance of successful operation on every PSTN network terminal point.
In the event of a problem you should contact your authorized local dealer in the first instance.
This product has been tested to and is compliant with ES 203 021-1, -2, -3, a specification for terminal equipment for use on analogue-switched telephone networks in the European Economic Area. This product provides an user-adjustable setting of the country code. Refer to the customer documentation for this procedure. Country codes should be set prior to connecting this product to the network.
Note: Although this product can use either loop disconnect (pulse) or DTMF (tone) signaling, it is recommended that it is set to use DTMF signaling. DTMF signaling provides reliable and faster call setup. Modification of this product, connection to external control software or to external control apparatus not authorized by Xerox, will invalidate its certification.

Fax Regulations
Phaser® 6115MFP Multifunction Product1-16
New Zealand Telecom Warning Notice1. The grant of a Telepermit for any item of terminal equipment indicates only that Telecom
has accepted that the item complies with minimum conditions for connection to its network. It indicates no endorsement of the product by Telecom, nor does it provide any sort of warranty. Above all, it provides no assurance that any item will work correctly in all respects with another item of Telepermitted equipment of a different make or model, nor does it imply that any product is compatible with all of Telecom’s network services.
The equipment may not be capable of correct operation at the higher data speeds designated. 33.6 kbps and 56 kbps connections are likely to be restricted to lower bit rates when connected to some PSTN implementations. Telecom will accept no responsibility should difficulties arise in such circumstances.
2. Immediately disconnect this equipment should it become physically damaged, and arrange for its disposal or repair.
3. This modem shall not be used in any manner which could constitute a nuisance to other Telecom customers.
4. This device is equipped with pulse dialing, while the Telecom standard is DTMF tone dialing. There is no guarantee that Telecom lines will always continue to support pulse dialing.
Use of pulse dialing, when this equipment is connected to the same line as other equipment, may give rise to 'bell tinkle' or noise and may also cause a false answer condition. Should such problems occur, the user should NOT contact the Telecom Faults Service.
The preferred method of dialing is to use DTMF tones, as this is faster than pulse (decadic) dialing and is readily available on almost all New Zealand telephone exchanges.
5. Warning Notice: No '111' or other calls can be made from this device during a mains power failure.
6. This equipment may not provide for the effective hand-over of a call to another device connected to the same line.
7. Some parameters required for compliance with Telecom’s Telepermit requirements are dependent on the equipment (PC) associated with this device. The associated equipment shall be set to operate within the following limits for compliance with Telecom’s Specifications:
For repeat calls to the same number:
■ There shall be no more than 10 call attempts to the same number within any 30 minute period for any single manual call initiation, and
■ The equipment shall go on-hook for a period of not less than 30 seconds between the end of one attempt and the beginning of the next attempt.
For automatic calls to different numbers:
■ The equipment shall be set to ensure that automatic calls to different numbers are spaced such that there is no less than 5 seconds between the end of one call attempt and the beginning of another.
8. For correct operation, total of the RN’s of all devices connected to a single line at any time should not exceed 5.
Product Specifications
Phaser® 6115MFP Multifunction Product1-17
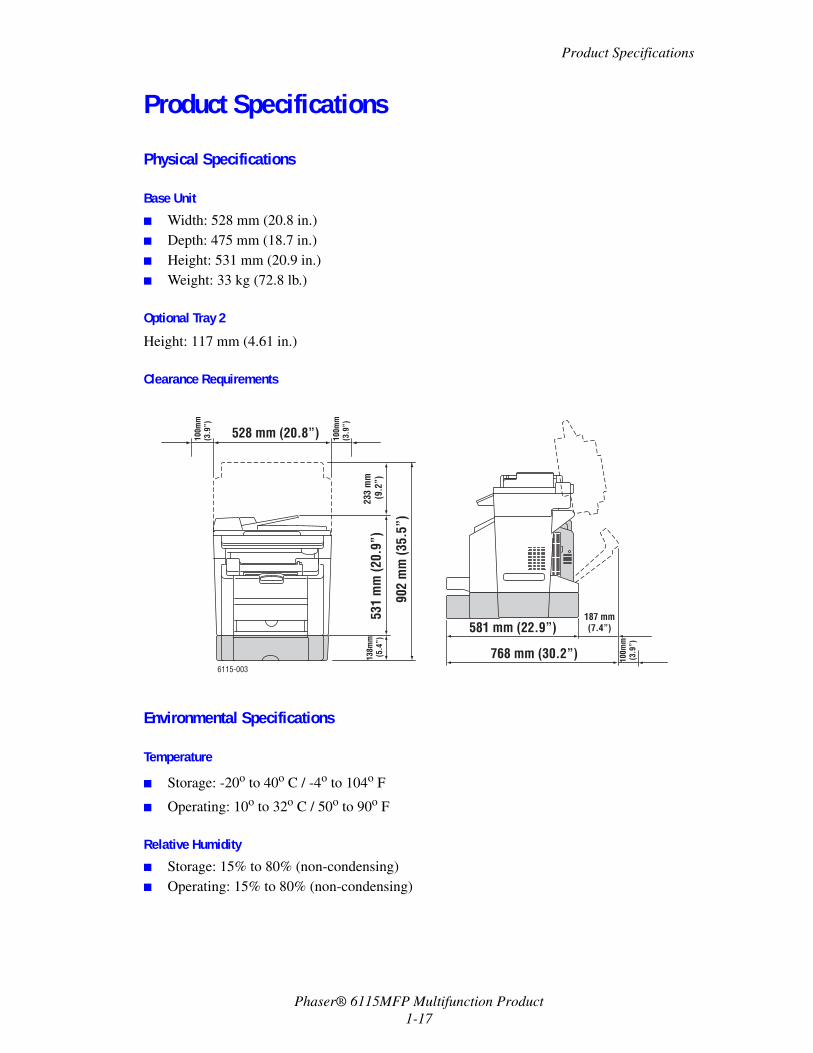
Product Specifications
Physical Specifications
Base Unit
■ Width: 528 mm (20.8 in.)■ Depth: 475 mm (18.7 in.)■ Height: 531 mm (20.9 in.)■ Weight: 33 kg (72.8 lb.)
Optional Tray 2
Height: 117 mm (4.61 in.)
Clearance Requirements
Environmental Specifications
Temperature
■ Storage: -20o to 40o C / -4o to 104o F
■ Operating: 10o to 32o C / 50o to 90o F
Relative Humidity
■ Storage: 15% to 80% (non-condensing)■ Operating: 15% to 80% (non-condensing)
6115-003
100m
m(3
.9”)
100m
m(3
.9”)
528 mm (20.8”)
531
mm
(20.
9”)
233
mm
(9.2
”)13
8mm
(5.4
”)
902
mm
(35.
5”)
768 mm (30.2”)
581 mm (22.9”)187 mm(7.4”)
100m
m(3
.9”)
Product Specifications
Phaser® 6115MFP Multifunction Product1-18
Electrical Specifications■ 110-127 VAC, 50-60 Hz ■ 110-120 VAC, 50-60 Hz (US/Canada Only)■ 220-240 VAC, 50-60 Hz■ ENERGY STAR qualified product. Default time to Energy Save: 30 minutes.
Performance Specifications
Resolution
Maximum Resolution: 2400 x 600 dpi
Print Speed
■ Color: 5 ppm (duplex: 5 ppm)■ Monochrome: 20 ppm (duplex: 11 ppm)
Copy Speed
■ Color: 5 cpm (600 x 300 dpi)■ Black and White: 12 cpm (600 x 300 dpi)
Controller SpecificationsRISC CPU (48 MHz) processor
Memory
■ 128 MB (SDRAM)
Interfaces
■ Ethernet 10/100 Base Tx■ Universal Serial Bus (USB 2.0)
Material Safety Data Sheet
Phaser® 6115MFP Multifunction Product1-19
Material Safety Data SheetFor Material Safety Data information regarding your Phaser 6115MFP product, go to:
■ United States and Canada: www.xerox.com/msds■ European Union: www.xerox.com/environment_europe
For the Customer Support Center phone numbers, go to www.xerox.com/office/contacts.
Product Recycling and Disposal
Phaser® 6115MFP Multifunction Product1-20
Product Recycling and Disposal
All CountriesIf you are managing the disposal of your Xerox product, please note that the product may contain, lead, mercury, perchlorate, and other materials whose disposal may be regulated due to environmental considerations. The presence of lead, mercury, and perchlorate is fully consistent with regulations applicable at the time that the product was placed on the market. For disposal information, contact your local authorities. Perchlorate Material - This product may contain one or more Perchlorate-containing devices, such as batteries. Special handling may apply, please see www.dtsc.ca.gov/hazardouswaste/perchlorate.
European UnionSome equipment may be used in both a domestic/household and a professional/business application.
Domestic/Household Environment
In accordance with European legislation, end of life electrical and electronic equipment subject to disposal must be segregated from household waste.
Private households within EU member states may return used electrical and electronic equipment to designated collection facilities free of charge. Please contact your local disposal authority for information.
In some member states, when you purchase new equipment, your local retailer may be required to take back your old equipment free of charge. Please ask you retailer for information.
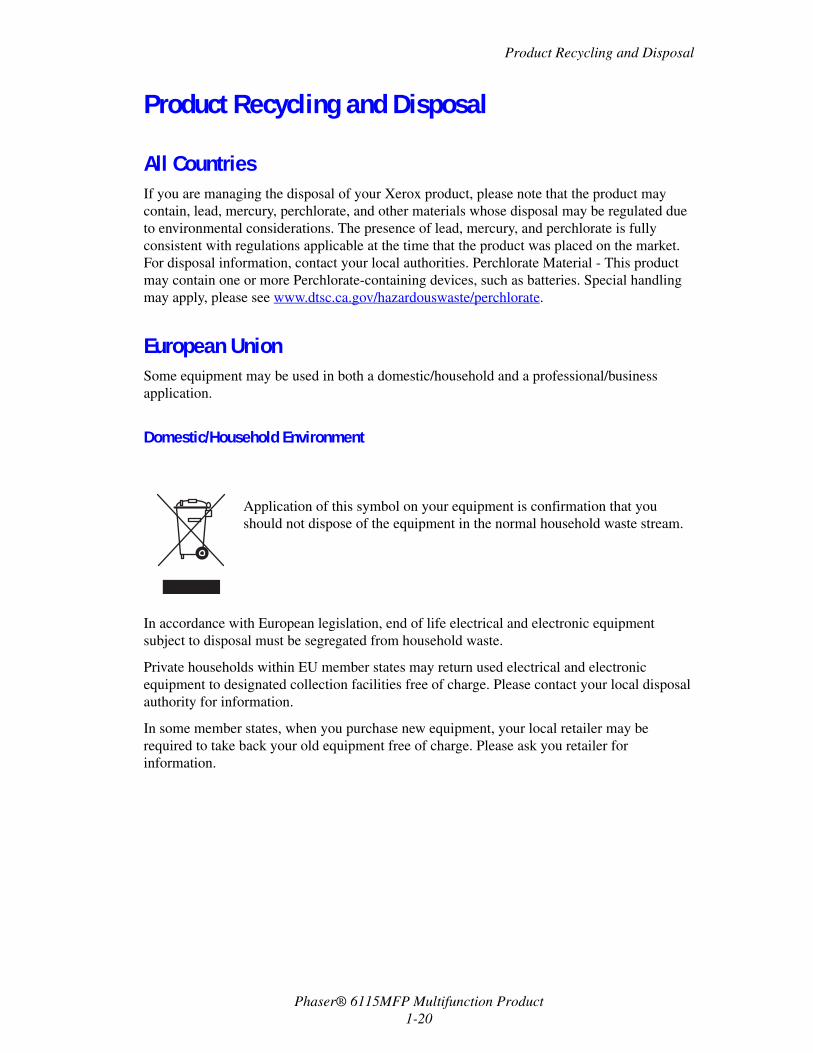
Application of this symbol on your equipment is confirmation that you should not dispose of the equipment in the normal household waste stream.
Product Recycling and Disposal
Phaser® 6115MFP Multifunction Product1-21
Professional/Business Environment
In accordance with European legislation, end of life electrical and electronic equipment subject to disposal must be managed within agreed procedures.
Prior to disposal, please contact your local reseller or Xerox representative for end of life takeback information.
North AmericaXerox operates an equipment takeback and reuse/recycle program. Contact your Xerox sales representative (1-800-ASK-XEROX) to determine whether this Xerox product is part of the program. For more information about Xerox environmental programs, visit www.xerox.com/environment.html or for recycling and disposal information, contact your local authorities.
In the United States, you may also refer to the Electronic Industries Alliance website at www.eiae.org.
Other CountriesPlease contact your local waste authorities and request disposal guidance.
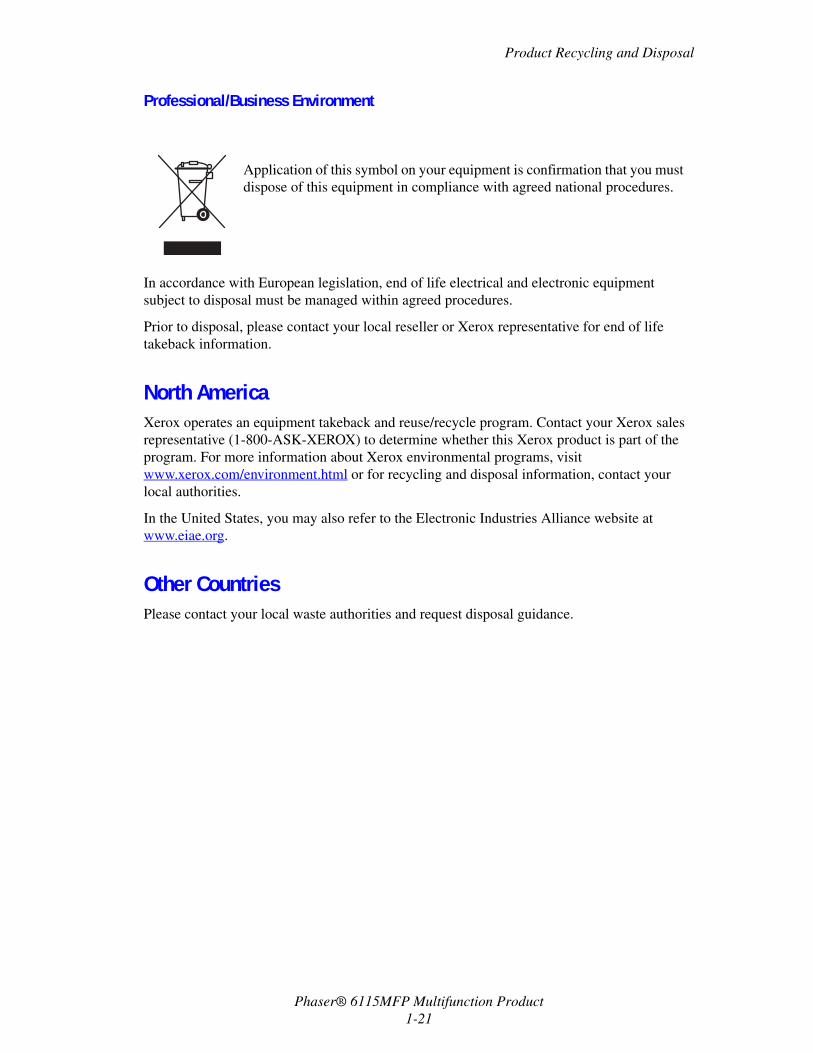
Application of this symbol on your equipment is confirmation that you must dispose of this equipment in compliance with agreed national procedures.
Phaser® 6115MFP Multifunction Product2-1
This chapter includes:
■ Product Tour on page 2-2■ Product Configurations on page 2-4■ Print and Scan Drivers on page 2-6■ Control Panel on page 2-7■ More Information on page 2-18
Product Features
Product Tour
Phaser® 6115MFP Multifunction Product2-2
Product TourThis section includes:
■ Front View on page 2-2■ Open View on page 2-3■ Back View on page 2-3■ Options on page 2-5
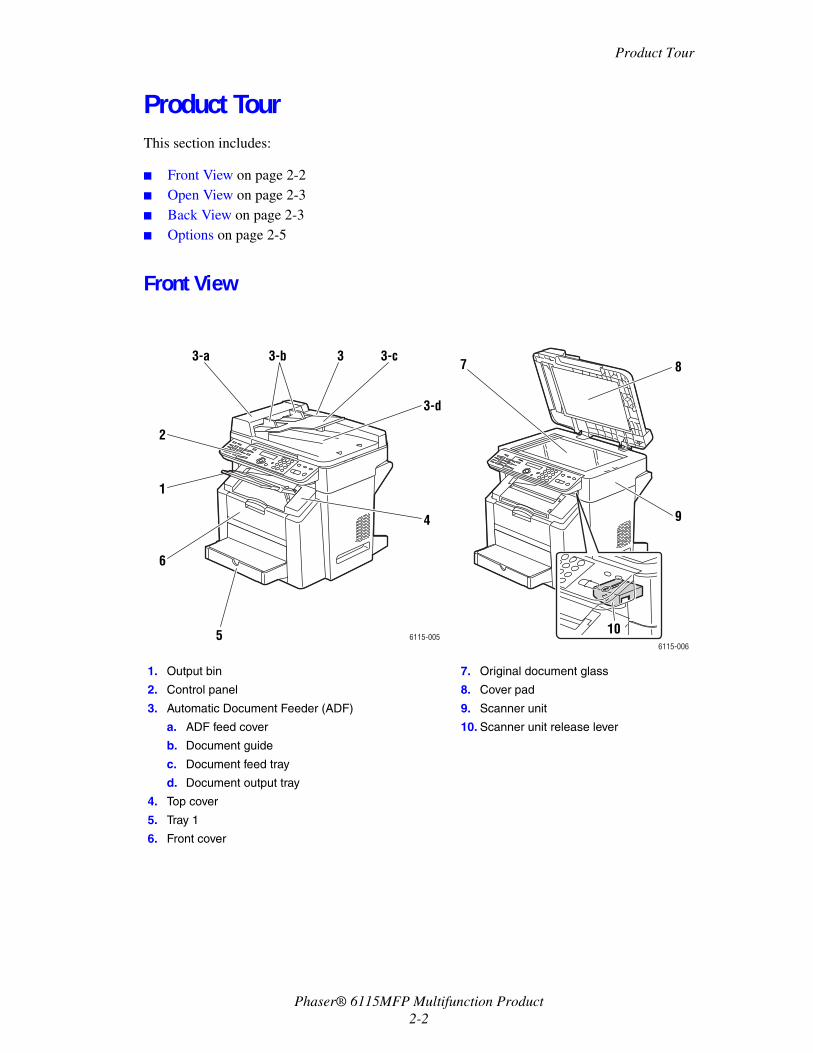
Front View
1. Output bin
2. Control panel
3. Automatic Document Feeder (ADF)
a. ADF feed cover
b. Document guide
c. Document feed tray
d. Document output tray
4. Top cover
5. Tray 1
6. Front cover
7. Original document glass
8. Cover pad
9. Scanner unit
10. Scanner unit release lever
6
2
3-a 3-b 3-c
3-d
4
5
3
1
6115-005
7
9
10
8
6115-006
Product Tour
Phaser® 6115MFP Multifunction Product2-3
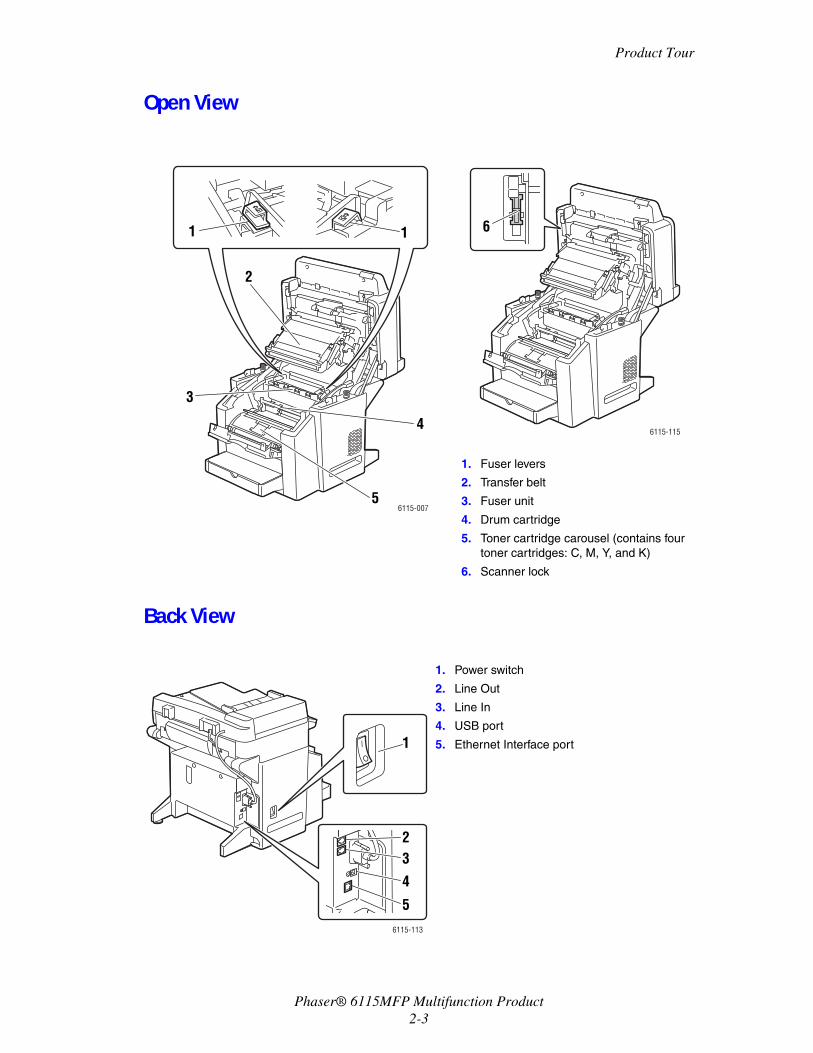
Open View
Back View
1. Fuser levers
2. Transfer belt
3. Fuser unit
4. Drum cartridge
5. Toner cartridge carousel (contains four toner cartridges: C, M, Y, and K)
6. Scanner lock
1. Power switch
2. Line Out
3. Line In
4. USB port
5. Ethernet Interface port
2
3
4
5
11
6115-007
6
6115-115
6115-113
5
4
3
1
2
Product Configurations
Phaser® 6115MFP Multifunction Product2-4
Product ConfigurationsThis section includes:
■ Standard Features on page 2-4■ Available Configurations on page 2-5■ Options on page 2-5
Standard FeaturesYour Phaser 6115MFP Multifunction Product offers many standard features to meet your office needs.
■ Print speeds (pages-per-minute) letter/A4■ Color: up to 5 ppm■ Monochrome: up to 20 ppm
■ Copy speeds■ Color: up to 5 ppm■ Monochrome: up to 12 ppm
■ First-page-out speed as fast as■ 45 second warm-up■ 13 seconds monochrome ■ 24 seconds color
■ Connections■ USB 2.0■ Ethernet 10/100 Base-Tx
■ Memory■ 128 MB maximum, not expandable
■ All-in-one standard features■ Print■ Copy■ Scan to PC Desktop, Application and Email■ Fax
Product Configurations
Phaser® 6115MFP Multifunction Product2-5
Available Configurations
Phaser 6115MFP/N
The Phaser 6115MFP/N configuration includes all standard features listed.
Phaser 6115MFP/D
The Phaser 6115MFP/D configuration includes all standard features listed and the optional duplex unit for automatic 2-sided printing.
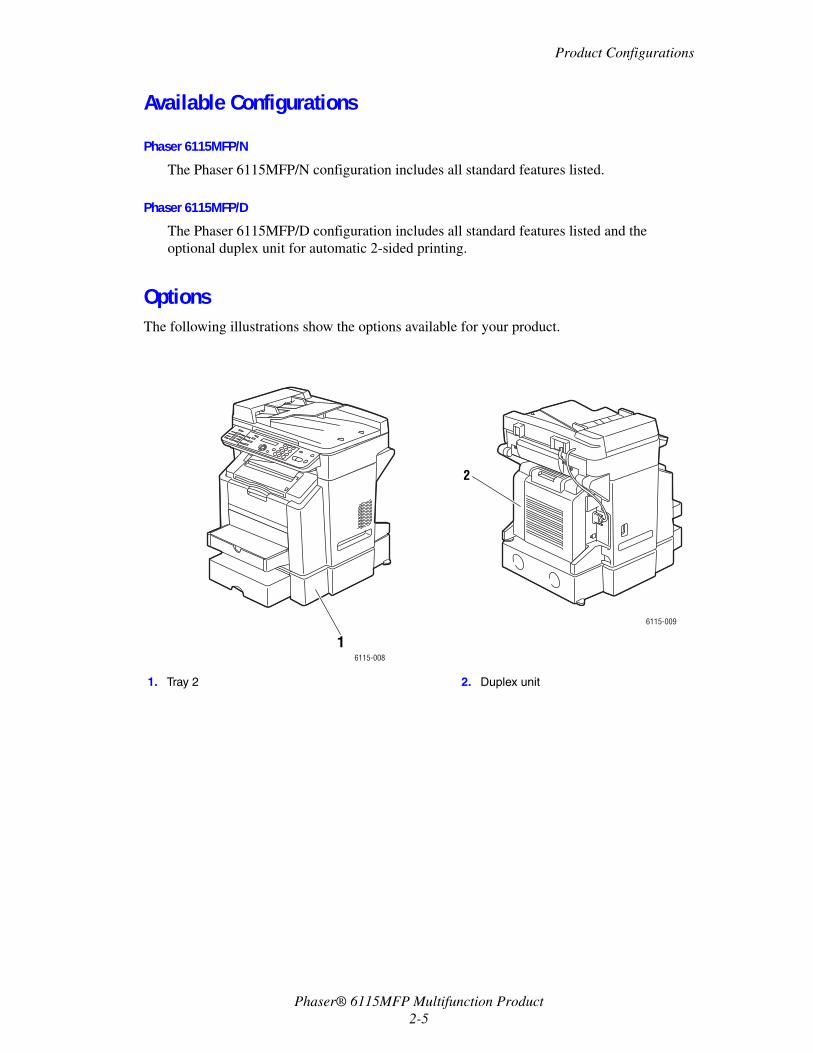
OptionsThe following illustrations show the options available for your product.
1. Tray 2 2. Duplex unit
16115-008
2
6115-009
Print and Scan Drivers
Phaser® 6115MFP Multifunction Product2-6
Print and Scan DriversTo access all of your product’s features, install the print and scan drivers from the Software and Documentation CD-ROM or from the driver website at www.xerox.com/drivers.
■ Print drivers enable your computer and product to communicate and provide access to your product features.
■ Scan drivers enable you to scan images directly to your personal computer and place scanned images directly into an application.
■ The MFP ControlCentre software enables you to configure your product, add email addresses and fax numbers over a USB connection (Windows Only).
For installing the print driver, scan driver, and MFP ControlCentre, see the Features Setup Guide that came with your product.
For using the print and scan drivers, see Using Printer Driver Options on page 5-1.
Computer System Requirements
Personal computer Pentium 2: 400 MHz or higher
Operating system Windows 2000, XP Home/Professional, Windows Server 2003
Mac OS X 10.2 or higher
Hard disk space 256 MB minimum
Memory 128 MB minimum
Disk drive CD-ROM or DVD drive
Interface 10Base T / 100BaseTX (IEEE802.3) Ethernet portUSB revision 2.0 compliant port
Control Panel
Phaser® 6115MFP Multifunction Product2-7
Control PanelThis section includes:
■ Control Panel Features on page 2-7■ Control Panel Layout on page 2-7■ Display Indicators on page 2-11■ Printing a Configuration Page on page 2-12■ Printing a Menu Map on page 2-12
Control Panel FeaturesThe control panel:
■ Displays the product’s operating status (for example, Printing, Ready to Print), product errors, and warnings.
■ Prompts you to load paper, order and replace supplies, and clear jams.■ Enables you to access tools and information pages to help resolve problems.■ Enables you to change product and network settings.
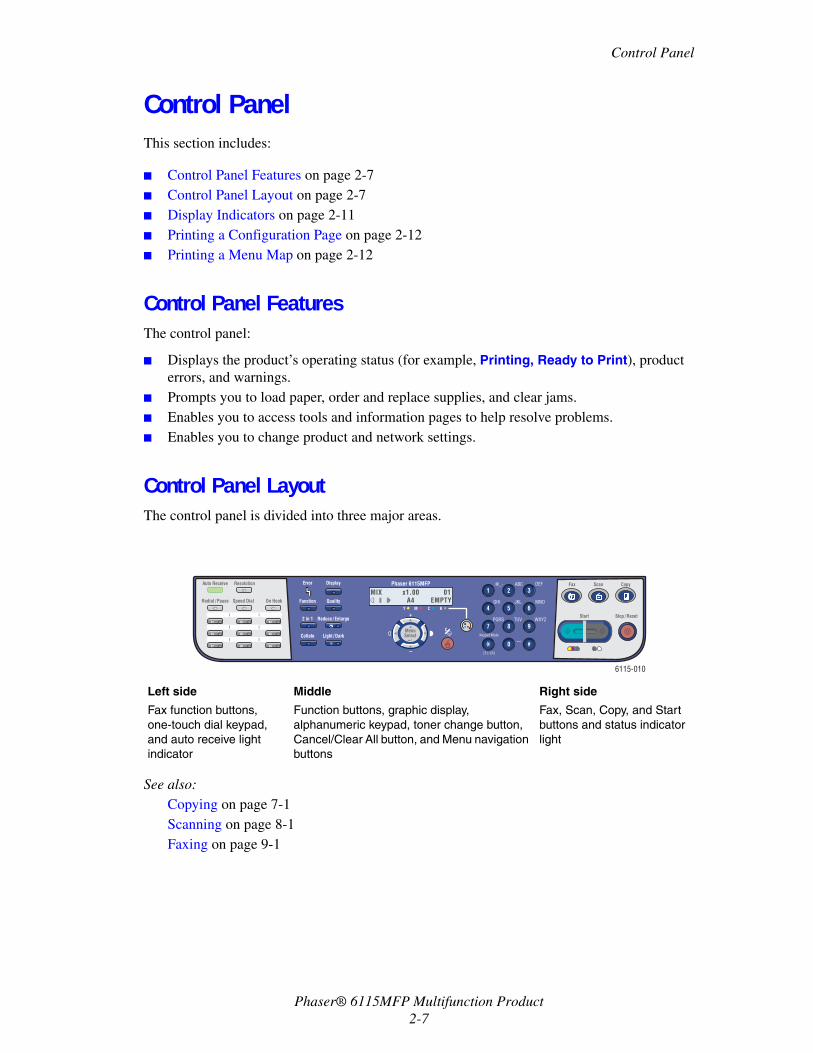
Control Panel LayoutThe control panel is divided into three major areas.
See also: Copying on page 7-1Scanning on page 8-1Faxing on page 9-1
Left side
Fax function buttons, one-touch dial keypad, and auto receive light indicator
Middle
Function buttons, graphic display, alphanumeric keypad, toner change button, Cancel/Clear All button, and Menu navigation buttons
Right side
Fax, Scan, Copy, and Start buttons and status indicator light
6115-010
1ABC.@_-
2DEF
3
GHI4
JKL5
MNO6
PQRS7
TUV8
WXYZ9
0 #
Error Display
QualityFunction
2 in 1
Collate Light / Dark
Reduce / Enlarge Stop / Reset
CopyFax Scan
Start
Redial / Pause Speed Dial
Auto Receive Resolution
On Hook
01 02 03
04 05 06
07 08 09
A4 EMPTYMIX x1.00 01
Y M C K
Phaser 6115MFP
CMenuSelect Keypad Mode
[1] / [A]
Control Panel
Phaser® 6115MFP Multifunction Product2-8
Left Side of the Control Panel
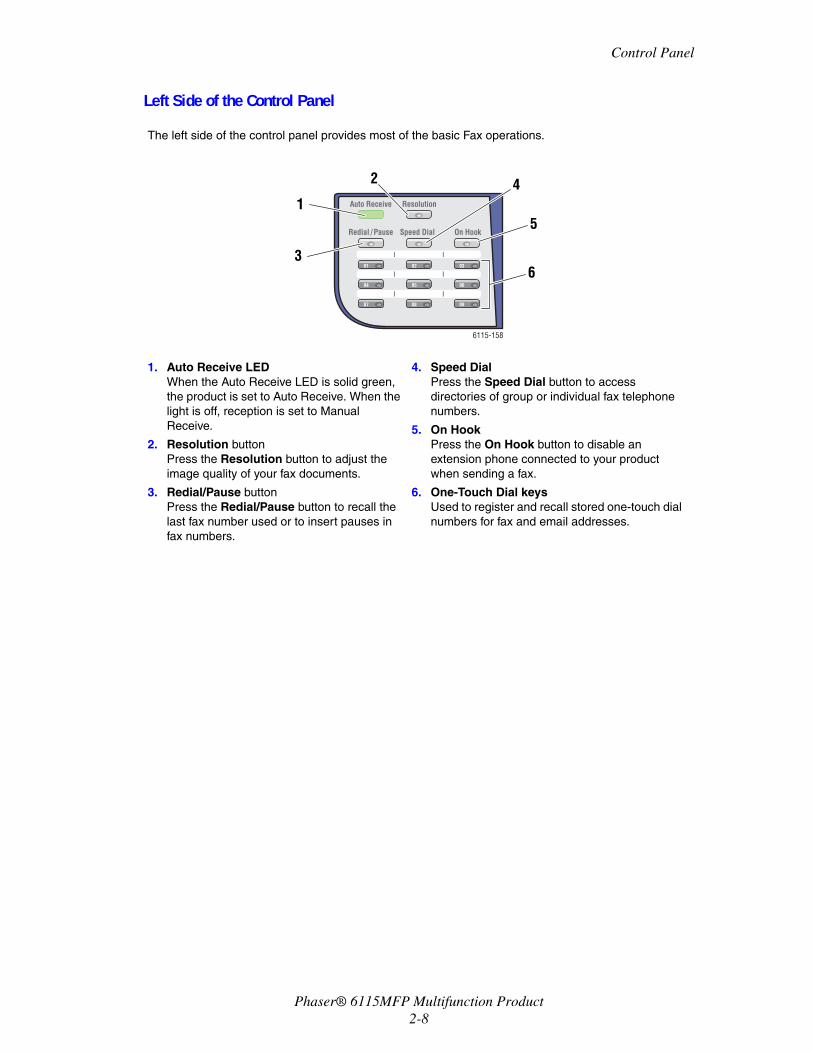
The left side of the control panel provides most of the basic Fax operations.
1. Auto Receive LEDWhen the Auto Receive LED is solid green, the product is set to Auto Receive. When the light is off, reception is set to Manual Receive.
2. Resolution buttonPress the Resolution button to adjust the image quality of your fax documents.
3. Redial/Pause buttonPress the Redial/Pause button to recall the last fax number used or to insert pauses in fax numbers.
4. Speed Dial Press the Speed Dial button to access directories of group or individual fax telephone numbers.
5. On Hook Press the On Hook button to disable an extension phone connected to your product when sending a fax.
6. One-Touch Dial keysUsed to register and recall stored one-touch dial numbers for fax and email addresses.
6115-158
Redial / Pause Speed Dial
Auto Receive Resolution
On Hook
01 02 03
04 05 06
07 08 09
1
3
2 4
5
6
Control Panel
Phaser® 6115MFP Multifunction Product2-9
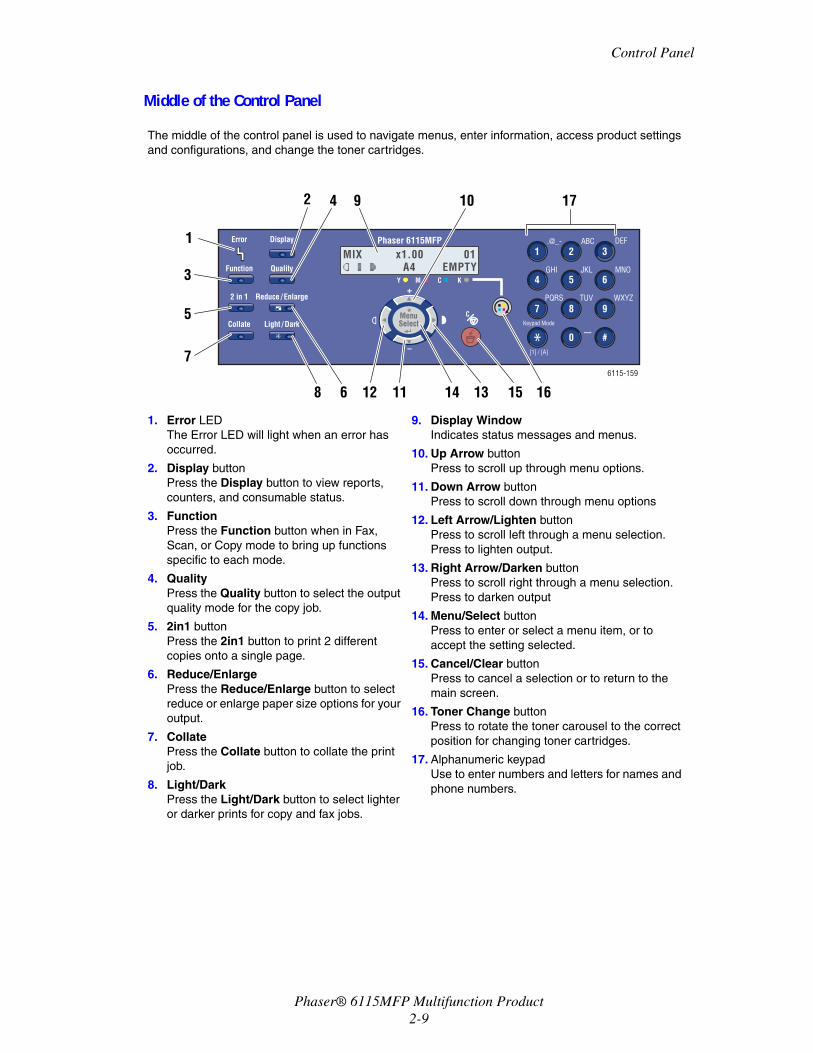
Middle of the Control Panel
The middle of the control panel is used to navigate menus, enter information, access product settings and configurations, and change the toner cartridges.
1. Error LEDThe Error LED will light when an error has occurred.
2. Display buttonPress the Display button to view reports, counters, and consumable status.
3. FunctionPress the Function button when in Fax, Scan, or Copy mode to bring up functions specific to each mode.
4. QualityPress the Quality button to select the output quality mode for the copy job.
5. 2in1 buttonPress the 2in1 button to print 2 different copies onto a single page.
6. Reduce/Enlarge Press the Reduce/Enlarge button to select reduce or enlarge paper size options for your output.
7. Collate Press the Collate button to collate the print job.
8. Light/DarkPress the Light/Dark button to select lighter or darker prints for copy and fax jobs.
9. Display WindowIndicates status messages and menus.
10. Up Arrow buttonPress to scroll up through menu options.
11. Down Arrow buttonPress to scroll down through menu options
12. Left Arrow/Lighten buttonPress to scroll left through a menu selection. Press to lighten output.
13. Right Arrow/Darken buttonPress to scroll right through a menu selection. Press to darken output
14. Menu/Select buttonPress to enter or select a menu item, or to accept the setting selected.
15. Cancel/Clear buttonPress to cancel a selection or to return to the main screen.
16. Toner Change buttonPress to rotate the toner carousel to the correct position for changing toner cartridges.
17. Alphanumeric keypadUse to enter numbers and letters for names and phone numbers.
6115-159
Keypad Mode
[1] / [A]
Error Display
QualityFunction
2 in 1
Collate Light / Dark
Reduce / Enlarge
A4 EMPTYMIX x1.00 01
Y M C K
Phaser 6115MFP
CMenuSelect
1ABC.@_-
2DEF
3
GHI4
JKL5
MNO6
PQRS7
TUV8
WXYZ9
0 #
1
2
3
5
7
4 9 10 17
6 1112 13 15 16148
Control Panel
Phaser® 6115MFP Multifunction Product2-10
Right Side of the Control Panel
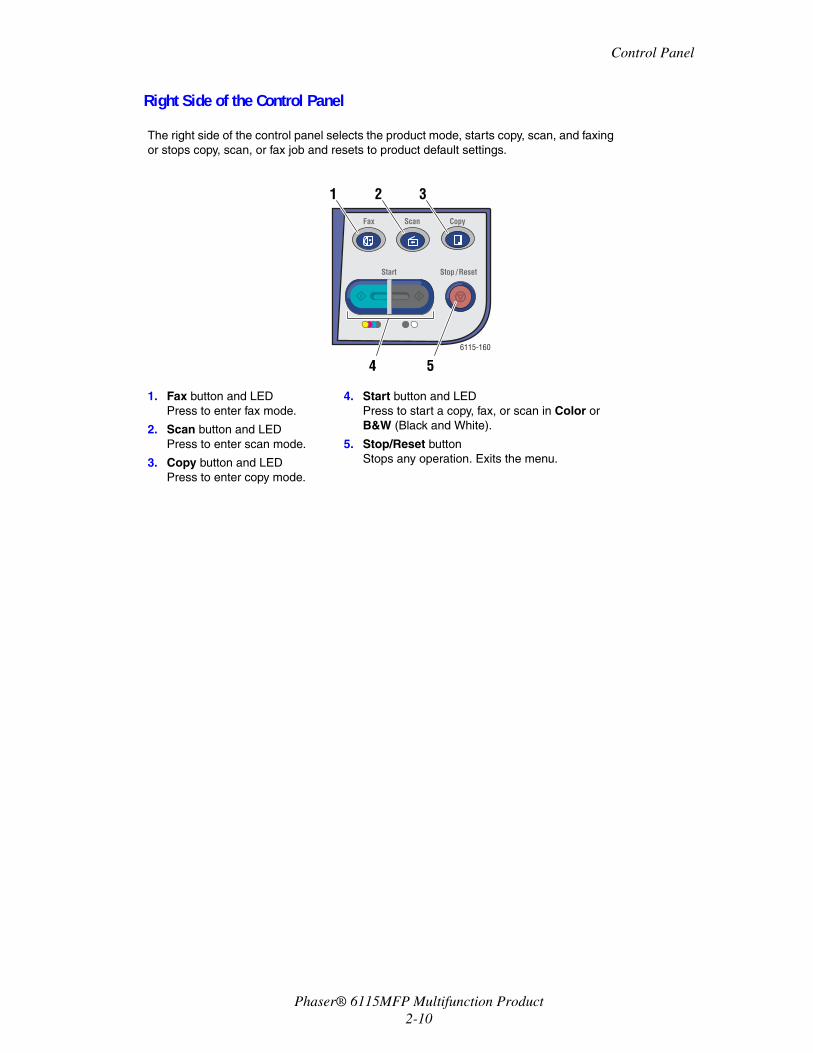
The right side of the control panel selects the product mode, starts copy, scan, and faxing or stops copy, scan, or fax job and resets to product default settings.
1. Fax button and LEDPress to enter fax mode.
2. Scan button and LEDPress to enter scan mode.
3. Copy button and LEDPress to enter copy mode.
4. Start button and LEDPress to start a copy, fax, or scan in Color or B&W (Black and White).
5. Stop/Reset buttonStops any operation. Exits the menu.
6115-160
Stop / Reset
CopyFax Scan
Start
21
4 5
3
Control Panel
Phaser® 6115MFP Multifunction Product2-11
Display Indicators
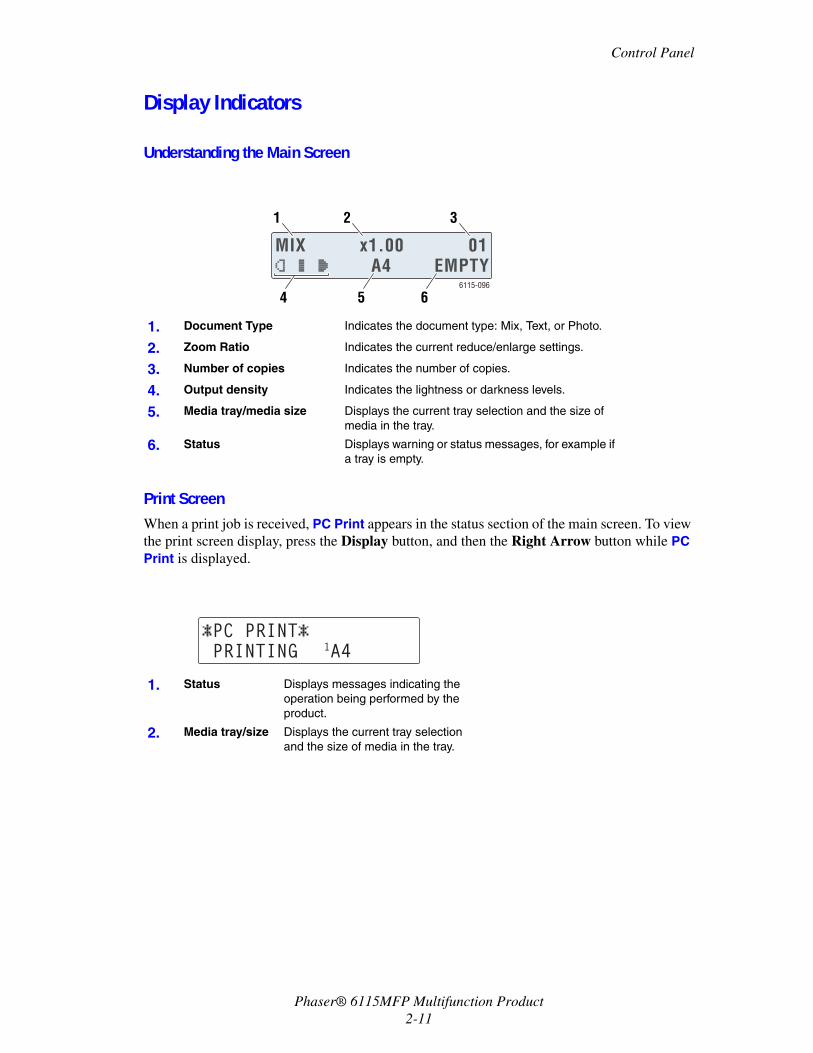
Understanding the Main Screen
Print ScreenWhen a print job is received, PC Print appears in the status section of the main screen. To view the print screen display, press the Display button, and then the Right Arrow button while PC Print is displayed.
1. Document Type Indicates the document type: Mix, Text, or Photo.
2. Zoom Ratio Indicates the current reduce/enlarge settings.
3. Number of copies Indicates the number of copies.
4. Output density Indicates the lightness or darkness levels.
5. Media tray/media size Displays the current tray selection and the size of media in the tray.
6. Status Displays warning or status messages, for example if a tray is empty.
1. Status Displays messages indicating the operation being performed by the product.
2. Media tray/size Displays the current tray selection and the size of media in the tray.
A4 EMPTYMIX x1.00 01
1
4 5 6
2 3
6115-096

Control Panel Menus
Phaser® 6115MFP Multifunction Product2-12
Control Panel Menus Navigate the control panel menus using the Up, Down, Left, and Right Arrow buttons and the Menu/Select button. Each sub-menu item is numbered and can be located quickly by selecting the associated number on the numeric keypad.
Printing a Configuration PageTo print the Configuration page, which displays current information about your product, do the following:
1. On the control panel, press the Display button.
2. Scroll to Configuration Page, and then press the Menu/Select button to print.
Printing a Menu MapThe Menu Map helps you navigate the control panel menus. To print the Menu Map:
1. On the control panel, press the Display button.
2. Scroll to Menu Map, and then press the Menu/Select button to print.
Control Panel Menus
Phaser® 6115MFP Multifunction Product2-13
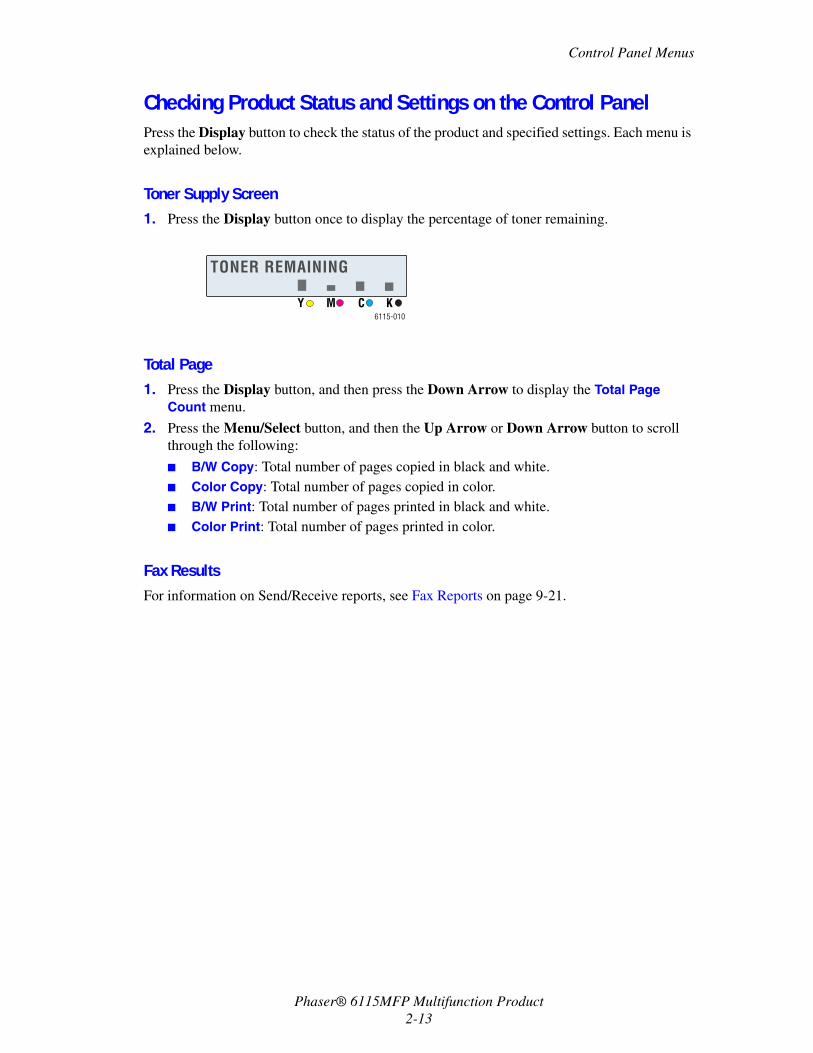
Checking Product Status and Settings on the Control PanelPress the Display button to check the status of the product and specified settings. Each menu is explained below.
Toner Supply Screen1. Press the Display button once to display the percentage of toner remaining.
Total Page 1. Press the Display button, and then press the Down Arrow to display the Total Page
Count menu.
2. Press the Menu/Select button, and then the Up Arrow or Down Arrow button to scroll through the following:
■ B/W Copy: Total number of pages copied in black and white.■ Color Copy: Total number of pages copied in color.■ B/W Print: Total number of pages printed in black and white.■ Color Print: Total number of pages printed in color.
Fax ResultsFor information on Send/Receive reports, see Fax Reports on page 9-21.
6115-010
TONER REMAININGTONER REMAINING
Y M C K
Control Panel Menus
Phaser® 6115MFP Multifunction Product2-14
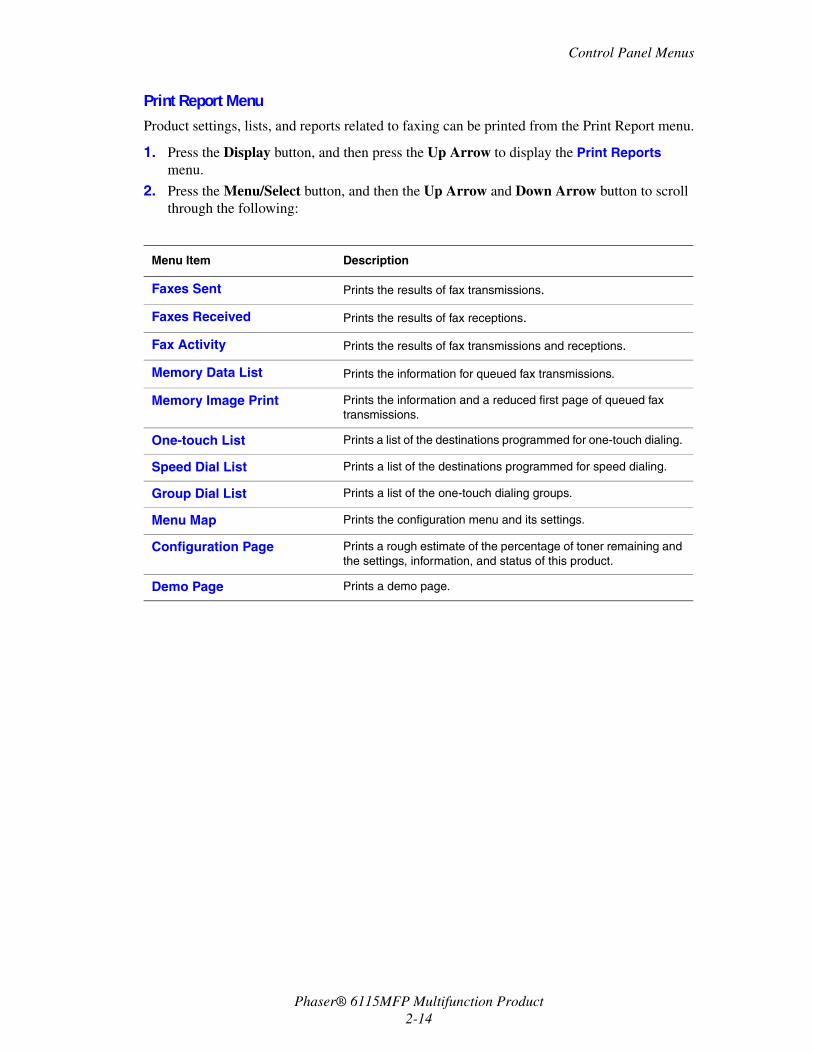
Print Report MenuProduct settings, lists, and reports related to faxing can be printed from the Print Report menu.
1. Press the Display button, and then press the Up Arrow to display the Print Reports menu.
2. Press the Menu/Select button, and then the Up Arrow and Down Arrow button to scroll through the following:
Menu Item Description
Faxes Sent Prints the results of fax transmissions.
Faxes Received Prints the results of fax receptions.
Fax Activity Prints the results of fax transmissions and receptions.
Memory Data List Prints the information for queued fax transmissions.
Memory Image Print Prints the information and a reduced first page of queued fax transmissions.
One-touch List Prints a list of the destinations programmed for one-touch dialing.
Speed Dial List Prints a list of the destinations programmed for speed dialing.
Group Dial List Prints a list of the one-touch dialing groups.
Menu Map Prints the configuration menu and its settings.
Configuration Page Prints a rough estimate of the percentage of toner remaining and the settings, information, and status of this product.
Demo Page Prints a demo page.
Control Panel Menu Structure
Phaser® 6115MFP Multifunction Product2-15
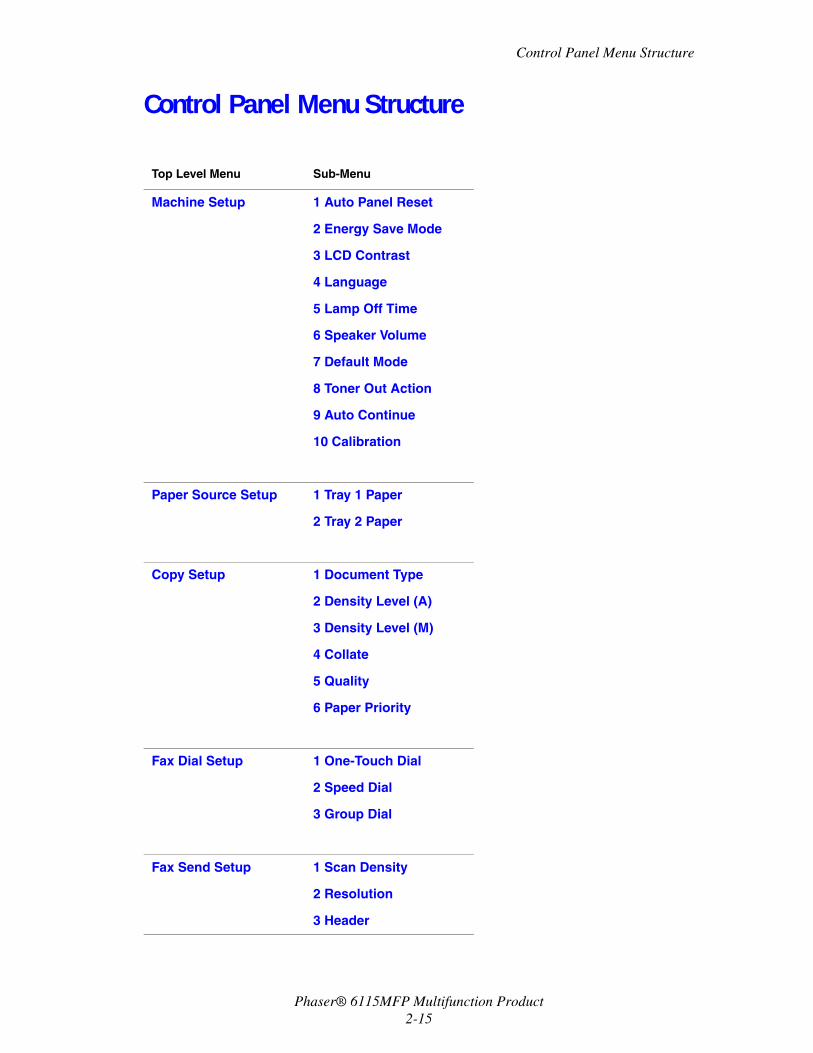
Control Panel Menu Structure
Top Level Menu Sub-Menu
Machine Setup 1 Auto Panel Reset
2 Energy Save Mode
3 LCD Contrast
4 Language
5 Lamp Off Time
6 Speaker Volume
7 Default Mode
8 Toner Out Action
9 Auto Continue
10 Calibration
Paper Source Setup 1 Tray 1 Paper
2 Tray 2 Paper
Copy Setup 1 Document Type
2 Density Level (A)
3 Density Level (M)
4 Collate
5 Quality
6 Paper Priority
Fax Dial Setup 1 One-Touch Dial
2 Speed Dial
3 Group Dial
Fax Send Setup 1 Scan Density
2 Resolution
3 Header
Control Panel Menu Structure
Phaser® 6115MFP Multifunction Product2-16
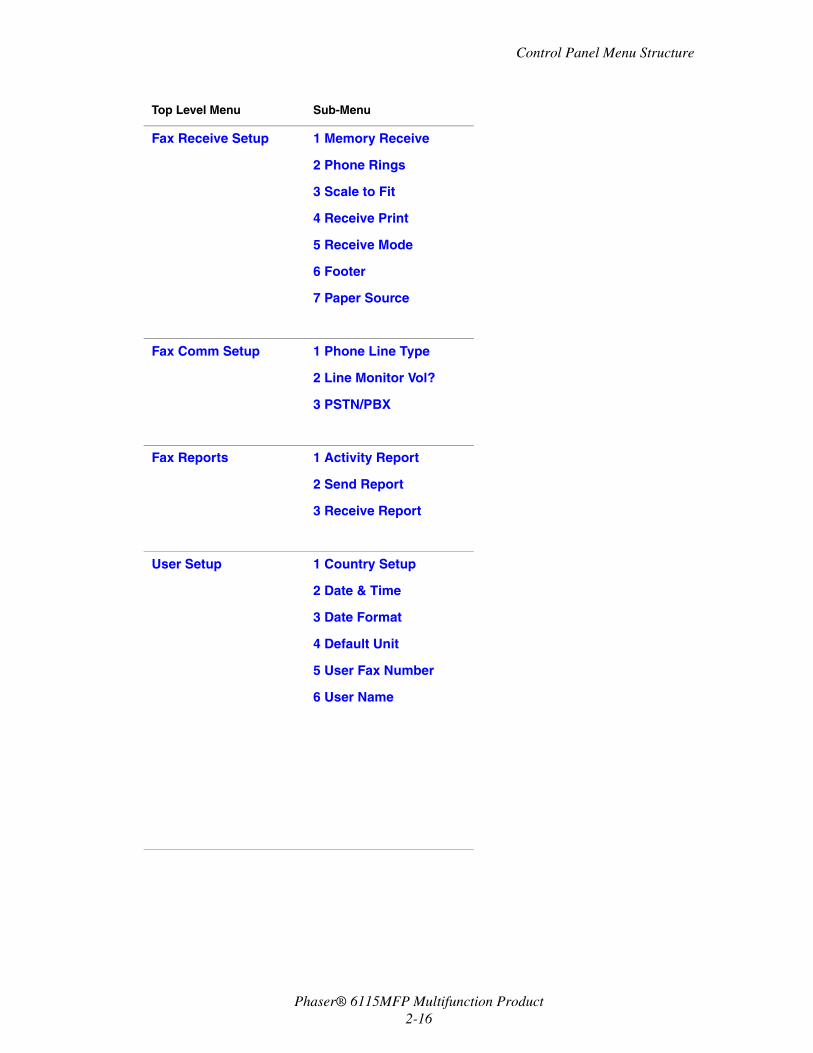
Fax Receive Setup 1 Memory Receive
2 Phone Rings
3 Scale to Fit
4 Receive Print
5 Receive Mode
6 Footer
7 Paper Source
Fax Comm Setup 1 Phone Line Type
2 Line Monitor Vol?
3 PSTN/PBX
Fax Reports 1 Activity Report
2 Send Report
3 Receive Report
User Setup 1 Country Setup
2 Date & Time
3 Date Format
4 Default Unit
5 User Fax Number
6 User Name
Top Level Menu Sub-Menu
Control Panel Menu Structure
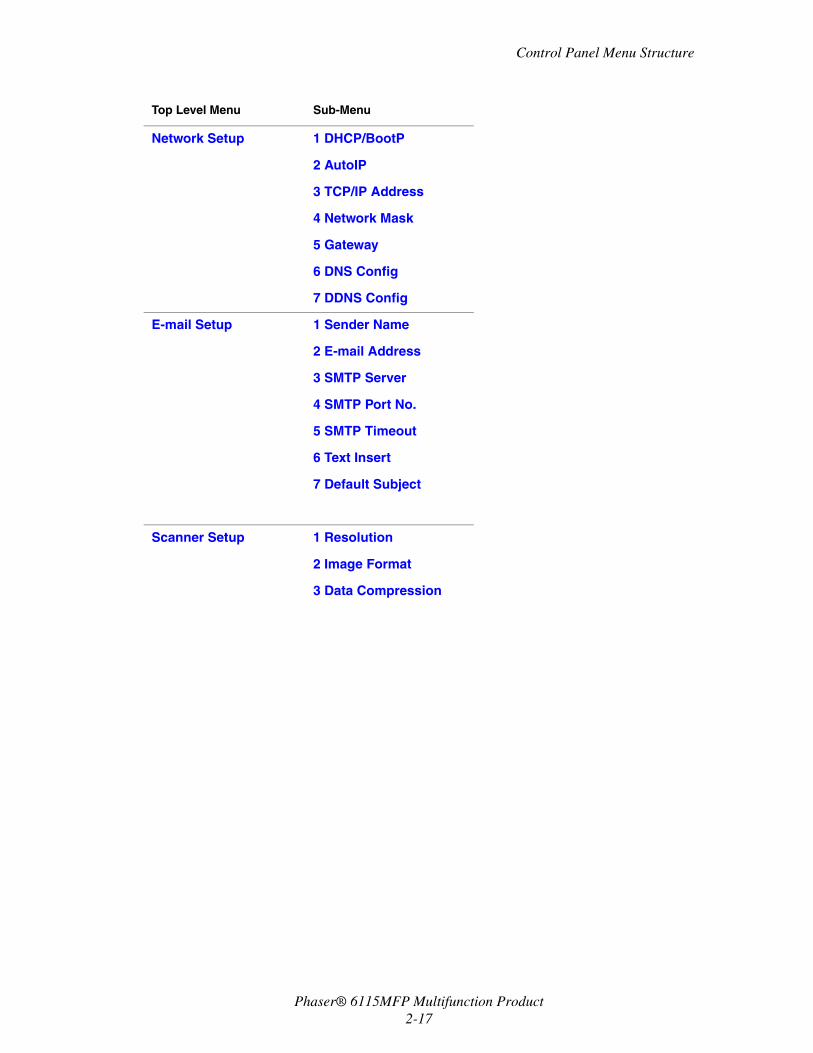
Phaser® 6115MFP Multifunction Product2-17
Network Setup 1 DHCP/BootP
2 AutoIP
3 TCP/IP Address
4 Network Mask
5 Gateway
6 DNS Config
7 DDNS Config
E-mail Setup 1 Sender Name
2 E-mail Address
3 SMTP Server
4 SMTP Port No.
5 SMTP Timeout
6 Text Insert
7 Default Subject
Scanner Setup 1 Resolution
2 Image Format
3 Data Compression
Top Level Menu Sub-Menu
More Information
Phaser® 6115MFP Multifunction Product2-18
More InformationObtain information regarding your product and its capabilities from the following sources.
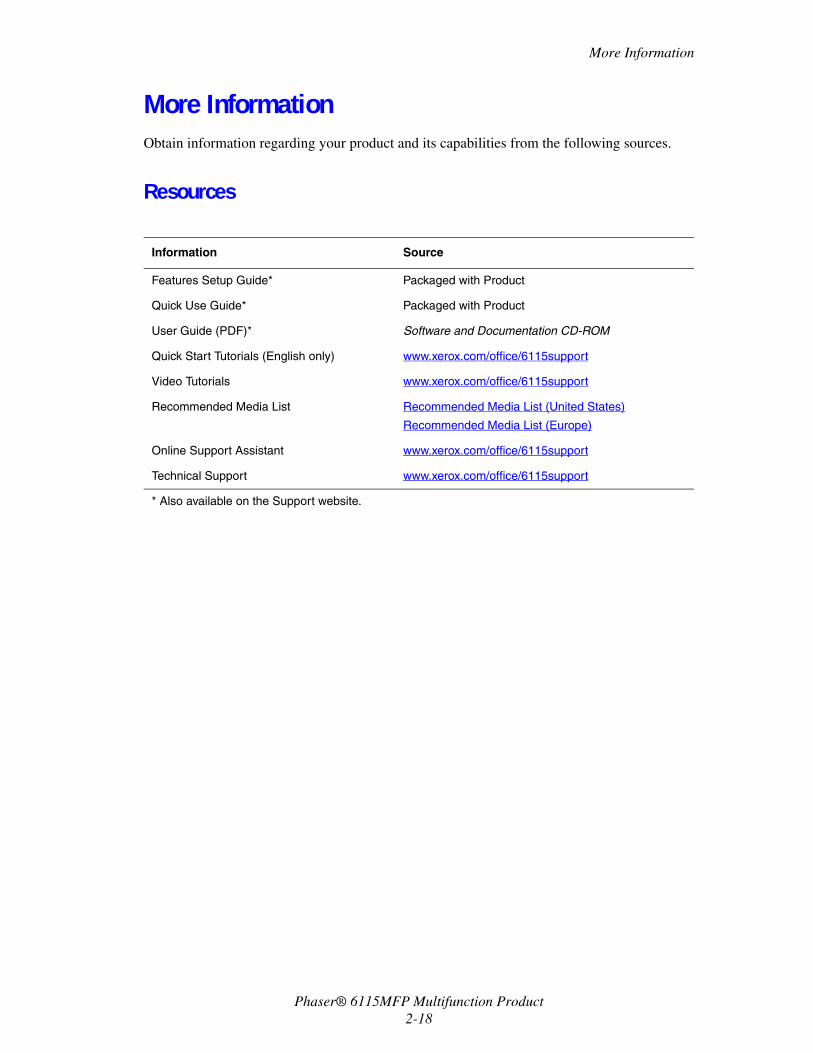
Resources
Information Source
Features Setup Guide* Packaged with Product
Quick Use Guide* Packaged with Product
User Guide (PDF)* Software and Documentation CD-ROM
Quick Start Tutorials (English only) www.xerox.com/office/6115support
Video Tutorials www.xerox.com/office/6115support
Recommended Media List Recommended Media List (United States)
Recommended Media List (Europe)
Online Support Assistant www.xerox.com/office/6115support
Technical Support www.xerox.com/office/6115support
* Also available on the Support website.
Phaser® 6115MFP Multifunction Product3-1
.
This chapter includes:
■ Product Management Overview on page 3-2■ CentreWare Internet Services on page 3-3■ MFP ControlCentre (Windows Only with USB Connection) on page 3-4■ Configuring the Product on page 3-5
Product Management
Product Management Overview
Phaser® 6115MFP Multifunction Product3-2
Product Management OverviewThe Phaser 6115MFP comes with three different ways to manage your product settings and configurations.
■ Control Panel■ CentreWare Internet Service (CentreWare IS) (Network Only)■ MFP ControlCentre (USB and Windows Only)
The following sections outline configuring and setting up your product using these device management options, it is recommended you use CentreWare IS or the MCC whenever possible.
CentreWare Internet Services
Phaser® 6115MFP Multifunction Product3-3
CentreWare Internet ServicesFor information on the initial set-up of CentreWare IS services, see the Features Setup Guide that came with your product.
This section provides information on CentreWare Internet Services, an HTTP (HyperText Transfer Protocol)-based web page service that installs with your product driver and is accessed through your web browser.
These pages give you instant access to product status, and product configuration options. Anyone on your network can access the product using a their web browser software. In administrative mode you can change the configuration of the printer, setup your fax directories, and manage your product settings without leaving your computer.
Note: Users who are not given passwords by the administrator can still view the configuration settings and options in user mode. They will not be able to save or apply any changes to the current configuration.
Creating an Administrative Password1. Launch your web browser.
2. Enter the product’s IP address in the browser’s Address field (http://xxx.xxx.xxx.xxx).
3. The default administrator password field is “blank”.
4. Click the Login button.
5. In the left navigation pane, click the plus sign (+) next to Administration.
6. From the Administration list click Security.
7. Enter the current password, or leave the field blank if no password has been setup.
8. Enter the new password in the New Password field, and again in the Retype New Password field.
9. Click Save Changes, your new password has been set and anyone with the administrator password can log in and make changes to the product configuration and settings.
See also: Configuring the Product on page 3-5Copying on page 7-1Scanning on page 8-1Faxing on page 9-1
MFP ControlCentre (Windows Only with USB Connection)
Phaser® 6115MFP Multifunction Product3-4
MFP ControlCentre (Windows Only with USB Connection)The MFP ControlCentre (MCC) provides an easy to use Graphical User Interface (GUI) that simplifies configuring your product and managing your fax directory lists from your computer over USB.
The MCC stores configuration and setting in a .dat file that is uploaded from your computer to your Phaser 6115MFP. It is possible to also save the .dat file to a directory on your computer.
Using the MFP ControlCentre1. From your computer, select Start > All Programs > Xerox Office Printing >
Phaser 6115MFP > MCC.
2. From the MCC dialog box, click the Connect to Machine button.
3. Click the Download button. This downloads the current .dat file from the product.
4. Click the Menu button.
5. You can now configure your product settings.
and/or
6. Click the Plus (+) icon in the left pane of the dialog box and configure your fax speed dial, one-touch, group numbers, and email addresses.
7. When finished, click the Upload button to save these settings to the product.
8. When prompted, you can save the new .dat file you created to your computer.
See also: Configuring the Product on page 3-5Copying on page 7-1Scanning on page 8-1Faxing on page 9-1
Configuring the Product
Phaser® 6115MFP Multifunction Product3-5
Configuring the ProductThis section includes:
■ User Setup on page 3-5■ Setting the Auto Panel Reset on page 3-6■ Changing the Energy Save Mode on page 3-7■ Setting the LCD Contrast on page 3-7■ Setting the Control Panel Language on page 3-8■ Setting the Scanner Lamp Off Time on page 3-9■ Setting the Speaker Volume on page 3-9■ Setting the Control Panel Default Mode on page 3-10■ Setting the Toner Out Action on page 3-11■ Setting the Media Mismatch Behavior on page 3-12■ Calibrating the Product on page 3-13
This section details general product configuration and setup. For Copy, Scan, and Fax configurations and setup, see the appropriate section in this manual.
Note: For a complete diagram of the control panel menus, print a Menu Map from the control panel, or see Control Panel Menus on page 2-12.
User Setup
Using the Control Panel1. From the main screen, press the Menu/Select button.
2. Using the Up Arrow or Down Arrow button, scroll to the User Setup menu, and then press the Menu/Select button.
3. Set the following information within the User Setup menu:
■ 1 Country Setup: Select your country.■ 2 Date & Time: Set the current date and time.■ 3 Date Format: Set the order of the month, day, and year.■ 4 Default Zoom: Set to inches or metric; based on paper sizes for your region.■ 5 User Fax Number: Enter your fax number for this product.■ 6 User Name: Enter your user name for this product.
4. Press the Menu/Select button after each entry.
5. Press the Cancel/C button to exit.
Configuring the Product
Phaser® 6115MFP Multifunction Product3-6
Setting the Auto Panel ResetAuto panel reset returns the control panel to its default settings after the product has been idle for the specified a specified amount of time.
Using the Control Panel1. From the main screen, press the Menu/Select button to enter the Machine Setup menu.
2. Scroll to the Auto Panel Reset menu, or press number 1 on the alphanumeric keypad, and then press the Menu/Select button.
3. Use the Right Arrow or Left Arrow button to select ON or OFF, and then press the Menu/Select button.
OFF: The control panel auto reset operation is not performed.
ON: The control panel will be reset to its default values at the intervals selected by the user.
4. If you select ON, select from 0.5, 1, 2, 3, 4, 5 minutes for the product to be idle before the control panel is reset to its default values, and then press the Menu/Select button to save the settings.
Using CentreWare IS1. Launch your web browser.
2. Enter the product’s IP address in the browser’s Address field (http://xxx.xxx.xxx.xxx).
3. Click the Login button and log in as an administrator.
4. Under Administration, click the Reset button.
5. Select Reset All Factory Settings, and then click Save Changes.
Using the MFP ControlCentre1. Open the MCC, connect to your product and download the current .dat file.
2. Click the Menu button.
3. Select the Machine Setup tab.
4. Select the desired amount of time from the Auto Panel Reset drop-down list, and then click OK.
5. Click the Upload button to save the new settings to the product.
Configuring the Product
Phaser® 6115MFP Multifunction Product3-7
Changing the Energy Save Mode
Using the Control Panel1. From the main screen, press the Menu/Select button to enter the Machine Setup menu.
2. Scroll to the Energy Save Mode menu, or press number 2 on the alphanumeric keypad, and then press the Menu/Select button.
3. Use the Right Arrow or Left Arrow button to select 5, 15, 30, or 60 minutes for the product to be idle before entering Energy Save mode, and then press the Menu/Select button to save this setting.
Using the MFP ControlCentre1. Open the MCC, connect to your product and download the current .dat file.
2. Click the Menu button.
3. Select the Machine Setup tab.
4. Select the desired amount of time from the Energy Save drop-down list, and then click OK.
5. Click the Upload button to save the new settings to the product.
Setting the LCD Contrast
Using the Control Panel1. From the main screen, press the Menu/Select button to enter the Machine Setup menu.
2. Scroll to the LCD Contrast menu, or press number 4 on the alphanumeric keypad, and then press the Menu/Select button.
3. Select the control panel display contrast level by using the Right Arrow or Left Arrow button.
Lighter -1, 0, 1 Darker.
4. Press the Menu/Select button to save the settings.
Using the MFP ControlCentre1. Open the MCC, connect to your product and download the current .dat file.
2. Click the Menu button.
3. Select the Machine Setup tab.
4. Use the LCD Contrast slider to adjust the LCD contrast, and then click OK.
5. Click the Upload button to save the new settings to the product.
Configuring the Product
Phaser® 6115MFP Multifunction Product3-8
Setting the Control Panel Language
Using the Control Panel1. From the main screen, press the Menu/Select button to enter the Machine Setup menu.
2. Scroll to the Control Panel Language menu, or press number 5 on the alphanumeric keypad, and then press the Menu/Select button.
3. Scroll to the correct control panel language for your product using the Up Arrow or Down Arrow button.
4. Press the Menu/Select button to save the settings.
Using CentreWare IS1. Launch your web browser.
2. Enter the product’s IP address in the browser’s Address field (http://xxx.xxx.xxx.xxx).
3. Click the Login button and log in as an administrator.
4. Under Administration, click Language.
5. Select your language from the drop-down list, and then click Save Changes.
Using the MFP ControlCentre1. Open the MCC, connect to your product and download the current .dat file.
2. Click the Menu button.
3. Select the Machine Setup tab.
4. From the Language drop-down list, select your language, and then click OK.
5. Click the Upload button to save the new settings to the product.
Configuring the Product
Phaser® 6115MFP Multifunction Product3-9
Setting the Scanner Lamp Off TimeSelect the length of time the product is idle before the scanner unit lamp is turned off.
1. From the main screen, press the Menu/Select button to enter the Machine Setup menu.
2. Scroll to the Lamp Off Time menu, or press number 6 on the alphanumeric keypad, and then press the Menu/Select button.
3. Select from the following options by using the Left Arrow or Right Arrow button.
■ HRS: The lamp turns off after 4 hours of being idle.■ E-Star: The lamp turns off as soon as the product enters Energy Save mode.
4. Press the Menu/Select button to save the settings.
Using the MFP ControlCentre1. Open the MCC, connect to your product and download the current .dat file.
2. Click the Menu button.
3. Select the Machine Setup tab.
4. Under Lamp Off Time, select either 4 hours or Energy Saver, and then click OK.
5. Click the Upload button to save the new settings to the product.
Note: Cannot be set from CentreWare IS.
Setting the Speaker Volume
Using the Control Panel1. From the main screen, press the Menu/Select button to enter the Machine Setup menu.
2. Scroll to the Speaker Volume menu, or press number 7 on the alphanumeric keypad, and then press the Menu/Select button.
3. Select from the following options by using the Up Arrow or Down Arrow button.
Set the fax buzzer and control panel beep to High, Low, or Off.
4. Press the Menu/Select button to save the settings.
Using the MFP ControlCentre1. Open the MCC, connect to your product and download the current .dat file.
2. Click the Menu button.
3. Select the Machine Setup tab.
4. Under Speaker Volume, select either High, Low, or Off, and then click OK.
5. Click the Upload button to save the new settings to the product.
Note: Cannot be set from CentreWare IS.
Configuring the Product
Phaser® 6115MFP Multifunction Product3-10
Setting the Control Panel Default ModeSetting the default start mode tells the product to enter either Fax or Copy mode when turned on or when the settings on the control panel return to their defaults.
Using the Control Panel1. From the main screen, press the Menu/Select button to enter the Machine Setup menu.
2. Scroll to the Default Mode menu, or press number 8 on the alphanumeric keypad, and then press the Menu/Select button.
3. Select from the following options by using the Right Arrow or Left Arrow button.
■ Fax: Starts in fax mode.■ Copy: Starts in copy mode.
4. Press the Menu/Select button to save the settings.
Using the MFP ControlCentre1. Open the MCC, connect to your product and download the current .dat file.
2. Click the Menu button.
3. Select the Machine Setup tab.
4. Under Default Mode, select Fax or Copy, and then click OK.
5. Click the Upload button to save the new settings to the product.
Note: Cannot be set from CentreWare IS.
Configuring the Product
Phaser® 6115MFP Multifunction Product3-11
Setting the Toner Out ActionSetting the toner out action tells the product to continue printing or faxing when the toner cartridge runs out.
Using the Control Panel1. From the main screen, press the Menu/Select button to enter the Machine Setup menu.
2. Scroll to the Toner Out Action menu, or press number 8 on the alphanumeric keypad, and then press the Menu/Select button.
3. Select from the following options by using the Up Arrow or Down Arrow button.
Stop: All printing, copying, and faxing stop when the toner runs out.
Stop (Fax): Only faxing stops when the toner runs out.
Cont: Printing, copying, and faxing continues when the toner runs out.
4. Press the Menu/Select button to save the settings.
Using the MFP ControlCentre1. Open the MCC, connect to your product and download the current .dat file.
2. Click the Menu button.
3. Select the Machine Setup tab.
4. Under Toner Out, select Stop, Stop for Fax, or Continue, and then click OK.
5. Click the Upload button to save the new settings to the product.
Note: Cannot be set from CentreWare IS.
Configuring the Product
Phaser® 6115MFP Multifunction Product3-12
Setting the Media Mismatch BehaviorIf you select a media type in the printer driver that is different than the paper source set on the products control panel, you can choose whether or not the product continues to print job.
Using the Control Panel1. From the main screen, press the Menu/Select button to enter the Machine Setup menu.
2. Scroll to the Auto Continue menu, or press number 10 on the alphanumeric keypad, and then press the Menu/Select button.
3. Select from the following options by using the Right Arrow or Left Arrow buttons.
■ ON: The product continues printing when a media size error occurs.■ OFF: The product stops printing when a media size error occurs.
4. Press the Menu/Select button to save the settings.
Using the MFP ControlCentre1. Open the MCC, connect to your product and download the current .dat file.
2. Click the Menu button.
3. Select the Machine Setup tab.
4. Check Auto Continue, and then click OK.
5. Click the Upload button to save the new settings to the product.
Note: Cannot be set from CentreWare IS.
Configuring the Product
Phaser® 6115MFP Multifunction Product3-13
Calibrating the Product
Using the Control Panel1. From the main screen, press the Menu/Select button to enter the Machine Setup menu.
2. Scroll to the Calibration menu, or press number 11 on the alphanumeric keypad, and then press the Menu/Select button.
3. Select from the following options by using the Right Arrow or Left Arrow button.
■ ON: Stabilizes the image.■ OFF: Does not stabilize the image.
4. Press the Menu/Select button to save the settings.
Using the MFP ControlCentre1. Open the MCC, connect to your product and download the current .dat file.
2. Click the Menu button.
3. Select the Machine Setup tab.
4. Check Calibration, and then click OK.
5. Click the Upload button to save the new settings to the product.
Note: Cannot be set from CentreWare IS.
Configuring the Product
Phaser® 6115MFP Multifunction Product3-14
Paper Source Setup MenuSetting the control panel’s paper source setup tells the product what type of paper is loaded in the trays. The media settings in the printer driver will override the control panel settings.
Setting the Tray 1/Tray 2 Paper Source1. From the main screen, scroll to the Paper Source menu using the Up Arrow or
Down Arrow button, and then press the Menu/Select button.
2. Select Tray1 Paper or Tray 2 Paper, and then press the Menu/Select button.
3. Select the type of paper currently loaded in the tray by using the Up Arrow or Down Arrow button.
4. Press the Menu/Select button to save the settings.
Using the MFP ControlCentre1. Open the MCC, connect to your product and download the current .dat file.
2. Click the Menu button.
3. Select the Paper Source tab.
4. Select the Type and Size of the paper in the tray, and then click OK.
5. Click the Upload button to save the new settings to the product.
Note: Cannot be set from CentreWare IS.
See also: Copying on page 7-1Faxing on page 9-1Scanning on page 8-1
Phaser® 6115MFP Multifunction Product4-1
This chapter includes:
■ Networking Protocols on page 4-2■ Network Connection Overview on page 4-4■ Automatically Setting the Product’s IP Address on page 4-7■ Manually Setting the Product’s IP Address on page 4-8
This chapter provides a general overview on networking and network protocols available to your product.
See also: Features Setup Guide at www.xerox.com/office/6115support
Network Basics
Networking Protocols
Phaser® 6115MFP Multifunction Product4-2
Networking ProtocolsThe Phaser 6115MFP supports the following network protocols:
■ BOOTP/DHCP■ HTTP■ IPP■ LPD/LPR■ SLP■ SNMP■ Port 9100■ SMTP
BOOTPBOOTP (Bootstrap Protocol) is an Internet protocol that enables a diskless workstation to discover (1) its own IP address, (2) the IP address of a BOOTP server on the network, and (3) a file that can be loaded into memory to boot the workstation. This enables the workstation to boot without requiring a hard or floppy disk drive.
DHCPDHCP (Dynamic Host Configuration Protocol) is a protocol for assigning dynamic IP addresses to devices on a network. With dynamic addressing, a device can have a different IP address every time it connects to the network. In some products, the device’s IP address can even change while it is still connected. DHCP also supports a mix of static and dynamic IP addresses. Dynamic addressing simplifies network administration because the software keeps track of IP addresses rather than requiring an administrator to manage the task. This means that a new computer can be added to a network without the hassle of manually assigning it a unique IP address.
HTTPHTTP (HyperText Transfer Protocol) is the underlying protocol used by the World Wide Web. It defines how messages are formatted and transmitted, and what actions web servers and browsers should take in response to various commands. For example, when you enter a URL in your browser, this actually sends an HTTP command to the web server directing it to fetch and transmit the requested web page.
IPPIPP (Internet Printing Protocol) is a protocol for end users’ most common printing situations over the Internet. It allows users to find out about a printer’s capabilities, submit print jobs to a printer, determine the status of the printer or print job, and cancel a previously submitted print job.
Networking Protocols
Phaser® 6115MFP Multifunction Product4-3
LPD/LPRLPD/LPR (Line Printer Daemon/Line Printer Request) is a platform-independent printing protocol that runs over TCP/IP. Originally implemented for BSD UNIX, its use has spread into the desktop world and is now an industry standard.
SLPTraditionally, in order to locate services on the network, users had to supply the host name or network address of the machine providing the desired service. This has created many administrative problems.
However, SLP (Service Location Protocol) simplifies the discovery and use of network resources such as printers by automating a number of network services. It provides a framework that allows networking applications to discover the existence, location, and configuration of networked services.
With SLP users no longer need to know the names of network hosts. Instead, they need to know only the description of the service they are interested in. Based on this description, SLP is able to return the URL of the desired service.
SNMPSNMP (Simple Network Management Protocol) is a set of protocols for managing complex networks. SNMP works by sending messages to different parts of a network. SNMP-compliant devices, called agents, store data about themselves in Management Information Bases (MIBs) and return this data to the SNMP requesters.
Port 9100When printing through a network, TCP/IP port number 9100 can be used to send raw data.
SMTPSMTP (Simple Mail Transfer Protocol) is a protocol for sending email.
This protocol was originally used to send email between servers; however, currently client email software uses it to send email to servers using POP.
Networking Protocols
Phaser® 6115MFP Multifunction Product4-4
Network Connection OverviewDepending on your particular setup, the following hardware and cabling is required for Ethernet.
■ If you are connecting to one computer, an Ethernet RJ-45 crossover cable is required. ■ If you are connecting to one or more computers with a hub, an Ethernet hub and two
twisted-pair (category 5/RJ-45) cables are required. ■ If you are connecting to one or more computers using a cable or DSL router, a cable or
DSL router and two or more twisted-pair (category 5/RJ-45) cables are required. (One cable for each device.)
■ If you are connecting to one or more computers with a hub, connect the computer to the hub with one cable, and then connect the product to the hub with the second cable. Connect to any port on the hub except the uplink port.
TCP/IP and EtherTalk are the most common protocols used with Ethernet. To print using a TCP/IP protocol, each computer and product requires a unique IP address.
TCP/IP and IP Address OverviewIf your computer is on a large network, contact your network administrator for the appropriate TCP/IP addresses and additional configuration information.
If you are creating your own small Local Area Network or connecting the product directly to your computer using Ethernet, follow the procedure for automatically setting the product’s Internet Protocol (IP) address.
PCs and products primarily use TCP/IP protocols to communicate over an Ethernet network. With TCP/IP protocols, each product and computer must have a unique IP address. It is important that the addresses are similar, but not the same; only the last digit needs to be different. For example, your product can have the address 192.168.1.2 while your computer has the address 192.168.1.3. Another device can have the address 192.168.1.4.
Generally, Macintosh computers use either TCP/IP or the EtherTalk protocol to talk to a networked printer. For Mac OS X products, TCP/IP is preferred. Unlike TCP/IP, however, EtherTalk does not require products or computers to have IP addresses.
Many networks have a Dynamic Host Configuration Protocol (DHCP) server. A DHCP server automatically programs an IP address into every PC and product on the network that is configured to use DHCP. A DHCP server is built into most cable and DSL routers. If you use a cable or DSL router, see your router’s documentation for information on IP addressing.
See also: Online Support Assistant at www.xerox.com/office/6115support
Networking Protocols
Phaser® 6115MFP Multifunction Product4-5
Installing Over a Network Connection1. Turn on the product and the computer.
2. Connect the product to the network using the recommended hardware and cables.
3. Configure the product’s network address, which is required to identify the product on the network.
■ Windows operating products: Run the installer on the Software and Documentation CD-ROM to automatically set the product’s IP address if the product is connected to an established TCP/IP network. You can also manually set the printer’s IP address on the control panel. Once the IP address is set, continue the installation procedure to install the driver software.
■ Macintosh products: Manually set the product’s network address (for TCP/IP) on the control panel. Install the driver software on the computer from the Software and Documentation CD-ROM.
If the Software and Documentation CD-ROM is not available, you can download the latest drivers from www.xerox.com/drivers.
See also: Features Setup Guide at www.xerox.com/office/6115support
Methods of Setting the Product’s IP Address
Phaser® 6115MFP Multifunction Product4-6
Methods of Setting the Product’s IP AddressThis section includes:
■ Automatically Setting the Product’s IP Address on page 4-7■ Manually Setting the Product’s IP Address on page 4-8
Set the product’s IP address using any of the following methods. DHCP is enabled by default on all Phaser printers.
■ MFP ControlCentre■ CentreWare IS■ Dynamic (Auto IP)
Information Required for Manual IP Addressing
Information Comments
Internet Protocol (IP) address of the product Format is xxx.xxx.xxx.xxx, where xxx represents a decimal number from 0–255.
Network Mask If you are unsure, leave this blank; the product chooses an appropriate mask.
Default Router/Gateway address Router address is required to communicate with the host device from anywhere other than the local network segment.
Methods of Setting the Product’s IP Address
Phaser® 6115MFP Multifunction Product4-7
Automatically Setting the Product’s IP AddressIf the product is connected to a small established TCP/IP network without a DHCP server, use the installer on the Software and Documentation CD-ROM to detect or assign an IP address to your product.
Note: For the automatic Installer to function, the product must be connected to an established TCP/IP network.
You can turn on/off both protocols using the control panel, or use CentreWare IS to turn on/off DHCP.
On the Control Panel1. Press the Menu/Select button.
2. Using the Up Arrow or Down Arrow button, scroll to Network Setup, and then press the Menu/Select button.
3. Ensure DHCP/BootP or AutoIP are set to ON.
4. Reboot the product and then print a configuration page.
Using CentreWare IS1. Launch your web browser.
2. Enter the product’s IP address in the browser’s Address field (http://xxx.xxx.xxx.xxx).
3. Login with your administrator’s password.
4. Click the Network tab.
5. From the TCP/IP drop-down list, select Enable.
6. If you have a DHCP server, select Enable from the DHCP drop-down list.
7. If you wish the product to auto assign, select Enable from the AutoIP drop-down list.
8. Click Save Changes at the bottom of the page.
Methods of Setting the Product’s IP Address
Phaser® 6115MFP Multifunction Product4-8
Manually Setting the Product’s IP Address
Note: Verify that your computer has a properly configured IP address for your network. Contact your network administrator for more information. DNS must be disabled to manually set the IP address.
If you are on a network without a DNS server, or in an environment where the network administrator assigns product IP addresses, you can use this method to manually set the IP address. Manually setting the IP address overrides DHCP and AutoIP settings. Alternatively, if you are in a small office with a single PC and use a dialup modem connection, you can manually set the IP address.
Using the Control Panel
1. Press the Menu/Select button.
2. Using the Up Arrow or Down Arrow button, scroll to Network Setup, and then press the Menu/Select button.
3. Scroll to TCP/IP Address, and then press the Menu/Select button.
4. Enter the IP Address using the numeric keypad.
5. Press the Menu/Select button to save the IP address.
6. Follow the above steps to set the Subnet Mask and Gateway addresses, if necessary.
Using CentreWare IS
CentreWare IS provides a simple interface that enables you to manage, configure, and monitor networked products from your desktop using an embedded web server.
1. Launch your web browser.
2. Enter the product’s IP address in the browser’s Address field (http://xxx.xxx.xxx.xxx).
3. Login with your administrator’s password.
4. Click the Network tab.
5. From the TCP/IP drop-down list, select Enable.
6. Select Disable from the DHCP and AutoIP drop-down lists.
7. Enter or modify the network settings on the TCP/IP page, and then click Save Changes at the bottom of the page.
Using Host Names with the Domain Name Service (DNS)The product supports DNS through an embedded DNS resolver. The DNS resolver protocol communicates with one or more DNS servers to resolve the IP address for a given host name or the host name for a given IP address.
To use an IP host name for the product, the product administrator must configure one or more DNS servers and a local DNS domain name space database. To set up the printer for DNS, supply a maximum of two DNS name server IP addresses.
Phaser® 6115MFP Multifunction Product5-1
This chapter includes:
■ Accessing the Printer Driver Settings on page 5-2■ Using the Windows Printer Driver on page 5-4
See also: (English only)Using the Windows Printer Driver tutorial at www.xerox.com/office/6115support
Using Printer Driver Options
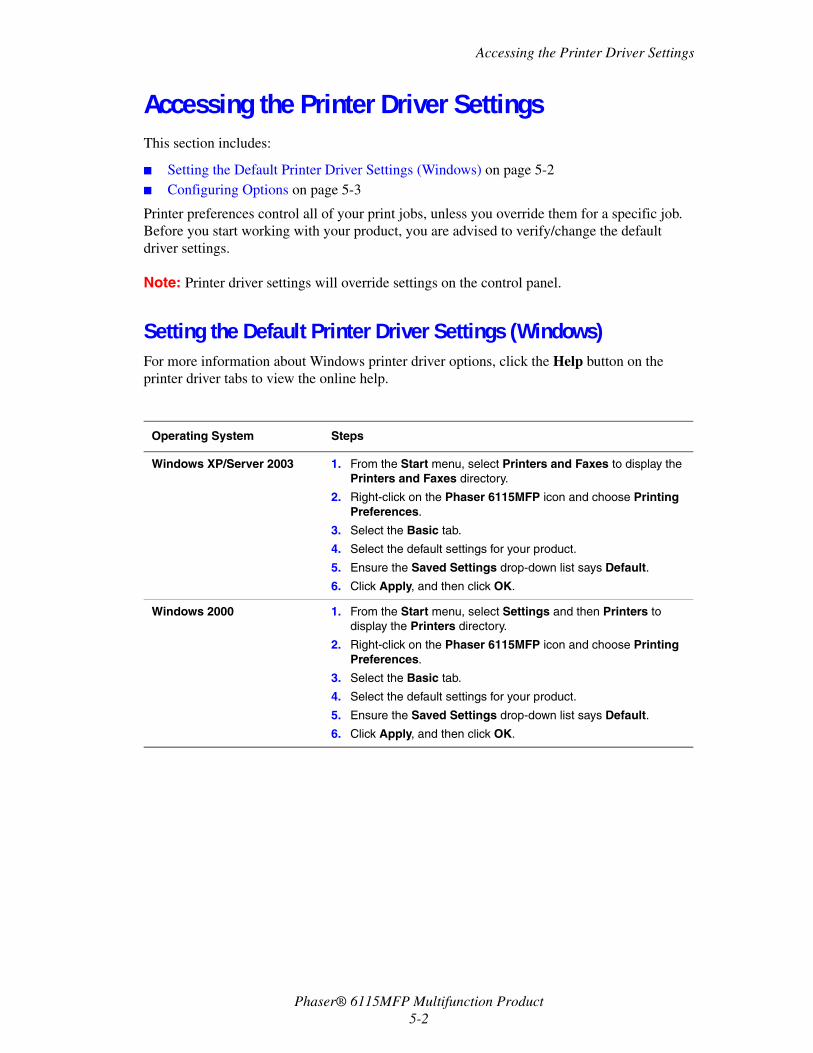
Accessing the Printer Driver Settings
Phaser® 6115MFP Multifunction Product5-2
Accessing the Printer Driver Settings This section includes:
■ Setting the Default Printer Driver Settings (Windows) on page 5-2■ Configuring Options on page 5-3
Printer preferences control all of your print jobs, unless you override them for a specific job. Before you start working with your product, you are advised to verify/change the default driver settings.
Note: Printer driver settings will override settings on the control panel.
Setting the Default Printer Driver Settings (Windows)For more information about Windows printer driver options, click the Help button on the printer driver tabs to view the online help.
Operating System Steps
Windows XP/Server 2003 1. From the Start menu, select Printers and Faxes to display the Printers and Faxes directory.
2. Right-click on the Phaser 6115MFP icon and choose Printing Preferences.
3. Select the Basic tab.
4. Select the default settings for your product.
5. Ensure the Saved Settings drop-down list says Default.
6. Click Apply, and then click OK.
Windows 2000 1. From the Start menu, select Settings and then Printers to display the Printers directory.
2. Right-click on the Phaser 6115MFP icon and choose Printing Preferences.
3. Select the Basic tab.
4. Select the default settings for your product.
5. Ensure the Saved Settings drop-down list says Default.
6. Click Apply, and then click OK.
Accessing the Printer Driver Settings
Phaser® 6115MFP Multifunction Product5-3
Configuring OptionsIf you have options installed, you need to enable the options in the printer driver. Ensure the option is installed correctly and the product is turned on before configuring the driver.
Enabling Options (Windows)1. Follow the instructions for displaying the printer driver, see Accessing the Printer Driver
Settings on page 5-2.
2. Select the Device Options tab.
■ If your options are listed as Installed in the Device Options list, click OK.■ If your options are listed as Not Installed, continue with the following steps.
3. Clear the Auto Configure check box.
4. Select the option (one at a time) from the list.
5. Select Installed from the Settings drop-down list.
6. Click Apply, and then click OK to exit.
Enabling Options (Macintosh)1. Use the Printer Setup Utility or Printer Center, and select Show Info from the Printers
menu.
2. Click Name & Location from the drop-down list, and then select Installable Options from the menu.
3. Select the options installed on your product, and then click Apply Changes.
Using the Windows Printer Driver
Phaser® 6115MFP Multifunction Product5-4
Using the Windows Printer Driver This section details many of the Xerox printer driver features that are available, includes more information about these features, and information about how to use the feature in the driver.
Note: For information about scan driver features, see Scanning on page 8-1.
This section includes:
■ Create or Delete a Saved Settings File on page 5-4■ Add, Edit, or Delete Custom Paper Sizes on page 5-5■ Pages per Sheet on page 5-6■ Booklet Printing on page 5-7■ Poster Printing on page 5-8■ Add, Edit, or Delete an Overlay on page 5-9■ Add, Edit, or Delete a Watermark on page 5-10
Create or Delete a Saved Settings FileSaved Settings enables you to save custom driver settings so you can use them again later by selecting the desired saved name from the Saved Settings drop-down list
Creating a New Saved Settings File1. In the printer driver, make the appropriate driver settings on each tab.
2. Click the Save button.
3. Type a name for the Saved Settings file, and then click OK.
Delete a Saved Setting File1. In the printer driver, choose the name of the Saved Settings file from the drop-down list,
and then click Edit.
2. In the Edit Saved Settings dialog box, highlight the name of the file you want to delete, and then click the Delete button.
Using the Windows Printer Driver
Phaser® 6115MFP Multifunction Product5-5
Add, Edit, or Delete Custom Paper SizesYou can create, edit, and delete custom size paper for your product. The custom size must be within the maximum and minimum size ranges for your product, see Supported Paper and Media on page 6-2.
Adding a New Custom Size Paper1. Select the Basic tab.
2. Click the Edit Custom Paper... button.
3. To create a new Custom Size, click the New button.
4. Type a name for your custom paper in the Custom Paper dialog box.
5. Select inches or millimeters for the unit measurement.
6. Enter the Width and Height for the custom size paper and click OK.
7. Click OK.
Editing Custom Size Paper1. Select the Basic tab.
2. Click the Edit Custom Paper... button.
3. Highlight the custom size paper you want to edit and click the Edit button.
4. Select inches or millimeters for the unit measurement.
5. Edit the Width and Height for the custom size paper and click OK.
6. Click OK.
Deleting Custom Size Paper1. Select the Basic tab.
2. Click the Edit Custom Paper... button.
3. Highlight the custom size paper you want to remove and click the Delete button.
4. When asked if you are sure you want to delete the custom size, click Yes.
5. Click OK.
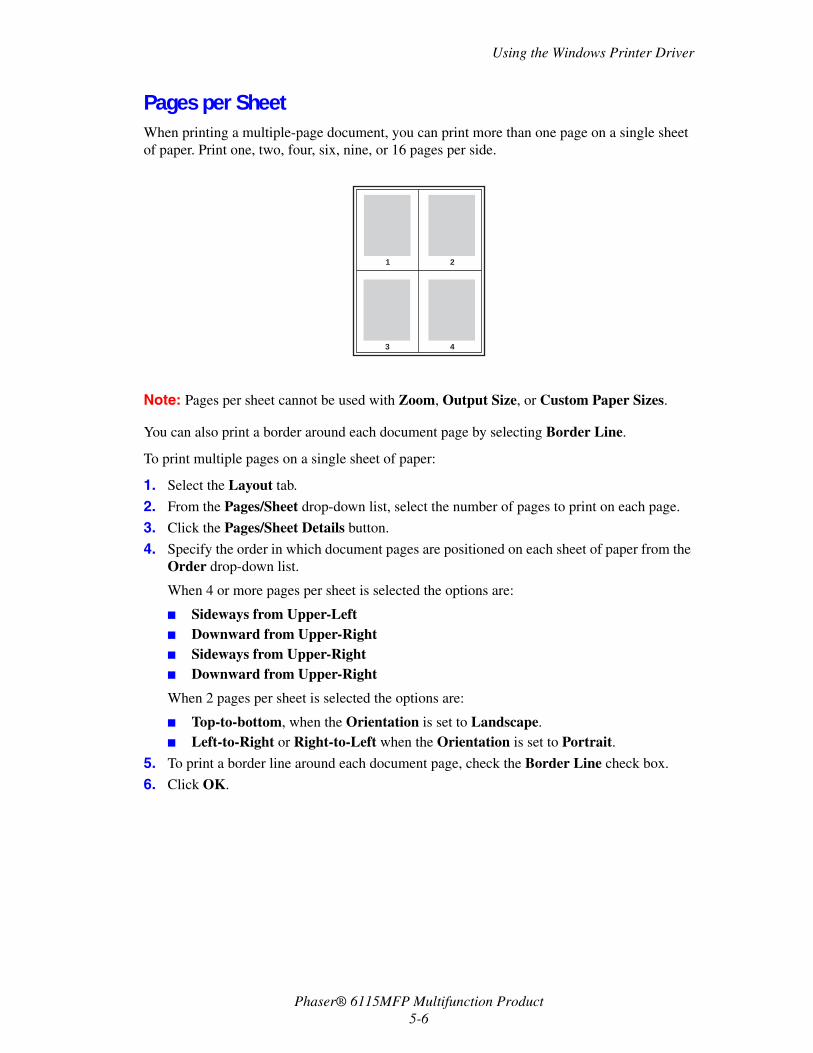
Using the Windows Printer Driver
Phaser® 6115MFP Multifunction Product5-6
Pages per Sheet When printing a multiple-page document, you can print more than one page on a single sheet of paper. Print one, two, four, six, nine, or 16 pages per side.
Note: Pages per sheet cannot be used with Zoom, Output Size, or Custom Paper Sizes.
You can also print a border around each document page by selecting Border Line.
To print multiple pages on a single sheet of paper:
1. Select the Layout tab.
2. From the Pages/Sheet drop-down list, select the number of pages to print on each page.
3. Click the Pages/Sheet Details button.
4. Specify the order in which document pages are positioned on each sheet of paper from the Order drop-down list.
When 4 or more pages per sheet is selected the options are:
■ Sideways from Upper-Left■ Downward from Upper-Right■ Sideways from Upper-Right■ Downward from Upper-Right
When 2 pages per sheet is selected the options are:
■ Top-to-bottom, when the Orientation is set to Landscape.■ Left-to-Right or Right-to-Left when the Orientation is set to Portrait.
5. To print a border line around each document page, check the Border Line check box.
6. Click OK.
1 2
43
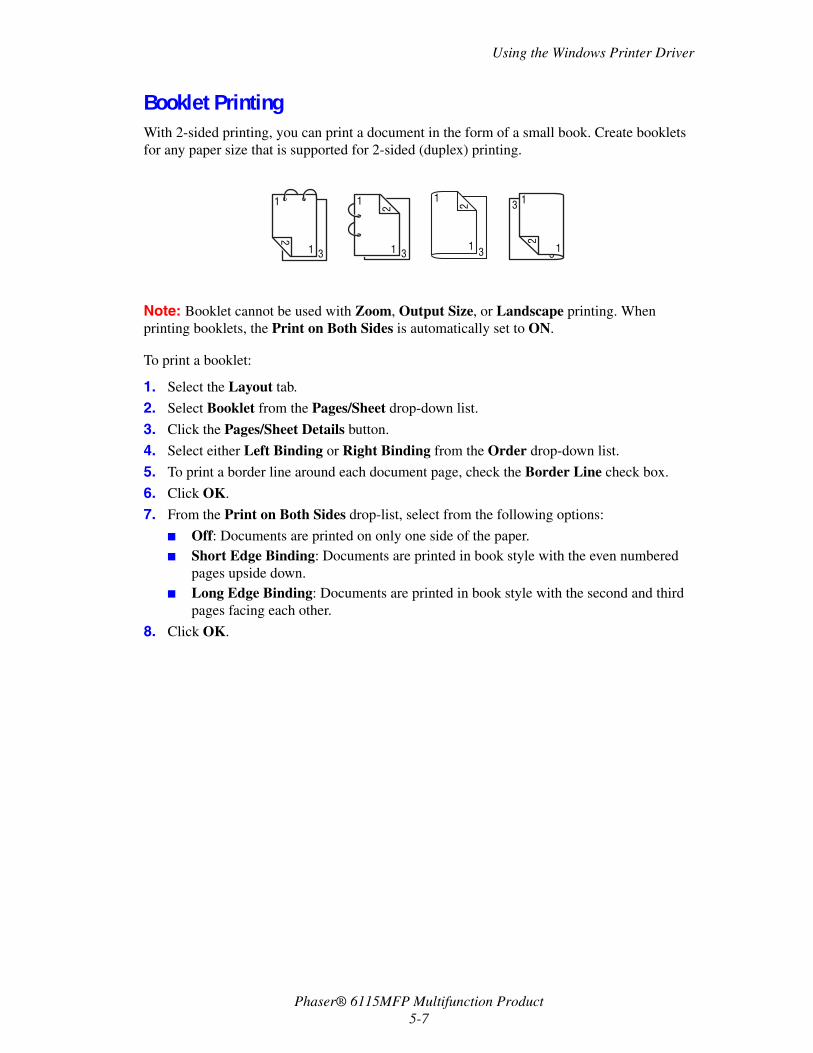
Using the Windows Printer Driver
Phaser® 6115MFP Multifunction Product5-7
Booklet PrintingWith 2-sided printing, you can print a document in the form of a small book. Create booklets for any paper size that is supported for 2-sided (duplex) printing.
Note: Booklet cannot be used with Zoom, Output Size, or Landscape printing. When printing booklets, the Print on Both Sides is automatically set to ON.
To print a booklet:
1. Select the Layout tab.
2. Select Booklet from the Pages/Sheet drop-down list.
3. Click the Pages/Sheet Details button.
4. Select either Left Binding or Right Binding from the Order drop-down list.
5. To print a border line around each document page, check the Border Line check box.
6. Click OK.
7. From the Print on Both Sides drop-list, select from the following options:
■ Off: Documents are printed on only one side of the paper.■ Short Edge Binding: Documents are printed in book style with the even numbered
pages upside down.■ Long Edge Binding: Documents are printed in book style with the second and third
pages facing each other.
8. Click OK.
1
3
1
2
1
111
1
2
3
1
1
2
3
3
31
1
2
Using the Windows Printer Driver
Phaser® 6115MFP Multifunction Product5-8
Poster PrintingPoster printing enables you to print a document on multiple sheets of paper.
Note: Poster printing cannot be used with Printing on Both Sides, Image Shifting, or Output Size.
1. Open the printer driver and select the Layout tab.
2. From the Pages/Sheet drop-list, select from the following options:
■ 2x2: Four sheets of paper per document page.■ 3x3: Nine sheets of paper per document page.■ 4x4: Sixteen sheets of paper per document page.■ 5x5: Twenty-five sheets of paper per document page.
3. Click OK.
Using the Windows Printer Driver
Phaser® 6115MFP Multifunction Product5-9
Add, Edit, or Delete an OverlayAn overlay is a print image added to your print job. The overlay can be printed on only the first page, like a cover page, or on all the pages of your print job. An overlay must be created in another application and added to the printer driver to create an overlay file. You can add, edit, or delete overlay file associations with the printer driver. When you edit or delete an overlay file from the printer driver, this does not effect the overlay file itself.
Note: An overlay file cannot be more than one page.
To Create an Overlay File1. Create an overlay file in any other application.
2. Open the printer driver and select the Overlay tab.
3. Click the Add... button.
4. Enter a name for the overlay in the Overlay Form Name text field.
5. Click the Browse button to browse to the overlay file.
6. Click OK.
To Edit an Overlay File1. Open the printer driver and select the Overlay tab.
2. Select the overlay you want to edit and click the Edit button.
3. Enter a new name for the overlay in the Overlay Form Name text field if necessary.
4. Click the Browse button to browse to the file.
5. Click OK.
To Delete an Overlay File1. Open the printer driver and select the Overlay tab.
2. Select the overlay you want to delete and click the Delete button.
3. Click Yes when asked if you are sure you want to delete the current overlay.
4. Click OK.
Printing an Overlay1. Open the printer driver and select the Overlay tab.
2. Select the overlay file to use from the Overlay list box.
3. From the Pages drop-down list box select one of the following:
■ First Page: Prints the overlay only on the first page of your print job.■ All Pages: The overlay is printed on all pages of the print job.
4. Click OK.
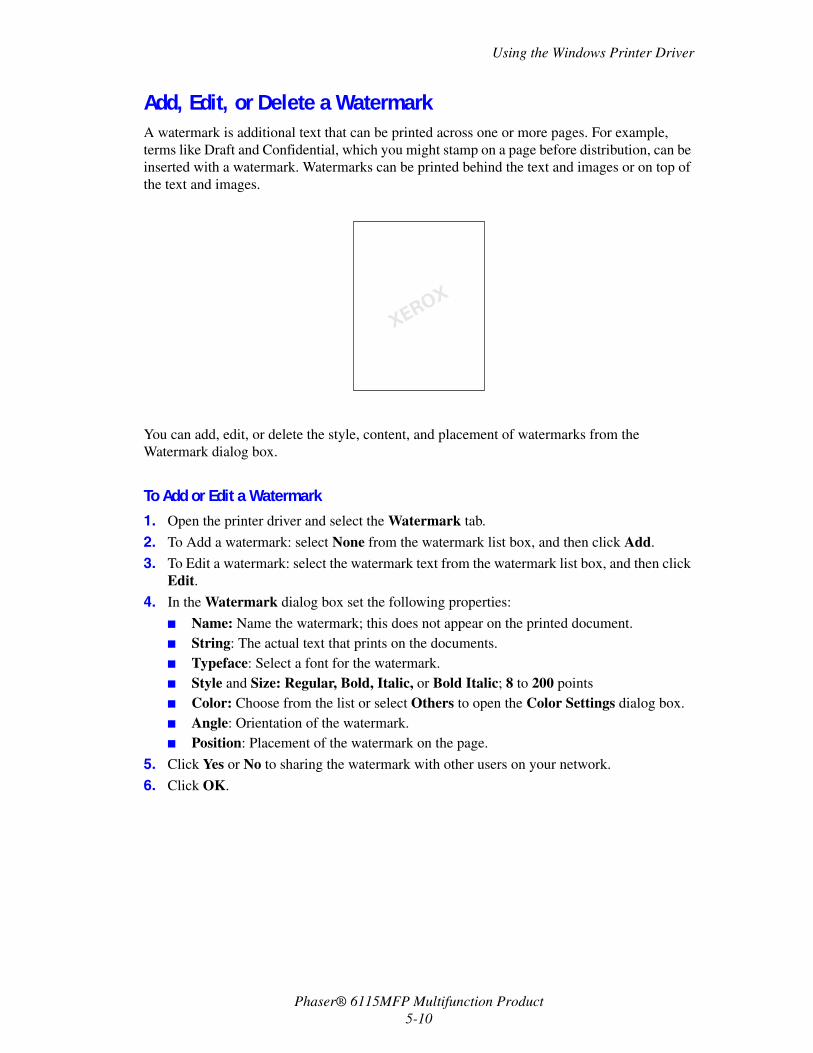
Using the Windows Printer Driver
Phaser® 6115MFP Multifunction Product5-10
Add, Edit, or Delete a WatermarkA watermark is additional text that can be printed across one or more pages. For example, terms like Draft and Confidential, which you might stamp on a page before distribution, can be inserted with a watermark. Watermarks can be printed behind the text and images or on top of the text and images.
You can add, edit, or delete the style, content, and placement of watermarks from the Watermark dialog box.
To Add or Edit a Watermark1. Open the printer driver and select the Watermark tab.
2. To Add a watermark: select None from the watermark list box, and then click Add.
3. To Edit a watermark: select the watermark text from the watermark list box, and then click Edit.
4. In the Watermark dialog box set the following properties:
■ Name: Name the watermark; this does not appear on the printed document.■ String: The actual text that prints on the documents.■ Typeface: Select a font for the watermark.■ Style and Size: Regular, Bold, Italic, or Bold Italic; 8 to 200 points■ Color: Choose from the list or select Others to open the Color Settings dialog box.■ Angle: Orientation of the watermark.■ Position: Placement of the watermark on the page.
5. Click Yes or No to sharing the watermark with other users on your network.
6. Click OK.
Using the Windows Printer Driver
Phaser® 6115MFP Multifunction Product5-11
Printing a Watermark1. Open the printer driver and select the Watermark tab.
2. Select the watermark text from the Watermark list box.
3. Select Background if you want the watermark to print behind the text and images.
4. Select Repeat to repeat the watermark on the printed page.
5. Select 1st Page Only if you want the watermark to appear only on the first page of the print job.
6. Click OK.
Using the Macintosh Printer Driver
Phaser® 6115MFP Multifunction Product5-12
Using the Macintosh Printer DriverThis section includes:
■ Selecting Print Options on page 5-12■ Specifying Page Setup Settings on page 5-12■ Custom Paper Size Options on page 5-12■ Specifying Print Settings on page 5-13
Selecting Print Options1. Open Printer Setup Utility, which can be accessed by selecting Macintosh HD,
Applications, and then Utilities.
2. Select this printer in the Printer List, and then select Show Info from the Printers menu.
3. Select Installable Options from the pop-up menu. Select the options that you have on your printer, and then click Apply Changes.
4. Close the Printer Info dialog box.
Specifying Page Setup SettingsThe following dialog box appears when Page Setup... is selected from the File menu in the application being used.
1. Select Page Setup... from the File menu. The Page Setup dialog box appears.
2. Select your printer in the Format for pop-up menu.
Page Attributes OptionsThe Page Attributes section is used to specify the settings for the paper size, scaling, and print orientation.
1. Paper Size: Select the desired paper size from the Paper Size pop-up menu.
2. Orientation: Select either a vertical or horizontal page orientation for printouts.
3. Scale: If you want to enlarge or reduce the size of the printout, enter the scale ratio here.
Custom Paper Size OptionsThe Custom Paper Size section is found under the Paper Size pop-up menu. It is used to specify the dimensions for a custom paper size.
1. Page Size: Enter the dimensions of the paper height and width for the custom paper size.
2. Printer Margins: Enter the dimensions for the top, left, right, and bottom margins.
3. Duplicate: Click this button to duplicate (copy) the settings of an existing custom paper size and create a new custom paper size based on those settings.
Specifying Print Settings
Phaser® 6115MFP Multifunction Product5-13
Specifying Print SettingsThe following dialog box appears when Print... is selected from the File menu in the application being used.
1. Select Print... from the File menu, the Print dialog box appears.
2. Select your printer in the Printer pop-up menu. The Print dialog box is used to specify the following print options.
Print Dialog Description
Copies and PagesThe Copies and Pages section is used to specify the number of copies to print and the range of pages to print.
1. Copies: This specifies the number of copies to be printed. If the Collated check box is selected, all pages in the documents are printed as sets of printouts.For example, if 5 is entered for Copies and Collated is selected, the document is printed five times from the first page to the last page.
2. Pages:
■ All: Prints all pages in the document.■ From, to: Specifies the range of pages to be printed.
Section Description
Copies and Pages (page 5-13) This section contains options for the number of copies to be printed and the range of pages to print.
Layout (page 5-14) This section contains options for specifying the page layout when printing.
Duplex (2-Sided) (page 5-14) This section contains options for 2-sided printing. This is only available when the optional duplex unit is installed.
Output Options This allows you to print your output to a specific format, such as PDF.
Scheduler (page 5-14) This section contains options for specifying the print timing and priority of jobs.
Paper Handling (page 5-15) This section contains options for specifying the pages to be printed and their printing order.
ColorSync (page 5-15) This section contains options for specifying ColorSync settings.
Cover Page (page 5-15) This section contains options for specifying cover page settings.
Paper Feed (page 5-15) This section contains paper feed options.
Specifying Print Settings
Phaser® 6115MFP Multifunction Product5-14
LayoutThe Layout section is used to specify the page layout when printing and the setting for two-sided printing.
1. Pages per Sheet: Specifies the number of pages to be printed on one sheet of paper. For example, if 2 is selected, two pages are printed on one sheet of paper.
2. Layout Direction: If you are printing more than one page per sheet, this specifies the direction and order the pages should be arranged on each sheet of paper.
3. Border: This prints a border around the image for each of the pages printed on one sheet of paper when more than one page is printed on one sheet of paper.
4. Two-Sided: Select the desired setting for two-sided printing when the optional duplex unit is installed.
■ Off: Two-sided printing is not performed.■ Long-edged Binding: Two-sided printing is performed with the binding along the
long edge of the paper.■ Short-edged Binding: Two-sided printing is performed with the binding along the
short edge of the paper.
SchedulerThe Scheduler section is used to specify the timing and priority for printing jobs.
1. Print Document
■ Now: Select this option to begin printing immediately.■ At: Specify the time to begin printing.■ On Hold: Select this option to hold the print job.
2. Priority: Select the priority for printing jobs that are being held.
Duplex (2-Sided Printing)The Duplex section is used to specify whether the pages are to be printed on one-side or both sides of the paper.
1. Print on Both Sides: Select this box to print on both sides of the paper.
■ Long-edged Binding: Two-sided printing is performed with the binding along the long edge of the paper.
■ Short-edged Binding: Two-sided printing is performed with the binding along the short edge of the paper.
Specifying Print Settings
Phaser® 6115MFP Multifunction Product5-15
Paper HandlingThe Paper Handling section is used to specify the pages that are to be printed and the order in which the pages are printed.
1. Page Order: Select the order in which you want the document to print.
2. Print:
■ All pages: Select this option to print all pages.■ Odd numbered pages: Select this option to print only the pages with odd page
numbers.■ Even numbered pages: Select this option to print only the pages with even page
numbers.
3. Destination Paper Size: Select the output paper size of the job. You can scale to fit or use the current document size.
ColorSync1. Color Conversion: Enables you to select host-based color matching or printer-based color
matching.
2. Quartz Filter: Allows you to select Quartz Filter.
Cover Page1. Print Cover Page: Allows you to set cover page before or after document.
2. Cover Page Type: Allows you to select cover page type.
3. Billing Info: Allows you to set billing information printed on cover page.
Paper FeedThe Paper Feed section is used to specify the paper feed setting.
1. All pages from: All pages in the document are printed using the paper in the specified paper tray.
2. First page from: The first page of the document is printed on paper from a paper tray different from the tray used to print the rest of the document.
3. Remaining from: The rest of the document is printed from the specified paper tray when the first page is to be printed on paper from a different tray.
Phaser® 6115MFP Multifunction Product6-1
This chapter includes:
■ Supported Paper and Media on page 6-2■ Output Bin on page 6-3■ Loading Media on page 6-5■ Guaranteed Imageable (Printable) Area on page 6-24■ Options on page 6-25
Printing Basics
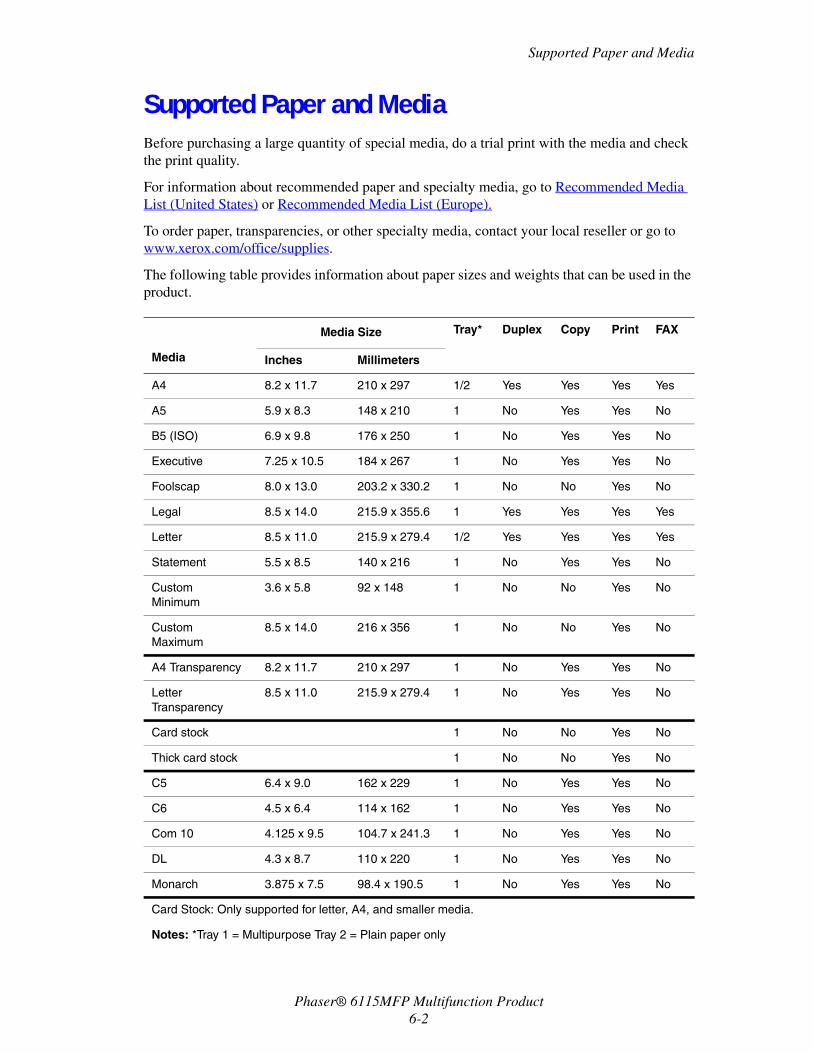
Supported Paper and Media
Phaser® 6115MFP Multifunction Product6-2
Supported Paper and Media Before purchasing a large quantity of special media, do a trial print with the media and check the print quality.
For information about recommended paper and specialty media, go to Recommended Media List (United States) or Recommended Media List (Europe).
To order paper, transparencies, or other specialty media, contact your local reseller or go to www.xerox.com/office/supplies.
The following table provides information about paper sizes and weights that can be used in the product.
Media
Media Size Tray* Duplex Copy Print FAX
Inches Millimeters
A4 8.2 x 11.7 210 x 297 1/2 Yes Yes Yes Yes
A5 5.9 x 8.3 148 x 210 1 No Yes Yes No
B5 (ISO) 6.9 x 9.8 176 x 250 1 No Yes Yes No
Executive 7.25 x 10.5 184 x 267 1 No Yes Yes No
Foolscap 8.0 x 13.0 203.2 x 330.2 1 No No Yes No
Legal 8.5 x 14.0 215.9 x 355.6 1 Yes Yes Yes Yes
Letter 8.5 x 11.0 215.9 x 279.4 1/2 Yes Yes Yes Yes
Statement 5.5 x 8.5 140 x 216 1 No Yes Yes No
Custom Minimum
3.6 x 5.8 92 x 148 1 No No Yes No
Custom Maximum
8.5 x 14.0 216 x 356 1 No No Yes No
A4 Transparency 8.2 x 11.7 210 x 297 1 No Yes Yes No
Letter Transparency
8.5 x 11.0 215.9 x 279.4 1 No Yes Yes No
Card stock 1 No No Yes No
Thick card stock 1 No No Yes No
C5 6.4 x 9.0 162 x 229 1 No Yes Yes No
C6 4.5 x 6.4 114 x 162 1 No Yes Yes No
Com 10 4.125 x 9.5 104.7 x 241.3 1 No Yes Yes No
DL 4.3 x 8.7 110 x 220 1 No Yes Yes No
Monarch 3.875 x 7.5 98.4 x 190.5 1 No Yes Yes No
Card Stock: Only supported for letter, A4, and smaller media.
Notes: *Tray 1 = Multipurpose Tray 2 = Plain paper only
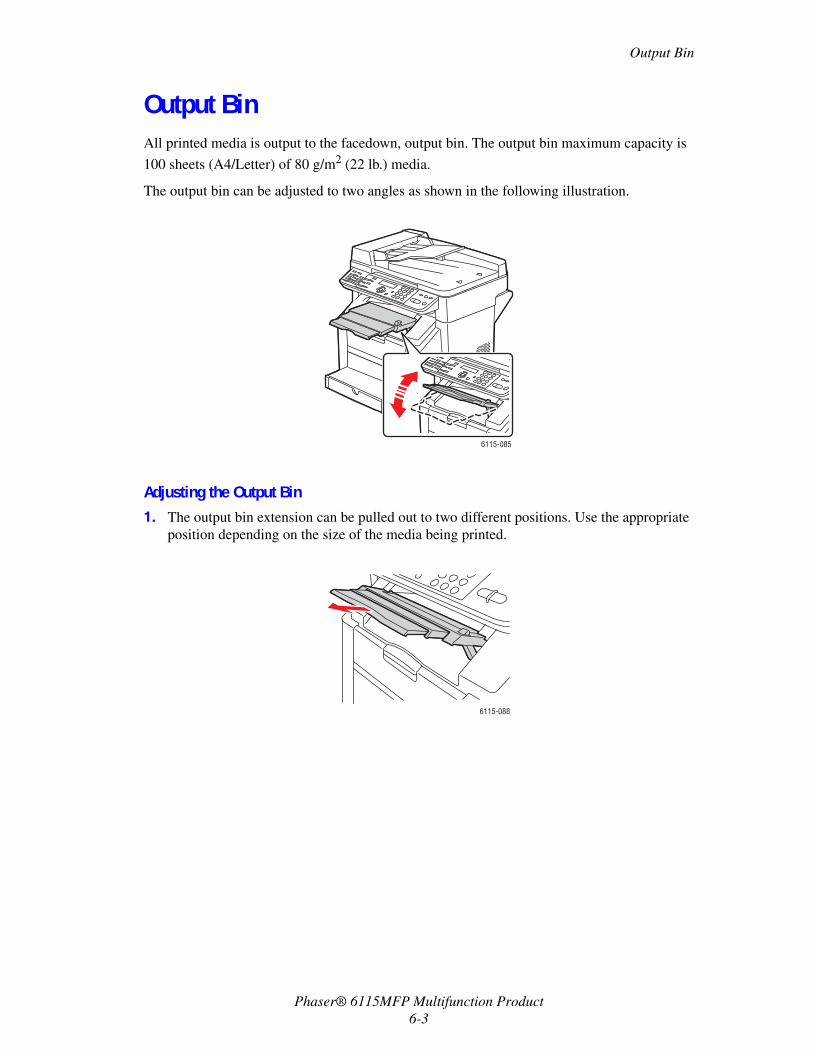
Output Bin
Phaser® 6115MFP Multifunction Product6-3
Output BinAll printed media is output to the facedown, output bin. The output bin maximum capacity is
100 sheets (A4/Letter) of 80 g/m2 (22 lb.) media.
The output bin can be adjusted to two angles as shown in the following illustration.
Adjusting the Output Bin1. The output bin extension can be pulled out to two different positions. Use the appropriate
position depending on the size of the media being printed.
6115-085
6115-088
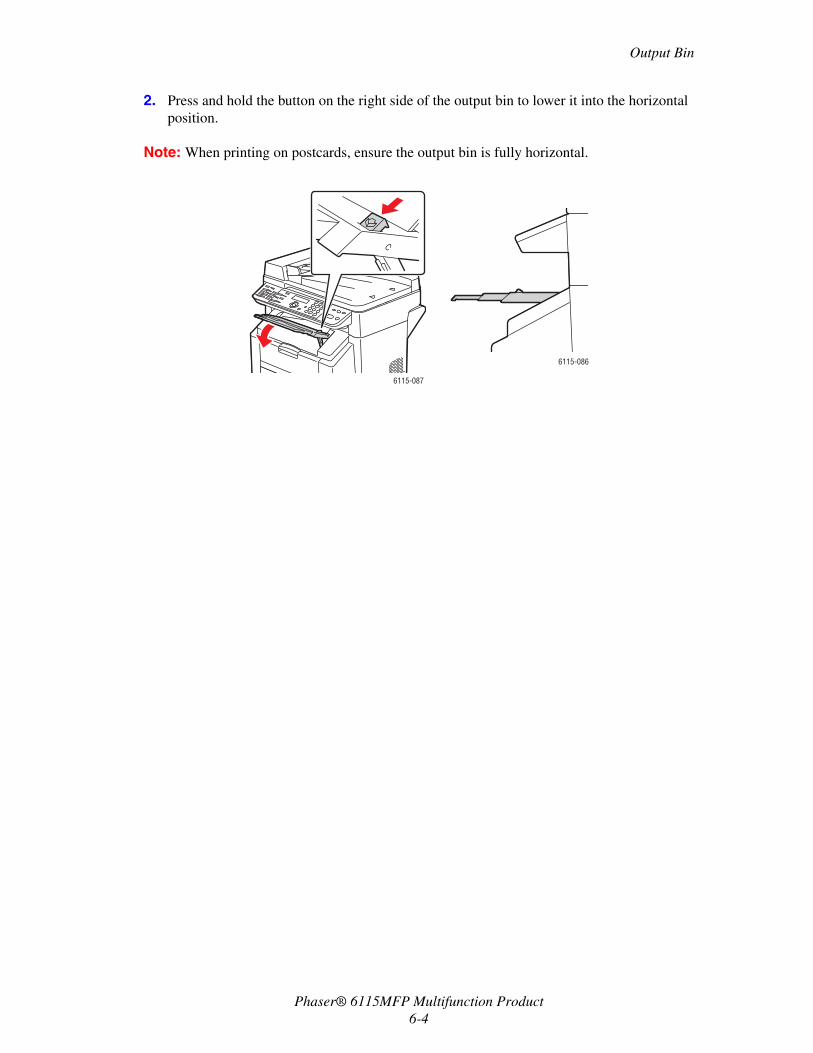
Output Bin
Phaser® 6115MFP Multifunction Product6-4
2. Press and hold the button on the right side of the output bin to lower it into the horizontal position.
Note: When printing on postcards, ensure the output bin is fully horizontal.
6115-087
6115-086
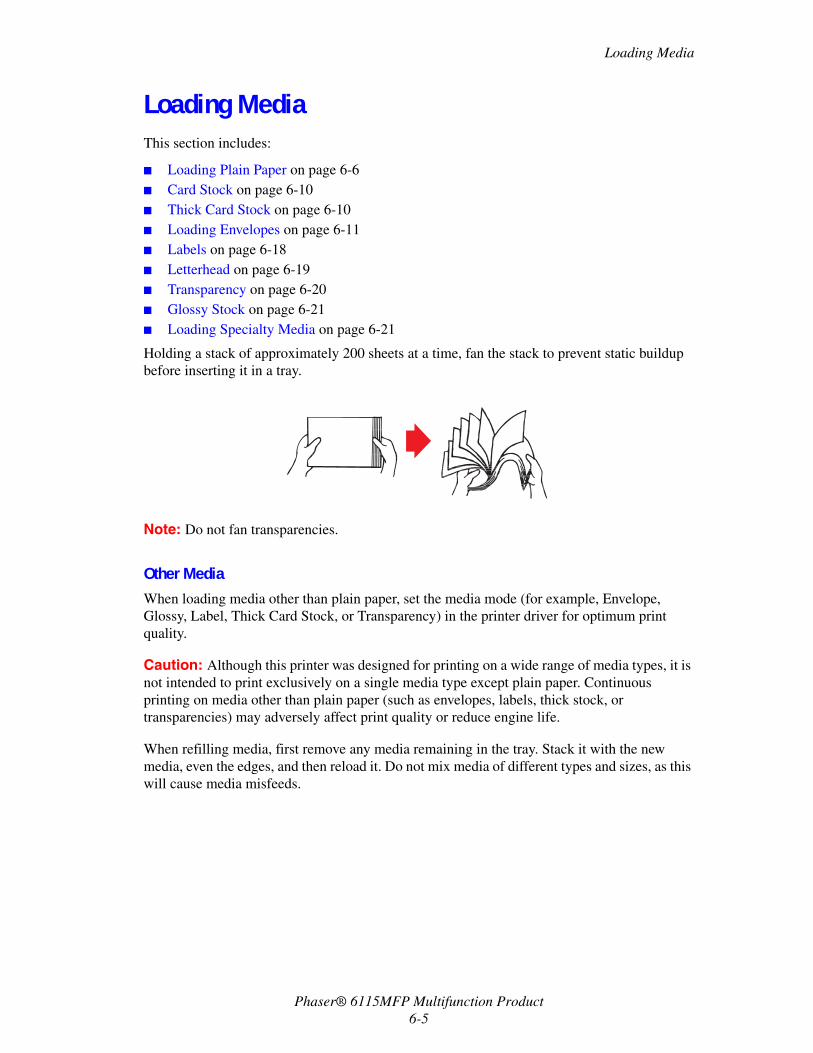
Loading Media
Phaser® 6115MFP Multifunction Product6-5
Loading MediaThis section includes:
■ Loading Plain Paper on page 6-6■ Card Stock on page 6-10■ Thick Card Stock on page 6-10■ Loading Envelopes on page 6-11■ Labels on page 6-18■ Letterhead on page 6-19■ Transparency on page 6-20■ Glossy Stock on page 6-21■ Loading Specialty Media on page 6-21
Holding a stack of approximately 200 sheets at a time, fan the stack to prevent static buildup before inserting it in a tray.
Note: Do not fan transparencies.
Other MediaWhen loading media other than plain paper, set the media mode (for example, Envelope, Glossy, Label, Thick Card Stock, or Transparency) in the printer driver for optimum print quality.
Caution: Although this printer was designed for printing on a wide range of media types, it is not intended to print exclusively on a single media type except plain paper. Continuous printing on media other than plain paper (such as envelopes, labels, thick stock, or transparencies) may adversely affect print quality or reduce engine life.
When refilling media, first remove any media remaining in the tray. Stack it with the new media, even the edges, and then reload it. Do not mix media of different types and sizes, as this will cause media misfeeds.
Loading Media
Phaser® 6115MFP Multifunction Product6-6
Loading Plain PaperUse plain paper that is:
■ Kept on a flat, level surface in its original wrapper until it is time to load it.■ Suitable of laser printers, such as standard or recycled office paper.■ Keep media between 35% and 85% relative humidity.
Do not use media that is:
■ Coated with a processed surface (such as carbon paper, digitally gloss-coated media, and colored paper that has been treated.
■ Carbon backed■ Iron-on transfer media (such as heat-sensitive paper, heat-pressure paper, and heat-
press transfer paper)■ Cold-water-transfer paper■ Pressure sensitive■ Designed specifically for inkjet printers (such as superfine paper, glossy film, and
postcards)■ Already printed on by another printer, copier or fax machine■ Dusty, wet, or damp■ Layered■ Adhesive■ Folded, creased, curled, embossed, warped, or wrinkled■ Too slick, too coarse, or too textured.■ Too thick or too thin■ Composed of foil or gilt; too luminous or shiny
■ Heat sensitive or cannot withstand the fusing temperature (180o C [356o F])■ Irregularly shaped (not rectangle or not cut at right angles)■ Attached with glue, tape, paper clips, staples, ribbons, hooks, or buttons■ Acidic■ Any media not supported by this product
Capacity
Tray 1 Up to 200 sheets, depending on the paper weight
Tray 2 Up to 500 sheets, depending on the paper weight
Orientation Faceup
Driver media type Plain paper
Weight 60 to 90 g/m2 (16 to 24 lb. Bond)
2-Sided printing (Duplexing)
See 2-Sided Printing (Duplexing) on page 6-28.
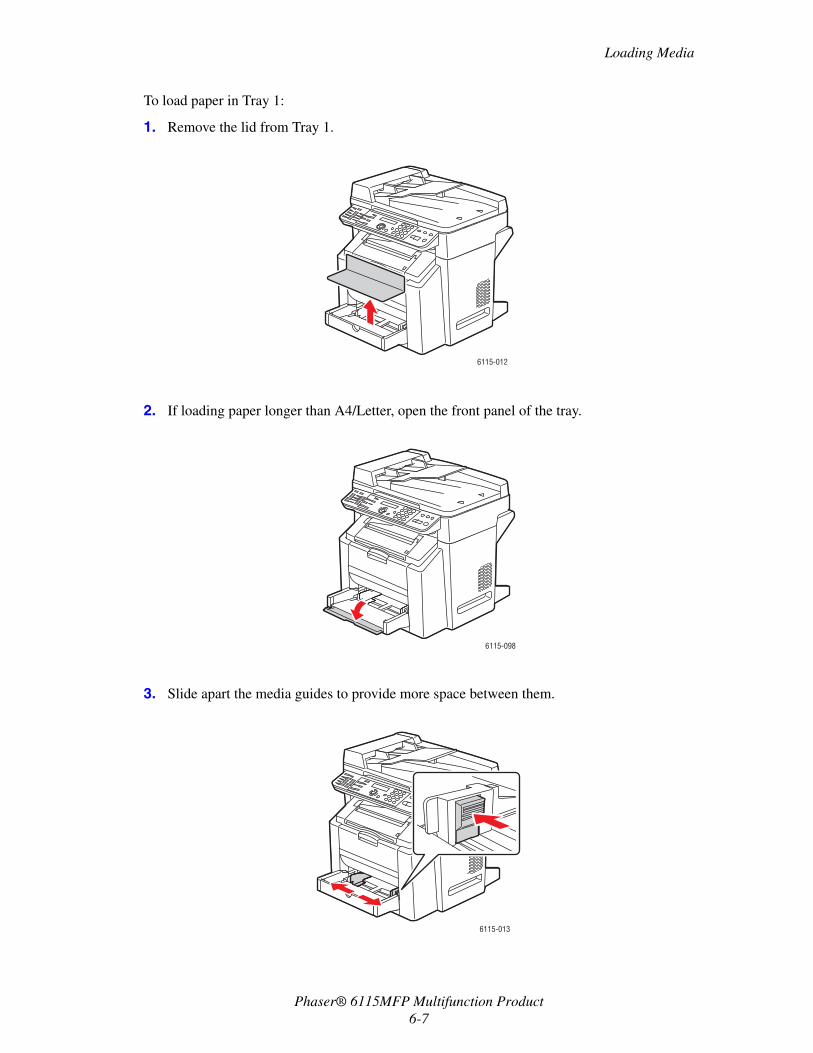
Loading Media
Phaser® 6115MFP Multifunction Product6-7
To load paper in Tray 1:
1. Remove the lid from Tray 1.
2. If loading paper longer than A4/Letter, open the front panel of the tray.
3. Slide apart the media guides to provide more space between them.
6115-012
6115-098
6115-013
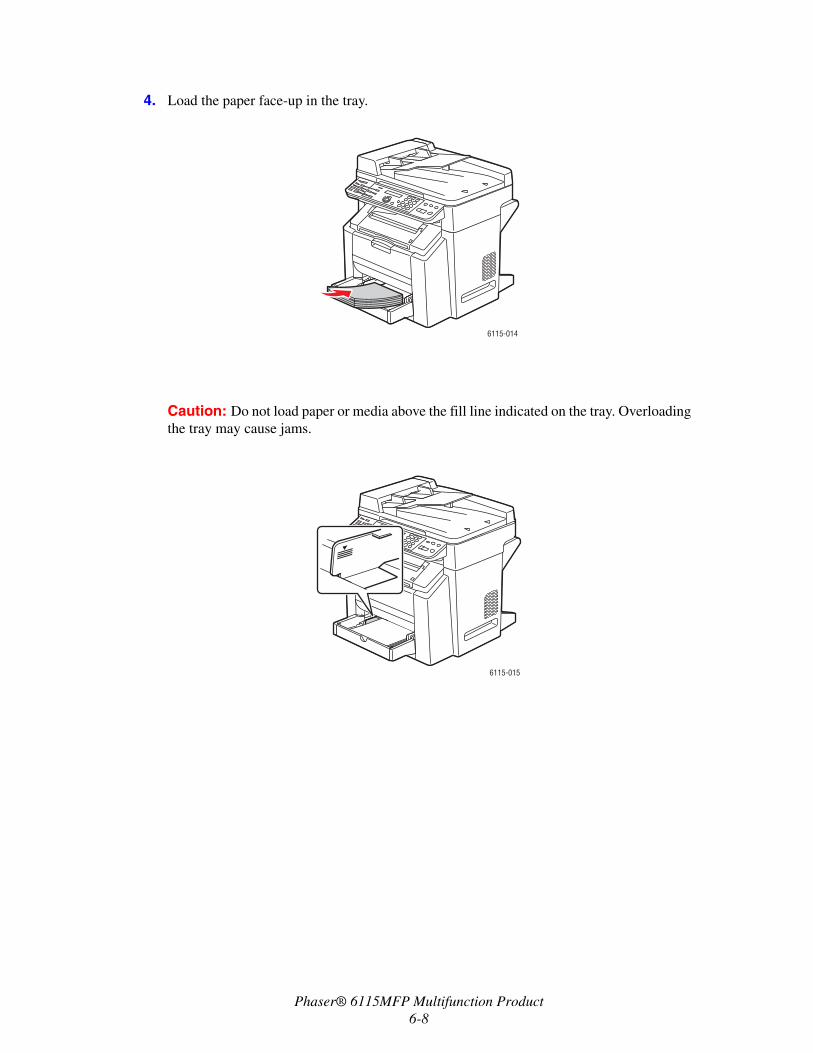
Phaser® 6115MFP Multifunction Product6-8
4. Load the paper face-up in the tray.
Caution: Do not load paper or media above the fill line indicated on the tray. Overloading the tray may cause jams.
6115-014
6115-015
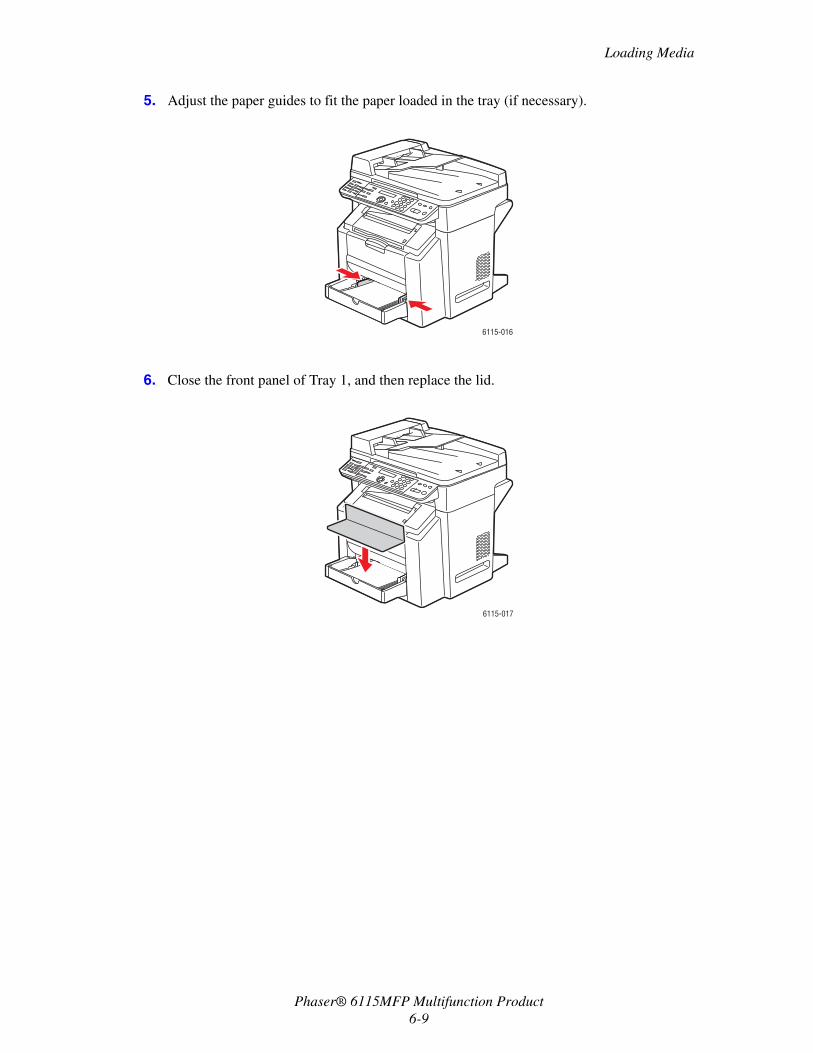
Loading Media
Phaser® 6115MFP Multifunction Product6-9
5. Adjust the paper guides to fit the paper loaded in the tray (if necessary).
6. Close the front panel of Tray 1, and then replace the lid.
6115-016
6115-017
Loading Media
Phaser® 6115MFP Multifunction Product6-10
Card StockTest all card stock to ensure acceptable performance and to ensure that the image does not shift. Use card stocks that are approved for laser printers.
Do not use card stocks that are:
■ Coated■ Designed for inkjet printers■ Precut or perforated■ Preprinted or multicolored■ Folded, wrinkled, creased or warped■ Mixed with any other media in the trays, this will cause misfeeding.
Thick Card StockPaper thicker than 90 g/m2 (24 lb. bond) is referred to as Thick card stock.
Capacity
Tray 1 Up to 50 sheets, depending on their thickness.
Tray 2 Not supported; Do not use in Tray 2.
Orientation Faceup
Driver media type Card stock
Weight
60 to 163 g/m2 (16 to 43 lb. Bond)
Note: 43 lb. bond is also referred to as 90 lb. index stock or 60 lb. cover.
2-sided printing Not supported
Capacity
Tray 1 Up to 50 sheets, depending on their thickness
Tray 2 Not supported; Do not use in Tray 2
Orientation Face up
Driver media type Thick card stock
Weight
91 to 200 g/m2 (25 to 53 lb. Bond)
Note: 53 lb. bond is also referred to as 110 lb. index stock or 75 lb. cover.
2-sided printing Not supported
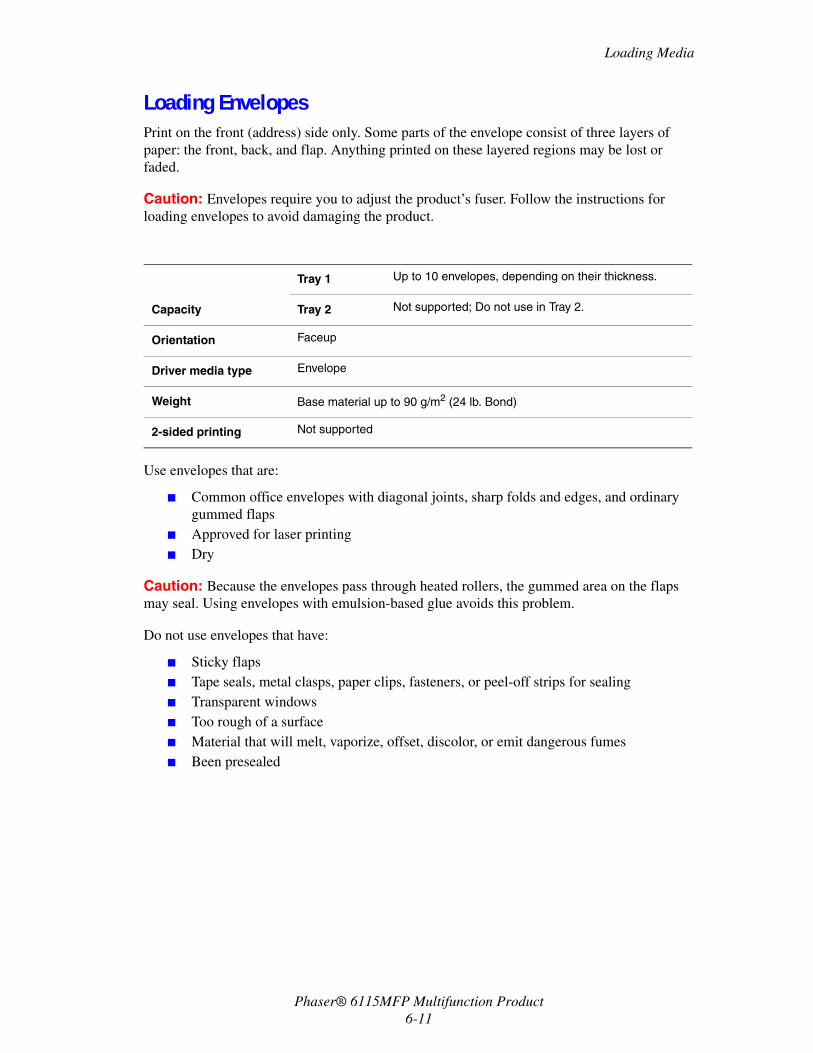
Loading Media
Phaser® 6115MFP Multifunction Product6-11
Loading EnvelopesPrint on the front (address) side only. Some parts of the envelope consist of three layers of paper: the front, back, and flap. Anything printed on these layered regions may be lost or faded.
Caution: Envelopes require you to adjust the product’s fuser. Follow the instructions for loading envelopes to avoid damaging the product.
Use envelopes that are:
■ Common office envelopes with diagonal joints, sharp folds and edges, and ordinary gummed flaps
■ Approved for laser printing■ Dry
Caution: Because the envelopes pass through heated rollers, the gummed area on the flaps may seal. Using envelopes with emulsion-based glue avoids this problem.
Do not use envelopes that have:
■ Sticky flaps■ Tape seals, metal clasps, paper clips, fasteners, or peel-off strips for sealing■ Transparent windows■ Too rough of a surface■ Material that will melt, vaporize, offset, discolor, or emit dangerous fumes■ Been presealed
Capacity
Tray 1 Up to 10 envelopes, depending on their thickness.
Tray 2 Not supported; Do not use in Tray 2.
Orientation Faceup
Driver media type Envelope
Weight Base material up to 90 g/m2 (24 lb. Bond)
2-sided printing Not supported
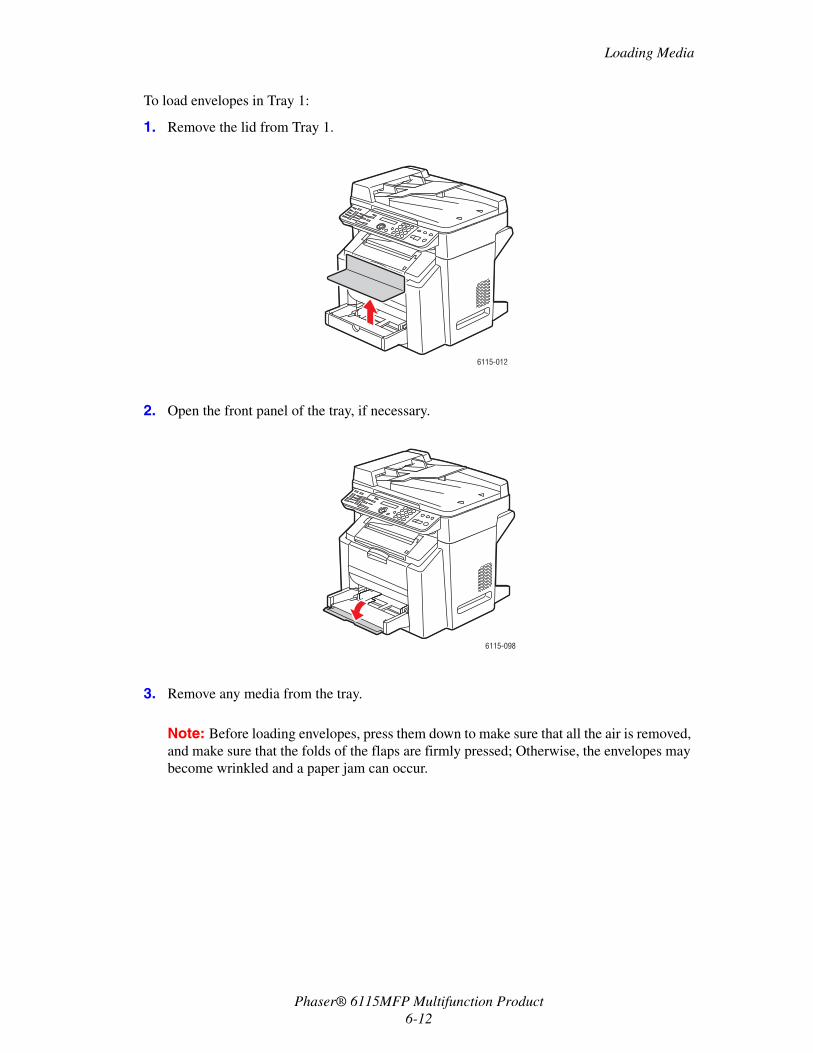
Loading Media
Phaser® 6115MFP Multifunction Product6-12
To load envelopes in Tray 1:
1. Remove the lid from Tray 1.
2. Open the front panel of the tray, if necessary.
3. Remove any media from the tray.
Note: Before loading envelopes, press them down to make sure that all the air is removed, and make sure that the folds of the flaps are firmly pressed; Otherwise, the envelopes may become wrinkled and a paper jam can occur.
6115-012
6115-098
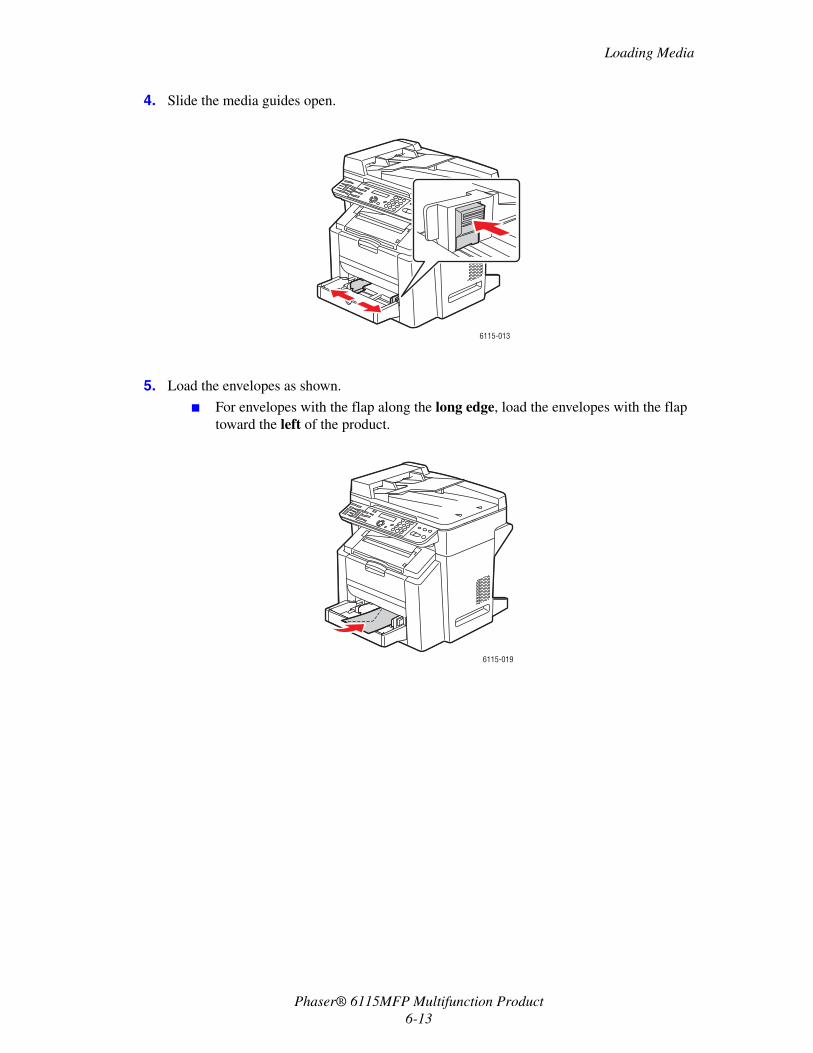
Loading Media
Phaser® 6115MFP Multifunction Product6-13
4. Slide the media guides open.
5. Load the envelopes as shown.
■ For envelopes with the flap along the long edge, load the envelopes with the flap toward the left of the product.
6115-013
6115-019
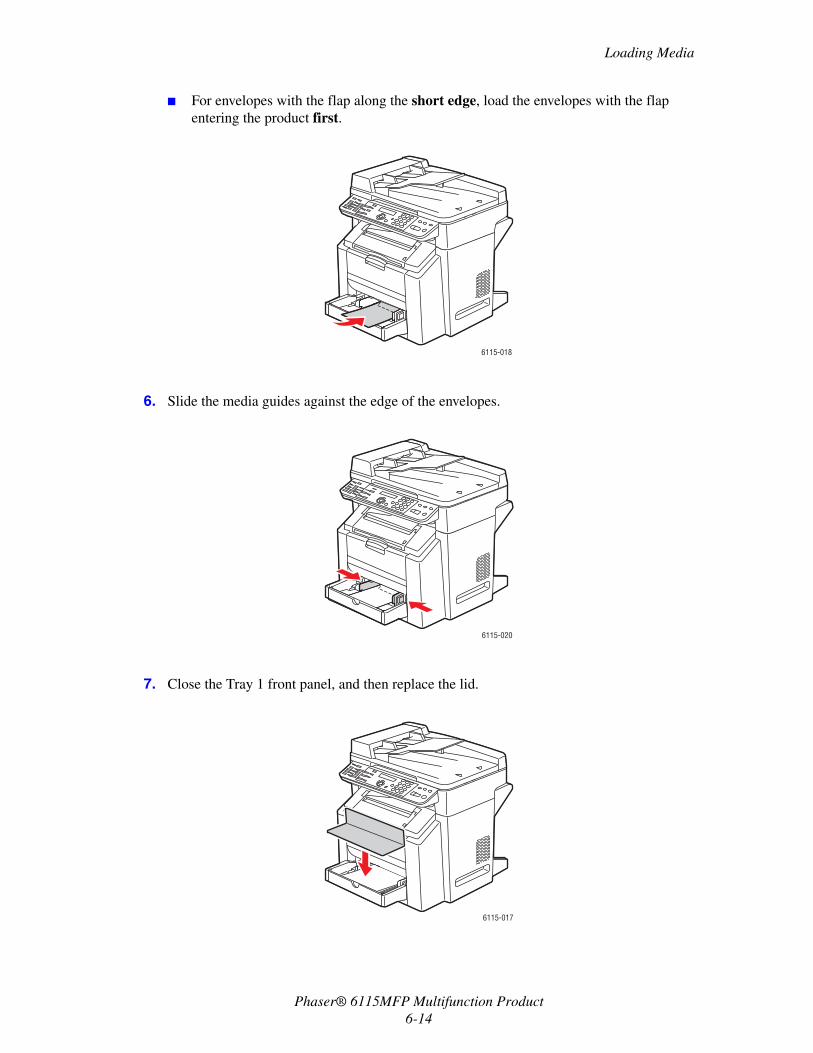
Loading Media
Phaser® 6115MFP Multifunction Product6-14
■ For envelopes with the flap along the short edge, load the envelopes with the flap entering the product first.
6. Slide the media guides against the edge of the envelopes.
7. Close the Tray 1 front panel, and then replace the lid.
6115-018
6115-020
6115-017

Loading Media
Phaser® 6115MFP Multifunction Product6-15
8. Ensure the automatic document feeder is closed.
9. Release the scanner latch and lift the scanner unit.
6115-102
6115-021
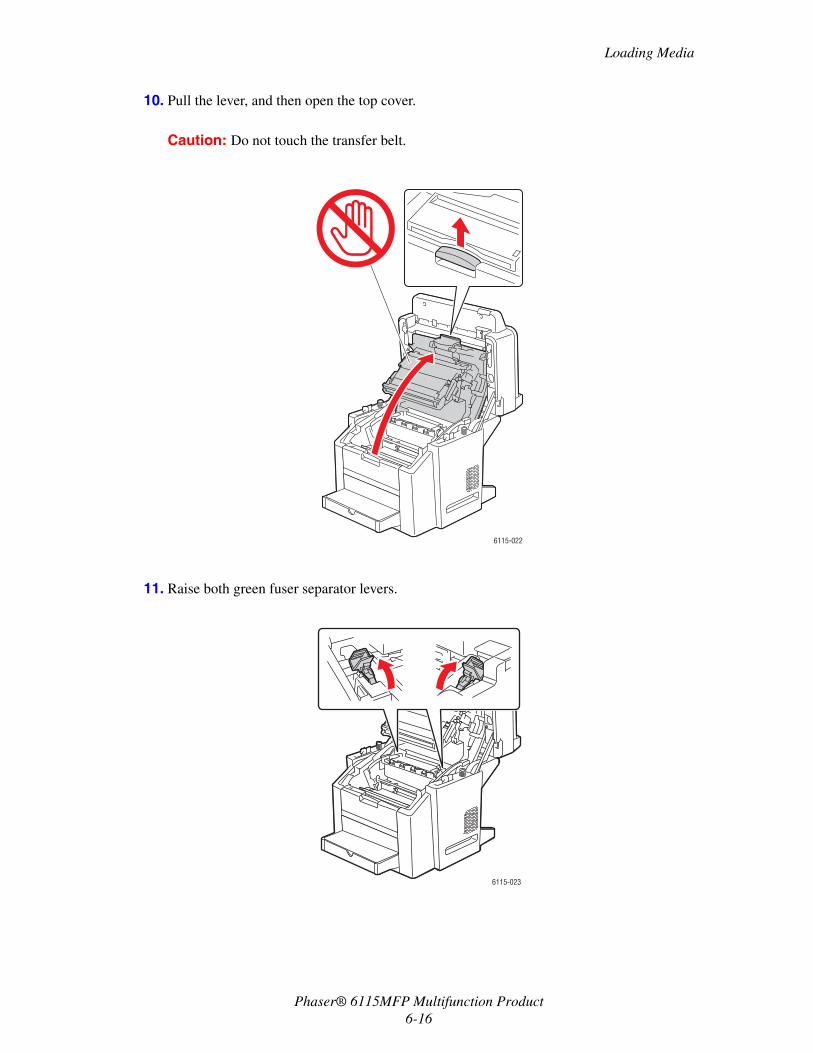
Loading Media
Phaser® 6115MFP Multifunction Product6-16
10. Pull the lever, and then open the top cover.
Caution: Do not touch the transfer belt.
11. Raise both green fuser separator levers.
6115-022
6115-023
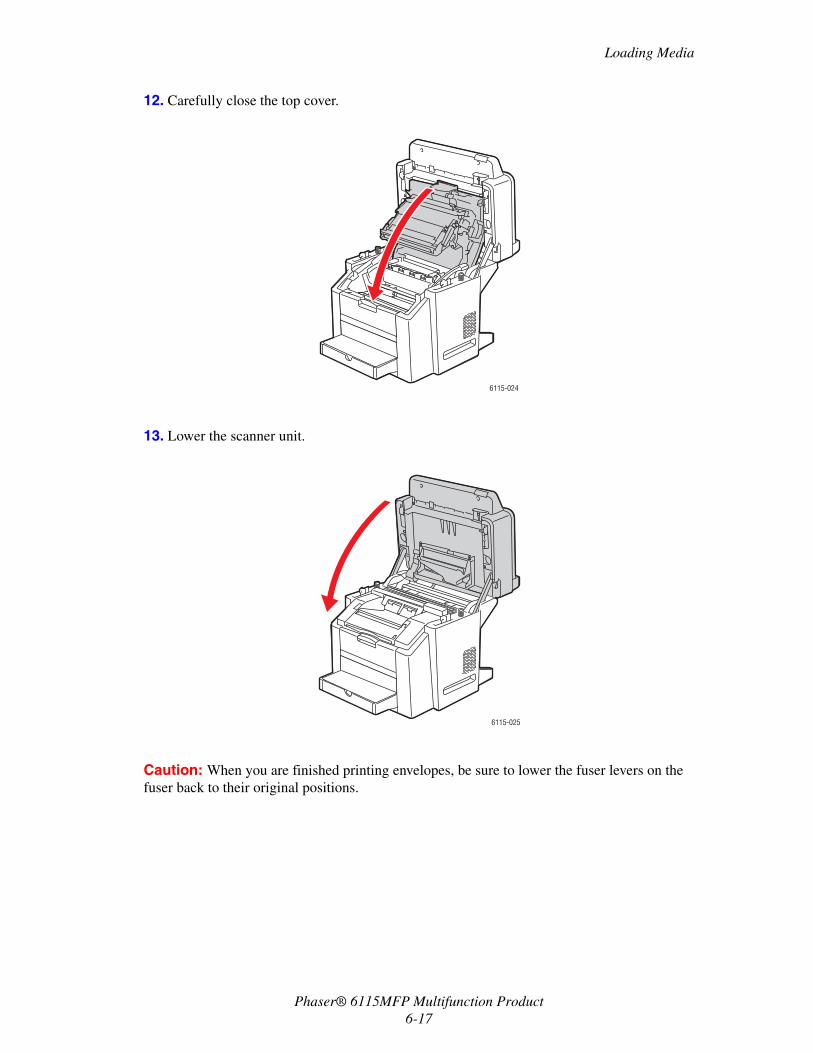
Loading Media
Phaser® 6115MFP Multifunction Product6-17
12. Carefully close the top cover.
13. Lower the scanner unit.
Caution: When you are finished printing envelopes, be sure to lower the fuser levers on the fuser back to their original positions.
6115-024
6115-025
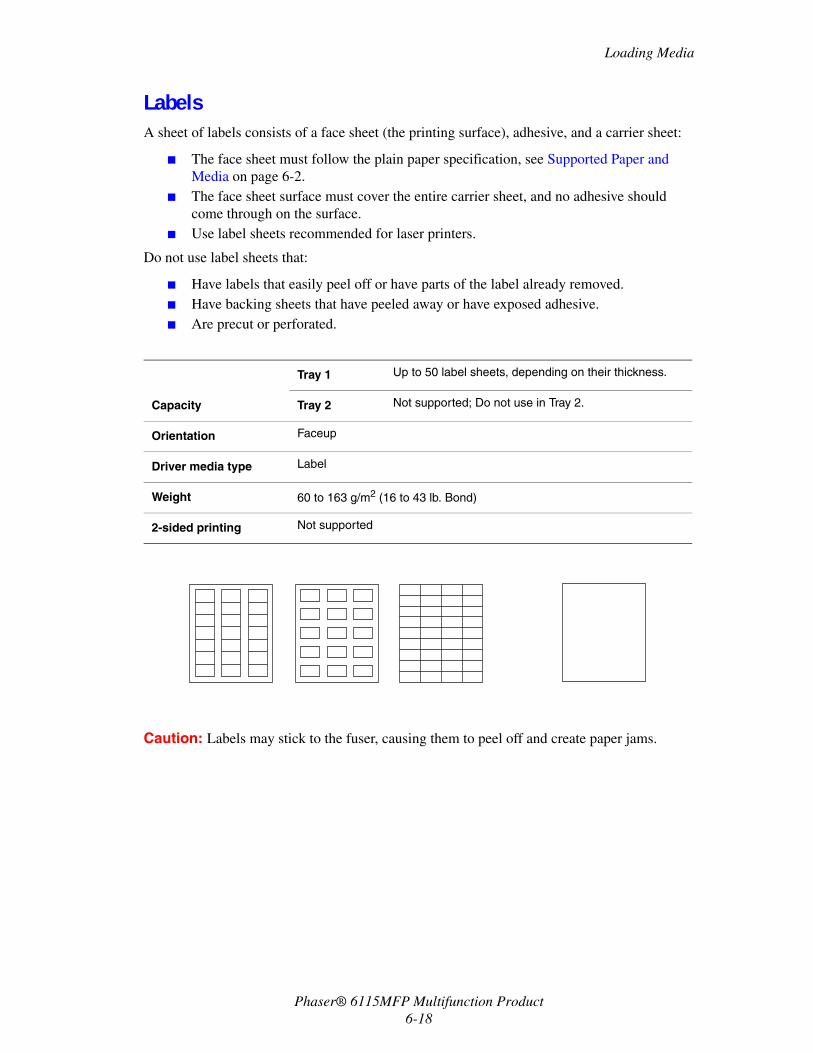
Loading Media
Phaser® 6115MFP Multifunction Product6-18
LabelsA sheet of labels consists of a face sheet (the printing surface), adhesive, and a carrier sheet:
■ The face sheet must follow the plain paper specification, see Supported Paper and Media on page 6-2.
■ The face sheet surface must cover the entire carrier sheet, and no adhesive should come through on the surface.
■ Use label sheets recommended for laser printers.
Do not use label sheets that:
■ Have labels that easily peel off or have parts of the label already removed.■ Have backing sheets that have peeled away or have exposed adhesive.■ Are precut or perforated.
Caution: Labels may stick to the fuser, causing them to peel off and create paper jams.
Capacity
Tray 1 Up to 50 label sheets, depending on their thickness.
Tray 2 Not supported; Do not use in Tray 2.
Orientation Faceup
Driver media type Label
Weight 60 to 163 g/m2 (16 to 43 lb. Bond)
2-sided printing Not supported
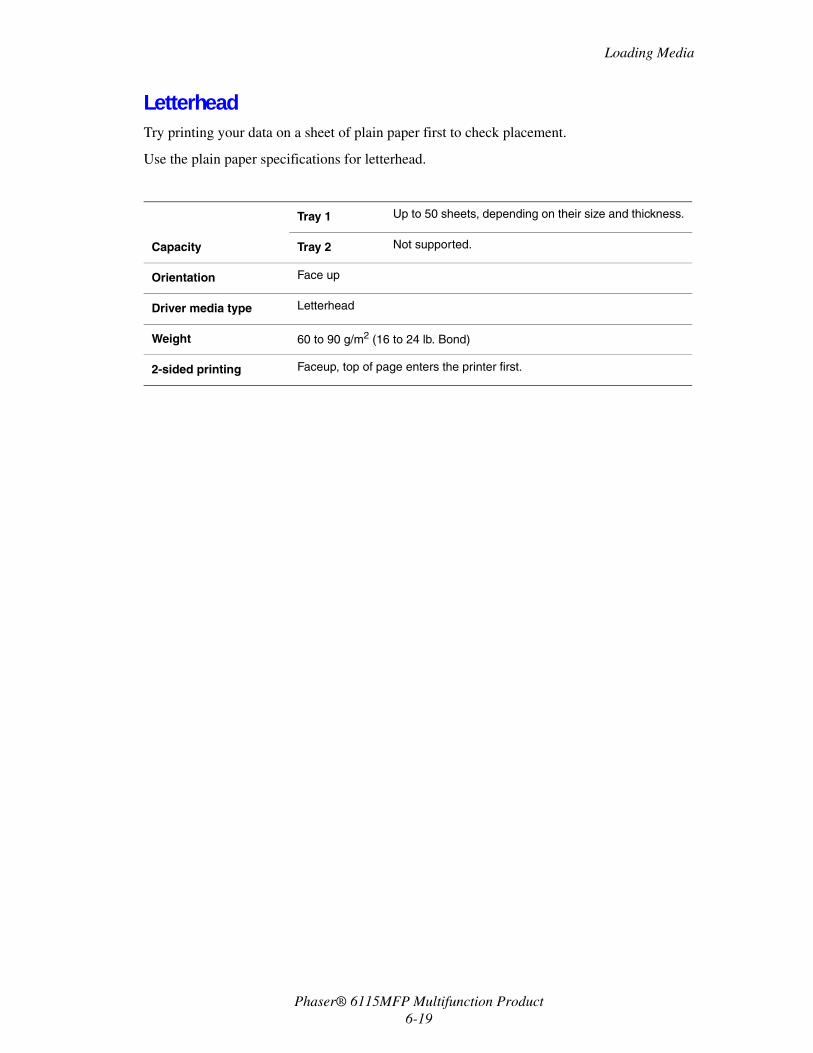
Loading Media
Phaser® 6115MFP Multifunction Product6-19
LetterheadTry printing your data on a sheet of plain paper first to check placement.
Use the plain paper specifications for letterhead.
Capacity
Tray 1 Up to 50 sheets, depending on their size and thickness.
Tray 2 Not supported.
Orientation Face up
Driver media type Letterhead
Weight 60 to 90 g/m2 (16 to 24 lb. Bond)
2-sided printing Faceup, top of page enters the printer first.
Loading Media
Phaser® 6115MFP Multifunction Product6-20
TransparencyUse the following guidelines when printing on transparencies.
■ Do not fan transparencies before loading them. Resulting static electricity may cause printing errors.
■ If you touch the face of the transparencies with your bare hands, print quality may be affected.
■ Keep the printer paper path clean. Transparencies are especially sensitive to a dirty media path. If there are shadows on either the top or the bottom of the sheets, see Product Maintenance on page 10-1.
■ Remove transparencies as soon as possible from the output tray to avoid static buildup.
■ If you have problems feeding 50 sheets, try loading only 1–10 sheets at a time. Loading a large number of transparencies at one time may cause static buildup, causing feeding problems.
■ Always test a small quantity of a particular type of transparency.
You can print continuously with transparencies. However, this could affect feed reliability, depending on the media quality, static buildup, and printing environment.
ONLY use transparencies that are Xerox approved, and on the recommended media list for your product.
Do not use transparencies that:
■ Have static electricity build up, causing them to stick together.■ Are specified for inkjet printers only.
Capacity
Tray 1 Up to 50 sheets, depending on their thickness.
Tray 2 Not supported
Orientation Faceup
Driver media type Transparency
2-sided printing Not supported
Loading Media
Phaser® 6115MFP Multifunction Product6-21
Glossy StockTest all glossy stock to ensure acceptable performance and to ensure that the image does not shift on the page.
Do not use glossy stock that is:
■ Mixed with any other media in the trays (this will cause the printer to misfeed).■ Specified for inkjet printers only.
Loading Specialty Media1. Remove the lid from Tray 1.
Capacity
Tray 1 Up to 50 glossy sheets, depending on their thickness.
Tray 2 Not supported; Do not use in Tray 2.
Orientation Faceup
Driver media type Glossy
2-sided printing Not supported
6115-012
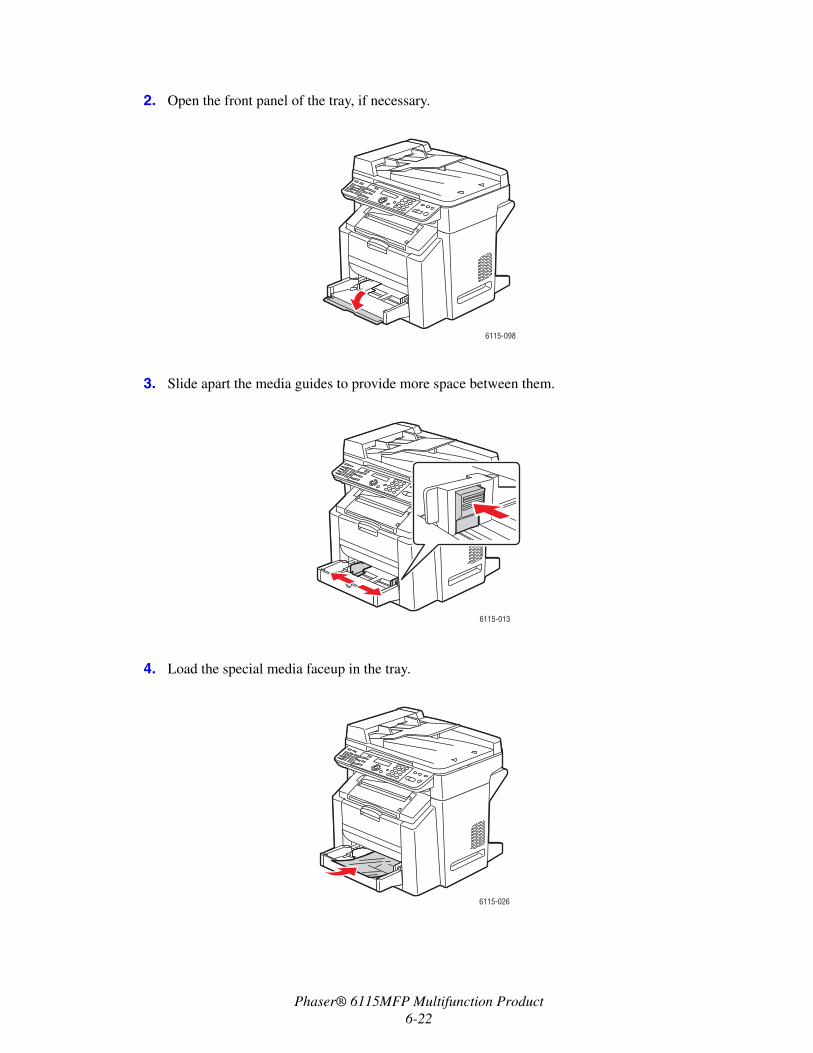
Phaser® 6115MFP Multifunction Product6-22
2. Open the front panel of the tray, if necessary.
3. Slide apart the media guides to provide more space between them.
4. Load the special media faceup in the tray.
6115-098
6115-013
6115-026
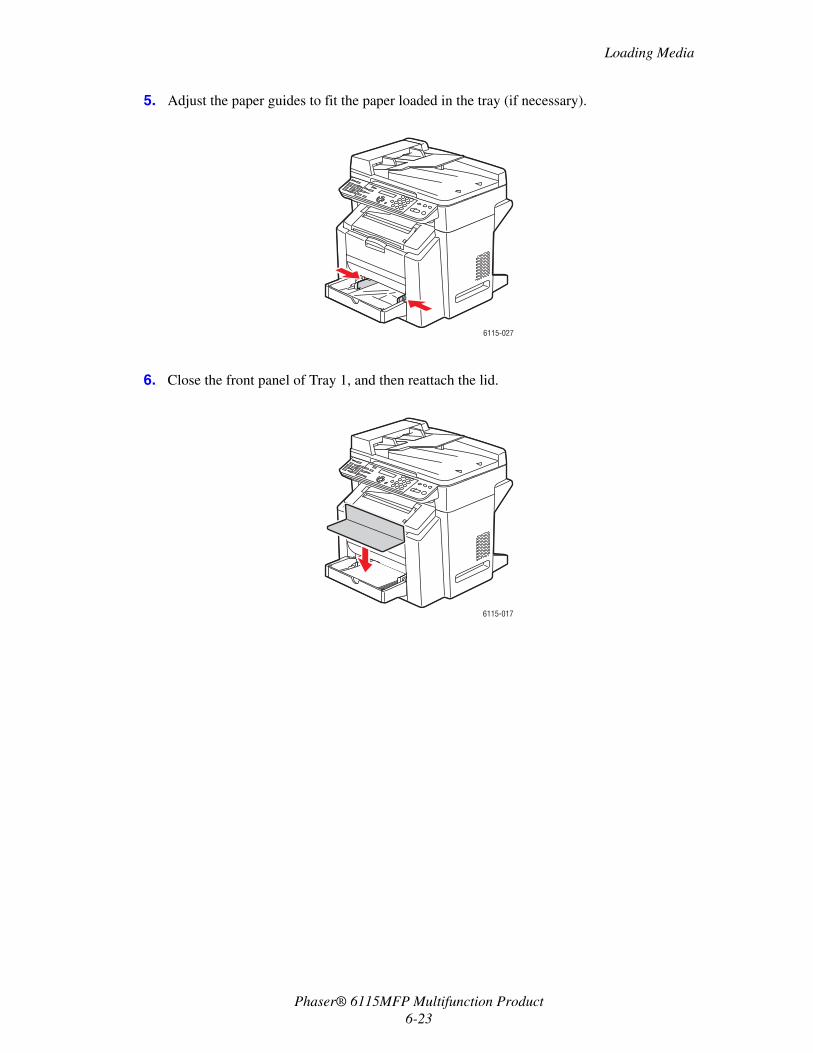
Loading Media
Phaser® 6115MFP Multifunction Product6-23
5. Adjust the paper guides to fit the paper loaded in the tray (if necessary).
6. Close the front panel of Tray 1, and then reattach the lid.
6115-027
6115-017
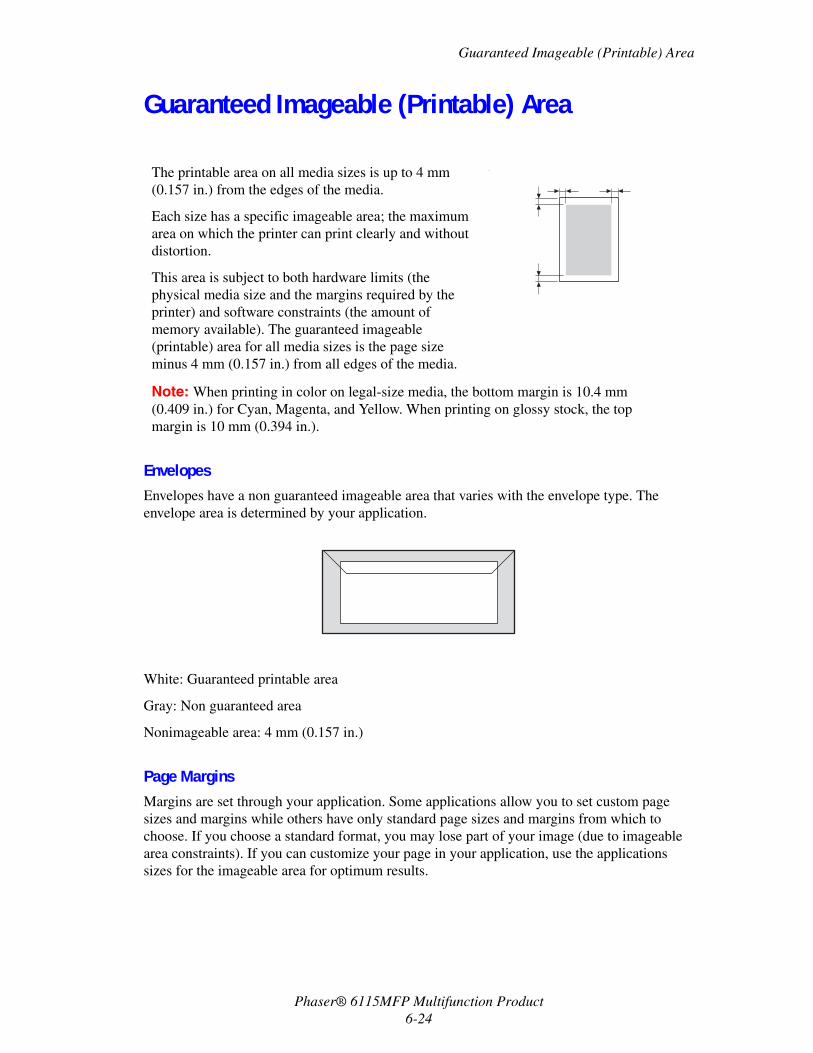
Guaranteed Imageable (Printable) Area
Phaser® 6115MFP Multifunction Product6-24
Guaranteed Imageable (Printable) Area
EnvelopesEnvelopes have a non guaranteed imageable area that varies with the envelope type. The envelope area is determined by your application.
White: Guaranteed printable area
Gray: Non guaranteed area
Nonimageable area: 4 mm (0.157 in.)
Page MarginsMargins are set through your application. Some applications allow you to set custom page sizes and margins while others have only standard page sizes and margins from which to choose. If you choose a standard format, you may lose part of your image (due to imageable area constraints). If you can customize your page in your application, use the applications sizes for the imageable area for optimum results.
The printable area on all media sizes is up to 4 mm (0.157 in.) from the edges of the media.
Each size has a specific imageable area; the maximum area on which the printer can print clearly and without distortion.
This area is subject to both hardware limits (the physical media size and the margins required by the printer) and software constraints (the amount of memory available). The guaranteed imageable (printable) area for all media sizes is the page size minus 4 mm (0.157 in.) from all edges of the media.
.
Note: When printing in color on legal-size media, the bottom margin is 10.4 mm (0.409 in.) for Cyan, Magenta, and Yellow. When printing on glossy stock, the top margin is 10 mm (0.394 in.).

Options
Phaser® 6115MFP Multifunction Product6-25
OptionsThis section includes:
■ Loading Paper in Tray 2 on page 6-25■ 2-Sided Printing (Duplexing) on page 6-28
Loading Paper in Tray 21. Pull Tray 2 out as far as possible. Lift up Tray 2 and remove it.
2. Remove the lid from Tray 2.
6115-028
6115-029
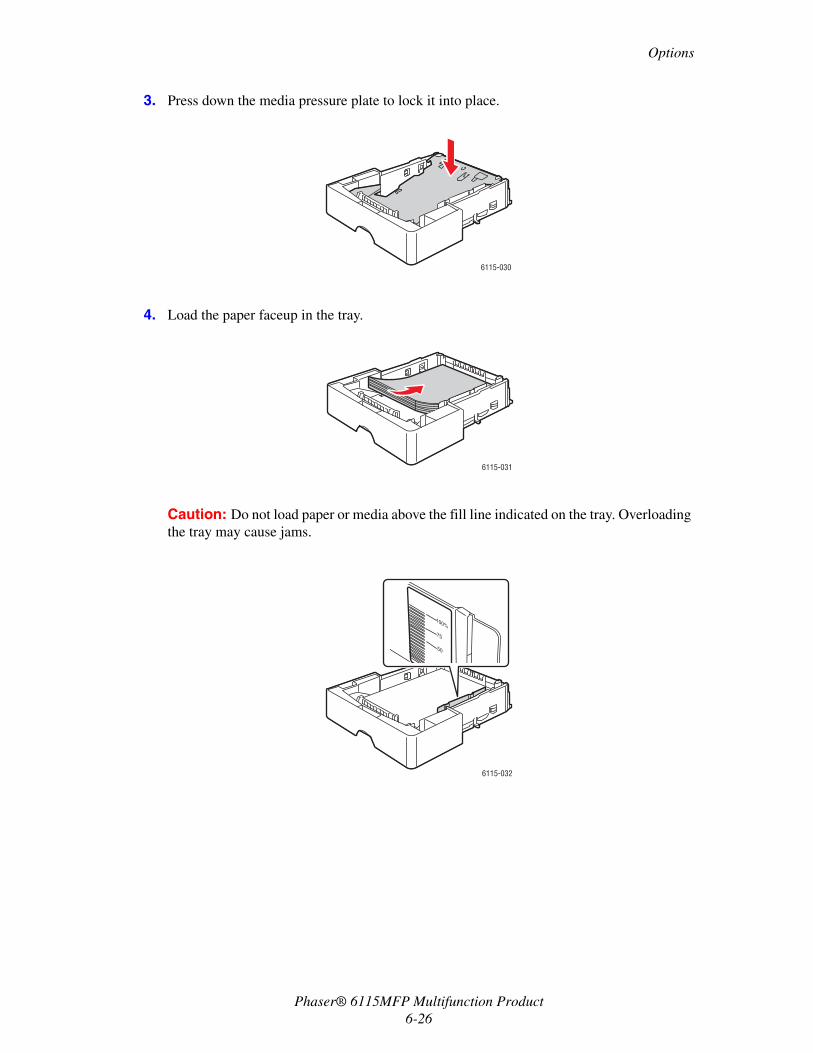
Options
Phaser® 6115MFP Multifunction Product6-26
3. Press down the media pressure plate to lock it into place.
4. Load the paper faceup in the tray.
Caution: Do not load paper or media above the fill line indicated on the tray. Overloading the tray may cause jams.
6115-030
6115-031
6115-032
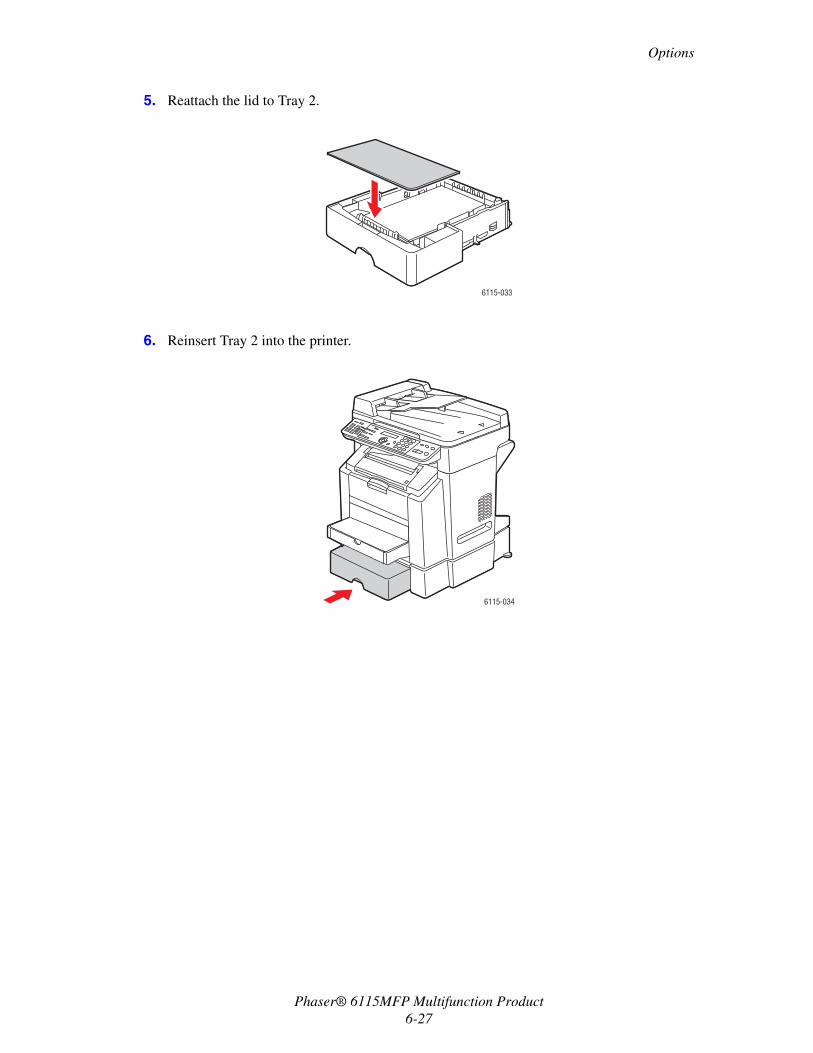
Options
Phaser® 6115MFP Multifunction Product6-27
5. Reattach the lid to Tray 2.
6. Reinsert Tray 2 into the printer.
6115-033
6115-034
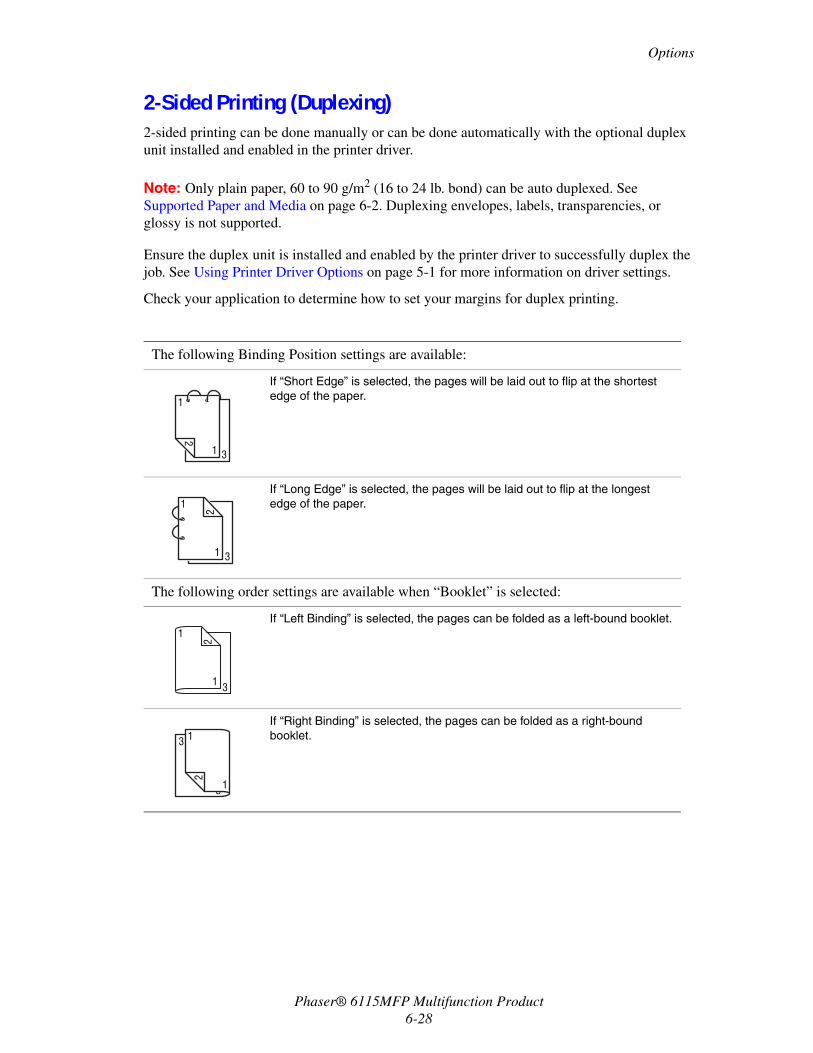
Options
Phaser® 6115MFP Multifunction Product6-28
2-Sided Printing (Duplexing)2-sided printing can be done manually or can be done automatically with the optional duplex unit installed and enabled in the printer driver.
Note: Only plain paper, 60 to 90 g/m2 (16 to 24 lb. bond) can be auto duplexed. See Supported Paper and Media on page 6-2. Duplexing envelopes, labels, transparencies, or glossy is not supported.
Ensure the duplex unit is installed and enabled by the printer driver to successfully duplex the job. See Using Printer Driver Options on page 5-1 for more information on driver settings.
Check your application to determine how to set your margins for duplex printing.
The following Binding Position settings are available:
If “Short Edge” is selected, the pages will be laid out to flip at the shortest edge of the paper.
If “Long Edge” is selected, the pages will be laid out to flip at the longest edge of the paper.
The following order settings are available when “Booklet” is selected:
If “Left Binding” is selected, the pages can be folded as a left-bound booklet.
If “Right Binding” is selected, the pages can be folded as a right-bound booklet.
1
3
1
2
1
111
1
2
3
1
1
2
3
3
31
1
2
Phaser® 6115MFP Multifunction Product7-1
This chapter includes:
■ Basic Copying on page 7-2■ Adjusting Copy Options on page 7-3■ Advanced Copying on page 7-8
Copying
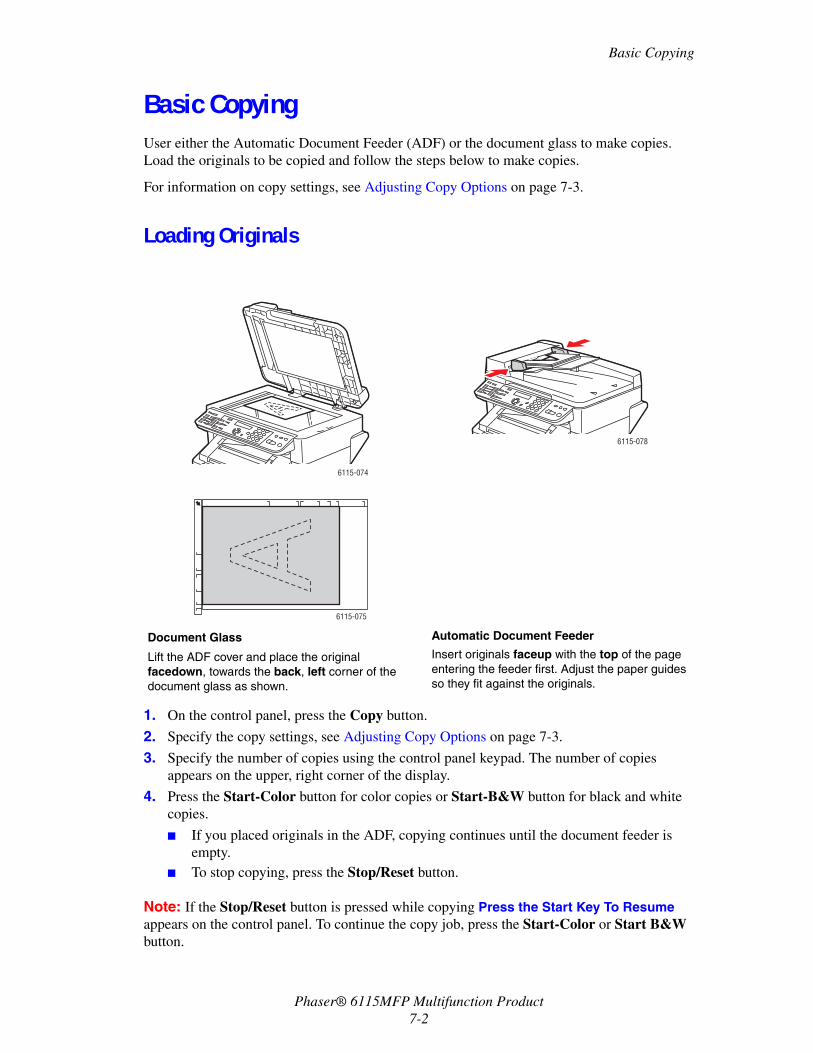
Basic Copying
Phaser® 6115MFP Multifunction Product7-2
Basic CopyingUser either the Automatic Document Feeder (ADF) or the document glass to make copies. Load the originals to be copied and follow the steps below to make copies.
For information on copy settings, see Adjusting Copy Options on page 7-3.
Loading Originals
1. On the control panel, press the Copy button.
2. Specify the copy settings, see Adjusting Copy Options on page 7-3.
3. Specify the number of copies using the control panel keypad. The number of copies appears on the upper, right corner of the display.
4. Press the Start-Color button for color copies or Start-B&W button for black and white copies.
■ If you placed originals in the ADF, copying continues until the document feeder is empty.
■ To stop copying, press the Stop/Reset button.
Note: If the Stop/Reset button is pressed while copying Press the Start Key To Resume appears on the control panel. To continue the copy job, press the Start-Color or Start B&W button.
Document Glass
Lift the ADF cover and place the original facedown, towards the back, left corner of the document glass as shown.
Automatic Document Feeder
Insert originals faceup with the top of the page entering the feeder first. Adjust the paper guides so they fit against the originals.
6115-074
6115-075
6115-078
Adjusting Copy Options
Phaser® 6115MFP Multifunction Product7-3
Adjusting Copy OptionsThis section includes:
■ Setting the Original Document Type on page 7-3■ Setting the Copy Quality on page 7-4■ Setting the Copy Density on page 7-4■ Collating Copies on page 7-5■ Selecting Paper Priority on page 7-6■ Specifying a Zoom Ratio on page 7-7
If you are connected to your product via USB, you can change copy settings through the MFP ControlCentre (MCC). For instructions on using the MFP ControlCentre, see the chapter on Product Management on page 3-1.
If you are connected to your product over a network, use the control panel to adjust copy options.
Note: Pressing the Stop/Reset button returns all settings to their default values.
Setting the Original Document TypeFor the best print quality, set the original document type to a mode that most closely matches your originals.
To set the original document type:
Using the MFP ControlCentre1. Open the MCC, connect to your product and download the current .dat file.
2. Click the Menu button.
3. Select the Copy Setup tab.
4. Select Mix, Text, or Photo from the items.
If you selected Text:
■ Select Auto, to let the product manage the density level.■ Select Manual if you want to manually adjust the density level.
5. Select OK to save the new settings.
6. Upload the new settings to the product.
Using the Control Panel1. On the control panel, press the Copy button.
2. Press the Quality button once.
3. Use the Right Arrow or Left Arrow button to select Mix, Text, or Photo.
4. Press the Menu/Select button to accept the new setting.
Adjusting Copy Options
Phaser® 6115MFP Multifunction Product7-4
Setting the Copy QualityCopies can be printed in either standard (600 x 300) or enhanced (600 x 600) mode.
To set the copy quality:
Using the MFP ControlCentre1. Open the MCC, connect to your product and download the current .dat file.
2. Click the Menu button.
3. Select the Copy Settings tab.
4. From the Quality list, select Standard or Enhanced.
5. Select OK to save the new settings.
6. Upload the new settings to the product.
Using the Control Panel1. On the control panel, press the Copy button.
2. Press the Quality button twice.
3. Use the Right Arrow and Left Arrow button to select STD or ENH.
4. Press the Menu/Select button to accept the new setting.
Setting the Copy DensityYou can lighten or darken the density on your printed copies.
To set the copy density level:
Using the MFP ControlCentre1. Open the MCC, connect to your product and download the current .dat file.
2. Click the Menu button.
3. Select the Copy Settings tab.
4. Using the Density slider, move the slider left or right the lighten or darken the copy density.
5. Select OK to save the new settings.
6. Upload the new settings to the product.
Using the Control Panel1. On the control panel, press the Copy button.
2. Press the Light/Dark button.
3. Use the Right Arrow and Left Arrow button to adjust the copy density.
4. Press the Menu/Select button to accept the new setting.
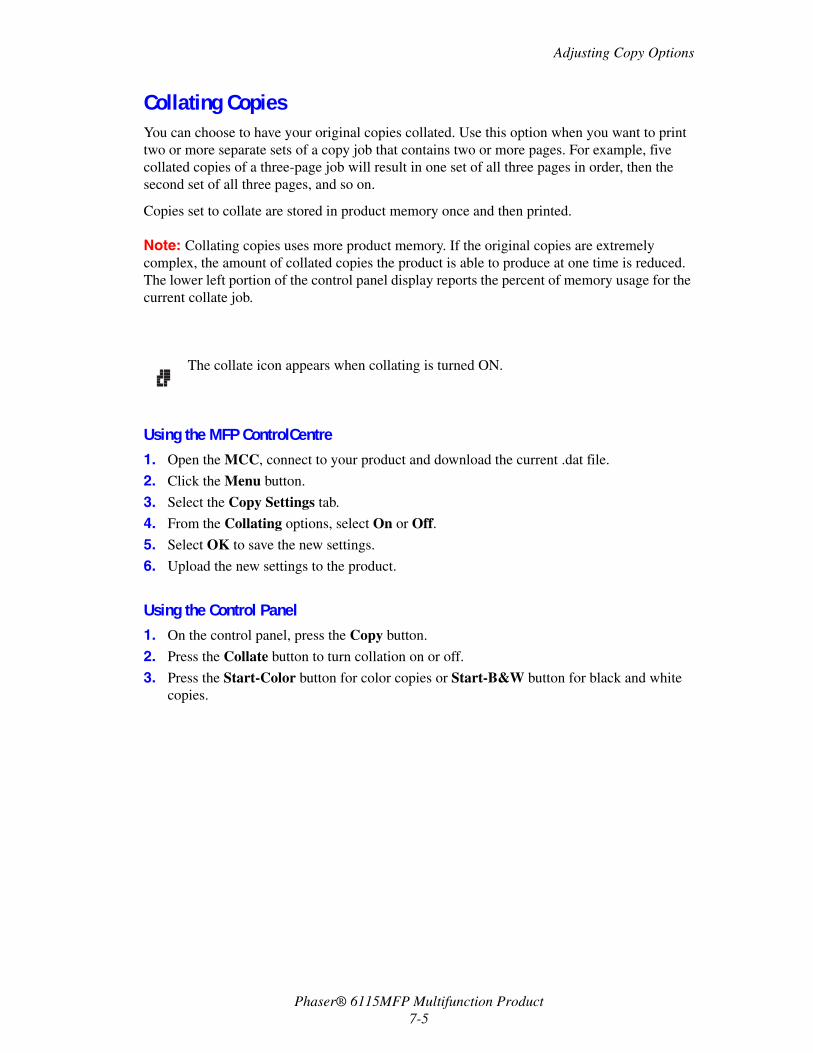
Adjusting Copy Options
Phaser® 6115MFP Multifunction Product7-5
Collating CopiesYou can choose to have your original copies collated. Use this option when you want to print two or more separate sets of a copy job that contains two or more pages. For example, five collated copies of a three-page job will result in one set of all three pages in order, then the second set of all three pages, and so on.
Copies set to collate are stored in product memory once and then printed.
Note: Collating copies uses more product memory. If the original copies are extremely complex, the amount of collated copies the product is able to produce at one time is reduced. The lower left portion of the control panel display reports the percent of memory usage for the current collate job.
Using the MFP ControlCentre1. Open the MCC, connect to your product and download the current .dat file.
2. Click the Menu button.
3. Select the Copy Settings tab.
4. From the Collating options, select On or Off.
5. Select OK to save the new settings.
6. Upload the new settings to the product.
Using the Control Panel1. On the control panel, press the Copy button.
2. Press the Collate button to turn collation on or off.
3. Press the Start-Color button for color copies or Start-B&W button for black and white copies.
. The collate icon appears when collating is turned ON.
Adjusting Copy Options
Phaser® 6115MFP Multifunction Product7-6
Selecting Paper Priority
Note: If Tray 2 is not installed, Tray 1 Select will not appear on the control panel.
Using the MFP ControlCentre1. Open the MCC, connect to your product and download the current .dat file.
2. Click the Menu button.
3. Select the Copy Settings tab.
4. Select the default tray from the Paper Priority drop-down list.
5. Select OK to save the new settings.
6. Upload the new settings to the product.
Using the Control Panel1. Press the Function button, and then press the Menu/Select button.
2. Press the Left Arrow or Right Arrow button to select Tray 1 or Tray 2.
3. Press the Menu/Select button to accept the default tray setting.

Adjusting Copy Options
Phaser® 6115MFP Multifunction Product7-7
Specifying a Zoom RatioThe zoom ratio can be specified either by selecting a preset zoom ratio or by specifying a custom zoom ratio.
Note: Depending on the selected preset zoom ration, a sample of the change to the media size may appear in the status area of the control panel. The sample of the media size change will disappear after 5 seconds.
Specifying a Preset Zoom Ratio
1. On the control panel, press the Reduce/Enlarge button until the desired zoom ratio is selected.
Specifying a Custom Zoom Ratio1. On the control panel, press the Reduce/Enlarge button.
2. Use the Up Arrow or Down Arrow button to input a custom zoom ratio.
3. Press the Start-Color button for color copies or Start-B&W button for black and white copies.
Metric
1.15 B5 -> A4
1.41 A5 -> A4
2.00
0.50
0.70 A4 -> A5
0.81 B5 -> A5
Inch
1.29 Statement -> Letter
1.54 Statement -> Legal
2.00
0.50
0.64 Letter -> Statement
0.78 Legal -> Letter
Advanced Copying
Phaser® 6115MFP Multifunction Product7-8
Advanced CopyingThis section includes:
■ Setting 2in1 Copying on page 7-8■ ID Card Copying on page 7-9■ Printing 2-Sided Copies on page 7-10
Setting 2in1 CopyingWith 2in1 copying, two separate document pages can be copied together onto a single page.
Note: The original documents must be placed in the automatic document feeder for 2in1 copying. 2in1 copying cannot be performed using the document glass.
1. On the control panel, press the 2in1 button.
■ The zoom ratio is automatically set to 0.64 for USA and Canada■ The zoom ratio is automatically set to 0.70 for all other countries.
2. Press the Start-Color button for color copies or Start-B&W button for black and white copies.
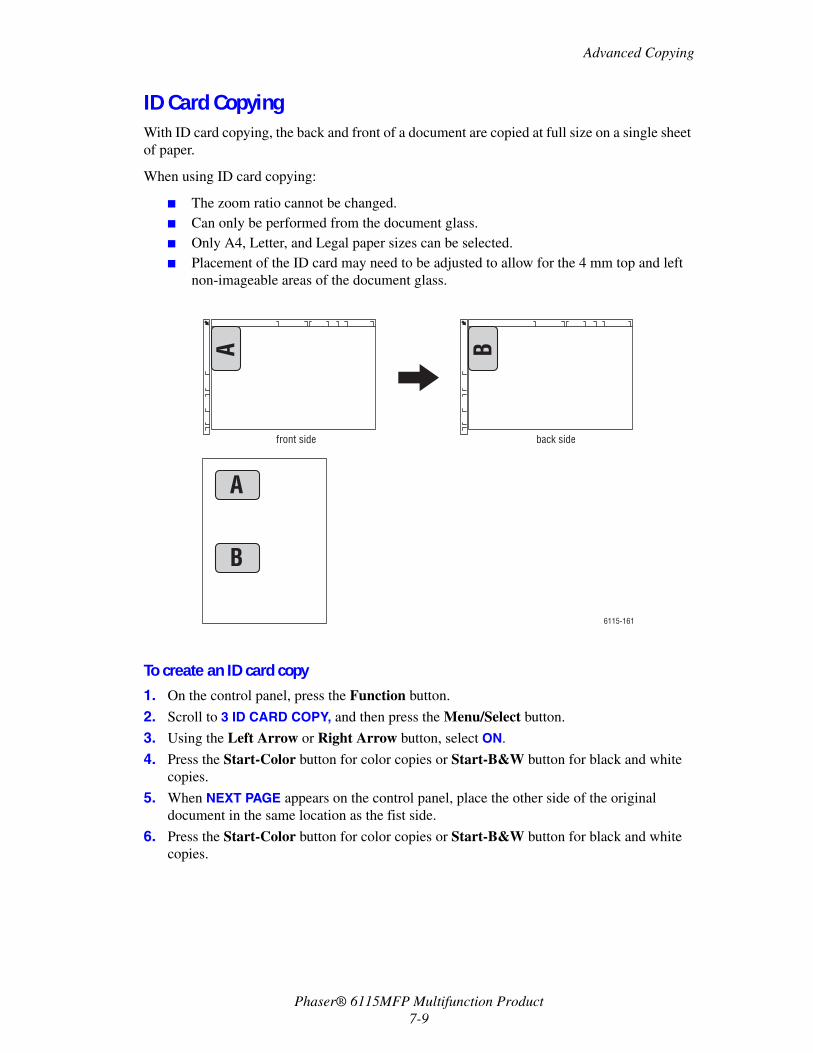
Advanced Copying
Phaser® 6115MFP Multifunction Product7-9
ID Card CopyingWith ID card copying, the back and front of a document are copied at full size on a single sheet of paper.
When using ID card copying:
■ The zoom ratio cannot be changed.■ Can only be performed from the document glass.■ Only A4, Letter, and Legal paper sizes can be selected.■ Placement of the ID card may need to be adjusted to allow for the 4 mm top and left
non-imageable areas of the document glass.
To create an ID card copy1. On the control panel, press the Function button.
2. Scroll to 3 ID CARD COPY, and then press the Menu/Select button.
3. Using the Left Arrow or Right Arrow button, select ON.
4. Press the Start-Color button for color copies or Start-B&W button for black and white copies.
5. When NEXT PAGE appears on the control panel, place the other side of the original document in the same location as the fist side.
6. Press the Start-Color button for color copies or Start-B&W button for black and white copies.
A
A
B
B
front side back side
6115-161
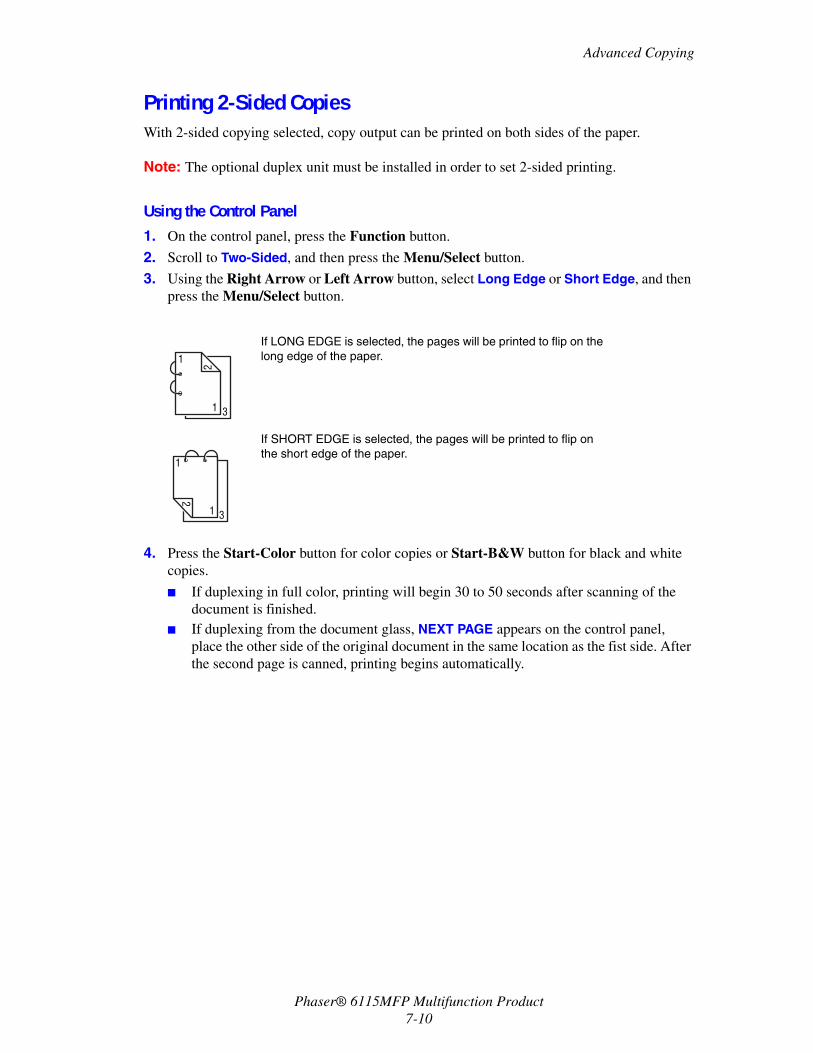
Advanced Copying
Phaser® 6115MFP Multifunction Product7-10
Printing 2-Sided CopiesWith 2-sided copying selected, copy output can be printed on both sides of the paper.
Note: The optional duplex unit must be installed in order to set 2-sided printing.
Using the Control Panel1. On the control panel, press the Function button.
2. Scroll to Two-Sided, and then press the Menu/Select button.
3. Using the Right Arrow or Left Arrow button, select Long Edge or Short Edge, and then press the Menu/Select button.
4. Press the Start-Color button for color copies or Start-B&W button for black and white copies.
■ If duplexing in full color, printing will begin 30 to 50 seconds after scanning of the document is finished.
■ If duplexing from the document glass, NEXT PAGE appears on the control panel, place the other side of the original document in the same location as the fist side. After the second page is canned, printing begins automatically.
If LONG EDGE is selected, the pages will be printed to flip on the long edge of the paper.
If SHORT EDGE is selected, the pages will be printed to flip on the short edge of the paper.
111
1
2
3
1
3
1
2
1
Phaser® 6115MFP Multifunction Product8-1
This chapter includes:
■ Basic Scanning via USB on page 8-2■ Scan to Email (Network Only) on page 8-3
See also: (English only)Using the Scanner (Windows) tutorial at www.xerox.com/office/6115supportUsing the Scanner (Macintosh) tutorial at www.xerox.com/office/6115support
Scanning
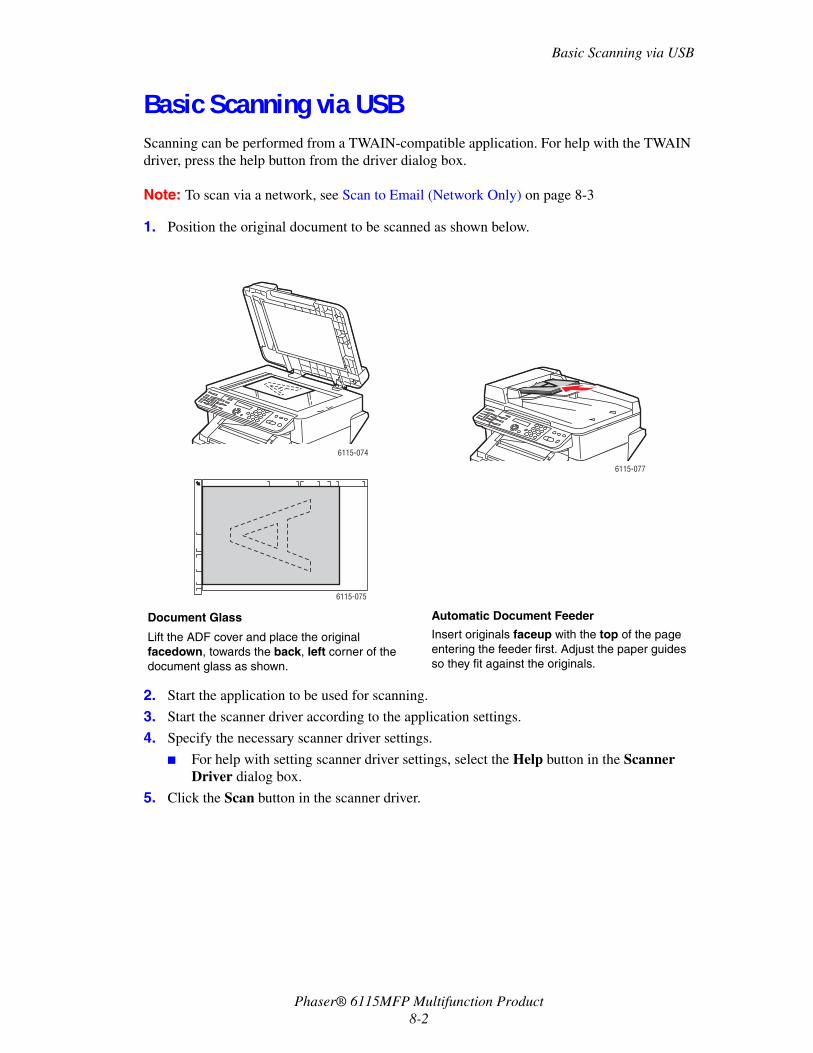
Basic Scanning via USB
Phaser® 6115MFP Multifunction Product8-2
Basic Scanning via USB Scanning can be performed from a TWAIN-compatible application. For help with the TWAIN driver, press the help button from the driver dialog box.
Note: To scan via a network, see Scan to Email (Network Only) on page 8-3
1. Position the original document to be scanned as shown below.
2. Start the application to be used for scanning.
3. Start the scanner driver according to the application settings.
4. Specify the necessary scanner driver settings.
■ For help with setting scanner driver settings, select the Help button in the Scanner Driver dialog box.
5. Click the Scan button in the scanner driver.
Document Glass
Lift the ADF cover and place the original facedown, towards the back, left corner of the document glass as shown.
Automatic Document Feeder
Insert originals faceup with the top of the page entering the feeder first. Adjust the paper guides so they fit against the originals.
6115-074
6115-075
6115-077

Scan to Email (Network Only)
Phaser® 6115MFP Multifunction Product8-3
Scan to Email (Network Only)Scanning to Email is only available if your product is connected to a network. With scan to email, documents are scanned and sent via an SMTP mail server.
This section includes:
■ Setting up the SMTP Server on page 8-3■ Scan to Email Using the ADF on page 8-5■ Scan to Email Using the Document Glass on page 8-7■ Specifying a Recipient on page 8-8■ Changing the Scan Mode Settings on page 8-9■ Changing the Scanned Image Size on page 8-9
Setting up the SMTP ServerTo use the scan to email feature you first need to set up your SMTP server information. SMTP (Simple Mail Transfer Protocol) is a protocol for sending email.
This protocol was originally used to send email between servers; however, currently client email software uses it to send email to servers using POP.
The following E-mail settings can be configured through the control panel, CentreWare IS, or the MCC.
Menu Item Definition
1 Sender Name Enter your name or company name to be used in emails.
A maximum of 20 characters can be entered.
2 E-mail Address Type in the email address of the sender when using network scanning.
A maximum of 64 characters can be entered.
3 SMTP Server Type in the IP address or host name for the SMTP server.
A maximum of 64 characters can be entered.
4 SMTP PORT NO. Specify the number of the port communicating with the SMTP server.
5 SMTP Timeout Enter the amount of time (in seconds) until the connection with the SMTP server times out. (30 to 300)
6 Text Insert Select whether or not text is inserted into the body of the email message when using network scanning.
ON: The text specified is inserted as the body of the email message.
Image data (TIFF format) has been attached to the email.
OFF: Only the scanned image is attached, and no text is inserted into the email message.
7 Default Subject Specify the default subject of the email message when using network scanning.
A maximum of 20 characters can be entered.
Scan to Email (Network Only)
Phaser® 6115MFP Multifunction Product8-4
Using the Control Panel1. On the control panel, press the Menu/Select button.
2. Using the Up Arrow or Down Arrow button, scroll to the E-mail Setup menu, and then press the Menu/Select button.
3. Enter your email settings, see the table on page 8-3.
Using CentreWare IS1. Launch your web browser.
2. Enter the product’s IP address in the browser’s Address field (http://xxx.xxx.xxx.xxx).
3. Click the Login button and log in as an administrator.
4. Click the Network tab, and select SNMP from the Network list.
5. Select Enable from the SNMP drop-down list, and then click Save changes.
6. Select Email from the Network list.
7. Enter your e-mail settings and then click Save Changes.
Using the MFP ControlCentre1. From your computer, select Start > All Programs > Xerox Office Printing >
Phaser 6115MFP > MCC.
2. From the MCC dialog box, click the Connect to Machine button.
3. Click the Download button. This downloads the current .dat file from the product.
4. Click the Menu button.
5. Select the E-mail Settings tab, enter your e-mail settings, and then click the OK button.
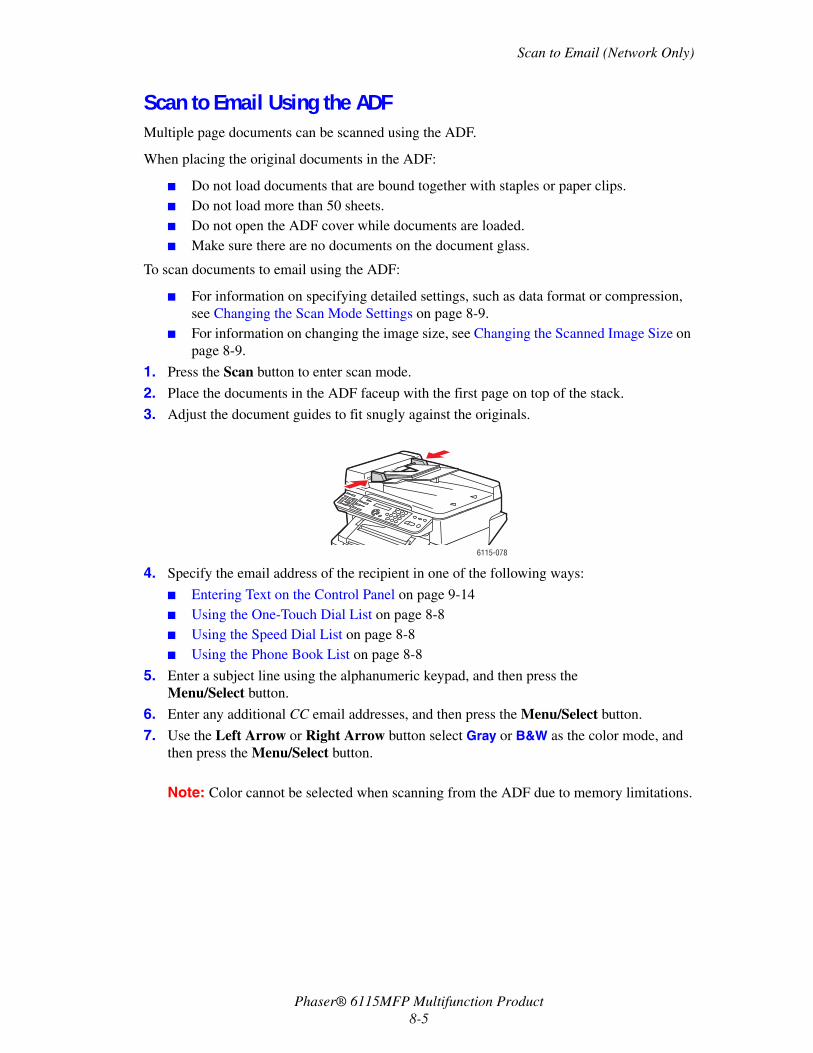
Scan to Email (Network Only)
Phaser® 6115MFP Multifunction Product8-5
Scan to Email Using the ADFMultiple page documents can be scanned using the ADF.
When placing the original documents in the ADF:
■ Do not load documents that are bound together with staples or paper clips.■ Do not load more than 50 sheets.■ Do not open the ADF cover while documents are loaded.■ Make sure there are no documents on the document glass.
To scan documents to email using the ADF:
■ For information on specifying detailed settings, such as data format or compression, see Changing the Scan Mode Settings on page 8-9.
■ For information on changing the image size, see Changing the Scanned Image Size on page 8-9.
1. Press the Scan button to enter scan mode.
2. Place the documents in the ADF faceup with the first page on top of the stack.
3. Adjust the document guides to fit snugly against the originals.
4. Specify the email address of the recipient in one of the following ways:
■ Entering Text on the Control Panel on page 9-14■ Using the One-Touch Dial List on page 8-8■ Using the Speed Dial List on page 8-8■ Using the Phone Book List on page 8-8
5. Enter a subject line using the alphanumeric keypad, and then press the Menu/Select button.
6. Enter any additional CC email addresses, and then press the Menu/Select button.
7. Use the Left Arrow or Right Arrow button select Gray or B&W as the color mode, and then press the Menu/Select button.
Note: Color cannot be selected when scanning from the ADF due to memory limitations.
6115-078
Scan to Email (Network Only)
Phaser® 6115MFP Multifunction Product8-6
8. Continue setting the desired scan mode settings.
■ For information on specifying detailed settings, such as data format or compression encoding, and scan resolution, see Changing the Scan Mode Settings on page 8-9.
■ For information on changing the image size, see Changing the Scanned Image Size on page 8-9.
■ To change the size of the scanned image, see Changing the Scanned Image Size on page 8-9.
9. Using the Left Arrow or Right Arrow button, select ADF, and then press the Menu/Select button to start scanning.
To Stop the Transmission1. On the control panel, press the Stop/Reset button.
2. The control panel will display a confirmation message to cancel the setting. Select YES, and then press the Menu/Select button.
To Cancel a Queued for Transmission Scan1. On the control panel, press the Function button.
2. Select CANCEL RESERV from the function menu, and then press the Menu/Select button.
To print a Transmission Report, see Faxing on page 9-1.
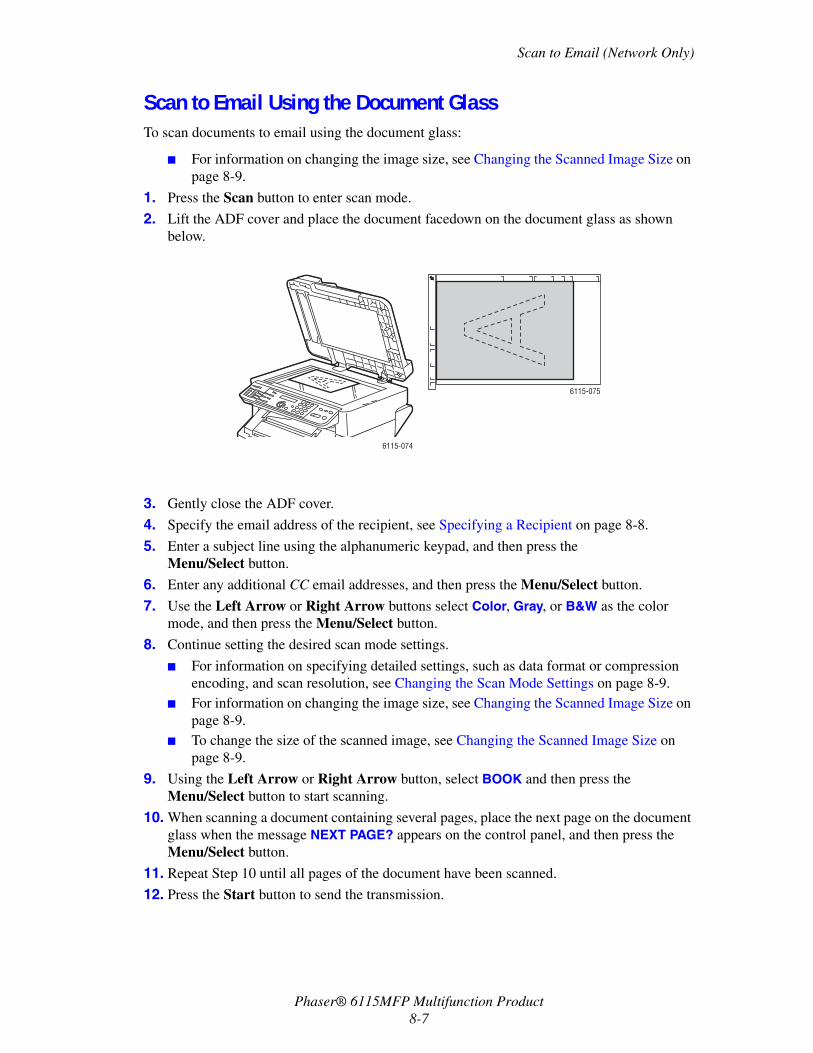
Scan to Email (Network Only)
Phaser® 6115MFP Multifunction Product8-7
Scan to Email Using the Document GlassTo scan documents to email using the document glass:
■ For information on changing the image size, see Changing the Scanned Image Size on page 8-9.
1. Press the Scan button to enter scan mode.
2. Lift the ADF cover and place the document facedown on the document glass as shown below.
3. Gently close the ADF cover.
4. Specify the email address of the recipient, see Specifying a Recipient on page 8-8.
5. Enter a subject line using the alphanumeric keypad, and then press the Menu/Select button.
6. Enter any additional CC email addresses, and then press the Menu/Select button.
7. Use the Left Arrow or Right Arrow buttons select Color, Gray, or B&W as the color mode, and then press the Menu/Select button.
8. Continue setting the desired scan mode settings.
■ For information on specifying detailed settings, such as data format or compression encoding, and scan resolution, see Changing the Scan Mode Settings on page 8-9.
■ For information on changing the image size, see Changing the Scanned Image Size on page 8-9.
■ To change the size of the scanned image, see Changing the Scanned Image Size on page 8-9.
9. Using the Left Arrow or Right Arrow button, select BOOK and then press the Menu/Select button to start scanning.
10. When scanning a document containing several pages, place the next page on the document glass when the message NEXT PAGE? appears on the control panel, and then press the Menu/Select button.
11. Repeat Step 10 until all pages of the document have been scanned.
12. Press the Start button to send the transmission.
6115-074
6115-075
Scan to Email (Network Only)
Phaser® 6115MFP Multifunction Product8-8
Specifying a RecipientYou can specify the email address of the recipient in any one of the following ways:
■ Using the One-Touch Dial List on page 8-8■ Using the Speed Dial List on page 8-8■ Using the Phone Book List on page 8-8■ Searching the Phone Book on page 8-9
Note: For information on setting up one-touch dial, speed dial, group dial lists and entering characters from the control panel, see Registering Recipients on page 9-13.
Using the One-Touch Dial ListIf a recipient has been registered in your one-touch dial list, the recipient’s email address can be entered by pressing the programmed one-touch dial button (01 - 09).
Note: If a one-touch button is programmed as a set of group dial recipients, all email addresses included in the group dial are added to the list of recipients.
To select a one-touch dial recipient:
1. On the control panel, press the recipient’s One-touch dial button.
2. When the recipient appears on the control panel, press the Start button.
Using the Speed Dial ListIf a recipient has been registered in your speed dial list, the recipient’s email address can be entered by entering the recipient’s three-digit speed dial number (001 - 100).
To select a speed dial list recipient:
1. On the control panel, press the Speed Dial button.
2. Use the alphanumeric keypad to enter the three-digit speed dial number associated with the recipient.
Note: If the one-touch recipient is not registered with an email address, the message NOT E-MAIL ADDRESS appears on the control panel display.
3. When the recipient’s name displays on the control panel, press the Start button.
Using the Phone Book List The phone book contains all recipients, email addresses and phone numbers, registered in your one-touch, speed dial, and group lists.
1. On the control panel, press the Speed Dial button twice.
2. Using the Left Arrow or Right Arrow button, select LIST, and then press the Menu/Select button.
3. Scroll to the desired recipient, and then press the Menu/Select button.
Scan to Email (Network Only)
Phaser® 6115MFP Multifunction Product8-9
Searching the Phone BookIf you do not know the recipients speed dial number you can perform a search of the registered phone book on the control panel.
1. On the control panel, press the Speed Dial button twice.
2. Using the Left Arrow or Right Arrow button, select SEARCH, and then press the Menu/Select button.
3. At the SEARCH>> prompt, enter the first few characters of the name programmed for the recipient, and then press the Menu/Select button.
4. The number of names beginning with the characters entered are displayed.
5. Scroll to the desired recipient, and then press the Menu/Select button.
Changing the Scan Mode SettingsYou can change the data format, compression encoding, and scan resolutions from the control panel.
Note: The ADF cannot scan to email in color, use the document glass for color scans. If you selected COLOR or GRAY when scanning to email the 600 x 600 dpi scan resolution and compression encoding methods are unavailable.
When prompted on the control panel:
1. Use the Left Arrow or Right Arrow button select Color, Gray, or B&W as the color mode, and then press the Menu/Select button.
2. Use the Left Arrow or Right Arrow button select 150 x 150 dpi, 300 x300 dpi, or 600 x 600 dpi as the scan resolution, and then press the Menu/Select button.
3. Use the Left Arrow or Right Arrow button select TIFF or PDF as the data format, and then press the Menu/Select button.
4. Use the Left Arrow or Right Arrow button select MR or MMR as the compression encoding, and then press the Menu/Select button.
5. After these settings have been specified, press the Up Arrow until the scan resolution screen is displayed on the control panel.
Changing the Scanned Image SizeThe image size of your scanned documents can be changed from the control panel after selecting ADF or BOOK.
Available sizes: Letter, Statement, Legal, A4, A5, or B5.
1. On the control panel, use the Down Arrow button to enter the image size list.
2. Use the Left Arrow or Right Arrow button to select the scanned image size, and then press the Menu/Select button.

Phaser® 6115MFP Multifunction Product9-1
This chapter includes:
■ Managing Fax Functions on page 9-2■ Sending Faxes on page 9-8■ Receiving Faxes on page 9-12■ Registering Recipients on page 9-13■ Fax Reports on page 9-21■ Solving Fax Problems on page 9-23
See also: (English only)Using the Fax tutorial at www.xerox.com/office/6115support
Faxing
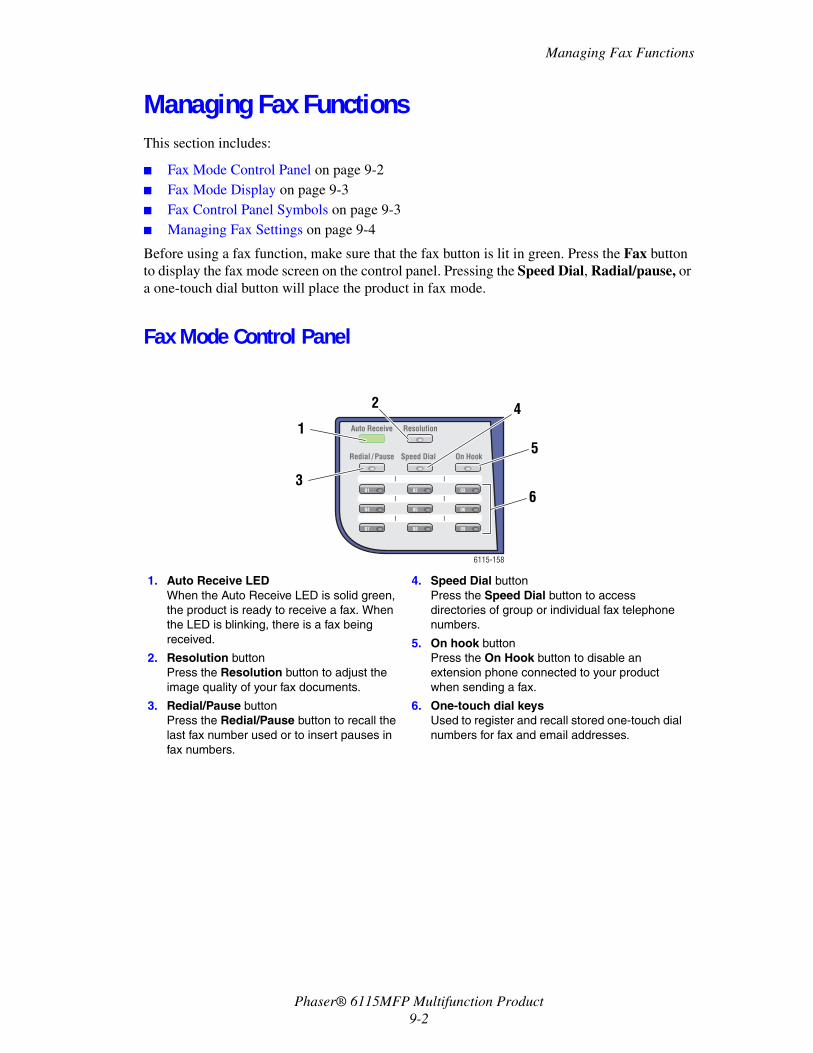
Managing Fax Functions
Phaser® 6115MFP Multifunction Product9-2
Managing Fax FunctionsThis section includes:
■ Fax Mode Control Panel on page 9-2■ Fax Mode Display on page 9-3■ Fax Control Panel Symbols on page 9-3■ Managing Fax Settings on page 9-4
Before using a fax function, make sure that the fax button is lit in green. Press the Fax button to display the fax mode screen on the control panel. Pressing the Speed Dial, Radial/pause, or a one-touch dial button will place the product in fax mode.
Fax Mode Control Panel
1. Auto Receive LEDWhen the Auto Receive LED is solid green, the product is ready to receive a fax. When the LED is blinking, there is a fax being received.
2. Resolution buttonPress the Resolution button to adjust the image quality of your fax documents.
3. Redial/Pause buttonPress the Redial/Pause button to recall the last fax number used or to insert pauses in fax numbers.
4. Speed Dial buttonPress the Speed Dial button to access directories of group or individual fax telephone numbers.
5. On hook buttonPress the On Hook button to disable an extension phone connected to your product when sending a fax.
6. One-touch dial keysUsed to register and recall stored one-touch dial numbers for fax and email addresses.
6115-158
Redial / Pause Speed Dial
Auto Receive Resolution
On Hook
01 02 03
04 05 06
07 08 09
1
3
2 4
5
6
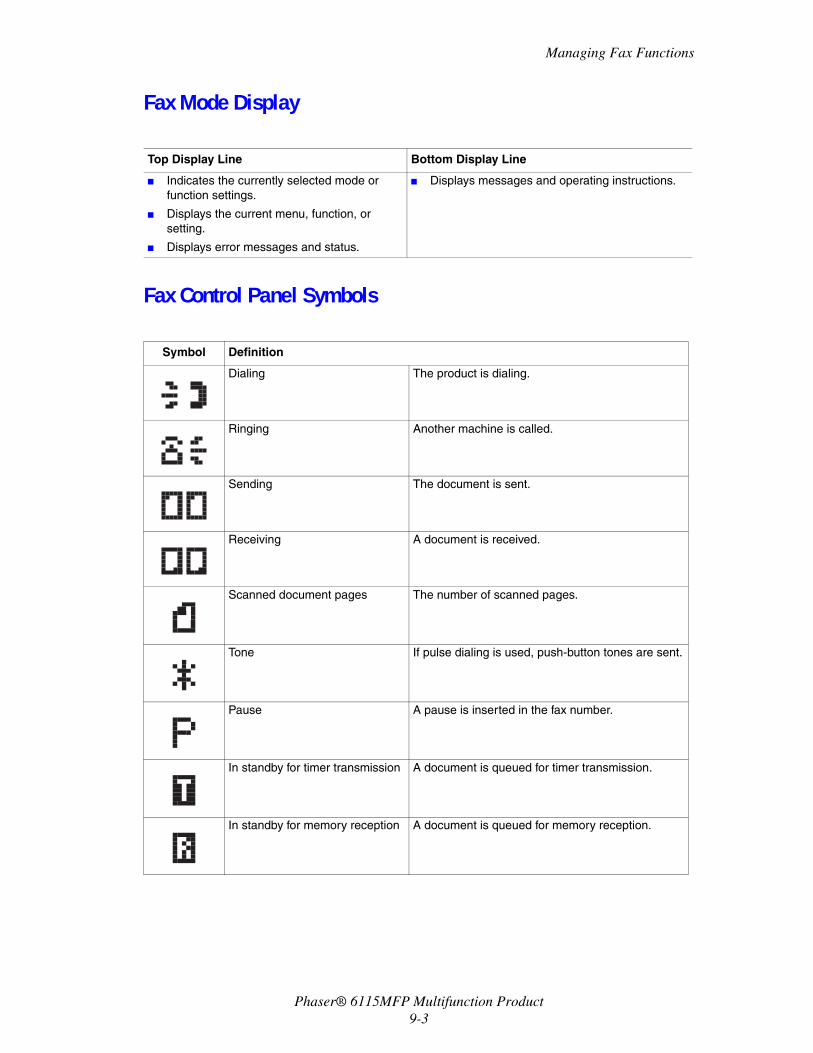
Managing Fax Functions
Phaser® 6115MFP Multifunction Product9-3
Fax Mode Display
Fax Control Panel Symbols
Top Display Line Bottom Display Line
■ Indicates the currently selected mode or function settings.
■ Displays the current menu, function, or setting.
■ Displays error messages and status.
■ Displays messages and operating instructions.
Symbol Definition
Dialing The product is dialing.
Ringing Another machine is called.
Sending The document is sent.
Receiving A document is received.
Scanned document pages The number of scanned pages.
Tone If pulse dialing is used, push-button tones are sent.
Pause A pause is inserted in the fax number.
In standby for timer transmission A document is queued for timer transmission.
In standby for memory reception A document is queued for memory reception.
Managing Fax Functions
Phaser® 6115MFP Multifunction Product9-4
Managing Fax SettingsProduct defaults, fax numbers, e-mail addresses and recipient names can all be programmed from the control panel, through CentreWare IS or the MCC.
Using the Control Panel1. On the control panel, press the Menu/Select button.
2. Using the Up Arrow or Down Arrow button, scroll to the Fax Setup menu, and then press the Menu/Select button.
3. Enter your fax settings, see the tables on page 9-4 through page 9-7.
Using CentreWare IS1. Launch your web browser.
2. Enter the product’s IP address in the browser’s Address field (http://xxx.xxx.xxx.xxx).
3. Click the Login button and log in as an administrator.
4. Click the Fax/E-Mail tab and configure your fax settings.
5. Enter your e-mail settings, and then click Save Changes.
Using the MFP ControlCentre1. From your computer, select Start > All Programs > Xerox Office Printing >
Phaser 6115MFP > MCC.
2. From the MCC dialog box, click the Connect to Machine button.
3. Click the Download button. This downloads the current .dat file from the product.
4. Click the Menu button.
5. Enter your fax settings on the following tabs, Communication/Report, Send Settings, Receive Settings, and E-mail Settings.
6. Click the OK button.
Fax Dial Setup MenuUse the fax dial setup menu to enter one-touch, speed dial, and group dial recipient fax numbers.
Menu Item Description
1: One-Touch Dial A maximum of nine one-touch dial keys can be stored.
2: Speed Dial A maximum of 100 fax numbers can be stored.
3: Group Dial A maximum of 50 different fax numbers can be specified as a group.
Managing Fax Functions
Phaser® 6115MFP Multifunction Product9-5
Fax Send Setup MenuUse the fax send setup menu to set the image quality settings for fax transmissions.
Fax Receive Setup MenuUse the fax receive setup menu to set the default settings for incoming faxes.
Menu Item Description
1: Scan Density Sets the density of scanned, fax documents.
2: Resolution Sets the default scanning resolution.
STD: For documents containing normal text.
Fine: For documents containing small text.
S/F: Super fine, for documents such as newspapers or those containing detailed illustrations.
H/T: Half tone, for documents with shades, such as photos. When selecting half tone, the control panel will prompt you for a detailed setting of STD, Fine, or S/F.
3: Header Prints the header information on all fax transmissions.
Menu Item Description
1: Memory Turns memory receive ON or OFF.
When memory receive mode is set to on, faxes received can be stored in the product memory and printed at a specified time.
A password can be set to specify the start time or end time of a memory reception, or to cancel. The start and end times are valid until memory receive is turned off.
For specifying memory receive settings, see Managing Fax Settings on page 9-4.
2: Phone Rings Sets the number of rings before the call is answered by the product.
1 to 16 rings, depending on your region.
3: Scale to Fit Sets whether documents longer than the currently loaded paper size are printed at a reduced size, split over multiple pages, or discarded.
ON: The document is printed to fit the paper.
OFF: The document is printed at full size and is split onto multiple pages.
CUT: The document is printed, but any part that does not fit onto the currently loaded paper is not printed.
Managing Fax Functions
Phaser® 6115MFP Multifunction Product9-6
4: Receive Print Sets whether the fax is printed after all pages of the document have been received, or to begin printing after only the first page of the document has been received.
Memory Receive: Printing begins after all the pages have been received.
Print Receive: Printing begins as soon as the first page has been received.
5: Receive Mode Sets the receive mode to automatic or manual.
Auto Receive: Begins receiving the fax after the specified number of rings.
Manual Receive: Begins receiving the fax after the telephone receiver has been picked up, the On Hook button has been pressed, and then the Start button is pressed.
6: Footer Sets whether or not the footer information, such as date, time, number of pages, etc., is printed on a received fax.
The following information can be contained in the footer of received faxes:
■ The product’s fax number
■ The reception date and time
■ Sender’s fax number
■ Session number used to manage received faxes
■ Page number
7: Paper Source Sets which tray to pick paper from for printing received faxes.
Menu Item Description
Managing Fax Functions
Phaser® 6115MFP Multifunction Product9-7
Fax Communication Setup MenuUse the fax communication setup menu to set default fax communication settings for your region or environment.
Fax Reports MenuUse the fax report menu to set when and how fax reports are printed.
Menu Item Description
1: Phone Line Type Sets the product phone line type for your region to Tone or Pulse.
Note: If the Phone Line Type is set to USA in the User Settings menu, this setting cannot be changed here.
2: Line Monitor Vol Sets the volume for the transmission monitoring signal to High, Low, or Off.
3: PSTN/PBX Sets whether the connected telephone wiring is a public switched telephone network (PSTN) or a private branch exchange (PBX).
For a PBX system, the prefix number or extension number can also be specified.
Menu Item Description
1: Activity Report Prints a transmission/reception fax report.
ON: Prints a report after 60 faxes have been transmitted and received.
OFF: Does not print a report unless prompted by the user.
2: Send Report Prints a fax transmission report.
ON: Prints a report after each transmission.
ON (ERROR): Prints a report after a transmission only if an error occurred.
OFF: Does not print a report, even if an error occurs.
3: Receive Report Prints a fax reception report.
ON: Prints a report after each fax received.
ON (ERROR): Prints a report after a fax has been received only if an error occurred.
OFF: Does not print a report, even if an error occurs.

Sending Faxes
Phaser® 6115MFP Multifunction Product9-8
Sending FaxesThis section includes:
■ Sending a Fax from the Automatic Document Feeder (ADF) on page 9-8■ Sending a Fax from the Document Glass on page 9-9■ Sending a Fax to Multiple Recipients on page 9-10■ Sending a Fax at a Specified Time on page 9-11■ Canceling a Document Queued in Memory for Transmission on page 9-11
Original documents containing a single or multiple pages can be automatically scanned and sent using the ADF or the document glass.
Note: To print a confirmation page displaying the fax transmission status, turn on the transmission report option.
See also: Registering Recipients on page 9-13Managing Fax Settings on page 9-4
Sending a Fax from the Automatic Document Feeder (ADF)To send a fax from the ADF:
1. Remove any staples and paper clips from pages and insert them faceup in the document feeder with the bottom of the page entering the document feeder first.
2. On the control panel, press the Fax button.
3. Choose the recipient:
■ Using the List menu, press the Speed Dial button twice, select List, and then press the Menu/Select button. Using the Up Arrow or Down Arrow button scroll to the recipient’s name. Press the Menu/Select button, and then press the Start button to send the fax.
■ Using the alphanumeric keypad, enter the fax telephone number, and then press the Start button.
■ Using the one-touch keypad, select the recipient’s one-touch number (01 - 09), and then press the Start button.
■ Press the Speed Dial button, enter the speed dial number associated with the intended recipient from the alphanumeric keypad, and then press the Start button.
4. The product scans the pages and transmits the fax when all pages have been scanned.
6115-077
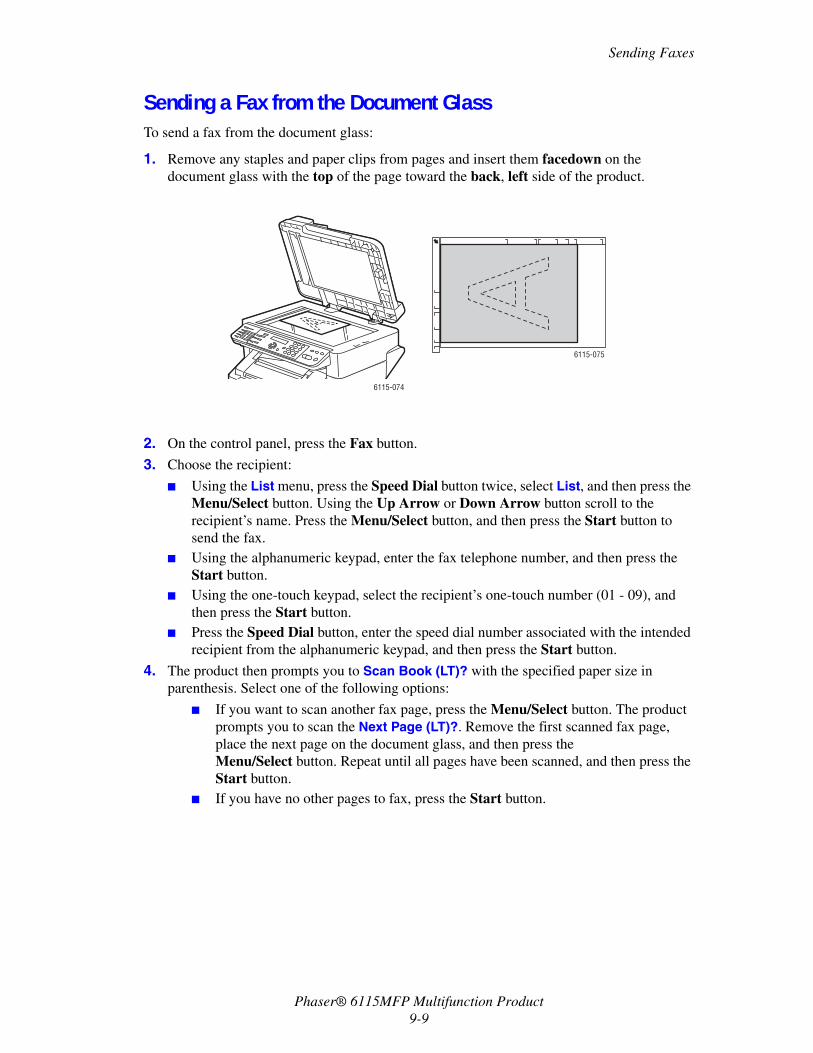
Sending Faxes
Phaser® 6115MFP Multifunction Product9-9
Sending a Fax from the Document GlassTo send a fax from the document glass:
1. Remove any staples and paper clips from pages and insert them facedown on the document glass with the top of the page toward the back, left side of the product.
2. On the control panel, press the Fax button.
3. Choose the recipient:
■ Using the List menu, press the Speed Dial button twice, select List, and then press the Menu/Select button. Using the Up Arrow or Down Arrow button scroll to the recipient’s name. Press the Menu/Select button, and then press the Start button to send the fax.
■ Using the alphanumeric keypad, enter the fax telephone number, and then press the Start button.
■ Using the one-touch keypad, select the recipient’s one-touch number (01 - 09), and then press the Start button.
■ Press the Speed Dial button, enter the speed dial number associated with the intended recipient from the alphanumeric keypad, and then press the Start button.
4. The product then prompts you to Scan Book (LT)? with the specified paper size in parenthesis. Select one of the following options:
■ If you want to scan another fax page, press the Menu/Select button. The product prompts you to scan the Next Page (LT)?. Remove the first scanned fax page, place the next page on the document glass, and then press the Menu/Select button. Repeat until all pages have been scanned, and then press the Start button.
■ If you have no other pages to fax, press the Start button.
6115-074
6115-075
Sending Faxes
Phaser® 6115MFP Multifunction Product9-10
Sending a Fax to Multiple RecipientsA fax can be sent to multiple recipients in a single transmission. There are two methods:
■ Using the group dial function■ Using the broadcast function
Broadcast TransmissionThe recipients can be selected using one-touch dial, speed dial, or group dialing, by using the phonebook list, or by entering the fax number using the keypad.
Note: A maximum of 125 recipients can be selected at one time. If recipients are selected by using one-touch dial keys, a maximum of 9 recipients can be specified. If recipients are selected by using speed dial numbers, a maximum of 100 recipients can be specified. A maximum of 16 recipients can be specified by entering the fax number using the keypad.
Note: With the transmission result report, you can check whether the fax was sent to all recipients.
1. Position the document for faxing.
2. Press the Function button and scroll to the Broadcast menu on the control panel, and then press the Menu/Select button.
3. Specify the fax number:
■ Using the List menu, press the Speed Dial button twice, select List, and then press the Menu/Select button. Using the Up Arrow or Down Arrow button, scroll to the recipient’s name. Press the Menu/Select button, and then select the next recipient.
■ Using the alphanumeric keypad, enter the fax number, press the Menu/Select button, and then specify the next recipient.
■ Using the one-touch keypad, select the recipient’s one-touch number (01 - 09), press the Menu/Select button, and then specify the next recipient.
■ Press the Speed Dial button, enter the speed dial or group dial number associated with the intended recipient from the alphanumeric keypad, press the Menu/Select button and then specify the next recipient.
4. Press the Start button.
5. A message appears asking you to select whether or not to check the recipients, press the Menu/Select button.
6. All recipients appear in the order they were selected or entered. Press the Menu/Select button to check the current recipient and move to the next. If you need to delete a recipient, press the Cancel/C button.
7. After all recipients have been checked, Save=Start appears on the control panel.
8. Press the Start button to begin scanning and sending the fax.
9. To stop the transmission, press the Stop/Reset button, select Yes, and then press the Menu/Select button.
Note: During transmission the message Set Document appears, however, the document is sent to all specified recipients after being scanned only once.
Sending Faxes
Phaser® 6115MFP Multifunction Product9-11
Sending a Fax at a Specified TimeA document can be scanned and stored in memory for sending at a specified time.
Note: The product needs to be programmed to the current time in order for this function to work properly.
To send a fax at a specified time:
1. Press the Function button and scroll to the Timed Send menu, and then press the Menu/Select button.
2. Using the alphanumeric keypad, enter the desired transmission time, and then press the Menu/Select button.
Note: The send time needs to be within the next 24 hours.
3. Specify the fax number of the recipient.
4. Press the Start button to start scanning the document.
5. The fax will be sent at the specified time.
See also: Sending a Fax from the Automatic Document Feeder (ADF) on page 9-8Entering Text on the Control Panel on page 9-14
Canceling a Document Queued in Memory for TransmissionDocuments stored in memory, that are waiting to be sent, can be deleted.
To cancel documents from memory:
1. Press the Function button and scroll to Cancel Batch Send, and then press the Menu/Select button.
2. Using the Up Arrow or Down Arrow button, select the job to be deleted. The following jobs will display:
■ Memory: Normal transmissions queued in memory■ B-Cast: Broadcast transmissions■ Timer: Timer transmissions■ Scan: Scan to e-mail transmissions
3. Press the Menu/Select button to delete the displayed job.

Receiving Faxes
Phaser® 6115MFP Multifunction Product9-12
Receiving FaxesThis section includes:
■ Receiving Faxes Automatically on page 9-12■ Receiving Faxes Manually on page 9-12
Receiving Faxes AutomaticallyIf fax Receive Mode is set to Auto Receive, fax reception begins after the specified number of rings.
If Memory Receive Mode is set to ON, printing does not begin automatically after the fax is received. A received document is saved in memory and printed at the time specified by the user.
See also: Fax Receive Setup Menu on page 9-5
Receiving Faxes ManuallyIf a telephone is connected to this product and the same line is used for phoning and faxing, the fax can be received after picking up the telephone receiver.
If the telephone receiver is not picked up, reception begins automatically if the call is from a fax machine and Receive Mode is set to Auto Receive on the control panel. If the call is from a telephone, it will continue to ring.
If the Receive Mode is set to Manual on the control panel, the ringing continues until the receiver is picked up.
1. When the telephone rings, pick up the telephone receiver, and then press the Start button.
2. After the reception is complete, hang up the telephone receiver.
Registering Recipients
Phaser® 6115MFP Multifunction Product9-13
Registering RecipientsThis section includes:
■ Using the Phone Book on page 9-13■ Entering Text on the Control Panel on page 9-14■ Adding One-Touch Dial Entries on page 9-15■ Editing or Deleting a One-Touch Entry on page 9-16■ Adding Speed Dial Entries on page 9-17■ Editing or Deleting Speed Dial Entries on page 9-18■ Adding Group Dial Entries on page 9-19■ Editing or Deleting Group Dial Entries on page 9-20
Note: Fax numbers, e-mail addresses and recipient names can be programmed through the control panel; however, it is strongly recommended you set up your fax numbers and e-mail addresses through CentreWare IS or the MFP ControlCentre, see Product Management on page 3-1.
The One-Touch Dial, Speed Dial, and Group Dial menus provide access to the most frequently used fax numbers, allowing the recipient to be selected easily without the need to manually enter the number using the control panel keypad each time.
Using the Phone BookThe phone book contains all recipients, email addresses and phone numbers, registered in your one-touch, speed dial, and group lists.
1. On the control panel, press the Speed Dial button twice.
2. Using the Left Arrow or Right Arrow button, select LIST, and then press the Menu/Select button.
3. Scroll to the desired recipient, and then press the Menu/Select button.
Searching the Phone BookIf you do not know the recipient’s speed dial number you can perform a search of the registered phone book on the control panel.
1. On the control panel, press the Speed Dial button twice.
2. Using the Left Arrow or Right Arrow button, select SEARCH, and then press the Menu/Select button.
3. At the SEARCH>> prompt, enter the first few characters of the name programmed for the recipient, and then press the Menu/Select button.
4. The number of names beginning with the characters entered will be displayed.
5. Scroll to the desired recipient, and then press the Menu/Select button.
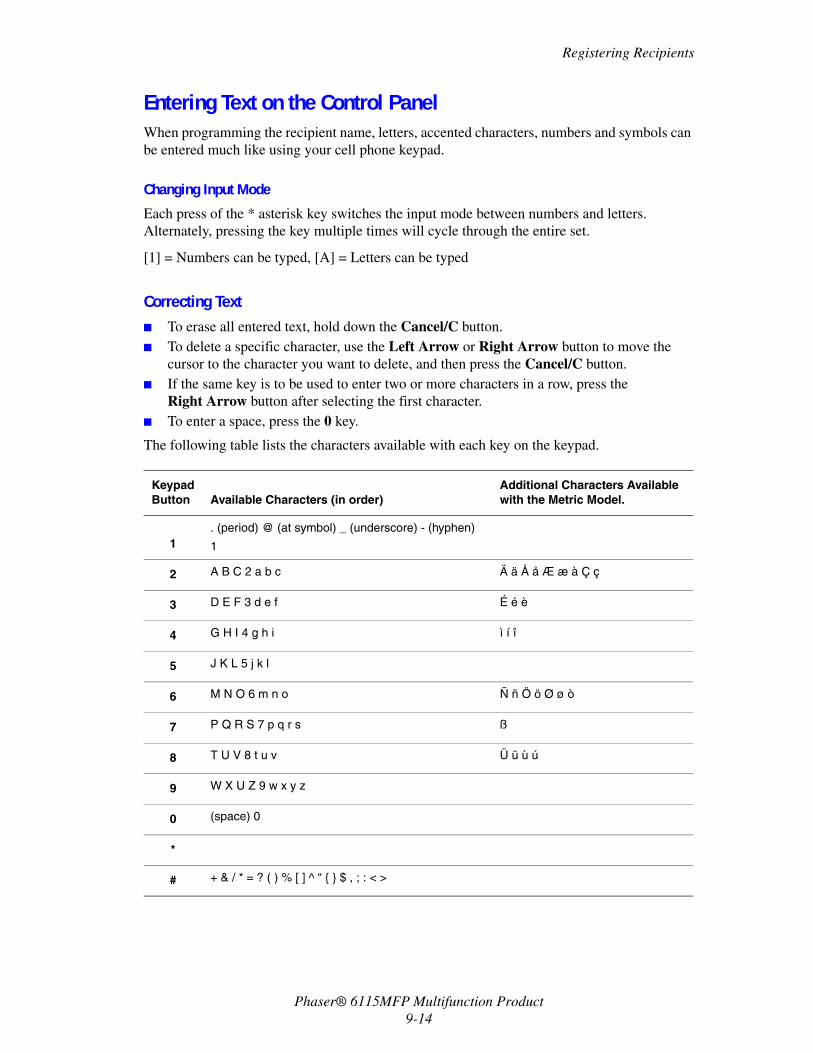
Registering Recipients
Phaser® 6115MFP Multifunction Product9-14
Entering Text on the Control PanelWhen programming the recipient name, letters, accented characters, numbers and symbols can be entered much like using your cell phone keypad.
Changing Input Mode
Each press of the * asterisk key switches the input mode between numbers and letters. Alternately, pressing the key multiple times will cycle through the entire set.
[1] = Numbers can be typed, [A] = Letters can be typed
Correcting Text■ To erase all entered text, hold down the Cancel/C button.■ To delete a specific character, use the Left Arrow or Right Arrow button to move the
cursor to the character you want to delete, and then press the Cancel/C button.■ If the same key is to be used to enter two or more characters in a row, press the
Right Arrow button after selecting the first character.■ To enter a space, press the 0 key.
The following table lists the characters available with each key on the keypad.
Keypad Button Available Characters (in order)
Additional Characters Available with the Metric Model.
1. (period) @ (at symbol) _ (underscore) - (hyphen)
1
2 A B C 2 a b c Ä ä Å å Æ æ à Ç ç
3 D E F 3 d e f É é è
4 G H I 4 g h i ì í î
5 J K L 5 j k l
6 M N O 6 m n o Ñ ñ Ö ö Ø ø ò
7 P Q R S 7 p q r s ß
8 T U V 8 t u v Ü ü ù ú
9 W X U Z 9 w x y z
0 (space) 0
*
# + & / * = ? ( ) % [ ] ^ “ { } $ , ; : < >
Registering Recipients
Phaser® 6115MFP Multifunction Product9-15
Adding One-Touch Dial EntriesThere can be a total of nine one-touch dial entries (01 - 09) programmed in the product.
Note: To program multiple recipient’s with a one-touch dial button (maximum nine), program the recipient’s as a group dial. See Adding Group Dial Entries on page 9-19.
Using CentreWare IS1. Launch your web browser.
2. Enter the product’s IP address in the browser’s Address field (http://xxx.xxx.xxx.xxx).
3. Click the Login button and log in as an administrator.
4. Select the Fax/E-Mail tab, and then click One-Touch Dial Settings.
5. Enter your one-touch dial recipients, and then click Save Changes.
Using the MFP ControlCentre1. From your computer, select Start > All Programs > Xerox Office Printing >
Phaser 6115MFP > MCC.
2. From the MCC dialog box, click the Connect to Machine button.
3. Click the Download button. This downloads the current .dat file from the product.
4. Click the Plus (+) sign in the left hand navigation pane.
5. Click One-Touch Dial, enter your one-touch dial recipients, and then click the OK button.
Using the Control Panel1. On the control panel, press the Menu/Select button.
2. Using the Up Arrow or Down Arrow button, scroll to the Fax Registration menu, and then press the Menu/Select button.
3. Using the Up Arrow or Down Arrow button, scroll to the One-Touch Dial menu, and then press the Menu/Select button.
4. On the one-touch dial keypad, press the number you want to program.
5. Using the alphanumeric keypad, enter the recipient’s name (up to 20 characters), and then press the Menu/Select button.
6. Using the alphanumeric keypad, enter the recipient’s fax number (up to 50 characters), and then press the Menu/Select button.
7. Select the modem speed, and then press the Menu/Select button.
8. The number is now programmed and the message Select Regist.Key appears on the control panel.
9. To program another one-touch key, press the one-touch number and repeat this procedure starting from Step 5.
10. To finish the procedure, press the Cancel/C button until the fax mode screen appears.
Registering Recipients
Phaser® 6115MFP Multifunction Product9-16
Editing or Deleting a One-Touch Entry1. On the control panel, press the Menu/Select button.
2. Using the Down Arrow button, scroll to the Fax Registration menu, and then press the Menu/Select button.
3. Scroll to the One-Touch Dial menu, and then press the Menu/Select button.
4. On the one-touch dial keypad, press the one-touch entry you want to edit or delete, and then press the Cancel/C button.
5. Using the Left Arrow and Right Arrow buttons, select Edit or Delete, and then press the Menu/Select button.
6. If you selected Delete, Select Regist.Key appears on the control panel and the entire entry is deleted.
7. If you selected Edit, change the name, fax number, or modem speed, and then press the Menu/Select button.
8. Select Regist.Key appears on the control panel. Press the Cancel/C button to finish.
Registering Recipients
Phaser® 6115MFP Multifunction Product9-17
Adding Speed Dial EntriesThere can be a total of 100 speed dial entries (001 - 100) programmed in the product.
Note: To program multiple recipients with a one-touch dial button (maximum nine), program the recipient’s as a group dial. See Adding Group Dial Entries on page 9-19.
Using CentreWare IS1. Launch your web browser.
2. Enter the product’s IP address in the browser’s Address field (http://xxx.xxx.xxx.xxx).
3. Click the Login button and log in as an administrator.
4. Select the Fax/E-Mail tab, and then click Speed Dial Settings.
5. Enter your speed dial recipients, and then click Save Changes.
Using the MFP ControlCentre1. From your computer, select Start > All Programs > Xerox Office Printing >
Phaser 6115MFP > MCC.
2. From the MCC dialog box, click the Connect to Machine button.
3. Click the Download button. This downloads the current .dat file from the product.
4. Click the Plus (+) sign in the left hand navigation pane.
5. Click Speed Dial, enter your speed dial recipients, and then click the OK button.
Using the Control Panel1. On the control panel, press the Menu/Select button.
2. Using the Up Arrow or Down Arrow button, scroll to the Fax Registration menu, and then press the Menu/Select button.
3. Using the Up Arrow or Down Arrow button, scroll to the Speed Dial menu, and then press the Menu/Select button.
4. Using the alphanumeric keypad, enter the 3-digit speed dial number.
5. Using the alphanumeric keypad, enter the recipient’s name (up to 20 characters), and then press the Menu/Select button.
6. Using the alphanumeric keypad, enter the recipient’s fax number (up to 50 characters), and then press the Menu/Select button.
7. Select the modem speed, and then press the Menu/Select button.
8. The number is now programmed and the message Select Regist.Key appears on the control panel display.
9. To program another speed dial number, press the one-touch number and repeat this procedure starting from Step 5.
10. To finish the procedure, press the Cancel/C button until the fax mode screen appears.
Registering Recipients
Phaser® 6115MFP Multifunction Product9-18
Editing or Deleting Speed Dial Entries1. On the control panel, press the Menu/Select button.
2. Using the Down Arrow button, scroll to the Fax Registration menu, and then press the Menu/Select button.
3. Scroll to the Speed Dial menu, and then press the Menu/Select button.
4. Using the alphanumeric keypad enter the 3-digit speed dial number entry you want to edit or delete, and then press the Cancel/C button.
5. Using the Left Arrow and Right Arrow buttons, select Edit or Delete, and then press the Menu/Select button.
6. If you selected Delete, Select Regist.Key appears on the control panel and the entire entry is deleted.
7. If you selected Edit, change the name, fax number, or modem speed, and then press the Menu/Select button.
8. Select Regist.Key appears on the control panel. Press the Cancel/C button to finish.
Registering Recipients
Phaser® 6115MFP Multifunction Product9-19
Adding Group Dial EntriesYou can program multiple frequently used fax numbers (maximum 50 recipient numbers in an individual group) together with one-touch dial keys only. There can be a maximum of nine registered groups.
Using CentreWare IS1. Launch your web browser.
2. Enter the product’s IP address in the browser’s Address field (http://xxx.xxx.xxx.xxx).
3. Click the Login button and log in as an administrator.
4. Select the Fax/E-Mail tab, and then click Group Dial Settings.
5. Enter your group dial recipient’s, and then click Save Changes.
Using the MFP ControlCentre1. From your computer, select Start > All Programs > Xerox Office Printing >
Phaser 6115MFP > MCC.
2. From the MCC dialog box, click the Connect to Machine button.
3. Click the Download button. This downloads the current .dat file from the product.
4. Click the Plus (+) sign in the left hand navigation pane.
5. Click Group Dial, enter your group dial recipients, and then click the OK button.
Using the Control Panel1. On the control panel, press the Menu/Select button.
2. Using the Up Arrow or Down Arrow button, scroll to the Fax Registration menu, and then press the Menu/Select button.
3. Using the Up Arrow or Down Arrow button, scroll to the Group Dial menu, and then press the Menu/Select button.
4. Press the one-touch dial key or speed dial number that you want to program.
5. Enter the name of the group, up to 20 characters, and then press the Menu/Select button.
6. Use the one-touch keys or speed dial numbers to specify the recipient you want to add to the group, and then press the Menu/Select button.
7. Repeat Steps 6 and 7 until all recipients have been added.
8. When you are done adding recipients, press the Start button. The message Select Regist.Key appears on the control panel.
9. To finish the procedure, press the Cancel/C button until the fax mode screen appears.
Registering Recipients
Phaser® 6115MFP Multifunction Product9-20
Editing or Deleting Group Dial Entries1. On the control panel, press the Menu/Select button.
2. Using the Down Arrow button, scroll to the Fax Registration menu, and then press the Menu/Select button.
3. Scroll to the Group Dial menu, and then press the Menu/Select button.
4. Press the one-touch dial or enter the speed dial entry you want to edit or delete, and then press the Cancel/C button.
5. Using the Left Arrow and Right Arrow buttons, select Edit or Delete, and then press the Menu/Select button.
6. If you want to change the name of the group, enter the new name, and then press the Menu/Select button.
7. To delete the displayed recipient, press the Cancel/C button.
8. To keep the recipient, press the Menu/Select button.
9. When you are done adding recipients, press the Start button. The message Select Regist.Key appears on the control panel display.
10. To finish, press the Cancel/C button to finish.
Fax Reports
Phaser® 6115MFP Multifunction Product9-21
Fax ReportsThis section includes:
■ Product Counters on page 9-21■ Printing Reports on page 9-22
Product CountersThe number of operations performed since the product was installed can be checked on the control panel using the Display button.
Fax Print CounterThe fax counter displays the total number of fax prints made.
1. Press the Display button once.
2. Scroll down until Total Page displays on the control panel, and then press the Menu/Select button.
3. Scroll down to the Fax Print menu, and then press the Menu/Select button.
Total Scan CounterThe scan counter displays the total number of scans made, excluding copies.
1. Press the Display button once.
2. Scroll down until Total Page displays on the control panel, and then press the Menu/Select button.
3. Scroll down to the Total Scan menu, and then press the Menu/Select button.
Send/Receive Results1. Press the Display button once.
2. Scroll down until Send/Recd Result displays on the control panel, and then press the Menu/Select button.
3. Press the Start button to print the results.
Fax Reports
Phaser® 6115MFP Multifunction Product9-22
Printing ReportsThe following reports can be printed from the control panel:
■ Send Result Report■ Receive Result Report■ Activity Report■ Memory Data List■ Memory Image Print Report■ One-Touch Dial List■ Speed Dial List■ Group Dial List
To Print a Report from the Control Panel1. Press the Display button.
2. Scroll to the Print Report menu.
3. Using the Up Arrow or Down Arrow button scroll to the desired report, and then press the Menu/Select button.
4. The report prints.
Solving Fax Problems
Phaser® 6115MFP Multifunction Product9-23
Solving Fax ProblemsIf the fax cannot be sent correctly, refer to the following table, and then perform the indicated operation. If the fax still cannot be sent correctly, even after performing the described operations, contact your service representative.
This section includes:
■ Problems Sending Faxes on page 9-24■ Problems Receiving Faxes on page 9-25■ Error Messages on page 9-25
Solving Fax Problems
Phaser® 6115MFP Multifunction Product9-24
Problems Sending Faxes
Symptom Cause Solution
The document is not scanned. The document is too thick, too thin, or too small.
Use the original glass to send the fax.
The document is scanned at an angle.
The document guides are not adjusted to the width of the document.
Slide the document guides to fit the width of the document.
The fax received by the recipient is blurry.
The document is incorrectly positioned.
Position the document correctly.
The original glass is dirty. Clean the original glass.
The text in the document is written too faint.
Adjust the resolution.
There may be a problem with the telephone connection.
Check the telephone line, and then try sending the fax again.
There may be a problem with the recipient’s fax machine.
Make a copy to check that this machine is operating correctly, and then, if the copy was printed correctly, have the recipient check the condition of their fax machine.
The fax received by the recipient is blank.
The document was sent with the front side facing down (when the ADF is used).
Load the document to be faxed facing up.
Transmission is not possible. The transmission procedure may have been performed incorrectly.
Check the transmission procedure, and then try sending the fax again.
The fax number may be wrong.
Check the fax number.
The one-touch dial key or speed dial may be incorrectly programmed.
Check that the keys were correctly programmed.
The telephone line may be incorrectly connected.
Check the telephone line connection. If it is disconnected, connect it.
There may be a problem with the recipient’s fax machine.
Contact the recipient.
Solving Fax Problems
Phaser® 6115MFP Multifunction Product9-25
Problems Receiving Faxes
Error Messages
Symptom Cause Solution
The received fax is blank. There may be a problem with the telephone connection or with the caller’s fax machine.
Check that the machine can make clean copies. If it can, have the caller send the fax again.
The caller may have loaded the pages backward.
Contact the caller.
Faxes cannot be received automatically.
The machine is set to receive faxes manually.
Set the machine to automatic reception.
The memory is full. Load paper if it is empty, and then print the faxes stored in the memory.
The telephone line is incorrectly connected.
Check the telephone line connection. If it is disconnected, connect it.
There may be a problem with the caller’s fax machine.
Make a copy to check that this machine is operating correctly, and then, if the copy was printed correctly, have the recipient check the condition of their fax machine.
Error message Cause Solution
LINE PROBLEM(Flashing alternately)
CHECK LINE
The telephone dialing system or telephone wiring system is not set correctly.
The telephone cable is not attached correctly.
Check the telephone dialing system or telephone wiring system and use the appropriate configuration menu to make the correct settings.
Correctly connect the telephone cable.
*COMM.ERROR*(####)
Communication is not possible because of some problem in the machine.
Communication is not possible because of a problem with the recipient/caller’s fax machine.
Check the transmission results.
*REDIAL ALL FAILED* All redial attempts failed because either the recipient’s line is busy or there was no answer.
Check the condition of the recipient’s line, and then try sending the fax again.
Solving Fax Problems
Phaser® 6115MFP Multifunction Product9-26
*MEM.FULL/TX CANCEL*
While sending a fax, the size of the data for the scanned image has exceeded the capacity of the memory.
Retrieve all received faxes stored in the memory.
Send the fax by direct transmission.
To print an error report, press the Cancel/C key while an error message is displayed.
*MEM.FULL/RX CANCEL*
While receiving a fax, the size of the data for the scanned image has exceeded the capacity of the memory.
Retrieve all received faxes stored in the memory.
To print an error report, press the Cancel/C key while an error message is displayed.
HANG UP THE PHONE The receiver of the connected telephone is lifted.
Replace the receiver of the connected telephone on the hook.
A fax error occurred while an operation was being performed in Copy mode.
Press the Fax key to check the error condition, and take appropriate measures.
A fax transmission error occurred while an operation was being performed in Copy mode.
Press the Fax key to check the error condition, and take appropriate measures.
*PLEASE WAIT!*ADMINISTERED BY PC
This machine is accessing LSD or the Admin. Mode of PageScope Web Connection.
Log off from CentreWare IS.
Exit MCC.
If no operation is performed for 600 seconds, the main screen appears.
Error message Cause Solution
Phaser® 6115MFP Multifunction Product10-1
This chapter includes:
■ Maintenance and Cleaning on page 10-2■ Moving the Product on page 10-4■ Ordering Supplies on page 10-15
See also: Maintenance video tutorials at www.xerox.com/office/6115supportReplacing supplies video tutorials at www.xerox.com/office/6115support
Product Maintenance
Maintenance and Cleaning
Phaser® 6115MFP Multifunction Product10-2
Maintenance and CleaningThis section includes:
■ General Precautions on page 10-2■ Moving the Product on page 10-4■ Cleaning the Exterior on page 10-5■ Cleaning the Original Glass and Cover Pad on page 10-6■ Cleaning the Media Feed Roller and Laser Lens on page 10-7■ Cleaning the Duplex Feed Rollers on page 10-11■ Cleaning the Tray 2 Feed Rollers on page 10-12■ Cleaning the ADF Feed Rollers on page 10-14
See also: User Safety on page 1-2
General Precautions
Warning: Turn off the product, unplug the power cord, and disconnect all interface cables before cleaning. Do not spill water or detergent into the product. Otherwise the product will be damaged and an electric shock may occur.
Warning: If you get toner in your eyes, wash it out immediately with cool water and consult a doctor.
Warning: The fuser is hot. When the top cover is opened the fuser will cool down. Wait at least 10 minutes for the fuser to cool.
Caution: Read all caution and warning labels carefully, making sure to follow any instructions contained in them. These labels are located on the inside of the product covers and the interior of the product body.
Caution: Handle the product with care to preserve its life. If dust and paper scraps remain on the inside or outside of the product, performance and print quality will suffer, so the product should be cleaned periodically.
Maintenance and Cleaning
Phaser® 6115MFP Multifunction Product10-3
Keep the following guidelines in mind:
■ Be careful when cleaning the inside of the product or removing media misfeeds, as the fuser and other internal parts may be very hot.
■ Do not place anything on top of the product.■ Use a soft cloth to clean the product.■ Never spray cleaning solutions directly on the product’s surface; the spray could penetrate
through the air vents of the product and damage the internal circuits.■ Avoid using abrasive or corrosive solutions or solutions that contain solvents (such as
alcohol and benzene) to clean the product.■ Always test any cleaning solution (such as mild detergent) on a small inconspicuous area
of your product to check the solution’s performance.■ Never use sharp or rough implements, such as wire or plastic cleaning pads.■ Always close the product’s covers gently. Never subject the product to vibration.■ Do not leave the product’s covers open for any length of time, especially in well-lit places.
Light exposure can damage the imaging unit.■ Do not open the product’s covers during printing.■ Do not lubricate or disassemble the product.■ Do not tilt the product while in use.■ Do not touch the electrical contacts, gears, or laser devices. Doing so may damage the
product and cause the print quality to deteriorate.■ Keep media in the output bin at a minimum level. If the media is stocked too high, your
product may experience media misfeeds and excessive media curl.■ Make sure any parts removed during cleaning are replaced before you plug in the product.
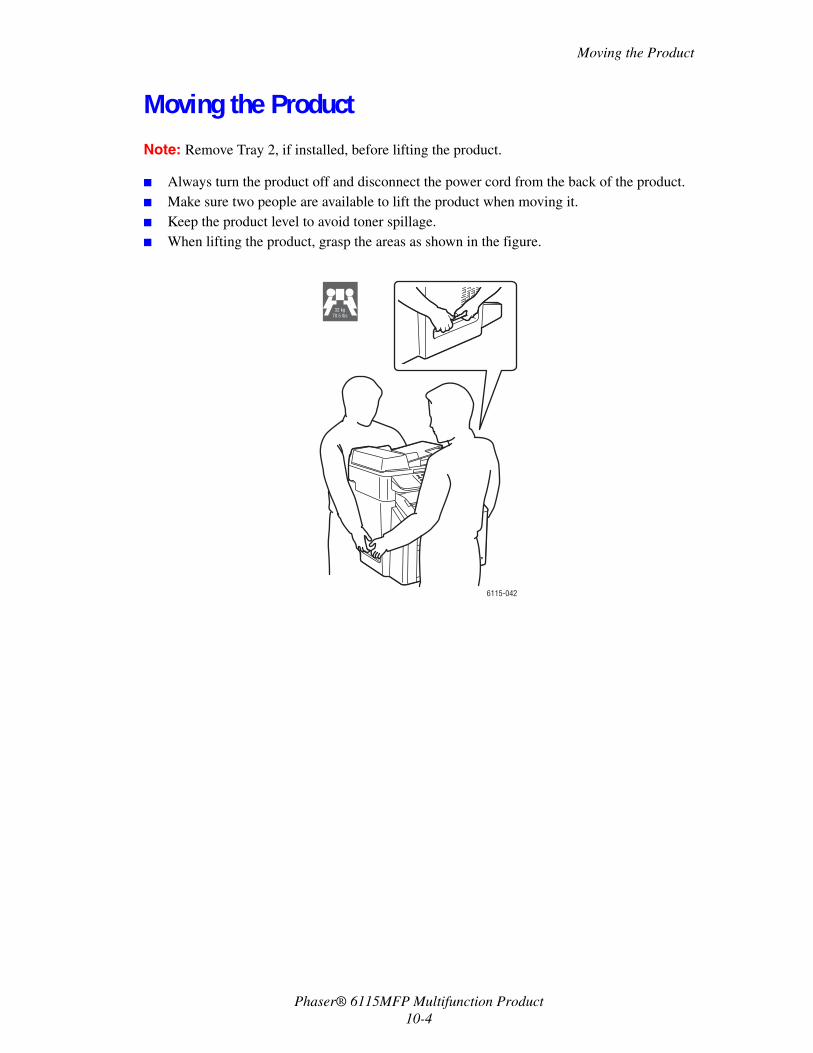
Moving the Product
Phaser® 6115MFP Multifunction Product10-4
Moving the Product
Note: Remove Tray 2, if installed, before lifting the product.
■ Always turn the product off and disconnect the power cord from the back of the product.■ Make sure two people are available to lift the product when moving it. ■ Keep the product level to avoid toner spillage.■ When lifting the product, grasp the areas as shown in the figure.
6115-042
32 kg70.5 lbs
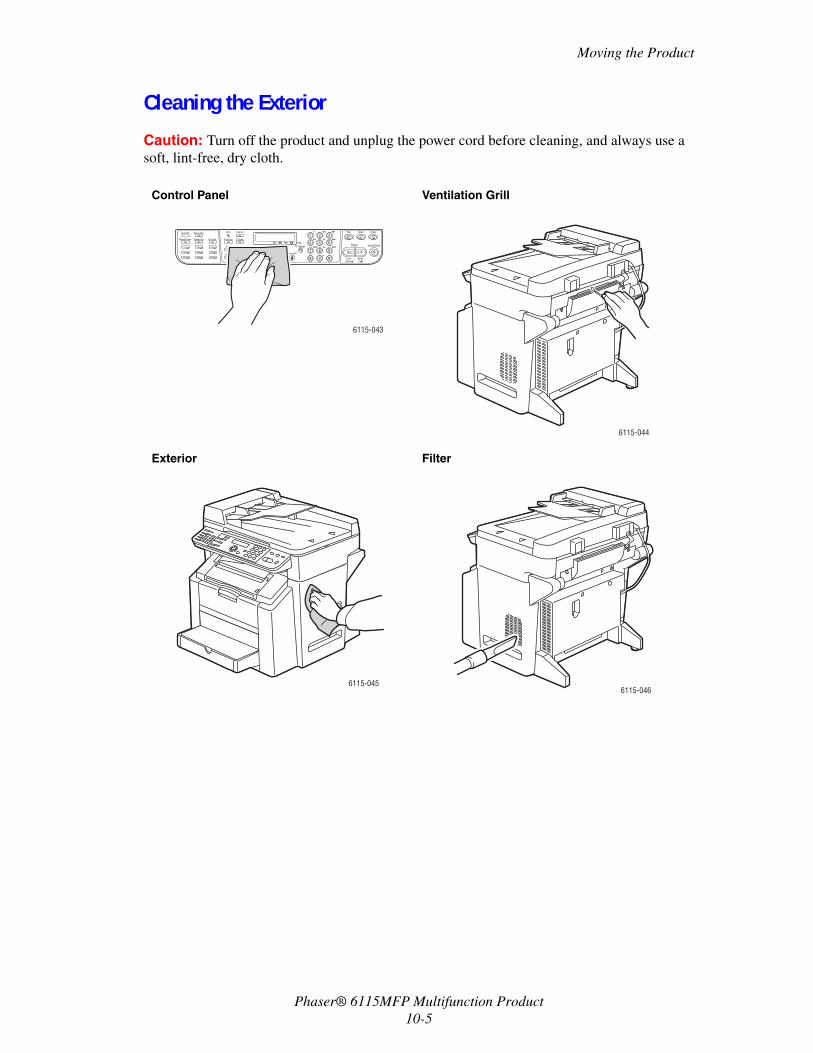
Moving the Product
Phaser® 6115MFP Multifunction Product10-5
Cleaning the Exterior
Caution: Turn off the product and unplug the power cord before cleaning, and always use a soft, lint-free, dry cloth.
Control Panel Ventilation Grill
Exterior Filter
6115-043
6115-044
6115-0456115-046
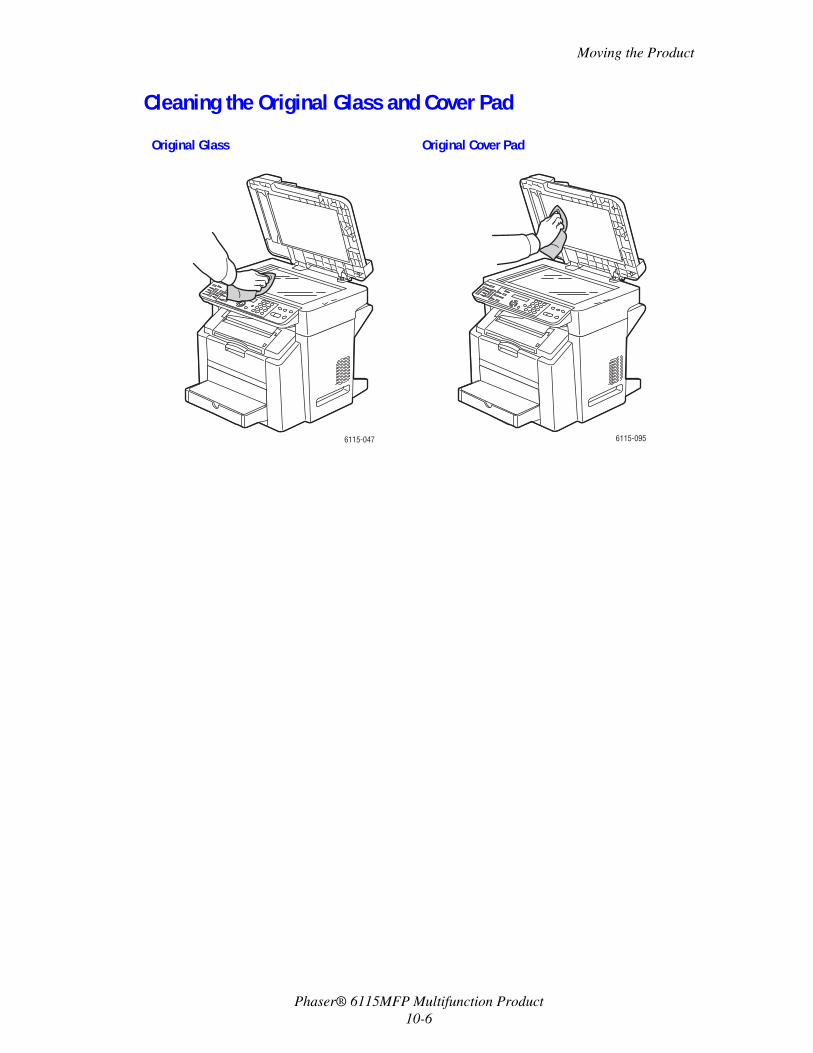
Moving the Product
Phaser® 6115MFP Multifunction Product10-6
Cleaning the Original Glass and Cover Pad
Original Glass Original Cover Pad
6115-047 6115-095

Moving the Product
Phaser® 6115MFP Multifunction Product10-7
Cleaning the Media Feed Roller and Laser Lens1. Ensure the document feeder is closed, release the scanner lever, and then lift the scanner
unit.
2. Remove any media and close the output bin.
6115-021
6115-083
6115-103
6115-087
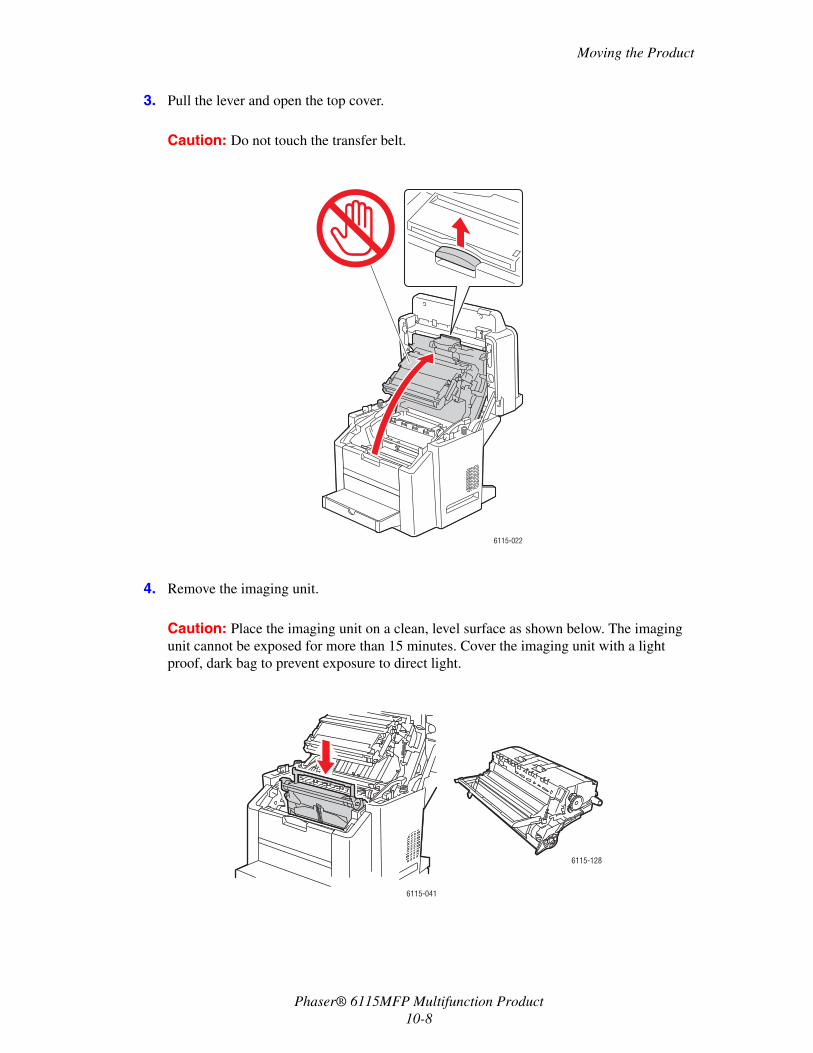
Moving the Product
Phaser® 6115MFP Multifunction Product10-8
3. Pull the lever and open the top cover.
Caution: Do not touch the transfer belt.
4. Remove the imaging unit.
Caution: Place the imaging unit on a clean, level surface as shown below. The imaging unit cannot be exposed for more than 15 minutes. Cover the imaging unit with a light proof, dark bag to prevent exposure to direct light.
6115-022
6115-041
6115-128
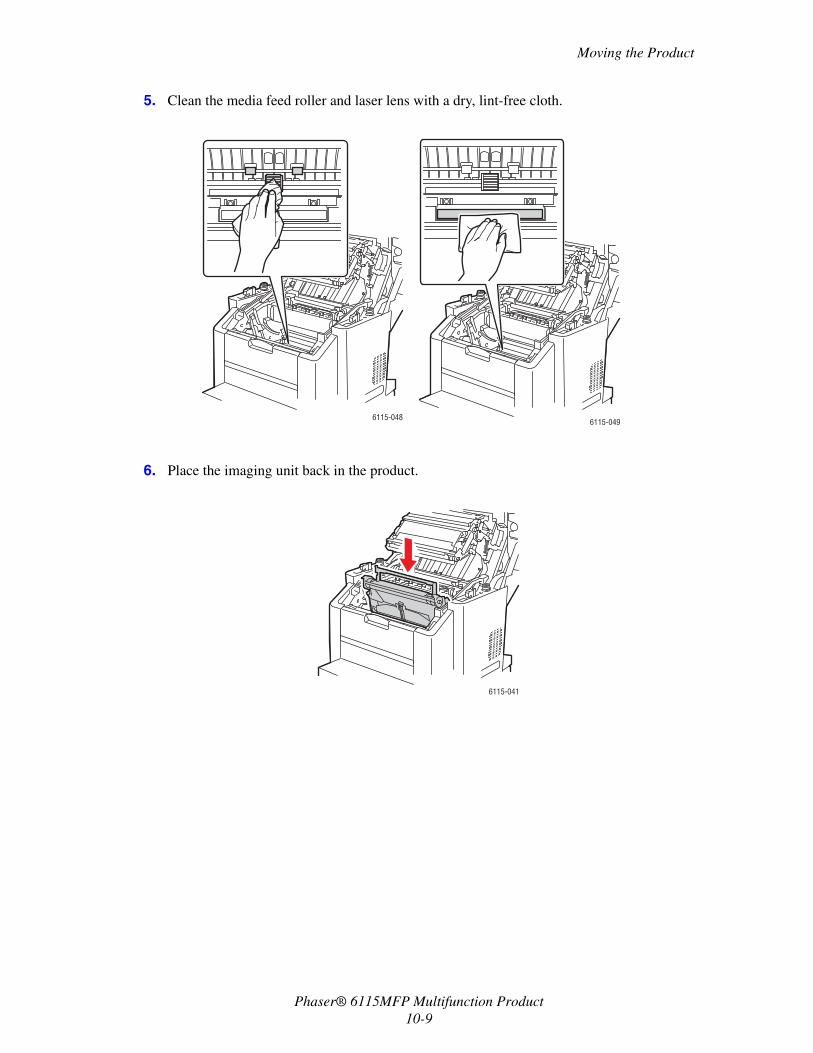
Moving the Product
Phaser® 6115MFP Multifunction Product10-9
5. Clean the media feed roller and laser lens with a dry, lint-free cloth.
6. Place the imaging unit back in the product.
6115-048 6115-049
6115-041
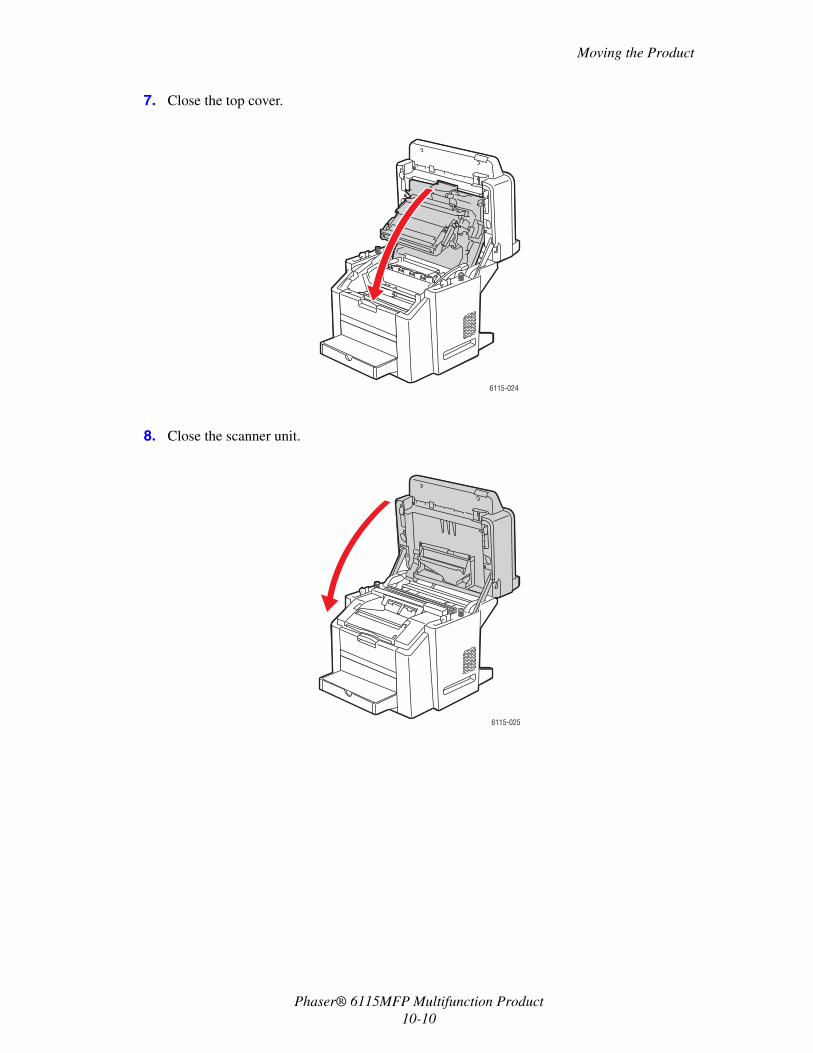
Moving the Product
Phaser® 6115MFP Multifunction Product10-10
7. Close the top cover.
8. Close the scanner unit.
6115-024
6115-025
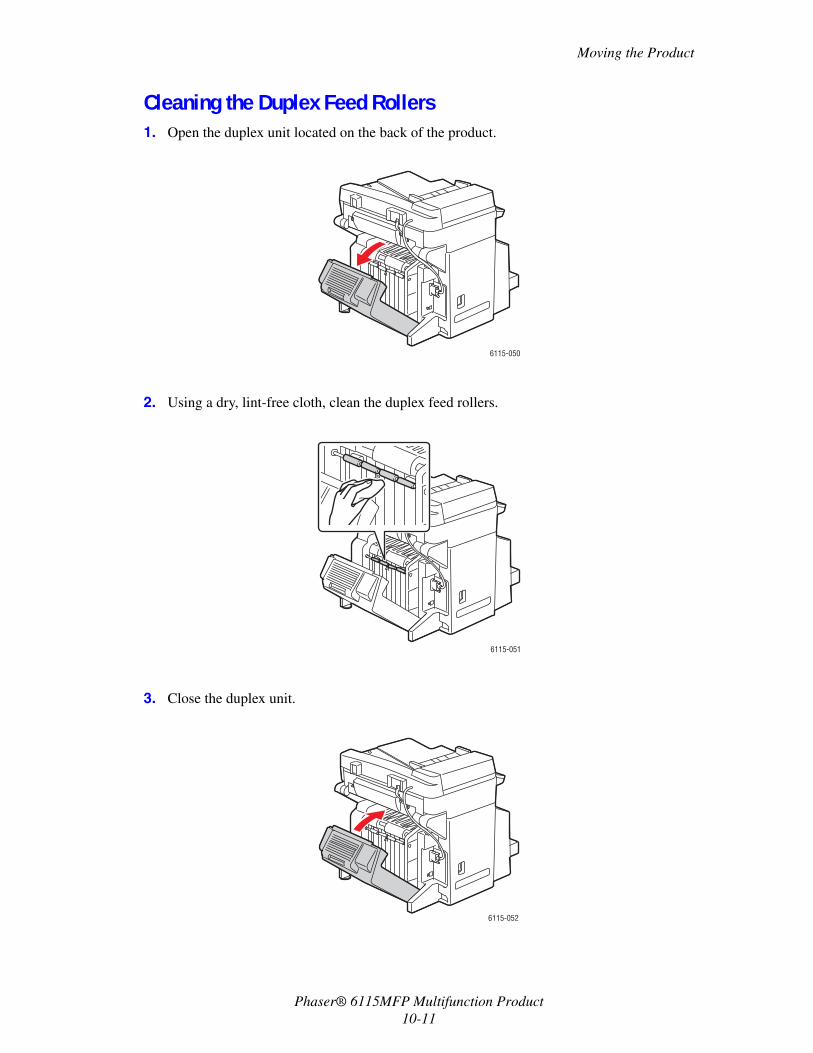
Moving the Product
Phaser® 6115MFP Multifunction Product10-11
Cleaning the Duplex Feed Rollers1. Open the duplex unit located on the back of the product.
2. Using a dry, lint-free cloth, clean the duplex feed rollers.
3. Close the duplex unit.
6115-050
6115-051
6115-052
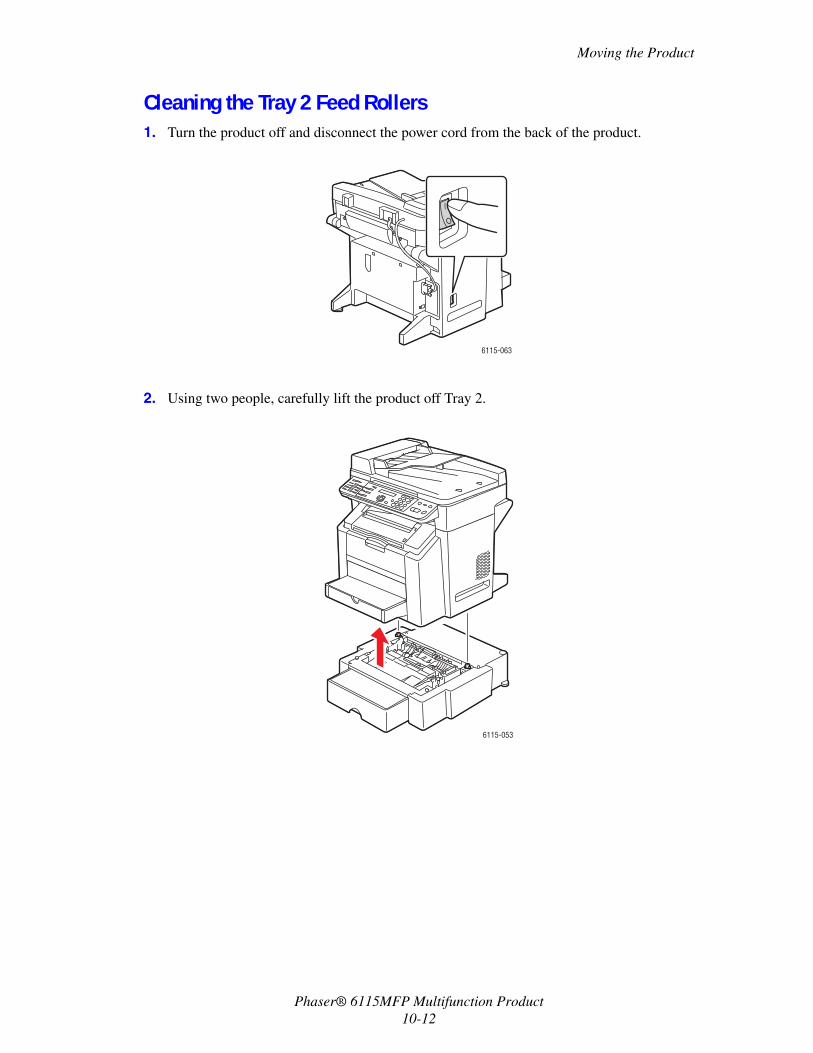
Moving the Product
Phaser® 6115MFP Multifunction Product10-12
Cleaning the Tray 2 Feed Rollers1. Turn the product off and disconnect the power cord from the back of the product.
2. Using two people, carefully lift the product off Tray 2.
6115-063
6115-053
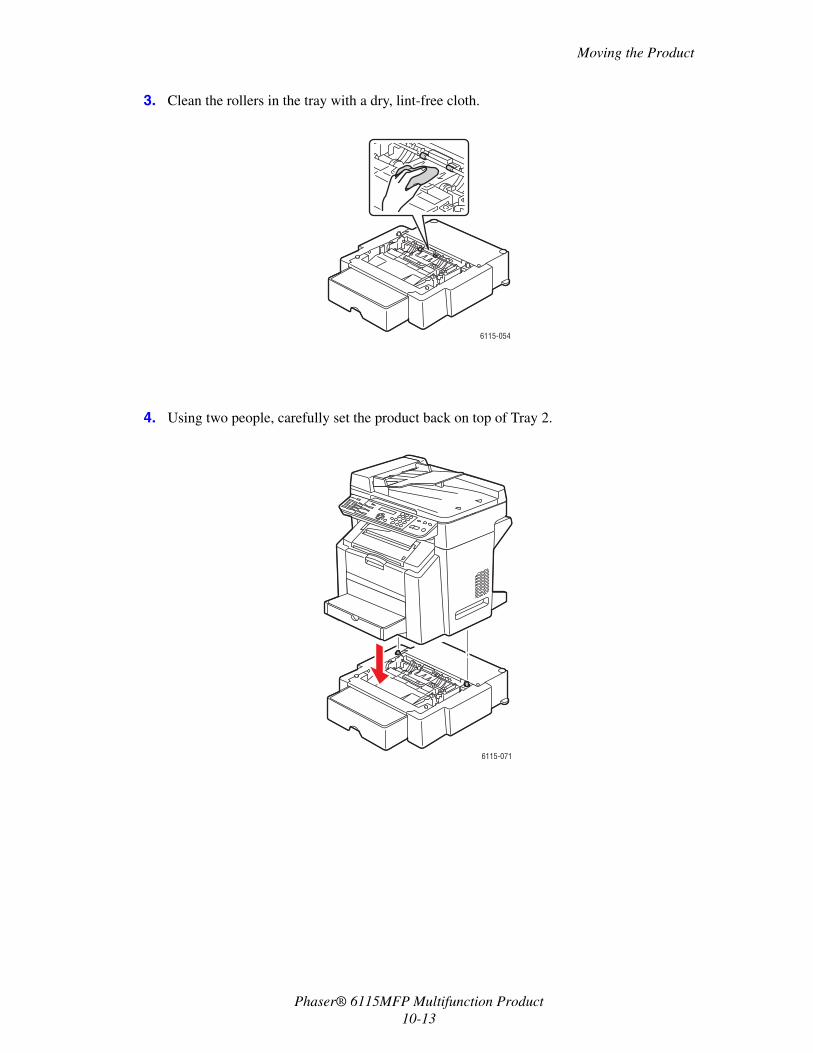
Moving the Product
Phaser® 6115MFP Multifunction Product10-13
3. Clean the rollers in the tray with a dry, lint-free cloth.
4. Using two people, carefully set the product back on top of Tray 2.
6115-054
6115-071
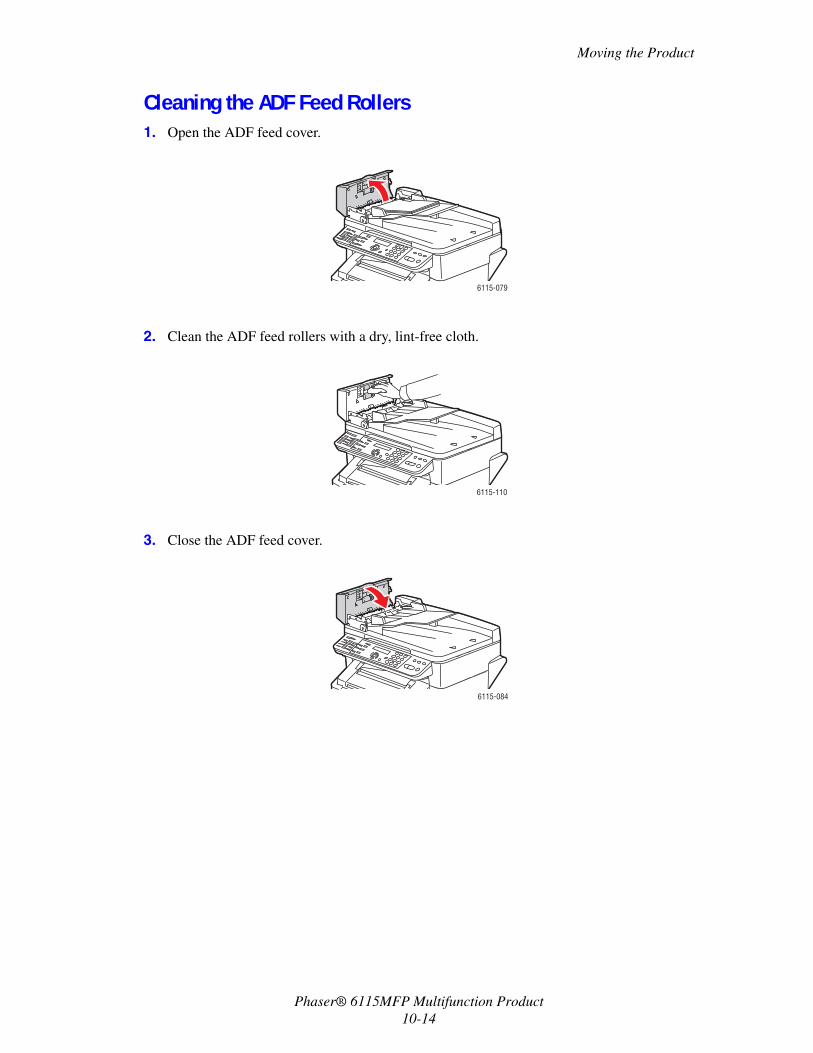
Moving the Product
Phaser® 6115MFP Multifunction Product10-14
Cleaning the ADF Feed Rollers1. Open the ADF feed cover.
2. Clean the ADF feed rollers with a dry, lint-free cloth.
3. Close the ADF feed cover.
6115-079
6115-110
6115-084
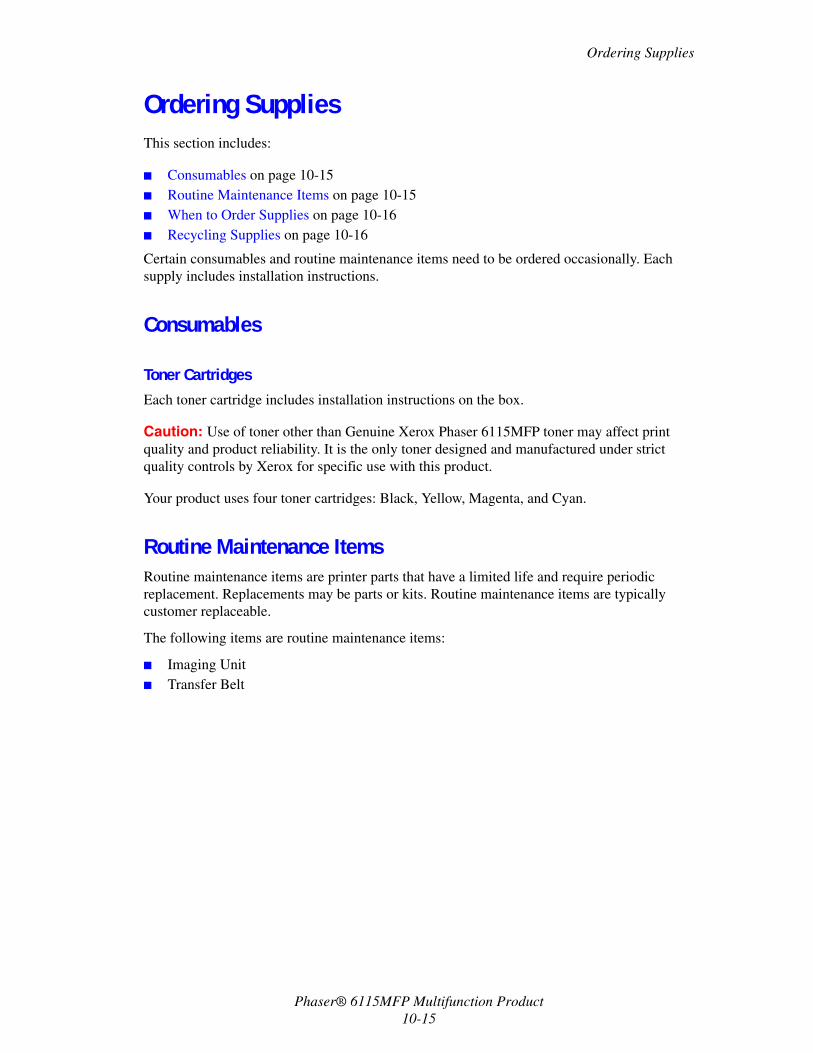
Ordering Supplies
Phaser® 6115MFP Multifunction Product10-15
Ordering SuppliesThis section includes:
■ Consumables on page 10-15■ Routine Maintenance Items on page 10-15■ When to Order Supplies on page 10-16■ Recycling Supplies on page 10-16
Certain consumables and routine maintenance items need to be ordered occasionally. Each supply includes installation instructions.
Consumables
Toner CartridgesEach toner cartridge includes installation instructions on the box.
Caution: Use of toner other than Genuine Xerox Phaser 6115MFP toner may affect print quality and product reliability. It is the only toner designed and manufactured under strict quality controls by Xerox for specific use with this product.
Your product uses four toner cartridges: Black, Yellow, Magenta, and Cyan.
Routine Maintenance ItemsRoutine maintenance items are printer parts that have a limited life and require periodic replacement. Replacements may be parts or kits. Routine maintenance items are typically customer replaceable.
The following items are routine maintenance items:
■ Imaging Unit■ Transfer Belt
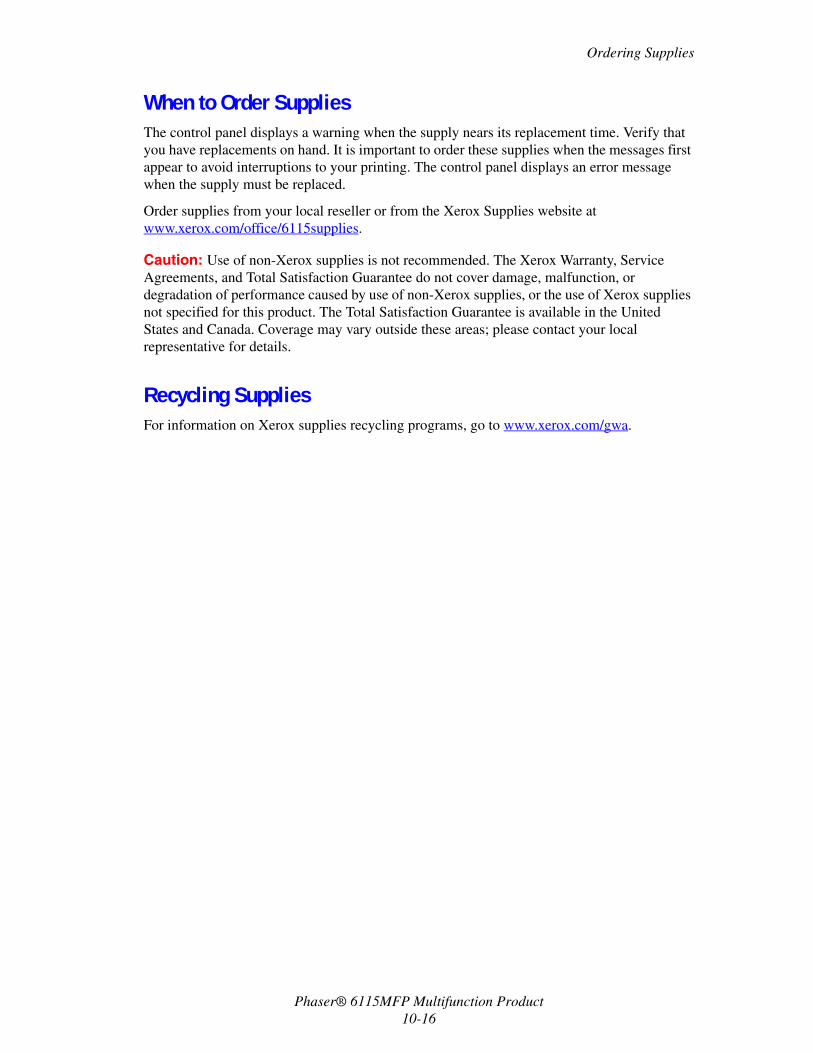
Ordering Supplies
Phaser® 6115MFP Multifunction Product10-16
When to Order SuppliesThe control panel displays a warning when the supply nears its replacement time. Verify that you have replacements on hand. It is important to order these supplies when the messages first appear to avoid interruptions to your printing. The control panel displays an error message when the supply must be replaced.
Order supplies from your local reseller or from the Xerox Supplies website at www.xerox.com/office/6115supplies.
Caution: Use of non-Xerox supplies is not recommended. The Xerox Warranty, Service Agreements, and Total Satisfaction Guarantee do not cover damage, malfunction, or degradation of performance caused by use of non-Xerox supplies, or the use of Xerox supplies not specified for this product. The Total Satisfaction Guarantee is available in the United States and Canada. Coverage may vary outside these areas; please contact your local representative for details.
Recycling SuppliesFor information on Xerox supplies recycling programs, go to www.xerox.com/gwa.
Phaser® 6115MFP Multifunction Product11-1
This chapter includes:
■ Preventing Paper Jams on page 11-2■ Clearing Paper Jams on page 11-4■ Product Troubleshooting on page 11-19■ Print-Quality Problems on page 11-23■ Status, Error, and Service Messages on page 11-33■ Getting Help on page 11-38
See also: Troubleshooting video tutorials at www.xerox.com/office/6115support
Troubleshooting
Preventing Paper Jams
Phaser® 6115MFP Multifunction Product11-2
Preventing Paper JamsThis section provides information to aid you in resolving paper jams.
Make sure that:
■ Media matches the product specifications, see Supported Paper and Media on page 6-2.■ Media is flat, especially on the leading edge.■ The product is on a hard, flat, level surface.■ You store media in a dry location away from moisture and humidity.■ The output bin is positioned horizontally when postcards are being printed.■ You remove transparencies from the output bin immediately after printing to avoid static
buildup.■ You always adjust the media guides in Tray 1 after inserting the media. A guide that is not
properly adjusted can cause poor print quality, media misfeeds, and product damage.■ You load the media printing-side up in the tray (many manufacturers place an arrow on the
end of the wrapper to indicate the printing side).
Avoid the following:
■ Media that is specially designed for ink-jet printers with polyester coating.■ Media that is folded, wrinkled, or excessively curled.■ Double feeding (remove the media and fan the sheets—they may be sticking together). ■ Fanning transparencies since this causes static.■ Loading more than one type/size/weight of media in a tray at the same time.■ Overfilling the trays. ■ Allowing the output bin to overfill.■ Allowing the output bin to fill with more than a few transparencies.
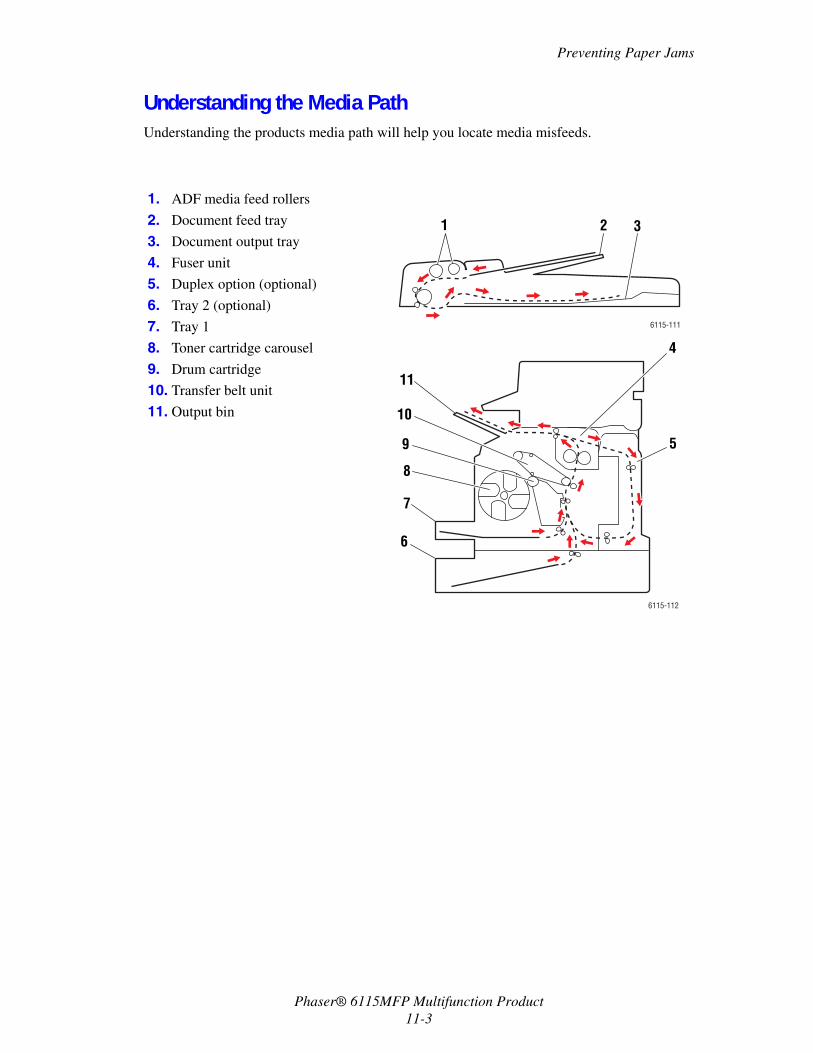
Preventing Paper Jams
Phaser® 6115MFP Multifunction Product11-3
Understanding the Media PathUnderstanding the products media path will help you locate media misfeeds.
1. ADF media feed rollers
2. Document feed tray
3. Document output tray
4. Fuser unit
5. Duplex option (optional)
6. Tray 2 (optional)
7. Tray 1
8. Toner cartridge carousel
9. Drum cartridge
10. Transfer belt unit
11. Output bin
11
7
8
6
59
10
4
6115-112
1 32
6115-111
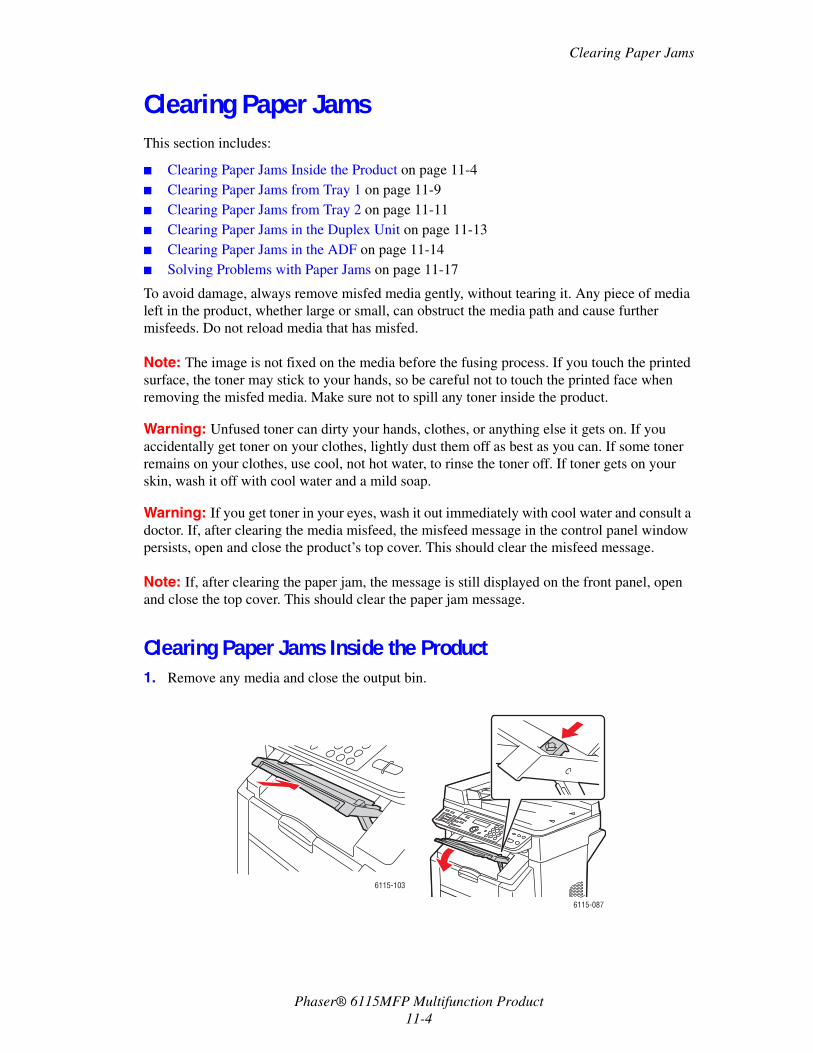
Clearing Paper Jams
Phaser® 6115MFP Multifunction Product11-4
Clearing Paper JamsThis section includes:
■ Clearing Paper Jams Inside the Product on page 11-4■ Clearing Paper Jams from Tray 1 on page 11-9■ Clearing Paper Jams from Tray 2 on page 11-11■ Clearing Paper Jams in the Duplex Unit on page 11-13■ Clearing Paper Jams in the ADF on page 11-14■ Solving Problems with Paper Jams on page 11-17
To avoid damage, always remove misfed media gently, without tearing it. Any piece of media left in the product, whether large or small, can obstruct the media path and cause further misfeeds. Do not reload media that has misfed.
Note: The image is not fixed on the media before the fusing process. If you touch the printed surface, the toner may stick to your hands, so be careful not to touch the printed face when removing the misfed media. Make sure not to spill any toner inside the product.
Warning: Unfused toner can dirty your hands, clothes, or anything else it gets on. If you accidentally get toner on your clothes, lightly dust them off as best as you can. If some toner remains on your clothes, use cool, not hot water, to rinse the toner off. If toner gets on your skin, wash it off with cool water and a mild soap.
Warning: If you get toner in your eyes, wash it out immediately with cool water and consult a doctor. If, after clearing the media misfeed, the misfeed message in the control panel window persists, open and close the product’s top cover. This should clear the misfeed message.
Note: If, after clearing the paper jam, the message is still displayed on the front panel, open and close the top cover. This should clear the paper jam message.
Clearing Paper Jams Inside the Product1. Remove any media and close the output bin.
6115-103
6115-087
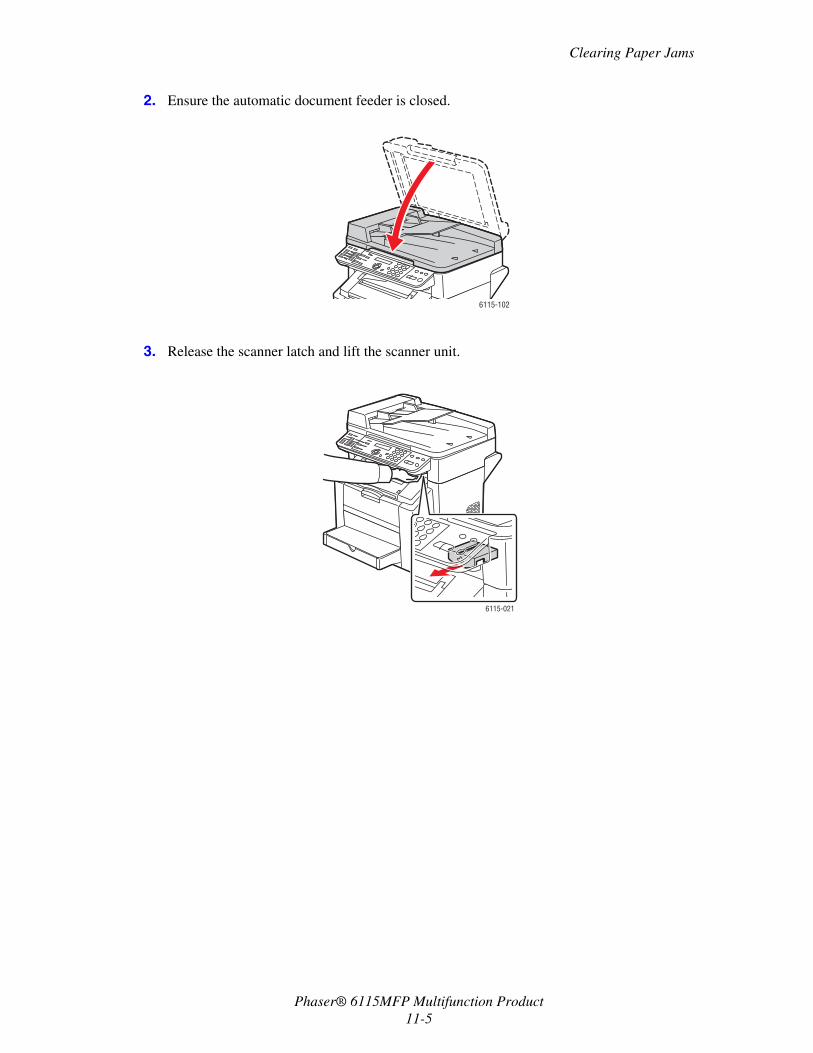
Clearing Paper Jams
Phaser® 6115MFP Multifunction Product11-5
2. Ensure the automatic document feeder is closed.
3. Release the scanner latch and lift the scanner unit.
6115-102
6115-021

Clearing Paper Jams
Phaser® 6115MFP Multifunction Product11-6
4. Pull the lever and open the top cover.
Caution: Do not touch the transfer belt.
5. Remove the drum cartridge.
Caution: Place the drum cartridge on a clean, level surface as shown below. The drum cartridge cannot be exposed for more than 15 minutes. Cover the drum cartridge with a light proof bag to prevent exposure to direct light.
6115-022
6115-041
6115-128
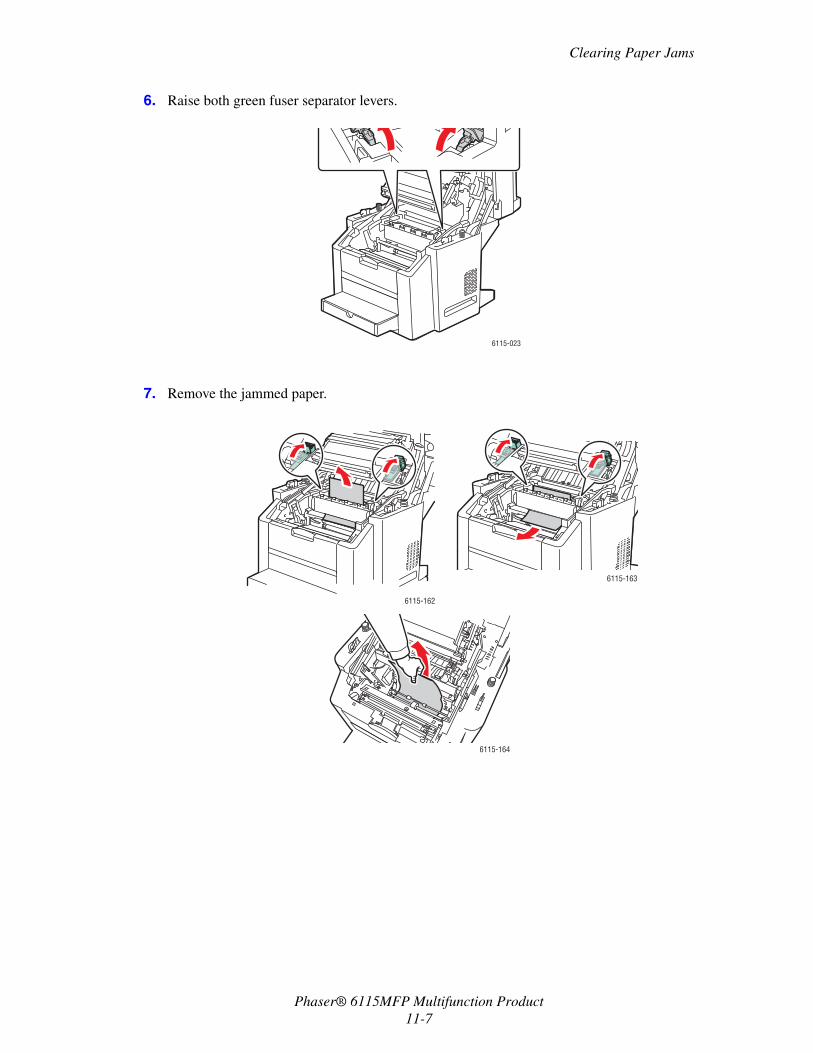
Clearing Paper Jams
Phaser® 6115MFP Multifunction Product11-7
6. Raise both green fuser separator levers.
7. Remove the jammed paper.
6115-023
6115-162
6115-163
6115-164
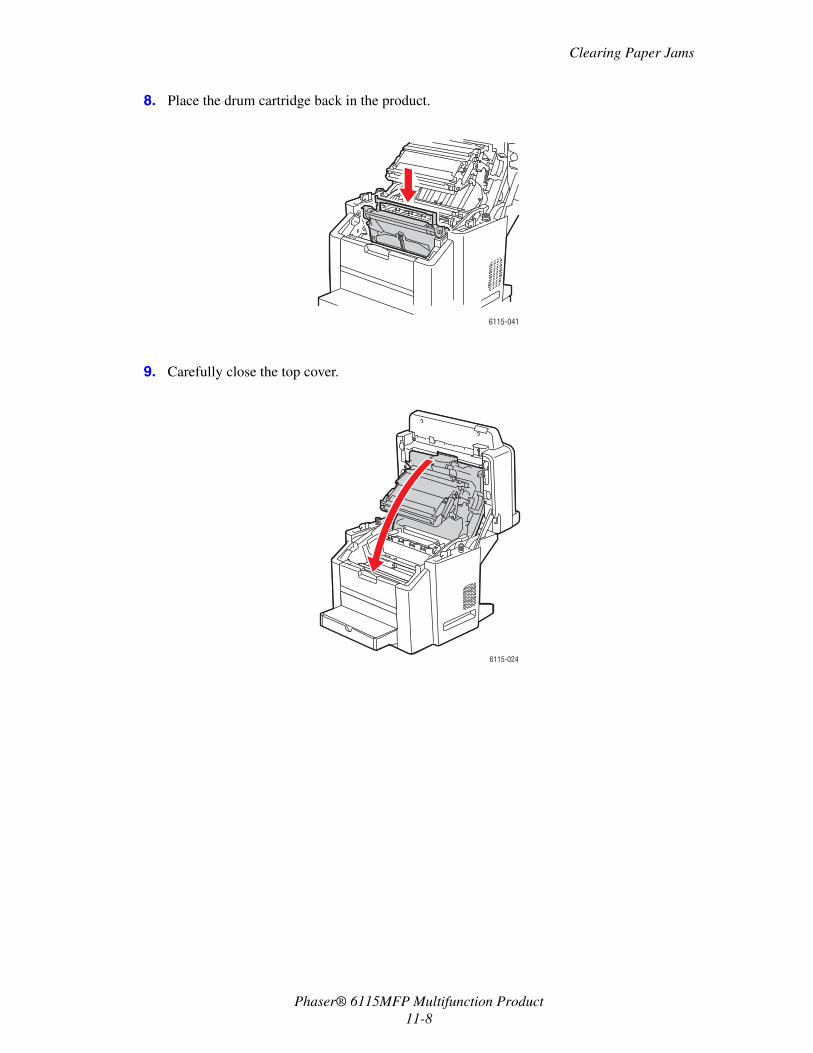
Clearing Paper Jams
Phaser® 6115MFP Multifunction Product11-8
8. Place the drum cartridge back in the product.
9. Carefully close the top cover.
6115-041
6115-024
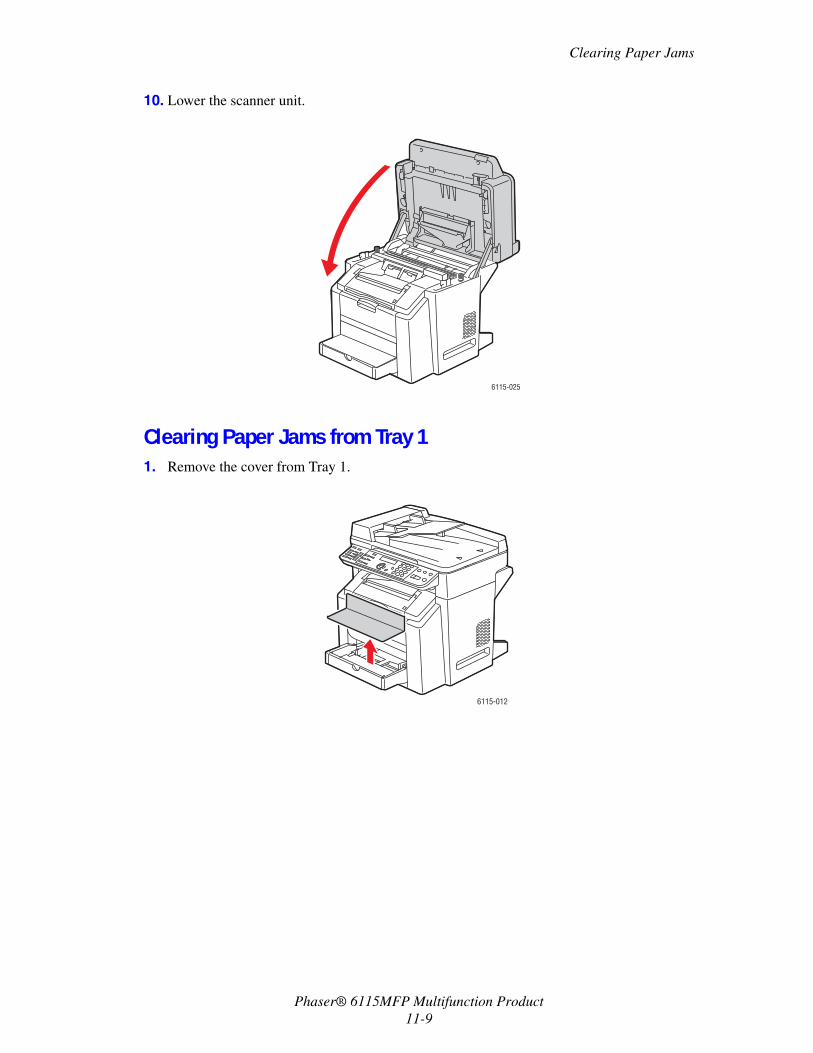
Clearing Paper Jams
Phaser® 6115MFP Multifunction Product11-9
10. Lower the scanner unit.
Clearing Paper Jams from Tray 11. Remove the cover from Tray 1.
6115-025
6115-012
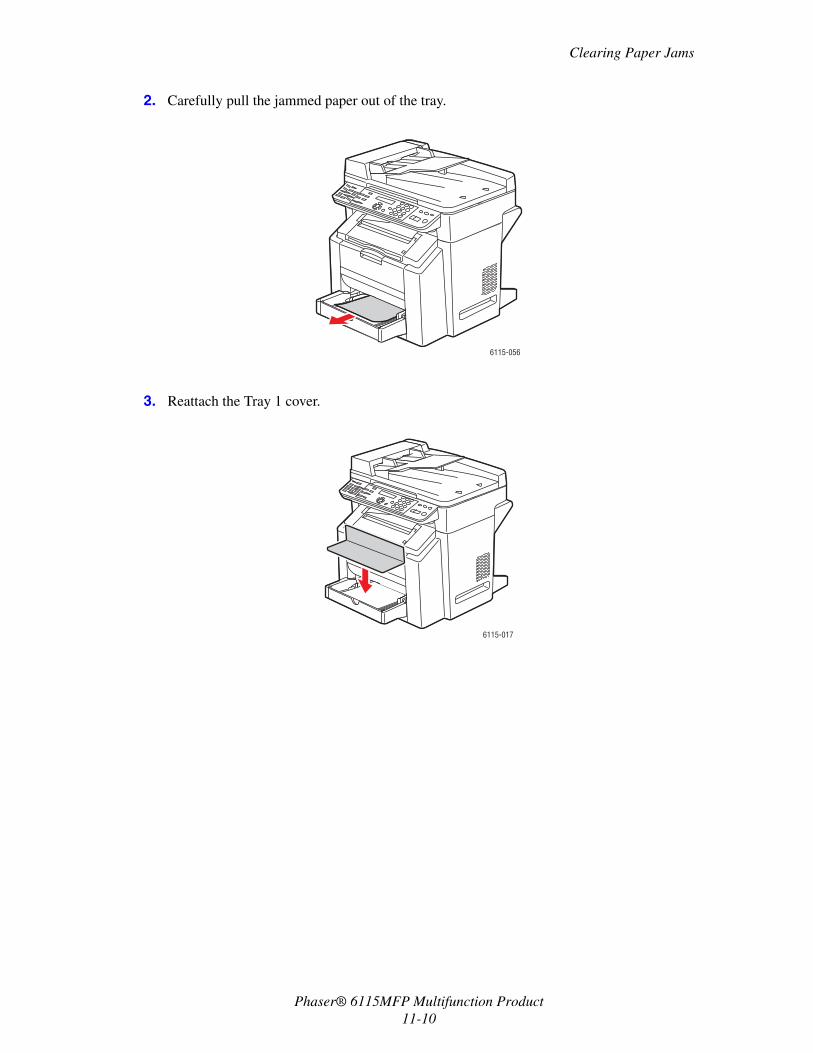
Clearing Paper Jams
Phaser® 6115MFP Multifunction Product11-10
2. Carefully pull the jammed paper out of the tray.
3. Reattach the Tray 1 cover.
6115-056
6115-017
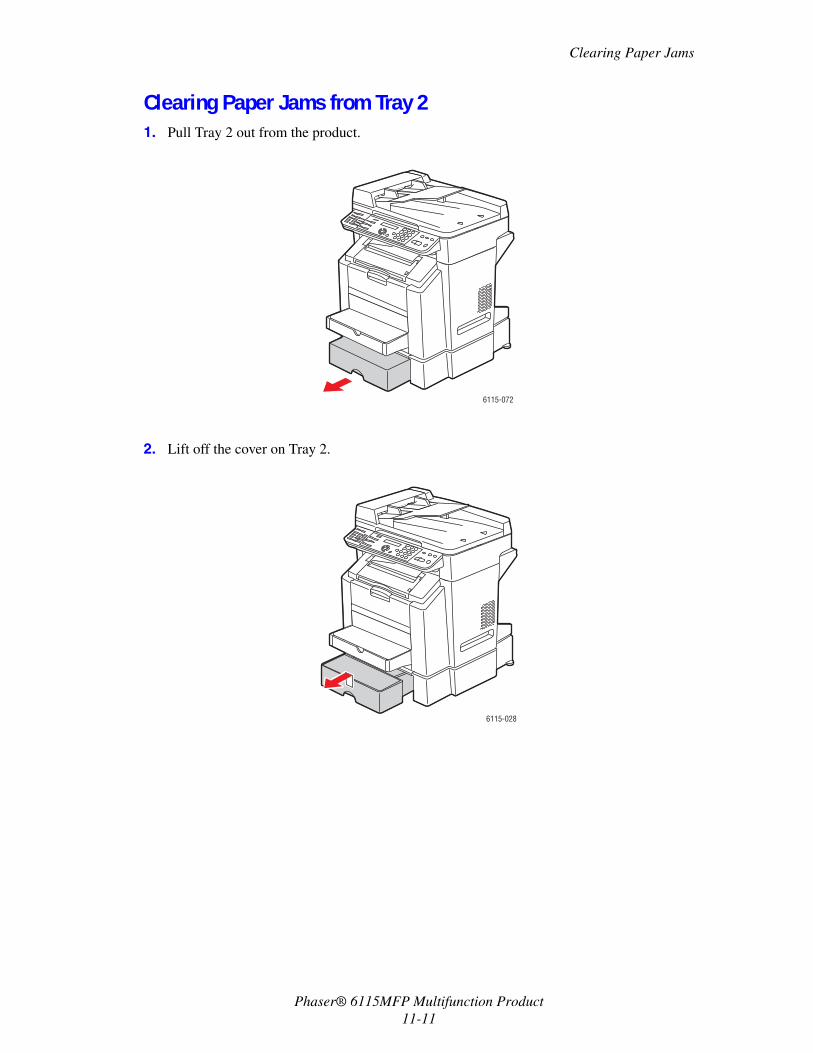
Clearing Paper Jams
Phaser® 6115MFP Multifunction Product11-11
Clearing Paper Jams from Tray 21. Pull Tray 2 out from the product.
2. Lift off the cover on Tray 2.
6115-072
6115-028
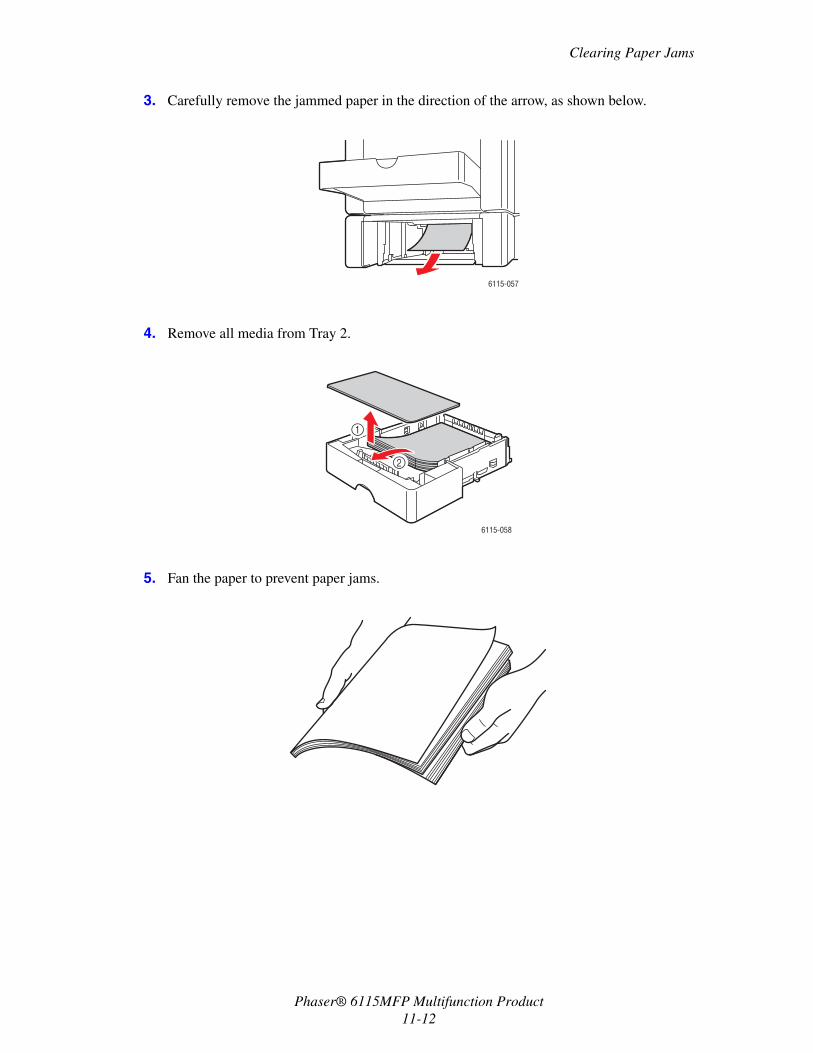
Clearing Paper Jams
Phaser® 6115MFP Multifunction Product11-12
3. Carefully remove the jammed paper in the direction of the arrow, as shown below.
4. Remove all media from Tray 2.
5. Fan the paper to prevent paper jams.
6115-057
6115-058
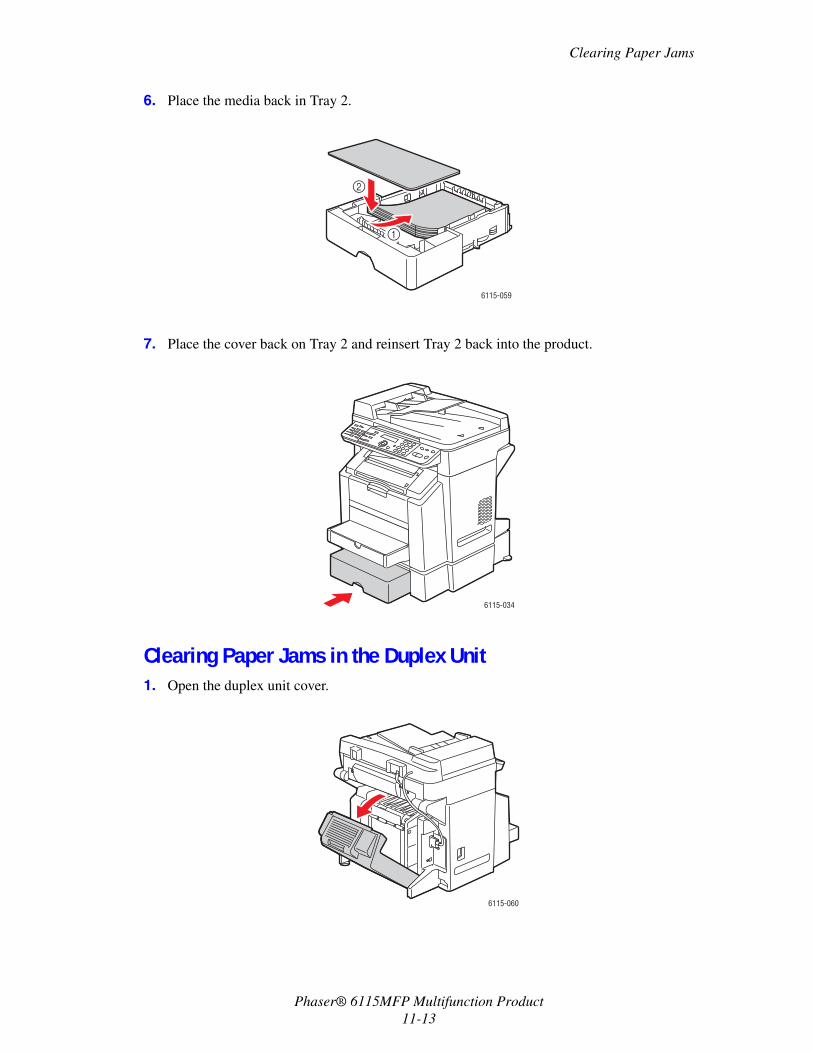
Clearing Paper Jams
Phaser® 6115MFP Multifunction Product11-13
6. Place the media back in Tray 2.
7. Place the cover back on Tray 2 and reinsert Tray 2 back into the product.
Clearing Paper Jams in the Duplex Unit1. Open the duplex unit cover.
6115-059
6115-034
6115-060
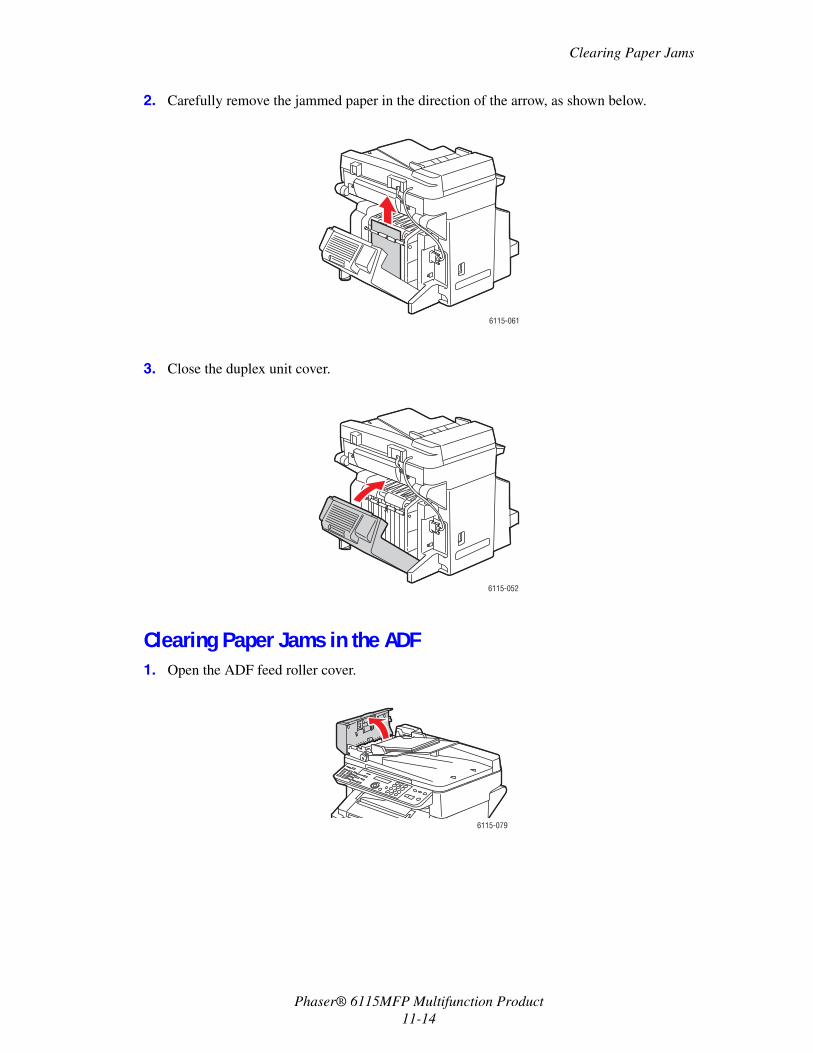
Clearing Paper Jams
Phaser® 6115MFP Multifunction Product11-14
2. Carefully remove the jammed paper in the direction of the arrow, as shown below.
3. Close the duplex unit cover.
Clearing Paper Jams in the ADF1. Open the ADF feed roller cover.
6115-061
6115-052
6115-079
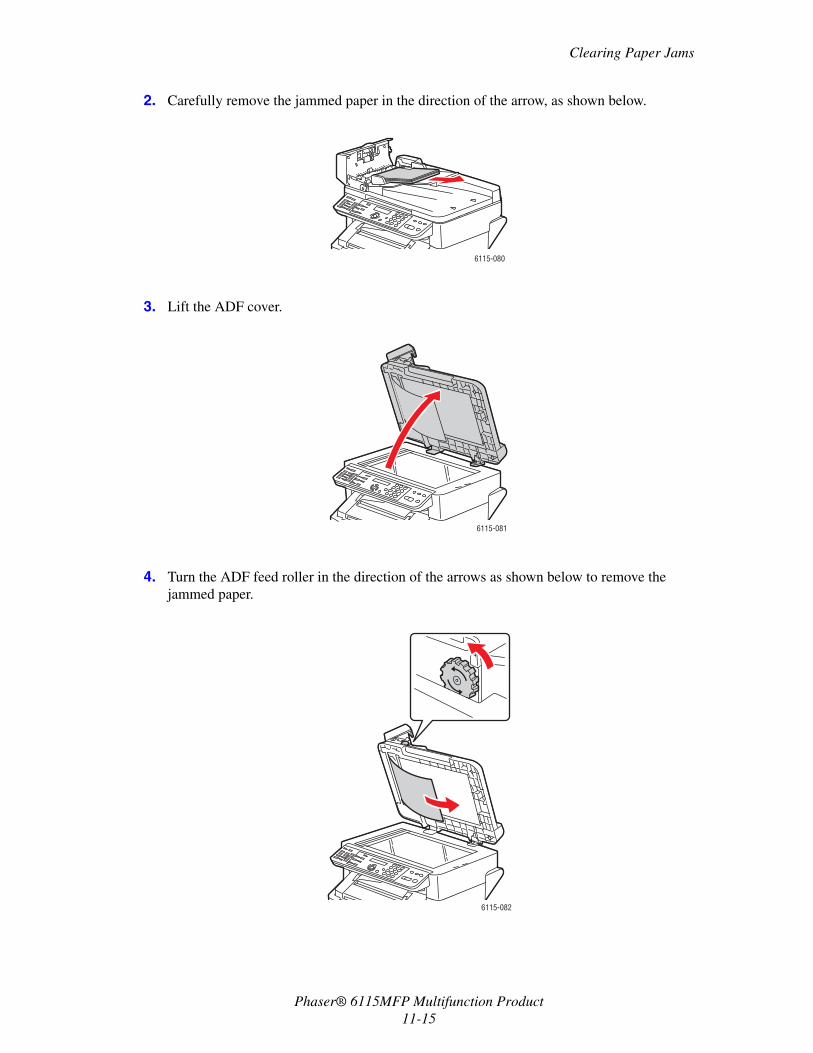
Clearing Paper Jams
Phaser® 6115MFP Multifunction Product11-15
2. Carefully remove the jammed paper in the direction of the arrow, as shown below.
3. Lift the ADF cover.
4. Turn the ADF feed roller in the direction of the arrows as shown below to remove the jammed paper.
6115-080
6115-081
6115-082
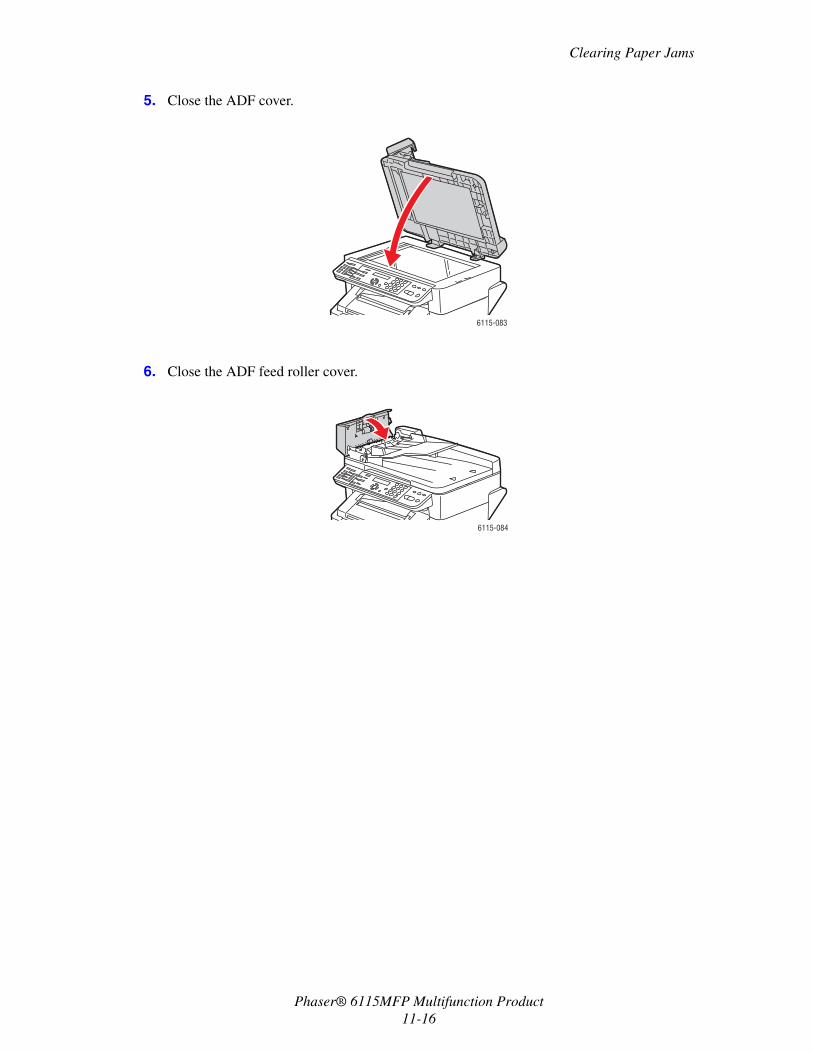
Clearing Paper Jams
Phaser® 6115MFP Multifunction Product11-16
5. Close the ADF cover.
6. Close the ADF feed roller cover.
6115-083
6115-084
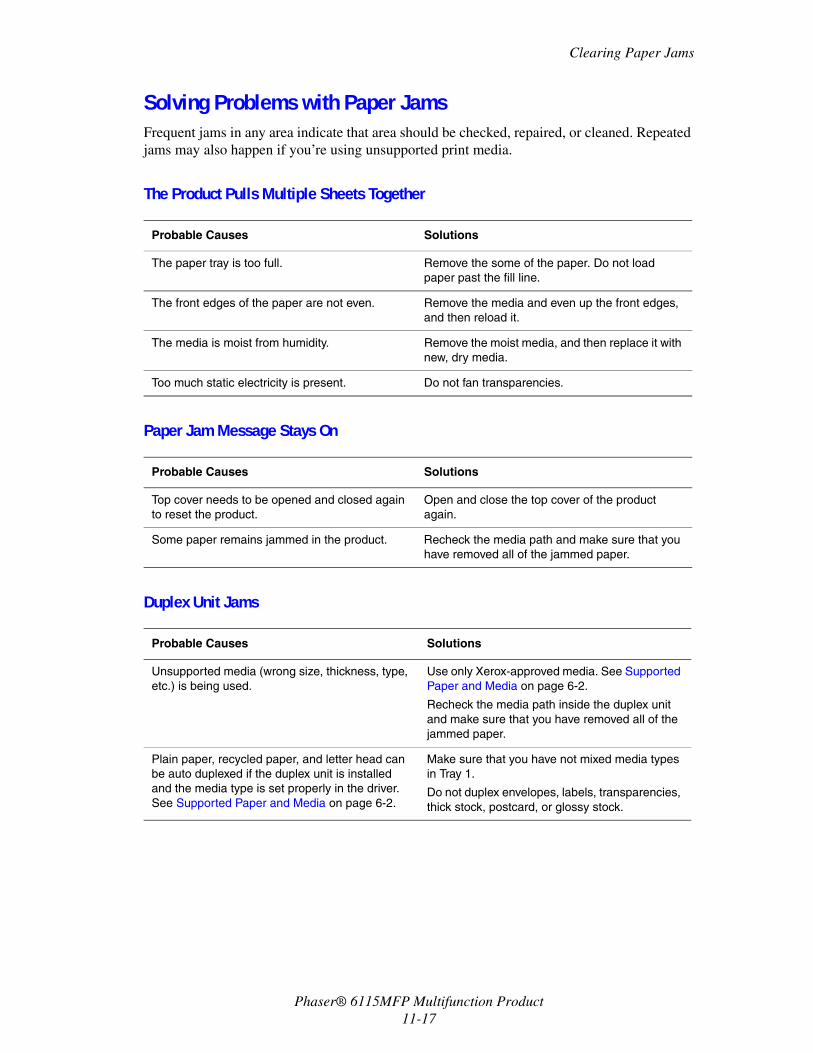
Clearing Paper Jams
Phaser® 6115MFP Multifunction Product11-17
Solving Problems with Paper JamsFrequent jams in any area indicate that area should be checked, repaired, or cleaned. Repeated jams may also happen if you’re using unsupported print media.
The Product Pulls Multiple Sheets Together
Paper Jam Message Stays On
Duplex Unit Jams
Probable Causes Solutions
The paper tray is too full. Remove the some of the paper. Do not load paper past the fill line.
The front edges of the paper are not even. Remove the media and even up the front edges, and then reload it.
The media is moist from humidity. Remove the moist media, and then replace it with new, dry media.
Too much static electricity is present. Do not fan transparencies.
Probable Causes Solutions
Top cover needs to be opened and closed again to reset the product.
Open and close the top cover of the product again.
Some paper remains jammed in the product. Recheck the media path and make sure that you have removed all of the jammed paper.
Probable Causes Solutions
Unsupported media (wrong size, thickness, type, etc.) is being used.
Use only Xerox-approved media. See Supported Paper and Media on page 6-2.
Recheck the media path inside the duplex unit and make sure that you have removed all of the jammed paper.
Plain paper, recycled paper, and letter head can be auto duplexed if the duplex unit is installed and the media type is set properly in the driver. See Supported Paper and Media on page 6-2.
Make sure that you have not mixed media types in Tray 1.
Do not duplex envelopes, labels, transparencies, thick stock, postcard, or glossy stock.
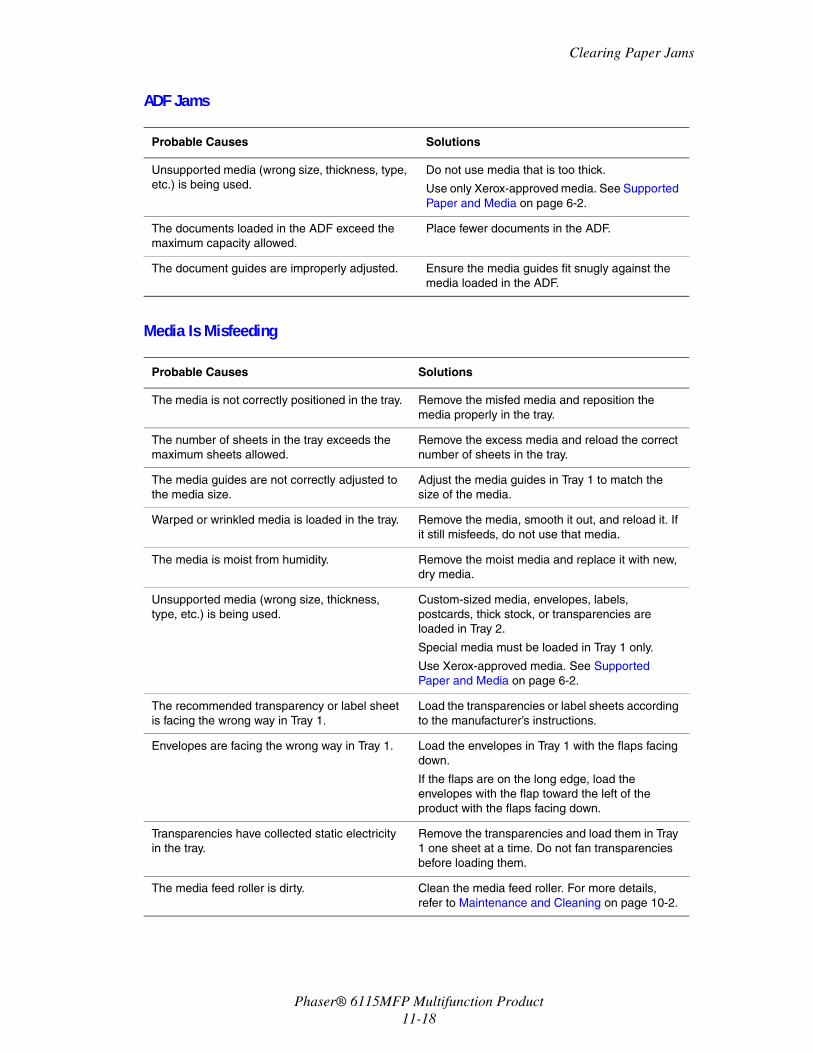
Clearing Paper Jams
Phaser® 6115MFP Multifunction Product11-18
ADF Jams
Media Is Misfeeding
Probable Causes Solutions
Unsupported media (wrong size, thickness, type, etc.) is being used.
Do not use media that is too thick.
Use only Xerox-approved media. See Supported Paper and Media on page 6-2.
The documents loaded in the ADF exceed the maximum capacity allowed.
Place fewer documents in the ADF.
The document guides are improperly adjusted. Ensure the media guides fit snugly against the media loaded in the ADF.
Probable Causes Solutions
The media is not correctly positioned in the tray. Remove the misfed media and reposition the media properly in the tray.
The number of sheets in the tray exceeds the maximum sheets allowed.
Remove the excess media and reload the correct number of sheets in the tray.
The media guides are not correctly adjusted to the media size.
Adjust the media guides in Tray 1 to match the size of the media.
Warped or wrinkled media is loaded in the tray. Remove the media, smooth it out, and reload it. If it still misfeeds, do not use that media.
The media is moist from humidity. Remove the moist media and replace it with new, dry media.
Unsupported media (wrong size, thickness, type, etc.) is being used.
Custom-sized media, envelopes, labels, postcards, thick stock, or transparencies are loaded in Tray 2.
Special media must be loaded in Tray 1 only.
Use Xerox-approved media. See Supported Paper and Media on page 6-2.
The recommended transparency or label sheet is facing the wrong way in Tray 1.
Load the transparencies or label sheets according to the manufacturer’s instructions.
Envelopes are facing the wrong way in Tray 1. Load the envelopes in Tray 1 with the flaps facing down.
If the flaps are on the long edge, load the envelopes with the flap toward the left of the product with the flaps facing down.
Transparencies have collected static electricity in the tray.
Remove the transparencies and load them in Tray 1 one sheet at a time. Do not fan transparencies before loading them.
The media feed roller is dirty. Clean the media feed roller. For more details, refer to Maintenance and Cleaning on page 10-2.
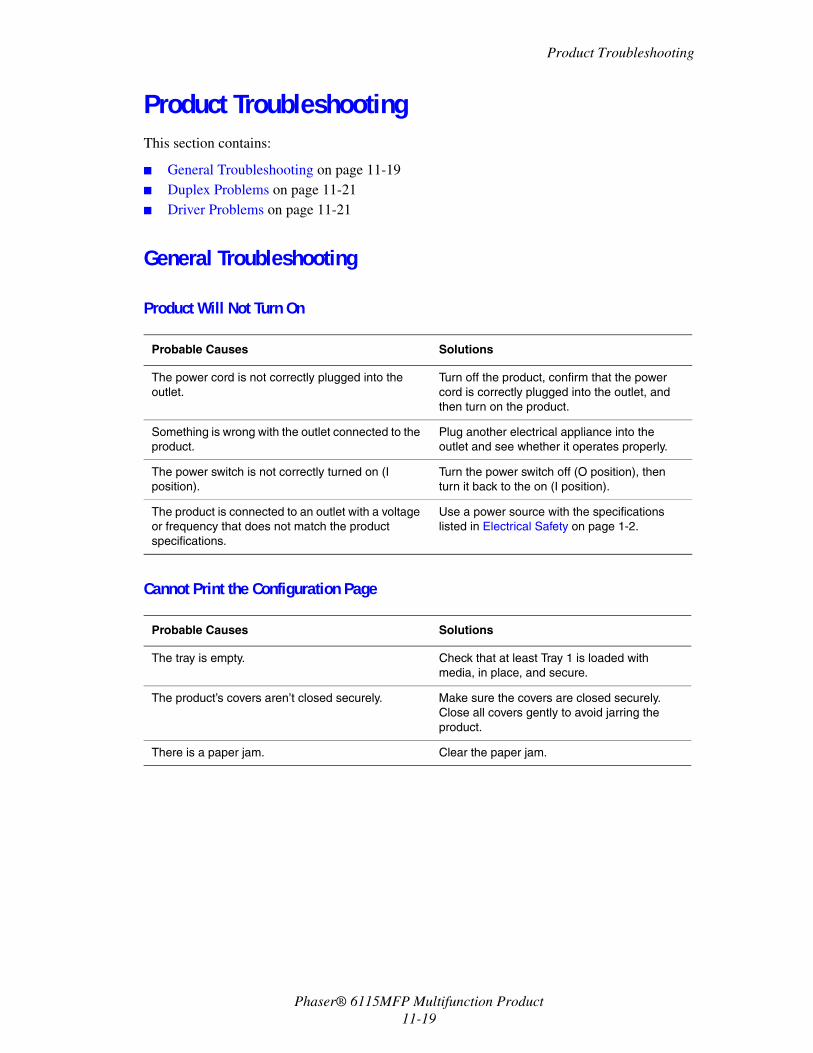
Product Troubleshooting
Phaser® 6115MFP Multifunction Product11-19
Product TroubleshootingThis section contains:
■ General Troubleshooting on page 11-19■ Duplex Problems on page 11-21■ Driver Problems on page 11-21
General Troubleshooting
Product Will Not Turn On
Cannot Print the Configuration Page
Probable Causes Solutions
The power cord is not correctly plugged into the outlet.
Turn off the product, confirm that the power cord is correctly plugged into the outlet, and then turn on the product.
Something is wrong with the outlet connected to the product.
Plug another electrical appliance into the outlet and see whether it operates properly.
The power switch is not correctly turned on (I position).
Turn the power switch off (O position), then turn it back to the on (I position).
The product is connected to an outlet with a voltage or frequency that does not match the product specifications.
Use a power source with the specifications listed in Electrical Safety on page 1-2.
Probable Causes Solutions
The tray is empty. Check that at least Tray 1 is loaded with media, in place, and secure.
The product’s covers aren’t closed securely. Make sure the covers are closed securely. Close all covers gently to avoid jarring the product.
There is a paper jam. Clear the paper jam.
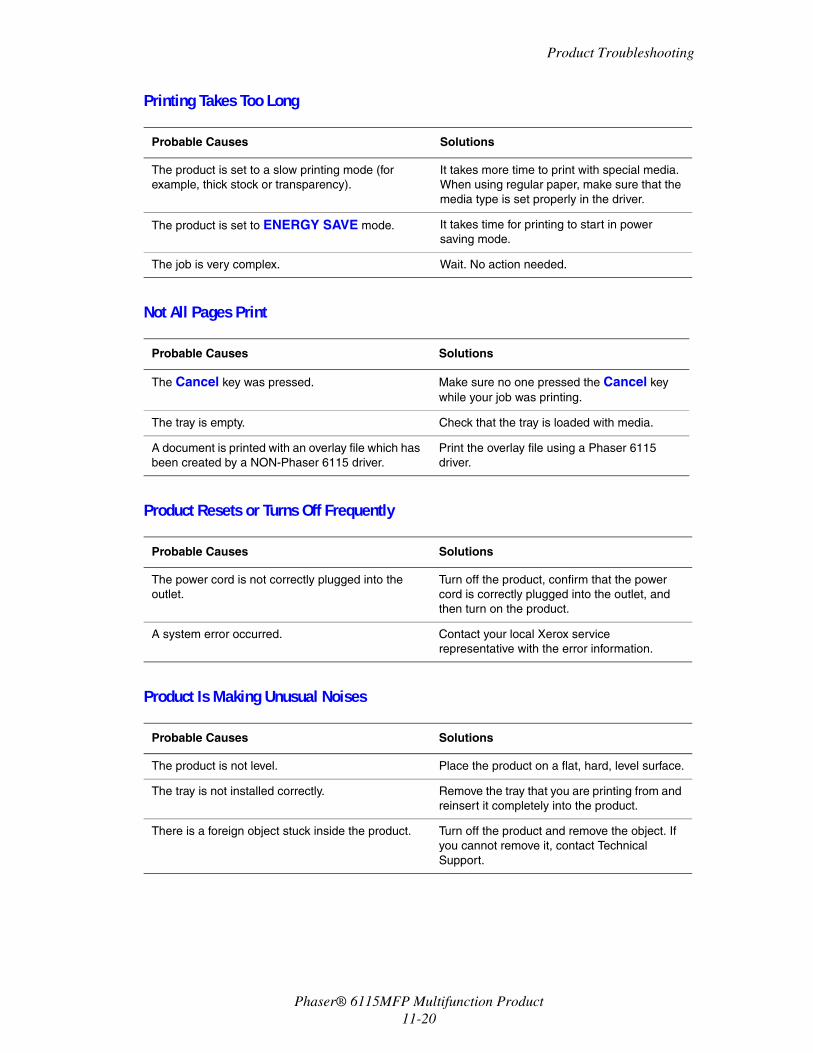
Product Troubleshooting
Phaser® 6115MFP Multifunction Product11-20
Printing Takes Too Long
Not All Pages Print
Product Resets or Turns Off Frequently
Product Is Making Unusual Noises
Probable Causes Solutions
The product is set to a slow printing mode (for example, thick stock or transparency).
It takes more time to print with special media. When using regular paper, make sure that the media type is set properly in the driver.
The product is set to ENERGY SAVE mode. It takes time for printing to start in power saving mode.
The job is very complex. Wait. No action needed.
Probable Causes Solutions
The Cancel key was pressed. Make sure no one pressed the Cancel key while your job was printing.
The tray is empty. Check that the tray is loaded with media.
A document is printed with an overlay file which has been created by a NON-Phaser 6115 driver.
Print the overlay file using a Phaser 6115 driver.
Probable Causes Solutions
The power cord is not correctly plugged into the outlet.
Turn off the product, confirm that the power cord is correctly plugged into the outlet, and then turn on the product.
A system error occurred. Contact your local Xerox service representative with the error information.
Probable Causes Solutions
The product is not level. Place the product on a flat, hard, level surface.
The tray is not installed correctly. Remove the tray that you are printing from and reinsert it completely into the product.
There is a foreign object stuck inside the product. Turn off the product and remove the object. If you cannot remove it, contact Technical Support.

Product Troubleshooting
Phaser® 6115MFP Multifunction Product11-21
The Date and Time Are Incorrect
Duplex Problems
Driver Problems
With Pages/Sheet on Multiple Copies, the Output Is Incorrect
Booklet Left and Right Binding Output Is Incorrect
Probable Causes Solutions
Did you set the correct date and time? Ensure you have set the correct Date and Time on the control panel, through CentreWare IS or the MCC.
The backup battery has reached the end of its service life.
Replace the backup battery.
Probable Causes Solutions
Media or settings are not correct. Make sure the duplex unit is installed and enabled in the product driver.
Make sure that you are using correct media. See Supported Paper and Media on page 6-2. Do not duplex custom-sized media, envelopes, labels, postcards, thick stock, or transparencies.
Make sure that you have not mixed media types in Tray 1.
In the product driver choose "Print on Both Sides".
Probable Causes Solutions
Both the driver and the application have been set to Collate.
For Pages/Sheet on multiple copies, choose Collate only in the driver’s Basic tab. Do not set collation in the application.
Probable Causes Solutions
Both the driver and the application have been set to Collate.
For Booklet Left Binding and Booklet Right Binding, choose Collate only in the product driver’s Basic tab.
Do not set collation in the application.
Product Troubleshooting
Phaser® 6115MFP Multifunction Product11-22
Product Management Software Problems
CentreWare IS Cannot be Accessed
The MFP ControlCentre
Probable Causes Solutions
The CentreWare IS Administrator’s password is incorrect.
The CentreWare IS Administrator password has a 6-character minimum and a 16-character maximum.
Your network settings are incorrect. Verify your network settings are correct.
Probable Causes Solutions
The MCC software has not been installed. Install the MCC software from your documentation CD ROM.
There is a problem with your USB connection. Verify you are using the correct USB cabling.
Verify your USB port is working correctly.
Print-Quality Problems
Phaser® 6115MFP Multifunction Product11-23
Print-Quality ProblemsThis section contains:
■ Controlling the Quality of Your Prints on page 11-23■ Selecting a Resolution on page 11-23■ Adjusting Color on page 11-24■ Troubleshooting Print-Quality Problems on page 11-25
Controlling the Quality of Your PrintsThe resolution and print-quality mode settings directly control the quality of your prints. The print-quality mode and paper type directly control the print speed. You can change these settings in the product driver or on the control panel.
Note: Driver settings override the control panel settings.
Selecting a ResolutionPrint-quality modes available with the Phaser 6115MFP product include:
Resolution Type of Print Job
Draft (600 dpi) General-purpose mode for full-color printing. Produces crisp, bright prints at high speed. Recommended for vibrant, saturated color prints.
Standard (1200 dpi) Best mode for business presentations. Produces superior text resolution and very smooth light colors.
Enhanced (2400 dpi) Highest-quality mode for color prints. Provides the best detail and smoothness for photographic images. Produces highest-quality color prints, with the best text resolution and smoothest light colors. This mode takes longer to process and print than the other modes.
Line Art Use this option with one of the above three options to print more precisely, but with fewer levels of gray.
Print-Quality Problems
Phaser® 6115MFP Multifunction Product11-24
Adjusting Color
Color SettingsThis setting lets you choose whether to print in color or monochrome.
Color: Use this setting to print color documents.
Grayscale: Use this setting to print monochrome (black and white) documents.
Color MatchingThese settings let you enable or disable Color Matching. Color Matching is the product’s ability to adjust hues to maintain the integrity of a document’s on-screen image. There are three different types, Images, Graphics, and Text.
Note: Some desktop applications send image data to the product by performing color matching to provide optimized data for printers. When you are using an application that has this output setting, disable Color Matching in the product driver by selecting OFF.
When color matching is enabled you can select one of the following settings for images, graphics, and text. Use the Contrast, Brightness, Saturation, and Sharpness adjustment slider bars to fine tune the tones and darkness of an image. Usually the default values selected by the driver provide optimum results for most images.
Note: The Sharpness adjustment is only available when Color Matching is set to OFF.
Perceptual This method can be used for photographic images, where the spectral relationship of the grayscale needs to be preserved in order to produce smooth images.
Colorimetric This method reproduces hues of the original image more accurately, however, when the product cannot reproduce some on-screen hues, it will replace them with the closest colors possible by the product.
Saturation This method can be used for business presentations, where image color vividness is required.
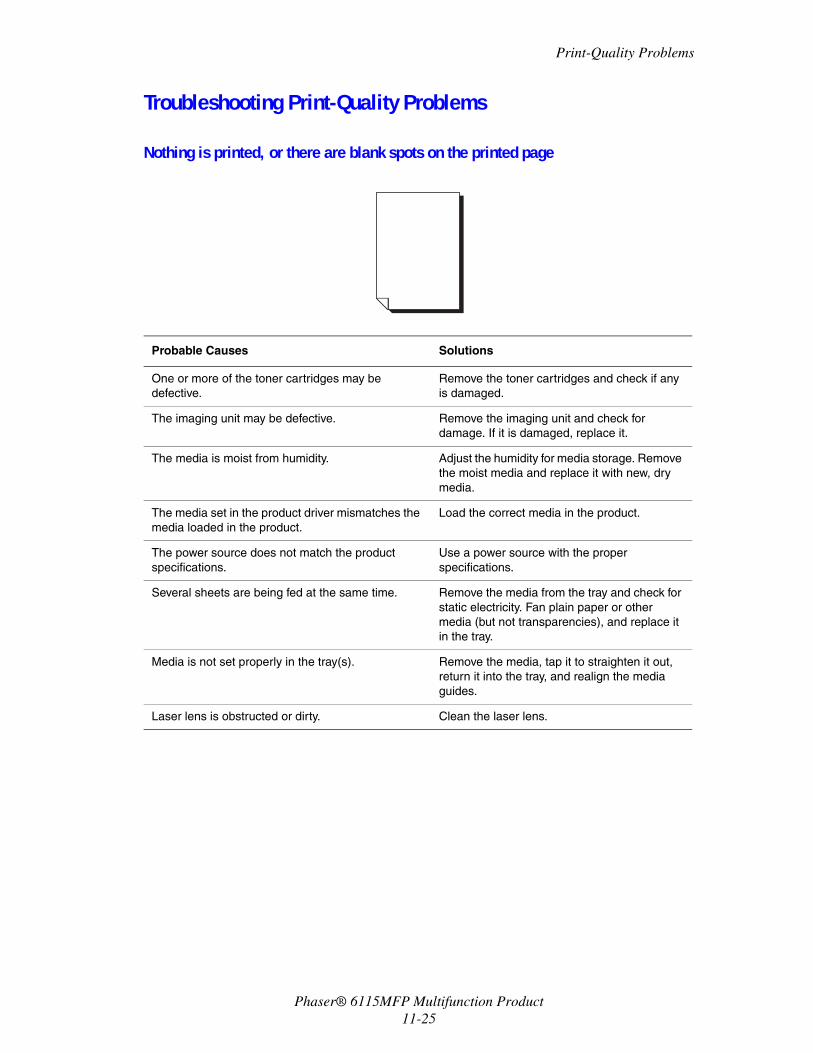
Print-Quality Problems
Phaser® 6115MFP Multifunction Product11-25
Troubleshooting Print-Quality Problems
Nothing is printed, or there are blank spots on the printed page
Probable Causes Solutions
One or more of the toner cartridges may be defective.
Remove the toner cartridges and check if any is damaged.
The imaging unit may be defective. Remove the imaging unit and check for damage. If it is damaged, replace it.
The media is moist from humidity. Adjust the humidity for media storage. Remove the moist media and replace it with new, dry media.
The media set in the product driver mismatches the media loaded in the product.
Load the correct media in the product.
The power source does not match the product specifications.
Use a power source with the proper specifications.
Several sheets are being fed at the same time. Remove the media from the tray and check for static electricity. Fan plain paper or other media (but not transparencies), and replace it in the tray.
Media is not set properly in the tray(s). Remove the media, tap it to straighten it out, return it into the tray, and realign the media guides.
Laser lens is obstructed or dirty. Clean the laser lens.
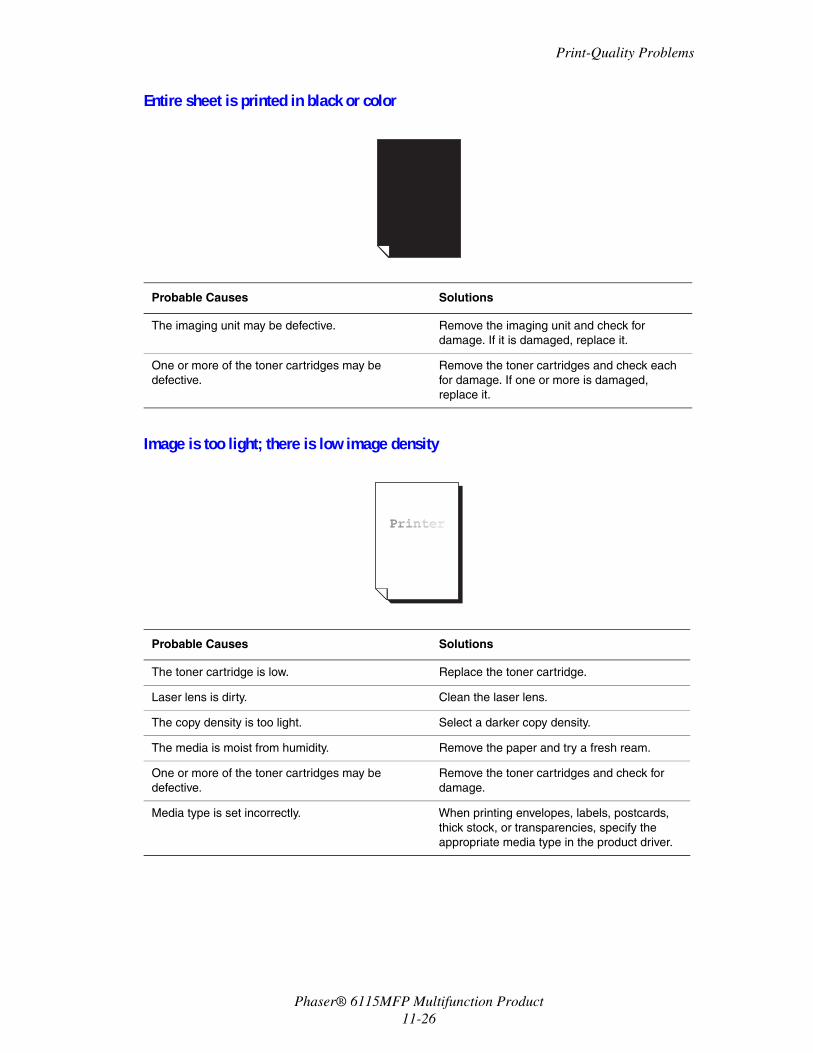
Print-Quality Problems
Phaser® 6115MFP Multifunction Product11-26
Entire sheet is printed in black or color
Image is too light; there is low image density
Probable Causes Solutions
The imaging unit may be defective. Remove the imaging unit and check for damage. If it is damaged, replace it.
One or more of the toner cartridges may be defective.
Remove the toner cartridges and check each for damage. If one or more is damaged, replace it.
Probable Causes Solutions
The toner cartridge is low. Replace the toner cartridge.
Laser lens is dirty. Clean the laser lens.
The copy density is too light. Select a darker copy density.
The media is moist from humidity. Remove the paper and try a fresh ream.
One or more of the toner cartridges may be defective.
Remove the toner cartridges and check for damage.
Media type is set incorrectly. When printing envelopes, labels, postcards, thick stock, or transparencies, specify the appropriate media type in the product driver.
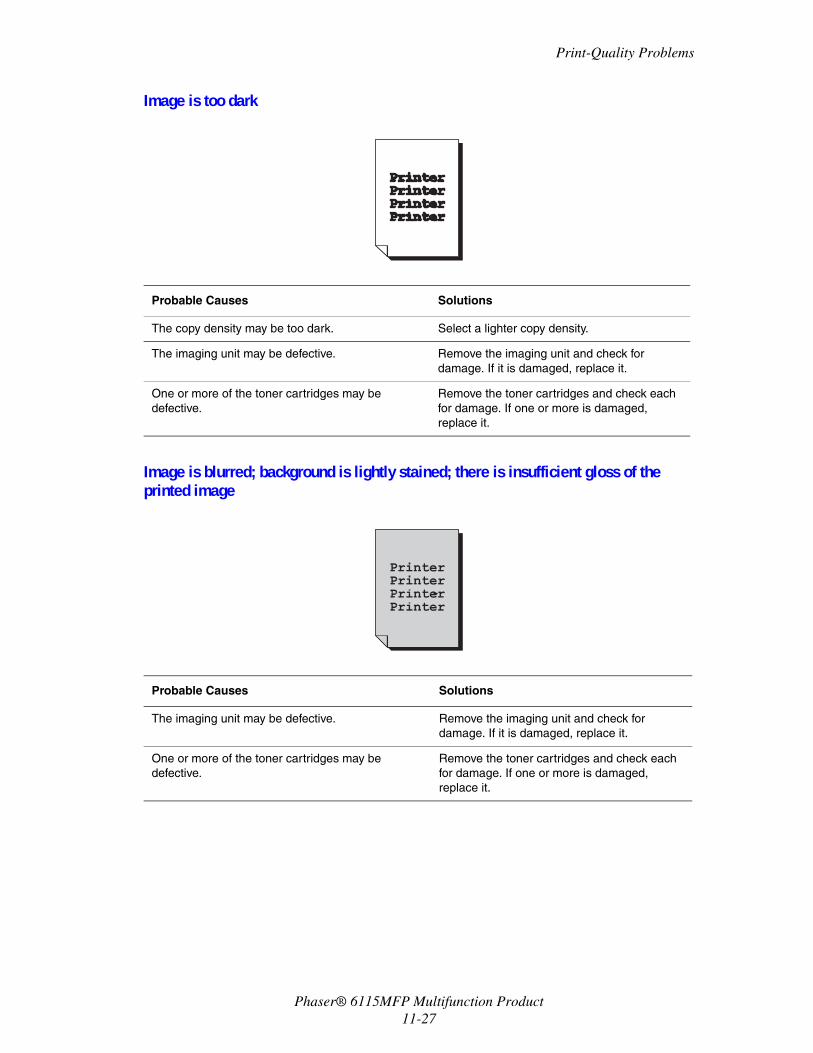
Print-Quality Problems
Phaser® 6115MFP Multifunction Product11-27
Image is too dark
Image is blurred; background is lightly stained; there is insufficient gloss of the printed image
Probable Causes Solutions
The copy density may be too dark. Select a lighter copy density.
The imaging unit may be defective. Remove the imaging unit and check for damage. If it is damaged, replace it.
One or more of the toner cartridges may be defective.
Remove the toner cartridges and check each for damage. If one or more is damaged, replace it.
Probable Causes Solutions
The imaging unit may be defective. Remove the imaging unit and check for damage. If it is damaged, replace it.
One or more of the toner cartridges may be defective.
Remove the toner cartridges and check each for damage. If one or more is damaged, replace it.
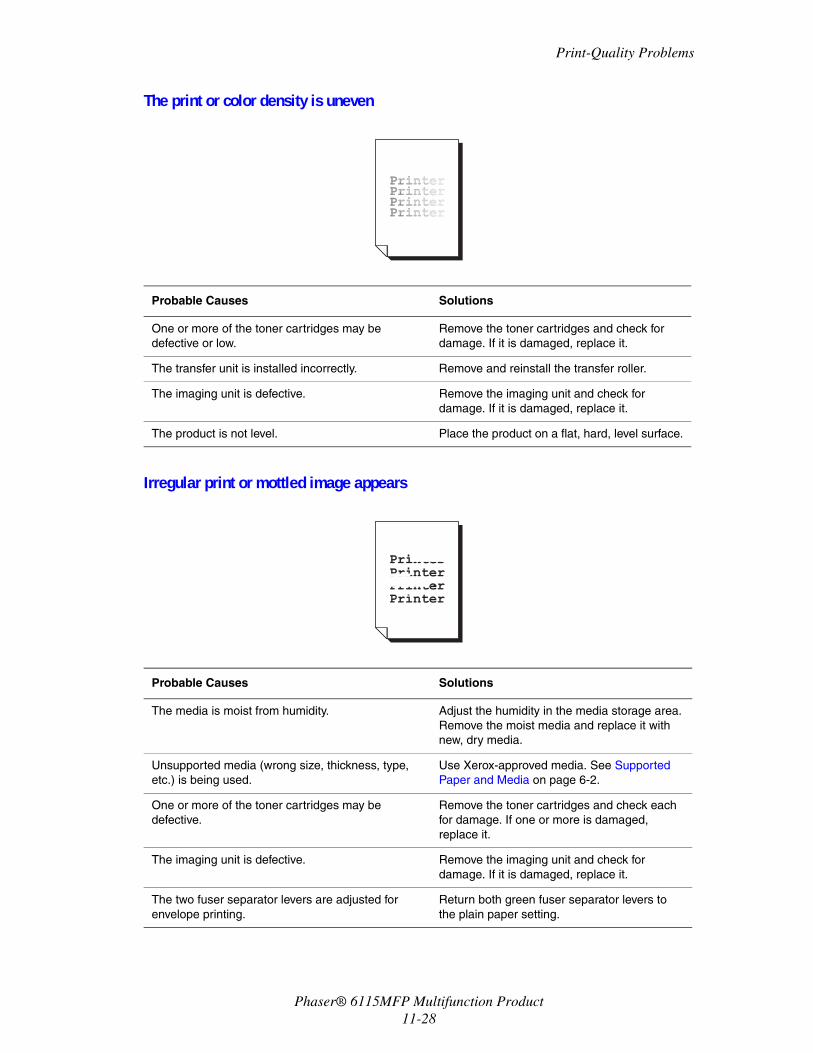
Print-Quality Problems
Phaser® 6115MFP Multifunction Product11-28
The print or color density is uneven
Irregular print or mottled image appears
Probable Causes Solutions
One or more of the toner cartridges may be defective or low.
Remove the toner cartridges and check for damage. If it is damaged, replace it.
The transfer unit is installed incorrectly. Remove and reinstall the transfer roller.
The imaging unit is defective. Remove the imaging unit and check for damage. If it is damaged, replace it.
The product is not level. Place the product on a flat, hard, level surface.
Probable Causes Solutions
The media is moist from humidity. Adjust the humidity in the media storage area.Remove the moist media and replace it with new, dry media.
Unsupported media (wrong size, thickness, type, etc.) is being used.
Use Xerox-approved media. See Supported Paper and Media on page 6-2.
One or more of the toner cartridges may be defective.
Remove the toner cartridges and check each for damage. If one or more is damaged, replace it.
The imaging unit is defective. Remove the imaging unit and check for damage. If it is damaged, replace it.
The two fuser separator levers are adjusted for envelope printing.
Return both green fuser separator levers to the plain paper setting.
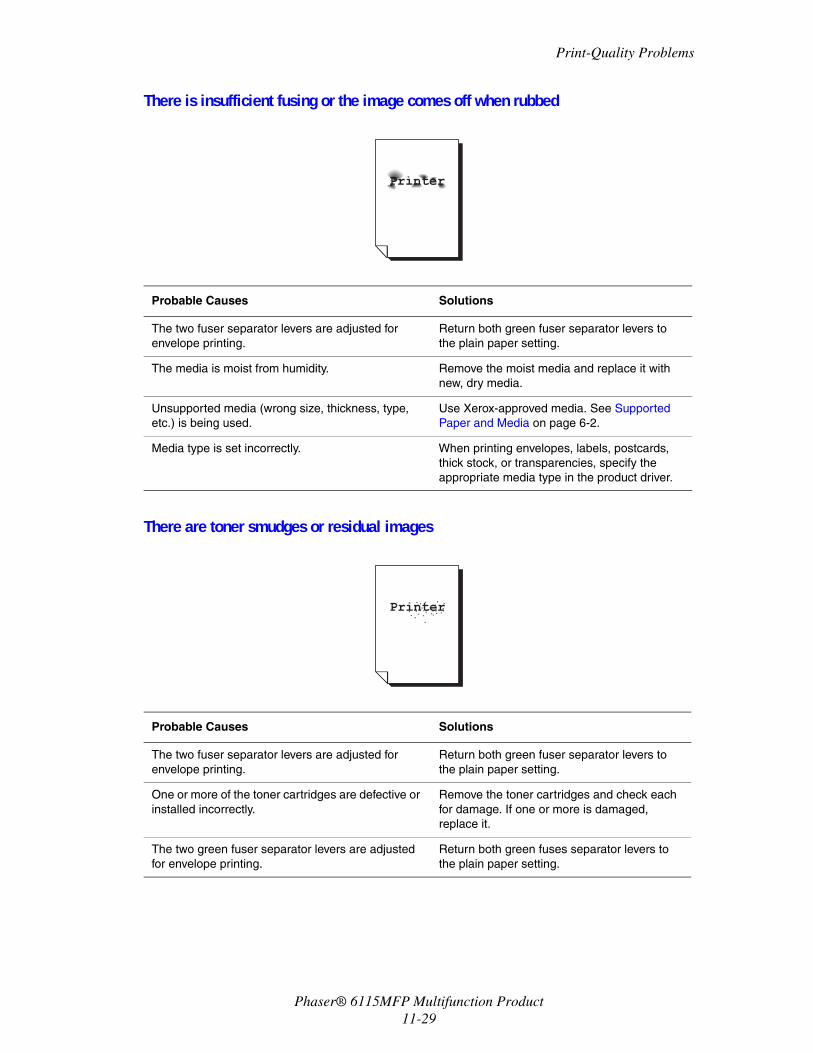
Print-Quality Problems
Phaser® 6115MFP Multifunction Product11-29
There is insufficient fusing or the image comes off when rubbed
There are toner smudges or residual images
Probable Causes Solutions
The two fuser separator levers are adjusted for envelope printing.
Return both green fuser separator levers to the plain paper setting.
The media is moist from humidity. Remove the moist media and replace it with new, dry media.
Unsupported media (wrong size, thickness, type, etc.) is being used.
Use Xerox-approved media. See Supported Paper and Media on page 6-2.
Media type is set incorrectly. When printing envelopes, labels, postcards, thick stock, or transparencies, specify the appropriate media type in the product driver.
Probable Causes Solutions
The two fuser separator levers are adjusted for envelope printing.
Return both green fuser separator levers to the plain paper setting.
One or more of the toner cartridges are defective or installed incorrectly.
Remove the toner cartridges and check each for damage. If one or more is damaged, replace it.
The two green fuser separator levers are adjusted for envelope printing.
Return both green fuses separator levers to the plain paper setting.
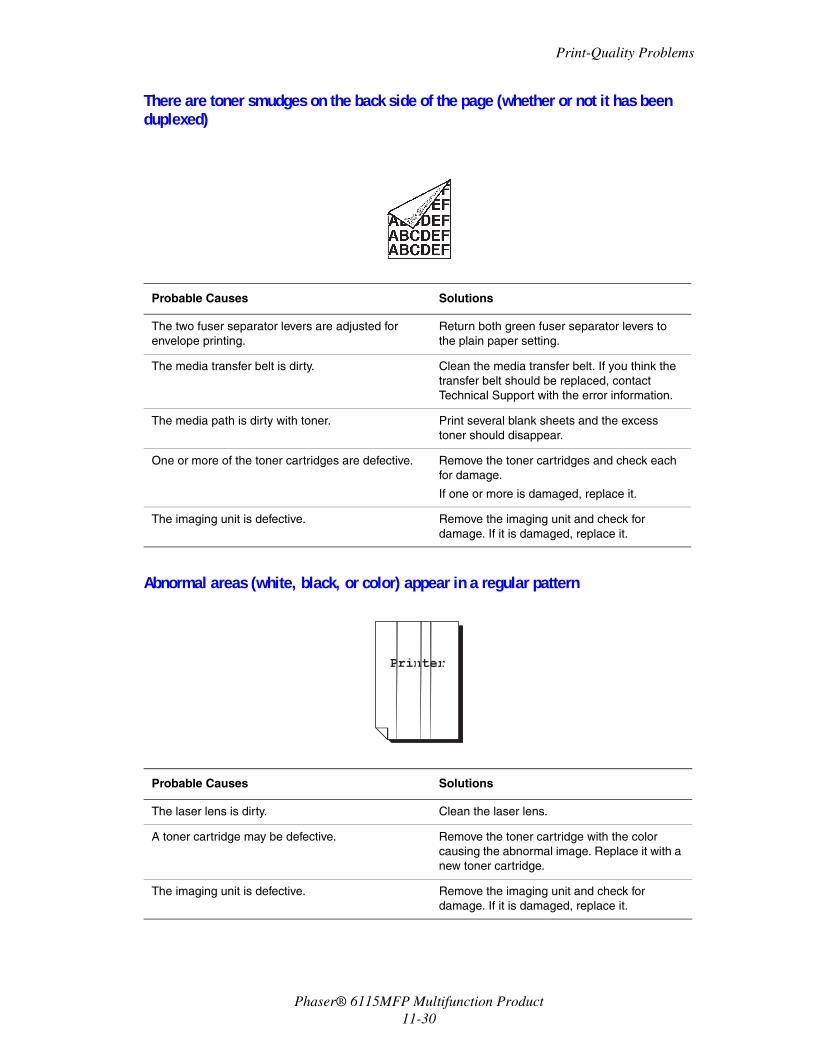
Print-Quality Problems
Phaser® 6115MFP Multifunction Product11-30
There are toner smudges on the back side of the page (whether or not it has been duplexed)
Abnormal areas (white, black, or color) appear in a regular pattern
Probable Causes Solutions
The two fuser separator levers are adjusted for envelope printing.
Return both green fuser separator levers to the plain paper setting.
The media transfer belt is dirty. Clean the media transfer belt. If you think the transfer belt should be replaced, contact Technical Support with the error information.
The media path is dirty with toner. Print several blank sheets and the excess toner should disappear.
One or more of the toner cartridges are defective. Remove the toner cartridges and check each for damage.
If one or more is damaged, replace it.
The imaging unit is defective. Remove the imaging unit and check for damage. If it is damaged, replace it.
Probable Causes Solutions
The laser lens is dirty. Clean the laser lens.
A toner cartridge may be defective. Remove the toner cartridge with the color causing the abnormal image. Replace it with a new toner cartridge.
The imaging unit is defective. Remove the imaging unit and check for damage. If it is damaged, replace it.
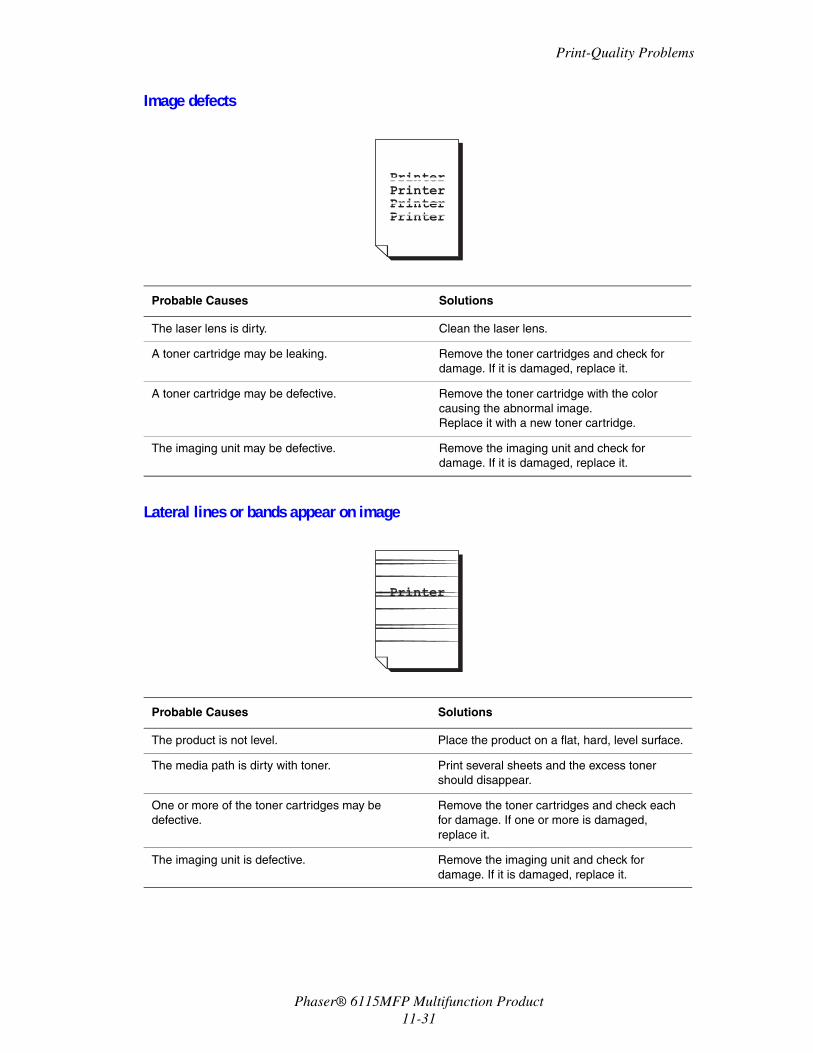
Print-Quality Problems
Phaser® 6115MFP Multifunction Product11-31
Image defects
Lateral lines or bands appear on image
Probable Causes Solutions
The laser lens is dirty. Clean the laser lens.
A toner cartridge may be leaking. Remove the toner cartridges and check for damage. If it is damaged, replace it.
A toner cartridge may be defective. Remove the toner cartridge with the color causing the abnormal image.Replace it with a new toner cartridge.
The imaging unit may be defective. Remove the imaging unit and check for damage. If it is damaged, replace it.
Probable Causes Solutions
The product is not level. Place the product on a flat, hard, level surface.
The media path is dirty with toner. Print several sheets and the excess toner should disappear.
One or more of the toner cartridges may be defective.
Remove the toner cartridges and check each for damage. If one or more is damaged, replace it.
The imaging unit is defective. Remove the imaging unit and check for damage. If it is damaged, replace it.
Print-Quality Problems
Phaser® 6115MFP Multifunction Product11-32
Colors look drastically wrong
Colors are not registering properly; colors are mixed or have page-to-page variation
The color has a poor reproduction or has poor color density
Probable Causes Solutions
One or more of the toner cartridges may be defective.
Remove the toner cartridges and verify that the toner is distributed evenly on each cartridge roller, and reinstall the toner cartridges.
One or more of the toner cartridges may be low or empty.
Check the control panel for an X LOW or X EMPTY message. If necessary, replace the specified toner cartridge.
Check the Color Matching settings in the product driver or your application.
Probable Causes Solutions
The top cover is not properly closed. Make sure that the top cover is closed.
The imaging unit is not correctly seated. Remove the imaging unit and reinstall it.
One or more of the toner cartridges may be defective.
Remove the toner cartridges and check each for damage. If one or more is damaged, replace it.
The media is moist from humidity. Remove the moist media and replace it with new, dry media.
Probable Causes Solutions
The imaging unit may be defective. Remove the imaging unit and check for damage. If it is damaged, replace it.
Check the Color Matching settings in the product driver or your application.
Status, Error, and Service Messages
Phaser® 6115MFP Multifunction Product11-33
Status, Error, and Service MessagesThis section includes:
■ Status Messages on page 11-33■ Error Messages on page 11-34■ Getting Help on page 11-38
Status, error, and service messages are displayed in the control panel message window. They provide information about your product and help you locate many problems. When the condition associated with a displayed message has changed, the message is cleared from the window.
Status Messages
Message Definition Solutions
CANCELLING JOB The job is being cancelled. No action needed.
*ENERGY SAVE* The machine is in Energy Saver mode to reduce power consumption during periods of inactivity.
*PLEASE WAIT!* After replacing a toner cartridge, or after rebooting your machine after environmental changes, your machine automatically pauses to do an Auto-Image Density Control (AIDC) cycle. This process is provided to make reliable machine operation with optimum output quality possible.
The machine is warming up.
Status, Error, and Service Messages
Phaser® 6115MFP Multifunction Product11-34
Error Messages
Message Definition Solutions
TRAY [1] [2] EMPTY Tray 1 or Tray 2 ran out of paper. Load media into the specified tray.
*CANNOT CONNECT*
XXX Server
While the scanned document was being sent in Scan mode, a connection with the specified server could not be established.
Check the Network and E-mail settings and send the data again.
*IP ADDRESS NOT SET*
SMTP Server
The IP address of the SMTP server could not be obtained from the DNS server.
Check the Network and E-mail settings and send the data again.
*COMM. ERROR*
SMTP Server
While data was being sent in Scan mode, the connection to the server was cut.
Check the Network and E-mail settings and send the data again.
*DISCONNECT*
SMTP Server
In Scan mode, the connection to the server was cut.
Check the Network and E-mail settings and send the data again.
DOC. FEED COVER OPEN
CLOSE DOC. FEED COVER
The ADF feed cover is open. Close the ADF feed cover.
DOCUMENT COVER OPEN
CLOSE DOCUMENT COVER
The document is loaded into the ADF, but the ADF is open.
Close the ADF.
IMAGING UNIT
END
The drum cartridge has reached the end of its service life.
Replace the drum cartridge.
IMAGING UNIT
LOW
The drum cartridge is near the end of its life.
Prepare a new drum cartridge.
IMAGING UNIT
NOT INSTALLED
The drum cartridge is not installed.
Install the drum cartridge.
IMAGING UNIT END CHANGE DRUM
The waste toner bottle in the drum cartridge is full.
Replace the drum cartridge.
DUPLEX COVER OPENCLOSE DUPLEX COVER
Duplex cover is open. Close the duplex cover.
FILE FULL
PRESS ANY KEY
The memory has becomes full while scanning a document in Scan mode.
Turn the machine off, and then, after waiting a few seconds, turn it on again.
Decrease the amount of data to be scanned (for example, by decreasing the resolution), and then try scanning again.
Status, Error, and Service Messages
Phaser® 6115MFP Multifunction Product11-35
TOP COVER OPEN
CLOSE TOP COVER
The engine cover is open. Close the engine cover.
*JOB CANCELED* While a document was being scanned from the original glass in Scan mode, more than one minute had passed after the first page of the document was scanned or the data could not be sent. Therefore, the scan job was automatically canceled.
Turn the machine off, and then, after waiting a few seconds, turn it on again.
When sending multiple pages, for example, from a book, scan the first page, and then scan the next page within one minute.
INCORRECT PAPER
LOAD PAPER(XX)
ID card copying is specified, but paper of a size other than A4, Letter or Legal is loaded in the paper tray.
Load A4, Letter- or Legal-size paper in the paper tray. ID card copying cannot be used with paper of a size other than A4, Letter or Legal.
MEDIA TYPE ERROR
LOAD CORRECT MEDIA
TRANSPARENCY was selected as the paper type, but paper other than transparencies is loaded into Tray 1.
Load the correct media type in Tray 1.
A setting other than TRANSPARENCY was selected as the paper type, but transparencies are loaded into Tray 1.
MEMORY FULL
PRESS ANY KEY
The machine has received more data than can be processed with its internal memory.
Cancel the current job.
Turn the machine off, and then, after a few seconds, turn it on again. Decrease the amount of data to be printed (for example, by decreasing the resolution), and then try printing again.
LOAD CORRECT PAPER
Duplex (2-Sided) printing is specified, but no paper compatible with duplex (2-Sided) printing is loaded.
Load paper compatible with duplex (2-Sided) printing. Only plain and letterhead paper are compatible with duplex (2-Sided) printing.
*NO NETWORK SETTING*
The network settings had not been completely specified when the machine was switched to Scan mode.
Before scanning in Scan mode, specify the network settings in the NETWORK SETTING menu.
*NOT CORRECT
E-MAIL ADDRESS*
An email address was not programmed in the one-touch dial key or speed dial number.
(This message appears if a fax number or email address is programmed for group dialing.)
Before sending scan data using one-touch dial keys or speed dial numbers, register an email address with the one-touch dial key or speed dial number.
*NOT REGISTERD* An email address was not programmed in the one-touch dial key or speed dial number.
Message Definition Solutions
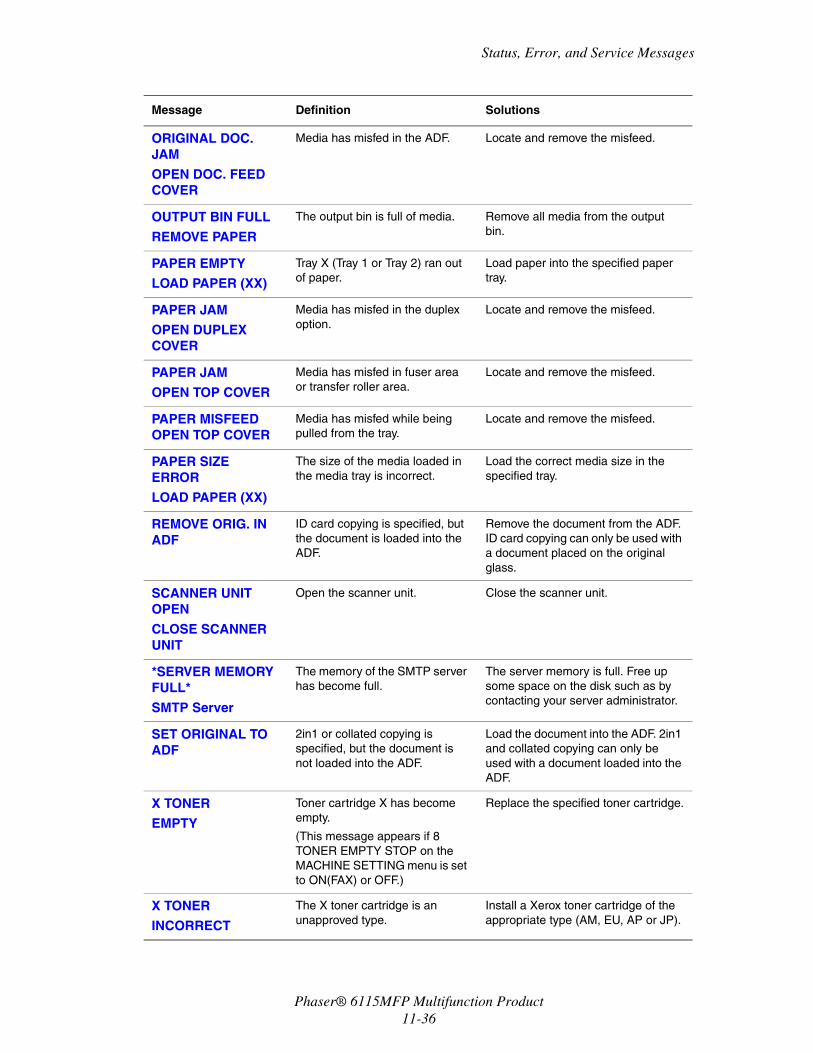
Status, Error, and Service Messages
Phaser® 6115MFP Multifunction Product11-36
ORIGINAL DOC. JAM
OPEN DOC. FEED COVER
Media has misfed in the ADF. Locate and remove the misfeed.
OUTPUT BIN FULL
REMOVE PAPER
The output bin is full of media. Remove all media from the output bin.
PAPER EMPTY
LOAD PAPER (XX)
Tray X (Tray 1 or Tray 2) ran out of paper.
Load paper into the specified paper tray.
PAPER JAM
OPEN DUPLEX COVER
Media has misfed in the duplex option.
Locate and remove the misfeed.
PAPER JAM
OPEN TOP COVER
Media has misfed in fuser area or transfer roller area.
Locate and remove the misfeed.
PAPER MISFEED OPEN TOP COVER
Media has misfed while being pulled from the tray.
Locate and remove the misfeed.
PAPER SIZE ERROR
LOAD PAPER (XX)
The size of the media loaded in the media tray is incorrect.
Load the correct media size in the specified tray.
REMOVE ORIG. IN ADF
ID card copying is specified, but the document is loaded into the ADF.
Remove the document from the ADF. ID card copying can only be used with a document placed on the original glass.
SCANNER UNIT OPEN
CLOSE SCANNER UNIT
Open the scanner unit. Close the scanner unit.
*SERVER MEMORY FULL*
SMTP Server
The memory of the SMTP server has become full.
The server memory is full. Free up some space on the disk such as by contacting your server administrator.
SET ORIGINAL TO ADF
2in1 or collated copying is specified, but the document is not loaded into the ADF.
Load the document into the ADF. 2in1 and collated copying can only be used with a document loaded into the ADF.
X TONER
EMPTY
Toner cartridge X has become empty.
(This message appears if 8 TONER EMPTY STOP on the MACHINE SETTING menu is set to ON(FAX) or OFF.)
Replace the specified toner cartridge.
X TONER
INCORRECT
The X toner cartridge is an unapproved type.
Install a Xerox toner cartridge of the appropriate type (AM, EU, AP or JP).
Message Definition Solutions
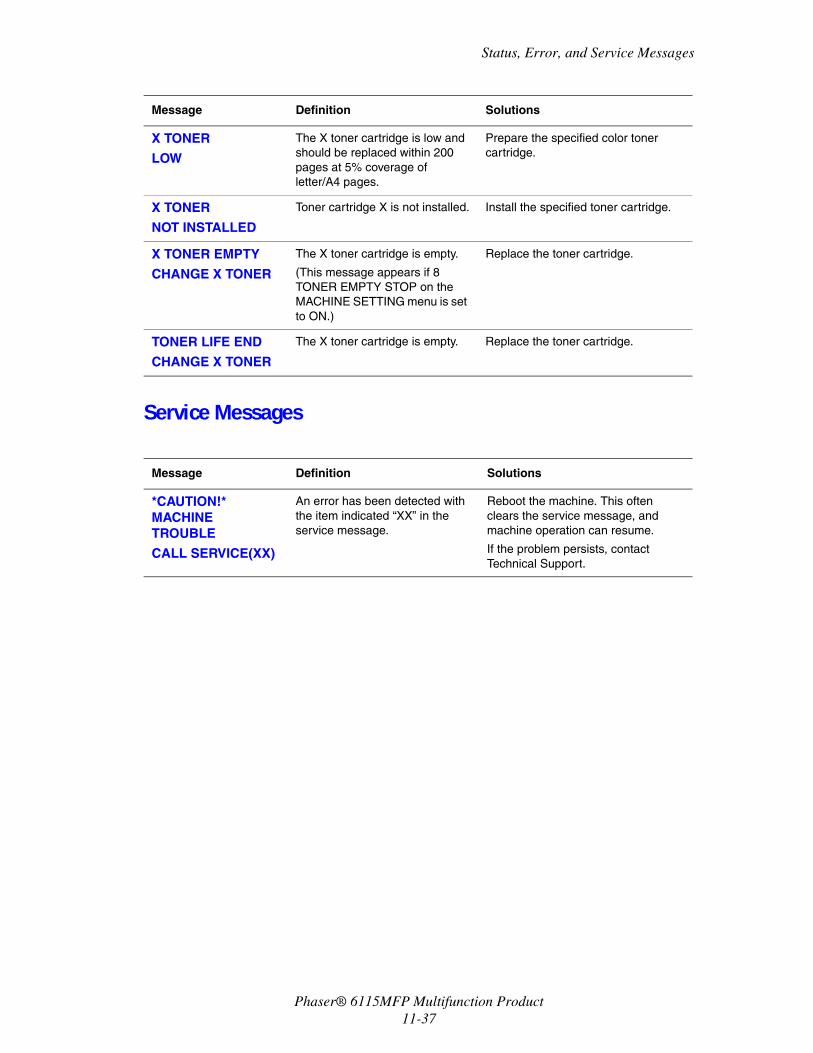
Status, Error, and Service Messages
Phaser® 6115MFP Multifunction Product11-37
Service Messages
X TONER
LOW
The X toner cartridge is low and should be replaced within 200 pages at 5% coverage of letter/A4 pages.
Prepare the specified color toner cartridge.
X TONER
NOT INSTALLED
Toner cartridge X is not installed. Install the specified toner cartridge.
X TONER EMPTY
CHANGE X TONER
The X toner cartridge is empty.
(This message appears if 8 TONER EMPTY STOP on the MACHINE SETTING menu is set to ON.)
Replace the toner cartridge.
TONER LIFE END
CHANGE X TONER
The X toner cartridge is empty. Replace the toner cartridge.
Message Definition Solutions
*CAUTION!* MACHINE TROUBLE
CALL SERVICE(XX)
An error has been detected with the item indicated “XX” in the service message.
Reboot the machine. This often clears the service message, and machine operation can resume.
If the problem persists, contact Technical Support.
Message Definition Solutions
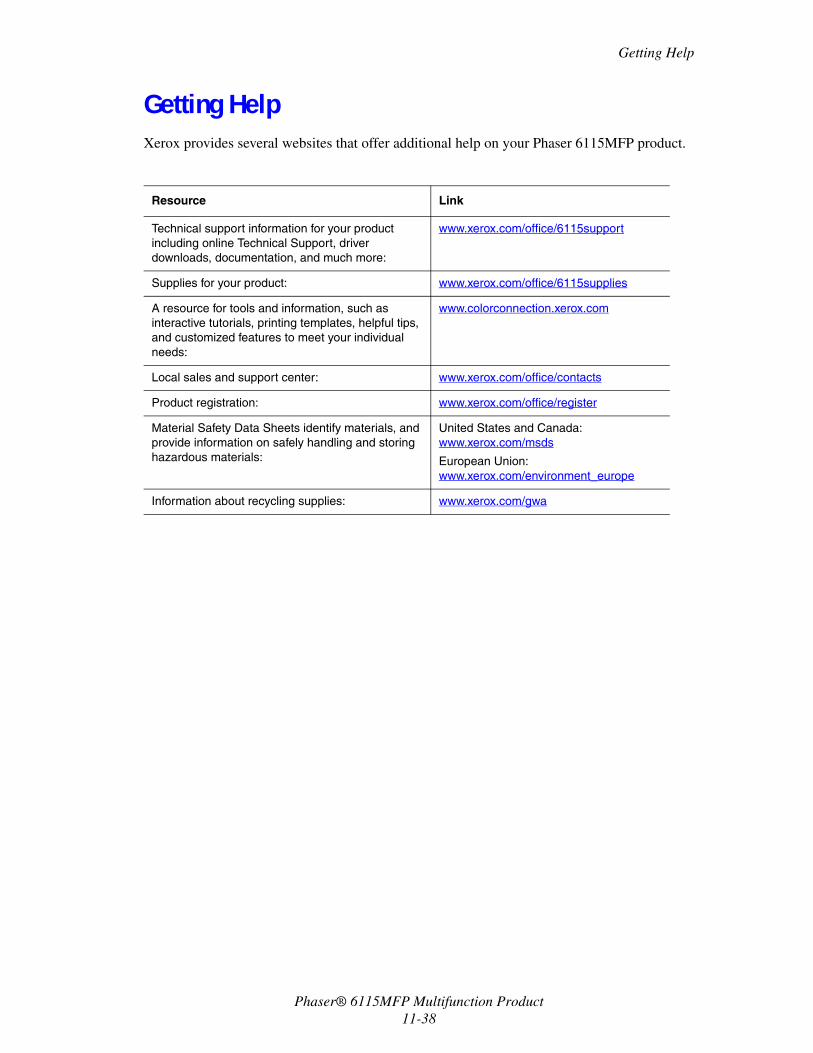
Getting Help
Phaser® 6115MFP Multifunction Product11-38
Getting HelpXerox provides several websites that offer additional help on your Phaser 6115MFP product.
Resource Link
Technical support information for your product including online Technical Support, driver downloads, documentation, and much more:
www.xerox.com/office/6115support
Supplies for your product: www.xerox.com/office/6115supplies
A resource for tools and information, such as interactive tutorials, printing templates, helpful tips, and customized features to meet your individual needs:
www.colorconnection.xerox.com
Local sales and support center: www.xerox.com/office/contacts
Product registration: www.xerox.com/office/register
Material Safety Data Sheets identify materials, and provide information on safely handling and storing hazardous materials:
United States and Canada: www.xerox.com/msds
European Union: www.xerox.com/environment_europe
Information about recycling supplies: www.xerox.com/gwa
Phaser® 6115MFP Multifunction ProductIndex-1
IndexNumerics2in1 copying, 7-82-sided printing, 6-28
Macintosh, 5-14Windows, 6-28
Aadding
group dial entries, 9-19one-touch dial entries, 9-15recipients, 9-13speed dial entries, 9-17
ADF feed rollerscleaning, 10-14
adjusting color, 11-24adjusting copy options, 7-3administrator
password, 3-3advanced copying, 7-8alphanumeric keypad symbols, 9-14auto panel reset, 3-6automatic
print-quality mode, 11-23automatically setting the system’s IP address
(Windows only), 4-7
Bbasic
copying, 7-2faxing, 9-1printing, 6-1scanning, 8-1
booklet printing, 5-7BOOTP, 4-2broadcast transmission faxes, 9-10
Ccalibrating, 3-13card stock, 6-10caution symbols, 1-6CentreWare IS
automatically setting the system’s IP address, 4-6
changing or modifying the system’s IP address, 4-8
creating password, 3-3overview, 3-3password, 3-3
changing the IP address using CentreWare IS, 4-8
changing the scanned image size, 8-9cleaning
ADF feed rollers, 10-14duplex feed rollers, 10-11exterior, 10-5feed rollers, 10-7laser lens, 10-7original glass, 10-6Tray 2 feed rollers, 10-12
collatingcopies, 7-5setting on the control panel, 7-5
color matching, 11-24computer requirements, 2-6configuration page, 2-12configuring options, 5-3configuring the product, 3-5connection
Ethernet, 4-4consumables
ordering, 10-15control panel, 2-7
auto reset, 3-6controlling print quality, 11-23default mode, 3-10display indicatiors, 2-11entering text, 9-14fax results, 2-13features and layout, 2-7information pages, 2-12language, 3-8LCD contrast, 3-7main screen, 2-11Menu Map, 2-12print report, 2-14print screen, 2-11product status, 2-13toner supply display, 2-13total page counters, 2-13
Index
Phaser® 6115MFP Multifunction ProductIndex-2
controller specifications, 1-18copy density, 7-4copying, 7-1
2in1, 7-82-sided, 7-10adjusting copy options, 7-3advanced, 7-8basic, 7-2collating, 7-5copy quality, 7-4default mode, 3-10from the document feeder (ADF), 7-2ID card, 7-9image placement adjustment, 7-8loading originals, 7-2options, 7-3paper priority, 7-6set document, 7-3setting the copy density, 7-4setting the default tray, 7-3specifying the zoom ration, 7-7
countersfax print, 9-21total fax scans, 9-21total page, 2-13
creating an adminstrator password, 3-3custom paper size
adding, 5-5deleting, 5-5editing, 5-5
Ddefault router/gateway address, 4-6deleting
group dial recipients, 9-20one-touch recipients, 9-16speed dial recipients, 9-18
DHCP, 4-2enable for Dynamic Domain Name
Service (DDNS), 4-8setting the system’s IP address
automatically, 4-6display
toner supply, 2-13DNS, 4-8document type
setting, 7-3
Domain Name Service (DNS)local domain name space database, 4-8using host names, 4-8
driveraccessing settings, 5-2booklet printing, 5-7custom paper size, 5-5default settings, 5-2overlays, 5-9poster printing, 5-8printer, 2-6saved settings, 5-4scanner, 2-6watermarks, 5-10
duplex feed rollerscleaning, 10-11
duplexing, 6-28Dynamic Domain Name Service
(DDNS), 4-8dynamically setting the system’s IP
address, 4-6
Eediting
group dial recipients, 9-20one-touch recipients, 9-16speed dial recipients, 9-18
electrical safety, 1-2electrical specifications, 1-18energy save mode, 3-7enhanced print-quality mode, 11-23entering text on the control panel, 9-14envelopes
loading, 6-11printable area, 6-24
environmental specifications, 1-17error messages, 11-33
Ffax
print counter, 9-21send/receive results, 9-21total scan counter, 9-21troubleshooting, 9-23
fax communication setup menu, 9-7fax dial setup menu, 9-4fax mode, 9-2fax receive setup menu, 9-5
Index
Phaser® 6115MFP Multifunction ProductIndex-3
fax reports menu, 9-7fax results, 2-13fax send setup menu, 9-5faxing, 9-1
adding group dial entries, 9-19adding one-touch dial entries, 9-15adding speed dial entries, 9-17broadcast transmission, 9-10canceling a document queued in
memory, 9-11communication setup menu, 9-7control panel default mode, 3-10control panel symbols, 9-3deleting or editing group dial
entries, 9-20dial setup menu, 9-4edit or delete one-touch entries, 9-16editing or deleting group dial
entries, 9-20editing or deleting speed dial
entries, 9-18fax mode display, 9-3from the ADF, 9-8from the document glass, 9-9managing, 9-2manually, 9-12problems receiving, 9-25product counters, 9-21receive setup menu, 9-5receiving, 9-12receiving automatically, 9-12registering recipients, 9-13reports, 9-21reports menu, 9-7send setup menu, 9-5sending, 9-8sending a fax at a specified time, 9-11setting a destination, 9-16settings, 9-4setup, 9-4solving fax problems, 9-23solving problems, 9-23to multiple recipients, 9-10using the phone book, 9-13
featuresproduct configurations, 2-5
feed rollerscleaning, 10-6
Ggetting help, 11-38glossy paper
loading, 6-21guidelines
printing safety, 1-5
Hhelp
resources, 2-18high-resolution print mode, 11-23host names
using with Domain Name Service (DNS), 4-8
HTTP, 4-2
IID card copying, 7-9images
adjusting placement, 7-8individual
adding a speed dial entry, 9-15deleting, 9-16editing, 9-16fax directory, 9-15
informationabout your system, 2-18information pages, 2-18Installation Guide, 2-18product management tools, 2-18Quick Use Guide, 2-18resources, 2-18technical support, 2-18video tutorials, 2-18web links, 2-18
information pages, 2-12Configuration page, 2-12Menu Map, 2-12
installingoptions, 5-3
installing over a network, 4-5
Index
Phaser® 6115MFP Multifunction ProductIndex-4
IP addresschanging or modifying using
CentreWare IS, 4-8dynamic, 4-7format, 4-6router address, 4-6setting automatically (Windows
only), 4-7setting manually, 4-8static, 4-8
IPP, 4-2
Jjams
solving, 11-17
Llabels
loading, 6-18laser lens
cleaning, 10-7LCD contrast, 3-7letterhead
loading, 6-19loading
labels, 6-18paper in Tray 1, 6-7paper in Tray 2, 6-25
local Domain Name Service (DNS) name space, 4-8
location of the product, 1-5LPD/LPR, 4-3
MMac OS X
print settings, 5-13Macintosh print driver
2-sided printing, 5-14ColorSync, 5-15copies and pages, 5-13cover page, 5-15layout, 5-14page attributes, 5-12page setup, 5-12paper feed, 5-15paper handling, 5-15paper size options, 5-12
print options, 5-12print settings, 5-13scheduler, 5-14
maintenancecleaning, 10-2consumables, 10-15general precautions, 10-2ordering supplies, 10-16routine maintenance items, 10-15safety, 1-4
managingcopy functions, 7-3fax functions, 9-2scan functions, 8-9
manual faxing, 9-12manually setting the printer’s IP address
overrides DHCP, 4-8manually setting the system’s IP address, 4-8
overrides AutoIP, 4-8Material Safety Data Sheet, 1-19MCC
using, 3-4media
supported, 6-2media mismatch behavior, 3-12memory, 1-18Menu Map, 2-12messages, 11-33MFP ControlCentre
using, 3-4misfeeding, 11-18modes
copy, 7-1fax, 9-1print-quality, 11-23
modifying the IP address using CentreWare IS, 4-8
moving the product, 10-4
Nnetwork
basics, 4-1BOOTP, 4-2connection, 4-4DHCP, 4-2DNS, 4-8HTTP, 4-2installing, 4-5IPP, 4-2
Index
Phaser® 6115MFP Multifunction ProductIndex-5
LPD/LPR, 4-3mask, 4-6overview, 4-4port 9100, 4-3protocols, 4-2SLP, 4-3SMTP, 4-3SNMP, 4-3TCP/IP, 4-4
Ooperational safety, 1-5options
additional trays, 2-5configuring, 5-3duplex unit, 2-5memory, 2-5
ordering supplies, 10-15, 10-16output bin, 6-3
adjusting, 6-3overlays
adding, 5-9deleting, 5-9editing, 5-9printing, 5-9
Ppage margins, 6-24Page setup settings
Page attributes options, 5-12custom paper size options, 5-12
paperloading, 6-5supported, 6-2types, 6-2
paper jams, 11-2clearing, 11-4document feeder, 11-14duplex unit, 11-13inside product, 11-4preventing, 11-2solving problems, 11-17Tray 1, 11-9Tray 2, 11-11
paper path, 11-3
paper prioritysetting, 7-6
paper source setup menu, 3-14parts of the product, 2-2performance specifications, 1-18photo print-quality mode, 11-23physical specifications, 1-17port 9100, 4-3poster printing, 5-8print quality
modes, 11-23printable area, 6-24printer
physical specifications, 1-17printer driver, 5-2
controlling print-quality, 11-23installing, 2-6Macintosh, 5-12Windows, 5-4
printing2-sided, 6-282-sided copies, 7-10basics, 6-1card stock, 6-10configuration page, 2-12envelopes, 6-11glossy paper, 6-21labels, 6-18letterhead, 6-19Menu Map, 2-12overlays, 5-9plain paper, 6-6safety guidelines, 1-5specialty media, 6-21thick card stock, 6-10transparency, 6-20watermarks, 5-11
print-qualityadjusting color, 11-24
print-quality modesautomatic, 11-23enhanced, 11-23photo, 11-23standard, 11-23
print-quality problemstroubleshooting, 11-23
problems receiving faxes, 9-25problems sending faxes, 9-24
Index
Phaser® 6115MFP Multifunction ProductIndex-6
productavailable configurations, 2-5configuring, 3-5control panel features, 2-7default mode, 3-10energy save mode, 3-7features, 2-4front view, 2-2information resources, 2-18maintenance, 10-1managing software, 3-1moving, 10-4options, 2-5setup, 3-5speaker volume, 3-9
product specifications, 1-17product status, 2-13protocols
network, 4-2
Rreceiving faxes, 9-12receiving faxes automatically, 9-12receiving faxes manually, 9-12recipients
specifying, 8-8recycling and disposing product, 1-20recycling supplies, 10-16registering recipients, 9-13regulatory information
Canada, 1-7Europe, 1-8United States, 1-7
removinga group, 9-20an individual, 9-16
reportsfax, 9-21fax menu, 9-7fax send/receive results, 9-21print report menu, 2-14printing, 9-22
resolutionspecifying, 11-23
resourcesinformation, 2-18
router addressIP address, 4-6
routine maintenance items, 10-15
Ssafety
electrical, 1-2maintenance, 1-4operational, 1-5printing guidelines, 1-5symbols, 1-6user, 1-1
saved settingscreating, 5-4deleting, 5-4
scan driverinstalling, 2-6
scan to email, 8-3ADF, 8-5cancel queued transmission, 8-6document glass, 8-7one-touch dial list, 8-8phone book list, 8-8searching the phone book, 8-9specify recipient, 8-8speed dial list, 8-8stopping the transmission, 8-6
scanner lampsetting off time, 3-9
scanningbasic, 8-1changing the image size, 8-9changing the scan mode settings, 8-9compression encoding, 8-9data format, 8-9loading originals in the document
feeder, 7-2loading originals on the document
glass, 7-2, 8-2resolution, 8-9scan to email, 8-3USB, 8-2
selectinga print-quality mode, 11-23
send setup menu, 9-5sending a fax, 9-8
Index
Phaser® 6115MFP Multifunction ProductIndex-7
sending a fax at a specified time, 9-11changing the scan mode, 8-9control panel language, 3-8copy density, 7-4copy quality, 7-4LCD contrast, 3-7media mismatch behavior, 3-12paper priority, 7-6product’s IP address manually, 4-8scanner lamp off, 3-9toner out action, 3-11
setupfax, 9-4scan to email, 8-3SMTP, 8-3user settings, 3-5
SLP, 4-3SMTP, 4-3SNMP, 4-3software
managing, 3-1speaker volume, 3-9specialty media
loading, 6-21specifications
controller, 1-18environmental, 1-17memory, 1-18performance, 1-18product, 1-17
specifying recipients, 8-8specifying the copy zoom ratio, 7-7speed dial
adding, 9-17deleting, 9-18editing, 9-18
status messages, 11-33supplies, 1-6
ordering, 10-15recycling, 10-16toner cartridges, 10-15when to order, 10-16
supported paper and media, 6-2symbols marked on product, 1-6system
advanced features, 2-5
TTCP/IP, 4-4technical support, 2-18thick card stock, 6-10toner cartridge
ordering, 10-15toner out action, 3-11transparency
loading, 6-20Tray 2 feed rollers
cleaning, 10-12troubleshooting
duplex unit, 11-21fax problems, 9-23general, 11-19MFP ControlCentre, 11-22paper jams, 11-2PhaserSMART, 2-18printer driver, 11-21print-quality problems, 11-23product management software, 11-22receiving faxes, 9-25sending faxes, 9-24technical support, 2-18
Uuser safety, 1-1user setup, 3-5using host names with Domain Name Service
(DNS), 4-8
Vviews of the product
back, 2-3front, 2-2open, 2-3options, 2-5
Wwatermarks
adding, 5-10deleting, 5-10editing, 5-10printing, 5-11
web linksinformation, 2-18
Index
Phaser® 6115MFP Multifunction ProductIndex-8
XXerox
supplies recycling programs, 10-16supplies website, 10-16
Zzoom ratio
customizing, 7-7presets, 7-7specifying, 7-7