photography walk #4
DESCRIPTION
Photography Walk #4 LessonTRANSCRIPT

We will be walking on Wednesday of this week with a repeat on Friday for those that cannot
attend the Tuesday session.
We will begin the discussion on moving beyond the ―AUTO‖ safety zone. The AUTO setting on
your camera is a fantastic general setting for 80% of the shots you want to take. It is however
lousy for 20% of the shots you want to take and usually those are the most stunning! There is
simply no way the picture above could have been captured with an auto setting. Focal Plane is
as narrow as I could get it to blur the background and I needed a relatively fast shutter-speed
to sharpen the bird while leaving the wings slightly blurry. Notice the Eye is in sharp focus ( the
focal plane is centered here) but the water just 1/2 – 1 inches forward of the focal plane is
already blurring.
There are three settings that you will trade off to get those 20% of the shots that Auto wont
work for: Shutter Speed — ISO — F-Stop also called Depth of Field (Selective Focus)
We will begin to explore these things this week.
Walk #4 - Out of the AUTO Zone
Venue: Chinatown
Picture data
Calistoga
Hummer Shutter Speed=1/250sec
Lens= 300mm
F=5.6
ISO 400
Cropped
Flash did not fire
The picture on the left was taken in Calistoga
October 2008
IT WOULD BE A GOOD IDEA TO SEE IF
YOU CAN FIND THE MANUAL THAT
CAME WITH YOUR CAMERA AND
BRING IT WITH YOU.
WE WILL BE DOING SOME THINGS
THAT DEPENDING ON YOUR CAMERA
ARE NOT ALWAYS OBVIOUS FROM THE
ICONS ON THE BUTTONS AND DIALS.
IF YOU CANNOT FIND THE MANUAL
CHECK ONLINE AS THERE ARE A
NUMBER OF PEOPLE WHO REWRITE
CAMERA MANUALS SEEMINGLY FOR
THE FUN OF IT… THEY USUALLY
HAVE SOME GOOD TIPS AS WELL...
Look for your Camera Manual
January 20, 2009 Volume 1, Issue 1
P H O T O G R A P H Y F O R T H E F U N O F I T !
Photography Walk Newsletter
Time: 12—1:00PM
Time: 1—2:00PM
Date: 02/4/09
Date: 01/6/09
Day 1
Day 2
Page 2
Photography for the fun of it!
P H O T O G R A P H Y W A L K N E W S L E T T E R
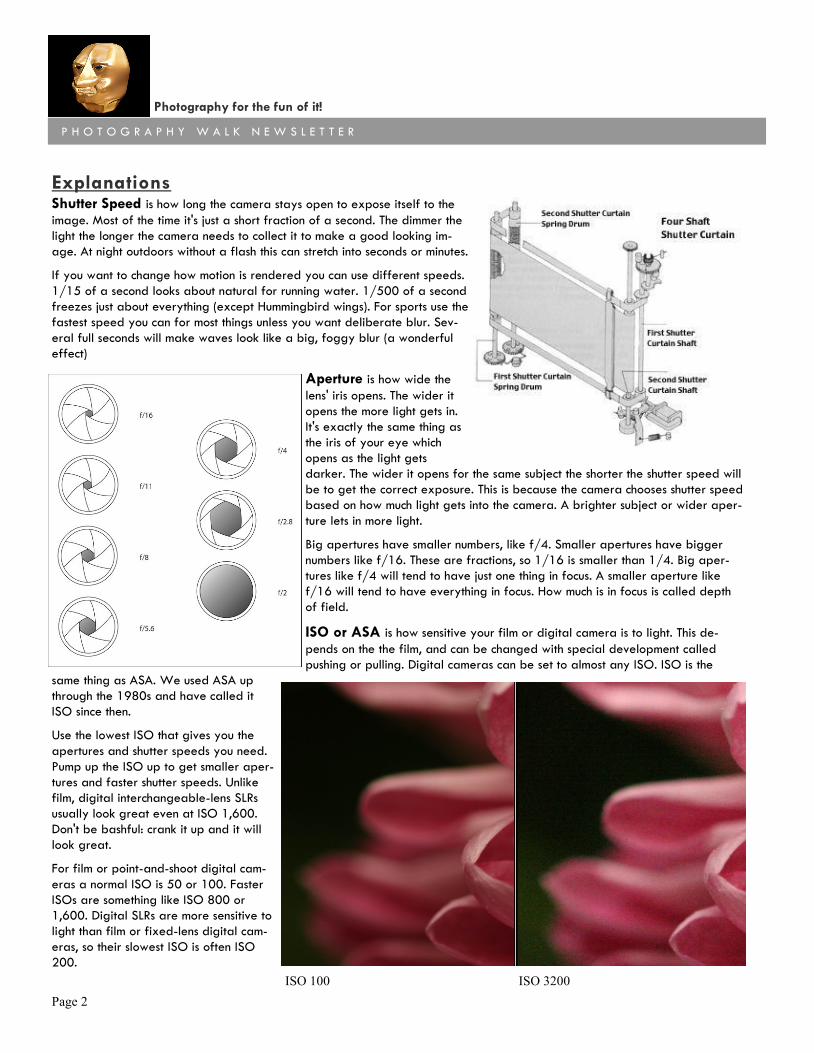
Explanations Shutter Speed is how long the camera stays open to expose itself to the
image. Most of the time it's just a short fraction of a second. The dimmer the
light the longer the camera needs to collect it to make a good looking im-
age. At night outdoors without a flash this can stretch into seconds or minutes.
If you want to change how motion is rendered you can use different speeds.
1/15 of a second looks about natural for running water. 1/500 of a second
freezes just about everything (except Hummingbird wings). For sports use the
fastest speed you can for most things unless you want deliberate blur. Sev-
eral full seconds will make waves look like a big, foggy blur (a wonderful
effect)
Aperture is how wide the
lens' iris opens. The wider it
opens the more light gets in.
It's exactly the same thing as
the iris of your eye which
opens as the light gets
darker. The wider it opens for the same subject the shorter the shutter speed will
be to get the correct exposure. This is because the camera chooses shutter speed
based on how much light gets into the camera. A brighter subject or wider aper-
ture lets in more light.
Big apertures have smaller numbers, like f/4. Smaller apertures have bigger
numbers like f/16. These are fractions, so 1/16 is smaller than 1/4. Big aper-
tures like f/4 will tend to have just one thing in focus. A smaller aperture like
f/16 will tend to have everything in focus. How much is in focus is called depth
of field.
ISO or ASA is how sensitive your film or digital camera is to light. This de-
pends on the the film, and can be changed with special development called
pushing or pulling. Digital cameras can be set to almost any ISO. ISO is the
same thing as ASA. We used ASA up
through the 1980s and have called it
ISO since then.
Use the lowest ISO that gives you the
apertures and shutter speeds you need.
Pump up the ISO up to get smaller aper-
tures and faster shutter speeds. Unlike
film, digital interchangeable-lens SLRs
usually look great even at ISO 1,600.
Don't be bashful: crank it up and it will
look great.
For film or point-and-shoot digital cam-
eras a normal ISO is 50 or 100. Faster
ISOs are something like ISO 800 or
1,600. Digital SLRs are more sensitive to
light than film or fixed-lens digital cam-
eras, so their slowest ISO is often ISO
200.
ISO 100 ISO 3200
Page 3
Photography for the fun of it!
P H O T O G R A P H Y W A L K N E W S L E T T E R
P H O T O G R A P H Y W A L K N E W S L E T T E R
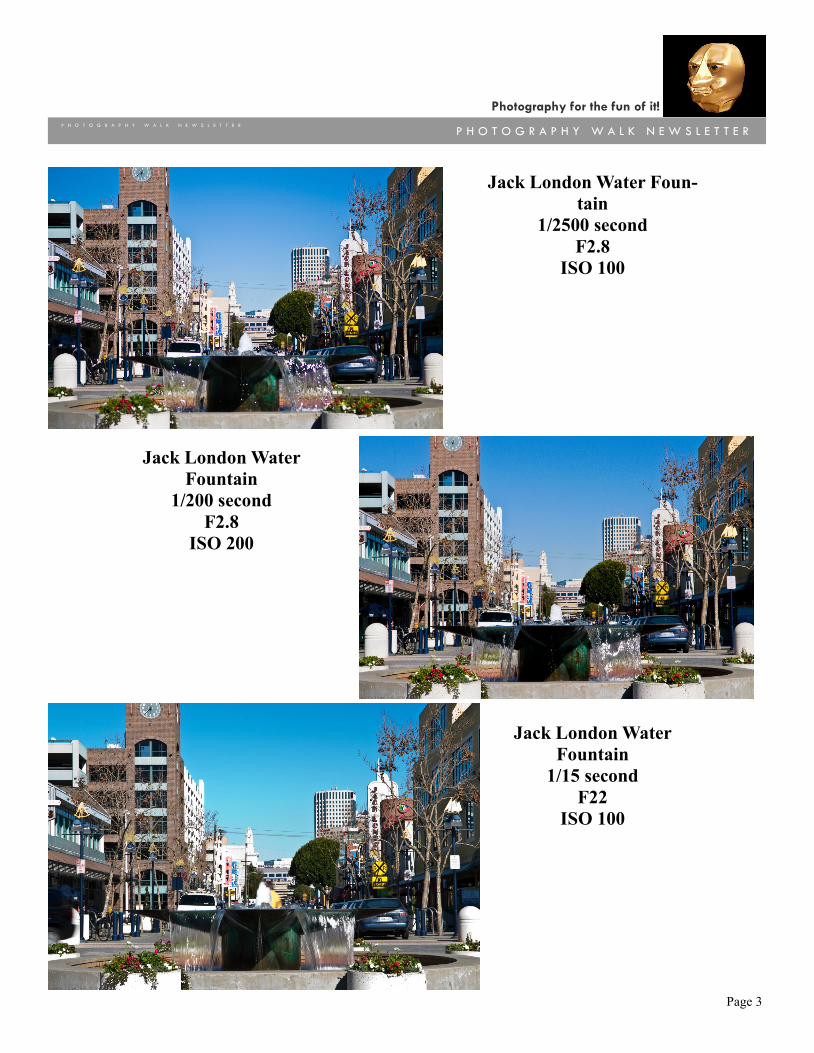
Jack London Water Foun-
tain
1/2500 second
F2.8
ISO 100
Jack London Water
Fountain
1/200 second
F2.8
ISO 200
Jack London Water
Fountain
1/15 second
F22
ISO 100
Page 4
Photography for the fun of it!
P H O T O G R A P H Y W A L K N E W S L E T T E R
by redsunphotography
There are 3 things that affect your image quality in photography; ISO, aperture and shutter speed. All 3 of
these things depend on one other factor which is light. A photograph is basically a chemical process in which
light is exposed to film, or a sensor in digital cameras, and registers an image.
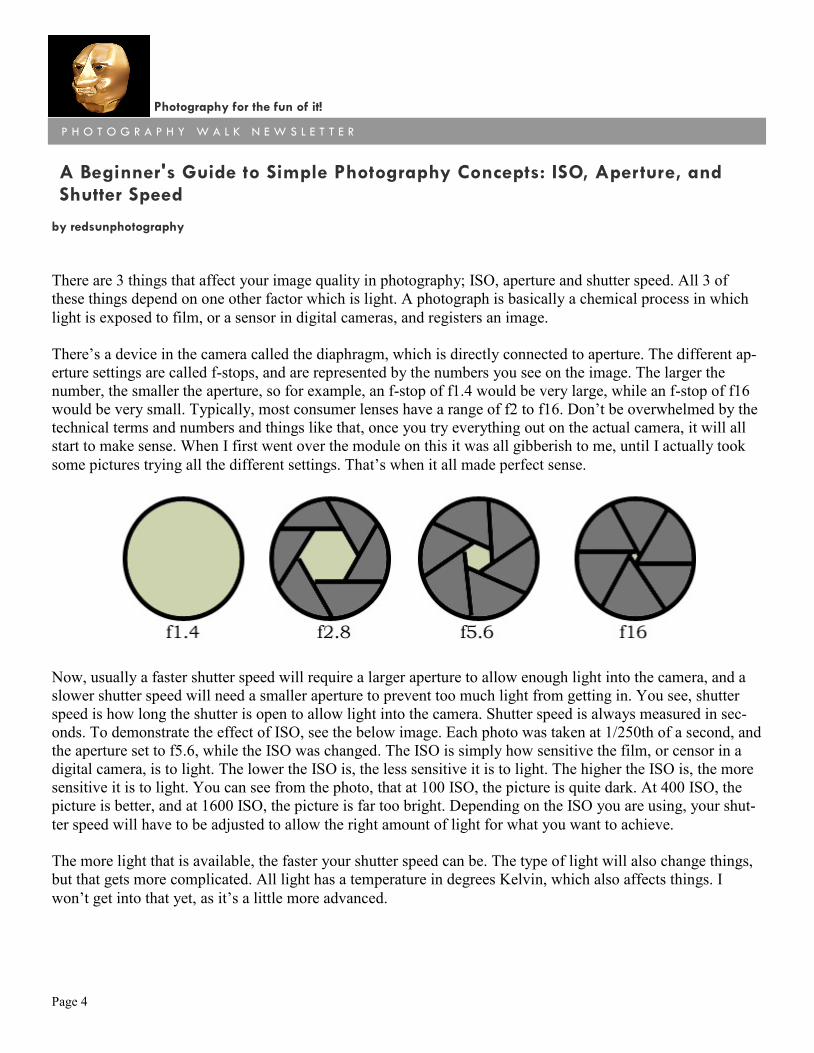
There’s a device in the camera called the diaphragm, which is directly connected to aperture. The different ap-
erture settings are called f-stops, and are represented by the numbers you see on the image. The larger the
number, the smaller the aperture, so for example, an f-stop of f1.4 would be very large, while an f-stop of f16
would be very small. Typically, most consumer lenses have a range of f2 to f16. Don’t be overwhelmed by the
technical terms and numbers and things like that, once you try everything out on the actual camera, it will all
start to make sense. When I first went over the module on this it was all gibberish to me, until I actually took
some pictures trying all the different settings. That’s when it all made perfect sense.
Now, usually a faster shutter speed will require a larger aperture to allow enough light into the camera, and a
slower shutter speed will need a smaller aperture to prevent too much light from getting in. You see, shutter
speed is how long the shutter is open to allow light into the camera. Shutter speed is always measured in sec-
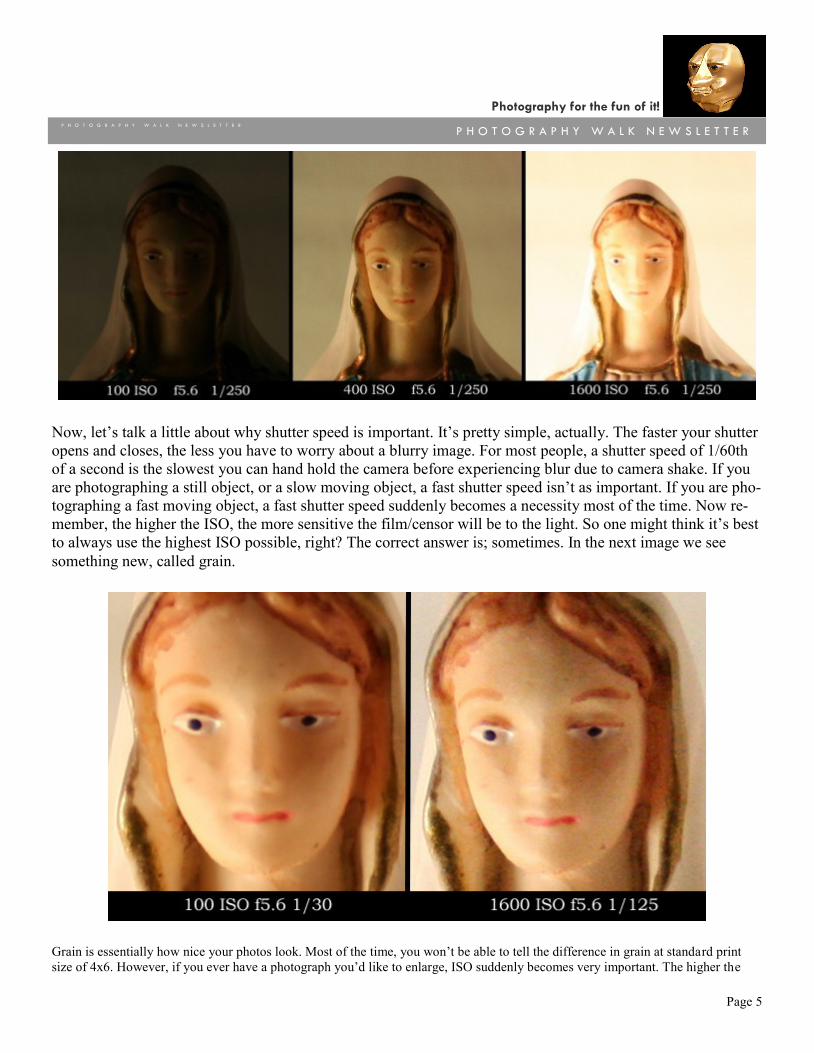
onds. To demonstrate the effect of ISO, see the below image. Each photo was taken at 1/250th of a second, and
the aperture set to f5.6, while the ISO was changed. The ISO is simply how sensitive the film, or censor in a
digital camera, is to light. The lower the ISO is, the less sensitive it is to light. The higher the ISO is, the more
sensitive it is to light. You can see from the photo, that at 100 ISO, the picture is quite dark. At 400 ISO, the
picture is better, and at 1600 ISO, the picture is far too bright. Depending on the ISO you are using, your shut-
ter speed will have to be adjusted to allow the right amount of light for what you want to achieve.
The more light that is available, the faster your shutter speed can be. The type of light will also change things,
but that gets more complicated. All light has a temperature in degrees Kelvin, which also affects things. I
won’t get into that yet, as it’s a little more advanced.
A Beginner's Guide to Simple Photography Concepts: ISO, Aperture, and Shutter Speed
Page 5
Photography for the fun of it!
P H O T O G R A P H Y W A L K N E W S L E T T E R
P H O T O G R A P H Y W A L K N E W S L E T T E R
Now, let’s talk a little about why shutter speed is important. It’s pretty simple, actually. The faster your shutter
opens and closes, the less you have to worry about a blurry image. For most people, a shutter speed of 1/60th
of a second is the slowest you can hand hold the camera before experiencing blur due to camera shake. If you
are photographing a still object, or a slow moving object, a fast shutter speed isn’t as important. If you are pho-
tographing a fast moving object, a fast shutter speed suddenly becomes a necessity most of the time. Now re-
member, the higher the ISO, the more sensitive the film/censor will be to the light. So one might think it’s best
to always use the highest ISO possible, right? The correct answer is; sometimes. In the next image we see
something new, called grain.
Grain is essentially how nice your photos look. Most of the time, you won’t be able to tell the difference in grain at standard print
size of 4x6. However, if you ever have a photograph you’d like to enlarge, ISO suddenly becomes very important. The higher the

Page 6
Photography for the fun of it!
P H O T O G R A P H Y W A L K N E W S L E T T E R
ISO, the grainier your photo will look. Below I cropped just the face of an image, one at 100 ISO and the other
at 1600 ISO. The first photo looks smoother, while the second looks, well, grainy. Most consumers won’t need
to be making a lot of enlargements, so this doesn’t always matter. But even an amateur will sometimes get that
one perfect shot they just would love to hang on their wall. Unfortunately, if that perfect shot was taken with a
high ISO film, or using a high ISO setting on a digital camera, the size of the enlargement will be limited be-
fore it starts to look bad. I find for the average every-day John and Jane Q. Normal, 400 ISO is best. It gets
more complicated of course if you’re looking at it from a professional level, and I may get into that another
time.
Finally, we get to what most people get lost on, Depth of Field. Let’s start this time by looking at a picture.
Most likely, in the first frame, your eye is attracted to the figurine. This is because the back round is blurred,
and unobtrusive. In the second frame still focused on the figurine, but a little distracted. In the last frame, your
eye was probably drawn first to the red box, and when you look at the figurine, you’re distracted by the box in
the center. So as you can see from the pictures, depth of field is essentially the area in front and behind the ob-
ject that is in focus..
Each photo was taken with the same ISO, but both the shutter speed and aperture were changed. As you can
see, the back round became less blurred the smaller the aperture. The entire time I kept focused on the figurine.
Anything in front of, or behind the figurine would appear blurry. You can set things up however so that your
depth of field is infinite (to a degree) and everything is sharp. The further away something is, the more infinite
the focus can be. The closer it is, the more limited that becomes. For example, if taking a macro photo of a
small insect, you can have the insect in focus, but no matter what lens or camera you have, you can focus on
both the insect up close and mountains in the distance. The closer something is, the more limited the depth of
field will be.
Depth of Field is probably the most confusing to beginners, because reading about it can be complicated, as
there are many different factors that will affect your depth of field. For example, a telephoto lens will have a
more sensitive depth of field, while a wide angle lens will be less obvious. It’s easiest to tackle this one factor
by taking your camera out and just trying the different aperture settings and distances from objects. Some cam-
eras will have a depth of field preview button, that will show you in the viewfinder how the depth of field will
look. This is a very helpful function to have, but if not, trial and error must be used for the beginner.
The best thing to do is buy or rent an old, fully manual film camera. The biggest problem most beginners face

Page 7
Photography for the fun of it!
P H O T O G R A P H Y W A L K N E W S L E T T E R
P H O T O G R A P H Y W A L K N E W S L E T T E R
is the ease of automatic features. Buying a fully manual camera forces you to learn these beginner concepts,
which will aid greatly in how all you photographs will look in the future. My 2 favorite manual cameras are
the Pentax K1000 and the Canon AE-1 (But do not get the Canon AE-1 Program, as it is largely automatic if
you want it to be).
The settings for all these functions will be available on most digital cameras, not just SLR’s. Chances are if
your camera is 3 megapixels and up, it will have the right functions. You’ll have to consult your manual for
help on where to find them and how to set them on your camera however.
Page 8
Photography for the fun of it!
P H O T O G R A P H Y W A L K N E W S L E T T E R
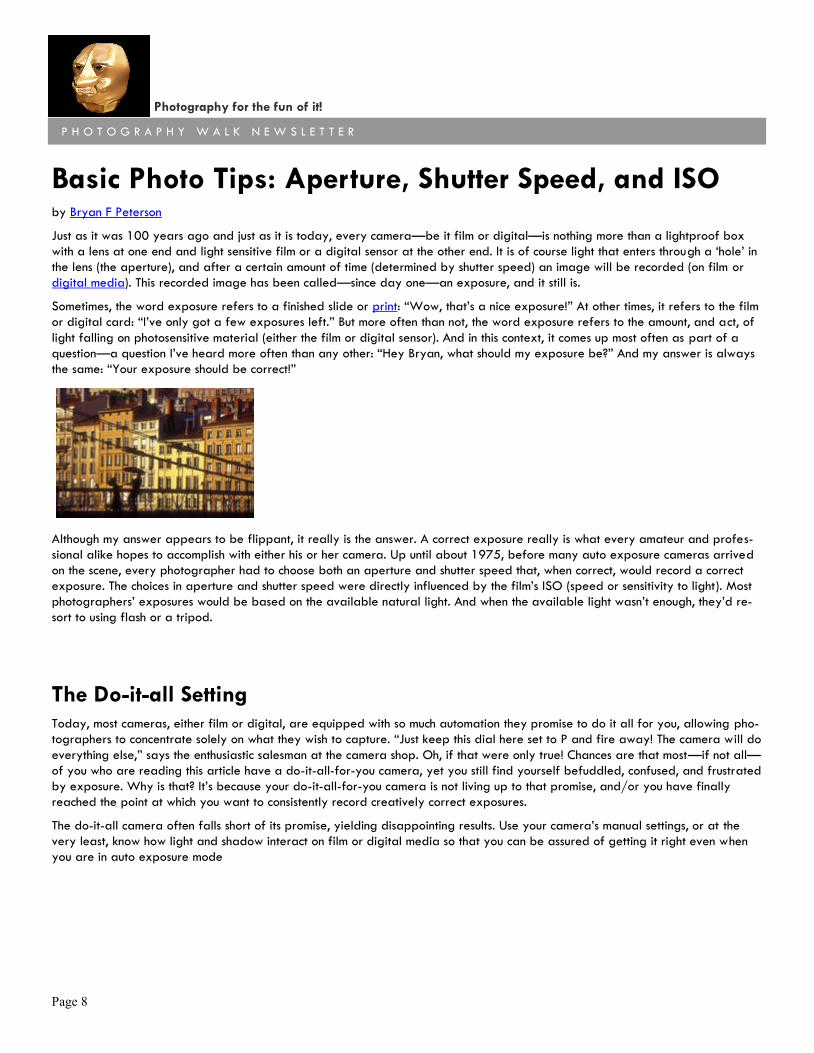
Basic Photo Tips: Aperture, Shutter Speed, and ISO by Bryan F Peterson
Just as it was 100 years ago and just as it is today, every camera—be it film or digital—is nothing more than a lightproof box
with a lens at one end and light sensitive film or a digital sensor at the other end. It is of course light that enters through a ‗hole‘ in
the lens (the aperture), and after a certain amount of time (determined by shutter speed) an image will be recorded (on film or
digital media). This recorded image has been called—since day one—an exposure, and it still is.
Sometimes, the word exposure refers to a finished slide or print: ―Wow, that‘s a nice exposure!‖ At other times, it refers to the film
or digital card: ―I‘ve only got a few exposures left.‖ But more often than not, the word exposure refers to the amount, and act, of
light falling on photosensitive material (either the film or digital sensor). And in this context, it comes up most often as part of a
question—a question I‘ve heard more often than any other: ―Hey Bryan, what should my exposure be?‖ And my answer is always
the same: ―Your exposure should be correct!‖
Although my answer appears to be flippant, it really is the answer. A correct exposure really is what every amateur and profes-
sional alike hopes to accomplish with either his or her camera. Up until about 1975, before many auto exposure cameras arrived
on the scene, every photographer had to choose both an aperture and shutter speed that, when correct, would record a correct
exposure. The choices in aperture and shutter speed were directly influenced by the film‘s ISO (speed or sensitivity to light). Most
photographers‘ exposures would be based on the available natural light. And when the available light wasn‘t enough, they‘d re-
sort to using flash or a tripod.
The Do-it-all Setting Today, most cameras, either film or digital, are equipped with so much automation they promise to do it all for you, allowing pho-
tographers to concentrate solely on what they wish to capture. ―Just keep this dial here set to P and fire away! The camera will do
everything else,‖ says the enthusiastic salesman at the camera shop. Oh, if that were only true! Chances are that most—if not all—
of you who are reading this article have a do-it-all-for-you camera, yet you still find yourself befuddled, confused, and frustrated
by exposure. Why is that? It‘s because your do-it-all-for-you camera is not living up to that promise, and/or you have finally
reached the point at which you want to consistently record creatively correct exposures.
The do-it-all camera often falls short of its promise, yielding disappointing results. Use your camera‘s manual settings, or at the
very least, know how light and shadow interact on film or digital media so that you can be assured of getting it right even when
you are in auto exposure mode

Page 9
Photography for the fun of it!
P H O T O G R A P H Y W A L K N E W S L E T T E R
P H O T O G R A P H Y W A L K N E W S L E T T E R
Setting and Using Your Camera on Manual Exposure
I know of no other way to consistently make correct exposures than to learn how to shoot a fully manual exposure. Once you‘ve
learned how to shoot in manual exposure mode (it‘s really terribly easy), you‘ll better understand the outcome of your exposures
when you choose to shoot in semi- or full auto exposure mode.
With your camera and lens in front of you, set your camera dial to M for manual. (If you‘re unsure on how to set your camera to
manual exposure mode, read the camera manual!) Grab your kid or a friend to use as your subject and go to a shady part of
your yard or a neighborhood park, or if it‘s an overcast day, anywhere in the yard or park will do. Regardless of your camera,
and regardless of what lens you‘re using, set your camera dial to M Mode and the lens opening to the number 5.6 (f/5.6). Place
your subject up against the house or some six- to eight-foot shrubbery. Now, look through the viewfinder and focus on your sub-
ject. Adjust your shutter speed until the camera‘s light meter indicates a ―correct‖ exposure in your viewfinder and take the photo-
graph. You‘ve just made a manual correct exposure!
Operating in manual exposure mode is empowering, so make a note of this memorable day.
The Photographic Triangle This does not mean that I want you to forever leave your camera‘s aperture at f/5.6 and simply adjust your shutter speed for the
light falling on your subject until the viewfinder indicates a correct exposure. Before you forge ahead with your newfound ease in
setting a manual exposure, you need to learn some basic concepts about exposure.
A correct exposure is a simple combination of three important factors: aperture, shutter speed, and ISO. Since the beginning of
photography, these same three factors have always been at the heart of every exposure, whether that exposure was correct or
not, and they still are today—even if you‘re using a digital camera. I refer to them as the photographic triangle.
Locate the button, wheel, or dial on your camera or lens that controls the aperture. If you‘re using an older camera and lens, the
aperture control is a ring that you turn on the lens itself. Whether you push buttons, turn a wheel, or rotate a ring on the lens, you‘ll
see a series of numbers coming up in the viewfinder or on the lens itself. Of all of the numbers you‘ll see, take note of 4, 5.6, 8,
11, 16, and maybe even a 22. (If you‘re shooting with a fixed-zoom-lens digital camera, you may find that your apertures don‘t
go past 8 or maybe 11). Each one of these numbers corresponds to a specific opening in your lens and these openings are called
f-stops. In photographic terms, the 4 is called f/4, the 5.6 is f/5.6, and so on. The primary function of these lens openings is to

Page 10
Photography for the fun of it!
P H O T O G R A P H Y W A L K N E W S L E T T E R
control the volume of light that reaches the film or digital media during an exposure. The smaller the f-stop number, the larger the
lens opening; the larger the f-stop, the smaller the lens opening.
For the technical minded out there, an f-stop is a fraction that indicates the diameter of the aperture. The f stands for the focal
length of the lens, the slash (/) means divided by, and the number represents the stop in use. For example, if you were shooting
with a 50mm lens set at an aperture of f/1.4, the diameter of the actual lens opening would be 35.7mm. Here, 50 (lens focal
length) divided by 1.4 (stop) equals 35.7 (diameter of lens opening). Whew! It makes my head spin just thinking about all that.
Thank goodness this has very little, if anything, to do with achieving a correct exposure.
Aperture
Interestingly enough, each time you descend from one aperture opening to the next, or stop down, such as from f/4 to f/5.6, the
amount of light passing through the lens is cut in half. Likewise, if you change from an aperture opening of f/11 to f/8, the volume
of light entering the lens doubles. Each halving or doubling of light is referred to as a full stop. This is important to note since many
cameras today offer not only full stops, but also the ability to set the aperture to one-third stops, i.e. f/4, f/4.5, f/5, f/5.6, f/6.3,
f/7.1, f/8, f/9, f/10, f/11, and so on. (The underlined numbers represent the original, basic stops while the others are the newer
one-third options sometimes available).
Shutter Speed
Now let‘s turn to shutter speed. Depending on the make and model, your camera may offer shutter speeds from a blazingly fast
1/8000s all the way down to 30 seconds. The shutter speed controls the amount of time that the volume of light coming through
the lens (determined by the aperture) is allowed to stay on the film or digital media in the camera. The same halving and dou-
bling principle that applies to aperture also applies to shutter speed.
Let me explain. Set the shutter speed control on your camera to 500. This number denotes a fraction—500 represents 1/500 sec-
ond. Now change from 500 to 250; again, this represents 1/250s. From 1/250s you go to 1/125, 1/60, 1/30, 1/15, and so on.
Whether you change from 1/30s to 1/60s (decreasing the time the light stays on the film/digital media) or from 1/60s to 1/30s
(increasing the time the light stays on the film/digital media), you‘ve shifted a full stop. Again this is important to note since many
cameras today also offer the ability to set the shutter speed to one-third stops: 1/500s, 1/400s, 1/320s, 1/250s, 1/200s,
1/160s, 1/125s, 1/100s, 1/80s, 1/60s, and so on. (Again, the underlined numbers represent the original, basic stops while the
others are the newer one-third options sometimes available). Cameras that offer one-third stops reflect the camera industry‘s at-
tempts to make it easier for you to achieve ―perfect‖ exposures. But as you‘ll learn later on, it‘s rare that one always wants a per-
fect exposure.
ISO
The final leg of the triangle is ISO. Whether you shoot with film or use a digital camera, your choice of ISO has a direct impact on
the combination of apertures and shutter speeds you can use.. To better understand the effect of ISO on exposure, think of the ISO
as a worker bee. If my camera is set for ISO 100, I have, in effect, 100 worker bees; and if your camera is set for ISO 200, you
have 200 worker bees. The job of these worker bees is to gather the light that comes through the lens and make an image. If both
of us set our lenses at the same aperture of f/5.6—meaning that the same volume of light will be coming through our lenses—who
will record the image the quickest, you or me? You will, since you have twice as many worker bees at ISO 200 than I do at ISO
100.

Page 11
Photography for the fun of it!
P H O T O G R A P H Y W A L K N E W S L E T T E R
P H O T O G R A P H Y W A L K N E W S L E T T E R
ISO and Shutter Speed How does this relate to shutter speed? Let‘s assume the photo in question is of a lone flower taken on an overcast day. Remember
that your camera is set to ISO 200 and mine to ISO 100, both with an aperture of f/5.6. So, when you adjust your shutter speed
for a correct exposure, 1/250s is indicated as ―correct,‖ but when I adjust my shutter speed for a correct exposure, 1/125s—a
longer exposure—is indicated. This is because your 200 worker bees need only half as much time as my 100 worker bees to
make the image.
Understanding Exposure
Since this is such an important part of understanding exposure, I want you to pause in your reading for a moment and get out your
camera, as well as a pen and paper. Set the film speed dial to ISO 200; (If you are a film shooter, do this even if you have a roll
of film in your film camera that is not ISO 200, but don‘t forget to set the ISO back to the correct number when we‘re done here.)
Now, set your aperture opening to f/8, and with the camera pointed at something that‘s well illuminated, adjust your shutter
speed until a correct exposure is indicated in the viewfinder. (If you want, you can leave the camera in the automatic aperture-
priority mode for this exercise, too). Write down that shutter speed. Then, change your film speed again, this time to ISO 400,
leaving the aperture at f/8, and once again point the camera at the same subject. Whether you‘re in manual mode or auto-
aperture-priority mode, you‘ll see that your light meter is indicating a different shutter speed for a correct exposure. Once again,
write down this shutter speed. And finally, change the ISO to 800, and repeat the steps above.
What have you noticed? When you change from ISO 100 to ISO 200 your shutter speed changed: from 1/125s to 1/250s or
perhaps something like from 1/160s to 1/320s. These shutter speeds are examples, of course, and not knowing what your subject
was, it‘s difficult at best to determine your actual shutter speeds, but one thing is certain: each shutter speed is close to if not ex-
actly half as much as the one before it.
When you increase the number of worker bees (the ISO) from 100 to 200, you cut the time necessary to get the job done in half.
(If only the real world worked like that!) This is what your shutter speed was telling you: Going from 1/125s to 1/250s is half as
long an exposure time. When you set the ISO to 400, you went from 1/125s—passing by 1/250s—and ended up at 1/500s.
Just as each halving of the shutter speed is called 1 stop, each change from ISO 100 to ISO 200 to ISO 400 is considered a 1-
stop increase (an increase of worker bees).
You can do this same exercise just as easily by leaving the shutter speed constant, for instance at 1/125s, and adjusting the aper-
ture until a correct exposure is indicated in the viewfinder; or, if you choose to stay in auto exposure mode, select shutter-priority,
set a shutter speed of 1/125s, and the camera will set the correct aperture for you.
Page 12
Photography for the fun of it!
P H O T O G R A P H Y W A L K N E W S L E T T E R
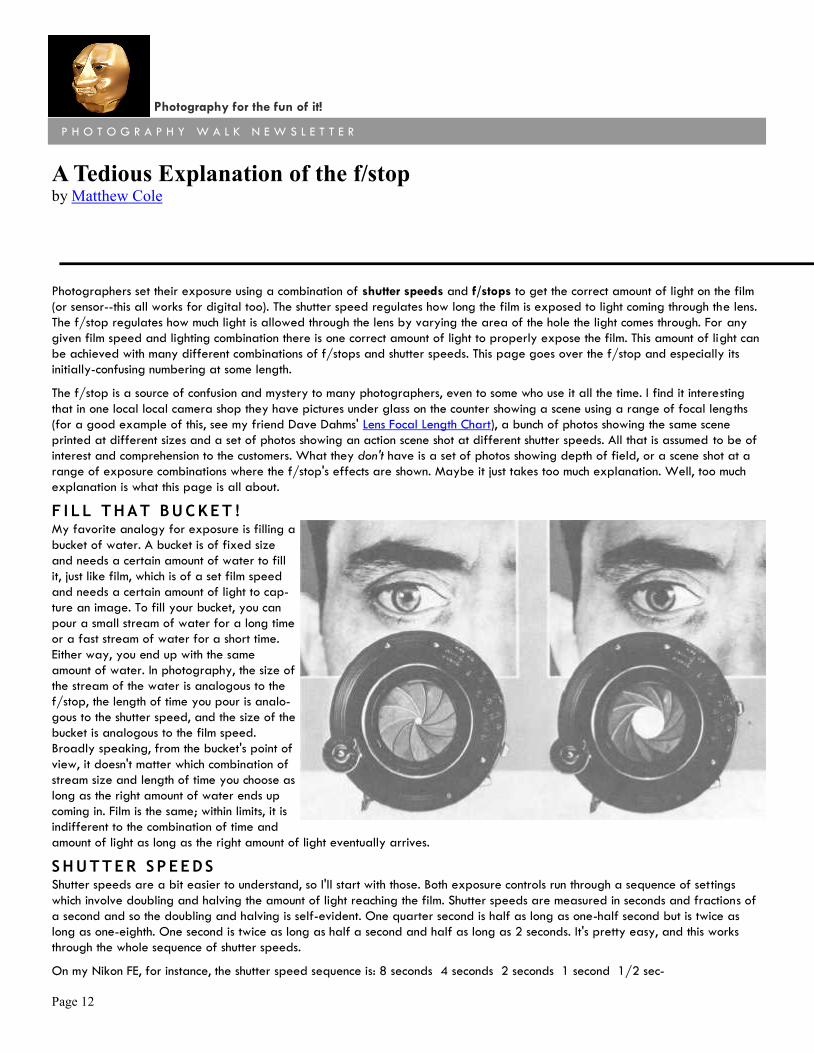
A Tedious Explanation of the f/stop by Matthew Cole
Photographers set their exposure using a combination of shutter speeds and f/stops to get the correct amount of light on the film
(or sensor--this all works for digital too). The shutter speed regulates how long the film is exposed to light coming through the lens.
The f/stop regulates how much light is allowed through the lens by varying the area of the hole the light comes through. For any
given film speed and lighting combination there is one correct amount of light to properly expose the film. This amount of light can
be achieved with many different combinations of f/stops and shutter speeds. This page goes over the f/stop and especially its
initially-confusing numbering at some length.
The f/stop is a source of confusion and mystery to many photographers, even to some who use it all the time. I find it interesting
that in one local local camera shop they have pictures under glass on the counter showing a scene using a range of focal lengths
(for a good example of this, see my friend Dave Dahms' Lens Focal Length Chart), a bunch of photos showing the same scene
printed at different sizes and a set of photos showing an action scene shot at different shutter speeds. All that is assumed to be of
interest and comprehension to the customers. What they don't have is a set of photos showing depth of field, or a scene shot at a
range of exposure combinations where the f/stop's effects are shown. Maybe it just takes too much explanation. Well, too much
explanation is what this page is all about.
F I L L T H A T B U C K E T ! My favorite analogy for exposure is filling a
bucket of water. A bucket is of fixed size
and needs a certain amount of water to fill
it, just like film, which is of a set film speed
and needs a certain amount of light to cap-
ture an image. To fill your bucket, you can
pour a small stream of water for a long time
or a fast stream of water for a short time.
Either way, you end up with the same
amount of water. In photography, the size of
the stream of the water is analogous to the
f/stop, the length of time you pour is analo-
gous to the shutter speed, and the size of the
bucket is analogous to the film speed.
Broadly speaking, from the bucket's point of
view, it doesn't matter which combination of
stream size and length of time you choose as
long as the right amount of water ends up
coming in. Film is the same; within limits, it is
indifferent to the combination of time and
amount of light as long as the right amount of light eventually arrives.
S H U T T E R S P E E D S Shutter speeds are a bit easier to understand, so I'll start with those. Both exposure controls run through a sequence of settings
which involve doubling and halving the amount of light reaching the film. Shutter speeds are measured in seconds and fractions of
a second and so the doubling and halving is self-evident. One quarter second is half as long as one-half second but is twice as
long as one-eighth. One second is twice as long as half a second and half as long as 2 seconds. It's pretty easy, and this works
through the whole sequence of shutter speeds.
On my Nikon FE, for instance, the shutter speed sequence is: 8 seconds 4 seconds 2 seconds 1 second 1/2 sec-

Page 13
Photography for the fun of it!
P H O T O G R A P H Y W A L K N E W S L E T T E R
P H O T O G R A P H Y W A L K N E W S L E T T E R
ond 1/4 1/8 1/15 1/30 1/60 1/125 1/250 1/500 1/1000
Each of these settings is clearly half/double the length of time of its immediate neighbors (OK, I know, 1/15 isn't exactly half the
time of 1/8th and 1/125th isn't half the time of 1/60th, but it's close). This dou-
bling/halving is thus pretty simple to comprehend for this exposure setting.
F / S T O P S f/stops are a bit more confusing because the numbers appear so arbitrary. This is
the standard sequence of f/stops from f/1.4 to f/22. Although it doesn't seem in-
tuitive at first, in this sequence the f/1.4 setting lets in the most light while the f/22
setting lets in the least. Also, each of these f/stops has precisely the same halv-
ing/doubling relationship as the shutter speed sequence.
1.4 2.0 2.8 4 5.6 8 11 16 22
On the face of it, going from f/4 to f/5.6 doesn't sound like halving the amount of
light. What's more, 5.6 is a larger number and sounds like it ought to be more light,
not less. Neither does f/4 to f/2.8 sound like doubling the amount of light. In fact,
each of the numbers in this sequence is a halving/doubling of the amount of light
from its immediate neighbours, just like the shutter speed settings are. Not only that,
but it makes sense, as I shall show below.
The reason that both the halving and doubling and the smaller numbers mean more light things make sense is that the f/stop is a
ratio. The ratio is between the diameter of the aperture in the lens and the focal length of the lens. The focal length is generally
measured in millimeters, so we'll stick with those as our unit of measure. On a 50mm lens, f/2 is saying that the diameter of the
aperture is 25mm. The ratio is this 50/25 = 2. A good question might be, what is the area of that aperture? Well, the aperture is
usually a set of five to fifteen blades which form a roughly circular hole, so we'll use the formula for the area of a circle, which as
you all remember from fifth grade math is π * radius2. For π I'll use 3.14159265. On our 50mm lens, the aperture at f/2 has a
diameter of 25mm which is a radius of 12.5mm. The area of the aperture is thus π X 12.52, or 3.14159265 X 156.25, or 490.9
square millimetres.
This fact by itself isn't all that useful. It is useful in relation to the adjacent f/stops. What is the area of the aperture at f/2.8?
Well, because the f/stop is a ratio of the focal length to diameter, our 50mm lens at f/2.8 would have a diameter of 50/2.8 =
17.86mm. The area of the circle thus formed would be π X (17.86/2)2, or 250.5 square mm. That's about 250 sq. mm at f/2.8
f/stop
Diameter of
aperture (mm)
Radius of
aperture (mm)
Area of
Aperture (sq. mm)
f/1.0 50.0 25.0 1,963
f/1.4 35.7 17.9 1,002
f/2.0 25.0 12.5 491
f/2.8 17.9 8.9 250
f/4 12.5 6.3 123
f/5.6 8.9 4.5 63
f/8 6.3 3.1 31
f/11 4.5 2.3 16
f/16 3.1 1.6 8
f/22 2.3 1.1 4
(As shown on lens) (50mm divided by f/stop) (1/2 the diameter) (pi X the radius squared)

Page 14
Photography for the fun of it!
P H O T O G R A P H Y W A L K N E W S L E T T E R
and 500 at f/2, a double/half relationship. Aha! So that's it! The area of the hole doubles and halves, it's just represented by a
ratio on the lens! No wonder it's so darn confusing.
Here's a table of the aperture areas for the common f/stops for a 50mm lens:
If you look down the column of figures on the right, you can see the (more or less) doubling/halving going on
up and down the column. You can see also how the big numbers make for smaller areas since the f/stop num-
ber is being divided into the focal length, then halved, then squared, then multiplied by π. It's no wonder this
seems obscure. Why not just call for the aperture area directly? A couple of reasons. First of all, if you have a 50mm lens on and say "I shot this
with my 50mm at 1/125th and an aperture area of 63 square millimeters" you will impart correct and exact information that
precisely zero people will understand. It's way easier to say "I shot this at 1/125th at f/5.6". Also, 63 square millimeters is f/5.6
only with a 50mm lens. If your lens is a 35mm, or an 85, or a 300, the ratio is changed around and the exposure is different. In
fact, that 63 sq. mm is about f/4 on the 35mm, f/9.5 on the 85mm and f/32 on the 300. Knowing only the area of the aperture
requires also knowing the length of the lens also to be informative as to the amount of light coming through the lens. The f/stop
figure incorporates both of these in one useful if initially confusing measure and the lens length is immaterial. It's shorthand, in ef-
fect. When you say f/8, you mean for this focal length (the f?), give me an aperture whose area is such that diameter of the re-
sulting circle goes eight times into my focal length. Fortunately, the lens makers figure out all these things for us and just mark the
f/stops on the lens for us. They're doing us a big favor.
Got it. What about other f/stop terms?
When people talk about an fast lens, what does that mean?
Lenses are referred to by their maximum aperture (that's the biggest hole, the smaller number). Thus, Nikon made (at least) three
28mm lenses at one point, a 28 f/2.0, a 28 f/2.8 and a 28 f/3.5. All three of these lenses had f/4, f/5.6, and so on up to f/16;
they were distinguished by the maximum amount of light they could let in. The 28mm f/3.5, one of which I own, when set to its
maximum aperture of f/3.5, lets in one third less light that the 28 f/2.8. The 28 f/2.8, in turn, at its maximum aperture, lets in only
half the light of the 28 f/2.0 at it's maximum aperture. Lenses which have wide maximum apertures and let in lots of light are
called fast lenses. Lenses which let in comparatively less light at their maximum apertures are called slow lenses. The 28 f/2.0
would be a fast lens; the 28 f/2.8 would be sort of regular, for which there isn't really a name; the 28 f/3.5 would be kind of
slow.
Why wouldn't you always use a fast lens?
Weight and expense. To get those larger diameter apertures means you need larger pieces of glass mounted in correspondingly
larger lens barrels. They're harder to manufacture, the lens barrel keeps getting heavier to hold all that heavy glass in alignment
so it all gets weighty in a hurry, and they're more challenging optical designs. There have been very fast lenses made which have
the reputation of being really nice wide open but kind of doggy performers stopped down. If you normally do not use the fast
lens at its widest settings, if you are mostly at, say, f/8, then you are carrying around a heavy and expensive optic which may be
underperforming its cheaper brethren stopped down.
The size penalty is really obvious in the long lenses. The weight balloons and the cost skyrockets. For instance, I used to own a
Nikon 300mm f/4.5 ED-IF lens. The IF is internal focus, the ED had to do with the Extra-low Dispersion glass used. It was a sweet
lens, 300mm in length, with silky smooth focusing and weighed in at 2 lbs. 2.9 oz. (989g). If I stepped up to the 300 f/2.8 lens the
weight went to 5 lbs. 8 oz (2500g). Not fast enough? How about Nikon's 300 f/2? It weighed in at 15 lbs. 6.9 oz. (7000g). The
300 f/2 picks up 2 1/3 stops over the 300 f/4.5 I owned, but it takes an eminently hand-holdable telephoto that fits in the cam-
era bag and makes it into an unwieldy unit needing a tripod, requiring its own suitcase and weighing seven times as much.
Even on shorter lenses the difference is noticeable; my brother-in-law's Nikon 55 f/1.2 is much heavier than my 50 f/1.8. His view-
finder sure is bright and that last stop can be handy sometimes, but the camera weighs a lot on the neckstrap and you start to
question its value if you're shooting at f/11 anyway. If you do decide you want the fastest possible lenses, go buy yourself a
Leica M6 or M7, for which you can buy a 50mm f/1.0 lens and a 75mm f/1.4. And before you think that it's modern technology
that allows these wonders, recall that Canon made a 50mm f/0.95 for their rangefinder cameras back in the 1950s.
Page 15
Photography for the fun of it!
P H O T O G R A P H Y W A L K N E W S L E T T E R
P H O T O G R A P H Y W A L K N E W S L E T T E R
I hear stops referred to a lot. Are these always f/stops?
No. A source of confusion is that "stops", as in f/stops, has become something of a handy shorthand for other doubling/halving
relationships when referring to exposure. Thus, when someone says they "stopped down", they probably did change the aperture
from, say, f/8 to f/11. However, if someone says they wish they had a stop more light, they mean they wish they had twice as
much. If they say they got some ASA 400 film which is two stops faster than their Sensia II, it means it is four times as sensitive and
you can infer that the Sensia was ASA 100 (from 400, 200 would be one stop, one halving, and 100 would be the second stop,
the second halving). Even experienced photographers get confused sometimes; I had one guy tell me he "pulled his film 6 stops,
from ASA 100 to ASA 6". Well, that's not six stops, it's four. Here, count along: 100 to 50 is one, 50 to 25 is two, 25 to 12 is
three, 12 to 6 is four.
Note that stops always refer to exposure things. You would
not say a 100mm lens is a "stop longer" than a 50mm be-
cause it was twice as long! You would say it was twice as
long, or just that it's a 100mm.
What is stopping down?
I've had a number of emails asking about this. When you
stop down a lens, you are going to a larger number/smaller
aperture and therefore less light. Going from f/8 to f/11 is
stopping down. The opposite is opening up; going from
f/11 to f/8 is moving towards the smaller number/larger
aperture and therefore more light.
What About my weird f/stops?
The f/stop sequence I listed is the full stops. Most things in
photography work in 1/3 and 1/2 stop increments, and you
will find lenses with maximum apertures at other-than-full
f/stops. In fact, among the lenses I own or have owned,
there are maximum apertures are f/2, f/2.8 and f/4, all
right on the full stops, and others in between at f/1.8,
f/2.5, f/3.2, f/3.5, f/3.8 and f/4.5.
You Say Most things Double and Halve?
Yep. Shutter speeds do the 1/15 1/30 1/60 1/125
thing referred to earlier. The f/stops we have referred to
extensively in their f/2.8 f/4 f/5.6 etc. sequence. Film
speeds do the same thing. The doubling goes like this in the common range of film speeds:
25 50 100 200 400 800
Each step here is a doubling/halving of the film's sensitivity to light. Thus, an ASA 100 film requires twice as much light to be cor-
rectly exposed as an ASA 200 film but only half as much as an ASA 50 film. You would say it was a stop slower than the 200, a
stop faster than the 50.
There are third-stop intervals in ASAs as well. Here are the third stop increments of ASA with the full-stops in bold.
25 32 40 50 64 80 100 125 160 200 250 320 400
There are still films made at some of the intermediate speeds, like Kodachrome 64 slide film, Plus-X Pan Professional black and
white at ASA 125, and Fuji NPS and some Kodak Portra color negative film at ASA 160.
How do you refer to exposures between full f/stops?
Page 16
Photography for the fun of it!
P H O T O G R A P H Y W A L K N E W S L E T T E R
Generally, I just say f/5.6 and a third, or halfway between f/5.6 and f/8, or something. I have a Sekonic light meter that reads
full f/stops plus a fraction in between expressed in tenths. If I took a reading that said 1/125th of a second at f/5.6 plus four of
these ten segments, I could go through the machinations to figure out exactly what f/stop that is (f/6.25) but that's not all that
handy, to tell you the truth. No lenses are incremented in tenths of stops and tenth-stops are a needless amount of precision any-
way given all the sources of slop in photography. Half and third stops are about as fine a distinction as matters. I have had a
number of inquiries about what the intermediate stops are. I finally did a Printable Sheet of Third-Stop Increments which you can
look at if you are deeply interested.
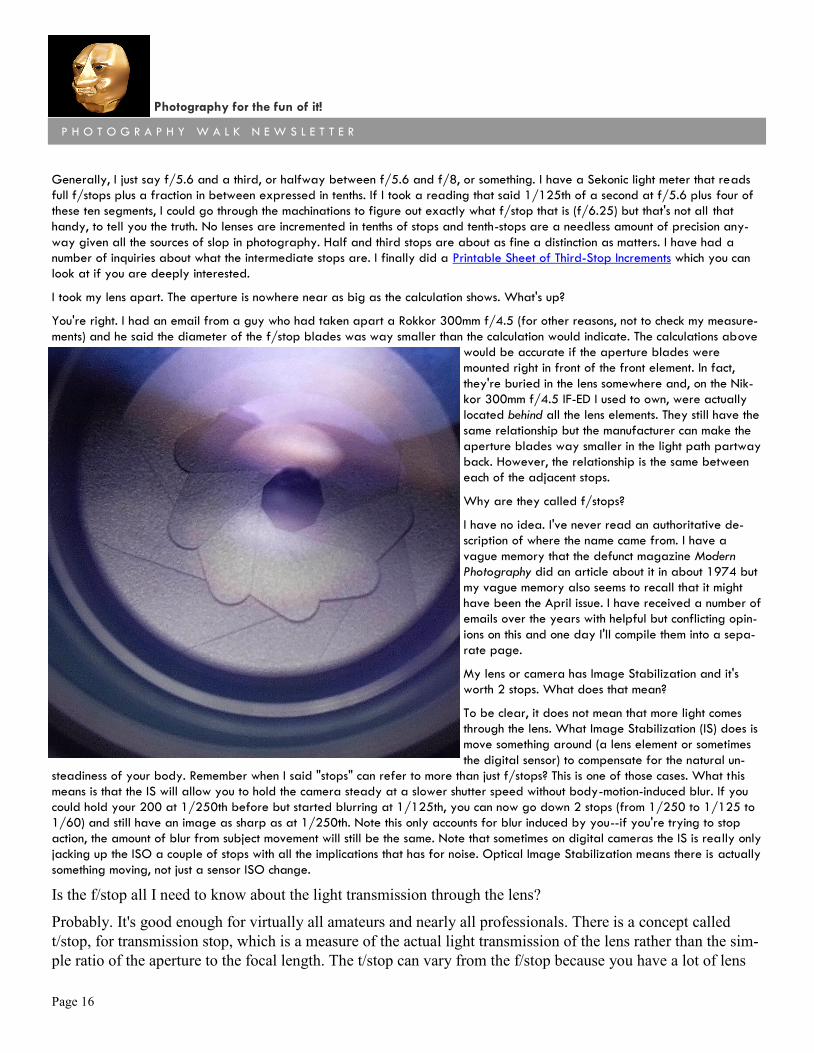
I took my lens apart. The aperture is nowhere near as big as the calculation shows. What's up?
You're right. I had an email from a guy who had taken apart a Rokkor 300mm f/4.5 (for other reasons, not to check my measure-
ments) and he said the diameter of the f/stop blades was way smaller than the calculation would indicate. The calculations above
would be accurate if the aperture blades were
mounted right in front of the front element. In fact,
they're buried in the lens somewhere and, on the Nik-
kor 300mm f/4.5 IF-ED I used to own, were actually
located behind all the lens elements. They still have the
same relationship but the manufacturer can make the
aperture blades way smaller in the light path partway
back. However, the relationship is the same between
each of the adjacent stops.
Why are they called f/stops?
I have no idea. I've never read an authoritative de-
scription of where the name came from. I have a
vague memory that the defunct magazine Modern
Photography did an article about it in about 1974 but
my vague memory also seems to recall that it might
have been the April issue. I have received a number of
emails over the years with helpful but conflicting opin-
ions on this and one day I'll compile them into a sepa-
rate page.
My lens or camera has Image Stabilization and it's
worth 2 stops. What does that mean?
To be clear, it does not mean that more light comes
through the lens. What Image Stabilization (IS) does is
move something around (a lens element or sometimes
the digital sensor) to compensate for the natural un-
steadiness of your body. Remember when I said "stops" can refer to more than just f/stops? This is one of those cases. What this
means is that the IS will allow you to hold the camera steady at a slower shutter speed without body-motion-induced blur. If you
could hold your 200 at 1/250th before but started blurring at 1/125th, you can now go down 2 stops (from 1/250 to 1/125 to
1/60) and still have an image as sharp as at 1/250th. Note this only accounts for blur induced by you--if you're trying to stop
action, the amount of blur from subject movement will still be the same. Note that sometimes on digital cameras the IS is really only
jacking up the ISO a couple of stops with all the implications that has for noise. Optical Image Stabilization means there is actually
something moving, not just a sensor ISO change.
Is the f/stop all I need to know about the light transmission through the lens?
Probably. It's good enough for virtually all amateurs and nearly all professionals. There is a concept called
t/stop, for transmission stop, which is a measure of the actual light transmission of the lens rather than the sim-
ple ratio of the aperture to the focal length. The t/stop can vary from the f/stop because you have a lot of lens
Page 17
Photography for the fun of it!
P H O T O G R A P H Y W A L K N E W S L E T T E R
P H O T O G R A P H Y W A L K N E W S L E T T E R
elements (big zoom lenses might have these) or you have one lens coated and another not coated. About the
only people who need this level of precision are professional cinemaphotographers who use the t/stop to set
exposure. Their lenses sometimes have both f/stop and t/stop scales marked. Even when they know the t/stops
of the lens, the f/stops remain important because depth of field is driven by the f/stop regardless of the light-
passing ability of the glass. I have never seen a still photography lens marked in t/stops, but the concept is out
there so I thought I'd mention it.
The only time I have found the marked f/stop to be undependable was with a Vivitar 600mm f/8 Series One
lens I had. This was a catadioptric (mirror) lens billed as a Solid Cat because rather than mirrors and airspace,
it had mirrors with solid glass in between. This puppy weighed a lot! Anyway, the lens was f/8 but my own
experience was that if you used a separate meter you'd better think about it as an f/8 and a half or f/11 lens.
So What's Important in all this?
You need to know the doubling/halving relationship and how it works with shutter speeds in exposure. This is
key since the shutter speeds and f/stops you choose have implications in how your final photograph will look
in ways other than purely the amount of light on the film. You need to know that as you stop down you get
more depth of field. You do not need to go around calculating aperture areas for your lenses and f/stops. If
you're like me, it's worth doing it once to see that it works, then forgetting about.
How a Range of Settings Gives the Same Amount of Light
Now, to bring this all together, we know that the shutter speeds and f/stops both double and halve. Thus, we
know that we can open up an f/stop (letting in twice the light) and move the shutter speed one step faster
(cutting the time in half) and have the same amount of light on the film. For instance, if we meter a scene and
it tells us that 1/125th at f/8 is the correct exposure, any of the following combinations would work:
Practically speaking, you aren't going to have one lens which takes you from f/1.4 to f/45 and your camera
body may not have the higher shutter speeds. Also, if you are without a tripod, there are limits to how slow
your shutter speed can be before your body movements blur the photo, so there are some constraints. But the
point remains, all these combinations yield the same amount of light on the film and an identical picture in
terms of brightness. What does vary is the ability of the camera to stop action and the depth of field, or how
much is in focus in front of and behind the subject. This gives you some control over how your photographs
will turn out. You should understand it and use it.
Shutter 1/4 sec- 1/8 1/15 1/30 1/60 1/125 1/250 1/500 1/1000 1/2000 1/4000
f/stop f/45 f/32 f/22 f/16 f/11 f/8 f/5.6 f/4 f/2.8 f/2 f/1.4