physical description-for printing
DESCRIPTION
Physical DescriptionTRANSCRIPT
REPORT 1
MICROSCOPY
As Partial Fulfillment of the course required for Biology 22 – General
Zoology Laboratory for the Second Semester AY 2010-2011
Mark Lester V. Magabo
Researcher
Mr. Rommel Oba
Adviser
NOVEMBER 21, 2011

I. Physical Description (OVERVIEW)
Fluorescence Microscope Phase-Contrast Microscope
Scanning Electron
Microscope
Transmission Electron
Microscope
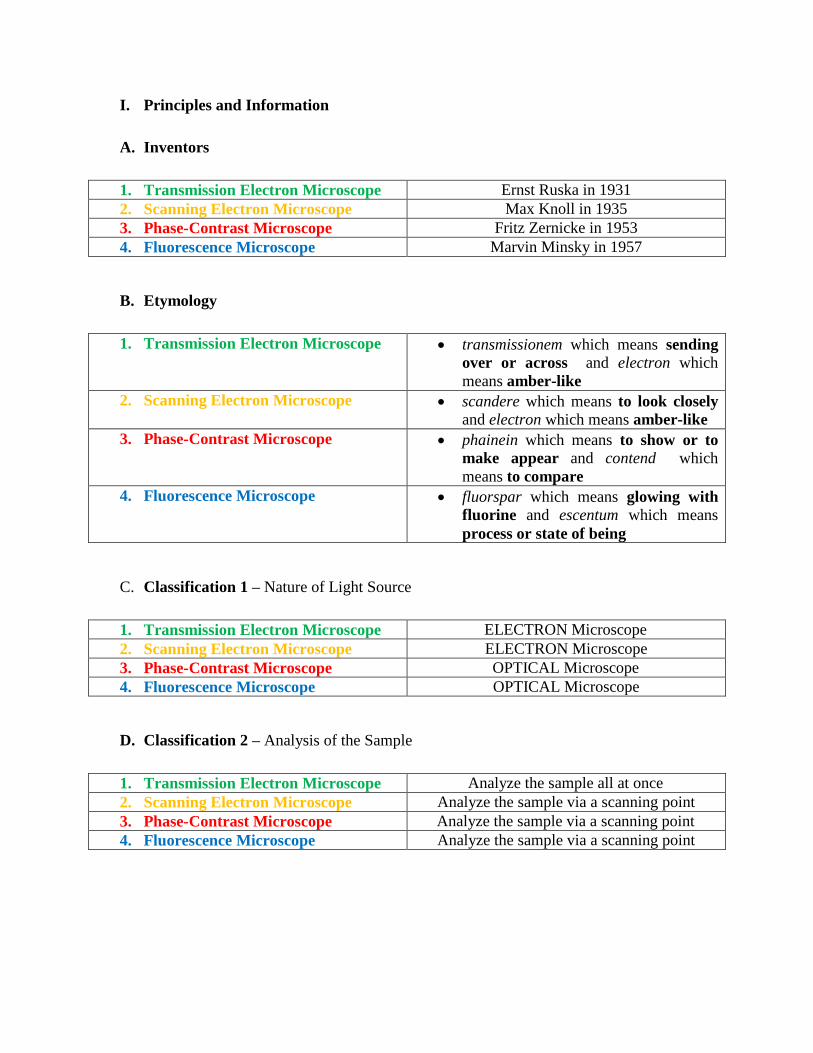
I. Principles and Information
A. Inventors
1. Transmission Electron Microscope Ernst Ruska in 1931
2. Scanning Electron Microscope Max Knoll in 1935
3. Phase-Contrast Microscope Fritz Zernicke in 1953
4. Fluorescence Microscope Marvin Minsky in 1957
B. Etymology
1. Transmission Electron Microscope transmissionem which means sending
over or across and electron which
means amber-like
2. Scanning Electron Microscope scandere which means to look closely
and electron which means amber-like
3. Phase-Contrast Microscope phainein which means to show or to
make appear and contend which
means to compare
4. Fluorescence Microscope fluorspar which means glowing with
fluorine and escentum which means
process or state of being
C. Classification 1 – Nature of Light Source
1. Transmission Electron Microscope ELECTRON Microscope
2. Scanning Electron Microscope ELECTRON Microscope
3. Phase-Contrast Microscope OPTICAL Microscope
4. Fluorescence Microscope OPTICAL Microscope
D. Classification 2 – Analysis of the Sample
1. Transmission Electron Microscope Analyze the sample all at once
2. Scanning Electron Microscope Analyze the sample via a scanning point
3. Phase-Contrast Microscope Analyze the sample via a scanning point
4. Fluorescence Microscope Analyze the sample via a scanning point

E. Basic Uses
1. Transmission Electron Microscope Used to study the internal ultrastructure
of cells
2. Scanning Electron Microscope Especially useful for the detailed study
of the surface of a specimen
3. Phase-Contrast Microscope Enhances contrast in unstained cells by
amplifying variations in density within
the specimen especially useful for
examining living, unpigmented cells
4. Fluorescence Microscope Shows the location of specific
molecules in the cell by tagging the
molecule with fluorescent dyes or
antibodies
F. What interacts with the sample to generate the image?
1. Transmission Electron Microscope Uses beam of electrons transmitted
through an ultra-thin specimen
2. Scanning Electron Microscope Uses high energy beam of electrons in a
raster scan pattern
3. Phase-Contrast Microscope Uses the phase shifting of light which
causes its amplitude and phase to
change in a way that it may give rise to
different colors and enhances contrasts
of transparent and colorless objects
4. Fluorescence Microscope Uses the principle of fluorescence (the
emission of light by a substance that
has observed light or other
electromagnetic radiation of a different
wavelength) and phosphorescence
(similar to the fluorescence but does
not immediately re-emit the radiation it
absorbs.
G. Staining of the Sample Specimen
1. Transmission Electron Microscope The specimen has been stained with
atoms of heavy metals, which attach to
certain cellular structures, thus
enhancing the electron density of some
parts of the cell more than the others
2. Scanning Electron Microscope The specimen is usually coated with a

thin film of gold
3. Phase-Contrast Microscope The specimen does not require staining
to view the slide
4. Fluorescence Microscope The sample can either be fluorescing in
its natural form like chlorophyll and
some minerals or treated with
fluorescing chemicals
H. Preparation of the Sample Specimen
1. Transmission Electron Microscope Sample preparation in TEM can be a
complex procedure. TEM specimens
are required to be at most hundreds of
nanometers thick, as
unlike neutron or X-Ray radiation the
electron beam interacts readily with the
sample, an effect that increases roughly
with atomic number squared.
Preparation includes:
1. Tissue Sectioning
2. Sample Staining
3. Mechanical Milling
4. Chemical Etching
5. Ion Etching
6. Replication
2. Scanning Electron Microscope For conventional imaging in the SEM,
specimens must be electrically
conductive, at least at the surface,
and electrically grounded to prevent the
accumulation of electrostatic charge at
the surface. Metal objects require little
special preparation for SEM except for
cleaning and mounting on a specimen
stub.
3. Phase-Contrast Microscope The cells are grown in a cell culture
container. Some cells are fixed to retain
the original morphology or structure of
cells and tissues. A microtome is use to
cut thin sections.
4. Fluorescence Microscope The specimen are prepared by fixation
done in three ways:
1. Cross-linking - involves treating
specimens with reagents that

penetrate into the cells and tissues
and form covalent cross-links
between intracellular components
2. Precipitation – usually done by the
immersion of sample specimen in
cool organic solvents.
3. Cryofixation – involves rapidly
freezing the cells or tissues on a
cooled back of heat-conductive
metal or plunging into a cold
medium, such as liquid nitrogen or
freon.
I. Principal Process on the use of each Microscope
1. Transmission
Electron
Microscope
A "light source" at the top of the microscope emits the electrons
that travel through vacuum in the column of the microscope.
Instead of glass lenses focusing the light in the light microscope,
the TEM uses electromagnetic lenses to focus the electrons into a
very thin beam. The electron beam then travels through the
specimen of study. Depending on the density of the material
present, some of the electrons are scattered and disappear from
the beam. At the bottom of the microscope the unscattered
electrons hit a fluorescent screen, which gives rise to a "shadow
image" of the specimen with its different parts displayed in
varied darkness according to their density. The image can be
studied directly by the operator or photographed with a camera.
2. Scanning
Electron
Microscope
The electron beam scans the surface of the sample coated with a
thin film of gold. The beam excites the electrons on the surface,
and these secondary electrons are detected by a device that
translates the patter of electrons into an electronic signal to a
video screen. The result is an image of the specimen topography.
The SEM has a great depth of field, resulting in an image that
appears three-dimensional.
3. Phase-
Contrast
Microscope
The phase contrast microscope uses the fact that the light passing
through a transparent part of the specimen travels slower and,
due to this is shifted compared to the uninfluenced light. This
difference in phase is not visible to the human eye. However, the
change in phase can be increased to half a wavelength by a
transparent phase-plate in the microscope and thereby causing a
difference in brightness. This makes the transparent object shine
out in contrast to its surroundings.
4. Fluorescence
Microscope The basic task of the fluorescence microscope is to let excitation
light radiate the specimen and then sort out the much weaker

emitted light to make up the image. First, the microscope has a
filter that only lets through radiation with the desired wavelength
that matches your fluorescing material. The radiation collides
with the atoms in your specimen and electrons are excited to a
higher energy level. When they relax to a lower level, they emit
light. To become visible, the emitted light is separated from the
much brighter excitation light in a second filter. Here, the fact
that the emitted light is of lower energy and has a longer
wavelength is used. The fluorescing areas can be observed in the
microscope and shine out against a dark background with high
contrast.
J. Direction of Light Path
1. Transmission Electron Microscope
2. Scanning Electron Microscope

3. Phase-Contrast Microscope
4. Fluorescence Microscope
K. Magnification and Resolution
1. Transmission Electron Microscope M – 50,000,000 x
R – 5 Angstroms or 50 picometers
2. Scanning Electron Microscope M – 500,000 x
R – 1 nanometer
3. Phase-Contrast Microscope M – 40x – 1600 x
R – 60 nanometers
4. Fluorescence Microscope M – 10x-120x
R – 10 nanometers

II. Advantages and Disadvantages
A. Advantages
1. Transmission Electron Microscope TEMs offer the most powerful
magnification, potentially over one
million times or more
TEMs have a wide-range of
applications and can be utilized in a
variety of different scientific,
educational and industrial fields
TEMs provide information on element
and compound structure
Images are high-quality and detailed
TEMs are able to yield information of
surface features, shape, size and
structure
They are easy to operate with proper
training
2. Scanning Electron Microscope Advantages of a Scanning Electron
Microscope include its wide-array of
applications, the detailed three-
dimensional and topographical imaging
and the versatile information garnered
from different detectors.
SEMs are also easy to operate with the
proper training and advances in
computer technology and associated
software make operation user-friendly.
This instrument works fast, often
completing SEI, BSE and EDS
analyses in less than five minutes. In
addition, the technological advances in
modern SEMs allow for the generation
of data in digital form.
Although all samples must be prepared
before placed in the vacuum chamber,
most SEM samples require minimal
preparation actions.
3. Phase-Contrast Microscope The capacity to observe living cells
and, as such, the ability to examine
cells in a natural state
Observing a living organism in its

natural state and/or environment can
provide far more information than
specimens that need to be killed, fixed
or stain to view under a microscope
High-contrast, high-resolution images
Ideal for studying and interpreting thin
specimens
Ability to combine with other means of
observation, such as fluorescence
Modern phase contrast microscopes,
with CCD or CMOS computer devices,
can capture photo and/or video images
4. Fluorescence Microscope The fluorescence microscope objective
serves first as a well-corrected
condenser and secondly as the image-
forming light gatherer. Being a single
component, the objective/condenser is
always in perfect alignment.
B. Disadvantages
1. Transmission Electron Microscope TEMs are large and very expensive
Laborious sample preparation
Potential artifacts from sample
preparation
Operation and analysis requires special
training
Samples are limited to those that are
electron transparent, able to tolerate the
vacuum chamber and small enough to
fit in the chamber
TEMs require special housing and
maintenance
Images are black and white
2. Scanning Electron Microscope SEMs are expensive, large and must be
housed in an area free of any possible
electric, magnetic or vibration
interference.
Maintenance involves keeping a steady
voltage, currents to electromagnetic
coils and circulation of cool water.
Special training is required to operate
an SEM as well as prepare samples.

The preparation of samples can result in
artifacts. The negative impact can be
minimized with knowledgeable
experience researchers being able to
identify artifacts from actual data as
well as preparation skill. There is no
absolute way to eliminate or identify all
potential artifacts.
In addition, SEMs are limited to solid,
inorganic samples small enough to fit
inside the vacuum chamber that can
handle moderate vacuum pressure.
Finally, SEMs carry a small risk of
radiation exposure associated with the
electrons that scatter from beneath the
sample surface.
3. Phase-Contrast Microscope Annuli or rings limit the aperture to
some extent, which decreases
resolution
This method of observation is not ideal
for thick organisms or particles
Thick specimens can appear distorted
Images may appear grey or green, if
white or green lights are used,
respectively, resulting in poor
photomicrography
Shade-off and halo effect, referred to a
phase artifacts
Shade-off occurs with larger particles,
results in a steady reduction of contrast
moving from the center of the object
toward its edges
Halo effect, where images are often
surrounded by bright areas, which
obscure details along the perimeter of
the specimen
4. Fluorescence Microscope Fluorophores lose their ability to
fluoresce as they are illuminated in a
process called photobleaching.
Photobleaching occurs as the
fluorescent molecules accumulate
chemical damage from the electrons
excited during fluorescence.
Photobleaching can severely limit the

time over which a sample can be
observed by fluorescent microscopy
Fluorescence microscopy with
fluorescent reporter proteins has
enabled analysis of live cells by
fluorescence microscopy, however cells
are susceptible to phototoxicity,
particularly with short wavelength
light.
Sources
A. Books
Bacallao, R., and Steltzer, E. (1989) Meth. Cell Biol. 31, 437-452
Campbell, N.A., Reece, J. B. et al. Biology Eight Edition. Pearson Education Incorporated-Benjamin
Cummnigs.2008. pp 95-97
Danilatos, G,D. "Foundations of environmental scanning electron microscopy". Advances in
Electronics and Electron Physics 71: 109–250.
Manuel Gunkel, Fabian Erdel, Karsten Rippe, Paul Lemmer, Rainer Kaufmann, Christoph Hörmann,
Roman Amberger and Christoph Cremer. Dual color localization microscopy of cellular
nanostructures. In: Biotechnology Journal, 2009, 4, 927-938. ISSN 1860-6768
Porter, K and Blum, J (1953). "A study in Microtomy for Electron Microscopy".The anatomical
record 117 (4): 685–710.
B. Internet
http://en.wikipedia.org/wiki/Fluorescence_microscope
http://en.wikipedia.org/wiki/Microscope#The_rise_of_modern_light_microscopy
http://en.wikipedia.org/wiki/Phase_contrast_microscopy
http://en.wikipedia.org/wiki/Scanning_electron_microscope#Sample_preparation
http://en.wikipedia.org/wiki/Transmission_electron_microscopy#Electrons
http://serc.carleton.edu/research_education/geochemsheets/browse.html
http://typesofmicroscopes.blogspot.com/2009/07/scanning-electron-microscope.html
http://www.biologymad.com/cells/microscopy.htm
http://www.etymonline.com/
http://www.microscopemaster.com/scanning-electron-microscope.html
http://www.microscopemaster.com/transmission-electron-microscope.html
http://www.nobelprize.org/