plank bending
DESCRIPTION
techniques for plank bending. ship model buildingTRANSCRIPT
Model Ship World Data Sheet
Plank Bending Compiled by: Martin Wallen Last updated: 4 April 2011
The following subject matter has been compiled from original posts within the Model Ship World forums. The information is reproduced from the original information provided by the identified members for the benefit and interest of model ship builders. Please note that all information and photos images on this site are subject to copyright and must not be used for any commercial purposes without the permission of the owner and/or MSW.
Introduction The following are a series of posts from the MSW forums relating to plank bending. They are reproduced here in a single document to provide a summary, and a ready reference of the various techniques used by modellers.
Example 1.
Phrygian posts this information on 10 May 2007.
There is a detailed booklet on steam bending available free on the Lee Valley site: http://www.leevalley.com/wood/page.aspx?c=1&p=31161&cat=1,45866,45867 This technique is directed towards bending on a larger scale than usual in ship modelling, but there should be some useful information and the basic technique is applicable.
Example 2.
This comes from johannesludo5 on 21 October 2010.
I have altered his comments slightly to bring them into more idiomatic English [ed].
http://modelshipworld.com/phpBB2/viewtopic.php?t=13530
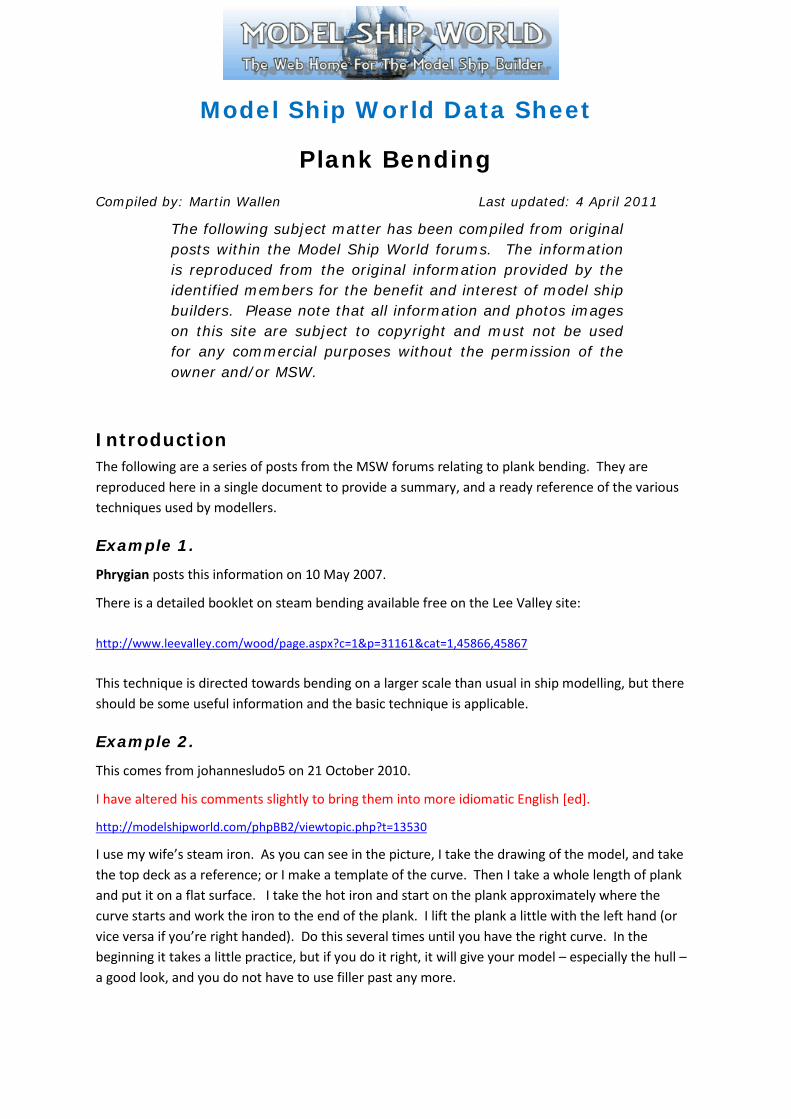
I use my wife’s steam iron. As you can see in the picture, I take the drawing of the model, and take the top deck as a reference; or I make a template of the curve. Then I take a whole length of plank and put it on a flat surface. I take the hot iron and start on the plank approximately where the curve starts and work the iron to the end of the plank. I lift the plank a little with the left hand (or vice versa if you’re right handed). Do this several times until you have the right curve. In the beginning it takes a little practice, but if you do it right, it will give your model – especially the hull – a good look, and you do not have to use filler past any more.
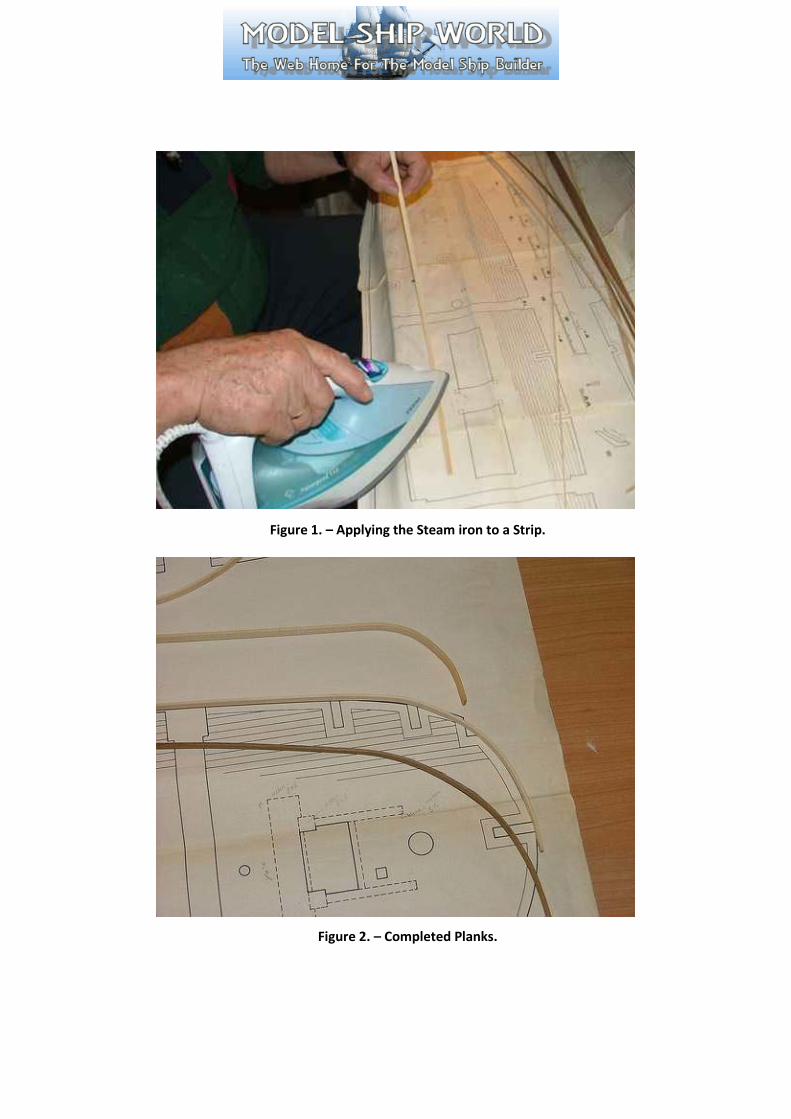
Figure 1. – Applying the Steam iron to a Strip.
Figure 2. – Completed Planks.

Example 3.
This thread comes from tjdarla2 who began the discussion on 28 February 2010.
I have edited some comments for brevity and pertinence [ed].
http://modelshipworld.com/phpBB2/viewtopic.php?t=11137
On the AL Santa Ana kit they have Sapelli wood for the hull. I have tried boiling water, soaking over night and used the wife’s iron and cannot get this stuff to bend over the stern. Any ideas of what I can try next to bend this stuff?
clloyd:
1: Steam. 2: Make a bending iron out of a soldering iron. Sometimes you just need more heat and sustained as the wood bends, and the flat surface of an iron doesn't deliver.
Jack Nastyface:
Most woods will bend but the stern is tough sometimes. I dip the plank in water for a few minutes then used an electric bender with a curved aluminium end, but a copper soldering iron will work also, so will heating up a length of 1/2" copper pipe. Don't do the bend all in one go. Keep dipping and bending---slowly.
amateur:
I had some good experience with using ammonia – I used quite a lot (and left the window open). Problem is that it might change the structure and colour of the wood. Advantage, it softens the structure of the wood, enabling you to do some amazing bends in the wood (and after drying the bend holds, as the wood hardens again when it dries).
tjdarla2:
I changed my thinking on bending the wood. I was letting it soak for 3 or more hours and it was still hard to bend. So I tried a steam pot method to bend the wood. I only have to steam the planks for 30 minutes to get the right bend, longer for the stern planks. Here are some pictures.
Figure 1. – Plank Steaming Set-up.
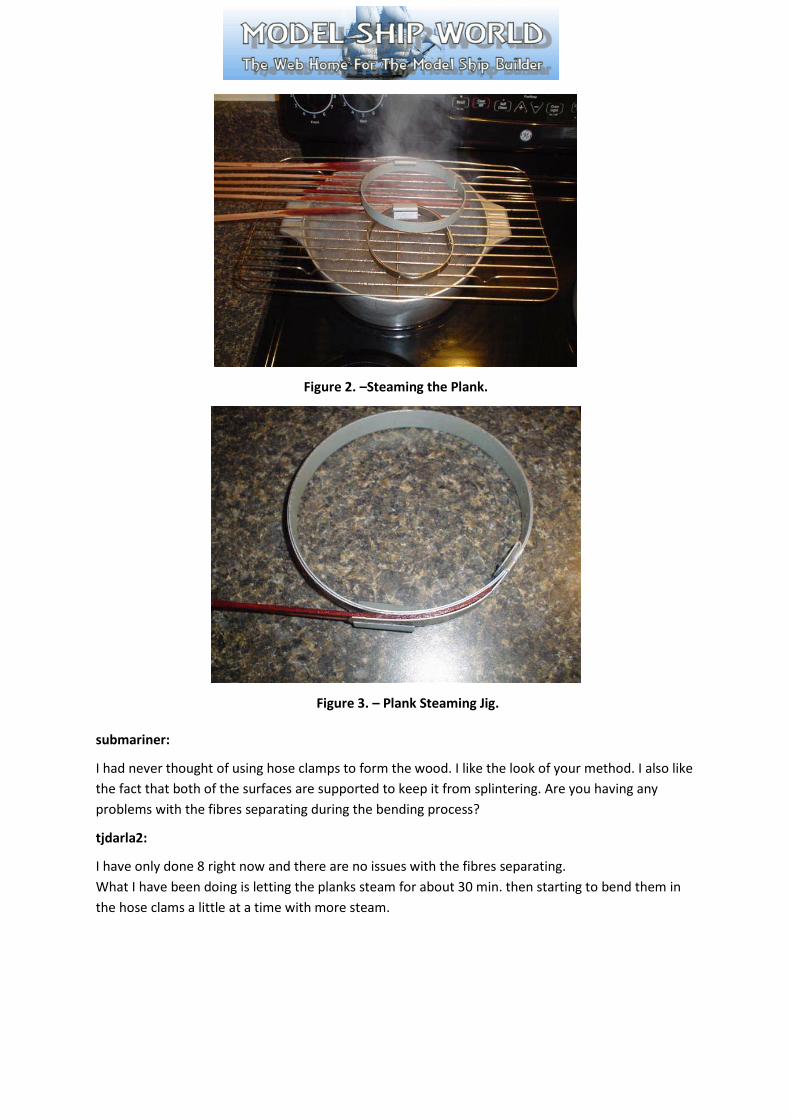
Figure 2. –Steaming the Plank.
Figure 3. – Plank Steaming Jig.
submariner:
I had never thought of using hose clamps to form the wood. I like the look of your method. I also like the fact that both of the surfaces are supported to keep it from splintering. Are you having any problems with the fibres separating during the bending process?
tjdarla2:
I have only done 8 right now and there are no issues with the fibres separating. What I have been doing is letting the planks steam for about 30 min. then starting to bend them in the hose clams a little at a time with more steam.
Example 4.
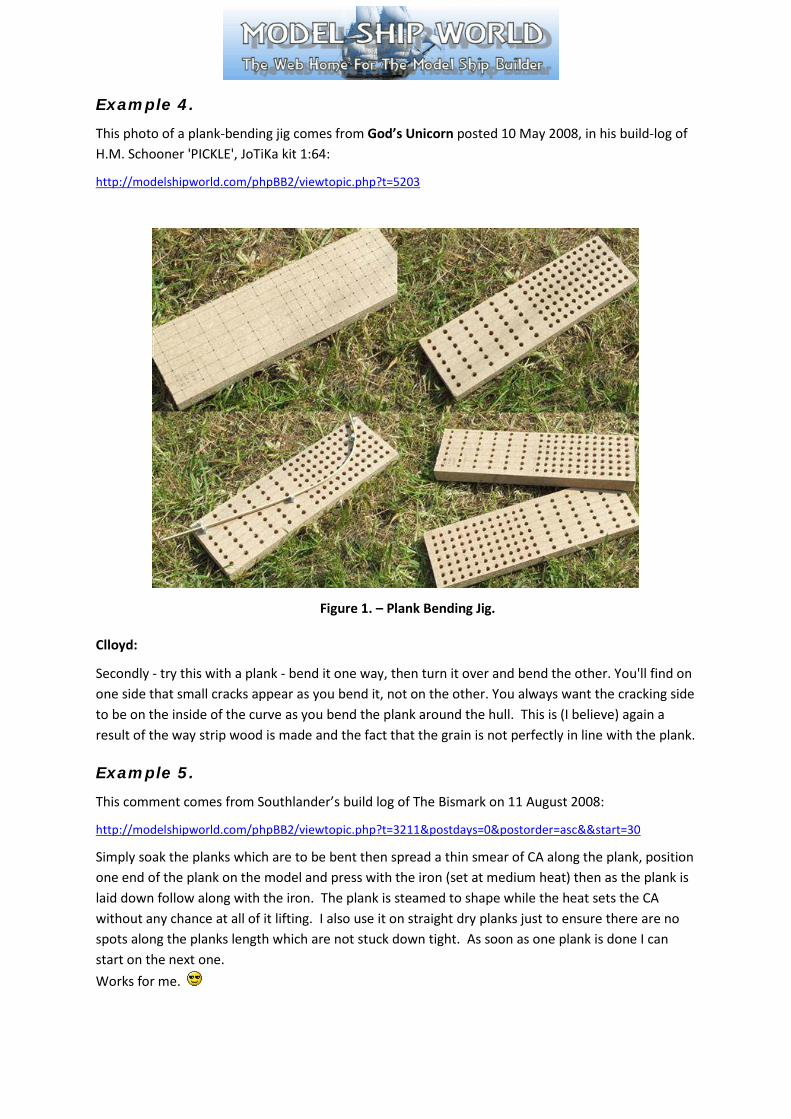
This photo of a plank-bending jig comes from God’s Unicorn posted 10 May 2008, in his build-log of H.M. Schooner 'PICKLE', JoTiKa kit 1:64:
http://modelshipworld.com/phpBB2/viewtopic.php?t=5203
Figure 1. – Plank Bending Jig.
Clloyd:
Secondly - try this with a plank - bend it one way, then turn it over and bend the other. You'll find on one side that small cracks appear as you bend it, not on the other. You always want the cracking side to be on the inside of the curve as you bend the plank around the hull. This is (I believe) again a result of the way strip wood is made and the fact that the grain is not perfectly in line with the plank.
Example 5.
This comment comes from Southlander’s build log of The Bismark on 11 August 2008:
http://modelshipworld.com/phpBB2/viewtopic.php?t=3211&postdays=0&postorder=asc&&start=30
Simply soak the planks which are to be bent then spread a thin smear of CA along the plank, position one end of the plank on the model and press with the iron (set at medium heat) then as the plank is laid down follow along with the iron. The plank is steamed to shape while the heat sets the CA without any chance at all of it lifting. I also use it on straight dry planks just to ensure there are no spots along the planks length which are not stuck down tight. As soon as one plank is done I can start on the next one. Works for me.
Example 6.
These comments come from the log by Mando of Static – Swift 1805 (AL) 1:50 Scale, on 27 April 2010:
http://modelshipworld.com/phpBB2/viewtopic.php?t=11756&postdays=0&postorder=asc&&start=10
George Lounsbury:
Planking seems to be hard until you get the idea and feel. I usually taper the plank widths to keep from having short runs. Also use heat and water to mould the plank to the hull curve. My heat source is a small iron sold for applying the heat shrink coverings on model airplanes. As I am in the middle of planking the sub planks mow I could add photos of my method to my build log or here.
Kid Salty:
I wasn't really crazy about using an electrical plank-bending tool. An easier technique is soaking the strips in very hot water for 15 minutes, pinning them in place until they dry, then removing the pins and gluing them into position. Don't actually pin through the planks...pin next to them into the framework.
Danvad:
To bend the planks for the first layer you could use a Plank Nipper instead of soaking them - you get an instant bend that stays that way. These are available from your hobby shop, on-line, or you could try making one yourself as I did. The bought ones tend to cut into the plank a fair bit - if you dull the sharp cutting edge on them they work a little better. The one I made doesn't cut the plank, it has more of a "crushing" action which leaves the inside face fairly smooth for exposed planks like the inside of the upper bulwarks. You won't need a plank bender or even soaking for the 2nd layer of planks, they are thin enough to bend easily.
Example 7.
This comment comes from the build log for Static HM Schooner Ballahoo 1:64 - Caldercraft (First build), by cornish_kj; the topic of plank bending comes up on Fri Nov 05, 2010
http://modelshipworld.com/phpBB2/viewtopic.php?t=13545&start=10&postdays=0&postorder=asc&highlight=plankbending
Mudmuppet:
For plank bending, I put two planks back to back, and gently keep nipping down the length with a pair of side cutters. You can see both planks bending away from each other before your eyes. By crimping close together, or further apart, increases the severity of the bend. Doing it this way only marks the inside of the plank. If it’s in a place where the rear will be visible you can’t use this method. Just don’t nip too tight or you will cut straight through.
Dan Vad:
Further to Lee's (mudmuppet) comment above regarding using side-cutters, if you can make your own simple tools have a look at the Plank Bender I made from an old "Saw Set":
http://modelshipworld.com/phpBB2/viewtopic.php?t=6061&highlight=plank+bender
The link Danny provides here brings up the following which he posted on 29 August 2008 [Ed.]
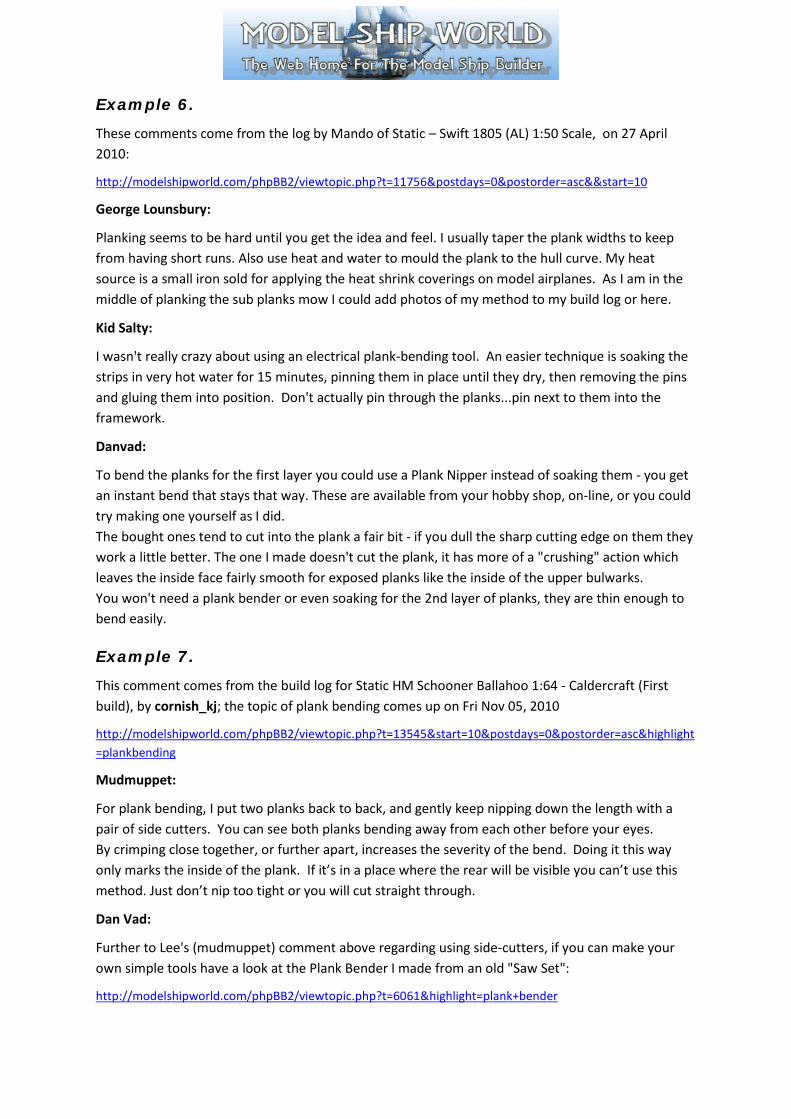
I'm new to this site, so I thought the best way to start would be to give someone out there a Tip. Last year I bought a Plank Bender, I don't remember the brand but it had plastic handles and used a "crimping" action to bend the plank. Looked a bit like a side-cutter. The concept worked fine once I got used how much pressure to apply to get an even bend without crushing the plank. I got about halfway through planking my model when one of the plastic handles snapped! Now without a Plank Bender and still with half of my planking to do I came up with an idea. I had an old brass "Saw Set" (used for setting the teeth on a handsaw) that I hadn't used for many years, and figured I could make a much stronger bender out of it than my previous one. The tool has basically four parts - a body, handle, blade and blade holder. Both the blade and its holder are independently spring loaded. I dismantled and cleaned the tool. Then I ground a convex shape into the blade holder. I ground the blade down about 2mm and radiused its shoulders. After several re-assemblies in which I modified the angles of blade and holder, I made up a piece of flat aluminium which I ground into a concave shape to roughly match the shape of the blade holder. I then epoxied that part to the inside top end of the body. The Bender works very well indeed. I can make inside or outside curves in a plank, with only a light sand needed to remove the crimp marks, and even put a twist into a plank by varying the angle of entry.
Cost: about A$25.00 for a new Saw Set, A$10.00 for a used one, or A$0.00 if you have an old one you don't need any more. Time to Build: about 1 to 1.5 hours.
I hope someone can make use of my idea. See photos below.
Figure 1. – Close-up of the Jaws.
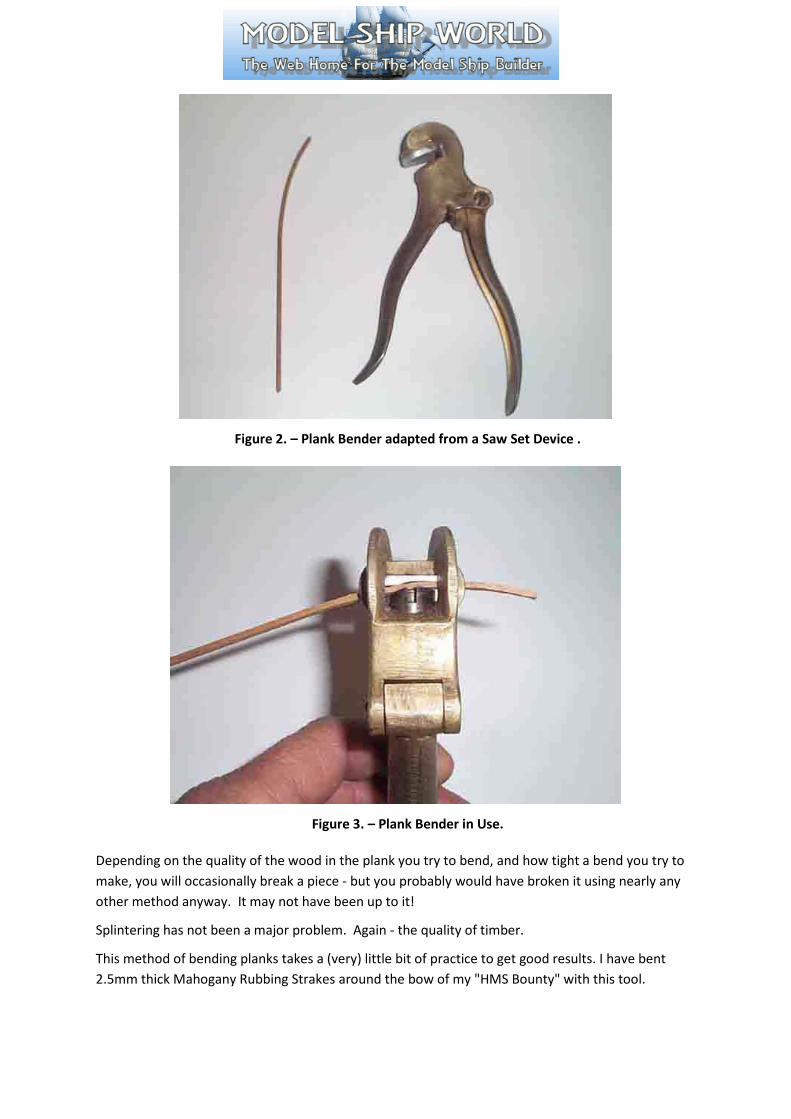
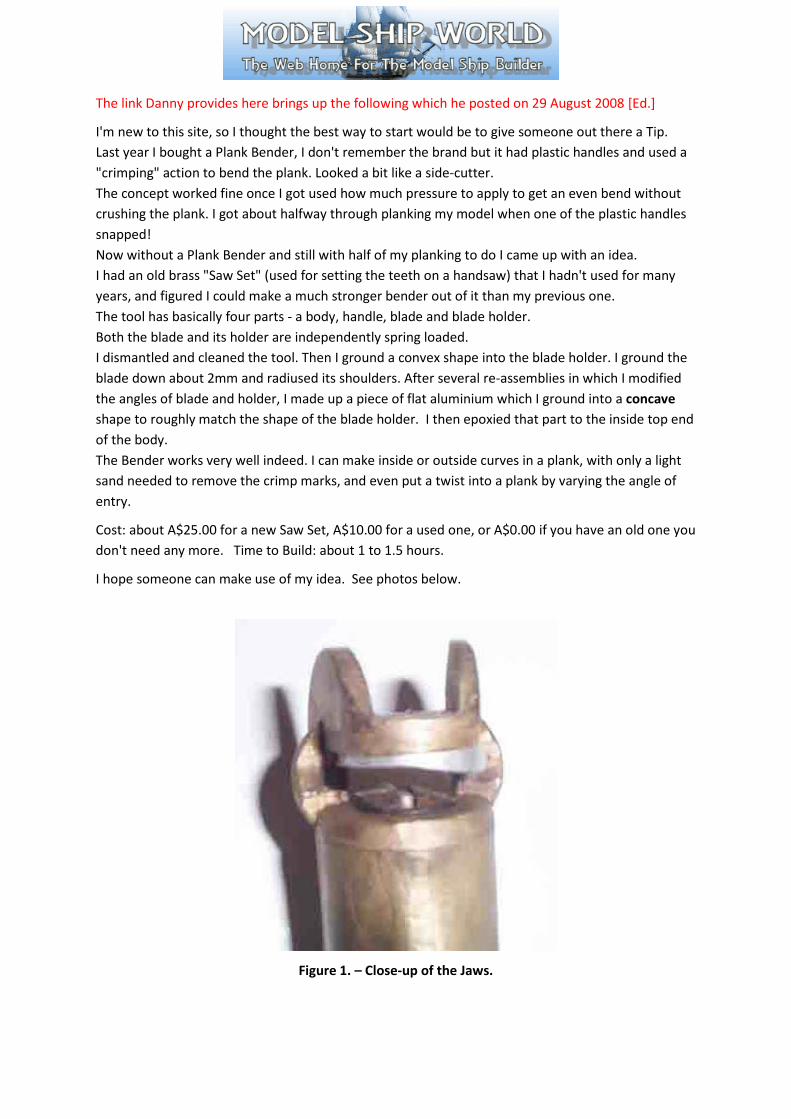
Figure 2. – Plank Bender adapted from a Saw Set Device .
Figure 3. – Plank Bender in Use.
Depending on the quality of the wood in the plank you try to bend, and how tight a bend you try to make, you will occasionally break a piece - but you probably would have broken it using nearly any other method anyway. It may not have been up to it!
Splintering has not been a major problem. Again - the quality of timber.
This method of bending planks takes a (very) little bit of practice to get good results. I have bent 2.5mm thick Mahogany Rubbing Strakes around the bow of my "HMS Bounty" with this tool.
I would advise you try it out on a few pieces of scrap before doing that plank you have just spent an hour getting to just the right taper though!
Dan Vad:
I've had quite a few positive comments about my Plank Bender, so I thought I'd bring it back into the "Spotlight" again - with a few more pictures of some recent ones I've built for a few mates.
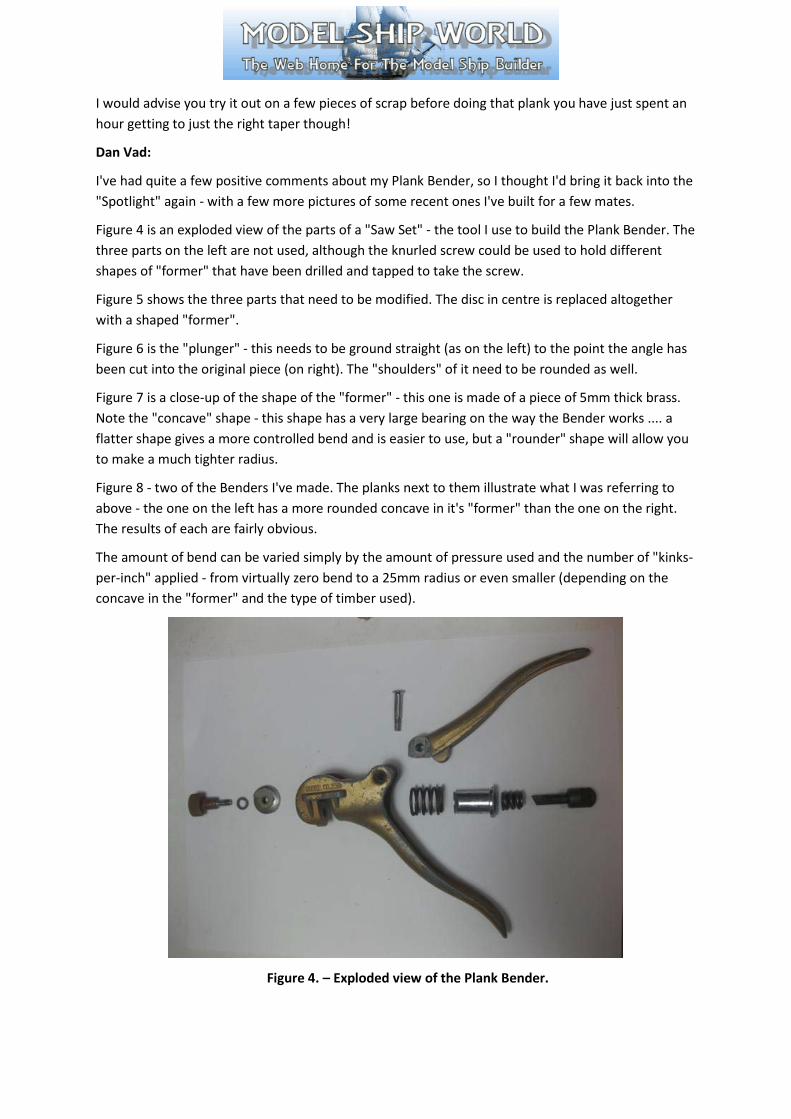
Figure 4 is an exploded view of the parts of a "Saw Set" - the tool I use to build the Plank Bender. The three parts on the left are not used, although the knurled screw could be used to hold different shapes of "former" that have been drilled and tapped to take the screw.
Figure 5 shows the three parts that need to be modified. The disc in centre is replaced altogether with a shaped "former".
Figure 6 is the "plunger" - this needs to be ground straight (as on the left) to the point the angle has been cut into the original piece (on right). The "shoulders" of it need to be rounded as well.
Figure 7 is a close-up of the shape of the "former" - this one is made of a piece of 5mm thick brass. Note the "concave" shape - this shape has a very large bearing on the way the Bender works .... a flatter shape gives a more controlled bend and is easier to use, but a "rounder" shape will allow you to make a much tighter radius.
Figure 8 - two of the Benders I've made. The planks next to them illustrate what I was referring to above - the one on the left has a more rounded concave in it's "former" than the one on the right. The results of each are fairly obvious.
The amount of bend can be varied simply by the amount of pressure used and the number of "kinks-per-inch" applied - from virtually zero bend to a 25mm radius or even smaller (depending on the concave in the "former" and the type of timber used).
Figure 4. – Exploded view of the Plank Bender.

Figure 5. – Parts of the Plank Bender that Require Modification.
Figure 6. – Saw Set Plunger.
Figure 7. – Close-up of the Former.
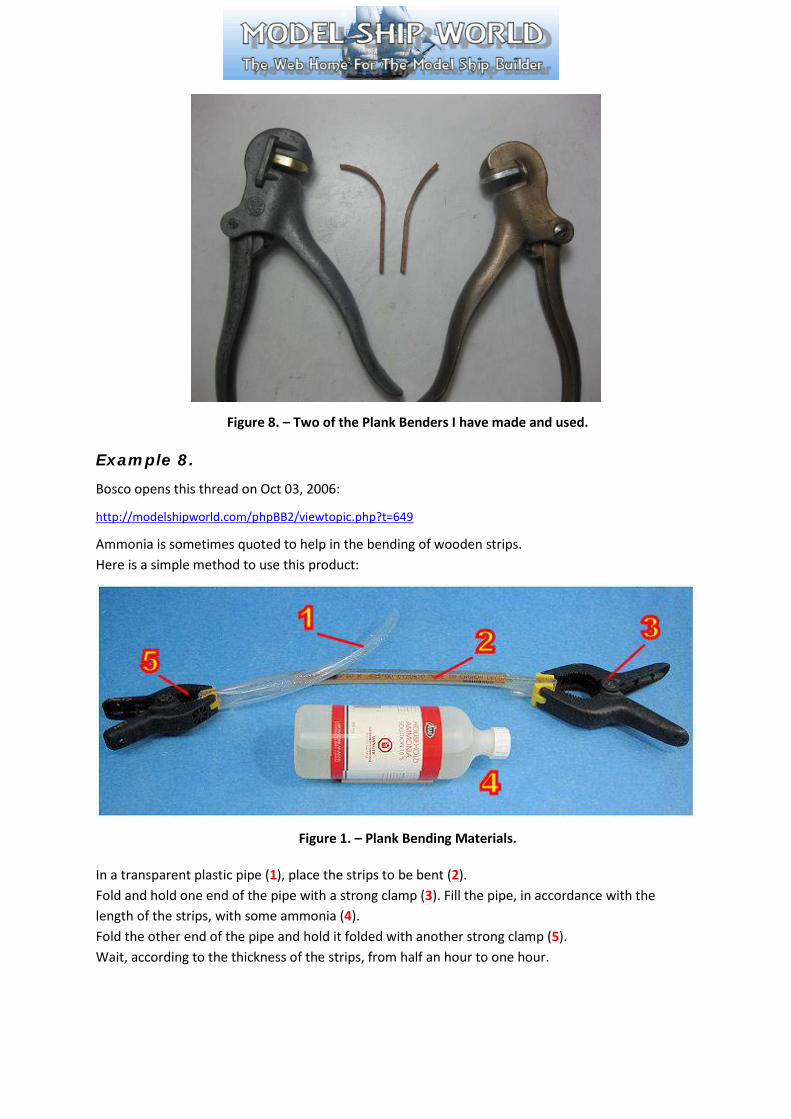
Figure 8. – Two of the Plank Benders I have made and used.
Example 8.
Bosco opens this thread on Oct 03, 2006:
http://modelshipworld.com/phpBB2/viewtopic.php?t=649
Ammonia is sometimes quoted to help in the bending of wooden strips. Here is a simple method to use this product:
Figure 1. – Plank Bending Materials.
In a transparent plastic pipe (1), place the strips to be bent (2). Fold and hold one end of the pipe with a strong clamp (3). Fill the pipe, in accordance with the length of the strips, with some ammonia (4). Fold the other end of the pipe and hold it folded with another strong clamp (5). Wait, according to the thickness of the strips, from half an hour to one hour.
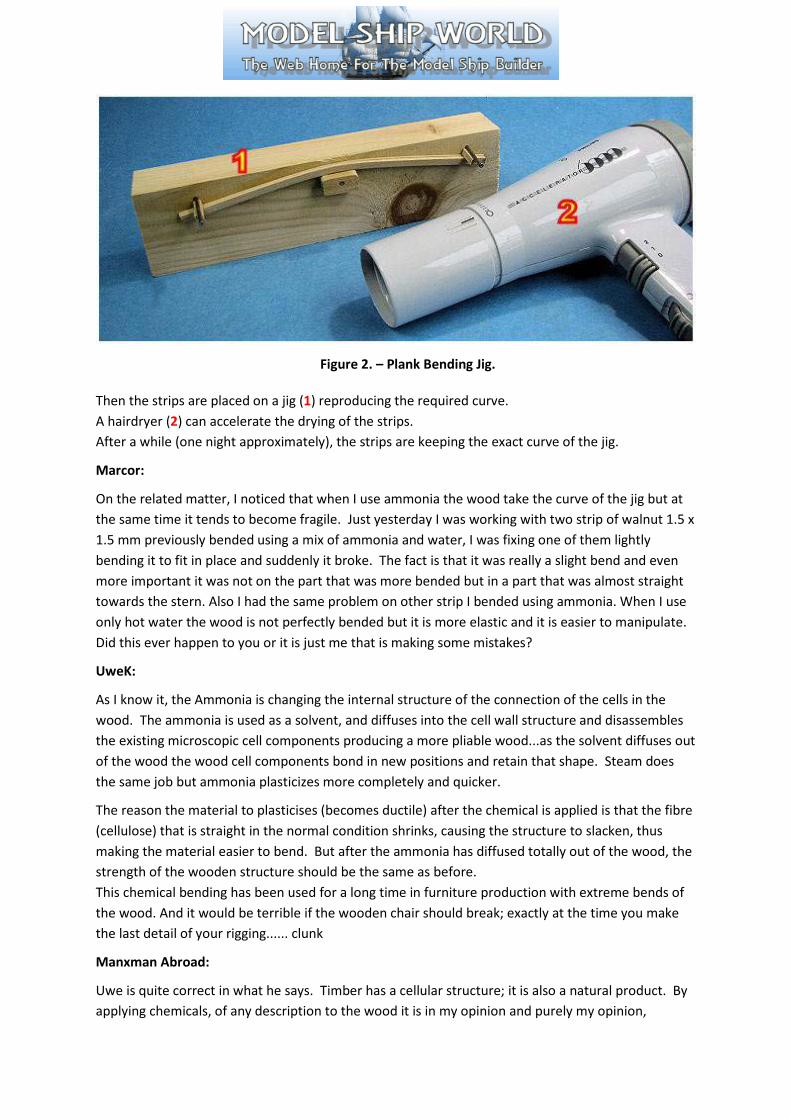
Figure 2. – Plank Bending Jig.
Then the strips are placed on a jig (1) reproducing the required curve. A hairdryer (2) can accelerate the drying of the strips. After a while (one night approximately), the strips are keeping the exact curve of the jig.
Marcor:
On the related matter, I noticed that when I use ammonia the wood take the curve of the jig but at the same time it tends to become fragile. Just yesterday I was working with two strip of walnut 1.5 x 1.5 mm previously bended using a mix of ammonia and water, I was fixing one of them lightly bending it to fit in place and suddenly it broke. The fact is that it was really a slight bend and even more important it was not on the part that was more bended but in a part that was almost straight towards the stern. Also I had the same problem on other strip I bended using ammonia. When I use only hot water the wood is not perfectly bended but it is more elastic and it is easier to manipulate. Did this ever happen to you or it is just me that is making some mistakes?
UweK:
As I know it, the Ammonia is changing the internal structure of the connection of the cells in the wood. The ammonia is used as a solvent, and diffuses into the cell wall structure and disassembles the existing microscopic cell components producing a more pliable wood...as the solvent diffuses out of the wood the wood cell components bond in new positions and retain that shape. Steam does the same job but ammonia plasticizes more completely and quicker.
The reason the material to plasticises (becomes ductile) after the chemical is applied is that the fibre (cellulose) that is straight in the normal condition shrinks, causing the structure to slacken, thus making the material easier to bend. But after the ammonia has diffused totally out of the wood, the strength of the wooden structure should be the same as before. This chemical bending has been used for a long time in furniture production with extreme bends of the wood. And it would be terrible if the wooden chair should break; exactly at the time you make the last detail of your rigging...... clunk
Manxman Abroad:
Uwe is quite correct in what he says. Timber has a cellular structure; it is also a natural product. By applying chemicals, of any description to the wood it is in my opinion and purely my opinion,

weakened. Also dependent on were the wood in question has come from, it may also have been chemically treated at source. Something most of us do not realise, hence the applications of other chemicals can only make it less stable. I know that many woods are bleached or dyed during and after machining prior to being sold. For what purpose I don't know other than to try and make all the timber seem the same as a selling point. It should not all be the same. Wood is natural and hence never all the same that’s what makes wood so beautifully.
Uwe is quite right in referring to the plasticising effects on wood and that it is used in the manufacture of furniture, but we are talking about pieces of timber that are far bigger than the pieces that we use. Another thing that in again my opinion has to be taken into consideration is that wood contains, or should contain, about 8-10% water. Hence it is 90-92% dry, or to put it another way, it’s a sponge. Immerse it in a chemical and it will absorb it very quickly. What guarantee have you that you have removed all of the chemical from that wood once you have finished bending it. Basically, you have no guarantee that it has all been removed.
If this is the case and I highly suspect that it is, these chemical deposits, irrespective of how weak, can and may affect any finishing material applied, or any material such as whipping material can suffer long term. Any fixings can be affected, again long term, by the use of chemicals. Certain woods have natural acids in them, for instance Oak is a well known wood for this. The use of any ferrous fixing with Oak wood will cause blue black stains to appear next to the ferrous fitting, but not with non ferrous fittings.
The amazing qualities of wood is what makes it so fascinating to me, and why I love working with it.
I know that it is a very hard problem as to what to do to get woods to bend and I really don't know the answer other than steam bending. A tried and tested method used for centuries by master shipwrights and joiners, I tend to be old fashioned and I will stick with their methods, after all they knew more about wood and how to "sort" it than I will ever begin to know.
Raymond:
I use ammonia mixed with 50% water and that works for me very well as the plank remains in form when dry. I did all bending this way on my San Felipe. I do the mix in an aquarium tube that is fixed to a wooden plank to keep it right. I seal the ends of course, and leave it there for a couple hours depending on the thickness of the wood. I find also that you can feel the grain softly to determine which direction the bending will go best. I did this only with walnut. I have no idea how well it works with pear, ebony or cherry.
Bosco:
For 1.5 x 1.5mm strips, I use some water and one electric iron.
In this case, they are 5 x 5mm strips which must be slightly bent. Rather than cutting this curve from a board of 5mm of thickness, I used ammonia to bend some strips in stock.
On another forum they told about methylated spirit which is better than ammonia and the drying of which is faster. What do you think about that?
The parts I treated were "decorative" not structural ones.
Just a small photo to remind you that methylated spirit is much better than ammonia for bending wood. It is odourless and dries very quickly.
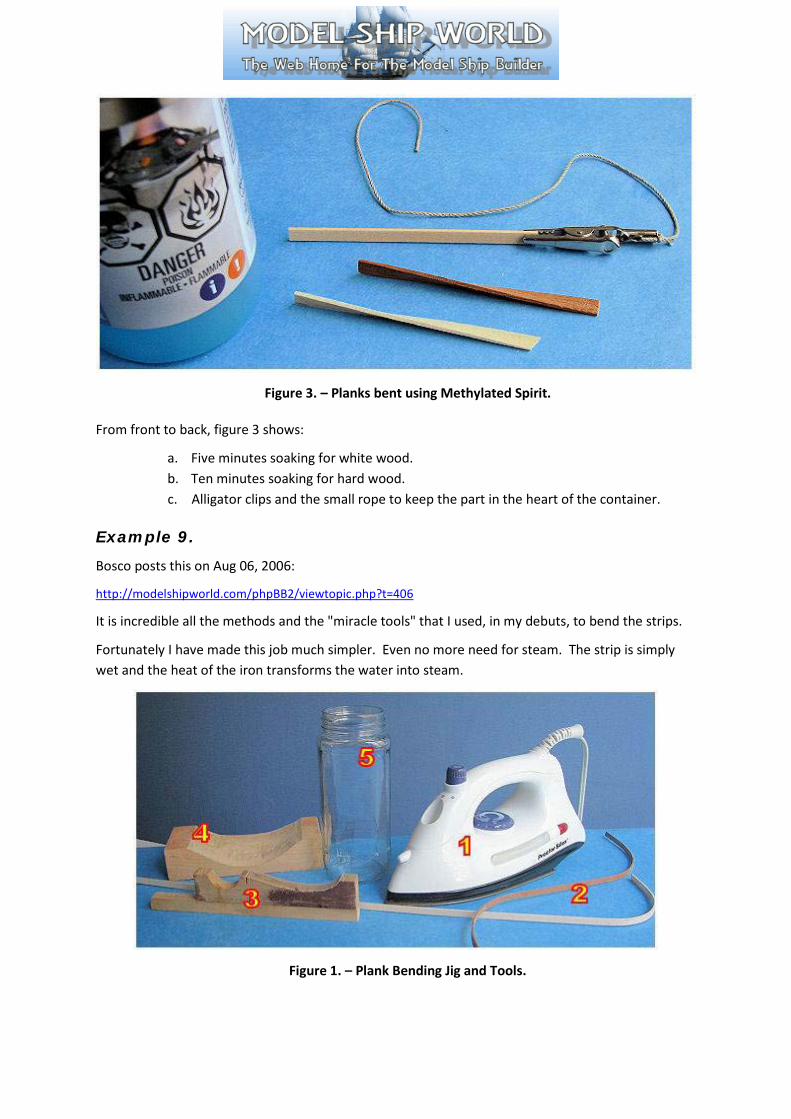
Figure 3. – Planks bent using Methylated Spirit.
From front to back, figure 3 shows:
a. Five minutes soaking for white wood. b. Ten minutes soaking for hard wood. c. Alligator clips and the small rope to keep the part in the heart of the container.
Example 9.
Bosco posts this on Aug 06, 2006:
http://modelshipworld.com/phpBB2/viewtopic.php?t=406
It is incredible all the methods and the "miracle tools" that I used, in my debuts, to bend the strips.
Fortunately I have made this job much simpler. Even no more need for steam. The strip is simply wet and the heat of the iron transforms the water into steam.
Figure 1. – Plank Bending Jig and Tools.
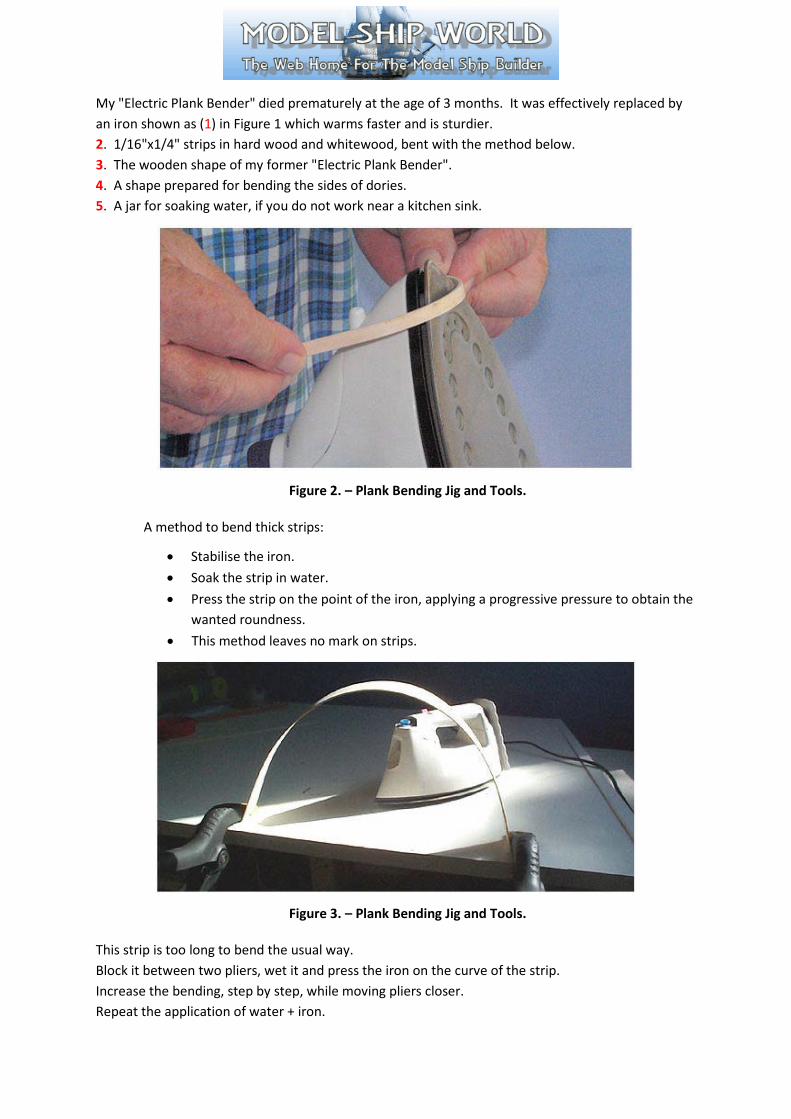
My "Electric Plank Bender" died prematurely at the age of 3 months. It was effectively replaced by an iron shown as (1) in Figure 1 which warms faster and is sturdier. 2. 1/16"x1/4" strips in hard wood and whitewood, bent with the method below. 3. The wooden shape of my former "Electric Plank Bender". 4. A shape prepared for bending the sides of dories. 5. A jar for soaking water, if you do not work near a kitchen sink.
Figure 2. – Plank Bending Jig and Tools.
A method to bend thick strips:
• Stabilise the iron. • Soak the strip in water. • Press the strip on the point of the iron, applying a progressive pressure to obtain the
wanted roundness. • This method leaves no mark on strips.
Figure 3. – Plank Bending Jig and Tools.
This strip is too long to bend the usual way. Block it between two pliers, wet it and press the iron on the curve of the strip. Increase the bending, step by step, while moving pliers closer. Repeat the application of water + iron.
Mtaylor:
There seems to be a basic problem with the ammonia and water or vinegar and water methods that I've not seen addressed anywhere. Ammonia is a base (if I remember my chemistry rightly) and vinegar is an acid. Won't these substances deteriorate the wood over time? I've heard the horror stories about tea and coffee stained sails crumbling and am wondering about these bending methods.
Ply and water don't go together well, unless its marine ply. Ordinary ply may not have A type bond, waterproof glue and may dissolve the glue resulting in lots of veneer pieces. Waterproof A bond type ply will need very hot water or steam to soften, not dissolve the glue. An electric jug is ideal for this, just tape the switch down but don't let it boil dry or you will be in no end of trouble with the other half. Hold the end to be bent with a pair of pliers or something of that nature as steam and hot wood burns like hell. Either bend it over a jig or a tin, or something about the right radius, and leave it to cool set in that position and shape. It doesn't take long in the steam trail of a jug to soften so try it a couple of times until its soft enough to bend. That's the way it was done in the old days and still works well.
Kelvin12:
I have been using ammonia and water mix for a long time without problems, although on some pine timbers it can discolour. It depends on the amount of ammonia being used; 100% can stain some timbers, 10% doesn't seem to have any effect on the timbers I use. Wash the ammonia mix off the timber with clean cold water before using.
Example 10.
This thread comes from a poll on Bending begun 12 August 2007:
http://modelshipworld.com/phpBB2/viewtopic.php?t=2731&highlight=
Don Lean:
I have had a lot of experience in bending wood and have tried most methods. I have never used ammonia so I don’t know how effective it is and plank nippers I know nothing about. The best method I’ve found is the method used by violin makers who use a ‘bending iron’ which is a heated oval shaped metal block. A damp cloth is sandwiched between the wood to be bent and a flexible metal strap and bent to the desired curve around the bending iron. This method allows bending with a twist which is what is often needed in planking. Temperature controlled bending irons are available from Luthier suppliers. I use a lash-up consisting of a length of copper pie and a hot air paint stripper. Scorched fingers are common but we must suffer for our craft. Steam chest bending is the traditional method of bending wood and certainly works. Sometime I must experiment with a small scale chest just for fun. (I spend too much time trying new methods and not enough time actually building the model).
Stelios:
I'd agree with Don; the traditional way used from carpenters is "water and fire" meaning use of water to soak the plank and then heat to help with the bending. In my case I soak the strips then I use a hot piece of steel to "iron" the strip and bend it gradually. I never used ammonia.
Zeldazork:
I have only used very hot water then bend the plank into shape and let it dry.
Queequeg:
I think a distinction between types of wood may be necessary. Lime can be soaked in ambient temperature water and formed fairly easily, walnut requires hotter water and ebony requires steam. The method is definitely wood type dependent. I personally do all shaping before soaking and bending when using basswood/lime.
Kelvin12:
I generally just go from one method to the other just to try them out rather than adopt one method suit all applications. Also as others have said, it all depends on the timber and thickness and, in particular, whether the timber allows for the method to be used. It’s an interesting pole regardless and good on you for instigating it.
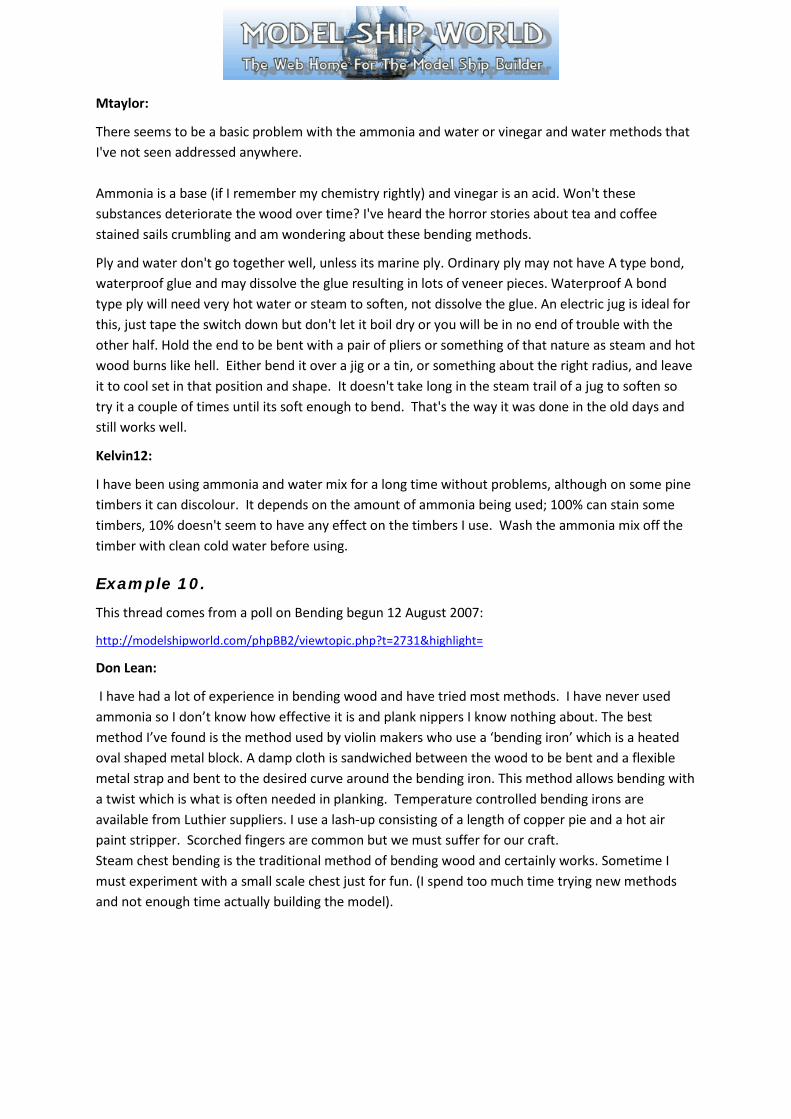
Skuta:
Here is a method (Figure 1) that I have used successfully over many years; this is by no means my own invention. Just soak the timber to be bent, warm up the copper tube (not too hot) and bend the timber over the tube.
Figure 1. – Plank Bending Jig (Skuta).
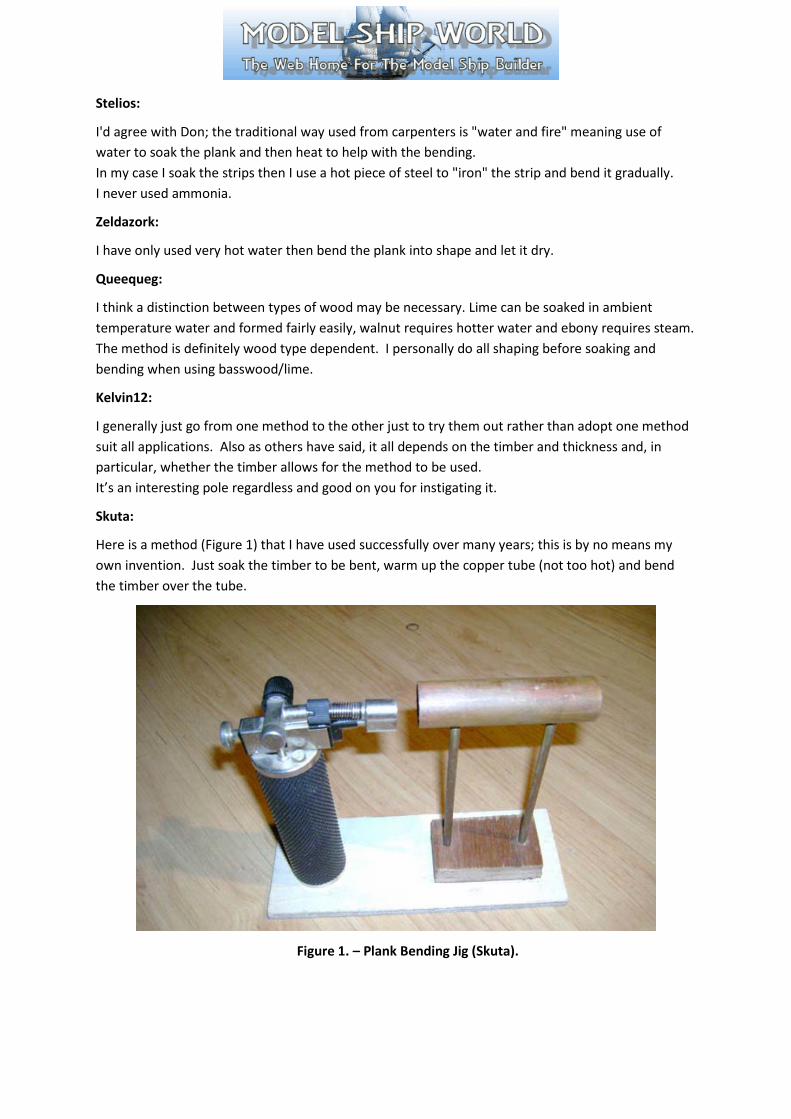
Bosco:
The following is the method I used for the building of launches. The strips were too small to be bent with warmth without crushing them.
Figure 2. – Step 1.
A straight strip is glued on its starting point with cyano gel (Figure 2).
Figure 3. – Step 2.
With a paintbrush (Figure 3), some alcohol is painted on the strip while a pressure moves the strip closer to the bulkhead. When the strip touches the bulkhead, we loosen the pressure, we apply a drop of cyano-gel on the bulkhead and finally we press / glue the strip on the bulkhead. While applying pressure to the plank, paint the strip with alcohol. Alcohol evaporates very quickly.
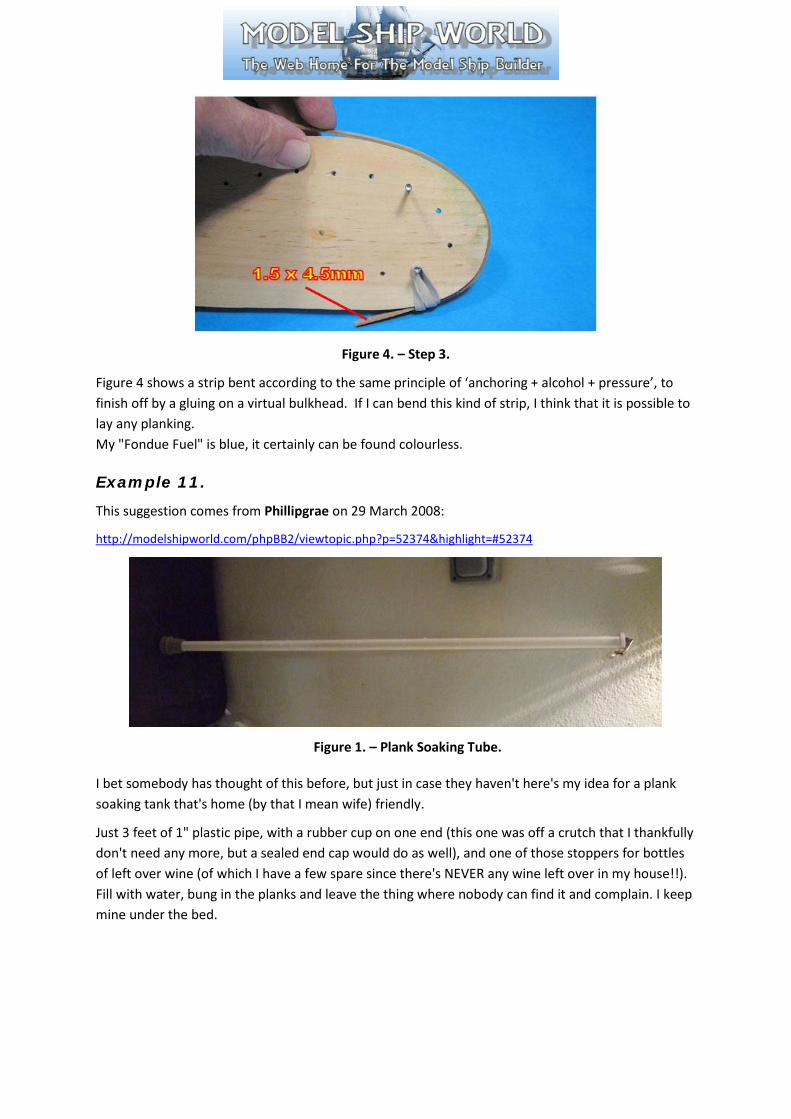
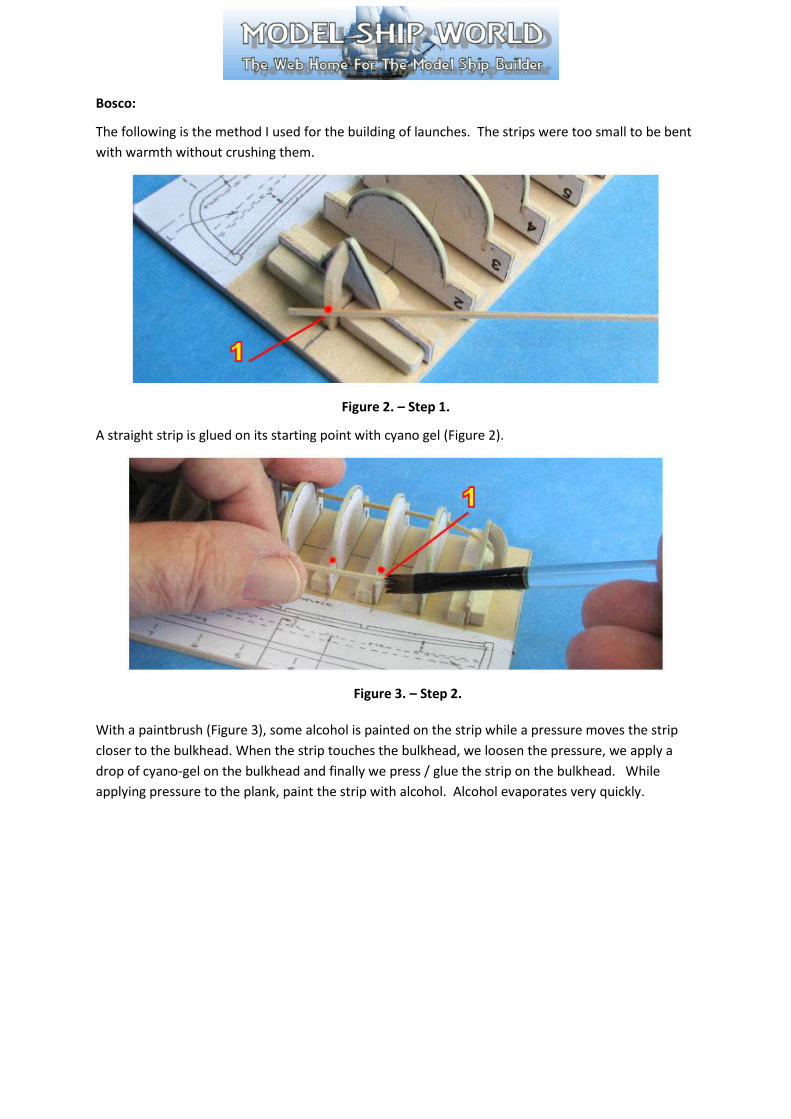
Figure 4. – Step 3.
Figure 4 shows a strip bent according to the same principle of ‘anchoring + alcohol + pressure’, to finish off by a gluing on a virtual bulkhead. If I can bend this kind of strip, I think that it is possible to lay any planking. My "Fondue Fuel" is blue, it certainly can be found colourless.
Example 11.
This suggestion comes from Phillipgrae on 29 March 2008:
http://modelshipworld.com/phpBB2/viewtopic.php?p=52374&highlight=#52374
Figure 1. – Plank Soaking Tube.
I bet somebody has thought of this before, but just in case they haven't here's my idea for a plank soaking tank that's home (by that I mean wife) friendly.
Just 3 feet of 1" plastic pipe, with a rubber cup on one end (this one was off a crutch that I thankfully don't need any more, but a sealed end cap would do as well), and one of those stoppers for bottles of left over wine (of which I have a few spare since there's NEVER any wine left over in my house!!). Fill with water, bung in the planks and leave the thing where nobody can find it and complain. I keep mine under the bed.
Example 12.
Torchy raises this question on April 28, 2008.
http://modelshipworld.com/phpBB2/viewtopic.php?t=5117
How long do you soak planks for before fitting? Can they be over soaked?
Coater87:
This is one of those things you will just have to experiment with. There are so many ways to bend planks, and so many heat sources, and so many jigs to hold them. It all depends on how YOU want to do it. Just be sure no matter the method you use, to let the planks dry thoroughly before you glue them down. Or else they will shrink as they dry, and leave gaps later.
Philipgrae:
There's definitely a time limit on soaking. I left some mahogany ones in to soak then forgot about them. After about a week they'd developed black stains which couldn't be removed.
Also I left some Lime ones in my unpatented Plank Soaking Tube for about four days and the ends started going black.
So I would say the minimum is the time required to make them pliable, and the maximum is not long after that.
WileyFromTexas:
You are asking about soaking wood prior to bending. I thought this was a good opportunity to share a bit of furniture making industry knowledge about bending wood as it dispels many myths us modellers have to contend with.
Wood can be bent by simple soaking, bending and drying but the result is often unstable over time and tends to straighten as it soaks up and releases atmospheric moisture with humidity changes.
To properly bend wood the cell walls have be heated to the point that some of the natural elements "plasticise" allowing it to flex and maintain its shape when cooled. Industry research has measured this point to be about 170C (338F) degrees! Adding the right amount of moisture can reduce this requirement.
The most popular ways to bend wood for models that stands up to scientific scrutiny are: dry heat bending; steam bending; immersing wood in boiling water; and microwaving soaked wood briefly (seconds). Any of these will elevate the temperature enough to plasticise.
Dry bending is typically done with a soldering iron with or without a special attachment for shaping the bend. Some folks even use mid-wattage light bulbs. A touch of the heat to the wood will contract it (and bend it). Repeated gentle application of heat will often do the trick as long as the wood does not scorch or burn.
The general steaming and boiling guidelines are 15 minutes per cm of wood (38 minutes per inch) thickness. If your wood is well seasoned or otherwise particularly dry, then more time (up to doubling) will be required.
Here is a key - when the wood is heated and ready for bending it must be done right out of the heat source before it cools too much. This cooling can sometimes just take seconds so get the wood on your work right away!
There are some myths that additives to the water or steam will make it more effective. Ammonia and Urea are most often mentioned. It is true these will work but they have to be induced under pressure into the wood before bending. Most hobbyists don't have the equipment to do this at home.
Finally some limits on bending expectations. Most woods can withstand about 25% to 30% compression when bending but can only withstand 1% to 2% stretching. Industry bending is sometimes done with a flexible metal strip with solid stops on it. The strip is put against the back of the wood bend and the stops adjusted snugly against the end of the wood piece. This way, when it bends the outside half does not stretch while the inside compresses. It is all compression.
Example 13.
This suggestion comes from TRM Posted April 26, 2009.
http://modelshipworld.com/phpBB2/viewtopic.php?t=8176
I wrote an article for another forum on my need for a bender, it was received well and I thought I would share it with you.
I had a problem with conventional bending, by soaking and making a jig and so on. I decide to embark on creating one from home with as little cost as possible.
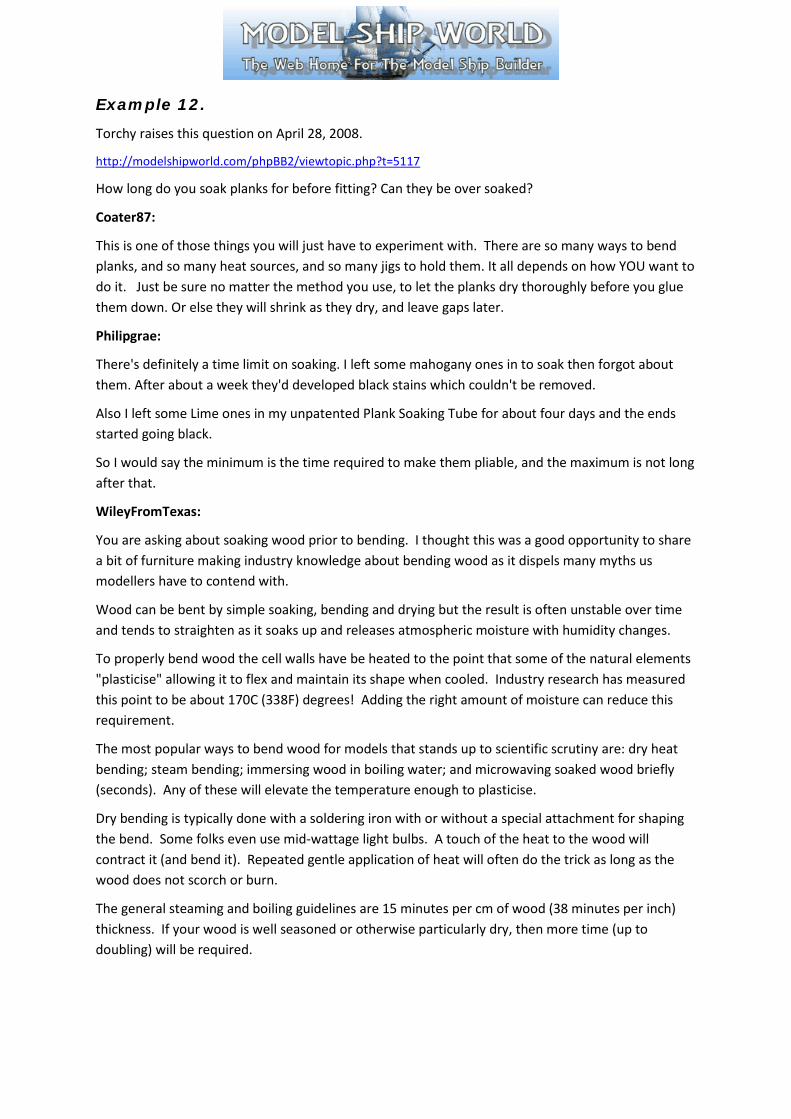
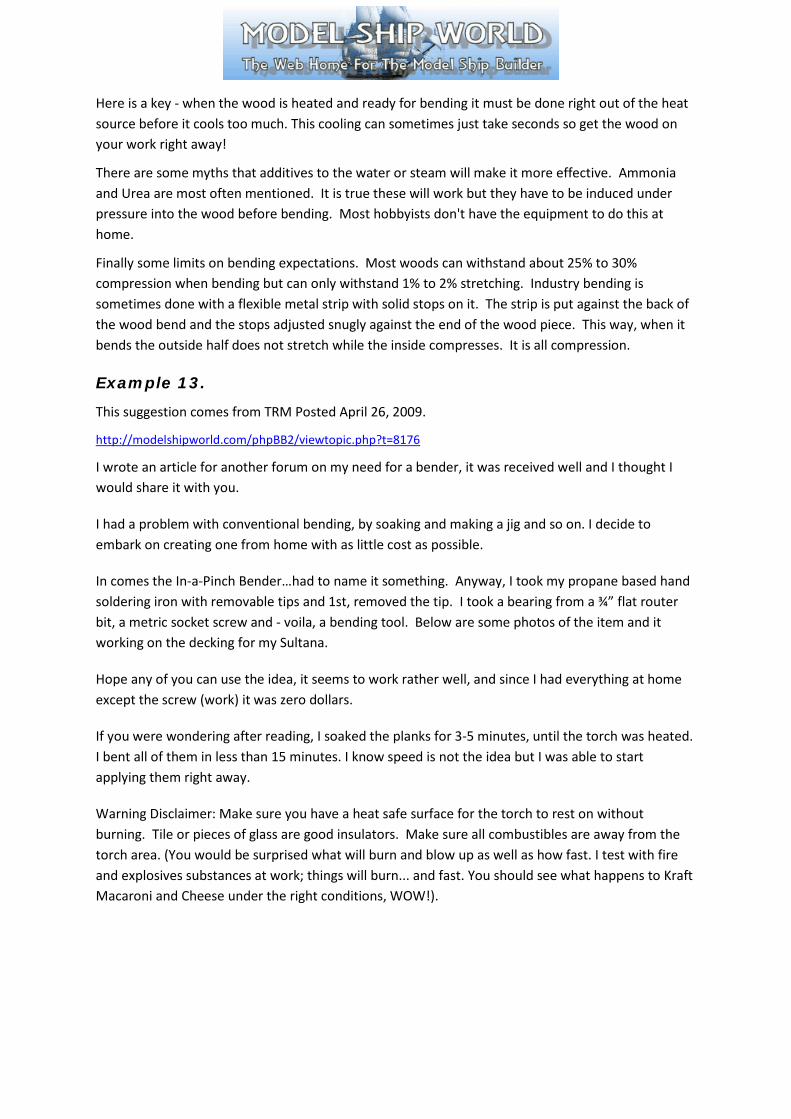
In comes the In-a-Pinch Bender…had to name it something. Anyway, I took my propane based hand soldering iron with removable tips and 1st, removed the tip. I took a bearing from a ¾” flat router bit, a metric socket screw and - voila, a bending tool. Below are some photos of the item and it working on the decking for my Sultana.
Hope any of you can use the idea, it seems to work rather well, and since I had everything at home except the screw (work) it was zero dollars.
If you were wondering after reading, I soaked the planks for 3-5 minutes, until the torch was heated. I bent all of them in less than 15 minutes. I know speed is not the idea but I was able to start applying them right away.
Warning Disclaimer: Make sure you have a heat safe surface for the torch to rest on without burning. Tile or pieces of glass are good insulators. Make sure all combustibles are away from the torch area. (You would be surprised what will burn and blow up as well as how fast. I test with fire and explosives substances at work; things will burn... and fast. You should see what happens to Kraft Macaroni and Cheese under the right conditions, WOW!).
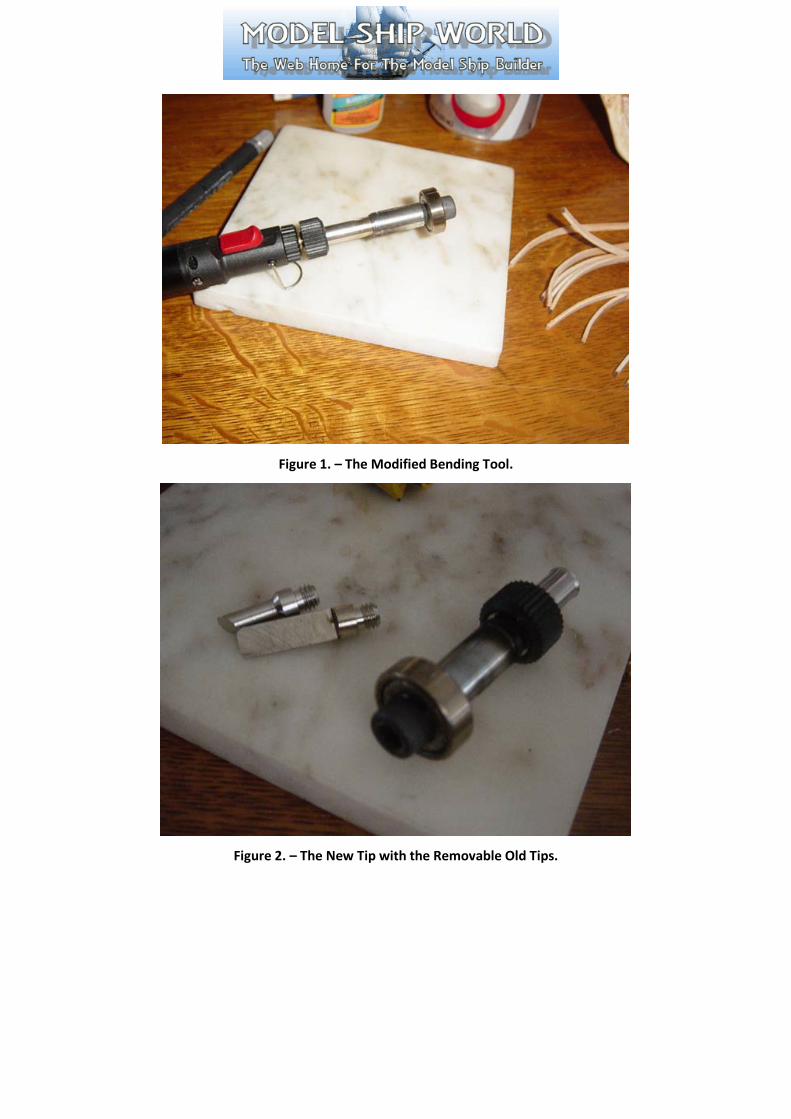
Figure 1. – The Modified Bending Tool.
Figure 2. – The New Tip with the Removable Old Tips.
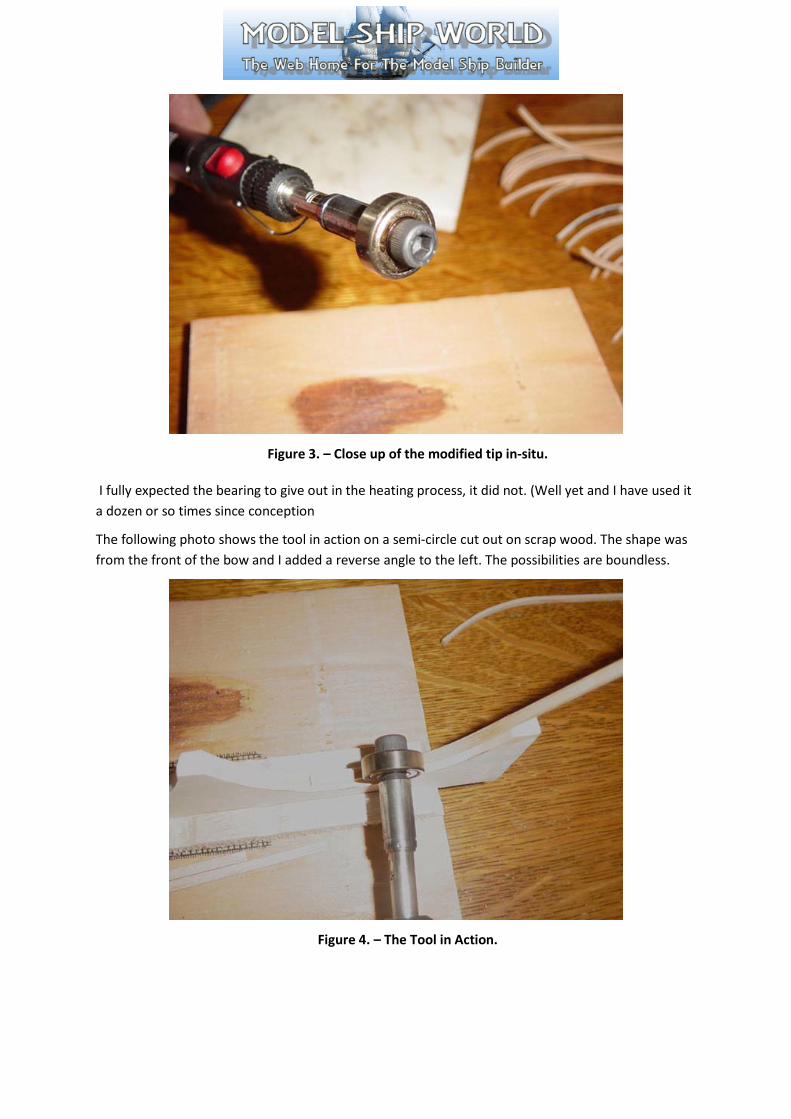
Figure 3. – Close up of the modified tip in-situ.
I fully expected the bearing to give out in the heating process, it did not. (Well yet and I have used it a dozen or so times since conception
The following photo shows the tool in action on a semi-circle cut out on scrap wood. The shape was from the front of the bow and I added a reverse angle to the left. The possibilities are boundless.
Figure 4. – The Tool in Action.
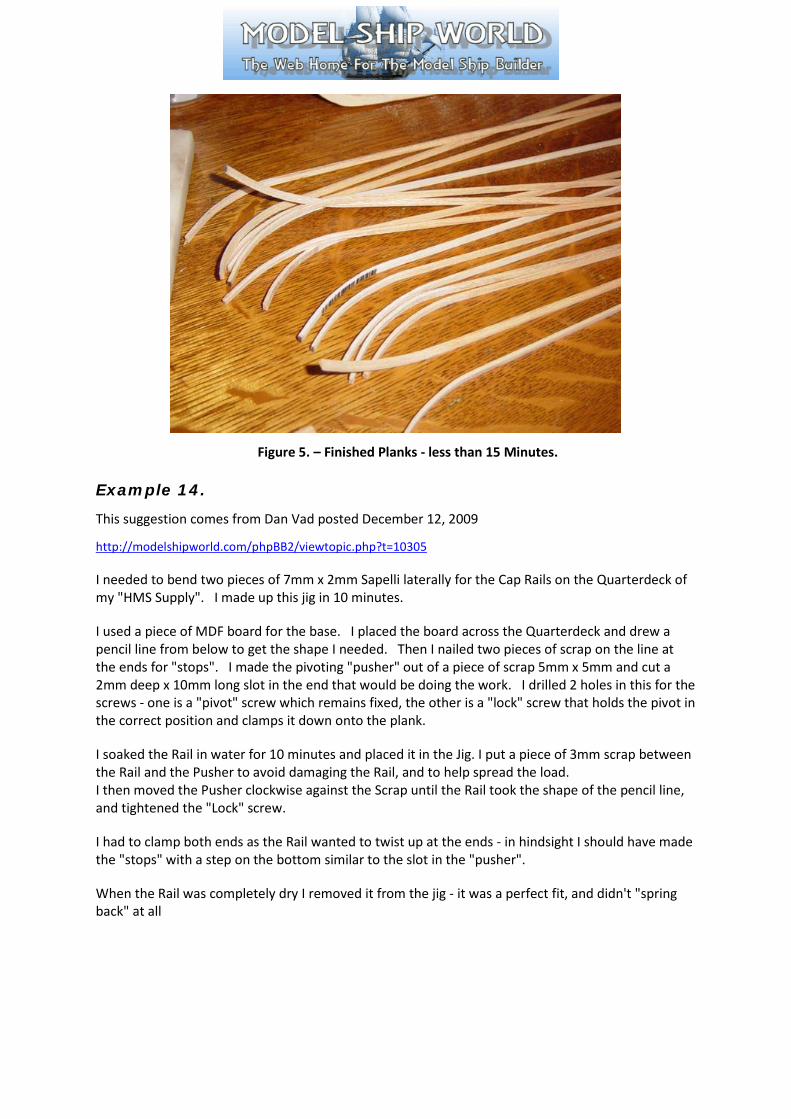
Figure 5. – Finished Planks - less than 15 Minutes.
Example 14.
This suggestion comes from Dan Vad posted December 12, 2009
http://modelshipworld.com/phpBB2/viewtopic.php?t=10305
I needed to bend two pieces of 7mm x 2mm Sapelli laterally for the Cap Rails on the Quarterdeck of my "HMS Supply". I made up this jig in 10 minutes.
I used a piece of MDF board for the base. I placed the board across the Quarterdeck and drew a pencil line from below to get the shape I needed. Then I nailed two pieces of scrap on the line at the ends for "stops". I made the pivoting "pusher" out of a piece of scrap 5mm x 5mm and cut a 2mm deep x 10mm long slot in the end that would be doing the work. I drilled 2 holes in this for the screws - one is a "pivot" screw which remains fixed, the other is a "lock" screw that holds the pivot in the correct position and clamps it down onto the plank.
I soaked the Rail in water for 10 minutes and placed it in the Jig. I put a piece of 3mm scrap between the Rail and the Pusher to avoid damaging the Rail, and to help spread the load. I then moved the Pusher clockwise against the Scrap until the Rail took the shape of the pencil line, and tightened the "Lock" screw.
I had to clamp both ends as the Rail wanted to twist up at the ends - in hindsight I should have made the "stops" with a step on the bottom similar to the slot in the "pusher".
When the Rail was completely dry I removed it from the jig - it was a perfect fit, and didn't "spring back" at all
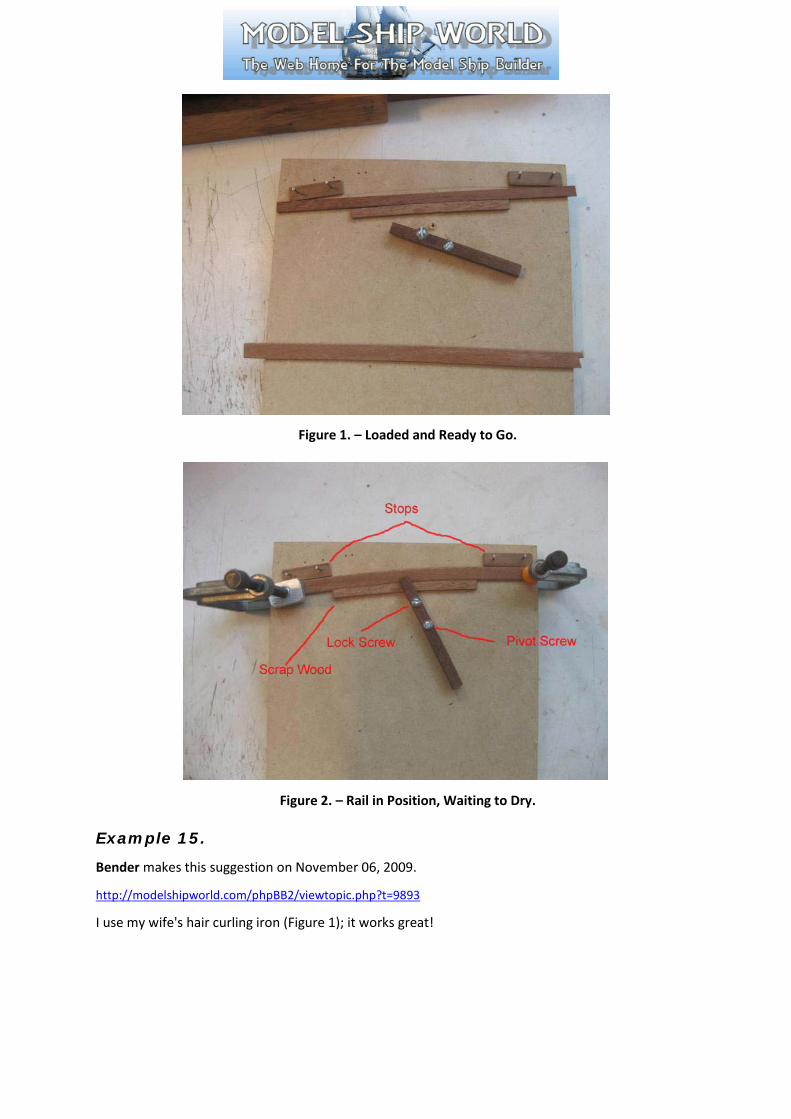
Figure 1. – Loaded and Ready to Go.
Figure 2. – Rail in Position, Waiting to Dry.
Example 15.
Bender makes this suggestion on November 06, 2009.
http://modelshipworld.com/phpBB2/viewtopic.php?t=9893
I use my wife's hair curling iron (Figure 1); it works great!
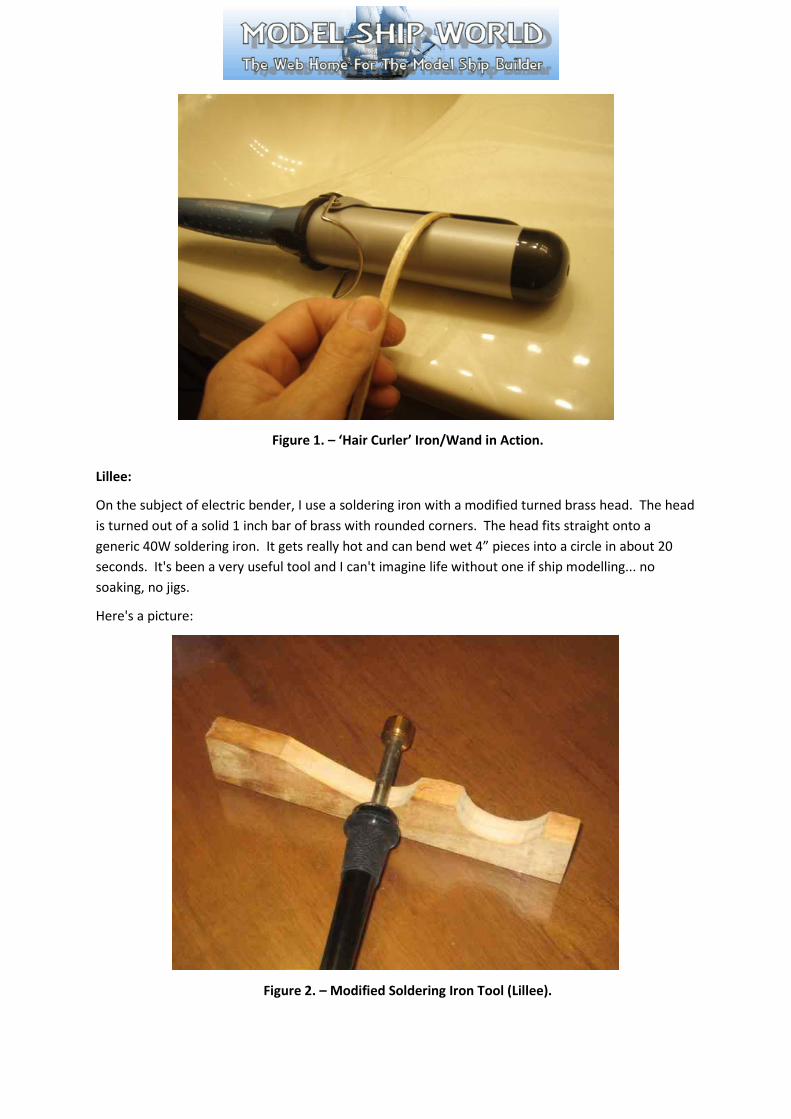
Figure 1. – ‘Hair Curler’ Iron/Wand in Action.
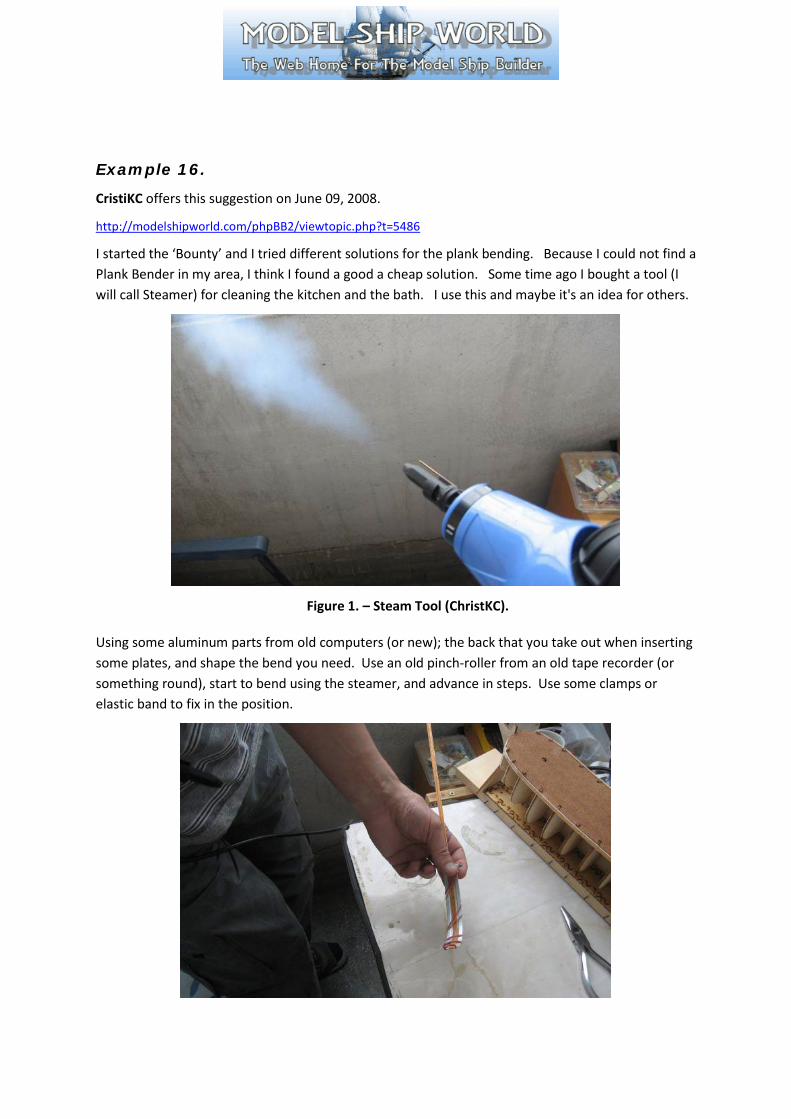
Lillee:
On the subject of electric bender, I use a soldering iron with a modified turned brass head. The head is turned out of a solid 1 inch bar of brass with rounded corners. The head fits straight onto a generic 40W soldering iron. It gets really hot and can bend wet 4” pieces into a circle in about 20 seconds. It's been a very useful tool and I can't imagine life without one if ship modelling... no soaking, no jigs.
Here's a picture:
Figure 2. – Modified Soldering Iron Tool (Lillee).
Example 16.
CristiKC offers this suggestion on June 09, 2008.
http://modelshipworld.com/phpBB2/viewtopic.php?t=5486
I started the ‘Bounty’ and I tried different solutions for the plank bending. Because I could not find a Plank Bender in my area, I think I found a good a cheap solution. Some time ago I bought a tool (I will call Steamer) for cleaning the kitchen and the bath. I use this and maybe it's an idea for others.
Figure 1. – Steam Tool (ChristKC).
Using some aluminum parts from old computers (or new); the back that you take out when inserting some plates, and shape the bend you need. Use an old pinch-roller from an old tape recorder (or something round), start to bend using the steamer, and advance in steps. Use some clamps or elastic band to fix in the position.
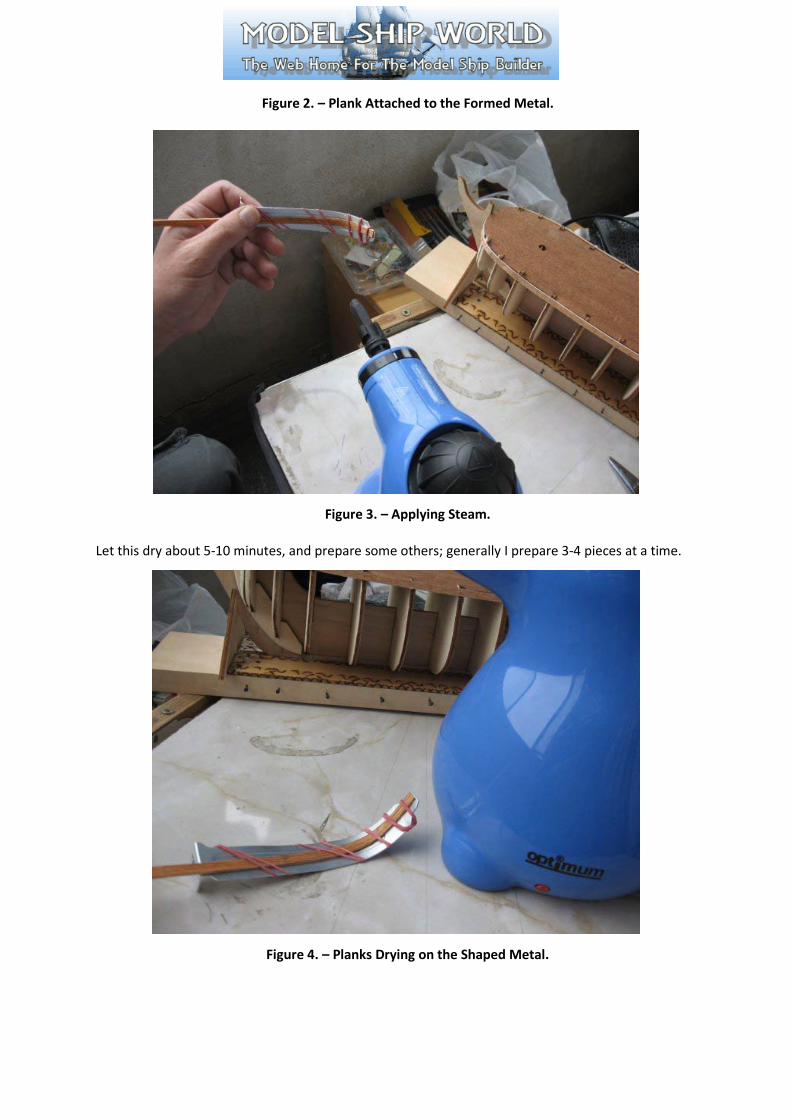
Figure 2. – Plank Attached to the Formed Metal.
Figure 3. – Applying Steam.
Let this dry about 5-10 minutes, and prepare some others; generally I prepare 3-4 pieces at a time.
Figure 4. – Planks Drying on the Shaped Metal.
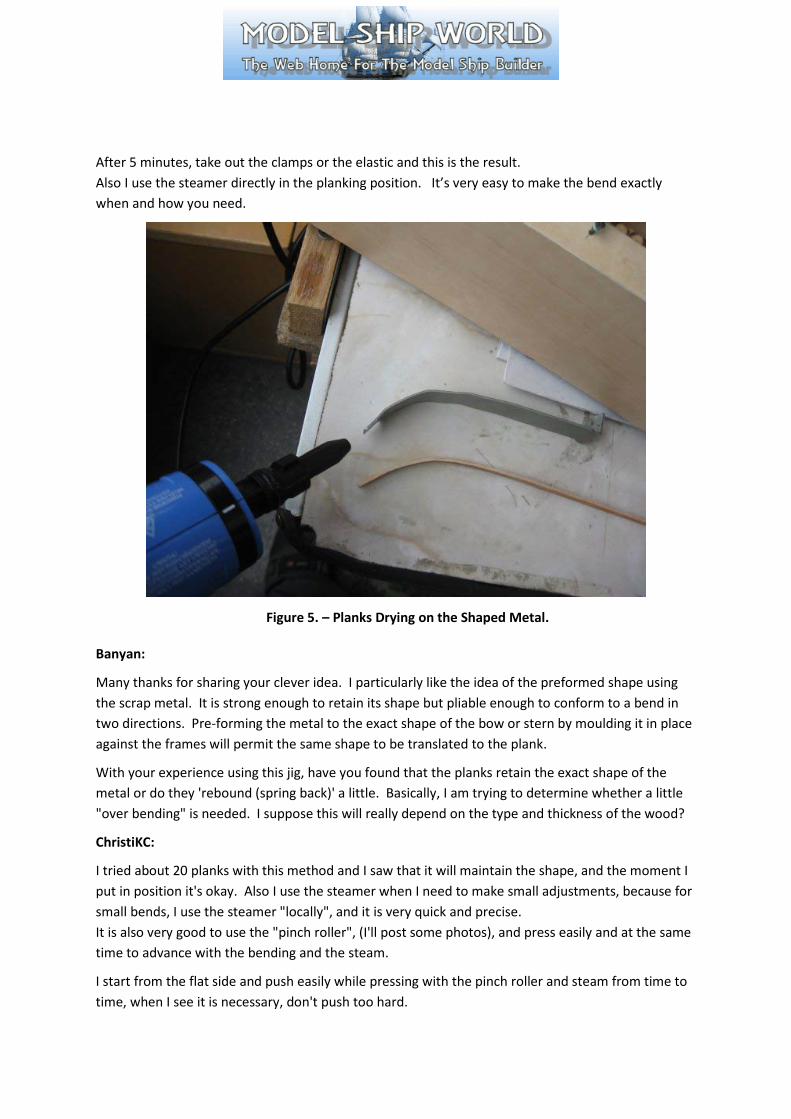
After 5 minutes, take out the clamps or the elastic and this is the result. Also I use the steamer directly in the planking position. It’s very easy to make the bend exactly when and how you need.
Figure 5. – Planks Drying on the Shaped Metal.
Banyan:
Many thanks for sharing your clever idea. I particularly like the idea of the preformed shape using the scrap metal. It is strong enough to retain its shape but pliable enough to conform to a bend in two directions. Pre-forming the metal to the exact shape of the bow or stern by moulding it in place against the frames will permit the same shape to be translated to the plank.
With your experience using this jig, have you found that the planks retain the exact shape of the metal or do they 'rebound (spring back)' a little. Basically, I am trying to determine whether a little "over bending" is needed. I suppose this will really depend on the type and thickness of the wood?
ChristiKC:
I tried about 20 planks with this method and I saw that it will maintain the shape, and the moment I put in position it's okay. Also I use the steamer when I need to make small adjustments, because for small bends, I use the steamer "locally", and it is very quick and precise. It is also very good to use the "pinch roller", (I'll post some photos), and press easily and at the same time to advance with the bending and the steam.
I start from the flat side and push easily while pressing with the pinch roller and steam from time to time, when I see it is necessary, don't push too hard.
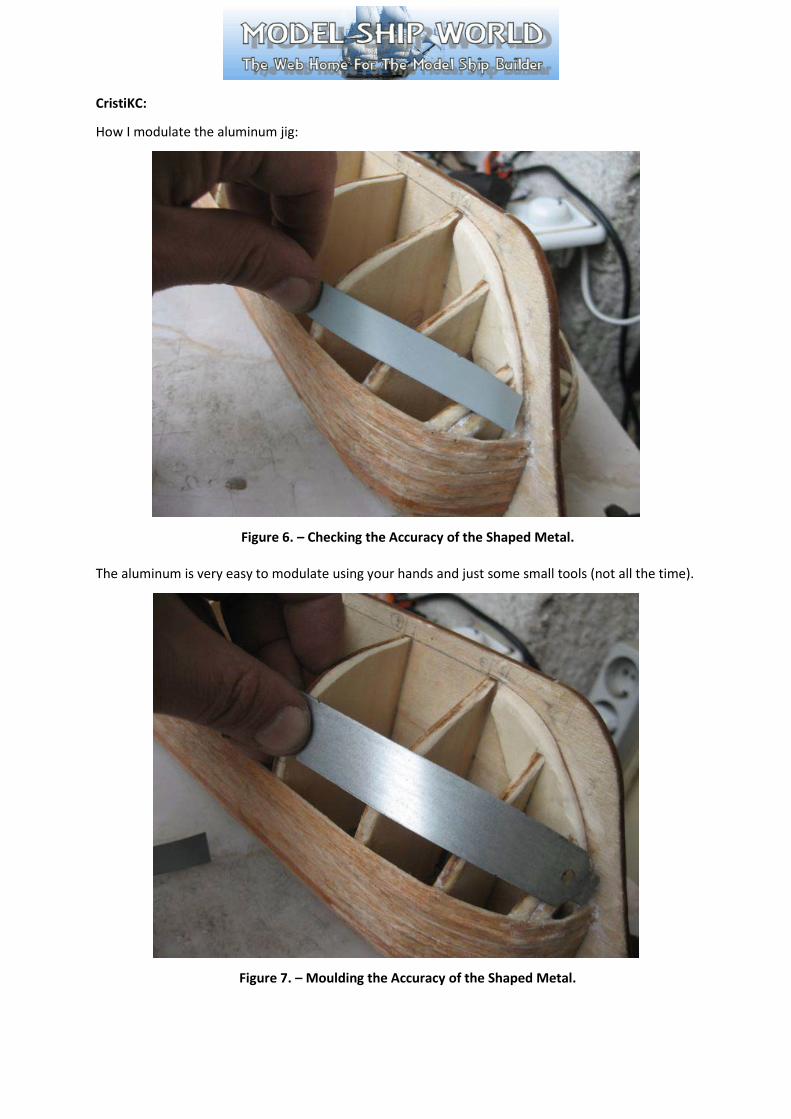
CristiKC:
How I modulate the aluminum jig:
Figure 6. – Checking the Accuracy of the Shaped Metal.
The aluminum is very easy to modulate using your hands and just some small tools (not all the time).
Figure 7. – Moulding the Accuracy of the Shaped Metal.
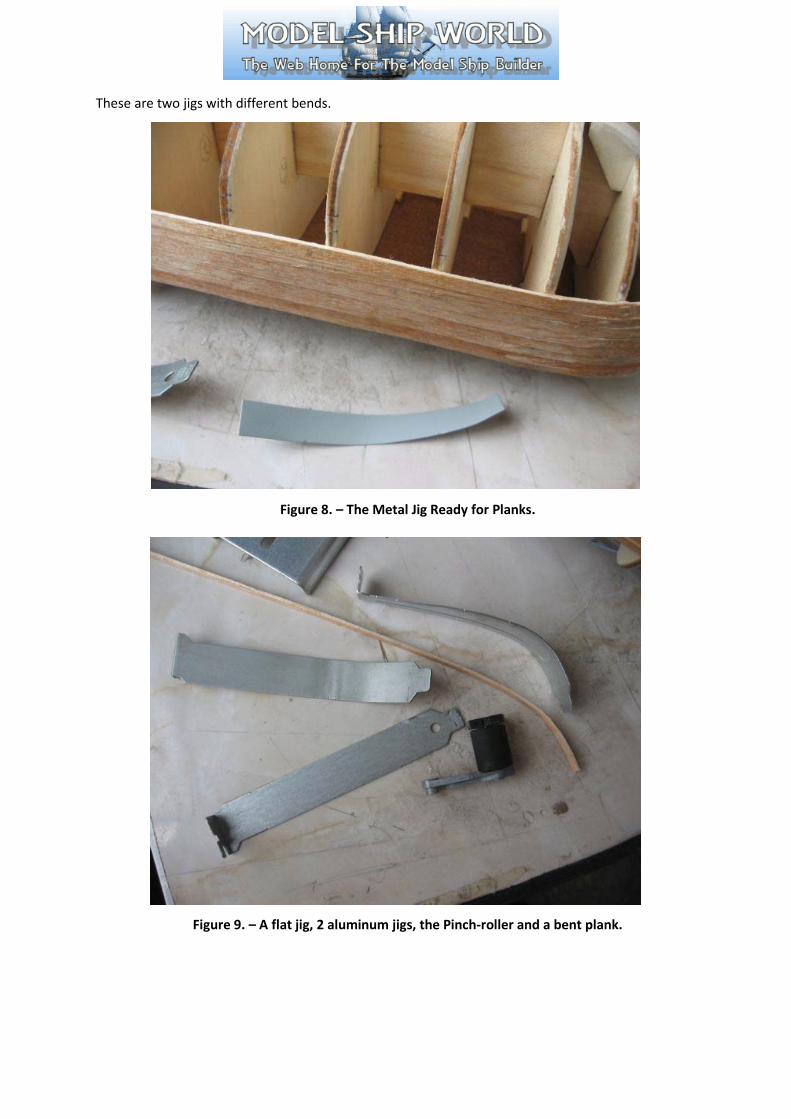
These are two jigs with different bends.
Figure 8. – The Metal Jig Ready for Planks.
Figure 9. – A flat jig, 2 aluminum jigs, the Pinch-roller and a bent plank.
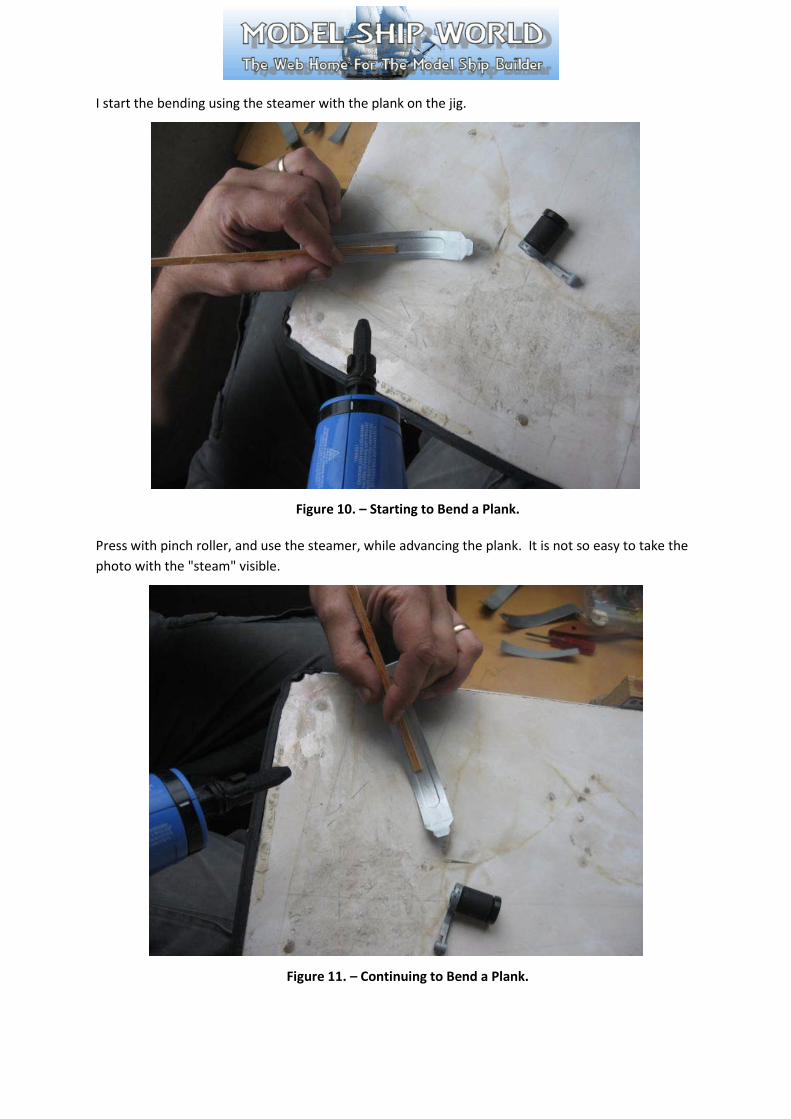
I start the bending using the steamer with the plank on the jig.
Figure 10. – Starting to Bend a Plank.
Press with pinch roller, and use the steamer, while advancing the plank. It is not so easy to take the photo with the "steam" visible.
Figure 11. – Continuing to Bend a Plank.
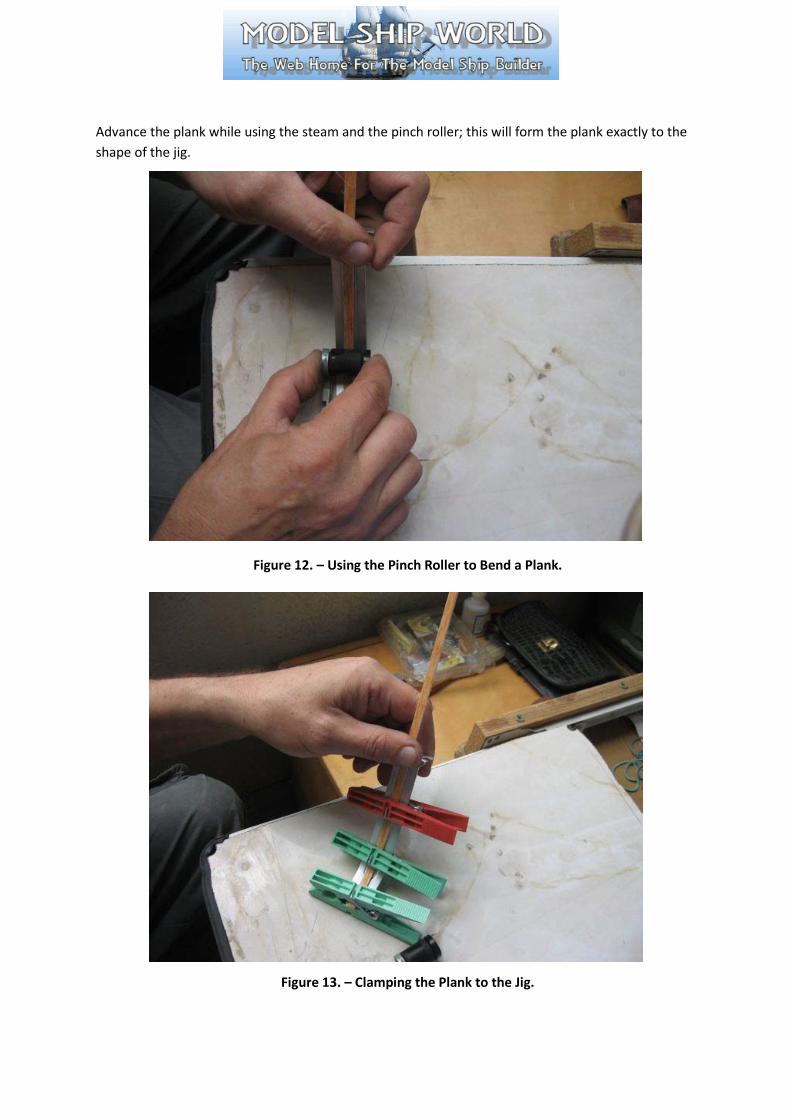
Advance the plank while using the steam and the pinch roller; this will form the plank exactly to the shape of the jig.
Figure 12. – Using the Pinch Roller to Bend a Plank.
Figure 13. – Clamping the Plank to the Jig.
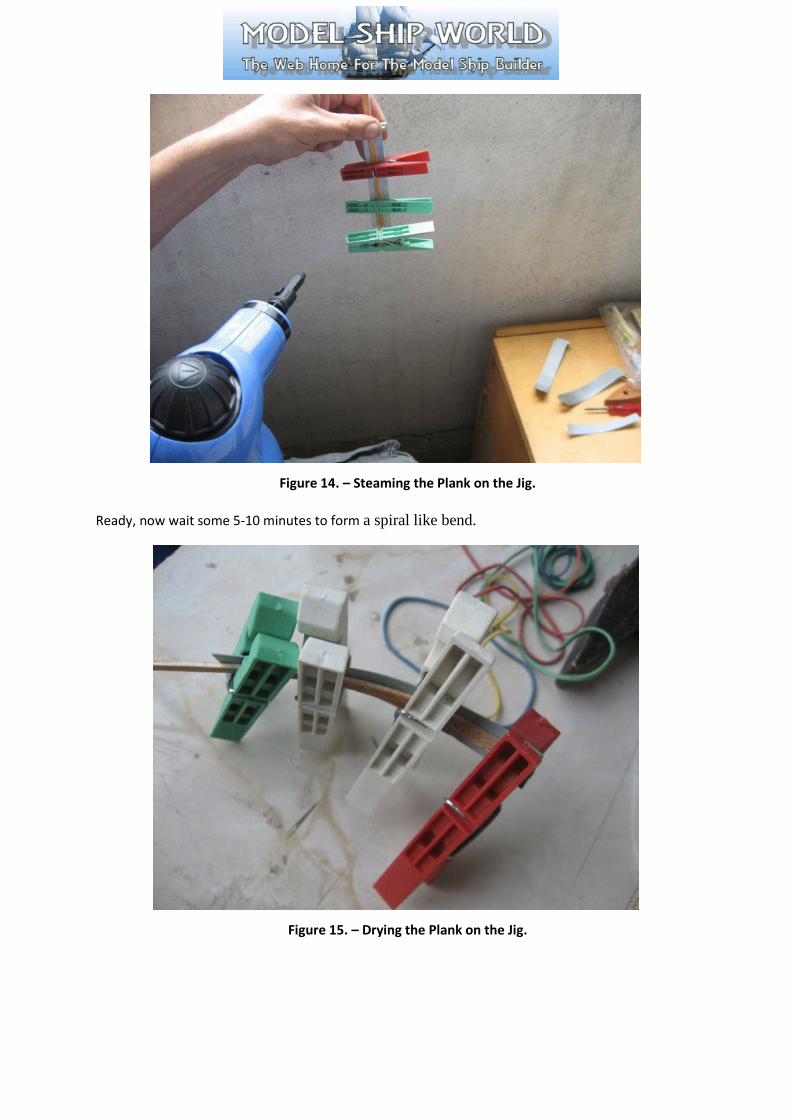
Figure 14. – Steaming the Plank on the Jig.
Ready, now wait some 5-10 minutes to form a spiral like bend.
Figure 15. – Drying the Plank on the Jig.
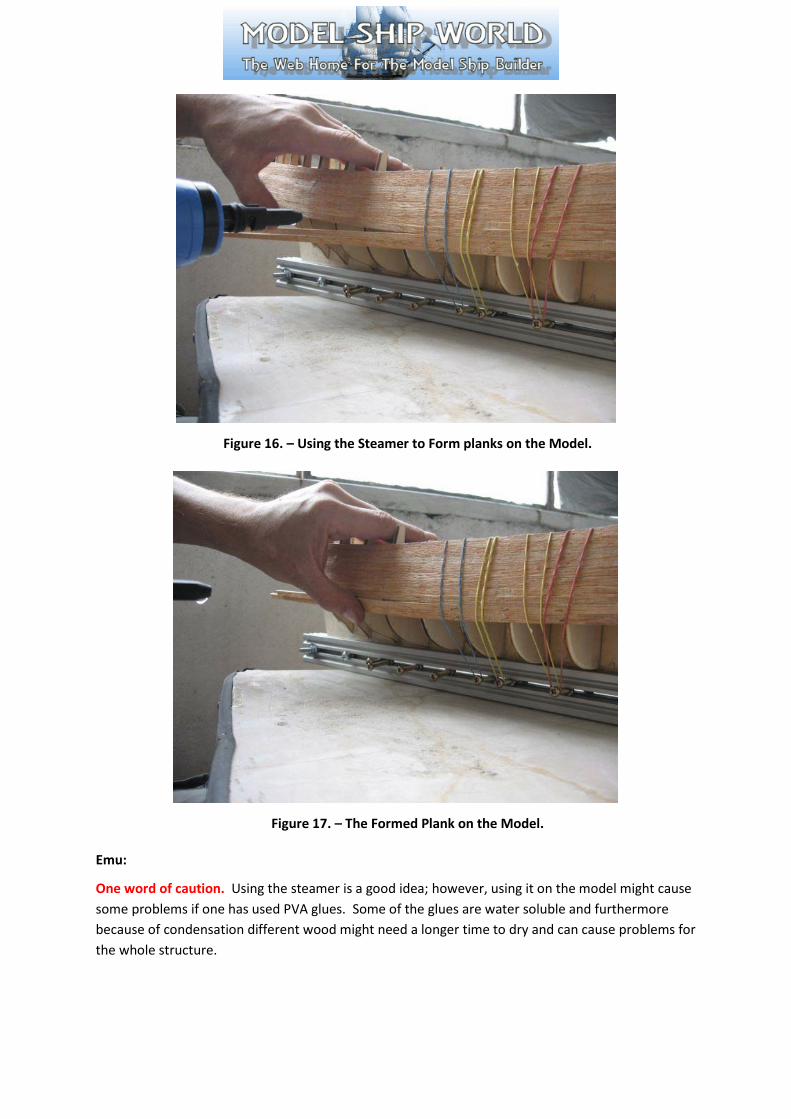
Figure 16. – Using the Steamer to Form planks on the Model.
Figure 17. – The Formed Plank on the Model.
Emu:
One word of caution. Using the steamer is a good idea; however, using it on the model might cause some problems if one has used PVA glues. Some of the glues are water soluble and furthermore because of condensation different wood might need a longer time to dry and can cause problems for the whole structure.
Example 17.
Darius359au begins this discussion on Jan 19 2011:
http://modelshipworld.com/phpBB2/viewtopic.php?t=14375
Has anyone had experience with one of these? http://www.hobbytools.com.au/prod1390.htm
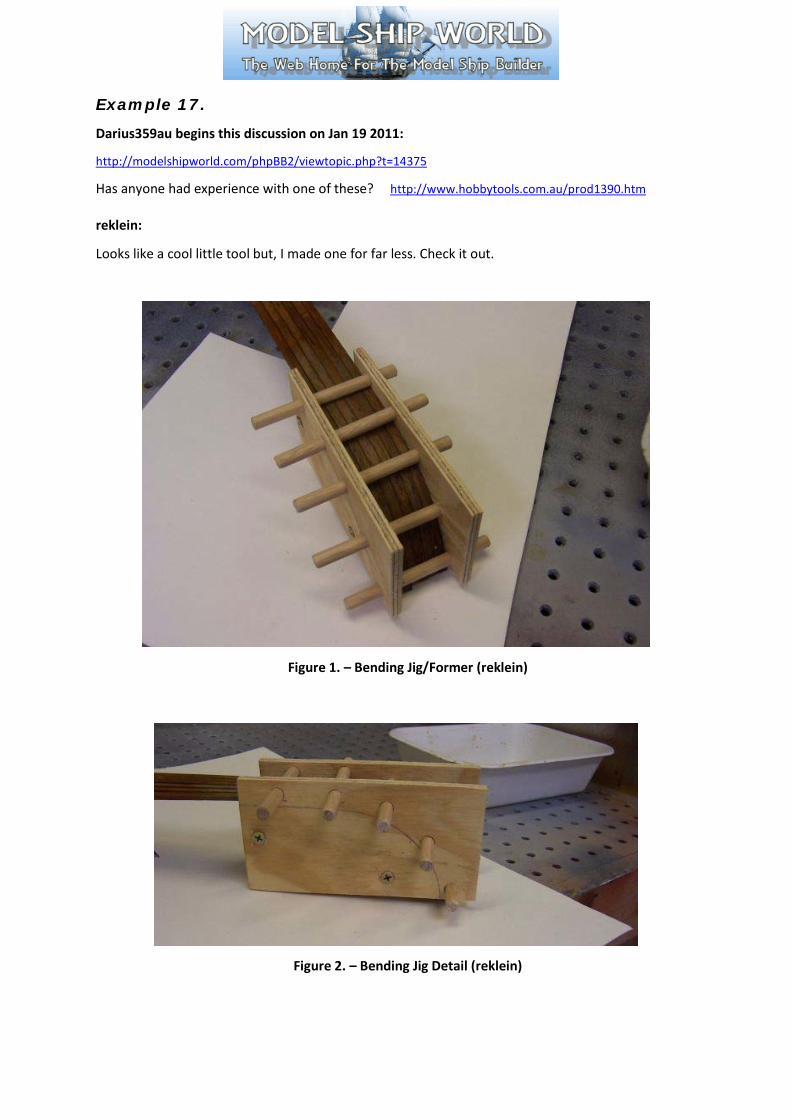
reklein:
Looks like a cool little tool but, I made one for far less. Check it out.
Figure 1. – Bending Jig/Former (reklein)
Figure 2. – Bending Jig Detail (reklein)
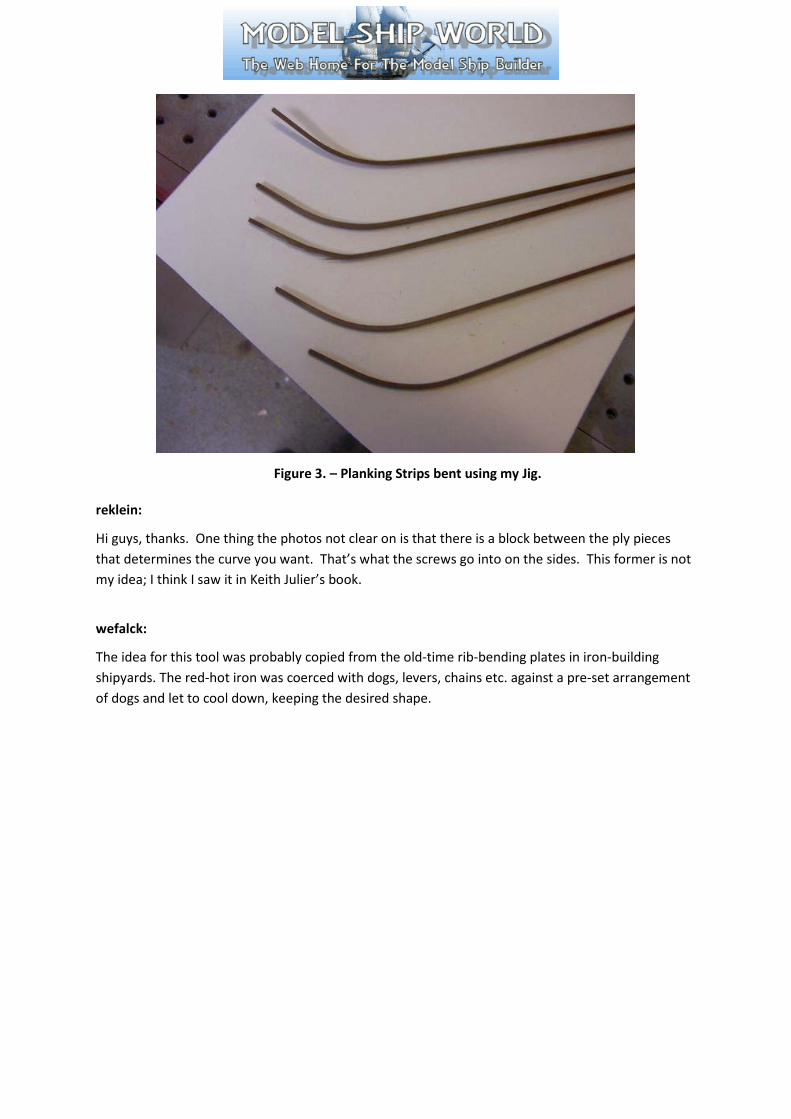
Figure 3. – Planking Strips bent using my Jig.
reklein:
Hi guys, thanks. One thing the photos not clear on is that there is a block between the ply pieces that determines the curve you want. That’s what the screws go into on the sides. This former is not my idea; I think I saw it in Keith Julier’s book.
wefalck:
The idea for this tool was probably copied from the old-time rib-bending plates in iron-building shipyards. The red-hot iron was coerced with dogs, levers, chains etc. against a pre-set arrangement of dogs and let to cool down, keeping the desired shape.