planon software suite · fundamentals fundamentals - 7 overview this topic describes the basic...
TRANSCRIPT

Planon Software SuiteVersion: L60
Fundamentals
Table of Contents
2 - Table of Contents
Table of Contents
Starting Web Client............................................................................................................................................................5
Logging in...................................................................................................................................................................... 5
Logging out....................................................................................................................................................................6
Overview............................................................................................................................................................................ 7
Planon ribbon................................................................................................................................................................ 8
Help menu................................................................................................................................................................. 9
My account.............................................................................................................................................................. 10
Navigation panel..........................................................................................................................................................11
Homepage....................................................................................................................................................................13
Gadgets................................................................................................................................................................... 13
Configuring gadgets on the home page.............................................................................................................15
Tablet users..................................................................................................................................................................... 16
Getting started............................................................................................................................................................. 16
Web Client menu.........................................................................................................................................................17
Basic navigation on a tablet........................................................................................................................................17
Elements panel on a tablet.....................................................................................................................................19
Data panel on a tablet............................................................................................................................................ 19
Action panel on a tablet..........................................................................................................................................20
Standard features............................................................................................................................................................ 21
Selection bar................................................................................................................................................................21
Elements panel............................................................................................................................................................22
Element hierarchy................................................................................................................................................... 23
Footer bar................................................................................................................................................................23
Action on selection...................................................................................................................................................... 24
Modify within selection................................................................................................................................................ 26
Data panel................................................................................................................................................................... 28
Panel resizing..........................................................................................................................................................30
Uploading a file........................................................................................................................................................... 31

Table of Contents
Table of Contents - 3
Action panel.................................................................................................................................................................32
Copy........................................................................................................................................................................ 33
Delete...................................................................................................................................................................... 33
Change type............................................................................................................................................................ 33
View status flow...................................................................................................................................................... 34
Searching / filtering.......................................................................................................................................................... 36
Search operators......................................................................................................................................................... 36
Filter types................................................................................................................................................................... 37
Using search operators...........................................................................................................................................37
Using filters..................................................................................................................................................................38
Using the date-time filter criteria.............................................................................................................................39
Date-time operators.....................................................................................................................................................39
Toggle a filter on/off................................................................................................................................................39
Adding an AND/OR filter.........................................................................................................................................39
Using the AND/OR filter..........................................................................................................................................41
Grouping filters........................................................................................................................................................ 41
Relative filters using macros....................................................................................................................................... 42
Relative date-time filters......................................................................................................................................... 43
Primary and secondary arguments.........................................................................................................................43
Special relative filters..........................................................................................................................................46
Editing a filter.............................................................................................................................................................. 46
Copying a filter............................................................................................................................................................ 47
Previewing changes in the existing filter.....................................................................................................................47
Deleting a filter............................................................................................................................................................ 47
Communication logs........................................................................................................................................................ 48
Communication logs - reference date.........................................................................................................................48
Reporting..........................................................................................................................................................................49
Saving reports............................................................................................................................................................. 49
Save options for reports..............................................................................................................................................49
Exporting data to XLS / XLSX.....................................................................................................................................50

Table of Contents
4 - Table of Contents
Previewing & printing reports...................................................................................................................................... 51
Report settings............................................................................................................................................................ 52
Archiving element(s)........................................................................................................................................................ 53
Field types........................................................................................................................................................................54
Self-Service – an Introduction......................................................................................................................................... 58
Self-Service - Standard features..................................................................................................................................... 59
Self-Service form......................................................................................................................................................... 59
Searching in Self-Service............................................................................................................................................ 60
Shortcut keys................................................................................................................................................................... 62
Index.................................................................................................................................................................................65

Fundamentals
Fundamentals - 5
Starting Web Client
Logging inTo log in to Planon Web Client
Procedure1. Click the URL of the Planon Web Client.2. On the login screen, enter your user name and password.
3. Click Login.
• The login page will be displayed in the language of the browser. If this language is notsupported, the login page will default be displayed in English. • After logging in, the Web Client will be shown in the language of the user account. • If your organization uses ‘single sign on’ to log in, you may not see the login page.
If your password is reset, depending on the password settings, you will be prompted to change yourpassword at the time of log in. The following change password screen is displayed.

Fundamentals
6 - Fundamentals
• In the Current password field, enter your password.
• In the New password field, enter your new password.
• In the Confirm new password field, retype your new password for confirmation.
• Click OK. You can now log in with your changed password.
Logging outYou can log out of the Planon Web Client in three ways:
• Using the Log out button on your account information.
This is the preferred way, as this frees your license.
• Closing the browser - the session will expire after a certain time, only then the license will be freed.
• If you do not use the application for a certain period of time specified by your administrator, you will belogged out automatically.
Fundamentals
Fundamentals - 7
Overview
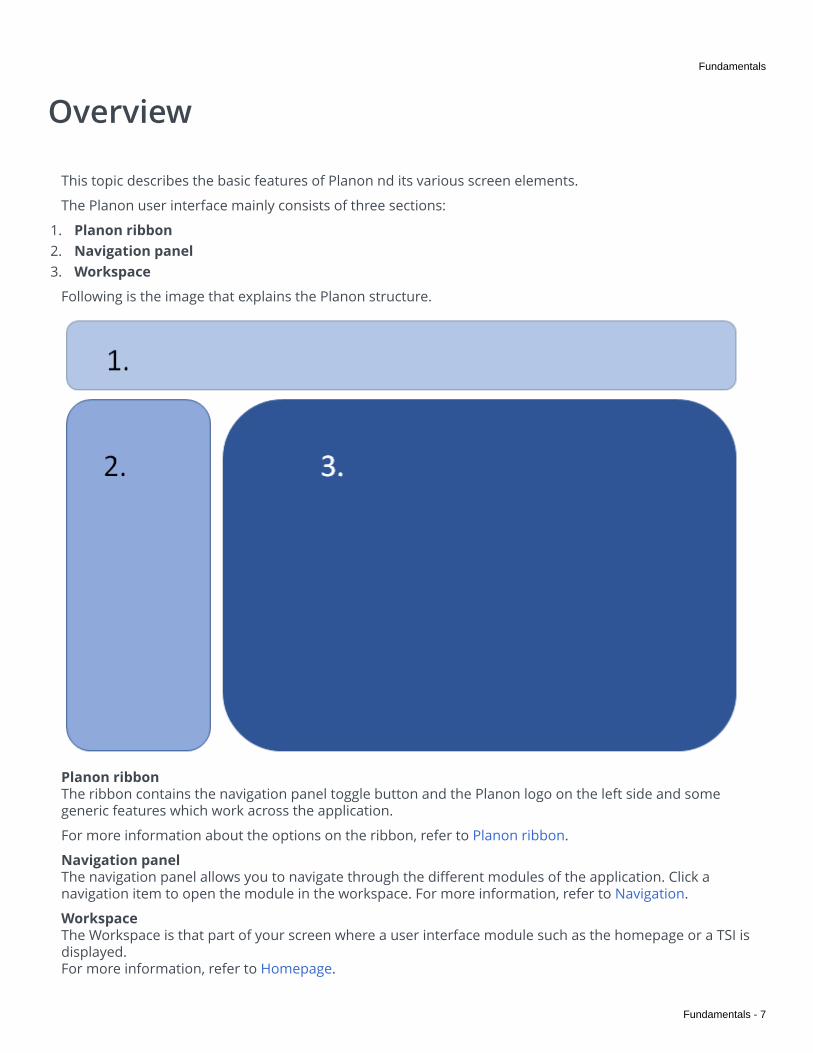
This topic describes the basic features of Planon nd its various screen elements.
The Planon user interface mainly consists of three sections:
1. Planon ribbon2. Navigation panel3. Workspace
Following is the image that explains the Planon structure.
Planon ribbonThe ribbon contains the navigation panel toggle button and the Planon logo on the left side and somegeneric features which work across the application.
For more information about the options on the ribbon, refer to Planon ribbon.
Navigation panelThe navigation panel allows you to navigate through the different modules of the application. Click anavigation item to open the module in the workspace. For more information, refer to Navigation.
WorkspaceThe Workspace is that part of your screen where a user interface module such as the homepage or a TSI isdisplayed. For more information, refer to Homepage.

Fundamentals
8 - Fundamentals
Multi tab browser support
• You can open Planon in multiple tabs on your browser.
• A single login works for all browser tabs.
• Only one module license is used for all tabs.
• When you open the application in different tabs, you can view the same or different TSIs from yournavigation panel.
• This can be done by copying the URL to a new tab or right-clicking a TSI in the navigation panel andopening it in a new tab or a window.
Planon ribbonThe Planon ribbon contains the following general screen elements and functions that are applicable acrossthe application:
• The Planon logo.
• The reference date button: today is selected by default. The Choose reference date option allowsyou to select a specific date from the calendar. The selected reference date is taken into account for alltransactions across the application.You can make the reference date inactive by selecting the Inactive option. The Or select another dateoption enables you to select another date as a reference date.

Fundamentals
Fundamentals - 9
•Clicking the button will redirect you to the alarms set for you.
•Clicking the button will redirect you to the Help menu.
• Click on My account to view/edit personal information.
• Click Log out to log out of Planon Web Client. Your license will be released and you will be redirected tothe login screen.
Help menuPlanon features a Help button in the top-right corner that opens a menu providing access to informationabout the software and privacy statement of your company (GDPR legislation).
The options listed in the Help menu are:
• TSI Help: Enables you to view help information related to the TSI that is active on the screen. The optionis visible only if a document/web page related URL is specified in TSIs > TSI Help URL. If there is no URLspecified, the option will not be visible in the menu.
• WebHelp: Enables a user to start and view the Planon WebHelp. The WebHelp is displayed in thelanguage of the version of the WebHelp specified in System Settings > General > Help URL.
• Privacy statement: Enables you to view the privacy statement of your company to be compliantwith GDPR regulation. The privacy statement can be specified in General settings TSI > PrivacyStatement. If there is no privacy statement specified, the option will not be visible in the menu. Formore information about the Privacy Policy statement, refer to Authorization > Privacy statement.
• About: Enables you to get information about the version of Planon you are using.

Fundamentals
10 - Fundamentals
For information about the history of installed versions of Planon in your environment, see Applicationmanagement > Business processes > Creating a product version overview.
• Keyboard shortcuts: Enables you to view the available keyboard shortcuts in Planon. For morekeyboard shortcuts, refer to Shortcut keys.
My accountPlanon features a My account button to allow users to edit their personal information. The button isavailable in the Account menu.
Using My account, a user can change his/her password, edit personal data and other settings by clicking theEdit button.
Planon provides the following basic options in the My account pop-up. The Planon application manager canadd or remove fields to this pop-up by using Web Configuration .
• Account details
The user can view his/her User name, Password expiry date and change password using the Changepassword option.
• Personal data
The user can edit his/her personal data such as First name, Surname, Email, Telephone, Property,Department and Photo. Users can change their photo by dragging and dropping an image or bybrowsing for the right file.
• My account settings
The user can change specify settings such as Theme, Use 24 hour notation?, Planon Language,Displayed unit of length and Autoselect first item in list.
To view the changes, save and re-login to the account
The name displayed in the My Account drop-down is derived from the person or account. The followingtable indicates which name is displayed:
Account Person Displayed
User name Description First name Last name
WEASLY Adam Weasly Adam Bilt Adam Bilt
WEASLY Adam Weasly Adam Adam
WEASLY Adam Weasly Bilt Bilt
WEASLY Adam Weasly Adam Weasly
WEASLY Adam Bilt Adam Bilt

Fundamentals
Fundamentals - 11
Account Person Displayed
User name Description First name Last name
WEASLY Adam Adam
WEASLY Bilt Bilt
WEASLY WEASLY
The photo displayed on the My Account drop down is determined based on the following table:
Account - Photo Person - Photo Photo displayed in 'My Account'
Y Y Person-Photo
Y N Default image
N Y Person-Photo
N N Default image
When the Person-Photo of the linked person does not have a value, then a default image will be displayed.This image placeholder will have a colored background with one or two characters. The following exampleshows which characters will be displayed in the placeholder:
Account - Username
Person - First namePerson - Surname Displayed
WEASLY Adam Bilt AB
WEASLY Adam A
WEASLY Bilt B
WEASLY W
When Person - First Name and Person - Last Name both do not contain any value, it meanseither the fields are empty (none of them are system mandatory) or there is no person linked to theaccount.
Navigation panelThe navigation panel displays the available navigation groups. Navigation groups typically include variousfunctionally related navigation items (TSIs or URLs).

Fundamentals
12 - Fundamentals
Instead of browsing for navigation items, you can search for them using the quick search bar . Thesearch will remember your last five searched items and will display them when clicking in the search bar.
There are two modes for the navigation panel:
Expanded and pinned: This is the default mode. In this mode, the navigation panel is always visible on thesame plain as the workspace. It is pinned and all the TSIs are available to be opened in the workspace. You
can collapse the navigation panel by clicking on the button.
The panel can be pinned, only if the screen resolution is >1200 pixels.
Collapsed: In this mode, the navigation panel is hidden. You can expand the navigation panel by hovering
the cursor on the button. A floating navigation panel becomes available and allows you to do youractions on the navigation items, such as, opening a TSI in the workspace. To hide the navigation panel again,
move the cursor out of the panel area. You can pin the panel to keep it expanded by clicking on the

Fundamentals
Fundamentals - 13
button. When you minimize your computer screen, the navigation panel is automatically collapsed. It jumpsback to the previous mode when you expand it again.
The panel cannot be pinned if the screen is minimized or the screen resolution is <1200 pixels. Inthis state, the navigation panel is in the slide mode.
HomepageAfter the login, the homepage is shown in the workspace.
The following image displays the Homepage with several gadgets. You can see a gadget highlighted.
GadgetsA gadget gives you quick and easy access to vital information directly from your homepage. You canconfigure the gadgets on your homepage by using the gadget library. The library contains several predefinedgadgets and allow you to customize your homepage with gadgets of your choice. The application managercan create new gadgets if needed.
If filtering is configured for the gadgets, a bar with generic filter icon is displayed on the homepage. If agadget is using a filter, the filter icon is displayed on the gadget in yellow color. The search fields in thegadgets will be read only when using the generic filter. You can use a filter to get an overview for theselected gadgets based on the filter criteria.

Fundamentals
14 - Fundamentals
You can select multiple values (using click selection or Shift + select) to filter on if In operator isselected in the search fields. For more information, see Web configurations > Search block.
For more information on configuring a generic filter, see Web configurations > Adding a generic filterfor gadgets on the homepage.

Fundamentals
Fundamentals - 15
Configuring gadgets on the home pageTo configure gadgets on the homepage
Procedure1. Click the Edit mode button on the right. The gadget library appears and the existing gadgets on your
homepage are unlocked.2. The library displays all available gadgets.
3. Click on a gadget to add it to the homepage.4. To move the gadget around on the workspace, hold the gadget (with the four-arrowed cursor) and drag it
to the required position.5. To remove the gadget from the homepage, click the cross sign on the top right corner of the gadget. The
gadget disappears from the homepage and moves back to the library.
Click the button, when you have finished configuring the homepage. The library is closed and thegadgets are locked on the homepage.
The gadgets you selected from the gadget library are now activated.
The gadget library will be empty, if all the gadgets are added to the homepage.
Fundamentals
16 - Fundamentals
Tablet users
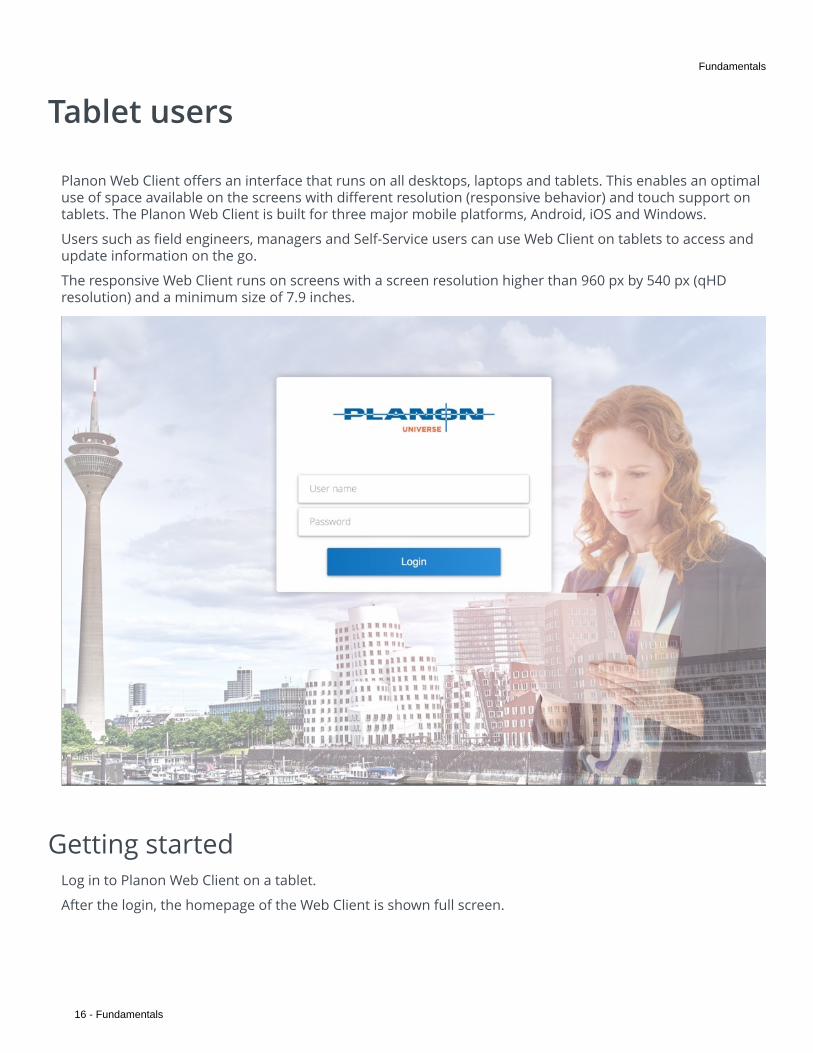
Planon Web Client offers an interface that runs on all desktops, laptops and tablets. This enables an optimaluse of space available on the screens with different resolution (responsive behavior) and touch support ontablets. The Planon Web Client is built for three major mobile platforms, Android, iOS and Windows.
Users such as field engineers, managers and Self-Service users can use Web Client on tablets to access andupdate information on the go.
The responsive Web Client runs on screens with a screen resolution higher than 960 px by 540 px (qHDresolution) and a minimum size of 7.9 inches.
Getting startedLog in to Planon Web Client on a tablet.
After the login, the homepage of the Web Client is shown full screen.

Fundamentals
Fundamentals - 17
Web Client menuThe Web Client menu represented by the button, integrates the navigation panel and the ribbon into asingle menu. Tap this button to open the navigation panel and the general functions. The Web Client menuappears as an overlay on the workspace.
Navigation panel on a tablet
The navigation panel is shown, when you open the Web Client menu.
Tap a navigation group and then a navigation item. The corresponding module opens in the workspace andthen the Web Client menu is hidden.
General functions
At the bottom of the Web Client menu, the general functions such as user account details, the alarms buttonand other details are displayed.
For more information about the general functions, refer to Ribbon > User account details.
The Show desktop version button enables you to open the desktop version of the Web Client.
Basic navigation on a tablet

Fundamentals
18 - Fundamentals
When you open a Web Client module on a tablet:
• the elements list is shown,
• the data panel is hidden,
• the action panel is shown minimized,
• the quick search and filter panels are available.
All these panels can be expanded and collapsed to optimize the available space on the screen. These usersettings are stored for every selection level and step. These settings are retained when you log in next time.
The following image displays a module open on a tablet with just the elements panel expanded. The actionpanel is minimized and only the corresponding icons are displayed.
The following image displays a module with all the three panels (elements panel, data panel and the actionpanel) expanded on a tablet.
Fundamentals
Fundamentals - 19
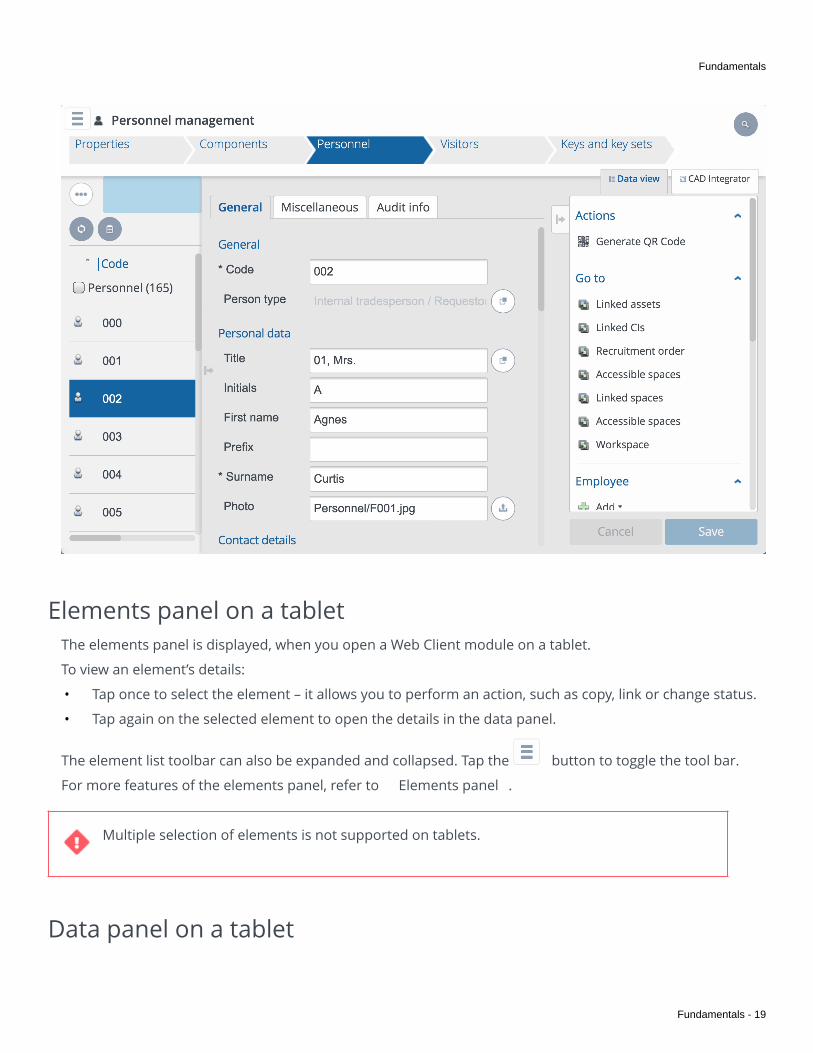
Elements panel on a tabletThe elements panel is displayed, when you open a Web Client module on a tablet.
To view an element’s details:
• Tap once to select the element – it allows you to perform an action, such as copy, link or change status.
• Tap again on the selected element to open the details in the data panel.
The element list toolbar can also be expanded and collapsed. Tap the button to toggle the tool bar.
For more features of the elements panel, refer to Elements panel .
Multiple selection of elements is not supported on tablets.
Data panel on a tablet

Fundamentals
20 - Fundamentals
You can expand and collapse the data panel using the buttons on the center-left of the data panel. Onthe data panel, you can view/modify data. The keyboard on the tablet becomes available, if you want to add/change information on the data panel.
When the data panel is expanded:
• the quick search and the filter panel are minimized,
• the elements list is minimized.
The quick search and filter show a color if the filter is active. Click on the panel to access the quick searchand the filter bar. At this moment, the data panel will be collapsed and the elements panel will be expanded.
For more features of the data panel, see Data panel.
Action panel on a tablet
You can expand and collapse the action panel using the buttons on the top-left of the action panel.Collapse the action panel for a full view of the data panel. When the action panel is collapsed, only the iconscorresponding to the actions are visible.
For more information on actions, refer to Action panel.

Fundamentals
Fundamentals - 21
Standard features
This chapter describes the standard features available across all the TSIs of Planon ProCenter.
Following is an example of a TSI in the Web Client:
Planon ProCenter supports working with several keyboard shortcut keys to perform certain actions in theapplication.
For more information, refer to Planon ProCenter-Shortcut Keys.
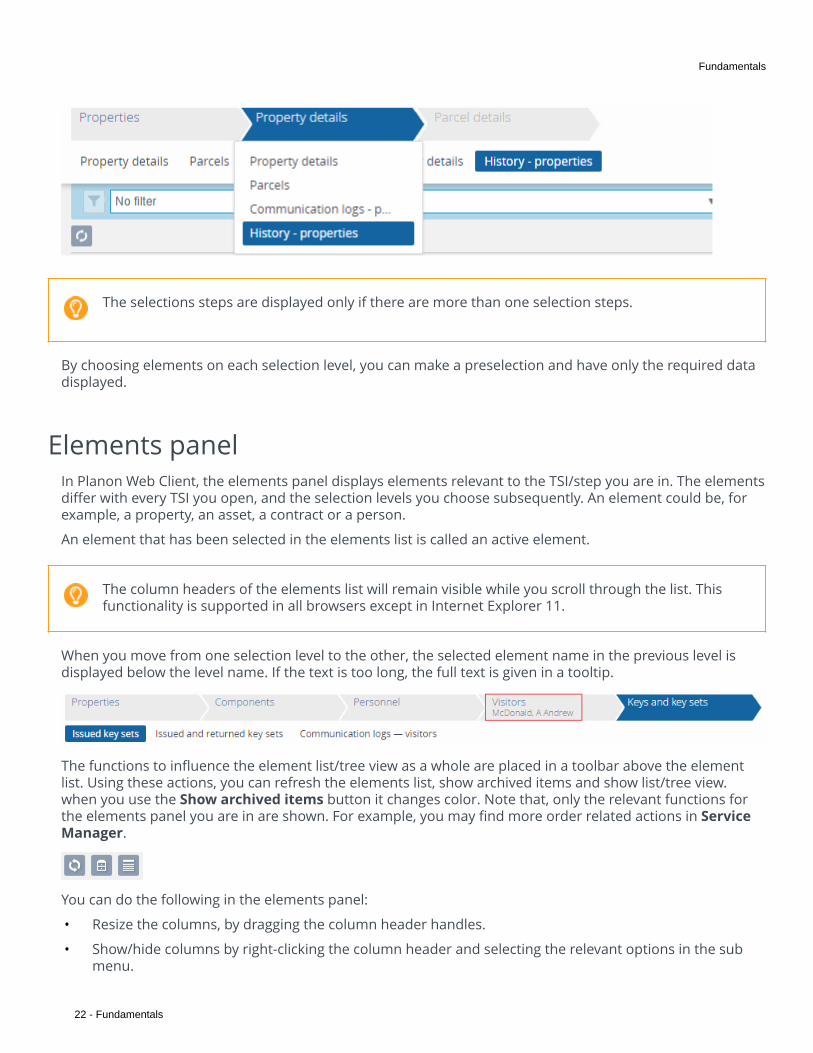
Selection barThe selection bar displays all the available selection levels of the TSI you have currently selected. Onselecting a selection level, the corresponding selection steps are displayed.
When you hover over a selection level, a drop-down list of selection steps on that level will be displayed. Youcan also jump to a selection step by selecting it from this list. The currently active step on that level will behighlighted in the list.
Fundamentals
22 - Fundamentals
The selections steps are displayed only if there are more than one selection steps.
By choosing elements on each selection level, you can make a preselection and have only the required datadisplayed.
Elements panelIn Planon Web Client, the elements panel displays elements relevant to the TSI/step you are in. The elementsdiffer with every TSI you open, and the selection levels you choose subsequently. An element could be, forexample, a property, an asset, a contract or a person.
An element that has been selected in the elements list is called an active element.
The column headers of the elements list will remain visible while you scroll through the list. Thisfunctionality is supported in all browsers except in Internet Explorer 11.
When you move from one selection level to the other, the selected element name in the previous level isdisplayed below the level name. If the text is too long, the full text is given in a tooltip.
The functions to influence the element list/tree view as a whole are placed in a toolbar above the elementlist. Using these actions, you can refresh the elements list, show archived items and show list/tree view.when you use the Show archived items button it changes color. Note that, only the relevant functions forthe elements panel you are in are shown. For example, you may find more order related actions in ServiceManager.
You can do the following in the elements panel:
• Resize the columns, by dragging the column header handles.
• Show/hide columns by right-clicking the column header and selecting the relevant options in the submenu.

Fundamentals
Fundamentals - 23
• Move viewing area up, down, left, or right by using the horizontal and vertical scroll bars.
• You can view the elements list in a tree or list view.
The selected view per TSI will be remembered even after logging out.
Element hierarchyThere are two element types in Planon ProCenter:
• Hierarchical elements
• Simple elements
Hierarchical elements are divided into sub elements. For example, Department.
A simple element cannot be subdivided. For example, Person.
The hierarchical elements in the elements list can be collapsed or expanded. The symbol in front of ahierarchical element’s name indicates the presence of sub-elements.
It is possible that sub elements inherit values from the parent element. The inherited data will overwrite alldata that would be automatically specified as a result of selections made on previous selection levels.
Footer bar
The footer bar has the following functions:
• Count - displays the total number of elements in the list.
• All - selects all the elements in the element list.
Fundamentals
24 - Fundamentals
• None - deselects the selected elements.
The footer bar also displays pagination. It enables you to navigate between pages in case the elementslist is divided into pages. Click the arrow buttons << >> to go to the first, previous and last pages or clickthe numbers to go to a specific page.
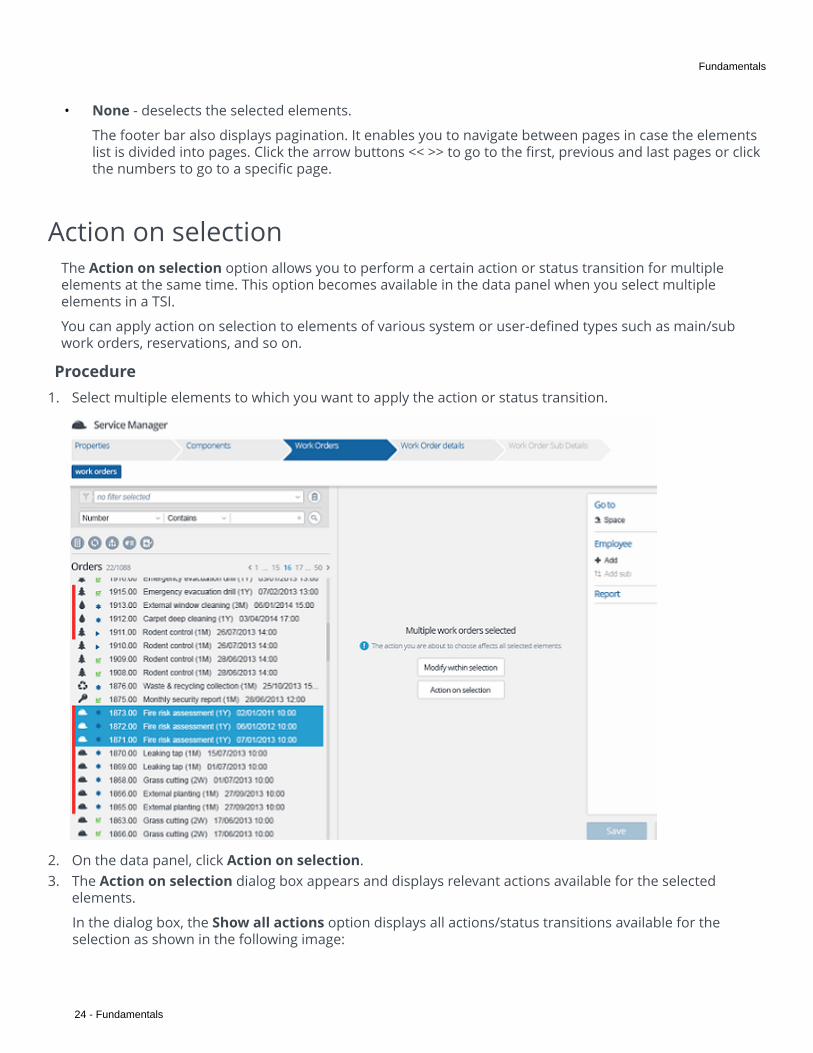
Action on selectionThe Action on selection option allows you to perform a certain action or status transition for multipleelements at the same time. This option becomes available in the data panel when you select multipleelements in a TSI.
You can apply action on selection to elements of various system or user-defined types such as main/subwork orders, reservations, and so on.
Procedure1. Select multiple elements to which you want to apply the action or status transition.
2. On the data panel, click Action on selection.3. The Action on selection dialog box appears and displays relevant actions available for the selected
elements.
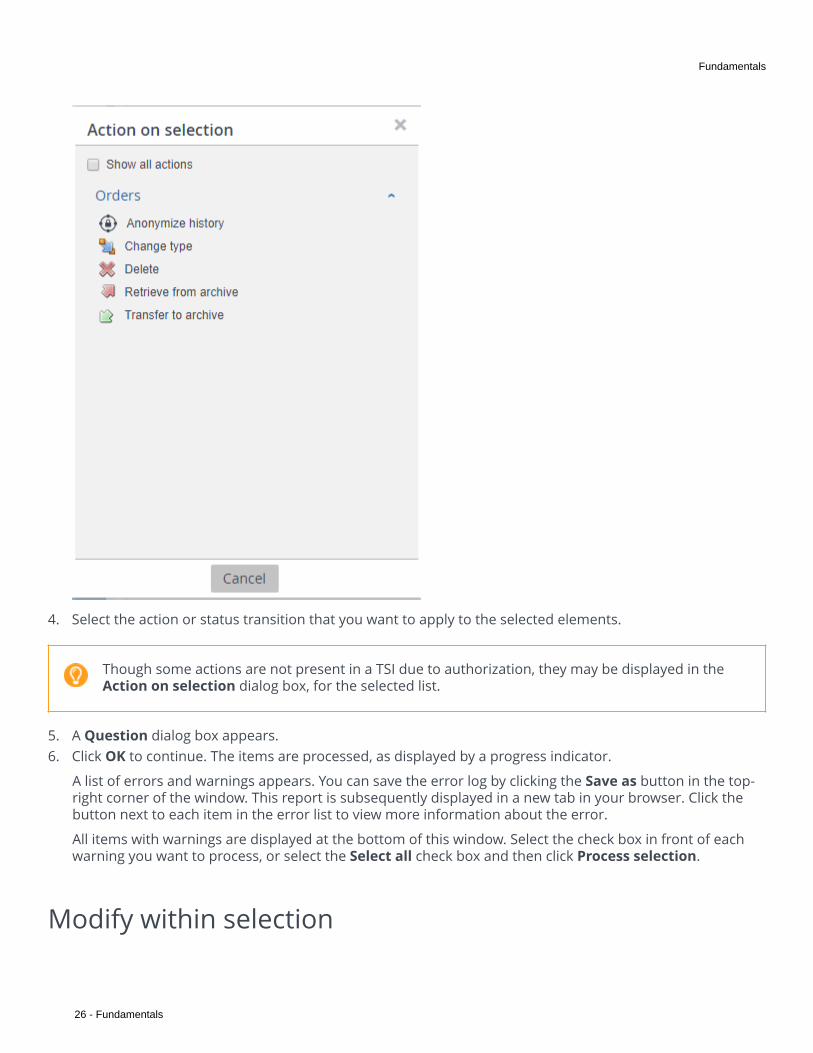
In the dialog box, the Show all actions option displays all actions/status transitions available for theselection as shown in the following image:

Fundamentals
Fundamentals - 25
If you de-clear the Show all actions check box, only the actions available to all types in the selection will bedisplayed as shown in the following image:
Fundamentals
26 - Fundamentals
4. Select the action or status transition that you want to apply to the selected elements.
Though some actions are not present in a TSI due to authorization, they may be displayed in theAction on selection dialog box, for the selected list.
5. A Question dialog box appears.6. Click OK to continue. The items are processed, as displayed by a progress indicator.
A list of errors and warnings appears. You can save the error log by clicking the Save as button in the top-right corner of the window. This report is subsequently displayed in a new tab in your browser. Click thebutton next to each item in the error list to view more information about the error.
All items with warnings are displayed at the bottom of this window. Select the check box in front of eachwarning you want to process, or select the Select all check box and then click Process selection.
Modify within selection

Fundamentals
Fundamentals - 27
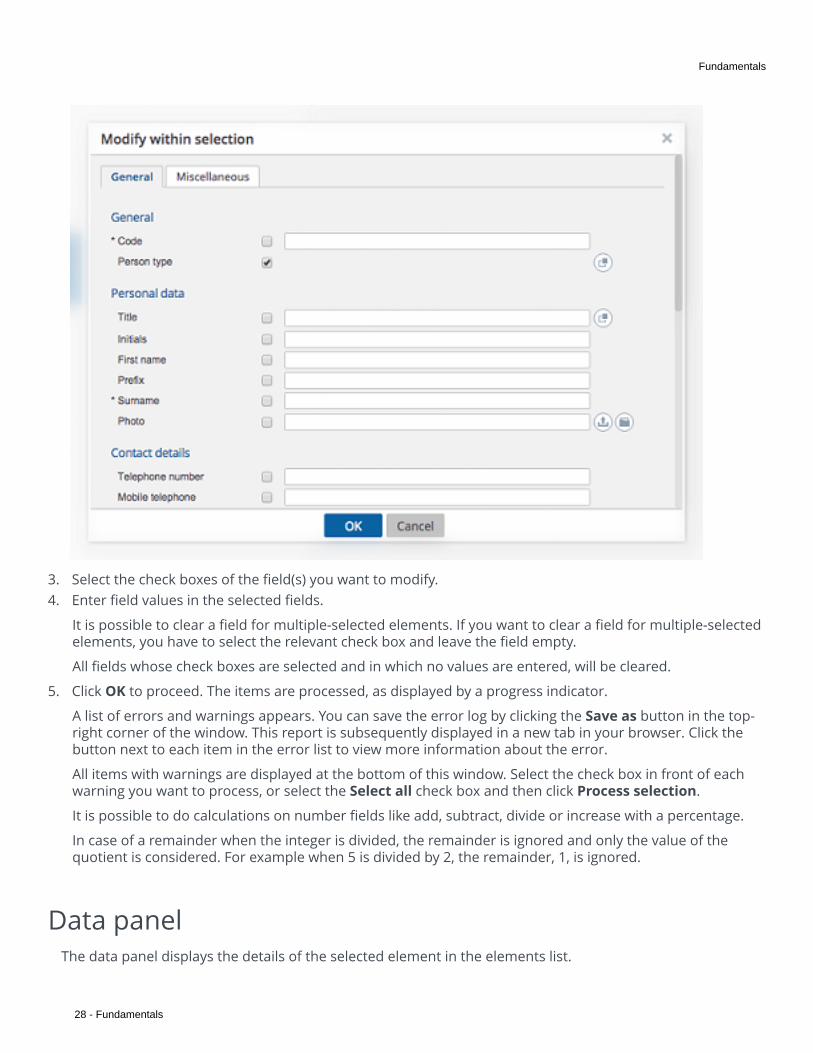
The Modify within selection option allows you to change the value of a field for multiple elements at thesame time. This option becomes available in the data panel when you select multiple elements in a selectionlevel in a TSI. You can change the values of all fields.
To use Modify within selection, you must select elements of a single type. If a selectioncontains elements of different types (for example, a work order and a reservation), Modifywithin selection is not possible.
Procedure1. Select the elements for which you want to change the field value. For example, the selected personnel
have moved to another department and therefore you have to change the Department and Work addressfields of these persons.
2. On the data panel, click Modify within selection.
Fundamentals
28 - Fundamentals
3. Select the check boxes of the field(s) you want to modify.4. Enter field values in the selected fields.
It is possible to clear a field for multiple-selected elements. If you want to clear a field for multiple-selectedelements, you have to select the relevant check box and leave the field empty.
All fields whose check boxes are selected and in which no values are entered, will be cleared.
5. Click OK to proceed. The items are processed, as displayed by a progress indicator.
A list of errors and warnings appears. You can save the error log by clicking the Save as button in the top-right corner of the window. This report is subsequently displayed in a new tab in your browser. Click thebutton next to each item in the error list to view more information about the error.
All items with warnings are displayed at the bottom of this window. Select the check box in front of eachwarning you want to process, or select the Select all check box and then click Process selection.
It is possible to do calculations on number fields like add, subtract, divide or increase with a percentage.
In case of a remainder when the integer is divided, the remainder is ignored and only the value of thequotient is considered. For example when 5 is divided by 2, the remainder, 1, is ignored.
Data panelThe data panel displays the details of the selected element in the elements list.

Fundamentals
Fundamentals - 29
In the following example, you can see property data:
Detailed information about the selected element is grouped by headers in the data panel and theinformation is spread over different tabs. For example, General > Address data. This allows you to find theinformation you need about the selected element easily.
On the data panel, fields marked with an
icon are mandatory fields. These fields must be filled in, if not, the changes cannot be saved.
The changes you made to the element data in the data panel can be saved or canceled.
Some TSIs can have different data views. You can switch views on the upper right, just below the selectionlevels and steps. Example: Data view and CAD Integrator.

Fundamentals
30 - Fundamentals
Panel resizingIt is possible to resize the width of the data panel. The size of the data panel is stored for each step.
Panels have a minimum size and are dependent on the screen resolution. If you use a computer withsmaller screen resolution or if the screen is minimized, the data panel size will remain the same but theelements panel will be resized. The handles shown in the image below, allow you to resize the panel.

Fundamentals
Fundamentals - 31
Uploading a fileOn the data panel, fields with the
icon indicate that you can upload files into Planon. Upload enables you to add additional related informationin any file format such as pdf, jpg or docx. The procedure to upload a file is similar across Planon.
To upload a file
Procedure1. Go to the field with the Upload option.2. In the Upload field, you can drag a file directly from your local machine or browse to and select a file by
clicking the Upload
Fundamentals
32 - Fundamentals
icon.
You can drag only one image at a time and only from your local machine.
3. If you click the Upload
icon, an Upload file dialog box will appear.4. Click the Choose file button to browse and select a file from your local drive.5. Click OK.
The file is now uploaded to the WebDAV location specified in System Settings.
After upload,
• For image type fields, the image is directly displayed in the data panel. You can use the Clear / X optionto remove it. However, it will still reside in the WebDAV location.
• For document type fields, the View button is displayed. Depending on your browser settings, thisbutton enables you to download or view the file.
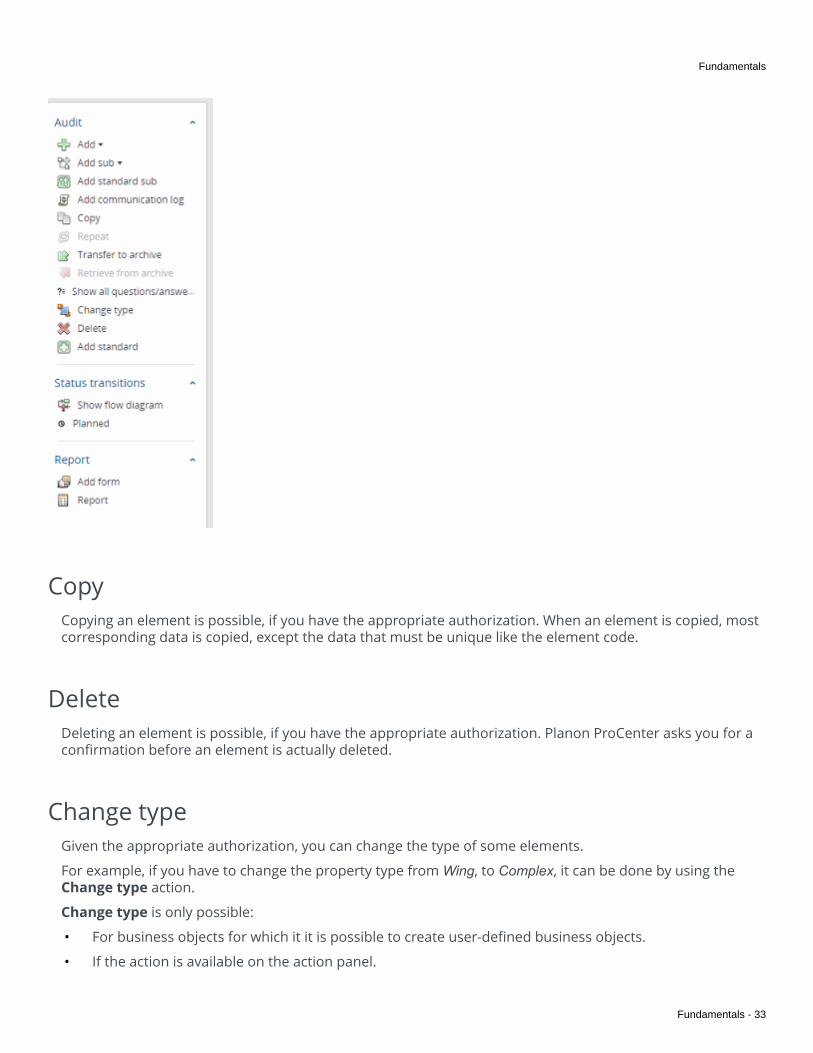
Action panelThe action panel is available on the right and consists of all the actions that can be performed on a selectedelement.
Common actions available are Add/Add sub, Copy and Delete. The actions you see on the actions panelmay differ and depend on the TSI and the business object you select.
The following image displays the actions available in Service Manager > Work orders.
Fundamentals
Fundamentals - 33
CopyCopying an element is possible, if you have the appropriate authorization. When an element is copied, mostcorresponding data is copied, except the data that must be unique like the element code.
DeleteDeleting an element is possible, if you have the appropriate authorization. Planon ProCenter asks you for aconfirmation before an element is actually deleted.
Change typeGiven the appropriate authorization, you can change the type of some elements.
For example, if you have to change the property type from Wing, to Complex, it can be done by using theChange type action.
Change type is only possible:
• For business objects for which it it is possible to create user-defined business objects.
• If the action is available on the action panel.
Fundamentals
34 - Fundamentals
• If both business objects have the initial (default) status.
For more information, see Field definer .
View status flowIn Planon Web Client, you can view the complete status flow and the possible status transitions of elementssuch as, Reservations, Orders, Visitors, Contracts and so on.
The status flow diagram displays the current status and the possible transitions of a selected element. Youcan also view the initial status(es) and the status icons. The three buttons on the top right of the panel allowyou to zoom in, zoom out and to perform a zoom-to-fit of the flow diagram.
To view status flow of an element:
• Select an element in the element list panel.
• Click Show Status flow on the action panel.
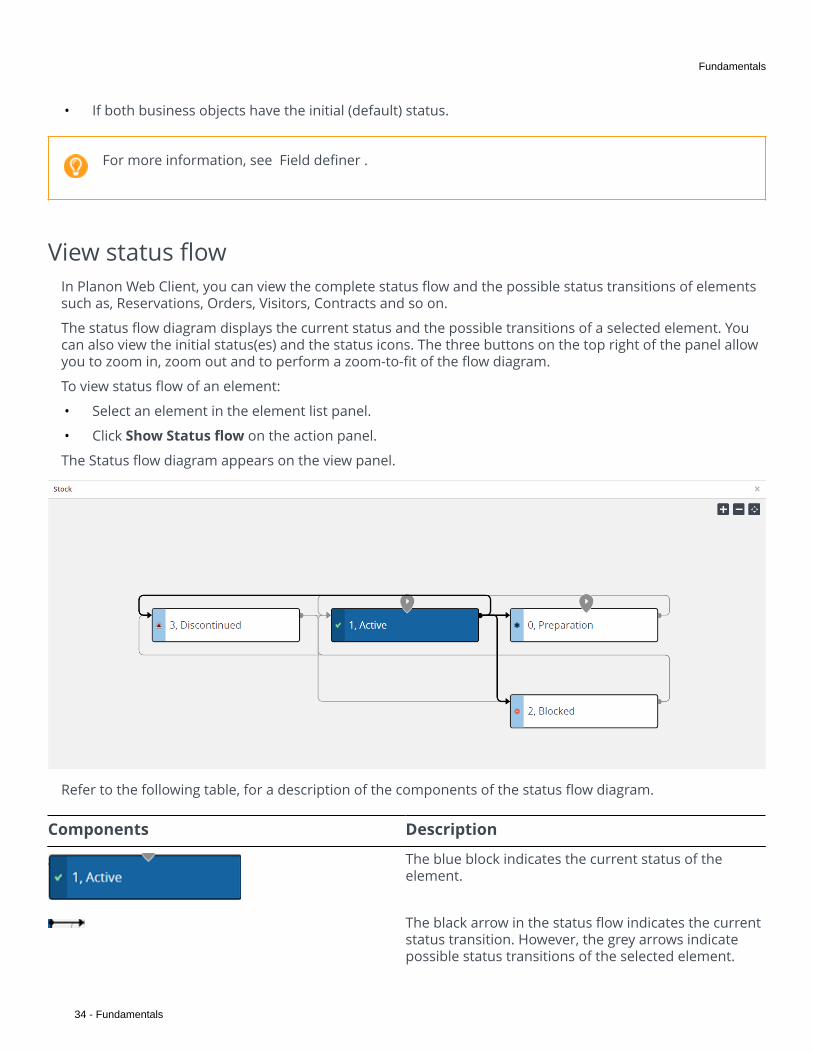
The Status flow diagram appears on the view panel.
Refer to the following table, for a description of the components of the status flow diagram.
Components Description
The blue block indicates the current status of theelement.
The black arrow in the status flow indicates the currentstatus transition. However, the grey arrows indicatepossible status transitions of the selected element.

Fundamentals
Fundamentals - 35
Components Description
The Grey lines indicate transitions that are currentlynot possible within the status flow.
The bend in the line indicates from where thetransition is coming.
The blue bar in the status flow block displays the statusicon. Here, the star indicates the Preparation status.
This is the initial status marker. An element can havemultiple initial statuses in a flow. You can start theelement from any of these initial statuses.

Fundamentals
36 - Fundamentals
Searching / filtering
In Planon Web Client, searching can be done in various ways:
• Search: This button is available at the top right of the screen and it provides a quick access forsearching. Note that this feature is available only in some modules.
When you use this search option, it takes priority over an existing filter. Clicking the Refresh button willdisplay the filter results again.
Use CTRL+space to search for an element.
• Filter and search bar
The filter and search bars are available above the element list. You can define a search query using thesearch bar and then display data that is only relevant to you. The available search possibilities depend onthe element you are currently working with.
You can use one specific field to search on. If required, you can also select a different search field, select anoperator and specify a value. The following table describes the search operators in detail:
Search operators
Operator Description
<, ≤, =, ≥, ><>, <> or empty
Logical operators that compare the search field withthe search value.
%searchkey% Operator that enables you to search for entriescontaining (parts of) the specific word (search key). Youcan use multiple search keys to fine-tune your result.
ContainsDoes not contain
Operators that search for the presence of the searchvalue in the search field.
Contains a valueDoes not contain a value
Operators that search for the presence of any value inthe search field.
Starts withDoes not start withDoes not start with or is empty
Operators that search for the presence of the searchvalue at the beginning of the search field.

Fundamentals
Fundamentals - 37
Operator Description
Ends withDoes not end withDoes not end with or is empty
Operators that search for the presence of the searchvalue at the end of the search field.
InNot inNot in or empty
Operators that search for the presence of a set ofsearch values in the search field.
Between Operators that search for a range of values in thesearch field. It includes both the start and end values.
For orders, using the search operatorBetween is not possible for alphanumericfields containing only digits because it throwsoff sorting. To work around this issue, do notfilter on Number, but add No. (SysOrderID) tothe layout to filter on the (main) order.
Filter typesThe following filters are used in Planon ProCenter:
• Personal filters: Personal filters for personal use can be added, managed and activated by the enduser.
• Temporary filter: As the name suggests, a temporary filter is created for a current search anddisappears when you click on any other filter. If you give a name to a temporary filter and save it, itbecomes a personal filter.
• Permanent filter: A filter created with search criteria for a quick data selection in the elements list.Typically, your Application manager manages permanent filters.
Using search operatorsThe following is an example for using the In operator in the Personnel TSI. Go to Personnel.
Procedure1. In the search bar select Department.2. In the next column, select the In operator.

Fundamentals
38 - Fundamentals
Click the button to open the following dialog box:
Select the departments you want to include in your selection, move them to the In use section and clickOK.
All persons belonging to the Central staff and Finance department are now displayed.
Contrary to filters (refer to Using filters) it is not possible to save search queries that youperform via the search bar. In addition, when performing a search request via the search bar, you can only select froma limited number of search fields. With filters, you can search on almost any field of anelement.
Using filtersA filter contains one or more selection criteria on the basis of which the user can select the data quickly andeasily. You can save the filters in Planon Web Client, and use them without having to specify the selectioncriteria again.
You can activate a filter by selecting it from the filters pick list. Different filters are available at every selectionlevel. On the filter bar, you can view, add, delete, edit and copy a filter by clicking the Filter option button.You can switch between filters or select No filter, if you do not want to use any filters.
Fundamentals
Fundamentals - 39
Using the date-time filter criteriaYou can filter on date and time using the date-time filter criteria. The date-time filter allows you to set afilter on dates as well as the required time if necessary. When you select a date-time field in the Select filtercriteria dialog box and click the calendar button, you will see that the current time is displayed (as the ‘=’operator is selected by default.)
For the time values set for each operator available in the date-time filters across the application, refer to thetable below.
Click the Today button to set the current day, date and time in the date-time field in the Selectfilter criteria dialog box.
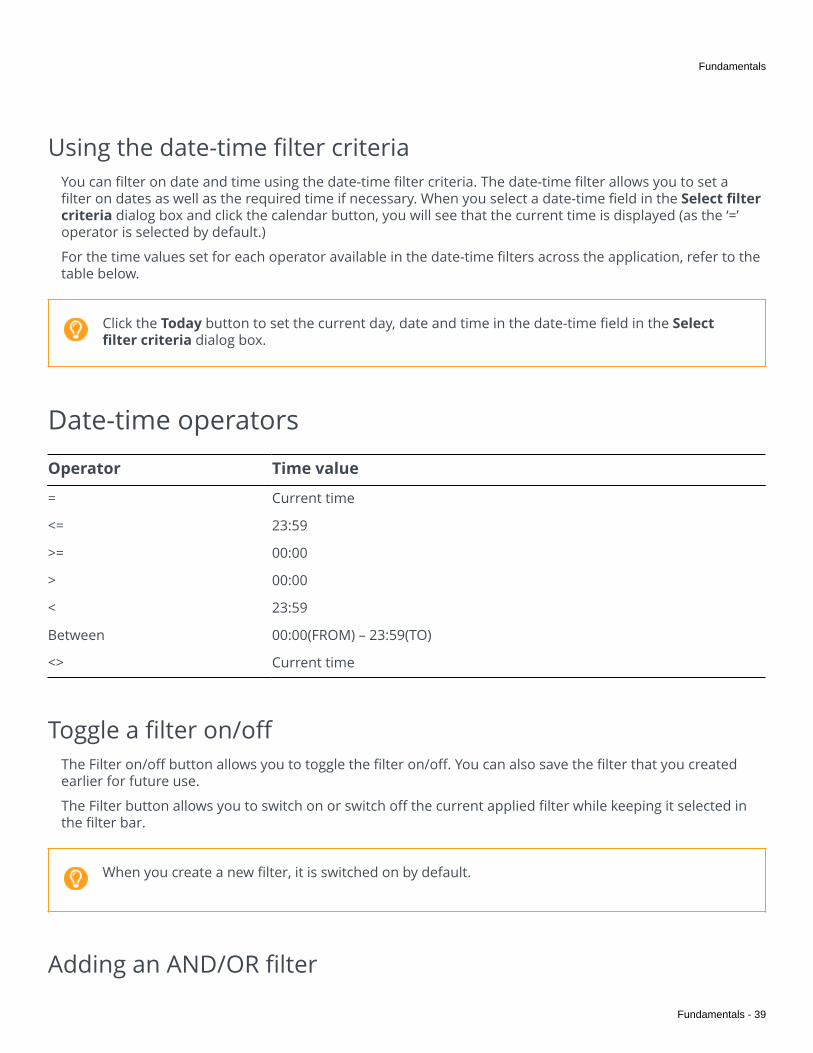
Date-time operators
Operator Time value
= Current time
<= 23:59
>= 00:00
> 00:00
< 23:59
Between 00:00(FROM) – 23:59(TO)
<> Current time
Toggle a filter on/offThe Filter on/off button allows you to toggle the filter on/off. You can also save the filter that you createdearlier for future use.
The Filter button allows you to switch on or switch off the current applied filter while keeping it selected inthe filter bar.
When you create a new filter, it is switched on by default.
Adding an AND/OR filter
Fundamentals
40 - Fundamentals
Planon ProCenter allows you to create filters and group them with AND/OR relations so that you can do anadvanced filtering of data.
The filtering is available at every selection level and step in Planon ProCenter.
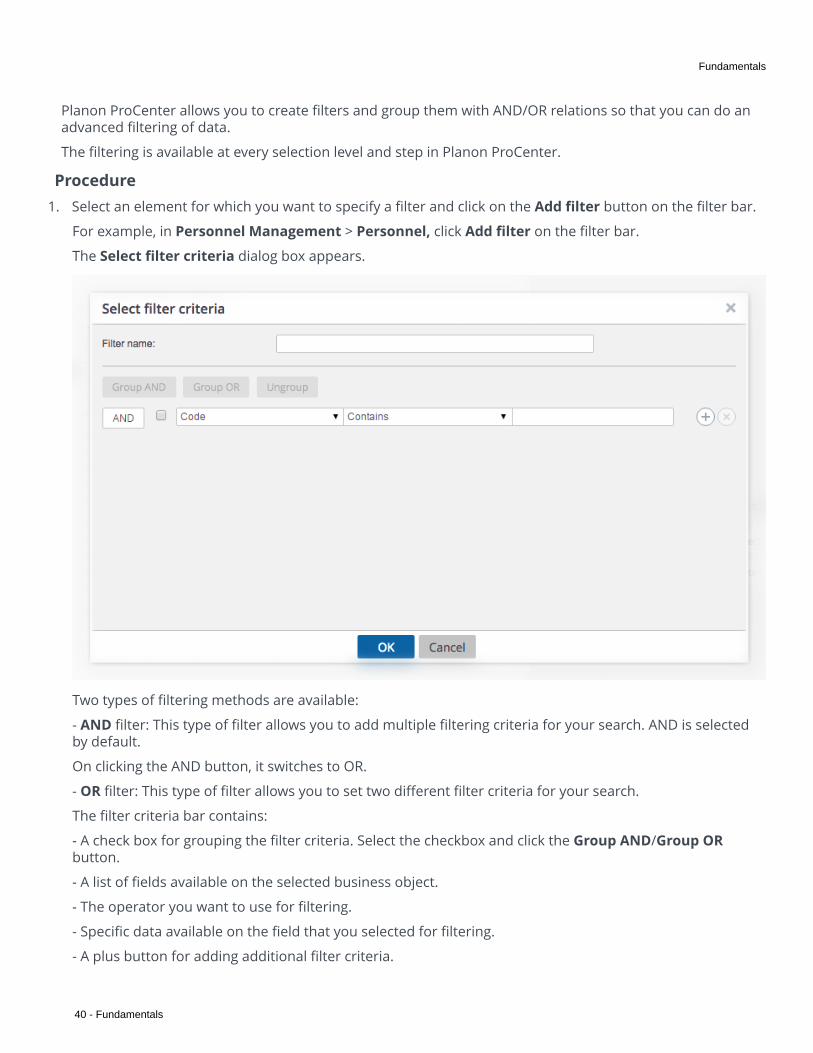
Procedure1. Select an element for which you want to specify a filter and click on the Add filter button on the filter bar.
For example, in Personnel Management > Personnel, click Add filter on the filter bar.
The Select filter criteria dialog box appears.
Two types of filtering methods are available:
- AND filter: This type of filter allows you to add multiple filtering criteria for your search. AND is selectedby default.
On clicking the AND button, it switches to OR.
- OR filter: This type of filter allows you to set two different filter criteria for your search.
The filter criteria bar contains:
- A check box for grouping the filter criteria. Select the checkbox and click the Group AND/Group ORbutton.
- A list of fields available on the selected business object.
- The operator you want to use for filtering.
- Specific data available on the field that you selected for filtering.
- A plus button for adding additional filter criteria.

Fundamentals
Fundamentals - 41
- A cross button for deleting the existing filter criteria.
Using the AND/OR filterProcedure
1. When you want to use more than one filter criteria, use the AND button.
To create an OR filter, click the OR button.
2. Enter a name for the filter in the Filter name field.If you do not give a name to the filter, it will be treated as a temporary
filter and is deleted when you deactivate it.
3. Select the field for which you want to set a filter. For example, Person.4. Select an operator, for example, '=.'5. Fill in the person's name you want to filter on.
If you want to add additional filter criteria, click the plus button and enter the filter options.6. Click OK. An AND/OR filter is created.
Grouping filtersYou can group the AND/OR filters. The filter criteria are grouped by selecting two or more criteria.
Procedure1. Add multiple filter criteria by clicking the plus icon.

Fundamentals
42 - Fundamentals
2. Select the check boxes of the filter criteria that you want to group.3. Click Group OR. The selected criteria are grouped into a subset.4. To ungroup, click the Ungroup button.
You can group the filter criteria (only) up to three levels.
5. Click OK. The filter is now active.
You can also add a filter on system fields such as System code, Update count, and so on.
Relative filters using macrosIn some cases it may be convenient to define filters that enable you to filter out variable field data instead offixed field data. This is called making relative filter selections. Relative filter selections are made by applyingmacros in filter definitions. Examples of variable field data are the current date-time and the current user.
Using macros in filter definitions on variable data saves you the trouble of having to adapt your filterdefinition every time you apply the filter.
A relative filter selection may consist of two parts:

Fundamentals
Fundamentals - 43
• A primary argument that defines the current date, current time, current user, current person or currentproperty set,
• A secondary argument that defines the period of the relative filter (only applicable in date-time relatedfilters).
Relative date-time filtersIn the Service Manager TSI, you may want to know, on a regular basis, which orders have to be carried outon a particular day. Or in the Personnel Management TSI you may want to retrieve the visitors for the current week or day. For this purpose you can use a selection by date field. It would be convenient if you were able to save a recurring selection such as this one, but if you enter thedate the 'usual' way, you will need to change it each time you want to apply the selection.
You can define a relative filter from the current date-time in the date-time field. Here, relative means withrespect to the current date and time. The system date is used for determining the current date and time.
A relative selection on date-time may consist of a primary argument that defines the current date and timeand a secondary argument that defines the period of the relative filter.
Secondary arguments are entered after the primary argument. The two arguments are separated by aspace. The secondary argument is followed by a number that indicates the number of times the specifiedperiod should be applied (e.g. &D5, &D#5). Both positive and negative numbers can be used. Note that apositive number is not indicated by a + sign.
Primary and secondary arguments are available in Planon ProCenter for date-time filter macros, checkPrimary and secondary arguments.
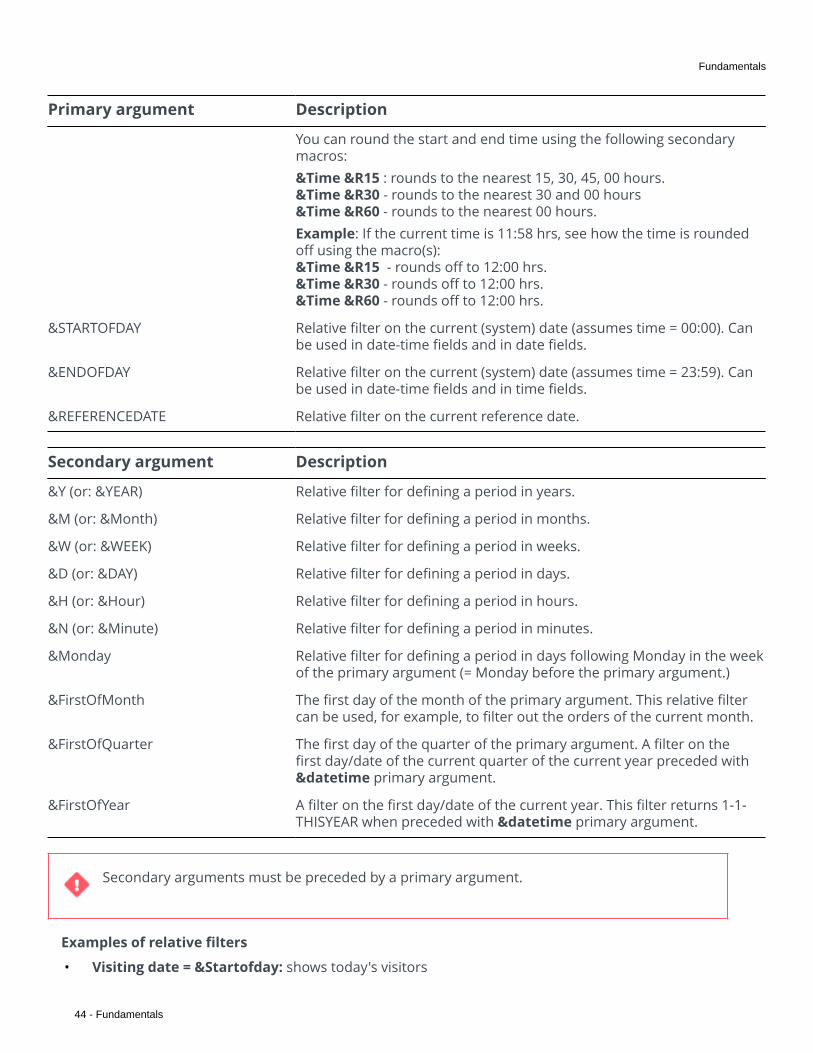
Primary and secondary arguments
Primary argument Description
&DATETIME Relative filter on the current (system) date-time. Can be used in date-time fields and in date fields.Rounding of time: You can round the start and end time using thefollowing secondary macros:&R15, &R30, &R60.&R15 - rounds to the nearest 15, 30, 45, 00 hours. &R30 - rounds to the nearest 30 and 00 hours &R60 - rounds to the nearest 00 hours.Example: If the current time is 11:36 hrs, see how the time is roundedoff using the macro(s):&datetime &h1 &R15 - the time is rounded to 12:45. &datetime &h1 &R30 - the time is rounded off to 13:00. &datetime &h1 &R30 - the time is rounded off to 13:00.
&TIME Relative filter on the current (system) time. Can be used on time fields.For example, Visitor's arrival/departure time.
Fundamentals
44 - Fundamentals
Primary argument Description
You can round the start and end time using the following secondarymacros:&Time &R15 : rounds to the nearest 15, 30, 45, 00 hours. &Time &R30 - rounds to the nearest 30 and 00 hours &Time &R60 - rounds to the nearest 00 hours.Example: If the current time is 11:58 hrs, see how the time is roundedoff using the macro(s):&Time &R15 - rounds off to 12:00 hrs. &Time &R30 - rounds off to 12:00 hrs. &Time &R60 - rounds off to 12:00 hrs.
&STARTOFDAY Relative filter on the current (system) date (assumes time = 00:00). Canbe used in date-time fields and in date fields.
&ENDOFDAY Relative filter on the current (system) date (assumes time = 23:59). Canbe used in date-time fields and in time fields.
&REFERENCEDATE Relative filter on the current reference date.
Secondary argument Description
&Y (or: &YEAR) Relative filter for defining a period in years.
&M (or: &Month) Relative filter for defining a period in months.
&W (or: &WEEK) Relative filter for defining a period in weeks.
&D (or: &DAY) Relative filter for defining a period in days.
&H (or: &Hour) Relative filter for defining a period in hours.
&N (or: &Minute) Relative filter for defining a period in minutes.
&Monday Relative filter for defining a period in days following Monday in the weekof the primary argument (= Monday before the primary argument.)
&FirstOfMonth The first day of the month of the primary argument. This relative filtercan be used, for example, to filter out the orders of the current month.
&FirstOfQuarter The first day of the quarter of the primary argument. A filter on thefirst day/date of the current quarter of the current year preceded with&datetime primary argument.
&FirstOfYear A filter on the first day/date of the current year. This filter returns 1-1-THISYEAR when preceded with &datetime primary argument.
Secondary arguments must be preceded by a primary argument.
Examples of relative filters
• Visiting date = &Startofday: shows today's visitors

Fundamentals
Fundamentals - 45
• Visiting date between &Startofday and &Startofday &D1: shows the visitors of today and tomorrow
• &Startofday &Monday3 (or &Startofday &Monday &D3) means Thursday (00:00 h) of the week inwhich the current day falls.Note that a week starts on Monday, so if today is Sunday, this macro means last Thursday. If today isMonday, the macro means this Thursday.
• &Startofday &FirstOfMonth-1 (or &Startofday &FirstOfMonth &D-1) means the last day of theprevious month.
• &Startofday &FirstOfMonth9 (or &Startofday &FirstOfMonth &D9) means the 10th day of thecurrent month.
Below is an example of a relative filter set on the Visiting Date field of a visitor.
• &datetime &Firstofquarter : shows October 1, 2018 when executed in Q4 2018.
• &datetime &Firstofyear: shows January 1, 2018 when executed in Q4 2018.
Macros cannot be used in combination with fixed dates! So, a relative filter that includes anactual date will result in an error.

Fundamentals
46 - Fundamentals
Special relative filtersThere is a number of special primary arguments that enable you to define relative filters for specificpurposes. For a description of these filters, see the table below.
Primary argument Description
&DATASECTION Can be used to define a relative filter on the current property set.
&CODEGEN In the FieldDefiner TSI, authorized users can use the &CODEGEN macroto automatically generate codes (with max. length of 10 characters).Codes can be generated for business objects such as properties,persons and addresses.
For more information on using the &CODEGEN macro, refer toFieldDefiner.
&USERNAME Can be used to define a relative filter on the current user.
&USERID Can be used to define a relative filter on the user ID code of the currentuser.
&PERSON Can be used to define a relative filter on the person included in thePersonnel Management TSI who is linked to the logged-on user.Authorized users can link a user ID to a person from the PersonnelManagement TSI in Authorization > User groups.
&Person.Property Use this macro to display or filter on the property of the user linked tothe account that is used. This macro only works for a property referencefield.
&Person.Space Use this macro to display or filter on the space of the user linked to theaccount that is used. This macro only works for a space reference field.
&Person.Address Use this macro to display or filter on the address of the user linkedto the account that is used. This macro only works for an addressreference field.
&Person.Department Use this macro to display or filter on the department of the user linkedto the account that is used. This macro only works for a departmentreference field.
&Person.CostCenter Use this macro to display or filter on the cost center of the user linkedto the account that is used. This macro only works for a cost centerreference field.
Editing a filterProcedure
1. On the filter bar, select a filter you want to edit from the drop down list.2. Click on the Edit filter button.
Fundamentals
Fundamentals - 47
The Select filter criteria window appears.3. Edit the filter name or filter settings in this window.4. Save the changes by clicking the OK button.
Copying a filterProcedure
1. Select the filter you want to copy from the list in the filter bar.2. Click Copy filter.
The filter is copied and the name of the original filter appears with a number enclosed in parenthesisappended to it.
The copy filter button allows you to copy both your own user-defined (personal) filters and anypredefined TSI user filters managed by your Planon administrator. Once you copy a predefined TSIuser filter, the copy effectively becomes a personal filter.
Previewing changes in the existing filterWhen you modify an existing filter by changing the filter criteria or adding more filter criteria, you can viewthe changes by clicking the Preview button in the Select filter criteria dialog box.
If the search results are satisfactory, save the changes on the filter and make it a new regular filter renamingit. You can also choose to save the changes on the same existing filter.
You cannot copy a temporary filter.
Deleting a filterProcedure
1. Select the filter you want to delete from the pick list in the filter bar.2. Click on the Delete filter button.
Planon ProCenter asks you to confirm before the filter is actually deleted.
Fundamentals
48 - Fundamentals
Communication logs
Communication logs are records of communication regarding an item that is added to Planon ProCenter .These records are added manually in the respective TSIs and they can include all types of communicationsuch as emails, faxes, reports, transcriptions of phone calls etc.
You can upload documents as reference or even include a link to a URL, which will always open in a separatebrowser window.
Communication logs can be added for many types of elements in Planon ProCenter , for example orders (allorder types), properties, visitors, budgets, invoices and so on.
You can create an action definition in Alerts to automatically delete communication logs based on aschedule.
Communication logs - reference dateUsing a reference date with communication logs allows you to only view communication logs that are validon that date. The reference date is set via Reference date button in the Planon ribbon and it is the currentdate by default. Clicking Reference date causes a date picker to appear from which you can select anotherdate that is in the past or in the future.You can deactivate the reference date by clicking Deactivate reference date in the Planon ribbon.

Fundamentals
Fundamentals - 49
Reporting
The Reports tool is available on all the TSI selection levels and steps. It allows you to create reports for theselected data.
There are ready-made user report definitions available in the Reports dialog box > User reports tab. Youcan create three types of user reports: Report, Data only, Mail merge.
On some selection levels and steps, there are also system reports available on the System reports tab.System reports are the report definitions programmed by Planon. These definitions cannot be modified. Youcan, however, modify the report settings, if required.
Prior to creating a report, you must first select the TSI > selection level > selection step corresponding to thesubject of the report. Data corresponding to these elements will be included in the report. For a descriptionof the report field settings, refer to Report settings.
For example, if you want to generate a report on available workspaces, go to Spaces & Workspaces >Workspaces and click Report.
• The report settings you configure are stored per report and per individual user. Next time youlog in your personal settings are loaded again.• When using the Web Client for creating reports, check your browser's pop-up blocker settings.The Planon site needs to be a part of the allowed sites of your browser's pop-up blocker otherwisereporting functionality, such as previewing a report, will not work properly.
Saving reportsThis topic describes how you can save reports in Planon ProCenter . Reports can be saved in several formats,such as CSV, PDF, HTML and XLS.
Procedure1. Select the report you want to generate.2. On the action menu, click Save as.
The Save as dialog box appears.
Refer to Save options for reports and select the appropriate options in the dialog box.
3. Click OK.
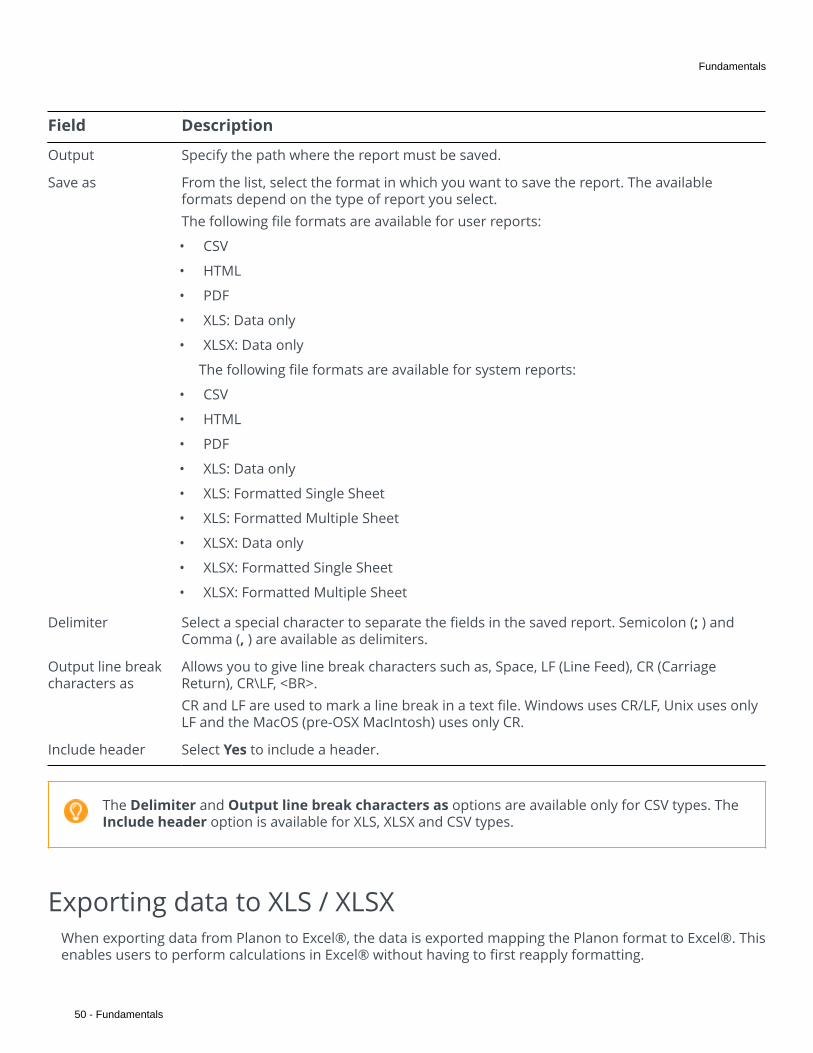
Save options for reportsComplete the following fields when saving a report:
Fundamentals
50 - Fundamentals
Field Description
Output Specify the path where the report must be saved.
Save as From the list, select the format in which you want to save the report. The availableformats depend on the type of report you select.The following file formats are available for user reports:
• CSV
• HTML
• XLS: Data only
• XLSX: Data only
The following file formats are available for system reports:
• CSV
• HTML
• XLS: Data only
• XLS: Formatted Single Sheet
• XLS: Formatted Multiple Sheet
• XLSX: Data only
• XLSX: Formatted Single Sheet
• XLSX: Formatted Multiple Sheet
Delimiter Select a special character to separate the fields in the saved report. Semicolon (; ) andComma (, ) are available as delimiters.
Output line breakcharacters as
Allows you to give line break characters such as, Space, LF (Line Feed), CR (CarriageReturn), CR\LF, <BR>.CR and LF are used to mark a line break in a text file. Windows uses CR/LF, Unix uses onlyLF and the MacOS (pre-OSX MacIntosh) uses only CR.
Include header Select Yes to include a header.
The Delimiter and Output line break characters as options are available only for CSV types. TheInclude header option is available for XLS, XLSX and CSV types.
Exporting data to XLS / XLSXWhen exporting data from Planon to Excel®, the data is exported mapping the Planon format to Excel®. Thisenables users to perform calculations in Excel® without having to first reapply formatting.

Fundamentals
Fundamentals - 51
The mapping between Planon and Excel® is as follows:
Planon field type Excel® cell format Remark
Numbers General Not taking into account the Planon mask
Dates/date-time/time Custom Taking into account the Planon mask
• There is a difference in the way times are treated in Planon and Excel®. Times are stored in numbers inPlanon and the '0' is defined differently. This may cause unexpected results when comparing times inPlanon and in Excel®.
• Expressions, if the result is a number, date, date-time or time, will be formatted as specified above.
• Totals and group totals will be formatted as specified above.
• Group headers will not be formatted.
• Expressions, if the result is a number, date, date-time or time, without a Planon mask will be exportedwith the Planon java mask. This could differ from the Excel® mask.
• Separators (date, decimal, thousand) are derived from the Excel ®user locale.
Previewing & printing reportsFor user reports, when selecting the Preview & Print option, a dialog box indicating a step by step progressof report generation is displayed. The generation process also displays the number of elements beingretrieved and filled. You can cancel the preview of a report while it is in progress by clicking Cancel or by justclosing the dialog box.
Fundamentals
52 - Fundamentals
When a report contains more than 500 records, generating it may take a long time. Whenthis happens, a warning message will be displayed notifying the user about this possibleperformance issue.
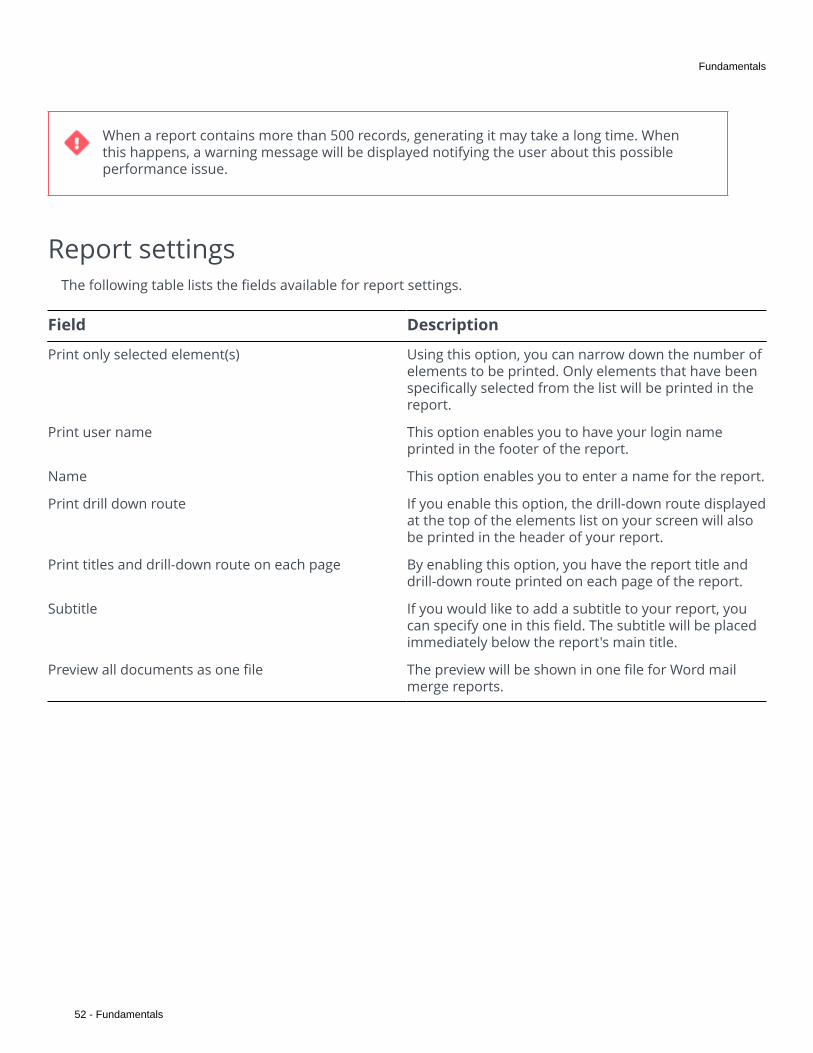
Report settingsThe following table lists the fields available for report settings.
Field Description
Print only selected element(s) Using this option, you can narrow down the number ofelements to be printed. Only elements that have beenspecifically selected from the list will be printed in thereport.
Print user name This option enables you to have your login nameprinted in the footer of the report.
Name This option enables you to enter a name for the report.
Print drill down route If you enable this option, the drill-down route displayedat the top of the elements list on your screen will alsobe printed in the header of your report.
Print titles and drill-down route on each page By enabling this option, you have the report title anddrill-down route printed on each page of the report.
Subtitle If you would like to add a subtitle to your report, youcan specify one in this field. The subtitle will be placedimmediately below the report's main title.
Preview all documents as one file The preview will be shown in one file for Word mailmerge reports.
Fundamentals
Fundamentals - 53
Archiving element(s)
In Planon Web Client, it is possible to transfer some elements, such as orders or visitors, using the Transferto archive button. If you archive elements, the elements are no longer shown on the elements panel.
Once archived, the data of these elements cannot be modified.
If you need to modify an archived element, you must first retrieve it from the archive. It is,however, also possible to modify archived elements directly. For the required settings, contact yourapplication manager.
If you want to archive multiple elements at the same time, use the Action on selection option.
To display the archived elements in the elements panel, click the toggle button or the Show archiveditems button.

Fundamentals
54 - Fundamentals
Field types
Planon ProCenter supports different field types. For an overview of field types refer to the table below:
Field type Description
Text field Enter free text. The length of the text field is limited.
Comment field A comment field is used to enter comments of any length.
Reference / pick list field Select an option from a predefined pick list. Instead of selecting a valuefrom a pick list directly, you can select a value from a pick list through autosuggestions. The auto-complete feature allows you to enter partial text anddisplays matching results. You can then select the correct value from thesuggested list. A maximum of (first) 10 items are displayed. Select one of theoptions from the results displayed. If you want to hide the list, press the ESCkey on your keyboard, the cursor moves back to the end of the entered text.Each element in a pick list is linked to a code and description.In pick lists containing codes, however, you must enter a code. Do not use adescription in these fields.It is possible to use search options in pick lists. You can search by the codeand/or the element’s description.When performing a search request, it is necessary to select one of theavailable operators. For more information on the available operators referto Search operators.In some pick lists, it is possible to use predefined filters. Use the radiobuttons to select the appropriate filter option.In a multiple pick list, multiple options can be selected at the same time. Anexample of a multiple pick list is the Person type list. A person can haveseveral roles (= person types) in Planon ProCenter, so it is possible to selectmore than one person type.
Numerical field Enter numerical data.
Date field Enter a date from a date picker.The following date formats are supported:For English users:mmddyyyy / mmddyy / mmddFor non-English users:ddmmyyyy / ddmmyy / ddmmIf you do not enter the year, the current year is added to the date.You can also enter the date in numeric format in the Date-time field.The date is converted to the appropriate format automatically based on theregional settings of the user.
You can also press CTRL+D to insert the current date.
Time field Allows you to enter the time using the built-in date picker.

Fundamentals
Fundamentals - 55
Field type Description
Time can be specified in hours, minutes and seconds.
Date-time field Allows you to use the built-in picker to select a date and time.You can also enter the date and time in numeric format. For example,10182012 14:40.For more details on entering a date in numeric format, see Date field.If you enter only the date, and not the time, and then tab out of the field,the time is displayed as 00:00.However, if you specify a default time, the time is calculated automaticallyand added.
You can also press CTRL+D to insert the current date and time.
Multiple time zone field - property If the multiple time zone functionality has been activated, data in date-time fields that is directly related to a property, will be derived from theproperty's time zone.
Multiple time zone field - user If the multiple time zone functionality has been activated, data in date-time fields that is directly related to a user account, will be derived from theuser's time zone.
Period field A period can be specified in minutes, hours, days, weeks, months or years.A period field is often used in conjunction with date fields.
Link field By means of a link field, a file that has not been created in Planon ProCentermay be linked, for example an AutoCADdrawing or a Microsoft Excel
document. You can view this file by clicking the button.In Web Client, when WebDAV is used, the WebDAV location will not bedisplayed, only the folder excluding the folder specified in file location andfile name will be displayed.
File upload field Using a file upload field, a file can first be retrieved from a source locationand then sent to a target location (specified in System Settings > Filelocations).Only the file path relative to the WebDAV location is displayed and not thefull WebDAV location.See also Uploading a file.
Life cycle aware fields The fields which can have multiple life cycles are called life cycle awarefields. For example, Contract, Contract line and Rentable unit. The valuedisplayed in the field depends on the reference date.When the reference date is turned off, the icons are highlighted in red colorand a tooltip is displayed to warn the user.
Document (secure) In the Document (secure) field authorized users can view a document thatis stored at a secure file location, without accessing the actual secure filelocation itself.Users with Read/Write rights for this field can even upload documentsto this secure location. The maximum file size is 20 MB. With Read rights
users can view the document by clicking the button. With Read/Write

Fundamentals
56 - Fundamentals
Field type Descriptionrights users can view the document and edit it in a temporary directory ontheir local machine. The edited document can then be uploaded back to thesecure location via the folder button.Only the file path relative to the WebDAV location is displayed and not thefull WebDAV location.Application behavior:
• When you upload a document with the same name (again), it willoverwrite the existing document and will prompt a warning messageasking to confirm the action.
• When you upload a new document (with a different name), it willoverwrite the existing document on disk.
• When you delete a document, it will not only be deleted from the record,but also from disk.
• When you copy a record containing a secure document, also thedocument on disk will be copied.
Money field Allows you to enter monetary amounts. Planon Web Client automaticallyadds the currency symbol and the required commas or decimal points.
Money fields accept and display values as per the defined number ofdecimal places.
Internet address field Allows you to enter an Internet address in this field.
Image This is a link field that allows you to link a file that has not been created inPlanon ProCenter, for example a drawing or photograph of a property. You can clear, rotate, upload or select an image file using the
buttons respectively. Planon supports the imagetypes .jpg, .jpeg, .png, .gif, .tiff, .svg, .bmp, and .ico.To reduce overhead and improve scalability for viewing and downloadingimages, images are scaled while uploading. The original uploaded image isstored in WebDAV file location of Planon.For the extensions .jpg, .jpeg, .png and .gif, the uploaded image is displayedas a thumbnail and if you click on the image, it is displayed in its full size.When you click another image file type, the file is downloaded for securityreasons.To download an image, place the cursor on the image > right-click >Saveimage as > specify Path and File name > click Save.

Fundamentals
Fundamentals - 57
Field type Description
The displayed or downloaded image is a scaled image, not theoriginal image you uploaded.
Indicates that no image is selected.
Indicates that the uploaded image is a document.
Indicates that the selected image no longer exists.

Fundamentals
58 - Fundamentals
Self-Service – an Introduction
Planon Self-Service (PSS) allows users to complete simple tasks more easily. These tasks can be started fromthe gadgets on their homepage. PSS can also be integrated into your intranet as a stand-alone product.
PSS is a collection of several web definitions that are linked to a site. A web definition is a web form throughwhich functionality is made available for users. Service Requests, Knowledge Base, Visitors, Reservationsare some of the PSS web definitions that are available as web forms.
The forms displayed on your site depend on how your company chooses to configure them for you. You canuse the PSS features either through the Planon Web Client interface or publish (integrate) all Self-Serviceweb definitions via a self-designed intranet page of your organization.
For more information about the Web Client interface, refer to Planon Web Client - an Overview.
What you see on your Self-Service screen is configured for you.
For example, if you are working for an educational organization, there may be different sites configured forthe staff and students. A link on the intranet page takes you to the Self-Service screen that you want to use.
Contact your application manager for more information about customizing your PSS configuration.

Fundamentals
Fundamentals - 59
Self-Service - Standard features
Planon Self-Service (PSS) web forms have a common structure. The print screens and information displayedin this document are an example of what a form could look like. Contact your application manager forcustomizing the forms.
Self-Service formA Self-Service form is a web page that combines various blocks. A block is a section in a page.
The following table describes the generic pages and blocks available in PSS:
Page Description
Add page Allows you to add an element which then becomes availablein the list page. For example, if you add a visitor using theVisitor add page, the visitor is listed in the Visitor list pageand becomes available for the back office.An add page has an add block where you fill in the informationto create a new element. The fields with an asterisk mark mustbe filled in mandatorily.For example, you fill in the visitor data on the add block of theVisitor page.
For a description of the field types and thecorresponding icons used, refer to Basic navigation inPlanon Web Client.
Edit page Allows you to edit the element details. For example, edit avisitor’s details.An edit page has an edit block where you can makemodifications/edits and submit the changes.There are, however, some differences in the way the edit pageworks across the modules:
For more information, refer to Self-Service Modules.
List page The List page consists of:- An information block/help text on the top of the page.The information block displays additional information orinstructions specified for the page.

Fundamentals
60 - Fundamentals
Page Description
- A search block that allows you to search for a specificelement. Specify the search criteria in the search fields.- A list block that displays the available elements on the page. The list block displays search results in the form of rows.Clicking a row will display the details of the selected element ina detail block.If the number of results exceeds the number specified in thesettings, navigation buttons are enabled.
The Navigation buttons display a count of thenumber of pages on the web form. The display of the pagenumbers is configurable by your application manager.
Confirmation page Consists of a confirmation block. It displays the default textto confirm the action that you performed. For example, aconfirmation is displayed when a new visitor is added.
Details page Consists of a details block. It displays complete details of anelement.
In PSS, there are some blocks that are available only with specific pages. The following table describes thesespecific blocks:
Page Description
Order lines block This block is available only in the Work orders page.
Upload block The upload block is available in the Add/edit pages of Servicerequests, Orders, Move request, Workflow and Reservations
Communication logs block This block is available in Service calls > Details page.
Question block This block is available in Service calls and Workflow.
Searching in Self-ServiceIn Self-Service, end users can search for information in various ways. The configuration of search actions isdone in Web Configuration .
• Auto-suggest: enables users to find and select a value by providing a list of possible results based onmatching characters typed by the user.
You cannot search if a mandatory field is left empty.
• Pop-up and auto-suggest: enables users to search either by selecting an entry from a pop-up orselecting a suggestion from the auto-suggest directly.
Fundamentals
Fundamentals - 61
• Drop-down: Users can select the search criteria from a drop-down list.
• Free text field: Users can type search criteria in a free text field.
If the setting Split search string is set to Yes in a Search block, users can enter search criteriathat include multiple search terms in random order. For more information on the field, see WebConfigurations > Search block.
Important: click the Search button again to see the search results when you change thesearch criteria.

Fundamentals
62 - Fundamentals
Shortcut keys
Planon ProCenter supports keyboard shortcut keys to perform certain actions in the application.
• Shortcut keys are not supported on tablets or mobile phones. • Pressing the ? on your keyboard (SHIFT+?) will display a dialog box containing (some of) the most
important shortcuts. You can also display this dialog box by clicking > Keyboard shortcuts.
The following lists display the most important keyboard shortcut keys that can be used in the Planonapplication.
General
Press key(s)... To...
CTRL+F4 Quit the current browser tab
ALT+F4 Quit the browser
TAB Navigate to the next screen element
SHIFT+TAB Navigate to the previous screen element
CTLR+F5 Refresh your browser
ALT+F1 Open the configured Planon WebHelp.Note: An error is displayed if no webhelp is configured.
? (SHIFT+/) Display a list of keyboard shortcuts in Planon
ALT+L Open/close navigation panel
ALT+S Activate searching in the navigation panel; puts cursor inside the search box.
CRTL+S Save the record
Zoom in/out
Press key(s)... To...
CTRL+ Zoom in (maximum font size 24 pt)
CTRL- Zoom out (minimum font size 6 pt)
CTRL 0 Reset font size
CTRL+scroll Zoom in or out

Fundamentals
Fundamentals - 63
In Windows 10, the default zoom for the Google Chrome browser is set to 125%. Hence,elements in Planon may look larger in Chrome when compared to other browsers.
Data panel
Press key(s)... To...
CTRL+D Enter the current date-time in date-time fields (and also the user name inmemo fields)
Enter the current date (date fields only)
Enter the current time (time fields only)
CTRL+C Copy selected text
CTRL+V Paste selected text
CTRL+X Cut selected text
DELETE Delete selected text
CTRL+Z Undo (only changes in the active field)
HOME Go to the beginning of the line
END Go to the end of the line
CTRL+A Select the field value (text) if cursor is placed in it.
Select entire text in the page when cursor is not placed in a field
CTRL+HOME Move the cursor to the beginning of the field (memo fields only)
CTRL+END Move cursor to the end of the field (memo fields only)
Holding SHIFT+cursor movement(ARROW, HOME or END keys)
Select or extend the selection of text
Holding SHIFT+CTRL+cursormovement
Select or extend the selection of text by word or text block
CTRL+LEFT/RIGHT ARROW Move cursor to the beginning of the previous or next word
LEFT/RIGHT ARROW Move cursor within a field (only when field has focus)
UP/DOWN ARROW Move up and down through editable fields
TAB Move forward through fields and field buttons.Focus on info or pop-up buttons.
Set a tab in a memo field
SHIFT+TAB Move backward between fields and field buttons
CTRL+TAB Go to the next browser tab
ENTER Enter a new line in a memo field.

Fundamentals
64 - Fundamentals
Press key(s)... To...
Select the focused element.
HOME Jump to the beginning of a row
END Jump to the end of a row
Arrow keys Navigate through the element list / tree
Any alphabet key Jump to the first element in the list / tree starting with that key(alphanumerical). Pressing the key multiple times loops through all theelements starting with that key.On a non-paginated list / tree, it goes through all the opened nodes.On a paginated list / tree it only goes through the opened nodes of thecurrent page.
SHIFT+HOME Select the root node of a list or tree (grid and proxy panel)
F5 Refresh the elements list
Actions
Press key(s)... To...
ESC Cancel changes
CTRL+S Save changes
CTRL+space Find an element by its number or code.
The shortcut will only work if there is a Find icon ( ) at the top rightcorner of the header.
The shortcut is included in the following TSIs:
• Work Orders
• Assets
• Personnel
• Contracts
• Invoices
• Moves
• Projects
RIGHT ARROW Open the action drop-down list if there is more than one action
UP/DOWN ARROW Navigate through action items

Index
Index - 65
IndexA
Action on selection 24Action on selection: warning message 24Action panel on a tablet 20Active element 22Add page 59Archived items: hide 53Archived items: show 53
BBasic navigation on a tablet 17, 19
Cchange password 10Classic 10Comment field 54Communication logs 48Configuring gadgets 15Confirmation page 59
DDark 10Data panel on a tablet 19Data section 28Date field 54Date-time field 54Details page 59drag-and-drop 31
EEdit page 59Elements 22Elements: archive 53Elements: hierarchy 23Elements:change type 33Elements:copy 33Elements:delete 33
FField types 54File location
secure 54File upload field 54Filter and search bar 36Filter macros 42Filter: types 37Filter:add 39

Index
66 - Index
Filter:copy 47Filter:delete 47Filter:edit 46
Ggadget library 15Gadgets 13GDPR 9, 10Grouping filters 41
HHeader 7Help 9Homepage 7, 13
IImage field 54initial status 34Internet address field 54
KKeyboard shortcuts 9
LLight 10Link field 54List page 59Log on 5Logging in 5Logging out 6
Mmacros
primary arguments 43secondary arguments 43
Modify within Selection 26Money field 54Multiple time zone
field type 54My account 10
NNavigation panel
Pin / Unpin 11Search 11
Navigation Panel 7Numerical field 54
PPanel resizing 30Period field 54
Index
Index - 67
Planon Self-Service 58, 59Previewing & printing reports 51primary arguments
macros 46Privacy statement 9Property file field 54
RReference date 8Reference field / pick list field
description or code 54filter options 54search options 54
Relative filter 43Relative selections 42Report:generate 49Ribbon 8
SSaving reports 49Search operators 37Searching in Self-Service 60Secure document 54Secure document field 54Selection bar 21Selection level 21Selection step 21Selections: via filters 38Selections: via search bar 36Self-Service form 59Shortcut keys
Actions 62Data panel 62General 62Zoom in/out 62
Start 5
TText field 54Time field 54TSI help 9
Uuploading a file 31user account details 8Using AND OR filter 41
Vview status flow of an element 34

Index
68 - Index
WWeb Client for tablet users 16
Android 16iOS 16
Web Client menu 17WebHelp 9Workspace 7