plaplaybookybook · el agheila entry area 132 / ariete div el agheila entry area 8 ber / ariete div...
TRANSCRIPT

PLAYBOOKPLAYBOOK
GMT Games, LLC • P.O. Box 1308, Hanford, CA 93232-1308 • www.GMTGames.com
1.0 Scenarios ...........................................................................21.1 Compass ..........................................................................21.2 Sunflower .........................................................................41.3 Crusader ...........................................................................61.4 Gazala ..............................................................................8
2.0 ZOC Effects Summary...................................................103.0 OOS Effects Summary ...................................................10Extended Example of Play ..................................................11Designer’s Notes ...................................................................19
Table of Contents

The Dark Sands ~ Playbook2
© 2018 GMT Games, LLC
1.0 Scenarios The scenarios are both self-contained and potential starting points in the campaign. The setup instructions contain directions for setting up all units, counters and tracks. The setup instruc-tions also indicate which Units and Assets should be placed on the Reinforcements Track for the scenario being played.Each scenario setup section has the following sections:
On Map:Place listed units on the map locations indicated.
Available Assets:Place listed Assets in the appropriate “Available Assets” box.
Out of Play Units:Place listed units in the game box.
Returning Units:Place listed units in their returning location on the “Reinforce-ments Track.”
Rebuildable Units:Place listed units in the appropriate “Rebuildable Units” box.
Tracks:Set the markers as indicated in this section.
1.1 COMPASSOperation Compass began as a probing attack by the British Western Desert Force against the much larger Italian 10th Army that had invaded Egypt three months previously, but Italian weakness quickly turned it into a series of major offensives that by February had destroyed the Italian forces and cleared the Axis from eastern Libya.
1.1.1 Start TurnThe Compass scenario starts on Turn 1 and is two turns long.

The Dark Sands ~ Playbook 3
© 2018 GMT Games, LLC
1.1.2 Set UpAll Units and Assets with a hex location listed on their counter are placed on the map, per the instructions in the “On Map” section below. All units that are due to arrive on Turn 1 or 2 are placed on the Reinforcements Track.
On Map:Place the “At Start” units as listed below.
Location Italian Units1647 Fortified Box, Cirene1848 Fortified Box, 1 Meditrn1949 Fortified Box, 2 Libya, Maletti Group2150 Fortified Box, 1 Libya2436 Sirte1839 (Sidi Omar) Garrison2045 (Buqbuq) Fortified Box, Catanzaro2140 (Ft. Capuzzo) 28 October2141 (Sollum) Marmaca2149 (Sidi Barrani) Fortified Box, 3 January2441 (Bardia) 23 March2830 (Tobruk) Garrison
Location British Units1877 22 Guard Inf1959 11/4 Ind Mot Inf2051 3 Coldstream Guard Inf1951 Selby Mot Inf1650 4/7 Armour, 7/7 Armour, 7SG/7 Mot Inf1550 5/5 Ind Mot Inf, 7/5 Ind Mot Inf, 16/70 Inf1960 Railhead marker
Available Assets:The following Assets are available and should be placed in the appropriate “Available Assets” box.
Commonwealth:6x Fortified Box4x British Garrison1x Coastal Navy1x RAF +21x RAF +1
Out of Play Units:None
Returning Units:None
Rebuildable Units:None
Tracks:Turn Record Track: Turn 1, British InitiativeSaved Inf Replacements: 0Saved Armor Replacements: 0Commonwealth VPs: 0Axis VPs: 0
1.1.3 Victory ConditionsThere is no losing this scenario for the British. The real test here is how significantly the British win. Of all the possible levels of victory, anything other than Strategic Victory should be blamed on the chits and dice—or on a British blunder.
British Apparent VictoryThere are no Axis units in Egypt. Bardia, Tobruk, and Benghazi are Italian controlled.Congratulations. You have followed your orders to the letter. Your reliable mediocrity will ensure a steady flow of inconsequential assignments and an obscure footnote in someone’s memoirs. With these results the DAK will not be sent and North Africa will remain a backwater to the war.
British Marginal VictoryThere are no Axis units in Egypt and Bardia is British controlled. Tobruk and Benghazi are Italian controlled.Congratulations. Your unimaginative but stylish victory appears to have placed British forces in an over extended and indefen-sible position. Your next assignment will be less than obscure but, for the sake of appearances, will be honorable. After all, you were victorious.
British Tactical VictoryThere are no Axis units in Egypt and both Bardia and Tobruk are British controlled. Benghazi is Italian controlled. Congratulations. Your plodding but aggressive command has achieved what appears to be a true victory. Sadly, this is the worst possible result. You will still be in command, probably sipping tea in Tobruk, when DAK comes roaring out of the desert and forces you to scamper back to Egypt.
British Operational VictoryThere are no Axis units in Egypt, and Bardia, Tobruk, and Benghazi are British controlled. At least one Italian step is still on the board and able to trace an LOS. Congratulations. This is the best possible situation. You have cleared eastern Libya of enemy forces, badly damaging the Italian army in the process. The Italians are being reinforced by DAK; you have been given two more divisions to complete the conquest of Italian North Africa. Good Luck. You will need it.
British Strategic Victory (historical and the only acceptable level)The British player wins immediately at the end of a Victory Check Segment if there are no Axis units on the map that can trace an LOS.Congratulations. You have cleared the map of the enemy. High Command is convinced the show is over and is stripping you of your better units. The next few months will be a shock to all concerned.
Axis VictoryAvoid a British Strategic Victory.Any other level of British Victory is actually an Axis Victory due British mistakes or extreme bad luck. You should let them try again.

The Dark Sands ~ Playbook4
© 2018 GMT Games, LLC
1.2 SUNFLOWEROperation Sunflower was the code name for Hitler’s reinforcing North Africa to prevent the collapse of Italy’s Empire. Rommel turned this essentially defensive operation into an offensive that threw the British back to the gates of Egypt.A word to the wise: Do not send Italians into the desert!
1.2.1 Start TurnSunflower begins on Turn 3, and is three turns long.Sunflower starts with the Turn 3 Replacements Phase and ends after the Turn 5 End Phase.
1.2.2 Set UpTurn 3 Reinforcements Action Segment is assumed to have been performed before the play started. The following setup includes the withdrawals and reinforce-ments that would be part of these action rounds.
Note: In the campaign game the players will perform the Reinforcement Action Rounds at the start of the Action Phase prior to the Initiative Action Round.
All Units and Assets scheduled to arrive on Turn 3, 4, and 5 are placed on the Reinforcements Track. The units that arrived prior to Turn 3 are setup according to the following instruction.
On Map:Place the “At Start” units as listed below.
Location Axis UnitsEl Agheila Entry Area 21 Corps HQEl Agheila Entry Area 132 / Ariete DivEl Agheila Entry Area 8 Ber / Ariete DivEl Agheila Entry Area 32 / Ariete DivEl Agheila Entry Area Pavia El Agheila Entry Area BolognaEl Agheila Entry Area BresciaEl Agheila Entry Area SavonaEl Agheila Entry Area TrentoEl Agheila Entry Area Afrika Corps HQEl Agheila Entry Area 1 / 5 / 21 PzEl Agheila Entry Area 2 / 5 / 21 PzEl Agheila Entry Area 3 / 21El Agheila Entry Area 2 MG El Agheila Entry Area 8 MG
Location British Units1877 (Alexandria) Garrison2830 (Tobruk) 24/9 Australian2830 (Tobruk) Garrison1960 (Mersa Matruh) 22 Guards1960 (Mersa Matruh) Garrison2429 (El Adem) 3 Indian2906 26/9 Australian2904 (Benghazi) 20/9 Australian1905 (Agedabia) 1 /2 British1905 (Agedabia) 3/2 British1702 2SG/2 British1957 Railhead marker

The Dark Sands ~ Playbook 5
© 2018 GMT Games, LLC
Available Assets:The following Assets are available and should be placed in the appropriate “Available Assets” box.
German:6x Fortified Box2x Italian Garrison2x German Garrison21 Corps Arty +1Regia Areo +1
Commonwealth:6x Fortified Box1x British Garrison1x Coastal Navy +21x RAF +11x RAF +2
Out of Play Units:All Italian “At Start” UnitsSelby Company3 Coldstream Gds Company6 Australian Division (3 units)
Returning Units:Turn 4: 7 British Armour Division (3 units)Turn 4: 7/4 and 11/4 Indian BrigadesTurn 6: 70 British Div (3units) For Campaign Start onlyTurn 7: 5/4 Indian Brigade For Campaign Start only
Rebuildable Units: Axis:Sabratha Division
Tracks:Turn Record Track: Turn 3, German InitiativeReplacement Track: All chits available in poolSaved Inf Replacements: 0Saved Armor Replacements: 0Tank Upgrade: 0Commonwealth VPs: 1Axis VPs: 0
1.2.3 Victory Conditions Axis Victory:
The Axis player wins immediately at the end of any Victory Check Segment that one of the following apply:• He controls El Agheila, Benghazi and Tobruk.• There are no British units on the Center map outside Tobruk.• It is turn 5 and he controls Benghazi, Bardia, Sollum, and
Hellfire Pass (hex 2042).
British Victory: The British player wins by avoiding the Axis Victory Conditions by the end of the scenario.

The Dark Sands ~ Playbook6
© 2018 GMT Games, LLC
1.3 CRUSADEROperation Crusader was the third attempt to lift the siege of To-bruk. Operations Brevity and Battleaxe had both failed in short order. Each time the British were unable to capitalize on initial successes. Strong defenses and aggressive German counter at-tacks quickly drove the British back past Halfaya Pass.This time the British invested heavily in planning, preparation, and deception. The Germans were surprised, initially slow to re-spond, and underestimated British forces. Three weeks of fierce back and forth fighting saw the German counter attacks close to once again driving the British out of Libya. Stiffening of British resolve, attrition within the Panzer units, and an unexpectedly strong breakout from Tobruk eventually saw Rommel withdraw with heavy losses first to Gazala and eventually to El Agheila.
1.3.1 Start TurnCrusader starts with the Turn 8 Replacements Phase and ends after the Turn 9 End Phase.
1.3.2 Set UpAll Units and Assets scheduled to arrive on Turn 8 and 9 are placed on the Reinforcements Track. The units that arrived prior to Turn 8 are setup according to the following instructions.
On Map:Place the “At Start” units as listed below.
Location Axis Units2042 (Halfaya Pass) Fortified Box, 200/90 (-)2041 Fortified Box, 104/212040 Fortified Box, Savona (-)2031 (Bir El Gubi) 132/Ariete, 8 Ber/Ariete, 9Ber/Ariete, 32/Ariete2727 21 Corps HQ2728 Trento2629 Pavia2630 Bologna (-)2828 Brescia2441 (Bardia) Afrika Korps HQ2437 1/5/21 Pz, 2/5/21 Pz2337 3/21, 33/15, 580/902534 8 MG, 1/8/15 Pz2435 2/8/15 Pz, 115/152730 155/90 (-), 288/90, 361/901938 Recam2125 (Bir Hacheim) 65/Trieste, 66/Trieste
Location British Units1041 29/5Ind, 3/2SA1241 22 Guards1648 4/2SA, 6/2SA1740 British 7 Armour (3 Units)1741 22/1 Armour1744 1/1SA, 5/1SA1842 7/4Ind, 1 Armour 1942 2 NZ Division (3 Units)1948 5/4Ind2043 11/4Ind2729 23/70, Polish 2829 16/70, 14/701877 (Alexandria) Garrison1960 (Mersa Matruh) 2/1SA2830 (Tobruk) Garrison, 32 Armour1546 Railhead marker

The Dark Sands ~ Playbook 7
© 2018 GMT Games, LLC
Available Assets:The following Assets are available and should be placed in the appropriate “Available Assets” box.
German:3x Fortified Boxes2x Italian Garrison2x German GarrisonRegia Areo +121 Corps Arty +1Luftwaffe +11/33 AT 1/18 AT
Commonwealth:6x Fortified Boxes2x Garrison1x RAF +11x RAF +21x Coastal Navy +2
Out of Play Units:All Italian “At Start” UnitsSelby Company3 Coldstream Gds Company6 Australian Division (3 units)2 British Armour Division (3 units)
Returning Units:Turn 10: 3 Indian Brigade For Campaign Start onlyTurn 13: 9 Australian Division (3 units) For Campaign Start only
Rebuildable Units: Axis:Sabratha Division2 MG Battalion
Tracks:Turn Record Track: Turn 8, British InitiativeReplacements Track: All Repl Chits in pool. Saved Inf Replacements: 0Saved Armor Replacements: 0Commonwealth VPs: 1Axis VPs: 0
1.3.3 Victory Conditions Axis Victory:
The Axis player wins immediately at the end of any Victory Check Segment that one of the following apply:• The Axis player controls Tobruk and Bardia and can trace an
LOS from each port back to El Agheila.• The Axis player avoids the British Victory Conditions at the
end of Turn 9.
British Victory: The British player wins immediately at the end of any Victory Check Segment when:• The British player controls Tobruk with an overland LOS to
Alexandria or Cairo, and◊ there is only one Panzer step on the map, or◊ there are no Non-OOS Axis units within 6 hexes of Tobruk,
hex 2830.
1.3.4 The Dash to the Wire (optional)Historically Rommel sensed that the will of the 8th Army Com-mander, General Cunningham, was cracking, and launched a raid into Egypt to stampede Cunningham into ordering a withdrawal. This had the intended effect, but unfortunately for Rommel, Cunningham’s boss, General Auchinleck was made of sterner stuff; Cunningham was relieved and the 8th Army continued the battle until it was Rommel who was forced to retreat. To provide a motivation for player’s to attempt Rommel’s raid into Egypt, use the following rule:
If, on Turn 8, five or more German Panzer steps end a move in Egypt east of hex column xx40, the Axis player immediately rolls one die: on a roll of 1, 2 or 3 remove The Auk from the British player’s Turn 9 available chits.

The Dark Sands ~ Playbook8
© 2018 GMT Games, LLC
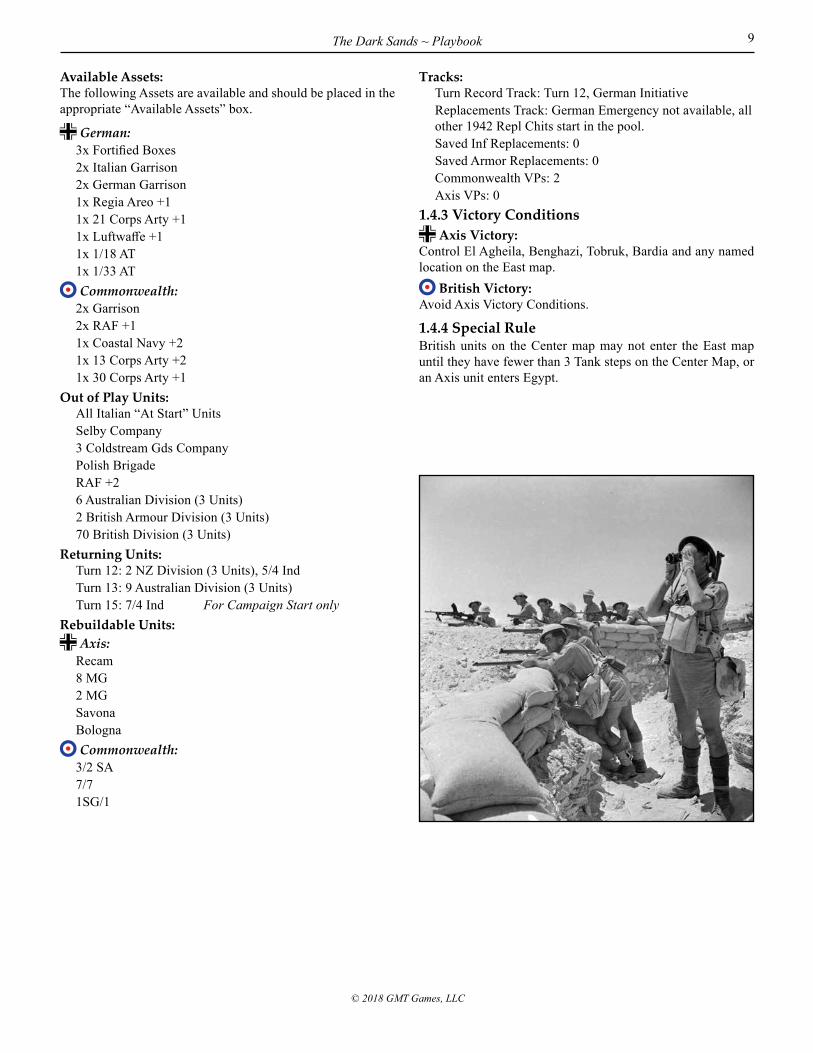
1.4 GAZALADevelopments in the Mediterranean enabled the rebuild of Axis forces near El Agheila. In late January German advances found the British overstretched and forced to fall back. By early February the Germans had advanced to Al Tamimi just west of Gazala where the British had mustered the forces to turn and fight. Both sides spent the next three months in preparation.This time Rommel had an advantage that allowed him to mislead and surprise the British. British military operational reports were being read by German intelligence shortly after being transmitted. When the battle of Gazala began the fighting was chaotic and fierce. But this time the British armored forces are soundly de-feated and the British infantry were unable to resist the Panzers without supporting armor. Tobruk, having been stripped of much of its defenses, fell after three weeks. Ten days later the British have pulled back to El Alamein.
1.4.1 Start TurnGazala starts with the Turn 12 Replacements Phase and ends after the Turn 13 End Phase.
1.4.2 Set UpAll Units and Assets scheduled to arrive on Turn 12 and 13 are placed on the Reinforcements Track. The units that arrived prior to Turn 12 are setup according to the following instructions.
On Map:Place the “At Start” units as listed below.
Location Axis Units1626 580/90, 288/90, 155/901825 1/8/15, 2/8/15, 115/15, 33/15, Pz Army Afrika HQ1924 104 /21, 3/21, 1/5/21, 2/5/21, Afrika Korps HQ2024 132/Ariete, 8Ber/Ariete, 32/Ariete, 9Ber/Ariete2223 65/Trieste, 66/Trieste2522 Fortified Box, Pavia, Brescia2622 21 Corps HQ2722 Fortified Box, Sabratha, Trento2823 Fortified Box, 361/90, 200/90
Location British Units1927 7SG/72128 4/72230 30 Corps HQ2324 Fortified Box, 150/502428 2/1 Armour2523 Fortified Box, 69/50, 131/502526 Fortified Box, 22 Guards2528 22/1 Armour2535 (Gambut) 10/5 Ind2625 1 Tank2723 Fortified Box, 1/1 SA, 2/1 SA2729 6/2 SA2824 32 Armour2829 4/2 SA2923 Fortified Box, 5/1 SA1877 (Alexandria) Garrison1960 (Mersa Matruh) Garrison2031 (Bir El Gubi) 29/5 Ind2125 (Bir Hacheim) Fortified Box, 1 FF2141 (Sollum) 11/4 Ind2429 (El Adem) 13 Corps HQ2432 (Sidi Rezegh) 3 Ind2441 (Bardia) 2 FF2830 (Tobruk) 9/5 Ind2337 Railhead marker
The Dark Sands ~ Playbook 9
© 2018 GMT Games, LLC
Available Assets:The following Assets are available and should be placed in the appropriate “Available Assets” box.
German:3x Fortified Boxes2x Italian Garrison2x German Garrison1x Regia Areo +11x 21 Corps Arty +11x Luftwaffe +11x 1/18 AT1x 1/33 AT
Commonwealth:2x Garrison2x RAF +11x Coastal Navy +21x 13 Corps Arty +21x 30 Corps Arty +1
Out of Play Units:All Italian “At Start” UnitsSelby Company3 Coldstream Gds CompanyPolish BrigadeRAF +26 Australian Division (3 Units)2 British Armour Division (3 Units)70 British Division (3 Units)
Returning Units:Turn 12: 2 NZ Division (3 Units), 5/4 IndTurn 13: 9 Australian Division (3 Units)Turn 15: 7/4 Ind For Campaign Start only
Rebuildable Units: Axis:Recam8 MG2 MG SavonaBologna
Commonwealth:3/2 SA7/71SG/1
Tracks:Turn Record Track: Turn 12, German InitiativeReplacements Track: German Emergency not available, all other 1942 Repl Chits start in the pool.Saved Inf Replacements: 0Saved Armor Replacements: 0Commonwealth VPs: 2Axis VPs: 0
1.4.3 Victory Conditions Axis Victory:
Control El Agheila, Benghazi, Tobruk, Bardia and any named location on the East map.
British Victory: Avoid Axis Victory Conditions.
1.4.4 Special RuleBritish units on the Center map may not enter the East map until they have fewer than 3 Tank steps on the Center Map, or an Axis unit enters Egypt.
The Dark Sands ~ Playbook10
© 2018 GMT Games, LLC
2.0 ZOC Effects SummaryThis section contains a summary of all ZOC effects. This in-formation is available throughout the rules. This appendix is here for the convenience of the player. Nothing in this section should be construed as over-riding any rules from the Rulebook.• A friendly ZOC does not affect other friendly units in any
manner.• A unit must halt its movement on entering a EZOC.
Exception: German Infiltration Move• Units may not move directly from one EZOC to another.
Exception: German Infiltration Move• A contested EZOC is one that contains a friendly unit.• A stack may retreat through an uncontested EZOC at the cost
of 1 step loss per EZOC retreated through.• Retreating units may not end their retreat in a EZOC, and if
forced to do so are eliminated. • The ZOC of an OOS or Disrupted unit does not affect retreats. • Advance after Combat ignores the EZOC in the combat hex
entered.• Uncontested EZOCs do block the overland portion of an
LOS.• Uncontested EZOCs do not block the Road/Trail/Rail portion
of an LOS.• ZOCs do not affect hex control; a unit must enter an enemy
controlled hex for control of that hex to change sides.
3.0 OOS Effects SummaryThis section contains a summary of all OOS effects. OOS is when there is an OOS marker on the unit.This information is available or inferred throughout the rules. This appendix is here for the convenience of the player. Noth-ing in this section should be construed as over-riding any rules from the Rulebook.• Movement Allowance of 3; Garrisons remain at 0 MP.• OOS movement effect is accumulative with Half Move
Actions. Round up; i.e., A 6MP unit that is OOS and has an effective MP of 2. 6/2=3, 3/2=1.5; 1.5 rounds up to 2.
• May not use Extended Move.• ZOC does not affect enemy retreats.• HQs cannot allocate assets or activate units.• HQ units may still bring in reinforcements, if in LOS.• Axis may not attach AT Guns. Attached AT Assets return to
Asset Box, face down.• –2 drm on attack, +2 drm on defense.• Combat drm is not accumulative with the Disrupted Combat
drm.• Eliminated if OOS without LOS during Attrition Segment.
Applies to Units, Garrisons, and HQs.
The Dark Sands ~ Playbook 11
© 2018 GMT Games, LLC
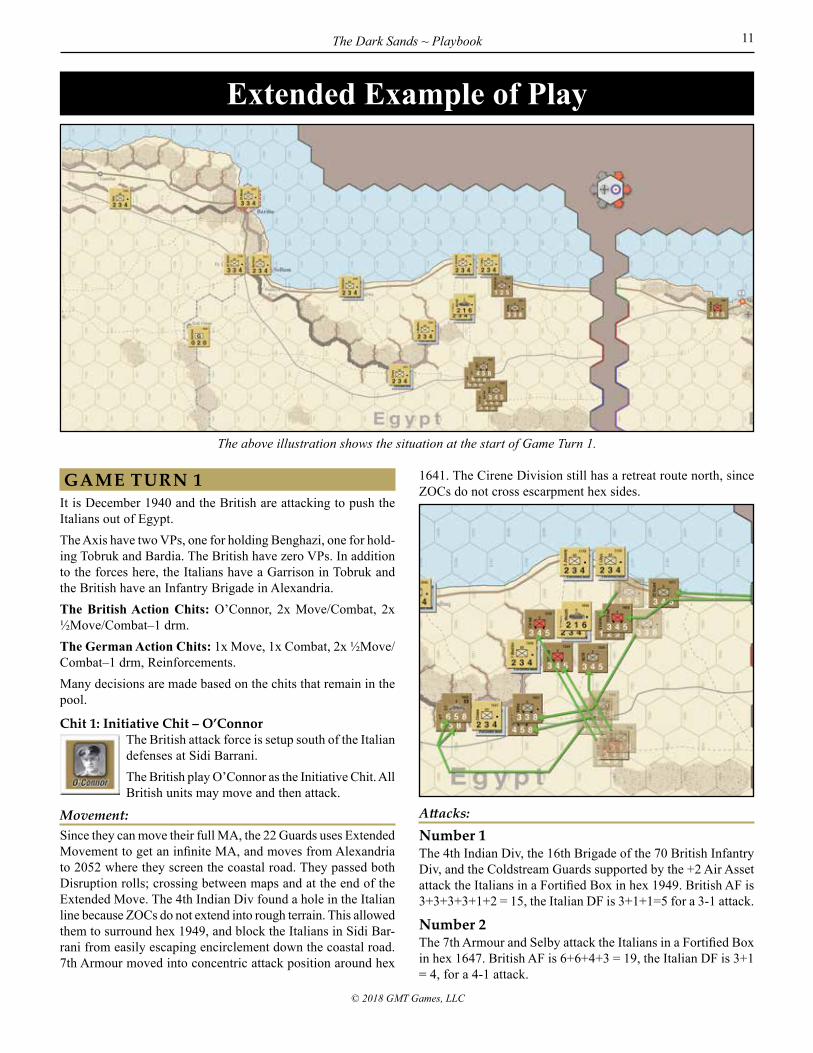
GAME TURN 1 It is December 1940 and the British are attacking to push the Italians out of Egypt.The Axis have two VPs, one for holding Benghazi, one for hold-ing Tobruk and Bardia. The British have zero VPs. In addition to the forces here, the Italians have a Garrison in Tobruk and the British have an Infantry Brigade in Alexandria.The British Action Chits: O’Connor, 2x Move/Combat, 2x ½Move/Combat–1 drm.The German Action Chits: 1x Move, 1x Combat, 2x ½Move/Combat–1 drm, Reinforcements.Many decisions are made based on the chits that remain in the pool.
Chit 1: Initiative Chit – O’ConnorThe British attack force is setup south of the Italian defenses at Sidi Barrani.The British play O’Connor as the Initiative Chit. All British units may move and then attack.
Movement:Since they can move their full MA, the 22 Guards uses Extended Movement to get an infinite MA, and moves from Alexandria to 2052 where they screen the coastal road. They passed both Disruption rolls; crossing between maps and at the end of the Extended Move. The 4th Indian Div found a hole in the Italian line because ZOCs do not extend into rough terrain. This allowed them to surround hex 1949, and block the Italians in Sidi Bar-rani from easily escaping encirclement down the coastal road. 7th Armour moved into concentric attack position around hex
1641. The Cirene Division still has a retreat route north, since ZOCs do not cross escarpment hex sides.
Attacks:
Number 1The 4th Indian Div, the 16th Brigade of the 70 British Infantry Div, and the Coldstream Guards supported by the +2 Air Asset attack the Italians in a Fortified Box in hex 1949. British AF is 3+3+3+3+1+2 = 15, the Italian DF is 3+1+1=5 for a 3-1 attack.
Number 2The 7th Armour and Selby attack the Italians in a Fortified Box in hex 1647. British AF is 6+6+4+3 = 19, the Italian DF is 3+1 = 4, for a 4-1 attack.
Extended Example of Play
The above illustration shows the situation at the start of Game Turn 1.

The Dark Sands ~ Playbook12
© 2018 GMT Games, LLC
Combat Results:
Number 1The British roll a 4 for DR*. The Italians lose one step for the * result and then retreat. Since the retreat must go through an EZOC, the retreating stack loses one more step per EZOC entered.
Number 2The roll is 6 for DR. The Cirene Division retreats 4 hexes to Buqbuq.
The eliminated Italians are all non-rebuildable, so they go to the game box. The British Air and Axis Fortified Box assets go to their Asset Boxes face down. They will be usable next turn.
Chit 2: British Combo Move/CombatThe British decide to take this as a full move to go through the desert and take the Halfaya Pass isolat-ing five Italian divisions. They have to leave a large contingent behind to prevent the Italians from
threatening the desert trails providing supply to the British advance.
Chit 3: LogisticsExcellent timing for the British. The five Italian divisions are now OOS, less of a threat, and certain to be eliminated during the attrition segment.The below illustration shows the British moves (Chit 2) and
the situation at the end of Chit 3’s Logistics.

The Dark Sands ~ Playbook 13
© 2018 GMT Games, LLC
Chit 4: German Combo ½ Move/Combat –1 drmThe British still have one move available that can surround the remainder of the Italian units. So the Italians must take this Combo as a ½ Move and start moving back to the Tobruk line. The Italian
OOS units move to make the most of their presence. The ½ Move did not get them to their next line of defense at Tobruk. The remaining chits can spell disaster if drawn in the wrong order.
This illustration shows the Axis moves after Chit 4.
Chit 5: British Combo ½ Move/Combat –1 drm The Garrison needs to be cleared from Sidi Omar for the British to keep advancing through the desert. So they use the +1 Air Asset and attack with the Selby company supported by the +1 Air Asset. The
attack is 2-1 with a –1 drm. The roll is 3, resulting in a BL1. Selby is reduced and the Garrison is eliminated. The path is open for the British to use Extended Move to El Agheila.
Chit 6: German CombatThis is their second allowed Combat Chit, even though no attacks are made. Refer to rule 18.7 Ac-tion Chit Limits.
Chit 7: British Combo ½ Move/Combat –1 drmThe British player can use this as either a ½ Move or Combat –1 drm. Neither is very useful. They decide to play it as a Combat –1 drm even though no attacks are made. This is their second allowed
Combat Chit. They still have one allowed Move Chit.
Chit 8: German MoveThe British have not played a Move Chit since the Chit 4 German ½ Move/Combat –1 drm was played as a ½ Move. By playing this chit as a Move, the Italians get two moves in a row. This allows them to
get into their next line of defense between 2830 Tobruk and 2031 Bir El Gubi. Refer to the image in Chit 4 German ½ Move/Com-bat –1 chit for the Italian start and the image in Chit 11 British Move/Combat for the Italian ending positions for this chit.The Marmarica Division moves from 2139 Fort Capuzzo to 2729 Tobruk Fort hex. The Italian player wanted to leave a Garrison at Fort Capuzzo but none were available. If the Italian Garrison at Sidi Omar had survived the Marmarica Division would stay. Fort Capuzzo and Sidi Omar is the last line before Tobruk that can be held by two units. The Sirte Division moves from 2438 Sidi Rezegh through El Adem and Bir El Gubi to 2030 to block the southernmost desert trail. The 23 March Division moves to El Adem to block the middle route through the desert. The 28 October Division moves to 2730 where it completes a line from Tobruk to El Adem.

The Dark Sands ~ Playbook14
© 2018 GMT Games, LLC
The Italians now have a line from Tobruk to Bir El Gubi that will force the British to stop and attack. It is a weak line. With two consecutive moves the British can cross the line between Tobruk and El Adem where the it is only one ZOC deep. The ridges north of El Adem and the rough terrain between El Adem and Bir El Gubi block ZOCs. The Marmarica Division cannot project a ZOC out of the Tobruk Fort hex. The situation would have been far better if the Reinforcement Chit had been drawn before the Move was drawn.
Chit 9: German ReinforcementsThe Italian turn one reinforcements are placed on hex 3418 Derna on the West map section.
Chit 10: LogisticsNone of the OOS units can trace an LOS and all other units can trace an LOS. So no changes in status.
This illustrates the British moves from play of Chit 11.
Chit 11: British Combo Move/CombatThe British finally get their full move and close with the Italian line. The 7th Armour moves up the coast road gaining control of Sollum and Bardia VP hexes then starts squeezing between the Tobruk
forts and El Adem. The 11/4 Indian and 16/70 British brigades use Extended Move. The 11/4 disrupts. The 11/4 Brigade dropped a Garrison as it passed through hex 1933 Gabr Salah.The 22 Guards, 7/4, and 3 Coldstream Guards also move through the desert to get around the Italians on the coast. They are stopped by the Cirene Division EZOC being projected onto the trail.The British move has left the OOS Italian units unguarded. But they have no Move Chits left and they will be eliminated during the Attrition Segment even if there are no enemy units adjacent.
Chit 12: German Combo ½ Move/Combat –1 drm The Germans must play this as a Combat Chit since they have already played two Move Chits. The Italians could conceivably attack the British tank brigade in hex 2630 at 1-1 –1 drm, but decide to
avoid the risk of losing both attacking divisions.
End of TurnDuring the End Phase the OOS units are eliminated, the Dis-ruption is removed, and all Assets are flipped to their available side. The Garrison assets stay on the map. No Victory Condi-tions are met.

The Dark Sands ~ Playbook 15
© 2018 GMT Games, LLC
GAME TURN 2 The British Action Chits: O’Connor, Combeforce, Move/Combat, 2x ½ Move/Combat –1 drm, Reinf. They will also get the Tobruk Falls chit if they capture Tobruk.The Italian Action Chits: 2x Move, 2x ½ Move/Combat –1 drm.
Chit 1; Initiative Chit: O’ConnorInitiative goes to the British. They again select the O’Connor chit as their Initiative Chit.
Movement:The 7th Armour swings around to attack Tobruk from behind and the units near Sidi Rezegh move to attack the Italian southeast of Tobruk. In the desert south of Buqbuq, the 22 Guards, 7/4 Indian, and 3 Coldstream Guards use Extended Move to get to Sidi Regezh. The 22 Guards is disrupted. 5/4 and a reduced Selby encircle the Sirte Division hoping it goes OOS so they can attack.
Combat:7/7 and 7SG/7 attack Tobruk. The Italian Garrison does not ben-efit from the Tobruk Fort hex so the odds are 5-1. Roll is 6 for a DE*. The Garrison is eliminated and the * result is not applied because the Garrison was defending alone. 4/7, 16/70 and 11/4 attack the 28 October Division in hex 2730. Odds are 3-1 (12 to 4) and the roll is 2; BL1. The 4/7 flips and the 28 October is eliminated. The British add their Tobruk Falls chit to the pool.
This shows the units’ positions at the start of Game Turn 2. The Italians also have Pavia, Sabratha, and the Babini group in Derna on the West Map Section.
The Dark Sands ~ Playbook16
© 2018 GMT Games, LLC
Chit 2: German MoveThe Marmarica Division moves to hex 2728 to block the coast road. 23 March drops a Garrison on El Adem to block the middle road and moves west to join the reinforcements on a second line. The Sirte
Division strengthens its hold on the road from Bir El Gubi to Bir Hacheim with a Fortified Box. The second line of defense is established by the Sabratha Division, Pavia Division, and Babini tank group starting in 3418 Derna, and the 23 March Division starting in 2429 El Adem. Pavia moves to 2823. Sa-bratha moves to 2723. Babini moves to 2324, and 23 March moves to 2523. Italy continues to effectively block a British victory.
Chit 3: LogisticsThe Sirte division cannot trace LOS and becomes OOS (as shown in above illustration).
Chit 4: German Combo ½ Move/Combat –1 drmThe Italian plays this combo as a Combat Chit because they cannot afford to be without any more moves so early in the turn. There are no attacks.
Chit 5: British Combo Move/Combat The British play this as a Move Chit leaving them with one more Move Chit for this turn. The 7/7 Brigade moves one hex down the coastal road and is stopped by the Marmarica Division EZOC.
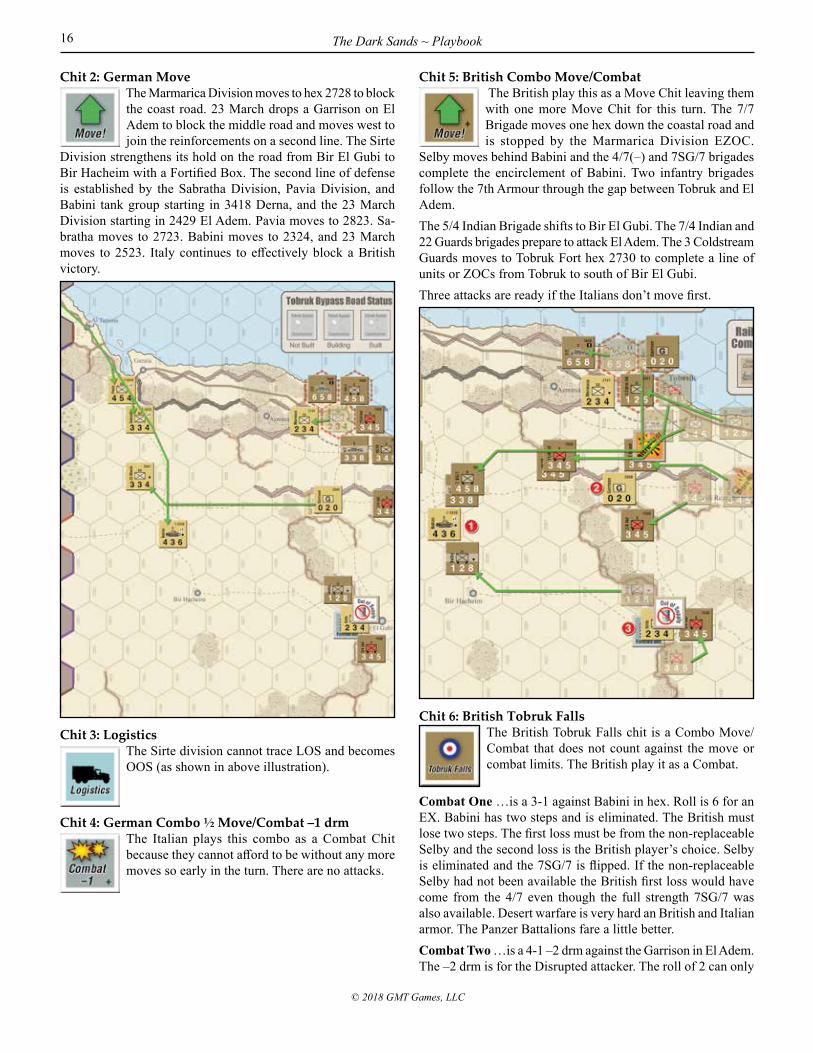
Selby moves behind Babini and the 4/7(–) and 7SG/7 brigades complete the encirclement of Babini. Two infantry brigades follow the 7th Armour through the gap between Tobruk and El Adem. The 5/4 Indian Brigade shifts to Bir El Gubi. The 7/4 Indian and 22 Guards brigades prepare to attack El Adem. The 3 Coldstream Guards moves to Tobruk Fort hex 2730 to complete a line of units or ZOCs from Tobruk to south of Bir El Gubi.Three attacks are ready if the Italians don’t move first.
Chit 6: British Tobruk FallsThe British Tobruk Falls chit is a Combo Move/Combat that does not count against the move or combat limits. The British play it as a Combat.
Combat One …is a 3-1 against Babini in hex. Roll is 6 for an EX. Babini has two steps and is eliminated. The British must lose two steps. The first loss must be from the non-replaceable Selby and the second loss is the British player’s choice. Selby is eliminated and the 7SG/7 is flipped. If the non-replaceable Selby had not been available the British first loss would have come from the 4/7 even though the full strength 7SG/7 was also available. Desert warfare is very hard an British and Italian armor. The Panzer Battalions fare a little better.Combat Two …is a 4-1 –2 drm against the Garrison in El Adem. The –2 drm is for the Disrupted attacker. The roll of 2 can only
The Dark Sands ~ Playbook 17
© 2018 GMT Games, LLC
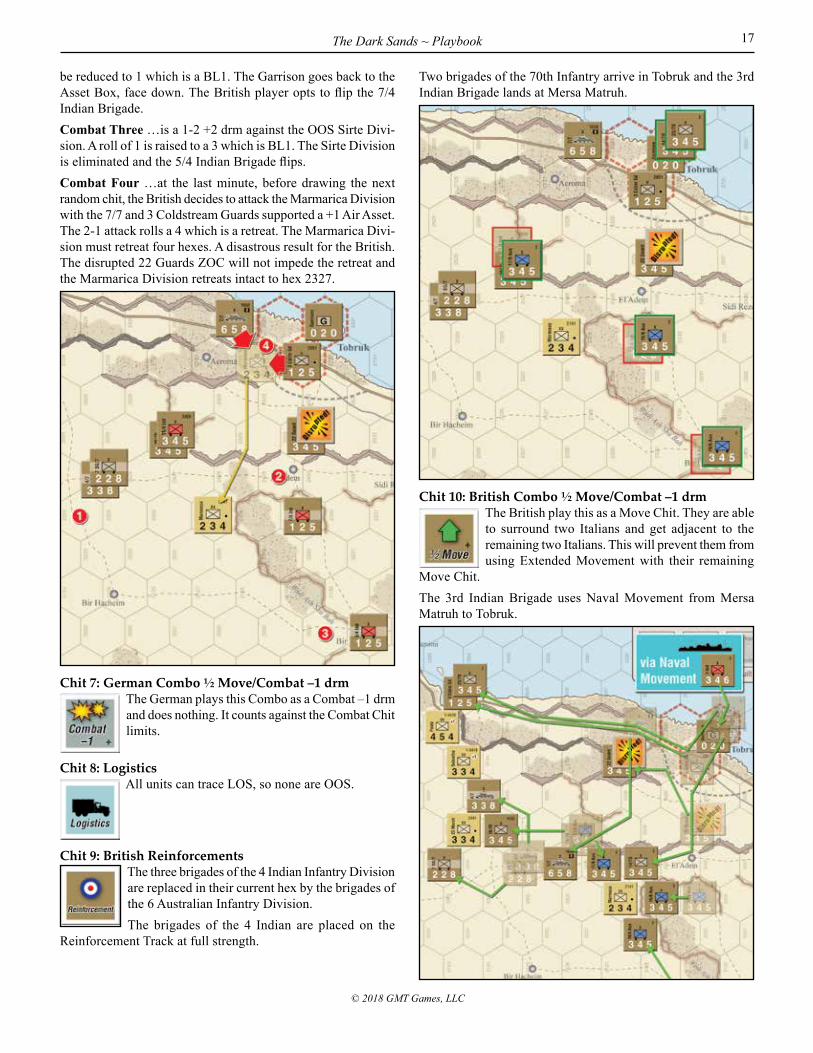
be reduced to 1 which is a BL1. The Garrison goes back to the Asset Box, face down. The British player opts to flip the 7/4 Indian Brigade.Combat Three …is a 1-2 +2 drm against the OOS Sirte Divi-sion. A roll of 1 is raised to a 3 which is BL1. The Sirte Division is eliminated and the 5/4 Indian Brigade flips.Combat Four …at the last minute, before drawing the next random chit, the British decides to attack the Marmarica Division with the 7/7 and 3 Coldstream Guards supported a +1 Air Asset. The 2-1 attack rolls a 4 which is a retreat. The Marmarica Divi-sion must retreat four hexes. A disastrous result for the British. The disrupted 22 Guards ZOC will not impede the retreat and the Marmarica Division retreats intact to hex 2327.
Chit 7: German Combo ½ Move/Combat –1 drmThe German plays this Combo as a Combat –1 drm and does nothing. It counts against the Combat Chit limits.
Chit 8: LogisticsAll units can trace LOS, so none are OOS.
Chit 9: British ReinforcementsThe three brigades of the 4 Indian Infantry Division are replaced in their current hex by the brigades of the 6 Australian Infantry Division. The brigades of the 4 Indian are placed on the
Reinforcement Track at full strength.
Two brigades of the 70th Infantry arrive in Tobruk and the 3rd Indian Brigade lands at Mersa Matruh.
Chit 10: British Combo ½ Move/Combat –1 drmThe British play this as a Move Chit. They are able to surround two Italians and get adjacent to the remaining two Italians. This will prevent them from using Extended Movement with their remaining
Move Chit.The 3rd Indian Brigade uses Naval Movement from Mersa Matruh to Tobruk.

The Dark Sands ~ Playbook18
© 2018 GMT Games, LLC
Chit 11: German MoveSince the previous two chits were British, this chit must be German. The only remaining German chit left is the Move Chit.Pavia moves down the coastal road to the cross
roads at El Tamimi. An excellent defensive position.Sabratha Division moves out across the desert and crosses between maps from 2721 to 2719. When a unit exits a map via a hexside of a given color it may enter the adjacent map by crossing any hexside on that map of the same color. Sabratha could have entered the West Map Section at any of the hexes 2919, 2820, or 2719.
Given the current situation and the remaining chits in the pool it is impossible for the British to win a scenario Strategic Victory. But don’t quit now, there are still 15 turns left in the Campaign.
Chit 12: British Combo ½ Move/Combat –1 drmThe British have already used two Move Chits so must play this as a Combat Chit and make two at-tacks.
Combat One …is a 3-1 –1 drm against 23 March with support from a +2 Air Asset. The roll is 4 reduced to a 3 for a DR which eliminates 23 March.Combat Two …is a 3-1 against Marmarica. With no disrupted units nearby it will not escape again. A roll of 3 reduced to 2 results in a BL1. Marmarica is eliminated and the 17/6 Australian Brigade is flipped.
Chit 13: British CombeForceThe 7/7 Armour Brigade is activated, moves to 2620 without disrupting. Then attacks Sabratha at 2-1 and rolls a 4 for a DR. The Sabratha must retreat 2 hexes and goes to 2618.
End PhaseThe scenario result is an (arbitrarily named) Tactical Victory.In the context of the Campaign Game the VPs are currently 0 German and 0 British. The British need to hold Benghazi to gain VPs during the game. Tobruk, Bardia, and Sollum only provide a VP on Game Turn 17.This example shows an exceptionally well managed Italian retreat combined with fair luck and a few minor British errors. The Italian always established a blocking line of defense before the British were able to exploit the collapse of the previous line. The low unit count and numerous axes of advance in the Center Map Section make this scenario very unforgiving of errors.

The Dark Sands ~ Playbook 19
© 2018 GMT Games, LLC
Of all my designs, The Dark Valley: The East Front Campaigns, 1941-45 (TDV) is my personal favorite, so it was natural for me to see what other campaigns its chit-pull system could be used for. The choice of North Africa was not, however, an obvious one, given the vastly different scale of the fighting between a front involving hundreds of divisions across an area a thousand miles wide and one involving a score of divisions on a narrow front a thousand miles deep. But both campaigns were examples of the advantages and limits of German operational warfare, the often slow learning curve of their opponents, and the chaos of armored battle. And most importantly like TDV, North Africa was a fascinating theater that had yet to produce a game that matched exactly what I was looking for on that topic. So I set to work on The Dark Sands (TDS).The biggest difference between TDV and TDS is again a reflec-tion of the massive difference in the scale of forces involved. In TDV the chit pull system is almost entirely random. Apart from the Initiative Player choosing the first chit, and the Soviet Stavka and German Manstein/Model chits, the order the chits played is the order the chits come out of the cup. In July 1941—when the Germans have eight chits to the Soviets two—the German player could in theory get all eight of his Action Rounds in a row. And yet the size of the forces involved, along with the size of Russia, means that even such a streak of chit pulls is unlikely to be decisive. Hence I could let the chits fall where they may.It quickly became apparent that given the smaller, more fragile, armies of the North African theater—along with the much more restricted geography—this wasn’t going to work in TDS. As with my Case Yellow: 1940 design (which used an earlier simpler ver-sion of what became the TDV chit system), TDS would have to limit how many activations each side could perform in a row —or see a lucky player run the board before his opponent could react! In TDS a player can still get a lucky streak of activations, but both sides know there are limits. If the chaos of the activation system is more limited in TDS than in TDV, this is compensated for by the greater range of chits available: limited movement, limited combat, leaders, and headquarters that present a different mix of options.In both “Dark” designs, chaos is provided by the chit pulls within a framework that keeps the overall campaigns on a reasonably historic track. This is accomplished by the specific chits available to each side each turn. In TDV this was reflection of the climate with increased German activity in summer, greater relative Soviet activity in winter, and the pattern of both sides building up their forces during the muddy thaw of spring. The chits available also represented the gradual decline of the German armed forces, the growing skill of the Soviets, and the increasing pressure on Ger-man resources from the events in other theaters.In TDS climate was less of a factor: though there are certainly differences between summer and winter in the desert, major campaigns were fought in all seasons. Yet, as with the Eastern Front, the North African front saw recurring patterns of active campaigns followed by lengthy pauses in major activity, and a
switching of the initiative from one side to the other. As in TDV, these patterns are locked into the list of available chits. In the case of TDS, this represents first of all the difficulty of sustaining offensive operations in an environment in which not only fuel and ammo but also food and water have to be carried long distances to the front. Periods of activity are inevitably followed by the need to replenish and rebuild. For both sides, the chit selection also represents the effects of events outside their immediate control: the needs of other theaters and for the Axis the difficulty of get-ting supplies across the Med. And as in TDV, the chits also show the (slowly) growing skill of the Allied forces.With that in mind, let’s look at the chit variety in a bit more depth. First, the Axis chits include the effects of Malta and Allied ef-forts to disrupt Axis supply. To make these effects random could end up with the game turning on some lucky/unlucky die rolls/chit draws, but the only other option would be to play out the Malta campaign with a level of detail inappropriate for TDS’s chosen level of complexity. So Malta is “baked in.” Likewise, the reinforcements/withdrawals are baked in on a turn-by-turn basis, but the inclusion of a Reinforcement Chit means there is still a limited fog of war in regards to exactly when they will be useable. The overall effect is to allow operational chaos while keeping the design within reasonable strategic limits. This also keeps the system complexity level within reason as well. If you inevitably have more knowledge of the future than your historic counterparts, you will find it difficult to make important use of that information.Finally, a word about another unique feature of TDS: the map …or rather the maps. Given the narrowness of the North African theater compared to its length, games on the subject have gener-ally either had to choose a map with a front-line limited to a few hexes, or choose a scale that blows up the game to multiple maps to cover the length of the campaign. No Retreat: North Africa came up with the idea of eliminating parts of the front which mainly involved pursuit. This was clever and effective, but I felt missed a trick in not showing the central area of the map, where the bulk of the fighting took place, in greater detail.Therefore, in TDS I used the separate maps idea of No Retreat, but by using a different scale for the Center map I was able to show the major events of Compass, Battleaxe, Crusader and Gazala in greater operational detail. The Gazala Line is actually a line in TDS—not just four adjacent hexes. At the same time the bottlenecks of Alamein and El Agheila remain bottlenecks. I note that the Center map is almost the same scale as Campaign for North Africa, but without the need for a ping-pong table to play!Though it underwent major modifications (and special thanks to Developer Tim Wilcox here!), the TDV system has, I believe, proved its adaptability with TDS. I’m currently working on a “Dark” design covering the Normandy campaign in ’44, and see other possibilities for the system as well.
Until then, Enjoy the game!Ted Raicer
Designer’s Notes

The Dark Sands ~ Playbook20
© 2018 GMT Games, LLC
GMT Games, LLCP.O. Box 1308, Hanford, CA 93232-1308
The Dark Sands Credits Designer:Ted Raicer Developer:Tim Wilcox
Art Director and Package Design:Rodger B. MacGowan
Map, Counters, Rules Layout:Charles Kibler Playtesters:
Gary Quick, Bob Goddard, Dave Deitch, Steven Brooks, Paul Marjoram
Proofreaders:John Holden, Hans Korting, Jonathan Squibb
Production Coordination:Tony CurtisProducers:
Gene Billingsley, Tony Curtis, Rodger MacGowan, Andy Lewis and Mark Simonitch