please do not return product to the retail store. for
TRANSCRIPT

Wireless Rain Gauge#00614/00626SB
Instruction ManualPackage Contents:(1) Main Unit (A)(1) Wireless Collector (B)(1) Collector Funnel (C)(1) Instruction Manual
What You Need:• Philips Screwdriver• (5) AA batteries -see “Install Batteries” on page 2
A. Main Unit
B. Wireless Rain Collector
1 • OVERVIEW OF FEATURES - MAIN UNIT
Thank You for purchasing this ACURITE® product. The collector component of this wireless rain gauge is self emptying with an extra large 6” collector for enhanced accuracy. The main unit features a 24 hour total rainfall display or accumulative rainfall total display, large number display in inches or millimeters and customizable rain monitor alert. Please read this manual in it’s entirety to fully enjoy the benefits and features of this product. Please keep this manual for future reference.
NOTE: Remove packing materials from inside of the rain collector. Also not that a clear film is applied to the LCD at the factory that must be removed prior to using this product. Locate the clear tab and simply peel to remove.
Please DO NOT return product to the retail store. For technical assistance and product return information, please call Customer Care: 877-221-1252 Mon. - Fri. 8:00 A.M. to 4:45 P.M. (CST)
www.chaneyinstrument.comLIMITED ONE YEAR WARRANTYChaney Instrument Company warrants that all products it manufactures to be of good material and workmanship and to be free of defects if properly installed and operated for a period of one year from date of purchase. REMEDY FOR BREACH OF THIS WARRANTY IS EXPRESSLY LIMITED TO REPAIR OR REPLACEMENT OF DEFECTIVE ITEMS. Any product which, under normal use and service, is proven to breach the warranty contained herein within ONE YEAR from date of sale will, upon examination by Chaney, and at its sole option, be repaired or replaced by Chaney. In all cases, transportation costs and charges for returned goods shall be paid for by the purchaser. Chaney hereby disclaims all responsibility for such transportation costs and charges. This warranty will not be breached, and Chaney will give no credit for products it manufactures which shall have received normal wear and tear, been damaged, tampered, abused, improperly installed, damaged in shipping, or repaired or altered by others than authorized representatives of Chaney.
THE ABOVE-DESCRIBED WARRANTY IS EXPRESSLY IN LIEU OF ALL OTHER WARRANTIES, EXPRESS OR IMPLIED, AND ALL OTHER WARRANTIES ARE HEREBY EXPRESSLY DISCLAIMED, INCLUDING WITHOUT LIMITATION THE IMPLIED WARRANTY OF MERCHANTABILITY AND THE IMPLIED WARRANTY OF FITNESS FOR A PARTICULAR PURPOSE. CHANEY EXPRESSLY DISCLAIMS ALL LIABILITY FOR SPECIAL, CONSEQUENTIAL OR INCIDENTAL DAMAGES, WHETHER ARISING IN TORT OR BY CONTRACT FROM ANY BREACH OF THIS WARRANTY. SOME STATES DO NOT ALLOW THE EXCLUSION OR LIMITATION OF INCIDENTAL OR CONSEQUENTIAL DAMAGES, SO THE ABOVE LIMITATION OR EXCLUSION MAY NOT APPLY TO YOU. CHANEY FURTHER DISCLAIMS ALL LIABILITY FROM PERSONAL INJURY RELATING TO ITS PRODUCTS TO THE EXTENT PERMITTED BY LAW. BY ACCEPTANCE OF ANY OF CHANEY’S EQUIPMENT OR PRODUCTS, THE PURCHASER ASSUMES ALL LIABILITY FOR THE CONSEQUENCES ARISING FROM THEIR USE OR MISUSE. NO PERSON, FIRM OR CORPORATION IS AUTHORIZED TO ASSUME FOR CHANEY ANY OTHER LIABILITY IN CONNECTION WITH THE SALE OF ITS PRODUCTS. FURTHERMORE, NO PERSON, FIRM OR CORPORATION IS AUTHORIZED TO MODIFY OR WAIVE THE TERMS OF THIS PARAGRAPH, AND THE PRECEDING PARAGRAPH, UNLESS DONE IN WRITING AND SIGNED BY A DULY AUTHORIZED AGENT OF CHANEY. THIS WARRANTY GIVES YOU SPECIFIC LEGAL RIGHTS, AND YOU MAY ALSO HAVE OTHER RIGHTS WHICH VARY FROM STATE TO STATE.
For in-warranty repair, please contact:Customer Care DepartmentChaney Instrument Company965 Wells StreetLake Geneva, WI 53147
Chaney Customer Care 877-221-1252Mon-Fri 8:00 a.m. to 4:45 p.m. CST
www.chaneyinstrument.com
This device complies with part 15 of the FCC rules. Operation is subject to the following two conditions:1- This device may NOT cause harmful interference, and2- This device must accept any interference received, including interference that may cause undesired operation.
NOTE: This equipment has been tested and found to comply with the limits for a Class B digital device, pursuant to Part 15 of the FCC rules. These limits are
designed to provide reasonable protection against harmful interference in a residential installation. This equipment generates, uses and can radiate radio frequency energy and, if not installed and used in accordance with the instructions, may cause harmful interference to radio communications. However, There is no guarantee that interference will not occur in a particular installation. If this equipment does cause harmful interference to radio or television reception, which can be determined by turning the equipment off and on, the user is encouraged to try to correct the interference by one or more of the following measures:•Reorient or relocate the receiving antenna.• Increase the separation between the equipment and the receiver.• Connect the equipment into an outlet on a circuit different from that to which the receiver is connected• Consult the dealer or an experienced radio/TV technician for help.
NOTE: The manufacturer is not responsible for any radio or TV interference caused by unauthorized modifications to this equipment. Such modifications could void the user authority to operate the equipment.
Rain Monitor Button( ON - set alert - OFF )
Inch/Millimeter Button( In. or mm. display )
Mode Button (HOLD TO RESET)( 24 hour total oracumulative total )
Main UnitLow Battery Indicator
24 Hour Total Mode( Currently Selected )
Accumulative Total Mode( Not Currently Selected )
Rain MonitorSet Alert Quantity
Rain CollectorReception Indicator
Rain CollectorLow Battery Indicator
Rain Quantity( 24 hour total
currently shown )
C. Collector Funnel
Patent numbers: 5,978,738; 6,076,044; 6,597,990- 1 -

3 • SETUP
PLEASE DISPOSE OF OLD OR DEFECTIVE BATTERIES IN AN ENVIRONMENTALLY SAFE WAY AND IN ACCORDANCE WITH YOUR LOCAL LAWS AND REGULATIONS.
BATTERY SAFETY: Follow the polarity (+/-) diagram in the battery compartment. Promptly remove dead batteries from the device. Dispose of used batteries properly. Only batteries of the same or equivalent type as recommended are to be used. DO NOT incinerate used batteries. DO NOT dispose of batteries in fire, as batteries may explode or leak. DO NOT mix old and new batteries or types of batteries (alkaline/standard). DO NOT use rechargeable batteries. DO NOT recharge non-rechargeable batteries. DO NOT short-circuit the supply terminals.
A. Rain CollectorAlways install batteries into the rain collector FIRST to ensure proper wireless synchronization with the main unit.
1) Separate the upper and lower casing of the rain collector.
2) Remove the battery compartment & electronics box. Remove the now loose battery compartment cover and install 2 fresh “AA” batteries as shown here.
B. Main Unit Remove the battery compartment cover and install 3 fresh “AA” batteries as shown here.
Install BatteriesNOTE: Install all batteries in both units within a 6 minute period to ensure proper wireless functionality.
2 • OVERVIEW OF FEATURES - RAIN COLLECTOR
Removable Debris ScreenThe Debris Screen prevents leaves and sticks fromentering into the rain collector. Remove and cleandebris periodically to ensure collector accuracy.
Removable Rain Collector FunnelThe Funnel is specially designed with a large 6”opening to maximize the rain collection area.The funnel is removable for easy cleaning. To remove,simply rotate the funnel in either direction and pull out.
Remove Packing MaterialThe Rain Collector and Rain Collector Tipping Bucket arepackaged with a protective material inserted to preventexcessive movement during shipping. Carefully removeall of these materials and discard them.
Collector Upper CasingThe Collector Upper Casing encloses the sensor/batterycompartment component and seals the collectiontipping bucket from wind and non-metered rain drops.To remove upper casing from lower casing, press inwardon side tabs and lift up carefully.
Collector Lower Casing BaseThe Collector Lower Casing Base supports the entire raingauge and also serves as a mounting base. It is veryimportant that the base be placed on a flat, level surface forproper operation.
Battery Compartment & Electronics BoxThe Battery Compartment & Electronics Box componentof the rain collector slides into place on slots andencases the batteries and other electronics components.To remove this component, squeeze the two tabs andgently slide the box out. Take care that the box is re-installedin the correct manner (with the batter compartment coverfacing the outside of the Upper Casing) when slid back in.
Rain Collection Tipping BucketThe Rain Collection Tipping Bucket collects a meteredamount of rain and tips to automatically empty, allowing forcontinuous rain measurement.
INSTALL3 “AA”BATTERIES
- 3 -- 2 -A
B C Tapa del
compartimiento de las baterías
BATTERY
COMPARTMENT
COVER

Place the main unit in a dry area free of dirt and dust. You may place the main unit on a table top or other flat surface.
Placement of Main Unit
The wireless rain collector MUST BE PLACED OUTDOORS to observe and record rain measurements and relay the information to the main unit display. The wireless rain collector must be placed less than 100 feet from the main unit.
The wireless rain collector MUST be placed on a flat, level surface to allow for proper rain measurement. Make certain the rain collector is not placed in a low spot that may become flooded or in an are where there are obstructions above it such as trees or other structures that may block the rain from being collected properly.
It is strongly recommended that the rain collector be mounted to a solid, flat surface such as a deck railing for best results.
Placement of Rain Collector
Surface Mounting of Rain Collector
4 • PLACEMENT
Now that setup is complete, you must choose a location to place the wireless rain collector and the main unit. The wireless rain collector MUST be placed less than 100 feet away from the main unit.
This wireless rain gauge uses radio frequency for communication, which is susceptible to interference from other electronic devices and large metallic items or thick walls. Always place both units at least 3 feet away from appliances ( TV, microwave, radios, etc. ) or objects ( large metal surfaces, thick stone walls, etc. ) that may interfere with the wireless communication.
It is recommended that the rain collector be mounted to a solid, level surface with limited grass growth such as a deck railing or similar surface. To mount the rain collector, first separate the lower casing base from the upper casing. Next locate the four holes within the lower casing base. Then, using only hand tools (power tools may slip during use, possibly damaging sensitive rain collector components), secure the lower casing base to the chosen surface using the appropriate hardware.
TV 3
DO NOT PLACE IN WATEROR IN UNEVEN ORLOW SPOTS THAT
MAY BECOME FLOODED.
DO PLACE ON A LEVELSURFACE WITH NO
OBSTRUCTIONSABOVE.
DO NOT PLACE INAREAS WHERE PLANT
GROWTH CAN GROW INTOCASE AND OBSTRUCTRAINFLOW THROUGH
COLLECTOR
DO NOT PLACE IN ANAREA WITH
OBSTRUCTIONS ABOVE
OK
1. SEPARATE LOWER CASING BASE
2. INSTALL 4 SCREWS USINGHAND TOOLS ONLY
3. RE-ATTACH UPPER CASING- 5 -- 4 -

5 • OPERATION
The main unit has a wireless signal reception icon in the lower left display area. If there are a low number of “bars” present, you may experience no communication ( “--” ) or inaccuracy. In either case, you may need to relocate one or both of the units. If most or all 4 of the bars are present, wireless reception is good and no action is required.
Wireless Reception
no reception great reception
collector signal reception
Display Mode
Rain Monitor
B
B
A A
Rain MonitorThe rain monitor feature will sound an audible alert every time the set amount of rainfall is recorded. For example, for every .50 inches (10 mm if in mm mode) of rain that is recorded- the alert will sound briefly. To turn this function on, press the “rain monitor” button ( ). The rain monitor and default set quantity of .50 in. will appear. You may then press the button again to raise the rain monitor value in .50 increments up to 5.00 inches. Press the “rain monitor” button once more after you reach 5.00 inches and the rain monitor feature will turn off. When the alert is sounding, you may press any button to silence the alert.
A
Press toturn ON
After 5.00 in.is reached,
Press toturn OFF
Pressrepeatedly
to raise alertin .50 in. increments
( up to 5.00 inches )
rain monitor OFF rain monitor ON maximum value (5.00)
Display ModeThis feature allows you to view recorded rain quantity for either the last 24 hours, or the accumulative total amount of rain ( up to 99.99 inches ) recorded since both units were powered on. You may switch between both modes at any time by pressing the “mode” button. You may reset the entire rain count by pressing and holding the “mode” button.
B
Care Instructions for Rain Collector
Debris and Foreign Matter
The Wireless Rain Collector was designed with materials suitable for outdoor use. However, certain environmental conditions may require periodic cleaning of the collector components. If the funnel becomes extremely dirty, rain water may not flow correctly into the rain collector. In most cases, removing and cleaning off the debris screen will be sufficient. Certain locations may have an abundance of plant matter or tree seeds, etc. that may obstruct water flow through the collection funnel. More extensive clearing out and cleaning of the funnel and other components may be required in these cases.
It is recommended that the funnel and be checked and cleaned periodically to ensure proper operation of the rain gauge system.
Winter Climates
The Wireless Rain Collector is designed to collect and record liquid rainfall only, it will not detect or record snowfall levels. It is recommended that the rain collector be brought indoors if you live in an area that has extreme cold weather, ice and snow during the winter months.
General Cleaning
Periodic cleaning of the rain collection funnel may be required to ensure efficient water flow into the collector base. To clean the funnel, remove by twisting 90º in any direction and pulling outward. Rinse out the funnel with warm water and wipe clean with a soft cloth. Do not use coarse abrasive pads or scrubbing materials.
- 7 -- 6 -

A B
C
BatteryCompartment
Cover
This wireless rain gaugeuses long range 433mhz radio frequency for communication.
In the event that you have reception problems due to interference, both the main unit and the wireless rain collector have a selectable wireless ID. The ID switches are located within the battery compartments of the main unit and the wireless rain collector.
You may choose A, B or C; but both the main units’ and the wireless rain collectors’ IDs must match for successful synchronization.
Set Wireless ID
both wireless ID’smust match
Measurement RangesRainfallAccumulative Rainfall Range: 0 to 99.99 inches ( 0 to 2540 mm )
SpecificationsRain Gauge General SpecificationsRainfall Resolution: 0.02 inchesRainfall Units: Inches (in) and millimeters (mm)Wireless Rain Collector: automatic self emptying, continuous rainfall measuring
Power RequirementsMain Unit: 3 x “AA” alkaline or lithium batteriesWireless Rain Collector: 2 x “AA” alkaline or lithium batteries
Wireless CommunicationRadio Frequency: 433 mhzTransmission Intervals: every 16 seconds
6 • PRODUCT SPECIFICATIONS
A B C A B C
Troubleshooting
Problem
Bad Rain CollectorReception
Relocate the main unit and/or the wirelessrain collector closer together. Both units mustbe within 100 feet from each other. Make sureboth units are placed at least 3 feet from otherelectronic appliances and devices that mayinterfere with the wireless communication(such as TV’s, microwaves, computers etc.).NOTE: It may take up to 20 minutes for themain unit to re-synchronize with the sensorwhen batteries are replaced.
Main UnitDisplay Not Working
Make certain that the batteries are installedcorrectly. The batteries may need replacing.
No Rain DataRecorded On Main Unit
(no communication)
If wireless reception is bad (no bars), see“Bad Reception” section above. The wirelessID setting on each unit must match for bothunits to communicate properly. See “SetWireless ID” on the next page.
Possible Solution
no bars
Suspected RainMeasurement
Inaccuracy
If you suspect the rainfall measurement isnot accurate, make certain the rain collectorbatteries are fresh.
Check that the collector is mounted to alevel surface and that no foreign debris orplant matter is preventing the flow of rainfallinto the collector. See “Care Instructions.”
Make certain that the internal tipping bucketis allowed to move freely and is not obstructedby any foreign objects or debris.
Product Registration
To receive product information, registeryour product online. It’s quick and easy!
Log on to http://www.chaneyinstrument.com/product_reg.htm
- 9 -- 8 -

Pluviómetro inalámbrico
No.00614/00626SB
Manual de instruccionesContenido del paquete:(1) Unidad principal (A)(1) Colector inalámbrico (B)(1) Embudo colector (C)(1) Manual de instrucciones
Lo que necesita:• Destornillador Philips • (5) baterías AA -consulte «Instalación de baterías» en la página 2
A. Unidad principal
B. Colector de lluvia inalámbrico
INST - 00614/00626SB 073107
1 • CARACTERÍSTICAS GENERALES – UNIDAD PRINCIPAL
Gracias por comprar este producto de ACURITE®. El componente colector de este medidor de lluvia inalámbrico tiene la capacidad de auto vaciado y tiene un colector extra largo de 6 pulgadas (15,2 cm) para una mayor precisión. La unidad principal cuenta con un visor de las lluvias totales caídas en 24 horas o un visor de las lluvias totales acumuladas, un visor con números grandes en pulgadas o milímetros y una alarma personalizada de monitoreo de lluvia. Lea todo este manual para disfrutar al máximo de los beneficios y de las características de este producto. Guarde este manual para referencias futuras.
NOTA: Quite los materiales de empaque del interior del colector de lluvia. Tenga en cuenta además que el LCD viene con una película transparente colocada en fábrica que se debe quitar antes de utilizar este producto. Ubique la lengüeta transparente y simplemente despéguela.
NO devuelva este producto a la tienda minorista. Para obtener asistencia técnica e información de devolución del producto, llame al servicio al cliente: 877-221-1252 de lunes a viernes, de 8:00 a.m. a 4:45 p.m. (hora central estándar)
www.chaneyinstrument.comGARANTÍA LIMITADA POR UN AÑOChaney Instrument Company garantiza que sus productos están fabricados con buenos materiales y mano de obra y que no tienen defectos si se instalan correctamente y funcionan por un período de un año desde la fecha de compra. EL RECURSO POR INCUMPLIMIENTO DE ESTA GARANTÍA ESTÁ EXPRESAMENTE LIMITADO A LA REPARACIÓN O AL REEMPLAZO DE LOS ARTÍCULOS DEFECTUOSOS. Si se comprueba que cualquier producto, en condiciones de uso y servicio normales, no cumple con la garantía mencionada en el presente dentro del período de UN AÑO desde la fecha de venta, Chaney reparará o reemplazará el producto luego de inspeccionarlo, y a su entera discreción. En todos los casos, los costos de transporte y los gastos de devolución de los productos deberán ser pagados por el comprador. Por la presente, Chaney se exime de toda responsabilidad con respecto a dichos costos y gastos de transporte. Esta garantía quedará nula y Chaney no reconocerá ningún producto si este se ha desgastado por el uso diario normal, ha sido dañado, manipulado, incorrectamente instalado, dañado durante el envío o reparado o alterado por terceros que no sean representantes autorizados de Chaney.
LA GARANTÍA MENCIONADA ANTERIORMENTE REEMPLAZARÁ EXPRESAMENTE CUALQUIER OTRA GARANTÍA EXPRESA O IMPLÍCITA Y CHANEY RENUNCIA A CUALQUIER OTRA GARANTÍA, INCLUYENDO, SIN LIMITACIÓN, CUALQUIER GARANTÍA IMPLÍCITA DE COMERCIABILIDAD O DE APTITUD CON UN FIN DETERMINADO. CHANEY RENUNCIA EXPRESAMENTE A TODAS LAS GARANTÍAS POR DAÑOS ESPECIALES, INCIDENTALES O CONSIGUIENTES, YA SEA QUE SURJAN POR UN AGRAVIO O POR CONTRATO DE CUALQUIER INCUMPLIMIENTO DE ESTA GARANTÍA. ALGUNOS ESTADOS NO PERMITEN LA EXCLUSIÓN O LIMITACIÓN DE LOS DAÑOS INCIDENTALES O CONSIGUIENTES, POR LO TANTO, ES POSIBLE QUE LAS LIMITACIONES Y EXCLUSIONES MENCIONADAS ANTERIORMENTE NO SE APLIQUEN EN SU CASO. ASIMISMO, CHANEY RENUNCIA A TODAS LAS GARANTÍAS POR LESIONES PERSONALES RELACIONADAS CON SUS PRODUCTOS HASTA DONDE LA LEY LO PERMITA. AL ACEPTAR CUALQUIERA DE LOS PRODUCTOS O EQUIPOS DE CHANEY, EL COMPRADOR ASUME TODAS LAS RESPONSABILIDADES QUE PUEDAN SURGIR POR SU USO O MAL USO. NINGUNA PERSONA, EMPRESA O CORPORACIÓN ESTÁ AUTORIZADA A ASUMIR POR CHANEY NINGÚN TIPO DE RESPONSABILIDAD EN RELACIÓN A LA VENTA DE SUS PRODUCTOS. ADEMÁS, NINGUNA PERSONA, EMPRESA O SOCIEDAD ANÓNIMA ESTÁ AUTORIZADA A MODIFICAR O RENUNCIAR A LOS TÉRMINOS DE ESTE PÁRRAFO Y DEL PÁRRAFO PRECEDENTE, SALVO QUE ESTÉ ESCRITO Y FIRMADO POR UN REPRESENTANTE DE CHANEY DEBIDAMENTE AUTORIZADO. ESTA GARANTÍA LE OTORGA DERECHOS LEGALES ESPECÍFICOS, A LOS QUE PUEDEN SUMÁRSELES OTROS DERECHOS QUE PUEDE TENER, LOS QUE VARÍAN DE ESTADO EN ESTADO.
Para la reparación bajo garantía, contacte al:Departamento de servicio al clienteChaney Instrument Company965 Wells StreetLake Geneva, WI 53147
Servicio al cliente de Chaney (877) 221-1252 de lunes a viernes, de 8:00 a.m. a 4:45 p.m., hora central estándar
www.chaneyinstrument.com
Este dispositivo cumple con la sección 15 del Reglamento FCC. El funcionamiento está sujeto a las dos condiciones siguientes:1- Es posible que este dispositivo NO cause interferencia perjudi-cial y 2- Este dispositivo debe aceptar cualquier interferencia recibida, incluso la que puede producir un funcionamiento no deseado.
NOTA: este equipo ha sido probado y cumple con los límites de los dispositivos digitales clase B conforme a la sección 15 del Reglamento FCC. Estos límites
están diseñados para ofrecer una protección razonable contra la interferencia perjudicial en una instalación residencial. Este equipo genera usos y puede irradiar energía de frecuencia de radio y, si no se instala y se utiliza según las instrucciones, puede producir interferencia perjudicial en la comuni-cación radial. Sin embargo, no existe garantía alguna que indique que no habrá interferencia en una instalación particular. Si este equipo produce una interferencia perjudicial para la recepción de las emisiones de radio o de televisión, que se puede determinar al apagar y encender el equipo, se recomienda que el usuario trate de corregir la interferencia mediante una o más de las siguientes medidas: • Vuelva a orientar y ubicar la antena receptora.• Aumente la distancia entre el equipo y el receptor.• Conecte el equipo a un tomacorriente en un circuito diferente a aquel en el que está conectado el receptor.• Consulte con su distribuidor o con un técnico experto en radio y televisión para re ayuda.
NOTA: el fabricante no es responsable de ninguna interferencia en las emisiones de radio o de televisión causada por modificaciones no autorizadas a este equipo. Dichas modificaciones pueden anular la autoridad del usuario para hacer funcionar el equipo.
Botón de control de lluvia(ENCENDIDO – ajustar alarma – APAGADO)
Botón pulgadas/milímetros(se visualiza in. o mm)
Botón de modo (PRESIONE PARA VOLVER A CONFIGURAR)(Total de 24 horas o total acumulado)
Indicador de batería bajade la unidad principal
Modo total 24 horas(Seleccionado)
Modo acumulación total(no seleccionado)
Control de lluviaAjuste de la
cantidad de alerta
Indicador de recepción del colector de lluvia
Indicador de batería baja del colector de lluvia
Cantidad de lluvia( se muestra el total
de las 24 horas actuales )
C. Embudo colector
Números de patente: 5,978,738; 6,076,044; 6,597,990
- 1 -

3 • INSTALACIÓN
DESECHE LAS BATERÍAS VIEJAS O DEFECTUOSAS DE MANERA SEGURA PARA EL MEDIO AMBIENTE Y SEGÚN LAS LEYES Y REGULACIONES LOCALES.
SEGURIDAD DE LA BATERÍA: siga el diagrama de polaridad (+/-) del compartimiento de las baterías. Quite inmediatamente las baterías descargadas. Deséchelas correctamente. Se recomienda utilizar únicamente las baterías del mismo tipo o de un tipo equivalente. NO
queme las baterías utilizadas. NO arroje las baterías al fuego ya que pueden explotar o se puede producir un escape. NO mezcle las baterías viejas con las nuevas o los tipos de baterías (las alcalinas con las comunes). NO utilice baterías recargables. NO recargue las baterías no recargables. NO ocasione un corto circuito en las terminales de alimentación.
A. Colector de lluviaSiempre instale PRIMERO las baterías en el colector de lluvia para asegurar la correcta sincronización inalámbrica con la unidad principal.
Separe la carcasa superior e inferior del colector de lluvia. Deslice la batería y la caja electrónica hacia afuera.
Quite los cuatro tornillos de la tapa del compartimiento de las baterías. Ahora quite la tapa suelta del compartimiento de las baterías e instale dos baterías «AA» nuevas según se muestra aquí. Vuelva a colocar la tapa del compartimiento de las baterías. Vuelva a instalar los cuatro tornillos en la tapa del compartimiento de las baterías.
B. Unidad principalAhora quite la tapa del compartimiento de las baías e instale tres baterías «AA» nuevas según se muestra aquí.
Instalación de las baterías
A B
C
NOTA: instale todas las baterías en ambas unidades dentro de un período de seis minutos para garantizar la correcta funcionalidad inalámbrica.
2 • CARACTERÍSTICAS GENERALES DEL COLECTOR DE LLUVIA
Tapa del compartimiento de las baterías
- 3 -- 2 -
BATTERY
COMPARTMENT
COVER
Malla desmontable contra desechoLa malla contra desechos evita que las hojas y los palos entren al colector de lluvia. Quite la malla contra desechos periódicamente para garantizar la precisión del colector.
Embudo desmontable del colector de lluviaEl embudo está específicamente diseñado con una abertura de seis pulgadas (15,2 cm) para maximizar el área de recolección de lluvia. El embudo se desmonta para una fácil limpieza. Para quitarlo, simplemente gírelo en cualquier dirección y retírelo.
Quite el material de embalajeEl colector de lluvia y el balde volcador del colector de lluvia están embalados con un material protector incluido para evitar el movimiento excesivo durante el envío. Quite cuidadosamente todos estos materiales y deséchelos.
Carcasa superior de colector La carcasa superior del colector incluye el componente del compartimiento de las baterías/del sensor y sella el balde volcador del colector para evitar el ingreso del viento y de las gotas de lluvia no medidas. Para separar la carcasa superior de la carcasa inferior, presione hacia adentro las lengüetas laterales y levante cuidadosamente.
Base de la carcasa inferior del colectorLa base de la carcasa inferior del colector sostiene al medidor de lluvia en su totalidad y también funciona como una superficie de montaje. Es muy importante que la base esté asegurada sobre una superficie nivelada y plana para su correcto funcionamiento.
Compartimiento de las baterías y la caja electrónicaEl componente del compartimiento de las baterías y de la caja electrónica del colector de lluvia se desliza en su lugar en las ranuras y guarda las baterías y otros componentes electrónicos. Para quitar este componente, apriete las dos lengüetas y retire la caja hacia afuera suavemente. Asegúrese de que la caja se vuelva a instalar de manera correcta (que la tapa del compartimiento de las baterías quede orientada hacia la parte exterior de la carcasa superior) cuando la vuelva a colocar.
Balde volcador del colector de lluviaEl balde volcador recoge una cantidad de lluvia medida y la vierte automáticamente hasta que queda vacío para permitir la medición continua de lluvia.
INSTALE dos baterías
«AA»
INSTALE tres baterías
«AA»

Coloque la unidad principal en un área seca sin suciedad ni polvo. Asegúrese de que la unidad esté ubicada en una superficie nivelada y suave.
Ubicación de la unidad principal
El colector de lluvia DEBE UBICARSE EN EXTERIORES para observar y registrar las mediciones de lluvia y retransmitir la información a la pantalla de la unidad principal. El colector de lluvia inalámbrico DEBE estar ubicado a una distancia menor a 100 pies (30,5 m) de la unidad principal.
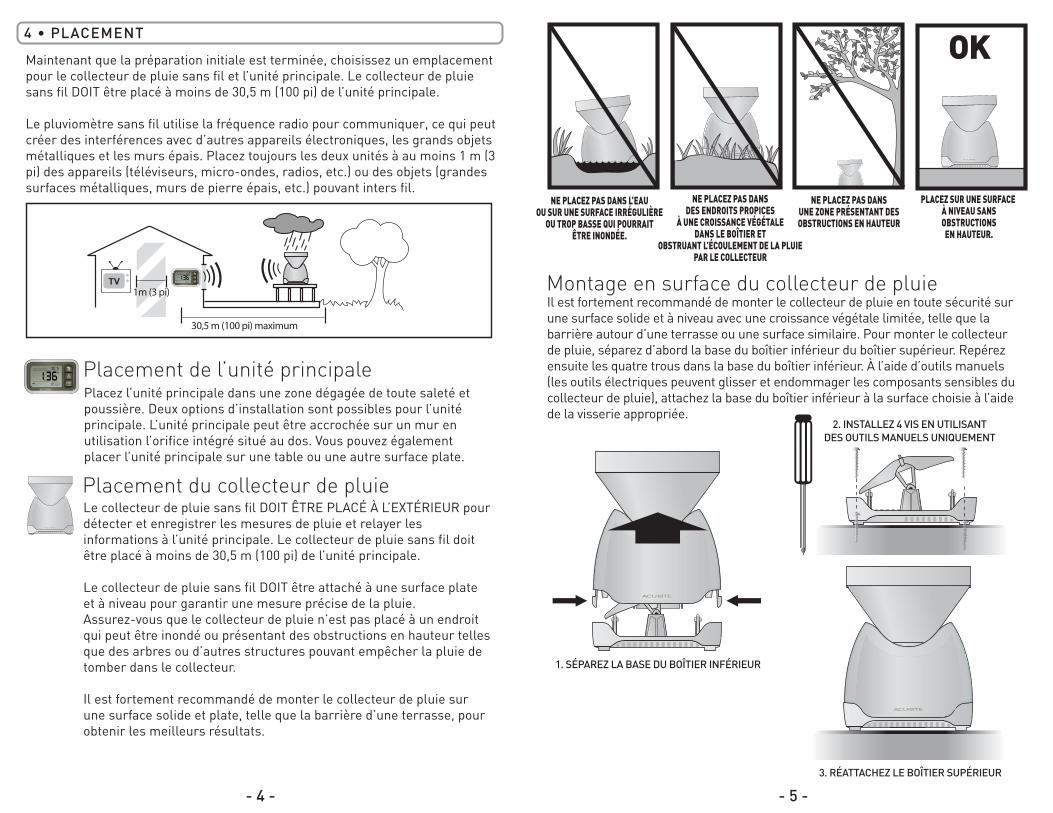
El colector de lluvia inalámbrico DEBE estar colocado en una superficie nivelada y plana para permitir la correcta medición de lluvia. Asegúrese de que el colector de lluvia no esté ubicado en un área más baja que pueda inundarse o en un área donde haya obstrucciones aéreas como árboles y otras estructuras que puedan bloquear la correcta recolección de la lluvia.
Para obtener mejores resultados, se recomienda enfáticamente que el colector de lluvia se instale en una superficie sólida y plana al menos a 2 PIES (60,9 cm) DEL SUELO, como una plataforma. Si ubica el colector al menos a 2 pies (60,9 cm) del suelo, se reducen los errores de salpicaduras de lluvia y la pérdida de la señal inalámbrica debido al césped húmedo y al follaje.
Ubicación del colector de lluvia
Superficie de montaje del colector de lluvia
4 • UBICACIÓN
Una vez que hay finalizado la instalación, debe elegir una ubicación para colocar el colector de lluvia inalámbrico y la unidad principal. El colector de lluvia DEBE estar ubicado a una distancia menor a 100 pies (30,5 m) de la unidad principal.El medidor de lluvia inalámbrico utiliza la frecuencia de radio para la comunicación, que es susceptible a la interferencia recibida de otros artefactos electrónicos y de artículos grandes de metal o de paredes gruesas. Siempre coloque ambas unidades al menos a 3 pies (91,4 cm) de los artefactos (televisor, microondas, radios, etc.) u otros objetos (superficies grandes de metal, paredes gruesas de piedra, etc.) que puedan interferir con la comunicación inalámbrica.
Se recomienda enfáticamente que el colector de lluvia se coloque de manera segura sobre una superficie sólida y nivelada donde el crecimiento del césped sea limitado. Para montar el colector de lluvia, primero separe la base de la carcasa inferior de la carcasa superior. Luego, ubique los cuatro agujeros dentro de la base de la carcasa inferior. Después, con herramientas manuales únicamente (las herramientas eléctricas pueden resbalarse y posiblemente, dañar los componentes sensibles del colector de lluvia), asegure la base de la carcasa inferior a la superficie elegida con los accesorios adecuados.
TV
CORRECTO
- 5 -- 4 -
Al menos 24 pulg.
(60,9 cm)
3 pies (91,4 cm)
100 pies máximo (30,5 m)
NO LO COLOQUE SOBRE EL AGUA NI EN ÁREAS BAJAS O IRREGULARES QUE PUEDAN
INUNDARSE.
NO LO COLOQUE EN ÁREAS DONDE LAS PLANTAS
PUEDEN CRECER Y OBSTRUIR EL FLUJO DE LLUVIA A TRAVÉS DEL
COLECTOR
NO LO COLOQUE EN ÁREAS DONDE HAYA
OBSTRUCCIONES EN LA PARTE SUPERIOR
COLÓQUELO EN UNA SUPERFICIE NIVELADA QUE NO TENGA OBSTRUCCIONES
EN LA PARTE SUPERIOR. ASEGÚRESE DE QUE EL
COLECTOR ESTÉ UBICADO AL MENOS A 2 PIES (60,9 cm)
DEL SUELO
2. INSTALE LOS 4 TORNILLOS ÚNICAMENTE CON HERRAMIENTAS
MANUALES
1. SEPARE LA BASE DE LA CARCASA INFERIOR
3. VUELVA A COLOCAR LA CARCASA SUPERIOR
5 • FUNCIONAMIENTO
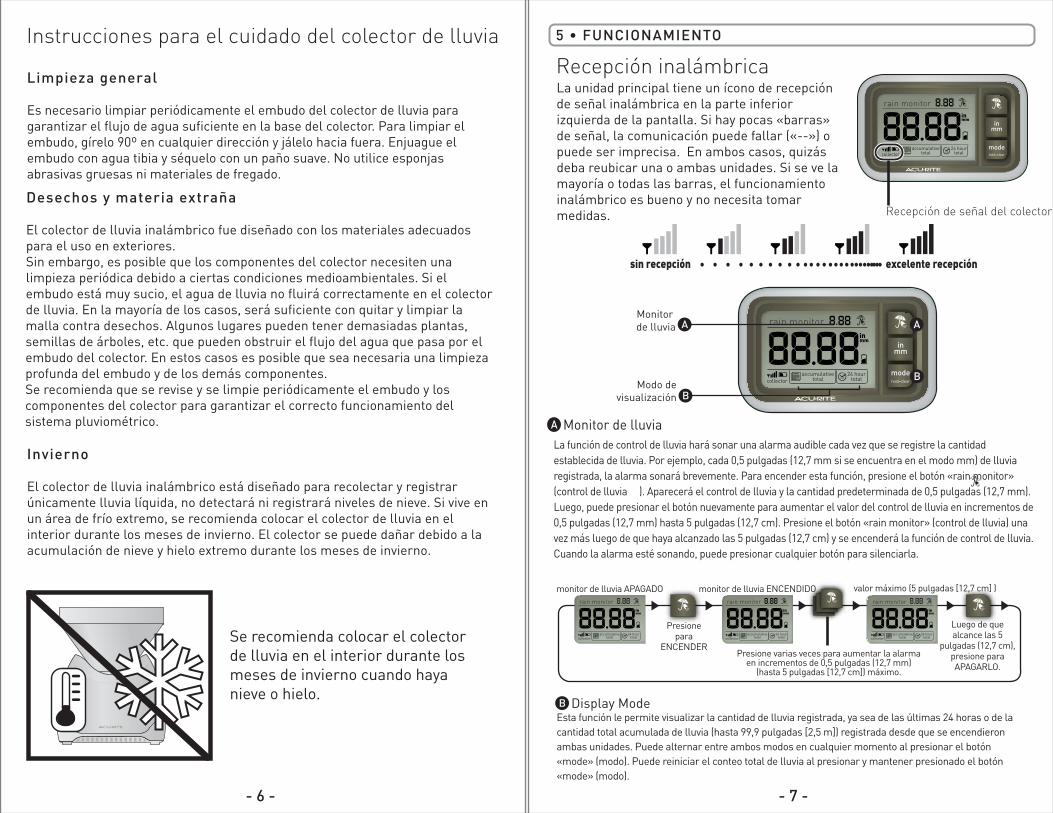
La unidad principal tiene un ícono de recepción de señal inalámbrica en la parte inferior izquierda de la pantalla. Si hay pocas «barras» de señal, la comunicación puede fallar («--») o puede ser imprecisa. En ambos casos, quizás deba reubicar una o ambas unidades. Si se ve la mayoría o todas las barras, el funcionamiento inalámbrico es bueno y no necesita tomar medidas.
Recepción inalámbrica
sin recepción excelente recepción
Recepción de señal del colector
Modo devisualización
Monitor de lluvia
B
B
A A
Monitor de lluviaLa función de control de lluvia hará sonar una alarma audible cada vez que se registre la cantidad establecida de lluvia. Por ejemplo, cada 0,5 pulgadas (12,7 mm si se encuentra en el modo mm) de lluvia registrada, la alarma sonará brevemente. Para encender esta función, presione el botón «rain monitor» (control de lluvia ). Aparecerá el control de lluvia y la cantidad predeterminada de 0,5 pulgadas (12,7 mm). Luego, puede presionar el botón nuevamente para aumentar el valor del control de lluvia en incrementos de 0,5 pulgadas (12,7 mm) hasta 5 pulgadas (12,7 cm). Presione el botón «rain monitor» (control de lluvia) una vez más luego de que haya alcanzado las 5 pulgadas (12,7 cm) y se encenderá la función de control de lluvia. Cuando la alarma esté sonando, puede presionar cualquier botón para silenciarla.
A
monitor de lluvia APAGADO monitor de lluvia ENCENDIDO valor máximo (5 pulgadas [12,7 cm] )
Display ModeEsta función le permite visualizar la cantidad de lluvia registrada, ya sea de las últimas 24 horas o de la cantidad total acumulada de lluvia (hasta 99,9 pulgadas [2,5 m]) registrada desde que se encendieron ambas unidades. Puede alternar entre ambos modos en cualquier momento al presionar el botón «mode» (modo). Puede reiniciar el conteo total de lluvia al presionar y mantener presionado el botón «mode» (modo).
B
Instrucciones para el cuidado del colector de lluvia
Desechos y materia extraña
El colector de lluvia inalámbrico fue diseñado con los materiales adecuados para el uso en exteriores. Sin embargo, es posible que los componentes del colector necesiten una limpieza periódica debido a ciertas condiciones medioambientales. Si el embudo está muy sucio, el agua de lluvia no fluirá correctamente en el colector de lluvia. En la mayoría de los casos, será suficiente con quitar y limpiar la malla contra desechos. Algunos lugares pueden tener demasiadas plantas, semillas de árboles, etc. que pueden obstruir el flujo del agua que pasa por el embudo del colector. En estos casos es posible que sea necesaria una limpieza profunda del embudo y de los demás componentes.Se recomienda que se revise y se limpie periódicamente el embudo y los componentes del colector para garantizar el correcto funcionamiento del sistema pluviométrico.
Invierno
El colector de lluvia inalámbrico está diseñado para recolectar y registrar únicamente lluvia líquida, no detectará ni registrará niveles de nieve. Si vive en un área de frío extremo, se recomienda colocar el colector de lluvia en el interior durante los meses de invierno. El colector se puede dañar debido a la acumulación de nieve y hielo extremo durante los meses de invierno.
Limpieza general
Es necesario limpiar periódicamente el embudo del colector de lluvia para garantizar el flujo de agua suficiente en la base del colector. Para limpiar el embudo, gírelo 90º en cualquier dirección y jálelo hacia fuera. Enjuague el embudo con agua tibia y séquelo con un paño suave. No utilice esponjas abrasivas gruesas ni materiales de fregado.
- 7 -- 6 -
Se recomienda colocar el colector de lluvia en el interior durante los meses de invierno cuando haya nieve o hielo.
Presione varias veces para aumentar la alarma en incrementos de 0,5 pulgadas (12,7 mm)
(hasta 5 pulgadas [12,7 cm]) máximo.
Luego de que alcance las 5
pulgadas (12,7 cm), presione para APAGARLO.
Presione para
ENCENDER

A B
C
Tapa del compartimiento
de la batería
Este medidor de lluvia inalámbrico utiliza una frecuencia de radio de 433mhz de amplio rango para establecer la comunicación.
En caso de que tenga problemas de recepción debido a la interferencia, tanto la unidad principal como el colector de lluvia tienen identificaciones inalámbricas seleccionables. Los interruptores de las identificaciones están ubicados dentro de los compartimientos de las baterías de la unidad principal y del colector de lluvia inalámbrico.
Puede elegir entre A, B o C, pero las identificaciones de la unidad principal y del colector de lluvia inalámbrico deben coincidir para lograr una sincronización exitosa.
Configuración del identificador inalámbrico
ambas identificaciones inalámbricas deben coincidir
Rangos de mediciónLluviaRango de lluvia acumulada: De 0 a 99,99 pulgadas (0 a 2540 mm)
EspecificacionesEspecificaciones generales del pluviómetroResolución de lluvia: 0,02 pulgadas (0,5 mm)Unidades de lluvia: pulgadas y milímetros (mm)Colector de lluvia inalámbrico: capacidad de auto vaciado y medición continua de lluvia
Requisitos de energíaUnidad principal: tres baterías «AA» alcalinas o de litioColector de lluvia inalámbrico: dos baterías «AA» alcalinas o de litio
Comunicación inalámbricaFrecuencia de radio: 433 mhzIntervalos de transmisión: cada 16 segundos
6 • ESPECIFICACIONES DEL PRODUCTO
A B C A B C
Solución de problemas
Problema
Mala recepción del colector de lluvias
La pantalla de la unidad principal no funciona
No hay información de lluvia registrada
en la unidad principal(no hay comunicación)
Posible solución
sin barras
Posible imprecisiónen la medición
de lluvia
Registro del producto
Para recibir información del producto,registre su producto en línea. ¡Es rápido y fácil!
Regístrese en http://www.chaneyinstrument.com/product_reg.htm
- 9 -- 8 -
Coloque la unidad principal y/o el colector de lluvia inalámbrico más cerca uno del otro. Ambas unidades deben estar ubicadas a 100 pies (30,5 m) una de la otra. Asegúrese de que ambas unidades estén ubicadas al menos a 3 pies (91,4 cm) de otros artefactos electrónicos y dispositivos que puedan interferir con la comunicación inalám-brica (como televisores, microondas, computado-ras, etc.). NOTA: puede tardar hasta 20 minutos para que la unidad principal vuelva a sincroni-zarse con el sensor cuando se cambian las baterías.
Si sospecha que la medición de lluvia no es precisa, asegúrese de que las baterías del colector de lluvia estén cargadas.Verifique que el colector esté instalado en una superficie nivelada y que no haya desechos extraños o plantas que impidan que la lluvia fluya a través del colector. Consulte las «Instrucciones para el cuidado».Asegúrese de que el balde volcador interno se mueva libremente y que no esté obstruido por ningún objeto extraño o desecho.
Si la recepción inalámbrica es mala (sin barras), consulte la sección «Mala recepción» mencionada anteriormente. La configuración del identificador inalámbrico de cada unidad debe coincidir en ambas unidades para que la comunicación sea correcta. Consulte la sección «Configuración del identificador inalámbrico» en la siguiente página.
Asegúrese de que las baterías estén instaladas correctamente. Es posible que necesite cambiar-las.


Remove (un-snap) this partIt will not be used when the rain gauge is set up to be calibrated
Insert a small nut 6-32 hex nut into the base receiver (stainless steel) is preferred -secure the nut in place using glue or silicone caulk-install a screw 6-32 into the nut, 3/4” or 1” long should work best.
Use the original plastic stop as a height gaugeturn it upside down as shown in the picture. This will provide the initial screw height.
--- Raising the height of the screw increases the rain fall reading by allowing the bucket to tip sooner, with a smaller volume of water
--- lowering the height of the screw decreases the rain fall reading
*** every bucket tip equals 0.02” of rainfall
Height mark
1.
2.
3.
00614 Calibration option