pointmax cpe configuration -...
TRANSCRIPT

PointMax CPE Configuration
1. First connect Wimax modem to Power adapter port named as “PoE” and Connect power adapter to AC supply. 2. Connect Data port of the WiMAX adapter to Computer LAN port. After setting Computer LAN configurations as
“Obtain IP automatically” and Obtain “DNS automatically”, log on to WiMAX Modem by typing IP address 192.168.0.254 using any web browser like Internet explorer Google Chrome etc. Giver User name as Operator and password as operator. Click on Loginn Button.

3. You will get the following screen

4. Click on Wimax -Profile then you will get the screen

5. Click on Frequency Settings Tab on Right side.
6. Choose Setting Type as “By List”. Join Wide Scan Result as “Yes”. Default Bandwidth as 5 MHz as shown in
previous snapshot.

7. Click on Authentication settings as User authentication. Select EAP mode as EAP-TTLS. Enter Anonymous ID as
bsnl.

8. Enter Username as [email protected] and password as password.

9. Put Tick for “Ignore Cert Verification” by clicking
10. Save by clicking on the save button.

11. Click on the “Wide Scan” link available on the left frame. Wimax- wide Scan.
12. Select Auto wide Scan as Yes. And Save configurations by clicking on Save button.

13. Click on Home--Information available on left frame.
14. Check the Link Quality which is same as CINR of ICOMM CPE. It should be around 20 dB. If everything is
OK WANstatus will become connected and show value for IP address.
Alternate Method.
1. First connect Wimax modem to Power adapter port named as “PoE” and Connect power adapter to AC supply. 2. Connect Data port of the WiMAX adapter to Computer LAN port. After setting Computer LAN configurations as
“Obtain IP automatically” and Obtain “DNS automatically”. Copy the file “wimax point red cpe config.vbs” to Desktop of the computer. Double click on that file . It will automatically update most of the settings except the Username.
3. For updating user name log on to Modem by any browser as mentioned in previous procedure step 2. Then click on Wimax-profile and select tab Authentication settings. Enter Username as [email protected]. Check status in Home information.

ZTE CPE firmware up gradation
OX253P firmware upgrade guide :-
1-Login into Wimax CPE through browser by typing 192.168.1.1 2- Go to advance setup and enter into the device. 3- Click over "Advanced" tab. 4- Now select "System configuration" tab. 5- Now you will get an option of "firmware" 6- after clicking over "firmware" click over "choose file" and select the firmware file from your PC where you have save the new firmware that I have provide in this mail

7- After selecting firmware click over "Upload" and now file will get save in to the flash memory of the CPE and it will reboot automatically.

8.After reboot completion CPE will automatically get connected with the Wimax network. Now customer is not required to dial his username and password after Power Off/On condition.

ZTE CPE Configuration
1. First connect Wimax modem to Power adapter port named as “PoE” and Connect power adapter to AC supply. 2. Connect Data port of the WiMAX adapter to Computer LAN port. After setting Computer LAN configurations
as “Obtain IP automatically” and Obtain “DNS automatically”, log on to WiMAX Modem by typing IP address 192.168.0.254 using any web browser like Internet explorer Google Chrome etc. Give User name as admin and password as admin. Click on Login Button.
WiMax CPE Configuration steps

3. Select advance setup wizard.
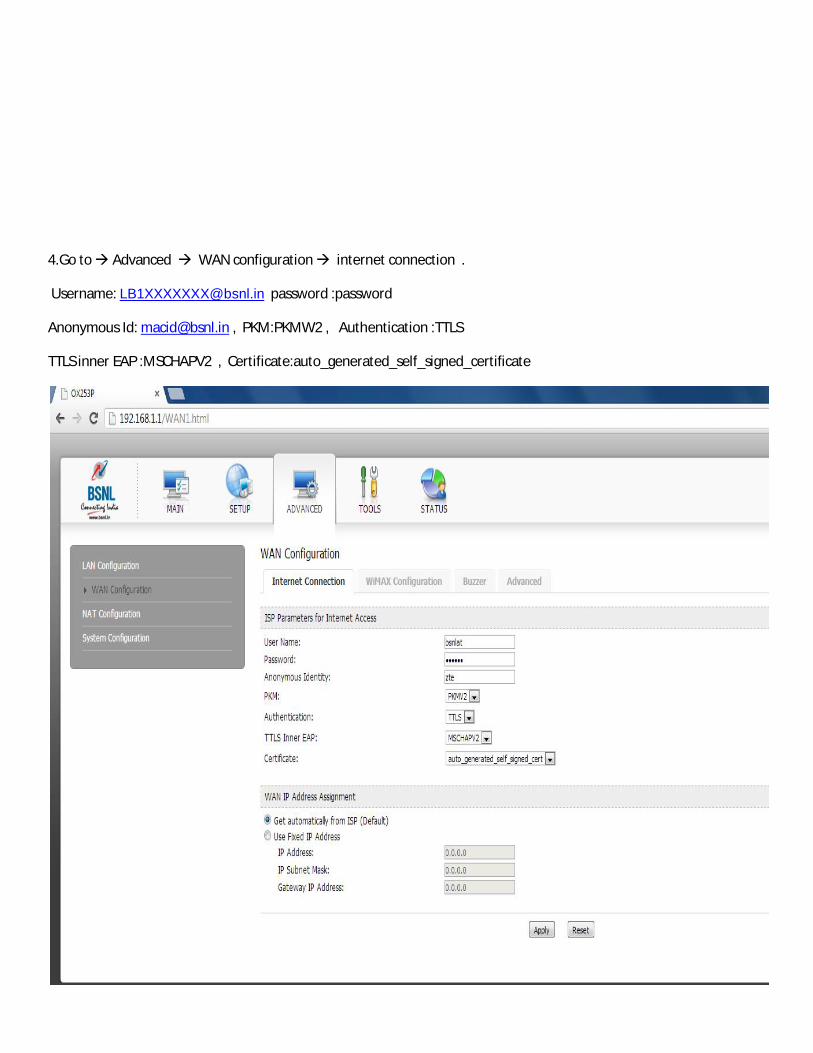
4.Go to Advanced WAN configuration internet connection .
Username: [email protected] password :password
Anonymous Id: [email protected] , PKM:PKMW2 , Authentication :TTLS
TTLS inner EAP :MSCHAPV2 , Certificate:auto_generated_self_signed_certificate

4. Go to Advanced tab select WAN configuration select Wimax configuration. Enter following frequencies 2637500,2642500,2647500,2652500.

5. Verifying status.
Go to tab system status .
WAN IP address: 117.253.167.206 (Public IP)
LAN IP address : 192.168.1.1 (Local IP assigned to PC)

System status continued…..
Wimax state :OPERATIONAL indicated CPE is connected to internet.
CINR : CINR Mean (Average signal quality)
RSSI : Signal strength

Configurations for ZTE CPE Working in Bridge Mode (Only ZTE supports this mode)
1.Go to Advanced -> System configuration -> Bridge Mode ->
2.Select ->Single DHCP Bridge
Then apply.

Verify the assigned IP address of computer
4. Go to -> Run of windows PC type cmd Type command ipconfig
Arrow indicates Public IP address assigned to computer.

ICOMM CPE Configuration
1. First connect Wimax modem to Power adapter port named as “PoE” and Connect power adapter to AC supply. 2. Connect Data port of the WiMAX adapter to Computer LAN port. After setting Computer LAN configurations
as “Obtain IP automatically” and Obtain “DNS automatically”, log on to WiMAX Modem by typing IP address 192.168.0.254 using any web browser like Internet explorer Google Chrome etc. Give admin. Click on Login Button.

3. Go to Internet tab ,select Wimax security tab.
Select Authentication : EAP-TTLS- MSCHAPV2
Username: [email protected]
password :password Realm :bsnl

4. Status : State :OPERATIONAL RSSI:Signal strength CINR :Signal quality
ICOMM CPE Firmware upgradation for Engineering option:-
Some CPEs don’t have Engineering option ( cross mark indicate absence of engineering option) CPEs can be upgraded to get engineering option.
Depending up on CPE software version there are 2 versions of engineerin option.
1.engineeringweb_01.01.02.999_arm.ipk corresponding to CPE version 01.01.02.999
2. engineeringweb_01.01.02.991_arm.ipk corresponding to CPE version 01.01.03.991
If CPE belongs any other software versions ,modem should be upgraded to any of the versions 01.01.02.999 or 01.01.03.991.Then to corresponding engineering version .
Here CPE version is 01.01.08.991 first CPE is upgraded to 01.01.03.999 then with engineeringweb_01.01.02.991_arm.ipk .

3. Select choose File tab

5. Upgrading

6.Rebooting.
6. Left arrow indicate newly installed engineering option. Up arrow indicate engineering option software version.

Configurations for latching ICOMM CPEs to particular Base station.


Configurations for latching Point Red CPEs to particular Base station .
1.Click on Wimax - Profile then you will get the screen .
2. In connect settings Ensure that Enable Handover and Enable Idle Mode are unchecked.

1. Click on Frequency Settings Tab on Right side.
2. Choose Setting Type as “By List”. 3. Join Wide Scan Result as “No ”. Default Bandwidth as 5 MHz as shown in previous snapshot. 4. Click on add but , enter the frequency of the best signal/sector only. Only one entry should be there as we are
fixing to one sector/ frequency.

5. Click on Authentication settings as User authentication. Select EAP mode as EAP-TTLS. Enter Anonymous ID as
bsnl.

6. Enter Username as [email protected] and password as password.

7. Put Tick for “Ignore Cert Verification” by clicking
8. Save by clicking on the save button.

9. Click on the “Wide Scan” link available on the left frame. Wimax- wide Scan.
10. Select Auto wide Scan as No . And Save configurations by clicking on Save button.

11. Click on Home--Information available on left frame.
12. Check the Link Quality which is same as CINR of ICOMM CPE. It should be around 20 dB. If everything is OK WANstatus will become connected and show value for IP address. Check the frequency and BSID and ensure that the CPE is latched to the specified sector

Configurations for latching ZTE CPEs to particular Base station .
1. Advanced WAN configuration

2. Enter the required base stations frequency as DL Frequency[1] and set all other frequencies s to zero.