polar a300 user manual - support
TRANSCRIPT
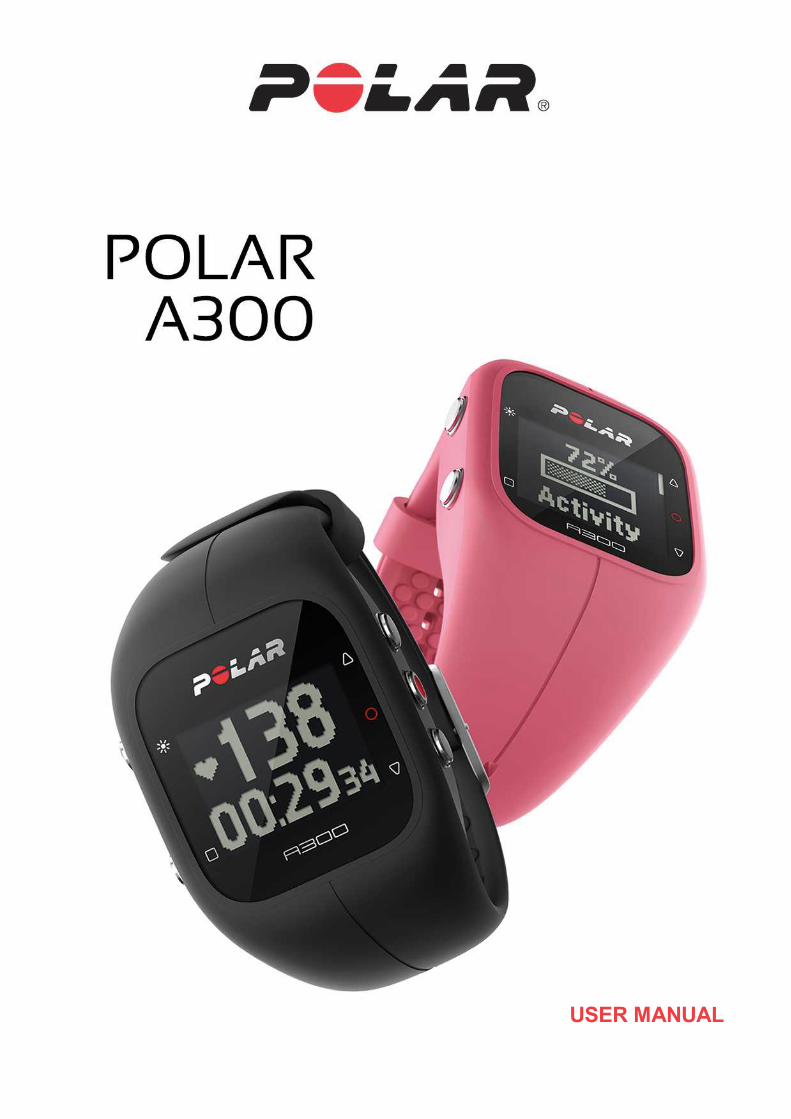
USER MANUAL

2
CONTENTSContents 2
Polar A300 User Manual 9
Introduction 9
Polar A300 9
USB cable 9
Polar Flow App 10
Polar FlowSync Software 10
Polar Flow Web Service 10
H7Heart Rate Sensor 10
Get started 11
Set up your A300 11
Quick set up 11
Basic settings 12
Wristband 12
Button Functions andMenu Structure 14
Button Functions 14
Menu Structure 14
Pairing 15
Pair a Heart Rate Sensor with A300 15
Pair aMobile Device with A300 16
Pair Polar Balance scale with A300 16
3
Delete a Pairing 17
Settings 18
General Settings 18
Pair and Sync 18
Flight mode 18
Inactivity Alert 18
Units 18
Language 19
About Product 19
Sport Profile settings 19
Sport Profiles 19
Settings 20
Physical Settings 20
General Settings 20
Pair and Sync 21
Flight mode 21
Inactivity Alert 21
Units 21
Language 21
About Product 22
Watch Settings 22
Alarm 22
Time 22

4
Date 22
Date format 22
Watch Face 23
Firmware Update 23
Reset A300 24
Training 25
Wear Heart Rate Sensor 25
Start a Training Session 25
Start a training session with a target 26
During training 27
Training views 27
Training with heart rate 27
Training without heart rate 28
Training with a duration or calorie based training target 28
Training with a phased training target 30
Functions During Training 30
Lock a Zone 30
See the time of day 31
Activate backlight 31
Night mode function 31
Pause/Stop a training session 31
Training Summary 31
After Training 31
5
Training History in A300 32
Polar Flow App 32
Polar Flow Web Service 33
Features 34
24/7 Activity Tracking 34
Activity Goal 34
Activity data 34
Inactivity alert 35
Sleep information at Flow web service and Flow app 35
Activity data in Flow App and Flow web service 36
Sport Profiles 36
Smart Coaching features 36
Smart Calories 36
Energy Pointer 37
Heart Rate Zones 37
Fitness Test 41
Before the test 42
Performing the Test 42
Troubleshooting: 42
Test Results 42
Fitness Level Classes 44
Men 44
Women 44
6
Vo2max 45
Training Benefit 45
Smart notifications (Polar Flow app iOS) 46
Settings 46
A300 47
Phone 47
Use 47
Dismiss Notifications 47
Do not disturb 48
Smart notifications (Polar Flow app Android) 48
Settings 48
A300 48
Polar Flow app 49
Phone 49
Use 49
Dismiss notifications 50
DoNot Disturb 50
Block apps 50
Polar Flow 51
Polar Flow App 51
Polar Flow Web Service 51
Feed 51
Explore 52
7
Diary 52
Progress 52
Plan Your Training 52
Create a Training Target 52
Quick Target 52
Phased target 53
Favorites 53
Sync the Targets to your A300 53
Favorites 54
Add a Training Target to Favorites: 54
Edit a Favorite 54
Remove a favorite 54
Sport profiles in Flow Web Service 54
Add a Sport profile 55
Edit a Sport Profile 55
Basics 55
Heart Rate 55
Syncing 55
Sync with Flow App 56
Sync With Flow Web Service Via FlowSync 56
Important Information 58
Taking Care of Your A300 58
A300 58
8
Heart rate sensor 59
Storing 59
Service 59
Batteries 59
Charging A300 battery 60
Battery Operating Time 60
Low Battery Notifications 61
Changing Heart Rate Sensor Battery 61
Precautions 62
Interference During Training 62
Electromagnetic Interference and Training Equipment 62
Minimizing Risks When Training 62
Technical Specification 63
A300 63
H7Heart Rate Sensor 64
Polar FlowSync Software 64
Polar Flow mobile application compatibility 65
Water resistance of Polar products 65
Limited International Polar Guarantee 66
Compliance Statement 67
Compliance Statement 67
Disclaimer 68

9
POLAR A300 USER MANUALINTRODUCTION
This user manual helps you get started with your new A300. To check the video tutorials and the latest versionof this user manual, go to www.polar.com/support/A300.
POLAR A300
Monitor your activities in your everyday life and see how they benefit your health. You'll get tips on how toreach your daily activity goal. Check your goal from the Flow app or Flow web service. Change the wristbandand accessorize any outfit! You can buy additional wristbands separately.
USB CABLE
A product set includes a standard USB cable. You can use it for charging the battery and syncing databetween your A300 and Flow web service via FlowSync software.
10
POLAR FLOW APP
View your activity and training data at a glance. Flow app syncs your activity and training data wirelessly tothe Polar Flow web service. Get it on the App StoreSM or Google playTM.
POLAR FLOWSYNC SOFTWARE
Polar FlowSync syncs your data between your A300 and the Polar Flow web service on your computer. Go toflow.polar.com/start to start using your A300 and to download and install the FlowSync software.
POLAR FLOWWEB SERVICE
Plan your training, follow your achievements, get guidance and see detailed analyses of your activity and train-ing results. Let all your friends know about your achievements. Find all this at polar.com/flow.
H7 HEART RATE SENSOR
Wearing your A300 together with a heart rate sensor, you can get more out of your daily sports. See live, accur-ate heart rate on your A300 during training. Your heart rate information is used to analyze how your sessionwent. The Polar H7 heart rate sensor detects your heart rate also when swimming.
Only included in A300 with heart rate sensor sets. If you bought a set that doesn't include a heart ratesensor, not to worry, you can always buy one later.

11
GET STARTEDSET UP YOUR A300
When you get hold of your new A300, it’s in storagemode. It wakes up when you plug it to a computer forsetup or a USB charger for charging. We recommend that you charge the battery before you start using yourA300. If the battery is completely empty, it takes a couple of minutes for the charging to start. See Batteriesfor detailed information on charging the battery, battery operating times and low battery notifications.
To make sure you get to enjoy your A300 at its best, please start using it as follows:
1. Go to flow.polar.com/start and install the FlowSync software to set up your A300 and keep it up todate.
2. Detach the wristband as described in chapterWristband.
3. Plug your A300 to your computer either directly (A) or with the USB cable (B) for set up and chargingthe battery. Make sure the cable is right way up - the USB symbols of the device and the cable shouldbe next to each other (picture 2). Make sure that the A300 is dry before connecting it to the computer.
4. Then we’ll walk you through setting up your A300 and signing up to the Flow web service.
To get themost accurate and personal activity and training data, it’s important that you’re precisewith the settings when signing up to the web service.
After the setup is done, you’re ready to go. Have fun!
QUICK SET UP
If you’re in a hurry for your first active day with your A300, you can do a quick set up to get you going.
12
If you do the quick setup, you can use your A300 only in English. If you choose a language other than Eng-lish, you will be guided to go to flow.polar.com/start to get the language. When taking A300 into use with theFlow web service, you can add another language during the setup.
1. Detach the wristband and plug your A300 into a computer or a USB charger to wake it up and charge the bat-tery. If the battery is completely empty, it takes a couple of minutes for the charging to start.
2. Set up your A300 by entering the basic settings on the device.
BASIC SETTINGS
To get themost accurate and personal training data, it’s important that you’re precise with your physical set-tings, as they have an effect on calorie calculation as well as all the other Smart Coaching features.
Set up Polar A300 is displayed. Set the following data, and confirm each selection with the START button. Ifat any point you want to return and change a previous setting, press BACK.
1. Set time format : Choose 12 h or 24 h. With 12 h, select AM orPM. Then set the local time.
2. Date format : Choose date format and then enter the current date.
3. Units : ChooseMetric (kg, cm) or Imperial (lb, ft) units.
4. Date of birth : Enter your date of birth.
5. Set weight : Enter your weight.
6. Set height : Enter your height.
7. Choose sex : SelectMale or Female.
3. Ready to go! is displayed when you’re done with the settings, and A300 goes to time view.
To get accurate activity and training data and tomake sure you get the latest software, please do the setupin the Flow web service as described earlier.
WRISTBAND
The USB connector of your A300 is in the device inside the wristband. You need to detach the wristband forsetting up your A300 with a computer, charging the battery and changing the wristband.

13
1. Bend the wristband from the buckle side to detach it from the device.
2. Hold the wristband from the buckle side. Pass the wristband over the buttons first from one side andthen from the other side. Stretch the wristband only when necessary.
3. Pull the device from the wristband.
To attach the wristband, perform the steps in the reverse order.

14
BUTTON FUNCTIONS AND MENU STRUCTUREBUTTON FUNCTIONS
A300 has five buttons that have different functions depending on the situation of use. See the image below tofind out what functions the buttons have in different modes.
PRACTICAL TIPS
l In any view, except during training, pressing UP, DOWN, START or BACK turns on a dim backlight.To turn on a brighter backlight, press the LIGHT button.
l To lock and unlock buttons press and hold LIGHT in time view or during training session.
l To change the watch face press and hold UP in time view.
l To sync your A300 with Flow app press and hold BACK in time view.
l To return to the time view frommenu press hand hold BACK.
l To lock/unlock a zone during training session press and hold START.
l To end your training session press and hold BACK for 3 seconds.
MENU STRUCTURE
Enter and browse through themenu by pressing UP or DOWN. Confirm selections with the START button,and return with the BACK button.

15
In themenu you'll find:
l Activity
l History
l Settings
l Fitness test
If you have added some training targets as favorites in the Flow web service, you'll also find Favorites in themenu.
If you have created training targets in the Flow web service and transferred them to your A300, you'll also findTargets in themenu.
PAIRING
BluetoothSmart ® heart rate sensor or mobile device (smartphone, tablet) has to be paired with your A300 forthem to function together. Pairing only takes a few seconds, and ensures that your A300 receives signalsfrom your sensors and devices only, and allows disturbance-free training in a group. Before entering an eventor race, make sure that you do the pairing at home to prevent interference from other devices.
PAIR A HEART RATE SENSOR WITH A300
When using the Polar H7 heart rate sensor, A300may detect your heart rate via GymLink transmissionbefore you have paired the sensor with your A300. GymLink transmission is optimized to be used in swim-ming, and we recommend using Bluetooth Smart ® transmission in other sports. So, pleasemake sure youhave paired your heart rate sensor before training.
There are two ways to pair a heart rate sensor with your A300:
1. Wear the heart rate sensor, and press START in time view to enter pre-trainingmode.
2. WhenPairing is displayed, touch the heart rate sensor with your A300.
3. Pairing completed is shownwhen you're done.
or
1. Go toGeneral Settings > Pair and sync > Pair other device and press START.
2. WhenPairing is displayed, touch the heart rate sensor with your A300.

16
3. Pairing completed is displayed when you're done.
PAIR A MOBILE DEVICE WITH A300
Before pairing amobile device
l do the setup at flow.polar.com/start as described in chapter Set up your A300
l download Flow app from the App Store
l make sure your mobile device has Bluetooth turned on, and airplanemode/flight mode is not turned on.
To pair a mobile device:
1. On your mobile device, open Flow app and sign in with your Polar account, which you have createdwhen setting up your A300.
2. Wait for theConnect product view to appear on your mobile device (Waiting for A300) is displayed.
3. In A300, press and hold the BACK button
OR
Go toSettings > General settings > Pair and sync > Pair mobile and press START
4. Pair: touch device with A300 is displayed. Touch themobile device with your A300
5. Pairing is displayed.
6. Confirm on other dev. xxxxx is displayed on your A300. Enter the pin code from the A300 on themobile device. The pairing starts.
7. Pairing completed is displayed when you're done.
PAIR POLAR BALANCE SCALE WITH A300
There are two ways to pair a Polar Balance scale with your A300:
1. Step on the scale. The display shows your weight.
2. After a beep sound, the Bluetooth icon on the scale display starts flashing, whichmeans that the con-nection is now on. The scale is ready to be paired with your A300.
3. Press and hold the BACK button for 2 seconds on your A300 and wait until the display indicates thepairing is complete.
or
1. Go toGeneral Settings > Pair and sync > Pair other device and press START.
2. A300 starts searching for your scale.
3. Step on the scale. The display shows your weight.

17
4. Once the scale is found, the device ID Polar scale xxxxxxxx is displayed on your A300.
5. Press START, Pairing is displayed.
6. Pairing completed is shownwhen you are done.
The scale can be paired with 7 different Polar devices. When the number of paired devices exceeds 7, thefirst pairing will be removed and replaced.
DELETE A PAIRING
To delete a pairing with a sensor or mobile device:
1. Go toSettings > General settings > Pair and sync > Remove pairings and press START.
2. Choose the device you want to remove from the list and press START.
3. Delete pairing? is displayed, chooseYes and press START.
4. Pairing deleted is displayed when you're done.
18
SETTINGSGENERAL SETTINGS
To view and edit the general settings, go toSettings > General settings.
InGeneral settings you'll find:
l Pair and sync
l Flight mode
l Inactivity alert
l Units
l Language
l About product
PAIR AND SYNCl Pair and sync mobile device: Pair mobile devices with your A300. For more information, see Pairing.Sync data from your A300 to amobile device. Tip:You can also sync by pressing and holding theBACK button in the time view.
l Pair other device: Pair heart rate sensors with your A300. For more information, see Pairing.
l Remove pairings: Remove pairing with a heart rate sensor or mobile device.
FLIGHT MODE
ChooseOn orOff
Flight mode cuts off all wireless communication from the device. You can still use it to collect activity, but youcannot use it in training sessions with aBluetooth® Smart heart rate sensor nor sync your data to the PolarFlow mobile app becauseBluetooth® Smart is disabled.
INACTIVITY ALERT
Set the inactivity alert On orOff. Seemore information in 24/7 Activity Tracking.
UNITS
ChooseMetric (kg, cm) or Imperial (lb, ft). Set the units used tomeasure weight, height, distance andspeed.
19
LANGUAGE
By default, A300 only comes in English. You can choose another language when setting up your A300 at flow.-polar.com/start, or change the language later in the Flow web service.
To add another language later:
1. Go to polar.com/flow and sign in.
2. Click your name/profile photo in the upper right corner, chooseProducts, and then Polar A300Set-tings.
3. Choose a language from the list.
4. Sync the data from Flow web service to your A300 with FlowSync.
ABOUT PRODUCT
Check the device ID of your A300, as well as the firmware version and HW model. Youmay need this inform-ation if you contact Polar customer care.
SPORT PROFILE SETTINGSSPORT PROFILES
Formore information on sport profiles, see chapter Sport Profiles.
The followingSport profiles are already there in your A300:
l Running
l Walking
l Cycling
l Strength training
l Group exercise
l Other indoor
l Other outdoor
l Swimming
In the Flow web service you can add new sport profiles and sync them to your A300, and this way create a listof all your frequent sports. Seemore information in Sport profiles in Flow web service.
If you have edited your sport profiles in the Flow web service before your first training session,and syncedthem to your A300, the sport profile list will contain the edited sport profiles.
20
SETTINGS
InSettings > Sport profiles you can edit some settings for each sport profile to best suit your training needs.
To view ormodify sport profile settings, go toSettings > Sport profiles and choose the profile you want toedit.
l Training sounds: ChooseOff orOn.
l Vibration feedback: ChooseOff orOn. When set on, A300 vibrates when, for example, you start orstop a training session or reach a training target.
l HR settings (heart rate settings): HR view: ChooseBeats per min (beats per minute) or% of max(% of your maximum heart rate). HR visible to others: ChooseOn orOff. If you chooseOn, othercompatible devices (e.g. gym equipment) can detect your heart rate.
A wider range of customization options is available in the Flow web service. For more information, seeSport profiles in Flow web service.
PHYSICAL SETTINGS
To view and edit your physical settings, go toSettings > Physical settings. It is important that you're pre-cise with the physical settings, as they have an impact on the accuracy of the values that aremeasured byyour A300, such as the heart rate zone limits and calorie expenditure.
InPhysical settings you'll find:
l Weight: Set your weight in kilograms (kg) or pounds (lbs).
l Height: Set your height in centimeters (metric) or in feet and inches (imperial).
l Date of birth: Set your birthday. The order in which the date settings are depends on which time anddate format you have chosen (24h: day - month - year / 12h: month - day - year).
l Sex: SelectMale or Female.
Please complete your settings in the Flow web service to get accurate activity data and activity goal, andto be able to use all features on your A300.
GENERAL SETTINGS
To view and edit the general settings, go toSettings > General settings.
InGeneral settings you'll find:
l Pair and sync
l Flight mode
21
l Inactivity alert
l Units
l Language
l About product
PAIR AND SYNCl Pair and sync mobile device: Pair mobile devices with your A300. For more information, see Pairing.Sync data from your A300 to amobile device. Tip:You can also sync by pressing and holding theBACK button in the time view.
l Pair other device: Pair heart rate sensors with your A300. For more information, see Pairing.
l Remove pairings: Remove pairing with a heart rate sensor or mobile device.
FLIGHT MODE
ChooseOn orOff
Flight mode cuts off all wireless communication from the device. You can still use it to collect activity, but youcannot use it in training sessions with aBluetooth® Smart heart rate sensor nor sync your data to the PolarFlow mobile app becauseBluetooth® Smart is disabled.
INACTIVITY ALERT
Set the inactivity alert On orOff. Seemore information in 24/7 Activity Tracking.
UNITS
ChooseMetric (kg, cm) or Imperial (lb, ft). Set the units used tomeasure weight, height, distance andspeed.
LANGUAGE
By default, A300 only comes in English. You can choose another language when setting up your A300 at flow.-polar.com/start, or change the language later in the Flow web service.
To add another language later:
1. Go to polar.com/flow and sign in.
2. Click your name/profile photo in the upper right corner, chooseProducts, and then Polar A300Set-tings.
3. Choose a language from the list.
4. Sync the data from Flow web service to your A300 with FlowSync.

22
ABOUT PRODUCT
Check the device ID of your A300, as well as the firmware version and HW model. Youmay need this inform-ation if you contact Polar customer care.
WATCH SETTINGS
To view and edit your watch settings, go toSettings > Watch settings.
InWatch settings you'll find:
l Alarm
l Time
l Date
l Date format
l Watch face
ALARM
Set alarm repetition: Off, Once, Mon-Fri (Monday-Friday) orDaily. If you chooseOnce, Mon-Fri orDaily,also set the time for the alarm.
When the alarm is set on, a clock icon is displayed in the time view.
TIME
Set the time format: 24 h or 12 h.Then set the time of day.
When syncing with the Flow app and web service, the time of day is automatically updated from the ser-vice.
DATE
Set the date.
When syncing with the Flow app and web service, the date is automatically updated from the service.
DATE FORMAT
Choose theDate format. You can choosemm/dd/yy, dd/mm/yy, yy/mm/dd, dd-mm-yy, yy-mm-dd,dd.mm.yy or yy.mm.dd.
23
When syncing with the Flow app and web service, the week's starting day is automatically updated fromthe service.
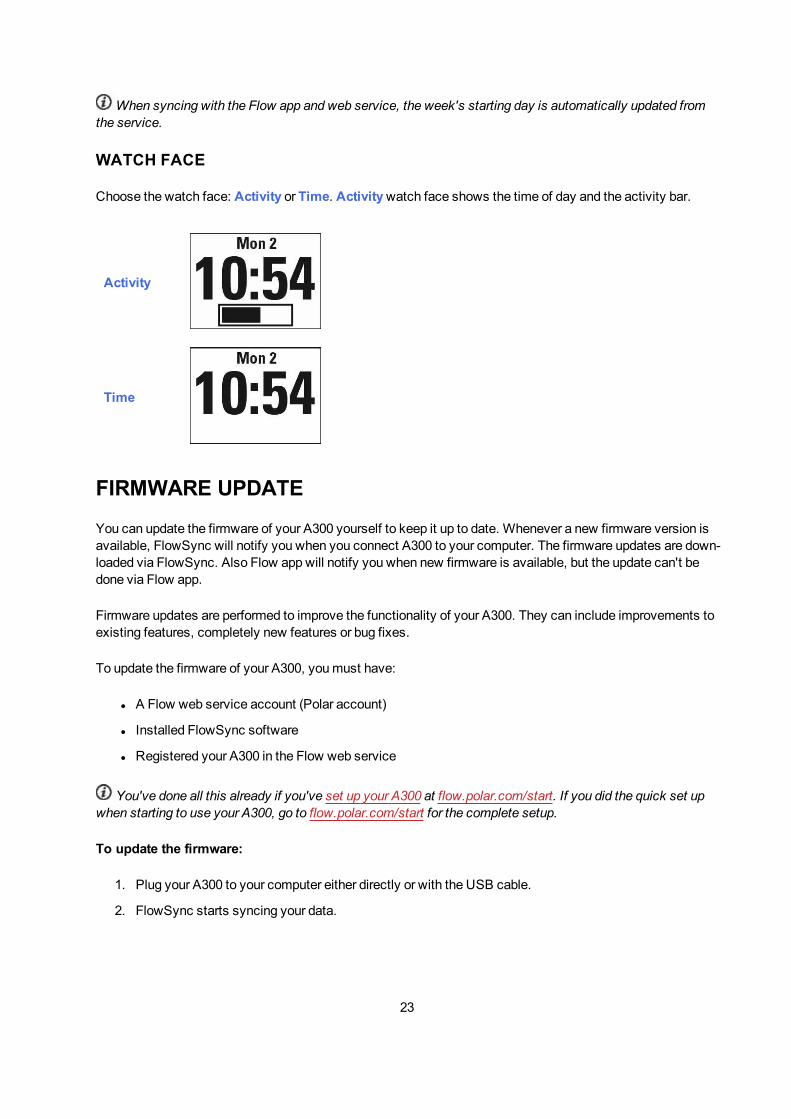
WATCH FACE
Choose the watch face: Activity or Time. Activitywatch face shows the time of day and the activity bar.
Activity
Time
FIRMWARE UPDATE
You can update the firmware of your A300 yourself to keep it up to date. Whenever a new firmware version isavailable, FlowSync will notify you when you connect A300 to your computer. The firmware updates are down-loaded via FlowSync. Also Flow app will notify you when new firmware is available, but the update can't bedone via Flow app.
Firmware updates are performed to improve the functionality of your A300. They can include improvements toexisting features, completely new features or bug fixes.
To update the firmware of your A300, youmust have:
l A Flow web service account (Polar account)
l Installed FlowSync software
l Registered your A300 in the Flow web service
You've done all this already if you've set up your A300 at flow.polar.com/start. If you did the quick set upwhen starting to use your A300, go to flow.polar.com/start for the complete setup.
To update the firmware:
1. Plug your A300 to your computer either directly or with the USB cable.
2. FlowSync starts syncing your data.

24
3. After syncing, you are asked to update the firmware.
4. ChooseYes. New firmware is installed (this may take some time), and A300 restarts.
Youwon't lose any data due to the firmware update: Before the update begins, the data from your A300 issynced to the Flow web service.
RESET A300
Like any electronic device, A300 is recommended to be restarted every now and then. If you experience prob-lems with your A300, try resetting it. Reset your A300 by pressing and holding theUP, DOWN, BACK andLIGHT buttons simultaneously for a couple of seconds until the Polar animation is shown on the display. Thisis called a soft reset, and it will not erase your data.
25
TRAININGWEAR HEART RATE SENSOR
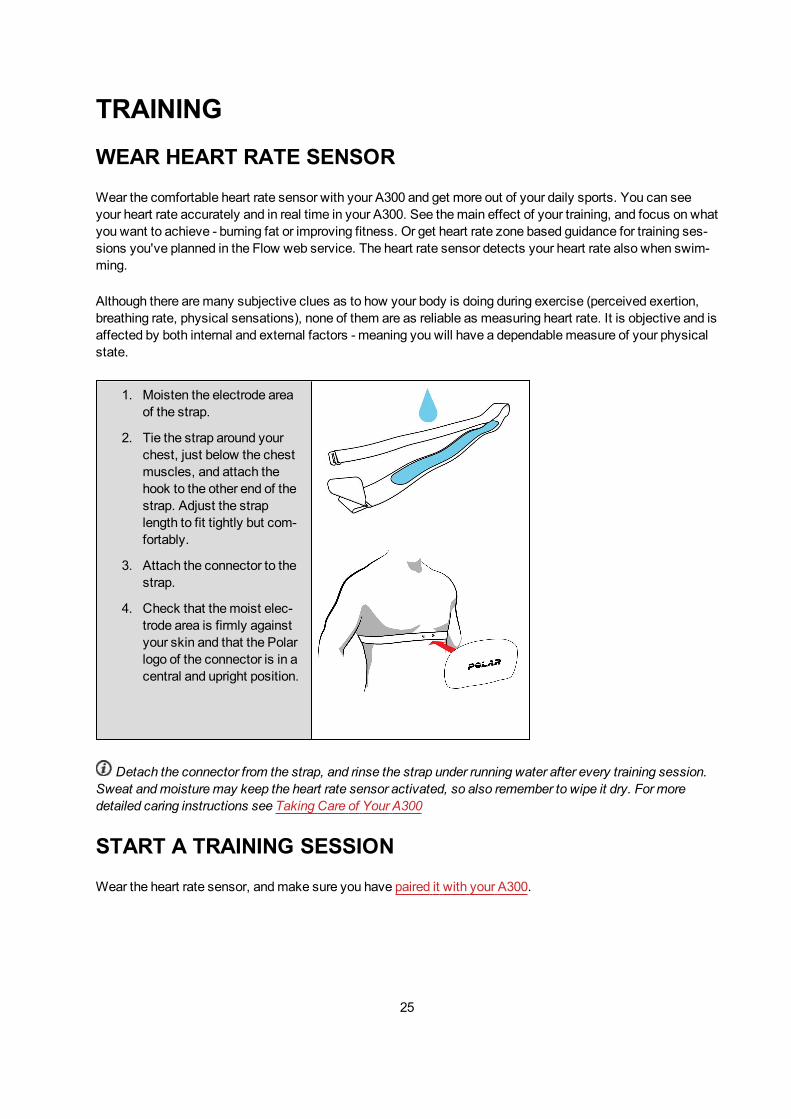
Wear the comfortable heart rate sensor with your A300 and get more out of your daily sports. You can seeyour heart rate accurately and in real time in your A300. See themain effect of your training, and focus on whatyou want to achieve - burning fat or improving fitness. Or get heart rate zone based guidance for training ses-sions you've planned in the Flow web service. The heart rate sensor detects your heart rate also when swim-ming.
Although there aremany subjective clues as to how your body is doing during exercise (perceived exertion,breathing rate, physical sensations), none of them are as reliable as measuring heart rate. It is objective and isaffected by both internal and external factors - meaning you will have a dependablemeasure of your physicalstate.
1. Moisten the electrode areaof the strap.
2. Tie the strap around yourchest, just below the chestmuscles, and attach thehook to the other end of thestrap. Adjust the straplength to fit tightly but com-fortably.
3. Attach the connector to thestrap.
4. Check that themoist elec-trode area is firmly againstyour skin and that the Polarlogo of the connector is in acentral and upright position.
Detach the connector from the strap, and rinse the strap under running water after every training session.Sweat andmoisturemay keep the heart rate sensor activated, so also remember to wipe it dry. For moredetailed caring instructions see Taking Care of Your A300
START A TRAINING SESSION
Wear the heart rate sensor, andmake sure you have paired it with your A300.
26
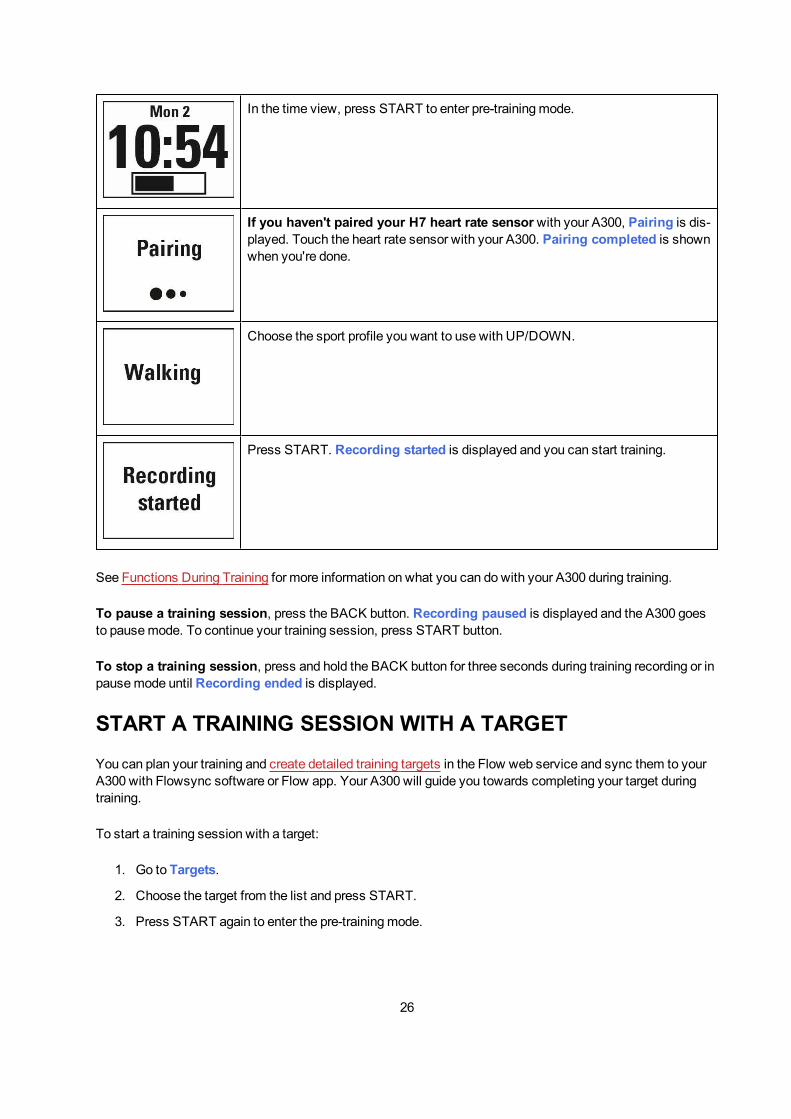
In the time view, press START to enter pre-trainingmode.
If you haven't paired your H7 heart rate sensorwith your A300, Pairing is dis-played. Touch the heart rate sensor with your A300. Pairing completed is shownwhen you're done.
Choose the sport profile you want to use with UP/DOWN.
Press START. Recording started is displayed and you can start training.
See Functions During Training for more information on what you can do with your A300 during training.
To pause a training session, press the BACK button. Recording paused is displayed and the A300 goesto pausemode. To continue your training session, press START button.
To stop a training session, press and hold the BACK button for three seconds during training recording or inpausemode until Recording ended is displayed.
START A TRAINING SESSION WITH A TARGET
You can plan your training and create detailed training targets in the Flow web service and sync them to yourA300 with Flowsync software or Flow app. Your A300 will guide you towards completing your target duringtraining.
To start a training session with a target:
1. Go to Targets.
2. Choose the target from the list and press START.
3. Press START again to enter the pre-trainingmode.
27
4. Choose the sport you want to use and press START.
5. Recording started is displayed and you can start training.OR
1. In the time view, press START to enter pre-trainingmode.
2. If you have training targets for today, your A300 asks whether you want to start the training target ornot. ChooseYes.
3. Choose the sport you want to use and press START.
4. Recording started is displayed and you can start training.
DURING TRAININGTRAINING VIEWS
You can browse through training views with UP/DOWN. You can see the available training views below.
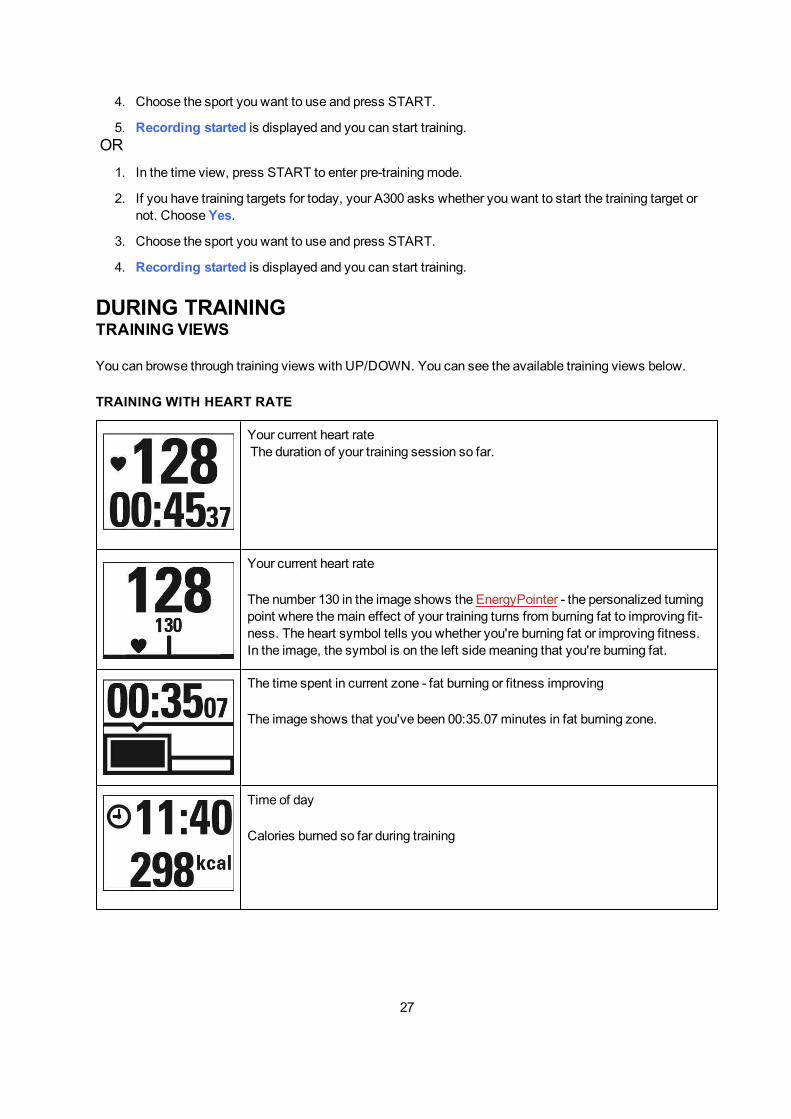
TRAINING WITH HEART RATE
Your current heart rateThe duration of your training session so far.
Your current heart rate
The number 130 in the image shows the EnergyPointer - the personalized turningpoint where themain effect of your training turns from burning fat to improving fit-ness. The heart symbol tells you whether you're burning fat or improving fitness.In the image, the symbol is on the left sidemeaning that you're burning fat.
The time spent in current zone - fat burning or fitness improving
The image shows that you've been 00:35.07minutes in fat burning zone.
Time of day
Calories burned so far during training

28
TRAINING WITHOUT HEART RATE
The duration of the training session so far.
Time of day
Calories burned so far
TRAINING WITH A DURATION OR CALORIE BASED TRAINING TARGET
If you have created a training target based on duration or calories in the Flow web service and synced it to yourA300, you have the following views:
OR
If you've created a target based on calories, you can see how much of your targetyou've completed both in calories and as a percentage.
If you've created a target based on time, you can see how much of your targetyou've completed both in time and as a percentage.
Your current heart rate
The duration of your training session so far

29
Your current heart rate.
The heart symbol shows in which heart rate zone you are.
Time spent in the heart rate zone you are currently in
Time of day
Calories burned so far during training
30
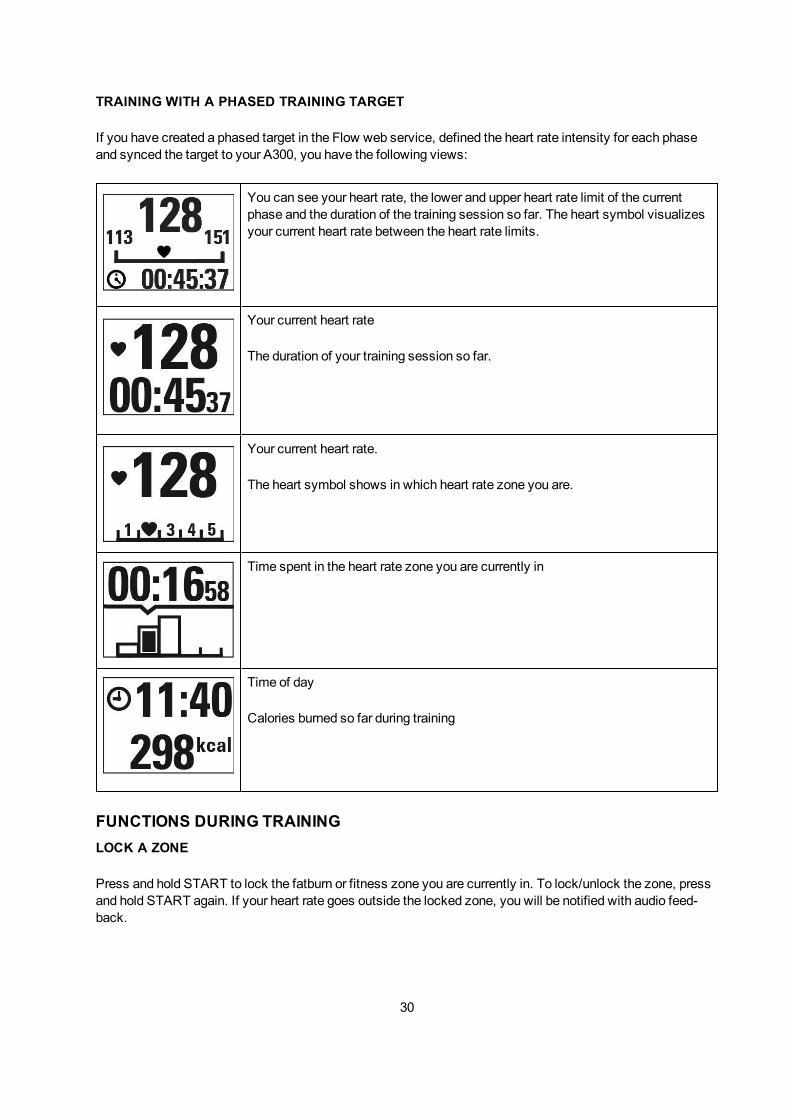
TRAINING WITH A PHASED TRAINING TARGET
If you have created a phased target in the Flow web service, defined the heart rate intensity for each phaseand synced the target to your A300, you have the following views:
You can see your heart rate, the lower and upper heart rate limit of the currentphase and the duration of the training session so far. The heart symbol visualizesyour current heart rate between the heart rate limits.
Your current heart rate
The duration of your training session so far.
Your current heart rate.
The heart symbol shows in which heart rate zone you are.
Time spent in the heart rate zone you are currently in
Time of day
Calories burned so far during training
FUNCTIONS DURING TRAININGLOCK A ZONE
Press and hold START to lock the fatburn or fitness zone you are currently in. To lock/unlock the zone, pressand hold START again. If your heart rate goes outside the locked zone, you will be notified with audio feed-back.

31
You can't lock zones during a heart rate guided phased training session you've created in the Flow web ser-vice and started in your A300. If you have set the upper and lower heart rate limits for each phase, your A300will notify if you are outside the limits.
SEE THE TIME OF DAY
Bring your A300 close to your heart rate sensor to see the time of day during training. This function is calledHeartTouch. HeartTouch works with Polar heart rate sensors using GymLink technology, for example PolarH7.
ACTIVATE BACKLIGHT
Press the LIGHT button to activate backlight during training. The backlight stays on for a couple of secondsand turns off automatically.
NIGHT MODE FUNCTION
Your A300 has a night mode function. If you press the LIGHT button once during pre-trainingmode, trainingrecordingmode or pausemode, the backlight will be activated every time you press any of the buttons duringthe training session. The display will also light up if a message is displayed. Night mode will be switched offwhen you finish the training recording.
PAUSE/STOP A TRAINING SESSION1. To pause a training session, press the BACK button. Recording paused is dis-played. To continue your training session, press START.
2. To stop a training session, press and hold the BACK button for three secondsduring training recording or in pausemode until Recording ended is displayed.
If you stop your session after pausing, the time elapsed after pausing is not included in the total trainingtime.
TRAINING SUMMARYAFTER TRAINING
You'll get a summary of your training session on your A300 right after you've stopped training. Get amoredetailed and illustrated analysis in the Flow app or in the Flow web service.
32
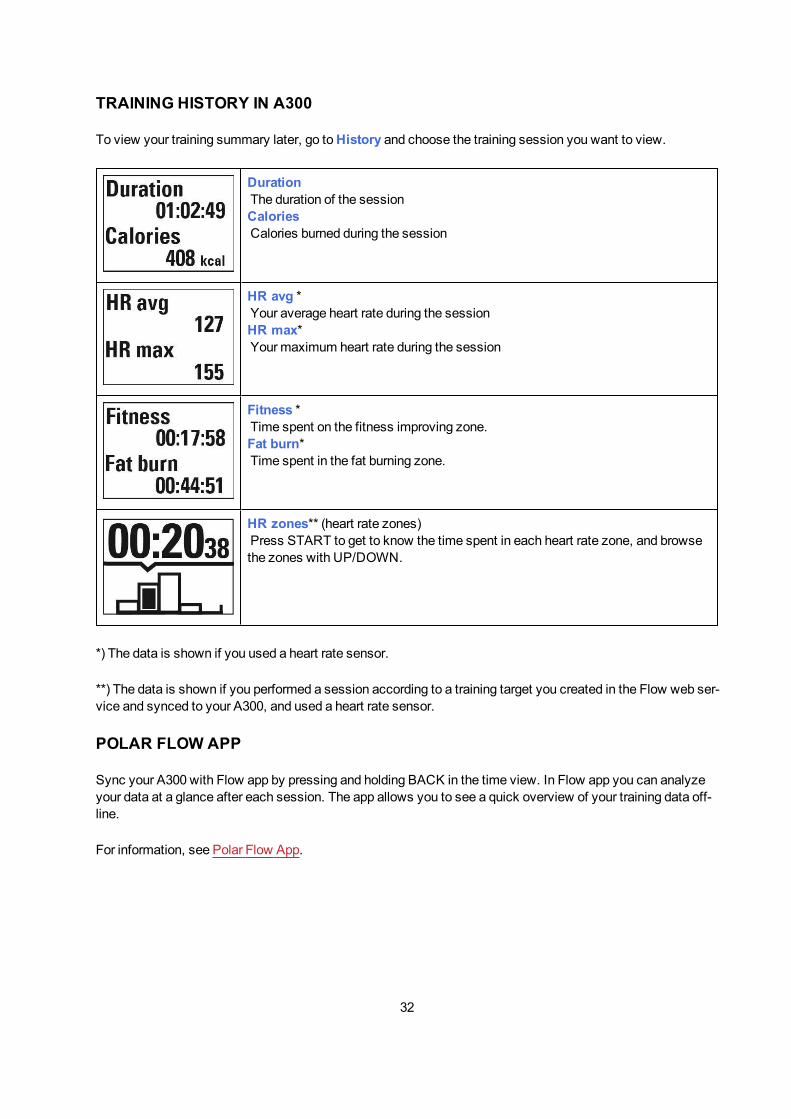
TRAINING HISTORY IN A300
To view your training summary later, go toHistory and choose the training session you want to view.
DurationThe duration of the sessionCaloriesCalories burned during the session
HR avg *Your average heart rate during the sessionHR max*Your maximum heart rate during the session
Fitness *Time spent on the fitness improving zone.Fat burn*Time spent in the fat burning zone.
HR zones** (heart rate zones)Press START to get to know the time spent in each heart rate zone, and browsethe zones with UP/DOWN.
*) The data is shown if you used a heart rate sensor.
**) The data is shown if you performed a session according to a training target you created in the Flow web ser-vice and synced to your A300, and used a heart rate sensor.
POLAR FLOW APP
Sync your A300 with Flow app by pressing and holding BACK in the time view. In Flow app you can analyzeyour data at a glance after each session. The app allows you to see a quick overview of your training data off-line.
For information, see Polar Flow App.

33
POLAR FLOWWEB SERVICE
The Polar Flow web service allows you to analyze every detail of your training and learnmore about your per-formance. Follow your progress and also share your best sessions with others.
For more information, see Polar Flow Web Service.
34
FEATURES
24/7 ACTIVITY TRACKING
A300 tracks your activity with an internal 3D accelerometer that records your wrist movements. It analyzesthe frequency, intensity and regularity of your movements together with your physical information, allowingyou to see how active you really are in your everyday life, on top of your regular training.
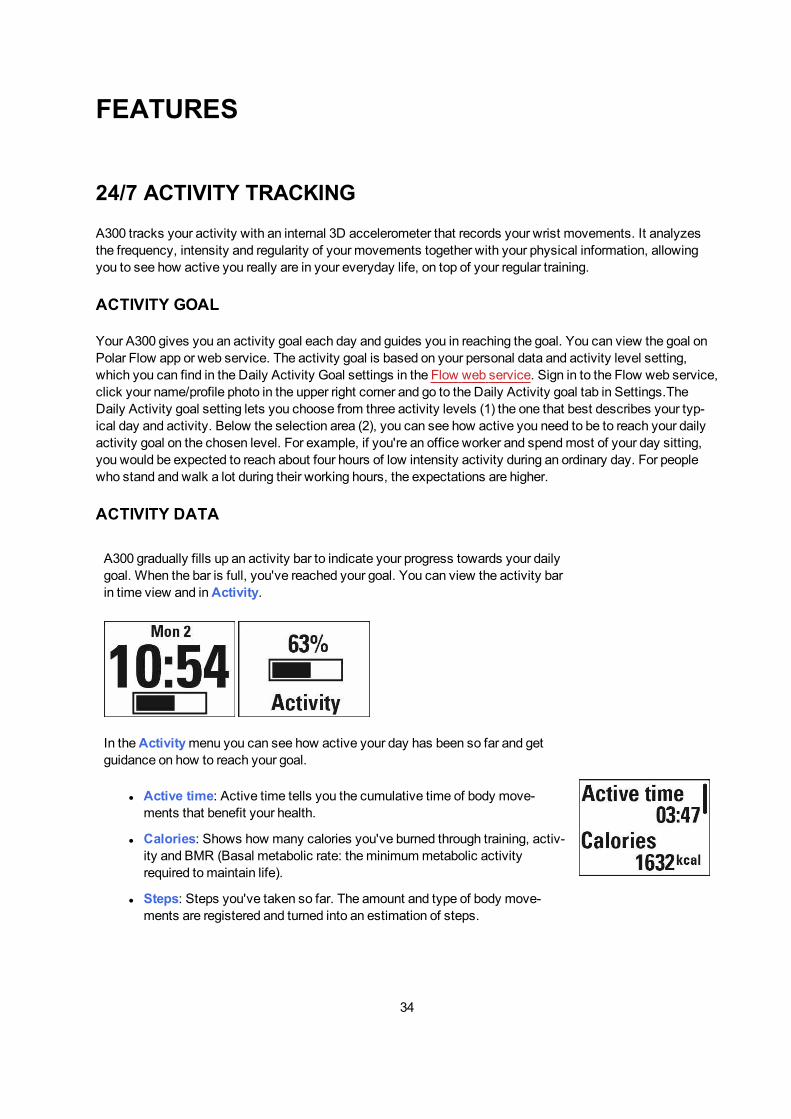
ACTIVITY GOAL
Your A300 gives you an activity goal each day and guides you in reaching the goal. You can view the goal onPolar Flow app or web service. The activity goal is based on your personal data and activity level setting,which you can find in the Daily Activity Goal settings in the Flow web service. Sign in to the Flow web service,click your name/profile photo in the upper right corner and go to the Daily Activity goal tab in Settings.TheDaily Activity goal setting lets you choose from three activity levels (1) the one that best describes your typ-ical day and activity. Below the selection area (2), you can see how active you need to be to reach your dailyactivity goal on the chosen level. For example, if you're an office worker and spendmost of your day sitting,you would be expected to reach about four hours of low intensity activity during an ordinary day. For peoplewho stand and walk a lot during their working hours, the expectations are higher.
ACTIVITY DATA
A300 gradually fills up an activity bar to indicate your progress towards your dailygoal. When the bar is full, you've reached your goal. You can view the activity barin time view and inActivity.
In theActivitymenu you can see how active your day has been so far and getguidance on how to reach your goal.
l Active time: Active time tells you the cumulative time of body move-ments that benefit your health.
l Calories: Shows how many calories you've burned through training, activ-ity and BMR (Basal metabolic rate: theminimummetabolic activityrequired tomaintain life).
l Steps: Steps you've taken so far. The amount and type of body move-ments are registered and turned into an estimation of steps.

35
l Distance: Distance you've covered so far. The distance calculation isbased on your height and the steps you've taken.
l To go: Your A300 gives you options for reaching your daily activity goal. Ittells you how much longer you need to be active if you choose low,medium or high intensity activities. You have one goal, but a number ofways to achieve it. The daily activity goal can be reached at low, mediumor high intensities. In the A300, 'up' means low intensity, 'walking' meansmedium intensity, and 'jogging' means high intensity. You can findmoreexamples for low, medium and high intensity activities at the Flow web ser-vice andmobile app and choose the best way of reaching your goal.
INACTIVITY ALERT
It's widely known that physical activity is amajor factor in maintaining health. In addition to being physicallyactive, it's important to avoid prolonged sitting. Sitting for long periods of time is bad for your health, even onthose days when you train and gain enough daily activity. Your A300 spots if you’re being inactive for too longduring your day and this way helps you to break up your sitting to avoid the negative effects it has on yourhealth.
If you’ve been still for almost an hour, you'll get an inactivity alert - It's time to move is shown. Stand up andfind your ownway to be active. Take a short walk, stretch, or do some other light activity. Themessage goesaway when you start moving or press any button. If you don't get active in fiveminutes, you'll get an inactivitystamp, which you can see on the Flow app and Flow web service after syncing.
You can set the alert on or off inSettings > General Settings > Inactivity alert.
The Flow app gives the same notification if it has a Bluetooth connection to your A300.
Both Flow app and Flow web service will show you how many inactivity stamps you have received. This wayyou can check back on your daily routine andmake changes towards amore active life.
SLEEP INFORMATION AT FLOWWEB SERVICE AND FLOW APP
A300 will track your sleep time and quality (restful / restless), if you wear it at night. You don't have to turn thesleepmode on, the device automatically detects from your wrist movements that you're sleeping. Sleep time,and its quality (restful / restless) is shown at the Flow web service and Flow app after A300 is synced.
Your sleep time is the longest continuous rest time that takes place within 24 hours starting from 18:00/6pm tonext day’s 18:00/6pm. Breaks shorter than one hour in your sleep don't stop sleep tracking, but they are nottaken into account in the sleep time. Breaks longer than 1 hour stop sleep time tracking.
The periods when you sleep peacefully and don’t move a lot are calculated as restful sleep. The periods whenyoumove and change your position are calculated as restless sleep. Instead of simply summing up all the
36
immobile periods, the calculation gives more weight to long than short immobile periods. The percentage ofrestful sleep compares the time you slept restfully with the total sleeping time. Restful sleep is highly indi-vidual and should be interpreted together with sleep time.
Knowing the amount of restful and restless sleep gives you a look into how you sleep at night and if it’saffected by any changes in your daily life. This may help you in finding ways to improve your sleep and feelwell rested during the day.
ACTIVITY DATA IN FLOW APP AND FLOWWEB SERVICE
With the Flow app you can follow and analyze your activity data on the go and have your data synced wire-lessly from your A300 to the Flow web service. The Flow web service gives you themost detailed insight intoyour activity information.
SPORT PROFILES
Wehave created eight default sport profiles to your A300. In the Flow web service you can add new sport pro-files and sync them to your A300, and this way create a list of all your favorite sports. You can also definesome specific settings for each sport profile. For example, set training sounds off in yoga sport profile. Formore information, see Sport Profile Settings and Sport Profiles in Flow Web Service.
Using sport profiles makes it possible for you to keep up with what you've done and see the progress you'vemade in different sports. You can do this in the Flow web service.
SMART COACHING FEATURES
Whether it’s assessing your day-to-day fitness levels, creating individual training plans, working out at theright intensity or receiving instant feedback, Smart Coaching offers a choice of unique, easy-to-use features,personalized to your needs and designed for maximum enjoyment andmotivation when training.
A300 includes the following Smart Coaching features:
l Smart calories
l EnergyPointer
l Heart rate zones
l Fitness Test
l Training Benefit
SMART CALORIES
Themost accurate calorie counter on themarket calculates the number of calories burned. The energyexpenditure calculation is based on:
37
l Body weight, height, age, gender
l Individual maximum heart rate (HRmax)
l Heart rate during training
l Activity measurement outside of training sessions and when you train without heart rate
l Individual maximal oxygen uptake (VO2max)VO2max tells about your aerobic fitness. You can find out your estimated VO2max with the Polar Fit-ness Test.
ENERGY POINTER
The EnergyPointer isn't available for training sessions that were created as training targets in Flow webservice.
The EnergyPointer is a simple feature that visually shows you what themain effect of your training is - fat burn-ing or improving fitness. It helps you focus on what you want to achieve.
Your A300 automatically calculates a personalized turning point where themain effect of your training turnsfrom fat burning to fitness improving. This point is called EnergyPointer. The average EnergyPointer value cor-responds to 69% of your maximum heart rate. However, it is normal that EnergyPointer value varies as yourdaily physical andmental condition varies. Your A300 detects your body's daily state from your heart rate andheart rate variability and, if necessary, adjusts the EnergyPointer accordingly. For example, if your body isrecovered from previous training session and you're not tired or stressed, then you are prepared for moreintensive training and the Energy Pointer value changes. The highest possible value of EnergyPointer is 80%of your maximum heart rate.
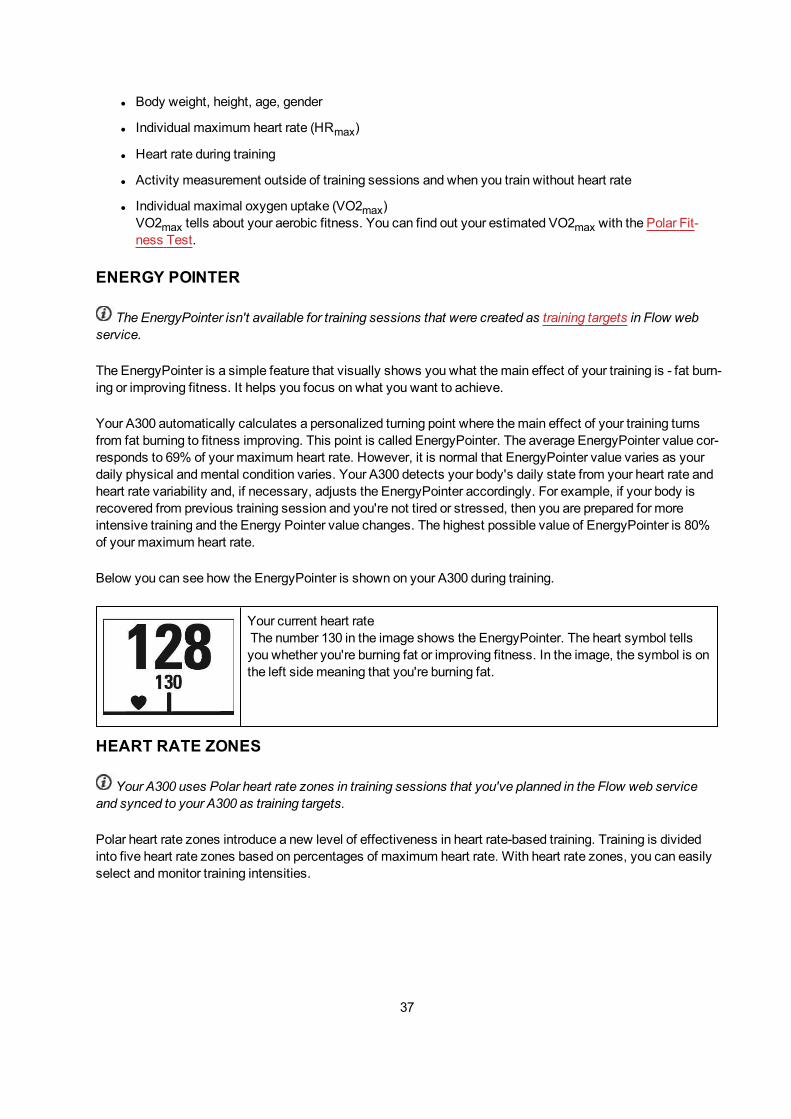
Below you can see how the EnergyPointer is shown on your A300 during training.
Your current heart rateThe number 130 in the image shows the EnergyPointer. The heart symbol tellsyou whether you're burning fat or improving fitness. In the image, the symbol is onthe left sidemeaning that you're burning fat.
HEART RATE ZONES
Your A300 uses Polar heart rate zones in training sessions that you've planned in the Flow web serviceand synced to your A300 as training targets.
Polar heart rate zones introduce a new level of effectiveness in heart rate-based training. Training is dividedinto five heart rate zones based on percentages of maximum heart rate. With heart rate zones, you can easilyselect andmonitor training intensities.

38
Target zone Intensity % ofHRmax
HRmax = Max-imum heart rate(220-age).
Example: Heartrate zones (inbeats per minute)for a 30-years-oldperson, whosemaximum heartrate is 190 bpm(220–30).
Example dur-ations
Training effect
MAXIMUM 90–100% 171–190 bpm less than 5minutes
Benefits: Max-imal or nearmaximal effortfor breathingandmuscles.
Feels like:Very exhaust-ing for breath-ing andmuscles.
Recommendedfor: Very exper-ienced and fitathletes. Shortintervals only,usually in finalpreparation forshort events.
HARD 80–90% 152–172 bpm 2–10minutes Benefits:Increased abil-ity to sustainhigh speedendurance.
Feels like:Causes mus-cular fatigueand heavybreathing.
Recommendedfor: Exper-ienced athletesfor year-roundtraining, and forvarious dur-ations.

39
Target zone Intensity % ofHRmax
HRmax = Max-imum heart rate(220-age).
Example: Heartrate zones (inbeats per minute)for a 30-years-oldperson, whosemaximum heartrate is 190 bpm(220–30).
Example dur-ations
Training effect
Becomes moreimportant dur-ing pre com-petitionseason.
MODERATE 70–80% 133–152 bpm 10–40minutes Benefits:Enhances gen-eral trainingpace, makesmoderateintensityefforts easierand improvesefficiency.
Feels like:Steady, con-trolled, fastbreathing.
Recommendedfor: Athletestraining forevents, or look-ing for per-formancegains.
LIGHT 60–70% 114-133 bpm 40–80minutes Benefits:Improves gen-eral base fit-ness, improvesrecovery andboosts meta-bolism.
Feels like:Comfortableand easy, low

40
Target zone Intensity % ofHRmax
HRmax = Max-imum heart rate(220-age).
Example: Heartrate zones (inbeats per minute)for a 30-years-oldperson, whosemaximum heartrate is 190 bpm(220–30).
Example dur-ations
Training effect
muscle and car-diovascularload.
Recommendedfor: Everybodyfor long trainingsessions dur-ing base train-ing periods andfor recoveryexercises dur-ing competitionseason.
VERY LIGHT 50–60% 104–114 bpm 20–40minutes Benefits:Helps to warmup and cooldown andassists recov-ery.
Feels like:Very easy,little strain.
Recommendedfor: For recov-ery and cool-down, through-out training sea-son.
Training in heart rate zone 1 is done at a very low intensity. Themain training principle is that performanceimproves when recovering after, and not only during training. Accelerate the recovery process with very lightintensity training.
Training in heart rate zone 2 is for endurance training, an essential part of any training program. Training ses-sions in this zone are easy and aerobic. Long-duration training in this light zone results in effective energyexpenditure. Progress will require persistence.

41
Aerobic power is enhanced in heart rate zone 3. The training intensity is higher than in sport zones 1 and 2, butstill mainly aerobic. Training in sport zone 3may, for example, consist of intervals followed by recovery. Train-ing in this zone is especially effective for improving the efficiency of blood circulation in the heart and skeletalmuscles.
If your goal is to compete at top potential, you will have to train in heart rate zones 4 and 5. In these zones, youexercise anaerobically in intervals of up to 10minutes. The shorter the interval, the higher the intensity. Suf-ficient recovery between intervals is very important. The training pattern in zones 4 and 5 is designed to pro-duce peak performance.
The Polar target heart rate zones can be personalized by using a laboratory measured HRmax value, or by tak-ing a field test to measure the value yourself. When training in a target heart rate zone, try to make use of theentire zone. Themid-zone is a good target, but keeping your heart rate at that exact level all the time is notnecessary. Heart rate gradually adjusts to training intensity. For instance, when crossing from heart rate tar-get zone 1 to 3, the circulatory system and heart rate will adjust in 3-5minutes.
Heart rate responds to training intensity depending on factors such as fitness and recovery levels, as well asenvironmental factors. It is important to look out for subjective feelings of fatigue, and to adjust your trainingprogram accordingly.
FITNESS TEST
The Polar Fitness Test is an easy, safe and quick way to estimate your aerobic (cardiovascular) fitness atrest. The result, Polar OwnIndex, is comparable tomaximal oxygen uptake (VO2max), which is commonlyused to evaluate aerobic fitness. Your long-term training background, heart rate, heart rate variability at rest,gender, age, height, and body weight all influenceOwnIndex. The Polar Fitness Test is developed for use byhealthy adults.
Aerobic fitness relates to how well your cardiovascular system works to transport oxygen to your body. Thebetter your aerobic fitness, the stronger andmore efficient your heart is. Good aerobic fitness has many healthbenefits. For example, it helps in decreasing the risk of high blood pressure and your risk of cardiovascular dis-eases and stroke. If you want to improve your aerobic fitness it takes, on average, six weeks of regular train-ing to see a noticeable change in your OwnIndex. Less fit individuals see progress evenmore rapidly. Thebetter your aerobic fitness, the smaller the improvements in your OwnIndex.
Aerobic fitness is best improved by training types that use largemuscle groups. Such activities include run-ning, cycling, walking, rowing, swimming, skating, and cross-country skiing. Tomonitor your progress, startby measuring your OwnIndex a couple of times during the first two weeks in order to get a baseline value, andthen repeat the test approximately once amonth.
Tomake sure the test results are reliable, the following basic requirements apply:
l You can perform the test anywhere - at home, at the office, at a health club - provided the testing envir-onment is peaceful. There should be no disturbing noises (e.g. television, radio, or telephone) and noother people talking to you.
l Always take the test in the same environment and at the same hour.
l Avoid eating a heavy meal or smoking 2-3 hours prior to testing.

42
l Avoid heavy physical exertion, alcohol, and pharmaceutical stimulants on the test day and the pre-vious day.
l You should be relaxed and calm. Lie down and relax for 1-3minutes before starting the test.
BEFORE THE TEST
Note that you can do the test only if you have set up your A300 at flow.polar.com/start.
The Fitness Test works only with compatible Polar heart rate sensors. The Fitness Test is a Polar pro-prietary smart coaching feature and requires accurate heart rate variability measurement. This is why youneed a Polar heart rate sensor.
Wear your heart rate sensor. For more information, seeWear Heart Rate Sensor.
Before starting the test, make sure your physical settings including training background are accurate in theFlow web service.
PERFORMING THE TEST
1. Go to Fitness test > Start test. Your A300 starts searching for your heart rate. Heart rate found andLie down and relax is shown on the display and the test starts.
2. Lie down, stay relaxed and limit body movements and communication with other people. The bar onyour A300's display fills up as the test progresses.
3. After the test Test completed is shown and you'll get your test result.
4. Press DOWN to see your estimated VO2max. Press START and select Yes to update your VO2maxvalue, which is shown in Polar Flow web service.
You can interrupt the test in any phase by pressing BACK. Test canceled is displayed.
Troubleshooting:
l Touch sensor with A300 is displayed, if A300 can't identify your heart rate sensor. Touch the sensorwith your A300 to identify and pair the sensor.
l Couldn't find heart rate is displayed, if A300 can't find your heart rate. Check that the heart ratesensor electrodes are wet and that the textile strap fits snugly.
l You need a Polar HR sensor is displayed, if A300 can't find a Polar heart rate sensor.
TEST RESULTS
Your latest test result is shown in Fitness test > Test results. You can see the results also in your TrainingDiary in Flow app.

43
For a visual analysis of your Fitness test results, go to the Flow web service and open the test from your Diaryto view the details of the tests you've performed.

44
Fitness Level Classes
Men
Age / Years Very low Low Fair Moderate Good Very good Elite
20-24 < 32 32-37 38-43 44-50 51-56 57-62 > 62
25-29 < 31 31-35 36-42 43-48 49-53 54-59 > 59
30-34 < 29 29-34 35-40 41-45 46-51 52-56 > 56
35-39 < 28 28-32 33-38 39-43 44-48 49-54 > 54
40-44 < 26 26-31 32-35 36-41 42-46 47-51 > 51
45-49 < 25 25-29 30-34 35-39 40-43 44-48 > 48
50-54 < 24 24-27 28-32 33-36 37-41 42-46 > 46
55-59 < 22 22-26 27-30 31-34 35-39 40-43 > 43
60-65 < 21 21-24 25-28 29-32 33-36 37-40 > 40
Women
Age / Years Very low Low Fair Moderate Good Very good Elite
20-24 < 27 27-31 32-36 37-41 42-46 47-51 > 51
25-29 < 26 26-30 31-35 36-40 41-44 45-49 > 49
30-34 < 25 25-29 30-33 34-37 38-42 43-46 > 46
35-39 < 24 24-27 28-31 32-35 36-40 41-44 > 44
40-44 < 22 22-25 26-29 30-33 34-37 38-41 > 41
45-49 < 21 21-23 24-27 28-31 32-35 36-38 > 38
50-54 < 19 19-22 23-25 26-29 30-32 33-36 > 36
55-59 < 18 18-20 21-23 24-27 28-30 31-33 > 33
60-65 < 16 16-18 19-21 22-24 25-27 28-30 > 30
The classification is based on a literature review of 62 studies where VO2max was measured directly inhealthy adult subjects in the USA, Canada and 7 European countries. Reference: Shvartz E, Reibold RC. Aer-obic fitness norms for males and females aged 6 to 75 years: a review. Aviat Space EnvironMed; 61:3-11,1990.

45
VO2MAX
A clear link exists betweenmaximal oxygen consumption (VO2max) of the body and cardiorespiratory fitnessbecause oxygen delivery to tissues is dependent on lung and heart function. VO2max (maximal oxygenuptake, maximal aerobic power) is themaximal rate at which oxygen can be used by the body duringmaximalexercise; it is related directly to themaximal capacity of the heart to deliver blood to themuscles. VO2max canbemeasured or predicted by fitness tests (e.g. maximal exercise tests, submaximal exercise tests, Polar Fit-ness Test). VO2max is a good index of cardiorespiratory fitness and a good predictor of performance capabilityin endurance events such as distance running, cycling, cross-country skiing, and swimming.
VO2max can be expressed either as milliliters per minute (ml/min = ml ■ min-1) or this value can be divided bythe person’s body weight in kilograms (ml/kg/min = ml ■ kg-1■ min-1).
TRAINING BENEFIT
Training Benefit gives you textual feedback on your performance for each training session helping you betterunderstand the effectiveness of your training. You can see the feedback in Flow app and Flow web service.To get the feedback, you need to have trained at least a total of 10minutes in the heart rate zones. TrainingBenefit feedback is based on heart rate zones. It reads into how much time you spend and how many caloriesyou burn in each zone.
The descriptions of different training benefit options are listed in the table below
Feedback Benefit
Maximum training+ That was a hard session! You improved your sprint speed and thenervous system of your muscles, whichmake youmore efficient.This session also increased your resistance to fatigue.
Maximum training That was a hard session! You improved your sprint speed and thenervous system of your muscles, whichmake youmore efficient.
Maximum & Tempo training What a session! You improved your speed and efficiency. Thissession also significantly developed your aerobic fitness and yourability to sustain high intensity effort for longer.
Tempo & Maximum training What a session! You significantly improved your aerobic fitnessand your ability to sustain high intensity effort for longer. This ses-sion also developed your speed and efficiency.
Tempo training+ Great pace in a long session! You improved your aerobic fitness,speed, and ability to sustain high intensity effort for longer. Thissession also increased your resistance to fatigue.
Tempo training Great pace! You improved your aerobic fitness, speed, and abilityto sustain high intensity effort for longer.
Tempo & Steady state training Good pace! You improved your ability to sustain high intensityeffort for longer. This session also developed your aerobic fitnessand the endurance of your muscles.
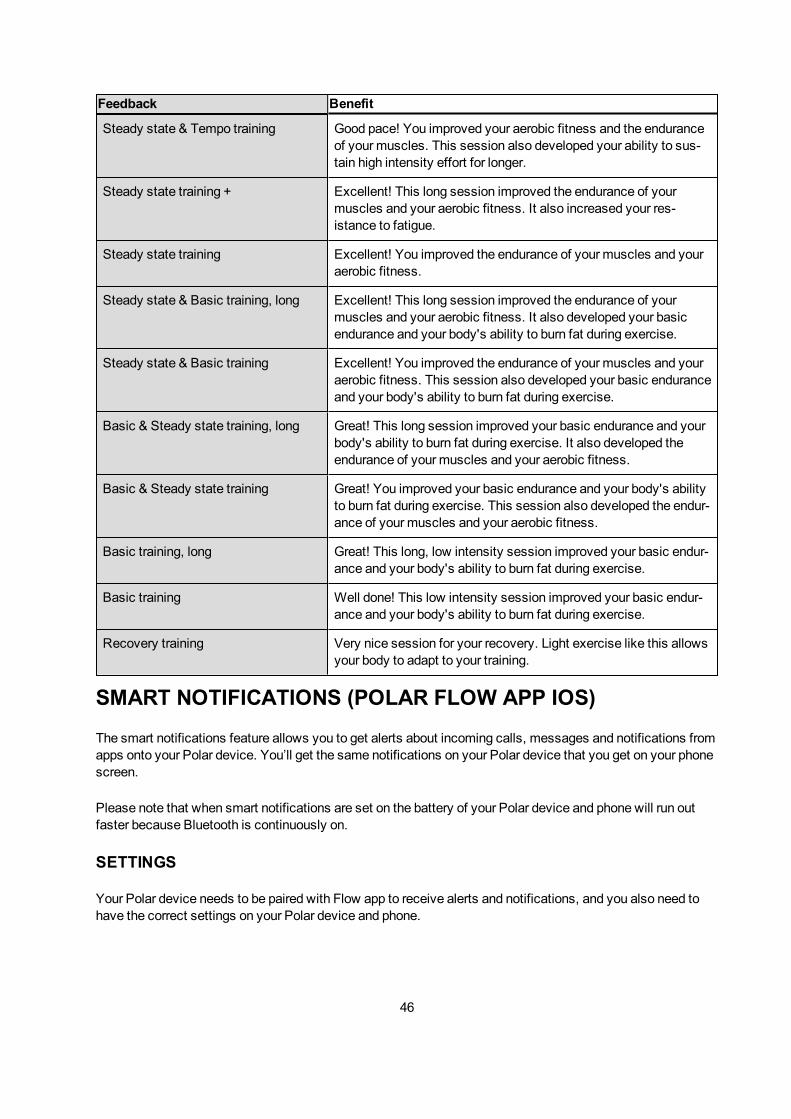
46
Feedback Benefit
Steady state & Tempo training Good pace! You improved your aerobic fitness and the enduranceof your muscles. This session also developed your ability to sus-tain high intensity effort for longer.
Steady state training + Excellent! This long session improved the endurance of yourmuscles and your aerobic fitness. It also increased your res-istance to fatigue.
Steady state training Excellent! You improved the endurance of your muscles and youraerobic fitness.
Steady state & Basic training, long Excellent! This long session improved the endurance of yourmuscles and your aerobic fitness. It also developed your basicendurance and your body's ability to burn fat during exercise.
Steady state & Basic training Excellent! You improved the endurance of your muscles and youraerobic fitness. This session also developed your basic enduranceand your body's ability to burn fat during exercise.
Basic & Steady state training, long Great! This long session improved your basic endurance and yourbody's ability to burn fat during exercise. It also developed theendurance of your muscles and your aerobic fitness.
Basic & Steady state training Great! You improved your basic endurance and your body's abilityto burn fat during exercise. This session also developed the endur-ance of your muscles and your aerobic fitness.
Basic training, long Great! This long, low intensity session improved your basic endur-ance and your body's ability to burn fat during exercise.
Basic training Well done! This low intensity session improved your basic endur-ance and your body's ability to burn fat during exercise.
Recovery training Very nice session for your recovery. Light exercise like this allowsyour body to adapt to your training.
SMART NOTIFICATIONS (POLAR FLOW APP IOS)
The smart notifications feature allows you to get alerts about incoming calls, messages and notifications fromapps onto your Polar device. You’ll get the same notifications on your Polar device that you get on your phonescreen.
Please note that when smart notifications are set on the battery of your Polar device and phone will run outfaster because Bluetooth is continuously on.
SETTINGS
Your Polar device needs to be paired with Flow app to receive alerts and notifications, and you also need tohave the correct settings on your Polar device and phone.

47
After updating the firmware of your Polar device, you need to pair it with Flow app again in order for the smartnotifications settings to appear. If you do not pair them again, the setting will not become visible.
A300
Please note that the Smart notifications feature doesn’t support Chinese and Japanese languages.
Notifications are off by default. Set them on inMenu > Settings > General settings > Smart notif. ChooseOn to receive notifications, and have the contents of the notifications shown the display. ChooseOn (no pre-view) if you don’t want to see the contents of the notifications on the display. You’ll just be informed thatyou’ve received a notification.
Sync your A300 with themobile app by pressing and holding the BACK button in time view.
PHONE
The notification settings on your phone determine what notifications you receive on your Polar device. To editthe notification settings on your iOS phone:
1. Go toSettings > Notifications and choose the app.
2. Make sure that Allow Notifications is on and theALERT STYLE WHEN UNLOCKED is BannersorAlerts.
USE
When getting an alert, your Polar device will discreetly notify you by vibrating. When receiving a call, you canchoose to answer, silence or decline it (only with iOS 8 or later). Silencing just silences your Polar device, itwon’t silence your phone. If a notification arrives during a call alert, it will not be shown.
During a training session you can receive calls if you have Flow app running on your phone. You will notreceive any notifications (email, calendar, apps etc.) during training sessions.
DISMISS NOTIFICATIONS
Notifications can be dismissedmanually or by timeout. Manually dismissing the notification also dismisses itfrom your phone screen, but timeout just removes it from your Polar device, and it will still be visible on yourphone.
To dismiss notifications from the display:
l Manually: Press the BACK button.
l Timeout: The notification will disappear after 30 seconds if you do not dismiss it manually.

48
DO NOT DISTURB
If you want to disable notification alerts for certain hours of the day, set Do not disturb on in the Polar Flowmobile app. When it's on, you won't receive any notification alerts during the time period you've set. Do notdisturb is set on by default, and the time period is 10 pm – 7 am. Change theDo not disturb setting as fol-lows:
1. Open the Polar Flow mobile app.
2. Go toMore > Devices.
3. UnderSmart notifications you can set Do not disturb on or off, and set the start and end time forDonot disturb.
Sync your A300 with themobile app by pressing and holding the BACK button of your A300.
SMART NOTIFICATIONS (POLAR FLOW APP ANDROID)
The smart notifications feature allows you to get alerts about incoming calls, messages and notifications fromapps onto your Polar device. You’ll get the same notifications on your Polar device that you get on your phonescreen. Please note that you can’t receive any notifications during training sessions.
l Make sure you have Android version 5.0 or newer on your phone.
l Make sure you have the latest firmware on your Polar device.
l To use the Smart Notifications feature you need to have the Polar Flow mobile app for Android, andyour Polar device needs to be paired with the app. For the Smart Notifications feature to work, PolarFlow appmust be running on your phone.
l Please note that when the Smart Notifications feature is on, the battery of your Polar device and phonewill run out faster because Bluetooth is continuously on.
We have verified the functionality with some of themost common phonemodels, like SamsungGalaxyS5, SamsungGalaxy S6, Nexus 5, LGG4, Sony Xperia Z3. Theremight be differences in the functionalitywith other phonemodels which support Android 5.0.
SETTINGS
Your Polar device needs to be paired with Flow app to receive alerts and notifications, and you also need tohave the correct settings on your Polar device and phone.
Notifications are off by default. They can be set on/off on your Polar device or the Polar Flow app. Whenmak-ing changes to the settings, we recommend you always make them on your Polar device.
A300
Please note that the Smart notifications feature doesn’t support Chinese and Japanese languages.
49
Notifications are off by default. Set them on inMenu > Settings > General settings > Smart notif. ChooseOn to receive notifications, and have the contents of the notifications shown the display. ChooseOn (no pre-view) if you don’t want to see the contents of the notifications on the display. You’ll just be informed thatyou’ve received a notification.
Sync your A300 with themobile app by pressing and holding the BACK button in the time view.
POLAR FLOW APP
Set the Smart Notifications feature on/off in the Polar Flow mobile app as follows.
1. Open the Polar Flow mobile app.
2. Sync your Polar device with themobile app by pressing and holding the BACK button of your Polardevice.
3. Open themenu from the top left corner and chooseDevices.
4. UnderSmart notifications chooseOn, On (no preview) orOff.
When you turn Smart notifications on, you will be guided to enable the notifications on your phone (i.e.give Polar Flow app an access to your phone notifications), if you haven’t enabled them. Enable noti-fications? is shown. TapEnable. Then choosePolar Flow and tapOK.
5. Sync your Polar device with themobile app by pressing and holding the BACK button of your Polardevice.
Whenever you change the notification settings on the Polar Flow mobile app, remember to sync your Polardevice with themobile app.
PHONE
To be able to receive notifications from your phone on your Polar device, you first need to enable notificationson themobile applications from which you want to receive them. You can do this either via themobile applic-ation’s settings or via your Android phone’s App notifications settings. See the user manual of your phone forfurther information on App notifications settings.
Then Polar Flow app has to have permission to read the notifications from your phone. You have to give PolarFlow app access to your phone notifications (i.e. enable notifications in the Polar Flow app). Polar Flow appguides you to give access when needed.
USE
When getting an alert, your Polar device will discreetly notify you by vibrating. A calendar event or messagealert once, while incoming calls alert until you press the BACK button on your Polar device, answer the phone,or after alerting for 30 seconds.

50
The caller’s name is shown on the display if you have the caller on your mobile phonebook and the name onlyincludes basic Latin characters and special characters of the following languages: French, Finnish, Swedish,German, Norwegian or Spanish.
In some cases when receiving a call, the answer option is missing from the display. This is becausesome Android phones do not have a notification action for answering a call. Please be aware that in cases likethis youmay not be notified about an incoming call at all.
DISMISS NOTIFICATIONS
Notifications can be dismissedmanually or by timeout. Manually dismissing the notification also dismisses itfrom your phone screen, but timeout just removes it from your Polar device, and it will still be visible on yourphone.
To dismiss notifications from the display:
l Manually: Press the BACK button
l Timeout: The notification will disappear after 30 seconds if you do not dismiss it manually
DO NOT DISTURB
If you want to disable notification alerts for certain hours of the day, set Do not disturb on in the Polar Flowmobile app. When it's on, you won't receive any notification alerts during the time period you've set. Do notdisturb is set on by default, and the time period is 10 pm – 7 am. Change theDo not disturb setting as fol-lows:
1. Open the Polar Flow mobile app.
2. Open themenu from the top left corner and chooseDevices.
3. UnderSmart notifications you can set Do not disturb on or off, and set the start and end time forDonot disturb.
Sync your A300 with themobile app by pressing and holding the BACK button of your A300.
BLOCK APPS
In Polar Flow app you can block notifications from certain apps. As soon as you’ve received the first noti-fication from an app to your Polar device, the app will be listed underBlock apps. To block an app, open themenu on the top left corner and chooseDevices > Block apps.
51
POLAR FLOWPOLAR FLOW APP
Polar Flow app allows you to see an instant visual interpretation of your activity and training data offlinewhenever you want.
Get details of your 24/7 activity. Find out what you're missing from your daily goal and how to reach it. Seesteps, covered distance, burned calories and sleep time. Get inactivity alerts when it's time to get up andmove.
Flow app lets you easily access your training targets and view fitness test results.Get a quick overview ofyour training and analyze every detail of your performance right away. See the weekly summaries of your train-ing in the training diary.
To start using the Flow app, download it from App Store or Google Play onto your mobile. For support andmore information about using Polar Flow app, go to www.polar.com/en/support/Flow_app. Before taking anew mobile device (smartphone, tablet) into use, it has to be paired with your A300. For more information, seePairing.
To see your training data in Flow app, youmust sync your A300 with it after your session. When you syncyour A300 with the Flow app, your activity and training data are also synced automatically via an internet con-nection to the Flow web service. Flow app is the easiest way to sync your training data from your A300 withthe web service. For information on syncing, see Syncing.
POLAR FLOW WEB SERVICE
The Polar Flow web service shows your activity goal and the details of your activity, and helps you under-stand how your daily habits and choices affect your well-being. Flow web service allows you to plan and ana-lyze every detail of your training and learnmore about your performance and progress. Set up and customizeyour A300 to perfectly fit your training needs by adding sport profiles and tailoring settings. You can also sharethe highlights of you training with your followers.
To start using the Flow web service set up your A300 at flow.polar.com/start. There you are guided to down-load and install the FlowSync software for syncing data between your A300 and the web service, and to cre-ate a user account for the web service. Also get the Flow app for your mobile for instant analysis and for easydata sync to the web service.
FEED
In Feed you can see what you and your friends have been up to lately. Check out the latest training sessionsand activity summaries, share your best achievements, comment and like your friends' activities.
52
EXPLORE
InExplore you can browse themap and see other users' shared training sessions with route information. Youcan also relive other people’s routes and see where the highlights happened.
DIARY
InDiary you can see your daily activity, planned training sessions (training targets), as well as review pasttraining results and fitness test results.
PROGRESS
InProgress you can follow your development with reports. Reports are a handy way to follow your progress intraining over longer periods. In week, month and year reports you can choose the sport for the report. In cus-tom period, you can choose both the period and the sport. Choose the time period and sport for report from thedrop-down lists, and press the wheel icon to choose what data you want to view in the report graph.
For support andmore information about using the Flow web service, go to, polar.com/en/support/flow.
PLAN YOUR TRAINING
Plan your training in the Flow web service by creating detailed training targets and syncing them to your A300with Flowsync or via Flow app. Your A300 will guide you towards completing your target during training. Notethat A300 uses heart rate zones in trainings planned in the Flow web service - EnergyPointer feature is notavailable.
l Quick Target: Choose a duration or calorie target for the training. You can, for example, choose to burn500 kcal, or train for 30minutes.
l Phased Target: You can split your training into phases and set a different duration and intensity foreach of them. This one is for e.g. creating an interval training session, and adding proper warm-up andcool-down phases to it.
l Favorites: Create a target, and add it to Favorites to easily access it every time you want to perform itagain.
CREATE A TRAINING TARGET
1. Go toDiary, and click Add > Training target.
2. In theAdd training target view, chooseQuick orPhased.
Quick Target
1. ChooseQuick
2. ChooseSport, enter Target name (maximum 45 digits), Date and Time and any Notes (optional) youwant to add.
3. Fill in either duration or calories. You can only fill in one of the values.
53
4. Click the favorite icon if you want to add the target to your Favorites.
5. Click Save to add the target to yourDiary.
Phased target
1. ChoosePhased
2. ChooseSport, enter Target name (maximum 45 digits), Date and Time and any Notes (optional) youwant to add.
3. Choose whether you want to create a new phased target (CREATE NEW) or use the template (USETEMPLATE).
4. Add phases to your target. Click DURATION to add a phase based on duration.Choose name and dur-ation for each phase, manual or automatic next phase start, and the intensity.
5. Click the favorite icon if you want to add the target to your Favorites.
6. Click Save to add the target to yourDiary.
Favorites
If you have created a target and added it to your favorites you can use it as a scheduled target.
1. Choose FAVORITE TARGETS. Your training target favorites are shown.
2. Click USE to select a favorite as a template for your target.
3. EnterDate and Time.
4. You can edit the target if you wish, or leave it as it is.
Editing the target in this view doesn’t affect the favorite target. If you want to edit the favorite target,go to FAVORITES by clicking the star-icon right next to your name and profile photo.
5. Click ADD TO DIARY to add the target to yourDiary.
SYNC THE TARGETS TO YOUR A300
Remember to sync the training targets to your A300 from the Flow web service via FlowSync orFlow App. If you don't sync them, they are only visible in your Flow web service Diary or Favorites list.
After syncing your training targets to your A300, you can find:
l scheduled trainings targets in Targetsmenu (unperformed trainings of the past 1 week and next 4weeks)
l training targets listed as favorites in Favorites.
For information on starting a training target session, see Start a training session.
54
FAVORITES
In Favorites, you can store andmanage your favorite training targets in the Flow web service. Your A300 canhave amaximum of 20 favorites at a time. If you have over 20 favorites in the Flow web service, the first 20 inthe list are transferred to your A300 when syncing. You can find them under the Favoritesmenu in your A300.
You can change the order of your favorites by dragging and dropping them in the web service. Choose thefavorite you want to move and drag it into the place you want to put it in the list.
Add a Training Target to Favorites:
1. Create a training target.
2. Click the favorites icon on the lower right corner of the page.
3. The target is added to your favorites
or
1. Open an existing target from yourDiary.
2. Click the favorites icon on the lower right corner of the page.
3. The target is added to your favorites.
Edit a Favorite
1. Click the favorites icon on the upper right corner next to your name. All your favorite training targetsare shown.
2. Choose the favorite you want to edit.
3. You can change the name of the target. Click SAVE.
4. To edit other details of the target click VIEW. After you've done all the needed changes, clickUPDATE CHANGES.
Remove a favorite
1. Click the favorites icon on the upper right corner next to your name. All your favorite training targetsare shown.
2. Click the delete icon in upper right corner of the training target to remove it from the favorites list.
SPORT PROFILES IN FLOWWEB SERVICE
There are eight sport profiles on your A300 by default. In the Flow web service you can add new sport profilesto your sports list, as well as edit them and existing profiles. Your A300 can contain amaximum of 20 sportprofiles. If you have over 20 sport profiles in the Flow web service, the first 20 in the list are transferred to yourA300 when syncing.
55
You can change the order of your sport profiles by dragging and dropping them. Choose the sport you want tomove and drag it into the place you want to put it in the list.
ADD A SPORT PROFILE
In the Flow web service:
1. Click your name/profile photo in the upper right corner.
2. ChooseSport Profiles.
3. Click ADD SPORT PROFILE, and choose the sport from the list.
4. The sport is added to your sport list.
EDIT A SPORT PROFILE
In the Flow web service:
1. Click your name/profile photo in the upper right corner.
2. ChooseSport Profiles.
3. Click EDIT under the sport you want to edit.
In each sport profile, you can edit the following information:
Basics
l Training sounds
Heart Rate
l Heart rate view
l Heart rate visible to other devices (Other compatible devices using Bluetooth ® Smart wireless tech-nology (e.g. gym equipment) can detect your heart rate.)
l Heart rate zone type of the training sessions you have created in the Flow web service and transferredto your A300.
When you're done with the sport profile settings, click SAVE. Remember to sync the settings to your A300.
SYNCING
You can transfer data from your A300 via the USB port with FlowSync software or wirelessly via BluetoothSmart® with the Flow app. To be able sync data between your A300 and the Flow web service and app, youneed to have a Polar account and FlowSync software. You already have created the account and downloadedthe software, if you have set up your A300 at flow.polar.com/start. If you did the quick set up when starting touse your A300, go to flow.polar.com/start for the complete setup. Download Flow app onto your mobile fromthe App Store.
56
Remember to sync and keep your data up-to-date between your A300, the web service and themobile appwherever you are.
SYNC WITH FLOW APP
Before syncingmake sure:
l You have a Polar account and Flow app
l You have synced data via FlowSync software at least once.
l Yourmobile device has Bluetooth turned on, and airplanemode/flight mode is not turned on.
l You have paired your A300 with your mobile. For more information, see Pairing.
There are two ways to sync your data:
1. Sign into Flow app and press and hold the BACK button on your A300.
2. Connecting to device is displayed, followed by Connecting to app.
3. Syncing completed is displayed when you're done.
or
1. Sign into Flow app, and on your A300 go toSettings > General settings > Pair and sync > Syncdata and press the START button.
2. Connecting to device is displayed, followed by Connecting to app.
3. Syncing completed is displayed when you are done.
When you sync your A300 with the Flow app, your activity and training data are also synced automaticallyvia an internet connection to the Flow web service.
For support andmore information about using Polar Flow app, go to www.polar.com/en/support/Flow_app
SYNC WITH FLOWWEB SERVICE VIA FLOWSYNC
To sync data with the Flow web service you need FlowSync software. Go to flow.polar.com/start, and down-load and install it before trying to sync.
1. Plug your A300 to your computer either directly or with the USB cable. Make sure FlowSync softwareis running.
2. The FlowSync window opens on your computer, and the syncing starts.
3. Completed is displayed when you are done.
Every time you plug in your A300 to your computer, the Polar FlowSync software will transfer your data to thePolar Flow web service and sync any settings youmay have changed. If the syncing does not automatically

57
start, start FlowSync from the desktop icon (Windows) or from the applications folder (Mac OS X). Every timea firmware update is available, FlowSync will notify you, and request you to install it.
If you change settings in the Flow web service while your A300 is plugged into your computer, press thesynchronize button on FlowSync to transfer to the settings to your A300.
For support andmore information about using the Flow web service, go to www.polar.com/en/support/flow
For support andmore information about using FlowSync software, go to www.-polar.com/en/support/FlowSync

58
IMPORTANT INFORMATIONTAKING CARE OF YOUR A300
Like any electronic device, Polar A300 should be treated with care. The suggestions below will help you fulfillguarantee obligations and enjoy this product for many years to come.
A300
Keep your training device clean.
l We recommend that you wash the device and the silicone wristband after each training session underrunning water with amild soap and water solution. Please remove the device from the wristband andwash them separately. Wipe them dry with a soft towel. Don't charge the device when it is wet.
It is essential that you wash the device and the wristband if you wear them in a swimming poolwhere chlorine is used for keeping the pool clean.
l If you don't wear the device 24/7, wipe off any moisture before storing it. Don't store in non-breathablematerial or in a damp environment, e.g. plastic bag or damp gym bag.
l Wipe it dry with a soft towel when needed. Use a damp paper towel to wipe dirt from the trainingdevice. Tomaintain the water resistance, do not wash the training device with a pressure washer.Never use alcohol or any abrasivematerial such as steel wool or cleaning chemicals.
l When you connect your A300 to a computer, check that there is nomoisture, hair, dust or dirt on theA300's USB connector. Gently wipe off any dirt or moisture. Don't use any sharp tools for cleaning toavoid scratching.
Operating temperatures are -10 °C to +50 °C / +14 °F to +122 °F.

59
HEART RATE SENSOR
Connector: Detach the connector from the strap after every use and dry the connector with a soft towel.Clean the connector with amild soap and water solution when needed. Never use alcohol or any abrasivematerial (e.g. steel wool or cleaning chemicals).
Strap: Rinse the strap under running water after every use and hang to dry. Clean the strap gently with amildsoap and water solution when needed. Do not usemoisturizing soaps, because they can leave residue on thestrap. Do not soak, iron, dry clean or bleach the strap. Do not stretch the strap or bend the electrode areassharply.
Check the washing instructions on the label of the strap.
STORING
Keep your training device and heart rate sensor in a cool and dry place. Do not keep them in a damp envir-onment, in non-breathable material (a plastic bag or a sports bag) nor with conductivematerial (a wet towel).Do not expose the training device to direct sunlight for extended periods, such as by leaving it in a car or moun-ted on the bikemount.
It is recommended to store the training device partially or fully charged. The battery slowly loses its chargewhen it is stored. If you are going to store the training device for several months, it is recommended torecharge it after a few months. This will prolong the battery lifetime.
Dry and store the strap and the connector separately to maximize the heart rate sensor battery lifetime. Keepthe heart rate sensor in a cool and dry place. To prevent snap oxidation, do not store the heart rate sensor wetin non-breathingmaterial, such as a sports bag. Do not expose the heart rate sensor to direct sunlight forextended periods.
SERVICE
During the two-year guarantee/warranty period we recommend that you have service done by an authorizedPolar Service Center only. The warranty does not cover damage or consequential damage caused by servicenot authorized by Polar Electro. For further information, see Limited International Polar Guarantee.
For contact information and all Polar Service Center addresses, visit www.polar.com/support and country-spe-cific websites.
BATTERIES
At the end of the working life of the product Polar encourages you tominimize possible effects of waste on theenvironment and human health by following local waste disposal regulations and, where possible, utilizing sep-arate collection of electronic devices. Do not dispose of this product as unsortedmunicipal waste.
Keep the batteries away from children. If swallowed, contact a doctor immediately. Batteries should be dis-posed of properly according to local regulations.

60
CHARGING A300 BATTERY
The A300 has an internal, rechargeable battery. Rechargeable batteries have a limited number of chargecycles. You can charge and discharge the battery over 300 times before a notable decrease in its capacity.The number of charge cycles also varies according to use and operating conditions.
Do not charge the battery in temperatures under 0°C or when the A300 is wet.
The USB connector is in the device, whichmakes recharging simple - no long and clumsy cables needed.Just plug your A300 straight to your computer. However, we deliver a standard USB cable along with theA300, so if you prefer using it, please do.
You can also charge the battery via a wall outlet. When charging via a wall outlet use a USB power adapter(not included in the product set). If you use an AC adapter, make sure that the adapter is marked with "output5Vdc" and that it provides aminimum of 500mA. Only use an adequately safety approved AC adapter (markedwith "LPS", "Limited Power Supply" or "UL listed").
1. Plug your A300 to your computer's USB port either directly (A) or with the USB cable (B). Make surethe cable is right way up - the USB symbols on the back cover of the device and on the cable are nextto each other. Check that the A300 is dry before connecting it to the computer. If the battery is com-pletely empty, it takes a couple of minutes for the charging to start.
2. Charging appears on the display.
3. When A300 is fully charged, Battery full. Unplug. is displayed.
Don't leave the battery fully discharged for a long period of time or keep it fully charged all the time,because it may affect the battery life time.
BATTERY OPERATING TIME
The battery operating time is up to 26 days with 24/7 activity tracking and 1h/day training. The operating timedepends onmany factors, such as the temperature of the environment in which you use your A300, the

61
features you use, and battery aging. The operating time is significantly reduced in temperatures well belowfreezing. Wearing the A300 under your overcoat helps to keep it warmer and to increase the operating time.
LOW BATTERY NOTIFICATIONS
Battery lowThe battery charge is low. It is too low for recording a training session. It is recom-mended to charge A300.
Battery low. Charge.The charge has dropped to a critical level. Charge your A300 as soon as possible.The charge is too low for recording a training session. A new training session can-not be started before charging A300.
When the display is blank, the battery is empty and A300 has gone to sleepmode. Charge your A300. If thebattery is totally drained, it may take a while for the charging animation to appear on the display.
CHANGING HEART RATE SENSOR BATTERY
To change the battery of the heart rate sensor yourself, carefully follow the instructions below:
When changing the battery, make sure the sealing ring is not damaged, in which case you should replace itwith a new one. You can purchase the sealing ring/battery kits at well-equipped Polar retailers and authorizedPolar Services. In the USA and Canada, the additional sealing rings are available at authorized Polar ServiceCenters. In the USA the sealing ring/battery kits are also available at www.shoppolar.com.
When handling a new, fully charged battery, avoid clasp-like contact, i.e. simultaneously from both sides, withmetal or electrically conducting tools, like tweezers. This may short circuit the battery, causing it to dischargemore rapidly. Typically, short circuiting does not damage the battery, but it may decrease the capacity and thelifetime of the battery.
1. Using a coin, open thebattery cover by turningit counterclockwise toOPEN.
2. Insert the battery (CR2025) inside the coverwith the positive (+)side against the cover.Make sure the sealingring is in the groove toensure water res-
62
istance.
3. Press the cover backinto the connector.
4. Use the coin to turn thecover clockwise toCLOSE.
Danger of explosion if the battery is replaced with wrong type.
PRECAUTIONS
The Polar A300 is designed tomeasure heart rate and tell your activity. No other use is intended or implied.
The training device should not be used for obtaining environmental measurements that require professional orindustrial precision.
INTERFERENCE DURING TRAININGELECTROMAGNETIC INTERFERENCE AND TRAINING EQUIPMENT
Disturbancemay occur near electrical devices. AlsoWLAN base stations may cause interference when train-ing with the training device. To avoid erratic reading or misbehavior, move away from possible sources of dis-turbance.
Training equipment with electronic or electrical components such as LED displays, motors and electricalbrakes may cause interfering stray signals. To solve these problems, try the following:
1. Remove the heart rate sensor strap from your chest and use the training equipment as you would nor-mally.
2. Move the training device around until you find an area in which it displays no stray reading or does notflash the heart symbol. Interference is often worst directly in front of the display panel of the equipment,while the left or right side of the display is relatively free of disturbance.
3. Put the heart rate sensor strap back on your chest and keep the training device in this interference-freearea as much as possible.
If the training device still does not work with the training equipment, it may be electrically too noisy for wire-less heart rate measurement. For further information, www.polar.com/support.
MINIMIZING RISKS WHEN TRAINING
Trainingmay include some risk. Before beginning a regular training program, it is recommended that youanswer the following questions concerning your health status. If you answer yes to any of these questions,we recommend that you consult a doctor before starting any training program.

63
l Have you been physically inactive for the past 5 years?
l Do you have high blood pressure or high blood cholesterol?
l Are you taking any blood pressure or heart medication?
l Do you have a history of breathing problems?
l Do you have symptoms of any disease?
l Are you recovering from a serious illness or medical treatment?
l Do you use a pacemaker or other implanted electronic device?
l Do you smoke?
l Are you pregnant?
Note that in addition to training intensity, medications for heart conditions, blood pressure, psychological con-ditions, asthma, breathing, etc., as well as some energy drinks, alcohol, and nicotinemay also affect heartrate.
It is important to be sensitive to your body’s responses during training. If you feel unexpected pain orexcessive fatigue when training, it is recommended that you stop the training or continue at a lighterintensity.
Note! If you are using a pacemaker, defibrillator or other implanted electronic device, you can use Polarproducts. In theory interference to pacemaker caused by Polar products should not be possible. In practice noreports exist to suggest anyone ever having experienced interference. We cannot however issue an officialguarantee on our products’ suitability with all pacemakers or other implanted devices, such as defibrillators,due to the variety of devices available. If you have any doubts, or if you experience any unusual sensationswhile using Polar products, please consult your physician or contact the implanted electronic deviceman-ufacturer to determine safety in your case.
If you are allergic to any substance that comes into contact with your skin or if you suspect an allergic reactiondue to using the product, check the listedmaterials in Technical Specifications. To avoid any skin reaction tothe heart rate sensor, wear it over a shirt, but moisten the shirt well under the electrodes to ensure flawlessoperation.
The combined impact of moisture and intense abrasionmay cause color to come off the heart ratesensor’s surface, possibly staining clothes. If you use perfume, suntan/sunscreen lotion or insect repellent onyour skin, youmust ensure that it does not come into contact with the training device or the heart rate sensor.Please avoid clothing with colors that might transfer onto the training device (especially training devices withlight/bright colors) when worn together.
TECHNICAL SPECIFICATIONA300
Battery type: 68mAh Li-pol rechargeable battery
Operating time: Up to 26 days with 24/7 activity tracking and 1h/day train-ing
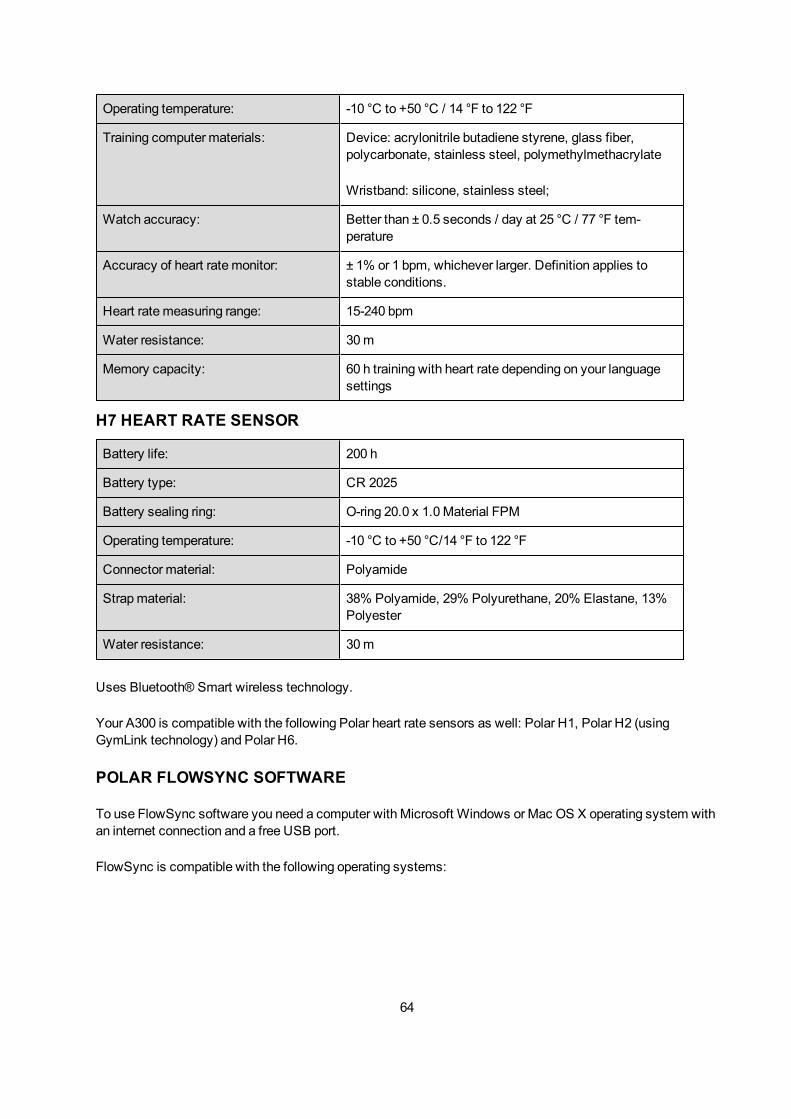
64
Operating temperature: -10 °C to +50 °C / 14 °F to 122 °F
Training computer materials: Device: acrylonitrile butadiene styrene, glass fiber,polycarbonate, stainless steel, polymethylmethacrylate
Wristband: silicone, stainless steel;
Watch accuracy: Better than ± 0.5 seconds / day at 25 °C / 77 °F tem-perature
Accuracy of heart rate monitor: ± 1% or 1 bpm, whichever larger. Definition applies tostable conditions.
Heart rate measuring range: 15-240 bpm
Water resistance: 30m
Memory capacity: 60 h training with heart rate depending on your languagesettings
H7 HEART RATE SENSOR
Battery life: 200 h
Battery type: CR 2025
Battery sealing ring: O-ring 20.0 x 1.0Material FPM
Operating temperature: -10 °C to +50 °C/14 °F to 122 °F
Connector material: Polyamide
Strapmaterial: 38% Polyamide, 29% Polyurethane, 20% Elastane, 13%Polyester
Water resistance: 30m
Uses Bluetooth® Smart wireless technology.
Your A300 is compatible with the following Polar heart rate sensors as well: Polar H1, Polar H2 (usingGymLink technology) and Polar H6.
POLAR FLOWSYNC SOFTWARE
To use FlowSync software you need a computer with Microsoft Windows or Mac OS X operating system withan internet connection and a free USB port.
FlowSync is compatible with the following operating systems:

65
Computer operating system 32-bit 64-bit
Windows XP X
Windows 7 X X
Windows 8 X X
Windows 8.1 X X
Windows 10 X X
OS X 10.9 X
OS X 10.10 X
OS X 10.11 X
macOS 10.12 X
macOS 10.13 X
POLAR FLOWMOBILE APPLICATION COMPATIBILITY
Polar devices work with most modern smartphones. Here are theminimum requirements:
l iOS mobile devices iPhone 5 and later
l Android mobile devices with Bluetooth 4.0 capability and Android 4.4 or later (check full phone spe-cification from your phonemanufacturer)
There is plenty of variation between how different Android devices handle the technologies used in ourproducts and services, such as Bluetooth Low Energy (BLE) and different standards and protocols. Becauseof this, compatibility varies between phonemanufacturers, and unfortunately Polar cannot guarantee that allfeatures can be used with all devices.
WATER RESISTANCE OF POLAR PRODUCTS
In the watch industry, water resistance is generally indicated as meters, whichmeans the static water pres-sure of that depth. Polar uses this same indication system. Water resistance of Polar products is testedaccording to International Standard ISO 22810 or IEC60529. Every Polar device that has water resistanceindication is tested before the delivery to stand water pressure.
Polar products are divided into four different categories according to their water resistance. Check the back ofyour Polar product for the water resistance category, and compare it to the chart below. Please note that thesedefinitions do not necessarily apply to products of other manufacturers.
When performing any underwater activity, the dynamic pressure generated by moving in water is greater thanthe static pressure. This means that moving the product under water subjects it to a greater pressure than ifthe product were stationary.

66
Marking on theback of theproduct
Washsplashes,sweat, rain-drops etc.
Bathing andswimming
Skin divingwith snorkel(no air tanks)
SCUBAdiving(withairtanks)
Water resistant char-acteristics
Water resistantIPX7
OK - - - Do not wash with a pres-sure washer.Protected againstsplashes, raindrops etc.Reference standard:IEC60529.
Water resistantIPX8
OK OK - - Minimum for bathing andswimming.Reference standard:IEC60529.
Water resistantWater resistant20/30/50metersSuitable for swim-ming
OK OK - - Minimum for bathing andswimming.Reference standard:ISO22810.
Water resistant 100meters
OK OK OK - For frequent use in waterbut not SCUBA diving.Reference standard:ISO22810.
LIMITED INTERNATIONAL POLAR GUARANTEEl This guarantee does not affect the consumer’s statutory rights under applicable national or state lawsin force, or the consumer’s rights against the dealer arising from their sales/purchase contract.
l This limited Polar international guarantee is issued by Polar Electro Inc. for consumers who have pur-chased this product in the USA or Canada. This limited Polar international guarantee is issued by PolarElectro Oy for consumers who have purchased this product in other countries.
l Polar Electro Oy/Polar Electro Inc. guarantees the original consumer/purchaser of this device that theproduct will be free from defects in material or workmanship for two (2) years from the date of pur-chase.
l The receipt of the original purchase is your proof of purchase!
l The guarantee does not cover the battery, normal wear and tear, damage due tomisuse, abuse, acci-dents or non-compliance with the precautions; improper maintenance, commercial use, cracked,broken or scratched cases/displays, armband, elastic strap and Polar apparel.
l The guarantee does not cover any damage/s, losses, costs or expenses, direct, indirect or incidental,consequential or special, arising out of, or related to the product.

67
l Items purchased second hand are not covered by the two (2) year warranty, unless otherwise stip-ulated by local law.
l During the guarantee period, the product will be either repaired or replaced at any of the authorizedPolar Service Centers regardless of the country of purchase.
Guarantee with respect to any product will be limited to countries where the product has been initially mar-keted.
Manufactured by Polar Electro Oy, Professorintie 5, FI-90440 KEMPELE, Tel +358 8 5202 100, Fax +358 85202 300, www.polar.com.
Polar Electro Oy is a ISO 9001:2008 certified company.
© 2017 Polar Electro Oy, FI-90440 KEMPELE, Finland. All rights reserved. No part of this manual may beused or reproduced in any form or by any means without prior written permission of Polar Electro Oy.
The names and logos in this user manual or in the package of this product are trademarks of Polar Electro Oy.The names and logos marked with a ® symbol in this user manual or in the package of this product areregistered trademarks of Polar Electro Oy. Windows is a registered trademark of Microsoft Corporation andMac OS is a registered trademark of Apple Inc. The Bluetooth® wordmark and logos are registered trade-marks owned by Bluetooth SIG, Inc. and any use of suchmarks by Polar Electro Oy is under license.
COMPLIANCE STATEMENTCOMPLIANCE STATEMENT
CANADA
Polar Electro Oy has not approved any changes or modifications to this device by the user. Any changes ormodifications could void the user’s authority to operate the equipment.
Polar Electro Oy n’a approué aucunemodification apportée à l’appareil par l’utilisateur, quelle qu’en soit lanature. Tout changement ou toutemodification peuvent annuler le droit d’utilisation de l’appareil parl’utilisateur.
Industry Canada (IC) regulatory information
This device complies with Industry Canada licence-exempt RSS standard(s). Operation is subject to the fol-lowing two conditions: (1) this devicemay not cause interference, and (2) this devicemust accept any inter-ference, including interference that may cause undesired operation of the device.
Avis de conformité à la réglementation d’Industrie Canada
Le présent appareil est conforme aux CNR d’Industrie Canada applicables aux appareils radio exempts delicence. L’exploitation est autorisée aux deux conditions suivantes : (1) l’appareil ne doit pas produire de brouil-lage, et (2) l’utilisateur de l’appareil doit accepter tout brouillage radioélectrique subi, même si le brouillage estsusceptible d’en compromettre le fonctionnement.

68
CAN ICES-3(B)/NMB-3(B)
USA
Polar Electro Oy has not approved any changes or modifications to this device by the user. Any changes ormodifi cations could void the user’s authority to operate the equipment.
FCC regulatory information
This device complies with part 15 of the FCC rules. Operation is subject to the following two conditions: (1)This devicemay not cause harmful interference, and (2) This devicemust accept any interference received,including interference that may cause undesired operation.
Note: This equipment has been tested and found to comply with the limits for a Class B digital device, pur-suant to part 15 of the FCC Rules. These limits are designed to provide reasonable protection against harmfulinterference in a residential installation. This equipment generates, uses and can radiate radio frequencyenergy and, if not installed and used in accordance with the instructions, may cause harmful interference toradio communications. However, there is no guarantee that interference will not occur in a particular install-ation.
If this equipment does cause harmful interference to radio or television reception, which can be determined byturning the equipment off and on, the user is encouraged to try to correct the interference by one or more of thefollowingmeasures:
1. Reorient or relocate the receiving antenna.
2. Increase the separation between the equipment and receiver.
3. Connect the equipment into an outlet on a circuit different from that to which the receiver is connected.
4. Consult the dealer or an experienced radio/ TV technician for help.
This product emits radio frequency energy, but the radiated output power of this device is far below the FCCradio frequency exposure limits.
This equipment complies with FCC RF radiation exposure limits forth for an uncontrolled environment. Never-theless, the device should be used in such amanner that the potential for human contact with the antenna dur-ing normal operation is minimized.
DISCLAIMERl Thematerial in this manual is for informational purposes only. The products it describes are subject tochange without prior notice, due to themanufacturer’s continuous development program.
l Polar Electro Inc./Polar Electro Oy makes no representations or warranties with respect to this manualor with respect to the products described herein.
l Polar Electro Inc./Polar Electro Oy shall not be liable for any damages, losses, costs or expenses, dir-ect, indirect or incidental, consequential or special, arising out of, or related to the use of this material orthe products described herein.

69
4.0 EN 05/2016