pot.im.07.1.017.13 workbook windows
TRANSCRIPT

7/28/2019 PoT.im.07.1.017.13 Workbook Windows
http://slidepdf.com/reader/full/potim07101713-workbook-windows 1/232
IBM Software
Information Management
An IBM Proof of Technology
IBM DB2 10.1 Administration for the Experienced SQL Server DBA
Lab Exercises
7/28/2019 PoT.im.07.1.017.13 Workbook Windows
http://slidepdf.com/reader/full/potim07101713-workbook-windows 2/232
An IBM Proof of Technology
PoT.IM.07.1.017.13
© Copyright IBM Corporation, 2006, 2012
US Government Users Restricted Rights - Use, duplication or disclosure restricted by GSA ADP Schedule Contract with IBM Corp.
Version 6.1 August 25, 2012
Burt Vialpando & Vikram Khatri

7/28/2019 PoT.im.07.1.017.13 Workbook Windows
http://slidepdf.com/reader/full/potim07101713-workbook-windows 3/232
Contents
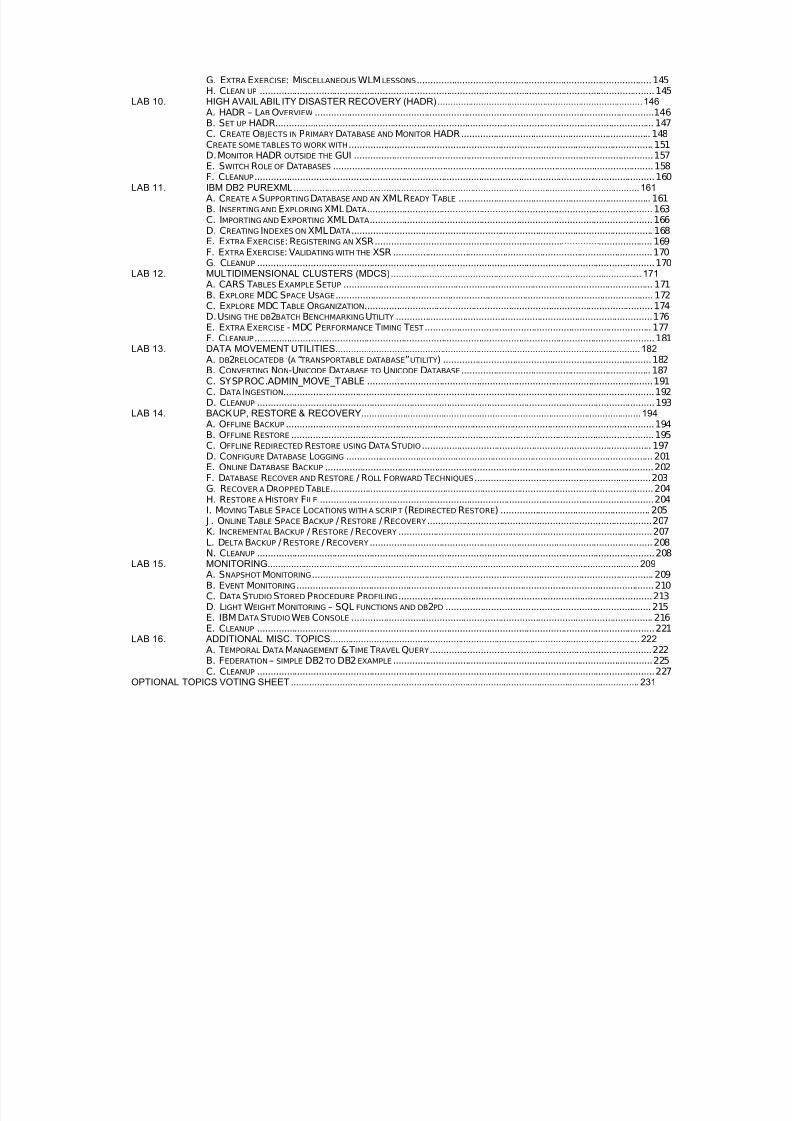
LAB 01. INSTANCE EXPLORATION ............................................................................................................................... 8 A. DB2 OPERATING S YSTEM DIRECTORIES AND FILES..............................................................................................8 B. S TART AND S TOP A DB2 INSTANCE...................................................................................................................12 C. CLP INTRODUCTION........................................................................................................................................13 D. DB2 WINDOWS REGISTRY...............................................................................................................................16 E. CREATE A NEW DB2 INSTANCE ........................................................................................................................17 F. CATALOG A NEW DB2 INSTANCE ......................................................................................................................19 G. EXTRA EXERCISES..........................................................................................................................................22
LAB 02. DATABASE CREATION AND EXPLORATION...............................................................................................24 A. GENERAL DB2 DATABASE COMMANDS .............................................................................................................24 B. THE DB2 S YSTEM ANDLOCAL DATABASE DIRECTORIES .....................................................................................26 C. CREATING A DATABASE ...................................................................................................................................27 D. EXPLORING VARIOUS DB2DATABASE FUNCTIONALITY FEATURES .........................................................................30 E. ALTERING A TABLE ..........................................................................................................................................31
LAB 03. DATA STUDIO..................................................................................................................................................32 A. LAUNCHING DATA S TUDIO................................................................................................................................32 B. CONNECTING TO AND MANAGING A DATABASE ....................................................................................................33
LAB 04. CLPPLUS AND ORACLE COMPATIBILITY....................................................................................................55 A. LOGGING ON TO CLPPLUS...............................................................................................................................55 B. INTERACTIVE CLPPLUS COMMANDS..................................................................................................................57 C. RUNNING A SCRIPT FILE IN BATCH MODE ............................................................................................................63 D. ORACLE COMPATIBILITY ..................................................................................................................................66
LAB 05. SECURITY........................................................................................................................................................ 77 A. INSTANCE LEVEL SECURITY..............................................................................................................................77 B. DATABASE LEVEL SECURITY ............................................................................................................................80 B. DATABASE LEVEL SECURITY ............................................................................................................................80 D. USING THE S YSTEM CATALOG SECURITY VIEWS ................................................................................................86 E. USER AND GROUP OVERVIEW ..........................................................................................................................89 F. SCHEMAS .......................................................................................................................................................90 G. VIEWING DATABASE AUTHORITIES ......................................................................................................................91 H. COLUMN AND ROW LEVEL SECURITY ..................................................................................................................92 I. EXTRA EXERCISE: DB2AUDIT AND AUDIT POLICY ............................................................................................94 J . EXTRA EXERCISE: A QUICK LOOK INTO LABEL BASED ACCESS CONTROL...............................................................96 K. CLEANUP .......................................................................................................................................................96
LAB 06.
AUTONOMIC COMPUTING............................................................................................................................. 97
A. SELF TUNING MEMORY MANAGER (STMM).......................................................................................................97 B. AUTOMATIC S TORAGE ...................................................................................................................................101 C. RUN AUTOCONFIGURE (COMMAND LINE FOR CONFIGURATIONADVISOR)............................................................102 D. EXTRA EXERCISE: AUTOMATIC MAINTENANCE .................................................................................................103 E. EXTRA EXERCISE: S TATISTIC PROFILING .........................................................................................................109 F. EXTRA EXCERCISE: SYSTOOLS SETUP .........................................................................................................110 G. CLEANUP .....................................................................................................................................................110
LAB 07. DEEP COMPRESSION .................................................................................................................................. 111 A. TABLE DEEP COMPRESSION...........................................................................................................................111 C. CLEAN UP ....................................................................................................................................................115
LAB 08. EXPLAIN FACILITIES AND THE OPTIMIZER............................................................................................... 116 A. CREATE EXPLAIN TABLES ..............................................................................................................................116 B. UNION ALL VIEW EXAMPLE SETUP .................................................................................................................. 117 C. VISUAL EXPLAIN IN DATA S TUDIO ...................................................................................................................119 D. VISUAL EXPLAIN – TUNING A QUERY ...............................................................................................................123 E. USING DB2EXFMT – EXPLAIN MULTIPLE QUERIES AT ONCE..................................................................................128 F. EXTRA EXERCISE – USING DB2EXPLN .............................................................................................................129 H. EXTRA EXERCISES: REBIND ANDROW MOVEMENT...................................................................................131
LAB 09. WORKLOAD MANAGEMENT (WLM)............................................................................................................ 132 A. SETTING UP A CUSTOM WORKLOAD MANAGER ENVIRONMENT .............................................................................132 B. SETTING UP TO SIMULATE A WORKLOAD...........................................................................................................136 C. RUNNING A WORKLOAD AS USER DB2USER1 .................................................................................................... 138 D. RUNNING A SECOND WORKLOAD AS DB2COBRA ................................................................................................140 E. RUNNING A THIRD WORKLOAD AS USER DB2DEFAULT ........................................................................................142 F. WORKING WITH WLMEVENT MONITORS ..........................................................................................................144
7/28/2019 PoT.im.07.1.017.13 Workbook Windows
http://slidepdf.com/reader/full/potim07101713-workbook-windows 4/232
G. EXTRA EXERCISE: MISCELLANEOUS WLMLESSONS........................................................................................145 H. CLEAN UP ....................................................................................................................................................145
LAB 10. HIGH AVAIL ABILITY DISASTER RECOVERY (HADR)................................................................................146 A. HADR – LAB OVERVIEW ...............................................................................................................................146 B. SET UP HADR..............................................................................................................................................147 C. CREATE OBJECTS IN PRIMARY DATABASE AND MONITOR HADR.......................................................................148 CREATE SOME TABLES TO WORK WITH.................................................................................................................. 151 D. MONITOR HADR OUTSIDE THE GUI ................................................................................................................157
E. SWITCH ROLE OF DATABASES ........................................................................................................................158 F. CLEANUP......................................................................................................................................................160
LAB 11. IBM DB2 PUREXML....................................................................................................................................... 161 A. CREATE A SUPPORTING DATABASE AND AN XML READY TABLE ........................................................................161 B. INSERTING AND EXPLORING XML DATA...........................................................................................................163 C. IMPORTING AND EXPORTING XML DATA..........................................................................................................166 D. CREATING INDEXES ON XML DATA................................................................................................................. 168 E. EXTRA EXERCISE: REGISTERING AN XSR........................................................................................................169 F. EXTRA EXERCISE: VALIDATING WITH THE XSR .................................................................................................170 G. CLEANUP .....................................................................................................................................................170
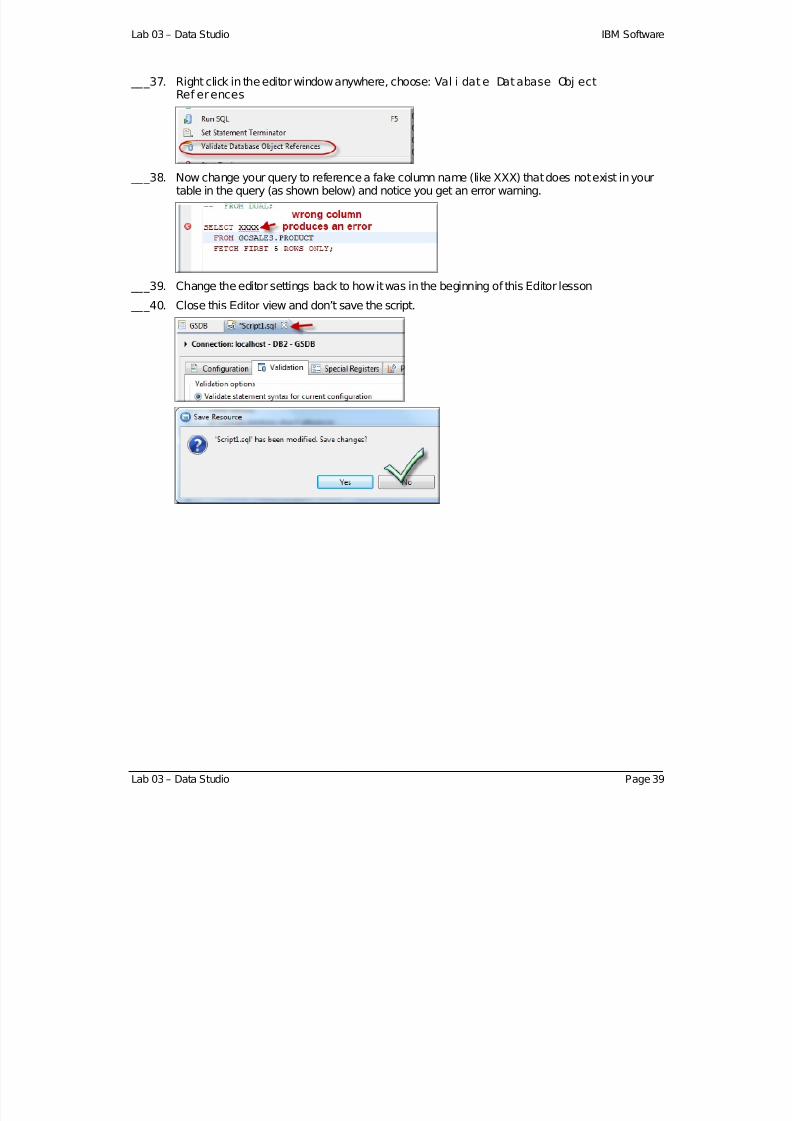
LAB 12. MULTIDIMENSIONAL CLUSTERS (MDCS).................................................................................................. 171 A. CARS TABLES EXAMPLE SETUP ....................................................................................................................171 B. EXPLORE MDC SPACE USAGE.......................................................................................................................172 C. EXPLORE MDC TABLE ORGANIZATION............................................................................................................174 D. USING THE DB2BATCH BENCHMARKING U TILITY ................................................................................................176 E. EXTRA EXERCISE - MDC PERFORMANCE TIMING TEST .....................................................................................177 F. CLEANUP......................................................................................................................................................181
LAB 13. DATA MOVEMENT UTILITIES....................................................................................................................... 182 A. DB2RELOCATEDB (A “ TRANSPORTABLE DATABASE”UTILITY) ..............................................................................182 B. CONVERTING NON-UNICODE DATABASE TO UNICODE DATABASE.......................................................................187 C. SYSPROC.ADMIN_MOVE_TABLE ...........................................................................................................191 C. DATA INGESTION...........................................................................................................................................192 D. CLEANUP .....................................................................................................................................................193
LAB 14. BACKUP, RESTORE & RECOVERY............................................................................................................. 194 A. OFFLINE BACKUP ..........................................................................................................................................194 B. OFFLINE RESTORE ........................................................................................................................................195 C. OFFLINE REDIRECTED RESTORE USING DATA S TUDIO ......................................................................................197 D. CONFIGURE DATABASE LOGGING ...................................................................................................................201 E. ONLINE DATABASE BACKUP ...........................................................................................................................202 F. DATABASE RECOVER AND RESTORE / ROLL FORWARD TECHNIQUES ..................................................................203 G. RECOVER A DROPPED TABLE.........................................................................................................................204 H. RESTORE A HISTORY FILE .............................................................................................................................204 I. MOVING TABLE SPACE LOCATIONS WITH A SCRIPT (REDIRECTED RESTORE) ........................................................ 205 J . ONLINE TABLE SPACE BACKUP / RESTORE / RECOVERY ....................................................................................207 K. INCREMENTAL BACKUP / RESTORE / RECOVERY ...............................................................................................207 L. DELTA BACKUP / RESTORE / RECOVERY ..........................................................................................................208 N. CLEANUP .....................................................................................................................................................208
LAB 15. MONITORING................................................................................................................................................. 209 A. SNAPSHOT MONITORING................................................................................................................................209 B. EVENT MONITORING......................................................................................................................................210 C. DATA S TUDIO S TORED PROCEDURE PROFILING...............................................................................................213 D. LIGHT WEIGHT MONITORING – SQL FUNCTIONS AND DB2PD .............................................................................215 E. IBM DATA S TUDIOWEB CONSOLE ................................................................................................................. 216 E. CLEANUP .....................................................................................................................................................221
LAB 16. ADDITIONAL MISC. TOPICS......................................................................................................................... 222 A. TEMPORAL DATA MANAGEMENT & TIME TRAVEL QUERY...................................................................................222 B. FEDERATION – SIMPLE DB2TO DB2EXAMPLE .................................................................................................225 C. CLEANUP .....................................................................................................................................................227
OPTIONAL TOPICS VOTING SHEET ........................................................................................................................................ 231

7/28/2019 PoT.im.07.1.017.13 Workbook Windows
http://slidepdf.com/reader/full/potim07101713-workbook-windows 5/232
[This page left intentionally blank]
7/28/2019 PoT.im.07.1.017.13 Workbook Windows
http://slidepdf.com/reader/full/potim07101713-workbook-windows 6/232
IBM Software DB2 10.1 Administration for the Experienced SQL Server DBA
Lab Instructions
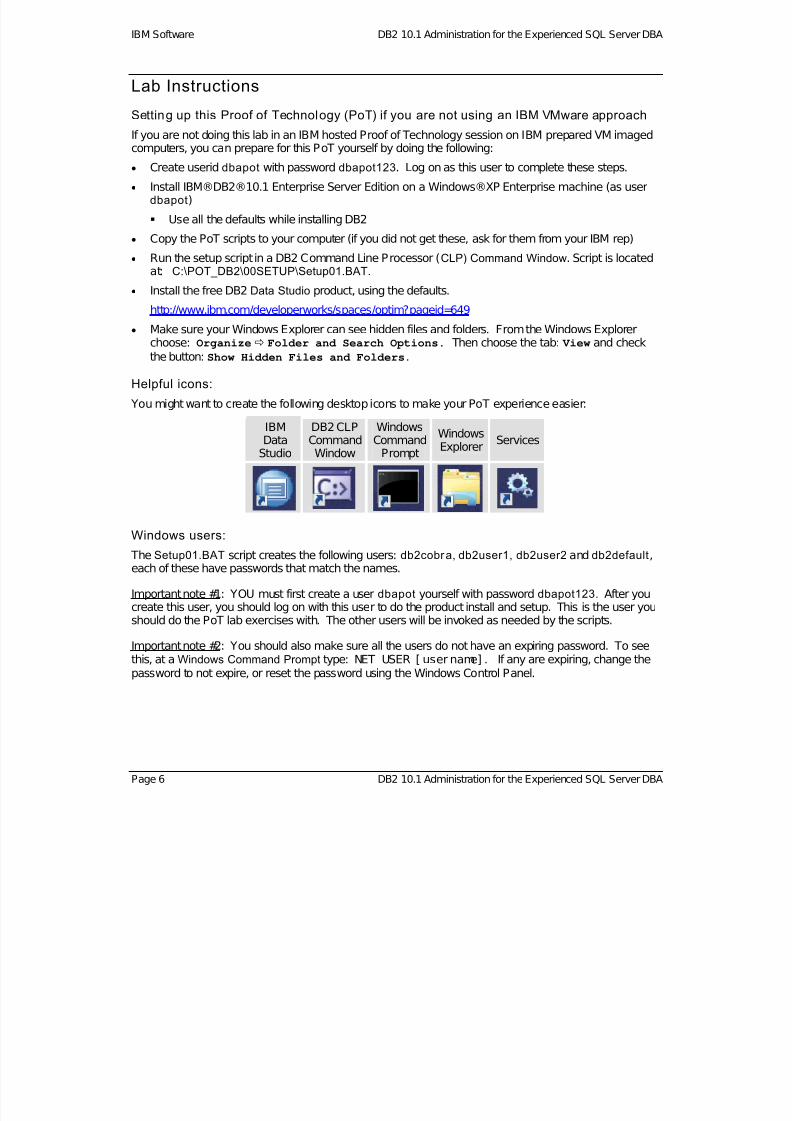
Setting up this Proof of Technology (PoT) if you are not using an IBM VMware approach
If you are not doing this lab in an IBM hosted Proof of Technology session on IBM prepared VM imagedcomputers, you can prepare for this PoT yourself by doing the following:
Create userid dbapot with password dbapot123. Log on as this user to complete these steps.
Install IBM®DB2®10.1 Enterprise Server Edition on a Windows®XP Enterprise machine (as userdbapot)
Use all the defaults while installing DB2
Copy the PoT scripts to your computer (if you did not get these, ask for them from your IBM rep)
Run the setup script in a DB2 Command Line Processor (CLP) Command Window. Script is locatedat: C:\POT_DB2\00SETUP\Setup01.BAT.
Install the free DB2 Data Studio product, using the defaults.
http://www.ibm.com/developerworks/spaces/optim?pageid=649
Make sure your Windows Explorer can see hidden files and folders. From the Windows Explorerchoose: Organize Folder and Search Options. Then choose the tab: View and check
the button: Show Hidden Files and Folders.
Helpful icons:
You might want to create the following desktop icons to make your PoT experience easier:
IBMData
Studio
DB2 CLPCommandWindow
WindowsCommand
Prompt
WindowsExplorer
Services
Windows users:
The Setup01.BAT script creates the following users: db2cobra, db2user1, db2user2 and db2default,each of these have passwords that match the names.
Important note #1: YOU must first create a user dbapot yourself with password dbapot123. After youcreate this user, you should log on with this user to do the product install and setup. This is the user youshould do the PoT lab exercises with. The other users will be invoked as needed by the scripts.
Important note #2: You should also make sure all the users do not have an expiring password. To seethis, at a Windows Command Prompt type: NET USER [ user name] . If any are expiring, change thepassword to not expire, or reset the password using the Windows Control Panel.
Page 6 DB2 10.1 Administration for the Experienced SQL Server DBA
7/28/2019 PoT.im.07.1.017.13 Workbook Windows
http://slidepdf.com/reader/full/potim07101713-workbook-windows 7/232
Lab Instructions IBM Software
Lab Instructions Page 7
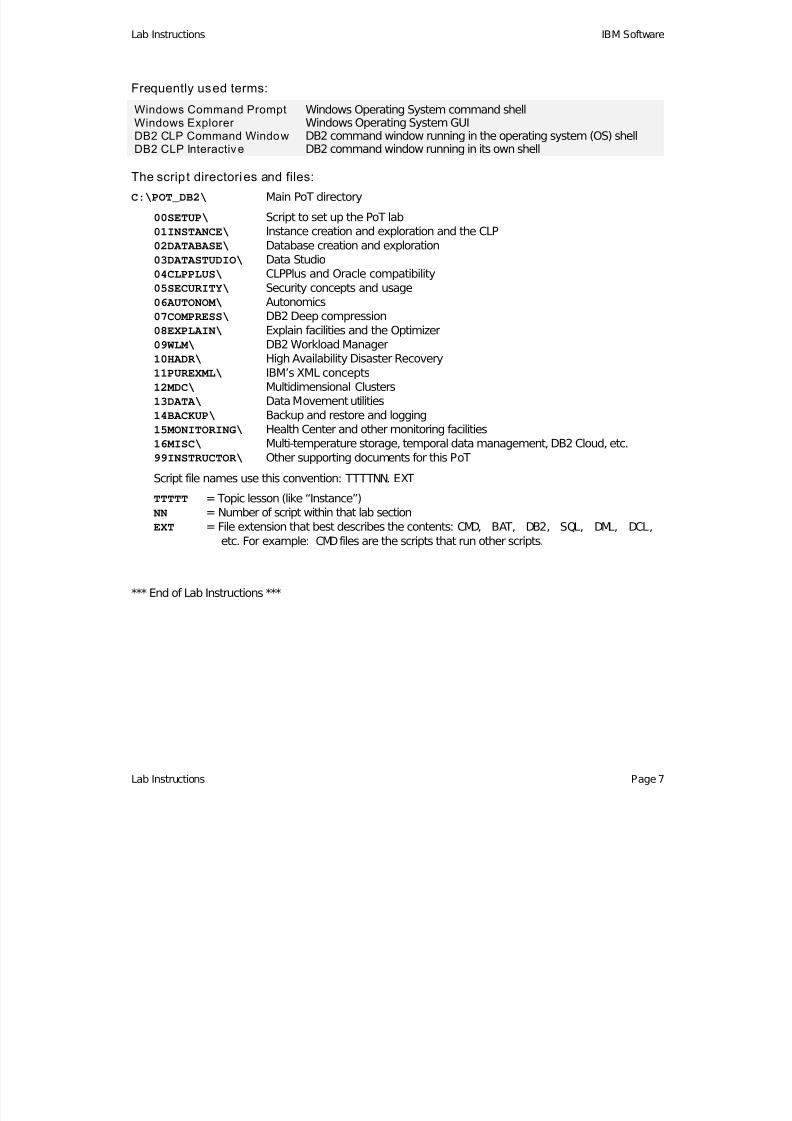
Frequently used terms:
Windows Command PromptWindows Explorer DB2 CLP Command WindowDB2 CLP Interactive
Windows Operating System command shellWindows Operating System GUIDB2 command window running in the operating system (OS) shellDB2 command window running in its own shell
The script directories and files:
C:\POT_DB2\ Main PoT directory
00SETUP\ Script to set up the PoT lab
01INSTANCE\ Instance creation and exploration and the CLP
02DATABASE\ Database creation and exploration
03DATASTUDIO\ Data Studio
04CLPPLUS\ CLPPlus and Oracle compatibility
05SECURITY\ Security concepts and usage
06AUTONOM\ Autonomics
07COMPRESS\ DB2 Deep compression08EXPLAIN\ Explain facilities and the Optimizer
09WLM\ DB2 Workload Manager
10HADR\ High Availability Disaster Recovery
11PUREXML\ IBM’s XML concepts
12MDC\ Multidimensional Clusters
13DATA\ Data Movement utilities
14BACKUP\ Backup and restore and logging
15MONITORING\ Health Center and other monitoring facilities
16MISC\ Multi-temperature storage, temporal data management, DB2 Cloud, etc.
99INSTRUCTOR\ Other supporting documents for this PoT
Script file names use this convention: TTTTNN. EXT
TTTTT = Topic lesson (like “Instance”)
NN = Number of script within that lab section
EXT = File extension that best describes the contents: CMD, BAT, DB2, SQL, DML, DCL,
etc. For example: CMDfiles are the scripts that run other scripts.
*** End of Lab Instructions ***
7/28/2019 PoT.im.07.1.017.13 Workbook Windows
http://slidepdf.com/reader/full/potim07101713-workbook-windows 8/232
IBM Software DB2 10.1 Administration for the Experienced SQL Server DBA
Lab 01. Instance Exploration
A. DB2 Operating System Directories and Files
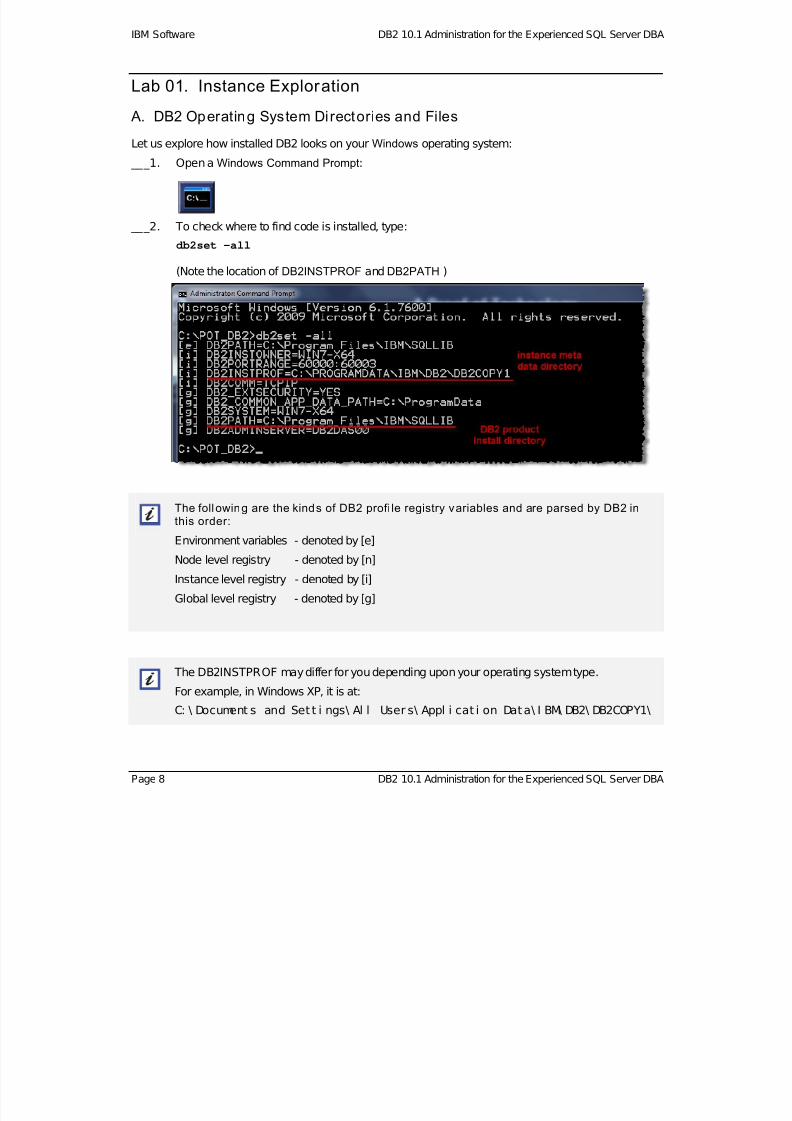
Let us explore how installed DB2 looks on your Windows operating system:
___1. Open a Windows Command Prompt:
___2. To check where to find code is installed, type:
db2set –all
(Note the location of DB2INSTPROF and DB2PATH )
The following are the kinds of DB2 profi le registry variables and are parsed by DB2 inthis order:
Environment variables - denoted by [e]
Node level registry - denoted by [n]
Instance level registry - denoted by [i]
Global level registry - denoted by [g]
The DB2INSTPROF may differ for you depending upon your operating system type.
For example, in Windows XP, it is at:
C: \ Document s and Set t i ngs\ Al l User s\ Appl i cat i on Data\ I BM\ DB2\ DB2COPY1\
Page 8 DB2 10.1 Administration for the Experienced SQL Server DBA
7/28/2019 PoT.im.07.1.017.13 Workbook Windows
http://slidepdf.com/reader/full/potim07101713-workbook-windows 9/232
Lab 01 – Instance Exploration IBM Software
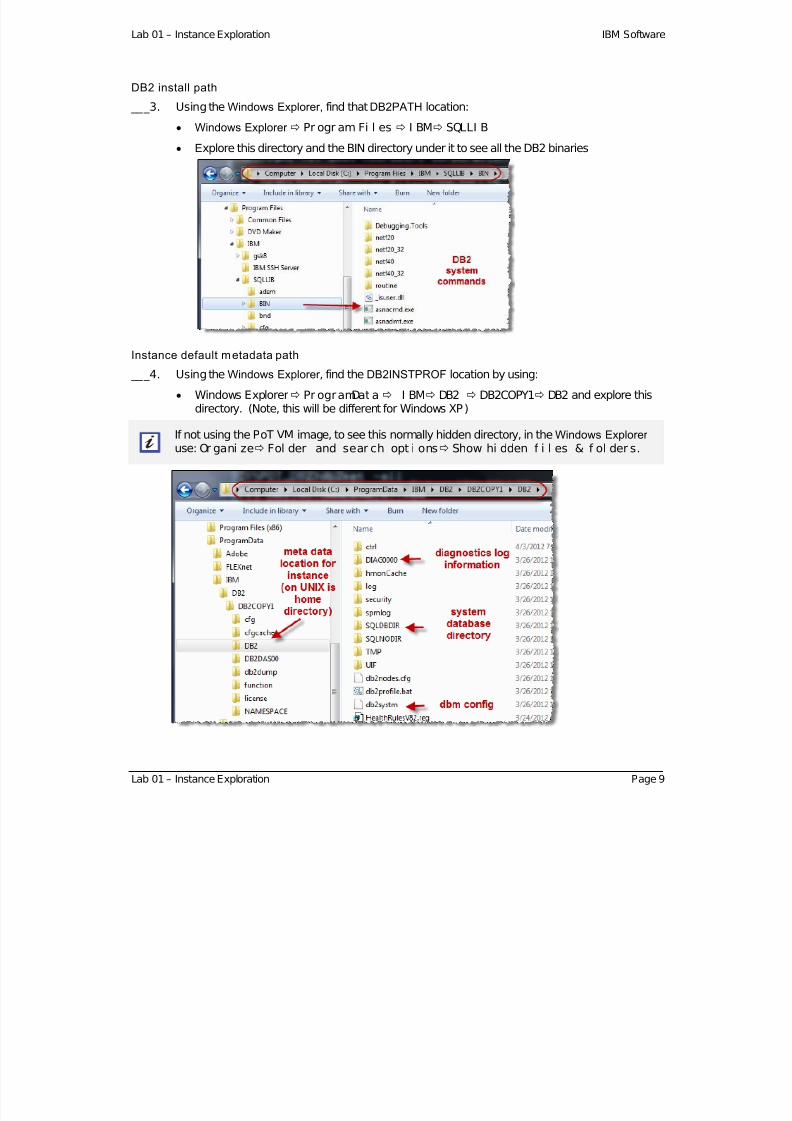
DB2 install path
___3. Using the Windows Explorer, find that DB2PATH location:
Windows Explorer Pr ogr am Fi l es I BM SQLLI B
Explore this directory and the BIN directory under it to see all the DB2 binaries
Instance default metadata path
___4. Using the Windows Explorer , find the DB2INSTPROF location by using:
Windows Explorer Pr ogramDat a I BM DB2 DB2COPY1 DB2 and explore thisdirectory. (Note, this will be different for Windows XP)
If not using the PoT VM image, to see this normally hidden directory, in the Windows Explorer use: Or gani ze Fol der and sear ch opt i ons Show hi dden f i l es & f ol der s.
Lab 01 – Instance Exploration Page 9
7/28/2019 PoT.im.07.1.017.13 Workbook Windows
http://slidepdf.com/reader/full/potim07101713-workbook-windows 10/232
IBM Software DB2 10.1 Administration for the Experienced SQL Server DBA
___5. Find the folder for instance called DB2:
Find db2syst m- this is the DBM config binary file. (Please, do not try to edit this.)
Find db2di ag. l og in the DI AG000 directory - this is the diagnostic log file. (You can editthis.)
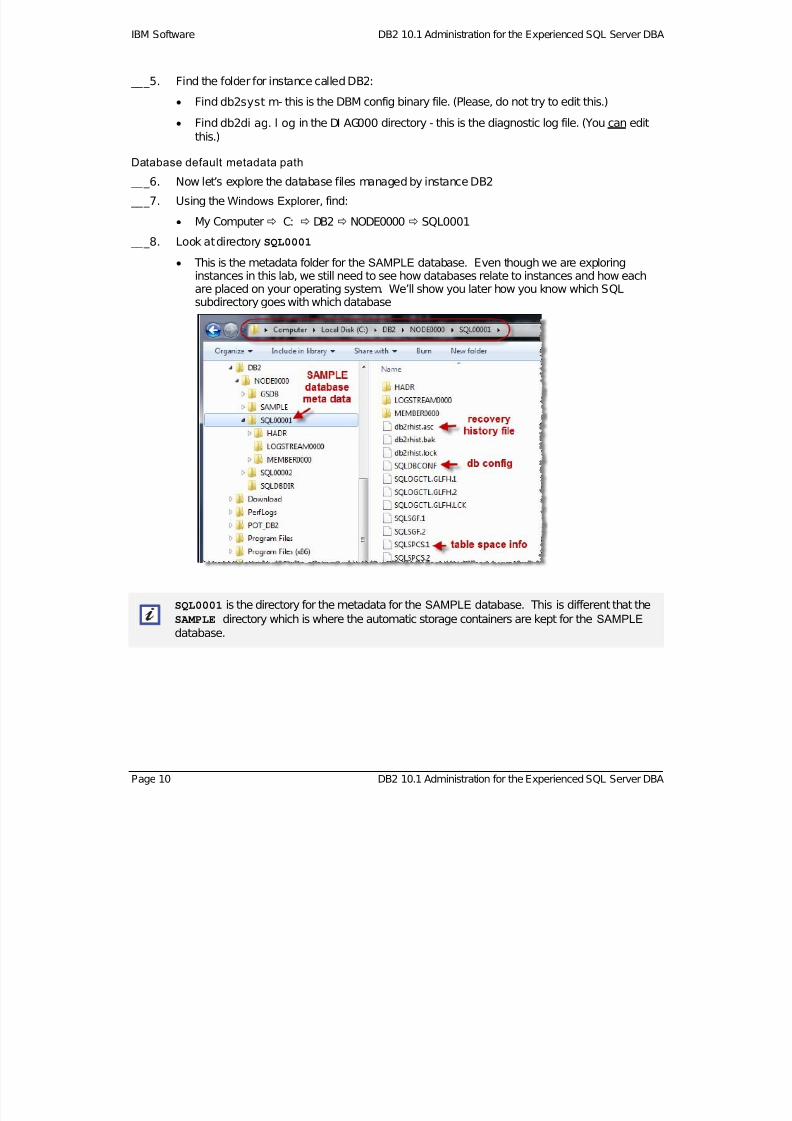
Database default metadata path
___6. Now let’s explore the database files managed by instance DB2
___7. Using the Windows Explorer , find:
My Computer C: DB2 NODE0000 SQL0001
___8. Look at directory SQL0001
This is the metadata folder for the SAMPLE database. Even though we are exploringinstances in this lab, we still need to see how databases relate to instances and how eachare placed on your operating system. We’ll show you later how you know which SQLsubdirectory goes with which database
SQL0001 is the directory for the metadata for the SAMPLE database. This is different that theSAMPLE directory which is where the automatic storage containers are kept for the SAMPLE
database.
Page 10 DB2 10.1 Administration for the Experienced SQL Server DBA

7/28/2019 PoT.im.07.1.017.13 Workbook Windows
http://slidepdf.com/reader/full/potim07101713-workbook-windows 11/232
Lab 01 – Instance Exploration IBM Software
Lab 01 – Instance Exploration Page 11
___9. Browse directorySAMPLE to see the metadata files located there
___10. Browse the various directories and files. What do you suppose SQLOGSTREAM0000 is? (Hint:it’s a default directory)
SQLOGSTREAM0000 is where your active log path defaults to unless you change the location
___11. SQLDBDIR , which is on the same level as SQL0001, is the location of the "local databasedirectory" for all databases created under instance DB2. We will be learning about what a localdatabase directory is later.
7/28/2019 PoT.im.07.1.017.13 Workbook Windows
http://slidepdf.com/reader/full/potim07101713-workbook-windows 12/232
IBM Software DB2 10.1 Administration for the Experienced SQL Server DBA
B. Start and Stop a DB2 Instance
___12. Open a Windows Command Prompt
___13. To see the environment variable that shows the current instance, type:
set db2instance
___14. To stop an instance, type:
db2stop force
This command works against the current instance only
db2 stop dbm is an alternative using the CLP (try later when we use the CLP)
___15. To start an instance, type:
db2start
A DB2 instance always takes only a few seconds to start
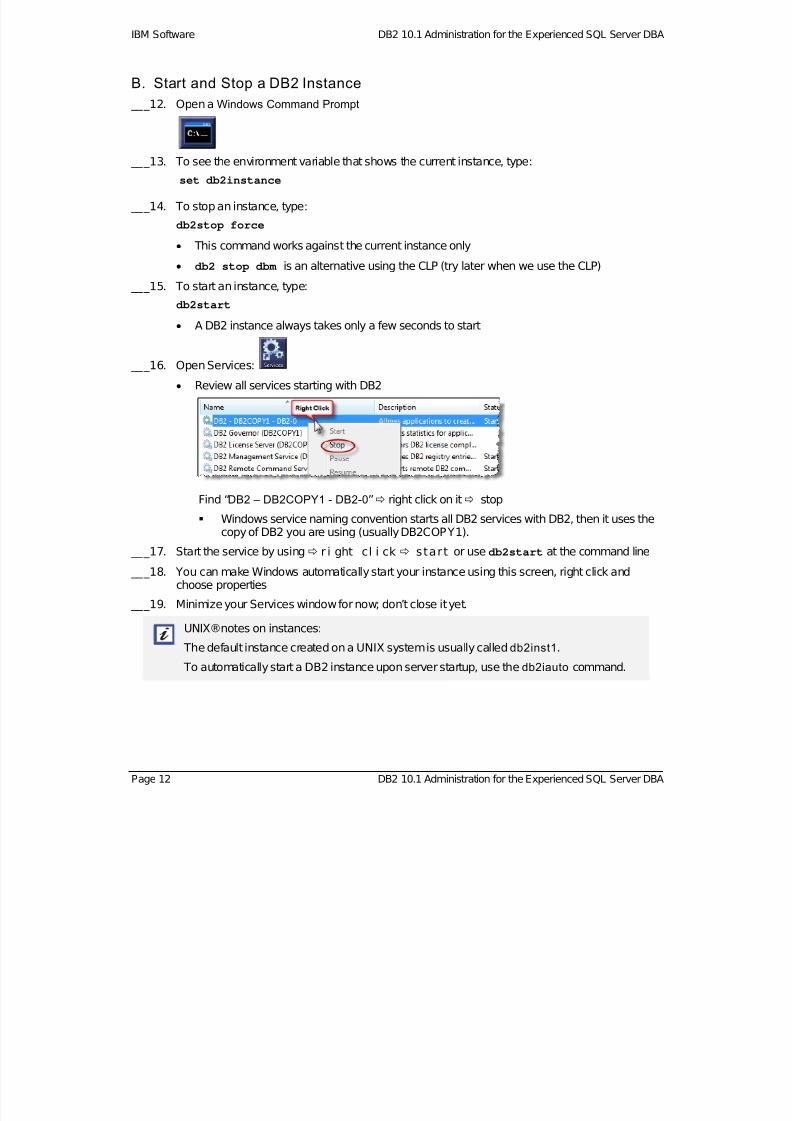
___16. Open Services:
Review all services starting with DB2
Find “DB2 – DB2COPY1 - DB2-0” right click on it stop
Windows service naming convention starts all DB2 services with DB2, then it uses thecopy of DB2 you are using (usually DB2COPY1).
___17. Start the service by using r i ght cl i ck start or use db2start at the command line
___18. You can make Windows automatically start your instance using this screen, right click andchoose properties
___19. Minimize your Services window for now; don’t close it yet.
UNIX®notes on instances: The default instance created on a UNIX system is usually calleddb2inst1.
To automatically start a DB2 instance upon server startup, use thedb2iauto command.
Page 12 DB2 10.1 Administration for the Experienced SQL Server DBA

7/28/2019 PoT.im.07.1.017.13 Workbook Windows
http://slidepdf.com/reader/full/potim07101713-workbook-windows 13/232
Lab 01 – Instance Exploration IBM Software
C. CLP Introduction
___20. This section is to demonstrate a command line interface for DB2.
___21. Here are terms used throughout these Proof of Technology lab workbooks:
Windows Command Prompt
Windows Explorer
DB2 CLP Command Window
DB2 CLP Interactive
Windows Operating System command shell
Windows Operating System GUI
DB2 command window running in the OS shell
DB2 command window running in its own shell
___22. To start the DB2CLP Command Window, from the Windows Command Prompt, type:
db2cmd
This starts the DB2 shell over the OS shell often called the “DB2 CLP Command Window This is one mode of the Command Line Processor (CLP)
___23. Close the Windows Command Prompt you opened first as we won't be needing it for now. ___24. From the new DB2 CLP Command Window you just opened, type:
db2 get dbm cfg
Notice the use of “dbm” (data base manager = instance)
These are the instance configuration parameters
___25. To see what is in the instance memory, hit your up arrow key, then finish typing:
db2 get dbm cfg show detail
You will get an error stating you are attached to the instance, so you cannot get detailedinformation from it. The “detail” will show temporary changes to the cfg settings (if any) soyou need to be attached to the instance to ‘”find” this information
The “cfg” it is referencing is simply information in a binary file and saved changes arepersistent.
Lab 01 – Instance Exploration Page 13
7/28/2019 PoT.im.07.1.017.13 Workbook Windows
http://slidepdf.com/reader/full/potim07101713-workbook-windows 14/232
IBM Software DB2 10.1 Administration for the Experienced SQL Server DBA
___26. To attach to a DB2 instance, type:
db2 attach to db2
___27. Try the previous command again (hint: hit your up arrow key):
db2 get dbm cfg show detail
___28. To see the DB2 Administration Server (DAS) settings, type:db2 get admin cfg
DAS is a special process that helps administrate communication between instances anddatabases, locally and remotely which has its own configuration settings
For UNIX systems, a special DAS user needs to be created, normally called dasusr1
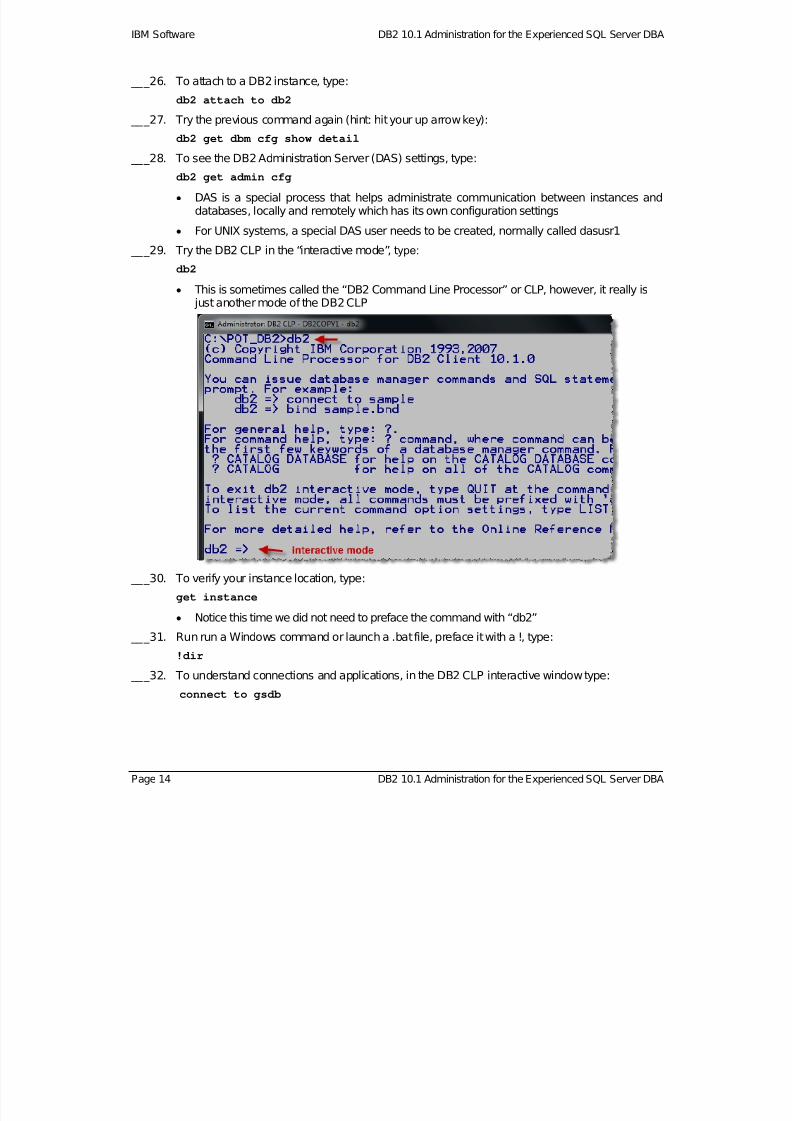
___29. Try the DB2 CLP in the “interactive mode”, type:
db2
This is sometimes called the “DB2 Command Line Processor” or CLP, however, it really is just another mode of the DB2 CLP
___30. To verify your instance location, type:
get instance
Notice this time we did not need to preface the command with “db2”
___31. Run run a Windows command or launch a .bat file, preface it with a !, type:
!dir
___32. To understand connections and applications, in the DB2 CLP interactive window type:
connect to gsdb
Page 14 DB2 10.1 Administration for the Experienced SQL Server DBA

7/28/2019 PoT.im.07.1.017.13 Workbook Windows
http://slidepdf.com/reader/full/potim07101713-workbook-windows 15/232
Lab 01 – Instance Exploration IBM Software
___33. Now, type:
list active databases
Active databases have at least one connection to them by at least one application
This database is active because we connected to it
___34. Type:
list applications
Notice that GSDB has a db2bp.exe application name (the CLP)
___35. Type:
list applications show detail
This demonstrates there are other applications to the database started on our behalf whenthe database was activated
___36. Type:
terminate
This command does the following: resets the connection to GSDB, refreshes the directorycache, stops the background process and leaves the CLP interactive session
___37. We are no longer in the interactive mode, but we can still run DB2 commands. Try listing theactive databases. What happens and why?
Lab 01 – Instance Exploration Page 15
7/28/2019 PoT.im.07.1.017.13 Workbook Windows
http://slidepdf.com/reader/full/potim07101713-workbook-windows 16/232
IBM Software DB2 10.1 Administration for the Experienced SQL Server DBA
D. DB2 Windows Registry
___38. Click the "Start" button
___39. In the search type:regedit then choose regedit.exe Do not make changes here!
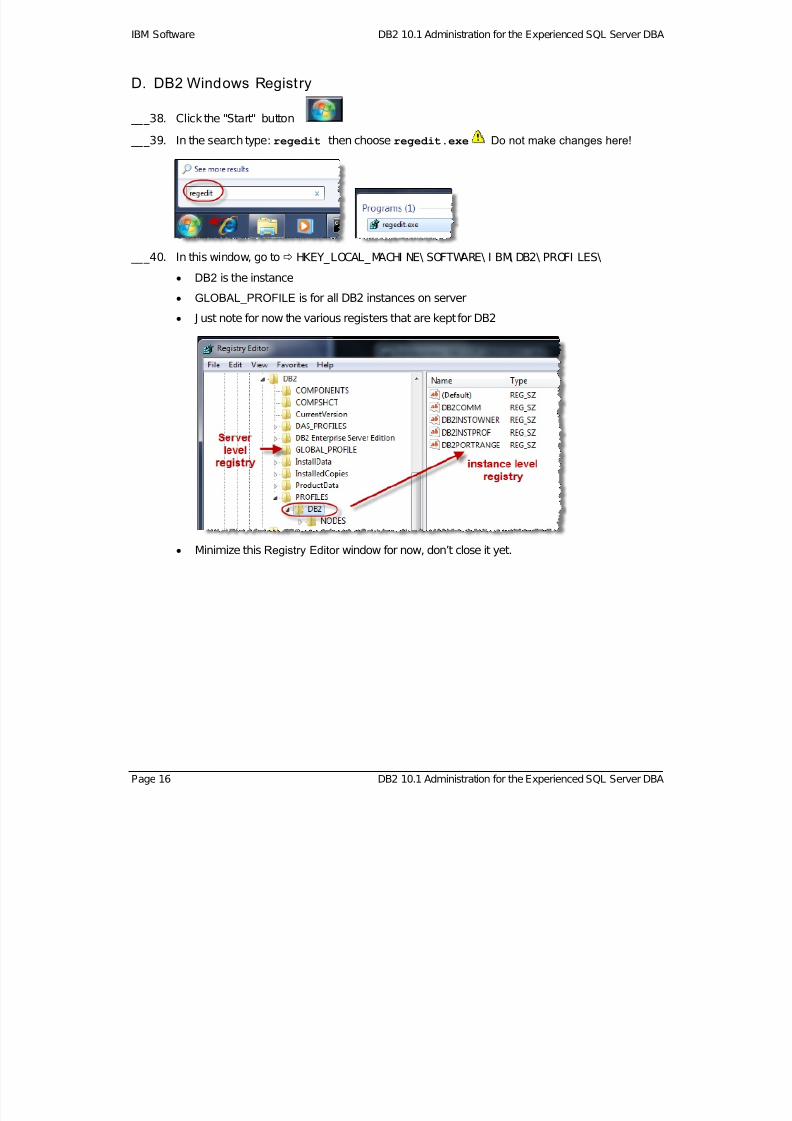
___40. In this window, go to HKEY_LOCAL_MACHI NE\ SOFTWARE\ I BM\ DB2\ PROFI LES\
DB2 is the instance
GLOBAL_PROFILE is for all DB2 instances on server
J ust note for now the various registers that are kept for DB2
Minimize this Registry Editor window for now, don’t close it yet.
Page 16 DB2 10.1 Administration for the Experienced SQL Server DBA

7/28/2019 PoT.im.07.1.017.13 Workbook Windows
http://slidepdf.com/reader/full/potim07101713-workbook-windows 17/232
Lab 01 – Instance Exploration IBM Software
E. Create a New DB2 Instance
DB2 instance creation on Windows:
1. Requires administration authority to run
2. Creates a Windows Service (with “DB2 – [instance_name – node_name]” convention)
3. Creates an Instance directory (e.g. Document s and set t i ngs…/ DB2copy1/ i nst _ name)
4. Creates a Registry Key (regedit, HKEY_LOCAL…)
DB2 Instance creation on UNIX:
1. Sets environment variables DB2INSTANCE and PATH
Creates /SQLLIB subdirectory in $HOME of the SYSADM (e.g. / home/ [ i nst - name]/ s ql l i b)
Configures communication based on servers available protocol
2. Creates files
db2profile – for main environment variable settings (bourne, bash, ksh) userprofile – for upgrade and additional environment variable settings
3. Requires user id to:
Run with root authority – this is because it needs to access the db2icrt command in the DB2install directory / opt / I BM/ db2/ [ ver si on] / i nst ance/ db2i crt on most UNIX platforms / opt / i bm/ db2/ [ ver si on] / i nst ance/ db2i crt on Linux®
Specifies an instance name that is tied to a particular user id which has its own home filesystem and home directory; this user id should also have the SYSADM authority
Create a DB2 instance and then verify it in Windows:
___41. In the DB2 CLP Command Window, change directories to C:\POT_DB2\01INSTANCE
___42. Type:
db2icrt db2bkp
The instance is created. For details on this command see file:
I nst ance_DB2I CRT_Command. t xt ___43. Services window check:
Go to Services window and click Action refresh
Find new service db2bkp (it’s name is: DB2 - DB2copy1 - db2bkp)
Start this instance (Hint: right click on it)
Close the Services window now.
Lab 01 – Instance Exploration Page 17

7/28/2019 PoT.im.07.1.017.13 Workbook Windows
http://slidepdf.com/reader/full/potim07101713-workbook-windows 18/232
IBM Software DB2 10.1 Administration for the Experienced SQL Server DBA
___44. Registry Editor check:
In your Registry Editor window click: Vi ew r ef r esh
Find the new folder created for db2bkp
Close the Registry Editor window
___45. Instance directory check:
Windows Explorer Vi ew r ef r esh
Find the instance metadata folder in: C: \ Progr am Dat a\ I BM\ DB2\ DB2COPY1 folder
You should see your new instance folder DB2BKP
___46. Perform other checks in a DB2CLP Command Window to see you new instance, type:
db2set –l (shows available instance profiles)
db2ilist (shows same thing, but with some options)
db2 get instance (what is your default instance?)
set db2instance=db2bkp (change your current instance)
db2 get instance (you should be pointing to DB2BKP instance now)
___47. Now let’s explore dropping instances:
db2icrt db2jnk (check to see if it created another instance)
db2idrop db2jnk (gets rid of this instance… that’s it!)
This command only has one flag that it so force applications off before dropping, see:Instance DB2IDROP_Command.txt
Creating and dropping instances in DB2 is just that easy
Page 18 DB2 10.1 Administration for the Experienced SQL Server DBA

7/28/2019 PoT.im.07.1.017.13 Workbook Windows
http://slidepdf.com/reader/full/potim07101713-workbook-windows 19/232
Lab 01 – Instance Exploration IBM Software
F. Catalog a New DB2 Instance
Now that we know that the instance has been created, we need to catalog it. To catalog the instancemanually with a script, go to a DB2 CLP Command Window:
___48. Make sure you change to directory C: \ POT_DB2\ 01I NSTANCE (Hint use CD command)
___49. Review and execute this script: Instance01.CMD
Note: to review scripts you can use “more [scriptname]” or use the Windows Explorer , clickon the file and right click on [edit]
To execute a CMD script simply type the name of the file (you can even leave off .CMD)
All scripts in this PoT will be run from a DB2 CLP Command Window from now on unlessotherwise specified
___50. From the DB2CLP Command Window type:
db2 list node directory
___51. Notice the instance DB2 now “knows about”, or has cataloged, the DB2BKP instance. Thismeans they can now communicate with each other and that any GUI tools launched can seeboth of them locally or remotely.
You can use the utilities db2cfexp AND db2cfimp to export and import all of your client’sconfiguration settings. This allows you to easily share all of the catalog information withoutdoing individual catalog commands. These commands also allow you to exchange protocol,registry, dbm cfg and ODBC/CLI settings. (ODBC is Open Database Connectivity.)
Usage of this tool is demonstrated in the extra exercises of this lab.
Lab 01 – Instance Exploration Page 19
7/28/2019 PoT.im.07.1.017.13 Workbook Windows
http://slidepdf.com/reader/full/potim07101713-workbook-windows 20/232
IBM Software DB2 10.1 Administration for the Experienced SQL Server DBA
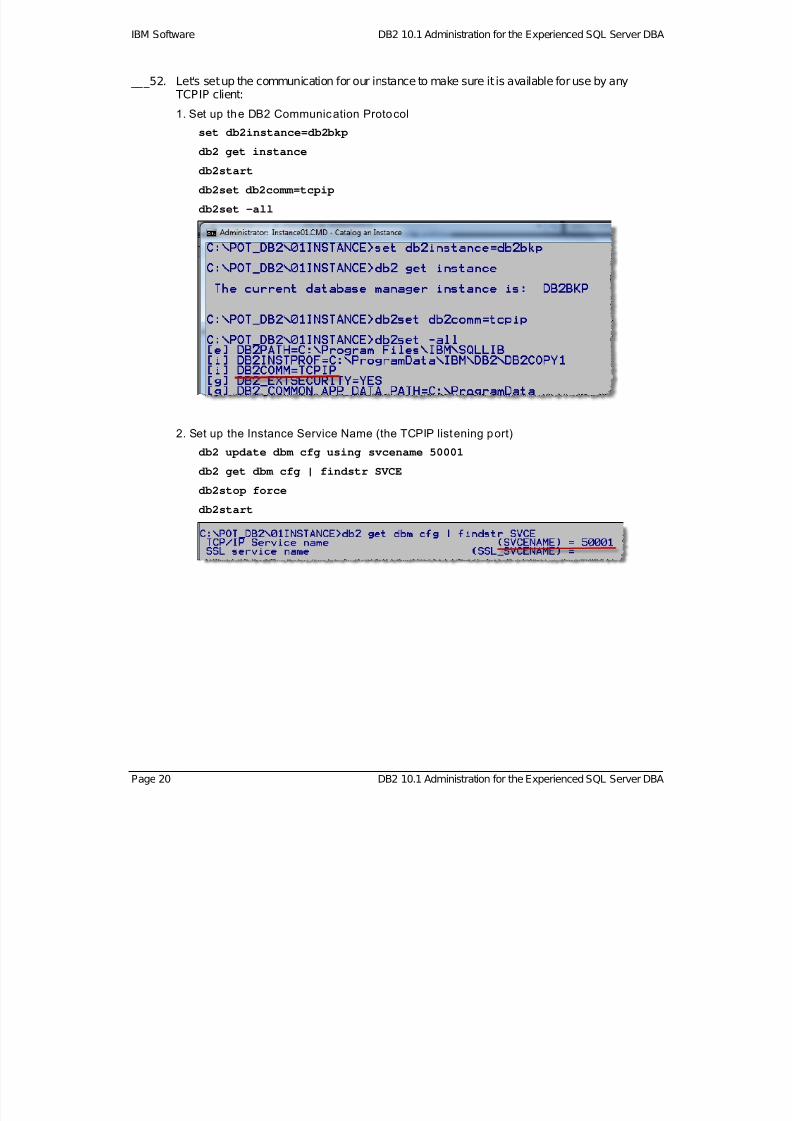
___52. Let's set up the communication for our instance to make sure it is available for use by any TCPIP client:
1. Set up the DB2 Communication Protocol
set db2instance=db2bkp
db2 get instance
db2start
db2set db2comm=tcpip
db2set -all
2. Set up the Instance Service Name (the TCPIP listening port)
db2 update dbm cfg using svcename 50001
db2 get dbm cfg | findstr SVCEdb2stop force
db2start
Page 20 DB2 10.1 Administration for the Experienced SQL Server DBA
7/28/2019 PoT.im.07.1.017.13 Workbook Windows
http://slidepdf.com/reader/full/potim07101713-workbook-windows 21/232
Lab 01 – Instance Exploration IBM Software
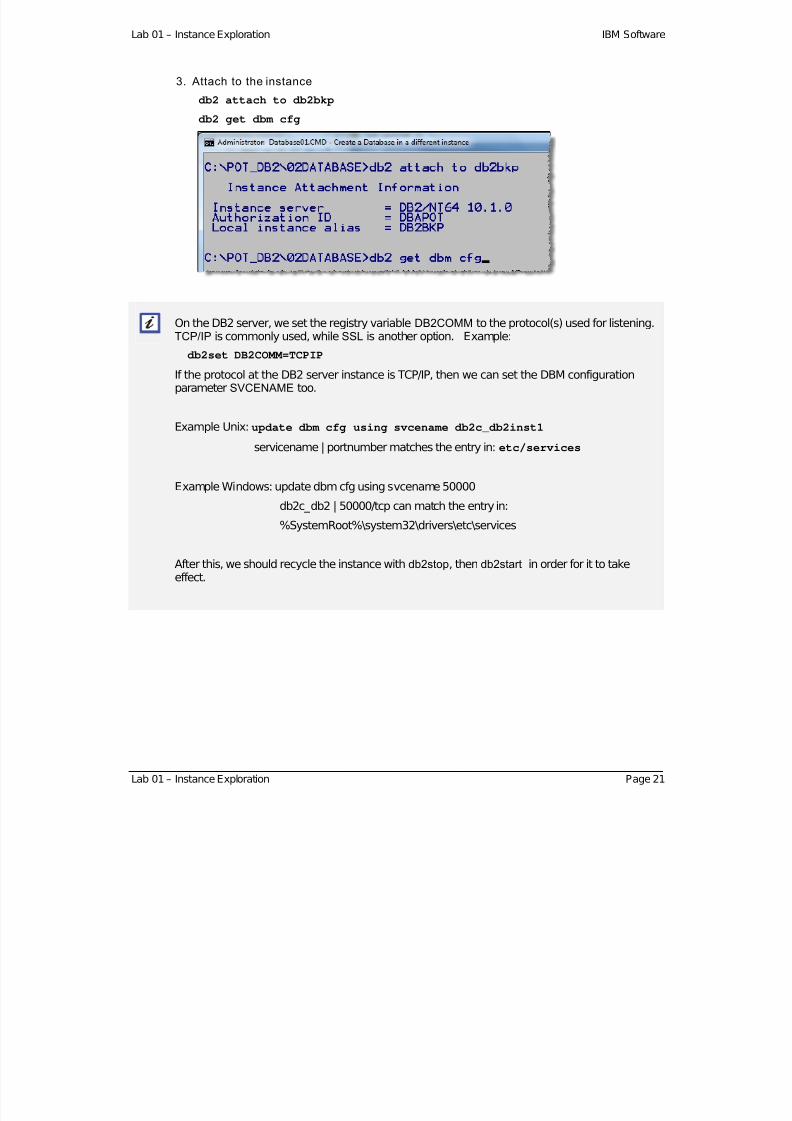
3. Attach to the instance
db2 attach to db2bkp
db2 get dbm cfg
On the DB2 server, we set the registry variable DB2COMM to the protocol(s) used for listening.TCP/IP is commonly used, while SSL is another option. Example:
db2set DB2COMM=TCPIP
If the protocol at the DB2 server instance is TCP/IP, then we can set the DBM configurationparameter SVCENAME too.
Example Unix: update dbm cfg using svcename db2c_db2inst1
servicename | portnumber matches the entry in: etc/services
Example Windows: update dbm cfg using svcename 50000
db2c_db2 | 50000/tcp can match the entry in:
%SystemRoot%\system32\drivers\etc\services
After this, we should recycle the instance with db2stop, then db2start in order for it to takeeffect.
Lab 01 – Instance Exploration Page 21

7/28/2019 PoT.im.07.1.017.13 Workbook Windows
http://slidepdf.com/reader/full/potim07101713-workbook-windows 22/232
IBM Software DB2 10.1 Administration for the Experienced SQL Server DBA
G. Extra Exercises
DB2CFEXP (Connect ivity Configuration Export Tool ) usage example
___53. Review and execute script: Instance02.CMD
Review files Instance02_OUTPUT.TXT
DBMCFG, DBCFG and REG_VARIABLES Administration v iews usage example
___54. Review and execute script: Instance03.CMD which executes Instance04.SQL
DB2DIAG (diagnostic log too l) usage example
___55. Review and execute script: Instance05.CMD
Review files Instance05a_OUTPUT.TXT and Instance05b_OUTPUT.TXT
INSPECT and DB2INSPF usage example
___56. Review and execute script: Instance06.CMD
Review files Instance06_OUTPUT.TXT
DB2PD (Problem Determination) usage example
___57. Review and execute script: Instance07.CMD
Review files Instance07_OUTPUT.TXT
DB2GCF (Generic Control Facil ity) usage example
___58. Review and execute script: Instance08.CMD
Review files Instance08_OUTPUT.TXT
DB2SUPPORT usage example
___59. Review script and execute it: Instance09.CMD
Executes problem analysis support tool, db2support, in a full mode
Review file instance09_out.zip and then launch db2support.html
Page 22 DB2 10.1 Administration for the Experienced SQL Server DBA

7/28/2019 PoT.im.07.1.017.13 Workbook Windows
http://slidepdf.com/reader/full/potim07101713-workbook-windows 23/232
Lab 01 – Instance Exploration IBM Software
Lab 01 – Instance Exploration Page 23
CLP exercises
___60. How do you change your CLP interactive prompt to: “Your next wish master? “
db2set db2_clpprompt=”Your wish master? ”
When this is done, change it back to the default with:
db2set db2_clpprompt=
___61. Execute these commands from the CLP interactive mode:
connect to sample
select current date from sysibm.dummy
___62. When you get an error code, check it out by using the following:
DB2 ? SQL0204N
___63. Fix this command by executing this:
select current date from sysibm.sysdummy1
*** End of Instance Exploration Lab - by Burt Vialpando ***
7/28/2019 PoT.im.07.1.017.13 Workbook Windows
http://slidepdf.com/reader/full/potim07101713-workbook-windows 24/232
IBM Software DB2 10.1 Administration for the Experienced SQL Server DBA
Lab 02. Database Creation and Exploration
A. General DB2 Database Commands
Let’s explore the database called sample in instance called DB2. First let’s make sure we are pointing
to the appropriate instance. ___1. Open a DB2 CLP Command Window if you don’t already have one open.
___2. Change directory to C: \ POT_DB2\ 02DATABASE
___3. In this window type:
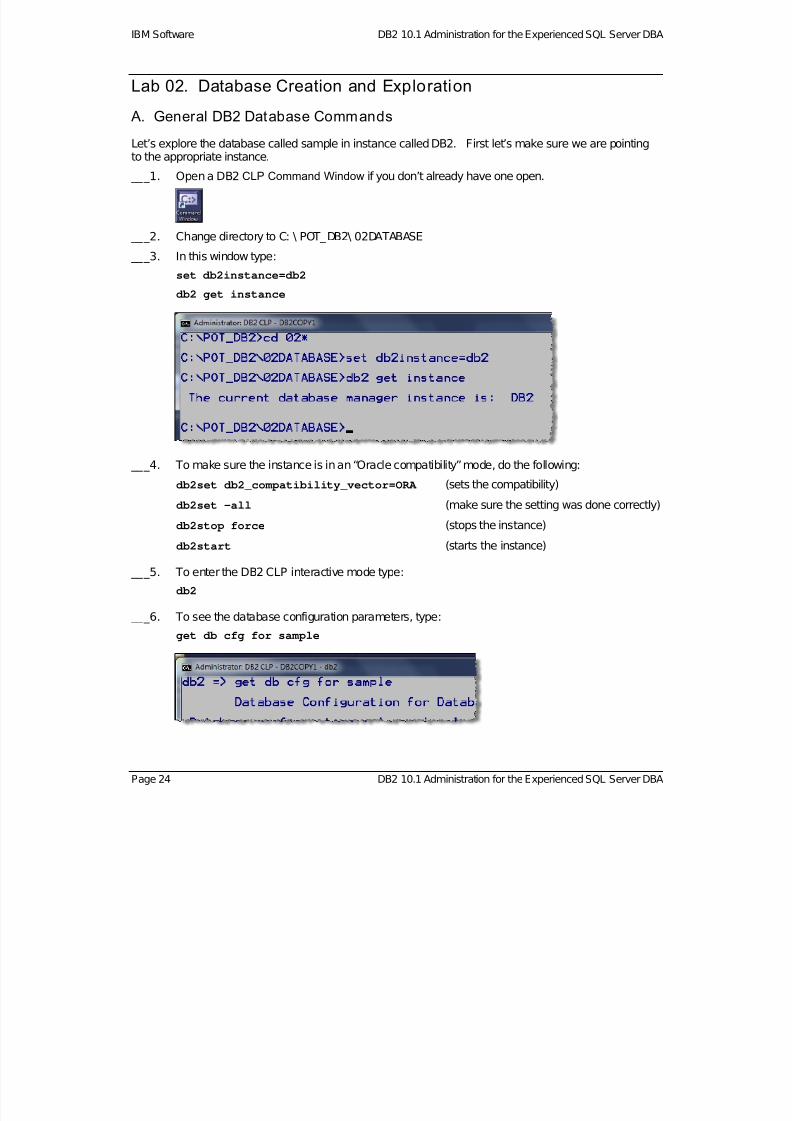
set db2instance=db2
db2 get instance
___4. To make sure the instance is in an “Oracle compatibility” mode, do the following:
db2set db2_compatibility_vector=ORA (sets the compatibility)
db2set –all (make sure the setting was done correctly)
db2stop force (stops the instance)
db2start (starts the instance)
___5. To enter the DB2 CLP interactive mode type:
db2
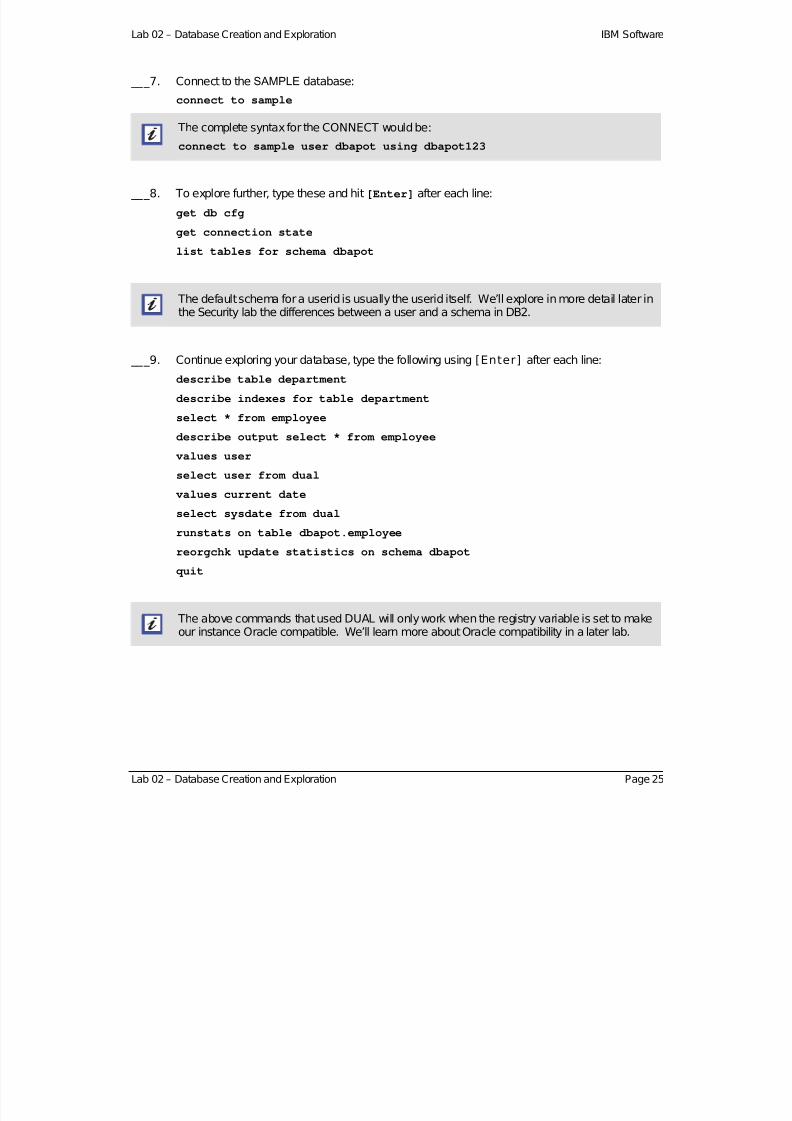
___6. To see the database configuration parameters, type:
get db cfg for sample
Page 24 DB2 10.1 Administration for the Experienced SQL Server DBA
7/28/2019 PoT.im.07.1.017.13 Workbook Windows
http://slidepdf.com/reader/full/potim07101713-workbook-windows 25/232
Lab 02 – Database Creation and Exploration IBM Software
___7. Connect to the SAMPLE database:
connect to sample
The complete syntax for the CONNECT would be:
connect to sample user dbapot using dbapot123
___8. To explore further, type these and hit[Enter] after each line:
get db cfg
get connection state
list tables for schema dbapot
The default schema for a userid is usually the userid itself. We’ll explore in more detail later in
the Security lab the differences between a user and a schema in DB2.
___9. Continue exploring your database, type the following using[Enter] after each line:
describe table department
describe indexes for table department
select * from employee
describe output select * from employee
values user
select user from dual
values current date
select sysdate from dual
runstats on table dbapot.employee
reorgchk update statistics on schema dbapot
quit
The above commands that used DUAL will only work when the registry variable is set to make
our instance Oracle compatible. We’ll learn more about Oracle compatibility in a later lab.
Lab 02 – Database Creation and Exploration Page 25

7/28/2019 PoT.im.07.1.017.13 Workbook Windows
http://slidepdf.com/reader/full/potim07101713-workbook-windows 26/232
IBM Software DB2 10.1 Administration for the Experienced SQL Server DBA
B. The DB2 System and Local Database Director ies
___10. In order to learn about DB2 database directories, use commands from the DB2 CLP CommandWindow:
db2 list database directory
This is a system database directory, which means a directory of all databases both remoteand local that are cataloged for the current instance.
The command: db2 list database directory on c: would give you a local database directory, which means all databases created on the drive path. This is onlyupdated during a CREATE DATABASE or DROP DATABASE command.
___11. Connect to the GSDB database to prove that you can access it, type:
db2 connect to gsdb
___12. Connect back to the SAMPLE database using the same background process:
db2 connect to sample
___13. Uncatalog the GSDB database in the current instance:
db2 uncatalog database gsdb
___14. Refresh the directory cache (and terminate the background process as well):
db2 terminate
___15. List the system database directory again. Notice GSDB is not there:
db2 list database directory
___16. List the local database directory
db2 list database directory on c:
___17. Try to connect to the GSDB directory (notice you cannot):
db2 connect to gsdb
___18. Recatalog database GSDB to make it available again:
db2 catalog db gsdb
___19. Refresh the directory cache (and terminate the background process as well):
db2 terminate
___20. Try to connect to the GSDB directory (notice now you can!):
db2 connect to gsdb
Page 26 DB2 10.1 Administration for the Experienced SQL Server DBA
7/28/2019 PoT.im.07.1.017.13 Workbook Windows
http://slidepdf.com/reader/full/potim07101713-workbook-windows 27/232
Lab 02 – Database Creation and Exploration IBM Software
C. Creating a Database
Creating a database managed by the instance DB2
___21. To create a database in the instanceDB2, try these commands:
set db2instance=db2
db2 get instance
db2 terminate
db2 create database sample2
This will take a few minutes…while this command is executing, see the explanation in thebox below for what the CREATE DATABASE command is doing.
Also, review the file Database_CREATE_DATABASE_Command.txt
The DB2CREATE DATABASE command does the following:
1. Creates a subdirectory to hold the database metadata information
2. Creates SYCATSPACE, TEMPSPACE1 and USERSPACE1 table spaces
3. Creates system catalog tables in the SYSCATSPACE table space
4. Creates SQLJ , SYSCAT, SYSFUN, SYSIBM, SYSIBMADM, SYSIBMINTERNAL, SYSIBMTS,SYSPROC, SYSPUBLIC and SYSSTAT schemas
5. Grants SECADM, DBADM, DATAACCESS and ACCESSCTRL authorities to the databasecreator
6. Grants selected database privileges to PUBLIC (unless specified as restricted)
7. Defaults many things for you, but you can control these if you wish:
Partition number Install path Database alias name Collating characteristics Codeset and territory Table space characteristics (types, sizes, containers, etc.) Database configuration parameters (using feature called “autoconfigure” which we’ll go
through later) Set up “Automatic Storage” and “Automatic Resize” defaults
Many other things (see: Database CREATE_DATABASE_Command.txt)
___22. When the CREATE DATABASE command finishes, run this command next:
db2 list db directory
Lab 02 – Database Creation and Exploration Page 27
7/28/2019 PoT.im.07.1.017.13 Workbook Windows
http://slidepdf.com/reader/full/potim07101713-workbook-windows 28/232
IBM Software DB2 10.1 Administration for the Experienced SQL Server DBA
Creating a database managed by the instance DB2BKP
___23. Now let’s create a database calledBACKDB in a different instance: DB2BKP
___24. Review and run these scripts:
Database01.CMD which executes Database02.DB2
Remember, it takes a few minutes to finish... while this is running.
___25. Execute these commands:
db2 get instance
db2 list db directory
___26. Notice database BACKDB is not in the directory for our instance DB2. This is because we havenot yet cataloged it to instance DB2. (It is however cataloged to the instance DB2BKP whichmanages / owns it.)
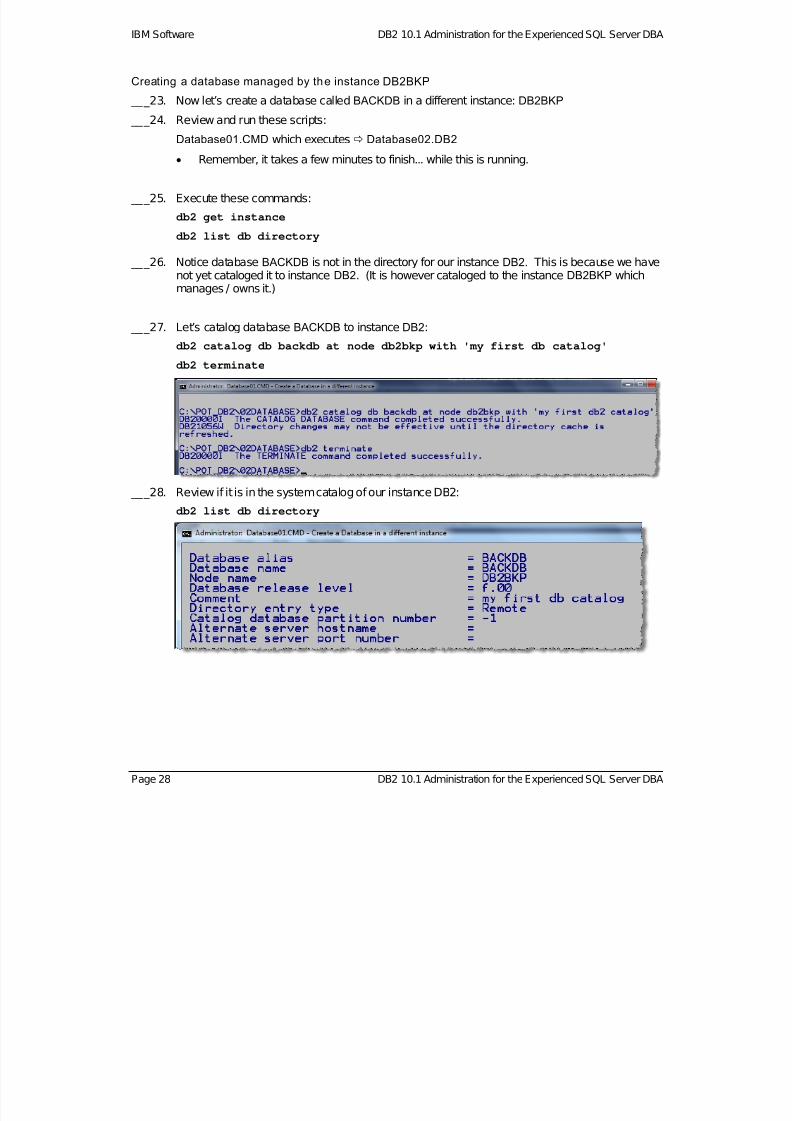
___27. Let’s catalog database BACKDB to instance DB2:
db2 catalog db backdb at node db2bkp with 'my first db catalog'
db2 terminate
___28. Review if it is in the system catalog of our instance DB2:
db2 list db directory
Page 28 DB2 10.1 Administration for the Experienced SQL Server DBA
7/28/2019 PoT.im.07.1.017.13 Workbook Windows
http://slidepdf.com/reader/full/potim07101713-workbook-windows 29/232
Lab 02 – Database Creation and Exploration IBM Software
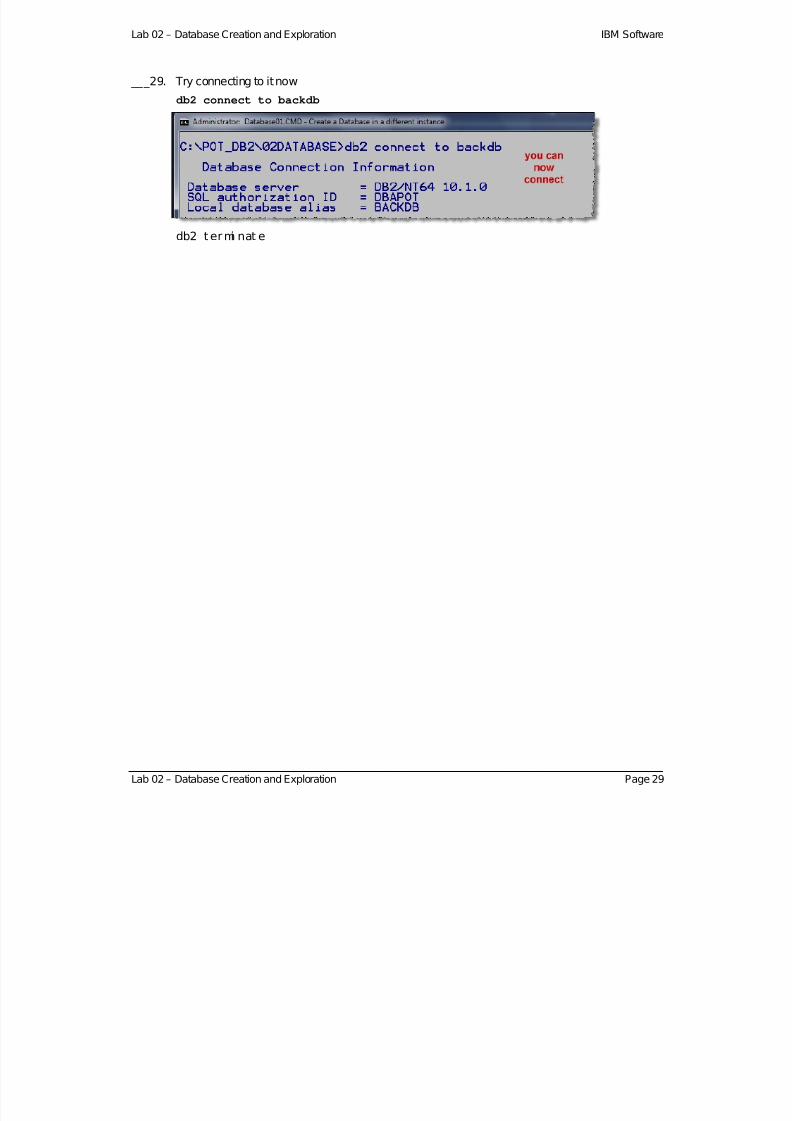
___29. Try connecting to it now
db2 connect to backdb
db2 t ermi nat e
Lab 02 – Database Creation and Exploration Page 29
7/28/2019 PoT.im.07.1.017.13 Workbook Windows
http://slidepdf.com/reader/full/potim07101713-workbook-windows 30/232
IBM Software DB2 10.1 Administration for the Experienced SQL Server DBA
D. Exploring various DB2 database functionality features
Run the following exercises in a DB2 CLP Command Window:
___30. To learn about administrative views and functions:
Review and run script: Database03.CMD
Review file: Database03_OUTPUT.TXT
___31. To learn about db2mtrk Memory Tracking:
Review and run script: Database04.CMD
Review files: Database04_OUTPUT.TXT & Database_DB2MTRK_Command.txt
___32. To learn about Event Monitoring:
Review and run script: Database05.CMD
Review file: Database05_OUTPUT.TXT & Database_DB2EVMON_Commant.txt
Page 30 DB2 10.1 Administration for the Experienced SQL Server DBA
7/28/2019 PoT.im.07.1.017.13 Workbook Windows
http://slidepdf.com/reader/full/potim07101713-workbook-windows 31/232
Lab 02 – Database Creation and Exploration IBM Software
Lab 02 – Database Creation and Exploration Page 31
E. Altering a Table
DB2 allows you to alter a table in many different ways. Here is an example of how DB2 can alter a table:
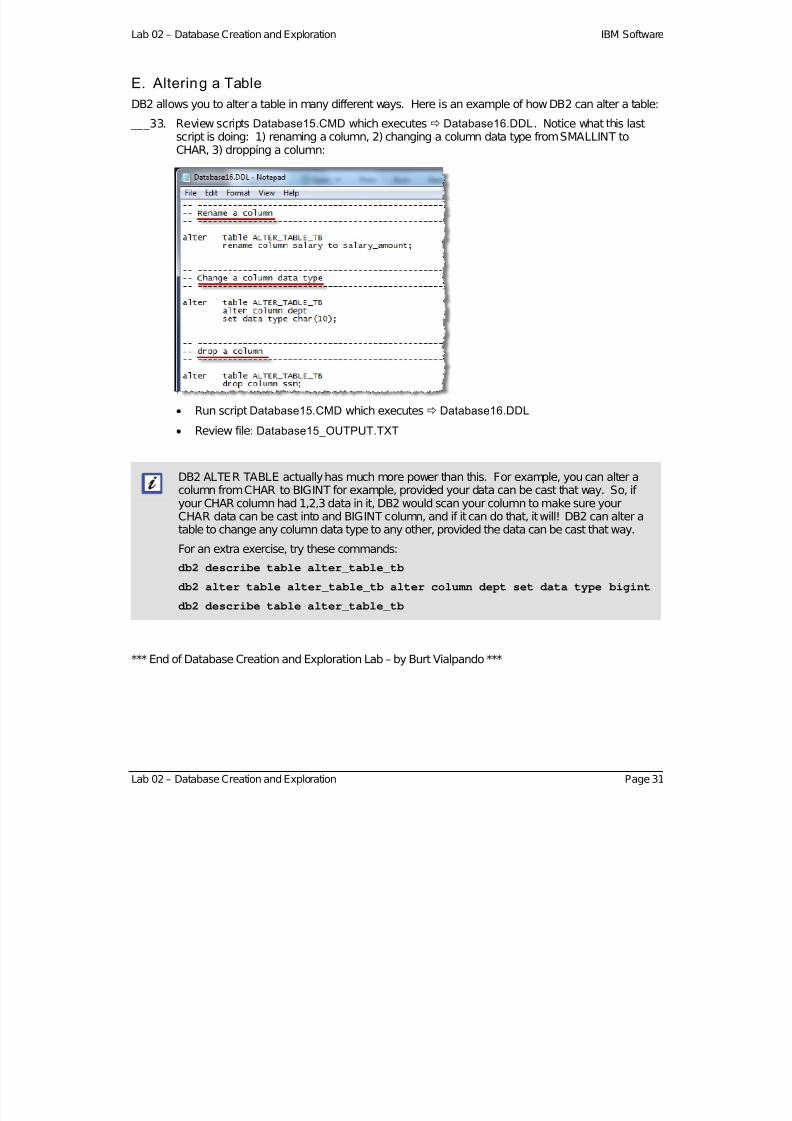
___33. Review scripts Database15.CMD which executes Database16.DDL . Notice what this lastscript is doing: 1) renaming a column, 2) changing a column data type from SMALLINT toCHAR, 3) dropping a column:
Run script Database15.CMD which executes Database16.DDL
Review file: Database15_OUTPUT.TXT
DB2 ALTER TABLE actually has much more power than this. For example, you can alter acolumn from CHAR to BIGINT for example, provided your data can be cast that way. So, if your CHAR column had 1,2,3 data in it, DB2 would scan your column to make sure yourCHAR data can be cast into and BIGINT column, and if it can do that, it will! DB2 can alter atable to change any column data type to any other, provided the data can be cast that way.
For an extra exercise, try these commands:
db2 describe table alter_table_tb
db2 alter table alter_table_tb alter column dept set data type bigint
db2 describe table alter_table_tb
*** End of Database Creation and Exploration Lab – by Burt Vialpando ***
7/28/2019 PoT.im.07.1.017.13 Workbook Windows
http://slidepdf.com/reader/full/potim07101713-workbook-windows 32/232
IBM Software DB2 10.1 Administration for the Experienced SQL Server DBA
Lab 03. Data Studio
A. Launching Data Studio
___1. Open the IBM Data Studio by clicking on this icon on your desktop or in your task bar:
OR…You can open Data Studio by choosing:
Start Al l Progr ams I BM Dat a St udi o Dat a St udi o 3. 1. 1 Ful lcl i ent
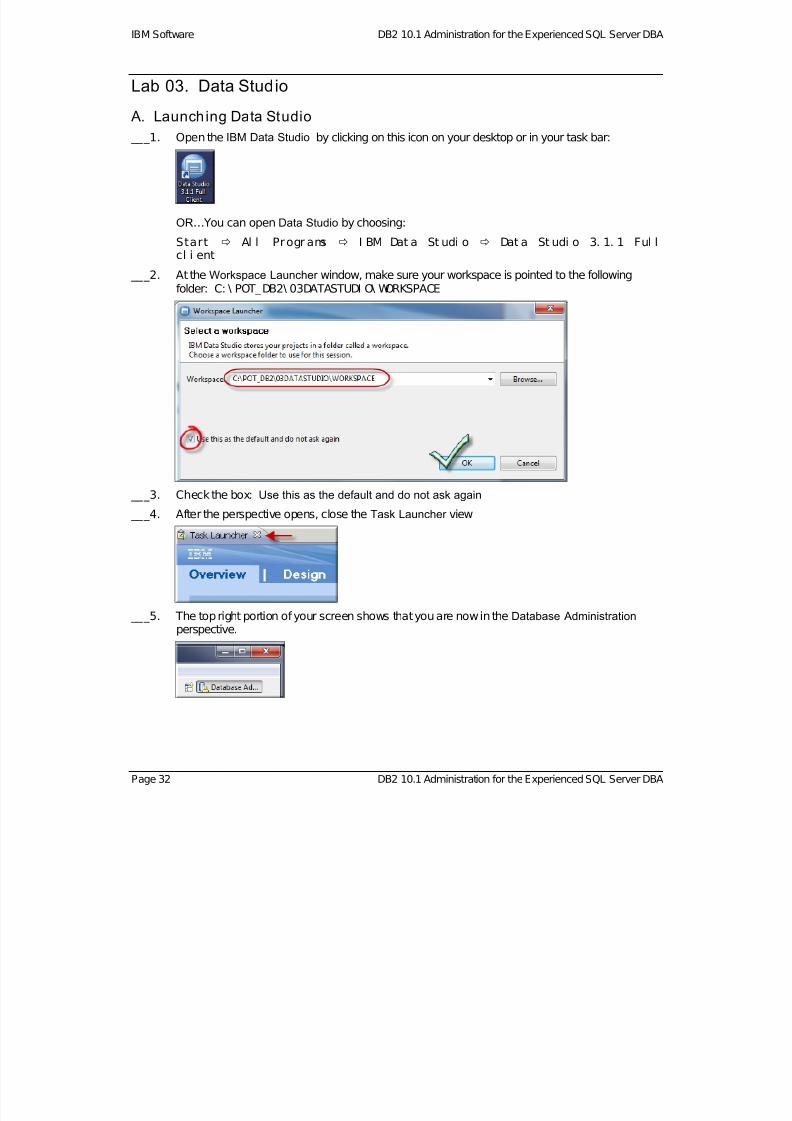
___2. At the Workspace Launcher window, make sure your workspace is pointed to the followingfolder: C: \ POT_DB2\ 03DATASTUDI O\ WORKSPACE
___3. Check the box: Use this as the default and do not ask again
___4. After the perspective opens, close the Task Launcher view
___5. The top right portion of your screen shows that you are now in theDatabase Administration
perspective.
Page 32 DB2 10.1 Administration for the Experienced SQL Server DBA

7/28/2019 PoT.im.07.1.017.13 Workbook Windows
http://slidepdf.com/reader/full/potim07101713-workbook-windows 33/232
Lab 03 – Data Studio IBM Software
B. Connecting to and managing a database
Now we will connect to the GSDB database using the Administration Explorer view. You will find thisview in the top left corner of your Database Administration perspective. (A perspective is made up of anumber of views.)
___6. Expand the view Administration Explorer a little more by clicking on its edge and dragging itover. Then expand the view to see all the databases.
___7. Right click on the connection propertyGSDB Connect
___8. You are now in a Properties for GSDB screen. Fill in the following (case sensitive!) User name: dbapot Password: dbapot123 Save password: [check]
___9. Try [ Test Connect i on] . You should get: Pi ng succeeded!
Lab 03 – Data Studio Page 33
7/28/2019 PoT.im.07.1.017.13 Workbook Windows
http://slidepdf.com/reader/full/potim07101713-workbook-windows 34/232
IBM Software DB2 10.1 Administration for the Experienced SQL Server DBA
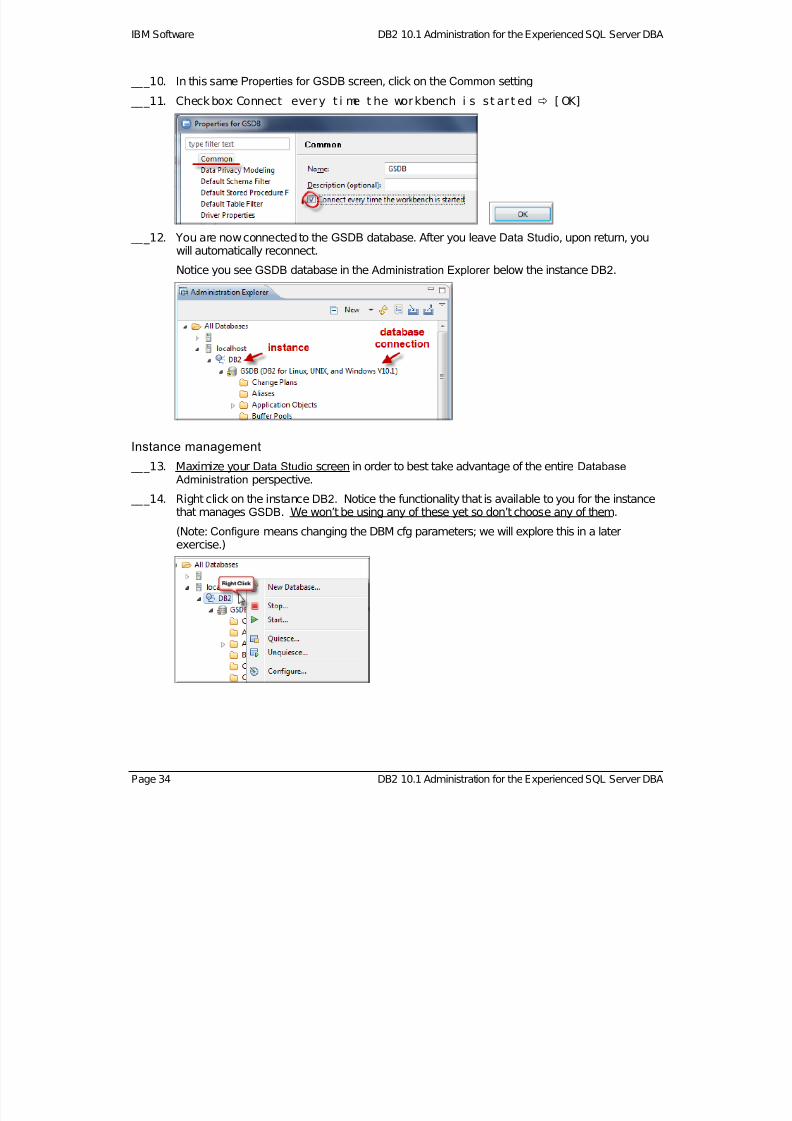
___10. In this same Properties for GSDB screen, click on the Common setting
___11. Check box: Connect every t i me t he workbench i s st ar t ed [ OK]
___12. You are now connected to the GSDB database. After you leave Data Studio, upon return, youwill automatically reconnect.
Notice you see GSDB database in the Administration Explorer below the instance DB2.
Instance management
___13. Maximize your Data Studio screen in order to best take advantage of the entire Database
Administration perspective.
___14. Right click on the instanceDB2. Notice the functionality that is available to you for the instancethat manages GSDB. We won’t be using any of these yet so don’t choose any of them.
(Note: Configure means changing the DBM cfg parameters; we will explore this in a laterexercise.)
Page 34 DB2 10.1 Administration for the Experienced SQL Server DBA
7/28/2019 PoT.im.07.1.017.13 Workbook Windows
http://slidepdf.com/reader/full/potim07101713-workbook-windows 35/232
Lab 03 – Data Studio IBM Software
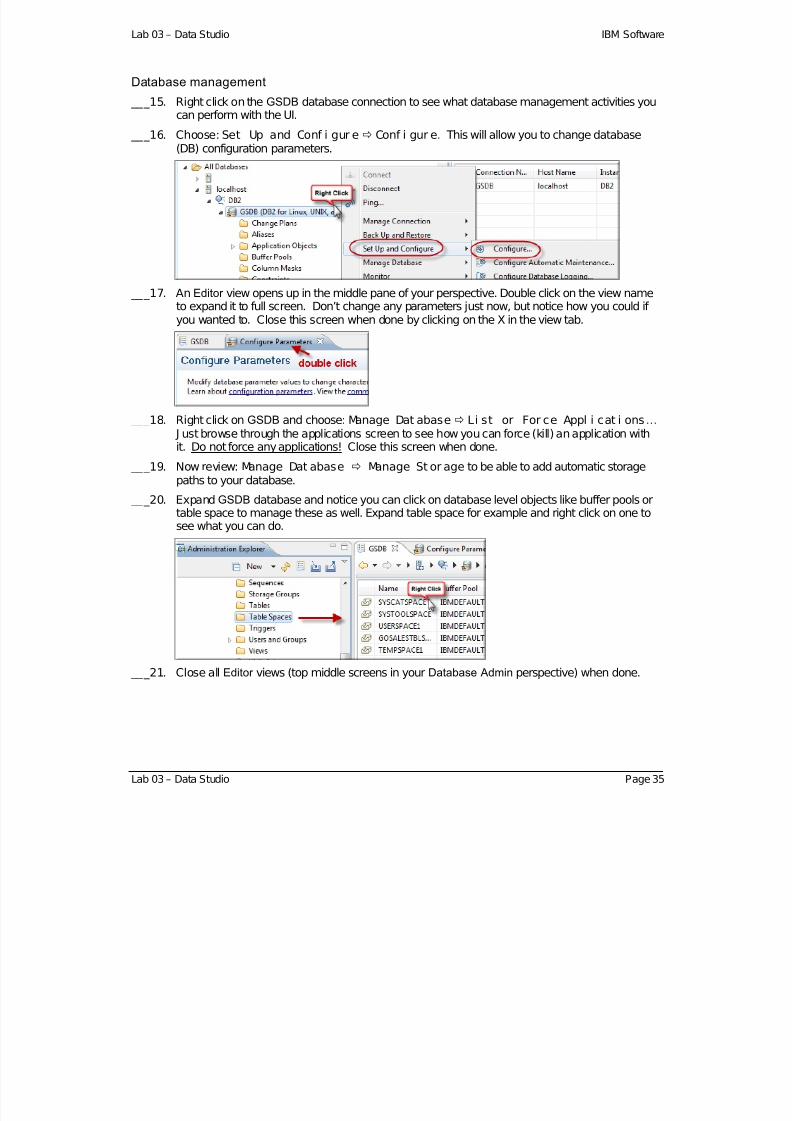
Database management
___15. Right click on the GSDB database connection to see what database management activities youcan perform with the UI.
___16. Choose:Set Up and Conf i gur e Conf i gur e. This will allow you to change database(DB) configuration parameters.
___17. An Editor view opens up in the middle pane of your perspective. Double click on the view nameto expand it to full screen. Don’t change any parameters just now, but notice how you could if
you wanted to. Close this screen when done by clicking on theX in the view tab.
___18. Right click on GSDB and choose: Manage Dat abase Li st or For ce Appl i cat i ons…
J ust browse through the applications screen to see how you can force (kill) an application withit. Do not force any applications! Close this screen when done.
___19. Now review: Manage Dat abase Manage St or age to be able to add automatic storagepaths to your database.
___20. Expand GSDB database and notice you can click on database level objects like buffer pools ortable space to manage these as well. Expand table space for example and right click on one tosee what you can do.
___21. Close all Editor views (top middle screens in your Database Admin perspective) when done.
Lab 03 – Data Studio Page 35
7/28/2019 PoT.im.07.1.017.13 Workbook Windows
http://slidepdf.com/reader/full/potim07101713-workbook-windows 36/232
IBM Software DB2 10.1 Administration for the Experienced SQL Server DBA
Editing and Running SQL
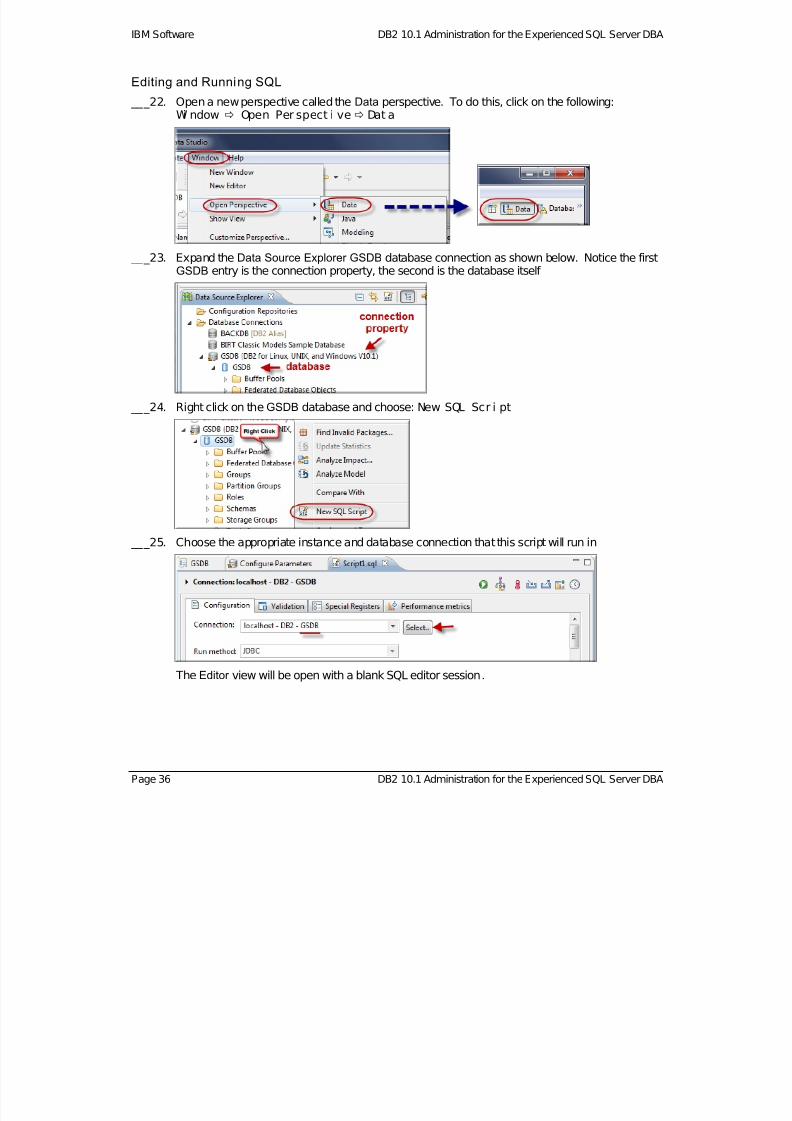
___22. Open a new perspective called the Data perspective. To do this, click on the following:Wi ndow Open Per spect i ve Dat a
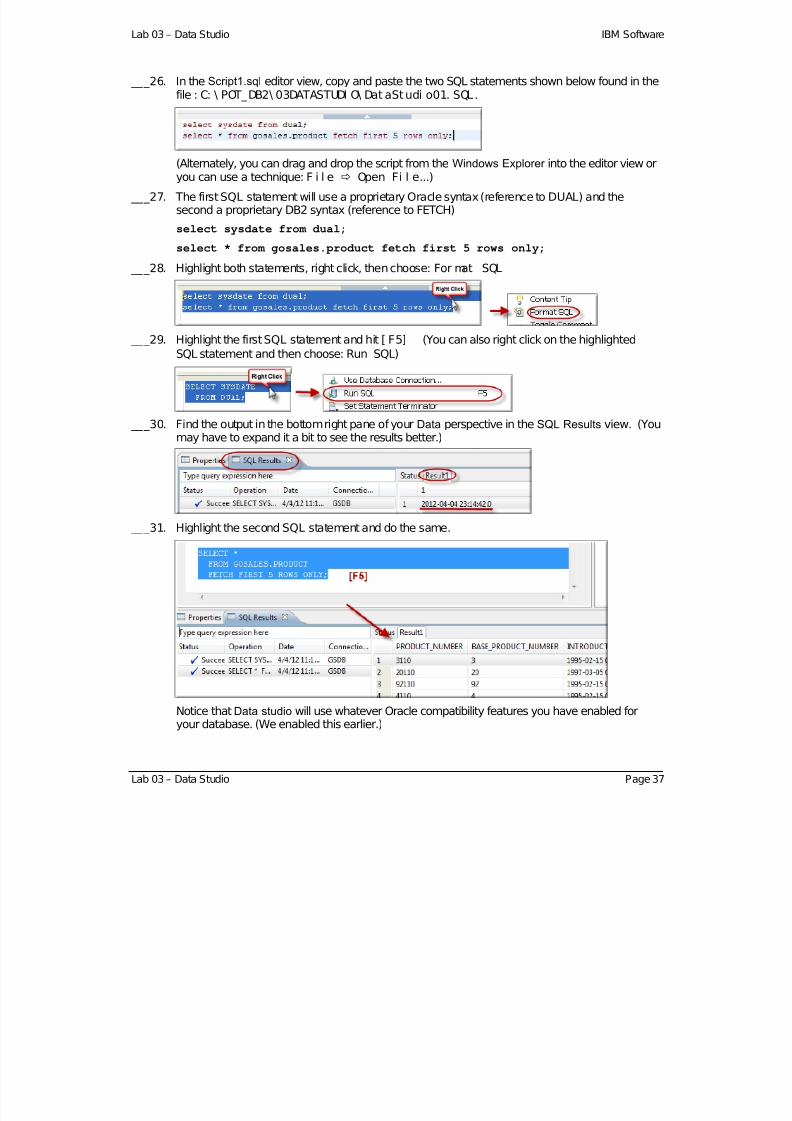
___23. Expand the Data Source Explorer GSDB database connection as shown below. Notice the firstGSDB entry is the connection property, the second is the database itself
___24. Right click on theGSDB database and choose: New SQL Scr i pt
___25. Choose the appropriate instance and database connection that this script will run in
The Editor view will be open with a blank SQL editor session.
Page 36 DB2 10.1 Administration for the Experienced SQL Server DBA
7/28/2019 PoT.im.07.1.017.13 Workbook Windows
http://slidepdf.com/reader/full/potim07101713-workbook-windows 37/232
Lab 03 – Data Studio IBM Software
___26. In the Script1.sql editor view, copy and paste the two SQL statements shown below found in thefile : C: \ POT_DB2\ 03DATASTUDI O\ Dat aStudi o01. SQL.
(Alternately, you can drag and drop the script from the Windows Explorer into the editor view oryou can use a technique:F i l e Open Fi l e...)
___27. The first SQL statement will use a proprietary Oracle syntax (reference to DUAL) and thesecond a proprietary DB2 syntax (reference to FETCH)
select sysdate from dual;
select * from gosales.product fetch first 5 rows only;
___28. Highlight both statements, right click, then choose:For mat SQL
___29. Highlight the first SQL statement and hit[ F5] (You can also right click on the highlightedSQL statement and then choose:Run SQL)
___30. Find the output in the bottom right pane of yourData perspective in the SQL Results view. (Youmay have to expand it a bit to see the results better.)
___31. Highlight the second SQL statement and do the same.
Notice that Data studio will use whatever Oracle compatibility features you have enabled foryour database. (We enabled this earlier.)
Lab 03 – Data Studio Page 37

7/28/2019 PoT.im.07.1.017.13 Workbook Windows
http://slidepdf.com/reader/full/potim07101713-workbook-windows 38/232
IBM Software DB2 10.1 Administration for the Experienced SQL Server DBA
___32. Look at theSQL Results section closely. Notice you can now click on either query you have runbefore. Both result sets are available to you.
You can right click in the SQL Results pane and remove or save any of these results.
___33. Highlight the first query, then right click on it, then choose: Toggl e Comment (or [ Ct r l ] / )
___34. Position your cursor after the asterisk in the second query. Use[ Ct r l ] [ Space] to getcontext assist for this SQL.
Notice here it gives the column names and data types from the table referenced. This helps youbuild or edit the query without having to go to another window to look these things up. You candouble click on any column name to put it into the query. Try it.
.
___35. Remove the keyword “ONLY” from the second query. Notice you get a syntax warning with thered X mark on the line and a red underline near the syntax problem. (Note: you can turn theseoff if you don't want to see them.)
___36. Put the keyword "ONLY" back into the SQL statement to fix the syntax error.
Page 38 DB2 10.1 Administration for the Experienced SQL Server DBA
7/28/2019 PoT.im.07.1.017.13 Workbook Windows
http://slidepdf.com/reader/full/potim07101713-workbook-windows 39/232
Lab 03 – Data Studio IBM Software
___37. Right click in the editor window anywhere, choose:Val i dat e Database Obj ectRef erences
___38. Now change your query to reference a fake column name (like XXX) that does not exist in yourtable in the query (as shown below) and notice you get an error warning.
___39. Change the editor settings back to how it was in the beginning of this Editor lesson
___40. Close this Editor view and don’t save the script.
Lab 03 – Data Studio Page 39
7/28/2019 PoT.im.07.1.017.13 Workbook Windows
http://slidepdf.com/reader/full/potim07101713-workbook-windows 40/232
IBM Software DB2 10.1 Administration for the Experienced SQL Server DBA
C. Exploring Tables
Overview diagrams
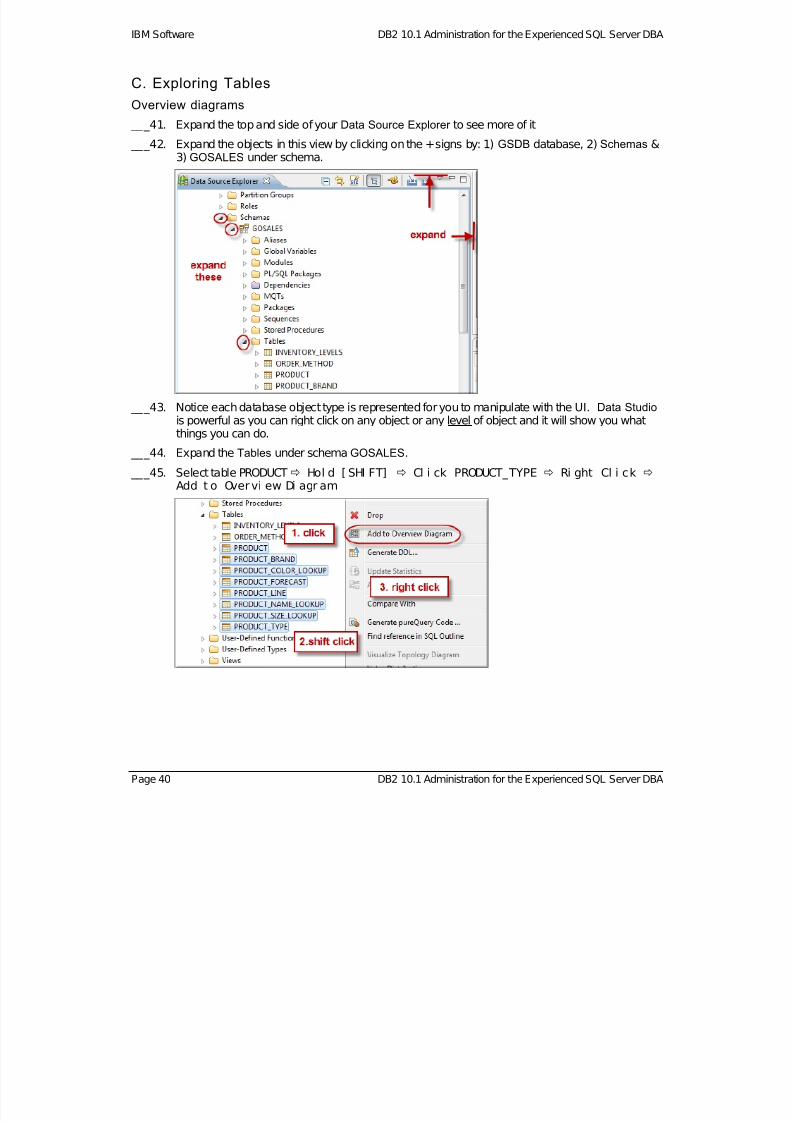
___41. Expand the top and side of your Data Source Explorer to see more of it
___42. Expand the objects in this view by clicking on the + signs by: 1)GSDB database, 2) Schemas &
3) GOSALES under schema.
___43. Notice each database object type is represented for you to manipulate with the UI. Data Studio is powerful as you can right click on any object or any level of object and it will show you whatthings you can do.
___44. Expand the Tables under schema GOSALES.
___45. Select tablePRODUCT Hol d [ SHI FT] Cl i ck PRODUCT_TYPE Ri ght Cl i ck Add t o Overvi ew Di agr am
Page 40 DB2 10.1 Administration for the Experienced SQL Server DBA
7/28/2019 PoT.im.07.1.017.13 Workbook Windows
http://slidepdf.com/reader/full/potim07101713-workbook-windows 41/232
Lab 03 – Data Studio IBM Software
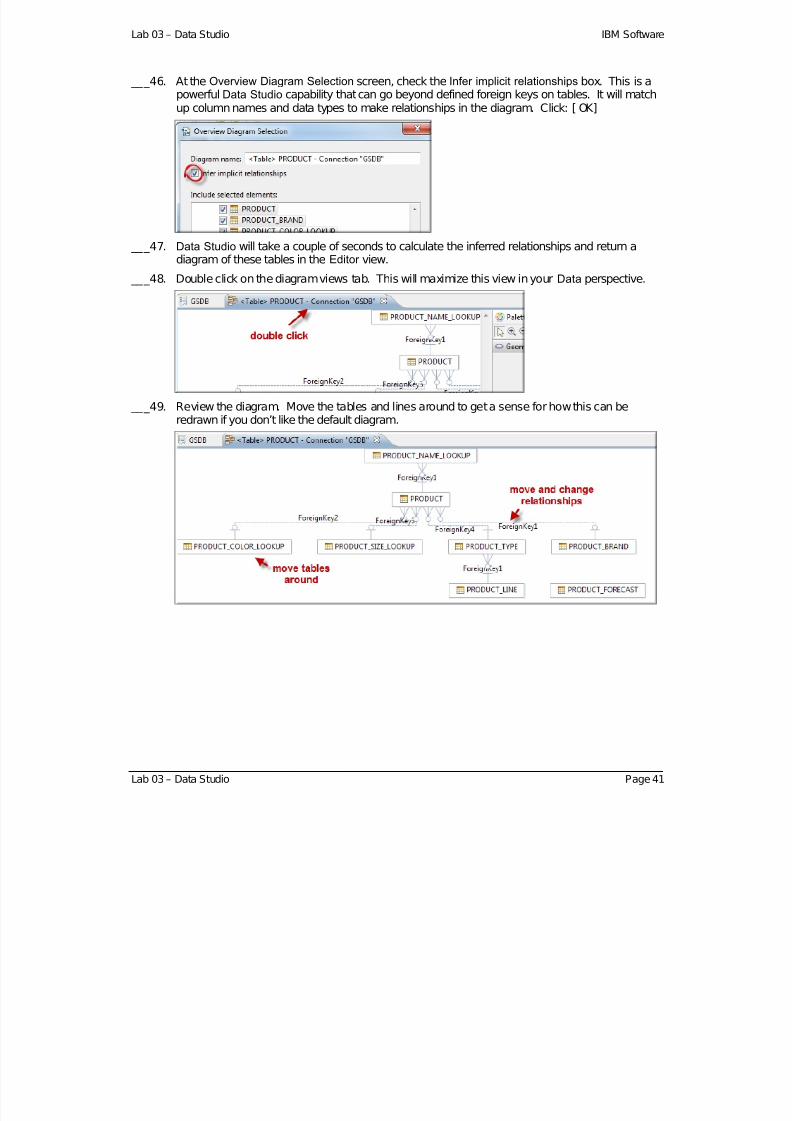
___46. At the Overview Diagram Selection screen, check the Infer implicit relationships box. This is apowerful Data Studio capability that can go beyond defined foreign keys on tables. It will matchup column names and data types to make relationships in the diagram. Click: [ OK]
___47. Data Studio will take a couple of seconds to calculate the inferred relationships and return adiagram of these tables in the Editor view.
___48. Double click on the diagram views tab. This will maximize this view in yourData perspective.
___49. Review the diagram. Move the tables and lines around to get a sense for how this can beredrawn if you don’t like the default diagram.
Lab 03 – Data Studio Page 41
7/28/2019 PoT.im.07.1.017.13 Workbook Windows
http://slidepdf.com/reader/full/potim07101713-workbook-windows 42/232
IBM Software DB2 10.1 Administration for the Experienced SQL Server DBA
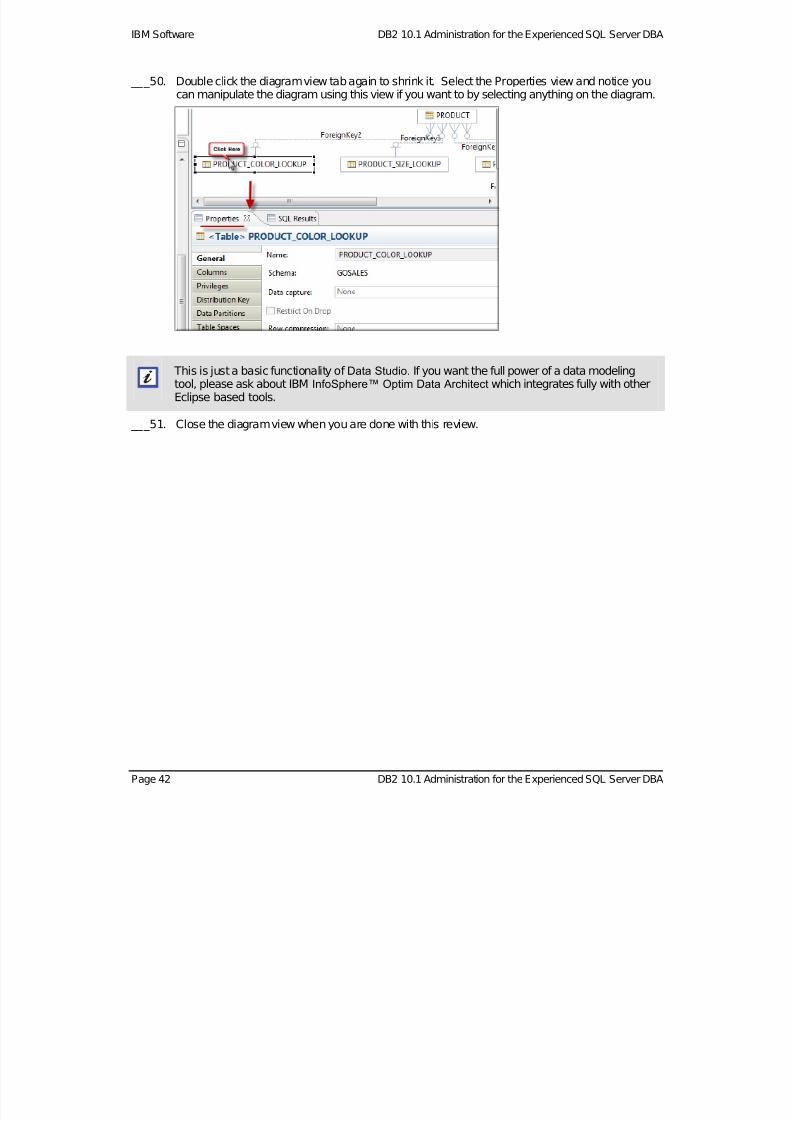
___50. Double click the diagram view tab again to shrink it. Select the Properties view and notice youcan manipulate the diagram using this view if you want to by selecting anything on the diagram.
This is just a basic functionality of Data Studio. If you want the full power of a data modelingtool, please ask about IBM InfoSphere™ Optim Data Architect which integrates fully with otherEclipse based tools.
___51. Close the diagram view when you are done with this review.
Page 42 DB2 10.1 Administration for the Experienced SQL Server DBA

7/28/2019 PoT.im.07.1.017.13 Workbook Windows
http://slidepdf.com/reader/full/potim07101713-workbook-windows 43/232
Lab 03 – Data Studio IBM Software
Editing and viewing table data
___52. Find tablePRODUCT_LINE. Right click on it then Dat a Edi t
___53. In the editing screen find the last row<new r ow>. Right click on it I nser t Row
___54. Add values 2104 and Bur t s Beeswax to the row. Update another row by changing a value init like shown below. Click Save or [ CTRL] +S
___55. Notice the SQL Results view message that reflects what you just did.
___56. Close the Edit view. Save your work as you exit.
___57. Right click on the tablePRODUCT_LINE again. This time try:Dat a Sampl e Cont ent s
___58. Look in the SQL Results view, your changes should be there.
Lab 03 – Data Studio Page 43
7/28/2019 PoT.im.07.1.017.13 Workbook Windows
http://slidepdf.com/reader/full/potim07101713-workbook-windows 44/232
IBM Software DB2 10.1 Administration for the Experienced SQL Server DBA
Generating DDL
___59. Select all tables in schema:GOSALES (hint: hold [Shi f t ] ).
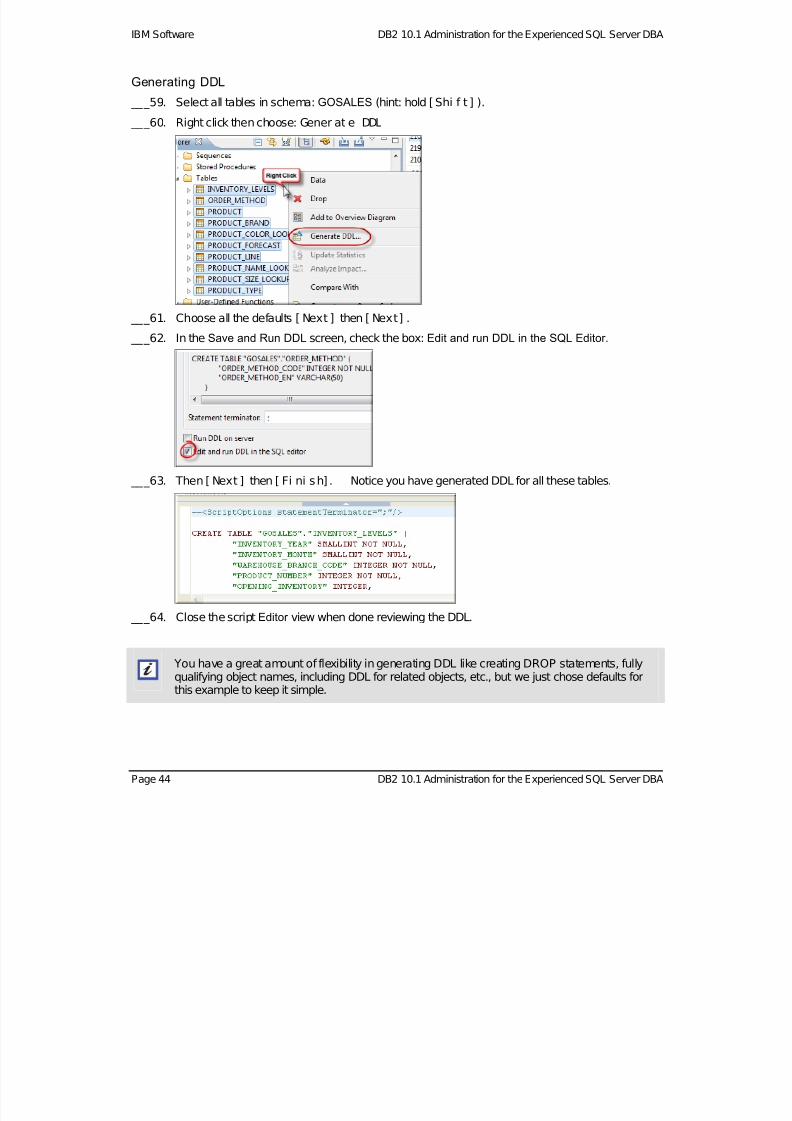
___60. Right click then choose: Gener at e DDL
___61. Choose all the defaults [ Next ] then [ Next] .
___62. In the Save and Run DDL screen, check the box: Edit and run DDL in the SQL Editor.
___63. Then [ Next ] then [ Fi ni sh] . Notice you have generated DDL for all these tables.
___64. Close the script Editor view when done reviewing the DDL.
You have a great amount of flexibility in generating DDL like creating DROP statements, fullyqualifying object names, including DDL for related objects, etc., but we just chose defaults forthis example to keep it simple.
Page 44 DB2 10.1 Administration for the Experienced SQL Server DBA
7/28/2019 PoT.im.07.1.017.13 Workbook Windows
http://slidepdf.com/reader/full/potim07101713-workbook-windows 45/232
Lab 03 – Data Studio IBM Software
Table maintenance exercices: runstats, reorg
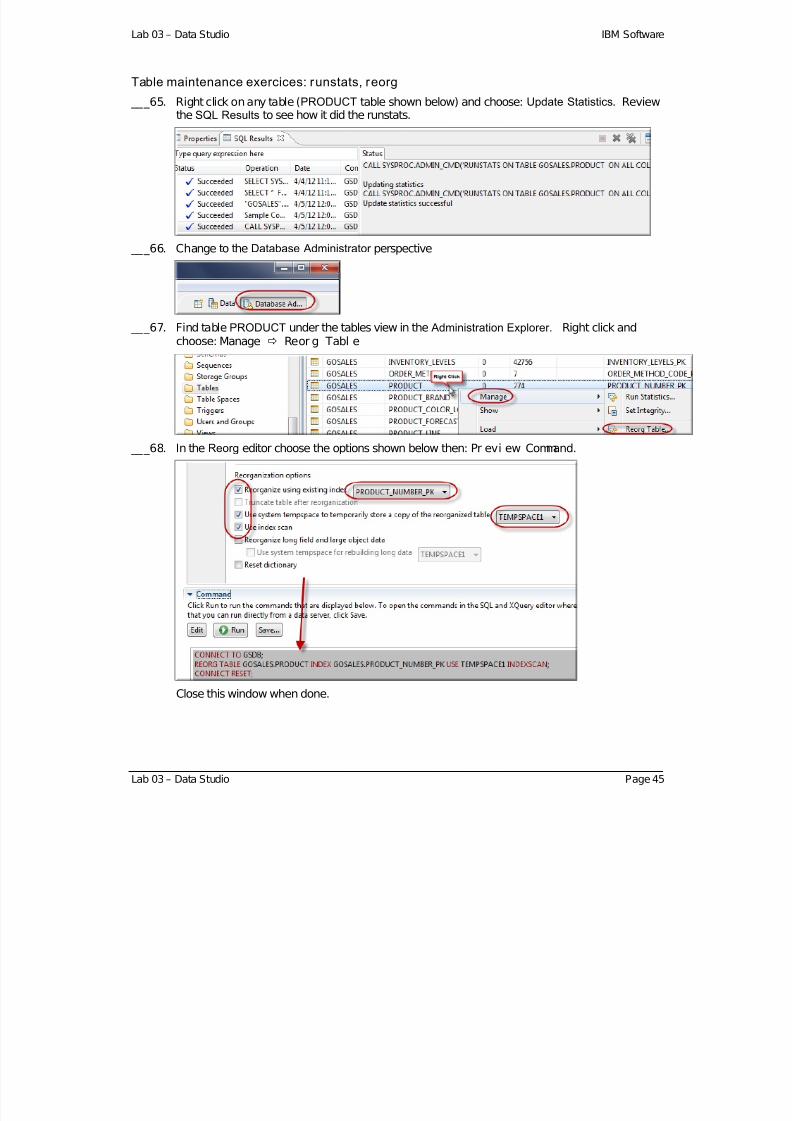
___65. Right click on any table (PRODUCT table shown below) and choose: Update Statistics. Reviewthe SQL Results to see how it did the runstats.
___66. Change to the Database Administrator perspective
___67. Find tablePRODUCT under the tables view in the Administration Explorer. Right click andchoose: Manage Reor g Tabl e
___68. In the Reorg editor choose the options shown below then:Pr evi ew Command.
Close this window when done.
Lab 03 – Data Studio Page 45

7/28/2019 PoT.im.07.1.017.13 Workbook Windows
http://slidepdf.com/reader/full/potim07101713-workbook-windows 46/232
IBM Software DB2 10.1 Administration for the Experienced SQL Server DBA
E. Extra Exercise: Debug a stored procedure
Creating a project
To debug a stored procedure, it is best to first create a project to put our work into. This allows us tocreate, alter, and save our scripts in a folder under our workspace.
___69. Return to the Data perspective.
___70. At the top of your Data Studio menu choose: F i l e New Dat a Devel opmentPr oj ect
___71. Give the project a name:MyFirstProject. Click [ Next ] .
___72. Make sure you associate the GSDB database connection property with this project. Click[ Next] .
___73. Change the Default schema to be GOSALESCT which happens to be where the storedprocedure is we want to debug.
___74. Click [ Fi ni sh] . Your project will be created with the properties you just chose.
Page 46 DB2 10.1 Administration for the Experienced SQL Server DBA
7/28/2019 PoT.im.07.1.017.13 Workbook Windows
http://slidepdf.com/reader/full/potim07101713-workbook-windows 47/232
Lab 03 – Data Studio IBM Software
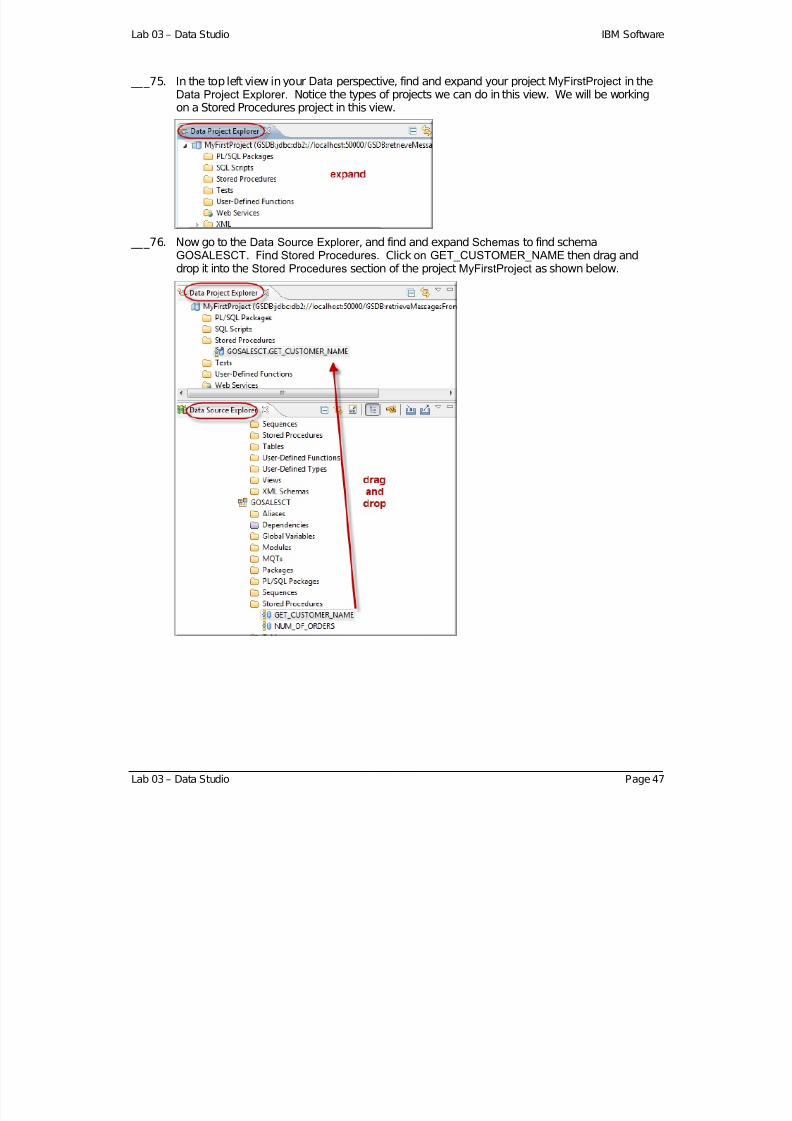
___75. In the top left view in yourData perspective, find and expand your projectMyFirstProject in theData Project Explorer. Notice the types of projects we can do in this view. We will be workingon a Stored Procedures project in this view.
___76. Now go to the Data Source Explorer , and find and expand Schemas to find schemaGOSALESCT. Find Stored Procedures. Click on GET_CUSTOMER_NAME then drag anddrop it into the Stored Procedures section of the project MyFirstProject as shown below.
Lab 03 – Data Studio Page 47
7/28/2019 PoT.im.07.1.017.13 Workbook Windows
http://slidepdf.com/reader/full/potim07101713-workbook-windows 48/232
IBM Software DB2 10.1 Administration for the Experienced SQL Server DBA
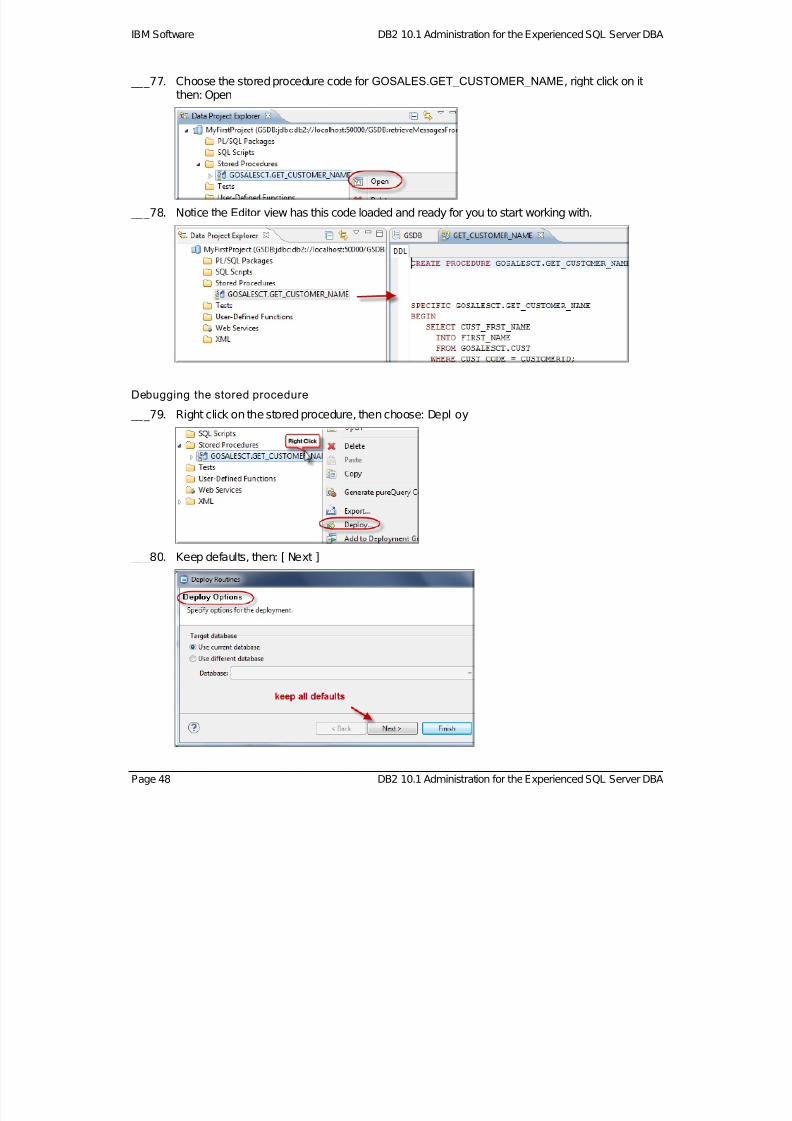
___77. Choose the stored procedure code for GOSALES.GET_CUSTOMER_NAME, right click on itthen: Open
___78. Notice the Editor view has this code loaded and ready for you to start working with.
Debugging the stored procedure
___79. Right click on the stored procedure, then choose:Depl oy
___80. Keep defaults, then: [ Next ]
Page 48 DB2 10.1 Administration for the Experienced SQL Server DBA

7/28/2019 PoT.im.07.1.017.13 Workbook Windows
http://slidepdf.com/reader/full/potim07101713-workbook-windows 49/232
Lab 03 – Data Studio IBM Software
Lab 03 – Data Studio Page 49
___81. On the Routine Options screen, make sure to click: Enabl e debuggi ng
Then: [ Fi ni sh]
___82. The routine should be deployed to the database like this:
___83. Now right click on the stored procedure, then choose:Debug
___84. In the Specify Parameter Values screen, set CUSTOMERID to 101.
Then: [ Debug]
7/28/2019 PoT.im.07.1.017.13 Workbook Windows
http://slidepdf.com/reader/full/potim07101713-workbook-windows 50/232
IBM Software DB2 10.1 Administration for the Experienced SQL Server DBA
Page 50 DB2 10.1 Administration for the Experienced SQL Server DBA
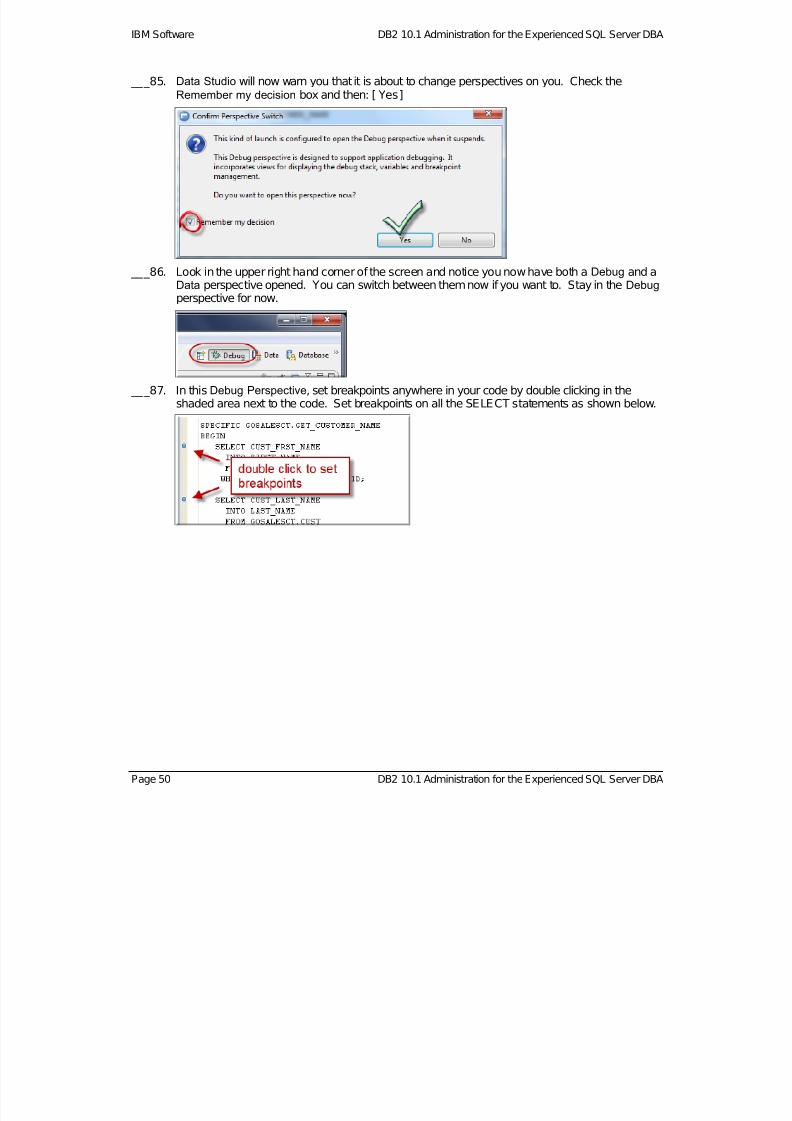
___85. Data Studio will now warn you that it is about to change perspectives on you. Check thecision box and then: [ Yes] Remember my de
___86. Look in the upper right hand corner of the screen and notice you now have both aDebug and aData perspective opened. You can switch between them now if you want to. Stay in theDebug perspective for now.
___87. In this Debug Perspective, set breakpoints anywhere in your code by double clicking in theshaded area next to the code. Set breakpoints on all the SELECT statements as shown below.

7/28/2019 PoT.im.07.1.017.13 Workbook Windows
http://slidepdf.com/reader/full/potim07101713-workbook-windows 51/232
Lab 03 – Data Studio IBM Software
Lab 03 – Data Studio Page 51
___88. Now either press [ F5] to go from line to line or use the icon shown below to “Step Into” thcode. Learn to use [ F6] and [ F7] for “Step R
eeturn” and “Step Over”.
___89. As you step through this simple stored procedure, notice the output parameters (variables)change.
The code we are using here is purposefully simple to demonstrate how strategically placedbreakpoints will help you find what your code is doing and what it is returning.
___90. If you run all the way through the code and the session is terminated, then just right click on theterminated session itself and choose: Rel aunch.
This will let you start your debugging all over again.

7/28/2019 PoT.im.07.1.017.13 Workbook Windows
http://slidepdf.com/reader/full/potim07101713-workbook-windows 52/232
IBM Software DB2 10.1 Administration for the Experienced SQL Server DBA
Page 52 DB2 10.1 Administration for the Experienced SQL Server DBA
___91. Close the Debug perspective when you are done by right clicking on it and then: Cl ose.
___92. Back in the Data perspective, close all the editor views.
7/28/2019 PoT.im.07.1.017.13 Workbook Windows
http://slidepdf.com/reader/full/potim07101713-workbook-windows 53/232
Lab 03 – Data Studio IBM Software
Lab 03 – Data Studio Page 53
F. Extra Exercise: Stored procedure performance information (profil ing)
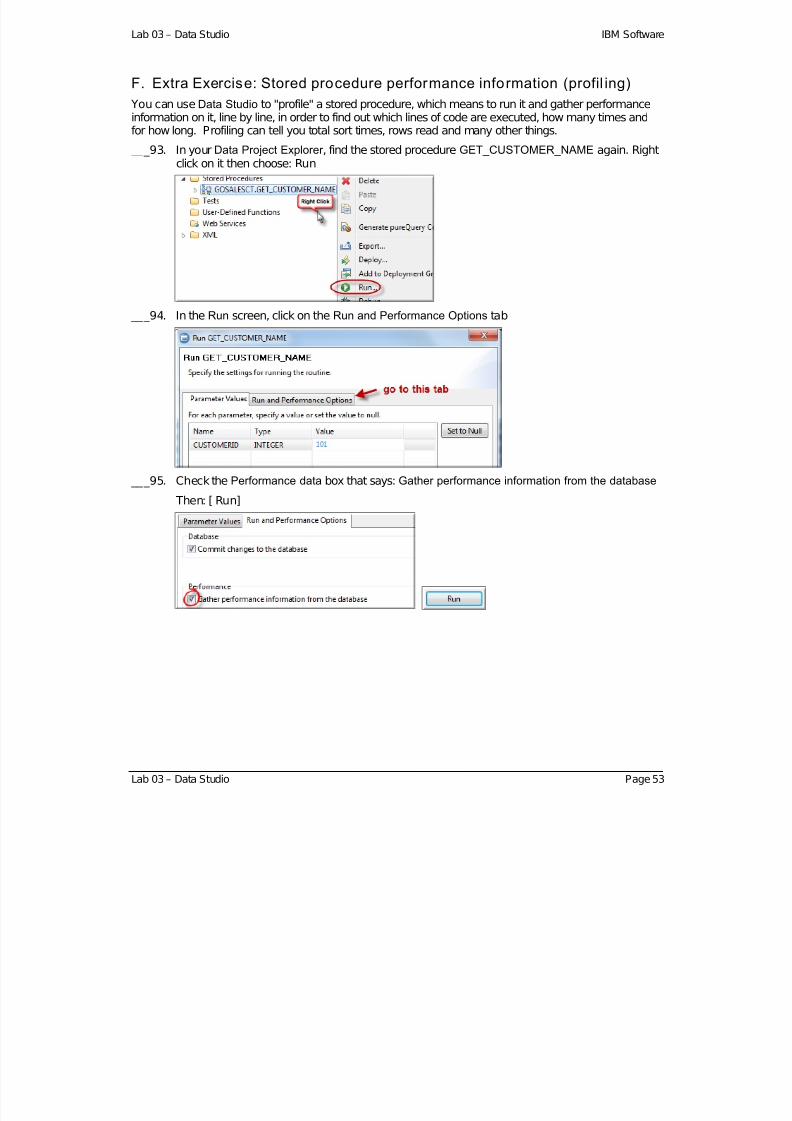
You can use Data Studio to "profile" a stored procedure, which means to run it and gather performanceinformation on it, line by line, in order to find out which lines of code are executed, how many times andfor how long. Profiling can tell you total sort times, rows read and many other things.
___93. In your Data Project Explorer , find the stored procedure GET_CUSTOMER_NAME again. Rightclick on it then choose: Run
___94. In the Run screen, click on the Run and Performance Options tab
___95. Check the Performance data box that says: Gather performance information from the database
Then: [ Run]
7/28/2019 PoT.im.07.1.017.13 Workbook Windows
http://slidepdf.com/reader/full/potim07101713-workbook-windows 54/232
IBM Software DB2 10.1 Administration for the Experienced SQL Server DBA
Page 54 DB2 10.1 Administration for the Experienced SQL Server DBA
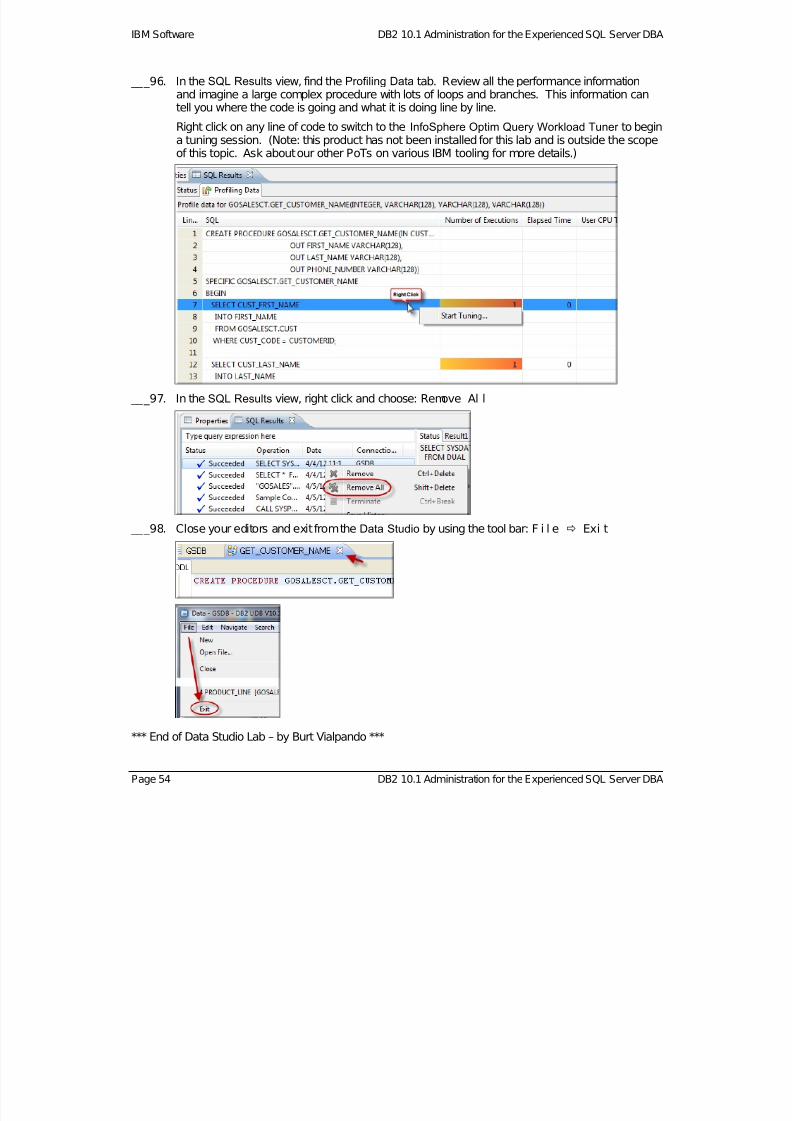
___96. In the SQL Results view, find the Profiling Data tab. Review all the performance informationand imagine a large complex procedure with lots of loops and branches. This information cantell you where the code is going and what it is doing line by line.
Right click on any line of code to switch to the InfoSphere Optim Query Workload Tuner to begina tuning session. (Note: this product has not been installed for this lab and is outside the scope
of this topic. Ask about our other PoTs on various IBM tooling for more details.)
___97. In the SQL Results view, right click and choose: Remove Al l
___98. Close your editors and exit from the Data Studio by using the tool bar: F i l e Exi t
*** End of Data Studio Lab – by Burt Vialpando ***
7/28/2019 PoT.im.07.1.017.13 Workbook Windows
http://slidepdf.com/reader/full/potim07101713-workbook-windows 55/232
Lab 04 – CLPPlus and Oracle Compatibility IBM Software
Lab 04. CLPPlus and Oracle Compatibil ity
A. Logging on to CLPPlus
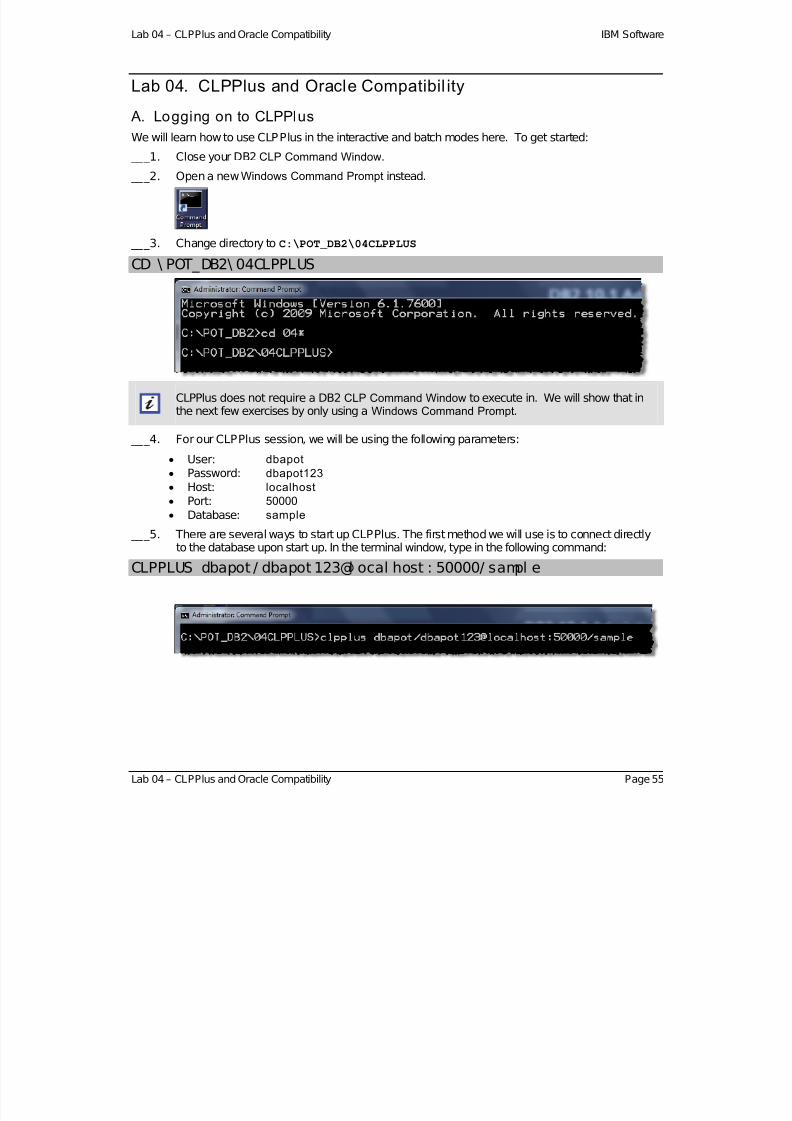
We will learn how to use CLPPlus in the interactive and batch modes here. To get started:
___1. Close your DB2 CLP Command Window. ___2. Open a newWindows Command Prompt instead.
___3. Change directory to C:\POT_DB2\04CLPPLUS
CD \ POT_DB2\ 04CLPPLUS
CLPPlus does not require a DB2 CLP Command Window to execute in. We will show that inthe next few exercises by only using a Windows Command Prompt.
___4. For our CLPPlus session, we will be using the following parameters:
User: dbapot
Password: dbapot123 Host: localhost Port: 50000 Database: sample
___5. There are several ways to start up CLPPlus. The first method we will use is to connect directlyto the database upon start up. In the terminal window, type in the following command:
CLPPLUS dbapot / dbapot 123@l ocal host : 50000/ sampl e
Lab 04 – CLPPlus and Oracle Compatibility Page 55

7/28/2019 PoT.im.07.1.017.13 Workbook Windows
http://slidepdf.com/reader/full/potim07101713-workbook-windows 56/232
IBM Software DB2 10.1 Administration for the Experienced SQL Server DBA
Page 56 DB2 10.1 Administration for the Experienced SQL Server DBA
___6. You are now in an interactive “CLPPlus” window with a default prompt:SQL>
We could have started CLPPlus without a new window staying in theWindows CommandPrompt window instead. To do this use the -nw option, as shown below.
For these exercises, we'll just use the default window.

7/28/2019 PoT.im.07.1.017.13 Workbook Windows
http://slidepdf.com/reader/full/potim07101713-workbook-windows 57/232
Lab 04 – CLPPlus and Oracle Compatibility IBM Software
B. Interactive CLPPlus commands
___7. Use the DESCRIBE command to look at the details of the table EMPLOYEE. The columns andtheir details are listed.
DESCRI BE empl oyee
CLPPlus commands are not case sensitive. In this lab, CLPPlus commands are capitalized in
order to distinguish the command from the keywords.
___8. Use the HOST command to run any operating system command. For example, try this:
HOST di r
___9. Using the Windows Explorer, review script file:CLPPlus01.SQL.
___10. To execute this script in CLPPlus, use the command:
START CLPPl us01. SQL
___11. Any DB2 commands in the script will be loaded to the SQL buffer and executed.
Lab 04 – CLPPlus and Oracle Compatibility Page 57
7/28/2019 PoT.im.07.1.017.13 Workbook Windows
http://slidepdf.com/reader/full/potim07101713-workbook-windows 58/232
IBM Software DB2 10.1 Administration for the Experienced SQL Server DBA
The GET command will load the script into the SQL buffer without executing it.
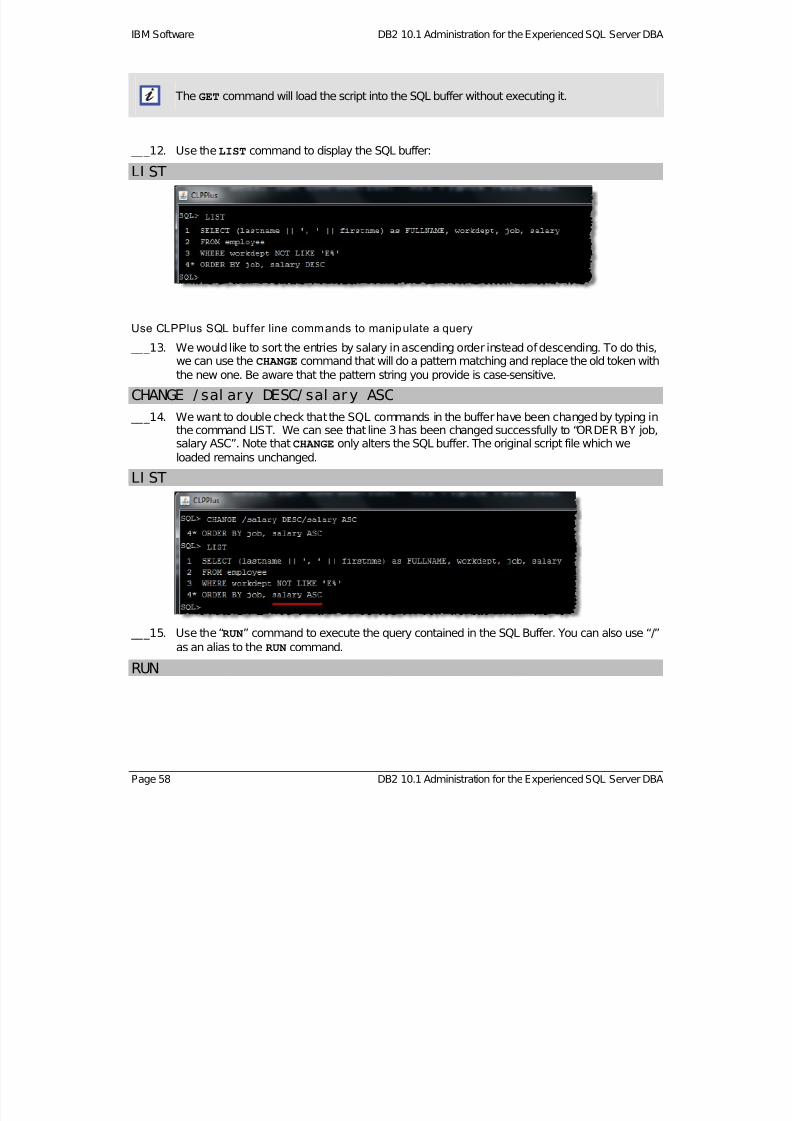
___12. Use theLIST command to display the SQL buffer:
LI ST
Use CLPPlus SQL buf fer line commands to manipulate a query
___13. We would like to sort the entries by salary in ascending order instead of descending. To do this,we can use the CHANGE command that will do a pattern matching and replace the old token withthe new one. Be aware that the pattern string you provide is case-sensitive.
CHANGE / sal ar y DESC/ sal ary ASC
___14. We want to double check that the SQL commands in the buffer have been changed by typing inthe command LIST. We can see that line 3 has been changed successfully to “ORDER BY job,salary ASC”. Note thatCHANGE only alters the SQL buffer. The original script file which weloaded remains unchanged.
LI ST
___15. Use the “RUN” command to execute the query contained in the SQL Buffer. You can also use “/”as an alias to the RUN command.
RUN
Page 58 DB2 10.1 Administration for the Experienced SQL Server DBA
7/28/2019 PoT.im.07.1.017.13 Workbook Windows
http://slidepdf.com/reader/full/potim07101713-workbook-windows 59/232
Lab 04 – CLPPlus and Oracle Compatibility IBM Software
Using the editor
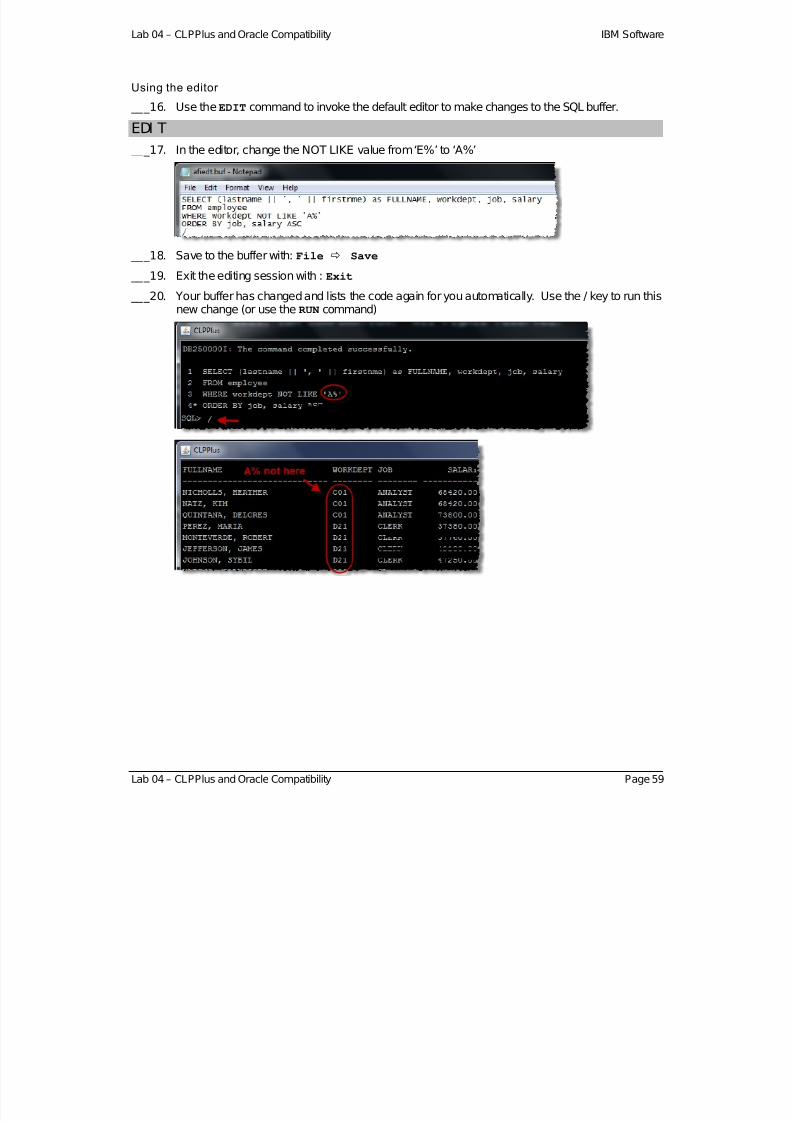
___16. Use theEDIT command to invoke the default editor to make changes to the SQL buffer.
EDI T
___17. In the editor, change the NOT LIKE value from ‘E%’ to ‘A%’
___18. Save to the buffer with:File Save
___19. Exit the editing session with :Exit
___20. Your buffer has changed and lists the code again for you automatically. Use the / key to run thisnew change (or use theRUN command)
Lab 04 – CLPPlus and Oracle Compatibility Page 59

7/28/2019 PoT.im.07.1.017.13 Workbook Windows
http://slidepdf.com/reader/full/potim07101713-workbook-windows 60/232
IBM Software DB2 10.1 Administration for the Experienced SQL Server DBA
Writing results to a file (SPOOL)
___21. Use theSPOOL command to save the results of our SQL output to a file in order to make areport. SPOOL requires an output file name and optionally a complete path. Type in thecommand:
SPOOL empl oyee_r epor t . t xt ___22. Now execute the following commands to create your report file:
RUN
SPOOL OFF
___23. In the Windows Explorer , find your report file and open it:
___24. Use theSHOW command to check the value of a particular CLPPlus setting. Try this to see if your spool is on or not:
SHOW spool
___25. Try this to see all of your command control settings:
SHOW
Page 60 DB2 10.1 Administration for the Experienced SQL Server DBA
7/28/2019 PoT.im.07.1.017.13 Workbook Windows
http://slidepdf.com/reader/full/potim07101713-workbook-windows 61/232
Lab 04 – CLPPlus and Oracle Compatibility IBM Software
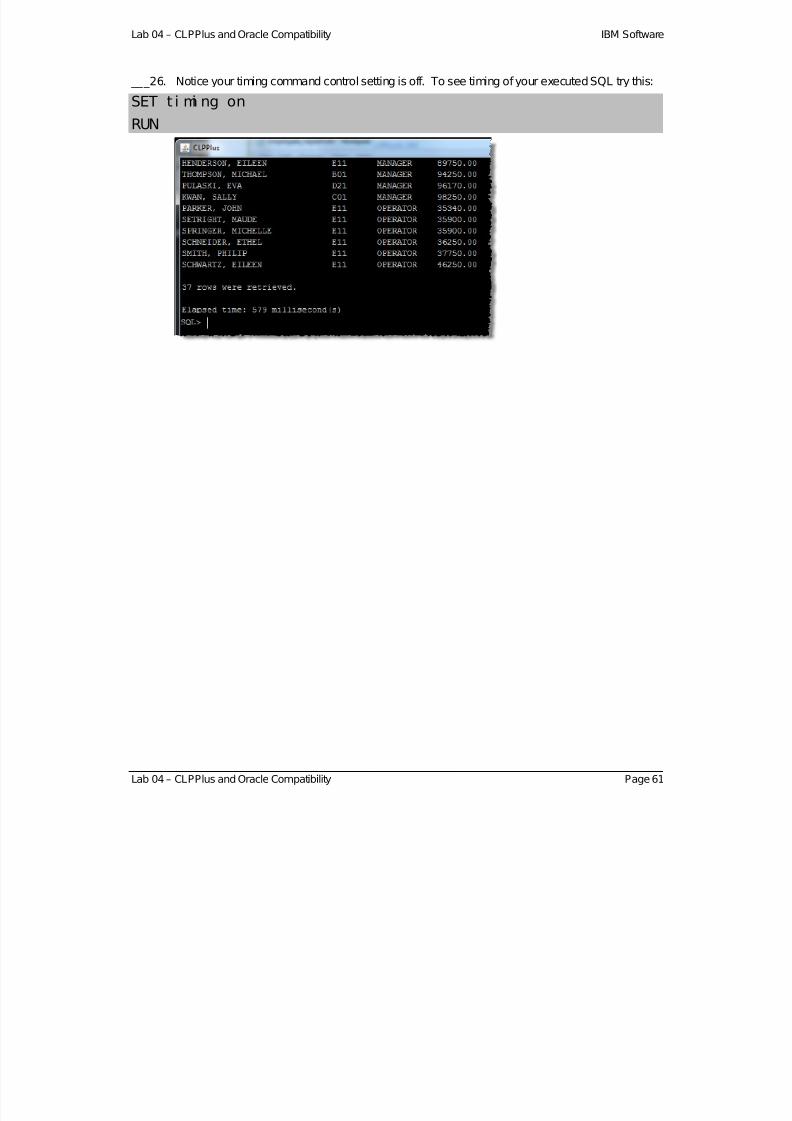
___26. Notice your timing command control setting is off. To see timing of your executed SQL try this:
SET t i mi ng on
RUN
Lab 04 – CLPPlus and Oracle Compatibility Page 61

7/28/2019 PoT.im.07.1.017.13 Workbook Windows
http://slidepdf.com/reader/full/potim07101713-workbook-windows 62/232
IBM Software DB2 10.1 Administration for the Experienced SQL Server DBA
Save and clear the SQL buffer content
___27. Use theSAVE command to save the contents of the SQL buffer to a file:
SAVE empl oyee_changed_r epor t . sql
___28. Now find and review this file using theWindows Explorer
With SAVE, you could hard code a complete path where you want the saved file to go,
otherwise CLPPlus will put the file in the path where you invoked SAVE from.
___29. Use theCLEAR command to empty your SQL buffer in order to start fresh.
CLEAR BUFFER
LI ST
___30. Use theQUIT command to exit CLPPlus.
QUI T
Page 62 DB2 10.1 Administration for the Experienced SQL Server DBA

7/28/2019 PoT.im.07.1.017.13 Workbook Windows
http://slidepdf.com/reader/full/potim07101713-workbook-windows 63/232
Lab 04 – CLPPlus and Oracle Compatibility IBM Software
C. Running a script file in batch mode
Starting ou t using CLPPlus batch mode
___31. Using the Windows Explorer , find the command file CLPPlus02.CMD in the directory03CLPPLUS. Open it. (Right click Edit)
___32. Notice in this script we invoke the CLPPlus with a SQL script file all in one command line:
___33. Using the Windows Explorer , find the SQL script file CLPPlus03.SQL. Open it and review it. Take time to review the control setting commands likeSET orCOLUMN.
___34. Run the command file to see how it creates a report automatically for you using all of thesetechniques we’ve seen so far:
CLPPl us02. CMD
___35. Notice the output report is spooled to a file CLPPlus02_OUTPUT_REPORT.TXT. Use theWindows Explorer to open this report to see the formatting.
Lab 04 – CLPPlus and Oracle Compatibility Page 63
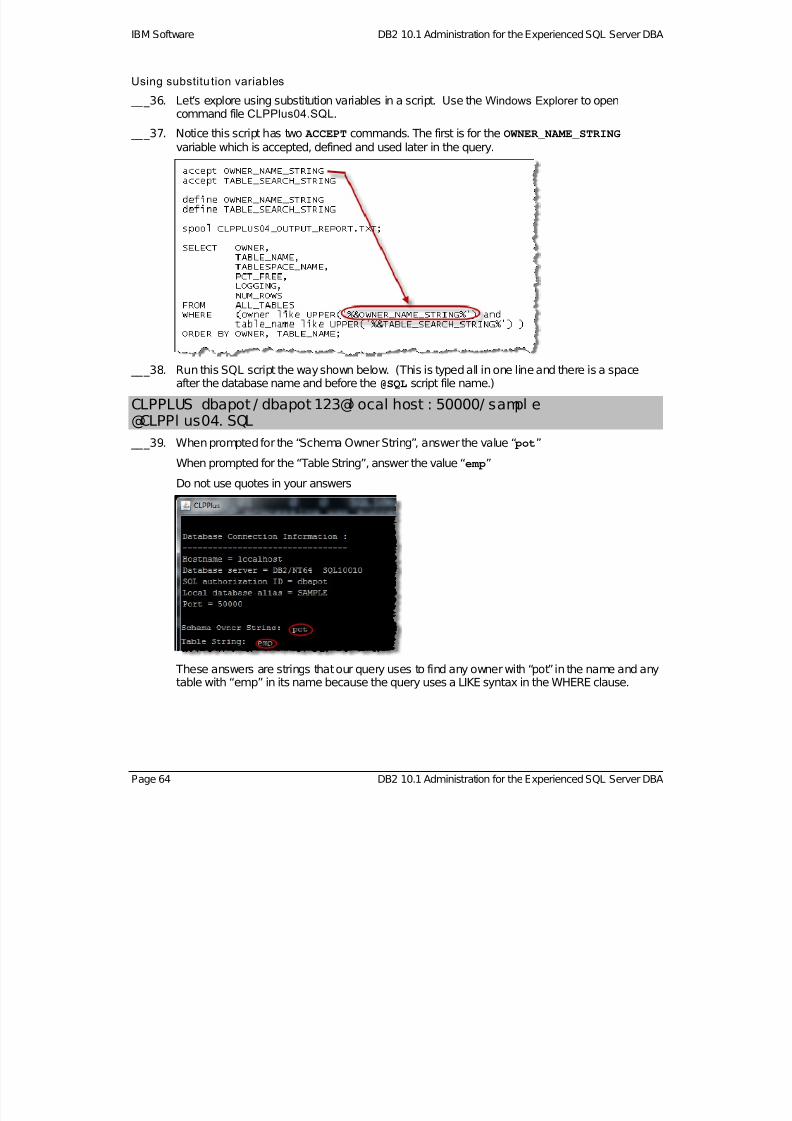
7/28/2019 PoT.im.07.1.017.13 Workbook Windows
http://slidepdf.com/reader/full/potim07101713-workbook-windows 64/232
IBM Software DB2 10.1 Administration for the Experienced SQL Server DBA
Using substitu tion variables
___36. Let’s explore using substitution variables in a script. Use theWindows Explorer to opencommand file CLPPlus04.SQL.
___37. Notice this script has two ACCEPT commands. The first is for the OWNER_NAME_STRING variable which is accepted, defined and used later in the query.
___38. Run this SQL script the way shown below. (This is typed all in one line and there is a spaceafter the database name and before the @SQL script file name.)
CLPPLUS dbapot / dbapot 123@l ocal host : 50000/ sampl e@CLPPl us04. SQL
___39. When prompted for the “Schema Owner String”, answer the value “ pot”
When prompted for the “Table String”, answer the value “emp”
Do not use quotes in your answers
These answers are strings that our query uses to find any owner with “pot” in the name and anytable with “emp” in its name because the query uses a LIKE syntax in the WHERE clause.
Page 64 DB2 10.1 Administration for the Experienced SQL Server DBA

7/28/2019 PoT.im.07.1.017.13 Workbook Windows
http://slidepdf.com/reader/full/potim07101713-workbook-windows 65/232
Lab 04 – CLPPlus and Oracle Compatibility IBM Software
___40. Review output reportCLPPlus04_OUTPUT_REPORT.TXT.
Notice our query has used the substitution variables to customize the report. (Owner only has“pot” in the name and the table_name only has ones with “emp” in the name.
Try running this script again, but this time use different values for the variables, or, just hit[ENTER] when prompted for the variable and let it default and see what happens. (Hint: use
the up arrow key to bring back your old command at the Windows Command Prompt.)
Substitution variables can be used in your SQL in any way you can dream up in any part of theSQL statement, not just in the WHERE clause. These make a single query more flexible.
___41. Run this SQL script again, but use the way shown below to see that you can providesubstitution variables with the execution of the script (without having to do it interactively.) Usethe variables “dba” and “ mdc” as shown below:
CLPPLUS dbapot / dbapot 123@l ocal host : 50000/ sampl e@CLPPl us04. SQL dba mdc
___42. Review output reportCLPPlus04_OUTPUT_REPORT.TXT again.
Lab 04 – CLPPlus and Oracle Compatibility Page 65

7/28/2019 PoT.im.07.1.017.13 Workbook Windows
http://slidepdf.com/reader/full/potim07101713-workbook-windows 66/232
IBM Software DB2 10.1 Administration for the Experienced SQL Server DBA
D. Oracle Compatibility
Now let’s see some more native Oracle functionality using the CLPPlus. This functionality works in theDB2 CLP Command Window too by the way, or in any programming interface for that matter. We will bemixing CLP with CLPPlus command examples in this lab exercise, so do the following:
Checking your “ Oracle compatibility environment” ___43. First, let’s look at our registry variables to see if we are in an Oracle compatible mode. Type the
following:
db2set - al l
Notice the registry variable DB2_COMPATIBILITY_VECTOR. Setting this to ORA turns on allOracle compatibility features. (It is possible to set this to choose only some compatibilityfeatures, but we have set it for all Oracle related features.) To activate this registry variable foryour instance, you would start and stop the instance with two commands:DB2STOP thenDB2START. (We did these things already in the first command script in this lab.)
Once this registry variable is set for your instance, you would next create your database.Creating a database with the compatibility vector set will enable it to use Oracle native datatypes and also creates an Oracle data dictionary compatible set of views in the DB2 systemcatalog. (We have already done that for the SAMPLE database in our setup script for this PoT.)
___44. To see the Oracle dictionary views in the DB2 database, review and run scriptCLPPlus05.CMD:
CLPPl us05. CMD
___45. Review CLPPLUS05_OUTPUT_REPORT.TXT. Seeing these views and the compatibility vector
as above tells us we are ready to use all Oracle native PL/SQL syntax.
Page 66 DB2 10.1 Administration for the Experienced SQL Server DBA

7/28/2019 PoT.im.07.1.017.13 Workbook Windows
http://slidepdf.com/reader/full/potim07101713-workbook-windows 67/232
Lab 04 – CLPPlus and Oracle Compatibility IBM Software
Using Oracle proprietary syntax in a DB2 database with CLPPlus
___46. Review and run scriptCLPPlus05.CMD and CLPPlus06.SQL to see SQL using Oracleproprietary syntax used in a DB2 database. Notice now you will be able to run these kinds of commands in DB2 because you are in a compatibility mode. You can run these in the CLP, inCLPPlus, in a J ava™ program, in any way that you may want.
CLPPl us06. CMD
___47. Review the output file CLPPlus05_OUTPUT_REPORT.TXT to see how DB2 can use:DECODE, SYSDATE, DUAL, ROWNUM and NVL.
Using Oracle proprietary syntax in a DB2 database with the CLP
___48. Close your Windows Command Prompt window
___49. Open a DB2 CLP Command Window and change to directoryC:\POT_DB2\04CLPPLUS
___50. We can run Oracle syntax in the DB2 CLP Command Window too. However, the CLP does notby default recognize the / as a delimiter in scripts the way CLPPlus does. So, in order to get theCLP to use this / delimiter we use a SET SQLCOMPAT command.
___51. Review script CLPPlus08.CMD
___52. Review the script it calls: CLPPlus09.SQL. Notice this is just regular Oracle PL/SQL syntaxthat creates a procedure.
Lab 04 – CLPPlus and Oracle Compatibility Page 67
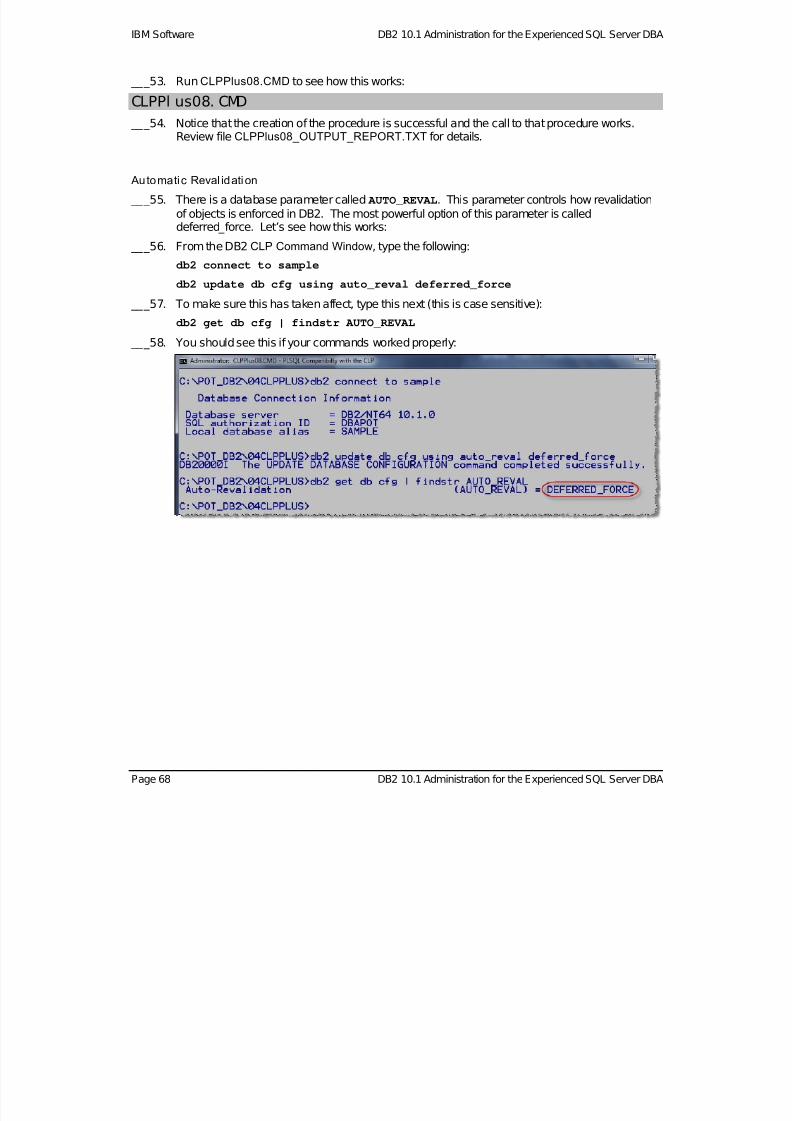
7/28/2019 PoT.im.07.1.017.13 Workbook Windows
http://slidepdf.com/reader/full/potim07101713-workbook-windows 68/232
IBM Software DB2 10.1 Administration for the Experienced SQL Server DBA
___53. RunCLPPlus08.CMD to see how this works:
CLPPl us08. CMD
___54. Notice that the creation of the procedure is successful and the call to that procedure works.Review file CLPPlus08_OUTPUT_REPORT.TXT for details.
Automatic Reval idation
___55. There is a database parameter called AUTO_REVAL. This parameter controls how revalidationof objects is enforced in DB2. The most powerful option of this parameter is calleddeferred_force. Let’s see how this works:
___56. From the DB2 CLP Command Window, type the following:
db2 connect to sample
db2 update db cfg using auto_reval deferred_force
___57. To make sure this has taken affect, type this next (this is case sensitive):
db2 get db cfg | findstr AUTO_REVAL
___58. You should see this if your commands worked properly:
Page 68 DB2 10.1 Administration for the Experienced SQL Server DBA
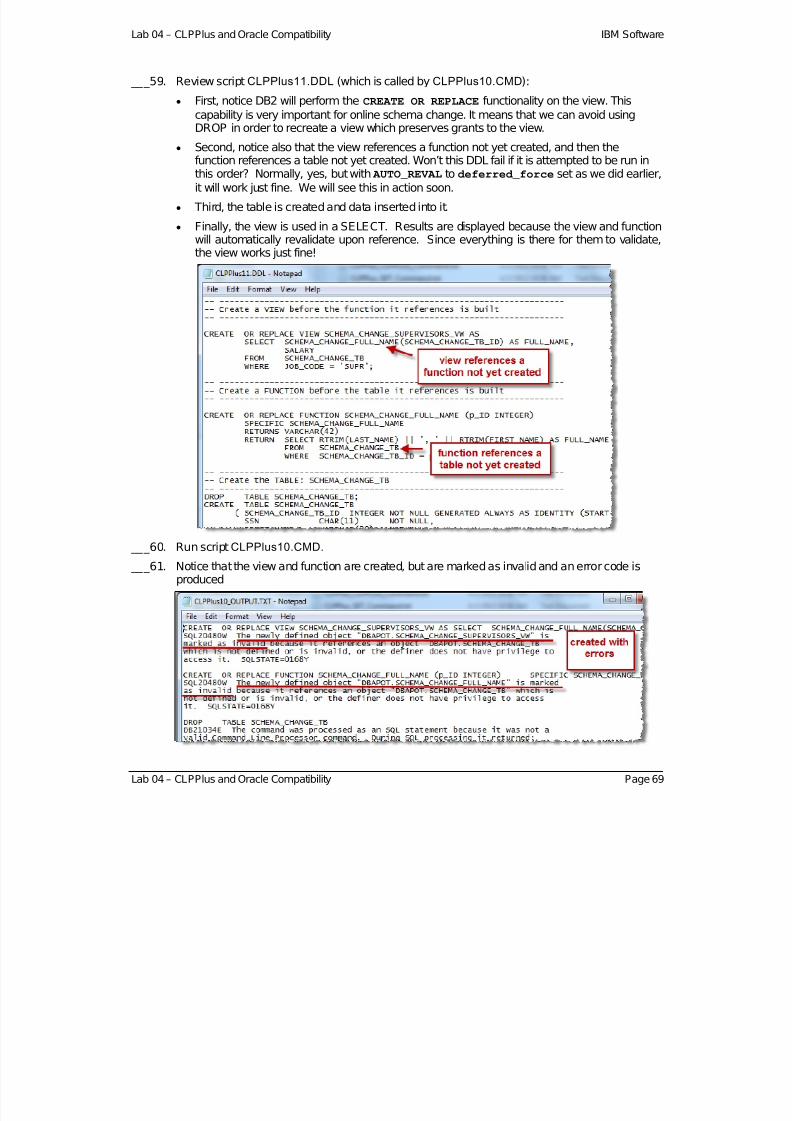
7/28/2019 PoT.im.07.1.017.13 Workbook Windows
http://slidepdf.com/reader/full/potim07101713-workbook-windows 69/232
Lab 04 – CLPPlus and Oracle Compatibility IBM Software
___59. Review script CLPPlus11.DDL (which is called by CLPPlus10.CMD):
First, notice DB2 will perform the CREATE OR REPLACE functionality on the view. Thiscapability is very important for online schema change. It means that we can avoid usingDROP in order to recreate a view which preserves grants to the view.
Second, notice also that the view references a function not yet created, and then the
function references a table not yet created. Won’t this DDL fail if it is attempted to be run inthis order? Normally, yes, but with AUTO_REVAL to deferred_force set as we did earlier,it will work just fine. We will see this in action soon.
Third, the table is created and data inserted into it.
Finally, the view is used in a SELECT. Results are displayed because the view and functionwill automatically revalidate upon reference. Since everything is there for them to validate,the view works just fine!
___60. Run scriptCLPPlus10.CMD.
___61. Notice that the view and function are created, but are marked as invalid and an error code isproduced
Lab 04 – CLPPlus and Oracle Compatibility Page 69
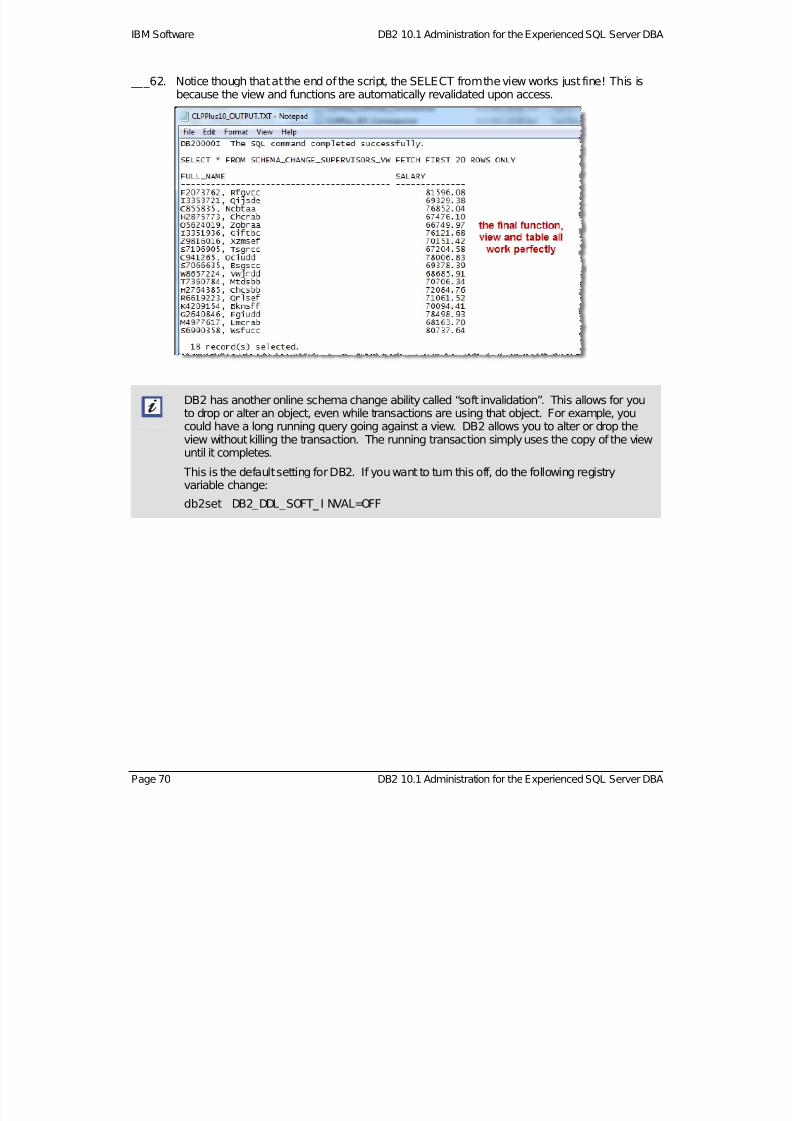
7/28/2019 PoT.im.07.1.017.13 Workbook Windows
http://slidepdf.com/reader/full/potim07101713-workbook-windows 70/232
IBM Software DB2 10.1 Administration for the Experienced SQL Server DBA
___62. Notice though that at the end of the script, the SELECT from the view works just fine! This isbecause the view and functions are automatically revalidated upon access.
DB2 has another online schema change ability called “soft invalidation”. This allows for youto drop or alter an object, even while transactions are using that object. For example, youcould have a long running query going against a view. DB2 allows you to alter or drop theview without killing the transaction. The running transaction simply uses the copy of the viewuntil it completes.
This is the default setting for DB2. If you want to turn this off, do the following registryvariable change:
db2set DB2_DDL_SOFT_ I NVAL=OFF
Page 70 DB2 10.1 Administration for the Experienced SQL Server DBA
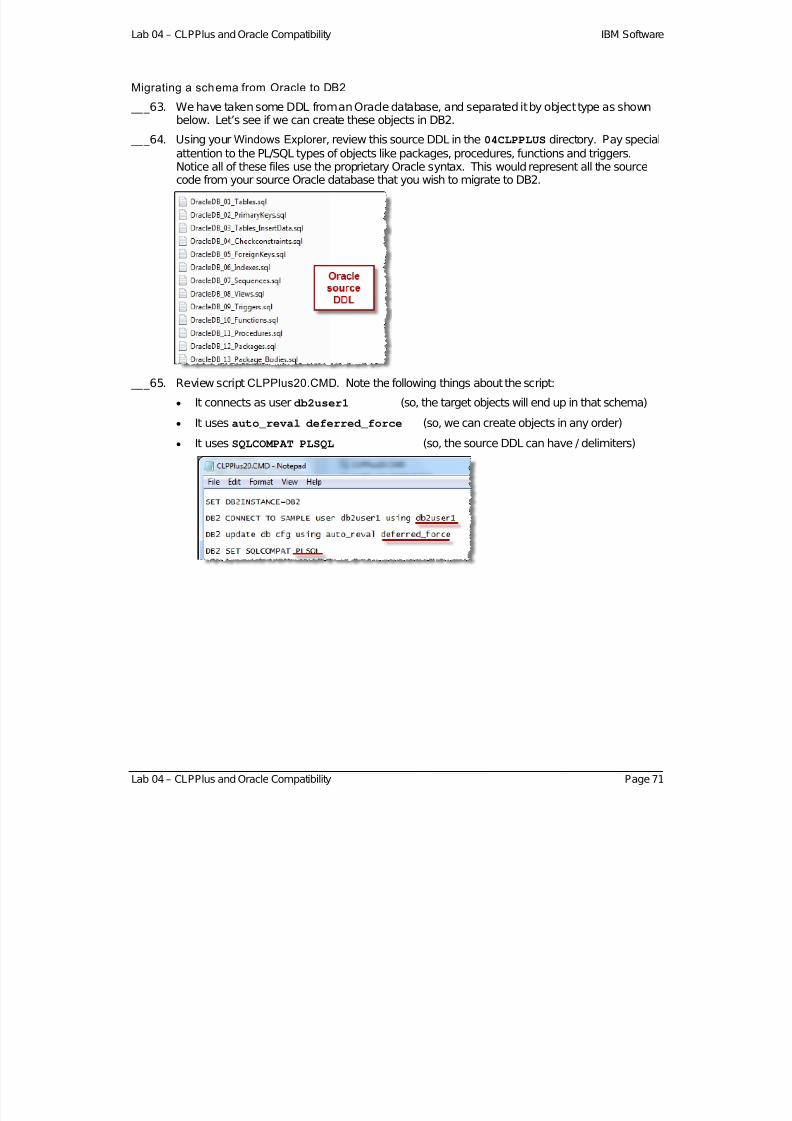
7/28/2019 PoT.im.07.1.017.13 Workbook Windows
http://slidepdf.com/reader/full/potim07101713-workbook-windows 71/232
Lab 04 – CLPPlus and Oracle Compatibility IBM Software
Migrating a schema from Oracle to DB2
___63. We have taken some DDL from an Oracle database, and separated it by object type as shownbelow. Let’s see if we can create these objects in DB2.
___64. Using your Windows Explorer , review this source DDL in the 04CLPPLUS directory. Pay special
attention to the PL/SQL types of objects like packages, procedures, functions and triggers.Notice all of these files use the proprietary Oracle syntax. This would represent all the sourcecode from your source Oracle database that you wish to migrate to DB2.
___65. Review script CLPPlus20.CMD. Note the following things about the script:
It connects as user db2user1 (so, the target objects will end up in that schema)
It uses auto_reval deferred_force (so, we can create objects in any order)
It uses SQLCOMPAT PLSQL (so, the source DDL can have / delimiters)
Lab 04 – CLPPlus and Oracle Compatibility Page 71

7/28/2019 PoT.im.07.1.017.13 Workbook Windows
http://slidepdf.com/reader/full/potim07101713-workbook-windows 72/232
IBM Software DB2 10.1 Administration for the Experienced SQL Server DBA
___66. It then calls each .sql file using the DB2CLP Batch Command Processor
___67. Run scriptCLPPlus20.CMD to create all these objects in DB2
CLPPl us20. CMD
___68. You can review file CLPPlus20_OUTPUT.RPT to see the details on this. (Please make sureyou use WordPad and notNotepad to review this file. WordPad formats this for better viewing.)
___69. Run scriptCLPPlus21.CMD to see a report of all the objects in the DB2 database underschema db2user1. ReviewCLPPlus21_OUTPUT.TXT for that report.
CLPPl us21. CMD
Page 72 DB2 10.1 Administration for the Experienced SQL Server DBA
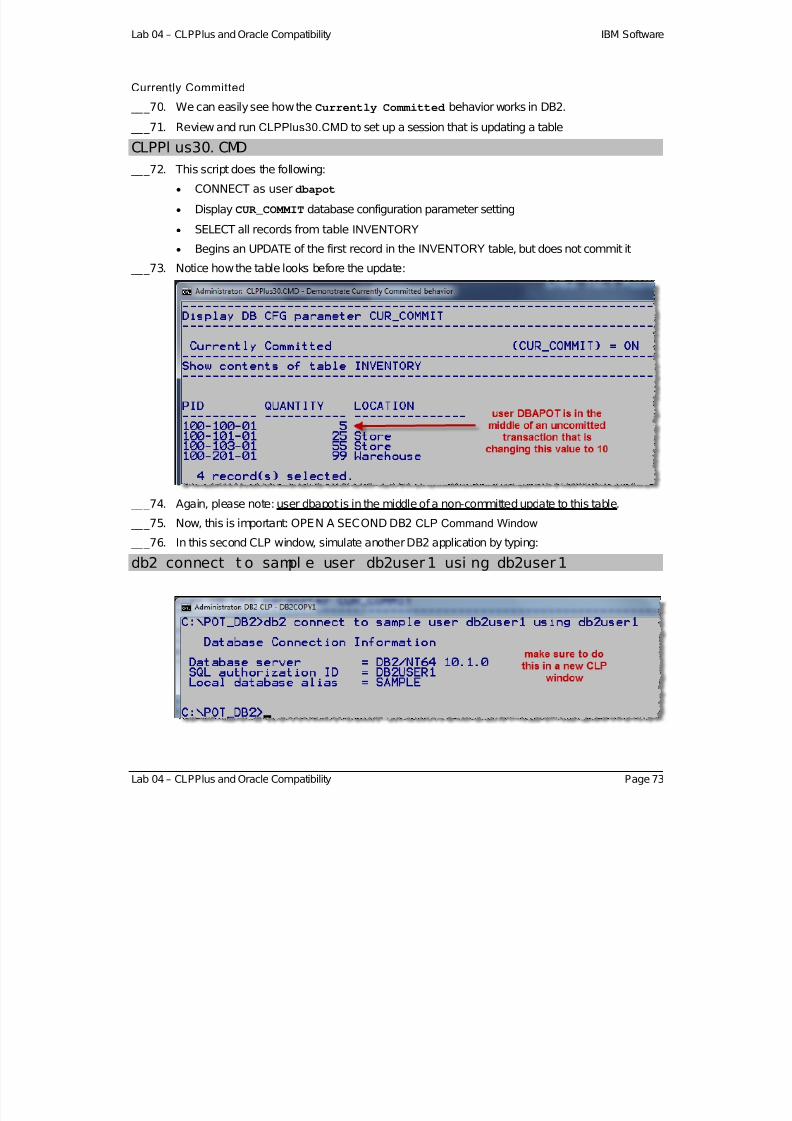
7/28/2019 PoT.im.07.1.017.13 Workbook Windows
http://slidepdf.com/reader/full/potim07101713-workbook-windows 73/232
Lab 04 – CLPPlus and Oracle Compatibility IBM Software
Currently Committed
___70. We can easily see how the Currently Committed behavior works in DB2.
___71. Review and run CLPPlus30.CMD to set up a session that is updating a table
CLPPl us30. CMD
___72. This script does the following:
CONNECT as user dbapot
Display CUR_COMMIT database configuration parameter setting
SELECT all records from table INVENTORY
Begins an UPDATE of the first record in the INVENTORY table, but does not commit it
___73. Notice how the table looks before the update:
___74. Again, please note: user dbapot is in the middle of a non-committed update to this table.
___75. Now, this is important: OPEN A SECOND DB2 CLP Command Window
___76. In this second CLP window, simulate another DB2 application by typing:
db2 connect t o sampl e user db2user1 usi ng db2user 1
Lab 04 – CLPPlus and Oracle Compatibility Page 73
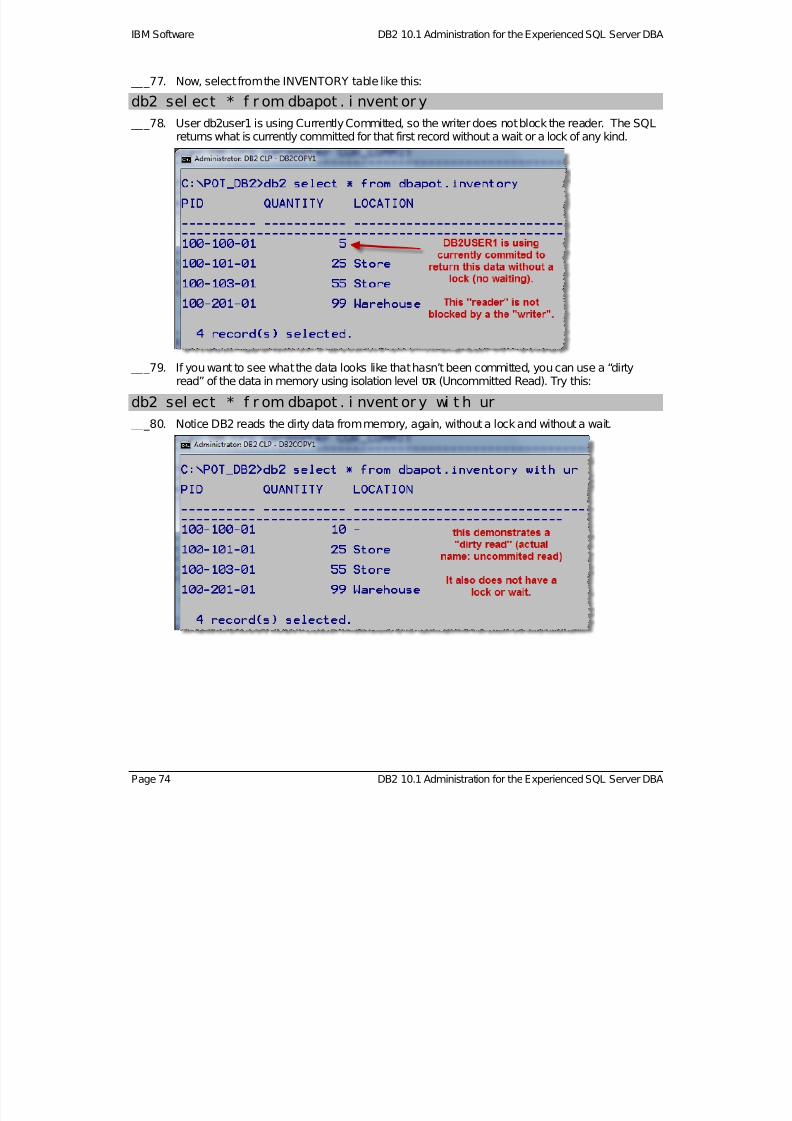
7/28/2019 PoT.im.07.1.017.13 Workbook Windows
http://slidepdf.com/reader/full/potim07101713-workbook-windows 74/232
IBM Software DB2 10.1 Administration for the Experienced SQL Server DBA
___77. Now, select from the INVENTORY table like this:
db2 sel ect * f r om dbapot . i nvent or y
___78. User db2user1 is using Currently Committed, so the writer does not block the reader. The SQLreturns what is currently committed for that first record without a wait or a lock of any kind.
___79. If you want to see what the data looks like that hasn’t been committed, you can use a “dirtyread” of the data in memory using isolation level UR (Uncommitted Read). Try this:
db2 sel ect * f r om dbapot . i nvent or y wi t h ur
___80. Notice DB2 reads the dirty data from memory, again, without a lock and without a wait.
Page 74 DB2 10.1 Administration for the Experienced SQL Server DBA
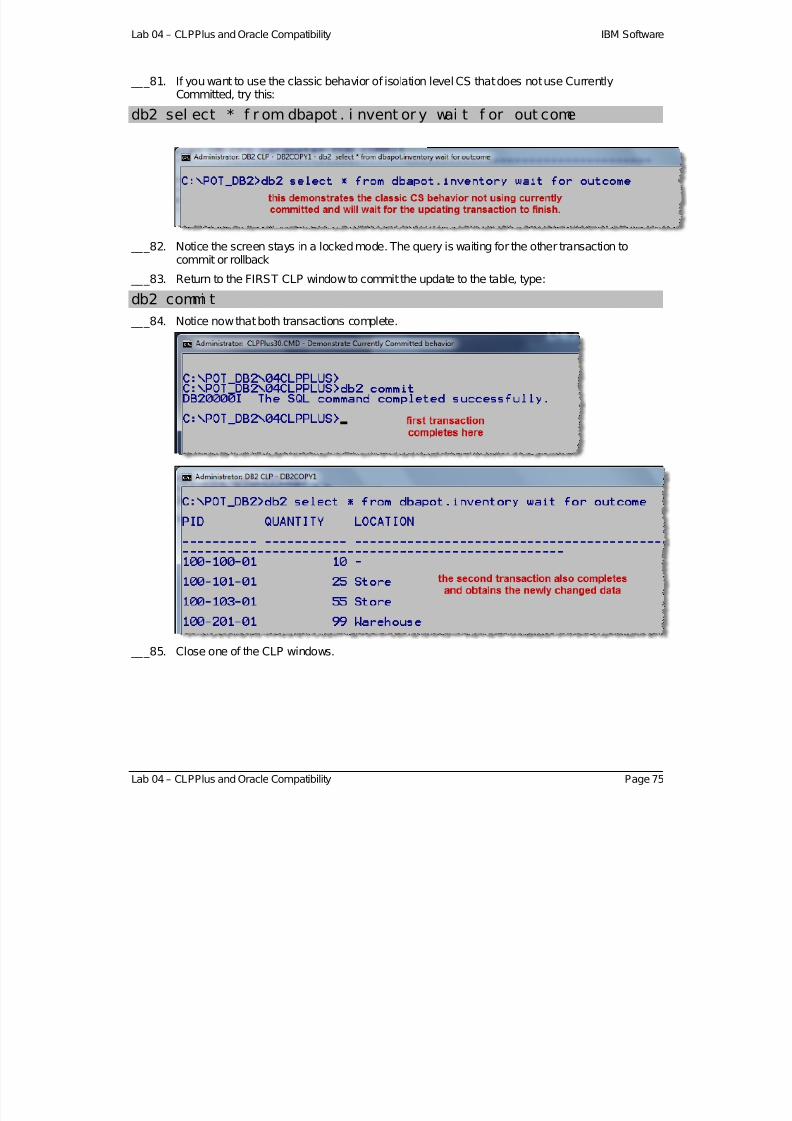
7/28/2019 PoT.im.07.1.017.13 Workbook Windows
http://slidepdf.com/reader/full/potim07101713-workbook-windows 75/232
Lab 04 – CLPPlus and Oracle Compatibility IBM Software
___81. If you want to use the classic behavior of isolation level CS that does not use CurrentlyCommitted, try this:
db2 sel ect * f r om dbapot . i nvent or y wai t f or out come
___82. Notice the screen stays in a locked mode. The query is waiting for the other transaction tocommit or rollback
___83. Return to the FIRST CLP window to commit the update to the table, type:
db2 commi t
___84. Notice now that both transactions complete.
___85. Close one of the CLP windows.
Lab 04 – CLPPlus and Oracle Compatibility Page 75
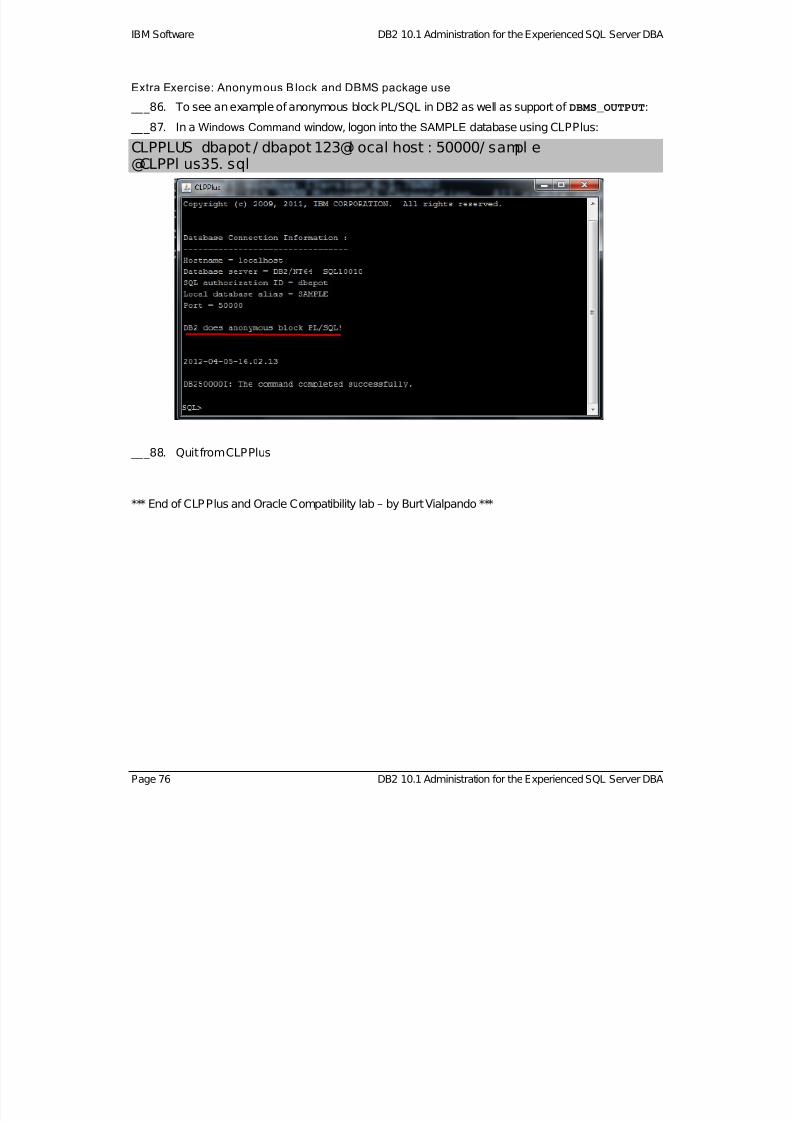
7/28/2019 PoT.im.07.1.017.13 Workbook Windows
http://slidepdf.com/reader/full/potim07101713-workbook-windows 76/232
IBM Software DB2 10.1 Administration for the Experienced SQL Server DBA
Page 76 DB2 10.1 Administration for the Experienced SQL Server DBA
Extra Exercise: Anonymous B lock and DBMS package use
___86. To see an example of anonymous block PL/SQL in DB2 as well as support of DBMS_OUTPUT:
___87. In a Windows Command window, logon into the SAMPLE database using CLPPlus:
CLPPLUS dbapot / dbapot 123@l ocal host : 50000/ sampl e@CLPPl us35. sql
___88. Quit from CLPPlus
*** End of CLPPlus and Oracle Compatibility lab – by Burt Vialpando ***

7/28/2019 PoT.im.07.1.017.13 Workbook Windows
http://slidepdf.com/reader/full/potim07101713-workbook-windows 77/232
Lab 05 – Security IBM Software
Lab 05. Securi ty
A. Instance Level Security
This lab assumes you have already completed theData Studio Lab 03 exercises.
If you have not, then you should complete sections A and B of Lab 03 to learn how to launchData Studio and connect to a database.
We will first check the instance configuration parameters using Data Studio.
___1. LaunchData Studio make sure you are open to the Database Administrator perspective.
___2. In the Administration Explorer , connect to the SAMPLE database. (Hint: right click onthe database).
Use dbapot, dbapot123 as the User name and Password to connect with as shown below
___3. Right click on the instanceDB2, then choose: Conf i gur e
Lab 05 – Security Page 77

7/28/2019 PoT.im.07.1.017.13 Workbook Windows
http://slidepdf.com/reader/full/potim07101713-workbook-windows 78/232
IBM Software DB2 10.1 Administration for the Experienced SQL Server DBA
___4. Choose SAMPLE as the Connection Profile.
___5. Review the Administration section of DBM cfg parameters in the UI
This “section” of DBM cfg parameters controls security at the instance level
A “section” of DBM cfg parameters is a UI concept only as this arrangement is to help youfind similar parameters within the Data Studio UI interface.
___6. Click on parameter: AUTHENTICATION. Then click in the Pending Value box to find adrop down option.
You can now set the DBM cfg value in the UI
Hover on the question mark symbol to see help on this parameter
___7. Review parameters: TRUST_ALLCLNTS and TRUST_CLNTAUTH
Page 78 DB2 10.1 Administration for the Experienced SQL Server DBA
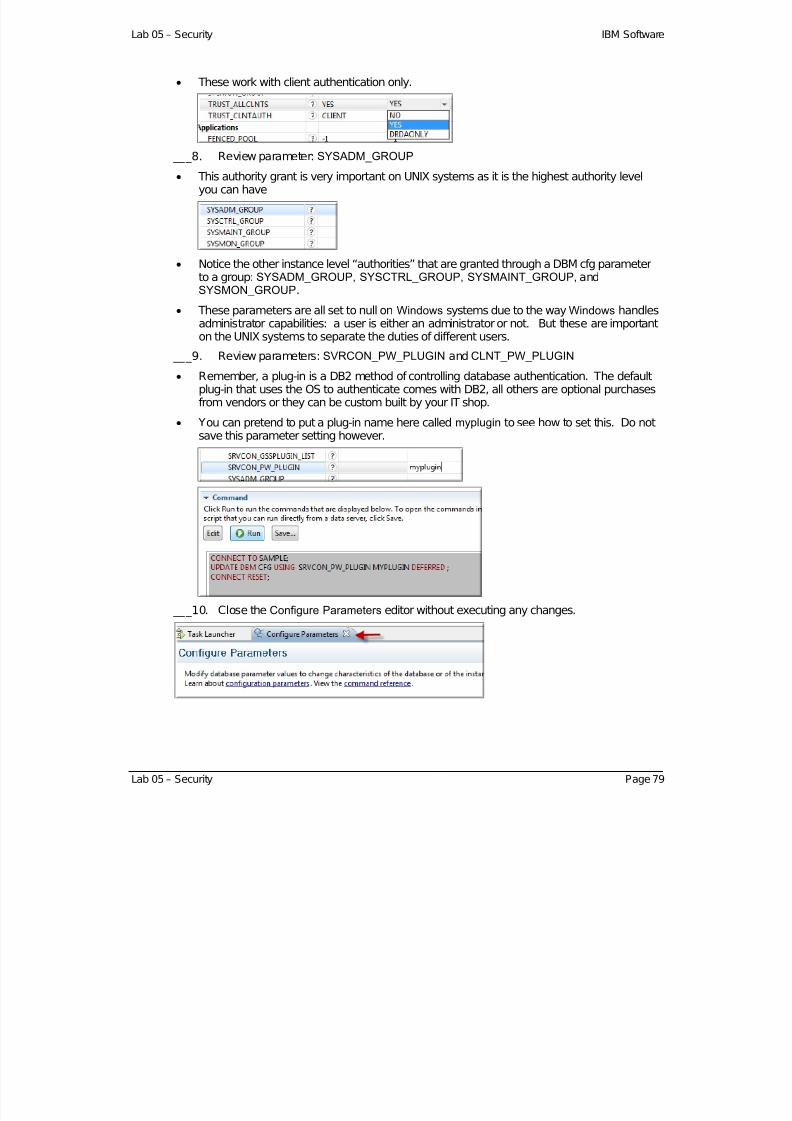
7/28/2019 PoT.im.07.1.017.13 Workbook Windows
http://slidepdf.com/reader/full/potim07101713-workbook-windows 79/232
Lab 05 – Security IBM Software
These work with client authentication only.
___8. Review parameter: SYSADM_GROUP
This authority grant is very important on UNIX systems as it is the highest authority levelyou can have
Notice the other instance level “authorities” that are granted through a DBM cfg parameterto a group: SYSADM_GROUP, SYSCTRL_GROUP, SYSMAINT_GROUP, and SYSMON_GROUP.
These parameters are all set to null on Windows systems due to the way Windows handlesadministrator capabilities: a user is either an administrator or not. But these are importanton the UNIX systems to separate the duties of different users.
___9. Review parameters: SVRCON_PW_PLUGIN and CLNT_PW_PLUGIN
Remember, a plug-in is a DB2 method of controlling database authentication. The defaultplug-in that uses the OS to authenticate comes with DB2, all others are optional purchasesfrom vendors or they can be custom built by your IT shop.
You can pretend to put a plug-in name here called myplugin to see how to set this. Do notsave this parameter setting however.
___10. Close the Configure Parameters editor without executing any changes.
Lab 05 – Security Page 79
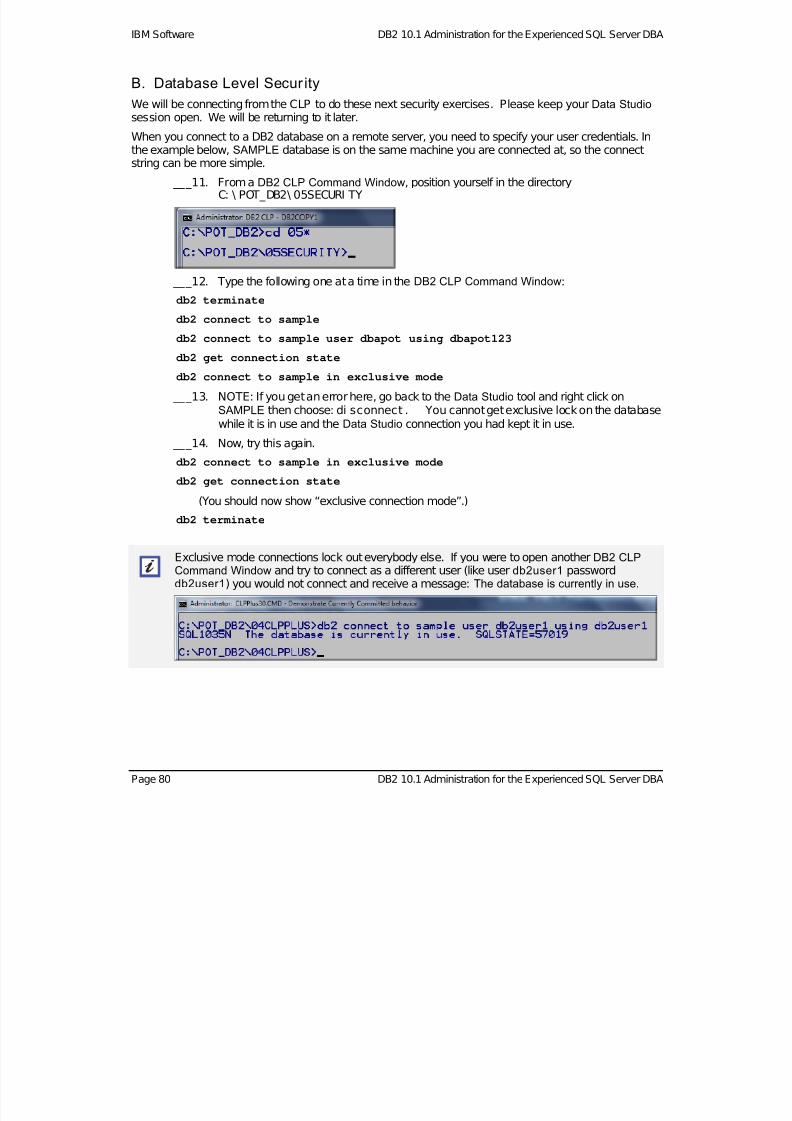
7/28/2019 PoT.im.07.1.017.13 Workbook Windows
http://slidepdf.com/reader/full/potim07101713-workbook-windows 80/232
IBM Software DB2 10.1 Administration for the Experienced SQL Server DBA
B. Database Level Secur ity
We will be connecting from the CLP to do these next security exercises. Please keep yourData Studio session open. We will be returning to it later.
When you connect to a DB2 database on a remote server, you need to specify your user credentials. Inthe example below, SAMPLE database is on the same machine you are connected at, so the connectstring can be more simple.
___11. From a DB2 CLP Command Window, position yourself in the directoryC: \ POT_DB2\ 05SECURI TY
___12. Type the following one at a time in the DB2 CLP Command Window:
db2 terminate
db2 connect to sample
db2 connect to sample user dbapot using dbapot123
db2 get connection state
db2 connect to sample in exclusive mode
___13. NOTE: If you get an error here, go back to the Data Studio tool and right click onSAMPLE then choose: di sconnect . You cannot get exclusive lock on the databasewhile it is in use and the Data Studio connection you had kept it in use.
___14. Now, try this again.
db2 connect to sample in exclusive mode
db2 get connection state
(You should now show “exclusive connection mode”.)
db2 terminate
Exclusive mode connections lock out everybody else. If you were to open anotherDB2 CLPCommand Window and try to connect as a different user (like userdb2user1 password db2user1) you would not connect and receive a message: The database is currently in use.
Page 80 DB2 10.1 Administration for the Experienced SQL Server DBA
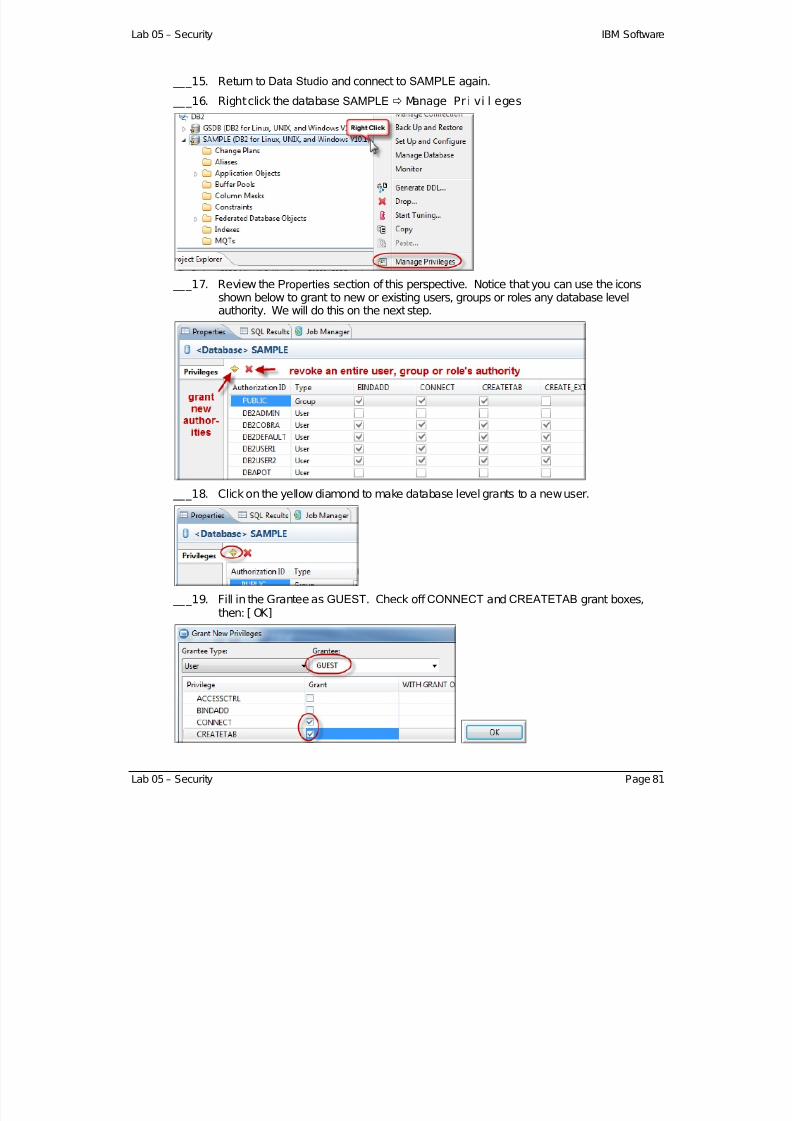
7/28/2019 PoT.im.07.1.017.13 Workbook Windows
http://slidepdf.com/reader/full/potim07101713-workbook-windows 81/232
Lab 05 – Security IBM Software
___15. Return to Data Studio and connect to SAMPLE again.
___16. Right click the database SAMPLE Manage Pr i vi l eges
___17. Review the Properties section of this perspective. Notice that you can use the iconsshown below to grant to new or existing users, groups or roles any database levelauthority. We will do this on the next step.
___18. Click on the yellow diamond to make database level grants to a new user.
___19. Fill in the Grantee as GUEST. Check off CONNECT and CREATETAB grant boxes,then: [ OK]
Lab 05 – Security Page 81

7/28/2019 PoT.im.07.1.017.13 Workbook Windows
http://slidepdf.com/reader/full/potim07101713-workbook-windows 82/232
IBM Software DB2 10.1 Administration for the Experienced SQL Server DBA
You did NOT just create a user GUEST. You simply are performing a grant to a user calledGUEST so that, if properly authenticated, that user is allowed to connect to the SAMPLE database and then create a table in it. You don’t care at this point howGUEST authenticates,you have just made sure that if they do authenticate, they will have these database authorities.
___20. Try this again, but this time useGroup and name the new group NEWGROUP.
DB2 does not have concept of creating nor maintaining users as does some other databaseslike SQL Server. Only the grants to users, groups and roles are maintained in DB2.
We will show how this looks in the system catalog later in this lab.
___21. You will now harden these changes to the database by performing the following:
___22. Make sure to click on the database SAMPLE in the Administration Explorer
___23. Find the “Review and Deploy Changes” icon in the top right corner of the editor view
which looks like the one below. Hover on it first to make sure it is the correct one, thenclick on it.
Page 82 DB2 10.1 Administration for the Experienced SQL Server DBA

7/28/2019 PoT.im.07.1.017.13 Workbook Windows
http://slidepdf.com/reader/full/potim07101713-workbook-windows 83/232
Lab 05 – Security IBM Software
___24. The very first time this is done in a Data Studio session, it can take a few seconds tocomplete, so please be patient.
___25. Review the changes then click [ Run] .
___26. The SQL Results view will tell you if you did this properly.
Lab 05 – Security Page 83
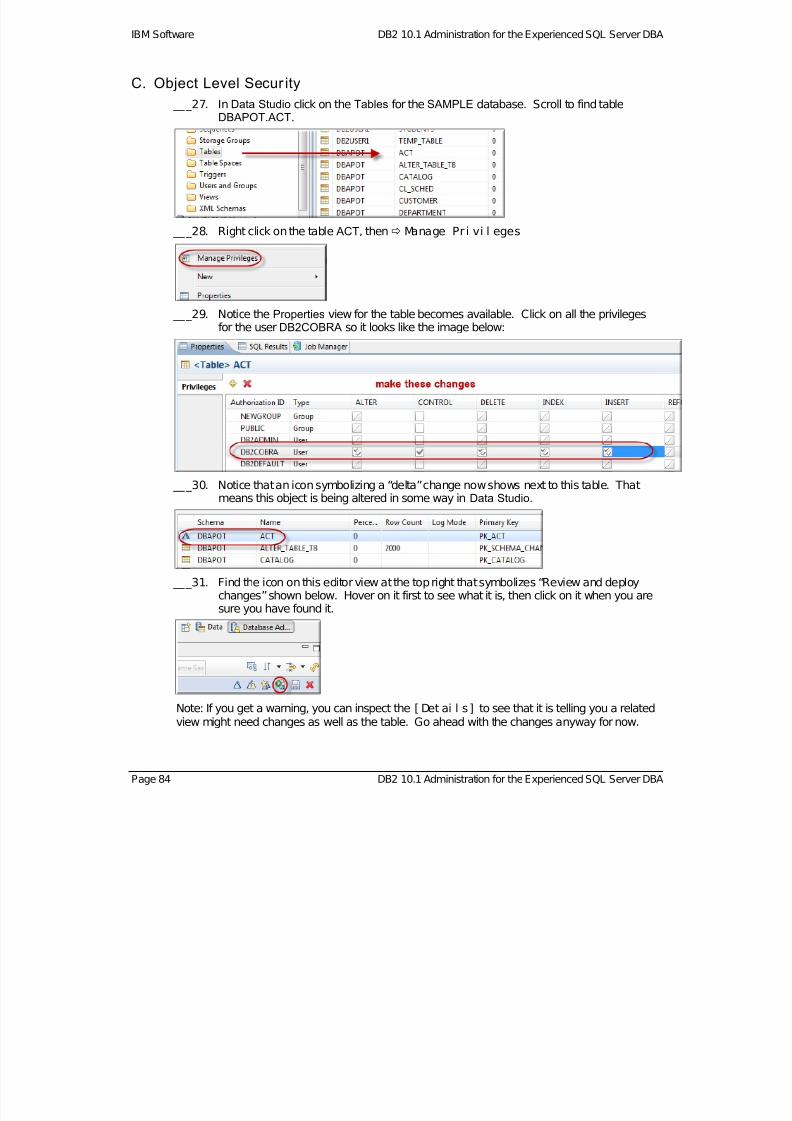
7/28/2019 PoT.im.07.1.017.13 Workbook Windows
http://slidepdf.com/reader/full/potim07101713-workbook-windows 84/232
IBM Software DB2 10.1 Administration for the Experienced SQL Server DBA
C. Object Level Secur ity
___27. In Data Studio click on the Tables for the SAMPLE database. Scroll to find tableDBAPOT.ACT.
___28. Right click on the table ACT, then Manage Pr i vi l eges
___29. Notice the Properties view for the table becomes available. Click on all the privilegesfor the user DB2COBRA so it looks like the image below:
___30. Notice that an icon symbolizing a “delta” change now shows next to this table. Thatmeans this object is being altered in some way in Data Studio.
___31. Find the icon on this editor view at the top right that symbolizes “Review and deploychanges” shown below. Hover on it first to see what it is, then click on it when you aresure you have found it.
Note: If you get a warning, you can inspect the [ Det ai l s] to see that it is telling you a relatedview might need changes as well as the table. Go ahead with the changes anyway for now.
Page 84 DB2 10.1 Administration for the Experienced SQL Server DBA
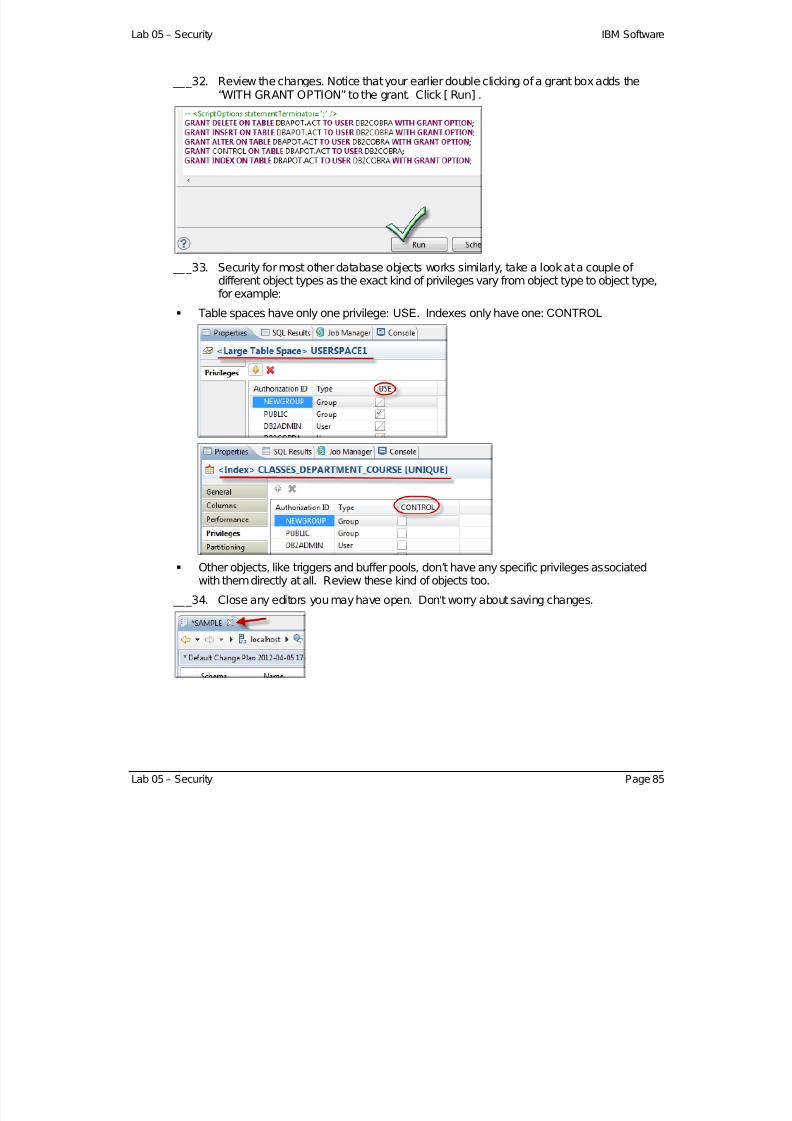
7/28/2019 PoT.im.07.1.017.13 Workbook Windows
http://slidepdf.com/reader/full/potim07101713-workbook-windows 85/232
Lab 05 – Security IBM Software
___32. Review the changes. Notice that your earlier double clicking of a grant box adds the“WITH GRANT OPTION” to the grant. Click [ Run] .
___33. Security for most other database objects works similarly, take a look at a couple of different object types as the exact kind of privileges vary from object type to object type,for example:
Table spaces have only one privilege: USE. Indexes only have one: CONTROL
Other objects, like triggers and buffer pools, don’t have any specific privileges associatedwith them directly at all. Review these kind of objects too.
___34. Close any editors you may have open. Don't worry about saving changes.
Lab 05 – Security Page 85
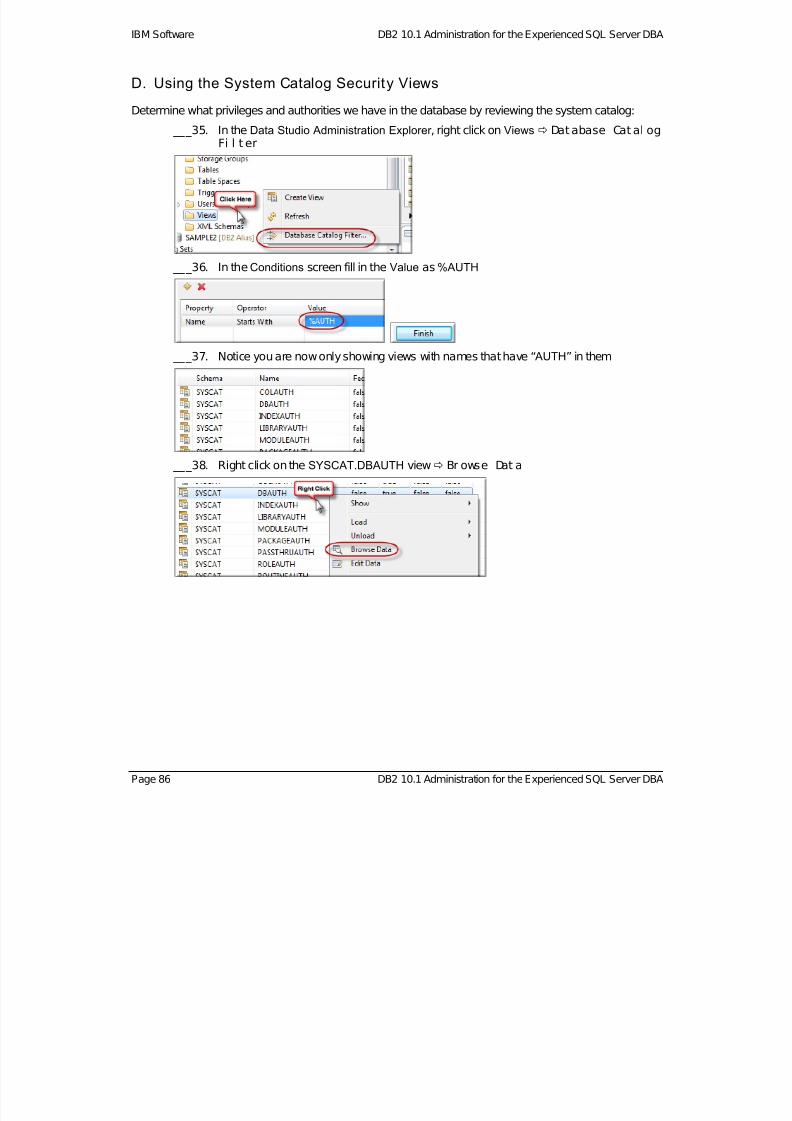
7/28/2019 PoT.im.07.1.017.13 Workbook Windows
http://slidepdf.com/reader/full/potim07101713-workbook-windows 86/232
IBM Software DB2 10.1 Administration for the Experienced SQL Server DBA
D. Using the System Catalog Security Views
Determine what privileges and authorities we have in the database by reviewing the system catalog:
___35. In the Data Studio Administration Explorer , right click on Views Dat abase Cat al ogFi l t er
___36. In theConditions screen fill in the Value as %AUTH
___37. Notice you are now only showing views with names that have “ AUTH” in them
___38. Right click on the SYSCAT.DBAUTH view Br owse Dat a
Page 86 DB2 10.1 Administration for the Experienced SQL Server DBA
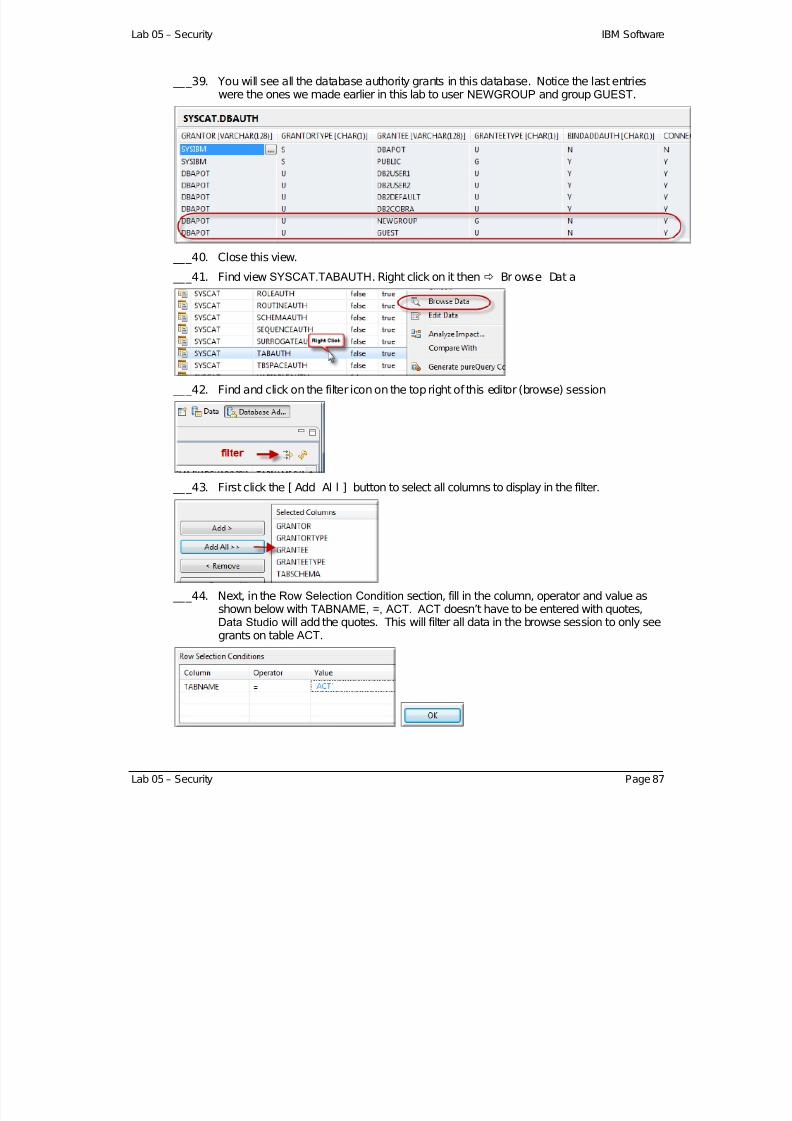
7/28/2019 PoT.im.07.1.017.13 Workbook Windows
http://slidepdf.com/reader/full/potim07101713-workbook-windows 87/232
Lab 05 – Security IBM Software
___39. You will see all the database authority grants in this database. Notice the last entrieswere the ones we made earlier in this lab to user NEWGROUP and group GUEST.
___40. Close this view.
___41. Find view SYSCAT.TABAUTH. Right click on it then Br owse Dat a
___42. Find and click on the filter icon on the top right of this editor (browse) session
___43. First click the [ Add Al l ] button to select all columns to display in the filter.
___44. Next, in the Row Selection Condition section, fill in the column, operator and value asshown below with TABNAME, =, ACT. ACT doesn’t have to be entered with quotes,Data Studio will add the quotes. This will filter all data in the browse session to only see
grants on table ACT.
Lab 05 – Security Page 87

7/28/2019 PoT.im.07.1.017.13 Workbook Windows
http://slidepdf.com/reader/full/potim07101713-workbook-windows 88/232
IBM Software DB2 10.1 Administration for the Experienced SQL Server DBA
___45. Click [ OK] to see the results of this filter for the data in this view. You will notice we cansee the grants we made earlier in this lab for table ACT for user DB2COBRA.
___46. Right click on the filteredViews in the Administration Explorer again Dat abaseCat al og Fi l t er
___47. Blank out the filter and click [ Fi ni sh]
___48. The views should no longer have a filter on them.
Page 88 DB2 10.1 Administration for the Experienced SQL Server DBA
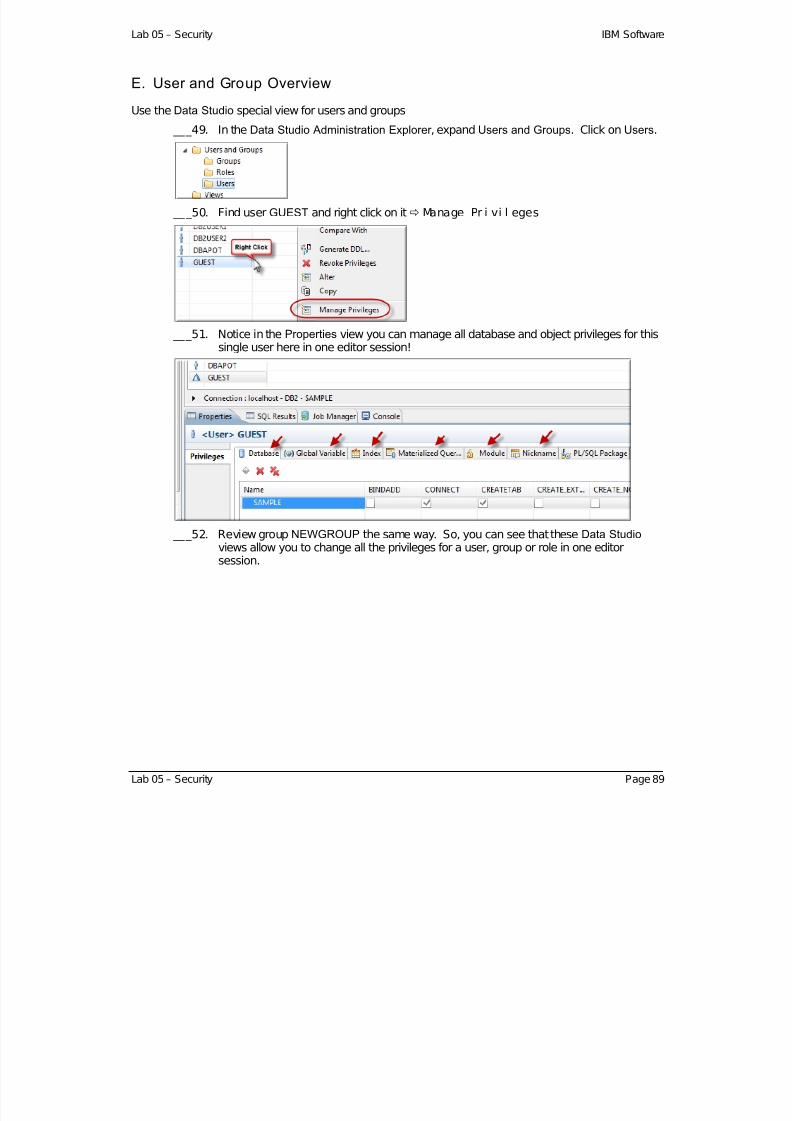
7/28/2019 PoT.im.07.1.017.13 Workbook Windows
http://slidepdf.com/reader/full/potim07101713-workbook-windows 89/232
Lab 05 – Security IBM Software
E. User and Group Overview
Use the Data Studio special view for users and groups
___49. In the Data Studio Administration Explorer , expand Users and Groups. Click on Users.
___50. Find user GUEST and right click on it Manage Pr i vi l eges
___51. Notice in the Properties view you can manage all database and object privileges for thissingle user here in one editor session!
___52. Review group NEWGROUP the same way. So, you can see that these Data Studio views allow you to change all the privileges for a user, group or role in one editorsession.
Lab 05 – Security Page 89
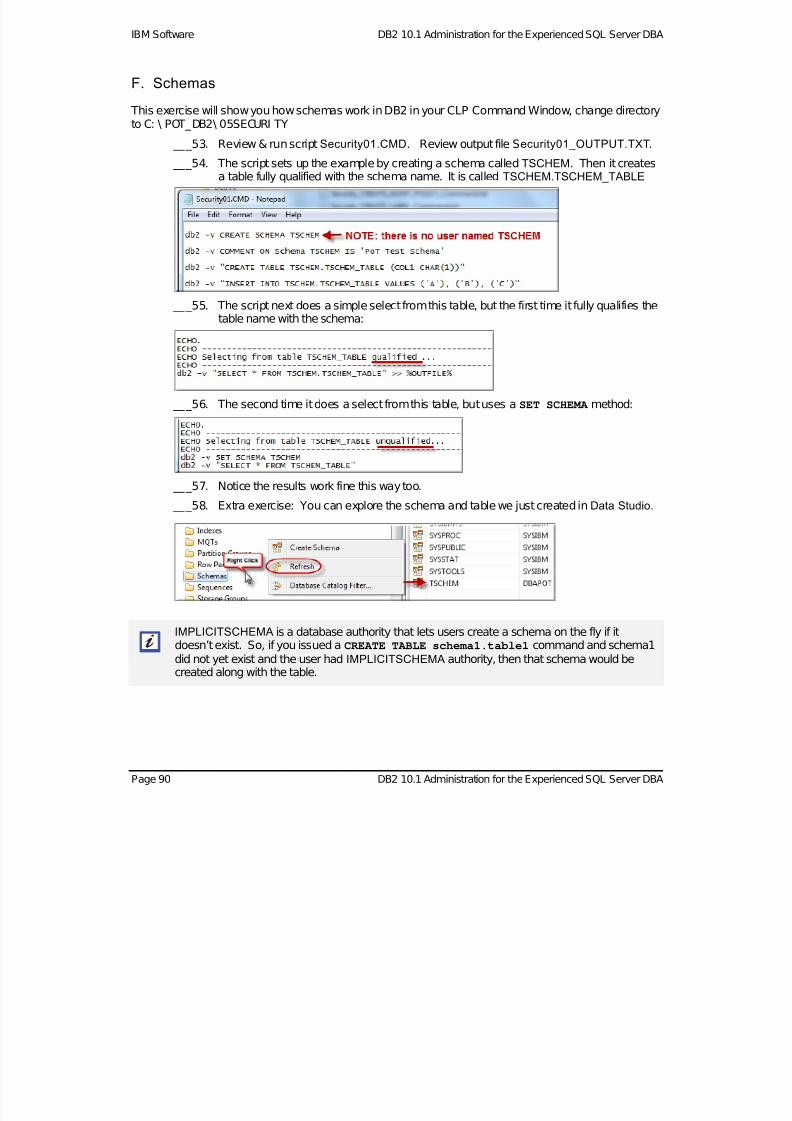
7/28/2019 PoT.im.07.1.017.13 Workbook Windows
http://slidepdf.com/reader/full/potim07101713-workbook-windows 90/232
IBM Software DB2 10.1 Administration for the Experienced SQL Server DBA
F. Schemas
This exercise will show you how schemas work in DB2 in your CLP Command Window, change directoryto C: \ POT_DB2\ 05SECURI TY
___53. Review & run scriptSecurity01.CMD. Review output file Security01_OUTPUT.TXT.
___54. The script sets up the example by creating a schema calledTSCHEM. Then it createsa table fully qualified with the schema name. It is called TSCHEM.TSCHEM_TABLE
___55. The script next does a simple select from this table, but the first time it fully qualifies the
table name with the schema:
___56. The second time it does a select from this table, but uses aSET SCHEMA method:
___57. Notice the results work fine this way too.
___58. Extra exercise: You can explore the schema and table we just created inData Studio.
IMPLICITSCHEMA is a database authority that lets users create a schema on the fly if itdoesn’t exist. So, if you issued a CREATE TABLE schema1.table1 command and schema1did not yet exist and the user had IMPLICITSCHEMA authority, then that schema would becreated along with the table.
Page 90 DB2 10.1 Administration for the Experienced SQL Server DBA

7/28/2019 PoT.im.07.1.017.13 Workbook Windows
http://slidepdf.com/reader/full/potim07101713-workbook-windows 91/232
Lab 05 – Security IBM Software
G. Viewing database authorities
We will show you how to view your database authorities using one table function:SYSPROC.AUTH_LIST_AUTHORITIES_FOR_AUTHID
___59. Review and run: Security02.CMD. After running above script, review file:Security02_OUTPUT.TXT
___60. The output from this function shows both direct and indirect grants to an authoritythrough various means.
The first columns are for direct grants to a user, group or through a public grant
The last columns are for role grants, first direct, then indirect
Asterisks (*) mean this is not applicable. For example, you cannot grant instance levelauthorities like SYSADM through a user grant, only through a group assignment (pleaserecall our first exercise in this lab...)
Authorities without a "Y" somewhere means the user does not have this authority
Lab 05 – Security Page 91
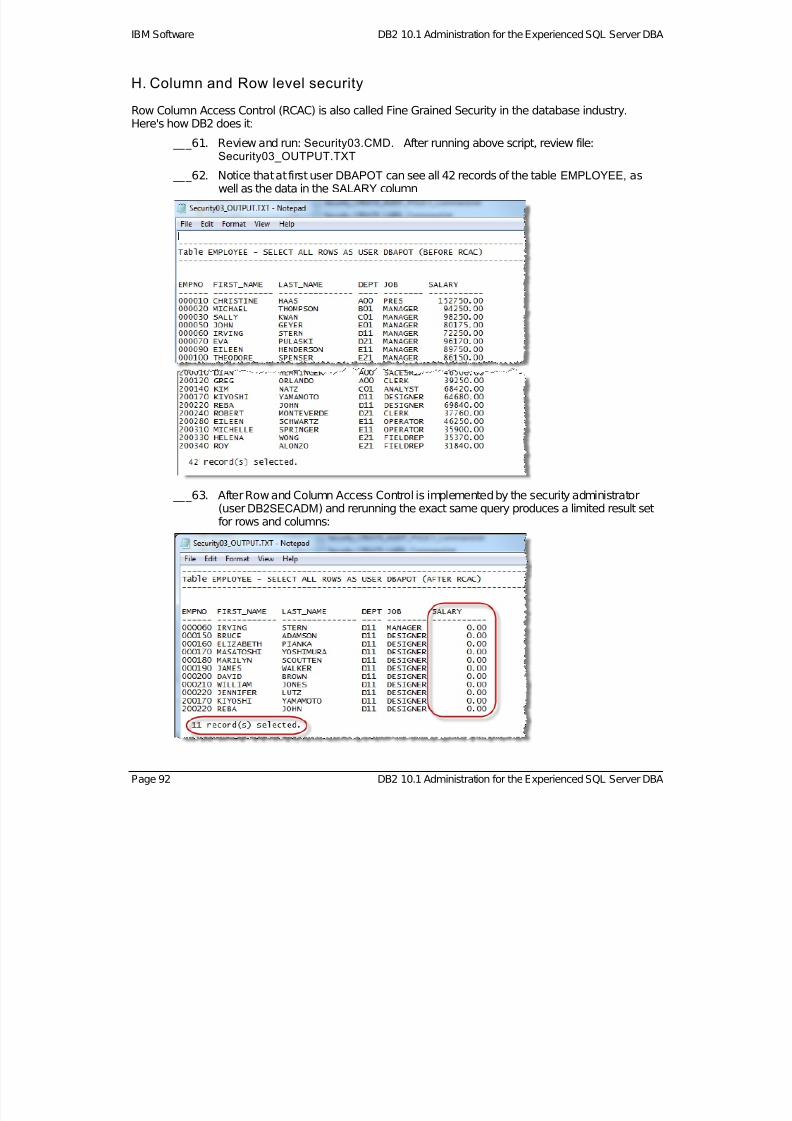
7/28/2019 PoT.im.07.1.017.13 Workbook Windows
http://slidepdf.com/reader/full/potim07101713-workbook-windows 92/232
IBM Software DB2 10.1 Administration for the Experienced SQL Server DBA
H. Column and Row level security
Row Column Access Control (RCAC) is also called Fine Grained Security in the database industry.Here's how DB2 does it:
___61. Review and run: Security03.CMD. After running above script, review file:
Security03_OUTPUT.TXT ___62. Notice that at first user DBAPOT can see all 42 records of the table EMPLOYEE, as
well as the data in the SALARY column
___63. After Row and Column Access Control is implemented by the security administrator(user DB2SECADM) and rerunning the exact same query produces a limited result setfor rows and columns:
Page 92 DB2 10.1 Administration for the Experienced SQL Server DBA
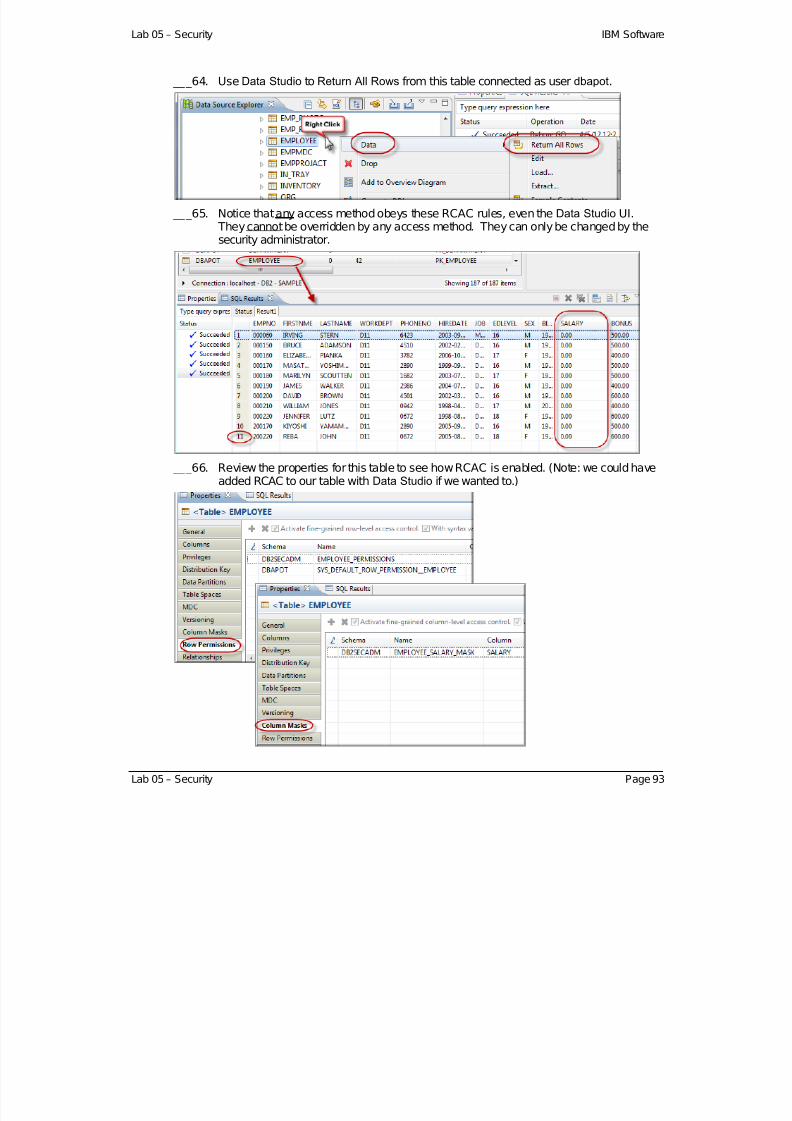
7/28/2019 PoT.im.07.1.017.13 Workbook Windows
http://slidepdf.com/reader/full/potim07101713-workbook-windows 93/232
Lab 05 – Security IBM Software
___64. Use Data Studio to Return All Rows from this table connected as user dbapot.
___65. Notice that any access method obeys these RCAC rules, even theData Studio UI. They cannot be overridden by any access method. They can only be changed by thesecurity administrator.
___66. Review the properties for this table to see how RCAC is enabled. (Note: we could haveadded RCAC to our table with Data Studio if we wanted to.)
Lab 05 – Security Page 93

7/28/2019 PoT.im.07.1.017.13 Workbook Windows
http://slidepdf.com/reader/full/potim07101713-workbook-windows 94/232
IBM Software DB2 10.1 Administration for the Experienced SQL Server DBA
I. Extra Exercise: DB2Audit and AUDIT POLICY
Please disconnect from the SAMPLE database in Data Studio before doing this exercise.
DB2 passive auditing is controlled in following 2 ways:
SYSADM is in control of instance level security through the use of the db2audit tool.
SECADM is in control of database level security through the use of AUDIT POLICY and AUDITcommands.
___67. A user with SYSADM grants SECADM authority to user secpot which creates 2 auditpolicies.
Review and run scriptSecurity04.CMD. Explore output file Security04_OUTPUT.TXT;
Notice that secpot with SECADM creates 2 audit policies:
CHECK_POLICY to determine what DBAs are doing
SENSITIVE_DATA_POLICY to determine who is accessing a given table.
___68. The audit facility controlled bySYSADM is demonstrated by the scriptSecurity05.CMD. Review and run scripts: Security05.CMD that executes Security07.SQL and Security08.SQL
Explore output file Security05_OUTPUT.TXT. The last part of the output shows the outputof SQL reports run against AUDIT tables.
This shows that user dbapot usingSYSADM:
Did see instance level auditing information, in this case, connection audits
Did not see database level audit results fromSAMPLE database at all
Page 94 DB2 10.1 Administration for the Experienced SQL Server DBA
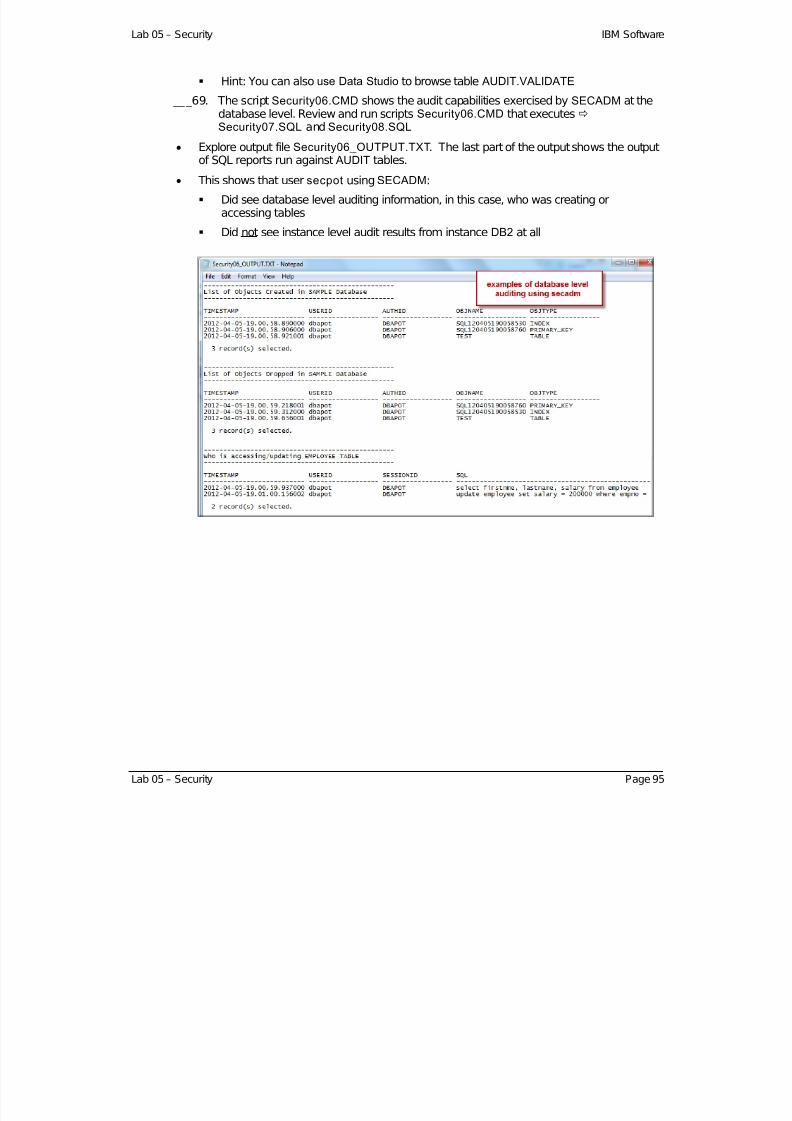
7/28/2019 PoT.im.07.1.017.13 Workbook Windows
http://slidepdf.com/reader/full/potim07101713-workbook-windows 95/232
Lab 05 – Security IBM Software
Lab 05 – Security Page 95
Hint: You can also use Data Studio to browse table AUDIT.VALIDATE
___69. The script Security06.CMD shows the audit capabilities exercised by SECADM at thedatabase level. Review and run scripts Security06.CMD that executes Security07.SQL and Security08.SQL
Explore output file Security06_OUTPUT.TXT. The last part of the output shows the output
of SQL reports run against AUDIT tables.
This shows that user secpot using SECADM:
Did see database level auditing information, in this case, who was creating oraccessing tables
Did not see instance level audit results from instanceDB2 at all
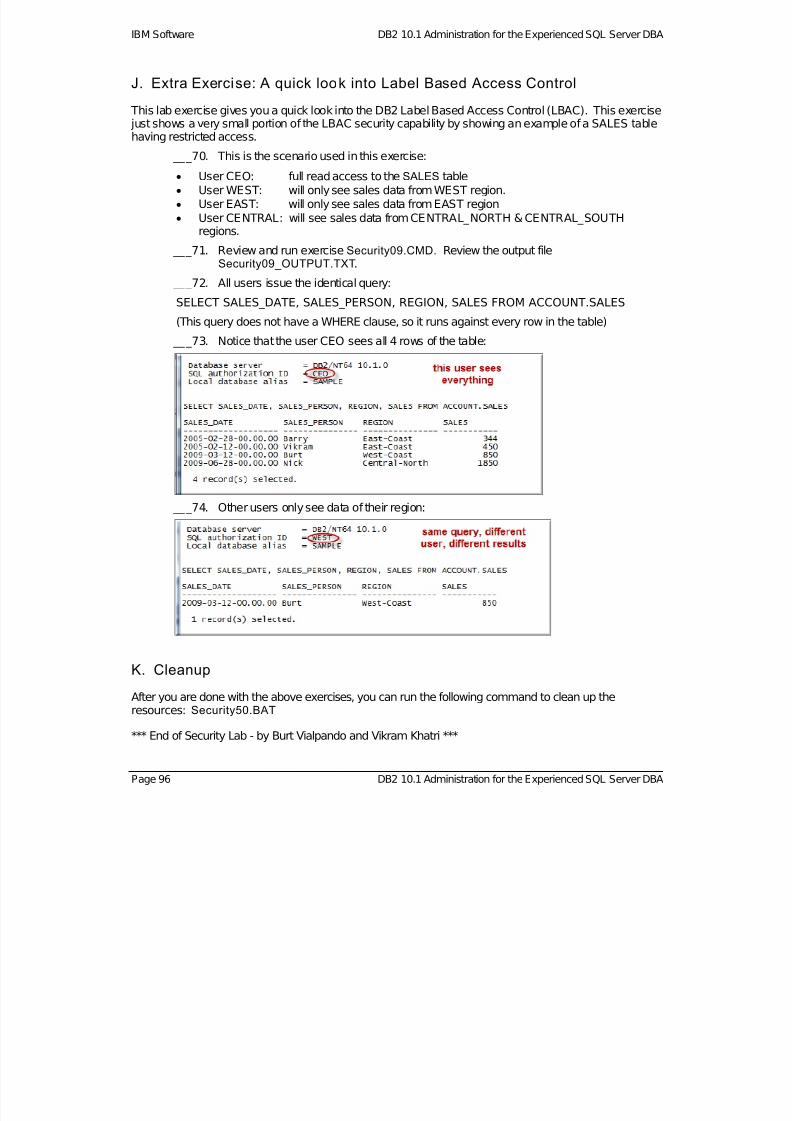
7/28/2019 PoT.im.07.1.017.13 Workbook Windows
http://slidepdf.com/reader/full/potim07101713-workbook-windows 96/232
IBM Software DB2 10.1 Administration for the Experienced SQL Server DBA
J. Extra Exercise: A quick look into Label Based Access Control
This lab exercise gives you a quick look into the DB2 Label Based Access Control (LBAC). This exercise just shows a very small portion of the LBAC security capability by showing an example of a SALES tablehaving restricted access.
___70. This is the scenario used in this exercise: User CEO: full read access to the SALES table User WEST: will only see sales data from WEST region. User EAST: will only see sales data from EAST region User CENTRAL: will see sales data from CENTRAL_NORTH & CENTRAL_SOUTH
regions.
___71. Review and run exercise Security09.CMD. Review the output fileSecurity09_OUTPUT.TXT.
___72. All users issue the identical query:
SELECT SALES_DATE, SALES_PERSON, REGION, SALES FROM ACCOUNT.SALES
(This query does not have a WHERE clause, so it runs against every row in the table)
___73. Notice that the user CEO sees all 4 rows of the table:
___74. Other users only see data of their region:
K. Cleanup
After you are done with the above exercises, you can run the following command to clean up theresources: Security50.BAT
*** End of Security Lab - by Burt Vialpando and Vikram Khatri ***
Page 96 DB2 10.1 Administration for the Experienced SQL Server DBA

7/28/2019 PoT.im.07.1.017.13 Workbook Windows
http://slidepdf.com/reader/full/potim07101713-workbook-windows 97/232
Lab 06 – Autonomic Computing IBM Software
Lab 06. Autonomic Comput ing
This lab assumes you have already completed theData Studio Lab 03 exercises.
If you have not, then you should complete sections A and B of Lab 03 to learn how to launchData Studio and connect to a database.
A. Self Tuning Memory Manager (STMM)
___1. Open a DB2 CLP Command Window
___2. Go to the directory C: \ POT_DB2\ 06AUTONOM
___3. Review and then execute Autonom01.CMD which executes Atonom02.DB2 and Autonom03.DB2. This will set up our lab. Notice that these scripts create a database AUTONMDB, a buffer pool, a table space and a table for our lab exercises. The script takesabout 2 minutes to complete. Wait for the script to finish before going on to the next step.
___4. After the script is finished, restartData Studio by choosing: F i l e Rest ar t
___5. The restart should have automatically added a new database connection attribute for AUTONMDB inData Studio. If it did not, then you can add a new connection manually by rightclicking on the All Databases folder in the Administration Explorer view and choosing: NewConnect i on t o a database
Lab 06 – Autonomic Computing Page 97

7/28/2019 PoT.im.07.1.017.13 Workbook Windows
http://slidepdf.com/reader/full/potim07101713-workbook-windows 98/232
IBM Software DB2 10.1 Administration for the Experienced SQL Server DBA
___6. Then fill out the connection attributes as shown below. Test the connection before finishing. You will now be ready to work with your new database AUTONMDB inData Studio.
___7. Next run Autonom04.CMD which creates output files Autonom04_OUTPUT1.TXT and Autonom04_OUTPUT2.TXT.
___8. This file shows all the STMM related database configuration parameters for AUTONMDB:
___9. This file shows the buffer pools that are STMM configurable for our database:
Page 98 DB2 10.1 Administration for the Experienced SQL Server DBA
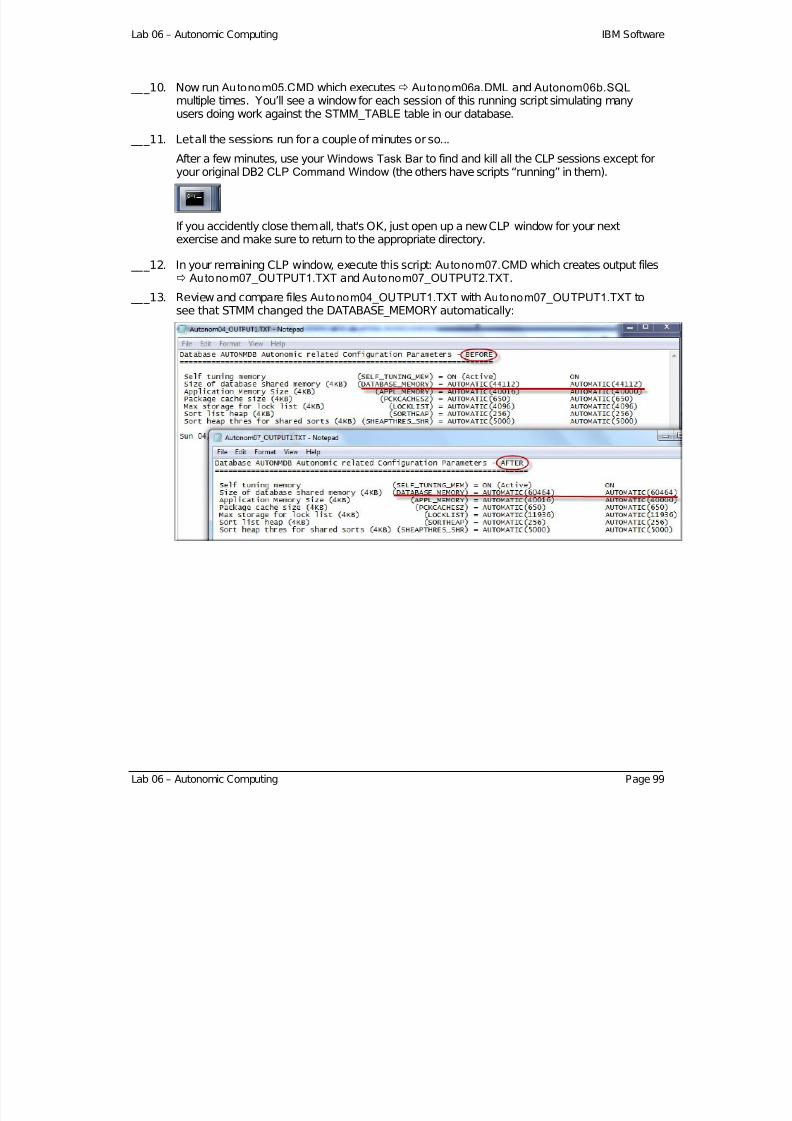
7/28/2019 PoT.im.07.1.017.13 Workbook Windows
http://slidepdf.com/reader/full/potim07101713-workbook-windows 99/232
Lab 06 – Autonomic Computing IBM Software
___10. Now run Au tonom05.CMD which executes Autonom06a.DML and Autonom06b.SQLmultiple times. You’ll see a window for each session of this running script simulating manyusers doing work against the STMM_TABLE table in our database.
___11. Let all the sessions run for a couple of minutes or so...
After a few minutes, use your Windows Task Bar to find and kill all the CLP sessions except foryour original DB2 CLP Command Window (the others have scripts “running” in them).
If you accidently close them all, that's OK, just open up a new CLP window for your nextexercise and make sure to return to the appropriate directory.
___12. In your remaining CLP window, execute this script: Autonom07.CMD which creates output files Autonom07_OUTPUT1.TXT and Autonom07_OUTPUT2.TXT.
___13. Review and compare files Autonom04_OUTPUT1.TXT with Autonom07_OUTPUT1.TXT tosee that STMM changed the DATABASE_MEMORY automatically:
Lab 06 – Autonomic Computing Page 99
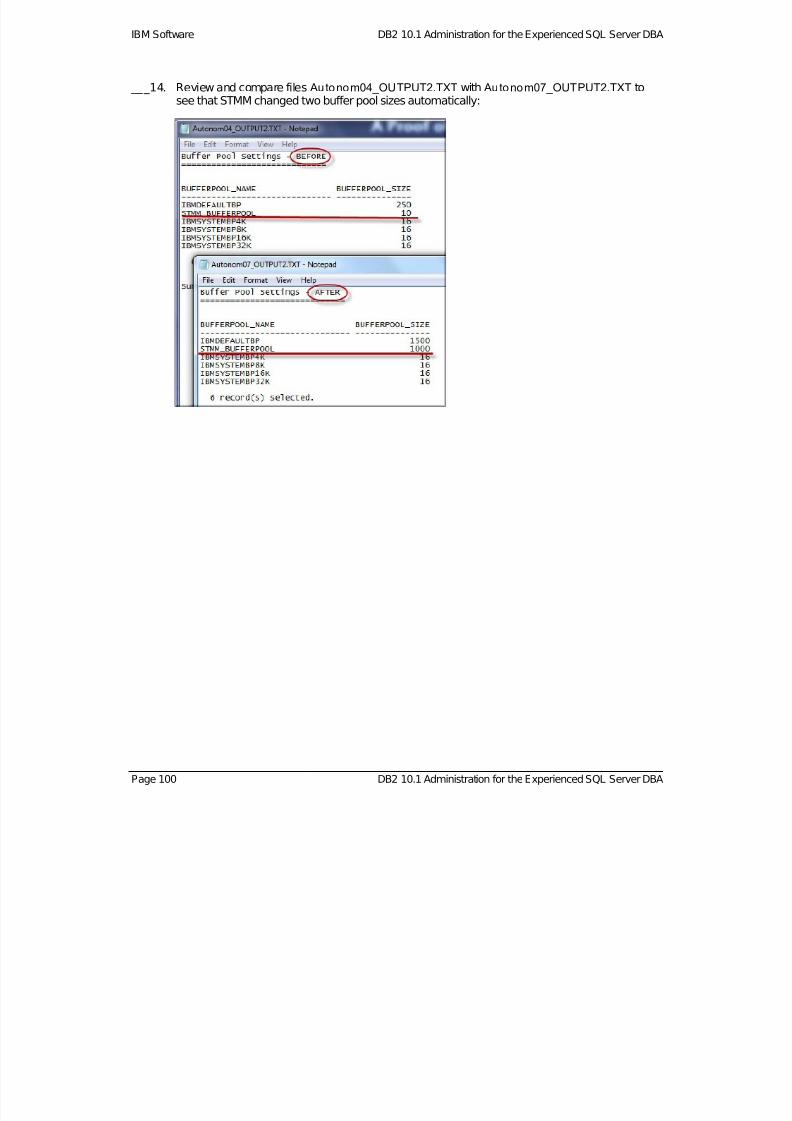
7/28/2019 PoT.im.07.1.017.13 Workbook Windows
http://slidepdf.com/reader/full/potim07101713-workbook-windows 100/232
IBM Software DB2 10.1 Administration for the Experienced SQL Server DBA
___14. Review and compare files Autonom04_OUTPUT2.TXT with Autonom07_OUTPUT2.TXT tosee that STMM changed two buffer pool sizes automatically:
Page 100 DB2 10.1 Administration for the Experienced SQL Server DBA
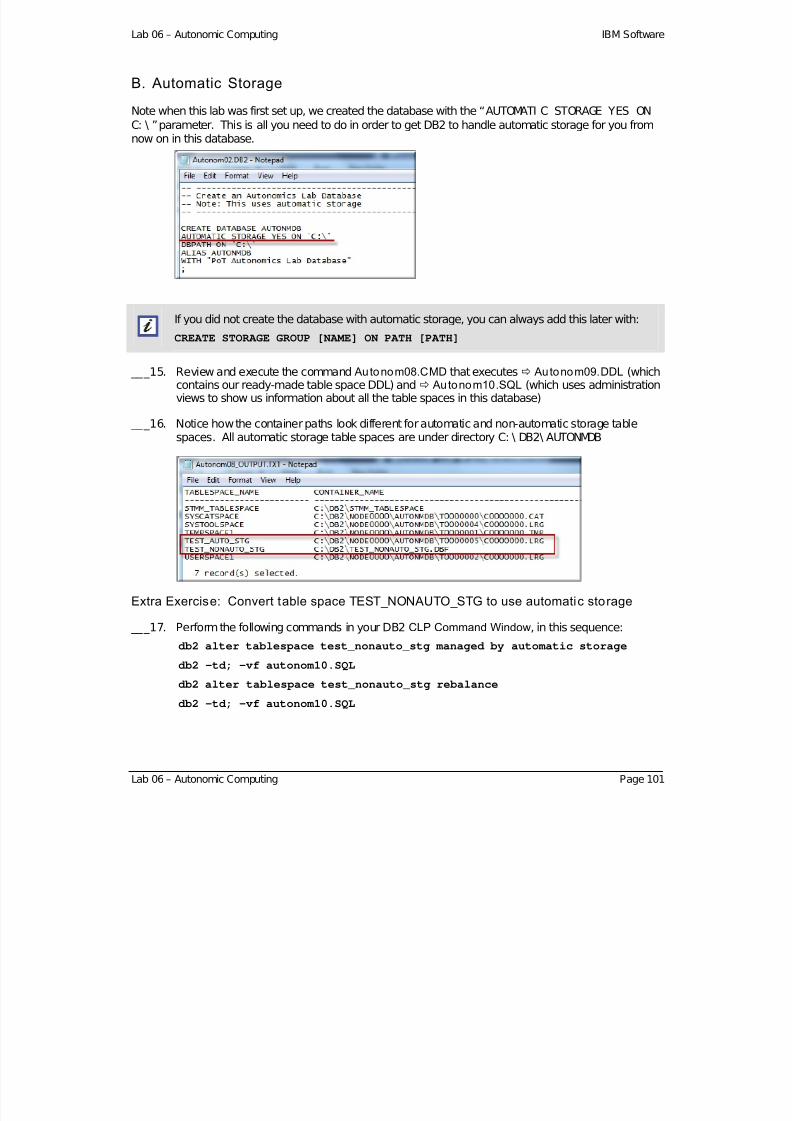
7/28/2019 PoT.im.07.1.017.13 Workbook Windows
http://slidepdf.com/reader/full/potim07101713-workbook-windows 101/232
Lab 06 – Autonomic Computing IBM Software
B. Automatic Storage
Note when this lab was first set up, we created the database with the “AUTOMATI C STORAGE YES ONC: \ ” parameter. This is all you need to do in order to get DB2 to handle automatic storage for you fromnow on in this database.
If you did not create the database with automatic storage, you can always add this later with:
CREATE STORAGE GROUP [NAME] ON PATH [PATH]
___15. Review and execute the command Autonom08.CMD that executes Autonom09.DDL (whichcontains our ready-made table space DDL) and Autonom10.SQL (which uses administrationviews to show us information about all the table spaces in this database)
___16. Notice how the container paths look different for automatic and non-automatic storage tablespaces. All automatic storage table spaces are under directory C: \ DB2\ AUTONMDB
Extra Exercise: Convert table space TEST_NONAUTO_STG to use automatic storage
___17. Perform the following commands in your DB2 CLP Command Window, in this sequence:
db2 alter tablespace test_nonauto_stg managed by automatic storage
db2 –td; –vf autonom10.SQL
db2 alter tablespace test_nonauto_stg rebalance
db2 –td; –vf autonom10.SQL
Lab 06 – Autonomic Computing Page 101

7/28/2019 PoT.im.07.1.017.13 Workbook Windows
http://slidepdf.com/reader/full/potim07101713-workbook-windows 102/232
IBM Software DB2 10.1 Administration for the Experienced SQL Server DBA
Page 102 DB2 10.1 Administration for the Experienced SQL Server DBA
C. Run Autoconf igure (Command Line for Configuration Advisor)
___18. Review and execute the command Autonom20.CMD to run autoconfigure command containedin Autonom21.DB2.
___19. Review the output in Autonom20_OUTPUT.TXT file
___20. You can modify the Autonom21.DB2 to change APPLY NONE parameter to APPLY DB ANDDBM to apply changes in database manager and database configuration parameters.
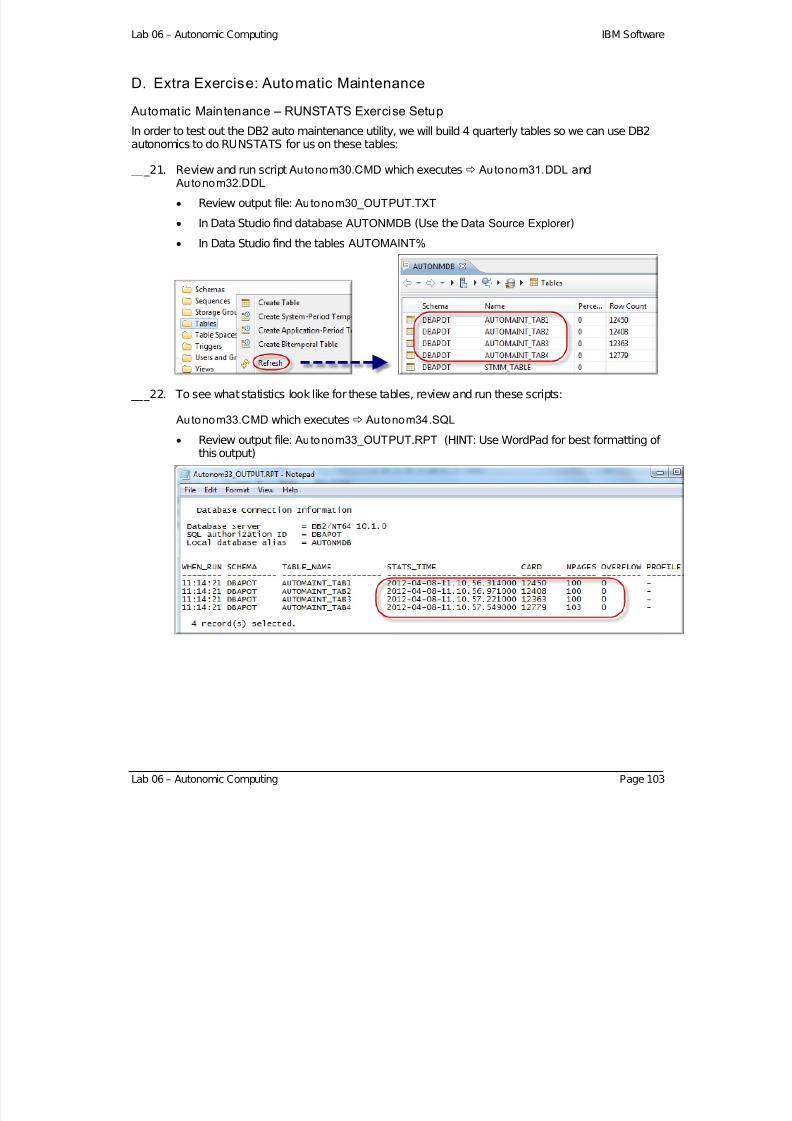
7/28/2019 PoT.im.07.1.017.13 Workbook Windows
http://slidepdf.com/reader/full/potim07101713-workbook-windows 103/232
Lab 06 – Autonomic Computing IBM Software
D. Extra Exercise: Automatic Maintenance
Automatic Maintenance – RUNSTATS Exercise Setup
In order to test out the DB2 auto maintenance utility, we will build 4 quarterly tables so we can use DB2autonomics to do RUNSTATS for us on these tables:
___21. Review and run script Autonom30.CMD which executes Autonom31.DDL and Autonom32.DDL
Review output file: Autonom30_OUTPUT.TXT
In Data Studio find database AUTONMDB (Use the Data Source Explorer )
In Data Studio find the tables AUTOMAINT%
___22. To see what statistics look like for these tables, review and run these scripts:
Autonom33.CMD which executes Autonom34.SQL
Review output file: Autonom33_OUTPUT.RPT (HINT: Use WordPad for best formatting of this output)
Lab 06 – Autonomic Computing Page 103

7/28/2019 PoT.im.07.1.017.13 Workbook Windows
http://slidepdf.com/reader/full/potim07101713-workbook-windows 104/232
IBM Software DB2 10.1 Administration for the Experienced SQL Server DBA
___23. Run script Autonom35.CMD which executes Autonom36.DDL. This script will reset thestatistics for the table cardinality and NPAGES.
___24. Autonom33.CMD which executes Autonom34.SQL (yes, run this again)
Now review this file again: Autonom33_OUTPUT.RPT (Use WordPad)
So, now you know what these tables look like with and without statistics
We will set up the automatic maintenance facility to update these statistics for us from nowon.
Page 104 DB2 10.1 Administration for the Experienced SQL Server DBA

7/28/2019 PoT.im.07.1.017.13 Workbook Windows
http://slidepdf.com/reader/full/potim07101713-workbook-windows 105/232
Lab 06 – Autonomic Computing IBM Software
Automatic Maintenance – RUNSTATS UI Settings
The first automatic maintenance feature we will explore it the RUNSTATS feature. As of DB2 9.1, theRUNSTATS feature in automatic maintenance is already on by default. Still, we will learn how to use itand customize it in this lab so we can get a handle on how the rest of the automatic maintenance
features work.
___25. In Data Studio get to the Database Administration perspective, and find the AdministrationExplorer
___26. Right click on database AUTONMDB Set Up and Conf i gur e Conf i gur eAutomat i c Mai ntenance
___27. Options screen: Review defaults and leave as-is, click: Onl i ne Mai nt enance Wi ndow
___28. Online Maintenance Window screen: Review defaults and leave as-is, click Of f l i neMai nt enance Wi ndow
___29. Offline Maintenance Window screen: Review defaults and leave as-is, click Runst atsPol i cy
Lab 06 – Autonomic Computing Page 105

7/28/2019 PoT.im.07.1.017.13 Workbook Windows
http://slidepdf.com/reader/full/potim07101713-workbook-windows 106/232
IBM Software DB2 10.1 Administration for the Experienced SQL Server DBA
___30. Runstats Policy screen:
Check off: Create or update the runstats policy.
Click on: Selected tables
Fill in simple condition as shown below which will only run statistics on tables with names thatstart AUTOMAINT%
___31. Click onPreview Command
___32. Review the commands that will perform the automatic maintenance set up tasks in yourdatabase, then click: [ Run]
___33. Wait for the command to finish and make sure it is successful. Close the task assistant editor.
Page 106 DB2 10.1 Administration for the Experienced SQL Server DBA
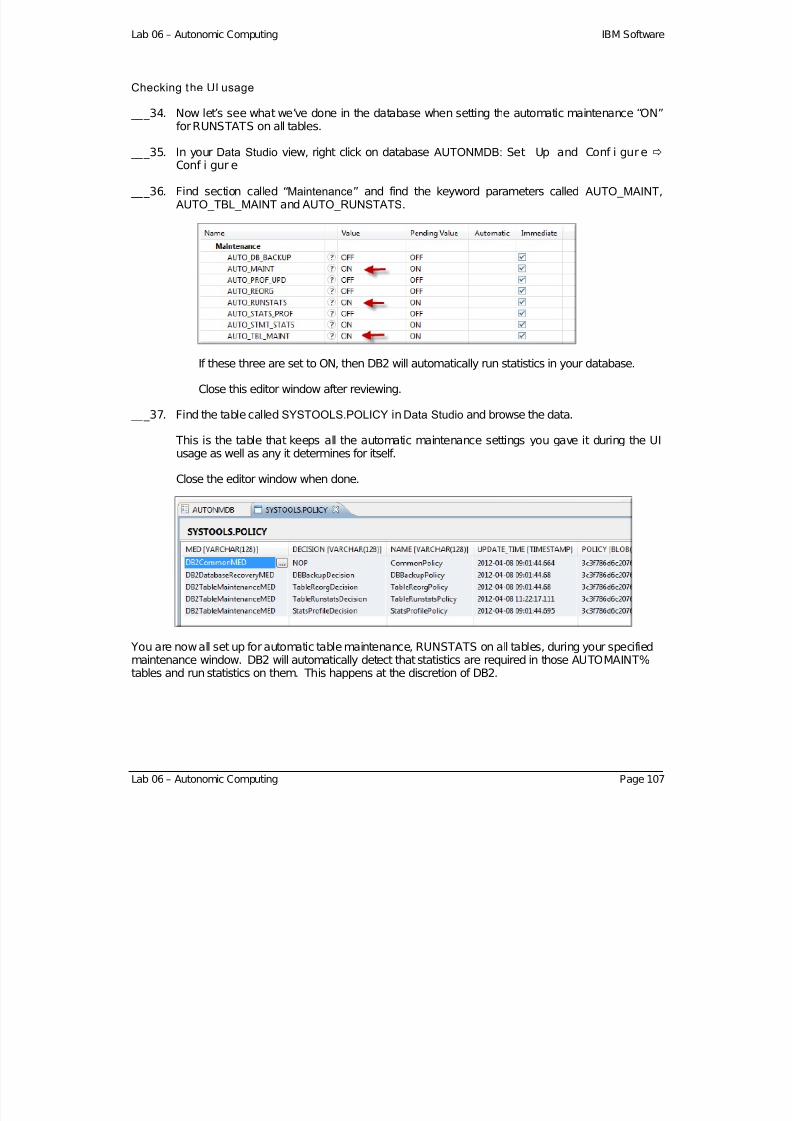
7/28/2019 PoT.im.07.1.017.13 Workbook Windows
http://slidepdf.com/reader/full/potim07101713-workbook-windows 107/232
Lab 06 – Autonomic Computing IBM Software
Checking the UI usage
___34. Now let’s see what we’ve done in the database when setting the automatic maintenance “ON”for RUNSTATS on all tables.
___35. In yourData Studio
view, right click on database AUTONMDB:
Set Up and Conf i gure
Conf i gur e
___36. Find section called “Maintenance” and find the keyword parameters called AUTO_MAINT, AUTO_TBL_MAINT and AUTO_RUNSTATS.
If these three are set to ON, then DB2 will automatically run statistics in your database.
Close this editor window after reviewing.
___37. Find the table calledSYSTOOLS.POLICY inData Studio and browse the data.
This is the table that keeps all the automatic maintenance settings you gave it during the UIusage as well as any it determines for itself.
Close the editor window when done.
You are now all set up for automatic table maintenance, RUNSTATS on all tables, during your specifiedmaintenance window. DB2 will automatically detect that statistics are required in those AUTOMAINT%tables and run statistics on them. This happens at the discretion of DB2.
Lab 06 – Autonomic Computing Page 107
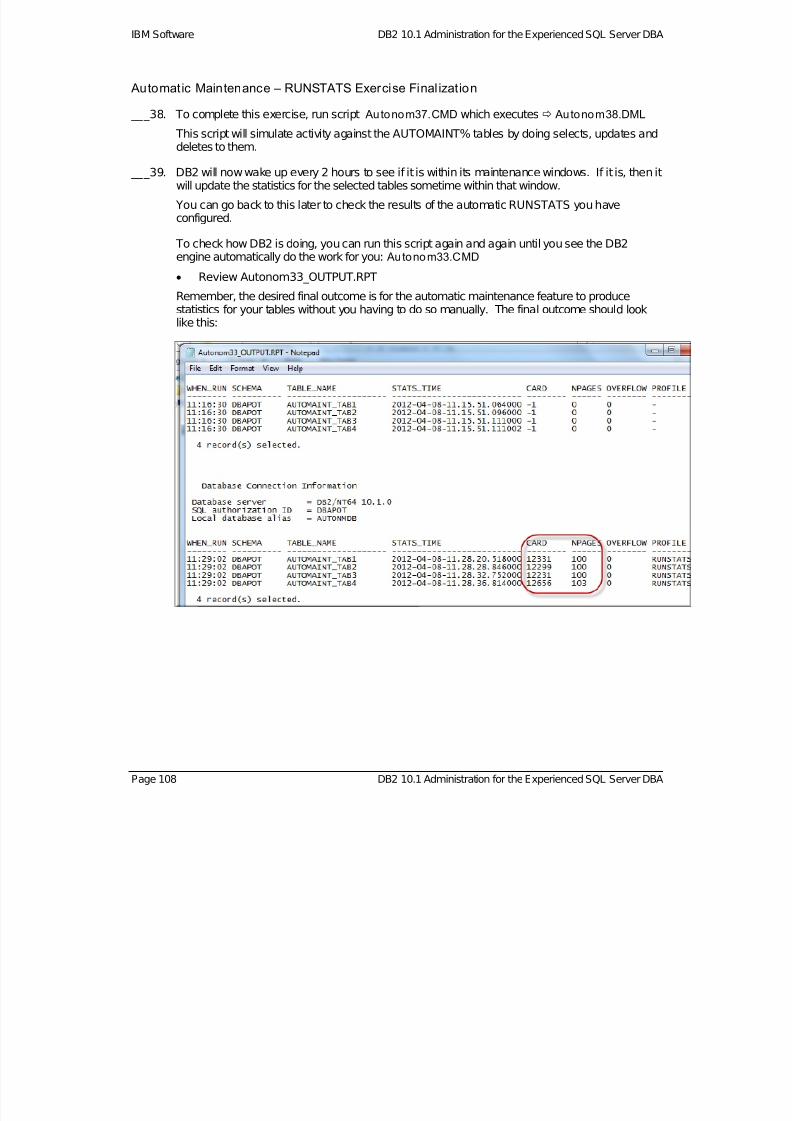
7/28/2019 PoT.im.07.1.017.13 Workbook Windows
http://slidepdf.com/reader/full/potim07101713-workbook-windows 108/232
IBM Software DB2 10.1 Administration for the Experienced SQL Server DBA
Automatic Maintenance – RUNSTATS Exercise Final ization
___38. To complete this exercise, run script Autonom37.CMD which executes Autonom38.DML
This script will simulate activity against the AUTOMAINT% tables by doing selects, updates anddeletes to them.
___39. DB2 will now wake up every 2 hours to see if it is within its maintenance windows. If it is, then itwill update the statistics for the selected tables sometime within that window.
You can go back to this later to check the results of the automatic RUNSTATS you haveconfigured.
To check how DB2 is doing, you can run this script again and again until you see the DB2engine automatically do the work for you: Autonom33.CMD
Review Autonom33_OUTPUT.RPT
Remember, the desired final outcome is for the automatic maintenance feature to producestatistics for your tables without you having to do so manually. The final outcome should looklike this:
Page 108 DB2 10.1 Administration for the Experienced SQL Server DBA
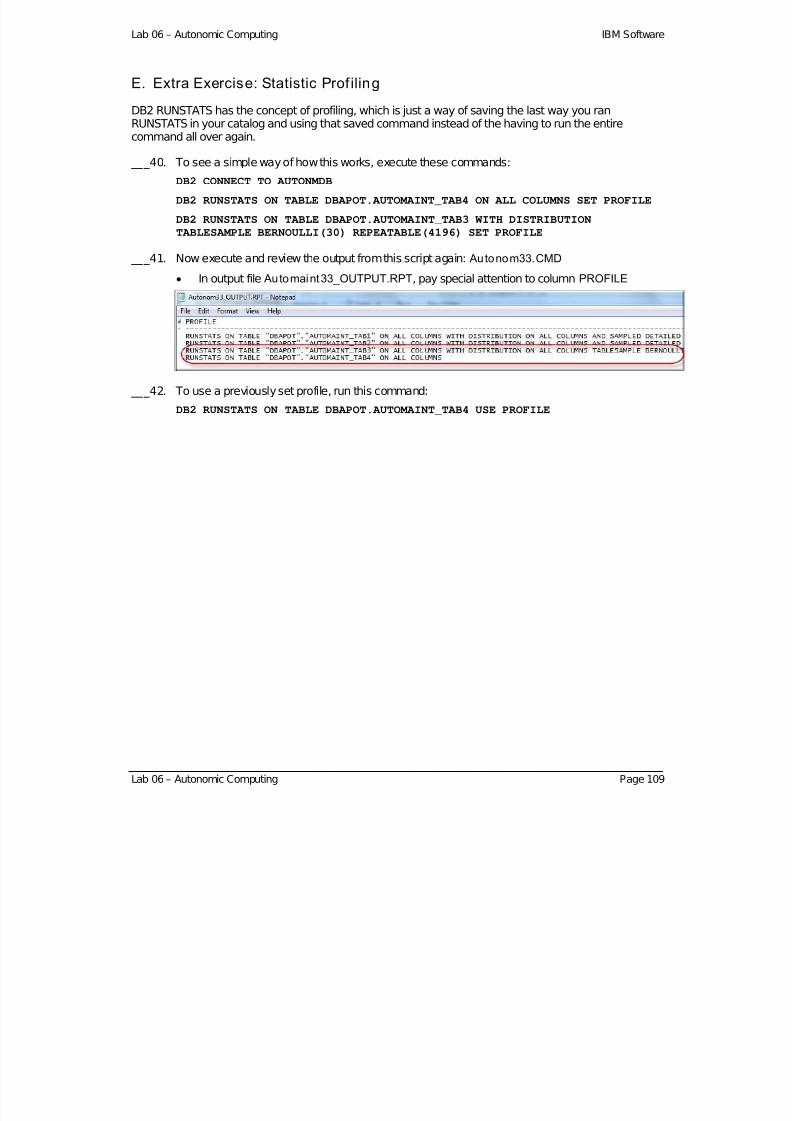
7/28/2019 PoT.im.07.1.017.13 Workbook Windows
http://slidepdf.com/reader/full/potim07101713-workbook-windows 109/232
Lab 06 – Autonomic Computing IBM Software
E. Extra Exercise: Statistic Prof iling
DB2 RUNSTATS has the concept of profiling, which is just a way of saving the last way you ranRUNSTATS in your catalog and using that saved command instead of the having to run the entirecommand all over again.
___40. To see a simple way of how this works, execute these commands:
DB2 CONNECT TO AUTONMDB
DB2 RUNSTATS ON TABLE DBAPOT.AUTOMAINT_TAB4 ON ALL COLUMNS SET PROFILE
DB2 RUNSTATS ON TABLE DBAPOT.AUTOMAINT_TAB3 WITH DISTRIBUTION
TABLESAMPLE BERNOULLI(30) REPEATABLE(4196) SET PROFILE
___41. Now execute and review the output from this script again: Autonom33.CMD
In output file Automaint33_OUTPUT.RPT, pay special attention to column PROFILE
___42. To use a previously set profile, run this command:
DB2 RUNSTATS ON TABLE DBAPOT.AUTOMAINT_TAB4 USE PROFILE
Lab 06 – Autonomic Computing Page 109
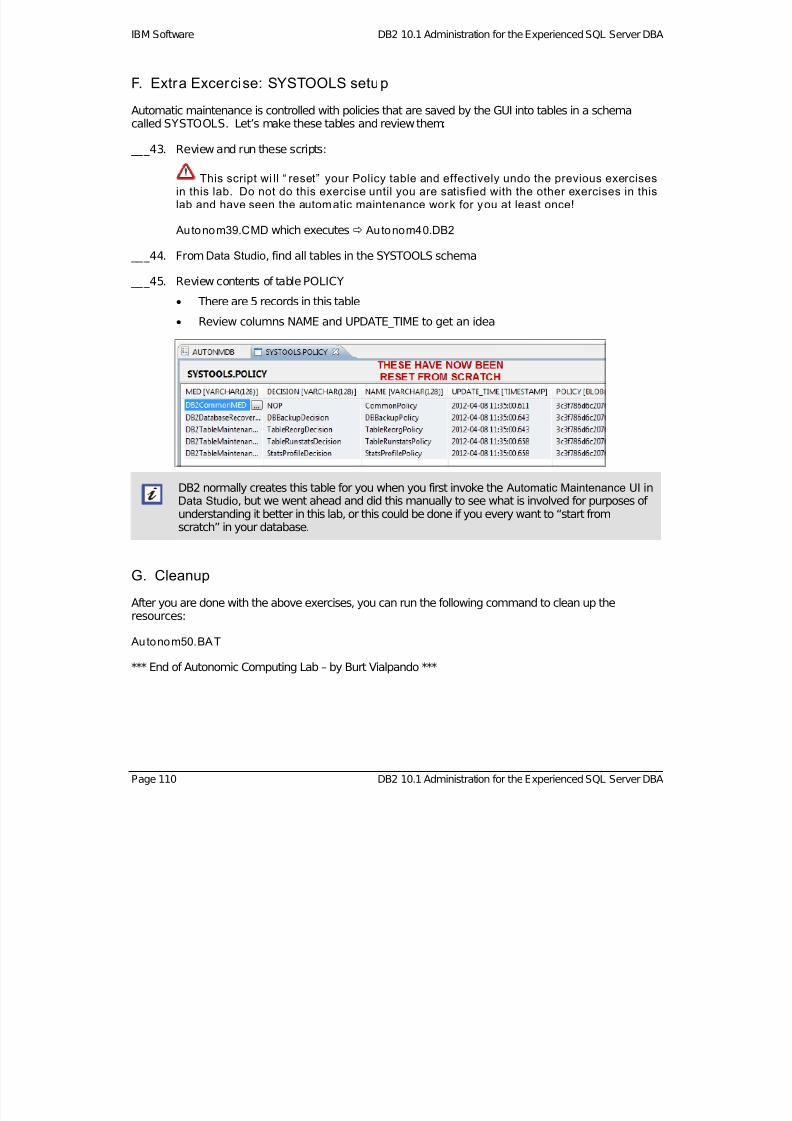
7/28/2019 PoT.im.07.1.017.13 Workbook Windows
http://slidepdf.com/reader/full/potim07101713-workbook-windows 110/232
IBM Software DB2 10.1 Administration for the Experienced SQL Server DBA
Page 110 DB2 10.1 Administration for the Experienced SQL Server DBA
F. Extra Excercise: SYSTOOLS setup
Automatic maintenance is controlled with policies that are saved by the GUI into tables in a schemacalled SYSTOOLS. Let’s make these tables and review them:
___43. Review and run these scripts:
This script wi ll “ reset” your Policy table and effectively undo the previous exercisesin this lab. Do not do this exercise until you are satisfied with the other exercises in thislab and have seen the automatic maintenance work for you at least once!
Autonom39.CMD which executes Autonom40.DB2
___44. FromData Studio, find all tables in the SYSTOOLS schema
___45. Review contents of table POLICY
There are 5 records in this table
Review columns NAME and UPDATE_TIME to get an idea
DB2 normally creates this table for you when you first invoke the Automatic Maintenance UI inData Studio, but we went ahead and did this manually to see what is involved for purposes of understanding it better in this lab, or this could be done if you every want to “start fromscratch” in your database.
G. Cleanup
After you are done with the above exercises, you can run the following command to clean up theresources:
Autonom50.BAT
*** End of Autonomic Computing Lab – by Burt Vialpando ***

7/28/2019 PoT.im.07.1.017.13 Workbook Windows
http://slidepdf.com/reader/full/potim07101713-workbook-windows 111/232
Lab 07 – Deep Compression IBM Software
Lab 07. Deep Compression
This lab assumes you have already completed theData Studio Lab 03 exercises.
If you have not, then you should complete sections A and B of Lab 03 to learn how to launchData Studio and connect to a database.
A. Table Deep Compression
Setting up the database compression exercise – using SAMPLE database
___1. Open a DB2 CLP Command Window and go to the directory C: \ POT_DB2\ 07COMPRESS
___2. Run scriptCompress01.CMD
While it is running review the script to notice that it creates a table called COMP1.ORDERS inthe SAMPLE database. It generates a data file Compress04.DAT for this table through a datageneration program and then loads 1.5 million records in that table through a DB2 LOADcommand. Please review Compress01_OUTPUT.TXT when it completes.
___3. In Data Studio, go to the Data perspective and find the SAMPLE database. Find and review thetable COMP1.ORDERS. Notice in its properties that it starts out as not using row compression.
___4. Open the SQL Script Editor by right clicking on database SAMPLE New SQL Scr i pt
___5. Run the following SQL in theSQL Script Editor to check the cardinality of this table:
SELECT COUNT(*) FROM COMP1.ORDERS
Lab 07 – Deep Compression Page 111
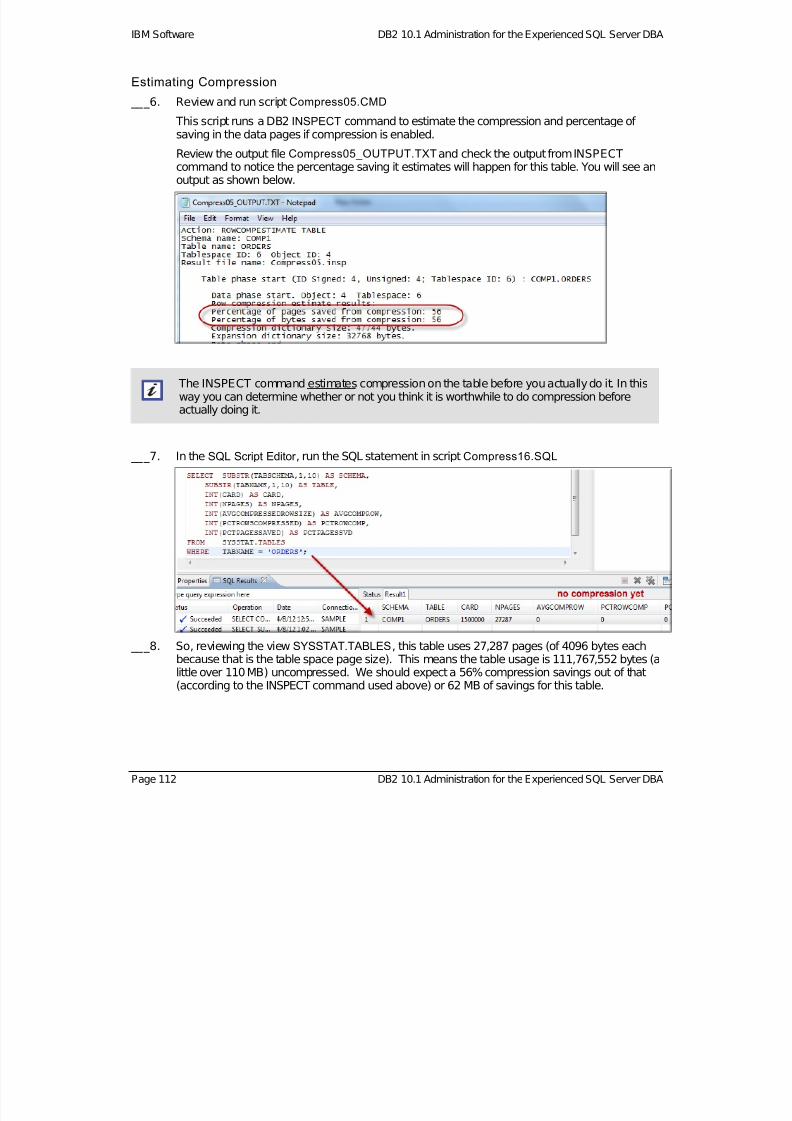
7/28/2019 PoT.im.07.1.017.13 Workbook Windows
http://slidepdf.com/reader/full/potim07101713-workbook-windows 112/232
IBM Software DB2 10.1 Administration for the Experienced SQL Server DBA
Estimating Compression
___6. Review and run scriptCompress05.CMD
This script runs a DB2 INSPECT command to estimate the compression and percentage of saving in the data pages if compression is enabled.
Review the output file Compress05_OUTPUT.TXT and check the output from INSPECTcommand to notice the percentage saving it estimates will happen for this table. You will see anoutput as shown below.
The INSPECT command estimates compression on the table before you actually do it. In thisway you can determine whether or not you think it is worthwhile to do compression beforeactually doing it.
___7. In the SQL Script Editor , run the SQL statement in scriptCompress16.SQL
___8. So, reviewing the view SYSSTAT.TABLES, this table uses 27,287 pages (of 4096 bytes eachbecause that is the table space page size). This means the table usage is 111,767,552 bytes (alittle over 110 MB) uncompressed. We should expect a 56% compression savings out of that(according to the INSPECT command used above) or 62 MB of savings for this table.
Page 112 DB2 10.1 Administration for the Experienced SQL Server DBA

7/28/2019 PoT.im.07.1.017.13 Workbook Windows
http://slidepdf.com/reader/full/potim07101713-workbook-windows 113/232
Lab 07 – Deep Compression IBM Software
Compressing a table – Complete REORG
___9. Review and run scriptCompress06.CMD
This script will first alter the COMP1.ORDERS table to turn compression “ON” and then it willperform a REORG on that table which will build the dictionary used to compress the data during
the REORG. This is the most “complete” way to compress a table because it builds a table-level compression dictionary based on all of the data in the table.
___10. The script does a RUNSTATS on the table to collect the latest statistics for us so we can view itagain in Data Studio.
___11. Run the SQL from scriptCompress16.SQL in the SQL Editor for a second time.
___12. Notice it had a compression ratio of the same amount as the INSPECT command estimated.
Compressing a table – Partial sample REORG with secondary load
___13. Review and run scriptCompress07.CMD
This script first creates a new table called COMP2.ORDERS which has compression turned“ON” during its creation usingCOMPRESS YES.
It then splits the 1.5 million record data file into two files of 150,000 records in the first oneand the remaining 1,350,000 records in the second one.
It then loads the first 150,000 record file into the COMP2.ORDERS table (10% sample).
It then does a REORG on the table and builds the dictionary during the REORG but onlyusing the 150,000 record, 10% sample to do so.
It then loads the remaining records into theCOMP2.ORDERS table which will becompressed DURING the load compression is turned on and because a dictionary wasalready built for it during the REORG of the partial data 150,000 record data.
___14. When this completes, use the SQL Editor to run scriptCompress16.SQL for a third time.
___15. Notice now that the table that had the entire REORG (the exercise we just did previously) hadslightly better compression than the table with a partial REORG and subsequent LOAD after thecompression dictionary was built on the sample data. However, the compression results are an
impressive 55% even using the partial LOAD/REORG and subsequent LOAD method.
Lab 07 – Deep Compression Page 113
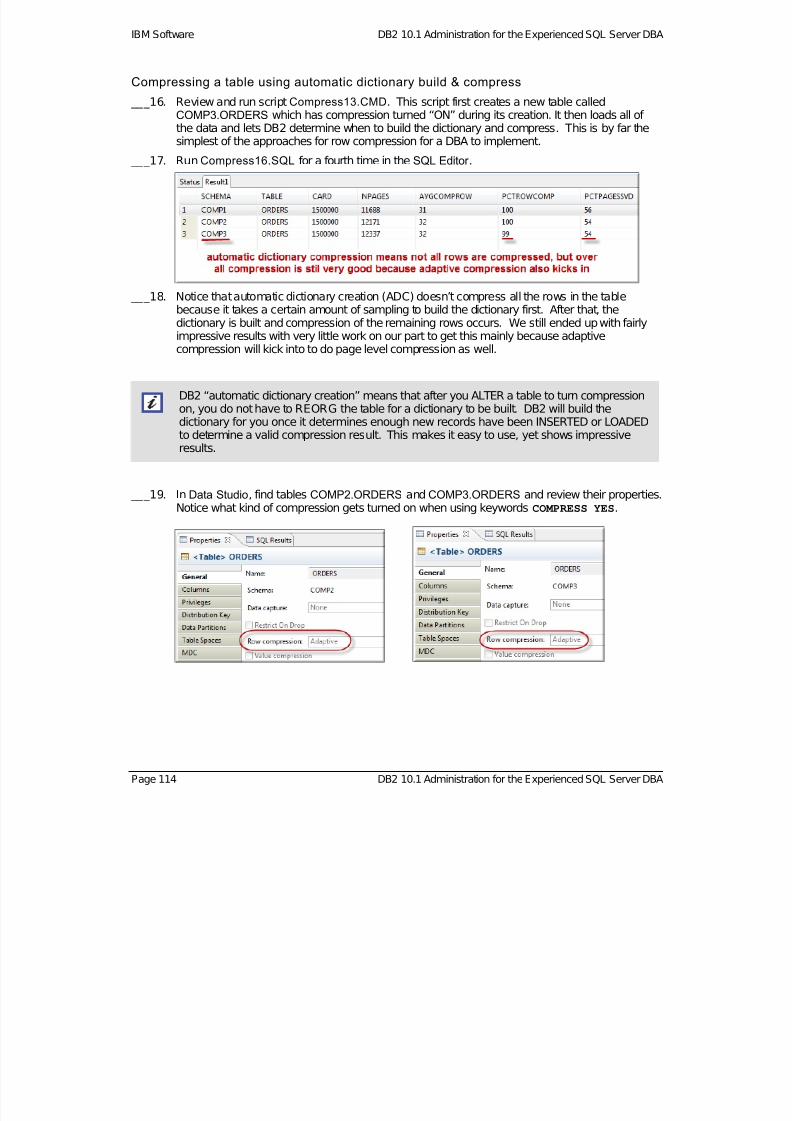
7/28/2019 PoT.im.07.1.017.13 Workbook Windows
http://slidepdf.com/reader/full/potim07101713-workbook-windows 114/232
IBM Software DB2 10.1 Administration for the Experienced SQL Server DBA
Compressing a table using automatic dictionary build & compress
___16. Review and run scriptCompress13.CMD. This script first creates a new table calledCOMP3.ORDERS which has compression turned “ON” during its creation. It then loads all of the data and lets DB2 determine when to build the dictionary and compress. This is by far thesimplest of the approaches for row compression for a DBA to implement.
___17. Run Compress16.SQL for a fourth time in the SQL Editor .
___18. Notice that automatic dictionary creation (ADC) doesn’t compress all the rows in the tablebecause it takes a certain amount of sampling to build the dictionary first. After that, thedictionary is built and compression of the remaining rows occurs. We still ended up with fairlyimpressive results with very little work on our part to get this mainly because adaptivecompression will kick into to do page level compression as well.
DB2 “automatic dictionary creation” means that after you ALTER a table to turn compressionon, you do not have to REORG the table for a dictionary to be built. DB2 will build thedictionary for you once it determines enough new records have been INSERTED or LOADEDto determine a valid compression result. This makes it easy to use, yet shows impressiveresults.
___19. In Data Studio, find tables COMP2.ORDERS and COMP3.ORDERS and review their properties.Notice what kind of compression gets turned on when using keywords COMPRESS YES.
Page 114 DB2 10.1 Administration for the Experienced SQL Server DBA

7/28/2019 PoT.im.07.1.017.13 Workbook Windows
http://slidepdf.com/reader/full/potim07101713-workbook-windows 115/232
Lab 07 – Deep Compression IBM Software
Lab 07 – Deep Compression Page 115
Compressing indexes
___20. Review and run scriptCompress18.CMD.
___21. This script uses theCOMPRESS YES for a CREATE INDEX statement. That’s all you need to doin order to compress an index. (If the index already exists, then you can do an ALTER INDEX COMPRESS YES followed by a REORG INDEX command)
___22. The script next uses a table function to help show compression for indexes. We could haveused a table function for showing compression on our tables too.
___23. This is the output results from this compression on our index:
C. Clean up
In Data Studio, close your editors.
RunCompress50.Bat to clean up resources after above lab exercises.
*** End of Deep Compression Lab - by Vikram Khatri and Burt Vialpando ***

7/28/2019 PoT.im.07.1.017.13 Workbook Windows
http://slidepdf.com/reader/full/potim07101713-workbook-windows 116/232
IBM Software DB2 10.1 Administration for the Experienced SQL Server DBA
Lab 08. Explain Facilit ies and the Optimizer
This lab assumes you have already completed theData Studio Lab 03 exercises.
If you have not, then you should complete sections A and B of Lab 03 to learn how to launchData Studio and connect to a database.
A. Create Explain Tables
All DB2 explain facility tools use the explain tables, so let’s create them now. We will use the DB2supplied script found in the install library under folderMISC. The script is called EXPLAIN.DDL. Here ishow to do this:
___1. Open a DB2 CLP Command Window and change your directory to C: \ POT_DB2\ 08EXPLAI N
___2. Review and run the following script to create the explain tables in databaseGSDB:
Explain01.CMD
___3. LaunchData Studio (if not open) and open the Data perspective:
___4. Connect to GSDB database. Verify that the explain tables were created in schema DBAPOT. These tables are named: EXPLAIN_%
The script also created the ADVISE_% tables. The presentation material mentioned howthese tables can be used, but we will not be working with these tables in this lab.
Page 116 DB2 10.1 Administration for the Experienced SQL Server DBA
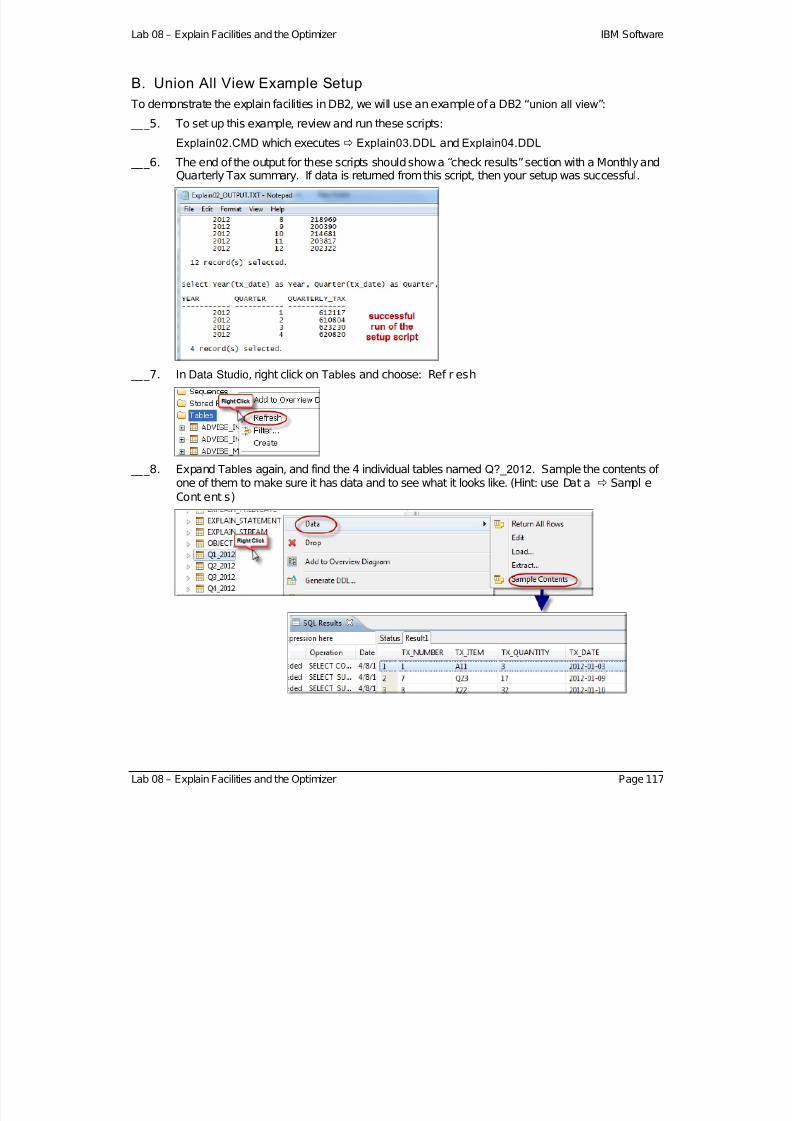
7/28/2019 PoT.im.07.1.017.13 Workbook Windows
http://slidepdf.com/reader/full/potim07101713-workbook-windows 117/232
Lab 08 – Explain Facilities and the Optimizer IBM Software
B. Union All View Example Setup
To demonstrate the explain facilities in DB2, we will use an example of a DB2 “union all view”:
___5. To set up this example, review and run these scripts:
Explain02.CMD which executes Explain03.DDL and Explain04.DDL
___6. The end of the output for these scripts should show a “check results” section with a Monthly andQuarterly Tax summary. If data is returned from this script, then your setup was successful.
___7. In Data Studio, right click on Tables and choose: Ref r esh
___8. Expand Tables again, and find the 4 individual tables namedQ?_2012. Sample the contents of one of them to make sure it has data and to see what it looks like. (Hint: use Dat a Sampl eCont ent s)
Lab 08 – Explain Facilities and the Optimizer Page 117
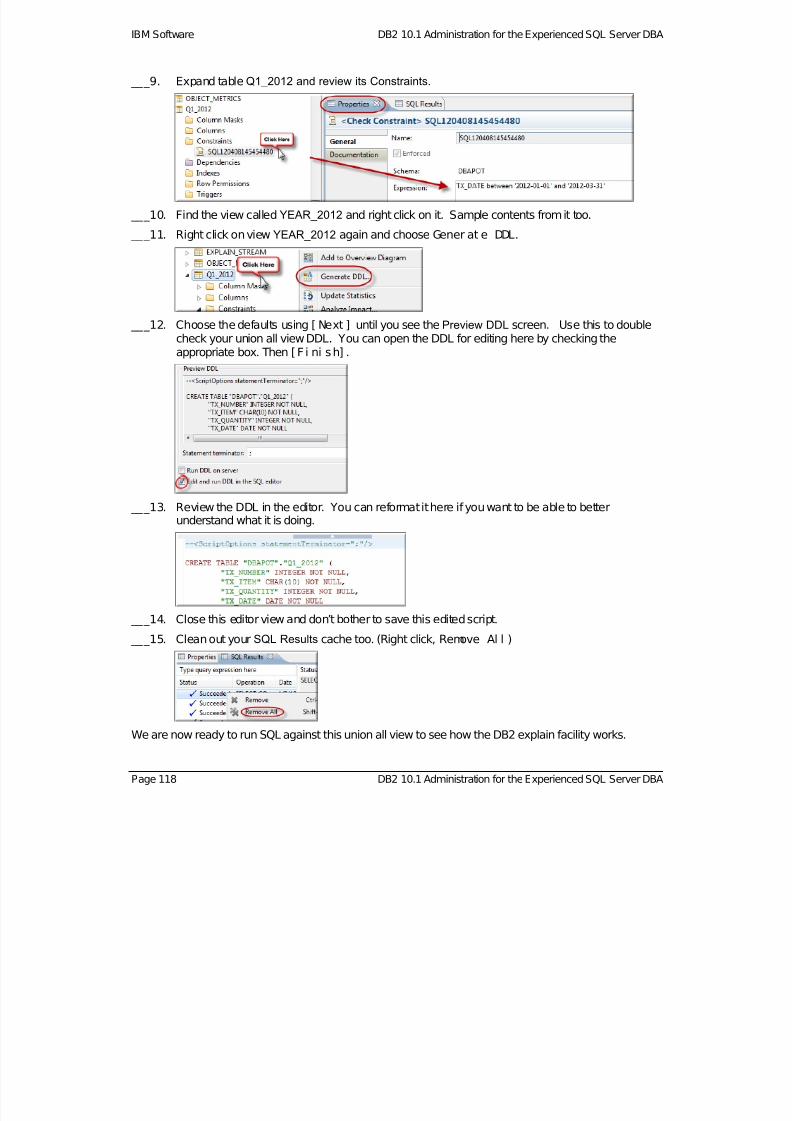
7/28/2019 PoT.im.07.1.017.13 Workbook Windows
http://slidepdf.com/reader/full/potim07101713-workbook-windows 118/232
IBM Software DB2 10.1 Administration for the Experienced SQL Server DBA
___9. Expand tableQ1_2012 and review its Constraints.
___10. Find the view calledYEAR_2012 and right click on it. Sample contents from it too.
___11. Right click on view YEAR_2012 again and choose Gener at e DDL.
___12. Choose the defaults using [ Next ] until you see the Preview DDL screen. Use this to doublecheck your union all view DDL. You can open the DDL for editing here by checking theappropriate box. Then [F i ni sh] .
___13. Review the DDL in the editor. You can reformat it here if you want to be able to betterunderstand what it is doing.
___14. Close this editor view and don’t bother to save this edited script.
___15. Clean out your SQL Results cache too. (Right click, Remove Al l )
We are now ready to run SQL against this union all view to see how the DB2 explain facility works.
Page 118 DB2 10.1 Administration for the Experienced SQL Server DBA
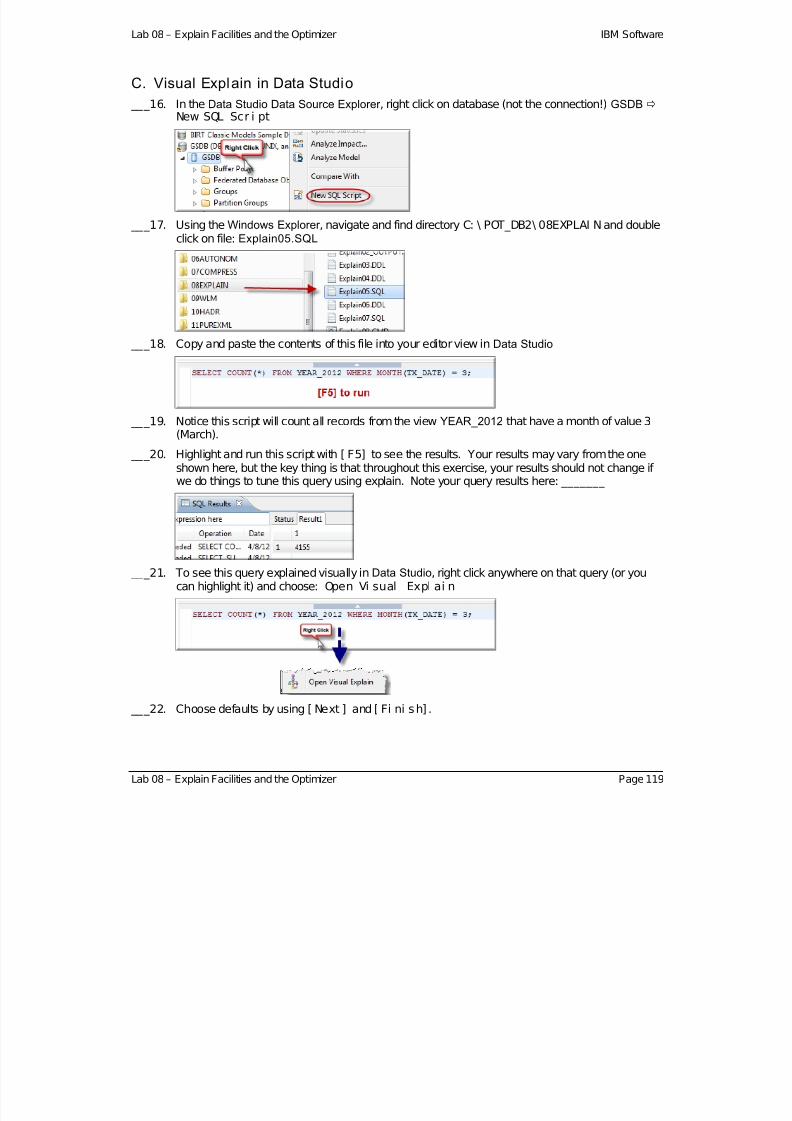
7/28/2019 PoT.im.07.1.017.13 Workbook Windows
http://slidepdf.com/reader/full/potim07101713-workbook-windows 119/232
Lab 08 – Explain Facilities and the Optimizer IBM Software
C. Visual Explain in Data Studio
___16. In the Data Studio Data Source Explorer , right click on database (not the connection!) GSDB New SQL Scr i pt
___17. Using the Windows Explorer , navigate and find directory C: \ POT_DB2\ 08EXPLAI Nand doubleclick on file: Explain05.SQL
___18. Copy and paste the contents of this file into your editor view inData Studio
___19. Notice this script will count all records from the viewYEAR_2012 that have a month of value 3(March).
___20. Highlight and run this script with [ F5] to see the results. Your results may vary from the oneshown here, but the key thing is that throughout this exercise, your results should not change if we do things to tune this query using explain. Note your query results here: _______
___21. To see this query explained visually inData Studio, right click anywhere on that query (or youcan highlight it) and choose: Open Vi sual Expl ai n
___22. Choose defaults by using [ Next ] and [ Fi ni sh] .
Lab 08 – Explain Facilities and the Optimizer Page 119
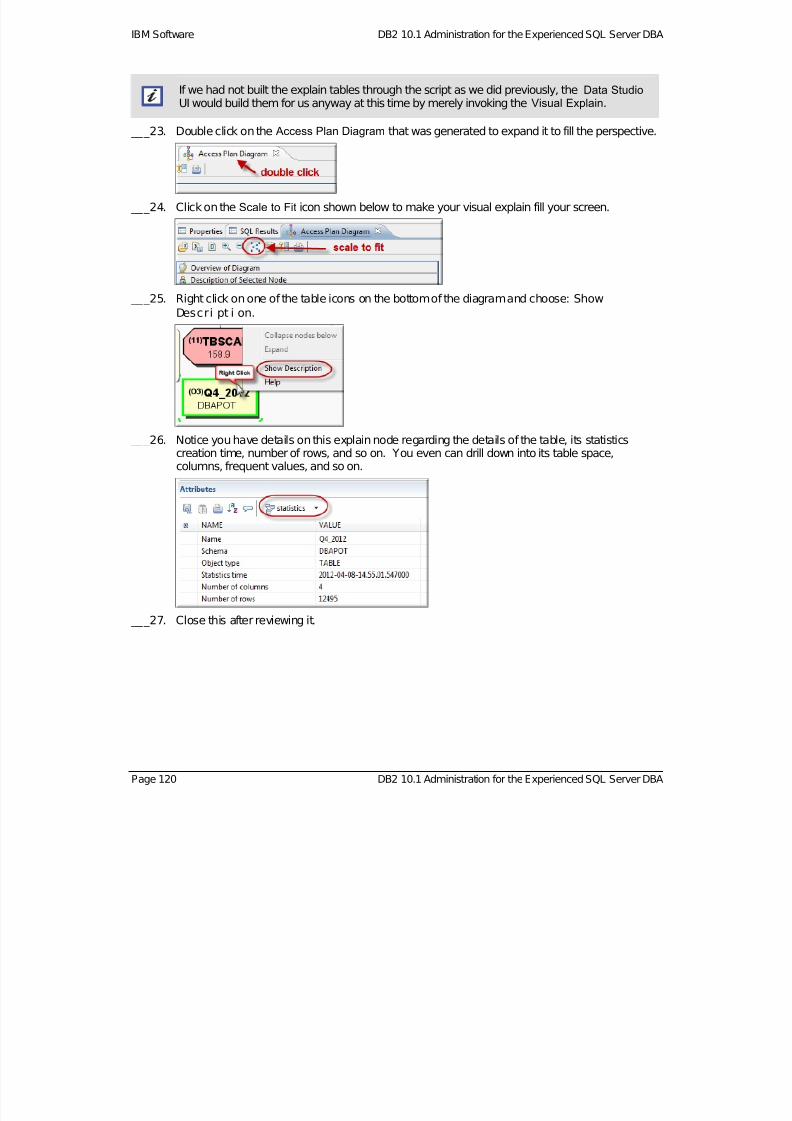
7/28/2019 PoT.im.07.1.017.13 Workbook Windows
http://slidepdf.com/reader/full/potim07101713-workbook-windows 120/232
IBM Software DB2 10.1 Administration for the Experienced SQL Server DBA
If we had not built the explain tables through the script as we did previously, the Data Studio UI would build them for us anyway at this time by merely invoking the Visual Explain.
___23. Double click on the Access Plan Diagram that was generated to expand it to fill the perspective.
___24. Click on the Scale to Fit icon shown below to make your visual explain fill your screen.
___25. Right click on one of the table icons on the bottom of the diagram and choose:Show
Descri pt i on.
___26. Notice you have details on this explain node regarding the details of the table, its statisticscreation time, number of rows, and so on. You even can drill down into its table space,columns, frequent values, and so on.
___27. Close this after reviewing it.
Page 120 DB2 10.1 Administration for the Experienced SQL Server DBA
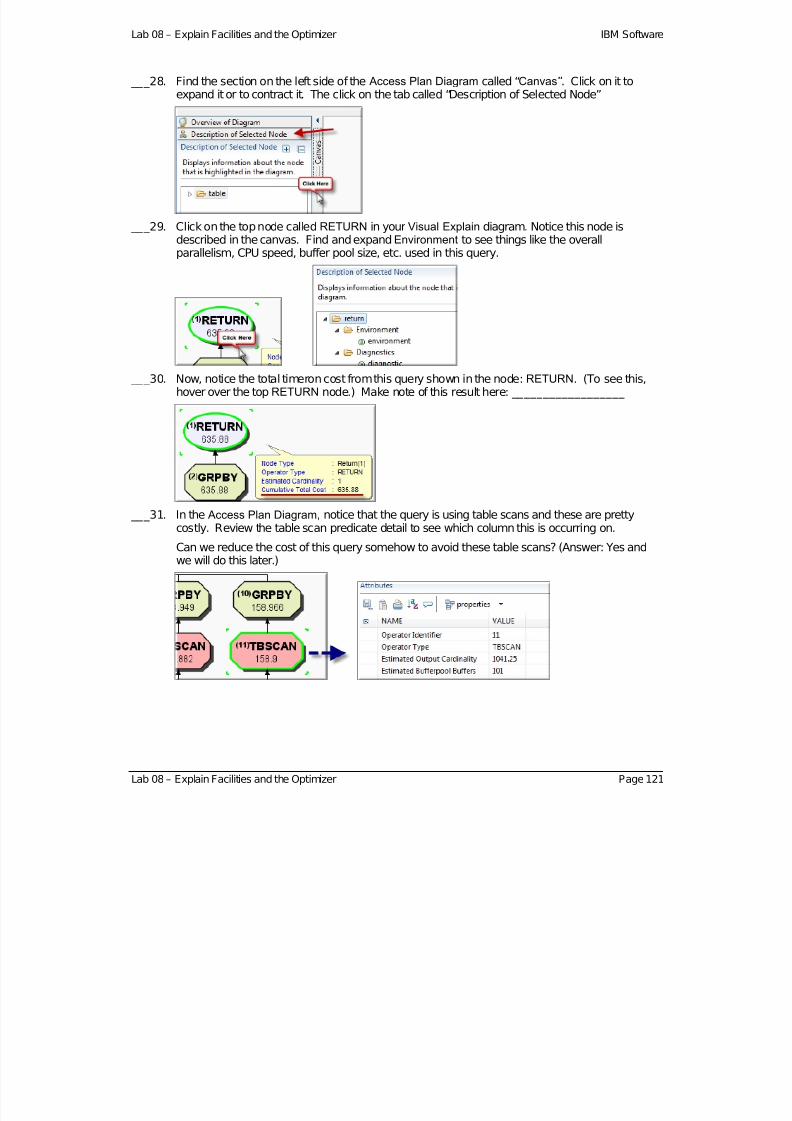
7/28/2019 PoT.im.07.1.017.13 Workbook Windows
http://slidepdf.com/reader/full/potim07101713-workbook-windows 121/232
Lab 08 – Explain Facilities and the Optimizer IBM Software
___28. Find the section on the left side of the Access Plan Diagram called “Canvas”. Click on it toexpand it or to contract it. The click on the tab called “Description of Selected Node”
___29. Click on the top node calledRETURN in your Visual Explain diagram. Notice this node isdescribed in the canvas. Find and expandEnvironment to see things like the overallparallelism, CPU speed, buffer pool size, etc. used in this query.
___30. Now, notice the total timeron cost from this query shown in the node:RETURN. (To see this,hover over the top RETURN node.) Make note of this result here: __________________
___31. In the Access Plan Diagram, notice that the query is using table scans and these are prettycostly. Review the table scan predicate detail to see which column this is occurring on.
Can we reduce the cost of this query somehow to avoid these table scans? (Answer: Yes andwe will do this later.)
Lab 08 – Explain Facilities and the Optimizer Page 121

7/28/2019 PoT.im.07.1.017.13 Workbook Windows
http://slidepdf.com/reader/full/potim07101713-workbook-windows 122/232
IBM Software DB2 10.1 Administration for the Experienced SQL Server DBA
___32. In the Canvas, find the tab called “Overview Diagram”. Click on the icons shown below to seewhat they do.
___33. Close this Access Plan Diagram when you are finished.
Page 122 DB2 10.1 Administration for the Experienced SQL Server DBA
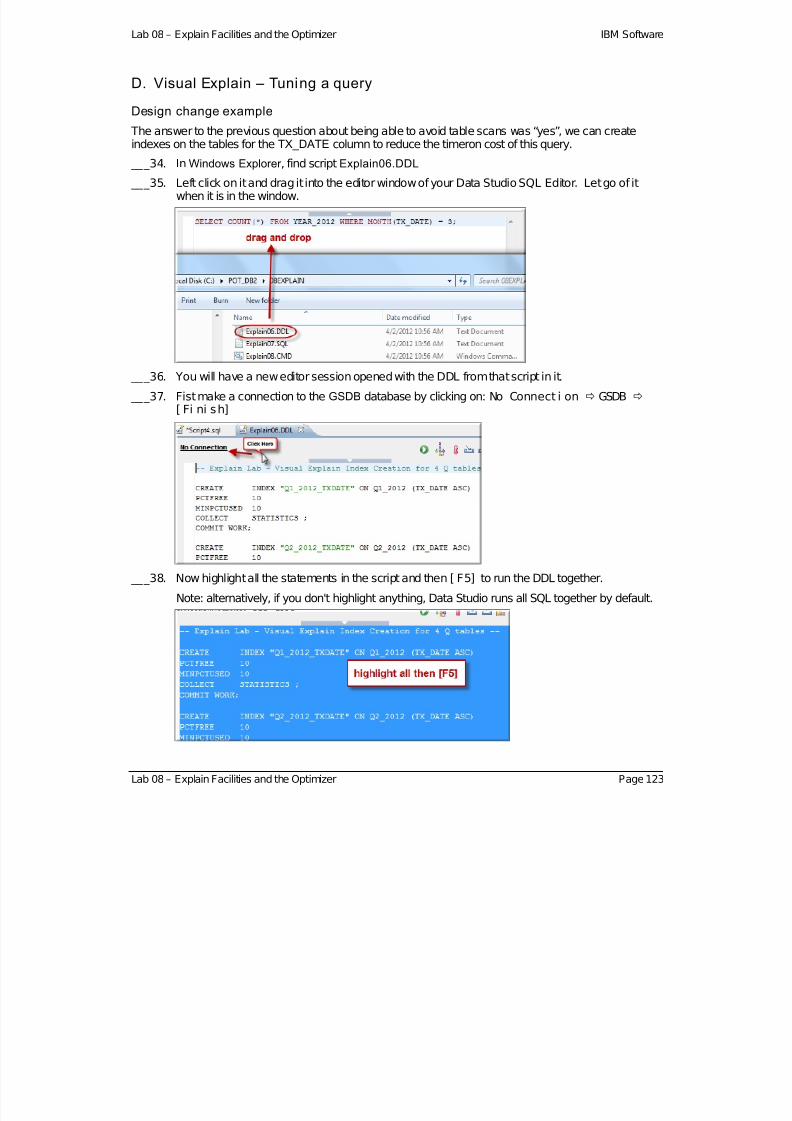
7/28/2019 PoT.im.07.1.017.13 Workbook Windows
http://slidepdf.com/reader/full/potim07101713-workbook-windows 123/232
Lab 08 – Explain Facilities and the Optimizer IBM Software
D. Visual Explain – Tuning a query
Design change example
The answer to the previous question about being able to avoid table scans was “yes”, we can createindexes on the tables for the TX_DATE column to reduce the timeron cost of this query.
___34. In Windows Explorer , find script Explain06.DDL
___35. Left click on it and drag it into the editor window of your Data Studio SQL Editor. Let go of itwhen it is in the window.
___36. You will have a new editor session opened with the DDL from that script in it.
___37. Fist make a connection to the GSDB database by clicking on: No Connect i on GSDB [ Fi ni sh]
___38. Now highlight all the statements in the script and then [ F5] to run the DDL together.
Note: alternatively, if you don't highlight anything, Data Studio runs all SQL together by default.
Lab 08 – Explain Facilities and the Optimizer Page 123

7/28/2019 PoT.im.07.1.017.13 Workbook Windows
http://slidepdf.com/reader/full/potim07101713-workbook-windows 124/232
IBM Software DB2 10.1 Administration for the Experienced SQL Server DBA
___39. Review the SQL Results view to see if these were created. Make sure all 4 indexes werecreated.
___40. If the DDL ran successfully, close the editor for this DDL script. You are done with it.
___41. Find tableQ1_2012 in the Data Source Explorer and verify it has an index by expanding asshown below: (note: you may have to refresh the view to see it.)
___42. Highlight the original query in your editor, right click on it and choose:Open Vi sual Expl ai n again. Choose the same defaults again.
Review the Access Plan Diagram now that we have made a design change to the database byadding indexes. Notice the reduced timeron count.
Page 124 DB2 10.1 Administration for the Experienced SQL Server DBA
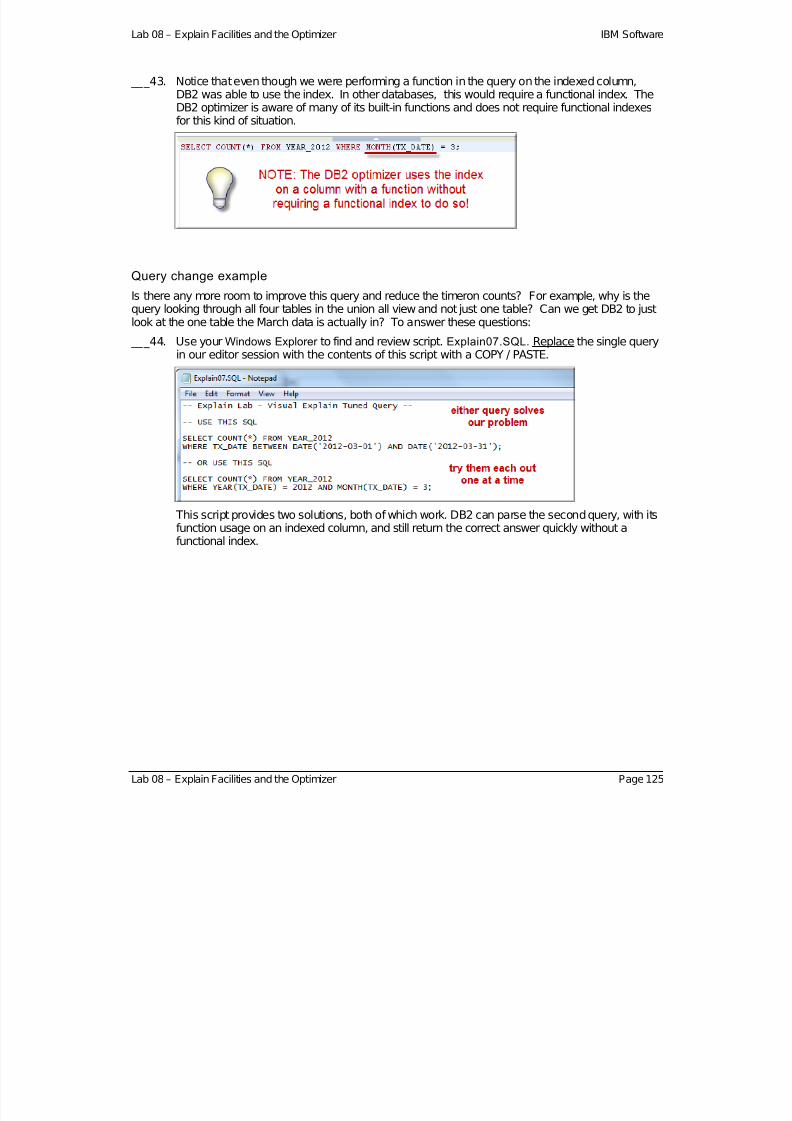
7/28/2019 PoT.im.07.1.017.13 Workbook Windows
http://slidepdf.com/reader/full/potim07101713-workbook-windows 125/232
Lab 08 – Explain Facilities and the Optimizer IBM Software
___43. Notice that even though we were performing a function in the query on the indexed column,DB2 was able to use the index. In other databases, this would require a functional index. TheDB2 optimizer is aware of many of its built-in functions and does not require functional indexesfor this kind of situation.
Query change example
Is there any more room to improve this query and reduce the timeron counts? For example, why is thequery looking through all four tables in the union all view and not just one table? Can we get DB2 to justlook at the one table the March data is actually in? To answer these questions:
___44. Use your Windows Explorer to find and review script. Explain07.SQL. Replace the single queryin our editor session with the contents of this script with a COPY / PASTE.
This script provides two solutions, both of which work. DB2 can parse the second query, with itsfunction usage on an indexed column, and still return the correct answer quickly without afunctional index.
Lab 08 – Explain Facilities and the Optimizer Page 125

7/28/2019 PoT.im.07.1.017.13 Workbook Windows
http://slidepdf.com/reader/full/potim07101713-workbook-windows 126/232
IBM Software DB2 10.1 Administration for the Experienced SQL Server DBA
___45. Highlight the first query andOpen Vi sual Expl ai n for it to see the solution work. Noticethe total timeron count has fallen even more and that the query is looking through only one tablein the union all view.
___46. Why does the SQL work? Because we also provided the YEAR and not the just MONTH in thequery. Our union all view was based on the table constraints for each table and thoseconstraints contained both YEAR and MONTH. J ust providing a month alone in the query wasnot enough for the optimizer to “prune” the other tables out. This is true for partitioned tables inSQL Server, DB2, etc. You must provide the entire partition key in the WHERE predicate forpartition pruning to work.
___47. Run this query to make sure the final answer is not changed from our original answer.
___48. Highlight the second query solution (the one using functions) and run it with[F5]. Theanswer should be the same as when we first ran it at the beginning of this lab. So, addingindexes should not change the result of the query, and writing our query more efficiently shouldnot change the result answer either.
___49. Do a visual explain on the second query too. Notice it also gives an efficient plan.
Page 126 DB2 10.1 Administration for the Experienced SQL Server DBA
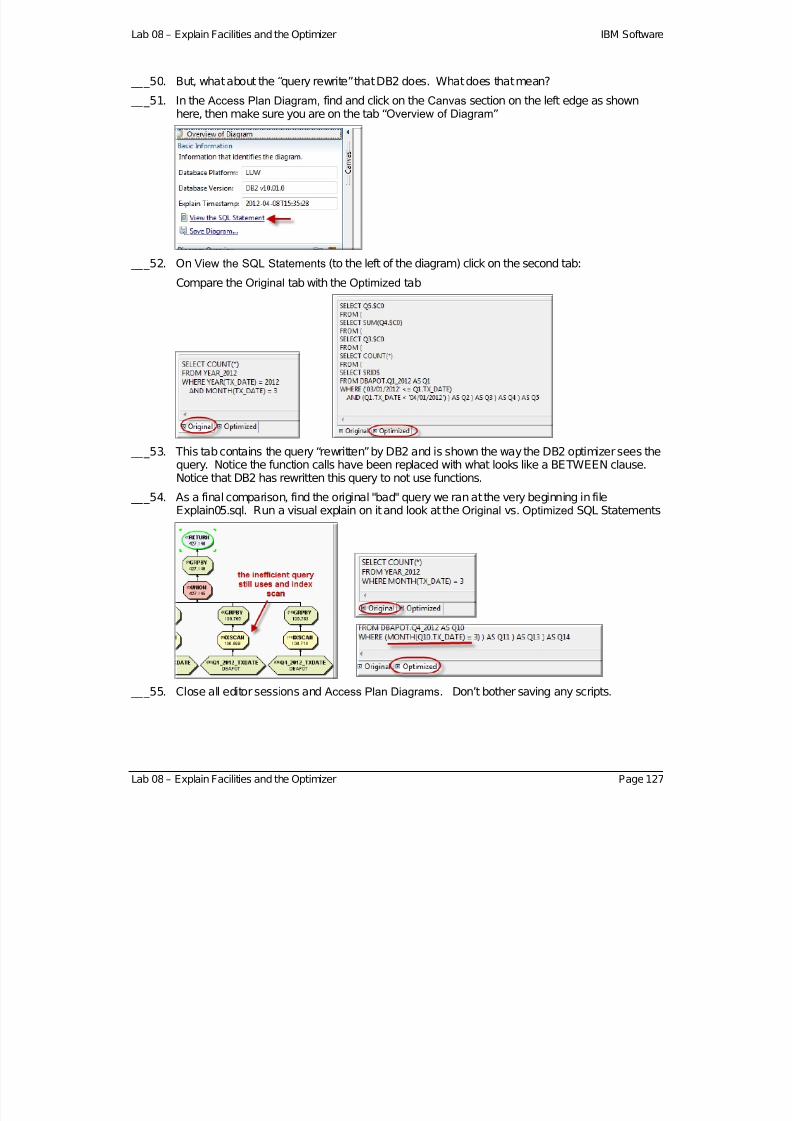
7/28/2019 PoT.im.07.1.017.13 Workbook Windows
http://slidepdf.com/reader/full/potim07101713-workbook-windows 127/232
Lab 08 – Explain Facilities and the Optimizer IBM Software
___50. But, what about the “query rewrite” that DB2 does. What does that mean?
___51. In the Access Plan Diagram, find and click on the Canvas section on the left edge as shownhere, then make sure you are on the tab “Overview of Diagram”
___52. On View the SQL Statements (to the left of the diagram) click on the second tab:
Compare the Original tab with the Optimized tab
___53. This tab contains the query “rewritten” by DB2 and is shown the way the DB2 optimizer sees thequery. Notice the function calls have been replaced with what looks like a BETWEEN clause.
Notice that DB2 has rewritten this query to not use functions.
___54. As a final comparison, find the original "bad" query we ran at the very beginning in fileExplain05.sql. Run a visual explain on it and look at theOriginal vs. Optimized SQL Statements
___55. Close all editor sessions and Access Plan Diagrams. Don’t bother saving any scripts.
Lab 08 – Explain Facilities and the Optimizer Page 127

7/28/2019 PoT.im.07.1.017.13 Workbook Windows
http://slidepdf.com/reader/full/potim07101713-workbook-windows 128/232
IBM Software DB2 10.1 Administration for the Experienced SQL Server DBA
E. Using db2exfmt – explain multip le queries at once
___56. To demonstrate howdb2exfmt works, review these scripts
Explain08.CMD which executes Explain09.DML
___57. From a DB2 CLP Command Window, run Explain08.CMD
___58. Explore output file Explain08_OUTPUT_PLAN.TXT. Notice that explain plans for 3 differentqueries are included in this output. You can find the beginning of each query by searching onthe following text: EXPLAI N I NSTANCE
___59. Review the data in the explain tables EXPLAIN_INSTANCE and EXPLAIN_PREDICATE.Notice what the EXPLAIN ALL FOR command produces in these tables.
___60. Review Explain_DB2EXFMT_Command.txt for full command syntax
___61. Use Data Studio to explore the data in EXPLAIN_INSTANCE and EXPLAIN_STATEMENT tables.
Page 128 DB2 10.1 Administration for the Experienced SQL Server DBA

7/28/2019 PoT.im.07.1.017.13 Workbook Windows
http://slidepdf.com/reader/full/potim07101713-workbook-windows 129/232
Lab 08 – Explain Facilities and the Optimizer IBM Software
F. Extra Exercise – Using db2expln
Static SQL method
Earlier in script Explain04.DDL, we created a stored procedure called: UNION_DATA. Let’s find theDB2 package that contains the static SQL in that stored procedure so we can explain that package:
___62. Review and run this script in the SQL script editor:Explain10.SQL Find the package name for the stored procedure in your own database and note it here:
_____________
___63. To demonstrate how the db2expln utility works in its static mode, review and run this script:
Explain11.CMD [package_name]
Don’t forget to use the package_name parameter when executing this script!
___64. Explore output file Explain11_OUTPUT_PLAN.TXT
Notice packages are broken into sections. Each section is for each SQL statement in thepackage. So, each SQL statement in any DB2 package can be explained this way.
___65. Close any editor session you may have open inData Studio. Don’t bother to save the scripts.
Lab 08 – Explain Facilities and the Optimizer Page 129

7/28/2019 PoT.im.07.1.017.13 Workbook Windows
http://slidepdf.com/reader/full/potim07101713-workbook-windows 130/232
IBM Software DB2 10.1 Administration for the Experienced SQL Server DBA
Dynamic SQL Method
___66. To demonstrate how the db2expln utility works in its dynamic mode, review and run thesescripts:
Explain12.CMD which executes Explain13.SQL
___67. Explore output file Explain12_OUTPUT_PLAN.TXT
Check the explain tables
___68. Review Explain_DB2EXPLN_Command.txt for full command syntax
Page 130 DB2 10.1 Administration for the Experienced SQL Server DBA
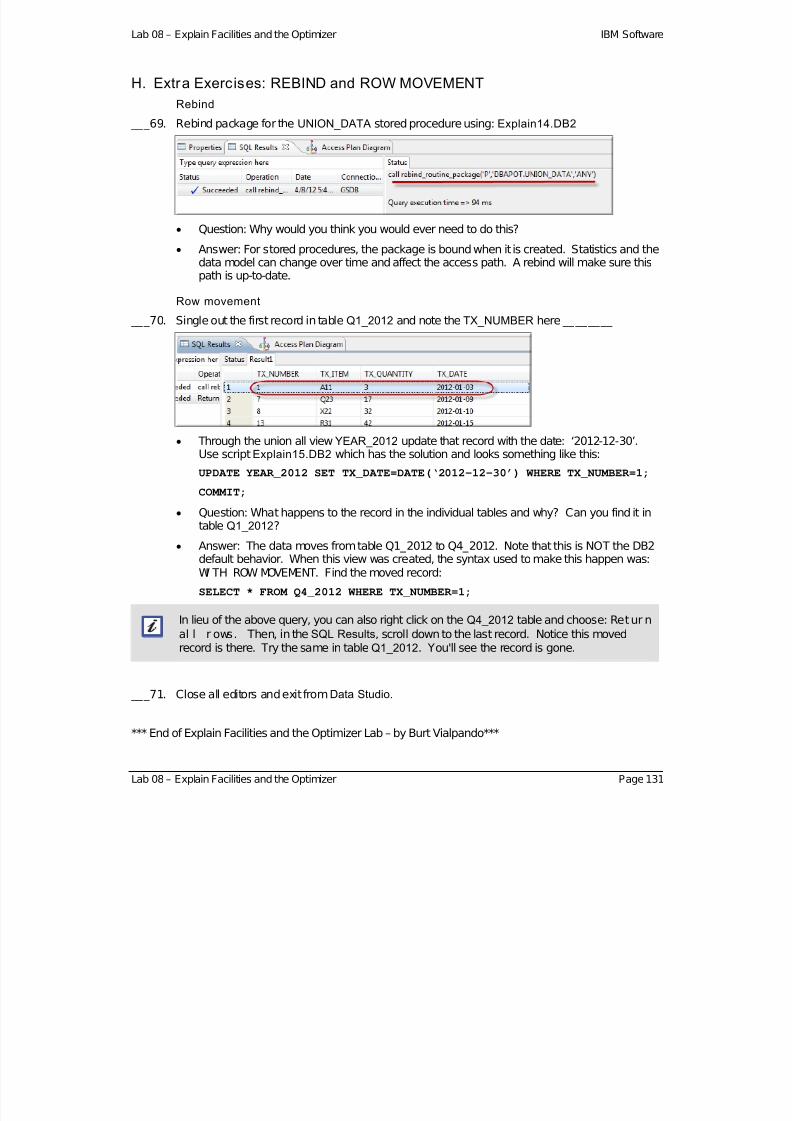
7/28/2019 PoT.im.07.1.017.13 Workbook Windows
http://slidepdf.com/reader/full/potim07101713-workbook-windows 131/232

7/28/2019 PoT.im.07.1.017.13 Workbook Windows
http://slidepdf.com/reader/full/potim07101713-workbook-windows 132/232
IBM Software DB2 10.1 Administration for the Experienced SQL Server DBA
Lab 09. Workload Management (WLM) This lab assumes you have already completed theData Studio Lab 03 exercises.
If you have not, then you should complete sections A and B of Lab 03 to learn how to launchData Studio and connect to a database.
A. Sett ing up a custom workload manager envi ronment
___1. In a DB2 CLP Command Window, change the directory to C:\POT_DB2\09WLM
___2. Review and run WLM01.CMD. This script will execute SQL against the system catalog of theSAMPLE database showing how the WLM environment looks.
This first run of this script shows the default workloads and no defined service classes, which isthe way a DB2 database looks just after creation.
Review WLM01_OUTPUT.TXT to see how a default WLM database environment looks.
___3. Review scripts WLM03.CMD and WLM04.DB2. This will customize the WLM environment.Notice it creates workloads, services classes, thresholds, work class sets, work action sets, etc.
This script does these things in a particular order since the WLM objects are hierarchicallydependant upon one another.
Page 132 DB2 10.1 Administration for the Experienced SQL Server DBA
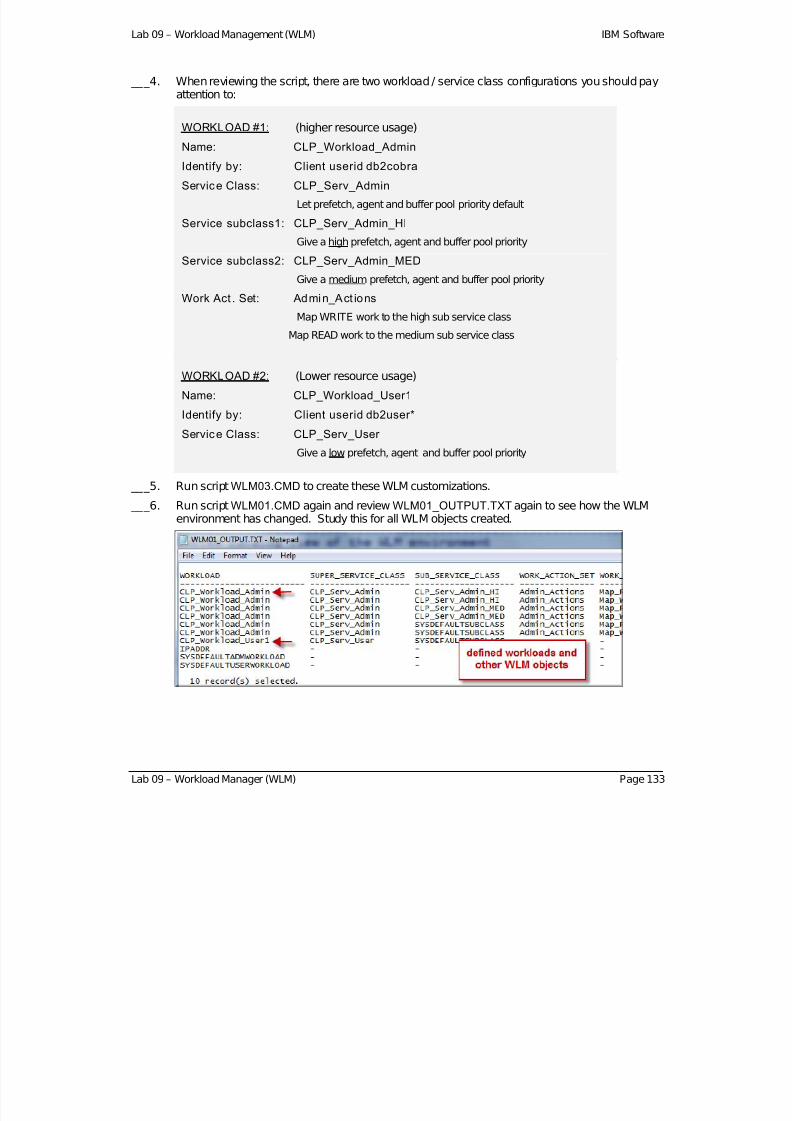
7/28/2019 PoT.im.07.1.017.13 Workbook Windows
http://slidepdf.com/reader/full/potim07101713-workbook-windows 133/232
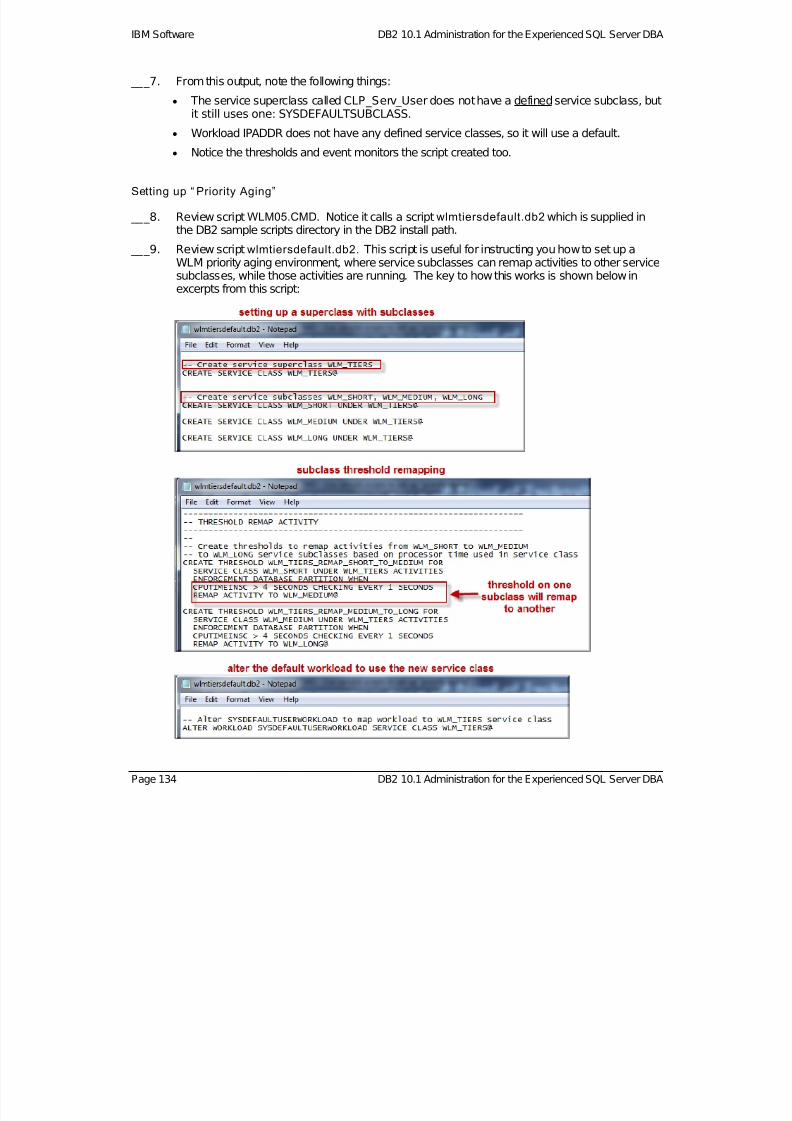
7/28/2019 PoT.im.07.1.017.13 Workbook Windows
http://slidepdf.com/reader/full/potim07101713-workbook-windows 134/232
IBM Software DB2 10.1 Administration for the Experienced SQL Server DBA
___7. From this output, note the following things:
The service superclass called CLP_Serv_User does not have a defined service subclass, butit still uses one: SYSDEFAULTSUBCLASS.
Workload IPADDR does not have any defined service classes, so it will use a default.
Notice the thresholds and event monitors the script created too.
Setting up “ Priority Aging”
___8. Review script WLM05.CMD. Notice it calls a scriptwlmtiersdefault.db2 which is supplied inthe DB2 sample scripts directory in the DB2 install path.
___9. Review script wlmtiersdefault.db2. This script is useful for instructing you how to set up aWLM priority aging environment, where service subclasses can remap activities to other servicesubclasses, while those activities are running. The key to how this works is shown below inexcerpts from this script:
Page 134 DB2 10.1 Administration for the Experienced SQL Server DBA
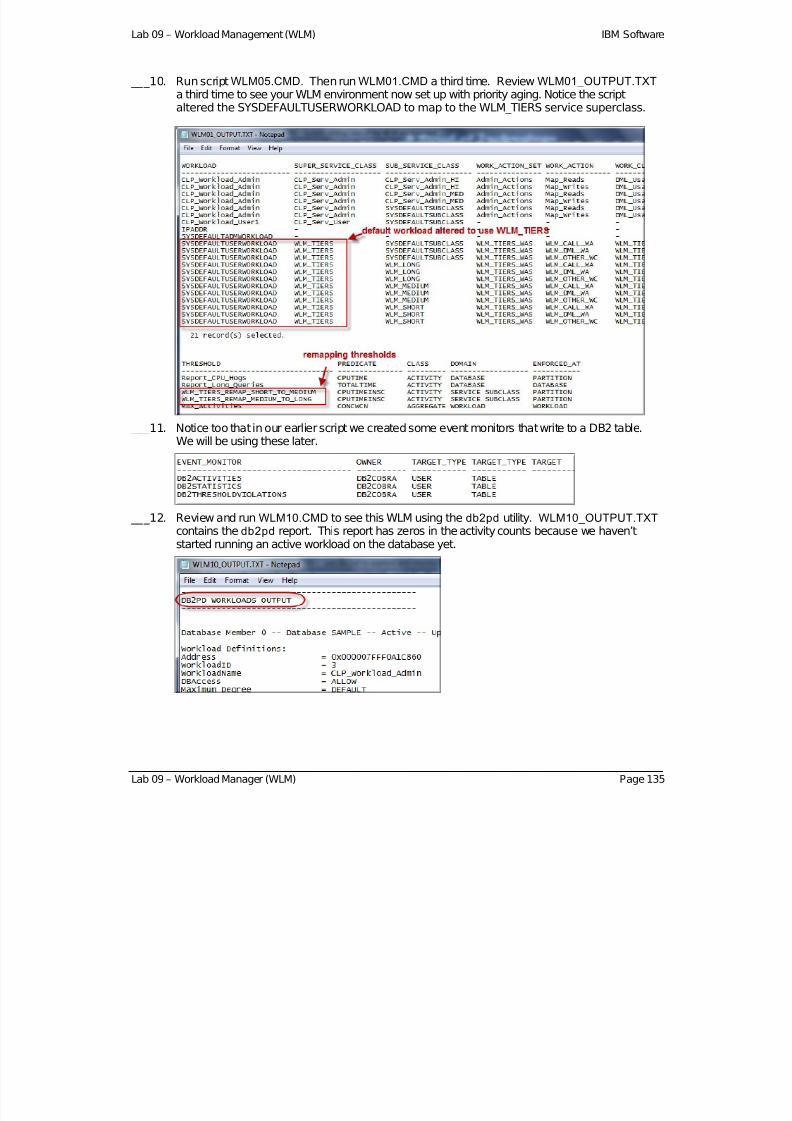
7/28/2019 PoT.im.07.1.017.13 Workbook Windows
http://slidepdf.com/reader/full/potim07101713-workbook-windows 135/232

7/28/2019 PoT.im.07.1.017.13 Workbook Windows
http://slidepdf.com/reader/full/potim07101713-workbook-windows 136/232
IBM Software DB2 10.1 Administration for the Experienced SQL Server DBA
B. Setting up to simulate a workload
___13. Review and run WLM20.CMD which runs WLM21.DDL. These scripts will create a table andinserts 200,000 records into it. This table is used in a simulated workload later.
___14. This script takes a few minutes to run, so while it is running go on to the next steps to save time
in this lab. ___15. In Data Studio, we will connect to the SAMPLE database as user db2cobra, password
db2cobra. Right click on SAMPLE then:Properties
___16. In the Driver Properties screen, fill in the new credentials as below, then[OK]. Answer "yes"to reconnect.
Note: if the reconnect fails, just connect as usual.
___17. Start the Data Studio SQL Script Editor for the SAMPLE database.
___18. Copy and paste into the editor the contents of script file:WLM30.SQL
Hint: it is located at:C:\POT_DB2\09WLM\
Page 136 DB2 10.1 Administration for the Experienced SQL Server DBA
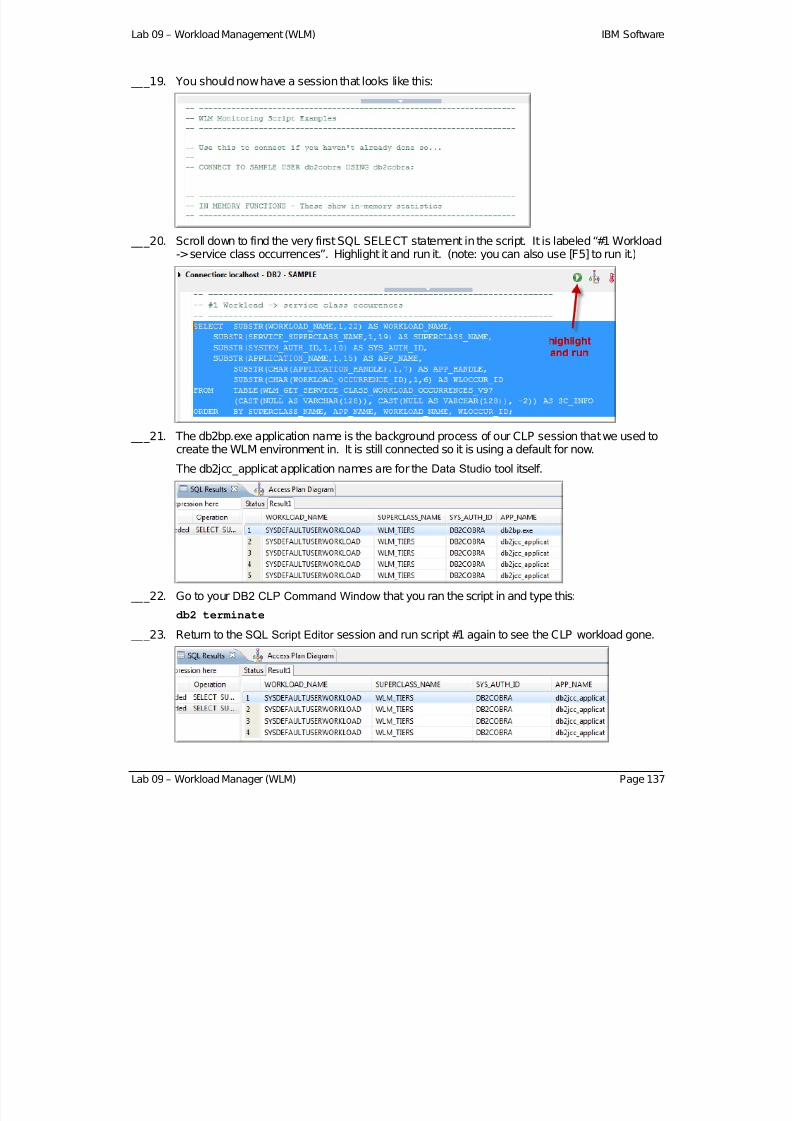
7/28/2019 PoT.im.07.1.017.13 Workbook Windows
http://slidepdf.com/reader/full/potim07101713-workbook-windows 137/232
Lab 09 – Workload Management (WLM) IBM Software
___19. You should now have a session that looks like this:
___20. Scroll down to find the very first SQL SELECT statement in the script. It is labeled “#1 Workload-> service class occurrences”. Highlight it and run it. (note: you can also use [F5] to run it.)
___21. The db2bp.exe application name is the background process of our CLP session that we used tocreate the WLM environment in. It is still connected so it is using a default for now.
The db2jcc_applicat application names are for the Data Studio tool itself.
___22. Go to your DB2 CLP Command Window that you ran the script in and type this:
db2 terminate
___23. Return to the SQL Script Editor session and run script #1 again to see the CLP workload gone.
Lab 09 – Workload Manager (WLM) Page 137
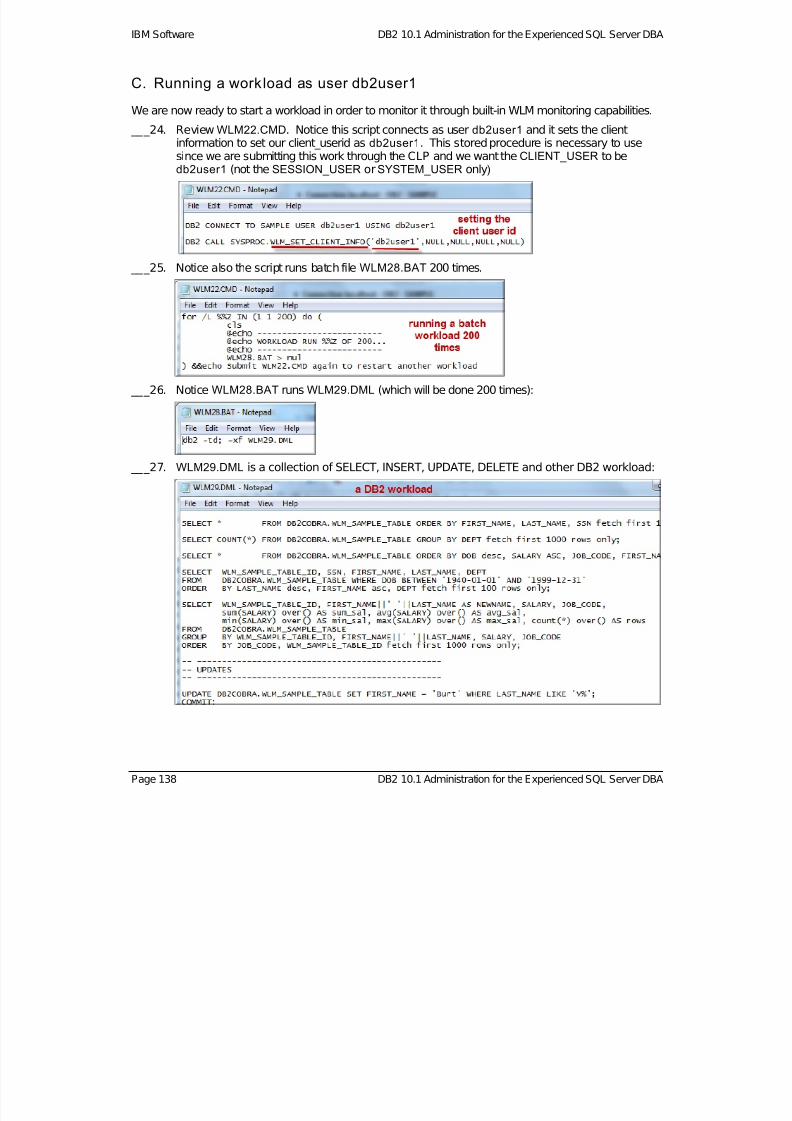
7/28/2019 PoT.im.07.1.017.13 Workbook Windows
http://slidepdf.com/reader/full/potim07101713-workbook-windows 138/232
IBM Software DB2 10.1 Administration for the Experienced SQL Server DBA
C. Running a workload as user db2user1
We are now ready to start a workload in order to monitor it through built-in WLM monitoring capabilities.
___24. Review WLM22.CMD. Notice this script connects as user db2user1 and it sets the clientinformation to set our client_userid as db2user1. This stored procedure is necessary to use
since we are submitting this work through the CLP and we want theCLIENT_USER to bedb2user1 (not the SESSION_USER orSYSTEM_USER only)
___25. Notice also the script runs batch file WLM28.BAT 200 times.
___26. Notice WLM28.BAT runs WLM29.DML (which will be done 200 times):
___27. WLM29.DML is a collection of SELECT, INSERT, UPDATE, DELETE and other DB2 workload:
Page 138 DB2 10.1 Administration for the Experienced SQL Server DBA
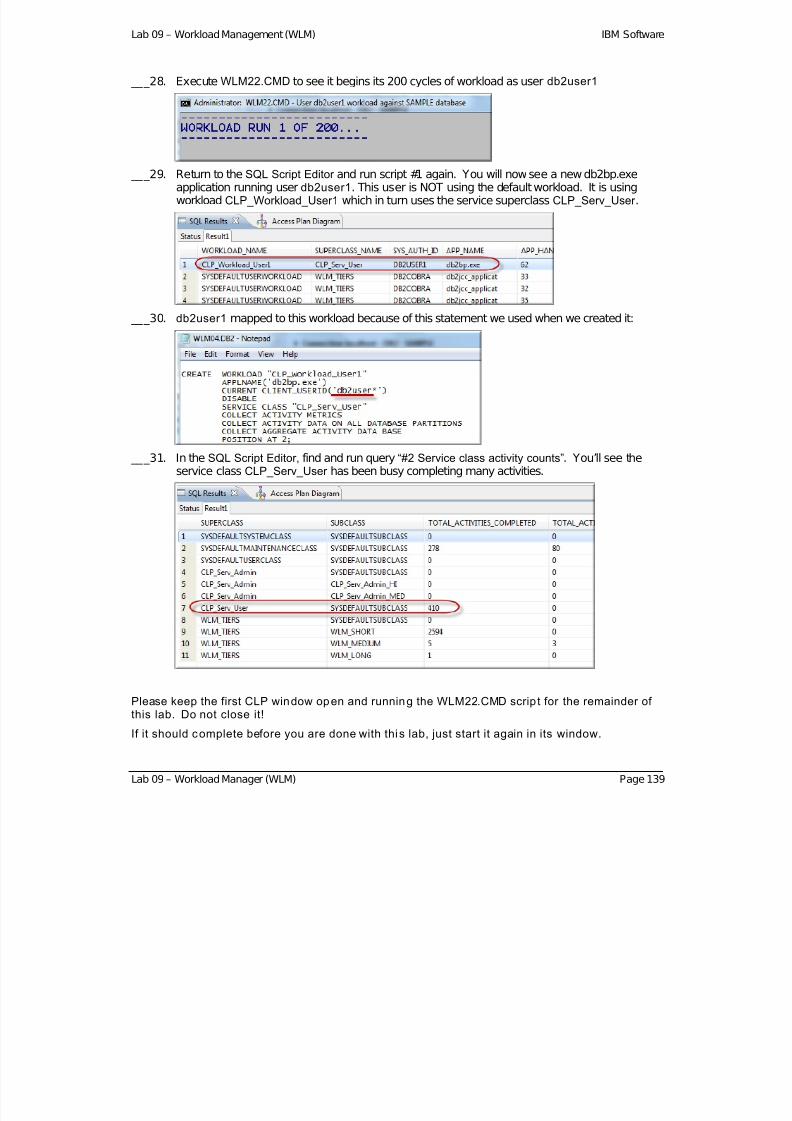
7/28/2019 PoT.im.07.1.017.13 Workbook Windows
http://slidepdf.com/reader/full/potim07101713-workbook-windows 139/232
Lab 09 – Workload Management (WLM) IBM Software
___28. Execute WLM22.CMD to see it begins its 200 cycles of workload as user db2user1
___29. Return to the SQL Script Editor and run script #1 again. You will now see a new db2bp.exeapplication running userdb2user1. This user is NOT using the default workload. It is usingworkload CLP_Workload_User1 which in turn uses the service superclass CLP_Serv_User .
___30. db2user1 mapped to this workload because of this statement we used when we created it:
___31. In the SQL Script Editor, find and run query “#2 Service class activity counts”. You’ll see the
service class CLP_Serv_User has been busy completing many activities.
Please keep the first CLP window open and running the WLM22.CMD scrip t for the remainder of this lab. Do not close it!
If it should complete before you are done with this lab, just start it again in its window.
Lab 09 – Workload Manager (WLM) Page 139
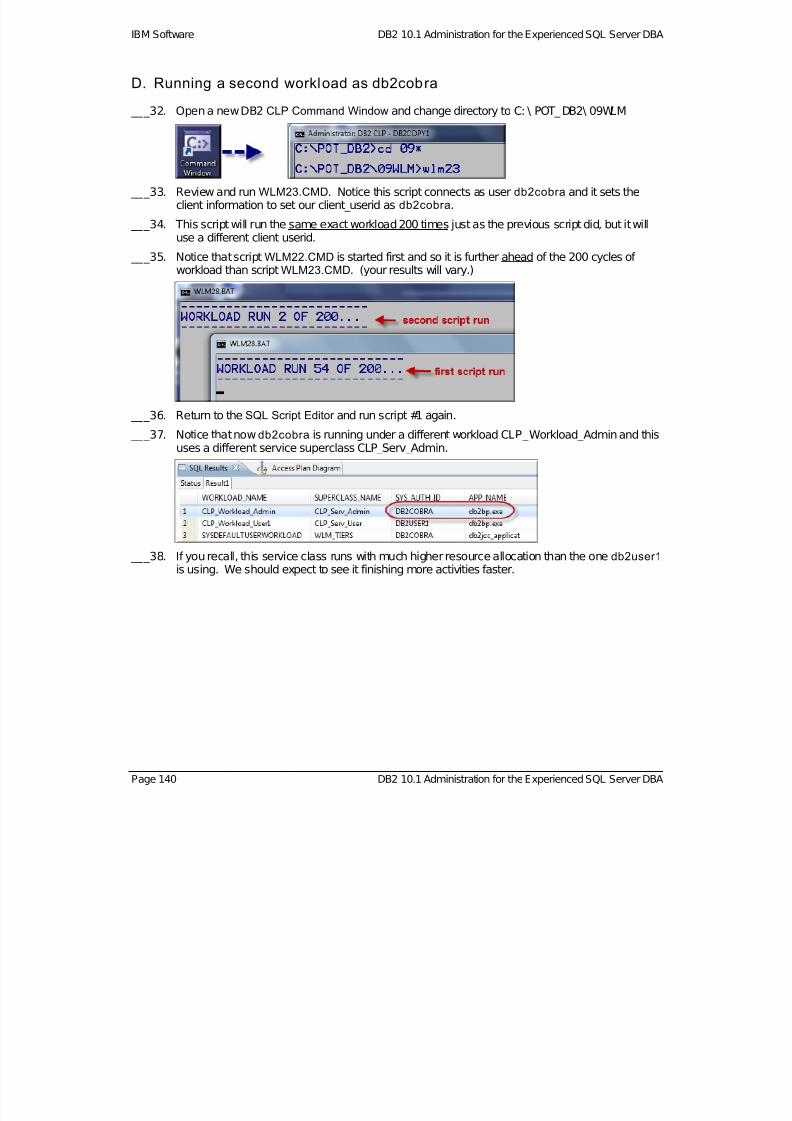
7/28/2019 PoT.im.07.1.017.13 Workbook Windows
http://slidepdf.com/reader/full/potim07101713-workbook-windows 140/232
IBM Software DB2 10.1 Administration for the Experienced SQL Server DBA
D. Running a second workload as db2cobra
___32. Open a new DB2 CLP Command Window and change directory to C: \ POT_ DB2\ 09WLM
___33. Review and run WLM23.CMD. Notice this script connects as user db2cobra and it sets theclient information to set our client_userid as db2cobra.
___34. This script will run the same exact workload 200 times just as the previous script did, but it willuse a different client userid.
___35. Notice that script WLM22.CMD is started first and so it is further ahead of the 200 cycles of workload than scriptWLM23.CMD. (your results will vary.)
___36. Return to the SQL Script Editor and run script #1 again.
___37. Notice that nowdb2cobra is running under a different workload CLP_Workload_Admin and thisuses a different service superclass CLP_Serv_Admin.
___38. If you recall, this service class runs with much higher resource allocation than the onedb2user1 is using. We should expect to see it finishing more activities faster.
Page 140 DB2 10.1 Administration for the Experienced SQL Server DBA
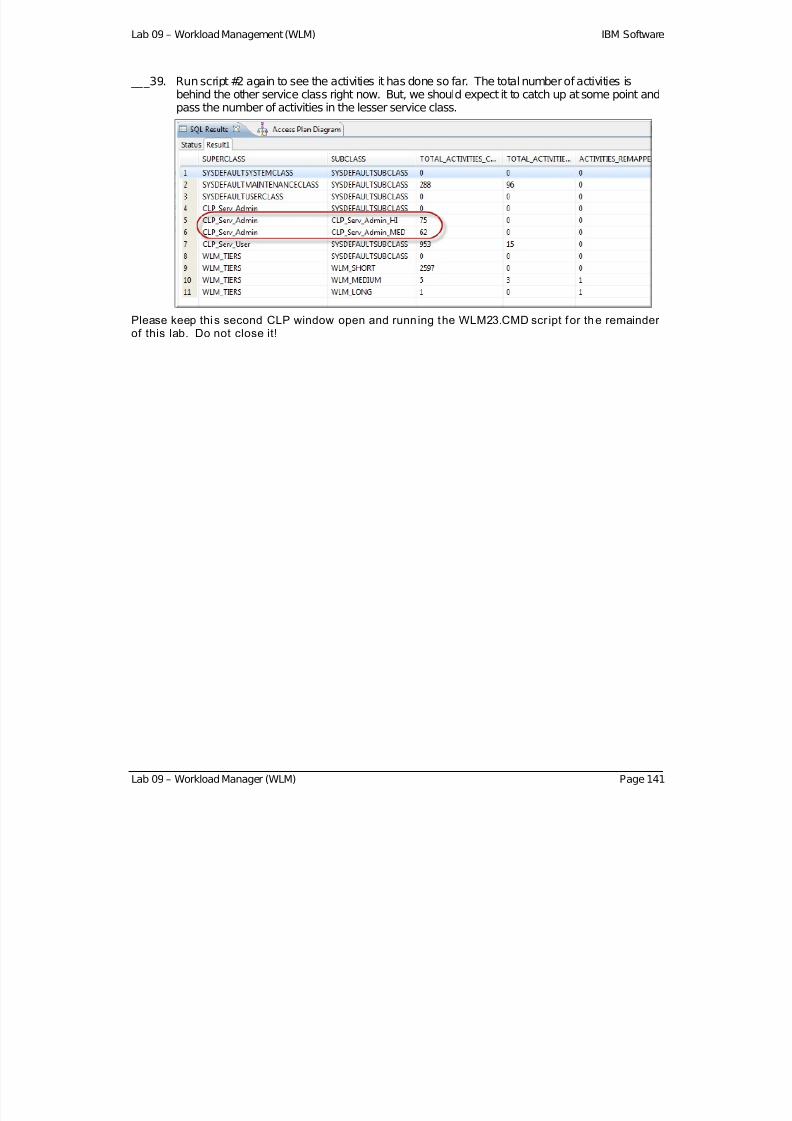
7/28/2019 PoT.im.07.1.017.13 Workbook Windows
http://slidepdf.com/reader/full/potim07101713-workbook-windows 141/232
Lab 09 – Workload Management (WLM) IBM Software
___39. Run script #2 again to see the activities it has done so far. The total number of activities isbehind the other service class right now. But, we should expect it to catch up at some point andpass the number of activities in the lesser service class.
Please keep this second CLP window open and running the WLM23.CMD scr ipt for the remainder of this lab. Do not close it!
Lab 09 – Workload Manager (WLM) Page 141

7/28/2019 PoT.im.07.1.017.13 Workbook Windows
http://slidepdf.com/reader/full/potim07101713-workbook-windows 142/232
IBM Software DB2 10.1 Administration for the Experienced SQL Server DBA
E. Running a third workload as user db2default
___40. Open a new DB2 CLP Command Window and change directory to C: \ POT_ DB2\ 09WLM
___41. Review and run WLM24.CMD. Notice this script connects as user db2default and it sets theclient information to set our client_userid as db2default.
___42. Run script #1 and #2 again in theSQL Script Editor.
___43. Run script “#3 Work Action Set Activity Count”. Remember, scriptwlmtiersdefault.db2 usedwork action sets to do initial mapping into the service subclasses depending upon what type of activity it was.
We can also use work action sets to map to subclasses based on data tags in table spaces orstorage groups. We don't show that in this exercise, but it works in the same way.
Page 142 DB2 10.1 Administration for the Experienced SQL Server DBA
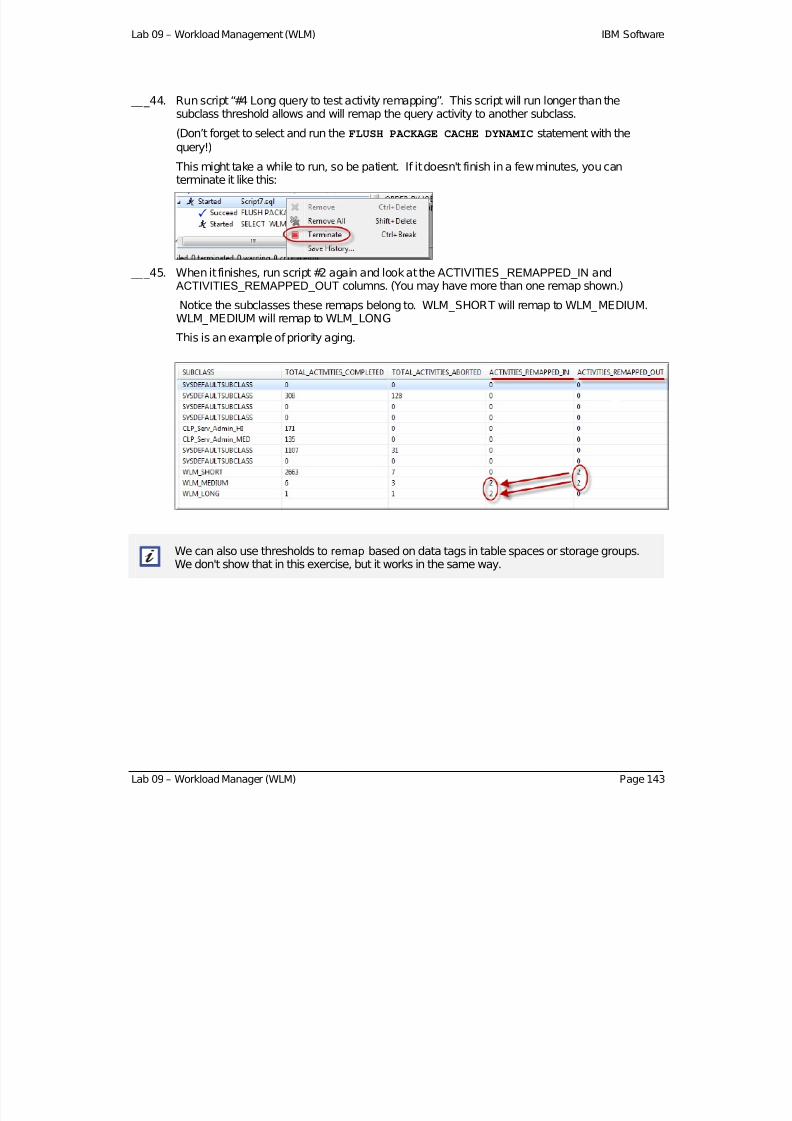
7/28/2019 PoT.im.07.1.017.13 Workbook Windows
http://slidepdf.com/reader/full/potim07101713-workbook-windows 143/232
Lab 09 – Workload Management (WLM) IBM Software
___44. Run script “#4 Long query to test activity remapping”. This script will run longer than thesubclass threshold allows and will remap the query activity to another subclass.
(Don’t forget to select and run the FLUSH PACKAGE CACHE DYNAMIC statement with thequery!)
This might take a while to run, so be patient. If it doesn't finish in a few minutes, you canterminate it like this:
___45. When it finishes, run script #2 again and look at the ACTIVITIES _REMAPPED_IN and ACTIVITIES_REMAPPED_OUT columns. (You may have more than one remap shown.)
Notice the subclasses these remaps belong to. WLM_SHORT will remap to WLM_MEDIUM.
WLM_MEDIUM will remap to WLM_LONG
This is an example of priority aging.
We can also use thresholds to remap based on data tags in table spaces or storage groups.We don't show that in this exercise, but it works in the same way.
Lab 09 – Workload Manager (WLM) Page 143

7/28/2019 PoT.im.07.1.017.13 Workbook Windows
http://slidepdf.com/reader/full/potim07101713-workbook-windows 144/232
IBM Software DB2 10.1 Administration for the Experienced SQL Server DBA
F. Working with WLM event monitors
___46. Run the CALL WLM_COLLECT_STATS() stored procedure in the script
___47. Immediately run script #2 again.
___48. Notice the in-memory statistics have been set back to zero. But, fortunately, they have beencollected in our event monitors. Since our event monitors were created as tables, we can easilyselect from them.
___49. Run scripts #5, #6, #7 and #8. These seem familiar as they are like the in-memory statisticsqueries we were using earlier, only now we are using our event monitor tables. These persistafter a database is deactivated, in-memory statistics don’t.
___50. Now, let’s look at a very special event monitor called “Threshold Violations”. This containsinformation we cannot get from in-memory statistics.
Run script “ #9. Threshold violations event monitor summary table select”
___51. Notice we show two threshold violated, one resulting in a “Continue” and another in “Remap” wediscussed earlier.
___52. If you are not doing the extra exercises in the next section, you can close all theDB2 CLPCommand Windows now.
Page 144 DB2 10.1 Administration for the Experienced SQL Server DBA

7/28/2019 PoT.im.07.1.017.13 Workbook Windows
http://slidepdf.com/reader/full/potim07101713-workbook-windows 145/232
Lab 09 – Workload Management (WLM) IBM Software
Lab 09 – Workload Manager (WLM) Page 145
G. Extra Exercise: Miscellaneous WLM lessons
Using the entire in-memory functions:
___53. Review and run each in-memory function that is provided in the script. These are the samefunctions that we were using earlier in the labs. The earlier exercises only used some of thecolumns, so these will give you every column, not just the ones we wanted to show you earlier.
Revisiting db2pd:
___54. Open yet another DB2 CLP window and run scriptWLM10.CMD. This is the db2pd script. Thistime you will have in-memory statistics from running workloads to review this utility with.
___55. Close all DB2 CLP Command Windows now.
H. Clean up
___56. Run WLM50.BAT to clean up resources after above lab exercises.
*** End of Workload Manager (WLM) Lab – by Burt Vialpando ***

7/28/2019 PoT.im.07.1.017.13 Workbook Windows
http://slidepdf.com/reader/full/potim07101713-workbook-windows 146/232
IBM Software DB2 10.1 Administration for the Experienced SQL Server DBA
Lab 10. High Availabil ity Disaster Recovery (HADR)
This lab assumes you have already completed theData Studio Lab 03 exercises.
If you have not, then you should complete sections A and B of Lab 03 to learn how to launchData Studio and connect to a database.
A. HADR – Lab Overview
In a normal situation, you would configure HADR on two separate servers. For demonstration purposesfor this lab, we will create two separate instances and configure HADR on each database in eachinstance on the same machine. We will use the default DB2 instance to make the first connection to theHADR database.
The following is an overview of how this lab will be set up:
In this lab exercise, we set up HADR manually with a script. However, back in your own ITenvironment, you probably should set up HADR for the first time using the Data Studio HADRwizard, as it is very easy to use and will walk you through the required steps.
Client Application Machine
Instance Name = DB2
Make a connection to the HADB database
Standby Database (Server)
Instance Name = DB2_S
Restore Database HADB from Primary
Enable HADR on Standby
Start HADR in standby mode
Lab Exercise Host Machine
Primary Database (Server)
Instance Name = DB2_P
Create Database = HADB
Turn on Archival Logging
Take a backup of HADB database
Enable HADR on Primary
Page 146 DB2 10.1 Administration for the Experienced SQL Server DBA

7/28/2019 PoT.im.07.1.017.13 Workbook Windows
http://slidepdf.com/reader/full/potim07101713-workbook-windows 147/232
Lab 10 – HADR IBM Software
B. Set up HADR
___1. Close Data Studio if it is open.
___2. Open a DB2 CLP Command Window and change the directory to: C: \ POT_DB2\ 10HADR
___3. Run the scriptHADR01.CMD.
___4. While it is running, review the script which does the following steps:
___a. Create a DB2_P instance (assume this to be an instance on the primary database server).
___b. Create an HADB database in the DB2_P instance.
___c. Turn on archival logging for this database.
___d. Take a backup of the HADB database.
___e. Create a DB2_S instance (assume this to be an instance on the secondary database server).
___f. Restore HADB database in the DB2_S instance from the backup taken in the previous step ‘d’.
___g. Catalog the DB2_S instance in the DB2_P instance and the DB2_P instance in the DB2_S instance
___h. On the DB2_P instance, catalog the local HADB database as HADBP and the remote HADB database on DB2_S as HADBS.
___i. On the DB2_S instance, catalog the local HADB database as HADBS and the remote HADB database on DB2_P as HADBP.
___j. Configure client re-route on DB2_P andDB2_S instances for HADBS and HADBP databasesrespectively.
___k. Configure HADR on DB2_P and DB2_S instances for HADB database.
___l. Start HADR on DB2_S database server in STANDBY mode
___m. Start HADR on DB2_P database server in PRIMARY mode.
___5. Please note the following TCPIP ports used in this HADR lab.
Type Port Number
DB2 default instance 50000
DB2_P Primary HADR instance 51600
DB2_S Standby HADR instance 51700
HADR Port on Primary 51800HADR Port on Standby 51900
Lab 10 – HADR Page 147

7/28/2019 PoT.im.07.1.017.13 Workbook Windows
http://slidepdf.com/reader/full/potim07101713-workbook-windows 148/232
IBM Software DB2 10.1 Administration for the Experienced SQL Server DBA
C. Create Objects in Primary Database and Monitor HADR
___6. OpenData Studio by clicking on this icon on your desktop or in your task bar:
OR…You can open Data Studio by choosing:
St ar t Al l Progr ams I BM Dat a St udi o Dat a St udi o 3. 1. 1 Ful l cl i ent
___7. After the perspective opens, close the Task Launcher view
___8. In Administration Explorer , expand l ocal host 51600 and selectHADBP. Right click andclick Connect .
___9. Specify user name dbapot and password dbapot 123. Check Save Passwor d. Click OK .
Page 148 DB2 10.1 Administration for the Experienced SQL Server DBA
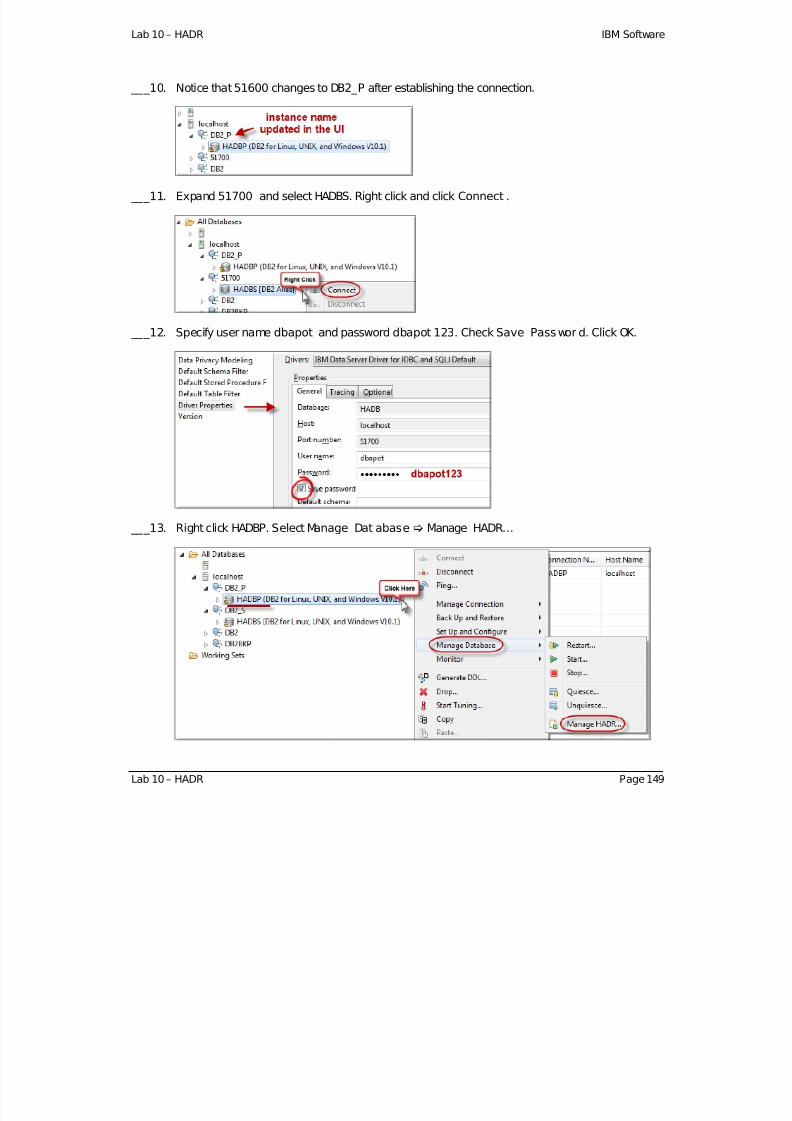
7/28/2019 PoT.im.07.1.017.13 Workbook Windows
http://slidepdf.com/reader/full/potim07101713-workbook-windows 149/232
Lab 10 – HADR IBM Software
___10. Notice that51600 changes to DB2_P after establishing the connection.
___11. Expand 51700 and select HADBS. Right click and click Connect .
___12. Specify user name dbapot and password dbapot 123. Check Save Passwor d. Click OK .
___13. Right click HADBP. Select Manage Dat abase Manage HADR…
Lab 10 – HADR Page 149
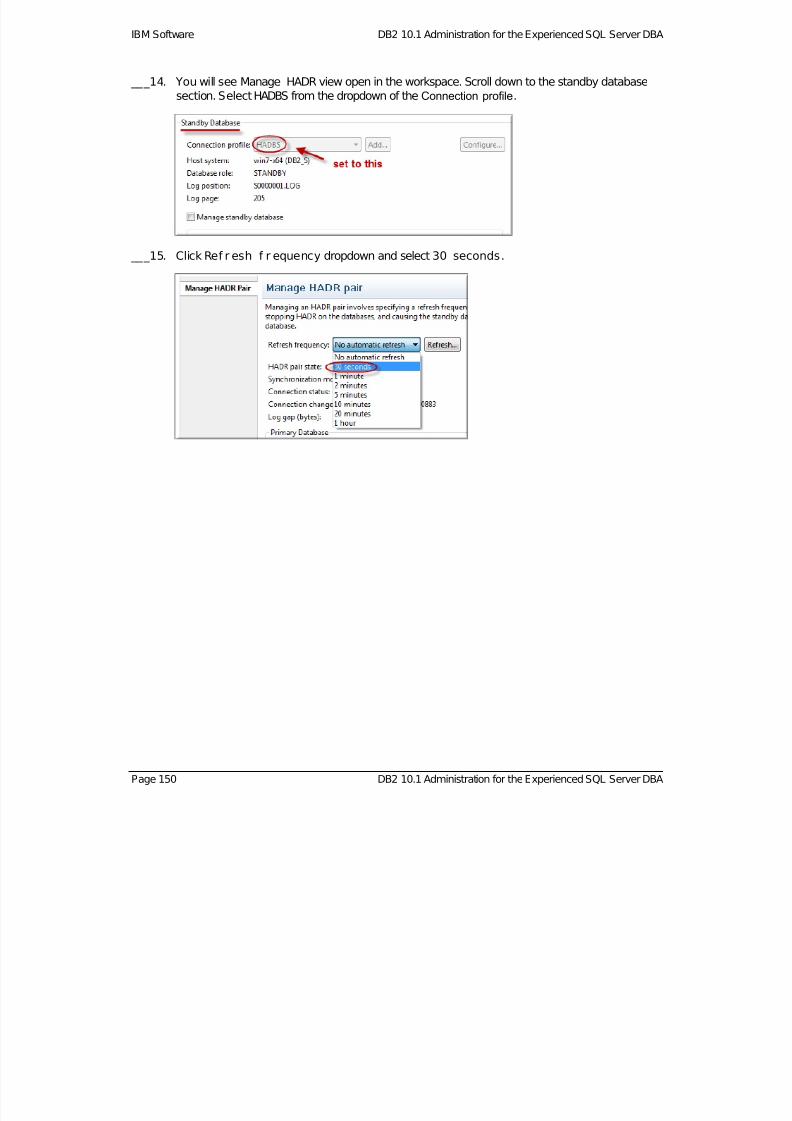
7/28/2019 PoT.im.07.1.017.13 Workbook Windows
http://slidepdf.com/reader/full/potim07101713-workbook-windows 150/232
IBM Software DB2 10.1 Administration for the Experienced SQL Server DBA
___14. You will see Manage HADR view open in the workspace. Scroll down to the standby databasesection. SelectHADBS from the dropdown of the Connection profile.
___15. ClickRef r esh f r equency dropdown and select30 seconds.
Page 150 DB2 10.1 Administration for the Experienced SQL Server DBA

7/28/2019 PoT.im.07.1.017.13 Workbook Windows
http://slidepdf.com/reader/full/potim07101713-workbook-windows 151/232
Lab 10 – HADR IBM Software
Create some tables to work with
We created an empty database HADB and enabled it for HADR. We will test HADR by first setting upsome tables using script: HADR02.CMD to:
Create the HATABLE table, primary key, indexes, and insert 50,000 rows. The HADRprocess should propagate the table, primary key, indexes and data to the standby as we dothis.
Create the HALOAD table, primary key, indexes, and load data using the DB2 LOAD utilityin COPY YES mode. Since the LOAD operation does not log the data, the COPY YESoption allows the standby database to execute the LOAD command using the same datathat was saved by the LOAD operation. It is critical that the path used in COPY YESoperation is available to the standby database. The standby database will also have thedata loaded to it.
___16. Go back to your DB2 command prompt and run the commandHADR02.CMD. This command
will create a HATABLE and HALOAD table in HADB database on the primary server.
Run the command HADR02.CMD now.
___17. After starting the above command, go back to the Data Studio Manage HADR view (you can use[ Al t ] [ Tab] to do this)
___18. Observe the Log posi t i on and Log page after creation of the two tables.
Lab 10 – HADR Page 151
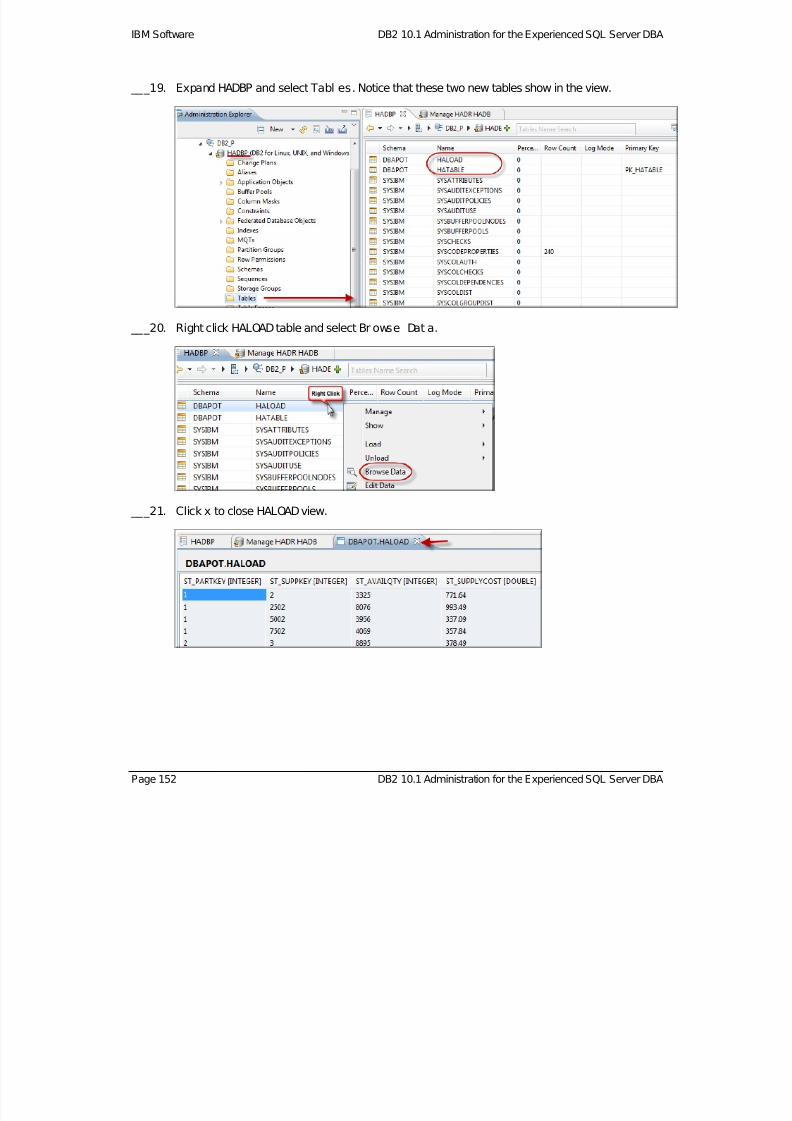
7/28/2019 PoT.im.07.1.017.13 Workbook Windows
http://slidepdf.com/reader/full/potim07101713-workbook-windows 152/232
IBM Software DB2 10.1 Administration for the Experienced SQL Server DBA
___19. Expand HADBP and select Tabl es. Notice that these two new tables show in the view.
___20. Right click HALOADtable and select Br owse Dat a.
___21. Clickx to close HALOADview.
Page 152 DB2 10.1 Administration for the Experienced SQL Server DBA

7/28/2019 PoT.im.07.1.017.13 Workbook Windows
http://slidepdf.com/reader/full/potim07101713-workbook-windows 153/232
Lab 10 – HADR IBM Software
___22. Expand HADBS and select Tabl es. Right click HALOADtable and select Br owse Dat a.
___23. Notice the error thrown for the STANDBY database. Click OK.
Note: The standby database is available for READ only operations due toregistry variable DB2_ HADR_ROS=ONbut only uncommitted read (UR)isolation level is allowed. Since Data Studio did not use UR, we see aboveerror.
To avoid the above error, we have to use isolation level to UR in the selectstatement or set DB2 registry variable DB2_STANDBY_I SOto UR. Whenstandby database becomes primary, this variable has no effect and onlyapplies to the database as a standby.
Lab 10 – HADR Page 153
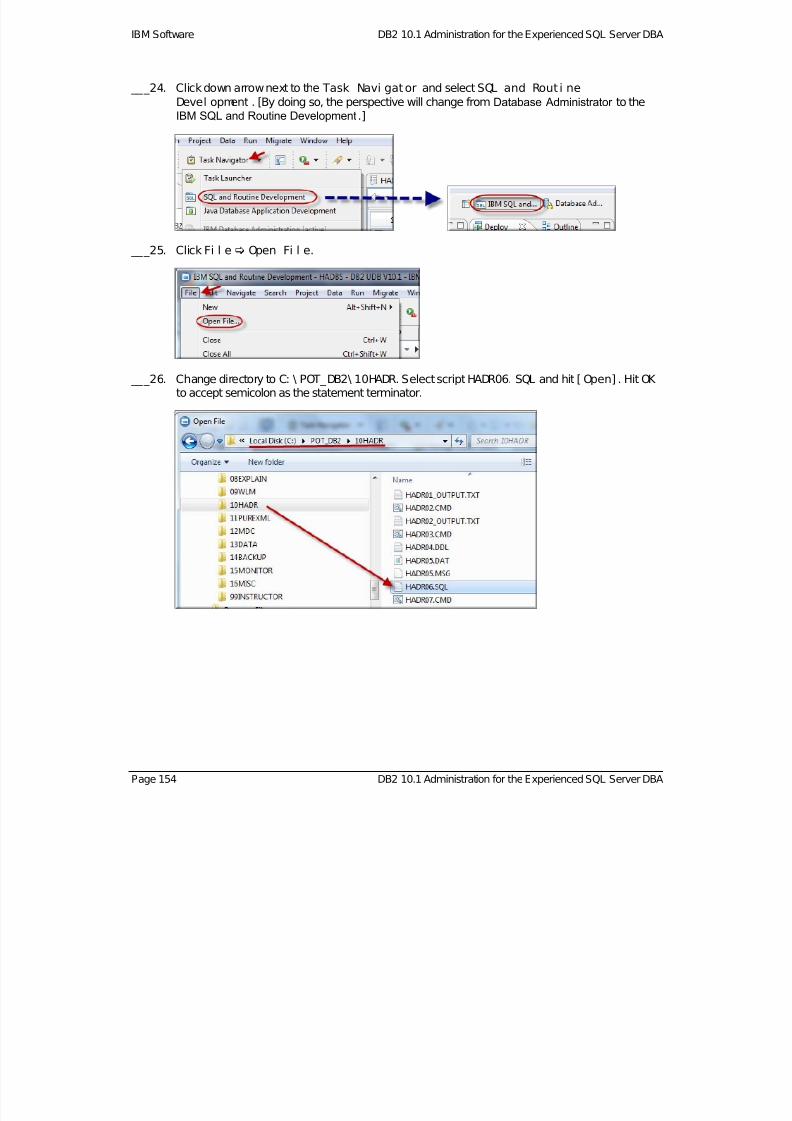
7/28/2019 PoT.im.07.1.017.13 Workbook Windows
http://slidepdf.com/reader/full/potim07101713-workbook-windows 154/232
IBM Software DB2 10.1 Administration for the Experienced SQL Server DBA
___24. Click down arrow next to the Task Navi gator and selectSQL and Rout i neDevel opment . [By doing so, the perspective will change fromDatabase Administrator to theIBM SQL and Routine Development.]
___25. ClickFi l e Open Fi l e.
___26. Change directory to C: \ POT_DB2\ 10HADR. Select scriptHADR06. SQL and hit [ Open] . Hit OK to accept semicolon as the statement terminator.
Page 154 DB2 10.1 Administration for the Experienced SQL Server DBA
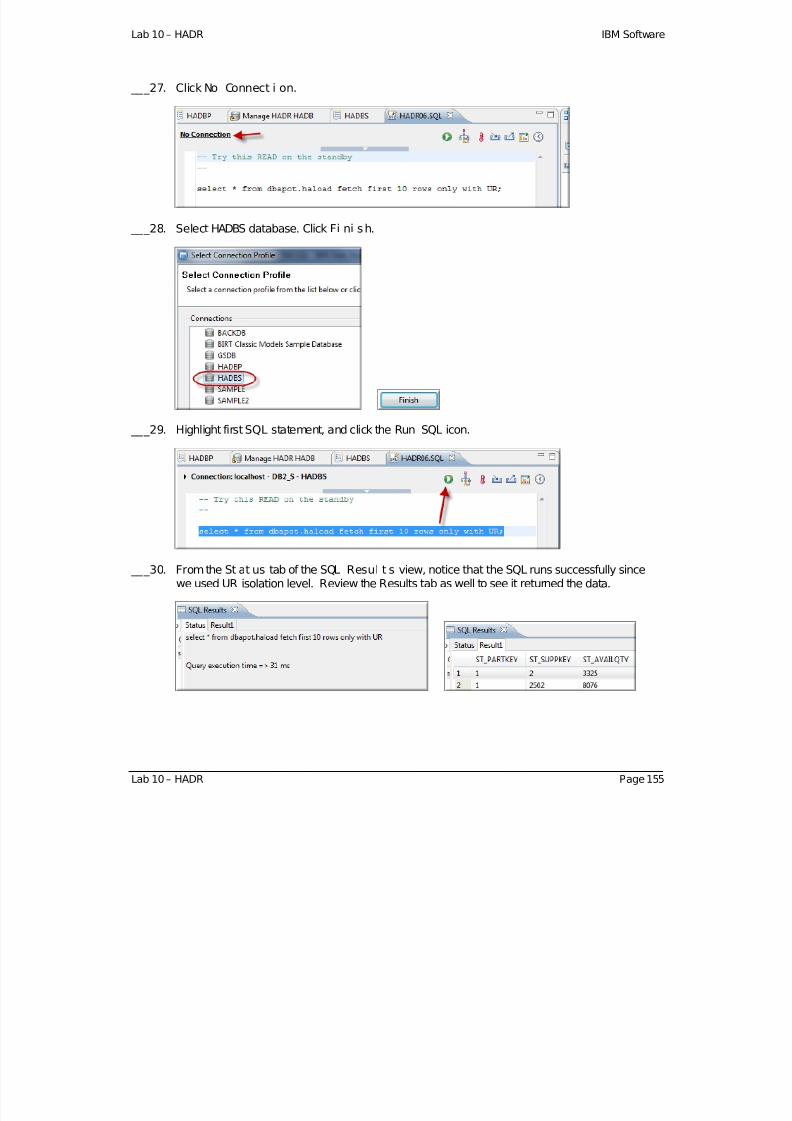
7/28/2019 PoT.im.07.1.017.13 Workbook Windows
http://slidepdf.com/reader/full/potim07101713-workbook-windows 155/232
Lab 10 – HADR IBM Software
___27. ClickNo Connect i on.
___28. Select HADBS database. Click Fi ni sh.
___29. Highlight first SQL statement, and click the Run SQL icon.
___30. From the St at us tab of the SQL Resul t s view, notice that the SQL runs successfully sincewe used UR isolation level. Review the Results tab as well to see it returned the data.
Lab 10 – HADR Page 155

7/28/2019 PoT.im.07.1.017.13 Workbook Windows
http://slidepdf.com/reader/full/potim07101713-workbook-windows 156/232
IBM Software DB2 10.1 Administration for the Experienced SQL Server DBA
___31. Highlight second SQL statement and click Run SQL icon.
Notice the error in the SQL Results view since we tried to do an update on a read onlydatabase.
Page 156 DB2 10.1 Administration for the Experienced SQL Server DBA
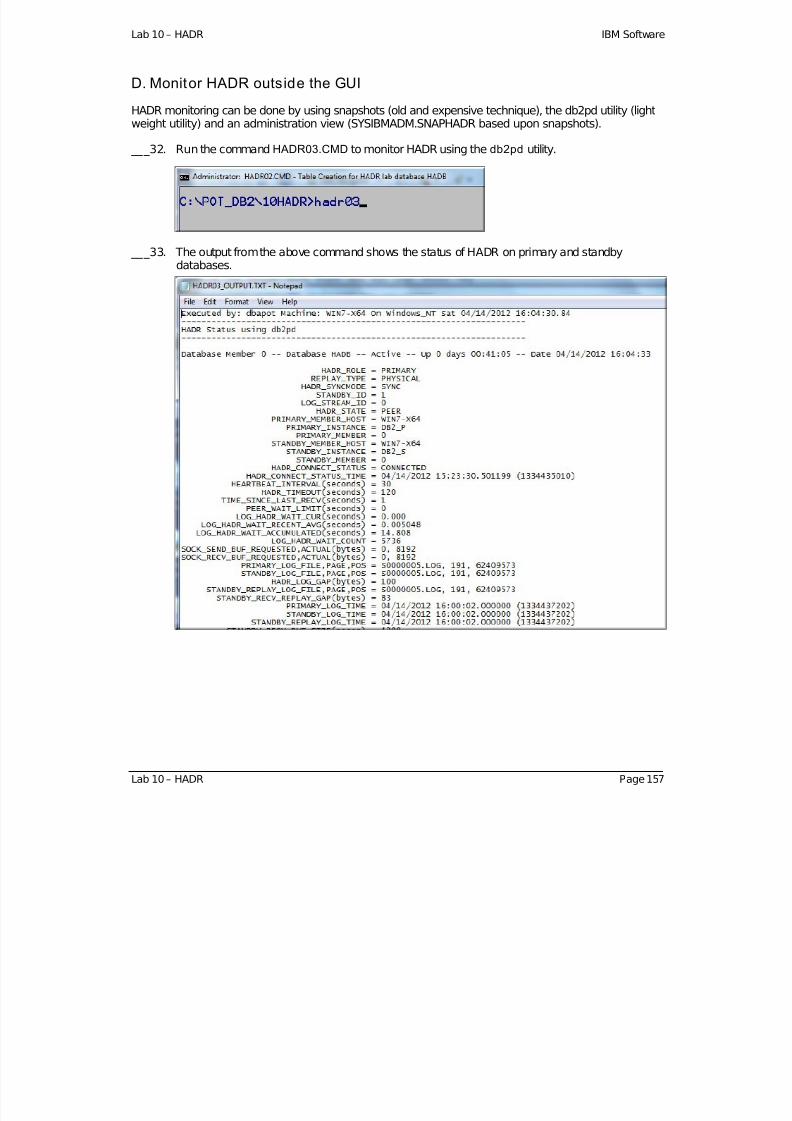
7/28/2019 PoT.im.07.1.017.13 Workbook Windows
http://slidepdf.com/reader/full/potim07101713-workbook-windows 157/232
Lab 10 – HADR IBM Software
D. Monitor HADR outside the GUI
HADR monitoring can be done by using snapshots (old and expensive technique), the db2pd utility (lightweight utility) and an administration view (SYSIBMADM.SNAPHADR based upon snapshots).
___32. Run the command HADR03.CMD to monitor HADR using the db2pd utility.
___33. The output from the above command shows the status of HADR on primary and standbydatabases.
Lab 10 – HADR Page 157
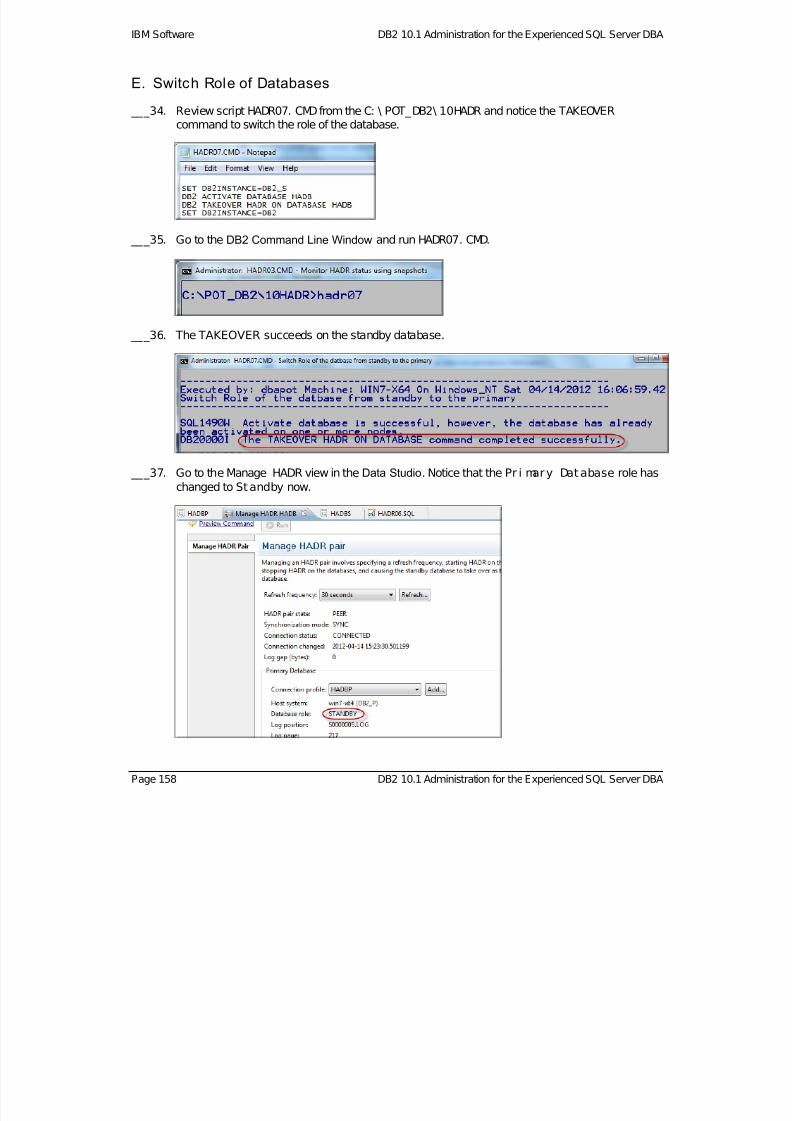
7/28/2019 PoT.im.07.1.017.13 Workbook Windows
http://slidepdf.com/reader/full/potim07101713-workbook-windows 158/232
IBM Software DB2 10.1 Administration for the Experienced SQL Server DBA
E. Switch Role of Databases
___34. Review script HADR07. CMD from the C: \ POT_DB2\ 10HADR and notice the TAKEOVER command to switch the role of the database.
___35. Go to the DB2 Command Line Window and run HADR07. CMD.
___36. The TAKEOVER succeeds on the standby database.
___37. Go to theManage HADR view in the Data Studio. Notice that the Pr i mary Dat abase role haschanged to Standby now.
Page 158 DB2 10.1 Administration for the Experienced SQL Server DBA
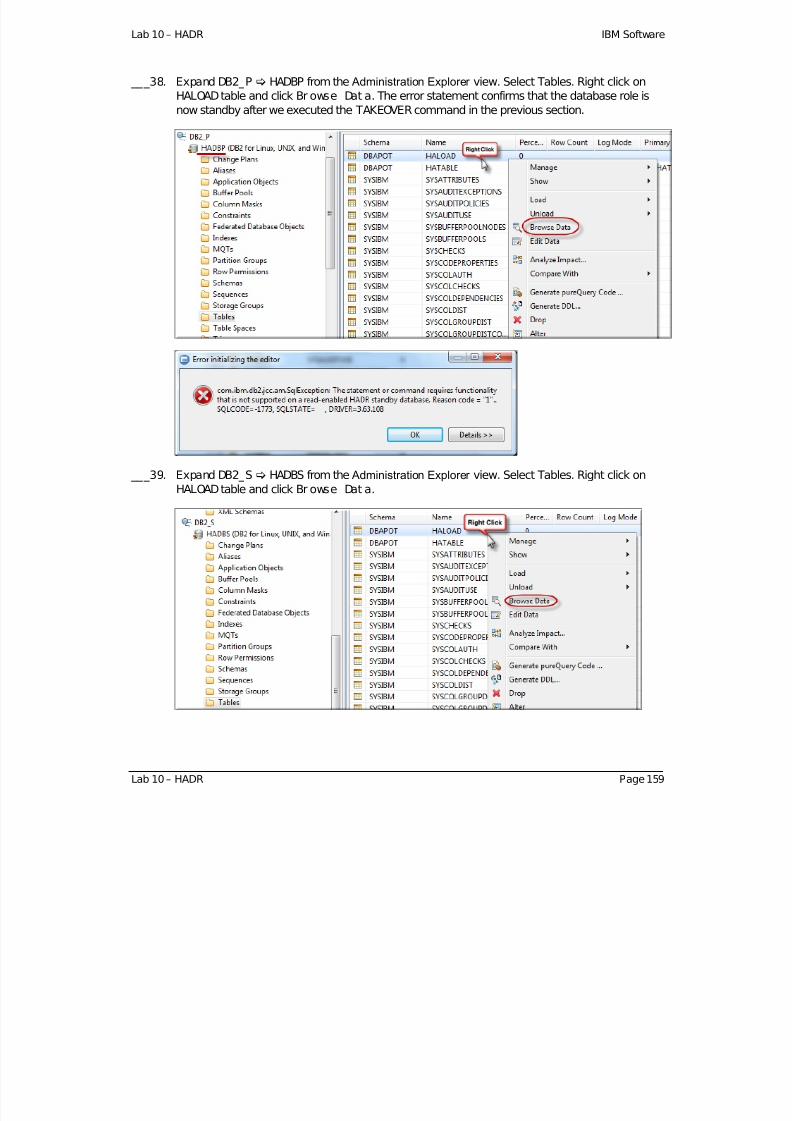
7/28/2019 PoT.im.07.1.017.13 Workbook Windows
http://slidepdf.com/reader/full/potim07101713-workbook-windows 159/232
Lab 10 – HADR IBM Software
___38. Expand DB2_P HADBP from the Administration Explorer view. Select Tables. Right click onHALOADtable and click Br owse Dat a. The error statement confirms that the database role isnow standby after we executed the TAKEOVERcommand in the previous section.
___39. Expand DB2_S HADBS from the Administration Explorer view. Select Tables. Right click onHALOADtable and click Br owse Dat a.
Lab 10 – HADR Page 159

7/28/2019 PoT.im.07.1.017.13 Workbook Windows
http://slidepdf.com/reader/full/potim07101713-workbook-windows 160/232
IBM Software DB2 10.1 Administration for the Experienced SQL Server DBA
Page 160 DB2 10.1 Administration for the Experienced SQL Server DBA
___40. Notice that you can see the data in theHALOADtable, which was populated using the DB2LOAD utility on the primary database.
Note: The LOAD operation is not a logged operation butCOPY YES optionallows HADR to apply LOAD on the Standby database.
___41. Use theWindows Explorer to review the following directories you have created with scriptHADR01.CMD. Make sure your REFRESH your screen to see the new directories.
Note: These are shown from theC: \ root directory:
F. Cleanup
After you are done with the above exercises, you can run the following command to clean up resources.
Run: HADR50.BAT
*** End of HADR Lab – by Vikram Khatri and Burt Vialpando ***

7/28/2019 PoT.im.07.1.017.13 Workbook Windows
http://slidepdf.com/reader/full/potim07101713-workbook-windows 161/232
Lab 11 – pureXML IBM Software
Lab 11. IBM DB2 pureXML
This lab assumes you have already completed theData Studio Lab 03 exercises.
If you have not, then you should complete sections A and B of Lab 03 to learn how to launchData Studio and connect to a database.
A. Create a Supporting Database and an XML Ready Table
First, in order to start working with IBM DB2 pureXML®, we’ll create a database for it.
___1. Close Data Studio. (We will show you how it adds a newly cataloged database automatically.)
___2. Open a DB2 CLP Command Window and position yourself inC: \ POT_DB2\ 11PUREXML
___3. Run script: pureXML01.CMD which executes pureXML02.DB2
___4. Review these scripts while they are running. Wait for the scripts to complete.
___5. LaunchData Studio when the scripts are finished.
___6. In the Database Admin perspective, find database XMLDB that was just created and right click
on it. Connect with the user namedbapot and password dbapot123
Lab 11 – pureXML Page 161
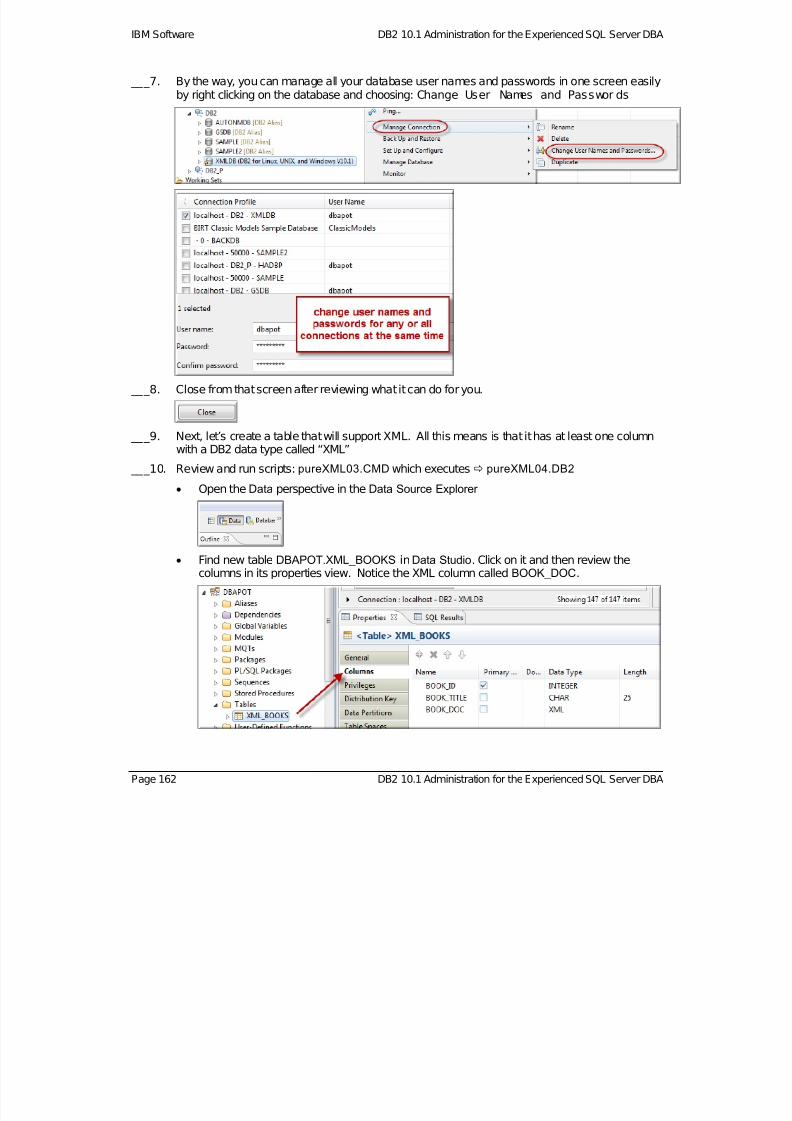
7/28/2019 PoT.im.07.1.017.13 Workbook Windows
http://slidepdf.com/reader/full/potim07101713-workbook-windows 162/232
IBM Software DB2 10.1 Administration for the Experienced SQL Server DBA
Page 162 DB2 10.1 Administration for the Experienced SQL Server DBA
___7. By the way, you can manage all your database user names and passwords in one screen easilyby right clicking on the database and choosing:Change User Names and Passwor ds
___8. Close from that screen after reviewing what it can do for you.
___9. Next, let’s create a table that will support XML. All this means is that it has at least one columnwith a DB2 data type called “XML”
___10. Review and run scripts: pureXML03.CMD which executes pureXML04.DB2
Open the Data perspective in the Data Source Explorer
Find new table DBAPOT.XML_BOOKS inData Studio. Click on it and then review thecolumns in its properties view. Notice the XML column calledBOOK_DOC.

7/28/2019 PoT.im.07.1.017.13 Workbook Windows
http://slidepdf.com/reader/full/potim07101713-workbook-windows 163/232
Lab 11 – pureXML IBM Software
B. Inserting and Exploring XML Data
___11. Review and run scripts: pureXML05.CMD which executes pureXML06.DB2
Right click on XML_BOOKS and choose: Dat a Edi t
Notice three new records in the table. Review the XML documents by clicking on theBOOK_DOC fields in any row. Ellipses will appear. Click on the ellipses.
In the XML Cell Editor , find the XML Tree tab. Expand the tree and review.
Explore other XML documents and see if you can tell how they are different from eachother. Notice how they have different element structures. For example, the XML documentfor the record BOOK_ID=34567 has an element called “extras” that the other XML
documents do not have. This shows the flexibility of XML. Notice you can edit this data if you wanted to. We won't be doing that for this lab .
Click [ Cancel ] when done reviewing.
Lab 11 – pureXML Page 163
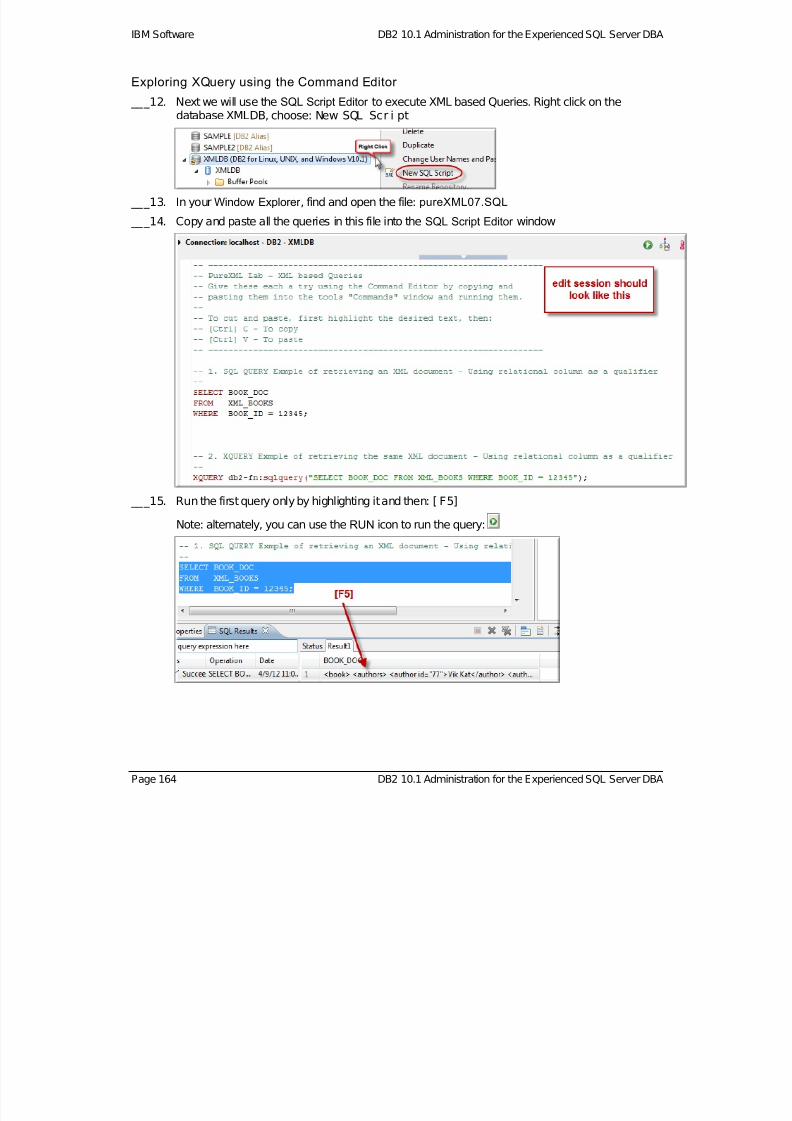
7/28/2019 PoT.im.07.1.017.13 Workbook Windows
http://slidepdf.com/reader/full/potim07101713-workbook-windows 164/232
IBM Software DB2 10.1 Administration for the Experienced SQL Server DBA
Exploring XQuery using the Command Editor
___12. Next we will use the SQL Script Editor to execute XML based Queries. Right click on thedatabase XMLDB, choose: New SQL Scr i pt
___13. In your Window Explorer , find and open the file: pureXML07.SQL
___14. Copy and paste all the queries in this file into theSQL Script Editor window
___15. Run the first query only by highlighting it and then:[ F5]
Note: alternately, you can use the RUN icon to run the query:
Page 164 DB2 10.1 Administration for the Experienced SQL Server DBA
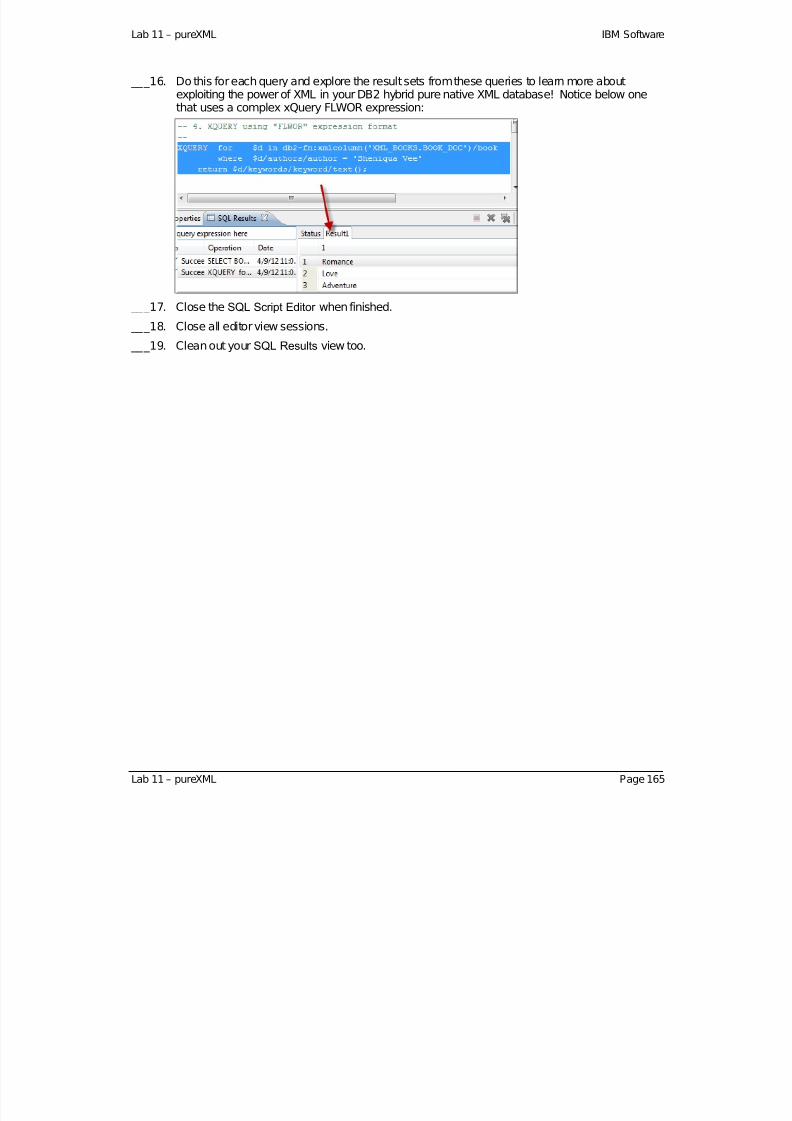
7/28/2019 PoT.im.07.1.017.13 Workbook Windows
http://slidepdf.com/reader/full/potim07101713-workbook-windows 165/232
Lab 11 – pureXML IBM Software
___16. Do this for each query and explore the result sets from these queries to learn more aboutexploiting the power of XML in your DB2 hybrid pure native XML database! Notice below onethat uses a complex xQuery FLWOR expression:
___17. Close the SQL Script Editor when finished.
___18. Close all editor view sessions.
___19. Clean out your SQL Results view too.
Lab 11 – pureXML Page 165

7/28/2019 PoT.im.07.1.017.13 Workbook Windows
http://slidepdf.com/reader/full/potim07101713-workbook-windows 166/232
IBM Software DB2 10.1 Administration for the Experienced SQL Server DBA
C. Importing and Exporting XML Data
Importing XML data – Using a script
___20. Review and run scripts: pureXML08.CMD which executes pureXML09.DB2
___21. As the presentation already covered, the key to the import utility working for the XML data is the
“XML FROM” keywords which point to subdirectory the XML documents are stored in.
___22. The data file itself has pointers to the exact file, and offset within that file, where the XML data is
located for each row of data.
___23. Use Data Studio to view the newly imported data. (Hint: use Edit)
Page 166 DB2 10.1 Administration for the Experienced SQL Server DBA

7/28/2019 PoT.im.07.1.017.13 Workbook Windows
http://slidepdf.com/reader/full/potim07101713-workbook-windows 167/232
Lab 11 – pureXML IBM Software
Extracting XML data – using a UI
___24. In Data Studio and right click the table XML_BOOKS Data Ext r act
___25. Fill in the output file name, like below. Leave the delimiters as-is:
___26. Find and open the file in Notepad
Lab 11 – pureXML Page 167
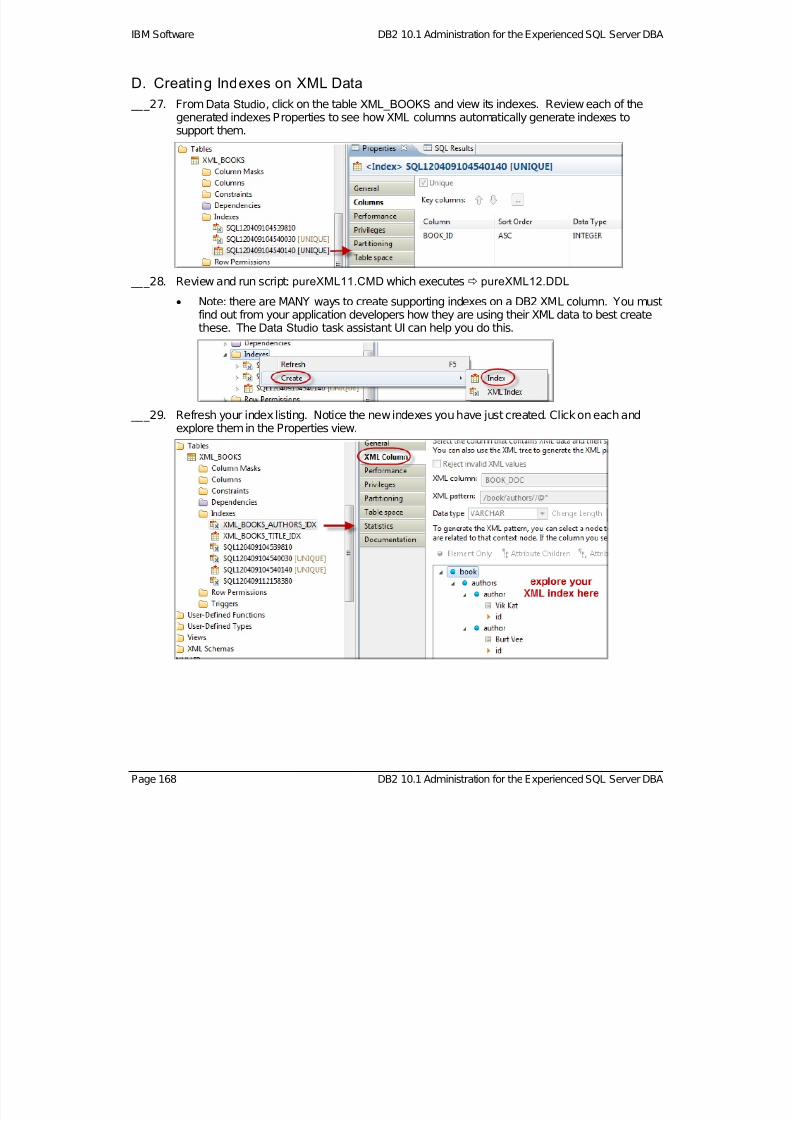
7/28/2019 PoT.im.07.1.017.13 Workbook Windows
http://slidepdf.com/reader/full/potim07101713-workbook-windows 168/232
IBM Software DB2 10.1 Administration for the Experienced SQL Server DBA
D. Creating Indexes on XML Data
___27. FromData Studio, click on the table XML_BOOKS and view its indexes. Review each of thegenerated indexes Properties to see how XML columns automatically generate indexes tosupport them.
___28. Review and run script: pureXML11.CMD which executes pureXML12.DDL
Note: there are MANY ways to create supporting indexes on a DB2 XML column. You must
find out from your application developers how they are using their XML data to best createthese. The Data Studio task assistant UI can help you do this.
___29. Refresh your index listing. Notice the new indexes you have just created. Click on each andexplore them in the Properties view.
Page 168 DB2 10.1 Administration for the Experienced SQL Server DBA
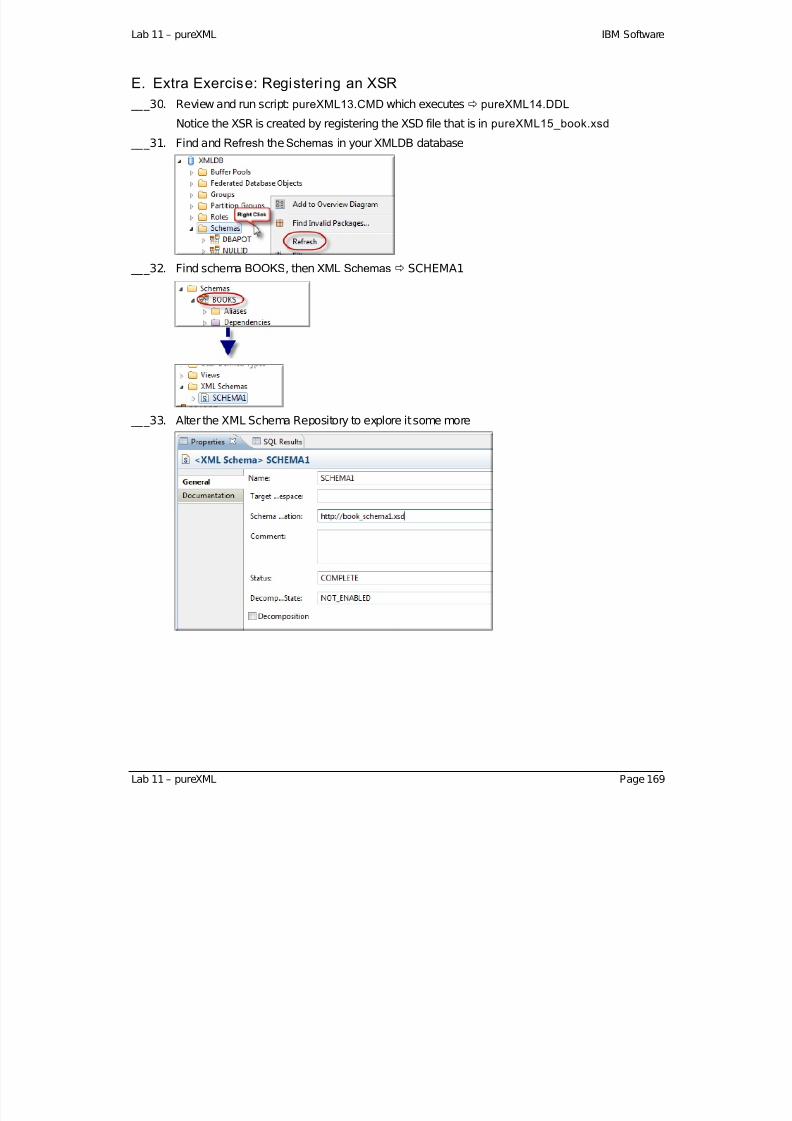
7/28/2019 PoT.im.07.1.017.13 Workbook Windows
http://slidepdf.com/reader/full/potim07101713-workbook-windows 169/232
Lab 11 – pureXML IBM Software
E. Extra Exercise: Registering an XSR
___30. Review and run script: pureXML13.CMD which executes pureXML14.DDL
Notice the XSR is created by registering the XSD file that is in pureXML15_book.xsd
___31. Find and Refresh theSchemas in your XMLDB database
___32. Find schema BOOKS, then XML Schemas SCHEMA1
___33. Alter the XML Schema Repository to explore it some more
Lab 11 – pureXML Page 169

7/28/2019 PoT.im.07.1.017.13 Workbook Windows
http://slidepdf.com/reader/full/potim07101713-workbook-windows 170/232
IBM Software DB2 10.1 Administration for the Experienced SQL Server DBA
Page 170 DB2 10.1 Administration for the Experienced SQL Server DBA
F. Extra Exercise: Validating with the XSR
___34. Copy script pureXML16.DML into the SQL Script Editor and run it. (Hint: New SQL Script)What SQL error code do you get and why? (Answer: Element “nonxsdelement” isn’t allowed byour XSD validation check.)
___35. Edit your INSERT statement and take out the element called<nonxsdelement> that is notregistered in your XSR and rerun the INSERT statement. Your INSERT statement should nowvalidate against your XSR and succeed.
G. Cleanup
After you are done with the above exercises, you can run the following command to clean up theresources: pureXML50.BAT
*** End of pureXML Lab – by Burt Vialpando ***
7/28/2019 PoT.im.07.1.017.13 Workbook Windows
http://slidepdf.com/reader/full/potim07101713-workbook-windows 171/232
Lab 12 – Multidimensional Clusters (MDCs) IBM Software
Lab 12. Multidimensional Clusters (MDCs)
This lab assumes you have already completed theData Studio Lab 03 exercises.
If you have not, then you should complete sections A and B of Lab 03 to learn how to launchData Studio and connect to a database.
A. CARS Tables Example Setup
To show MDCs in action, we need to create two otherwise identical tables in their own table spaces, butone is MDC and one is traditionally index clustered with indexes on all the key columns. The data we’llput into these tables is identical for each table.
___1. Open a DB2 CLP Command Window and change directory to C: \ POT_DB2\ 12MDC
___2. To set up this lab, run these scripts right away without reviewing them:
MDC01.CMD which executes these 3 scripts:
MDC02.DB2 & MDC03.DB2 & MDC04.BAT
This should take about 4 to 5 minutes to complete. While these scripts run, take this timereview what the scripts are doing. Here is an overview of what these scripts do:
Overview of what the setup scripts create in database GSDB:
Table: CARS
Table: CARS_MDC
Table: CARS_TIMING_CHECK
Table space: CARS_DATA
Table space: CARS_INDEX
Table space: CARS_MDC_DATA
Table space: CARS_MDC_INDEX
Buffer pool: CARS_BP_DATA
Buffer pool: CARS_BP_INDEX
Buffer pool: CARS_MDC_BP_DATABuffer pool: CARS_MDC_BP_INDEX
Procedure: CARS_INSERT_ALL
Procedure: CARS_FETCH_CHK
Procedure: CARS_INSERT_CHK
Procedure: CARS_UPDATE_CHK
Procedure: CARS_DELETE_CHK
Regular table w/clustered index and regular indexes
MDC table, with dimensions CARNAME, COLOR & YEAR
Repository table used to collect timing statistics
Each table and indexes for each table has its own table space which has itsown buffer pool.
(the timing table is put in the userspace1 table space)
Buffer pool for non-MDC data
Buffer pool for non-MDC indexes
Buffer pool for MDC dataBuffer pool for MDC indexes
Used to populate CARS & CARS_MDC with generated data
Used to perform fetches on both tables and time the results
Used to perform inserts on both tables and time the results
Used to perform updates on both tables and time the results
Used to perform deletes on both tables and time the results
Lab 12 – Multidimensional Clusters (MDCs) Page 171
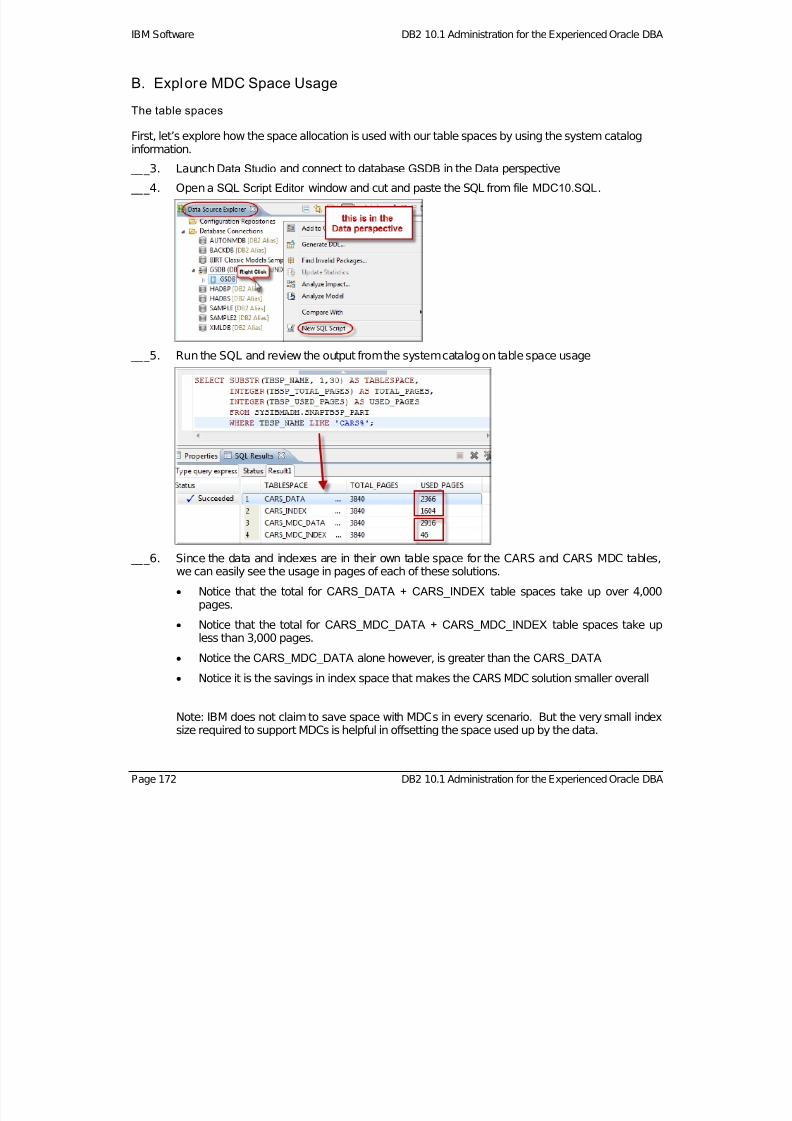
7/28/2019 PoT.im.07.1.017.13 Workbook Windows
http://slidepdf.com/reader/full/potim07101713-workbook-windows 172/232
IBM Software DB2 10.1 Administration for the Experienced Oracle DBA
B. Explore MDC Space Usage
The table spaces
First, let’s explore how the space allocation is used with our table spaces by using the system cataloginformation.
___3. LaunchData Studio and connect to database GSDB in the Data perspective
___4. Open a SQL Script Editor window and cut and paste the SQL from file MDC10.SQL.
___5. Run the SQL and review the output from the system catalog on table space usage
___6. Since the data and indexes are in their own table space for the CARS and CARS MDC tables,we can easily see the usage in pages of each of these solutions.
Notice that the total for CARS_DATA + CARS_INDEX table spaces take up over 4,000pages.
Notice that the total for CARS_MDC_DATA + CARS_MDC_INDEX table spaces take up
less than 3,000 pages.
Notice the CARS_MDC_DATA alone however, is greater than the CARS_DATA
Notice it is the savings in index space that makes the CARS MDC solution smaller overall
Note: IBM does not claim to save space with MDCs in every scenario. But the very small indexsize required to support MDCs is helpful in offsetting the space used up by the data.
Page 172 DB2 10.1 Administration for the Experienced Oracle DBA

7/28/2019 PoT.im.07.1.017.13 Workbook Windows
http://slidepdf.com/reader/full/potim07101713-workbook-windows 173/232
Lab 12 – Multidimensional Clusters (MDCs) IBM Software
The tables
Now let's explore this at the table level from the system catalog.
___7. In the SQL Script Editor window and cut and paste the SQL from file MDC11.SQL.
___8. Run the script.
___9. Notice that in fact the MDC table uses up more data pages, even though it has the exact samedata and number of rows. Why? Because some extents are allocated, but not used up.(Remember the presentation?)
The indexes
Now let's explore the indexes from the system catalog.
___10. In the SQL Script Editor window and cut and paste the SQL from file MDC12.SQL.
___11. Run the script.
___12. Notice the indexes for the MDC tables are significantly smaller and less complex
___13. Notice the indexes for the MDC tables are generated names, created during table creation time
Lab 12 – Multidimensional Clusters (MDCs) Page 173

7/28/2019 PoT.im.07.1.017.13 Workbook Windows
http://slidepdf.com/reader/full/potim07101713-workbook-windows 174/232
IBM Software DB2 10.1 Administration for the Experienced Oracle DBA
C. Explore MDC Table Organization
Let’s look at how these two tables differ in the way the data is added to the tables themselves:
___14. FromData Studio browse the data in the DBAPOT.CARS table first (use Ret ur n al l r ows)
___15. Notice what the first 10 rows looks like unfiltered and unsorted (your solution may vary as thedata is randomly generated)
___16. Now browse the CARS_MDC table next (again Ret ur n al l r ows)
___17. Notice what the first 10 rows of this table looks like unfiltered and unsorted (your solution mayvary)
___18. Notice that the CARS data look randomly put into the table. Actually, it is randomly put into thetable. (Only sorting or indexing on it will give it order.)
Page 174 DB2 10.1 Administration for the Experienced Oracle DBA
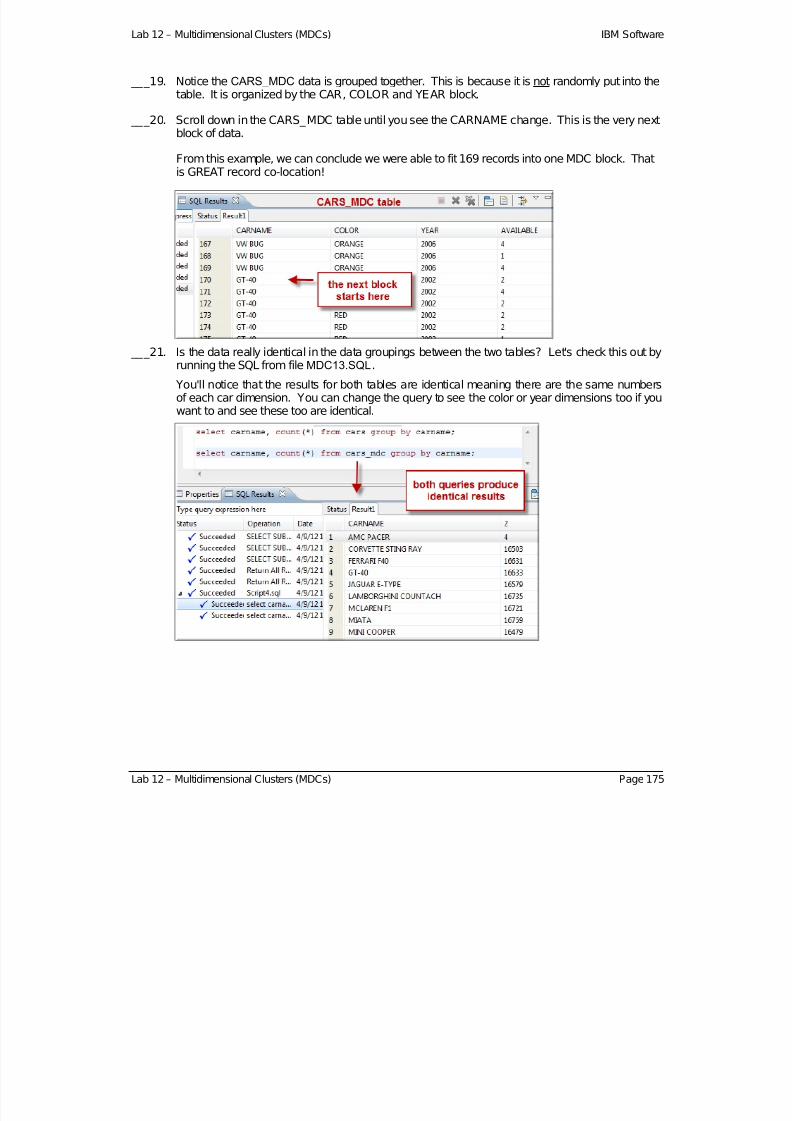
7/28/2019 PoT.im.07.1.017.13 Workbook Windows
http://slidepdf.com/reader/full/potim07101713-workbook-windows 175/232
Lab 12 – Multidimensional Clusters (MDCs) IBM Software
___19. Notice the CARS_MDC data is grouped together. This is because it is not randomly put into thetable. It is organized by the CAR, COLOR and YEAR block.
___20. Scroll down in the CARS_MDC table until you see the CARNAME change. This is the very nextblock of data.
From this example, we can conclude we were able to fit 169 records into one MDC block. Thatis GREAT record co-location!
___21. Is the data really identical in the data groupings between the two tables? Let's check this out byrunning the SQL from file MDC13.SQL.
You'll notice that the results for both tables are identical meaning there are the same numbersof each car dimension. You can change the query to see the color or year dimensions too if youwant to and see these too are identical.
Lab 12 – Multidimensional Clusters (MDCs) Page 175
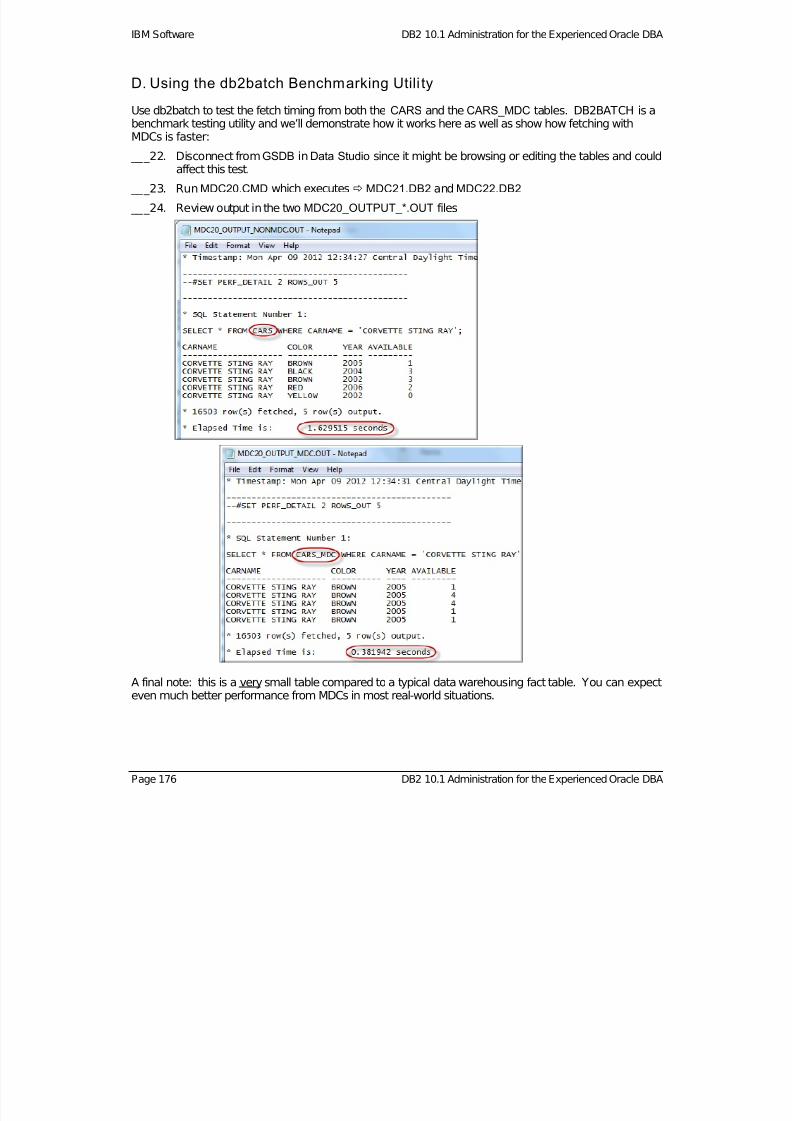
7/28/2019 PoT.im.07.1.017.13 Workbook Windows
http://slidepdf.com/reader/full/potim07101713-workbook-windows 176/232
IBM Software DB2 10.1 Administration for the Experienced Oracle DBA
D. Using the db2batch Benchmarking Utili ty
Use db2batch to test the fetch timing from both the CARS and the CARS_MDC tables. DB2BATCH is abenchmark testing utility and we’ll demonstrate how it works here as well as show how fetching withMDCs is faster:
___22. Disconnect fromGSDB in Data Studio since it might be browsing or editing the tables and couldaffect this test.
___23. RunMDC20.CMD which executes MDC21.DB2 and MDC22.DB2
___24. Review output in the two MDC20_OUTPUT_*.OUT files
A final note: this is a very small table compared to a typical data warehousing fact table. You can expecteven much better performance from MDCs in most real-world situations.
Page 176 DB2 10.1 Administration for the Experienced Oracle DBA
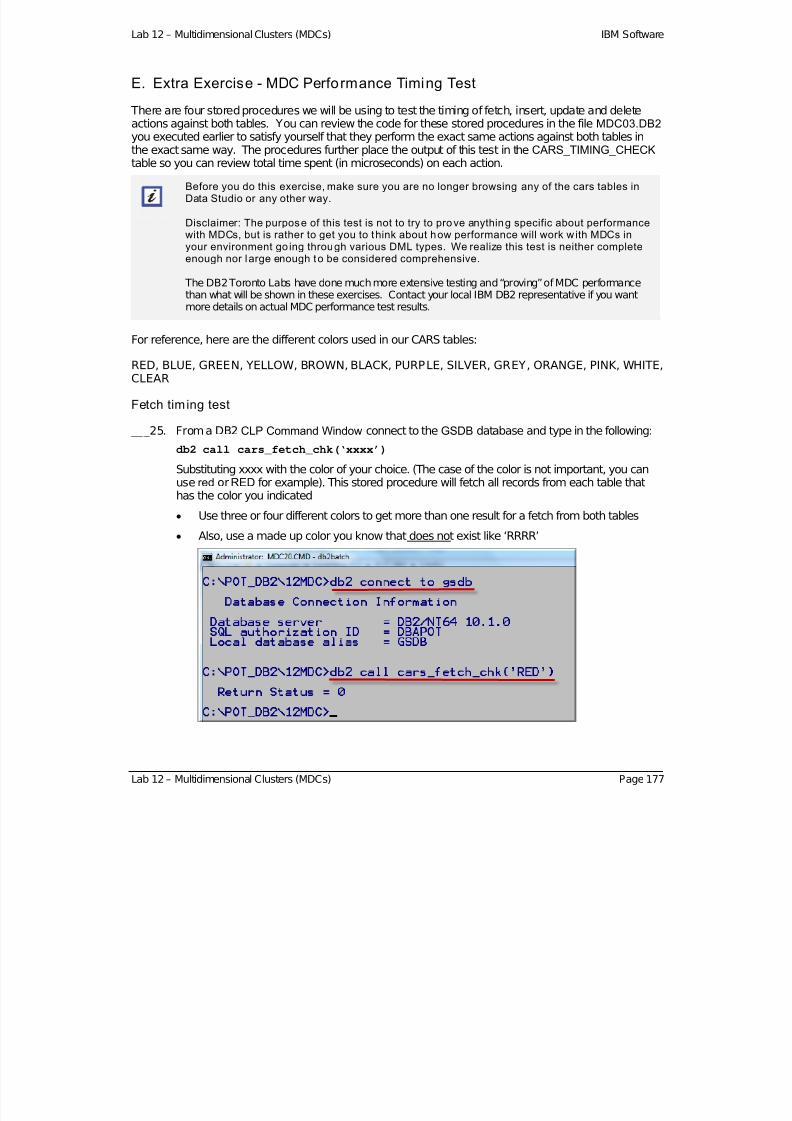
7/28/2019 PoT.im.07.1.017.13 Workbook Windows
http://slidepdf.com/reader/full/potim07101713-workbook-windows 177/232
Lab 12 – Multidimensional Clusters (MDCs) IBM Software
E. Extra Exercise - MDC Performance Timing Test
There are four stored procedures we will be using to test the timing of fetch, insert, update and deleteactions against both tables. You can review the code for these stored procedures in the fileMDC03.DB2you executed earlier to satisfy yourself that they perform the exact same actions against both tables inthe exact same way. The procedures further place the output of this test in theCARS_TIMING_CHECK table so you can review total time spent (in microseconds) on each action.
Before you do this exercise, make sure you are no longer browsing any of the cars tables inData Studio or any other way.
Disclaimer: The purpose of this test is not to try to prove anything specific about performancewith MDCs, but is rather to get you to think about how performance will work w ith MDCs inyour environment go ing through various DML types. We realize this test is neither completeenough nor l arge enough to be considered comprehensive.
The DB2 Toronto Labs have done much more extensive testing and “proving” of MDC performancethan what will be shown in these exercises. Contact your local IBM DB2 representative if you wantmore details on actual MDC performance test results.
For reference, here are the different colors used in our CARS tables:
RED, BLUE, GREEN, YELLOW, BROWN, BLACK, PURPLE, SILVER, GREY, ORANGE, PINK, WHITE,CLEAR
Fetch timing test
___25. From a DB2 CLP Command Window connect to the GSDB database and type in the following:
db2 call cars_fetch_chk(‘xxxx’)
Substituting xxxx with the color of your choice. (The case of the color is not important, you canuse red orRED for example). This stored procedure will fetch all records from each table thathas the color you indicated
Use three or four different colors to get more than one result for a fetch from both tables
Also, use a made up color you know that does not exist like ‘RRRR’
Lab 12 – Multidimensional Clusters (MDCs) Page 177
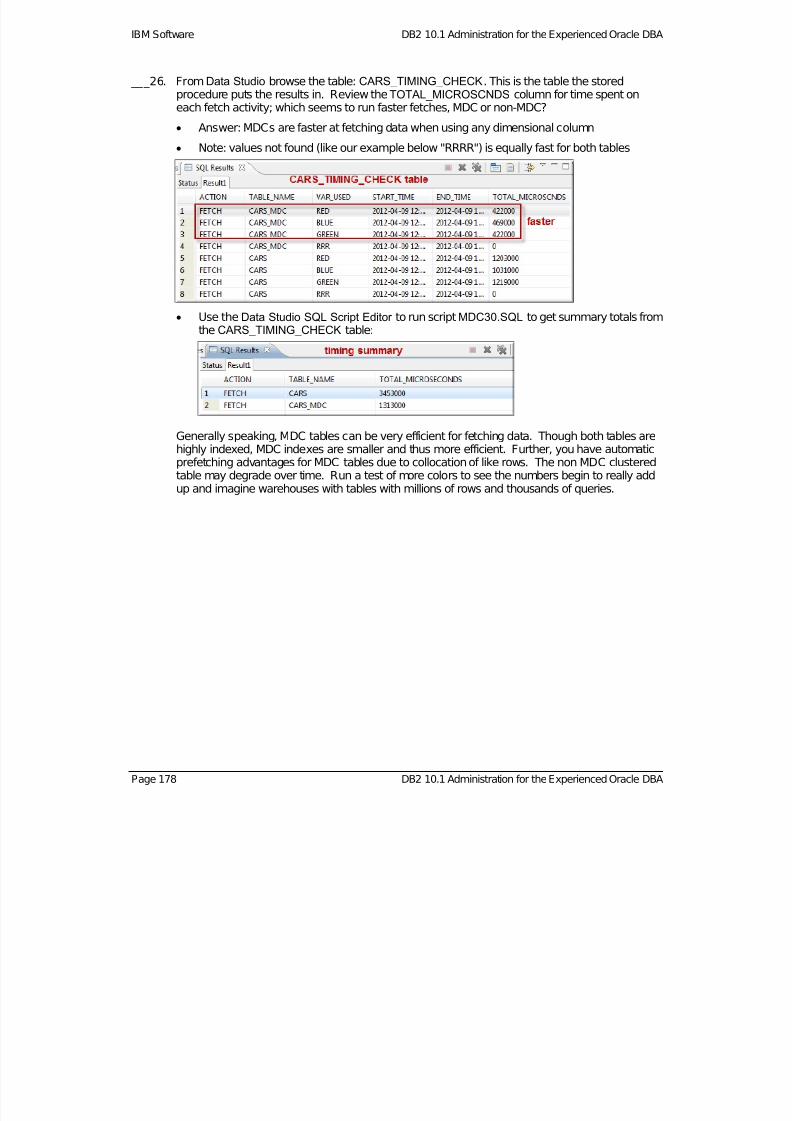
7/28/2019 PoT.im.07.1.017.13 Workbook Windows
http://slidepdf.com/reader/full/potim07101713-workbook-windows 178/232
IBM Software DB2 10.1 Administration for the Experienced Oracle DBA
___26. FromData Studio browse the table: CARS_TIMING_CHECK. This is the table the storedprocedure puts the results in. Review theTOTAL_MICROSCNDS column for time spent oneach fetch activity; which seems to run faster fetches, MDC or non-MDC?
Answer: MDCs are faster at fetching data when using any dimensional column
Note: values not found (like our example below "RRRR") is equally fast for both tables
Use the Data Studio SQL Script Editor to run script MDC30.SQL to get summary totals fromthe CARS_TIMING_CHECK table:
Generally speaking, MDC tables can be very efficient for fetching data. Though both tables arehighly indexed, MDC indexes are smaller and thus more efficient. Further, you have automaticprefetching advantages for MDC tables due to collocation of like rows. The non MDC clustered
table may degrade over time. Run a test of more colors to see the numbers begin to really addup and imagine warehouses with tables with millions of rows and thousands of queries.
Page 178 DB2 10.1 Administration for the Experienced Oracle DBA
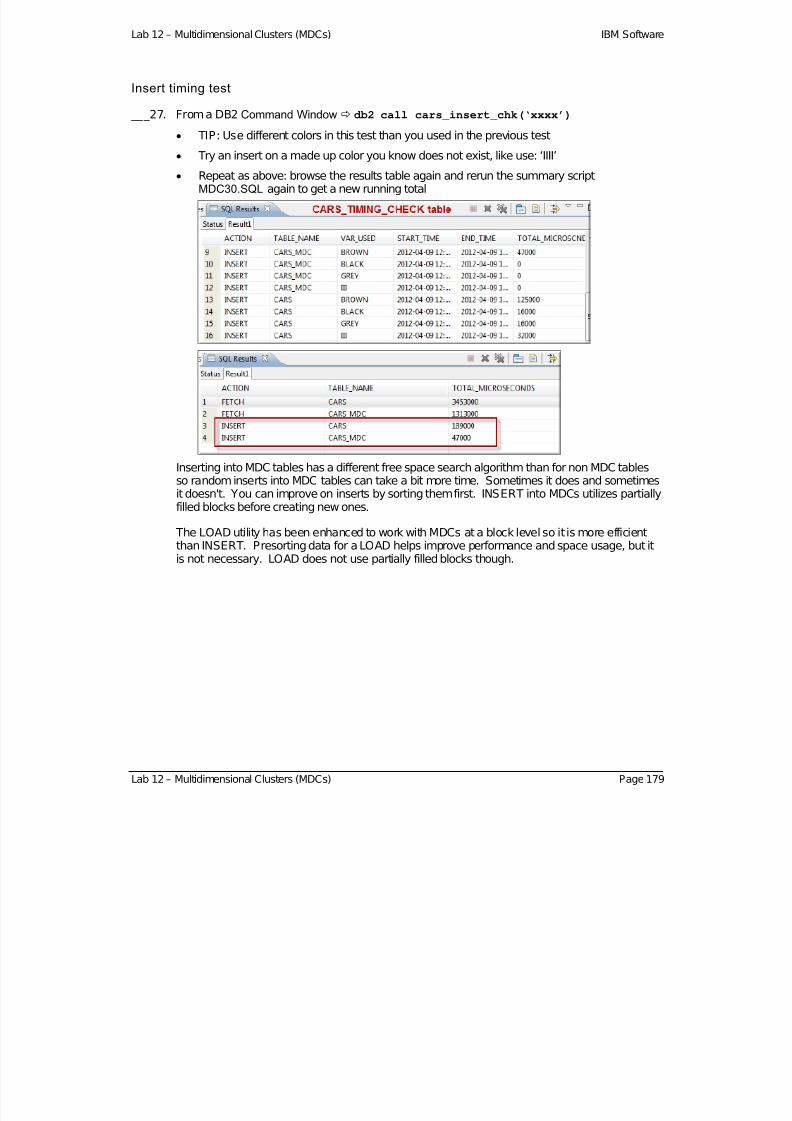
7/28/2019 PoT.im.07.1.017.13 Workbook Windows
http://slidepdf.com/reader/full/potim07101713-workbook-windows 179/232
Lab 12 – Multidimensional Clusters (MDCs) IBM Software
Insert timing test
___27. From a DB2 Command Window db2 call cars_insert_chk(‘xxxx’)
TIP: Use different colors in this test than you used in the previous test
Try an insert on a made up color you know does not exist, like use: ‘IIII’ Repeat as above: browse the results table again and rerun the summary script
MDC30.SQL again to get a new running total
Inserting into MDC tables has a different free space search algorithm than for non MDC tablesso random inserts into MDC tables can take a bit more time. Sometimes it does and sometimesit doesn't. You can improve on inserts by sorting them first. INSERT into MDCs utilizes partiallyfilled blocks before creating new ones.
The LOAD utility has been enhanced to work with MDCs at a block level so it is more efficientthan INSERT. Presorting data for a LOAD helps improve performance and space usage, but itis not necessary. LOAD does not use partially filled blocks though.
Lab 12 – Multidimensional Clusters (MDCs) Page 179
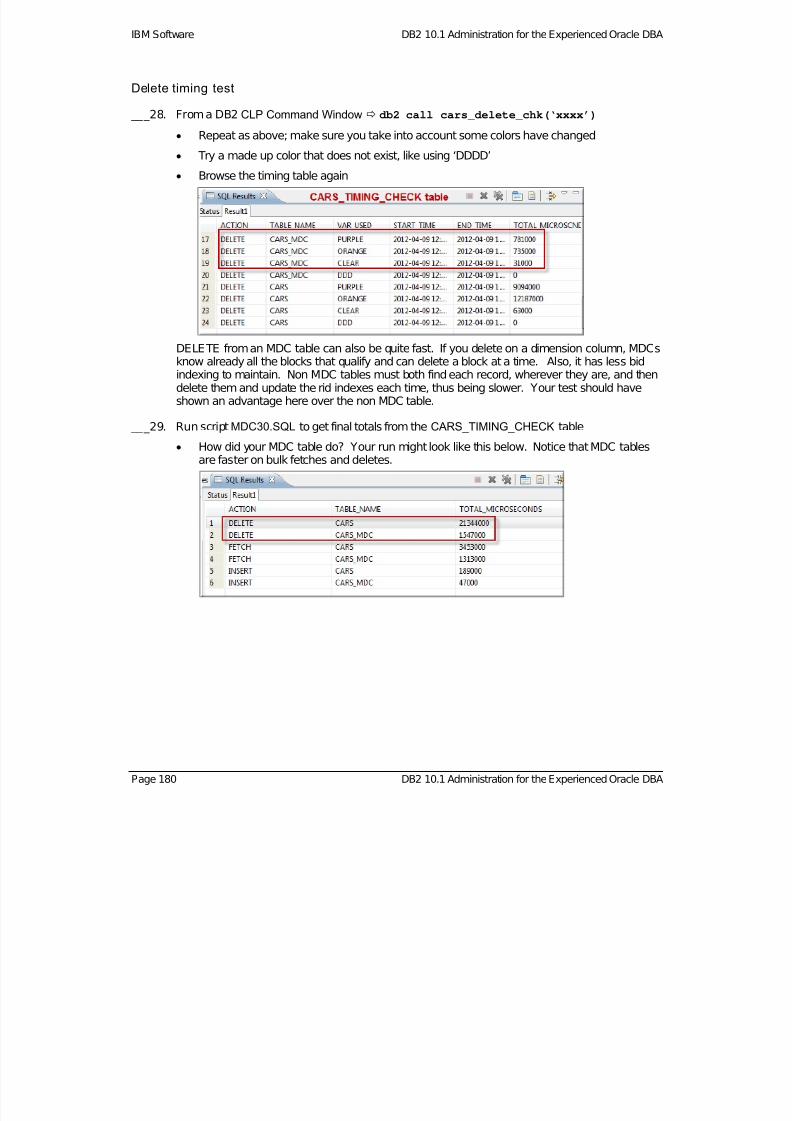
7/28/2019 PoT.im.07.1.017.13 Workbook Windows
http://slidepdf.com/reader/full/potim07101713-workbook-windows 180/232
IBM Software DB2 10.1 Administration for the Experienced Oracle DBA
Delete timing test
___28. From a DB2 CLP Command Window db2 call cars_delete_chk(‘xxxx’)
Repeat as above; make sure you take into account some colors have changed
Try a made up color that does not exist, like using ‘DDDD’ Browse the timing table again
DELETE from an MDC table can also be quite fast. If you delete on a dimension column, MDCsknow already all the blocks that qualify and can delete a block at a time. Also, it has less bidindexing to maintain. Non MDC tables must both find each record, wherever they are, and thendelete them and update the rid indexes each time, thus being slower. Your test should haveshown an advantage here over the non MDC table.
___29. Run scriptMDC30.SQL to get final totals from the CARS_TIMING_CHECK table
How did your MDC table do? Your run might look like this below. Notice that MDC tablesare faster on bulk fetches and deletes.
Page 180 DB2 10.1 Administration for the Experienced Oracle DBA

7/28/2019 PoT.im.07.1.017.13 Workbook Windows
http://slidepdf.com/reader/full/potim07101713-workbook-windows 181/232
Lab 12 – Multidimensional Clusters (MDCs) IBM Software
Lab 12 – Multidimensional Clusters (MDCs) Page 181
Update timing test
___30. From a DB2 CLP Command Window db2 call cars_update_chk(‘xxxx’)
Repeat as above and try to use colors you have not yet used.
Make sure to pick colors that are still in the database, so don't use the ones you deleted inthe delete test.
Note: this procedure updates the color you choose and adds an X to the front of the data.
UPDATE of MDC tables can be faster or slower depending upon what is being updated. In thisexercise, we updated on one of the dimension columns which can make the MDC UPDATE fastbecause it changes every record in the block quickly as it reads all records together and writes itback in bulk.
If our test were to only update one record on a dimension column however, it would have torelocate the data to a new or different block making it slower. How did your test do?
F. Cleanup
After you are done with the above exercises, you can run the following command to clean up theresources: MDC50.BAT
*** End of MDC Lab – by Burt Vialpando ***
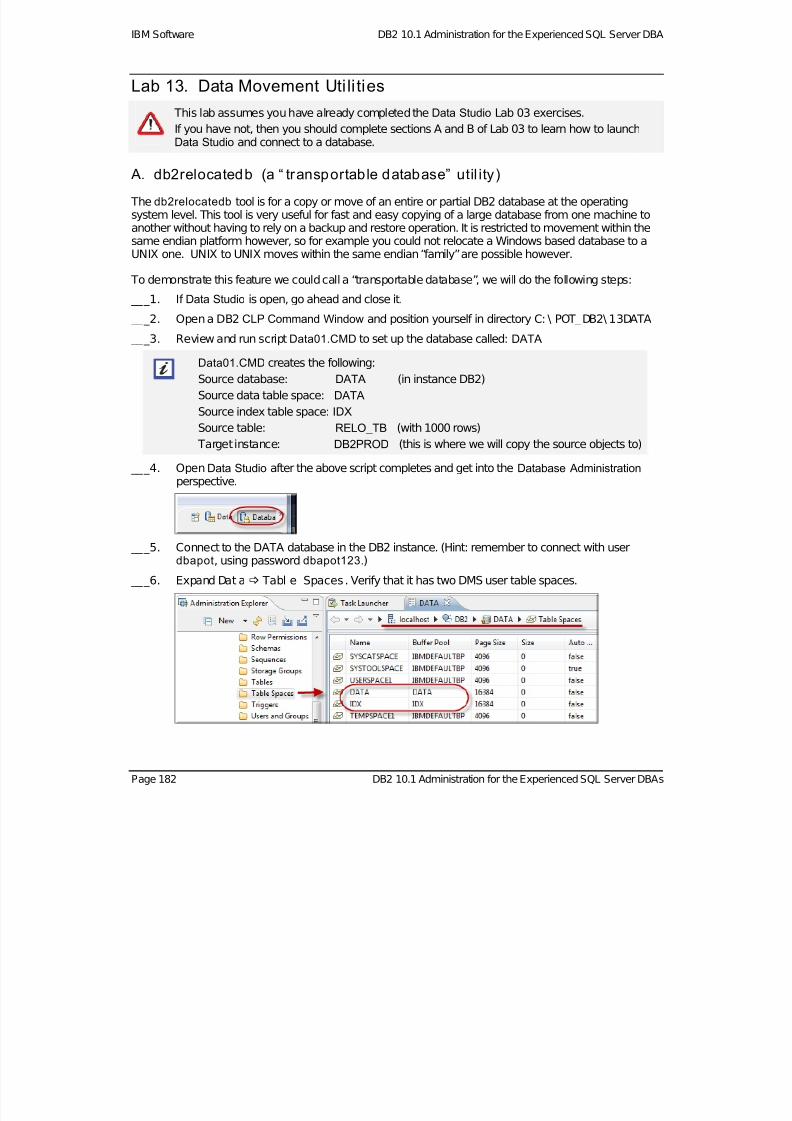
7/28/2019 PoT.im.07.1.017.13 Workbook Windows
http://slidepdf.com/reader/full/potim07101713-workbook-windows 182/232
IBM Software DB2 10.1 Administration for the Experienced SQL Server DBA
Lab 13. Data Movement Uti li ties
This lab assumes you have already completed theData Studio Lab 03 exercises.
If you have not, then you should complete sections A and B of Lab 03 to learn how to launchData Studio and connect to a database.
A. db2relocatedb (a “ transportable database” util ity)
The db2relocatedb tool is for a copy or move of an entire or partial DB2 database at the operatingsystem level. This tool is very useful for fast and easy copying of a large database from one machine toanother without having to rely on a backup and restore operation. It is restricted to movement within thesame endian platform however, so for example you could not relocate a Windows based database to aUNIX one. UNIX to UNIX moves within the same endian “family” are possible however.
To demonstrate this feature we could call a “transportable database”, we will do the following steps:
___1. If Data Studio is open, go ahead and close it.
___2. Open a DB2 CLP Command Window and position yourself in directory C: \ POT_DB2\ 13DATA
___3. Review and run scriptData01.CMD to set up the database called: DATA
Data01.CMD creates the following:
Source database: DATA (in instance DB2)
Source data table space: DATA
Source index table space: IDX
Source table: RELO_TB (with 1000 rows)
Target instance: DB2PROD (this is where we will copy the source objects to)
___4. OpenData Studio after the above script completes and get into the Database Administration perspective.
___5. Connect to the DATA database in the DB2 instance. (Hint: remember to connect with userdbapot, using password dbapot123.)
___6. Expand Dat a Tabl e Spaces. Verify that it has two DMS user table spaces.
Page 182 DB2 10.1 Administration for the Experienced SQL Server DBAs
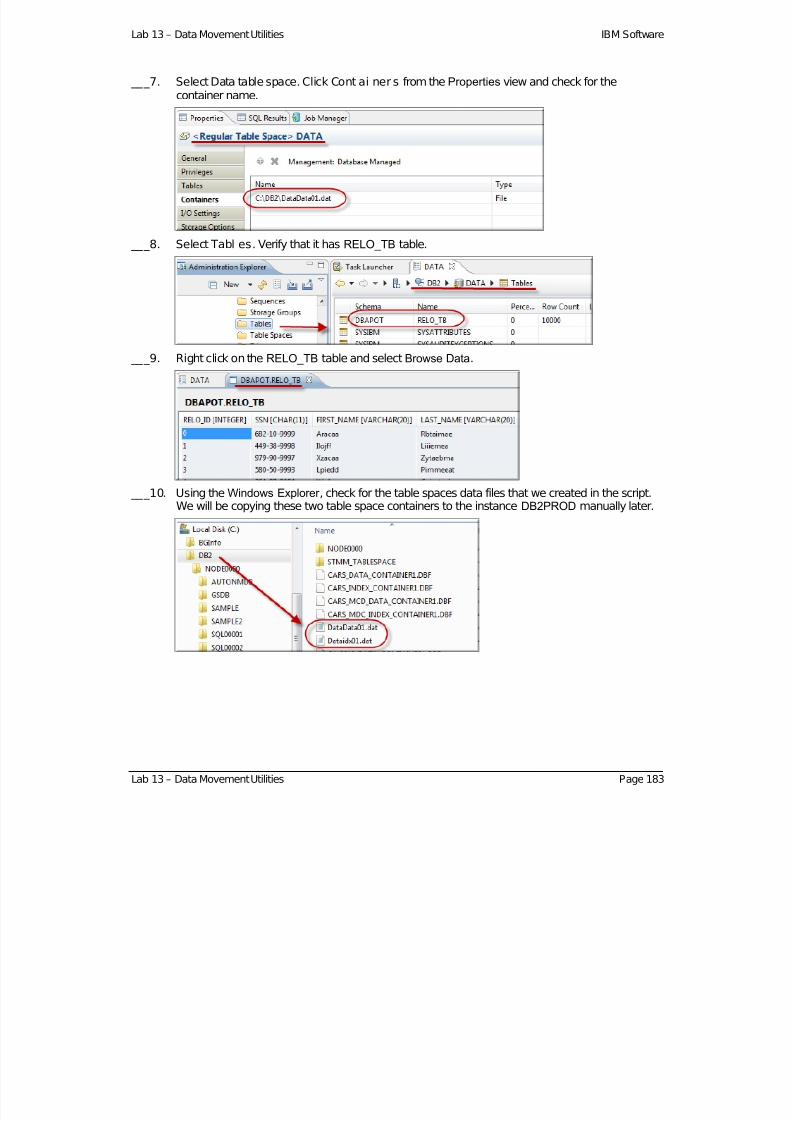
7/28/2019 PoT.im.07.1.017.13 Workbook Windows
http://slidepdf.com/reader/full/potim07101713-workbook-windows 183/232
Lab 13 – Data Movement Utilities IBM Software
___7. Select Data table space. ClickCont ai ner s from the Properties view and check for thecontainer name.
___8. Select Tabl es. Verify that it has RELO_TB table.
___9. Right click on the RELO_TB table and select Browse Data.
___10. Using the Windows Explorer , check for the table spaces data files that we created in the script.We will be copying these two table space containers to the instanceDB2PROD manually later.
Lab 13 – Data Movement Utilities Page 183
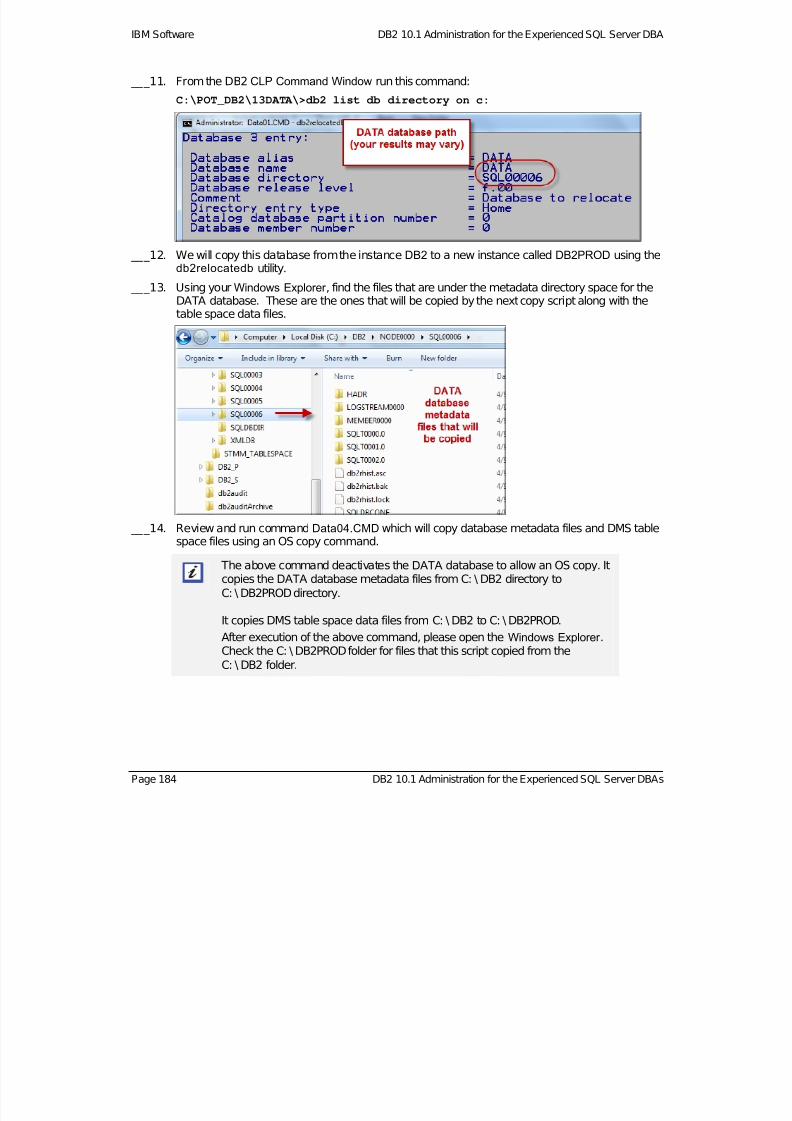
7/28/2019 PoT.im.07.1.017.13 Workbook Windows
http://slidepdf.com/reader/full/potim07101713-workbook-windows 184/232
IBM Software DB2 10.1 Administration for the Experienced SQL Server DBA
___11. From the DB2 CLP Command Window run this command:
C:\POT_DB2\13DATA\>db2 list db directory on c:
___12. We will copy this database from the instanceDB2 to a new instance called DB2PROD using thedb2relocatedb utility.
___13. Using your Windows Explorer , find the files that are under the metadata directory space for theDATA database. These are the ones that will be copied by the next copy script along with the
table space data files.
___14. Review and run command Data04.CMD which will copy database metadata files and DMS tablespace files using an OS copy command.
The above command deactivates the DATA database to allow an OS copy. Itcopies the DATA database metadata files fromC: \ DB2 directory toC: \ DB2PRODdirectory.
It copies DMS table space data files from C: \ DB2 to C: \ DB2PROD.
After execution of the above command, please open the Windows Explorer .Check the C: \ DB2PRODfolder for files that this script copied from theC: \ DB2 folder.
Page 184 DB2 10.1 Administration for the Experienced SQL Server DBAs
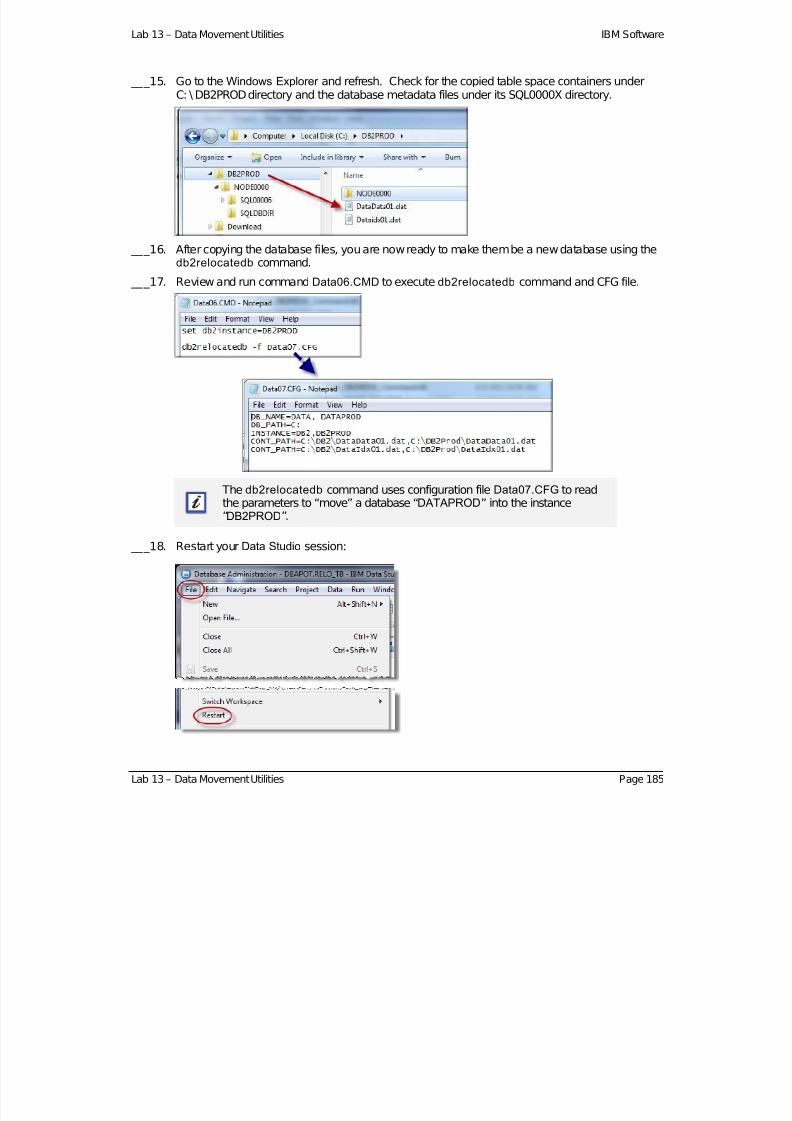
7/28/2019 PoT.im.07.1.017.13 Workbook Windows
http://slidepdf.com/reader/full/potim07101713-workbook-windows 185/232
Lab 13 – Data Movement Utilities IBM Software
___15. Go to the Windows Explorer and refresh. Check for the copied table space containers underC: \ DB2PRODdirectory and the database metadata files under its SQL0000X directory.
___16. After copying the database files, you are now ready to make them be a new database using thedb2relocatedb command.
___17. Review and run command Data06.CMD to execute db2relocatedb command and CFG file.
The db2relocatedb command uses configuration file Data07.CFG to readthe parameters to “move” a database “DATAPROD” into the instance“DB2PROD”.
___18. Restart your Data Studio session:
Lab 13 – Data Movement Utilities Page 185

7/28/2019 PoT.im.07.1.017.13 Workbook Windows
http://slidepdf.com/reader/full/potim07101713-workbook-windows 186/232
IBM Software DB2 10.1 Administration for the Experienced SQL Server DBA
___19. Expand the 50001 instance and connect to database DATAPROD
___20. Expand the database to find the new tableRELO_TB and browse the data to see that the utilityworked as desired. Find the table spaces and their data files as well.
db2relocatedb also allows you to move or rename data files for a tablespace in a DB2 database. To do this, you do an OS rename of the datafile(s) and run thedb2relocatedb command making the source and targetdatabase and instance the same.
Page 186 DB2 10.1 Administration for the Experienced SQL Server DBAs

7/28/2019 PoT.im.07.1.017.13 Workbook Windows
http://slidepdf.com/reader/full/potim07101713-workbook-windows 187/232
Lab 13 – Data Movement Utilities IBM Software
B. Convert ing Non-Unicode Database to Unicode Database
In this lab exercise, we will convert the non-Unicode database DATA (created in previous lab exercise) toa Unicode database using the following tools:
db2move to export / import database
db2look to generate the necessary DDL files to reproduce the database
This exercise also demonstrates how you can convert one database from one codepage to another fromone platform to another by a mass move of all the objects out of one database into another database.
___21. From a DB2 CLP Window, enter the following command:
C:\POT_DB2\13DATA\>db2 get db cfg for data | findstr code
Notice the code page and code set for this database which is NOT unicode
___22. Step #1. Review and run Data10.CMD. This script exports the DATA database using thedb2move command. It puts the data in a directory called DUMP under your current labdirectory:
Lab 13 – Data Movement Utilities Page 187

7/28/2019 PoT.im.07.1.017.13 Workbook Windows
http://slidepdf.com/reader/full/potim07101713-workbook-windows 188/232
IBM Software DB2 10.1 Administration for the Experienced SQL Server DBA
___23. Review Data10_OUTPUT.TXT to see how it worked.
___24. Step #2. Review and run Data11.CMD. This generates a DDL script using the db2look command. The breakdown of this command is as follows:
db2look -d data -e -o db2look_dump.ddl -l -x -f
The “-d” option indicates the database name to be reengineered The “-e” option extracts all objects (entire database) The “-o” option indicates the output file name for the generated DDL script The “-l” option generates DDL for user defined table spaces, database partition groups and
buffer pools, The “-x” option generates authorization DDL
The“-f ” option generates an update command for database configuration parameters
The “-m” option generates statistics statements.
___25. This creates a DDL dump file DB2LOOK_DUMP.ddl. Review it to see the entire database.(note: it is located in the DUMP directory)
Page 188 DB2 10.1 Administration for the Experienced SQL Server DBAs
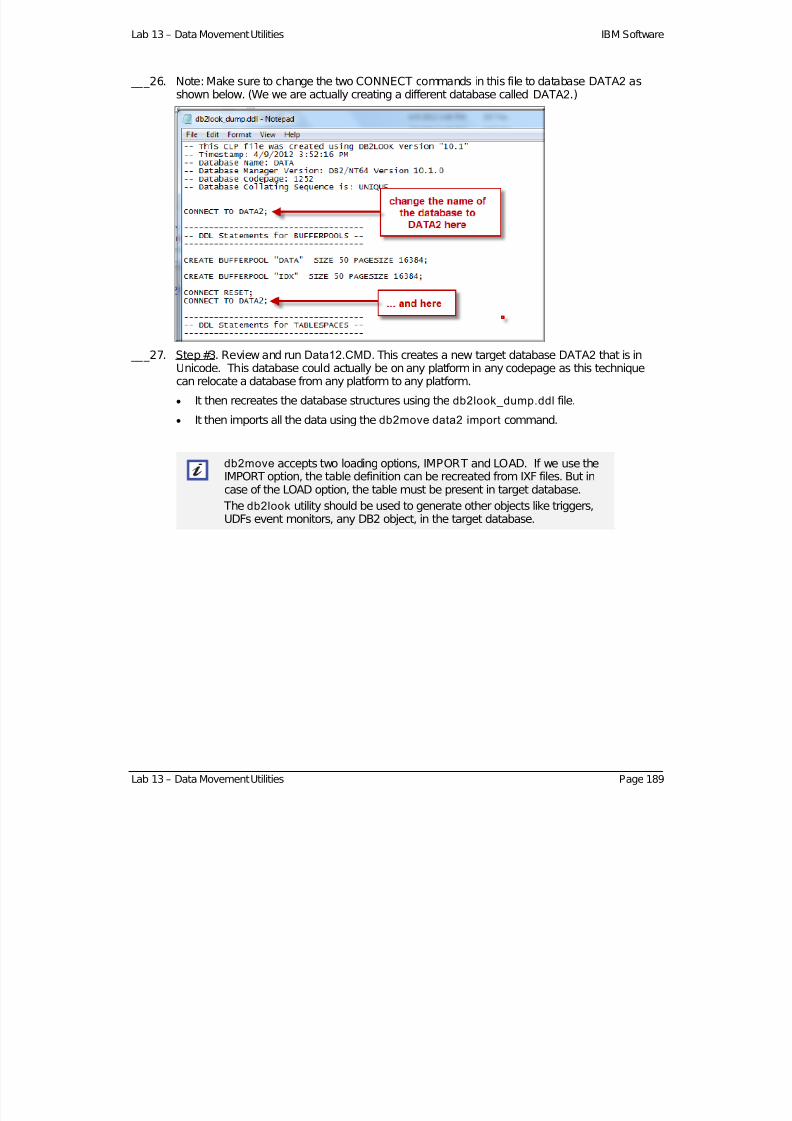
7/28/2019 PoT.im.07.1.017.13 Workbook Windows
http://slidepdf.com/reader/full/potim07101713-workbook-windows 189/232
Lab 13 – Data Movement Utilities IBM Software
___26. Note: Make sure to change the two CONNECT commands in this file to databaseDATA2 asshown below. (We we are actually creating a different database called DATA2.)
___27. Step #3. Review and run Data12.CMD. This creates a new target database DATA2 that is inUnicode. This database could actually be on any platform in any codepage as this techniquecan relocate a database from any platform to any platform.
It then recreates the database structures using the db2look_dump.ddl file.
It then imports all the data using thedb2move data2 import command.
db2move accepts two loading options, IMPORT and LOAD. If we use the
IMPORT option, the table definition can be recreated from IXF files. But incase of the LOAD option, the table must be present in target database.
The db2look utility should be used to generate other objects like triggers,UDFs event monitors, any DB2 object, in the target database.
Lab 13 – Data Movement Utilities Page 189
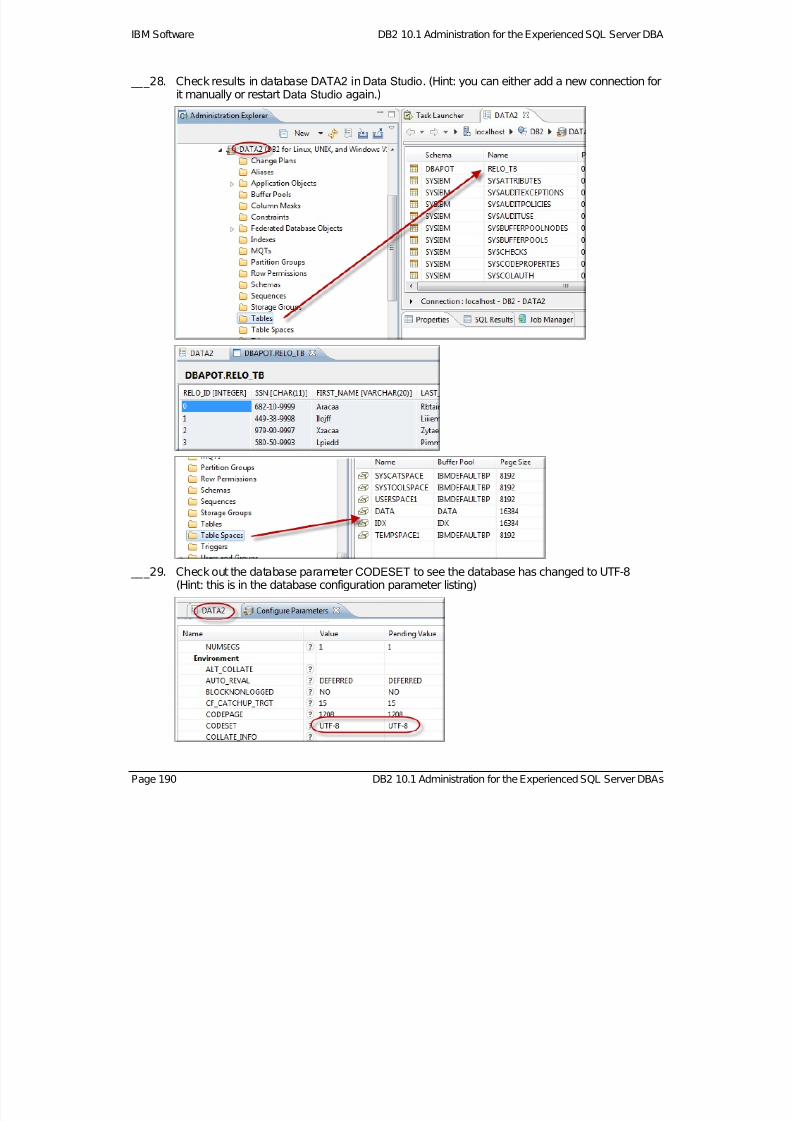
7/28/2019 PoT.im.07.1.017.13 Workbook Windows
http://slidepdf.com/reader/full/potim07101713-workbook-windows 190/232
IBM Software DB2 10.1 Administration for the Experienced SQL Server DBA
___28. Check results in database DATA2 inData Studio. (Hint: you can either add a new connection forit manually or restartData Studio again.)
___29. Check out the database parameterCODESET to see the database has changed to UTF-8(Hint: this is in the database configuration parameter listing)
Page 190 DB2 10.1 Administration for the Experienced SQL Server DBAs
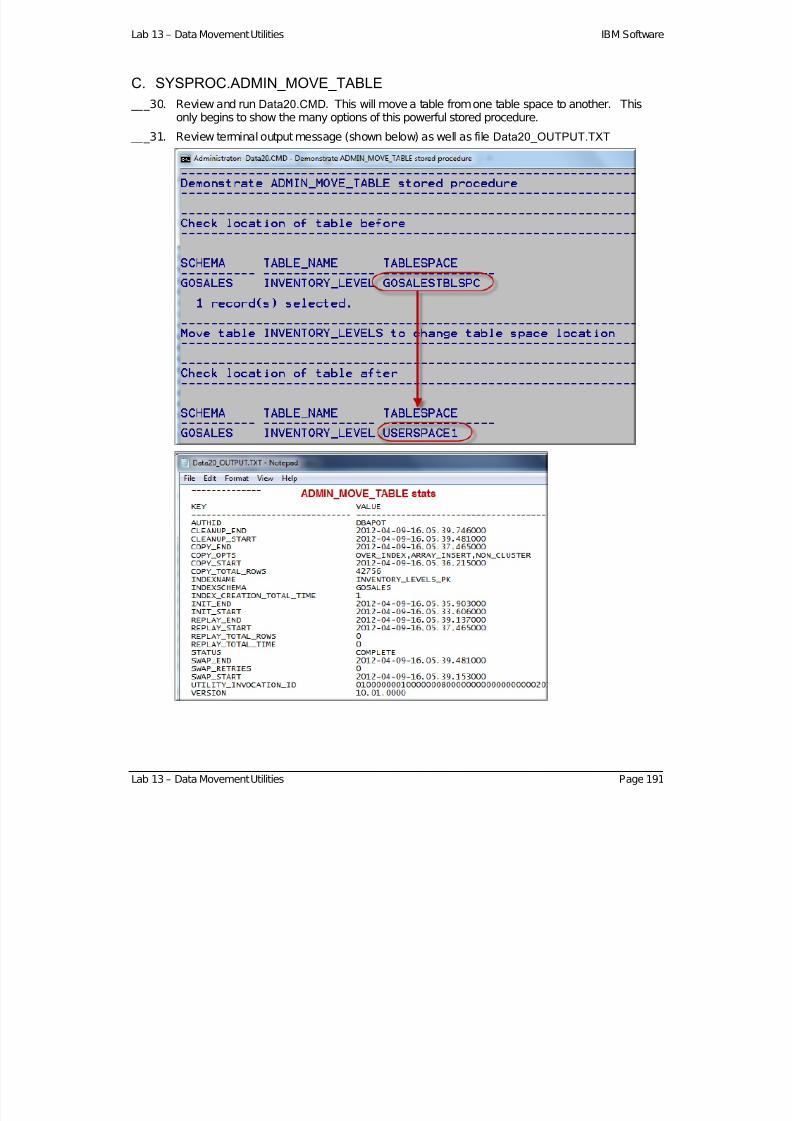
7/28/2019 PoT.im.07.1.017.13 Workbook Windows
http://slidepdf.com/reader/full/potim07101713-workbook-windows 191/232
Lab 13 – Data Movement Utilities IBM Software
C. SYSPROC.ADMIN_MOVE_TABLE
___30. Review and run Data20.CMD. This will move a table from one table space to another. Thisonly begins to show the many options of this powerful stored procedure.
___31. Review terminal output message (shown below) as well as file Data20_OUTPUT.TXT
Lab 13 – Data Movement Utilities Page 191
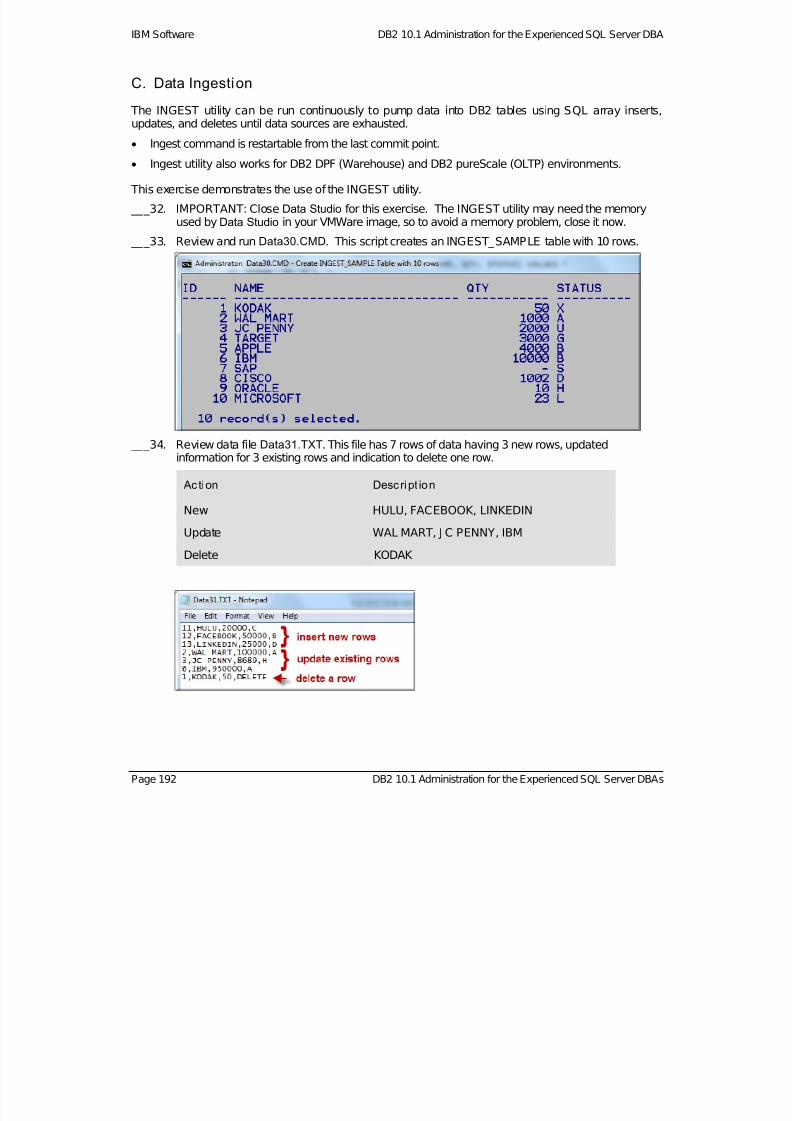
7/28/2019 PoT.im.07.1.017.13 Workbook Windows
http://slidepdf.com/reader/full/potim07101713-workbook-windows 192/232
IBM Software DB2 10.1 Administration for the Experienced SQL Server DBA
C. Data Ingestion
The INGEST utility can be run continuously to pump data into DB2 tables using SQL array inserts,updates, and deletes until data sources are exhausted.
Ingest command is restartable from the last commit point.
Ingest utility also works for DB2 DPF (Warehouse) and DB2 pureScale (OLTP) environments.
This exercise demonstrates the use of the INGEST utility.
___32. IMPORTANT: Close Data Studio for this exercise. The INGEST utility may need the memoryused by Data Studio in your VMWare image, so to avoid a memory problem, close it now.
___33. Review and run Data30.CMD. This script creates an INGEST_SAMPLE table with 10 rows.
___34. Review data file Data31.TXT. This file has 7 rows of data having 3 new rows, updatedinformation for 3 existing rows and indication to delete one row.
Ac tion Descript ion
New HULU, FACEBOOK, LINKEDIN
Update WAL MART, J C PENNY, IBM
Delete KODAK
Page 192 DB2 10.1 Administration for the Experienced SQL Server DBAs

7/28/2019 PoT.im.07.1.017.13 Workbook Windows
http://slidepdf.com/reader/full/potim07101713-workbook-windows 193/232
Lab 13 – Data Movement Utilities IBM Software
Lab 13 – Data Movement Utilities Page 193
___35. Review script Data33.SQL which has the INGEST command to merge the data.
___36. Review and run scriptData32.CMD. This script will run the INGEST command against data file
Data31.TXT and merge the data in INGEST_SAMPLE table.
Note: 3 new rows are inserted, 3 rows are updated and 1 row is deleted.
We have only shown one capability of the INGEST utility and there areothers like continuous data ingestion, reading from pipe etc.
D. Cleanup
Run the following command to clean up DATA database from DB2 instance and drop DB2PROD
instance: Data50.BAT
*** End of Data Movement Utilities Lab – by Vikram Khatri and Burt Vialpando ***

7/28/2019 PoT.im.07.1.017.13 Workbook Windows
http://slidepdf.com/reader/full/potim07101713-workbook-windows 194/232
IBM Software DB2 10.1 Administration for the Experienced SQL Server DBA
Lab 14. Backup, Restore & Recovery
A. Off line Backup
We will create a database called BKPTEST to demonstrate DB2 core backup, restore and recovery
features. ___1. Close Data Studio (if it is open)
___2. Open a DB2 CLP Command Window and go to directory C: \ POT_DB2\ 14BACKUP
___3. Review and execute scriptBackup01.CMD
___4. This script creates a database BKPTEST and adds some tables to it so it will have data to workwith for this lab.
___5. The next thing the script does is quiesce and deactivates that database, which is a key way totaking an offline backup. It then performs the backup as shown below. The output of allcommands is stored in Backup01_OUTPUT.TXT file. Please review this file after executing thecommand.
___6. Find the backup in the directory C: \ DB2Backup. Notice the file name of that backupincorporates the timestamp taken from the backup. This is how DB2 names all its backups so itis impossible to accidentally write over a DB2 backup in the operating system.
Page 194 DB2 10.1 Administration for the Experienced SQL Server DBA
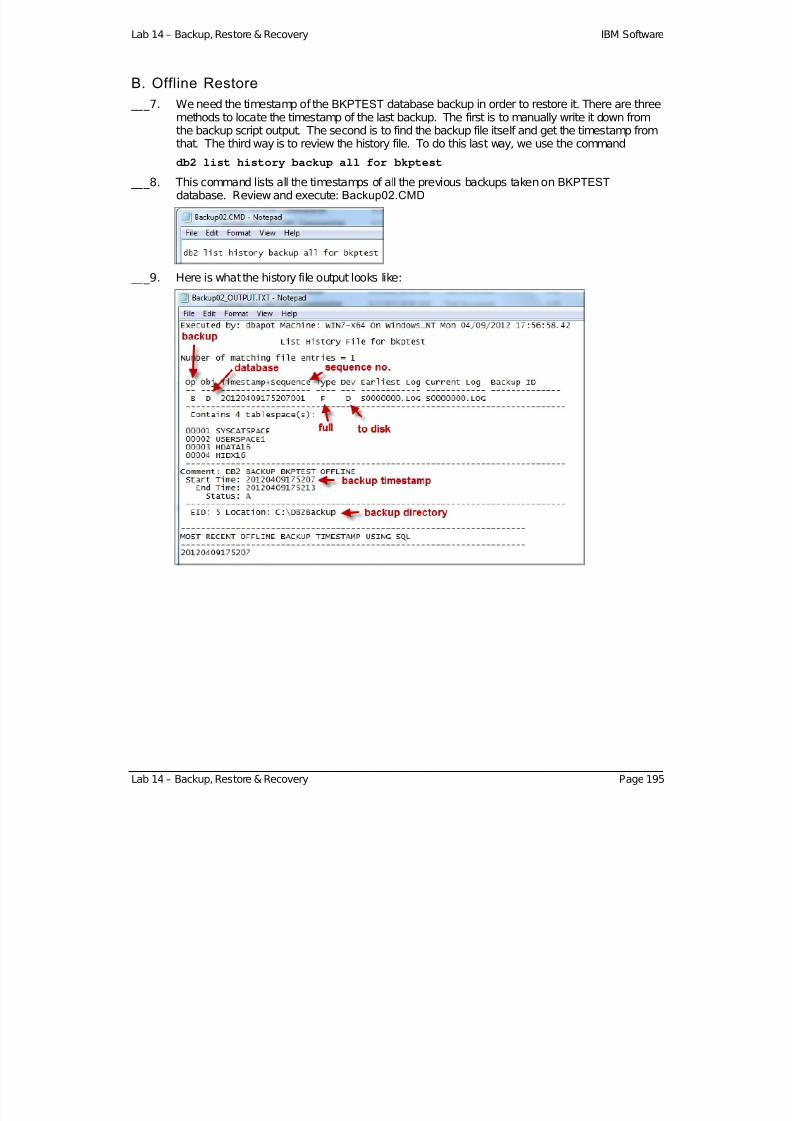
7/28/2019 PoT.im.07.1.017.13 Workbook Windows
http://slidepdf.com/reader/full/potim07101713-workbook-windows 195/232
Lab 14 – Backup, Restore & Recovery IBM Software
B. Offline Restore
___7. We need the timestamp of the BKPTEST database backup in order to restore it. There are threemethods to locate the timestamp of the last backup. The first is to manually write it down fromthe backup script output. The second is to find the backup file itself and get the timestamp fromthat. The third way is to review the history file. To do this last way, we use the command
db2 list history backup all for bkptest
___8. This command lists all the timestamps of all the previous backups taken onBKPTEST database. Review and execute: Backup02.CMD
___9. Here is what the history file output looks like:
Lab 14 – Backup, Restore & Recovery Page 195

7/28/2019 PoT.im.07.1.017.13 Workbook Windows
http://slidepdf.com/reader/full/potim07101713-workbook-windows 196/232
IBM Software DB2 10.1 Administration for the Experienced SQL Server DBA
___10. You can also use following SQL command to find most recent timestamp from history file for fullbackup using the view SYSIBMADM.DB_HISTORY
db2 connect to bkptest
db2 –x SELECT max(START_TIME) FROM SYSIBMADM.DB_HISTORY whereoperation = 'B' and operationtype = 'F'
The value of operation and operation type can be looked from following table:
Operation Description Operation Type
B BackupF – Offline backupN – Online BackupI – Incremental offlineO – Incremental onlineD – Delta offlineE – Delta online
D Dropped table None
F Roll forward E – End of logsP – Point in time
R RestoreF – OfflineI – Incremental offlineN – OnlineO – Incremental onlineR – Rebuild
___11. Review and run scriptBackup03.CMD to restore the BKPTEST database from a backup.
Error message SQL2540W, warning “2539” is normal for restoring over analready existing database, which is what we did in this exercise.
Page 196 DB2 10.1 Administration for the Experienced SQL Server DBA
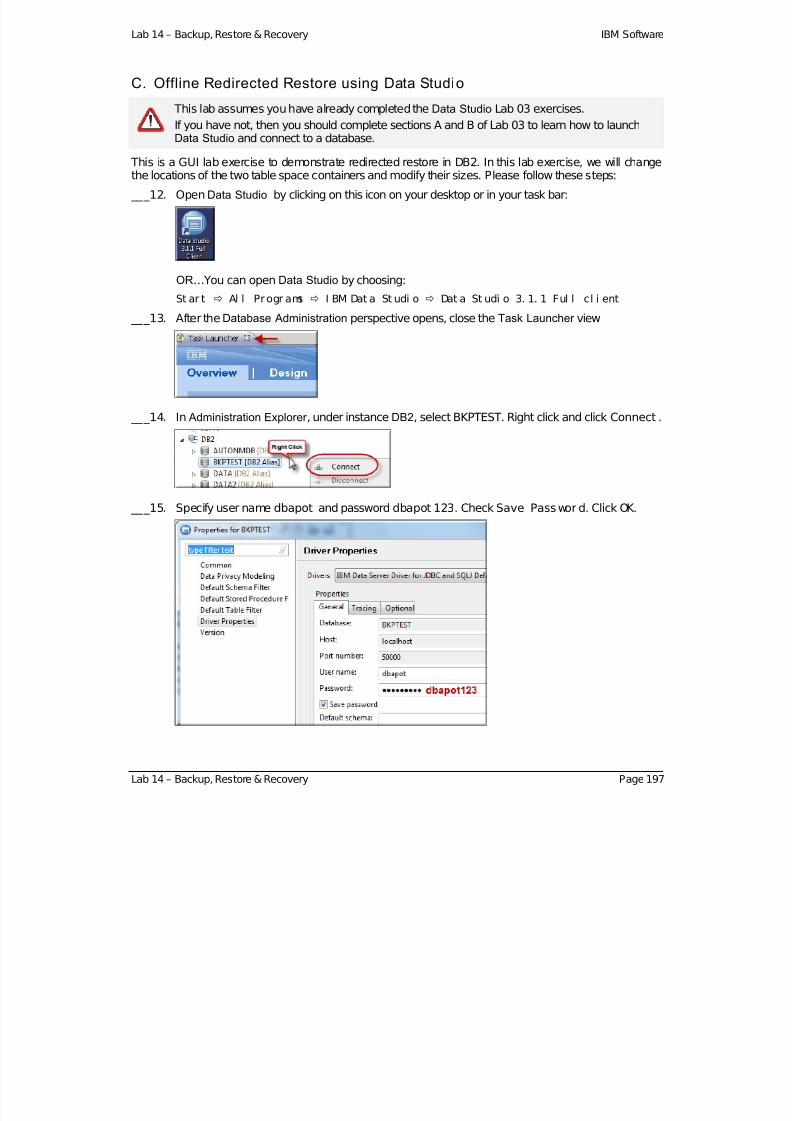
7/28/2019 PoT.im.07.1.017.13 Workbook Windows
http://slidepdf.com/reader/full/potim07101713-workbook-windows 197/232
Lab 14 – Backup, Restore & Recovery IBM Software
C. Offline Redirected Restore using Data Studio
This lab assumes you have already completed theData Studio Lab 03 exercises.
If you have not, then you should complete sections A and B of Lab 03 to learn how to launchData Studio and connect to a database.
This is a GUI lab exercise to demonstrate redirected restore in DB2. In this lab exercise, we will changethe locations of the two table space containers and modify their sizes. Please follow these steps:
___12. OpenData Studio by clicking on this icon on your desktop or in your task bar:
OR…You can open Data Studio by choosing:
St ar t Al l Progr ams I BM Dat a St udi o Dat a St udi o 3. 1. 1 Ful l cl i ent
___13. After theDatabase Administration perspective opens, close the Task Launcher view
___14. In Administration Explorer , under instance DB2, select BKPTEST. Right click and click Connect .
___15. Specify user name dbapot and password dbapot 123. Check Save Passwor d. Click OK .
Lab 14 – Backup, Restore & Recovery Page 197
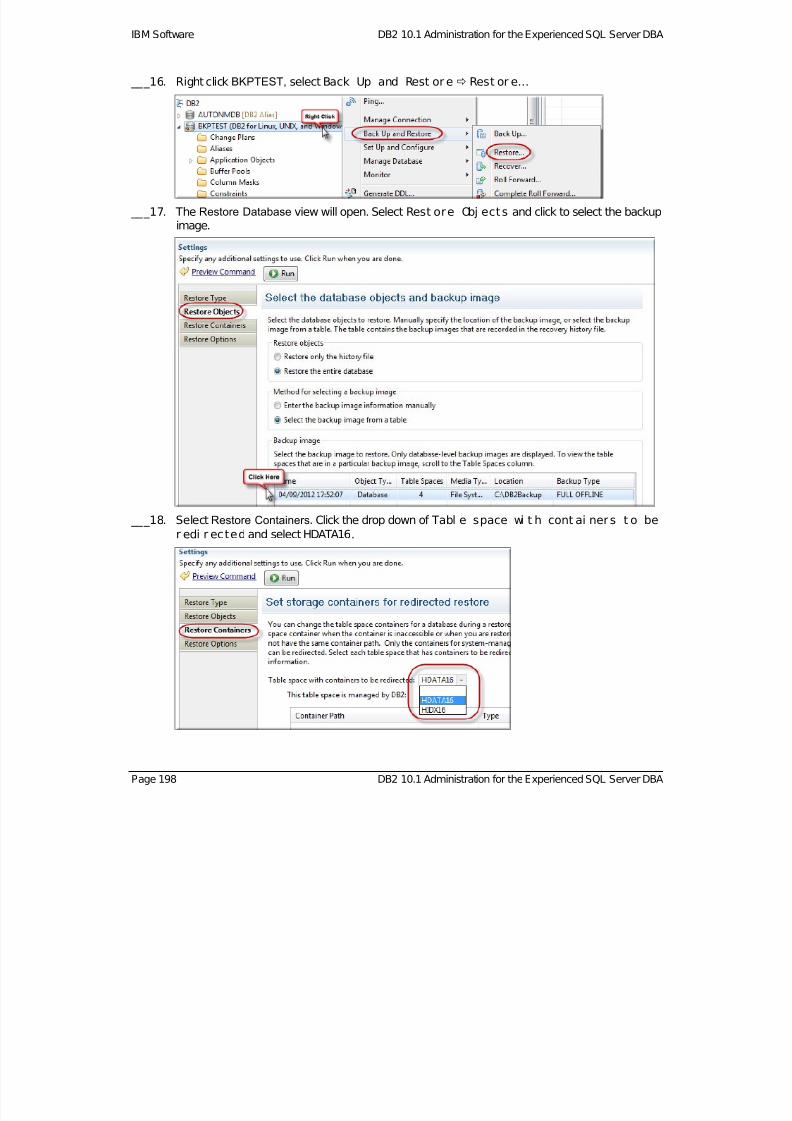
7/28/2019 PoT.im.07.1.017.13 Workbook Windows
http://slidepdf.com/reader/full/potim07101713-workbook-windows 198/232
IBM Software DB2 10.1 Administration for the Experienced SQL Server DBA
___16. Right click BKPTEST, select Back Up and Rest or e Rest or e…
___17. The Restore Database view will open. Select Rest ore Obj ects and click to select the backupimage.
___18. Select Restore Containers. Click the drop down of Tabl e space wi t h cont ai ners t o ber edi r ected and selectHDATA16.
Page 198 DB2 10.1 Administration for the Experienced SQL Server DBA
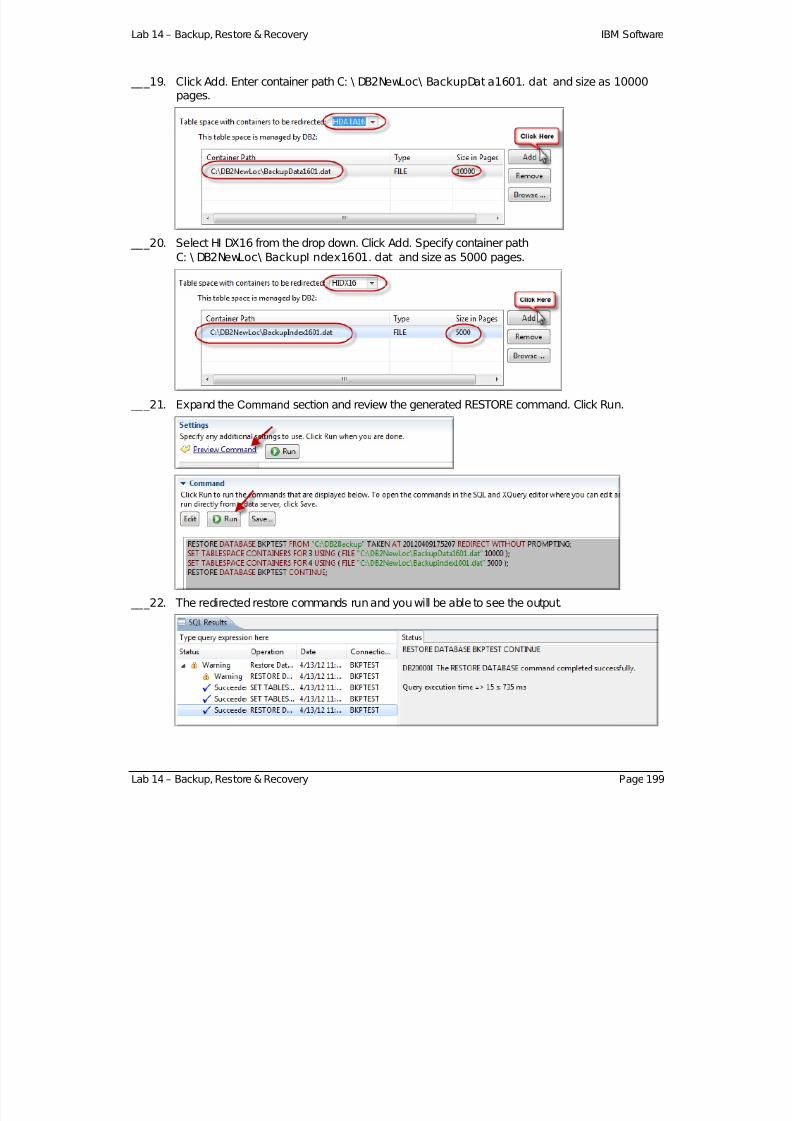
7/28/2019 PoT.im.07.1.017.13 Workbook Windows
http://slidepdf.com/reader/full/potim07101713-workbook-windows 199/232
Lab 14 – Backup, Restore & Recovery IBM Software
___19. ClickAdd. Enter container path C: \ DB2NewLoc\ BackupDat a1601. dat and size as 10000 pages.
___20. Select HI DX16 from the drop down. Click Add. Specify container pathC: \ DB2NewLoc\ BackupI ndex1601. dat and size as 5000 pages.
___21. Expand the Command section and review the generated RESTORE command. Click Run.
___22. The redirected restore commands run and you will be able to see the output.
Lab 14 – Backup, Restore & Recovery Page 199
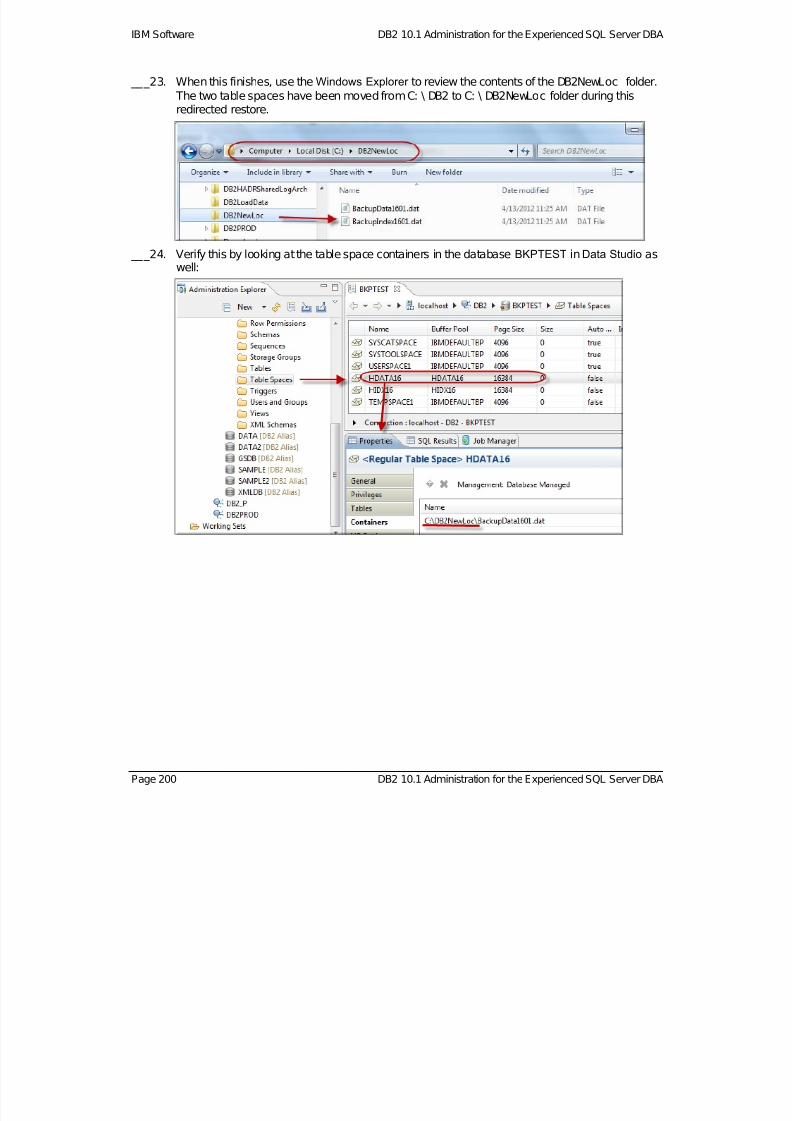
7/28/2019 PoT.im.07.1.017.13 Workbook Windows
http://slidepdf.com/reader/full/potim07101713-workbook-windows 200/232
IBM Software DB2 10.1 Administration for the Experienced SQL Server DBA
___23. When this finishes, use theWindows Explorer to review the contents of the DB2NewLoc folder. The two table spaces have been moved fromC: \ DB2 to C: \ DB2NewLoc folder during thisredirected restore.
___24. Verify this by looking at the table space containers in the databaseBKPTEST inData Studio aswell:
Page 200 DB2 10.1 Administration for the Experienced SQL Server DBA
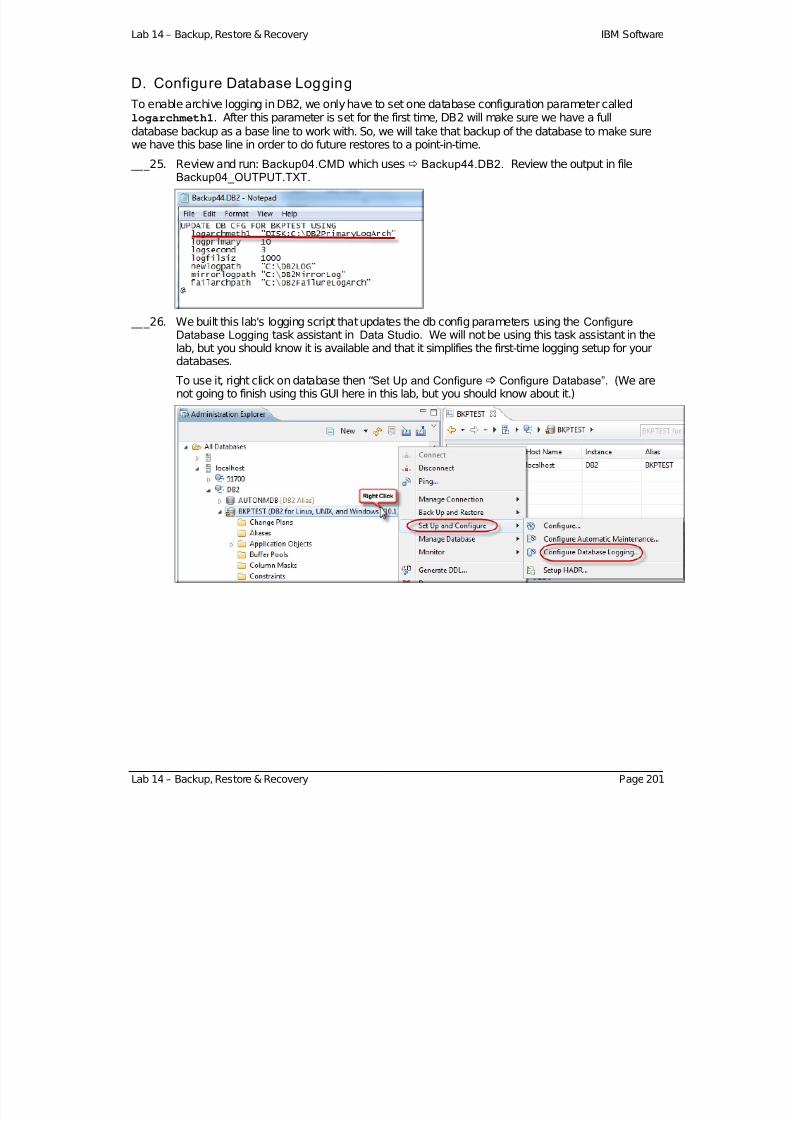
7/28/2019 PoT.im.07.1.017.13 Workbook Windows
http://slidepdf.com/reader/full/potim07101713-workbook-windows 201/232
Lab 14 – Backup, Restore & Recovery IBM Software
D. Configure Database Logging
To enable archive logging in DB2, we only have to set one database configuration parameter calledlogarchmeth1. After this parameter is set for the first time, DB2 will make sure we have a fulldatabase backup as a base line to work with. So, we will take that backup of the database to make surewe have this base line in order to do future restores to a point-in-time.
___25. Review and run: Backup04.CMD which uses Backup44.DB2. Review the output in fileBackup04_OUTPUT.TXT.
___26. We built this lab's logging script that updates the db config parameters using theConfigureDatabase Logging task assistant in Data Studio. We will not be using this task assistant in thelab, but you should know it is available and that it simplifies the first-time logging setup for yourdatabases.
To use it, right click on database then “Set Up and Configure Configure Database”. (We arenot going to finish using this GUI here in this lab, but you should know about it.)
Lab 14 – Backup, Restore & Recovery Page 201

7/28/2019 PoT.im.07.1.017.13 Workbook Windows
http://slidepdf.com/reader/full/potim07101713-workbook-windows 202/232
IBM Software DB2 10.1 Administration for the Experienced SQL Server DBA
E. Online Database Backup
After turning archive logging on, it is now possible to take online backups of the database as well as takeindividual table space backups. This next script takes an online backup of database BKPTEST that willinclude all of the table spaces.
___27. Review command Backup05.CMD before running it. This lab script will kick off a secondaryscript that inserts data into table BACKUPTEST and then loads records into table BKPLOAD before doing the on-line backup. The purpose of this is to demonstrate the online backup beingdone while work (eg. the INSERTs and the LOAD) is being done on the database. It also showshow recoverable load operations are handled.
___28. Once the above lab exercise is done, please go to the Windows Explorer (refresh if necessary)and review the contents of DB2LoadDat a and DB2Pr i maryLogAr ch folders. During the loadoperation, DB2 keeps a copy of the data in DB2LoadDat a folder so that the subsequentRESTORE operation can use the same data to load the table during recovery process. This isimportant to note as the LOAD utility does not generate DB2 LOG records but it is possible touse a recoverable load as shown in this lab exercise.
___29. Run: Backup05.CMD. Notice that two different CLP windows are doing work. One is doing theonline backup while the other is doing INSERT and LOAD operations.
___30. Notice how LOAD data is kept in the DB2LoadDat a directory
___31. Close one of the CLP windows in order to continue with the rest of the lab exercises
Page 202 DB2 10.1 Administration for the Experienced SQL Server DBA
7/28/2019 PoT.im.07.1.017.13 Workbook Windows
http://slidepdf.com/reader/full/potim07101713-workbook-windows 203/232
Lab 14 – Backup, Restore & Recovery IBM Software
F. Database Recover and Restore / Roll Forward Techniques
___32. First, the database RECOVER command is demonstrated. (This is for ease of use.)
Review and run: Backup06.CMD
___33. Next, the RESTORE database and ROLLFORWARD commands are demonstrated. (This is forgreater control.)
Next, review and run: Backup07.CMD
Check the count in BACKUPTEST and BKPLOAD tables and it should be50,000 rows. The BACKUPTEST table gets 25,000 rows from the LOGS
whereas table BKPLOAD gets its data using the RECOVERABLE loadoperation fromC: \ DB2LoadDat a location.
Lab 14 – Backup, Restore & Recovery Page 203
7/28/2019 PoT.im.07.1.017.13 Workbook Windows
http://slidepdf.com/reader/full/potim07101713-workbook-windows 204/232
IBM Software DB2 10.1 Administration for the Experienced SQL Server DBA
Extra Exercises
G. Recover a Dropped Table
___34. To recover a dropped table, it is necessary that we have an offline/online database/table spacelevel backup taken previously and that the database is in RECOVER mode. These are the 7
steps used to simulate a recovery of a dropped table:
1. Take an online back up of the database to level-set this exercise
2. Create a table after the full database backup and then drop it to simulate an accidental loss
3. Pick up the dropped table ID from the history of the dropped table
4. Restore the table space (containing the table) from the previous backup image
5. Unload the dropped table's data
6. Recreate the table using the DDL from the history command
7. Load the data into the table
___35. Review and run the following command to execute all above steps:Backup08.CMD
H. Restore a History File
Sometimes we may need to restore a history file from a backup. The script Backup09.CMD restores thehistory file from most recent online backup. The heart of this script is the command:
db2 restore database bkptest history file online from c:\db2backup taken attimestamp
___36. Review and run: Backup09.CMD
Page 204 DB2 10.1 Administration for the Experienced SQL Server DBA

7/28/2019 PoT.im.07.1.017.13 Workbook Windows
http://slidepdf.com/reader/full/potim07101713-workbook-windows 205/232
Lab 14 – Backup, Restore & Recovery IBM Software
I. Moving Table Space Locations wi th a script (Redirected Restore)
___37. You have already seen an exercise using a GUI to perform a redirected restore to move thetable space container locations. The heart of the redirected restore is the RESTORE commandfollowed by SET TABLESPACE command. Then it continues the RESTORE operation. It lookssomething like this:
RESTORE DATABASE TEST FROM "c:\db2backup" TAKEN AT %timestamp% REPLACEHISTORY FILE REDIRECT WITHOUT PROMPTING
SET TABLESPACE CONTAINERS FOR 3 IGNORE ROLLFORWARD CONTAINER OPERATIONS USING (FILE "C:\DB2\BackupData1601.dat" 2560, FILE"C:\DB2NEWLOC\BackupData1601.dat" 2560)
SET TABLESPACE CONTAINERS FOR 4 IGNORE ROLLFORWARD CONTAINER OPERATIONS USING (FILE "C:\DB2\BackupIndex1601.dat" 625, FILE"C:\DB2NEWLOC\BackupIndex1601.dat" 625)
RESTORE DATABASE TEST CONTINUE
ROLLFORWARD DATABASE TEST TO END OF LOGS AND COMPLETE
___38. You can also perform a redirected restore using an automatically generated script throughRESTORE command. Review and run: Backup10.CMD (the heart of this script is as follows):
___39. When you run the above script, the RESTORE command generates the redirected restore scriptto a file called redirect.CLP.
Find this file and right click on it. Choose:Edit
Lab 14 – Backup, Restore & Recovery Page 205

7/28/2019 PoT.im.07.1.017.13 Workbook Windows
http://slidepdf.com/reader/full/potim07101713-workbook-windows 206/232
IBM Software DB2 10.1 Administration for the Experienced SQL Server DBA
___40. Modify the table space container names for HDATA16 and HIDX16 as shown below. (Note:there are TWO changes you need to make!)
___41. After modifying the generated script to change container names, run this script as follows:
db2 –tvf redirect.clp
(Please disconnect the Data Studio connection if it is open. You may get “Database is in use
error ” if applications are connected with it. The redirected restore can be performed only inoffline mode with the above command.)
___42. The output from above script is kept is BKPTEST_NODE0000.out. Please verify this file and if itwas executed correctly, you will see the new table space container names. Use the Windows Explorer and check the new table space containers locations.
___43. After running above script, you cannot connect to the database as it is in roll forward pendingmode. Run the roll forward command as shown below.
db2 rollforward db bkptest to end of logs and complete
Page 206 DB2 10.1 Administration for the Experienced SQL Server DBA
7/28/2019 PoT.im.07.1.017.13 Workbook Windows
http://slidepdf.com/reader/full/potim07101713-workbook-windows 207/232
Lab 14 – Backup, Restore & Recovery IBM Software
J. Online Table Space Backup / Restore / Recovery
___44. To demonstrate online backup/restore and recovery of table spaces, we will follow these steps.
1. Insert 1000 rows in already created BACKUPTEST table.
2. Take online backup of these two table spaces.
3. Insert another 1000 rows in theBACKUPTEST table.
4. Assume that we need to recover these two table spaces due to disk failure. Do an OnlineRestore of these two table spaces. After the online restore, you will get an SQL0290N errorif you try to access the table space.
5. Roll forward the transactions to apply changes from logs.
6. Check the count of rows and it should be 2000 rows inBACKUPTEST table.
___45. Run the following command to perform the online backup and restore of the above two tablespaces. Run: Backup11.CMD
K. Incremental Backup / Restore / Recovery ___46. We will use the following steps to demonstrate incremental backup and restore:
1. Update TRACKMOD database parameter to enable incremental backup
2. Insert 1000 rows in theBACKUPTEST table.
3. Perform online backup of BKPTEST database.
4. Insert another 1000 rows in the table
5. Perform 1st incremental backup on BKPTEST database.
6. Insert another 1000 rows in the table
7. Perform 2nd incremental backup onBKPTEST
database8. Insert another 1000 rows in the table
9. Assume that the disk containing HDATA16 and HIDX16 has failed. Restore backup of BKPTEST database
10. Apply incremental backups
11. Roll forward the transactions
12. We should see 4000 rows in the table after recovery
___47. Run the following command to demonstrate online incremental backup and restore:Backup12.CMD
Lab 14 – Backup, Restore & Recovery Page 207

7/28/2019 PoT.im.07.1.017.13 Workbook Windows
http://slidepdf.com/reader/full/potim07101713-workbook-windows 208/232
IBM Software DB2 10.1 Administration for the Experienced SQL Server DBA
Page 208 DB2 10.1 Administration for the Experienced SQL Server DBA
L. Delta Backup / Restore / Recovery
___48. We will use the following steps to demonstrate delta backup and restore:
1. Update TRACKMOD database parameter to enable incremental backup
2. Insert 1000 rows in theBACKUPTEST table.
3. Perform online backup of BKPTEST database.
4. Insert another 1000 rows in the table
5. Perform 1st delta backup on BKPTEST database.
6. Insert another 1000 rows in the table
7. Perform 2nd delta backup on BKPTEST database
8. Insert another 1000 rows in the table
9. Assume that the disk containing HDATA16 and HIDX16 has failed. Restore backup of BKPTEST database
10. Apply delta backups11. Roll forward the transactions.
12. We should see 4000 rows in the table after recovery
___49. Run the following command to demonstrate online incremental backup/restore and recovery.Run: Backup13.CMD
___50. Close Data Studio.
N. Cleanup
After you are done with the above exercises, you can run the following command to clean up resources.
Run: Backup60.BAT
*** End of Backup, Restore and Recovery Lab – by Vikram Khatri and Burt Vialpando ***

7/28/2019 PoT.im.07.1.017.13 Workbook Windows
http://slidepdf.com/reader/full/potim07101713-workbook-windows 209/232
Lab 15 – Monitoring IBM Software
Lab 15. Monitoring
This lab assumes you have already completed theData Studio Lab 03 exercises.
If you have not, then you should complete sections A and B of Lab 03 to learn how to launchData Studio and connect to a database.
A. Snapshot Monitoring
The snapshot monitoring requires turning on switches either at an instance level or at a session level. The following lab exercise shows how to turn on and off monitoring switches.
___1. Open a DB2 CLP Command Window and change your directory to C: \ POT_DB2\ 15MONI TOR
___2. Review and run Monitor01.CMD. Review output in file Monitor01_OUTPUT.TXT to see themonitor switches set at the instance and session levels.
Notice that the global monitoring switches are set using UPDATE DBMcommand at the DB2 Instance level and session specific monitoringswitches is set using UPDATE MONI TORcommand.
The snapshot monitor is a classic monitoring approach accomplished by the use of theGET SNAPSHOT CLP command.
___3. Review and run the script: Monitor02.CMD to see the output from theGET SNAPSHOT command. Review output in file Monitor02_OUTPUT.TXT.
The snapshot monitoring is the technology of yesteryear. While it is going tostay around, the current preference is to use light weigh monitoringfunctions and the db2pd command line tool which we will demonstrate laterin this lab.
Lab 15 – Monitoring Page 209

7/28/2019 PoT.im.07.1.017.13 Workbook Windows
http://slidepdf.com/reader/full/potim07101713-workbook-windows 210/232
IBM Software DB2 10.1 Administration for the Experienced SQL Server DBA
B. Event Monitoring
An event monitor differs from other monitor types due to the fact that information is collected at the timewhen that event is detected or completes. The following lab exercise is an example of event monitoringwhere we will capture elapsed time used by the SQL statements inside a stored procedure.
___4. Review and run the command: Monitor03.CMD which runs Monitor04.SQL that has DDL tocreate a table MONITOR_TAB and a stored procedure MONITOR_SP to insert and update datain that table. Review Monitor03_OUTPUT.TXT to see the results of running the storedprocedure.
___5. Review and run the command: Monitor05.CMD which runs Monitor06.SQL that creates anevent monitor POT_EVEMON and a stored procedure MONITOR_RS which we will use to seethe elapsed time for each SQL statements used inside MONITOR_SP procedure.
The db2evtbl command line tool can help you generate event monitor
command scripts to store data in target DB2 tables. In the DB2 installpath, under the folder MISC, there is an example script for building DB2Workload Manager event monitors called: wlmevmon.ddl
Notice that this script turns on the statement event monitorPOT_EVEMON and then runs theprocedure MONITOR_SP. The statement event monitor captures the data from this procedureand populates three event monitor tables: POT_EVEMON_HEAD, POT_EVEMON_STMT and POT_EVEMON_CTRL
Now we will run the MONITOR_RS procedure in Data Studio to see the elapsed time for each SQLstatement that was inside the procedure MONITOR_SP.
___6. Open the IBM Data Studio by clicking on this icon on your desktop or in your task bar:
OR…You can open Data Studio by choosing:
St ar t Al l Progr ams I BM Dat a St udi o Dat a St udi o 3. 1. 1 Ful l cl i ent
Page 210 DB2 10.1 Administration for the Experienced SQL Server DBA
7/28/2019 PoT.im.07.1.017.13 Workbook Windows
http://slidepdf.com/reader/full/potim07101713-workbook-windows 211/232
Lab 15 – Monitoring IBM Software
___7. After the perspective opens, close the Task Launcher view
___8. In the Database Administration perspective, find the Administration Explorer and expandl ocal host DB2 and select SAMPLE. Right click and click Connect .
___9. Navigate to schema DBAPOT and expand node Stored Procedures.
___10. You should see MONITOR_SP and MONITOR_RS stored procedures. (If not, refresh this viewso they will appear.) We will run MONITOR_RS procedure to pull information from eventmonitor tables in which we captured data from the MONITOR_SP procedure.
___11. Right click on stored procedure MONITOR_RS and open click on Run.
Lab 15 – Monitoring Page 211
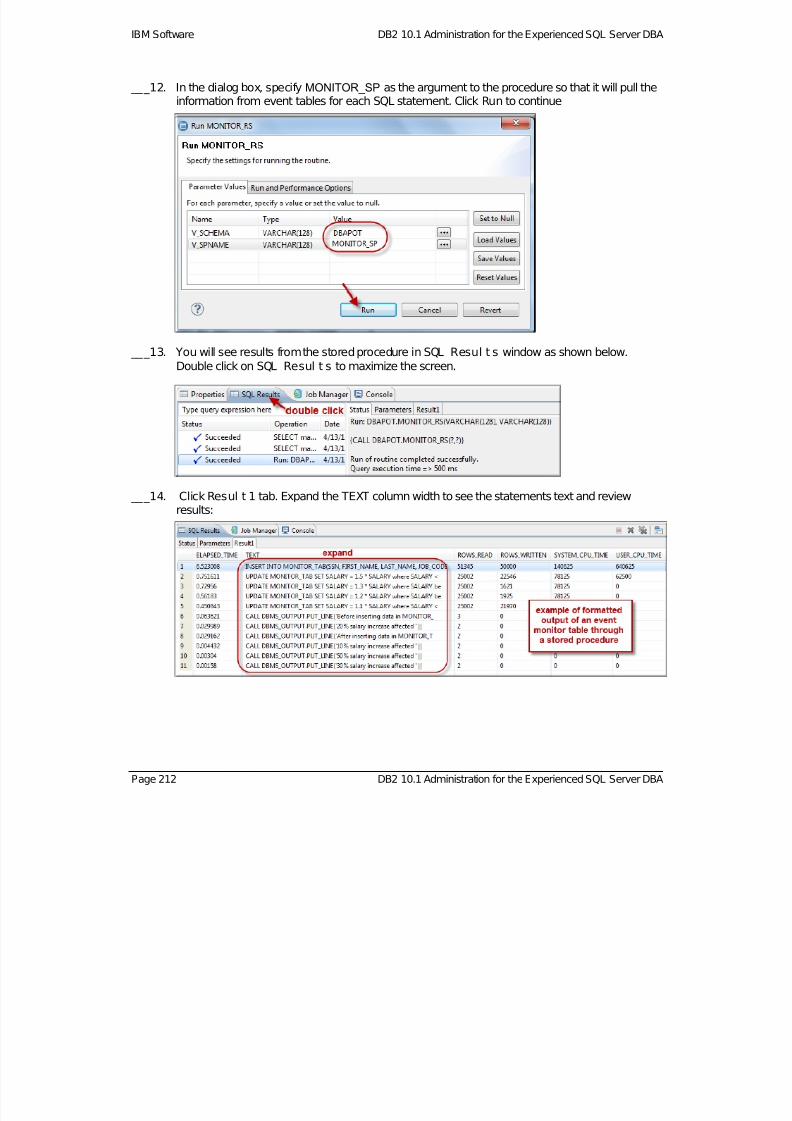
7/28/2019 PoT.im.07.1.017.13 Workbook Windows
http://slidepdf.com/reader/full/potim07101713-workbook-windows 212/232
IBM Software DB2 10.1 Administration for the Experienced SQL Server DBA
___12. In the dialog box, specify MONITOR_SP as the argument to the procedure so that it will pull theinformation from event tables for each SQL statement. Click Run to continue
___13. You will see results from the stored procedure inSQL Resul t s window as shown below.Double click on SQL Resul t s to maximize the screen.
___14. ClickResul t 1 tab. Expand the TEXT column width to see the statements text and reviewresults:
Page 212 DB2 10.1 Administration for the Experienced SQL Server DBA

7/28/2019 PoT.im.07.1.017.13 Workbook Windows
http://slidepdf.com/reader/full/potim07101713-workbook-windows 213/232
Lab 15 – Monitoring IBM Software
C. Data Studio Stored Procedure Profiling
Data Studio can also be used to gather performance data for a stored procedure.
___15. From the Data Studio, right click on the MONI TOR_SP stored procedure. Choose: Run.
___16. CheckGather per f or mance i nf or mat i on f r omt he dat abase. Click Run.
___17. When the run is completed, double clickSQL Resul t s tab.
Lab 15 – Monitoring Page 213
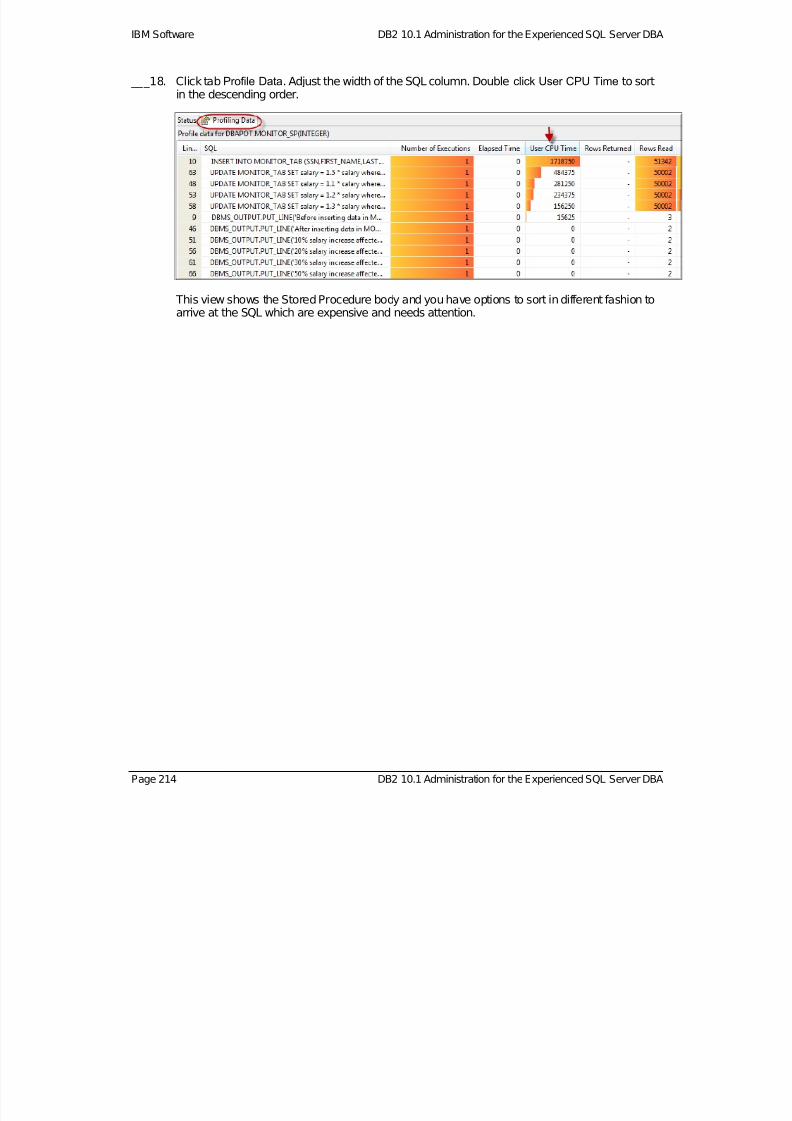
7/28/2019 PoT.im.07.1.017.13 Workbook Windows
http://slidepdf.com/reader/full/potim07101713-workbook-windows 214/232
IBM Software DB2 10.1 Administration for the Experienced SQL Server DBA
___18. Click tabProfile Data. Adjust the width of the SQL column. Double click User CPU Time to sortin the descending order.
This view shows the Stored Procedure body and you have options to sort in different fashion to
arrive at the SQL which are expensive and needs attention.
Page 214 DB2 10.1 Administration for the Experienced SQL Server DBA
7/28/2019 PoT.im.07.1.017.13 Workbook Windows
http://slidepdf.com/reader/full/potim07101713-workbook-windows 215/232
Lab 15 – Monitoring IBM Software
D. Light Weight Monitoring – SQL functions and db2pd
There are two kinds of “light weight” monitoring in DB2 that is free from latch contention and does notrequire use of the monitoring switches. The first type of monitoring like this is accomplished using SQLbased table functions. The second is using the tool:db2pd
___19. Review and run scriptMonitor07.CMD, which calls Monitor08.SQL
___20. Notice that the script loops and does three things in each loop:
Runs two SQL table function queries Runs db2pd with the -LOGS switch Runs the stored procedure MONITOR_SP to do work in the database so the results will
change on the next loop
The use of these SQL table functions shown in this exercise are only 2 of 48currently available to you in DB2.
___21. Review the output inMonitor07_OUTPUT.TXT file. Notice that we did monitoring of MONITOR_TAB table by running a work load and monitoring the table, table space containersand logs using these lightweight monitoring techniques.
db2pd additional functionality
Unlike the other monitoring tools, db2pd can also be used when the database is not available. This tools“peeks” inside the instance and database memory to give you unprecedented power and flexibility.
___22. To see more on this tool, open a Windows Command Prompt or a DB2 CLP Command Window. Type:
db2pd –osinfo
db2pd -interactive
–edus
-mempools
-quit
db2pd –h file=help_OUTPUT.TXT
NOTEPAD help_OUTPUT.TXT
Lab 15 – Monitoring Page 215
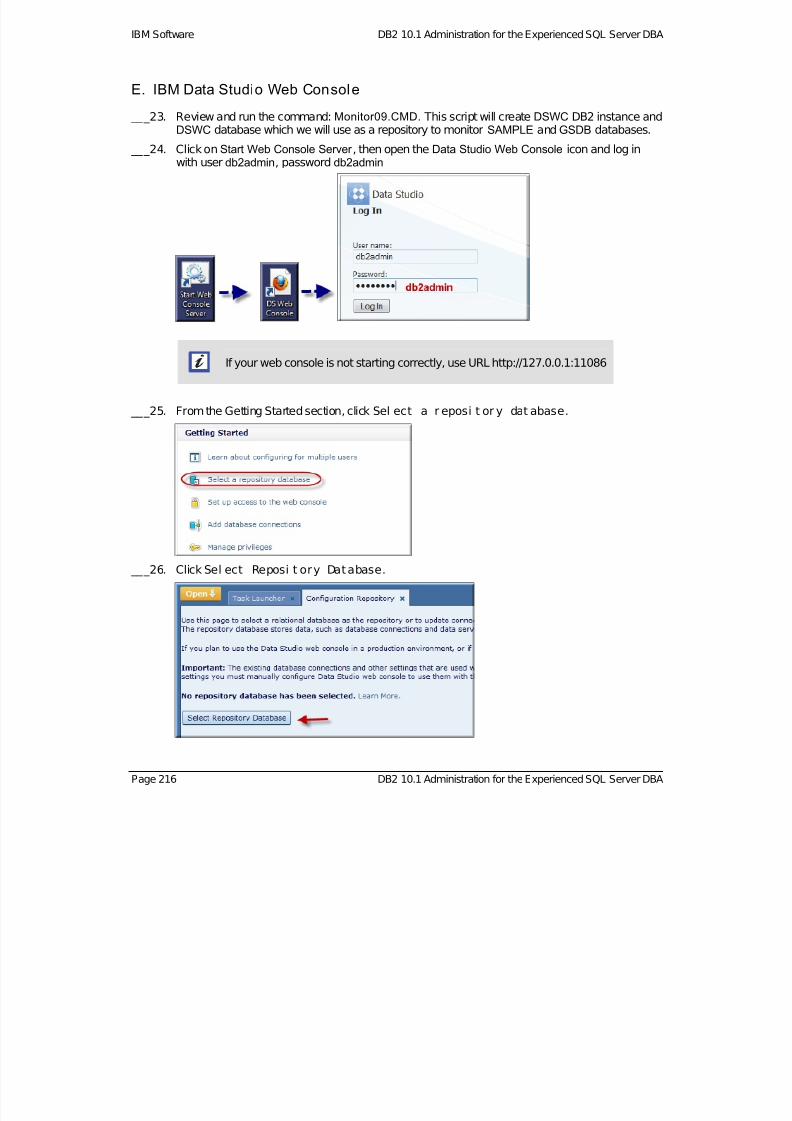
7/28/2019 PoT.im.07.1.017.13 Workbook Windows
http://slidepdf.com/reader/full/potim07101713-workbook-windows 216/232
IBM Software DB2 10.1 Administration for the Experienced SQL Server DBA
E. IBM Data Studio Web Console
___23. Review and run the command: Monitor09.CMD. This script will create DSWC DB2 instance andDSWC database which we will use as a repository to monitor SAMPLE and GSDB databases.
___24. Click onStart Web Console Server , then open the Data Studio Web Console icon and log inwith user db2admin, password db2admin
If your web console is not starting correctly, use URL http://127.0.0.1:11086
___25. From the Getting Started section, click Sel ect a r eposi t or y dat abase.
___26. ClickSel ect Reposi t ory Database.
Page 216 DB2 10.1 Administration for the Experienced SQL Server DBA

7/28/2019 PoT.im.07.1.017.13 Workbook Windows
http://slidepdf.com/reader/full/potim07101713-workbook-windows 217/232
Lab 15 – Monitoring IBM Software
___27. Specify database DSWC, host name l ocal host , port number 50010, user id dbapot andpassword dbapot 123. Click Test Connect i on and if it succeeds, click OK .
By following the above steps, we have chosen DSWC as repository for theData Studio Web Console. Now we will add databases to do the healthmonitoring.
___28. Clickx to close Conf i gur at i on Reposi t or y.
___29. ClickAdd dat abase connect i ons.
Lab 15 – Monitoring Page 217

7/28/2019 PoT.im.07.1.017.13 Workbook Windows
http://slidepdf.com/reader/full/potim07101713-workbook-windows 218/232
IBM Software DB2 10.1 Administration for the Experienced SQL Server DBA
___30. ClickAdd….
___31. Specify database connection name SAMPLE, database name SAMPLE, host name l ocal host ,port number 50000, user id dbapot , password dbapot 123. Click Test Connect i on and if itsucceeds, click OK .
___32. Clickx to close Dat abases tab.
Page 218 DB2 10.1 Administration for the Experienced SQL Server DBA
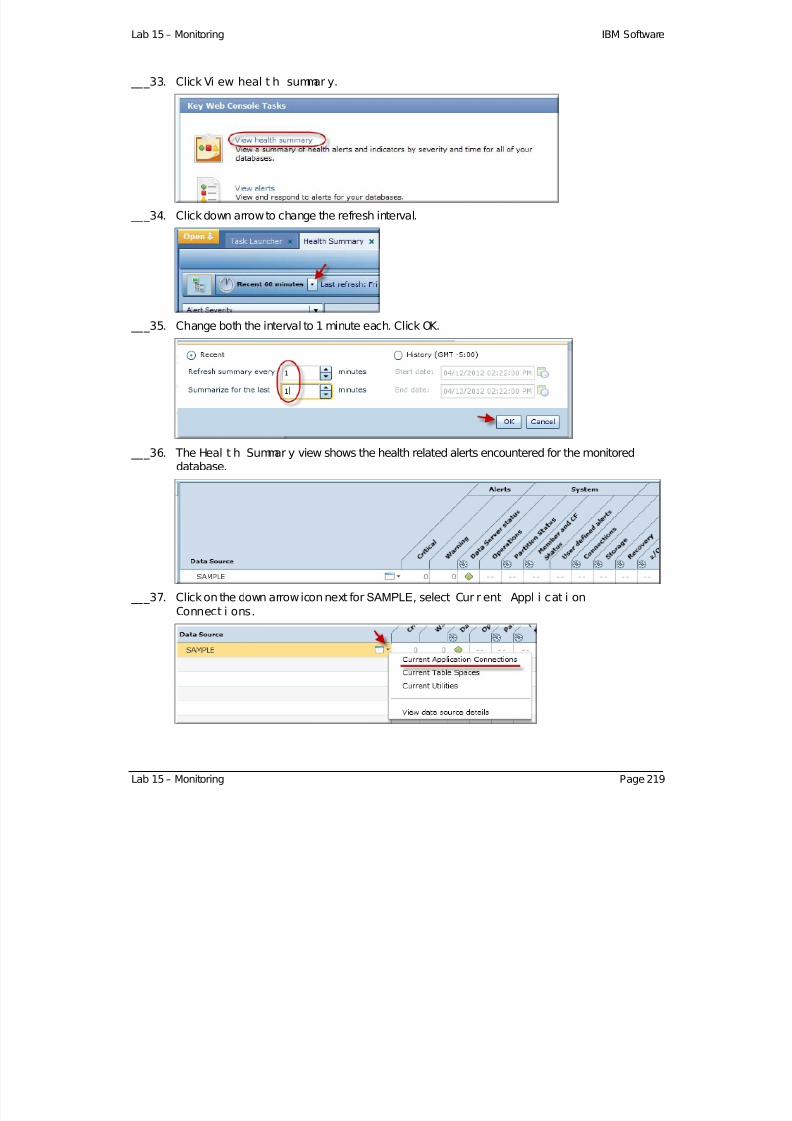
7/28/2019 PoT.im.07.1.017.13 Workbook Windows
http://slidepdf.com/reader/full/potim07101713-workbook-windows 219/232
Lab 15 – Monitoring IBM Software
___33. ClickVi ew heal t h summar y.
___34. Click down arrow to change the refresh interval.
___35. Change both the interval to 1 minute each. ClickOK .
___36. The Heal t h Summar y view shows the health related alerts encountered for the monitoreddatabase.
___37. Click on the down arrow icon next forSAMPLE, select Cur r ent Appl i cat i onConnect i ons.
Lab 15 – Monitoring Page 219

7/28/2019 PoT.im.07.1.017.13 Workbook Windows
http://slidepdf.com/reader/full/potim07101713-workbook-windows 220/232
IBM Software DB2 10.1 Administration for the Experienced SQL Server DBA
___38. Review the current application connections in the view.
Note: The HEALTH_MON database manager parameter must be turned on
for the health related alerts to show up in the Health Summary view. So, if nothing is showing up do the following:
db2 get dbm cfg | findstr HEALTH
db2 update dbm cfg using HEALTH_MON ON
db2stop force
db2start
Now connect to SAMPLE again through Data Studio
___39. Close x Cur r ent Appl i cat i on Connect i ons view.
___40. Disconnect from the SAMPLE database
Page 220 DB2 10.1 Administration for the Experienced SQL Server DBA
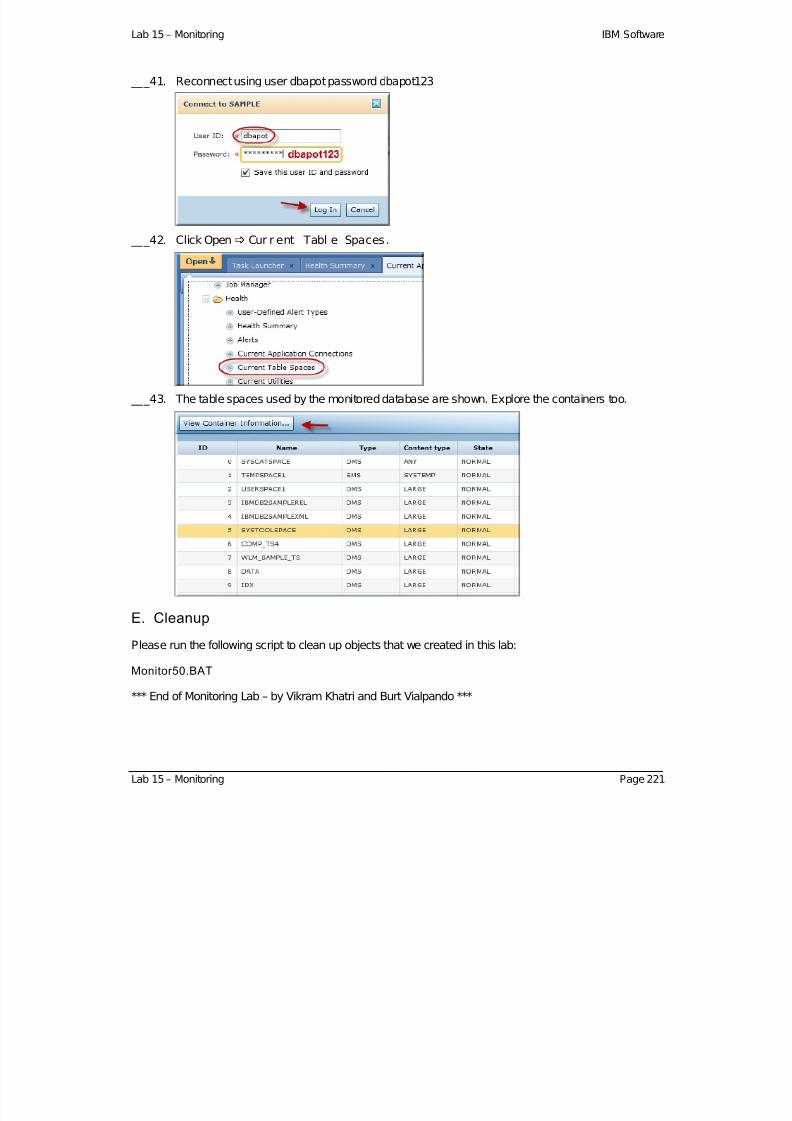
7/28/2019 PoT.im.07.1.017.13 Workbook Windows
http://slidepdf.com/reader/full/potim07101713-workbook-windows 221/232
Lab 15 – Monitoring IBM Software
Lab 15 – Monitoring Page 221
___41. Reconnect using user dbapot password dbapot123
___42. ClickOpen Cur r ent Tabl e Spaces.
___43. The table spaces used by the monitored database are shown. Explore the containers too.
E. Cleanup
Please run the following script to clean up objects that we created in this lab:
Monitor50.BAT
*** End of Monitoring Lab – by Vikram Khatri and Burt Vialpando ***

7/28/2019 PoT.im.07.1.017.13 Workbook Windows
http://slidepdf.com/reader/full/potim07101713-workbook-windows 222/232
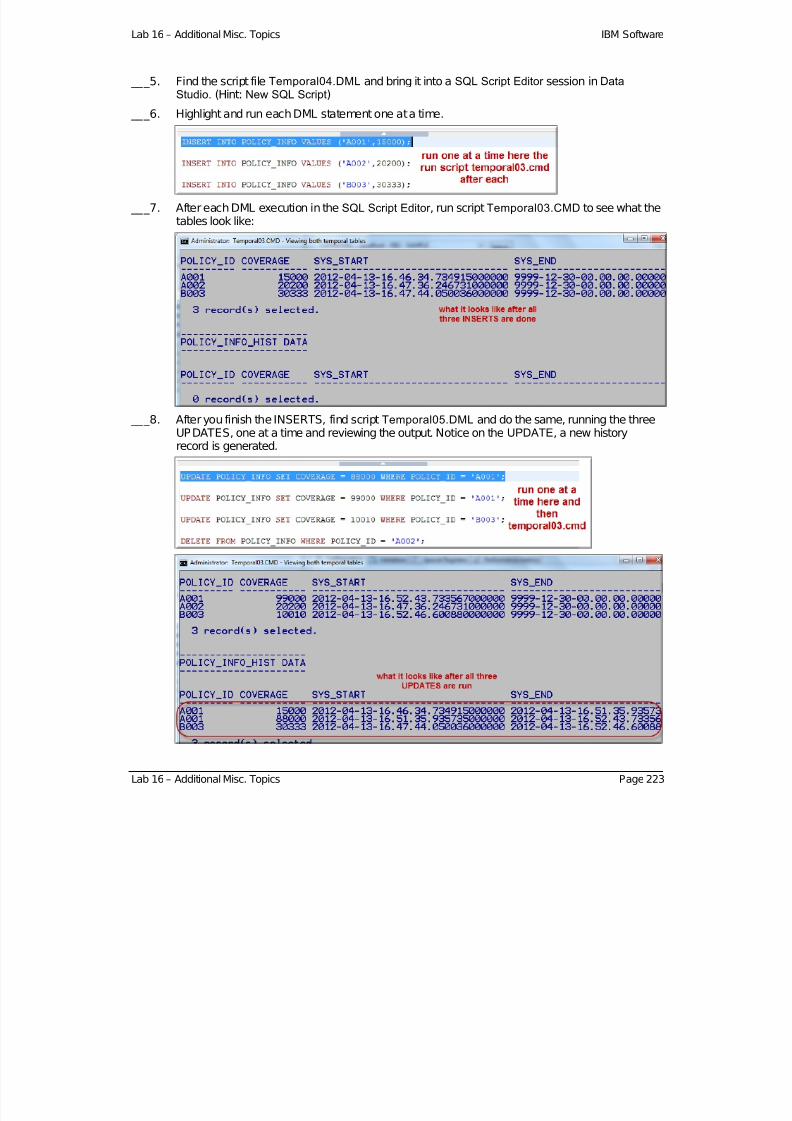
7/28/2019 PoT.im.07.1.017.13 Workbook Windows
http://slidepdf.com/reader/full/potim07101713-workbook-windows 223/232
Lab 16 – Additional Misc. Topics IBM Software
___5. Find the script file Temporal04.DML and bring it into a SQL Script Editor session in DataStudio. (Hint: New SQL Script)
___6. Highlight and run each DML statement one at a time.
___7. After each DML execution in theSQL Script Editor , run script Temporal03.CMD to see what thetables look like:
___8. After you finish the INSERTS, find scriptTemporal05.DML and do the same, running the threeUPDATES, one at a time and reviewing the output. Notice on theUPDATE, a new historyrecord is generated.
Lab 16 – Additional Misc. Topics Page 223
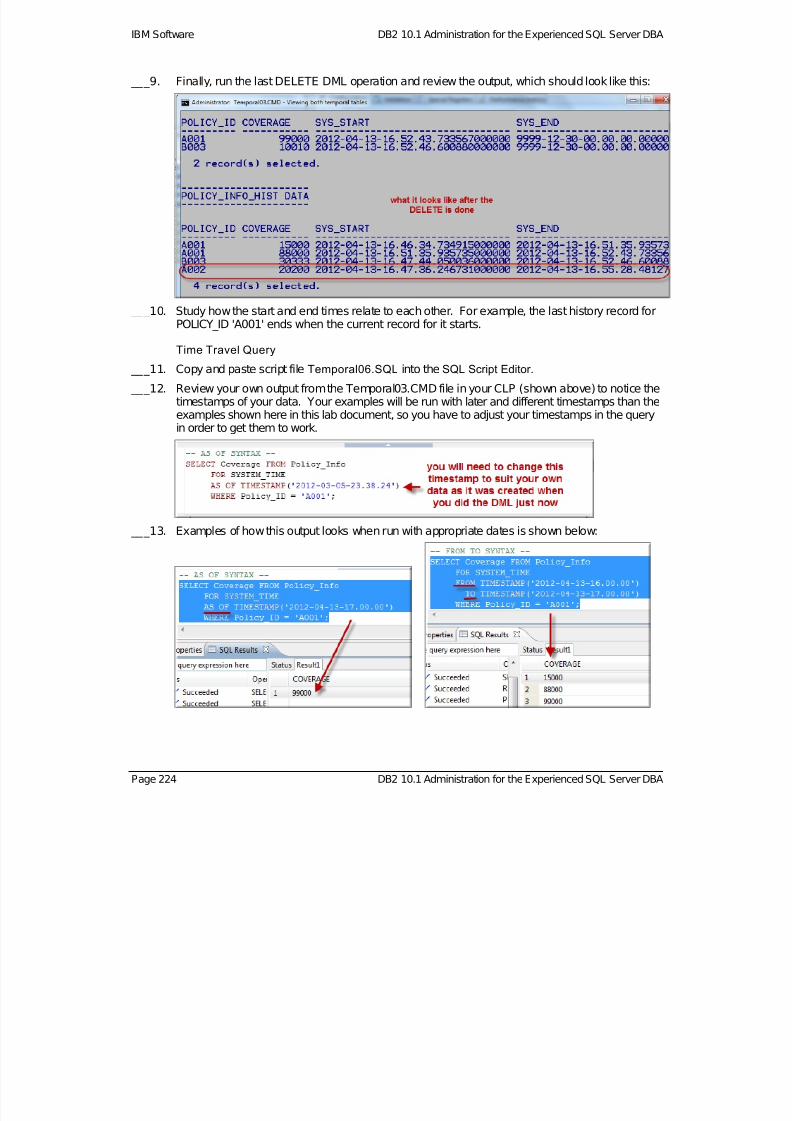
7/28/2019 PoT.im.07.1.017.13 Workbook Windows
http://slidepdf.com/reader/full/potim07101713-workbook-windows 224/232
IBM Software DB2 10.1 Administration for the Experienced SQL Server DBA
___9. Finally, run the last DELETE DML operation and review the output, which should look like this:
___10. Study how the start and end times relate to each other. For example, the last history record forPOLICY_ID 'A001' ends when the current record for it starts.
Time Travel Query
___11. Copy and paste script file Temporal06.SQL into the SQL Script Editor.
___12. Review your own output from the Temporal03.CMD file in your CLP (shown above) to notice thetimestamps of your data. Your examples will be run with later and different timestamps than theexamples shown here in this lab document, so you have to adjust your timestamps in the queryin order to get them to work.
___13. Examples of how this output looks when run with appropriate dates is shown below:
Page 224 DB2 10.1 Administration for the Experienced SQL Server DBA

7/28/2019 PoT.im.07.1.017.13 Workbook Windows
http://slidepdf.com/reader/full/potim07101713-workbook-windows 225/232
Lab 16 – Additional Misc. Topics IBM Software
B. Federation – simple DB2 to DB2 example
___14. Open a DB2 CLP Command Window and change to directoryC: \ POT_DB2\ 16MI SC
___15. If you have NOT done so already, create a SAMPLE2 database by using the following CLPcommand: db2 create database sample2 (we will need this database to federate from)
___16. Review script Fed01.CMD to see it has 5 steps: 1) Enable federation, 2) create a wrapper, 3)create a server, 4) create a mapping and 5) create a nickname.
___17. Run scriptFed01.CMD
___18. At end of the script, notice it runs a query using the nicknameEMP_NICK which is in theSAMPLE2 database federated from the table EMP in the SAMPLE database
Federation is enabled
___19. In Data Studio connect to database SAMPLE2.
___20. In the Database Administration perspective, right click on Instance DB2 and choose:Conf i gur e
Lab 16 – Additional Misc. Topics Page 225

7/28/2019 PoT.im.07.1.017.13 Workbook Windows
http://slidepdf.com/reader/full/potim07101713-workbook-windows 226/232
IBM Software DB2 10.1 Administration for the Experienced SQL Server DBA
___21. Find the section called “Envi r onment ”, then the parameter “FEDERATED” and notice the scripthas changed this to “ YES”. This allows for federation to be done in any database in thisinstance.
___22. Close this parameter edit session when done reviewing.
Review federated objects
___23. FromData Studio, go to the Data perspective.
___24. In the Data Source Explorer , find and expand the entire tree for Federated Objects underSAMPLE2 database
___25. First notice the Wrappers and the one called DRDA
This wrapper library is found in the BIN subdirectory of your DB2 install path, so on Windows bydefault this should be in C: \ Pr ogram Fi l es\ I BM\ SQLLI B\ BI N. If we had other wrapperDLL for Oracle or SQL Server, this is where we would put them to create a wrapper.
___26. Next notice the Defined Remote Servers. We have defined one calledSAMPLE for theSAMPLE database
___27. Next notice the User Mappings. We have defined one calledDBAPOT for server SAMPLE.
Page 226 DB2 10.1 Administration for the Experienced SQL Server DBA
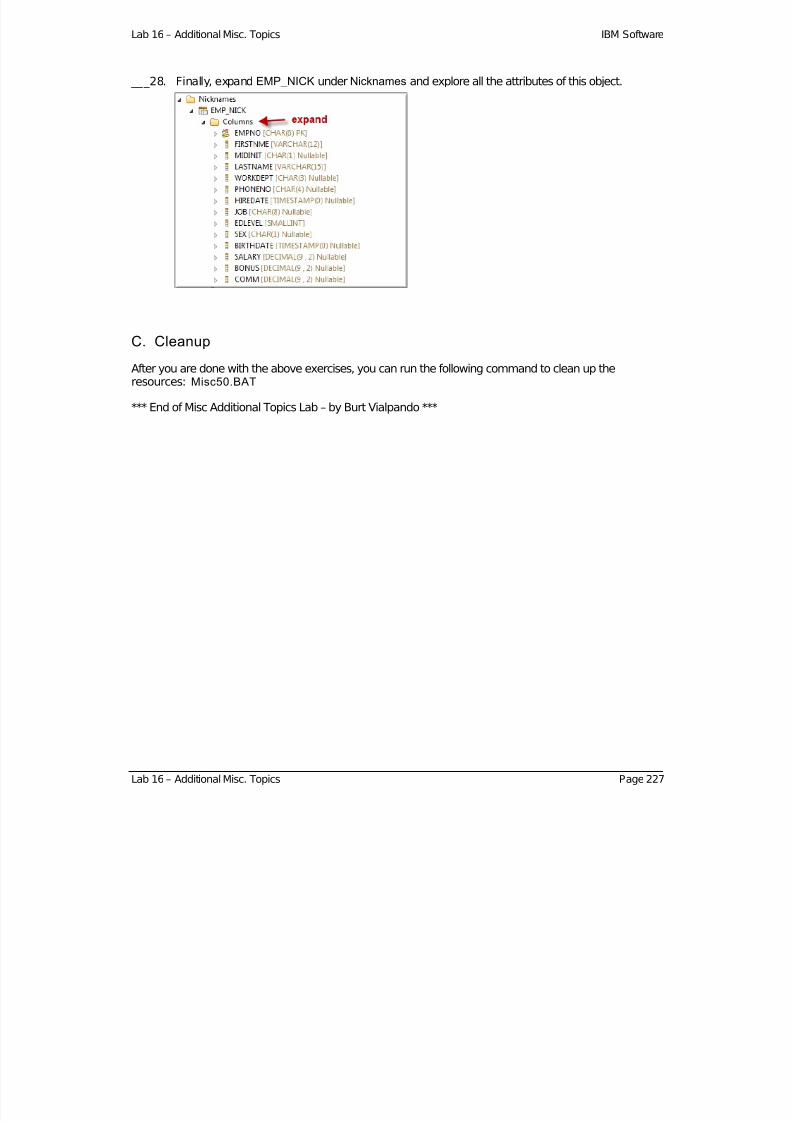
7/28/2019 PoT.im.07.1.017.13 Workbook Windows
http://slidepdf.com/reader/full/potim07101713-workbook-windows 227/232
Lab 16 – Additional Misc. Topics IBM Software
Lab 16 – Additional Misc. Topics Page 227
___28. Finally, expand EMP_NICK under Nicknames and explore all the attributes of this object.
C. Cleanup
After you are done with the above exercises, you can run the following command to clean up theresources: Misc50.BAT
*** End of Misc Additional Topics Lab – by Burt Vialpando ***
7/28/2019 PoT.im.07.1.017.13 Workbook Windows
http://slidepdf.com/reader/full/potim07101713-workbook-windows 228/232
IBM Software
Appendix A. Notices
This information was developed for products and services offered in the U.S.A.
IBM may not offer the products, services, or features discussed in this document in other countries.Consult your local IBM representative for information on the products and services currently available in
your area. Any reference to an IBM product, program, or service is not intended to state or imply thatonly that IBM product, program, or service may be used. Any functionally equivalent product, program, orservice that does not infringe any IBM intellectual property right may be used instead. However, it is theuser's responsibility to evaluate and verify the operation of any non-IBM product, program, or service.
IBM may have patents or pending patent applications covering subject matter described in thisdocument. The furnishing of this document does not grant you any license to these patents. You cansend license inquiries, in writing, to:
IBM Director of LicensingIBM CorporationNorth Castle DriveArmonk, NY 10504-1785U.S.A.
For license inquiries regarding double-byte (DBCS) information, contact the IBM Intellectual PropertyDepartment in your country or send inquiries, in writing, to:
IBM World Trade Asia CorporationLicensing2-31 Roppongi 3-chome, Minato-ku
Tokyo 106-0032, J apan
The following paragraph does not apply to the United Kingdom or any other country where suchprovisions are inconsis tent with local law: INTERNATIONAL BUSINESS MACHINESCORPORATION PROVIDES THIS PUBLICATION "AS IS" WITHOUT WARRANTY OF ANY KIND,EITHER EXPRESS OR IMPLIED, INCLUDING, BUT NOT LIMITED TO, THE IMPLIED WARRANTIES
OF NON-INFRINGEMENT, MERCHANTABILITY OR FITNESS FOR A PARTICULAR PURPOSE. Somestates do not allow disclaimer of express or implied warranties in certain transactions, therefore, thisstatement may not apply to you.
This information could include technical inaccuracies or typographical errors. Changes are periodicallymade to the information herein; these changes will be incorporated in new editions of the publication.IBM may make improvements and/or changes in the product(s) and/or the program(s) described in thispublication at any time without notice.
Any references in this information to non-IBM Web sites are provided for convenience only and do not inany manner serve as an endorsement of those Web sites. The materials at those Web sites are not partof the materials for this IBM product and use of those Web sites is at your own risk.
IBM may use or distribute any of the information you supply in any way it believes appropriate without
incurring any obligation to you.
Any performance data contained herein was determined in a controlled environment. Therefore, theresults obtained in other operating environments may vary significantly. Some measurements may havebeen made on development-level systems and there is no guarantee that these measurements will bethe same on generally available systems. Furthermore, some measurements may have been estimatedthrough extrapolation. Actual results may vary. Users of this document should verify the applicable datafor their specific environment.
Page 228 DB2 10.1 Administration for the Experienced SQL Server DBA

7/28/2019 PoT.im.07.1.017.13 Workbook Windows
http://slidepdf.com/reader/full/potim07101713-workbook-windows 229/232
IBM Software
Information concerning non-IBM products was obtained from the suppliers of those products, theirpublished announcements or other publicly available sources. IBM has not tested those products andcannot confirm the accuracy of performance, compatibility or any other claims related to non-IBMproducts. Questions on the capabilities of non-IBM products should be addressed to the suppliers of those products.
All statements regarding IBM's future direction and intent are subject to change or withdrawal withoutnotice, and represent goals and objectives only.
Appendix Page 229

7/28/2019 PoT.im.07.1.017.13 Workbook Windows
http://slidepdf.com/reader/full/potim07101713-workbook-windows 230/232
IBM Software
Page 230 DB2 10.1 Administration for the Experienced SQL Server DBA
Appendix B. Trademarks and copyrights
The following terms are trademarks of International Business Machines Corporation in the United States,other countries, or both:
IBM IBM logo 1-2-3 AIX DB2 IMS
Lotus pureXML Sametime
Microsoft, Windows, Windows NT, and the Windows logo are trademarks of Microsoft Corporation in theUnited States, other countries, or both.
UNIX is a registered trademark of The Open Group in the United States and other countries.
Linux is a registered trademark of Linus Torvalds in the United States, other countries, or both.
Other company, product and service names may be trademarks or service marks of others.
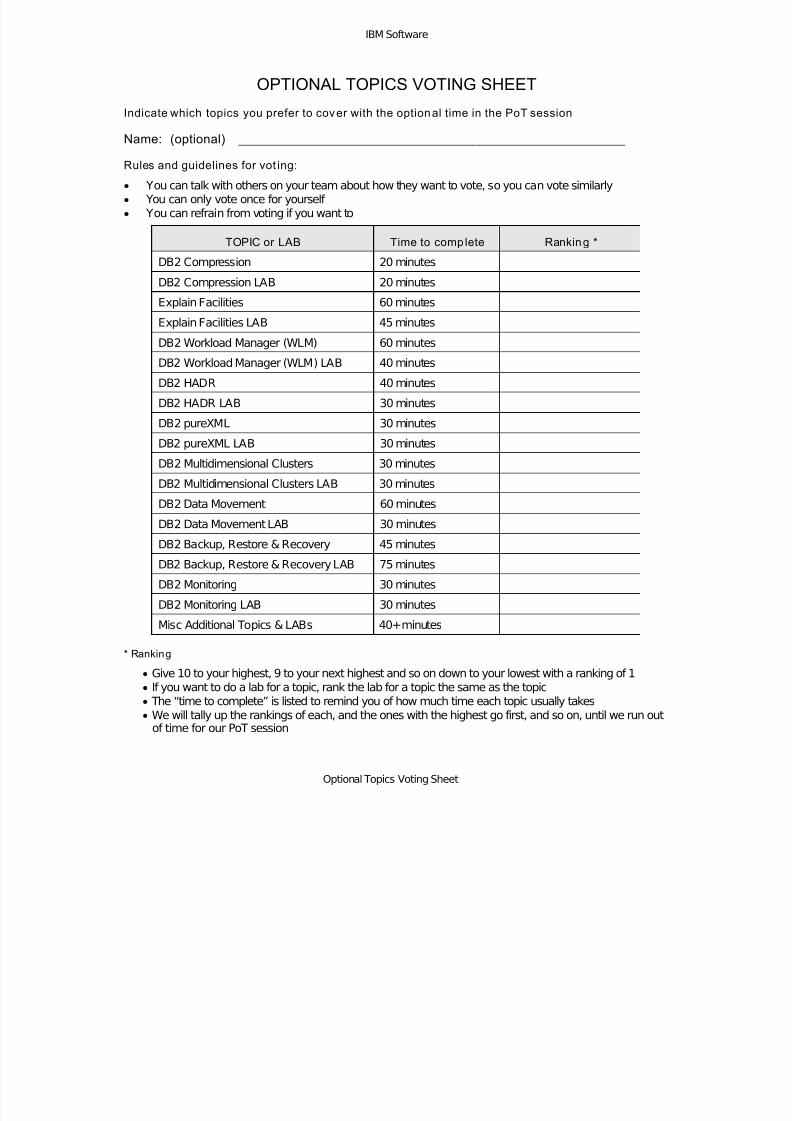
7/28/2019 PoT.im.07.1.017.13 Workbook Windows
http://slidepdf.com/reader/full/potim07101713-workbook-windows 231/232
IBM Software
OPTIONAL TOPICS VOTING SHEET
Indicate which topics you prefer to cover with the optional time in the PoT session
Name: (optional) _____________________________________________________________
Rules and guidelines for vot ing:
You can talk with others on your team about how they want to vote, so you can vote similarly You can only vote once for yourself
You can refrain from voting if you want to
TOPIC or LAB Time to complete Ranking *
DB2 Compression 20 minutes
DB2 Compression LAB 20 minutes
Explain Facilities 60 minutes
Explain Facilities LAB 45 minutes
DB2 Workload Manager (WLM) 60 minutes
DB2 Workload Manager (WLM) LAB 40 minutes
DB2 HADR 40 minutes
DB2 HADR LAB 30 minutes
DB2 pureXML 30 minutes
DB2 pureXML LAB 30 minutes
DB2 Multidimensional Clusters 30 minutes
DB2 Multidimensional Clusters LAB 30 minutes
DB2 Data Movement 60 minutes
DB2 Data Movement LAB 30 minutes
DB2 Backup, Restore & Recovery 45 minutes
DB2 Backup, Restore & Recovery LAB 75 minutes
DB2 Monitoring 30 minutes
DB2 Monitoring LAB 30 minutes
Misc Additional Topics & LABs 40+ minutes
* Ranking
Give 10 to your highest, 9 to your next highest and so on down to your lowest with a ranking of 1
If you want to do a lab for a topic, rank the lab for a topic the same as the topic The “time to complete” is listed to remind you of how much time each topic usually takes We will tally up the rankings of each, and the ones with the highest go first, and so on, until we run out
of time for our PoT session
Optional Topics Voting Sheet

7/28/2019 PoT.im.07.1.017.13 Workbook Windows
http://slidepdf.com/reader/full/potim07101713-workbook-windows 232/232
© Copyright IBM Corporation 2012.
The information contained in these materials is provided for
informational purposes only, and is provided AS IS without
warranty of any kind, express or implied. IBM shall not be
responsible for any damages arising out of the use of, or otherwise
l d h i l N hi i d i h i l