powerpoint 2013 cheat sheet - icevonline.com · powerpoint 2013 cheat sheet ® ... slide masters...
TRANSCRIPT
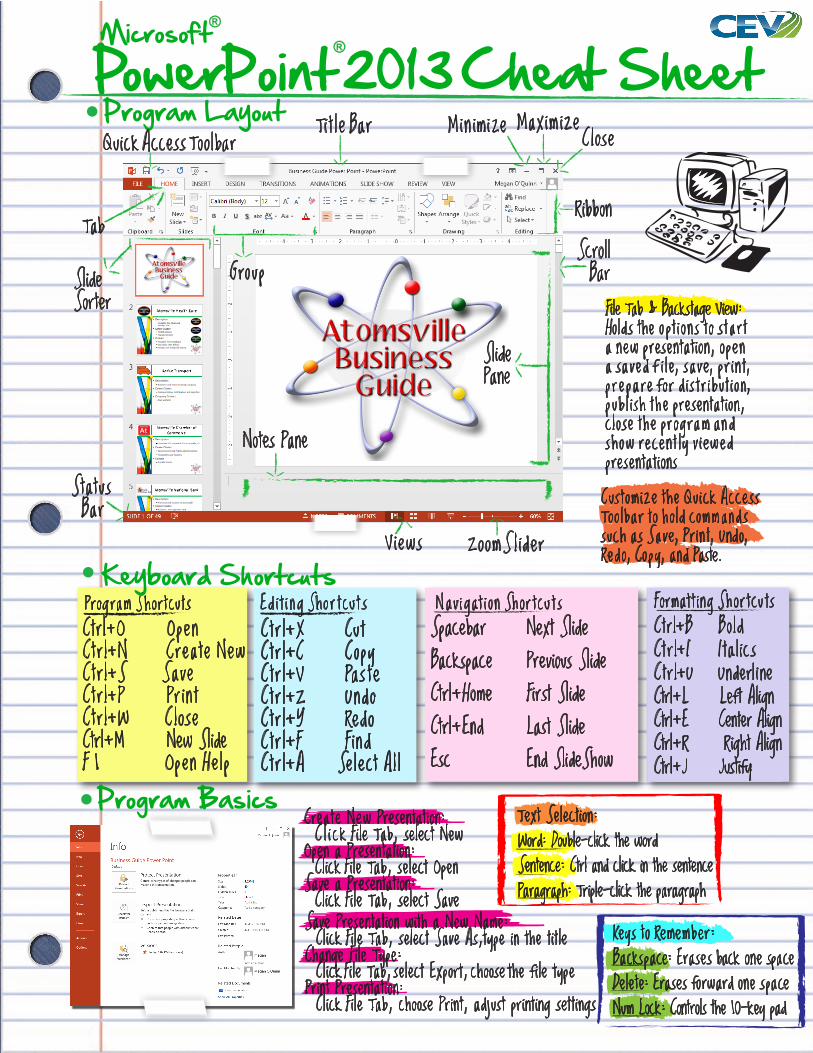
Microsoft ®
PowerPoint 2013 Cheat Sheet®
Cus tom ize the Qu ick Access Too lbar to ho ld comm and s such as Save, Prin t, Undo, Red o, Co py, and Paste.
File Tab & Backstage View:Hold s the o p t i o n s to s t a r t a new presentation, o p e n a sa v ed f i l e, s a v e, p r i n t, p r e pa re fo r d i s t r i b u t i o n, p u b l i sh t h e presentation, c l ose t h e pr og ram an d sh ow recen t l y v i ewed presentations
Prog ram Shor t cu tsCtrl+O OpenCtr l+N Create NewCtr l+S SaveCtr l+P Pr in tC tr l+W C loseCtrl+M New SlideF 1 Open He lp
Ed i t i n g Sho r t cu t sC tr l+X Cu tCtr l+C CopyCtr l+V Pas t eCtr l+Z Und oCtr l+Y Red oCtr l+F Fin dCtr l+A Se lect A l l
Format t in g Sho r t cu tsCtrl+B Bo ldCt r l+I I ta l i csCtr l+U Underl i neCtrl+L Left AlignCtrl+E Center AlignCtrl+R Right Align Ctrl+J Justify
N av i gat i o n Sh or t cu t sSpacebar Next SlideBackspace Previous SlideCtrl+Home First SlideCtrl+End Last SlideEsc End SlideShow
Keyboard Shortcuts
Create New Presentation: C l i c k File Tab, select New Open a Presentation: Click File Tab, select OpenSave a Presentation: Click File Tab, select SaveSave Presentation with a New Name: Click File Tab, select Save As,type in the titleChange File Type: Click File Tab, select Export, choose the file typePrint Presentation: Click File Tab, choose Print, adjust printing settings
Program Basics Text Selection:Word: Double-click the wordSentence: Ctrl and click in the sentenceParagraph: Triple-click the paragraph
Keys to Remember:Backspace: Erases back one spaceDelete: Erases forward one spaceNum Lock: Controls the 10-key pad
Program LayoutQuick Access Toolbar Ti t le Bar M i n im i ze Max im ize C lose
Tab
Status Bar
Notes Pane
Slide Sorter
Grou p
Zoom S l id erV iews
Slide Pane
Scroll Bar
Ribbon

Formatting
Paragraph Grou p
Home Tab
Using the Clipboard Group:Cut and Copy Text: Select the text and click on the Cut or Copy button Paste Text: Put insertion point where you want the text and click on the Paste button Copy Formatting: Select text with formatting, click the Format Painter button, select text you want to apply the formatting
Formatting Fonts Using the Font Group:Style: Use the Bold, Italics and Underline buttonsType: Choose an option from the Font ListSize: Choose an option from the Font Size ListColor:Choose an option by clicking the Font Color Button
Editing GroupFind Text: Click the Find buttonReplace Text: Click the Replace buttonS lid es GroupHolds options for adding a new slide, changing layout and deleting a slide.
Drawing GroupHolds options for adding shapes, arranging the shapes, applying quick styles, changing the shape’s color, border and effects.
Using the Paragraph Group:Change Paragraph Alignment:Click the left, right, center or justify buttonsIndent Paragraph:Click Increase Indent ButtonDecrease an Indent:Click Decrease Indent ButtonAdjust Line Spacing:Click the Line Spacing button and choose from the listCreate a Bulleted or Numbered List:Select the paragraph, click on the Bullets or Numbering button
You can also change the text direction, align text in the slide and convert to SmartArt using the Paragraph group.
Format the Slide Background: Click Format Background in the Customize Group and edit the options to fit your needs
Using the Design Tab:Change the Slide Size: Click Slide Size in the Customize GroupChange Slide Orientation: Click Slide Size in the Customize Group, select Custom Slide Size and change the orientationAdd a Theme: Click the theme you want in the Themes group and it will be applied
Clipboard Grou p S lides Grou p Font Grou p Drawing Grou p Editing Grou p
Design Tab
Themes Group Customize Grou pVariants Grou p

The Insert Tab
Illustrations Grou p
Links Grou p Media GroupText Grou p
To Create a Chart: Click the Insert tab, click the chart button in the Illustrations group, choose the type of chart you want to display the data and use the Excel spreadsheet’s cells to insert the data you want represented in the chart
C harts
Use the Chart Tools section of the Ribbon to change the Design, Layout and Format of the chart.
Use the Table Tools section of the Ribbon to change the Design and Layout of the table.
Insert a Table: Click t he I nsert tab, click the table button in the Tables group and select Insert Table Insert a Column or Row: Click the Layout tab under Table Tools, use the commands in the Rows & Columns groupDelete a Column or Row: Select the item you want to delete, click the Layout tab under Table Tools, click Delete button in the Rows & Columns group
Table s
GraphicsAdding Pictures: Click the Picture button in the Images group, locate the picture you want to addAdding Screen Shot: Click the Screen Shot button in the Images group, locate the screen shot you want to add Adding Shapes: Click the Shapes button in the Illustrations group and choose from the drop down menuAdding SmartArt: Click the SmartArt button in the Illustrations group and choose the SmartArt you want to use Adding WordArt: Click WordArt in the Text group and choose the option you would like to useAdding a Photo Album: Click Photo Album in the Images group and choose the album you need to insert
Items to AddText Box: Click Text box in the Text groupHeader & Footer: Click the Header & Footer button in the Text group and choose the options you wantDate & Time: Click the Date & Time button in the Text groupSlide Numbers: Click the Slide Number button in the Text groupHyperlinks: Click Hyperlink in the Links groupSymbols: Click Symbols and choose the symbol you need from the gallery which appearsMovie: Click the Movie button in the Media group and choose where the movie f ile is locatedSound: Click the Sound button in the Media group choose the option you need such as CD Music
Insert Tab
Slides Grou p Tables Grou p Images
Group Comments Grou p
Symbols Grou p

Slide Masters Slide Master Tab
Edit Master Grou p Master Layout Grou p Edit Theme Grou p
Size Grou pBackground Grou p
View Slide Master: Cl ick on the Views tab and choose Slide Master in the Presentation Views group
Use Slide Masters: -To create a custom presentation design -To add items to certain slide types
ViewsViewing Options: Normal: Default view which includes the outline, slide and notes panesSlide Sorter: Displays all of the slides in the presentation as thumbnailsSlide Show: Displays presentation as a slide showMaster Views: Allow you to make changes to the layout of the presentation and handouts without changing the content
Add Slide Transitions: Choose slide, click the Transitions tab on the Ribbon and in the Transition to this Slide group choose the transition you wantAdd Animation to Object: Select the object, click the Animation Styles button in the Animations group, choose the animation you want to addAdd Slide Timings: Click the Slide Show tab, click the Rehearse Timings button in the Set up group, navigate through presentation, click yes to save timings
Delivery, Transitions & Animation
To present a slide show, click the Slide Show button on the status bar.
Your Notes....
Close Master Button