powerpoint presentation of essential concepts powerpoint presentation of essential concepts chalice...
TRANSCRIPT
PowerPoint PresentationPowerPoint Presentationof Essential Conceptsof Essential Concepts
Chalice TillisChalice Tillis
LEM 511LEM 511
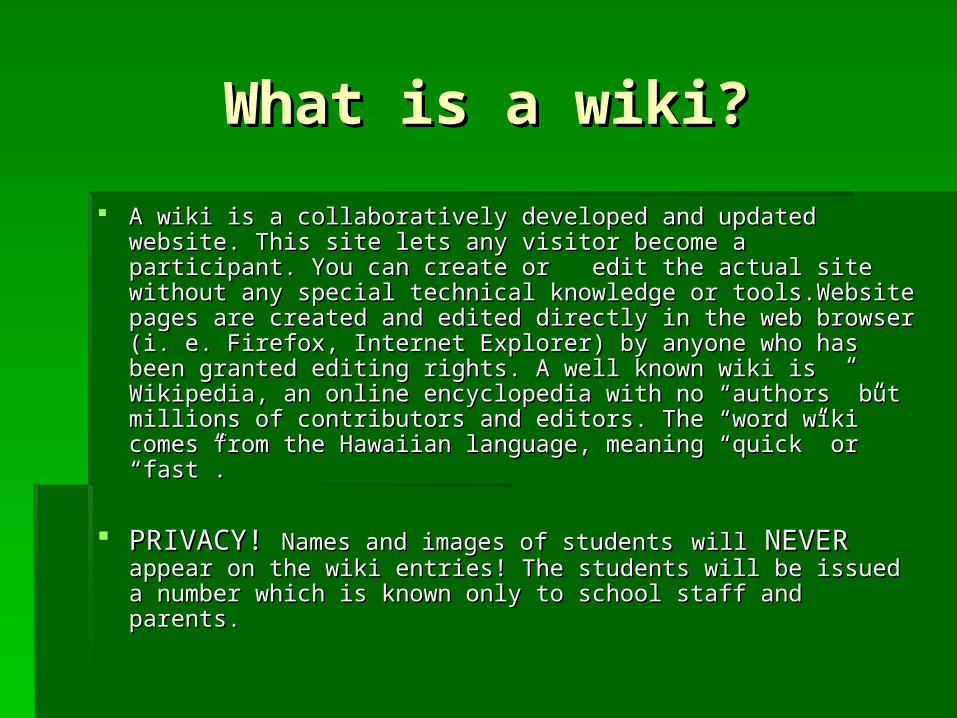
What is a wiki?What is a wiki?
A wiki is a collaboratively developed and updated website. This A wiki is a collaboratively developed and updated website. This site lets any visitor become a participant. You can create or edit site lets any visitor become a participant. You can create or edit the actual site without any special technical knowledge or the actual site without any special technical knowledge or tools.Website pages are created and edited directly in the web tools.Website pages are created and edited directly in the web browser (i. e. Firefox, Internet Explorer) by anyone who has been browser (i. e. Firefox, Internet Explorer) by anyone who has been granted editing rights. A well known wiki is Wikipedia, an online granted editing rights. A well known wiki is Wikipedia, an online encyclopedia with no “authors” but millions of contributors and encyclopedia with no “authors” but millions of contributors and editors. The “word wiki” comes from the Hawaiian language, editors. The “word wiki” comes from the Hawaiian language, meaning “quick” or “fast”.meaning “quick” or “fast”.
PRIVACY! PRIVACY! Names and images of studentsNames and images of students willwill NEVER NEVER appear appear on the wiki entries! The students will be issued a number which is on the wiki entries! The students will be issued a number which is known only to school staff and parents.known only to school staff and parents.

How can I use the wiki in How can I use the wiki in my classroom?my classroom?
Wikis can be used with any grade levelWikis can be used with any grade level Students work independently and collaboratively with classmates and have Students work independently and collaboratively with classmates and have
opportunities to share their work with the entire classopportunities to share their work with the entire class It can be used to post homework, concepts, vocabulary etc., and assignments (So It can be used to post homework, concepts, vocabulary etc., and assignments (So
much for “leaving your book at school”) much for “leaving your book at school”) Research projectsResearch projects Writing projectsWriting projects Post examples of students workPost examples of students work
Encourages group social interaction and collaborationEncourages group social interaction and collaboration
* * Examples of wikis in the classroom will be posted at the end of this power point.Examples of wikis in the classroom will be posted at the end of this power point.
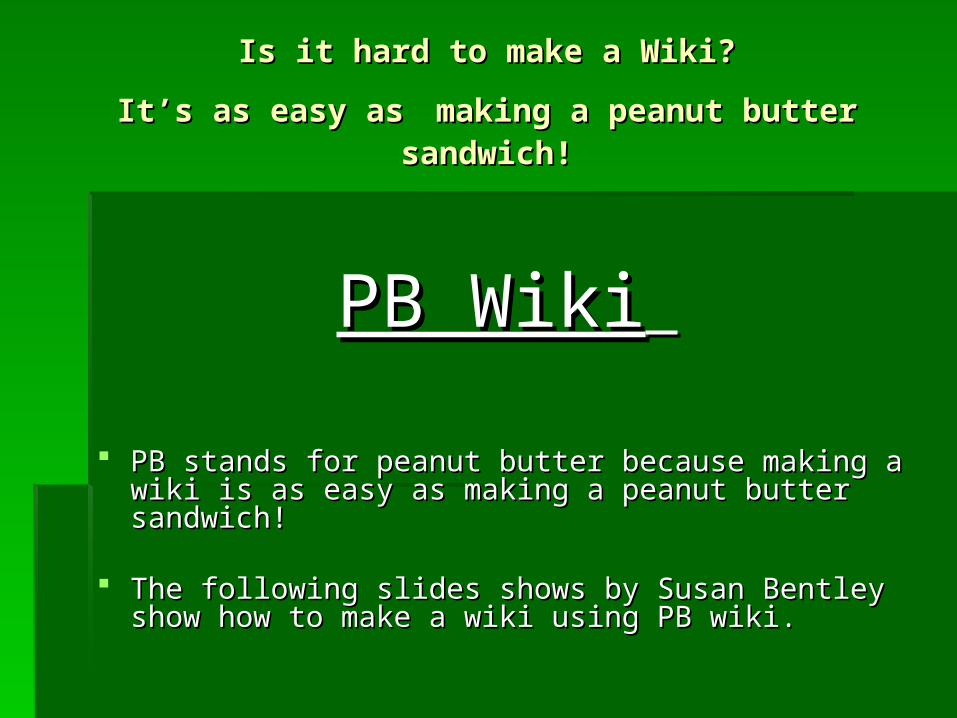
Is it hard to make a Wiki?Is it hard to make a Wiki?
It’s as easy asIt’s as easy as making a peanut butter making a peanut butter sandwich!sandwich!
PB WikiPB Wiki
PB stands for peanut butter because making a wiki is PB stands for peanut butter because making a wiki is as easy as making a peanut butter sandwich!as easy as making a peanut butter sandwich!
The following slides shows by Susan Bentley show The following slides shows by Susan Bentley show how to make a wiki using PB wiki.how to make a wiki using PB wiki.

How to create a How to create a wikiwiki
using pbworksusing pbworks
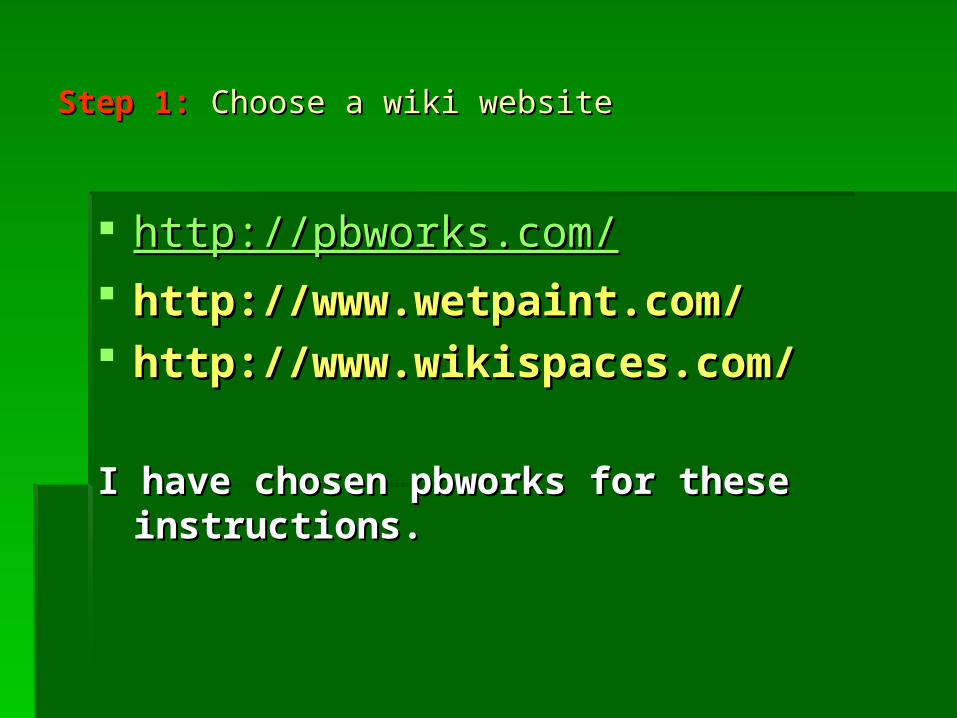
Step 1:Step 1: Choose a wiki websiteChoose a wiki website
http://pbworks.com/http://pbworks.com/ http://www.wetpaint.com/ http://www.wetpaint.com/ http://www.wikispaces.com/http://www.wikispaces.com/
I have chosen pbworks for these instructions.I have chosen pbworks for these instructions.
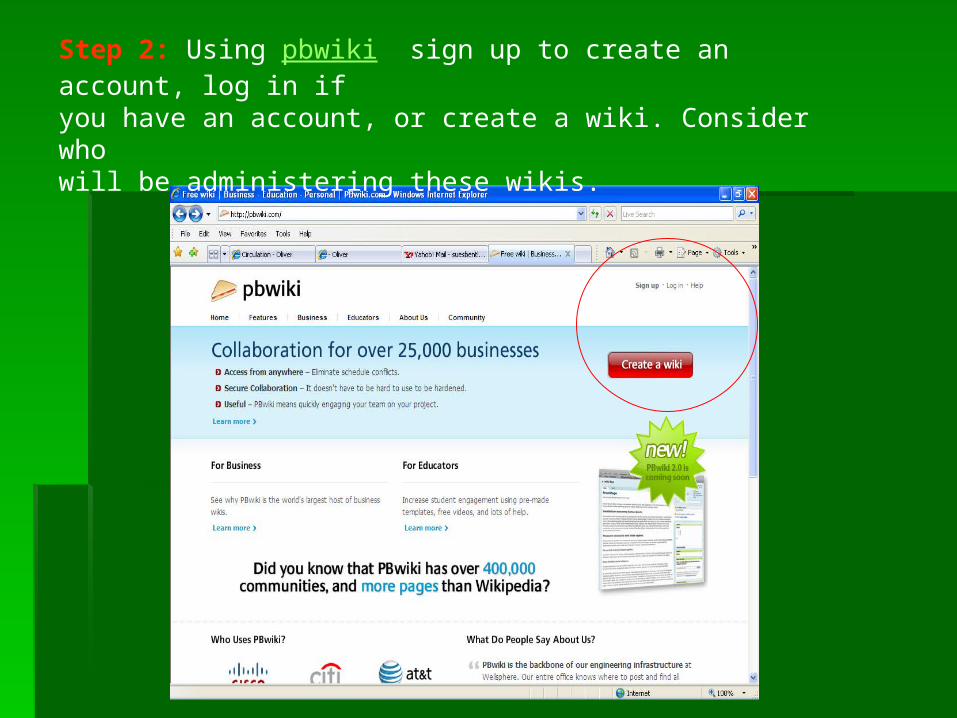
Step 2: Using pbwiki sign up to create an account, log in ifyou have an account, or create a wiki. Consider who will be administering these wikis.

In your account the wikis you have created will be In your account the wikis you have created will be listed.listed.

Step 3:Step 3: From this page you can access any of those listed or From this page you can access any of those listed or scroll down to create a new wiki.scroll down to create a new wiki.

Step 4:Step 4: Create a wiki thinking carefully about the URL you will Create a wiki thinking carefully about the URL you will create. We use “tclibrary” as a preface to provide an identity create. We use “tclibrary” as a preface to provide an identity and an umbrella of association. and an umbrella of association. i.e. i.e. http://tclibrary-vcebiology.pbwiki.comhttp://tclibrary-vcebiology.pbwiki.com Select “education” from the menu if appropriate.Select “education” from the menu if appropriate.

Step 5:Step 5: Now you can set the password (invite key) and set Now you can set the password (invite key) and set your wiki for public or private viewing, and check the Terms of your wiki for public or private viewing, and check the Terms of Service.Service.

Step 6:Step 6: You will be offered the option to upgrade your wiki or You will be offered the option to upgrade your wiki or to just continue on with a free wiki.to just continue on with a free wiki.

Step 7:Step 7: Now you can begin to create your wiki space Now you can begin to create your wiki space to your requirements.to your requirements.
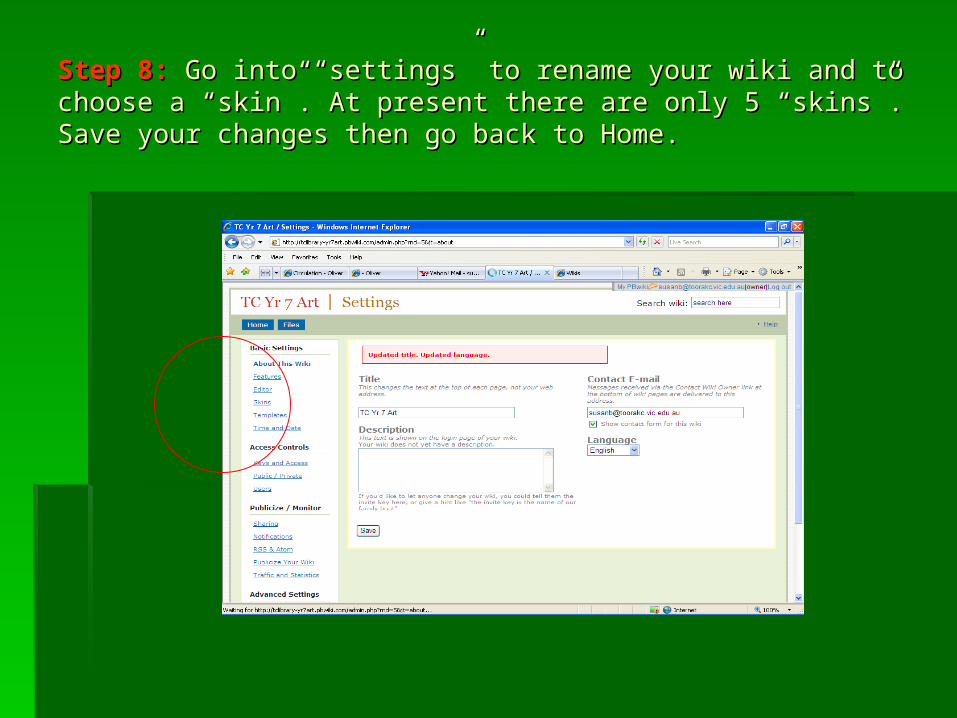
Step 8:Step 8: Go into “settings” to rename your wiki and to choose a Go into “settings” to rename your wiki and to choose a “skin”. At present there are only 5 “skins”. Save your changes “skin”. At present there are only 5 “skins”. Save your changes then go back to Home.then go back to Home.

Step 9:Step 9: Now edit your front page. I like to use this page as a Now edit your front page. I like to use this page as a title page, but you can really do whatever you want. title page, but you can really do whatever you want.
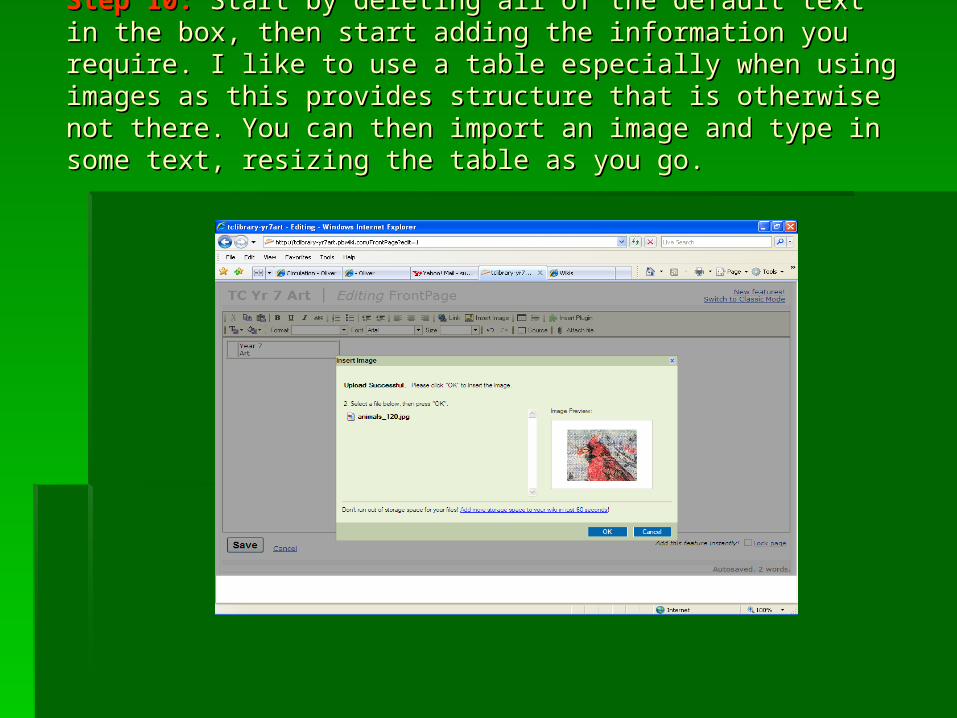
Step 10:Step 10: Start by deleting all of the default text in the box, Start by deleting all of the default text in the box, then start adding the information you require. I like to use a then start adding the information you require. I like to use a table especially when using images as this provides structure table especially when using images as this provides structure that is otherwise not there. You can then import an image and that is otherwise not there. You can then import an image and type in some text, resizing the table as you go.type in some text, resizing the table as you go.
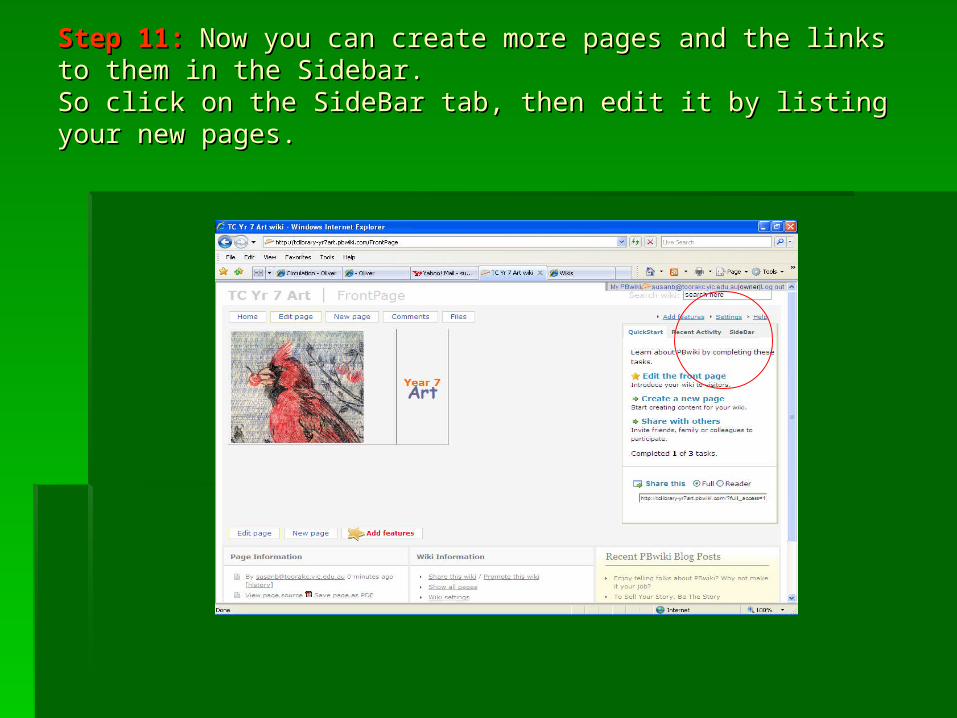
Step 11:Step 11: Now you can create more pages and the links to Now you can create more pages and the links to them in the Sidebar.them in the Sidebar.So click on the SideBar tab, then edit it by listing your new So click on the SideBar tab, then edit it by listing your new pages.pages.
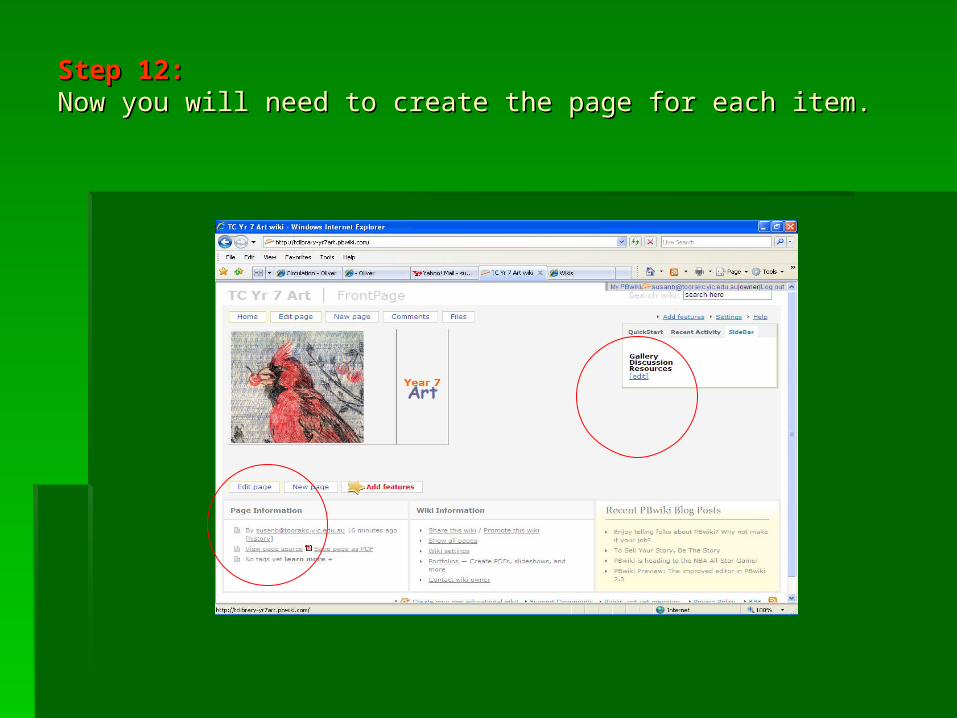
Step 12:Step 12: Now you will need to create the page for each item.Now you will need to create the page for each item.

Step 13:Step 13: You can choose the default of “No template” or You can choose the default of “No template” or select one that is offered. Then click on “Create new page”. select one that is offered. Then click on “Create new page”. The new page will open ready for you to add content or you The new page will open ready for you to add content or you can choose to do this later.can choose to do this later.

Step 14:Step 14: Once you have created all of the new pages you Once you have created all of the new pages you require, you will need to provide links to them via the SideBar. require, you will need to provide links to them via the SideBar. So reopen the SideBar for editing. Highlight the text, and then So reopen the SideBar for editing. Highlight the text, and then click on “Link” to access the box. Choose Link Type as Wiki click on “Link” to access the box. Choose Link Type as Wiki Page and locate the appropriate wiki page in the next drop-Page and locate the appropriate wiki page in the next drop-down menu. All of the new pages you created should be there. down menu. All of the new pages you created should be there. Say OK and repeat this process for all of the new pages. Save Say OK and repeat this process for all of the new pages. Save your changes.your changes.
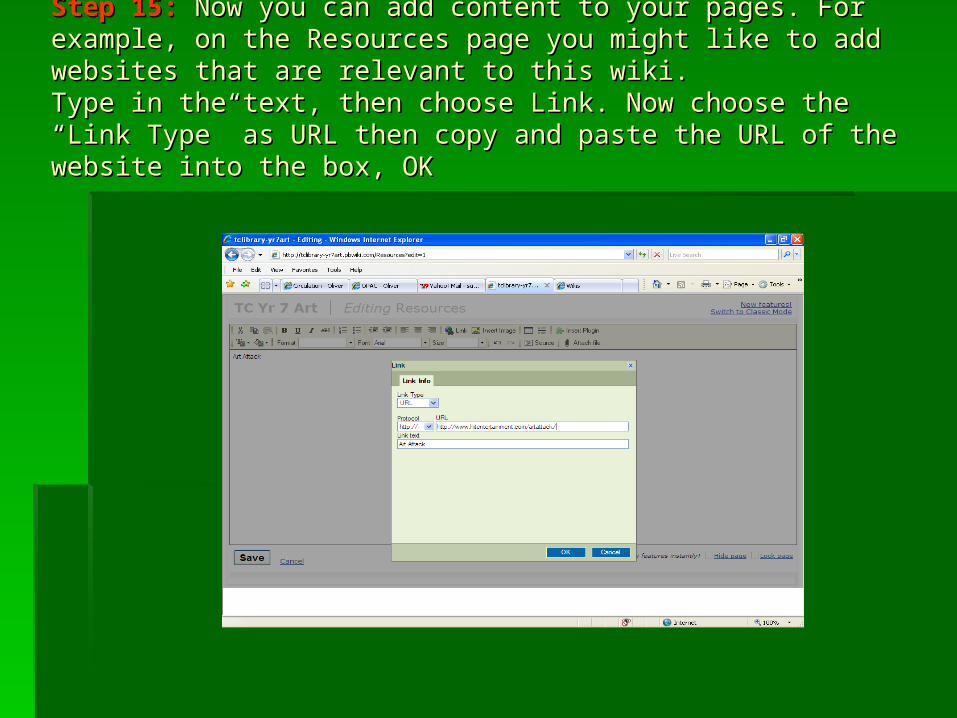
Step 15:Step 15: Now you can add content to your pages. For Now you can add content to your pages. For example, on the Resources page you might like to add websites example, on the Resources page you might like to add websites that are relevant to this wiki.that are relevant to this wiki.Type in the text, then choose Link. Now choose the “Link Type” Type in the text, then choose Link. Now choose the “Link Type” as URL then copy and paste the URL of the website into the as URL then copy and paste the URL of the website into the box, OKbox, OK

The “Resources” page created will now look like this with live The “Resources” page created will now look like this with live links: links:

Step 16:Step 16: To add a video that will play automatically.To add a video that will play automatically.Edit a page then “Insert Plugin”, click on “Video”.Edit a page then “Insert Plugin”, click on “Video”.
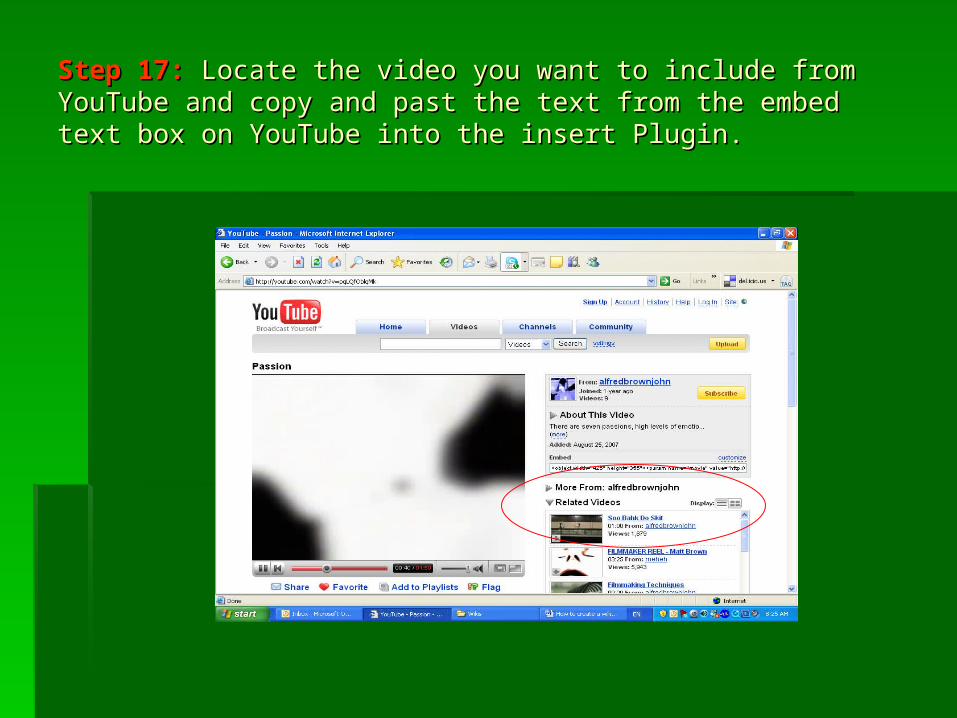
Step 17:Step 17: Locate the video you want to include from YouTube Locate the video you want to include from YouTube and copy and past the text from the embed text box on and copy and past the text from the embed text box on YouTube into the insert Plugin. YouTube into the insert Plugin.
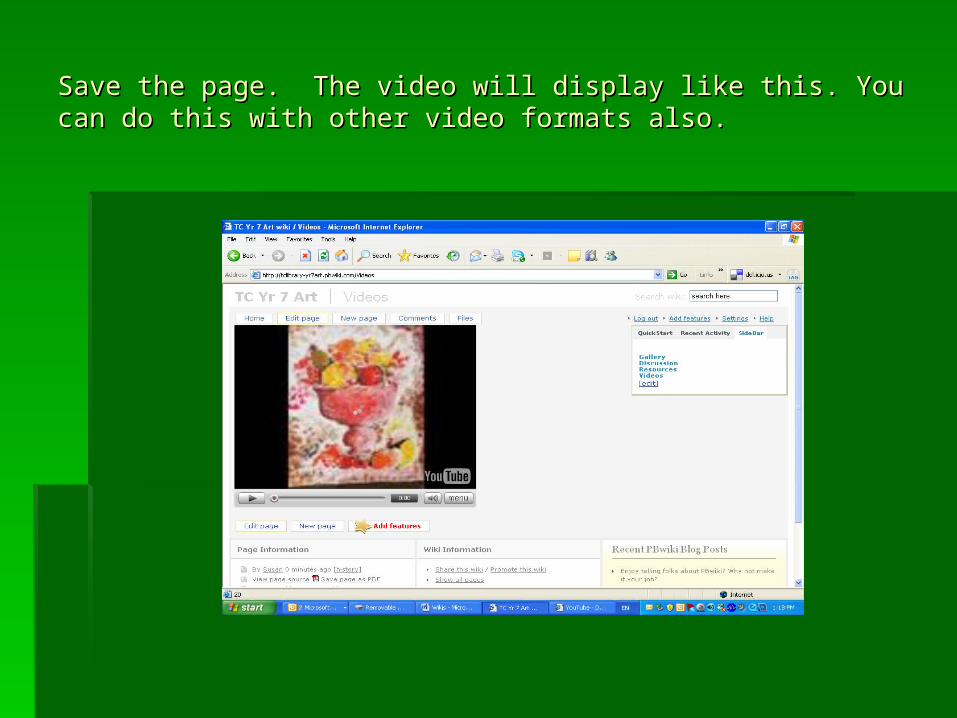
Save the page. The video will display like this. You can do this Save the page. The video will display like this. You can do this with other video formats also.with other video formats also.
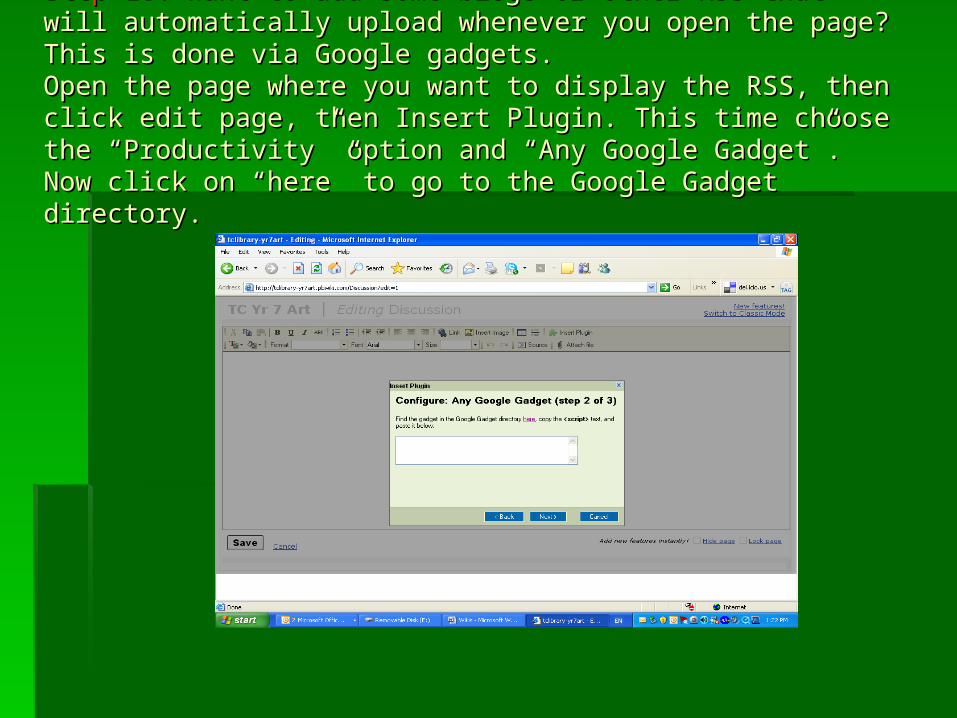
Step 18:Step 18: Want to add some blogs or other RSS that will Want to add some blogs or other RSS that will automatically upload whenever you open the page? This is automatically upload whenever you open the page? This is done via Google gadgets.done via Google gadgets.Open the page where you want to display the RSS, then click Open the page where you want to display the RSS, then click edit page, then Insert Plugin. This time choose the edit page, then Insert Plugin. This time choose the “Productivity” option and “Any Google Gadget”. Now click on “Productivity” option and “Any Google Gadget”. Now click on “here” to go to the Google Gadget directory.“here” to go to the Google Gadget directory.

Step 19:Step 19: To find a gadget for blogs (or RSS) type RSS into the To find a gadget for blogs (or RSS) type RSS into the search box and search. A few options will appear and you can search box and search. A few options will appear and you can decide which one is best for you.decide which one is best for you.

Step 20:Step 20: Click “Add to your webpage” and then fill in the form Click “Add to your webpage” and then fill in the form with the appropriate details. You will need to find the RSS feed with the appropriate details. You will need to find the RSS feed URL from the blog you want to add to your wiki. URL from the blog you want to add to your wiki.
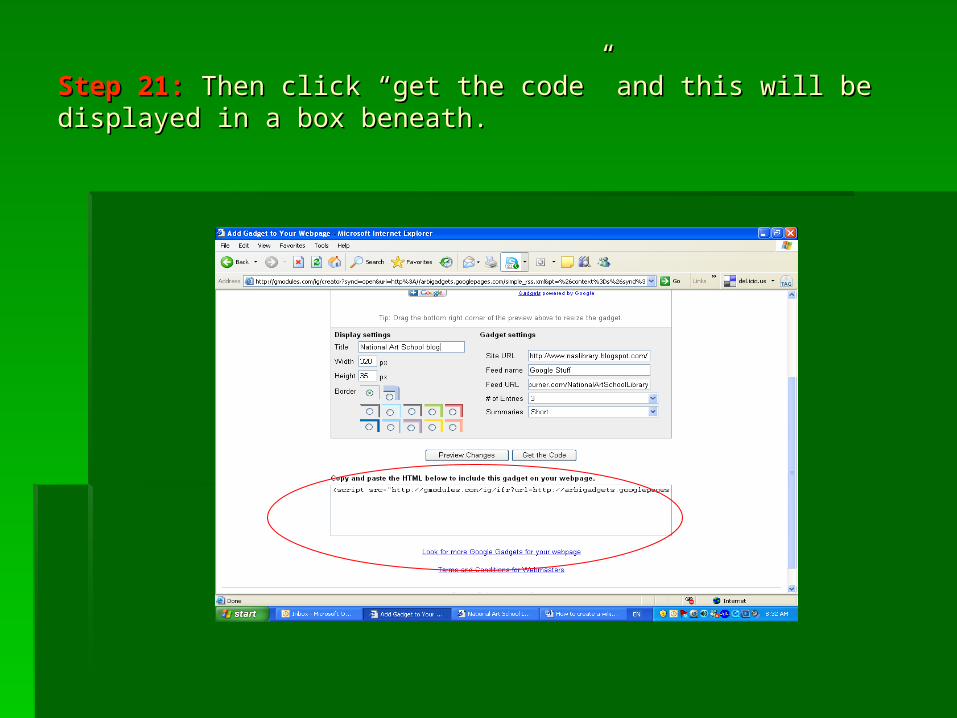
Step 21:Step 21: Then click “get the code” and this will be displayed in Then click “get the code” and this will be displayed in a box beneath. a box beneath.

Step 22:Step 22: Copy and paste this text into the wiki gadget plugin Copy and paste this text into the wiki gadget plugin box, then click next and Save.box, then click next and Save.

In your wiki the blog will RSS feed will be displayed In your wiki the blog will RSS feed will be displayed like this and will be refreshed each time the page is like this and will be refreshed each time the page is
visited.visited.
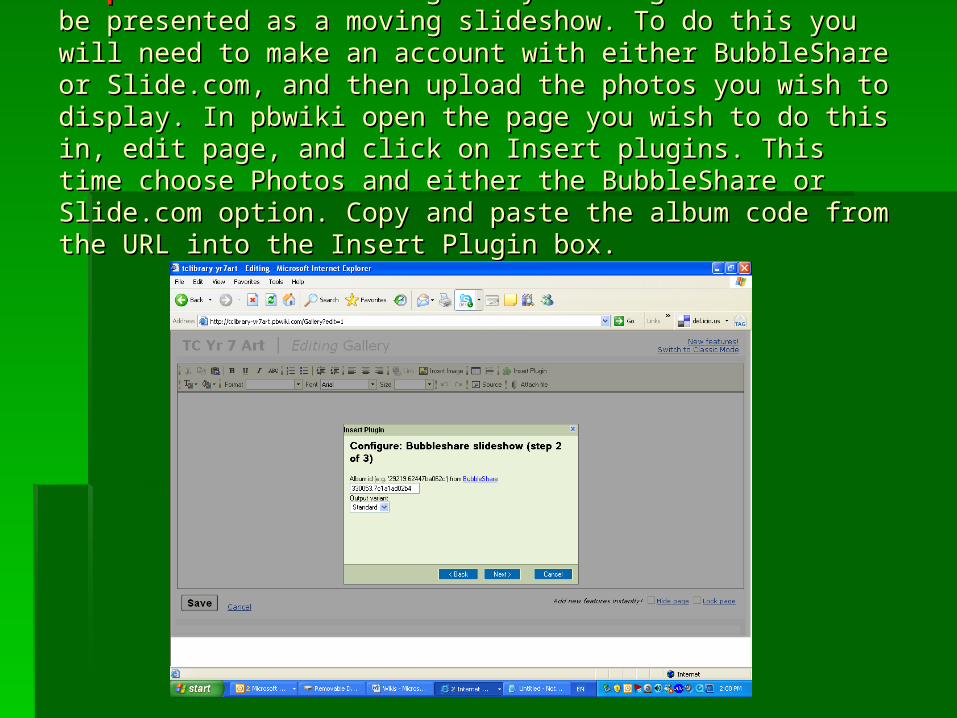
Step 23:Step 23: You can add a gallery of images that will be You can add a gallery of images that will be presented as a moving slideshow. To do this you will need to presented as a moving slideshow. To do this you will need to make an account with either BubbleShare or Slide.com, and make an account with either BubbleShare or Slide.com, and then upload the photos you wish to display. In pbwiki open the then upload the photos you wish to display. In pbwiki open the page you wish to do this in, edit page, and click on Insert page you wish to do this in, edit page, and click on Insert plugins. This time choose Photos and either the BubbleShare plugins. This time choose Photos and either the BubbleShare or Slide.com option. Copy and paste the album code from the or Slide.com option. Copy and paste the album code from the URL into the Insert Plugin box.URL into the Insert Plugin box.

Step 24:Step 24: Click next, finish and save. Your album of images will Click next, finish and save. Your album of images will scroll along automatically. scroll along automatically.
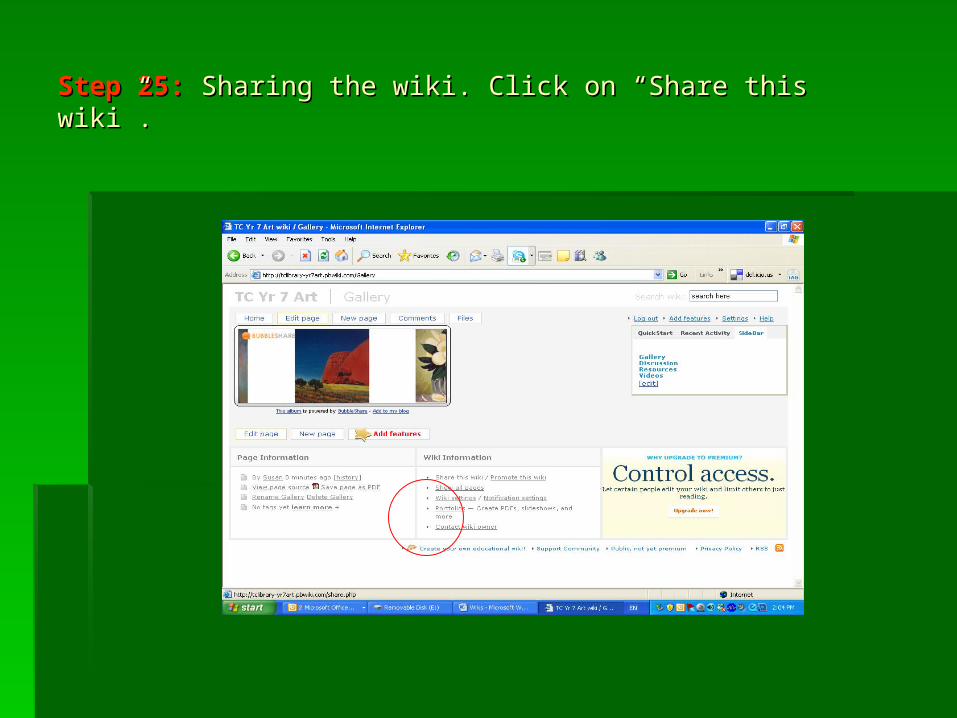
Step 25:Step 25: Sharing the wiki. Click on “Share this wiki”.Sharing the wiki. Click on “Share this wiki”.
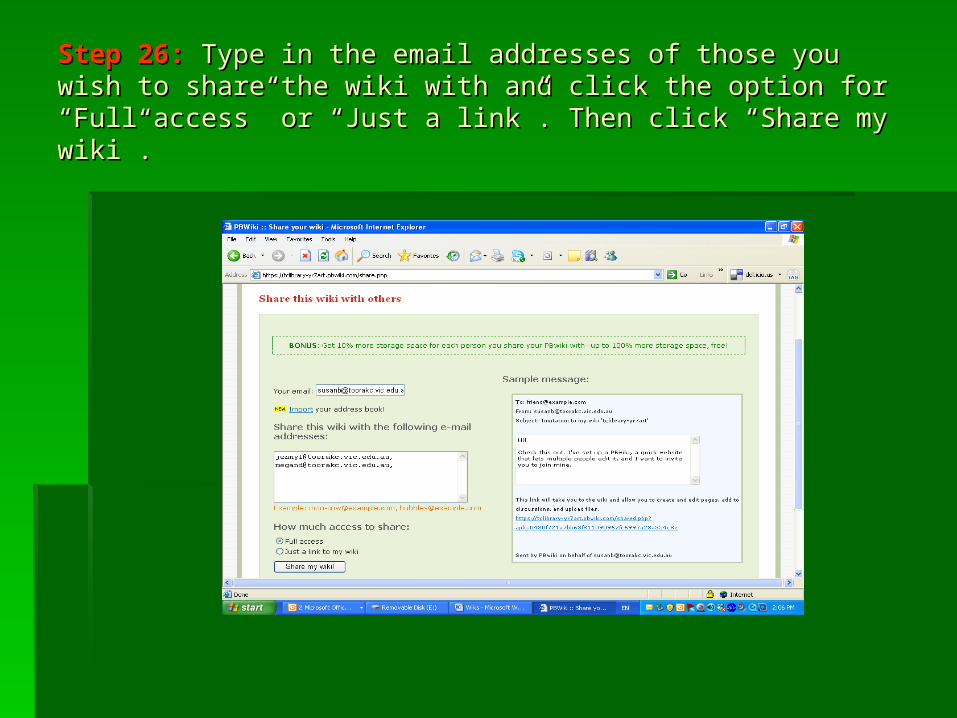
Step 26:Step 26: Type in the email addresses of those you wish to Type in the email addresses of those you wish to share the wiki with and click the option for “Full access” or “Just share the wiki with and click the option for “Full access” or “Just a link”. Then click “Share my wiki”.a link”. Then click “Share my wiki”.

Step 27:Step 27: On your library or school website create a webpage On your library or school website create a webpage
where the links to these wikis can be easily accessed.where the links to these wikis can be easily accessed.

There are lots of other plugins and There are lots of other plugins and functions such as: calendars, maps, functions such as: calendars, maps, spreadsheets, planners, visitor spreadsheets, planners, visitor counters, chat rooms, and more, that counters, chat rooms, and more, that can be added to your can be added to your pbwikipbwiki. Experiment . Experiment and see what works for you.and see what works for you.
This presentation created by This presentation created by
Susan Bentley Susan Bentley ©©20082008

Wiki Web sites Wiki Web sites
http://www.malts.ed.ac.uk/idel/assignment/wiki/http://www.malts.ed.ac.uk/idel/assignment/wiki/000022.htmlhttp://www.malts.ed.ac.uk/idel/assi000022.htmlhttp://www.malts.ed.ac.uk/idel/assignment/wiki/000022.htmlgnment/wiki/000022.html
http://webtools4u2use.wikispaces.com/Wikishttp://webtools4u2use.wikispaces.com/Wikis http://blog.pbwiki.com/category/educators-cornhttp://blog.pbwiki.com/category/educators-corn
er/er/ http://blog.pbwiki.com/category/educators-cornhttp://blog.pbwiki.com/category/educators-corn
er/er/