prc nueye tracking manual - liberator.net.au · calibration is the process by which the prc eye...
TRANSCRIPT

18735 Version 2.01
Eye Tracking System
User’s Guide
Accent® Devices with Empower™ Software Accent® Devices with NuVoice® Software
Look User’s Guide 2
Copyright and Trademark Information © 2019-2020 PRC-Saltillo. Non-commercial reprint rights for clinical or personal use granted with inclusion of copyright notice. Commercial use prohibited; may not be used for resale. Contact PRC-Saltillo for questions regarding permissible uses. Accent, Empower, Look, NuEye, and NuVoice are trademarks of PRC-Saltillo. The MINSPEAK®, SEMANTIC COMPACTION®, UNITY®, and UNIDAD® trademarks are under license from Semantic Compaction Systems, Inc. in the United States and other countries. PIXON® brand products are trademarks under license from Semantic Compaction Systems, Inc. in the United States and/or other countries. Microsoft and Windows are registered trademarks of Microsoft Corporation in the United States and/or other countries.
Contact Information Manufacturer Authorized Representative in the EU Importer
Prentke Romich Company 1022 Heyl Rd Wooster, OH 44691, USA Tel.: (330) 262-1984 · (800) 262-1984 Fax: (330) 262-4829 Email: [email protected] Web: www.saltillo.com
Prentke Romich GmbH Karthäuserstr. 3 D-34117 Kassel, Germany Tel.: (05 61) 7 85 59-0 Fax: (05 61) 7 85 59-29 Email: [email protected] Web : www.prentke-romich.de
Liberator Ltd “Whitegates”, 25-27 High Street Swinstead, Lincolnshire NG33 4PA, UK Tel.: +44 (0) 1733 370 470 Fax: +44 (0) 1476 552 473 Email: [email protected] Web: www.liberator.co.uk
Document Version 18735v2.01 · 03/12/2020 For Accent devices with Empower software or NuVoice software
Look User’s Guide 3
Contents Important Safety Guidelines ............................................................................................................................ 4 Introducing Your Look Eye Tracking System ....................................................................................................... 5 Attaching the Look Module: Accent 1000 ......................................................................................................... 6 Attaching the Look Module: Accent 1400-20..................................................................................................... 8 Attaching the Look Module: Accent 1400-30................................................................................................... 10 Positioning the User and Eye Tracking System ................................................................................................ 12
Look Eye Tracking System Parameters ................................................................................................................. 12 Positioning Guidelines .......................................................................................................................................... 13
Calibrating and Setting Up Eye Tracking in Empower ....................................................................................... 14 Starting Eye Tracking in Empower ........................................................................................................................ 14 Using the Positioning Guide ................................................................................................................................. 14 Calibrating Eye Tracking ....................................................................................................................................... 15 Configuring Calibration Settings ........................................................................................................................... 16 Adjusting Eye Tracking Selection Settings ............................................................................................................ 17
Setting up Dwell Selection ............................................................................................................................. 17 Setting up Blink Selection .............................................................................................................................. 18 Setting up Switch Selection ........................................................................................................................... 18
Pausing and Resuming Eye Tracking ..................................................................................................................... 19 Observing the User’s Performance ....................................................................................................................... 19 Adjusting Eye Tracking Settings ............................................................................................................................ 20 Adjusting Additional Eye Tracking Settings .......................................................................................................... 21 Adding Eye Tracking Shortcuts ............................................................................................................................. 22
Adding a Positioning Shortcut ....................................................................................................................... 22 Adding a Tracking Shortcut ........................................................................................................................... 23
Adjusting Additional Empower Settings ............................................................................................................... 24 Adjusting Feedback Settings.......................................................................................................................... 24 Adjusting Button Padding .............................................................................................................................. 24 Adjusting the Action of Empty Buttons ......................................................................................................... 24
Calibrating and Setting Up Eye Tracking in NuVoice ........................................................................................ 25 Starting Eye Tracking in NuVoice .......................................................................................................................... 25 Using the Track Status Box ................................................................................................................................... 26
Track Status Box ............................................................................................................................................ 26 Eye Tracking Positioning Markers ................................................................................................................. 27
Adjusting Positioning ............................................................................................................................................ 28 Correct Positioning ............................................................................................................................................... 29 Calibrating the Look Eye Tracking System ............................................................................................................ 30
Calibrating for the First Time ......................................................................................................................... 30 Adjusting Calibration Settings ....................................................................................................................... 31 Using Calibration Menu Settings ................................................................................................................... 32
Configuring a Selection Method ........................................................................................................................... 33 Choosing the Selection Type ......................................................................................................................... 33 Trying Out Your Settings ................................................................................................................................ 34
Pausing Look Eye Tracking .................................................................................................................................... 35 Changing Pointer Settings .................................................................................................................................... 36 Changing Tracking Settings ................................................................................................................................... 39 Changing Off-Screen Key Settings ........................................................................................................................ 40 Working with Profiles ........................................................................................................................................... 42
Selecting and Loading a Profile ..................................................................................................................... 42 Managing Eyegaze Profiles ............................................................................................................................ 43
Appendix A: Cleaning the Look Eye Tracking Module ...................................................................................... 45 Appendix B: Compliance Information ................................................................................................................. 46

Look User’s Guide 4
Important Safety Guidelines Emergencies
The device with the Look module attached is not intended to be an emergency call device or sole communication aid.
Cleaning, Maintaining, and Servicing Do not attempt to service or maintain the device or Look module when they are in use. Disconnect the charger and turn off the
device before cleaning or disinfecting the device or module.
If the module is damaged, call Service for assistance. Do not attempt to make repairs yourself.
Accessories Do not use accessories, detachable parts, or materials not described in this manual.
Do not use accessories, detachable parts, or materials in any other way than described in this user's guide.
Small Parts When you are installing the Look module, loose screws can be a choking hazard.
If you install the Look module on an Accent 1000, loose adapters can be a choking hazard.
Small parts can present a choking or other hazard.
Interference When operating the device and module in a medical environment, do not use with any product that is not medically approved.
Follow all rules for appropriate cell phone and wireless device use.
Do not use this module close to sources of RF/RFID radiation or you may encounter interference. Move away, if possible, from the source of the interference.
Mounting and Positioning A qualified person should analyze positioning to prevent repetitive stress injuries to the user.
A qualified person should install and adjust any mounts used, including switch mounts. Failure to install the mounting system according to the manufacturer's instructions may result in an injury to the user.
Do not place the device with the module attached where it is difficult to operate or difficult to disconnect from the charger.
Damage Do not use the module if the lens is cracked or broken.
Environment Do not use the system in an environment in which explosive or flammable gases could be present.
Water The device with the module is intended for use in normal communication situations. It is not waterproof, so use extreme caution
when using it around water. As with most electronic devices, you should never use the device when you are actually in the water (for example, a pool or bath).
Fatigue While the user is getting used to eye tracking, take frequent breaks to rest the user’s eyes and relax his or her concentration.
Some people may experience a certain amount of fatigue (due to intentional eye focusing and hard concentration) or even a dryness of the eyes (due to less frequent blinking) when first getting used to eye tracking. If you are experiencing fatigue or dry eyes, start off slowly and limit the length of your eye tracking sessions to your comfort level. Moisturizing eye drops can be helpful to combat dryness.
Seizures Some people may have epileptic seizures triggered by light flashes or patterns. This may occur while presented successive pictures
or video material, even if they have never had a seizure before. Observe the individual using the system. Move the person away from the system immediately and consult a physician if the individual shows the following or similar symptoms: involuntary movements, disorientation, convulsions, loss of awareness, or altered vision.
Infrared Emissions Your Look eye tracking system uses infrared (IR) technology. Certain medical devices are susceptible to disturbance by IR emissions.
Do not use the Look eye tracking system when in the vicinity of such susceptible medical devices. If you have questions about the susceptibility of a medical device, consult the manufacturer of the medical device or your health care provider.
If you have questions about the susceptibility of a medical device to the infrared technology that is part of your eye tracking system, consult the manufacturer of the medical device or your health care provider.

Look User’s Guide 5
Introducing Your Look Eye Tracking System Look® is an eye tracking system that provides hands-free, switch-free access to an Accent® device, allowing the user to select keys by gazing for a specified period of time to generate speech. The Look eye tracking system is compatible with Accent 1400-20 models, Accent 1400-30 models, and Accent 1000 models that have serial numbers 10000AC10 and higher or serial numbers between 5000AC10 and 9999AC10.
Before Using Your Look Eye Tracking System Please be sure to view the Important Safety Guidelines on page 4.
Mounting Your Accent Device and Look Module Mount your Accent device (with the Look module attached) to a wheelchair mount or table stand. If the Look module did not come already attached to your device, you must attach it before you can start using eye tracking.
• For instructions on attaching a Look module to an Accent 1000 device with a serial number 10000AC10 or higher or a serial number between 5000AC10 and 9999AC10, see “Attaching the Look Module: Accent 1000” on page 6.
• For instructions on attaching a Look module to an Accent 1400 device, see “Attaching the Look Module: Accent 1400-20” on page 8.
• For instructions on attaching a Look module to an Accent 1400 device, see “Attaching the Look Module: Accent 1400-30” on page 10.
Additional Considerations If you are using your Accent for the first time, plug in the battery charger.
When your Accent with the Look module attached is mounted on a wheelchair or a table stand and the Accent is charged, you are ready to position the user, calibrate eye tracking, and configure a selection method.
Look User’s Guide 6
Attaching the Look Module: Accent 1000 If you purchased the Look eye tracking system with your Accent 1000, the module is already attached to the device. Proceed to Starting Eye Tracking on page 14.
If you purchased the module separately: An extended-capacity battery was included in the package with the Look module. We recommend that you replace the battery in your device with the extended-capacity battery.
Follow the instructions in this section to attach the module to your device. Follow the instructions that came with the extended-capacity battery to replace your old battery. You will need a Phillips screwdriver.
The mounts used should be fitted by a qualified person. Failure to install the mounting system according to the manufacturer's instructions may result in an injury to the user. Be certain that the user's view is not obstructed by the mounting.
Loose screws and adapters can be choking hazards.
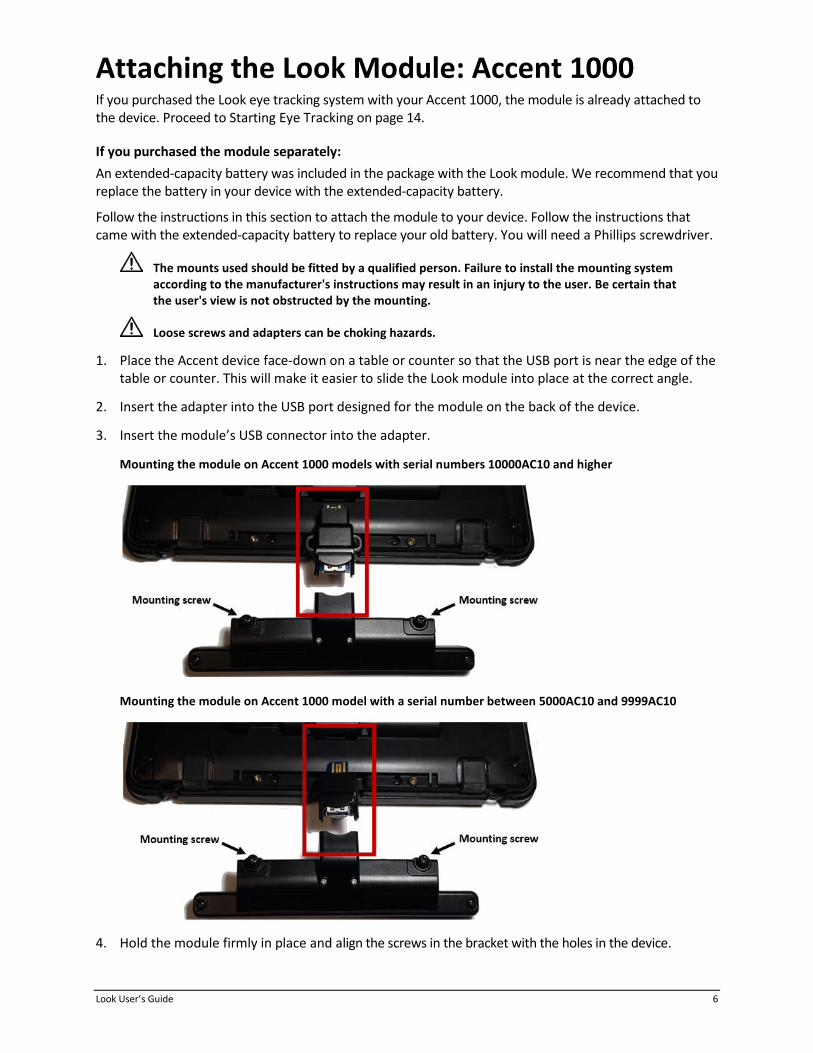
1. Place the Accent device face-down on a table or counter so that the USB port is near the edge of the table or counter. This will make it easier to slide the Look module into place at the correct angle.
2. Insert the adapter into the USB port designed for the module on the back of the device.
3. Insert the module’s USB connector into the adapter.
Mounting the module on Accent 1000 models with serial numbers 10000AC10 and higher
Mounting the module on Accent 1000 model with a serial number between 5000AC10 and 9999AC10
4. Hold the module firmly in place and align the screws in the bracket with the holes in the device.

Look User’s Guide 7
5. Tighten the screws evenly to make sure the module attaches flat against the device.
Important! Be sure each screw is actually threading into the holes in the device.
6. Now you can place your Accent device on a wheelchair mount or a table stand. Your Look eye tracking module is ready to use.
In this example, the head of the screw is flat against the module bracket …
but the screw is not threaded all the way into the hole in the device. The module sits unevenly against the device and will not work properly.
If this happens, loosen the screw and make sure it passes through both the upper and lower holes before tightening.
Look User’s Guide 8
Attaching the Look Module: Accent 1400-20 If you purchased the Look eye tracking system with your Accent 1400, the module is already attached to the device. If you purchased the module later, follow these instructions to attach it to the device. You can attach the module to a device with or without a frame.
Note: You will need a Phillips screwdriver.
The mounts used should be fitted by a qualified person. Failure to install the mounting system according to the manufacturer's instructions may result in an injury to the user. Be certain that the user's view is not obstructed by the mounting.
Loose screws can be choking hazards.
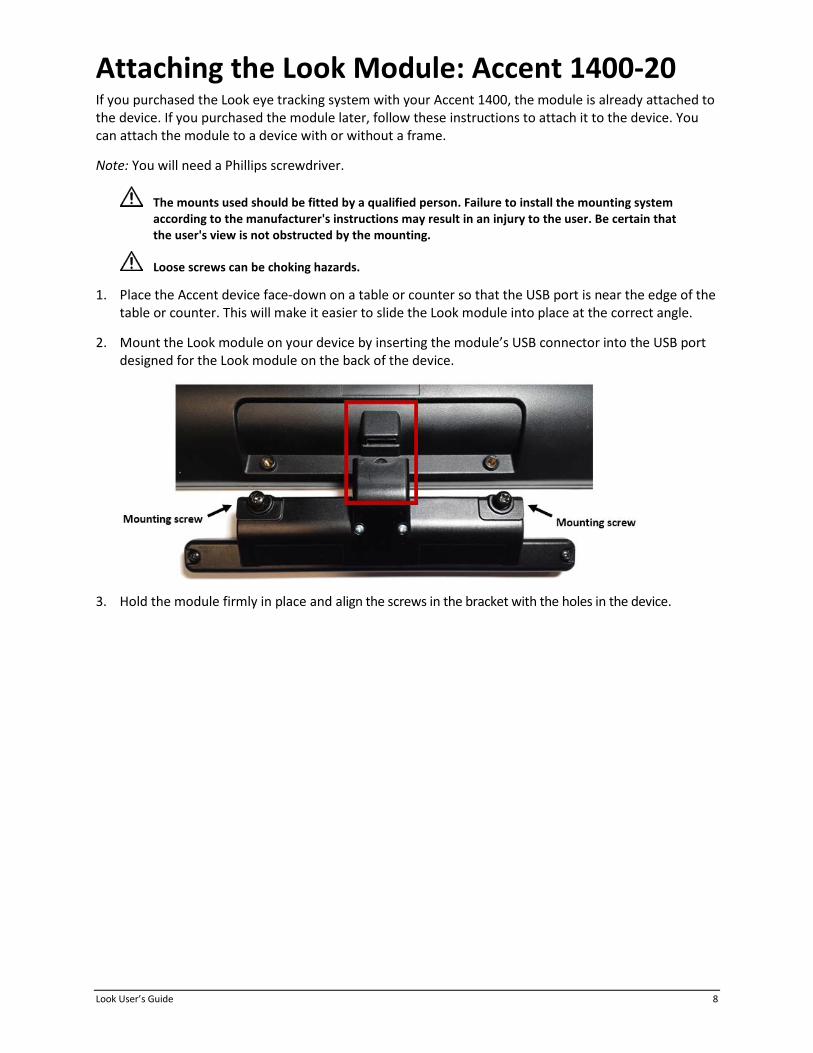
1. Place the Accent device face-down on a table or counter so that the USB port is near the edge of the table or counter. This will make it easier to slide the Look module into place at the correct angle.
2. Mount the Look module on your device by inserting the module’s USB connector into the USB port designed for the Look module on the back of the device.
3. Hold the module firmly in place and align the screws in the bracket with the holes in the device.

Look User’s Guide 9
4. Tighten the screws evenly to make sure the module attaches flat against the device.
Important! Be sure each screw is actually threading into the holes in the device.
5. Now you can place your Accent device on a wheelchair mount or a table stand. Your Look eye tracking module is ready to use.
In this example, the head of the screw is flat against the module bracket …
but the screw is not threaded all the way into the hole in the device. The module sits unevenly against the device and will not work properly.
If this happens, loosen the screw and make sure it passes through both the upper and lower holes before tightening.
Look User’s Guide 10
Attaching the Look Module: Accent 1400-30 If you purchased the Look eye tracking system with your Accent 1400, the module is already attached to the device. If you purchased the module later, follow these instructions to attach it to the device. You can attach the module to a device with or without a frame.
Note: You will need a Phillips screwdriver.
The mounts used should be fitted by a qualified person. Failure to install the mounting system according to the manufacturer's instructions may result in an injury to the user. Be certain that the user's view is not obstructed by the mounting.
Loose screws can be choking hazards.
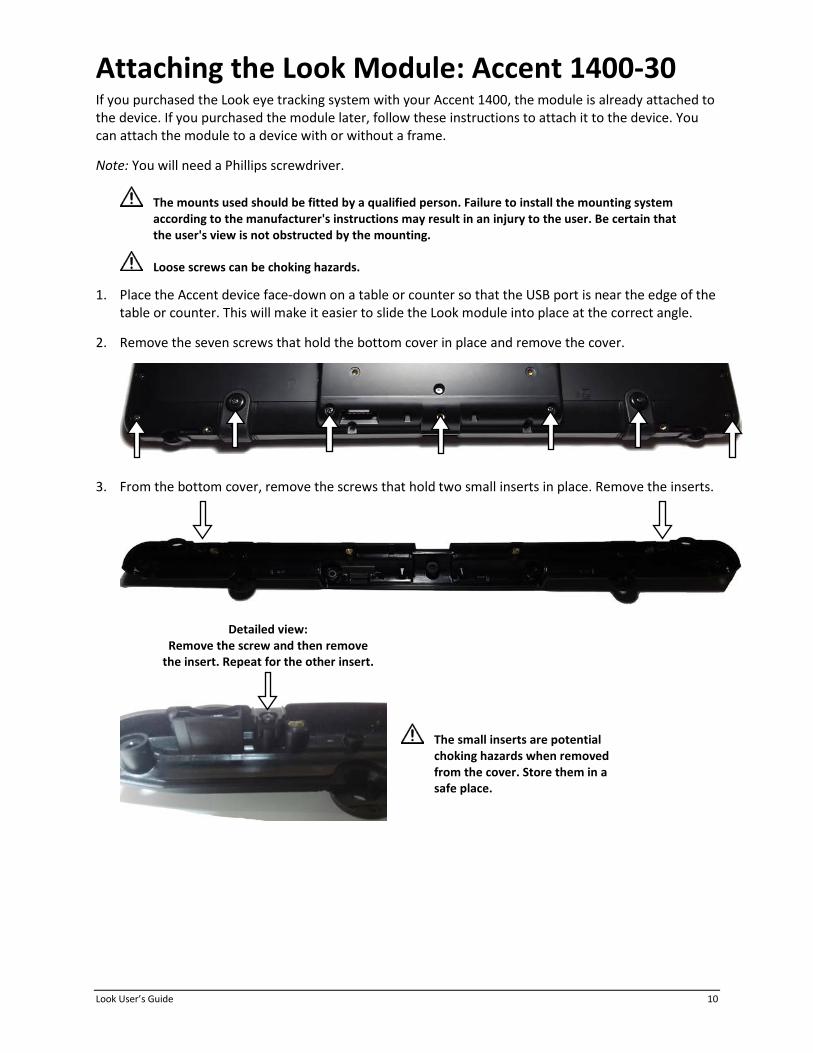
1. Place the Accent device face-down on a table or counter so that the USB port is near the edge of the table or counter. This will make it easier to slide the Look module into place at the correct angle.
2. Remove the seven screws that hold the bottom cover in place and remove the cover.
3. From the bottom cover, remove the screws that hold two small inserts in place. Remove the inserts.
The small inserts are potential choking hazards when removed from the cover. Store them in a safe place.
Detailed view: Remove the screw and then remove
the insert. Repeat for the other insert.
Look User’s Guide 11
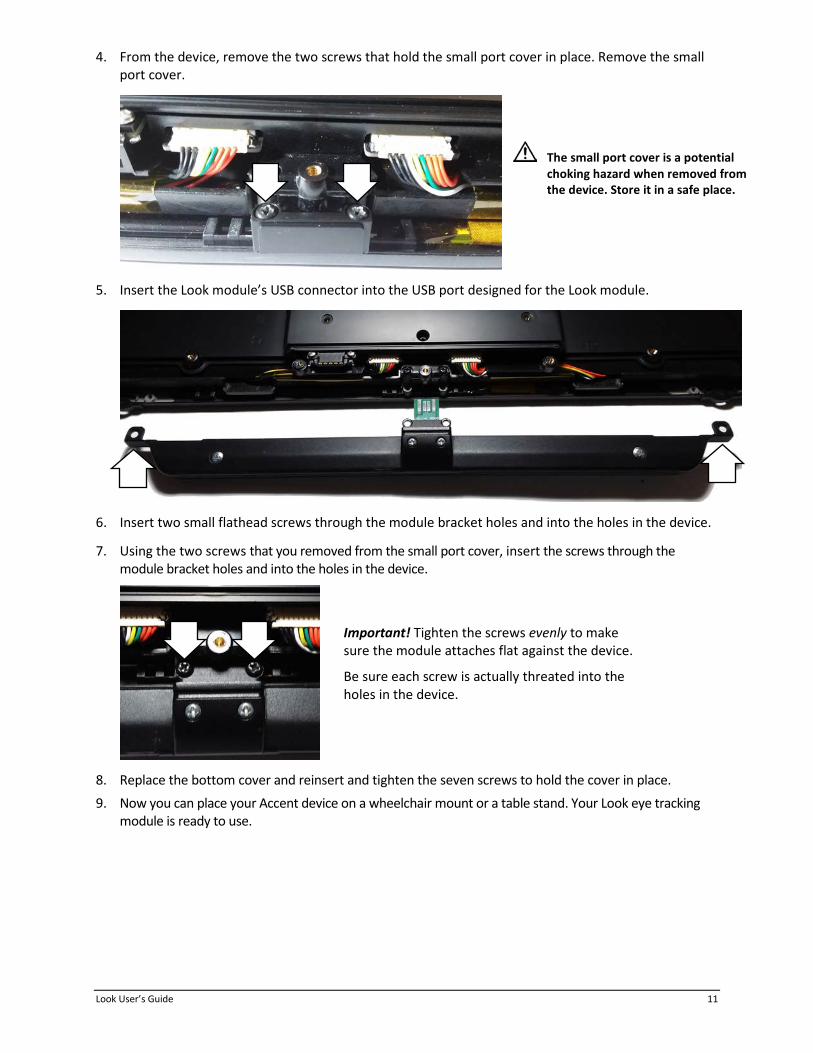
4. From the device, remove the two screws that hold the small port cover in place. Remove the small port cover.
5. Insert the Look module’s USB connector into the USB port designed for the Look module.
6. Insert two small flathead screws through the module bracket holes and into the holes in the device.
7. Using the two screws that you removed from the small port cover, insert the screws through the module bracket holes and into the holes in the device.
8. Replace the bottom cover and reinsert and tighten the seven screws to hold the cover in place. 9. Now you can place your Accent device on a wheelchair mount or a table stand. Your Look eye tracking
module is ready to use.
Important! Tighten the screws evenly to make sure the module attaches flat against the device.
Be sure each screw is actually threated into the holes in the device.
The small port cover is a potential choking hazard when removed from the device. Store it in a safe place.
Look User’s Guide 12
Positioning the User and Eye Tracking System Select the Tracking is ON/Tracking is OFF dropdown and select Pause. The dropdown will show Tracking is OFF. You are now ready to position the user and the Look module.
The positioning the eye tracking system in relation to the user is extremely important. The goal of positioning is to achieve a stable eye image for the Look eye tracking system to track. Because of this, you will probably need to try out different positions.
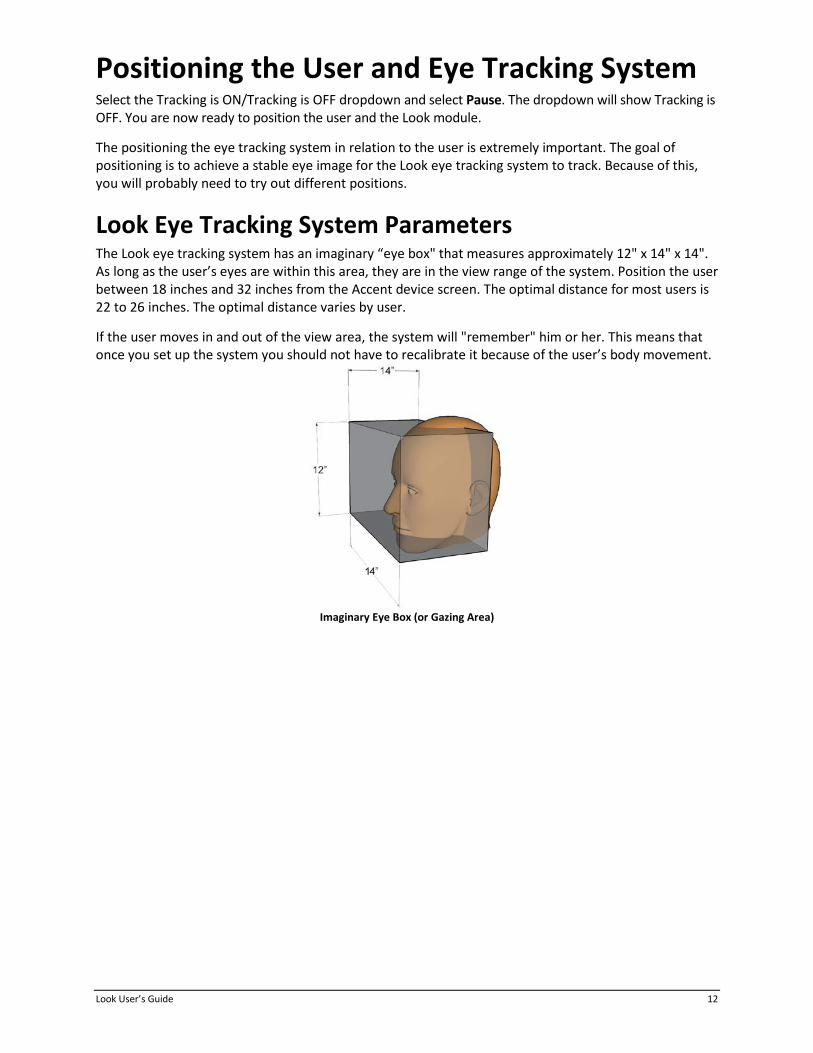
Look Eye Tracking System Parameters The Look eye tracking system has an imaginary “eye box" that measures approximately 12" x 14" x 14". As long as the user’s eyes are within this area, they are in the view range of the system. Position the user between 18 inches and 32 inches from the Accent device screen. The optimal distance for most users is 22 to 26 inches. The optimal distance varies by user.
If the user moves in and out of the view area, the system will "remember" him or her. This means that once you set up the system you should not have to recalibrate it because of the user’s body movement.
Imaginary Eye Box (or Gazing Area)

Look User’s Guide 13
Positioning Guidelines Meeting these positioning guidelines will help you achieve success with the Look eye tracking system.
• Both eyes must be within the eye box; however, one eye will work.
• The user should be approximately 22 to 26 inches from the Accent device’s screen.
• The user’s nose should be aimed at the midpoint or upper two-thirds of the screen.
• The user’s face should be parallel to the screen. If the user is tilted due to positioning or posture, the Accent device should be tilted at a similar angle.
• There should be no obstructions between the user’s face and the Accent device and Look module.
Typically, a communication partner helps during the eye tracking setup process.
• The communication partner can pause and resume eye tracking by touching with a finger the miniaturized positioning guide in the Multi-bar. Blue indicates eye tracking is active. Grey indicates eye tracking is paused.
• While selecting menu options the communication partner can touch the with a finger.
Look User’s Guide 14
Calibrating and Setting Up Eye Tracking in Empower Note: Accent devices ship with two software options—Empower and NuVoice. Choose which software to use based on your preferences and the features available. For information on how to use eye tracking with NuVoice software, please see “Calibrating and Setting Up Eye Tracking in NuVoice”, beginning on page 25.
Starting Eye Tracking in Empower Note: Eye Tracking appears as a selection only if you have an eye tracking module connected to your device.
To use eye movement to control your device, select Menu > Toolbox > User Settings > Access Method > Eye Tracking.
• The Eye Tracking window displays the positioning guide with calibration and eye tracking settings.
• A Tracking is ON/Tracking is OFF dropdown appears at the top of the screen. Once you configure eye tracking as the access method for a user, eye tracking is active and all settings saved for that user take effect immediately.
Recommendation: While the user is getting used to eye tracking, take frequent breaks to rest the user’s eyes and relax his or her concentration.
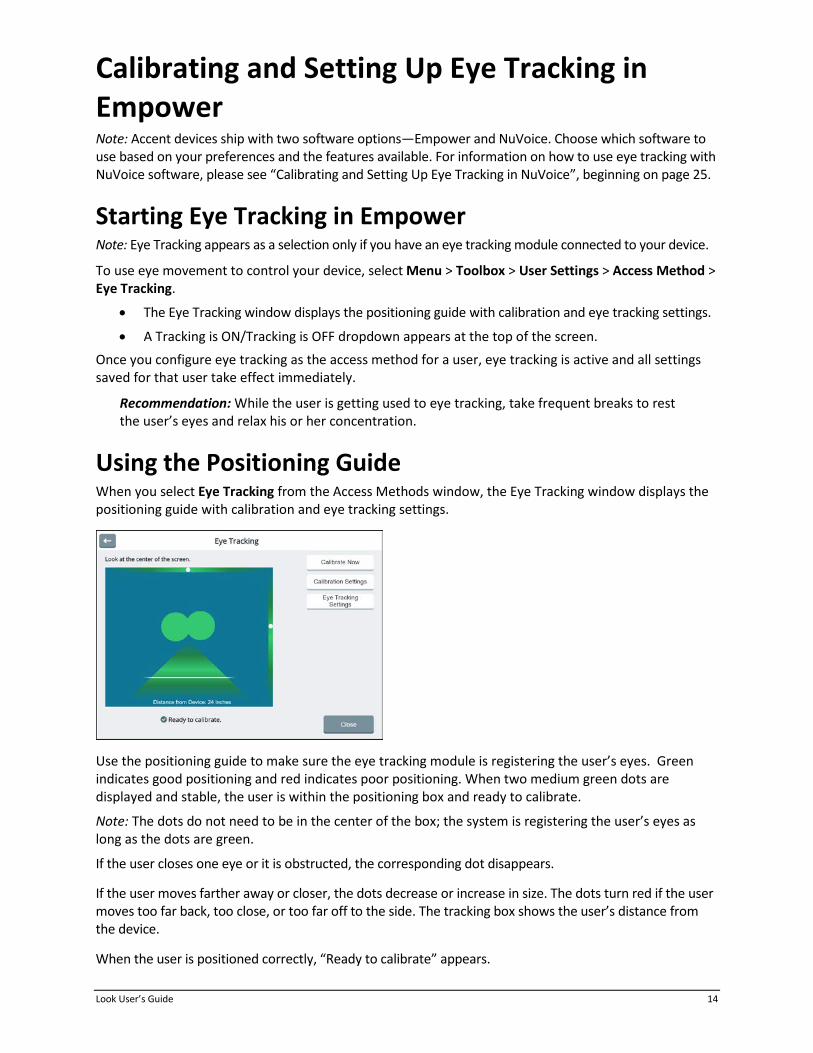
Using the Positioning Guide When you select Eye Tracking from the Access Methods window, the Eye Tracking window displays the positioning guide with calibration and eye tracking settings.
Use the positioning guide to make sure the eye tracking module is registering the user’s eyes. Green indicates good positioning and red indicates poor positioning. When two medium green dots are displayed and stable, the user is within the positioning box and ready to calibrate.
Note: The dots do not need to be in the center of the box; the system is registering the user’s eyes as long as the dots are green.
If the user closes one eye or it is obstructed, the corresponding dot disappears.
If the user moves farther away or closer, the dots decrease or increase in size. The dots turn red if the user moves too far back, too close, or too far off to the side. The tracking box shows the user’s distance from the device.
When the user is positioned correctly, “Ready to calibrate” appears.
Look User’s Guide 15
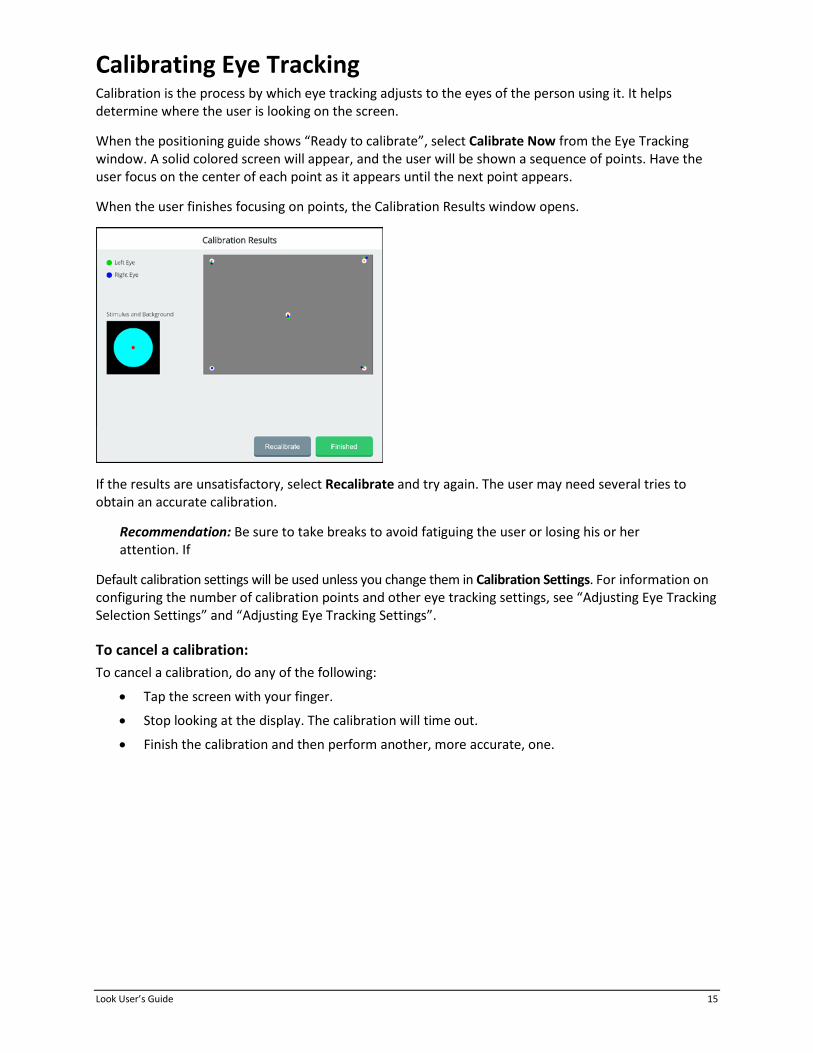
Calibrating Eye Tracking Calibration is the process by which eye tracking adjusts to the eyes of the person using it. It helps determine where the user is looking on the screen.
When the positioning guide shows “Ready to calibrate”, select Calibrate Now from the Eye Tracking window. A solid colored screen will appear, and the user will be shown a sequence of points. Have the user focus on the center of each point as it appears until the next point appears.
When the user finishes focusing on points, the Calibration Results window opens.
If the results are unsatisfactory, select Recalibrate and try again. The user may need several tries to obtain an accurate calibration.
Recommendation: Be sure to take breaks to avoid fatiguing the user or losing his or her attention. If
Default calibration settings will be used unless you change them in Calibration Settings. For information on configuring the number of calibration points and other eye tracking settings, see “Adjusting Eye Tracking Selection Settings” and “Adjusting Eye Tracking Settings”.
To cancel a calibration: To cancel a calibration, do any of the following:
• Tap the screen with your finger.
• Stop looking at the display. The calibration will time out.
• Finish the calibration and then perform another, more accurate, one.
Look User’s Guide 16
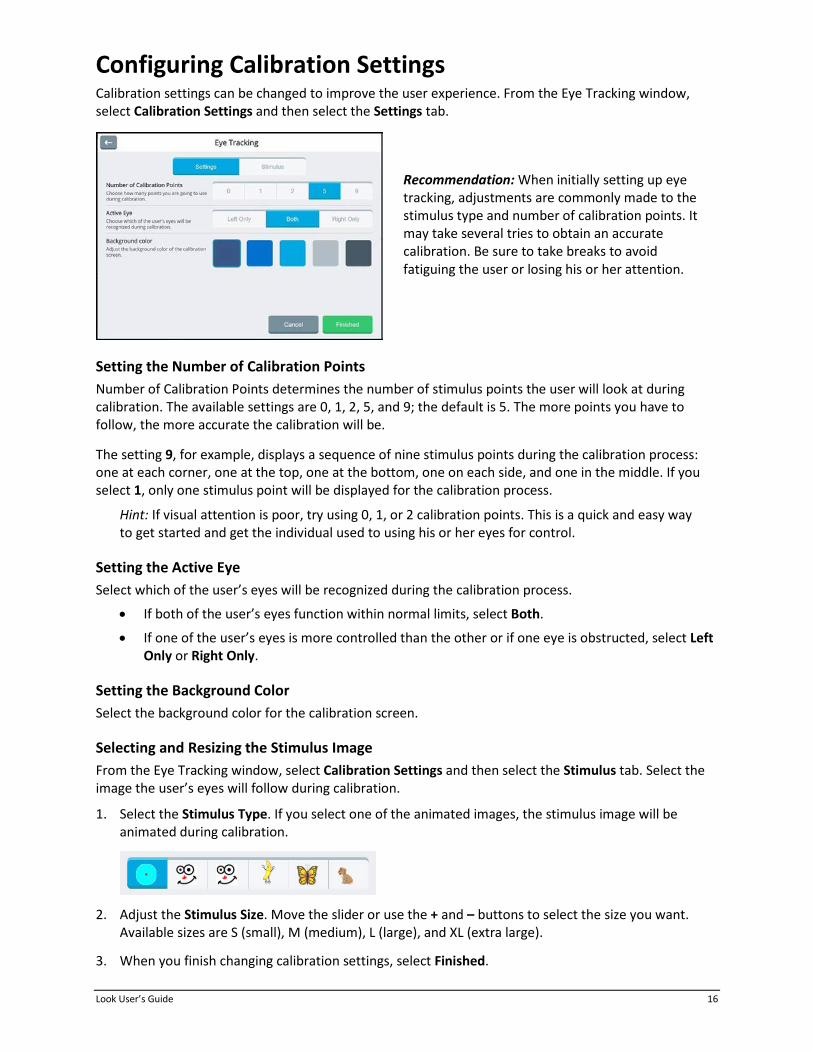
Configuring Calibration Settings Calibration settings can be changed to improve the user experience. From the Eye Tracking window, select Calibration Settings and then select the Settings tab.
Setting the Number of Calibration Points Number of Calibration Points determines the number of stimulus points the user will look at during calibration. The available settings are 0, 1, 2, 5, and 9; the default is 5. The more points you have to follow, the more accurate the calibration will be.
The setting 9, for example, displays a sequence of nine stimulus points during the calibration process: one at each corner, one at the top, one at the bottom, one on each side, and one in the middle. If you select 1, only one stimulus point will be displayed for the calibration process.
Hint: If visual attention is poor, try using 0, 1, or 2 calibration points. This is a quick and easy way to get started and get the individual used to using his or her eyes for control.
Setting the Active Eye Select which of the user’s eyes will be recognized during the calibration process.
• If both of the user’s eyes function within normal limits, select Both.
• If one of the user’s eyes is more controlled than the other or if one eye is obstructed, select Left Only or Right Only.
Setting the Background Color Select the background color for the calibration screen.
Selecting and Resizing the Stimulus Image From the Eye Tracking window, select Calibration Settings and then select the Stimulus tab. Select the image the user’s eyes will follow during calibration.
1. Select the Stimulus Type. If you select one of the animated images, the stimulus image will be animated during calibration.
2. Adjust the Stimulus Size. Move the slider or use the + and – buttons to select the size you want. Available sizes are S (small), M (medium), L (large), and XL (extra large).
3. When you finish changing calibration settings, select Finished.
Recommendation: When initially setting up eye tracking, adjustments are commonly made to the stimulus type and number of calibration points. It may take several tries to obtain an accurate calibration. Be sure to take breaks to avoid fatiguing the user or losing his or her attention.

Look User’s Guide 17
Adjusting Eye Tracking Selection Settings Select Menu > Toolbox > User Settings > Access Method > Eye Tracking. From the Eye Tracking window, select Eye Tracking Settings. The Eye Tracking window opens to the Selection tab.
Three methods are available for selecting a button on the screen.
Dwell: Select a button by dwelling on it. Buttons are selected automatically according to the Dwell Time you choose.
Blink: Select a button by blinking volitionally. Use the Minimum Blink Duration and Maximum Blink Duration sliders to adjust the amount of time you must close your eyes for the eye tracking system to register a blink.
Switch: The user moves the cursor with his or her eyes and makes selections by activating a switch. Use the slider to adjust switch selection time.
Setting up Dwell Selection
Selection Type In the Eye Tracking window, with the Selection tab selected, select the Dwell tab. When Dwell is selected, you can select a button by dwelling on it. Buttons are selected automatically according to the dwell time you choose.
Dwell Time Adjust the amount of time you need to gaze on a button to select it. Dwell time ranges from 0.0 to 10.0.
Repeat Delay Repeat delay allows you to set how soon a button press will begin repeating when you continue to gaze at a button beyond its initial dwell time. This setting is only available when the Dwell tab is selected.
Repeat Rate Repeat Rate is the speed at which a button will repeat itself when you dwell on it. This setting is only available when the repeat delay is set higher than 0.0.
Look User’s Guide 18
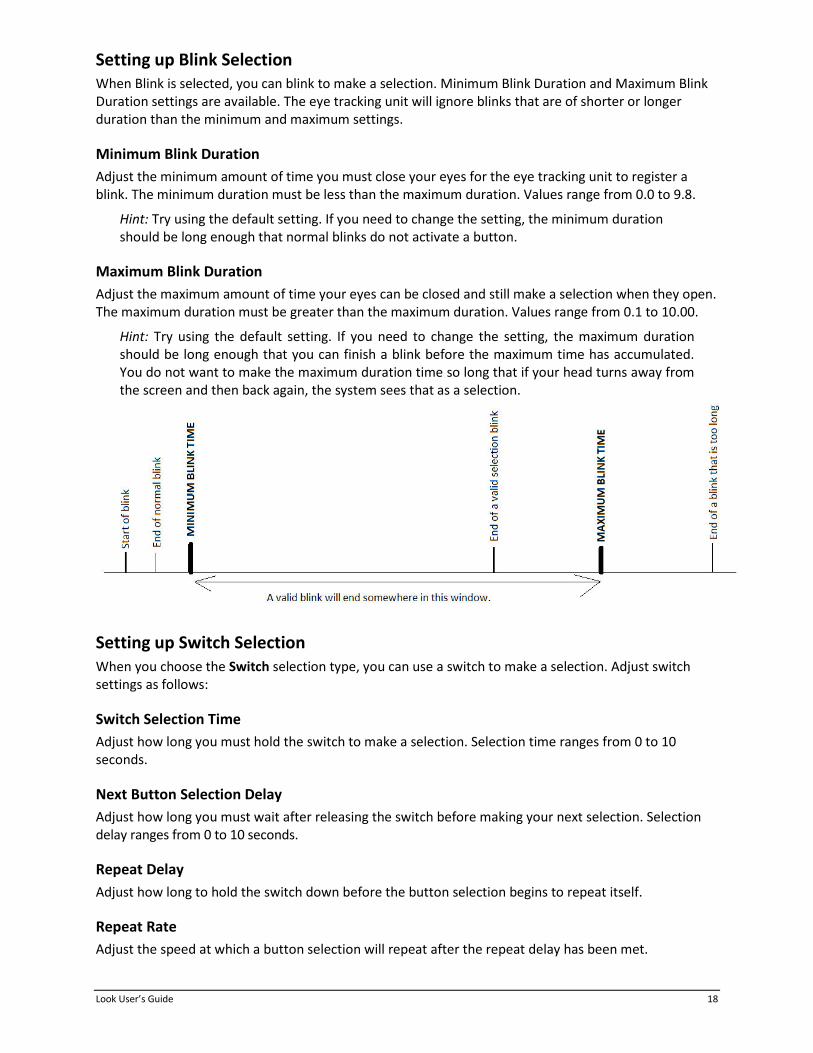
Setting up Blink Selection When Blink is selected, you can blink to make a selection. Minimum Blink Duration and Maximum Blink Duration settings are available. The eye tracking unit will ignore blinks that are of shorter or longer duration than the minimum and maximum settings.
Minimum Blink Duration Adjust the minimum amount of time you must close your eyes for the eye tracking unit to register a blink. The minimum duration must be less than the maximum duration. Values range from 0.0 to 9.8.
Hint: Try using the default setting. If you need to change the setting, the minimum duration should be long enough that normal blinks do not activate a button.
Maximum Blink Duration Adjust the maximum amount of time your eyes can be closed and still make a selection when they open. The maximum duration must be greater than the maximum duration. Values range from 0.1 to 10.00.
Hint: Try using the default setting. If you need to change the setting, the maximum duration should be long enough that you can finish a blink before the maximum time has accumulated. You do not want to make the maximum duration time so long that if your head turns away from the screen and then back again, the system sees that as a selection.
Setting up Switch Selection When you choose the Switch selection type, you can use a switch to make a selection. Adjust switch settings as follows:
Switch Selection Time Adjust how long you must hold the switch to make a selection. Selection time ranges from 0 to 10 seconds.
Next Button Selection Delay Adjust how long you must wait after releasing the switch before making your next selection. Selection delay ranges from 0 to 10 seconds.
Repeat Delay Adjust how long to hold the switch down before the button selection begins to repeat itself.
Repeat Rate Adjust the speed at which a button selection will repeat after the repeat delay has been met.

Look User’s Guide 19
Pausing and Resuming Eye Tracking When eye tracking is the current access method, a Tracking is ON/Tracking is OFF dropdown appears at the top of the screen.
When eye tracking is active, the button shows “Tracking is ON”.
When you dwell on the button, “Pause” is displayed. To pause eye tracking, select Pause; the button changes to “Tracking is OFF”.
When eye tracking is paused, the button shows “Tracking is OFF”.
When you dwell on the button, “Resume” is displayed. To resume eye tracking, select Resume; the button change to “Tracking is ON”.
When you want to pause eye tracking but still be able to make menu selections with a finger, select Pause. Select Resume to resume using eye tracking. During setup, it is best to pause eye tracking until you are ready to calibrate.
Show or hide the Tracking is ON/Tracking is OFF dropdown Select Menu > Toolbox > User Settings > Access Method > Eye Tracking Settings and then select the Settings tab. Select the Pause/Resume Dropdown toggle to turn the dropdown on or off.
Communication Partner: Quickly pause and resume eye tracking The communication partner can pause and resume eye tracking by touching with a finger the miniaturized positioning guide in the Multi-bar. Blue indicates eye tracking is active. Grey indicates eye tracking is paused.
Observing the User’s Performance Observe the user’s performance while using the default eye tracking settings and note any difficulties the user is experiencing. This will help you decide if adjustments are needed. If you need to adjust some settings, use the information in the following sections.
Look User’s Guide 20
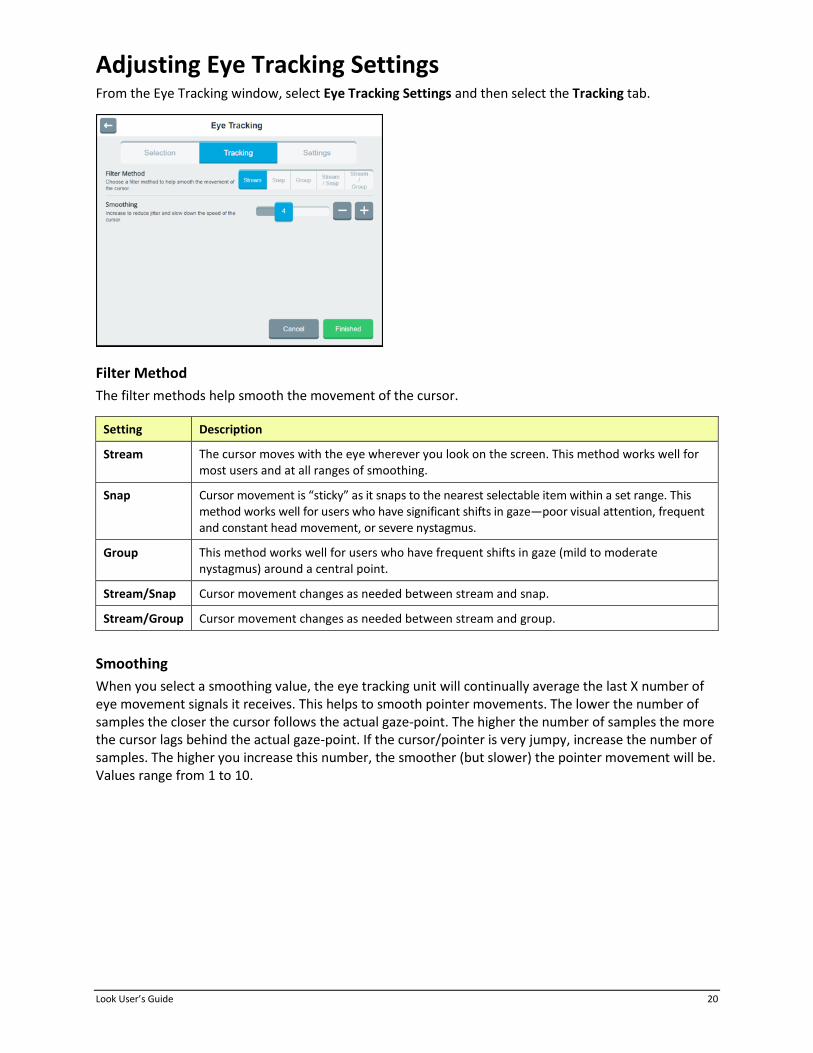
Adjusting Eye Tracking Settings From the Eye Tracking window, select Eye Tracking Settings and then select the Tracking tab.
Filter Method The filter methods help smooth the movement of the cursor.
Setting Description
Stream The cursor moves with the eye wherever you look on the screen. This method works well for most users and at all ranges of smoothing.
Snap Cursor movement is “sticky” as it snaps to the nearest selectable item within a set range. This method works well for users who have significant shifts in gaze—poor visual attention, frequent and constant head movement, or severe nystagmus.
Group This method works well for users who have frequent shifts in gaze (mild to moderate nystagmus) around a central point.
Stream/Snap Cursor movement changes as needed between stream and snap.
Stream/Group Cursor movement changes as needed between stream and group.
Smoothing When you select a smoothing value, the eye tracking unit will continually average the last X number of eye movement signals it receives. This helps to smooth pointer movements. The lower the number of samples the closer the cursor follows the actual gaze-point. The higher the number of samples the more the cursor lags behind the actual gaze-point. If the cursor/pointer is very jumpy, increase the number of samples. The higher you increase this number, the smoother (but slower) the pointer movement will be. Values range from 1 to 10.

Look User’s Guide 21
Adjusting Additional Eye Tracking Settings From the Eye Tracking window, select Eye Tracking Settings and then select the Settings tab.
Text Field Keyboard in Edit Mode When Text Field Keyboard in Edit Mode is turned on, a keyboard will appear when you select a text field in edit mode. You do not need to select the keyboard icon. When Text Field Keyboard in Edit Mode is turned off, you must select the keyboard icon to display the keyboard.
Pause/Resume Dropdown Show or hide the Tracking is ON/Tracking is OFF dropdown.
The Tracking is ON/Tracking is OFF dropdown will appear at the top of the screen when eye tracking is active.
The Tracking is ON/Tracking is OFF dropdown will not appear at the top of the screen when eye tracking is active.
Look User’s Guide 22
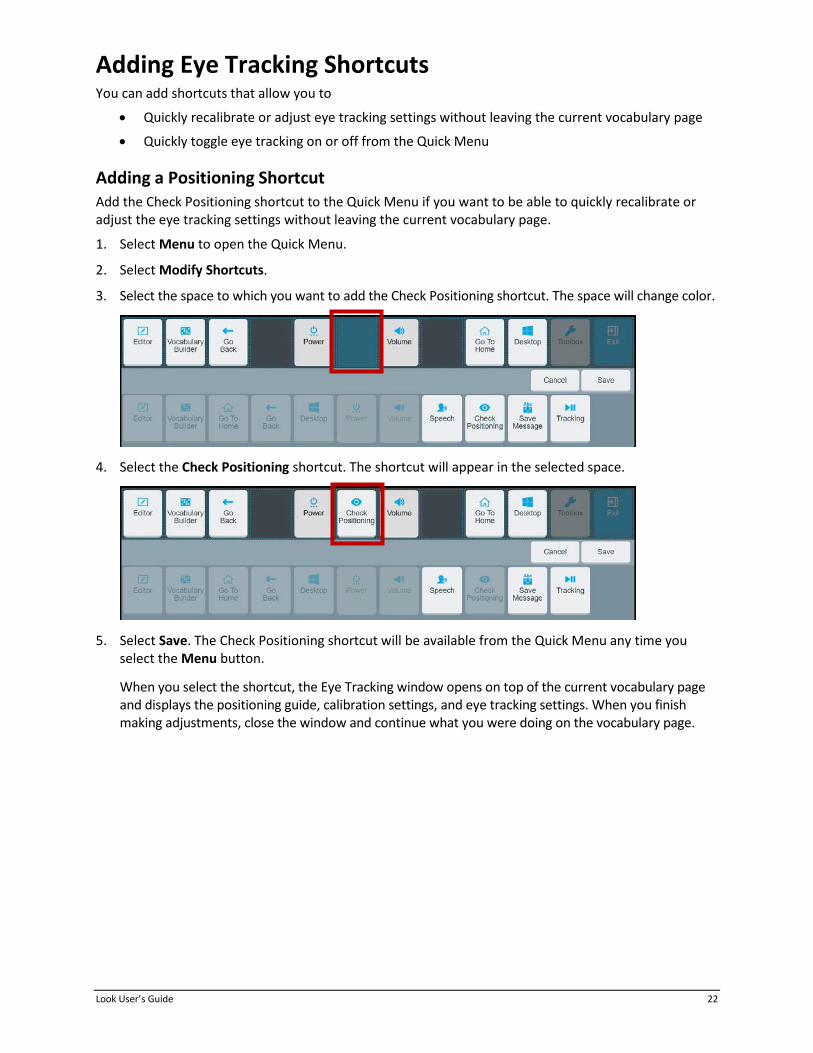
Adding Eye Tracking Shortcuts You can add shortcuts that allow you to
• Quickly recalibrate or adjust eye tracking settings without leaving the current vocabulary page
• Quickly toggle eye tracking on or off from the Quick Menu
Adding a Positioning Shortcut Add the Check Positioning shortcut to the Quick Menu if you want to be able to quickly recalibrate or adjust the eye tracking settings without leaving the current vocabulary page.
1. Select Menu to open the Quick Menu.
2. Select Modify Shortcuts.
3. Select the space to which you want to add the Check Positioning shortcut. The space will change color.
4. Select the Check Positioning shortcut. The shortcut will appear in the selected space.
5. Select Save. The Check Positioning shortcut will be available from the Quick Menu any time you select the Menu button.
When you select the shortcut, the Eye Tracking window opens on top of the current vocabulary page and displays the positioning guide, calibration settings, and eye tracking settings. When you finish making adjustments, close the window and continue what you were doing on the vocabulary page.
Look User’s Guide 23
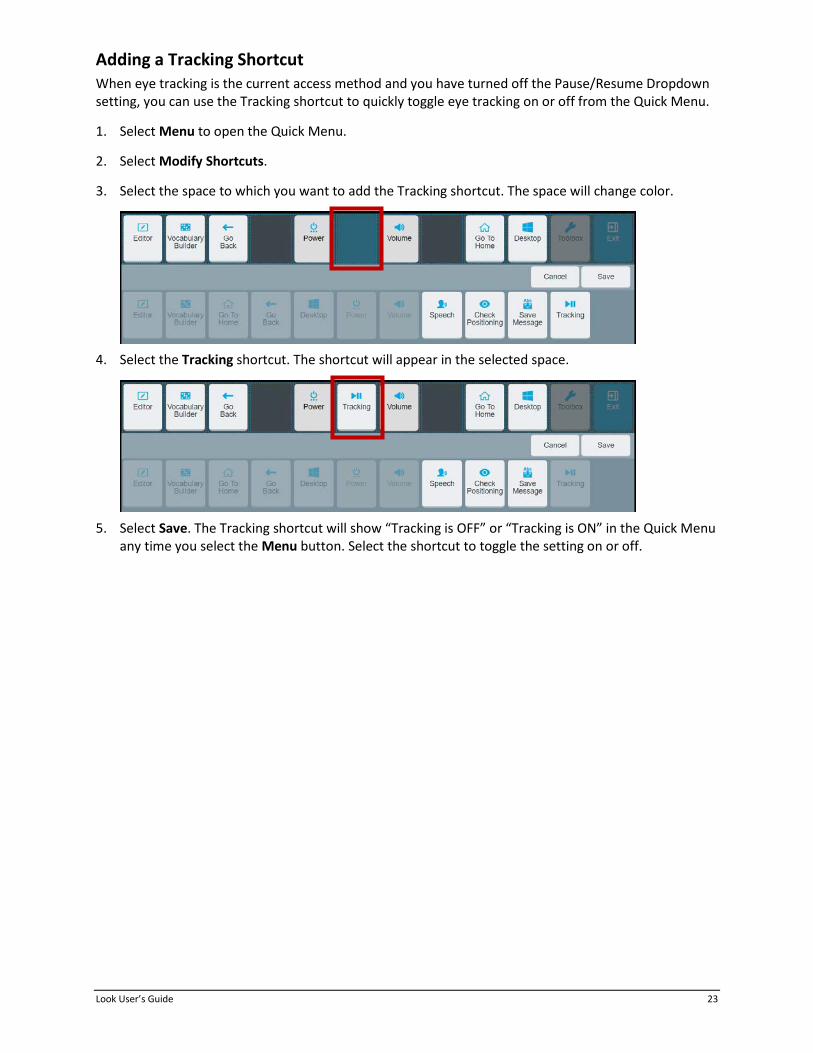
Adding a Tracking Shortcut When eye tracking is the current access method and you have turned off the Pause/Resume Dropdown setting, you can use the Tracking shortcut to quickly toggle eye tracking on or off from the Quick Menu.
1. Select Menu to open the Quick Menu.
2. Select Modify Shortcuts.
3. Select the space to which you want to add the Tracking shortcut. The space will change color.
4. Select the Tracking shortcut. The shortcut will appear in the selected space.
5. Select Save. The Tracking shortcut will show “Tracking is OFF” or “Tracking is ON” in the Quick Menu
any time you select the Menu button. Select the shortcut to toggle the setting on or off.

Look User’s Guide 24
Adjusting Additional Empower Settings You may find that adjusting additional settings will help the eye tracking experience.
Adjusting Feedback Settings
Adjusting Cursor Feedback Adjust the appearance of the cursor. Select Menu > Toolbox > User Settings > Cursor, Dwell & Selection Feedback > Cursor.
Cursor: When Cursor is turned on, a real-time cursor appears on the screen in the shape of an arrow or hand. The default setting is on. Cursor Size: Choose S (small), M (medium), or L (large). Cursor Color: Select the Colors tab on the left side of the window and set the color of the cursor.
Adjusting Dwell Feedback Adjust what you see when you dwell on a button. Select Menu > Toolbox > User Settings > Cursor, Dwell & Selection Feedback > Dwell Feedback.
Pointer: The pointer is an on-screen indicator that shows what button the user is pointing to. Choose None, Circle, or Square. The default is None. Pointer Size: Choose a number between 1 and 10. Pointer Animation: Choose None or Shrink. Pointer Color: Select the Colors tab on the left side of the window and set the color of the pointer. Dwell Feedback: Set how a button looks when you dwell on it. Choose None, Invert, Border, or Fill.
Adjusting Selection Feedback Adjust what happens when you select a button. Select Menu > Toolbox > User Settings > Cursor, Dwell & Selection Feedback > Selection Feedback.
Selection Feedback: To see a visual indication when a button is selected, select Invert, Border, or Fill. Beep: To hear a beep when a button is selected, turn Beep on.
Adjusting Button Padding Increase or decrease the space between buttons.
1. Select Menu > Toolbox > Vocabulary > Vocabulary Settings.
2. Select the Button Preferences tab.
3. Set Button Padding (the space between buttons) as a percentage from 0% to 40%.
Adjusting the Action of Empty Buttons Choose how buttons that have no content act.
1. Select Menu > Toolbox > Vocabulary > Vocabulary Settings.
2. Select the Button Preferences tab.
3. Set Empty Button Action as either No Action or Go To Home.
Look User’s Guide 25
Calibrating and Setting Up Eye Tracking in NuVoice Note: Accent devices ship with two software options—Empower and NuVoice. Choose which software to use based on your preferences and the features available. For information on how to use eye tracking with Empower software, please see “Calibrating and Setting Up Eye Tracking in Empower”, beginning on page 14.
Starting Eye Tracking in NuVoice Typically, a communication partner helps during the setup process. While selecting menu options the communication partner can touch the keys with a finger.
1. Turn on the Accent device by pressing the power button on the top edge of the device.
2. Select the Tools key to the right of the text display area. The Tools menu will slide out from the left side of the screen.
3. Select the Toolbox key from the Tools menu. The Toolbox will open.
4. From the Toolbox select Access Method Menu. The Access Method Menu will open.
5. Select Choose Different Access Method and then Eyegaze.
• “Current Access Method: Eyegaze” will be displayed to the right of Choose Different Access Method and the Track Status box will be displayed in the Status area.
• When the Track Status box is green, eye tracking is active. When the Track Status box is red, eye tracking is paused. To change the status, simply select the Track Status box to change the color.
Note: During setup, it is best to pause eye tracking until you are ready to calibrate.
Look User’s Guide 26
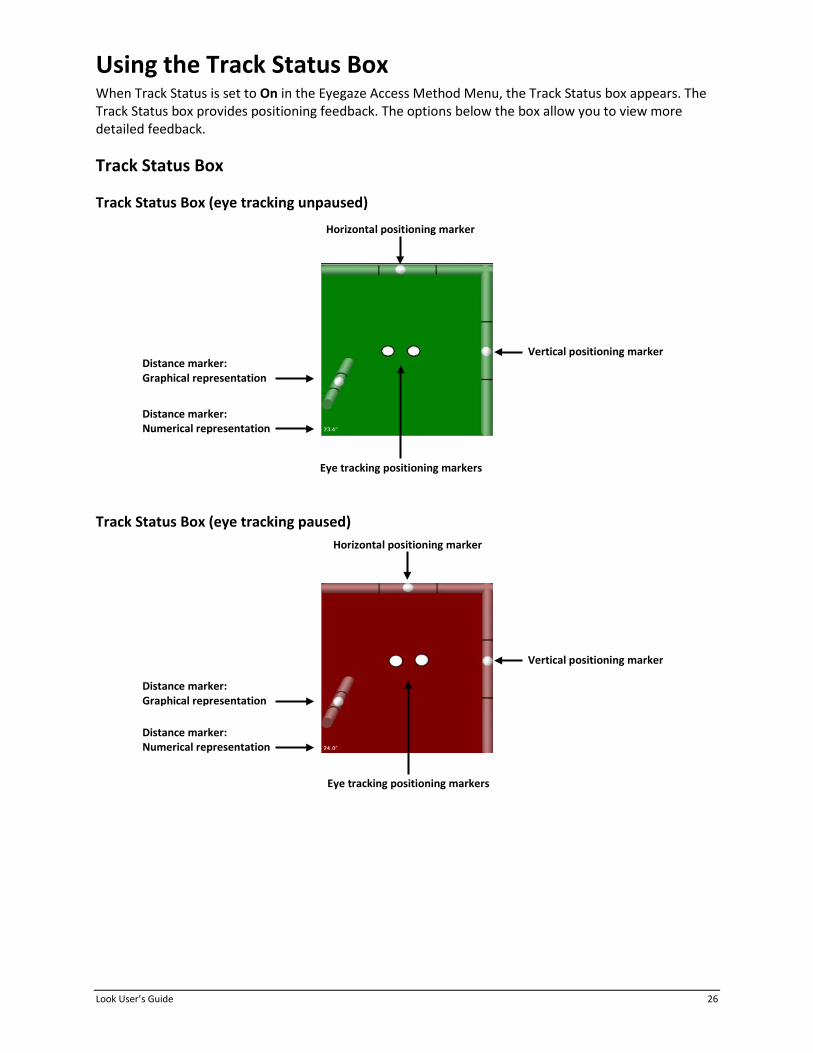
Using the Track Status Box When Track Status is set to On in the Eyegaze Access Method Menu, the Track Status box appears. The Track Status box provides positioning feedback. The options below the box allow you to view more detailed feedback.
Track Status Box
Track Status Box (eye tracking unpaused)
Track Status Box (eye tracking paused)
Horizontal positioning marker
Vertical positioning marker
Eye tracking positioning markers
Distance marker: Graphical representation
Distance marker: Numerical representation
Horizontal positioning marker
Vertical positioning marker
Eye tracking positioning markers
Distance marker: Graphical representation
Distance marker: Numerical representation
Look User’s Guide 27
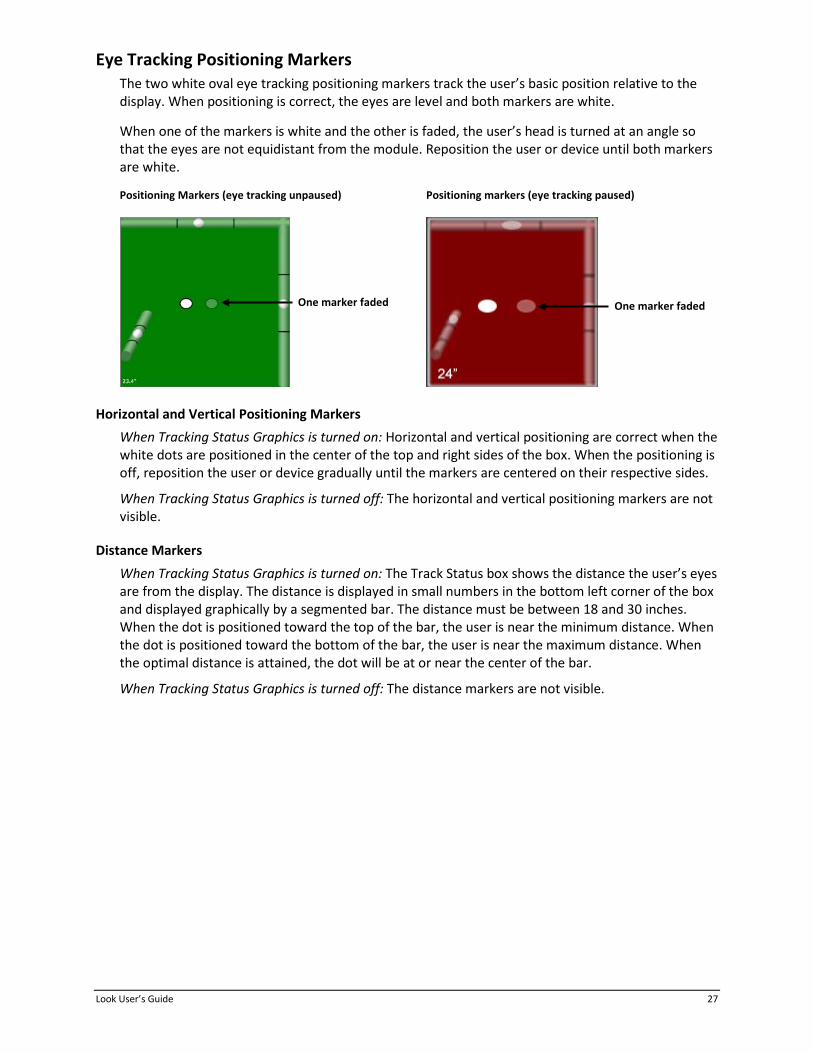
Eye Tracking Positioning Markers The two white oval eye tracking positioning markers track the user’s basic position relative to the display. When positioning is correct, the eyes are level and both markers are white.
When one of the markers is white and the other is faded, the user’s head is turned at an angle so that the eyes are not equidistant from the module. Reposition the user or device until both markers are white.
Positioning Markers (eye tracking unpaused) Positioning markers (eye tracking paused)
Horizontal and Vertical Positioning Markers When Tracking Status Graphics is turned on: Horizontal and vertical positioning are correct when the white dots are positioned in the center of the top and right sides of the box. When the positioning is off, reposition the user or device gradually until the markers are centered on their respective sides.
When Tracking Status Graphics is turned off: The horizontal and vertical positioning markers are not visible.
Distance Markers When Tracking Status Graphics is turned on: The Track Status box shows the distance the user’s eyes are from the display. The distance is displayed in small numbers in the bottom left corner of the box and displayed graphically by a segmented bar. The distance must be between 18 and 30 inches. When the dot is positioned toward the top of the bar, the user is near the minimum distance. When the dot is positioned toward the bottom of the bar, the user is near the maximum distance. When the optimal distance is attained, the dot will be at or near the center of the bar.
When Tracking Status Graphics is turned off: The distance markers are not visible.
One marker faded One marker faded
Look User’s Guide 28
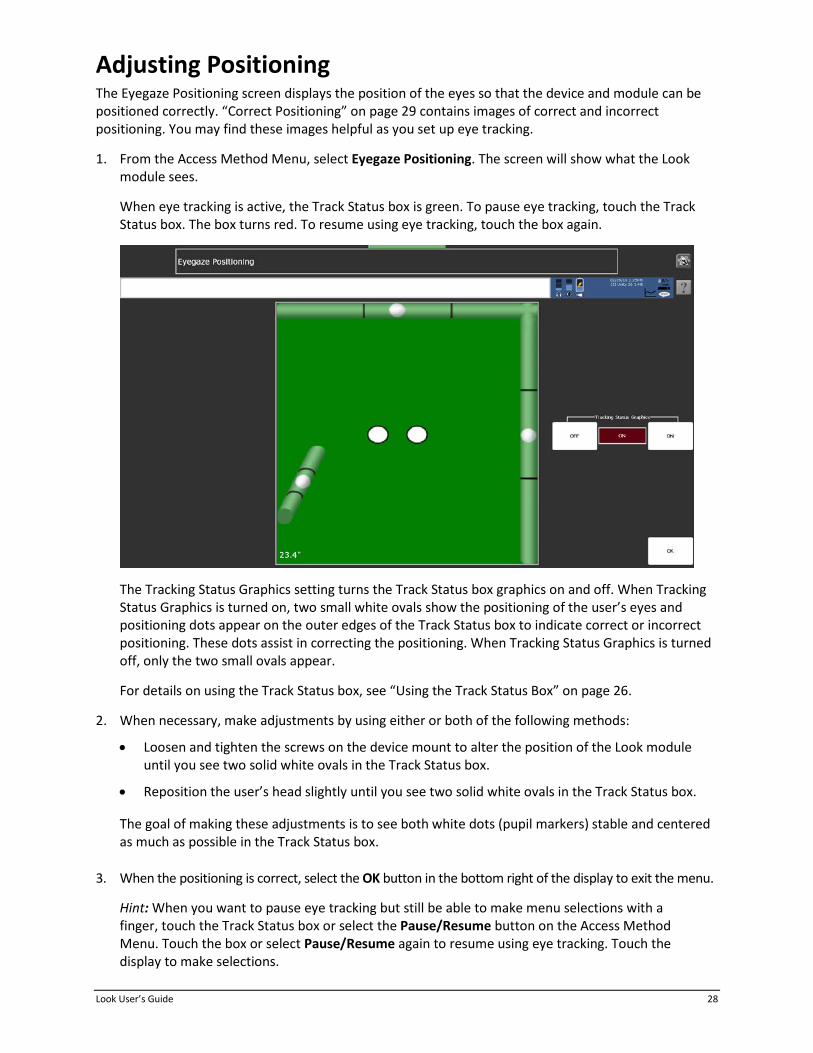
Adjusting Positioning The Eyegaze Positioning screen displays the position of the eyes so that the device and module can be positioned correctly. “Correct Positioning” on page 29 contains images of correct and incorrect positioning. You may find these images helpful as you set up eye tracking.
1. From the Access Method Menu, select Eyegaze Positioning. The screen will show what the Look module sees.
When eye tracking is active, the Track Status box is green. To pause eye tracking, touch the Track Status box. The box turns red. To resume using eye tracking, touch the box again.
The Tracking Status Graphics setting turns the Track Status box graphics on and off. When Tracking Status Graphics is turned on, two small white ovals show the positioning of the user’s eyes and positioning dots appear on the outer edges of the Track Status box to indicate correct or incorrect positioning. These dots assist in correcting the positioning. When Tracking Status Graphics is turned off, only the two small ovals appear.
For details on using the Track Status box, see “Using the Track Status Box” on page 26.
2. When necessary, make adjustments by using either or both of the following methods:
• Loosen and tighten the screws on the device mount to alter the position of the Look module until you see two solid white ovals in the Track Status box.
• Reposition the user’s head slightly until you see two solid white ovals in the Track Status box.
The goal of making these adjustments is to see both white dots (pupil markers) stable and centered as much as possible in the Track Status box.
3. When the positioning is correct, select the OK button in the bottom right of the display to exit the menu.
Hint: When you want to pause eye tracking but still be able to make menu selections with a finger, touch the Track Status box or select the Pause/Resume button on the Access Method Menu. Touch the box or select Pause/Resume again to resume using eye tracking. Touch the display to make selections.

Look User’s Guide 29
If the User is Wearing Glasses Initially, when positioning Look eye tracking for a user who wears glasses, you will most likely see dots around the eyes. These indicate that the eye tracking system is seeing only the reflections from the glasses. In this case, you must work at positioning the user and/or device until there is no glare coming from the glasses and the Track Status box shows you some feedback. When you are satisfied with the positioning, select the OK key in the bottom right of the display.
Correct Positioning When positioning is correct, the device and the user’s face will be on the same plane—basically parallel to each other. The track box will always show two white circles next to each other near the center of the box. The user’s eyes will be within 22 inches to 26 inches of the screen.
Correct Positioning (eye tracking unpaused): Eyes are level and gaze is in the middle-to-upper part of the display.
Correct Positioning (eye tracking paused): Eyes are level and gaze is in the middle-to-upper part of the display.
With correct positioning, the nose should be pointed at the vertical middle of the display and the eyes should be looking in the middle to the top two-thirds of the display. To achieve correct positioning, you may need to move your device, the user, or both until the user is comfortable and the white ovals line up in the track box.
Look User’s Guide 30
Calibrating the Look Eye Tracking System Calibration is the process by which the PRC eye tracking system adjusts to the eyes of the person using the system. It helps determine where the user is looking on the screen. The more precise the calibration, the smaller the target the user can look at and select.
Calibrating for the First Time This section explains how to set up an initial calibration using the default calibration settings. The next section explains how to fine-tune the calibration if the user has a difficult time working with the default calibration settings.
1. Touch “Pause” in top right of screen.
2. With eye tracking paused, display the Toolbox and select Access Method Menu.
3. Check the alignment in the eye positioning menu.
4. Have the user focus on the center of each stimulus point as it appears until the next point appears automatically.
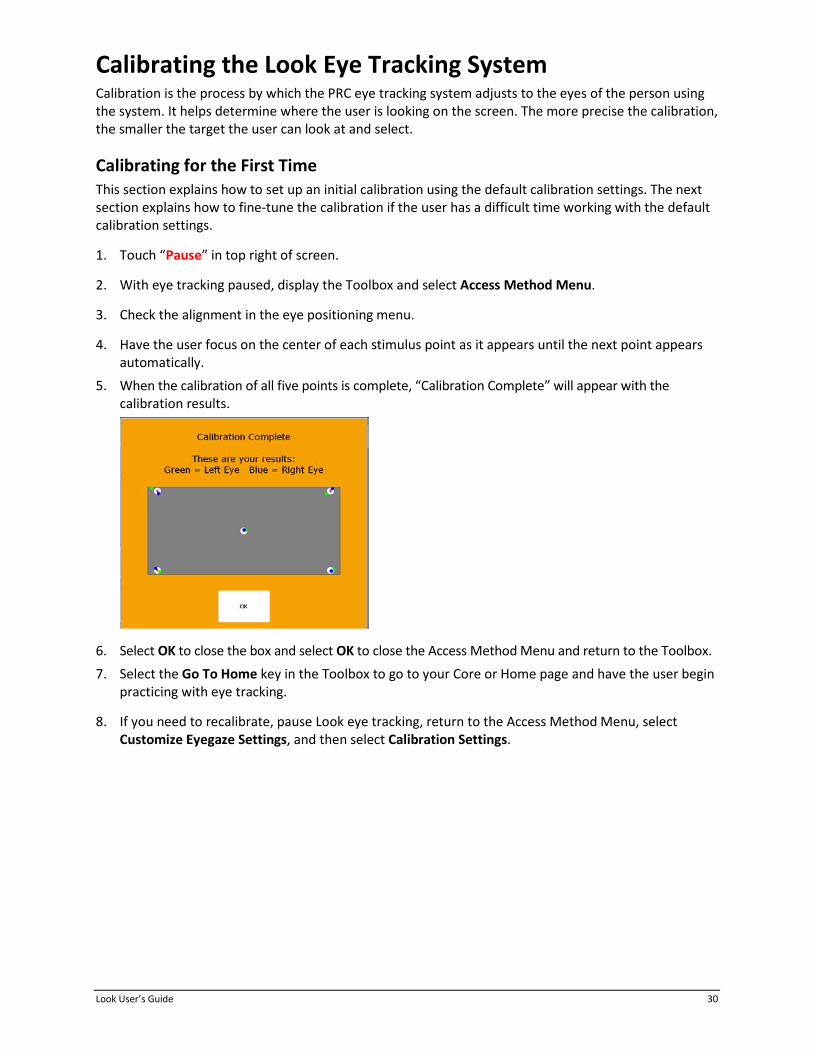
5. When the calibration of all five points is complete, “Calibration Complete” will appear with the calibration results.
6. Select OK to close the box and select OK to close the Access Method Menu and return to the Toolbox. 7. Select the Go To Home key in the Toolbox to go to your Core or Home page and have the user begin
practicing with eye tracking.
8. If you need to recalibrate, pause Look eye tracking, return to the Access Method Menu, select Customize Eyegaze Settings, and then select Calibration Settings.

Look User’s Guide 31
Adjusting Calibration Settings Calibration settings can be changed to improve the user experience.
Recommendation: When initially setting up Look eye tracking, adjustments are commonly made to the stimulus type and number of calibration points. If visual attention is poor, try using a 0-point calibration.
Be sure to take breaks to avoid fatiguing the user or losing his or her attention.
1. From the Access Method Menu, select Customize Eyegaze Settings and then select Calibration Settings. The Calibration Settings Menu will open.
2. Adjust the settings to the user’s needs. For an explanation of how to use each setting, see the next section, “Using Calibration Menu Settings”.
3. When you finish adjusting settings, select OK.
4. Select Calibrate Now. When the calibration is complete, select OK to exit.
Look User’s Guide 32
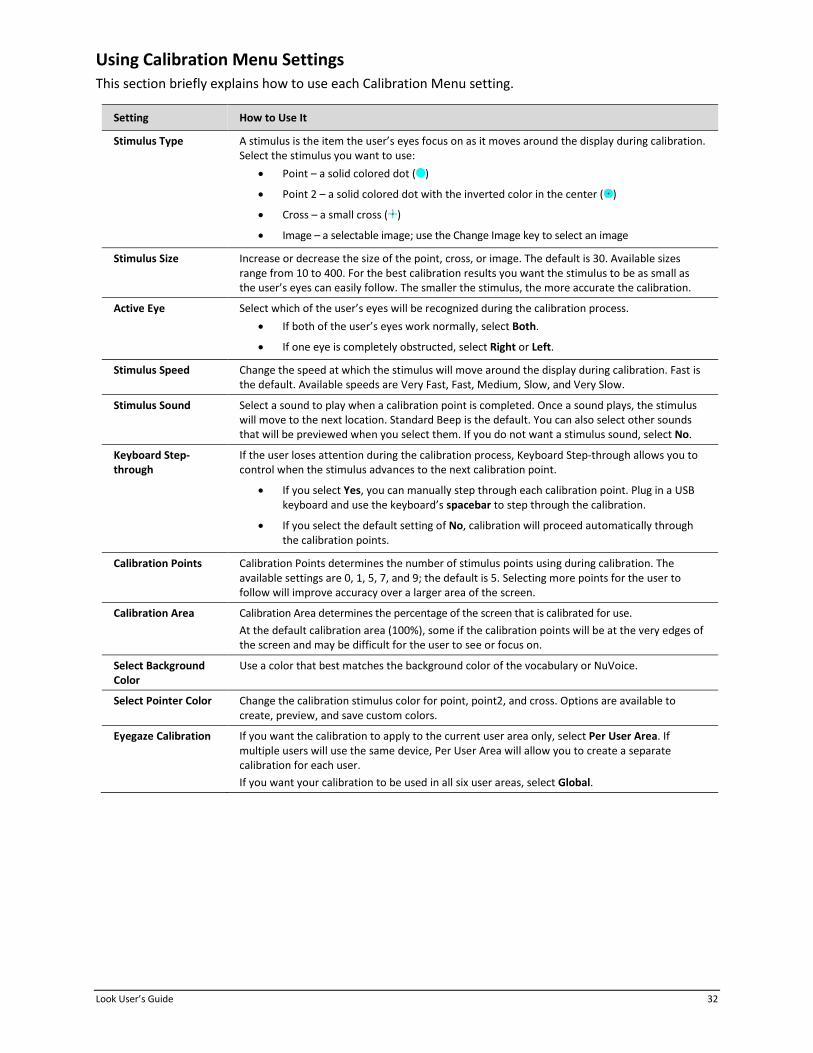
Using Calibration Menu Settings This section briefly explains how to use each Calibration Menu setting.
Setting How to Use It
Stimulus Type A stimulus is the item the user’s eyes focus on as it moves around the display during calibration. Select the stimulus you want to use:
• Point – a solid colored dot ( )
• Point 2 – a solid colored dot with the inverted color in the center ( )
• Cross – a small cross ( )
• Image – a selectable image; use the Change Image key to select an image
Stimulus Size Increase or decrease the size of the point, cross, or image. The default is 30. Available sizes range from 10 to 400. For the best calibration results you want the stimulus to be as small as the user’s eyes can easily follow. The smaller the stimulus, the more accurate the calibration.
Active Eye Select which of the user’s eyes will be recognized during the calibration process. • If both of the user’s eyes work normally, select Both.
• If one eye is completely obstructed, select Right or Left.
Stimulus Speed Change the speed at which the stimulus will move around the display during calibration. Fast is the default. Available speeds are Very Fast, Fast, Medium, Slow, and Very Slow.
Stimulus Sound Select a sound to play when a calibration point is completed. Once a sound plays, the stimulus will move to the next location. Standard Beep is the default. You can also select other sounds that will be previewed when you select them. If you do not want a stimulus sound, select No.
Keyboard Step-through
If the user loses attention during the calibration process, Keyboard Step-through allows you to control when the stimulus advances to the next calibration point.
• If you select Yes, you can manually step through each calibration point. Plug in a USB keyboard and use the keyboard’s spacebar to step through the calibration.
• If you select the default setting of No, calibration will proceed automatically through the calibration points.
Calibration Points Calibration Points determines the number of stimulus points using during calibration. The available settings are 0, 1, 5, 7, and 9; the default is 5. Selecting more points for the user to follow will improve accuracy over a larger area of the screen.
Calibration Area Calibration Area determines the percentage of the screen that is calibrated for use. At the default calibration area (100%), some if the calibration points will be at the very edges of the screen and may be difficult for the user to see or focus on.
Select Background Color
Use a color that best matches the background color of the vocabulary or NuVoice.
Select Pointer Color Change the calibration stimulus color for point, point2, and cross. Options are available to create, preview, and save custom colors.
Eyegaze Calibration If you want the calibration to apply to the current user area only, select Per User Area. If multiple users will use the same device, Per User Area will allow you to create a separate calibration for each user. If you want your calibration to be used in all six user areas, select Global.
Look User’s Guide 33
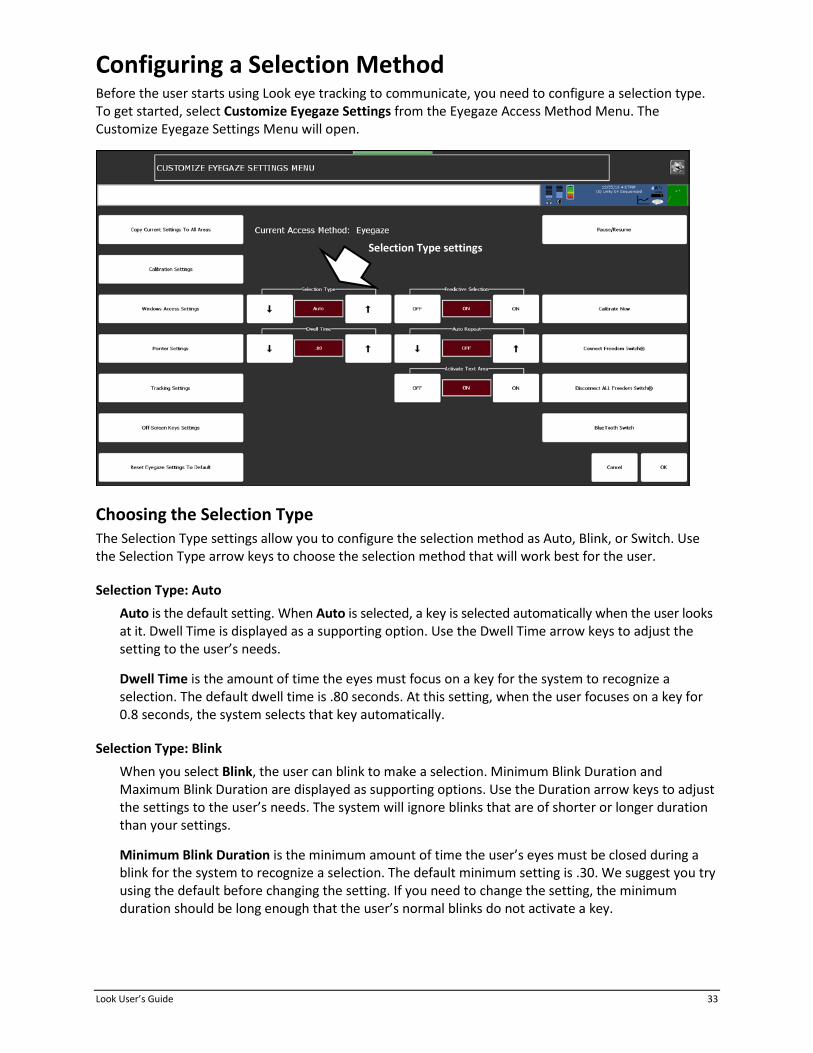
Configuring a Selection Method Before the user starts using Look eye tracking to communicate, you need to configure a selection type. To get started, select Customize Eyegaze Settings from the Eyegaze Access Method Menu. The Customize Eyegaze Settings Menu will open.
Choosing the Selection Type The Selection Type settings allow you to configure the selection method as Auto, Blink, or Switch. Use the Selection Type arrow keys to choose the selection method that will work best for the user.
Selection Type: Auto Auto is the default setting. When Auto is selected, a key is selected automatically when the user looks at it. Dwell Time is displayed as a supporting option. Use the Dwell Time arrow keys to adjust the setting to the user’s needs.
Dwell Time is the amount of time the eyes must focus on a key for the system to recognize a selection. The default dwell time is .80 seconds. At this setting, when the user focuses on a key for 0.8 seconds, the system selects that key automatically.
Selection Type: Blink When you select Blink, the user can blink to make a selection. Minimum Blink Duration and Maximum Blink Duration are displayed as supporting options. Use the Duration arrow keys to adjust the settings to the user’s needs. The system will ignore blinks that are of shorter or longer duration than your settings.
Minimum Blink Duration is the minimum amount of time the user’s eyes must be closed during a blink for the system to recognize a selection. The default minimum setting is .30. We suggest you try using the default before changing the setting. If you need to change the setting, the minimum duration should be long enough that the user’s normal blinks do not activate a key.
Selection Type settings
Look User’s Guide 34
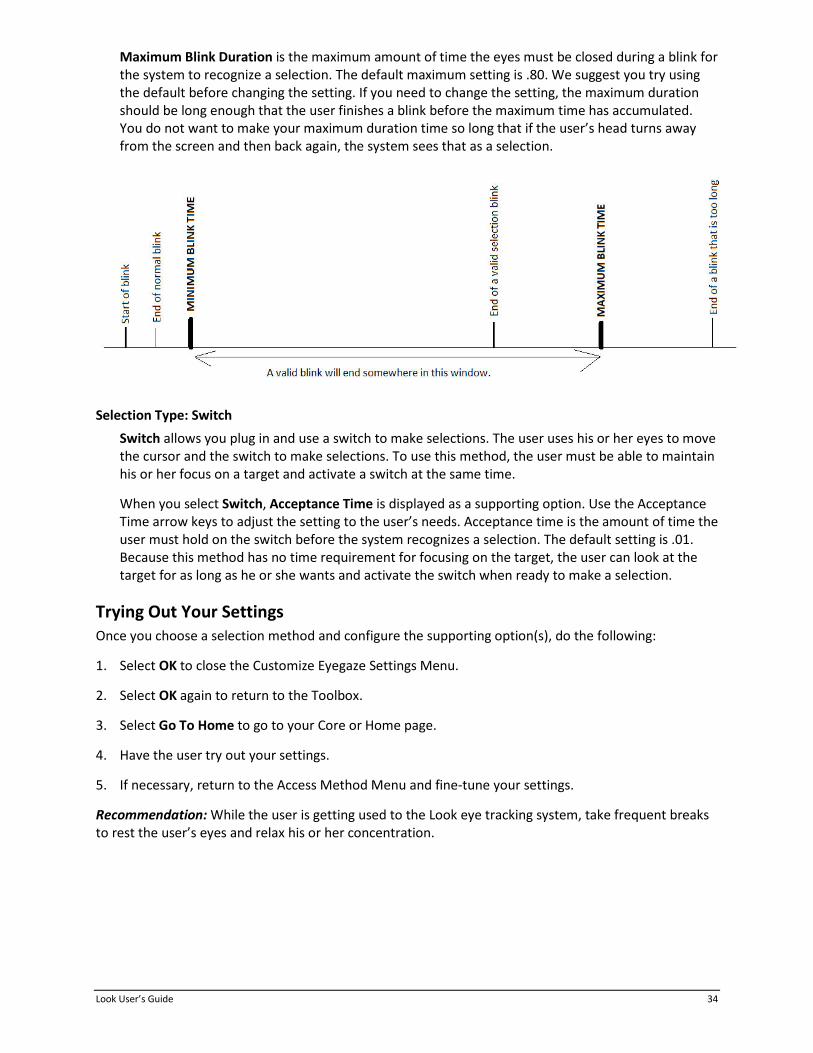
Maximum Blink Duration is the maximum amount of time the eyes must be closed during a blink for the system to recognize a selection. The default maximum setting is .80. We suggest you try using the default before changing the setting. If you need to change the setting, the maximum duration should be long enough that the user finishes a blink before the maximum time has accumulated. You do not want to make your maximum duration time so long that if the user’s head turns away from the screen and then back again, the system sees that as a selection.
Selection Type: Switch Switch allows you plug in and use a switch to make selections. The user uses his or her eyes to move the cursor and the switch to make selections. To use this method, the user must be able to maintain his or her focus on a target and activate a switch at the same time.
When you select Switch, Acceptance Time is displayed as a supporting option. Use the Acceptance Time arrow keys to adjust the setting to the user’s needs. Acceptance time is the amount of time the user must hold on the switch before the system recognizes a selection. The default setting is .01. Because this method has no time requirement for focusing on the target, the user can look at the target for as long as he or she wants and activate the switch when ready to make a selection.
Trying Out Your Settings Once you choose a selection method and configure the supporting option(s), do the following:
1. Select OK to close the Customize Eyegaze Settings Menu.
2. Select OK again to return to the Toolbox.
3. Select Go To Home to go to your Core or Home page.
4. Have the user try out your settings.
5. If necessary, return to the Access Method Menu and fine-tune your settings.
Recommendation: While the user is getting used to the Look eye tracking system, take frequent breaks to rest the user’s eyes and relax his or her concentration.
Look User’s Guide 35
Pausing Look Eye Tracking You can use a variety of methods to stop and re-start eye tracking while you make adjustments to the settings or if you need to look longer at a screen or menu. Touch the screen to activate keys when eye tracking is paused. When eye tracking is paused, the Track Status box is red. When eye tracking is active, the Track Status box is green.
Use any of the following methods to pause Look eye tracking.
Method 1 – Touch the Track Status Box When Eye Track Status is turned on in the Access Method Menu, the Track Status box is visible. Touch the Track Status box to pause eye tracking. Touch it again to resume using eye tracking.
Method 2 – Eyegaze Access Method Menu Use the Pause/Resume key in the Eyegaze Access Method Menu. Have the user gaze at (or press) the Pause/Resume option to set or release Pause.
Method 3 – Disable Pointer Insertable Tool Assign the insertable tool Disable Pointer to a customized key. Press the key to set Pause. Press it again to set Resume. To do this:
1. Be looking at the key where you want to store the Disable Pointer tool.
2. Select the Tools key.
3. Select the Setup key.
4. Select the key you want to use.
5. Select Spell Message or Define Key Function.
6. Select Insert Tool.
7. Select Disable Pointer.
8. Select OK two times.
Method 4 – Front Panel of Device Case Have the user gaze directly at “PAUSE” on the front panel of the device case until Pause or Resume is selected.
Look User’s Guide 36
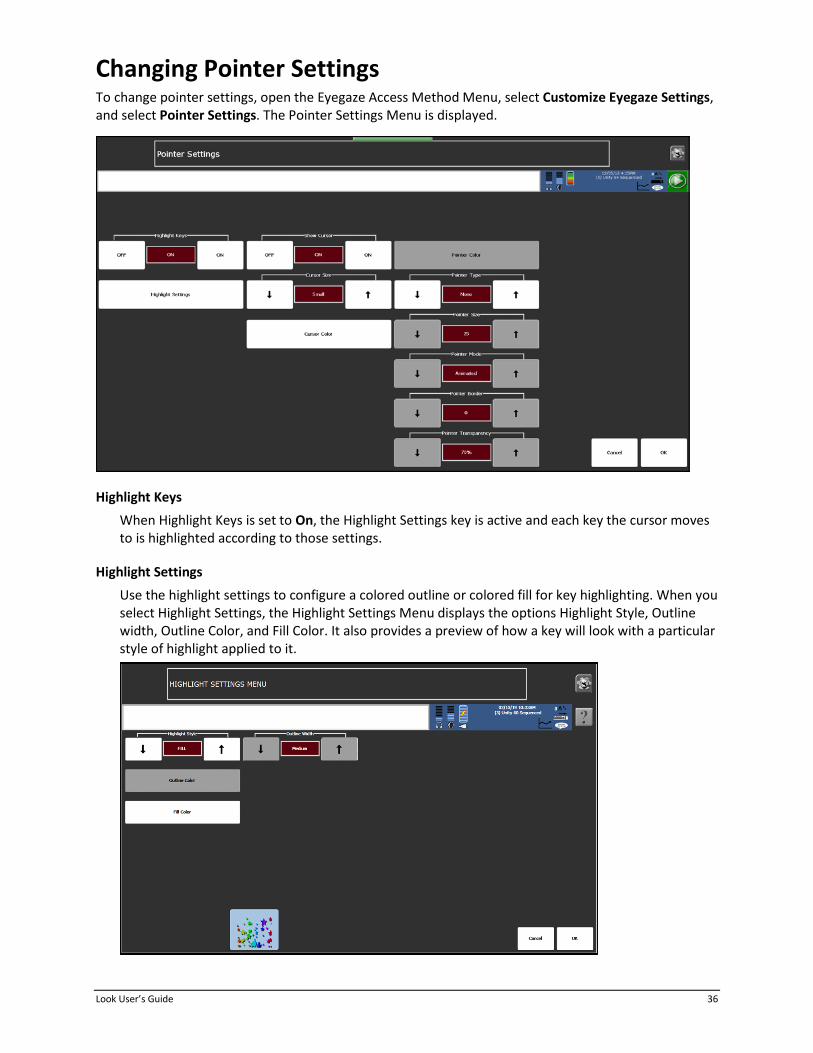
Changing Pointer Settings To change pointer settings, open the Eyegaze Access Method Menu, select Customize Eyegaze Settings, and select Pointer Settings. The Pointer Settings Menu is displayed.
Highlight Keys When Highlight Keys is set to On, the Highlight Settings key is active and each key the cursor moves to is highlighted according to those settings.
Highlight Settings Use the highlight settings to configure a colored outline or colored fill for key highlighting. When you select Highlight Settings, the Highlight Settings Menu displays the options Highlight Style, Outline width, Outline Color, and Fill Color. It also provides a preview of how a key will look with a particular style of highlight applied to it.

Look User’s Guide 37
Highlight Style Highlight Style allows you to select the style of visual feedback applied to a key. Use the arrow keys to choose one of the available selections: Outline, Invert, Outline and Invert, Fill, or Outline and Fill.
Option Description Key Appearance
Outline The key is outlined in the selected Outline Color and width of the selected Outline Width. Fill Color is not available when this option is selected.
Invert The key’s colors are inverted. For example, white appears as black. Outline Color and Fill Color are not available when this option is selected.
Outline and Invert The key is outlined in the selected Outline Color and width of the selected Outline Width and is also inverted. Fill Color is not available when this option is selected.
Fill The key is filled with the selected Fill Color. Outline Color is not available when this option is selected.
Outline and Fill The key is outlined in the selected Outline Color and width of the selected Outline With and is also filled with the selected Fill Color.
Outline Width Outline Width allows you to select the thickness of the outline when you select one of the outline options. Use the arrow keys to choose one of the available selections: Very Thin, Thin, Medium, Thick, or Very Thick.
Outline Color Outline Color allows you to select the color of the outline when you select one of the outline options. Selecting the Outline Color key opens the Highlight Outline Color Menu. From the menu, select a color area in the large box and then use the color bar and arrows to the left of the box to “fine tune” the color. You can also adjust hue, saturation, and luminosity and save the color.
Fill Color Fill Color allows you to select the color of the key fill when you select one of the fill options. Selecting the fill Color key opens the Highlight Fill Color Menu. From the menu, select a color area in the large box and then use the color bar and arrows to the left of the box to “fine tune” the color. You can also adjust hue, saturation, and luminosity and save the color.
Look User’s Guide 38
Cursor Settings
Show Cursor
The cursor on your device is a hand. When the cursor is turned on, it follows your eye movements. The cursor shows you where you are, or where you are going, on your display screen. If you turn the cursor off, you will no longer see the hand.
Cursor Size
The Cursor Size option allows you to set the size of the cursor to Small, Medium, or Large.
Cursor Color
The Cursor Color option allows you to change the color of the cursor.
Pointer Settings
Pointer Color The Pointer Color option allows you to change the color of the pointer.
Pointer Type The pointer shows what particular object the user is focusing on. When Circle or Square is selected and the user focuses on a key, a circle or a square appears over the key to show that’s where the user’s focus is. If the user dwells on the key long enough, it will be selected. When Circle or Square is selected, additional options are available: Pointer Size, Pointer Mode, Pointer Border, and Pointer Transparency. When None, is selected, no pointer will be visible, and you will have no feedback to show where the user’s eyes are focused or what the user might be selecting on the screen.
Pointer Size The Pointer Size option allows you to make the circle or square pointer larger or smaller.
Pointer Mode When Animated is selected, the circle or square pointer will shrink in size while the key is being selected. It’s an easy way to tell that the user has hit his or her target. If you select Static, the pointer maintains the same size while the key is selected.
Pointer Border Selecting any Pointer Border value greater than 0 puts a darker border around the perimeter of the circle or square. Increase or decrease the value to adjust the thickness of the border.
Pointer Transparency 90% transparency means that the circle or square is almost clear. You can barely tell it is on a key. 0% means the pointer is completely opaque. You cannot see through it to read any text that might be on a key.

Look User’s Guide 39
Changing Tracking Settings The Tracking Settings help to adjust the smoothness of pointer/cursor movements. If you have set up the eye tracking system and aren’t satisfied with the smoothness of the pointer movements, try changing the settings using this option. Select Customize Eyegaze Settings, and select Tracking Settings. The Tracking Settings Menu is displayed.
Smoothing
The lower you set the smoothing number the faster the cursor or pointer will move. The higher you set the number, the slower the cursor or pointer will move. This helps to refine cursor and pointer movements. Selectable numbers range from 2 to 45.
Filter Method
The Look eye tracking system can determine the difference between saccades and fixations and apply separate methods to each type of eye behavior. Saccades are rapid, jerky movements of the eyes between fixation points over a short duration. Fixations refer to the eye resting on a point over a longer period of time. The available filtering methods are Stream, Snap, Group, Stream + Snap, and Stream + Group.
Stream works well for most users and at all ranges of smoothing. This setting moves with the eye wherever the user looks on the screen. Stream, applied to both eye movement and fixation, is the default filtering method.
Snap works well for users who have dramatic shifts in gaze (for example, poor visual attention, frequent and constant head movement, or severe nystagmus). Snap is very robust and makes the cursor feel “sticky”.
Group works well for users who have frequent shifts in gaze (for example, mild to moderate nystagmus) around a central point.
If none of these three filtering methods meets your needs, you can try one of the combination methods, Stream + Snap or Stream + Group. These separate the movements from the fixations and may benefit individuals who require filtering.
Look User’s Guide 40
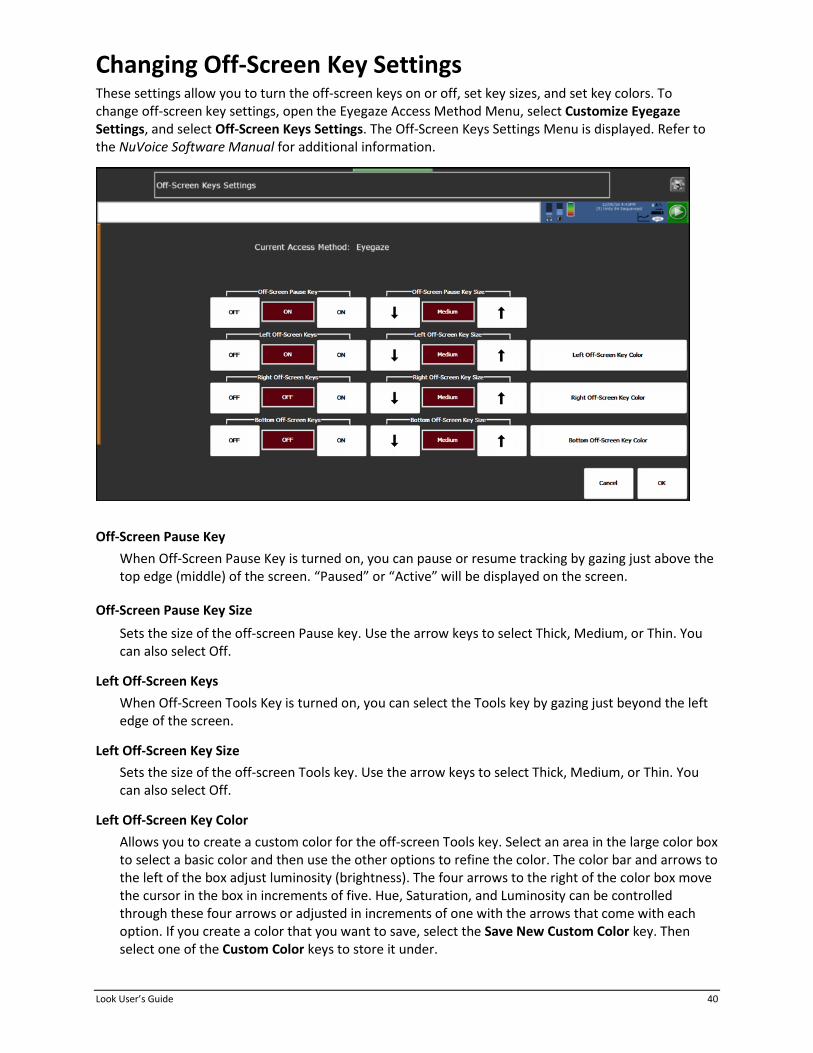
Changing Off-Screen Key Settings These settings allow you to turn the off-screen keys on or off, set key sizes, and set key colors. To change off-screen key settings, open the Eyegaze Access Method Menu, select Customize Eyegaze Settings, and select Off-Screen Keys Settings. The Off-Screen Keys Settings Menu is displayed. Refer to the NuVoice Software Manual for additional information.
Off-Screen Pause Key When Off-Screen Pause Key is turned on, you can pause or resume tracking by gazing just above the top edge (middle) of the screen. “Paused” or “Active” will be displayed on the screen.
Off-Screen Pause Key Size Sets the size of the off-screen Pause key. Use the arrow keys to select Thick, Medium, or Thin. You can also select Off.
Left Off-Screen Keys When Off-Screen Tools Key is turned on, you can select the Tools key by gazing just beyond the left edge of the screen.
Left Off-Screen Key Size Sets the size of the off-screen Tools key. Use the arrow keys to select Thick, Medium, or Thin. You can also select Off.
Left Off-Screen Key Color Allows you to create a custom color for the off-screen Tools key. Select an area in the large color box to select a basic color and then use the other options to refine the color. The color bar and arrows to the left of the box adjust luminosity (brightness). The four arrows to the right of the color box move the cursor in the box in increments of five. Hue, Saturation, and Luminosity can be controlled through these four arrows or adjusted in increments of one with the arrows that come with each option. If you create a color that you want to save, select the Save New Custom Color key. Then select one of the Custom Color keys to store it under.

Look User’s Guide 41
Right Off-Screen Keys When Right Off-Screen Keys is turned on, you can access the off-screen keys by gazing just beyond the right edge of the screen.
Right Off-Screen Key Size Sets the size of the right off-screen key. Use the arrow keys to select Thick, Medium, or Thin. You can also select Off.
Right Off-Screen Key Color Allows you to create a custom color for the right off-screen key. Select an area in the large color box to select a basic color and then use the other options to refine the color. The color bar and arrows to the left of the box adjust luminosity (brightness). The four arrows to the right of the color box move the cursor in the box in increments of five. Hue, Saturation, and Luminosity can be controlled through these four arrows or adjusted in increments of one with the arrows that come with each option. If you create a color that you want to save, select the Save New Custom Color key. Then select one of the Custom Color keys to store it under.
Bottom Off-Screen Keys When Bottom Off-Screen Keys is turned on, you can access the off-screen keys by gazing just beyond the bottom edge of the screen.
Bottom Off-Screen Key Size Sets the size of the bottom off-screen key. Use the arrow keys to select Thick, Medium, or Thin. You can also select Off.
Bottom Off-Screen Key Color Allows you to create a custom color for the bottom off-screen key. Select an area in the large color box to select a basic color and then use the other options to refine the color. The color bar and arrows to the left of the box adjust luminosity (brightness). The four arrows to the right of the color box move the cursor in the box in increments of five. Hue, Saturation, and Luminosity can be controlled through these four arrows or adjusted in increments of one with the arrows that come with each option. If you create a color that you want to save, select the Save New Custom Color key. Then select one of the Custom Color keys to store it under.

Look User’s Guide 42
Working with Profiles The Manage Eyegaze Profiles Menu allows you to save, load, or delete eyegaze profiles. This menu is especially helpful if you use the device with multiple individuals.
Selecting and Loading a Profile The Look eye tracking system has several pre-defined profiles that you can choose from to help the user get started. These profiles contain eyegaze settings that have been selected to match the profile name. For example, if the user has never used an eye tracking system before, the Beginner profile might work the best. If the user has some experience using eye tracking, try Novice or Typical.
1. From the Eyegaze Access Method Menu, select Manage Eyegaze Profiles.
2. Select Load Eyegaze Profile.
3. Select the profile that best applies to the user.
4. A yellow box will ask if you want to copy these eyegaze settings to all areas.
• If you select No, the settings will be copied only to the area you are currently using. For now, we suggest you select No.
• If you select Yes, the settings will be copied to all user areas. You will also be asked if you want to set all areas to eyegaze access. If you select Yes, eyegaze access will be applied to all user areas.
5. Select OK to exit the Profiles Menu and return to the Access Method Menu.
Note: You can pause the eye tracking system by selecting the Access Method Menu’s Pause/Resume key. Select the key again to resume eye tracking. Touch the screen to make selections.

Look User’s Guide 43
Managing Eyegaze Profiles An eyegaze profile consists of a combination of the eyegaze settings you have selected from the Customize Eyegaze Settings Menu and the actual data from the calibration you performed. There are also several pre-defined profiles that you can select from when you first set up your eye tracking system. You can also create and save profiles of your own. To manage profiles, select Manage Eyegaze Profiles from the Eyegaze Access Method Menu.
Loading an Eyegaze Profile Several pre-defined profiles are available. These contain eyegaze settings that have the best chance of working well for a beginner or advanced user. When you first set up your system, you may find it easier to select one of these profiles to use while the user is learning the system.
The Load Eyegaze Profile key allows you to load any of these pre-defined profiles or a profile that you created and saved to a USB flash drive. The flash drive must be plugged into your device in order to do this.
1. From the Eyegaze Access Method Menu, select Manage Eyegaze Profiles.
2. Select Load Eyegaze Profile.
3. Select the profile that best applies to the user. If the user has never used an eye tracking system before, select Beginner.
4. You will see a yellow box asking if you want to copy these eyegaze settings to all areas.
• If you select No, the settings will be copied only to the area you are currently using.
Note: If the user is a beginner or novice, we suggest you select No.
• If you select Yes, the settings will be copied to all user areas in the device. You will also be asked if you want to set all areas to eyegaze access. If you select Yes, you will be using eyegaze access in each area in the device.
5. Select OK to exit the Profiles menu and return to the Eyegaze Access Method Menu.

Look User’s Guide 44
Saving Current Settings and Calibration to a Profile This key allows you to save an eyegaze profile to the default Profiles location in your device or to a USB flash drive.
1. From the Eyegaze Access Method Menu, select Manage Eyegaze Profiles.
2. Select Save Current Settings and Calibration to a Profile.
3. After saving a profile, select Load Eyegaze Profile to load the profile into a user area at any time.
If you are working with multiple users using one device, you may want to save the eyegaze profiles of your users. Then you can simply load each user’s profile into a user area (or globally if that was selected as the Eyegaze Calibration option).
Important Information about Resetting to Factory Defaults
If you need to reset your device to the factory defaults (by selecting Reset to Factory Defaults from the Maintenance Menu) and you want to keep your calibration, you must save your eyegaze profile to a USB flash drive before you reset the device.
After resetting your device, select Load Eyegaze Profile to reload the profile. If you use profiles, it is a good idea to save them to a flash drive as a backup.
Deleting Eyegaze Profiles Use the Delete Eyegaze Profile key to delete any profiles that you no longer use.
Look User’s Guide 45
Appendix A: Cleaning the Look Eye Tracking Module
• Never immerse the Look module in water.
• Never use abrasives or cleaning cloths that will scratch the transparent area of the module.
• You received a microfiber (lint-free) cleaning cloth with your Look module. Use this cloth to wipe the enclosure and transparent area.
• If the Look module needs more than a dry wipe-down, dampen this cloth or another lint-free cloth. Damp means wrung out, never dripping. Dry the unit thoroughly with a dry lint-free cloth.
• If the transparent area gets smeary or visibly dirty, place a small amount of rubbing alcohol on a lint-free cloth and gently wipe it. Polish the area with a dry part of your cloth.
• Keep the microfiber (lint-free) cloth handy and wipe the transparent area daily.
• For information about cleaning and disinfecting your Accent device, refer to the Accent User’s Guide for your device.
Look User’s Guide 46
Appendix B: Compliance Information Federal Communications Commission (FCC) Warning This module complies with Part 15 of the FCC Rules. Operation is subject to two conditions: (1) this module may not cause harmful interference, and (2) this module must accept any interference received, including interference that may cause undesired operation.
Changes or modifications to this product not expressly approved by PRC-Saltillo could exceed FCC limits and negate your authority to use this product.
Note: This equipment has been tested and found to comply with the limits for a Class B digital device, pursuant to Part 15 of the FCC Rules. These limits are designed to provide reasonable protection against harmful interference in a residential installation. This equipment generates, uses and can radiate radio frequency energy and, if not installed and used in accordance with the instructions, may cause harmful interference to radio communications. However, there is no guarantee that interference will not occur in a particular installation. If this equipment does cause harmful interference to radio or television reception, which can be determined by turning the equipment off and on, the user is encouraged to try to correct the interference by one or more of the following measures:
• Reorient or relocate the receiving antenna.
• Increase the separation between the equipment and receiver.
• Connect the equipment into an outlet on a circuit different from that to which the receiver is connected.
• Consult the dealer or an experienced radio/TV technician for help.
Industry Canada (IC) Warning This device complies with Industry Canada license-exempt RSS standard(s). Operation is subject to the following two conditions: (1) This device may not cause interference, and (2) This device must accept any interference, including interference that may cause undesired operation of the device.
Le présent appareil est conforme aux CNR d'Industrie Canada applicables aux appareils radio exempts de licence. L'exploitation est autorisée aux deux conditions suivantes: (1) l'appareil ne doit pas produire de brouillage, et (2) l'utilisateur de l'appareil doit accepter tout brouillage radioélectrique subi, même si le brouillage est susceptible d'en compromettre le fonctionnement.
Module Intended Purpose The Look eye tracking system tracks eye movement, allowing users with restricted muscle control to fully access communication software. The module attaches to the user’s device, which can be mounted to a wheelchair or table stand. The module does not incorporate in any way medicinal substances, human blood or plasma derivatives, nor is it manufactured using tissues of animal origin.
Expected Service Life The expected service life of the module is five years.
If you dispose of your module, please dispose of it in accordance with your local, state, and/or country electronic recycling laws.
Intended Operators The individual using a device with the module attached to communicate, the individual’s communication partner, and/or the person changing device settings, maintaining software files, etc. are the intended operators. The pictures and text in this document will help these operators achieve the intended use of the module.
Expected Position of Operators The module is attached to the device. In normal use, the device is expected to be within 12 to 14 inches of the individual’s body. The distance will vary according to whether the device mounted on a wheelchair or table.
Special Skills, Training, or Knowledge Required No special skills or training are required to operate or maintain the device. The pictures and text in this document will help the operators acquire the knowledge to achieve the intended use of the device.
Instructions for Use • All functions of the module are safe for use by the user. For best results, follow the instructions in this manual.
• To report any serious incident associated with the module, contact PRC-Saltillo and your national authority.
• For information on cleaning the module, see “Appendix A: Cleaning the Look Eye Tracking Module”.
Contact Information for Assistance If you need assistance in setting up, using, or maintaining your device or module, or if you need to report unexpected operation or an unexpected event related to the device or module, please contact us by phone at 1-800-382-8622 or by email at [email protected].
Instructions for Storage If you will be leaving the device and module in storage for a long period of time, turn the device and amplifier off. Devices in storage must be charged every six months.

Look User’s Guide 47
Explanation of Symbols
Symbol Explanation
The device is Federal Communications Commission (FCC)-compliant.
The device is Industry Canada (IC)-compliant.
Recycle electronic equipment. Do not throw the device in the trash.
The device conforms to European Union health, safety, and environmental standards.
The entire device, excluding the adapter and signal input/output ports, is a type BF applied part. “Applied part” refers to the part of the device with which the user comes into physical contact when using it for its intended function.
Attention! Read all warnings and precautions in the instruction manual.
IP22 The device is protected against solid objects larger than 12.5mm (for example, a finger) and protected against vertically falling drops of water when the device is tilted at any angle up to 15 degrees from vertical.
The range of temperatures to which the device can be exposed while in use is 10°C to 35°C (50°F to 95°F). During transport or while in storage, the range of temperatures to which the device can be exposed is -20°C to 70°C (-4°F to 158°F).
Caution: If the device has been stored in an environment in which the temperature range is different from “the range of temperatures to which the device can be exposed while in use”, let the device stand for at least 30 minutes before using it.
The range of humidity to which the device can be exposed while in use is 20% to 85%. During transport or while in storage, the range of humidity to which the device can be exposed is 10% to 85%.
Atmospheric pressure while in use or in storage is 80 kPa to 106 kPa.
Follow the instructions for use. Refer to the instruction manual.
The name and address of the manufacturer of the device.
The authorized representative in the European Community.
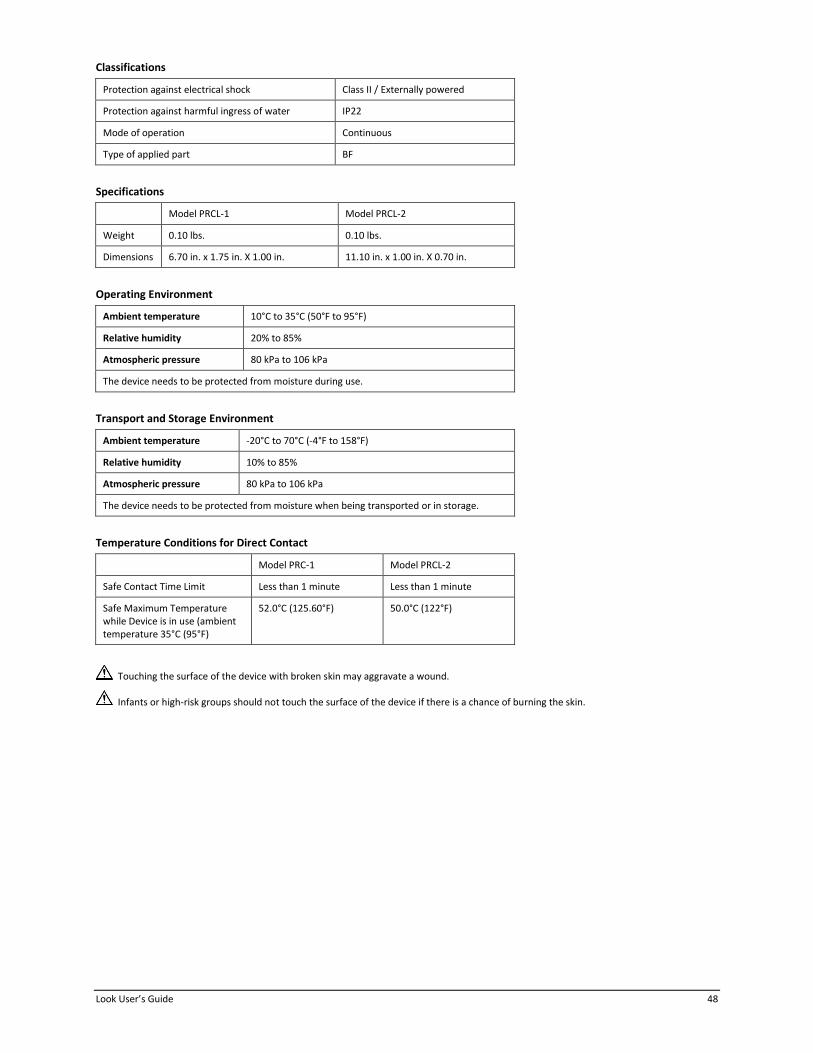
Look User’s Guide 48
Classifications
Protection against electrical shock Class II / Externally powered
Protection against harmful ingress of water IP22
Mode of operation Continuous
Type of applied part BF
Specifications
Model PRCL-1 Model PRCL-2
Weight 0.10 lbs. 0.10 lbs.
Dimensions 6.70 in. x 1.75 in. X 1.00 in. 11.10 in. x 1.00 in. X 0.70 in.
Operating Environment
Ambient temperature 10°C to 35°C (50°F to 95°F)
Relative humidity 20% to 85%
Atmospheric pressure 80 kPa to 106 kPa
The device needs to be protected from moisture during use.
Transport and Storage Environment
Ambient temperature -20°C to 70°C (-4°F to 158°F)
Relative humidity 10% to 85%
Atmospheric pressure 80 kPa to 106 kPa
The device needs to be protected from moisture when being transported or in storage.
Temperature Conditions for Direct Contact
Model PRC-1 Model PRCL-2
Safe Contact Time Limit Less than 1 minute Less than 1 minute
Safe Maximum Temperature while Device is in use (ambient temperature 35°C (95°F)
52.0°C (125.60°F) 50.0°C (122°F)
Touching the surface of the device with broken skin may aggravate a wound.
Infants or high-risk groups should not touch the surface of the device if there is a chance of burning the skin.