printing from undefined - mitchell-auto · remove intake air duct and crankcase ventilation tube....
TRANSCRIPT

2001 ENGINES
3.5L V6
ENGINE IDENTIFICATION
Engine can be identified by fourth character of Vehicle Identification Number (VIN). VIN is located on top left end of instrument panel, near windshield. Engine serial number is stamped on a machined pad on cylinder block, near engine-to-transaxle/transmission flange, below right cylinder head.
ENGINE IDENTIFICATION CODE
ADJUSTMENTS
VALVE CLEARANCE ADJUSTMENT
Checking Valve Clearance
1. Remove engine cover. Remove air cleaner case, collectors, hoses, and wiring harnesses as needed. Remove coils, and spark plugs. Remove right and left cylinder head covers. Rotate crankshaft until cylinder No. 1 is at TDC of compression stroke. Ensure timing mark on crankshaft pulley aligns with "0" mark on timing chain case. Check clearance on all valves.
2. Ensure valve lifters on cylinder No. 1 are loose and valve lifters on cylinder No. 4 are tight. Using feeler gauge, measure and record clearance between valve lifter and camshaft at specified valves. See VALVE CLEARANCE CHECKING SEQUENCE and VALVE CLEARANCE SPECIFICATIONS tables. If clearance is not as specified, adjust valves. See ADJUSTING VALVE CLEARANCE .
3. Rotate crankshaft 240 degrees (cylinder No. 3 at TDC of compression stroke). Measure and record valve clearance at specified valves. See VALVE CLEARANCE CHECKING SEQUENCE and VALVE CLEARANCE SPECIFICATIONS tables. If clearance is not as specified, adjust valves. See ADJUSTING VALVE CLEARANCE .
4. To check remaining valves, rotate crankshaft 240 degrees (cylinder No. 5 at TDC of compression stroke). Measure and record valve clearance at remaining valves. See VALVE CLEARANCE CHECKING SEQUENCE and VALVE CLEARANCE SPECIFICATIONS tables. If clearance is not as specified, adjust valves. See ADJUSTING VALVE CLEARANCE .
VALVE CLEARANCE CHECKING SEQUENCE
NOTE: For repair procedures not covered in this article, see ENGINE OVERHAUL PROCEDURES article in GENERAL INFORMATION.
Engine Code 3.5L V6 (VQ35DE) D
NOTE: Check and adjust valve clearance when engine is cold.
Cylinder No. At TDC Check Intake Valves No. Check Exhaust Valves No. 1 1 & 6 2 & 3 3 2 & 3 4 & 5
2001 Nissan Pathfinder LE
2001 ENGINES 3.5L V6
2001 Nissan Pathfinder LE
2001 ENGINES 3.5L V6
тел. 095 - 747-77-11
7 сентября 2005 г. 10:42:20 Page 1 © 2004 Mitchell Repair Information Company, LLC.
тел. 095 - 747-77-11
7 сентября 2005 г. 10:42:27 Page 1 © 2004 Mitchell Repair Information Company, LLC.

VALVE CLEARANCE SPECIFICATIONS
Adjusting Valve Clearance
1. Rotate camshaft until lobe is facing upward, away from valve lifter. Rotate valve lifter so notch on valve lifter is facing center of cylinder head. Rotate Valve Clearance Adjuster (J38972-1) to push valve lifter downward. See Fig. 1 .
2. Place Valve Lifter Retainer (J38972-2) between camshaft and valve lifter. Remove valve clearance adjuster. Using a magnet and small screwdriver, remove shim. Using a micrometer, measure thickness of shim removed.
3. If valve clearance is not as specified, install appropriate size shim. Shims are available in 64 sizes, ranging in thickness from .0913" (2.32 mm) to .1161" (2.95 mm) in increments of .0004" (.010 mm). Thickness is stamped in millimeters on bottom face of shim.
4. Ensure clearance is as specified. See VALVE CLEARANCE SPECIFICATIONS table. Install cylinder head cover. Tighten bolts to specification. See TORQUE SPECIFICATIONS . Recheck clearance.
Fig. 1: Adjusting Valve Clearance Courtesy of NISSAN MOTOR CO., U.S.A.
TROUBLE SHOOTING
5 4 & 5 1 & 6
Valve In. (mm) Exhaust .011-.015 (.29-.37) Intake .010-.013 (.26-.34)
NOTE: To trouble shoot engine mechanical components, see appropriate table in TROUBLE SHOOTING article in GENERAL INFORMATION.
2001 Nissan Pathfinder LE
2001 ENGINES 3.5L V6
тел. 095 - 747-77-11
7 сентября 2005 г. 10:42:21 Page 2 © 2004 Mitchell Repair Information Company, LLC.

REMOVAL & INSTALLATION
FUEL PRESSURE RELEASE
Remove fuel pump fuse from fuse block at left end of instrument panel. Start engine. After engine stalls, crank engine 2 or 3 times to ensure fuel pressure is released. Turn ignition off. Reinstall fuse. Disconnect and reconnect battery negative cable to erase ECM memory.
COOLING SYSTEM BLEEDING
1. On vehicles with manual A/C, set temperature control lever in full HOT position to open heater valve. On models with automatic A/C, set temperature display at full HOT position and turn ignition off to open heater valve.
2. Fill radiator slowly to allow air in system to escape. Install and tighten radiator cap. Run engine until warm. Race engine 2 or 3 times under no load. Stop engine. Allow engine to cool. Remove radiator cap. Fill radiator as necessary. Install and tighten radiator cap.
3. Repeat step 2) if necessary. Recheck coolant level and refill as necessary. Fill coolant reservoir.
ENGINE
Removal
1. Release fuel system pressure. See FUEL PRESSURE RELEASE . Remove hood. Remove right and left front tire and wheel assemblies. Drain cooling system. Remove engine undercover and suspension member stay.
2. Remove radiator shroud, radiator, cooling fan, accessory drive belts, battery, engine cover, and throttle wires. Disconnect all electrical connectors, hoses and cables necessary for engine removal.
3. Remove air duct and cleaner case. Remove A/C compressor (if equipped) with hoses connected, and wire aside. Remove power steering pump and reservoir tank with bracket, and wire aside.
4. Remove generator. Remove front exhaust tube heat insulators. Remove oxygen sensors. Remove front and rear exhaust tubes.
5. Raise and support vehicle. Remove transmission. See TRANSMISSION REMOVAL & INSTALLATION article in TRANSMISSION SERVICING. Remove Three Way Catalytic converter (TWC) manifold heat insulators, and TWC manifolds. Remove engine-to-crossmember retaining bolts.
6. Lower vehicle. Install engine slingers. Install hoist chains to engine slingers. Hoist engine, and remove engine mounts. Remove engine.
Installation
To install, reverse removal procedure. Replace rubber engine mounts if deteriorated. Tighten all bolts and nuts to specification. See TORQUE SPECIFICATIONS . Fill and bleed cooling system. See COOLING SYSTEM BLEEDING . Fill crankcase.
NOTE: For reassembly reference, label all electrical connectors, vacuum hoses and fuel lines before removal. Also place mating marks on engine hood and other major assemblies before removal.
2001 Nissan Pathfinder LE
2001 ENGINES 3.5L V6
тел. 095 - 747-77-11
7 сентября 2005 г. 10:42:21 Page 3 © 2004 Mitchell Repair Information Company, LLC.

INTAKE MANIFOLD
Removal Upper Collector
1. Release fuel system pressure. See FUEL PRESSURE RELEASE . Disconnect battery. Drain cooling system. Disconnect and label vacuum and coolant lines attached to intake manifold. Disconnect throttle linkage.
2. Remove upper intake manifold collector bolts and nuts in reverse order of tightening sequence. See Fig. 2 .
Removal Lower Collector
Remove upper manifold collector. See Removal Upper Collector . Remove lower intake manifold collector bolts and nuts in reverse order of tightening sequence. See Fig. 2 .
Removal Intake Manifold
Remove intake manifold collectors. See Removal Upper Collector and Removal Lower Collector . Remove fuel injectors and fuel rails as an assembly. Remove intake manifold bolts, in reverse order of tightening sequence. See Fig. 15 . Remove intake manifold.
Installation
Install intake manifold with NEW gasket. Starting with inside bolts and working outward, tighten intake manifold bolts to specification. See Fig. 15 . Install lower and upper intake manifold collectors. Tighten bolts in sequence to specification. See Fig. 2 . See TORQUE SPECIFICATIONS . To complete installation, reverse removal procedure. Fill and bleed cooling system. See COOLING SYSTEM BLEEDING .
2001 Nissan Pathfinder LE
2001 ENGINES 3.5L V6
тел. 095 - 747-77-11
7 сентября 2005 г. 10:42:21 Page 4 © 2004 Mitchell Repair Information Company, LLC.

Fig. 2: Upper & Lower Intake Manifold Collector Bolt Tightening Sequence Courtesy of NISSAN MOTOR CO., U.S.A.
EXHAUST MANIFOLD
Removal
Ensure exhaust system is cool. Remove exhaust manifold shields. Raise and support vehicle. Disconnect
2001 Nissan Pathfinder LE
2001 ENGINES 3.5L V6
тел. 095 - 747-77-11
7 сентября 2005 г. 10:42:21 Page 5 © 2004 Mitchell Repair Information Company, LLC.

exhaust pipes from manifolds. Remove exhaust manifold bolts, starting with outside bolts and working inward. Remove exhaust manifold.
Installation
Install exhaust manifold with NEW gasket. Starting with outside bolts and working inward, tighten exhaust manifold bolts to specification. See TORQUE SPECIFICATIONS . To install remaining components, reverse removal procedure.
CYLINDER HEAD
Removal
1. Remove engine. See ENGINE . Remove exhaust manifolds. See EXHAUST MANIFOLD . Remove upper and lower intake manifold collectors. See INTAKE MANIFOLD . Remove fuel injector rail with injectors. Remove intake manifold. See INTAKE MANIFOLD .
2. Remove oil pan. See OIL PAN . Remove cylinder head covers. Remove timing chain. See TIMING CHAIN . Remove camshaft sprockets and camshaft chains. Remove camshaft tensioners from cylinder heads. Camshaft tensioners are located at front of cylinder heads between camshafts.
3. Remove rear timing chain case bolts in sequence. See Fig. 18 . Using Seal Cutter (J37228), separate rear timing chain case from cylinder block and cylinder heads. Remove rear timing chain case. Remove cylinder head "O" rings. Remove cylinder block "O" rings. Remove CVTC valves.
4.
Remove camshaft bracket bolts in sequence. See Fig. 17 . Loosen bolts in 2 or 3 steps. Remove camshaft bracket bolts and brackets. Remove camshafts.
5. Remove cylinder head bolts in reverse order of tightening sequence. See Fig. 14 . Loosen bolts in 2 or 3 steps. Remove cylinder head.
Inspection
1. Check cylinder head for cracks and damage. Measure cylinder head and cylinder block mating surface warpage. If warpage exceeds specification, machine surface. See CYLINDER HEAD and CYLINDER BLOCK tables under ENGINE SPECIFICATIONS.
2. If machining reduces cylinder head height or cylinder block deck height to less than specification, replace cylinder head or cylinder block.
Installation
1. Set cylinder No. 1 at TDC by rotating crankshaft until keyway on front of shaft is at 11 o'clock position and No. 1 piston is at top of its stroke.
2. Install cylinder head and NEW gasket. Oil cylinder head bolt threads and washers. Install cylinder head bolts and tighten in sequence to specification in 5 steps. See Fig. 14 . See TORQUE
NOTE: When removing and installing bolt securing exhaust camshaft sprocket, prevent camshaft from turning by attaching wrench to square part of camshaft.
NOTE: Mark sprockets, camshaft brackets and camshafts for reassembly reference.
2001 Nissan Pathfinder LE
2001 ENGINES 3.5L V6
тел. 095 - 747-77-11
7 сентября 2005 г. 10:42:21 Page 6 © 2004 Mitchell Repair Information Company, LLC.

SPECIFICATIONS . 3. Install camshafts ensuring camshaft keyways are positioned toward top surface of cylinder head.
Install camshaft brackets. Tighten bracket bolts to specification in reverse order of removal. See Fig. 17 . See TORQUE SPECIFICATIONS . To complete installation, reverse removal procedure.
FRONT COVER OIL SEAL
Removal
Remove engine lower cover. Remove suspension member stay. Remove accessory drive belts. Remove crankshaft position sensor. Remove crankshaft pulley. Remove radiator. Pry oil seal out of front cover.
Installation
Apply engine oil to new seal. Drive seal into oil pump housing. To complete installation, reverse removal procedure. Tighten bolts to specification. See TORQUE SPECIFICATIONS .
TIMING CHAIN
Removal
1. Release fuel system pressure. See FUEL PRESSURE RELEASE . Remove battery. Drain coolant from radiator and cylinder block. Remove radiator. Drain engine oil. Remove accessory drive belts and idler pulley with brackets.
2. Remove intake air duct and crankcase ventilation tube. Label and disconnect all electrical connectors, hoses and cables necessary for cylinder head removal. Remove A/C compressor and power steering pump, and wire aside. Remove generator.
3. Remove camshaft position sensor and CVTC sensor. Remove crankshaft position sensor from front of engine under crankshaft pulley. Remove upper and lower intake manifold collectors. See INTAKE MANIFOLD . Remove fuel injector rail with injectors. Remove ignition coils and spark plugs. Remove cylinder head covers.
4. Set piston No. 1 at TDC of compression stroke. Ensure mark on crankshaft pulley aligns with pointer on front timing chain case. Check intake and exhaust cam lobes on cylinder No. 1 are in correct position. See Fig. 3 . If cam lobes are not in correct position, rotate crankshaft 360 degrees.
5.
Remove starter motor, and set ring gear stopper using starter motor mounting bolt hole. Remove crankshaft pulley bolt. Using puller, remove pulley. Remove upper oil pan.
6. Temporarily loosen suspension member bolts, and engine mounting nuts. Remove CVTC cover bolts in reverse of tightening sequence. See Fig. 4 . Remove front timing chain case bolts in sequence. See Fig. 8 . Separate front and rear timing chain cases by driving Seal Cutter (J37228) between case halves. Remove front timing chain case.
CAUTION: If one or both cylinder heads is installed and timing chain is disconnected, DO NOT rotate camshaft or crankshaft; valves will contact pistons, resulting in bent valves.
NOTE: Ensure crankshaft does not rotate when removing crankshaft pulley bolt.
2001 Nissan Pathfinder LE
2001 ENGINES 3.5L V6
тел. 095 - 747-77-11
7 сентября 2005 г. 10:42:21 Page 7 © 2004 Mitchell Repair Information Company, LLC.

7.
Remove internal timing chain guide. Remove upper chain guide. Remove timing chain tensioner and slack side chain guide. Install stopper pins into camshaft tensioners. Ensuring camshafts do not rotate, remove intake and exhaust camshaft sprocket bolts. Remove primary and secondary camshaft timing chains. Remove lower chain guide. Remove crankshaft sprocket. Remove timing chain. See Fig. 5 .
Fig. 3: Cylinder No.1 Camshaft Lobe Position Courtesy of NISSAN MOTOR CO., U.S.A.
NOTE: Paint a mark on sprockets for reassembly reference.
2001 Nissan Pathfinder LE
2001 ENGINES 3.5L V6
тел. 095 - 747-77-11
7 сентября 2005 г. 10:42:21 Page 8 © 2004 Mitchell Repair Information Company, LLC.

Fig. 4: CVTC Cover Bolt Tightening Sequence Courtesy of NISSAN MOTOR CO., U.S.A.
2001 Nissan Pathfinder LE
2001 ENGINES 3.5L V6
тел. 095 - 747-77-11
7 сентября 2005 г. 10:42:21 Page 9 © 2004 Mitchell Repair Information Company, LLC.
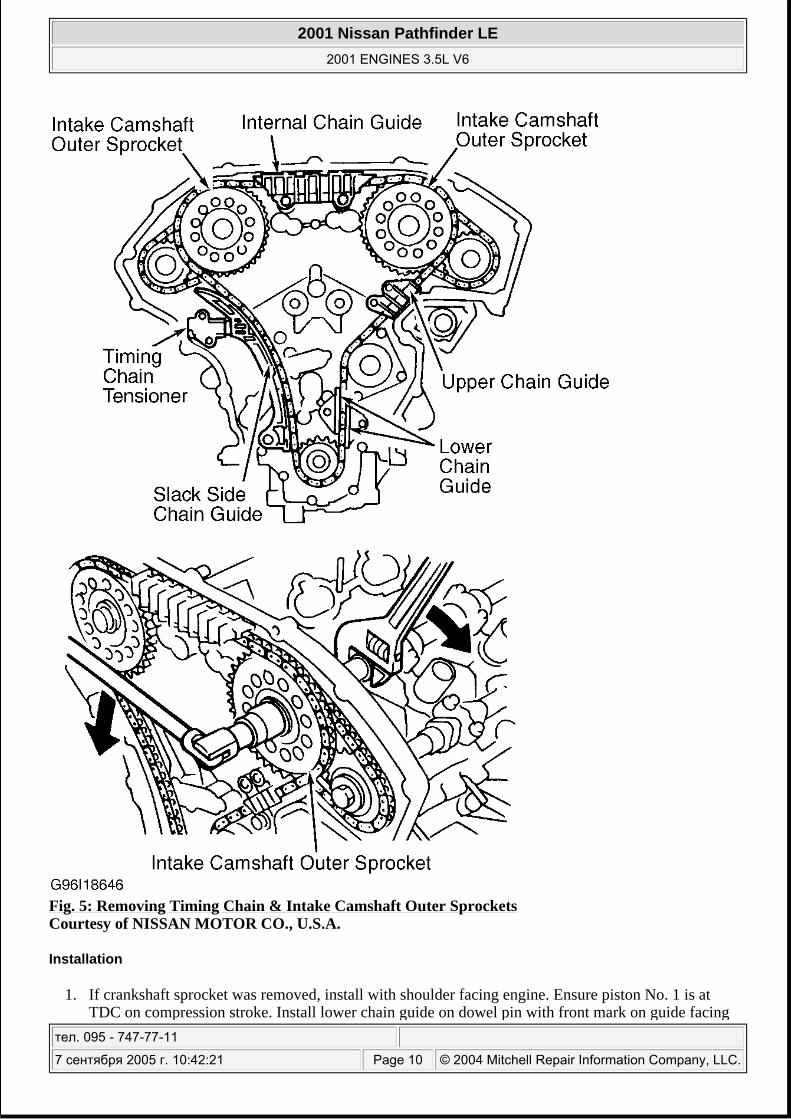
Fig. 5: Removing Timing Chain & Intake Camshaft Outer Sprockets Courtesy of NISSAN MOTOR CO., U.S.A.
Installation
1. If crankshaft sprocket was removed, install with shoulder facing engine. Ensure piston No. 1 is at TDC on compression stroke. Install lower chain guide on dowel pin with front mark on guide facing
2001 Nissan Pathfinder LE
2001 ENGINES 3.5L V6
тел. 095 - 747-77-11
7 сентября 2005 г. 10:42:21 Page 10 © 2004 Mitchell Repair Information Company, LLC.

upward. 2. Align match mark on intake camshaft outer sprocket mating marks. See Fig. 6 . Install camshaft
chains and sprockets.
Fig. 6: Aligning Camshaft Mating Marks Courtesy of NISSAN MOTOR CO., U.S.A.
3. Align primary timing chain Yellow link with punched mating mark on camshaft sprocket. Align notched mating mark on crankshaft sprocket with match mark on timing chain. Install chain onto water pump sprocket. See Fig. 7 . Tighten camshaft sprocket mounting bolts. Remove stopper pin from secondary timing chain tensioners. Install chain guides and chain tensioner. Tighten all bolts to specification. See TORQUE SPECIFICATIONS .
4. Ensure front timing chain case is clean. Apply liquid gasket to mating surfaces. Install front timing chain case. Tighten bolts in sequence to specification. See Fig. 8 . See TORQUE SPECIFICATIONS . Install seal rings onto CVTC cover. Apply a .083-.122" (2.1-3.1 mm) liquid gasket onto CVTC covers. Install timing chain front cover "O" rings. Install CVTC covers and tighten bolts in sequence to specification. See Fig. 4 . See TORQUE SPECIFICATIONS . To complete
2001 Nissan Pathfinder LE
2001 ENGINES 3.5L V6
тел. 095 - 747-77-11
7 сентября 2005 г. 10:42:21 Page 11 © 2004 Mitchell Repair Information Company, LLC.

installation, reverse removal procedure.
Fig. 7: Aligning Timing Marks Courtesy of NISSAN MOTOR CO., U.S.A.
2001 Nissan Pathfinder LE
2001 ENGINES 3.5L V6
тел. 095 - 747-77-11
7 сентября 2005 г. 10:42:21 Page 12 © 2004 Mitchell Repair Information Company, LLC.

Fig. 8: Timing Chain Front Cover Bolt Loosening & Tightening Sequence Courtesy of NISSAN MOTOR CO., U.S.A.
CAMSHAFT
NOTE: When removing and installing bolt securing exhaust camshaft sprocket, prevent camshaft from turning by attaching wrench to square part of camshaft.
2001 Nissan Pathfinder LE
2001 ENGINES 3.5L V6
тел. 095 - 747-77-11
7 сентября 2005 г. 10:42:21 Page 13 © 2004 Mitchell Repair Information Company, LLC.

Removal
1. Release fuel system pressure. See FUEL PRESSURE RELEASE . Label and disconnect all electrical connectors, hoses and cables necessary for intake manifold collector removal.
2. Remove upper and lower intake manifold collectors. Remove spark plugs. Remove cylinder head covers. Remove timing chain. See TIMING CHAIN .
3. Remove camshaft sprockets. Remove chain guide from cylinder heads. Camshaft guide is located at front of cylinder heads between camshafts. Remove camshaft bracket bolts in sequence. See Fig. 17 . Loosen bolts in 2 or 3 steps. Remove camshaft bracket bolts and brackets. Remove camshafts.
Inspection
Check camshaft journals and lobes for scratches, seizure and wear. Measure camshaft journal diameter. Measure camshaft bearing bore diameter, end play, camshaft runout, sprocket runout and lobe height. Determine oil clearance. Replace camshaft if not within specification. See CAMSHAFT table under ENGINE SPECIFICATIONS.
Installation
Lubricate bearing surfaces. Install camshafts ensuring camshaft keyways are positioned toward top surface of cylinder head. Install camshaft brackets. Tighten bracket bolts to specification in reverse order of removal. See TORQUE SPECIFICATIONS . See Fig. 14 . To complete installation, reverse removal procedure.
REAR CRANKSHAFT OIL SEAL
Removal & Installation
Remove transmission. See appropriate TRANSMISSION REMOVAL article in TRANSMISSIONS. Remove flexplate/flywheel. Remove oil pan. See OIL PAN . Remove rear oil seal retainer. Pry seal out of retainer. Lubricate new seal. Drive seal into retainer. Tighten rear oil seal retainer bolts to specification. See TORQUE SPECIFICATIONS . To complete installation, reverse removal procedure.
WATER PUMP
Removal
1. Remove engine undercover. Remove suspension member stay. Drain coolant from radiator and engine block. Remove radiator shrouds. Remove accessory drive belts. Remove cooling fan. Remove idler pulley bracket. Remove front timing chain case. Remove timing chain tensioner cover and water pump cover.
2. Push tension sleeve back to relieve chain tension. Push stopper pin to hold sleeve in retracted position. Remove timing chain tensioner assembly. Secure a gap between timing chain and water pump by rotating crankshaft pulley 20 degrees counterclockwise. Remove 3 water pump mounting bolts.
3. Install two 8-mm bolts into opposing water pump bolts holes. Tighten bolts evenly until they contact rear timing chain case. Tighten bolts 1/2 turn at a time until water pump separates from rear timing
NOTE: Mark sprockets, camshaft brackets and camshafts for reassembly reference.
2001 Nissan Pathfinder LE
2001 ENGINES 3.5L V6
тел. 095 - 747-77-11
7 сентября 2005 г. 10:42:21 Page 14 © 2004 Mitchell Repair Information Company, LLC.

chain case. See Fig. 9 . Remove water pump.
Installation
Clean old liquid gasket from water pump. Apply liquid gasket to water pump. Install water pump. Tighten water pump bolts to specification. See TORQUE SPECIFICATIONS . To install remaining components, reverse removal procedure.
Fig. 9: Removing Water Pump Courtesy of NISSAN MOTOR CO., U.S.A.
OIL PAN
Removal
1.
Remove battery. Remove accessory drive belts and idler pulley with bracket. Remove power steering pump and position aside. Remove generator. Remove oil level dipstick. Install engine slingers.
2. Raise and support vehicle. Remove front tire and wheel assemblies. Remove engine under cover. Remove suspension member stay. Drain coolant from radiator. Disconnect A/T oil cooler hoses, if equipped. Drain engine oil. Remove crankshaft position sensors. Remove 4WD front drive shaft. Remove front exhaust pipe heat insulators, front exhaust pipes, and rear heat oxygen sensors. Remove
NOTE: For additional information on cooling systems, see SPECIFICATIONS or ELECTRIC COOLING FANS article in ENGINE COOLING.
CAUTION: When removing aluminum oil pan, first remove crankshaft position sensors from assembly, using care not to damage sensor edges, or signal plate teeth.
NOTE: It is not necessary to remove steel oil pan prior to removing aluminum oil pan.
2001 Nissan Pathfinder LE
2001 ENGINES 3.5L V6
тел. 095 - 747-77-11
7 сентября 2005 г. 10:42:21 Page 15 © 2004 Mitchell Repair Information Company, LLC.

4WD front axle. See 4WD FRONT AXLE R200A article in DRIVE AXLES. 3. Remove starter motor. Disconnect oil pressure switch wiring harness connector. Loosen steering
column assembly lower joint bolts and disconnect lower joint from steering gear. Position a transmission jack under front suspension member and hoist engine using a suitable crane, and engine slingers. Remove left and right side front engine mounting nuts. Remove front suspension member bolts. Using transmission jack, carefully lower suspension member enough to gain clearance for oil pan removal. Remove A/T cooler tube, and water hose and tube Remove 4 engine-to-transmisson bolts. Remove aluminum oil pan bolts in sequence. See Fig. 10 .
4. Separate oil pan from cylinder block by driving Seal Cutter (J37228) between pan and block, and sliding cutter along, by tapping with a hammer. DO NOT pry pan away from block with a screwdriver; pan or block gasket surface may be damaged. Remove oil pan.
Installation
Carefully clean all gasket surfaces. Apply bead of liquid gasket to oil pan mating surface. Install oil pan and bolts. Tighten bolts in sequence to specification. See Fig. 10 . See TORQUE SPECIFICATIONS . To complete installation, reverse removal procedure.
2001 Nissan Pathfinder LE
2001 ENGINES 3.5L V6
тел. 095 - 747-77-11
7 сентября 2005 г. 10:42:22 Page 16 © 2004 Mitchell Repair Information Company, LLC.

Fig. 10: Oil Pan Bolt Removal & Tightening Sequence Courtesy of NISSAN MOTOR CO., U.S.A.
OVERHAUL
NOTE: For overhaul procedures not covered in this article, see ENGINE OVERHAUL PROCEDURES article in GENERAL INFORMATION.
2001 Nissan Pathfinder LE
2001 ENGINES 3.5L V6
тел. 095 - 747-77-11
7 сентября 2005 г. 10:42:22 Page 17 © 2004 Mitchell Repair Information Company, LLC.

CYLINDER HEAD
Cylinder Head
If cylinder head warpage exceeds specification, machine surface. See CYLINDER HEAD table under ENGINE SPECIFICATIONS. If machining reduces cylinder head height to less than specification, replace cylinder head. DO NOT remove more than .008" (.20 mm) of material from cylinder head and/or cylinder block combined.
Valve Springs
Using Valve Spring Compressor (J-26336-A and J-26336-20), remove valve spring. Replace valve spring if free length, out-of-square or pressure is not within specification. See VALVES & VALVE SPRINGS table under ENGINE SPECIFICATIONS.
Valve Stem Oil Seals
Remove oil seals, using pliers. Apply oil to NEW seal. Using Installer (J-39386), drive seal onto valve guide until fully seated.
Valve Guides
1. Heat cylinder head to 230-266°F (110-130°C). Using press or hammer and drift, force guide out of cylinder head from combustion chamber side. Allow head to cool to room temperature. Ream valve guide cylinder head bore until inner diameter is as specified. See CYLINDER HEAD table under ENGINE SPECIFICATIONS.
2. Reheat head. Press service guide into cylinder head until valve guide installed height is as specified. Measure installed height from top of guide to valve spring seat surface.
3. Ream valve guides until inner diameter is as specified. Ensure valve stem-to-guide oil clearance is as specified.
Valve Seat
1. Service valve guide before servicing or replacing valve seat. Bore valve seat until it collapses. Remove seat. Ream seat bore for oversize seat. See CYLINDER HEAD table under ENGINE SPECIFICATIONS.
2. Heat cylinder head to 230-266°F (110-130°C). Press seat into bore until fully seated. Grind or cut valve seat until seat angle and width are as specified. After machining, lap valve seat with lapping compound.
Valves
Check valve dimensions. See VALVES & VALVE SPRINGS table under ENGINE SPECIFICATIONS. Replace valves as necessary.
NOTE: Mark component locations for reassembly reference.
NOTE: Install outer valve spring with paint mark or narrow pitch coils toward cylinder head.
2001 Nissan Pathfinder LE
2001 ENGINES 3.5L V6
тел. 095 - 747-77-11
7 сентября 2005 г. 10:42:22 Page 18 © 2004 Mitchell Repair Information Company, LLC.

VALVE TRAIN
Lifters
Check lifters and lifter guide bore for scratches, seizure and wear. Measure outer diameter of lifter and inner diameter of lifter guide to determine oil clearance. See VALVE LIFTERS table under ENGINE SPECIFICATIONS. If not within specification, replace components as necessary.
CYLINDER BLOCK ASSEMBLY
Piston & Rod Assembly
1. Mark cylinder number on piston. Cylinder number is marked on connecting rod and bearing cap. See Fig. 11 . Grade number is marked on opposite side of connecting rod and bearing cap. To separate piston and connecting rod, remove snap ring from piston.
2. Heat piston in oil to 140-158°F (60-70°C). Press piston pin out of connecting rod. Measure rod bend and twist. If bend and twist are not within specification, replace rod. See CONNECTING RODS table under ENGINE SPECIFICATIONS.
3. Measure piston pin diameter. See PISTONS, PINS & RINGS table under ENGINE SPECIFICATIONS. Determine piston fit (clearance between pin and piston). Determine rod fit (clearance between pin and rod bushing). If not within specification, replace components as necessary.
4. To reassemble, install NEW snap ring in piston. Reheat piston. Press pin through piston and rod, ensuring rod is correctly oriented to piston (note relationship between oil hole in rod and front mark on top of piston). See Fig. 11 . Ensure rod is centered on pin.
5. Install remaining snap ring. Ensure rod swings freely. Install piston and rod assembly with front mark on top of piston toward front of engine. When installing rod bearing cap, ensure cylinder numbers on rod and cap are on same side, and grade numbers are on same side.
6. Tighten connecting rod bearing caps evenly to specification. See TORQUE SPECIFICATIONS . Measure connecting rod side play. If side play is not within specification, replace connecting rod and/or crankshaft.
NOTE: Grade numbers may be in Arabic or Roman numeral form.
2001 Nissan Pathfinder LE
2001 ENGINES 3.5L V6
тел. 095 - 747-77-11
7 сентября 2005 г. 10:42:22 Page 19 © 2004 Mitchell Repair Information Company, LLC.
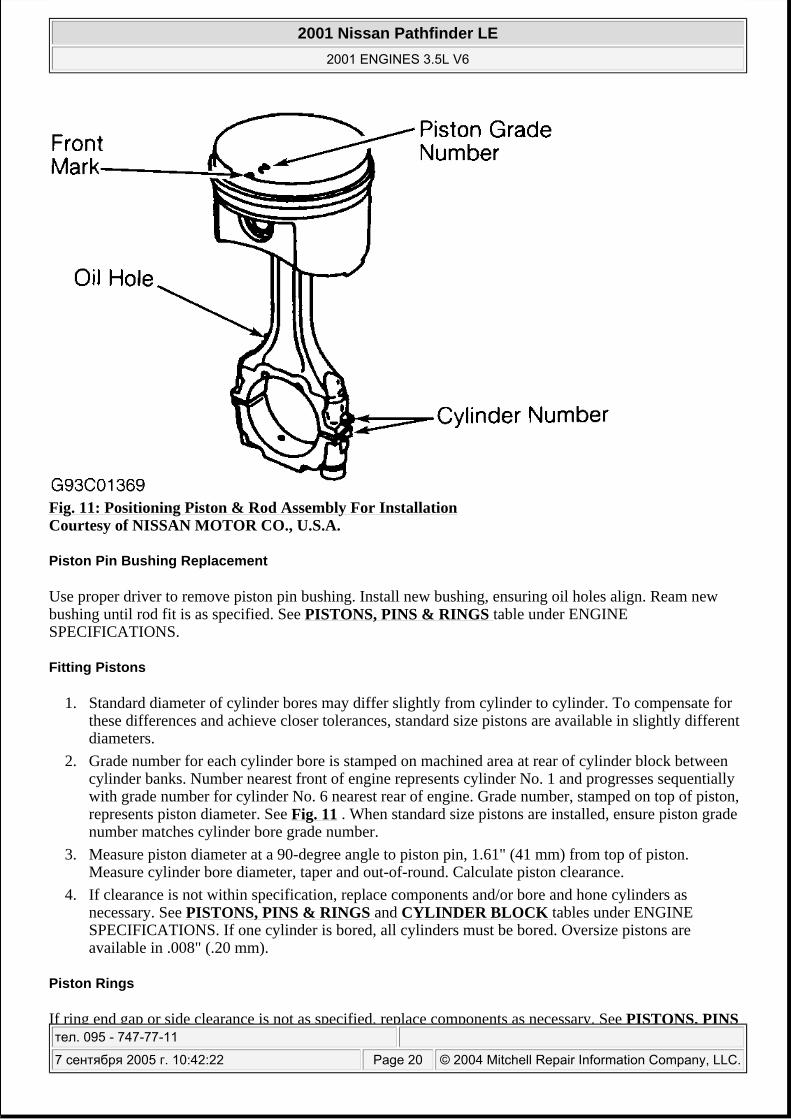
Fig. 11: Positioning Piston & Rod Assembly For Installation Courtesy of NISSAN MOTOR CO., U.S.A.
Piston Pin Bushing Replacement
Use proper driver to remove piston pin bushing. Install new bushing, ensuring oil holes align. Ream new bushing until rod fit is as specified. See PISTONS, PINS & RINGS table under ENGINE SPECIFICATIONS.
Fitting Pistons
1. Standard diameter of cylinder bores may differ slightly from cylinder to cylinder. To compensate for these differences and achieve closer tolerances, standard size pistons are available in slightly different diameters.
2. Grade number for each cylinder bore is stamped on machined area at rear of cylinder block between cylinder banks. Number nearest front of engine represents cylinder No. 1 and progresses sequentially with grade number for cylinder No. 6 nearest rear of engine. Grade number, stamped on top of piston, represents piston diameter. See Fig. 11 . When standard size pistons are installed, ensure piston grade number matches cylinder bore grade number.
3. Measure piston diameter at a 90-degree angle to piston pin, 1.61" (41 mm) from top of piston. Measure cylinder bore diameter, taper and out-of-round. Calculate piston clearance.
4. If clearance is not within specification, replace components and/or bore and hone cylinders as necessary. See PISTONS, PINS & RINGS and CYLINDER BLOCK tables under ENGINE SPECIFICATIONS. If one cylinder is bored, all cylinders must be bored. Oversize pistons are available in .008" (.20 mm).
Piston Rings
If ring end gap or side clearance is not as specified, replace components as necessary. See PISTONS, PINS
2001 Nissan Pathfinder LE
2001 ENGINES 3.5L V6
тел. 095 - 747-77-11
7 сентября 2005 г. 10:42:22 Page 20 © 2004 Mitchell Repair Information Company, LLC.

& RINGS table under ENGINE SPECIFICATIONS. When installing rings, ensure marked side of ring is facing upward (if marked), and ring end gaps are correctly spaced around circumference of piston. See Fig. 12 .
Fig. 12: Installing Piston Rings Courtesy of NISSAN MOTOR CO., U.S.A.
Rod Bearings
1. Standard diameter of rod bearing journals and crankpin bore may differ slightly from journal to journal. To compensate for these differences and achieve closer tolerances, standard size rod bearings are available in slightly different thicknesses.
2. Grade number, stamped on front crankshaft throw, represents diameter of rod bearing journal. See
2001 Nissan Pathfinder LE
2001 ENGINES 3.5L V6
тел. 095 - 747-77-11
7 сентября 2005 г. 10:42:22 Page 21 © 2004 Mitchell Repair Information Company, LLC.

Fig. 13 . Connecting rod bearing grade is denoted by color marking on rod bearing. See CONNECTING ROD BEARING SPECIFICATIONS table. Correct bearing size is determined by adding grade number on crankshaft throw to grade number of rod bearing.
3. For example, if grade number on crankshaft throw is "1" and grade number of rod bearing is "1" (Brown mark), install a bearing with grade "2" (Green mark). See CONNECTING ROD BEARING SPECIFICATIONS table for bearing identification color.
4. If rod journal diameter or rod bearing oil clearance are not as specified, replace rod bearings or machine rod bearing journal and install undersize bearings. See CRANKSHAFT MAIN & CONNECTING ROD BEARINGS and CONNECTING RODS table under ENGINE SPECIFICATIONS. Undersize bearings are available in .010" (.25 mm) undersize.
5. When installing rod bearings, ensure oil hole in connecting rod aligns with oil hole in rod bearing. When installing rod bearing cap, ensure cylinder identification number on rod and cap are on same side. See Fig. 11 .
6. Tighten connecting rod bearing caps evenly to specification. See TORQUE SPECIFICATIONS . Measure connecting rod side play. If side play is not within specification, replace connecting rod and/or crankshaft.
CONNECTING ROD BEARING SPECIFICATIONS
Fig. 13: Locating Connecting Rod & Main Journal Grade Numbers Courtesy of NISSAN MOTOR CO., U.S.A.
Crankshaft & Main Bearings
Grade Number ID Color Thickness - In. (mm) 0 Black .0591-.0592 (1.500-1.503) 1 Brown .0592-.0593 (1.503-1.506) 2 Green .0593-.0594 (1.506-1.509)
2001 Nissan Pathfinder LE
2001 ENGINES 3.5L V6
тел. 095 - 747-77-11
7 сентября 2005 г. 10:42:22 Page 22 © 2004 Mitchell Repair Information Company, LLC.

1. Loosen main bearing caps in 2 or 3 steps in sequential order. See Fig. 16 . Upper and lower halves of main bearings are not interchangeable. Upper half can be identified by oil hole.
2. Standard diameters of crankshaft main bearing journals and main bearing journal block bores may differ slightly from journal to journal. To compensate for these differences and achieve closer tolerances, standard size main bearings are available in slightly different thicknesses.
3. Thickness is represented by grade numbers. Grade number stamped on crankshaft throw represents diameter of main bearing journal. See Fig. 13 .
4. Grade number representing diameter of main journal block bore is stamped on machined area at rear of cylinder block between cylinder banks (next to cylinder bore grade numbers). Number nearest front of engine denotes journal No. 1 and progresses sequentially with grade number for journal No. 4 nearest rear of engine. Correct bearing size is determined by adding grade number on crankshaft throw to grade number on bottom of cylinder block.
5. For example, if grade number on crankshaft throw is 1 and grade number on cylinder block is "2", install a bearing with grade "3". Color code on side of main bearing corresponds to main bearing grade number. See MAIN BEARING SPECIFICATIONS (MATCHED SET) or MAIN BEARING SPECIFICATIONS (UNMATCHED SET) table for bearing identification color and thickness.
6. Determine main bearing oil clearance. If oil clearance is not within specification, replace main bearings or machine crankshaft and install undersize bearings. See CRANKSHAFT MAIN & CONNECTING ROD BEARINGS table under ENGINE SPECIFICATIONS. Undersize bearings are available in .010" (.25 mm) undersize.
7. Thrust bearing is located at journal No. 4 (rear bearing). See THRUST BEARING . Tighten main bearing cap bolts to specification in reverse order of loosening sequence. See Fig. 16 . See TORQUE SPECIFICATIONS .
MAIN BEARING SPECIFICATIONS (MATCHED SET)(1)(2)
MAIN BEARING SPECIFICATIONS (MISMATCHED SET) (1)(2)
Grade Number ID Color Thickness - In. (mm) 0 Black .0787-.0789 (2.000-2.003) 1 Brown .0789-.0790 (2.003-2.006) 2 Green .0790-.0791 (2.006-2.009) 3 Yellow .0791-.0792 (2.009-2.012) 4 Blue .0792-.0793 (2.012-2.015) 5 Pink .0793-.0794 (2.015-2.018) 6 Purple .0794-.0796 (2.018-2.021) 7 White .0796-.0797 (2.021-2.024) (1) Width for all bearings is .783-.791" (19.9-20.1 mm).(2) Grade is the same for lower and upper bearings.
Grade Number ID Color Thickness - In. (mm) 01
Lower Brown/Black .0787-.0789 (2.000-2.003 Upper Brown/Black .0789-.0790 (2.003-2.006)
12
2001 Nissan Pathfinder LE
2001 ENGINES 3.5L V6
тел. 095 - 747-77-11
7 сентября 2005 г. 10:42:22 Page 23 © 2004 Mitchell Repair Information Company, LLC.

Thrust Bearing
Main bearing No. 4 (rear bearing) is thrust bearing. If crankshaft end play is not within specification, replace thrust bearing. See CRANKSHAFT MAIN & CONNECTING ROD BEARINGS table under ENGINE SPECIFICATIONS.
Cylinder Block
1. If maximum deck warpage exceeds specification, resurface deck. See CYLINDER BLOCK table under ENGINE SPECIFICATIONS. Maximum resurfacing limit of cylinder head and/or cylinder block combined is .008" (.20 mm).
2. Standard diameter of cylinder bores may differ from cylinder to cylinder. Grade number on cylinder block deck surface (next to each cylinder bore) represents standard diameter of cylinder. If installing standard diameter pistons, ensure grade number on top of piston matches cylinder bore grade number.
3. If cylinder bore diameter, maximum taper or maximum out-of-round exceed specification, bore all cylinders and install oversize pistons. Before boring, install main bearing caps and tighten bolts to specification to prevent cylinder distortion. See TORQUE SPECIFICATIONS .
ENGINE OILING
ENGINE LUBRICATION SYSTEM
Oil pump, mounted on front of cylinder block, behind rear timing chain case, draws oil from pan through a screen to oil pump. Oil is delivered to full-flow filter and main oil gallery. Main oil gallery supplies oil to crankshaft main bearings and drilled passages in crankshaft. Passages from main gallery to lifter guides
Lower Green/Brown .0789-.0790 (2.003-2.006) Upper Green/Brown .0790-.0791 (2.006-2.009)
23 Lower Yellow/Green .0790-.0791 (2.006-2.009) Upper Yellow/Green .0791-.0792 (2.009-2.012)
34 Lower Blue/Yellow .0791-.0792 (2.009-2.012) Upper Blue/Yellow .0792-.0793 (2.012-2.015)
45 Lower Pink/Blue .0792-.0793 (2.012-2.015) Upper Pink/Blue .0793-.0794 (2.015-2.018)
56 Lower Purple/Pink .0793-.0794 (2.015-2.018) Upper Purple/Pink .0794-.0796 (2.018-2.021)
67 Lower White/Purple .0794-.0796 (2.018-2.021) Upper White/Purple .0796-.0797 (2.021-2.0224)
(1) Width for all bearings is .783-.791" (19.9-20.1 mm).(2) Grade is different for lower and upper bearings.
2001 Nissan Pathfinder LE
2001 ENGINES 3.5L V6
тел. 095 - 747-77-11
7 сентября 2005 г. 10:42:22 Page 24 © 2004 Mitchell Repair Information Company, LLC.
supply oil to camshaft, rocker arms and lifters. Regulator valve is located on oil pump, and is accessible with oil pan removed.
Crankcase Capacity
Crankcase capacity is 4.0 qts. (3.8L) with oil filter change.
Oil Pressure
Oil pressure should be at least 14 psi (1 kg/cm 2 ) at idle, and 43 psi (3 kg/cm 2 ) at 2000 RPM.
OIL PUMP
Removal & Disassembly
Remove timing chain. See TIMING CHAIN under REMOVAL & INSTALLATION. Remove oil pump assembly.
Inspection
Clean components with solvent. Check regulator valve, valve bore and gears for wear. Ensure regulator valve slides freely in bore. Regulator valve-to-bore clearance should be .0016-.0038" (.040-.097 mm). Replace components as necessary. Replace gear set and/or oil pump if clearances are not within specification. See OIL PUMP SPECIFICATIONS table.
Reassembly & Installation
Coat pump components with oil. Reassemble regulator valve and gears. Install cover on pump. Fill pump housing with oil. To install remaining components, reverse removal procedure. Install pick-up tube with new gasket.
OIL PUMP SPECIFICATIONS
TORQUE SPECIFICATIONS
TORQUE SPECIFICATIONS
Application Clearance - In. (mm) Body-To-Outer Gear .0045-.0079 (.114-.200) Inner Gear-To-Outer Gear Less Than .0071 (.180) Housing-To-Inner Gear (1) .0012-.0028 (.030-.070)
Housing-To-Outer Gear (1) .0020-.0043 (.050-.110) Inner Gear Shoulder-To-Housing .0018-.0036 (.045-.091) (1) Lay straightedge across gears and housing. Insert feeler gauge between
straightedge and gear.
Application Ft. Lbs. (N.m) Camshaft Sprocket Bolts
Primary 65-72 (89-98)
2001 Nissan Pathfinder LE
2001 ENGINES 3.5L V6
тел. 095 - 747-77-11
7 сентября 2005 г. 10:42:22 Page 25 © 2004 Mitchell Repair Information Company, LLC.

Secondary 87-94 (118-128) Connecting Rod Nut
Step 1 14-15 (19-21) Step 2 (1)
Crankshaft Pulley Bolt 29-36 (39-49) Cylinder Head Bolt (2)
Step 1 72 (98) Step 2 Loosen Bolts Step 3 25-32 (34-44) Step 4 (1)
Step 5 (1)
Engine Mount Bracket-To-Engine Bolt 32-41 (43-55) Bracket-To-Mount Nut 43-58 (59-78) Mount-To-Chassis Nut 32-41 (43-55)
Exhaust Manifold Nut 21-24 (28-32) Flywheel/Flexplate Bolt 61-69 (83-93) Intake Manifold (3)
Bolt 15-18 (20-25) Nut 16-19 (22-26)
Intake Manifold Collector Bolt/Nut Lower & Upper 13-15 (18-21)
Main Bearing Cap Bolt (4) 67-74 (91-100) Step 1 24-28 (32-38) Step 2 (1)
Oil Drain Plug 22-29 (30-39) Oil Pump Pick-Up Tube-To-Oil Pump Bolt 15-16 (20-22) Regulator Valve Cap 29-51 (39-69)
INCH Lbs. (N.m)Camshaft Bracket Bolt (5)
Step 1 (Bolts No. 7-10 First, Then Tighten Bolts No. 1-6) 18 (2) Step 2 (All Bolts) 53 (6) Step 3 80-106 (9.0-12)
Cylinder Head Cover Nut 61-78 (7-9) CVTC Cover 88-106 (10-12) Front Timing Chain Case Bolt
8 mm Bolt (7)
6 mm Bolt 106-124 (12-14) Oil Pan Bolt 44-53 (5-6) Oil Pump Cover Bolt
2001 Nissan Pathfinder LE
2001 ENGINES 3.5L V6
тел. 095 - 747-77-11
7 сентября 2005 г. 10:42:22 Page 26 © 2004 Mitchell Repair Information Company, LLC.

Long Bolt 53-62 (6-7) Short Bolt 35-43 (4-5)
Rear Oil Seal Retainer Bolt 72-82 (8-9) Rear Timing Chain Case Bolt (6) 106-115 (12-13) Timing Chain Tensioner Bolt 62-82 (7-9) Water Pump Bolt 72-95 (8-11) (1) Tighten bolts an additional 90-95 degrees.(2) Tighten bolts in sequence. See Fig. 14 .(3) Tighten bolts in sequence. See Fig. 15 .(4) Tighten in reverse order of loosening sequence. See Fig. 16(5) Tighten in reverse order of loosening sequence. See Fig. 17(6) Tighten in reverse order of loosening sequence. See Fig. 18(7) Tighten to 19-23 ft. lbs. (26-31 N.m)
2001 Nissan Pathfinder LE
2001 ENGINES 3.5L V6
тел. 095 - 747-77-11
7 сентября 2005 г. 10:42:22 Page 27 © 2004 Mitchell Repair Information Company, LLC.

Fig. 14: Cylinder Head Bolt Tightening Sequence Courtesy of NISSAN MOTOR CO., U.S.A.
2001 Nissan Pathfinder LE
2001 ENGINES 3.5L V6
тел. 095 - 747-77-11
7 сентября 2005 г. 10:42:22 Page 28 © 2004 Mitchell Repair Information Company, LLC.

Fig. 15: Intake Manifold Bolt Tightening Sequence Courtesy of NISSAN MOTOR CO., U.S.A.
Fig. 16: Main Bearing Cap Bolt Loosening Sequence Courtesy of NISSAN MOTOR CO., U.S.A.
2001 Nissan Pathfinder LE
2001 ENGINES 3.5L V6
тел. 095 - 747-77-11
7 сентября 2005 г. 10:42:22 Page 29 © 2004 Mitchell Repair Information Company, LLC.
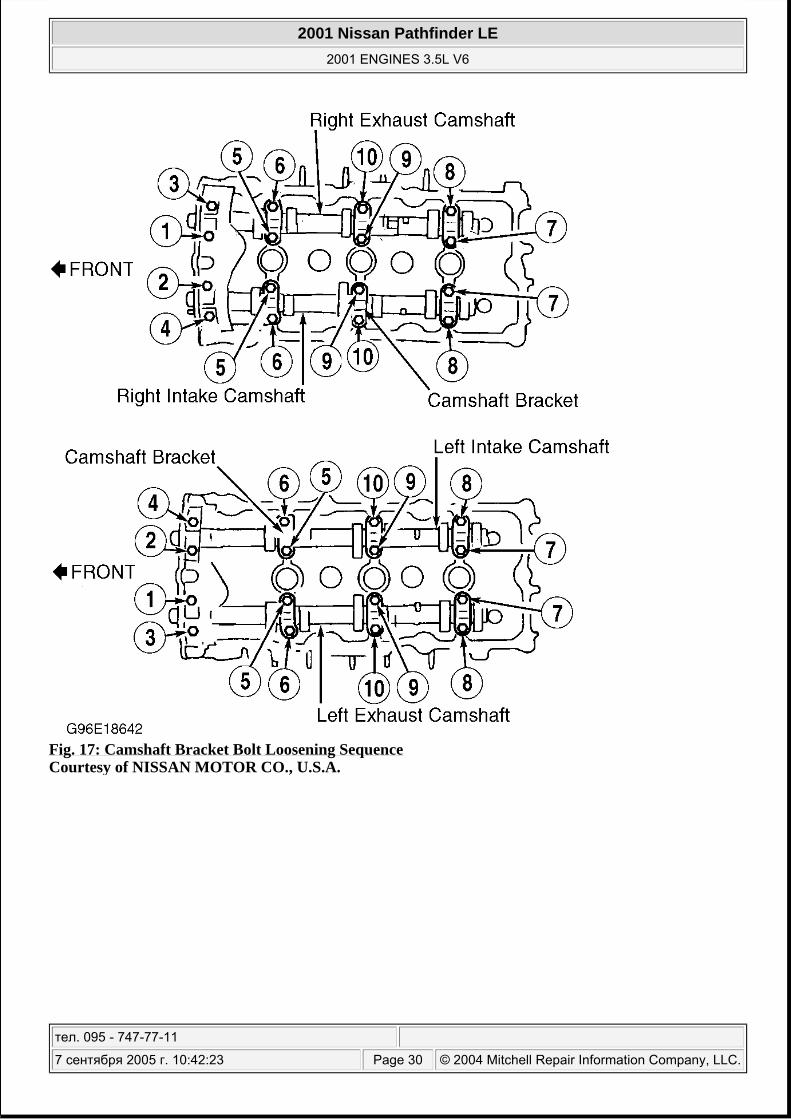
Fig. 17: Camshaft Bracket Bolt Loosening Sequence Courtesy of NISSAN MOTOR CO., U.S.A.
2001 Nissan Pathfinder LE
2001 ENGINES 3.5L V6
тел. 095 - 747-77-11
7 сентября 2005 г. 10:42:23 Page 30 © 2004 Mitchell Repair Information Company, LLC.

Fig. 18: Rear Timing Chain Case Bolt Loosening Sequence Courtesy of NISSAN MOTOR CO., U.S.A.
ENGINE SPECIFICATIONS
GENERAL SPECIFICATIONS
CRANKSHAFT MAIN & CONNECTING ROD BEARINGS
Application Specification Displacement 213.45 Cu. In. (3.5L) Bore 3.760" (95.5 mm) Stroke 3.205" (73.3 mm) Compression Pressure 142-185 psi (10.0-13.0 kg/cm 2 ) Compression Ratio 10.0:1 Fuel System SFI
Application In. (mm) Crankshaft
End Play Standard .0039-.0098 (.10-.25) Service Limit .0118 (.30)
Runout .0039 (.10) Main Bearings
2001 Nissan Pathfinder LE
2001 ENGINES 3.5L V6
тел. 095 - 747-77-11
7 сентября 2005 г. 10:42:23 Page 31 © 2004 Mitchell Repair Information Company, LLC.

CONNECTING RODS
Journal Diameter Grade No. A 2.3612-2.3612 (59.974-59.975) Grade No. B 2.3611-2.3612 (59.973-59.974) Grade No. C 2.3611-2.3611 (59.972-59.973) Grade No. D 2.3611-2.3611 (59.971-59.972) Grade No. E 2.3610-2.3611 (59.970-59.971) Grade No. F 2.3610-2.3610 (59.969-59.970) Grade No. G 2.3610-2.3609 (59.968-59.969) Grade No. H 2.3609-2.3609 (59.967-59.968) Grade No. J 2.3609-2.3609 (59.966-59.967) Grade No. K 2.3608-2.3609 (59.965-59.966) Grade No. L 2.3608-2.3608 (59.964-59.965) Grade No. M 2.3607-2.3608 (59.963-59.964) Grade No. N 2.3607-2.3607 (59.962-59.963) Grade No. P 2.3607-2.3607 (59.961-59.962) Grade No. R 2.3606-2.3607 (59.960-59.961) Grade No. S 2.3606-2.3606 (59.959-59.960) Grade No. T 2.3605-2.3606 (59.958-59.959) Grade No. U 2.3605-2.3605 (59.957-59.958) Grade No. V 2.3605-2.3605 (59.956-59.957) Grade No. W 2.3604-2.3605 (59.955-59.956) Grade No. X 2.3604-2.3604 (59.954-59.955) Grade No. Y 2.3603-2.3604 (59.953-59.954) Grade No. 4 2.3603-2.3603 (59.952-59.953) Grade No. 7 2.3603-2.3603 (59.951-59.922)
Journal Out-Of-Round .0001 (.002) Journal Taper .0001 (.002) Oil Clearance
Standard .0005-.0012 (.012-.030) Service Limit .0026 (.065)
Connecting Rod Bearings Journal Diameter
Grade No. 0 1.7704-1.7706 (44.968-44.974) Grade No. 1 1.7702-1.7704 (44.962-44.968) Grade No. 2 1.7699-1.7702 (44.956-44.962)
Journal Out-Of-Round .0001 (.002) Journal Taper .0001 (.002) Oil Clearance
Standard .0008-.0018 (.020-.045) Service Limit .0028 (.070)
2001 Nissan Pathfinder LE
2001 ENGINES 3.5L V6
тел. 095 - 747-77-11
7 сентября 2005 г. 10:42:23 Page 32 © 2004 Mitchell Repair Information Company, LLC.

PISTONS, PINS & RINGS
CYLINDER BLOCK
Application In. (mm) Bore Diameter
Pin Bore .9441-.9449 (23.980-24.000) Crankpin Bore 2.1654-2.1659 (55.000-55.013)
Center-To-Center Length 5.8110-5.8149 (144.15-144.25) Maximum Bend Per 3.94" (100 mm) .006 (.15) Maximum Twist Per 3.94" (100 mm) .012 (.30) Side Play
Standard .0079-.0138 (.20-.35) Service Limit .0157 (.40)
Application In. (mm) Pistons
Clearance .0004-.0012 (.010-.030) Diameter
Grade No. 1 3.7590-3.7594 (95.480-95.490) Grade No. 2 3.7594-3.7598 (95.490-95.500) Grade No. 3 3.7598-3.7602 (95.000-95.510) .008" (.20 mm) Oversize 3.7669-3.7681 (95.680-95.710)
Pins Diameter
Grade No. 01 .8657-.8659 (21.989-21.995) Grade No. 02 .8659-.8662 (21.995-22.001)
Piston Interference Fit .0001-.0002 (.002-.006) Rod Bushing Clearance
Standard .0002-.0007 (.005-.017) Service Limit .0012 (.030)
Rings No. 1
End Gap .0091-.0130 (.23-.33) Side Clearance .0016-.0031 (.040-.080)
No. 2 End Gap .0130-.0189 (.33-.48) Side Clearance .0012-.0028 (.030-.070)
No. 3 (Oil Control) End Gap .0079-.0315 (.20-.80) Side Clearance .0006-.0020 (.015-.050)
Application In. (mm) Cylinder Bore
2001 Nissan Pathfinder LE
2001 ENGINES 3.5L V6
тел. 095 - 747-77-11
7 сентября 2005 г. 10:42:23 Page 33 © 2004 Mitchell Repair Information Company, LLC.

VALVES & VALVE SPRINGS
CYLINDER HEAD
Standard Diameter Grade No. 1 3.7598-3.7602 (95.500-95.510) Grade No. 2 3.7602-3.7606 (95.510-95.520) Grade No. 3 3.7606-3.7610 (95.520-95.530)
Maximum Taper .0006 (.015) Maximum Out-Of-Round .0006 (.015)
Maximum Deck Warpage (1) .004 (.10) (1) Maximum resurfacing limit of cylinder block and cylinder head combined
is .008" (.20).
Application In. (mm) Intake Valves
Face Angle 45 Degrees 15 Minutes-45 Degrees 45 Minutes Head Diameter 1.4567-1.4685 (37.00-37.30) Minimum Margin .020 (.50) Minimum Length 3.7842 (96.12) Stem Diameter .2348-.2354 (5.965-5.980) Valve Tip Maximum Refinish .008 (.20)
Exhaust Valves Face Angle 45 Degrees 15 Minutes-45 Degrees 45 Minutes Head Diameter 1.228-1.240 (31.20-31.50) Minimum Margin .020 (.50) Minimum Length 3.6870 (93.65) Stem Diameter .2341-.2346 (5.945-5.960) Valve Tip Maximum Refinish .008 (.20)
Valve Springs Free Length 1.854 (47.10) Out-Of-Square .079 (2.00)
Lbs. @ In. (kg @ mm)Pressure
Standard 45.4 @ 1.457 (20.6 @ 37.0) Service Limit 98.1 @1.110 (44.5 @ 28.2)
Application In. (mm) Cylinder Head Height (1) 4.972-4.980 (126.30-126.50)
Maximum Warpage (2) .004 (.10) Valve Seats
Seat Angle 45 Degrees Seat Width
Exhaust .051-.059 (1.29-1.51)
2001 Nissan Pathfinder LE
2001 ENGINES 3.5L V6
тел. 095 - 747-77-11
7 сентября 2005 г. 10:42:23 Page 34 © 2004 Mitchell Repair Information Company, LLC.

CAMSHAFT
Intake .043-.052 (1.09-1.31) Seat Bore (Oversize)
Exhaust 1.2873-1.2880 (32.700-32.716) Intake 1.5157-1.5164 (38.500-38.516)
Valve Guides Cylinder Head Valve Guide Bore I.D.
Standard .3927-.3935 (9.975-9.996) Service Limit .4006-.4014 (10.175-10.196)
Valve Guide I.D. .2362-.2369 (6.000-6.018) Valve Guide Installed Height .496-.504 (12.60-12.80) Valve Stem-To-Guide Oil Clearance
Exhaust Standard .0016-.0029 (.040-.073) Service Limit .004 (.10)
Intake Standard .0008-.0021 (.020-.053) Service Limit .003 (.08)
(1) Measure from cylinder head cover surface to head gasket surface.(2) Maximum resurfacing limit of cylinder block and cylinder head combined is .008
(.20).
Application In. (mm) Bore Diameter
No. 1 1.0236-1.0244 (26.000-26.021) No. 2, 3 & 4 .9252-.9260 (23.500-.23.521)
End Play Standard .0045-.0074 (.115-.188) Service Limit .0094 (.24)
Journal Diameter No. 1 1.0211-1.0218 (25.935-25.955) No. 2, 3 & 4 .9230-.9238 (23.445-23.465)
Camshaft Runout Standard Less Than .0008 (.020) Service Limit .002 (.05)
Sprocket Runout Less Than .006 (.15) Lobe Height
Standard 1.7506-1.7581 (44.465-44.655) Service Limit .008 (.20)
Oil Clearance Standard
Journal No. 1 .0018-.0034 (.045-.086)
2001 Nissan Pathfinder LE
2001 ENGINES 3.5L V6
тел. 095 - 747-77-11
7 сентября 2005 г. 10:42:23 Page 35 © 2004 Mitchell Repair Information Company, LLC.

VALVE LIFTERS
Journal No. 2, 3, & 4 .0014-.0030 (.035-.076) Service Limit .0059 (.150)
Application In. (mm) Bore Diameter 1.3780-1.3788 (35.000-35.021) Lifter Diameter 1.3764-1.3770 (34.960-34.975) Oil Clearance .0010-.0024 (.025-.061)
2001 Nissan Pathfinder LE
2001 ENGINES 3.5L V6
тел. 095 - 747-77-11
7 сентября 2005 г. 10:42:23 Page 36 © 2004 Mitchell Repair Information Company, LLC.