products painting techniques - scaleautomag.com · ner paints. always test spray to achieve a...
TRANSCRIPT

P R O D U C T SScale Auto Direct – Downloadable Articles
Painting Techniques

lacquer paintingSecrets of

SOME MODELERS STILL think of lacquerpainting as a black art. Other hobbyistsdon’t think lacquer can be applied overplastic to produce a mirror finish. Butsome master the seemingly arcane art
of lacquer painting and present stunning fin-ishes at contests across the country.
The advantages of lacquer painting aremany, but these advantages aren’t alwaysgenerally understood. First, lacquer is verythin and preserves subtle detail on a model. Ifproperly applied, a complete lacquer finish(with its primer, sealer, and color coats) can
be as thin as just two average coats of hobbyenamel. Second, errors in the finish can becorrected quickly because lacquer dries sorapidly. Third, the array of paint types andcolors offered is generally greater than otherfinishing systems.
Of course, there are some drawbacks.Lacquers contain some volatile organic com-pounds that can be harmful to your health, butevery kind of paint exposes the hobbyist tosome medical risk if they’re not used pro-perly. Every potential risk can be avoided bytaking the proper precautions. Work safely
and you’ll be able to make the most of lac-quer’s numerous advantages. That’s goodadvice no matter what kind of paint you use.
This article covers the basics of lacquerpainting. We’ll work through surface prepa-ration, apply a bullet-proof sealer to avoidthe dreaded appearance of “ghost” images,apply a solid color, and rub it out to glassysmoothness without a clear coat.
Our guinea pig is a mildly customizedAMT/Ertl 1966 Buick Riviera (kit no. 30083).Follow along, and with a little practice, you’llmaster the art of lacquer painting.
Basic techniques for glass-smooth finishes
2The best overall primer I’ve discovered isDuPont’s Fill ‘N Sand (no. 131S); it’s a light
gray acrylic lacquer primer/surfacer. Mix thethinner (and paint) according to the LacquerPaint Thinning Chart on page 30.
3Regardless of whether you do any bodywork,you must seal the primed surface and bare
plastic. I use DuPont’s VariPrime sealer (no.615s) with DuPont VariPrime Fast Converter (no.620S). This combination prevents “shadow”images from appearing in the completed finish.
1I use DuPont products exclusively, especiallythe company’s Acrylic Lacquer Thinner (no.
3661S). I also use DuPont Acrylic LacquerRetarder (no. 3979S), especially when I paint inthe dry summer months. The Retarder helps thelacquer to “flow out” after it’s applied to themodel. Retarder is also useful if you live in avery humid area. Different thinners are avail-able, so talk with your paint jobber to select thebest thinner for your climate.
1A great finish is no better than the surfacepreparation under it. You should acquire a
range of sanding sticks as well as some 3M wet-or-dry auto body sandpaper in 600-, 800-, 1200-,and 2000-grit varieties. You’ll also need coarse150-grit paper for rough work.
2This project will be a mild custom, so theemblems, door handles, and other excess
factory ornaments are coming off. Use a motortool with a round cutter to lightly excavate thearea around each emblem. Refer to Figure 1 fordetails on how to do this.
by MARK S . GUSTAVSON photos by MIKE BARLOW and MARK S . GUSTAVSON
SA
Materials
3Mask around the affected spot to protect thesurrounding area from excess putty. Mix up
some catalyzed putty (I used Evercoat’s two-part polyester putty) and fill the area, extendingthe putty just beyond the depression. SeeFigure 2 for application instructions.
Bodywork

8Next, sand the area at a 45-degree angle tothe edge of the hood using a medium-grit
sanding stick. My sanding revealed a couple ofpersistent high spots, as well as an irregulardepression along the center putty line that hadgone undetected. If you have similar problems,prime the area again, apply another guide coat,and sand until these problems disappear. A uni-formly gray primer surface after you sand indi-cates that you’re ready to move to the sealerand color coats.
7It’s time for the first primer coat. Wear agood, two-stage respirator when you paint.
Install a medium tip on your airbrush, and adjustits air pressure to 35-40 psi. Thin the primeraccording to the chart below, but rememberthat the mixing formula is based on the primer’soriginal thickness. Primer can thicken slightly asit gets older, so you may need to make adjust-ments. Apply your first coat of primer, let it dry,then lightly sand it using a medium-grit sandingstick. My first effort revealed several surfaceirregularities. Areas where the primer remainsare “low,” and areas where putty or plastic arerevealed are “high.” These problems are signifi-cant, so we’ll prime this panel again, and apply amedium guide coat of flat dark gray lacquer.
4Use a piece of 150-grit sandpaper to knockdown the crown of the putty once it has
cured. Then, grab a coarse sanding stick andcomplete the sanding. The flat sanding stickhelps “true” the area to prevent the appearanceof a crown or other surface flaw when the coloris polished. See Figure 3 for detailed sandinginstructions.
5The hood on this model has a badly marredsurface because the underhood engraving
appears in a shadow pattern on the outside.Though a real annoyance, it presents us with anexcellent opportunity to discuss the techniquesto correct this problem. Let’s also remove thechrome molding on the hood. Grind out theshape, then…
6…fill the gap with a strip of styrene, attachedwith gap-filling super glue. Don’t use solvent-
based glues for this step. Note that the chrome-plated trim has been stripped and attached tothe front edge of the hood. After the super gluecures, apply a thin coat of polyester putty overthe entire area, including the interface betweenthe hood molding and hood. Sand the panel totrue the area, then sand the entire body with afine sanding stick.
Area where detail was removed
Putty
Sanding stickBulge inbodywork
Dip inbodywork
Panel line
FIGURE 1 Remove emblem…
Fill with putty…
Sand smooth
FIGURE 2
FIGURE 3
Bodywork, cont.
LACQUER PAINT THINNING CHART
Thinning Chart25% = 4 parts color to 1 part thinner33% = 3 parts color to 1 part thinner50% = 2 parts color to 1 part thinner100% = 1 part color to 1 part thinner125% = 4 parts color to 5 parts thinner150% = 2 parts color to 3 parts thinner200% = 1 part color to 2 parts thinner500% = 1 part color to 5 parts thinner
DuPont Lacquer ThinnersFast Dry (no. 3608S)Medium Dry (no. 3661S)Slow Dry/High Gloss (no. 3602S)
Standard Thinning *Lacquer colors 125-150%Lacquer clear 150-200%Candies 150-200%Final clear (after color sanding) 500%
* Airbrushes are small, and therefore require thin-ner paints. Always test spray to achieve a smoothflow of materials. The thinner the paint, thesmoother the flow. However, the “flow” character-istics of lacquer paints are inversely related to the“hiding” ability of the colors. The occurrence ofruns and sags is directly related to “thinness” ofthe paint. This is why it is essential to follow thin-ning formulas to the letter.
Tapered area that willbe filled with putty
Area of removed detail(emblem, molding, etc.)
Body
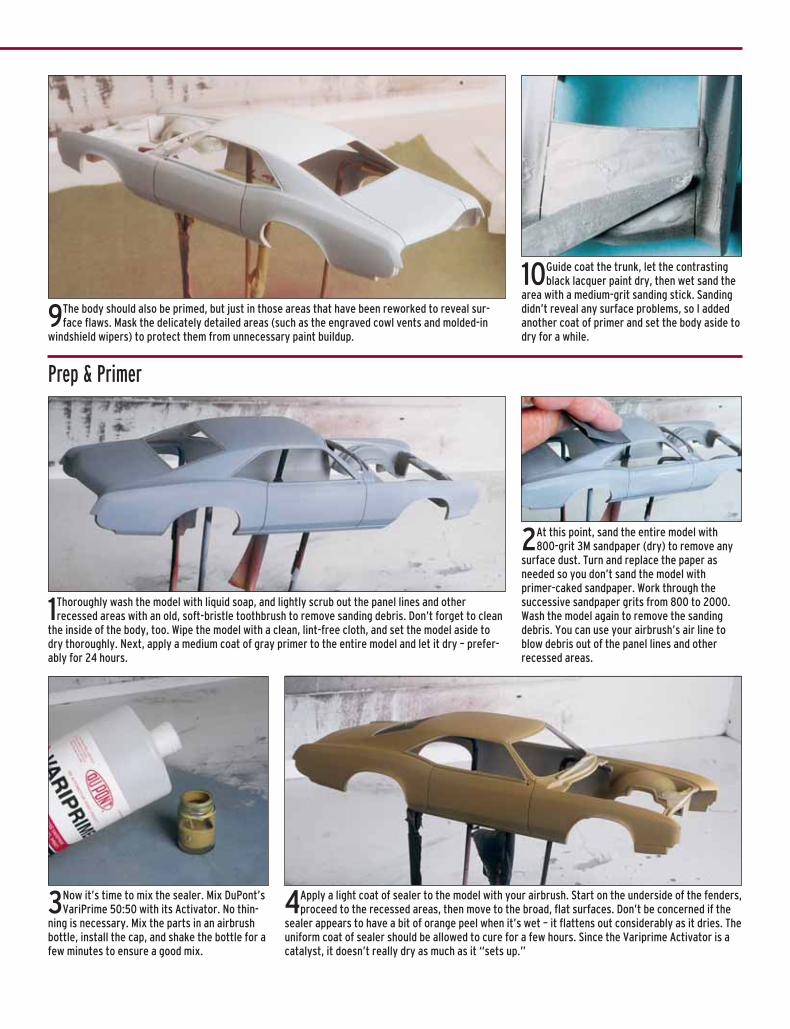
10Guide coat the trunk, let the contrastingblack lacquer paint dry, then wet sand the
area with a medium-grit sanding stick. Sandingdidn’t reveal any surface problems, so I addedanother coat of primer and set the body aside todry for a while.
9The body should also be primed, but just in those areas that have been reworked to reveal sur-face flaws. Mask the delicately detailed areas (such as the engraved cowl vents and molded-in
windshield wipers) to protect them from unnecessary paint buildup.
1Thoroughly wash the model with liquid soap, and lightly scrub out the panel lines and otherrecessed areas with an old, soft-bristle toothbrush to remove sanding debris. Don’t forget to clean
the inside of the body, too. Wipe the model with a clean, lint-free cloth, and set the model aside todry thoroughly. Next, apply a medium coat of gray primer to the entire model and let it dry – prefer-ably for 24 hours.
2At this point, sand the entire model with800-grit 3M sandpaper (dry) to remove any
surface dust. Turn and replace the paper asneeded so you don’t sand the model withprimer-caked sandpaper. Work through thesuccessive sandpaper grits from 800 to 2000.Wash the model again to remove the sandingdebris. You can use your airbrush’s air line toblow debris out of the panel lines and otherrecessed areas.
3Now it’s time to mix the sealer. Mix DuPont’sVariPrime 50:50 with its Activator. No thin-
ning is necessary. Mix the parts in an airbrushbottle, install the cap, and shake the bottle for afew minutes to ensure a good mix.
4Apply a light coat of sealer to the model with your airbrush. Start on the underside of the fenders,proceed to the recessed areas, then move to the broad, flat surfaces. Don’t be concerned if the
sealer appears to have a bit of orange peel when it’s wet – it flattens out considerably as it dries. Theuniform coat of sealer should be allowed to cure for a few hours. Since the Variprime Activator is acatalyst, it doesn’t really dry as much as it “sets up.”
Prep & Primer

9Use the airbrush air line to blow debris out of the model’s panel lines and recessed areas (do thisaway from your painting area to keep dust to a minimum). When you’re finished, gently wipe
down the surface with the tack rag.
1Start by applying the color over the sealer.Hold your airbrush six to eight inches from the
surface, and move it across the model at moder-ate speed. I use a Badger 350 single-action air-brush with a heavy nozzle and tip, and apply thepaint at 35 to 40 psi. Hit the recessed areasfirst. Here I’ve painted the inner fender panelswith the nozzle closed down to a fine opening.
2Next, apply the color around the wheel openings and along the lower part of the model. Do this onboth sides, then apply two medium coats of paint to the entire model. Before the coats dry, turn
the model so you can apply color along the top edges of the fenders, up the A-pillars to the roof, andthen onto the trunk. Since this is a solid color, the actual spray pattern isn’t critical, though it isgenerally best to apply the paint in a line parallel with the panel’s longest dimension. Start on thefogged edge of the color and move up and away from that surface. It’s important to minimize roughoverspray wherever possible.
5Some surface flaws may persist. I missed thisproblem on the front fender. Once the sealer
had thoroughly cured (about an hour), I used afine-grit sanding stick to wet sand the offendingarea. After the model was washed (again) anddried, I applied additional sealer to just this areaover the bare plastic. The sealer has a “pot life”of about 48 hours after you mix it, but alwaysshake the bottle before you reapply it.
6Let’s mix up the colors coats as the primercures. I’m using a 1996 Hyundai color with a
rich, red-wine tone. A paint jobber in my areawill mix up any color in the DuPont catalog insmall bottles. A few phone calls will probablyturn up a paint shop in your area that will do thesame. Always strain the paint to remove imper-fections, and discard the strainer after use.
7Pour the paint slowly, fill the bottle to a littleless than half full, then add the thinner.
Leave a little space at the top for proper agita-tion when you shake up the mixture. Mix thepaint, load the airbrush, and spray a test pat-tern. Mixing formulas may require a little finetuning before everything will work the way it’ssupposed to.
8Before you paint, you’ll need to remove dustand other debris from the surface of the
model. Gently wipe down the model with a“clear coat” tack rag. Don’t use one of the old-style yellow tack rags; they can depositbeeswax on the surface of the model.
Prep and Primer, cont.
Painting

3Paint the hood next. Paint the underside andpanel edges first. When that coat is dry,
mount your hood as shown and paint the top.Unless you’re spraying a custom finish (metallic,candy, pearl, etc.) the spray pattern is relativelyunimportant.
4Check your model thoroughly to make sure every area has received the first color coats. If not,turn down the airbrush pressure to around 25 psi and paint just that area. The model should have
a relatively flat surface with a moderate gloss. Once the model has been treated to two passes ofcolor, set it aside to dry. Here the model has dried for about an hour – look at that gloss! It’s impor-tant to let lacquer “gas out,” which means allowing the thinner to evaporate from the paint beforeapplying more coats. It’s recommended that you set aside the model for at least 24 hours becauselacquer shrinks as it dries. If you’re in a humid area, allow more time. Once the model has dried,apply another coat of color, repeating the sequence described previously. Allow this coat to dry.
5If you find a major flaw, wet sand it with 2000-grit paper, then wash and dry the model.
Don’t sand until the paint has dried for at least aday. Wash and dry again, go over the area with atack rag, then apply two color coats to the area.(No, the trim strip didn’t grow back. This is a dif-ferent hood than the one that appeared earlier.)
6Wet sand the entire model with Meguiar’s 3500-grit paper, then wash and dry it. Apply two morecoats of color. Use the same sequence as before, but thin the color an additional 10 percent and
apply the paint at 35-40 psi. Remember to let the first coat gas out. At this point, there are six coatsof paint on the model, and it has a rich deep shine. As the paint dries, it will shrink a bit, which willintroduce a slight texture to the surface. When the finish is dry, it should have a very good shine. Thissurface hasn’t been polished, and it’s almost two hours old!
1Since we’re using auto paint, auto-paint pol-ishes will work best. Visit an auto supply store
and buy Meguiar’s no. 3 Machine Glaze and no. 7Show Car Glaze. (I don’t recommend using sili-cone-based polishes, because they can contami-nate your work area and interfere with the painton future projects.) Pour a small dollop ofMeguiar’s no. 3 onto a soft, freshly launderedcloth. An old T-shirt or cloth diaper works well.
2Gently rub the surface of the model with thepolish using a circular motion. After just a
few minutes the finish will have a mirror-likeshine. Work gently, don’t press too hard, andalways support the panel by placing your otherhand beneath it. Avoid rubbing too much on anysharp panel crease or other protrusion – you caneasily rub right through the color to the sealerbelow if you’re not paying attention.
3In small areas adjacent to sharp panel lines,such as this rocker panel molding, approach
the area from the opposite side of the crease.Never work over the top of the line. Gently rubalong the length of the inside of the crease.
Painting, cont.
Polishing

4The same process is used on the top of thefender. By placing your index finger inside
the polish-soaked rag you can get a mirror-likefinish along a recessed area like this one. Watchthe progress of your work to avoid rubbingthrough on a sharp panel crease.
5When you need to rub out paint around awheel arch, rub the polish into the surface,
and then rotate your shrouded finger up andaround the edge.
6A long panel should first be polished along itslength to cut down the orange peel. Once the
finish is smooth – and don’t be afraid to use thepolish liberally – return to the area with a seriesof small circular motions applied along thelength of the panel.
7Flat, rectangular areas like the trunk areeasy to rub out. You should also polish the
paint on the molded-in trim strip around the win-dow opening. If the trim is mirror-smooth, themetal foil you apply over it will be, too.
8After the last panel is polished with Meguiar’s no. 3, wash the model in tepid water and gently dryit. Grab a fresh polishing rag, and gently rub Meguiar’s no. 7 into the surface of the model, again
using a circular motion. Afterward, wash the model again, and it should have a glass-smooth finish.This model has not been sanded with harsh sandpapers, and no clear lacquer or wax was applied toenhance its gloss.
Polishing, cont.
Although some modelers think applying lacquer is a compli-cated process, it’s actually a straightforward technique thatmakes glass-smooth finishes like this one possible.

IWANTED TO SEE if I could build a high quality, eye-catchingmodel that would be competitive on any show table. That’s chal-lenging enough, but I also wanted to see if I could finish that same
model using spray cans instead of an airbrush. Why? We live in anera where many modelers think spray cans are amateurish andimprecise, and that the only way to build a killer model is to use anairbrush. I’m here to tell you, “It just ain’t so!” There are a lot ofgood reasons to use aerosol paint.
Perhaps you’re a beginner who just wants to break through theorange peel barrier and build consistently nice models you’ll beproud to put on your shelf. Aerosol is for you. Perhaps you have afamily or demanding job and consequently don’t have a lot of timefor modeling. Aerosol is for you. Heck, you could be a burned-outveteran contest winner who just wants to get back to the enjoyableroots of modeling. Surprisingly, aerosol may be for you!
Today there are many excellent aerosol paints available for carmodelers, more than we’ve ever seen in the long history of ourhobby. Testors rules the roost with an excellent selection of both
stock and custom colors in enamels, and Tamiya’snew lacquers have sweetened the pot
considerably. Adding spice to themix is the incredibly expansive arrayof commercially available paintsoffered by manufacturers such as
Great paint from spray cansPart I: Simple steps to a
glass-smooth paint job
by PAT COVERT

Krylon, Dupli-Color, Plasti-kote, and others. It may sound likeheresy, but you could take away my airbrush, and I wouldn’t missit a bit!
I’m a closet Ferrari nut, so I couldn’t wait to get my hands onTamiya’s 360 Modena kit (no. 24228). The beautifully detailedModena would give me the opportunity to use a wide variety ofaerosol paints, including gloss, flat, and metallic varieties.
For the body, I used Tamiya’s Italian Red spray paint (no. TS-8).These lacquers are still relatively new to the States, and indeed, tomany of our readers. Tamiya’s spray paints are lacquers, but they’redifferent from chemically “hot” commercial automotive paints thatcan damage plastic. Tamiya’s lacquers are “cool” and can be applieddirectly to kit plastic without threat of damage.
If you prefer enamel, have no fear. Testors Italian Red (no. 2919)spray paint is just as suitable for this project. In fact, throughout thisproject you’ll notice there are options for using different brands ofpaint. There are subtle differences, for instance, between the semi-gloss black paints made by Tamiya and Testors. You can use thesedifferences to your advantage to add more visual interest to themodel. Testors’ clear lacquer top coats are available in gloss, semi-gloss, and flat varieties, and can be used to vary the surfaces of flat,semigloss, and metallic paints, adding even more variety to themix. You should not use Testors’ clear lacquers over gloss enam-els, as they can separate from the paint, but they work quite well over
the aforementioned paints with excellent effect.There’s no substitute for a good-looking paint job. It’s the first
thing you notice about a model car! In this installment, I’ll show youhow to prepare, paint, and polish out the body of the Modena.Follow along as we take the screaming-red 360 through the pacesfrom start to finish!
S O U R C E S
Novus Plastic Polish Ltd.10425 Hampshire Ave. S., Dept. SAE
Minneapolis, MN 55438E-mail: [email protected]
Web Address: www.novus123.comCatalog: Online
Shabo Hobby DesignW225 S4839 Guthrie Rd., Dept. SAE
Waukesha, WI 53189Catalog: LSASE
Ferrari is legendary for its red finishes. It seemed only natural to paintTamiya’s Ferrari 360 Modena with Tamiya Italian Red. A spray canpaint job gives this model a finish that rivals a full-size Ferrari!

1The selection of aerosol paints available to car modelers is staggering.Along with a wide range of hobby paints, there’s a veritable cornucopia
of offerings from commercial sources. Note that all manufacturers havetheir own secret formulas for their particular paints, some of which mayrequire special primers due to hotter solvents. Also, while you’re outbuying paint, make a side trip to your local bookstore or newsstand. Ifound two magazines with reference material on the Modena.
2The first thing you’ll want to do to a body is remove the seams left bythe molding process. These are hard to spot on Tamiya kits, a credit to
the manufacturer’s attention to detail. You’ll have to look closely beforeyou’ll find the seams. Sand them down a bit with 400-grit sandpaper andthey’ll be easier to spot. Make sure you remove all of the molding seams,or they’ll show up through your carefully applied finish! By the way, painthasn’t been applied yet – the Modena’s body is molded in red styrene.
3My only gripe with the Modena body is that the panel lines are some-what faint. I remedied this by whipping out my Bare-Metal Foil panel
scriber and adding more depth to the body’s panel lines. Often, panelscribers leave a burr along the edge of the scribed area that must beremoved before painting. Remove these by running the edge of a sheetof 400-grit sandpaper along the panel line until the burr releases or issanded away.
4There weren’t anyareas that needed
filling on the Ferraribody, so I proceededto the primer stage.After applying severalcoats of Tamiya flatwhite Fine SurfacePrimer (no. 87044), Inoticed the red pig-ment in the plasticwas bleeding through.This is common withred, yellow, andorange styrene. Tostop the bleeding, Iapplied two coats ofDesign Master SuperSurface Sealer. Thisaerosol sealing agentis available at craftand art-supply stores.
5Here’s the body after the sealer and another coat of primer havebeen applied. The sealer worked quite well, eliminating the possibil-
ity that the pigment might bleed through. Since I was painting theFerrari red, it might not have been noticeable, but if I had done somebodywork or were painting the body another color, the results couldhave been disastrous.
6Just to satisfy my curiosity, I did a test on a piece of red sprue fromthe kit. I applied some yellow Tamiya spray paint directly onto the red
sprue to see if the pigment would bleed through. Ironically, the pigmentsdid not bleed through the paint as it had the primer. I probably couldhave painted the body without using the sealer, but when there’s thepossibility of a problem occurring, I’d rather be safe than sorry. I’ve seentoo many paint jobs ruined by pigment problems!

7Only a small amount of bodywork was required before applying thefinal primer coats. I used a large, fine-grit flexible sander to do the
minor cleanup, then added a final coat of sealer and primer. The Tamiyaprimer goes on in thin layers with virtually no texture, so I chose not togive the body an overall sanding as I usually do before painting. If you’reusing a thick primer with a noticeable texture, smooth it with 600-gritsandpaper to reduce the possibility of texture in the color coats.
8Before we startpainting, let’s look
at different ways tomount parts. Here’sthe Ferrari bodyattached to a Shabopainting stand; it’snext to a similarstand I made myself.This type of stand isthe best way I’vefound to mount abody for painting. Thewire supports areflexible and can bebent outward to addtension. Sure beatsthe old bent coathanger!
9Small, unusually shaped parts can be mounted on strips of styrene ormetal tubing for painting. A small amount of super glue holds the
part. I usually have several of these around when I paint, and I standthem up in a glass bottle between coats. Once the paint has cured, sim-ply pop the parts loose and sand away any excess glue. Small body-colored parts, like side-view mirrors, should receive the same number ofcolor coats as the main body parts to assure a good color match.
10Small parts that only need to be painted on one side can bemounted on sticky-side-out loops of tape. You can use virtually any
kind of masking or packing tape to hold the parts. This is also a good wayto mount wheel rims for painting. If you need to paint both sides of thepart, flip the part over and repeat the process after the first coat is dry.Works like a charm!
11Let’s paint! The first order of business is warming up the paint so itwill flow better. This is very important with thick enamel paints. The
Tamiya lacquer is considerably thinner than enamel, but I still recommendwarming it up to help it flow. Cold paint has a tendency to clump anddevelop an “orange peel” texture. To warm up the paint, fill a bowl (orthe bottom of a sink) with about three inches of hot water. Stand thespray can in the hot water for a few minutes before you start painting.
12After shaking the can vigorously for a couple of minutes, apply thefirst mist coat of paint to the model. This light dusting of paint
shouldn’t cover the entire surface. These mist coats may seem like a nui-sance to apply, but they’re laying the foundation for optimum coverageonce the wet coats are applied. Wait approximately 20 minutes betweenmist coats to allow the paint to set up. Any parts (even the smallestones) that will be spray painted with a gloss color should be mist coated.

17I started polishing the finish with a 3,200-grit pad (the workhorse ofthe bunch), as it will level the surface of the paint. On this important
first step, I always use the pad dry because it’s easier to determine whenthe texture has been removed. Work slowly when using this coarse grit, asit can easily cut through the paint and into the primer. Note the dull finishon the body, a sign that all of the surface texture has been removed.
13Here’s the body after three mist coats. Complete coverage isalmost achieved, but I’ll add one more coat to be sure the body is
completely covered. After the last coat has been applied, let the body sitfor an hour to allow the paint to set up. The mist coats will help the laterwet coats adhere to the model, and keep the paint from pulling awayfrom panel lines and exposing the primer underneath.
15At this stage, the Modena body has had several wet coats applied.The Tamiya lacquer isn’t as thick as enamel, but is somewhat heav-
ier than standard automotive lacquers. Consequently, you’ll need toapply several more coats of the Tamiya paint. When I ran out of paint, Istill felt like I could’ve added another coat or two to the body.
16Most paint will have some surface texture after it cures andTamiya’s lacquer is no exception. This is where a polishing kit comes
in handy. Lacquer solvents evaporate faster than enamel solvents andcure or “gas out” in less time. You can polish lacquer in about four days,as opposed to the 7-10 you’d have to wait for enamel. I’ll use sanding padsto rub out the Modena’s finish, but sanding sheets would work just as well.
14Now the real work begins! The following coats are heavier, “wet”coats, in which the paint glosses up during application. The trick to
applying a wet coat is simple: Apply just enough paint so that the coatingis wet and glossy, but not so much that it runs or drips. Mastering the artof the wet coat takes practice, but eventually becomes very natural. Ifound the Tamiya paint to be very forgiving. This paint sets up fasterthan most enamels and isn’t as prone to run.
18Here the finish has been wet-sanded with consecutively finer gritsin the polishing set. By the time the 12,000-grit pad has done its
duty, a nice luster has returned to the paint’s surface. It’s hard tobelieve that the dull paint from the last step is now so glossy. But wait –the next step adds even more shine!

I’ll finish up this installment with one importantnote about Tamiya’s lacquer paint. If you choose toapply Tamiya’s clear gloss (no. TS-13) over aTamiya color finish, you’ll need to be careful whenyou apply it. You have two choices: you can add the
clear coat immediately after applying the last wetcolor coat, or you can apply the clear coat after the color
coat has cured and gassed out for at least a month. Tamiya’s cleargloss paint cures at a different rate than the color paints in theline. If you wait even a day to apply the clear gloss, the different curing rates will cause the clear finish to crack.
I have used Tamiya’s spray paints on several occasions, andthey have always been easy to use. I did, however, run out ofpaint before I finished the job on this Ferrari. In retrospect, Ishould have had an extra can handy to handle this situation.Other than that, this easy-to-use paint is truly a viable option toboth enamels and automotive lacquers.
In the next installment, we’ll finish the Modena using aplethora of aerosol paints. Join us for the fun!
For more information about clear coating, see my book, “TheModeler’s Guide to Scale Automotive Finishes,” available fromKalmbach Publishing.
19Polish removes the surface haze left by the sanding grits. There aremany good polishes available; I use Novus no. 2 plastic polish. This
polish is applied by dabbing a small amount on a piece of flannel clothand rubbing it into the surface of the paint using circular strokes.Afterward, the excess polish is buffed off with a clean portion of theflannel cloth. Applied in much the same manner as the polish, Novus no. 1serves as a surface protector and glossing agent. This is the final step inthe finishing process.
20Here’s the Modena body, fluffed-and-buffed to a high shine. Withsuch a smooth, trim-free body, I thought that it would be easy to
rub out. I was wrong. It has more twists and turns in it than a good spynovel! Several areas, such as the concave lower side scoops, are almostimpossible to reach with a sanding pad or sheet. The edges around thescoop are sharp as well, increasing the possibility of cutting through thepaint. The bottom line: Proceed with caution when sanding and polishingthis kit.
CAREFUL WITH THAT CLEAR
Don’t miss next month’sinstallment, as we paint the
rest of Tamiya’s Ferrari 360Modena. We’ll show you how different
types of aerosol paint can be employed to givea multitude of finishes to scale auto parts.

Doing it all with aerosol by PAT COVERT
Great paintfrom spray cans
Part 2: Doing it all with aerosolby PAT COVERT

GOOD OLD-FASHIONED FUNDAMENTALS, suchas preparation and masking, are essential toany good paint job, whether you’re painting a
whole model or just some parts. In the last issue, weapplied a killer spray-can finish on the body of aTamiya Ferrari 360 Modena. Now we’ll complete thejob. We’ll use a wide range of aerosol paints andexamine techniques to make them work to theirfullest potential.
Using clear and translucent coatings to vary thefinish on the kit parts is particularly effective. Thistechnique better duplicates the many hues and tonesin the paint of a full-size vehicle, such as the differ-ent shades of silver on the wheels and exhaust sys-tem. By taking simple colors and adding one ofthree Testors aerosol clear coats – flat, semigloss, orgloss, you can alter the finish on various partsthroughout the assembly, enhancing the detail.Serious replica-stock builders can really take advan-tage of these paints and rack up points with contestjudges. Even if you’re not building cars for compe-tition, using these techniques can have your modelslooking fantastic.
1Paint doesn’t cover mistakes. It actually emphasizes surface imperfec-tions, such as flash and molding seams. For a slick finished model,
eliminate these shortcomings before painting. A great tool for takingcare of excess plastic and unsightly seams is the flexible sanding stick.These sticks come in a variety of grits and are available from hobby com-panies like Creations Unlimited and at beauty supply stores.
2Creations Unlimited’s Flex-I-File can get into places that other sand-ing tools can’t. By taking the sanding strip off one end of the bow and
weaving it through holes or gaps, you can more easily access the areasto be sanded. Creations Unlimited also offers sanding strips in a varietyof grits, so you can tailor the tool to the job at hand.
3When it comes time to buy paint, choose your brands wisely. My testswith Testors and Tamiya semigloss black paints showed that there
was a difference in the level of shine between the two brands. Tamiyatends to be a bit glossier than the Testors, which can be a good thing.You can use both paints to achieve subtle differences between the semi-gloss black parts on your models.
My entire Tamiya Ferrari 360Modena was painted using aerosol
spray cans. By varying the levelsof shine throughout the paintingprocess, I significantly increased
the realism of the model.

9The window glass on modernvehicles often has black trim
and accents. This can be repli-cated by masking off areas not tobe painted. Tamiya packages anice set of window masks in theModena kit, but masks for all ofthe glass panels aren’t included.You’ll have to do a bit more onyour own if you plan to spray paintall of the “glass” parts. In addi-tion, the trim strip around the top of each side window must be maskedfor painting, as well as the area on the front windshield. I used artist’sfrisket material for the additional masking. This thin, clear, adhesive-backed film can be purchased at art supply stores. I masked the insidewindow panels, as well as the outside areas that required protectionfrom overspray.
4You can alter a semigloss paint (or any other paint for that matter)by applying Testors Semi-Gloss Clear (no. 2016) top coat over a part
that has already been painted. The Testors clear paints are lacquers, butthey don’t contain the hot solvents typically associated with thesepaints. Therefore, they can be safely sprayed over most other paintswith no ill effect. However, do not apply these clears over gloss enamels,as they don’t adhere well to the high-resin-content enamel.
5Metallic finishes are very prevalent in the hobby world. Testors’ widerange of Metalizer paints can be used to simulate an endless variety
of metal finishes. Some of these paints can be buffed to a high shine aswell. Tamiya also offers a selection of metallics in its line. Tamiya’spaints are classified as lacquers, but like the Testors clear coats, theydon’t cause the problems with styrene that automotive lacquers do; allof these paints can be sprayed directly onto plastic.
6Here are three Testors Model Master aerosol top coats that you canuse to vary the surface finish of parts. Lusterless Flat (no. 1960)
takes all the shine out of a surface. Semi-Gloss (no. 1959) imparts a sub-tle shine, while Gloss (no. 1961) adds a slick, glass-like finish to the sur-face. There is an extra benefit to these paints – they can be used to pro-tect parts. Frequently, I’ll top coat flat painted parts in Lusterless Flat tomake them more durable during handling.
7Chrome parts can also be enhanced using various top coats. Partssuch as chrome wheels can be sprayed with flat or semigloss clear to
add a satin finish. Here, I treated the Modena’s exhaust assembly to sub-tle finish variations by masking off certain portions and spraying TestorsLusterless Flat onto the exposed areas. When finished in this fashion, thecomponents look more realistic.
8The engine bay, interior, and chassis are near completion. Just abouteverything in these subassemblies required black or aluminum silver
paint, but I was able to get a broad variety of surface finishes using thewide range of available black, aluminum, and silver paints. Aside from a bitof brush painting to highlight a few areas, this is an all-aerosol paint job.

10Tamiya Semi-Gloss Black (no. TS29) was used to spray the black-ened areas of the window glass. This paint applies in thin layers,
making it perfect for the job. Don’t try to paint the black areas in onecoat, as the paint will build up around the edges of the masks. Instead,apply the paint in several thin layers until you have complete coverage.
11Here’s the windshield after both the front and rear masks have beenremoved. Use fine-tipped tweezers to get under the edges and lift
off the masks. Be careful when using tweezers as the tips can scratchthe plastic. Notice how the black areas on the underside of the glassappear glossy, while the painted portion on the front of the glass retainsthe semigloss finish of the paint.
12Here’s the fully painted engine, chassis, and interior assembly. Shortof mounting the wheels, there is little else to do here.
Although several parts are painted the same color, theyeach have a different surface finish. It’s a shame the bodywill cover most of our efforts, but hopefully welearned a thing or two along the way.
S O U R C E S
Creations Unlimited Hobby Products4318 Plainfield Ave. NE, Dept. SAE
Grand Rapids, MI 49525Catalog: $1 and LSASE
Whether you’re abeginner or a seasoned pro,
aerosol paints are a viable alter-native for your next project. So let’s
get shakin’ – aerosol cans, that is.
For a complete reference about painting model cars,check out Pat’s book, “The Modeler’s Guide to ScaleAutomotive Finishes,” available from KalmbachPublishing. To order a copy, call Kalmbach Publishing at:1-800-533-6644, or visit the company’s website at:www.scaleautomag.com.

DID YOU EVER see a great-looking model and won-der how the builder got that “miles-deep” finish?Have you shied away from attempting such a paintjob, figuring that it would be too difficult?
Larry Huff’s models have that showroom-type
look, and it’s no mystery how he does it. Let’s take alook at two of Larry’s models – a 1/24 scale RevellBaldwin-Motion Cobra (no. 85-7664) and a Revell-Monogram 1959 Chevrolet Lowrider (no. 85-2516)– and see how he got such spectacular results.
SURFACE PREP The key to any good finish is getting the basicsright. Before you begin building the model, wash all of the parts to
remove residue left during manufacture. Larry uses automotive carwash soap to help prevent fisheyes in the finish.
This is especially important if yourfinish of choice is auto-
motive lacquer, as was the case with these models.Cleanup of the body and other parts begins with removal of
injector pin marks, mold lines, and sink holes. For major repairs thatrequire putty, Larry uses Evercoat two-part body filler, available atautomotive paint or parts stores. It can be rough-shaped within 15minutes and finish-sanded in an hour.
Before you start painting, be sure you have allowed enough timeto complete the entire process (at least 20 minutes bewteen coats).This is especially important when you use automotive acrylic lac-quers. And if you are planning a fade scheme like the one on the ’59Chevy, practice the technique before you paint the model.
Larry mists the inside surfaces of his paint booth with water tocontrol dust.
PRIMER Check to be sure the body surfaceis level with a “glide coat” of two differ-
ent colors of primer. For a light colorscheme, start with a gray primer, fol-lowed with white (reverse the orderfor a dark paint scheme). The Cobra
body was primed using Plasti-kote® sandable grayno. 466 and white no. T-237. When you sand off the
white primer, high and low spots are revealed. When the
Patience and solid technique are keys to great-looking paint jobs by LARRY HUFF w i th DAVID VON ALMEN
Strongto
thefinish
COBRA
From primer to clearcoat, allow plenty of timeto apply the finish so youdon’t have to rush and sothe layers of paint willdry properly.

If you want the type of finish shownhere on Larry Huff’s Cobra and 1959Chevy, you need a well-primed model,plenty of painting practice, and thepatience to slowly build the finishwith a number of light coats. It takestime, but look at the results!

body has been leveled, apply a final coat of primer and polish thebody with a fine cloth.
BODY COLOR Black Gold Models’ House of Kolor automotivelacquer was used in a three-stage painting process. Larry uses PPGDT870 reducer to thin the paint, because it dries slowly enough toprevent problems such as orange peel and does not affect the primer.
Three base coats of Neon Red got things started, followed bytwocoats of clear mixed with silver metal flake powder. Larry thenmixed gold metal flake powder into the clear and sprayed on twomore coats, then three coats of Candy Apple Red.
Three coats of equal parts clear and Candy Apple Red were fol-lowed by three coats of a mixture of one part Candy Apple Red tothree parts of clear. The final three top coats were clear only. Larryrubbed out the finish every three coats to ensure a smooth surface.
Let the paint sit at least 24 hours before you begin polishing thefinish. If you start with a smooth, level surface and rub out theclear coats correctly, polishing should be a simple task.To preventscratches in the surface and make your polishing cloths last longer,do all of your polishing with water – “wet-sanding” if you will.
When polishing was complete, the Cobra received a coat ofLiquid Glass to protect the finish and enhance its shine. By doing allof the painting first, everything had time to cure before assembly.
DOING THE FADE Two light coats of House of Kolor whiteacrylic lacquer were used as a base for the Snowhite Pearl, appliedin three light coats with 20 minutes between coats. A note of cau-tion: Stop immediately if you see a dust speck in the paint, so youdon’t paint over the dust. Wait 20 minutes, then remove the dust witha 6000 or 8000 polishing cloth.
Larry misted Goldmine Pearl in the deep recesses of the fins,along the sharp edges, and on the rocker panels to establish the darkbeginnings of the fade scheme. Then he sprayed Kandy Rootbeer tohighlight the edges of the Goldmine Pearl making sure to get the fadeeffect toward the light centerline of the car. Kandy Pagan Gold wasblended toward the centerline and along the edges of the Rootbeer.For a finishing touch, he painted all of the chrome Pagan Gold.
To complement the body paint, the chassis, engine, drive train,and dashboard were painted Goldmine Pearl. The seats are SnowhitePearl with a mist coat of Candy Pagan Gold. The floorboards are flatbrown, to simulate carpet.
With a good subject, a well-prepared surface, and the patience toapply the finish slowly and carefully, that “showroom shine” iswithin your grasp. Give it a try on your next project!
Larry’s Cobra got its beautiful finish frommany light coats of paint applied at least20 minutes apart and rubbed out everythree coats.
Gold metal flake powder was mixed with clear and sprayed over Houseof Kolor Neon Red, followed by Candy Apple Red applied in progres-sively-thinner coats, topped with three clear coats. Polishing and acoat of Liquid Glass completed the Cobra’s finish.
The “fade” scheme on Larry’s 1959 Chevy began with white acryliclacquer, followed by Snowhite Pearl and a mist coat of Goldmine Pearlalong the edges and recesses. A light coat of Kandy Rootbeer next tothe Goldmine Pearl added to the effect.
’59 CHEVY

CAR MODELERS are always looking forways to enhance their creations – withphotoetched-metal or cast-resin details
or special refinishing products. One of themost exciting such products I’ve seen is apowder called Pearl-Ex, marketed byJacquard Products (www.jacquardprod-ucts.com) and available in craft stores.
Pearl-Ex is nontoxic and inert, and isavailable in a set of 32 colors: 16 pearles-cents, five interference colors that reflect atcertain angles, three duo-colors that flip-flop, and eight metallics or pastels. Whenone of these colors is added to almost anymedium, the result is a sparkle and brilliancethat simply cannot be accomplished withpaint alone. Here’s the 32-color assortment, available at craft stores.
Painting withMix Pearl-Ex with clear for dazzling effects Story and photos by STEVE CULPEPPER

Steve Culpepper has tested Jacquard Products’ Pearl-Expowdered pigment extensively, and says “there may be nowrong way to use it.”
At left is the approximate ratio of powder to clear medium that Steve uses instead of “normal” paint. At right, less powder is mixed with clearwhen a highlight effect is desired, applied as an overcoat.
powder

Antique Silver over Flamingo Pink gives a “period look” to this 1958 Plymouth Belvedere.
This Opel GT is finished in Antique Bronze with Model Master high-gloss enamel clear coat.
When a relatively large quantity of pow-der is mixed with a clear medium, the com-bination can be used instead of “normal”paint, with excellent coverage and minimalbuildup. The details don’t get lost as they dowith some other premixed paints; the colorslay down flat and deliver an extremelysmooth surface when dry.
When a smaller quantity of powder isused, the mixture can be applied as an over-coat, yielding colorful special effects. A rea-sonable rendition of carbon fiber can bemade by mixing gold or silver with flat orsemigloss black or brown. There are severalshades of gold and silver, as well as threewhite pearls that can be used as base forcandy colors.
As with any metallic or three-stage paint,a clear top coat is usually necessary to pro-tect the particles from damage and give agloss finish if desired. However, the car-bon-fiber mixture described above needs nosuch protection; the paint is protectionenough for the Pearl-Ex.
This product has many positives, and I’vediscovered only two minor negatives: Sincethe product must be mixed by the user, itmust be applied with an airbrush. Andalthough Pearl Ex has a long shelf life in anunmixed state, after it’s mixed it turns intojelly about a week later – even in an airtightcontainer. Be extra careful to mix only asmuch as you need, and don’t try to save anyleftover paint.
This product is so user-friendly that thespecial effects are limited only by yourimagination. Check out the examples I’veshown, and use them as a starting point foryour next finishing project.
Steve mixed Sparkle Gold Pearl-Ex into Model Master Sublime Green and topped it off with a coat of clear enamel.