progeny analyzer user manual - s4science...barcode scanner all uses using the barcode batch...
TRANSCRIPT
1006232_RevD
3
Progeny™ and Progeny™ LT Analyzer
User Manual
Rev D

1006232_RevD
Copyright © 2017 Rigaku Analytical Devices, Inc.
All rights reserved. Neither this publication nor any part thereof can be copied, photocopied, reproduced,
translated, or converted to any electronic or machine-readable form in whole or in part without prior written
approval of Rigaku Analytical Devices, Inc. This documentation is furnished under license and can be used or
copied only in accordance with the terms of such license.
The content of this documentation is furnished for informational use only, is subject to change without notice, and
does not represent a commitment or guaranty by Rigaku Analytical Devices, Inc. The statements, configurations,
technical data, and recommendations in this document are believed to be accurate and reliable as of the time of
publication, but Rigaku Analytical Devices, Inc. assumes no responsibility or liability for any errors or inaccuracies
that may appear in this documentation. DOCUMENTATION IS PROVIDED "AS IS" AND ALL EXPRESS OR IMPLIED
CONDITIONS, REPRESENTATIONS AND WARRANTIES, INCLUDING ANY IMPLIED WARRANTY OF MERCHANTABILITY,
FITNESS FOR A PARTICULAR PURPOSE OR NONINFRINGEMENT, ARE DISCLAIMED. UNDER NO CIRCUMSTANCES,
INCLUDING BUT NOT LIMITED TO RIGAKU ANALYTICAL DEVICES’ NEGLIGENCE, SHALL RIGAKU ANALYTICAL DEVICES
BE LIABLE FOR ANY CONSEQUENTIAL, DIRECT, INCIDENTAL, INDIRECT, PUNITIVE, OR SPECIAL DAMAGES RELATED
TO (A) THE USE OF, (B) THE INABILITY TO USE, OR (C) ERRORS OR OMISSIONS IN THE CONTENTS AND FUNCTIONS
OF THIS SITE, EVEN IF RIGAKU ANALYTICAL DEVICES OR AN AUTHORIZED REPRESENTATIVE THEREOF HAS BEEN
ADVISED OF THE POSSIBILITY OF SUCH DAMAGES.
Progeny is a trademark of Rigaku Analytical Devices, Inc. All other trademarks are the property of their respective
holders.
Software version 1.6.0.0 and higher
Contents i
1006232_RevD
Contents
Preface ............................................................................................................... 1
Document Overview .......................................................................................................... 1
Document Conventions ...................................................................................................... 2
Progeny Analyzer Safety and Compliance Notices ............................................................... 2
Laser Safety and Compliance ................................................................................................................ 3
General Safety and Compliance ............................................................................................................ 4
Safe Operation Notices ......................................................................................................................... 5
Contacting Rigaku Analytical Devices .................................................................................. 6
Introduction ........................................................................................................ 7
Progeny – The New Generation! ......................................................................................... 7
Carrying Your Instrument ................................................................................................... 9
Understanding Raman Spectroscopy ................................................................................ 10
What You Can Do with Progeny Analyzers ........................................................................ 10
Verify Chemicals.................................................................................................................................. 11
Setup Flexible Laboratories ................................................................................................................ 11
Screen for Counterfeit Products ......................................................................................................... 11
Ensure Homeland Security .................................................................................................................. 11
Identify Narcotics ................................................................................................................................ 11
Getting Started with your Progeny Analyzer ..................................................... 12
Opening and Closing the Battery Compartment ................................................................ 12
Opening the Door ............................................................................................................................... 12
Closing the Door.................................................................................................................................. 12
Removing/Installing the Battery ....................................................................................... 13
Charging the Battery ........................................................................................................ 13
Powering Your Instrument ............................................................................................... 13
Powering On ....................................................................................................................................... 13
Powering Off ....................................................................................................................................... 14
Using Instrument Controls ................................................................................................ 16
Using the Touchscreen........................................................................................................................ 16
Using the Keypad ................................................................................................................................ 17
Understanding the Touchscreen and Keypad .................................................................... 17

Contents ii
1006232_RevD
Using Instrument with No Login vs. Login Requirement .................................................... 19
Using Instrument with Login ............................................................................................. 19
Logging In with the Users List ............................................................................................................. 19
Logging In without the Users List ........................................................................................................ 19
Resetting User Passwords ................................................................................................................... 20
Using Standard or Strong Passwords .................................................................................................. 20
Accessing Primary Features .............................................................................................. 21
Using Common On-screen Controls .................................................................................. 21
Logging Out ...................................................................................................................... 23
Operating Progeny Analyzers ............................................................................ 24
Preparing to Scan: Performance Qualification .................................................................. 24
Performance Verification .................................................................................................................... 25
Instrument Calibration ..................................................................................................... 26
Preparing to Scan: Hazardous or Volatile Materials ........................................................... 27
Preparing to Scan: Setting Scan Conditions ....................................................................................... 28
Optimize focus of the instrument – basic mode: ............................................................................... 28
Optimize Focal Length – advanced mode: .......................................................................................... 28
Preparing to Scan: Other scan settings and properties ..................................................................... 29
Performing Scans ............................................................................................................. 30
Scanning with Analyze ........................................................................................................................ 30
Advanced Options............................................................................................. 40
Custom Applications ........................................................................................................ 40
Verification of Known Substances ...................................................................................................... 41
Identification in Custom Libraries ....................................................................................................... 45
Viewing Results ................................................................................................................ 48
Viewing Scan Data Summaries ............................................................................................................ 48
Viewing Diagnostics and Information ............................................................................... 51
Viewing Instrument and Status Information ...................................................................................... 51
Viewing Diagnostics Data .................................................................................................................... 52
Managing Libraries ........................................................................................................... 54
Adding Spectral Profiles to the Master Library ................................................................................... 57
Creating Spectral Sub-Libraries ........................................................................................................... 61
Adding Spectral Profiles to Sub-Libraries ............................................................................................ 61
Removing Spectral Profiles from Sub-Libraries .................................................................................. 63
Deleting Spectral Sub-Libraries ........................................................................................................... 64

Contents iii
1006232_RevD
Managing Applications ..................................................................................................... 65
Viewing the Applications List .............................................................................................................. 65
Adding New Applications .................................................................................................................... 65
Configuring Applications ..................................................................................................................... 66
Deleting Applications .......................................................................................................................... 68
Configuring Progeny Analyzers ......................................................................... 69
Logging In as Primary Administrator ................................................................................. 69
Accessing Instrument Settings .......................................................................................... 69
Customizing Global Settings ............................................................................................. 70
Configuring Login ................................................................................................................................ 71
Configuring LDAP (Lightweight Directory Access Protocol) Login Method ........................................ 72
Enabling LDAP on the Progeny............................................................................................................ 73
Configuring Progeny LDAP Setting ...................................................................................................... 73
Customizing Data Options .................................................................................................................. 73
Choosing Language ............................................................................................................................. 74
Search Again ....................................................................................................................................... 74
Results ................................................................................................................................................. 74
Managing User Accounts .................................................................................................. 75
Adding User Accounts ......................................................................................................................... 75
Viewing User Accounts ....................................................................................................................... 77
Changing User Permission Levels ....................................................................................................... 78
Locking User Accounts ........................................................................................................................ 78
Resetting User Passwords ................................................................................................................... 79
Unlocking User Accounts .................................................................................................................... 79
Moving User Account Data onto Your Instrument ............................................................. 79
Barcode Scanner ............................................................................................... 80
Using Barcode Scanner & Camera ..................................................................................... 81
Batch Collection ................................................................................................ 82
Enabling and Disabling Batch Mode and Rescans .............................................................. 82
Customizing User Prompts ............................................................................................... 83
Running Batch Applications .............................................................................................. 83
Sync Results to Personal Computer ................................................................... 90
Progeny to PC Configuration via USB connection .............................................................. 90
Progeny to PC Configuration via Simple Wi-Fi connection ................................................. 92

Contents iv
1006232_RevD
Progeny to PC Configuration via Advanced Wi-Fi connection ............................................ 94
View Instrument Results Files on PC ................................................................................. 97
8. Export and Import Settings ......................................................................... 98
Export Data and Settings .................................................................................................. 98
Import Data and Settings ................................................................................................. 98
9. Maintenance and Troubleshooting ........................................................... 100
Cleaning Your Instrument ............................................................................................... 100
Viewing Instrument Runtime Information ...................................................................... 100
Verifying the Instrument Serial Number ......................................................................... 101
Appendix A. Operating Specifications ......................................................... 102
Optical Specifications ..................................................................................................... 102
Sampling Specifications .................................................................................................. 102
Physical Specifications .................................................................................................... 102
Electronics and Data Processing Specifications ............................................................... 102
Environmental Specifications ......................................................................................... 103
Electrical Specifications .................................................................................................. 103
Appendix B. Nose Cone Positions ................................................................ 104
Appendix C. Statements of Compliance ...................................................... 105
Statement of Compliance, 21 CFR Part 11 ....................................................................... 105
Introduction ...................................................................................................................................... 105
Articles and Assessments .................................................................................................................. 105
United States Pharmacopeia (USP) Chapter <1120> - Raman Spectroscopy Statement of Compliance .................................................................................................................... 111
Summary ........................................................................................................................................... 111
European Pharmacopeia (Ph. Eur.) Chapter 2.2.48 - Raman Spectrometry Statement of Compliance .................................................................................................................... 111
Summary ........................................................................................................................................... 111
Appendix D. Regulatory Statements ............................................................ 113
FCC and Industry Canada Statements ............................................................................. 113
Export Regulation Statements ........................................................................................ 113
EC Statements ................................................................................................................ 113

Contents v
1006232_RevD
European WEEE Recycling and RoHS ............................................................................... 114
WEEE Compliance ............................................................................................................................. 114
WEEE Konformität ............................................................................................................................ 114
Conformité DEEE ............................................................................................................................... 114

Preface 1
1006232_RevD
Preface
This manual provides instructions for operating and taking care of the Rigaku Analytical Devices (RAD) Progeny™ instrument that use Raman spectroscopy to identify a wide range of substances.
Document Overview
This manual includes the following sections:
These sections… Provide… With information about…
Introduction All users Finding instrument features
Understanding Raman spectroscopy
Ways of using instruments
Getting Started with your Progeny Analyzer All users Performing basic procedures
Operating Progeny Analyzers Operators Preparing and scanning samples
Reviewing results
Maintaining instrument
Creating Spectral Sub-Libraries Developers Managing spectral profile libraries
Creating scan applications
Designing results output templates
Configuring Progeny Analyzers Administrator Setting up the instrument
Customizing the instrument
Managing user accounts
Barcode Scanner All uses Using the barcode
Batch Collection All users Setting up batch collection
Running batch applications
Sync Results to Personal Computer All users Setting up USB and Wi-Fi connections
Synchronizing scan data with PC workstations
Viewing scan data archives on PC workstations
Export and Import Settings All users Archiving and reinstalling instrument setups
Maintenance and Troubleshooting All users Collecting customer support information
Appendix A: Operating Specifications All users Instrument specifications
Appendix B: Nose Cone Positions All Users Recommended positioning
Appendix C: Statements of Compliance All users Documentation of compliance with safety requirements
Appendix D: Regulatory Statements All users Documentation of compliance with regulatory requirements
Preface 2
1006232_RevD
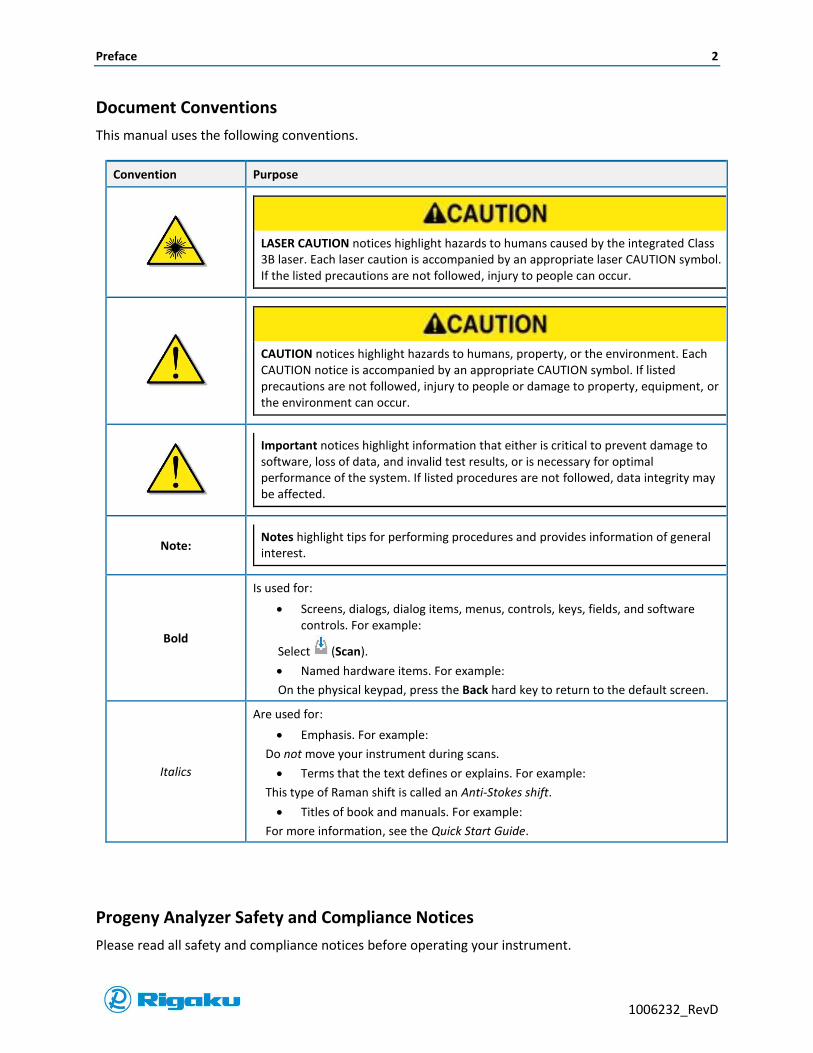
Document Conventions
This manual uses the following conventions.
Convention Purpose
LASER CAUTION notices highlight hazards to humans caused by the integrated Class 3B laser. Each laser caution is accompanied by an appropriate laser CAUTION symbol. If the listed precautions are not followed, injury to people can occur.
CAUTION notices highlight hazards to humans, property, or the environment. Each CAUTION notice is accompanied by an appropriate CAUTION symbol. If listed precautions are not followed, injury to people or damage to property, equipment, or the environment can occur.
Important notices highlight information that either is critical to prevent damage to software, loss of data, and invalid test results, or is necessary for optimal performance of the system. If listed procedures are not followed, data integrity may be affected.
Note:
Notes highlight tips for performing procedures and provides information of general interest.
Bold
Is used for:
Screens, dialogs, dialog items, menus, controls, keys, fields, and software controls. For example:
Select (Scan).
Named hardware items. For example:
On the physical keypad, press the Back hard key to return to the default screen.
Italics
Are used for:
Emphasis. For example:
Do not move your instrument during scans.
Terms that the text defines or explains. For example:
This type of Raman shift is called an Anti-Stokes shift.
Titles of book and manuals. For example:
For more information, see the Quick Start Guide.
Progeny Analyzer Safety and Compliance Notices
Please read all safety and compliance notices before operating your instrument.
Preface 3
1006232_RevD
This instrument uses Class 3B lasers. Consequently, before setting up or operating this instrument and its accessories:
Read the sections Laser Safety and Compliance, General Safety and Compliance, and Safe Operation Notices.
Complete appropriate training about your organization’s procedures and policies for using this instrument on both known and unknown samples.
Ensure that your Progeny Analyzer is setup correctly for analysis of the samples you are testing.
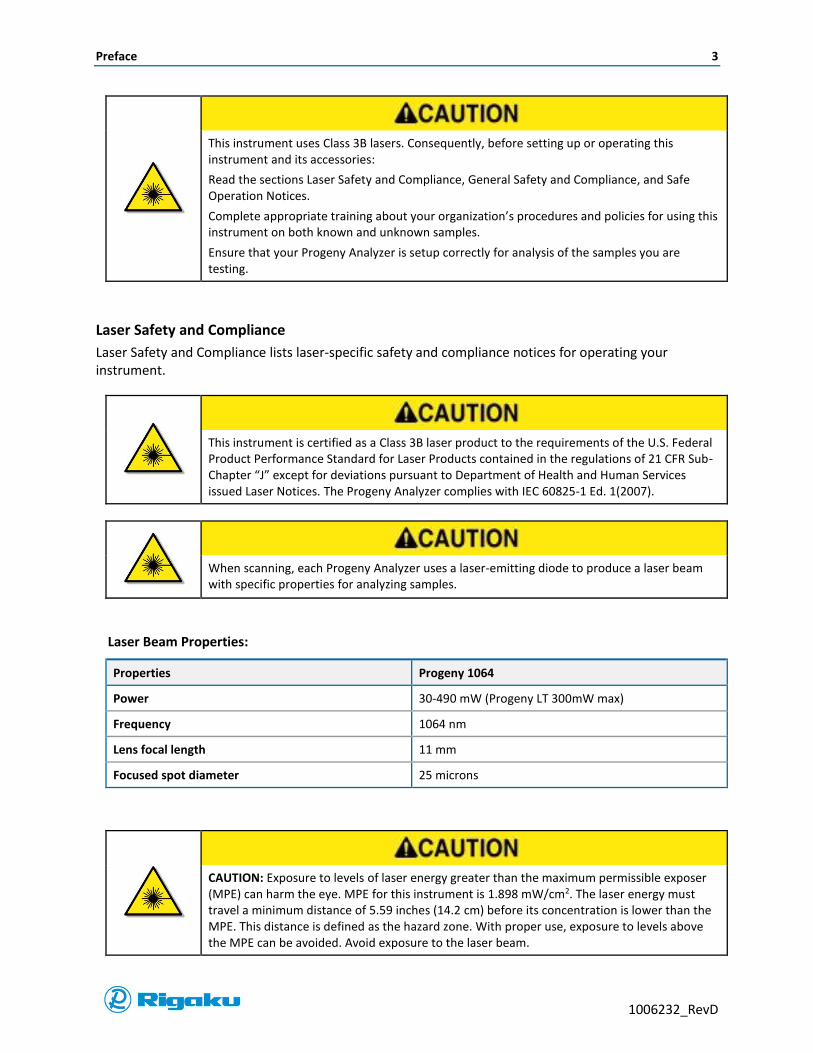
Laser Safety and Compliance
Laser Safety and Compliance lists laser-specific safety and compliance notices for operating your instrument.
This instrument is certified as a Class 3B laser product to the requirements of the U.S. Federal Product Performance Standard for Laser Products contained in the regulations of 21 CFR Sub-Chapter “J” except for deviations pursuant to Department of Health and Human Services issued Laser Notices. The Progeny Analyzer complies with IEC 60825-1 Ed. 1(2007).
When scanning, each Progeny Analyzer uses a laser-emitting diode to produce a laser beam with specific properties for analyzing samples.
Laser Beam Properties:
Properties Progeny 1064
Power 30-490 mW (Progeny LT 300mW max)
Frequency 1064 nm
Lens focal length 11 mm
Focused spot diameter 25 microns
CAUTION: Exposure to levels of laser energy greater than the maximum permissible exposer (MPE) can harm the eye. MPE for this instrument is 1.898 mW/cm2. The laser energy must travel a minimum distance of 5.59 inches (14.2 cm) before its concentration is lower than the MPE. This distance is defined as the hazard zone. With proper use, exposure to levels above the MPE can be avoided. Avoid exposure to the laser beam.
Preface 4
1006232_RevD
CAUTION: Because exposure to Class 3B laser energy can be hazardous, avoid exposure to the beam. In addition, avoid exposure to specular, or mirror-like, reflections. Never point the instrument at anyone.
CAUTION: If your workplace does not have established safety standards or requirements, consult both the American National Standard ANSI Z136.1 for policies about the safe use of lasers and the International Standard IEC 60825-14 for information about identifying and controlling hazards of laser use.
CAUTION: Calculations performed in accordance with the recommended practices of ANSI Z136.1 and IEC 60825-1 give a Nominal Ocular Hazard Distance (NOHD) of approximately 5.59 inches (14.2 cm) from the focal point of the lens and an estimated optical density (OD) greater than 2.
The above MEP and NOHD were calculated in accordance with American National Standard ANSI Z136.1 and the International Standard IEC 60825-14 for Rigaku Analytical Devices by John R. Kretsch, P.E., NCE of Interpro Consulting Engineering, LLC.
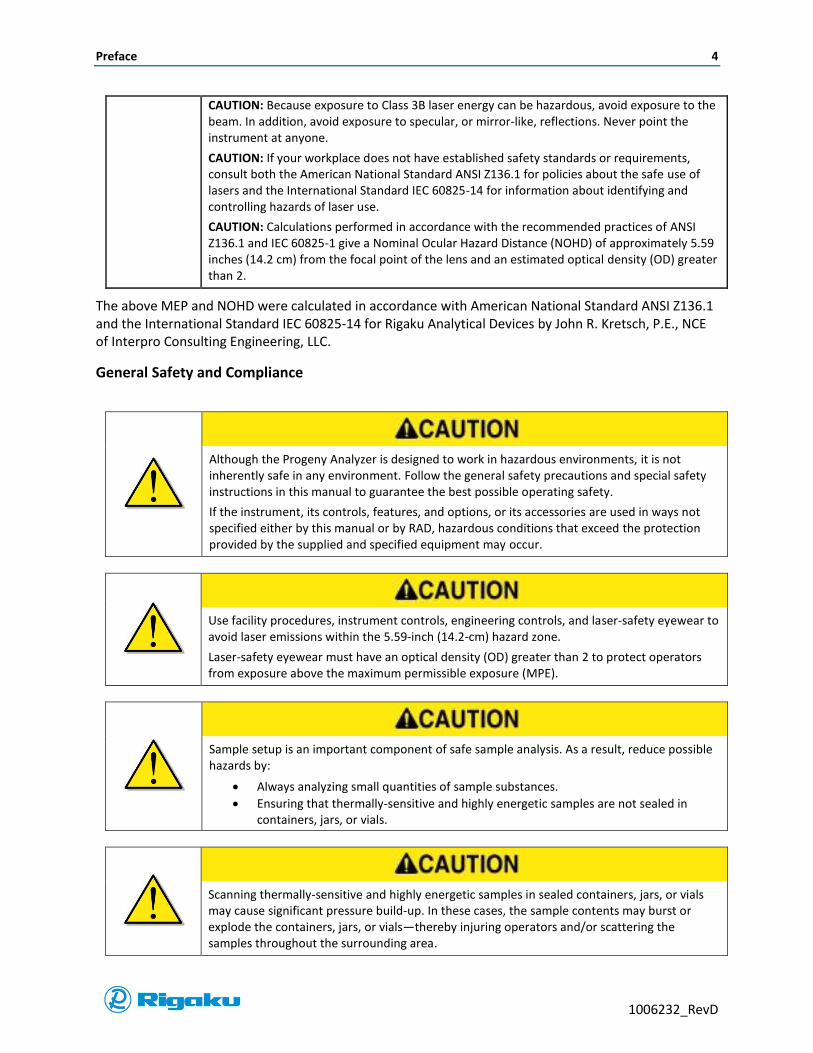
General Safety and Compliance
Although the Progeny Analyzer is designed to work in hazardous environments, it is not inherently safe in any environment. Follow the general safety precautions and special safety instructions in this manual to guarantee the best possible operating safety.
If the instrument, its controls, features, and options, or its accessories are used in ways not specified either by this manual or by RAD, hazardous conditions that exceed the protection provided by the supplied and specified equipment may occur.
Use facility procedures, instrument controls, engineering controls, and laser-safety eyewear to avoid laser emissions within the 5.59-inch (14.2-cm) hazard zone.
Laser-safety eyewear must have an optical density (OD) greater than 2 to protect operators from exposure above the maximum permissible exposure (MPE).
Sample setup is an important component of safe sample analysis. As a result, reduce possible hazards by:
Always analyzing small quantities of sample substances.
Ensuring that thermally-sensitive and highly energetic samples are not sealed in containers, jars, or vials.
Scanning thermally-sensitive and highly energetic samples in sealed containers, jars, or vials may cause significant pressure build-up. In these cases, the sample contents may burst or explode the containers, jars, or vials—thereby injuring operators and/or scattering the samples throughout the surrounding area.
Preface 5
1006232_RevD
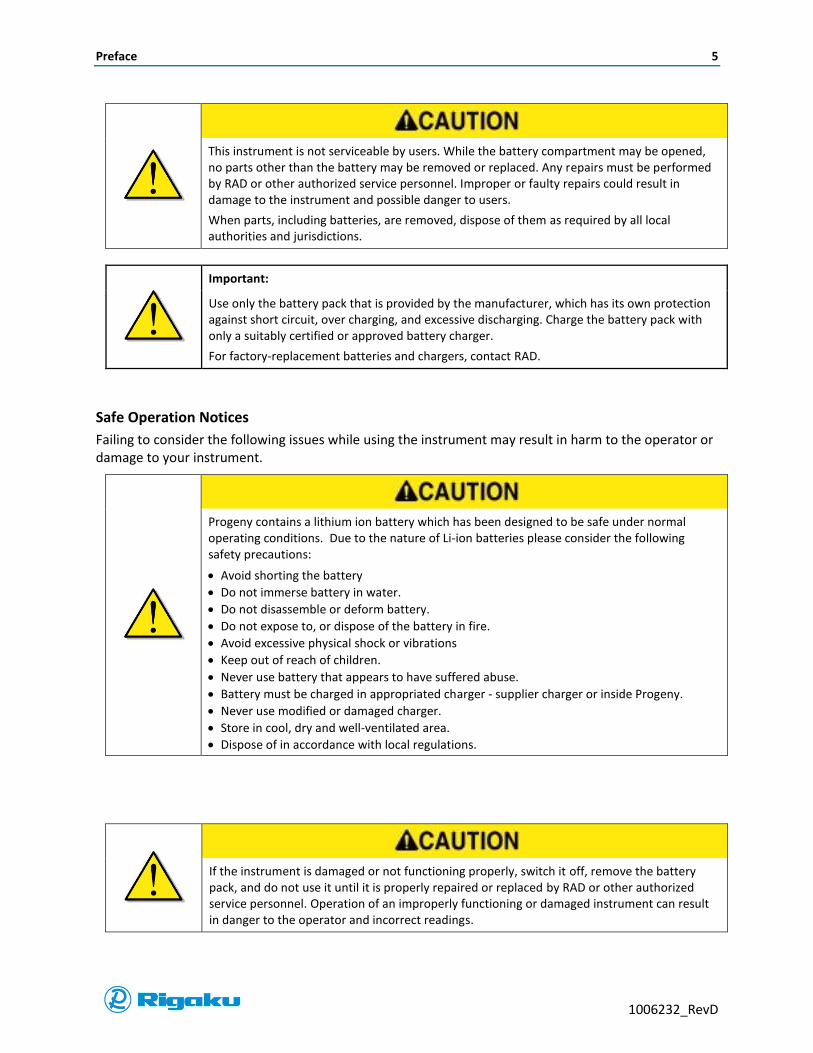
This instrument is not serviceable by users. While the battery compartment may be opened, no parts other than the battery may be removed or replaced. Any repairs must be performed by RAD or other authorized service personnel. Improper or faulty repairs could result in damage to the instrument and possible danger to users.
When parts, including batteries, are removed, dispose of them as required by all local authorities and jurisdictions.
Important:
Use only the battery pack that is provided by the manufacturer, which has its own protection against short circuit, over charging, and excessive discharging. Charge the battery pack with only a suitably certified or approved battery charger.
For factory-replacement batteries and chargers, contact RAD.
Safe Operation Notices
Failing to consider the following issues while using the instrument may result in harm to the operator or damage to your instrument.
Progeny contains a lithium ion battery which has been designed to be safe under normal operating conditions. Due to the nature of Li-ion batteries please consider the following safety precautions:
Avoid shorting the battery
Do not immerse battery in water.
Do not disassemble or deform battery.
Do not expose to, or dispose of the battery in fire.
Avoid excessive physical shock or vibrations
Keep out of reach of children.
Never use battery that appears to have suffered abuse.
Battery must be charged in appropriated charger - supplier charger or inside Progeny.
Never use modified or damaged charger.
Store in cool, dry and well-ventilated area.
Dispose of in accordance with local regulations.
If the instrument is damaged or not functioning properly, switch it off, remove the battery pack, and do not use it until it is properly repaired or replaced by RAD or other authorized service personnel. Operation of an improperly functioning or damaged instrument can result in danger to the operator and incorrect readings.

Preface 6
1006232_RevD
Important:
If the instrument is damaged by either consistent or occasional impact or exposure to any of the following conditions, the warranty will be voided.
Steam
High humidity or moisture condensing conditions
Extreme ambient temperatures above 104°F (40°C) or below 40°F (5°C)
Strong electromagnetic (motors or transformers) or electrostatic fields
Strong vibrations and impacts
Contact with oxidative, corrosive, and caustic liquids including, but not limited to:
Chlorine gas Hydrochloric acid Ammonia Concentrated hydrogen peroxide Sulfuric acid Aqueous sodium hydroxide
Please contact RAD if you require modifications for working in any of these conditions.
Contacting Rigaku Analytical Devices
Contact us between 9:00 AM and 5:00 PM Eastern Time Zone (UTC-04:00) for information and assistance:
Customer Support Contact Information
Telephone: +1-855-785-1064
Fax: +1-781-328-0119
Email sales: [email protected]
Email service: [email protected]
Website: http://www.rigaku.com/Progeny
Address:
Rigaku Analytical Devices, Inc.
30 Upton Drive, Suite 2
Wilmington, MA 01887

Introduction 7
1006232_RevD
Introduction
Progeny – The New Generation!
From the evolution of handheld spectroscopy arrives Progeny - the first handheld Raman analyzer designed to be customizable and flexible for seamless integration into any work environment. With its lab-quality analysis of solids, powders, and liquids, Progeny ensures product safety around the globe.
Progeny Analyzers provide the power of Raman spectroscopy with no compromises. Actionable software provides either simple PASS/FAIL decisions or more detailed analyses for a variety of applications in the lab, in the field, or wherever you need data. Each Progeny package includes:
Progeny Analyzer
1064nm laser
Spectrometer subsystem
Touchscreen and keypad interface
Battery
USB Stick with Progeny Analyzer software and User Manual (in PDF format)
Progeny Analyzer Quick Start Guide
Factory Calibration Certificate
AC Power Supply
Case

Introduction 8
1006232_RevD
Figure 1: Top View
Display
Keypad
Battery-door
Active laser warning
Heat sink
Power/Enter

Introduction 9
1006232_RevD
Figure 2: Front View
Figure 3: Battery-door View
Carrying Your Instrument
When moving your Progeny Analyzer from one work site to another, RAD recommends using the carrying case and including the following items:
Charger
Cables
Battery
Instrument
Any RAD instrument accessories
Close both latches to secure the case before lifting it.
Important:
When packed with your instrument and all its accessories, the case weighs as much as 20 lbs. (9.1 kg). Please consider this when lifting your instrument.
Camera
Heat sink
Laser aperture
Battery-door assembly
Introduction 10
1006232_RevD
Understanding Raman Spectroscopy
Raman spectroscopy (named after C. V. Raman), is a technique for studying vibrational, rotational, and other low-frequency aspects of molecular systems. To use the technique, monochromatic light, usually from lasers in the visible, near infrared, or near ultraviolet ranges, is aimed onto a substance. The laser light interacts with the molecular vibrations, phonons, and other excitations of the substance’s molecular systems. This interaction generates a unique spectral response that is analyzed to identify the substance.
The typical spectral response of molecular systems to laser light includes three modes of light refraction or scattering. The most intense of these scattering modes is elastic (or Rayleigh) scattering. This occurs when the light interacting with a molecule scatters at the same energy, or frequency, it had when it encountered the molecule. While the intensity of this response is millions of times more than that of the other modes, it usually does not help identify the substance. Typically, it has been filtered out of the spectral response with holographic gratings and multiple dispersion stages. Current setups use more efficient notch or edge filters to reject this type of spectral response.
In addition to the elastic scattering, two less-intense scattering modes, first observed by C. V. Raman in 1928, also occur. Currently called Raman shifts, these light scattering modes happen when photons from the laser light impinge upon and interact with the electron clouds and atomic bonds of a molecule. This interaction causes bonds within the molecule to vibrate, and excites the molecule from its ground state to a virtual energy state. In these modes, when the molecule then relaxes and emits photons, it returns to a different rotational or vibrational state by either retaining some of the energy added by the photons, or losing some of its ground state energy to the emitted light. Raman shifts are called inelastic scattering because of this energy transfer between molecules and photons during their interaction.
This energy transfer shifts the energy level, or frequency, of the scattered laser light up or down. When the molecule retains energy from the photons the emitted light shifts to a lower frequency than the laser stimulus. This type of Raman shift is called a Stokes shift. When the molecule loses energy to the emitted photons the emitted light shifts to a higher frequency than the laser stimulus. This type of Raman shift is called an Anti-Stokes shift. As a result, these energy transfers change the rotational and vibrational states of the molecule and determine the shifted pattern of emitted light frequencies.
To display these Raman effects, the molecule requires a change in the molecular polarizability—or amount of deformation of the electron cloud—with respect to the vibrational coordinates. When this occurs, the amount of change in the molecular polarization potential determines the Raman scattering intensity. Raman scattering should not be confused with absorption (as with fluorescence) where the molecule is excited to a discrete, or non-virtual, energy level.
The wavelengths of these frequency shifts are separated with transmission volume phase grating and then recorded with array detectors to produce the Raman spectra. The energy shifts shown in the spectra data provide information about the molecular structure of the sample. With this information the substance can be identified by matching it to the energy shift data from spectral libraries of known substances.
What You Can Do with Progeny Analyzers
Progeny Analyzers provide a portable platform for analyzing a wide range of substances. Their customizable interfaces and flexible operating properties make it simple to verify or identify the substances you encounter. The following sections outline how Progeny Analyzers can integrate the power of Raman spectroscopy into your development, manufacturing, or security protocols. With your

Introduction 11
1006232_RevD
Progeny Analyzer you can Verify Chemicals, Setup Flexible Laboratories, Screen for Counterfeit Products, Ensure Homeland Security and Identify Narcotics.
Verify Chemicals
As raw material supply-chains grow globally, manufacturers must find effective and efficient ways to evaluate product safety. Progeny Analyzers give manufacturers opportunities to perform lab-quality analysis at any point in the production process. The results are stronger quality programs, documentable adherence to legal requirements, and improved consumer safety. With Progeny, bringing the lab to the samples allows manufacturers to receive, validate, and immediately put materials straight through to production.
Setup Flexible Laboratories
Leading-edge lab designs empower scientists to collaborate more effectively while conducting new research. Progeny’s lightweight, battery-powered instruments provide portable Raman spectroscopy in the laboratory, in the classroom, and in the field. As a result, the advances in Raman spectroscopy support collaborative and interdisciplinary approaches to data collection and analysis. Progeny Analyzers can be integrated into a wide variety of contexts from research laboratories to hands-on lab-lecture classrooms.
Screen for Counterfeit Products
Progeny Analyzers provide portable, handheld Raman spectroscopy to world-wide regulatory enforcement agencies and brand security teams. The global trade in counterfeit goods is booming and impacts both manufacturers and consumers. The 2007 report from the Organization for Economic Cooperation and Development (OECD) puts the value of counterfeit consumer goods, chemicals/pesticides, food/beverage products, precious gems, and pharmaceuticals crossing international borders at more than $250 billion. The most critical of these dangers is counterfeit pharmaceuticals. The World Health Organization estimates that roughly 10 percent of the world’s pharmaceuticals are counterfeit or substandard, and that these counterfeit medicines lead to approximately 700,000 deaths annually. With Progeny Analyzers, enforcement agencies and brand security teams can examine the chemical composition of products on the spot, resulting in rapid identification of counterfeits and their immediate removal from the supply chain.
Ensure Homeland Security
Emerging threats continue to menace communities around the world. With greater material coverage and easy-to-interpret, actionable results, RAD products provide lab-quality analysis in the field for first responders, homeland security, military, law enforcement, and forensic chemistry personnel. Using Progeny Analyzers, they can quickly identify potential threats and make life-saving decisions on the spot.
Identify Narcotics
As drug abuse and illegal trafficking of controlled substances continue to be global problems, recent news highlights the alarming rate at which designer drugs are entering the market. Often referred to as “party drugs”, these narcotics have an increasingly negative impact on public health and safety. As law enforcement and security personnel seek ways to perform rapid narcotic identification, Progeny Analyzers provide non-destructive, actionable results for a wide range of materials in seconds. The portable power of Raman spectroscopy helps them remove these increasingly dangerous substances from circulation.
Getting Started with your Progeny Analyzer 12
1006232_RevD
Getting Started with your Progeny Analyzer
The section contains instructions for getting to know your instrument, logging in, and navigating through basic functionality.
Opening and Closing the Battery Compartment
The battery compartment contains a battery slot, a power connector, and a mini-USB connector that enables users to access data. The battery compartment is accessible by a door at the back of your instrument. When latched, the door seals moisture, dust, and other contaminants out of the battery compartment.
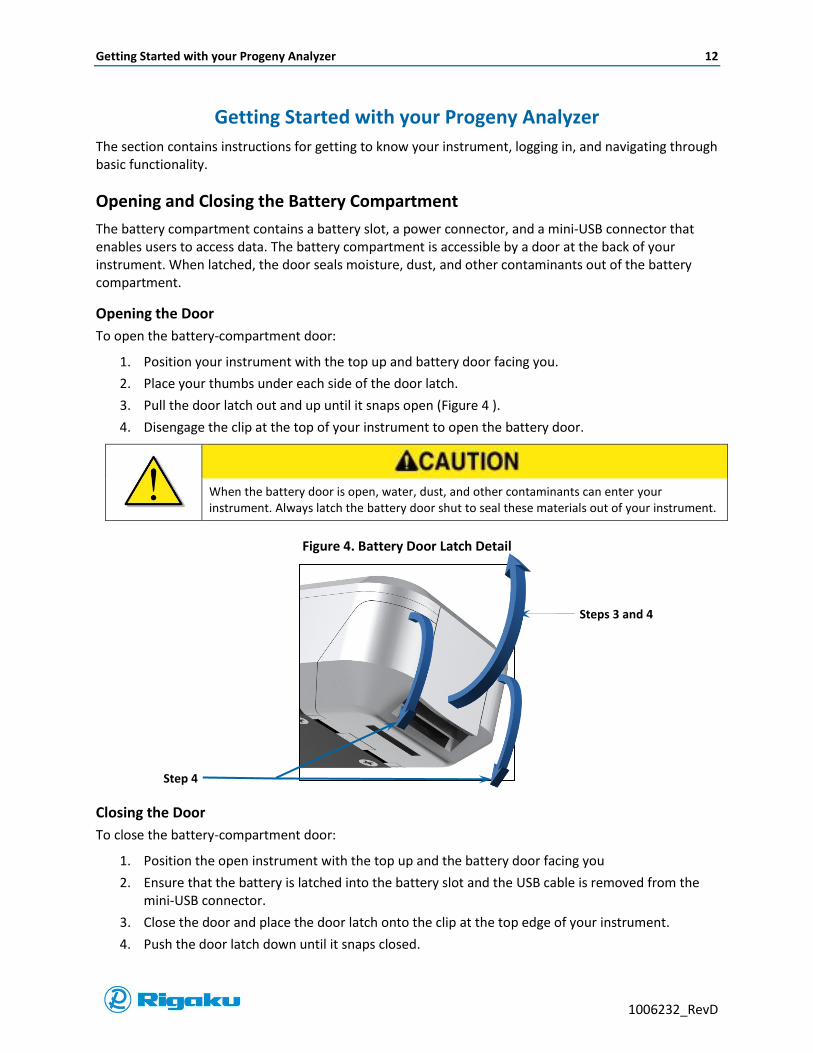
Opening the Door
To open the battery-compartment door:
1. Position your instrument with the top up and battery door facing you.
2. Place your thumbs under each side of the door latch.
3. Pull the door latch out and up until it snaps open (Figure 4 ).
4. Disengage the clip at the top of your instrument to open the battery door.
When the battery door is open, water, dust, and other contaminants can enter your instrument. Always latch the battery door shut to seal these materials out of your instrument.
Figure 4. Battery Door Latch Detail
Closing the Door
To close the battery-compartment door:
1. Position the open instrument with the top up and the battery door facing you
2. Ensure that the battery is latched into the battery slot and the USB cable is removed from the mini-USB connector.
3. Close the door and place the door latch onto the clip at the top edge of your instrument.
4. Push the door latch down until it snaps closed.
Steps 3 and 4
Step 4
Getting Started with your Progeny Analyzer 13
1006232_RevD
Removing/Installing the Battery
To operate your instrument, a rechargeable Lithium ion battery specified by RAD (14.4 V) must be installed.
1. Powering off the instrument (see “Powering Off”)
Important:
Do not remove or replace the battery while your instrument is powered on. Doing so can cause system errors, power-up issues, and other software problems. When these occur, return your instrument to RAD or your local RAD representative for repairs.
2. Disengage the battery latch and slide the battery out of the slot.
3. To install the battery, orient the battery so that the notched corner faces away from you and to the right.
4. Hold the battery latch in the disengaged position then insert and slide the battery into the battery slot.
5. Slide the battery into the battery slot until the battery latch clicks into place.
Charging the Battery
After installing the battery, if Power Status (Figure 5) indicates that power is low, charge the battery.
1. Insert the AC-adapter power cord into the connector behind the battery-compartment door.
2. Plug the AC adapter into an appropriate electrical outlet (120/240V).
An indicator appears on the screen:
If your instrument is powered-off a small screen on the battery shows percentage.
If your instrument is powered-on the Power Status icon - - displays on the right side of the screen Status bar (Figure 5).
Note:
A full charge takes approximately 1 ½ - 2 hours.
The instrument may be used while charging.
If you have a docking stating (optional) the device charges when docked.
Powering Your Instrument
Progeny Analyzers have three power modes—power on, power off, and sleep or “power saving” mode. All power modes are available when either the battery is installed and charged, or your instrument is connected to the AC adapter.
Powering On
1. Ensure that either the battery is installed or the AC adapter is connected and plugged into an electrical outlet.
Getting Started with your Progeny Analyzer 14
1006232_RevD
2. Hold down the Power/Enter hard key on your instrument keypad for a few seconds to display the Progeny Raman Welcome screen (Figure 5).
Powering Off
Your instrument may be powered off using either the Power soft key on the touchscreen, or the
Power/Enter hard key on the keypad.
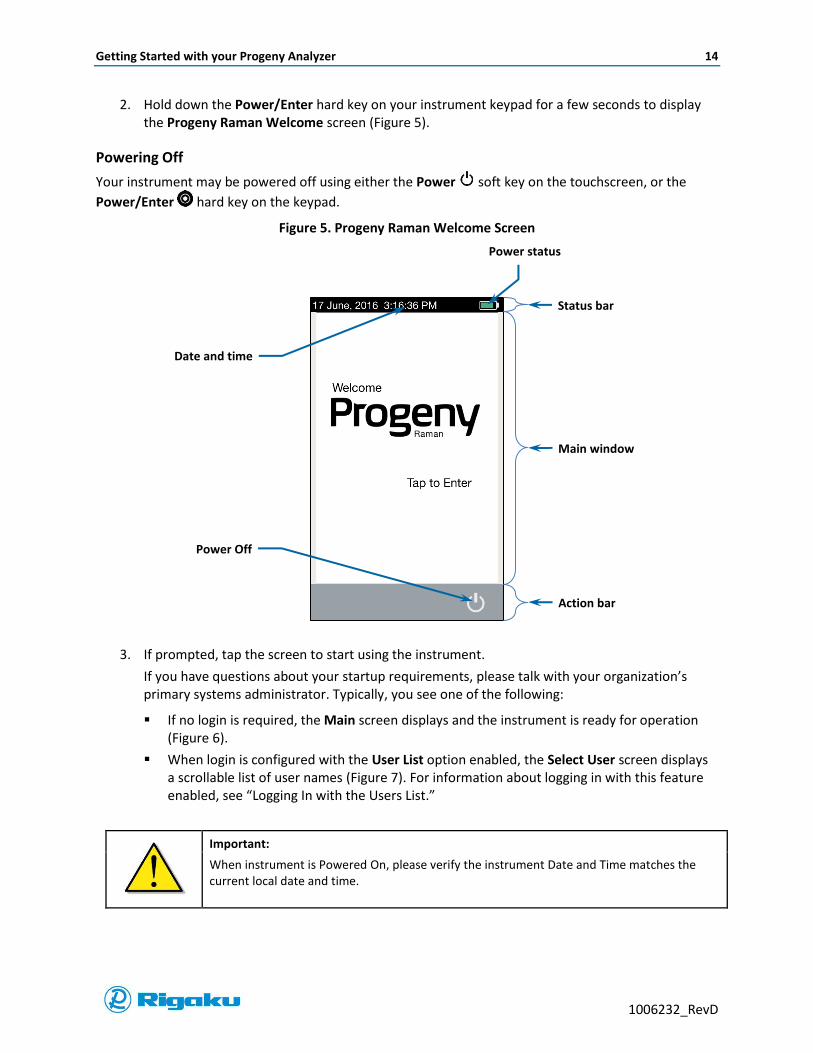
Figure 5. Progeny Raman Welcome Screen
3. If prompted, tap the screen to start using the instrument.
If you have questions about your startup requirements, please talk with your organization’s primary systems administrator. Typically, you see one of the following:
If no login is required, the Main screen displays and the instrument is ready for operation (Figure 6).
When login is configured with the User List option enabled, the Select User screen displays a scrollable list of user names (Figure 7). For information about logging in with this feature enabled, see “Logging In with the Users List.”
Important:
When instrument is Powered On, please verify the instrument Date and Time matches the current local date and time.
Status bar
Date and time
Main window
Action bar
Power Off
Power status

Getting Started with your Progeny Analyzer 15
1006232_RevD
Figure 6. Progeny Main Screen with No Login
Figure 7. Select User Screen
When login is configured with the User List option disabled, the Enter User Name screen displays a virtual keyboard for entering your user name and logging in (Figure 8).
Scrollable users list
Cancel/Back
Enter/OK
Power Off

Getting Started with your Progeny Analyzer 16
1006232_RevD
For information about logging in with a secure login, see “Logging In without the Users List.”
Figure 8. Enter User Name Screen
Using Instrument Controls
Progeny Analyzers have a touchscreen, virtual keyboard and keypad for navigating, viewing data, entering information, and scanning samples.
Using the Touchscreen
The touchscreen provides access to features, applications, and – depending on permission level –instrument configuration settings. The following gestures are available:
Gesture Use to…
Touch
Select and start on-screen controls or menu items.
Select soft keys.
Select letters from the virtual keyboard to enter information.
Drag
Scroll slowly through screen content or from one screen to other related screens.
Swipe
Scroll quickly through screen content or from one screen to other related screens.
User name box
Cancel/Back
Enter/OK
Virtual keyboard

Getting Started with your Progeny Analyzer 17
1006232_RevD
Using the Keypad
The physical keypad contains the hard keys shown in Figure 9, which users in protective gear access to analyze samples in hazardous conditions.
Figure 9. Keypad Layout
The keypad functions are:
Hard Keys Key Names Use to…
Power/Enter Power your instrument on (see “Powering Your Instrument”).
Start highlighted on-screen controls or menu items.
Arrows:
Up
Highlight an on-screen control or menu item.
Scroll right or left from one screen to other related screens.
Select letters and numbers from the virtual keyboard to enter information.
Note:
You can only highlight one control, menu item, or letter at a time.
Once the required control, menu item, or letter is highlighted, you must press the Power/Enter hard key to select it.
Left Right
Down
Camera Read barcodes and attach an image to a scan result file.
Cancel/Back Cancel a selection and/or go back to previous screens.
Understanding the Touchscreen and Keypad
When analyzing samples, you can use either the touchscreen or the keypad. The following displays how to perform frequent tasks in both modes:
Up arrow
Camera
Right arrow
Cancel/Back
Left arrow
Down arrow
Power/Enter
Getting Started with your Progeny Analyzer 18
1006232_RevD
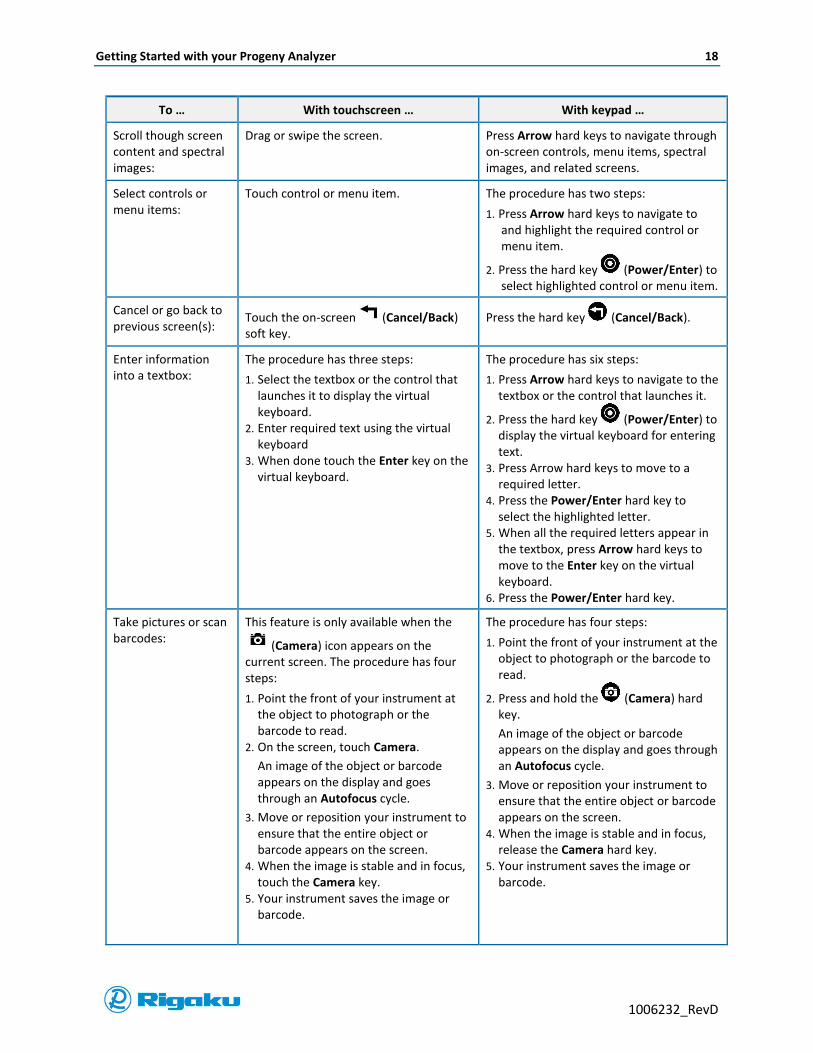
To … With touchscreen … With keypad …
Scroll though screen content and spectral images:
Drag or swipe the screen. Press Arrow hard keys to navigate through on-screen controls, menu items, spectral images, and related screens.
Select controls or menu items:
Touch control or menu item. The procedure has two steps:
1. Press Arrow hard keys to navigate to and highlight the required control or menu item.
2. Press the hard key (Power/Enter) to select highlighted control or menu item.
Cancel or go back to previous screen(s):
Touch the on-screen (Cancel/Back) soft key.
Press the hard key (Cancel/Back).
Enter information into a textbox:
The procedure has three steps:
1. Select the textbox or the control that launches it to display the virtual keyboard.
2. Enter required text using the virtual keyboard
3. When done touch the Enter key on the virtual keyboard.
The procedure has six steps:
1. Press Arrow hard keys to navigate to the textbox or the control that launches it.
2. Press the hard key (Power/Enter) to display the virtual keyboard for entering text.
3. Press Arrow hard keys to move to a required letter.
4. Press the Power/Enter hard key to select the highlighted letter.
5. When all the required letters appear in the textbox, press Arrow hard keys to move to the Enter key on the virtual keyboard.
6. Press the Power/Enter hard key.
Take pictures or scan barcodes:
This feature is only available when the
(Camera) icon appears on the current screen. The procedure has four steps:
1. Point the front of your instrument at the object to photograph or the barcode to read.
2. On the screen, touch Camera.
An image of the object or barcode appears on the display and goes through an Autofocus cycle.
3. Move or reposition your instrument to ensure that the entire object or barcode appears on the screen.
4. When the image is stable and in focus, touch the Camera key.
5. Your instrument saves the image or barcode.
The procedure has four steps:
1. Point the front of your instrument at the object to photograph or the barcode to read.
2. Press and hold the (Camera) hard key.
An image of the object or barcode appears on the display and goes through an Autofocus cycle.
3. Move or reposition your instrument to ensure that the entire object or barcode appears on the screen.
4. When the image is stable and in focus, release the Camera hard key.
5. Your instrument saves the image or barcode.

Getting Started with your Progeny Analyzer 19
1006232_RevD
Using Instrument with No Login vs. Login Requirement
Progeny Analyzers have two security configurations:
Open access with no login - Provides Administrator access to all users. Secure access with user login – Provides user specific, permission based access.
Using Instrument with Login
If your organization requires IT security or needs to track how users’ setup and use the instrument you may need to log in with a password before you can use the instrument, using either the list of users or entering your user name.
Logging In with the Users List
1. At the Progeny Raman Welcome screen, select the main screen of the display to display the
Select User screen and the current users list.
2. Scroll through the list to locate and select your name.
3. Select (Enter) to display the Enter Password screen.
4. Enter your password using either the touchscreen or the virtual keyboard.
For information about the possible types of passwords, see “Using Standard or Strong Passwords.”
Note:
The characters in the password appear as an * (asterisk) in the password box.
5. Select (Enter).
If the password is correct, the instrument shows a valid (Enter) on the action bar and returns you to the Main screen
From this screen:
1. Review the instrument’s primary features (see “Accessing Primary Features”).
2. Begin operating the instrument (see “Operating Progeny Analyzers”).
If the password is incorrect an Error Incorrect Password message is displayed.
1. Select the valid (Enter) key to display the Progeny Raman Welcome screen.
2. Repeat the login process
If your password no longer works, contact your organization’s primary systems administrator for instructions.
Logging In without the Users List
When your organization requires a higher level of instrument security, logging into your Progeny Analyzer may require you to manually enter both your user name and password.
1. At the Progeny Raman Welcome screen tap the screen to display the Enter User Name screen.
2. Input your user name appears in the box and select (Enter).
Note:
Usernames are case-sensitive.
Getting Started with your Progeny Analyzer 20
1006232_RevD
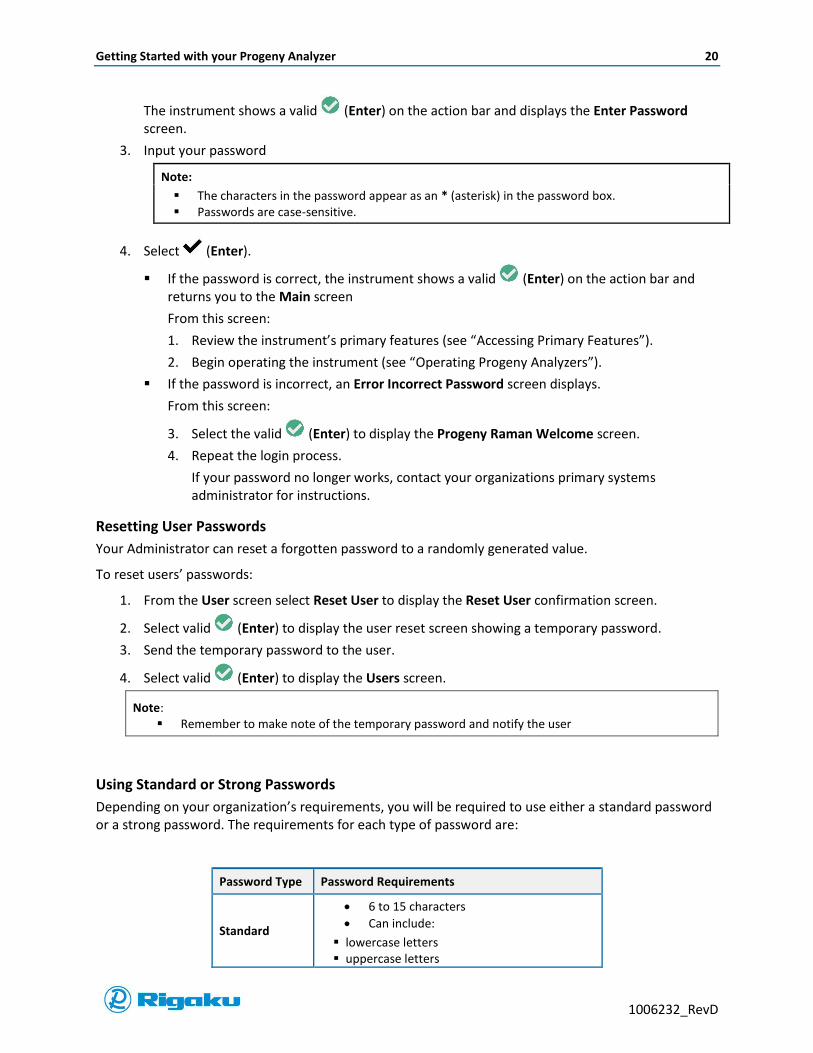
The instrument shows a valid (Enter) on the action bar and displays the Enter Password screen.
3. Input your password
Note:
The characters in the password appear as an * (asterisk) in the password box. Passwords are case-sensitive.
4. Select (Enter).
If the password is correct, the instrument shows a valid (Enter) on the action bar and returns you to the Main screen
From this screen:
1. Review the instrument’s primary features (see “Accessing Primary Features”).
2. Begin operating the instrument (see “Operating Progeny Analyzers”).
If the password is incorrect, an Error Incorrect Password screen displays.
From this screen:
3. Select the valid (Enter) to display the Progeny Raman Welcome screen.
4. Repeat the login process.
If your password no longer works, contact your organizations primary systems administrator for instructions.
Resetting User Passwords
Your Administrator can reset a forgotten password to a randomly generated value.
To reset users’ passwords:
1. From the User screen select Reset User to display the Reset User confirmation screen.
2. Select valid (Enter) to display the user reset screen showing a temporary password.
3. Send the temporary password to the user.
4. Select valid (Enter) to display the Users screen.
Note: Remember to make note of the temporary password and notify the user
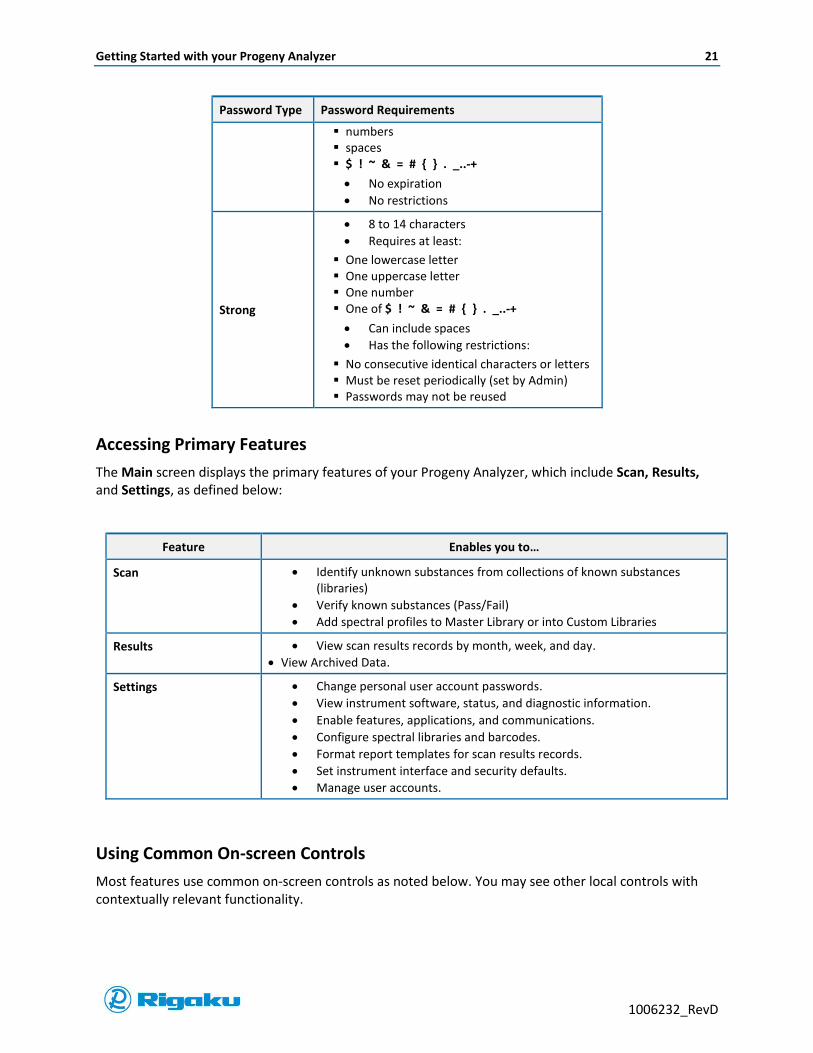
Using Standard or Strong Passwords
Depending on your organization’s requirements, you will be required to use either a standard password or a strong password. The requirements for each type of password are:
Password Type Password Requirements
Standard
6 to 15 characters
Can include:
lowercase letters uppercase letters
Getting Started with your Progeny Analyzer 21
1006232_RevD
Password Type Password Requirements
numbers spaces $ ! ~ & = # { } . _..-+
No expiration
No restrictions
Strong
8 to 14 characters
Requires at least:
One lowercase letter One uppercase letter One number One of $ ! ~ & = # { } . _..-+
Can include spaces
Has the following restrictions:
No consecutive identical characters or letters Must be reset periodically (set by Admin) Passwords may not be reused
Accessing Primary Features
The Main screen displays the primary features of your Progeny Analyzer, which include Scan, Results, and Settings, as defined below:
Feature Enables you to…
Scan Identify unknown substances from collections of known substances (libraries)
Verify known substances (Pass/Fail)
Add spectral profiles to Master Library or into Custom Libraries
Results View scan results records by month, week, and day.
View Archived Data.
Settings Change personal user account passwords.
View instrument software, status, and diagnostic information.
Enable features, applications, and communications.
Configure spectral libraries and barcodes.
Format report templates for scan results records.
Set instrument interface and security defaults.
Manage user accounts.
Using Common On-screen Controls
Most features use common on-screen controls as noted below. You may see other local controls with contextually relevant functionality.

Getting Started with your Progeny Analyzer 22
1006232_RevD
Control Name/Type Description
Power off
Is available only from the Progeny Raman Welcome screen.
Shuts down instrument firmware.
Powers the instrument off.
Enter Enables a user-specified feature or setting change.
Valid enter Enables a validated feature or setting change.
Cancel/back
Cancels current action.
Returns to the previous screen.
Note:
For some screens, this control does not cancel the current action, but only returns to the previous screen.
Invalid setting Indicates that you cannot enter the current setting or configuration.
Help Displays feature-specific on-screen help.
Calibration status Select for Performance Verification or Instrument Calibration.
Extended screen
Indicates that you can view hidden sections of the current screen.
The number of icon items shows the number of available sections.
The visible section is gray.
Hidden sections are empty.
Swipe screen, or press left/right hard keys to view hidden sections.
New sample Indicates that you can repeat the current operation.
Switch off Indicates that the feature is disabled.
Switch on Indicates that the feature is enabled.
Soft key Provides access to settings screens for selecting appropriate options.
Feature add/modify soft key
Users with Administrator or Developer permission levels are able to :
Change feature setting.
Launch feature change confirmation screen.
Note: Some features do not require change confirmation screens.
Editable text entry field
Allows users with Administrator or Developer permission levels to customize the instrument’s interface or output.
Getting Started with your Progeny Analyzer 23
1006232_RevD
Logging Out
After performing operations, developing applications, or configuring your instrument, log out of your user account.
1. Select (Cancel/Back) until the Main screen displays.
2. Select your user name to display the Logout confirmation screen.
3. Select the valid (Enter) to display the Progeny Raman Welcome screen.
Operating Progeny Analyzers 24
1006232_RevD
Operating Progeny Analyzers
Progeny Analyzers are durable, water-resistant, and simple to configure, providing you with the ability to identify liquids, powders and solids in the lab, in the plant or in the field.
Before using your instrument, you may need to verify performance calibration or calibrate the instrument. Instructions for performing those operations, as well as working with libraries, etc., are included in this section.
Preparing to Scan: Performance Qualification
Prior to scanning materials, it is good practice to perform an Instrument Verification. Instrument Verification is recommended if there are any issues with spectra, the instrument has been recently serviced, or if the instrument has been stored.
The Progeny Analyzer checks for the latest calibration status to ensure that it accurately processes spectral data. There are 2 options available for Instrumental Verification and Calibration:
1. Performance Verification is a daily test done to ensure that the instrument is performing within acceptable specifications. It is a check only and does not change the instrument.
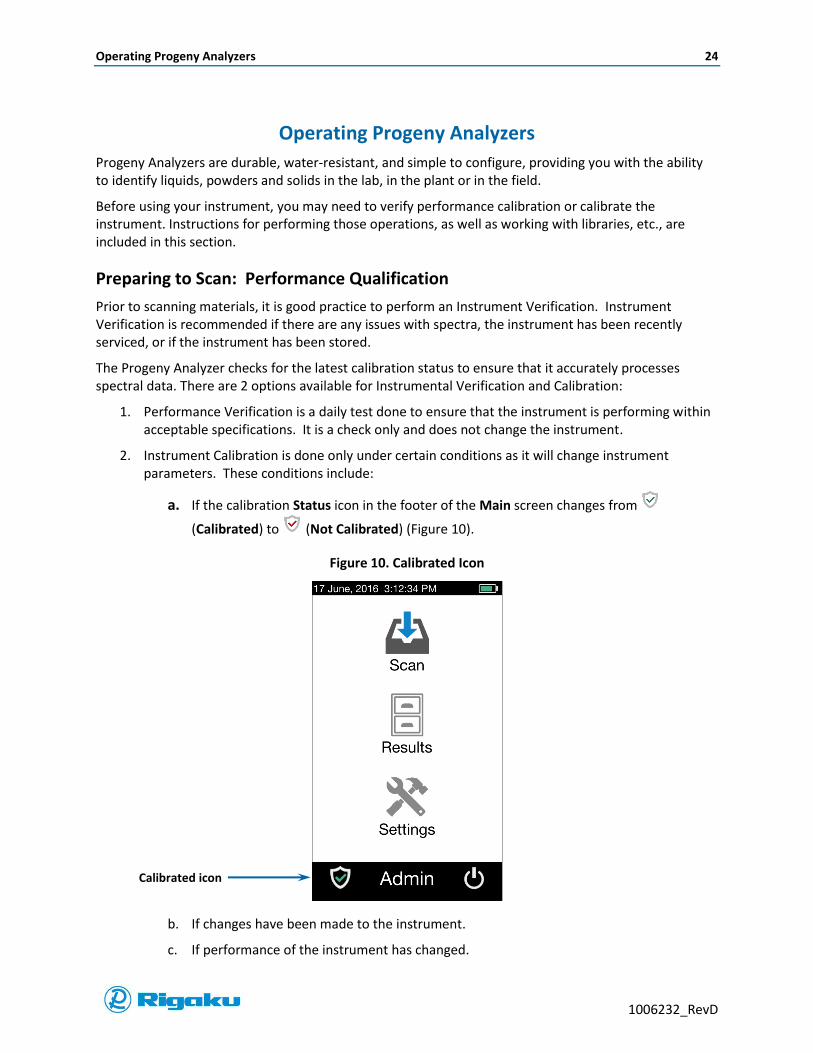
2. Instrument Calibration is done only under certain conditions as it will change instrument parameters. These conditions include:
a. If the calibration Status icon in the footer of the Main screen changes from
(Calibrated) to (Not Calibrated) (Figure 10).
Figure 10. Calibrated Icon
b. If changes have been made to the instrument.
c. If performance of the instrument has changed.
Calibrated icon

Operating Progeny Analyzers 25
1006232_RevD
Performance Verification
It is good practice to include Performance Verification as part of the daily performance qualification prior to running any applications.
1. From the Main screen, select (Calibration) from the left of the action bar to display the Select Method screen with the calibration options (Figure 11).
Figure 11. Select Method Screen for Calibration
2. Select Performance Verification to display the Verification screen with a list of the RAD-supplied calibration samples (Figure 12a).
Figure 12a. Verification Screen with RAD Sample List

Operating Progeny Analyzers 26
1006232_RevD
3. Choose an item from the RAD-supplied samples to display a confirmation screen.
4. Select the OK/ARM LASER soft key to display the Performance Verification scan screen
5. Select the Scan soft key to start the sample-analysis cycle.
The sample-analysis cycle runs through four phases, (scanning, background, search, results) then shows the Performance Verification on-screen results for the RAD-supplied sample profile (Figure 12b).
Figure 12b Performance Verification Result Screen
If the result is Pass, select (Cancel/Back) to return to the Main screen.
Or:
If the result is Fail, calibrate your instrument (see “Instrument Calibration”).
Instrument Calibration
It is not necessary to do an Instrument Calibration unless you run Performance Verification and get a failing result, or the instrument was recently serviced and/or spectral performance has changed or if there is a RED checkmark in the shield indicating a Fail for Verification or Calibration. The Instrument Calibration is usually done as part of the PQ/OQ procedures. The Instrument Calibration is run using a calibration sample (Benzonitrile) provided by RAD to ensure that your instrument accurately collects and processes spectral data and resets its Certification Status.
To re-calibrate your instrument for current operating conditions and reset the Certification Status:
1. If your Progeny Analyzer is off, power on (see “Powering On”) and log in (see “Using Instrument with Login”) to a user account.
2. From the Main screen, select (Calibration) from the left corner of the action bar (Figure 10).
The Select Method screen shows the calibration options (Figure 11).
Operating Progeny Analyzers 27
1006232_RevD
3. Select Instrument Calibration.
Instrument Calibration is performed using the Benzonitrile sample only, so there is no material selection list.
A confirmation screen similar to the Analyze Laser Warning screen (Figure 15) shows the laser warning.
4. Select the OK/ARM LASER soft key.
An Instrument Calibration scan screen instructs the user to position the Benzonitrile RAD-supplied sample.
5. Select the Scan soft key to start the sample-analysis cycle.
Similar to Identification application scans, the sample-analysis cycle starts, goes through four major phases, and then shows the Instrument Calibration on-screen results for the RAD-supplied sample profile.
If the result is Pass, select (Cancel/Back) to return to the Main screen.
Perform the Performance Verification procedure again to ensure a PASS.
Or:
If the result is Fail, reposition the Benzonitrile standard in the sample holder and repeat the above Calibration steps. Contact your organization’s primary system administrator, RAD or your local RAD representative.
Preparing to Scan: Hazardous or Volatile Materials
In a potentially hazardous environment, for thermally reactive materials or if samples are unknown, it is recommended that a liquid aliquot be taken from a bulk solution and placed in a smaller sample to ensure personal safety and limit the possibility of any reaction from the scan.
1. Place a portion of the substance into a glass or plastic container that is not opaque. 4 mL standard glass vials are most common.
2. Loosely fix the cap on the vial and place in the vial adaptor.
3. Scan the material using all appropriate safety precautions
Note:
If further precautions are required select the (Scan Delay optional) soft key prior to scanning
Note: If material is dark and potentially thermally reactive DO NOT SCAN. Dark materials will absorb energy from the photons and are not appropriate materials for Raman
spectroscopy.
Do not seal highly volatile or explosive materials in any container prior to scan with a Raman laser.

Operating Progeny Analyzers 28
1006232_RevD
Preparing to Scan: Known Materials
In a pharmaceutical environment the instrument can be used to scan through common packaging materials for verification or identification of pharmaceutical excipients and active pharmaceutical ingredients (API).
The container can be either glass or plastic, but the material must not be opaque. In general, the more transparent the container is the more accurate the analysis will be. The container format can be a beaker, jar, vial, or bags with a wall thickness of no more than 3-4 mm.
1. Ensure that there is sufficient quantity of material in the sample. For bulk samples ensure that the packaging is not excessively interfering with the scans. For samples in clear bottles or vials ensure that the quantity of the substance provides between 5 mm and 10 mm of sample height in the container.
2. Check to make sure that when held steady the whole nose-cone of the instrument is in line with the sample inside the container or, if scanning samples inside a sample vial, place the vial in the vial adaptor.
3. Perform a scan using Analyze and the Auto Collect settings or, set optimal conditions based on the sample and the instrument attachments.
Preparing to Scan: Setting Scan Conditions
The instrument has several settings to allow for optimal focal depth penetration into the sample. A chart is included in Appendix B with recommended settings based on the type of packaging. Alternatively, the user can determine the optimal focus based on a possible range of distance from the nose cone to the sample of between 1 to 5.5 mm.
Optimize focus of the instrument – basic mode:
1. Position the instrument with the nose-cone in contact with the container.
2. Taking the wall thickness of the container into consideration, estimate the distance between the nose cone and the sample substance.
3. If necessary, adjust the settings on the nose cone of the instrument:
Closer to the instrument for thick container walls, further from the instrument for thin container walls and bags.
Note: A setting of 3.0-3.5 is recommended as a starting point.
Further fine adjustment may be done using the Optimize function.
Optimize Focal Length – advanced mode:
The focal length position into the sample can be adjusted on any of the attachments. There are settings from 0 to 5.5 mm for the regular and the bottle adaptor and settings for 0 to 3 mm on the vial holder. Place the sample in the adaptor and beginning at the lowest setting slowly increment the settings until a maximum peak is observed in the spectra. This will be the optimal focal length for this type of material. If the Optimize function is used, then it is recommended that the optimal focal point be determined for a liquid sample and then again for a solid sample.
1. Position the sample in front of the instrument.
2. Tap Arm Laser, then Swipe to open the Analyze panel.

Operating Progeny Analyzers 29
1006232_RevD
3. On the bottom of the panel select (Optimize).
4. Tap Arm Laser, and then Scan to begin continuous scanning in which another measurement is performed as soon as the first is finished.
The spectra of the material are shown in the background and in the foreground is a red line showing the counts.
Figure 13. Optimize Focus
5. You will need to maximize the counts to determine the optimal focal point setting. While the Optimize is running- slowly make small (0.5-1mm) movements of the adaptor focal position. The counts will increase as you do so. Do this until the highest Raman signal is obtained. This is the optimal focal position for the adaptor and the type of material used, and should be used for any further testing.
Preparing to Scan: Other scan settings and properties
Once the focal point is set for a sample there are other scan properties that may need to be adjusted to get sufficiently detailed spectral results. These are:
Power—specifies the intensity of the laser stimulus of the sample.
Exposure—specifies the duration of the spectral collection period.
Averages—specifies the number of times the stimulus/collection sequence is performed during the Scanning phase of the sample-analysis cycle.
Note: Adjustments to other scan properties may change the quality of spectral result.
It is recommended that the user select the Auto Collect option as a preliminary test of the samples, and adjust any scan properties only if Auto Collect settings are not adequate for the sample type.
When the sample container is aligned and scan properties selected you are ready to perform a scan (see “Performing Scans”).
Operating Progeny Analyzers 30
1006232_RevD
Performing Scans
Progeny Analyzers have two basic modes of operation—Analyze and Application. In both modes, the instrument starts by collecting spectral data from a sample of a substance.
Analyze mode The instrument compares the detected data to its Master Library of spectral profiles and then calculates a Correlation Coefficient (CC) value for each comparison. After making CC comparisons to all spectral profiles in the library, the instrument identifies the substance named in the spectral profile with the highest CC value. While the Top Match is returned, the user can select up to 5 closest matches for a sample. This extra data lets you evaluate results and compare possible alternative matches. Because Analyze mode uses the instrument’s Master Library of spectral profiles and analyzes the data with selectable scan properties, it is most useful for identifying samples of unknown substances.
Application mode The instrument collects the spectral data using a specified collection of pre-set instrument settings and custom libraries. The application allows you to search through only those spectral profiles you have validated for certain situations. As a result, applications are most useful for either identifying or verifying samples from known collections of substances.
In the Application mode the sample is compared only to a sub-library of spectral profiles to calculate the correlation value. Provided that the top match(es) are greater than the cutoff correlation a result is returned on the instrument. The user can set the output of the instrument to be either Identification mode, which returns the closest match from the library to the sample, or to Verification mode which requires the user to specify the material and a Pass or Fail will be returned as a result.
In addition to these two modes, organizations may need to ensure that the process of collecting sample spectral data is routinely replicable. To make this possible certain configurations of the instrument can run Batch applications. When available, this feature enables organizations to standardize the process of collecting sample data for large-scale substance identification or verification purposes.
For more information about setting up Batch collection and running Batch applications, see “Batch Collection.”
Scanning with Analyze
When scanning an unknown substance in Analyze mode your instrument identifies the closest library match to the sample. To do this it collects raw spectral data, processes that data, compares the results to each spectral profile in the instrument’s Master Library, and calculates a Correlation Coefficient (CC) value for each profile.
Once analysis is complete the instrument generates a scan results report that includes:
Colored graph with both the detected spectrum and the spectrum from the matching profile.
Up to five Library Matches (when Max # of Search Results is enabled) with each match showing the substance name and information listed in the Master Library spectral profile.
After generating the report, the instrument displays the on-screen results and saves the results report to the instrument’s results archive for follow-up review.
1. From the Main screen select (Scan) to display the scan options (Figure 14).

Operating Progeny Analyzers 31
1006232_RevD
Figure 14. Main Screen with Scan Options
2. From the Scan options, select (Analyze) to display the Analyze confirmation screen with the laser warning (Figure 15).
Figure 15. Laser Warning
3. Select OK/ARM LASER to display the Analyze scan screen with the sample alignment diagram (Figure 16).
Scan options
OK/ARM LASER
Extended screen control
Laser warning

Operating Progeny Analyzers 32
1006232_RevD
Figure 16. Analyze Scan Screen
4. Drag (Extended Screen) to the right, or select it and press the left arrow hard key, to review information about and/or change current scan properties.
A screen listing your instrument’s current scan configuration displays the property settings for the Collect Settings category (Figure 17).
Figure 17. Analyze Scan Properties Screen
Scan soft key
Use Extended screen to see scan properties
Sample alignment
Add Application
Enter
Optimize

Operating Progeny Analyzers 33
1006232_RevD
1. The configuration shown has the default setting, Auto Collect, selected which automatically cycles through a high, medium and low Power setting while scanning the material. From these settings, the user can then optimize the focal point and/or change the parameters in the Configuration.
Icons common to Scan: Analyze and Applications are:
Control Name/Type Description
Cancel/back
Cancels current action.
Returns to the previous screen.
Optimize Opens Optimize panel
Default setting
Return all settings to the factory default setting
Auto Collect
Baseline Correction
Wavelet algorithm
Search Master Library
New Application Create a new application
Barcode Read a barcode
Search Search library to Select Material for Application Verify mode
2. Advanced users can change settings for the (Collect Settings), (Baseline Correction),
(Search Algorithm), and (Search Results) properties categories.
a. Select a property control to display the settings screen.
b. Scroll through the settings screen and select the required value.
c. Select (Enter) to change the setting.
Operating Progeny Analyzers 34
1006232_RevD
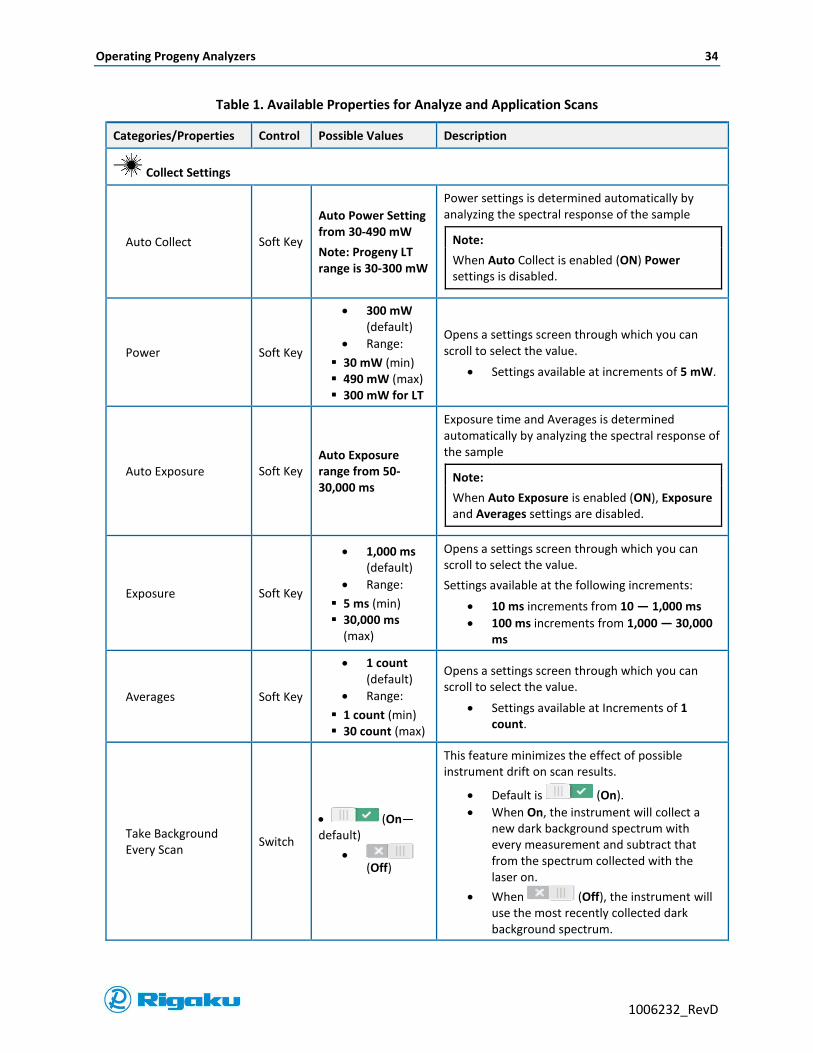
Table 1. Available Properties for Analyze and Application Scans
Categories/Properties Control Possible Values Description
Collect Settings
Auto Collect Soft Key
Auto Power Setting from 30-490 mW
Note: Progeny LT range is 30-300 mW
Power settings is determined automatically by analyzing the spectral response of the sample
Note:
When Auto Collect is enabled (ON) Power settings is disabled.
Power Soft Key
300 mW (default)
Range:
30 mW (min) 490 mW (max) 300 mW for LT
Opens a settings screen through which you can scroll to select the value.
Settings available at increments of 5 mW.
Auto Exposure Soft Key Auto Exposure range from 50-30,000 ms
Exposure time and Averages is determined automatically by analyzing the spectral response of the sample
Note:
When Auto Exposure is enabled (ON), Exposure and Averages settings are disabled.
Exposure Soft Key
1,000 ms (default)
Range:
5 ms (min) 30,000 ms
(max)
Opens a settings screen through which you can scroll to select the value.
Settings available at the following increments:
10 ms increments from 10 — 1,000 ms
100 ms increments from 1,000 — 30,000 ms
Averages Soft Key
1 count (default)
Range:
1 count (min) 30 count (max)
Opens a settings screen through which you can scroll to select the value.
Settings available at Increments of 1 count.
Take Background Every Scan
Switch
(On—default)
(Off)
This feature minimizes the effect of possible instrument drift on scan results.
Default is (On).
When On, the instrument will collect a new dark background spectrum with every measurement and subtract that from the spectrum collected with the laser on.
When (Off), the instrument will use the most recently collected dark background spectrum.

Operating Progeny Analyzers 35
1006232_RevD
Categories/Properties Control Possible Values Description
Baseline Correction
Switch
(On default)
(Off)
This feature minimizes the effect of fluorescence on scan results.
Default is (On).
When On, the instrument will mathematically remove any slowly varying slope or curvature in the baseline of the spectrum.
When (Off), no mathematical processing is applied to the baseline
Note:
When comparing measured spectra to library spectra it is important to have baseline correction in the same state in both the library and measurement. Usually this will be On.
Also when adding spectra to a library, this feature should be On. Any library to be built must have consistent Baseline settings for each spectra.
Search Algorithm
Type Soft Key
Wavelet (default)
HQI (optional)
Rigaku Mixture (optional)
Associates current Analyze scan or application with a specific algorithm type.
Opens a settings screen through which you can scroll to select the value.
Settings screen lists all available algorithm types.
Mixture Components Soft Key
1 (default)
Range:
1 (min) 6 (max)
Sets the number of components that are listed in the scan result when Rigaku Mixture is set as the Search Algorithm Type.
Library Soft Key Master Library (default)
Sets the library of available spectral images to which current spectral result is compared
Opens a settings screen through which you can scroll to select the value.
Up to four libraries can be specified to search in order. The columns Library1 – Library4 contain the names of all the libraries on the unit.
Note:
Multiple library selection is available for Analyze and Identification applications. Verification applications can have only one library defined.

Operating Progeny Analyzers 36
1006232_RevD
Categories/Properties Control Possible Values Description
Pass (or Match) Threshold
Soft Key
0.80 (default)
Range:
0.99 (max) 0.60 (min)
Opens a settings screen to select the correlation percentage for matching spectral results. The property has:
Decimal format
Increments of 0.01
Note:
In a Verify type application, this is Pass Threshold and in an Identify type application, this is Match Threshold. In either case, it should be greater than, or equal to, the Search Result Threshold of the application Apply these settings in the Application mode
Wavelength Start Soft Key
200 cm-1 (default)
Range:
200 cm-1 (min) 2,500 cm-1
(max)
Opens a settings screen through which you can scroll to select the value.
Settings available at increments of 50 cm-
1.
Note:
Wavelength Start and Wavelength End are only enabled when Search Algorithm type is set to HQI.
Wavelength End Soft Key
2,500 cm-1 (default)
Range:
2,500 cm-1 (max)
200 cm-1 (min)
Opens a settings screen through which you can scroll to select the value.
Settings available at Increments of 50 cm-
1.
Search Results
Maximum Number of Search Results
Soft Key
Range:
None (disabled)
5 (max)
Opens a setting screen through which you can scroll to select the value.
When set to None, or disabled, no library matches are displayed. Consequently, use this setting for Verification applications only.
Settings are available at increments of 1.
Enable Search Result Threshold
Soft Key
(On default)
(Off)
When Enable Search Results Threshold is ON the Search Result Threshold number is used to filter search results that do not meet the minimum search threshold value (see next row)
Search Threshold Soft Key
0.85 (default)
Range:
0.99 (max) 0.50 (min)
Opens a settings screen to select the library correlation match value. The lower the value, the more search results will be displayed. The property has:
Decimal format

Operating Progeny Analyzers 37
1006232_RevD
Categories/Properties Control Possible Values Description
Increments of:
0.05 from 0.50 to 0.80 0.01 from 0.80 to 0.99
Note:
Search Threshold should be less than, or equal to, the Pass Threshold of the application.
3. Select the Scan soft key to start the sample-analysis cycle.
The sample-analysis cycle through:
Background filtering
Scanning the sample
Processing the spectral data
Searching onboard libraries for spectral matches
Important:
Do not move the instrument during the Background and Scanning phases of the sample-analysis cycle. Moving the instrument during these phases will significantly reduce both the quality of spectral results and the accuracy of sample matches.
When the sample-analysis cycle completes the scan results screen displays the information shown in Figure 18.
Figure 18. Analyze Scan Results Screen
Add Photo Add to Library
File Name
Search details
NFPA 704 labels
Spectral data graph
View Landscape Mode
F n fdf
Next Scan Cancel/Back Sign
Operating Progeny Analyzers 38
1006232_RevD
Note: When Max # of Search Results is set to greater than 0 the substance name and data from the
library with the closest spectral match from the selected library is displayed.
4. To display the spectral data graph in a separate page in landscape view:
a. On the scan results screen, tap the Enlarge Plot icon, or drag (Extended screen) to the right, or press the left arrow hard key.
b. Tap or select the Pan On icon to display a cross-hatch that can be dragged across
the spectra to show peak position. Tap the Pan Off icon to return to default spectra view.
c. Tap or select the Overlay Spectra icon to select a spectra from the Master Library, Current Matches, or Recent Results to overlay on the spectra view.
d. Tap or select the Stack Spectra icon to view the additional spectra on different levels of the spectra view.
5. If required, update the File Name below the graph:
a. Select the Name field to display the virtual keyboard.
b. Enter the Scan Name using either the touchscreen or the virtual keyboard.
c. Select (Enter) to save the memo to the scan results record.
6. If required, attach an Image to the result:
a. Press the Camera hard key to display the Capture Image screen appears with a viewfinder.
b. Point the Progeny unit at the object to be captured (e.g., material, container, label, etc.).
c. Press the Camera hard key again or the (Camera Icon)
d. Select (Enter) to acknowledge the “Save Image to result?” prompt and save the image to the scan results record.
7. If required, enter a Memo for the scan results record:
e. On the scan results screen, drag (Extended screen) to the left, or select it and press the right arrow hard key to display a screen with a custom Memo field as well as a list of peak position and highest peak intensities.
f. Select the Memo field to display the virtual keyboard.
g. Enter the desired text by tapping the touchscreen keyboard or using the hard button arrows to move to a keyboard character, then the Enter button to select it.
h. Select (Enter) to save the memo to the scan results record.
i. Drag (Extended screen) to the right, or select it and press the left arrow hard key to return to the scan results screen.
8. If required, view the results in the Output Template format:
a. Drag (Extended screen) to the left, or select it and press the right arrow hard key to display a screen with the Title and Memo lines.
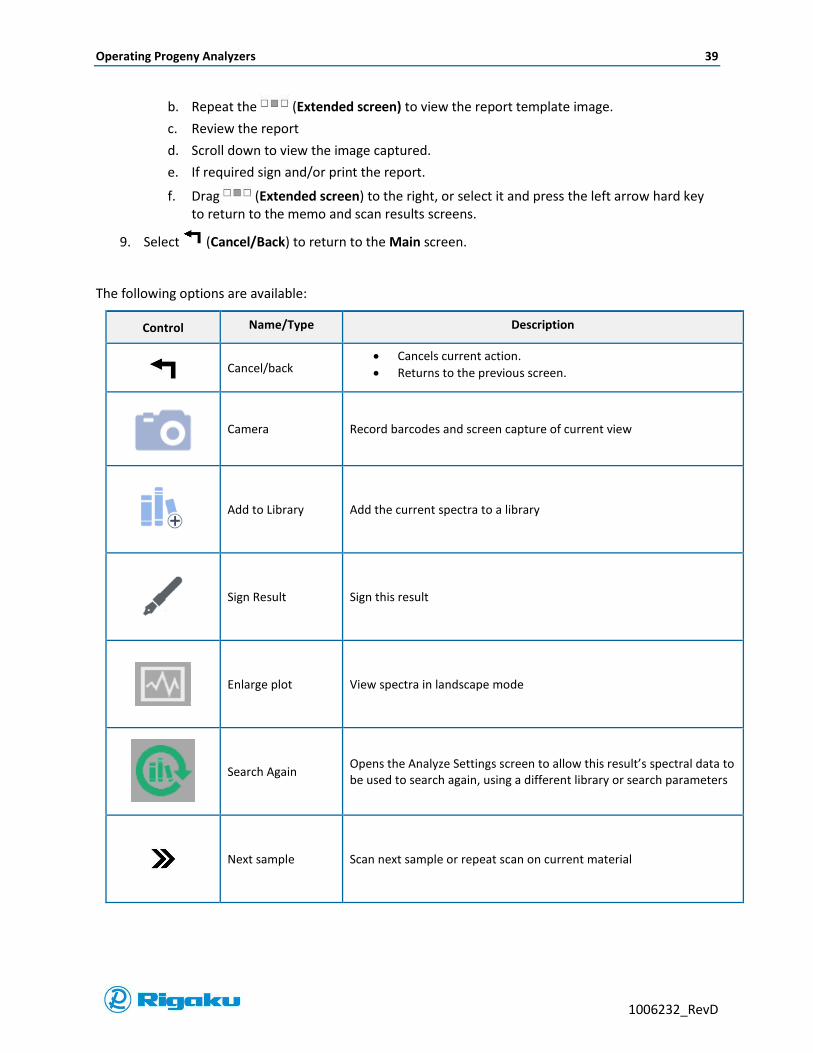
Operating Progeny Analyzers 39
1006232_RevD
b. Repeat the (Extended screen) to view the report template image.
c. Review the report
d. Scroll down to view the image captured.
e. If required sign and/or print the report.
f. Drag (Extended screen) to the right, or select it and press the left arrow hard key to return to the memo and scan results screens.
9. Select (Cancel/Back) to return to the Main screen.
The following options are available:
Control Name/Type Description
Cancel/back
Cancels current action.
Returns to the previous screen.
Camera Record barcodes and screen capture of current view
Add to Library Add the current spectra to a library
Sign Result Sign this result
Enlarge plot View spectra in landscape mode
Search Again Opens the Analyze Settings screen to allow this result’s spectral data to be used to search again, using a different library or search parameters
Next sample Scan next sample or repeat scan on current material
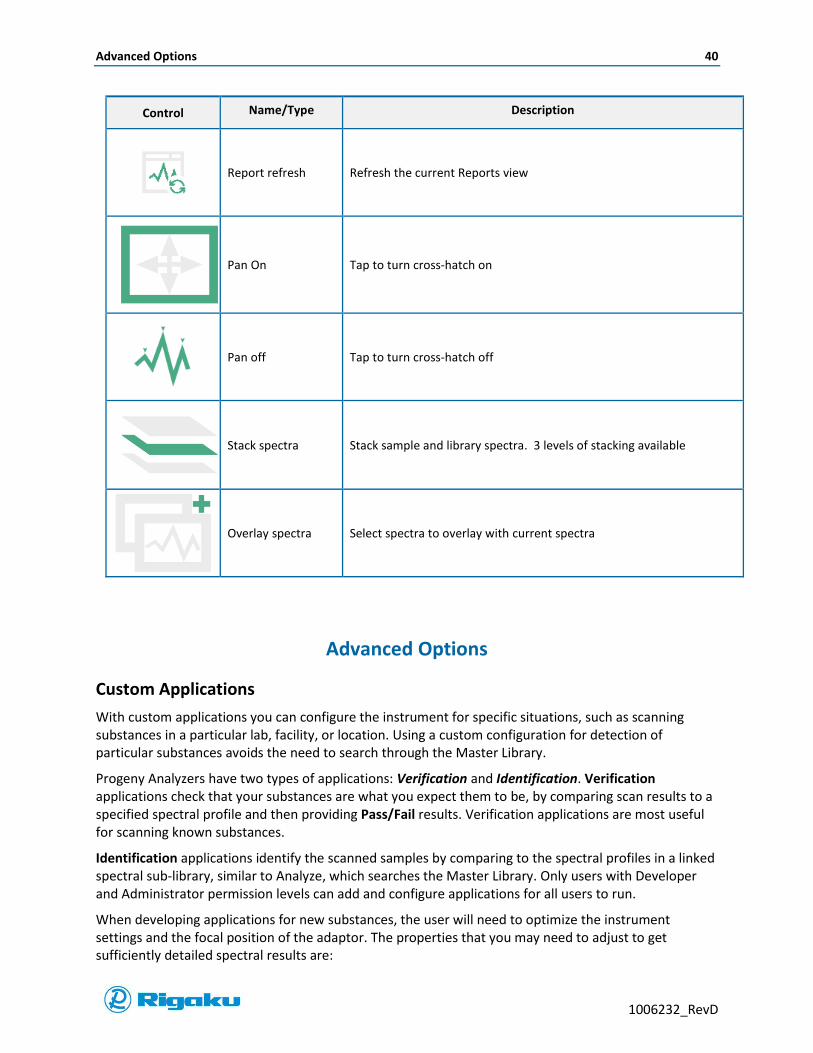
Advanced Options 40
1006232_RevD
Control Name/Type Description
Report refresh Refresh the current Reports view
Pan On Tap to turn cross-hatch on
Pan off Tap to turn cross-hatch off
Stack spectra Stack sample and library spectra. 3 levels of stacking available
Overlay spectra Select spectra to overlay with current spectra
Advanced Options
Custom Applications
With custom applications you can configure the instrument for specific situations, such as scanning substances in a particular lab, facility, or location. Using a custom configuration for detection of particular substances avoids the need to search through the Master Library.
Progeny Analyzers have two types of applications: Verification and Identification. Verification applications check that your substances are what you expect them to be, by comparing scan results to a specified spectral profile and then providing Pass/Fail results. Verification applications are most useful for scanning known substances.
Identification applications identify the scanned samples by comparing to the spectral profiles in a linked spectral sub-library, similar to Analyze, which searches the Master Library. Only users with Developer and Administrator permission levels can add and configure applications for all users to run.
When developing applications for new substances, the user will need to optimize the instrument settings and the focal position of the adaptor. The properties that you may need to adjust to get sufficiently detailed spectral results are:

Advanced Options 41
1006232_RevD
Power—specifies the intensity of the laser stimulus of the sample.
Exposure—specifies the duration of the spectral collection period.
Averages—specifies the number of times the stimulus/collection sequence is performed during the Scanning phase of the sample-analysis cycle.
Focal Position – specifies where the sample sits in comparison to the laser focus.
It is imperative that when building a custom library that the spectral quality of the included samples be of the highest possible quality. For pharmaceutical applications traceability and certificates of analysis may be required to be cGMP compliant.
Note: Materials built into a custom library will automatically be placed into the Master Library.
When building a custom library the user will have the option of specifying the results returned on the instrument. The settings for Verify (Pass/Fail) or Identification are set at the same time as other instrument parameters by the Administrator and cannot be adjusted in the application later on by other users. The Administrator will set the appropriate conditions for each application when the custom application is created. At the same time, the Administrator will collect and add materials to the application and/or create new libraries. The following instructions for Verification and Identification of Substances presumes that any custom applications or libraries have already been built and are on the instrument ready for the user.
Verification of Known Substances
Verification applications confirm that a sample is the expected substance. The custom application uses the pre-defined instrumental settings and prompts the user for the sample to be tested. The sample must be present in the library already. After selecting the sample, you can start the scan.
The instrument scans the sample and then compares the spectra generated to the spectral profile of the library material. If the two spectra have a correlation above the correlation cutoff set for a Match in the instrument parameters, the result screen will return a green Pass. If the instrument determines that the sample does not match selected substance within the set correlation Match the result returned will be a red Fail. The instrument will then start a discovery search in the Master Library.
If one or more matches are found in the Master Library as set in the Max # of Search Results, and if these have correlations greater than the correlation cutoff, then these results will be returned in the scan results. Once the verification application’s scan cycle is complete, the instrument generates a scan results that includes:
Color coded results header:
Green for Pass.
Red for Fail.
Colored graph with both the detected spectrum and the spectrum from the selected profile.
Library match data (when Max # of Search Results is enabled):
For scans that return Pass—Substance data listed in the selected profile.
For scans that return Fail —Substance data from the library profile with the closest spectrum.
For applications with a Max # of Search Results setting greater than 0—Substance names and data listed in up to five library profiles.
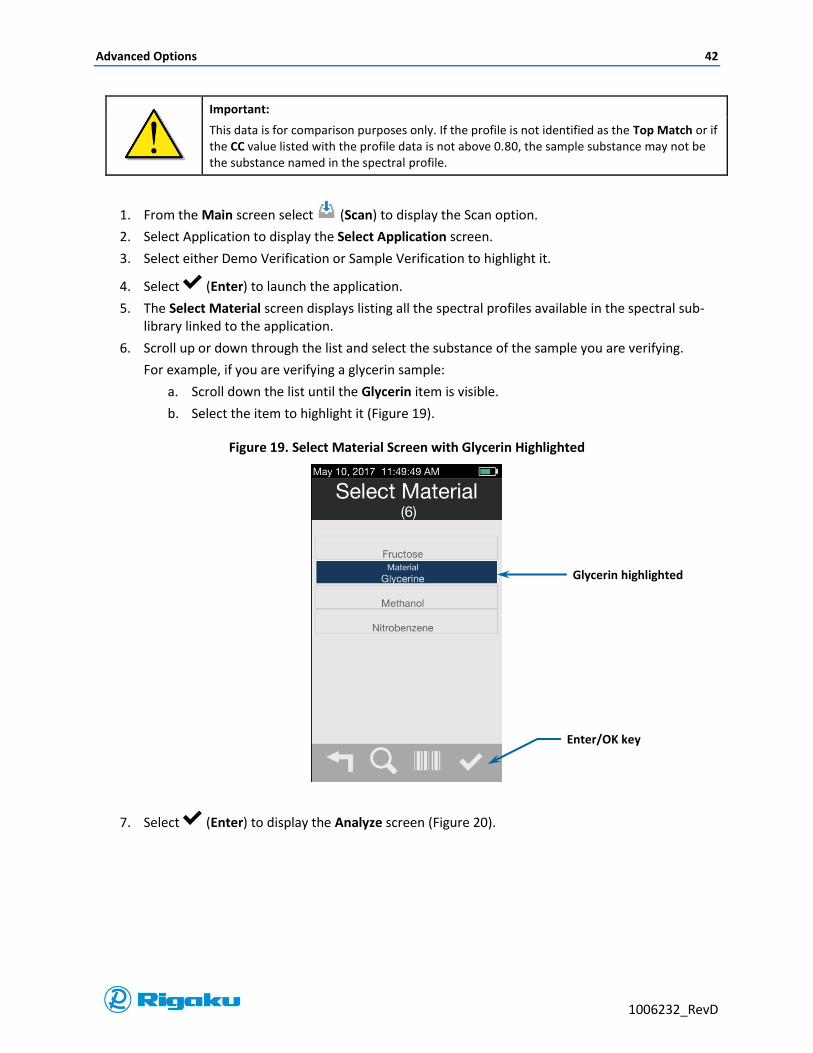
Advanced Options 42
1006232_RevD
Important:
This data is for comparison purposes only. If the profile is not identified as the Top Match or if the CC value listed with the profile data is not above 0.80, the sample substance may not be the substance named in the spectral profile.
1. From the Main screen select (Scan) to display the Scan option.
2. Select Application to display the Select Application screen.
3. Select either Demo Verification or Sample Verification to highlight it.
4. Select (Enter) to launch the application.
5. The Select Material screen displays listing all the spectral profiles available in the spectral sub-library linked to the application.
6. Scroll up or down through the list and select the substance of the sample you are verifying.
For example, if you are verifying a glycerin sample:
a. Scroll down the list until the Glycerin item is visible.
b. Select the item to highlight it (Figure 19).
Figure 19. Select Material Screen with Glycerin Highlighted
7. Select (Enter) to display the Analyze screen (Figure 20).
Glycerin highlighted
Enter/OK key

Advanced Options 43
1006232_RevD
Figure 20. Verification Laser Warning
8. Select OK/ARM LASER to display the application’s scan screen for the selected substance appears (Figure 21).
Figure 21. Verification Application Scan Screen
9. Select the Scan soft key to start the sample-analysis cycle.
When the sample-analysis cycle is completed the scan results screen displays (Figure 22).
Scan soft key
Sample alignment
OK/ARM LASER soft key
Use Extended Screen to view scan properties
Laser warning
Use Extended Screen to view scan properties

Advanced Options 44
1006232_RevD
Figure 22. Verification Application Scan Results Screen
10. Review on-screen results:
Color-coded Pass or Fail results header with the name of the selected substance.
Color graph of both the sample’s spectral data and the spectral data from either the selected profile for scans that Pass or the library profile with the closest data for scans that Fail.
When Max # of Search Results is set to greater than 0, substance name and data from either the verified profile or the library profile(s) with the closest spectral data.
11. If required, attach an image to the result:
a. Press the Camera hard key to display the capture Image screen with a viewfinder.
b. Point the Progeny unit at the object to be captured (e.g., material, container, label, etc.).
c. Press the Camera hard key again or the (Camera Icon)
d. Select (Enter) to acknowledge the “Save Image to result?” prompt and save the image to the scan results record.
12. If required, update the Memo to the scan results record:
a. On the scan results screen, drag (Extended screen) to the left, or select it and press the right arrow hard key to display a screen with a custom Memo field as well as a list of peak position and highest peak intensities.
b. Select the Memo field to display the virtual keyboard.
c. Enter the Record Title using either the touchscreen or the virtual keyboard.
Result summary
NFPA 704 labels
Cancel/Back
Sign
Next sample
Result File Name
Selected material
Result Details
Spectral data graph
Results header
Add Photo View
Landscape Mode
F n fdf

Advanced Options 45
1006232_RevD
d. Select (Enter) to save the title to the scan results record.
e. Drag (Extended screen) to the right, or select it and press the left arrow hard key to return to the scan results screen.
13. If required, view the results in the Report Template format:
a. Drag (Extended screen) to the left, or select it and press the right arrow hard key to display the screen with the Title and Memo lines.
b. Repeat the (Extended screen) to view the report template image.
The instrument shows an image of the results report formatted with the selected results report template.
c. Review the report and, if required, sign or print the report.
d. Drag (Extended screen) to the right, or select it and press the left arrow hard key to return to the results record information and scan results screens.
14. Select (Cancel/Back) to return to the Main screen or (New Sample) to start a new application scan cycle.
Identification in Custom Libraries
Identification applications compare the spectral data collected from the sample to all the profiles included in the linked spectral sub-library and calculates the correlation of the sample to the library material.
Profile data from up to five matches are listed sequentially, with the closest match as Top Match data and the next four matches as Second through Fifth Match data. Once the Identification application’s scan cycle is complete, the instrument generates a scan results report that includes:
Gray results header for Search Results.
Colored graph with both the detected spectrum and the spectrum from the closest profile.
Substance names and data, for applications with a Max # of Search Results setting greater than 0, listed in up to five library profiles.
Important:
This data is for comparison purposes only. If the profile is not identified as the Top Match or if the CC value listed with the profile data is not above 0.80, the sample substance may not be the substance named in the spectral profile.
After generating the report, the instrument displays the results on the screen and saves the results report to the instrument’s results archive for follow-up review.
1. From the Main screen select (Scan) to display the Scan options.
2. Select Application to display the Select Application screen (Figure 23).
3. Select an identification application.
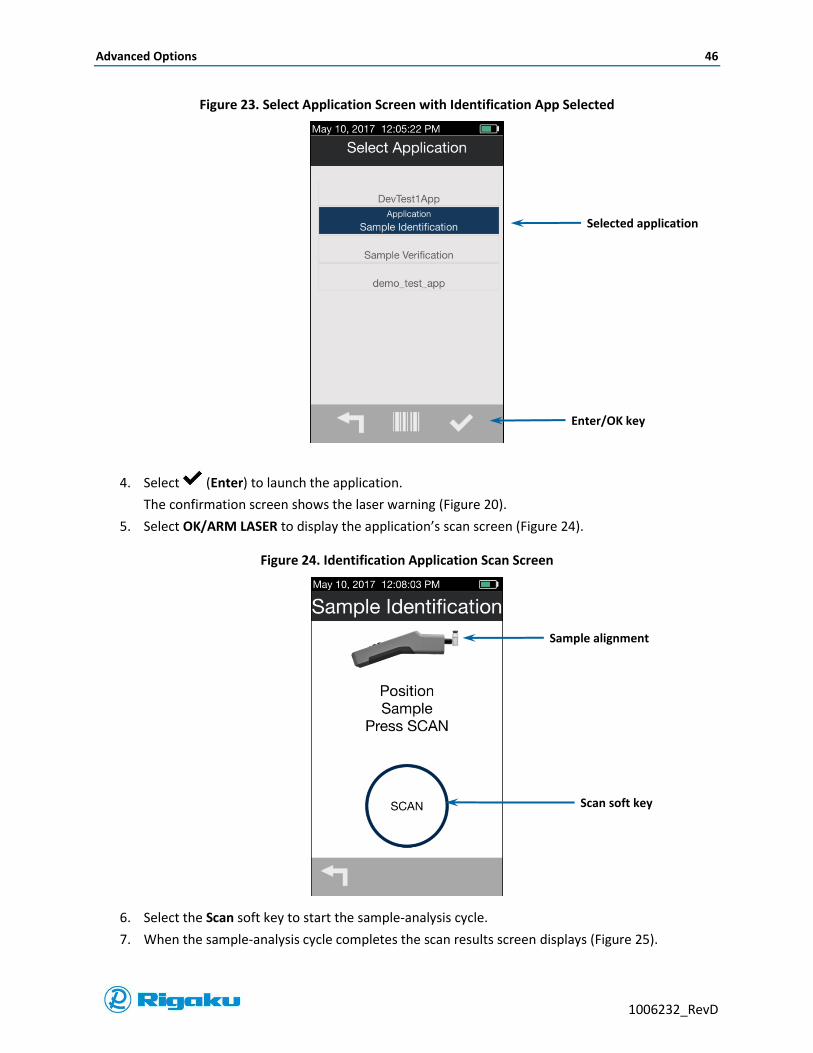
Advanced Options 46
1006232_RevD
Figure 23. Select Application Screen with Identification App Selected
4. Select (Enter) to launch the application.
The confirmation screen shows the laser warning (Figure 20).
5. Select OK/ARM LASER to display the application’s scan screen (Figure 24).
Figure 24. Identification Application Scan Screen
6. Select the Scan soft key to start the sample-analysis cycle.
7. When the sample-analysis cycle completes the scan results screen displays (Figure 25).
Selected application
Enter/OK key
Scan soft key
Sample alignment

Advanced Options 47
1006232_RevD
Figure 25. Identification Application Scan Results Screen
8. Review results.
When Max # of Search Results is set to greater than 0, substance name and data from the
Library profile(s) with the closest spectral data is displayed.
9. If required, update the File Name below the graph:
a. Select the Name field to display the virtual keyboard.
b. Enter the Scan Name using either the touchscreen or the virtual keypad
c. Select (Enter) to save the File Name to the scan results record.
10. If required, attach an image to the result:
a. Press the Camera hard key to display the capture Image screen with a viewfinder.
b. Point the Progeny unit at the object to be captured (e.g., material, container, label, etc.).
c. Press the Camera hard key again or the (Camera Icon),
d. Select (Enter) to acknowledge the “Save Image to result?” prompt and save the image to the scan results record.
11. If required, update the Memo to the scan results record:
a. On the scan results screen, drag (Extended screen) to the left, or select it and press the right arrow hard key.
A screen displays with a custom Memo field as well as a list of peak position and highest peak intensities.
b. Select the Memo field to display the virtual keyboard.
Result summary
NFPA 704 labels
Cancel/Back
Sign
Next sample
Result File Name
Matched material
Result Details
Spectral data graph
Results header
Add Photo View
Landscape Mode
F n fdf

Advanced Options 48
1006232_RevD
c. Enter the Record Title using either the touchscreen or the virtual keyboard.
d. Select (Enter) to save the title to the scan results record.
e. Drag (Extended screen) to the right, or select it and press the left arrow hard key to return to the scan results screen.
12. If required, view the results in the Report Template format:
a. Drag (Extended screen) to the left, or select it and press the right arrow hard key to display the Title and Memo lines.
b. Repeat the (Extended screen) to view the report template image.
The instrument shows an image of the results report formatted with the selected results report template.
c. Review the report and, if required, sign or print the report.
d. Drag (Extended screen) to the right, or select it and press the left arrow hard key to return to the results record information and scan results screens.
13. Select (Cancel/Back) to return to the Main screen or (New Sample) to start a new application scan cycle.
Viewing Results
Scan results records are automatically saved onto the Progeny Analyzer after every scan, allowing all users to view and sign them.
Viewing Scan Data Summaries
1. From the Main screen select (Results).
2. From the Results Options screen (Figure 26) select either:
Recent to view recent results that have not been downloaded or synced to a computer.
Or:
Archived to view results that have been previously downloaded or synced to a computer.

Advanced Options 49
1006232_RevD
Figure 26. Results Options Screen
3. The Results screen displays with the tab for the current week selected, and lists the scan results summaries by date (Figure 27a).
Figure 27a. Results Screen
4. Scroll through the screen to view summaries for the current week.
Month Week tabs
Archived
Recent

Advanced Options 50
1006232_RevD
The screen lists any records from the selected week, by date, which are currently stored on the instrument.
Each summary shows information about the name of the primary substance match and a color-coded result icon as defined below.
Table 2. Color Coding for Scan Results
Colors Analyze and Identification Applications Verification Applications
Indicates Means that the sample spectrum… Indicates Means that the sample spectrum…
Gray No Match Does not match any item in the searched library
N/A N/A
Yellow Incomplete Indicates an incomplete (cancelled) batch scan result.
Incomplete Indicates an incomplete (cancelled) batch scan result.
Green Positive ID Was positively Identified Pass Matches the profile for which the current Verification application tests.
Red No ID Not Identified Fail Fails to match the profile for which the current Verification application tests.
5. Select another Week tab to review summaries from that week, within the current month.
6. To review summaries from a different month:
a. Select (Month) to display the Select Month screen listing previous months that may contain scan results records.
b. Scroll through the list and select the required month.
c. Select (Enter) to return to the Data screen with the Week tabs updated for the selected month.
d. If the data is from a different week than the one that is highlighted, select the week in which the scan results record was saved.
e. Scroll down the results summary list to locate the results you need to review.
7. When you finish viewing the results list for the selected week:
Select a scan result record to view detailed scan data.
Archive results data (see “Sync Results to Personal Computer”).
Select (Back) to return to the Main screen.
8. To re-process a result’s spectral data using a different library or search parameters:
Select the Search Again icon.
A new result is added to the summary list under the original result, preceded by the Search Again icon (Figure 27b).
Note: The Search Again feature is only available for results from Analyze scans. Results from applications
cannot be searched again.

Advanced Options 51
1006232_RevD
Figure 27b. Results list containing a Search Again result
Viewing Diagnostics and Information
Operational diagnostics and instrument-specific information are available from the Instrument Settings screen, and includes the instrument’s operating parameters and information that may be needed for troubleshooting.
Viewing Instrument and Status Information
To simplify maintenance, setup, and troubleshooting, Information provides instrument-specific data on available storage memory, current calibration and verification status, and general instrument hardware and software features.
1. From the Main screen select (Settings) to display the Instrument Settings screen.
2. From the list of Instrument Settings categories, select (Information) to display the
Information screen showing the instrument-specific information as described below.
Table 3. Information Screen Drop-Down Data Items
Drop-Downs Data Items Typical Values Descriptions
Instrument
Model Number Progeny 1064 Lists the model number of your Progeny Analyzer.
Serial Number SN P14270001 Lists the serial number of your instrument. Format starts with “SN” followed by an eight-digit, alpha-numeric serial number.
Laser 1064nm Lists the 1064nm frequency of your instrument’s laser.
Software Version 1.6.x.x Lists the version number of your Progeny software.

Advanced Options 52
1006232_RevD
Drop-Downs Data Items Typical Values Descriptions
Status
Last Calibration PASS date
FAIL date
If calibration fails, check sample and focus.
Note:
This information uses your instrument’s specified date format.
Last Verification PASS date
FAIL date
If verification fails, check sample and focus.
Note:
This information uses your instrument’s specified date format.
Audit Log Activities Activity names
Lists the instrument status and activity data for all users from the last instrument synchronization.
Synchronizing your instrument appends the Audit Log data to the Audit Log archive in the local-PC or network archive location.
3. Select the appropriate category to view information.
4. The Audit Log lists instrument status and activity. To meet 21 CFR Part 11 validation requirements, Progeny Analyzers automatically save instrument status and activity data for all users. To view logged data select Audit Log.
a. The icons near the top of the screen show audit log data in the following categories: all
data , User related actions , Application related actions , Library related actions
, stored results
b. Tap the desired icon to display that category of log data.
c. Scroll down the list to locate the action for which you need to view log data.
5. Select the Cancel soft key to return to the Main screen.
Viewing Diagnostics Data
Instrument-specific Diagnostic data is available for monitoring the instrument’s internal temperature, available power, laser usage data and scans taken and archived for maintenance and troubleshooting.
1. From the Main screen select (Settings) to display the Instrument Settings screen.
2. From the list of Instrument Settings categories, select (Diagnostics) to display the Diagnostics screen showing instrument-specific diagnostics (Figure 28).

Advanced Options 53
1006232_RevD
Figure 28. Diagnostics Screen with Information Displayed
Note: The icon ( ) is for password protected manufacturing entry only.
3. Select (Cancel/Back) to return to the Instrument Settings screen.
Table 4. Diagnostic Screen Data Items
Headers Data Items Typical Values Descriptions
Temperature
Optical Engine
30-40C but can vary by environment
Optical engine internal temperature
Detector 5C but varies by
environment Detector package temperature
Power Battery
Varies
Displays approximate battery charge percentage remaining
Storage
Available Disk Space
Varies depending on number of scans and photos collected
Percent of disk space remaining
Scans Taken Varies Number of scans collected
Scans Archived
Varies Number of scans archived (downloaded off instrument)

Advanced Options 54
1006232_RevD
Managing Libraries
Progeny Analyzers let users view, but not change, the Master Library and any sub-libraries of spectral profiles.
1. From the Main screen select (Settings) to display the Instrument Settings screen.
2. Select (Library) to display the Libraries screen listing both the Master Library and any defined sub-libraries.
a. Select the Master Library or any defined sub-libraries to view the library profile names.
b. Select the profile names to view the profiles spectrums and any included optional substance data.
Figure 29. Master Library Screen
3. To find a spectral profile Select (Search Icon) to display the virtual keyboard and enter the name, first letter, CAS number or synonym to search the library. (Figure 30).
Profile list for selected library
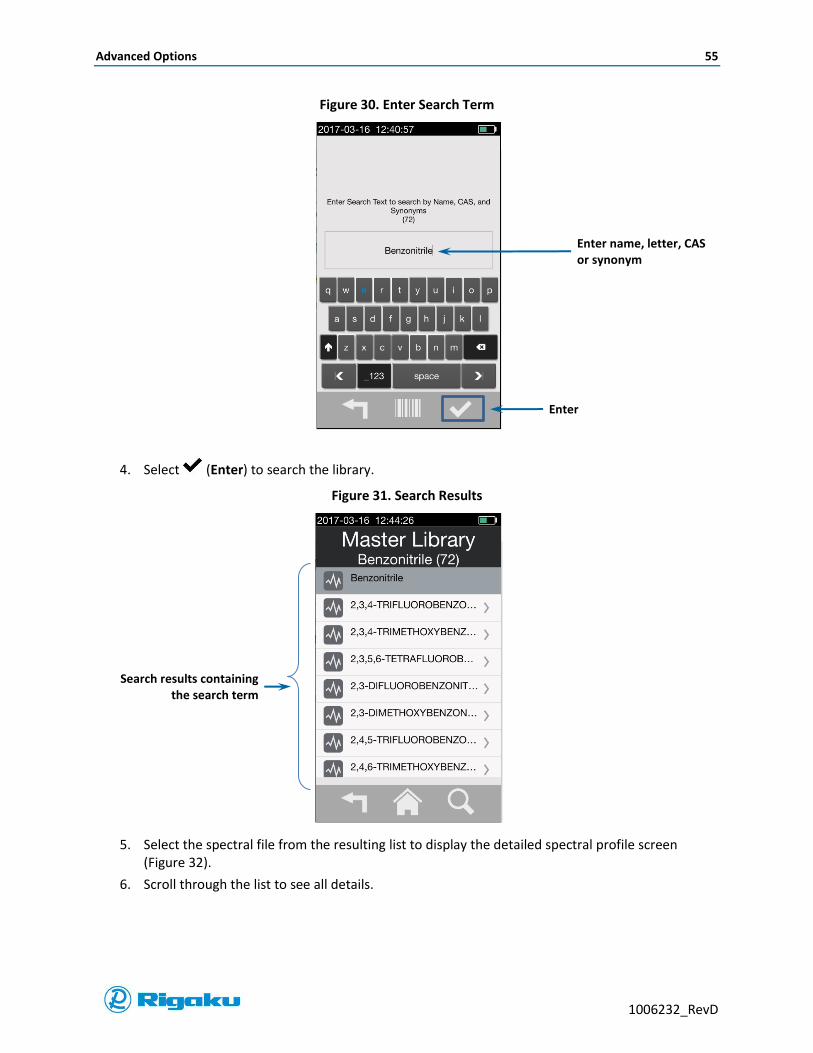
Advanced Options 55
1006232_RevD
Figure 30. Enter Search Term
4. Select (Enter) to search the library.
Figure 31. Search Results
5. Select the spectral file from the resulting list to display the detailed spectral profile screen (Figure 32).
6. Scroll through the list to see all details.
Enter name, letter, CAS or synonym
Search results containing the search term
Enter

Advanced Options 56
1006232_RevD
Figure 32. Spectral Profile Details Screen for Benzonitrile
Note: The Spectral Profile items listed below are optional except for Validation Material Background
Material and Warnings.
Item Description
Product Names Primary product names for the spectral profile.
File Name The name of the material as it appears in the Library.
CAS # Chemical Abstract Service Registry Number (CAS #) for the spectral library match.
Synonyms Any known alternative product names for the spectral library match.
Sub-Libraries Name(s) of sub-libraries this material appears in
Manufacturer Name(s) of the manufacturer(s) for the spectral library match.
Appearance Substance description for the spectral library match.
Lot Number Identifier for a specific lot of material.
Barcode The numeric contents of associated barcodes.
Validation Material On/Off switch to specify if this material is to be included in the Performance Verification material list.
Background Material
Specifies a material (e.g., plastic bag) to be subtracted from a material scan.
Classification Custom classification of material (e.g., OTC, Narcotic)
Threat
A designation using the following marker symbols:
– Unknown

Advanced Options 57
1006232_RevD
Item Description
– Threat
– Caution
– No Threat
Warnings
Select up to 3 from the following list of warning symbols:
– None – Irritant
– Toxic – Explosive
– Polluting – Corrosive
– Flammable – Oxidizing
NFPA 704 label The information label specified in National Fire Protection Agency (NFPA) 704 – Standard System for the Identification of the Hazards of Materials for Emergency Response for the spectral library match.
Molecular diagram For RAD-supplied Master Library profiles only.
7. Select (Cancel/Back) to return to the previous screen.
Adding Spectral Profiles to the Master Library
If the Master Library does not have the spectral profiles you need, you can add them with the Analyze feature.
Note: If the spectral files added to the Master Library are not of good quality the results for any profiled
compared to them could be compromised. When adding spectral profiles of new substances to the Master Library you may need to run a series of
tests to optimize the instrument setup for that particular sample.
The central scan properties that you may need to adjust to receive sufficiently detailed spectral results are:
Power—specifies the intensity of the laser stimulus of the sample.
Exposure—specifies the duration of the spectral collection period.
Averages—specifies the number of times the stimulus/collection sequence is performed during the Scanning phase of the sample-analysis cycle.
Focal Position—specifies where the sample sits in comparison to the laser focus.
Adjustments to other scan properties may change the quality of the spectral result. For more information about scan properties, see Appendix B.
For questions regarding how to get detailed spectral results, contact RAD or your local RAD representative.
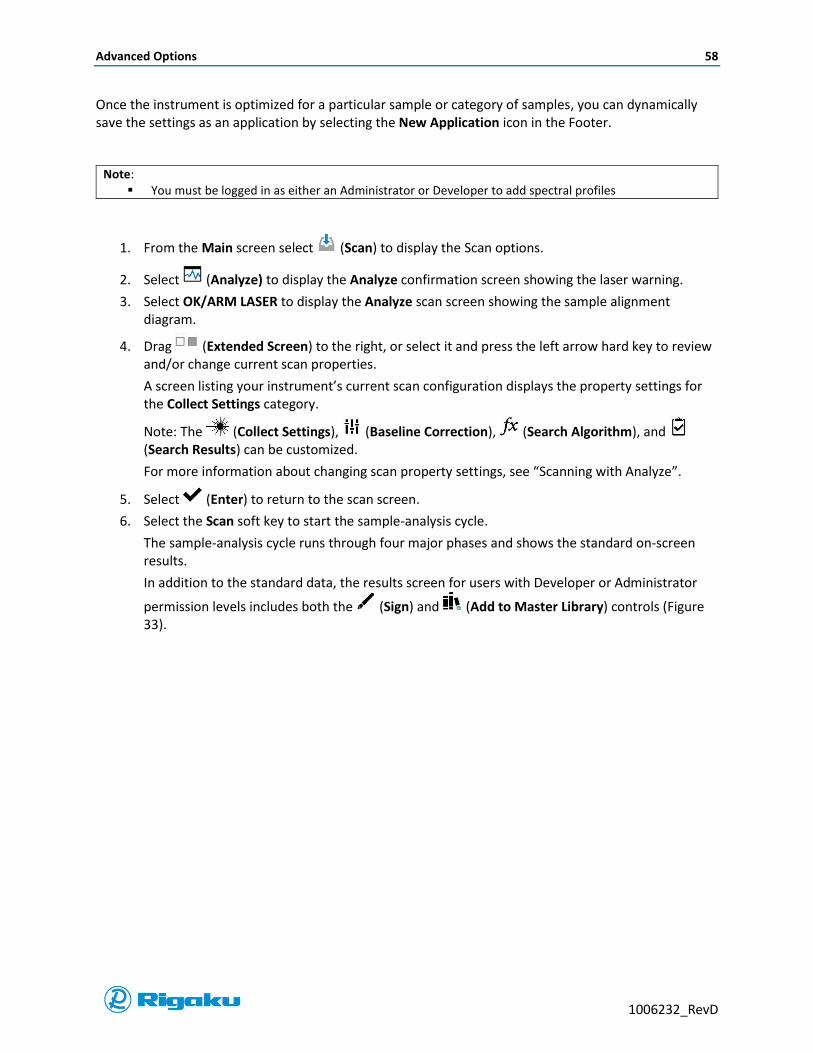
Advanced Options 58
1006232_RevD
Once the instrument is optimized for a particular sample or category of samples, you can dynamically save the settings as an application by selecting the New Application icon in the Footer.
Note: You must be logged in as either an Administrator or Developer to add spectral profiles
1. From the Main screen select (Scan) to display the Scan options.
2. Select (Analyze) to display the Analyze confirmation screen showing the laser warning.
3. Select OK/ARM LASER to display the Analyze scan screen showing the sample alignment diagram.
4. Drag (Extended Screen) to the right, or select it and press the left arrow hard key to review and/or change current scan properties.
A screen listing your instrument’s current scan configuration displays the property settings for the Collect Settings category.
Note: The (Collect Settings), (Baseline Correction), (Search Algorithm), and (Search Results) can be customized.
For more information about changing scan property settings, see “Scanning with Analyze”.
5. Select (Enter) to return to the scan screen.
6. Select the Scan soft key to start the sample-analysis cycle.
The sample-analysis cycle runs through four major phases and shows the standard on-screen results.
In addition to the standard data, the results screen for users with Developer or Administrator
permission levels includes both the (Sign) and (Add to Master Library) controls (Figure 33).

Advanced Options 59
1006232_RevD
Figure 33. Analyze Results Screen
7. Select (Add to Library) to display the Enter Material Name screen.
8. Use the virtual keyboard or the touchscreen to enter the name of the sample substance. Select
(Enter) to open the Select Library list. Choose a library to add the new substance to. The new profile is saved into the Library and the detailed profile data is displayed (Figure 34).
Cancel/Back Add to Library
Sign
Result summary

Advanced Options 60
1006232_RevD
Figure 34. New Profile Details Screen
9. Add any of the details you need (see “Editing the Details of Spectral Profiles”).
10. Select (Enter) to save the updated profile.
Editing the Details of Spectral Profiles
After adding a spectral profile to the instrument’s Master Library, you can edit or enter the substance details of that profile. When editing the details from a Master Library profile you are setting the baseline information for any subsequent copies of that Master Library profile into sub-libraries. In contrast, any updates to sub-library profiles are local to the sub-library’s copy of the spectral profile. This lets you:
Create distinct instances of a Master Library profile in different sub-libraries.
Customize each sub-library instance for specific contexts.
Use the different sub-libraries in specific situations or link them to specific scanning applications.
With this flexibility you can maintain a general purpose profile in the Master Library and target substance data in sub-library profiles to specific tasks.
Note: Profiles in the Master Library supplied by RAD cannot be edited or deleted by operators.
1. View the Master Library or sub-library containing the spectral profile you need to edit.
2. Navigate to the spectral profile and select it to display the detailed spectral profile screen with the name of the substance at the top.
3. Scroll down the list of profile details and select the detail you need to change.
Either a screen with a virtual keyboard for editing the value or a selection screen with a list of options appears.
4. Using either the touchscreen or the virtual keyboard, enter any required changes to the value appearing in the box, or choose the required item from the list of options.
Enter
New Profile/material name
Select detail to edit

Advanced Options 61
1006232_RevD
5. Select (Enter) to return to the detailed spectral profile screen.
6. Repeat the above steps to make all required changes.
7. Select (Enter) to save the changes.
Creating Spectral Sub-Libraries
Because all Progeny Analyzer applications link to sub-libraries, to find spectral profiles for verifying or identifying scanned substances you must create spectral sub-libraries for the instrument before setting up your applications.
1. View the spectral library list.
2. From the Libraries screen select (Add Library) to display the Enter New Library Name screen.
3. Using either the touchscreen or the virtual keyboard enter the required library name.
4. Select (Enter) to create the library.
Important:
New sub-libraries have no linked spectral profiles.
Until you add copies of Master Library profiles, applications that use the sub-libraries have no access to spectral profiles for verifying or identifying samples.
For information about adding spectral profiles to sub-libraries, see “Adding Spectral Profiles to Sub-Libraries”
Adding Spectral Profiles to Sub-Libraries
Because all Progeny Analyzer applications link to sub-libraries, to find spectral profiles for verifying or identifying scanned substances you must add copies of Master Library profiles to spectral sub-libraries before setting up your applications.
1. View the sub-library that requires spectral profiles.
2. Select (Add Spectra) to display the Master Library list of profiles.
3. Choose a profile from the displayed list, or click the Search icon to enter the profile name.
As you enter each letter or CAS #, the list will be refined to display matching profiles (Figure 35).
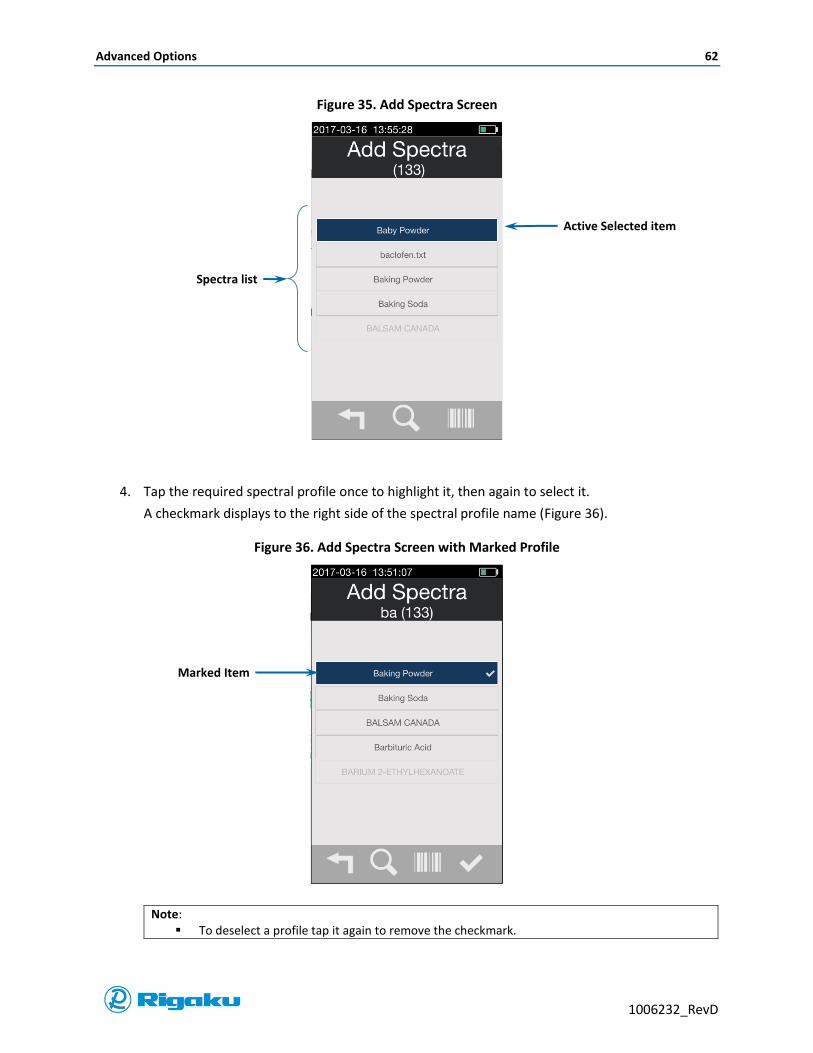
Advanced Options 62
1006232_RevD
Figure 35. Add Spectra Screen
4. Tap the required spectral profile once to highlight it, then again to select it.
A checkmark displays to the right side of the spectral profile name (Figure 36).
Figure 36. Add Spectra Screen with Marked Profile
Note: To deselect a profile tap it again to remove the checkmark.
Active Selected item
Spectra list
Marked Item
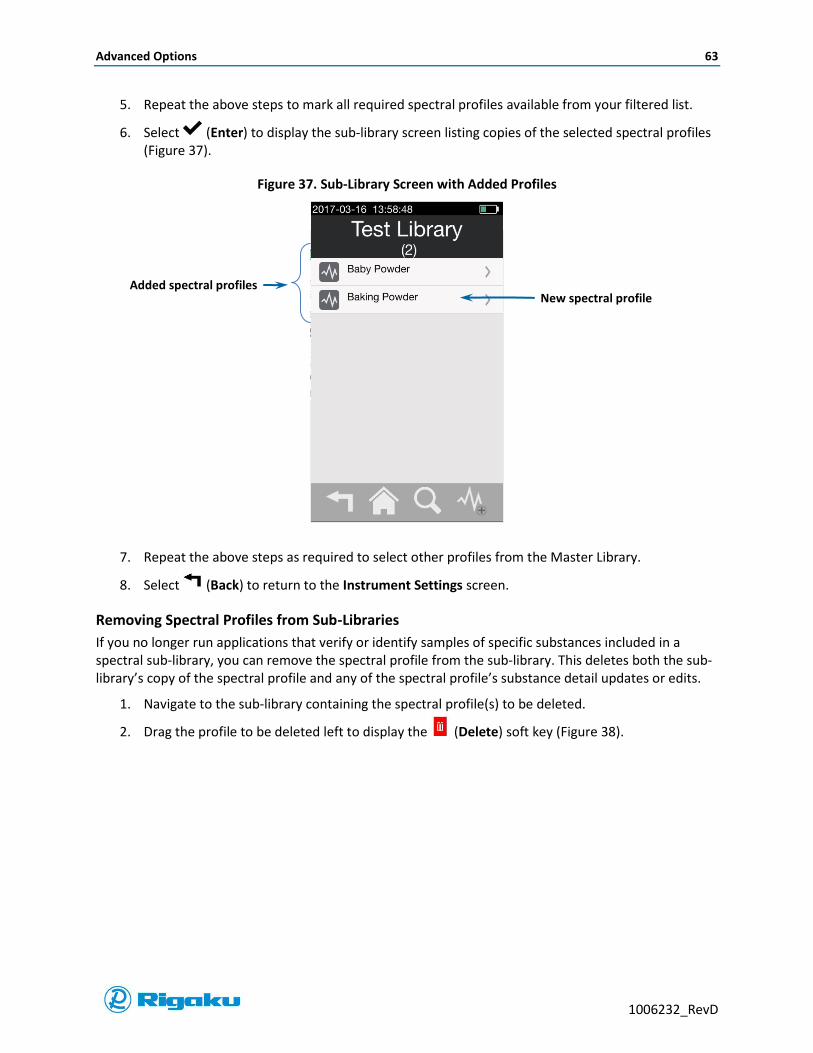
Advanced Options 63
1006232_RevD
5. Repeat the above steps to mark all required spectral profiles available from your filtered list.
6. Select (Enter) to display the sub-library screen listing copies of the selected spectral profiles (Figure 37).
Figure 37. Sub-Library Screen with Added Profiles
7. Repeat the above steps as required to select other profiles from the Master Library.
8. Select (Back) to return to the Instrument Settings screen.
Removing Spectral Profiles from Sub-Libraries
If you no longer run applications that verify or identify samples of specific substances included in a spectral sub-library, you can remove the spectral profile from the sub-library. This deletes both the sub-library’s copy of the spectral profile and any of the spectral profile’s substance detail updates or edits.
1. Navigate to the sub-library containing the spectral profile(s) to be deleted.
2. Drag the profile to be deleted left to display the (Delete) soft key (Figure 38).
Added spectral profiles New spectral profile
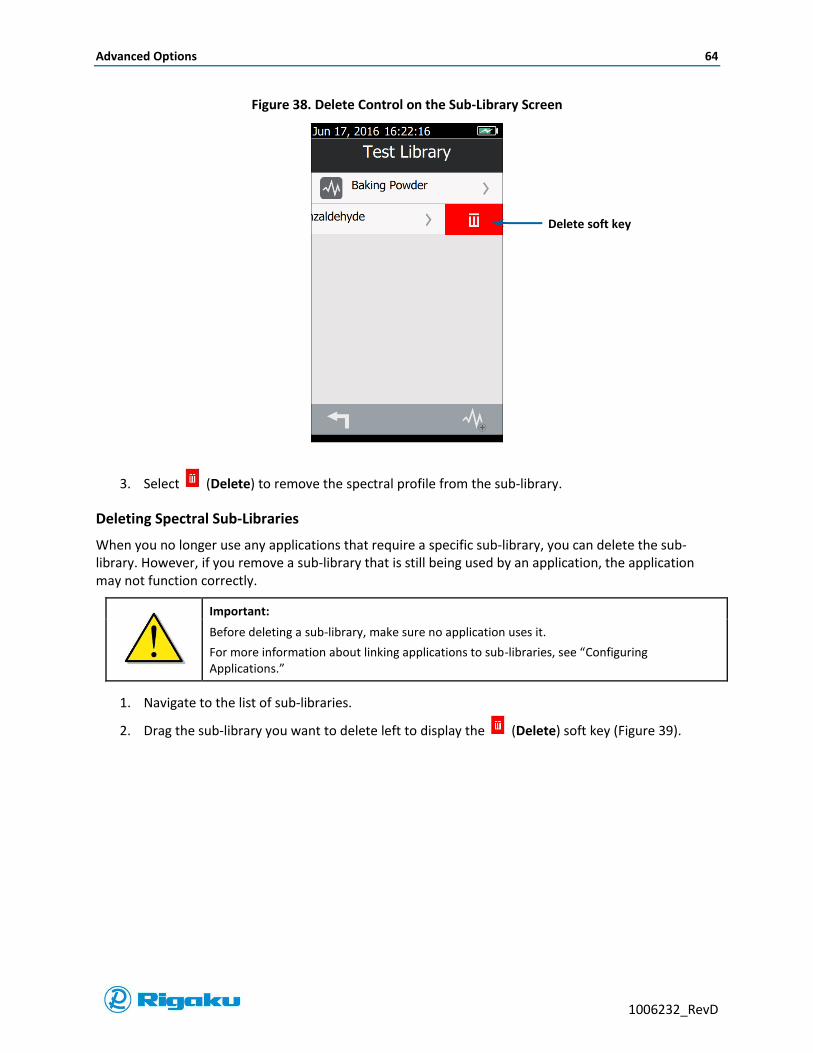
Advanced Options 64
1006232_RevD
Figure 38. Delete Control on the Sub-Library Screen
3. Select (Delete) to remove the spectral profile from the sub-library.
Deleting Spectral Sub-Libraries
When you no longer use any applications that require a specific sub-library, you can delete the sub-library. However, if you remove a sub-library that is still being used by an application, the application may not function correctly.
Important:
Before deleting a sub-library, make sure no application uses it.
For more information about linking applications to sub-libraries, see “Configuring Applications.”
1. Navigate to the list of sub-libraries.
2. Drag the sub-library you want to delete left to display the (Delete) soft key (Figure 39).
Delete soft key
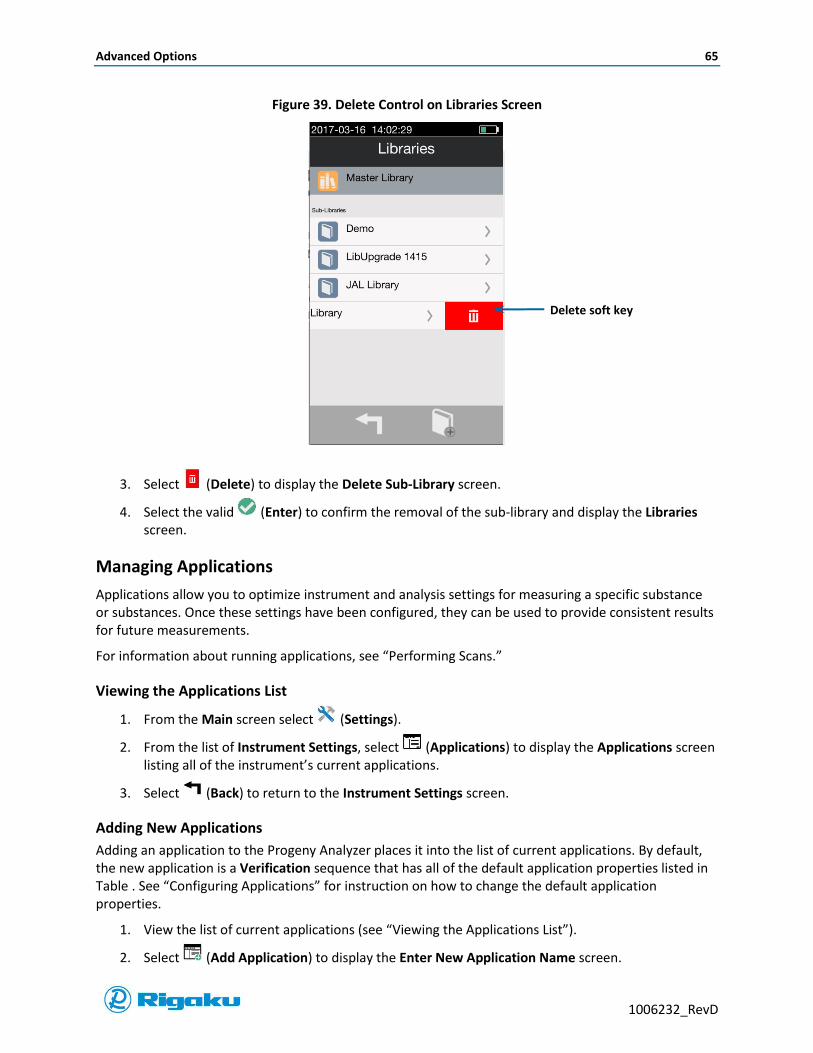
Advanced Options 65
1006232_RevD
Figure 39. Delete Control on Libraries Screen
3. Select (Delete) to display the Delete Sub-Library screen.
4. Select the valid (Enter) to confirm the removal of the sub-library and display the Libraries screen.
Managing Applications
Applications allow you to optimize instrument and analysis settings for measuring a specific substance or substances. Once these settings have been configured, they can be used to provide consistent results for future measurements.
For information about running applications, see “Performing Scans.”
Viewing the Applications List
1. From the Main screen select (Settings).
2. From the list of Instrument Settings, select (Applications) to display the Applications screen listing all of the instrument’s current applications.
3. Select (Back) to return to the Instrument Settings screen.
Adding New Applications
Adding an application to the Progeny Analyzer places it into the list of current applications. By default, the new application is a Verification sequence that has all of the default application properties listed in Table . See “Configuring Applications” for instruction on how to change the default application properties.
1. View the list of current applications (see “Viewing the Applications List”).
2. Select (Add Application) to display the Enter New Application Name screen.
Delete soft key

Advanced Options 66
1006232_RevD
3. Use the touch-screen or the virtual keyboard to enter the name of the new application.
Note:
If a duplicate application name is selected, (Invalid) appears in place of the (Enter) key on the Enter New Application Name screen. If the application name you enter is the same as a current or locked application, the instrument will display a warning that duplicate application names are not valid.
4. Select (Enter) to create the new application.
5. Repeat the above steps to add additional applications.
6. Select (Back) to return to the Instrument Settings screen.
Configuring Applications
After adding the required new applications to your Progeny Analyzer, you must configure them to optimally analyze your substance samples. This process involves setting the properties for:
Collecting, correcting, and smoothing detected spectral results.
Optimizing the analysis algorithm for comparing scan data to spectral library profiles.
Choosing a results-report template.
1. View the list of current applications (see “Viewing the Applications List”).
2. Select the application you need to configure to display the Information screen for the selected application and a list of the property categories (Figure 40).
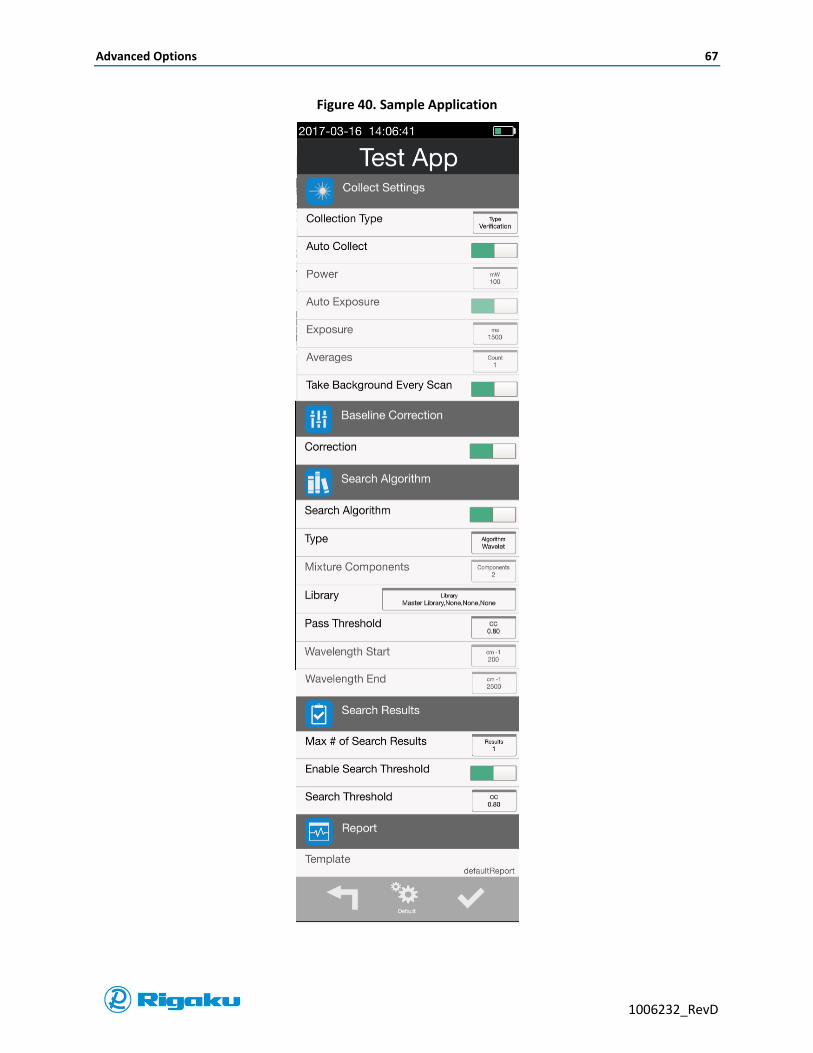
Advanced Options 67
1006232_RevD
Figure 40. Sample Application

Advanced Options 68
1006232_RevD
3. Select the category you need to configure.
Table 1 lists the available values for the Settings (Page 35)
Table 5 lists the available values for Search Results (Page 69)
4. The Report Templates option lists your instrument’s current report templates. Select the report template you need to view to display the Report Template Overview screen with the name of the template at the top. This screen both displays a sample page preview and lists the template’s section, graph, and text areas.
5. Select (Enter) to display the Application Saved confirmation screen.
6. Select (Enter) to confirm the changes and return to the Applications screen.
7. Select (Back) to return to the Instrument Settings screen.
Table 5. Search Results Options
Search Results Options
Categories/Properties Control Possible Values Description
Maximum Number of Search Results
Soft Key
Range:
None (disabled)
5 (max)
Opens a setting screen through which you can scroll to select the value.
When set to None, or disabled, no library matches are displayed. Use this setting for Verification applications only.
Settings are available at increments of 1.
Enable Search Result Threshold
Soft Key (On
default)
(Off)
When Enable Search Results Threshold is ON the Search Result Threshold number is used to filter search results that do not meet the minimum search threshold value (see Search Result Threshold)
Search Result Threshold
Soft Key
Default: 0.80
Range:
0.99 (max) 0.50 (min)
Opens a settings screen to select the library correlation match value. The lower the value, the more search results will be displayed. The property has:
Decimal format
Increments of:
0.05 from 0.50 to 0.80 0.01 from 0.80 to 0.99
Note:
Search Result Threshold should be less than, or equal to, the Pass Threshold of the application.
Deleting Applications
If you no longer need an application, you can delete it from the instrument’s application list.
1. View the list of current applications (see “Viewing the Applications List”).
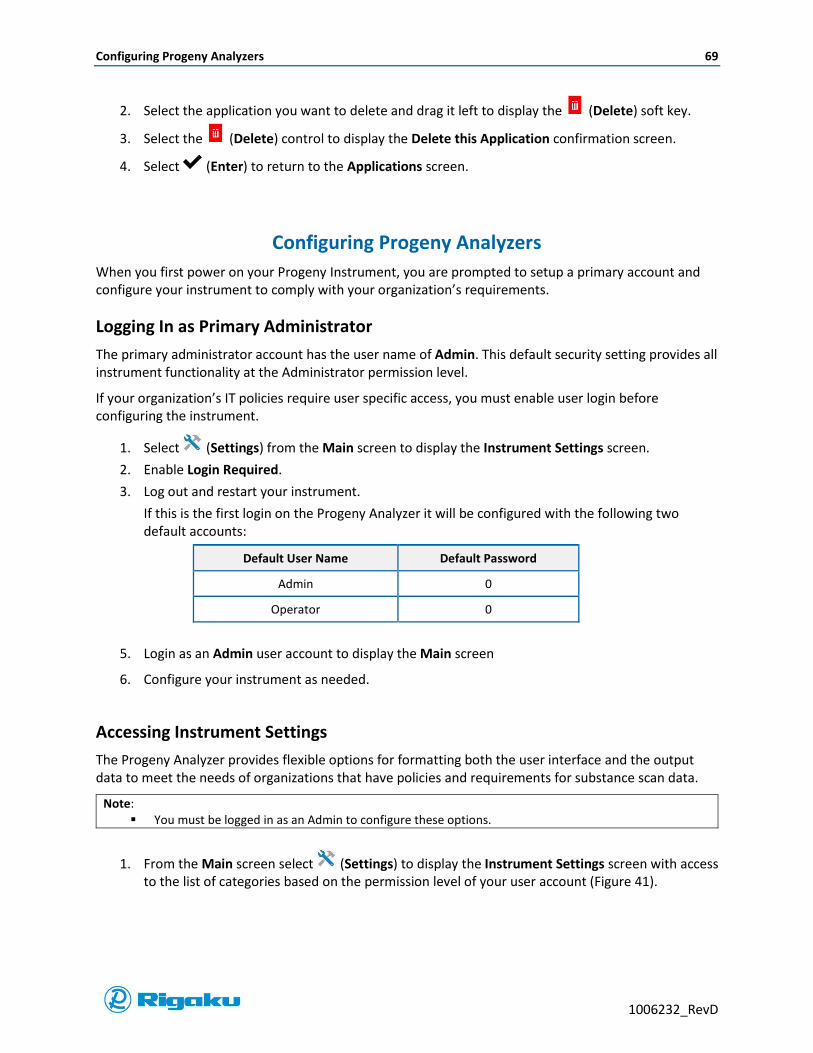
Configuring Progeny Analyzers 69
1006232_RevD
2. Select the application you want to delete and drag it left to display the (Delete) soft key.
3. Select the (Delete) control to display the Delete this Application confirmation screen.
4. Select (Enter) to return to the Applications screen.
Configuring Progeny Analyzers
When you first power on your Progeny Instrument, you are prompted to setup a primary account and configure your instrument to comply with your organization’s requirements.
Logging In as Primary Administrator
The primary administrator account has the user name of Admin. This default security setting provides all instrument functionality at the Administrator permission level.
If your organization’s IT policies require user specific access, you must enable user login before configuring the instrument.
1. Select (Settings) from the Main screen to display the Instrument Settings screen.
2. Enable Login Required.
3. Log out and restart your instrument.
If this is the first login on the Progeny Analyzer it will be configured with the following two default accounts:
Default User Name Default Password
Admin 0
Operator 0
5. Login as an Admin user account to display the Main screen
6. Configure your instrument as needed.
Accessing Instrument Settings
The Progeny Analyzer provides flexible options for formatting both the user interface and the output data to meet the needs of organizations that have policies and requirements for substance scan data.
Note: You must be logged in as an Admin to configure these options.
1. From the Main screen select (Settings) to display the Instrument Settings screen with access to the list of categories based on the permission level of your user account (Figure 41).

Configuring Progeny Analyzers 70
1006232_RevD
Figure 41. Instrument Settings Screen
2. Select the Instrument Settings category to be configured.
The available settings are based on your permission level as noted below:
Instrument Settings User Permission Levels
Administrator Developer Operator
Global Settings
Library
Applications
Report Templates
Users
E-Signatures
Batch Collection
Date and Time
Communication
Information
Diagnostics
Green = Available Red = Not available Yellow = Some options available
Customizing Global Settings
Configuring Global Settings ensures that the information collected by your Progeny Analyzer complies with your organization’s security and data requirements.
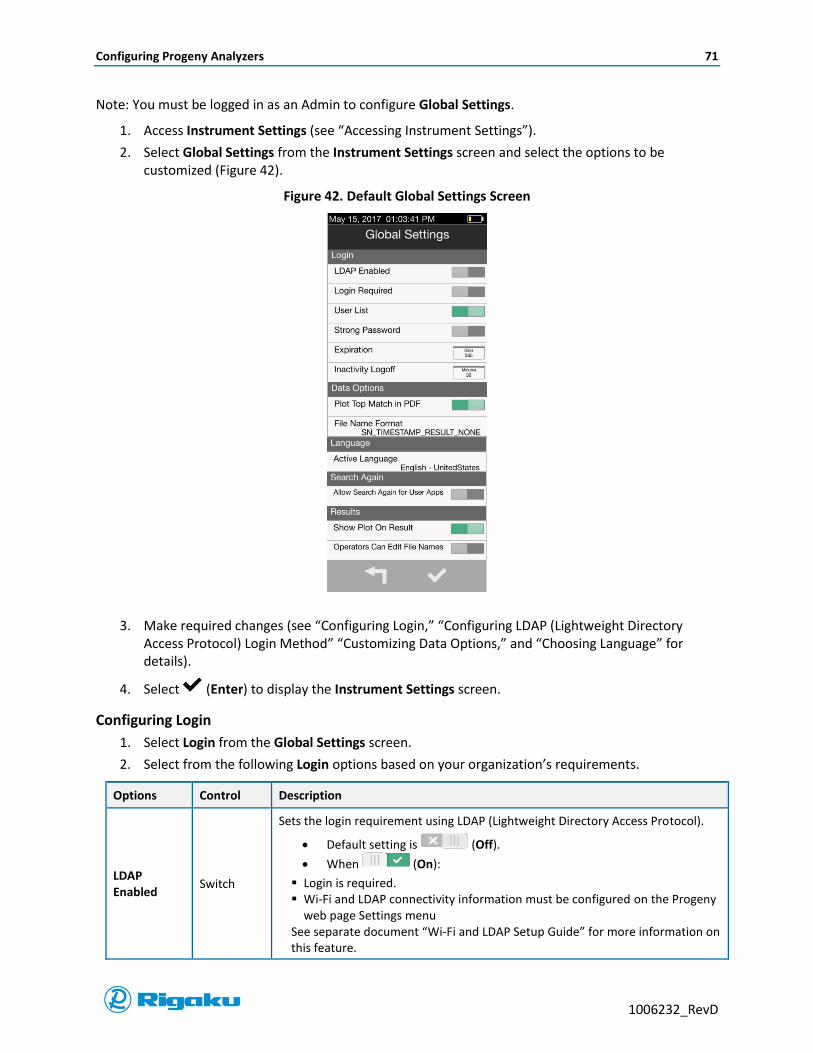
Configuring Progeny Analyzers 71
1006232_RevD
Note: You must be logged in as an Admin to configure Global Settings.
1. Access Instrument Settings (see “Accessing Instrument Settings”).
2. Select Global Settings from the Instrument Settings screen and select the options to be customized (Figure 42).
Figure 42. Default Global Settings Screen
3. Make required changes (see “Configuring Login,” “Configuring LDAP (Lightweight Directory Access Protocol) Login Method” “Customizing Data Options,” and “Choosing Language” for details).
4. Select (Enter) to display the Instrument Settings screen.
Configuring Login
1. Select Login from the Global Settings screen.
2. Select from the following Login options based on your organization’s requirements.
Options Control Description
LDAP Enabled
Switch
Sets the login requirement using LDAP (Lightweight Directory Access Protocol).
Default setting is (Off).
When (On):
Login is required. Wi-Fi and LDAP connectivity information must be configured on the Progeny
web page Settings menu See separate document “Wi-Fi and LDAP Setup Guide” for more information on this feature.

Configuring Progeny Analyzers 72
1006232_RevD
Options Control Description
When (Off):
Login using LDAP is not available. Other login options are not available.
Login Required
Switch
Sets the login requirement.
Default setting is (Off).
When (On):
Login is required. User List is available. Strong Password is available. Expiration is available. Inactivity Logoff is available.
When (Off):
Login is not required. Other login options are not available.
User List Switch
When enabled with Login Required, provides a user accounts list at login.
Default setting is (On).
When (Off), no user account list is displayed.
Strong Password
Switch
When enabled with Login Required, requires user accounts to use strong passwords.
Default setting is (On).
When (Off), standard passwords are accepted.
Expiration Soft key
When set with Login Required, user password expires after the specified number of days.
Default setting is (90 days).
Click to launch the settings screen.
Available settings are intervals of 30 days, from 30 to 360.
Note:
When the lower end of the setting range is displayed on the settings screen, only one option appears. Scroll up or down to view other options.
Inactivity Logoff
Soft key When set with Login Required, specifies the period of time after which the instrument automatically logs the current user off and enters “sleep” mode.
3. Select (Enter) to set the new Login options and return to the Instrument Settings screen.
Configuring LDAP (Lightweight Directory Access Protocol) Login Method
When LDAP (Lightweight Directory Access Protocol) is enabled on the Progeny Analyzer, user access is controlled by an LDAP server in a corporate IP network.
The Progeny software version that supports LDAP functionality is V1.4.0.0 or later. The Progeny unit must have Wi-Fi turned on.
Refer to the Sync Results to Personal Computer section of this document for details on how to enable and configure Wi-Fi.

Configuring Progeny Analyzers 73
1006232_RevD
Enabling LDAP on the Progeny
The user must be logged in as an Admin to enable LDAP.
1. Navigate to Settings -> Global Settings -> Login.
2. Set the LDAP Enabled to “On” and select (Enter) to display the LDAP User login screen.
3. Enter the identity and password information contained in the wpa_supplicant.conf file and
select (Enter).
Note: The wpa.supplicant.conf file can be obtained from your network administrator.
If the login is successful, you will be logged in with Operator level privileges, and your LDAP user name will be displayed at the bottom of the Progeny Main screen.
A special Admin user login is available at the LDAP login screen that allows Admin-level operations (including disabling LDAP mode) to be performed on the Progeny:
LDAP User: ldapadmin Password: 144
This special Admin user can only be used after Progeny restart. If the user has logged out, the Progeny must be restarted in order for this user to log in again.
Note: RAD recommends this password be changed after LDAP is set up and operating successfully.
Configuring Progeny LDAP Setting
1. On the Settings webpage enter the values for the LDAP server in your network.
Note: Your network administrator can provide the required values for the LDAP server’s Host URL LDAP Port and Auth Realm.
2. Click the Submit key and verify that the message “LDAP has been configured” is displayed
Customizing Data Options
1. Select Data Options from the Global Settings screen.
2. Select the Data Options settings your organization requires.
Options Control Description
Plot Top Match in PDF
Switch
Top match can be plotted on the PDF report.
When (On), Progeny generates data reports with top match overlaid onto scan

Configuring Progeny Analyzers 74
1006232_RevD
Options Control Description
File Name Format
Soft Key
Using up to four data fields from the operating properties of the instrument, this option allows you to set the data file names to comply with your organization’s IT requirements.
Default file name format uses the SN_USER_TIMESTAMP_NONE sequence for Field 1 through Field 4.
Selecting the Modify soft key launches the file name format settings screen.
File name options for data Field 1 through Field 4:
APPNAME – Application name RESULT – Scan result summary of Pass, Fail, Search Results SN – Serial number of the instrument TIMESTAMP – Time when sample was scanned USER – Name of the user account used for scan NONE – Available for Field 4 only
Note: Duplicate file name fields are possible. Check to make sure these File Name Format settings comply with your IT requirements.
3. Select (Enter) to set the new Data Options and return to the Instrument Settings screen.
Choosing Language
1. Select Language from the Global Settings screen.
2. Select the Language key to display a list of available options.
3. Scroll down the list and highlight the language you need.
4. Select (Enter) to set the new Language option and return to the Instrument Settings screen.
Search Again
1. When (On), results obtained using an application can be searched again using different analyze parameters or a different library.
2. Turn switch on to enable Search Again for user applications.
3. Turn switch off to disable Search Again for user applications.
4. Select (Enter) to set the new Language option and return to the Instrument Settings screen.
Results
1. Show Plot on Result. When (On), the spectral data graph is displayed on the result main page. Turn this switch off to disable spectra display on result main page.
2. Operators Can Edit File Names. When (On), the file name of a result can be changed by a logged in operator. Turn this switch off to prevent operators from changing a result file name.
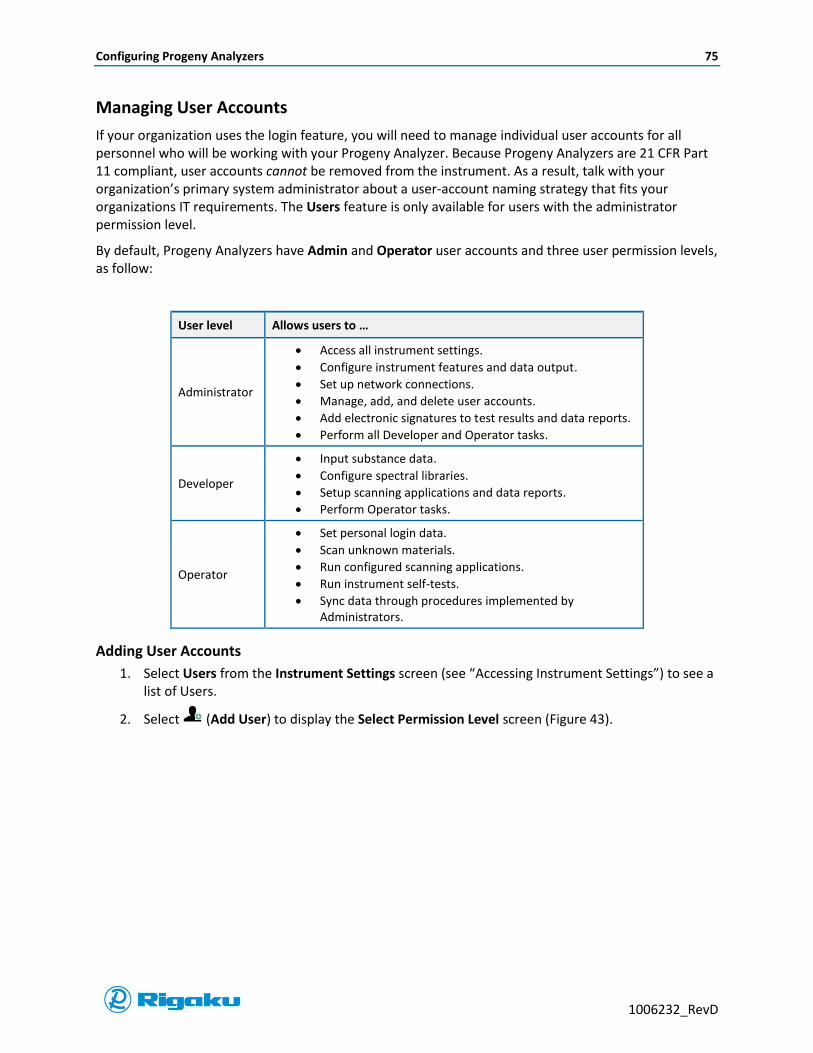
Configuring Progeny Analyzers 75
1006232_RevD
Managing User Accounts
If your organization uses the login feature, you will need to manage individual user accounts for all personnel who will be working with your Progeny Analyzer. Because Progeny Analyzers are 21 CFR Part 11 compliant, user accounts cannot be removed from the instrument. As a result, talk with your organization’s primary system administrator about a user-account naming strategy that fits your organizations IT requirements. The Users feature is only available for users with the administrator permission level.
By default, Progeny Analyzers have Admin and Operator user accounts and three user permission levels, as follow:
User level Allows users to …
Administrator
Access all instrument settings.
Configure instrument features and data output.
Set up network connections.
Manage, add, and delete user accounts.
Add electronic signatures to test results and data reports.
Perform all Developer and Operator tasks.
Developer
Input substance data.
Configure spectral libraries.
Setup scanning applications and data reports.
Perform Operator tasks.
Operator
Set personal login data.
Scan unknown materials.
Run configured scanning applications.
Run instrument self-tests.
Sync data through procedures implemented by Administrators.
Adding User Accounts
1. Select Users from the Instrument Settings screen (see “Accessing Instrument Settings”) to see a list of Users.
2. Select (Add User) to display the Select Permission Level screen (Figure 43).
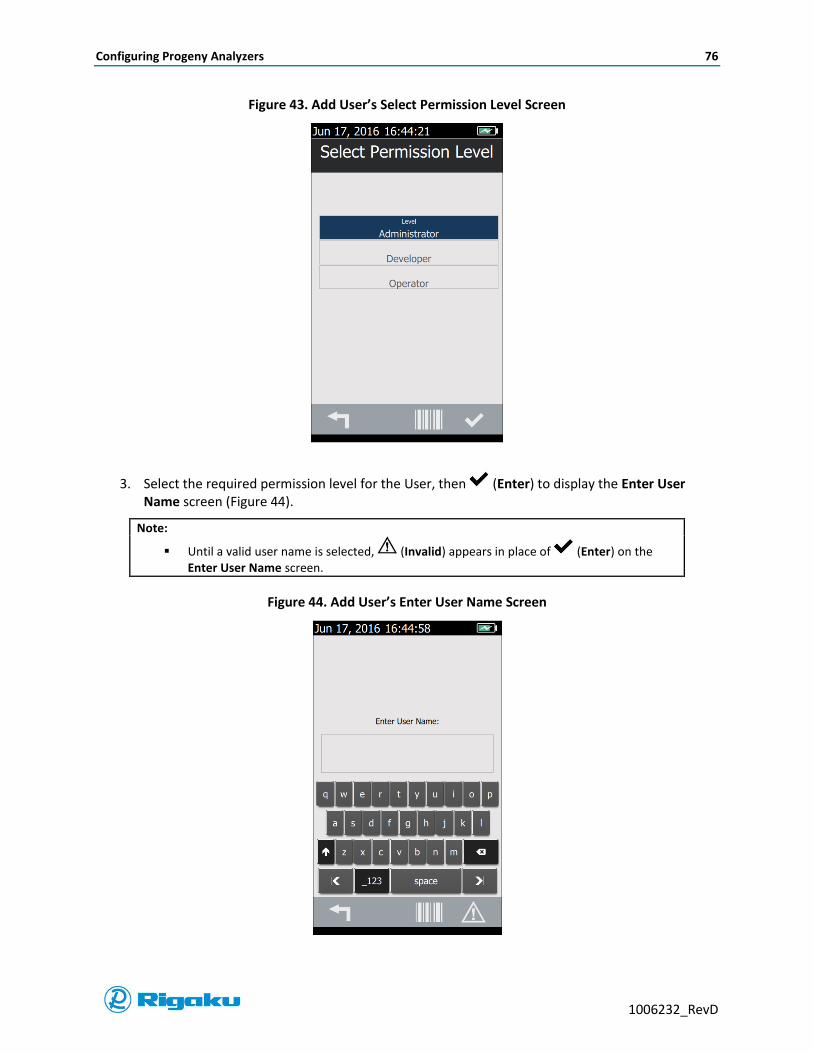
Configuring Progeny Analyzers 76
1006232_RevD
Figure 43. Add User’s Select Permission Level Screen
3. Select the required permission level for the User, then (Enter) to display the Enter User Name screen (Figure 44).
Note:
Until a valid user name is selected, (Invalid) appears in place of (Enter) on the Enter User Name screen.
Figure 44. Add User’s Enter User Name Screen

Configuring Progeny Analyzers 77
1006232_RevD
4. Select the text entry box and use the virtual keyboard to enter the User’s name.
Note:
User names must be between 6 - 36 characters long.
No spaces or special characters are allowed.
When the user name fits instrument requirements, (Enter) replaces (Invalid).
5. Select (Enter) to display the Permission Level, User name and a temporary password (Figure 45).
Note: If the user name you enter is the same as a current or locked user name, the instrument will show you a warning that duplicate user names are not valid.
Figure 45. Completed Add User Screen
6. Send the Temporary Password to the user.
7. Select (Enter).
Viewing User Accounts
1. From the Users screen, select a User name to display their account information (Figure 46).
User permission level
User name
Temporary password
Enter
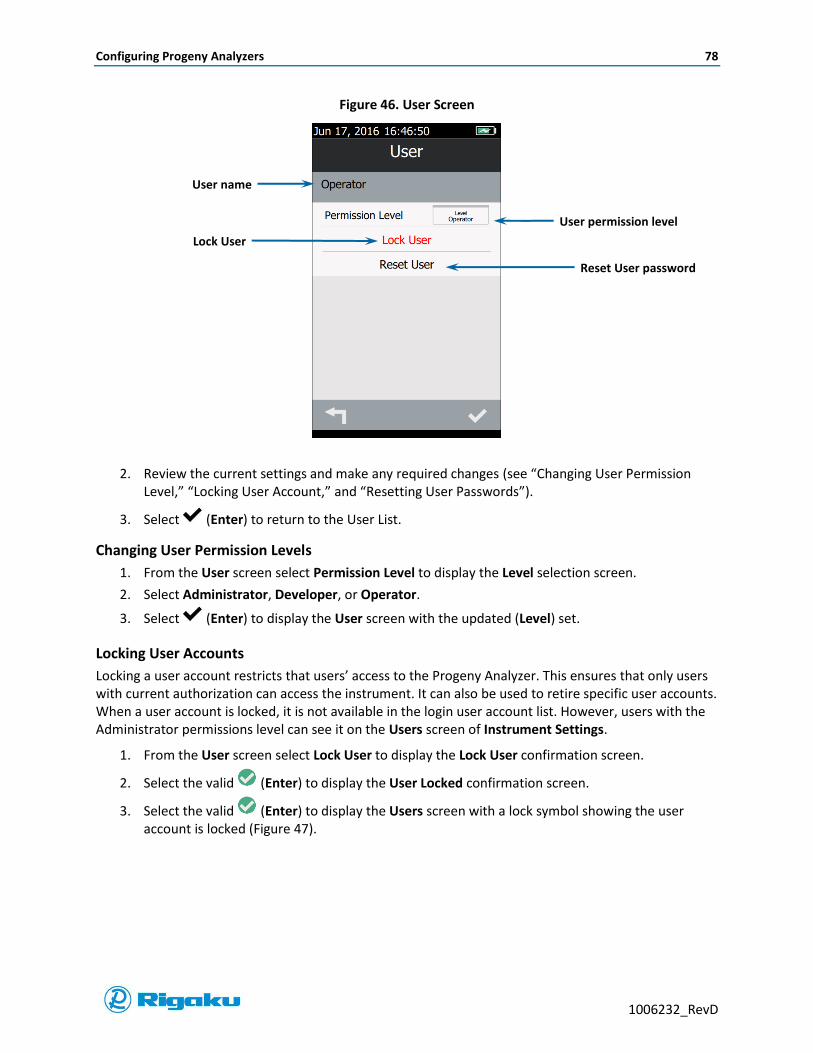
Configuring Progeny Analyzers 78
1006232_RevD
Figure 46. User Screen
2. Review the current settings and make any required changes (see “Changing User Permission Level,” “Locking User Account,” and “Resetting User Passwords”).
3. Select (Enter) to return to the User List.
Changing User Permission Levels
1. From the User screen select Permission Level to display the Level selection screen.
2. Select Administrator, Developer, or Operator.
3. Select (Enter) to display the User screen with the updated (Level) set.
Locking User Accounts
Locking a user account restricts that users’ access to the Progeny Analyzer. This ensures that only users with current authorization can access the instrument. It can also be used to retire specific user accounts. When a user account is locked, it is not available in the login user account list. However, users with the Administrator permissions level can see it on the Users screen of Instrument Settings.
1. From the User screen select Lock User to display the Lock User confirmation screen.
2. Select the valid (Enter) to display the User Locked confirmation screen.
3. Select the valid (Enter) to display the Users screen with a lock symbol showing the user account is locked (Figure 47).
User permission level
User name
Reset User password
Lock User

Configuring Progeny Analyzers 79
1006232_RevD
Figure 47. New User Locked Screen
Resetting User Passwords
Users with the Administrator permission level can reset a users’ password to a randomly generated values.
1. From the User screen select Reset User to display the Reset User confirmation screen.
2. Select the valid (Enter) to display the user reset screen with a new temporary password listed.
3. Send the temporary password to the user.
4. Select the valid (Enter).
Unlocking User Accounts
1. From the Users screen select a locked user account from the accounts list to display the Unlock user confirmation screen.
2. Select (Enter) to display the User Unlocked screen with a new temporary password listed.
3. Send the temporary password to the user.
4. Select (Enter).
Moving User Account Data onto Your Instrument
While you can standardize your instrument setups by importing a “master” instrument settings archive onto other instruments (see “Export and Import Settings”), to maintain 21 CFR Part 11 compliance user accounts and activity data cannot be included in the process. If you need complete data transfers for individual instruments, please contact RAD, or your local RAD representative.
Lock User
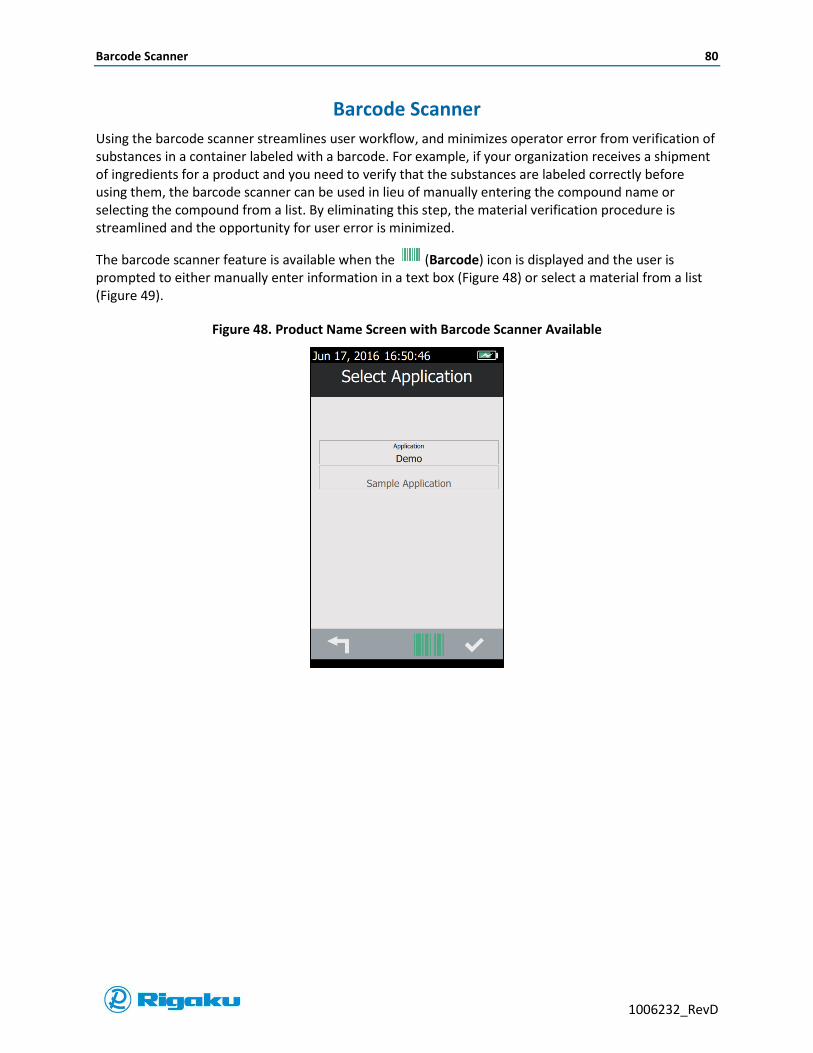
Barcode Scanner 80
1006232_RevD
Barcode Scanner
Using the barcode scanner streamlines user workflow, and minimizes operator error from verification of substances in a container labeled with a barcode. For example, if your organization receives a shipment of ingredients for a product and you need to verify that the substances are labeled correctly before using them, the barcode scanner can be used in lieu of manually entering the compound name or selecting the compound from a list. By eliminating this step, the material verification procedure is streamlined and the opportunity for user error is minimized.
The barcode scanner feature is available when the (Barcode) icon is displayed and the user is prompted to either manually enter information in a text box (Figure 48) or select a material from a list (Figure 49).
Figure 48. Product Name Screen with Barcode Scanner Available
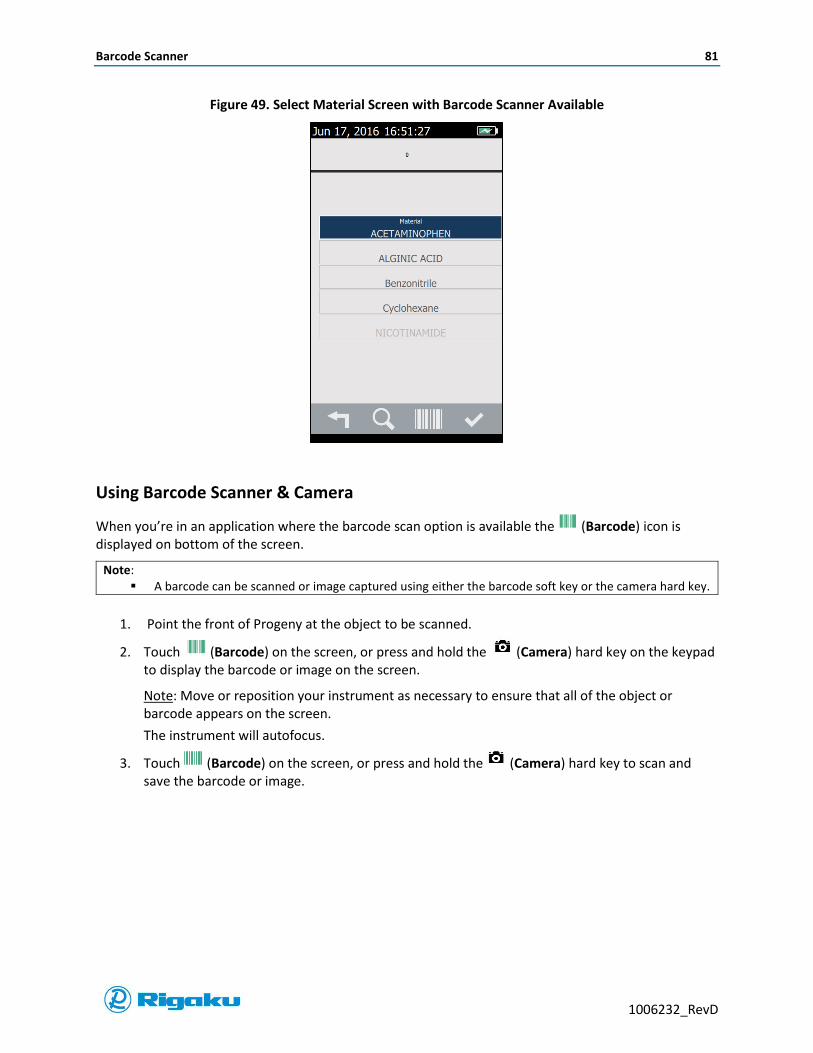
Barcode Scanner 81
1006232_RevD
Figure 49. Select Material Screen with Barcode Scanner Available
Using Barcode Scanner & Camera
When you’re in an application where the barcode scan option is available the (Barcode) icon is displayed on bottom of the screen.
Note: A barcode can be scanned or image captured using either the barcode soft key or the camera hard key.
1. Point the front of Progeny at the object to be scanned.
2. Touch (Barcode) on the screen, or press and hold the (Camera) hard key on the keypad to display the barcode or image on the screen.
Note: Move or reposition your instrument as necessary to ensure that all of the object or barcode appears on the screen.
The instrument will autofocus.
3. Touch (Barcode) on the screen, or press and hold the (Camera) hard key to scan and save the barcode or image.

Batch Collection 82
1006232_RevD
Batch Collection
Batch collection simplifies the verification or identification of multiple substances in a per-session setup. For example, if your organization receives a shipment of ingredients for a product and you need to verify that the substances are labeled correctly before using them, batch collection lets you group all the scans for this shipment into a single session. For users with Developer or Administrator permission levels, setting up batch sessions requires enabling Progeny’s batch-collection feature and then customizing interface prompts for collecting at least three parameters from users. When combined, these parameters specify the number of scan events for each batch session.
Default Batch Session Prompts for Required Parameters
Prompt Asks users to respond by specifying the…
Number of Containers Number of containers to be scanned in the batch session.
Number of Samples Per Container Number of samples to be scanned from each container in the batch session.
Number of Measurements Per Sample
Number of times to scan each sample from each container in the batch session.
In addition to the default session parameter prompts, your organization may need to collect other batch-session data.
Default Batch Session Prompts for Optional Parameters
Prompt Asks users to respond by entering …
Enter Container ID
A unique ID based on either the supplier’s or the organization’s internal alpha-numeric container ID policy.
This ID cannot be longer than thirty-six characters.
Enter Sample ID
A unique ID for each of the samples taken from each container in the batch session.
This ID cannot longer than thirty-six characters.
Enter Lot Number
A unique value that indicates to which group of manufacturing run and/or scans this cycle of the batch analysis belongs.
This number cannot be longer than thirty-six characters.
Taken together, these Batch Collection Settings provide the flexibility to customize batch sessions to comply with your organization’s substance analysis.
Enabling and Disabling Batch Mode and Rescans
1. Select (Settings) from the Main screen to display the Instrument Settings screen.
2. Select (Batch Collection) from the list of Instrument Settings to display the Batch Collect Settings screen (Figure 50).

Batch Collection 83
1006232_RevD
Figure 50. Batch Collect Settings Screen with Batch Mode On
3. Select Batch Mode to enable/disable the functionality.
(On), Batch Mode is enabled.
(Off), Batch Mode is disabled.
4. Select Allow Rescans to enable/disable the functionality to rescan a sample during batch mode analysis.
(On), Allow Rescans is enabled.
(Off), Allow Rescans is disabled.
5. Select (Enter).
Customizing User Prompts
Although the basic parameters that specify the extent of batch collection sessions are required, the prompts may be customized for your organization, including any prompts for scan event items that apply ID parameters to particular scans
1. Select (Batch Collection) from the list of Instrument Settings to display the Batch Collect Settings screen.
2. Select Add Prompt (Figure 50) to display the virtual keyboard.
3. Enter the text and select (Enter).
Running Batch Applications
1. From the Main screen select (Scan) to display the Scan options (Figure 51).
Add Prompt
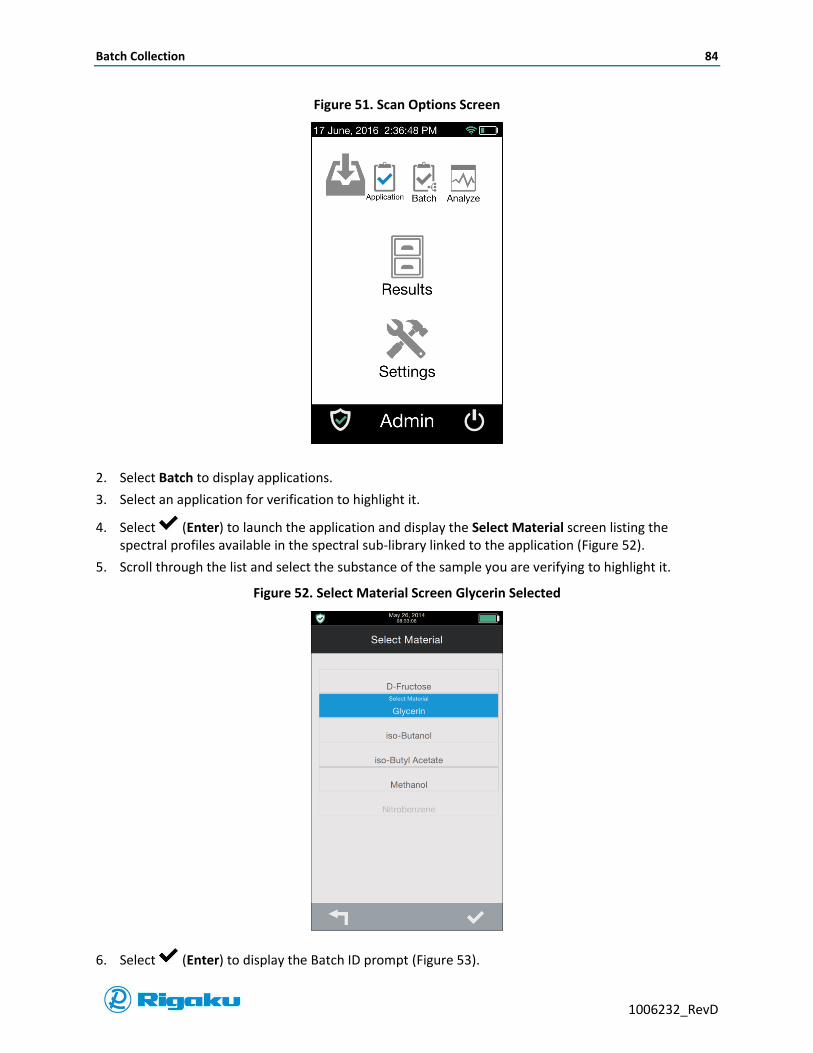
Batch Collection 84
1006232_RevD
Figure 51. Scan Options Screen
2. Select Batch to display applications.
3. Select an application for verification to highlight it.
4. Select (Enter) to launch the application and display the Select Material screen listing the spectral profiles available in the spectral sub-library linked to the application (Figure 52).
5. Scroll through the list and select the substance of the sample you are verifying to highlight it.
Figure 52. Select Material Screen Glycerin Selected
6. Select (Enter) to display the Batch ID prompt (Figure 53).

Batch Collection 85
1006232_RevD
Figure 53. Batch ID Prompt
7. Input the batch ID and select (Enter) to display the Number of Containers prompt. Figure 54 shows the number of containers set to “1,234”.
Note: A total of 9,999 containers are possible to input. Figure 54
Figure 54. Containers
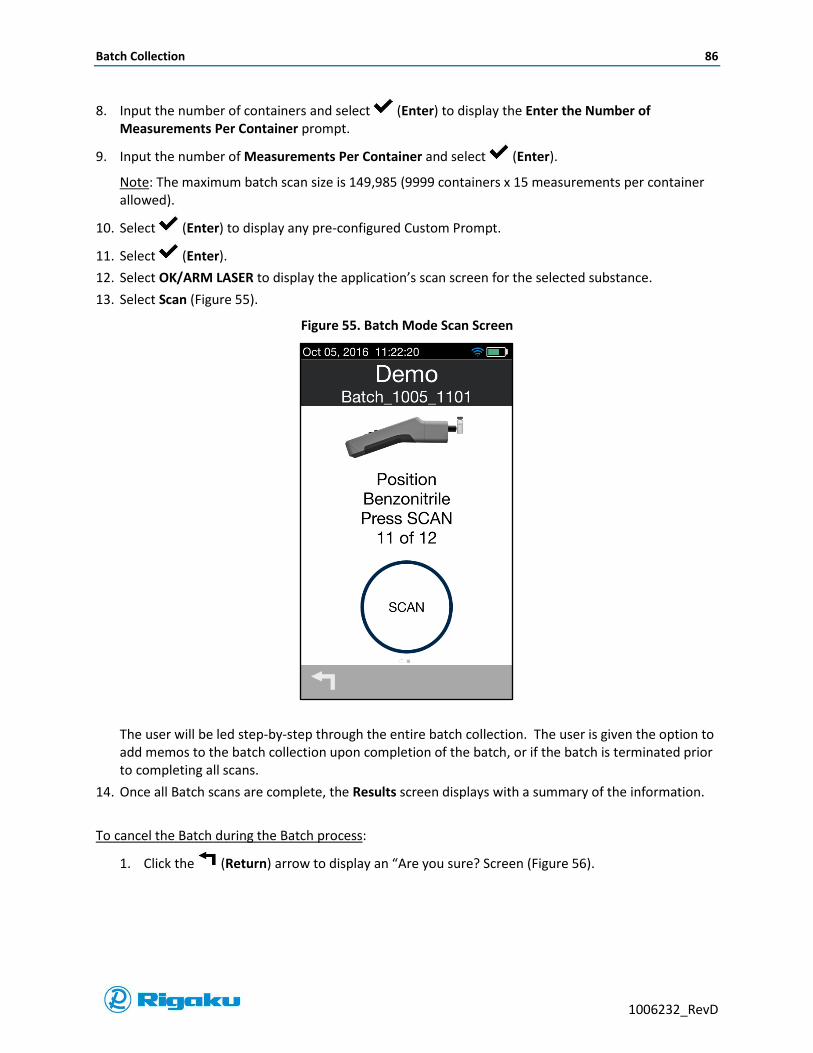
Batch Collection 86
1006232_RevD
8. Input the number of containers and select (Enter) to display the Enter the Number of Measurements Per Container prompt.
9. Input the number of Measurements Per Container and select (Enter).
Note: The maximum batch scan size is 149,985 (9999 containers x 15 measurements per container allowed).
10. Select (Enter) to display any pre-configured Custom Prompt.
11. Select (Enter).
12. Select OK/ARM LASER to display the application’s scan screen for the selected substance.
13. Select Scan (Figure 55).
Figure 55. Batch Mode Scan Screen
The user will be led step-by-step through the entire batch collection. The user is given the option to add memos to the batch collection upon completion of the batch, or if the batch is terminated prior to completing all scans.
14. Once all Batch scans are complete, the Results screen displays with a summary of the information.
To cancel the Batch during the Batch process:
1. Click the (Return) arrow to display an “Are you sure? Screen (Figure 56).

Batch Collection 87
1006232_RevD
Figure 56. Confirmation Screen
2. Press (Enter) to cancel the Batch and display a new screen.
3. Enter the Batch Cancel Memo (Figure 57).
Figure 57. Batch Cancel Memo
The Batch Summary screen displays with relevant Batch information at time of cancellation (
4. Figure 58).

Batch Collection 88
1006232_RevD
Figure 58. Batch Summary
To resume the Batch Collection:
a. Select (Batch Resume). Or,
b. Navigate to Results to see the incomplete Batch indicated with a yellow maker (Figure 59a).
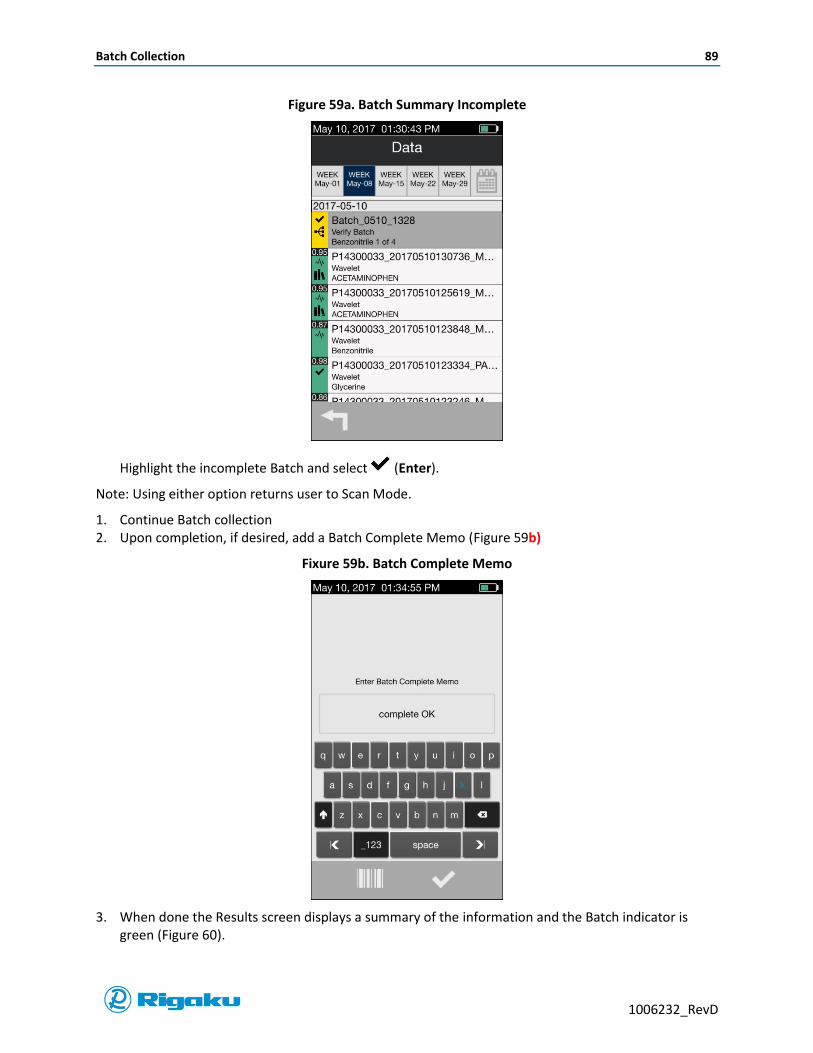
Batch Collection 89
1006232_RevD
Figure 59a. Batch Summary Incomplete
Highlight the incomplete Batch and select (Enter).
Note: Using either option returns user to Scan Mode.
1. Continue Batch collection 2. Upon completion, if desired, add a Batch Complete Memo (Figure 59b)
Fixure 59b. Batch Complete Memo
3. When done the Results screen displays a summary of the information and the Batch indicator is green (Figure 60).

Sync Results to Personal Computer 90
1006232_RevD
Figure 60. Batch Summary Complete
Sync Results to Personal Computer
Result files can be copied manually to a personal computer (PC) or automatically using the RigakuSync PC application, via USB or Wi-Fi connection
The PC requirements are:
Operating System: Windows XP, Windows 7, Windows 8.x or Windows 10
USB port –or– Wi-Fi connection
Compatible Web Browsers: Explorer, Chrome, Firefox
Note: A broadband connection is not necessary for connection.
Progeny to PC Configuration via USB connection
1. Connect Progeny to USB port on PC with provided mini-USB to USB cable.
2. Wait for PC to recognize the new USB connection (USB Ethernet-RNDIS Gadget).
3. Type http://Progeny or IP address into your browser.
Note:
Do not include WWW prefix. Progeny only supports one connection at a time. If the Progeny address does not connect, please try alternative addresses.

Sync Results to Personal Computer 91
1006232_RevD
Alternative USB Connected IP Address: http://10.0.0.1 or 10.0.10.64 or 192.168.10.64
The currently configured USB IP Address can be located by navigating to Settings -> Communication -> USB ->USB IP Address.
The Progeny instrument details will be displayed in the web browser (Figure 61).
Figure 61. Progeny Web Browser Screen
4. Click on a date from the calendar view or an individual Results filename to open it as a PDF form in a new browser window
5. To download individual or multiple files; select Include PDF’s, Generate XML’s, and/or Generate TXT Options (highlighted region in Figure 62)
6. Select Download All or Download Selected to download as PDF, XML and or TXT format
Figure 62. Progeny Web Browser Screen
From the Progeny web browser screen the user can view Results, Applications on the instrument, and other Users of the instrument.
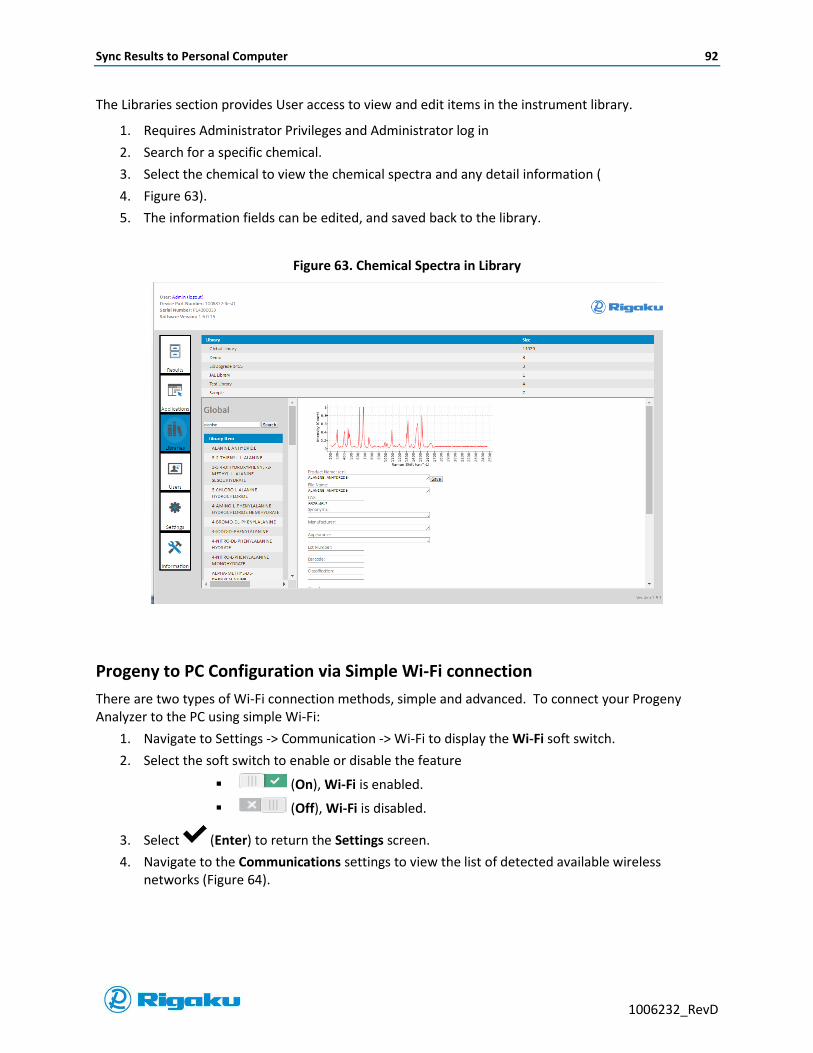
Sync Results to Personal Computer 92
1006232_RevD
The Libraries section provides User access to view and edit items in the instrument library.
1. Requires Administrator Privileges and Administrator log in
2. Search for a specific chemical.
3. Select the chemical to view the chemical spectra and any detail information (
4. Figure 63).
5. The information fields can be edited, and saved back to the library.
Figure 63. Chemical Spectra in Library
Progeny to PC Configuration via Simple Wi-Fi connection
There are two types of Wi-Fi connection methods, simple and advanced. To connect your Progeny Analyzer to the PC using simple Wi-Fi:
1. Navigate to Settings -> Communication -> Wi-Fi to display the Wi-Fi soft switch.
2. Select the soft switch to enable or disable the feature
(On), Wi-Fi is enabled.
(Off), Wi-Fi is disabled.
3. Select (Enter) to return the Settings screen.
4. Navigate to the Communications settings to view the list of detected available wireless networks (Figure 64).
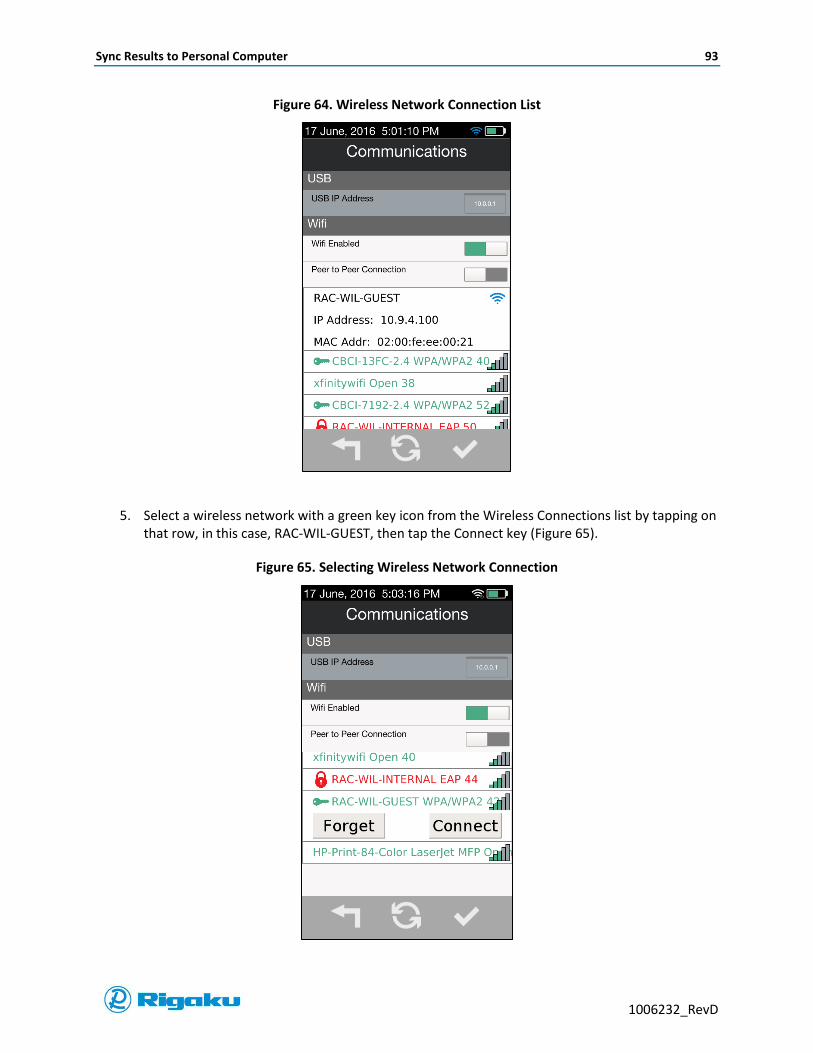
Sync Results to Personal Computer 93
1006232_RevD
Figure 64. Wireless Network Connection List
5. Select a wireless network with a green key icon from the Wireless Connections list by tapping on that row, in this case, RAC-WIL-GUEST, then tap the Connect key (Figure 65).
Figure 65. Selecting Wireless Network Connection
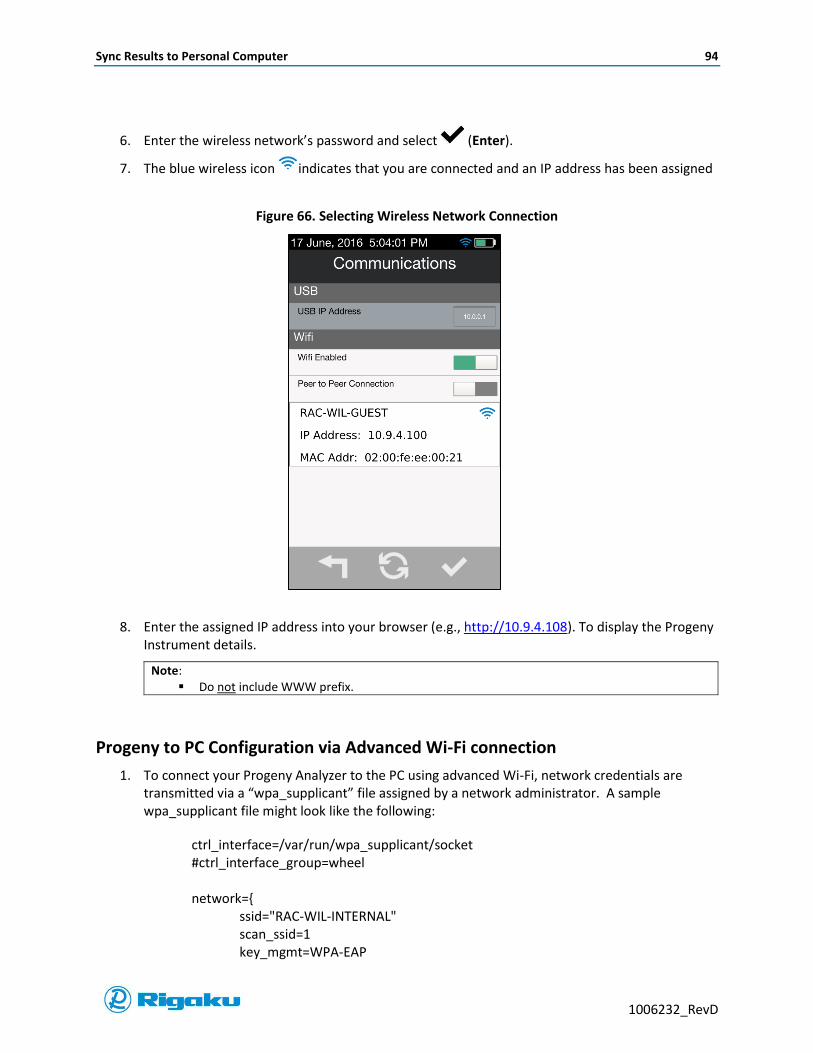
Sync Results to Personal Computer 94
1006232_RevD
6. Enter the wireless network’s password and select (Enter).
7. The blue wireless icon indicates that you are connected and an IP address has been assigned
Figure 66. Selecting Wireless Network Connection
8. Enter the assigned IP address into your browser (e.g., http://10.9.4.108). To display the Progeny Instrument details.
Note: Do not include WWW prefix.
Progeny to PC Configuration via Advanced Wi-Fi connection
1. To connect your Progeny Analyzer to the PC using advanced Wi-Fi, network credentials are transmitted via a “wpa_supplicant” file assigned by a network administrator. A sample wpa_supplicant file might look like the following:
ctrl_interface=/var/run/wpa_supplicant/socket #ctrl_interface_group=wheel
network={ ssid="RAC-WIL-INTERNAL" scan_ssid=1 key_mgmt=WPA-EAP
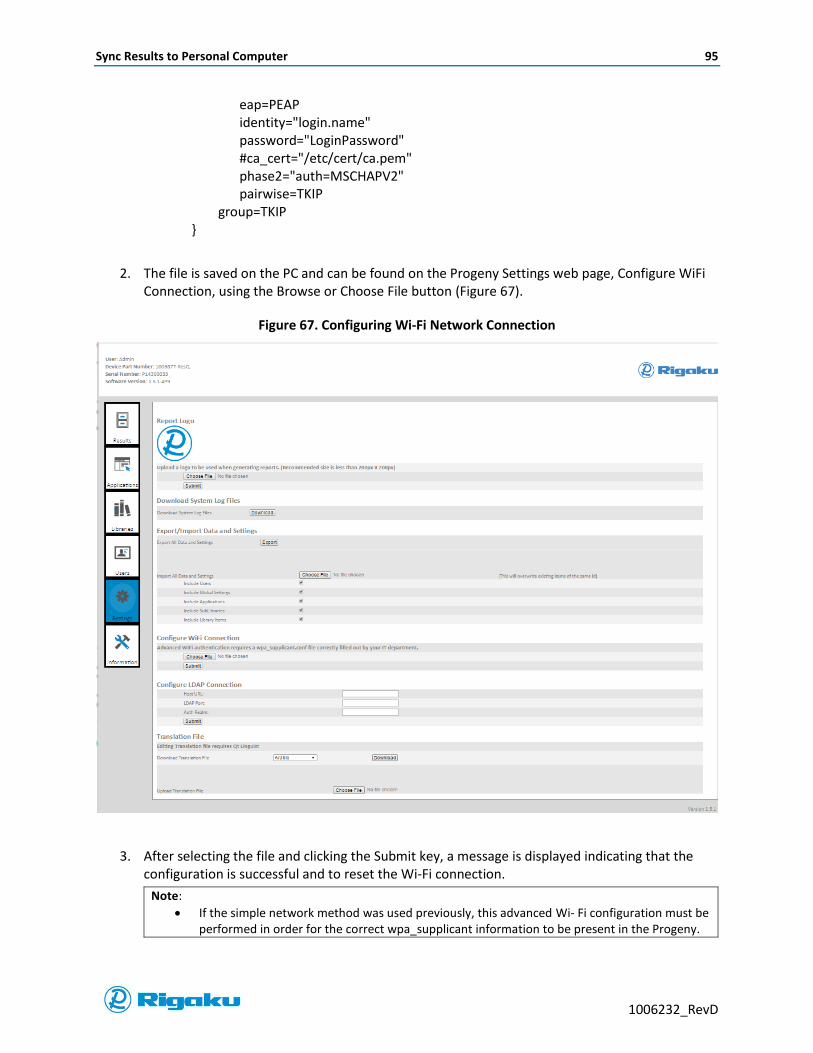
Sync Results to Personal Computer 95
1006232_RevD
eap=PEAP identity="login.name" password="LoginPassword" #ca_cert="/etc/cert/ca.pem" phase2="auth=MSCHAPV2" pairwise=TKIP group=TKIP }
2. The file is saved on the PC and can be found on the Progeny Settings web page, Configure WiFi Connection, using the Browse or Choose File button (Figure 67).
Figure 67. Configuring Wi-Fi Network Connection
3. After selecting the file and clicking the Submit key, a message is displayed indicating that the configuration is successful and to reset the Wi-Fi connection.
Note:
If the simple network method was used previously, this advanced Wi- Fi configuration must be performed in order for the correct wpa_supplicant information to be present in the Progeny.
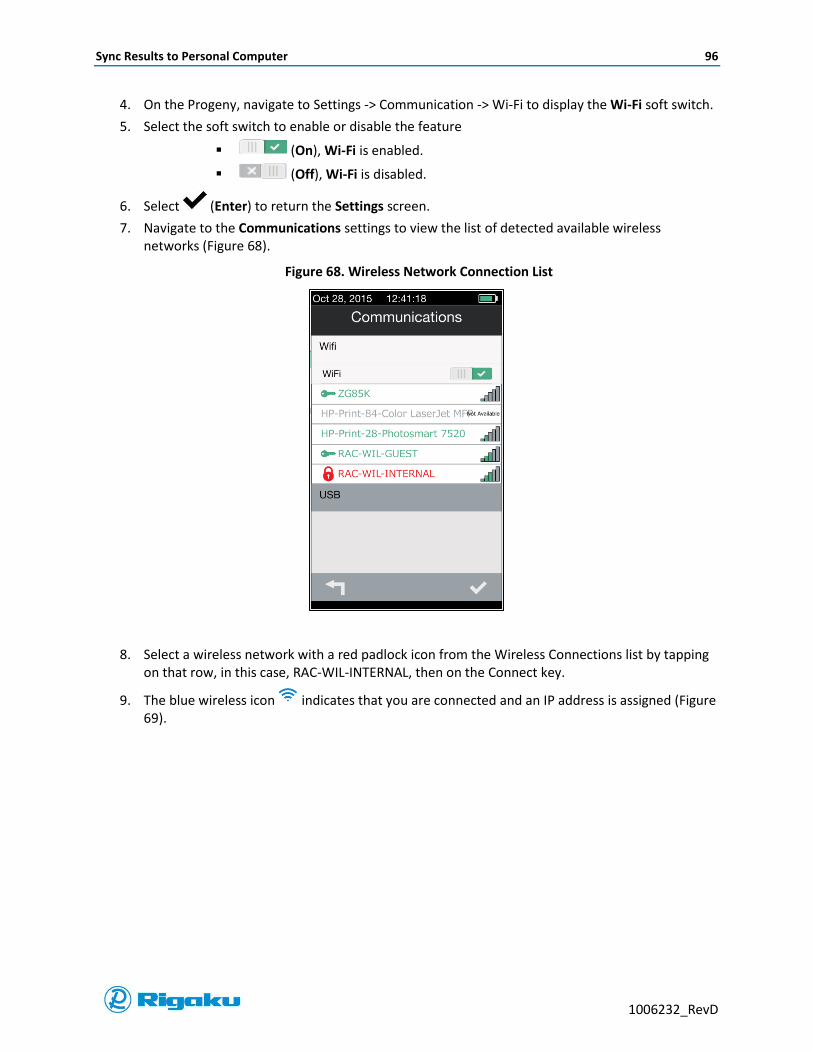
Sync Results to Personal Computer 96
1006232_RevD
4. On the Progeny, navigate to Settings -> Communication -> Wi-Fi to display the Wi-Fi soft switch.
5. Select the soft switch to enable or disable the feature
(On), Wi-Fi is enabled.
(Off), Wi-Fi is disabled.
6. Select (Enter) to return the Settings screen.
7. Navigate to the Communications settings to view the list of detected available wireless networks (Figure 68).
Figure 68. Wireless Network Connection List
8. Select a wireless network with a red padlock icon from the Wireless Connections list by tapping on that row, in this case, RAC-WIL-INTERNAL, then on the Connect key.
9. The blue wireless icon indicates that you are connected and an IP address is assigned (Figure 69).
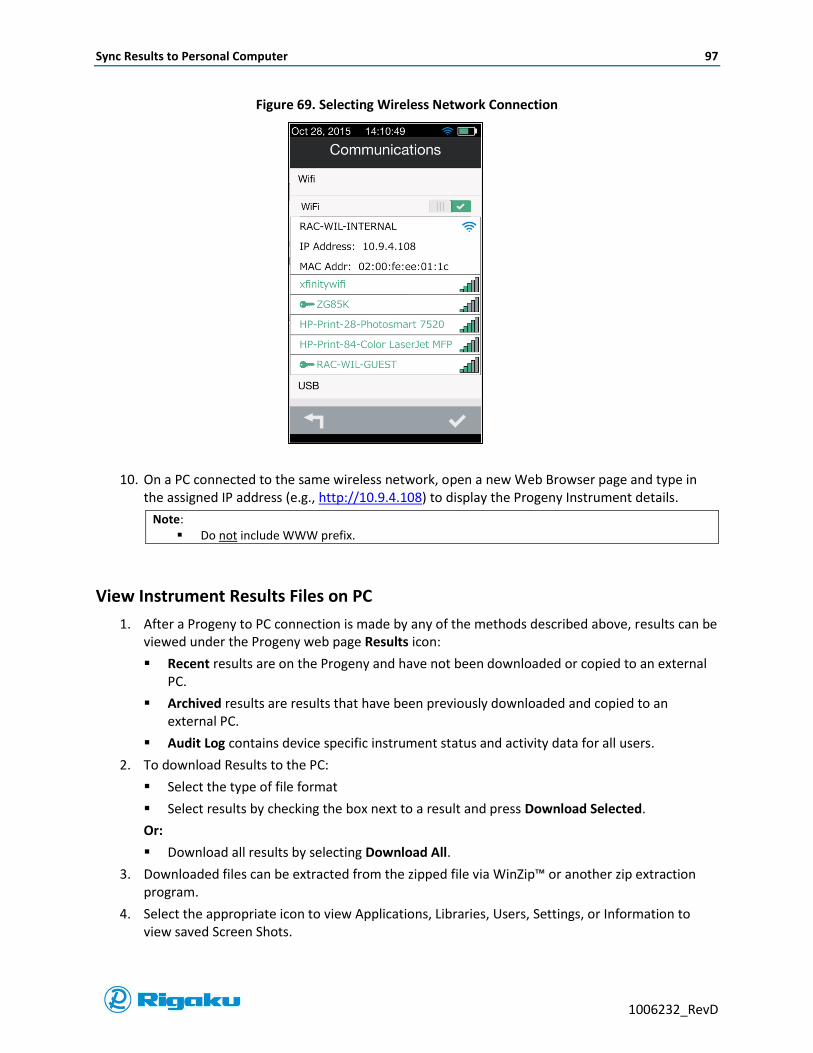
Sync Results to Personal Computer 97
1006232_RevD
Figure 69. Selecting Wireless Network Connection
10. On a PC connected to the same wireless network, open a new Web Browser page and type in the assigned IP address (e.g., http://10.9.4.108) to display the Progeny Instrument details.
Note: Do not include WWW prefix.
View Instrument Results Files on PC
1. After a Progeny to PC connection is made by any of the methods described above, results can be viewed under the Progeny web page Results icon:
Recent results are on the Progeny and have not been downloaded or copied to an external PC.
Archived results are results that have been previously downloaded and copied to an external PC.
Audit Log contains device specific instrument status and activity data for all users.
2. To download Results to the PC:
Select the type of file format
Select results by checking the box next to a result and press Download Selected.
Or:
Download all results by selecting Download All.
3. Downloaded files can be extracted from the zipped file via WinZip™ or another zip extraction program.
4. Select the appropriate icon to view Applications, Libraries, Users, Settings, or Information to view saved Screen Shots.

Export and Import Settings 98
1006232_RevD
8. Export and Import Settings
Export Data and Settings
1. With the Progeny connected to your PC, select (Settings) from the Progeny web browser screen to display the Settings screen.
2. Select Export>Export All Data and Settings (Figure ).
A compressed .zip file will be generated, which contains all instrument settings and data.
3. Save the compressed file to the desktop or custom location, to use in “Import Data and Settings.”
Import Data and Settings
1. With the Progeny connected to your PC, select (Settings) from the Progeny web browser screen to display the Settings screen.
2. Select the desired settings option(s) to import:
a. Include Users—Imports all user information from another device.
b. Include Global Settings—Imports all Global instrument settings from another device.
c. Include Applications—Imports all Applications from another device
a. Note: All sub libraries and Library Items associated with applications will be imported when this option is selected).
d. Include Sub Libraries—Imports all Sub Libraries from another device.
e. Include Library Items—Imports all Library items from another device.
3. Select Choose File.
4. Navigate to and select the compressed file generated in “Export Data and Settings” step.
Web browser busy indicator will display during import. The Browse File box will clear once import is complete.
NOTE: Language translation files are also available to customize. Please contact your local RAD sales or service representative for more details.
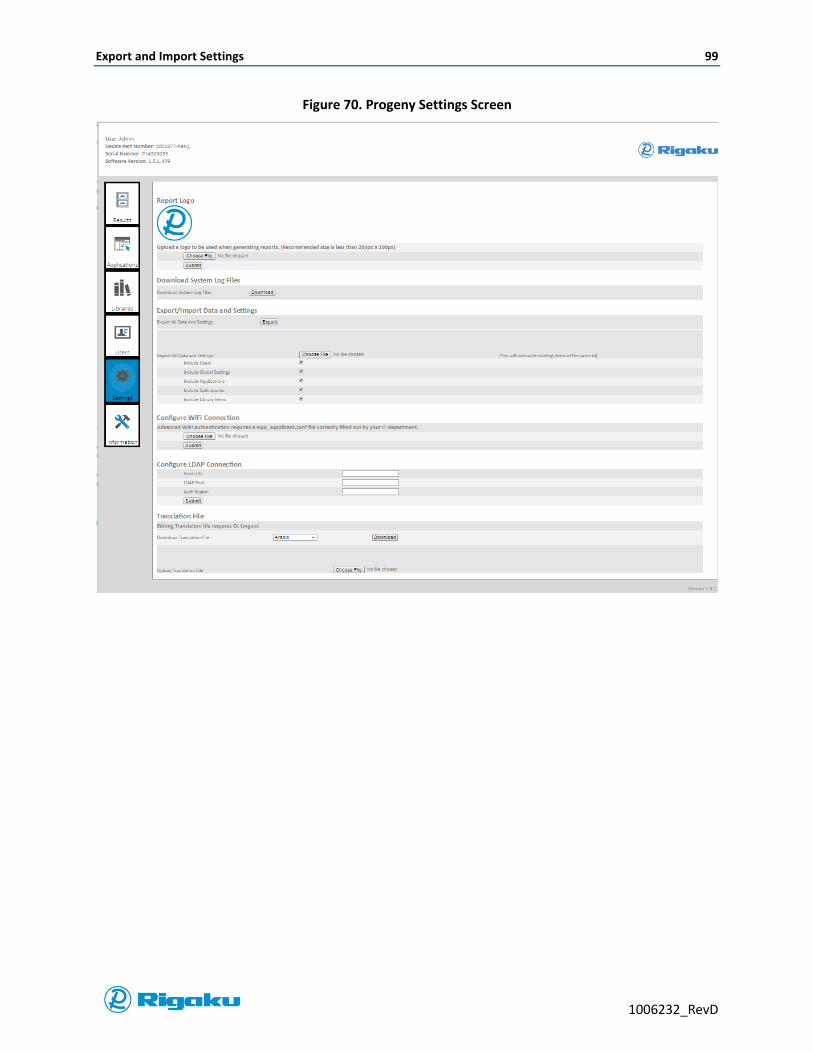
Export and Import Settings 99
1006232_RevD
Figure 70. Progeny Settings Screen

Maintenance and Troubleshooting 100
1006232_RevD
9. Maintenance and Troubleshooting
If you encounter any problems with your instrument, you’ll need to capture the Instrument Runtime Information and Serial Number for troubleshooting.
Cleaning Your Instrument
Maintaining a clean Progeny Analyzer helps ensure that cross-substance scanning issues do not occur. After scanning open-air samples or after the lens aperture becomes soiled, clean your instrument with pre-packaged sanitary wipes featuring at least 70% Isopropyl alcohol cleaning solutions.
1. Log off, remove the battery, and close the battery compartment.
2. With 70% Isopropyl alcohol sanitary wipes, clean all loose or stuck-on materials off the surfaces of your instrument from front to back in the following sequence:
Laser aperture
Front
Top
Sides
Bottom
Back
3. When finished, let your instrument air dry.
Viewing Instrument Runtime Information
While powered on, Progeny Analyzers monitor runtime information for both maintaining your instrument and complying with process regulations.
1. Select (Information) from the Instrument Settings screen to see the color-coded status summaries along with the following details:
Select … To see …
Instrument
Model Number
Serial Number
Laser
Software Version
Status Last Calibration
Last Verification
Audit Log Instrument status and activity data for all
users
2. Select (Back) to return to the Instrument Settings screen.
3. Select (Diagnostics) to see information related to the temperature and power:

Maintenance and Troubleshooting 101
1006232_RevD
Select … To see …
Temperature Detector Set Temperature
Power Battery Remaining Power
4. Select (Back) to return to the Instrument Settings screen.
5. Select (Back) to return to the Main screen.
Verifying the Instrument Serial Number
When troubleshooting Progeny Analyzers, you may need to verify that the serial number listed on the instrument settings Information screen matches the hardware serial number on your instrument’s Serial Number label.
1. Access the instrument settings Information screen (see “Cleaning Your Instrument
2. Maintaining a clean Progeny Analyzer helps ensure that cross-substance scanning issues do not occur. After scanning open-air samples or after the lens aperture becomes soiled, clean your instrument with pre-packaged sanitary wipes featuring at least 70% Isopropyl alcohol cleaning solutions.
3. Log off, remove the battery, and close the battery compartment.
4. With 70% Isopropyl alcohol sanitary wipes, clean all loose or stuck-on materials off the surfaces of your instrument from front to back in the following sequence:
Laser aperture
Front
Top
Sides
Bottom
Back
5. When finished, let your instrument air dry.
6. Viewing Instrument Runtime Information”) to find the Serial Number and compare to the SN located on the label on the back of the instrument.
7. If the numbers do not match, contact RAD or your local RAD representative.

Appendix A. Operating Specifications 102
1006232_RevD
Appendix A. Operating Specifications
It is recommended that you review these specifications before operating your RAD Progeny Analyzer.
Optical Specifications
Specification Value
Operation process Raman spectroscopy
Range – spectral ~200-2500 cm-1 (1087-1450 nm)
Laser (excitation wavelength): 1064 nm
Laser output power (mW) Adjustable: 30 mW—490 mW (Progeny LT 300mW max)
Exposure Adjustable: 5 ms—30 sec
Resolution – spectral 8—11 cm-1 (FWHM) across range
Detector 512 pixel TE Cooled InGaAs
Dispersion mode Transmissive VPG
Collection optics NA=0.25
Sampling Specifications
Specification Value
Sample distance with vial scanning Adjustable in standard vial holder accessory
Sample distance with nose cone Adjustable in standard nose cone accessory
Physical Specifications
Hardware Specification Value
Progeny Analyzers Length 11.8 in (29.9 cm)
Width 3.2 in (8.1 cm)
Height 2.9 in (7.4 cm)
Weight 3.5 lbs. (1.6 kg)
Electronics and Data Processing Specifications
Specification Value
Controller Embedded iMX 6 Quad Core processor
Algorithm Proprietary sample analysis routines
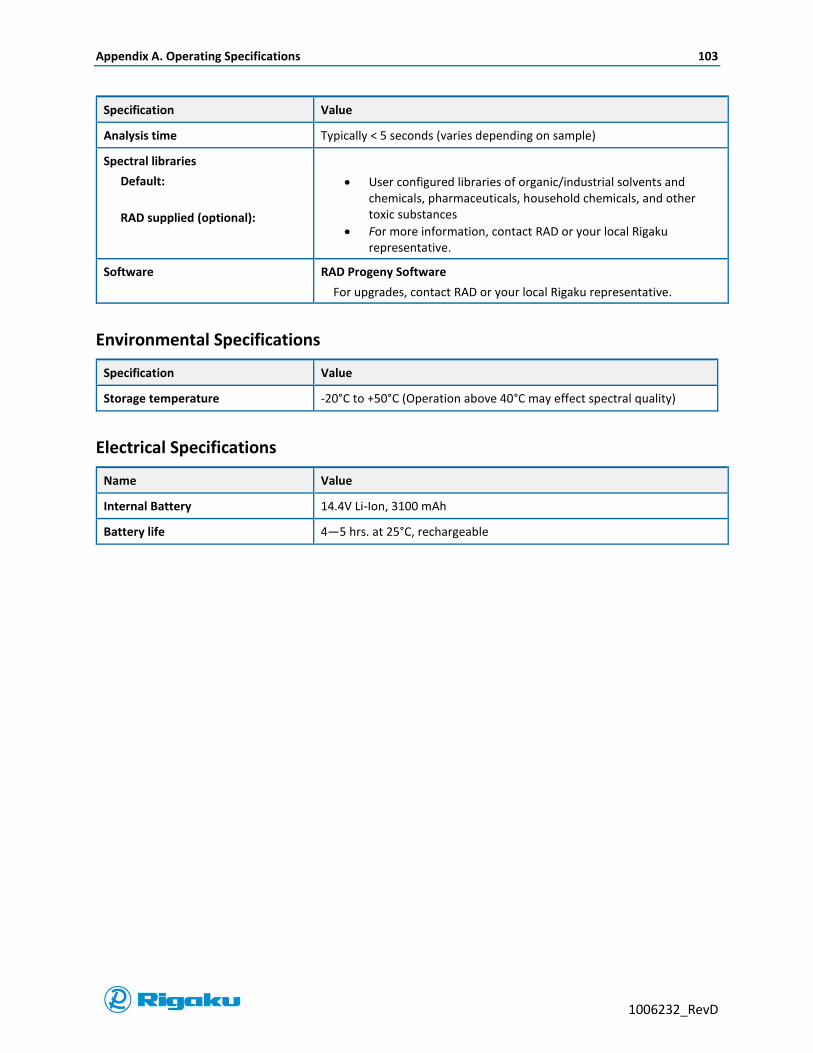
Appendix A. Operating Specifications 103
1006232_RevD
Specification Value
Analysis time Typically < 5 seconds (varies depending on sample)
Spectral libraries
Default:
RAD supplied (optional):
User configured libraries of organic/industrial solvents and chemicals, pharmaceuticals, household chemicals, and other toxic substances
For more information, contact RAD or your local Rigaku representative.
Software RAD Progeny Software
For upgrades, contact RAD or your local Rigaku representative.
Environmental Specifications
Specification Value
Storage temperature -20°C to +50°C (Operation above 40°C may effect spectral quality)
Electrical Specifications
Name Value
Internal Battery 14.4V Li-Ion, 3100 mAh
Battery life 4—5 hrs. at 25°C, rechargeable

Appendix B. Nose Cone Positions 104
1006232_RevD
Appendix B. Nose Cone Positions
Appendix C. Statements of Compliance 105
1006232_RevD
Appendix C. Statements of Compliance
“Statements of Compliance” contains all required certification and compliance statements and includes:
Statement of Compliance, 21 CFR Part 11
United States Pharmacopeia (USP) Chapter <1120> - Raman Spectroscopy Statement of Compliance
European Pharmacopeia (Ph. Eur.) Chapter 2.2.48 - Raman Spectrometry Statement of Compliance
Statement of Compliance, 21 CFR Part 11
Introduction
21 CFR Part 11 titled “Electronic Records and Electronic Signatures” came into effect August20, 1997 both to govern the use of state-of-the-art technology, and to prevent falsification, abuse, or inadvertent corruption of electronic data and electronic signatures. The regulation sets forth the requirements that computerized systems need to fulfill for electronic signatures and records to replace handwritten signatures on paper records.
Procedures fully complying with these requirements include:
Administrative and procedural controls which ensure that persons who develop, maintain, or use electronic records and signature systems have the education, training, and experience to perform their assigned tasks
Technical and system controls that provide computer-generated, time-stamped audit trails for system activities, electronic records, and electronic signatures
Computerized system validation for systems that include:
Hardware
Software
Users
System-controlled validation policies and procedures
Controlled access to the computerized system
Electronic signatures for authenticating electronic records
Storage of electronic records
The following sections provide excerpts of relevant 21 CFR Part 11 articles, and RAD’ corresponding strategies for addressing the articles’ core requirements with the Progeny 1064. These excerpts are for information purposes only, and do not provide comprehensive coverage of the 21 CFR Part 11 regulation. For more information, contact RAD.
Articles and Assessments
Definition: § 11.3 (4) Closed system means an environment in which system access is controlled by persons who are responsible for the content of electronic records that are on the system.
Progeny 1064: In order to use the Progeny instrument in contexts that require compliance with the 21 CFR Part 11, all users must first be granted user accounts or given appropriate administrative access as determined by an organization’s primary system administrator. In instances for which a single

Appendix C. Statements of Compliance 106
1006232_RevD
organization authority grants user access rights on an individual basis, we understand that the instrument fits the description of a “closed system” found in this article.
Requirement: § 11.10 (a) Validation of systems to ensure accuracy, reliability, consistent intended performance, and the ability to discern invalid or altered records.
Progeny 1064: This article addresses validation in a way that is not limited to the instrument. As a result, the validation process for Progeny instruments includes factory calibration, routine calibration, instrument self-test, and the provided documentation for implementing operating qualification of instrument results.
Requirement: § 11.10 (b) The ability to generate accurate and complete copies of records in both human readable and electronic form suitable for inspection, review, and copying by the agency. Persons should contact the agency if there are any questions regarding the ability of the agency to perform such review and copying of the electronic records.
Progeny 1064: The instrument produces electronic records that include all instrument and scan data using security features necessary for compliance with this article. These records are available in a number of human readable formats including PDF, JPEG, and SPC (open binary standard spectroscopy format).
Requirement: § 11.10 (c) Protection of records to enable their accurate and ready retrieval throughout the records retention period.
Progeny 1064: Instrument and scan records cannot be altered on the instrument. In addition, the instrument cannot permanently store electronic records. Once scanning is complete, electronic records must be delivered to a secure location that is provided and controlled by the primary system administrator of the organization through a RAD proprietary secure TCP/IP data-synchronization process.
Requirement: § 11.10 (d) Limiting system access to authorized individuals.
Progeny 1064: In contexts that require compliance with the 21 CFR Part 11, all users must first be granted user accounts by the primary system administrator before they can use or configure the instrument. When implemented, user access to all functions is restricted by user names and passwords that reside on the instrument itself. In addition, administrative controls or institutional policies should restrict physical access to the instrument when it is not in use.
Typically, users with the Operator permission level may perform instrument self-tests and basic sample-scanning tasks. Users with the Developer permission level typically may perform both Operator tasks and spectral-library management and application implementation tasks. Users with Administrator permission level typically may perform Operator tasks, Developer tasks, and user management tasks such as create and edit user accounts, reset passwords, and implement other access restriction tasks. By default, the primary Administrator account has access to all instrument functionality.
Requirement: § 11.10 (e) Use of secure, computer-generated time-stamped audit trails to independently record the date and time of operator entries and actions that create, modify, or delete electronic records.
Appendix C. Statements of Compliance 107
1006232_RevD
Record changes shall not obscure previously recorded information. Such audit trail documentation shall be retained for a period at least as long as that required for the subject electronic records and shall be available for agency review and copying.
Progeny 1064: The instrument automatically creates electronic records containing all specified information with valid audit trails. Once created, any changes invalidate the included audit trails. Records with valid audit trails can be transferred by the data-synchronization process to a secure location provided and controlled by the primary system administrator for permanent storage.
Requirement: § 11.10 (f) Use of operational system checks to enforce permitted sequencing of steps and events, as appropriate.
Progeny 1064: In contexts that require compliance with the 21 CFR Part 11, the instrument can be configured to have a strictly enforced workflow that will not allow operation outside of the permitted sequencing of steps. For information about setting up restricted workflow sequencing, please contact RAD.
Requirement: § 11.10 (g) Use of authority checks to ensure that only authorized individuals can use the system, electronically sign a record, access the operation or computer system input or output device, alter a record, or perform the operation at hand.
Progeny 1064: By default, the instrument has three levels of user permissions: Administrator, Developer, and Operator. System administrators must specify one of these user permission levels when creating or editing each user account.
Requirement: § 11.10 (h) Use of device (e.g., terminal) checks to determine, as appropriate, the validity of the source of data input or operational instruction.
Progeny 1064: The instrument records all data input in electronic records. In contexts that require compliance with the 21 CFR Part 11, organization must put policies and procedures in place to preserve the validity of this input.
Requirement: § 11.10 (i) Determination that persons who develop, maintain or use electronic record/electronic signature systems have the education, training and experience to perform their assigned tasks.
Progeny 1064: In contexts that require compliance with the 21 CFR Part 11, organizations must implement policies and procedures both to appropriately control user access and to provide adequate user training. For more information about user access controls and user training, contact RAD or your local Rigaku representative.
Requirement: § 11.10 (j) The establishment of, and adherence to, written policies that hold individuals accountable and responsible for actions initiated under their electronic signatures, in order to deter record and signature falsification.
Progeny 1064: The implementation and adherence to such policies and procedures must be monitored by organizations administrative procedures.
Appendix C. Statements of Compliance 108
1006232_RevD
Requirement: § 11.10 (k) Use of appropriate controls over systems documentation including (1) adequate controls over the distribution of, access to, and use of documentation for system operation and maintenance (2) revision and change control procedures to maintain an audit trail that documents time-sequenced development and modification of systems documentation.
Progeny 1064: While the instrument internally maintains an audit trail for any changes to system configuration made by developers and administrators, it does not document policy and procedure changes. Consequently, in contexts that require compliance with the 21 CFR Part 11, organizations must implement policies and procedures for tracking and documenting any changes made to instrument configuration and use.
Requirement: § 11.30 Controls for open systems.
Progeny 1064: In contexts that require compliance with the 21 CFR Part 11, the instrument is configured as a closed system by default. As a result, organization policies and procedures for controls for open systems are not relevant.
Requirement: § 11.50 (a) Signed electronic records shall contain information associated with the signing that clearly indicates all of the following: 1) The printed name of the signer, 2) The date and time when the signature was executed, and 3) the meaning (such as review, approval, responsibility or authorship) associated with the signature.
Progeny 1064: When confirming records, the instrument creates an electronic record of each confirmation that includes information about when the signature was applied to the record, which user signed it, and a memo stating the reason it was signed.
Requirement: § 11.50 (b) The items identified in (§ 11.50 (a)) shall be subject to the same controls as for electronic records and shall be included as part of any human readable form of the electronic record (such as electronic display or printout).
Progeny 1064: The instrument creates records of confirmations described in § 11.50 (a) in the same way as it creates other electronic records, and provides same record transfer and output features for records of confirmations as it does for other electronic records.
Requirement: § 11.70 Electronic signatures and handwritten signatures executed to electronic records shall be linked to their respective electronic records to ensure that the signatures cannot be excised, copied, or otherwise transferred to falsify an electronic record by ordinary means.
Progeny 1064: Users electronic signatures are embedded in all electronic records and cannot be excised or copied.
Requirement: § 11.100 (a) Each electronic signature shall be unique to one individual and shall not be reused by, or reassigned to, anyone else.
Progeny 1064: Duplicate user names are not available on an instrument. In addition, while user names can be edited, and user accounts can be disabled, user accounts cannot be deleted from an instrument. As a result, each electronic signature will be traceable to a user account on a particular instrument.

Appendix C. Statements of Compliance 109
1006232_RevD
However, organizations must implement policies and procedures to ensure that user names are neither replicated for different individuals on different instruments nor changed to allow new users to use previously assigned user names.
Requirement: § 11.100 (b) Before an organization establishes, assigns, certifies, or otherwise sanctions an individual’s electronic signature, or any element of such electronic signature, the organization shall verify the identity of the individual.
Progeny 1064: Organizations must implement policies and procedures to verify the identities of individuals for whom they create user accounts.
Requirement: § 11.100 (c) Persons using electronic signatures shall, prior to or at the time of such use, certify to the agency that the electronic signatures in their system, used on or after August 20, 1997, are intended to be legally binding equivalent of traditional handwritten signatures.
Progeny 1064: Organizations must implement policies and procedures to certify that users understand this article.
Requirement: § 11.200 (a)(1) Electronic signatures that are not based upon biometrics shall (1) employ at least two distinct ID components such as identification code and password.
Progeny 1064: The instrument uses both a user name and a password to identify each user at instrument login.
Requirement: § 11.200 (a)(1)(i) When an individual executes a series of signings during a single continuous period of controlled system access, the first signing shall be executed using all electronic signature components; subsequent signings shall be executed using at least one electronic signature component that is only executable by, and designed to be used only by, the individual.
Progeny 1064: The instrument uses both a user name and a password to identify each user at instrument login. It then includes this information in records of all instrument activity until after the user logs out or the session times out because of instrument inactivity.
Requirement: § 11.200 (a)(1)(ii) When an individual executes one or more signings not performed during a single, continuous period of controlled system access, each signing shall be executed using all of the electronic signature components.
Progeny 1064: The instrument uses both a user name and a password to identify each user at instrument login. This information is then integrated into the electronic signature during that particular session. After a user logs off, or after a session times out because of system inactivity and thereby automatically logs the user off, the user must log back on to use the instrument. As a result, a new electronic signature with all of the electronic signature components is created at log in.

Appendix C. Statements of Compliance 110
1006232_RevD
Requirement: § 11.200 (a)(2) Electronic signatures that are not based upon biometrics shall be used only by their genuine owners.
Progeny 1064: Organizations must implement policies and procedures to ensure that electronic signatures are used only by assigned users.
Requirement: § 11.200 (a)(3) Electronic signatures that are not based upon biometrics shall be administered and executed to ensure that attempted use of an individual’s electronic signature by anyone other than it’s genuine owner requires collaboration of two or more individuals.
Progeny 1064: The instrument creates electronic signatures only for the user name and password combinations of users with the Administrator permission level. For other users, access to features that require electronic signatures is restricted. If users forget their passwords, the primary system administrator can re-set user passwords.
Requirement: § 11.200 (b) Electronic signatures based on biometrics shall be designed to ensure that they cannot be used by anyone other than their genuine owners.
Progeny 1064: The instrument uses combinations of user names and passwords to create electronic signatures. No biometrics option is available.
Requirement: § 11.300 Persons who use electronic signatures based upon the use of identification codes in combination with passwords shall employ controls to ensure their security and integrity. Such controls shall include: a) Maintaining the uniqueness of each combined identification code and password, such that no two individuals have the same combination of identification code and password. b) Ensuring that identification and password issuances are periodically checked, recalled, or revised. c) Following loss management procedures to electronically deauthorize lost, stolen, missing, or otherwise potentially compromised tokens, cards, and other devices that bear or generate identification code or password information, and to issue temporary or permanent replacements using suitable, rigorous controls. d) Use of transaction safeguards to prevent unauthorized use of passwords and/or identification codes and to detect and report in an immediate and urgent manner any attempts at their unauthorized use to the system security unit, and as appropriate, to organizational management. e) Initial and periodic testing of devices, such as tokens or cards, that bear or generate identification code or password information to ensure that they function properly and have not been altered in an unauthorized manner.
Progeny 1064: The instrument addresses each clause of this article as follows:
a) The instrument does not allow duplicate user names for different user accounts.
b), d) & e) The instrument allows for passwords to be periodically recalled or revised through a password aging feature that is configured by the primary system administrator while setting up the instrument.
c) When necessary, the primary system administrator can deactivate user accounts.
d) The instrument records failed login attempts in audit logs. If the number of failed login attempts for a particular user account is greater than the number set by the primary system administrator, that user account gets locked. Only another user with the Administrator permission level may reset the password and release the user account.
e) The instrument does not user tokens or cards.
Appendix C. Statements of Compliance 111
1006232_RevD
United States Pharmacopeia (USP) Chapter <1120> - Raman Spectroscopy Statement of Compliance
Summary
USP Chapter 1120 establishes guidance around Raman spectroscopy for implementation in a regulated, pharmaceutical environment. USP <1120> establishes criteria for both qualitative and quantitative implementation of Raman spectroscopy. Because Progeny instruments are intended for material identification in pharmaceutical environments, only aspects that apply to qualitative analysis are discussed. Additionally, USP <1120> was written for fixed, bench-top Raman systems and predates portable Raman spectrometers. Only the requirements that pertain to portable Raman systems used for material identification will be discussed. These requirements include laser safety, wavelength calibration, external calibration, and performance qualification / verification. Progeny instruments are compliant with this guidance.
Progeny instruments use a CLASS IIIb/Class3b laser.
Progeny instruments are factory calibrated for wavenumber accuracy according to ASTM E1840-96 using benzonitrile and verified with cyclohexane, and napthalene.
Intensity axis calibration is not necessary since quantitative analytical methods are not intended to be transferred between instruments.
Progeny instruments have a user-selected calibration module based on a certified benzonitrile calibration standard.
Progeny instruments have a calibration validation routine based on a certified benzonitrile, cyclohexane or naphthalene calibration standard that can be used to verify instruments’ calibration.
Progeny instruments have appropriate interfaces that allow a user to develop appropriate test conditions and validate analytical methods.
European Pharmacopeia (Ph. Eur.) Chapter 2.2.48 - Raman Spectrometry Statement of Compliance
Summary
Ph. Eur. Chapter 2.2.48 establishes guidance around Raman spectroscopy for implementation in a regulated, pharmaceutical environment within the European Union and other areas that recognize Ph. Eur. Chapter 2.2.48 establishes criteria for both qualitative and quantitative implementation of Raman spectroscopy and summarizes instrument components and sample preparation for successful Raman measurements. Because Progeny instruments are intended for material identification in pharmaceutical environments, only aspects that apply to qualitative analysis are discussed. Progeny instruments are not calibrated for Intensity axis and are not qualified for transfer of quantitative methods between instruments. This guidance includes wavenumber shift tolerances for reference standards including: cyclohexane, indene, and naphthalene. It is important to recognize these tolerances were developed for high resolution bench instruments; European pharmaceutical regulatory agencies are aware these tolerances don’t meet the needs of lower resolution hand-held Raman spectrometers. Progeny instruments are compliant with this guidance.
Progeny instruments are factory calibrated using benzonitrile and verified with cyclohexane and naphthalene.
Appendix C. Statements of Compliance 112
1006232_RevD
Progeny instruments meet wavenumber tolerances established by RAD with input from 3rd party consultants.
Progeny instruments can be installed and qualified using an IQOQPQ procedure to ensure that performance criteria meet wavenumber tolerances specified by RAD.
Verification of the intensity scale is unnecessary since quantitative analytical methods are not intended to be transferred between instruments.
Progeny instruments use both commercially available and user created libraries for identification of materials.
Appendix D. Regulatory Statements 113
1006232_RevD
Appendix D. Regulatory Statements
“Regulatory Statements” contains all required regulatory statement and includes:
FCC and Industry Canada Statements
Export Regulation Statements
EC Statements
European WEEE Recycling and RoHS
FCC and Industry Canada Statements
This equipment has been tested and found to comply with the limits for a Class A digital instrument, pursuant to Part 15 of the FCC Rules. These limits are designed to provide reasonable protection against harmful interference when the equipment is operated in a commercial environment. This equipment generates, uses, and can radiate radio frequency energy and, if not installed and used in accordance with the instruction manual, may cause harmful interference to radio communications. Operation of this equipment in a residential area is likely to cause harmful interference in which case the users will be required to correct the interference at their own expense.
The instrument is not intended to be used in a hazardous location. The battery pack should be charged only with a suitably certified or approved battery charger.
This Class A digital apparatus meets all requirements of the Canadian Interference-Causing Equipment Regulations.
Cet appareil numérique de la Classe A respecté toutes les exigences du Règlement sur le matériel brouilleur du Canada.
This is a Class A product. In a domestic environment this product may cause radio interference, in which case the user may be required to take adequate measures.
Export Regulation Statements
The technical information contained with this document is subject to the Export Administration Regulations. Export of this technical information to foreign persons or foreign companies, within or outside the United States, may require prior written authorization by the U.S. Department of Commerce, Bureau of Industry and Security. Contact RAD prior to such a transfer.
EC Statements
This equipment is in conformity with the provisions of the following EC Directives:
Low-Voltage Directive (LVD): 2006/95/EC
Electromagnetic Compatibility (EMCD): 2004/108/EC
Waste of Electrical and Electronic Equipment (WEEE) 2002/96/EC

Appendix D. Regulatory Statements 114
1006232_RevD
Restriction of the Use of Certain Hazardous Substances in Electrical and Electronic Equipment (RoHS) 2002/95/EC
European WEEE Recycling and RoHS
The following sections provide the RAD compliance statements for European WEEE and RoHS regulations.
WEEE Compliance
This product is required to comply with the European Union’s Waste Electrical & Electronic Equipment (WEEE) Directive 2002/96/EC. It is marked with the following symbol:
RAD has contracted with one or more recycling or disposal companies in each European Union (EU) Member State, and these companies should dispose of or recycle this product. For further information, contact RAD or your local RAD representative.
WEEE Konformität
Dieses Prudukt muss die EU Waste Electrical & Electronic Equipment (WEEE) Richtlinie 2002/96/EC erfüllen. Das Produkt ist durch folgendes Symbol gekennzeichnet:
Rigaku Analytical Devices hat Vereinbarungen mit Verwertungs/Entsorgungsfirmen in allen EU-Mitgliedsstaaten getroffen, damit dieses Produkt durch diese Firmen wiederverweret order entsorgt warden kann. Füer mehr infromationen bitte kontaktieren sie Rigaku Analytical Devices oder Ihre öertliche Vertretung.
Conformité DEEE
Ce produit doit être conforme à la directive européenne (2002/96/EC) des Déchets d’Equipements et Electroniques (DEEE). Il est marqué par le symbole suivant:

Appendix D. Regulatory Statements 115
1006232_RevD
Rigaku Analytical Devices s’est associé avec une ou plusieurs compagnies de recyclage dans chaque état membre de l’union européenne et ce produit devrait être collecté ou recyclé par celles-ci. Pour de plus amples renseignements, veuillez contacter Rigaku Analytical Devices ou bien ses représentants locaux.