pstvs11 英文说明书 -v3.0- 2019.9 - images-na.ssl ...s.pdf · pstvs11 英文说明书 -v3.0-...
TRANSCRIPT

PSTVS11
V3.0
•Carefully open the carton, remove contents and lay out on cardboard or other protective surface to avoid damage.•Check package contents against the Supplied Parts List in the next page to assure that all components were received undamaged. Do not use damaged or defective parts.•Not all parts and hardware included will be used. lf you require replacement parts, contact customer service at [email protected] •Carefully read all instructions before attempting installation.•If you do not understand the instructions or have any concerns or questions, please contact customer service at [email protected]•This product may contain moving parts. Use with caution.•Do not use this product for any purpose or in any configuration not explicitly specified in this instruction. We hereby disclaim any liability for injury or damage arising from incorrect assembly. incorrect mounting, or incorrect use of this product.
UNPACKING INSTRUCTIONS AND IMPORTANT SAFETY INFORMATION

1
Steel Washer
Step 1
01
F
Connecting the Support Pillar to Tempered Glass
(01)Tempered Glass
3 (03)Plastic Cover
Plastic Washer
3(C) (D)
(J)Wrench
1 1(02)Support Pillar
6 (F)Foot Pads
1M6×25 Bolt
(B)
3
1
02
03
JB D C
Place foot pad F on the bottom of the tempered glass base 01 at the corners.
Attaching the glass base by using M6*25 bolts B ,steel washers D and plstic washers C .

Connecting the TV Plate to Support PillarStep 2
2
E
A
D
04J
J
(E)M6x50 Bolt
(04)TV Plate
(A)
4
1 4
(J)Wrench
1
(D)4
(H)Wire Clip
Attaching wire clips H
H
2
Connecting TV plate to support pillar by using M6*50 bolts E and supporting with steel washer D and M6 nut A .
M6 Nut
SteelWasher

3
Measure the distance between the holes located at the back of your TV (these measures may form the shape of a square, or a rectangle) and check that these taken measures are within the VESA (*) range for this wall mount. (*) VESA: International standard established by the TV manufacturers used to determine if LCD/LED TVs are compatible with wall mounts.
Measure VESA and Check TV screws
600mm
400m
mMounting the TV Bracket to a TVStep 3
TV Bracket
M8x25 Bolt
M8x50 Bolt M8x65 Bolt
D8
M6x35 BoltM6x16 Bolt
(I)(05)
(TV1) (TV2)
(TV4)(TV3)
(TV5) (TV6)2.5mm Spacer
(TV8)10mm Spacer
(TV7) 5mm Spacer

4
Option A (For Flat Back TV)
Option C (For Round Back TV)
Option B
TV5
TV5
I
TV2/TV3/TV4
TV6/TV7/TV8
TV1(M6x16)
TV1(M6x35)
TV5
I
TV2/TV3/TV4
TV6/TV7/TV8
TV1(M6x35)
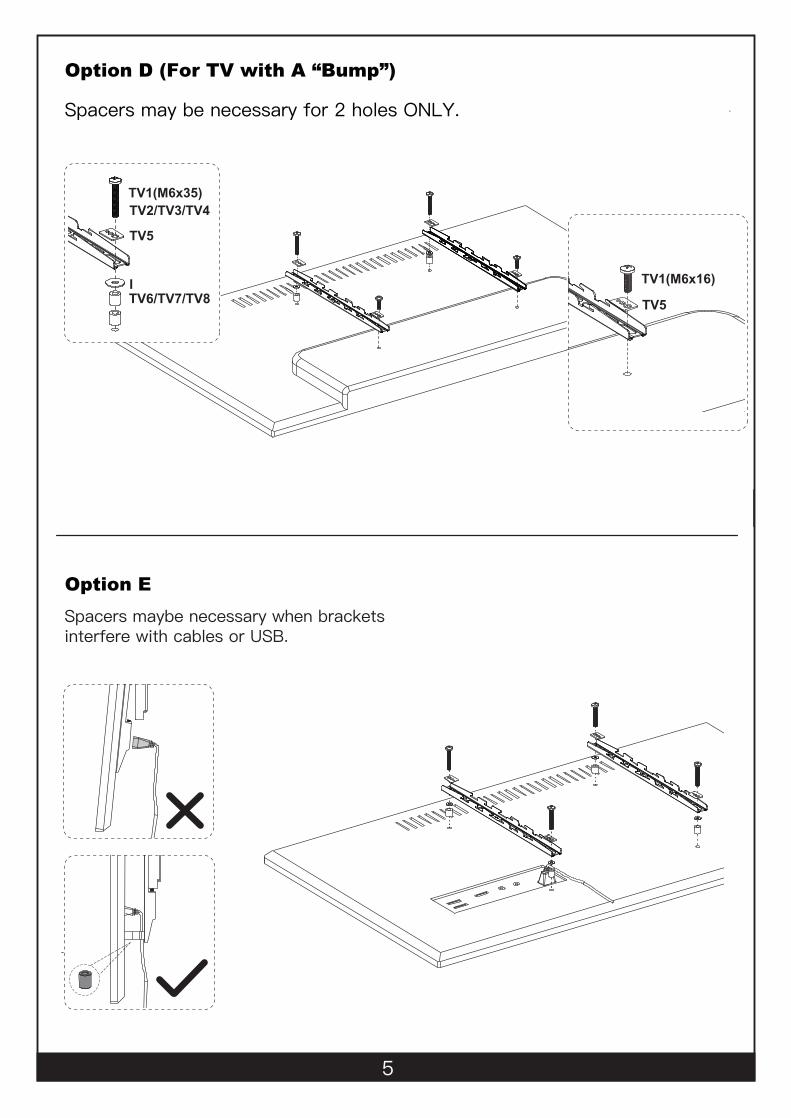
If the length of the screws is too long, the spacers can be used in multi-layer. If the installation fails after trying various methods, please contact customer service at [email protected].
The spacers must be used with washers (I), to stop it falling down.
I
5
Spacers may be necessary for 2 holes ONLY.
Option D (For TV with A “Bump”)
TV5
Option E Spacers maybe necessary when brackets interfere with cables or USB.
TV1(M6x16)
TV5
I
TV2/TV3/TV4
TV6/TV7/TV8
TV1(M6x35)

Attaching TV to the TV Plate and Managing the WiresStep 4
TV brackets are three-height-adjustable. You can choose the proper height.
6
Insert the safety lock in the bottom of the bracket and then tighten the screws.
“Be gentle”
(G) Safety Lock
G
The second choice
The first choice
The thirdchoice