pt 350 faqs manual 356a572 rev1 - seaward using the serial cable (primetest 350 only), are you also...
TRANSCRIPT


- i -
PrimeTest 350 Frequently Asked Questions
Table of Contents
1 How do I download my PrimeTest 350 to PATGuard 2? ............................................................
2 How do I upload my PrimeTest 350 from PATGuard 2? ............................................................
3 How to update the PrimeTest 350 Firmware. ..................................................................
4 How do I upload a logo to my tester for printing? .....................................................................
5 How do I setup my Bluetooth Scanner? ......
6 How do I setup my Bluetooth printer? .........
7 Can deleted results be retrieved? ...................
8 After test there is no option to print labels
9 PC is asking for a Bluetooth PIN .......................
10 What is the difference between restoring factory settings and restoring factory sequences? ..............................................................
Page
1
5
13
16
20
22
23
24
25
26
Note: If your question is not answered in this booklet, go to www.seaward.co.uk/faqs

- 1 -
PrimeTest 350 Frequently Asked Questions
1 How do I download my PrimeTest 3xx?
The following document is intended to be a troubleshooting guide to ensure you are downloading data from your tester to the Seaward Software packages in the correct manner. Please check all aspects of this before contacting the technical helpline.
If using the Serial Cable (PrimeTest 350 only), are you also using a Serial to USB adaptor. If so we can only guarantee that one from a company called easy sync will work. This has been tried and tested with our cable. Please call 0191 5878708 if you require one.
COM ports. Please ensure your com port is the correct one, usually for a direct Serial connection this tends to be COM1, however this is likely to be different if a Serial to USB adaptor is being used.
- On the PC click on ‘Start’.
- Click ‘Settings’, ‘Control Panel’.
- In Control Panel look for ‘System’ and click on it.
- A pop up will appear look for and click on the tab labelled ‘Hardware’.
- With the Hardware section click on ‘Device Manager’.
- In Device Manager look for ‘Ports (COM & LPT)’, click the ‘+’ sign to expand the ports out. From here you will be able to see which COM port the software will need to use to connect.
The next step will be to ensure the settings for download on the software are correct.
- 2 -
PrimeTest 350 Frequently Asked Questions
PATGuard Elite and Pro
- Load up your software, and open a new blank database (File à New…). Name the fi le anything you prefer. (This may not be necessary if you have a database already created).
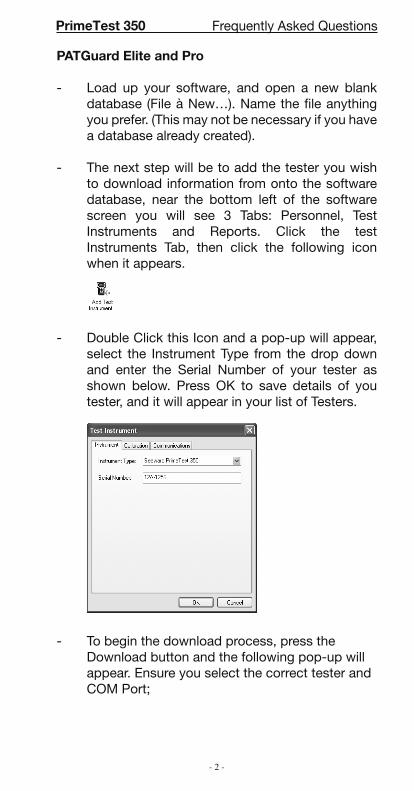
- The next step will be to add the tester you wish to download information from onto the software database, near the bottom left of the software screen you will see 3 Tabs: Personnel, Test Instruments and Reports. Click the test Instruments Tab, then click the following icon when it appears.
- Double Click this Icon and a pop-up will appear, select the Instrument Type from the drop down and enter the Serial Number of your tester as shown below. Press OK to save details of you tester, and it will appear in your list of Testers.
- To begin the download process, press the Download button and the following pop-up will appear. Ensure you select the correct tester and COM Port;

- 3 -
PrimeTest 350 Frequently Asked Questions
- Press OK at this screen and the next. You will then be further prompted to “Start the transmission Now…”
PatGuard Lite Only
- Load your software and at the prompt select the option “Download a Tester”. A pop-up will appear, ensure you select the correct Instrument Type and COM Port. Press OK and you will be prompted to “Enter a New Filename” for the downloaded database. Call this anything you like, and press Save. You will then be further prompted to “Start the transmission Now…”

- 4 -
PrimeTest 350 Frequently Asked Questions
You will now need to confi gure your tester for the download.
- At the main menu, scroll down to “Data Transfer”, and press F4 to confi rm.
- Then select “Download to PC” and confi rm by pressing F4.
- At this point a screen will pop up, ensure the transfer characteristics are set.
> Format - PATGuard SSS.
> Computer - Either the Computer name if Bluetooth, or RS-232 if using the cable to transfer.
> Baud - 57600.
- Once connected you should see the Send option above the F4 key. Press this now to send the information.
- A process bar will show up on the screen of the tester, and within the software you should see an indication of data being received, as shown below.
- The software will process the data, and then produce your Sites, Location and Assets within the Database.
- 5 -
PrimeTest 350 Frequently Asked Questions
2 Uploading from PATGuard Elite to a PrimeTest 350
The PATGuard Upload feature can be used to transfer Asset information to a Seaward PrimeTest 350 to simplify retesting. Information including the Asset ID, Description, Test Sequence, Site and Location can be uploaded from PATGuard into the PrimeTest 350.
When an Asset ID is entered on PrimeTest 350 Asset Details screen, the assets stored in upload memory are automatically searched for a matching Asset ID. If a match is found the uploaded asset data is retrieved and shown on the PrimeTest 350 display.
Preparing PATGuard for Upload
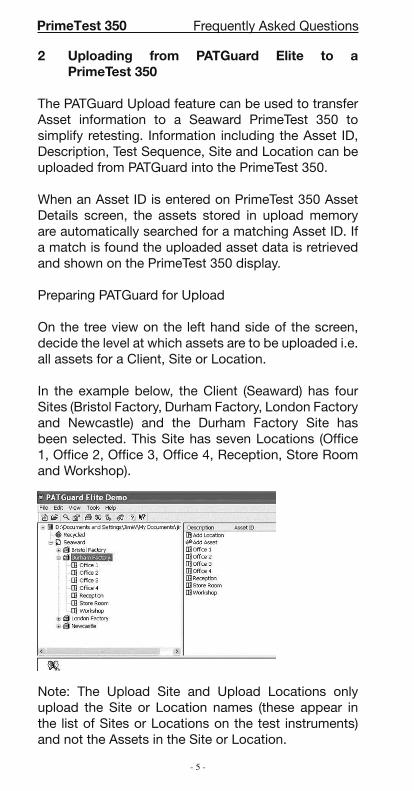
On the tree view on the left hand side of the screen, decide the level at which assets are to be uploaded i.e. all assets for a Client, Site or Location.
In the example below, the Client (Seaward) has four Sites (Bristol Factory, Durham Factory, London Factory and Newcastle) and the Durham Factory Site has been selected. This Site has seven Locations (Offi ce 1, Offi ce 2, Offi ce 3, Offi ce 4, Reception, Store Room and Workshop).
Note: The Upload Site and Upload Locations only upload the Site or Location names (these appear in the list of Sites or Locations on the test instruments) and not the Assets in the Site or Location.

- 6 -
PrimeTest 350 Frequently Asked Questions
Right click on the icon at the required level and select Upload Assets. In the example below, all assets in the Durham Factory Site will be uploaded.
In this example, only the Assets in Location Offi ce 1 will be uploaded.
When the Upload window appears, select the relevant Seaward test instrument from the drop down list.

- 7 -
PrimeTest 350 Frequently Asked Questions
Note: Only instruments shown in the PATGuard Test Instruments tab will appear in the drop down list.
NOTE - If a PrimeTest 350 is not shown on the Destination drop down list
If a PrimeTest 350 is not shown in the list of available instruments it should be added used the Add Test Instrument option in the Test Instruments tab on the bottom right hand side of the PATGuard display.
When adding a new test instrument, it must be selected from the drop down list. Do not simply type in the tester instrument name.
PATGuard is now ready to send data to the Seaward test instrument.
Do not press OK until the PrimeTest 350 has been set to receive the upload.

- 8 -
PrimeTest 350 Frequently Asked Questions
Setting the PrimeTest 350 to receive an Upload
- Select Menu (F4)
- Data Transfer
- Upload from PC
Check that the correct setting is shown in the Computer fi eld i.e. RS-232 when using a cable connection or the PC name when using Bluetooth.

- 9 -
PrimeTest 350 Frequently Asked Questions
Uploading data
- Press OK on the PATGuard Upload window to start uploading data.
- A progress bar will appear on the PATGuard screen to show the data transfer.
- The Asset ID numbers will appear on the PrimeTest 350 display as they arrive until Upload is complete and the End of Data message appears below the last Asset ID.
The total number of Assets uploaded will be shown in the No. of assets fi eld – in this case 70 Assets have been uploaded.

- 10 -
PrimeTest 350 Frequently Asked Questions
Viewing Uploaded Assets
The number of Assets in upload memory can be view be selecting
- Menu (F4)
- Memory Options.
In this case there are a total of 189 Assets in the upload memory.
The Assets in upload memory can be viewed using the View Saved Data option on the PrimeTest 350 as follows. Press
- Menu (F4),
- View Saved Data,
- Search (F1) and
- Change the Test Status fi eld to Uploaded as shown.

- 11 -
PrimeTest 350 Frequently Asked Questions
- Press OK (F4) to show all Assets in the upload memory. Uploaded Assets are marked with a “U” on the right hand side of the display.

- 12 -
PrimeTest 350 Frequently Asked Questions
Retesting Uploaded Assets
- Press Menu (F4) and select Auto Mode
- In the Asset Details fi eld, enter the Asset ID of an item uploaded for retest
- Press Re-test (F3) to show the Last Test Details
- The uploaded Asset information, including Site, Location and Test sequence are shown.
- Press Re-test (F4) to begin the test sequence.

- 13 -
PrimeTest 350 Frequently Asked Questions
3 How to update the PrimeTest 350 fi rmware
Note: Before updating your fi rmware please ensure to download the tester as any results may be lost.
- Download the fi rmware from the Seaward website (found in the downloads section) and save onto your PC. You will need to be logged in to the site before downloading this update.
- Connect the PrimeTest 350 to your PC. If you are using a serial – USB adapter we can only support use of the Easysync adapter available from Seaward.
- Using your Microsoft Windows instruction manual, determine what COM port the tester is using.
- On the PC open up the ‘PrimeTest Data Transfer’ program. This will be in the Start Menu with your PATGuard 2 software under Prime Test Utilities.

- 14 -
PrimeTest 350 Frequently Asked Questions
- On the tester hold down the ‘U’ button whilst powering up.
Ensure the correct COM port is selected in the PrimeTest Utilities program by using the drop down menu and selected the COM port found in step 3.
Check the COM port settings in the PrimeTest Utilities by Selecting ‘Confi gure COM Port ’.
Ensure the settings are as per the below.
On the tester select ‘Menu’ and then with ‘Code Update’ selected press ‘Accept’.

- 15 -
PrimeTest 350 Frequently Asked Questions
Press the right arrow until ‘RS-232 57600 Baud’ is selected. You should now see ‘Ready to Receive’ on the PrimeTest Data Transfer screen.
Click on ‘File’ and then ‘Code Update’ on the PC and locate and open the fi rmware fi le saved in step 1 from the website.
The tester will now start the sequence; a progress bar will appear on the screen of the tester and the PC.
It will show ‘Erasing’ fi rst then ‘In Progress’ as below.
The following text will show on the tester.
Erasing……….DoneProgramming……………Done
Do not press any buttons on the tester until the download is complete.
Once complete please turn the tester off. The fi rmware update is now fi nished.

- 16 -
PrimeTest 350 Frequently Asked Questions
4 How do I upload a logo into PrimeTest 300/350 series tester for use with Test’n’Tag Elite printer?
Logo Characteristics
The logo used must have a maximum size of 320 pixels by 240 pixels. It must be saved as Monochrome Bitmap, and the colours must be inverted.
A simple program to use in order to change the fi le type for upload is Microsoft Paint. Open your logo in this program, press File then Save As.
A box will open offering the user a location to save into, at the drop down box adjacent to Save as Type, ensure you select Monochrome Bitmap.
If you require a white background when printing your logo, you will need to ensure the colours are inverted (eg Black background on the image), as shown above.
To invert your colour scheme within Paint, simply click Image from the top menu bar, then Invert Colours. Once again ensure your fi le is saved as Monochrome Bitmap.

- 17 -
PrimeTest 350 Frequently Asked Questions
Transferring the Logo to your Tester
Turn your tester on and go into the main menu, scroll to Data Transfer, press OK then scroll down to Load TnT Logo. The following screen will appear.
Bluetooth ConnectionWithin the computer tab you should see the computer name that you originally paired the tester with. If not use the left or right arrow to scroll until you fi nd the computer. Await the egg timer to change into the Bluetooth Icon and the tester is ready to receive data.
Wired Connection (PT350 Only)Within the computer tab you will need to ensure RS-232 is selected. The Tester is now confi gured to receive the logo.
Computer Transfer ApplicationRun the fi le Seaward DataTransfer.exe application, this can be found on the Utilities Disc provided with your tester. The following program will open.

- 18 -
PrimeTest 350 Frequently Asked Questions
Ensure you have selected the correct COM Port, this will be the same port used for downloading of test results. You can check the port settings by clicking Confi gure COM Port. A display will appear, ensure your settings are set as below. If not change them and confi rm by pressing Apply, then OK.
On the Data Transfer utility, press File, then click the Send File option.
A pop up will appear, automatically looking for Bitmap fi les, (.bmp).
Select the logo fi le you saved earlier and the transfer should automatically begin.
A progress bar on the application will indicate fi le transfer, and the amount of data received will be shown numerically in the top left hand of the tester screen.
Once the progress is complete, you should see the logo displayed on the tester. Do not be alarmed if the logo does not appear centralised within the display.
Press Ok to return to the main screen on the tester.

- 19 -
PrimeTest 350 Frequently Asked Questions
Select Logo to Print
In order to apply a logo to the print label you must instruct the tester where to look for the logo.
On the main screen of the tester press Menu, scroll to View Saved Data. If you do not have any data on your tester it is advisable to perform a test in order to have a result.
Highlight any test and press the Select (F4), a Test Details screen will then be displayed. Press the soft key Options (F4), select the option Print Label.
You should then see the label display, at this point press the soft key Setup (F3), and the following screen will be displayed.
To apply the logo, to both Pass and Fail Labels, scroll down to Pass Logo and change the option to User Defi ned Logo, as shown above, repeat the process for the fail logo and your tester is confi gured to print your logo.
- 20 -
PrimeTest 350 Frequently Asked Questions
5 Seaward Bluetooth Scanner
Initial Confi guration
• Fit the batteries (supplied)
• Press the trigger and scan the set up codes 1 to 8, of the supplied barcode setup sheet, in the correct order. (The scanner will beep after reading each barcode)
• Press the trigger to scan code 9, this will cause the light to start fl ashing blue
PrimeTest Confi guration
• Turn the PrimeTest on and select Menu -> Confi guration -> Bluetooth Favourites
• Highlight the Barcode fi eld and press Setup
• Press Search to scan for local Bluetooth devices. (hint: it helps if the scanner is the only Bluetooth device turned on at this time)
• Select the scanner in the New fi eld (look for the device named “OPL-2724_ . . . . . ”)
• And then press Add New
• Press OK to accept the new barcode setting, Then press OK again to save the new Bluetooth confi guration
Turn on
• Turn the scanner on by pressing and holding the trigger for at least 5 seconds. The light under the trigger will fl ash blue, indicating that the scanner is ready to make a Bluetooth connection
• On the PrimeTest, make sure User Preferences are set for Barcode or Barcode Comments. Then start Auto Mode. The PrimeTest will make a Bluetooth connection to the scanner
• When the connection is made, the Bluetooth icon will appear on the PrimeTest and the light on the scanner will go off

- 21 -
PrimeTest 350 Frequently Asked Questions
• Press the trigger to scan a barcode. The scanner will beep when it detects a good barcode
Turn off
• The scanner will turn itself off automatically if not used for 10 minutes
• Or it can be turned into low power mode by pressing and holding the trigger for at least 8 seconds. (Note that in this case you can press the trigger and the laser will scan, but the scanner will not make a Bluetooth connection until it has been turned on again as above)
- 22 -
PrimeTest 350 Frequently Asked Questions
6 Seaward Test N Tag Elite Printer
Initial Confi guration for printer
• Fit the battery (supplied)
• Turn on the printer
PrimeTest Confi guration
• Turn the PrimeTest on and select Menu -> Confi guration -> Bluetooth Favourites
• Highlight the Printer fi eld and press Setup
• Press Search to scan for local Bluetooth devices. (hint: it helps if the printer is the only Bluetooth device turned on at this time)
• Select the scanner in the New fi eld (look for the device named with the printer serial number)
• And then press Add New, the device name will be seen in the ‘Printer’ fi eld
• Scroll down to ‘Printer Type’ and select ‘Test N Tag’
• Press OK to accept the new printer setting, Then press OK again to save the new Bluetooth confi guration

- 23 -
PrimeTest 350 Frequently Asked Questions
7 Can deleted results be retrieved?
Once deleted, results cannot be retrieved.
The PrimeTest 350 will indicate a number of deleted results if those assets are deleted through the ‘View Saved Data’ menu.
Erasing assets from the ‘Memory Options’ screen will delete all data without any trace

- 24 -
PrimeTest 350 Frequently Asked Questions
8 After test there is no option to print labels On the tester go to:
• Select Menu (F4)
• Select User Options
• Select Test Options
• Select After Test
• Press right arrow and select:
o Print Label, or
o Options (will give you option to print, download or New Test)
• Press OK (F4) to save

- 25 -
PrimeTest 350 Frequently Asked Questions
9 PC is asking for a Bluetooth pin.
Some computer systems have higher security on Bluetooth connections causing them to require a pin number to connect with devices.
To set a pin on your PT350 in order to complete the download you will need to reconfi gure the tester to the PC:
On the tester select:
• Menu (F4)
• Select Confi guration
• Select Bluetooth Favourites
• Select Computer
• Press Setup (F3)
• Ensure the correct computer is selected.
• Enter Pin - press OK
• Press OK again to save. The tester should let out a long beep.
- 26 -
PrimeTest 350 Frequently Asked Questions
10 What is the difference between restoring factory setting and restoring factory sequences?
Restoring Factory Settings
This setting will restore all of the user settings that have been made and or changed via the confi guration and user options The test sequences that the user has set will remain on the tester.
Restoring Factory Sequences
This setting will restore all of the Factory Test Sequences that were originally programmed into the PrimeTest 350 fi rmware. The user settings that have been set will remain on the tester.
Both options are accessed by the following
- Menu (F4)
- Confi guration
- Restore Factory Settings OR Restore Factory Sequences
The tester will prompt ‘Are you sure?’
- Yes (F4)

- 27 -
PrimeTest 350 Frequently Asked Questions

