publisher 2007 tutorial - rochester hills · publisher 2007 tutor 1 publisher 2007 tutorial ... go...
TRANSCRIPT
Burlington-Edison Technology Competencies
Publisher 2007 Tutor
1
Publisher 2007 Tutorial
• Use principles of design • Use features of publications • Plan a publication • Create a new publication • Use layout features • Create and use backgrounds • Add objects • Add and use table frames • Add and use text frames • Add and use graphic frames • Print • Use HELP to gain information

Burlington-Edison Technology Competencies
Publisher 2007 Tutor
2
Use principles of design Unity: Each part fits together as a whole consistent with your topic. Balance: Individual elements fit together as a whole, but at the same time there is enough variety to keep the publication interesting. Rhythm: Consistency and repetition are evident throughout the publication (for multiple pages or related publications).
Use features of publications Publisher has plenty of help for the novice desktop publisher! Publisher’s wizards will help you create brochures, flyers, newsletters, calendars, award certificates, menus, postcards, signs, and even Web pages (though we recommend you use FrontPage for Web page construction) by offering over 2000 publication templates. Of course you can also do all this from scratch! ☺ Plan a publication
Font selections should be limited in number, easy to read, and large enough for the intended audience to scan.
Text frames should be in proportion to the page margins and borders. Be careful of placing too much text on one side of a publication. Think about balance between space and objects.
Graphics should complement your content and design without distracting the viewer.
Simple colors should be used. Choose opposites that contrast well. Light text on a dark background or dark text on a light background provides good contrast.
Consider the readability of some color schemes. Borders and backgrounds should be consistent and compliment the
content. Layout should be consistent throughout the publication.
Publication Features
Publisher has plenty of help for the novice desktop publisher! Publisher’s wizards will help you create brochures, flyers, newsletters, calendars, award certificates, menus, postcards, signs, and even Web pages (though we recommend you use FrontPage for Web page construction) by offering over 2000 publication templates. Of course you can also do all this from scratch! ☺
Burlington-Edison Technology Competencies
Publisher 2007 Tutor
3
How Publisher Works
Publisher works with objects. The main idea is for you to arrange objects (text frames, graphic frames, table frames, and decorative objects) on a page to create some type of publication.
Pre-publishing Activities
It is very easy to become lost in the development of a publication without some basic organization. Think about the following when creating a publication:
1. What kind of publication do you need? 2. What features so you want to include? 3. Who is your audience? 4. What is your goal? Write with your goal in mind! 5. What extra features will you include (borders, tables, etc.)? 6. What do you want it to look like? Would it be a good idea to storyboard
your publication? 7. What colors do you plan to use? 8. What graphics will you use to support your content?
Burlington-Edison Technology Competencies
Publisher 2007 Tutor
4
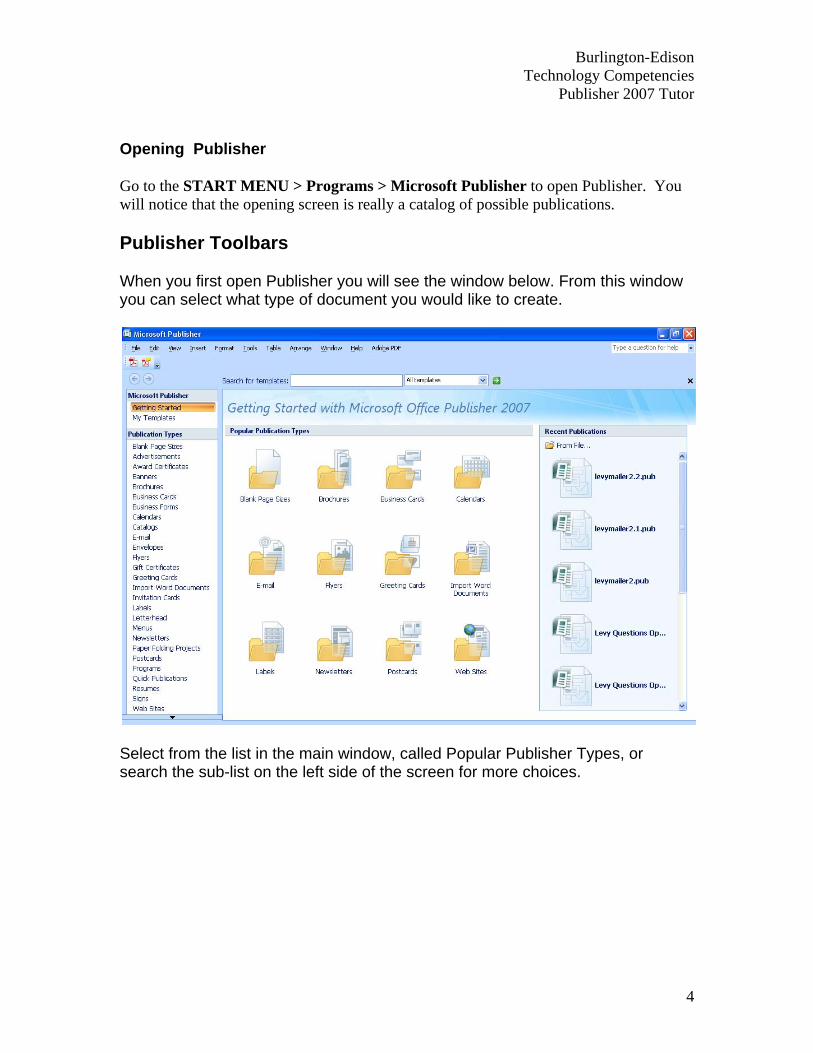
Opening Publisher
Go to the START MENU > Programs > Microsoft Publisher to open Publisher. You will notice that the opening screen is really a catalog of possible publications.
Publisher Toolbars
When you first open Publisher you will see the window below. From this window you can select what type of document you would like to create.
Select from the list in the main window, called Popular Publisher Types, or search the sub-list on the left side of the screen for more choices.
Burlington-Edison Technology Competencies
Publisher 2007 Tutor
5
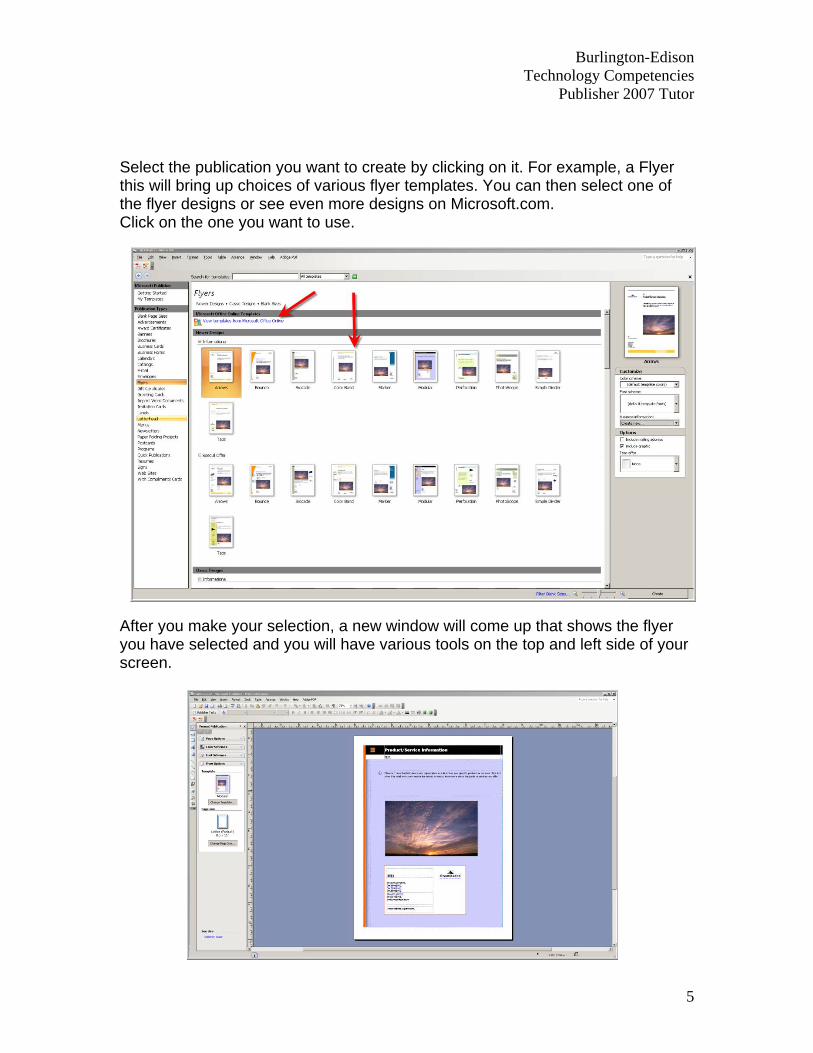
Select the publication you want to create by clicking on it. For example, a Flyer this will bring up choices of various flyer templates. You can then select one of the flyer designs or see even more designs on Microsoft.com. Click on the one you want to use. After you make your selection, a new window will come up that shows the flyer you have selected and you will have various tools on the top and left side of your screen.
Burlington-Edison Technology Competencies
Publisher 2007 Tutor
6
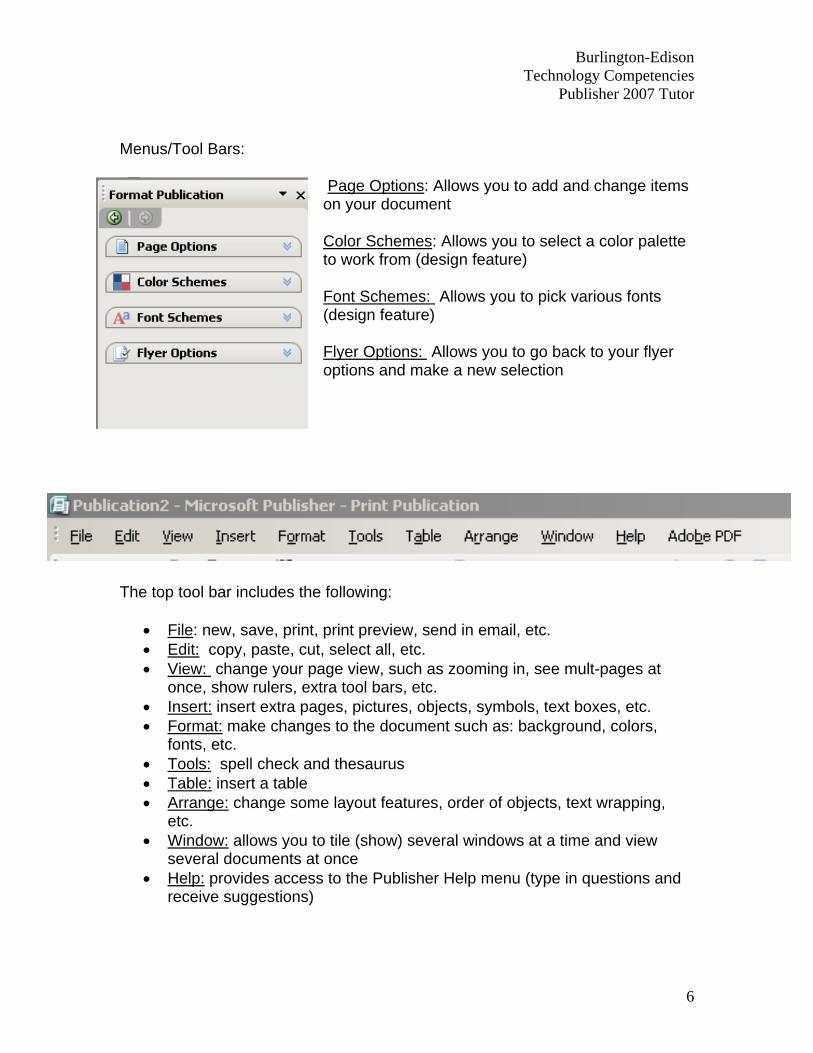
Menus/Tool Bars:
Page Options: Allows you to add and change items on your document
Color Schemes: Allows you to select a color palette to work from (design feature)
Font Schemes: Allows you to pick various fonts (design feature)
Flyer Options: Allows you to go back to your flyer options and make a new selection
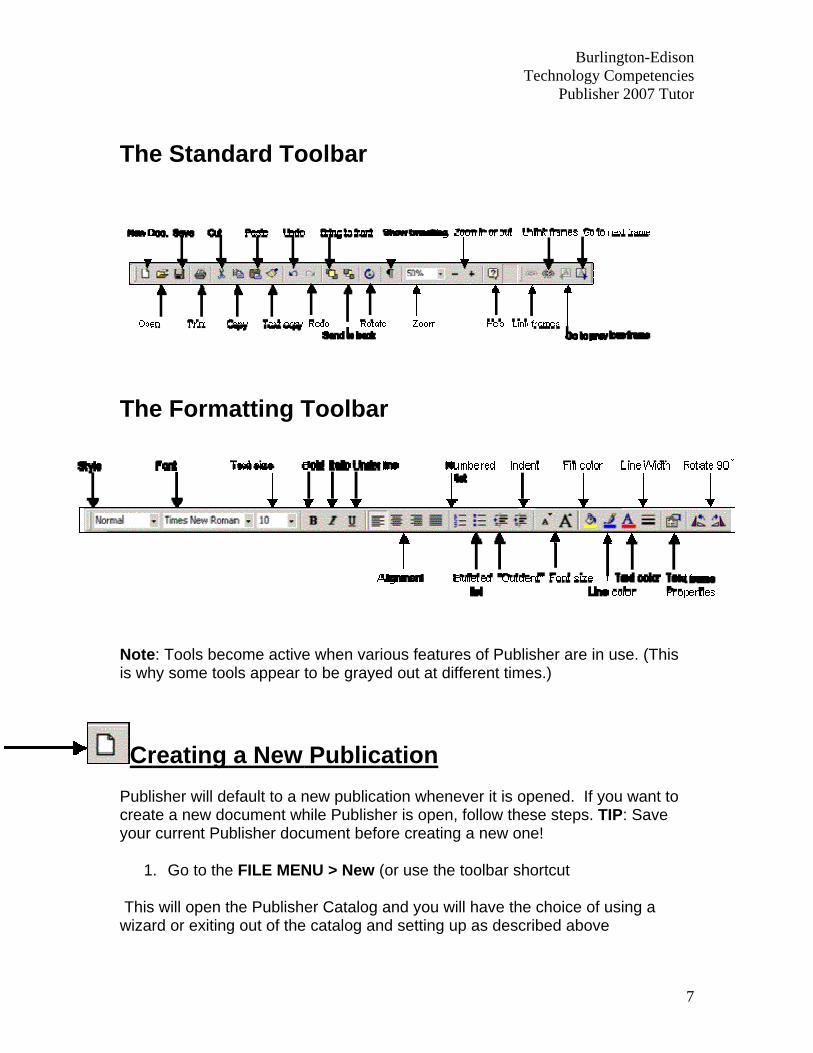
The top tool bar includes the following:
• File: new, save, print, print preview, send in email, etc. • Edit: copy, paste, cut, select all, etc. • View: change your page view, such as zooming in, see mult-pages at
once, show rulers, extra tool bars, etc. • Insert: insert extra pages, pictures, objects, symbols, text boxes, etc. • Format: make changes to the document such as: background, colors,
fonts, etc. • Tools: spell check and thesaurus • Table: insert a table • Arrange: change some layout features, order of objects, text wrapping,
etc. • Window: allows you to tile (show) several windows at a time and view
several documents at once • Help: provides access to the Publisher Help menu (type in questions and
receive suggestions)
The
The
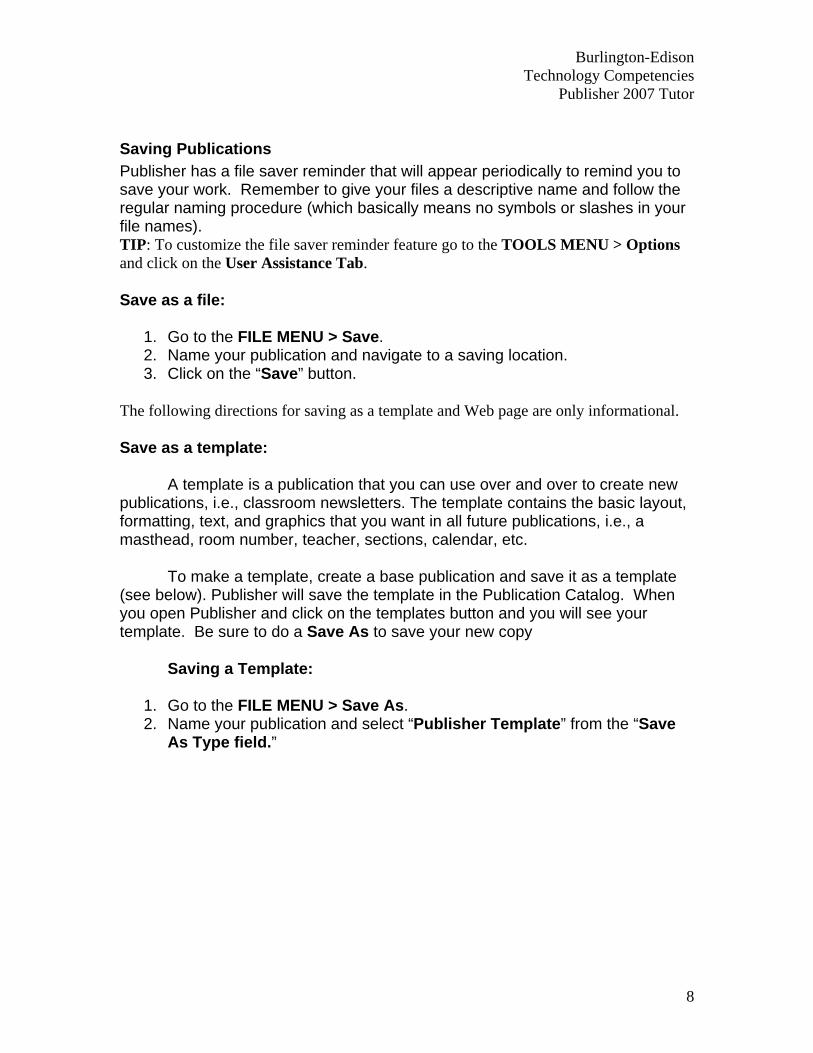
Noteis wh
CrPublcreatyour
1
Thiswiza
e Stand
e Form
e: Tools bechy some too
reating isher will dete a new docurrent Pu
. Go to the
s will open trd or exiting
dard To
atting T
come activeols appear
a New efault to a nocument whblisher doc
e FILE MEN
the Publishg out of the
oolbar
Toolba
e when varto be graye
Publicnew publicahile Publishcument befo
NU > New (
er Catalog e catalog an
r
ious featureed out at dif
cation ation wheneher is open,ore creating
(or use the
and you wind setting u
T
es of Publisfferent time
ever it is op, follow thesg a new one
toolbar sho
ill have the up as descr
BurliTechnology C
Publishe
sher are in es.)
pened. If yose steps. Te!
ortcut
choice of uibed above
ngton-EdisoCompetencieer 2007 Tuto
use. (This
ou want to IP: Save
using a e
on es or
7
Burlington-Edison Technology Competencies
Publisher 2007 Tutor
8
Saving Publications Publisher has a file saver reminder that will appear periodically to remind you to save your work. Remember to give your files a descriptive name and follow the regular naming procedure (which basically means no symbols or slashes in your file names). TIP: To customize the file saver reminder feature go to the TOOLS MENU > Options and click on the User Assistance Tab.
Save as a file:
1. Go to the FILE MENU > Save. 2. Name your publication and navigate to a saving location. 3. Click on the “Save” button.
The following directions for saving as a template and Web page are only informational.
Save as a template:
A template is a publication that you can use over and over to create new publications, i.e., classroom newsletters. The template contains the basic layout, formatting, text, and graphics that you want in all future publications, i.e., a masthead, room number, teacher, sections, calendar, etc.
To make a template, create a base publication and save it as a template (see below). Publisher will save the template in the Publication Catalog. When you open Publisher and click on the templates button and you will see your template. Be sure to do a Save As to save your new copy
Saving a Template:
1. Go to the FILE MENU > Save As. 2. Name your publication and select “Publisher Template” from the “Save
As Type field.”
Burlington-Edison Technology Competencies
Publisher 2007 Tutor
9
Accessing your template:
1. Open Publisher (Start Menu > Programs > Microsoft Publisher). 2. Click on the “Templates” button. 3. This will open a dialog box. Select your template and click on the “Open”
button. 4. When the template is open in Publisher, you will need to go to the FILE
MENU > Save As to save. Name your publication and navigate to your “My Documents” folder to save.
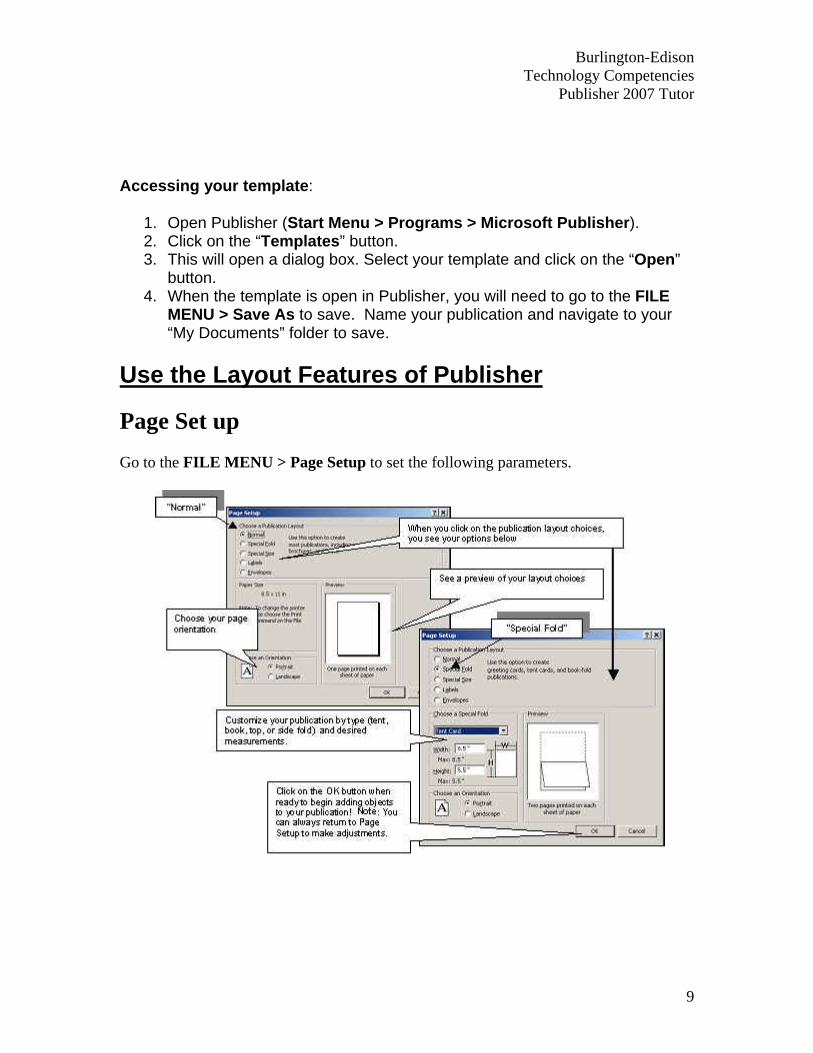
Use the Layout Features of Publisher
Page Set up Go to the FILE MENU > Page Setup to set the following parameters.
View
(Not page
12
Np
View
You or les
1
2. YStan
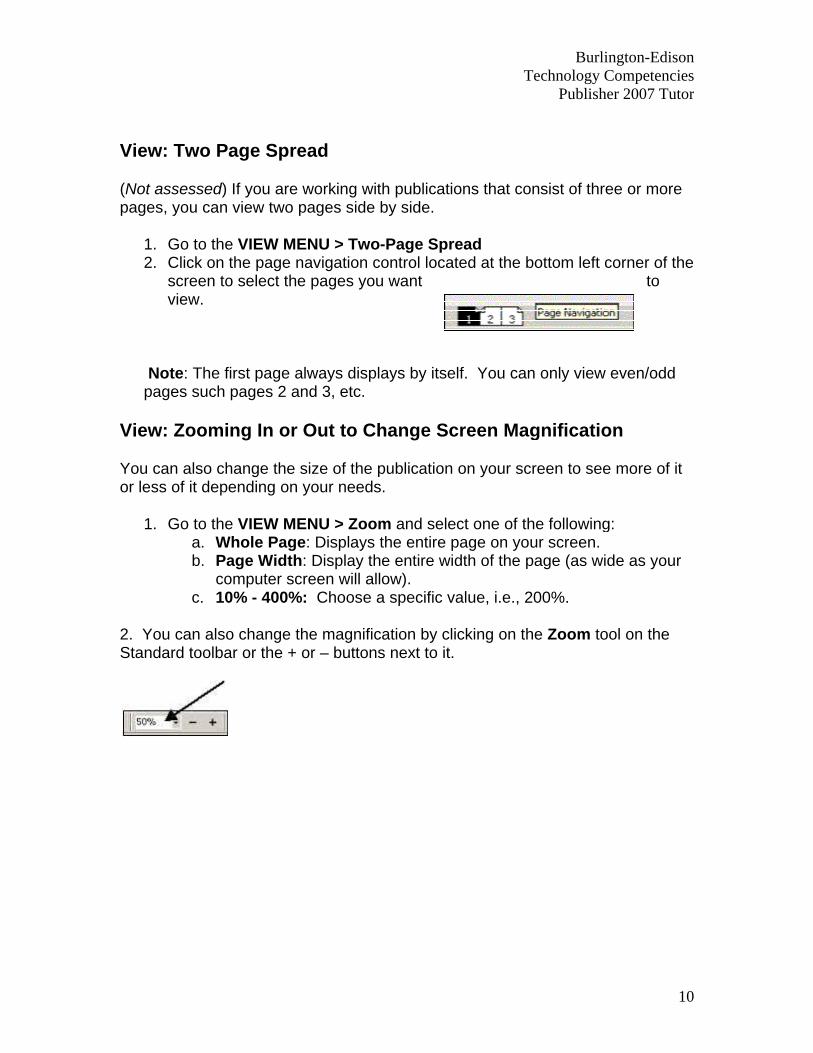
w: Two P
assessed) es, you can
. Go to the
. Click on screen toview.
Note: The fages such
w: Zoomi
can also chss of it dep
. Go to thea. Wb. Pa
coc. 10
You can alsodard toolba
age Spre
If you are wview two p
e VIEW MEthe page no select the
first page apages 2 an
ng In or O
hange the sending on y
e VIEW MEWhole Page
age Width:omputer scr0% - 400%:
o change thar or the + o
ead
working witpages side
ENU > Twoavigation c
e pages you
lways displnd 3, etc.
Out to Ch
size of the pyour needs
ENU > Zoome: Displays t: Display threen will all: Choose a
he magnificor – buttons
th publicatioby side.
-Page Sprecontrol locatu want
ays by itse
hange Sc
publication s.
m and selethe entire pe entire widow).
a specific va
cation by clis next to it.
T
ons that co
ead ted at the b
lf. You can
creen Mag
on your sc
ct one of thpage on youdth of the p
alue, i.e., 2
cking on th
BurliTechnology C
Publishe
nsist of thre
bottom left c
n only view
gnificatio
reen to see
he followingur screen. page (as wid
00%.
he Zoom to
ngton-EdisoCompetencieer 2007 Tuto
1
ee or more
corner of thto
even/odd
on
e more of it
g:
de as your
ol on the
on es or
0
e
Burlington-Edison Technology Competencies
Publisher 2007 Tutor
11
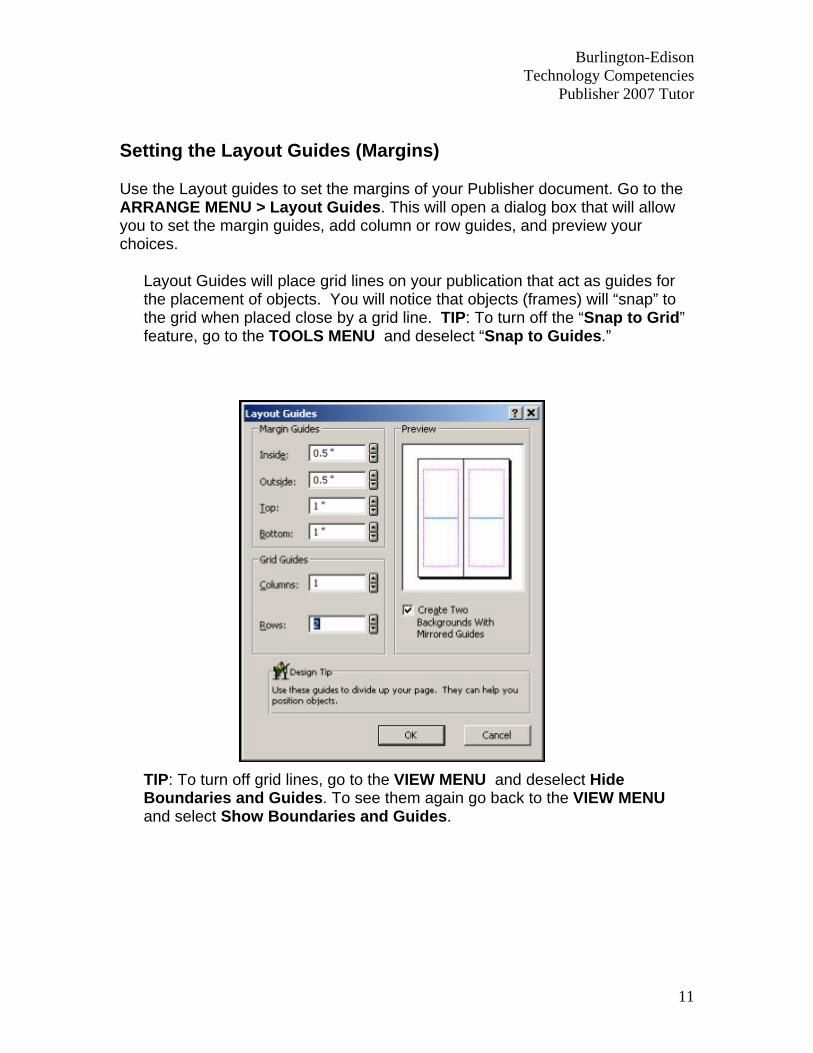
Setting the Layout Guides (Margins)
Use the Layout guides to set the margins of your Publisher document. Go to the ARRANGE MENU > Layout Guides. This will open a dialog box that will allow you to set the margin guides, add column or row guides, and preview your choices.
Layout Guides will place grid lines on your publication that act as guides for the placement of objects. You will notice that objects (frames) will “snap” to the grid when placed close by a grid line. TIP: To turn off the “Snap to Grid” feature, go to the TOOLS MENU and deselect “Snap to Guides.”
TIP: To turn off grid lines, go to the VIEW MENU and deselect Hide Boundaries and Guides. To see them again go back to the VIEW MENU and select Show Boundaries and Guides.
Burlington-Edison Technology Competencies
Publisher 2007 Tutor
12
View: Background and Foreground
There are two views from which to work in Publisher. The Background View allows you to place elements on your publication that you want repeated on every page, i.e., headers, footers, page numbers, or graphics. Place these elements on the background and they will appear on every page. Use the Foreground View to add objects that will appear only on that page.
To switch back and forth between the background and foreground, go to the VIEW MENU and select “Go to Foreground” or “Go to Background.”
TIP: Use the VIEW MENU > “Go to Page” feature to view a specific page.
Creating a Background
We are going to apply a background border that will appear on each page of our “All About Me” publication. You can also add other elements to the background view.
1. Be sure you are in “Background” view. 2. Select a method to create a border:
a. Use the MS Clip Gallery b. Use Border Art c. Use a file from another source
Using the MS Clip Gallery
You can use borders found in the Borders and Frames category of the MS Clip Gallery.
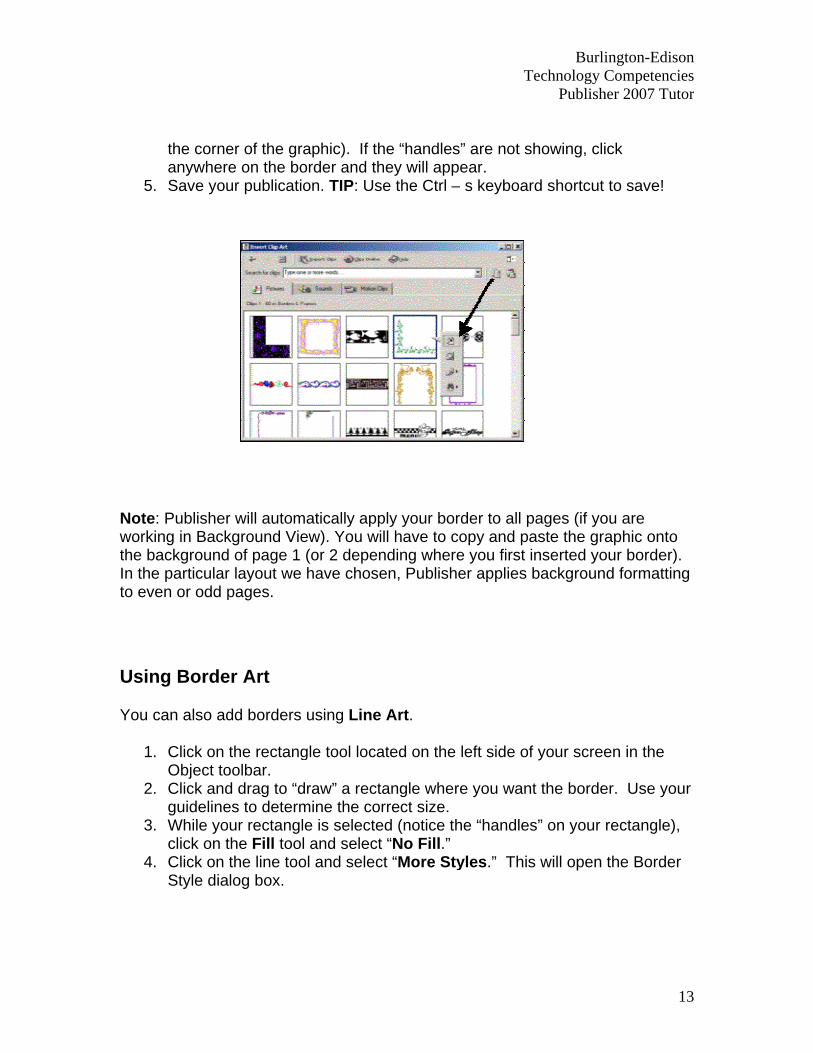
1. Go to the INSERT MENU > Picture > Clip Gallery. 2. Click on the “Borders and Frames” category. 3. Select a border, click on it and then click on the “Insert” button (These
skills were covered in Level I.) 4. Drag the graphic to a corner of the publication (look for the guidelines) and
resize it to fit by dragging a corner “handle” (the small black rectangle on
5
Noteworkthe bIn theto ev
Usin
You
1
2
3
4
the corneanywher
. Save you
e: Publisherking in Backbackgrounde particular
ven or odd p
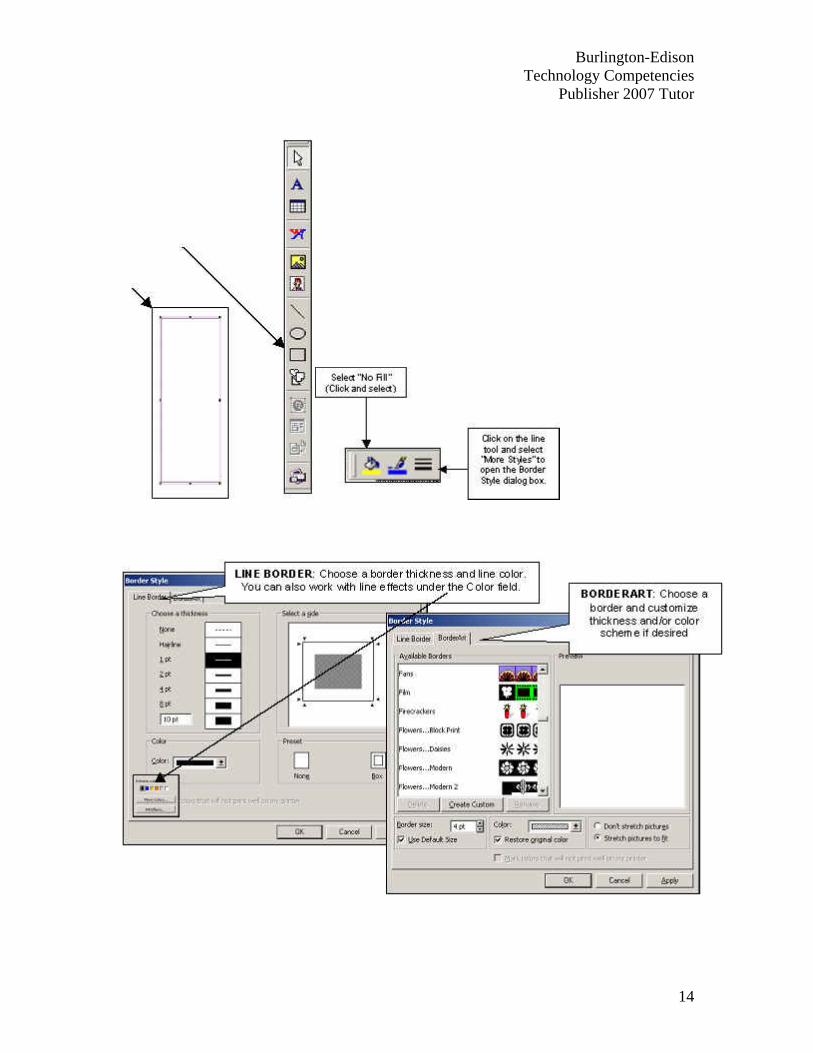
ng Borde
can also ad
. Click on Object to
. Click andguideline
. While yoclick on t
. Click on Style dia
er of the grae on the bour publicatio
r will automkground Vied of page 1 r layout we pages.
er Art
dd borders
the rectangoolbar. d drag to “des to determur rectanglthe Fill toolthe line toolog box.
aphic). If thorder and thon. TIP: Us
matically appew). You wi(or 2 depenhave chose
using Line
gle tool loca
draw” a rectmine the coe is selecte and select
ol and selec
he “handleshey will appse the Ctrl –
ply your borill have to cnding wheren, Publish
e Art.
ated on the
tangle wherrrect size.
ed (notice tht “No Fill.” ct “More Sty
T
s” are not spear. – s keyboar
rder to all pcopy and pae you first i
her applies
left side of
re you wan
he “handles
yles.” This
BurliTechnology C
Publishe
howing, clic
rd shortcut
pages (if yoaste the granserted yobackground
f your scree
t the borde
s” on your r
s will open t
ngton-EdisoCompetencieer 2007 Tuto
1
ck
to save!
u are aphic onto ur border). d formatting
en in the
r. Use you
rectangle),
the Border
on es or
3
g
ur
Burlington-Edison Technology Competencies
Publisher 2007 Tutor
14

Burlington-Edison Technology Competencies
Publisher 2007 Tutor
15
Adding Other Objects You might want to add a text or graphic frame to your publication. Objects can be added to the background or foreground of a publication. Remember this when setting up a template for classroom newsletter!
Adding a Text or WordArt Frame
Let’s add a title to our first page. Before you can enter text, you must first create a text frame (to put your text in). Publisher has two types of text frames.
1. Text Frames: Displays text that you format. 2. WordArt Frames: Displays text as art (artsy looking text) with limited
formatting.
Text Frames: 1. Click on the Text Tool (this turns your cursor into a text frame drawing
tool). 2. Click and drag (on your page) where you want your text frame. TIP: You
can adjust the size and shape of your text box by dragging the handles. 3. Click inside the frame and begin typing.
Note: Click inside your text frame to edit text. Highlight and Format your text as you would in Word. This includes alignment, font, style, size, color, etc.
Important TIP: To get rid of the hyphens, right click in the text frame and select “Proofing Tools > Hyphenation.” Deselect the “Hyphenate this Story” box.
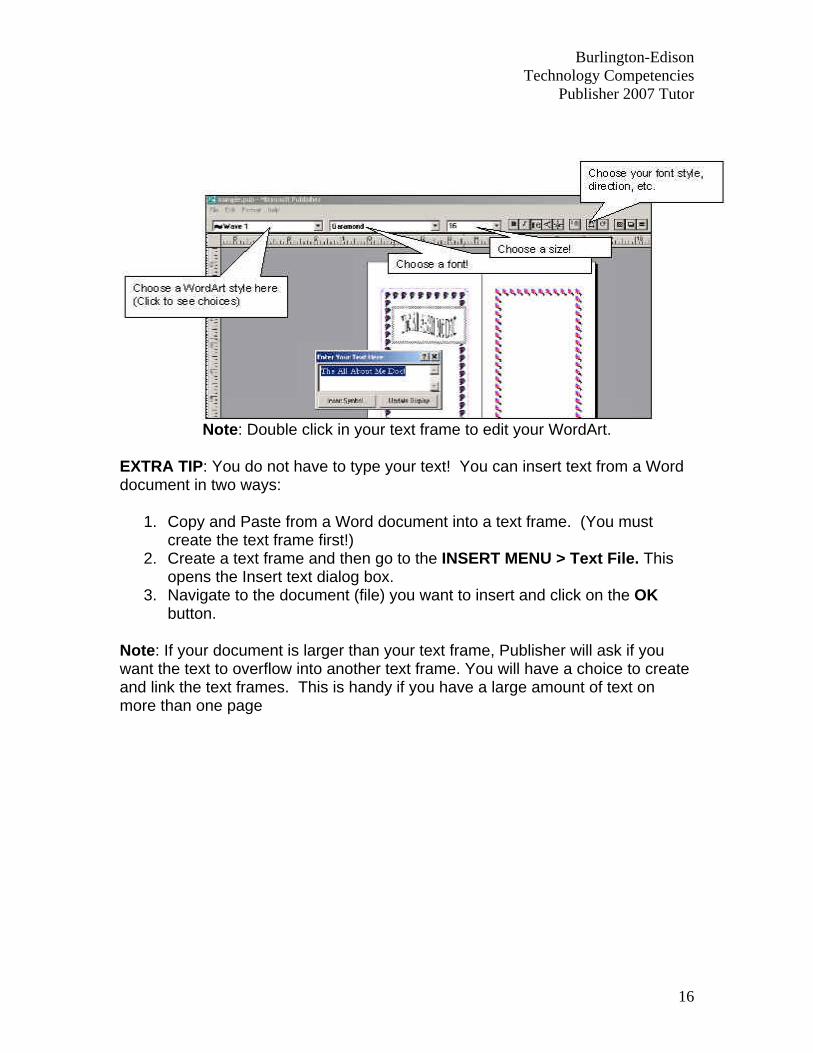
WordArt Frames: 1. Click on the WordArt tool (this turns your cursor into a text frame drawing
tool) 2. Click and drag (on your page) where you want your text frame. 3. The “Enter Your text Here” dialog box will appear and you can type your
text. 4. Format your WordArt! (See diagram)
Click outside your WordArt text frame when finished formatting (the WordArt formatting tools will disappear).
Burlington-Edison Technology Competencies
Publisher 2007 Tutor
16
Note: Double click in your text frame to edit your WordArt.
EXTRA TIP: You do not have to type your text! You can insert text from a Word document in two ways:
1. Copy and Paste from a Word document into a text frame. (You must create the text frame first!)
2. Create a text frame and then go to the INSERT MENU > Text File. This opens the Insert text dialog box.
3. Navigate to the document (file) you want to insert and click on the OK button.
Note: If your document is larger than your text frame, Publisher will ask if you want the text to overflow into another text frame. You will have a choice to create and link the text frames. This is handy if you have a large amount of text on more than one page

Burlington-Edison Technology Competencies
Publisher 2007 Tutor
17
Adding Tables to a Publication
1. Click on the “Insert Table” tool located on the Objects toolbar. 2. Click and drag to draw a table frame.
A dialog box will open asking you to format your new table.
Click on the OK button when you are finished formatting your table.
Add or Delete Rows or Columns in a Table
Add
1. Select the same number of rows or columns as the number of rows or columns you want to insert. (Click and drag to highlight rows or columns, or use the arrow shaped cursor to the left or top of the table)
2. Go to the TABLE MENU, drag down to Insert, and then select the Insert command you want (this menu changes depending on what you have highlighted).
Burlington-Edison Technology Competencies
Publisher 2007 Tutor
18
Delete
1. Highlight the columns or rows you want to delete.
Go to the TABLE MENU, drag down to Delete and then select the Delete command you want.
Merging Cells in Tables
You might want to merge cells in the first column or the top row of a table. See example below.
Sample table with merged cells Cell Cell Cell
To Merge Cells
1. Highlight the cells you want to merge. 2. Go to the TABLE MENU and select Merge Cells.
To “unmerge” (split) cells, highlight the merged cell and go to the TABLE MENU and select Split Cells.
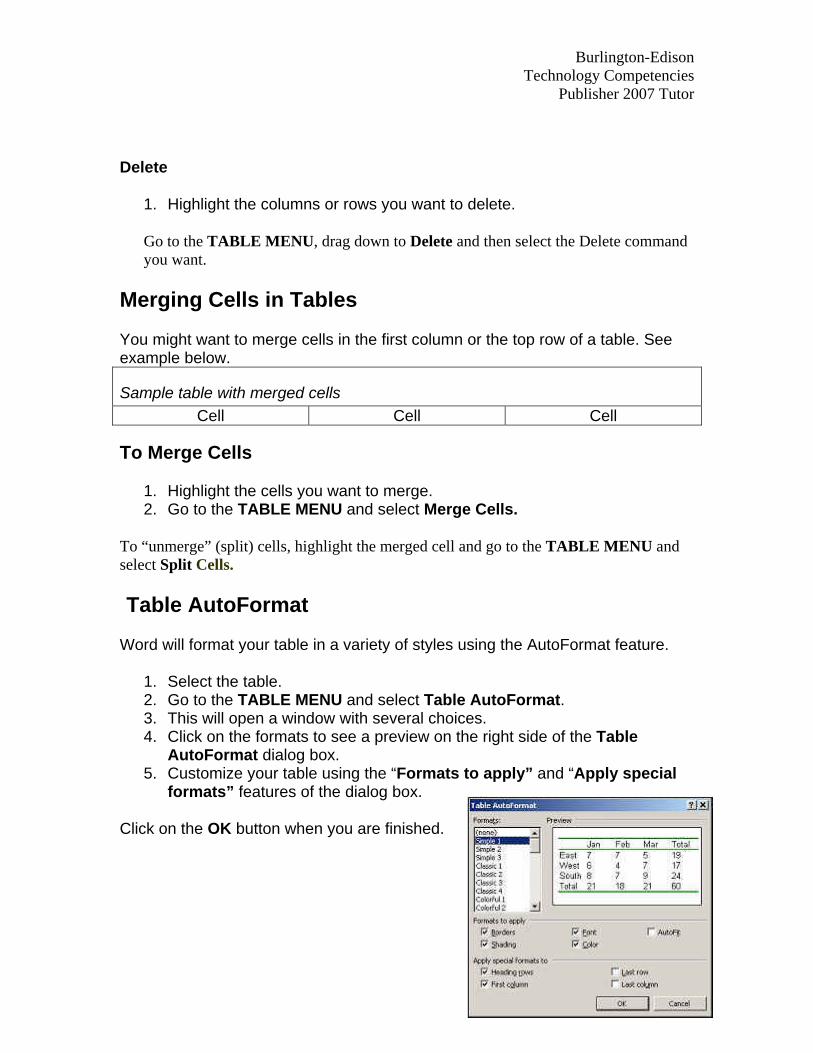
Table AutoFormat Word will format your table in a variety of styles using the AutoFormat feature.
1. Select the table. 2. Go to the TABLE MENU and select Table AutoFormat. 3. This will open a window with several choices. 4. Click on the formats to see a preview on the right side of the Table
AutoFormat dialog box. 5. Customize your table using the “Formats to apply” and “Apply special
formats” features of the dialog box.
Click on the OK button when you are finished.

Burlington-Edison Technology Competencies
Publisher 2007 Tutor
19
1. AutoFormat. 2. This will open a window with several choices. 3. Click on the formats to see a preview on the right side of the Table
AutoFormat dialog box. 4. Customize your table using the “Formats to apply” and “Apply special
formats” features of the dialog box.
Click on the OK button when you are finished.
Resize a row or column 1. Click the table to select it. 2. Position the mouse pointer over the row boundary or the column boundary
("A" or "B") until you see the Adjust pointer ("C").
Hold down the mouse button and drag the row or column boundary to a new position.
Formatting/Editing Table Text 1. Right click on the table.
Select an editing tool
Burlington-Edison Technology Competencies
Publisher 2007 Tutor
20
Using MS Publisher Help
There are two methods for using the “Help” files in Publisher.
1. Use Publisher Help
2. Use the Office Assistance
Use Publisher Help To get rid of your Office Assistant: Right click on the assistant and select “Options” and then deselect “Use the Office Assistant.”
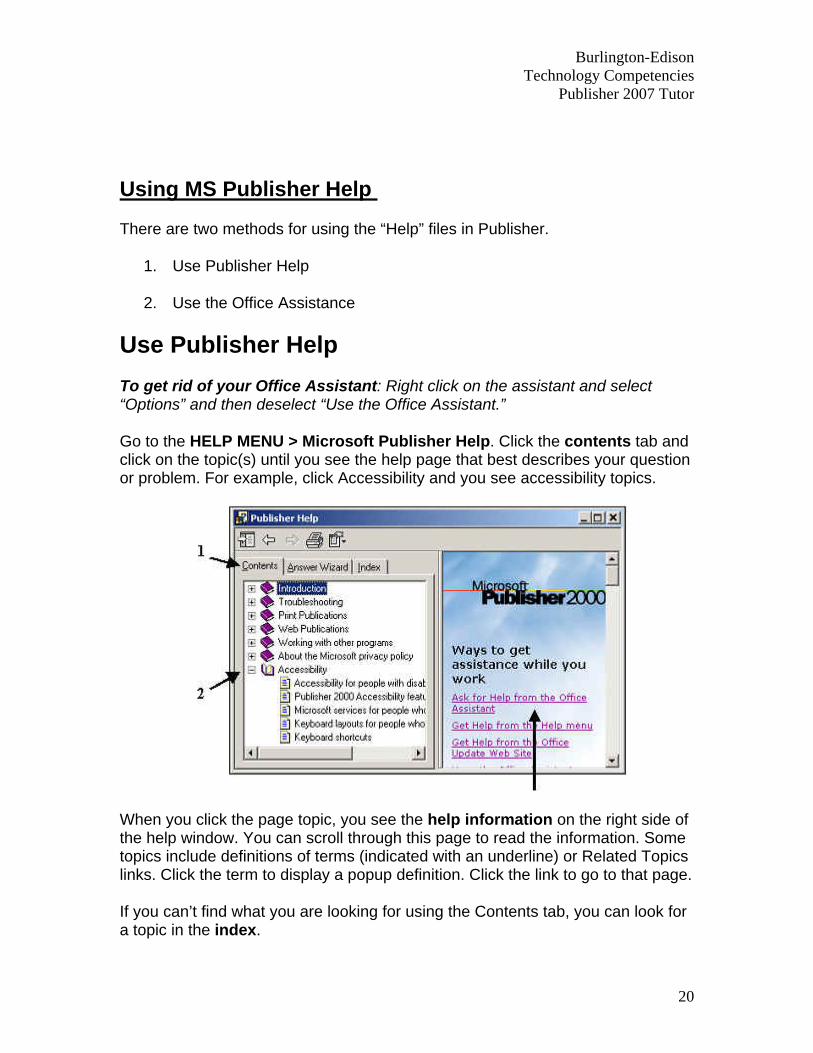
Go to the HELP MENU > Microsoft Publisher Help. Click the contents tab and click on the topic(s) until you see the help page that best describes your question or problem. For example, click Accessibility and you see accessibility topics.
When you click the page topic, you see the help information on the right side of the help window. You can scroll through this page to read the information. Some topics include definitions of terms (indicated with an underline) or Related Topics links. Click the term to display a popup definition. Click the link to go to that page.
If you can’t find what you are looking for using the Contents tab, you can look for a topic in the index.
Burlington-Edison Technology Competencies
Publisher 2007 Tutor
21
Click the Index tab and then type the word or phrase to find. As you type, Windows scrolls to display matching entries.
You need to double click on the topic to display the information on the right side of the screen.
Use the Office Assistant If your office assistant is not showing, go to the HELP MENU > Show Office Assistant.
You can also receive help from the Office Assistant.
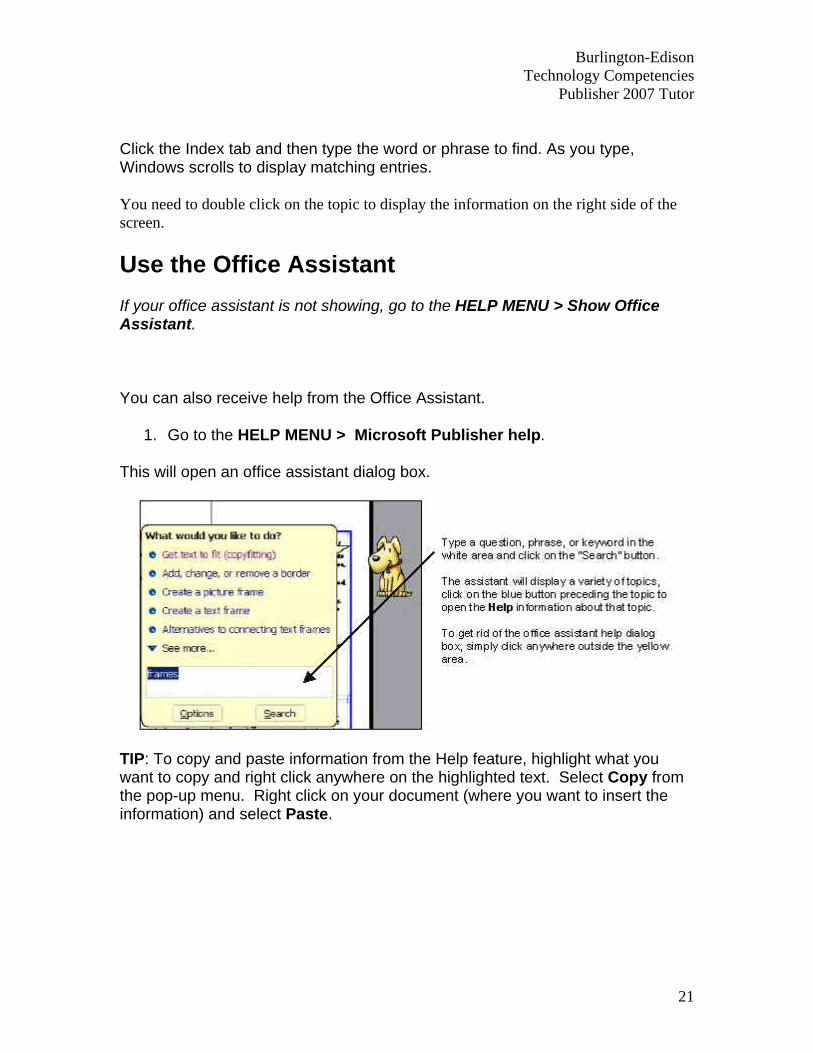
1. Go to the HELP MENU > Microsoft Publisher help.
This will open an office assistant dialog box.
TIP: To copy and paste information from the Help feature, highlight what you want to copy and right click anywhere on the highlighted text. Select Copy from the pop-up menu. Right click on your document (where you want to insert the information) and select Paste.