qlikview desktop installation...
TRANSCRIPT

1
Academic Program
QLIKVIEW DESKTOP INSTALLATION GUIDE
June 2013

2
Academic Program
QLIKVIEW DESKTOP INSTALLATION GUIDE
Follow the instructions below to install QlikView Desktop or watch this video brief video that walks you through
the steps.
If you have questions or are unable to successfully install QlikView Desktop, please contact
Qoncierge Service

3
Academic Program
Create a QlikView Account
1. Go to www.qlik.com to create a QlikView account
2. Click on Login, Get a QlikView Account
3. Create the new user information. After completion, a username and password will be emailed to you. This is the
account that you will use to download QlikView.
NOTE! Professors and students accounts must have the same company name. The company name will reflect
the university name listed in your application, unless otherwise suggested by Qlik. Using any other name than
what Qlik assigns will prohibit your download.
In Company Field:* Must enter Institution Name as
referenced in the Academic Program welcome email
In Job Title:* Enter Academic Program- Professor OR
Academic Program- Student
In Work Email:* Professor and student must use
Email affiliated with Academic Institution.

Academic Program
Download QlikView
.
1. Go to www.qlik.com
2. Go to Login: Log in to QlikView
3. Enter your login credentials in the single sign-on box
4. Go to Support: Download

Academic Program
5. You will be presented with two options:
a. Bookmarked Downloads: a pre-filtered selection of the most common downloads
b. Filter Your Options: manual selection
6. Select your download product (Tab)
a. QlikView - QlikView Desktop or Server/Publisher *

Academic Program
7. Select your preferred language
8. Select QlikView Type (Desktop or Server /Publisher)
9. Select Version Number and Release Number
10. Select File Function = Installation Program
11. Select your Operating System
12. Select Release Stage = latest SR(X) - Public Release (GA)
13. Click on the download link for your installation file and begin download

Academic Program
Installing QlikView
14. Select your language from the drop down list, and click OK.
15. Wait while the installation is prepared, according to the dialog box displayed.
16. When the Welcome dialog box opens, read the information and click Next.

Academic Program
17. Read the software license agreement and click “I accept the license agreement” (if this is the
case), then click Next.
18. Enter a user name and your organization name. Click Next to continue.

Academic Program
19. Verify the destination folder, or click change to select an alternative destination folder for the
program installation. Then click Next.
20. The Setup Type dialog appears. Selecting complete installs the following features to the folder
specified in the previous dialog:
The QlikView program and its help file
The QlikView Internet
Explorer Plug-In
Examples of QlikView functionality and features.

Academic Program
Selecting custom and clicking next opens a dialog box where you can specify which features to install.
Make the selections and click Next.

Academic Program
21. The installation is now ready to begin. Click Install to get started.
22. In the last dialog box, click Finish to complete the installation process.
Note: Always enter the QlikView license on the account that installed it; otherwise it might not
function properly.

Academic Program
LOGGING THE INSTALLATION
When Setup.exe is run, a log file is written to the temp folder of the user. The log file is called
QlikViewx86.wil for the x86 version and QlikViewx64.wil for the 64-bit version. Each time the installation
is run, a new file is generated, over writing the old log file.
QLIKVIEW SETTINGS FILE
As of version 10, all settings for QlikView are saved in a file instead of being written to the registry. The
file, Settings.ini, is located in C:\Users\username\AppData\Roaming\QlikTech\QlikView on Windows
Vista, Windows 7 and Windows 8. On older systems, the file is found in C:\Documents and
Settings\username\Application Data\QlikTech\QlikView.
The settings for QlikView OCX are found in the same file.

Academic Program
ENTERING YOUR QLIKVIEW
LICENCE KEY
1. Open QlikView Developer
2. 2. Select Settings -> User Preferences
3. Select License Tab

Academic Program
4. Click the Change button
5. Enter your 16-digit license key, enter your five-digit control number.
If you are unable to locate your 16-digit license key or five-digit control number, please contact
Qoncierge Service
c. Enter a user name (create this now)
d. Enter your organization name (university name)
e. Click Next

Academic Program
6. Select your region, and click OK
7. Read the license agreement, and click “I Agree” to accept it
Academic Program
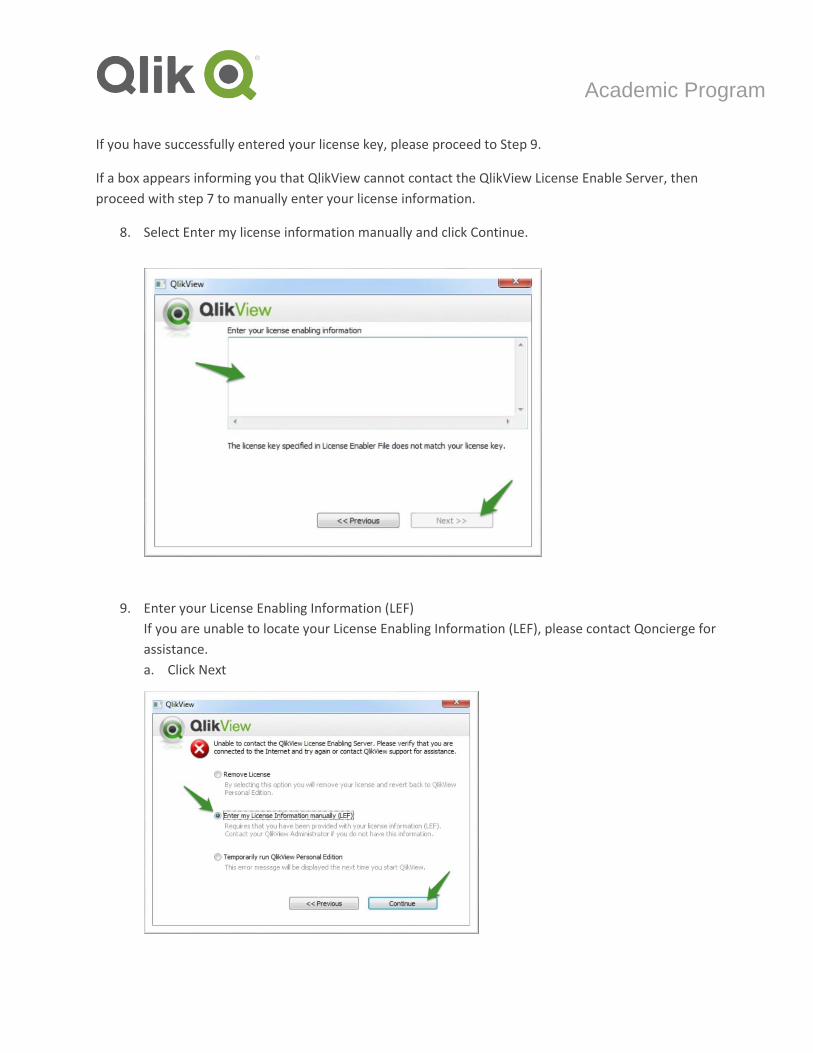
If you have successfully entered your license key, please proceed to Step 9.
If a box appears informing you that QlikView cannot contact the QlikView License Enable Server, then
proceed with step 7 to manually enter your license information.
8. Select Enter my license information manually and click Continue.
9. Enter your License Enabling Information (LEF)
If you are unable to locate your License Enabling Information (LEF), please contact Qoncierge for
assistance.
a. Click Next

Academic Program
b. Click Continue
c. Click OK
d. You are now on the home screen. You should see confirmation that QlikView is now using
the license key you just entered.
Please contact Qoncierge Service if you were unable to successfully enter your license key. If you
purchased QlikView from one of our partners, please contact your partner representative directly.
© 2014 QlikTech International AB. All rights reserved. Qlik®, QlikView®, QlikTech®, and the QlikTech logos are trademarks of QlikTech International AB which have been registered in
multiple countries. Other marks and logos mentioned herein are trademarks or registered trademarks of their respective owners.