quantstudio (for human identification) · 3 instrument drawer – contains sample plate. the...
TRANSCRIPT

For Research, Forensic, or Paternity Use Only. For licensing and limited use restrictionsvisit thermofisher.com/HIDlicensing.
QuantStudio™ 5 Real-Time PCR Instrument(for Human Identification)USER GUIDE
Installation, maintenance, and administration
for use with:HID Real‑Time PCR Analysis Software v1.3Publication Number MAN0017162
Revision A.0

Manufacturer: Life Technologies Holdings Pte Ltd | Block 33 | Marsiling Industrial Estate Road 3 | #07-06, Singapore 739256
The information in this guide is subject to change without notice.
DISCLAIMER: TO THE EXTENT ALLOWED BY LAW, LIFE TECHNOLOGIES AND/OR ITS AFFILIATE(S) WILL NOT BE LIABLE FOR SPECIAL, INCIDENTAL,INDIRECT, PUNITIVE, MULTIPLE, OR CONSEQUENTIAL DAMAGES IN CONNECTION WITH OR ARISING FROM THIS DOCUMENT, INCLUDING YOURUSE OF IT.
Revision history: Pub. No. MAN0017162
Revision Date DescriptionA.0 15 June 2017 New document for Human Identification workflows using instrument firmware v1.3.1.
Important Licensing Information: This product may be covered by one or more Limited Use Label Licenses. By use of this product, you accept theterms and conditions of all applicable Limited Use Label Licenses.Trademarks: All trademarks are the property of Thermo Fisher Scientific and its subsidiaries unless otherwise specified. Microsoft and Windows aretrademarks of Microsoft Corporation. Pentium is a trademark of Intel Corporation.
©2017 Thermo Fisher Scientific Inc. All rights reserved.

Contents
■ CHAPTER 1 Product information . . . . . . . . . . . . . . . . . . . . . . . . . . . . . . . . . . . . . . . 7
Instrument overview . . . . . . . . . . . . . . . . . . . . . . . . . . . . . . . . . . . . . . . . . . . . . . . . . . . . . . . . . . . . . 7
Installation, verification, and calibration . . . . . . . . . . . . . . . . . . . . . . . . . . . . . . . . . . . . . . . . . . . 8
Instrument filters and supported dyes . . . . . . . . . . . . . . . . . . . . . . . . . . . . . . . . . . . . . . . . . . . . . 9System dyes . . . . . . . . . . . . . . . . . . . . . . . . . . . . . . . . . . . . . . . . . . . . . . . . . . . . . . . . . . . . . . . 9Custom dyes . . . . . . . . . . . . . . . . . . . . . . . . . . . . . . . . . . . . . . . . . . . . . . . . . . . . . . . . . . . . . . 10
Parts of the instrument . . . . . . . . . . . . . . . . . . . . . . . . . . . . . . . . . . . . . . . . . . . . . . . . . . . . . . . . . 10
Parts of the home screen . . . . . . . . . . . . . . . . . . . . . . . . . . . . . . . . . . . . . . . . . . . . . . . . . . . . . . . 11
Comparison of features in desktop software and the instrument . . . . . . . . . . . . . . . . . . . . . 13
■ CHAPTER 2 Install the instrument . . . . . . . . . . . . . . . . . . . . . . . . . . . . . . . . . . . . 14
Workflow: Install the instrument . . . . . . . . . . . . . . . . . . . . . . . . . . . . . . . . . . . . . . . . . . . . . . . . . 14
Before you begin installation . . . . . . . . . . . . . . . . . . . . . . . . . . . . . . . . . . . . . . . . . . . . . . . . . . . . 14
Unpack and install the instrument . . . . . . . . . . . . . . . . . . . . . . . . . . . . . . . . . . . . . . . . . . . . . . . 15
Power on and follow the startup wizard . . . . . . . . . . . . . . . . . . . . . . . . . . . . . . . . . . . . . . . . . . . 15
Instrument and computer connections . . . . . . . . . . . . . . . . . . . . . . . . . . . . . . . . . . . . . . . . . . . . 16
Computer-to-instrument configuration . . . . . . . . . . . . . . . . . . . . . . . . . . . . . . . . . . . . . . . . . . . 17Firewall ports that must be open . . . . . . . . . . . . . . . . . . . . . . . . . . . . . . . . . . . . . . . . . . . . 17
■ CHAPTER 3 General procedures to use the instrument . . . . . . . . . . . . . 18
Precautions for use . . . . . . . . . . . . . . . . . . . . . . . . . . . . . . . . . . . . . . . . . . . . . . . . . . . . . . . . . . . . 18
Power on the instrument . . . . . . . . . . . . . . . . . . . . . . . . . . . . . . . . . . . . . . . . . . . . . . . . . . . . . . . . 19
Power off the instrument . . . . . . . . . . . . . . . . . . . . . . . . . . . . . . . . . . . . . . . . . . . . . . . . . . . . . . . 19
Sign in . . . . . . . . . . . . . . . . . . . . . . . . . . . . . . . . . . . . . . . . . . . . . . . . . . . . . . . . . . . . . . . . . . . . . . . . 20
Sign out . . . . . . . . . . . . . . . . . . . . . . . . . . . . . . . . . . . . . . . . . . . . . . . . . . . . . . . . . . . . . . . . . . . . . . . 20
Load and unload plate in the instrument . . . . . . . . . . . . . . . . . . . . . . . . . . . . . . . . . . . . . . . . . . 21
View real-time data and plots on the instrument touchscreen . . . . . . . . . . . . . . . . . . . . . . . . 22Adjust the display of real-time plots on the instrument touchscreen . . . . . . . . . . . . . . 22
Transfer EDS files from the instrument home screen . . . . . . . . . . . . . . . . . . . . . . . . . . . . . . . 22
QuantStudio™ 5 Real-Time PCR Instrument User Guide (for Human Identification) | MAN0017162 A.0 3
■ CHAPTER 4 Configure the instrument and manageinstrument profiles . . . . . . . . . . . . . . . . . . . . . . . . . . . . . . . . . . . . . . . . . . . . . . . . . . . . . . . 23
Initial start up . . . . . . . . . . . . . . . . . . . . . . . . . . . . . . . . . . . . . . . . . . . . . . . . . . . . . . . . . . . . . . . . . 23
Overview of instrument settings (Administrator) . . . . . . . . . . . . . . . . . . . . . . . . . . . . . . . . . . . 24
Overview of instrument settings (Standard or Guest) . . . . . . . . . . . . . . . . . . . . . . . . . . . . . . . 26
Manage instrument profiles . . . . . . . . . . . . . . . . . . . . . . . . . . . . . . . . . . . . . . . . . . . . . . . . . . . . . 27Instrument profiles and signed-in users . . . . . . . . . . . . . . . . . . . . . . . . . . . . . . . . . . . . . . 27Create an administrator instrument profile during initial start-up . . . . . . . . . . . . . . . . 27Create a new instrument profile . . . . . . . . . . . . . . . . . . . . . . . . . . . . . . . . . . . . . . . . . . . . . 28Edit an instrument profile . . . . . . . . . . . . . . . . . . . . . . . . . . . . . . . . . . . . . . . . . . . . . . . . . . . 28Manage all instrument profiles . . . . . . . . . . . . . . . . . . . . . . . . . . . . . . . . . . . . . . . . . . . . . . 28
Require instrument profile sign-in . . . . . . . . . . . . . . . . . . . . . . . . . . . . . . . . . . . . . . . . . . . . . . . 29
Manage the sign out timer . . . . . . . . . . . . . . . . . . . . . . . . . . . . . . . . . . . . . . . . . . . . . . . . . . . . . . 29
Manage the instrument name . . . . . . . . . . . . . . . . . . . . . . . . . . . . . . . . . . . . . . . . . . . . . . . . . . . . 29
Enable sleep mode . . . . . . . . . . . . . . . . . . . . . . . . . . . . . . . . . . . . . . . . . . . . . . . . . . . . . . . . . . . . . 30
Set the idling temperature for the heated cover . . . . . . . . . . . . . . . . . . . . . . . . . . . . . . . . . . . . 30
Set the date and time . . . . . . . . . . . . . . . . . . . . . . . . . . . . . . . . . . . . . . . . . . . . . . . . . . . . . . . . . . . 30
Restore factory defaults . . . . . . . . . . . . . . . . . . . . . . . . . . . . . . . . . . . . . . . . . . . . . . . . . . . . . . . . 31
Enable Remote Monitoring Service . . . . . . . . . . . . . . . . . . . . . . . . . . . . . . . . . . . . . . . . . . . . . . . 31
Update instrument software . . . . . . . . . . . . . . . . . . . . . . . . . . . . . . . . . . . . . . . . . . . . . . . . . . . . . 32
■ CHAPTER 5 Calibrate and verify instrument performance . . . . . . . . . 33
Calibration and verification schedule . . . . . . . . . . . . . . . . . . . . . . . . . . . . . . . . . . . . . . . . . . . . . 34
Calibration descriptions . . . . . . . . . . . . . . . . . . . . . . . . . . . . . . . . . . . . . . . . . . . . . . . . . . . . . . . . 35
View calibration status and set reminders in the instrument . . . . . . . . . . . . . . . . . . . . . . . . . 36
Perform ROI/uniformity, background, and dye calibrations . . . . . . . . . . . . . . . . . . . . . . . . . . 36Workflow: Calibration . . . . . . . . . . . . . . . . . . . . . . . . . . . . . . . . . . . . . . . . . . . . . . . . . . . . . . 36Prepare a calibration plate . . . . . . . . . . . . . . . . . . . . . . . . . . . . . . . . . . . . . . . . . . . . . . . . . . 37Perform calibrations . . . . . . . . . . . . . . . . . . . . . . . . . . . . . . . . . . . . . . . . . . . . . . . . . . . . . . . 38View calibration images . . . . . . . . . . . . . . . . . . . . . . . . . . . . . . . . . . . . . . . . . . . . . . . . . . . . 39Identify contamination . . . . . . . . . . . . . . . . . . . . . . . . . . . . . . . . . . . . . . . . . . . . . . . . . . . . . . 40Create a background plate (optional) . . . . . . . . . . . . . . . . . . . . . . . . . . . . . . . . . . . . . . . . . 40
Contents
4 QuantStudio™ 5 Real-Time PCR Instrument User Guide (for Human Identification) | MAN0017162 A.0
Calibrate dyes for HID‑validated workflows . . . . . . . . . . . . . . . . . . . . . . . . . . . . . . . . . . . . . . . . 41Workflow: Calibrate dyes for HID‑validated workflows . . . . . . . . . . . . . . . . . . . . . . . . . . 41Prepare a calibration plate for HID‑validated workflows . . . . . . . . . . . . . . . . . . . . . . . . 41Add custom dyes to the instrument for HID‑validated workflows . . . . . . . . . . . . . . . . . 42Perform a custom dye calibration for HID‑validated workflows . . . . . . . . . . . . . . . . . . 42
Perform instrument verification using RNase P plates . . . . . . . . . . . . . . . . . . . . . . . . . . . . . . 44Instrument verification description . . . . . . . . . . . . . . . . . . . . . . . . . . . . . . . . . . . . . . . . . . 44RNase P instrument verification plate . . . . . . . . . . . . . . . . . . . . . . . . . . . . . . . . . . . . . . . . 45Performance specifications pass criteria . . . . . . . . . . . . . . . . . . . . . . . . . . . . . . . . . . . . . 45Prepare an RNase P plate . . . . . . . . . . . . . . . . . . . . . . . . . . . . . . . . . . . . . . . . . . . . . . . . . . . 46Perform RNase P verification . . . . . . . . . . . . . . . . . . . . . . . . . . . . . . . . . . . . . . . . . . . . . . . 47
■ CHAPTER 6 Maintain the instrument . . . . . . . . . . . . . . . . . . . . . . . . . . . . . . . . . 48
Backup or restore the instrument . . . . . . . . . . . . . . . . . . . . . . . . . . . . . . . . . . . . . . . . . . . . . . . . 48
Decontaminate the sample block . . . . . . . . . . . . . . . . . . . . . . . . . . . . . . . . . . . . . . . . . . . . . . . . . 49Materials required . . . . . . . . . . . . . . . . . . . . . . . . . . . . . . . . . . . . . . . . . . . . . . . . . . . . . . . . . 49Clean the sample block . . . . . . . . . . . . . . . . . . . . . . . . . . . . . . . . . . . . . . . . . . . . . . . . . . . . . 49Detailed procedures for cleaning the sample block . . . . . . . . . . . . . . . . . . . . . . . . . . . . . 51
Replace the instrument fuses . . . . . . . . . . . . . . . . . . . . . . . . . . . . . . . . . . . . . . . . . . . . . . . . . . . . 52Materials required . . . . . . . . . . . . . . . . . . . . . . . . . . . . . . . . . . . . . . . . . . . . . . . . . . . . . . . . . 52Replace the fuses . . . . . . . . . . . . . . . . . . . . . . . . . . . . . . . . . . . . . . . . . . . . . . . . . . . . . . . . . . 52
Store, move, or ship the instrument . . . . . . . . . . . . . . . . . . . . . . . . . . . . . . . . . . . . . . . . . . . . . . 53Prepare the instrument to store, move, or ship . . . . . . . . . . . . . . . . . . . . . . . . . . . . . . . . 53Move the instrument . . . . . . . . . . . . . . . . . . . . . . . . . . . . . . . . . . . . . . . . . . . . . . . . . . . . . . . 53Return the instrument for service . . . . . . . . . . . . . . . . . . . . . . . . . . . . . . . . . . . . . . . . . . . . 54
■ APPENDIX A Troubleshooting . . . . . . . . . . . . . . . . . . . . . . . . . . . . . . . . . . . . . . . . . 55
Instrument troubleshooting . . . . . . . . . . . . . . . . . . . . . . . . . . . . . . . . . . . . . . . . . . . . . . . . . . . . . 55
Troubleshoot calibration failure . . . . . . . . . . . . . . . . . . . . . . . . . . . . . . . . . . . . . . . . . . . . . . . . . . 56
Troubleshoot verification failure . . . . . . . . . . . . . . . . . . . . . . . . . . . . . . . . . . . . . . . . . . . . . . . . . 57
■ APPENDIX B Parts and materials . . . . . . . . . . . . . . . . . . . . . . . . . . . . . . . . . . . . . 58
Kits, consumables, accessories, and reagents . . . . . . . . . . . . . . . . . . . . . . . . . . . . . . . . . . . . . 58
Consumables (96‑well, 0.2‑mL format) . . . . . . . . . . . . . . . . . . . . . . . . . . . . . . . . . . . . . . . . . . . . 59
Accessories . . . . . . . . . . . . . . . . . . . . . . . . . . . . . . . . . . . . . . . . . . . . . . . . . . . . . . . . . . . . . . . . . . . 60
General-use materials and consumables . . . . . . . . . . . . . . . . . . . . . . . . . . . . . . . . . . . . . . . . . 60
Contents
QuantStudio™ 5 Real-Time PCR Instrument User Guide (for Human Identification) | MAN0017162 A.0 5

■ APPENDIX C Instrument specification and layout . . . . . . . . . . . . . . . . . . . 61
Configured system dimensions . . . . . . . . . . . . . . . . . . . . . . . . . . . . . . . . . . . . . . . . . . . . . . . . . . 62
Instrument and computer connections . . . . . . . . . . . . . . . . . . . . . . . . . . . . . . . . . . . . . . . . . . . . 63
Instrument clearances . . . . . . . . . . . . . . . . . . . . . . . . . . . . . . . . . . . . . . . . . . . . . . . . . . . . . . . . . . 64
Electrical requirements . . . . . . . . . . . . . . . . . . . . . . . . . . . . . . . . . . . . . . . . . . . . . . . . . . . . . . . . . 64
Environmental requirements . . . . . . . . . . . . . . . . . . . . . . . . . . . . . . . . . . . . . . . . . . . . . . . . . . . . 65
■ APPENDIX D Safety . . . . . . . . . . . . . . . . . . . . . . . . . . . . . . . . . . . . . . . . . . . . . . . . . . . . . 66
Symbols on this instrument . . . . . . . . . . . . . . . . . . . . . . . . . . . . . . . . . . . . . . . . . . . . . . . . . . . . . 67Conformity symbols . . . . . . . . . . . . . . . . . . . . . . . . . . . . . . . . . . . . . . . . . . . . . . . . . . . . . . . . 68
Safety alerts on this instrument . . . . . . . . . . . . . . . . . . . . . . . . . . . . . . . . . . . . . . . . . . . . . . . . . . 69Location of safety labels on the instrument . . . . . . . . . . . . . . . . . . . . . . . . . . . . . . . . . . . 69
Safety information for instruments not manufactured by Thermo Fisher Scientific . . . . . 70
Instrument safety . . . . . . . . . . . . . . . . . . . . . . . . . . . . . . . . . . . . . . . . . . . . . . . . . . . . . . . . . . . . . . 70General . . . . . . . . . . . . . . . . . . . . . . . . . . . . . . . . . . . . . . . . . . . . . . . . . . . . . . . . . . . . . . . . . . 70Physical injury . . . . . . . . . . . . . . . . . . . . . . . . . . . . . . . . . . . . . . . . . . . . . . . . . . . . . . . . . . . . 71Electrical . . . . . . . . . . . . . . . . . . . . . . . . . . . . . . . . . . . . . . . . . . . . . . . . . . . . . . . . . . . . . . . . . 72Cleaning and decontamination . . . . . . . . . . . . . . . . . . . . . . . . . . . . . . . . . . . . . . . . . . . . . . . 72
Safety and electromagnetic compatibility (EMC) standards . . . . . . . . . . . . . . . . . . . . . . . . . . 72Safety compliance . . . . . . . . . . . . . . . . . . . . . . . . . . . . . . . . . . . . . . . . . . . . . . . . . . . . . . . . . 73EMC . . . . . . . . . . . . . . . . . . . . . . . . . . . . . . . . . . . . . . . . . . . . . . . . . . . . . . . . . . . . . . . . . . . . . . 73Environmental design . . . . . . . . . . . . . . . . . . . . . . . . . . . . . . . . . . . . . . . . . . . . . . . . . . . . . . 74
Chemical safety . . . . . . . . . . . . . . . . . . . . . . . . . . . . . . . . . . . . . . . . . . . . . . . . . . . . . . . . . . . . . . . . 74
Biological hazard safety . . . . . . . . . . . . . . . . . . . . . . . . . . . . . . . . . . . . . . . . . . . . . . . . . . . . . . . . . 75
■ Documentation and support . . . . . . . . . . . . . . . . . . . . . . . . . . . . . . . . . . . . . . . . . . . . . 76
Related documentation . . . . . . . . . . . . . . . . . . . . . . . . . . . . . . . . . . . . . . . . . . . . . . . . . . . . . . . . . 76
Obtain information from the Help system . . . . . . . . . . . . . . . . . . . . . . . . . . . . . . . . . . . . . . . . . 76
Customer and technical support . . . . . . . . . . . . . . . . . . . . . . . . . . . . . . . . . . . . . . . . . . . . . . . . . 76
Limited product warranty . . . . . . . . . . . . . . . . . . . . . . . . . . . . . . . . . . . . . . . . . . . . . . . . . . . . . . . 76
Index . . . . . . . . . . . . . . . . . . . . . . . . . . . . . . . . . . . . . . . . . . . . . . . . . . . . . . . . . . . . . . . . . . . . . . . 77
Contents
6 QuantStudio™ 5 Real-Time PCR Instrument User Guide (for Human Identification) | MAN0017162 A.0

Product information
■ Instrument overview . . . . . . . . . . . . . . . . . . . . . . . . . . . . . . . . . . . . . . . . . . . . . . . . . . 7
■ Installation, verification, and calibration . . . . . . . . . . . . . . . . . . . . . . . . . . . . . . . . . . 8
■ Instrument filters and supported dyes . . . . . . . . . . . . . . . . . . . . . . . . . . . . . . . . . . . . 9
■ Parts of the instrument . . . . . . . . . . . . . . . . . . . . . . . . . . . . . . . . . . . . . . . . . . . . . . . . 10
■ Parts of the home screen . . . . . . . . . . . . . . . . . . . . . . . . . . . . . . . . . . . . . . . . . . . . . . . 11
■ Comparison of features in desktop software and the instrument . . . . . . . . . . . . 13
Instrument overview
The QuantStudio™ 5 Real-Time PCR Instrument uses fluorescence-based polymerasechain reaction (PCR) reagents to perform:
• Quantitative detection of target nucleic acid sequences (targets).• Qualitative detection of targets (endpoint analysis, genotyping, and
presence/absence).
The instrument is configured with a 96-well 0.2-mL fixed block (6 color de-coupled).
To run experiments using HID assays, the instrument must be integrated with theHID Real-Time PCR Analysis Software v1.3.
1
QuantStudio™ 5 Real-Time PCR Instrument User Guide (for Human Identification) | MAN0017162 A.0 7

Installation, verification, and calibration
Your HID Support Representative will contact you to schedule the installation. Duringinstrument installation, the service representative will perform the initial instrumentverification using an RNase P plate and calibrate the instrument for the versions ofABY™ and JUN™ dye used by HID-validated workflows.
Instruments are factory calibrated, so ROI, uniformity, background, and system dyecalibrations are not necessary at installation.
You do have the option to install the instrument yourself. Before first use of theinstrument, complete the following tasks:
• Install the instrument (see page 14).• Verify instrument performance (see page 44).• Perform custom dye calibrations for ABY™ and JUN™ dyes (see page 41).
After installation, perform regular calibration and verification according to the “Calibration and verification schedule“ on page 34.
Chapter 1 Product informationInstallation, verification, and calibration1
8 QuantStudio™ 5 Real-Time PCR Instrument User Guide (for Human Identification) | MAN0017162 A.0

Instrument filters and supported dyes
The instrument uses a de-coupled six-color optical filter set that supports the dyesshown in the following table and figure. For more information about the spectral dyecalibration kits available for the instrument, contact your HID SupportRepresentative.
Peakfilter Color
Filter wavelength(nm)[1] Factory-calibrated
dyesExample
custom dyesExcitation Emission
x1-m1 Blue 470 ± 15 520 ± 15 FAM™,SYBR™ Green SYT09
x2-m2 Green 520 ± 10 558 ± 12 VIC™ JOE™,HEX™, TET™ [2]
x3-m3 Yellow 550 ± 10 587 ± 10 NED™, TAMRA™,ABY™ [3] Cy®3
x4-m4 Orange 580 ± 10 623 ± 14 ROX™, JUN™ [3] Texas Red™
x5-m5 Red 640 ± 10 682 ± 14 MUSTANGPURPLE™, Cy®5 LIZ™
x6-m6 Deep-Red 662 ± 10 711 ± 12 None [4] Cy® 5.5
[1] The central wavelengths are the optimized wavelengths.[2] The HEX™ and TET™ dyes from Thermo Fisher Scientific fall within the emission wavelength range of the
system, therefore they can be added and adapted for use on the instrument.[3] HID-validated workflows use versions of ABY™ and JUN™ dyes that are considered custom dyes.[4] This filter set currently does not support any dyes supplied by Thermo Fisher Scientific.
Filters
Wavelength(nm)
1 2 3 4 5
x1-m1 x2-m2 x3-m3 x4-m4 x5-m5 x6-m6
EmissionSpectra
1 x1-m1 — FAM™, SYBR™ Green2 x2-m2 — VIC™
3 x3-m3 — ABY™, NED™, Cy®3, TAMRA™
4 x4-m4 — JUN™, ROX™, Texas Red™
5 x5-m5 — Cy®5, MUSTANG PURPLE™
System dyes
Chapter 1 Product informationInstrument filters and supported dyes 1
QuantStudio™ 5 Real-Time PCR Instrument User Guide (for Human Identification) | MAN0017162 A.0 9

The instrument can run assays designed with custom dyes. Custom dyes include:• Dyes that are not supplied by Thermo Fisher Scientific.• Dyes or versions of dyes that are not factory-calibrated on the instrument.
Note: HID-validated workflows use versions of ABY™ and JUN™ dyes that areconsidered custom dyes for the instrument. To calibrate these ABY™ and JUN™
dyes, see page 41. To calibrate any other custom dye, contact your HID SupportRepresentative.
Parts of the instrument
1
2
3
1 Touchscreen – Controls the instrument.2 USB port – For connection to an external network drive or external data storage device.3 Instrument drawer – Contains sample plate.
The instrument includes three additional USB ports on the back of the instrument.
Note: The instrument recognizes only one external storage device at a time for datatransfer.
Custom dyes
Chapter 1 Product informationParts of the instrument1
10 QuantStudio™ 5 Real-Time PCR Instrument User Guide (for Human Identification) | MAN0017162 A.0
Parts of the home screen
2
4
5
6
1
3
9
8
7
1 Avatar and Instrument name2 Eject instrument drawer icon3 Help system icon4 Status dial5 Instrument profile name;
instrument block type
6 Settings button7 Access templates buttons (not applicable
for HID‑validated workflows)8 Connectivity icons9 Sign In (or My Profile) button
Table 1 Parts of the home screen
Element of the home screen Function
Avatar and Instrument name Set by the administrator to uniquely identify the instrument.
Eject instrument drawer icon Touch to open or close the instrument drawer.
Help icon Touch to launch the touchscreen Help system to access step-by-stepinstructions.
Status dial When the instrument is not in use – Displays Set up run.
Note: Instrument runs must be set up and started from the desktop software.
When the instrument is in use – Displays the sample block temperature, theelapsed run time, and the run status.
Note: Swipe the dial to the left or touch to access real-time views of the run.
Instrument profile usernameand block type
Displays the username of a signed-in user and the instrument block type.
Note: If no user is signed in, the instrument defaults to the Guest profile.
Chapter 1 Product informationParts of the home screen 1
QuantStudio™ 5 Real-Time PCR Instrument User Guide (for Human Identification) | MAN0017162 A.0 11

Element of the home screen Function
Settings button Touch Settings to configure, calibrate, or learn about the instrument.
Connectivity icons • – The instrument is connected via a wired configuration.
• – A USB drive is plugged into the instrument.
Sign In button
(My Profile button when a useris signed in)
• Touch Sign In to sign into an instrument profile.
• Touch My Profile to change instrument profile settings.
Chapter 1 Product informationParts of the home screen1
12 QuantStudio™ 5 Real-Time PCR Instrument User Guide (for Human Identification) | MAN0017162 A.0

Comparison of features in desktop software and the instrument
To run experiments using HID assays, the instrument must be integrated with theHID Real-Time PCR Analysis Software v1.3.
Actions Desktop software Instrument
Enter or edit properties [1]
Edit experiment name; enter user name ✓ —
Select instrument, experiment type, chemistry, run mode ✓ —
Edit method [1]
Edit the thermal protocol, reaction volume, optical filter selection ✓ —
Set up plate and well details [1]
Define samples ✓ —
Assign samples to wells ✓ —
Define targets ✓ —
Assign targets to wells ✓ —
Instrument run
Start an instrument run [1] ✓ —
Monitor a run in progress ✓ ✓
View time remaining ✓ ✓
View real-time plots — ✓
Run results
Review run results (analyzed run data) ✓ —
Configure analysis settings ✓ —
Export
Select export options for run data and run results (analyzed run data) ✓ —
Export run data ✓ ✓
Export template settings ✓ —
[1] Feature is available in the instrument touchscreen, but it is not validated for the HID assay workflow.
Chapter 1 Product informationComparison of features in desktop software and the instrument 1
QuantStudio™ 5 Real-Time PCR Instrument User Guide (for Human Identification) | MAN0017162 A.0 13
Install the instrument
■ Workflow: Install the instrument . . . . . . . . . . . . . . . . . . . . . . . . . . . . . . . . . . . . . . . 14
■ Before you begin installation . . . . . . . . . . . . . . . . . . . . . . . . . . . . . . . . . . . . . . . . . . . 14
■ Unpack and install the instrument . . . . . . . . . . . . . . . . . . . . . . . . . . . . . . . . . . . . . . 15
■ Power on and follow the startup wizard . . . . . . . . . . . . . . . . . . . . . . . . . . . . . . . . . 15
■ Instrument and computer connections . . . . . . . . . . . . . . . . . . . . . . . . . . . . . . . . . . 16
■ Computer-to-instrument configuration . . . . . . . . . . . . . . . . . . . . . . . . . . . . . . . . . . 17
Workflow: Install the instrument
Perform all steps in “Before you begin installation“ on page 14
▼
“Unpack and install the instrument“ on page 15
▼
“Power on and follow the startup wizard“ on page 15
▼
“Perform instrument verification using RNase P plates“ on page 44
▼
“Calibrate dyes for HID‑validated workflows“ on page 41
Before you begin installation
A Thermo Fisher Scientific service representative will contact you to schedule aninstallation. However, you do have the option to install the instrument yourself.
Before starting the installation:• Review the site requirements in the QuantStudio™ 5 Real-Time PCR Instrument Site
Preparation Guide (for Human Identification) (Pub. No. MAN0016701).• Review the HID-validated computer-to-instrument configuration (page 16).
2
14 QuantStudio™ 5 Real-Time PCR Instrument User Guide (for Human Identification) | MAN0017162 A.0

Unpack and install the instrument
1. Prepare the installation site as described in the QuantStudio™ 5 Real-Time PCRInstrument Site Preparation Guide (for Human Identification) (Pub.No. MAN0016701).
2. Follow the pre-printed instructions on the instrument box to unpack theinstrument, accessories, and reference documentation. Save the packing materialfor future use or recycle it.The instrument box contains:
• Reference documentation: Welcome note, unpacking and set up instructionscard, system documentation insert
• One instrument• Accessories: power cable, Ethernet cable, USB drive, reaction tube retainer• Shipping plate
Note: Save the shipping plate but do not use it to operate the instrument.• Spectral calibration plates for HID-validated workflows.
Note: Store these plates at –20°C (–15°C to –25°C).
3. Place the instrument on the bench.
4. Plug the power cable into the power port on the back panel of the instrument,then plug the cable into an electrical receptacle.
5. Connect an Ethernet cable to the Ethernet port on the back panel of theinstrument, then connect the cable to the computer.
Power on and follow the startup wizard
1. Power on the instrument.
2. Follow the startup wizard through the following tasks:• Accept the license agreement• Configure the instrument date and time.• Create an administrator instrument profile
Note: You can perform any of the steps above at a later time if you do not havethe information needed to complete the startup screens. See page 23.
IMPORTANT! Before using the instrument for the first time, we recommend that you “Perform instrument verification using RNase P plates“ on page 44.
Chapter 2 Install the instrumentUnpack and install the instrument 2
QuantStudio™ 5 Real-Time PCR Instrument User Guide (for Human Identification) | MAN0017162 A.0 15

Instrument and computer connections
1
7
66
5
4
2
3
Figure 1 Instrument back panel1 USB ports2 WiFi USB port—Not applicable3 Ethernet Port—RJ45 port for
100/1,000 Mbps Ethernet communicationwith the instrument
4 RS232 Port—For service use only5 Fuse Cover6 Power Switch7 Power Port—100 to 240 VAC
3
1 1
2
4
Figure 2 Instrument‑to‑computer connections (minitower configuration)1 Detachable power supply cord compatible with local power supply receptacle.2 Connection between the computer and the instrument.3 Connection between the computer and the monitor, keyboard, and mouse.4 Connection between the computer and the (optional) handheld barcode scanner.
Chapter 2 Install the instrumentInstrument and computer connections2
16 QuantStudio™ 5 Real-Time PCR Instrument User Guide (for Human Identification) | MAN0017162 A.0

Computer-to-instrument configuration
IMPORTANT! For HID use, the QuantStudio™ 5 Real-Time PCR System has beenvalidated for a direct (computer-to-instrument) configuration. During installation, aThermo Fisher Scientific service representative can set up only a direct configuration.
Direct configuration
• A computer provided by Thermo Fisher Scientific with the HID Real‑Time PCR Analysis Software v1.3
• Computer‑to‑instrument connection:– Direct, wired connection between the computer and the instrument
using an Ethernet cable
Ports Condition
mDNS, 7000 Instrument-to-computer connection
mDNS, 5353 Instrument discovery
Firewall ports thatmust be open
Chapter 2 Install the instrumentComputer-to-instrument configuration 2
QuantStudio™ 5 Real-Time PCR Instrument User Guide (for Human Identification) | MAN0017162 A.0 17

General proceduresto use the instrument
■ Precautions for use . . . . . . . . . . . . . . . . . . . . . . . . . . . . . . . . . . . . . . . . . . . . . . . . . . . 18
■ Power on the instrument . . . . . . . . . . . . . . . . . . . . . . . . . . . . . . . . . . . . . . . . . . . . . . 19
■ Power off the instrument . . . . . . . . . . . . . . . . . . . . . . . . . . . . . . . . . . . . . . . . . . . . . . 19
■ Sign in . . . . . . . . . . . . . . . . . . . . . . . . . . . . . . . . . . . . . . . . . . . . . . . . . . . . . . . . . . . . . . 20
■ Sign out . . . . . . . . . . . . . . . . . . . . . . . . . . . . . . . . . . . . . . . . . . . . . . . . . . . . . . . . . . . . . 20
■ Load and unload plate in the instrument . . . . . . . . . . . . . . . . . . . . . . . . . . . . . . . . 21
■ View real-time data and plots on the instrument touchscreen . . . . . . . . . . . . . . . 22
■ Transfer EDS files from the instrument home screen . . . . . . . . . . . . . . . . . . . . . . 22
Precautions for use
CAUTION! PHYSICAL INJURY HAZARD. Do not remove the instrumentcover. There are no components inside the instrument that you can safelyservice yourself. If you suspect a problem, contact technical support.
CAUTION! FIRE HAZARD. For continued protection against the risk of fire,replace fuses only with listed and certified fuses of the same type and rating asthose currently in the instrument.
CAUTION! PHYSICAL INJURY HAZARD. During instrument operation, thesample block temperature can reach 100°C. Allow it to cool to roomtemperature before handling.
CAUTION! Before using a cleaning or decontamination method other thanthose recommended by Thermo Fisher Scientific, confirm with Thermo FisherScientific that the proposed method will not damage the instrument.
CAUTION! Use flat caps for tubes. Rounded caps can damage the heated cover.
3
18 QuantStudio™ 5 Real-Time PCR Instrument User Guide (for Human Identification) | MAN0017162 A.0
Power on the instrument
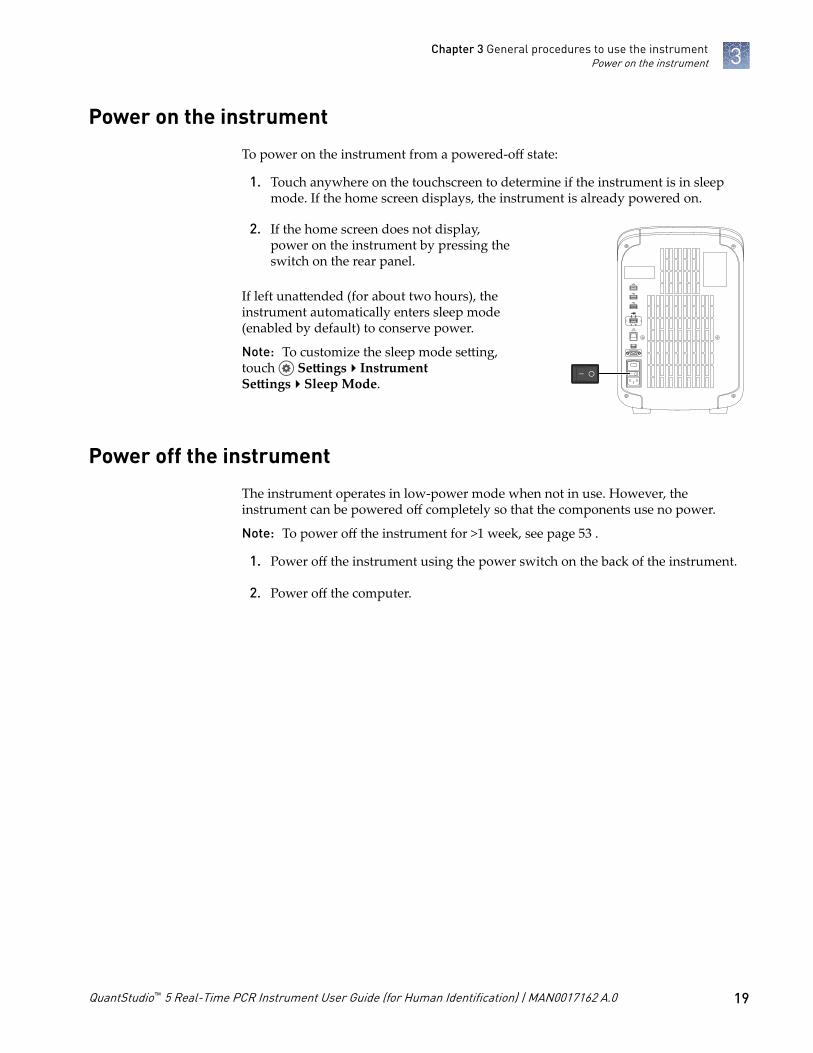
To power on the instrument from a powered-off state:
1. Touch anywhere on the touchscreen to determine if the instrument is in sleepmode. If the home screen displays, the instrument is already powered on.
2. If the home screen does not display,power on the instrument by pressing theswitch on the rear panel.
If left unattended (for about two hours), theinstrument automatically enters sleep mode(enabled by default) to conserve power.
Note: To customize the sleep mode setting,touch Settings4InstrumentSettings4Sleep Mode.
Power off the instrument
The instrument operates in low-power mode when not in use. However, theinstrument can be powered off completely so that the components use no power.
Note: To power off the instrument for >1 week, see page 53 .
1. Power off the instrument using the power switch on the back of the instrument.
2. Power off the computer.
Chapter 3 General procedures to use the instrumentPower on the instrument 3
QuantStudio™ 5 Real-Time PCR Instrument User Guide (for Human Identification) | MAN0017162 A.0 19
Sign in
Create an instrument profile before signing into the instrument (see “Create a newinstrument profile“ on page 28).
Note: An instrument profile is a user account specifically for the instrument. It is notrelated to any other user account for the system or software.
In the home screen:
1. Touch Sign In.
2. Touch Sign In, then select your username.
3. Enter your PIN, then touch Enter.
Sign out
In the home screen:
1. Touch My Profile.
2. Touch Sign Out.
Chapter 3 General procedures to use the instrumentSign in3
20 QuantStudio™ 5 Real-Time PCR Instrument User Guide (for Human Identification) | MAN0017162 A.0
Load and unload plate in the instrument
CAUTION! Use optical flat caps for tubes. Rounded caps can damage theheated cover.
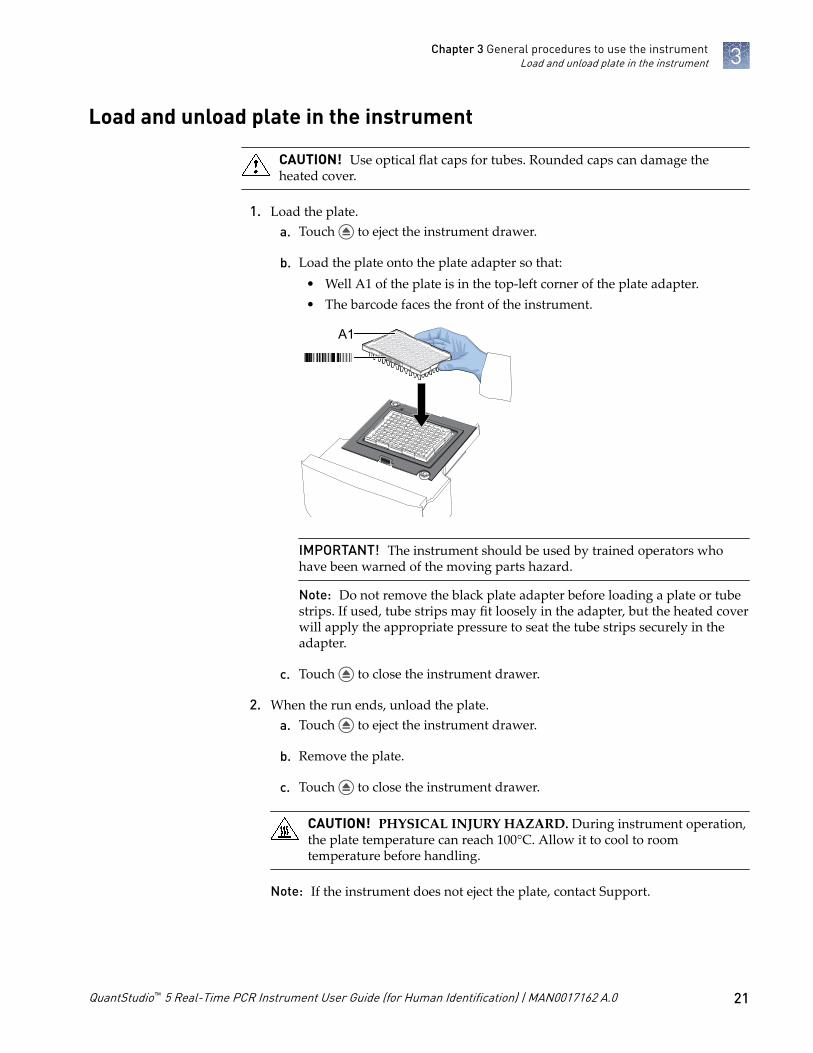
1. Load the plate.a. Touch to eject the instrument drawer.
b. Load the plate onto the plate adapter so that:• Well A1 of the plate is in the top-left corner of the plate adapter.• The barcode faces the front of the instrument.
IMPORTANT! The instrument should be used by trained operators whohave been warned of the moving parts hazard.
Note: Do not remove the black plate adapter before loading a plate or tubestrips. If used, tube strips may fit loosely in the adapter, but the heated coverwill apply the appropriate pressure to seat the tube strips securely in theadapter.
c. Touch to close the instrument drawer.
2. When the run ends, unload the plate.a. Touch to eject the instrument drawer.
b. Remove the plate.
c. Touch to close the instrument drawer.
CAUTION! PHYSICAL INJURY HAZARD. During instrument operation,the plate temperature can reach 100°C. Allow it to cool to roomtemperature before handling.
Note: If the instrument does not eject the plate, contact Support.
Chapter 3 General procedures to use the instrumentLoad and unload plate in the instrument 3
QuantStudio™ 5 Real-Time PCR Instrument User Guide (for Human Identification) | MAN0017162 A.0 21

View real-time data and plots on the instrument touchscreen
In the instrument home screen, during an instrument run:
1. Touch or swipe left twice.
2. Touch Well details.
3. Touch Samples, Targets, or Tasks to select a graphical representation of eachselection.
4. Touch Close to return to the home screen.
In the instrument home screen, during an instrument run:
1. Touch or swipe left twice to view real-time data and plots.
2. Touch Zoom.
3. Touch or to zoom in or out.
4. Touch the arrows to pan left, right, up, or down on the graph.
5. Touch Close to return to the default view.
Transfer EDS files from the instrument home screen
In the instrument home screen, when a run ends:
1. Touch Transfer File.
2. Select the data destination for the EDS file.
3. Navigate to and select a folder.
4. Touch OK.
5. Touch Transfer.
Note: Touch Settings4Run History to transfer EDS files at any time.
Adjust the displayof real-time plotson the instrumenttouchscreen
Chapter 3 General procedures to use the instrumentView real-time data and plots on the instrument touchscreen3
22 QuantStudio™ 5 Real-Time PCR Instrument User Guide (for Human Identification) | MAN0017162 A.0

Configure the instrument andmanage instrument profiles
■ Initial start up . . . . . . . . . . . . . . . . . . . . . . . . . . . . . . . . . . . . . . . . . . . . . . . . . . . . . . . . 23
■ Overview of instrument settings (Administrator) . . . . . . . . . . . . . . . . . . . . . . . . . 24
■ Overview of instrument settings (Standard or Guest) . . . . . . . . . . . . . . . . . . . . . . 26
■ Manage instrument profiles . . . . . . . . . . . . . . . . . . . . . . . . . . . . . . . . . . . . . . . . . . . . 27
■ Require instrument profile sign-in . . . . . . . . . . . . . . . . . . . . . . . . . . . . . . . . . . . . . . 29
■ Manage the sign out timer . . . . . . . . . . . . . . . . . . . . . . . . . . . . . . . . . . . . . . . . . . . . . 29
■ Manage the instrument name . . . . . . . . . . . . . . . . . . . . . . . . . . . . . . . . . . . . . . . . . . 29
■ Enable sleep mode . . . . . . . . . . . . . . . . . . . . . . . . . . . . . . . . . . . . . . . . . . . . . . . . . . . . 30
■ Set the idling temperature for the heated cover . . . . . . . . . . . . . . . . . . . . . . . . . . . 30
■ Set the date and time . . . . . . . . . . . . . . . . . . . . . . . . . . . . . . . . . . . . . . . . . . . . . . . . . . 30
■ Restore factory defaults . . . . . . . . . . . . . . . . . . . . . . . . . . . . . . . . . . . . . . . . . . . . . . . 31
■ Enable Remote Monitoring Service . . . . . . . . . . . . . . . . . . . . . . . . . . . . . . . . . . . . . 31
■ Update instrument software . . . . . . . . . . . . . . . . . . . . . . . . . . . . . . . . . . . . . . . . . . . 32
Initial start up
Perform initial start up tasks:• After initially powering on the instrument (see page 19).• After restoring factory defaults (see page 31).
1. Ensure that there is a direct, wired connection between the computer and theinstrument using an Ethernet cable (see page 17).
2. Create an administrator instrument profile (see page 27).
3. (Optional) Manage the instrument name (see page 29).
4. Set the date and time (see page 30).
4
QuantStudio™ 5 Real-Time PCR Instrument User Guide (for Human Identification) | MAN0017162 A.0 23
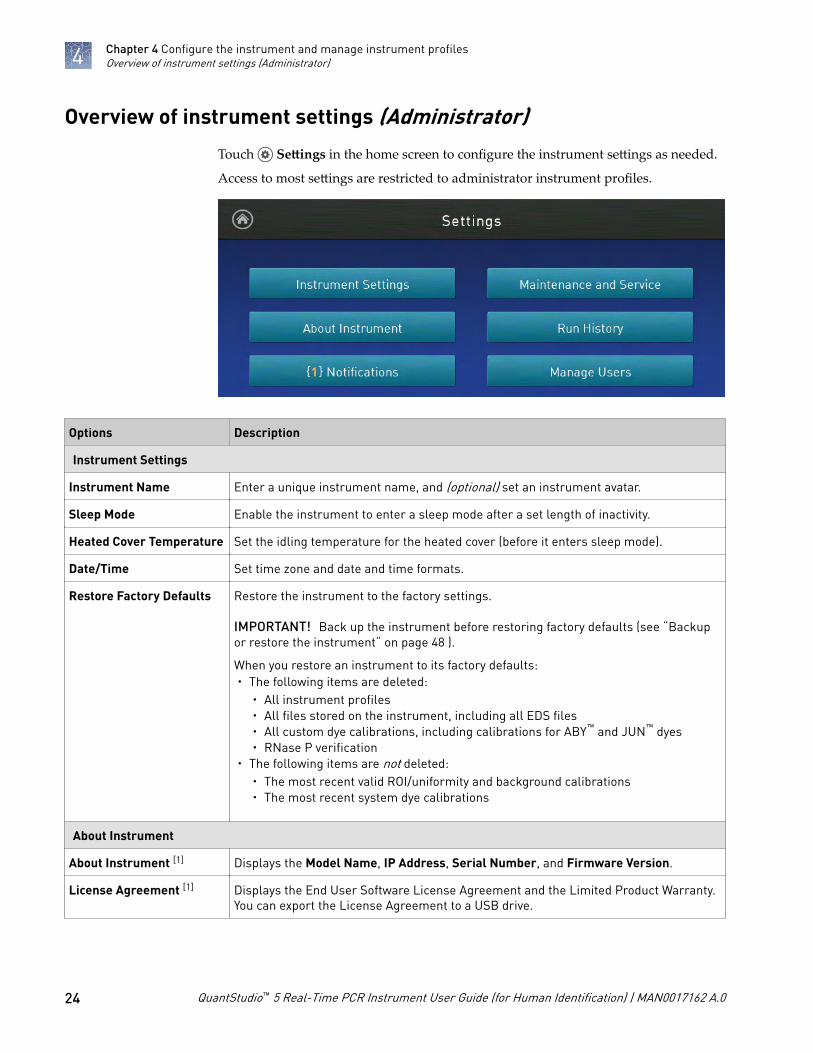
Overview of instrument settings (Administrator)Touch Settings in the home screen to configure the instrument settings as needed.
Access to most settings are restricted to administrator instrument profiles.
Options Description
Instrument Settings
Instrument Name Enter a unique instrument name, and (optional) set an instrument avatar.
Sleep Mode Enable the instrument to enter a sleep mode after a set length of inactivity.
Heated Cover Temperature Set the idling temperature for the heated cover (before it enters sleep mode).
Date/Time Set time zone and date and time formats.
Restore Factory Defaults Restore the instrument to the factory settings.
IMPORTANT! Back up the instrument before restoring factory defaults (see “Backupor restore the instrument“ on page 48 ).
When you restore an instrument to its factory defaults:· The following items are deleted:
· All instrument profiles· All files stored on the instrument, including all EDS files· All custom dye calibrations, including calibrations for ABY™ and JUN™ dyes· RNase P verification
· The following items are not deleted:· The most recent valid ROI/uniformity and background calibrations· The most recent system dye calibrations
About Instrument
About Instrument [1] Displays the Model Name, IP Address, Serial Number, and Firmware Version.
License Agreement [1] Displays the End User Software License Agreement and the Limited Product Warranty.You can export the License Agreement to a USB drive.
Chapter 4 Configure the instrument and manage instrument profilesOverview of instrument settings (Administrator)4
24 QuantStudio™ 5 Real-Time PCR Instrument User Guide (for Human Identification) | MAN0017162 A.0

Options Description
Notifications [1]
— Enable home screen notifications of instrument errors.
The number of new, unviewed notifications displays over Settings in the home screen.
Maintenance and Service
Monitoring Enable the Remote Monitoring Service to automatically notify Thermo Fisher Scientificsupport teams in real time of potential instrument issues.
The service monitors and sends general instrument data, but the service does notmonitor or send customer data.
Instrument Statistics [1] Displays instrument usage information, including Disk Space Remaining, LED Life, andRNase P Status.
Calibrations • Perform calibrations.– ROI and Uniformity
– Dye
– Custom (including calibrations for background and ABY™ and JUN™ dyes)
• View calibration history and set calibration reminders in History and Reminders.
RNase P Verification [1] Perform instrument performance verification using an RNase P plate.
Self Verification Test [1] Check the instrument hardware functions.
Log [1] View and export the Instrument Run Log.
Backup / Restore • Backup the instrument [1]
• Restore an instrument backup
Ship Prep Mode [1] Place the instrument in a safe state for moving or long-term storage.
Run History [1]
— Displays the instrument runs and whether the EDS file for the run was transferred.
Touch a run to view its details or to transfer or delete (Administrator only) its EDS file.
Manage Users
Sign In Required Enable only signed-in users to access the instrument for any task, including accessingSettings. Enabling this feature disables the guest profile access to the instrument.
Note: Instrument runs must be started from the desktop software, and actions duringan instrument run are automatically logged to the guest instrument profile (even if auser was signed into the instrument).
Sign Out Timer Set the time length of inactivity before a user is automatically signed out.
Manage Profiles Access the profile information for the instrument.
[1] Also available to standard and guest instrument profiles.
Chapter 4 Configure the instrument and manage instrument profilesOverview of instrument settings (Administrator) 4
QuantStudio™ 5 Real-Time PCR Instrument User Guide (for Human Identification) | MAN0017162 A.0 25

Overview of instrument settings (Standard or Guest)Touch Settings in the home screen to configure the instrument settings as needed.
Access to most settings are restricted to administrator instrument profiles.
Options Description
About Instrument
About Instrument Displays the Model Name, IP Address, Serial Number, and Firmware Version.
License Agreement Displays the End User Software License Agreement and the Limited Product Warranty.You can export the License Agreement to a USB drive.
Notifications
— Enable home screen notifications of instrument errors.
The number of new, unviewed notifications displays over Settings in the home screen.
Maintenance and Service
Instrument Statistics Displays instrument usage information, including Disk Space Remaining, LED Life, andRNase P Status.
RNase P Verification Perform instrument performance verification using an RNase P plate.
Self Verification Test Check the instrument hardware functions.
Log View and export the Instrument Run Log.
Backup / Restore Backup the instrument
Ship Prep Mode Place the instrument in a safe state for moving or long-term storage.
Run History
— Displays the instrument runs and whether the EDS file for the run was transferred.
Touch a run to view its details and to transfer its EDS file.
Chapter 4 Configure the instrument and manage instrument profilesOverview of instrument settings (Standard or Guest)4
26 QuantStudio™ 5 Real-Time PCR Instrument User Guide (for Human Identification) | MAN0017162 A.0

Manage instrument profiles
Note: An instrument profile is a user account specifically for the instrument. It is notrelated to any other user account for the system or software.
To See
Create a profile • “Create an administrator instrument profile during initial start-up“ on page 27
• “Create a new instrument profile“ on page 28
Configure a profile • “Edit an instrument profile“ on page 28
View or manage allprofiles
• “Manage all instrument profiles“ on page 28
An instrument profile is a user account specifically for the instrument. It is not relatedto any other user account for the system or software.
Instrument profile type Allowed actions
Administrator All maintenance and administrative tasks, including instrument configuration
Standard View instrument status, transfer files, and many maintenance tasks(such as Rnase P Verification and Self Verification Test)
Guest View instrument status, transfer files, and many maintenance tasks(such as Rnase P Verification and Self Verification Test)
Note: All instrument runs and actions during a run are logged to the guest profile(even if a user was signed-in to the instrument when the run was started).
Instrument runs must be started from the desktop software. The instrument willautomatically sign-off a signed-in user when an instrument run begins.
Note: To disable guest profile access to the instrument settings: Settings4ManageUsers4Sign In Required set to on.
During the initial instrument start-up or after restoring factory defaults, theinstrument automatically prompts for the creation of an administrator profile.
• The first instrument profile created during installation is given administratorprivileges.
• Administrators can grant administrative privileges to other users (see “Manageall instrument profiles“ on page 28).
1. Touch Name, enter a username, then touch Done.
2. Touch PIN, enter a four-digit numerical password, then touch Enter.
Note: Touch the Show PIN checkbox to switch PIN display on or off.
3. Touch Confirm PIN, then repeat step 2.
4. Touch Create profile.
Instrumentprofiles andsigned-in users
Create anadministratorinstrument profileduring initialstart-up
Chapter 4 Configure the instrument and manage instrument profilesManage instrument profiles 4
QuantStudio™ 5 Real-Time PCR Instrument User Guide (for Human Identification) | MAN0017162 A.0 27

In the home screen:
1. Touch Sign In, then touch Get Started.
2. Touch Name, enter a username, then touch Done.
3. Touch PIN Code, enter a four-digit numerical password, then touch Enter.
Note: Touch the Show PIN checkbox to switch PIN display on or off.
4. Touch Confirm PIN, then repeat step 2.
5. Touch Create profile.
In the home screen:
1. Touch My Profile.
Note: Administrators can also navigate to this screen by touching Settings4Manage Users4Manage Profiles.
2. Touch Edit.
3. Select the fields to edit, then make changes.
4. Touch Done.
In the home screen:
1. Access the All Profiles tab.
• Touch My Profile4All Profiles.• Touch Settings4Manage Users4Manage Profiles4All Profiles.
A list of users, the date the profile was created, and the user type displays.
2. Select the instrument profile to edit.
3. Edit the profile.
• To delete the profile, touch Delete profile4Delete.• To reset the PIN, touch Reset PIN4Reset.
– The user will be directed to enter a new PIN at the next sign in.• To enable or disable administrative privileges, slide the control to
Administrator or Standard, respectively.
4. Touch Done.
Create a newinstrument profile
Edit an instrumentprofile
Manage allinstrumentprofiles
Chapter 4 Configure the instrument and manage instrument profilesManage instrument profiles4
28 QuantStudio™ 5 Real-Time PCR Instrument User Guide (for Human Identification) | MAN0017162 A.0

Require instrument profile sign-in
In the home screen:
1. Touch Settings4Manage Users4Sign In Required.
2. Slide the control On.Only signed-in users can access the instrument settings.
3. Touch Done.
Note: Instrument runs must be started from the desktop software, and actions duringan instrument run are automatically logged to the guest instrument profile (even if auser was signed into the instrument).
Manage the sign out timer
In the home screen:
1. Touch Settings4Manage Users4Sign Out Timer.
2. Touch the Edit Time field, then enter the desired duration of inactivity beforeautomatic user sign out.
3. Touch Enter, then touch Done.
Manage the instrument name
In the home screen:
1. Touch Settings4Instrument Settings4Instrument Name.
2. Touch the Instrument Name field, enter an instrument name, then touch Done.
3. (Optional) Touch Add Avatar to associate an avatar with the instrument.Insert a USB drive with image files to use this option.
4. Touch OK.
Chapter 4 Configure the instrument and manage instrument profilesRequire instrument profile sign-in 4
QuantStudio™ 5 Real-Time PCR Instrument User Guide (for Human Identification) | MAN0017162 A.0 29

Enable sleep mode
In the home screen:
1. Touch Settings4Instrument Settings4Sleep Mode.
2. Slide the control On to enable sleep mode.
3. Touch Edit Time, then enter the time length of inactivity before the instrumententers sleep mode.
4. Touch Enter, then touch OK.
Set the idling temperature for the heated cover
In the home screen:
1. Touch Settings4Instrument Settings4Heated Cover Idle Temperature.
2. Slide the control On to set the idling temperature for the heated cover.
3. Touch the Edit Temperature field, then enter the desired idling temperature.
4. Touch Enter, then touch OK.
Set the date and time
In the home screen:
1. Touch Settings4Instrument Settings4Date/Time.
2. Select a time zone from the dropdown list.
3. Select a date format.a. Touch Date Format, then select the preferred date format.
b. Touch Next, touch the date field, then enter the date.
c. Touch Enter, then touch Done.
4. Select a time format.a. Touch Time Format.
b. Slide the control to select a 12-hour or 24-hour clock.
c. Touch Next, touch the time field, then enter the time.
d. Touch Enter, then touch Done.
5. Touch Done.
Chapter 4 Configure the instrument and manage instrument profilesEnable sleep mode4
30 QuantStudio™ 5 Real-Time PCR Instrument User Guide (for Human Identification) | MAN0017162 A.0

Restore factory defaults
IMPORTANT! Back up the instrument before restoring factory defaults (see “Backupor restore the instrument“ on page 48 ).
When you restore an instrument to its factory defaults:· The following items are deleted:
· All instrument profiles· All files stored on the instrument, including all EDS files· All custom dye calibrations, including calibrations for ABY™ and JUN™ dyes· RNase P verification
· The following items are not deleted:· The most recent valid ROI/uniformity and background calibrations· The most recent system dye calibrations
In the home screen:
1. Touch Settings4Instrument Settings4Restore Factory Defaults.
2. Touch Restore Factory Defaults.
3. Power Off, then power On the instrument to apply the change.
After restoring factory defaults, perform the “Initial start up“ tasks.
Enable Remote Monitoring Service
Note: Enabling the Remote Monitoring Service allows the instrument toautomatically notify Thermo Fisher Scientific support teams in real time of potentialinstrument issues. The service monitors and sends general instrument data, but theservice does not monitor or send customer data.
In the home screen:
1. Touch Settings4Maintenance and Service4Monitoring.
2. Slide the control On to enable the Remote Monitoring Service.
3. Touch OK.
Chapter 4 Configure the instrument and manage instrument profilesRestore factory defaults 4
QuantStudio™ 5 Real-Time PCR Instrument User Guide (for Human Identification) | MAN0017162 A.0 31

Update instrument software
IMPORTANT! Update the instrument software only under the specific guidance ofyour HID Support Representative.
In the home screen:
1. Touch Settings4Maintenance and Service4Software Update.
2. Touch the location of the update files.
3. When prompted, confirm your request to update the software.
Chapter 4 Configure the instrument and manage instrument profilesUpdate instrument software4
32 QuantStudio™ 5 Real-Time PCR Instrument User Guide (for Human Identification) | MAN0017162 A.0

Calibrate and verify instrumentperformance
■ Calibration and verification schedule . . . . . . . . . . . . . . . . . . . . . . . . . . . . . . . . . . . 34
■ Calibration descriptions . . . . . . . . . . . . . . . . . . . . . . . . . . . . . . . . . . . . . . . . . . . . . . . 35
■ View calibration status and set reminders in the instrument . . . . . . . . . . . . . . . . 36
■ Perform ROI/uniformity, background, and dye calibrations . . . . . . . . . . . . . . . . 36
■ Calibrate dyes for HID-validated workflows . . . . . . . . . . . . . . . . . . . . . . . . . . . . . 41
■ Perform instrument verification using RNase P plates . . . . . . . . . . . . . . . . . . . . . 44
5
QuantStudio™ 5 Real-Time PCR Instrument User Guide (for Human Identification) | MAN0017162 A.0 33

Calibration and verification schedule
The instrument is factory-calibrated and does not require calibration at installation. Toensure optimal performance, perform calibrations at the recommended frequency.
Note: During instrument installation, the Thermo Fisher Scientific servicerepresentative will perform the initial instrument verification using an RNase P plateand calibrate the instrument for the versions of ABY™ and JUN™ dyes used byHID-validated workflows.
IMPORTANT! Perform calibrations and instrument runs under the environmentalconditions that are specified in “Environmental requirements“ on page 65. Exposureto extreme temperatures can adversely affect the instrument performance and shortenthe life span of the instrument components.
Set the calibration frequency for the instrument: Touch Settings4Maintenanceand Service4Calibrations4History and Reminders4Edit4Exp interval field.
Calibration Recommended frequency
ROI/Uniformity • Every two years (recommended)
• Always perform new background and dye calibrations after anROI/uniformity calibration.
Note: Performing an ROI/uniformity calibration invalidates allother calibrations.
Background • Every two years (recommended)
• Background calibration can also be performed, as needed:– To check for contamination (depends on usage and
laboratory conditions).
– To obtain the most accurate data for the removal ofbackground fluorescence.
Note: Performing a background calibration does not invalidateany other calibration.
Dye
(system and customdyes, including ABY™
and JUN™ dyes )
• Every two years (recommended)
• During a dye calibration, only the dyes on the given spectralcalibration plate are calibrated.
Note: Performing a dye calibration for a given dye plate does not invalidate any other calibration.
RNase P instrumentverification
• After performing instrument calibrations
• As needed to confirm instrument performance
Chapter 5 Calibrate and verify instrument performanceCalibration and verification schedule5
34 QuantStudio™ 5 Real-Time PCR Instrument User Guide (for Human Identification) | MAN0017162 A.0

Calibration descriptions
Calibration description and purpose Pass Criteria
ROI/Uniformity
• The software captures images for each optical filter.
• The software uses calibration data to map the increase in fluorescenceto the plate wells during subsequent runs and to evaluate well-to-wellconsistency of the signals.
The image for each filterdistinguishes all wells of the plate.
Each well in the image is distinct.
Background
• The software captures background images for each optical filter in theabsence of sample and reagent, and it checks that the fluorescencefrom each well is below a fluorescence threshold.
• The software uses calibration data to remove background fluorescenceduring a run.
Note: You can also run this calibration to determine if contamination isrelated to the sample block or the plate.
The plate images for all filters arefree of abnormal fluorescence.
Dye
• The software extracts a spectral profile for each dye standard, thenproduces a set of spectral profiles plotted as fluorescence vs filter.
• The software uses calibration data to characterize and distinguish theindividual contribution of each dye in the total fluorescence signalscollected by the instrument.
Dye spectra peak within the samefilter as their group.
Chapter 5 Calibrate and verify instrument performanceCalibration descriptions 5
QuantStudio™ 5 Real-Time PCR Instrument User Guide (for Human Identification) | MAN0017162 A.0 35

View calibration status and set reminders in the instrument
In the home screen:
1. Touch Settings4Maintenance and Service4Calibrations4History andReminders.
2. In the Calibration Reminders screen, view the status of each calibration type.
3. (Optional) Touch a calibration row to view the history of that specific calibrationtype, then touch Done.
4. Touch Edit to set the calibration reminder settings. For each calibration type:a. Slide the control On to enable the calibration reminder.
b. Edit the Exp interval and Remind me fields.
c. Touch Save.
5. (Optional) To transfer the calibration report, touch Export then follow thedirections on the screen.
6. Touch Done.
Perform ROI/uniformity, background, and dye calibrations
Perform an ROI/uniformity calibration
You are automatically prompted to perform background calibration.
▼
Perform a background calibration
Perform any time that ROI/uniformity calibrations are current.
▼
Perform system dye calibrations
Perform any time that ROI/uniformity and background calibrations are current.
▼
Perform dye calibrations for ABY™ and JUN™ dyes (page 41)
Perform any time that ROI/uniformity and background calibrations are current.
Workflow:Calibration
Chapter 5 Calibrate and verify instrument performanceView calibration status and set reminders in the instrument5
36 QuantStudio™ 5 Real-Time PCR Instrument User Guide (for Human Identification) | MAN0017162 A.0

Materials required for calibration plate preparation
• Plate(s) for the calibration you are performing:– ROI/Uniformity plate (one ROI plate needed)– Background calibration plate– Dye calibration plates
Note: We recommend calibrating with all Spectral Dye Calibrations Plateseven if you are not using all the dyes in the plates.
Note: Do not discard the packaging for the calibration plates. Each calibrationplate can be used up to 3 times if the plate is:· Stored in its packing sleeve at –15 to –25°C· Used within 6 months after opening· Used before the plate expiry date
• Centrifuge with plate adapter; buckets cleaned before use• Powder-free gloves• Safety glasses
Thaw, vortex, and centrifuge a calibration plate
1. Remove the calibration plate from the freezer, then thaw the plate in itspackaging. Keep plates protected from light until you perform the calibration.
• Thaw each plate for 30 minutes.• Use each plate within 2 hours of thawing.
IMPORTANT! Do not remove the plate from its packaging until you are ready touse it. The fluorescent dyes in the wells of calibration plates are photosensitive.Prolonged exposure to light can diminish the fluorescence of the dyes.
2. While wearing powder-free gloves, remove the calibration plate from itspackaging and retain the packaging. Do not remove the optical film.
3. Vortex the plate for 5 seconds, then centrifuge at 750 to 1,000 × g for 2 minutes.
4. Confirm that the liquid in each well is at the bottom of the well and free ofbubbles. If it is not, centrifuge the plate again.
IMPORTANT! Keep the bottom of the plate clean. Fluids and other contaminantson the bottom of the plate can contaminate the sample block and cause anabnormally high background signal.
Prepare acalibration plate
Chapter 5 Calibrate and verify instrument performancePerform ROI/uniformity, background, and dye calibrations 5
QuantStudio™ 5 Real-Time PCR Instrument User Guide (for Human Identification) | MAN0017162 A.0 37

1. In the instrument home screen:
Calibration Touch
ROI/Uniformity[1] Settings4Maintenance and Service4Calibrations4ROI andUniformity
Background[2] Settings4Maintenance andService4Calibrations4Custom4Background
System Dye Settings4Maintenance and Service4Calibrations4Dye
[1] Automatically followed by background calibration.[2] Initiate via this route if performing background calibration only.
2. Follow the instructions on the screen to start the calibration.
Note: For dye calibration only: Select the Dye Plate to run, then touch Next.
3. Load the plate into the instrument.
IMPORTANT! The instrument should be used by trained operators who havebeen warned of the moving parts hazard.
4. Touch Start.
5. When the run is complete and the screen displays Calibration Complete, touchView Results to check the calibration status.
Calibration status Action
Passed Touch Next to proceed to the next required calibration.
Failed See “Troubleshoot calibration failure“ on page 56.
Note: You can view the calibration images only after the ROI/uniformity andbackground calibrations pass.
6. Unload the plate from the instrument.
CAUTION! PHYSICAL INJURY HAZARD. During instrument operation,the plate temperature can reach 100°C. Allow it to cool to roomtemperature before handling.
Note: If the instrument does not eject the plate, contact Support.
7. Return the plate to its original packaging.
Note: Each calibration plate can be used up to 3 times if the plate is:· Stored in its packing sleeve at –15 to –25°C· Used within 6 months after opening· Used before the plate expiry date
Performcalibrations
Chapter 5 Calibrate and verify instrument performancePerform ROI/uniformity, background, and dye calibrations5
38 QuantStudio™ 5 Real-Time PCR Instrument User Guide (for Human Identification) | MAN0017162 A.0

You can view the calibration images after the background calibration is complete.
1. In the Calibration Status screen, touch Details.
2. In the Details screen, touch a calibration type to view its images and plots.
Calibration Example results indicating successful calibration
ROI
Note: Select the desiredfilter combination from theFilter Set dropdown list.
Green circles around all wells and bright well centers.
Uniformity Signals from each well following a uniform trend.
Background Few, if any, signals with abnormally high fluorescence.
Dye Signals from each well following a uniform trend, andeach dye peaks at the correct filter.
3. In the Calibration Status screen, touch Accept Results or Reject Results.Accepting the results saves the calibration data to the instrument and overwritesexisting data.
View calibrationimages
Chapter 5 Calibrate and verify instrument performancePerform ROI/uniformity, background, and dye calibrations 5
QuantStudio™ 5 Real-Time PCR Instrument User Guide (for Human Identification) | MAN0017162 A.0 39

Signals that exceed the limit of normal fluorescence may indicate fluorescentcontaminants on the calibration plate or the sample block. Common contaminantsinclude ink residue from permanent pens, powder from disposable gloves, and dust.
To identify and resolve a possible contamination problem:
1. View the calibration data and note the wells that failed the calibration.
2. Remove the plate from the instrument, rotate the plate 180°, then perform thecalibration again.
3. Determine the location of the failed wells again as in step 1.
Position of failed wells Action
Identical The sample block is contaminated.Decontaminate the sample block (see page 49).
Reversed The plate is contaminated.Discard the plate, then perform the calibration using anew calibration plate.
4. If the calibration fails after you decontaminate the sample block and replace theplate, contact Support.
Whenever possible, use a background plate listed in Appendix B, “Parts andmaterials“. These plates contain a buffer that accurately simulates the reagents usedfor PCR, and, therefore, produces high-quality calibration data.
If a background plate is not available, you can create one as described below.
Required materials:• MicroAmp™ optical 96-well reaction plate• Optical adhesive cover or optical flat caps• Pipettor, 200-µL (with pipette tips)• Powder-free gloves• Safety glasses• Deionized water
IMPORTANT! Wear powder-free gloves while creating the background plate.
1. Remove a reaction plate from its box and place it on a clean, dry surface.
2. Aliquot 50 µL of deionized water to each well of the reaction plate.
3. Seal the plate using an optical adhesive cover or optical flat caps.
4. Use the plate for background calibration.
Identifycontamination
Create abackground plate(optional)
Chapter 5 Calibrate and verify instrument performancePerform ROI/uniformity, background, and dye calibrations5
40 QuantStudio™ 5 Real-Time PCR Instrument User Guide (for Human Identification) | MAN0017162 A.0

Calibrate dyes for HID‑validated workflows
HID-validated workflows use versions of ABY™ and JUN™ dyes that are consideredcustom dyes for the instrument. These dyes require custom dye calibration.
To calibrate any other custom dye, contact your HID Support Representative.
IMPORTANT! To perform a custom dye calibration for HID-validated workflows, usethe following prepared spectral calibration plates:
· ABY™ Spectral Calibration Plate, 96-Well 0.2-mL (Cat. No. 4461591)· JUN™ Spectral Calibration Plate, 96-Well 0.2-mL (Cat. No. 4461593)
Prepare a calibration plate (page 41)
▼
Add the custom dye to the instrument (page 42)
▼
Perform a custom dye calibration (page 42)
Materials required for calibration plate preparation
• Plate(s) for the calibration you are performing:– ABY™ Spectral Calibration Plate, 96-Well 0.2-mL (Cat. No. 4461591)– JUN™ Spectral Calibration Plate, 96-Well 0.2-mL (Cat. No. 4461593)
Note: Do not discard the packaging for the calibration plates. Each calibrationplate can be used up to 3 times if the plate is:· Stored in its packing sleeve at –15 to –25°C· Used within 6 months after opening· Used before the plate expiry date
• Centrifuge with plate adapter; buckets cleaned before use• Powder-free gloves• Safety glasses
Thaw, vortex, and centrifuge a calibration plate
1. Remove the calibration plate from the freezer, then thaw the plate in itspackaging. Keep plates protected from light until you perform the calibration.
• Thaw each plate for 30 minutes.• Use each plate within 2 hours of thawing.
IMPORTANT! Do not remove the plate from its packaging until you are ready touse it. The fluorescent dyes in the wells of calibration plates are photosensitive.Prolonged exposure to light can diminish the fluorescence of the dyes.
2. While wearing powder-free gloves, remove the calibration plate from itspackaging and retain the packaging. Do not remove the optical film.
Workflow:Calibrate dyes forHID‑validatedworkflows
Prepare acalibration platefor HID‑validatedworkflows
Chapter 5 Calibrate and verify instrument performanceCalibrate dyes for HID‑validated workflows 5
QuantStudio™ 5 Real-Time PCR Instrument User Guide (for Human Identification) | MAN0017162 A.0 41

3. Vortex the plate for 5 seconds, then centrifuge at 750 to 1,000 × g for 2 minutes.
4. Confirm that the liquid in each well is at the bottom of the well and free ofbubbles. If it is not, centrifuge the plate again.
IMPORTANT! Keep the bottom of the plate clean. Fluids and other contaminantson the bottom of the plate can contaminate the sample block and cause anabnormally high background signal.
1. In the instrument home screen, touch Settings4Maintenance andService4Calibrations4Custom4Custom Dye.
2. Touch Add Custom Dye.
3. Enter the dye information:
Field/option Action
Custom Dye Name Enter the names for the custom dyes:
• ABY-HID
• JUN-HID
IMPORTANT! Dye names are spacing sensitive.
Type Select:
• ABY-HID—Reporter
• JUN-HID—Reporter
4. Touch Save.
1. Load the plate into the instrument.
IMPORTANT! The instrument should be used by trained operators who havebeen warned of the moving parts hazard.
2. In the instrument home screen, touch Settings4Maintenance andService4Calibrations4Custom4Custom Dye.
3. Touch the custom dye to calibrate.
4. Review the custom dye information, (optional) make changes, then touch Update.
5. Enter the calibration temperature.
6. (Optional) Touch Reagents, then enter reagent information.
Add custom dyesto the instrumentfor HID‑validatedworkflows
Perform a customdye calibration forHID‑validatedworkflows
Chapter 5 Calibrate and verify instrument performanceCalibrate dyes for HID‑validated workflows5
42 QuantStudio™ 5 Real-Time PCR Instrument User Guide (for Human Identification) | MAN0017162 A.0

7. Touch Start.
8. When the run is complete and the screen displays Calibration Complete, touchView Results4Details.
9. Review the plot. Passing calibration results show uniform signals with peaksaligned with the dye wavelength.
Dye Peak filterFilter wavelength (nm)
Excitation Emission
ABY-HID x3-m3 550 ± 10 587 ± 10
JUN-HID x4-m4 580 ± 10 623 ± 14
ABY‑HID dye calibration plot JUN‑HID dye calibration plot
10. Select an action depending on whether the custom dye calibration passed orfailed.
Calibration status Action
Passed Touch Accept Results or Reject Results.
Note: Accepting the results saves the calibration data to theinstrument and overwrites existing data.
Failed See “Troubleshoot calibration failure“ on page 56.
11. Unload the plate from the instrument.
CAUTION! PHYSICAL INJURY HAZARD. During instrument operation,the plate temperature can reach 100°C. Allow it to cool to roomtemperature before handling.
Note: If the instrument does not eject the plate, contact Support.
Chapter 5 Calibrate and verify instrument performanceCalibrate dyes for HID‑validated workflows 5
QuantStudio™ 5 Real-Time PCR Instrument User Guide (for Human Identification) | MAN0017162 A.0 43

Perform instrument verification using RNase P plates
During instrument installation, your HID Support Representative will performinstrument verification. However, perform instrument verification:
• After performing instrument calibrations.• As needed to confirm instrument performance.
The instrument requires valid ROI/uniformity, background, and dye calibrations toperform instrument verification.
Purpose Description Pass criteria
Confirms theperformance of theinstrument.
Quantifies the number of copies ofthe human RNase P gene in sampleswith known concentrations of thecorresponding DNA template.
The instrument passes performance specificationsif the following inequality is true and theinstrument successfully distinguishes betweenunknown populations A and B with a statisticalconfidence level of 99.7%.
[(CtA) – 3(σCtA)] > [(CtB) + 3(σCtB)]
where:
• CtA = Average Ct of unknown population A
• σCtA = Standard deviation of unknownpopulation A
• CtB = Average Ct of unknown population B
• σCtB = Standard deviation of unknownpopulation B
Instrument verification description
Chapter 5 Calibrate and verify instrument performancePerform instrument verification using RNase P plates5
44 QuantStudio™ 5 Real-Time PCR Instrument User Guide (for Human Identification) | MAN0017162 A.0

The RNase P plate contains the reagents necessary for the detection and quantitationof genomic copies of the human RNase P gene (a single-copy gene encoding theRNase moiety of the RNase P enzyme). Each well contains: PCR master mix, RNase Pprimers, FAM™ dye-labeled probe, and a known concentration of human genomicDNA template.
1
42
5 76
3
8
Figure 3 96-well RNase P plate1 Unknown A (5,000)2 NTC (no template control)3 STD 1,250 copies4 STD 2,500 copies
5 STD 5,000 copies6 STD 10,000 copies7 STD 20,000 copies8 Unknown B (10,000)
After the run, the software calculates average copy number values and standarddeviation values. The instrument passes performance specifications if the followinginequality is true and the instrument successfully distinguishes between unknownpopulations A and B with a statistical confidence level of 99.7%.
[(CtA) – 3(σCtA)] > [(CtB) + 3(σCtB)]
where:• CtA = Average Ct of unknown population A• σCtA = Standard deviation of unknown population A• CtB = Average Ct of unknown population B• σCtB = Standard deviation of unknown population B
The software automatically adjusts the threshold and omits a defined number of wellsfrom the unknown populations to meet the performance specifications. To view anyomitted wells, open the EDS file for the verification in the desktop software.
RNase Pinstrumentverification plate
Performancespecificationspass criteria
Chapter 5 Calibrate and verify instrument performancePerform instrument verification using RNase P plates 5
QuantStudio™ 5 Real-Time PCR Instrument User Guide (for Human Identification) | MAN0017162 A.0 45
Materials required for RNase P plate preparation
• RNase P instrument verification plate• Centrifuge with plate adapter; buckets cleaned before use• Powder-free gloves• Safety glasses
Thaw, vortex, and centrifuge an RNase P plate
1. Remove the RNase P plate from the freezer, then thaw the plate in its packaging.• Thaw the plate for approximately 5 minutes.• Use the plate within 30 minutes of thawing.
2. While wearing powder-free gloves, remove the plate from its packaging.
3. Vortex the plate for 5 seconds, then centrifuge at 750 to 1,000 × g for 2 minutes.
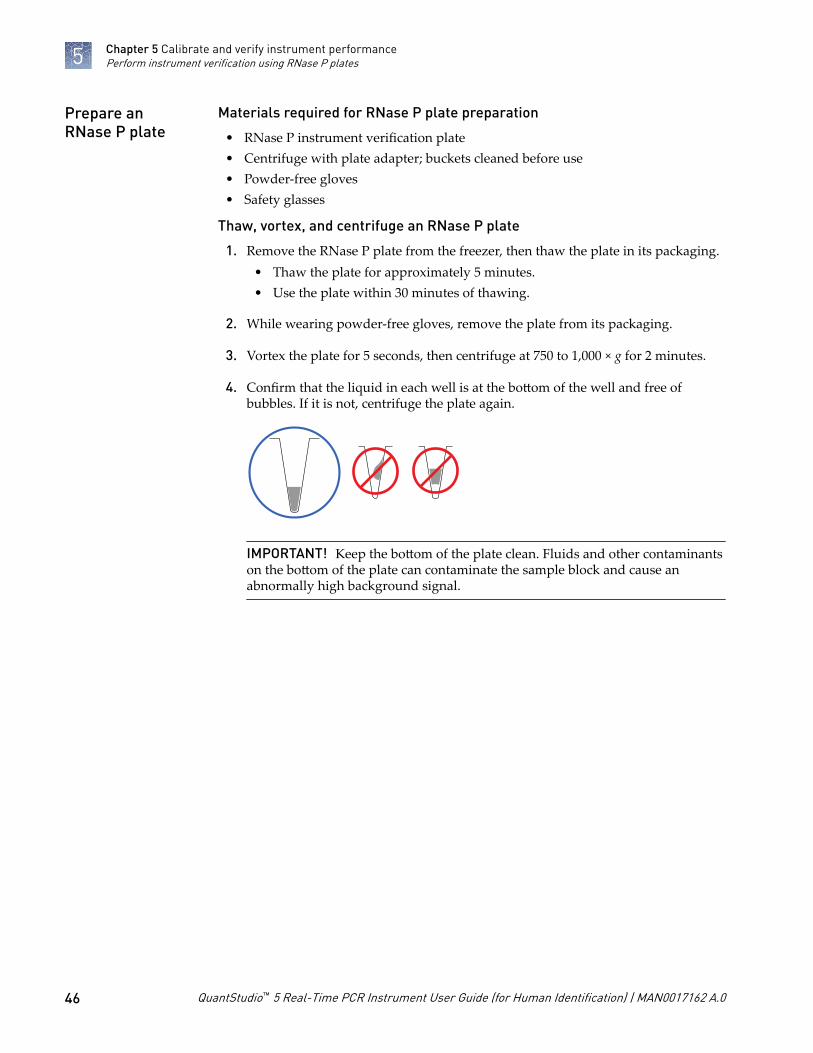
4. Confirm that the liquid in each well is at the bottom of the well and free ofbubbles. If it is not, centrifuge the plate again.
IMPORTANT! Keep the bottom of the plate clean. Fluids and other contaminantson the bottom of the plate can contaminate the sample block and cause anabnormally high background signal.
Prepare anRNase P plate
Chapter 5 Calibrate and verify instrument performancePerform instrument verification using RNase P plates5
46 QuantStudio™ 5 Real-Time PCR Instrument User Guide (for Human Identification) | MAN0017162 A.0

1. In the home screen, touch Settings4Maintenance and Service4RNase PVerification.
2. Load the plate into the instrument.
IMPORTANT! The instrument should be used by trained operators who havebeen warned of the moving parts hazard.
3. Touch Start.
4. When the run is complete and the screen displays Verification Complete, touchView Results to confirm the status of the run.
Calibration status Action
Passed Instrument is ready for use.
Failed See “Troubleshoot verification failure“ on page 57.
5. In the RNase P Verification Status screen, touch:
• Accept Results to save the results to the instrument• Reject Results to delete the RNase P verification results• Export Results to export the calibration results to a USB
6. Unload the plate from the instrument.
CAUTION! PHYSICAL INJURY HAZARD. During instrument operation,the plate temperature can reach 100°C. Allow it to cool to roomtemperature before handling.
Note: If the instrument does not eject the plate, contact Support.
Perform RNase Pverification
Chapter 5 Calibrate and verify instrument performancePerform instrument verification using RNase P plates 5
QuantStudio™ 5 Real-Time PCR Instrument User Guide (for Human Identification) | MAN0017162 A.0 47

Maintain the instrument
■ Backup or restore the instrument . . . . . . . . . . . . . . . . . . . . . . . . . . . . . . . . . . . . . . . 48
■ Decontaminate the sample block . . . . . . . . . . . . . . . . . . . . . . . . . . . . . . . . . . . . . . . 49
■ Replace the instrument fuses . . . . . . . . . . . . . . . . . . . . . . . . . . . . . . . . . . . . . . . . . . . 52
■ Store, move, or ship the instrument . . . . . . . . . . . . . . . . . . . . . . . . . . . . . . . . . . . . . 53
IMPORTANT! This chapter contains user maintenance procedures for the instrument.Procedures other than those described in this document must be performed by aqualified Service Engineer.
Backup or restore the instrument
In the home screen:
Touch Settings4Maintenance and Service4Backup/Restore.
To Action
Backup 1. Insert a USB into the front‑panel USB port.
2. Touch Backup Instrument.3. Touch USB.
4. Enter a backup file name, then touch Done.
5. Select which elements to backup, or leave them all selected.
6. Touch Backup.
Restore(Administrator only)
1. Insert the USB that contains the backup file into thefront‑panel USB port.
2. Touch Restore a Backup.
3. Touch USB.
4. Select the backup file, then touch Restore.
6
48 QuantStudio™ 5 Real-Time PCR Instrument User Guide (for Human Identification) | MAN0017162 A.0

Decontaminate the sample block
Perform this procedure to eliminate fluorescent contaminants from the instrumentsample block. Contamination is generally evident in failed background calibrationswhere one or more wells consistently exhibit abnormally high signals.
CAUTION! PHYSICAL INJURY HAZARD. Do not remove the instrumentcover. There are no components inside the instrument that you can safelyservice yourself. If you suspect a problem, contact Support.
CAUTION! PHYSICAL INJURY HAZARD. During instrument operation, thesample block temperature can reach 100°C. Allow it to cool to roomtemperature before handling.
CAUTION! Before using a cleaning or decontamination method other thanthose recommended by Thermo Fisher Scientific, confirm with Thermo FisherScientific that the proposed method will not damage the equipment.
• Safety glasses• Powder-free gloves• Tissue, lint-free• Cotton or nylon swabs and lint-free cloths• Pipette (100-µL) with pipette tips• Deionized water• Ethanol, 95% solution• Bleach, 10% solution
CAUTION! PHYSICAL INJURY HAZARD. During instrument operation, thesample block temperature can reach 100°C. Allow it to cool to roomtemperature before handling.
IMPORTANT! Wear powder-free gloves when you perform this procedure.
IMPORTANT! Always use deionized water to rinse wells after cleaning with bleach orethanol solution.
1. Identify the contaminated wells of the sample block (see page 40).
2. Prepare the instrument and access the sample block:a. Power off and unplug the instrument, then allow it to cool for 15 minutes.
b. Pull the instrument drawer forward to expose the sample block.
Materials required
Clean the sampleblock
Chapter 6 Maintain the instrumentDecontaminate the sample block 6
QuantStudio™ 5 Real-Time PCR Instrument User Guide (for Human Identification) | MAN0017162 A.0 49

3. Rinse the contaminated wells with deionized water (see page 51).
4. Close the drawer and test the sample block for contamination:a. Push the instrument drawer back in to the instrument.
b. Plug in, then power on the instrument.
c. Perform a background calibration to confirm that you have eliminated thecontamination.
5. If the contamination remains:a. Repeat step 2 – step 3.
b. Clean the contaminated wells using a 95% ethanol solution (see page 51).
c. Repeat step 3 – step 4 to rinse the sample block with deionized water and toconfirm that you have eliminated the contamination.
IMPORTANT! Always use deionized water to rinse wells after cleaning withbleach or ethanol solution.
6. If the contamination still remains:a. Repeat step 2 – step 3.
b. Clean the contaminated wells using a 10% bleach solution (see page 51).
c. Repeat step 3 – step 4 to rinse the sample block with deionized water and toconfirm that you have eliminated the contamination.
IMPORTANT! Always use deionized water to rinse wells after cleaning withbleach or ethanol solution.
7. If the contamination continues to remain, contact Support.
Chapter 6 Maintain the instrumentDecontaminate the sample block6
50 QuantStudio™ 5 Real-Time PCR Instrument User Guide (for Human Identification) | MAN0017162 A.0

IMPORTANT! Use these cleaning procedures only in conjunction with the "Clean thesample block" procedures.
Rinse the sample block with deionized water
1. Pipet a small volume of deionized water into each contaminated well.
2. In each well, pipet the water up and down several times to rinse the well.
3. Pipet the water to a waste beaker.
4. Use a cotton swab to scrub inside of each contaminated well.
5. Use a lint-free cloth to absorb the excess deionized water.
Clean the sample block with 95% ethanol
1. Pipet a small volume of 95% ethanol solution into each contaminated well.
2. In each well, pipet the solution up and down several times to rinse the well.
3. Pipet the ethanol solution to a waste beaker.
IMPORTANT! Always use deionized water to rinse wells after cleaning with bleach orethanol solution.
Clean the sample block with 10% bleach
1. Pipet a small volume of 10% bleach solution into each contaminated well.
2. In each well, pipet the solution up and down several times to rinse the well.
3. Pipet the bleach solution to a waste beaker.
IMPORTANT! Always use deionized water to rinse wells after cleaning with bleach orethanol solution.
Detailedprocedures forcleaning thesample block
Chapter 6 Maintain the instrumentDecontaminate the sample block 6
QuantStudio™ 5 Real-Time PCR Instrument User Guide (for Human Identification) | MAN0017162 A.0 51

Replace the instrument fuses
CAUTION! FIRE HAZARD. For continued protection against the risk of fire,replace fuses only with listed and certified fuses of the same type and rating asthose currently in the instrument.
• Fuses (2) – 10A, Time-Lag T, 250VAC, 5 × 20mm• Safety glasses• Powder-free gloves• Screwdriver, flathead
1. Power off and unplug the instrument, then allow it to cool for 15 minutes.
2. Using a flat-head screwdriver, unscrew and remove the fuse holder.
3. Remove each fuse from its fuse holder and inspect it for damage. Carbontypically coats the inside of failed fuses.
Good Failed
4. Replace each failed fuse.
Note: The voltage and amperage ratings are on the fuse holder.
5. Install the fuse holder back into the instrument.
6. Plug in, then power on the instrument.The installation is successful if the instrument powers on.
Note: Fuse failure can result from fluctuations in the supplied power to the system.To prevent further failures, consider installing an electrical protective device, such as aUPS or a surge protector. If issues with the fuse persist, contact Support.
Materials required
Replace the fuses
Chapter 6 Maintain the instrumentReplace the instrument fuses6
52 QuantStudio™ 5 Real-Time PCR Instrument User Guide (for Human Identification) | MAN0017162 A.0

Store, move, or ship the instrument
In the home screen:
1. Touch Settings4Maintenance and Service4Ship Prep Mode4Next.
2. Touch to eject the instrument drawer.
3. Load the packing plate or an empty plate, then touch to close the drawer.
4. Touch Lock Block.
5. Power off the instrument using the power switch on the back of the instrument.
The instrument is now ready to store, move, or ship.
CAUTION! PHYSICAL INJURY HAZARD. Do not attempt to lift theinstrument or any other heavy objects unless you have received relatedtraining. Incorrect lifting can cause painful and sometimes permanent backinjury. Use proper lifting techniques when lifting or moving the instrument. Atleast two people are required to lift it.
IMPORTANT! Moving your instrument can create subtle changes in the alignment ofthe instrument optics. Recalibrate the instrument if necessary.
• Ensure that the surface on which you place the instrument can support at least35 kg (77 lbs).
• Ensure that the path to transport the instrument is clear of obstructions.• At least two people are needed to lift and carry the instrument.• Keep your spine in a good neutral position.• Bend at the knees and lift with your legs.• Do not lift an object and twist your torso at the same time.• Coordinate your intentions with your assistant before lifting and carrying.
IMPORTANT! After moving the instrument, perform an RNase P instrumentverification run. If the run fails, perform ROI/ uniformity, background, and dyecalibrations.
Prepare theinstrument tostore, move, orship
Move theinstrument
Chapter 6 Maintain the instrumentStore, move, or ship the instrument 6
QuantStudio™ 5 Real-Time PCR Instrument User Guide (for Human Identification) | MAN0017162 A.0 53

The service process requires 2 to 3 weeks.
Before returning the instrument for service:
1. Back up the instrument (see “Backup or restore the instrument“ on page 48 ).2. In the home screen, touch Settings4Instrument Settings4Reset Factory
defaults.3. Set the instrument to Ship Prep Mode (see “Prepare the instrument to store,
move, or ship“ on page 53).
To return the instrument for service:
1. Contact your local customer care center or technical support group to obtain acopy of the Certificate of Instrument Decontamination, a service notification, aservice call number, and packaging materials (if required).
2. Follow the instructions in the form to decontaminate the instrument.
IMPORTANT! The instrument must be decontaminated before packing it forshipping.
3. Complete and sign a copy of the Certificate of Instrument Decontamination.
4. Fax the Certificate of Instrument Decontamination to the customer care center.
5. Pack the instrument in the provided packaging and follow the instructions in thetable below.
Prepare Include Exclude
1. Transfer any datafiles from theinstrument.
2. Load an empty platein the sample block.
3. Use the touchscreento place theinstrument in shipmode.
Note: The empty plateand ship mode protectsthe internal components ofthe instrument duringtransport.
• Instrument
• Completed and signedCertificate ofInstrumentDecontamination
Note: The instrument willnot be accepted for servicewithout a hard copy of theCertificate of InstrumentDecontamination.
Any accessories, including:
• Power cord
• Ethernet cable
• USB drive
• Wireless adapter
Note: If included with theinstrument, these itemswill be disposed of duringservice and not returned.
6. Attach the postage provided with the Certificate of Instrument Decontaminationto the box, then ship the instrument to the designated facility.
Return theinstrument forservice
Chapter 6 Maintain the instrumentStore, move, or ship the instrument6
54 QuantStudio™ 5 Real-Time PCR Instrument User Guide (for Human Identification) | MAN0017162 A.0

Troubleshooting
Instrument troubleshooting
Observation Possible cause Recommended action
Insufficient disk space message Insufficient disk space to save arun.
1. In the home screen, touch Settings4Run History4Manage.
2. Delete or transfer experiments from theinstrument.
The touchscreen is black The instrument is in sleepmode.
Touch anywhere on the instrumenttouchscreen.
The instrument is not poweredon.
If you touch the instrument touchscreen and itremains black, check if the instrument ispowered on. The power switch is located on therear panel of the instrument.
If the instrument does not power on, checkthat the instrument is properly plugged in.
If the instrument does not power on and theinstrument is properly plugged in, contactSupport.
Forgot PIN for instrumentprofile
Non-administrator forgotinstrument profile PIN.
See “Manage all instrument profiles“ onpage 28.
Administrator forgotinstrument profile PIN.
Have another administrator reset the PIN forthe forgotten-PIN profile (see “Manage allinstrument profiles“ on page 28).
If there is not another administrator profile onthe instrument, you must restore factorydefaults (see “Restore factory defaults“ onpage 31).
A
QuantStudio™ 5 Real-Time PCR Instrument User Guide (for Human Identification) | MAN0017162 A.0 55

Troubleshoot calibration failure
Observation Possible cause Recommended action
Calibration failed The plate was improperlyprepared.
Ensure the following:
• The correct plate was used for thecalibration performed.
• The plate was properly thawed.
• The plate was properly centrifuged.
• The heat seal of the plate was properlysealed.
The plate is damaged orcontaminated.
Check for damage, improper heat seal, orcontamination.
Order a replacement plate. If the replacementplate fails, contact Support.
High fluorescence signal Signals that exceed the limit ofnormal fluorescence mayindicate fluorescentcontaminants on the plate orthe sample block.
See “Identify contamination“ on page 40.
Calibration failed but plate isundamaged
The incorrect plate was usedfor calibration performed.
Use the plate that matches the calibrationperformed.
The plate was improperlyprepared.
Repeat the calibration with the plate properlyprepared.
If the calibration fails again, order areplacement plate. If the replacement platefails, contact Support.
Appendix A TroubleshootingTroubleshoot calibration failureA
56 QuantStudio™ 5 Real-Time PCR Instrument User Guide (for Human Identification) | MAN0017162 A.0

Troubleshoot verification failure
Observation Possible cause Recommended action
Verification failed The plate was improperlyprepared.
Ensure the following:
• The correct plate was used for theverification performed.
• The plate was properly thawed.
• The plate was properly centrifuged.
• The heat seal of the plate was properlysealed.
The plate is damaged orcontaminated.
Check for damage, improper heat seal, orcontamination.
Order a replacement plate. If the replacementplate fails, contact Support.
High fluorescence signal The reaction volume is notcorrect.
Ensure that reaction volumes in the plate arecorrect and match the volume that is enteredin the Method tab.
Signals that exceed the limit ofnormal fluorescence mayindicate fluorescentcontaminants on the plate orthe sample block.
Examine the bottom of the reaction plate. Ifthere is contamination, prepare a new plateand run the experiment again.
Identify the location of contamination on theplate or sample block.
1. Obtain or prepare a background plate (see page 40).
2. Follow the procedures that are describedin “Identify contamination“ on page 40.
Verification failed but plate isundamaged
The incorrect plate was usedfor verification.
Use the correct RNase P plate for verification.
The plate was improperlyprepared.
Repeat the verification with a new properlyprepared plate.
Note: The verification procedure is aninstrument run, so each RNase P plate canonly be used once.
If the verification fails again, order areplacement plate. If the replacement platefails, contact Support.
Appendix A TroubleshootingTroubleshoot verification failure A
QuantStudio™ 5 Real-Time PCR Instrument User Guide (for Human Identification) | MAN0017162 A.0 57

Parts and materials
■ Kits, consumables, accessories, and reagents . . . . . . . . . . . . . . . . . . . . . . . . . . . . . 58
■ Consumables (96-well, 0.2-mL format) . . . . . . . . . . . . . . . . . . . . . . . . . . . . . . . . . . 59
■ Accessories . . . . . . . . . . . . . . . . . . . . . . . . . . . . . . . . . . . . . . . . . . . . . . . . . . . . . . . . . 60
■ General-use materials and consumables . . . . . . . . . . . . . . . . . . . . . . . . . . . . . . . . . 60
Kits, consumables, accessories, and reagents
Unless otherwise indicated, all materials are available through thermofisher.com.
Store all calibration and RNase P plates at –20°C. All other items can be storedat 15–30°C. Use all materials by the expiration date on the packaging.
B
58 QuantStudio™ 5 Real-Time PCR Instrument User Guide (for Human Identification) | MAN0017162 A.0

Consumables (96‑well, 0.2‑mL format)
Consumable Amount Cat. No.
MicroAmp™ Optical 8-Cap Strips 300 strips 4323032
MicroAmp™ Optical 8-Tube Strip, 0.2 mL 125 strips 4316567
MicroAmp™ Optical Tube without Cap, 0.2 mL 2,000 tubes N8010933
MicroAmp™ Optical 96-Well Reaction Plate with Barcode20 plates 4306737
500 plates 4326659
Instrument verification or calibration plate Cat. No.
TaqMan® RNase P Instrument Verification Plate, 96‑Well 0.2‑mL 4432382
Region of Interest (ROI) and Background Plates, 96‑Well 0.2‑mL (2 plates) 4432364
QuantStudio™ 3/5 10‑Dye Spectral Calibration Kit, 96‑Well 0.2‑mL(contains all 3 spectral calibration plates listed below) A26343
QuantStudio™ 3/5 Spectral Calibration Plate 1, 96‑Well 0.2‑mL(FAM™, VIC™, ROX™, and SYBR™ dyes) A26331
QuantStudio™ 3/5 Spectral Calibration Plate 2, 96‑Well 0.2‑mL(ABY™, JUN™, and MUSTANG PURPLE™ dyes) A26332
QuantStudio™ 3/5 Spectral Calibration Plate 3, 96‑Well 0.2‑mL(TAMRA™, NED™, and Cy®5 dyes) A26333
Spectral calibration plates for dyes used with HID-validated workflows
ABY™ Spectral Calibration Plate, 96‑Well 0.2‑mL 4461591
JUN™ Spectral Calibration Plate, 96‑Well 0.2‑mL 4461593
Appendix B Parts and materialsConsumables (96‑well, 0.2‑mL format) B
QuantStudio™ 5 Real-Time PCR Instrument User Guide (for Human Identification) | MAN0017162 A.0 59

Accessories
Item Amount Cat. No.
MicroAmp™ 96-Well Tray/Retainer Set 10 trays 4381850
MicroAmp™ Multi Removal Tool 1 tool 4313950
MicroAmp™ Cap Installing Tool (handle style) 1 tool 4330015
MicroAmp™ Optical Adhesive Film 25 films 4360954
100 films 4311971
MicroAmp™ Adhesive Film Applicator 5 applicators 4333183
General-use materials and consumables
The following general-use materials and consumables are required to calibrate,maintain, and operate the instrument. Unless otherwise indicated, all materials areavailable through thermofisher.com.
Material/Consumable Source
Bleach, 10% solution MLS
Centrifuge with 96‑well plate buckets MLS
Cotton or nylon swabs and lint‑free cloths MLS
Ethanol, 95% solution MLS
Optical clear adhesive film for PCR MLS
Pipettors, 100‑µL and 200‑µL (with pipette tips) MLS
Powder‑free gloves MLS
Safety glasses MLS
Screwdriver, flathead MLS
Tissue, lint‑free MLS
Deionized water MLS
Appendix B Parts and materialsAccessoriesB
60 QuantStudio™ 5 Real-Time PCR Instrument User Guide (for Human Identification) | MAN0017162 A.0

Instrument specification and layout
■ Configured system dimensions . . . . . . . . . . . . . . . . . . . . . . . . . . . . . . . . . . . . . . . . . 62
■ Instrument and computer connections . . . . . . . . . . . . . . . . . . . . . . . . . . . . . . . . . . 63
■ Instrument clearances . . . . . . . . . . . . . . . . . . . . . . . . . . . . . . . . . . . . . . . . . . . . . . . . . 64
■ Electrical requirements . . . . . . . . . . . . . . . . . . . . . . . . . . . . . . . . . . . . . . . . . . . . . . . . 64
■ Environmental requirements . . . . . . . . . . . . . . . . . . . . . . . . . . . . . . . . . . . . . . . . . . . 65
C
QuantStudio™ 5 Real-Time PCR Instrument User Guide (for Human Identification) | MAN0017162 A.0 61

Configured system dimensions
Allow space for the configured instrument. A typical setup with a co-locatedminitower computer is shown below.
Note: Dimensions are rounded to the nearest whole or half unit.
15 cm (6 in.)
27 cm (10.5 in.)
50 cm (20 in.)
30 cm (12 in.)
40 cm (16 in.)
207 cm (81.5 in.)
Appendix C Instrument specification and layoutConfigured system dimensionsC
62 QuantStudio™ 5 Real-Time PCR Instrument User Guide (for Human Identification) | MAN0017162 A.0

Instrument and computer connections
1
7
66
5
4
2
3
Figure 4 Instrument back panel1 USB ports2 WiFi USB port—Not applicable3 Ethernet Port—RJ45 port for
100/1,000 Mbps Ethernet communicationwith the instrument
4 RS232 Port—For service use only5 Fuse Cover6 Power Switch7 Power Port—100 to 240 VAC
3
1 1
2
4
Figure 5 Instrument‑to‑computer connections (minitower configuration)1 Detachable power supply cord compatible with local power supply receptacle.2 Connection between the computer and the instrument.3 Connection between the computer and the monitor, keyboard, and mouse.4 Connection between the computer and the (optional) handheld barcode scanner.
Appendix C Instrument specification and layoutInstrument and computer connections C
QuantStudio™ 5 Real-Time PCR Instrument User Guide (for Human Identification) | MAN0017162 A.0 63

Instrument clearances
During instrument installation and maintenance, it is necessary to access the back ofthe instrument. If the back of the instrument faces a wall, ensure that there is sufficientclearance on the bench to rotate the instrument for access.
IMPORTANT! For safety, the power outlet for the instrument must be accessible.
Component Top Front Sides Back
Instrument 30 cm (12 in.) 30 cm (12 in.) 15 cm (6 in.) 15 cm (6 in.)
Computer — 15 cm (6 in.) — 15 cm (6 in.)
Electrical requirements
WARNING! For safety, the power outlet used for powering the instrumentmust be accessible at all times. See “Instrument clearances“ for informationabout the space needed between the wall and the instrument. In case ofemergency, you must be able to immediately disconnect the main power supplyto all the equipment. Allow adequate space between the wall and theequipment so that the power cords can be disconnected in case of emergency.
• Electric receptacle with grounding capability• Maximum power dissipation: ~960 W (not including computer and monitor)• Mains AC line voltage tolerances must be up to ±10 percent of nominal voltage
Device Rated voltage Circuitrequired
Ratedfrequency
Ratedpower
Instrument 100–240 ±10% VAC[1] 10 A 50/60 Hz 960 W
Computer (laptop) 100–240 ±10% VAC 10 A 50/60 Hz 90 VA
Computer (desktop)100–240 ±10% VAC 10 A 50/60 Hz
125 VA
Monitor 65 VA
[1] If the supplied power fluctuates beyond the rated voltage, a power line regulator may be required. High or low voltages can adversely affect the electronic components of the instrument.
Appendix C Instrument specification and layoutInstrument clearancesC
64 QuantStudio™ 5 Real-Time PCR Instrument User Guide (for Human Identification) | MAN0017162 A.0
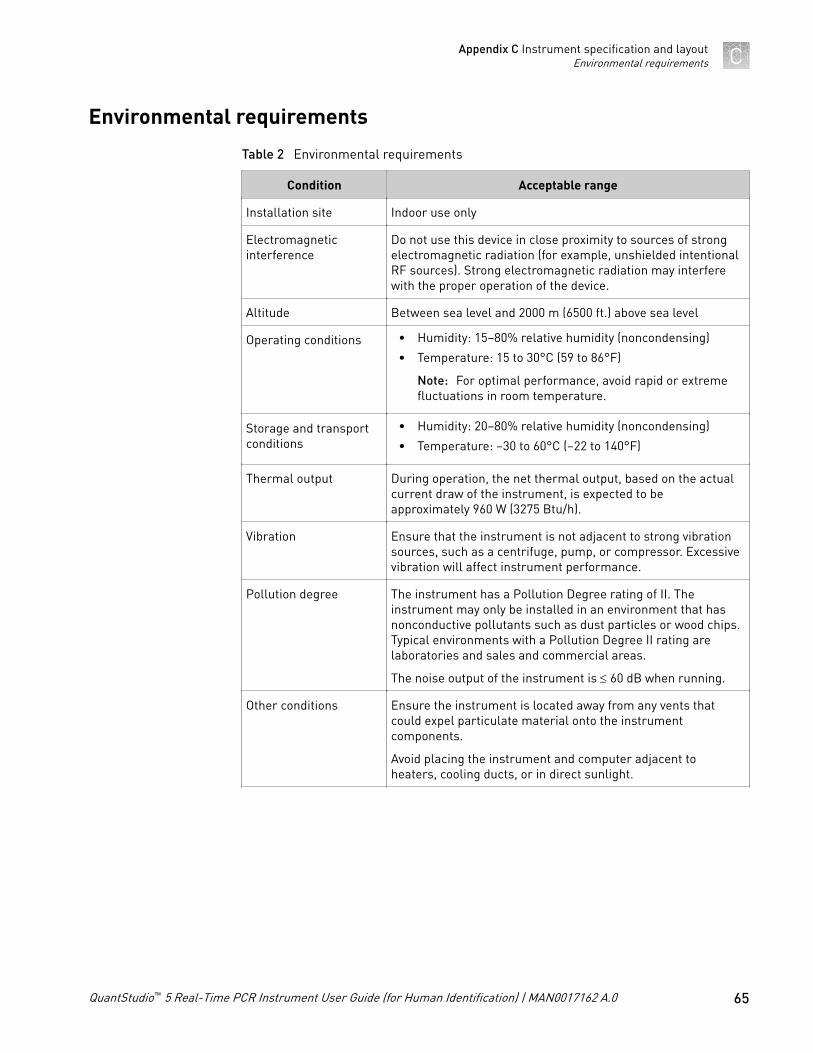
Environmental requirements
Table 2 Environmental requirements
Condition Acceptable range
Installation site Indoor use only
Electromagneticinterference
Do not use this device in close proximity to sources of strongelectromagnetic radiation (for example, unshielded intentionalRF sources). Strong electromagnetic radiation may interferewith the proper operation of the device.
Altitude Between sea level and 2000 m (6500 ft.) above sea level
Operating conditions • Humidity: 15–80% relative humidity (noncondensing)
• Temperature: 15 to 30°C (59 to 86°F)
Note: For optimal performance, avoid rapid or extremefluctuations in room temperature.
Storage and transportconditions
• Humidity: 20–80% relative humidity (noncondensing)
• Temperature: –30 to 60°C (–22 to 140°F)
Thermal output During operation, the net thermal output, based on the actualcurrent draw of the instrument, is expected to beapproximately 960 W (3275 Btu/h).
Vibration Ensure that the instrument is not adjacent to strong vibrationsources, such as a centrifuge, pump, or compressor. Excessivevibration will affect instrument performance.
Pollution degree The instrument has a Pollution Degree rating of II. Theinstrument may only be installed in an environment that hasnonconductive pollutants such as dust particles or wood chips.Typical environments with a Pollution Degree II rating arelaboratories and sales and commercial areas.
The noise output of the instrument is £ 60 dB when running.
Other conditions Ensure the instrument is located away from any vents thatcould expel particulate material onto the instrumentcomponents.
Avoid placing the instrument and computer adjacent toheaters, cooling ducts, or in direct sunlight.
Appendix C Instrument specification and layoutEnvironmental requirements C
QuantStudio™ 5 Real-Time PCR Instrument User Guide (for Human Identification) | MAN0017162 A.0 65
Safety
■ Symbols on this instrument . . . . . . . . . . . . . . . . . . . . . . . . . . . . . . . . . . . . . . . . . . . . 67
■ Safety alerts on this instrument . . . . . . . . . . . . . . . . . . . . . . . . . . . . . . . . . . . . . . . . . 69
■ Safety information for instruments not manufactured by ThermoFisher Scientific . . . . . . . . . . . . . . . . . . . . . . . . . . . . . . . . . . . . . . . . . . . . . . . . . . . . . . 70
■ Instrument safety . . . . . . . . . . . . . . . . . . . . . . . . . . . . . . . . . . . . . . . . . . . . . . . . . . . . . 70
■ Safety and electromagnetic compatibility (EMC) standards . . . . . . . . . . . . . . . . 72
■ Chemical safety . . . . . . . . . . . . . . . . . . . . . . . . . . . . . . . . . . . . . . . . . . . . . . . . . . . . . . 74
■ Biological hazard safety . . . . . . . . . . . . . . . . . . . . . . . . . . . . . . . . . . . . . . . . . . . . . . . 75
WARNING! GENERAL SAFETY. Using this product in a manner not specifiedin the user documentation may result in personal injury or damage to theinstrument or device. Ensure that anyone using this product has receivedinstructions in general safety practices for laboratories and the safetyinformation provided in this document.
· Before using an instrument or device, read and understand the safetyinformation provided in the user documentation provided by themanufacturer of the instrument or device.
· Before handling chemicals, read and understand all applicable Safety DataSheets (SDSs) and use appropriate personal protective equipment (gloves,gowns, eye protection, etc). To obtain SDSs, see the “Documentation andSupport” section in this document.
D
66 QuantStudio™ 5 Real-Time PCR Instrument User Guide (for Human Identification) | MAN0017162 A.0

Symbols on this instrument
Symbols may be found on the instrument to warn against potential hazards or conveyimportant safety information. In this document, the hazard symbol is used along withone of the following user attention words:
• CAUTION! – Indicates a potentially hazardous situation that, if not avoided,may result in minor or moderate injury. It may also be used to alert againstunsafe practices.
• WARNING! – Indicates a potentially hazardous situation that, if not avoided,could result in death or serious injury.
• DANGER! – Indicates an imminently hazardous situation that, if not avoided,will result in death or serious injury.
Symbol English Français
Caution, risk of danger
Consult the manual for further safetyinformation.
Attention, risque de danger
Consulter le manuel pour d’autresrenseignements de sécurité.
Caution, risk of electrical shock Attention, risque de choc électrique
Moving parts Parties mobiles
Caution, hot surface Attention, surface chaude
Potential biohazard Danger biologique potentiel
Ultraviolet light Rayonnement ultraviolet
Potential slipping hazard Danger de glisser potentiel
On On (marche)
Off Off (arrêt)
On/Off On/Off (marche/arrêt)
Standby En attente
Appendix D SafetySymbols on this instrument D
QuantStudio™ 5 Real-Time PCR Instrument User Guide (for Human Identification) | MAN0017162 A.0 67

Symbol English Français
Earth (ground) terminal Borne de (mise à la) terre
Protective conductor terminal (mainground)
Borne de conducteur de protection(mise à la terre principale)
Terminal that can receive or supplyalternating current or voltage
Borne pouvant recevoir ou envoyerune tension ou un courant de typealternatif
Terminal that can receive or supplyalternating or direct current orvoltage
Borne pouvant recevoir ou envoyerune tension ou un courant continu oualternatif
Do not dispose of this product inunsorted municipal waste
CAUTION! To minimizenegative environmentalimpact from disposal ofelectronic waste, do notdispose of electronic waste inunsorted municipal waste.Follow local municipal wasteordinances for properdisposal provision andcontact customer service forinformation about responsibledisposal options.
Ne pas éliminer ce produit avec lesdéchets usuels non soumis au trisélectif.
CAUTION! Pour minimiserles conséquences négativessur l’environnement à la suitede l’élimination de déchetsélectroniques, ne paséliminer ce déchetélectronique avec les déchetsusuels non soumis au trisélectif. Se conformer auxordonnances locales sur lesdéchets municipaux pour lesdispositions d’élimination etcommuniquer avec le serviceà la clientèle pour desrenseignements sur lesoptions d’éliminationresponsable.
Conformity mark Description
Indicates conformity with safety requirements for Canada andU.S.A.
Indicates conformity with European Union requirements for safetyand electromagnetic compatibility.
Indicates conformity with Australian standards forelectromagnetic compatibility.
Conformitysymbols
Appendix D SafetySymbols on this instrumentD
68 QuantStudio™ 5 Real-Time PCR Instrument User Guide (for Human Identification) | MAN0017162 A.0

Safety alerts on this instrument
Additional text may be used with one of the symbols described above when morespecific information is needed to avoid exposure to a hazard. See the following tablefor safety alerts found on the instrument.
English French translation
CAUTION! Hazardous chemicals.Read the Safety Data Sheets (SDSs)before handling.
ATTENTION! Produits chimiquesdangereux. Lire les fiches signalétiques(FS) avant de manipuler les produits.
CAUTION! Hazardous waste. Referto SDS(s) and local regulations forhandling and disposal.
ATTENTION! Déchets dangereux. Lire lesfiches signalétiques (FS) et laréglementation locale associées à lamanipulation et à l’élimination des déchets.
Location of safetylabels on theinstrument
Appendix D SafetySafety alerts on this instrument D
QuantStudio™ 5 Real-Time PCR Instrument User Guide (for Human Identification) | MAN0017162 A.0 69
Safety information for instruments not manufactured by ThermoFisher Scientific
Some of the accessories provided as part of the instrument system are not designed orbuilt by Thermo Fisher Scientific. Consult the manufacturer's documentation for theinformation needed for the safe use of these products.
Instrument safety
CAUTION! Do not remove instrument protective covers. If you remove theprotective instrument panels or disable interlock devices, you may be exposedto serious hazards including, but not limited to, severe electrical shock, laserexposure, crushing, or chemical exposure.
CAUTION! Solvents and Pressurized fluids. Wear eye protection whenworking with any pressurized fluids. Use caution when working with anypolymeric tubing that is under pressure:
· Extinguish any nearby flames if you use flammable solvents.· Do not use polymeric tubing that has been severely stressed or kinked.· Do not use polymeric tubing with tetrahydrofuran or nitric and sulfuric
acids.· Be aware that methylene chloride and dimethyl sulfoxide cause polymeric
tubing to swell and greatly reduce the rupture pressure of the tubing.· Be aware that high solvent flow rates (~40mL/min) may cause a static charge
to build up on the surface of the tubing and electrical sparks may result.
General
Appendix D SafetySafety information for instruments not manufactured by Thermo Fisher ScientificD
70 QuantStudio™ 5 Real-Time PCR Instrument User Guide (for Human Identification) | MAN0017162 A.0

CAUTION! Moving and Lifting Injury. The instrument is to be moved andpositioned only by the personnel or vendor specified in the applicable sitepreparation guide. Improper lifting can cause painful and permanent backinjury.
Things to consider before lifting or moving the instrument or accessories:· Depending on the weight, moving or lifting may require two or more
persons.· If you decide to lift or move the instrument after it has been installed, do notattempt to do so without the assistance of others, the use of appropriatemoving equipment, and proper lifting techniques.
· Ensure you have a secure, comfortable grip on the instrument or accessory.· Make sure that the path from where the object is to where it is being moved
is clear of obstructions.· Do not lift an object and twist your torso at the same time. Keep your spine
in a good neutral position while lifting with your legs.· Participants should coordinate lift and move intentions with each other
before lifting and carrying.· For smaller packages, rather than lifting the object from the packing box,
carefully tilt the box on its side and hold it stationary while someone elseslides the contents out of the box.
CAUTION! Moving Parts. Moving parts can crush, pinch and cut. Keep handsclear of moving parts while operating the instrument. Disconnect power beforeservicing.
WARNING! Do not attempt to lift or move the instrument without theassistance of others. Use appropriate moving equipment and proper liftingtechnique, improper lifting may result in serious injury.
Physical injury
Appendix D SafetyInstrument safety D
QuantStudio™ 5 Real-Time PCR Instrument User Guide (for Human Identification) | MAN0017162 A.0 71

WARNING! Fuse Installation. Before installing the instrument, verify that thefuses are properly installed and the fuse voltage matches the supply voltage.Replace fuses only with the type and rating specified for the unit. Improperfuses can damage the instrument wiring system and cause a fire.
WARNING! Ensure appropriate electrical supply. For safe operation of theinstrument:
· Plug the system into a properly grounded receptacle with adequate currentcapacity.
· Ensure the electrical supply is of suitable voltage.· Never operate the instrument with the ground disconnected. Grounding
continuity is required for safe operation of the instrument.
WARNING! Power Supply Line Cords. Use properly configured and approvedline cords for the power supply in your facility.
WARNING! Disconnecting Power. To fully disconnect power either detach orunplug the power cord, positioning the instrument such that the power cord isaccessible.
CAUTION! Cleaning and Decontamination. Use only the cleaning anddecontamination methods specified in the manufacturer's user documentation.It is the responsibility of the operator (or other responsible person) to ensurethe following requirements are met:
· No decontamination or cleaning agents are used that could cause aHAZARD as a result of a reaction with parts of the equipment or withmaterial contained in the equipment.
· The instrument is properly decontaminated a) if hazardous material isspilled onto or into the equipment, and/or b) prior to having the instrumentserviced at your facility or sending the instrument for repair, maintenance,trade-in, disposal, or termination of a loan (decontamination forms may berequested from customer service).
· Before using any cleaning or decontamination methods (except thoserecommended by the manufacturer), users should confirm with themanufacturer that the proposed method will not damage the equipment.
Safety and electromagnetic compatibility (EMC) standards
The instrument design and manufacture complies with the standards andrequirements for safety and electromagnetic compatibility as noted in the followingtable:
Electrical
Cleaning anddecontamination
Appendix D SafetySafety and electromagnetic compatibility (EMC) standardsD
72 QuantStudio™ 5 Real-Time PCR Instrument User Guide (for Human Identification) | MAN0017162 A.0

Reference Description
EU Directive2014/35/EU
European Union “Low Voltage Directive”
IEC 61010-1
EN 61010-1
UL 61010-1
CSA C22.2 No.61010-1
Safety requirements for electrical equipment for measurement,control, and laboratory use – Part 1: General requirements
IEC 61010-2-010
EN 61010-2-010
Safety requirements for electrical equipment for measurement,control and laboratory use – Part 2-010: Particular requirementsfor laboratory equipment for the heating of materials
IEC 61010-2-081
EN 61010-2-081
Safety requirements for electrical equipment for measurement,control and laboratory use – Part 2-081: Particular requirementsfor automatic and semi-automatic laboratory equipment foranalysis and other purposes
Reference Description
Directive 2014/30/EU European Union “EMC Directive”
EN 61326-1/ IEC 61326-1 Electrical Equipment for Measurement, Control andLaboratory Use – EMC Requirements – Part 1: GeneralRequirements
AS/NZS CISPR 11 Limits and Methods of Measurement of ElectromagneticDisturbance Characteristics of Industrial, Scientific, andMedical (ISM) Radiofrequency Equipment
ICES-001, Issue 4 Industrial, Scientific and Medical (ISM) Radio FrequencyGenerators
FCC Part 15 Subpart B (47CFR)
U.S. Standard Radio Frequency Devices
This equipment has been tested and found to comply with the limits for a Class Adigital device, pursuant to part 15 of the FCC Rules. These limits are designed toprovide reasonable protection against harmful interference when the equipment isoperated in a commercial environment. This equipment generates, uses, and canradiate radio frequency energy and, if not installed and used in accordance with theinstruction manual, may cause harmful interference to radio communications.Operation of this equipment in a residential area is likely to cause harmfulinterference in which case the user will be required to correct the interference at hisown expense.
Safety compliance
EMC
Appendix D SafetySafety and electromagnetic compatibility (EMC) standards D
QuantStudio™ 5 Real-Time PCR Instrument User Guide (for Human Identification) | MAN0017162 A.0 73

Reference Description
Directive 2012/19/EU European Union “WEEE Directive” – Waste electrical andelectronic equipment
Directive 2011/65/EU European Union “RoHS Directive” – Restriction of hazardoussubstances in electrical and electronic equipment
Directive 2006/66/EC European Union “Battery Directive”
Chemical safety
WARNING! GENERAL CHEMICAL HANDLING. To minimize hazards,ensure laboratory personnel read and practice the general safety guidelines forchemical usage, storage, and waste provided below, and consult the relevantSDS for specific precautions and instructions:· Read and understand the Safety Data Sheets (SDSs) provided by the
chemical manufacturer before you store, handle, or work with any chemicalsor hazardous materials. To obtain SDSs, see the “Documentation andSupport” section in this document.
· Minimize contact with chemicals. Wear appropriate personal protectiveequipment when handling chemicals (for example, safety glasses, gloves, orprotective clothing).
· Minimize the inhalation of chemicals. Do not leave chemical containers open.Use only with adequate ventilation (for example, fume hood).
· Check regularly for chemical leaks or spills. If a leak or spill occurs, followthe manufacturer's cleanup procedures as recommended in the SDS.
· Handle chemical wastes in a fume hood.· Ensure use of primary and secondary waste containers. (A primary waste
container holds the immediate waste. A secondary container contains spillsor leaks from the primary container. Both containers must be compatiblewith the waste material and meet federal, state, and local requirements forcontainer storage.)
· After emptying a waste container, seal it with the cap provided.· Characterize (by analysis if necessary) the waste generated by the particular
applications, reagents, and substrates used in your laboratory.· Ensure that the waste is stored, transferred, transported, and disposed of
according to all local, state/provincial, and/or national regulations.· IMPORTANT! Radioactive or biohazardous materials may require special
handling, and disposal limitations may apply.
WARNING! HAZARDOUS WASTE (from instruments). Waste produced bythe instrument is potentially hazardous. Follow the guidelines noted in thepreceding General Chemical Handling warning.
WARNING! 4L Reagent and Waste Bottle Safety. Four-liter reagent and wastebottles can crack and leak. Each 4-liter bottle should be secured in a low-densitypolyethylene safety container with the cover fastened and the handles locked inthe upright position.
Environmentaldesign
Appendix D SafetyChemical safetyD
74 QuantStudio™ 5 Real-Time PCR Instrument User Guide (for Human Identification) | MAN0017162 A.0

Biological hazard safety
WARNING! Potential Biohazard. Depending on the samples used on thisinstrument, the surface may be considered a biohazard. Use appropriatedecontamination methods when working with biohazards.
WARNING! BIOHAZARD. Biological samples such as tissues, body fluids,infectious agents, and blood of humans and other animals have the potential totransmit infectious diseases. All work should be conducted in properlyequipped facilities using the appropriate safety equipment (for example,physical containment devices). Safety equipment also may include items forpersonal protection, such as gloves, coats, gowns, shoe covers, boots,respirators, face shields, safety glasses, or goggles. Individuals should betrained according to applicable regulatory and company/ institutionrequirements before working with potentially biohazardous materials. Followall applicable local, state/provincial, and/or national regulations. The followingreferences provide general guidelines when handling biological samples inlaboratory environment.
· U.S. Department of Health and Human Services, Biosafety in Microbiologicaland Biomedical Laboratories (BMBL), 5th Edition, HHS Publication No. (CDC)21-1112, Revised December 2009; found at:www.cdc.gov/biosafety/publications/bmbl5/BMBL.pdf
· World Health Organization, Laboratory Biosafety Manual, 3rd Edition,WHO/CDS/CSR/LYO/2004.11; found at:www.who.int/csr/resources/publications/biosafety/Biosafety7.pdf
Appendix D SafetyBiological hazard safety D
QuantStudio™ 5 Real-Time PCR Instrument User Guide (for Human Identification) | MAN0017162 A.0 75

Documentation and support
Related documentation
Document Pub. No.
QuantStudio™ 5 Real-Time PCR Instrument Site Preparation Guide (for Human Identification) MAN0016701
QuantStudio™ 5 Real-Time PCR Instrument User Guide (for Human Identification) MAN0017162
HID Real‑Time PCR Analysis Software v1.3 User Guide MAN0009819
Obtain information from the Help system
The instrument has a Help system that describes how to use each feature of thetouchscreen. Touch on the instrument touchscreen to access the Help system.
Customer and technical support
For support:• In North America—Send an email to [email protected], or
call 888-821-4443 option 1.• Outside North America—Contact your local support office.• For latest services and support information for all locations, go to thermofisher.com/support.
Limited product warranty
Life Technologies Corporation and/or its affiliate(s) warrant their products as set forthin the Life Technologies' General Terms and Conditions of Sale found on LifeTechnologies' website at www.thermofisher.com/us/en/home/global/terms-and-conditions.html. If you have any questions, please contact LifeTechnologies at www.thermofisher.com/support.
76 QuantStudio™ 5 Real-Time PCR Instrument User Guide (for Human Identification) | MAN0017162 A.0

Index
Aaccessories 60administrator instrument profile 27
Bbackground calibration
create plate 40description 35plate, prepare 37, 41run 38when to perform 34
backup instrument 48biohazard safety 75
Ccalibration
background 38custom dye. See custom dyedye 38plate, prepare 37, 41reminders 36ROI/uniformity 38schedule 34status 36transfer results 39view images 39workflow 36
calibration failure, troubleshoot 56computer
connection to instrument or LAN 17connections 16, 63
consumables, 96-well 0.2-mL 59contamination, identify 40custom dye
add to the instrument 42calibration, perform 42description 10
custom dye calibration, workflow, HID 41custom dyes, HID-validated workflow 41
Ddate and time 30disk space message documentation, related 76dye calibration
description 35plate, prepare 37, 41run 38when to perform 34
dyescustom 10system 9
EEDS files, transfer 22
Ffactory defaults 31firewall ports 17fluorescence high fuses, replace 52
Gguest profile, disable 29
Hheated cover temperature, set for instrument idling
30Help system, access 76home screen, parts of 11
Iinstallation
before you begin 14workflow 14
instrumentprofile, create 28avatar 29connections 16, 63
QuantStudio™ 5 Real-Time PCR Instrument User Guide (for Human Identification) | MAN0017162 A.0 77

enable for remote monitoring 31heated cover idle temperature 30move 53name 29overview 7parts of 10power off 19power on 19prepare to store or move or ship 53profile, overview 27return for service 54touchscreen black
instrument filters 9instrument layout 61instrument settings 24, 26instrument specification 61instrument verification. See RNase P verification
Llimited product warranty 76load plate 21
Mmaintenance 48
Nnetwork, configurations supported 17
Oonline Help. See Help system
Pperformance verification. See RNase P verificationPIN reset 28profiles
administrator 27delete 28edit 28guest, disable 29instrument 28require sign-in 29reset PIN 28sign in 20
Rreal-time plots
view on instrument touchscreen 22zoom 22
related documentation 76Replace with index term require sign in 29restore instrument 48RNase P verification
pass criteria 45plate description 45plate, prepare 46run 47
ROI/uniformity calibrationdescription 35plate, prepare 37, 41run 38when to perform 34
run data, transfer 22
Ssafety, biohazard 75sample block
clean 49decontaminate 49
settings 24, 26sign in, require 29sign out
profile 20timer, set 29
sleep mode 30software updates 32standby mode 30startup wizard 15supported dyes 9symbols, safety 67system dyes 9
Tterms and conditions 76troubleshooting 55
Uuniformity calibration
description 35plate, prepare 37, 41run 38when to perform 34
unload plate 21unpack instrument 15
Vverification failure, troubleshoot 57
Index
78 QuantStudio™ 5 Real-Time PCR Instrument User Guide (for Human Identification) | MAN0017162 A.0

Wwarranty 76well details, view on instrument touchscreen 22workflow, custom dye calibration, HID 41
Zzoom 22
Index
QuantStudio™ 5 Real-Time PCR Instrument User Guide (for Human Identification) | MAN0017162 A.0 79

thermofisher.com/support | thermofisher.com/askaquestion
thermofisher.com
15 June 2017