quick start guide brush size for … · 2. hand position hold the airbrush as you would hold a...
TRANSCRIPT
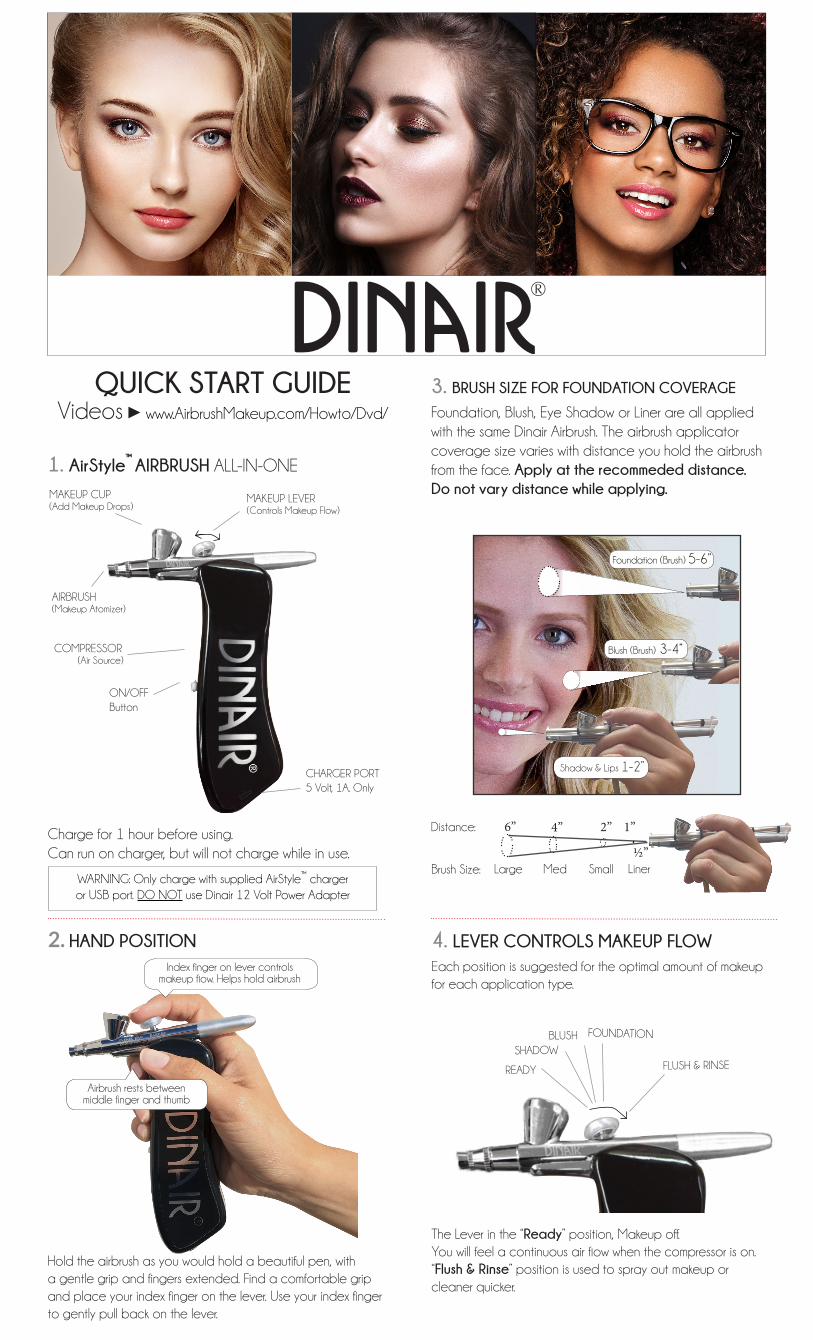
2. HAND POSITION
Hold the airbrush as you would hold a beautiful pen, witha gentle grip and fingers extended. Find a comfortable grip and place your index finger on the lever. Use your index finger to gently pull back on the lever.
ON/OFF Button
CHARGER PORT 5 Volt, 1A. Only
MAKEUP CUP(Add Makeup Drops)
COMPRESSOR (Air Source)
AIRBRUSH (Makeup Atomizer)
MAKEUP LEVER (Controls Makeup Flow)
1. AirStyle™
AIRBRUSH ALL-IN-ONE
Index finger on lever controlsmakeup flow. Helps hold airbrush
Airbrush rests between middle finger and thumb
QUICK START GUIDE Videos►www.AirbrushMakeup.com/Howto/Dvd/
3. BRUSH SIZE FOR FOUNDATION COVERAGE
Shadow & Lips 1-2”
The Lever in the “Ready” position, Makeup off.You will feel a continuous air flow when the compressor is on.“Flush & Rinse” position is used to spray out makeup or cleaner quicker.
Charge for 1 hour before using.Can run on charger, but will not charge while in use.
Foundation, Blush, Eye Shadow or Liner are all applied with the same Dinair Airbrush. The airbrush applicator coverage size varies with distance you hold the airbrush from the face. Apply at the recommeded distance.Do not vary distance while applying.
READY
SHADOWBLUSH FOUNDATION
FLUSH & RINSE
Foundation (Brush) 5-6”
Blush (Brush) 3-4”
6” 2” 1”
½”
4”
4. LEVER CONTROLS MAKEUP FLOW Each position is suggested for the optimal amount of makeup for each application type.
Large Small LinerBrush Size:
Distance:
MedWARNING: Only charge with supplied AirStyle™ charger or USB port. DO NOT use Dinair 12 Volt Power Adapter

5. TRY WITH WATER FIRSTMISTAKES EVAPORATE WHEN PRACTICING WITH WATER!
Put a few drops of water into the makeup cup. Where you can add and mix makeup colors. It is recommended to parcticewith water first.
Use a safety pin to make a small hole through the pour spoutsafety seal. Angle Pin towards center of bottle.Do not remove cap. Angle bottle to 90° and squeeze gentlyto dispense drops of makeup into the makeup Cup. 90
0 angle
keeps top of cap clean.
6. OPEN NOZZLE TIP SEAL - NOT THE CAP
OPEN TIP SAFETY SEAL WITH PIN
HOLD UPRIGHT 90°TO DISPENSE AND KEEP CAP CLEAN
9. AIRBRUSH SPRAYING POORLY
Add cleaner to brush and vigorously brush airbrush tipto remove stubborn dried makeup
PINCH IT &SCRAP OFF!
BRUSH IT!TOOTHBRUSH
Dinair Video and Tutorial LibraryLearn how to airbrush makeup online!
Full Face, Hair, nails, tanning and so much more!
Explore our Online Video Library and Online Courses:www.AirbrushMakeup.com/howto/media/face/
Call or visit us online!Dinair ’s Award-Winning Customer Service Team
looks forward to answering your questions
M-F 8:30am-5pm, SAT 10am-2pm PST.800.785.4770
AirbrushMakeup.com | [email protected]
DO NOT REMOVE
CAP
1. Pick your foundation Shade2. Put 3 drops in the Cup to start3. Hold the airbrush like a pen, check your color on a tissue4. Move airbrush in a circular or oval motion at 5-6” from face5. Pull the lever back gradually, feel a light coolness of makeup 6. Watch for uneven skin tones begin to blur and blend7. Apply lightly to whole face, add 3 drops, again. 6 to 12 drop total8. Lightly misting face, neck and ears as skin tone becomes blended and even
Advanced1. If blemish areas are pronounced apply Dinair Neutralizer* before foundation2. For the longest lasting coverage add Dinair Makeup Extender* to makeup
More Info Neutralizer - Special Coverage • Apply before foundation to neutralize (conceal) blemishes, freckles and unwanted coloration • Neutralizer creates an ultra thin color blocking coverage • Neutralize first to prevent excess foundation look Extender • Makeup will last longer and be more water resistant • Weddings. Travel in a tropical areas • Oily skin, excess perspiration • Active lifestyle and sports
7. FOUNDATION COVERAGELight
PassesGood
Distance
Pinch tip with fingernails to remove dry makeup
8. CLEAN AND STORE
When you are ready to use your airbrush - remove your cleaning-storage cap, start compressor and rinse out airbrush cleaner with a few drops of water.
1) Put lever wedge betweenthe lever and front of the cup. Hold the lever back, in full open position.
2) Put 5 drops of Dinair Airbrush Cleaner in the makeup cup. Allow cleaner to circulate. Push the nose cap on.
3) Squeeze the nose tip until you see foam in the makeup cup. Foaming shows that cleaner has circulated. Airbrush is now ready to be capped. Always store your airbrush in caps with cleaner.
Add cleaner, circulate, cap it, soak your airbrush. To keep it clean and ready between uses.
Patent Pending
www.AirbrushMakeup.com/Shop/Airbrush_Clean/
1
2
3