quick start guide - teledynamics · fax 978-998-7883 [email protected] [email protected] snom france...
TRANSCRIPT

snom technology AGCharlottenstr. 6810117 BerlinGermanyTel. +49 30 39 83 3-0Fax +49 30 39 83 31 [email protected]; [email protected] snom technology, Inc.100 Cummings Center, Suite 125-GBeverly, MA 01915Tel. 978-998-7882 Fax [email protected]
snom France SARL6 Parc des fontenelles78870 BaillyTel. +33 1 80 87 62 87Fax +33 1 80 87 62 [email protected]@snom.com
snom technology SRLVia A. Lusardi 1020122 MilanoTel +39 02 00611212Fax +39 02 [email protected] [email protected]
Your specialist retailer - Ihr Fachhändler - Votre distributeur - Su distribuidor - Il tuo rivenditore:
© 2010 snom technology AGv1.01
Quick Start Guide
VoIP Business Phone
E NG LI S HD E UTSCHFRANÇAI SITALIANOE S PAÑOLPORTUG U Ê S
2
snom technical datasheet (P-DIN_A4) Version 1.2.1. /// Nov 2009
company snom technology AGrevision PS No. ERP No. scale
total pages page
model snom 370 5 4.12. 00001438 1:1 1
1product LABEL TYPE prepared by Martin Taube
filename type_label_snom370_rev5.pdf checked by
created 2007-10-09 approved by
last saved 2009-11-04 status
139.5
39.5
N14647
XXXYY88888899999
0 0 0 4 1 3 2 A 0 0 4 4A B
1. Bar code System: Code 1282. Material: white ART paper3. Black printing / SIZE: 139.5(W)X39.5(H)mm4. Tolerence: ±0.2mm6. Print content: A.
B. Bar code: MAC Address same as mainboard label7. attach onto the backside of the phone
Serial Number (5 digits)DDMMYY day, month, year (only last two digits)Product of factory abbreviation - provided by snom (2 digits)Country of Origin - ISO 3166-1 alpha-3 (3 digits)
• per il posizionamento su una scrivania
• para a colocação em uma mesa
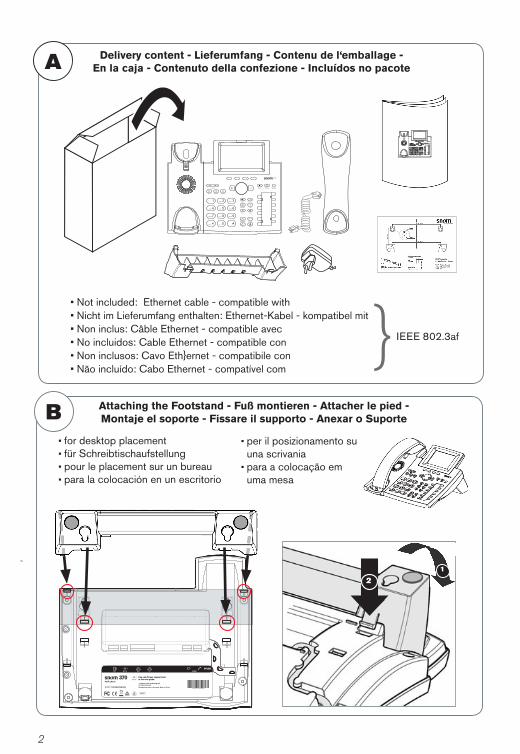
Attaching the Footstand - Fuß montieren - Attacher le pied - Montaje el soporte - Fissare il supporto - Anexar o SuporteB
• for desktop placement• für Schreibtischaufstellung • pour le placement sur un bureau • para la colocación en un escritorio
Delivery content - Lieferumfang - Contenu de l‘emballage - En la caja - Contenuto della confezione - Incluídos no pacoteA
• Not included: Ethernet cable - compatible with • Nicht im Lieferumfang enthalten: Ethernet-Kabel - kompatibel mit • Non inclus: Câble Ethernet - compatible avec • No incluidos: Cable Ethernet - compatible con • Non inclusos: Cavo Eth}ernet - compatibile con• Não incluído: Cabo Ethernet - compatível com
IEEE 802.3af}
21

3
3
• for wall mounting• für die Wandbefestigung• pour l'installation sur le mur
• para el montaje en pared• per il montaggio a parete• para montagem na parede
N14647N14647
XXXYY888888999990 0 0 4 1 3 2 A 0 0 4 4
2
12
4
Detaching the Footstand - Fuß abmontieren - Démonter le pied - Desmontar el soporte - Smantellare il supporto - Destacandar o Suporte
2.1.
C
1
snom technical datasheet (P-DIN_A4) Version 1.2.1. /// Nov 2009
companysnom technology AG
revisionPS No.
ERP No.scale total pages
page
modelsnom 370
54.12.
000014381:1
1
1
productLABEL TYPE
prepared by
Martin Taube
filenametype_label_snom370_rev5.pdf
checked by
created2007-10-09
approved by
last saved2009-11-04
status
139.5
39.5N14647
XXXYY88888899999
0 0 0 4 1 3 2 A 0 0 4 4
A
B
1. Bar code System: Code 1282. Material: white ART paper
3. Black printing / SIZE: 139.5(W)X39.5(H)mm
4. Tolerence: ±0.2mm6. Print content:
A.
B. Bar code: MAC Address same as mainboard label
7. attach onto the backside of the phone
Serial Number (5 digits)DDMMYY day, month, year (only last two digits)
Product of factory abbreviation - provided by snom (2 digits)
Country of Origin - ISO 3166-1 alpha-3 (3 digits)
4
4 x
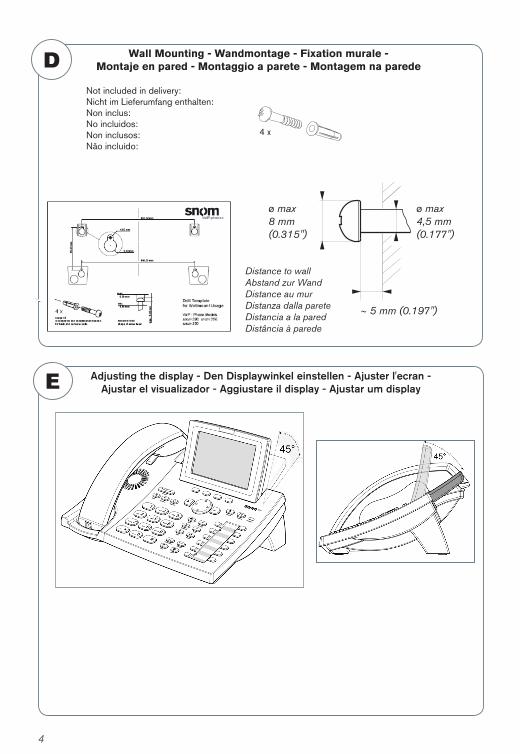
Not included in delivery: Nicht im Lieferumfang enthalten: Non inclus: No incluidos:Non inclusos:Não incluído:
Distance to wallAbstand zur WandDistance au murDistanza dalla pareteDistancia a la pared Distância à parede
∼ 5 mm (0.197")
ø max 8 mm(0.315")
ø max 4,5 mm(0.177")
Wall Mounting - Wandmontage - Fixation murale - Montaje en pared - Montaggio a parete - Montagem na paredeD
Adjusting the display - Den Displaywinkel einstellen - Ajuster l'ecran - Ajustar el visualizador - Aggiustare il display - Ajustar um displayE

5
Connecting - Anschließen - Connecter - Conectar - Collegare -F
snom technical datasheet (P-DIN_A4) Version 1.2.1. /// Nov 2009
companysnom technology AG
revisionPS No.
ERP No.scale total pages
page
modelsnom 370
54.12.
000014381:1
1
1
productLABEL TYPE
prepared by
Martin Taube
filenametype_label_snom370_rev5.pdf
checked by
created2007-10-09
approved by
last saved2009-11-04
status
139.5
39.5N14647
XXXYY88888899999
0 0 0 4 1 3 2 A 0 0 4 4
A
B
1. Bar code System: Code 1282. Material: white ART paper
3. Black printing / SIZE: 139.5(W)X39.5(H)mm
4. Tolerence: ±0.2mm6. Print content:
A.
B. Bar code: MAC Address same as mainboard label
7. attach onto the backside of the phone
Serial Number (5 digits)DDMMYY day, month, year (only last two digits)
Product of factory abbreviation - provided by snom (2 digits)
Country of Origin - ISO 3166-1 alpha-3 (3 digits)
If no PoE availableWenn PoE nicht verfügbarS'il n'y a pas de PoESi no se dispone de PoESe non disponibile PoESe não disponível PoE
3
2
1
Optional - OpzionaleOptionel - Opcional
6
Quick Start Guide
ENGLISH ......................................................................................... 7
DEUTSCH ....................................................................................... 15
FRANÇAIS ...................................................................................... 23
ITALIANO ......................................................................................... 31
ESPAÑOL ........................................................................................ 39
PORTUGUÊS ................................................................................. 47
APPENDIX ANHANG ANNEXE APENDICE ANEXO
GNU General Public License .......................................................... 55
Symbols used in this guide Symboles utilisés dans ce manuel Símbolos usados en este manual
In dieser Anleitung benutzte Symbole Symboli utilizzati in questa manuale Símbolos utilizados neste manual
p u q t Press / Drücken / Appuyez / Premere / Pulse / Pressione:
-
>:Next stepPassez à l'étape suivanteSiguiente paso
Nächster Schritt Passo successivo Próxima etapa
[Reg] Text in square bracketsText in eckigen KlammernText en crochetsTesto tra parentesi quadreTexto entre corchetesTexto entre colchetes Press
Appuyez Pulse
Drücken Premere Pressione

Quick Start Guide
7
ENGLISH
ENGLISH
This quick start guide describes the installation, setup, and operation of the snom 370. For further information please refer to the manual on our web page,
http://wiki.snom.com/Snom370.
Copyright, Trademarks, GPL, Legal Disclaimers
© 2010 snom technology Aktiengesellschaft All Rights Reserved.snom, the names of snom products, and snom logos are trademarks owned by snom technology AG. All other product names and names of enterprises are the property of their respective owners.
snom technology AG reserves the right to revise and change this document at any time, without being obliged to announce such revisions or changes beforehand or after the fact.
Texts, images, and illustrations and their arrangement in this document are subject to the protection of copyrights and other legal rights worldwide. Their use, reproduction, and transmittal to third parties without express written permission may result in legal proceedings in the criminal courts as well as civil courts.
Although due care has been taken in the compilation and presentation of the information in this document, the data upon which it is based may have changed in the meantime. snom therefore disclaims all warranties and liability for the accurateness, completeness, and currentness of the information published, except in the case of intention or gross negligence on the part of snom or where liability arises due to binding legal provisions.
Our firmware includes some source code that may be used and modified by anyone and everyone under the GNU Public License (GPL) (see Appendix on page ), provided they, in turn, make it available to everyone else with the same licensing agreement. Please go to http://www.snom.com/en/support/download/gpl-quellcode/ for the original GPL license and the source code of components licensed under GPL and used in snom products.
Important InformationPlease read the instructions on safety and disposal and on how to set up and use the device before using it and also give them to other users to read or inform those users of their contents. Save this manual and do not give the device to third parties without it.
Safety Instructions Follow the instructions in this manual and other applicable documentation of the device.
• If the phone is not supplied with power via an Ethernet cable, use only the power adapter included in the package or one expressly recommended by snom technology. Other power supplies may damage or destroy the phone, affect its behavior, or induce noise.
ENGLISH

8
snom 370 Quick Start GuideENGLISH
• Avoidplacingthecableswherepeoplemaytripoverthemorwheretheymaybeexposedtomechanicalpressureasthismaydamagethem.
• Thisdeviceisforindooruseonly!Donotinstalloutdoors-NOTFOROUTDOORUSE!
• Donotinstallthedeviceinroomswithhighhumidity(forexample,inbathrooms,laundryrooms,dampbasements).Donotimmersethedeviceinwateranddonotspillorpourliquidsofanykindontoorintothedevice.
• Donotinstallthedeviceinsurroundingsatriskforexplosions(paintshops,forexample).Donotusethedeviceifyousmellgasorotherpotentiallyexplosivefumes.
• Donotusethedeviceduringthunderstorms.Lightningstrikingthepowergridmaycauseelectricshocks.
SELV (Safety Extra Low Voltage) Compliance
SafetystatusofInput/OutputconnectionscomplywithSELVrequirements.
Warning:Toavoidelectricshock,donotconnectsafetyextra-lowvoltage(SELV)circuitstotelephone-networkvoltage(TNV)circuits.LANportscontainSELVcircuits,andPSTNportscontainTNVcircuits.SomeLANandPSTNportsbothuseRJ-45(8P8C)connectors.Usecautionwhenconnectingcables.
Standards conformance
ThisdeviceisCEandFCC-certifiedandmeetsEuropeanandUShealth,safety,andenvironmentalstandards.
Unauthorizedopening,changing,ormodifyingthedevicewillcausethewarrantytolapseandmayalsoresultinthelapseoftheCEandFCCcertifications.Incaseofmalfunctioncontactauthorizedservicepersonnel,yourseller,orsnom.
• Safety: IEC60950-1:2001,CBTestCertificate:DE2-013297• Certifications: FCCClassB,CEMark• Power consumption: 2.8–2.9watts• Power: 5VDC• 1 x LAN, 1 x PC: RJ45(Ethernet)• Ethernet: 2xIEEE802.310/100Mbpsswitch• Power over Ethernet: IEEE802.3af,Class1
Disposal of the device
ThisdeviceissubjecttoEuropeanDirective2002/96/ECandmaynotbedisposedofwithgeneralhouseholdgarbage.
Ifyoudonotknowwhereyoumaydisposeofthedeviceattheendofitslifespan,contactyourmunicipality,yourlocalwastemanagementprovider,oryourseller.
CleaningTocleanthedevice,useananti-staticcloth.Pleaseavoidcleaningliquidsastheymightdamagethesurfaceorinternalelectronicsofthedevice.
Quick Start Guide
9
ENGLISH
ENGLISH
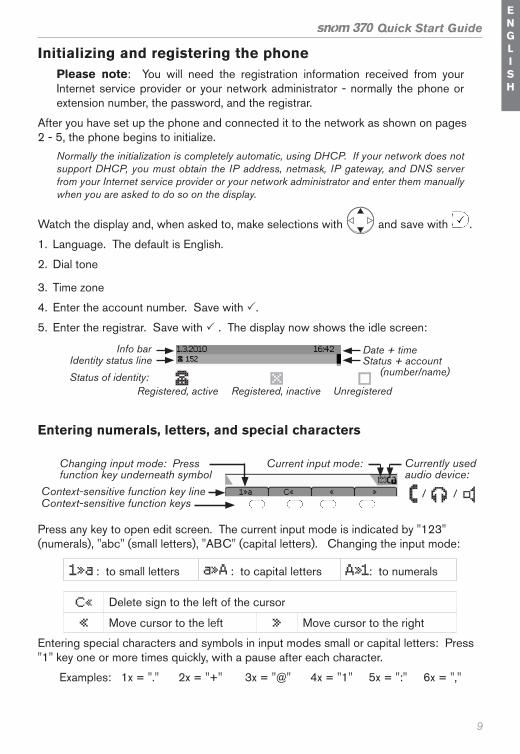
Initializing and registering the phonePlease note: You will need the registration information received from your Internet service provider or your network administrator - normally the phone or extension number, the password, and the registrar.
After you have set up the phone and connected it to the network as shown on pages 2 - 5, the phone begins to initialize.
Normally the initialization is completely automatic, using DHCP. If your network does not support DHCP, you must obtain the IP address, netmask, IP gateway, and DNS server from your Internet service provider or your network administrator and enter them manually when you are asked to do so on the display.
Watch the display and, when asked to, make selections with and save with .
1. Language. The default is English.
2. Dial tone
3. Time zone
4. Enter the account number. Save with P.
5. Enter the registrar. Save with P . The display now shows the idle screen:
(number/name)Status of identity:Unregistered
Info barIdentity status line
Date + time Status + account
Registered, active Registered, inactive
Entering numerals, letters, and special characters
Context-sensitive function keysContext-sensitive function key line
Current input mode: Currently used audio device:
Changing input mode: Pressfunction key underneath symbol
/ /
Press any key to open edit screen. The current input mode is indicated by "123" (numerals), "abc" (small letters), "ABC" (capital letters). Changing the input mode:
: to small letters : to capital letters : to numerals
Delete sign to the left of the cursor
Move cursor to the left Move cursor to the right
Entering special characters and symbols in input modes small or capital letters: Press "1" key one or more times quickly, with a pause after each character.
Examples: 1x = "." 2x = "+" 3x = "@" 4x = "1" 5x = ":" 6x = ","
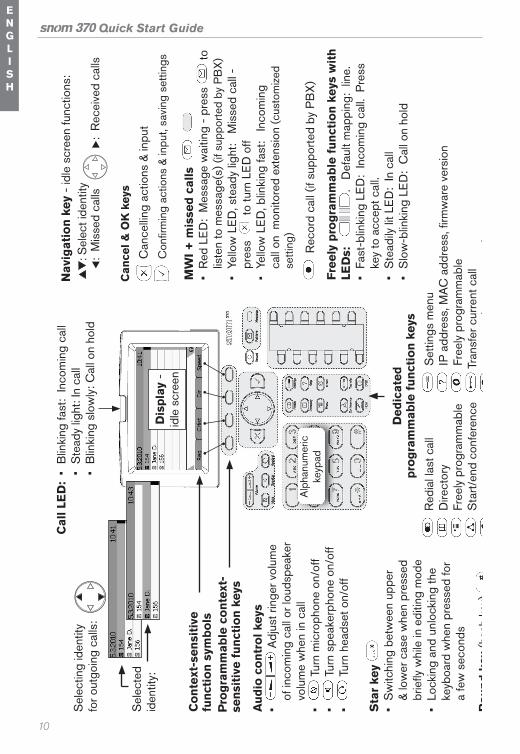
10
Quick Start GuideENGLISH
Alp
hanu
mer
ic
keyp
ad
Dis
play
-
idle
scr
een
• B
linki
ng fa
st:
Inco
min
g ca
ll•
Ste
ady
light
: In
call
• B
linki
ng s
low
ly: C
all o
n ho
ld
Cal
l LE
D:
Ded
icat
ed
prog
ram
mab
le f
unct
ion
keys
R
edia
l las
t cal
l
Dire
ctor
y
Fre
ely
prog
ram
mab
le
Sta
rt/en
d co
nfer
ence
Hol
d/un
hold
cal
l
S
ettin
gs m
enu
I
P ad
dres
s, M
AC a
ddre
ss, fi
rmw
are
vers
ion
F
reel
y pr
ogra
mm
able
T
rans
fer c
urre
nt c
all
Tur
n D
ND
(do
not d
istu
rb) o
n/of
f
MW
I + m
isse
d ca
lls
•
Red
LE
D:
Mes
sage
wai
ting
- pre
ss
to
liste
n to
mes
sage
(s) (
if su
ppor
ted
by P
BX)
• Ye
llow
LE
D, s
tead
y lig
ht:
Mis
sed
call
- pr
ess
t
o tu
rn L
ED
off
• Ye
llow
LE
D, b
linki
ng fa
st:
Inco
min
g ca
ll on
mon
itore
d ex
tens
ion
(cus
tom
ized
setti
ng)
Rec
ord
call
(if s
uppo
rted
by P
BX)
Free
ly p
rogr
amm
able
fun
ctio
n ke
ys w
ith
LED
s:
.
Def
ault
map
ping
: lin
e.•
Fast
-blin
king
LE
D:
Inco
min
g ca
ll. P
ress
ke
y to
acc
ept c
all.
• S
tead
ily li
t LE
D:
In c
all
• S
low
-blin
king
LE
D:
Cal
l on
hold
Pou
nd k
ey (h
ash
key)
Sta
r ke
y •
Sw
itchi
ng b
etw
een
uppe
r &
low
er c
ase
whe
n pr
esse
d br
iefl y
whi
le in
edi
ting
mod
e•
Lock
ing
and
unlo
ckin
g th
e ke
yboa
rd w
hen
pres
sed
for
a fe
w s
econ
ds
Aud
io c
ontr
ol k
eys
•
Adj
ust r
inge
r vol
ume
of in
com
ing
call
or lo
udsp
eake
r vo
lum
e w
hen
in c
all
•
Tur
n m
icro
phon
e on
/off
•
Tur
n sp
eake
rpho
ne o
n/of
f•
T
urn
head
set o
n/of
f
Sel
ectin
g id
entit
yfo
r out
goin
g ca
lls:
Sel
ecte
d id
entit
y:
Con
text
-sen
siti
ve
func
tion
sym
bols
Pro
gram
mab
le c
onte
xt-
sens
itiv
e fu
ncti
on k
eys
Can
cel &
OK
key
s
Can
cellin
g ac
tions
& in
put
Con
fi rm
ing
actio
ns &
inpu
t, sa
ving
set
tings
Nav
igat
ion
key
- idl
e sc
reen
func
tions
:
t:
Mis
sed
calls
u:
Rec
eive
d ca
lls
:
Sel
ect i
dent
ity

Quick Start Guide
11
ENGLISH
ENGLISH
Alp
hanu
mer
ic
keyp
ad
Dis
play
-
idle
scr
een
• B
linki
ng fa
st:
Inco
min
g ca
ll•
Ste
ady
light
: In
call
• B
linki
ng s
low
ly: C
all o
n ho
ld
Cal
l LE
D:
Ded
icat
ed
prog
ram
mab
le f
unct
ion
keys
R
edia
l las
t cal
l
Dire
ctor
y
Fre
ely
prog
ram
mab
le
Sta
rt/en
d co
nfer
ence
Hol
d/un
hold
cal
l
S
ettin
gs m
enu
I
P ad
dres
s, M
AC a
ddre
ss, fi
rmw
are
vers
ion
F
reel
y pr
ogra
mm
able
T
rans
fer c
urre
nt c
all
Tur
n D
ND
(do
not d
istu
rb) o
n/of
f
MW
I + m
isse
d ca
lls
•
Red
LE
D:
Mes
sage
wai
ting
- pre
ss
to
liste
n to
mes
sage
(s) (
if su
ppor
ted
by P
BX)
• Ye
llow
LE
D, s
tead
y lig
ht:
Mis
sed
call
- pr
ess
t
o tu
rn L
ED
off
• Ye
llow
LE
D, b
linki
ng fa
st:
Inco
min
g ca
ll on
mon
itore
d ex
tens
ion
(cus
tom
ized
setti
ng)
Rec
ord
call
(if s
uppo
rted
by P
BX)
Free
ly p
rogr
amm
able
fun
ctio
n ke
ys w
ith
LED
s:
.
Def
ault
map
ping
: lin
e.•
Fast
-blin
king
LE
D:
Inco
min
g ca
ll. P
ress
ke
y to
acc
ept c
all.
• S
tead
ily li
t LE
D:
In c
all
• S
low
-blin
king
LE
D:
Cal
l on
hold
Pou
nd k
ey (h
ash
key)
Sta
r ke
y •
Sw
itchi
ng b
etw
een
uppe
r &
low
er c
ase
whe
n pr
esse
d br
iefl y
whi
le in
edi
ting
mod
e•
Lock
ing
and
unlo
ckin
g th
e ke
yboa
rd w
hen
pres
sed
for
a fe
w s
econ
ds
Aud
io c
ontr
ol k
eys
•
Adj
ust r
inge
r vol
ume
of in
com
ing
call
or lo
udsp
eake
r vo
lum
e w
hen
in c
all
•
Tur
n m
icro
phon
e on
/off
•
Tur
n sp
eake
rpho
ne o
n/of
f•
T
urn
head
set o
n/of
f
Sel
ectin
g id
entit
yfo
r out
goin
g ca
lls:
Sel
ecte
d id
entit
y:
Con
text
-sen
siti
ve
func
tion
sym
bols
Pro
gram
mab
le c
onte
xt-
sens
itiv
e fu
ncti
on k
eys
Can
cel &
OK
key
s
Can
cellin
g ac
tions
& in
put
Con
fi rm
ing
actio
ns &
inpu
t, sa
ving
set
tings
Nav
igat
ion
key
- idl
e sc
reen
func
tions
:
:
Mis
sed
calls
:
Rec
eive
d ca
lls
:
Sel
ect i
dent
ity
O
n/O
ff
xx
xxx>
Sel
ect e
vent
:
>
·
Alw
ays
· W
hen
Bus
y·
On
Tim
eout
Sel
ect t
arge
t: T
ype
num
ber
>
Turn
cal
l fw
d of
f:
Sel
ect e
vent
:
>
·
Nev
er
2R
ing
Tone
9 (7
)*
Key
Map
ping
1 D
HC
P2
IP A
ddre
ss3
Net
mas
k4
Hos
tnam
e5
IP G
atew
ay6
Dom
ain
7 D
NS
Ser
ver 1
8 D
NS
Ser
ver 2
9 N
TP S
erve
r10
Web
serv
er
Type
11 H
TTP
Adm
in12
HTT
P Pa
ssw
ord
13 S
ettin
gs
Ser
ver
14 V
LAN
ID15
VLA
N P
riorit
y16
Res
et V
LAN
8 *
Net
wor
k
7 (6
)*
Cal
l For
war
ding
1
Cal
l Fo
rwar
ding
Eve
nt
2
Cal
l Fo
rwar
ding
Tim
e3
Alw
ays
Targ
et
4B
usy
Targ
et
5Ti
meo
ut T
arge
t
4P
refe
renc
es1
Lang
uage
2 Ti
mez
one
3 To
ne S
chem
e
5 *
Iden
tity
1 O
utgo
ing
Iden
tity
2 R
ereg
iste
r
3 Edit 4
Logo
ff U
ser
5 Lo
goff
all
10 (8
)*
Mai
nten
ance
1 **
Use
r Mod
e
2N
et In
fo
3 M
em In
fo
4 R
eboo
t
5 R
eset
Val
ues
adm
inis
trat
or
mod
e
user
mod
e
The
mai
nten
ance
m
enu
in:
10 (8
) *M
aint
enan
ce1
**
Adm
inis
trato
r Mod
e
2N
et In
fo
3 M
em In
fo
4 R
eboo
t
5R
eset
Val
ues
6 (5
)*
Pho
ne B
ehav
ior
1
Hid
e ow
n ou
tgoi
ng ID
2 R
ejec
t ano
nym
ous
3 A
uto
Dia
l
4 A
uto
answ
er in
dica
tion
5A
uto
Ans
wer
Typ
e
6C
all C
ompl
etio
n
7 N
umbe
r Gue
ssin
g
8 C
all W
aitin
g
9 B
lock
Scr
oll w
ith
, se
lect
with
3A
udio
1 H
eads
et D
evic
e
2 M
WI N
otifi
catio
nS
ilent
Bee
p
R
emin
der
1D
ispl
ay1
Con
trast
Sel
ect w
ith:
· Onl
y na
me
· Onl
y nu
mbe
r· N
ame
+ n
umbe
r· N
umbe
r + n
ame
· Sho
w fu
ll co
ntac
t
3 B
ackl
ight
2 D
ispl
ay M
etho
d
>
Sel
ect i
dent
ity a
nd
ringe
r with
+
Sel
ect k
ey w
ith
+
. S
elec
t fun
ctio
n w
ith
>
. T
ype
num
ber i
f pro
mpt
ed >
S
elec
t on/
off:
>
* T
he id
enti
ty a
nd n
etw
ork
men
us (s
hade
d da
rk g
ray)
are
not
ava
ilabl
e w
hen
the
phon
e is
run
ning
in u
ser
mod
e.**
Sw
itch
ing
from
use
r m
ode
to a
dmin
istr
ator
mod
e:
Adm
inis
trat
or
pass
wor
d re
quir
ed.
Fact
ory
defa
ult:
000
0 (4
x z
ero)
.
Set
ting
s m
enu
Pres
s to
ope
n. U
se
to
scro
ll or
ent
er n
umbe
r on
keyp
ad
to g
o to
a s
ubm
enu
dire
ctly.
Pre
ss
o
r [C
ance
l] to
retu
rn to
the
idle
sc
reen
.

12
Quick Start GuideENGLISH
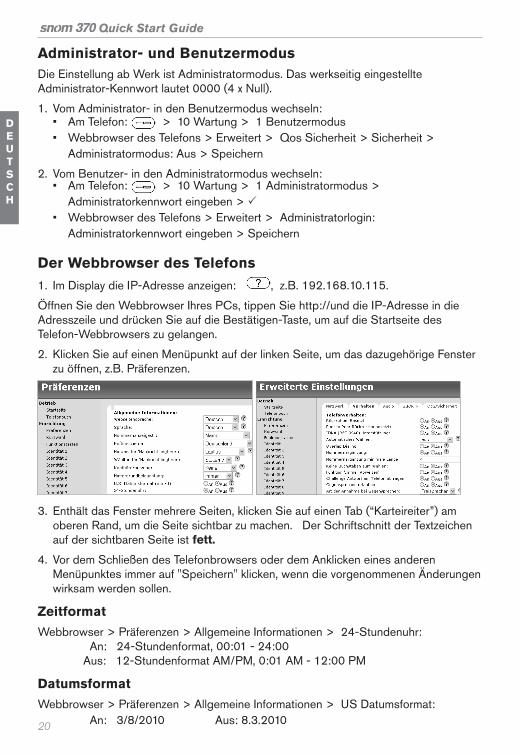
Administrator/user modeThe factory setting is administrator mode. The default administrator password is 0000 (4 x zero). Changing from administrator mode to user mode and vice versa:
1. From administrator mode to user mode: • On the phone: > 10 Maintenance > 1 User Mode• Web interface > Advanced > Qos/Security > Security > Administrator Mode:
Off > Save.
2. Switch from user mode to administrator mode: • On the phone: > 10 Maintenance > 1 Administrator Mode• Web interface > Advanced > Administrator Login > enter administrator
password > Save.
The phone's web interface1. Look up the phone's IP address: . Example: 192.168.10.115.
2. Open a web browser on your PC. Enter http:// and the IP address in the address bar and press ENTER. The "welcome" screen opens.
3. Click on an item in the menu on the left side of the screen to open that window.
4. If a window contains several pages, click on the tab at the top to open the page. The font weight of the characters on the tab of the visible page is bold.
5. Any changes you make will not take effect until you click on "Save". Changes will be lost if you open another page of the web interface without first clicking on "Save" .
Clock/time formatWeb interface > Preferences > General Information > 24 Hour Clock:
On: 24-hour format, 00:01 to 24:00 Off: 12-hour AM/PM format, 0:01 AM to 12:00 PM
Date formatWeb interface > Preferences > General Information > US date format:
On: 3/8/2010 Off: 8.3.2010
Configuring & modifying identity
Web interface > Identity 1-12 >

Quick Start Guide
13
ENGLISH
ENGLISH
Using the phone
Select outgoing identityFrom the idle screen, press pq to select one of the configured identities.
Making calls• Enter the number on the alphanumeric keypad and pick up the handset or• pick up the handset, enter the number, P or• , enter the number, P
Accepting calls• With handset: Pick up the handset• With a headset: Press P or blinking line key • With the speakerphone: Press
Putting calls on hold
Press or the line key of the call. The LED starts to blink slowly. Press to resume the call. With more than one call on hold: pq to select call, press P or or [R] to resume the selected call.
Conference (3 parties)
1. Your phone number: 154. Put first caller (Jane Doe) on hold.
2. Call second party (158). With second party on the line:
3. Press to start conference. In conference:
4. Press to stop conference and put both parties on hold.
5. Resume conference: Press function key .
Call transfer
Attended transfer
Put the call on hold. Dial the number that you wish to transfer the call to. If the third party wishes to accept the call > press > press P.
Blind transferWhen the incoming call is ringing or with the call on the line: Press > dial the phone number the call is to be transferred to > press P.

14
Quick Start GuideENGLISH
Call forwarding 1. Turn call forwarding on.
a. All incoming calls: > 7 Call forwarding > 1 Call forwarding event > t u Always > P > 3 Always target > enter target phone number > P.
b. When busy: > 7 Call forwarding > 1 Call forwarding event > t u When busy > P > 4 Busy target > enter target phone number > P.
c. When call is not picked up: > 7 Call forwarding > 1 Call forwarding event > t u On Timeout > P > 5 Timeout target > enter target phone number > P > 2 Call forwarding time > enter number of seconds after which call will be forwarded > P.
d. Call forwarding is on: .
2. Turn call forwarding off: > 7 Call forwarding > 1 Call forwarding event > t u Never > P.
Call lists1. From the idle screen, press [CHist] to open.
2. Select list of missed, received, dialed calls: pq > P.
3. Scroll through list: pq . Dial selected number: P.
Directory• Open: Press . Scroll: pq . Dial number of selected entry: P.• <New Item>: [R].• Editing entries: See "Entering numerals, letters, and special characters" on page 9.
Trouble shooting
Reboot
> 10 Maintenance > P > 4 Reboot > P > Reboot? > [OK] or P
Hard rebootDisconnect power, wait for a few seconds, reconnect.
Never disconnect the power during a firmware update!
Reset to factory valuesAll customized settings will be lost!
> 10 Maintenance > P > 5 Reset Values > P > enter administrator password > P. The default administrator password is 0000 (4 x zero).

Quick Start Guide
15
DEUTSCH
Diese Kurzanleitung beschreibt die Installation, Einrichtung und den Betrieb des snom 370. Weitere Informationen finden Sie auf unserer Webseite,
http://wiki.snom.com/Snom370.
Copyright, Markenrechte, GNU Lizenz, Haftung© 2010 snom technology Aktiengesellschaft Alle Rechte reserviert.snom sowie die Namen der snom-Produkte und die snom logos sind gesetzlich geschützte Marken der snom technology AG. Alle anderen Produkt- und Firmennamen sind Marken der jeweiligen Inhaber.
snom technology AG behält sich jederzeit das Recht auf Überarbeitung und Änderung dieses Dokumentes vor, ohne verpflichtet zu sein, die vorgenommenen Änderungen anzukündigen oder mitzuteilen.
Texte, Bilder, Grafiken und deren Anordnung in diesem Dokument unterliegen weltweit dem Schutz des Urheberrechts und anderen Schutzgesetzen. Ihre Verwendung, Reproduktion oder Weitergabe ohne ausdrückliche schriftliche Zustimmung der snom technology AG können sowohl straf- als auch zivilrechtlich verfolgt werden.
Trotz der angewandten Sorgfalt bei der Zusammenstellung und Präsentation der Informationen in diesem Dokument können sich Daten zwischenzeitlich geändert haben. Daher übernimmt snom keine Gewähr für die Richtigkeit, Vollständigkeit oder Aktualität der zur Verfügung gestellten Informationen. Jegliche Haftung für Schäden ist ausgeschlossen, sofern diese nicht auf Vorsatz oder grober Fahrlässigkeit auf seiten von snom beruhen oder sofern keine Haftung aufgrund zwingender gesetzlicher Bestimmungen eintritt.
Unsere Firmware enthält teilweise Quellcodes, die unter der GNU Public License (GPL) von jedermann genutzt und modifiziert werden dürfen, solange sie wiederum mit denselben Lizenzbedingen zur allgemeinen Nutzung veröffentlicht werden. Die Quellcodes der von snom genutzten und der GPL unterliegenden Komponenten können Sie auf der Supportseite unserer Webseite auf www.snom.com, den Wortlaut der GPL auf http://www.snom.com/de/support/download/gpl-quellcode/ herunterladen.
Wichtige HinweiseLesen Sie bitte vor Inbetriebnahme die Sicherheitshinweise und die Bedienungsanlei-tung. Lassen Sie sie auch von den Mitbenutzern des Gerätes lesen oder informieren Sie sie über deren Inhalt. Bewahren Sie diese Bedienungsanleitung auf und geben Sie das Telefon nur mit der Bedienungsanleitung an Dritte weiter..
Sicherheit Befolgen Sie die Anweisungen in dieser Bedienungsanleitung und in der sonstigen Dokumentation des Geräts.
• Falls die Stromversorgung nicht über das Ethernetkabel erfolgt, verwenden Sie nur das mitgelieferte Netzteil. Die Verwendung anderer Netzteile könnte das Telefon beschädigen oder gar zerstören.
• Vermeiden Sie es, die Netz- und Stromkabel so zu verlegen, dass sie durch mechanischen Druck beschädigt werden oder dass Personen darüber stolpern könnten.
DEUTSCH

16
snom 370 Quick Start Guide
DEUTSCH
• DiesesGerätistnurfürdenGebrauchinInnenräumenbestimmt-NICHTFÜRDENAUSSENBEREICH!
• StellenSiedasTelefonnichtinRäumenmithoherLuftfeuchtigkeitwiez.B.Badezimmern,Waschküchen,feuchtenKellerräumenauf.TauchenSiedasTelefonnichtinWasserundgießenSiekeineFlüssigkeitenaufoderindasGerät.
• StellenSiedasTelefonnichtinexplosionsgefährdetenUmgebungen(z.B.Lackiereien)auf.BenutzenSiedasTelefonnicht,wennSieGasoderanderemöglicherweiseexplosionsgefährlicheDämpferiechen.
• TelefonierenSienichtwährendeinesGewitters(StromschlaggefahrbeiBlitzeinschlaginsNetz).
SELV (Safety Extra Low Voltage) Einhaltung
DieEingangs-/AusgangsverbindungenhaltendieSELV-RichtlinienfürKleinspannungs-geräteein.
Warnung:UmelektrischeSchlägezuvermeiden,verbindenSiekeineSELV-GerätemitGeräten,dieTelefon-/Netzwerk-Spannung(TNV)führen.NuranLAN-Portsanschließen!
Normkonformität
DiesesGerätistCE-undFCC-geprüftundentsprichtdengeltendeneuropäischenundUS-amerikanischenRichtlinien.
DieeigenmächtigeÖffnungdesGerätssowieÄnderungenundModifizierun-genamGerätführenzumErlöschenderGewährleistungspflichtundkönnendarüberhinauszumErlöschenderZulassungenführen.WendenSiesichbeiBetriebsstörungenoderDefektenanauthorisiertesServicepersonal,anIhrenVerkäuferoderansnom.
• Sicherheit:IEC60950-1:2001,CBTest-Zertifikat:DE2-013297• Zertifikate:FCCClassB,CEMark• ��Stromspeisung:ÜberNetzwerk(PoE,IEEE802.3af,Klasse1)oderNetzteil5V
DC ¡Leistungsaufnahme:2,8–2,9Watt• 1�x�LAN,�1�x�PC:RJ45(Ethernet)¡Ethernet:2xIEEE802.310/100Mbpsswitch
Entsorgung des Produkts
DiesesGerätunterliegtdereuropäischenRichtlinie2002/96/EGunddarfnichtimHausmüllentsorgtwerden.WennSienichtwissen,woSieIhrAltgerätentsorgenkönnen,wendenSiesichbitteanIhreKommune,IhrenörtlichenMüllentsorgeroderIhrenFachhändler.
ReinigungBenutzenSieeinantistatischesTuch.BenutzenSiekeinWasserundkeineReinigungsflüssigkeiten,dasiedieOberflächeunddieElektronikdesGerätesbeschädigenkönnten.
Quick Start Guide
17
DEUTSCH
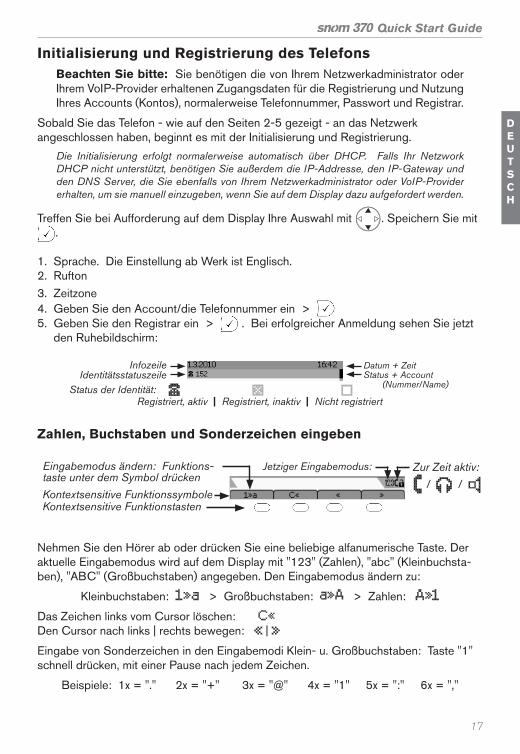
Initialisierung und Registrierung des TelefonsBeachten Sie bitte: Sie benötigen die von Ihrem Netzwerkadministrator oder Ihrem VoIP-Provider erhaltenen Zugangsdaten für die Registrierung und Nutzung Ihres Accounts (Kontos), normalerweise Telefonnummer, Passwort und Registrar.
Sobald Sie das Telefon - wie auf den Seiten 2-5 gezeigt - an das Netzwerk angeschlossen haben, beginnt es mit der Initialisierung und Registrierung.
Die Initialisierung erfolgt normalerweise automatisch über DHCP. Falls Ihr Netzwork DHCP nicht unterstützt, benötigen Sie außerdem die IP-Addresse, den IP-Gateway und den DNS Server, die Sie ebenfalls von Ihrem Netzwerkadministrator oder VoIP-Provider erhalten, um sie manuell einzugeben, wenn Sie auf dem Display dazu aufgefordert werden.
Treffen Sie bei Aufforderung auf dem Display Ihre Auswahl mit . Speichern Sie mit .
1. Sprache. Die Einstellung ab Werk ist Englisch. 2. Rufton 3. Zeitzone 4. Geben Sie den Account/die Telefonnummer ein > 5. Geben Sie den Registrar ein > . Bei erfolgreicher Anmeldung sehen Sie jetzt
den Ruhebildschirm:
(Nummer/Name)Status der Identität:
InfozeileIdentitätsstatuszeile
Datum + Zeit Status + Account
Registriert, aktiv | Registriert, inaktiv | Nicht registriert
Zahlen, Buchstaben und Sonderzeichen eingeben
Kontextsensitive FunktionstastenKontextsensitive Funktionssymbole
Jetziger Eingabemodus: Zur Zeit aktiv:Eingabemodus ändern: Funktions-taste unter dem Symbol drücken
/ /
Nehmen Sie den Hörer ab oder drücken Sie eine beliebige alfanumerische Taste. Der aktuelle Eingabemodus wird auf dem Display mit "123" (Zahlen), "abc" (Kleinbuchsta-ben), "ABC" (Großbuchstaben) angegeben. Den Eingabemodus ändern zu:
Kleinbuchstaben: > Großbuchstaben: > Zahlen:
Das Zeichen links vom Cursor löschen: Den Cursor nach links | rechts bewegen: |
Eingabe von Sonderzeichen in den Eingabemodi Klein- u. Großbuchstaben: Taste "1" schnell drücken, mit einer Pause nach jedem Zeichen.
Beispiele: 1x = "." 2x = "+" 3x = "@" 4x = "1" 5x = ":" 6x = ","

18
Quick Start Guide
DEUTSCH
Alp
hanu
mer
i-sc
he T
asta
tur
Dis
play
-
Ruh
ebild
schi
rm
• S
chne
lles
Blin
ken:
Ein
gehe
nder
Anr
uf•
Leuc
htet
: Im
Ges
präc
h•
Lang
sam
es B
linke
n: G
ehal
tene
r Anr
uf
Anr
uf-L
ED
Vorp
rogr
amm
iert
eFu
nkti
onst
aste
n
Ern
eut w
ähle
n
Tel
efon
buch
F
rei p
rogr
amm
ierb
ar
Kon
fere
nz s
tarte
n/be
ende
n A
nruf
auf
Hal
ten
setz
en
M
enü
Eins
tellu
ngen
I
P-A
dres
se, M
AC-A
dres
se, F
irmw
are-
Vers
ion
F
rei p
rogr
amm
ierb
ar
Anr
uf w
eite
rleite
n "
Nic
ht s
töre
n"-F
unkt
ion
an/a
us
Neu
e N
achr
icht
+ v
erpa
sste
Anr
ufe
•
Rot
e LE
D:
Neu
e N
achr
icht
- zu
m A
bhör
en
drü
cken
(fal
ls v
on T
el.-A
nlag
e un
ters
tütz
t)•
LED
leuc
htet
gel
b:
Verp
asst
er A
nruf
- zu
m
Aus
scha
lten
der L
ED
d
rück
en•
Sch
nell
blin
kend
e ge
lbe
LED
: A
uf N
eben
-st
elle
ein
gehe
nder
Anr
uf (b
ei e
ntsp
rech
ende
r Ta
sten
bele
gung
)
Auf
zeic
hnun
g (fa
lls v
on T
el-A
nlag
e un
ters
tütz
t)
Frei
pro
gram
mie
rbar
e Fu
nkti
onst
aste
n m
it L
ED
s:
.
Sta
ndar
dein
stel
lung
: Le
itung
.•
Sch
nell
blin
kend
e LE
D:
Eing
ehen
der A
nruf
. Zu
r Ann
ahm
e Ta
ste
drüc
ken.
•
Leuc
hten
de L
ED
: Im
Ges
präc
h•
Lang
sam
blin
kend
e LE
D:
Geh
alte
ner A
nruf
Rau
teta
ste
Ste
rnch
enta
ste
• Ku
rz g
edrü
ckt:
Bei
der
Tex
-te
inga
be z
wis
chen
Gro
ß-u.
Kl
einb
uchs
tabe
n w
echs
eln
• Ei
nige
Sek
unde
n ge
drüc
kt:
Tast
atur
ver
riege
ln/e
ntrie
geln
Aud
iota
sten
•
Lau
tstä
rker
egel
ung
der K
linge
l bei
läut
ende
m A
nruf
bz
w. d
es L
auts
prec
hers
, wen
n im
G
espr
äch
•
Mik
rofo
n ei
n-/a
ussc
halte
n•
G
ehäu
sela
utsp
rech
er e
in/a
us•
H
eads
et e
in-/
auss
chal
ten
Iden
tität
aus
wäh
len
für
ausg
ehen
de A
nruf
e:
Der
zeiti
ge
Iden
tität
:
Kon
text
sens
itiv
e Fu
nkti
onss
ymbo
leP
rogr
amm
ierb
are
kont
ext-
sens
itiv
e Fu
nkti
onst
aste
n
Nav
igat
ions
tast
e - F
unkt
ione
n be
i R
uheb
ildsc
hirm
:
t:
Mis
sed
calls
u:
Rec
eive
d ca
lls
:
Iden
tität
aus
wäh
len
Bee
nden
- &
OK
-Tas
ten
Akt
ione
n &
Eing
aben
abb
rech
en
A
ktio
nen
& Ei
ngab
en a
usfü
hren
, spe
iche
rn
Auf
ein
en B
lick

Quick Start Guide
19
DEUTSCH
A
n/A
us
xx
xxx>P
2K
linge
lton
9 (7
)*
Tast
enbe
legu
ng
1 D
HC
P2
IP A
dres
se3
Net
zmas
ke4
Hos
tnam
e5
IP G
atew
ay6
DN
S D
omai
n7
DN
S S
erve
r 18
DN
S S
erve
r 29
NTP
Ser
ver
10 V
erbi
ndun
gs-
art (
web
)11
HTT
P A
dmin
12 H
TTP
Pass
wor
d13
Set
tings
S
erve
r14
VLA
N ID
14 V
LAN
Prio
rität
16 V
LAN
zur
ücks
.
8 *
Net
zwer
k
7 (6
)*
Um
leit
ung
1
Um
leitu
ng
2
Zeit
bis
Um
leitu
ng3
Ziel
bei
Imm
er
4Zi
el b
ei B
eset
zt
5Zi
el b
ei T
imeo
ut
4P
räfe
renz
en1
Spr
ache
2 Ze
itzon
e
3 To
nsch
ema
5 *
Iden
titä
t1
Iden
tität
wäh
len
2 N
utze
rR
ereg
iste
riere
n
3 N
utze
r edi
tiere
n
4 B
enut
zer a
bmel
den
5 A
lle a
bmel
den
10 (8
)*
War
tung
1 **
Ben
utze
r Mod
us
2N
et In
fo
3 M
em In
fo
4 N
eust
art
5 W
erte
zurü
ckse
tzen
Adm
inis
trat
or-
mod
us
Ben
utze
r-m
odus
Das
War
tung
s-m
enü
im:
10 (8
) *W
artu
ng1
**
Adm
inis
trato
rmod
us
2N
et In
fo
3 M
em In
fo
4 N
eust
art
5 W
erte
zurü
ckse
tzen
6 (5
)*
Tele
fonv
erha
lten
1
Nr.
vers
teck
en2
Kein
e an
on. A
nruf
e
3 A
uto-
mat
isch
wäh
len
4 A
utom
ati-
sche
r Ann
ahm
eton
5 A
utom
ati-
sche
r Ann
ahm
eart
6 A
utom
a-tis
cher
Rüc
kruf
7 N
umm
ervo
rsch
lage
n
8 A
nklo
pfen
9 I.
Abw
eise
n
Scr
olle
n:
. A
us-
wah
l spe
iche
rn: P
3A
udio
1 Ko
pfhö
rer
2 M
ailb
oxhi
nwei
sKe
in T
on tu
Pie
pton
tu
Erin
neru
ngst
on
tuP
1D
ispl
ay1
Kont
rast
Aus
wäh
len
mit:
· Nur
Nam
e· N
ur N
umm
er· N
ame
+ N
r· N
r + N
ame
· Zei
ge g
anze
n Ko
ntak
t
3 B
eleu
chtu
ng
2 A
nzei
gest
il
>P
Iden
tität
und
Klin
gel-
ton
mit
+
au
swäh
len
PTa
ste
ausw
ähle
n:
+
. F
unkt
ion
aus-
w
ähle
n:
>
.
Bei
Auf
ford
erun
g N
umm
er e
inge
ben
>
PP
P
Erei
gnis
aus
wäh
len:
>
· Im
mer
· B
ei B
eset
zt·
Nac
h Ze
it(ab
lauf
)U
mle
itung
szie
l: N
um-
mer
ein
gebe
n >
B
ei T
imeo
ut:
Zeit
in
Sek
unde
n ei
ngeb
en >
Um
leitu
ng a
ussc
halte
n:
1 U
mle
itung
>
Nie
>
P
P
P
P
Aus
wah
l An/
Aus
:
>P
* D
ie
Unt
erm
enüs
Id
enti
tät
und
Net
zwer
k (d
unke
lgra
u)
sind
im
B
enut
zerm
odus
nic
ht v
erfü
gbar
.**
Vom
Ben
utze
r- i
n de
n A
dmin
istr
ator
mod
us w
echs
eln:
E
rfor
dert
di
e E
inga
be d
es A
dmin
istr
ator
kenn
wor
ts.
Wer
ksei
tige
Ein
stel
lung
: 00
00 (4
x N
ull).
Men
ü E
inst
ellu
ngen
Ö
ffnen
: .
In d
er L
iste
scr
olle
n m
it pq
oder
Num
mer
ein
es U
nter
men
üs
auf d
er T
asta
tur e
inge
ben
und P
dr
ücke
n. M
it
ode
r [A
bbr]
zur
ück
zum
Ruh
ebild
schi
rm.
20
Quick Start Guide
DEUTSCH
Administrator- und BenutzermodusDie Einstellung ab Werk ist Administratormodus. Das werkseitig eingestellte Administrator-Kennwort lautet 0000 (4 x Null).
1. Vom Administrator- in den Benutzermodus wechseln: • Am Telefon: > 10 Wartung > 1 Benutzermodus• Webbrowser des Telefons > Erweitert > Qos Sicherheit > Sicherheit >
Administratormodus: Aus > Speichern
2. Vom Benutzer- in den Administratormodus wechseln: • Am Telefon: > 10 Wartung > 1 Administratormodus >
Administratorkennwort eingeben > P• Webbrowser des Telefons > Erweitert > Administratorlogin:
Administratorkennwort eingeben > Speichern
Der Webbrowser des Telefons 1. Im Display die IP-Adresse anzeigen: , z.B. 192.168.10.115.
Öffnen Sie den Webbrowser Ihres PCs, tippen Sie http://und die IP-Adresse in die Adresszeile und drücken Sie auf die Bestätigen-Taste, um auf die Startseite des Telefon-Webbrowsers zu gelangen.
2. Klicken Sie auf einen Menüpunkt auf der linken Seite, um das dazugehörige Fenster zu öffnen, z.B. Präferenzen.
3. Enthält das Fenster mehrere Seiten, klicken Sie auf einen Tab (“Karteireiter”) am oberen Rand, um die Seite sichtbar zu machen. Der Schriftschnitt der Textzeichen auf der sichtbaren Seite ist fett.
4. Vor dem Schließen des Telefonbrowsers oder dem Anklicken eines anderen Menüpunktes immer auf "Speichern" klicken, wenn die vorgenommenen Änderungen wirksam werden sollen.
ZeitformatWebbrowser > Präferenzen > Allgemeine Informationen > 24-Stundenuhr: An: 24-Stundenformat, 00:01 - 24:00 Aus: 12-Stundenformat AM/PM, 0:01 AM - 12:00 PM
DatumsformatWebbrowser > Präferenzen > Allgemeine Informationen > US Datumsformat: An: 3/8/2010 Aus: 8.3.2010

Quick Start Guide
21
DEUTSCH
Identitäts-/KontoeinstellungenWebbrowser > Identität 1-12
Die Bedienung des Telefons
Identität für ausgehende Anrufe wählenVom Ruhebildschirm p q mit eine der konfigurierten Identitäten auswählen.
Anrufen
• Nummer auf der alphanumerischen Tastatur eingeben und Hörer abheben oder• Hörer abheben, Nummer eingeben, P oder• , Nummer eingeben, P.
Anrufe annehmen
• Mit dem Hörer: Hörer abheben• Mit einem Headset: P oder blinkende Leitungstaste drücken• Mit dem Gehäuselautsprecher/-mikrofon: drücken.
Anruf auf Halten setzen
oder die Leitungstaste des Anrufs drücken. Die LED blinkt jetzt langsam. Erneut drücken, um den Anruf wieder aufzumehmen. Wenn mehr als ein Anruf gehalten wird: Mit pq Anruf auswählen und P oder oder [R] drücken, um den ausgewählten Anruf wieder aufzunehmen.
Konferenz (3-er)
1. Ihre Telefonnummer: 154. Setzen Sie den ersten Anrufer (Jane Doe) auf Halten.
2. Rufen Sie den zweiten Teilnehmer (158) an. Mit dem zweiten Teilnehmer in der Leitung:
3. Konferenz starten: drücken. Während der Konferenz:
4. Mit die Konferenz stoppen und beide Teilnehmer auf Halten setzen:
5. Konferenz erneut starten: Funktionstaste drücken.
Weiterleitung
Mit Ankündigung
Anruf auf Halten setzen. Telefonnummer wählen, an die weitergeleitet werden soll. Will der Teilnehmer den Anruf entgegennehmen: > P drücken.

22
Quick Start Guide
DEUTSCH
Ohne Ankündigung
Wenn ein eingehender Anruf läutet oder mit einem Anruf in der Leitung: drücken > Telefonnummer, an die weitergeleitet wird, wählen > P drücken.
Rufumleitung1. Rufumleitung einschalten.
a. Alle eingehenden Anrufe: > 7 Umleitung > P> 1 Umleitung > P > t u Immer > P > 3 Ziel bei Immer > P > Telefonnummer eingeben > P.
b. Bei Besetzt: > 7 Umleitung > P> 1 Umleitung > P > t u Bei Besetzt > P > 3 Ziel bei Besetzt > P > Telefonnummer eingeben > P.
c. Wenn der Anruf nicht angenommen wird: > 7 Umleitung > P > 1 Umleitung > P > t u Nach Zeit > P > 3 Ziel bei Timeout > P > Telefonnummer eingeben > P > 2 Zeit bis Umleitung Zeit > P > Anzahl der Sekunden eingeben, nach deren Verstreichen umgeleitet wird > P.
d. Umleitungshinweis auf dem Ruhebildschirm:
2. Rufumleitung ausschalten: > 7 Umleitung > P > 1 Umleitung > P > t u Nie > P.
Anruflisten1. Vom Ruhebildschirm öffnen: [Listen].
2. Liste der verpassten, angenommenen oder gewählten Anrufe auswählen: pq> P
3. Listeneintrag suchen: pq . Nummer des markierten Eintrags wählen: P.
Telefonbuch
• Öffnen: . Scrollen: pq. Nummer des markierten Eintrags wählen: P.• <Neuer Eintrag>: [R] drücken• Einträge bearbeiten: Siehe „Zahlen, Buchstaben und Sonderzeichen eingeben“ auf
Seite 17.
FehlerbehebungNeustart (Reboot): > 10 Wartung > P > 4 Neustart > P > "Neustart?" > P
Harter Neustart: Netzstecker ziehen. Telefon nach ein paar Sekunden wieder anschließen.
Nie während eines Firmware-Updates die Stromzufuhr unterbrechen!
Werte zurücksetzen: > 10 Wartung > P > 5 Werte zurücksetzen > Administrator-Kennwort eingeben > P oder [OK]. Das werkseitig eingestellte Kennwort ist 0000 (4x Null).
Alle persönlichen Einstellungen werden gelöscht!

Quick Start Guide
23
FRANÇAIS
Ce manuel abrégé décrit l'installation, l'initialisation et la mise en service du snom 370. Consultez notre site web pour des informations complémentaires:
http://wiki.snom.com/Snom370.
Copyright, Marques Déposées, GPL, Non Responsabilitée© 2010 snom technology Aktiengesellschaft Tous droits réservés. snom, les noms des produits snom et les logos snom sont des marques déposées par snom technology AG. Tous les autres noms de produits et noms d'entreprises sont les propriétés de leurs détenteurs respectifs.
snom technology AG se réserve le droit de modifier et de changer ce document à n'importe quel moment, sans devoir annoncer de telles modifications ou changements avant ou après leur mise en place.
Les textes, images et illustrations ainsi que leur mise en page dans ce document sont protégés par les copyrights et autres dispositions légales internationales. Leur utilisation, leur reproduction et leur transmission à des parties tierces sans accord express écrit peut induire des poursuites devant les cours criminelles et civiles.
Bien que le plus grand soin ait été apporté à la compilation et à la présentation des informations contenues dans ce document, les données sur lesquelles elles sont basées peuvent entre-temps avoir été modifiées. snom doit donc décliner toute garantie et toute responsabilité quand à l'exactitude et à l'exhaustivité des informations publiées excepté en cas de négligence flagrante de la part de snom ainsi que des les cas ou la responsabilité de snom est engagée de par la loi.
Notre firmware inclus des éléments de code source qui peuvent être utilisés et modifié par quiconque selon les termes des licences GPL (cf. page 110), à condition qu'à leurs tours ils les rendent disponibles selon les mêmes termes. Veuillez vous rendre sur http://www.snom.com/de/support/download/gpl-quellcode/ pour consulter la licence GPL originelle et le code source des composants couverts par la licence GPL qui sont utilisé dans les produits snom.
Informations importantesVeuillez lire les informations concernant la sécurité et la mise au rebut de l'appareil ainsi que celles concernant son installation et son utilisation avant d'utiliser l'appareil. Communiquez également ces informations aux autres utilisateurs ou faites-les leur lire. Conservez ce manuel et ne cédez pas l'appareil à une tierce partie sans y joindre le manuel.
Sécurité Suivez les instructions présentes dans ce manuel et dans les autres documents concernant l'appareil.• Evitez de placer le câble d'alimentation de l'appareil dans un endroit ou il est
possible de trébucher dessus. Evitez également de le placer là ou il pourrait être exposé à un écrasement car il pourrait en être endommagé. Si le cordon d'alimentation ou la fiche sont endommagés, débranchez l'appareil et contactez du personnel d'entretien qualifié.
• Cet appareil est destiné à une utilisation en intérieur uniquement! Ne l'installez pas au dehors!
FRANÇAIS

24
snom 370 Quick Start Guide
FRANÇAIS
• N'installezpasl'appareildansdespiècestrèshumides(parexemple,dansunesalledebain,unebuanderieouunsous-solhumide).N'immergezpasl'appareildansl'eauetneversezpasdeliquidesd'aucunesortesuroudansl'appareil.
• N'installezpasl'appareildansunlieuprésentantunrisqued'explosion(unmagasindepeintureparexemple).N'utilisezpasl'appareilsivoussentezuneodeurdegazoud'autresémanationspotentiellementexplosives.
• N'utilisezpasl'appareildurantlesorages,lechocd'unéclairsurlescircuitsélectriquespeutprovoqueruneélectrocution.
Conforme à T.B.T.S (Très Basse Tension de Sécurité)
Leniveaudesécuritédesconnexionsd'entré/sortieestconformeauxrecommandationsT.B.T.S(SELV).
Avertissement :Pouréviterlesélectrocutions,neconnectezpaslescircuitsdeSELV/TBTSauxcircuitssoustensionduréseautéléphonique(TNV).NeconnectezlecâbleNET/Ethernetqu'àunportLAN!
Conformité au standards
CetappareilestcertifiéCEetFCCetrépondauxstandardsenvironnementaux,desécuritéetdesantéeuropéensetaméricains.
L'ouverture,lamodificationouleremplacementsansautorisationdel'appareilannulelagarantieetpeutégalementannulerlescertifica-tionsCEetFCC.Encasdemauvaisfonctionnement,veuillezcontac-terlepersonneld'entretienagrée,votrerevendeuroubiensnom.
• Sécurité: IEC60950-1:2001,CertificatCBTest:DE2-013297• Certificat: FCCClassB,CEMark• Consommation d´énergie: 2,8–2,9Watts• Alimentation: Partransformation 5VDCouPoE(PoweroverEthernet)IEEE
802.3af,Classe1• 1 x LAN, 1 x PC: RJ45(Ethernet)• Ethernet: 2xIEEE802.310/100Mbpsswitch
Mise au Rébut du Produit
CetappareilestsoumisàlaDirective2002/96/CEetnepeutêtremisaurebutaveclesdéchetsménagersnormaux.
Sivousnesavezpasoumettreaurebutoúfairerecyclerl'appareillorsqu'ilarriveautermedesonexistence,contactezvotremunicipalité,lasociétélocaleenchargedelagestiondesdéchetsouvotrevendeur.
NettoyageUtilisezuntissuantistatique.N'utilisezpasdel'eauouunproduitdenettoyageliquideousolide.Ilspeuventendommagerl'éléctroniqueoulessufacesdel'appareil.

Quick Start Guide
25
FRANÇAIS
Initialisation et enrégistrationRenseignement: Vous devez également disposer des données pour la registration et l'utilisation de votre compte que vous avez reçu de votre administrateur réseau ou de votre fournisseur de VoIP, normalement la numéro de téléphone, le mot de passe et le régistraire.
Une fois que l'appareil est connecté avec le réseau comme indiqué sur les pages 2-5, il commence à s'initialiser et se registrer.
L'initialisation est normalement fait automatiquement via DHCP. Si votre réseau ne supporte pas le protocole DHCP, vous devez également saisir l'adresse IP, la passerelle IP et le serveur DNS manuellement. Demandez-les de votre administrateur réseau ou de votre fournisseur de VoIP et suivez les instruction qui s'affi chent à l'ecran.
Sélectionnez une option avec et sauvegardez chaque sélection avec . 1. Langue. Le paramètre par défaut est Anglais. 2. Tonalité3. Fuseau horaire4. Saisissez votre numéro de téléphone/compte + appuyez sur P 5. Saisissez votre registraire + P . Si l'enregistrement a réussi l'écran d'attente
s'affi che:
(numéro/nom)État des identités:
Barre d‘informationLigne d‘état d‘identité
Date + heure État + compte
Enregistrée, active | Enregistrée, inactive | Pas enregistrée
Saisie de lettres, chiffres et caractères spéciaux
Touches de fonction contextuellesSymboles de fonction contextuelles
Mode de saisie actuel: Mode audio actuel:
Changer le mode de saisie: Appuyez sur la touche de fonction au-dessous du symbole
/ /
Appuyez sur l'une quelconque des touches alphanumeriques. Le mode de saisie actuel est indiqué par "123" (chiffres), "abc" (lettres minuscules), "ABC" (lettres majuscules). Changer le mode de saisie en:
Lettres minuscules: > Lettres majuscules: > Chiffres:
Supprimer la lettre à la gauche du curseur: Déplacer le curseur vers la gauche | vers la droite: |
Saisie de caractères spéciaux en mode de saisie lettres: Appuyez rapidement plusieurs fois sur la touche "1", avec une petite pause après chaque caractère.
Examples: 1x = "." 2x = "+" 3x = "@" 4x = "1" 5x = ":" 6x = ","
26
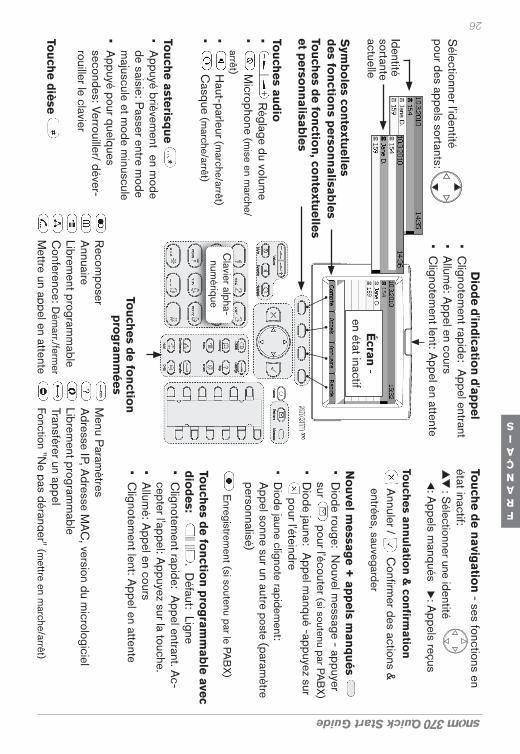
Quick Start Guide
FRANÇAIS
Clavier alpha-num
érique
Écran -
en état inactif
• Clignotem
ent rapide: Appel entrant
• Allum
é: Appel en cours
• Clignotem
ent lent: Appel en attente
Diode d'indication d'appel
Touches de fonction program
mées
R
ecomposer
A
nnuaire
Librement program
mable
C
onference: Dém
arr./fermer
Mettre un appel en attente
M
enu Paramètres
A
dresse IP, Adresse M
AC, version du m
icrologiciel
Librement program
mable
Transférer un appel Fonction "N
e pas déranger" (mettre en m
arche/arrêt)
Nouvel m
essage + appels m
anqués
• Diode rouge: N
ouvel message - appuyer
sur pour l'écouter (si soutenu par PA
BX)
• Diode jaune: A
ppel manqué -appuyez sur
pour l'éteindre•
Diode jaune clignote rapidem
ent: A
ppel sonne sur un autre poste (paramètre
personnalisé)
Enregistrement (si soutenu par le PA
BX)
Touches de fonction programm
able avec diodes:
. D
éfaut: Ligne• C
lignotement rapide: A
ppel entrant. Ac-
cepter l'appel: Appuyez sur la touche.
• Allum
é: Appel en cours
• Clignotem
ent lent: Appel en attente
Touche dièse
Touche asterisque •
Appuyé brièvem
ent en mode
de saisie: Passer entre mode
majuscule et m
ode minuscule
• Appuyé pour quelques
secondes: Verrouiller/ déver-rouiller le clavier
Touches audio•
Réglage du volum
e •
Microphone (m
ise en marche/
arrêt)•
Haut-parleur (m
arche/arrêt)•
Casque (m
arche/arrêt)
Sélectionner l'identité
pour des appels sortants:
Identitésortante actuelle
Sym
boles contextuelles des fonctions personnalisablesTouches de fonction, contextuelles et personnalisables
Touche de navigation - ses fonctions en état inactif: t
: Appels m
anqués u: A
ppels reçus : S
électionner une identité
Touches annulation & confi rm
ation A
nnuler / Confi rm
er des actions & entrées, sauvegarder

Quick Start Guide
27
FRANÇAIS
Arrê
t/Mar
che
>P
2S
onne
rie
9 (7
)* A
ffec
t-at
ion
d. t
ouch
es
1 D
HC
P2
Adr
esse
IP3
Mas
que
rése
au4
Hos
tnam
e5
Pas
sere
lle IP
6 D
omai
ne D
NS
7 S
erve
ur D
NS
18
Ser
veur
DN
S 2
9 S
erve
ur N
TP10
Typ
e se
rveu
r w
eb11
HTT
P A
dmin
12 M
ot d
e pa
sse
HTT
P13
Par
amet
res
Ser
veur
14 V
LAN
ID15
VLA
N P
riorit
y16
Res
et V
LAN
8 *
Rés
eau
7 (6
)*
Ren
voi d
‘app
els
1
Faire
sui
vre
2
Atte
nte
en
seco
ndes
3C
ible
touj
ours
4O
ccup
e
5C
ible
Tim
eout
4P
réfé
renc
es1
Lang
ue
2 Fu
seau
3 T
onal
ité
de n
umér
otat
ion
5 *
Iden
tité
1 S
élec
tion
utilis
ateu
r
2 R
éenr
egis
trer
utilis
ateu
r
3 Ed
it. u
tilis
ateu
r
4 D
écon
nexio
n ut
ilisat
eur
5 To
ut d
écon
nect
er
10 (8
)*
Mai
nten
ance
1 **
Mod
e U
tilis
ateu
r
2N
et In
fo
3 M
em In
fo
4 R
edém
arra
ge
5
Réi
nit.
Para
m.
Adm
inis
trat
eur
Uti
lisat
eur
Le m
enu
mai
n-te
nanc
e en
mod
e:
10 (8
) *M
aint
enan
ce1
**
Mod
e A
dmin
istra
teur
2N
et In
fo
3 M
em In
fo
4 R
edém
arra
ge
5R
éini
t. Pa
ram
.
6 (5
)*
Per
sonn
alis
atio
n
1
Mas
quer
l‘id
entit
é2
Ref
user
n° m
asqu
é
3
Com
p. A
uto
4 I
ndic
. Rep
. A
utom
atiq
ue
5 R
épon
se
auto
mat
ique
6 R
appe
l au
tom
atiq
ue
7 D
éter
min
atio
n nu
mér
o
8 A
ppel
en
atte
nte
9 T.
Ref
u
Scr
olle
r:
.
S
auve
gard
er v
otre
sé
lect
ion:
P
3A
udio
1 C
asqu
e
2 N
otifi
catio
n M
WI
Sile
ncie
ux tu
Bip
tu
Rap
pel t
u
P
1A
ffi c
hage
1 C
ontra
ste
Sél
ectio
nner
:
· Nom
seu
l(em
ent)
· Num
éro
seul
(em
ent)
· Nom
+ N
umér
o· N
umér
o +
Nom
· Dét
ails
con
tact
3 R
étro
écl
aira
ge
2 M
ode
d‘af
fi cha
ge
>P
Sél
ectio
nner
iden
tité
+ s
onne
rie:
+P
Sél
ectio
nner
touc
he
et fo
nctio
n:
+
Déf
aut:
Lig
ne
Sur
requ
is: S
aisi
r le
num
éro
>
P
P
Sél
éctio
nner
évé
nem
ent:
>
·
Touj
ours
· Q
uand
Occ
upé
· S
ans
répo
nse
"Cib
les"
3-5
: S
aisi
r le
num
éro
de te
l. >
En
cas
de
sans
répo
nse:
2
Atte
nte
... >
>
Sai
sir
le n
umér
o de
sec
onde
s > D
ésac
tiver
le re
nvoi
d'
appe
l: 1
Fai
re s
uivr
e
>
>
> J
amai
s >
P
P
PP
PP
Sél
ectio
nner
On/
Off
(mar
che/
arrê
t):
>P
*
Les
sous
-men
us Id
enti
té e
t R
ésea
u (g
ris
fonc
é) n
e so
nt p
as
disp
onib
le e
n m
ode
utili
sate
ur.
** P
asse
r de
mod
e ut
ilisa
teur
en
mod
e ad
min
istr
ateu
r:
L‘en
trée
du
mot
de
pass
e ad
min
istr
ateu
r es
t re
quis
. D
éfau
t: 0
000
(4 x
zér
o).
Men
u P
aram
ètre
s O
uvrir
: .
Faire
défi
ler l
a lis
te a
vec
pq
ou s
aisi
r le
num
éro
d‘un
sou
s-m
enu
sur l
es to
uche
s al
phan
umér
ique
et
app
uyez
sur
P.
Ret
ourn
er à
l‘éc
ran
d‘at
tent
e av
ec
ou
[Ann
uler
].

28
Quick Start Guide
FRANÇAIS
Mode administrateur/mode utilisateurLa réglage par défaut est le mode administrateur. Le mot de passe administrateur par défaut est: 0000 (4 x zéro).
1. Passer de mode administrateur en mode utilisateur: • Avec le téléphone: > 10 Maintenance > 1 Mode utilisateur• Interface web du téléphone > Avancés > Qos/Security > Securité > Mode
Administrateur: Off > Sauvegarder 2. Passer de mode utilisateur en mode administrateur:
• Avec le téléphone: > 10 Maintenance > 1 Mode administrateur: saisessez le mot de passe administrateur
• Interface web du téléphone > Avancés > Login Administrateur: Saisissez le mot de passe administrateur dans le champs de saisie > Sauvegarder.
�
L'interface Web du téléphone 1. Obtenir l'adresse IP: , p.ex. 192.168.10.115.
2. Ouvrez le navigateur web de votre PC et saisissez http:// suivi de l'adresse IP dans la barre d'adresse. Appuyez sur la touche d'entrée pour ouvrir la page d'accueil de l'interface Web du téléphone.
3. Cliquez sur un élément au menu à gauche pour ouvrir la page correspondante.
4. Certaines pages contiennent plusieurs documents. Pour rendre visible un document, cliquez sur 'onglet correspondant. Les lettres de l'onglet actif sont affichées en caractères gras.
5. Appuyez toujours sur la touche "Sauvegarder" avant de cliquer sur un menu different ou de refermer l'interface Web si vous désirez appliquer les modifications que vous avez effectuées.
Format de l'heure
Interface Web > Préférences > Informations générals > Horloge 24 Heures On: Format 24 heures, 00:01 - 24:00 Off: Format 12 heures AM/PM, 0:01 AM - 12:00 PM
Format de la dateInterface Web > Préférences > Informations générals > Format date U.S. (mm/dd): On: 3/8/2010 Off: 8.3.2010

Quick Start Guide
29
FRANÇAIS
Paramètres d'identité/compteInterface Web > Identité 1-12
Utilizer le téléphone
Sélectionner un identité pour l'appel sortant en coursede l'écran en état inactif: qp
Passer des appels
• Saisissez le numéro sur le clavier alphanumérique et décrochez le combiné ou • Saisissez le combiné, saisissez le numéro et appuyez sur P ou• , saisissez le numéro, P.
Accepter des appels• Avec le combiné: Décrochez le combiné• Avec un casque: Appuyez sur P ou la touche clignotante de la ligne• Avec le haut-parleur/microphone du boîtier: Appuyez sur
Placer un appel en attente
Appuyez sur ou la touche de la ligne. La diode commence à clignoter lentement. Reprendre l'appel: Appuyez sur ou la touche de la ligne. S'il y'a plusieurs appels en attente: qp pour sélectionner l'un d'eux > P ou
ou [R] pour le reprendre.
Conference à trois
1. Example: Votre numéro de téléphone est le 154. Mettez le premier appel (Jane Doe) en attente.
2. Appelez la deuxième partie (158). L'écran avec le deuxième appel en ligne:
3. Commencer la conférénce: Appuyez sur . L'écran avec la conférénce en cours:
4. Arrêter a conférénce et mettre les deux parties en attente: .
5. Recommencer la conférénce: Appuyez sur [R].
Transfert d'un appelTransfert attendu
Mettre l'appel en attente > Composez le numéro de la tierce partie. Annoncez l'appel. > Si la tierce partie veux l'accepter: Appuyez sur > P.
30
Quick Start Guide
FRANÇAIS
Sans l'annoncer á la tierce partie
Quand un appel sonne ou avec l'appel en ligne: Composez le numéro de la tierce partie, appuyez sur P.
Renvoi d'appel 1. Activer le renvoi d'appel.
a. Tous les appels entrants: > 7 Renvoi d'appel > 1 Faire suivre > t u Toujours > P > 3 Cibler toujours > composez le numéro > P.
b. Sur occupation: > 7 Renvoi d'appel > 1 Faire suivre > t u Occupé > P > 4 Occupé > composez le numéro > P.
c. Après un délai de réponse: > 7 Renvoi d'appel > 1 Faire suivre > t u Sans réponse > P > 5 Cible Timeout > composez le numéro > P > 2 Attente en secondes > saisissez le nombre de secondes > P.
d. L'écran inactif quand le renvoi d'appel est activé:
2. Désactiver le renvoi d'appel: > 7 Renvoi d'appel > 1 Faire suivre > t u > Jamais > P.
Listes des appels1. Ouvrir les listes de l'écran inactif: [Appels].
2. Sélectionner une des listes des appels (manqués (perdu), recus, appelés): pq > P
3. Chercher un appel dans une liste: pq. Composer le numéro de l'entrée choisie: P
Annuaire du téléphone
• Ouvrir: Appuyez sur . Faire défiler: pq. Composer le numéro de l'entrée choisie: P
• <Nouvelle Entrée>: Appuyez sur [R]• Modifier les entrées: Cf. "Saisie de lettres, chiffres et caractères spéciaux", page 25.
Dépannage
Redémarrage (Reboot) > 10 Maintenance > P> 4 Redémarrage > P> "Reboot?" > P
Redémarrage à froid Retirez la prise de courant. Rebranchez l'alimentation après quelques secondes.
Ne coupez pas l'alimentation pendant une mise à jour du firmware !
Réinitilasation aux valeurs d'usine > 10 Maintenance > P> 5 Reinit. Param. > P> Saisissez le mot de passe
administrateur > P. Mot de passe administrateur par défaut: 0000 (4 x zéro)
Tous les paramètres personnalisés seront écrasés!
Quick Start Guide
31
ITALIANO
Questa è la guida rapida per l'installazione, l'impostazione e il funzionamento dello snom 370. Per ulteriori informazioni consultare la nostra pagina web:
http://wiki.snom.com/Snom370.
Copyright, Marchi registrati, GPL, Declinazione di responsa-bilita© 2010 snom technology Aktiengesellschaft Tutti i diritti riservati.snom, i nomi dei prodotti snom, ed i loghi snom sono marchi registrati di proprietà di snom technology AG. Tutti gli altri nomi di prodotti e di imprese sono proprietà dei rispettivi proprietari.
snom technology AG si riserva il diritto di rivedere e modificare il presente documento in qualsiasi momento senza alcun obbligo di notifica precedente o posteriore a tali cambiamenti.
Testi, immagini ed illustrazioni ed il loro ordine in questo documento sono soggetti a protezione del diritto d’autore ed altri diritti legali a livello mondiale. Il loro utilizzo, riproduzione e trasmissione a terzi senza il permesso scritto potrebbe dar luogo ad azioni legali, in sede penale e civile.
Sebbene sia stata prestata la massima attenzione nella stesura e presentazione delle informazioni in questo documento, i dati su cui si basa potrebbero già aver subito variazioni. snom pertanto declina ogni responsabilità riguardo a tutte le garanzie di affidabilità, accuratezza, completezza ed attualità delle informazioni pubblicate, tranne nel caso di grossolana negligenza da parte di snom o laddove per legge è ritenuta responsabile.
Il nostro firmware include codice sorgente utilizzabile e modificabile da chiunque. La licenza pubblica GNU (GPL) (cfr. pag. 92), consente di rendere disponibile il software con lo stesso accordo di licenza. Visitate http://www.snom.com/de/support/download/gpl-quellcode/ per la licenza GPL originale e per i codici di sorgente di componenti sotto licenza GPL ed utilizzati in prodotti snom.
Informazioni importantiPregasi leggere con attenzione le istruzioni inerenti la sicurezza, lo smaltimento e l‘installazione del dispositivo prima del suo impiego. Tali informazioni vanno condivise con gli altri utenti. È altresì necessario conservare questo manuale, consegnandolo insieme al dispositivo qualora esso venga dato a terzi.
Sicurezza Seguite le istruzioni in questo manuale e tutta la documentazione relativa al dispositivo.• Utilizzate solo l’adattatore del dispositivo. Altri adattatori di corrente potrebbero
danneggiare, anche irreversibilmente, il dispositivo soggetto a pressione meccanica ed il cavo. Se il cavo o la spina si danneggiano, scollegare il dispositivo e contattare il personale di assistenza qualificato.
• Non posizionare il cavo di corrente del telefono dove può essere calpestato. Non posizionare il cavo di corrente del telefono dove può essere soggetto a pressione meccanica perchè potrebbe danneggiare il cavo. Se il cavo o la spina si
ITALIANO

32
snom 370 Quick Start Guide
ITALIANO
danneggiano, scollegare il telefono e contattare il personale di assistenza qualificato.• Questo apparecchio si può impiegare solo al chiuso! Non installare all'aperto!• Non installare il dispositivo in ambienti con alta umidità (ad es., in bagno, lavanderia,
seminterrati umidi). Non immergere il dispositivo in acqua e non versarvi liquidi sopra• Non installare il dispositivo nei pressi di locali a rischio esplosione (colorifici,
ad es.). Non utilizzare il dispositivo se sentite odore di gas o di altra esalazione potenzialmente esplosiva.
• Non utilizzare il dispositivo durante i temporali. Qualora un fulmine colpisca la rete elettrica, è passibile di scossa.
Conforme al circuito SELV (bassissima tensione di sicurezza)
Il nivello di scurezza dei circuiti in ingresso / uscita è conforme alle raccomandazioni SELV.
Attenzione: Per evitare scosse elettriche non collegare i circuiti SELV a quelli della rete telefonica (TNV). Le porte LAN hanno circuiti SELV, le porte PSTN hanno circuiti TNV.
Conformità
Il dispositivo è certificato CE e FCC e risponde agli standard europei e statunitensi di salute, sicurezza ed ambientali.
Eventuali modifiche, cambiamenti e l’apertura non autorizzata del dis-positivo invalidano la garanzia e potrebbero eventualmente annullare le certificazioni CE e FC. In caso di malfunzionamento contattare il personale di assistenza autorizzato, il rivenditore, o snom.
• Sicurezza: IEC 60950-1:2001, Certificato Test CB: DE 2-013297• Certificazioni: FCC Class B, Marchio CE • Consumo di potenza: 2,8 – 2,9 Watt• Potenza: 5 V DC o PoE (Power over Ethernet`) IEEE 802.3af, Class 1• 1 x LAN, 1 x PC: RJ45 (Ethernet)• Ethernet: 2 interruttori IEEE 802.3 da 10/100 Mbps
Smaltimento del dispositivo
Questo dispositivo è soggetto alla Direttiva Europea 2002/96/EC e non può essere smaltito con i rifiuti domestici.
Se non sapete come smaltire l’apparecchio una volta inutilizzabile, contattate il comune, la nettezza urbana locale, o il vostro rivenditore.
PuliziaUtilizzare un panno antistatico. Evitare acqua e altri liquidi o detergenti solidi che potrebbero danneggiare la superficie o l’elettronica interna.

Quick Start Guide
33
ITALIANO
Iniziallizzazione e registrazioneSi prega di notare: Le informazioni dell’account fornite dal vostro amministratore di rete o un account VoIP presso un provider VoIP che supporti lo standard VoIP SIP, normalemente il utente (di solito corresponde al numero di telefono), il password e il registrar.
Collegare il dispositivo alla rete (vedi pagina 2-5). Il telefono avvia il processo di inizializzazione e registeration.
L'inizializzazione e la registrazione avviene normalmente tramite DHCP. Se il vostro sistema telefonico IP non supporta l’avvio automatico, richiesta l'indirizzo IP, gateway IP e server DNS dal tuo amministratore di rete o provider VoIP il manuale per l’avvio del telefono.
Selezionare un'opzione con e salvare ogni selezione con .
1. Lingua. La lingua di default è l'inglese.
2. Segnali di linee libera
3. Fuso orario
4. Digitare il tuo numero di conto/telefono + premere P
5. Digitare il registrar + P . Se la registrazione è riuscita, il display visualizza la schermata inattivo:
(numero/nome)Stato della identità:
Barra infoBarra di stato della identità:
Data + horaStato + account
Registrato, attivo | Registrato, inattivo | Non registrati
Inserire lettere, numeri e caratteri speciali
Tasti funzione per il contesto
Simboli delle funzioni disponibile in base al contesto
Modalità di inserimento attuale:
Dispositivo audio attivo:
Cambia la modalità d‘inserimento: Premere il tasto funzione sotto il simbolo
/ /
Premere un tasto qualsiasi alfanumerico. La modalità di inserimento corrente è indicata da "123" (numeri), "abc" (lettere minuscole), "ABC" (lettere maiuscole). Cambia la modalità d'inserimento per:
Lettere minuscole: > Lettere maiuscole: > Numeri:
Cancellare il carattere a sinistra del cursore: Spostare il cursore a sinistra | a destra: |
Inserire caratteri speciali - modalità lettere minuscole o maiuscole): Premere rapidamente il tasto "1" più volte, con una piccola pausa dopo ogni lettera.
Esempi: 1x = "." 2x = "+" 3x = "@" 4x = "1" 5x = ":" 6x = ","

34 Quick S
tart Guide
ITALIANO
Tastiera alfanumerica
Display - stato inattivo
Tasti funzionidedicati/preprogrammato
Richiamo Rubrica Liberamente programmabili Iniziare/terminare conferenza
Tasto attesa
Menu Impostazioni Indirizzo IP, indirizzo MAC, versione fi rmware Liberamente programmabili Trasferimento
Funzione "non disturbare" on/off
Nuovi messaggi + chiam. perse • LED rosso: Nuovo mess. - premere
per ascoltarla (se supportato dal PBX)• LED giallo: Chiamata perse. Spegnere il
LED: Premere .• LED giallo, lampeggia velocamente: Chia-
mata in arrivo su un altro interno (impostazio-ne personalizzata)
Registrare una chiamata (se support.dal PBX)
Tasti funzioni con LED, liberamente programmabili: . Impostazione di fabbrica: Linea. Il LED: • Lampeggia rapidamente: Chiamata in arrivo • Brillare senza lampeggia: Telefonata in corso• Lampeggia lentamente: Chiamata attesa
Tasto cancelletto
Tasto asterisco • Premuto brevemente in moda-
lità inserimento: Passare dalla modalità lettere minuscole e maiuscole
• Premuto per alcuni secondi: Bloccare/sbloccare la tastiera
Tasti audio• Mofi cicare il volume
della suoneria (chiam. in arrivo) o del vivavoce (chiamata en corso)
• Microfono on/off• Vivavoce on/off• Cuffi a on/off
Selezionare una identità per chiamate in uscita:
Identità corrente:
Simboli delle funzioni disponibile in base al contestoTasti funzione per il contesto, programmabili
• Lampeggia rapidamente: Chiamata in arrivo• Luce costante: Chiamata en corso• Lampeggia lentamente: Chiamata in attesa
LED di chiamata Tasto navigazione - funzioni in stato inattivo: t: Chiamate perse u: Chiam. ricevuto : Selezionare identità
Tasti annulla & OK Annullare azioni & inserimenti Confermare azioni & inserimenti, salvare
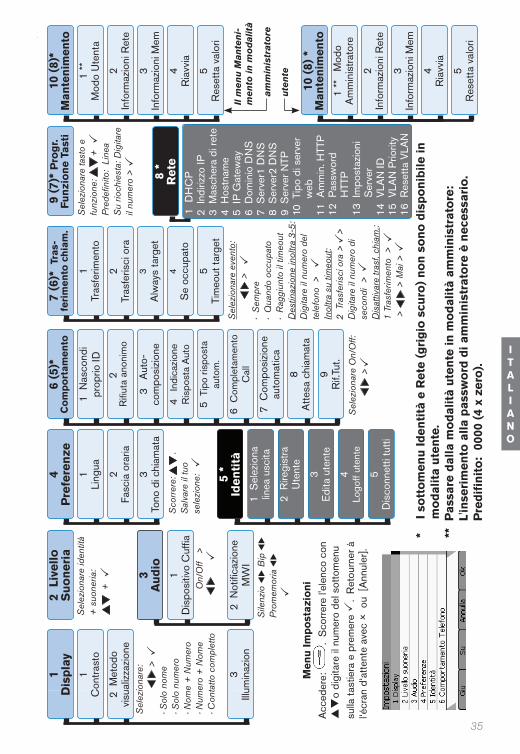
Quick Start Guide
35
ITALIANO
On/
Off
> P
2 L
ivel
loS
uone
ria
9 (7
)* P
rogr
. Fu
nzio
ne T
asti
1 D
HC
P2
Indi
rizzo
IP3
Mas
cher
a di
rete
4 H
ostn
ame
5 IP
Gat
eway
6 D
omin
io D
NS
7 S
erve
r1 D
NS
8
Ser
ver2
DN
S
9 S
erve
r NTP
10 T
ipo
di s
erve
r w
eb11
Am
min
. HTT
P 12
Pas
swor
d H
TTP
13 I
mpo
staz
ioni
S
erve
r14
VLA
N ID
15 V
LAN
Prio
rity
16 R
eset
ta V
LAN
8 *
Ret
e
7 (6
)* T
ras-
feri
men
to c
hiam
.
1
Tras
ferim
ento
2
Tras
feris
ci o
ra3
Alw
ays
targ
et
4S
e oc
cupa
to
5Ti
meo
ut ta
rget
4P
refe
renz
e1
Ling
ua
2 Fa
scia
ora
ria
3
Tono
di c
hiam
ata
5 *
Iden
tità
1 S
elez
iona
lin
ea u
scita
2 R
iregi
stra
Ute
nte
3 Ed
ita u
tent
e
4
Logo
ff ut
ente
5 D
isco
nnet
ti tu
tti
10 (8
)*
Man
teni
men
to1
**M
odo
Ute
nta
2In
form
azio
ni R
ete
3 In
form
azio
ni M
em
4 R
iavv
ia
5
Res
etta
val
ori
amm
inis
trat
ore
uten
te
Il m
enu
Man
teni
-m
ento
in m
odal
ità
10 (8
) *M
ante
nim
ento
1 **
M
odo
Am
min
istra
tore
2In
form
azio
ni R
ete
3 In
form
azio
ni M
em
4 R
iavv
ia
5R
eset
ta v
alor
i
6 (5
)*
Com
port
amen
to
1 N
asco
ndi
prop
rio ID
2 R
ifi ut
a an
onim
o
3 A
uto-
com
posi
zione
4 I
ndic
azio
ne
Ris
post
a A
uto
5 T
ipo
rispo
sta
auto
m.
6 C
ompl
etam
ento
C
all
7 C
ompo
sizio
ne
auto
mat
ica
8 A
ttesa
chi
amat
a
9 R
if.Tu
t.
Sco
rrere
:
.
S
alva
re il
tuo
sele
zion
e: P
3A
udio
1 D
ispo
sitiv
o C
uffi a
2 N
otifi
cazio
ne
MW
IS
ilenz
io tu
Bip
tu
P
rom
emor
ia tu
P
1D
ispl
ay1
Con
trast
o
Sel
ezio
nare
:
· Sol
o no
me
· Sol
o nu
mer
o· N
ome
+ N
umer
o· N
umer
o +
Nom
e· C
onta
tto c
ompl
etto
3 Ill
umin
azio
n
2 M
etod
o vis
ualiz
zazio
ne
>P
Sel
ezio
nare
iden
tità
+ s
uone
ria:
+P
Sel
ezio
nare
tast
o e
funz
ione
:
+
P
rede
fi nito
: Li
nea
Su
rioch
iest
a: D
igita
re
il nu
mer
o >
P
P
Sel
ezio
nare
eve
nto:
>
·
Sem
pre
· Q
uand
o oc
cupa
to·
Rag
giun
to il
tim
eout
D
estin
azio
ne in
oltra
3-5
: D
igita
re il
num
ero
del
tele
fono
>
Inol
tra s
u tim
eout
: 2
Tra
sfer
isci
ora
>
>
Dig
itare
il n
umer
o di
se
cond
i >
Dis
attiv
are
trasf
. chi
am.:
1
Tras
ferim
ento
>
>
> M
ai >
P P
P
P
PP
Sel
ezio
nare
On/
Off:
>P
*
I sot
tom
enu
Iden
tità
e R
ete
(gri
gio
scur
o) n
on s
ono
disp
onib
ile in
m
odal
ita
uten
te.
** P
assa
re d
alla
mod
alit
à ut
ente
in m
odal
ità
amm
inis
trat
ore:
L'
inse
rim
ento
alla
pas
swor
d di
am
min
istr
ator
e è
nece
ssar
io.
Pre
difi
nito
: 00
00 (4
x z
ero)
.
Men
u Im
post
azio
ni
Acc
eder
e:
. S
corre
re l'
elen
co c
on
pq
o di
gita
re il
num
ero
del s
otto
men
u su
lla ta
stie
ra e
pre
mer
e P
. R
etou
rner
à
l‘écr
an d
‘atte
nte
avec
o
u [A
nnul
er].

36
Quick Start Guide
ITALIANO
Modalità utente/Modalità amministratoreL'impostazione di fabbrica è la modalità di amministratore. La password di default per l'amministratore è: 0000 (4 x zero). Cambiare la modalità:
1. Tra modalità amministratore a modalità utente: • Con il telefono: > 10 Mantenimento > 1 Modalità utente• Interfaccia web > Avanzate > QoS/Security > Sicurezza > Mod. amministratore:
Off > Salva.
2. Tra modalità utente a modalità amministratore: • Con il telefono: > 10 Mantenimento > 1 Modalità amministratore > digitare
la password di amministratore > P• Interfaccia web > Avanzate > Login amministratore: Digitare la password di
amministratore > Salva.
L'interfaccia Web del telefono 1. Trovare l'indirizzo IP: , per esempio 192.168.10.115.
2. Aprire il browser web del vostro PC e digitare http:// seguito dall'indirizzo IP nella barra degli indirizzi. Premere Invio per apprire l'interfaccia Web del telefono.
3. Cliccare su una voce del menu per aprire la pagina relativa.
`
4. Alcune pagine contengono svariati documenti. Per rendere visibile un documento, cliccare sulla sua scheda. Il carattere è in grassetto per la scheda attiva.
5. Ricordare di premere sempre "Salva" prima di cliccare su un'altra voce del menu o di chiudere l'interfaccia web se volete che le modifiche vengano applicate.
Formato ora
Interfaccia Web > Preferenze > Informazioni generali > 24 Hour clock: On: Formato 24 ore, 00:01 - 24:00 Off: Formato 12 ore AM/PM, 0:01 AM - 12:00 PM
Formato della dataInterfaccia Web > Preferenze > Informazioni generali > US date format (mm/dd): On: 3/8/2010 Off: 8.3.2010
Impostazioni identità/AccountInterfaccia Web > Identità 1-12

Quick Start Guide
37
ITALIANO
Usare il telefono
Selezionare un’identità per la chiamata in uscita in corsodallo display inattivo: qp
Chiamare• Digitare il numero e sganciare la cornetta o • Sganciare la cornetta, digitare il numero e premere P o• , digitare il numero, P.
Accettare le chiamate• Usando la cornetta: Sganciare la cornetta• Usando una cuffia: Premere P o il tasto linea lampeggiante• Usando il vivavoce: Premere
Mettere le telefonate in corso in attesa
Premere . Il LED lampeggia lentamente. Riprendere la chiamata: Premere . Con più chiamate in attesa: Selezionare chiamata con qp, premere P o o [R] per riprendere uno da cui.
Conferenza a tre
1. Il tuo numero di telefono: 154. Mettere le prima chiamata (Jane Doe) in attesa.
2. Chiamare il secondo partecipante (158). Con la seconda chiamata sulla linea:
3. Avviare la conferenza: . Conferenza in corso:
4. Fermare la conferenza e mettere i partecipanti in attesa: .
5. Avviare la conferenza di nuovo: Premere il tasto funzione [R].
TrasferimentoAnnunciato: Mettere le chiamata in attesa > Digitare il numero della terza persona. Annunciate la chiamata > Se il terzo desidera accettare la chiamata: Premere > P.
Trasferimento diretto (senza annunciare la chiamata): Con la chiamata sulla linea: Premere , digitare il numero della terza persona > premere P.

38
Quick Start Guide
ITALIANO
Inoltro di chiamate1. Attivare l'inoltro di chiamate
a. Tutte le chiamate in arrivo: > 7 Trasferimento Chiamata > 1 Trasferimento > t u Sempre > P > 3 Always target > digitare il numero > P.
b. Se occupato: > 7 Trasferimento Chiamata > 1 Trasferimento > t u Quando occupato > P > 4 Se occupato rosso > digitare il numero > P .
c. Dopo timeout (senza risposta): q > 7 Trasferimento Chiamata > 1 Trasferimento > t u Raggiunto il timeout > P > Timeout Target > digitare il numero > Ora trasferiment > numero di secondi precedenti all'inoltro > P.
d. Display inattivo con trasferimento automatico attivato:
2. Disattivare: > 7 Trasferimento Chiamata > 1 Trasferimento > t u Mai > P.
Gli elenchi chiamate1. Per aprire in stato di inattività: Premere [Reg.ch.].
2. Selezionare un elenco (Lista chiamate: Perse, Entranti (in ingresso), in Uscenti) con: pq > P
3. Scorrere l'elenco: pq. Chiamare il numero della registrazione selezionata: P
Elenco del telefono
• Per aprire: Premere . Scorrere: pq. Chiamare il numero selezionata: P• Nuovo indirizzo: Premere [New].• Modificare indirizzi: Vedi "Inserire lettere, numeri e caratteri speciali", pagina 33.
Risoluzione dei problemi
Riavvio (Reboot)
> 10 Mantenimento > 4 Riavvia > P > "Riavviare?" > P
Riavvio forzato Staccare il telefono dalla presa di corrente. Ricollegare il telefono alla corrente dopo alcuni secundi.
Non staccare dalla corrente quando il telefono si sta riavviando !
Reimpostare i valori di fabbrica
> 10 Mantenimento > 5 Resetta valori > P > digitare il password amministratore > P
Tutte le impostazioni modificate andranno perse!

Quick Start Guide
39
ESPAÑOL
Esta es la Guía de Inicio Rápido para la instalación, configuración y uso del snom 370. Para más información, consulte el manual en nuestra página web
http://wiki.snom.com/Snom370.
Propriedad intelectual, Marcas registradas, GPL, Exenciόn de responsabilidad
© 2010 snom technology Aktiengesellschaft Todos los derechos reservados.
snom, los nombres de los productos snom, y los logos de snom son marcas comerciales propiedad de snom technology AG. Los demás nombres de producto y empresas son propiedad de sus respectivos propietarios.
snom technology AG se reserva el derecho de revisar y modificar este documento en cualquier momento, sin obligación de notificar estas revisiones o modificaciones por adelantado o con posterioridad a sz realización.
Los textos, imagines e ilustraciones, y su presentación en este documento, están sujetos a la protección de copyright y otros derechos legales internacionales. Su uso, reproducción y transmisión a terceros sin permiso expreso por escrito puede dar lugar al inicio de procedimientos legales en los tribunales penales y civiles.
Aunque se han tomado todas las precauciones posibles en la compilación y presentación de la información de este documento, los datos en los que se basa pueden haber cambiado con el tiempo. snom, por lo tanto, renuncia a cualquier garantía y responsabilidad respecto a la precisión, exhaustividad y vigencia actual de la información publicada, excepto en el caso de intencionalidad o negligencia grave por parte de snom cuando se deriven responsabilidades de acuerdo con las disposiciones legales vinculantes.
Nuestro firmware incluye código fuente que puede ser usado y modificado por cualquier persona bajo la licencia pública GNU (GPL) (vease la página 55), siempre que, a su vez, lo ponga a dis-posición de cualquier otra persona que tenga el mismo acuerdo de licencia. Acceda a http://www.snom.com/de/support/download/gpl-quellcode/ para obtener la licencia GPL original y el código fuente de los componentes con licencia en virtud de la GPL y utilizados en productos snom.
Información importanteLea las instrucciones sobre seguridad y reciclaje del teléfono, y sobre cómo configurar y utilizar el teléfono antes de usarlo, y ofrézcalas igualmente a otros usuarios para que las lean o se informen de su contenido. Conserve este manual y no entregue el teléfono a terceros sin el mismo.
SeguridadSiga las instrucciones de este manual y cualquier otra documentación aplicable del dispositivo. • Si la alimentación del teléfono no se realiza mediante/por Ethernet, use exclusiva-
mente el adaptador de alimentación entregado con el teléfono o uno recomendado de forma expresa par snom. Otros adaptadores pueden dañar o incluso destruir el teléfono, afectar a su funcionamiento o provocar ruidos.
ESPAÑOL
40
snom 370 Quick Start Guide
ESPAÑOL
• Eviteponerloscablesdemodoqueotraspersonaspuedantropezarconelmismo.Nocoloqueloscablesdeformaquepuedaversesometidoapresionesmecánicas,yaqueesopodríadañarloscables.Sielcabledealimentaciónoelenchufeestándañados,desconecteelteléfonoycontacteconpersonaldeserviciocualificado.
• Estedispositivoessolamente para uso en interiores.• Noinstaleelteléfonoenlugaresconhumedadelevada(porejemplo,enbaños,
lavaderos,osótanoshúmedos).Nosumerjaelteléfonoenaguaniderrameoviertalíquidosdeningúntiposobreelteléfono.
• Noinstaleelteléfonocercadelugaresconriesgodeexplosión(talleresdepintura,porejemplo).Nouseelteléfonosihueleagasoaotrosvaporesquepuedanserexplosivos.
• Nouseelteléfonoduranteunatormenta;losrayosqueimpactenenlaredeléctricapuedendescargaseléctricas.
Cumplimiento de los requisitos SELV (Tensión Extra-Baja de Seguridad)
Lascondicionesdeseguridaddelasconexionesdeentrada/salidacumplenconlosrequisitosSELV.
Atención:Paraevitardescargaseléctricas,noconectecircuitosdeseguridaddetensiónextra-baja(SELV)acircuitosdetensiónderedtelefónica(TNV).LospuertosLANcontienencircuitosSELV,lospuertoscontienencircuitosTNV.AlgunospuertosLANyPSTNutilizanconectoresRJ-45(8P8C).Tomeprecausionescuandoconecteloscables..
Cumplimiento con la normativa
EsteteléfonotienecertificaciónCEyFCC,ycumpleconlosestándaresdesalud,seguridadymedioambientaleseuropeosydeEstadosUnidos.
Laapertura,cambio,omodificaciónnoautorizadasdelteléfonoprovocaránquelagarantíasecancele,ytambiénpuedenresultarenlacancelacióndelascertificacionesCEyFCC.Encasodeavería,contacteconpersonaldeservicioautorizado,suvendedor,osnom.
• Seguridad: IEC60950-1:2001,CertificadodecomprobaciónCB:DE2-013297• Certificados: FCCClassB,IndicaciónCE• Consumo eléctrico: 2,8–2,9W•1 x LAN, 1 x PC: RJ45(Ethernet)• Alimentación: 5VDCoPoE(PoweroverEthernet)IEEE802.3af,Clase1• Ethernet: 2xIEEE802.3conmutador10/100Mbps
Eliminación
EsteteléfonoestásujetoalaDirectrizEuropea2002/96/EC,ynosepuededesecharconlosresiduosdomésticosgenerales.
Sinosabedóndereciclareldispositivocuandodejedefuncionar,contacteconlasautoridadesmunicipales,consuproveedordegestiónderesiduoslocaloconsuvendedor.

Quick Start Guide
41
ESPAÑOL
LimpiezaUse una paño antiestático. No utilice agua ni productos de limpieza, ya que podrían dañar la superfi cie o los componentes electrónicos del aparato.
Inizialización y registroImportante: La información de registro que le haya proporcionada su proveedor de internet o su administrador de red, normalemente, el número de teléfono, la extensión, la contraseña y el registro.
Cuando haya confi gurado el teléfono y lo haya conectado la red como se indica en las páginas 2-5, el teléfono empezará a inicializar.
Normalmente la inicialización es totalmente automática y se realiza a través del protocolo DHCP. Si su red no admite DHCP, debe obtener la dirección IP, la máscara de red, el IP de la puerta de enlace y el servidor DNS de su proveedor de internet o su administrador de red e introducirlos manualmente cuando se le solicite en la pantalla.
Cuando se le indique, seleccione una opción con y guarde los cambios con .
1. Idioma. El idioma por defecto es inglés. 2. Tono de marcado3. Huso horario4. Introduzca la cuenta/el número de teléfono y pulse P 5. Introduzca el registro (Registrar) y pulse P. Si el registro se realizó correctamente,
la pantalla mostrará:
(número/nombre)Estados de las identidades:
Barra de informaciónBarra del estado de la
identidad:
Fecha + horaEstado + cuenta
: Registrado, activo | : Registrado, inactivo | : No registrado
Introducir letras, números y caracteres especiales
Teclas de función:
Símbolos de las funciones dispo-nibles en este contexto particular:
El modo de entrada actual:
Dispositivo audio actual:
Cambiar el modo de entrada: Pulse la tecla de función debajo del símbolo:
/ /
Pulse cualquier tecla. El modo de entrada en uso se indica en pantalla mediante "123" (números), "abc" (minúsculas), "ABC" (mayúsculas). Cambiar el modo de entrada a:
Minúsculas: > Mayúsculas: > Números:
Eliminar el carácter a la izquierda del cursor: Mover el cursor a la izquierda | a la derecha: |
Introducir caracteres especiales y símbolos en modo letras: Pulse la tecla "1" una o varias veces rápidamente, con una breve pausa después de cada letra.
Ejemplos: 1x = "." 2x = "+" 3x = "@" 4x = "1" 5x = ":" 6x = ","

42 Quick S
tart Guide
ESPAÑOL
Tecladoalfanuméricas
Pantalla - estado inactivo
Teclas funcionespreprogramada/programable
Rellamada Directorio telefónico Libramente programmable Conferencia
Espera
Menú Ajustes Dirección IP, dirección MAC, versión de fi rmware Libramente programmable Transferencia
Función "no molestar" encendido/apagado
Mensajes nuevos + llamad. perdidas • LED rojo: Mensaje nuovo - pulse para
apagarlo (si es compatible con la PBX)• LED ámbar, luz fi ja: Llamada perdida.
Apadado el LED: Pulse .• LED ámbar, parpadeo lento: Llamada
entrante en otra línea interna (confi guración personalizada)
Grabar una llamada (si es comp. con la PBX)
Teclas de función con LEDs, libramente programables: . confi guración predeterminada de fábrica: Línea. LED: • Parpadeo rápido: Llamada entrante • Luz fi ja: Llamada en curso• Parpadeo lento: Llamada en espera
Tecla almohadilla
Tecla asterisco • Pulsado brevemente en modo
de edición: Alternar entre minúsculas y mayúsculas
• Pulsado durante varios se-gundos: Bloquear/desbloque-ar el teclado
Teclas de audio• Ajuste de volumen del
timbre (llam. entrante) o del alta-voz (llamada en curso)
• Micrófono (encend./apag.)• Altavoz (encendido/apagado)• Auriculares (encend./apag.)
Selección de identidad para la llamada saliente:
Identidad actual:
Símbolos de las funciones dispo-nibles en este contexto particular
Teclas de función, programables
• Parpadeo rápido: Llamada entrante• Luz fi ja: Llamada en curso• Parpadeo lento: Llamada en espera
LED indicador de llamada Tecla de navegación - las funciones en estado inactivo: t: Llamad. perdidas u: Llamad. recibidas : Selección de identidad
Teclas Cancelar & Confi rmación Cancelar acciones & entradas Confi rmar acciones & entradas, guardar

Quick S
tart Guide43
ESPAÑOL
2 Tono de timbre
9 (7)* Seleccionar teclas de función
1 DHCP2 Direccion IP3 Mascara de red4 Hostname5 Puerto de enlace IP6 Dominio DNS7 Servidor DNS 18 Servidor DNS 29 Servidor NTP10 Tipo de servidor
Web11 Admin. HTTP 12 Contraseña
HTTP13 Servicor de
ajustes14 VLAN ID15 VLAN Priority16 Reiniciar VLAN
8 *Red
7 (6)* Desvío
1 Desvío
2 Hora de desvío
3(Dest) siempre
4Destino occupado
5Destino ausente
4Preferencias
1 Idioma
2 Uso horario
3 Tono de marcado
5 *Identidad
1 Seleccionar identidad
2 Registrar usuario nuevamente
3 Editar usuario
4 Anular usuario
5 Anular todos
10 (8)* Mantenimiento
1 **Modo usuario
2 Información de red
3 Información de memoria
4 Reinicio
5 Reajustar valores
administrador
usuario
El menú Manteni-miento en modo
10 (8) *Mantenimiento
1 ** Modo administrador
2 Información de red
3 Información de memoria
4 Reinicio
5Reajustar valores
6 (5)* Comportamiento
1 Esconder Nr.
2 Sin llamadas anónimas
3 Marcado automático
4 Tono automático de llamada aceptada
5 Tipo de re-spuesta automática
6 Llamada completa
7 Determinar número
8 Llamada en espera
9 Deneg. Todo
Desplazar: . Guardar la selección:
P On/Off >P
3Audio
1 Dispositivo casco
2 Notifi cación MWI
Mudo tu Pitido tu Tono para recordar tu P
1Pantalla
1 Contraste
Seleccionar:· Solo nombre· Solo número· Nombre + número· Número + nombre· Visualizar todos los contactos
3 Contraluz
2 Modo de pantalla
> P
Seleccionar identidad + tono de llamada: + P
Seleccionar tecla y función: + Preajustado: Línea Si es necesario: Introducir el número >
P
P
Seleccionar evento: > · Siempre· Cuando está ocupado· Tiempo límite de desv. Destino desvío 3-5: Introducir el número de teléfono > Desvío tras tiempo exce-dido : 2 Hora de desvío > > Introd. el número de segundos >Desactivar le desvío de llamada: 1 Desvío > > > Nunca >
P
PP
P
PP
Seleccionar On/Off: >P
* Los submenús Identidad y e Red (gris oscuro) no son accesibles en modo de usuario.
** Cambiar de modo usuario a modo administrador: Requiere la entrada de la contraseña de administrador. Contraseña predeterminada de fábrica: 0000 (4 x zero).
Menu AjustesAbrir: . Desplazar con pq o introducir el número del submenú en el teclado y pulsar P. Volver a la pantalla de inactividad con o [Cancelar].
On = activado/encendido una funciónOff = desactivado/apagado

44
Quick Start Guide
ESPAÑOL
Modo usuario/modo administradoreLa configuración por defecto de fábrica es el modo de administrador. La contraseña del administrador es 0000 (4 x cero). Cambiar el modo:
1. Del modo administrador a modo de usuario: • En el teléfono: > 10 Mantenimiento > 1 Modo Usuario• Interfaz web del teléfono > Avanzado > Qos/Security > Seguridad > Modo
Administrador: apagado > Salvar.
2. Del modo de usuario a modo de administradore: • En el teléfono: > 10 Mantenimiento > 1 Modo Administrador > introducir
la contraseña de administrador > P• Interfaz web del teléfono > Avanzado > Administrador Acceso: introducir la
contraseña de administrador en la caja de texto > Salvar.
La interfaz web del telefono 1. Obtenga la dirección IP del teléfono: , por ejemplo 192.168.10.115.
2. Abra el navegador de su PC y teclee http:// seguido de la dirección IP en la barra de direcciones. Pulse Enter para abrir la interfaz web del teléfono.
3. Haga clic en un elemento del menú de la izquierda para abrir la página.
4. Si una ventana contiene diversas páginas, haga clic en la pestaña de la parte superior de la página para abrirla. La fuente de los caracteres de la pestaña activa está en negrita.
5. Los cambios que realice no tendrán efecto hasta que haga clic en "Salvar". Se perderán todos los cambios si abre otra página de la interfaz web o o si cierra la interfaz web sin haber pulsado antes "Salvar".
Formato de hora
Interfaz Web > Preferencias > Información General > 24 Hour clock: Encendido: Formato 24 horas, 00:01 - 24:00 Apagado: Formato 12 horas AM/PM, 0:01 AM - 12:00 PM
Formato de fecha
Interfaz Web > Preferencias > Información General > US date format (mm/dd) Encendido: 3/8/2010 Apagado: 8.3.2010
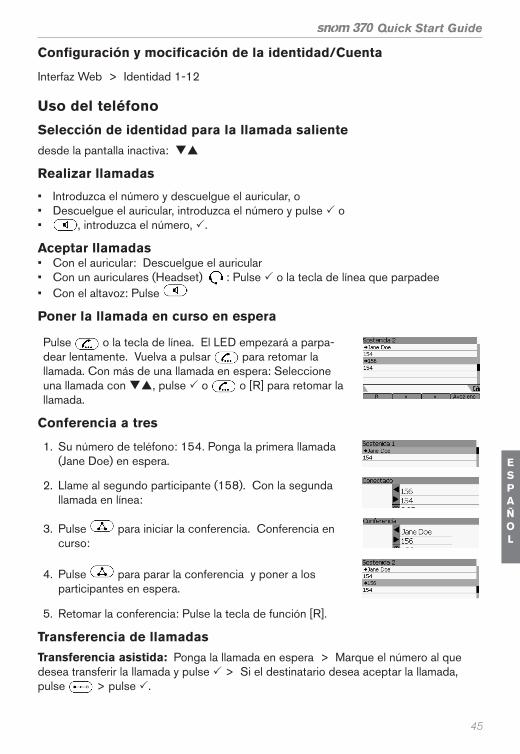
Quick Start Guide
45
ESPAÑOL
Configuración y mocificación de la identidad/Cuenta
Interfaz Web > Identidad 1-12
Uso del teléfono
Selección de identidad para la llamada salientedesde la pantalla inactiva: qp
Realizar llamadas
• Introduzca el número y descuelgue el auricular, o • Descuelgue el auricular, introduzca el número y pulse P o• , introduzca el número, P.
Aceptar llamadas• Con el auricular: Descuelgue el auricular• Con un auriculares (Headset) : Pulse P o la tecla de línea que parpadee• Con el altavoz: Pulse
Poner la llamada en curso en espera
Pulse o la tecla de línea. El LED empezará a parpa-dear lentamente. Vuelva a pulsar para retomar la llamada. Con más de una llamada en espera: Seleccione una llamada con qp, pulse P o o [R] para retomar la llamada.
Conferencia a tres
1. Su número de teléfono: 154. Ponga la primera llamada (Jane Doe) en espera.
2. Llame al segundo participante (158). Con la segunda llamada en línea:
3. Pulse para iniciar la conferencia. Conferencia en curso:
4. Pulse para parar la conferencia y poner a los participantes en espera.
5. Retomar la conferencia: Pulse la tecla de función [R].
Transferencia de llamadasTransferencia asistida: Ponga la llamada en espera > Marque el número al que desea transferir la llamada y pulse P > Si el destinatario desea aceptar la llamada, pulse > pulse P.
46
Quick Start Guide
ESPAÑOL
Transferencia directa (sin anunciar la llamada): Con la llamada en la línea: Pulse > marque el número al que se desea transferir la llamada > pulse P.
Desvío de llamadas1. Activar el desvío de llamadas.
a. Todas las llamadas entrantes: > 7 Desvío > 1 Desvío > t u Siempre > P > 3 siempre > introducir el número al que desviar la llamada > P.
b. Cuando la línea este ocupada: > 7 Desvío > 1 Desvío > t u Ocupado > P > 4 Destino ocupado > introducir el número al que desviar la llamada > P .
c. Si no responde a la llamada: > 7 Desvío > 1 Desvío > t u Fuera de tiempo > P > 5 Destino ausente > introducir el número al que desviar la llamada > 2 Hora de desvío > introducir el número de segundos tras los que se debe desviar la llamada > P.
d. Pantalla inactiva con desvío de llamadas activado:
2. Desactivar: > 7 Desvío > 1 Desvío > t u Nunca > P.
Listas de llamadas1. Para abrir: Pulse [Listas].
2. Seleccionar una lista (Perdidas, Recibidas, Marcadas) con: pq > P
3. Seleccionar un número de teléfono de la lista: pq > marcar el número con P
Directorio telefónico• Para abrir: Pulse . Localice una entrada: pq > marcar el número con P• Crear una nueva entrada: Pulse [New].• Crear/modificare las entradas: Consulte la página 41, "Introducir letras, números y
caracteres especiales".
Solución de problemas
Reinicio (Reboot)
> 10 Mantenimiento > Reinicio > P > "Reiniciar?" > P
Reinicio físico Desconecte el cable de alimentación del teléfono. Vuelva a conectar la alimentación pasados unos segundos.
No desconecte el cable de alimentación mientras se está actualizando el Firmware!
Restablecer valores de fábrica
> 10 Mantenimiento > Reajuste > introducir la contraseña de administrador > P
Toda la configuración se borrará !

47
snom 370 Quick Start Guide
PORTUGUÊS
Este manual de iníciação rápida descreve a instalação, configuração e operação de snom 370. Para mais informações, consulte o manual disponível na nossa página na rede:
http://wiki.snom.com/Snom370.
Copyright, Marcas Comerciais, GPL, Reclamações Legais© 2010 snom technology Aktiengesellschaft Todos os direitos reservados.snom, os nomes dos produtos snom, e logotipos snom são marcas pertencentes à snom tecnologia AG. Todos os outros nomes de produtos e nomes de empresas são propriedade dos seus respectivos proprietários.
snom tecnologia AG reserva o direito de rever e alterar este documento a qualquer momento, sem ser obrigado a anunciar tais revisões ou alterações antes ou depois do facto.
Textos, imagens, ilustrações e sua disposição neste documento estão sujeitos à proteção de direitos autorais e outros direitos legais a nível mundial. A sua utilização, reprodução e transmissão a terceiros, sem expressa autorização por escrito pode resultar em processos judiciais nos tribunais penais, bem como nos tribunais civís.
Embora já se tenham tomado os devidos cuidados na elaboração e apresentação das informações contidas neste documento, os dados em que se baseiam podem mudar sem aviso, pelo que, snom rejeita todas as garantias e responsabilidades pela não exactidão, integridade e atualização das informações publicadas, salvo em caso de ou negligência grosseira por parte da snom ou quando a responsabilidade surge devido à sua ligação a disposições legais.
Nosso firmware inclui fonte de código que pode ser usado e modificado por todo e qualquer um mediante Licença Pública GNU (GPL) (ver Anexo na página), desde que, por sua vez, o torne disponível para todos os outros, sob o mesmo acordo de licenciamento. Por favor, aceda a http://www.snom.com/en/support/download/gpl-quellcode/ para obter a licença GPL original e a fonte de código para componentes licenciados sob GPL e usado em produtos snom.
Informações ImportantesPor favor, leia as instruções de segurança e de eliminação, bem como as de configuração e utilização do aparelho, antes de usá-lo e recomende a outros utilizadores que as leiam ou informe-os do conteúdo. Guarde este manual e não transfira o dispositivo a terceiros sem incluí-lo.
Instruções de Segurança Siga as instruções deste manual e outra documentação aplicável ao dispositivo.
• Se o telefone não é fornecido com a corrente através de um cabo Ethernet, use apenas o adaptador de alimentação incluído na embalagem ou outro expressamente recomendado pela snom tecnologia. Outras fontes de alimentação podem danificar ou destruir o telefone, afectar o seu comportamento, ou provocar ruído.
• Evite colocar os cabos onde as pessoas, podem tropeçar ou onde podem ficar
PORTUGUÊS
48
snom 370 Quick Start Guide
PORTUGUÊS
expostas a pressão mecânica, pois pode danificá-los.• Este dispositivo é apenas para uso doméstico! Não instale ao ar livre - NÃO SE
DESTINA A UTILIZAÇÃO AO AR LIVRE!• Não instale o aparelho em ambientes com elevada humidade (por exemplo, em
banheiros, lavanderias, cave húmida). Não mergulhe o aparelho em água e não o derrame nem permita o contacto com líquidos de qualquer tipo.
• Não instale o aparelho em ambientes com risco de explosões (lojas de tintas, por exemplo). Não utilize o dispositivo se sentir cheiro de gás ou outros químicos potencialmente explosivos.
• Não utilize o dispositivo durante trovoadas. Raios que atingem a rede eléctrica podem causar choque eléctrico.
Conformidade SELV (Tensão Extra Baixa de Segurança)
A segurança das ligações de Entrada/Saída cumpre com os requisitos SELV.
Atenção: Para evitar choque eléctrico, não ligue a Segurança Extra a Baixa Tensão (SELV) aos circuitos de tensão da rede telefónica (TNV). As entradas LAN contêm circuitos SELV e as POTS contêm circuitos TNV. Algumas entradas LAN e POTS usam ligações RJ-45 (8P8C). Tenha cuidado ao ligar os cabos.
Padrões de Conformidade
Este dispositivo possui a certificação CE e FCC e cumpre as normas europeias e dos E.U.A relativos à saúde, segurança e meio ambiente.
A abertura não autorizado ou modificação do aparelho não autorizada fará com que a garantia seja anulada e pode também resultar na extinção das certificações CE e FCC. Em caso de mau funcionamento contacte o pessoal autorizado, o vendedor, ou a snom.
• Segurança: IEC 60950-1:2001, CB Teste Certificação: DE 2-013297• Certificados: FCC Classe B, CE Marca • Consumo de energia: 2,8 – 2,9 Watt• Tensão: 5 V DC ou PoE (Power over Ethernet) IEEE 802.3af, Classe 1• Ethernet: 2 x IEEE 802.3 da 10/100 Mbps • 1 x LAN, 1 x PC: RJ45 (Ethernet)
Eliminação do dispositivo
Este dispositivo está sujeito à directiva europeia 2002/96/CE e não pode ser eliminado como lixo doméstico.
Se não tem conhecimento do local de eliminação do dispositivo no final do ciclo de vida útil, contacte o gestor de resíduos local do seu município ou o vendedor do dispositivo.
LimpezaPara limpar o aparelho, use um pano anti-estático. Por favor, evite líquidos de limpeza, já que podem danificar a superfície ou a parte eletrónica no interior do dispositivo.
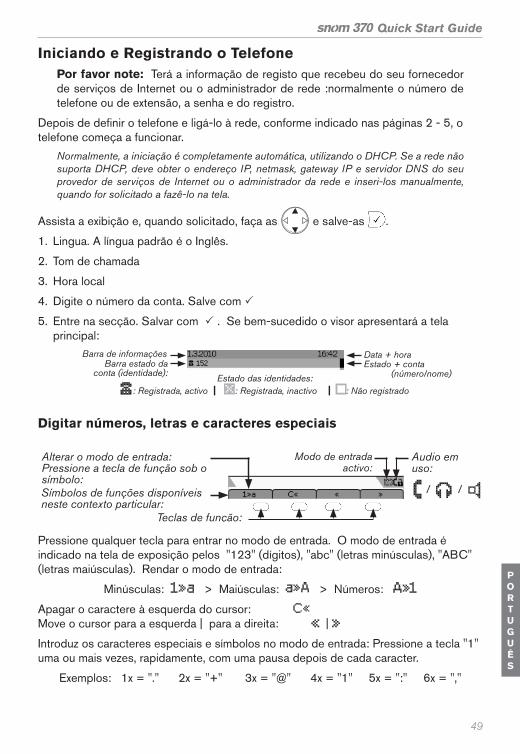
Quick Start Guide
49
PORTUGUÊS
Iniciando e Registrando o TelefonePor favor note: Terá a informação de registo que recebeu do seu fornecedor de serviços de Internet ou o administrador de rede :normalmente o número de telefone ou de extensão, a senha e do registro.
Depois de defi nir o telefone e ligá-lo à rede, conforme indicado nas páginas 2 - 5, o telefone começa a funcionar.
Normalmente, a iniciação é completamente automática, utilizando o DHCP. Se a rede não suporta DHCP, deve obter o endereço IP, netmask, gateway IP e servidor DNS do seu provedor de serviços de Internet ou o administrador da rede e inseri-los manualmente, quando for solicitado a fazê-lo na tela.
Assista a exibição e, quando solicitado, faça as e salve-as .
1. Lingua. A língua padrão é o Inglês.
2. Tom de chamada
3. Hora local
4. Digite o número da conta. Salve com P
5. Entre na secção. Salvar com P . Se bem-sucedido o visor apresentará a tela principal:
(número/nome)Estado das identidades:
Barra de informaçõesBarra estado da
conta (identidade):
Data + horaEstado + conta
: Registrada, activo | : Registrada, inactivo | : Não registrado
Digitar números, letras e caracteres especiais
Teclas de função:
Símbolos de funções disponíveis neste contexto particular:
Modo de entrada activo:
Audio em uso:
Alterar o modo de entrada: Pressione a tecla de função sob o símbolo:
/ /
Pressione qualquer tecla para entrar no modo de entrada. O modo de entrada é indicado na tela de exposição pelos "123" (dígitos), "abc" (letras minúsculas), "ABC" (letras maiúsculas). Rendar o modo de entrada:
Minúsculas: > Maiúsculas: > Números:
Apagar o caractere à esquerda do cursor: Move o cursor para a esquerda | para a direita: |
Introduz os caracteres especiais e símbolos no modo de entrada: Pressione a tecla "1" uma ou mais vezes, rapidamente, com uma pausa depois de cada caracter.
Exemplos: 1x = "." 2x = "+" 3x = "@" 4x = "1" 5x = ":" 6x = ","

50
Quick Start Guide
PORTUGUÊS
Tecl
ado
alfa
num
éric
o
Exp
osiç
ão -
es
tado
inac
tivo
Tecl
as d
e fu
nção
pré-
prog
ram
ados
/pro
gram
ávei
s
Rem
arca
ção
D
irect
ório
Livr
emen
te p
rogr
amáv
eis
C
onfe
rênc
ia
Esp
era
M
enú
de c
onfi g
uraç
ões
E
nder
eço
IP, e
nder
eço
MAC
, ver
são
do fi
rmw
are
L
ivre
men
te p
rogr
amáv
eis
T
rans
ferê
ncia
Fun
ção
"não
per
turb
e" (
ligar
/des
ligar
)
Men
sage
m e
m e
sper
a +
cha
mad
as n
ão
aten
dida
s
• LE
D v
erm
elho
: M
ensa
je n
uovo
- pu
lse
pa
ra a
paga
rlo (s
e su
porta
do p
elo
PB
X)•
LED
âm
bar,
luz
fi xa:
C
ham
ada
perd
ida.
D
eslig
ue L
ED
: Pr
essi
one
.•
LED
âm
bar,
pisc
ando
rapi
dam
ente
: C
ha-
mad
a em
out
ro ra
ma
(con
fi gur
ação
per
sona
-liz
ada)
G
raçã
o de
um
a ch
amad
a (s
e su
porta
do p
elo
PB
X)
Tecl
as d
e fu
nção
com
LE
Ds,
livr
amen
te
prog
ram
ávei
s:
.
Con
fi gur
ação
de
fábr
ica:
Lin
ha.
LED
: •
Pisc
ando
rápi
dam
ente
: Cha
mad
a re
cibi
da
• Lu
z fi x
a: E
m c
ham
ada
• Pi
scan
do le
ntam
ente
: Cha
mad
a em
esp
era
Tecl
a ce
rqui
lha
Tecl
a as
teri
sco
• Pr
essi
onad
a m
omen
tane
a-m
ente
no
mod
o de
edi
ção:
M
udar
ent
re m
inús
cula
s y
mai
úscu
las
• Pr
essi
onad
o po
r alg
uns
segu
ndos
: Blo
quei
a/
de
sblo
quei
a o
tecl
ado
Tecl
as d
e au
dio
•
Aju
star
vol
ume
da
cam
pain
ha (c
ham
ada
reci
vida)
ou
o al
tifal
ante
(em
cha
mad
a)•
M
icro
fone
(lig
ar/d
eslig
ar)
•
Alto
fala
nte
(liga
r/de
slig
ar)
•
Aur
icul
ar (l
igar
/des
ligar
)
Sel
eçao
de
uma
iden
tidad
e pa
ra c
ham
adas
de
saíd
a:
Iden
tidad
e at
ual:
Sím
bolo
s da
s fu
nçõe
s di
spon
ívei
s ne
ste
cont
exto
par
ticu
lar
Tecl
as d
e fu
nção
, pro
gram
ável
• Pi
scan
do ra
pida
men
te: C
ham
ada
reci
bida
• Lu
z fi x
a: E
m c
ham
ada
• Pi
scan
do le
ntam
ente
: Cha
mad
a em
esp
era
LED
indi
cado
r de
cha
mad
a Te
cla
de n
aveg
ação
- a
s fu
nçõe
s em
es
tado
inat
ivo:
t u
: Cha
mad
as p
erdi
das/
reci
bida
s
:
Sel
eçao
de
uma
iden
tidad
e
Tecl
as C
ance
lar
& E
nter
Can
cela
r acç
ões
e en
trada
Con
fi rm
ar a
ções
, sel
eçõe
s e
entra
da,
salv
ar

Quick Start Guide
51
PORTUGUÊS
2
Rin
gton
e9
(7)*
M
apea
ndo
Tecl
as
1 D
HC
P2
IP a
ddre
ss
3 N
etm
ask
(sub
-red
e)4
Hos
tnam
e5
IP G
atew
ay6
DN
S D
omai
n7
DN
S S
erve
r 18
DN
S S
erve
r 29
NTP
Ser
ver
10 W
ebse
rver
Ty
pe11
HTT
P A
dmin
12 H
TTP
Pass
wor
d13
Set
tings
S
erve
r14
VLA
N ID
15 V
LAN
Prio
rity
16 R
eset
VLA
N
8 *
(Red
e)N
etw
ork
7 (6
)*
Sig
a-m
e
1 E
vent
o de
sig
a-m
e
2
Hor
a de
sig
a-m
e
3 (D
est)
Sig
a-m
e se
mpr
e
4
Sig
a-m
e se
ocu
pado
5Ti
meo
ut ta
rget
4P
refe
rênc
ias
1 Id
iom
a
2 Fu
so h
orár
io
3 To
ne s
chem
e (to
m d
e di
scag
em)
5 *
Iden
tida
de1
Iden
tidad
e de
sa
ída
2
Reg
istra
r Usu
ário
3 Ed
itar U
suár
io
4
Logo
ff U
suár
io
5 Lo
goff
todo
s
10 (8
)*
Man
uten
ção
1 **
Mod
o us
uário
2 In
form
ação
da
rede
3 In
form
ação
de
mem
ória
4 R
eboo
t
5
Res
etar
val
ores
adm
inis
trad
or
usuá
rio
O m
enu
Man
uten
-çã
o em
mod
o de
10 (8
) *M
anut
ençã
o1
**
Mod
o
adm
inis
trado
r
2 In
form
ação
da
rede
3 In
form
ação
de
mem
ória
4 R
eboo
t
5R
eset
ar v
alor
es
6 (5
)*
Com
port
amen
to
1
Blo
quea
r BIN
A2
Rej
eite
r ch
amad
a de
scon
h.
3 D
isca
gem
au
tom
átic
a4
Indi
caçã
o at
endi
-m
ento
aut
omát
ico
5 T
ipo
de a
tend
i-m
ento
aut
omát
ico
6 C
ompl
etam
ento
de
Cha
mad
a
7 E
scol
ha d
e n ú
mer
os
8 C
ham
ada
em e
sper
a
9 B
lock
Loca
lizar
:
.
S
alva
r a s
eleç
ão:
P O
n/O
ff > P
3A
udio
1 H
eads
et
2 In
diçã
o de
M
ensa
gem
Silê
ncio
tu
Bee
p tu
Le
mbr
ete tu
P
1D
ispl
ay1
Con
trast
e
Sel
ecci
onar
:· S
omen
te n
ome
· Som
ente
núm
ero
· Nom
e +
Núm
ero
· Núm
ero
+ N
ome
· Mos
tra tu
do (U
RL)
3 B
ackl
ight
2 M
étod
o de
m
ostra
gem
>P
Sel
ecci
onar
iden
tidad
e +
tom
de
cham
ada:
+P
Sel
ecci
onar
tecl
a e
funç
ão:
+
C
onfi g
uraç
ão p
adrã
o:
Linh
a S
e ne
cess
ário
: Int
ro-
duza
o n
úmer
o >
P P
Sel
ecci
onar
eve
nto:
· S
empr
e
· S
e es
tiver
ocu
pado
· S
e a
cham
ada
não
for
aten
dida
D
estin
o un
s de
svio
s 3-
5:
Intro
duza
o n
úmer
o de
te
lefo
ne >
D
esvi
ar a
pós
a ex
pira
ção
do in
terv
alo
de te
mpo
: 2
Hor
a de
sig
a-m
e >
>
In
trod.
o n
úmer
o de
se
gund
os >
Des
ligar
o fu
nção
: 1
Even
to d
e S
iga-
me
>
>
>
Nun
ca >
P P
P
P
PP
Sel
ecci
onar
On/
Off:
>
Logo
ff =
Can
cela
r ins
criç
ão
P
*
Os
subm
enus
Iden
tida
de e
Red
e (c
inza
esc
uro)
não
est
ão a
cess
ívei
s no
mod
o us
uári
o.**
Reu
dar
do m
odo
usuá
rio
para
mod
o ad
min
istr
ador
: R
eque
r di
gita
r a
senh
a de
adm
inis
trad
or.
A s
enha
de
adm
inis
trad
or p
adrã
o é:
000
0 (4
x z
ero)
.
Men
ú de
con
fi gu
raçõ
esPa
ra a
brir:
. S
elec
cion
ar u
m it
em
do m
enu
com
pq
ou
digi
te o
núm
ero
do it
em n
o te
clad
o e
pres
sion
e P
. Pa
ra v
olta
r ao
ecrã
ant
erio
r ou
o ec
rã
inac
tivo
com
o
[C
ance
lar].
On
= li
gar u
ma
funç
ãoO
ff =
des
ligar
um
a fu
nção
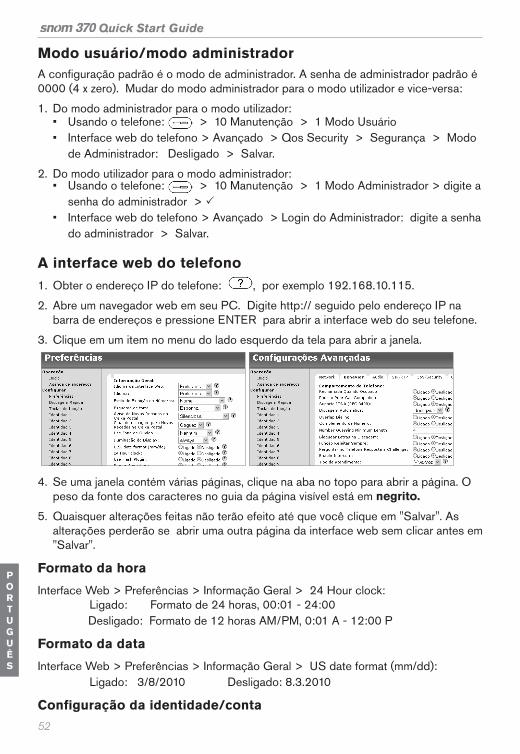
52
Quick Start Guide
PORTUGUÊS
Modo usuário/modo administradorA configuração padrão é o modo de administrador. A senha de administrador padrão é 0000 (4 x zero). Mudar do modo administrador para o modo utilizador e vice-versa:
1. Do modo administrador para o modo utilizador: • Usando o telefone: > 10 Manutenção > 1 Modo Usuário• Interface web do telefono > Avançado > Qos Security > Segurança > Modo
de Administrador: Desligado > Salvar.
2. Do modo utilizador para o modo administrador: • Usando o telefone: > 10 Manutenção > 1 Modo Administrador > digite a
senha do administrador > P• Interface web do telefono > Avançado > Login do Administrador: digite a senha
do administrador > Salvar.
A interface web do telefono 1. Obter o endereço IP do telefone: , por exemplo 192.168.10.115.
2. Abre um navegador web em seu PC. Digite http:// seguido pelo endereço IP na barra de endereços e pressione ENTER para abrir a interface web do seu telefone.
3. Clique em um item no menu do lado esquerdo da tela para abrir a janela.
4. Se uma janela contém várias páginas, clique na aba no topo para abrir a página. O peso da fonte dos caracteres no guia da página visível está em negrito.
5. Quaisquer alterações feitas não terão efeito até que você clique em "Salvar". As alterações perderão se abrir uma outra página da interface web sem clicar antes em "Salvar".
Formato da hora
Interface Web > Preferências > Informação Geral > 24 Hour clock: Ligado: Formato de 24 horas, 00:01 - 24:00 Desligado: Formato de 12 horas AM/PM, 0:01 A - 12:00 P
Formato da data
Interface Web > Preferências > Informação Geral > US date format (mm/dd): Ligado: 3/8/2010 Desligado: 8.3.2010
Configuração da identidade/conta

Quick Start Guide
53
PORTUGUÊS
Interface Web > Identidad 1-12
Utilizar o telefone
Selecione uma identidade para as chamadas efectuadasa partir da ecrã inativo: qp
Fazer chamadas
• Digite o número através do teclado alfanumérico e pegue no auscultador ou • digite o número e pressione P ou• > digite o número > P.
Aceitar chamadas• Com o auscultador: Levantar o auscultador• Com o auricular: Pressione a P ou a tecla de linha e aceite a chamada• Com o altifalante: Pressione a
Colocar chamadas en curso em espera
Pressione ou a tecla de linha da chamada. O LED começa a piscar lentamente. Pressione novamente para retomar a chamada. Com mais de uma chamada em espera: Pressione qp para seleccionar a chamada, pressione P ou
ou [R] para retomar a chamada.
Conferência de tres
1. O seu número de telefone: 154. Coloque a primeira chamada (Jane Doe) em espera.
2. Ligue para o segundo participante (158). Com a segunda chamada na linha:
3. Iniciar a conferência: . Conferência en curso:
4. Pressione para suspender a conferência e colocar os participantes em espera.
5. Iniciar a conferência de nuovo: Pressione [R].
Transferir chamadas manualmente
Transferência anunciado
Colocar a chamada em espera > disque o número que deseja transferir a chamada > se o terceiro quer aceitar o chamada: Pressione a .
Transferência cega (sem anúncio)
Com a chamada em linha: Pressione > disque o número de telefone que a
54
Quick Start Guide
PORTUGUÊS
chamada vai ser transferida > P.
Encaminhar chamadas1. Activar el encaminhamento de llamadas.
a. Todas as chamadas recebidas: > 7 Siga-me > P > 1 Evento de siga-me > P > t u Sempre > P > 3 Siga-me sempre > P > digite o número de telefono > P.
b. Se tiver ocupado: > 7 Siga-me > P > 1 Evento de siga-me > P > t u se ocupado > P > 4 Siga-me se ocupado > P > digite o número de telefono > P.
c. Se a chamada não for atendida: > 7 Siga-me > P> 1 Evento de siga-me > P > t u No timeout > P > 5 Timeout target > digite o número de telefono > P > 2 Hora de siga-me > P > digite o número de segundos seguintes que o convite deverá ser enviado > P.
d. Ecrã inactivo com desvio de chamadas activado:
2. Desactivar: > 7 Siga-me > P> 1 Evento de siga-me > P> tu Nunca > P.
Listas de chamadas (histórico de chamadas)1. Para abrir: Pressione [Listas].
2. Selecionar uma lista (Perdida(s), Recibida(s), Discada(s)) com: pq > P
3. Percorra a lista com pq. Telefonar para o número destacado com: P.
Directório 1. Para abrir: Pressione
2. Localizar uma entrada: pq. Telefonar para o número destacado com: P.
3. <Novo item>: Pressione [Novo].
4. Alterar/corrigir entradas: Ver página 49, "Digitar números, letras e caracteres especiais".
Solução de problemas
Reiniciar (Reboot)
10 Manutenção > 4 Reboot > P > "Reiniciar?" > P
Reinicio bruscamente Desligue o cabo de alimentação > aguarde alguns segundos > reconecte.
Não corte a energia durante uma atualização de firmware !
Restaurar as configurações da fábrica
10 Manutenção > 5 Resetar valores > digite a senha do administrador > P
Todas as configurações perder-se-ão !

APPENDIX
APP
55
COPYRIGHT NOTICE AND WARRANTY DISCLAIMER
I. Das Produkt enthält Software, die unter der GNU General Public License, Version 2, frei genutzt werden darf.
This Product contains Software applicable to GNU General Public License, Version 2 which can be used freely.
II. Im Verhältnis zu den Lizenzgebern der Soft-ware gilt der folgende Haftungsausschluss:
Towards the licensor of this Software the fol-lowing liability is disclaimed:
This program is distributed in the hope that it will be useful, but WITHOUT ANY WARRANTY; without even the implied warranty of MERCHANTABILITY or FIT-NESS FOR A PARTICULAR PURPOSE. See the GNU General Public License for more details.
III.
Der Lizenztext der GPL lautet wie folgt:
The GNU General Public License is as follows:
GNU GENERAL PUBLIC LICENSEVersion 2, June 1991
Copyright (C) 1989, 1991 Free Software Foundation, Inc.59 Temple Place, Suite 330 Boston, MA 02111-1307, USA
Everyone is permitted to copy and distribute verbatim copies of this license document, but changing it is not allowed.
Preamble
The licenses for most software are designed to take away your freedom to share and change it. By contrast, the GNU General Public License is intended to guarantee your freedom to share and change free software--to make sure the software is free for all its users. This General Public License applies to most of the Free Software Foundation‘s software and to any other program whose authors commit to using it. (Some other Free Software Foundation software is covered by the GNU
Library General Public License instead.) You can apply it to your programs, too.
When we speak of free software, we are referring to freedom, not price. Our General Public Licenses are designed to make sure that you have the freedom to distribute copies of free software (and charge for this service if you wish), that you receive source code or can get it if you want it, that you can change the software or use pieces of it in new free programs; and that you know you can do these things.
To protect your rights, we need to make restrictions that forbid anyone to deny you these rights or to ask you to surrender the rights. These restrictions translate to certain responsibilities for you if you distribute copies of the software, or if you modify it. For example, if you distribute copies of such a program, whether gratis or for a fee, you must give the recipients all the rights that you have. You must make sure that they, too, receive or can get the source code. And you must show them these terms so they know their rights.
We protect your rights with two steps: (1) copyright the software, and (2) offer you this license which gives you legal permission to copy, distribute and/or modify the software.
Also, for each author‘s protection and ours, we want to make certain that everyone understands that there is no warranty for this free software. If the software is modified by someone else and passed on, we want its recipients to know that what they have is not the original, so that any problems introduced by others will not reflect on the original authors‘ reputations.
Finally, any free program is threatened constantly by software patents. We wish to avoid the danger that redistributors of a free program will individually obtain patent licenses, in effect making the program proprietary. To prevent this, we have made it clear that any patent must be licensed for everyone‘s free use or not licensed at all.
The precise terms and conditions for copying, distribution and modification follow.
GNU GENERAL PUBLIC LICENSE
TERMS AND CONDITIONS FOR COPYING, DISTRIBUTION AND MODIFICATION
0. This License applies to any program or other work which contains a notice placed by the copyright holder saying it may be distributed
APPENDIX
APP
56
under the terms of this General Public License. The „Program“, below, refers to any such program or work, and a „work based on the Program“ means either the Program or any derivative work under copyright law: that is to say, a work containing the Program or a portion of it, either verbatim or with modifications and/or translated into another language. (Hereinafter, translation is included without limitation in the term „modification“.) Each licensee is addressed as „you“. Activities other than copying, distribution and modification are not covered by this License; they are outside its scope. The act of running the Program is not restricted, and the output from the Program is covered only if its contents constitute a work based on the Program (independent of having been made by running the Program). Whether that is true depends on what the Program does.
1.You may copy and distribute verbatim copies of the Program‘s source code as you receive it, in any medium, provided that you conspicuously and appropriately publish on each copy an appropriate copyright notice and disclaimer of warranty; keep intact all the notices that refer to this License and to the absence of any warranty; and give any other recipients of the Program a copy of this License along with the Program. You may charge a fee for the physical act of transferring a copy, and you may at your option offer warranty protection in exchange for a fee.
2. You may modify your copy or copies of the Program or any portion of it, thus forming a work based on the Program, and copy and distribute such modifications or work under the terms of Section 1 above, provided that you also meet all of these conditions:
a) You must cause the modified files to carry prominent notices stating that you changed the files and the date of any change.
b) You must cause any work that you distribute or publish, that in whole or in part contains or is derived from the Program or any part thereof, to be licensed as a whole at no charge to all third parties under the terms of this License.
c) If the modified program normally reads commands interactively when run, you must
cause it, when started running for such interactive use in the most ordinary way, to print or display an announcement including an appropriate copyright notice and a notice that there is no warranty (or else, saying that you provide a warranty) and that users may redistribute the program under these conditions, and telling the user how to view a copy of this License. (Exception: if the Program itself is interactive but does not normally print such an announcement, your work based on the Program is not required to print an announcement.)
These requirements apply to the modified work as a whole. If identifiable sections of that work are not derived from the Program, and can be reasonably considered independent and separate works in themselves, then this License, and its terms, do not apply to those sections when you distribute them as separate works. But when you distribute the same sections as part of a whole which is a work based on the Program, the distribution of the whole must be on the terms of this License, whose permissions for other licensees extend to the entire whole, and thus to each and every part regardless of who wrote it. Thus, it is not the intent of this section to claim rights or contest your rights to work written entirely by you; rather, the intent is to exercise the right to control the distribution of derivative or collective works based on the Program. In addition, mere aggregation of another work not based on the Program with the Program (or with a work based on the Program) on a volume of a storage or distribution medium does not bring the other work under the scope of this License.
3. You may copy and distribute the Program (or a work based on it, under Section 2) in object code or executable form under the terms of Sections 1 and 2 above provided that you also do one of the following:
a) Accompany it with the complete corresponding machine-readable source code, which must be distributed under the terms of Sections 1 and 2 above on a medium customarily used for software interchange; or,
b) Accompany it with a written offer, valid for at least three years, to give any third party, for a charge no more than your cost of

APPENDIX
APP
57
physically performing source distribution, a complete machine-readable copy of the corresponding source code, to be distributed under the terms of Sections 1 and 2 above on a medium customarily used for software interchange; or,
c) Accompany it with the information you received as to the offer to distribute corresponding source code. (This alternative is allowed only for noncommercial distribution and only if you received the program in object code or executable form with such an offer, in accord with Subsection b above.)
The source code for a work means the preferred form of the work for making modifications to it. For an executable work, complete source code means all the source code for all modules it contains, plus any associated interface definition files, plus the scripts used to control compilation and installation of the executable. However, as a special exception, the source code distributed need not include anything that is normally distributed (in either source or binary form) with the major components (compiler, kernel, and so on) of the operating system on which the executable runs, unless that component itself accompanies the executable.
If distribution of executable or object code is made by offering access to copy from a designated place, then offering equivalent access to copy the source code from the same place counts as distribution of the source code, even though third parties are not compelled to copy the source along with the object code.
4. You may not copy, modify, sublicense, or distribute the Program except as expressly provided under this License. Any attempt otherwise to copy, modify, sublicense or distribute the Program is void, and will automatically terminate your rights under this License. However, parties who have received copies, or rights, from you under this License will not have their licenses terminated so long as such parties remain in full compliance.
5. You are not required to accept this License, since you have not signed it. However, nothing else grants you permission to modify or distribute the Program or its derivative works. These actions are prohibited by law if you do not accept this License. Therefore, by modifying
or distributing the Program (or any work based on the Program), you indicate your acceptance of this License to do so, and all its terms and conditions for copying, distributing or modifying the Program or works based on it.
6. Each time you redistribute the Program (or any work based on the Program), the recipient automatically receives a license from the original licensor to copy, distribute or modify the Program subject to these terms and conditions. You may not impose any further restrictions on the recipients‘ exercise of the rights granted herein. You are not responsible for enforcing compliance by third parties to this License.
7. If, as a consequence of a court judgment or allegation of patent infringement or for any other reason (not limited to patent issues), conditions are imposed on you (whether by court order, agreement or otherwise) that contradict the conditions of this License, they do not excuse you from the conditions of this License. If you cannot distribute so as to satisfy simultaneously your obligations under this License and any other pertinent obligations, then as a consequence you may not distribute the Program at all. For example, if a patent license would not permit royalty-free redistribution of the Program by all those who receive copies directly or indirectly through you, then the only way you could satisfy both it and this License would be to refrain entirely from distribution of the Program.
If any portion of this section is held invalid or unenforceable under any particular circumstance, the balance of the section is intended to apply and the section as a whole is intended to apply in other circumstances.
It is not the purpose of this section to induce you to infringe any patents or other property right claims or to contest validity of any such claims; this section has the sole purpose of protecting the integrity of the free software distribution system, which is implemented by public license practices. Many people have made generous contributions to the wide range of software distributed through that system in reliance on consistent application of that system; it is up to the author/donor to decide if he or she is willing to distribute software through any other system and a licensee cannot impose that choice. This section is intended to make thoroughly clear what is believed to be a consequence of

APPENDIX
APP
58
the rest of this License. 8. If the distribution and/or use of the Program is
restricted in certain countries either by patents or by copyrighted interfaces, the original copyright holder who places the Program under this License may add an explicit geographical distribution limitation excluding those countries, so that distribution is permitted only in or among countries not thus excluded. In such case, this License incorporates the limitation as if written in the body of this License.
9. The Free Software Foundation may publish revised and/or new versions of the General Public License from time to time. Such new versions will be similar in spirit to the present version, but may differ in detail to address new problems or concerns. Each version is given a distinguishing version number. If the Program specifies a version number of this License which applies to it and „any later version“, you have the option of following the terms and conditions either of that version or of any later version published by the Free Software Foundation. If the Program does not specify a version number of this License, you may choose any version ever published by the Free Software Foundation.
10. If you wish to incorporate parts of the Program into other free programs whose distribution conditions are different, write to the author to ask for permission. For software which is copyrighted by the Free Software Foundation, write to the Free Software Foundation; we sometimes make exceptions for this. Our decision will be guided by the two goals of preserving the free status of all derivatives of our free software and of promoting the sharing and reuse of software generally.
NO WARRANTY
11. BECAUSE THE PROGRAM IS LICENSED FREE OF CHARGE, THERE IS NO WARRANTY FOR THE PROGRAM, TO THE EXTENT PERMITTED BY APPLICABLE LAW. EXCEPT WHEN OTHERWISE STATED IN WRITING THE COPYRIGHT HOLDERS AND/OR OTHER PARTIES PROVIDE THE PROGRAM „AS IS“ WITHOUT WARRANTY OF ANY KIND, EITHER EXPRESSED OR IMPLIED, INCLUDING, BUT NOT LIMITED TO, THE IMPLIED WARRANTIES OF MERCHANTABILITY AND FITNESS FOR A
PARTICULAR PURPOSE. THE ENTIRE RISK AS TO THE QUALITY AND PERFORMANCE OF THE PROGRAM IS WITH YOU. SHOULD THE PROGRAM PROVE DEFECTIVE, YOU ASSUME THE COST OF ALL NECESSARY SERVICING, REPAIR OR CORRECTION.
12. IN NO EVENT UNLESS REQUIRED BY APPLICABLE LAW OR AGREED TO IN WRITING WILL ANY COPYRIGHT HOLDER, OR ANY OTHER PARTY WHO MAY MODIFY AND/OR REDISTRIBUTE THE PROGRAM AS PERMITTED ABOVE, BE LIABLE TO YOU FOR DAMAGES, INCLUDING ANY GENERAL, SPECIAL, INCIDENTAL OR CONSEQUENTIAL DAMAGES ARISING OUT OF THE USE OR INABILITY TO USE THE PROGRAM (INCLUDING BUT NOT LIMITED TO LOSS OF DATA OR DATA BEING RENDERED INACCURATE OR LOSSES SUSTAINED BY YOU OR THIRD PARTIES OR A FAILURE OF THE PROGRAM TO OPERATE WITH ANY OTHER PROGRAMS), EVEN IF SUCH HOLDER OR OTHER PARTY HAS BEEN ADVISED OF THE POSSIBILITY OF SUCH DAMAGES.
END OF TERMS AND CONDITIONS
How to Apply These Terms to Your New Programs
If you develop a new program, and you want it to be of the greatest possible use to the public, the best way to achieve this is to make it free software which everyone can redistribute and change under these terms.
To do so, attach the following notices to the program. It is safest to attach them to the start of each source file to most effectively convey the exclusion of warranty; and each file should have at least the „copyright“ line and a pointer to where the full notice is found.
<one line to give the program‘s name and a brief idea of what it does>
Copyright (C) <year> <name of author>
This program is free software; you can
APPENDIX
APP
59
redistribute it and/or modify it under the terms of the GNU General Public License as published by the Free Software Foun-dation; either version 2 of the License, or (at your option) any later version.
This program is distributed in the hope that it will be useful, but WITHOUT ANY WARRANTY; without even the implied warranty of MERCHANTABILITY or FIT-NESS FOR A PARTICULAR PURPOSE. See the GNU General Public License for more details.
You should have received a copy of the GNU General Public License along with this program; if not, write to the Free Soft-ware Foundation, Inc., 59 Temple Place, Suite 330, Boston, MA 02111-1307 USA
IV.
Den vollständigen korrespondierenden Sourcecode der Software schickt Ihnen die snom technology AG auf Nachfrage gerne auf einem üblichen Datenträger gegen Erstattung der Herstellungskosten in Höhe von EUR 5,- zu.
Der vollständige korrespondierende Sourcecode kann auch über unsere Website unter http://www.snom.com/gpl_.html?&L=0 herunter geladen werden.
If requested by you, the complete corresponding source code of the Software can be sent by snom technology AG on a standard data storage medium against the reimbursement of the manufacturing costs of EUR 5.- per unit.
The complete corresponding source code of the Software can also be downloaded from our web site http://www.snom.com/gpl_.html?&L=0.
V..Weitere Informationen finden Sie auch unter http://www.snom.com.
For further information see http://www.snom.com.

snom technology AGCharlottenstr. 6810117 BerlinGermanyTel. +49 30 39 83 3-0Fax +49 30 39 83 31 [email protected]; [email protected] snom technology, Inc.100 Cummings Center, Suite 125-GBeverly, MA 01915Tel. 978-998-7882 Fax [email protected]
snom France SARL6 Parc des fontenelles78870 BaillyTel. +33 1 80 87 62 87Fax +33 1 80 87 62 [email protected]@snom.com
snom technology SRLVia A. Lusardi 1020122 MilanoTel +39 02 00611212Fax +39 02 [email protected] [email protected]
Your specialist retailer - Ihr Fachhändler - Votre distributeur - Su distribuidor - Il tuo rivenditore:
© 2010 snom technology AGv1.01
Quick Start Guide
VoIP Business Phone
E NG LI S HD E UTSCHFRANÇAI SITALIANOE S PAÑOLPORTUG U Ê S