quickbooks® integrator for postalmate® 800-778-4078
TRANSCRIPT

QuickBooks® Integrator for PostalMate® 800-778-4078 VSoftwareTools.com
Page 1
Version 1.04, Copyright © 2010—2012
IMPORTANT Please, carefully read these Instructions fully, BEFORE
trying to setup the QuickBooks® Integrator (QBI) in
PMTools.
The QuickBooks® Connector (QBC) is a separate program
installed on the QuickBooks® Computer
All information in this document is relevant to
successful use of this tool!
This document can help you avoid serious and costly
errors.
Please Backup PostalMate® and the QuickBooks®
Company file to avoid losing your data.
Always consult your accountant or bookkeeper prior to
making any changes to your QuickBooks®!
Thank You
QuickBooks® Integrator for PostalMate® 800-778-4078 VSoftwareTools.com
Page 3
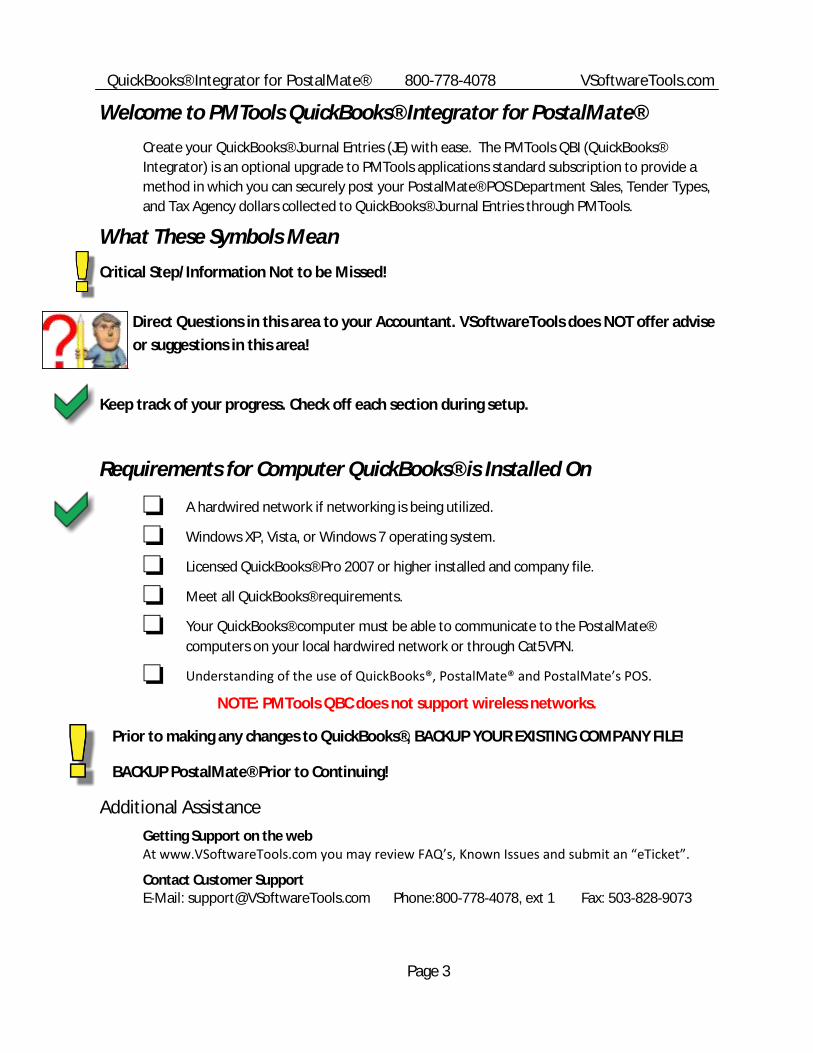
Welcome to PMTools QuickBooks® Integrator for PostalMate®
Create your QuickBooks® Journal Entries (JE) with ease. The PMTools QBI (QuickBooks®
Integrator) is an optional upgrade to PMTools applications standard subscription to provide a
method in which you can securely post your PostalMate® POS Department Sales, Tender Types,
and Tax Agency dollars collected to QuickBooks® Journal Entries through PMTools.
What These Symbols Mean
Critical Step/Information Not to be Missed!
Direct Questions in this area to your Accountant. VSoftwareTools does NOT offer advise
or suggestions in this area!
Keep track of your progress. Check off each section during setup.
Requirements for Computer QuickBooks® is Installed On
A hardwired network if networking is being utilized.
Windows XP, Vista, or Windows 7 operating system.
Licensed QuickBooks® Pro 2007 or higher installed and company file.
Meet all QuickBooks® requirements.
Your QuickBooks® computer must be able to communicate to the PostalMate®
computers on your local hardwired network or through Cat5VPN.
Understanding of the use of QuickBooks®, PostalMate® and PostalMate’s POS.
NOTE: PMTools QBC does not support wireless networks.
Prior to making any changes to QuickBooks®, BACKUP YOUR EXISTING COMPANY FILE!
BACKUP PostalMate® Prior to Continuing!
Additional Assistance
Getting Support on the web At www.VSoftwareTools.com you may review FAQ’s, Known Issues and submit an “eTicket”.
Contact Customer Support E-Mail: [email protected] Phone:800-778-4078, ext 1 Fax: 503-828-9073
QuickBooks® Integrator for PostalMate® 800-778-4078 VSoftwareTools.com
Page 4
Review these sections in order: Page
Welcome to PMTools QuickBooks® Integrator for PostalMate® ...................................................... 3
What These Symbols Mean .............................................................................................................. 3
Requirements for Computer QuickBooks® is Installed on .............................................................. 3
Additional Assistance ....................................................................................................................... 3
QuickBooks® Company File & Chart of Accounts (COA) .................................................................. 5
Sample COA’s from AMPC & MPC Coaches Network ...................................................................... 5
Tender Types .................................................................................................................................... 5
QuickBooks® Sales Tax Setup Requirements ................................................................................... 5
Determine Tax Method set in your QuickBooks® ............................................................................ 5
Adding a TAX Subaccount to Controlled Sales Tax Account ............................................................ 6
Other Current Liabilities or Dealing With HASH Type Department Sales ........................................ 6
Locate QuickBooks® Computer Name ............................................................................................. 6
PMToolsQBC Setup .......................................................................................................................... 7
Start QuickBooks® ............................................................................................................................ 7
Start QBC .......................................................................................................................................... 7
PMTools QuickBooks® Integrator for PostalMate® ....................................................................... 10
Setup Defaults ................................................................................................................................ 10
Default JE Prefix ............................................................................................................................. 11
Next JE Number .............................................................................................................................. 11
Confirm Changes ............................................................................................................................ 11
Connected to QuickBooks® ............................................................................................................ 11
Suppress / Un-Suppress ................................................................................................................. 12
Suppress ......................................................................................................................................... 12
Un-Suppress ................................................................................................................................... 13
Mapping Departments from PostalMate® to PMTools ................................................................. 14
Default Department in PostalMate ................................................................................................ 15
PostalMate® Accounts Receivable vs. QuickBooks® Accounts Receivable .................................... 15
Mapping Tender Types ................................................................................................................... 16
Mapping Sales Taxes ...................................................................................................................... 17
Mapping QuickBooks® GL Accounts to POS Tax Agencies ............................................................. 17
Time for a Break ............................................................................................................................. 18
Posting Journal Entries ................................................................................................................... 19
POS—QB Staging ........................................................................................................................... 19
Mapping Issues? ............................................................................................................................. 20
POS QB Pre Post Report ................................................................................................................. 21
QuickBooks® Integrator for PostalMate® 800-778-4078 VSoftwareTools.com
Page 5
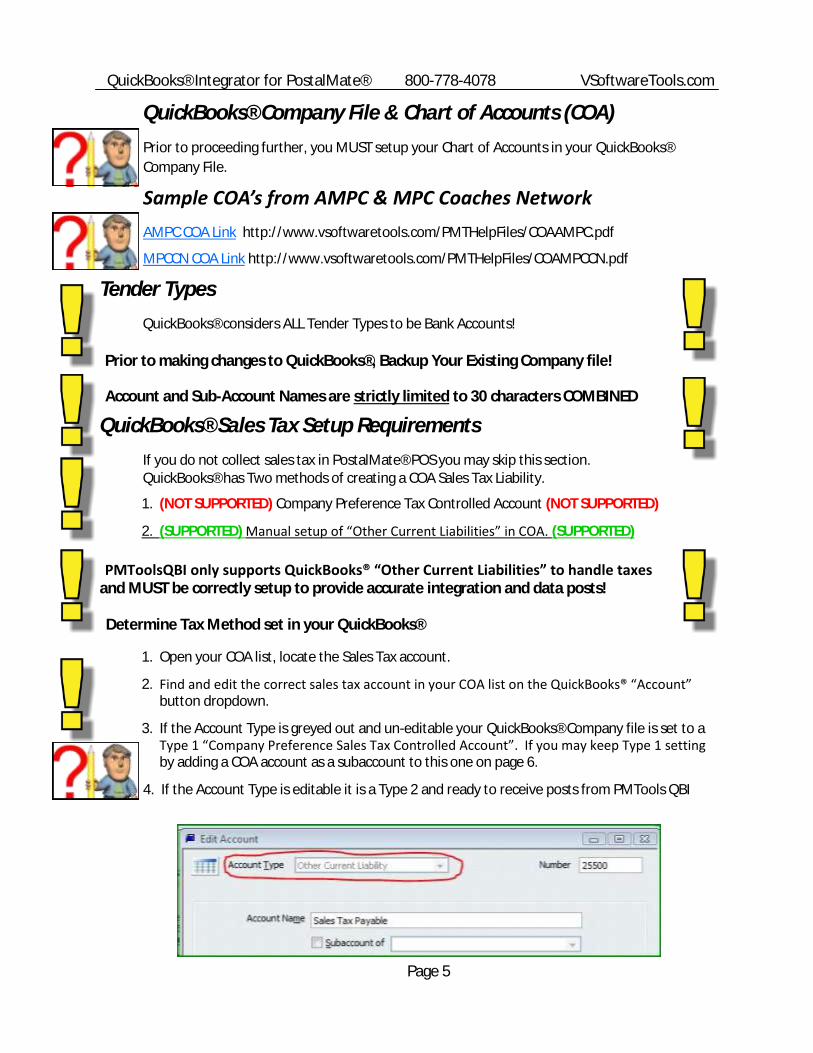
QuickBooks® Company File & Chart of Accounts (COA)
Prior to proceeding further, you MUST setup your Chart of Accounts in your QuickBooks®
Company File.
Sample COA’s from AMPC & MPC Coaches Network
AMPC COA Link http://www.vsoftwaretools.com/PMTHelpFiles/COAAMPC.pdf
MPCCN COA Link http://www.vsoftwaretools.com/PMTHelpFiles/COAMPCCN.pdf
Tender Types
QuickBooks® considers ALL Tender Types to be Bank Accounts!
Prior to making changes to QuickBooks®, Backup Your Existing Company file!
Account and Sub-Account Names are strictly limited to 30 characters COMBINED
QuickBooks® Sales Tax Setup Requirements
If you do not collect sales tax in PostalMate® POS you may skip this section. QuickBooks® has Two methods of creating a COA Sales Tax Liability.
1. (NOT SUPPORTED) Company Preference Tax Controlled Account (NOT SUPPORTED)
2. (SUPPORTED) Manual setup of “Other Current Liabilities” in COA. (SUPPORTED)
PMToolsQBI only supports QuickBooks® “Other Current Liabilities” to handle taxes and MUST be correctly setup to provide accurate integration and data posts!
Determine Tax Method set in your QuickBooks®
1. Open your COA list, locate the Sales Tax account.
2. Find and edit the correct sales tax account in your COA list on the QuickBooks® “Account” button dropdown.
3. If the Account Type is greyed out and un-editable your QuickBooks® Company file is set to a Type 1 “Company Preference Sales Tax Controlled Account”. If you may keep Type 1 setting by adding a COA account as a subaccount to this one on page 6.
4. If the Account Type is editable it is a Type 2 and ready to receive posts from PMTools QBI
Page 6
QuickBooks® Integrator for PostalMate® 800-778-4078 VSoftwareTools.com
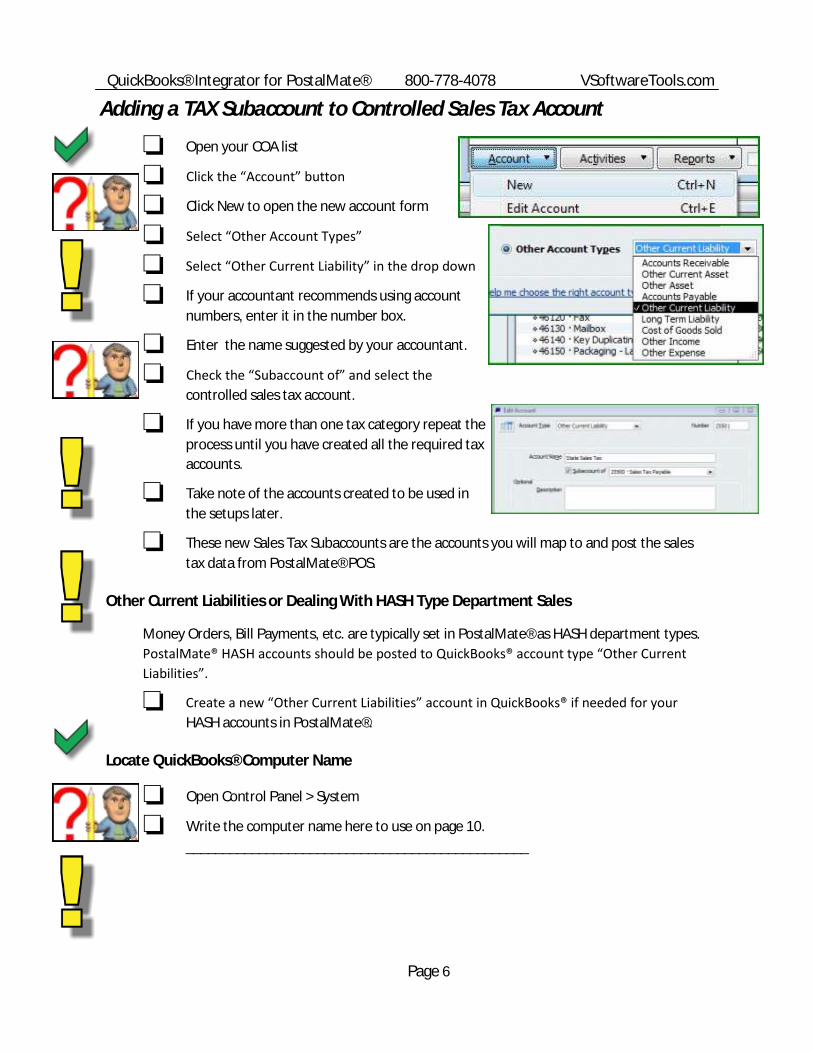
Adding a TAX Subaccount to Controlled Sales Tax Account
Open your COA list
Click the “Account” button
Click New to open the new account form
Select “Other Account Types”
Select “Other Current Liability” in the drop down
If your accountant recommends using account
numbers, enter it in the number box.
Enter the name suggested by your accountant.
Check the “Subaccount of” and select the
controlled sales tax account.
If you have more than one tax category repeat the
process until you have created all the required tax
accounts.
Take note of the accounts created to be used in
the setups later.
These new Sales Tax Subaccounts are the accounts you will map to and post the sales
tax data from PostalMate® POS.
Other Current Liabilities or Dealing With HASH Type Department Sales
Money Orders, Bill Payments, etc. are typically set in PostalMate® as HASH department types.
PostalMate® HASH accounts should be posted to QuickBooks® account type “Other Current
Liabilities”.
Create a new “Other Current Liabilities” account in QuickBooks® if needed for your
HASH accounts in PostalMate®.
Locate QuickBooks® Computer Name
Open Control Panel > System
Write the computer name here to use on page 10.
_______________________________________________

QuickBooks® Integrator for PostalMate® 800-778-4078 VSoftwareTools.com
Page 7
PMToolsQBC Setup
PMToolsQBC (QuickBooks® Connector) is a tiny application that must be installed and active in
the task tray on the QuickBooks® computer to create the gateway connection between
QuickBooks® and PMTools. QBC also allows your QuickBooks® to remain closed for security
while posting journal entries from any PMTools station in your hardwired network.
Start QuickBooks
Start QuickBooks®
As ADMIN log into your company file.
Note: You must be logged into QuickBooks® as Admin!
Minimize QuickBooks® and leave it running in the background.
Start QBC
Start the PMToolsQBC by going to
Start>Programs>PMTools>PMToolsQBC
Connector displays after starting
PMToolsQBC.
Make sure QuickBooks® is still running on the same computer you have this form
displayed
Click the “Link
2 QB” button
to allow the
PMToolsQBC
to find your
QuickBooks®
and set the
company
path.
Watch the
QuickBooks®
tab on the
Task Bar to
prompt you
to allow
PMTools
access to QuickBooks®. (The tab may change color)
Page 8
QuickBooks® Integrator for PostalMate® 800-778-4078 VSoftwareTools.com
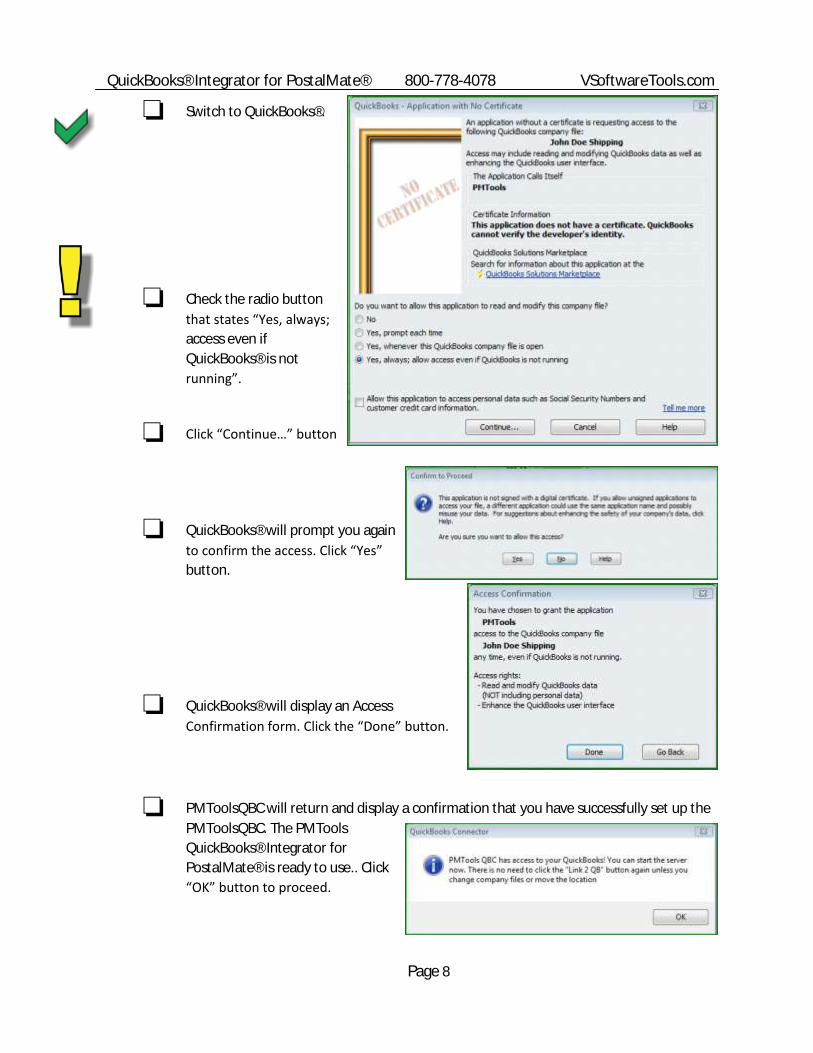
Switch to QuickBooks®.
Check the radio button
that states “Yes, always;
access even if
QuickBooks® is not
running”.
Click “Continue…” button
QuickBooks® will prompt you again
to confirm the access. Click “Yes”
button.
QuickBooks® will display an Access
Confirmation form. Click the “Done” button.
PMToolsQBC will return and display a confirmation that you have successfully set up the
PMToolsQBC. The PMTools
QuickBooks® Integrator for
PostalMate® is ready to use.. Click
“OK” button to proceed.
QuickBooks® Integrator for PostalMate® 800-778-4078 VSoftwareTools.com
Page 9
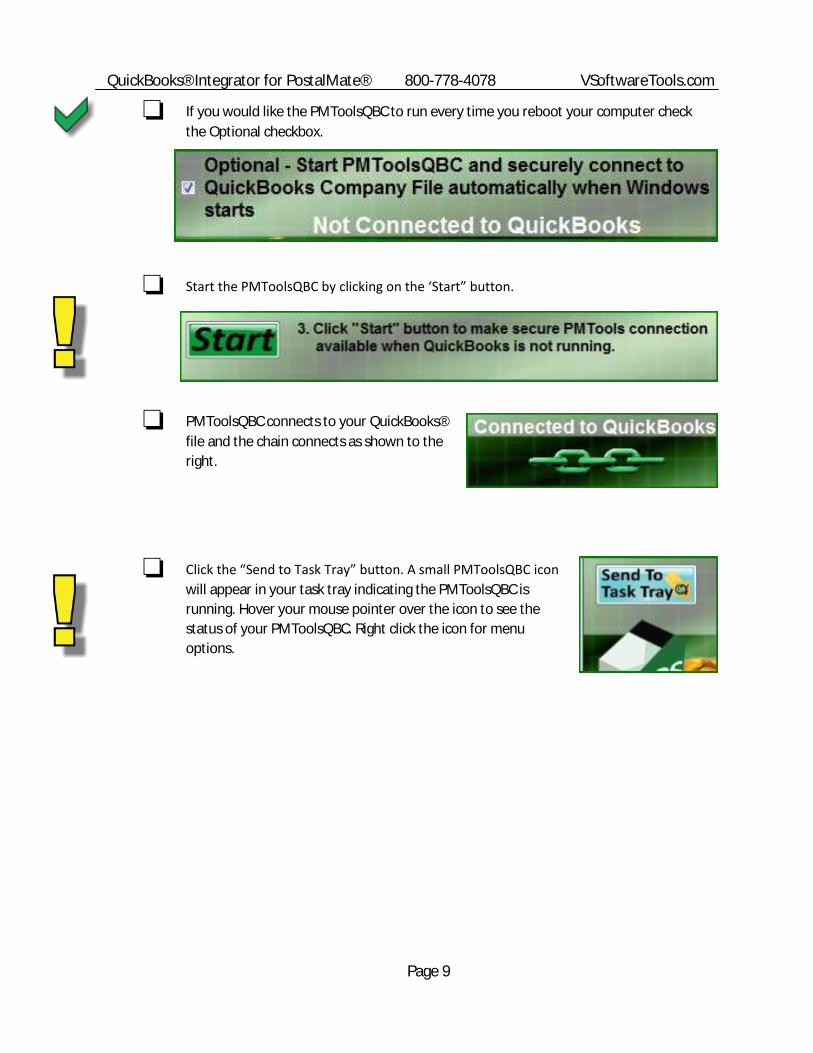
If you would like the PMToolsQBC to run every time you reboot your computer check
the Optional checkbox.
Start the PMToolsQBC by clicking on the ‘Start” button.
PMToolsQBC connects to your QuickBooks®
file and the chain connects as shown to the
right.
Click the “Send to Task Tray” button. A small PMToolsQBC icon
will appear in your task tray indicating the PMToolsQBC is
running. Hover your mouse pointer over the icon to see the
status of your PMToolsQBC. Right click the icon for menu
options.
Page 10
QuickBooks® Integrator for PostalMate® 800-778-4078 VSoftwareTools.com
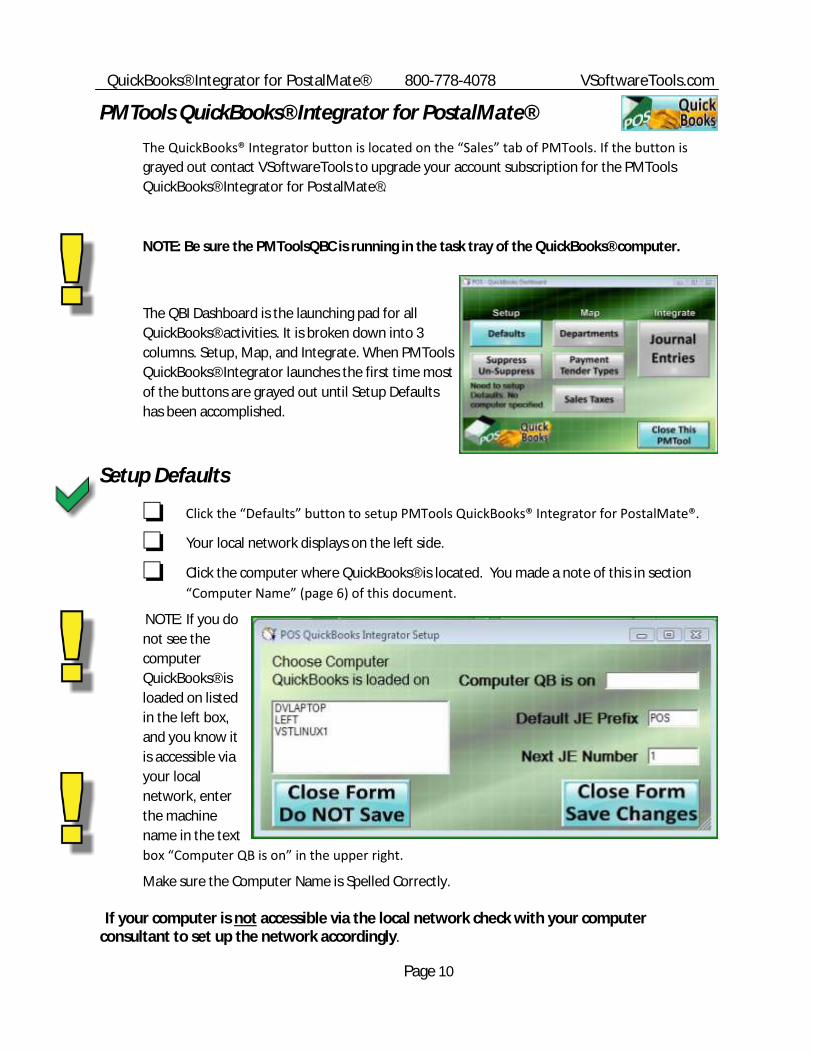
PMTools QuickBooks® Integrator for PostalMate®
The QuickBooks® Integrator button is located on the “Sales” tab of PMTools. If the button is
grayed out contact VSoftwareTools to upgrade your account subscription for the PMTools
QuickBooks® Integrator for PostalMate®.
NOTE: Be sure the PMToolsQBC is running in the task tray of the QuickBooks® computer.
The QBI Dashboard is the launching pad for all
QuickBooks® activities. It is broken down into 3
columns. Setup, Map, and Integrate. When PMTools
QuickBooks® Integrator launches the first time most
of the buttons are grayed out until Setup Defaults
has been accomplished.
Setup Defaults
Click the “Defaults” button to setup PMTools QuickBooks® Integrator for PostalMate®.
Your local network displays on the left side.
Click the computer where QuickBooks® is located. You made a note of this in section
“Computer Name” (page 6) of this document.
NOTE: If you do
not see the
computer
QuickBooks® is
loaded on listed
in the left box,
and you know it
is accessible via
your local
network, enter
the machine
name in the text
box “Computer QB is on” in the upper right.
Make sure the Computer Name is Spelled Correctly.
If your computer is not accessible via the local network check with your computer consultant to set up the network accordingly.

QuickBooks® Integrator for PostalMate® 800-778-4078 VSoftwareTools.com
Page 11
Default JE Prefix
The “Default JE Prefix” is a 5 character prefix you may
edit “as you wish” and have placed at the beginning of
each Journal Entry posted by PMTools.
Next JE Number
The “Next JE Number” is added to the prefix and will increase each time a Journal entry post is
performed by PMTools.
When you are satisfied with the Prefix and Next JE number click the “Close and Save Changes”
button.
Confirm Changes
PMTools will prompt you to approve the update/changes. Click “Yes” to confirm the change.
Connected to QuickBooks®
After PMTools QBI confirms a successful connection the Dashboard buttons will gain color and a
message will appear “Connected to QuickBooks”.

QuickBooks® Integrator for PostalMate® 800-778-4078 VSoftwareTools.com
Page 12
Suppress / Un-Suppress
Whether you’ve been manually posting JE’s to QuickBooks® or this is your first time the
data between your QuickBooks® and PostalMate’s POS is out of sync and a starting point
has not been set.
Suppress
Suppress / Un-Suppress tells PMTools the
date you want to start using QBC to
integrate your PostalMate® POS data with
QuickBooks® as journal entries. Suppress
is usually only used once at the beginning
of your setup process and helps avoid
duplicating entries you previously created
in QuickBooks®
Click the Suppress Un-Suppress
button.
Select the POS close dates you wish
to suppress.
Select the beginning date for
integrated Journal Entries.
Click the Suppress button.
Note: Your Auxiliary close dates are reflected in Master Close dates. The Master close date is the final date used to post JE’s to QuickBooks.
QuickBooks® Integrator for PostalMate® 800-778-4078 VSoftwareTools.com
Page 13
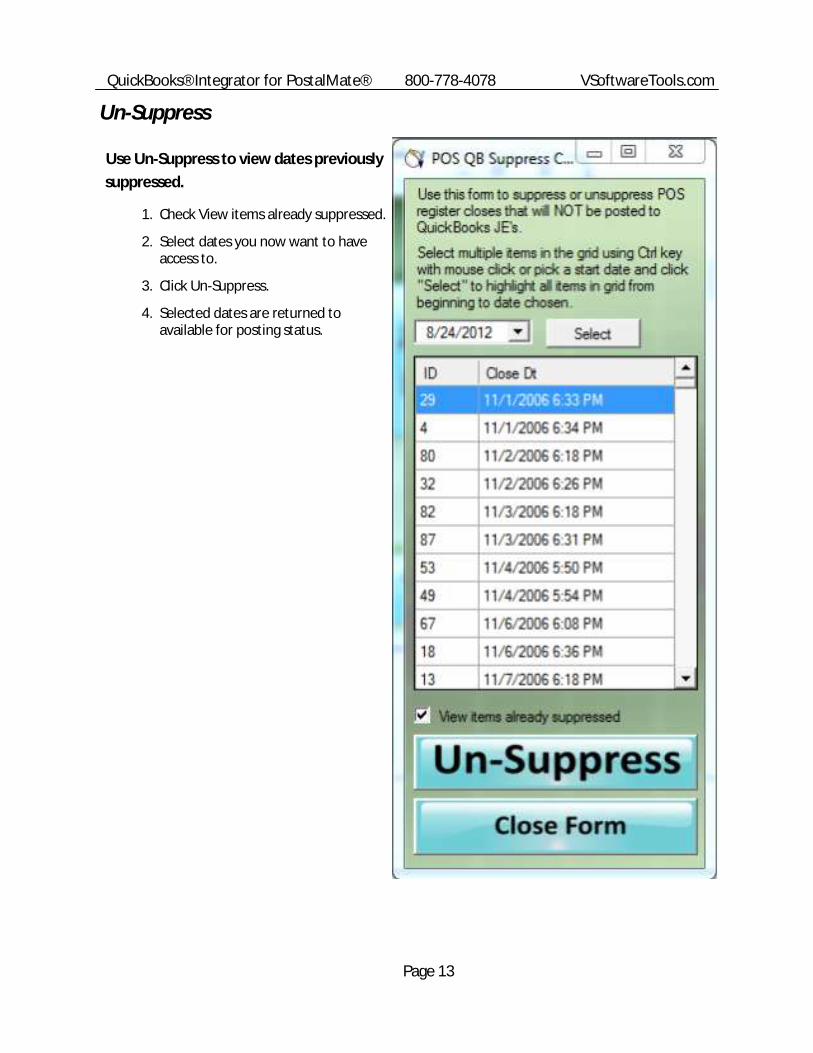
Un-Suppress
Use Un-Suppress to view dates previously
suppressed.
1. Check View items already suppressed.
2. Select dates you now want to have access to.
3. Click Un-Suppress.
4. Selected dates are returned to available for posting status.
QuickBooks® Integrator for PostalMate® 800-778-4078 VSoftwareTools.com
Page 14
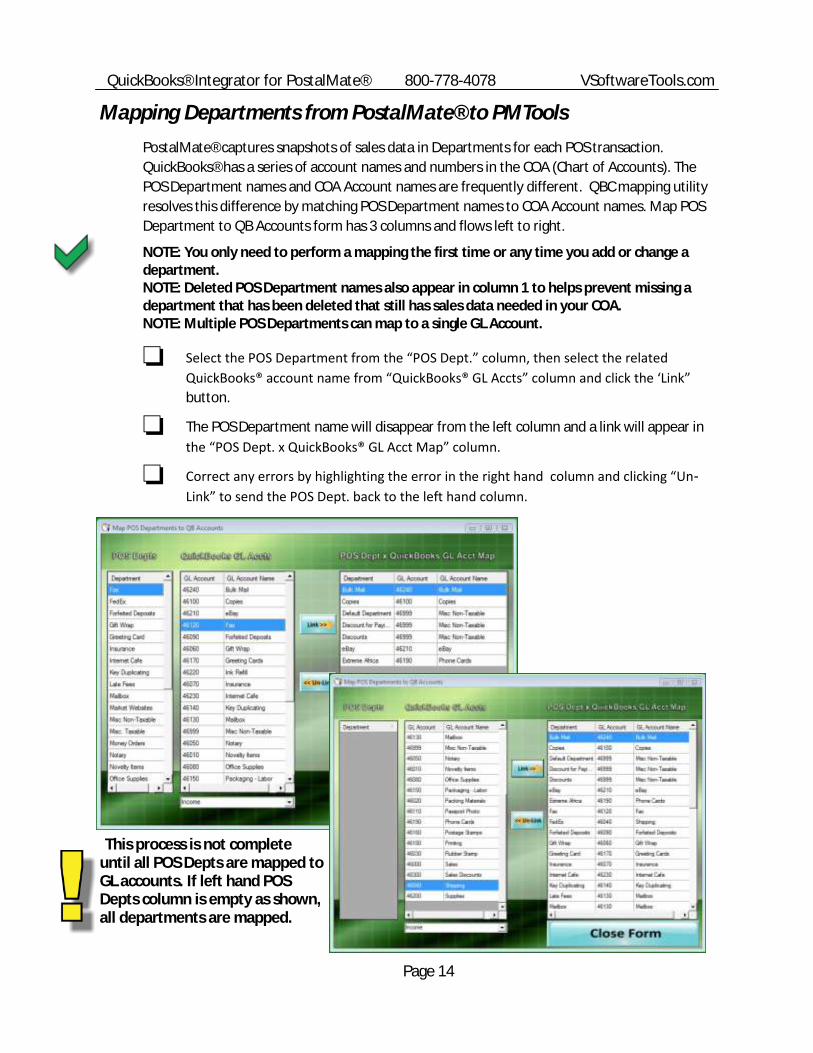
Mapping Departments from PostalMate® to PMTools
PostalMate® captures snapshots of sales data in Departments for each POS transaction.
QuickBooks® has a series of account names and numbers in the COA (Chart of Accounts). The
POS Department names and COA Account names are frequently different. QBC mapping utility
resolves this difference by matching POS Department names to COA Account names. Map POS
Department to QB Accounts form has 3 columns and flows left to right.
NOTE: You only need to perform a mapping the first time or any time you add or change a department. NOTE: Deleted POS Department names also appear in column 1 to helps prevent missing a department that has been deleted that still has sales data needed in your COA. NOTE: Multiple POS Departments can map to a single GL Account.
Select the POS Department from the “POS Dept.” column, then select the related
QuickBooks® account name from “QuickBooks® GL Accts” column and click the ‘Link”
button.
The POS Department name will disappear from the left column and a link will appear in
the “POS Dept. x QuickBooks® GL Acct Map” column.
Correct any errors by highlighting the error in the right hand column and clicking “Un-
Link” to send the POS Dept. back to the left hand column.
This process is not complete until all POS Depts are mapped to GL accounts. If left hand POS Depts column is empty as shown, all departments are mapped.
QuickBooks® Integrator for PostalMate® 800-778-4078 VSoftwareTools.com
Page 15
Default Department in PostalMate
Though not displayed in the POS edit Departments screen, a department named “Default
Department” is present. PostalMate® uses this department for any transaction that is not
mapped to a department. Some of PostalMate’s internal departments are behind the scenes
and can’t be mapped inside PostalMate. “Default Department” appears in the PMTools
Department Mapping list and must be mapped to a GL income account in QuickBooks.
“Default Department” transactions are created by POS when payments or deposits are received
on credit and debit accounts like key deposits, mail forwarding deposits, register paid outs, etc.
All funds tendered have to be accounted for by PostalMate® and PMTools.
We suggest creating a GL account in QuickBooks® named “POS Default Department” and map it
to PostalMate’s “Default Department” during setup in the Department Mapping tool.
PostalMate® Accounts Receivable vs. QuickBooks® Accounts Receivable
QuickBooks® Accounts Receivable is designed to create and manage Accounts Receivable
originating in QuickBooks. QuickBooks® is unable to decipher or interpret any Accounts
Receivable transactions from PostalMate!
PostalMate’s Register is capable and completely qualified to handle house, debit and mailbox
accounting for PostalMate® users. PostalMate® users ‘should’ be using the Accounts Receivable
in POS to manage accounts. Since PostalMate® POS is dealing with the accounts receivable,
QuickBooks® does not need to nor can it.
All transactions moving from PostalMate® to QuickBooks® are strictly Department related
Tender types.
When you finish a sale using the “Account” Button in PostalMate® POS think of the
“Account” button as poker chips.
Customers purchasing merchandise or services on “Account” are giving you poker
chips.
QuickBooks® needs to know how many poker chips you collected for the day.
We suggest you create in QuickBooks® a new account called “POS On Account” as a
type “Bank”.
Map PostalMate® POS tender type “On Account” to the newly created “POS On
Account” in QuickBooks® in the TENDER Mapping tool during setup.
Collect the “poker chips” throughout the month until your customer is ready to cash
them out by paying on the account balance at the “Cashier”. This transaction
accepts the Cash, Check, Credit Card tender type as income and returns the poker
chips back to the customer to start the process all over again.
QuickBooks® Integrator for PostalMate® 800-778-4078 VSoftwareTools.com
Page 16
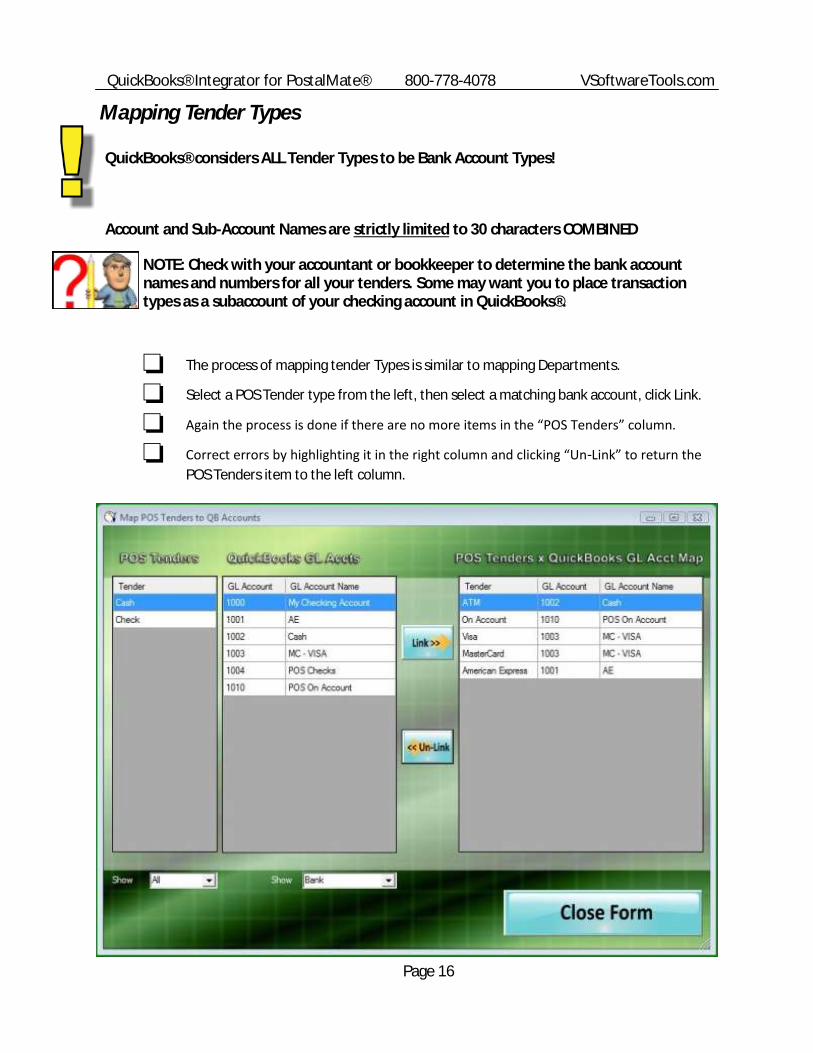
Mapping Tender Types
QuickBooks® considers ALL Tender Types to be Bank Account Types!
Account and Sub-Account Names are strictly limited to 30 characters COMBINED
NOTE: Check with your accountant or bookkeeper to determine the bank account names and numbers for all your tenders. Some may want you to place transaction types as a subaccount of your checking account in QuickBooks®.
The process of mapping tender Types is similar to mapping Departments.
Select a POS Tender type from the left, then select a matching bank account, click Link.
Again the process is done if there are no more items in the “POS Tenders” column.
Correct errors by highlighting it in the right column and clicking “Un-Link” to return the
POS Tenders item to the left column.
QuickBooks® Integrator for PostalMate® 800-778-4078 VSoftwareTools.com
Page 17
Mapping Sales Taxes
If you do not collect sales taxes you may skip to the next section. If you are one of the lucky
ones that collect sales taxes then you need to map the POS Tax Agencies to your QuickBooks®
GL account.
NOTE: If you have not read the section “Adding a TAX Subaccount to your Controlled Sales Tax Account” please do so before proceeding.
Account and Sub-Account Names are strictly limited to 30 characters COMBINED
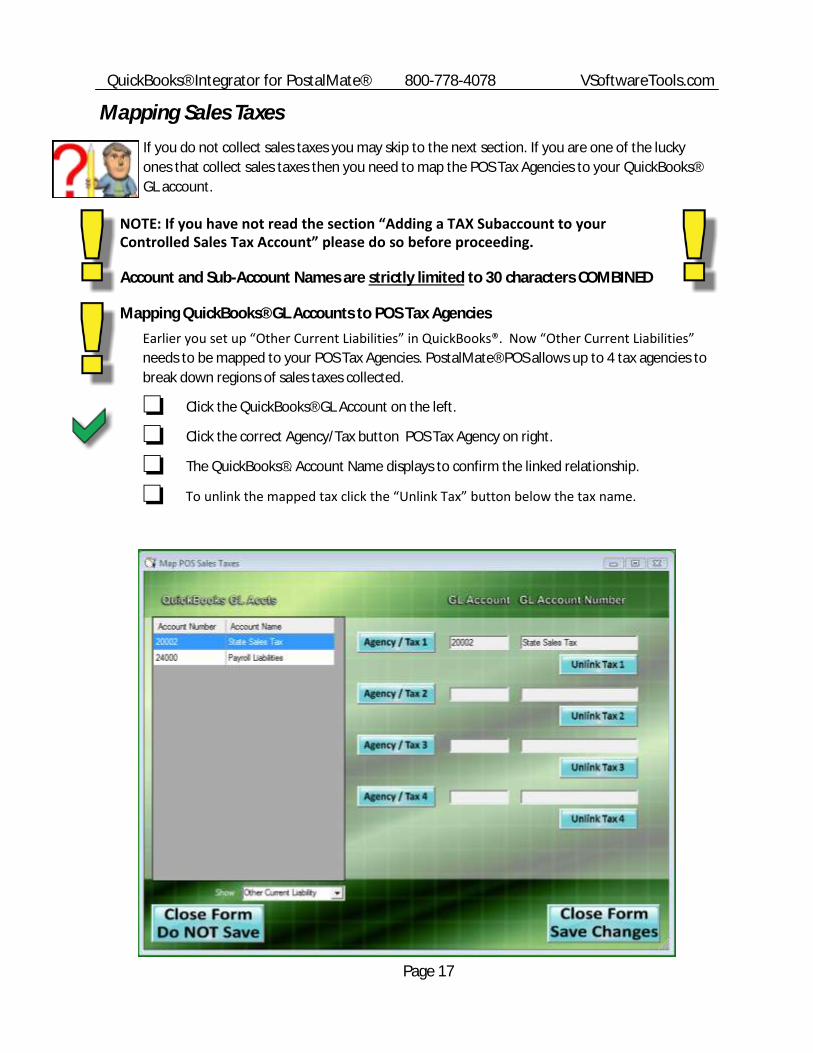
Mapping QuickBooks® GL Accounts to POS Tax Agencies
Earlier you set up “Other Current Liabilities” in QuickBooks®. Now “Other Current Liabilities”
needs to be mapped to your POS Tax Agencies. PostalMate® POS allows up to 4 tax agencies to
break down regions of sales taxes collected.
Click the QuickBooks® GL Account on the left.
Click the correct Agency/Tax button POS Tax Agency on right.
The QuickBooks®. Account Name displays to confirm the linked relationship.
To unlink the mapped tax click the “Unlink Tax” button below the tax name.

QuickBooks® Integrator for PostalMate® 800-778-4078 VSoftwareTools.com
Page 18
Time for a Break
Congrats, this is a great place to take a quick break.
When you get back, please return to page 5 and make sure all steps are completed up to this point?
QuickBooks® Integrator for PostalMate® 800-778-4078 VSoftwareTools.com
Page 19
Posting Journal Entries
DID YOU BACKUP POSTALMATE®? If not, lets do that now.
DID YOU BACKUP YOUR QUICKBOOKS® COMPANY FILE? If not, lets do it now.
After you have confirmed all mapping of Departments, Tenders, and Sales
Taxes you are ready to explore the world of Post Journal Entries.
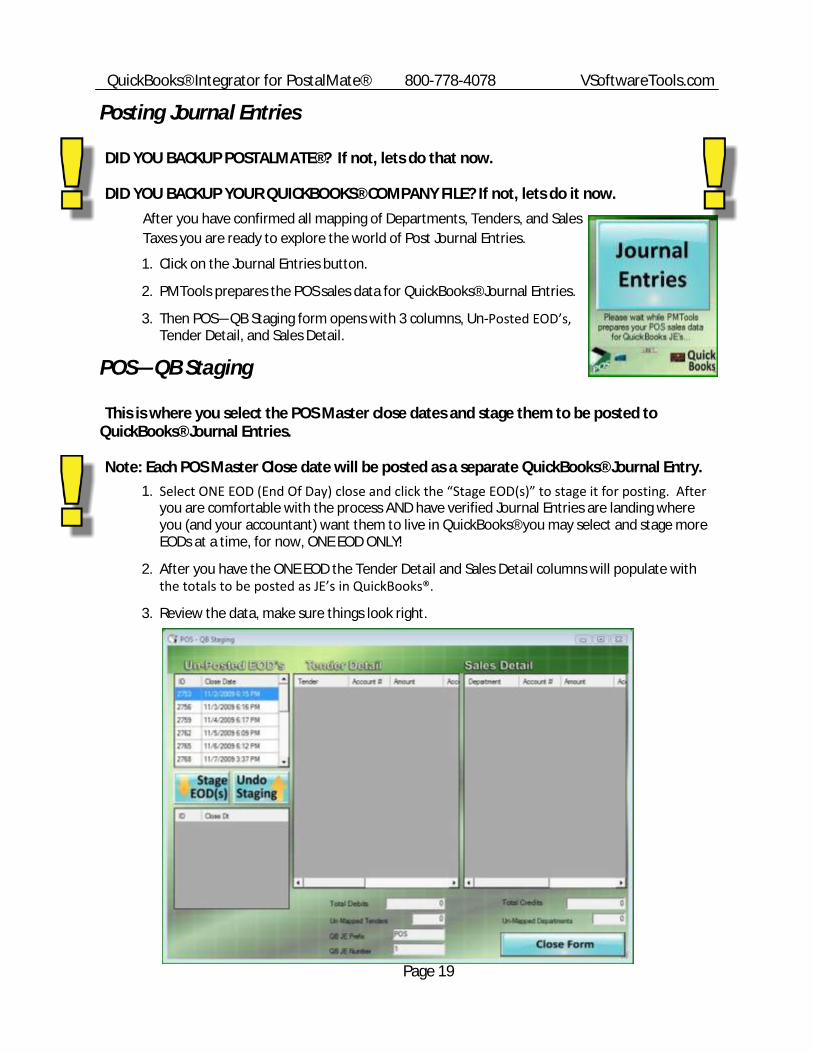
1. Click on the Journal Entries button.
2. PMTools prepares the POS sales data for QuickBooks® Journal Entries.
3. Then POS—QB Staging form opens with 3 columns, Un-Posted EOD’s, Tender Detail, and Sales Detail.
POS—QB Staging
This is where you select the POS Master close dates and stage them to be posted to QuickBooks® Journal Entries.
Note: Each POS Master Close date will be posted as a separate QuickBooks® Journal Entry.
1. Select ONE EOD (End Of Day) close and click the “Stage EOD(s)” to stage it for posting. After you are comfortable with the process AND have verified Journal Entries are landing where you (and your accountant) want them to live in QuickBooks® you may select and stage more EODs at a time, for now, ONE EOD ONLY!
2. After you have the ONE EOD the Tender Detail and Sales Detail columns will populate with the totals to be posted as JE’s in QuickBooks®.
3. Review the data, make sure things look right.
QuickBooks® Integrator for PostalMate® 800-778-4078 VSoftwareTools.com
Page 20
Mapping Issues?
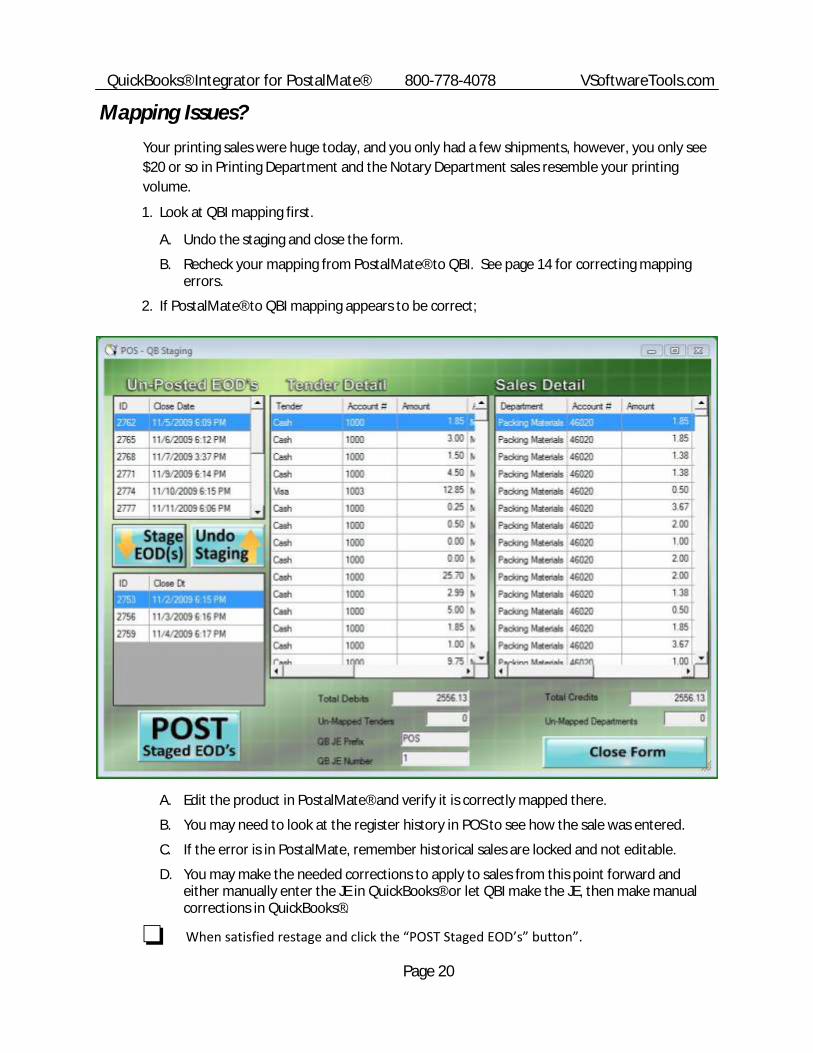
Your printing sales were huge today, and you only had a few shipments, however, you only see
$20 or so in Printing Department and the Notary Department sales resemble your printing
volume.
1. Look at QBI mapping first.
A. Undo the staging and close the form.
B. Recheck your mapping from PostalMate® to QBI. See page 14 for correcting mapping errors.
2. If PostalMate® to QBI mapping appears to be correct;
A. Edit the product in PostalMate® and verify it is correctly mapped there.
B. You may need to look at the register history in POS to see how the sale was entered.
C. If the error is in PostalMate, remember historical sales are locked and not editable.
D. You may make the needed corrections to apply to sales from this point forward and either manually enter the JE in QuickBooks® or let QBI make the JE, then make manual corrections in QuickBooks®.
When satisfied restage and click the “POST Staged EOD’s” button”.
QuickBooks® Integrator for PostalMate® 800-778-4078 VSoftwareTools.com
Page 21
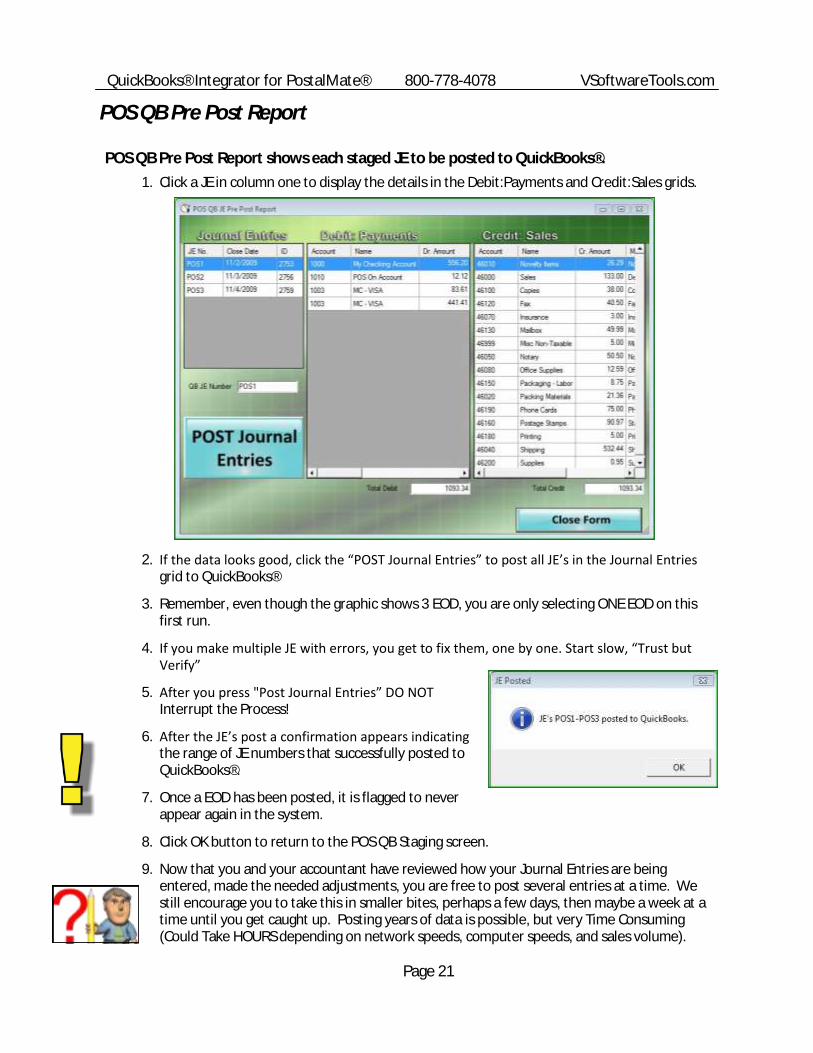
POS QB Pre Post Report
POS QB Pre Post Report shows each staged JE to be posted to QuickBooks®.
1. Click a JE in column one to display the details in the Debit:Payments and Credit:Sales grids.
2. If the data looks good, click the “POST Journal Entries” to post all JE’s in the Journal Entries grid to QuickBooks®
3. Remember, even though the graphic shows 3 EOD, you are only selecting ONE EOD on this first run.
4. If you make multiple JE with errors, you get to fix them, one by one. Start slow, “Trust but Verify”
5. After you press "Post Journal Entries” DO NOT Interrupt the Process!
6. After the JE’s post a confirmation appears indicating the range of JE numbers that successfully posted to QuickBooks®.
7. Once a EOD has been posted, it is flagged to never appear again in the system.
8. Click OK button to return to the POS QB Staging screen.
9. Now that you and your accountant have reviewed how your Journal Entries are being entered, made the needed adjustments, you are free to post several entries at a time. We still encourage you to take this in smaller bites, perhaps a few days, then maybe a week at a time until you get caught up. Posting years of data is possible, but very Time Consuming (Could Take HOURS depending on network speeds, computer speeds, and sales volume).