quiet time magic star v6 user guide version 1 - pianodisc magic star v6 user... · 2 ce -...
TRANSCRIPT

QuietTime® Magic Star© V6
User Guide Version 1.0
A product of
4111-A North Freeway Boulevard Sacramento, CA 95834, USA
© 2016 Burgett Inc. You are not allowed to completely or partially copy this user guide without obtaining explicit, written authorization from PianoDisc, a member of the Burgett Inc. Group of companies. QuietTime, PianoDisc and Burgett Inc., retain the right to modify their
product designs and product specifications at any time without giving prior notice.

2
CE - Certification The QuietTime system easily satisfies the basic requirements stipulated by all the relevant directives* issued by the European Union. The stipulated conformity process has been completed. *) At the present moment these are 2006/95/EG and 2004/108EG
Electrical and electronic products must not be disposed of with normal household waste. Dispose of the product, at the end of its service life, in accordance with valid statutory regulations.

3
Safety and warning instructions IMPORTANT! Please read these instructions first!
IMPORTANT INFORMATION: Complete safety when using the system is only guaranteed by PianoDisc if it has been installed correctly and is used correctly. Do not make any modifications of your own or encourage others to modify any part of the QuietTime systems, if PianoDisc has not specifically approved the modification.
Read these instructions before operating the system ! Interference from other devices on the same circuit may cause an unpleasant pop when the devices are switched on or off. Whenever possible, connect the QuietTime Silent System to a dedicated outlet. The PianoDisc warranty does not cover interference caused by other devices, which typically have inadequate filtering circuits. To avoid unwanted popping noises, avoid switching other devices on or off while the Silent System is powered. Other safety and installation instructions You will find information in this list that covers possible personal injuries, electrical shock and causes of fire. WARNING! You must always abide by the basic precautions, including the following instructions, when using electrical equipment:
1. Read all of the instructions before using the product for the first time.
2. The product must be connected to the type of power supply stipulated in this user guide or on the product
itself.
3. Never open the QuietTime System case under any circumstances.
4. Power is supplied through the plug. The system should only be connected to an electrical socket that is
suitable for use with the attached plug.
5. You should always try to keep the power cable a safe distance away from other objects. Make sure the
cable is not:
� Tangled
� Placed in a frequently used area
� Trapped beneath the piano
6. Do not position your piano and the QuietTime System in a location that is in direct sunlight or where they
are subjected to water, humidity or hot and cold airflows.
7. Your QuietTime System should be disconnected from the electrical outlet if it is not used for a long period
of time.
8. Only an authorized service agent should be contacted if your system needs repairing.
9. This product can generate volume levels that cause permanent loss of hearing when used alone or in
conjunction with an amplifier, headphones or loudspeakers. Consequently, never run the QuietTime
System for too long at a loud volume or even at a volume that is painful on the ears. Please visit an ear
specialist before using your QuietTime System again if you experience a loss of hearing or if you
experience ringing in your ears.
10. The product must be installed so that there is adequate ventilation.
11. Make sure no objects or liquids are able to leak into the system through the openings in the top of the
equipment.
12. The product must always be serviced by a qualified service technician, if:
a) The electrical cable or plug is damaged; or
b) Foreign objects or liquids spill into the system through the openings in the top; or
c) The system was left out in the rain; or
d) The system does not appear to work normally or it shows clear signs of working differently; or
e) The system has been dropped or severely jolted, or the top of the equipment has been damaged.

4
General user information • Leaving the QuietTime System’s plug perpetually plugged into an electrical outlet causes it to continually
draw power (approx. 0.5 Watt) and generate a small amount of heat. Disconnecting the piano’s plug from the electrical supply will completely isolate the unit unless the tone generator also has its own power supply.
• Ensure the tone generator is always adequately ventilated from above, below and the rear. The QuietTime
System’s tone generator must never be placed on a soft surface, such as a cushion or a towel. Never put any objects or containers on top of the tone generator.
• If the QuietTime System does not respond in any way to your controls, as described in this manual,
disconnect the unit from the power supply and contact your piano dealer or PianoDisc. U.S.A. information – FCC NOTE: This equipment has been tested and found to comply with the limits of a Class B digital device in
accordance with Part 15 of the U.S.A. FCC rules. These limits are designed to provide reasonable protection against harmful interference when used in a private residence. This equipment generates, uses and can radiate radio frequency energy and might cause harmful interference to radio communications if not installed and used in compliance with the instructions given in this user guide. However, there is no guarantee that interference will not be generated from a specific installation in rare cases. If this system does cause harmful interference to radio and TV reception, which can be determined by turning the system on and off, the user is encouraged to try to suppress the interference by using one or more of the following measures:
• Readjust the receiving antenna.
• Increase the distance between the system and the receiver.
• Connect the system's plug to a power outlet that is different from the one the receiver is using.
• Contact your dealer or an experienced radio/ TV technician for further help.
WARNING! Changes or modifications made to the electrical equipment that have not been expressly
approved by the manufacturer (PianoDisc) might void the user’s right to operate the equipment.

5
Content
Important ! You will find the safety and warning instructions on pages 3 and 4 in this user guide. Please read these instructions before you use your QuietTime System.
Chapter 1 About QuietTime 6 Welcome 6 Return your registration information 6 Guarantee Chapter 2 Controls 7 Magic Star front view 7 Magic Star top view
Chapter 3 Quick Start 8 Before you start 8 Extend or retract drawer 8 Switching On / Off 8 Activating / deactivating the stop rail 8 Plugging your headphones in 8 Controlling the volume
Chapter 4 Operation 9 Start position 9 The Basics
10 SOUND menu 10 Sound library / selecting a tone 11 Tones available 12 EFFECT menu 12 Reverberating effect (Reverb) 12 Chorus effect 13 Transpose effect (Transpose) 13 Pitch effect 13 Velocity effect (Velocity Curves) 13 METRONOME menu 13 Metronome, settings 14 Activating / deactivating the metronome 15 RECORD menu 15 Recording, starting / stopping 16 Settings for recording
17 PLAY menu 17 Playback, starting / stopping / pausing 18 Settings for playback 19 USERSET EDIT menu 19 Setting up the tone and combination of
sounds using own settings 20 SYSTEM menu 21 List of features and settings 21 Selecting and playing demo songs 23 List of the 80 available demo songs 24 Selecting the start-up or rather pre-set sound 25 Restoring factory settings 25 Installing firmware update 25 Adjusting date and time 26 Insert Note-Off feature for faster repetition 26 Pedal-on Adjust feature for selecting the switch point for the pedals 27 Basic calibration 28 Readjusting the sensitivity (volume) of
single keys Appendix: Technical Information 30 Rear connections 31 Stop rail operating lever 31 Pedals 31 Usage of USB stick 32 Interlinking to external audio equipment 33 Interlinking to external MIDI equipment 34 Connection summary 35 MIDI implementation chart 36 Technical specifications 37 Piano Disc contacts

6
Chapter 1 About QuietTime Welcome Welcome to QuietTime, the most advanced product in its class.
QuietTime combines the original touch of an acoustic piano with current digital piano technology. This gives you the perfect combination from both worlds!
With your QuietTime System you can:
• Still play your acoustic piano as usual; • Convert your acoustic piano into a digital piano by simply moving
a single lever; • Play and practice the piano without disturbing others; • Enjoy a wide selection of excellent instrument tones; • Use your acoustic piano as a MIDI controller*; and • Make use of the many other wonderful options. * Special MIDI cable is required.
Return registration Please take a moment to complete the following information. Return
the information to us by mail or email. Our mail and email addresses are listed in the Specifications appendix.
Please send us: 1. A copy of the invoice supplied with your QuietTime System. 2. A letterhead with your address and, 3. A note with QuietTime System’s model name and serial number.
(The name of the system is on the title page of this manual and the serial number is listed on the QuietTime System’s control unit.)
Warranty Your QuietTime System comes with a five-year warranty.
PianoDisc’s warranty covers any damage arising from normal system use.
Not covered by the warranty are: consumable parts and any damage
caused by incorrect use or foreign objects (e.g. water damage, fire or opening the case). PianoDisc exchanges defective parts free-of-charge and supplies parts needed to make repairs deemed necessary. An authorized PianoDisc dealer must undertake any repairs made to a QuietTime System.

7
Chapter 2 QuietTime controls
QuietTime – Front view
QuietTime – Top view; top view
A Power & reset button Briefly press the button to switch the
system On or Off. Press and hold the button while the system is turned on to reset the customized settings to factory settings.
B Headphone connections. Both connections can be used
simultaneously. C USB port (format Mini-B) for a connection to a PC/Mac –
MIDI IN/OUT in PC provided. Plug-and-play-device, no driver necessary.
D USB 2.0 connection for USB Stick. Recordings saved on
QuietTime can be copied on a USB stick. Further recordings can be directly saved onto the USAB. MIDI files on the USB stick can be played on QuietTime.
E Graphics display. Shows information about the selected feature. INFO: If the data-wheel or buttons are not used to make a
selection within 10 seconds, the display lighting will turn off. This feature can be adapted in the SYSTEM menu.
F Touch Screen for selection and handling of features – Tap on
the screen to select a feature or to change settings for it. Possible handling of the tap on screen are briefly tapping or touching and holding – this is how to reach the actual feature e.g. metronome On/Off or settings for features i.e beat/tempo/volume for the metronome.
D B A C B
E F
� Ein / Aus
Reset
HOME Preset Sound P1 : Piano 1

8
Chapter 3 QuietTime Quick Start Information Before you start Is the correct power supply available?
Make sure your power supply complies with the details listed on the accompanying power supply.
Has the power supply been plugged into the QuietTime tone
generator correctly?
Make sure the 12V DC plug is connected into the rear of the QuietTime drawer.
Operation
Extend drawer – Press gently against the front until counter pressure is notable. Let go and the drawer will slowly come out to the front.
Switching on – Briefly press the power button. Activating the stop rail - Move the lever (left side, beneath the piano
keyboard) into the “Mute” position. Plugging in and wearing the headphones. Plug your headphones
into one of the headphone jacks on the QuietTime drawer. Then put the headphones on.
Controlling the volume – Play something on the piano. Adjust the
headphone’s volume using the volume control on the touch screen. Establish a pleasant listening volume level.
Playing the piano. Play the piano as normal. Only you can hear the
sound of the piano. Switching off – Press the power button gently. Retracting drawer – Press the drawer back into casing as far as it
will go. Let go and the drawer will stay retracted. Deactivating the stop rail. Move the lever on the left beneath the
piano keyboard into the Normal position.
�
�
�
�
�
�
�

9
Chapter 4 QuietTime Magic Star operation Start Position The QuietTime Magic Star System is on, and the stop rail is activated.
Sit down at your piano and put on the headphones. Extending drawer To use the QuietTime Magic systems’ more advanced options, press
the drawer gently towards the back until counter pressure is notable. Let go and the drawer will slowly come out to the front. The display and touch screen of the system are now visible.
Push the drawer back into place when you have finished using the
system. The Basics How to use the system’s features of the menus: Selecting a menu – You will reach the features of the menus by
tapping the symbol of the desired feature on the touch screen. As long as you are in one of the menu features the symbol of the menu will be lit e.g. the symbol of the piano. The display will furthermore show the name of the active menu features as a headline e.g. Sound. Following feature menus are available:
SOUND = Selecting tones of instruments & saving your standard data EFFECT = Effect settings METRO = Metronome & metronome settings FUNC. = System settings RECPRD = Recording & recording settings START/STOP = Playback/stop & playback settings Selecting feature – Some menus e.g. EFFECT offer access to
multiple features, in this case e.g. reverb/chorus/pitch etc. You will reach further options by briefly tapping the button EFFECT again. Just tap as many times as you need until the desired feature appears on display.
Adjusting data – Tap the Up or Down arrow to reach the desired
setting. You can play the piano afterwards or select another menu with
different features to adjust settings there.
�
�
�

10
Sound menu Selecting another tone of instrument Tap the sound key to switch to the Sound menu.
INFO: You are in the HOME menu after you have switched on. TIP: Press and hold the Sound-button until "Press (Rec) to save all
settings" appears on the display, then press the RECORD-button to save your current settings (sound, reverb, etc.) as your start up settings. The system then starts with the “Userset Sound U0: default” To set the system back to the factory settings, press and hold the power-button till it starts blinking, then release it.
Tap the sound button again to select the active sound library. Tap the Up or Down arrow to select the instrument you want to
play.
INFO: Available instrument tones are listed on the following page.
e.g. changing display while touching the arrow buttons
- Preset Sounds - GM Sounds - Userset Sounds
�
Display in Sound-menu
SOUND Preset Sound P1 : Piano 1
�
Example: display of Sound menu / GM Sound-library
SOUND GM Sound 000 Piano1
Example: display of Sound menu / GM Sound-library
SOUND Userset Sound U0 : Default
� SOUND Userset Sound U1 : User 1
SOUND Userset Sound U2 : User 2

11
QuietTime Magic Star V6 – Tones available Pre-set sound library Popular tones selection P1: Piano1 P2: Piano2 P3: Piano1 + Fast Strings P4: Piano1 + Slow Strings P5: Fast Strings P6: Slow Strings
P7: Harpsichord P8: E-Piano P9: Ch. Organ P10: Piano2 + Fast Strings P11: Piano2 + Slow Strings P12: Piano Mute **
** Select P12 to use the system as metronome, while playing the acoustic piano.
GM sound library General MIDI tones 000 Piano1 001 Piano2 002 Piano3 003 Honky-Tonk Piano 004 E.Piano1 005 E.Piano 2 006 Harpsichord 007 Clavinet 008 Celesta 009 Glockenspiel 010 Music Box 011 Vibraphone 012 Marimba 013 Xylophone 014 Tubula Bells 015 Dulcimer 016 Organ 1 017 Organ 2 018 Organ 3 019 Church Org. 020 Reed-Organ 021 Accordion 022 Harmonica 023 Bandneon 024 Nylon.str. Guitar 025 Steel-str. Guitar 026 Jazz Guitar 027 Clean Guitar 028 Muted Guitar 029 Overdrive Guitar 030 Distortion Guitar 031 Guitar Harmonics 032 Acoustic Bass 033 Fingered Bass 034 Picked Bass 035 Fretless Bass 036 Slap Bass 1 037 Slap Bass 2 038 Synth Bass 1 039 Synth Bass 2 040 Violin 041 Viola 042 Cello
043 Contrabass 044 Tremolo Strings 045 Pizzicato Strings 046 Harp 047 Timpani 048 Strings 049 Slow Strings 050 Synth Strings 1 051 Synth Strings 2 052 Choir „ Aahs“ 053 Voice „Oohs“ 054 Synth Vox 055 Orchestra Hit 056 Trumpet 057 Trombone 058 Tuba 059 Muted Trumpet 060 French Horn 061 Brass 1 062 Synth Brass 1 063 Synth Brass 2 064 Soprano Sax 065 Alto Sax 066 Tenor Sax 067 Baritone Sax 068 Oboe 069 English Horn 070 Bassoon 071 Clarinet 072 Piccolo 073 Flute 074 Recorder 075 Pan Flute 076 Bottle Blow 077 Shakuhachi 078 Whistle 079 Ocarina 080 Square Wave 081 Saw Wave 082 Syn.Calliope 083 Chiffer Lead 084 Charang 085 Solo Vox
086 5th Saw Wave 087 Bass + Lead 088 Fantasia 089 Warm Pad 090 Polysynth 091 Space Voice 092 Blowed Glass 093 Metal Pad 094 Halo Pad 095 Sweep Pad 096 Ice Rain 097 Soundtrack 098 Crystal 099 Atmosphere 100 Brightness 101 Goblin 102 Echo Drops 103 Star Theme 104 Sitar 105 Banjo 106 Shamisen 107 Koto 108 Kalima 109 Bag Pipe 110 Fiddel 111 Shannai 112 Tinkle Bell 113 Agogo 114 Stehl Drums 115 Woodblock 116 Taiko 117 Melo Tom 118 Synth Drum 119 Reverse Cym 120 Guitar Fret Noise 121 Breath Noise 122 Seashore 123 Bird 124 Telephone 125 Helicopter 126 Applause 127 Gun Shot
Userset sound library Tones combined with your own preferred settings User 1
User 2
User 3

12
Effect menu Selecting and adjusting the sound effects Tap on the effect key to switch to the Effect menu. Tap the mode button to select a sound effect. Tap on the Up and Down arrows to set up the effect. You can now play the piano or select another menu and use the
other features. Effects and their impact ‘Reverb’ effect: The higher the setting the bigger the room will be in
which you play your instrument. ‘Chorus’ effect: This effect gives the impression that you are playing
several instruments simultaneously instead of just the one. The tone is more vibrant.
- Reverb-Effect Reverb Range: 0 – 127 (Default = 0)
- Chorus-Effect Chor Range: 0 – 127 (Default = 0)
- Transpose-Effect Transposition Range: -/+24 (Default = 0)
- Pitch-Effect Tuning Range: 438 - 445Hz (Default = 440Hz)
- Velocity-Effect Dynamic Curves Range: 1 – 5 (Default = 3)
� Display of effect menu / reverb-effect
EFFECT Reverb : 0
�
�
Display of Effect menu / reverb-effect
EFFECT Reverb : 0
Display of effect menu / chorus-effect
EFFECT Chorus : 0

13
‘Transpose’ effect: This gives you the option to move the piano’s pitch upwards or downwards by 24 halftones.
‘Pitch’ effect: Use this effect to change the system’s pitch or match it
to an acoustic instrument you want to accompany. ‘Velocity’ effect: You can set up how lightly/heavily a key must be
pressed to attain a specific volume. Example: Velocity 1 = Low volume from a light tap on the key … Velocity 5 = High volume from a light touch on the key.
Metronome menu Using the metronome, setting up as necessary Touch the metronome symbol key longer to switch to the
metronome menu. Tap on the metronome symbol again to select a metronome setting.
Display of effect menu / transpose-effect
EFFECT Transpose Semitone : 0
Display of effect menu / pitch-effect
EFFECT Pitch A49 = 440 Hz
Display of effect menu / velocity-effect
EFFECT Velocity Curve : 3 EFFECT
� Display of metronome menu / tempo setting
METRONOME Tempo : 120
� - Tempo setting Tempo range: 0 - 250 - Beat setting Beat range: 0/2 - 4/2, 0/4 - 8/4, 0/8 – 9/8 (Default = 4/4) - Volume setting Volume range: 0 – 9 (Default = 5) - Bell setting Bell range: On / Off (Default = On)

14
Tap on the Up and Down buttons to set up the setting. Metronome Activating / Deactivating Tap on the metronome symbol to start or stop the metronome.
Display of the metronome menu / beat setting
METRONOME Beat : 4/4
Display of the metronome menu / volume setting
METRONOME Volume : 5
Display of the metronome menu / bell setting
METRONOME Bell : On
�
� The metronome symbol will flash regularly when the metronome is active.
HOME Preset Sound P1 : Piano 1

15
Record menu Recording when you are playing the piano
Two types of recording are available with the Magic Star system. Type A and type B (Default = type A). The following will explain type A. How to choose the type of recording will be explained further down.
Press the Record-button to switch to the Record menu. Touch the Record button or Step on the right pedal to start the recording. Press the Stop button to stop recording
INFO: The system automatically returns to the HOME menu. Your recording will stay saved when the system is switched off or is disconnected from electricity. Recordings with up to 40.000MIDI events each track can be created in the Magic Star system. Each new recording will erase the previous recording. Each recording will be obtained until you delete them if you attach an USB stick as memory for the recording.
Press the Play button to play back your recording
INFO: You can stop the play back by pressing the Play button again or pause it by pressing the Func. button. Press Func. again to continue the playback.
Display of record menu / display before starting to record.
RECORD Push [Rec] or sustain to start recording �
�
� Timer
Display of record menu / display during recording
RECORD 00:01 Push [Stop] to stop recording
�
�
16
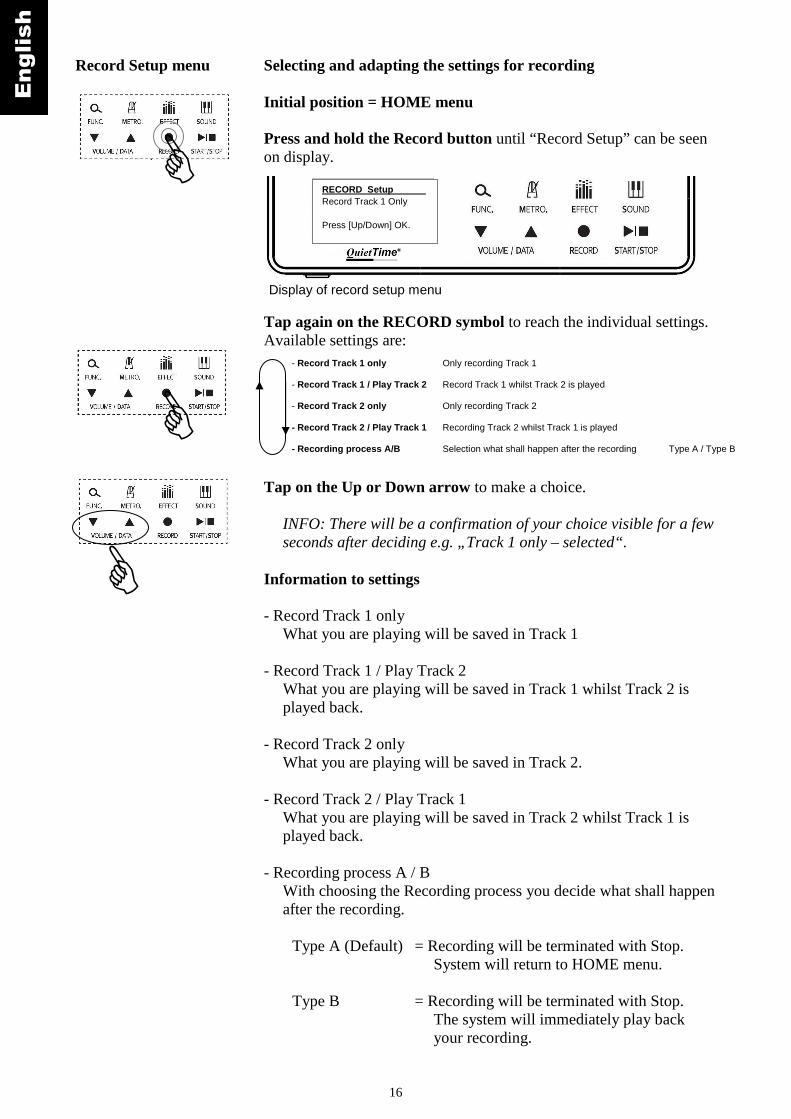
Record Setup menu Selecting and adapting the settings for recording Initial position = HOME menu Press and hold the Record button until “Record Setup” can be seen
on display. Tap again on the RECORD symbol to reach the individual settings.
Available settings are: Tap on the Up or Down arrow to make a choice.
INFO: There will be a confirmation of your choice visible for a few seconds after deciding e.g. „Track 1 only – selected“.
Information to settings - Record Track 1 only
What you are playing will be saved in Track 1 - Record Track 1 / Play Track 2
What you are playing will be saved in Track 1 whilst Track 2 is played back.
- Record Track 2 only
What you are playing will be saved in Track 2. - Record Track 2 / Play Track 1
What you are playing will be saved in Track 2 whilst Track 1 is played back.
- Recording process A / B
With choosing the Recording process you decide what shall happen after the recording.
Type A (Default) = Recording will be terminated with Stop. System will return to HOME menu.
Type B = Recording will be terminated with Stop. The system will immediately play back
your recording.
�
Display of record setup menu
RECORD Setup Record Track 1 Only Press [Up/Down] OK.
� - Record Track 1 only Only recording Track 1 - Record Track 1 / Play Track 2 Record Track 1 whilst Track 2 is played - Record Track 2 only Only recording Track 2 - Record Track 2 / Play Track 1 Recording Track 2 whilst Track 1 is played - Recording process A/B Selection what shall happen after the recording Type A / Type B
�

17
Play menu Playing back your recording Initial position = HOME menu Press the START/STOP key to reach the Play menu or rather
starting the play-back.
Press the START/STOP key to terminate the play-back. Press the FUNC. key to pause the play-back. Press Func. again to
continue the play-back. The timer will be flashing while the play-back is paused.
INFO: The system automatically returns to the HOME menu at the end of the play-back. It is always the last recording which will be played back. There will be a selection of the recording to play if you have an USB stick attached.
Play setup menu Selecting and adapting the settings for play-back Initial position = HOME menu Press and hold the key START/STOP until the heading “PLAY
Setup” is visible in the display.
Display of Play menu / display while playing back
PLAY 00:01 Push [STOP] to Stop Playback
Timer
�
�
Display of Home menu
HOME Preset Sound P1 : Piano 1
Display of Play Setup menu
PLAY Setup Playback Track 1 Press [Up/Down] OK.
�

18
Play-Setup menu Tap again on the key START/STOP to reach the individual settings. Available settings:
Tap on the Up or Down arrow to choose.
INFO: There will be a confirmation of your choice visible for a few seconds after deciding e.g. „Track 1– selected“.
Information to settings - Playback Track 1 (Default = Playback Track 1)
What was saved as Track 1 will be played back. - Playback Track 2
What was saved as Track 2 will be played back. - Playback Track 1+2
Both what was saved in Track 1 and Track 2 will be played back. - Loop ON / OFF (Default = OFF)
The play-back will be constantly repeated if you choose ON. If OFF is chosen one play-back only will be reproduced.
- Local ON / OFF (Default = ON)
The sound card will ignore what you are playing on the keyboard when the option OFF is set. The Magic Star system will only produce tones from MIDI files which are received over MIDI IN. The Magic Star works normal when the option ON is set.
- MIDI Out ON / OFF (Default = OFF) The Magic Star system will also send the play-back to the MIDI OUT connection so that it can be further processed or recorded by an external MIDI device.
- Playback Track 1 Only play back Track 1 - Playback Track 2 Only play back Track 2 - Playback Track 1+2 Play back Track 1 and Track 2 - Loop Function Loop play-back ON / OFF - Local Function MIDI function Local ON / OFF ON / OFF - MIDI Out Function Send play back also to MIDI Out ON / OFF
�
�

19
Userset edit menu Creating a tone of an instrument/sound combination with individual predetermined settings.
Initial position = HOME menu Press keys Record and Sound simultaneously until the heading
“USERSET EDIT” is visible in the display. You can change between the available predetermined settings for your
tone of instrument by tapping on the key Sound. You can define the key range by playing the lowest keys first and
then the highest key of the key range on the keyboard. All the other ones are defined by tapping on the Up and Down
arrows. Following settings are available:
INFO: See effect menu for information to the effects transpose, reverb, chorus, pitch, velocity. You can choose instruments from the GM library at “instrument”.
� �
Display in Userset edit menu
USERSET EDIT Channel : 01 Key Range : 01 A0 ~88 C8
�
� - Channel : 01 / Key Range MIDI Channel 1
- Channel : 01 / Instrument MIDI Channel 1
- Channel : 01 / Volume MIDI Channel 1
- Channel : 01 / Transpose Semitone MIDI Channel 1
- Reverb (for all MIDI channels)
- Chorus (for all MIDI channels)
- Pitch (for all MIDI channels)
- Velocity Curve (for all MIDI channels)
- Channel : 02 / Key Range MIDI channel 2, Key Range
- Channel : 02 / Instrument MIDI channel 2
- Channel : 02 / Volume MIDI channel 2
- Channel : 02 / Transpose Semitone MIDI channel 2
- Channel : 03 / Key Range MIDI channel 3
- Channel : 03 / Instrument MIDI channel 3
- Channel : 03 / Volume MIDI channel 3
- Channel : 03 / Transponse Semitone MIDI channel 3
� � 1 2

20
You can tap on the Record key at any time to start saving your Userset sounds.
Choose where to save your sound with the arrows. Available are:
User1, User2 und User3 Press the Record key again to terminate the saving of your Userset sounds abzuschließen.
INFO: Any existing information stored in the memory storage position that you have selected, e.g. User1, is overwritten by your new settings. You can exit the procedure without saving the data by switching the system off or pressing one of the following buttons: Effect, Metro, Func. or Start/Stop.
System menu Displaying or modifying the system information.
Access to the menu of the system: Initial position = HOME menu Press and hold the FUNC key until the heading “SYSTEM” is
visible in the display. Tap again on the key FUNC. to reach different information available
and reach the settings.
Display of the Userset edit menu, here saving of User1
USERSET EDIT Save to user : 1 Push [Rec.] to save.
�
�
�
Display of the Userset edit menu, here saving of User1
USERSET EDIT Save to user : 1 Push [Rec.] to save.
Display of the System menu, Grand Mute feature
SYSTEM Grand Mute : No Grand Module
�
�

21
System menu Continuation Tap on the Up or Down arrow to set the value and have it shown
respectively. Following features are available:
Many features are self-explanatory. This is why only features/settings
that need further knowledge for usage will be explained below. Tap the Sound-button to exit the system menu. System menu Playing the demo music 1 = the star in front of “01 Gurlitt, Cornelius” shows that you can now
select the demo song with the arrows. Tap on the Up or Down arrow to select a demo song. You will find
a list of the demo songs available below.
- 1 Demo Demo Song reproduction (01 – 81)
- 2 Control Show firmware versions
- 3 Start-Up Preset Choice of start preset (P1 – P12, User Set 0 – 3, default = P1)
- 4 Start Volume Volume after startup (0-100, default = 55)
- 5 Line-In Volume for the Line In input (-80-0, default = -10)
- 6 Line-Out Volume for the Line Out outlet (-80-0, default = 0)
- 7 Memory Initialize Reset to factory settings
- 8 Prg./Data Update Activation for firmware update via USB Midi connection
- 9 Power LED Switching the illumination on and off (On/Off, default = On)
- 10 LCD Contrast Contrast settings for the display (0-12, default 10)
- 11 LCD Backlight Set the time until LCD backlight turns off
(Always On, 10 Sec., 20 Sec., 30 Sec., default = 10 Sec.)
- 12 Power-On Hold Deactivating power button (On/Off, default = Off)
- 13 Date/Time Setting date and time
- 14 Key Correction Repeat = Limit Repetition
- 15 Key Correction Chord = Auto-correct for chords
- 16 Insert Note-off Feature for faster repeated play of tones, trill (On/Off, default = On)
- 17 Power-Off time Set time until the automatic switch off
(Always On, 5, 10, 20, 30 min, 1, 2, 3, 5, 12 h, default = 30 min)
- 18 Pedal-On Adj. Set the switch point for the pedals
�
Display of System menu, Demo feature
SYSTEM *01 Gurlitt, Cornelius … Tempo : 109 [Start/Stop] - Play
1
�
�

22
System menu Continuation / Playing the demo music Tap on the symbol Start/Stop to start or Stop the reproduction.
During reproduction
Regulating the volume with the arrow keys
Tap on the FUNC.-Taste to reach the settings for tempo. Tap on the
same key again to exit the setting possibilities and thereby enable the setting of volume via the arrows again.
1 = the star in front of “Tempo: 109” shows that you can now set the tempo with the arrows.
�
�
�
Display of System menu, Demo feature, whilst reproduction
SYSTEM 00:01 01 Gurlitt, Cornelius … Tempo : 109 [Start/Stop] - Play
Display of System menu, Demo feature, Reproduction/Tempo setting
SYSTEM 00:01 01 Gurlitt, Cornelius … *Tempo : 109 [Start/Stop] - Stop
1

23
System menu Continuation / QuietTime Magic Star - Demo Songs:
1. Attwood, Thomas - Sonatina in G 1st movement
2. Attwood, Thomas - Sonatina in G 2nd movement
3. Attwood, Thomas - Sonatina in G 3rd movement
4. Attwood, Thomas - Sonatina in F 1st movement
5. Attwood, Thomas - Sonatina in F 2nd movement
6. Attwood, Thomas - Sonatina in F 3rd movement
7. Beethoven, Ludwig van - Sonatina in G 1st movement
8. Beethoven, Ludwig van - Sonatina in G 2nd movement
9. Beethoven, Ludwig van - Sonatina in F 1st movement
10. Beethoven, Ludwig van - Sonatina in F 2nd movement
11. Beethoven, Ludwig van - Sonata, Op.49, No.2 1st move.
12. Beethoven, Ludwig van - Sonata, Op.49, No.2 2nd move.
13. Benda, Jiri Antonin - Sonatina in A Minor
14. Biehl, Albert - Sonatina, Op.57, No. 1 1st movement
15. Biehl, Albert - Sonatina, Op.57, No. 1 2nd movement
16. Biehl, Albert - Sonatina in C
17. Camidge, Matthew - Sonatina in D 1st movement
18. Camidge, Matthew - Sonatina in D 2nd movement
19. Clementi, Muzio - Sonatina Op.36, No.1, 1st movement
20. Clementi, Muzio - Sonatina Op.36, No.1, 2nd movement
21. Clementi, Muzio - Sonatina Op.36, No.1, 3rd movement
22. Clementi, Muzio - Sonatina Op.36, No.2, 1st movement
23. Clementi, Muzio - Sonatina Op.36, No.2, 2nd movement
24. Clementi, Muzio - Sonatina Op.36, No.2, 3rd movement
25. Clementi, Muzio - Sonatina Op.36, No.3, 1st movement
26. Clementi, Muzio - Sonatina Op.36, No.3, 2nd movement
27. Clementi, Muzio - Sonatina Op.36, No.3, 3rd movement
28. Clementi, Muzio - Sonatina Op.36, No.4, 1st movement
29. Clementi, Muzio - Sonatina Op.36, No.4, 2nd movement
30. Clementi, Muzio - Sonatina Op.36, No.4, 3rd movement
31. Clementi, Muzio - Sonatina Op.36, No.6, 1st movement
32. Clementi, Muzio - Sonatina Op.36, No.6, 2nd movement
33. Czerny, Carl - Sonatina, Op.792, No.8 1st movement
34. Czerny, Carl - Sonatina, Op.792, No.8 2nd movement
35. Czerny, Carl - Sonatina, Op.792, No.8 3rd movement
36. Diabelli, Anton - Sonatina in F, 1st movement
37. Duncombe, William - Sonatina in C
38. Gurlitt, Cornelius - Sonatina in C, 1st movement
39. Gurlitt, Cornelius - Sonatina Op.36, No.6, 1st movement
40. Gurlitt, Cornelius - Sonatina Op.36, No.6, 2nd movement
41. Gurlitt, Cornelius - Sonatina Op.36, No.6, 3rd movement
42. Haslinger, Tobias - Sonatina in C 1st movement
43. Haslinger, Tobias - Sonatina in C 2nd movement
44. Haydn, Franz Joseph - Sonata, Hob.XVI/13, 3rd movement
45. Keller, Oswin - Sonatina
46. Kuhlau, Friedrich - Sonatina, Op.55, No.1 1st movement
47. Kuhlau, Friedrich - Sonatina, Op.55, No.1 2nd movement
48. Kuhlau, Friedrich - Sonatina, Op.55, No.3 1st movement
49. Kuhlau, Friedrich - Sonatina, Op.55, No.3 2nd movement
50. Kuhlau, Friedrich - Sonatina, Op.20, No.1 1st movement
51. Kuhlau, Friedrich - Sonatina, Op.20, No.1 2nd movement
52. Kuhlau, Friedrich - Sonatina, Op.20, No.1 3rd movement
53. Kuhlau, Friedrich - Sonatina, Op.88, No.1 1st movement
54. Kuhlau, Friedrich - Sonatina, Op.88, No.1 2nd movement
55. Kuhlau, Friedrich - Sonatina, Op.88, No.1 3rd movement
56. Kuhlau, Friedrich - Sonatina, Op.88, No.3 3rd movement
57. Latour, Jean Theodore - Sonatina in C, 1st movement
58. Latour, Jean Theodore - Sonatina in G, 1st movement
59. Latour, Jean Theodore - Sonatina in G, 2nd movement
60. Latour, Jean Theodore - Sonatina in G, 3rd movement
61. Latour, Jean Theodore - Sonatina in G, 1st variations
62. Latour, Jean Theodore - Sonatina in G, 2nd variations
63. Lichner, Heinrich - Sonatina, Op.49, No.1 1st movement
64. Lichner, Heinrich - Sonatina, Op.49, No.1 2nd movement
65. Lichner, Heinrich - Sonatina, Op.49, No.1 3rd movement
66. Lynew, Frank - Sonatina, Op.39, No. 1 1st movement
67. Lynew, Frank - Sonatina, Op.39, No. 1 2nd movement
68. Lynew, Frank - Sonatina, Op.39, No. 1 3rd movement
69. Mozart, Wolfgang Amadeus - Sonatina in C 1st movement
70. Mozart, Wolfgang Amadeus - Sonatina in C 2nd movement
71. Mozart, Wolfgang Amadeus - Sonata K.545, 1st movement
72. Mozart, Wolfgang Amadeus - Sonata K.545, 2nd movement
73. Mozart, Wolfgang Amadeus - Sonata K.545, 3rd movement
74. Mozart- Sonata in A Major, K.331, 3rd movement: Rondo a la Turk
75. Saliutrinskaya, Tat'iana - Sonatina in D
76. Spindler, Fritz - Sonatina, Op.157, No.1 1st movement
77. Spindler, Fritz - Sonatina, Op.157, No.1 2nd movement
78. Spindler, Fritz - Sonatina, Op.157, No.4 1st movement
79. Spindler, Fritz - Sonatina, Op.157, No.4 2nd movement
80. Wesley, Samuel - Sonatina Op.4, No.10

24
System menu Selecting Start-Up Preset You can decide with this setting which instrument and which
combinations of instruments (and their settings) you want to play as soon as the QuietTime Magic Star system is switched on.
You can choose from the Preset Sounds P1 to P12 and the Userset
Sounds U0 to U3. Your choice will be saved when you exit the System menu by pressing
on of the keys Metro / Effect / Sound / Record or Start/Stop. Tap on the Up or Down arrow to make a choice. System menu Memory Initialize feature – Restore factory settings.
Tap simultaneously the Up and Down arrow to start the restoring of
the factory settings. The system will automatically return to the HOME menu afterwards.
INFO: Press the FUNC key to reach the next feature without restoring
the factory settings. Or tap on Effect / Sound / Record or Start/Stop to exit the System menu.
TIP: You can also reach this feature easily and directly by pressing
the Power key for four seconds and releasing it afterwards. This direct access to Reset can be accessed at any point.
Display of System menu, Selecting Start-Up-Preset
SYSTEM Start-Up Preset : P1 : Piano 1
�
Display of System menu, Memory Initialize feature
SYSTEM Memory Initialize Press [Up/Down] to start.
� �

25
System menu Prg./Data Update feature– Installing Firmware Update.
Tap simultaneously the Up and Down arrow to prepare the installing
of the Firmware Update. The system will automatically return to the HOME menu afterwards.
INFO: A special computer program, the file with the Firmware
Update and a USB cable for the connection to the computer are necessary for a Firmware-Update. The USB-MIDI connection will be used as a connection. Detailed information for the update procedure will possibly be provided with the update.
System menu Setting date and time Tap simultaneously the Up and Down arrow to start the adjustment. Tap on FUNC to switch from year to month and month to day. You can set the values by tapping on either the Up or Down arrow
button. To save and return to the System menu press the RECORD key.
Display of System menu, Prg./Data Update feature
SYSTEM Prg./Data Update Press [Up/Down] to start.
� �
Display of System menu, date and time
SYSTEM 2013/01/01 AM 01:00:00 Press [Up/Down] edit.
� �
�
�
�

26
System menu Insert Note-Off feature –for faster repeated play of same tones You can determine the figures by tapping on the Up or Down
arrow.
Tip: This feature also influences how what you are playing on the piano will be converted in sounds and MIDI values respectively. Testing both ways (On and Off, Default = On) for a while is the best way to find out which setting will have the best results for your instrument. It is possible that e.g the Magic Star system in an Upright piano will have better results with the setting Grand instead of the setting Upright and reversed. It might also be possible that both settings bring equal good results.
Pedal-on Adj. Function – Set the switch point for the pedals
Tap on the up or the down arrow button to activate the function. Tap on the FUNC. button to switch between the pedals
Sof. = left/soft pedal; Sos = middle/sostenuto pedal; Sus = right/sustain pedal
To set the values, tap on the up and down buttons.
To save and get back to the system menu, press the RECORD-button.
Display of System menu, Insert Note-Off feature
SYSTEM Insert Note-off : On
�
Display of System menu, Pedal-on Adj. Function
SYSTEM Padal-On Adj. Sof,5 Sos,5 Sus,5
Press (Up/Down) edit.
� �
�
�

27
Calibrating Basic keyboard calibration
INFO: The piano has to be calibrated after the QuietTime Magic Star System has been installed in your piano. The reason for this is that the Magic Star tone generator requires information about each key’s movement path.
ATTENTION! Only a few or even none of the keys will function
correctly if you do not run a calibration. It might also be necessary to run a new calibration if the location or the form of keys has changed over time, e.g. after the piano has been delivered to your house.
How to perform a calibration: Requirements:
a. All cables are correctly connected to the QuietTime system. The system has to be switched on.
b. Move the stop rail lever to the “Normal” position (piano can
be played).
c. Make sure there is nothing on the piano that can press down a key.
Turn the system on.
Shortly after switching the device on (approx. 1-2 seconds) press and hold the METRO key. Let go when the headline “KEY INITIALIZE” is visible on the display. The following is displayed:
�
KEY INITIALIZE Press every key and Pedals, and press [METRO] when done.
�

28
�
Press each of the 88 keys and the pedals fully down, one after the other, using your normal force and speed. Hold each key down until you hear a corresponding sound in your headphones. Only after hearing the sound, you can release the key and begin with the next one, continue until you played every key. After that push the pedals down, one after the other: the left (, the middle*) and the right pedal. Release only when you hear a confirmation sound then begin with the next one. *It’s possible, that you will not hear a confirmation sound! The support of the middle pedal is optional.
After you have pressed all, terminate the calibration process by pressing the METRO key once. INFO: It will take a few seconds to save the data. After the data is
saved, the system automatically returns to the Home menu. Your QuietTime System is now ready.
Readjusting How to readjust single keys single keys
INFO: Follow the calibration steps listed on the previous page to ensure all of the keys are set to the same sensitivity. However, if you believe some keys play too loudly or softly, use the following procedure to readjust the sensitivity of each of those keys.
Make sure you switch off QuietTime System. Turn the Magic Star on.
�
�
�

29
�
Shortly after switching the device on (approx. 1-2 seconds) press and hold the Rec key. Let go after 3 seconds. The displayed will show the following:
Put your headphones on and then press each key to check its tone. Note the volume of each key.
If a key’s sensitivity has to be readjusted, use the Up and Down arrows to increase or decrease the volume of the last key that you pressed. This helps you to match the key’s sensitivity to that of adjacent keys.
The sensitivity for the current key is shown on the display as a value ranging between 000 - 255. INFO: The last value that was displayed for the previous key is
automatically saved when you switch to another key. After having worked with all the keys that need to adjusting press the Rec button gain to end the readjustment process. INFO: In a few seconds, the data is saved to the system’s memory.
The system automatically returns to the Home menu and is ready to play.
� KEY SENSE ADJ. Number : Sense : Push [Rec.] to Finish.
� KEY SENSE ADJ. Number : 76 Sense : 100 Push [Rec.] to Finish.
�
30
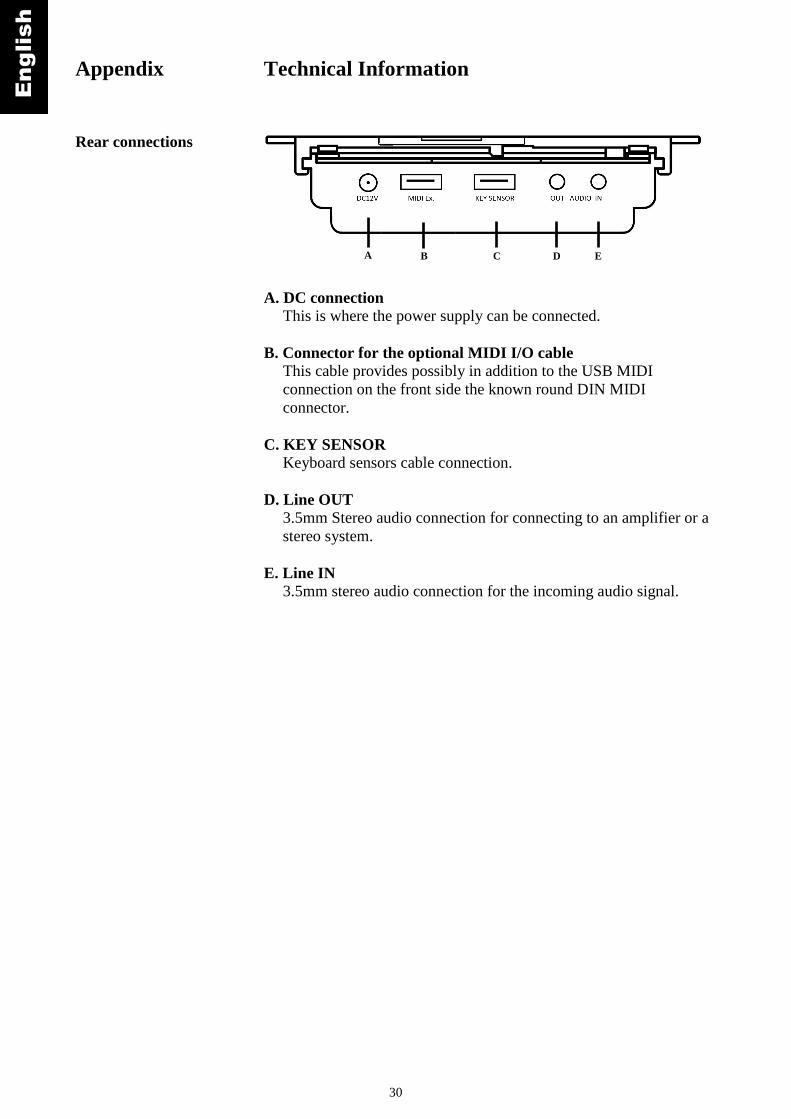
Appendix Technical Information Rear connections
A. DC connection This is where the power supply can be connected.
B. Connector for the optional MIDI I/O cable This cable provides possibly in addition to the USB MIDI
connection on the front side the known round DIN MIDI connector.
C. KEY SENSOR
Keyboard sensors cable connection. D. Line OUT
3.5mm Stereo audio connection for connecting to an amplifier or a stereo system.
E. Line IN
3.5mm stereo audio connection for the incoming audio signal.
A B C D E

31
Stop rail operating lever
Legend: Mute = Stop rail is active. Mute lever = Stop rail operating lever Normal = Stop rail deactivated, acoustic piano can be played.
Pedal information
The QuietTime System supports two (optional three) pedals: the left pedals: - The left pedal (soft) attenuates the tone slightly. - The center pedal (sostenuto) – optional provides sostenuto effect - The right pedal (sustain) lets all of the keys that were played continue to sound until the pedal is released.
Usage of USB sticks Just plug the USB memory stick into the connector on the front of the Magic Star Control Unit to use a USB stick with the Magic Star system. That followed the system will ask you if you would like to copy the recordings saved on the Magic Star onto the stick.
Question on display: “USB Memory / Copy recordings to USB? YES
[Rec] / No [Stop] Press RECORD for YES or START/STOP for NO. A copy of your recordings will be created on the USB stick if you answer with YES. All further recordings done after that will be saved on the USB stick as long as it is connected and the system is not switched off. If you answer with NO nothing will be saved on the USB stick but you can also choose General MIDI files in the Play menu, which are saved in the main directory of the USB stick. To have the USB stick recognized you will have to plug it in after switching the system on or rather disconnect and connect it shortly.
32
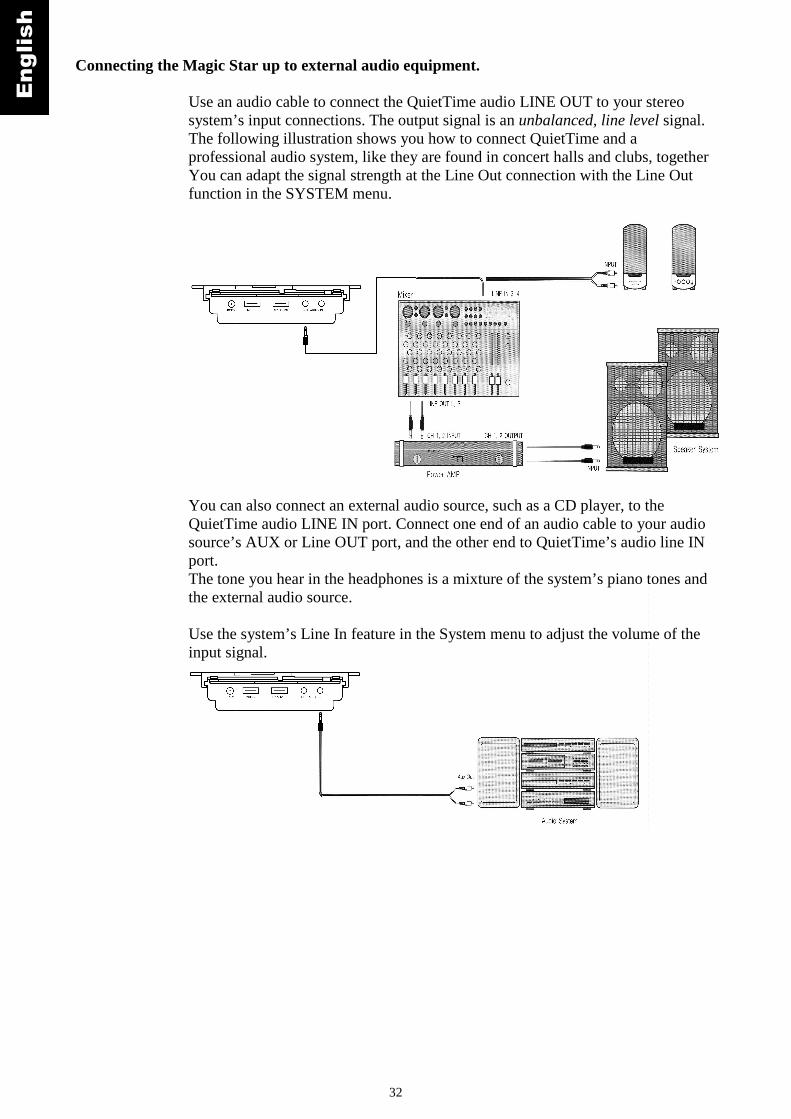
Connecting the Magic Star up to external audio equipment. Use an audio cable to connect the QuietTime audio LINE OUT to your stereo system’s input connections. The output signal is an unbalanced, line level signal. The following illustration shows you how to connect QuietTime and a professional audio system, like they are found in concert halls and clubs, together You can adapt the signal strength at the Line Out connection with the Line Out function in the SYSTEM menu.
You can also connect an external audio source, such as a CD player, to the QuietTime audio LINE IN port. Connect one end of an audio cable to your audio source’s AUX or Line OUT port, and the other end to QuietTime’s audio line IN port. The tone you hear in the headphones is a mixture of the system’s piano tones and the external audio source. Use the system’s Line In feature in the System menu to adjust the volume of the input signal.

33
Connecting the QuietTime to external MIDI equipment.
To send MIDI data to a MIDI synthesizer or computer connect QuietTime’s MIDI OUT port to your computer or synthesizer’s MIDI IN port. See the following illustration. The MIDI I/O Cable and the USB cable are optional equipment.
To receive MIDI data from the MIDI keyboard/synthesizer or computer connect the MIDI-OUT cable of the external MIDI device with help of a MIDI cable to the QuietTime’s MIDI IN port.
INFO: You can have MIDI IN and OUT cables connected at the same time. If you are using a computer, make sure the “Pass Through” is switched off in your software. This prevents double notes from being played or recorded.
Micro USB o USB Kabel (Optional)
MIDI I/O Kabel (Optional)
USB
MIDI OUT
MIDI I/O Kabel (Optional)
MIDI OUT
MIDI IN
MIDI I/O Kabel (Optional)

34
QuietTime Magic Star System connection summary
Legend: Keyboard Sensor = Key sensors Control Unit = Quiet Time tone generator and central processor Headphones = Headphones Power Supply = Power Supply Soft = Left pedal Center Pedal = Middle pedal (optional) Damper = Right pedal

35
MIDI implementation chart
Function Transmitted Received Remark
MIDI Channels 1-16 1-16
Mode X 3
Note Number 21-108 0-127
Velocity 0-127 0-127
Note On 9n, V=1-127 9n, V=1-127
Note Off 9n, V=0 8n, V=0-127
9n, V=0
Key Aftertouch X X
Channel Aftertouch X O
Pitchbend X O +/-2 Octave
PitchBend
Sensitivity
recognized
Control Change
0, 32 X O Blank select
1 X O Modulation
6, 38 X O Data entry
7 X O Main Volume
10 X O Pan
11 X O Expression
64 O O Damper pedal
67 O O Soft pedal
91 X O Reverb Depth
93 X O Chorus Depth
98 X O NRPN LSB
99 X O NRPN MSB
100 X O RPN LSB
101 X O RPN MSB
120 X O All Sound Off
121 X O Reset All
Controllers
123 X O All Note Off
Programm Change X O 0-127 Note: 1. Default Pitch Bend = 1 Semitone 2. Mode 1: OMNI ON, POLY 3. Mode 2: OMNI OFF, POLY

36
Specifications
Unit Specifications
Key sensors
Sensor Reflector Type sensor system, optical scanning
Sensitivity range 0 – 256 per key, individually adjustable
Velocity range 127
Velocity curves 5
Pedal sensors Standard Sustain-, Soft- pedal
Optional Sostenuto (middle pedal)
Instrument
Tones 12 Preset + 128 GM + 4 User Sounds
Storage 512 Mb
Polyphony max. 256
Effect
Transpose +- 24 half tones
Reverb 0 – 127
Chorus 0 – 127
Pitch 438 – 445 Hz (Default = 440 Hz)
Metronome
Tempo 25 – 250
Beat 0/2 - 4/2, 0/4 - 8/4, 0/8 – 9/8
Volume 0 – 9
Record, Playback
2 songs - intern each approx. 40,000+ MIDI events (notes)
Unlimited songs - USB Unlimited MIDI events (notes)
Demo melody 80 songs Various composers
Top view Control Unit
Display LCD back light type
Control panel Touch screen technology
Front view Control Unit
Headphone connections 2 x 3.5 mm
MDI USB (Micro USB) MIDI Interface for connection to the computer
USB Host For USB memory stick
Rear view Control Unit
MIDI I/O connection Optional MIDI I/O Interface für In / Thru / Out (5 Pin DIN Port)
DC connection, alternative 12V, 1.5A
Audio In Stereo 3.5mm, adjustable
Audio Out Stereo 3.5mm, adjustable
Measurements Control Unit Visible part 121 x 26 x 67 mm (W x H x D)
Power supply Input AC 100-240V, 50-60Hz
Output DC 12V, 1-3A
Entire system Consumption, operating Approx. 0.75-1.0W (nominal)
Consumption, standby Approx. 0.5 W (nominal)
The specifications listed above can be subject to change without any prior notice.

37
PianoDisc contact: PianoDisc Europe GmbH Schoenweissstr. 16, 90461 Nuremberg / Germany Phone: +49 (0) 911 / 44 30 35
www.pianodisc.eu [email protected] Monday – Friday: 9 a.m. – 5 p.m. (MEZ) PianoDisc – US 4111 North Freeway Blvd., Sacramento CA 95834 Phone: +1 (916) 567-9999 www.pianodisc.com [email protected] Monday – Friday: 8 a.m. – 5 p.m. (Pacific Time)