quiltcut 2 instruction manual · quiltcut 2 instruction manual ... slide the speed gauge to align...
TRANSCRIPT

1
Contents
Base
Lifter
Clamp Bar
Clamp Bar Track
LifterHead
Cutting Guide
PartsCutting Mat
Instructions
A Rotary Cutter is not included with this kit.Not shown are four Rubber Bumpers to place on the back of the Base.Remember: Always retract the blade on your rotary cutter between cuts. The blades are very sharp.
Side Rail
Speed Gauge
Parts ------------------------------------------------------------------------------------------------------------------- 1The Joy of Quilting -------------------------------------------------------------------------------------------------- 2Setting Up the System ---------------------------------------------------------------------------------------------- 4Cutting Guide Features --------------------------------------------------------------------------------------------- 5Positioning the Fabric ----------------------------------------------------------------------------------------------- 7Making the Cut ------------------------------------------------------------------------------------------------------ 9Using the Speed Gauge -------------------------------------------------------------------------------------------- 10Cutting Squares ----------------------------------------------------------------------------------------------------- 12Cutting Half-Square Triangles ----------------------------------------------------------------------------------- 14Cutting Quarter-Square Triangles -------------------------------------------------------------------------------- 16Stacking Scraps for Cutting -------------------------------------------------------------------------------------- 17Cutting Short Bias Strips ------------------------------------------------------------------------------------------ 18Cutting Long Bias Strips ------------------------------------------------------------------------------------------ 20Cutting Equilateral Triangles ------------------------------------------------------------------------------------- 22Cutting Hexagons -------------------------------------------------------------------------------------------------- 24Cutting Diamonds -------------------------------------------------------------------------------------------------- 26Strip Piecing -------------------------------------------------------------------------------------------------------- 27Realigning Strips and Pieces ------------------------------------------------------------------------------------- 28Making a Pentagon Template ------------------------------------------------------------------------------------- 30Cutting Pentagons -------------------------------------------------------------------------------------------------- 32Cutting Shapes Using Templates -------------------------------------------------------------------------------- 34Seam Allowances -------------------------------------------------------------------------------------------------- 36Advanced Design Ideas ------------------------------------------------------------------------------------------- 37
DVD
QuiltCut 2 Instruction ManualThis is a PDF version of the printed Instruction Manualthat comes with every QuiltCut 2 Fabric Cutting System

The Joy of Quilting2
The Joy of QuiltingThe is very easy to use and will become an essential part of your quiltmaking tools.

The Joy of Quilting 3

Setting up the System4
Setting up the System
When you receive your , check the Cutting Mat for proper alignment.
* Important! Make sure the horizontal Cutting Mat lines are parallel to the Cutting Guide. If theCutting Mat has shifted during shipping, place the Cutting Guide—set at 90°—on the Clamp Bar,gently lift the Mat to free the double-sided tape from the Base and move the Mat to align with theCutting Guide. The grid lines on the Cutting Mat must be perfectly aligned with the CuttingGuide.
Properly Aligned
Align the Cutting Mat
Cutting Matlines aligned againstthe Cutting Guide
Side Rail set for left-handed cutting.
Many quilters like to place the system’s Base atthe corner of the cutting table and work fromboth sides as needed. Orient the Cutting Systemhorizontally or vertically according to the mostcomfortable position for you.
Side Rail Position
The on your cutting table.
Side Rail set for right-handed cutting.
The Side Rail is set for right-handed use. If you need to reposition the SideRail for left-handed use, unscrew the screws with the proper sized Phillipsscrewdriver (#2), flip to the left and replace the screws. Do not over tighten.
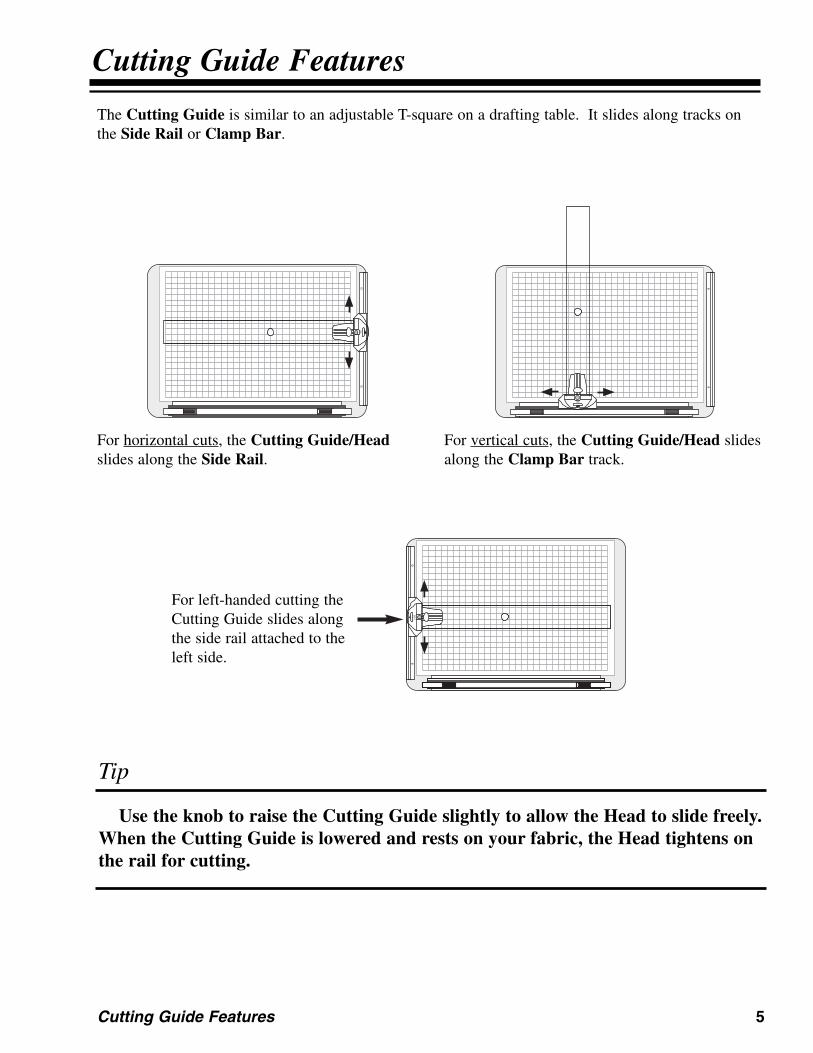
Cutting Guide Features 5
For horizontal cuts, the Cutting Guide/Headslides along the Side Rail.
For vertical cuts, the Cutting Guide/Head slidesalong the Clamp Bar track.
90
Use the knob to raise the Cutting Guide slightly to allow the Head to slide freely.When the Cutting Guide is lowered and rests on your fabric, the Head tightens onthe rail for cutting.
90
For left-handed cutting theCutting Guide slides alongthe side rail attached to theleft side.
Cutting Guide Features
The Cutting Guide is similar to an adjustable T-square on a drafting table. It slides along tracks onthe Side Rail or Clamp Bar.
Tip

Cutting Guide Features6
By squeezing the Spring-Latch the Cutting Guide can be set to various angles. In addition to commonangles of 90°, 60°, and 45°, the Cutting Guide rotates to snap in at several other useful angles. Look inthe window (just above the Spring-Latch) on the Head to see these angle settings: 90, A, B, C, 60, D,and 45 to the left or right of center. See the chart below for all of the angles.
To adjust the Cutting Guide to different angles lift the Cutting Guide slightly, release the Spring-Latchand rotate the Head to the desired angle.
The following angles correspond to thesettings on the Head when it is attached
to the Clamp Bar.
From FromHorizontal Vertical
90 = 90° 0°A = 81° 9°B = 72° 18°C = 67-1/2° 22-1/2°60 = 60° 30°D = 54° 36°45 = 45° 45°
Clamp BarHead Spring-Latch
Side Rail
90°
60°
45°
D
AB C
The angles below are both to the left and right of center
B
B
18°
72°
Angle set to "B"
45
Angle from theHorizontal - 72°
Angle from theVertical - 18°
Use of the advanced angles begins on page 30.

Positioning the Fabric 7
Positioning the Fabric
The Clamp Bar holds large pieces of fabric for cutting. Always use the Clamp Bar when your stackof fabric is larger than the Cutting Mat. For best results, wash and press the fabric before cutting.
1) Raise the Clamp Bar by sliding the Lifters toward the outer edges of the Base.
2) Stack up smaller pieces or fold a larger piece in half or quarters to fit on the Cutting Mat. Stackingeight to ten layers is fine. Some people cut even more.
Single Fold Double Fold
3) Insert the fabric between the Clamp Bar and the Base.Note: To make inserting fabric easier when cutting many layers of fabric, place the fabrics’ ends insidea piece of folded paper. Insert the folded paper between the Clamp Bar and the Base.
Slide Out

Positioning the Fabric8
4) Align the final fold with one of the vertical grid lines. You can also align the fabric’s final fold nextto the edge of the Cutting Guide—set at 90°. Take special care when cutting long strips. Careful fold-ing keeping the selvage edges and folds parallel, and accurate positioning prevents “Vs” or “Ws.”
5) Lower the Clamp Bar by sliding the Lifters toward the center. Just a gentle pressure on the bar isplenty to hold the fabric. Too much force on the Lifters may warp the Clamp Bar and hold the centerof the fabric incorrectly.
Align onvertical grid line
Align onCutting Guide
Slide I
n
Note: Always keep the Clamp Bar in the lowered position when cutting fabric, even when there is nofabric under the Clamp Bar.
OR

Making the Cut 9
Making the Cut
Most quilters are now accustomed to using basic tools: Cutting Mat, straight-edge, and a favoriterotary cutter. With the one end of the Cutting Guide is held in place on a rail,making it more stable and secure as you measure and cut the fabric.
1) With the fabric positioned, place the Cutting Guide on the Side Rail. Slide the Cutting Guide to thetop of the fabric to remove the raw edges. You need not align the Cutting Guide on a line, but place itsedge so you can cut off all of the uneven edges of fabric. When the Cutting Guide lies on the fabric,the Head tightens on the rail to hold the Cutting Guide stationary. Note: To move the Cutting Guidegrasp and lift the knob with one hand (to lift the Cutting Guide away from the fabric) and slide theHead into position with the other hand. Make fine adjustments by lightly pushing the Head.
2) Place your fingers on the Cutting Guide with your hand exerting a gentle pressure over the center ofthe fabric. If you are cutting across a very wide piece of fabric, keep even pressure on the CuttingGuide by repositioning your pressure hand as needed. Keep your fingers clear of the edge of theCutting Guide and blade. Make the cut by slowly pushing the rotary cutter away from you and againstthe edge of the Cutting Guide, through all the fabric layers.
3) Clean up the ragged edge of the fabric by making a horizontal cut.
Note: When using the rotary cutter, always push the cutter away from you. Keep your fingers clearof the edge of the Cutting Guide and blade. Remember: Always retract the blade on your rotary cut-ter between cuts. The blades are very sharp.
Left-HandedCutting Right-Handed
CuttingDirecti
on of Cut
Direction of Cut
Lift C
utting
Guid
e
off of
Fabric

Using the Speed Gauge10
2) Slide the Speed Gauge to align the desiredmeasurement with the small indicator arrow onthe Head. Tighten the thumb screw to a gentlepressure. Do not over tighten the screw or it willbend the Speed Gauge.
1) Loosen the small thumb screw in the Head andinsert one end of the Speed Gauge.
For Cutting Strips, Squares, and RectanglesYou can use the lines on the Cutting Mat or a ruler for measuring the size of your strips andrectangles. The Speed Gauge eliminates most of this time-consuming measuring. With the
, the Speed Gauge allows you to cut identical strips, squares, rectangles, diamonds,equilateral triangles and other shapes quickly and accurately.
Using the Speed Gauge
Important Note: The Speed Gaugemeasures from the inside edge to the CuttingGuide edge.
Right-handed setup.Left-handed setup. Note: For left-handed use,insert the Speed Gauge from the left, as shown.
Indicatorarrow
Tip of the Speed Gaugein the slot under thethumb screw.
Indicatorarrow
Indicatorarrow

Using the Speed Gauge 11
3) With the fabric aligned and the edge trimmed,adjust the Cutting Guide to align the inside edgeof the Speed Gauge at the edge of the fabric.This will set the strip width.
4) Cut along the edge of the Cutting Guide forthe first strip.
7) Continue cutting strips, repeating Steps 5 and 6, until you have the number of strips you need.
Note: If you are cutting many strips or varied strip widths and don’t want to cut shapes right away, youcan set the strips aside. Replace them later in stacks on the Cutting Mat prior to cutting the shapesyou need. Just take care to stack the strips accurately, with edges touching, so your shapes are perfect.
5) Lift the knob on the Cutting Guide and slidethe Head to align the Speed Gauge edge at thecut made in step 4. Note: Cut lines added forclarity.
6) Cut another strip. Do not remove the strips ifyou are planning to cut shapes from them.Leaving them undisturbed on the Cutting Matensures better accuracy when cutting shapes later.
Set to2-3/8"
Edge ofthe fabric
Note: Cut lines in photos have been highlighted for clarity.
Cutting Squares12
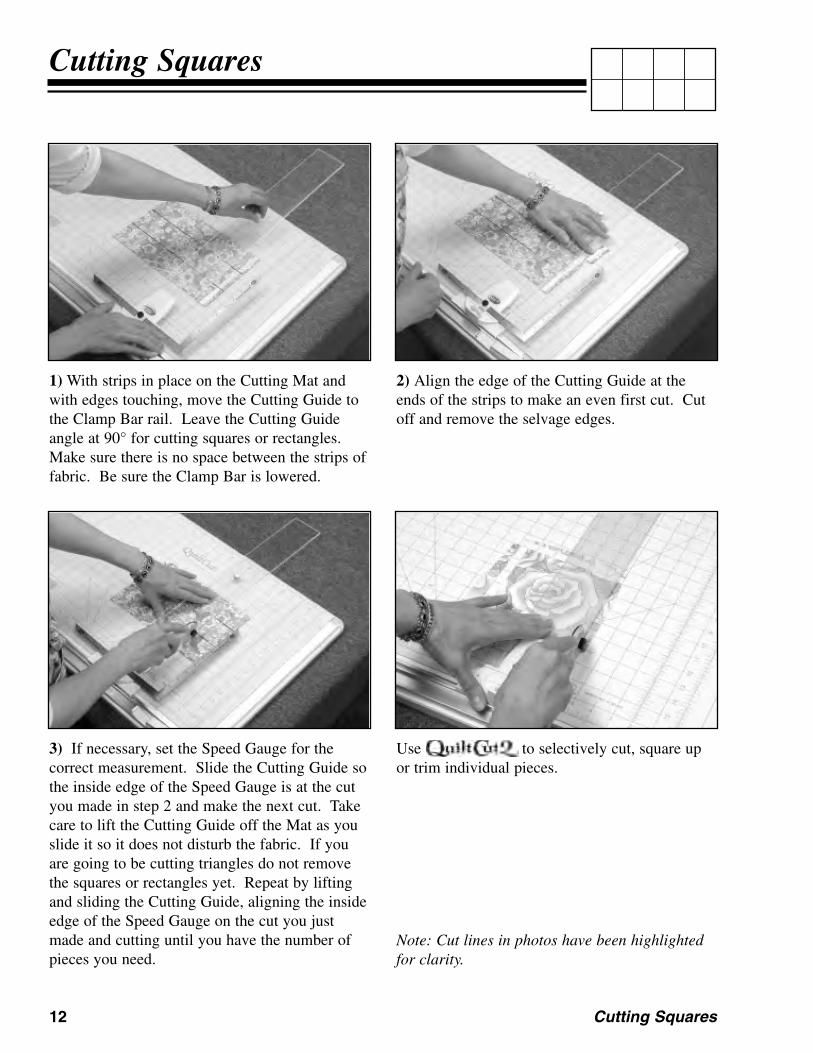
Cutting Squares
1) With strips in place on the Cutting Mat andwith edges touching, move the Cutting Guide tothe Clamp Bar rail. Leave the Cutting Guideangle at 90° for cutting squares or rectangles.Make sure there is no space between the strips offabric. Be sure the Clamp Bar is lowered.
2) Align the edge of the Cutting Guide at theends of the strips to make an even first cut. Cutoff and remove the selvage edges.
3) If necessary, set the Speed Gauge for thecorrect measurement. Slide the Cutting Guide sothe inside edge of the Speed Gauge is at the cutyou made in step 2 and make the next cut. Takecare to lift the Cutting Guide off the Mat as youslide it so it does not disturb the fabric. If youare going to be cutting triangles do not removethe squares or rectangles yet. Repeat by liftingand sliding the Cutting Guide, aligning the insideedge of the Speed Gauge on the cut you justmade and cutting until you have the number ofpieces you need.
Use to selectively cut, square upor trim individual pieces.
Note: Cut lines in photos have been highlightedfor clarity.

Cutting Squares 13
Using a Ruler to Measure CutsIf you would like to cut squares larger than 6-1/2" (the Speed Gauge’s maximum capacity), use thelines on the Cutting Mat, or use a see-through acrylic ruler.
1) With your fabric aligned and trimmed, place asee-through acrylic ruler on the fabric with thefabric’s edge lying under the desired measure-ment on the ruler.
2) With the ruler in place, carefully slide theCutting Guide to butt against the edge of theruler. Check the measurement again to makesure the ruler did not move then make your cut.

Cutting Half–Square Triangles14
Cutting Half–Square Triangles
One half of a diagonally cut square has the straight grain on both short sidesadjacent to the 90° angle.
1) Realign squares on the Cutting Mat ifnecessary. (See “Realigning Strips and Pieces”on pages 28 - 29.) Remove the Speed Gauge androtate the Cutting Guide left to 45°, taking carenot to disturb the pieces on the Cutting Mat.
Note: To cut left handed, rotate the CuttingGuide to the right (at step 1) and cut on the leftside of the Cutting Guide.
2) Slide the Cutting Guide until the edge restsdiagonally on one of the squares, touchingopposite corners. Make the first cut along theside of the Cutting Guide.
Note: To calculate seam allowances for cutting half-square triangles see page 36.
Note: Cut lines in photos have been highlightedfor clarity.

Cutting Half–Square Triangles 15
3) Slide the Cutting Guide to the next position, aligning the edge across the next square(s), and makethe next cut.
4) If you have moved the Cutting Guide fromone side of the system to the other and still havetriangles to cut, move the Cutting Guide to theSide Rail, then change the angle to the opposite45° angle.
5) Slide the Cutting Guide to align the edgesfrom corner to corner of the uncut squares asshown. Make the cut and continue until allsquares are cut into half-square triangles.
Cutting Guideset at 45°

Cutting Quarter–Square Triangles16
Cutting Quarter–Square Triangles
Cutting setting triangles is a breeze with this system. This triangle has thestraight of grain on the long side only.
1) Cut half-square triangles following thedirections on pages 14 and 15.
2) After cutting the half-square triangles, changethe Cutting Guide to the opposite 45° angle.Remove the Side Rail if neccessary to makeroom.
3) Slide the Cutting Guide into place with itsedge lying across the half-square-triangle cornersas shown. Lift the knob on the Cutting Guidewhen you move it so you won’t disturb thepieces on the Cutting Mat. Cut the quarter-square triangles.
4) Continue cutting quarter-square triangles. 5) If you have moved the Cutting Guide fromone side of the system to the other and still havetriangles to cut, move the Cutting Guide to theSide Rail and change to the opposite 45° angle.Align the Cutting Guide with the corners of theuncut pieces and make the cut.
Note: To calculate seam allowances for cutting Quarter-Square Triangles, see page 36.
Note: Cut lines in photos have been highlightedfor clarity.

Stacking Scraps for Cutting 17
Stacking Scraps for Cutting
If you are making a scrap quilt and need to cut identical pieces from differentfabrics, use your to speed up the process.
1) At the ironing board, layer scraps in stacks of eight to ten layers. Press each new scrap addition tothe pile, then press the stack of fabrics together so they are flat and free of wrinkles and bumps. Youdo not need to begin with identically shaped scraps, just stack them to yield the greatest number ofpieces. Never use a hot iron to press directly on the Cutting Mat. Move the pressed stack to the
and center on the Cutting Mat.
Tip: If you stack the scraps in pairs with right sides together, they will be ready to sew right aftercutting. Just separate the cut pieces in pairs and chain-piece them to speed up the process.
2) With the Cutting Guide on the Side Rail andset at 90° insert and set the Speed Gauge at thedesired strip width. Beginning at the top of thestack, cut strips, working from top to bottom.
3) Move the Cutting Guide to the Clamp BarRail. Reset the angle of the Cutting Guide andthe measurement on the Speed Gauge if neces-sary. Working from one side to the other, cutpieces from the strips. Discard the unusablescraps from the edges of the stack.
4) Stack the cut pieces ready for placement inyour quilt design. Repeat steps 1 - 3 forremaining scraps.
Note: Cut lines in photos have been highlightedfor clarity.

Cutting Short Bias Strips18
Cutting Short Bias Strips
1) With fabric(s) on the Cutting Mat, insert theSpeed Gauge to the desired strip width. Placethe Cutting Guide on the Side Rail and rotate to45°. Cut off a corner of the fabric.
2) Slide the Cutting Guide to line up the insideedge of the Speed Gauge with the first cut. Cutalong the Cutting Guide.
Many patterns require short bias strips for appliqué stems or suggest firstcutting bias strips to construct half-square triangle units. Refer to your pattern for specificinstructions or use your favorite method. Use this method for cutting bias strips from scraps orsmall pieces of fabric. The Speed Gauge moves with the Cutting Guide to make measuring quickand easy.

Cutting Short Bias Strips 19
4) If you need more strips, and still have uncut fabric remaining, remove the cut strips, move the fabriconto the Mat and align the edges to make more cuts. Check to make sure the 45° angle on the fabric isaccurate, trim if necessary, and continue making cuts.
3) Continue cutting strips until you run out of room on the Side Rail. Transfer the Cutting Guide to theClamp Bar Rail and change to the opposite 45° angle. Continue cutting strips.

Cutting Long Bias Strips20
Cutting Long Bias Strips
Use long bias strips for binding, Celtic or stained-glass techniques.Here’s a great way to cut long bias strips from fabric pieces largerthan 1/2 yard.
1) Fold opposite corners at 45° angles to thestraight of grain.
2) Fold once again, matching the folded edgesmade in step 1. It is important that the secondfold and first folds are parallel. (Pressing thefabric helps hold the folds parallel and easier toplace into the cutting system).
3) Raise the Clamp Bar and insert the fabric.Align the fold made in step 2 along one of thevertical lines on the Cutting Mat. Lower theClamp Bar.

Cutting Long Bias Strips 21
4) Place the Cutting Guide on the Side Rail, set at 90°. Set the Speed Gauge for the strip width youneed. Make the first cut near the “top” of the fabric. Remove the excess fabric.
5) Align the Speed Gauge along the cut edge of the fabric and make the cut. Continue making cutsuntil you run out of room on the Cutting Mat.
6) Remove strips and raise the Clamp Bar. Move remaining fabric onto the Cutting Mat and realignthe second fold (from step 2) as you did in step 3. Lower the Clamp Bar, trim raw edges if necessaryand continue cutting strips.

Cutting Equilateral Triangles22
Cutting Equilateral Triangles
1) Cut the number of strips required. (See “Using the Speed Gauge” for cutting strips on pages 10 and 11.)
2) Place the Cutting Guide on the Clamp BarRail and rotate to the left 60° position. To con-serve fabric, offset the strips using the CuttingGuide for reference as shown. Place the CuttingGuide across the strips as shown and cut off thestrip ends.
3) Slide the Cutting Guide to align the SpeedGauge with the first cut and make the next cut.Repeat by sliding the Cutting Guide and aligningthe Speed Gauge to make as many cuts across thestrips as you can. You have cut 60° diamondsfrom the strips.
4) Rotate the Cutting Guide to the opposite 60°position. Slide the Cutting Guide to align theedge at the intersections of the cuts as shown.Cut across the strips. Repeat by sliding theCutting Guide to make as many cuts across thestrips as you can.
Each side of an equilateral triangle is the same length, and each angle is 60°.Use these triangles with hexagons for interesting quilt blocks.
Note: To calculate seam allowances for cutting equilateral triangles, see page 36.

Cutting Equilateral Triangles 23
Cutting Equilateral Triangles from one Strip
1) Align strip parallel to the Clamp Bar. Placethe Cutting Guide on the Clamp Bar, rotate to theleft 60° position and set the edge across the endof the strip. Make the first cut.
2) Rotate the Cutting Guide to the opposite 60°position. Slide it to align with the top “point” ofthe triangle as shown. Make the next cut.
3) Rotate the Cutting Guide to the first 60° posi-tion and align with lower “point” of triangle asshown. Make the next cut.
4) Repeat steps 2 and 3, cutting the number oftriangles you need.

Cutting Hexagons24
Cutting Hexagons
Hexagons have 3 sets of sides that are equidistant. It is possible to cuthexagons on the without using templates. Set the Speed Gauge for the strip width,and leave it in place while you cut out the entire shape.
2) Use a ruler to make a small mark at the centerof the end of the strip.
3) With the Cutting Guide still on the Side Railand set at 90°, slide and align strip so centermark lines up with a horizontal line on theCutting Mat. (See “Realigning the Strips andPieces” on pages 28 - 29.)
4) Move the Cutting Guide to the Clamp Bar Railand cut off the selvage end of the strip. Re-markthe strip if needed.
5) Change the Cutting Guide angle to 60° rightand align the Cutting Guide’s edge over thestrip’s center mark. Cut off and remove thecorner of the strip.
Mark onfabric
Mark onfabric
Mark onfabric
1) With the Cutting Guide set at 90°, insert the Speed Gauge to your desired strip width and cut a strip.
Center ofstrip

Cutting Hexagons 25
6) Set the Speed Gauge at the same width as thestrip. Slide the Cutting Guide to align the insideedge of the Speed Gauge with the cut you madein step 5. Cut along the edge of the CuttingGuide as shown.
7) Change the Cutting Guide to the opposite 60°angle and slide it to align the edge with the cen-ter mark of the strip. Make the cut.
8) Slide the Cutting Guide to align the SpeedGauge with the cut you made in step 7 and makethe cut. You have cut a set of hexagons and twosets of equilateral triangles.
9) Remove hexagon(s) if desired, and both setsof equilateral triangles. Note that on the remain-ing strip you now have four sides of your next setof hexagons already cut!
11) Rotate the Cutting Guide to the opposite 60°angle and align the Speed Gauge with the cutedge on the end of the strip as shown.
12) Repeat steps 10 and 11 until you reach the end of the strip.
10) Slide the Cutting Guide to align the SpeedGauge with the cut you made in step 8 as shown.Make the cut.

Cutting Diamonds26
Cutting Diamonds
Traditionally, diamonds are constructed so the height and widthmeasurements are the same. This speed-cutting method works for cutting 45°, 60°, or any other-degree diamonds. Note: This method works only when cutting diamonds from strips that are all thesame width.
1) Start by cutting strips. Set the Cutting Guide at 90° and the Speed Gauge for the width of strip youneed. Cut the number of strips desired. (See “Using the Speed Gauge” for cutting strips on pages 10and 11.) Remove the remaining fabric.
2) Set the Cutting Guide Head on the Clamp BarRail at the desired angle (e.g., 60° for 60°diamonds, 45° for 45° diamonds, etc.). Toconserve fabric, offset the strips using theCutting Guide for reference as shown. Take careto keep the strips parallel to the lines on theCutting Mat (and to each other). Use the CuttingGuide to align. (To realign strips, see“Realigning Strips and Pieces” on pages 28 - 29.)
3) Cut off the ends of the strips.
4) Slide the Cutting Guide to align the SpeedGauge with the first cut. Take care not to shiftthe strips while moving the Cutting Guide. Makethe cut.
5) Repeat step 4 to continue sliding the CuttingGuide and cutting diamonds.

Strip Piecing 27
Strip Piecing
Use the for cutting strips prior to strip piecing, and for cuttingsegments after the strips are sewn together.
2) Place the pieced strip set on the Cutting Mat, with the stitching parallel to the Clamp Bar Rail. Youmay either align the stitching with the lines on the Cutting Mat (See “Align the Cutting Mat” on page10.) or with the Cutting Guide, set at 90°.
3) Place the Cutting Guide (with the Speed Gauge set for the segment width you need) on the ClampBar Rail. Set the Cutting Guide to the angle of segment you need to cut.
4) Slide the Cutting Guide to the end of the strip set and cut off the end of the pieced strip. Use theSpeed Gauge technique (pages 10 and 11) to cut the rest of your pieces.
Note: Sometimes the pieced strip set shifts as you cut segments, so check frequently between cuttingsegments to make sure the strip set is still aligned correctly. You may need to retrim the end of thestrip set every 3 or 4 cuts to maintain the correct angle.
Note: Some strip sets can be placed right sides together in pairs and segments can be cut from thesedoubled strip sets. Practice will tell you when you can successfully do this.
1) Cut the number of strips and sew strips together as required by your quilt pattern. Press the stripscarefully after stitching.
90° cuts 45° cuts

Realigning Strips and Pieces28
2) Without lifting the Cutting Guide off the Mat, gently slide it toward the Clamp Bar, using it to pushthe strips or pieces into alignment along its edge.
Realigning Strips and Pieces
Sometimes you’ll need to reposition the strips or squares on the Cutting Mat(or they are moved out of alignment accidentally). This is not a catastrophe—just use the Cutting Guide to realign the fabric pieces.
1) Set the Cutting Guide for 90°. Place the Cutting Guide on the Side Rail and, while lifting the knobto clear the fabric, slide the Cutting Guide to the top of the cutting system. When it has cleared thefabric pieces, set it flat on the Cutting Mat.
Strips Squares
Note: The outside of the pieces in these photos have been highlighted for clarity.

Realigning Strips and Pieces 29
3) Change the Cutting Guide to the Clamp Bar Rail. While lifting the Cutting Guide off the Mat, slideit to one side of the fabric pieces and set it flat on the Mat. Repeat step 2, gently sliding it to align thevertical edges of the fabric pieces. Note: This works better for squares or other pieces than for strips.For this alignment, you may need to gently pull the strips into place with your fingers.
4) Repeat steps 1-3 to push pieces back into alignment on the Mat, gently sliding the Cutting Guide onall sides of the fabric “grouping” if necessary, and resume cutting.

Making a Pentagon Template30
Making a Pentagon Template
Use the pentagon, with its 5-sided shape, for the center of 5-pointed stars.Because cutting each side identically is critical to this shape, we recommend you create anaccurate template first, then use it with the to cut your pentagons.
Note: To calculate seam allowances for cutting pentagons, see page 36.
2) Tape the template plastic or paper to the centerof the Cutting Mat on the . Placethe Cutting Guide—set at 90°—on the Side Rail.Draw a line along the edge of the Cutting Guideon the template material. Draw the line longerthan the side of the pentagon will be.
3) Place the Cutting Guide on the Clamp BarRail and set it for B (72°/18°). Slide the CuttingGuide toward one end of the drawn line and drawanother line, crossing the first line as shown.Draw the second line longer than the side of thepentagon will be.
4) Slide the Cutting Guide out of the way. Setyour compass for the length of the pentagon’sside. Place the point of the compass on theintersection of the two lines drawn in steps 2 and3. Rotate the compass to draw arcs across bothlines as shown.
5) Change the Cutting Guide to the opposite B(72°/18°) angle. Slide the Cutting Guide to alignone edge with the arc intersection drawn in step 4as shown. Draw the third line.
1) To make the template, you will need template plastic or stiff paper, tape, a compass, a pencil, paper-cutting scissors, and a ruler. Use a compass for making the most accurate template. You can alsomake a template with a ruler if a compass is unavailable.

Making a Pentagon Template 31
6) Slide the Cutting Guide out of the way. Placethe point of the compass on the intersection ofthe lines from step 5. Draw an arc across thethird line.
7) Place the Cutting Guide on the right Side Rail.Change the angle to the left-hand D (54°/36°)setting. Align the edge of the Cutting Guide withthe intersection of the line and arc as shown.Draw the fourth line.
8) Slide the Cutting Guide out of the way. Placethe point of the compass on the intersection ofthe lines from step 7. Draw an arc across thefourth line.
9) Move the Side Rail to the opposite side of theand place the Cutting Guide on
the Side Rail. Change the Cutting Guide to theopposite D (54°/36°) angle and line up the edgeat the two arc intersections as shown. Draw thefifth line.
10) Check the sides of your pentagon template by measuring from angle to angle with the compass orruler. Each side should be exactly the same length. When it is perfect, cut out the template carefullyalong the lines.

Cutting Pentagons32
Cutting Pentagons
This method requires you to turn the fabric piece instead of leaving the stripundisturbed on the Mat. You will still need to use a template.
Because of their angles, the most efficient method for cutting pentagons is cutting from one set ofstrips. For cutting several fabrics at once, layer the strips for a total of 6 to 10 layers.
Note: When using templates with the , align the edge of the Template to the edge of theCutting Guide whenever possible and cut against the Cutting Guide instead of the template.
1) With fabric aligned and trimmed in the, place one side of the template
along the cut edge of the fabric as shown. Placethe Cutting Guide—set at 90°—on the Side Railand slide it to touch the template.
2) Remove the template and cut along CuttingGuide. Move remaining fabric out of the waywithout disturbing the strip.
3) Place the Cutting Guide on the Clamp Bar andset it for left-hand B (72°/18°). Cut off a cornerat the end of the strip as shown.
4) On the strip, align the template with the upper and lower edges and side you cut in step 3. Changethe Cutting Guide’s angle to the opposite B (72°/18°). Butt the Cutting Guide against the edge of thetemplate. Remove the template and cut. Move the remaining strip out of the way.

Cutting Pentagons 33
5) Rotate the cut piece clockwise. Place the edge you cut in step 3 on a horizontal line on the CuttingMat. Set the Cutting Guide on the left-hand B. Align the template on the fabric and carefully butt theedge of the Cutting Guide against the edge of the template. Remove the template and make the cut.
6) Replace the template and rotate the cut piece counter-clockwise, placing the just-cut edge on thehorizontal line. Butt the Cutting Guide against the left edge of the template. Move the template out ofthe way and make the cut.
7) Place end of strip from step 4 back on the Mat. Align one edge on a horizontal line and place thetemplate on the fabric as shown.
8) Repeat steps 5 and 6 until you have cut the next set of pentagons.

Cutting Shapes Using Templates34
Cutting Shapes Using Templates
Many quilters have used pre-cut cardboard or acrylic templates to cut out their fabric pieces.Templates can be hard to hold and difficult to cut against. Combine the templates with the
Cutting Guide for more secure and accurate cutting. In this example we will cut aseries of hexagons with a hexagon template.
1) Cut strips the height of the hexagon. If youare cutting multiple strips set the Speed Gaugefor the strip width as shown.
2) Set the Cutting Guide at 60° to the right andcut off the lower right corner of the strip.
3) Line up the template at the corner of the strip.Move the Cutting Guide to the left-hand 60°angle. Slide the Cutting Guide to butt up to theleft edge of the template.
4) Hold down the template and the Cutting Guideas you cut off the upper right corner of thehexagon. This is the only cut you will makeusing the template’s edge as a cutting guide.
Align

Cutting Shapes Using Templates 35
5) Keeping the Cutting Guide in place, move thetemplate out of the way, and cut along theCutting Guide. After the cut, set the templateback in place.
6) Pivot the Cutting Guide 60° to the right andcarefully position it against the upper left edge ofthe template. Move the template out of the wayand cut against the Cutting Guide.
7) Repeat steps 3 through 6 until you have asmany hexagons as you need.
Note: The outside of the cut pieces in this photoshave been highlighted for clarity.
Seam Allowances36
Seam Allowances
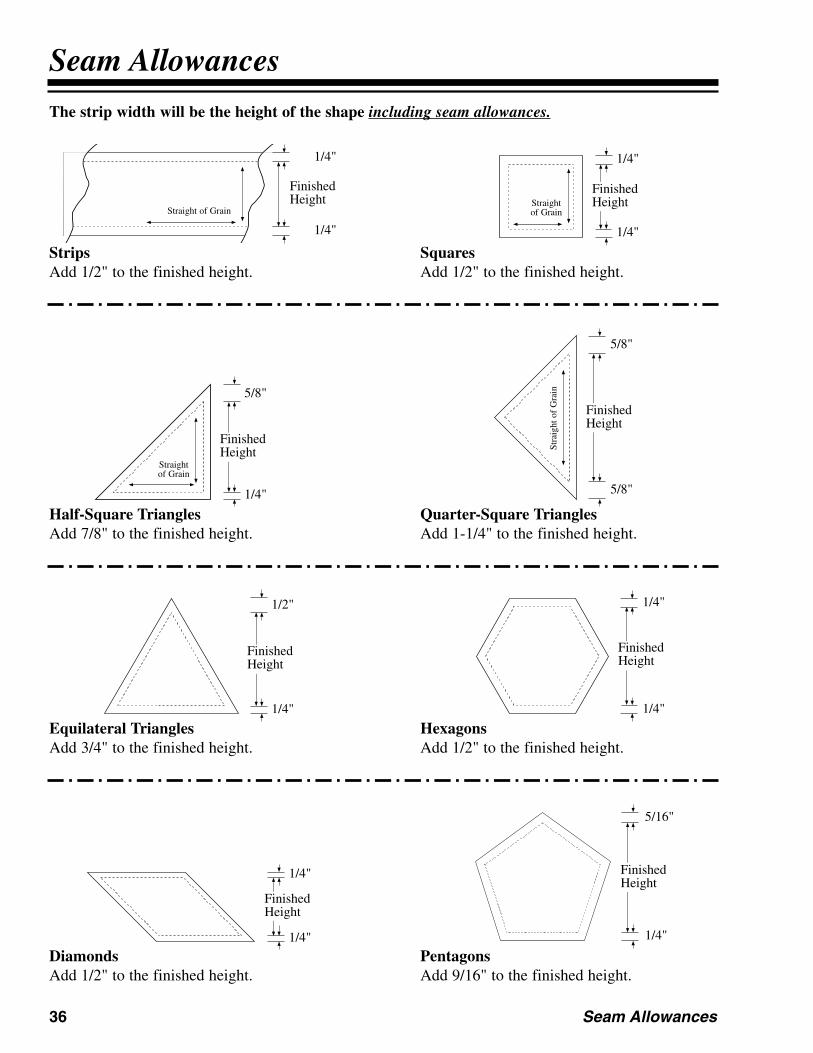
The strip width will be the height of the shape including seam allowances.
StripsAdd 1/2" to the finished height.
SquaresAdd 1/2" to the finished height.
Half-Square Triangles Add 7/8" to the finished height.
Quarter-Square Triangles Add 1-1/4" to the finished height.
Equilateral TrianglesAdd 3/4" to the finished height.
HexagonsAdd 1/2" to the finished height.
DiamondsAdd 1/2" to the finished height.
PentagonsAdd 9/16" to the finished height.
FinishedHeight
1/4"
1/4"
FinishedHeight
5/8"
1/4"
FinishedHeight
1/2"
1/4"
FinishedHeight
1/4"
1/4"
FinishedHeight
1/4"
1/4"
FinishedHeight
5/8"
5/8"
FinishedHeight
1/4"
1/4"
FinishedHeight
5/16"
1/4"
Straight of Grain
Straightof Grain
Straightof Grain
Stra
ight
of
Gra
in

The following angles correspond to thesettings on the Head when it is attached
to the Clamp Bar.Cutting Angle AngleGuide measured measuredHead off the off the
Window Horizontal Vertical90 = 90° 0°A = 81° 9°B* = 72° 18°C = 67-1/2° 22-1/2°60 = 60° 30°D = 54° 36°45 = 45° 45°
The following four pages show some of the many new designs that are possible with the Alto’s. Below is a review of the preset angles.
Advanced Design Ideas 37
Advanced Design Ideas
90
90°
60°
45°
D
AB C
The angles below are both to the left and right of center
A block using 90°, 54°, and 36° angles.54
36
90
36
54
90
36 54
90
54
36
54

Advanced Design Ideas38
A block using 90°, 72°, 54°, 45° and 36° angles.
54
36
90
54 54
72
72
72 72
54
36
54
54
36
90
45
45 90
A block using 90°, 81°, 72°, 67-1/2°, 22-1/2°, 18° and 9° angles.
189 22.5
90
81
72
67.5

Advanced Design Ideas 39
Using 81°, and 9° angles.
9
81
Using 90°, 54°, and 36° angles.
54 36
90
90
90
90
54
5436

Pentagons
36
18
90
54
36
72