quilting classroom - jennie rayment class...quilting classroom jennie rayment 10th sept 2017 8.00 am...
TRANSCRIPT

Quilting Classroom Jennie Rayment
10th Sept 2017 8.00 am

Tools & EquipmentBe original with some Origami style of folding squares. Conjure up a unique table decoration with this simple technique. Expand and explore the construction to produce other decorative
shapes. Fuse and fiddle - it’s fun!Remember to record this show or watch on line for next seven days on createandcraft.tv.
Sewing machine and thread to match fabrics
EZ 30° Triangle acrylic templateEZ 45° Triangle acrylic templateEZ 6.5” Easy Square Junior EZ 6.5” Easy Angle
Simplcity EZ Double Wedding Ring
Rotary Cutter 28/45/60 mm Cutting Mat 17 x 23” Clover mini iron
Fabric Products In- R-Form 6” Sq 12pkSingle Sided Fusible In-R-Form PACK F/Q pack Craft Cotton Co. Holly F/Q pack Craft Cotton Co.Cozy Christmas F/Q pack Craft Cotton Co. Tis the Season F/Q pack Craft Cotton Co.Traditional Wreath Craft Cotton Co. Fabric Roll Floral Sketch
Watch the show for more details on how to combine templates to get this intriguing shape - the idea for the design was suggested by Carole Coles.
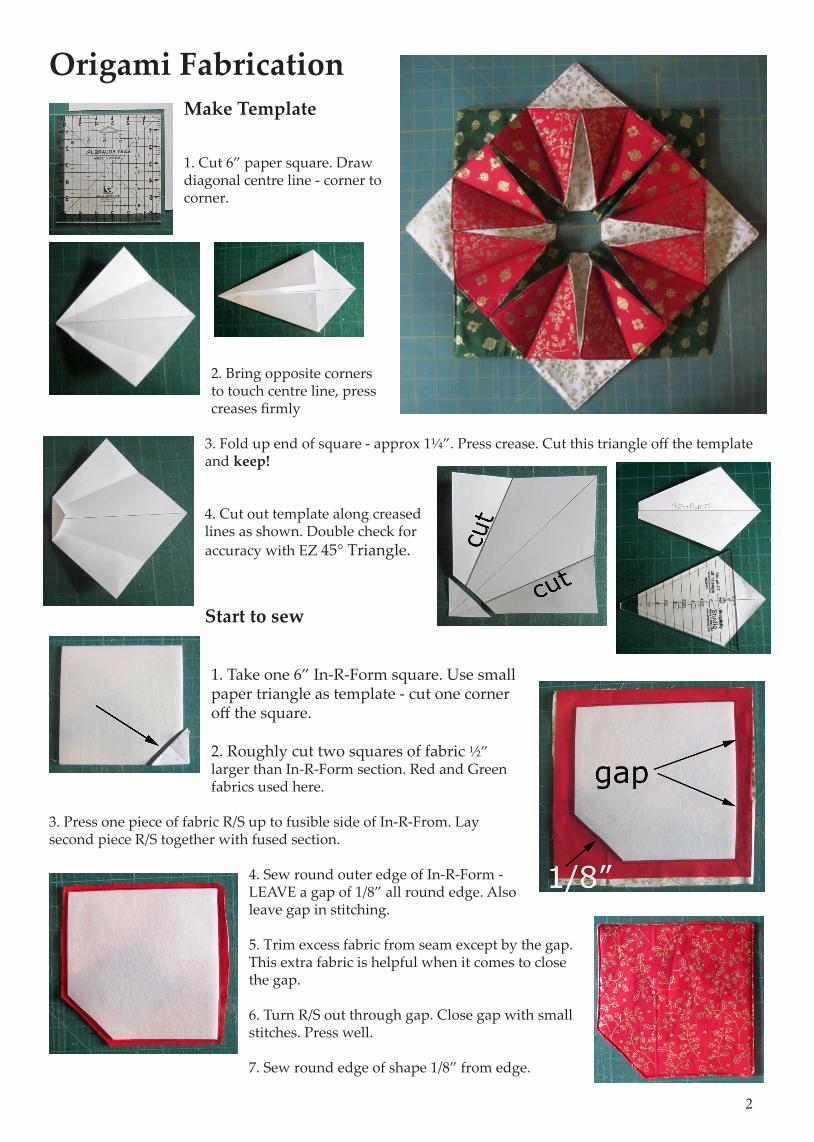
Origami FabricationMake Template
1. Cut 6” paper square. Draw diagonal centre line - corner to corner.
2. Bring opposite corners to touch centre line, press creases firmly
3. Fold up end of square - approx 1¼”. Press crease. Cut this triangle off the template and keep!
4. Cut out template along creased lines as shown. Double check for accuracy with EZ 45° Triangle.
Start to sew
1. Take one 6” In-R-Form square. Use small paper triangle as template - cut one corner off the square.
2. Roughly cut two squares of fabric ½” larger than In-R-Form section. Red and Green fabrics used here.
3. Press one piece of fabric R/S up to fusible side of In-R-From. Lay second piece R/S together with fused section.
4. Sew round outer edge of In-R-Form - LEAVE a gap of 1/8” all round edge. Also leave gap in stitching.
5. Trim excess fabric from seam except by the gap. This extra fabric is helpful when it comes to close the gap.
6. Turn R/S out through gap. Close gap with small stitches. Press well.
7. Sew round edge of shape 1/8” from edge.
2

8. Decide which side is to be on top side of design - see photo. Place template on top, draw lines either side of template.
9. Repeat Stages 1- 8 with seven more In-R-Form squares.
Select different colours to add more interest. Two slightly different Red designs, a White/Gold pattern and a Green/Gold are used here.
Sew Together
1. Sew two sections together along drawn line. If using two colours - alternate the colours.
2. Sew two of these sets to make one half of the design.
3. Repeat with remaining four sections.
4. Sew both halves together.
5. By hand, sew two corners firmly together.
6. Stitch lower edges together.
Why not add beads or sequins? Decorative stitching or free motion quilting could be added at Stage 7.
3

Play on.....
Hexagons can be used in similar fashion as can a kite shape. The kite shape was suggested by Carole Coles - she had this bright idea. Watch the show to see how to make the template.
Soft Cubes1. Cut six squares from In-R-Form.
2. Roughly cut fabric squares approx ¾” larger than In-R-Form squares.
3. Press fabric to fusible side of In-R-From.
4. Fold excess fabric to non-fusible side, tack/baste in place.
5. Sew all six squares to make cross.
6. Fold up sides of cross into box shape.
7. Sew up sides - leave gap in last side. Stuff box firmly through gap.
8. Close gap with small stitches
Make them in different sizes - fill with polybeads/wadding scraps/toy fill-ing.
How about sticking alphabet letters on the sides ... Or make up two small ones as dice (stick felt or paper circles on to represent the numbers) then you can hang them in the car..... from the dashboard not the windscreen please!
4

5


6
photo front page