quilting the quilt - apqs€¦ · how to accomplish curved crosshatching | 4 device, draw in a...
TRANSCRIPT

Quilting the Quilt5 Articles to Improve Your Quilting

2Current Article Title |
How to accomplish curved crosshatching ......................3-5
How to handle quilts with open seams ............................6-8
Quilting the Quilt: Getting from here to there ............9-14
How do you properly use rulers when you quilt? ..........15-16
How to quilt feathers – 2 Methods .................................17-20
Table of Contents
3How to accomplish curved crosshatching |
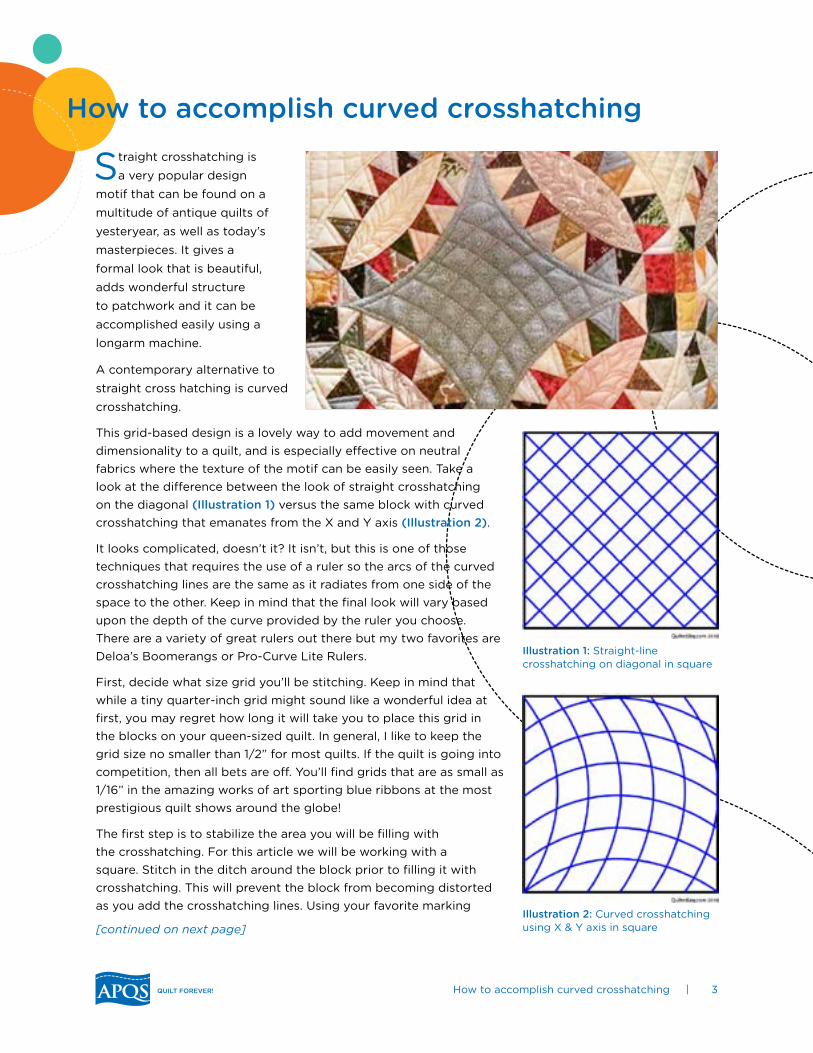
Straight crosshatching is a very popular design
motif that can be found on a multitude of antique quilts of yesteryear, as well as today’s masterpieces. It gives a formal look that is beautiful, adds wonderful structure to patchwork and it can be accomplished easily using a longarm machine.
A contemporary alternative to straight cross hatching is curved crosshatching.
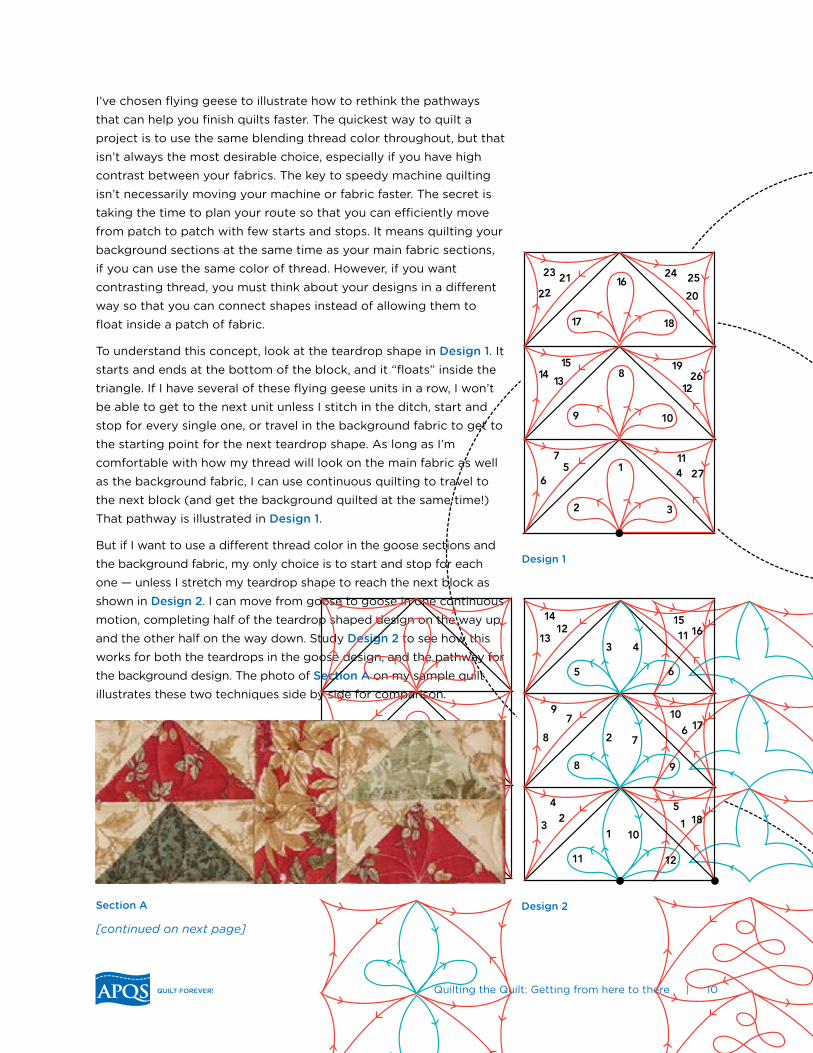
This grid-based design is a lovely way to add movement and dimensionality to a quilt, and is especially effective on neutral fabrics where the texture of the motif can be easily seen. Take a look at the difference between the look of straight crosshatching on the diagonal (Illustration 1) versus the same block with curved crosshatching that emanates from the X and Y axis (Illustration 2).
It looks complicated, doesn’t it? It isn’t, but this is one of those techniques that requires the use of a ruler so the arcs of the curved crosshatching lines are the same as it radiates from one side of the space to the other. Keep in mind that the final look will vary based upon the depth of the curve provided by the ruler you choose. There are a variety of great rulers out there but my two favorites are Deloa’s Boomerangs or Pro-Curve Lite Rulers.
First, decide what size grid you’ll be stitching. Keep in mind that while a tiny quarter-inch grid might sound like a wonderful idea at first, you may regret how long it will take you to place this grid in the blocks on your queen-sized quilt. In general, I like to keep the grid size no smaller than 1/2” for most quilts. If the quilt is going into competition, then all bets are off. You’ll find grids that are as small as 1/16” in the amazing works of art sporting blue ribbons at the most prestigious quilt shows around the globe!
The first step is to stabilize the area you will be filling with the crosshatching. For this article we will be working with a square. Stitch in the ditch around the block prior to filling it with crosshatching. This will prevent the block from becoming distorted as you add the crosshatching lines. Using your favorite marking
Illustration 1: Straight-line crosshatching on diagonal in square
Illustration 2: Curved crosshatching using X & Y axis in square
How to accomplish curved crosshatching
[continued on next page]

4How to accomplish curved crosshatching |
device, draw in a registration line down the middle of the block, both horizontally and vertically. These lines will help you keep your ruler properly aligned (Illustration 3).
Position the needle in the upper left corner of the block. Keep the center etched line in your curved crosshatching ruler aligned with the registration lines you marked previously. Position your ruler on the left side of the machine’s hopping foot using the ruler foot for your machine and an extended base. Refer to this article for more information about how to hold and use rulers safely with your longarm machine.
Run the machine down the curve of the ruler to the bottom left corner as shown in (Illustration 4). Travel along the seam’s ditch to the next entry point as shown. Slide the ruler to the next position while keeping the etched center mark on the ruler aligned with the center mark you made through the middle of the block. Continue in this manner until you reach the opposite side.
Break your threads or travel down the ditch to the lower right corner and move the machine along the edge of the ruler to the lower left corner (Illustration 5). Travel along the ditch to the next entry point while being sure to keep the ruler’s etched middle line oriented to the registration mark you placed denoting the center of the block. Continue to follow the stitching direction as shown in the diagram.
While the specialty crosshatching rulers have etched lines designed to allow you to stitch out curved crosshatching without marking any of the stitching lines, I recommend you go ahead and draw out the curves you’ll be stitching if this is the first time you’ve tried this technique as it is much easier to erase an errant drawn line than a stitched line. Once you’ve worked with curved crosshatching a little more you may find you do not need to draw out the path but, for now, go ahead and mark everything before you stitch.
There are a multitude of ways to add variety to curved crosshatching grids. This article has focused on placing curved crosshatching in a square in a very uniform way. But take a look at how amazing it is in a pinched diamond shape!
Illustration 3: Mark X & Y axis registration lines
Illustration 5: Stitch direction of second layer of arcs
Illustration 4: Stitch direction of first layer of arcs
[continued on next page]

5How to accomplish curved crosshatching |
In my opinion, the real power of curved crosshatching comes out when you prevent the first two intersecting arcs from crossing over each other along two sides of a square, triangle or other shape. This provides a frame that allows one to direct the eye as it flows over a block. Here are two examples. Aren’t they lovely?
Take a look at the negative spaces in the next quilt you work on to see if curved crosshatching might enhance your patchwork. If you have any questions, post them over in our APQS.com forums — there is a wonderful community of quilters there who’d love to help. Do you have an example of curved crosshatching you’ve done on a quilt? Share it over on our Facebook page! If you have any questions about APQS machines or the accessories that make curved crosshatching easier, call an APQS store or contact your local dealer. We are here to help! n
Written by Angela Huffman. Angela
is an APQS dealer and the owner of
Quilted Joy Studio in Louisville,
Kentucky.

6How to handle quilts with open seams |
You may have heard the phrase “every quilt tells a story,” but let’s face it — some quilts seem like they come from a horror novel.
Every quilter has struggled with some aspect of the process at one time or another, and each of us has a horror story to tell about one or more of our quilts. Sometimes the story ends with the quilt destined for the scrap pile, but many times we can “right the wrong” and still arrive at a happy ending.
In this post, we’ll come face to face with that dastardly villain known as the “open seam.” It creeps up on unsuspecting quilters who hurry through a project, convinced they can eyeball a 1/4-inch seam with one eye closed, leaving unsewn sections in the patchwork. It haunts quilters who eschew pins and rely on brute force to align slippery fabric edges only to leave lots of frayed fabric along the edges. It cackles at quilters who fight feed dogs by pulling and stretching savage fabric to tame it into submission, leaving a puckered wobbly mess.
And once it has weaseled its way into a quilt, it dares the quilter to find a seam ripper, challenging him or her to a duel. Most times the quilter will pick up that gauntlet and rip, rip, rip until they can re-sew the seam properly. But other times the open seam wins the battle and it sneaks into the quilt anyway, where it lies in wait for an unsuspecting longarm quilter to discover it by accident.
If the quilter’s lucky, they’ll catch the problem before it goes on the frame; if they’re not so lucky, the hopping foot on the quilting machine may slip right between those two unsewn fabrics where they’ll quickly stitch herself inside the quilt like a prisoner in a maximum security cell. If you have ever had that happen, then you know that doesn’t result in a happy ending! (Photo 1)
In a fairy tale quilting world, every quilt would have precise 1/4-inch seams — not too big and not too small, but just right. They would be perfectly pressed with no threads to trim, no fraying and no bulk. That is indeed every quilter’s dream. But alas, even if our quilts depict a fairy tale kingdom we must snap out of it and get back to reality. We quilters were born to be real, not perfect. Even award-
How to handle quilts with open seams
Photo 1
[continued on next page]

7How to handle quilts with open seams |
winning quilters struggle with making intersections align perfectly every single time, and have been known to skimp on that 1/4-inch seam if it meant that their points would not be cut off in the block.
It’s how we handle those imperfections that measure our success. Inaccurate seams pose lots of challenges, but with a little planning and forethought we can make lemonade from those lemons and still taste the sweetness of a job well done.
As a machine quilter, the best way to handle those horrible inaccurate seams is to conquer them before you load the quilt on your frame. Take the time sew the seam properly, even if it means ripping out a section to do so. If you quilt for others, it is helpful to educate your client about the pitfalls of open seams. Option 1 is to pay you to do repair them, in which case you’ll want to have a fee structure established for the service. Option 2 is showing the client how to do it themselves (thus saving your time and her money). The advantage to Option 2 is that if they learn how to correct the error (and will learn how long it takes to do that) then there’s a good chance they’ll be more careful with her next quilt before ever bringing it to you. You might need to teach them about the merits of pins, how to work a seam ripper, or how to add a second row of reinforcing stitches right next to the original line to help secure the seam.
Personally I prefer to educate the client about how an open seam can impact the quilt’s final appearance, not to mention the risk of tearing the quilt if I accidentally catch on an open seam. But there’s still an Option 3 — where the piecer decides to do nothing about the seams, and doesn’t want to pay me to fix them either. At that point I let the piecer know that the quilt will have “holes” in the piecing but I work within those limitations while still protecting my quilting machine and the quilt as best I can using one of the methods below.
Use these tips if you are faced with the horror of an inaccurate or open seam and won’t be fixing it before quilting:
Most importantly make sure you are aware of the trouble spots before you load the quilt. Spend as much time examining the back of the quilt as you do the front. Look for inconsistent seam allowances and put a safety pin in them on the front of the quilt so you can find them later. (Photo 2)
If you are doing an overall design using a pantograph, locate the safety pins with each advance of your fabric before adding your quilting stitches. You can do a “dry run” by moving your machine along the pantograph line near the safety pin without actually sewing. If the open seam falls under or near the stitching line, use a dry-erase marker on top of the clear protective cover over your pantograph to redraw the design near the bad seam so that you will not quilt over it. (Photo 3)
Photo 2
Photo 3
[continued on next page]

8How to handle quilts with open seams |
Alternatively you can hand baste or machine baste the seam closed on the quilt top and then quilt the design. Remove the basting when complete.
You can run a straight stitching line on top of the seam to permanently close it (This will appear as a straight stitched line in your design, which may not blend in. This solution works better when custom quilting where you can camouflage it like stitching in the ditch.)
Use a double-sided wash away adhesive like Dritz Wonder Tape to temporarily hold the seam together while you quilt over the top. Follow the instructions on the package and slip the tape inside the seam to secure it. (Photo 4)
You could use wash away fabric glue to hold the offending seam in place. (Photo 5)
Leave the safety pins in the quilt when you are finished (or put them back in to identify the open spot if you needed to remove them to execute one of the methods above.) Show the client the pins and advise her to hand-sew each of the open seams closed so that the quilt will not prematurely come apart. If you couldn’t convince the client to repair the open areas before you quilted it (or pay you to do it properly) then perhaps the sight of those safety pins glaring back at them will be a reminder that if you don’t conquer the open seam demons when you have the chance, they will come back to haunt you! n
Written by Dawn Cavanaugh. Dawn is the National Director of Education for APQS
Photo 4
Photo 5

9Quilting the Quilt: Getting from here to there |
The fast-paced world in which we live has contributed to the decline of hand quilting. The Internet connects us instantly with
quilters around the world. We can buy fabric in our pajamas and can find inspiration online. It’s no wonder machine quilting is now the top finishing method — we’ll never live long enough to complete all those projects we want to stitch by hand!
While we may secretly aspire to make a Best of Show quilt, most of the time we make quilts simply because they are fun! Many times we fell in love with the fabric or the pattern. Since we have so many quilts to make and so little time, machine quilting is a natural decision. We can cover the territory quickly with an allover quilting pattern. But if we do want to pay special attention to parts of our quilt, it’s nice to know some secrets for speeding up that process as well.
Quilting the Quilt: Getting from here to there
QU
ILT
ING
TH
E
QU
ILT
1
2 3
456
7
8
9 10
11
1213
1415
16
17 18
19
20
21
22
23 24 25
26
27
1
2
3 4
5 6
7
8 9
10
11 12
123
4 5
67
8
9 10
1112
13
14 1516
17
18
123
4
5
6
78
9
10
11
12
13141516 17
18
20
21
1 612
3
4 5
68
9 10
1112
13
14 1516
17
18
2 5
3 4
1723
4
5
16
156
7
8 14
13101112 21
20
18
19
1
9
1
2
3
123
4 5
68
9 10
1112
13
14 1516
17
18
1 4 52
3
6 9 107
8
11 14 1512
13
2021
1 191
2
18 17
16
15 14
13
3
12 11
10
9 8
7
4
6 5
1
2 3
456
7
8
9 10
11
1213
1415
16
17 18
19
20
21
22
23 24 25
26
27
1
2
3 4
5 6
7
8 9
10
11 12
123
4 5
67
8
9 10
1112
13
14 1516
17
18
123
4
5
6
78
9
10
11
12
13141516 17
18
20
21
1 612
3
4 5
68
9 10
1112
13
14 1516
17
18
2 5
3 4
1723
4
5
16
156
7
8 14
13101112 21
20
18
19
1
9
1
2
3
123
4 5
68
9 10
1112
13
14 1516
17
18
1 4 52
3
6 9 107
8
11 14 1512
13
2021
1 191
2
18 17
16
15 14
13
3
12 11
10
9 8
7
4
6 5
T he fast-paced world in which we live has contributed to the decline
of hand quilting. The Internet connects us instantly with quilters around the world. We can buy fabric in our pajamas and can find inspiration online. It’s no wonder machine quilting is now the top finishing method—we’ll never live long enough to complete all those projects we want to stitch by hand!
While we may secretly aspire to make a Best of Show quilt, most of the time we make quilts simply because they are fun! Many times we fell in love with the fabric or the pattern. Since we have so many quilts to make and so little time, machine quilting is a natural decision. We can cover the territory quickly with an allover quilting pattern. But if we do want to pay special attention to parts of our quilt, it’s nice to know some secrets for speeding up that process as well.
I’ve chosen flying geese to illustrate how to rethink the pathways that can help you finish quilts faster. The quickest way to quilt a project is to use the same blending thread color throughout, but that isn’t always the most desirable choice, especially if you have high contrast between your fabrics. The key to speedy machine quilting isn’t necessarily moving your machine or fabric faster. The secret is taking the time to plan your route so that you can efficiently move from patch to patch with few starts and stops. It means quilting your background sections at the same time as your main fabric sections if you can use the same color of thread. However, if you want contrasting thread, you must think about your designs in a different way so that you can connect shapes instead of allowing them to float inside a patch of fabric.
To understand this concept, look at the teardrop shape in Design 1. It starts and ends at the bottom of the block, and it “floats” inside the triangle. If I have several of these flying geese units in a row, I won’t be able to get to the next unit unless I stitch in the ditch, start and stop for every single one, or travel in the background fabric to get to the starting point for the next teardrop shape. As long as I’m comfortable with how my thread will look on the main fabric as well as the background fabric, I can use continuous quilting to travel to the next block (and get the background quilted at the same time!) That pathway is illustrated In Design 1.
But if I want to use a different thread color in the goose sections and the background fabric, my only choice
by DAWN CAVANAUGH
National Director of Education for American Professional Quilting Systems.
Contact: [email protected] apqs.com
DESIGN 1
SECTION A
DESIGN 2
Getting from Here to ThereTwenty years ago, machine quilting was considered “cheating” by a great majority of quilters,
and it was rare to find a machine-quilted project among show winners. Now hand-quilted quilts make up only a small percentage of completed quilts.
is to start and stop for each one—unless I stretch my teardrop shape to reach the next block as shown in Design 2. I can move from goose to goose in one continuous motion, completing half of the teardrop shaped design on the way up, and the other half on the way down. Study Design 2 to see how this works for both the teardrops in the goose design, and the pathway for
the background design. The photo of Section A on my sample quilt illustrates these two techniques side by side for comparison.
In Section B (page 78) on the quilt sample, I’ve quilted a different shape inside the goose sections, but it can still be completed with one pass (or with two if you want a different thread color for the goose triangles.) This works well by
JANUARY/FEBRUARY 2015 Fons & Porter’s: Love of Quilting | 7776 | FonsandPorter.com JANUARY/FEBRUARY 2015 FonsandPorter.com
Twenty years ago, machine
quilting was considered
“cheating” by a great
majority of quilters, and it
was rare to find a machine-
quilted project among
show winners. Now, hand-
quilted quilts make up only
a small percentage of
completed quilts.
[continued on next page]
10Quilting the Quilt: Getting from here to there |
I’ve chosen flying geese to illustrate how to rethink the pathways that can help you finish quilts faster. The quickest way to quilt a project is to use the same blending thread color throughout, but that isn’t always the most desirable choice, especially if you have high contrast between your fabrics. The key to speedy machine quilting isn’t necessarily moving your machine or fabric faster. The secret is taking the time to plan your route so that you can efficiently move from patch to patch with few starts and stops. It means quilting your background sections at the same time as your main fabric sections, if you can use the same color of thread. However, if you want contrasting thread, you must think about your designs in a different way so that you can connect shapes instead of allowing them to float inside a patch of fabric.
To understand this concept, look at the teardrop shape in Design 1. It starts and ends at the bottom of the block, and it “floats” inside the triangle. If I have several of these flying geese units in a row, I won’t be able to get to the next unit unless I stitch in the ditch, start and stop for every single one, or travel in the background fabric to get to the starting point for the next teardrop shape. As long as I’m comfortable with how my thread will look on the main fabric as well as the background fabric, I can use continuous quilting to travel to the next block (and get the background quilted at the same time!) That pathway is illustrated in Design 1.
But if I want to use a different thread color in the goose sections and the background fabric, my only choice is to start and stop for each one — unless I stretch my teardrop shape to reach the next block as shown in Design 2. I can move from goose to goose in one continuous motion, completing half of the teardrop shaped design on the way up, and the other half on the way down. Study Design 2 to see how this works for both the teardrops in the goose design, and the pathway for the background design. The photo of Section A on my sample quilt illustrates these two techniques side by side for comparison.
QU
ILT
ING
TH
E
QU
ILT
1
2 3
456
7
8
9 10
11
1213
1415
16
17 18
19
20
21
22
23 24 25
26
27
1
2
3 4
5 6
7
8 9
10
11 12
123
4 5
67
8
9 10
1112
13
14 1516
17
18
123
4
5
6
78
9
10
11
12
13141516 17
18
20
21
1 612
3
4 5
68
9 10
1112
13
14 1516
17
18
2 5
3 4
1723
4
5
16
156
7
8 14
13101112 21
20
18
19
1
9
1
2
3
123
4 5
68
9 10
1112
13
14 1516
17
18
1 4 52
3
6 9 107
8
11 14 1512
13
2021
1 191
2
18 17
16
15 14
13
3
12 11
10
9 8
7
4
6 5
1
2 3
456
7
8
9 10
11
1213
1415
16
17 18
19
20
21
22
23 24 25
26
27
1
2
3 4
5 6
7
8 9
10
11 12
123
4 5
67
8
9 10
1112
13
14 1516
17
18
123
4
5
6
78
9
10
11
12
13141516 17
18
20
21
1 612
3
4 5
68
9 10
1112
13
14 1516
17
18
2 5
3 4
1723
4
5
16
156
7
8 14
13101112 21
20
18
19
1
9
1
2
3
123
4 5
68
9 10
1112
13
14 1516
17
18
1 4 52
3
6 9 107
8
11 14 1512
13
2021
1 191
2
18 17
16
15 14
13
3
12 11
10
9 8
7
4
6 5
T he fast-paced world in which we live has contributed to the decline
of hand quilting. The Internet connects us instantly with quilters around the world. We can buy fabric in our pajamas and can find inspiration online. It’s no wonder machine quilting is now the top finishing method—we’ll never live long enough to complete all those projects we want to stitch by hand!
While we may secretly aspire to make a Best of Show quilt, most of the time we make quilts simply because they are fun! Many times we fell in love with the fabric or the pattern. Since we have so many quilts to make and so little time, machine quilting is a natural decision. We can cover the territory quickly with an allover quilting pattern. But if we do want to pay special attention to parts of our quilt, it’s nice to know some secrets for speeding up that process as well.
I’ve chosen flying geese to illustrate how to rethink the pathways that can help you finish quilts faster. The quickest way to quilt a project is to use the same blending thread color throughout, but that isn’t always the most desirable choice, especially if you have high contrast between your fabrics. The key to speedy machine quilting isn’t necessarily moving your machine or fabric faster. The secret is taking the time to plan your route so that you can efficiently move from patch to patch with few starts and stops. It means quilting your background sections at the same time as your main fabric sections if you can use the same color of thread. However, if you want contrasting thread, you must think about your designs in a different way so that you can connect shapes instead of allowing them to float inside a patch of fabric.
To understand this concept, look at the teardrop shape in Design 1. It starts and ends at the bottom of the block, and it “floats” inside the triangle. If I have several of these flying geese units in a row, I won’t be able to get to the next unit unless I stitch in the ditch, start and stop for every single one, or travel in the background fabric to get to the starting point for the next teardrop shape. As long as I’m comfortable with how my thread will look on the main fabric as well as the background fabric, I can use continuous quilting to travel to the next block (and get the background quilted at the same time!) That pathway is illustrated In Design 1.
But if I want to use a different thread color in the goose sections and the background fabric, my only choice
by DAWN CAVANAUGH
National Director of Education for American Professional Quilting Systems.
Contact: [email protected] apqs.com
DESIGN 1
SECTION A
DESIGN 2
Getting from Here to ThereTwenty years ago, machine quilting was considered “cheating” by a great majority of quilters,
and it was rare to find a machine-quilted project among show winners. Now hand-quilted quilts make up only a small percentage of completed quilts.
is to start and stop for each one—unless I stretch my teardrop shape to reach the next block as shown in Design 2. I can move from goose to goose in one continuous motion, completing half of the teardrop shaped design on the way up, and the other half on the way down. Study Design 2 to see how this works for both the teardrops in the goose design, and the pathway for
the background design. The photo of Section A on my sample quilt illustrates these two techniques side by side for comparison.
In Section B (page 78) on the quilt sample, I’ve quilted a different shape inside the goose sections, but it can still be completed with one pass (or with two if you want a different thread color for the goose triangles.) This works well by
JANUARY/FEBRUARY 2015 Fons & Porter’s: Love of Quilting | 7776 | FonsandPorter.com JANUARY/FEBRUARY 2015 FonsandPorter.com
Design 1
QU
ILT
ING
TH
E
QU
ILT
1
2 3
456
7
8
9 10
11
1213
1415
16
17 18
19
20
21
22
23 24 25
26
27
1
2
3 4
5 6
7
8 9
10
11 12
123
4 5
67
8
9 10
1112
13
14 1516
17
18
123
4
5
6
78
9
10
11
12
13141516 17
18
20
21
1 612
3
4 5
68
9 10
1112
13
14 1516
17
18
2 5
3 4
1723
4
5
16
156
7
8 14
13101112 21
20
18
19
1
9
1
2
3
123
4 5
68
9 10
1112
13
14 1516
17
18
1 4 52
3
6 9 107
8
11 14 1512
13
2021
1 191
2
18 17
16
15 14
13
3
12 11
10
9 8
7
4
6 5
1
2 3
456
7
8
9 10
11
1213
1415
16
17 18
19
20
21
22
23 24 25
26
27
1
2
3 4
5 6
7
8 9
10
11 12
123
4 5
67
8
9 10
1112
13
14 1516
17
18
123
4
5
6
78
9
10
11
12
13141516 17
18
20
21
1 612
3
4 5
68
9 10
1112
13
14 1516
17
18
2 5
3 4
1723
4
5
16
156
7
8 14
13101112 21
20
18
19
1
9
1
2
3
123
4 5
68
9 10
1112
13
14 1516
17
18
1 4 52
3
6 9 107
8
11 14 1512
13
2021
1 191
2
18 17
16
15 14
13
3
12 11
10
9 8
7
4
6 5
T he fast-paced world in which we live has contributed to the decline
of hand quilting. The Internet connects us instantly with quilters around the world. We can buy fabric in our pajamas and can find inspiration online. It’s no wonder machine quilting is now the top finishing method—we’ll never live long enough to complete all those projects we want to stitch by hand!
While we may secretly aspire to make a Best of Show quilt, most of the time we make quilts simply because they are fun! Many times we fell in love with the fabric or the pattern. Since we have so many quilts to make and so little time, machine quilting is a natural decision. We can cover the territory quickly with an allover quilting pattern. But if we do want to pay special attention to parts of our quilt, it’s nice to know some secrets for speeding up that process as well.
I’ve chosen flying geese to illustrate how to rethink the pathways that can help you finish quilts faster. The quickest way to quilt a project is to use the same blending thread color throughout, but that isn’t always the most desirable choice, especially if you have high contrast between your fabrics. The key to speedy machine quilting isn’t necessarily moving your machine or fabric faster. The secret is taking the time to plan your route so that you can efficiently move from patch to patch with few starts and stops. It means quilting your background sections at the same time as your main fabric sections if you can use the same color of thread. However, if you want contrasting thread, you must think about your designs in a different way so that you can connect shapes instead of allowing them to float inside a patch of fabric.
To understand this concept, look at the teardrop shape in Design 1. It starts and ends at the bottom of the block, and it “floats” inside the triangle. If I have several of these flying geese units in a row, I won’t be able to get to the next unit unless I stitch in the ditch, start and stop for every single one, or travel in the background fabric to get to the starting point for the next teardrop shape. As long as I’m comfortable with how my thread will look on the main fabric as well as the background fabric, I can use continuous quilting to travel to the next block (and get the background quilted at the same time!) That pathway is illustrated In Design 1.
But if I want to use a different thread color in the goose sections and the background fabric, my only choice
by DAWN CAVANAUGH
National Director of Education for American Professional Quilting Systems.
Contact: [email protected] apqs.com
DESIGN 1
SECTION A
DESIGN 2
Getting from Here to ThereTwenty years ago, machine quilting was considered “cheating” by a great majority of quilters,
and it was rare to find a machine-quilted project among show winners. Now hand-quilted quilts make up only a small percentage of completed quilts.
is to start and stop for each one—unless I stretch my teardrop shape to reach the next block as shown in Design 2. I can move from goose to goose in one continuous motion, completing half of the teardrop shaped design on the way up, and the other half on the way down. Study Design 2 to see how this works for both the teardrops in the goose design, and the pathway for
the background design. The photo of Section A on my sample quilt illustrates these two techniques side by side for comparison.
In Section B (page 78) on the quilt sample, I’ve quilted a different shape inside the goose sections, but it can still be completed with one pass (or with two if you want a different thread color for the goose triangles.) This works well by
JANUARY/FEBRUARY 2015 Fons & Porter’s: Love of Quilting | 7776 | FonsandPorter.com JANUARY/FEBRUARY 2015 FonsandPorter.com
Design 2
QU
ILT
ING
TH
E
QU
ILT
1
2 3
456
7
8
9 10
11
1213
1415
16
17 18
19
20
21
22
23 24 25
26
27
1
2
3 4
5 6
7
8 9
10
11 12
123
4 5
67
8
9 10
1112
13
14 1516
17
18
123
4
5
6
78
9
10
11
12
13141516 17
18
20
21
1 612
3
4 5
68
9 10
1112
13
14 1516
17
18
2 5
3 4
1723
4
5
16
156
7
8 14
13101112 21
20
18
19
1
9
1
2
3
123
4 5
68
9 10
1112
13
14 1516
17
18
1 4 52
3
6 9 107
8
11 14 1512
13
2021
1 191
2
18 17
16
15 14
13
3
12 11
10
9 8
7
4
6 5
1
2 3
456
7
8
9 10
11
1213
1415
16
17 18
19
20
21
22
23 24 25
26
27
1
2
3 4
5 6
7
8 9
10
11 12
123
4 5
67
8
9 10
1112
13
14 1516
17
18
123
4
5
6
78
9
10
11
12
13141516 17
18
20
21
1 612
3
4 5
68
9 10
1112
13
14 1516
17
18
2 5
3 4
1723
4
5
16
156
7
8 14
13101112 21
20
18
19
1
9
1
2
3
123
4 5
68
9 10
1112
13
14 1516
17
18
1 4 52
3
6 9 107
8
11 14 1512
13
2021
1 191
2
18 17
16
15 14
13
3
12 11
10
9 8
7
4
6 5
T he fast-paced world in which we live has contributed to the decline
of hand quilting. The Internet connects us instantly with quilters around the world. We can buy fabric in our pajamas and can find inspiration online. It’s no wonder machine quilting is now the top finishing method—we’ll never live long enough to complete all those projects we want to stitch by hand!
While we may secretly aspire to make a Best of Show quilt, most of the time we make quilts simply because they are fun! Many times we fell in love with the fabric or the pattern. Since we have so many quilts to make and so little time, machine quilting is a natural decision. We can cover the territory quickly with an allover quilting pattern. But if we do want to pay special attention to parts of our quilt, it’s nice to know some secrets for speeding up that process as well.
I’ve chosen flying geese to illustrate how to rethink the pathways that can help you finish quilts faster. The quickest way to quilt a project is to use the same blending thread color throughout, but that isn’t always the most desirable choice, especially if you have high contrast between your fabrics. The key to speedy machine quilting isn’t necessarily moving your machine or fabric faster. The secret is taking the time to plan your route so that you can efficiently move from patch to patch with few starts and stops. It means quilting your background sections at the same time as your main fabric sections if you can use the same color of thread. However, if you want contrasting thread, you must think about your designs in a different way so that you can connect shapes instead of allowing them to float inside a patch of fabric.
To understand this concept, look at the teardrop shape in Design 1. It starts and ends at the bottom of the block, and it “floats” inside the triangle. If I have several of these flying geese units in a row, I won’t be able to get to the next unit unless I stitch in the ditch, start and stop for every single one, or travel in the background fabric to get to the starting point for the next teardrop shape. As long as I’m comfortable with how my thread will look on the main fabric as well as the background fabric, I can use continuous quilting to travel to the next block (and get the background quilted at the same time!) That pathway is illustrated In Design 1.
But if I want to use a different thread color in the goose sections and the background fabric, my only choice
by DAWN CAVANAUGH
National Director of Education for American Professional Quilting Systems.
Contact: [email protected] apqs.com
DESIGN 1
SECTION A
DESIGN 2
Getting from Here to ThereTwenty years ago, machine quilting was considered “cheating” by a great majority of quilters,
and it was rare to find a machine-quilted project among show winners. Now hand-quilted quilts make up only a small percentage of completed quilts.
is to start and stop for each one—unless I stretch my teardrop shape to reach the next block as shown in Design 2. I can move from goose to goose in one continuous motion, completing half of the teardrop shaped design on the way up, and the other half on the way down. Study Design 2 to see how this works for both the teardrops in the goose design, and the pathway for
the background design. The photo of Section A on my sample quilt illustrates these two techniques side by side for comparison.
In Section B (page 78) on the quilt sample, I’ve quilted a different shape inside the goose sections, but it can still be completed with one pass (or with two if you want a different thread color for the goose triangles.) This works well by
JANUARY/FEBRUARY 2015 Fons & Porter’s: Love of Quilting | 7776 | FonsandPorter.com JANUARY/FEBRUARY 2015 FonsandPorter.com
Section A
[continued on next page]

11Quilting the Quilt: Getting from here to there |
In Section B on the quilt sample, I’ve quilted a different shape inside the goose sections, but it can still be completed with one pass (or with two if you want a different thread color for the goose triangles.) This works well by using the background pieces for traveling. Designs 3 and 4 illustrate the paths I chose to connect the goose blocks.
1
2 3
456
7
8
9 10
11
1213
1415
16
17 18
19
20
21
22
23 24 25
26
27
1
2
3 4
5 6
7
8 9
10
11 12
123
4 5
67
8
9 10
1112
13
14 1516
17
18
123
4
5
6
78
9
10
11
12
13141516 17
18
20
21
1 612
3
4 5
68
9 10
1112
13
14 1516
17
18
2 5
3 4
1723
4
5
16
156
7
8 14
13101112 21
20
18
19
1
9
1
2
3
123
4 5
68
9 10
1112
13
14 1516
17
18
1 4 52
3
6 9 107
8
11 14 1512
13
2021
1 191
2
18 17
16
15 14
13
3
12 11
10
9 8
7
4
6 5
1
2 3
456
7
8
9 10
11
1213
1415
16
17 18
19
20
21
22
23 24 25
26
27
1
2
3 4
5 6
7
8 9
10
11 12
123
4 5
67
8
9 10
1112
13
14 1516
17
18
123
4
5
6
78
9
10
11
12
13141516 17
18
20
21
1 612
3
4 5
68
9 10
1112
13
14 1516
17
18
2 5
3 4
1723
4
5
16
156
7
8 14
13101112 21
20
18
19
1
9
1
2
3
123
4 5
68
9 10
1112
13
14 1516
17
18
1 4 52
3
6 9 107
8
11 14 1512
13
2021
1 191
2
18 17
16
15 14
13
3
12 11
10
9 8
7
4
6 5
using the background pieces for traveling. Designs 3 and 4 illustrate the paths I chose to connect the goose blocks.
Section C shows a spiraling design through each goose. You can stitch the spirals close together or far apart, depending on the density of quilting you desire. Designs 5 and 6 show
DESIGN 4DESIGN 7 DESIGN 8
DESIGN 5 DESIGN 6 Look at Design 7 and notice that only one quilting line travels out from the corners to the teardrop shape in the center. This provides the connection from patch to patch with the same thread color, but I will not be able to join the shapes inside the triangles with that same shape if I want different thread. I need to add a second line that takes me back out of the corner and returns to the intersection at the top of the goose so that I can travel to the next block. Design 8 shows how I chose to make that jump.
Even though I’ve laid out a path for you with each of these design ideas, you can vary the path to your liking. Maybe you prefer quilting up the right side and then coming down the left. Maybe you want to do the goose design at a different time than what my sequence suggests. How you get from “here to there” isn’t important as long as you achieve your desired result. Experiment to find what works best for you. Try these techniques to speed up your machine quilting, and have fun!
SECTION D
SECTION C
DESIGN 3
SECTION B
you the pathway with the same and contrasting threads.
Look at Section D and study the shape in each goose triangle. This design starts and stops in the far corners of the triangle. I can quilt both the background and the goose design at the same time with the same thread color.
JANUARY/FEBRUARY 2015 Fons & Porter’s: Love of Quilting | 7978 | FonsandPorter.com JANUARY/FEBRUARY 2015 FonsandPorter.com
Section B
1
2 3
456
7
8
9 10
11
1213
1415
16
17 18
19
20
21
22
23 24 25
26
27
1
2
3 4
5 6
7
8 9
10
11 12
123
4 5
67
8
9 10
1112
13
14 1516
17
18
123
4
5
6
78
9
10
11
12
13141516 17
18
20
21
1 612
3
4 5
68
9 10
1112
13
14 1516
17
18
2 5
3 4
1723
4
5
16
156
7
8 14
13101112 21
20
18
19
1
9
1
2
3
123
4 5
68
9 10
1112
13
14 1516
17
18
1 4 52
3
6 9 107
8
11 14 1512
13
2021
1 191
2
18 17
16
15 14
13
3
12 11
10
9 8
7
4
6 5
1
2 3
456
7
8
9 10
11
1213
1415
16
17 18
19
20
21
22
23 24 25
26
27
1
2
3 4
5 6
7
8 9
10
11 12
123
4 5
67
8
9 10
1112
13
14 1516
17
18
123
4
5
6
78
9
10
11
12
13141516 17
18
20
21
1 612
3
4 5
68
9 10
1112
13
14 1516
17
18
2 5
3 4
1723
4
5
16
156
7
8 14
13101112 21
20
18
19
1
9
1
2
3
123
4 5
68
9 10
1112
13
14 1516
17
18
1 4 52
3
6 9 107
8
11 14 1512
13
2021
1 191
2
18 17
16
15 14
13
3
12 11
10
9 8
7
4
6 5
using the background pieces for traveling. Designs 3 and 4 illustrate the paths I chose to connect the goose blocks.
Section C shows a spiraling design through each goose. You can stitch the spirals close together or far apart, depending on the density of quilting you desire. Designs 5 and 6 show
DESIGN 4DESIGN 7 DESIGN 8
DESIGN 5 DESIGN 6 Look at Design 7 and notice that only one quilting line travels out from the corners to the teardrop shape in the center. This provides the connection from patch to patch with the same thread color, but I will not be able to join the shapes inside the triangles with that same shape if I want different thread. I need to add a second line that takes me back out of the corner and returns to the intersection at the top of the goose so that I can travel to the next block. Design 8 shows how I chose to make that jump.
Even though I’ve laid out a path for you with each of these design ideas, you can vary the path to your liking. Maybe you prefer quilting up the right side and then coming down the left. Maybe you want to do the goose design at a different time than what my sequence suggests. How you get from “here to there” isn’t important as long as you achieve your desired result. Experiment to find what works best for you. Try these techniques to speed up your machine quilting, and have fun!
SECTION D
SECTION C
DESIGN 3
SECTION B
you the pathway with the same and contrasting threads.
Look at Section D and study the shape in each goose triangle. This design starts and stops in the far corners of the triangle. I can quilt both the background and the goose design at the same time with the same thread color.
JANUARY/FEBRUARY 2015 Fons & Porter’s: Love of Quilting | 7978 | FonsandPorter.com JANUARY/FEBRUARY 2015 FonsandPorter.com
Design 3
1
2 3
456
7
8
9 10
11
1213
1415
16
17 18
19
20
21
22
23 24 25
26
27
1
2
3 4
5 6
7
8 9
10
11 12
123
4 5
67
8
9 10
1112
13
14 1516
17
18
123
4
5
6
78
9
10
11
12
13141516 17
18
20
21
1 612
3
4 5
68
9 10
1112
13
14 1516
17
18
2 5
3 4
1723
4
5
16
156
7
8 14
13101112 21
20
18
19
1
9
1
2
3
123
4 5
68
9 10
1112
13
14 1516
17
18
1 4 52
3
6 9 107
8
11 14 1512
13
2021
1 191
2
18 17
16
15 14
13
3
12 11
10
9 8
7
4
6 5
1
2 3
456
7
8
9 10
11
1213
1415
16
17 18
19
20
21
22
23 24 25
26
27
1
2
3 4
5 6
7
8 9
10
11 12
123
4 5
67
8
9 10
1112
13
14 1516
17
18
123
4
5
6
78
9
10
11
12
13141516 17
18
20
21
1 612
3
4 5
68
9 10
1112
13
14 1516
17
18
2 5
3 4
1723
4
5
16
156
7
8 14
13101112 21
20
18
19
1
9
1
2
3
123
4 5
68
9 10
1112
13
14 1516
17
18
1 4 52
3
6 9 107
8
11 14 1512
13
2021
1 191
2
18 17
16
15 14
13
3
12 11
10
9 8
7
4
6 5
using the background pieces for traveling. Designs 3 and 4 illustrate the paths I chose to connect the goose blocks.
Section C shows a spiraling design through each goose. You can stitch the spirals close together or far apart, depending on the density of quilting you desire. Designs 5 and 6 show
DESIGN 4DESIGN 7 DESIGN 8
DESIGN 5 DESIGN 6 Look at Design 7 and notice that only one quilting line travels out from the corners to the teardrop shape in the center. This provides the connection from patch to patch with the same thread color, but I will not be able to join the shapes inside the triangles with that same shape if I want different thread. I need to add a second line that takes me back out of the corner and returns to the intersection at the top of the goose so that I can travel to the next block. Design 8 shows how I chose to make that jump.
Even though I’ve laid out a path for you with each of these design ideas, you can vary the path to your liking. Maybe you prefer quilting up the right side and then coming down the left. Maybe you want to do the goose design at a different time than what my sequence suggests. How you get from “here to there” isn’t important as long as you achieve your desired result. Experiment to find what works best for you. Try these techniques to speed up your machine quilting, and have fun!
SECTION D
SECTION C
DESIGN 3
SECTION B
you the pathway with the same and contrasting threads.
Look at Section D and study the shape in each goose triangle. This design starts and stops in the far corners of the triangle. I can quilt both the background and the goose design at the same time with the same thread color.
JANUARY/FEBRUARY 2015 Fons & Porter’s: Love of Quilting | 7978 | FonsandPorter.com JANUARY/FEBRUARY 2015 FonsandPorter.com
Design 4
[continued on next page]

12Quilting the Quilt: Getting from here to there |
Section C shows a spiraling design through each goose. You can stitch the spirals close together or far apart, depending on the density of quilting you desire. Designs 5 and 6 show you the pathway with the same and contrasting threads.
1
2 3
456
7
8
9 10
11
1213
1415
16
17 18
19
20
21
22
23 24 25
26
27
1
2
3 4
5 6
7
8 9
10
11 12
123
4 5
67
8
9 10
1112
13
14 1516
17
18
123
4
5
6
78
9
10
11
12
13141516 17
18
20
21
1 612
3
4 5
68
9 10
1112
13
14 1516
17
18
2 5
3 4
1723
4
5
16
156
7
8 14
13101112 21
20
18
19
1
9
1
2
3
123
4 5
68
9 10
1112
13
14 1516
17
18
1 4 52
3
6 9 107
8
11 14 1512
13
2021
1 191
2
18 17
16
15 14
13
3
12 11
10
9 8
7
4
6 5
1
2 3
456
7
8
9 10
11
1213
1415
16
17 18
19
20
21
22
23 24 25
26
27
1
2
3 4
5 6
7
8 9
10
11 12
123
4 5
67
8
9 10
1112
13
14 1516
17
18
123
4
5
6
78
9
10
11
12
13141516 17
18
20
21
1 612
3
4 5
68
9 10
1112
13
14 1516
17
18
2 5
3 4
1723
4
5
16
156
7
8 14
13101112 21
20
18
19
1
9
1
2
3
123
4 5
68
9 10
1112
13
14 1516
17
18
1 4 52
3
6 9 107
8
11 14 1512
13
2021
1 191
2
18 17
16
15 14
13
3
12 11
10
9 8
7
4
6 5
using the background pieces for traveling. Designs 3 and 4 illustrate the paths I chose to connect the goose blocks.
Section C shows a spiraling design through each goose. You can stitch the spirals close together or far apart, depending on the density of quilting you desire. Designs 5 and 6 show
DESIGN 4DESIGN 7 DESIGN 8
DESIGN 5 DESIGN 6 Look at Design 7 and notice that only one quilting line travels out from the corners to the teardrop shape in the center. This provides the connection from patch to patch with the same thread color, but I will not be able to join the shapes inside the triangles with that same shape if I want different thread. I need to add a second line that takes me back out of the corner and returns to the intersection at the top of the goose so that I can travel to the next block. Design 8 shows how I chose to make that jump.
Even though I’ve laid out a path for you with each of these design ideas, you can vary the path to your liking. Maybe you prefer quilting up the right side and then coming down the left. Maybe you want to do the goose design at a different time than what my sequence suggests. How you get from “here to there” isn’t important as long as you achieve your desired result. Experiment to find what works best for you. Try these techniques to speed up your machine quilting, and have fun!
SECTION D
SECTION C
DESIGN 3
SECTION B
you the pathway with the same and contrasting threads.
Look at Section D and study the shape in each goose triangle. This design starts and stops in the far corners of the triangle. I can quilt both the background and the goose design at the same time with the same thread color.
JANUARY/FEBRUARY 2015 Fons & Porter’s: Love of Quilting | 7978 | FonsandPorter.com JANUARY/FEBRUARY 2015 FonsandPorter.com
Section C
1
2 3
456
7
8
9 10
11
1213
1415
16
17 18
19
20
21
22
23 24 25
26
27
1
2
3 4
5 6
7
8 9
10
11 12
123
4 5
67
8
9 10
1112
13
14 1516
17
18
123
4
5
6
78
9
10
11
12
13141516 17
18
20
21
1 612
3
4 5
68
9 10
1112
13
14 1516
17
18
2 5
3 4
1723
4
5
16
156
7
8 14
13101112 21
20
18
19
1
9
1
2
3
123
4 5
68
9 10
1112
13
14 1516
17
18
1 4 52
3
6 9 107
8
11 14 1512
13
2021
1 191
2
18 17
16
15 14
13
3
12 11
10
9 8
7
4
6 5
1
2 3
456
7
8
9 10
11
1213
1415
16
17 18
19
20
21
22
23 24 25
26
27
1
2
3 4
5 6
7
8 9
10
11 12
123
4 5
67
8
9 10
1112
13
14 1516
17
18
123
4
5
6
78
9
10
11
12
13141516 17
18
20
21
1 612
3
4 5
68
9 10
1112
13
14 1516
17
18
2 5
3 4
1723
4
5
16
156
7
8 14
13101112 21
20
18
19
1
9
1
2
3
123
4 5
68
9 10
1112
13
14 1516
17
18
1 4 52
3
6 9 107
8
11 14 1512
13
2021
1 191
2
18 17
16
15 14
13
3
12 11
10
9 8
7
4
6 5
using the background pieces for traveling. Designs 3 and 4 illustrate the paths I chose to connect the goose blocks.
Section C shows a spiraling design through each goose. You can stitch the spirals close together or far apart, depending on the density of quilting you desire. Designs 5 and 6 show
DESIGN 4DESIGN 7 DESIGN 8
DESIGN 5 DESIGN 6 Look at Design 7 and notice that only one quilting line travels out from the corners to the teardrop shape in the center. This provides the connection from patch to patch with the same thread color, but I will not be able to join the shapes inside the triangles with that same shape if I want different thread. I need to add a second line that takes me back out of the corner and returns to the intersection at the top of the goose so that I can travel to the next block. Design 8 shows how I chose to make that jump.
Even though I’ve laid out a path for you with each of these design ideas, you can vary the path to your liking. Maybe you prefer quilting up the right side and then coming down the left. Maybe you want to do the goose design at a different time than what my sequence suggests. How you get from “here to there” isn’t important as long as you achieve your desired result. Experiment to find what works best for you. Try these techniques to speed up your machine quilting, and have fun!
SECTION D
SECTION C
DESIGN 3
SECTION B
you the pathway with the same and contrasting threads.
Look at Section D and study the shape in each goose triangle. This design starts and stops in the far corners of the triangle. I can quilt both the background and the goose design at the same time with the same thread color.
JANUARY/FEBRUARY 2015 Fons & Porter’s: Love of Quilting | 7978 | FonsandPorter.com JANUARY/FEBRUARY 2015 FonsandPorter.com
Design 5
1
2 3
456
7
8
9 10
11
1213
1415
16
17 18
19
20
21
22
23 24 25
26
27
1
2
3 4
5 6
7
8 9
10
11 12
123
4 5
67
8
9 10
1112
13
14 1516
17
18
123
4
5
6
78
9
10
11
12
13141516 17
18
20
21
1 612
3
4 5
68
9 10
1112
13
14 1516
17
18
2 5
3 4
1723
4
5
16
156
7
8 14
13101112 21
20
18
19
1
9
1
2
3
123
4 5
68
9 10
1112
13
14 1516
17
18
1 4 52
3
6 9 107
8
11 14 1512
13
2021
1 191
2
18 17
16
15 14
13
3
12 11
10
9 8
7
4
6 5
1
2 3
456
7
8
9 10
11
1213
1415
16
17 18
19
20
21
22
23 24 25
26
27
1
2
3 4
5 6
7
8 9
10
11 12
123
4 5
67
8
9 10
1112
13
14 1516
17
18
123
4
5
6
78
9
10
11
12
13141516 17
18
20
21
1 612
3
4 5
68
9 10
1112
13
14 1516
17
18
2 5
3 4
1723
4
5
16
156
7
8 14
13101112 21
20
18
19
1
9
1
2
3
123
4 5
68
9 10
1112
13
14 1516
17
18
1 4 52
3
6 9 107
8
11 14 1512
13
2021
1 191
2
18 17
16
15 14
13
3
12 11
10
9 8
7
4
6 5
using the background pieces for traveling. Designs 3 and 4 illustrate the paths I chose to connect the goose blocks.
Section C shows a spiraling design through each goose. You can stitch the spirals close together or far apart, depending on the density of quilting you desire. Designs 5 and 6 show
DESIGN 4DESIGN 7 DESIGN 8
DESIGN 5 DESIGN 6 Look at Design 7 and notice that only one quilting line travels out from the corners to the teardrop shape in the center. This provides the connection from patch to patch with the same thread color, but I will not be able to join the shapes inside the triangles with that same shape if I want different thread. I need to add a second line that takes me back out of the corner and returns to the intersection at the top of the goose so that I can travel to the next block. Design 8 shows how I chose to make that jump.
Even though I’ve laid out a path for you with each of these design ideas, you can vary the path to your liking. Maybe you prefer quilting up the right side and then coming down the left. Maybe you want to do the goose design at a different time than what my sequence suggests. How you get from “here to there” isn’t important as long as you achieve your desired result. Experiment to find what works best for you. Try these techniques to speed up your machine quilting, and have fun!
SECTION D
SECTION C
DESIGN 3
SECTION B
you the pathway with the same and contrasting threads.
Look at Section D and study the shape in each goose triangle. This design starts and stops in the far corners of the triangle. I can quilt both the background and the goose design at the same time with the same thread color.
JANUARY/FEBRUARY 2015 Fons & Porter’s: Love of Quilting | 7978 | FonsandPorter.com JANUARY/FEBRUARY 2015 FonsandPorter.com
Design 6
[continued on next page]

13Quilting the Quilt: Getting from here to there |
Look at Section D and study the shape in each goose triangle. This design starts and stops in the far corners of the triangle. I can quilt both the background and the goose design at the same time with the same thread color.
Look at Design 7 and notice that only one quilting line travels out from the corners to the teardrop shape in the center. This provides the connection from patch to patch with the same thread color, but I will not be able to join the shapes inside the triangles with that same shape if I want different thread. I need to add a second line that takes me back out of the corner and returns to the intersection at the top of the goose so that I can travel to the next block. Design 8 shows how I chose to make that jump.
1
2 3
456
7
8
9 10
11
1213
1415
16
17 18
19
20
21
22
23 24 25
26
27
1
2
3 4
5 6
7
8 9
10
11 12
123
4 5
67
8
9 10
1112
13
14 1516
17
18
123
4
5
6
78
9
10
11
12
13141516 17
18
20
21
1 612
3
4 5
68
9 10
1112
13
14 1516
17
18
2 5
3 4
1723
4
5
16
156
7
8 14
13101112 21
20
18
19
1
9
1
2
3
123
4 5
68
9 10
1112
13
14 1516
17
18
1 4 52
3
6 9 107
8
11 14 1512
13
2021
1 191
2
18 17
16
15 14
13
3
12 11
10
9 8
7
4
6 5
1
2 3
456
7
8
9 10
11
1213
1415
16
17 18
19
20
21
22
23 24 25
26
27
1
2
3 4
5 6
7
8 9
10
11 12
123
4 5
67
8
9 10
1112
13
14 1516
17
18
123
4
5
6
78
9
10
11
12
13141516 17
18
20
21
1 612
3
4 5
68
9 10
1112
13
14 1516
17
18
2 5
3 4
1723
4
5
16
156
7
8 14
13101112 21
20
18
19
1
9
1
2
3
123
4 5
68
9 10
1112
13
14 1516
17
18
1 4 52
3
6 9 107
8
11 14 1512
13
2021
1 191
2
18 17
16
15 14
13
3
12 11
10
9 8
7
4
6 5
using the background pieces for traveling. Designs 3 and 4 illustrate the paths I chose to connect the goose blocks.
Section C shows a spiraling design through each goose. You can stitch the spirals close together or far apart, depending on the density of quilting you desire. Designs 5 and 6 show
DESIGN 4DESIGN 7 DESIGN 8
DESIGN 5 DESIGN 6 Look at Design 7 and notice that only one quilting line travels out from the corners to the teardrop shape in the center. This provides the connection from patch to patch with the same thread color, but I will not be able to join the shapes inside the triangles with that same shape if I want different thread. I need to add a second line that takes me back out of the corner and returns to the intersection at the top of the goose so that I can travel to the next block. Design 8 shows how I chose to make that jump.
Even though I’ve laid out a path for you with each of these design ideas, you can vary the path to your liking. Maybe you prefer quilting up the right side and then coming down the left. Maybe you want to do the goose design at a different time than what my sequence suggests. How you get from “here to there” isn’t important as long as you achieve your desired result. Experiment to find what works best for you. Try these techniques to speed up your machine quilting, and have fun!
SECTION D
SECTION C
DESIGN 3
SECTION B
you the pathway with the same and contrasting threads.
Look at Section D and study the shape in each goose triangle. This design starts and stops in the far corners of the triangle. I can quilt both the background and the goose design at the same time with the same thread color.
JANUARY/FEBRUARY 2015 Fons & Porter’s: Love of Quilting | 7978 | FonsandPorter.com JANUARY/FEBRUARY 2015 FonsandPorter.comSection D
1
2 3
456
7
8
9 10
11
1213
1415
16
17 18
19
20
21
22
23 24 25
26
27
1
2
3 4
5 6
7
8 9
10
11 12
123
4 5
67
8
9 10
1112
13
14 1516
17
18
123
4
5
6
78
9
10
11
12
13141516 17
18
20
21
1 612
3
4 5
68
9 10
1112
13
14 1516
17
18
2 5
3 4
1723
4
5
16
156
7
8 14
13101112 21
20
18
19
1
9
1
2
3
123
4 5
68
9 10
1112
13
14 1516
17
18
1 4 52
3
6 9 107
8
11 14 1512
13
2021
1 191
2
18 17
16
15 14
13
3
12 11
10
9 8
7
4
6 5
1
2 3
456
7
8
9 10
11
1213
1415
16
17 18
19
20
21
22
23 24 25
26
27
1
2
3 4
5 6
7
8 9
10
11 12
123
4 5
67
8
9 10
1112
13
14 1516
17
18
123
4
5
6
78
9
10
11
12
13141516 17
18
20
21
1 612
3
4 5
68
9 10
1112
13
14 1516
17
18
2 5
3 4
1723
4
5
16
156
7
8 14
13101112 21
20
18
19
1
9
1
2
3
123
4 5
68
9 10
1112
13
14 1516
17
18
1 4 52
3
6 9 107
8
11 14 1512
13
2021
1 191
2
18 17
16
15 14
13
3
12 11
10
9 8
7
4
6 5
using the background pieces for traveling. Designs 3 and 4 illustrate the paths I chose to connect the goose blocks.
Section C shows a spiraling design through each goose. You can stitch the spirals close together or far apart, depending on the density of quilting you desire. Designs 5 and 6 show
DESIGN 4DESIGN 7 DESIGN 8
DESIGN 5 DESIGN 6 Look at Design 7 and notice that only one quilting line travels out from the corners to the teardrop shape in the center. This provides the connection from patch to patch with the same thread color, but I will not be able to join the shapes inside the triangles with that same shape if I want different thread. I need to add a second line that takes me back out of the corner and returns to the intersection at the top of the goose so that I can travel to the next block. Design 8 shows how I chose to make that jump.
Even though I’ve laid out a path for you with each of these design ideas, you can vary the path to your liking. Maybe you prefer quilting up the right side and then coming down the left. Maybe you want to do the goose design at a different time than what my sequence suggests. How you get from “here to there” isn’t important as long as you achieve your desired result. Experiment to find what works best for you. Try these techniques to speed up your machine quilting, and have fun!
SECTION D
SECTION C
DESIGN 3
SECTION B
you the pathway with the same and contrasting threads.
Look at Section D and study the shape in each goose triangle. This design starts and stops in the far corners of the triangle. I can quilt both the background and the goose design at the same time with the same thread color.
JANUARY/FEBRUARY 2015 Fons & Porter’s: Love of Quilting | 7978 | FonsandPorter.com JANUARY/FEBRUARY 2015 FonsandPorter.com
Design 7
1
2 3
456
7
8
9 10
11
1213
1415
16
17 18
19
20
21
22
23 24 25
26
27
1
2
3 4
5 6
7
8 9
10
11 12
123
4 5
67
8
9 10
1112
13
14 1516
17
18
123
4
5
6
78
9
10
11
12
13141516 17
18
20
21
1 612
3
4 5
68
9 10
1112
13
14 1516
17
18
2 5
3 4
1723
4
5
16
156
7
8 14
13101112 21
20
18
19
1
9
1
2
3
123
4 5
68
9 10
1112
13
14 1516
17
18
1 4 52
3
6 9 107
8
11 14 1512
13
2021
1 191
2
18 17
16
15 14
13
3
12 11
10
9 8
7
4
6 5
1
2 3
456
7
8
9 10
11
1213
1415
16
17 18
19
20
21
22
23 24 25
26
27
1
2
3 4
5 6
7
8 9
10
11 12
123
4 5
67
8
9 10
1112
13
14 1516
17
18
123
4
5
6
78
9
10
11
12
13141516 17
18
20
21
1 612
3
4 5
68
9 10
1112
13
14 1516
17
18
2 5
3 4
1723
4
5
16
156
7
8 14
13101112 21
20
18
19
1
9
1
2
3
123
4 5
68
9 10
1112
13
14 1516
17
18
1 4 52
3
6 9 107
8
11 14 1512
13
2021
1 191
2
18 17
16
15 14
13
3
12 11
10
9 8
7
4
6 5
using the background pieces for traveling. Designs 3 and 4 illustrate the paths I chose to connect the goose blocks.
Section C shows a spiraling design through each goose. You can stitch the spirals close together or far apart, depending on the density of quilting you desire. Designs 5 and 6 show
DESIGN 4DESIGN 7 DESIGN 8
DESIGN 5 DESIGN 6 Look at Design 7 and notice that only one quilting line travels out from the corners to the teardrop shape in the center. This provides the connection from patch to patch with the same thread color, but I will not be able to join the shapes inside the triangles with that same shape if I want different thread. I need to add a second line that takes me back out of the corner and returns to the intersection at the top of the goose so that I can travel to the next block. Design 8 shows how I chose to make that jump.
Even though I’ve laid out a path for you with each of these design ideas, you can vary the path to your liking. Maybe you prefer quilting up the right side and then coming down the left. Maybe you want to do the goose design at a different time than what my sequence suggests. How you get from “here to there” isn’t important as long as you achieve your desired result. Experiment to find what works best for you. Try these techniques to speed up your machine quilting, and have fun!
SECTION D
SECTION C
DESIGN 3
SECTION B
you the pathway with the same and contrasting threads.
Look at Section D and study the shape in each goose triangle. This design starts and stops in the far corners of the triangle. I can quilt both the background and the goose design at the same time with the same thread color.
JANUARY/FEBRUARY 2015 Fons & Porter’s: Love of Quilting | 7978 | FonsandPorter.com JANUARY/FEBRUARY 2015 FonsandPorter.com
Design 8
[continued on next page]
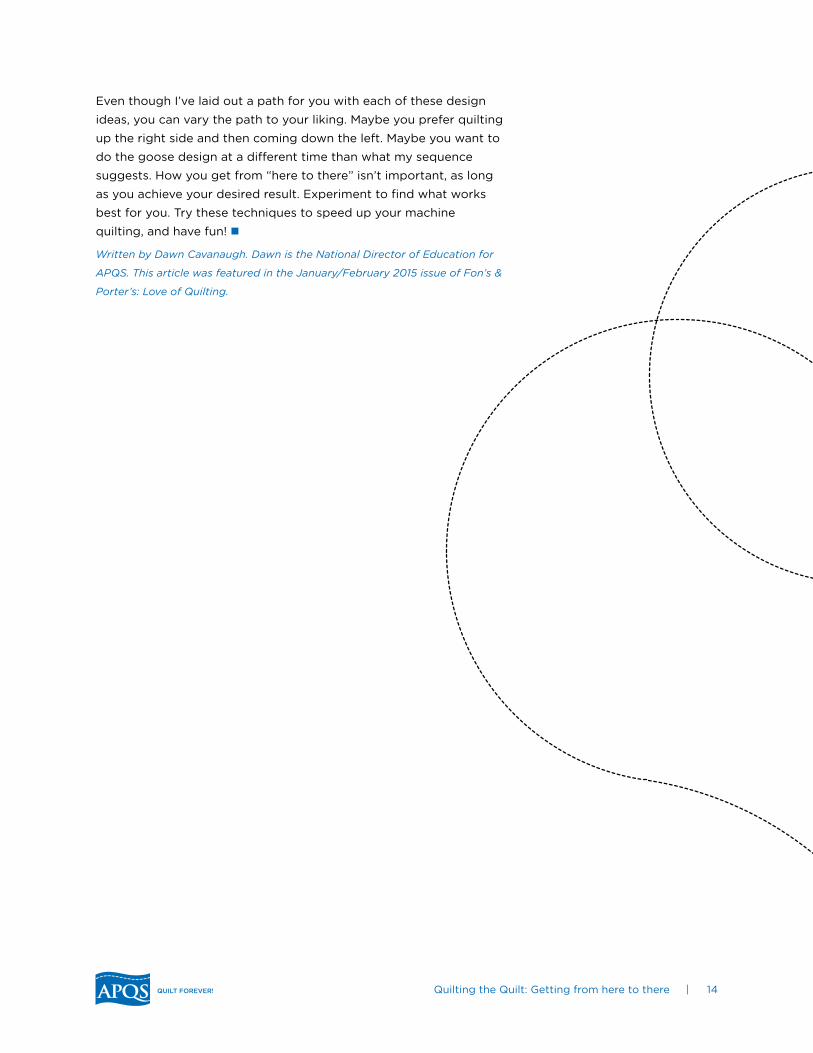
14Quilting the Quilt: Getting from here to there |
Even though I’ve laid out a path for you with each of these design ideas, you can vary the path to your liking. Maybe you prefer quilting up the right side and then coming down the left. Maybe you want to do the goose design at a different time than what my sequence suggests. How you get from “here to there” isn’t important, as long as you achieve your desired result. Experiment to find what works best for you. Try these techniques to speed up your machine quilting, and have fun! n
Written by Dawn Cavanaugh. Dawn is the National Director of Education for
APQS. This article was featured in the January/February 2015 issue of Fon’s &
Porter’s: Love of Quilting.
15How do you properly use rulers when you quilt |
Ruler work is a quick way to make a quilt spectacular, but it can be intimidating. The most important thing to remember is safety.
The last thing you want is to hear the heart sickening sound of the hopping foot crunching on Plexiglas while using your APQS longarm quilting machine.
The first step to properly using rulers is to make sure you have an extended base mounted to your quilting machine. An extended base is a small, plexiglass table that attaches to your longarm machine’s throat (Photo 1). It provides a large surface area under the quilt to support your rulers so they do not make unwanted contact with the needle. It also helps to add small gripping devices like adhesive sandpaper dots or rubber dots to the underside of your ruler to reduce slipping.
The next step is to consistently practice the proper grip. For a moment, let’s think about how you cut fabric with your rotary cutter and a long ruler. As you move your rotary cutter up your favorite piecing ruler, you walk your hand up the ruler like a spider to provide even resistance so the ruler doesn’t drift away from your desired cutting line. The motion of moving your hand along the ruler to keep it stable for the rotary cutter is exactly the same thing you’ll do with a ruler and a longarm machine.
When using a longarm ruler, splay out your thumb and forefinger of your non-dominant hand and lay them on the longarm ruler. Use the other fingers of your hand to hold onto the edge of the ruler with as many points of contact as you can manage. The area between your thumb and forefinger is the sweet spot. Keep your hopping foot along the ruler between these two fingers where you have the most control. For utmost control and safety, try to keep these two fingers pointing toward the hopping foot. Sometimes this may mean switching your hands around, holding with your dominant hand and driving the machine with the other hand.
If you are working with a shorter ruler, you can slide the ruler as you go to keep your hopping foot in the sweet spot between your two fingers (Photo 2). If you are working with a longer ruler, you’ll need to ‘walk’ your fingers down the ruler to reposition this sweet spot so your ruler doesn’t dangerously start to tip as you move the hopping foot along the edge of the ruler.
Press down with the ruler only hard enough to keep things stable. To check how much pressure you need to put on the ruler, lay it on top
How do you properly use rulers when you quilt
Photo 1
Photo 2
[continued on next page]

16How do you properly use rulers when you quilt |
of a piece of paper on a table and press down. Find the amount of pressure it takes to prevent the paper from being removed from under the ruler and how much pressure it takes to be able to move the paper. Right where those two levels of pressure meet is the pressure you should use to hold the ruler on your longarm machine. You want stability but you don’t want to press so hard you prevent the machine from moving freely.
There are many, many different rulers and templates out there. Have fun exploring all they can do, but remember to hold them correctly and practice good ruler safety. Make sure you post some photos of the quilts you finish with rulers over in our forums or on our Facebook page. We’d love to see what you are working on! n
Written by Angela Huffman. Angela is an APQS dealer and the owner of
Quilted Joy Studio in Louisville, Kentucky.

17How to quilt feathers – 2 methods |
When delving into the world of custom quilting there is one design element that virtually all quilters want to learn to
create – feathers! Feathers can take a simple quilt and send it soaring over the top with texture and visual interest. The best part is, with a little practice, anyone can create beautiful flowing feathers.
I think it is fair to say that feathers are my favorite thing to quilt. But before I ever touched the longarm machine I spent some time with pencil and paper. I practiced several different techniques for drawing feathers, the key being that as I drew them, I did not lift my pencil from the paper. You can practice feathers using pencil and paper, a dry erase board and erasable marker, or even on a graphic design tablet like I use to create my quilting design plans. Once you feel comfortable drawing feathers by hand, you are ready to move on to creating them on the longarm.
I have found that there are two common methods of creating feathers. Neither is right or wrong, but often one method seems to feel more comfortable to some people than the other. I would recommend at least trying both methods a few times and then choosing the one that feels right to you.
Method #1The first method is one in which each feather plume is created individually (Illustration 1). For this feather you are going to draw your spine with a water soluble or disappearing ink pen. Begin at the base of the feather spine, creating individual feather plumes trailing up the right side of the spine. The bulk of your back tracking will be over the length of the plume as you come back up the plume you just created to make the next.
When you reach the top of the marked spine, follow the line you drew in with stitching all the way back down to the base to create your stitched feather spine. By drawing in our line with
How to quilt feathers – 2 methods
Illustration 1
[continued on next page]

18How to quilt feathers – 2 methods |
removable ink before stitching, we avoid backtracking over the spine and create minimal thread buildup. Just as you did the right side, trail again up the left side of the spine creating plumes in the same manner. When you reach the top be sure to put one joining plume in the center to close the feather.
Voila! You have created a beautiful traditional feather!
[continued on next page]

19How to quilt feathers – 2 methods |
Method #2The next method for feathers is the one I personally prefer. It is often referred to as the “bump-bump” method.
For this version, you will again draw your spine first using water soluble or disappearing ink to plan ahead the placement of the spine. Start at the base and create a plume. When you reach the base of that plume, instead of backtracking over the length of the plume, push your stitching outward away from the first plume and go on to create another. Next you will backtrack over the hump or “bump” of that plume and then “bump” a second time to create the next plume.
By “bumping” over every other plume we are again eliminating backtracking that can cause thread build up. Here I have demonstrated using a contrasting thread, but by using a blending thread you will create texture and hide backtracking.
[continued on next page]

20How to quilt feathers – 2 methods |
Once you reach the top of the spine, you will again create your stitched spine by trailing back down the line you marked ahead of time in water soluble or disappearing ink. Reach the bottom of the spine and trail back up the left side of the spine in the same manner as you did the right, creating plumes and again being sure to place one or two small feathers at the top to close the feather.
Spend some time mastering one or both of these methods for creating feathers and you will be on your way to creating multitudes of heirloom quilting designs in no time! n
Valerie Smith, published quilting artist and blogger. She is a published quilting
artist based out of northeast Ohio. Quilting over a decade and sewing most of
her life, she made the decision to purchase an APQS longarm quilting
machine. She has since built a successful business focused on hand guided
custom machine quilting. You can find her blog – Pumpking Patch Quilter –
at www.pumpkinpatchquilter.com.

© APQS | apqs.com