rapidcomposer user guide - musicdevelopments
TRANSCRIPT

RapidComposermusic prototyping
User Guide
© 2021 by MusicDevelopments http://www.musicdevelopments.com
September 2021
RapidComposer User Guide

Table of Contents
Glossary 6Introduction 7Getting started 9
System requirements...............................................................................................9Windows................................................................................................................9macOS....................................................................................................................9
Installation..............................................................................................................10Installation on Windows.....................................................................................10Installation on macOS........................................................................................12
Software activation................................................................................................13Upgrading from version 3......................................................................................13
The basics 14Basic concept & functionality................................................................................14Working with phrases.............................................................................................16
Adding phrases to the composition..................................................................16Filling a track with phrases.................................................................................18Transposing phrases..........................................................................................22Resizing phrases.................................................................................................24Using the lock for phrases..................................................................................27Using the magnet for phrases............................................................................29Harmonization.....................................................................................................35Other phrase operations.....................................................................................39
Working with chords...............................................................................................40Editing chords on the master track...................................................................40Using the Chord Selector....................................................................................41Using the ‘Circle Of Fifths’ chart........................................................................43Using the ‘Tonnetz’..............................................................................................44Using the MIDI keyboard for chord selection....................................................45Using the computer keyboard for typing chord names....................................45Generating a chord progression........................................................................46
Working with tracks................................................................................................50The track instrument...........................................................................................51Variations.............................................................................................................51Adding a new track.............................................................................................51Rearranging tracks..............................................................................................52Removing a track................................................................................................52Mute and solo......................................................................................................52Track templates..................................................................................................53
Browsers.................................................................................................................54
RapidComposer User Guide i

Structure inspector.................................................................................................56Drag and drop.........................................................................................................57
Dragging and dropping phrases.........................................................................57Dragging and dropping rhythm..........................................................................58Dragging and dropping chord progressions.....................................................60Dragging MIDI to RapidComposer.....................................................................61Dragging MIDI from RapidComposer to DAW (or to Explorer/Finder)............63
Articulations............................................................................................................65Phrase Editor 66
Explanation for the notation used.........................................................................67Phrase generator reference 68
Arpeggiator..........................................................................................................69Bass Generator....................................................................................................71Chord Generator..................................................................................................72Dyads Run............................................................................................................73Fingerpicking Generator.....................................................................................74Generic Generator...............................................................................................76Markov Melody Generator..................................................................................77Melody Generator................................................................................................79Modern Chord Pattern Generator......................................................................82Motive Generator................................................................................................84Ostinato Generator..............................................................................................85Percussion Generator.........................................................................................87Phrase Container................................................................................................88Phrase Morpher...................................................................................................90Piano Chord Pattern Generator..........................................................................91Piano Run Generator...........................................................................................93Random Melody Generator................................................................................95Rest......................................................................................................................97Rhythm Mapper...................................................................................................97Strings Staccato Generator................................................................................99Strum Pattern Generator..................................................................................101
Rhythm generator reference 103Rhythm Processing...........................................................................................103Modern Rhythm.................................................................................................104Modern Random Rhythm.................................................................................106Schillinger's Interference..................................................................................106Subdivision........................................................................................................107Polyrhythm........................................................................................................108Generic Rhythm.................................................................................................109Probabilistic Rhythm.........................................................................................110Euclidean Rhythm.............................................................................................111
RapidComposer User Guide ii

Smooth Rhythm................................................................................................113Retro Rhythm.....................................................................................................114Simple Divisions................................................................................................115Toggle Divisions................................................................................................116Manual Editing..................................................................................................117
Variations 119Applying variations to the entire track.............................................................119Applying variations to a phrase.......................................................................120Variations included...........................................................................................121
Melody Editor 124Overview................................................................................................................124
Workflow............................................................................................................124User interface....................................................................................................124
Creating melodies................................................................................................132Melody generation............................................................................................132Melody mutation...............................................................................................139Melody editing...................................................................................................139
Chord Rules Editor 140MIDI Import 142
1. Selecting the file to import...........................................................................1422. Select tracks to import.................................................................................1433. Select tracks that contribute to the harmony (for chord detection).........1434. Select which tracks have to be converted to chord-relative or scale-relativeform...................................................................................................................1435. Set chord and scale detection options.......................................................1436. Set the scale and check chords...................................................................1437. Set structure options, and if you need phrase detection...........................1438. Set the instrument to be used for the imported tracks..............................1439. Press the “Import” button!............................................................................144
Chord voicings 145Voicing editor on the master track..................................................................145Voicing for a master track chord.....................................................................146Universal voicing...............................................................................................148
Idea Tool (full edition) 149Overview............................................................................................................149Entering Idea Tool mode..................................................................................149Workflow............................................................................................................150Master track options........................................................................................150Track options....................................................................................................151Generating tracks..............................................................................................154Possibilities of the Idea Tool............................................................................154
RapidComposer User Guide iii
Phrase Morphing (full edition) 155Settings 170
MIDI.......................................................................................................................170Audio.....................................................................................................................171VSTi.......................................................................................................................171Soundfonts............................................................................................................172
Another way of adding soundfonts.................................................................172Preview..................................................................................................................172
Chord preview options......................................................................................173Chord preview instrument................................................................................173Bass preview instrument..................................................................................173Scale preview instrument.................................................................................173Rhythm preview instrument.............................................................................173
Locations..............................................................................................................173Compositions....................................................................................................173Custom phrases................................................................................................174Custom rhythm patterns..................................................................................174Track templates................................................................................................174Windows portable use......................................................................................174
Miscellaneous.......................................................................................................175Editing................................................................................................................175Chords...............................................................................................................177Inspectors And Browsers.................................................................................178New Composition.............................................................................................179New Track.........................................................................................................179MIDI Export........................................................................................................181MIDI Recording..................................................................................................181VST Plug-in Hosting..........................................................................................182RapidComposer VST/VST3/AU.......................................................................182Analysis.............................................................................................................183History...............................................................................................................183Help....................................................................................................................184Experimental Features......................................................................................184
User Interface.......................................................................................................185Keyboard Shortcuts..............................................................................................185
Troubleshooting 186Starting RapidComposer without audio..........................................................186Skipping loading the last composition during startup...................................186Loading a composition without VST plug-ins.................................................187
Support 188Checking for updates...........................................................................................188Reporting bugs.....................................................................................................188
RapidComposer User Guide iv

RapidComposer User Guide v

Glossary
DAW: Digital Audio Workstation, the host application where VST and Audio Unit plugins are loaded.
Inversion: horizontal or vertical mirroring of notes. Play the motive upside down or right to left. The latter is also called ‘retrograde’.
Phrase: a group of musical notes, the basic building block of a composition in RapidComposer. Phrases typically include chord and/or scale relative notes, so they can be used with any chords and scales (smart phrases).
Phrase Generator: a phrase with notes created by an algorithm. Access phrase generators’ settings in the phrase inspector.
Motive: A motive is the smallest possible musical idea, no more than five or six notes at the most. A composer will use a motive to build larger structures by repeating, modifying and combining it with other motives. Motives are denoted as A, B, C, D, E, F, G and H in the MelodyEditor. We use the term ‘motive’ only in connection with melody.
RapidComposer User Guide 6

IntroductionRapidComposer is a unique, non-destructive, phrase-based music prototyping software, with VSTi and SoundFont support. You can read more about the features, view screenshots and tutorials (including tutorial videos) at www.musicdevelopments.com.
If you ever used a DAW, you won’t have any difficulties using RapidComposer. However, the software does assume that you have a basic knowledge of music theory, but even if you don’t,RapidComposer is very helpful in assisting you in regards to which chords fit together, and how scale intervals relate to chords.
This guide provides an introduction to RapidComposer and takes you through the basic workflow. You are advised to use the pop-up help windows (also known as tooltips) which contain more details. If you hover the mouse on any user interface element, a tooltip window appears after a few seconds.
RapidComposer features:• Advanced tools for phrase editing, phrase generation, phrase morphing, phrase
grouping, motif development, chord progression editing • Master track with chords (note names or universal notation) which all phrases
automatically conform to • Chord suggestions, chord progression generation with optional borrowed chords, chord
progression rules editing, chord voicing editing and assigning to tracks and phrases • Easy chord entry from Chord Selector, Circle Of Fifths chart, MIDI keyboard, or
computer keyboard. Chord Selector offers 'Chord List', 'Scale Degrees', 'Palette', 'Chord Builder' and 'Circle Of Fifths'.
• Included rhythm generators: Schillinger's Interference, Polyrhythm, Subdivision, Generic Rhythm, Probabilistic Rhythm, Euclidean Rhythm, Smooth Rhythm, Bass Rhythm, SimpleIntervals, Toggle Intervals
• Included phrase generators: Arpeggiator, Bass Generator, Chord Generator, Dyads Run, Generator, Fingerpicking Generator, Generic Generator, Modern Chord Pattern Generator, Ostinato Generator, Phrase Container, Piano Chord Pattern Generator, Piano Run Generator, Strings Staccato Generator, Strum Pattern Generator. Only in the full edition: Melody Generator, Random Melody Generator, Motive Generator, Percussion Generator, Phrase Morpher
• Included variations: Add Chord Notes, Add Interval, Adjust Note Lengths, Apply Rhythm, Audio Gain, Delay Notes, Double Note, Double Phrase, Expression, Extract Rhythm, Humanize, Join Notes, Limit Note Range, MIDI Echo, Make Monophonic, Mirror Horizontally, Mirror Vertically, Permute Chord Notes, Quantize, Remove Note, Remove
RapidComposer User Guide 7

Short Notes, Rests, Rotate Notes, Simplify Phrase, Spread Out Chord Notes, Staccato-Legato, Strumming, Swap Chord Notes, Swing, Transpose, Triple Phrase, Velocity, Velocity Generator
• Melody generation (full edition only), melody auto-harmonization using 2 methods, • Piano roll with scale and chord notes shading, and smart arranging of overlapped notes
in two styles. • In-place non-destructive phrase-level and note-level editing • Editing percussion tracks using drum maps • Sophisticated MIDI CC editing and recording • Articulations can be assigned to phrases or even individual notes (full edition only) • Extensive scale, chord, guitar chord, chord progression databases.• Rhythm drag-and-drop between phrases or from rhythm browser, applying a rhythm
pattern on a phrase, • Instrument browser of all MIDI, VSTi and SF2 presets in one place • Integrated Idea Tool that can generate a multi-track composition, offering 3 different
workflows (full edition only)• Unlimited undo (simple list or version tree with branches) • Fully customizable user interface (all colors and font size) with preset themes • Fully customizable keyboard shortcuts • MIDI drag-and-drop tracks or composition to DAWs • Virtual instruments (VSTi v2.4 plug-ins) support • SoundFont (.SF2) support • Simple activation. No internet connection is required for activation or operation
RapidComposer is available for Windows and macOS and comes as standalone application, VST2.4, VST3 and AU (synth and MIDI FX) plug-in versions.
RapidComposer User Guide 8

Getting startedSystem requirements
Windows
• Windows Vista/7/8/10 (32-bit or 64-bit) with at least 1GB RAM• Intel/AMD processor (1.4 GHz minimum)• ASIO driver is recommended for low-latency audio• VST or VST3 host required if using RapidComposer as a plug-in
macOS
• macOS 10.11-10.16 (latest update)• Intel Core Duo• 1GB RAM• VST, VST3 or AU host required if using RapidComposer as a plug-in
RapidComposer as a standalone application can host VST instruments and soundfonts. It is also possible to use a virtual MIDI cable to forward MIDI events to your favourite DAW, which will host the instruments. On macOS a virtual MIDI output is offered for this purpose. In this case you use “MIDI” instruments for the tracks rather than soundfont or VST plug-ins.
RapidComposer as a plug-in sends and receives MIDI events to/from the plug-in host. It can output audio, so soundfonts can be used in the plug-in which is useful for chords preview, for example. In order to use the plug-in you need to route the plug-in output to a virtual instrument track. You will find more details for how to accomplish this in the user guide of your DAW.
RapidComposer User Guide 9

InstallationThe installation should be guided and straight-forward. You only have to follow the steps described in the installation program.
Installation on Windows
During the installation, neither DLL files nor services are installed in the Windows system directories.
The setup file automatically installs RapidComposer into the Program Files or ProgramFiles(x86) directory (depending on your operating system, and whether it is the 32-bit or 64-bit version of RapidComposer).
VST2.4 (32-bit) plug-in location: C:\Program Files (x86)\VSTPlugins\RapidComposer_Win32.dll
VST2.4 (64-bit) plug-in location: C:\Program Files\VstPlugins\RapidComposer_x64.dll
You can override the VST2.4 plug-in paths during installation. The installer offers the last used VST path, read from the registry.
The VST3 plug-in is installed in C:\Program Files\Common Files\VST3, and inC:\Program Files (x86)\Common Files\VST3on 64-bit Windows.
The data and settings files are stored in your user documents folder:C:\Users\<username>\Documents\RapidComposerV4
After a successful installation it might be required to add the corresponding plug-in search path to your host software. Please refer to your DAWs manual to find out how to do that.
Portable Use (Windows Only)
RapidComposer User Guide 10

It is possible to run RapidComposer from a pen-drive.
Preparations
You need to move the installed application from “Program Files” (or “Program Files (x86)” depending on 32/64 bit installation) directory to your pen drive, e.g. to D:\RC. Installation installs data files to C:\Users\(Username)\Documents\RapidComposerV4 directory. Move RapidComposerV4 to the program folder, e.g. to D:\RC so that D:\RC\RapidComposerV4 will contain DB, Settings, SoundFonts, etc.
Usage
When RapidComposer is started from D:\RC, it will look for data files in RapidComposerV4 in the same directory. If it cannot find it, the usual location will be used in C:\Users\(Username)\Documents\.
Settings
For portable use the locations of the Custom Phrases, Rhythm Patterns, Track Templates can be made to point to directories on the pen-drive. For this use relative paths, like “.”, “..”, or pathnames beginning with “\”. The reference path (“.”) is the RapidComposerV4 directory.
Uninstallation
Uninstalling the application can be done either by selecting “Uninstall RapidComposer” in the Windows Start Menu (inside the RapidComposer folder), or from the Windows Control Panel. Since the system is not changed in any way during the installation, you can also remove the folders without uninstalling the software.
RapidComposer User Guide 11

Installation on macOS
Open the .dmg file, and click on “RapidComposer Installer”. The installer will install the following files:
Standalone application:Applications/RapidComposer.app
VST2.4 plug-in: /Library/Audio/Plug-Ins/VST/RapidComposer.vst
VST3 plug-in: /Library/Audio/Plug-Ins/VST3/RapidComposer.vst3
Audio unit (synth) plug-in: /Library/Audio/Plug-Ins/Components/RapidComposer.component
Audio unit (MIDI FX) plug-in: /Library/Audio/Plug-Ins/Components/RapidComposerMFX.component
The data and settings files are stored in~/Documents/RapidComposerV4
Important: you should allow RapidComposer to access your Documents folder, where it savessettings, chords, scales, progressions, etc. If RapidComposer cannot write into ~/Documents/RapidComposerV4, you cannot save new scales, chords, progressions, and youwill need to type your license key every time. RapidComposer will ask your permission to access the Documents folder. You can set the permission manually:
1. On your Mac, choose Apple menu >> System Preferences >> click Security & Privacy >> click Privacy.
2. Select Files and Folders. 3. Please select the checkbox below the RapidComposer application to access files and
folders in the Documents folder.
RapidComposer User Guide 12

Software activationWhen first running RapidComposer, you will be asked to type the license key that you receivedwith your order. No internet connection is required for activation or operation.
Upgrading from version 3Some notes if you have installed RapidComposer version 3 in the past:
The new version imports your v3 settings by default. If you want a clean installation, please rename your Documents/RapidComposerV3 folder before running v4.0 for the first time. Thenyou can rename it back.
v4.0 is not compatible with v3 composition files due to the internal changes. Still, it is possible to open v3 compositions, but the phrase generators will not show the same notes.
RapidComposer User Guide 13

The basics
Basic concept & functionalityRapidComposer is used to produce compositions quickly using MIDI phrases. It is not meant to mix or master music. Once a composition have been finished, it can be exported as a MIDI, WAV, or AIFF file. These files can then be imported into a DAW for mixing and mastering. RC can also be used as a VST/VST3/AU plugin inside your favorite DAW, for synching up audio and virtual instrument tracks (and vocals) with your RapidComposer compositions. Additionally, you can drag-and-drop entire Compositions or separate tracks to your DAW as MIDI files.
Before you start using RC, it is important to understand exactly what a Composition consists of. A Composition is a collection of one or more Tracks, each which contains an Instrument (SoundFont, VSTi, or MIDI) controlled by Phrases or Phrase Generators. Tracks are common to the whole composition, and, like DAWs, combine to produce a musical arrangement with harmony and melody.
The basic unit of composition is a Phrase, which is a sequence of notes and/or chords (i.e. notes in parallel). Most commonly, phrases are created and extensively manipulated by using rhythm and phrase generators. There are many rhythm and phrase generators in RC, more in the Rhythm Generator Reference or Phrase Generator Reference chapters.
As an important concept, phrases include chord-relative and/or scale-relative notes. Absolute notes (used in DAWs) are also allowed, as well as bass note relative notes. These special notes make the phrase automatically adhere to the master track chords and scales.
You can also create a phrase manually (in Note Editing Mode or in the Phrase Editor, by entering with mouse or recording from a MIDI keyboard). Furthermore, you are able to save custom phrases with RC. Generators and the Phrase Browser are covered in detail in other chapters. Commonly, you will start with a Generator and tweak it, as this is the fastest way to get ideas going in RC.
There are three types of tracks utilized in RapidComposer:
• Standard Tracks (MIDI) – Contain notes/chords/phrases for a particular Instrument. These track types are the bread and butter of RapidComposer.
RapidComposer User Guide 14

• Audio Tracks – Audio track implementation is basic with limited functionality (no pitch-detection or timestretch/tempo-matching). PCM WAV and AIFF (almost any sample format and sampling rate) can be imported. Useful for sound effect placement, perfectly-chopped drum loops with a known, solid tempo, or for non-harmonic sounds.
• Folder Tracks – contain other tracks. You can drag regular tracks over a folder track to be included. Alternatively you can use “Add To Folder Track” or “Remove From Folder Track” in the track inspector.
RapidComposer User Guide 15

Working with phrases
Adding phrases to the composition
As a preparation, click on New Composition:
Press Ctrl-N/Cmd-NOR
Press the 'Files' button:
Click on 'New Composition':
Open the Phrase Browser:
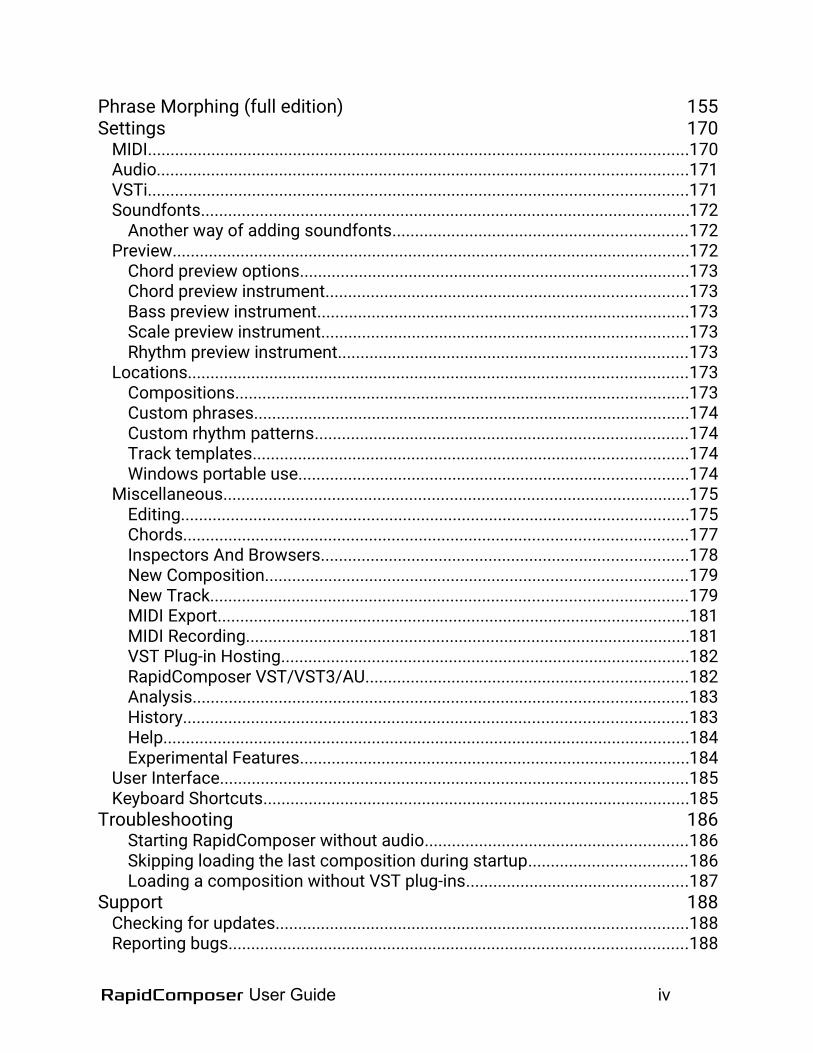
1. Dragging from the Phrase Browser
Drag and drop a phrase from the browser:
RapidComposer User Guide 16
2. Double-clicking in the track
The quickest way to add the selected phrase from the browser is for a double-click. After you added a phrase, you can use paste (Ctrl-V/Cmd-V) to insert additional phrases.
3. From the phrase inspector
For completeness you can find all phrase operations in the phrase inspector. The top item inserts the selected phrase to the time pointer:
RapidComposer User Guide 17

4. Dropping MIDI files on tracks
It is possible to drop MIDI files inside the track or on the track header. The MIDI file is insertedas a new phrase (named after the file) with absolute notes. You can convert the notes to chord or scale relative in the phrase inspector. Optionally, holding down Ctrl during dragging the MIDI file will convert the inserted MIDI notes to chord-relative form. This assumes chords can be successfully analyzed in the file, so this may or may not work optimally.
5. Copy and paste from Phrase Editor or Melody Editor
If you created a new phrase in the Phrase Editor or in the Melody Editor, you can add it in the clipboard by clicking on “Add To Clipboard”. Use Ctrl-V/Cmd-V to insert it in the composition.
Filling a track with phrases
Sometimes it is convenient to fill a track with phrases. You can do this with drag-and-drop andwith keyboard shortcuts (see Settings / Keyboard Shortcuts / Track).
1. With drag-and-drop
If you drop a phrase on the track header, the phrase is copied to the track multiple times. When you release the mouse button you have some options: holding down Shift will create ghost phrases, holding down Ctrl will activate the magnets for voice leading.
Examples: Drop without Shift and Ctrl:
RapidComposer User Guide 18

Drop with Shift held down:
Drop with Ctrl held down:
Drop with Shift and Ctrl held down:
RapidComposer User Guide 19

2. Using keyboard shortcuts
By default the ‘F’ key is assigned for filling a track with the current selection in the phrase browser. Shift and Ctrl behaves the same way as when dropping the phrase (Shift-F: create ghosts, Ctrl-F: use magnet, Ctrl-Shift-F: create ghosts and use magnet).
3. Making a ‘chords’ track
There are special shortcuts for setting up a chords track that will automatically follow the chords on the master track, with or without voice leading. The shortcuts are:
H: fill track with master track chords:
RapidComposer User Guide 20

Shift-H: fill track with master track chords with ‘Join’ option (Join variation is added to the track):
Ctrl-Shift-H: fill track with master track chords with ‘Join’ and ‘Magnet’ options:
RapidComposer User Guide 21

Transposing phrases
Dragging the phrases vertically with the mouse will transpose them. Transposition can also be set in the phrases inspector using a slider. There are 3 types of transposition (to be set in the Phrase Transpose menu above the composition), which are presented using a simple 1-3-5-3 phrase.
Phrase Transpose: ‘Phrase’
Note that the phrase shape remains the same:
Phrase Transpose: ‘Note’
Bottom notes jump up by an octave, the phrase shape changes:
RapidComposer User Guide 22

Phrase Transpose: ‘Octave’
All notes move by octaves, the phrase shape is preserved:
RapidComposer User Guide 23

Resizing phrases
Dragging the right edge will resize the phrases using the “Phrase Resize” option:
RapidComposer User Guide 24

Phrase Resize: Repeat
The phrase is repeated. It is a good idea to activate the phrase ‘lock’ for better voice leading. See the next chapter for explanations.
RapidComposer User Guide 25

Phrase Resize: Scale
Make all notes proportionally longer or shorter using the ‘scale’ mode:
Phrase Resize: Sustain
This is rarely needed, it sustains the last notes of the phrase that end at the right edge:
RapidComposer User Guide 26

Phrase Resize: Regenerate
This works only for phrase generators. The resized length will become the phrase length, and the phrase is regenerated.
Because resizing is non-destructive, the original phrase is not changed in any ways. This means phrases have an ‘original’ and a ‘resized’ size. You can set these in the phrase inspector (under the Size tab).
Using the lock for phrases
The ‘lock’ option is useful for voice leading long phrases which include chord and scale changes in the middle of a phrase. When there are chord changes, the most optimal inversion is used for chords. For scale changes, the closest note is used on the new scale so that the phrase shape is preserved.
Without ‘lock’ enabled:
RapidComposer User Guide 27

With ‘lock’ enabled:
RapidComposer User Guide 28

Using the magnet for phrases
Phrase magnets are useful for voice leading.
The small magnet icon at the top left corner of each phrase can help you to automatically transpose the phrase relative to the previous phrase or an envelope. You cannot move a phrase when the magnet is active. When several phrases are connected, you can move the first phrase and all other phrases will follow it.
The magnet has three states:
disabled, you can freely move the phrase around
it may point to the previous phrase which means the phrase will be adjusted to the previous phrase
it may point upwards which make the phrase follow the phrase envelope
Right clicking on the magnet will offer 5 ways of automatically transposing phrases:
Minimize Note Distance
RapidComposer User Guide 29

The phrase is transposed so that the distance between the first note of the phrase and last note of the previous phrase is minimized. This works best for monophonic phrases when there is exactly one 'first' note and one 'last' note.
Approach Average Note Height
The phrase is transposed so that the distance between the the average of the lowest and highest notes is minimized. This works well for both monophonic and polyphonic phrases.
RapidComposer User Guide 30

Highest Note Follows Envelope
The phrases are transposed so that the highest note is not lower than the envelope
RapidComposer User Guide 31

The envelope is evaluated at the phrase starting position:
RapidComposer User Guide 32

Average Note Height Follows Envelope
The phrases are transposed so that the average of the highest and lowest note is on the envelope:
The shorter the phrases are the smoother they will follow the envelope. Here we created a very simple phrase lasting for 2 beats that consists of only scale notes (set the Note Mappingoption to “Scale Notes [+semitones]”):
RapidComposer User Guide 33

Each Note Follows The Envelope Within Key
Notes are transposed independently to the nearest scale step on the envelope:
RapidComposer User Guide 34

Harmonization
You can auto-harmonize a melody line in RapidComposer. Harmonization works by finding suitable chords for a melody, that are placed on the master track after analysing the melody notes. Two algorithms are offered by RapidComposer.
Step 1: Insert the melody phrase in a track
The melody phrase can contain absolute or relative notes, and the source can be anything (imported from MIDI file, recorded, generated, manually edited, etc). For best results the melody should be monophonic and should include absolute notes.
Step 2: Make sure the scale is set correctly on the master track
The harmonization will use the master track scale as the base scale, so it should match the
RapidComposer User Guide 35

melody scale. Not just the scale but also the time signature has to be set, if you'd like to insertchords on bars.
Step 3: Open the phrase inspector, Harmonize tab
Right-click (secondary click) on the melody phrase. Click on the Harmonize tab to display harmonization options:
Step 4: Choose your preferred settings
There are two kinds of harmonization that RapidComposer offers, each with its own settings. Below you will find the explanation of these settings.
RapidComposer User Guide 36

Basic Functional
This is a simple harmonization that was used in the 18th century, usually it gives very good results. For each melody note, one or two (rarely three) possible chords can be used.
Chord Change:
Specify how often you want the insert a new chord. Possibilities are On Bars, OnBars Or Strong Beats (Automatic), On Strong Beats, On Beats. The program won't insert a new chord when it is not necessary.
Allow II, III, VI:
Select if the supertonic, mediant and submediant chords can be used in the harmonization, and in what extent. If you select 'No', only the primary chords (I, IV, V) will be used.
Allow Dominant 7th:
Select if the dominant 7th chord can be used in the harmonization, and in what extent.
Start With: When it is possible (the melody notes allow) you can force the harmonization to start with a chord. Possible choices are Any, I, V, I or V.
End With: When it is possible (the melody notes allow) you can force the harmonization to end with a chord. Possible choices are Any, I, With Perfect Cadence (I-V-I), With Imperfect Cadence (II-V-I).
Chord Inversions:
There are several possibilities to use chord inversions, because the root positions will rarely sound good. This is not required though, because you can choose to transpose the phrases (manually or automatically by using phrase magnets) or enable the master track magnet that also inverts chords for better voice leading. Options are: None, Adjust Highest Chord Note To Melody, Minimize Chord Note Distances, Minimize Bass Movement, Minimize Highest Note Movement.
Add 'Harmony' Track:
For your convenience a harmony track can be added which lets you immediatelylisten to the results of the harmonization. When such a track has already been added, it is updated after each harmonization. Feel free to set a different instrument, or change the transposition for this track, because the track settingswon't be reset. Only the phrases inside this track are updated.
Based on Rules
This algorithm builds a valid chord progression on the melody notes. Please note if the rules and settings are too restrictive, the program may not find a solution. A pop-up message will notify you about it, and that you should relax the rules.
RapidComposer User Guide 37

Rule Set: The chord progression rule contains the weights (probabilities) of the 'next' possible chords and is editable in RapidComposer. Make sure you use the right tonality, that should be in accordance with the master track scale.
Chord Change: Specify how often you want the insert a new chord. Possibilities are On Bars, On Bars Or Strong Beats (Automatic), On Strong Beats, On Beats. The program won't insert a new chord when it is not necessary.
Expectedness:
Select how the next chord is chosen using weights. Choices: Most Expected (use the chord with the highest weight; there is no randomness), Expected (select one randomly from the first two highest weights), Less Expected (ignore the highest weight, select one randomly from the 2nd and 3rd highestweights), Unexpected (ignore the first 2 highest weights, select randomly from rest), Random (select any of the possible 'next' chords randomly, ignoreweights).
Allow 6th and 7th:
Select if 6th and 7th chords can be used in the harmonization. Options: No, Only 6th, Only 7th, Both 6th and 7th
Start With: When it is possible (the melody notes allow) you can force the harmonizationto start with a chord. Possible choices are Any, I, V, I or V.
End With: When it is possible (the melody notes allow) you can force the harmonizationto end with a chord. Possible choices are Any, I, With Perfect Cadence (I-V-I), With Imperfect Cadence (II-V-I).
Chord Inversions:
There are several possibilities to use chord inversions, because the root positions will rarely sound good. This is not required though, because you can choose to transpose the phrases (manually or automatically by using phrase magnets) or enable the master track magnet that also inverts chords for better voice leading. Options are: None, Adjust Highest Chord Note To Melody, Minimize Chord Note Distances, Minimize Bass Movement, Minimize Highest Note Movement.
Add 'Harmony' Track:
For your convenience a harmony track can be added which lets you immediately listen to the results of the harmonization. When such a track has already been added, it is updated after each harmonization. Feel free to set a different instrument, or change the transposition for this track, becausethe track settings won't be reset. Only the phrases inside this track are updated.
Step 5: Press 'Auto-Harmonize'.
After you pressed the 'Auto-Harmonize' button, the master track is filled with chords, and the optional 'Harmony' track is filled with phrases. You can review the results immediately. Feel
RapidComposer User Guide 38

free to press the 'Auto-Harmonize' button again to get different chords (if the algorithm allowsrandom decisions).
Other phrase operations
All the phrase operations can be found in the phrase inspector. Click on .Many keyboard shortcuts are available for phrase editing under Settings/Keyboard Shortcuts.
By using the mouse on the workspace:
Phrase Editing mode:
• Select phrase: click inside phrase• Toggle phrase selection: Ctrl+click inside phrase• Multiple phrase selection: Shift+click inside phrase• Deselect all phrases/Mute phrase preview: click on workspace• Add phrase from browser: double-click on workspace• Copy phrase: Ctrl+drag phrase• Ghost copy phrase: Ctrl+Shift+drag phrase• Transpose+Move phrase: drag phrase• Drag original phrase&rhythm: Alt/Option+drag phrase• Drag phrase&rhythm with variations: Alt/Option+Shift+drag phrase• Replace rhythm/phrase or apply rhythm/melody: Drop phrase&rhythm on phrase
Note Editing mode:
• Select active phrase: click on a phrase note• Add new note: [select phrase to add to] double-click• Add 6 chord notes: [select phrase to add to] Ctrl+Alt/Option+drag• Duplicate selected notes: Ctrl+drag notes• [Rhythm] Add/remove event/toggle accent: Ctrl+click or right click
RapidComposer User Guide 39

Working with chords
Editing chords on the master track
Clicking on a master track chord will display a few options above the chord, and the Quick Suggestions pop-up below the chord:
RapidComposer User Guide 40

The buttons on the top allow you to select the chord using the Chord Selector, Circle Of Fifths Chart, MIDI keyboard and computer keyboard (in this order).
The Quick Suggestions pop-up is fully configurable; you can select what you want to display by clicking on the menu button in its top right corner. Clicking on “More suggestions” will open a more detailed pop-up with suggestions for multiple chords:
Using the Chord Selector
The Chord Selector is a flexible and universal way to
• select chords for the master track• edit, generate and save chord progressions
RapidComposer User Guide 41

• preview the edited phrase in the Phrase Editor• preview the currently selected phrase in the Phrase Browser• preview the selected phrase from the composition
using any chords. This is the 'target' that you select on the top half of the Chord Selector.
The bottom part shows the methods for chord selection:
• Chord List• Scale Degrees• Parallels• Palette• Builder• Tonnetz• Circle Of Fifths
All methods share the same color and preview options that you can select in the “Options”
RapidComposer User Guide 42

menu.
Using the ‘Circle Of Fifths’ chart
The “Circle Of Fifths Chart” is usable when the scale is one of the 'church' modes. The same chord preview settings are used here, as in the Chord Selector. The menu in the top right corner offers choices to set the master track scale when clicking on a mode or chord.
RapidComposer User Guide 43

Using the ‘Tonnetz’
The “Tonnetz” (tone network in German) is a two-dimensional lattice diagram showing the harmonic relationships between chords. A great amount of literature is available, if you search for “tonnetz” on the internet. You can start with https://en.wikipedia.org/wiki/Tonnetz.
In the diagram you can click in a triangle to select a major or minor chord, and may toggle additional notes. Scale notes have a blue border, chord notes are filled with green color. Each chord has a specific shape throughout the lattice.
The Tonnetz diagram can also be found on the master track. The master track version does not show the scale, selected notes, chord, naming and zoom as in the top line below. The scale, chord and chord naming is automatically taken from the master track. You can use the mouse wheel to zoom in and out.
RapidComposer User Guide 44

Using the MIDI keyboard for chord selection
Enter chords from your MIDI keyboard by holding down more than 2 keys. You can toggle keys on the displayed keyboard with the mouse. If the held down keys cannot be located in the chord library, semitone offsets are displayed. E.g. when you hold down C, C# and D, the chord name will become “C+1+2”. If that makes a valid chord, you can add it to the chord library. There is an option to jump to the next chord when you want to enter multiple chords from the MIDI keyboard.
Using the computer keyboard for typing chord names
You can type several chords separated by space to set multiple master track chords at the same time:
RapidComposer User Guide 45

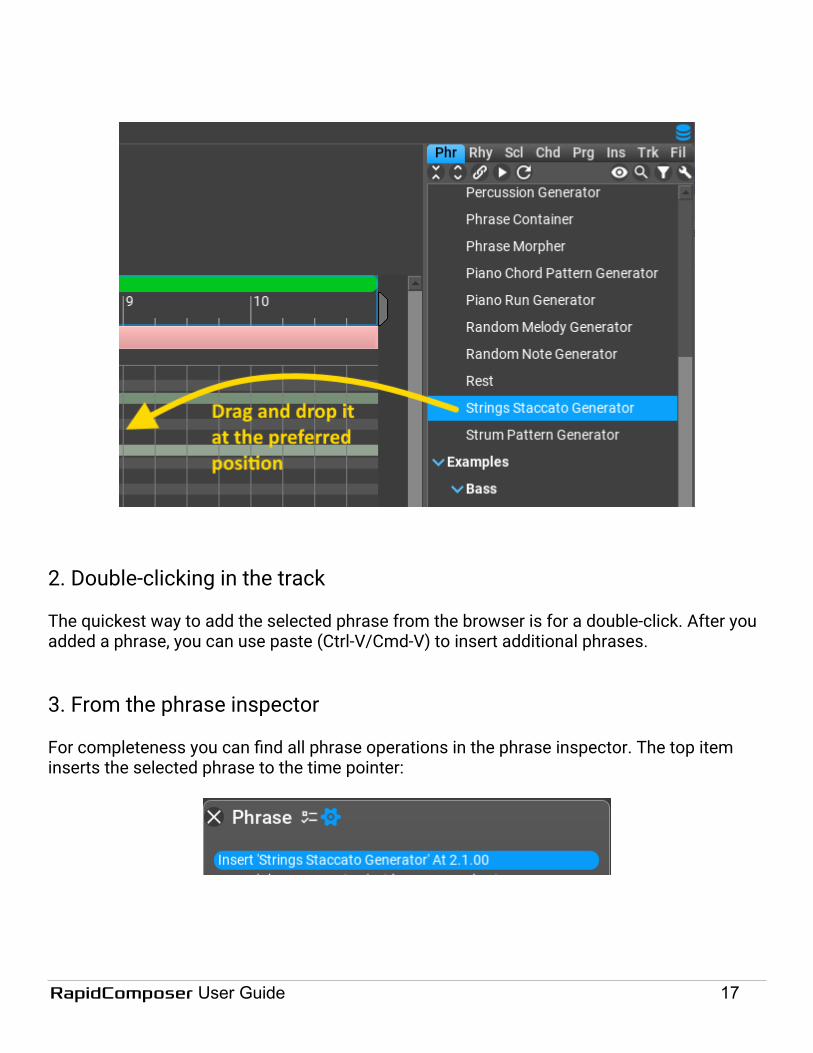
Generating a chord progression
There are several ways to generate a chord progression, or just replace a few chords on the master track.
Important: you need to set the proper chord progression rules for the composition, depending on the scale used. The rules should match the scale used. For a major scale, use rules for major scales, for a minor scale, use minor scale rules.
With chord selection on the master track
This is the quickest way. The master track inspector settings are used. Select a few chords toreplace, and click on the ‘dice’ button:
If you want to edit or save the progression, click on the ‘pencil’.
In the master track inspector
Select chords on the master track, set up the options, and click on the “Generate Progression…” button. Right-click on any chords to open the master track inspector, if it is not
RapidComposer User Guide 46

open.
Settings:
• Rule Set: specify which chord rules to use. It is important that the rules should match the scale. The rule name is set automatically based on the position of the first selected chord. You can assign separate rules to parts or lines in the structure inspector.
• Number Of Chords: the number of chords to place on the master track. The number is set based on the selected chord count every time you make a chord selection.
• Diversity: select the unexpectedness of the progression between ‘expected’ and ‘unexpected’. For the ‘unexpected’ option chords with smaller weights will be used more often.
• Keep harmonic rhythm: the existing chords will be replaced without changing their length. This disables the ‘number of chords’ slider.
• Allow returning to the previous chord: allow patterns like I-V-I.• Connect to next chord: take the next chord into consideration, according to the rules.
In the timeline inspector
Everything connected to ‘time’ can be found in the timeline inspector. You can select a range on the timeline which will be filled with chords (on the master track):
RapidComposer User Guide 47
The settings are the same as above.
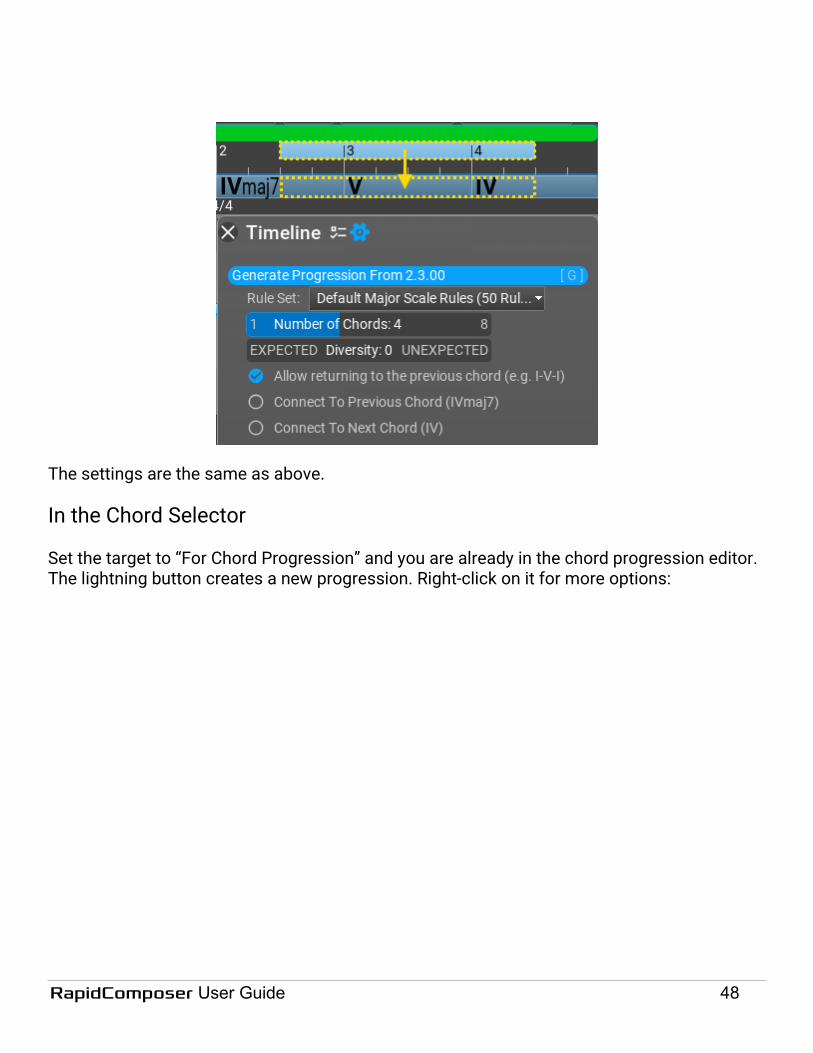
In the Chord Selector
Set the target to “For Chord Progression” and you are already in the chord progression editor. The lightning button creates a new progression. Right-click on it for more options:
RapidComposer User Guide 48

You can use ‘borrowed’ chords from other keys here. ‘Borrowed’ chords are not in the rules, but they make the progression more interesting. As a useful option you can tell the program which scale degrees may contain borrowed chords.
RapidComposer User Guide 49

Working with tracks
Right-click on a track to open the track inspector to set track properties and execute actions associated with tracks:
A track can be MIDI, folder or audio track. MIDI tracks may be a percussion track with a drum map assigned. For percussion tracks the percussion instruments assigned to MIDI notes are displayed instead of the piano keyboard. Drum map files can be created in a text editor (see existing .rcDRUM files).
RapidComposer User Guide 50

The track instrument
There are 3 types of instruments that can be used. Soundfonts, VST instruments and MIDI instruments.
MIDI instruments do not generate audio, but they are useful for sending MIDI events to external software and hardware synthesizers. You can set up RapidComposer to send MIDI events to a DAW on a virtual MIDI cable (e.g. LoopBe on Windows, or the RapidComposer Virtual MIDI Output on macOS). When you set up RapidComposer this way, you need to selecta “MIDI” instrument for the tracks.
Soundfonts are very useful for composition because they are relatively small, load quickly, and do not jeopardize the stability of the application by loading foreign code into the application address space, like VST plug-ins. You can find good quality soundfonts on the net,some of them are free. Add your soundfonts under the Settings / Soundfonts list.
VST plug-ins are VST2.4 instruments. Before using the VST plug-ins, you need to add them to the list under the Settings / VSTi tab. Make sure you set the ‘multi-timbral plug-in’ option according to the plug-in. It will influence how RapidComposer creates new plug-in instances internally. For non-multi-timbral plug-ins it will create a new instance for each track. For multi-timbral plug-ins several tracks share a common plug-in instance, each with its own MIDI channels.
Variations
You can add variations to the entire track (see the Variations chapter). Variations are applied to all phrases in the track, from top to bottom order.
Adding a new track
When the track headers are in keyboard focus (with blue rectangle around) you can simply press ‘+’ to add a new track. Another shortcut ‘*’ can be used to duplicate a track.
The track menu above the tracks offers adding tracks:
RapidComposer User Guide 51

Right-clicking on the empty area below the tracks opens a popup menu:
Rearranging tracks
Rearranging tracks is done by drag and drop, or from the track inspector (Move Up, Down). You can move a track into a folder track by dragging it over the folder track. Similarly you can move a track out of a folder track.
Removing a track
To remove a track, press the ‘delete’ button when the track headers are in keyboard focus. It is of course possible to remove a track in the track inspector.
Mute and solo
RapidComposer User Guide 52

A track can be muted by highlighting the small ‘m’ button ( ) in the track header. A track can be made ‘solo’ (that is to make all other tracks muted) by highlighting the small ‘s’ button ( ).There can be multiple solo tracks.
Track templates
As a convenience, tracks can be saved together with the instrument and all phrases as track templates. The track templates are saved in the Track Templates browser, from where you can drop track templates on an existing track to replace, or on the empty area to add a new track.
RapidComposer User Guide 53

Browsers
Browsers are docked on the right side of the workspace. Click on the small button at the top right corner to open the browsers:
Activate a browser by clicking on the tabs at the top. You can configure the browsers to
display full texts by right clicking on the button. The following abbreviations are used: Phr=Phrases, Rhy=Rhythms, Scl=Scales, Chd=Chords, Prg=Progressions, Ins=Instruments, Trk=Track Templates, Fil=Files.
The browsers offer various options for previewing, searching and filtering the library contents.The explanations for the buttons in the top row:
: collapse all folders : expand all folder : direct link to selected phrases. Phrase selection in the composition will select the same
phrases in the library. Selecting a phrase in the library will overwrite the selected phrases in the composition. This feature lets you replace all selected phrases with a single click!
: preview (listen to a phrase, rhythm, chord...) : reload custom phrases or rhythm patterns
RapidComposer User Guide 54

: display selected phrase/rhythm/chord/etc : search in library : display certain groups (filter) : browser group/sort/display/filter options for advanced users
You can drag phrases and rhythm patterns from the browser to the workspace. Dropping MIDIfiles or folders containing MIDI files to the phrase or rhythm browsers will convert the MIDI files to phrases. Dropping rhythm patterns to the rhythm browser will save the pattern.
RapidComposer User Guide 55

Structure inspectorYou can set up the hierarchic composition structure in the structure inspector. Create, duplicate and delete new parts and lines, set lengths, colors, change the order by dragging.
The structure inspector is available by clicking on :
It is important that in RapidComposer lower level units (parts, lines) inherit the properties of higher level units, but they can override them too. The properties include the scale, tempo andsignature. In the above screenshot ‘Part 3’ overrides the composition scale, and it will use C Major instead of E Major. ‘Part 2’ changes the tempo to 130 BPM. This means all lines in ‘Part2’ will use that tempo, but lines can also override any properties they inherit from parts or the composition.
Right-click on any parts or lines will open the Master Track inspector where you can set the name, length, scale, tempo and signature. Double-click on the name will let you rename it. Double-click on an empty area will bring the currently selected unit in focus in the composition.
RapidComposer User Guide 56

Drag and drop
Dragging and dropping phrasesUse the phrase browser to drag phrases to the workspace. Please note it is simpler to double-click on the workspace to insert the currently selected phrase.
Dragging a phrase from the Phrase Browser
Drop the phrase on the workspace to insert it in the composition. Alternatively you can use double-click, or press the '+' key (only when the workspace is in keyboard focus).
RapidComposer User Guide 57

Dropping a phrase on an existing phrase
Drop a phrase on another one to replace it.
Dropping a phrase on a track
The track will be filled with the phrase. If you hold down Ctrl during dropping, ghost copies willbe used.
Inversions
Drag phrases vertically to make an inversion of the phrase. The way the phrase is inverted depends on the “Phrase Transpose” setting over the workspace. Notes: when moving up, the bottom notes of the phrase move up. This won't preserve the phrase shape, but the harmony and rhythm will be the same. Phrase: when moving up, all phrase notes move up to the next chord note. This preserves the phrase shape. Octave: this setting allows the phrase to move by octaves only
Copying phrases/notes
Ctrl-drag phrases or notes
Ghost copying phrases
Ctrl-Shift-drag phrases to make a ghost copy. The “copy” will follow the changes in the original phrase. You can choose to apply the variations on the original phrase, or not.
Moving phrase between tracks
During a normal drag operation, you can drag the phrases to other tracks.
Dragging and dropping rhythm
It is possible to drag the rhythm part of phrases, or drop a rhythm pattern on phrases.
RapidComposer User Guide 58

Dragging rhythm from phrases
Alt+drag phrase
Dragging rhythm from the Rhythm Browser
Drag phrase from the Rhythm Browser
Dropping rhythm to phrases
If the phrase is a generator its rhythm is replaced, unless you hold down Ctrl, which means adding an “Apply Rhythm” variation.
For normal phrases an “Apply Rhythm” variation is added with the dropped rhythm.
Dropping rhythm to the Rhythm Browser
Drop the dragged rhythm to save it in the Rhythm Browser
RapidComposer User Guide 59

Dropping rhythm to tracks
Dropping a rhythm pattern on a track will add it as a new phrase. This is very useful for percussion tracks.
Dragging and dropping chord progressions
You can drag chord progressions from the browser or from the Chord Selector (“Drag” button in progression editor)
Dropping a chord progression on the master track
By default chord lengths are preserved if there are lengths assigned to chords in the progression. You can ignore the lengths by dropping the progression using the Ctrl key.
Dropping a chord progression on the timeline selection
The chords are placed automatically in the selected timeline range. This many not be possibleif the selection is too short, so make sure the chords will fit into the selection.
RapidComposer User Guide 60

Dragging MIDI to RapidComposer
You can drag and drop MIDI (either files or directly from DAWs) to any track or the master track. Dragging should work from most DAWs that use the standard D&D procedures. Only the first track is inserted from the MIDI files. You can import multiple tracks under the MIDI Import tab.
Dragging MIDI to tracks (with real-time preview)
If you hold down the Ctrl key, the dragged MIDI is analyzed for chords, and its relative form is dropped which automatically adhere to the master track chords. If you do not hold down Ctrl during dragging, the original MIDI notes are placed in the track. Some DAWs (like Reaper) do not make it possible to show a live preview of the dragged phrase, because the file data is created only when dropping the MIDI data. However it is still possible to drop MIDI from Reaper.
Dragging MIDI to the master track (with real-time preview)
The dragged MIDI file is analysed for chords which you can drop on the master track. Monophonic files without harmony do not work.
RapidComposer User Guide 61

Dragging MIDI to rhythm drop targets
It is possible to drop a MIDI file on “rhythm drop targets”. In this case the rhythm will be extracted from the first track of the MIDI data.
Dragging MIDI to the RC window
This will open the MIDI Import page for specifying further options
Dragging MIDI files and folders to the phrase browser
It is possible to batch convert MIDI files to phrases. You can drop multiple MIDI files or folder to the phrase browser. Folders are parsed hierarchically. Use simple, short MIDI files. Phrasesare saved in the same folder structure.
Dragging MIDI files and folders to the rhythm browser
It is possible to batch convert MIDI files to rhythm patterns. You can drop multiple MIDI files or folder to the rhythm browser. Folders are parsed hierarchically. Use simple, short MIDI files.Rhythm patterns are saved in the same folder structure.
Dragging MIDI files and folders to the chord progression browser
It is possible to batch convert MIDI files to chord progressions. You can drop multiple MIDI files or folder to the chord progression browser. Folders are parsed hierarchically. It is best to use MIDI files with a single track. ‘Chords-only’ MIDI files are smartly detected and a simpler, more reliable chord detection is used for these file. Chord progressions are saved in the samefolder structure.
RapidComposer User Guide 62

Dragging MIDI from RapidComposer to DAW (or to Explorer/Finder)
Dragging the whole composition
Use Ctrl-drag on the file icon. Muted tracks will not be included. You can select a section to drag by making a timeline selection.
Dragging a single track
Ctrl-drag the track name. You can select a section to drag by making a timeline selection.
Dragging selected phrases as MIDI
Ctrl-Alt-Shift+drag phrases
RapidComposer User Guide 63

RapidComposer User Guide 64

ArticulationsArticulations specify how individual notes are to be performed within a phrase or passage.
Articulations are described in an editable text file with .rcCTRL extension in one of these locations:Windows: C:\Users\<user name>\Documents\RapidComposerV3\DBOS X: ~\Documents\RapidComposerV3\DB
Each library or virtual instrument requires such an .rcCTRL file that defines the possible articulations, arranged in groups.
An articulation can be a key-switch or a controller value change or both. It can be assigned to a phrase, or individual phrase notes, or even a track can have its default articulation.
E.g. if you open “Garritan Personal Orchestra 4.rcCTRL” you’ll see that there are articulations with just key-switch or controller change or with both as ingroup=“GPOSoloStrings”; articulation=“Legato”; keyswitch=“C-1”; ctrl=68; ctrlval=127;
Explanation:“group”: articulation group“articulation”: articulation name“keyswitch” (together with “keyvelocity”, optional): specify keyswitch note as note name (C4=MIDI note 60) or MIDI note number (0-127)“keyvelocity” (together with “keyswitch”, optional): specify note on velocity for the keyswitch (0 is a note off event!)“ctrl” (together with “ctrlval”, optional): MIDI controller number (0-127)“ctrlval” (together with “ctrl”, optional): MIDI controller value (0-127)
The author will gladly help to create an articulations definition file, assuming there is a specification.
RapidComposer User Guide 65

Phrase EditorThe Phrase Editor is for “designing” and testing phrases, using different scales and chords. While the Note Editing mode lets you edit individual notes in phrases in the main composition workspace, many times it is more convenient to focus on a single phrase. To edit a phrase in the composition, double-click on it. When creating a phrase from scratch, you can save it, or add it to the clipboard for pasting in the composition.
The top toolbar:
RapidComposer User Guide 66

Please note: the Phrase Editor settings have no relation with the scales, chords or tempo used in the composition! These are independent settings.
Explanation for the notation usedBecause notes in RapidComposer hold extra qualities, we use a special notation for marking anote chord-relative or scale-relative.
There are 4 types of notes in RapidComposer:
• Scale note relative: one of the scale notes, denoted with a roman numeral (e.g. I=scale root, II=second scale note, etc…). The actual note depends on the scale used.
• Chord note relative: one of the chord notes, denoted with #<number>. The chord root is #1, the second chord note (typically a 3rd) is #2, the third chord note (typically a 5th) is #3, etc. Negative numbers can be used, #-1 means the top chord note transposed downby an octave. A special notation can address chord notes from the highest note: #TOP means the highest note in the chord, #TOP-1 is the second highest, etc.
• Bass note relative: the bass note of the chord, which is the chord root note, or the slash note (if used). It is denoted by B
• Absolute note: the usual MIDI note from C-1 to G9.
Roman numerals are used for scale step offsets use, while Arabic numbers are used semitone offsets.
These notations can be combined. Examples:#1+II means the chord root note plus 2 scale steps#3-1 means the third chord note (typically 5th but not always!) minus 1 semitonesB+IV means the bass note plus 4 scale steps
Don’t worry, you need not enter these notations in RapidComposer, only recognize if a note is chord or scale relative. The program selects the most logical parameters when you transposea note. During editing you set the Note Mapping depending on what you want to achieve: making a phrase that uses mainly chord notes, or a melody phrase with scale notes only.
Chord-relative notes are transposed differently than scale-relative notes. E.g. for the notes #1,#2, #3 (for a C Major chord: C E, G), the first transposition upward is #2, #3, #1+1 octave, so E,G, C+1 octave, as one would expect for a chord.Scale-relative notes are transposed from scale step to scale step, so scale notes I, II, III (for a C Major scale: C, D, E) will be transposed to II, III, IV (D, E, F).
RapidComposer User Guide 67

Phrase generator referenceIn phrase generators the notes are created by specialized algorithms. Each phrase generator has a specific purpose.
Clicking the Generator tab in the Phrase Inspector or Track Inspector shows all the parameters for the currently used phrase generator. Most phrase generators have a rhythm input, which means they work on a rhythm pattern (in most cases a rhythm generator, but you can use/edit your own rhythm patterns).
The following phrase generators are included:
• Arpeggiator: creates arpeggios from many types of patterns• Bass Generator: melody in a lower octave, resembling a bass guitar performance• Chord Generator: simple rhythms: quarter notes, half notes, whole notes, etc.• Dyads Run Generator: generates a MIDI run, commonly a “thirds run”• Fingerpicking Generator: guitar-style patterns/arpeggios• Generic Generator: piano-like patterns that can be easily manipulated rhythmically,
based on a series of variables• Markov Melody Generator: experimental, generates melodies where the next note
depends on previous notes. You need to enable this phrase generator under Settings / Miscellaneous / Experimental Features. Not available in the LE version
• Melody Generator: generates melodies that intelligently fit over any chord or key. Not available in the LE version
• Modern Chord Pattern Generator: creates chord patterns used in EDM genre. Not available in the LE version
• Motive Generator: motive generated or edited under the Melody Generator tab • Ostinato Generator: generates ostinato patterns• Percussion Generator: generates percussion patterns using multiple percussion
instruments• Phrase Container: arranges phrases using the selected order in the track• Phrase Morpher: intelligently connects 2 phrases or phrase generators by analysing
them and generating the missing notes between the two phrases. Not available in the LE version
• Piano Chord Pattern Generator: creates a pattern for the left and right hand• Piano Run Generator: rhythmically rich arpeggios running up and down chords• Random Melody Generator: a simple but effective way of making surprisingly good
melodies.• Random Note Generator: experimental, useful for triggering key-switches. You need to
RapidComposer User Guide 68

enable this phrase generator under Settings / Miscellaneous / Experimental Features.• Rest: Use only in the Idea Tool to insert rests in the composition• Rhythm Mapper: maps a different rhythm pattern to a phrase (available only in the
'Convert Phrase To Generator' menu!)• Strings Staccato Generator: creates beautiful staccato patterns, perfect for orchestral
and string quartet arrangements• Strum Pattern Generator: creates realistic guitar strum patterns with lots of options
Arpeggiator
Create simple or complex arpeggiated phrases with the Arpeggiator. As most other generators, the arpeggiator uses the rhythm generator which lets you create rhythmically complex, interesting arpeggiated phrases.
RapidComposer User Guide 69

Arpeggiator Settings
• Notes To Use: select usable notes. By default chord notes are used, but any notes can be assigned for arpeggiation.
• Shape: there are lots of options for how the notes follow each other. • Key Range: describes the number of chord notes to be used• Retrigger: the arpeggiated pattern will be restarted at the 'retrigger' duration (quarter
notes). 0 means the pattern never restarts.• Fill Between Notes: it is an interesting effect when you fill the space between
RapidComposer User Guide 70

arpeggiated notes with notes• Velocity For Filled Notes: velocity used for the added 'filler' notes
Bass Generator
The bass generator is a simple way of creating bass phrases.
Bass Generator Settings
• Allowed Notes: specify notes which the Bass Generator can use. Default setting: the Bass note, Bass+4 scale steps (typically 5th), Bass+6 scale steps (typically 7th), Bass+octave
• Global Movement: Phrase shape. Available settings are Up (default), Down, Up-Down, Down-Up, Random, and Select Randomly.
RapidComposer User Guide 71

• Note Movement: Specify how successive notes relate to each other. Available settings are None (default), Alternating, Select Randomly.
• Transpose (Octaves): Available settings are None, -1, -2 (default), -3, -4 Octaves.
Chord Generator
The simplest phrase generator that fills all rhythm events with chord notes. Optionally you canadd bass notes to the phrase a few octaves below the root note. The note selector allows usage of not just chord notes.
RapidComposer User Guide 72

Chord Generator Settings
• Notes To Use: select usable notes. By default chord notes are used, but any notes can be used.
• Add Bass Note: add bass note using octave transposition. Values: -1, -2, -3, -4 Octaves
Dyads Run
This generates a MIDI run, specifically by interval, commonly a “thirds run”, similar to the bridge of “Let It Be”, but could also be any interval, with polyphony option.
RapidComposer User Guide 73

Dyads Run Settings
• Motion: specify up or down motion• Interval: specify interval for the 2 notes. Possible values: Third (default), Fourth, Fifth,
Sixth, Seventh, Octave• Polyphony: when required, the polyphony can be increased by inserting notes in octave
distance from the original notes
Fingerpicking Generator
Create interesting guitar fingerpicking patterns with this generator. Set up the rhythm under the Rhythm tab.
RapidComposer User Guide 74

Fingerpicking Generator Settings:
• Notes To Use: select usable notes. By default 5 chord notes are used. If the chord is a 3-note chord, the 4th and 5th note will the 1st and 2nd note transposed up by an octave.
• Dedicated Bass: Set the number of (bottom) chord notes reserved for the bass pattern.• Retrigger: the fingerpicking pattern can be restarted after a number of quarter notes.• Sustain Notes: Note lengths increased so that notes last until the next note. Default
setting is enabled, where the MIDI notes resemble fingerpicking an acoustic guitar.
RapidComposer User Guide 75

Generic Generator
The Generic Generator lets you specify the proportion of ‘chord’ and ’other’ notes, the proportion of full polyphony/partial polyphony/monophonic notes, and note repetition options. You can set up exactly which notes to use for ‘chord’ notes (by default: chord notes), and for ‘other’ notes (by default: scale notes).
RapidComposer User Guide 76

Generic Generator Settings
• Chord/Other Notes: the proportion of ‘chord’ and ‘other’ notes. 100% Chord Notes only use the notes from the ‘chord notes’ list.
• Partial Polyphony: the percentage of using partial polyphony (a few chord notes but not all).
• Allowed Partial Polyphony: the possible number of chord notes to be played together when partial polyphony is used.
• Repeat Last / Second Last: How often you’ll hear notes repeated• ‘Chord’ Notes: list of notes to be used as ‘chord’ notes. Default: chord notes.• ‘Other’ Notes: list of notes to be used as ‘other’ notes. Default: scale notes
Markov Melody Generator
This phrase generator must be enabled among the Settings / Miscellaneous / Experimental Features before first use. It is only for expert users because there are MANY settings that you should set up. Markov Melody is a monophonic phrase generator where each note depends on the previous two notes. You set weights (probabilities) with the sliders for all the scenariosthat may happen. In the “Next Note” menu you can select from possible scale step offset for the next note compared to the last or second last note (depending on the scenario).
RapidComposer User Guide 77

Markov Melody Generator Settings• Higher Than Both, Between, Lower Than Both, etc (possible scenarios for the next
note): weight for this scenario
RapidComposer User Guide 78

• Next Note: scale step offset for the next note compared to the last or second last note (depending on the scenario)
Melody Generator
The Melody Generator is based on 'steps and leaps' and we at MusicDevelopments feel it is a great and incredibly useful addition to the full edition of the program. The Melody Generator iscapable of creating melodies for the master track chords, unlike the Motive Generator. It is the only phrase generator that uses the actual master track scale and chords for creating the melody. This means that transposition of Melody Generator is discouraged because it may not sound as good as untransposed.
RapidComposer User Guide 79
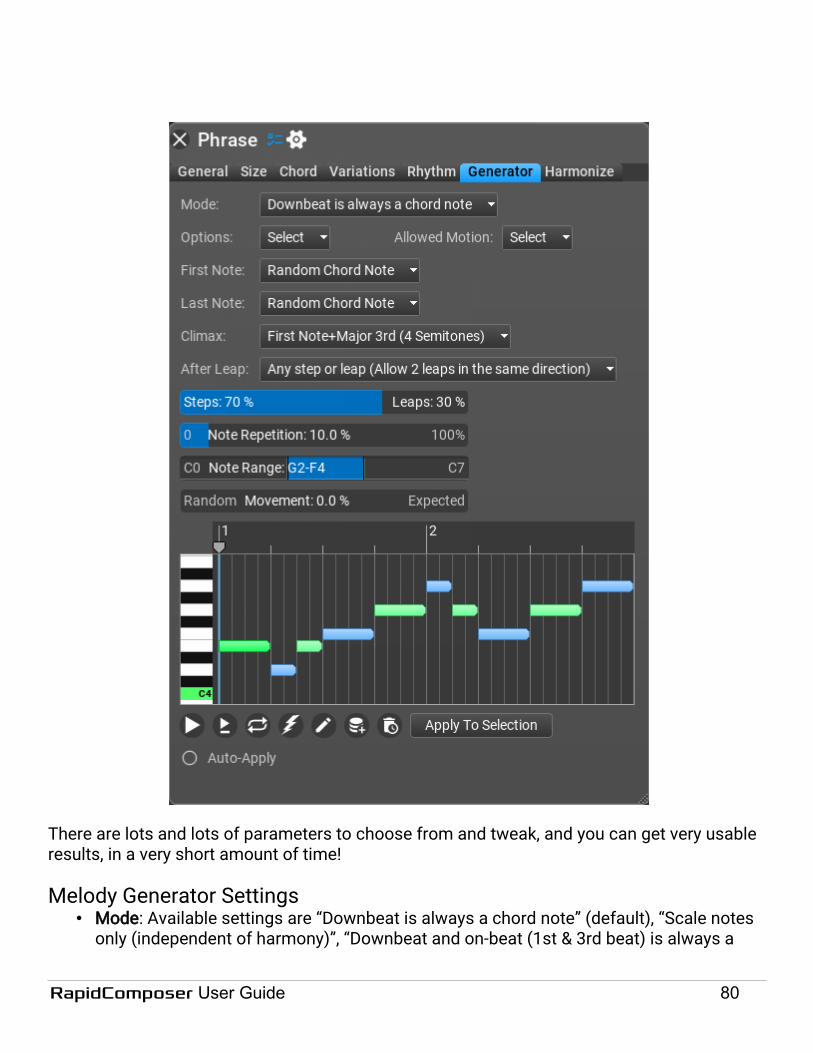
There are lots and lots of parameters to choose from and tweak, and you can get very usable results, in a very short amount of time!
Melody Generator Settings• Mode: Available settings are “Downbeat is always a chord note” (default), “Scale notes
only (independent of harmony)”, “Downbeat and on-beat (1st & 3rd beat) is always a
RapidComposer User Guide 80

chord note”, “Chord notes only” and “Scale notes and chord notes”. Depending on how these are set, you’ll hear more “chordal” melodies, or more “scalar” melodies.
• Options: Allowed up and down motion, and some other settings are here. • Penultimate note is a step above tonic: when set, the algorithm attempts to place
the note before the last note to be a scale step about the chord root note • Convert notes to 'chord note+scale steps' form: by default the Melody Generator
creates scale-relative notes, but you can convert them to chord-relative • Allow 2nd to be a melody note: you can allow the 2nd to be a melody note even
when using chord notes only. The 2nd very often participates in melodies.• Allow 7th to be a melody note: you can allow the 7th to be a melody note even
when using chord notes only. • Don’t be afraid to experiment! Default settings are “Penultimate note is a step
above tonic (also depends on the chord!)”, and nearly all “Allowed Up Motion” and“Allowed Down Motion” scale intervals are checked (except Octave motion).
• Allowed motion: check which intervals are allowed for steps and leaps from one note tothe other
• First Note: Available settings are “Random chord note” (default), “Chord root note”, “Random scale note in note range”, and various absolute notes.
• Last Note: Available settings are “Random chord note” (default), “Chord root note”, “Random scale note in note range”, and various absolute notes.
• Climax: There are many settings here. The default Climax setting is “First Note plus Major 3rd”. You can also choose “No Climax”, or various scale interval movements. Experiment!
• After Leap: This is the behavior that Melody Generator uses after notes “leap” (such as go up or down equal to or greater than a minor 3rd). The default setting is “Any step or leap (allow 2 leaps in the same direction)”. You can also choose “Step in the opposite direction”, “Step in any direction”, “Step or smaller leap in opposite direction”, or “Leap in opposite direction”.
• Steps & Leaps: Move to the right to have your melody movement be more “scalar” or step-wise, and move to the left to add more leaps to the melody.
• Note Repetition: Move to the right to increase the number of consecutive repeated notes in the melody.
• Note Range: Default range is G2 to F4 (common tenor range).• Random Movement: Specify the probability of an 'expected' movement. When set to
100%: 7th will move up to the root, and 4th will move down to the third (and other rules). Please note that sometimes the 'expected' movement is not possible when otherconditions do not allow it.
RapidComposer User Guide 81

Tips
• Set the Movement slider all the way to the right (100% expected), and increase the NoteRepetition slider for more “melodic” results.
• Set the Steps slider for a majority of steps (with fewer % leaps) for additional “melodic” results.
• Set the Climax to “No Climax” for melodies that don’t reach a “peak.” (a lot of melodies don’t… they hang around in one place, unless the melody is deliberately trying to draw attention to itself (then, a climax is recommended).
Modern Chord Pattern Generator
Create EDM chords with this phrase generator! For best results use 'Modern Rhythm' or 'Modern Random Rhythm' as the rhythm generator or you may edit the rhythm manually.
RapidComposer User Guide 82

Modern Chord Pattern Generator Settings
• Chord Placement: choose which rhythm notes represents the chord notes. 'Auto' will place a chord to each 8th note, 'All' means that all rhythm notes are chords
• Chord Notes: specify which chord notes to use for the full chord. Available settings:
RapidComposer User Guide 83
Root, 3rd, 5th, 7th, 9th, Root-1 Octave, 3rd-1 Octave, 5th-1 Octave, 7th-1 Octave, 9th-1 Octave
• Chord Polyphony: Decide to use one chord note at a time, or all chords notes• Chord Note Length: the length of chords notes. Available settings: As In Rhythm, Until
Next Chord, Until Next Chord-16th Note, 16th Note• Bass Placement: choose which rhythm notes represents the bass notes. 'Auto' will
place a bass note to each 16th note, 'All' means that bass notes are placed to all rhythmnotes
• Bass Note: Select which note to use as bass. Available settings: Random, Chord Root, 3rd, 5th
• Bass Note Octave: Bass note transposition• Bass Note Length: the length of bass notes. Available settings: As In Rhythm, Until Next
Bass, Until Next Bass-16th Note, 16th Note
Motive Generator
Motive generator encapsulates all the settings of the Melody Editor. It is the only phrase generator which has a dedicated page for editing, rather than a few buttons and sliders. Whenyou double-click on a ‘Motive Generator’, the Melody Editor opens, instead of the Phrase Editor as it usually happens.
RapidComposer User Guide 84

Motive Generator Settings
A whole chapter is devoted to explain motive editing and generation under the Melody Editor tab. Please look up the Melody Editor chapter.
Ostinato Generator
An ostinato is a recurring rhythmic or melodic pattern often found in both classical compositions and popular songs. Ostinato plays an important part in improvised music (rock and jazz), in which it is often referred to as a riff or a vamp. The Ostinato Generator does not use an external rhythm pattern.
RapidComposer User Guide 85

RapidComposer User Guide 86

Ostinato Generator Settings
• Pattern: choose from many pattern presets• Repeat Notes: it is possible to repeat notes maximum 4 times• Pattern Length (Retrigger): pattern length in quarter notes. The pattern is retriggered
when this length is reached.• Insert Chord Root Note Every: insert chord root note one octave below every Nth event
(not quarter note)• Changed Note Count: the number of notes that are changed randomly in 'pattern length'
duration. Downbeats and the first 3 notes are never changed.• Possible Intervals: specify allowed up and down motion intervals, in scale steps.
Available settings: +1 to +7, -1 to -7 scale steps
Percussion Generator
Create percussion patterns using multiple percussion instruments. Set the drum map first, use a percussion soundfont/VSTi instrument. You can re-generate one percussion, or all (unlocked) percussion instruments. Clicking on the pencil icon will open the rhythm generator options, where you can adjust the rhythm, or set up the rhythm manually.
RapidComposer User Guide 87

Phrase Container
The Phrase Container lays out phrases in a certain order. Typically you add the phrases to be used in the list, of which the Phrase Container will select the specified number of phrases, that it will lay down using the specified arrangement.
RapidComposer User Guide 88

Phrase Container Settings
• Number Of Phrases: number of phrases to select randomly from the list• Arrangement: order of phrases. The available settings depend on 'number of phrases'.• Possible Phrases: add the phrases that you want to include in the container. When
there are more phrases than the 'number of phrases' setting, the necessary number of phrases are randomly selected from the list
RapidComposer User Guide 89

Phrase Morpher
Phrase Morphing means that when you place a 'source' and 'target' phrase in the composition,the phrases between the two will be composed automatically by RapidComposer so that there is a smooth transition from the source phrase to the target phrase. There are several options to control this transition. Usually there are many possible transitions, if you don't like the one offered by the program, pressing 'Regenerate' (the lightning button) will create a different transition.
Phrase Morpher Settings
• Quantization: Horizontal note movement control. Specify if you allow notes moving in
RapidComposer User Guide 90

time and if so how they are quantized. Notes moving in time will change the rhythm, so if that is not what you want it is best to disable this option. Available settings: Disable Note Movement In Time, 1/4, 1/8, 1/16, 1/32, 1/64, 1/128
• Vertical Movement: Vertical note movement control. Specify if you allow notes moving vertically (becoming higher or lower notes) and if so how they are handled. Moving notes can be snapped to scale notes or semitones. Available settings: Disable Vertical Note Movement, Snap To Semitones, Snap To Scale
• Pair Note Additions And Removals: When checked adding a target note and removing a source note will happen at the same time as far as other conditions allow. This results a smoother transition.
• Handle Chord Notes Together: When checked chord notes with no offset will be added/removed together.
• Apply Automatic Transposition: Specify if transposition is applied to the generated phrases. When checked the highest note of the source phrase will approximate the highest note of the target phrase. This setting is ignored when guitar chords are used.
Piano Chord Pattern Generator
The Piano Chord Pattern Generator makes separate patterns for the left and right hands. The left hand (bass) patterns are taken from presets which have their own rhythm. The right hand uses the rhythm generator output, and applies chord patterns on the rhythm.
RapidComposer User Guide 91

Piano Chord Pattern Generator Settings
• Position: chord position. Available settings: Root is lowest (from C3), 3rd is lowest, 5th is lowest, Root is lowest (from C4)
• Mode: the chord pattern to play (order of chord notes).
• Rootless: remove the root note from the pattern
RapidComposer User Guide 92

• 7th, 9th, 11th, 13th: when to play these chord notes (assuming the chord includes this note). Available settings: None, With Root, With Third, With Fifth, Every Nth Event
• Bass: the bass pattern. Each bass pattern has its own rhythm.
• Bass Velocity: the velocity of bass notes
• Randomize!: you can randomize left and right hand patterns
Piano Run Generator
The Piano Run Generator offers a variable-note-length run through different octaves, in any direction, to easily add intensity or energy to a Composition.
RapidComposer User Guide 93

Piano Run Generator Settings
• Technique: the “style” of the run. Available settings: Straddle, Straddle Without Middle Note, 2-1 Breakup, 3-1 Breakup, Waterfall, Waterfall Using Inversions
• Motion: Upwards, Downward, Up-Down, Down-Up, Up-Down-Up-Down, Down-Up-Down-Up
RapidComposer User Guide 94
• Up Motion Range: the number of events (not quarter notes or semitones!) when movingup.
• Down Motion Range: the number of events (not quarter notes or semitones!) when moving down.
Random Melody Generator
This is a much simpler melody generator than 'Melody Generator' with less options. But still, itcan make very good melodies.
RapidComposer User Guide 95

Random Melody Generator Settings
• Options:• Wide Melody (Bigger Steps): allow bigger jumps for notes.• Last Note Is I: the last note becomes the root note of tonic• Force Chord Note For Notes Longer Than 2/4: longer notes will be chord notes
when this option is checked• Harmony Note Probability: higher probability means more chord notes will be used in
RapidComposer User Guide 96

the melody• Note Range: melody notes will be generated in the note range. Default: G2-F4• Note Repetition Probability: higher probability means more notes repeated.
Rest
This is an empty phrase used only in the Phrase Container and Idea Tool to add rest between phrases.
Rhythm Mapper
You can convert any phrase to a 'Rhythm Mapper' which lets you use a different rhythm pattern for the phrase. This is available only in the 'Convert Phrase To Generator' menu in the Phrase Inspector so you won’t find Rhythm Mapper in the phrase browser. Please note there exists a Rhythm Mapper variation with the same functionality. The difference is that you can add the Rhythm Mapper variation to phrases, which transform the phrase notes according to a rhythm pattern. On the other hand, the Rhythm Mapper generator stores the source phrase, and lets you use rhythm generators. Both are useful.
RapidComposer User Guide 97

Rhythm Mapper Generator Settings
Direct 1:1 Mapping
The rhythm events are mapped to phrase events. It is not the rhythm length that counts but the number of events in the rhythm. First the algorithm locates 'events' in the original phrase. An event has a position and a length. Events are when note(s) begin and last until the next note/event. Multiple notes (e.g. a chord) may belong to a single event. Also all rhythm notes are considered as an 'event'. Then the rhythm events are applied to the phrase, by shortening phrase notes if needed. Please note: a faster rhythm may change the phrase length. E.g. whenyou have 4 quarter notes, and you apply a rhythm consisting of eighth notes, the phrase becomes half the length. So the phrase length may change when using “Direct 1:1 Mapping”.
Preserve Phrase Shape
This functionality is the same as the Apply Rhythm variation. The phrase length does not
RapidComposer User Guide 98

change, notes are sliced according to the rhythm.
Strings Staccato Generator
The Staccato Strings Generator is best utilized with a Staccato Strings soundfont or VSTi. This Generator is absolutely perfect to create classical runs/arpeggios, that stay true to stringensemble arrangements, and the intervals they often use. The algorithm was painstakingly created through extensive study of classical compositions. There is no source rhythm for this generator.
If you love classical music and the beauty of staccato string arpeggios, this generator might be the missing puzzle piece for your ideas.
RapidComposer User Guide 99

Strings Staccato Generator Settings
• Polyphony: How “thin” the Phrase can be (Polyphony 3), or how “full” (Polyphony 8 or 9).Put simply: Polyphony 3 means 3 performers playing complimentary arpeggios, and Polyphony 9 or 10 means more than 3 performers playing complimentary arpeggios in different octaves.
• Density: Default setting is Low+Medium+High. Other available settings are Low, Low+Medium, Medium, Medium+High, and High.
RapidComposer User Guide 100

Strum Pattern Generator
Create interesting and realistic guitar strum patterns with this generator! Use the 'Steel Guitar'preset from the included 'GeneralUser GS-RC' soundfont, or similar virtual instrument.
RapidComposer User Guide 101

RapidComposer User Guide 102

Rhythm generator referenceBesides being able to edit rhythm manually, there are some interesting tools to generate rhythm patterns using mathematical algorithms. The rhythm generators are available only in the phrase generator Rhythm menu.
The following rhythm generators are included:
• Modern Rhythm• Modern Random Rhythm• Schillinger's Interference• Subdivision• Polyrhythm• Generic Rhythm• Probabilistic Rhythm• Euclidean Rhythm• Smooth Rhythm• Bass Rhythm• Simple Intervals• Toggle Intervals• Manual Editing
Rhythm Processing
There are a few rhythm settings (collapsed by default) that are common to all rhythm generators. You can see these controls under the rhythm generator UI, suggesting that these process the rhythm after rhythm generation. Please notice that note length is part of the rhythm in RapidComposer.
RapidComposer User Guide 103

• Dotted Notes: Use dotted notes where possible. E.g. when selecting “Dotted 1/4” when there are 2 quarter notes one after the other, the length of the first note becomes 3/8 and the length of the second quarter note becomes 1/8. Options are None, Dotted 1/2, Dotted 1/4, Dotted 1/8, Dotted 1/16, Double Dotted 1/2, Double Dotted 1/4, Double Dotted 1/8, Double Dotted 1/16
• Note Length: options are Sustain Notes, Set Equal Length, Change By Percentage, Change By Offset
• Rotate: shift notes left or right, using the snap setting• Rests: you can insert silence in the middle of a rhythm pattern• Accents: increase or decrease 1/4, 1/8 or 1/16 note accents• Humanize: humanize note positions, lengths, and velocity
More detailed descriptions of the various rhythm generators are followed:
Modern Rhythm
Modern Rhythm creates rhythm patterns used in modern EDM styles (trance, dubstep, trip-hop, DnB…). The rhythm is based on groups of three 16th notes with some 8th notes lead in. Itis best to use with the Modern Chord Pattern Generator.
RapidComposer User Guide 104

Modern Rhythm Settings
• Divide 3-Note Groups: Specify how a group of 3 16th note should look like. Possible options: No (16th+16th+16th), 1-2 (16th+8th), 2-1 (8th+16th), Randomly (choose any previous settings), Randomly For Each (select a random division for each group).
• Lead-in 8th Notes: You can use one or two (or none) 8th notes at the beginning of the rhythm pattern
• Remove 16th Notes: Remove all 16th notes from the pattern• Complexity: This setting will change 1 or 2 groups of 16th notes by re-grouping.
Possible options: Simple (no re-grouping), Medium (1 re-grouping), Complex (2 re-grouping)
RapidComposer User Guide 105

Modern Random Rhythm
Modern Random Rhythm is a rhythm generator for EDM (trance, dubstep, trip-hop, DnB…) and other modern styles especially for chord patterns. It works by joining preset rhythm patterns used in EDM songs randomly.
Schillinger's Interference
Schillinger’s Interference (based on Joseph Schillinger's work) places pulses on every Nth position creating an interference pattern. You can achieve a lot of nice results using this rhythm type. Experimentation is the key!
RapidComposer User Guide 106

Schillinger’s Interference Settings
• Duration: A pulse will be placed every Nth 'pulse width'. Set N with the Duration sliders.• Phase: You can offset the pattern. Valid phases are zero to Duration-1.• Pulse Width: Available settings are 1/4, 1/8, 1/16, 1/32, 1/64. The basic duration unit
used by the generator. Set it to 1/16 to better see how it works.• 1 Pulse, 2 Pulses, 3 Pulses: Specify what happens when there are 1, 2, or 3 pulses at a
given beat.
Subdivision
Subdivision works by recursive slicing of a long note. It is especially useful for creating
RapidComposer User Guide 107

percussion phrases but it can also create some very melodic and quirky patterns, which can be perfect for “chiptune” music. You can achieve a lot of great results in this style by increasing the Number of Subdivisions slider above the default of 6 (13 to 16 is a great number), and also increasing the Full Polyphony slider to above 50%. Subdivision is useful in alot of other ways.
Subdivision Settings
• Subdivision: Available settings are Random Weighted (default), Random, or Successive.Depending on how these are set, different algorithms are used.
• Number of Subdivisions: The number of slices, that is how many new notes are created.How “busy” the Phrase can be (or how “simple”).
Polyrhythm
Polyrhythm allows a phrase to include notes that are off-beat or uncommonly-placed. You canachieve a human-like performance quality using this rhythm generator type. You can set a
RapidComposer User Guide 108

duration (e.g. 2/4) which is then divided into 'division' parts.
Polyrhythm Settings
• Division1, Division2, Division3: Sets the number of divisions. E.g. if you set 5, the specified duration will be divided into 5 equal length parts
• Beats To Divide: Sets the duration in quarter notes that you want to divide.
Generic Rhythm
Generic Rhythm (especially inside a Generic Generator) is one of the most useful ways to generate “piano-style” patterns. Don’t be fooled by the word “generic”, as it is anything but.
RapidComposer User Guide 109

Generic Rhythm Settings
• Density: How “busy” the Phrase can be (or how “simple”)• Note Placement: Available settings are 1/4, 1/8, 1/16 or 1/32.• Musical Stress: Available settings are Strong, Strong-Middle, and Strong-Medium-Weak.
Probabilistic Rhythm
This generator will place notes based on probabilities. The bigger divisions have higher probabilities, e.g. 1/1 will more likely contain a note than 1/4 and 1/4 will more likely contain anote than 1/8, etc.
RapidComposer User Guide 110

Probabilistic Rhythm Settings
• Division: Available settings are 1/16, 1/8, 1/4, 2/4, 3/4, 4/4, 6/4, 8/4.• Density: The number of notes to generate. How “busy” the Phrase can be (or how
“simple”)• Randomness: Expected means a note is more probably placed on bigger division than
on a smaller one. E.g. note on a 1/4 will be placed with bigger probability than a note ona 1/8 or 1/16. You can make more interesting, more unexpected patterns when some randomness is used.
• Musical Stress: Accents to use in the rhythm pattern. Available settings are Strong, Strong+Middle, and Strong+Middle+Weak.
Euclidean Rhythm
The greatest common divisor of two numbers is used rhythmically giving the number of beats
RapidComposer User Guide 111

and silences, generating almost all of the most important World Music rhythms. The beats in the resulting rhythms are as equidistant as possible.
Euclidean Rhythm Settings
• Steps: the length of the rhythm sequence in 'division' units• Density: it is the number of notes spread evenly in the number of steps• Offset: offset of the rhythm sequence• Mirror: possibility to mirror the sequence• Division: the note length used in the rhythm sequence
RapidComposer User Guide 112

Smooth Rhythm
This generator creates a sequence where the neighboring note lengths are either the same, twice or half of the previous note. That is a 1/8 note will be followed by a 1/16, 1/8 or 1/4.
Smooth Rhythm Settings
• Shortest Note Length: the length of the shortest possible note in the sequence• Longest Note Length: the length of the longest possible note in the sequence• Allow 1:2:1 Division: option to allow/disallow a 1:2:1 division of a 4 unit long note
RapidComposer User Guide 113

Retro Rhythm
Retro Rhythm places interesting rhythmic patterns one after the other. It suits monophonic sounds (a bass guitar, and other instruments) best. If you play with the sliders a bit, you can achieve a lot of great dance/trance/techno-style piano patterns using this Rhythm type, with aGeneric Generator.
Retro Rhythm Settings
• Patterns: Select the possible patterns that are inserted to each quarter note. Available settings are One Note On Beat, Two 16th Notes Before and After Beat, Two 8th Notes Before and After Beat, Two 16th Notes Before and a Note On Beat, and finally, Two 8th Notes Before and a Note On Beat.
• Note Length: Available settings are Short, Medium (default) and Long.
RapidComposer User Guide 114

Simple Divisions
Simple Divisions are exactly that: simple rhythmic divisions. Sometimes you just need something simple and fast, that gets the harmonic job done, with a basic rhythm.
Simple Divisions Settings
• Division: Available settings are Bar, 3/4, 2/4, 1/4, 1/8, 1/16, 1/32, 1/64, 1/4T, 1/4T Shuffle, 1/8T, 1/8T Shuffle, 1/16T, 1/16T Shuffle. Depending on how these are set, you’llsee the notes below change to be more “busy” or more “simple.”
RapidComposer User Guide 115

• Weak Accent: accent or velocity to use for weak notes
• Strong Accent: accent or velocity to use for strong notes
• Strong Accent Every: a strong accented note can be placed on regular positions. When 0, there will be only weak accented notes, when 1, only strong accented notes are used.
Toggle Divisions
Toggle Divisions, like Simple Divisions, toggle when certain MIDI notes are played and when and where they are not.
Toggle Interval Settings
• Toggle Every: toggles every 4/4, 3/4, 2/4, 1/4, 1/4T(triplet), 1/8, 1/8T, 1/16 notes.
RapidComposer User Guide 116
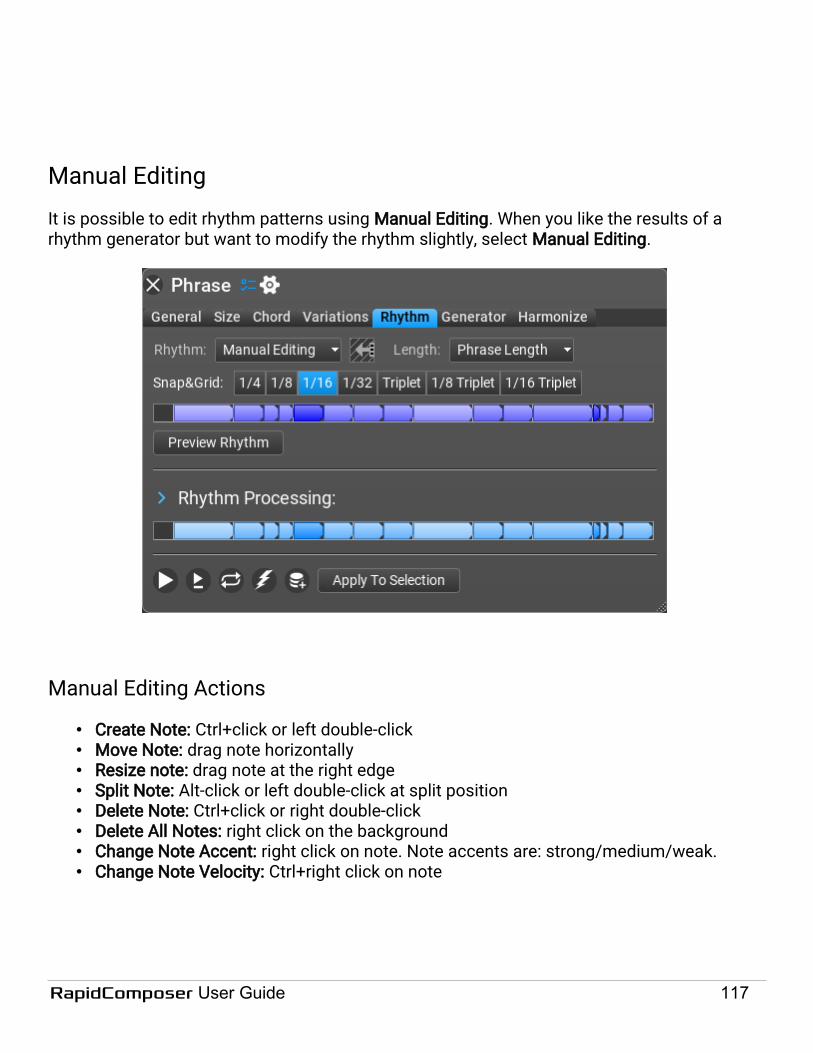
Manual Editing
It is possible to edit rhythm patterns using Manual Editing. When you like the results of a rhythm generator but want to modify the rhythm slightly, select Manual Editing.
Manual Editing Actions
• Create Note: Ctrl+click or left double-click• Move Note: drag note horizontally• Resize note: drag note at the right edge• Split Note: Alt-click or left double-click at split position• Delete Note: Ctrl+click or right double-click• Delete All Notes: right click on the background• Change Note Accent: right click on note. Note accents are: strong/medium/weak.• Change Note Velocity: Ctrl+right click on note
RapidComposer User Guide 117

Manual Editing Settings
• Snap&Grid: note snap and grid density: 1/4, 1/8, 1/16, 1/32, 1/8 Triplet, 1/16 Triplet.
RapidComposer User Guide 118

Variations
Variations are transformations with tweakable parameters that can be applied to entire tracks, or specific phrases. Multiple instances of the same variation (with different parameters) can be applied to a track or a phrase.
Important: variations are non-destructive, which means your original phrases won't be changed. Think of them as transformations that can be disabled or removed anytime.
Variations are applied top to bottom (order is important).
Variations are also a great way to get really interesting and unique ideas from the Idea Tool.
You can mute any variations by removing the checkmark in the box next to the Variation name.
Applying variations to the entire track
Right-click the track header to pull up the Track Inspector, and then click on the Variations tabto access the variations from the Track Inspector window.
Click the “Add” button on the bottom left to add (and tweak) variations to the entire track.
RapidComposer User Guide 119

Applying variations to a phrase
Right-click on a phrase to pull up the Phrase Inspector, and then click on the Variations tab to access the variations from the Phrase Inspector window.
Click the “Add” button on the bottom left to add (and tweak) Variations to the Phrase.
RapidComposer User Guide 120
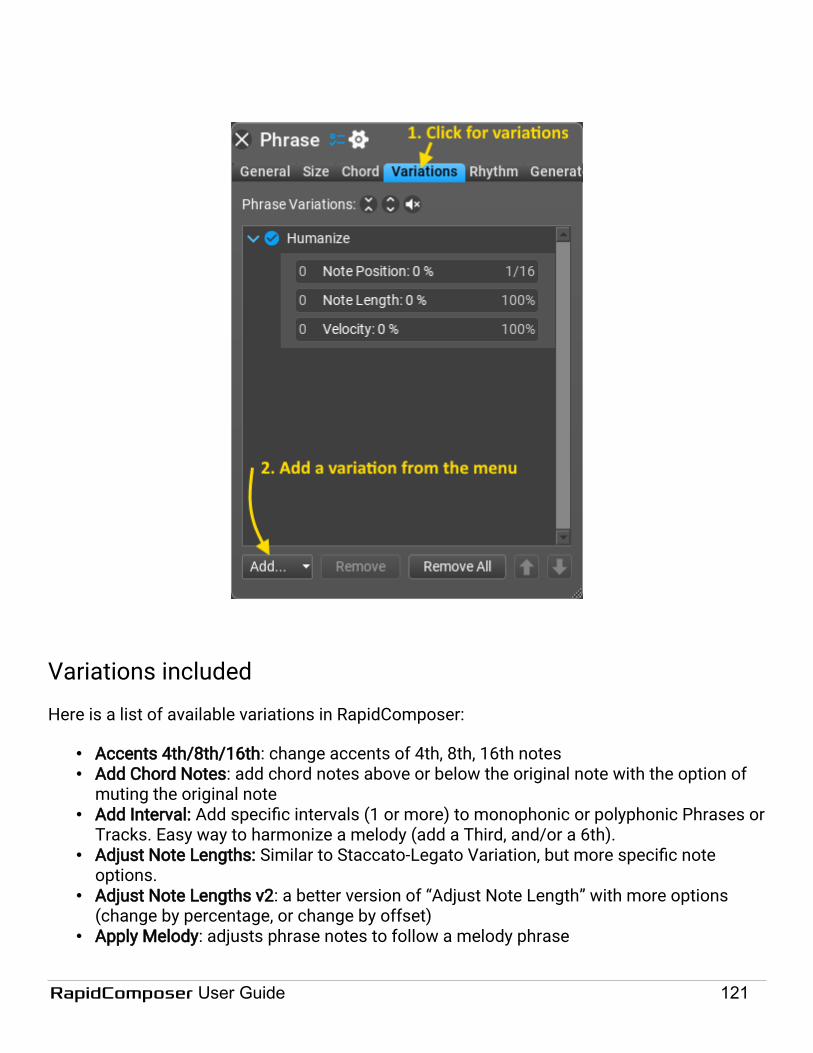
Variations included
Here is a list of available variations in RapidComposer:
• Accents 4th/8th/16th: change accents of 4th, 8th, 16th notes• Add Chord Notes: add chord notes above or below the original note with the option of
muting the original note• Add Interval: Add specific intervals (1 or more) to monophonic or polyphonic Phrases or
Tracks. Easy way to harmonize a melody (add a Third, and/or a 6th).• Adjust Note Lengths: Similar to Staccato-Legato Variation, but more specific note
options.• Adjust Note Lengths v2: a better version of “Adjust Note Length” with more options
(change by percentage, or change by offset)• Apply Melody: adjusts phrase notes to follow a melody phrase
RapidComposer User Guide 121

• Apply Rhythm: drag and drop a rhythm pattern to use for slicing the phrase notes according to the pattern.
• Apply Shape: use only the rhythm with the shape of another (dropped) phrase• Audio Gain: a simple control for audio gain, usable in audio tracks only• Delay Notes: Offset the beats/counts of notes by tiny increments (for a more “human”
feel). Similar to “Humanize.”• Double Note: Opposite of “Remove Note” with same settings (see below)• Double Phrase: Acts as a multiplier for the MIDI notes inside a phrase. If you have 8
straight 8th notes, it creates 16 16th notes).• Expression: Many slider variables available here. Works as MIDI velocity (soft to loud
notes). Each track has an Expression by default.• Extract Notes: extracts important notes from a phrase, ignores all other notes• Extract Rhythm: Makes a monophonic phrase by replacing every note with the given
note• Humanize: “Loosens” the timing of a phrase or track, for a more “human” performance.• Join Notes: No parameters - Glues two notes together when the first note ends and the
second one begins.• Limit Note Range: Two sliders available, controlling the lowest note and highest note.
Currently only effects entire Tracks as a Track Variation (not specific Phrases).• Make Monophonic: removes polyphony from the phrase• MIDI Echo: Adds an echo-effect by adding quieter MIDI notes to the main notes of a
Phrase.• Make Monophonic: Similar to Extract Rhythm, but with different options.• Mirror Horizontally: No parameters (reverses the MIDI notes, rhythmically and/or
melodically, inside a phrase)• Mirror Vertically: No parameters (reverses the MIDI notes, melodically (not
rhythmically), inside a phrase)• Permute Chord Notes: No parameters. Like Swap Chord Notes, it rearranges the chord
notes randomly.• Quantize: Tightens timing or changes timing entirely. Has many note alignments,
including triplets, quintuplets, and more. Includes slider amount for Quantize percentage.
• Remove Note: Available settings that are affected by the slider are Note at Index, Event at Index, Before Time and After Time. Settings that the slider has no effect on include All, Even Beats, Odd Beats, Random Note, Random Time, Shortest Note, Longest Note, All Shortest Notes, All Longest Notes, Notes on Whole Beats, Notes Between Beats.
• Remove Short Notes: Removes too short notes from the phrase with minimum length specified
• Re-rhythmize Phrase: Makes rhythmic variations of the same phrase. Enter the number of steps.
• Rests: Two sliders available, to generate rests in various places at at various lengths.
RapidComposer User Guide 122

• Rhythm Mapper: The “Preserve Phrase Shape” mode is the same as the 'Apply Rhythm' variation. With the “Direct 1:1 Mapping” each phrase event is mapped to the corresponding rhythm event, so it is best to use a rhythm with the same or similar note count as the phrase. A phrase generator with the same name and functionality exists, use which is more convenient.
• Rotate Notes: An interesting effect to rotate phrase notes.• Show/Hide Non-Existent Chord Notes: (rarely used) Hide or show 'non-existent' chord
notes in phrases. This affects notes that the chord does not include, e.g. when a note uses the 4th chord note (7th) but the master track chord consists of only 3 notes. These notes are either ignored or lower chord notes are transposed up.
• Simplify Phrase: Simplifies a phrase by removing less important notes.• Slice Phrase: Slices the phrase on note or 1/4, 1/8, etc division boundary and
rearranges slices to get a new phrase.• Spread Out Chord Notes: Makes phrases more “full” by spreading out the intervals of a
chord. Alternatively you can use a chord voicing, assigned to the phrase.• Staccato-Legato: Makes notes more “choppy” or more “smooth”.• Strumming: Moves MIDI notes by a tiny amount, to simulate a guitar chord strumming
(works best on chord Phrases with longer-duration notes… or any Phrase with 3 or morenotes played simultaneously).
• Swap Chord Notes: Available settings are First-Second, First-Third, First-Last, Second-Third, Second-Last, Third-Last. This Variation can do very interesting transformations on Phrases: it rearranges the chord notes depending on your setting.
• Swing: Applies a “shuffle” to straight Phrases. Great for making a phrase more funky or “bouncy”. Very useful also, for generating “chiptune/8-bit video-game” music phrases. Many settings. Common swing setting: Half Beat (1/8 Note), w/ Swing slider set to 40.
• Transpose: Increase or decrease the pitch of the Phrase or Track.• Triple Phrase: No parameters (acts as a multiplier just like Double Phrase. If you have 4
quarter notes in a phrase, it creates 12 notes, which become 8th note triplets).• Velocity: Basic MIDI velocity adjustment (soft to loud).• Velocity Generator: Many variables here that affect MIDI velocity and performance.• Velocity Range: Assign random MIDI velocities for downbeats/on-beats/off-beats, 8th
and 16th notes
RapidComposer User Guide 123

Melody EditorOverview
Workflow
You design or generate a melody line for the selected scale, drag the melody to the DAW, harmonize it to add chords, and finish the composition in the DAW. The Melody Editor tab offers melody generation for a chord progression if you enable the chords track. So two different workflows are supported:
• Create a catchy melody, then find chords for the melody later (chords track disabled)• Create melody for a given chord progression (chords track enabled)
Dropping a MIDI file on the workspace lets you work with existing melodies. The MIDI file is imported as one big section. You can make smaller sections by splitting the big section, regenerate parts of melody, make repetitions, etc.
User interface
There are three main pages in the user interface:• Melody Editor: the main melody editing workspace where you create or edit a melody• Settings: miscellaneous and user interface settings, keyboard shortcuts.• Support: update checking, version history and feedback
The Melody Editor
The user interface consists of the tool bar at the top and the workspace where you can edit the current melody notes.
RapidComposer User Guide 124

: Play back the currently edited melody. At the end of the playback the cursor returns to the last clicked position. Right-click to edit playback options
: Loop playback
: Generate melody. Right-click to edit generation options
: Mutate melody. Right-click to edit mutation options
: Drag melody as MIDI. You can drag the edited melody directly to the DAW
: Access melody presets. You can save a preset here. All the settings are saved with the preset
: Undo last change
: Redo
C Major: the scale the melody will use
120.00 BPM: playback tempo. By default this is the host tempo. Overriding the tempo is possible, see “Use Host Tempo” in the settings.
RapidComposer User Guide 125

4/4: the signature to use. By default this is the host signature. Overriding the signature is possible, see “Use Host Signature” in the settings.
+0 Octaves: octave offset applied to the melody
Default: note lengths options. Right-click for menu. Possible values: Default, Legato, 2/4, 1/4, 3/16, 1/8, 3/32, 1/16
100%: ‘note on’ velocity for melody notes
Playback options
By right-clicking on the ‘PLAY’ button you can enable chords track playback, which can be veryuseful during melody editing. You can set the volume (actually ‘note on’ velocity), voice leading and instruments here:
RapidComposer User Guide 126

Piano roll options
The piano roll does automatic vertical zooming by default. You can scroll the keyboard (vertical drag or mouse-wheel) and zoom the keyboard (Ctrl+vertical drag or Ctrl+mouse-wheel). Double-click to return to automatic zooming. Clicking on the ‘cogwheel’ icon will show more options:
Melody sections and operations
The melody includes several melody sections. A shape and rhythm is assigned to each section. The shape and rhythm comes from a motive that are displayed as capital letters fromA to H and indicated with different colors. You can see the motives above the sections:
There are lots of things you can do with a section: you can resize, remove, mute, duplicate, split, glue, regenerate them, add variations (which belong to the section, and not the motive!). Add rest or held notes. Inside the sections you can freely edit the notes.
RapidComposer User Guide 127

The top bar (ACTIONS) offers the following buttons in this order: remove ( ), mute/rest ( ), create new motive ( ), clone motive for editing ( ).
The MOTIVE and RHYTHM bars select the motive and rhythm for the particular section. The two letters need not be the same, you can use the rhythm from motive A for motive B, for example. Clicking a letter will select the motive, but clicking on the SAME letter will regeneratethe motive, or just the rhythm for the clicked motive.
The VARIATION bar offers often used melodic transformations. Right-clicking resets/removesthe transformation, Ctrl-clicking will apply the change to all sections, not just the edited one.
: horizontal offset in 16th note steps : transposition by scale steps
: retrograde (mirroring horizontally) : inversion (mirroring vertically)
: contour transformations (keep the same basic shape, but make the intervals between notes larger or smaller)
: menu with further variations:
• Rhythm Displacement: either a single randomly selected note or all notes left to or right to a randomly selected note will be shifted by the specified amount making an interesting rhythmic effect. This is often used in melodies.
• Simplify: removes less important notes from a motive. You can set how many times this is performed.
• Split Long Notes: find the longest note in the motive and split it at a sensible position, thus making two notes from a longer note.
• Connecting Notes: insert an additional short note between 2 motive notes, by making a connection between them. ‘Approach’ means the inserted note will be between the two
RapidComposer User Guide 128

notes, e.g. C → E F. The ‘Opposite’ option inserts a note from the other direction, e.g. →C → G F→
• Lead-in Notes: insert lead-in (pick-up) notes before the section, at the end of the previous section. This variation is not available for the very first section.
A context pop-up is available if you right click in a melody section with all possible operations on a section:
Generation Settings (For a Section)
Each section has its own settings, which were assigned during melody generation. You can change these settings and regenerate the motive or just the rhythm. The simplest way for regeneration is clicking on the same highlighted letter in the MOTIVE or RHYTHM bar. The settings are very similar to global melody settings:
RapidComposer User Guide 129

You can generate ( ) or mutate ( ) the rhythm or motive. Ctrl-click to generate both motive and rhythm. Rhythm settings
Density: it is proportional to the number of melody notes used. 100% means the maximum note count for all types of rhythms. For straight rhythm 100% means a note on each 1/8 grid. Method: the rhythm generation method. Possible values:
• Weighted Random: probabilities used for notes: downbeats > on-beats > off-beats > 1/8notes. The 'randomness' setting affects these probabilities.
RapidComposer User Guide 130

• Subdivision: works by dividing time into halves• Modern: rhythm used in deep house and other modern genres
Motive settings
Steps/Leaps: the proportion of steps and leaps. For each motive a random value is used between the minimum and maximum values on slider. Repetition: the probability of note repetition. Melodies often have repeated notes. For each motive a random value is used between the minimum and maximum values on slider.Returning: the probability of repeating the note before the previous melody note, like in C D →
C→After Leap: specify what should happen after a leap. Possible values:
• Step in the opposite direction• Step anywhere• Step or small leap in the opposite direction• Leap in the opposite direction• Anything
Leap Weights: the probabilities of jumps (leaps) in the melody in both directions.Scale Note Weights: the probabilities of each scale note to be used.
If you set all leap weights to the same amount, only scale note weights will be used. Similarly if you set all scale note weights to the same amount, only the leap weights will count.
The timeline
Dragging the timeline vertically will zoom in/out, horizontal dragging scrolls the timeline. Double-clicking will automatically zoom out the melody to the most optimal view.
RapidComposer User Guide 131

Creating melodies
Melody generation
Clicking on the ‘Generate’ button ( ) will generate a new melody based on the melody generation settings.
Right-clicking on the ‘Generate’ button ( ) will open the generation setting dialog.
Under the ‘Global’ tab you’ll find the following basic settings:
RapidComposer User Guide 132

Melody Length: in bars and optionally in quarter notesMelody Variety: an important setting: the number of motives to use. Motives are denoted as capital letters from A to H (maximum 8 motives). Typically 1 to 3 motives are used.Rhythm Variety: another important setting for the rhythmic variety: the number of motives to use for rhythm.Note Range: the allowed notes to use. Please note that some variations (transposition, lead-innotes…) may create notes outside of this range.
RapidComposer User Guide 133

Under the ‘Rhythm’ tab you’ll find the following settings:
Rhythm: straight, triplet, swing or syncopationDensity: it is proportional to the number of melody notes used. 100% means the maximum note count for all types of rhythms. For straight rhythm 100% means a note on each 1/8 grid. Method: the rhythm generation method. Possible values:
• Weighted Random: probabilities used for notes: downbeats > on-beats > off-beats > 1/8notes. The 'randomness' setting affects these probabilities.
• Subdivision: works by dividing time into halves• Modern: rhythm used in deep house and other modern genres
RapidComposer User Guide 134

Under the ‘Motive’ tab you’ll find the following settings:
The melody consists of steps and leaps. Step means a single scale step, a leap is bigger than a scale step. The proportion of steps and leaps, note repetitions, probabilities of leaps and scale notes, describe the melody shape.
Start Note: the possible start notes for the motives (scale degrees)Steps/Leaps: the proportion of steps and leaps. For each motive a random value is used between the minimum and maximum values on slider.
RapidComposer User Guide 135

Repetition: the probability of note repetition. Melodies often have repeated notes. For each motive a random value is used between the minimum and maximum values on slider.Returning: the probability of repeating the note before the previous melody note, like in C D →
C→After Leap: specify what should happen after a leap. Possible values:
• Step in the opposite direction• Step anywhere• Step or small leap in the opposite direction• Leap in the opposite direction• Anything
Leap Weights: the probabilities of jumps (leaps) in the melody in both directions.Scale Note Weights: the probabilities of each scale note to be used.
If you set all leap weights to the same amount, only scale note weights will be used. Similarly if you set all scale note weights to the same amount, only the leap weights will count.
When the chords track is enabled, Chord Options is displayed instead of Start Note:
Chord Options: select the possible first note of the motive, as well as notes that must be chord notes when generating a new motive
RapidComposer User Guide 136

Under the ‘Variations’ tab you’ll find the following settings:
For each variation a minimum and maximum probability is set in the sliders. During melody generation for each melody section all variations use a random probability between the minimum and maximum value. The variation is added according to the selected value.
RapidComposer User Guide 137

Enabling the chords track
The chords track can be enabled by clicking on the small ‘chord’ button:
The chords can be set by clicking on the chord note or chord name. Chord boxes are splitted/joined by using Alt-click (Option-click on macOS). It is possible to drag the chord edges to make a chord shorter or longer.
Pressing ‘Generate’ ( ) will create motives based on the Chord Settings under the Generation Options / Motive tab. This includes the possible first note, and whether to place chord notes on downbeats only or downbeats and on-beats (first and third beats in a bar), or all notes should be chord notes. When a motive is repeated under a different chord, the program tries to set the transposition to match the second chord, but sometimes this is not possible. The reason is that motives contain scale notes, and a repeated motive copies the original motive note by note. This means that the repeated motive cannot always be adjusted for different chords.
For best results use different motives (letters) for each melody section, with one or two rhythm patterns repeated. Making all notes to be chord notes may result a boring motive.
There are no chord-relative notes in a motive, so changing a chord won’t update the motive to match the new chord. The chord notes are displayed on the piano roll, so it is easy to adjust the notes if needed.
There are melodic transformations that introduce non-chord notes. Vertical inversion and random transposition is not used when new melody is generated with enabled chords track.
RapidComposer User Guide 138
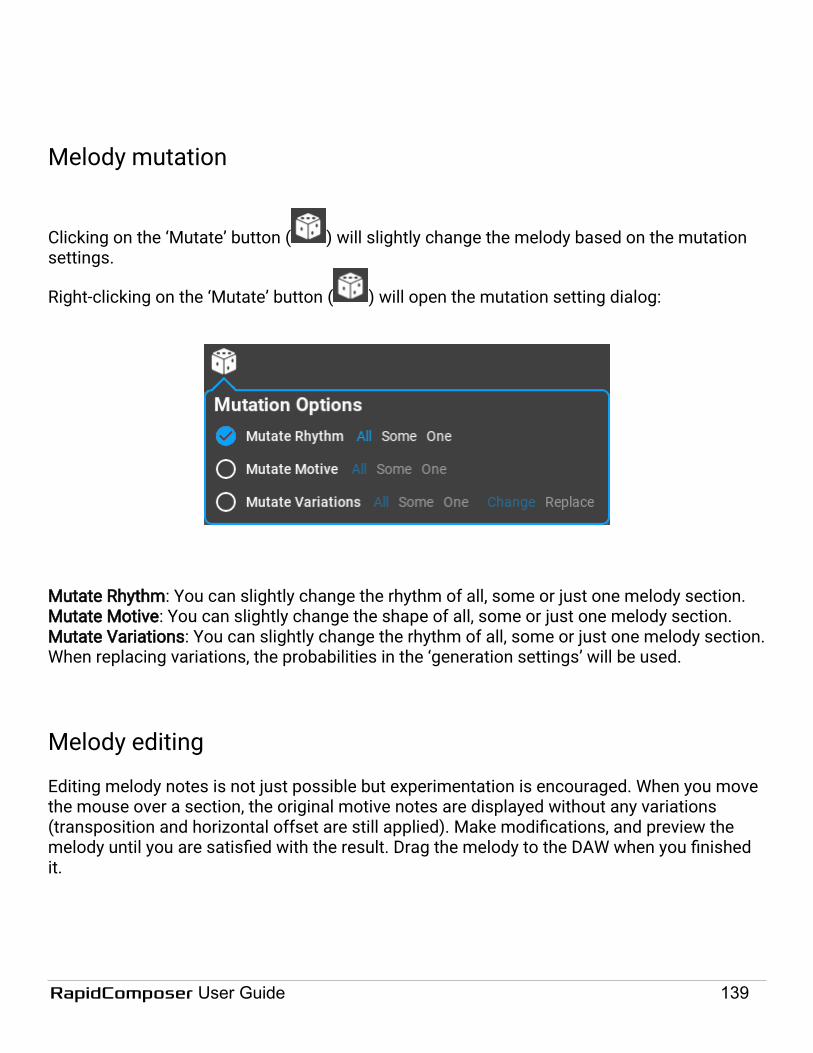
Melody mutation
Clicking on the ‘Mutate’ button ( ) will slightly change the melody based on the mutation settings.
Right-clicking on the ‘Mutate’ button ( ) will open the mutation setting dialog:
Mutate Rhythm: You can slightly change the rhythm of all, some or just one melody section.Mutate Motive: You can slightly change the shape of all, some or just one melody section.Mutate Variations: You can slightly change the rhythm of all, some or just one melody section.When replacing variations, the probabilities in the ‘generation settings’ will be used.
Melody editing
Editing melody notes is not just possible but experimentation is encouraged. When you move the mouse over a section, the original motive notes are displayed without any variations (transposition and horizontal offset are still applied). Make modifications, and preview the melody until you are satisfied with the result. Drag the melody to the DAW when you finished it.
RapidComposer User Guide 139

Chord Rules EditorThe chord rules are a collection of possible ‘next’ chords, with probabilities. RapidComposer can generate chord progressions based on these rules. It can even insert borrowed chords in the progression (in the Chord Selector) that are not part of these rules, to make the progression more interesting.
The possible ‘first’ and ‘last’ chords are listed for the chord progression, as well as ‘next’ chords for all the possible chords. There are small sliders under the ‘next’ chords to assign a probability. The sliders are color coded from red (not probable) to green (probable).
Because the rules work with any scales, the roman numeral notation are used here. If you right-click on a chord, you can delete, edit or duplicate the chord.
RapidComposer User Guide 140

It is important to list all possible ‘next’ chord in the left column. When there is an error in the rules, chords are highlighted with red.
RapidComposer User Guide 141

MIDI ImportImporting MIDI files require more attention than in other software, because it is slightly more complex. Importing a MIDI file involves:
• Selecting the MIDI file• Analyzing the MIDI file for scale to set composition scale• Analyzing the MIDI file for chords to set up the master track• Converting tracks to chord or scale-relative form• Breaking up long tracks to phrases • Setting up composition structure• Setting track instruments
You can drag and drop MIDI files directly on the composition which inserts the MIDI file as a phrase. It is useful if the MIDI file is simple (single-track). Holding down Ctrl during dragging will convert the MIDI notes to chord-relative notes. It is also possible to drop MIDI on the phrase browser or on the rhythms browser to save it as a phrase/rhythm. The following applies to importing multi-track MIDI files.
1. Selecting the file to import
Type the filename, or click on the ‘folder’ button to select a file. The easiest is dropping a MIDIfile on the RapidComposer window.
Once you selected a file, the track list is filled:
RapidComposer User Guide 142

2. Select tracks to import
Check/uncheck the first column (IMPORT)
3. Select tracks that contribute to the harmony (for chord detection)
Check/uncheck the second column (ANALYZE). Drum tracks are disabled by default, but melody tracks are usually not needed for chord detection. Uncheck all tracks that make the chords unnecessarily complex. Check the ‘Chords Preview’, where the first few chords are displayed.
4. Select which tracks have to be converted to chord-relative or scale-relative form
Set the third column to Chord+, Scale+ or None. In most cases all tracks should be chord-relative (Chord+).
5. Set chord and scale detection options
6. Set the scale and check chords
Detected scales are offered in the ‘Scale:’ menu. Select the one to use. Check the Chords Preview, and if the chords are too complex, uncheck tracks to exclude from analysis.
7. Set structure options, and if you need phrase detection
RapidComposer can break up long tracks to shorter phrases, if you enable “Auto Detect Phrases”:
8. Set the instrument to be used for the imported tracks
There are several options here:
RapidComposer User Guide 143

You can use a GM soundfont. If you prefer using VSTi plug-ins, you need to set up the tracks manually. Please remember: “General MIDI” instruments do not generate audio; they must be used when you send MIDI events to a DAW or an external software or hardware synth.
9. Press the “Import” button!
Or the “Import Into Current Composition” button:
Check the imported composition. You can still go back to the MIDI Import page, change settings and re-import the file if you find something is not optimal.
RapidComposer User Guide 144

Chord voicingsYou can define and use chord voicings in RapidComposer. Voicing is “simultaneous vertical placement of notes in relation to each other”. More than 20 predefined chord voicing files are included as .rcVOIC files in the RapidComposerV4/DB folder. There are two types of voicing inRapidComposer: voicing for a concrete chord, or universal voicing that works with any chords.
Voicing editor on the master track
The visual voicing editor opens when you click on the small V button in the Master Track, which allows you to conveniently set chord notes:
RapidComposer User Guide 145

Voicing for a master track chord
It is possible to assign a voicing to master track chords in the Quick Suggestions pop-up. Clicking on a chord will open Quick Suggestions, which offers a voicing editor:
RapidComposer User Guide 146

You can also edit voicing for a given chord by clicking on the voicing:
A voicing editor is added also in the Chord Selector, together with Chord Builder:
RapidComposer User Guide 147

Universal voicing
Universal voicings work with any chords, so during editing you work with 1st, 3rd, 5th, 7th, etc chord notes, rather than with concrete chord notes:
Save the voicing using the Save… button. Universal voicing can be assigned to tracks or phrases (in the Track Inspector and Phrase Inspector), or even to a chord on the master track by selecting a preset from the voicing menu. By default phrases use the track voicing, tracks use the master track voicing. 'Acoustic Guitar' is a special voicing where the chord notes are looked up from the guitar chord database.
You can not only use chord notes, but also add non-existent chord notes, e.g. a 7th note to a major chord. This means a phrase can use the 7th note, even if the master track chord is a simple major or minor chord. This means amazing flexibility. Use the “Add Extra Note” buttons.
RapidComposer User Guide 148

Idea Tool (full edition)The Idea Tool supports different workflows and several ways to generate the master track chords. In addition individual tracks can be generated, or just the master track chords.
Overview
Entering Idea Tool mode
Click on the editing mode menu, and select 'Idea Tool':
RapidComposer User Guide 149

RapidComposer’s Idea Tool can easily create a new composition with the following: a randomor key-specific or rule-based Chord Progression, any number of Phrases or Phrase generators arranged in a fixed or random pattern, with optional rhythm patterns and phrase variations… inbasically seconds!
Workflow
Three different types of workflow are offered:
• Generate Master Track And Independent TracksAll tracks are independent, and the master track is created first
• Use Existing Melody Track '…' Then Harmonize Melody Then Render Other TracksThere is a dedicated melody track with an existing melody in it. First the melody is harmonized to set up the master track chords, then all other tracks are generated. The melody track is untouched.
• Generate Melody Track '…' Then Harmonize Melody Then Render Other TracksA melody track is generated first based on the current master track. Then the new melody is harmonized which will possibly result slightly different chords on the master track. All other tracks are generated afterwards.
Master track options
There are several methods to choose from to add chords to the master track:
• Select scale and (relative) random progression from browser for that scaleProvide a scale, and the program will find a progression for that scale
• Select scale and choose from specified list of (relative) progressions randomlyProvide a scale and a list of possible progressions of which one is selected randomly
• Select scale and generate progression based on ruleProvide a scale and a chord progression rule, and a new progression is generated. Chord count and diversity (from expected to unexpected) can be selected.
RapidComposer User Guide 150

• Select from specified progressions with absolute chords, then find a scaleThe program will choose one of the provided progressions, and finds a suitable scale for it
• Select random progression with absolute chords, then find a scaleSame as the previous option, but any 'absolute' progression can be used from the browser
Additional chord options:
• Use roman numerals for chordsRoman numerals will be displayed for chord degrees instead of note names
• Automatically transpose and invert chords for optimal voice leadingApply 'Chord Magnet' which guarantees smooth voice leading. Use with care because it affects all tracks. Typically voice leading is handled in tracks.
Track options
The only mandatory input for creating a track is adding a few phrases in the 'Phrases' list.
You can add one or more phrases or phrase generators, or even many. Clicking inside the 'Phrases' list will open the Phrase library where you can drag and drop phrases in the list, or pressing the 'Add Selection' button will add the selected phrases from the library.
RapidComposer User Guide 151

It is important to set the actual number of phrases that will be used from this list. Click on the 'Use:' menu, and make your choice (1 to 4). The arrangement menu is set up based on your choice in the 'Use' menu. It offers various ways phrases can be arranged. E.g. if you plan to use 2 phrases (A and B), you can choose from ABAB…, AAAB, AABA, AABB, etc, but for 4 phrases used patterns like ABCD, ABACAD, AABBCD, etc is offered.
Optional track settings
You can provide rhythm patterns to use in the 'Rhythm Patterns' list:
The rhythm patterns in the list will be used for the phrases. For phrase generators, the rhythm is used the original rhythm, ignoring any rhythm generators. For ordinary phrases the rhythm patterns will be applied to the phrase using the 'Apply Rhythm' variation.
It is possible to add variations to phrases. Variations are transformations applied to one of more phrases. They may add or remove notes, change the timing or rhythm of notes, mirror the phrase, add chord notes or a fixed interval, the possibilities are endless. RapidComposer users come up with interesting new ideas from time to time, so the list is growing.
RapidComposer User Guide 152

The 'Variations/Phrase' slider controls the average number of variations applied to a phrase. 0.5 means every second phrase will have a variation, 1.0 means every phrase has exactly one variation, 2.0 means every phrase will have 2 variations, etc.
Load/Save/Copy/Paste Track Settings
You can copy and paste track settings if you click on the menu button:
You can choose from the following menu:
Other than track settings, there are possibilities for fine tuning how variations are assigned to
RapidComposer User Guide 153

phrases. Phrases from the list are usually used multiple times, but ‘Bind Phrases And Variations’ will use the same variations for the same phrases. That is when phrase ‘A’ appearsin the composition, all the instances will include the same variations. When ‘Use Rhythms For ‘Apply Rhythm’’ is checked, and an Apply Rhythm variation is in the list, the rhythm patterns will be used by Apply Rhythm, rather than used in rhythm generators.
Generating tracks
Finally after you decided your workflow, added tracks and set instruments for them, and whenyou set up how the master track chords are filled, a dropped a few phrases in the phrase list,
you are ready to make a composition, just press the 'Generate' button:
If you are not satisfied with a single track, you can regenerate the track only, by pressing the red lightning icon in the track header:
You can exclude any tracks from the idea tool by click on the blue light-bulb icon:
Possibilities of the Idea Tool
The Idea Tool can easily be used to great effect for electronic and dance-based music. Set your tempo to something medium-fast or above that (anything between 130 and 180 usually work pretty well for most electronic styles), pick some common dance-type chords (usually the vi-IV is a common chord sequence, such as Am to F in the key of C major)… and use someof your favorite VSTs that do the sound of dance music well and just experiment!
You can get a lot of good results when RC is a VST inside your favorite DAW, too… as you’ll beable to run RC right alongside some audio drum loops, or a sequenced beat you made…. to easily come up with some synth melodies or dance style chord rhythms.
The possibilities are truly endless with RapidComposer, and especially the Idea Tool.
RapidComposer User Guide 154

Phrase Morphing (full edition)
Phrase Morphing means that when you place a 'source' and 'target' phrase in the composition,the phrases between the two will be composed automatically by RapidComposer so that there is a smooth transition from the source phrase to the target phrase. There are several options to control this transition. Usually there are many possible transitions, if you don't like the one offered by the program, pressing 'Regenerate' will create a different transition. The following will explain the usage step by step:
1: Start a new composition.
Press Ctrl-N/Cmd-NOR
Press the 'Files' button:
Click on 'New Composition':
2: Add a new line.
Press the 'Structure Inspector' button . Select 'Line 1', and click on the bottom 'plus' icon as shown on the image:
RapidComposer User Guide 155

You will see this:
You can close the panel as it is not needed now.
3: Zoom out the timeline.
Ctrl-click on the timeline, and drag the mouse horizontally until you see 8 bars:
You should see this:
RapidComposer User Guide 156

4: Select 'Nylon Guitar' as the instrument.
Since we will work with acoustic guitar patterns, select 'Nylon Guitar' as the instrument. Right-click on the track header to open the track inspector.
RapidComposer User Guide 157

Select 'MIDI: GeneralMIDI' as the instrument, and 'Nylon Guitar' as the preset. You can use the included GeneralUser GS soundfont.
Note: you can choose a different instrument, but make sure 'Use Guitar Chords' is checked in the 'Track Hints' menu. This means that acoustic guitar chords will be used in this track.
5: Add the source phrase at the beginning.
We will make a transition from 'FingerPicking4' to 'FingerPicking1' in this example. Open the 'Phrase Browser':
RapidComposer User Guide 158

Note : the rest of the tutorial uses screenshots from version 3 of RapidComposer, but the same applies to version 4.
Click on a phrase which will be the ‘source’ phrase (in this example 'FingerPicking4'), drag anddrop it to the beginning of the track:
Result:
RapidComposer User Guide 159

Sometimes it is easier to double-click on the workspace to add a phrase. So you may double-click at position 1 on the workspace to insert 'FingerPicking4'.
6: Add the target phrase at the end of the track
Now click on the ‘target’ phrase (here 'FingerPicking1'), drag and drop it to the end of the track:
RapidComposer User Guide 160

Result:
RapidComposer User Guide 161
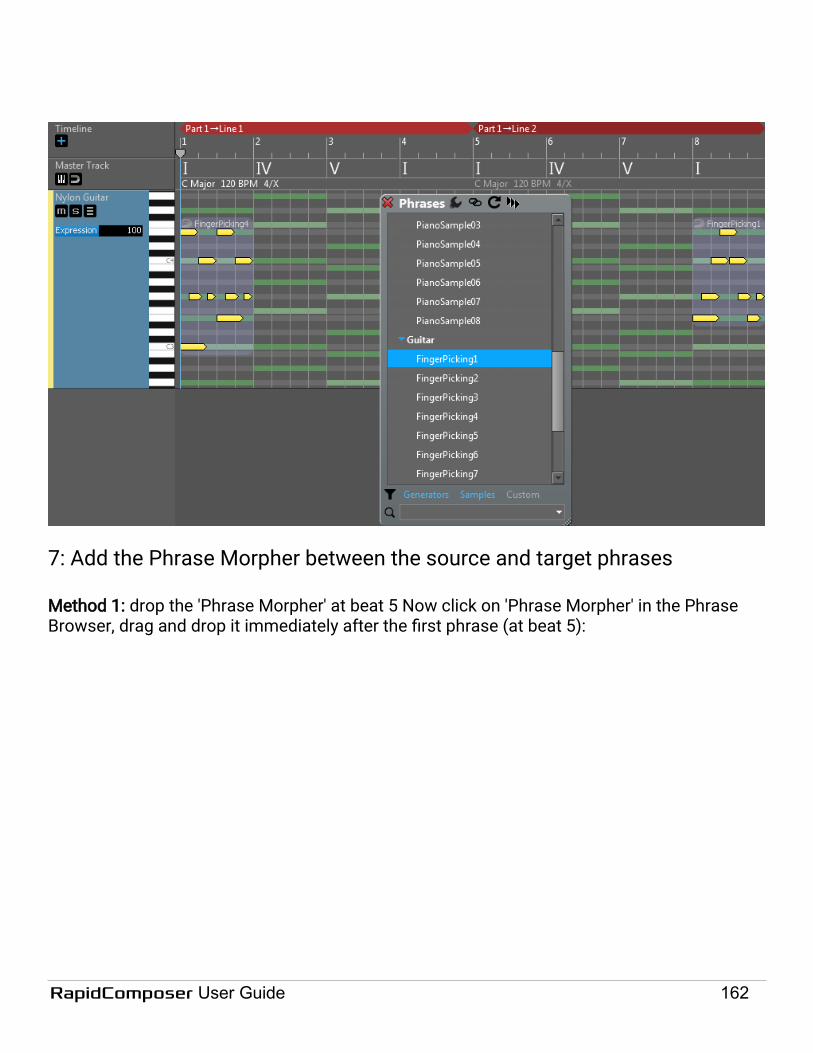
7: Add the Phrase Morpher between the source and target phrases
Method 1: drop the 'Phrase Morpher' at beat 5 Now click on 'Phrase Morpher' in the Phrase Browser, drag and drop it immediately after the first phrase (at beat 5):
RapidComposer User Guide 162

Result:
RapidComposer User Guide 163

Note: you may need to resize the 'Phrase Morpher' to extend until the last phrase. Make sure the resizing mode is set to 'Regenerate' (the menu above the workspace).
Method 2: pressing the 'Morph Between 2 Phrases' button Select the source and target phrase. Right-click on any phrases to open the Phrase Inspector. When exactly two phrases are selected, you will find the 'Morph Between 2 Phrases' button in the Phrase Inspector:
RapidComposer User Guide 164

Pressing that button will automatically insert a Phrase Morpher between the two phrases:
RapidComposer User Guide 165

The phrase morpher is added between the source and target phrases, and is filled with generated notes.
You can press the 'PLAY' button to listen to the track.
8: Change options and regenerate
Once you set up the phrase morpher, you can transpose or completely replace the source andtarget phrases. The phrase morpher will be automatically recalculated in these cases. Phrase Morpher has a few parameters that influence the way notes are generated.
Right-click on the Phrase Morpher to open the Phrase Inspector. Click on the small 'magic stick' icon at the top of the inspector to show the generator parameters.
RapidComposer User Guide 166

Options and explanations:
• Quantization:Horizontal note movement control. Specify if you allow notes moving in time and if so how they are quantized. Notes moving in time will change the rhythm, so if that is not what you want it is best to disable this option.
• Vertical Movement:Vertical note movement control. Specify if you allow notes moving vertically (becoming higher or lower notes) and if so how they are handled. Moving notes can be snapped to scale notes or semitones.
• Pair Note Additions And Removals:When checked adding a target note and removing a source note will happen at the same time as much as other conditions allow. This results a smoother transition.
• Handle Chord Notes Together:When checked chord notes with no offset will be added/removed together.
• Apply Automatic Transposition:Specify if transposition is applied to the generated phrases. When checked the highest note of the source phrase will approximate the highest note of the target phrase. This setting is ignored when guitar chords are used.
RapidComposer User Guide 167

If you change any of the above options, the preview is updated. In this tutorial we disabled the'Vertical Movement' and 'Pair Note Additions And Removals' options. You can press 'Regenerate' if you want to see another transition:
Pressing 'Apply To Selection' will replace the phrase in the composition:
RapidComposer User Guide 168

If you close the Phrase Inspector you should see something like this:
RapidComposer User Guide 169

SettingsAccessing the program global settings is possible by clicking on Settings in the top bar:
MIDI
MIDI In: Select a MIDI input device. If your device is not in the list, please press Rescan MIDI Devices
Receive MIDI Start/Stop/Continue
When a MIDI Start/Stop/Continue message arrives from the MIDI In, it will start or stop playback.
Receive MIDI Song Position Pointer
When a MIDI Song Position Pointer message arrives with MIDI Start, it will start playback from the song position in the message.
Default MIDI Out: Select a default MIDI output device. A separate MIDI device can be chosen for each track. A newly created track will use this 'Default MIDIOutput'.
Send MIDI Start/Stop/Continue
The application sends MIDI Start/Stop/Continue message when the transport state changes.
Send MIDI Song Position Pointer
The application sends MIDI Song Position Pointer message when the transport state changes.
Send MIDI Clock The application sends MIDI Clock messages during playback. Send MIDI Reset All Controllers
The application sends MIDI Reset All Controllers before playback if this setting is enabled.
Send MIDI Reset Pan The application sends MIDI Reset Pan before playback if this setting isenabled.
Send MIDI Reset Volume
The application sends MIDI Reset Volume before playback if this setting is enabled.
Send MIDI Song Position Pointer
The application sends MIDI Song Position Pointer message when the transport state changes.
Rescan MIDI Devices Check for newly attached or detached MIDI devices
RapidComposer User Guide 170

Audio
Audio API: [Windows:] Select one of ASIO (recommended), Windows MME (not recommended), WASAPI shared or exclusive mode [macOS:] CoreAudio is the only choice here.
Audio Device: The audio device that you will use, e.g. built-in, or USB sound card ASIO Channels: [Windows only] ASIO channels to use Sample Rate: It is best to use the default sample rate for the device Preferred BufferSize:
The latency depends on the buffer size, the smaller the buffer the lower the latency is.
Test Audio Press to check if your audio device works. A 440Hz sine signal at -6 dB is sent to your audio hardware.
Master Gain: Adjust Master Gain. This setting affects all audio and is applied as the last step before sending the audio to the output device.
VSTiYou need to add each VST instrument to the list of plug-ins before using them in RapidComposer. When you add a plug-in, an instrument file is created (.rcINST) with the presets. You can assign tags to presets in the Instrument Browser. The tags will also be saved in the .rcINST file.
As a unique feature of RapidComposer you can save the internal state of a VSTi plug-in as an instrument, to be used at a later time.
Remove Remove the selected plug-in from the list. The plug-in will not be offered in the instrument menu anymore
Add Add a new plug-in to the list Scan Folder For VSTi Plugins…
You can scan your VST directory to add all plug-ins. However this is not recommended, as all plug-ins are loaded into the application address space and executed afterwards, which can crash
RapidComposer User Guide 171

RapidComposer for a faulty plug-in.
Soundfonts
You need to add each soundfont that you want to be able to select for track instrument under the Soundfonts tab. The “Scan Soundfonts…” button will add all soundfonts in the selected directory and sub-directories but beware: it may not be a good idea to add hundreds or thousands of soundfonts, instead use a small set of high quality soundfonts for your compositions.
Soundfonts are your best friend, because they quickly load, and do not jeopardize the stability of RapidComposer by executing foreign code in the address space of the program, like VSTi plug-ins do. The included GeneralUser GS soundfont is good quality and is suitable for starting the composition.
It is important to set the Soundfont Gain properly. The sound should not clip or be too quiet.
It is recommended to enable the Reverb and Chorus which will create more natural, not too dry sound.
Another way of adding soundfonts
Soundfonts are automatically added/removed from the 'Soundfonts' directory in Windows: C:\Users\<username>\Documents\RapidComposerV4\Soundfonts macOS: ~/Documents/RapidComposerV4/Soundfonts
If you copy an .sf2 file into that directory, it will be available in RapidComposer the next time itruns.
Preview
It is important to have your preview instruments set that are used for specific purposes. Any of these instruments can be a soundfont, or VSTi plug-in, or you can send MIDI messages to
RapidComposer User Guide 172

an external software or hardware synth. When using the latter, you need to choose “MIDI: General MIDI”.
Chord preview options
Various settings for listening to chords in RapidComposer. You can set the same settings in the Chord Selector (click on the hamburger menu button).
Chord preview instrument
This is the instrument that is used the most, not just for chords but also for listening to phrases. Using a piano is recommended here, e.g. the included RCPiano soundfont.
Bass preview instrument
Used only when listening to chords together with bass notes (option: Chord+Bass). You can set a piano instrument here too.
Scale preview instrument
Used only when previewing scales, e.g. by right clicking on a scale in the Scales browser.
Rhythm preview instrument
Used only when previewing rhythm patterns. By default the RCClick soundfont is used for this purpose.
Locations
You can change the default locations for user content, like phrases, rhythm patterns and tracktemplates.
Compositions
This is the folder where the compositions (.rcCOMP files) are saved. Please note that always
RapidComposer User Guide 173

the last folder is used for saving a composition. The folder is updated when you save a composition into another folder.
Custom phrases
This is the folder where the user phrases are saved. Each phrase is saved in a separate file. Sub-folders are automatically created based on the 'group' specified when saving a phrase. Phrase files have the '.rcPHRS' file extension.
Default locations:Windows: C:\Users\(Username)\Documents\RapidComposerV4\CustomPhrasesmacOS: ~\Documents\RapidComposerV4\CustomPhrases
Custom rhythm patterns
User created rhythm patterns are saved here. Each pattern is saved in a separate file. Sub- folders are automatically created based on the 'group' specified when saving a rhythm pattern. Files have the '.rcRHYT' file extension.
Default locations:Windows: C:\Users\(Username)\Documents\RapidComposerV4\CustomRhythmsmacOS: ~\Documents\RapidComposerV4\CustomRhythms
Track templates
It is possible to save a whole track with phrases, variations and instruments to a separate file which you can insert to compositions later. The track templates are listed in the Track Template browser and saved in the Track Templates directory.
Default locations:Windows: C:\Users\(Username)\Documents\RapidComposerV4\TrackTemplatesmacOS: ~\Documents\RapidComposerV4\TrackTemplates
Windows portable use
For portable use the locations of the Custom Phrases, Rhythm Patterns, Track Templates can be made to point to directories on the pen-drive. For this use relative paths, like “.”, “..”, or pathnames beginning with “\”. The reference path (“.”) is the RapidComposerV4 folder.
RapidComposer User Guide 174

MiscellaneousExplanations for the various settings on this page:
Editing
Auto Save Composition Before Quitting: The edited composition is saved when you exitthe program.
Load Last Edited Composition at Startup: When you start the application, the last edited composition will be loaded automatically.
Restore Environment When Composition Loaded:
When checked, the following settings are saved and restored:. looping state, timeline range, zoom, scrollbar positions, playback speed, time pointer.
Maximum Note Height In Editor (pixels): The maximum height of a note in pixels when zoomed vertically.
Note Shape:
Notes are graphically displayed as either a rectangle, with or without a narrowing end. Possible values: Rectangle, Rectangle With Narrowing End, Rectangle With Notched End, Rectangle With Notched End At The Top
Overlapped Notes:
Specify how overlapped notes are displayed. Overlapping analysis takes some time, so it can be disabled if needed. Possible values: Off, Parallel Notes, Stacked Notes
Use Snap For Chord Positions: If enabled, master track chords can start at 'Snap' boundaries, otherwise they begin at beatboundaries.
Move Playback Position For Click On The Workspace:
Clicking on the workspace will set the playback head. This is useful before pasting phrases.
Do not transpose phrase when added by double-clicking on the workspace:
If checked, phrases are added at the root position when you double-click on the workspace.
RapidComposer User Guide 175

Inhibit phrase selection in multiple tracks: If enabled, you cannot select phrases in multiple tracks. For phrase selection all phrases in other tracks are deselected.
Allow transposition in guitar tracks: If checked, phrases can be transposed in a track that uses guitar chords.
Always Confirm Discarding Edited Phrase: When you forget to apply changes made to theedited phrase, an alert window will ask you to apply changes or discard editing.
Auto-Zoom During Phrase Dragging
Select your zoom preference when dragging phrases. It is possible to zoom out the compoaition to have more space for dragging. Possible values: No, No (Zoom Out Before Dragging), Yes
Highlight Middle C Note When Enabled, the middle C note will be highlighted with green Possible values: No, Yes
Allow Copy/Paste Between Two RC Apps
[Windows Only] When two RapidComposer applications are open at a time, you can copy/paste phrases between the two applications. Disable this setting when not used. Possible values: No, Yes
Invert Piano Roll Scrolling Direction Invert scrolling direction when using the mouse wheel.
Convert drum notes when changing drum map
The notes from the old drum map are looked up in the new drum map, and all notes are converted. E.g. a 'snare drum' note in the old drum map will look up 'snare drum' (or similar name) in the new drum map. Note: the matching algorithm is smart, but it does not always work well.
'Quick Suggestions' placement
You can open the chord suggestions below or right to the chord box. The latter does not cover the phrases.Possible values: Below The Chord Box, Left Or Right To The Chord Box
Show 'History' For PhrasesDisplay left and right arrows and the current history index at the top right corner of the phrase.
RapidComposer User Guide 176

Enable 'Lock To Scale' For All Added PhrasesFor better voice leading through the changing chords, it is possible to enable 'Lock To Scale' automatically.
When zooming into lines/parts
Double-clicking on the structure bar zooms in or out. Shift-doubleclick to zoom into a part.Possible values: Leave Timeline Selection, Select Line/Part, Select Line/Part and Enable Loop
When zooming out from lines/parts
Double-clicking on the structure bar zooms in or out. Shift-doubleclick to zoom into a part.Possible values: Restore Original Selection, Deselect Timeline, Leave Line/Part Selection
Chords
Sharps/Flats Usage:
Specify if sharps or flats are displayed. 'Automatic' will make the decision based on the scale. Possible values: Automatic, Use Sharps (#) Only, Use Flats (b) Only
Use UTF-8 sharp (#) and flat (b): You can use the UTF8 sharp and flat characters instead of # and b Possible values: No, Yes
Base Octave
Set base octave, the octave for MIDI note 0. This does not affect notes, only used for labeling. (MIDI note 60 is always middle 'C' according to the MIDI standard!)Possible values: “0 (Note 60: C5)", "-1 (Note 60:C4)", "-2 (Note 60: C3)”
Update Chord Slash Note When Voicing Is Set
It is possible to display the slash (bass) note automatically when the voicing has not got theroot note in the bass. When enabled, this option automatically sets the slash note when the voicing changes.
Chord List SeparatorWhen a list of chords is to be displayed (e.g. for a progression) this separates each chord.Possible values: dash, space, comma
RapidComposer User Guide 177

Display 2-Note Chords In Chord Selector
You can display the 5th chord, or any other 2-note chord in the chord selector. By default chords consisting of less than 2 notes are omitted.
Default Chord Voicing Behaviour
'Apply Voicing On Chord' means 1-to-1 mapping between master track chord notes and phrase chord notes.Possible values: Duplicate Phrase Notes, Apply Voicing On Chord
Inspectors And Browsers
Open Inspectors In Separate Window: The inspectors can be opened in a window which can be dragged outside of the main application window.
Keep Inspectors Windows Always On Top:
Tick this box if you want to keep the inspector windows always on top. Important: you need to restart the application so that this setting take effect for already open inspector windows.
Initial Scale Browser Group State: Specify initial group state in this browser. Possible values: Last Remembered, All Collapsed, All Expanded
Initial Chord Browser Group State: Specify initial group state in this browser. Possible values: Last Remembered, All Collapsed, All Expanded
Initial Chord Progression Browser Group State:
Specify initial group state in this browser. Possible values: Last Remembered, All Collapsed, All Expanded
Initial Phrase Browser Group State: Specify initial group state in this browser. Possible values: Last Remembered, All Collapsed, All Expanded
Initial Instrument Browser Group State: Specify initial group state in this browser. Possible values: Last Remembered, All Collapsed, All Expanded
Fade In/Out Time: Specify inspector/browser fade in and fade out time.
RapidComposer User Guide 178

Possible values: None, Very Fast, Fast, Slow, Very Slow
New Composition
Default Length: Set new composition length in bars. Possible values: 1 to 64
Default Signature: Set the time signature in a new composition.
Default Tempo: Set new composition default tempo. Possible values: 1 to 600
Default Track Height (pixels): Set track height in new composition (in pixels).
Possible values: 30 to 1200
Use Universal Notation For Chords: When checked, the default new composition (when you select 'Create New Composition') will use scale degrees for chords.
Start With Empty Master Track: If checked, the master track will not contain any chords
Maximum Chord Font Size On Master TrackWhen displaying master track chords, the font won't be bigger than this setting.Possible values: 8 to 80
Default Master Track Height Set default master track heightPossible values: 30 to 100
New Track
Default Instrument For New Tracks:
Set the default instrument for newly created tracks. Possible values: SF2: Piano, SF2: GeneralUser GS, General MIDI: Piano, General MIDI: No Patch Change, Chord Preview Instrument
Set General MIDI Controller Set: Set the midi controller set of newly created tracks to General MIDI Possible values: No, Yes
Add MIDI Volume: Add 'MIDI Volume' by default to new tracks.
RapidComposer User Guide 179

Possible values: No, Add, Add With Slider
Add MIDI Pan: Add 'MIDI Pan' by default to new tracks. Possible values: No, Add, Add With Slider
Add ‘Transpose’ Variation Add 'Transpose' by default to new tracks. Possible values: No, Add, Add With Slider
Display Slider for 'Expression' Variation:
Add 'Expression' slider by default to new tracks. Please note this is not the MIDI Expression controller, but the 'Expression' variation which affects MIDI 'Note On' velocities. Possible values: No, Yes
Display Audio Gain And Peak Display audio gain slider and peak meter for SF2 and VSTi tracks
New Track Height (pixels): Set the height of newly created tracks (in pixels). Possible values: 30 to 1200
Default Note Coloring Scheme:
Default note coloring for new tracks. Possible values: Color Notes By Track Color, Color Notes By Track Color + Velocity, Color Notes By Note Kind (Chord/Scale/Bass/Absolute), Color Notes By Note Kind + Accent, Color Notes By Rendered Note Kind (Chord/Scale/Out-of-scale), Color Notes By Rendered Note Kind + Velocity
Default Phrase Name Visibility: Default phrase name visibility for new tracks. Possible values: Hide Phrase Names, Show Phrase Names, Show Articulations
Default Shading Under Phrases:
Default shading under phrases for new tracks. Possible values: Hide Shading Under Phrases, Show Shading Under Selected Phrases, Show Shading Under All Phrases
Default Chord Notes Visibility In Piano Roll:
Default chord notes visibility in piano roll for new tracks. Possible values: Hide Chord Notes, Show Chord Notes
Default Note Shading In Piano Roll: Default note shading in piano roll for new tracks. Possible values: Hide Note Shading, Shade Black Piano Keys, Shade Scale Notes, Shade
RapidComposer User Guide 180

Out-Of-Scale Notes
Default Note Name Visibility On Keyboard:
Default note name visibility on keyboard for new tracks. Possible values: Hide Notes Names On Keyboard, Show Notes Names On Keyboard
Default Note Parameters Visibility On Notes:
Default note parameter visibility on notes for new tracks. Possible values: Hide Note Parameters, Show Note Parameters
Default Phrase Envelope Visibility On Piano Roll:
Default phrase envelope visibility on piano roll for new tracks. Possible values: Hide Phrase Envelope, Show Phrase Envelope
MIDI Export
Export Chords As MIDI Markers: Chords can be added to tracks as MIDI markers when exporting MIDI.
Set 'Note Off' Velocity To Zero Set 'Note Off' velocity to zero in exported MIDI files
MIDI Recording
Detect&Adjust Beat Intervals In Recording:
If the recorded phrase has a different tempo from the composition BPM the recorded notesare analyzed and note positions and lengths are recalculated to conform to the main tempo.
Align Recorded Phrase To Beats: The note timings are analyzed and a small offset is applied to the whole phrase so that note distances from beats will be minimal.
Add 'Quantize' Controller: After recording a phrase from MIDI input you can automatically add the 'Quantize' controller to the phrase. Alternatively it is possible to add'Quantize' to the track later. Possible values: Do Not Add, 1/4, 1/8, 1/16,
RapidComposer User Guide 181
1/32, 1/64
VST Plug-in Hosting
Open VST plug-in editor window after loading: If checked, the VST editor window is opened immediately when the plug-in is loaded.
Send VST Editor Keystrokes To RapidComposer
You can optionally send some key presses to the main RapidComposer window when editing in the VST plug-in editorPossible values: Space, Enter, Arrow Keys, Escape, Tab, Home/End
Make VST Editors Always On Top VST plug-in editor windows will be on top of RapidComposer
RapidComposer VST/VST3/AU
Open RapidComposer In A Separate Window:
When checked, the main window is opened separately from the plug-in GUI. This may be necessary when there are UI issues (OpenGL isused to display the plug-in GUI). Re-loading theplug-in is required if you change this setting.
Make Window Always On Top: When checked, the RapidComposer window will become the topmost window, above the host.
Enable Auto-Scrolling During Playback: When checked, the composition will show the playback position.
Start Playback From The Current Position Instead Of The Host Position:
RapidComposer can be either fully synchronized with the host (i.e. the playback position in RapidComposer will always be the same as in the host) or you can use the playback position that you set in RapidComposer to start playback from. Possible values: No, Yes
Reset Playback Position When Playback Starts:
When the above setting is enabled, the playback will automatically start from the last
RapidComposer User Guide 182

position until you set a new start position manually. Possible values: No, Yes
Audio Unit (Synth): Create Virtual MIDI Port
macOS audio units (synth) only:create a virtual MIDI port called 'RapidComposer' to send MIDI events to.Note: a virtual MIDI port is never created for the AU MIDI FX plug-in!
Analysis
Treat Lowest Note As Bass If Below:
During analysis the lowest note can be designated as bass note if it is lower than the specified note. Possible values: Never, C0, E0, A0, C1, E1, A1, C2, E2, A2, C3, E3, A3, C4, E4, A4, Always
Allowed 'Note On' Timing Imprecision (in 1/1024th)
This setting helps to align notes for more precise chord detection.Possible values: 0 – 64/1024 (max 1/16)
Prefer 7th to 6th Chords During Chord Detection
When the same notes (e.g. C, D, F, A) result 6thand 7th chord (with inversion) you can prefer using the 7th
History
Save VSTi State In History: Some VSTi plug-ins' state information is so bigthat is not reasonable to store in the history.
History Complexity:
In most cases the version tree used in earlier versions proved to be too complex. From v3.0 the simple list is used for history. Possible values: Simple (List), Complex (Version Tree)
Number Of Past States Stored Storing all the previous editing may take lots of disk space especially when VST plug-ins areused. To limit the disk space you can specify the number of past states stored.
RapidComposer User Guide 183

Possible values: 10, 20, 30, 40, 50, 100, 150, 200
Help
Show Popup Help: Enable/disable showing popup help windows when you hover the mouse over a UI element.
Popup Help Delay:
Specify the delay before the pop-up help appears. Short: approx. 0.5 sec, Medium: 1 sec, Long: 2 secs Possible values: Short, Medium, Long
Experimental Features
You need to restart RapidComposer if you enable any of these features.
Enable Chords With Relative Notes
If checked, you can use special chords from 'RelativeChords.rcCHRD' on the master track. These chords describe their notes as scale degrees, rather than semitone offsets. E.g. a triad is 1-3-5 which can be major or minor depending on the scale. It is not allowed to usethese chords with 'Auto' scales.
Enable 'Auto' Scale (application restart required):
If checked, you can use the 'Auto' scale on the master track. The actual scale will depend on the master track chord. E.g. for a G Minor chord the scale will be set up as G Minor. It is not meant to be used with relative chords. If you change this setting, you need to quit and start the program again so that 'Auto' appear in all menus.
Enable 'Markov Melody Generator' If checked, the Markov Melody Generator will be available in the phrase browser.
Enable 'Random Note Generator'If checked, the 'Random Note Generator' will be available in the phrase browser. It is usable for random pattern or keyswitch triggering.
RapidComposer User Guide 184

Allow Font And Style Adjustments
You can set fonts for the UI and chords, and customize the text styles used by the chords. New settings will appear under Settings / User Interface / Fonts (only for advanced users)
User InterfaceRapidComposer has a very flexible user interface: you can change colors, adjust font sizes, button shapes, shading and import/export UI themes. We won’t list all the color settings here.
Keyboard ShortcutsA keyboard shortcut is assigned to most operations. You can re-assign shortcuts, or display them as an HTML page.
RapidComposer User Guide 185

Troubleshooting
Starting RapidComposer without audio
Solution: start RapidComposer with the Alt/Option key held down.
When you start the application, immediately hold down the Alt/Option key and keep it held down until you see a message on the screen.
When to apply: when there are problems with setting up audio. In rare cases RapidComposer sets the wrong audio device by default which causes problems when you try to set another audio device.
[Windows:] When using ASIO drivers, it is possible that there are old, unused, obsolete ASIO drivers installed on your PC. If this happens, you have to manually delete the old entries in the Windows registry.
• Open the Windows registry (Start run regedit)→ →• Open the folder HKEY_LOCAL_MACHINE Software ASIO→ →• Delete the unnecessary audio card entries you do not want or need by right-clicking the
entry and choosing delete.
Skipping loading the last composition during startup
Solution: start RapidComposer with the Ctrl key held down.
When you start the application, immediately hold down the Ctrl key and keep it held down untilyou see a message on the screen.
When to apply: when RapidComposer crashes during start-up. The crash is caused either by a bug or a badly behaving VST plug-in.
RapidComposer User Guide 186

Loading a composition without VST plug-ins
Solution: Alt-click on “Open Composition…” or on recent compositions.
When to apply: when there is an issue during opening a composition file. Typically the problem is a VST plug-in.
RapidComposer User Guide 187

SupportVersion and build date is displayed on this page. You can check for updates or send bug reports, or open the on-line user guide in your web browser.
Checking for updatesClick on “Check For Updates”. If there is an update available, the program offers downloading it. RapidComposer does not start installation, and does not install anything automatically, you need to start the installer manually.
Reporting bugsPressing the “Send Bug Report” button opens the standard “mailto:” URL handler on your computer. In some cases this is not configured (e.g. when using a web based e-mail client). Inthis case please send us your questions, suggestions and bug reports to support at musicdevelopments dot com with as much information as possible: OS version, plug-in host version, RapidComposer version, the steps required to reproduce the issue. You can include a problematic composition file (with .rcCOMP file extension) as an attachment. Videos are welcome ;-)
RapidComposer User Guide 188

Trademarks
Cubase, VST, and Nuendo are trademarks of Steinberg Media Technologies GmbH. Logic, Mac, and macOS are trademarks of Apple Inc., registered in the U.S. and other countries. Windows is a registered trademark of Microsoft Corporation in the United States and other countries. All other product or company names are trademarks or registered trademarks of their respective owners.
RapidComposer User Guide 189