recipes for silicone trays - muji · recipes for silicone trays. ingredients 1 1/ 3 tablespoons...
TRANSCRIPT

Recipes for silicone trays

Ingredients
1 1/3 tablespoons lemon juice
2 tablespoons water
2 tablespoons honey
2 tablespoons powdered gelatinSome doughnut sugar (or fine powdered granulated sugar)
It is so much fun to press out these tiny sweet and sour marble-sized balls. Easy to make in the microwave oven. (Silicone tray- marbles, about one set)
Honey and Lemon Jelly
Directions
1. Put the lemon juice, water and honey in a heat-resistant bowl and mix well. Sprinkle the gelatin in and soak for around 15 minutes.
2. Heat 1 in the microwave oven (600W for 30-40 seconds) and completely melt the gelatin.
3. Pour 2 into the mold with a spoon and cool in the refrigerator for 1-2 hours until set.
4. Press the mold from the bottom and take out the jellies. Sprinkle on the doughnut sugar (or fine powdered granulated sugar.)
* When eating please be careful not to get the jelly stuck in your throat.
* Please read ‘How to use & Precautions’ on back page
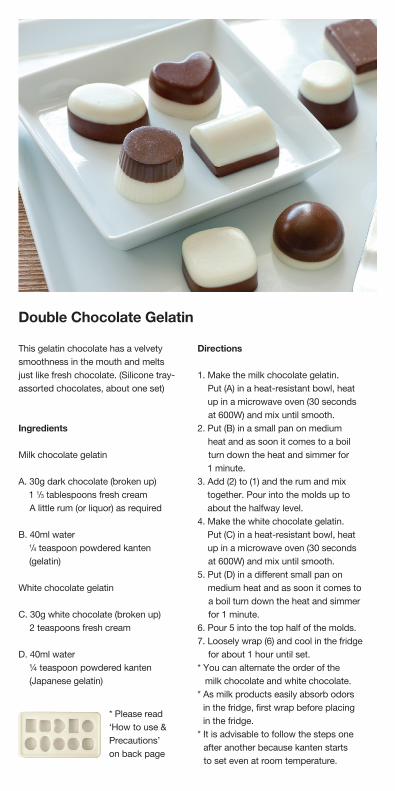
Ingredients
Milk chocolate gelatin
A. 30g dark chocolate (broken up) 1 1/3 tablespoons fresh cream A little rum (or liquor) as required
B. 40ml water 1/4 teaspoon powdered kanten (gelatin)
White chocolate gelatin
C. 30g white chocolate (broken up) 2 teaspoons fresh cream
D. 40ml water ¼ teaspoon powdered kanten (Japanese gelatin)
This gelatin chocolate has a velvety smoothness in the mouth and melts just like fresh chocolate. (Silicone tray-assorted chocolates, about one set)
Double Chocolate Gelatin
Directions
1. Make the milk chocolate gelatin. Put (A) in a heat-resistant bowl, heat up in a microwave oven (30 seconds at 600W) and mix until smooth. 2. Put (B) in a small pan on medium heat and as soon it comes to a boil turn down the heat and simmer for 1 minute.3. Add (2) to (1) and the rum and mix together. Pour into the molds up to about the halfway level.4. Make the white chocolate gelatin. Put (C) in a heat-resistant bowl, heat up in a microwave oven (30 seconds at 600W) and mix until smooth.5. Put (D) in a different small pan on medium heat and as soon it comes to a boil turn down the heat and simmer for 1 minute.6. Pour 5 into the top half of the molds.7. Loosely wrap (6) and cool in the fridge for about 1 hour until set. * You can alternate the order of the milk chocolate and white chocolate.* As milk products easily absorb odors in the fridge, first wrap before placing in the fridge.* It is advisable to follow the steps one after another because kanten starts to set even at room temperature.
* Please read ‘How to use & Precautions’ on back page

Ingredients
60g hot cake mix
50g butter (unsalted)
1 egg
1 3/4 tablespoons granulated sugar
2 teaspoon yoghurt
1 small tablespoon cocoa powder
Some vegetable oil
A two-colored steamed cake that is made in the microwave oven. If you use a piping bag you can you can make detailed letters well. (Silicone tray-alphabet models 1 and 2, about one set)
Alphabet Steamed Cake
Directions
1. Lightly grease the top and inner sides with vegetable oil.2. Put the butter in a heat-resistant bowl and melt it in the microwave oven (about 40 seconds at 600 watts)3. Put the yoghurt in a bowl and mix well. Add the egg and granulated sugar and mix together.4. Add the hot cake mix and the butter (2) to (3) and mix until smooth. 5. Put half of 4 in a piping bag. Sprinkle the cocoa powder on the remaining half, lightly mix and put it in a different piping bag. 6. Choose the color you want to use for the lettering and squeeze that color dough into the alphabet mold to about halfway up. Tap the mold and gently vent the dough. 7. Pour all of the colored dough to be used as the background into the top half of the letters and to the flat part of the mold and tap the mold again to gently vent the dough. 8. Heat for about 2 - 2 minutes 20 seconds in a 600W microwave oven and after cooling a little remove from the mold and cut into pieces as required.
* Please read ‘How to use & Precautions’ on back page
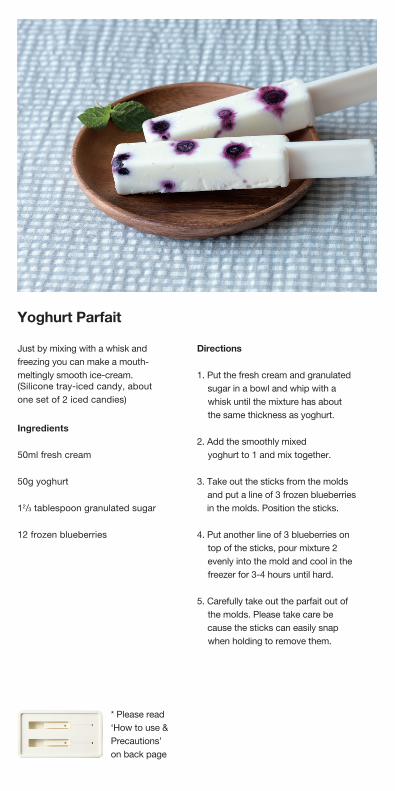
Ingredients
50ml fresh cream
50g yoghurt
12/3 tablespoon granulated sugar
12 frozen blueberries
Just by mixing with a whisk and freezing you can make a mouth-meltingly smooth ice-cream.(Silicone tray-iced candy, about one set of 2 iced candies)
Yoghurt Parfait
Directions
1. Put the fresh cream and granulated sugar in a bowl and whip with a whisk until the mixture has about the same thickness as yoghurt.
2. Add the smoothly mixed yoghurt to 1 and mix together.
3. Take out the sticks from the molds and put a line of 3 frozen blueberries in the molds. Position the sticks.
4. Put another line of 3 blueberries on top of the sticks, pour mixture 2 evenly into the mold and cool in the freezer for 3-4 hours until hard.
5. Carefully take out the parfait out of the molds. Please take care be cause the sticks can easily snap when holding to remove them.
* Please read ‘How to use & Precautions’ on back page

Ingredients
150g sweet red bean jelly
A. 140ml water ½ teaspoon powdered kanten (Japanese gelatin) 3 tablespoons highly refined white sugar A pinch of salt
B. 1 teaspoon powdered green tea (sprinkle on) 1 large tablespoon hot water
C. 100ml water 2 heaped tablespoons highly refined white sugar 2 teaspoons condensed milk ½ teaspoon powdered kanten (Japanese gelatin)
The sweet red bean jelly goes well with the bitterness of powdered green tea. Bite-sized water yokan. (Silicone tray-cube, about one set)
Two-Color Water Yokan (soft adzuki bean jelly)
Directions
1. Put (A) in a pan on a medium heat. After bringing to a boil turn down the heat and simmer for 1-2 minutes to boil down the contents.
2. Put the sweet red bean jelly into 1, melt well and mix. Pour into the bottom of the molds to about the halfway level.
3. Put (B) in a different pan and mix well so it does not become lumpy. Add (C) and mix.
4. Place 3 on a medium heat and after bringing to a boil, turn the heat down and boil down for 1-2 minutes. Pour into the top half of the molds.
5. Cool and set in the fridge for about one hour.
* Please read ‘How to use & Precautions’ on back page

Ingredients
70g canned mandarin oranges (only the fruit)
70g canned pineapple (only the fruit)
A bite-sized gem iced candy. Use any kind of canned fruit to your own liking. (Silicone tray-iced gem, about one set)
Whole Fruit Iced Gem
Directions
1. Using a food processor or mixer make the mandarin oranges and pineapple respectively into a paste.
2. Using a spoon fill the mold with 1 up to the 9/10 level and freeze for 3-4 hours in the freezer until set.
3. Slowly push the mold up from the bottom and remove the iced candy.
* Please read ‘How to use & Precautions’ on back page

How to use (Honey and Lemon Jelly, Double Chocolate Gelatin, Alphabet Steamed Cake,Two-Color Water Yokan (soft adzuki bean jelly), Whole Fruit Iced Gem)
• You can pour water, juice, melted chocolate or other ingredients into the molds. *As water and juice expand when frozen, better finished shapes can be achieved if you do not fill the molds completely to the top (1). *If you level out any chocolate that has spilled from the molds with a spatula, the chocolates will have a good finished shape and be easy to remove from the mold. Also, if you gently tap the chocolate after you have put it into the mold this levels out the chocolate and removes air bubbles resulting in an attractive finish. • When removing the chocolates, stretch the mold, press it up from the bottom and slowly take out the chocolates (2). *When putting the chocolates directly from the mold into something like a glass container, there is the danger that the container may break if you use too much force, so please put them in slowly. • It is possible to stack the same type of silicone trays. *As it is harder to chill the contents when the trays are stacked, it takes longer for the bottom layer of molds to set.• Can be heated in the microwave/ Can be washed in a dishwasher/ Can be frozen in a freezer
How to use (Yoghurt Parfait) • Set the sticks in the molds (1).• Pour juice or other ingredients for the candy into the molds. *Liquids such as juice expand when frozen so the iced candy will have a better shape if you do not fill the mold completely to the top. (2).• To remove the sticks easily, widen the mold at the side and lift up the sticks. (3).• Before putting them away, wash the mold and sticks well after usage. *As the sticks are long and thin be careful that small children do not accidently swallow them whilst using.• It is possible to stack the same type of silicone trays. *As it is harder to chill the contents when the trays are stacked, it takes longer for the bottom layer of molds to set.• Can be washed in a dishwasher/ Can be frozen in a freezer
Precautions for use• Please keep within the upper temperature limit.• Do not place next to an open flame.• Using a scrubbing brush or polish on the product may scratch it.• There is the risk that strongly smelling or colored objects can transfer their odor or color to the product.• If you scratch the product with a sharp object there is the danger that it will be damaged or broken.• After usage clean thoroughly and dry it after wiping the water from it.Upper temperature limit of the tray: 230˚C/446F Upper temperature limit of the tray of sticks: 120˚C/248FLower temperature limit of the tray and sticks: -20˚C/-4F