red hat hyperconverged infrastructure 1.0 maintaining … · red hat hyperconverged infrastructure...
TRANSCRIPT

Red Hat Hyperconverged Infrastructure1.0
Maintaining Red Hat HyperconvergedInfrastructure
Common maintenance tasks for Red Hat Hyperconverged Infrastructure
Last Updated: 2017-09-20

Red Hat Hyperconverged Infrastructure 1.0 Maintaining Red HatHyperconverged Infrastructure
Common maintenance tasks for Red Hat Hyperconverged Infrastructure
Laura [email protected]
Legal Notice
Copyright © 2017 Red Hat, Inc.
The text of and illustrations in this document are licensed by Red Hat under a Creative CommonsAttribution–Share Alike 3.0 Unported license ("CC-BY-SA"). An explanation of CC-BY-SA isavailable athttp://creativecommons.org/licenses/by-sa/3.0/. In accordance with CC-BY-SA, if you distribute this document or an adaptation of it, you mustprovide the URL for the original version.
Red Hat, as the licensor of this document, waives the right to enforce, and agrees not to assert,Section 4d of CC-BY-SA to the fullest extent permitted by applicable law.
Red Hat, Red Hat Enterprise Linux, the Shadowman logo, JBoss, OpenShift, Fedora, the Infinitylogo, and RHCE are trademarks of Red Hat, Inc., registered in the United States and othercountries.
Linux ® is the registered trademark of Linus Torvalds in the United States and other countries.
Java ® is a registered trademark of Oracle and/or its affiliates.
XFS ® is a trademark of Silicon Graphics International Corp. or its subsidiaries in the United Statesand/or other countries.
MySQL ® is a registered trademark of MySQL AB in the United States, the European Union andother countries.
Node.js ® is an official trademark of Joyent. Red Hat Software Collections is not formally related toor endorsed by the official Joyent Node.js open source or commercial project.
The OpenStack ® Word Mark and OpenStack logo are either registered trademarks/service marksor trademarks/service marks of the OpenStack Foundation, in the United States and other countriesand are used with the OpenStack Foundation's permission. We are not affiliated with, endorsed orsponsored by the OpenStack Foundation, or the OpenStack community.
All other trademarks are the property of their respective owners.
Abstract
Red Hat Hyperconverged Infrastructure (RHHI) combines compute, storage, networking, andmanagement capabilities into a single solution, simplifying deployment and reducing the cost ofacquisition and maintenance. This document explains how to perform maintenance tasks specific toRed Hat Hyperconverged Infrastructure.

. . . . . . . . . . . . . . . . . . . . . . . . . . . . . . . . . . . . . . . . . . . . . . . . . . . . . . . . . . . . . . . . . . . . . . . . . . . . . . . . . . . . . . . . . . . . . . . . . . . . . . . . . . . . . . . . . . . . . . . . . . . . . . . . . . . . . . . . . . . . . . . . . . . . . . . . . . . . . . . . . . . . . . . . . . . . . . . . . . . . . . . . . . . . . . . . . . . . . . . . . . . . . . . . . . . . . . . . . . . . . . . . . . . . . . . . . . . . . . . . . . . . . . . . . . . . . . . . . . . . . . . . . . . . . . . . . . . . . . . .
. . . . . . . . . . . . . . . . . . . . . . . . . . . . . . . . . . . . . . . . . . . . . . . . . . . . . . . . . . . . . . . . . . . . . . . . . . . . . . . . . . . . . . . . . . . . . . . . . . . . . . . . . . . . . . . . . . . . . . . . . . . . . . . . . . . . . . . . . . . . . . . . . . . . . . . . . . . . . . . . . . . . . . . . . . . . . . . . . . . . . . . . . . . . . . . . . . . . . . . . . . . . . . . . . . . . . . . . . . . . . . . . . . . . . . . . . . . . . . . . . . . . . . . . . . . . . . . . . . . . . . . . . . . . . . . . . . . . . . . .
. . . . . . . . . . . . . . . . . . . . . . . . . . . . . . . . . . . . . . . . . . . . . . . . . . . . . . . . . . . . . . . . . . . . . . . . . . . . . . . . . . . . . . . . . . . . . . . . . . . . . . . . . . . . . . . . . . . . . . . . . . . . . . . . . . . . . . . . . . . . . . . . . . . . . . . . . . . . . . . . . . . . . . . . . . . . . . . . . . . . . . . . . . . . . . . . . . . . . . . . . . . . . . . . . . . . . . . . . . . . . . . . . . . . . . . . . . . . . . . . . . . . . . . . . . . . . . . . . . . . . . . . . . . . . . . . . . . . . . . .
. . . . . . . . . . . . . . . . . . . . . . . . . . . . . . . . . . . . . . . . . . . . . . . . . . . . . . . . . . . . . . . . . . . . . . . . . . . . . . . . . . . . . . . . . . . . . . . . . . . . . . . . . . . . . . . . . . . . . . . . . . . . . . . . . . . . . . . . . . . . . . . . . . . . . . . . . . . . . . . . . . . . . . . . . . . . . . . . . . . . . . . . . . . . . . . . . . . . . . . . . . . . . . . . . . . . . . . . . . . . . . . . . . . . . . . . . . . . . . . . . . . . . . . . . . . . . . . . . . . . . . . . . . . . . . . . . . . . . . . .
. . . . . . . . . . . . . . . . . . . . . . . . . . . . . . . . . . . . . . . . . . . . . . . . . . . . . . . . . . . . . . . . . . . . . . . . . . . . . . . . . . . . . . . . . . . . . . . . . . . . . . . . . . . . . . . . . . . . . . . . . . . . . . . . . . . . . . . . . . . . . . . . . . . . . . . . . . . . . . . . . . . . . . . . . . . . . . . . . . . . . . . . . . . . . . . . . . . . . . . . . . . . . . . . . . . . . . . . . . . . . . . . . . . . . . . . . . . . . . . . . . . . . . . . . . . . . . . . . . . . . . . . . . . . . . . . . . . . . . . .
. . . . . . . . . . . . . . . . . . . . . . . . . . . . . . . . . . . . . . . . . . . . . . . . . . . . . . . . . . . . . . . . . . . . . . . . . . . . . . . . . . . . . . . . . . . . . . . . . . . . . . . . . . . . . . . . . . . . . . . . . . . . . . . . . . . . . . . . . . . . . . . . . . . . . . . . . . . . . . . . . . . . . . . . . . . . . . . . . . . . . . . . . . . . . . . . . . . . . . . . . . . . . . . . . . . . . . . . . . . . . . . . . . . . . . . . . . . . . . . . . . . . . . . . . . . . . . . . . . . . . . . . . . . . . . . . . . . . . . . .
. . . . . . . . . . . . . . . . . . . . . . . . . . . . . . . . . . . . . . . . . . . . . . . . . . . . . . . . . . . . . . . . . . . . . . . . . . . . . . . . . . . . . . . . . . . . . . . . . . . . . . . . . . . . . . . . . . . . . . . . . . . . . . . . . . . . . . . . . . . . . . . . . . . . . . . . . . . . . . . . . . . . . . . . . . . . . . . . . . . . . . . . . . . . . . . . . . . . . . . . . . . . . . . . . . . . . . . . . . . . . . . . . . . . . . . . . . . . . . . . . . . . . . . . . . . . . . . . . . . . . . . . . . . . . . . . . . . . . . . .
. . . . . . . . . . . . . . . . . . . . . . . . . . . . . . . . . . . . . . . . . . . . . . . . . . . . . . . . . . . . . . . . . . . . . . . . . . . . . . . . . . . . . . . . . . . . . . . . . . . . . . . . . . . . . . . . . . . . . . . . . . . . . . . . . . . . . . . . . . . . . . . . . . . . . . . . . . . . . . . . . . . . . . . . . . . . . . . . . . . . . . . . . . . . . . . . . . . . . . . . . . . . . . . . . . . . . . . . . . . . . . . . . . . . . . . . . . . . . . . . . . . . . . . . . . . . . . . . . . . . . . . . . . . . . . . . . . . . . . . .
. . . . . . . . . . . . . . . . . . . . . . . . . . . . . . . . . . . . . . . . . . . . . . . . . . . . . . . . . . . . . . . . . . . . . . . . . . . . . . . . . . . . . . . . . . . . . . . . . . . . . . . . . . . . . . . . . . . . . . . . . . . . . . . . . . . . . . . . . . . . . . . . . . . . . . . . . . . . . . . . . . . . . . . . . . . . . . . . . . . . . . . . . . . . . . . . . . . . . . . . . . . . . . . . . . . . . . . . . . . . . . . . . . . . . . . . . . . . . . . . . . . . . . . . . . . . . . . . . . . . . . . . . . . . . . . . . . . . . . . .
. . . . . . . . . . . . . . . . . . . . . . . . . . . . . . . . . . . . . . . . . . . . . . . . . . . . . . . . . . . . . . . . . . . . . . . . . . . . . . . . . . . . . . . . . . . . . . . . . . . . . . . . . . . . . . . . . . . . . . . . . . . . . . . . . . . . . . . . . . . . . . . . . . . . . . . . . . . . . . . . . . . . . . . . . . . . . . . . . . . . . . . . . . . . . . . . . . . . . . . . . . . . . . . . . . . . . . . . . . . . . . . . . . . . . . . . . . . . . . . . . . . . . . . . . . . . . . . . . . . . . . . . . . . . . . . . . . . . . . . .
. . . . . . . . . . . . . . . . . . . . . . . . . . . . . . . . . . . . . . . . . . . . . . . . . . . . . . . . . . . . . . . . . . . . . . . . . . . . . . . . . . . . . . . . . . . . . . . . . . . . . . . . . . . . . . . . . . . . . . . . . . . . . . . . . . . . . . . . . . . . . . . . . . . . . . . . . . . . . . . . . . . . . . . . . . . . . . . . . . . . . . . . . . . . . . . . . . . . . . . . . . . . . . . . . . . . . . . . . . . . . . . . . . . . . . . . . . . . . . . . . . . . . . . . . . . . . . . . . . . . . . . . . . . . . . . . . . . . . . . .
. . . . . . . . . . . . . . . . . . . . . . . . . . . . . . . . . . . . . . . . . . . . . . . . . . . . . . . . . . . . . . . . . . . . . . . . . . . . . . . . . . . . . . . . . . . . . . . . . . . . . . . . . . . . . . . . . . . . . . . . . . . . . . . . . . . . . . . . . . . . . . . . . . . . . . . . . . . . . . . . . . . . . . . . . . . . . . . . . . . . . . . . . . . . . . . . . . . . . . . . . . . . . . . . . . . . . . . . . . . . . . . . . . . . . . . . . . . . . . . . . . . . . . . . . . . . . . . . . . . . . . . . . . . . . . . . . . . . . . . .
. . . . . . . . . . . . . . . . . . . . . . . . . . . . . . . . . . . . . . . . . . . . . . . . . . . . . . . . . . . . . . . . . . . . . . . . . . . . . . . . . . . . . . . . . . . . . . . . . . . . . . . . . . . . . . . . . . . . . . . . . . . . . . . . . . . . . . . . . . . . . . . . . . . . . . . . . . . . . . . . . . . . . . . . . . . . . . . . . . . . . . . . . . . . . . . . . . . . . . . . . . . . . . . . . . . . . . . . . . . . . . . . . . . . . . . . . . . . . . . . . . . . . . . . . . . . . . . . . . . . . . . . . . . . . . . . . . . . . . . .
Table of Contents
PART I. CONFIGURATION TASKS
CHAPTER 1. ADD COMPUTE AND STORAGE RESOURCES1.1. SCALING RHHI DEPLOYMENTS
1.1.1. Before you begin1.1.2. Scaling RHHI by adding additional volumes on new nodes
CHAPTER 2. CONFIGURE HIGH AVAILABILITY USING FENCING POLICIES2.1. CONFIGURING FENCING POLICIES FOR GLUSTER STORAGE
CHAPTER 3. CONFIGURE DISASTER RECOVERY USING GEO-REPLICATION3.1. CONFIGURING GEO-REPLICATION FOR DISASTER RECOVERY
3.1.1. Before you begin3.1.2. Configuring a geo-replication session3.1.3. Configuring synchronization schedule3.1.4. Deleting synchronization schedule
CHAPTER 4. CONFIGURE ENCRYPTION WITH TRANSPORT LAYER SECURITY (TLS/SSL)4.1. CONFIGURING TLS/SSL USING SELF-SIGNED CERTIFICATES4.2. CONFIGURING TLS/SSL USING CERTIFICATE AUTHORITY SIGNED CERTIFICATES
PART II. MAINTENANCE TASKS
CHAPTER 5. UPDATING RED HAT HYPERCONVERGED INFRASTRUCTURE5.1. UPDATE WORKFLOW5.2. BEFORE YOU UPDATE5.3. UPDATING THE HOSTED ENGINE VIRTUAL MACHINE5.4. UPDATING THE PHYSICAL HOSTS
CHAPTER 6. REPLACING THE PRIMARY GLUSTER STORAGE NODE
CHAPTER 7. REPLACING A GLUSTER STORAGE NODE7.1. REPLACING A GLUSTER STORAGE NODE (DIFFERENT FQDN)7.2. REPLACING A GLUSTER STORAGE NODE (SAME FQDN)
CHAPTER 8. RESTORING A VOLUME FROM A GEO-REPLICATED BACKUP
PART III. REFERENCE MATERIAL
APPENDIX A. FENCING POLICIES FOR RED HAT GLUSTER STORAGE
APPENDIX B. EXAMPLE GDEPLOY CONFIGURATION FILESB.1. EXAMPLE GDEPLOY CONFIGURATION FILE FOR SETTING UP TLS/SSLB.2. EXAMPLE GDEPLOY CONFIGURATION FILE FOR PREPARING TO REPLACE A NODEB.3. EXAMPLE GDEPLOY CONFIGURATION FILE FOR SCALING TO ADDITIONAL NODES
3
4444
77
888889
101012
15
1616161617
18
222225
28
30
31
32323336
Table of Contents
1

Red Hat Hyperconverged Infrastructure 1.0 Maintaining Red Hat Hyperconverged Infrastructure
2

PART I. CONFIGURATION TASKS
PART I. CONFIGURATION TASKS
3
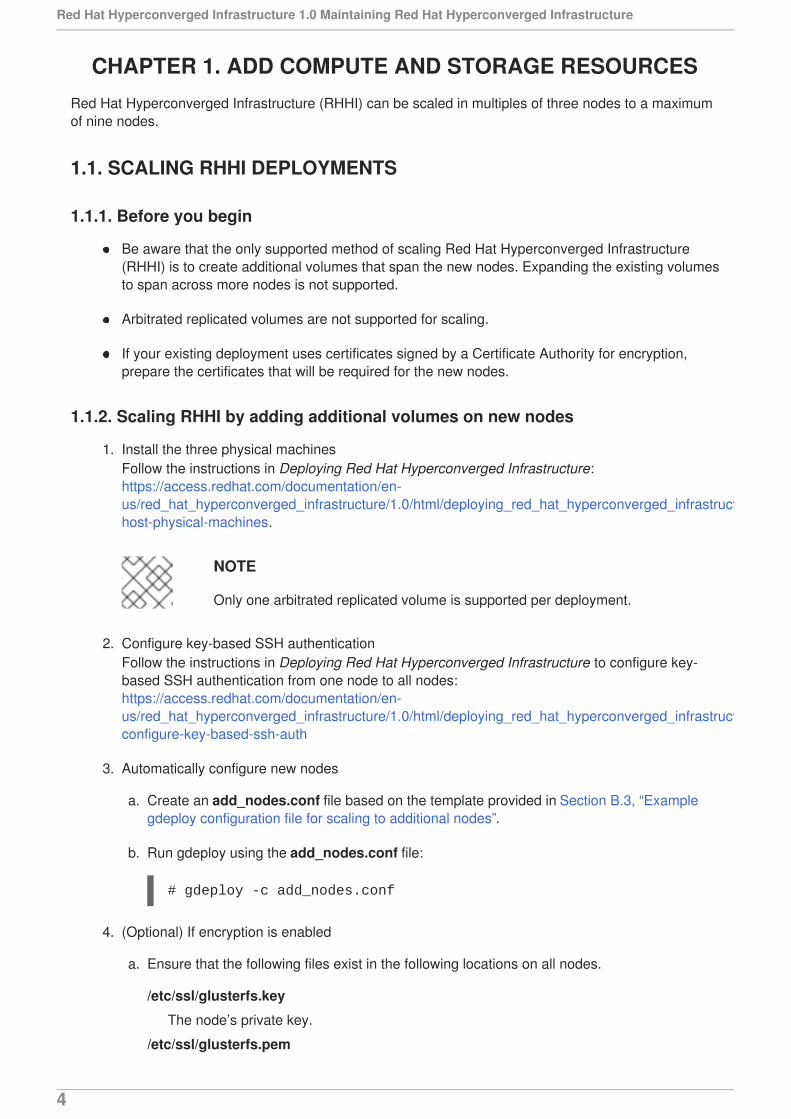
CHAPTER 1. ADD COMPUTE AND STORAGE RESOURCESRed Hat Hyperconverged Infrastructure (RHHI) can be scaled in multiples of three nodes to a maximumof nine nodes.
1.1. SCALING RHHI DEPLOYMENTS
1.1.1. Before you begin
Be aware that the only supported method of scaling Red Hat Hyperconverged Infrastructure(RHHI) is to create additional volumes that span the new nodes. Expanding the existing volumesto span across more nodes is not supported.
Arbitrated replicated volumes are not supported for scaling.
If your existing deployment uses certificates signed by a Certificate Authority for encryption,prepare the certificates that will be required for the new nodes.
1.1.2. Scaling RHHI by adding additional volumes on new nodes
1. Install the three physical machinesFollow the instructions in Deploying Red Hat Hyperconverged Infrastructure:https://access.redhat.com/documentation/en-us/red_hat_hyperconverged_infrastructure/1.0/html/deploying_red_hat_hyperconverged_infrastructure/install-host-physical-machines.
NOTE
Only one arbitrated replicated volume is supported per deployment.
2. Configure key-based SSH authenticationFollow the instructions in Deploying Red Hat Hyperconverged Infrastructure to configure key-based SSH authentication from one node to all nodes:https://access.redhat.com/documentation/en-us/red_hat_hyperconverged_infrastructure/1.0/html/deploying_red_hat_hyperconverged_infrastructure/task-configure-key-based-ssh-auth
3. Automatically configure new nodes
a. Create an add_nodes.conf file based on the template provided in Section B.3, “Examplegdeploy configuration file for scaling to additional nodes”.
b. Run gdeploy using the add_nodes.conf file:
# gdeploy -c add_nodes.conf
4. (Optional) If encryption is enabled
a. Ensure that the following files exist in the following locations on all nodes.
/etc/ssl/glusterfs.key
The node’s private key.
/etc/ssl/glusterfs.pem
Red Hat Hyperconverged Infrastructure 1.0 Maintaining Red Hat Hyperconverged Infrastructure
4
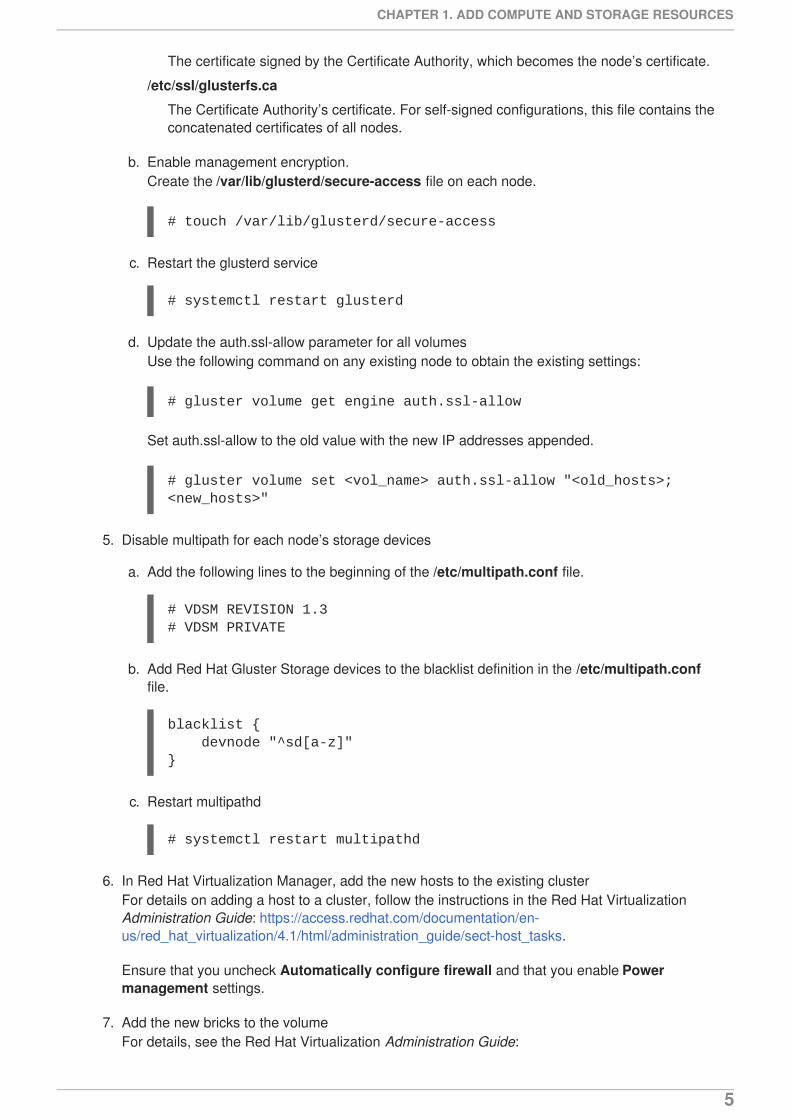
The certificate signed by the Certificate Authority, which becomes the node’s certificate.
/etc/ssl/glusterfs.ca
The Certificate Authority’s certificate. For self-signed configurations, this file contains theconcatenated certificates of all nodes.
b. Enable management encryption.Create the /var/lib/glusterd/secure-access file on each node.
# touch /var/lib/glusterd/secure-access
c. Restart the glusterd service
# systemctl restart glusterd
d. Update the auth.ssl-allow parameter for all volumesUse the following command on any existing node to obtain the existing settings:
# gluster volume get engine auth.ssl-allow
Set auth.ssl-allow to the old value with the new IP addresses appended.
# gluster volume set <vol_name> auth.ssl-allow "<old_hosts>;<new_hosts>"
5. Disable multipath for each node’s storage devices
a. Add the following lines to the beginning of the /etc/multipath.conf file.
# VDSM REVISION 1.3# VDSM PRIVATE
b. Add Red Hat Gluster Storage devices to the blacklist definition in the /etc/multipath.conffile.
blacklist { devnode "^sd[a-z]"}
c. Restart multipathd
# systemctl restart multipathd
6. In Red Hat Virtualization Manager, add the new hosts to the existing clusterFor details on adding a host to a cluster, follow the instructions in the Red Hat VirtualizationAdministration Guide: https://access.redhat.com/documentation/en-us/red_hat_virtualization/4.1/html/administration_guide/sect-host_tasks.
Ensure that you uncheck Automatically configure firewall and that you enable Powermanagement settings.
7. Add the new bricks to the volumeFor details, see the Red Hat Virtualization Administration Guide:
CHAPTER 1. ADD COMPUTE AND STORAGE RESOURCES
5
https://access.redhat.com/documentation/en-us/red_hat_virtualization/4.1/html/administration_guide/sect-using_red_hat_gluster_storage_as_a_storage_domain.
8. Attach the gluster network to the new hosts
a. Click the Hosts tab and select the host.
b. Click the Network Interfaces subtab and then click Setup Host Networks.
c. Drag and drop the newly created network to the correct interface.
d. Ensure that the Verify connectivity checkbox is checked.
e. Ensure that the Save network configuration checkbox is checked.
f. Click OK to save.
g. Verify the health of the networkClick the Hosts tab and select the host.
Click the Networks subtab and check the state of the host’s network
If the network interface enters an "Out of sync" state or does not have an IPv4 Address, clickthe Management tab that corresponds to the host and click Refresh Capabilities.
9. Create a new volume
a. Check the Optimize for virt-store checkbox.
b. Set the following volume options:
Set cluster.granular-entry-heal to on.
Set network.remote-dio to off
Set performance.strict-o-direct to on
c. Start the new volume.
10. Create a new storage domain
a. Click the Storage tab and then click New Domain.
b. Provide a Name for the domain.
c. Set the Domain function to Data.
d. Set the Storage Type to GlusterFS.
e. Check the Use managed gluster volume option.A list of volumes available in the cluster appears.
f. Click OK.
Red Hat Hyperconverged Infrastructure 1.0 Maintaining Red Hat Hyperconverged Infrastructure
6
CHAPTER 2. CONFIGURE HIGH AVAILABILITY USINGFENCING POLICIES
Fencing allows a cluster to enforce performance and availability policies and react to unexpected hostfailures by automatically rebooting virtualization hosts.
Several policies specific to Red Hat Gluster Storage must be enabled to ensure that fencing activities donot disrupt storage services in a Red Hat Hyperconverged (RHHI) Infrastructure deployment.
2.1. CONFIGURING FENCING POLICIES FOR GLUSTER STORAGE
1. In Red Hat Virtualization Manager, click the Clusters tab.
2. Click Edit. The Edit Cluster window opens.
3. Click the Fencing policy tab.
4. Check the Enable fencing checkbox.
5. Check the checkboxes for at least the following fencing policies:
Skip fencing if gluster bricks are up
Skip fencing if gluster quorum not met
See Appendix A, Fencing Policies for Red Hat Gluster Storage for details on the effects of thesepolicies.
6. Click OK to save settings.
CHAPTER 2. CONFIGURE HIGH AVAILABILITY USING FENCING POLICIES
7
CHAPTER 3. CONFIGURE DISASTER RECOVERY USING GEO-REPLICATION
Geo-replication is used to synchronize data from one Red Hat Gluster Storage cluster to another.Synchronizing your data volume from your discrete Red Hat Hyperconverged Infrastructure (RHHI)cluster to a central data center on a regular basis helps ensure you can restore your cluster to a workingstate after an outage.
3.1. CONFIGURING GEO-REPLICATION FOR DISASTER RECOVERY
3.1.1. Before you begin
Prepare a remote backup volume to hold the geo-replicated copy of your local volume.
Ensure that the volume you want to back up has shared storage enabled.
# gluster volume set all cluster.enable-shared-storage enable
Ensure that your remote backup volume has sharding enabled.
# gluster volume set VOLNAME features.shard enable
If encryption is enabled on the storage that you want to back up, encryption must also beenabled on your remote backup volume.
3.1.2. Configuring a geo-replication session
1. Create (but do not start) the geo-replication sessionUsing the command line interface, create (but do not start) a geo-replication session from a localvolume to the remote backup volume.
See the Red Hat Gluster Storage 3.2 Administration Guide for details:https://access.redhat.com/documentation/en-us/red_hat_gluster_storage/3.2/html/administration_guide/sect-Preparing_to_Deploy_Geo-replication#Setting_Up_the_Environment_for_Geo-replication_Session
2. Configure a meta-volume for your remote backupSee the Red Hat Gluster Storage 3.2 Administration Guide for details:https://access.redhat.com/documentation/en-us/red_hat_gluster_storage/3.2/html/administration_guide/sect-preparing_to_deploy_geo-replication#chap-Managing_Geo-replication-Meta_Volume.
3.1.3. Configuring synchronization schedule
1. Verify that geo-replication is configuredIn Red Hat Virtualization Manager, click the Volumes tab.
Check the Info column for the geo-replication icon. If present, a geo-replication session isconfigured for that volume.
2. In the Storage Domain tab, select the storage domain to back up.
3. Click the Remote Data Sync Setup sub-tab
Red Hat Hyperconverged Infrastructure 1.0 Maintaining Red Hat Hyperconverged Infrastructure
8
The Setup Remote Data Synchronization window opens.
a. In the Geo-replicated to field, select the backup destination.
b. In the Recurrence field, select a recurrence interval type.Valid values are WEEKLY with at least one weekday checkbox selected, or DAILY.
c. In the Hours and Minutes field, specify the time to start synchronizing.
NOTE
This time is based on the Hosted Engine’s timezone.
d. Click OK.
4. Check the Events pane at the time you specified to verify that synchronization works correctly.
3.1.4. Deleting synchronization schedule
1. In the Storage Domain tab, select the storage domain to back up.
2. Click the Remote Data Sync Setup sub-tabThe Setup Remote Data Synchronization window opens.
a. In the Recurrence field, select a recurrence interval type of NONE.
b. Click OK.
3. (Optional) Remove the geo-replication sessionRun the following command from the geo-replication master node:
# gluster volume geo-replication MASTER_VOL SLAVE_HOST::SLAVE_VOL delete
You can also run this command with the reset-sync-time parameter. For further informationabout this parameter and geo-replication in general, see the Red Hat Gluster StorageAdministration Guide: https://access.redhat.com/documentation/en-us/red_hat_gluster_storage/3.2/html/administration_guide/chap-managing_geo-replication.
CHAPTER 3. CONFIGURE DISASTER RECOVERY USING GEO-REPLICATION
9
CHAPTER 4. CONFIGURE ENCRYPTION WITH TRANSPORTLAYER SECURITY (TLS/SSL)
Transport Layer Security (TLS/SSL) can be used to encrypt management and storage layercommunications between nodes. This helps ensure that your data remains private.
Encryption can be configured using either self-signed certificates or certificates signed by a CertificateAuthority.
This document assumes that you want to enable encryption on an existing deployment. However,encryption can also be configured as part of the deployment process. See Deploying Red HatHyperconverged Infrastructure for details: https://access.redhat.com/documentation/en-us/red_hat_hyperconverged_infrastructure/1.0/html/deploying_red_hat_hyperconverged_infrastructure/.
4.1. CONFIGURING TLS/SSL USING SELF-SIGNED CERTIFICATES
IMPORTANT
Enabling or disabling encryption is a disruptive process that requires virtual machines andthe Hosted Engine to be shut down.
1. Shut down all virtual machinesSee Shutting Down a Virtual Machine in the Red Hat Virtualization documentation for details:https://access.redhat.com/documentation/en-us/red_hat_virtualization/4.1/html/virtual_machine_management_guide/chap-administrative_tasks.
2. Move all storage domains except the hosted engine storage domain into Maintenance modeSee Moving Storage Domains to Maintenance Mode in the Red Hat Virtualization documentationfor details: https://access.redhat.com/documentation/en-us/red_hat_virtualization/4.1/html/administration_guide/sect-storage_tasks.
3. Move the hosted engine into global maintenance modeRun the following command on the hypervisor that hosts the hosted engine:
# hosted-engine --set-maintenance --mode=global
4. Shut down the hosted engine virtual machineRun the following command on the hypervisor that hosts the hosted engine:
# hosted-engine --vm-shutdown
Verify that the hosted engine has shut down by running the following command:
# hosted-engine --vm-status
5. Stop all high availability servicesRun the following command on all hypervisors:
# systemctl stop ovirt-ha-agent# systemctl stop ovirt-ha-broker
Red Hat Hyperconverged Infrastructure 1.0 Maintaining Red Hat Hyperconverged Infrastructure
10

6. Unmount the hosted engine storage domain from all hypervisors
# hosted-engine --disconnect-storage
7. Verify that all volumes are unmountedOn each hypervisor, verify that all gluster volumes are no longer mounted.
# mount
8. Create a gdeploy configuration fileUse the template file in Section B.1, “Example gdeploy configuration file for setting up TLS/SSL”to create a new configuration file that will set up TLS/SSL on your deployment.
9. Run gdeploy using your new configuration fileOn the first physical machine, run gdeploy using the configuration file you created in theprevious step:
# gdeploy -c set_up_encryption.conf
This may take some time to complete.
10. Verify that no TLS/SSL errors occurredCheck the /var/log/glusterfs/glusterd.log file on each physical machine to ensure that noTLS/SSL related errors occurred, and setup completed successfully.
11. Start all high availability servicesRun the following commands on all hypervisors:
# systemctl start ovirt-ha-agent# systemctl start ovirt-ha-broker
12. Move the hosted engine out of Global Maintenance mode
# hosted-engine --set-maintenance --mode=none
The hosted engine starts automatically after a short wait.
13. Wait for nodes to synchronizeRun the following command on the first hypervisor to check synchronization status. If enginestatus is listed as unknown stale-data, synchronization requires several more minutes tocomplete.
The following output indicates completed synchronization.
# hosted-engine --vm-status | grep 'Engine status'Engine status : {"health": "good", "vm": "up", "detail": "up"}Engine status : {"reason": "vm not running on this host", "health": "bad", "vm": "down", "detail": "unknown"}Engine status : {"reason": "vm not running on this host", "health": "bad", "vm": "down", "detail": "unknown"}
14. Activate all storage domainsActivate the master storage domain first, followed by all other storage domains.
CHAPTER 4. CONFIGURE ENCRYPTION WITH TRANSPORT LAYER SECURITY (TLS/SSL)
11
For details on activating storage domains, see Activating Storage Domains from MaintenanceMode in the Red Hat Virtualization documentation: https://access.redhat.com/documentation/en-us/red_hat_virtualization/4.1/html/administration_guide/sect-storage_tasks.
15. Start all virtual machinesSee Starting a Virtual Machine in the Red Hat Virtualization documentation for details:https://access.redhat.com/documentation/en-us/red_hat_virtualization/4.1/html/virtual_machine_management_guide/sect-starting_the_virtual_machine.
4.2. CONFIGURING TLS/SSL USING CERTIFICATE AUTHORITYSIGNED CERTIFICATES
IMPORTANT
Enabling or disabling encryption is a disruptive process that requires virtual machines andthe Hosted Engine to be shut down.
IMPORTANT
Ensure that you have appropriate certificates signed by a Certificate Authority beforeproceeding. Obtaining certificates is outside the scope of this document, but further detailsare available in the Red Hat Gluster Storage Administration Guide:https://access.redhat.com/documentation/en-us/red_hat_gluster_storage/3.2/html/administration_guide/chap-network_encryption#chap-Network_Encryption-Prereqs.
1. Shut down all virtual machinesSee Shutting Down a Virtual Machine in the Red Hat Virtualization documentation for details:https://access.redhat.com/documentation/en-us/red_hat_virtualization/4.1/html/virtual_machine_management_guide/chap-administrative_tasks.
2. Move all storage domains except the hosted engine storage domain into Maintenance modeSee Moving Storage Domains to Maintenance Mode in the Red Hat Virtualization documentationfor details: https://access.redhat.com/documentation/en-us/red_hat_virtualization/4.1/html/administration_guide/sect-storage_tasks.
3. Move the hosted engine into global maintenance modeRun the following command on the hypervisor that hosts the hosted engine:
# hosted-engine --set-maintenance --mode=global
4. Shut down the hosted engine virtual machineRun the following command on the hypervisor that hosts the hosted engine:
# hosted-engine --vm-shutdown
Verify that the hosted engine has shut down by running the following command:
# hosted-engine --vm-status
Red Hat Hyperconverged Infrastructure 1.0 Maintaining Red Hat Hyperconverged Infrastructure
12
5. Stop all high availability servicesRun the following command on all hypervisors:
# systemctl stop ovirt-ha-agent# systemctl stop ovirt-ha-broker
6. Unmount the hosted engine storage domain from all hypervisors
# hosted-engine --disconnect-storage
7. Verify that all volumes are unmountedOn each hypervisor, verify that all gluster volumes are no longer mounted.
# mount
8. Configure Certificate Authority signed encryption
IMPORTANT
Ensure that you have appropriate certificates signed by a Certificate Authoritybefore proceeding. Obtaining certificates is outside the scope of this document.
a. Place certificates in the following locations on all nodes.
/etc/ssl/glusterfs.key
The node’s private key.
/etc/ssl/glusterfs.pem
The certificate signed by the Certificate Authority, which becomes the node’s certificate.
/etc/ssl/glusterfs.ca
The Certificate Authority’s certificate.
b. Stop all volumes
# gluster volume stop all
c. Restart glusterd on all nodes
# systemctl restart glusterd
d. Enable TLS/SSL encryption on all volumes
# gluster volume set <volname> client.ssl on# gluster volume set <volname> server.ssl on
e. Specify access permissions on all hosts
# gluster volume set <volname> auth.ssl-allow "host1,host2,host3"
f. Start all volumes
CHAPTER 4. CONFIGURE ENCRYPTION WITH TRANSPORT LAYER SECURITY (TLS/SSL)
13
# gluster volume start all
9. Verify that no TLS/SSL errors occurredCheck the /var/log/glusterfs/glusterd.log file on each physical machine to ensure that noTLS/SSL related errors occurred, and setup completed successfully.
10. Start all high availability servicesRun the following commands on all hypervisors:
# systemctl start ovirt-ha-agent# systemctl start ovirt-ha-broker
11. Move the hosted engine out of Global Maintenance mode
# hosted-engine --set-maintenance --mode=none
The hosted engine starts automatically after a short wait.
12. Wait for nodes to synchronizeRun the following command on the first hypervisor to check synchronization status. If enginestatus is listed as unknown stale-data, synchronization requires several more minutes tocomplete.
The following output indicates completed synchronization.
# hosted-engine --vm-status | grep 'Engine status'Engine status : {"health": "good", "vm": "up", "detail": "up"}Engine status : {"reason": "vm not running on this host", "health": "bad", "vm": "down", "detail": "unknown"}Engine status : {"reason": "vm not running on this host", "health": "bad", "vm": "down", "detail": "unknown"}
13. Activate all storage domainsActivate the master storage domain first, followed by all other storage domains.
For details on activating storage domains, see Activating Storage Domains from MaintenanceMode in the Red Hat Virtualization documentation: https://access.redhat.com/documentation/en-us/red_hat_virtualization/4.1/html/administration_guide/sect-storage_tasks.
14. Start all virtual machinesSee Starting a Virtual Machine in the Red Hat Virtualization documentation for details:https://access.redhat.com/documentation/en-us/red_hat_virtualization/4.1/html/virtual_machine_management_guide/sect-starting_the_virtual_machine.
Red Hat Hyperconverged Infrastructure 1.0 Maintaining Red Hat Hyperconverged Infrastructure
14

PART II. MAINTENANCE TASKS
PART II. MAINTENANCE TASKS
15
CHAPTER 5. UPDATING RED HAT HYPERCONVERGEDINFRASTRUCTURE
Updating involves moving from one version of a product to another minor release of the same productversion, for example, from Red Hat Virtualization 4.1 to 4.1.3.
Red Hat recommends updating your systems regularly to apply security and bug fixes and takeadvantage of minor enhancements that are made available between major product releases.
5.1. UPDATE WORKFLOW
Red Hat Hyperconverged Infrastructure is a software solution comprised of several differentcomponents. Apply updates in the following order to minimize disruption.
1. Hosted Engine virtual machine
2. Physical hosts
5.2. BEFORE YOU UPDATE
Ensure that your Hosted Engine virtual machine is subscribed to the rhel-7-server-rhvh-4-rpms and rhel-7-server-rhv-4-tools-rpms repositories.
# subscription-manager repos --enable=rhel-7-server-rhv-4.1-rpms# subscription-manager repos --enable=rhel-7-server-rhv-4-tools-rpms
Ensure that all physical machines are subscribed to the rhel-7-server-rhvh-4-rpmsrepository.
# subscription-manager repos --enable=rhel-7-server-rhv-4-rpms
If geo-replication is configured, ensure that data is not being synchronized.
a. Check the Tasks subtab and ensure that there are no ongoing tasks related to DataSynchronization. If data synchronization tasks are present, wait until they are completebefore beginning the update.
b. Stop all geo-replication sessions so that synchronization will not occur during the update.Click the Geo-replication subtab and select the session that you want to stop, then clickStop.Alternatively, run the following command to stop a geo-replication session.
# gluster volume geo-replication MASTER_VOL SLAVE_HOST::SLAVE_VOL stop
5.3. UPDATING THE HOSTED ENGINE VIRTUAL MACHINE
Follow the steps in the following section of the Red Hat Virtualization Upgrade Guide to update theHosted Engine virtual machine: https://access.redhat.com/documentation/en-us/red_hat_virtualization/4.1/html/upgrade_guide/chap-updates_between_minor_releases#Upgrading_between_Minor_Releases
Red Hat Hyperconverged Infrastructure 1.0 Maintaining Red Hat Hyperconverged Infrastructure
16
5.4. UPDATING THE PHYSICAL HOSTS
Follow the steps in the sections linked below to update the physical hosts one at a time.
Between updates, ensure that you wait for any heal operations to complete before updating the nexthost. You can view heal status in the Bricks subtab. Alternatively, run the following command for everyvolume, and ensure that Number of entries: 0 is displayed for each brick before updating the next host.
# gluster volume heal VOLNAME info
Most updates can be applied using Red Hat Virtualization Manager. Follow the steps in the followingsection of the Red Hat Virtualization Upgrade Guide to update the physical host machines one at a time:https://access.redhat.com/documentation/en-us/red_hat_virtualization/4.1/html/upgrade_guide/updating_virtualization_hosts.
If you need to apply a security fix, apply updates manually instead. Follow the steps in the followingsection of the Red Hat Virtualization Upgrade Guide: https://access.redhat.com/documentation/en-us/red_hat_virtualization/4.1/html/upgrade_guide/Manually_Updating_Virtualization_Hosts
IMPORTANT
Remember to move your hosts out of maintenance mode when their updates have beenapplied by running the following command:
# hosted-engine --set-maintenance --mode=none
CHAPTER 5. UPDATING RED HAT HYPERCONVERGED INFRASTRUCTURE
17
CHAPTER 6. REPLACING THE PRIMARY GLUSTER STORAGENODE
IMPORTANT
When self-signed encryption is enabled, replacing a node is a disruptive process thatrequires virtual machines and the Hosted Engine to be shut down.
1. (Optional) If encryption using a Certificate Authority is enabled, follow the steps at the followinglink before continuing: https://access.redhat.com/documentation/en-us/red_hat_gluster_storage/3.2/html/administration_guide/ch22s04.
2. Move the node to be replaced into Maintenance mode
a. In Red Hat Virtualization Manager, click the Hosts tab and select the Red Hat GlusterStorage node in the results list.
b. Click Maintenance to open the Maintenance Host(s) confirmation window.
c. Click OK to move the host to Maintenance mode.
3. Install the replacement nodeFollow the instructions in Deploying Red Hat Hyperconverged Infrastructure to install thephysical machine and configure storage on the new node.
a. Installing host physical machines
b. Configuring Public Key based SSH Authentication
c. Configuring RHGS for Hosted Engine using the Cockpit UI
4. Prepare the replacement node
a. Create a file called replace_node_prep.conf based on the template provided inSection B.2, “Example gdeploy configuration file for preparing to replace a node”.
b. From a node with gdeploy installed (usually the node that hosts the Hosted Engine), rungdeploy using the new configuration file:
# gdeploy -c replace_node_prep.conf
5. (Optional) If encryption with self-signed certificates is enabled
a. Generate the private key and self-signed certificate on the replacement node. See the RedHat Gluster Storage Administration Guide for details:https://access.redhat.com/documentation/en-us/red_hat_gluster_storage/3.2/html/administration_guide/chap-network_encryption#chap-Network_Encryption-Prereqs.
b. On a healthy node, make a backup copy of the /etc/ssl/glusterfs.ca file:
# cp /etc/ssl/glusterfs.ca /etc/ssl/glusterfs.ca.bk
c. Append the new node’s certificate to the content of the /etc/ssl/glusterfs.ca file.
Red Hat Hyperconverged Infrastructure 1.0 Maintaining Red Hat Hyperconverged Infrastructure
18
d. Distribute the /etc/ssl/glusterfs.ca file to all nodes in the cluster, including the new node.
e. Run the following command on the replacement node to enable management encryption:
# touch /var/lib/glusterd/secure-access
f. Include the new server in the value of the auth.ssl-allow volume option by running thefollowing command for each volume.
# gluster volume set <volname> auth.ssl-allow "<old_node1>,<old_node2>,<new_node>"
g. Restart the glusterd service on all nodes
# systemctl restart glusterd
h. Follow the steps in Section 4.1, “Configuring TLS/SSL using self-signed certificates” toremount all gluster processes.
6. Add the replacement node to the clusterRun the following command from any node already in the cluster.
# peer probe <new_node>
7. Move the Hosted Engine into Maintenance mode:
# hosted-engine --set-maintenance --mode=global
8. Stop the ovirt-engine service
# systemctl stop ovirt-engine
9. Update the database
# sudo -u postgres psql\c engine;UPDATE storage_server_connections SET connection ='<replacement_node_IP>:/engine' WHERE connection = ‘<old_server_IP>:/engine';UPDATE storage_server_connections SET connection ='<replacement_node_IP>:/vmstore' WHERE connection = ‘<old_server_IP>:/vmstore';UPDATE storage_server_connections SET connection ='<replacement_node_IP>:/data' WHERE connection = '<old_server_IP>:/data';
10. Start the ovirt-engine service
# systemctl start ovirt-engine
11. Stop all virtual machines except the Hosted Engine.
12. Move all storage domains except the Hosted Engine domain into Maintenance mode
CHAPTER 6. REPLACING THE PRIMARY GLUSTER STORAGE NODE
19
13. Stop the Hosted Engine virtual machineRun the following command on the existing node that hosts the Hosted Engine.
# hosted-engine --vm-shutdown
14. Stop high availability services on all nodes
# systemctl stop ovirt-ha-agent# systemctl stop ovirt-ha-broker
15. Disconnect Hosted Engine storage from the hypervisorRun the following command on the existing node that hosts the Hosted Engine.
# hosted-engine --disconnect-storage
16. Update the Hosted Engine configuration fileEdit the storage parameter in the /etc/ovirt-hosted-engine/hosted-engine.conf fileto use the replacement server.
storage=<replacement_server_IP>:/engine
17. Reboot the existing and replacement nodesWait until both nodes are available before continuing.
18. Take the Hosted Engine out of Maintenance mode
# hosted-engine --set-maintenance --mode=none
19. Verify replacement node is usedOn all virtualization hosts, verify that the engine volume is mounted from the replacement nodeby checking the IP address in the output of the mount command.
20. Activate storage domainsVerify that storage domains mount using the IP address of the replacement node.
21. Remove the old node
a. Using the RHV Management UI, remove the old node.
b. Detach the old host from the cluster.
# gluster peer detach <old_node_IP> force
22. Using the RHV Management UI, add the replacement nodeSpecify that the replacement node be used to host the Hosted Engine.
23. Move the replacement node into Maintenance mode.
# hosted-engine --set-maintenance --mode=global
24. Update the Hosted Engine configuration fileEdit the storage parameter in the /etc/ovirt-hosted-engine/hosted-engine.conf fileto use the replacement node.
Red Hat Hyperconverged Infrastructure 1.0 Maintaining Red Hat Hyperconverged Infrastructure
20
storage=<replacement_node_IP>:/engine
25. Reboot the replacement node.Wait until the node is back online before continuing.
26. Activate the replacement node from the RHV Management UI.Ensure that all volumes are mounted using the IP address of the replacement node.
27. Replace engine volume brickReplace the brick on the old node that belongs to the engine volume with a new brick on thereplacement node.
a. Click the Volumes tab.
b. Click the Bricks sub-tab.
c. Select the brick to replace, and then click Replace brick.
d. Select the node that hosts the brick being replaced.
e. In the Replace brick window, provide the new brick’s path.
28. On the replacement node, run the following command to remove metadata from the previoushost.
# hosted-engine --clean-metadata --host-id=<old_host_id> --force-clean
CHAPTER 6. REPLACING THE PRIMARY GLUSTER STORAGE NODE
21
CHAPTER 7. REPLACING A GLUSTER STORAGE NODEIf a Red Hat Gluster Storage node needs to be replaced, there are two options for the replacement node:
1. Replace the node with a new node that has a different fully-qualified domain name by followingthe instructions in Section 7.1, “Replacing a Gluster Storage Node (Different FQDN)”.
2. Replace the node with a new node that has the same fully-qualified domain name by followingthe instructions in Section 7.2, “Replacing a Gluster Storage Node (Same FQDN)”.
Follow the instructions in whichever section is appropriate for your deployment.
7.1. REPLACING A GLUSTER STORAGE NODE (DIFFERENT FQDN)
IMPORTANT
When self-signed encryption is enabled, replacing a node is a disruptive process thatrequires virtual machines and the Hosted Engine to be shut down.
1. Prepare the replacement nodeFollow the instructions in Deploying Red Hat Hyperconverged Infrastructure to install thephysical machine.
a. Installing host physical machines
b. Configuring Public Key based SSH Authentication
2. Stop any existing geo-replication sessions
# gluster volume geo-replication MASTER_VOL SLAVE_HOST::SLAVE_VOL stop
For further information, see the Red Hat Gluster Storage Administration Guide:https://access.redhat.com/documentation/en-us/red_hat_gluster_storage/3.2/html/administration_guide/sect-starting_geo-replication#Stopping_a_Geo-replication_Session.
3. Move the node to be replaced into Maintenance modePerform the following steps in Red Hat Virtualization Manager:
a. Click the Hosts tab and select the Red Hat Gluster Storage node in the results list.
b. Click Maintenance to open the Maintenance Host(s) confirmation window.
c. Click OK to move the host to Maintenance mode.
4. Prepare the replacement node
a. Configure key-based SSH authenticationConfigure key-based SSH authentication from a physical machine still in the cluster to thereplacement node. For details, see https://access.redhat.com/documentation/en-us/red_hat_hyperconverged_infrastructure/1.0/html/deploying_red_hat_hyperconverged_infrastructure/task-configure-key-based-ssh-auth.
b. Prepare the replacement node
Red Hat Hyperconverged Infrastructure 1.0 Maintaining Red Hat Hyperconverged Infrastructure
22
Create a file called replace_node_prep.conf based on the template provided inSection B.2, “Example gdeploy configuration file for preparing to replace a node”.
From a node with gdeploy installed (usually the node that hosts the Hosted Engine), rungdeploy using the new configuration file:
# gdeploy -c replace_node_prep.conf
5. Create replacement brick directoriesEnsure the new directories are owned by the vdsm user and the kvm group.
# mkdir /gluster_bricks/engine/engine# chmod vdsm:kvm /gluster_bricks/engine/engine# mkdir /gluster_bricks/data/data# chmod vdsm:kvm /gluster_bricks/data/data# mkdir /gluster_bricks/vmstore/vmstore# chmod vdsm:kvm /gluster_bricks/vmstore/vmstore
6. (Optional) If encryption is enabled
a. Generate the private key and self-signed certificate on the new server using the steps in theRed Hat Gluster Storage Administration Guide:https://access.redhat.com/documentation/en-us/red_hat_gluster_storage/3.2/html/administration_guide/chap-network_encryption#chap-Network_Encryption-Prereqs.If encryption using a Certificate Authority is enabled, follow the steps at the following linkbefore continuing: https://access.redhat.com/documentation/en-us/red_hat_gluster_storage/3.2/html/administration_guide/ch22s04.
b. Add the new node’s certificate to existing certificates.
i. On one of the healthy nodes, make a backup copy of the /etc/ssl/glusterfs.ca file.
ii. Add the new node’s certificate to the /etc/ssl/glusterfs.ca file on the healthy node.
iii. Distribute the updated /etc/ssl/glusterfs.ca file to all other nodes, including the newnode.
c. Enable management encryptionRun the following command on the new node to enable management encryption:
# touch /var/lib/glusterd/secure-access
d. Include the new server in the value of the auth.ssl-allow volume option by running thefollowing command for each volume.
# gluster volume set <volname> auth.ssl-allow "<old_node1>,<old_node2>,<new_node>"
e. Restart the glusterd service on all nodes
# systemctl restart glusterd
CHAPTER 7. REPLACING A GLUSTER STORAGE NODE
23
f. If encryption uses self-signed certificates, follow the steps in Section 4.1, “ConfiguringTLS/SSL using self-signed certificates” to remount all gluster processes.
7. Add the new host to the existing cluster
a. Run the following command from one of the healthy cluster members:
# gluster peer probe <new_node>
b. Add the new host to the existing cluster
i. Click the Hosts tab and then click New to open the New Host dialog.
ii. Provide a Name, Address, and Password for the new host.
iii. Uncheck the Automatically configure host firewall checkbox, as firewall rules arealready configured by gdeploy.
iv. In the Hosted Engine tab of the New Host dialog, set the value of Choose hostedengine deployment action to deploy.
v. Click Deploy.
vi. When the host is available, click the Network Interfaces subtab and then click SetupHost Networks.
vii. Drag and drop the network you created for gluster to the IP associated with this host,and click OK.See the Red Hat Virtualization 4.1 Self-Hosted Engine Guide for further details:https://access.redhat.com/documentation/en/red-hat-virtualization/4.1/paged/self-hosted-engine-guide/chapter-7-installing-additional-hosts-to-a-self-hosted-environment.
8. Configure and mount shared storage on the new host
# cp /etc/fstab /etc/fstab.bk# echo "<new_host>:/gluster_shared_storage /var/run/gluster/shared_storage/ glusterfs defaults 0 0" >> /etc/fstab# mount /gluster_shared_storage
9. Replace the old brick with the brick on the new host
a. In Red Hat Virtualization Manager, click the Hosts tab and select the volume.
b. Click the Bricks sub-tab.
c. Click Replace Brick beside the old brick and specify the replacement brick.
d. Verify that brick heal completes successfully.
10. In the Hosts tab, right-click on the old host and click Remove.Use gluster peer status to verify that that the old host no longer appears. If the old host isstill present in the status output, run the following command to forcibly remove it:
# gluster peer detach <old_node> force
Red Hat Hyperconverged Infrastructure 1.0 Maintaining Red Hat Hyperconverged Infrastructure
24
11. Clean old host metadata
# hosted-engine --clean-metadata --host-id=<old_host_id> --force-clean
12. Set up new SSH keys for geo-replication of new brick
# gluster system:: execute gsec_create
13. Recreate geo-replication session and distribute new SSH keys.
# gluster volume geo-replication <MASTER_VOL> <SLAVE_HOST>::<SLAVE_VOL> create push-pem force
14. Start the geo-replication session.
# gluster volume geo-replication <MASTER_VOL> <SLAVE_HOST>::<SLAVE_VOL> start
7.2. REPLACING A GLUSTER STORAGE NODE (SAME FQDN)
IMPORTANT
When self-signed encryption is enabled, replacing a node is a disruptive process thatrequires virtual machines and the Hosted Engine to be shut down.
1. (Optional) If encryption using a Certificate Authority is enabled, follow the steps at the followinglink before continuing: https://access.redhat.com/documentation/en-us/red_hat_gluster_storage/3.2/html/administration_guide/ch22s04.
2. Move the node to be replaced into Maintenance mode
a. In Red Hat Virtualization Manager, click the Hosts tab and select the Red Hat GlusterStorage node in the results list.
b. Click Maintenance to open the Maintenance Host(s) confirmation window.
c. Click OK to move the host to Maintenance mode.
3. Prepare the replacement nodeFollow the instructions in Deploying Red Hat Hyperconverged Infrastructure to install thephysical machine and configure storage on the new node.
a. Installing host physical machines
b. Configuring Public Key based SSH Authentication
c. Configuring RHGS for Hosted Engine using the Cockpit UI
4. Prepare the replacement node
a. Create a file called replace_node_prep.conf based on the template provided inSection B.2, “Example gdeploy configuration file for preparing to replace a node”.
CHAPTER 7. REPLACING A GLUSTER STORAGE NODE
25
b. From a node with gdeploy installed (usually the node that hosts the Hosted Engine), rungdeploy using the new configuration file:
# gdeploy -c replace_node_prep.conf
5. (Optional) If encryption with self-signed certificates is enabled
a. Generate the private key and self-signed certificate on the replacement node. See the RedHat Gluster Storage Administration Guide for details:https://access.redhat.com/documentation/en-us/red_hat_gluster_storage/3.2/html/administration_guide/chap-network_encryption#chap-Network_Encryption-Prereqs.
b. On a healthy node, make a backup copy of the /etc/ssl/glusterfs.ca file:
# cp /etc/ssl/glusterfs.ca /etc/ssl/glusterfs.ca.bk
c. Append the new node’s certificate to the content of the /etc/ssl/glusterfs.ca file.
d. Distribute the /etc/ssl/glusterfs.ca file to all nodes in the cluster, including the new node.
e. Run the following command on the replacement node to enable management encryption:
# touch /var/lib/glusterd/secure-access
6. Replace the host machineFollow the instructions in the Red Hat Gluster Storage Administration Guide to replace the host:https://access.redhat.com/documentation/en-us/red_hat_gluster_storage/3.2/html/administration_guide/sect-replacing_hosts#Replacing_a_Host_Machine_with_the_Same_Hostname.
7. Restart the glusterd service on all nodes
# systemctl restart glusterd
8. Verify that all nodes reconnect
# gluster peer status
9. (Optional) If encryption uses self-signed certificates, follow the steps in Section 4.1, “ConfiguringTLS/SSL using self-signed certificates” to remount all gluster processes.
10. Verify that all nodes reconnect and that brick heal completes successfully
# gluster peer status
11. Refresh fingerprint
a. In Red Hat Virtualization Manager, click the Hosts tab and select the new host.
b. Click Edit Host.
c. Click Advanced on the details screen.
Red Hat Hyperconverged Infrastructure 1.0 Maintaining Red Hat Hyperconverged Infrastructure
26
d. Click Fetch fingerprint.
12. Click Reinstall and provide the root password when prompted.
13. Click the Hosted Engine tab and click Deploy
14. Attach the gluster network to the host
a. Click the Hosts tab and select the host.
b. Click the Network Interfaces subtab and then click Setup Host Networks.
c. Drag and drop the newly created network to the correct interface.
d. Ensure that the Verify connectivity checkbox is checked.
e. Ensure that the Save network configuration checkbox is checked.
f. Click OK to save.
15. Verify the health of the networkClick the Hosts tab and select the host. Click the Networks subtab and check the state of thehost’s network.
If the network interface enters an "Out of sync" state or does not have an IPv4 Address, click theManagement tab that corresponds to the host and click Refresh Capabilities.
CHAPTER 7. REPLACING A GLUSTER STORAGE NODE
27
CHAPTER 8. RESTORING A VOLUME FROM A GEO-REPLICATED BACKUP
1. Install and configure a replacement Hyperconverged Infrastructure deploymentFor instructions, refer to Deploying Red Hat Hyperconverged Infrastructure:https://access.redhat.com/documentation/en-us/red_hat_hyperconverged_infrastructure/1.0/html/deploying_red_hat_hyperconverged_infrastructure/
2. Import the backup of the storage domainFrom the new Hyperconverged Infrastructure deployment, in Red Hat Virtualization Manager:
a. Click the Storage tab.
b. Click Import Domain. The Import Pre-Configured Domain window opens.
c. In the Storage Type field, specify GlusterFS.
d. In the Name field, specify a name for the new volume that will be created from the backupvolume.
e. In the Path field, specify the path to the backup volume.
f. Click OK. The following warning appears, with any active data centers listed below:
This operation might be unrecoverable and destructive!
Storage Domain(s) are already attached to a Data Center.Approving this operation might cause data corruption ifboth Data Centers are active.
g. Check the Approve operation checkbox and click OK.
3. Determine a list of virtual machines to import
a. Determine the imported domain’s identifierThe following command returns the domain identifier.
# curl -v -k -X GET -u "admin@internal:password" -H "Accept: application/xml" https://$ENGINE_FQDN/ovirt-engine/api/storagedomains/
For example:
# curl -v -k -X GET -u "[email protected]:mybadpassword" -H "Accept: application/xml" https://10.70.37.140/ovirt-engine/api/storagedomains/
b. Determine the list of unregistered disks by running the following command:
# curl -v -k -X GET -u "admin@internal:password" -H "Accept: application/xml" "https://$ENGINE_FQDN/ovirt-engine/api/storagedomains/DOMAIN_ID/vms;unregistered"
For example:
Red Hat Hyperconverged Infrastructure 1.0 Maintaining Red Hat Hyperconverged Infrastructure
28
# curl -v -k -X GET -u "[email protected]:mybadpassword" -H "Accept: application/xml" "https://10.70.37.140/ovirt-engine/api/storagedomains/5e1a37cf-933d-424c-8e3d-eb9e40b690a7/vms;unregistered"
4. Perform a partial import of each virtual machine to the storage domain
a. Determine cluster identifierThe following command returns the cluster identifier.
# curl -v -k -X GET -u "admin@internal:password" -H "Accept: application/xml" https://$ENGINE_FQDN/ovirt-engine/api/clusters/
For example:
# curl -v -k -X GET -u "admin@example:mybadpassword" -H "Accept: application/xml" https://10.70.37.140/ovirt-engine/api/clusters/
b. Import the virtual machinesThe following command imports a virtual machine without requiring all disks to be availablein the storage domain.
# curl -v -k -u 'admin@internal:password' -H "Content-type: application/xml" -d '<action> <cluster id="CLUSTER_ID"></cluster> <allow_partial_import>true</allow_partial_import> </action>' "https://ENGINE_FQDN/ovirt-engine/api/storagedomains/DOMAIN_ID/vms/VM_ID/register"
For example:
# curl -v -k -u '[email protected]:mybadpassword' -H "Content-type: application/xml" -d '<action> <cluster id="bf5a9e9e-5b52-4b0d-aeba-4ee4493f1072"></cluster> <allow_partial_import>true</allow_partial_import> </action>' "https://10.70.37.140/ovirt-engine/api/storagedomains/8d21980a-a50b-45e9-9f32-cd8d2424882e/e164f8c6-769a-4cbd-ac2a-ef322c2c5f30/register"
For further information, see the Red Hat Virtualization REST API Guide:https://access.redhat.com/documentation/en-us/red_hat_virtualization/4.1/html/rest_api_guide/.
5. Migrate the partially imported disks to the new storage domainOn the Disks tab, click on the Move Disk option. Move the imported disks from the syncedvolume to the replacement cluster’s storage domain. For further information, see the Red HatVirtualization Administration Guide.
6. Attach the restored disks to the new virtual machinesFollow the instructions in the Red Hat Virtualization Virtual Machine Management Guide toattach the replacement disks to each virtual machine.
CHAPTER 8. RESTORING A VOLUME FROM A GEO-REPLICATED BACKUP
29

PART III. REFERENCE MATERIAL
Red Hat Hyperconverged Infrastructure 1.0 Maintaining Red Hat Hyperconverged Infrastructure
30

APPENDIX A. FENCING POLICIES FOR RED HAT GLUSTERSTORAGE
The following fencing policies are required for Red Hat Hyperconverged Infrastructure (RHHI)deployments. They ensure that hosts are not shut down in situations where brick processes are stillrunning, or when shutting down the host would remove the cluster’s ability to reach a quorum.
These policies can be set in the New Cluster or Edit Cluster window in Red Hat Virtualization Managerwhen Red Hat Gluster Storage functionality is enabled.
Skip fencing if gluster bricks are up
Fencing is skipped if bricks are running and can be reached from other peers.
Skip fencing if gluster quorum not met
Fencing is skipped if bricks are running and shutting down the host will cause loss of quorum
These policies are checked after all other fencing policies when determining whether a node is fenced.
Additional fencing policies may be useful for your deployment. For further details about fencing, see theRed Hat Virtualization Technical Reference: https://access.redhat.com/documentation/en-us/red_hat_virtualization/4.1/html/technical_reference/fencing.
APPENDIX A. FENCING POLICIES FOR RED HAT GLUSTER STORAGE
31
APPENDIX B. EXAMPLE GDEPLOY CONFIGURATION FILES
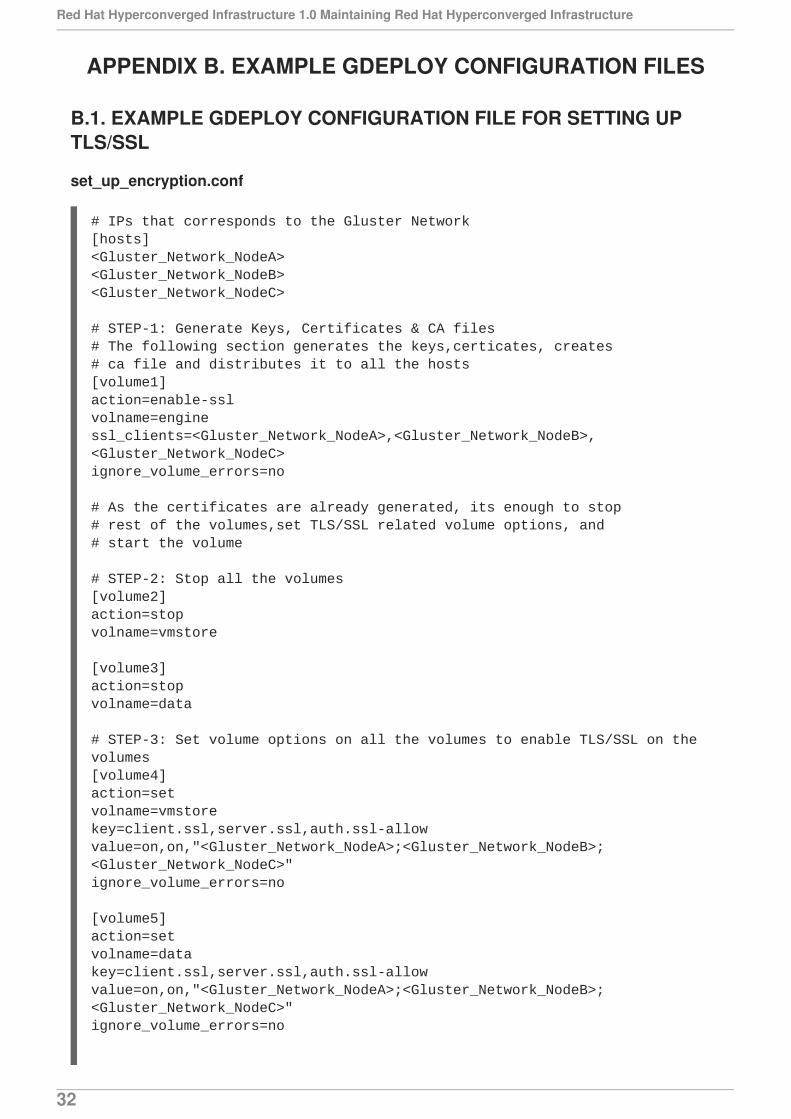
B.1. EXAMPLE GDEPLOY CONFIGURATION FILE FOR SETTING UPTLS/SSL
set_up_encryption.conf
# IPs that corresponds to the Gluster Network[hosts]<Gluster_Network_NodeA><Gluster_Network_NodeB><Gluster_Network_NodeC>
# STEP-1: Generate Keys, Certificates & CA files# The following section generates the keys,certicates, creates# ca file and distributes it to all the hosts[volume1]action=enable-sslvolname=enginessl_clients=<Gluster_Network_NodeA>,<Gluster_Network_NodeB>,<Gluster_Network_NodeC>ignore_volume_errors=no
# As the certificates are already generated, its enough to stop# rest of the volumes,set TLS/SSL related volume options, and# start the volume
# STEP-2: Stop all the volumes[volume2]action=stopvolname=vmstore
[volume3]action=stopvolname=data
# STEP-3: Set volume options on all the volumes to enable TLS/SSL on the volumes[volume4]action=setvolname=vmstorekey=client.ssl,server.ssl,auth.ssl-allowvalue=on,on,"<Gluster_Network_NodeA>;<Gluster_Network_NodeB>;<Gluster_Network_NodeC>"ignore_volume_errors=no
[volume5]action=setvolname=datakey=client.ssl,server.ssl,auth.ssl-allowvalue=on,on,"<Gluster_Network_NodeA>;<Gluster_Network_NodeB>;<Gluster_Network_NodeC>"ignore_volume_errors=no
Red Hat Hyperconverged Infrastructure 1.0 Maintaining Red Hat Hyperconverged Infrastructure
32
# STEP-4: Start all the volumes[volume6]action=startvolname=vmstore
[volume7]action=startvolname=data
B.2. EXAMPLE GDEPLOY CONFIGURATION FILE FOR PREPARING TOREPLACE A NODE
IMPORTANT
If the disks must be replaced as well as the node, ensure that the [pv], [vg], and [lv]sections are not commented out of this file.
For details about how to safely replace a node, see Chapter 7, Replacing a Gluster Storage Node.
replace_node_prep.conf
# EDITME: @1: Change to IP addresses of the network intended for gluster traffic# Values provided here are used to probe the gluster hosts.[hosts]10.70.X1.Y1
#EDITME : @2: Change to IP addresses of the network intended for gluster traffic#of the node which is going to be replaced.[script1]action=executeignore_script_errors=nofile=/usr/share/ansible/gdeploy/scripts/grafton-sanity-check.sh -d sdc -h 10.70.X1.Y1
# EDITME: @3: Specify the number of data disks in RAID configuration[disktype]raid6
[diskcount]4
[stripesize]256
# EDITME : @4: UNCOMMENT SECTION (RHEL ONLY) :Provide the subscription details# Register to RHSM only on the node which needs to be replaced#[RH-subscription1:10.70.X1.Y1]#action=register#username=<username>#password=<passwd>#pool=<pool-id>
APPENDIX B. EXAMPLE GDEPLOY CONFIGURATION FILES
33
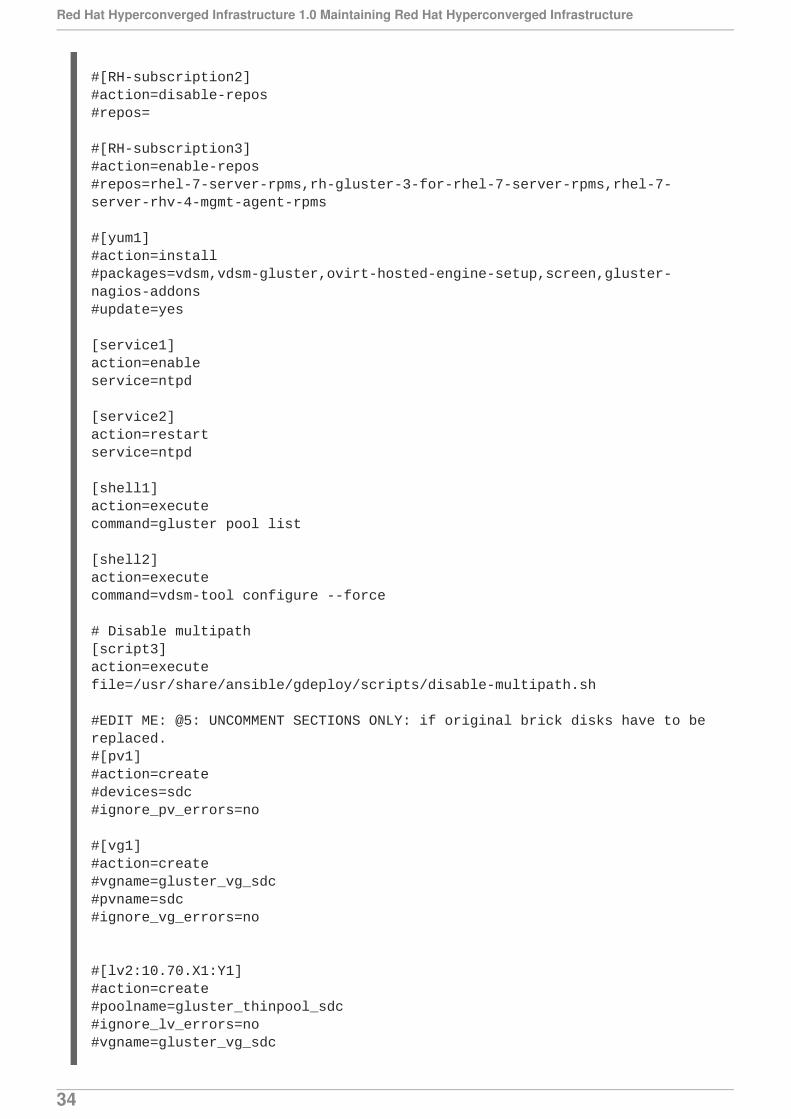
#[RH-subscription2]#action=disable-repos#repos=
#[RH-subscription3]#action=enable-repos#repos=rhel-7-server-rpms,rh-gluster-3-for-rhel-7-server-rpms,rhel-7-server-rhv-4-mgmt-agent-rpms
#[yum1]#action=install#packages=vdsm,vdsm-gluster,ovirt-hosted-engine-setup,screen,gluster-nagios-addons#update=yes
[service1]action=enableservice=ntpd
[service2]action=restartservice=ntpd
[shell1]action=executecommand=gluster pool list
[shell2]action=executecommand=vdsm-tool configure --force
# Disable multipath[script3]action=executefile=/usr/share/ansible/gdeploy/scripts/disable-multipath.sh
#EDIT ME: @5: UNCOMMENT SECTIONS ONLY: if original brick disks have to be replaced.#[pv1]#action=create#devices=sdc#ignore_pv_errors=no
#[vg1]#action=create#vgname=gluster_vg_sdc#pvname=sdc#ignore_vg_errors=no
#[lv2:10.70.X1:Y1]#action=create#poolname=gluster_thinpool_sdc#ignore_lv_errors=no#vgname=gluster_vg_sdc
Red Hat Hyperconverged Infrastructure 1.0 Maintaining Red Hat Hyperconverged Infrastructure
34
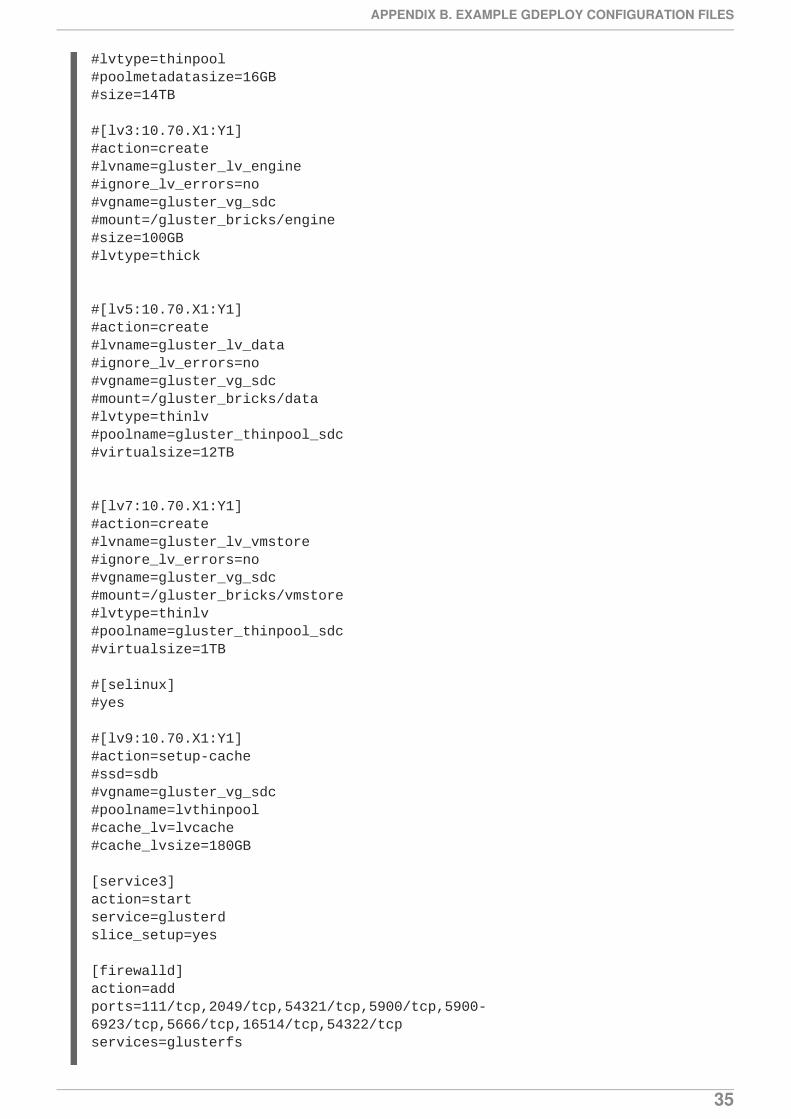
#lvtype=thinpool#poolmetadatasize=16GB#size=14TB
#[lv3:10.70.X1:Y1]#action=create#lvname=gluster_lv_engine#ignore_lv_errors=no#vgname=gluster_vg_sdc#mount=/gluster_bricks/engine#size=100GB#lvtype=thick
#[lv5:10.70.X1:Y1]#action=create#lvname=gluster_lv_data#ignore_lv_errors=no#vgname=gluster_vg_sdc#mount=/gluster_bricks/data#lvtype=thinlv#poolname=gluster_thinpool_sdc#virtualsize=12TB
#[lv7:10.70.X1:Y1]#action=create#lvname=gluster_lv_vmstore#ignore_lv_errors=no#vgname=gluster_vg_sdc#mount=/gluster_bricks/vmstore#lvtype=thinlv#poolname=gluster_thinpool_sdc#virtualsize=1TB
#[selinux]#yes
#[lv9:10.70.X1:Y1]#action=setup-cache#ssd=sdb#vgname=gluster_vg_sdc#poolname=lvthinpool#cache_lv=lvcache#cache_lvsize=180GB
[service3]action=startservice=glusterdslice_setup=yes
[firewalld]action=addports=111/tcp,2049/tcp,54321/tcp,5900/tcp,5900-6923/tcp,5666/tcp,16514/tcp,54322/tcpservices=glusterfs
APPENDIX B. EXAMPLE GDEPLOY CONFIGURATION FILES
35

[script2]action=executefile=/usr/share/ansible/gdeploy/scripts/disable-gluster-hooks.sh
B.3. EXAMPLE GDEPLOY CONFIGURATION FILE FOR SCALING TOADDITIONAL NODES
add_nodes.conf
# Add the hosts to be added[hosts]<Gluster_Network_NodeD><Gluster_Network_NodeE><Gluster_Network_NodeF>
# If using RHEL 7 as platform, enable required repos# RHVH has all the packages available#[RH-subscription]#ignore_register_errors=no#ignore_attach_pool_errors=no#ignore_enable_errors=no#action=register#username=<username>#password=<mypassword>#pool=<pool-id>#repos=rhel-7-server-rpms,rh-gluster-3-for-rhel-7-server-rpms,rhel-7-server-rhv-4-mgmt-agent-rpms#disable-repos=yes
# If using RHEL 7 as platform, have the following section to install packages[yum1]action=installpackages=vdsm-gluster,ovirt-hosted-engine-setup,screenupdate=yesgpgcheck=yesignore_yum_errors=no
# enable NTP[service1]action=enableservice=ntpd
# start NTP service[service2]action=restartservice=ntpd
# Setup glusterfs slice[service3]action=restartservice=glusterdslice_setup=yes
Red Hat Hyperconverged Infrastructure 1.0 Maintaining Red Hat Hyperconverged Infrastructure
36
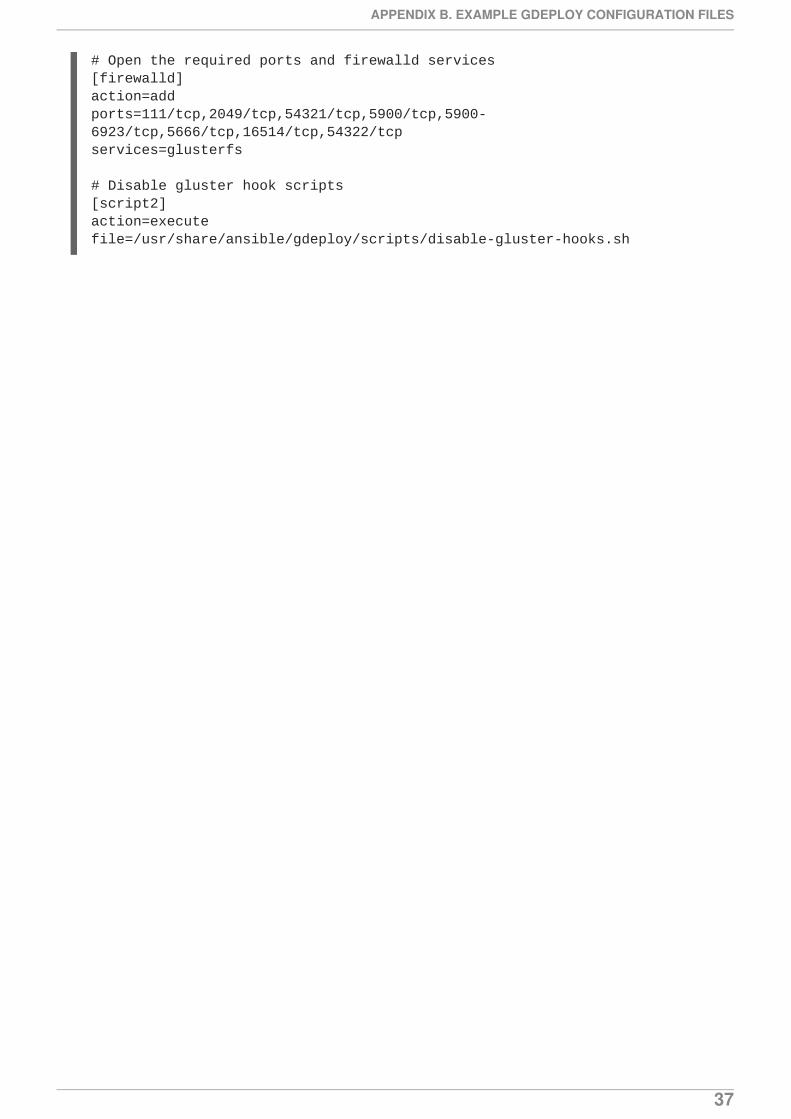
# Open the required ports and firewalld services[firewalld]action=addports=111/tcp,2049/tcp,54321/tcp,5900/tcp,5900-6923/tcp,5666/tcp,16514/tcp,54322/tcpservices=glusterfs
# Disable gluster hook scripts[script2]action=executefile=/usr/share/ansible/gdeploy/scripts/disable-gluster-hooks.sh
APPENDIX B. EXAMPLE GDEPLOY CONFIGURATION FILES
37