reference guide october 2008 net waste tool tool manual.pdf · reference guide october 2008 net...
TRANSCRIPT

Reference guide October 2008
Net Waste Tool User Guide, Version 1.1
Written by: Cyril Sweett

Published by: The Waste & Resources Action Programme The Old Academy, 21 Horse Fair, Banbury, Oxon OX16 0AH Tel: 01295 819900 Fax: 01295 819911 www.wrap.org.uk WRAP Business Helpline: Freephone: 0808 100 2040 October 2008 ISBN: X-XXXXX-XXX-X
WRAP, Cyril Sweett and Solstice Associates believe the content of this guide and the associated tool to be correct as at the date of writing. However, factors such as prices, wastage rates and levels of recycled content are subject to change and users of the Tool should check with their suppliers to confirm the current situation.
The guide and Tool do not claim to be exhaustive, nor do they claim to cover all relevant products and specifications available on the market. While steps have been taken to ensure accuracy, WRAP cannot accept responsibility or be held liable to any person for any loss or damage arising out of or in connection with this information being inaccurate, incomplete or misleading. It is the responsibility of the potential user of a material or product to consult with the supplier or manufacturer and ascertain whether a particular product will satisfy their specific requirements.
The listing or featuring of a particular product or company does not constitute an endorsement by WRAP and WRAP cannot guarantee the performance of individual products or materials. For more detail, please refer to WRAP’s Terms & Conditions on its web site: www.wrap.org.uk.

Net Waste Tool – User Guide, Version 1.0
Contents Subject Page Glossary 1 1.0 Introduction.....................................................................................................................4
1.1 Using the NW Tool......................................................................................................6 1.2 New user journey .......................................................................................................6 1.3 Component data review ..............................................................................................8
2.0 Quick Start Guide.............................................................................................................9 2.1 Key steps in using the NW Tool ...................................................................................9 2.2 Create an account ....................................................................................................11 2.3 My Projects ..............................................................................................................12 2.4 Enter basic project details .........................................................................................13 2.5 Use the Project Homepage ........................................................................................15 2.6 Enter project specifications........................................................................................16 2.7 Waste analysis .........................................................................................................17 2.8 Recycled content analysis..........................................................................................18 2.9 Review project summary / upload actuals data............................................................19 2.10 Download reports .....................................................................................................20 2.11 Navigating the Tool ..................................................................................................21 2.12 Help ........................................................................................................................21 2.13 Users of the Recycled Content Toolkit or NW Tool v1.0................................................21
3.0 Why use the Net Waste Tool?........................................................................................23 3.1 Implementing good practice ......................................................................................24
4.0 Data structure................................................................................................................26 4.2 Source of data on recycled content and costs of construction components.....................27 4.3 How the Tool allows for ‘unaccounted’ materials .........................................................28 4.4 Information required to use the Tool..........................................................................28 4.5 Data security............................................................................................................29 4.6 Types of Tool user....................................................................................................29
5.0 Getting started ..............................................................................................................31 5.1 Welcome page .........................................................................................................31 5.2 Registration and logging in........................................................................................32 5.3 My Projects ..............................................................................................................34
6.0 Setting up a project and using the Project Homepage .................................................35 6.1 Creating a project.....................................................................................................35 6.2 Entering project details .............................................................................................36 6.3 Using the Project Homepage .....................................................................................41
7.0 Analysing your project...................................................................................................43 7.1 Adding components ..................................................................................................43 7.2 Setting waste reduction actions .................................................................................47 7.3 Setting waste segregation options..............................................................................49 7.4 Setting waste recovery options ..................................................................................50 7.5 Setting Recycled Content Quick Wins .........................................................................52 7.6 Adding demolition and other non-construction wastes .................................................53 7.7 Setting requirements and targets ...............................................................................54
8.0 Managing your project ..................................................................................................56 8.1 Reviewing the project timeline...................................................................................56 8.2 Adding and managing guest users .............................................................................57 8.3 Reviewing the project audit history ............................................................................58 8.4 Generating reports ...................................................................................................58 8.5 Viewing selected components ....................................................................................60 8.6 Uploading information on actual waste arisings ...........................................................61
Net Waste Tool – User Guide, Version 1.0
8.7 Viewing project summary results ...............................................................................61 9.0 Compiling schemes........................................................................................................64
9.1 Creating a new scheme.............................................................................................64 9.2 Entering scheme details ............................................................................................64 9.3 Adding or removing construction projects ...................................................................65 9.4 Generating scheme reports .......................................................................................67
10.0 Reporting performance .................................................................................................68 10.1 Net Waste Project reports .........................................................................................68 10.2 Recycled Content Project reports ...............................................................................68 10.3 Scheme reports ........................................................................................................69 10.4 Corporate reporting ..................................................................................................69
11.0 Troubleshooting.............................................................................................................70 Appendix A: Waste calculations...................................................................................................71
Wasted materials .................................................................................................................71 Segregation and cost of waste disposal ..................................................................................72 Waste to landfill and recovery ...............................................................................................74 Carbon benefit .....................................................................................................................74
Appendix B: Recycled content analysis .......................................................................................75 Appendix C: What is Net Waste? .................................................................................................76 Appendix D: The importance of materials resource efficiency ....................................................78 Appendix E: Formulae for estimating project quantities.............................................................79
Description of Project Details fields ........................................................................................79 Tool formulae for default quantity calculations ........................................................................81

1 Net Waste Tool – User Guide, Version 1.0
Glossary
Term Description
Component A single material or product delivered to site, e.g. a brick. (This includes preassembled composite products such as windows.)
Element A major part of a construction project, e.g. a wall. Construction cost
The construction cost of the project, including labour but excluding, demolition, design/consultant fees and preliminaries. Specialist fitout items (e.g. for healthcare or retail applications) should also be excluded.
Project A construction type made up of a number of elements, e.g. a house. Scheme A collection of different projects. Corporate reporting
Multiple schemes and projects for which data are aggregated for corporate reporting.
Recycled content
At product level, recycled content is the proportion, by mass, of recycled material in a product or packaging (as defined by ISO 14021) At project level, recycled content is calculated as a proportion of the total value of materials used, by summing the total cost of each material multiplied by its % recycled content by mass.
Reused content The value of reused and reclaimed materials used in construction, quantified as 100% of the purchase cost of the equivalent newly manufactured product which is substituted.
RC Abbreviation for reused and recycled content (i.e. all use of recovered material as an input to new construction).
Project Homepage
Each project has a ‘homepage’ screen from where all analysis and project administration functions can be accessed. After the user has created a new project and entered basic details, they will arrive at the project homepage.
Material value Is the cost of a product to a purchaser at the point of purchase from a producer or supplier (generally defined as the price delivered to the site gate). Value added that occurs pre-purchase is included, but post-purchase value added (such as cost of assembly on site) is excluded.
Standard practice Recycled Content
Is the likely minimum level of recycled content in a given specification if no request is made for recycled content.
Good practice Recycled Content
A higher level of recycled content which is better than that for standard products but is still readily available in the marketplace at no extra cost.
Best practice Recycled Content
Is defined as the highest recycled content currently available in products on the UK market.
Proforma A proforma allows project data to be captured from a number of sources and written down prior to inputting data into the Tool.
Guest project Project(s) that users have been invited to view (as ‘guests’) by the project ‘owner’.
Module names Each named module, housing, residential, retail et al, has distinct creation details and therefore the correct module needs to be selected when specifying projects for particular construction applications.

2 Net Waste Tool – User Guide, Version 1.0
Unallocated material value
The Tool subtracts the total construction value represented by the items specified in the Tool from the estimated total construction cost of the project (which is entered separately by the user). This difference, i.e. the unaccounted construction cost, is assumed to be approximately 50% labour cost and 50% material cost. The 50% material cost for the unaccounted components (i.e. the ‘unaccounted material value’) is then added to the total material value of the quantified components. The overall project result for RC is then calculated as the value of recycled content in quantified components, divided by the total materials value (quantified plus unaccounted). This means that the Tool gives a more accurate yet conservative representation of the total recycled content by value of a construction project, even if all the components in the project have not been specified.
Baseline wastage rate
The percentage amount of a component (i.e. single material or product) that is likely to be wasted based on available data for current procurement and construction practice.
Good practice wastage rate
The percentage amount of a component (i.e. single material or product) that is likely to be wasted based on procurement and construction practice consistent with implementing “good practice” within a Site Waste Management Plan. The Tool also calculates overall baseline and good practice performance on waste, where:
baseline performance assumes baseline wastage rates and all waste being deposited in a mixed waste skip (from which materials are recovered at baseline recovery rates); and
good performance assumes good practice wastage rates for all components with all waste disposal being managed using the optimum level of segregation and recovery via segregated skips.
Net Waste The difference between the value of materials wasted and the value of recovered materials used in construction (see Appendix C).
Material type The material making up a component. Some components are made entirely from one material while for others several materials are assigned to a component (on a percentage by mass basis). The materials that a component contains influence the waste stream to which the component will be allocated. Those components that contain several different materials which are not separable are assigned to the mixed waste stream irrespective of the materials that they contain.
Waste stream A group of materials that can be segregated and managed in a consistent manner (for example inert wastes, or plasterboard wastes). The NW Tool contains seven defined waste streams together with ‘Miscellaneous’ and ‘User defined’ streams. Each component is allocated to a default waste stream based on its constituent materials. It is possible to reallocate any component if required.
Take back Where a product is returned to the manufacturer to be reused or reprocessed into new products. A common example is plasterboard off-cuts, although other products such as concrete blocks can also be returned to their manufacturers. Where appropriate a default cost is ascribed to sending a waste back to its manufacturer, this default can be amended or removed as appropriate.
Recovery rate The percentage of a material that is ‘recovered’ in some form (i.e. is not sent to landfill). Recovery rates will vary with the Waste Destination (see below) and the practices of the specific waste management contractor involved. Default recovery rates are attached to individual material types, these are used to create a weighted average recovery rate for the Waste Streams in which they are present. It is possible to edit the default recovery rates for individual materials and then
3 Net Waste Tool – User Guide, Version 1.0
recalculate the average recovery rate for the waste stream.
Retained on site Some genuine wastes do not get collected in waste containers because they are typically retained on site (e.g. waste in-situ concrete poured into foundations would typically remain in the foundation trench). Retained materials are still considered wastes (and therefore contribute to the value of wasted materials and mass of waste) but are not included in the mass / volume of materials to be sent for disposal (and are therefore excluded from waste to landfill calculations. Wastes that are simply retained on site are serving no useful project purpose and should not be confused with materials those that are reused onsite (i.e. where they serve a useful purpose replacing materials that would otherwise need to be brought onto site). Purposeful reuse (e.g. of half-bricks) can be modelled in the Tool as a lower wastage rate.
MMC components
Where a component could be included within an assembly that is manufactured offsite (using Modern Methods of Construction) then a check box is provided that enables the user to identify the component as being part of an MMC product. MMC components have much lower onsite wastage rates (reflecting increased amount of the construction process that takes place before reaching site).
Waste containers
Waste containers are the receptacles in which the materials forming different waste streams are held. Waste containers include a range of different sized skips together with bags and a ‘user defined’ container option. A default disposal cost is provided for each container type; these defaults can be overwritten with actual waste contractor information if this is available.
Waste destinations
Five waste destination options are available, including: o Takeback / reuse on site – where the waste stream will be sent
back to the original product manufacturer for recycling, or will be reused (usefully) onsite
o Recycling centre – where a specific waste stream will be sent to a recycling centre that is dedicated to managing a certain type of material (e.g. glass or plastic, etc),. This destination is not the same as a Materials Recovery Facility (MRF, see below) which is a facility for separating wastes into useful groupings.
o Landfill – licensed landfill where waste is subject to Landfill Tax o License exempt site – this is a waste destination that is able to
receive certain materials (e.g. inerts) without the need for a waste management license.
o Transfer station / MRF – where wastes are taken to a location where they are separated and redistributed to appropriate facilities. The Tool includes default recovery rates for a Standard Practice transfer station but these can be overwritten if the specific waste contractor can demonstrate better performance.
4 Net Waste Tool – User Guide, Version 1.0
1.0 Introduction
WRAP’s Net Waste Tool (the ‘Tool’ or ‘NW Tool’) is a freely accessible online resource, available at www.wrap.org.uk/nwtool. It will help you to:
generate waste forecasts and prioritise waste reduction and recovery actions to input to your Site Waste Management Plan – inputs which are required by the new SWMP Regulation in England from April 2008;
apply value engineering at the design stage to reduce the costs of wastage (value of wasted and unused materials, cost of waste recovery and disposal);
optimise your strategy for on-site segregation of wastes for minimum cost within a known space constraint;
target the top cost-competitive opportunities to adopt more reused materials and higher recycled content in building products, e.g. in response to a client requirement; and
evaluate performance against corporate targets, such as a reduction in construction waste to landfill (in line with Government policy objectives) and progress towards waste neutrality or zero Net Waste.
Figure 1.1 provides a schematic overview of the inputs and outputs of the Net Waste Tool when assessing an individual Project. The results derived for individual Projects can then be grouped together into Schemes or higher level Corporate Reports.

5 Net Waste Tool – User Guide, Version 1.0
Figure 1.1 Overview of the inputs and outputs of the Net Waste Tool The Tool has separate assessment modules for new build projects (including housing, retail, office, education, healthcare and bespoke projects), refurbishments and infrastructure projects. The Tool’s database of components is tailored to the sorts of specifications typically seen in these projects. Although the main focus of the Tool is on the construction process, the Tool can also estimate the likely quantity and composition of materials generated from demolition of different simple structures and can identify opportunities for reuse of these materials in
Forecast report (design stage)
Project setup
Analysis
Actuals report (construction stage)
Outputs o Value or mass of materials wasted o Cost of waste disposal o Volume or mass of waste to landfill o % recovery and recycling o Carbon impact of waste reduction and
recovery measures o Waste reduction and recovery action plan o Mass and value of recovered and recycled
materials used o Priority opportunities to increase recycled
content o Record of actions to utilise more recycled
content
Input o Actual waste arisings and destinations o Actual use of recovered materials and
products with higher recycled content
Input o Project details o Construction programme
phasing o Quantities and specification
of materials
Register / login
6 Net Waste Tool – User Guide, Version 1.0
components forming part of the new project. There are plans to further develop the demolition, excavation and other non-construction waste capabilities of the Tool in the future. 1.1 Using the NW Tool The NW Tool replaced the Recycled Content Toolkit in April 2008. An improved version of the NW Tool (1.1) was released in October 2008. The NW Tool has been designed as a series of simple web pages that enable the user to enter information on their project and the materials they are intending to use and then to carry out analysis on both waste management and recycled content. The Tool uses a dataset containing both recycled content data and waste data, therefore it is only necessary to enter project information once to conduct both analyses. The Tool contains data on the dimensions, recycled content, wastage rates and density (t/m3) of several thousand generic construction components. Once the user has entered information about their project, the Tool uses this information to estimate levels of wastage based on either value or mass of wasted material component. The Tool then allows the user to identify specific actions to reduce the levels of waste generated, sorting this information by either mass of waste or value of wasted materials. Appendix A contains further information on the way the NW Tool calculates waste information. Having effectively targeted the key sources of construction waste, the Tool then helps in the development of a suitable waste segregation strategy. Using information on the cost of disposing of different waste streams, the Tool identifies those waste streams that will offer the greatest reduction in disposal cost if separated out from the mixed waste stream. All of this information is presented on a monthly basis so the user can plan which waste containers to maintain on site at different times over the construction period. The last step in the waste analysis is to determine the destination of each of the waste streams segregated onsite or separated at the waste contractor’s Materials Recovery Facility (MRF). By determining the likely destination of each waste and, if known, the actual performance of the waste contractor in recovering materials from the waste stream, the Tool estimates the likely amount of waste going to landfill and that which will be recovered. The Tool uses the same core data to identify opportunities to increase the use of reused and recycled materials by using good practice products. Opportunities to increase recycled content by moving to ‘good’ practice products are called Quick Wins and should in most circumstances be deliverable at no additional cost and without impacting design or performance. Appendix B contains further information on the way the NW Tool considers recycled content. 1.2 New user journey Version 1.1 of the Tool was released in October 2008. This version has the same functionality as version 1.0, however the interface and user journey has been improved. The first version of the Tool (released April 2008) utilised a ‘wizard’ approach where users were guided through 8 steps, receiving summary results at Step 8, as shown in figure 1.2.

7 Net Waste Tool – User Guide, Version 1.0
Figure 1.2 ‘Wizard’ user journey
Version 1.1 utilises a ‘hub and spoke’ approach. Once you have set up a new project and entered basic project details you will arrive at the Project Homepage, from which all other screens are accessed. There are no separate ‘waste’ and ‘recycled content’ modules in the new Tool. The Project Homepage also provides some simple results graphs so users can see the results evolving as they move through the analysis. Figure 1.3 ‘Hub & Spoke’ user journey

8 Net Waste Tool – User Guide, Version 1.0
1.3 Component data review As part of the upgrade to version 1.1 (released October 2008) the Tool’s component data were subject to the following elements of review: Component descriptions Descriptions were reviewed to ensure all descriptions are
legible. Some simplifications have been made. The new descriptions will appear for both new projects and projects created in previous versions of the Tool.
Wastage rates Wastage rates were reviewed to check some queries raised by users of version 1.0. Some wastage rates have been amended however the new data will only apply to new projects.
Concrete components Recycled content rates were reviewed to ensure these are up-to-date. As a result the recycled content rates for most concrete components have been updated. Of particular note is the reduced ‘best practice’ rates, which reflect the levels of aggregate currently available in ready mix concrete across the UK.
Services components Previously, services components were based on a complete system e.g. ‘heating system generic’. Separate components have now been created for distribution (pipes, cables and containment). Waste is primarily associated with distribution (e.g. off-cuts) rather than with equipment (radiators, boilers, etc). The Tool now provides an estimate of the cost of waste associated with services installation.
Existing projects will draw on the dataset in which they were created and only new projects will draw from the new recycled content data. To update an existing project to make use of the more current dataset simply save it as a new project using the ‘Use as template’ function (see Section 2.13).

9 Net Waste Tool – User Guide, Version 1.0
2.0 Quick Start Guide
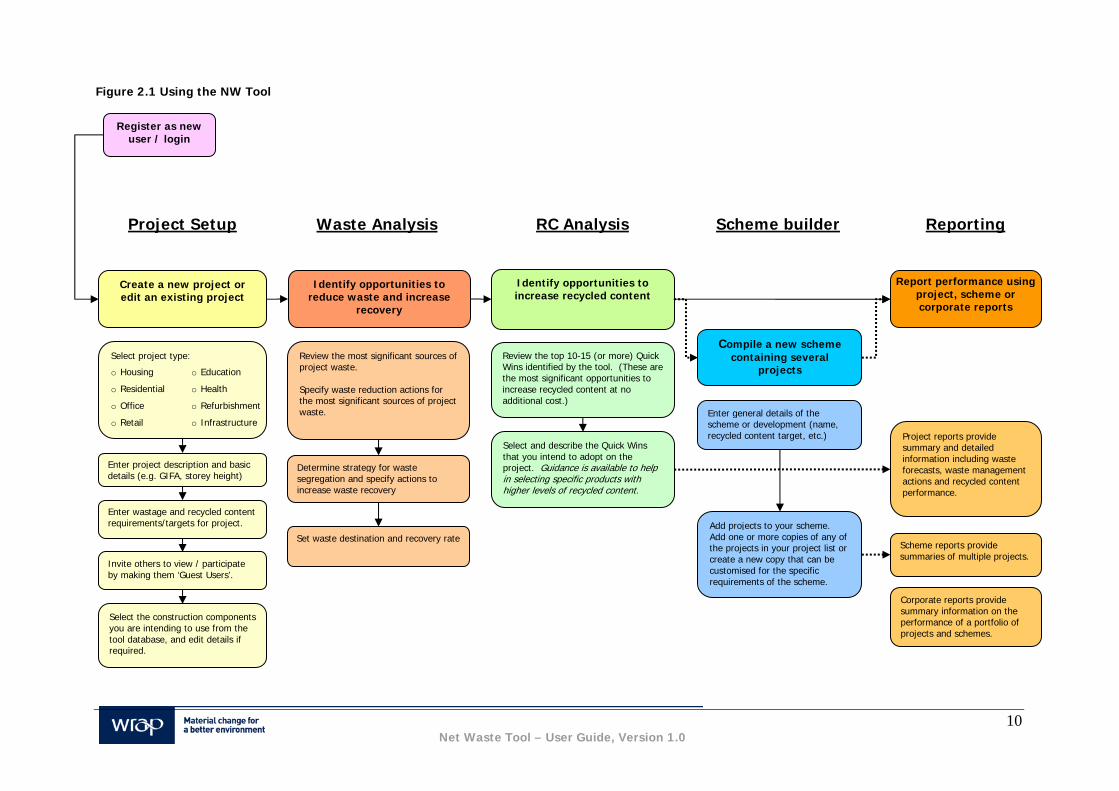
2.1 Key steps in using the NW Tool Figure 2.1 illustrates the key steps involved in using the Tool. This is followed by a step-by-step guide that explains how to rapidly register, use and generate reports using the Net Waste Tool (NW Tool).
10 Net Waste Tool – User Guide, Version 1.0
Figure 2.1 Using the NW Tool
Select project type:
o Housing o Education
o Residential o Health
o Office o Refurbishment
o Retail o Infrastructure
Register as new user / login
Report performance using project, scheme or corporate reports
Identify opportunities to increase recycled content
Review the top 10-15 (or more) Quick Wins identified by the tool. (These are the most significant opportunities to increase recycled content at no additional cost.)
Select and describe the Quick Wins that you intend to adopt on the project. Guidance is available to help in selecting specific products with higher levels of recycled content.
Compile a new scheme containing several
projects
Enter general details of the scheme or development (name, recycled content target, etc.)
Add projects to your scheme. Add one or more copies of any of the projects in your project list or create a new copy that can be customised for the specific requirements of the scheme.
Project reports provide summary and detailed information including waste forecasts, waste management actions and recycled content performance.
Scheme reports provide summaries of multiple projects.
Enter project description and basic details (e.g. GIFA, storey height)
Enter wastage and recycled content requirements/targets for project.
Invite others to view / participate by making them ‘Guest Users’.
Select the construction components you are intending to use from the tool database, and edit details if required.
Corporate reports provide summary information on the performance of a portfolio of projects and schemes.
Create a new project or edit an existing project
Identify opportunities to reduce waste and increase
recovery
Review the most significant sources of project waste. Specify waste reduction actions for the most significant sources of project waste.
Determine strategy for waste segregation and specify actions to increase waste recovery
Set waste destination and recovery rate
Project Setup Waste Analysis RC Analysis Scheme builder Reporting

11 Net Waste Tool – User Guide, Version 1.0
2.2 Create an account Before you can use the NW Tool, you need to register and create a new account. This is simple and takes two minutes. Complete the basic form and you will receive an auto-generated email welcoming you to the Tool. If your organisation uses the NW Tool routinely on its projects you may which to nominate a ‘Corporate Guest User’ when registering; this individual will have access to all the projects created.

12 Net Waste Tool – User Guide, Version 1.0
2.3 My Projects After login, you will arrive at your My Projects page. From here you can:
o create a new project (beginning with either Waste or Recycled Content); or o view any of your existing projects (including example projects provided by WRAP).
You can sort the list of projects shown on screen by project type, project name, date created or date modified. Click on the project name to enter an existing project. Click on ‘Add new project’ (top-left menu) to set up a new project.

13 Net Waste Tool – User Guide, Version 1.0
2.4 Enter basic project details Once you have selected to add a new project, the Tool will take you to the ‘Add new project’ screen. Here you can create a new project either by selecting the project type (e.g. housing or infrastructure), or by using an existing project as a template and giving it a new name.
Once you have asked the Tool to set up a new project, the Tool will ask you to enter general project details (e.g. name, location, construction cost, etc), a construction timeline and general quantities (e.g. floor area, number of windows, etc).

14 Net Waste Tool – User Guide, Version 1.0
Click ‘save and continue’ and the Tool will take you to the project homepage. From here you can conduct both waste and recycled content analyses, view results, or make administration changes to your project.

15 Net Waste Tool – User Guide, Version 1.0
2.5 Use the Project Homepage Each project has its own ‘homepage’, from which you can access any of the Tool’s functions. The page displays summary charts showing how your project is performing. The results will update as you move through the waste and recycled content analyses. From the homepage you can access the waste and recycled content analysis screens, edit project details and other administration tasks, and generate reports.
To begin analysis, you first need to enter your project’s specification. Click on the ‘Add Components’ icon located in the Analyse Project area of the screen.

16 Net Waste Tool – User Guide, Version 1.0
2.6 Enter project specifications The Tool allows you to specify individual components (e.g. Xm2 of brickwork). If your desired component is not on the list, you can select to ‘Add my own components’, or you can select to ‘view/edit’ a similar component and change the component description and other details (dimensions, density, etc).

17 Net Waste Tool – User Guide, Version 1.0
2.7 Waste analysis Once you have entered your specification, return to the project homepage. If you want to do a waste analysis for your project, you will need to move through the following screens (all accessible within the Analyse Project area of the Project Homepage):
1. Set waste reduction actions (review the key sources of waste and specify waste reduction actions) 2. Set waste segregation options (select a suitable segregation strategy by reviewing the likely cost of
waste disposal in each month of the project (and overall) if between one and six waste streams are segregated onsite. You can also identify any products that you are intending to send back to the original manufacturer.
3. Set waste recovery options (determine suitable onsite waste recovery actions and determine the likely destination of different waste streams on leaving the construction site).
Each of the above three stages provides step by step instructions on the screen.

18 Net Waste Tool – User Guide, Version 1.0
2.8 Recycled content analysis This part of the NW Tool will identify the top 5, 10, 15 or 20 ‘Quick Win’ opportunities to increase the overall recycled content of the project. From the project homepage, choose ‘Set Recycled Content Quick Wins’ located in the Analyse Project area of the screen. Review the potential Quick Wins, then select those that are deliverable on the project. Finally, provide a qualifying statement and then ultimately confirm their use on the project.
Now return to the project homepage.

19 Net Waste Tool – User Guide, Version 1.0
2.9 Review project summary / upload actuals data You can review a summary of your project’s performance, including the value of wasted materials, cost of waste disposal, mass and volume of waste going to landfill and use of recycled content. In addition you can review key performance indicators for the project. The Project Summary is accessed via the ‘View Detailed Performance’ link at the bottom left of the Project Homepage. The summary results screen shows forecasts of construction waste and waste to landfill, taking into account the steps taken to reduce the quantities generated and minimise the amount sent to landfill.
Once the project is onsite, information on actual waste arisings can be uploaded to the Tool for comparison with the forecast information. The upload function is located on the Project Homepage in the Administration area.

20 Net Waste Tool – User Guide, Version 1.0
2.10 Download reports All the information generated for your project on waste can be downloaded as comprehensive spreadsheet or .pdf reports from the Generate reports screen (accessible from the project homepage under Administration). This information can be used to develop a Site Waste Management Plan. The spreadsheet contains detailed waste generation data at component level, and waste to landfill data by waste stream. The Tool also generates .pdf reports on recycled content.
21 Net Waste Tool – User Guide, Version 1.0
2.11 Navigating the Tool The Tool has been designed to be as intuitive to use as possible. It runs through an .html browser interface (such as Internet Explorer) and can be navigated by clicking on underlined text or using the ‘save and back to’ buttons on each screen. Alternatively, you can navigate using the breadcrumbs at the top of the screen (welcome>my projects>). Version 1.1 of the Tool uses a ‘hub and spoke’ approach whereby all functions are accessed from one screen (i.e. the project homepage). The previous version of the Tool used a linear step-by-step or ‘wizard’ approach. There is also a menu bar at the top of each screen. From here you can choose to begin a new project at any time, download guidance documents, edit your personal details, access Help text or log out of the Tool. There are five menu options which appear on each screen in the Tool:
Add new project Download options (download NW Tool data from the Tool’s database, or download the user manual and
data report) User Options (edit your personal profile or download your custom Tool data) Help Logout
2.12 Help The Tool incorporates a comprehensive online help system. The symbol indicates that either a help screen, or a brief pop-up prompt, is available to provide further information on the topic. The full list of help topics can be viewed in a pop-up by clicking on the ‘Help’ menu. 2.13 Users of the Recycled Content Toolkit or NW Tool v1.0 Projects created under WRAP’s Recycled Content Toolkit (all versions) or the previous version of the NW Tool will be automatically transferred to the new Tool, providing immediate access to its enhanced functionality and performance. Existing usernames and passwords will still be valid. On logging into the Tool, it will be possible to carry out waste analysis of all of the projects previously created in the RC Toolkit. However, before commencing Steps 5-8 of the waste analysis on these projects, the following steps are required to add some additional project information:
Enter the construction timeline in the Project Details screen; this will enable the Tool to forecast waste arisings and their allocation to skips each month.
Review the selected components and check that the default dimensions now present in the Tool are accurate. A list of selected components can be generated from the Add Components screen.
Add information on dimensions, material type and wastage rate for any user-defined components (i.e. any components which you added that were not standard entries in the Toolkit database).
In updating the Tool, we have decided to remove some of the original components to replace them with more detailed specifications that are better suited to the different project types. Existing projects created in version 1.0 of the NW Tool will draw from the same database as previously, only recent changes to component descriptions will apply. Projects created in the Recycled Content Toolkit may contain components that are no longer supported by the Tool, particularly user-defined components, in which case you will need to select alternative components from the current database. To find out if a project created in the Recycled Content Toolkit contains components that are no longer available, go to the project homepage and click to ‘view selected components’ (under Administration). A table will be generated that indicates whether each component is user-defined or default. Any user-defined components will need to be re-entered.

22 Net Waste Tool – User Guide, Version 1.0

23 Net Waste Tool – User Guide, Version 1.0
3.0 Why use the Net Waste Tool?
The NW Tool has been produced to help developers and contractors increase the efficiency of their use of materials and comply with the requirements of the Site Waste Management Plan Regulations 20081. In addition, the Net Waste calculation provides a holistic approach to assessing resource use by considering both the waste generated by a project and the extent to which extra recycled content has been used (see Appendix C). However the Tool does much more than this, providing clients, designers and contractors with key information on the costs and quantities of project waste and the most suitable strategies for improving performance. The NW Tool is an important aid to delivering increased materials resource efficiency in the construction sector, and contributes to delivering a number of commercial and environmental benefits (see Appendix D) – including significant cost savings from waste reduction and recovery. Case study evidence indicates that changing from baseline to good practice wastage can save around 1% of construction cost. The practical benefits of the NW Tool lie in its ability to make a strong business case for more efficient materials management, provide guidance in the actions needed to achieve these efficiencies, and enable reporting on both predicted and actual performance. Specific benefits to different members of the construction and development industries are described in Table 3.1. Table 3.1 Benefits of the NW Tool
Group Benefits of the NW Tool
Sector bodies / trade associations
Tool outputs, such as the mass and value of wasted to materials and the quantity of waste going to landfill will help in monitoring sector performance towards industry targets such as: o halving waste to landfill (by 2012) o waste neutrality o zero waste to landfill (by 2020) The Tool provides a consistent assessment and reporting method for forecasting and recording construction waste arisings and recycled content. This information can then be aggregated to provide industry-wide results.
Clients (private and public)
The Tool can be used to measure and manage resource efficiency performance on projects, schemes and across a whole portfolio of projects. It provides a standard assessment and data handling method, thereby generating reliable corporate benchmarks and enabling better reporting of corporate performance. The Tool provides a design stage forecast of the value of wasted materials and disposal costs arising from inefficient use of materials. This information on priority sources of waste can be used to focus design team activities in preventing waste arisings and saving money. The waste forecast and action plan also provide one of the mandatory inputs to the regulatory SWMPs in England.
Design teams Identification of key sources of construction waste at an early stage in design enables waste reduction efforts to be focused on those project elements that will yield the largest cost and environmental benefits.
Contractors The Tool will provide the key elements of the project SWMP (waste forecast, reduction and recovery actions, waste to landfill) using a standardised method and data. This can be customised to reflect the specifics of the contractor’s performance and costs.
1 Statutory Instruments 2008 No. 314. Environmental Protection, England. The Site Waste Management Plans Regulations 2008. Available from http://www.opsi.gov.uk/si/si2008/uksi_20080314_en_1

24 Net Waste Tool – User Guide, Version 1.0
Group Benefits of the NW Tool
Comparison of forecast against actual performance can be used to provide valuable feedback on the accuracy of forecasting (thereby reducing risk in project pricing) and identifying opportunities to improve site practices. Information on likely waste arisings and disposal costs can be used to support negotiations with sub contractors and waste contractors. For example, by providing information on the likely wastes that will need removal, it should be possible for a contractor to devise a more tailored and competitive proposal.
Waste contractors
Over time, the increased use of more accurate and standardised waste forecasting will make it easier for waste contractors to demonstrate the benefits of their management practices in helping reduce and effectively remove and recover wastes.
The Tool would typically be used by a designer, quantity surveyor or cost planner working for the client or contractor (depending on the procurement process). Within a few hours it should be possible to enter the main project parameters, and get an initial approximation of the waste arisings for the project at standard and good rates, along with the options to reduce waste. Other outputs include developing a waste segregation strategy and reviewing the options to increase waste recovery. It is also possible to get a first estimate of recycled content for the project at standard and at good practice, and identify the top 5-10 potential Quick Wins that would contribute most to increasing the recycled content of the project in question. 3.1 Implementing good practice Effective waste and resources management must start during the design stage of a project, when waste can be avoided at source, and should not be left simply as a requirement on the principal contractor. The crucial first step is therefore for construction clients to take the lead and set clear performance requirements for their design teams, even during the earlier stages of design. Effective reduction of waste during design needs to be a targeted process. There is no point in attempting to generically ‘design out waste’ on a project; there are simply too many components and processes to consider. By forecasting likely waste arisings, and then focusing only on those components where the most substantial amounts of value are being wasted, it is possible to target energies where they will make most immediate impact and show the greatest financial return. Effective waste forecasting is therefore a key starting point of any strategy for achieving good practice in materials management. As a result, waste forecasting is one of the primary roles of the NW Tool although it also goes further to provide advice on the sorts of actions that could be taken to reduce priority wastes. Once waste has been forecasted and suitable strategies have been determined to manage it effectively, the next step is to embed these requirements within project processes in the form of contract clauses (e.g. for subcontractors or waste contractors) and within the SWMP. Ultimately, processes are needed to accurately record waste arisings and their fate (e.g. landfill, recycling facility, etc) so that actual practice can be reported and compared to the original forecast. This process is described in Figure 3.1; the NW Tool can be used throughout the detailed design (post stage D), construction and post construction stages, supported by SWMP documentation and onsite waste capture systems. The NW Tool together with an effective SWMP and a robust method for capturing live data on construction waste provides a comprehensive suite of tools for improving resource efficiency.

25 Net Waste Tool – User Guide, Version 1.0
Figure 3.1: The role of the NW Tool and other resources in project waste management
Client Contractor & team Sub Contractors & Waste Management Contractors
Procurement requirement set for project resource
efficiency
Designers to forecast waste and identify priority materials / components for waste reduction,
recovery, reuse and higher recycled content
Record waste forecasts, improvement actions and actual waste data for project in a
SWMP
Capture data on actual waste arisings
and their fate
Review performance and identify steps to improve future waste management and forecasting
Report on corporate performance
Contractor works with supply chain to implement actions to reduce waste, recover more waste and increase use of recycled content
Project requirements set for data reporting
Data on actual performance compared to forecast
Data
Requirement included in tender and appointment documents
Design team
Client makes commitment on
construction waste and includes requirements in all
policy documents
Contractor makes commitment on construction
waste and includes requirements in all policy
documents
Policy
Preparation & Design RIBA Stage A to E OGC Gateway 1 to 3B
Pre-construction & Construction RIBA Stage F to K OGC Gateway 3C to 4
Post-completion & Use RIBA Stage L & beyond OGC Gateway 5

26 Net Waste Tool – User Guide, Version 1.0
4.0 Data structure
All of the analysis in the NW Tool is built up from project specification information; this means that the analysis of each project is specific to the specification and quantities entered. Data are structured in line with the following hierarchy:
1. Components – the most basic products or materials delivered to site (e.g. bricks, concrete, carpet, etc). (This includes pre-assembled composite products such as windows.)
2. Elements – a major part of a project (e.g. external walls, floors, stairs, fencing, etc). 3. Projects – a collection of elements making up a defined project or other construction project (e.g. a
house, office, road, bridge, etc) 4. Scheme – a collection of projects making up a planned development (e.g. for a housing
development, this might be x number of house A, y number of house B, and an external works project comprising roads and landscaping)
5. ‘Corporate’ reports – providing information on corporate performance for a selection of both projects and/or schemes.
Each of these categories is described further below. 4.1.1 Components The Tool contains benchmark data on over 6,000 construction components covering all aspects of building and infrastructure projects. For each component, the following information is maintained:
unit (i.e. nr, m2, m3, t, etc); dimensions and density; percentage wastage rates for the following benchmarks (see Glossary for definitions):
o Baseline practice o Good practice;
recycled content by mass for the following benchmarks (see Glossary for definitions): o Standard practice o Good practice o Best practice;
material type (Each component can be made from up to four different material types. These material types define the disposal costs and routes of any wasted elements of the component.);
carbon factor (This includes the estimated carbon savings achieved from waste reduction activities, through avoided embodied energy, and the further savings achievable by recovering rather than landfilling wasted materials.);
rate i.e. installed cost including labour and materials (although for infrastructure and external works projects, data is stored as a Material Rate only); and
% materials i.e. the percentage of the overall rate that can be attributed to material cost. Any of the above reference data can be modified by a user to create ‘user-defined’ components, e.g. to refine the default data of a component. To calculate waste arisings or recycled content for a project, the Tool draws on the above reference data for each selected construction component together with information on the quantity to be used. The Tool can estimate ‘default’ quantities of materials needed for projects based on user-entered information on project dimensions2 (the formulae by which these quantities are estimated are described in Appendix E). The ‘default’ estimates in the Tool can subsequently be overwritten with more specific information on quantities as and when this becomes available.
2 The tool does not estimate quantities for infrastructure or external works projects.

27 Net Waste Tool – User Guide, Version 1.0
4.1.2 Elements Each of the components in the Tool is grouped within one or more project elements (e.g. external walls, windows and doors, substructure, etc). 4.1.3 Projects A project is a collection of one or more elements that are grouped together to represent a discrete construction activity, e.g. a house or a road. The Tool can be used to assess a variety of ‘generic’ construction project types both as new build projects and refurbishments, i.e.:
houses; residential apartments; offices; healthcare; retail; education; external works (e.g. landscaping or site roads); and infrastructure (e.g. roads, motorways, bridges and other civil engineering projects).
In addition, a ‘bespoke’ project type exists for projects that do not easily fit into any of the above categories. In theory, projects can be as complex as necessary, e.g. they could include all of the materials used for four buildings and associated external works. However, in practice it is often easier and clearer to create a number of distinct projects (in this example one project would be set up for each separate building with a fifth project for external works). These distinct projects can then be grouped together as a single scheme. 4.1.4 Schemes Many large developments are made up a number of different types of projects (e.g. houses, residential apartments, retail and some external works); therefore the Tool offers the functionality for combining these separate projects within one scheme. The scheme function calculates average performance for all of the projects in a scheme and generates summary reports displaying these overall results together with key information on each individual scheme. It therefore provides an effective means of demonstrating compliance with a development-wide Site Waste Management Plan or recycled content requirement without having to a) set up a single large and complex project, or b) provide detailed information on a large number of individual projects. 4.1.5 Corporate reports To enable the reporting of performance across a wide range of both projects and/or schemes, the Tool has a corporate reporting function. By selecting the desired projects and/or schemes from all of those to which the user has access (either as the project owner or as a guest), average results can be reported to show, for example, performance in a specific time period, location or sector. One typical application would be a contractor’s or client’s annual report on Corporate Social Responsibility or Environmental Management. 4.2 Source of data on recycled content and costs of construction
components The data used in the Tool are based on analysis of the UK construction products and waste management markets, and have been provided to WRAP by specialist cost consultants, engineers and market research organisations. Further information on the source of the component and waste data used in the Tool is presented in the accompanying Net Waste Data Report (at www.wrap.org.uk/nwtool). It is important to remember that once an assessment has been commenced, the data used in the assessment will remain unchanged. It is possible to update the data by creating a copy of the project, as each time a project copy is created the most current materials database is used. Any user-defined data are

28 Net Waste Tool – User Guide, Version 1.0
not updated by WRAP and it is the user’s responsibility to ensure that cost rates, wastage rates, recycled content levels, etc remain valid3. 4.3 How the Tool allows for ‘unaccounted’ materials For some projects it will not be possible (or necessary) to enter every material component into the Tool, either because they are not yet defined or because they are too numerous and would deliver little additional value to the assessment (e.g. light switches, etc). This is particularly the case for buildings where there may be many thousand individual components, and is generally less significant for infrastructure projects. To derive an accurate representation of the performance of a project4 even where all the components have not been specified, the Tool estimates the material value of the components that have not been accounted for in a specification. This ‘unaccounted’ material value is estimated by subtracting the total construction value represented by the items specified in the Tool from the estimated total construction cost of the project (the construction cost is entered in the Project Details page of the Tool). This unaccounted construction cost is assumed to be approximately 50% labour cost and 50% material cost. The 50% material cost estimated as being unaccounted components is then added to the total material value of the quantified components but not to the recycled content value5. Figure 4.1 below summarises this process. Figure 4.1 Calculation of ‘unaccounted for’ value
In order for the Tool to accurately calculate total material value and assess the ‘unaccounted’ value of the project, the total construction cost of the project must be entered, and cost figures for each component must include an indication of the proportion representative of material value, and of labour costs involved in its production. 4.4 Information required to use the Tool It is not necessary to have detailed information on all of the material quantities and specifications to be used in a project in order to estimate its waste arisings or recycled content, although providing more information will result in a more accurate assessment. For infrastructure / external works projects, it is necessary to have at least a high level estimate of the quantities of different materials that will be used in the project. For each building project, a series of ‘default’ component quantities are estimated based on simple design assumptions (Appendix E lists the formulae used to calculate component quantities for different project
3 A list of all of a user’s own ‘user-defined components’ can be downloaded from the tool to facilitate management of this information. 4 This function only applies to the recycled content analysis of building projects, i.e. unaccounted material value is not estimated for infrastructure and external works projects or within the waste module. 5 Therefore, where some components in a project remain unaccounted the estimated recycled content percentage maybe an underestimate of the true figure but is never an overestimate.
Labour cost £10,000
Material cost £10,000
Labour cost £40,000
Unaccounted remainder £20,000
Included in specification £80,000
Unaccounted material value £10,000
Total material value (£50,000)
Material value £40,000
Assessed material value £40,000
Projected total construction cost (£100,000)

29 Net Waste Tool – User Guide, Version 1.0
elements) and using the information entered in the ‘Project details’ page. These default calculations reduce the need to have detailed quantity information on all of the components in a building project. It is possible to overwrite both default quantity and other information on any component in the Tool by either modifying existing components or adding new components from scratch. Therefore, if desired, the dataset can be customised to reflect the exact specification and quantities to be used on a project (although this is usually not necessary to achieve a sufficiently reliable estimate to inform decision making). 4.5 Data security Project information held within the Tool is maintained on secure servers and only users that create a project or have explicitly been invited to view or enter information on a project will have access to project data. Guest users can have their access removed by the project creator, if required, further protecting the security of project data. WRAP have no access to information on individual projects but will be monitoring only high level statistics relating to the use of the website (e.g. number of projects created, average level of recycled content, etc). Your project information is therefore totally confidential and only individuals with ‘User’ or ‘Guest User’ access rights to the project will be able to view information. 4.6 Types of Tool user The Tool provides secure access to two types of user; Registered Users and Guest Users. In addition, a Registered User can also nominate a Corporate Guest User who will automatically have Guest access to all the projects created by the user. These user types are defined below. 4.6.1 Registered User Registered Users are the core user group. Registered Users are able to create new project datasets for which they are assigned ownership and the right to control the ability to perform a ‘save as’ operation on those datasets. 4.6.2 Guest User Guest Users have access to Tool projects created by Registered Users. Once a Registered User has created the project they can invite Guests to view or contribute information relevant to their expertise. For example, a Project Manager may create a project and then invite the Architect, Structural Engineer and Services Engineer to add elements of the building specification relevant to their discipline. Guest Users for each project are nominated by the project owner (the Registered User that creates the project) and defined simply by their name and email address. When adding a Guest User to the project, the project owner has the option of granting full (read/write) or read only access to the information on the project and may also enter a text note to the Guest User informing them of the action required from them. When the Guest User is added to the project, the Guest is sent a notification e-mail automatically. Guest Users may also be Registered Users in the NW Tool but this is not necessary. Unregistered Guest Users can view, edit and generate reports on projects but cannot create new projects. Registered Users will have a list of all projects for which they are a Guest on a tab in their ‘My Projects’ page. Unregistered Guest Users do not have a ‘My Projects’ page and therefore need to enter into each project for which they are a Guest by entering the project ID and password or by following the hotlink included in the email notification. 4.6.3 Corporate Guest User To enable corporate performance to be monitored and reported, it may be useful for one person (e.g. a sustainability or CSR manager) to be able to view and report on all of the projects set up by employees in the company. To facilitate this, the ‘Corporate Guest User’ function allows users to invite a ‘corporate guest’ to view or edit all of their projects. Multiple users can invite the same corporate guest, allowing that person to review a portfolio of projects. An example of this is where several project managers may be assessing different projects with the same

30 Net Waste Tool – User Guide, Version 1.0
corporate ownership or interest, and the Sustainability Manager needs to assess overall performance across all the projects for CSR reporting. If the sustainability manager of a construction client (e.g. a retailer) wanted to aggregate their corporate performance across multiple projects, they would ask the various contractors to assign them Guest User rights project-by-project, rather than being made a Corporate Guest User.

31 Net Waste Tool – User Guide, Version 1.0
5.0 Getting started
5.1 Welcome page The first screen you will see after arriving at www.nwtool.wrap.org.uk is the ‘Welcome’ screen (Figure 5.1). This screen provides overview information about the Tool including a downloadable Quick Start guide. Figure 5.1 Welcome screen
The welcome screen provides some resources that will help users get started, including description of the NW Tool and what it does, a downloadable Quick Start guide, and a link to WRAP’s construction portal where guidance documents on waste minimisation and management can be found.

32 Net Waste Tool – User Guide, Version 1.0
5.2 Registration and logging in On visiting the Tool’s login page you will be offered three options, as shown in Figure 5.2. If you have not used the Tool before, you will need to register as a new user to create your personal profile. Figure 5.2 Tool login page
5.2.1 Register – New Users ‘Register - New Users’ is in the middle section on the screen. Clicking on the register button in this section takes you to the Register screen (Figure 5.3).

33 Net Waste Tool – User Guide, Version 1.0
Figure 5.3 User registration screen
Once registered, you will be prompted to begin using the Tool. You need only register as a user the first time you use the Tool – after this your profile will be saved, along with any projects that you have entered. You will also be sent a confirmation email with details of your registration. Case study ‘Example Projects’ added and maintained by WRAP are also accessible within your personal profile. 5.2.2 Login – Existing Users If you have already registered as a user within the Tool (or are a previous user of the RC Toolkit), you simply need to login using the form at the left of the page (Figure 5.1), by entering your login name (the email address you specified when first registering), and password. If you have forgotten your password, a reminder can be sent to your email address. 5.2.3 Guest User Login Guest Users can enter the Tool directly through the hotlink contained in their email invitation; alternatively they can login by entering their email address together with the Project ID and password of the project to which they have been made a guest. Registered Users will also find a list of all of their Guest Projects in their ‘My Projects’ page and can also access these projects via this route (see Section 4).
Enter your details in the fields as required –compulsory fields are shown in bold.
Choose a password that is simple and easy to remember. If you forget the password a reminder can be sent to your email address.
If you wish you can enter the Corporate Guest User here (see Section 2.8).
34 Net Waste Tool – User Guide, Version 1.0
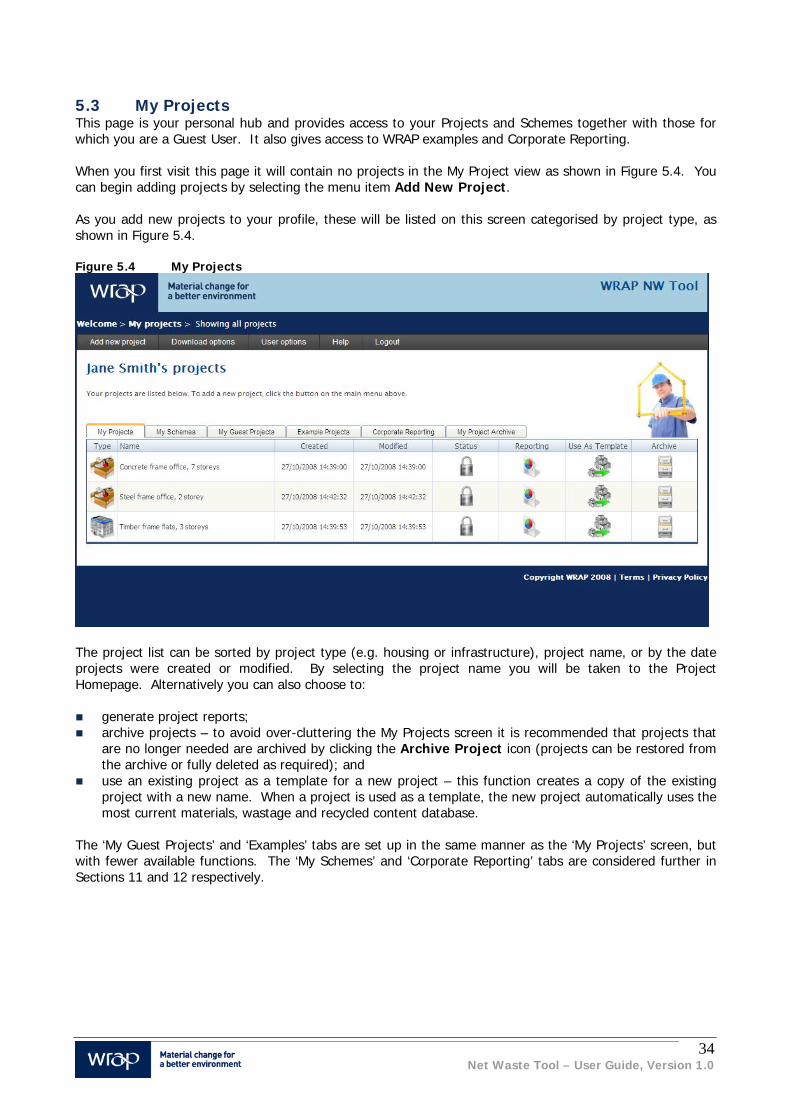
5.3 My Projects This page is your personal hub and provides access to your Projects and Schemes together with those for which you are a Guest User. It also gives access to WRAP examples and Corporate Reporting. When you first visit this page it will contain no projects in the My Project view as shown in Figure 5.4. You can begin adding projects by selecting the menu item Add New Project. As you add new projects to your profile, these will be listed on this screen categorised by project type, as shown in Figure 5.4. Figure 5.4 My Projects
The project list can be sorted by project type (e.g. housing or infrastructure), project name, or by the date projects were created or modified. By selecting the project name you will be taken to the Project Homepage. Alternatively you can also choose to:
generate project reports; archive projects – to avoid over-cluttering the My Projects screen it is recommended that projects that
are no longer needed are archived by clicking the Archive Project icon (projects can be restored from the archive or fully deleted as required); and
use an existing project as a template for a new project – this function creates a copy of the existing project with a new name. When a project is used as a template, the new project automatically uses the most current materials, wastage and recycled content database.
The ‘My Guest Projects’ and ‘Examples’ tabs are set up in the same manner as the ‘My Projects’ screen, but with fewer available functions. The ‘My Schemes’ and ‘Corporate Reporting’ tabs are considered further in Sections 11 and 12 respectively.
35 Net Waste Tool – User Guide, Version 1.0
6.0 Setting up a project and using the Project Homepage
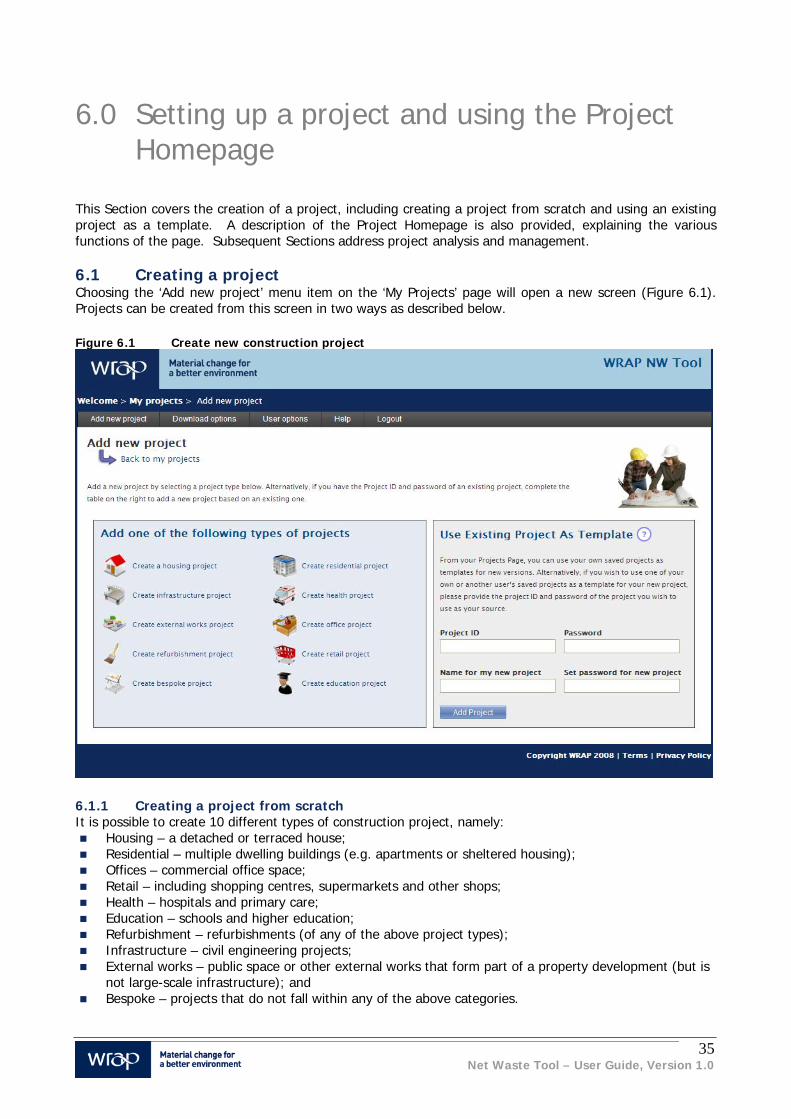
This Section covers the creation of a project, including creating a project from scratch and using an existing project as a template. A description of the Project Homepage is also provided, explaining the various functions of the page. Subsequent Sections address project analysis and management. 6.1 Creating a project Choosing the ‘Add new project’ menu item on the ‘My Projects’ page will open a new screen (Figure 6.1). Projects can be created from this screen in two ways as described below. Figure 6.1 Create new construction project
6.1.1 Creating a project from scratch It is possible to create 10 different types of construction project, namely:
Housing – a detached or terraced house; Residential – multiple dwelling buildings (e.g. apartments or sheltered housing); Offices – commercial office space; Retail – including shopping centres, supermarkets and other shops; Health – hospitals and primary care; Education – schools and higher education; Refurbishment – refurbishments (of any of the above project types); Infrastructure – civil engineering projects; External works – public space or other external works that form part of a property development (but is
not large-scale infrastructure); and Bespoke – projects that do not fall within any of the above categories.

36 Net Waste Tool – User Guide, Version 1.0
Clicking on either of these options will take you to the ‘Project Details’ screen, where you can begin setting up and analysing your project. 6.1.2 Using an existing project as a template This method allows a Registered User to select an existing project dataset as a seed for a new project, thereby creating a copy of the dataset (similar to performing a ‘Save As’ function). The seed project dataset may be from one of the following sources:
a) A Registered User’s existing project, a project for which they are a Guest or a WRAP Example. This involves clicking the Use as template icon which is located on the My Projects page next to the project you wish to copy.
b) An existing project from another registered user (for which project ID and password will be required). This involves entering the project ID and password of the source project into the ‘Use Existing Project as Template’ section of the ‘Create new construction project’ screen (Figure 4.1).
Prior to creation of the new project using a template, the Tool prompts the user for a new name and password for the new project. The new project will contain a duplicate of the project details and materials selections used in the previous project. Other project information such as the waste and recycled content targets, Quick Wins selections, and Audit history will be blank. Users can then edit the Project Details to tailor the new project data to their specific requirements. Setup option How to
Create a new project from scratch
Click on the ‘Add new project’ menu item at the top left of the screen..
Edit an existing project Click on the project name to edit a project. You can also click on ‘Use as template’ to set up a new project using the existing project’s data.
Create a new version of an existing project
Users also have access to example projects provided by WRAP. Select the ‘Example projects’ tab and click on ‘Use as template’ to create a new project using the example project’s data.
Create a scheme containing multiple projects
Click on the ‘My Schemes’ tab, then choose to ‘add new scheme’. Enter a description of the scheme then choose projects to add to the scheme.
6.2 Entering project details The first step is to provide initial information to help describe the project, its dimensions, and the key individuals involved in managing waste and the planned construction programme. It is possible to download blank proforma for housing, general ‘new build’ projects and refurbishments from the User Options menu on the left hand side of each page. These forms can be copied or emailed to appropriate individuals to complete off line if required.

37 Net Waste Tool – User Guide, Version 1.0
6.2.1 General details The General Details section of this screen is applicable to all projects (see Figure 6.2). The form should be used to record general information such as the project name, reference, location etc. The minimum required information is the project name, location, password and construction cost. The estimated construction cost is an important figure as it is used to estimate the amount of unaccounted material value and therefore has an influence over the results of the RC analysis (see Section 4.3). Figure 6.2 Entering general details
6.2.2 Construction timeline The materials used, and therefore the wastes generated, in different phases of a construction project vary widely. It is therefore important that the waste Tool can estimate when different materials will be used if it is to provide meaningful information on the likely waste arisings at any given time and hence the appropriate choice of skips. The second aspect of the Project Details screen therefore involves specifying a start and end month for each element of the project as shown in Figure 6.3. While this only generates a very approximate construction programme, it does enable the Tool to estimate the materials present on site based on the components selected under each building element and the timing of each element. Entering phasing information is an important part of a waste analysis and it is not possible to progress past this screen without having set an initial programme for the project (this can be refined as plans evolve or even during construction to reflect the onsite situation).

38 Net Waste Tool – User Guide, Version 1.0
Figure 6.3 Construction timeline
6.2.3 Project quantities For all building projects (i.e. not infrastructure and external works), the Tool will estimate the quantity of materials required for different project elements based on a limited number of project dimensions such as the gross internal floor area, the area of windows, number of storeys, etc. There are some differences in the project quantities screens for different building types. There are two options for entering dimensional information on a housing project, the simple quantity estimator or manual specification of dimensions and quantities in a more detailed manner. These two options are shown in Figures 6.4 and 6.5. It is possible to use the simple estimator to generate approximate figures which can then be refined manually.

39 Net Waste Tool – User Guide, Version 1.0
Figure 6.4 Simple quantity estimator for housing projects
Figure 6.5 Manually specifying quantities of a housing project

40 Net Waste Tool – User Guide, Version 1.0
Other new build (residential, offices, retail, health, education) There is no simple quantity estimator for other new build projects (i.e. all projects that are not houses, infrastructure or external works) and available project dimensions must be entered manually (see Figure 6.6). It is not necessary to complete each field; however, providing more information at this stage will enable the Tool to provide estimated quantities for a greater number of components. Figure 6.6 Project quantities screen (for buildings other than houses)
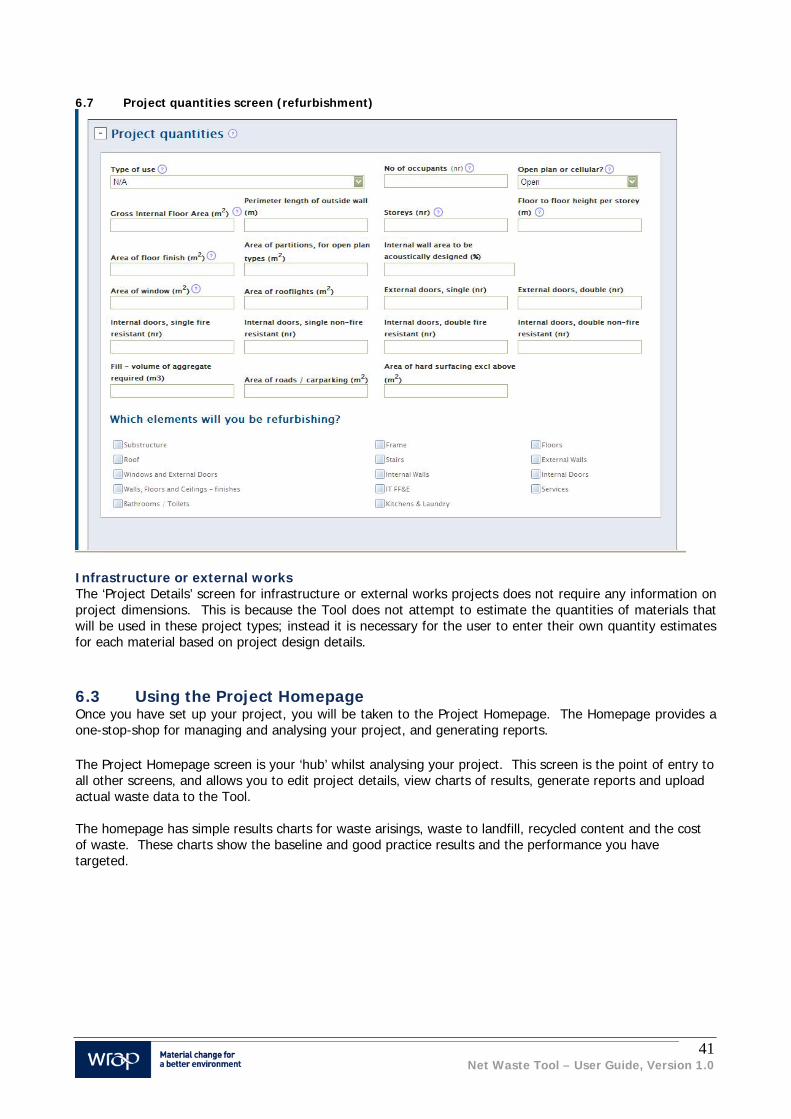
Refurbishment The ‘Project Details’ screen of the refurbishment module of the Tool is largely the same as that for new buildings with the exception that it is necessary to select the type of use for the refurbished building and the building elements that are included in the project (see Figure 6.7). Only those elements identified as being included in the project will be assessed in subsequent stages of the Tool.
41 Net Waste Tool – User Guide, Version 1.0
6.7 Project quantities screen (refurbishment)
Infrastructure or external works The ‘Project Details’ screen for infrastructure or external works projects does not require any information on project dimensions. This is because the Tool does not attempt to estimate the quantities of materials that will be used in these project types; instead it is necessary for the user to enter their own quantity estimates for each material based on project design details. 6.3 Using the Project Homepage Once you have set up your project, you will be taken to the Project Homepage. The Homepage provides a one-stop-shop for managing and analysing your project, and generating reports. The Project Homepage screen is your ‘hub’ whilst analysing your project. This screen is the point of entry to all other screens, and allows you to edit project details, view charts of results, generate reports and upload actual waste data to the Tool. The homepage has simple results charts for waste arisings, waste to landfill, recycled content and the cost of waste. These charts show the baseline and good practice results and the performance you have targeted.

42 Net Waste Tool – User Guide, Version 1.0
Figure 6.8 Project Homepage
Section 7 describes how to use the Homepage to analyse your project, while Section 8 explains how to use the project administration functions on the Homepage.
Follow the buttons under Project Analysis to work through a waste analysis. If you are just doing a recycled content analysis, first choose Add Components, then choose Set Recycled Content Quick wins.
The Project Homepage provides a summary of the project’s details, tells you who is working on the project (status) and allows you to edit project
Use the Administration area to keep you project details up-to-date, view the components you have selected, generate reports or upload actual waste data.
The charts show the project results as they emerge. This provides a useful indication of whether you are making inroads on waste and recycled content.

43 Net Waste Tool – User Guide, Version 1.0
7.0 Analysing your project
All stages of the waste analysis are accessed from the Project Homepage, in the Project Analysis section of the screen. The recycled content analysis is also available here (Set Recycled Content Quick Wins). This section explains how to move through the Project Analysis area of the Project Homepage, including:
o Adding components o Setting waste reduction options o Setting waste segregation options o Setting waste recovery actions o Setting RC quick wins o Adding data on demolition and other non construction wastes o Setting targets & requirements
Figure 7.1 Project Homepage, Analyse Project
The Tool first requires users to add components to their project, i.e. tell the Tool what materials and quantities are included in the specification. Once this information has been entered, the Tool can estimate the wastes likely to be generated and help you to set waste reduction actions (reduce waste arisings), set waste segregation options (select skip types) and set waste recovery options (increase recycling to divert materials from landfill). 7.1 Adding components This key area of the Tool is where the user inputs the project specifications, so it is worth taking a few minutes to familiarise yourself with the different options for entering information before beginning this process. The process is largely the same for all project types, although there are some slight differences for infrastructure and external works projects. 7.1.1 Overview The Tool allows the selection of individual components, e.g. bricks, in-situ or pre-cast concrete, plasterboard, etc. Component data are categorised by element, e.g. substructure, frame, external walls, etc. The ‘Add Components’ screen is accessed via the Project Homepage (in the Project Analysis area). The screen displays the elements as tabs, and components are displayed on screen under their respective categories. The screen shows the unit (e.g. m or m2) and the default quantity. You can enter your own quantity and this will overwrite the default quantity. You can also choose to show additional information on screen including the component rate (£/unit), recycled content levels, and wastage rates.

44 Net Waste Tool – User Guide, Version 1.0
Figure 7.2 Add components
The data shown on screen includes:
component description; quantity being used (both the default quantity calculated by the Tool or any user-defined quantity); unit (e.g. m2, nr, m, m3); rate (£ per unit); percentage of the rate that relates to materials; wastage benchmarks (for baseline and good practice); or recycled content benchmarks (for standard, good and best practice).
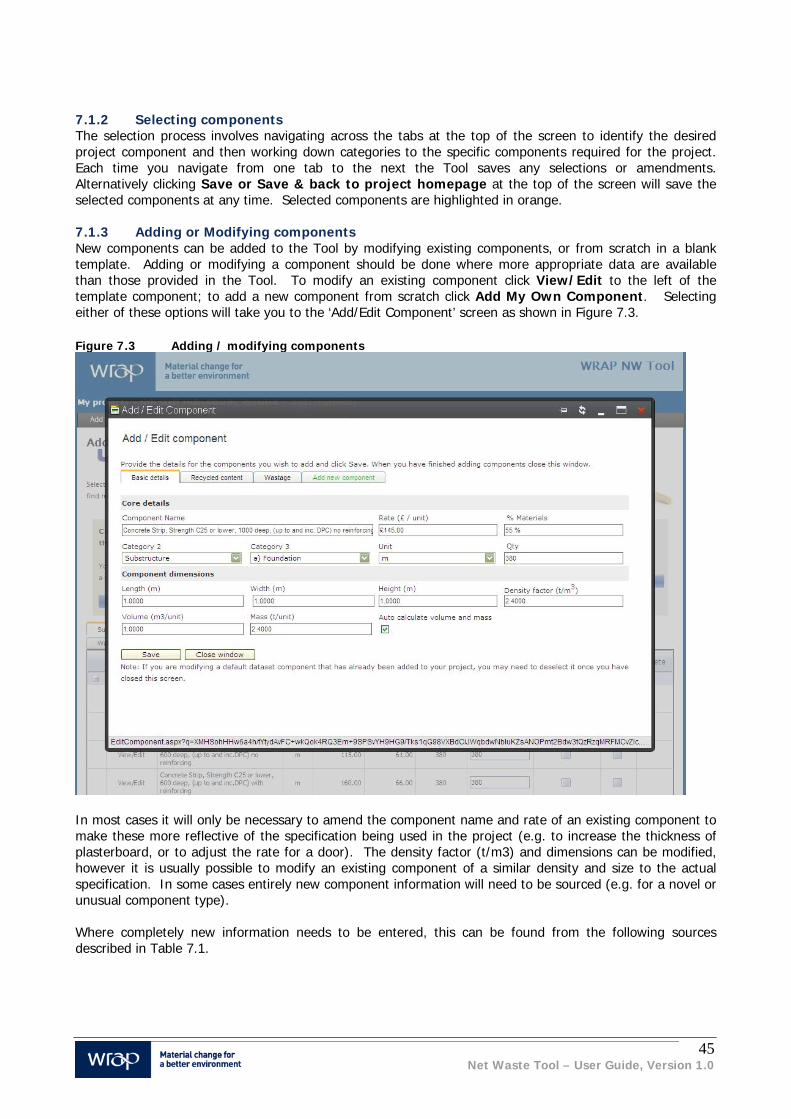
45 Net Waste Tool – User Guide, Version 1.0
7.1.2 Selecting components The selection process involves navigating across the tabs at the top of the screen to identify the desired project component and then working down categories to the specific components required for the project. Each time you navigate from one tab to the next the Tool saves any selections or amendments. Alternatively clicking Save or Save & back to project homepage at the top of the screen will save the selected components at any time. Selected components are highlighted in orange. 7.1.3 Adding or Modifying components New components can be added to the Tool by modifying existing components, or from scratch in a blank template. Adding or modifying a component should be done where more appropriate data are available than those provided in the Tool. To modify an existing component click View/Edit to the left of the template component; to add a new component from scratch click Add My Own Component. Selecting either of these options will take you to the ‘Add/Edit Component’ screen as shown in Figure 7.3. Figure 7.3 Adding / modifying components
In most cases it will only be necessary to amend the component name and rate of an existing component to make these more reflective of the specification being used in the project (e.g. to increase the thickness of plasterboard, or to adjust the rate for a door). The density factor (t/m3) and dimensions can be modified, however it is usually possible to modify an existing component of a similar density and size to the actual specification. In some cases entirely new component information will need to be sourced (e.g. for a novel or unusual component type). Where completely new information needs to be entered, this can be found from the following sources described in Table 7.1.

46 Net Waste Tool – User Guide, Version 1.0
Table 7.1 Sources of information on new components Basic details
Component name Give the new component a suitable name, ideally including sufficient information for another user to clearly identify the component.
Element:
Select most appropriate option from drop down list.
Sub-element
Select most appropriate option from drop down list.
Unit (of measurement)
Project Bill of Quantities, or similar. Assumptions can be made by specifying generic material types at early stages of the project.
Quantity
Project Bill of Quantities, or similar. Assumptions can be made by specifying generic material types at early stages of the project.
Rate Note that this should include labour and materials – not materials alone.
% Materials The % of the rate assigned to the value of materials must be entered. Users should not enter 100% material value.
Dimensions
Enter information on the length, width, height and density of the new component. Alternatively (e.g. for unusually shaped components) you can directly enter the volume and mass, per unit, of the component.
Recycled content
Recycled content % (Standard, Good or Best)
Information on the recycled content of a new component type can be gathered from several sources:
From the material supplier – an increasing number of suppliers are able to provide accurate information on the recycled content of their products.
By reference to existing WRAP benchmarks for similar components. For example, if only the dimensions of a component have changed then it would be reasonable to assume that recycled content figures for the new component would be similar to the component already present in the Tool.
By reference to WRAP materials benchmarks for the material types contained in the product. WRAP’s product guide (www.wrap.org.uk/rcproducts/) contains information on the recycled content found in a wide range of basic materials as well as for specific components. This basic material information can be used to estimate the recycled content of a new component.
Where no information on the recycled content of a new component can be identified, it should be assumed that the component has no recycled content.
Wastage
Wastage rates (baseline or good)
In most instances it should be possible to define indicative wastage rates for new components by reference to other similar components already within the NW Tool database.
Alternatively, information on the likely wastage rates for the new component can be sourced from manufacturers or contractor experience.
Cost of Takeback If the component is one where a manufacturer Takeback scheme is in place, you can enter information on any charges that will be levied for removal of suitable material from the site.
Packaging Identify any packaging that will be delivered to site with the component.

47 Net Waste Tool – User Guide, Version 1.0
Material type Choose up to four material types from the drop down list and identify the approximate percentage (by mass) of the component made up by each.
Once a new / modified component is added, it is shown in bold and automatically selected. New components can also be deleted if required. New / modified components will be available for all of the User’s other projects and are identified as User Defined Components in project Management and Component reports (see Section 7. 7.1.4 Selecting materials in infrastructure or external works projects The approach to materials selection for infrastructure projects is broadly the same as that described previously, with the following exceptions:
The Tool does not estimate any default quantities; therefore the User needs to enter their own quantity estimate for each selected component.
All components are presented with Material Rates rather than as Rates and % materials. This is because of the high variability in overall rate for an infrastructure component depending on the way it is used (e.g. the total rate for drainage pipes will depend on both depth and ground conditions).
There is the option to add User Defined Factors for some component types. User Defined Factors are used in the infrastructure and external works modules to enable users to enter more specific information about the components being used, e.g. the diameter of a pipe or the thickness of a layer of fill. The Tool uses a formula to estimate the rate for the specified component based on both the quantity of the component (e.g. m2) and the User Defined Factor (e.g. thickness in mm). This approach helps to minimise the number of individual components that are required in the Tool database, because only one component is needed to enable information on a wide range of specifications. When a User Defined Factor is entered (and the component selected and saved) the rate automatically updates to reflect the information entered; if you are not happy with the calculated rate then this can be overridden as for other components by clicking the View/Edit link at the far left of the screen.
7.2 Setting waste reduction actions Based on the project information previously entered, and the components selected or defined within the material profile, the ‘Set Waste Reduction Actions’ screen displays the components of the project that represent the most significant sources of project waste. The Tool automatically defaults to showing project waste by value, but there is a toggle function to show results by mass. The ‘Set Waste Reduction Actions’ screen contains one main table (see Figure 7.4). This table lists the top opportunities to reduce waste arisings by moving from ‘baseline wastage’ to ‘good wastage’. Waste reduction levels default to baseline levels for each component stored in the Tool database, however this can be edited by changing the % value in the ‘User defined target’ column of the table. The Tool automatically defaults to showing 10 reduction opportunities per waste stream. It is possible to adjust this figure by selecting the drop down box labelled ‘Maximum waste reduction opportunities’ and selecting either 5, 10, 15 or 20.

48 Net Waste Tool – User Guide, Version 1.0
Figure 7.4 Set waste reduction actions
The Tool does not calculate the mass or volume of waste from building services components (e.g. light and power, heating) as it is impractical to attempt to define a mass per m2 for services. However the Tool does calculate the value of building services waste and the mass and volume of associated packaging waste. Waste from building services is likely to have a high value, but is unlikely to contribute significantly to the mass or volume of construction waste on a project. In the ‘Actions’ column the Tool allows you to set specific actions for either a) all components in a waste stream or b) individual components in a waste stream. For a), click on the ‘set for waste stream’ link in the Actions column, and for b) click on the ‘set for component’ link in the Actions column. Once one of the ‘set actions’ links has been selected, a popup screen will appear (see Figure 7.5) providing the opportunity to select up to four recommended waste reduction actions. For each selected action, you can add information on the specifics of how it will be delivered and the individuals responsible. This information will be included in the Tool report for transfer to the project’s SWMP.

49 Net Waste Tool – User Guide, Version 1.0
Figure 7.5 Waste Reduction Actions pop-up
When you have identified the appropriate waste reduction actions and set a target wastage rate for each component, click save and close the window to return to the main screen. The table shows the reduction in waste if the target is met. If you click on the ‘Display total figures’ link in the upper right of the screen, a pop-up will appear showing a summary of the waste reduction opportunity totals. 7.3 Setting waste segregation options This stage helps you to select the number and type of waste streams to segregate each project month to help reduce waste disposal costs and increase the potential for waste recovery (subject to space constraints). The key activity in this Stage is to identify the waste streams that will be segregated during the project. However, before beginning this task it is necessary to:
1. Adjust the waste container sizes and disposal rates for your project – Clicking on the link opens a pop-up where you can edit the container size and disposal cost to more accurately reflect your circumstances. If your intended waste container is not on the list, you can enter custom volume and disposal cost details.
2. Identify opportunities for manufacturer Takeback of product waste – Clicking on the link will open a pop-up where you can select components that you intend to return directly to the supplier or to a third party for reprocessing. Where a wasted component is eligible for Takeback, you can enter the proportion to be taken back. By default, this automatically presented as 100%. The cost of Takeback for each unit returned to the supplier is estimated by the Tool. You can overwrite this with project specific rates if needed. The Tool will record entered information and use this when calculating overall project waste reduction actions.
3. Click on the ‘Select number of waste streams to segregate’ link. Review the estimated waste disposal costs for segregating between 1 and 6 waste streams – this pop-up will provide information

50 Net Waste Tool – User Guide, Version 1.0
on the overall costs of waste disposal (assuming the selected waste container sizes and disposal costs) for the project. Decide how many waste streams can be accommodated on site, based on known space constraints and the estimated disposal cost. Click to ‘accept selected strategy’. The pop-up will now close the Tool will generate a segregation strategy.
The Tool now displays a segregation strategy on the screen, with (up to) your chosen number of waste containers selected against each month. By default the mixed waste stream is selected for every month; as additional waste streams are selected, the waste materials that can be sent to these waste streams are moved from the mixed to the segregated waste stream. The wastes arising in each month are estimated using the phasing information provided in Stage 1 (this tells the Tool when different materials are likely to be used). By clicking on ‘previous month’ or ‘next month’ the table will show relevant information for that period. Review the strategy and remove any selections you think are inappropriate. Accept the strategy by clicking ‘save & back to project homepage’. Figure 7.6 Determining the waste segregation strategy
7.4 Setting waste recovery options The ‘Set waste recovery options’ screen allows you to set waste recovery actions and specify the waste destination for different waste streams. Only the waste streams specified in your segregation strategy will automatically appear. You can toggle between showing data by mass of waste or volume of waste. Review the table to find the most significant opportunities to improve recovery rates and reduce the quantity of waste going to landfill (see Figure 7.7). The ‘improvement potential’ column shows the difference

51 Net Waste Tool – User Guide, Version 1.0
between baseline and good practice and therefore highlights opportunities to increase the recovery of wastes. Figure 7.7 Opportunities to improve waste recovery and diversion from landfill
The ‘Click here to select a destination’ link can be used to select appropriate actions that can be implemented to help effectively manage wastes generated on site. Use the drop down list to select waste recovery actions relevant to specific waste streams. Next for each waste stream, specify the intended waste destination. Review the default recovery rates for each material type (these can be overwritten if you have better information on the rates achieved by your waste contractor). Save and close the link to review the impact of your selections on the target recovery rates in the table. Once information on the intended waste destination is entered, the main table summarises the selected waste management actions including levels of waste after reduction targets, levels of waste sent to landfill and diversion of material from landfill. There is a link in the upper right of the pop-up which will take you to relevant WRAP guidance on good practice in waste management. You can also set project-wide waste recovery actions from the main screen. These are actions that should assist with segregation and recovery for all waste streams, e.g. keeping a tidy site and clearly labelling skips. The NW Tool retains all of the functionality of the previous RC Toolkit, however Quick Wins can now be chosen from a single screen accessed from the Project Homepage. This means that you can rapidly review

52 Net Waste Tool – User Guide, Version 1.0
the key opportunities to increase the use of recycled content on the project either as a stand alone exercise or following on from the analysis of waste reduction and recovery opportunities. 7.5 Setting Recycled Content Quick Wins Based on the project information previously entered, and the components selected or defined within the material profile, the ‘Select Recycled Content Quick Wins’ screen displays the components of the project that have the most potential to increase the recycled content of the project, if good rather than standard practice products were used. The table (Figure 7.8) lists the top opportunities to increase recycled content by moving to good practice products, i.e. the top Quick Wins. Quick Win recycled content levels default to Good practice levels for each component stored in the Tool database; however this can be edited by changing the % value in the ‘Target level of recycled content %’ column of the table (Figure 9.1). The Tool automatically defaults to showing 5 Quick Wins. It is possible to adjust this figure by selecting the drop down box labelled ‘Max Quick Wins to show’ and selecting either 5, 10, 15, 20 or all. At this stage of evaluation, you will probably want to consult with e.g. buyers, builders’ merchants or subcontractors to determine which of the potential Quick Wins will work in this particular project and the available cost-competitive level of recycled content for each one (e.g. depending on local availability of recycled aggregate, stock availability from builders’ merchants etc). To facilitate this process, the user can download a pdf version of the list of Quick Wins for discussion off-line. Alternatively you could make a key supplier / subcontractor a Guest User so that they can view and comment (see Section 8) on the Quick Win opportunities within the Tool. When you have identified the appropriate Quick Wins and the actual level of recycled content available for each one, you can enter this information by ticking boxes in the Select column and adjusting the ‘Target level of recycled content’ where necessary. When these are ultimately confirmed as being used on the project (i.e. once information to demonstrate that they have actually been bought and used is available), then you can check the ‘confirm’ box on the far left of the table. This confirms that the targeted performance has actually been delivered.
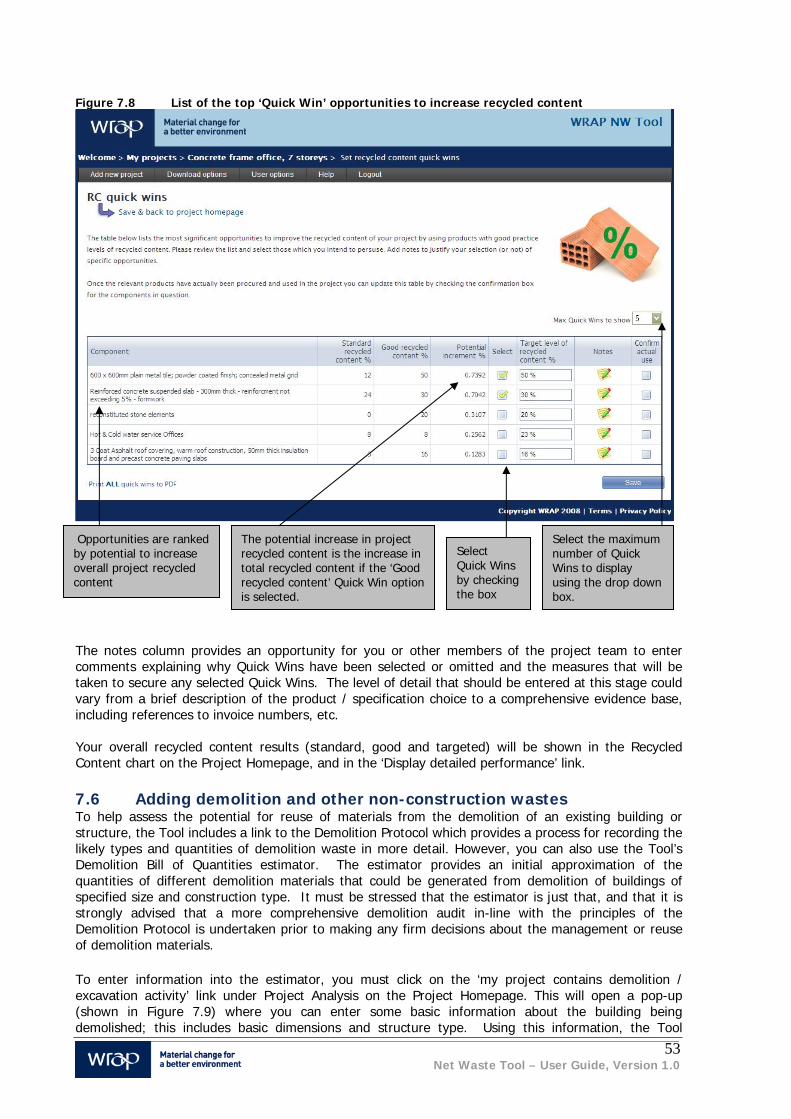
53 Net Waste Tool – User Guide, Version 1.0
Figure 7.8 List of the top ‘Quick Win’ opportunities to increase recycled content
The notes column provides an opportunity for you or other members of the project team to enter comments explaining why Quick Wins have been selected or omitted and the measures that will be taken to secure any selected Quick Wins. The level of detail that should be entered at this stage could vary from a brief description of the product / specification choice to a comprehensive evidence base, including references to invoice numbers, etc. Your overall recycled content results (standard, good and targeted) will be shown in the Recycled Content chart on the Project Homepage, and in the ‘Display detailed performance’ link. 7.6 Adding demolition and other non-construction wastes To help assess the potential for reuse of materials from the demolition of an existing building or structure, the Tool includes a link to the Demolition Protocol which provides a process for recording the likely types and quantities of demolition waste in more detail. However, you can also use the Tool’s Demolition Bill of Quantities estimator. The estimator provides an initial approximation of the quantities of different demolition materials that could be generated from demolition of buildings of specified size and construction type. It must be stressed that the estimator is just that, and that it is strongly advised that a more comprehensive demolition audit in-line with the principles of the Demolition Protocol is undertaken prior to making any firm decisions about the management or reuse of demolition materials. To enter information into the estimator, you must click on the ‘my project contains demolition / excavation activity’ link under Project Analysis on the Project Homepage. This will open a pop-up (shown in Figure 7.9) where you can enter some basic information about the building being demolished; this includes basic dimensions and structure type. Using this information, the Tool
The potential increase in project recycled content is the increase in total recycled content if the ‘Good recycled content’ Quick Win option is selected.
Select Quick Wins by checking the box
Opportunities are ranked by potential to increase overall project recycled content
Select the maximum number of Quick Wins to display using the drop down box.

54 Net Waste Tool – User Guide, Version 1.0
estimates the volume of space filled by the building and the fraction of this space taken up with different material types. The initial estimate of material quantities (in tonnes) can be overwritten as more detailed information becomes available (e.g. from a demolition audit) or to enter information on non-building demolitions (e.g. concrete ground slabs). At present the NW Tool does not enable you to take steps to manage demolition and excavation wastes (although future updates to the Tool will include this functionality). Nonetheless any demolition waste recorded on this screen will be carried through and reported in the Tool outputs. Figure 7.9 Entering demolition / excavation information
7.7 Setting requirements and targets The ‘Set targets & requirements’ screen is where targets for the overall waste management and recycled content for the project need to be set. Two targets can be set for waste and recycled content, a minimum requirement, and a higher target as shown in Figure 7.10. The minimum requirements recommended by WRAP6 are applied automatically by clicking on the Adopt Standard buttons in the Requirement sections. Higher targets can also be set to suit the nature of the project, based on the requirements of the client. This should also consider previous levels attained by similar project types. It is not necessary to set a higher target; however if you have an idea of a higher level that you wish to attain in your project, or have identified similar projects in the Library case studies to your own project, you may use these as guides to setting a higher target. The information boxes to the right of the screen allow you to record your justification for setting targets, for future reference.
6 WRAP, 2007. ‘Setting a requirement for recycled content in building projects’ and Achieving good practice in Waste Minimisation and Management’. Both available through www.wrap.org.uk/construction/ .

55 Net Waste Tool – User Guide, Version 1.0
Once these targets have been entered, along with the brief notes describing them, click on Save. Once the details have been saved, click on Go to Stage 3. Figure 7.10 Setting waste and recycled content requirements

56 Net Waste Tool – User Guide, Version 1.0
8.0 Managing your project
This section explains your options for managing your project and describes the functions contained within the Administration area of the Project Homepage, including:
o Reviewing the project timeline o Adding and managing guest users o Viewing the project audit history o Generating reports o Viewing selected components o Uploading information on actual waste arisings o Viewing project summary results
Figure 8.1 Project Homepage, Administration
8.1 Reviewing the project timeline From the Project Homepage, you can go back to the Project Timeline section of the Project Details page to review the construction programme entered. Figure 8.2 Project timeline
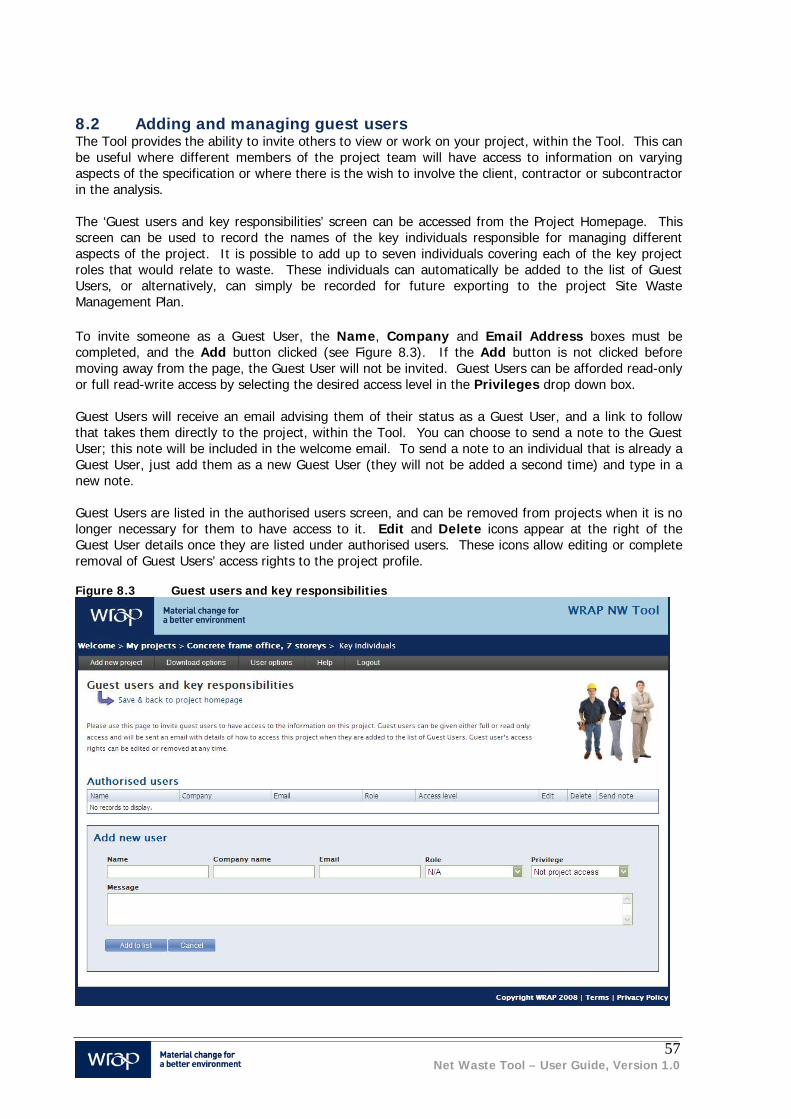
57 Net Waste Tool – User Guide, Version 1.0
8.2 Adding and managing guest users The Tool provides the ability to invite others to view or work on your project, within the Tool. This can be useful where different members of the project team will have access to information on varying aspects of the specification or where there is the wish to involve the client, contractor or subcontractor in the analysis. The ‘Guest users and key responsibilities’ screen can be accessed from the Project Homepage. This screen can be used to record the names of the key individuals responsible for managing different aspects of the project. It is possible to add up to seven individuals covering each of the key project roles that would relate to waste. These individuals can automatically be added to the list of Guest Users, or alternatively, can simply be recorded for future exporting to the project Site Waste Management Plan. To invite someone as a Guest User, the Name, Company and Email Address boxes must be completed, and the Add button clicked (see Figure 8.3). If the Add button is not clicked before moving away from the page, the Guest User will not be invited. Guest Users can be afforded read-only or full read-write access by selecting the desired access level in the Privileges drop down box. Guest Users will receive an email advising them of their status as a Guest User, and a link to follow that takes them directly to the project, within the Tool. You can choose to send a note to the Guest User; this note will be included in the welcome email. To send a note to an individual that is already a Guest User, just add them as a new Guest User (they will not be added a second time) and type in a new note. Guest Users are listed in the authorised users screen, and can be removed from projects when it is no longer necessary for them to have access to it. Edit and Delete icons appear at the right of the Guest User details once they are listed under authorised users. These icons allow editing or complete removal of Guest Users’ access rights to the project profile. Figure 8.3 Guest users and key responsibilities

58 Net Waste Tool – User Guide, Version 1.0
8.3 Reviewing the project audit history Any amendments made to your project data can be recorded in the ‘Project audit history’ screen (e.g. “data reviewed by consulting engineer 30/04/2008; frame details updated”). Entering simple explanatory data will enable the user and guest users to review the current status of the project. The Audit History notes can be sorted by date. Figure 8.4 Audit Data
8.4 Generating reports Users can generate spreadsheet or pdf reports on waste or recycled content. The Generate Reports screen (Figure 8.5) provides different reporting options on recycled content, and generates a detailed spreadsheet report on waste that can be used to populate a Site Waste Management Plan. The report can be generated to show results by mass, volume or value of waste. WRAP provides a Site Waste Management Plan template, which is available for download from the construction portal on WRAP’s website: http://www.wrap.org.uk/construction/index.html

59 Net Waste Tool – User Guide, Version 1.0
Figure 8.5 Generate reports
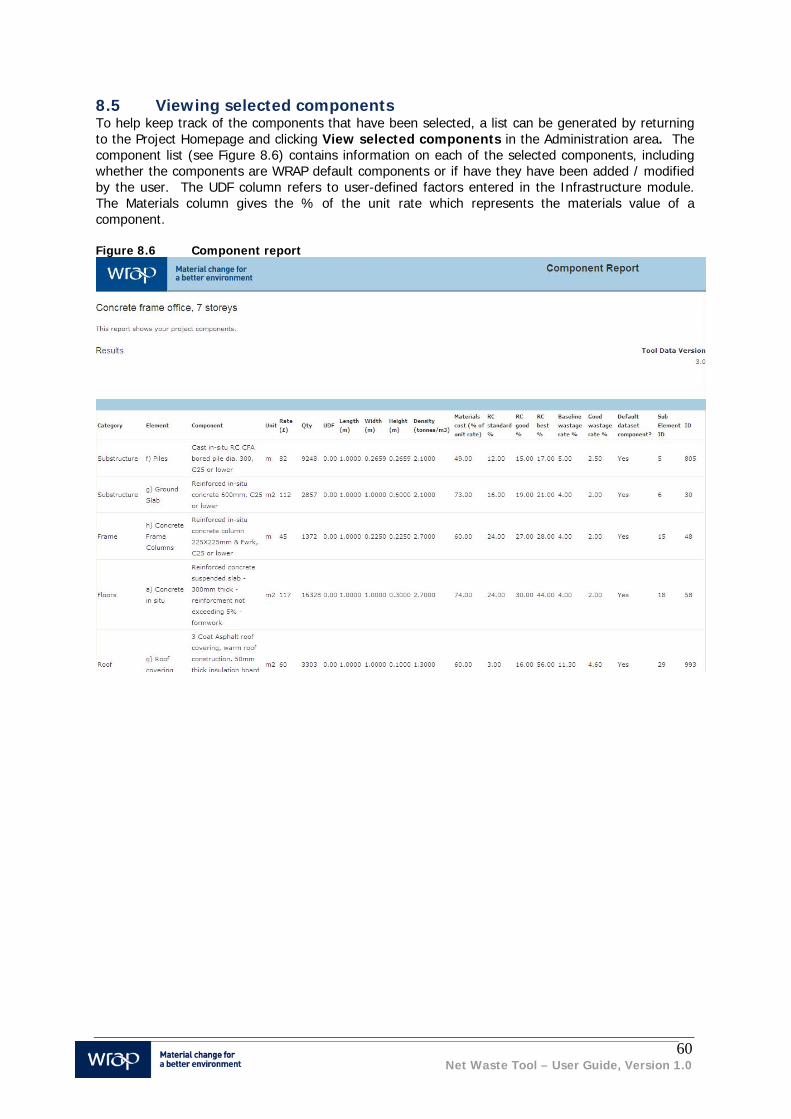
60 Net Waste Tool – User Guide, Version 1.0
8.5 Viewing selected components To help keep track of the components that have been selected, a list can be generated by returning to the Project Homepage and clicking View selected components in the Administration area. The component list (see Figure 8.6) contains information on each of the selected components, including whether the components are WRAP default components or if have they have been added / modified by the user. The UDF column refers to user-defined factors entered in the Infrastructure module. The Materials column gives the % of the unit rate which represents the materials value of a component. Figure 8.6 Component report

61 Net Waste Tool – User Guide, Version 1.0
8.6 Uploading information on actual waste arisings Once the project has begun on site and waste data is being generated it is possible to upload information on actual waste arisings. This actual practice data can then be used for reporting and also provides a useful comparison with the targeted forecast derived before construction began. To enter information on actual practice, click the Upload Actuals button in the Administration section of the Project Homepage. A popup will appear (see Figure 8.6) where you can enter information on waste quantities sent off site either by weight, volume or number of waste containers. The Tool uses this quantity information entered to estimate the actual practice performance of the project. Figure 8.6 Upload Actual data
8.7 Viewing project summary results The ‘Project Summary’ screen can be accessed from the ‘View Detailed Performance’ link on the bottom-left corner of the Project Homepage. The Project Summary lists the headline data and KPIs relevant to the project. It also shows any selected Recycled Content Quick Win details. More detailed reports are also automatically generated by the Tool in either spreadsheet or .pdf format (see Section 8.4 Generating Reports).

62 Net Waste Tool – User Guide, Version 1.0
Figure 8.7 Project Summary screen
Key project information is presented against four project specific performance measures:
Baseline practice – the performance likely to be achieved from current industry practices Good practice – the performance that could achieved by implementing Good practices such as a
Good Site Waste Management Plan Targeted practice – the levels of waste and recycled content that have been targeted for
delivery on the project (normally these would be between the Baseline and Good practice levels) Actual practice – the level of performance actually achieved based on real project data that have
been uploaded to the Tool. Information on actual practice will only be displayed once project data have been uploaded (see Section 10.2)
In addition to the summary performance information, the KPI’s presented on this screen include the major waste industry KPIs such as waste generation and waste to landfill per 100k or 100m2 of construction. As well as showing absolute quantities, information is also presented as an improvement against the baseline performance benchmark.

63 Net Waste Tool – User Guide, Version 1.0

64 Net Waste Tool – User Guide, Version 1.0
9.0 Compiling schemes
It is often easiest to assess complex or mixed use developments by generating a number of individual projects and then bringing these together into a scheme. This approach is particularly useful where a standard project type (e.g. a car park or a particular type of house) is replicated across a development or could be used in a number of different developments, by generating a ‘library’ of projects and then importing the appropriate ones into schemes as needed. The process for creating a scheme is similar to the project set-up but much simpler. The key steps are:
creating a new scheme; entering scheme details; adding or removing construction projects; and generating summary reports.
Each stage is described below. 9.1 Creating a new scheme The Tool scheme builder is located under the ‘My Schemes’ tab on the ‘My Projects’ page. Once a scheme has been created it will be listed on this screen, but on the first visit it is blank as shown in Figure 11.1. Clicking on Add New Scheme will take you into the scheme builder. Figure 9.1 My Schemes
9.2 Entering scheme details The first screen in the Scheme Builder is the ‘Scheme Summary’; an example for an empty scheme is shown in Figure 9.2. This screen provides an overview of the Scheme including its name, the Scheme wastage and recycled content requirements and targets (note these can be different to those set for the individual projects within the Scheme). As projects are added to the scheme, these are also listed on this screen.
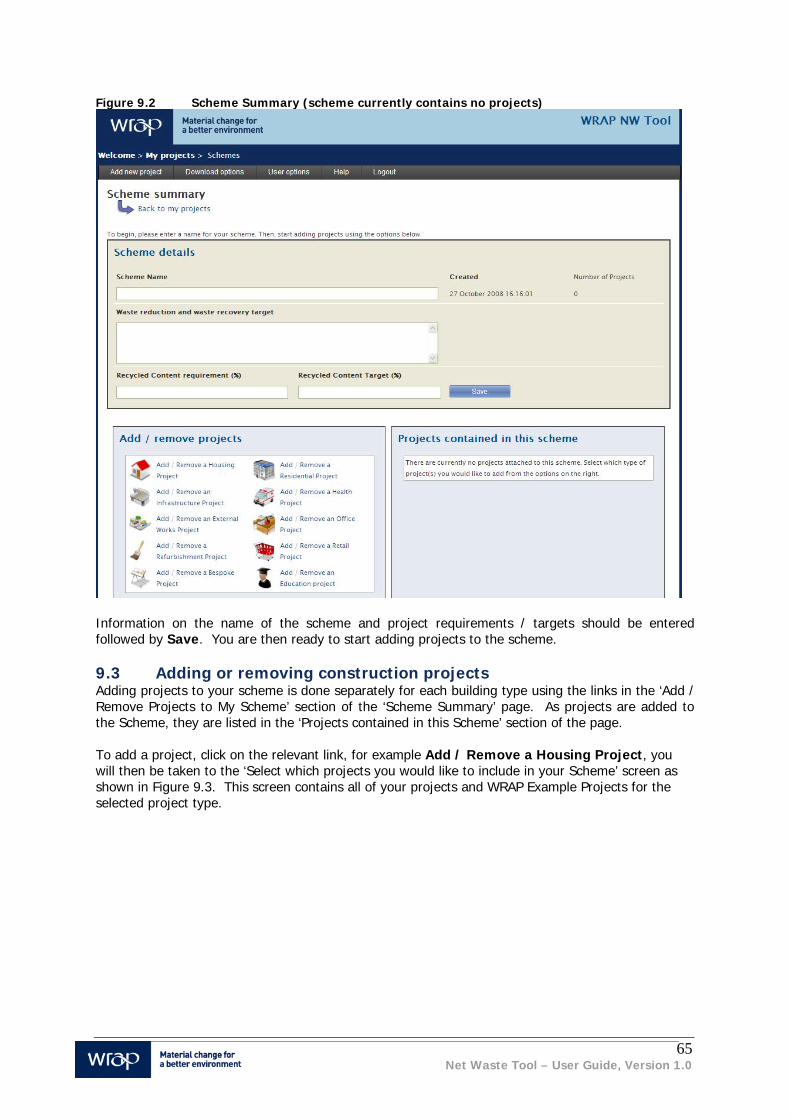
65 Net Waste Tool – User Guide, Version 1.0
Figure 9.2 Scheme Summary (scheme currently contains no projects)
Information on the name of the scheme and project requirements / targets should be entered followed by Save. You are then ready to start adding projects to the scheme. 9.3 Adding or removing construction projects Adding projects to your scheme is done separately for each building type using the links in the ‘Add / Remove Projects to My Scheme’ section of the ‘Scheme Summary’ page. As projects are added to the Scheme, they are listed in the ‘Projects contained in this Scheme’ section of the page. To add a project, click on the relevant link, for example Add / Remove a Housing Project, you will then be taken to the ‘Select which projects you would like to include in your Scheme’ screen as shown in Figure 9.3. This screen contains all of your projects and WRAP Example Projects for the selected project type.

66 Net Waste Tool – User Guide, Version 1.0
Figure 9.3 Selecting the projects to include in a scheme
For each project you have the option to include the Project directly or to include a copy of the Project as described in Table 9.1. The quantity box on the right hand side of each line can be used to define the number/quantity of each project that will be included in the Scheme. Table 9.1 Options for including projects within a scheme
Term Description
Do Not Include
Does not include the project within the scheme being built (this is the default option). Selecting this option for a previously selected project will result in the project being removed from the scheme.
Include Includes the project within the scheme being built. The project and the scheme are linked directly, i.e. any subsequent changes to the project being included will impact the performance of the scheme.
Include Copy
Includes a copy of the project within the scheme being built. In selecting this option you will have the opportunity to rename the copied project. Only changes to the copied project affect the performance of the scheme. This option is useful where a reference building might be used on a number of schemes (e.g. a housing development) with slight variations in some details between the schemes.
If you wish to remove a previously selected project from a scheme, simply change its status from ‘Include’ or ‘Include Copy’ to ‘Do Not Include’. Once you have selected the relevant projects, clicking Save will return to the ‘Scheme Summary’ screen. You will be prompted to rename any projects that have been included as a copy of an original; these renamed projects will be added to the relevant section of your ‘My Projects’ profile.

67 Net Waste Tool – User Guide, Version 1.0
The same process is repeated to add more projects of differing types to the scheme. Once all of the required projects have been added, a scheme report can be generated. 9.4 Generating scheme reports A scheme report can be generated by clicking Generate Printer Friendly Report or Generate PDF Report in the top right hand side of the ‘Scheme Summary’ screen. The scheme report provides a high level summary of the wastage and recycled content performance of each of the projects in the scheme together with the average results for the scheme as a whole.

68 Net Waste Tool – User Guide, Version 1.0
10.0 Reporting performance
The Tool generates several reports for demonstrating performance at project, scheme and corporate levels. The NW Tool retains the reporting functionality present in the previous RC Toolkit, but now also includes a comprehensive integrated waste and RC report that provides key information for use in a Site Waste Management Plan. 10.1 Net Waste Project reports Net Waste reports can be generated as an Excel workbook or a .pdf document. The reports can show waste information with different units (value of wasted materials, volume and mass). The information contained within the report includes:
project details;
waste forecasts;
waste reduction actions;
waste recovery actions;
waste to landfill;
cost of waste disposal;
recycled content, together with the selected RC Quick Wins; and
Net Waste.
Guidance is provided to show which bits of key information can be extracted for use within a Site Waste Management Plan (with reference to WRAP’s SWMP Template). 10.2 Recycled Content Project reports The Tool automatically generates three levels of recycled content project report either as printer friendly html, excel spreadsheets or pdf files. These are useful for different applications within the construction process. A description of these reports and examples of their use are listed in Table 10.1. Table 10.1 Types of project level report
Report Description Example application
Headline Report High level information on the building, the associated recycled content requirement and whether this has been achieved. It also lists the selected Quick Win items with an explanation as to why they have been used.
Outline Planning Application, Internal CSR report
Management Report Full information on the building details (dimensions and specifications) together with information on recycled content performance, selected Quick Wins, Guest
Outline / Full Planning Application

69 Net Waste Tool – User Guide, Version 1.0
Users and Audit data.
Project Component Report Component dataset for a building together with information on recycled content and rates.
Design team internal report, Research and development focused report
Project reports can be generated by selecting the Reporting icon for the relevant project on the ‘My Projects’ screen or by clicking on Generate Reports in the Administration area of the Project Homepage. 10.3 Scheme reports Scheme reports are accessed from the ‘Scheme Summary’ screen. These reports provide a summary of performance of all of the projects in a scheme as shown in Section 11. 10.4 Corporate reporting The Tool’s corporate reporting function is aimed at company Environmental / CSR managers who may wish to review or report on the performance of a selection of projects or schemes with which they have been involved. The corporate reporting function is accessed by clicking the tab on the far right of the ‘My Projects’ screen. The ‘Corporate Reporting’ screen is shown in Figure 10.1; it contains a list of all of the projects, guest projects or schemes to which the user has access. Figure 10.1 Corporate reporting
You can select which projects you wish to include in the corporate report by checking the appropriate box. Once the relevant projects have been selected, a corporate report is generated.

70 Net Waste Tool – User Guide, Version 1.0
11.0 Troubleshooting
Below are some of the questions you may have when using the NW Tool. WRAP will extend this list where necessary in response to user feedback. My development is complex with a variety of different building types and construction methods. How do I best use the NW Tool? It will probably be easier to split the analysis of the development into a number of individual projects. Each project can be set up and assessed using the most relevant NW Tool project type; you can then bring all of the projects together within a Scheme and generate average performance summaries for all of the development as a whole. It should be remembered that this approach is not ideal where different projects will share the same waste management facilities7. I have a large proportion of unaccounted value on my project, is this a problem? A large percentage of unaccounted value on a project is an indication that not all of the key materials being used have been entered, if this is the case it means that your waste arisings forecasts and likely percentage of recycled content are too low. Alternative explanations may be that:
the entered construction costs is too high – for example, you may have included the costs of demolition, preliminaries or specialist fit-out within the budget construction cost; or
the default rates for some of the selected components are too low – this would result in the Tool predicting that not all of the construction cost has been accounted for because it has underestimated the cost of some elements.
For the RC element of the Tool, a high (above 20%) percentage of unaccounted value will simply result in a conservative estimate of the total recycled content of the project (because unaccounted value is assumed to contain no recycled content). However, for the waste module, lots of unaccounted value should be avoided on a project because this may mean that the forecast levels of waste arisings and disposal costs will be inaccurate, potentially resulting in inappropriate project decisions. I have an unusually shaped building, how do I use the Tool? The simple estimates of project quantities determined using building dimensions are unlikely to be accurate where a building has unusual design features (e.g. irregular floorplates or mezzanine levels). In these cases, the best way to use the Tool is to simply enter component quantities directly in for each component when using the Add Components screen, based on the information in the project cost plan / bill of quantities. My project uses a Waste Broker If your project is using a waste broker that has provided a fixed price quote for managing all of the wastes on the project, the Tool’s default approach to estimating disposal cost (based on the cost per skip) is not applicable. The most suitable way to enter this information is to:
assume that no segregation will take place onsite;
select the ‘User defined’ waste container and enter a very large waste volume (e.g. 9999 m3); and
set a waste disposal cost that is the monthly average cost of the waste contract.
Future versions of the Tool will provide the facility to enter a total project disposal cost directly.
7 It is intended that a forthcoming update to the NW tool will enable users to assess their waste segregation and recovery options for an entire Scheme rather than just at the project level.

71 Net Waste Tool – User Guide, Version 1.0
Appendix A: Waste calculations
Figure A.1 summarises the key flows of construction materials on a project and the key data estimated by the waste module. This includes information on:
level of project wastage (mass and value);
the amount of this waste going to landfill (mass and volume); and
the approximate carbon benefits of waste reduction and recovery measures.
This core information can be used to calculate a range of KPI’s such as the project wastage rate, recovery rate, volume of waste per m2 construction area or per £100k of construction value.
Figure A.1 Summary of key material flows estimated by the waste module Wasted materials The value and mass of wasted materials is calculated using the project specification and applying component wastage rates (i.e. the percentage of the component that will be wasted). For example, if the wastage rate for bricks is 20% then for every £100 of bricks bought it is assumed that £20 will be wasted; if this £100 of bricks has a weight of 500kg then it is assumed that 100kg will be wasted. By taking this bottom up approach to waste estimation, the wastes forecasted for a project are specific to both the type and quantity of the components used. This is important because the major sources of waste on one project (e.g. bricks) may be completely absent in another (e.g. if cladding panels are used rather than bricks). The Tool contains information on the typical levels of construction wastage for each of the components in the database. Data is held on both the ‘baseline’ levels of wastage and a lower wastage level that could be achieved by adopting good practices for waste reduction. Using the brick example above, if the baseline wastage rate is 20%, and the wastage rate after good practices have
Materials purchased
Incorporated into project
Wasted materials
Waste to landfill
Waste recovered
Construction
Segregation and disposal
72 Net Waste Tool – User Guide, Version 1.0
been adopted is 10%, then the potential saving in materials value and mass is £10 and 50kg respectively. By forecasting the value and mass of wasted materials for all of the components on a project, the Tool can identify the most significant sources of waste, i.e. those where the adoption of waste reduction good practice would be most beneficial. While it is useful to have an overall view of the key sources of waste on a project, their effective management requires an indication of when different wastes are likely to be generated; this is achieved by specifying the start and end months of each construction element (e.g. substructure to start in May and end in July, with the building frame to start in July and end in October). The Tool assumes that all of the wastes associated with the components used for a given element are generated during the period when these activities are taking place. This means that the Tool can provide a waste forecast over time as well as for the project overall. Segregation and cost of waste disposal Using information on the quantities of different wastes present at different times in the construction process, the Tool helps develop an appropriate strategy for segregating these wastes in order to minimse the costs of waste disposal (while also increasing the potential for recovery of the wastes). Each construction component is classified of being made of one or more type of material (see Figure A.2). Depending on the material(s) from which it is made, the component will then be assigned to one of six waste streams8 (see Figure A.2). An approximate volume of waste is estimated from the mass of predicted waste arisings using the density of each component together with bulking factors for each material type (i.e. the amount of physical space required to hold a given mass of waste). This information is then used to assess the likely number of containers required to hold the forecast waste and the associated cost of disposal.
8 Components containing more than one material that are not separable onsite are considered as mixed waste irrespective of the materials they contain.

73 Net Waste Tool – User Guide, Version 1.0
NW Tool TOOL DATABASE
(>1000 CONSTRUCTION COMPONENTS)
METALS
GENERAL MIXED
TIMBER
INERT
PACKAGING
PLASTERBOARD
PALLETSUNPROCESSED TIMBER
PROCESSED TIMBER
CARDBOARD PACKAGINGPAPER PACKAGING
PLASTIC PACKAGING
PLASTERBOARD
GLASSGYPSUM PRODUCTS (Cement, Render, Mortar,
Plaster)INSULATION
TILED SOFT-FLOORINGROLLED SOFT FLOORING
PLASTICSTRUCTURAL WATERPROOFING
NON-HAZARDOUS WEEE
NON-FERROUS METALSFERROUS METALS
BRICKS AND BLOCKSAGGREGATES
SURFACING MATERIAL (Asphalt, Bitumen and Macadam)
TILES AND CERAMICSIN-SITU CONCRETE AND SCREED
PRE-CAST CONCRETEGRAVEL
SANDSTONE
OTHER INERT
COMPONENTS MATERIALS HEADLINE WASTE STREAMS
Figure A.2 Material and waste streams The Tool contains default data9 on the costs of disposing of different sized waste containers for each waste stream. These costs, together with the physical volume of waste being generated are used to estimate the costs of waste disposal, initially assuming that all of the waste will be treated as mixed waste (i.e. there will be no segregation on site). However, in many cases waste disposal costs can be reduced by segregating wastes on site (because the segregated wastes will incur a lower disposal cost than a generic mixed waste stream). Therefore where the user has specified that they will segregate a specific waste stream out of the general mixed waste, these materials are then assigned to the new waste stream and the disposal costs recalculated. The Tool assists this process by recommending the most suitable options for segregation and estimating the cost savings that could be achieved. To do this the Tool calculates the waste stream that would give the greatest overall reduction in disposal cost if it were segregated from the mixed waste stream. Then from the residual mixed waste it identifies the next most cost effective waste for segregation and so on. The Tool 9 These can be overwritten with actual contractor quotes.

74 Net Waste Tool – User Guide, Version 1.0
provides information on waste disposal costs where between one and six waste streams are segregated. The information is presented on a month by month basis because the merit in segregating a specific waste stream is dependant on whether it is actually likely to be present on site over the period in question. Waste to landfill and recovery Having used the Tool to forecast waste arisings and identify suitable reduction and segregation strategies the Tool is able to predict the quantities of different materials that will be present in different waste streams (e.g. the quantity of plasterboard present and whether this is in a plasterboard or mixed waste skip). To estimate the amount of this waste that will go to landfill and the proportion being recovered for reuse/recycling, the Tool needs to know the planned destination of the waste, such as:
a landfill site;
a licensed exempt site;
a transfer station / MRF;
a dedicated materials reprocessing facility; or
to the manufacturer for reuse in new product.
Depending on the planned disposal option, the Tool will apply a default waste recovery rate based on current practice for the specific material type and the receiving facility. This means that the recovery rate for a waste stream will vary depending on the recovery rates of the materials that it contains10. Where the specific waste contractor is known, it is possible to overwrite the Tool’s default assumptions and use the contractor’s stated recovery rates as the basis for estimating diversion from landfill. Carbon benefit Using published data on the carbon embodied in construction materials and the carbon saving arising from recovering rather than landfilling different materials, the Tool estimates the carbon benefits associated with waste reduction and recovery11. Based on the level of waste reduction and diversion from landfill being targeted by the project, the Tool can therefore estimate the potential benefit in terms of carbon reductions.
10 This level of detail is necessary given that the recoverable component of a mixed waste stream might be very high or low depending on the wastes generated by the project and the extent to which these have been segregated into other more specific waste streams. 11 It should be recognised that at present this information is purely indicative and further work is required to further develop the evidence base on carbon reductions from resource efficiency (this work is ongoing).

75 Net Waste Tool – User Guide, Version 1.0
Appendix B: Recycled content analysis
Recycled content by value is a function of the material value of a component (i.e. its total cost excluding the cost of construction labour), the quantity used and the percentage of the component by mass that is derived from recycled content. Thus, if a material costs £100 per m2 and has 20% recycled content by mass, the recycled content by value of 10 m2 would be:
£100 (per m2) x 10 (m2) x 20% = £200 The sum of the recycled content by value of all of the components in a project determines the total recycled content by value for the projects. When this is divided by the total value of all of the materials in the project, it gives the percentage recycled content by value, i.e.:
Total recycled content by value (£)
Total material value (£) x 100 = Recycled content by value (%)
The table below provides an example of how recycled content by value would be calculated for a whole project (units and prices are purely illustrative).
Component Quantity Material rate (excluding labour)
Material value
Recycled content by mass
Recycled content by value
Bricks 2,000 £250/1000 £500 15% £75
Dense blocks 50m2 £8/m2 £400 50% £200
Plasterboard 50 m2 £2/m2 £100 80% £80
Insulation 20 m2 £10/m2 £200 80% £160
Type I fill* 100m3 £10/m3 £1,000 100%* £1000
Unaccounted £2,000 0% £0
Total (£) £4,200 £1,515
Total (%) 36%
(£1,515/£4,200)
Note * in this example the Type I fill used in the project is from reused demolition waste, it is therefore
considered to be 100% ‘recycled’ and its cost is taken as being equal to the purchase price of an
equivalent quantity of product from the open market.
Because it would be unnecessarily time consuming to account for every single component in a project (particularly complex projects such as hospitals or shopping centres), it is possible to include components in a generic ‘unaccounted’ category. The material value of these components is included in the total material value but does not contribute to the overall recycled content value of the project. The Tool calculates the level of ‘unaccounted’ components automatically using information on the predicted construction cost of the project.
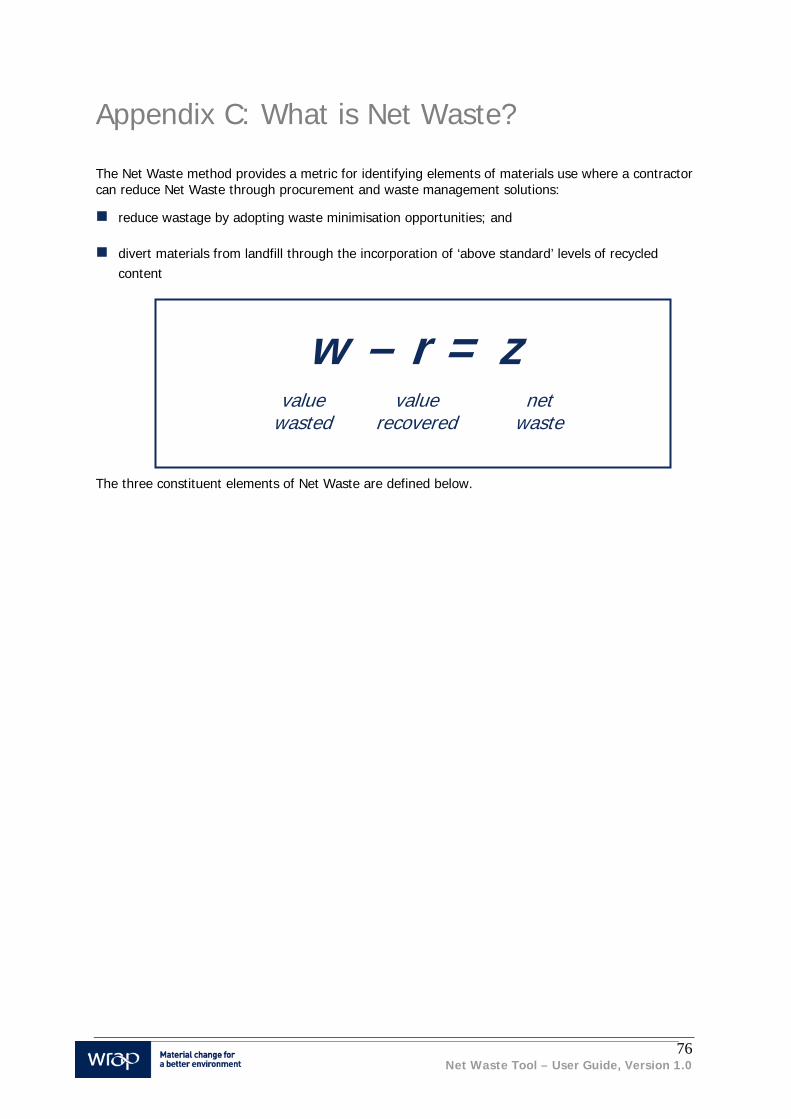
76 Net Waste Tool – User Guide, Version 1.0
Appendix C: What is Net Waste?
The Net Waste method provides a metric for identifying elements of materials use where a contractor can reduce Net Waste through procurement and waste management solutions:
reduce wastage by adopting waste minimisation opportunities; and
divert materials from landfill through the incorporation of ‘above standard’ levels of recycled content
The three constituent elements of Net Waste are defined below.
w – r = zvalue
wasted value
recovered net
waste

77 Net Waste Tool – User Guide, Version 1.0
W
Value of wasted
materials & packaging
The value of delivered construction materials that are wasted instead of being incorporated in the structure in their original form – including off cuts, damaged and unused materials either sent off site or reprocessed for alternative use on site. Value is the original purchase price of the materials as delivered to the site gate. W includes: - the original value of the materials sent off site as waste
(Note: the costs of waste disposal, such as collection fees, transport costs, gate fees, Landfill Tax, are not included in the calculation of W, but are modelled separately in the Net Waste Tool. Demolition and strip-out wastes are also excluded. Where potentially waste materials are reused on site in the same or similar application, such as half-bricks or timber off-cuts which are reused instead of skipped, the value wasted is reduced – and is modelled as a lower wastage rate.)
- the original value of the materials reprocessed for alternative use on site
(Where wasted materials are recycled on site, such as blocks and concrete crushed and screened for use as aggregate, their value of waste is still debited, but is partially or fully offset by their credit value as recovered materials – see below.)
- PLUS the value of packaging waste
(Note: this may be quantified as the cost of disposal of the packaging waste, as a proxy, if the materials value of the packaging is unknown. The Net Waste Tool estimates cost of packaging disposal instead of packaging value.)
- R
Value of recycled
content & reused
materials
The value of additional recovered materials incorporated in the construction works. R includes: - That percentage of the value of manufactured building products which derives from reused and
recycled content above ‘standard practice’ (For example: a lightweight concrete block normally contains 50% recycled material as ‘standard’ practice’, according to WRAP’s reference data. If an alternative brand of concrete block is used that is made from 80% recycled content, then the additional 30% of the value of the block is counted as R in order to reward the choice of the ‘good practice’ block. If reclaimed blocks were used, they would be ascribed 100% reused content, so R would be credited with 50% of the value of the equivalent newly manufactured blocks.)
- PLUS the value of any materials delivered to the site that are recovered for further use, either in
on site or off site construction applications (For example: the value of timber joist off-cuts reused on site in studwork OR the value of unused bricks recovered for use off site OR the value of left-over concrete blocks that are crushed on site and used as aggregate to make foot-paths OR the value of plasterboard that is returned direct to the manufacturer to be remade into new plasterboard. Recovered materials are valued in terms of the materials they replace, e.g. new timber, new bricks, virgin aggregate, and gypsum feedstock. Credit is also given for materials recovered from temporary works, such as hoarding and shuttering, for reuse on other projects.)
= Z Net Waste
W – R = Net Waste. Projects should seek to reduce their Net Waste by adopting cost-neutral and cost-saving good practice for waste reduction and greater use of recovered material. Ideally the Net Waste will be zero, or less than zero, although this may not be achievable on all types of project at present. For a given project, zero or less than zero Net Waste indicates that the value of recycled and reused materials that has been incorporated into the building is greater than the value of the material that has left the site as waste.

78 Net Waste Tool – User Guide, Version 1.0
Appendix D: The importance of materials resource efficiency
The construction sector is the largest consumer of materials in the UK. It generates more than one-third of waste materials, and only half of construction and demolition wastes are reused or recycled within the sector. Each year around 20 million tonnes of construction waste is sent to landfill. More efficient use of materials would make a major contribution to reducing the environmental impacts of construction – including landfill and the depletion of finite natural resources – whilst also contributing to the economic efficiency of the sector and of the UK as a whole. Fortunately it is possible to make major improvements in materials efficiency relatively easily and without incurring additional cost, by proactively managing waste and by using construction products with a higher level of recycled content. Proactive Waste Management Adopting the principles of good practice waste management on a project can demonstrate commitment to sustainable construction. If implemented correctly, good practice waste management can be a straightforward process that can deliver a range of benefits in addition to improvements in materials resource efficiency. Key benefits include:
Reduced material and disposal costs – less waste generated means that a reduced quantity of materials will be purchased, and less waste taken to landfill will reduce gate fees for disposal. Cost savings will stimulate the adoption of improved recovery practices and motivate a sustained change in waste management practice;
Increased competitive differentiation – benefits both developers and contractors, particularly
where this will help to meet prospective clients sustainability objectives;
Meeting planning requirements – planning authorities are increasingly setting conditions for environmental performance as part of the development process.
Increasing recycled content Increasing the proportion of the materials used in a project that come from a recycled source is a relatively simple, practical and cost-neutral way of showing a commitment to more sustainable construction. Key benefits include:
Increased performance against CSR objectives – quantified performance thereby meeting expectations of external stakeholders and employees;
Reduced materials costs - reusing materials and products or the use of locally sourced
construction and demolition waste is often cheaper than using virgin materials;
Driving down the cost of waste management. In the medium to long term, the increased use of recycled material will enhance its value and thereby make it more cost effective to recycle (as is the case with most metals). This will ultimately help to reduce costs of managing construction waste because more of the waste arisings will be recycled and less sent for disposal in landfills.
Neither proactive waste management nor use of products with high recycled content should have any adverse impact on project costs and it is likely that better materials management should result in cost savings, for example from reduced costs of materials purchase and waste disposal.

79 Net Waste Tool – User Guide, Version 1.0
Appendix E: Formulae for estimating project quantities
The information entered in the ‘Project Details’ screen is used to estimate the quantities of materials used for different components. These default estimates can be overwritten, but provide a starting point for assessing the likely value of different materials used in a project. Description of Project Details fields Tables B.1 provides a description of each of the fields in the ‘Project Details’ screen (not all of these fields are available for every project type), while Table B.2 shows the formulae that make use of this information to estimate quantities. Table B.1 Description of fields on ‘Project Details’ screen
Field Description
General details
Project name Name of project
Reference (optional) A reference number to help identify the specific
project revision being considered.
Project Location Location of the project
Project Password A password is entered to secure access to the
project (other users that are not project guests will
not be able to access or copy the project without
this password).
Project phase The project phase descriptor (Initial, Design,
Complete) can be used to filter the projects in the
Corporate Reporting function, e.g. so that only
those projects that are complete are shown for
reporting.
Projected Construction Cost (£) The projected construction cost is the cost in
materials, plant and labour of construction
activities; it excludes other project costs such as
demolition, design, planning, preliminaries or
specialist fitout.
For infrastructure and external works projects, it is
not necessary to include a projected construction
cost and the Tool assumes that all of the materials
used in the project will be specified within the
‘Select Materials’ screen.

80 Net Waste Tool – User Guide, Version 1.0
Field Description
Project description Use this field to add any text that will be useful to
identify / describe the project.
Project type
Type of use (refurbishment and bespoke only) The intended use of the project – or the most
similar option available from the drop down box.12
Number of occupants The number of occupants the project will provide
for.
Open plan or cellular The dominant internal figuration of the project –
select option from the drop down box.
Dimensions
Gross Internal Floor Area (GIFA) (m2) Gross internal floor space of all storeys
Perimeter length of outside wall (m) The length (m) of the outer wall perimeter
Number of storeys The number of storeys in the project including the
ground floor
Floor to floor height per storey (m) The distance between floor level and the top of the
wall stud – or an average height if these differ over
storeys.
Substructure
Pads Number of pads used in the foundations (if these
are used in the foundation system)
Piles Number of piles used in the foundations (if these
are used in the foundation system)
Depth of Piles If piles are used in the foundation system, enter the
depth of the piles here
Superstructure
Type of frame The predominant type of frame the project uses –
select the applicable option from the drop down
menu.
Number of flights of internal stairs The number of flights of internal stairs in the
project
12 The selection of project type does not influence project dimensions, instead it informs the selection of suitable components from the WRAP database and also the calculation of defaults for levels of servicing and sanitary fittings in relation to the project (these are estimated using the type of use and number of occupants).

81 Net Waste Tool – User Guide, Version 1.0
Field Description
Number of flights of external stairs The number of flights of external stairs the project
contains
Area of walls (m2) The gross area of all walls, both internal and
external, in m2.
Internal finish
Area of floor finish (m2) The total floor area which has floor finish – likely to
be the entire internal floor area. This can be
apportioned to different types of finishes at the
material specification stage.
Area of partitions for open plan types (m2) The area of partitions where these are present in
the specification.
Internal wall area to be acoustically designed
(%)
The proportion of the internal walls which is subject
to design that increases its acoustic performance –
usually resistance.
Windows and doors
Area of window (m2) The total area of all windows. This can be
apportioned out to different window types at the
material selection stage.
Area of rooflights (m2) The total area of rooflights
Number of external doors, single The total number of single external doors
Number of external doors, double The total number of double external doors
Number of fire resistant single internal doors The total number of fire resistant single internal
doors
Number of non fire resistant single internal
doors
The total number of non fire resistant single internal
doors
Number of fire resistant double internal doors The total number of fire resistant double internal
doors
Number of non fire resistant double internal
doors
The total number of non fire resistant double
internal doors
Tool formulae for default quantity calculations The Tool generates default quantities for components calculated using the formulae listed in this Appendix. The example below demonstrates this for the concrete strip component. This component is measured as the perimeter of external walls – 30m in this case (shown under Default QTY) Formulae calculate typical measurements for components; however default quantities can be overridden using the User QTY box if more accurate measurements are available for a project.

82 Net Waste Tool – User Guide, Version 1.0
Table B.2 Formulae for estimating default quantities (building project only) Project Element Formula
Substructure Foundation and Drainage = Perimeter Length of outside wall Ground Beams and Ground Slabs If Number of Storeys > 2 Then
= (Number of Pads x 10) x (0.6 x 0.6) Otherwise = (Number of Pads x 10) x (0.3 x 0.3)
DPM = Gross Internal Floor Area / Number of Storeys x 1.05
Pads = Number of Pads
Piles = Depth of Piles x Number of Piles
Frame Steel Frame = Gross Internal Floor Area
Steel Columns For Lightweight Frame
= Gross Internal Floor Area / 100 x Floor to Floor Height per Storey * 0.04 For Heavy Weight Frame = Gross Internal Floor Area / 100 x Floor to Floor Height per Storey * 0.01
Steel Beams = (Result from Steel Columns Calc) x 2 x 7 / Floor to Floor Height per Storey
Steel Bracing = (Result from Steel Beams Calc) x 2 / 3 Fire Protection = (Result from Steel Columns Calc) x 3 + (Result
from Steel Beams Calc) x 5 Concrete Frame, Timber Frame = Gross Internal Floor Area Concrete Columns = Gross Internal Floor Area / 50 x Floor to Floor
Height Per Storey Concrete Beams = Gross Internal Floor Area / 50 x 14 Floors Concrete in Situ, Concrete Pre Cast, Screed, Wooden Floor and Boarding
= Gross Internal Floor Area x (Number of Storeys -1) / Number of Storeys
Roof Wood Structure Generic, Roof Covering = Gross Internal Floor Area / Number of Storeys x
1.1 / Cosine(PI x 25 /180) Wood Structure Flat , Steel Structure Generic, Concrete Structure, Eaves
= Gross Internal Floor Area / Number of Storeys
Roof lights = Area of Roof Lighting Eaves = 0.1 x Gross Internal Floor Area / Number of
Storeys Stairs Internal Stairs = Number of Internal Stairs External Stairs = Number of External Stairs External Walls
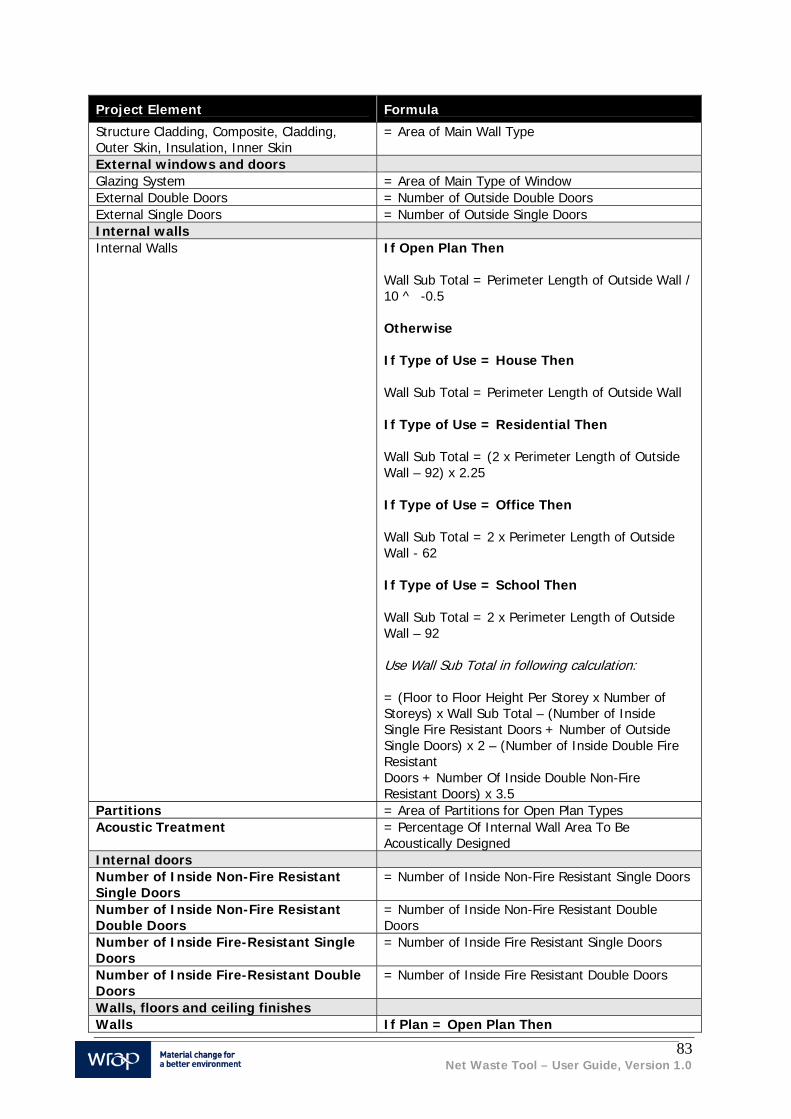
83 Net Waste Tool – User Guide, Version 1.0
Project Element Formula
Structure Cladding, Composite, Cladding, Outer Skin, Insulation, Inner Skin
= Area of Main Wall Type
External windows and doors Glazing System = Area of Main Type of Window External Double Doors = Number of Outside Double Doors External Single Doors = Number of Outside Single Doors Internal walls Internal Walls If Open Plan Then
Wall Sub Total = Perimeter Length of Outside Wall / 10 ^ -0.5 Otherwise If Type of Use = House Then Wall Sub Total = Perimeter Length of Outside Wall If Type of Use = Residential Then Wall Sub Total = (2 x Perimeter Length of Outside Wall – 92) x 2.25 If Type of Use = Office Then Wall Sub Total = 2 x Perimeter Length of Outside Wall - 62 If Type of Use = School Then Wall Sub Total = 2 x Perimeter Length of Outside Wall – 92 Use Wall Sub Total in following calculation: = (Floor to Floor Height Per Storey x Number of Storeys) x Wall Sub Total – (Number of Inside Single Fire Resistant Doors + Number of Outside Single Doors) x 2 – (Number of Inside Double Fire Resistant Doors + Number Of Inside Double Non-Fire Resistant Doors) x 3.5
Partitions = Area of Partitions for Open Plan Types Acoustic Treatment = Percentage Of Internal Wall Area To Be
Acoustically Designed Internal doors Number of Inside Non-Fire Resistant Single Doors
= Number of Inside Non-Fire Resistant Single Doors
Number of Inside Non-Fire Resistant Double Doors
= Number of Inside Non-Fire Resistant Double Doors
Number of Inside Fire-Resistant Single Doors
= Number of Inside Fire Resistant Single Doors
Number of Inside Fire-Resistant Double Doors
= Number of Inside Fire Resistant Double Doors
Walls, floors and ceiling finishes Walls If Plan = Open Plan Then

84 Net Waste Tool – User Guide, Version 1.0
Project Element Formula
= 2 x ((Gross Internal Floor Area / 15 / 7 – 2) x 12 + Perimeter Length of Outside Wall) x Floor to Floor Height Per Storey If Plan = Cellular Then = 2 x ((Gross Internal Floor Area / 15 / 4 - 2) x 12 + Perimeter Length of Outside Wall x Floor to Floor Height Per Storey Otherwise = 2 x Perimeter Length of Outside Wall / 6 x Floor To Floor Height Per Storey x Number of Storeys
Floors Main Type = Area of Main Floor Finish IT FF&E No formulae Services Heating, Lighting, Security Controls = Gross Internal Floor Area Bathrooms and toilets Number of Toilets If Type of Use = School Then
= Gross Internal Floor Area x 0.7 / 60 x (30 / 20 + 1 / 10) + 1) If Type of Use = House or Residential Then = 1 Otherwise = Number of Users / 15
Number of Urinals If Type of Use = School Then = 0.5 * Gross Internal Floor Area x 0.7 / 60 x (30 / 20 + 1 / 10) + 1) If Type of Use = House or Residential Then = 0 Otherwise = 0.5 x Number of Users / 15
Number of Showers If Type of Use = School Then = Gross Internal Floor Area x 0.7 / 60 x (1 / 10 + 1 / 10) + 1 If Type of Use = House or Residential Then = 1 Otherwise

85 Net Waste Tool – User Guide, Version 1.0
Project Element Formula
= Number of Users / 100
Number of Baths If Type of Use = School Then = 0 If Type of Use = House or Residential Then = 1 Otherwise = 0
Number of Sinks If Type of Use = School Then = Gross Internal Floor Area x 0.7 / 60 x (1 / 10) + 1 If Type of Use = House or Residential Then = 0 Otherwise = Number of Users / 100
