report writer series
TRANSCRIPT

Sage 100 Contractor
Modify System ReportsReport Writer series

Important NoticeThis is a publication of Sage Software, Inc.
© 2016 Sage Software, Inc. All rights reserved.
Sage, the Sage logos, and the Sage product and service names mentioned herein are registered trademarks or trademarks of Sage Software, Inc. or its affiliated entities. All other trademarks are the property of their respective owners.
This workbook provides general business information that should not be construed as professional advice. Sage does not represent or guarantee that the information is accurate or applicable to your business needs. Consult a tax, legal, financial, or other business professional to assess its suitability before implementing the information in your business. This information does not alter, amend, or become part of the license or purchase terms applicable to your use of any Sage product or service. Sage may make changes to this information at any time and without notice.
Your use of this document and the Sage product(s) described herein is governed by the terms and conditions of the Sage End User License Agreement ("EULA") or other agreement that is provided with or included in the Sage product. Nothing in this document supplements, modifies, or amends those terms and conditions. Except as expressly stated in those terms and conditions, the information in this document is provided by Sage "AS IS" and Sage disclaims all express, implied, or statutory warranties of any kind, including but not limited to the warranties of merchantability, fitness for a particular purpose, or of noninfringement. No implied license is granted to you under any Sage intellectual property or trade secret right. Sage reserves the right to revise, supplement, or remove information in this document at any time without notice to you or others.
10/2016

© 2016 Sage Software, Inc. 1
Modify System Reports Table of contents
Table of contentsPage
Modify system reports 7
What you will learn 7
Database essentials 8
System reports overview 9
Identify a system report file 10
Modify system reports 10
Activity 1 — Modify a report 13
How to modify a system report 14
Activity 2 — Make changes to a system report 14
Save report changes 15
Activity 3 — Save the system report changes 16
Common report modifications 18
Insert a logo 22
Modify a group 23
Remove/Change/Add Selection Criteria 27
Add or adjust a calculation 28
Additional activities 37

Table of contents Sage 100 Contractor
2 © 2016 Sage Software, Inc.

© 2016 Sage Software, Inc. 3
Modify System Reports Welcome
Welcome
This handout has been designed for use in an instructor-led class for Sage 100 Contractor. Detailed instructions help you recall the procedures introduced by your instructor. Depending on how your training class is conducted, some sections may not be addressed. Refer to these sections in the future as you continue to work with the software.
Course pre-requisitesList any pre-requisite knowledge that participants should have, and the courses or tutorials available for obtaining the knowledge if applicable. If no pre-requisites exist for the class, you can delete this section.
Training Data for lecture and activitiesAs your instructor demonstrates procedures in the software, he or she will access the training data set that has been used to capture software screens in this workbook. You will also use the training data set to complete the activities.
You can download the training data sets on the Sage University Web site (www.sageu.com) using the procedure explained on the next page.
Transaction dates in the Training Data setIn certain cases, transactions in the data set that you use may show a different year than the illustrations in this book, or than the instructor shows in class. If your data set transactions show a different year, but all other details such as the prefix and account setup, vendor names, and jobs are identical, your data set will correspond to the materials in all respects but the date.
When you complete the activities that involve dates, you may see a different year in the instructions or screen shot than in your data. Use the appropriate year based on the data you are using for activities.
For example, if 2012 is the current year in your data and the activity prompts you to enter prior year information, enter a date in 2011. If the activity prompts you to enter current year information, enter a date in 2012.
If you already have an older version of the training data installed, you can upgrade it using the directions below to download the latest training data set.
If you prefer to use another data set for the activities, you may do so, but your results may not resemble the images you see in the workbook.

Welcome Sage 100 Contractor
4 © 2016 Sage Software, Inc.
To add the training data to your server
1. Open Database Administration.
2. Select Add/Delete Companies to expand the options.
3. Select Deploy Sample Company.
4. Click the Deploy Sample button in the lower right.
5. Wait for the process to complete; you will see a message, “The Sample Company is ready for use.”
Menu pathsIn this workbook, menu paths show you the steps required to start a task. This is a sample menu path:
(4-3-2) Pay Vendors
This menu path represents the steps to take using the menu tree in the left panel of the Sage 100 Contractor main window.
Many tasks are also available from the activity center tabs, and from the associated process maps.
Where to get additional information
Help Files
Sage 100 Contractor contains an extensive Help system. The Help is your primary resource for reference and how-to information for all tasks. Help includes Contents, Index, and Search features that help you locate information quickly.
You can start Help in two easy ways:
Select About this Window from the Help menu in any window.
Press the F1 key in any window.
Technical support knowledgebase
The Technical Support Knowledgebase contains the latest information about software features. You must have a current service plan to access the knowledgebase.
InfoCenter
Be sure to check the InfoCenter for product news, announcements, support, and training. Access the InfoCenter from Home and Resources tab > Customer Resources.

© 2016 Sage Software, Inc. 5
Modify System Reports Welcome
Submit enhancement requestsDo you have a suggestion for how we can improve our software? We want to hear your ideas! Open the Product Enhancement Request option from Home and Resources tab > Customer Resources. Ideas you enter will be submitted to our Product Management team.
Welcome Sage 100 Contractor
6 © 2016 Sage Software, Inc.
Conventions used in this workbook
This workbook uses the following conventions:
The names of screens, windows, fields, buttons, and other features displayed by the software are shown in bold type.
Information you enter into the software is in bold type, as in the example below:
Type Miscellaneous in the Amount Type field.
Names of keys are shown in capitals; for example, ENTER, TAB. A plus sign (+) between two key names indicates that you should press both keys at the same time; for example, SHIFT + TAB.
NOTE: This symbol draws your attention to information of particular interest.
TIP: This symbol draws your attention to tips about using a helpful feature of the software.
WARNING: This symbol draws your attention to information that is important because it can help you avoid a costly or time-consuming error.
FOR MORE INFORMATION: This symbol draws your attention to a reference to another document or to another section in this document.

© 2016 Sage Software, Inc. 7
Modify System Reports What you will learn
Modify system reports
Many of the report changes you want to make are on reports that are installed as part of your software. This session provides you the foundation you need to modify reports. It highlights design basics such as how to get around in the report writer tool and access reports that come with your software. Then we’ll walk through the steps to make the most common report modifications such as text and image inserts, group changes, adjust criteria, and calculation basics.
What you will learnAt the completion of this session, you will be able to:
Understand the difference between a private and shared report and where locate reports of each type.
Explain the reports you can modify.
Save report changes in the proper naming format.
Navigate an existing report to make common report modifications.
Database essentials Sage 100 Contractor
8 © 2016 Sage Software, Inc.
Database essentials
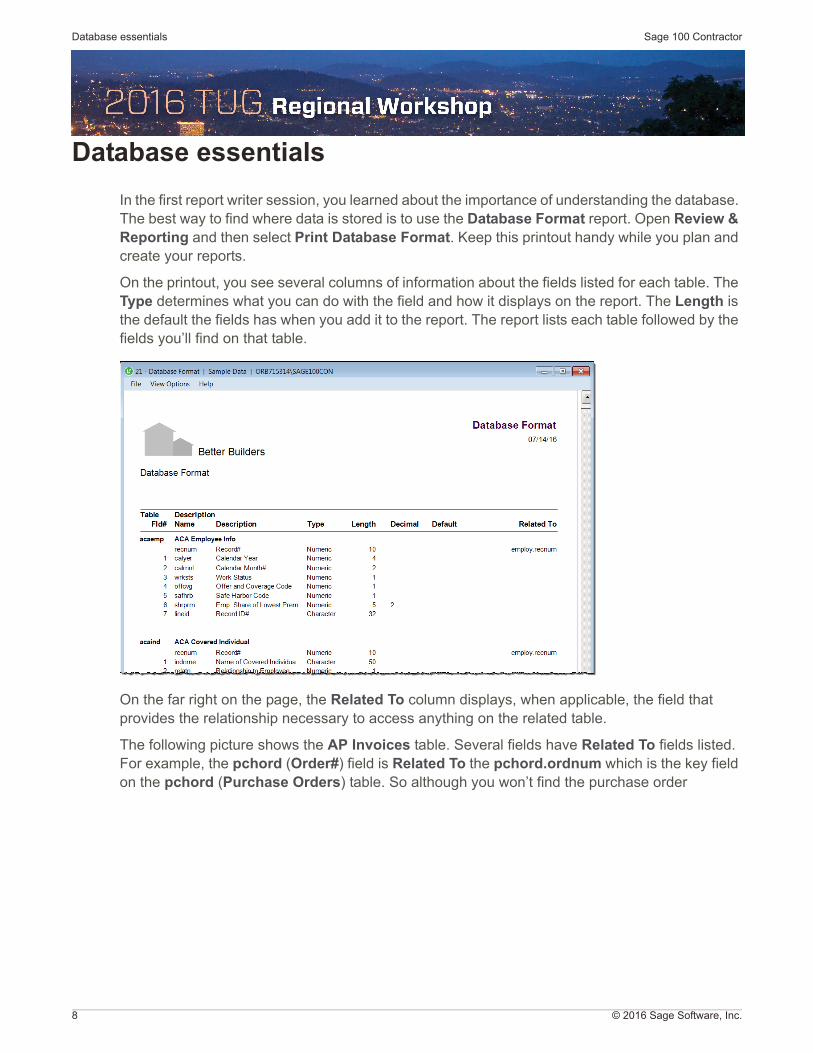
In the first report writer session, you learned about the importance of understanding the database. The best way to find where data is stored is to use the Database Format report. Open Review & Reporting and then select Print Database Format. Keep this printout handy while you plan and create your reports.
On the printout, you see several columns of information about the fields listed for each table. The Type determines what you can do with the field and how it displays on the report. The Length is the default the fields has when you add it to the report. The report lists each table followed by the fields you’ll find on that table.
On the far right on the page, the Related To column displays, when applicable, the field that provides the relationship necessary to access anything on the related table.
The following picture shows the AP Invoices table. Several fields have Related To fields listed. For example, the pchord (Order#) field is Related To the pchord.ordnum which is the key field on the pchord (Purchase Orders) table. So although you won’t find the purchase order

© 2016 Sage Software, Inc. 9
Modify System Reports System reports overview
description on the AP Invoices table, you can access it for a report because of the relationship to the purchase order table.
These relationships determine, for any report, from what tables you can pull data for the report.
System reports overviewWhen you save a report, you specify whether the report is private or public. Based on that option, the report is saved in different folder locations.
You print reports you save in the Custom Reports folder from either within Report Writer or Review & Reporting > Report Printing menu option. You print reports you save in System Reports from the actual menu options for which they are saved, such as 4-1-2 Accounts Payable Reports.
Identify a system report file Sage 100 Contractor
10 © 2016 Sage Software, Inc.
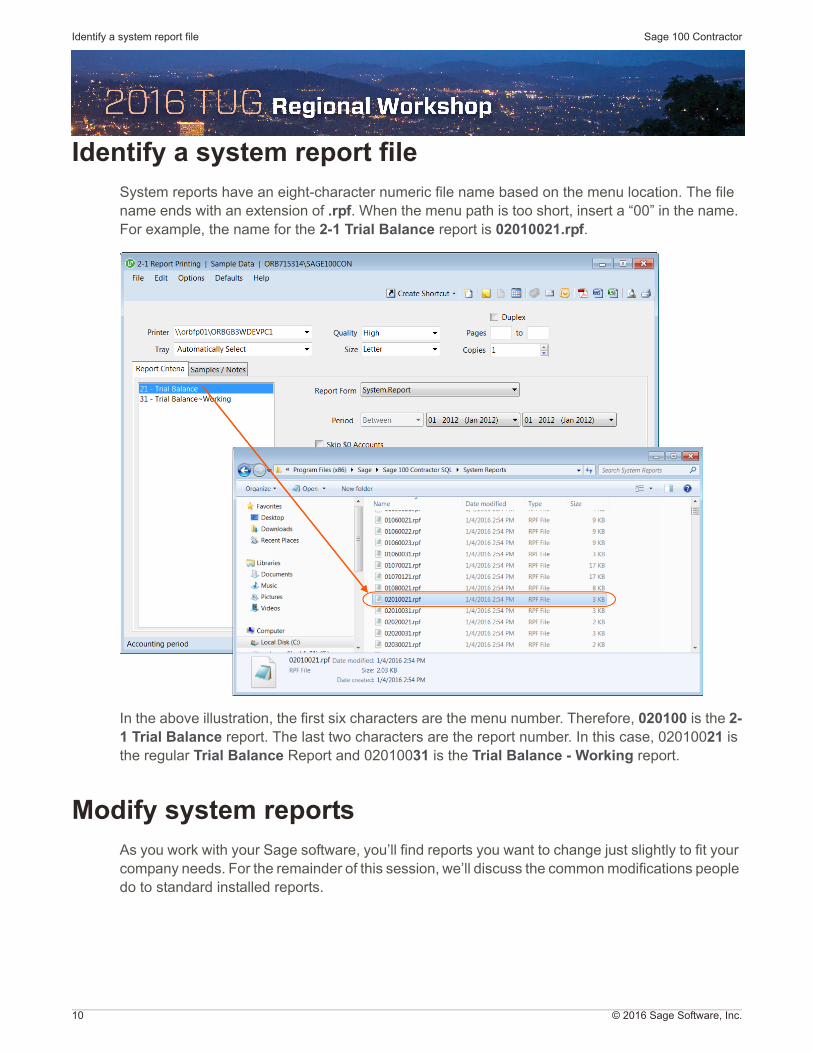
Identify a system report fileSystem reports have an eight-character numeric file name based on the menu location. The file name ends with an extension of .rpf. When the menu path is too short, insert a “00” in the name. For example, the name for the 2-1 Trial Balance report is 02010021.rpf.
In the above illustration, the first six characters are the menu number. Therefore, 020100 is the 2-1 Trial Balance report. The last two characters are the report number. In this case, 02010021 is the regular Trial Balance Report and 02010031 is the Trial Balance - Working report.
Modify system reportsAs you work with your Sage software, you’ll find reports you want to change just slightly to fit your company needs. For the remainder of this session, we’ll discuss the common modifications people do to standard installed reports.

© 2016 Sage Software, Inc. 11
Modify System Reports Modify system reports
Can I modify the report?The first question to answer when it comes to modifying reports is whether you can actually modify a report. In the Report Printing window for reports, you see the list of reports for a menu option on the left side of the window. If you can open the report with the report writer tool and make changes, you see the Modify Report button at the top of the window.
If you do not see the Modify Report button, you cannot modify the report. In some cases, reports have certain calculations programmed into the design which make it impossible to modify successfully.

Modify system reports Sage 100 Contractor
12 © 2016 Sage Software, Inc.
How to open the report to modifyThe second question you may ask is how do I open a report? There is more than one way to open a report to make modifications.
1. In the Report Printing window, click the Modify Report button to open the report in the Report Writer window to make changes.

© 2016 Sage Software, Inc. 13
Modify System Reports Modify system reports
2. Open Review & Reporting > Report Writer and select the option to Browse for an existing report. Click OK and then select the option to Display System Reports.
Activity 1 — Modify a report
Scenario
Find out whether a report is one you can modify or not by completing the steps in the activity.
1. Open 4-1-5 Vendor Payment Journal. Do any of the reports show a Modify Report button?
________________________________________________________________________
2. Open 4-1-2 Payable Invoice List. Do any of the reports show a Modify Reports button?
________________________________________________________________________
3. Click 31-AP Invoice List~by Vendor and then click File > Print Preview. Notice that the report is grouped and sorted by the vendor’s record number. Close the preview window.
4. Click the Modify Report button. Notice that the 13-3 Report Writer window appears with the AP Invoice List ~by Vendor report open and ready to make changes.
5. Leave this report open when you return to class.

How to modify a system report Sage 100 Contractor
14 © 2016 Sage Software, Inc.
How to modify a system reportOnce you have a system report open, use the Report Writer tools to edit or modify the report to fit your needs. For example, you may not like the report sorting by vendor numbers; instead you prefer names. Perform the activity below to change the system report to sort by the vendor’s name.
Activity 2 — Make changes to a system report
1. Report Writer should still be open with AP Invoice List~by Vendor from Activity 1.
2. Type Alpha at the end of the current Report Title.
3. Select Edit > Grouping/Sorting. Click on Vendor in the Fields to Group By box and press DELETE on your keyboard to remove the group.

© 2016 Sage Software, Inc. 15
Modify System Reports Save report changes
4. Change the current table selection to Accounts Payable in the Tables list. Then, double-click Vendor Name in the Fields in Accounts Payable table area. Verify the Vendor Name is added as a grouping on the report in the lower part of the window. Click OK to accept and exit.
Save report changesBefore you can test a report to see the changes you made, you must save the report with a new name. For reports you want to print from a report menu, you must save in the eight-character numeric naming format, with the last two digits being 01 through 20.
For example, if you want to see the changes made to the Accounts Payable Invoice report, keep the first six characters of the original report the same (040102). Change the last two digits to a number between 01 and 20. The full report name is 04010201.rpf.
You can save your report changes as private or shared. When you create a customized system report, and make is shared for other users, it is saved into the following folder location:
Version 19.7 and earlier
Type of form Location path
Private C:\Users\Username\AppData\Local\Sage\Sage 100 Contractor\Custom Reports
Shared \\MB7\Custom Reports
System \\Program File (x86)\Sage\Sage 100 Contractor\System Reports

Save report changes Sage 100 Contractor
16 © 2016 Sage Software, Inc.
Version 20 and later
Activity 3 — Save the system report changes
1. In the Report Writer window, select File > Save. This option is similar to Save As in other programs. In the Save Report window, type 04010201.rpf in the File Name box. In the lower part of the window, select if the report is shared or private, and then click Save.
Type of form Location path
Private C:\Sage100Con\Common\User Data\Server|User\Custom Reports
Shared \\Sage100Con\Common\Custom Reports
System \\Program File (x86)\Sage\Sage 100 Contractor SQL\Custom Reports

© 2016 Sage Software, Inc. 17
Modify System Reports Save report changes
2. Close the Report Writer window. On the Report Printing window, notice the new report displays at the top of the list.
To preview the report
1. In the Report Printing window, click on the 01 report you modified in the list on the Report Criteria tab.

Common report modifications Sage 100 Contractor
18 © 2016 Sage Software, Inc.
2. Select File > Preview.
3. Note the vendor groupings appear by name instead of number.
4. Close the preview window.
Common report modificationsSome of the top requests for report modifications include the following:
Change the logo or insert an image.
Modify the group information on a report.
Insert a forced page break on a report.
Adjust a selections criteria that is preset or nonessential.
Add or tweak a calculation for a field on a report.

© 2016 Sage Software, Inc. 19
Modify System Reports Common report modifications
Report Writer overviewLet’s begin with a short overview of the designer to review what you learned in the first session. The following window shows the main Report Writer window.
Here are some items to note about the window layout and working in the tool.
1. The header area display important information about the report.
a. The Report Title displays is the name you see for the report in lists.
b. The Primary Table defines the driving record on the report and what information is available from other table as well as the amount of detail that prints.
c. In the Report Form box, you see the default form for the report. You can change the form when you print the report.
d. New Form is typically set to Automatic, but in some reports, you want to reset the form to begin again based on the information on the report. For example, on the A/R Invoice report, a new form begins for each new invoice record. If you look at the report design, you see the New Form box set to On Group 1.
2. The toolbar is the most efficient way to work within report writer. You can find a list of the toolbar buttons in the table below.
3. The left side of the window displays the bands within the report.
a. There are six band types in a report: Heading, Group, Detail, Subtotal, Total, and No Print.
b. You can have more than one band of the same type. You may do this when you need the same level of information to print on multiple lines. For example, if you have multiple

Common report modifications Sage 100 Contractor
20 © 2016 Sage Software, Inc.
heading lines for a job report that include the job and address information, you may have up to four different band lines for the job group header.
c. There are properties for each band line. Click on the band and select the button to edit properties. You can change the font and color for all the fields on the row. You can change the height for empty band line rows if you need to create space between details on the report.
d. To insert a a new row, use the button at the top of the list of band lines for Insert a row above the selected row.
4. Right-click on any field in the design area to select Object Properties. The properties for each object type are different.
Another tip when you right-click on an object, you can use the align options to align multiple objects.
5. After you make changes to a standard installed report, you should not override the original report name. Each time you install a release update, the program overrides the reports in the \\MB7\System Reports folder. Create a new name based on the naming convention discussed earlier.
Toolbar shortcutsThe toolbar displays in the upper right on the design window. There is also another small toolbar above the band lines area.
Button Description Menu access
Open File. This is not available when you click the Modify Report button from a report printing window.
File > Open
Save. Similar to ‘save as’; it prompts for a report name each time you save.
File > Save
Change the font. Click on an object, then click to change the font, style, and size.
Edit > Font
Change the drawing color. Use for text and drawing colors. If you select an object, it displays with the new color. If there is no object select, the next insertion is the new color.
Edit > Color
Align text to the left. Click on an object, then click to justify.
Edit > Align Left
Align text to the right. Click on an object, then click to justify.
Edit > Align Right

© 2016 Sage Software, Inc. 21
Modify System Reports Common report modifications
Define calculated fields.This is where you create formulas for the report, or globally to use with any report.
Edit > Calculated Fields
Define grouping and sorting for the report. Add groups to the report or change the sort order.
Edit > Grouping/Sorting
Define selection criteria for the report. Modify or add selection criteria.
Edit > Selection Criteria
Insert fields from a list.On the main toolbar, select an area on the report, then click to display the Insert a Field window.
On the band toolbar, use to insert a new band row above the current selected row on the design.
Insert > Fields
Insert a picture. Click to insert a file. You can insert *.bmp, *.gif, or *.jpg file types.
Insert > Picture
Select multiple object by drawing around them. Click the button and then click and hold the mouse to lasso the fields you want to select.
Edit > Selected Object
Add text. Within Report Writer, there are work modes. Click Add Text to enable Insert a field or to click in the design and type text.
The current work mode displays in the lower left on the window.
Insert > Text
Draw lines. Insert a line above or below an object. Draw lines in a band of their own to enhance the layout of a report.
Open Edit > Select Objects to select the line and modify the style properties.
Insert > Line
Draw boxes. Insert a box around a group of fields on the report for visual purposes. You can select line types and foreground and background colors for the box.
Open Edit > Select Objects or right-click on and select Properties to modify the style.
Insert > Box
Enter notes for this record. Enter any information about this report someone who prints the report might find useful.
File > Print
Button Description Menu access
Insert a logo Sage 100 Contractor
22 © 2016 Sage Software, Inc.
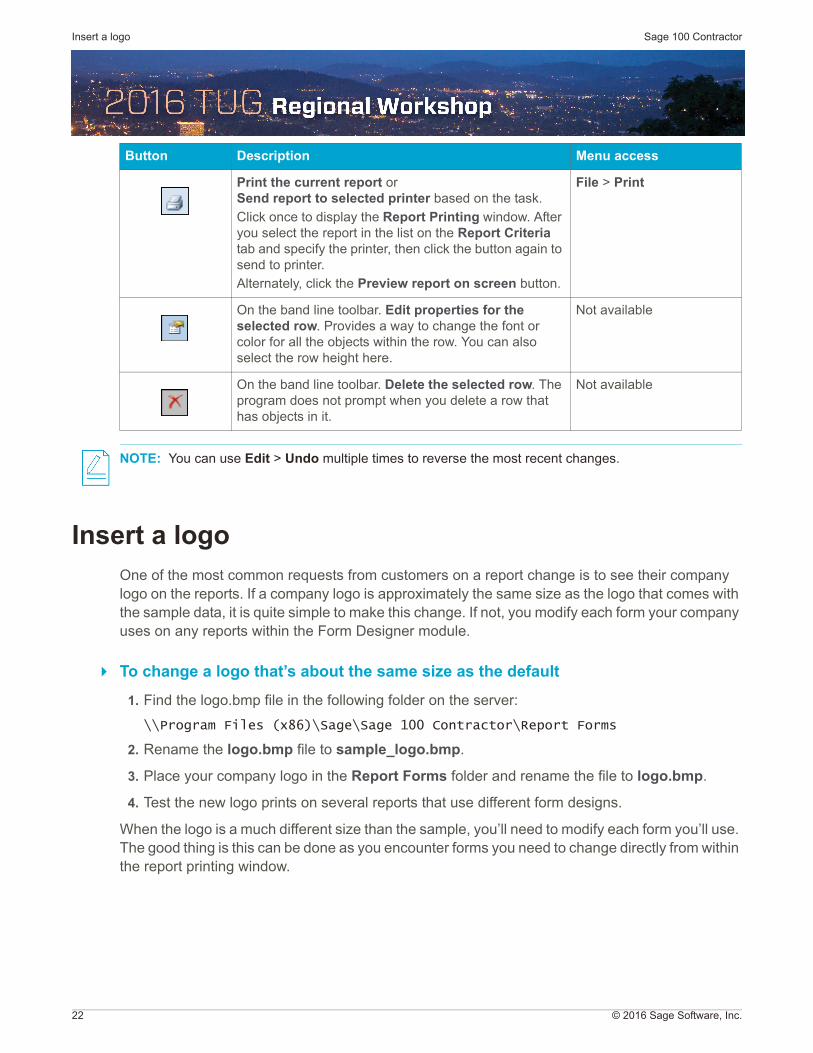
NOTE: You can use Edit > Undo multiple times to reverse the most recent changes.
Insert a logoOne of the most common requests from customers on a report change is to see their company logo on the reports. If a company logo is approximately the same size as the logo that comes with the sample data, it is quite simple to make this change. If not, you modify each form your company uses on any reports within the Form Designer module.
To change a logo that’s about the same size as the default
1. Find the logo.bmp file in the following folder on the server:
\\Program Files (x86)\Sage\Sage 100 Contractor\Report Forms
2. Rename the logo.bmp file to sample_logo.bmp.
3. Place your company logo in the Report Forms folder and rename the file to logo.bmp.
4. Test the new logo prints on several reports that use different form designs.
When the logo is a much different size than the sample, you’ll need to modify each form you’ll use. The good thing is this can be done as you encounter forms you need to change directly from within the report printing window.
Print the current report or Send report to selected printer based on the task.
Click once to display the Report Printing window. After you select the report in the list on the Report Criteria tab and specify the printer, then click the button again to send to printer.
Alternately, click the Preview report on screen button.
File > Print
On the band line toolbar. Edit properties for the selected row. Provides a way to change the font or color for all the objects within the row. You can also select the row height here.
Not available
On the band line toolbar. Delete the selected row. The program does not prompt when you delete a row that has objects in it.
Not available
Button Description Menu access
© 2016 Sage Software, Inc. 23
Modify System Reports Modify a group
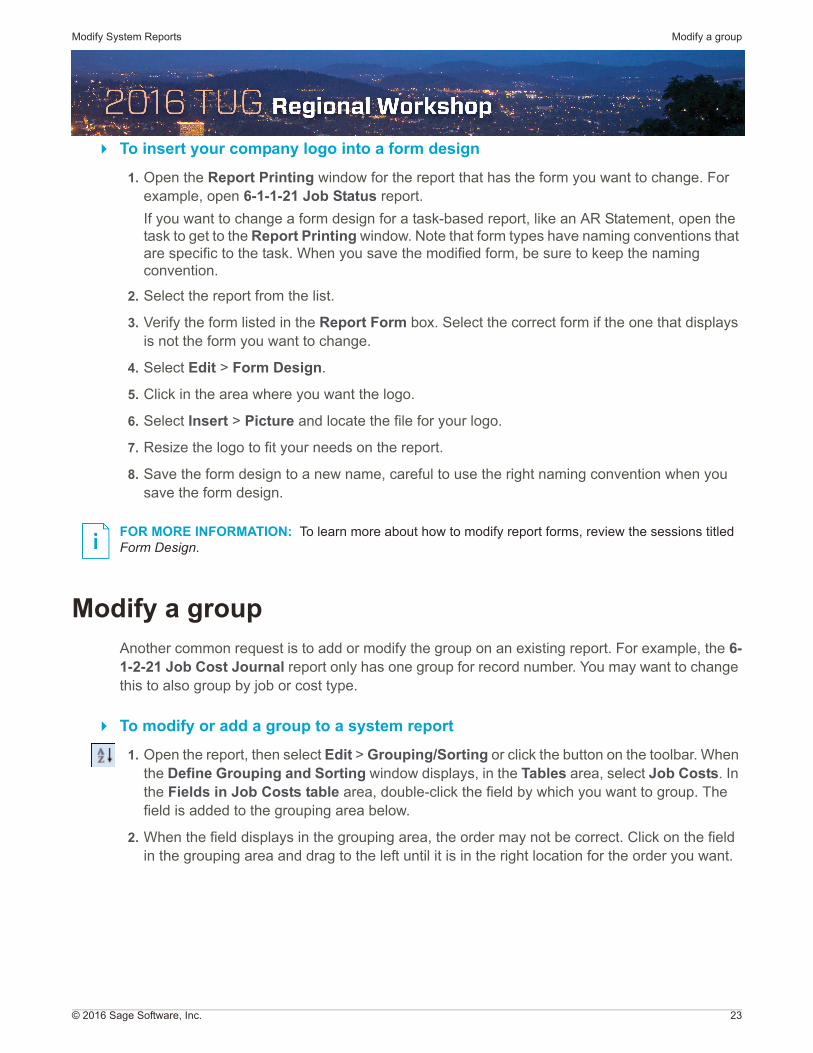
To insert your company logo into a form design
1. Open the Report Printing window for the report that has the form you want to change. For example, open 6-1-1-21 Job Status report.
If you want to change a form design for a task-based report, like an AR Statement, open the task to get to the Report Printing window. Note that form types have naming conventions that are specific to the task. When you save the modified form, be sure to keep the naming convention.
2. Select the report from the list.
3. Verify the form listed in the Report Form box. Select the correct form if the one that displays is not the form you want to change.
4. Select Edit > Form Design.
5. Click in the area where you want the logo.
6. Select Insert > Picture and locate the file for your logo.
7. Resize the logo to fit your needs on the report.
8. Save the form design to a new name, careful to use the right naming convention when you save the form design.
FOR MORE INFORMATION: To learn more about how to modify report forms, review the sessions titled Form Design.
Modify a groupAnother common request is to add or modify the group on an existing report. For example, the 6-1-2-21 Job Cost Journal report only has one group for record number. You may want to change this to also group by job or cost type.
To modify or add a group to a system report
1. Open the report, then select Edit > Grouping/Sorting or click the button on the toolbar. When the Define Grouping and Sorting window displays, in the Tables area, select Job Costs. In the Fields in Job Costs table area, double-click the field by which you want to group. The field is added to the grouping area below.
2. When the field displays in the grouping area, the order may not be correct. Click on the field in the grouping area and drag to the left until it is in the right location for the order you want.
Modify a group Sage 100 Contractor
24 © 2016 Sage Software, Inc.
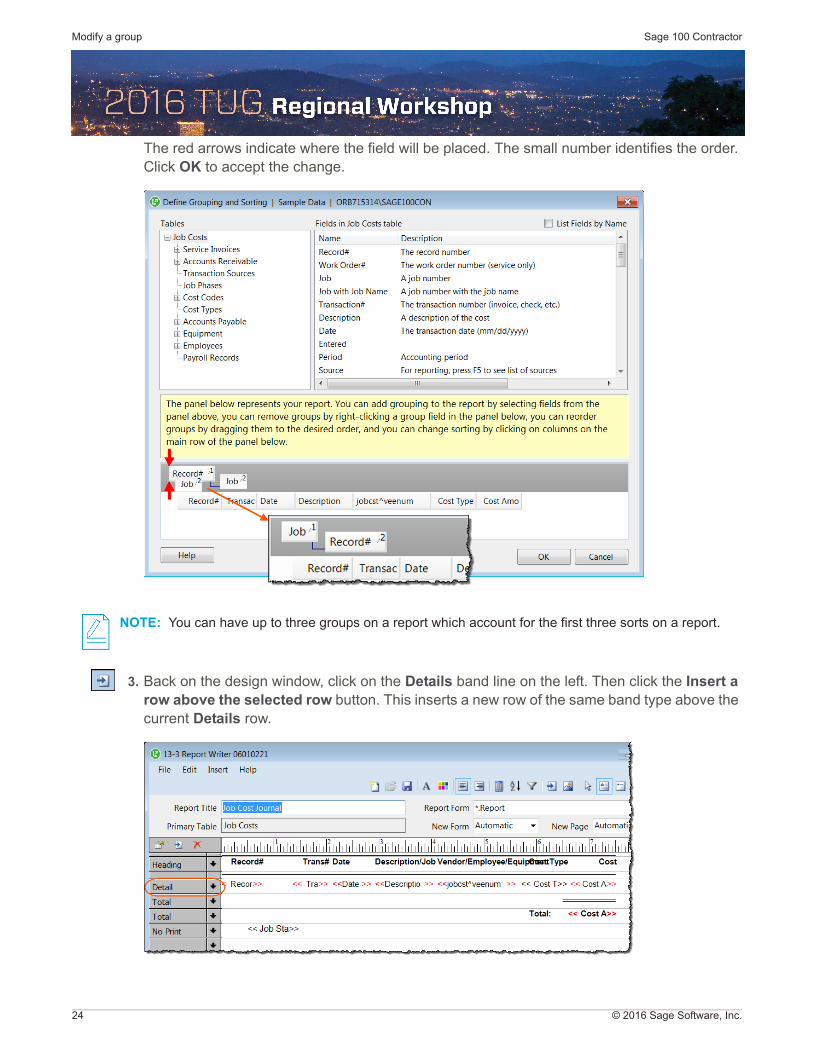
The red arrows indicate where the field will be placed. The small number identifies the order. Click OK to accept the change.
NOTE: You can have up to three groups on a report which account for the first three sorts on a report.
3. Back on the design window, click on the Details band line on the left. Then click the Insert a row above the selected row button. This inserts a new row of the same band type above the current Details row.

© 2016 Sage Software, Inc. 25
Modify System Reports Modify a group
4. To change the band type to Group 1, which ties to the grouping order, click the drop-down arrow and select Group 1 from the list.
5. Click in the new Group 1 row to create a box to insert a field. If you receive a warning, you may need to select Insert > Text first. Select Insert > Fields and choose Job with Job Name from the Job Costs table. Double-click on the field name in the list on the right side of the window to insert on the design.
6. Change the font on the Job with Job Name field to bold and increase the font one size.
7. You may also choose to insert subtotals for the group. To insert subtotals, click on the first Total band line and click the insert button to insert a new row. Repeat again, to create a second new

Modify a group Sage 100 Contractor
26 © 2016 Sage Software, Inc.
band lines. On what should be your new first Total band line that is blank, click the drop-down arrow to change the type to Subtotal 1. Do the same on the second Totals band line.
8. In the column under Cost Amount on the second Subtotal 1 row, insert the Cost Amount field from the Job Costs table again.
9. Save the report to a new name and test. If you save the report with the system naming convention into the System Reports folder, you must test the report from the menu to which you save it based on the file name.

© 2016 Sage Software, Inc. 27
Modify System Reports Remove/Change/Add Selection Criteria
Insert a group page breakWhen you create or modify a group, you may also want to include a page break for each new group the program encounters. This is done in the report with the New Page option in the header area of the report window.
Remove/Change/Add Selection CriteriaMany reports have selection criteria set up to automatically include or exclude data when you print the report. If you find these criteria cannot be changed at print time or you get tired of changing each time, in some cases you can open the report to fix the selection. You may also need to add a different selection criterion to a report.
In the following example, a selection criterion is modified on a report.
1. Open the report to which you want to change the criterion. In this example, we want to change the Job Cost Journal report to include voided transactions as well as open. When you print the report, the Status selection criterion is set to Equal 1 and you cannot change it. This is visible by the grayed out selection on the Report Printing window.
2. Click the Modify Report button in the print hub. When the report writer window displays, select Edit > Selection Criteria.
Add or adjust a calculation Sage 100 Contractor
28 © 2016 Sage Software, Inc.
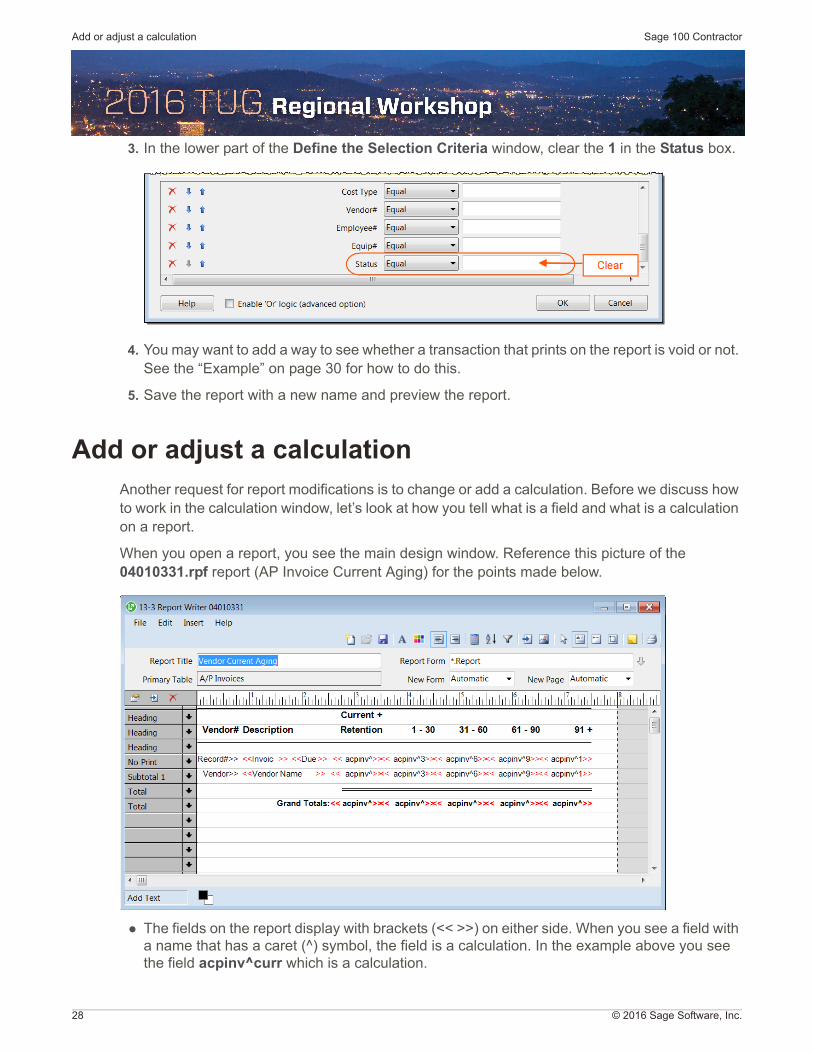
3. In the lower part of the Define the Selection Criteria window, clear the 1 in the Status box.
4. You may want to add a way to see whether a transaction that prints on the report is void or not. See the “Example” on page 30 for how to do this.
5. Save the report with a new name and preview the report.
Add or adjust a calculationAnother request for report modifications is to change or add a calculation. Before we discuss how to work in the calculation window, let’s look at how you tell what is a field and what is a calculation on a report.
When you open a report, you see the main design window. Reference this picture of the 04010331.rpf report (AP Invoice Current Aging) for the points made below.
The fields on the report display with brackets (<< >>) on either side. When you see a field with a name that has a caret (^) symbol, the field is a calculation. In the example above you see the field acpinv^curr which is a calculation.

© 2016 Sage Software, Inc. 29
Modify System Reports Add or adjust a calculation
There are two types of calculations; report and global. When you create a calculation on a report, unless you specify to Save to Global Calculations, the calculation is only available on that report.
When you want to add a calculation to a report, you can open a global calculation and then add it to a report to make it available on the report.
When you click the Define calculated fields button (or Edit > Calculated Fields), you click the button to Select Global Calculation to find the calculation. Then click Save to add the calculation to the report.
To add the calculation to a report, select Insert > Fields. In the lower part of the Insert a Field window is a list of Calculated Fields you can use on the current report. This includes any calculated fields that you add to the report.

Add or adjust a calculation Sage 100 Contractor
30 © 2016 Sage Software, Inc.
To view the calculation without opening the calculated fields, right-click on the field on the report and select Properties. On the Object Properties window, the calculation expression displays in the box in the lower part of the window.
Example
In the earlier report, on the selection criterion for Status, the preset 1 was removed. Now you need a way to see the transactions that have a void status. The column can print the status number, or you can create a calculated field that prints a “V” when the Status is 2.
1. Create the expression looks like the following:
IF(jobcst.status = 2)THEN("V")ELSE("")

© 2016 Sage Software, Inc. 31
Modify System Reports Add or adjust a calculation
2. Select Edit > Calculated Fields to create the new field.
3. In the Name box, enter something that identifies what the calculation does. There are no requirements on how to enter this.
4. In the Description box, enter a longer description that displays in selection lists.
5. In the area under Calculated Field Expression, enter the expression. Use the Functions for efficiency.
a. For this expression, double-click the IF( )THEN( )ELSE function.
b. Click in the first set of parenthesis next to IF and select Job Cost in the Tables list. Select the option to List Fields by Name and find the Status field. Double-click on Status to insert in the expression. Complete this part of the expression with = 2.
c. Click in the second set of parenthesis next to THEN and type “V” as the result to print when the status is 2 on the transaction.
d. Click in the third set of parenthesis next to ELSE and type “” as the alternate result to print.
e. Verify the expression is correct. Click Save to add this calculated field to the report.
NOTE: To save this calculated field to your global fields, save it to the report first. Then, open the expression again and select Save to Global Calculations.
Add or adjust a calculation Sage 100 Contractor
32 © 2016 Sage Software, Inc.
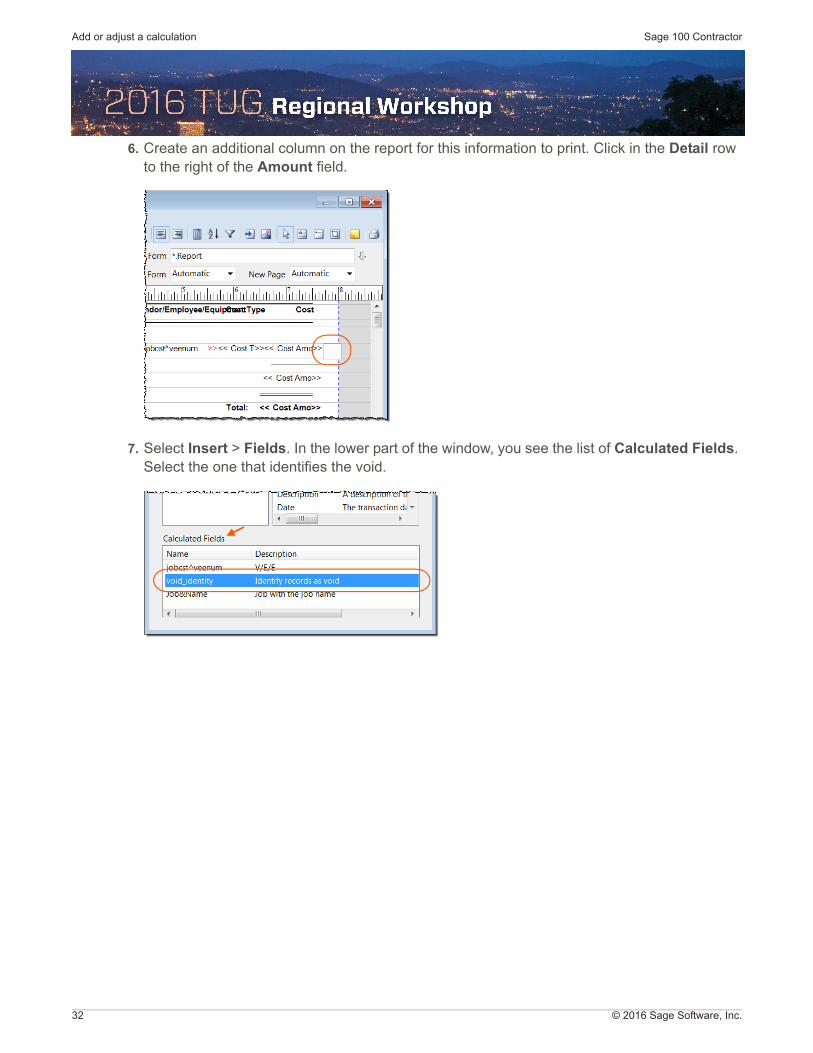
6. Create an additional column on the report for this information to print. Click in the Detail row to the right of the Amount field.
7. Select Insert > Fields. In the lower part of the window, you see the list of Calculated Fields. Select the one that identifies the void.

© 2016 Sage Software, Inc. 33
Modify System Reports Add or adjust a calculation
8. The field is too long when you insert it, right-click and select Properties. Change the Characters to 3.
9. Save the report to a new name and preview the report.
Advanced example
On the Vendor Current Aging, you want to change the report to include a cutoff date and age the columns based on the cutoff date. This requires you use a variable calculated field on your report. This is a calculated field where the expression is a date variable and you are prompted when you print the report to enter the value.
Variables
Variables act as placeholders for actual values. With a variables you can build calculated fields and save them but not enter actual values until you generate the report.
When you preview or print a report that contains a variable, you assign a value to each variable on the report. The program substitutes the declared values for each variable and computes the results on the report.
You can insert a variable for a date, number, or alphanumeric string. You can use variables to supply a piece of information which is not available within the data. You can use the calculated field in other places on the report.
Variable Description
Variable{S} Allows you to insert a variable for an alphanumeric string in the calculated field.
Syntax: {variable [S]}
Variable is what you want to replace when you generate the report.

Add or adjust a calculation Sage 100 Contractor
34 © 2016 Sage Software, Inc.
Ideas for use:
If you create a document that needs to be notarized and there are multiple notaries, you can create fill in fields for the notary name, notary expiration date, and country.
Create a prompt for a number which will be used as a divisor for other calculated fields.
Create a prompt for a series of information to print like ship to and destination.
Create the report; begin with the addition of the selection criterion for cutoff date:
1. In 4-1-3 Payable Aging, select 31-Vendor Current Aging and click the Modify Report report button.
2. Once the report is open, select Edit > Calculated Fields.
3. Create the calculated field for the variable.
a. Enter a Name and Description for the field.
b. In the expression area, enter a name and the type of variable [D] in brackets {}. For example, {Cutoff[D]}.
c. Save the calculated field.
Variable{N} Allows you to insert a variable for an alphanumeric string in the calculated field.
Syntax: {variable [N]}
Variable is what you want to replace when you generate the report.
Variable{D} Allows you to insert a variable for an alphanumeric string in the calculated field.
Syntax: {variable [D]}
Variable is what you want to replace when you generate the report.
Variable Description

© 2016 Sage Software, Inc. 35
Modify System Reports Add or adjust a calculation
4. Change the calculated fields for the aging columns on the report. When the Date$ function is in the expression, change it to {Cutoff[D]}. In the case of the acpinv^curret calculation:
IF(acpinv.duedte >= {Cutoff[D]})THEN( acpinv.invbal)ELSE( IF(acpinv.retain = 0)THEN()ELSE(acpinv.retain))
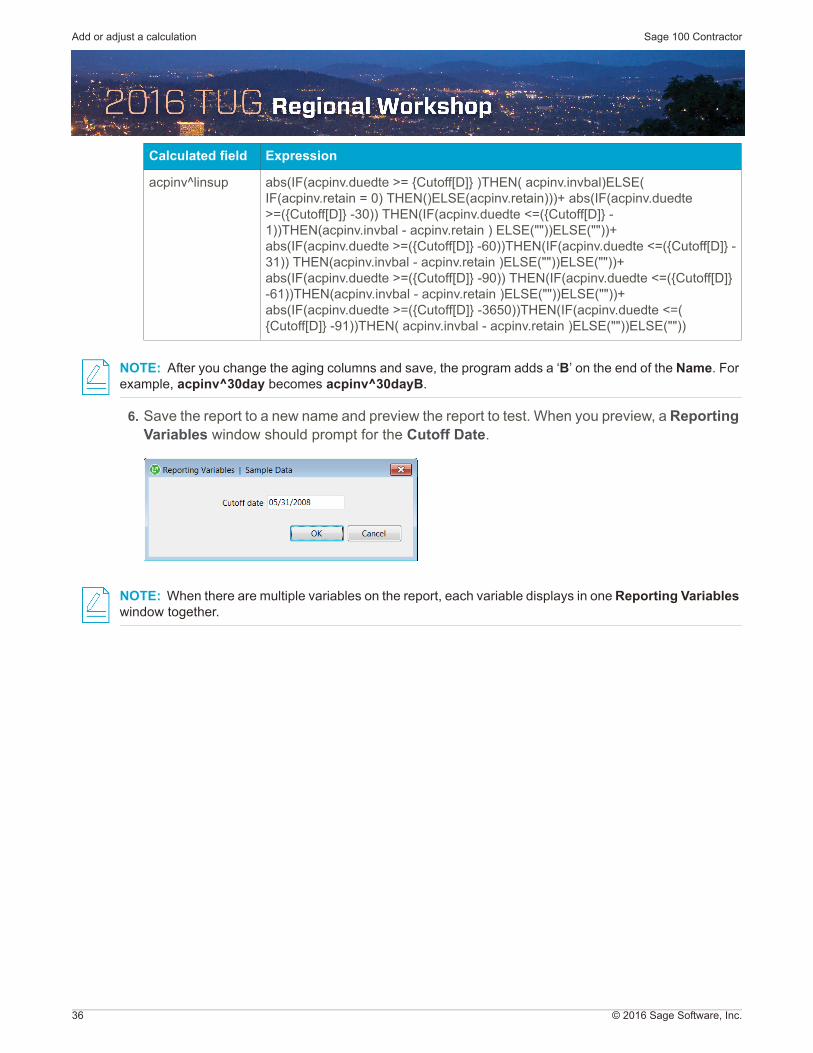
5. Here are the remaining calculations for the report:
Calculated field Expression
acpinv^30day IF(acpinv.duedte >=( {Cutoff[D]} -30))THEN(IF(acpinv.duedte <=( {Cutoff[D]} -1)) THEN(acpinv.invbal - acpinv.retain)
ELSE(""))ELSE("")
acpinv^60day IF(acpinv.duedte >=( {Cutoff[D]} -60))THEN(IF(acpinv.duedte <=( {Cutoff[D]} -31)) THEN(acpinv.invbal - acpinv.retain)
ELSE(""))ELSE("")
acpinv^90day IF(acpinv.duedte >=( {Cutoff[D]} -90))THEN(IF(acpinv.duedte <=( {Cutoff[D]} -61)) THEN(acpinv.invbal - acpinv.retain) ELSE(""))ELSE("")
acpinv^120day IF(acpinv.duedte >=( {Cutoff[D]} -3650)) THEN(IF(acpinv.duedte <=( {Cutoff[D]} -91))THEN( acpinv.invbal - acpinv.retain ) ELSE(""))ELSE("")
Add or adjust a calculation Sage 100 Contractor
36 © 2016 Sage Software, Inc.
NOTE: After you change the aging columns and save, the program adds a ‘B’ on the end of the Name. For example, acpinv^30day becomes acpinv^30dayB.
6. Save the report to a new name and preview the report to test. When you preview, a Reporting Variables window should prompt for the Cutoff Date.
NOTE: When there are multiple variables on the report, each variable displays in one Reporting Variables window together.
acpinv^linsup abs(IF(acpinv.duedte >= {Cutoff[D]} )THEN( acpinv.invbal)ELSE( IF(acpinv.retain = 0) THEN()ELSE(acpinv.retain)))+ abs(IF(acpinv.duedte >=({Cutoff[D]} -30)) THEN(IF(acpinv.duedte <=({Cutoff[D]} -1))THEN(acpinv.invbal - acpinv.retain ) ELSE(""))ELSE(""))+ abs(IF(acpinv.duedte >=({Cutoff[D]} -60))THEN(IF(acpinv.duedte <=({Cutoff[D]} -31)) THEN(acpinv.invbal - acpinv.retain )ELSE(""))ELSE(""))+ abs(IF(acpinv.duedte >=({Cutoff[D]} -90)) THEN(IF(acpinv.duedte <=({Cutoff[D]} -61))THEN(acpinv.invbal - acpinv.retain )ELSE(""))ELSE(""))+ abs(IF(acpinv.duedte >=({Cutoff[D]} -3650))THEN(IF(acpinv.duedte <=( {Cutoff[D]} -91))THEN( acpinv.invbal - acpinv.retain )ELSE(""))ELSE(""))
Calculated field Expression

© 2016 Sage Software, Inc. 37
Modify System Reports Add or adjust a calculation
Additional activities
These additional activities allow you to apply what you learned about common requests. Each activity provides an overview of the changes included in the report activity. The plan and steps are provided.
Note, there is often more than one way to get a result; consider the step-by-step instructions as suggestions, rather than the only means to accomplish the task.
Activity 4
Scenario
The 6-1-2-21 Job Cost Journal report found in Job Reports lists job cost transactions. This report includes a column for Cost Type, but prints a number for the cost type rather than a description. In addition, the selection criteria for Status is preset to 1-Open and you want to choose whether to include void transactions.
In this activity you change the cost type to print the description and remove the preset selection of 1-Open. As a challenge, create a formula to print a short version of the cost type description, if desired.
Report features:
Modify an existing report to add a field.
Change preset selection criteria.
Challenge: add a calculated field.

Add or adjust a calculation Sage 100 Contractor
38 © 2016 Sage Software, Inc.
Report plan
1. Determine the use and content.
You want to use this report instead of 21-Job Cost Journal because the cost type description means more to you than the number. In addition, since when you want remove the preset status selection status needs to be added to the report. Either add the status as a column or identify which transactions have a Status of 2-Void.
2. Design the layout of the report. Use the sample printout above as the layout of your report.
3. Determine the primary record. What is the primary record for this report?
_________________________________
4. Determine the groupings. What are the groupings on this report?
________________________________
5. Determine the sort. In addition to the groups, is there any specific sort that is needed? If so, what would you recommend?
________________________________
6. Determine the fields to select by. Are there any prompts or parameters on this report? Should the selection be pre-set or not?
______________________________________________________________
7. Other considerations. Are there any other things to think about for this report? Are there any user-defined calculations that will have to be created?
______________________________________________________________
8. Consider the following:
What is the primary table? _______________________
What are the related to tables? ________________________
Step-by-step instructions
1. Select 6-1-2-21 Job Cost Journal. In the Report Printing window, click the Modify Report button.
2. When the 13-3 Report Writer window displays, select File > Save. Save the report as 06010201.rpf and as a private report. If there is already a report with 01, use a different number between 01 and 20.
3. In the Detail row on the design, locate the Cost Type field. Click on it and press the DELETE key on your keyboard to remove it from the report.
4. Right-click on the jobcst^veenum field and select Properties. In the Object Properties window, change Characters to 25. Click OK to accept.
5. Move the Cost Amount in both the Detail and Total lines to the right edge of the design.
6. Select Insert > Text. Then click where the Cost Type field was originally located in the Detail row to the right of jobcst^veenum and select Insert > Fields.

© 2016 Sage Software, Inc. 39
Modify System Reports Add or adjust a calculation
7. Under Tables, select the Cost Types table and on the right, double-click on Type Name. The field displays on the report under the Cost Type column heading. You may need to adjust where the field is in the row. Click and drag the field to accomplish this.
NOTE: If you need to change the width of a field, right-click on the field and select Properties. In the Object Properties, enter a value in the Character box.
8. Save the report again. Preview the report to see how the new field and heading are lining up. Click the Print the current report button.Verify you have your modified report selected, and click the Preview report on screen button. Close the preview.
9. On the Report Printing window, click Modify Report again.
10. Select Edit > Selection Criteria and clear the 1 in the Status box. Click OK to accept the change.
11. Save the report again.
12. You should add the Status as a column on the report so when the Status selection criterion is left blank, you know which transactions have a status of void.
NOTE: If you do not see the Status print on the preview, it could be the field is partially off the page. Because the Status is only one character, you should change the Properties to only have one character and adjust the alignment.
13. Challenge: Create a formula that shows “V” when the Status is 2 - Void rather than print the actual Status for each transaction. Add the calculated field to the report to the right of the cost amount.
IF(jobcst.status=2)THEN("V")ELSE("")
14. Challenge: Create a formula to print an abbreviation for the cost type. There are a few ways to do this:
a. Create a calculation using an IF function
IF(jobcst.csttyp=1)THEN("MAT")ELSE(IF(jobcst.csttyp=2) THEN("LAB")ELSE(IF(jobcst.csttyp=3)THEN("EQP")ELSE(IF (jobcst.csttyp=4)THEN("SUB")ELSE(IF(jobcst.csttyp=5) THEN("OTH")ELSE("")))))
b. Create a calculation using a CASE function
CASE(jobcst.csttyp, 1, "MAT", 2, "LAB", 3, "EQP", 4, "SUB", 5, "OTH")
Add or adjust a calculation Sage 100 Contractor
40 © 2016 Sage Software, Inc.
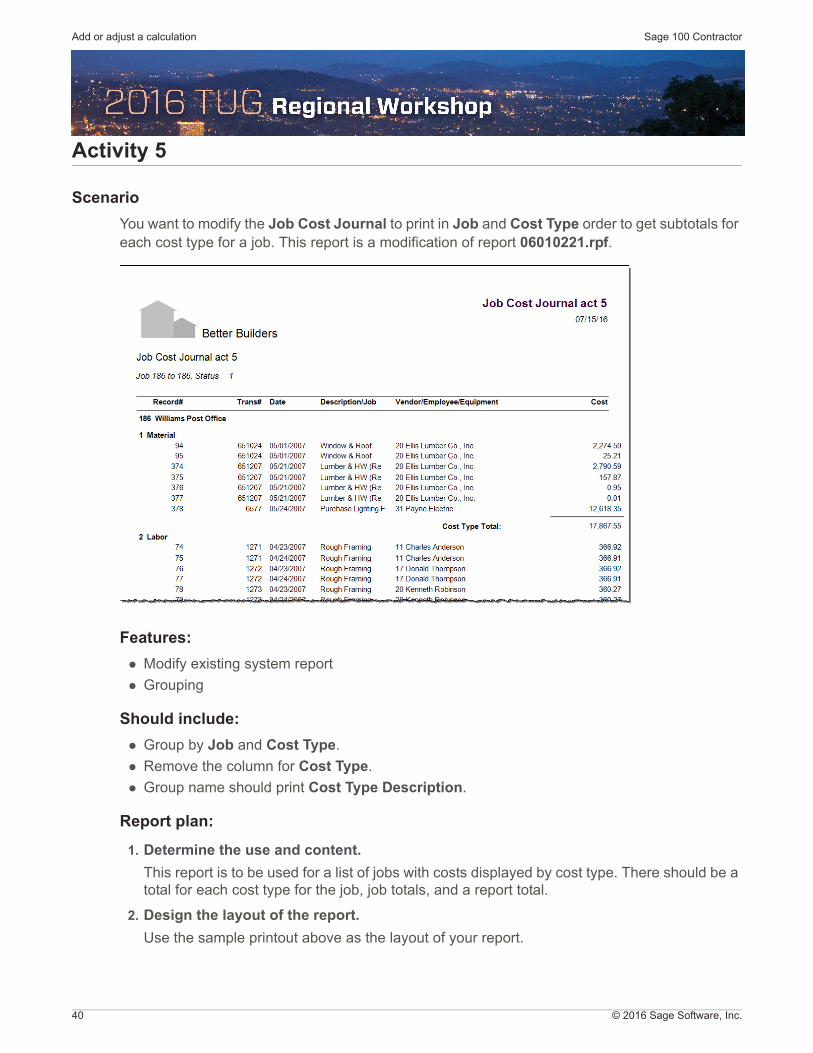
Activity 5
Scenario
You want to modify the Job Cost Journal to print in Job and Cost Type order to get subtotals for each cost type for a job. This report is a modification of report 06010221.rpf.
Features:
Modify existing system report
Grouping
Should include:
Group by Job and Cost Type.
Remove the column for Cost Type.
Group name should print Cost Type Description.
Report plan:
1. Determine the use and content.
This report is to be used for a list of jobs with costs displayed by cost type. There should be a total for each cost type for the job, job totals, and a report total.
2. Design the layout of the report.
Use the sample printout above as the layout of your report.

© 2016 Sage Software, Inc. 41
Modify System Reports Add or adjust a calculation
3. Determine the primary record. What is the Primary Record for this report?
_________________________________
4. Determine the groupings. What should the groupings be on this report?
_________________________________
5. Determine the sort. In addition to the groups, is there any specific sort that might be needed? If so, what would you recommend?
________________________________
6. Determine the fields to select by. Are there any prompts or parameters on this report? Should the selection be pre-set or not?
________________________________
________________________________
7. Other considerations. Are there any other things to think about for this report? Are there any user-defined calculations that will have to be created?
______________________________________________________________
8. Consider the following:
What is the primary table? _______________________
What are the related to tables? ________________________
Step-by-Step Instructions
1. In 6-1-2 Job Cost Journal reports, select 21-Job Cost Journal and click the Modify Report button.
2. Select File > Save and save this report as private; call it 06010202.rpf.
NOTE: If you save the report as one of the numbers recommended, such as 06010202.rpf as private or shared, it displays on the 6-1-2 Job Cost Journal reports list.
3. Change the Report Title to Job Cost Journal by Cost Type.
4. Select Edit Grouping/Sorting. Currently, the only group is Record#. Add two groupings; Job and Cost Type from the Job Costs table.
5. Delete Record# from the grouping window. Click on the field in the grouping box to select and press the DELETE key on your keyboard.
6. Adjust the sort of the groups, if necessary. Group by Job (1) and then by Cost Type (2). You can click and drag the field to change the grouping order.

Add or adjust a calculation Sage 100 Contractor
42 © 2016 Sage Software, Inc.
7. Add Record# as a sort for the details. Since Record# is already in the report fields in the white area below the group area, simply click on Record# field box to sort. A number 3 displays on the field box. Click OK to accept your changes.
8. On the report design window, click on the Detail band line. Then click the Insert a row above the selected row button three times to create three new band lines. All the new lines have a type of Detail.
NOTE: If you get a message that the row height can only be changed if it is blank and you are sure the row is blank, Click on the row below to insert another new band line, change the height on the new row, then delete the top row that disallowed the height change.
9. Click the arrow on each row to change band type. Change the first and second new lines to Group 1, and the third to Group 2.
10. Select Insert > Text. Then click on the Group 1 row to insert a field.
11. Select Insert > Fields, and insert Job with Job Name from the Job Costs table.

© 2016 Sage Software, Inc. 43
Modify System Reports Add or adjust a calculation
12. Click the second Group 1 row. Click the Edit properties for the selected row button. Select 1/4 Height.
13. Click on Group 2 row in the design area. Select Insert > Field, double-click Cost Type with Type Name from the Job Costs table.
14. If you haven’t already done so, align and adjust the properties on the fields you added. For example, the group heading fields should be left-justified and maybe bold. In addition, they should print on the left of the page.
15. Delete the Cost Type field in the Detail row and remove the text column heading from the Heading row.
16. Save the report.
17. Click the gray area of the first Total band line. Then click the option to Insert a row above the selected row button to create four new Total rows. Click the down arrow to change the first and second Total band lines to Subtotal 2. Then change the third and fourth Total lines to Subtotal 1. There should be two remaining Total rows.

Add or adjust a calculation Sage 100 Contractor
44 © 2016 Sage Software, Inc.
18. Change the first row of each band line type to 1/2 height.
19. Add the Cost Amount field from the Job Costs table into the second row of each band type. Then add a single line into the 1/2 height first rows. Add text or modify the existing text to the left of both subtotal amounts to describe the totals as Cost Type Total: or Job Total:
20. Verify the font is what you want on the report. You can change the font for an entire row if you click the gray area for a band line, and then click the Edit properties for the selected row button. Select Font and make the desired font changes.
21. Save the report again and preview.
© 2016 Sage Software, Inc. 45
Modify System Reports Add or adjust a calculation
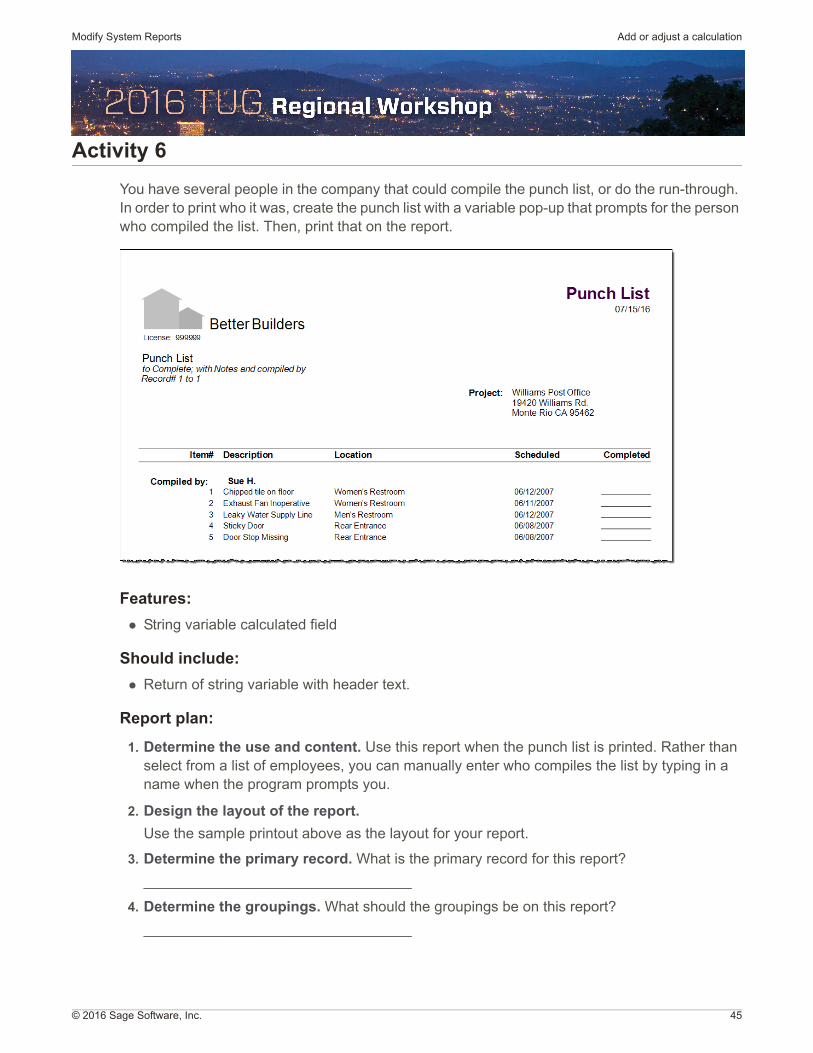
Activity 6
You have several people in the company that could compile the punch list, or do the run-through. In order to print who it was, create the punch list with a variable pop-up that prompts for the person who compiled the list. Then, print that on the report.
Features:
String variable calculated field
Should include:
Return of string variable with header text.
Report plan:
1. Determine the use and content. Use this report when the punch list is printed. Rather than select from a list of employees, you can manually enter who compiles the list by typing in a name when the program prompts you.
2. Design the layout of the report.
Use the sample printout above as the layout for your report.
3. Determine the primary record. What is the primary record for this report?
_________________________________
4. Determine the groupings. What should the groupings be on this report?
_________________________________

Add or adjust a calculation Sage 100 Contractor
46 © 2016 Sage Software, Inc.
5. Determine the sort. In addition to the groups, is there any specific sort that might be needed? If so, what would you recommend?
________________________________
6. Determine the fields to select by. Are there any prompts or parameters on this report? Should the selection be pre-set or not?
________________________________
________________________________
7. Other considerations. Are there any other things to think about for this report? Are there any user-defined calculations that will have to be created?
Think about the following:
What is the primary table? ___________________________
What are the related to tables? ________________________
Step-by-step instructions
1. Open 6-11-7 Punch Lists, click the Print records button in the upper right corner. Select 21-Punch List~to Complete;with Notes, and then click the Modify Report button. This displays the 13-3 Report Writer window with 06110721.rpf open. This could also be found in the System Reports folder.
2. Select File > Save to save the report as a private report with a name of 06110701.rpf.
© 2016 Sage Software, Inc. 47
Modify System Reports Add or adjust a calculation
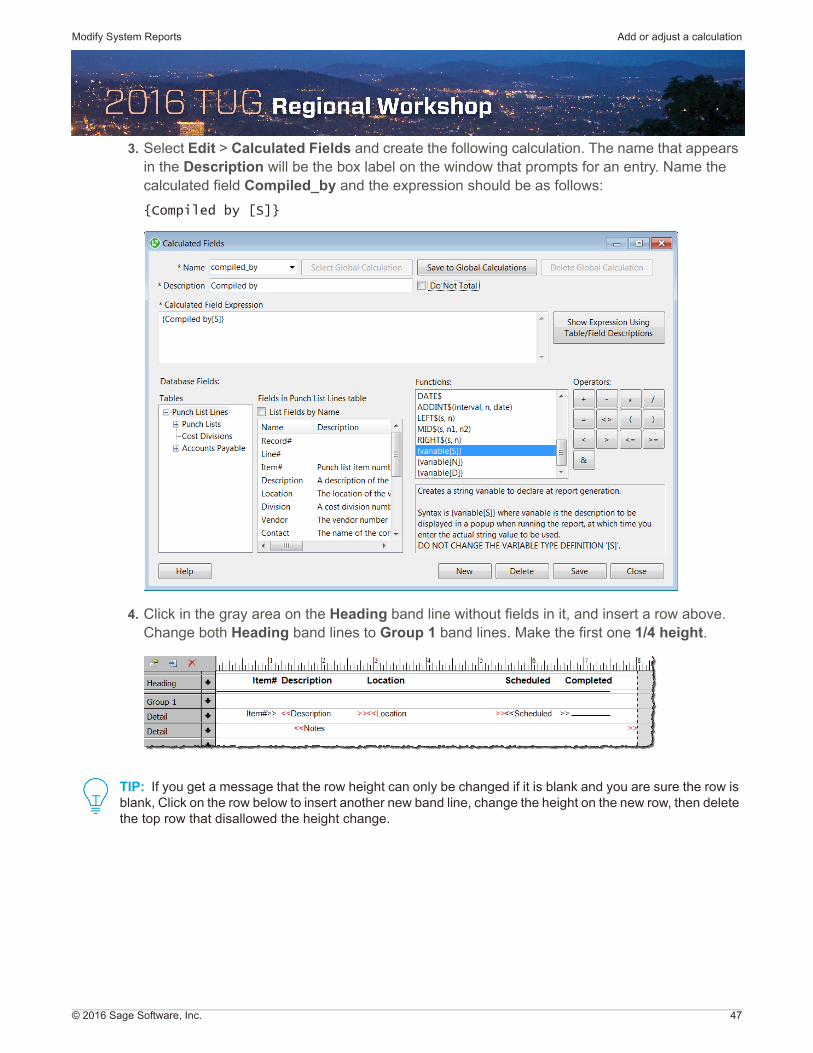
3. Select Edit > Calculated Fields and create the following calculation. The name that appears in the Description will be the box label on the window that prompts for an entry. Name the calculated field Compiled_by and the expression should be as follows:
{Compiled by [S]}
4. Click in the gray area on the Heading band line without fields in it, and insert a row above. Change both Heading band lines to Group 1 band lines. Make the first one 1/4 height.
TIP: If you get a message that the row height can only be changed if it is blank and you are sure the row is blank, Click on the row below to insert another new band line, change the height on the new row, then delete the top row that disallowed the height change.

Add or adjust a calculation Sage 100 Contractor
48 © 2016 Sage Software, Inc.
5. Add a text heading for Compiled By: in the Group 1 row. Insert the calculated field you created to the right of the text. Change the font to Bold and 10 point. Verify the fields do not overlap after the font change.
6. Save the report again. Print preview the report. A prompt should display for the Compiled By variable as shown below.
7. Enter a name value and click OK. When the report prints, the value you enter in the string variable box prints on the report.