resolving access issues for your partner university account · personal email address will be...
TRANSCRIPT

1
Resolving Access Issues for
Your Partner University Account May 2018
Contents Follow these steps to onboard or sign in to Partner University for the first time: .................................................... 1
Support: ................................................................................................................................................................................................... 3
You’re almost there! (Error Message) .................................................................................................................................. 3
Sorry, there was a problem calculating your assessment score (Error Message) ......................................... 9
Technical Support....................................................................................................................................................................... 10
Partner University and Learning Portal – site and/or content feedback ...................................................... 11
More about the Learner and Admin Dashboard experiences on Partner University: ............................................ 11
Learner Dashboard..................................................................................................................................................................... 11
Admin Site ...................................................................................................................................................................................... 12
Learning Plans .............................................................................................................................................................................. 13
Follow these steps to onboard or sign in to Partner University for the first time:
1. Sign in to Partner University with the personal Microsoft Account you used to associate to your
company’s MPN ID account.

2
2. There are two final steps to take, to create your Profile in Partner University so that the site
recognizes you each time you log in.
a. The first step is to agree to the Terms of Use.
b. The second step is to complete your Profile. Select your language preference and country.
3. After you’ve filled out your Profile, you will arrive at your Learner or Admin Dashboard in the
Partner University site. Screenshots below show the Learner Dashboard on the left; the Admin

3
Dashboard on the right. For more information please see More about the Learner and Admin
Dashboard experiences further below.
4. You are now free to explore the site. In the Learner Dashboard we suggest trying the Search
function to find the courses you want. You can filter the Search results by Product, Topic, Level or
Language. As an alternate, you can also go to the Learning Portal and browse the Learning Path
directory to view and explore all training offerings.
Support:
Below you will find some of the issues/error messages that might block you from getting into your
Partner University account, as well as steps to resolve and escalation points if needed.
You’re almost there! (Error Message)
This error message is generated when the learner is signing in with an email address that Partner
University does not recognize. Remember: you used a personal email account to associate to your
company’s MPN ID account, so that personal email address is the identifier that Partner University has on
file for you, not your work email address. Here are steps to follow to resolve this issue:

4
1. Please ensure you use your personal Microsoft account to login to Partner University. The
personal email address will be Partner University’s unique identifier for you, regardless of what
company you work for. Use of your personal email account ensures that the system preserves
your training records if you move between organizations. When the system is asking for your
“Microsoft account,” it is asking for your personal email address. It is *not* asking for your work
email address. FYI: The “Microsoft account” is also referred to as the “Windows Live” ID at several
points in the system.
2. Please ensure your personal email address is associated in one of the two partner membership
systems.
Partner Membership Center
1. Start by checking your record in Partner Membership Center. Log in with your personal
account at this site: https://partners.microsoft.com to confirm that you are associated to
your company’s MPN ID account.
i. If you get a screen similar to the picture below, this means that the email account
you’re using is not registered in the partner membership system and you are
using a non-associated account. You may have used a different personal account
to associate to your company’s MPN ID, or you might not have completed the
steps to associate to your MPN ID. Please see this resource: How to Associate to
Your MPN ID
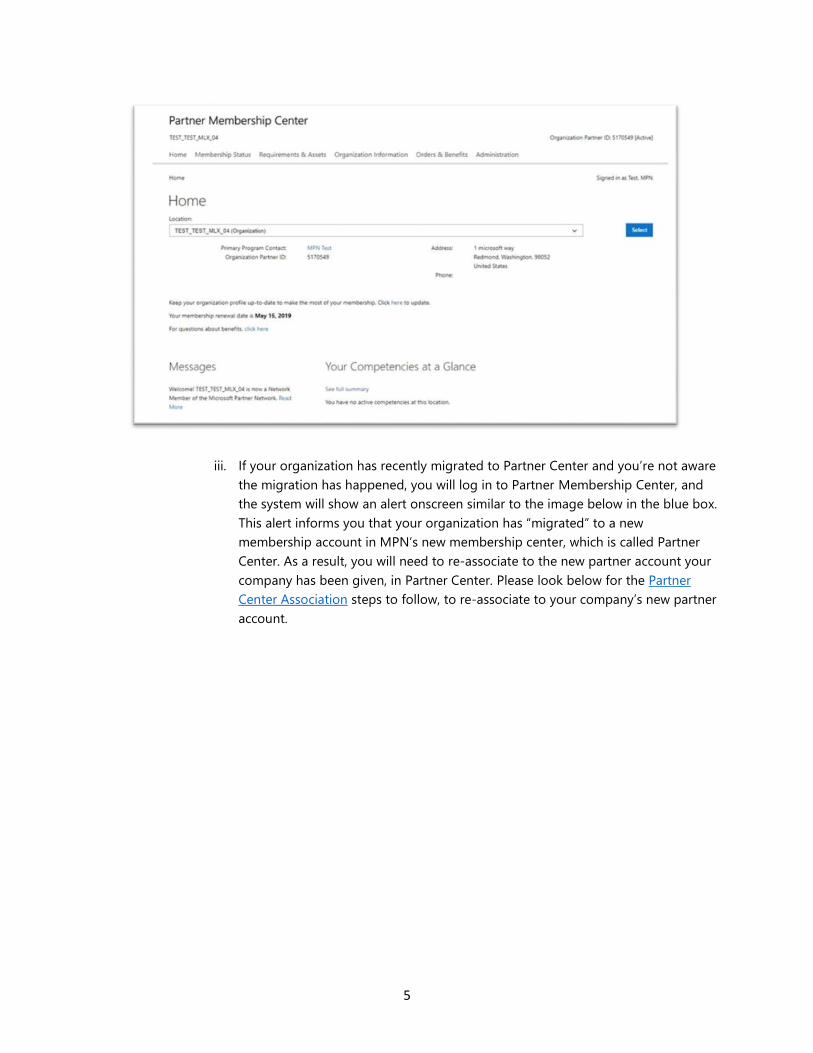
ii. The screenshot below is an example of what you will see if you’re signing in with
a valid associated email account. The system will recognize you and the company
you work for.
5
iii. If your organization has recently migrated to Partner Center and you’re not aware
the migration has happened, you will log in to Partner Membership Center, and
the system will show an alert onscreen similar to the image below in the blue box.
This alert informs you that your organization has “migrated” to a new
membership account in MPN’s new membership center, which is called Partner
Center. As a result, you will need to re-associate to the new partner account your
company has been given, in Partner Center. Please look below for the Partner
Center Association steps to follow, to re-associate to your company’s new partner
account.

6
i. If your company has recently migrated to Partner Center and you’re not aware
of it, you might see the image below when trying to access your Partner
University account. The screen will give you a view of your My Achievements
tile only; you will not be able to access any of the training in Partner University.
If this happens to you, it means that you need to re-associate to your
company’s new MPN ID account, on Partner Center. Please follow the Partner
Center Association steps below to connect to your company’s new MPN ID
account and “unlock” your Partner University account. Don’t worry: you won’t
lose any of your records in Partner University.

7
Reassociate in Partner Center: Steps to Follow
1. Partner Center is the new membership system which will replace the old Partner
Membership Center experience shown above. Again, the two clues that will point you to
“re-associate” in Partner Center are these:
a. If you’ve logged in to your Partner Membership Center account, and you see the
note in the blue banner, telling you that your company has migrated to Partner
Center… or
b. If you’re trying to sign in to your Partner University records, and you’re seeing the
“My Achievements” tile only, in your learner dashboard.
2. NOTE: Your records in Partner Center will be governed by your work email address. This
is different than Partner Membership Center, which uses your personal email address to
identify you. You will sign in to Partner Center with your work email address (e.g.
[email protected]) to access your MPN membership records.
3. Partner Center’s home page is here: https://partnercenter.microsoft.com.
4. Navigate here to sign in: https://partnercenter.microsoft.com/en-
us/pc/Users/MyAccount/
5. Again, be sure to use your work email address to sign in to Partner Center. The system
will allow you to create or change your password.

8
6. When you’ve signed in, the screen shot above is what you will see. This is your Partner
Center Profile page. Click the “Get Partner University access” box.
7. You will be prompted to sign in. Sign in with your personal email account. What you’re
doing here is connecting your known Partner University credentials to the new partner
account your company has established in Partner Center.
8. Once the re-association is complete, you will see a screen shot that looks like the one
below.
9. You can click on the “view training” link to sign in to Partner University (using the
personal email account you typically use to access your training records), and you will
find that all of your Partner University records are intact.
10. You can click on the “remove access” link to cancel or close your Partner University
account at any time.

9
You will notice the “Associate Microsoft Learning account” box, below your Partner University
account information. This box offers you the opportunity to link your MCP exams and
certifications to your Partner Center records, Doing so will ensure that your organization receives
competency “credit” for any exams you’ve passed that qualify you for an MPN competency. As
you did with the Partner University box, click the “Associate Microsoft Learning account” box and
sign in with the personal email account you used to register for your MCP exams. This will
connect your exam credentials to your Partner Center account.
If you get stuck at any point in this process, please reach out to [email protected] and
someone will reply to your email within two business days.
Sorry, there was a problem calculating your assessment score (Error Message)
Sorry, there was a problem calculating your
assessment score Please contact your regional support.
Error code 126000

10
This error message is typically seen if you are using a non-MPN organization in Partner University when
trying to complete an assessment.
Follow the steps below to see if you are associated to more than one organization/membership, and
identify which one you are using. If you have an MPN membership, please select it and then complete
the assessment.
Steps to Follow to “Switch” Your Organization:
Within Partner University, there is a drop-
down arrow on your organization and
name in the upper right corner.
If you click the down arrow and select
switch organization, do you have two or
more organizations listed?
You might have an MPN Membership, a
MSDN Membership, B2C, or others.
Please select the MPN membership.
If you do not have an MPN Membership option, please follow these instructions: How to Associate to
Your MPN ID.
Technical Support
Microsoft’s Regional Service Center (RSC) teams can help troubleshoot technical errors related to MPN
association, membership, and competencies.
You can contact the team via https://partner.microsoft.com/en-us/support. If you have trouble signing in
with your MPN ID to see your support options, click on the “Trouble signing in” link and you will see an
option as you scroll down, to begin chatting with an RSC agent.

11
Partner University and Learning Portal – site and/or content feedback
For non-technical matters – such as sharing feedback about your learning experience or for questions
about specific Partner University courses – please send email to [email protected]. This alias is
staffed by a team who will reply within two business days to your request.
More about the Learner and Admin Dashboard experiences on Partner University:
Learner Dashboard
The Search bar is a good way to discover all the content that’s been published to the Partner University
site. Type in course title or keywords to find trainings, and use the filters to the left (for Product, Topic,
Language, Level) to narrow the search results. If you know the MPN course number for a specific learning
path, you can type the number into the search bar to find the course. FYI: the course number will be the
numbers at the end of the title. You will see the course number at the end of each course title in Learning
Path directory.
If while searching you find courses that you’d like to bookmark for viewing later, click on the green “Add”
button, and the course will be added to your “My Courses” tile in your Learner Dashboard. When you
complete one of the courses listed in your “My Courses” tile, that course will show up in your red “My
Achievements” tile, where you will be able to print a transcript for the course or print a Certificate of
Completion.
You can also go to the Learning Portal site, find the course you want, click on the “launch course” link
and launch the course directly from Learning Portal.

12
There’s another way to view the entire list of courses published to the site: click on the “Catalog” button
at the top of the screen. You will find yourself looking at a list of course categories. One tip: the only way
out of the Catalog view is to click the Catalog button again. It functions as a toggle.
Admin Site
This dashboard is available only to those with MPN Global Administrator access in each partner company.
This is a unique feature that gives Administrators a birds-eye view of learner activity across their
organization. However, the Group tile in this dashboard will be empty if the Administrator’s employees
are not onboarded to and active in Partner University, and names will appear in the Groups tile only as the
company’s employees log in and create their Partner University profiles. Administrators: please encourage
those in your company to log in and establish their profiles in Partner University, to enable the tracking
features in Partner University. The more staffers who log in and establish profiles, the more robust the
Administrator dashboard’s functionality will be.
As learners in the company org log in, the Administrator will be able to track the learners’ progress
through courses and completion of assessments. The Administrator will also be able to assign learning
plans to learners and can categorize the employees in Groups for Learning Plan assignment tracking.

13
When logged into the Admin site, be sure to review the “User Guide” link or “FAQ” link at the bottom of
the page, for answers to your questions and helpful tips. Following is the Learning Plan guidance featured
in the online User Guide:
Learning Plans
How do I assign a learning plan to one or more users?
To assign a learning plan to one or more users:
1. Click Learning Plans.
2. Locate the learning plan that you want to edit. If you know any part of its name you can type that
in the Search box and press Enter.
3. Click the Manage Users icon in the bar at the bottom of the learning plan.
4. Select the users you want to add then, under Edit assignment, click Assign and Apply.
How do I remove a user from a learning plan?
This is almost the same as adding a user.
To assign a learning plan to one or more users:
1. Click Learning Plans.
2. Locate the learning plan that you want to edit. If you know any part of its name you can type that
in the Search box and press Enter.
3. Click the Manage Users icon in the bar at the bottom of the learning plan.
4. Locate the users you want to remove then, under Edit assignment, click Unassign and Apply.
How do I update the list of courses in a learning plan?
To update the list of courses in a learning plan:

14
1. Click the Learning Plans tile.
2. Click the Manage courses icon.
3. Expand the offerings in the course catalog and check the courses and collections to include in
the plan, or remove the check to remove them.
4. Click Save.
The learning plan is saved with its new collection of courses and you are returned to the Learning
Plans page. All users assigned to the plan should receive an email notifying them of the change.
If you change your mind about editing the learning plan you can click the Cancel button or the X in
the upper right corner.
Why don't we have a learning plan assigned to a user when he is added to a group associated with a
learning plan?
This is by design; we do not support live groups today. In this case adding the user to the group will
not assign the learning plan to him and there will be no trigger email generated for learning plan
assignment. The learning plan must be assigned to the user explicitly.
Please send any suggestions, questions or comments about the Partner University experience to
[email protected] and we will refresh this FAQ document with answers to your questions.
Thank you.