rise 3.0 - software manual - bfh-hafl · 3.4 different types of questions ... (i) click on...
TRANSCRIPT

Bern University of Applied Sciences
School of Agricultural, Forest and Food Sciences
RISE Response-Inducing Sustainability Evaluation
RISE 3.0 - Software Manual
Version: 04. May 2016

Berner Fachhochschule | Haute école spécialisée bernoise | Bern University of Applied Sciences
2
Authors:
Jan Grenz, Christian Thalmann, Luca Heeb, Michael Schoch, Madeleine Kaufmann, Rebekka
Wyss
Bern University of Applied Sciences
School of Agricultural, Forestry and Food Sciences HAFL
Länggasse 85
Berner Fachhochschule | Haute école spécialisée bernoise | Bern University of Applied Sciences
3
3052 Zollikofen, Switzerland
Technical support: [email protected]
Contents
1 Start the application and login ...................................................................................................... 5
1.1 Two ways to access the RISE 3.0 application ........................................................................ 5
1.2 Language selection ................................................................................................................. 5
1.3 Login to your personal user account ..................................................................................... 6
2 Opening a questionnaire ................................................................................................................ 6
2.1 Selection and opening of a project ........................................................................................ 6
2.2 Editing a questionnaire: Opening .......................................................................................... 7
2.3 Editing a questionnaire: Check out and check in ................................................................. 7
3 The RISE survey ............................................................................................................................... 8
3.1 Basic functions ........................................................................................................................ 8
3.2 The questionnaire tree ........................................................................................................... 9
3.3 Saving data ............................................................................................................................ 10
3.4 Different types of questions ................................................................................................ 11
3.5 The filter function ................................................................................................................. 12
4 Administrate questionnaires and farms ........................................................................................ 2
4.1 Adding of farms and surveys ................................................................................................. 2
4.2 Deleting of farms and surveys ............................................................................................... 2
4.3 Copying of farms and surveys ............................................................................................... 3
4.4 Theme variants ....................................................................................................................... 4
4.5 Printing a questionnaire ......................................................................................................... 5
5 The comments function ................................................................................................................. 7
5.1 Creating new comments ........................................................................................................ 8
5.2 Comments overview (questionnaire) ..................................................................................... 8
5.3 Creating comments (results section) ..................................................................................... 9
5.4 Comments overview (results section) .................................................................................... 9
5.5 Defining measures ................................................................................................................ 10
5.6 Overview of all comments .................................................................................................... 11
6 Calculation and analysis ............................................................................................................... 13
6.1 Calculate a questionnaire ..................................................................................................... 13
6.2 The results section ............................................................................................................... 15
6.3 Calculate average values ...................................................................................................... 17
6.4 Compare farm results ........................................................................................................... 19

Berner Fachhochschule | Haute école spécialisée bernoise | Bern University of Applied Sciences
4
6.5 Create a RISE-Sustainability report (Excel) .......................................................................... 19
6.6 Create a RISE-Sustainability report (Word) .......................................................................... 21
7 Working mode offline – online ..................................................................................................... 22
7.1 Change to offline mode........................................................................................................ 22
7.2 Synchronizing individual regions ........................................................................................ 23
7.3 Using the software in offline mode ..................................................................................... 24
7.4 Synchronize data after having worked offline .................................................................... 24
8 Reference data .............................................................................................................................. 27
8.1 Open the Reference data part .............................................................................................. 27
8.2 Project specific data ............................................................................................................. 27
8.3 Extend a region with animals and crops ............................................................................. 28
8.4 Extend master data............................................................................................................... 29
9 Frequently asked questions FAQ ................................................................................................. 31
10 Annex I: Create your own RISE user account .......................................................................... 34
11 Annex II: Installation of the RISE application on your computer ........................................... 36
12 Annex III: RISE-Calculation Check-list ...................................................................................... 37
Berner Fachhochschule | Haute école spécialisée bernoise | Bern University of Applied Sciences
5
Start the application and login
1.1 Two ways to access the RISE 3.0 application
1) RISE 3.0 application on your computer (recommended): Open the locally installed RISE
3.0 application with the RISE icon on the desktop of your computer.
Note 1: Please follow the steps described in Annex II of this manual to learn how to install
the RISE application on your computer if not yet done.
Note 2: If you intend to work in the offline mode (without Internet connection) you need to
install the application on your computer as the web based version of this application runs
only online.
2) Web browser (alternative): Navigate to the following URL using the Microsoft Internet
Explorer to open the RISE site: http://www.farmrise.ch
Note 1: The web access to RISE is designed for visitors and as an alternative for cases
where it’s not possible to install the application on your computer. Note that the web ver-
sion always requires an internet connection and that it’s not possible to work in the offline
mode.
Note 2: RISE is designed for and runs best with “Microsoft Internet ExplorerTM
”.
Note 3: You may be asked to install the “Microsoft SilverlightTM plug-in“ on your comput-
er. Please accept this installation in case. Otherwise RISE will not run. To check whether
you have the latest version of the plug-in, go to: http://www.microsoft.com/getsilverlight
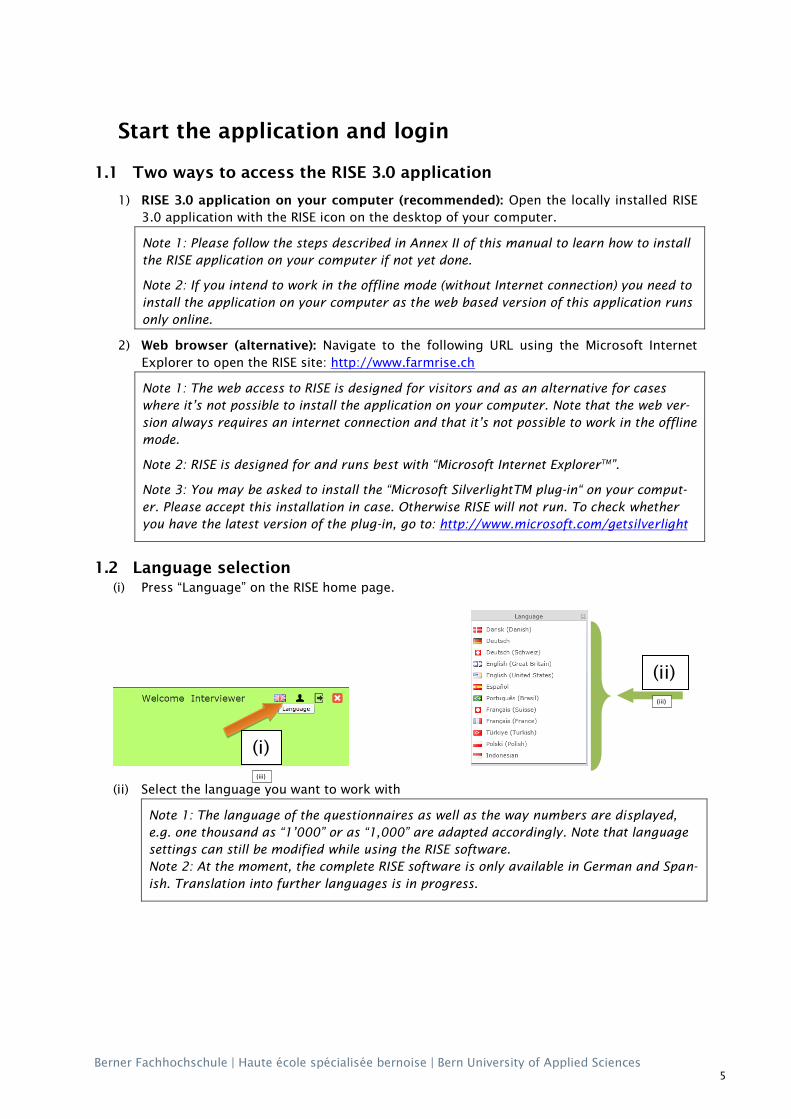
1.2 Language selection
(i) Press “Language” on the RISE home page.
(ii) Select the language you want to work with
Note 1: The language of the questionnaires as well as the way numbers are displayed,
e.g. one thousand as “1’000” or as “1,000” are adapted accordingly. Note that language
settings can still be modified while using the RISE software.
Note 2: At the moment, the complete RISE software is only available in German and Span-
ish. Translation into further languages is in progress.
(i)
(iii)
(ii)
(iii)
Berner Fachhochschule | Haute école spécialisée bernoise | Bern University of Applied Sciences
6
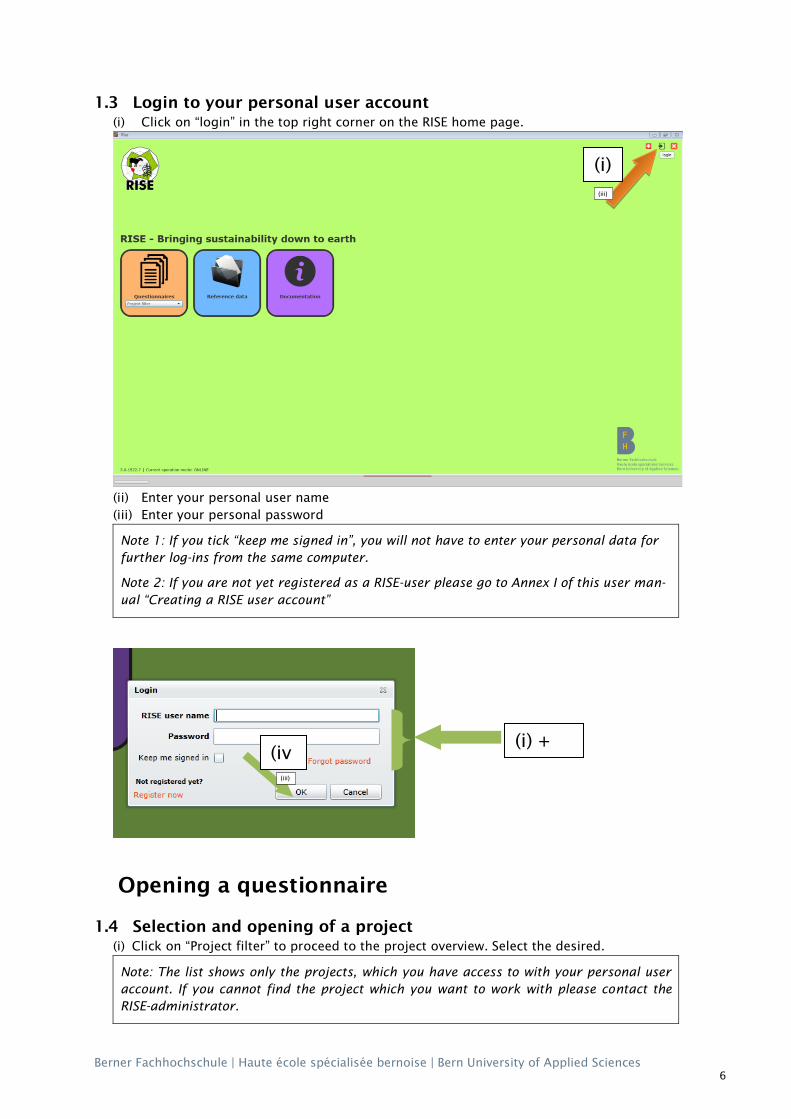
1.3 Login to your personal user account
(i) Click on “login” in the top right corner on the RISE home page.
(ii) Enter your personal user name
(iii) Enter your personal password
Note 1: If you tick “keep me signed in”, you will not have to enter your personal data for
further log-ins from the same computer.
Note 2: If you are not yet registered as a RISE-user please go to Annex I of this user man-
ual “Creating a RISE user account”
Opening a questionnaire
1.4 Selection and opening of a project
(i) Click on “Project filter” to proceed to the project overview. Select the desired.
Note: The list shows only the projects, which you have access to with your personal user
account. If you cannot find the project which you want to work with please contact the
RISE-administrator.
(i)
(iii)
(i) +
(ii) (iv
)
(iii)

Berner Fachhochschule | Haute école spécialisée bernoise | Bern University of Applied Sciences
7
1.5 Editing a questionnaire: Opening
(i) Open a questionnaire from the list by opening the drop-down menu of the according
farm.
(ii) And click „Open“.
Note 1: The same farm will be displayed several times for each questionnaire that exists
of it.
Note 2: If your questionnaire is not checked out (see chapter 1.6), it will appear in “read
only” mode and you can’t edit the data.
1.6 Editing a questionnaire: Check out and check in
(i) When you want to edit a questionnaire you have to check it out first. To do so, please click
on “Check out” in the drop-down menu of the according questionnaire.
(ii) When you do not want to edit it anymore please click on “Check in”.
Note 1: When you check out a questionnaire it will appear in read-only mode for other
users. Vice versa you may not check out a questionnaire that has been checked out by
somebody else. You may look in the window “Overview” in the column “Editor” if question-
naires are checked out and by what user.
Note: Number
of question-
naires that
should be
displayed on
one page
(i)
(iii)
(ii)
(iii)
Note: Selection of the pages

Berner Fachhochschule | Haute école spécialisée bernoise | Bern University of Applied Sciences
8
Note 2: If you are not allowed to edit data of a questionnaire the button is deactivated and
appears with the text “Read-only”. You may not check-out this questionnaire and it’s only
allowed to view the data. Please contact the project manager or the interviewer of this
questionnaire in case you need access.
Note 3: You may only check out those questionnaires you are listed as interviewer in the
column “Interviewer” or when the according cell is empty. The questionnaire may be
handed-over by the current interviewer to another user. Thereto the interviewer selects
the new interviewer at question 10.5.3 in the checked out questionnaire. In order to re-
lease the questionnaire reservation of this person he/she has to check in the questionnaire
at the “Overview” window.
The RISE survey
1.7 Basic functions
Back to home page To project overview
To current questionnaire
Categories (to open a
question page and /or
the respective sub-
category)
Questionnaire tree re-
flecting the structure of
the interview
Question page
Downloading the
user manual
The “i”-button next to
the question gives you
additional clarifications
regarding the question
when swiping over it
with the cursor
(i) + (ii)
Die Filterfunktion: Hiermit lassen
sich Fragen nach den Themenbe-
riechen der Analyse auflisten
Berner Fachhochschule | Haute école spécialisée bernoise | Bern University of Applied Sciences
9
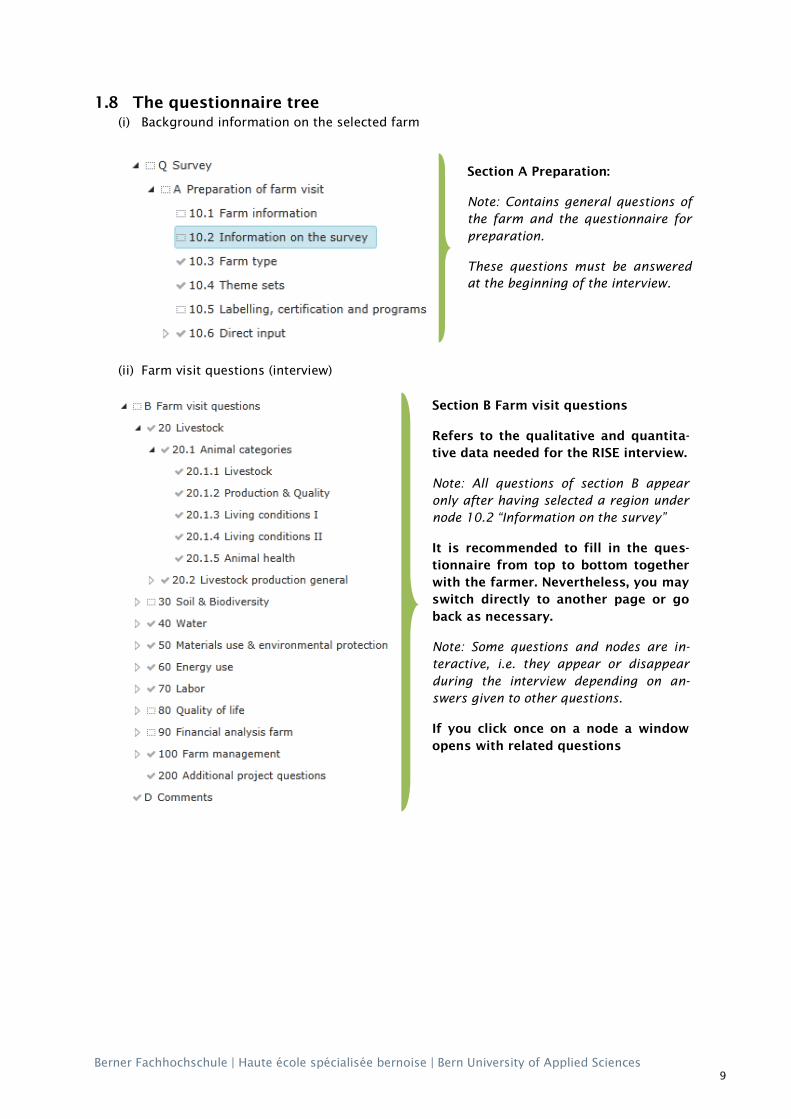
1.8 The questionnaire tree
(i) Background information on the selected farm
(ii) Farm visit questions (interview)
Section A Preparation:
Note: Contains general questions of
the farm and the questionnaire for
preparation.
These questions must be answered
at the beginning of the interview.
Section B Farm visit questions
Refers to the qualitative and quantita-
tive data needed for the RISE interview.
Note: All questions of section B appear
only after having selected a region under
node 10.2 “Information on the survey”
It is recommended to fill in the ques-
tionnaire from top to bottom together
with the farmer. Nevertheless, you may
switch directly to another page or go
back as necessary.
Note: Some questions and nodes are in-
teractive, i.e. they appear or disappear
during the interview depending on an-
swers given to other questions.
If you click once on a node a window
opens with related questions

Berner Fachhochschule | Haute école spécialisée bernoise | Bern University of Applied Sciences
10
1.9 Saving data
Click “Next” or “Previous” to pro-
ceed to the next or return to the
previous page.
Note 1: All data on this page are
automatically saved when changing
to another page.
Note 2: In case of entering incor-
rect data the page change will be
blocked and you have to correct
the data.
Note 3: When all questions are an-
swered, a tick “ ” appears beside
the corresponding node of the
questionnaire tree.
Berner Fachhochschule | Haute école spécialisée bernoise | Bern University of Applied Sciences
11
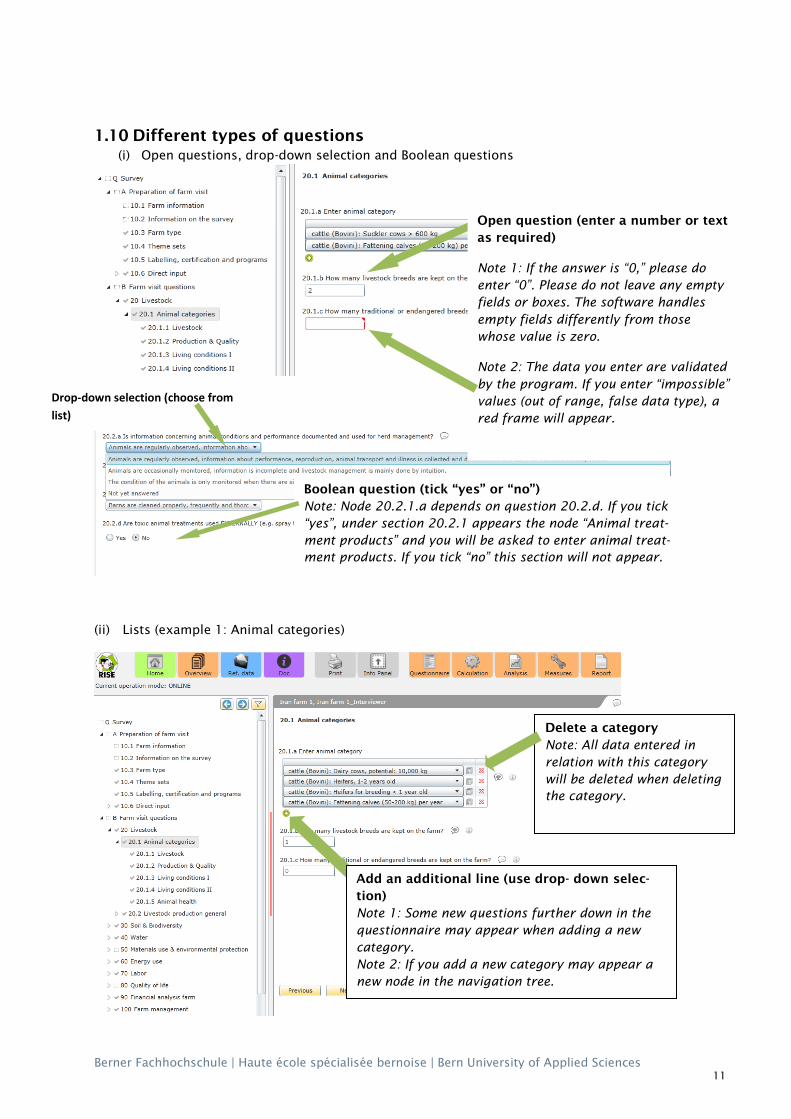
1.10 Different types of questions
(i) Open questions, drop-down selection and Boolean questions
(ii) Lists (example 1: Animal categories)
Drop-down selection (choose from
list)
Open question (enter a number or text
as required)
Note 1: If the answer is “0,” please do
enter “0”. Please do not leave any empty
fields or boxes. The software handles
empty fields differently from those
whose value is zero.
Note 2: The data you enter are validated
by the program. If you enter “impossible”
values (out of range, false data type), a
red frame will appear.
Boolean question (tick “yes” or “no”)
Note: Node 20.2.1.a depends on question 20.2.d. If you tick
“yes”, under section 20.2.1 appears the node “Animal treat-
ment products” and you will be asked to enter animal treat-
ment products. If you tick “no” this section will not appear.
Add an additional line (use drop- down selec-
tion)
Note 1: Some new questions further down in the
questionnaire may appear when adding a new
category.
Note 2: If you add a new category may appear a
new node in the navigation tree.
Delete a category
Note: All data entered in
relation with this category
will be deleted when deleting
the category.
Berner Fachhochschule | Haute école spécialisée bernoise | Bern University of Applied Sciences
12
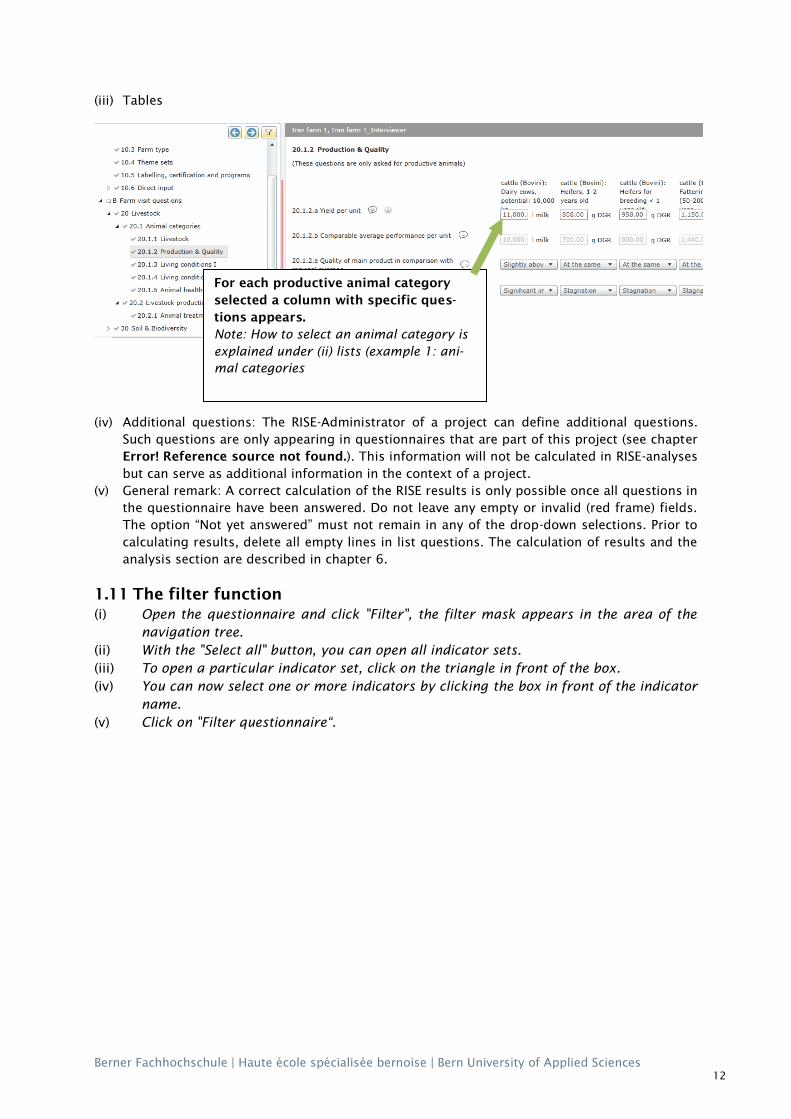
(iii) Tables
(iv) Additional questions: The RISE-Administrator of a project can define additional questions.
Such questions are only appearing in questionnaires that are part of this project (see chapter
Error! Reference source not found.). This information will not be calculated in RISE-analyses
but can serve as additional information in the context of a project.
(v) General remark: A correct calculation of the RISE results is only possible once all questions in
the questionnaire have been answered. Do not leave any empty or invalid (red frame) fields.
The option “Not yet answered” must not remain in any of the drop-down selections. Prior to
calculating results, delete all empty lines in list questions. The calculation of results and the
analysis section are described in chapter 6.
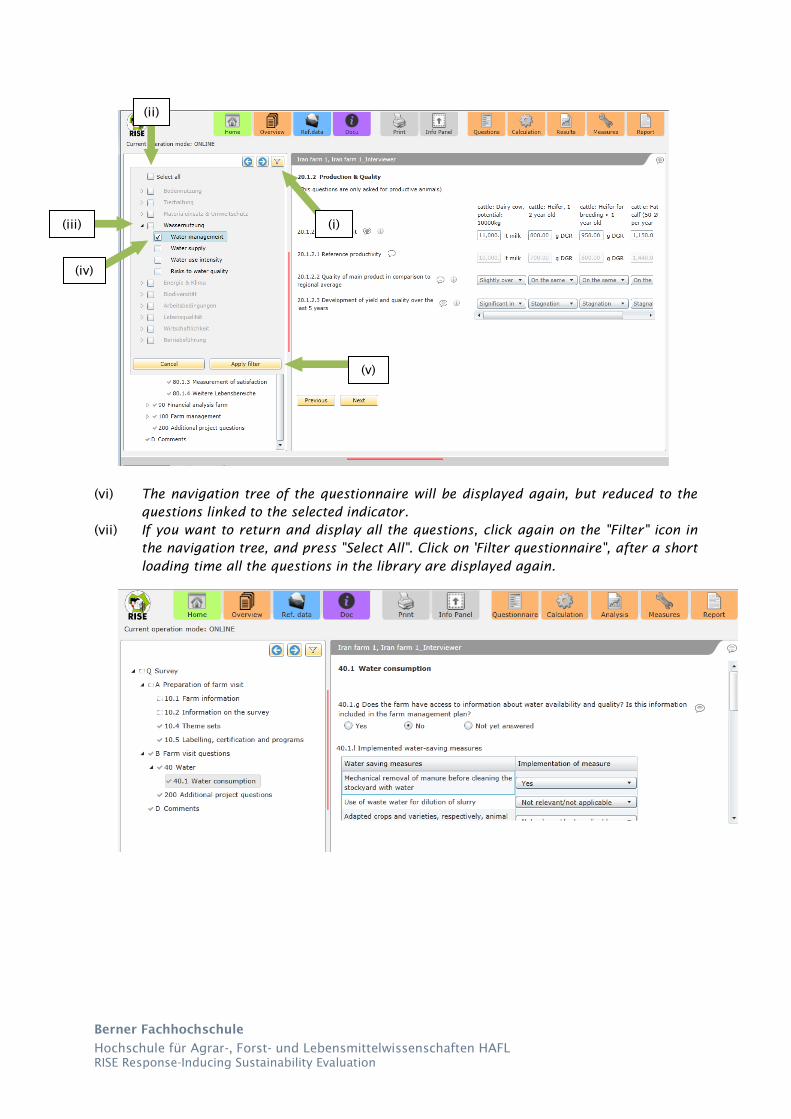
1.11 The filter function
(i) Open the questionnaire and click "Filter", the filter mask appears in the area of the
navigation tree.
(ii) With the "Select all" button, you can open all indicator sets.
(iii) To open a particular indicator set, click on the triangle in front of the box.
(iv) You can now select one or more indicators by clicking the box in front of the indicator
name.
(v) Click on "Filter questionnaire“.
For each productive animal category
selected a column with specific ques-
tions appears.
Note: How to select an animal category is
explained under (ii) lists (example 1: ani-
mal categories
Berner Fachhochschule
Hochschule für Agrar-, Forst- und Lebensmittelwissenschaften HAFL
RISE Response-Inducing Sustainability Evaluation
(vi) The navigation tree of the questionnaire will be displayed again, but reduced to the
questions linked to the selected indicator.
(vii) If you want to return and display all the questions, click again on the "Filter" icon in
the navigation tree, and press "Select All". Click on 'Filter questionnaire", after a short
loading time all the questions in the library are displayed again.
(i)
(ii)
(v)
(iii)
(iv)

Software manual RISE 3.0
Berner Fachhochschule | Haute école spécialisée bernoise | Bern University of Applied Sciences 2
Administrate questionnaires and farms
1.12 Adding of farms and surveys
(i) You may add (create) a new questionnaire by clicking “Add” at the “Overview” window.
(ii) In the appearing dialogue window you are asked whether the new questionnaire belongs
to an already entered farm (available in the dropdown list)
(iii) or whether a new farm shall be created.
(iv) After completion of the dialogue click “Add”. The new survey will appear in alphabetic or-
der in the window “Overview”.
1.13 Deleting of farms and surveys
(i) You may delete a questionnaire by clicking “Delete” in the dropdown menu of the accord-
ing questionnaire.
(ii) Please confirm the deletion in the appearing dialogue window.
Note 1: It is not possible to delete a farm in one step, as there several questionnaires may be
assigned to it. By deleting all assigned questionnaires you may delete the farm.
Note 2: You cannot delete a questionnaire that has been checked out by someone else.
(ii)
(iii)
(iv)
(i)
(ii)
(i)

Software manual RISE 3.0
Berner Fachhochschule | Haute école spécialisée bernoise | Bern University of Applied Sciences 3
Note 3: You may copy a complete survey of a farm and change data in the copy to calculate a
scenario for this farm.
1.14 Copying of farms and surveys
(i) You may copy a questionnaire by clicking “Copy” in the dropdown menu of the according
questionnaire.
(ii) In the appearing dialogue window you are asked whether the copied questionnaire be-
longs to an already entered farm (available in the dropdown list) or whether a new farm
shall be created. After completion of the dialogue click “Copy survey”. The new survey will
appear in alphabetic order in the window “Overview”.
Note: You may copy a questionnaire for adjusting or change data, or for calculating scenari-
os of a farm. You are automatically set as “Interviewer” in the according column and by
check out and edit questionnaires.
Check this option if
you intend to add the
copied survey to an
existing farm. Choose
the farm from the
drop-down selection
(on the right hand
side).
Select the project to which the
farm analysis belongs.
Note: Only projects to which you
have been assigned will appear.
Give a suitable name
to the questionnaire
or scenario
Check this option if you
intend to add the cop-
ied survey to a new
farm. Enter the name of
the new farm into the
field on the right hand
side.
(i)
(ii)
Software manual RISE 3.0
Berner Fachhochschule | Haute école spécialisée bernoise | Bern University of Applied Sciences 4
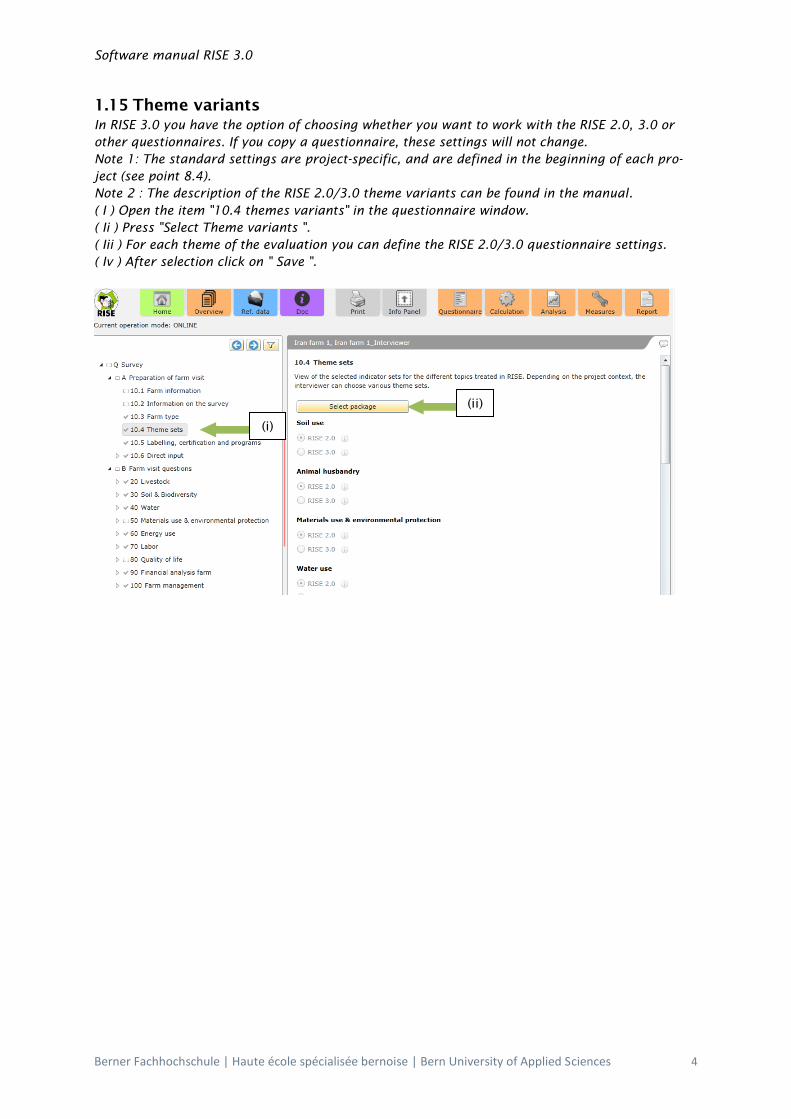
1.15 Theme variants
In RISE 3.0 you have the option of choosing whether you want to work with the RISE 2.0, 3.0 or
other questionnaires. If you copy a questionnaire, these settings will not change.
Note 1: The standard settings are project-specific, and are defined in the beginning of each pro-
ject (see point 8.4).
Note 2 : The description of the RISE 2.0/3.0 theme variants can be found in the manual.
( I ) Open the item "10.4 themes variants" in the questionnaire window.
( Ii ) Press "Select Theme variants ".
( Iii ) For each theme of the evaluation you can define the RISE 2.0/3.0 questionnaire settings.
( Iv ) After selection click on " Save ".
(i)
(ii)

Software manual RISE 3.0
Berner Fachhochschule | Haute école spécialisée bernoise | Bern University of Applied Sciences 5
1.16 Printing a questionnaire
(i) Choose “Print” in the open questionnaire.
Note 1: Please be patient after this step. You have to wait (up to 1 minute) until the printing pre-
view is generated by the program.
Note 2: Printing with PostScript enabled printers are possible (most printers)
Note 3: You may convert the questionnaire to pdf, in order to print it out from your computer or
your network.
(ii) Click “OK” on the print preview. It may appear a window "Check Printer Settings". It is rec-
ommended to select a resolution of 600 dpi and to use PostScript printers. Click „OK“.
(iii) Chose the printer.
(i)
(ii)

Software manual RISE 3.0
Berner Fachhochschule | Haute école spécialisée bernoise | Bern University of Applied Sciences 6
(iv) Click on “print”.
Note: For conversion to pdf please select a pdf-printer such as Adobe Printer.
(v) Depending on printer drivers, settings have to be adjusted in order to get optimal print-
ings. Thereto click on “Preferences”
(vi) Click at “Layout” window, click on “Advanced”;
(vii) Reduce the selected resolution (e.g. on 600 dpi).
(iii)
(v)
(iv)
(vi)
(vi)
(vii)
Note 1: Depending on your computer sys-tem the layout of the window may look different.
Note 2: Possibly your printer software requires different printing settings.

Software manual RISE 3.0
Berner Fachhochschule | Haute école spécialisée bernoise | Bern University of Applied Sciences 7
The comments function
You can always insert comments for each question of the questionnaire and to any part of
the results. There are different comment categories, some are just additional notes in the
questionnaire, and others are automatically inserted into the RISE sustainability report.
(i) Click on the "comment" icon.
Note: Each question-window and each question has its own "comment" icon.
(ii) The comment window opens. Now you can enter your comments and safe the com-
ments.
(iii) To close the comment window, click on the "Info Panel" icon.
Note: All comments of this
section are listed.
Note: Here you can input
the new comments.
(i)
Note: The title gives an orientation of the
comment section.
(ii)
(iii)

Software manual RISE 3.0
Berner Fachhochschule | Haute école spécialisée bernoise | Bern University of Applied Sciences 8
1.17 Creating new comments
(i) Click on the "comment" symbol of the question to which you want to submit a com-
ment.
(ii) The comment window opens.
(iii) Click on "New Comment".
(iv) Select from the dropdown menu the type of comment you need.
(v) Enter your comment in the text box.
(vi) Save the comment
(vii) If you want to delete or modify a comment, select the comment in the left list.
(viii) You can now modify or delete the comment.
1.18 Comments overview (questionnaire)
(i) Click “D Comments” in the navigation tree of the questionnaire.
(ii) All comments in the questionnaire are displayed.
(iii) You can filter the comments by clicking on "All comments" and selecting the desired
type of comment in the dropdown menu.
(iii
)
(i)
(v) (vii)
(iii) (iv) (vi) (viii)

Software manual RISE 3.0
Berner Fachhochschule | Haute école spécialisée bernoise | Bern University of Applied Sciences 9
1.19 Creating comments (results section)
(i) Switch to the “Analysis” view in the top menu bar.
(ii) Click on the "Comment" button in the area for which you want to submit a
comment.
(iii) Click "New Comment".
(iv) Select from the dropdown menu the type of comment you need.
(v) Enter your comment in the text box.
(vi) Save the comment.
(vii) If you want to delete or modify a comment, select the comment in the left list.
(viii) You can now modify or delete the comment.
1.20 Comments overview (results section)
(i) Click “C Comments” in the navigation tree.
(ii) All comments in the questionnaire are displayed.
(iii) You can filter the comments by clicking on "All comments" and selecting the de-
sired type of comment in the dropdown menu.
(v)
(vii)
(i)
(ii)
(iii) (iv) (vi) (viii)

Software manual RISE 3.0
Berner Fachhochschule | Haute école spécialisée bernoise | Bern University of Applied Sciences 10
1.21 Defining measures
(i) Go to the list with the overview of the registered comments in the analysis section "C
Comments" (described in 5.4)
(ii) Here you can select comments that you would like to define as a measure, and that
should be published in the RISE sustainability report.
(iii) Click on "Create Shortlist".
Note: the button "Create Shortlist" is at the bottom of this list, if you have a long list, you
have to scroll down.
(iv) The view changes to the "Measures" window.
Note: You can also get to this window by selecting the "Measure" button in the top menu
bar.
(iii)
(i)
(ii)
(iii)
Software manual RISE 3.0
Berner Fachhochschule | Haute école spécialisée bernoise | Bern University of Applied Sciences 11
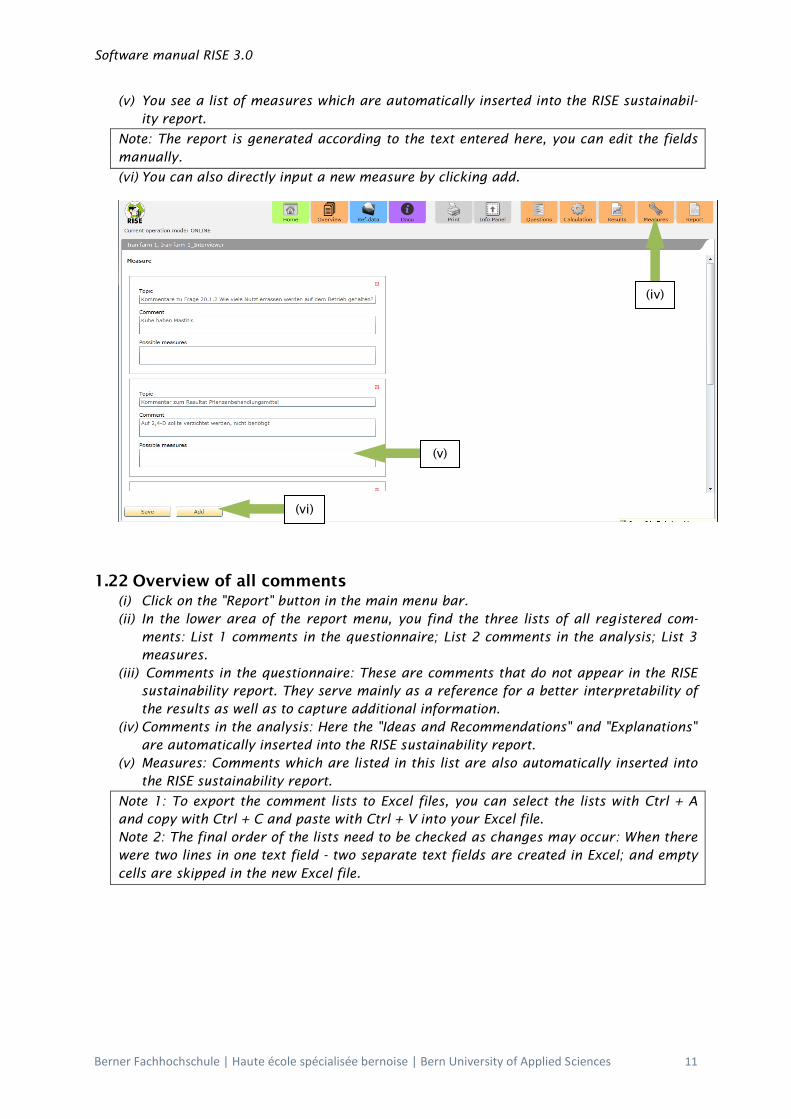
(v) You see a list of measures which are automatically inserted into the RISE sustainabil-
ity report.
Note: The report is generated according to the text entered here, you can edit the fields
manually.
(vi) You can also directly input a new measure by clicking add.
1.22 Overview of all comments
(i) Click on the "Report" button in the main menu bar.
(ii) In the lower area of the report menu, you find the three lists of all registered com-
ments: List 1 comments in the questionnaire; List 2 comments in the analysis; List 3
measures.
(iii) Comments in the questionnaire: These are comments that do not appear in the RISE
sustainability report. They serve mainly as a reference for a better interpretability of
the results as well as to capture additional information.
(iv) Comments in the analysis: Here the "Ideas and Recommendations" and "Explanations"
are automatically inserted into the RISE sustainability report.
(v) Measures: Comments which are listed in this list are also automatically inserted into
the RISE sustainability report.
Note 1: To export the comment lists to Excel files, you can select the lists with Ctrl + A
and copy with Ctrl + C and paste with Ctrl + V into your Excel file.
Note 2: The final order of the lists need to be checked as changes may occur: When there
were two lines in one text field - two separate text fields are created in Excel; and empty
cells are skipped in the new Excel file.
(vi)
(v)
(iv)

Software manual RISE 3.0
Berner Fachhochschule | Haute école spécialisée bernoise | Bern University of Applied Sciences 12
(i)
(ii)
Note: Scroll down to see more
comments.

Software manual RISE 3.0
Berner Fachhochschule | Haute école spécialisée bernoise | Bern University of Applied Sciences 13
Calculation and analysis
1.23 Calculate a questionnaire
(i) A questionnaire is ready for calculation when a tick appears next to “B Farm visit
questions”. This means that all questions were responded and therefore every chap-
ter from 20-100 has a tick on its left side. However, it is also possible that a set
of questions will not appear, as the overlaying topic was unselected as it is not
relevant (e.g. whether heavy machinery was used or not).
Note 1: A check-list with needed steps and questions to do before you can make a RISE-
calculation can be found in the annex III of this document.
Note 2: In principle, the RISE method only foresees to calculate complete questionnaires.
Nevertheless, it is also possible to calculate incomplete questionnaires. But in this case it
must be taken into consideration that calculation errors and wrong results cannot be
avoided.
(ii) Go to the calculation section of the application (click once on the “Calculation” icon)
(iii) Please ensure to select "Automatic update of master data before calculating", in or-
der to use the latest version of the master data for the calculation. "Results auto-
matically delete before calculating" reduces the likelihood of errors.
(i)
(ii)

Software manual RISE 3.0
Berner Fachhochschule | Haute école spécialisée bernoise | Bern University of Applied Sciences 14
Note 1: After changes in the questionnaire, you can also manually update the
master data before calculation.
Note 2: Old results, you can also remove manually.
(iv) Click on “Calculate” to start your RISE analysis. The page gets inactivated while cal-
culation is running. After completion the actual calculation time and date are shown
at the left hand side.
Note 1: Whenever you work several hours in the offline mode the software gets
slower and slower as a temporary buffer is filled. To avoid a software crash during
calculation, please take a break and restart the software before calculating results.
Note 1: If error messages appear during calculation you can close them by clicking on “OK”. This
happens normally due to missing data in the questionnaire. The RISE software will nevertheless
calculate your results.
Note 2: You can also have a look at these previous results in the analysis part without any prob-
lem. Note that due to the calculation problems some results may be missing or incorrect. .
Note 3: It is important that you delete the results before you go back to work on the question-
naire. Otherwise the application will not be able to save any changes you will make. Note that
deleting results does not affect the questionnaire data. If "Delete results automatically before
calculation" is selected, this process is automated.
(iii)
(iv)

Software manual RISE 3.0
Berner Fachhochschule | Haute école spécialisée bernoise | Bern University of Applied Sciences 15
1.24 The results section
(i) Go to the results section of the application (click once on the “Results” icon)
(ii) Use the navigation tree (“R Analysis results”) to access the different views on results
and background information.
(iii) 1 Farm details: A tabular overview on the farm data.
(iv) 2 Sustainability polygon: Graphical overview on themes and indicators in form of a
spider diagram. The degree of sustainability of the 10 themes connected with a red
line and the 50 indicators, visible as little black dots.
(v) 3 Theme overview: A tabular overview on themes and indicators. Here you have
the possibility to check detailed results and background information out of the RISE
manual.
Note 1: By clicking on the little triangle next to the indicator bar the table will be
expanded showing you the corresponding parameters. Use the same triangle to
collapse the table or use the “Collapse/Expand all” button at the top of the list.
(vi) 3 Indicator overview (details): By double-clicking on the green, red or yellow bars
you can open the detail results and see the composition of the score for every
theme/indicator.
Note 1: The tabular view on intermediate results and raw data allows you to under-
stand the composition of the score for every theme/indicator. In the figure below
the example of the indicator “soil management” is given. The calculation of indicator
is done from the right column to the left. As this farmer did neither calculate a nu-
trient balance for N and P (answer is “No”) nor carried out soil analyses (answer is
“No”) and got 33 of 100 possible points, therefore (middle column). In the upper
part of the column at the very right one can see that no farm area was lost in the
last 10 years and the farmer got therefore 100 points (middle column). The very
left column valued with 67 points is the average calculation of 100 and 33.
Note 2: If you want to copy the figures of a table out of RISE, please click first on the
button “Copy mode”. The table gets uncolored and can now be copied with the key
combination “Ctrl + C”.
(vii)
(vi)
(i)
(ii)
(iii)
(iv)
(v)

Software manual RISE 3.0
Berner Fachhochschule | Haute école spécialisée bernoise | Bern University of Applied Sciences 16
(vii) 3 Theme overview (background information): Click on the information button “i”
on the right hand side of the theme (respectively indicator) bar in the theme over-
view to open an information window with explanations and background information
to the theme (respectively indicator). This is the same information you can find in
the RISE Manual.
Note: The explanation window will open at the bottom of the page. You can adjust the size
of this window. Click on the red arrow at the right very bottom side of the application to
close it.
(viii) Check the nodes 4 to 12 of the analysis navigation tree for detailed results to spe-
cific aspects (Crop production, animal husbandry, plant protection, animal treat-
ment, energy, workforce and quality of life).
Note: As an example of such a table with detailed results, the aspect “11 Workforce” is
shown below. Every person registered as a workforce on this farm is listed in a separate
column with the individual results which are further aggregated to the parameters “Salary
and income level” and “Working times”.

Software manual RISE 3.0
Berner Fachhochschule | Haute école spécialisée bernoise | Bern University of Applied Sciences 17
1.25 Calculate average values
(i) To calculate an average result of a group of farms select all the farms under “overview”.
click on the RISE button on the top left corner and choose “Calculation of averages” under
“Analyses”.
(ii) Select the surveys of which you want to calculate an average result. By ticking the check
box in the header line, you may select all available (calculated) questionnaires in the cur-
rent view.
Note 1: You can only select questionnaires which have been calculated successfully. You may
recognize them as their check box is highlighted and the date of calculation is listed in the col-
umn “Last calculation”.
Note 2: You can either tick “select all calculated farms” in order to calculate an average of all
surveys in your project, or you can individually select the surveys.
Note 3: You may also include average results you calculated before.
Click “OK” when you finished the selection of questionnaires. Wait until data is loaded and the
average result is calculated. Select a farm or create a new one, give a name to the average result
and assign it to a project. Click “Add” to complete the process.
Note: By ticking this
box all calculated
questionnaires on the
current view may be
selected.
Note: Questionnaires
may also be selected
individually.
Software manual RISE 3.0
Berner Fachhochschule | Haute école spécialisée bernoise | Bern University of Applied Sciences 18
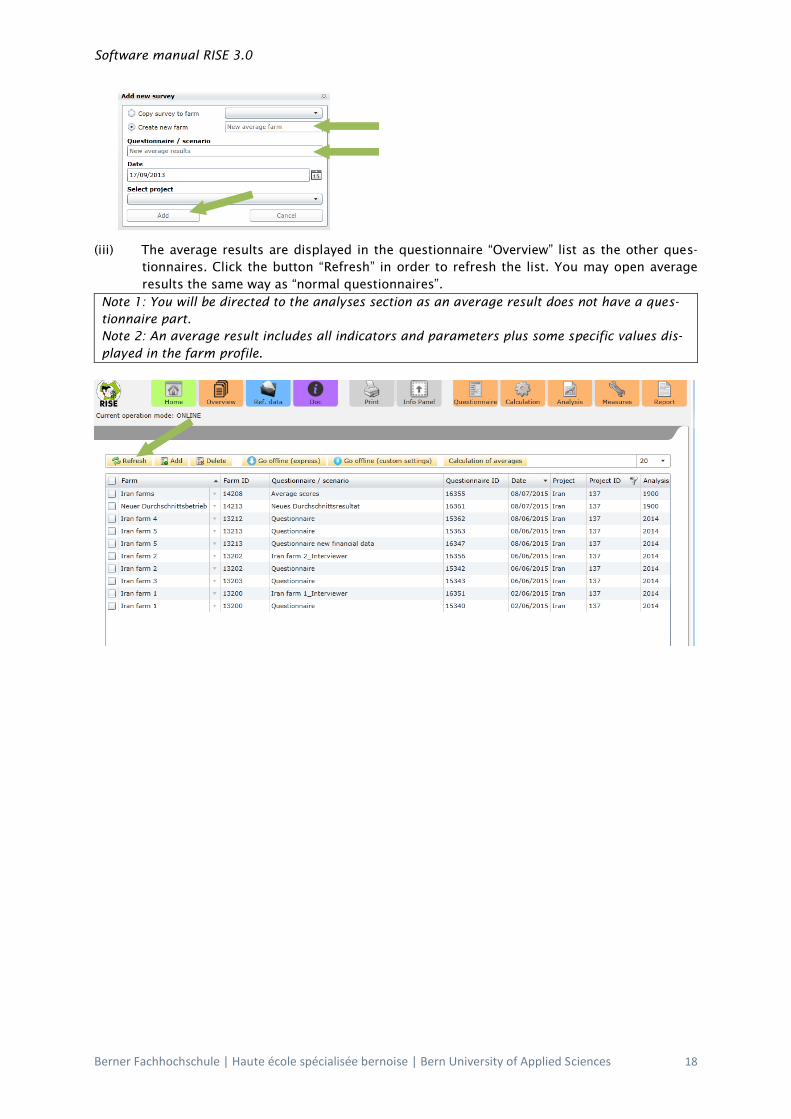
(iii) The average results are displayed in the questionnaire “Overview” list as the other ques-
tionnaires. Click the button “Refresh” in order to refresh the list. You may open average
results the same way as “normal questionnaires”.
Note 1: You will be directed to the analyses section as an average result does not have a ques-
tionnaire part.
Note 2: An average result includes all indicators and parameters plus some specific values dis-
played in the farm profile.

Software manual RISE 3.0
Berner Fachhochschule | Haute école spécialisée bernoise | Bern University of Applied Sciences 19
1.26 Compare farm results
(i) Go to the results section of the application.
Note: It’s possible to compare a farm result to the result of another farm or to a calculat-
ed average.
(ii) Click on the icon at the very right of the page (“Load reference surveys”) to select the sur-
veys.
(iii) Choose the surveys and/or calculated averages to which you want to compare your farm
result to. Proceed as described at chapter 1.250. “Close” to go back to the analyses sec-
tion.
Note 1: You may only select calculated questionnaires.
Note 2: You may select and deselect all calculated questionnaires of the current view by tick-
ing the check box in the header line.
(iv) If you successfully selected some surveys you will find now the results of several farms in
the following parts: “Farm profile”, “Sustainability polygon” and “Indicator overview”.
(v) In order to show the color code of the different surveys, click on the middle small icon at
the very right of the page.
Note: There are different colors used for the first six farms. The rest is displayed in black.
(vi) To deactivate the display of several surveys repeat step (ii) and tick the “Deselect” check-
box in the header line for the current view.
1.27 Create a RISE-Sustainability report (Excel)
(i) Go to the report section of the application.
(ii) Please click on “Download template” and save it on your computer. Open the template us-
ing Microsoft Excel on your computer.
(ii) (i)

Software manual RISE 3.0
Berner Fachhochschule | Haute école spécialisée bernoise | Bern University of Applied Sciences 20
Note 1: This template works only with Microsoft Excel.
(iii) Copy the complete line with the farm results. First click once into the line with results,
then select all with the keys “Ctrl+A” and copy the results with “Ctrl+C”.
(iv) Paste the results in the Excel template you opened in line 2 of the sheet named “Data”. By
doing so, the polygon and the overview on results are generated.
(v) Use the empty space in the report to explain the results in your words to the farm manag-
er and to note your recommendations. The consultation of the detailed results in the
analyses section of the software as well as the reading of the explanations in the RISE
manual will support you.
Note: The RISE method does not provide “recipe-like solutions”. The idea of this report is to
describe in your own words indicators and parameters with good performance as well as
aspects with opportunities for improvement, based on the knowledge about the RISE
method, the detailed result and about the local context. It’s important to formulate ideas
and recommendations to give it a forward looking perspective.
(i)
(ii)
(iii)

Software manual RISE 3.0
Berner Fachhochschule | Haute école spécialisée bernoise | Bern University of Applied Sciences 21
1.28 Create a RISE-Sustainability report (Word)
(i) Go to the report section of the application.
(ii) Click "Create Sustainability Report" to automatically generate a RISE sustainability re-
port in Word.
Note 1: The comments including the "ideas and recommendations" which you added
in the results section are automatically added to the appropriate topic in the RISE
sustainability report (see also section 5.3).
Note 2: Similarly the shortlisted comments and "Measures” of the results section are
automatically added to the sustainability report (see also section 5.5).
(i)
(ii)

Software manual RISE 3.0
Berner Fachhochschule | Haute école spécialisée bernoise | Bern University of Applied Sciences 22
Working mode offline – online
The RISE program offers the two options, to work in the online or offline mode. In the online
mode, there is a continuous data exchange between your computer and the RISE Server. This
has the advantage that the data is secured immediately.
You also have the option to work in the offline mode. This means that your data is tempo-
rarily not stored on the server but on your computer. For this all necessary reference data
(e.g. regional data, master data for animals, crops, fertilizers, etc.) are stored on your com-
puter, during your switch from online to offline mode. So the program can be used offline,
without internet connection. Once you have internet access again, the data can be trans-
ferred to the RISE Server (synchronization).
Note 1: You need a connection to the Internet to be able to switch to the offline mode
Note 2: It’s not possible to synchronize data and to work offline if you access RISE with your Web-
Browser. The RISE application has to be installed on your computer as described in Annex II of this
software manual.
1.29 Change to offline mode
(i) Click on the RISE-symbol on your desktop to open the software.
(ii) Login with your personal username and password and select the language you want to
work with.
(iii) Select the project you need in “ questionnaire overview” “project filter” (see also
chapter 2.1 and 2.2).
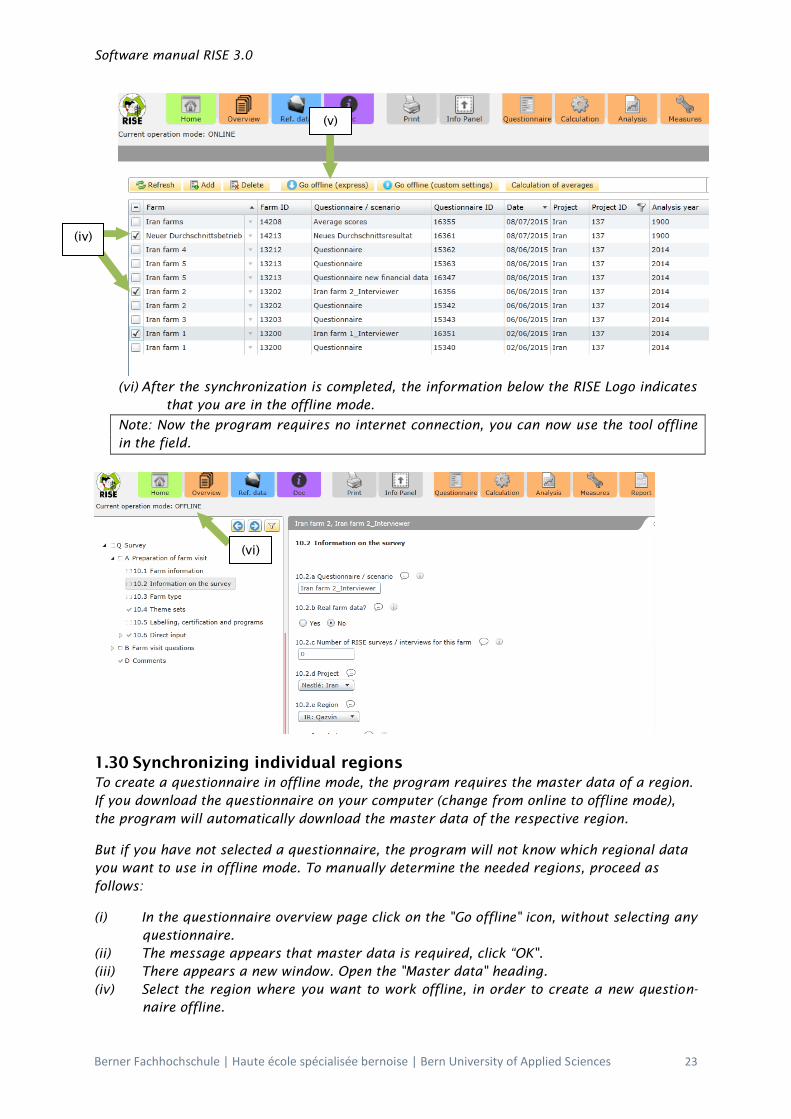
(iv) Select all the questionnaires that you want to use in offline mode.
Note 1: If you do not have a pre-defined questionnaire, you can switch directly to the of-
fline mode (chapter 1.4.
Note 2: It is possible to create a new questionnaire in the offline mode.
Note 3: If you want to change data in a copied questionnaire, you first need to reserve
this questionnaire. Please follow the instructions described in chapter 1.5.
(v) To start working in the offline mode, click "Synchronize" to download the question-
naires (and the associated reference data).
Software manual RISE 3.0
Berner Fachhochschule | Haute école spécialisée bernoise | Bern University of Applied Sciences 23
(vi) After the synchronization is completed, the information below the RISE Logo indicates
that you are in the offline mode.
Note: Now the program requires no internet connection, you can now use the tool offline
in the field.
1.30 Synchronizing individual regions
To create a questionnaire in offline mode, the program requires the master data of a region.
If you download the questionnaire on your computer (change from online to offline mode),
the program will automatically download the master data of the respective region.
But if you have not selected a questionnaire, the program will not know which regional data
you want to use in offline mode. To manually determine the needed regions, proceed as
follows:
(i) In the questionnaire overview page click on the "Go offline" icon, without selecting any
questionnaire.
(ii) The message appears that master data is required, click “OK".
(iii) There appears a new window. Open the "Master data" heading.
(iv) Select the region where you want to work offline, in order to create a new question-
naire offline.
(v)
(vi)
(iv)

Software manual RISE 3.0
Berner Fachhochschule | Haute école spécialisée bernoise | Bern University of Applied Sciences 24
(v) Click on "Go offline", the data will be synchronized. After downloading the regional
data, the program moves to the offline RISE homepage.
1.31 Using the software in offline mode
Note 1: The software opens by double-clicking on the RISE-symbol and lets shut like every
other window by clicking on the red cross on the top right corner . When you are work-
ing in offline mode you do not have to enter your personal username and password. This
implies that computer has to be protected with a password against unauthorized access.
Note 2: Whenever you open the software and at the same time an internet connection is
available the program will ask you if you want to synchronize your data and continue to
work online. If you would like to continue working in offline mode please click “cancel”.
Note 3: You have only displayed the farms which were synchronized and/or created in the
offline mode
Note 4: In general the software works the same way as in the online mode. The only con-
straint is that you are not able to delete farms in offline mode.
Note 5: Data is saved on your computer
Note 6: Attention! Keep in mind that you are allowed by default to work a maximum of 7
days in offline mode in order to prevent data losses. If you are not able to synchronize the
data at an interval of 7 days, please contact the RISE-administrator.
1.32 Synchronize data after having worked offline
By switching from offline to online, the locally stored data will be synchronized with the RISE-
Server via Internet.
Note: For the synchronization process, an internet connection is required.
(i) Please connect to the internet
(ii) To open the software please click on the RISE-symbol on your desktop
(v)
(iii
)
(iv)
Software manual RISE 3.0
Berner Fachhochschule | Haute école spécialisée bernoise | Bern University of Applied Sciences 25
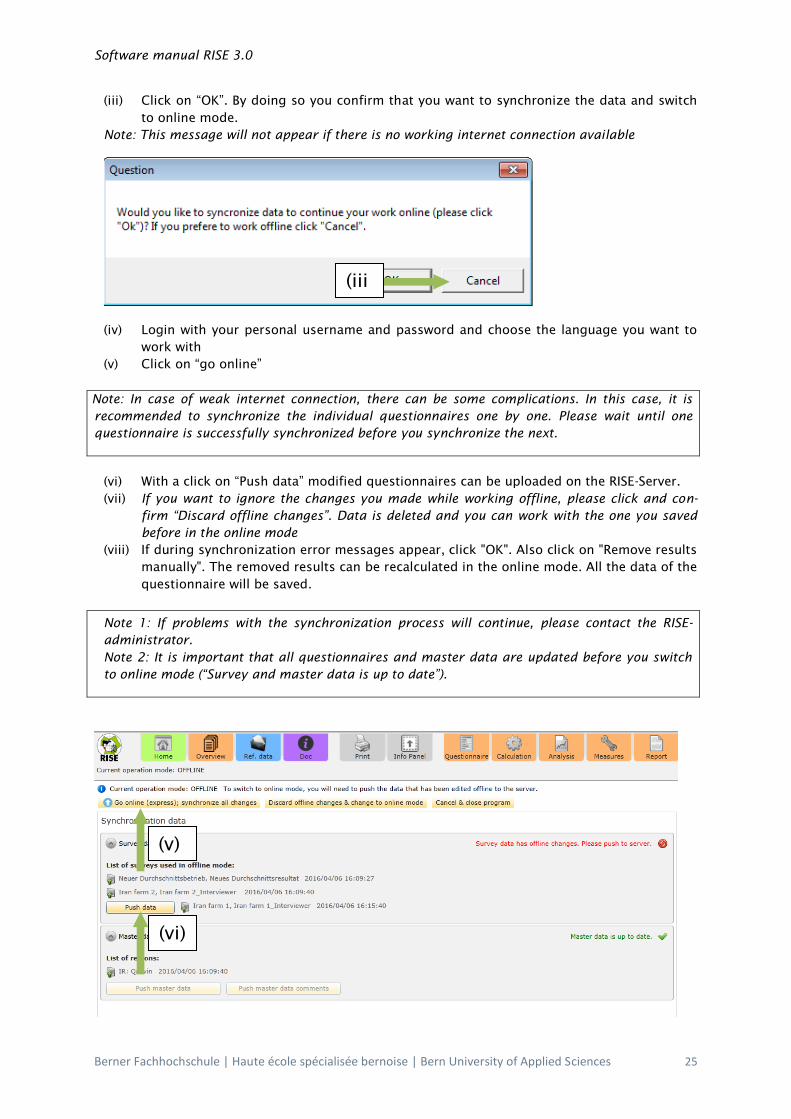
(iii) Click on “OK”. By doing so you confirm that you want to synchronize the data and switch
to online mode.
Note: This message will not appear if there is no working internet connection available
(iv) Login with your personal username and password and choose the language you want to
work with
(v) Click on “go online”
Note Note: In case of weak internet connection, there can be some complications. In this case, it is
recommended to synchronize the individual questionnaires one by one. Please wait until one
questionnaire is successfully synchronized before you synchronize the next.
(vi) With a click on “Push data” modified questionnaires can be uploaded on the RISE-Server.
(vii) If you want to ignore the changes you made while working offline, please click and con-
firm “Discard offline changes”. Data is deleted and you can work with the one you saved
before in the online mode
(viii) If during synchronization error messages appear, click "OK". Also click on "Remove results
manually". The removed results can be recalculated in the online mode. All the data of the
questionnaire will be saved.
Note 1: If problems with the synchronization process will continue, please contact the RISE-
administrator.
Note 2: It is important that all questionnaires and master data are updated before you switch
to online mode (“Survey and master data is up to date”).
(iii
)
(vi)
(v)

Software manual RISE 3.0
Berner Fachhochschule | Haute école spécialisée bernoise | Bern University of Applied Sciences 26
(ix) Click on “OK”. The software is now switching to online mode. This requires an internet
connection.
(x) The program has now changed to online mode
Note: Now you can use the software only with a working internet connection. This ap-
plies as long as you synchronize your data again.

Software manual RISE 3.0
Berner Fachhochschule | Haute école spécialisée bernoise | Bern University of Applied Sciences 27
Reference data
Reference-data are data linked to particular projects and regions as well as master data (e.g.
feed, fertilizer, livestock data, crop data, etc.). These data provide the reference for calculat-
ing all the indicators and parameters (e.g. water needs of particular livestock practices and
the level of potential nutrient excretions in such practices).
1.33 Open the Reference data part
(i) Click on “Reference data” on the home page
(ii) If you find yourself on the overview screen or in a questionnaire, click on the “Ref.data.
(iii) The home page of the Reference data part appears
1.34 Project specific data
Under the menu item “Project”, changes can only be made if you have editor rights for the particu-
lar project.
(i) In "1.1 Project information" basic information about the project can be defined.
(ii) In "1.2 Additional project information" supplementary project information can be added. This
information is not part of the calculations, but can serve to explain important project-specific
issues.
(iii) In "1.3 Theme variants” you can define the RISE 2.0/ 3.0 questionnaires, which will be the
standard questions for all assessments of a particular project. You can also pre-define some
question variants within individual questionnaires.
(i)
(ii)
(iii)

Software manual RISE 3.0
Berner Fachhochschule | Haute école spécialisée bernoise | Bern University of Applied Sciences 28
Note 1: For the content of the RISE 2.0/ 3.0 questionnaire, please consult the RISE user manual.
Note 2: This chapter will be further developed. For questions, please contact the RISE team.
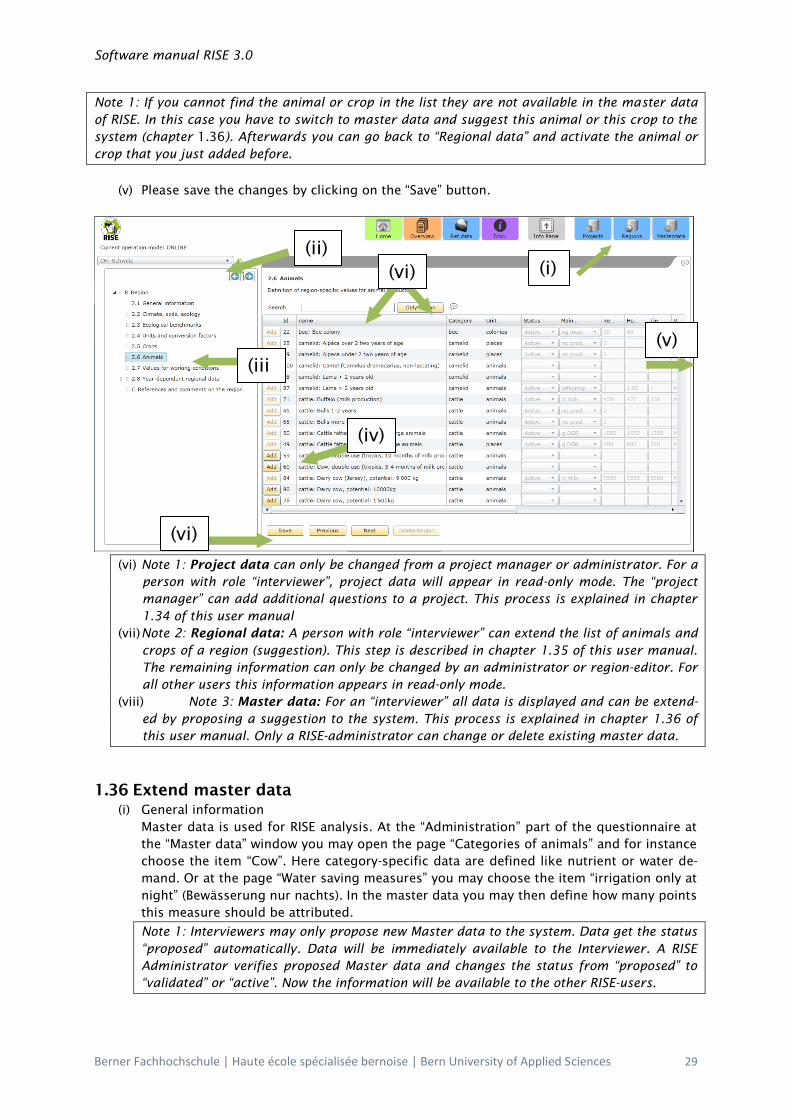
1.35 Extend a region with animals and crops
Each questionnaire refers to a region. Climatic, ecological and socio-economic data, as well as
different benchmarks are defined for every region. At the “Administration” part of the software, at
the “Regional data” window, please go to the pages “2.5 Crops” respective “2.6 Animals” at the
navigation tree. At these pages animals respectively crops are set, which are among the choices in
the questionnaire. If during the interview it occurs that an animal or a crop is not available in the
menu list the questionnaire you have to leave the questionnaire and extend the regional data.
Note: Most of the „regional data“ only the „region editor“ can edit. All other RISE users just can
read these data.
The crops and animals list can be edited by a person with interviewer rights.
Note 1: An RISE Interviewer can only propose animals and crops to the system. Data get the sta-
tus “proposed” automatically. These will be immediately available to the Interviewer. A RISE Ad-
ministrator verifies proposed master data and changes the status from “proposed” to “active”.
Now the information will be available to all RISE users.
Note 2: Please use the possibility to add items restrainedly, as validation process is complex. Most-
ly there is the possibility to select a similar crop or animal
(i) Please select the region you want to add an additional animal type or crop
(ii) Go to page “2.5 Crops” or “2.6 Animals”
(iii) You may select further crops respectively animals by clicking the “Add” button.Thereafter
the selected crop or animal will be available in the drop down menu in the questionnaire
part. The button “Remove” is always inactivated for Interviewers.
(iv) Please select a crop or an animal in master data of RISE. The software will take over the
default values of yield and performance etc. automatically. Please now adapt this data to
regional averages.
Software manual RISE 3.0
Berner Fachhochschule | Haute école spécialisée bernoise | Bern University of Applied Sciences 29
Note 1: If you cannot find the animal or crop in the list they are not available in the master data
of RISE. In this case you have to switch to master data and suggest this animal or this crop to the
system (chapter 1.36). Afterwards you can go back to “Regional data” and activate the animal or
crop that you just added before.
(v) Please save the changes by clicking on the “Save” button.
(vi) Note 1: Project data can only be changed from a project manager or administrator. For a
person with role “interviewer”, project data will appear in read-only mode. The “project
manager” can add additional questions to a project. This process is explained in chapter
1.34 of this user manual
(vii) Note 2: Regional data: A person with role “interviewer” can extend the list of animals and
crops of a region (suggestion). This step is described in chapter 1.35 of this user manual.
The remaining information can only be changed by an administrator or region-editor. For
all other users this information appears in read-only mode.
(viii) Note 3: Master data: For an “interviewer” all data is displayed and can be extend-
ed by proposing a suggestion to the system. This process is explained in chapter 1.36 of
this user manual. Only a RISE-administrator can change or delete existing master data.
1.36 Extend master data
(i) General information
Master data is used for RISE analysis. At the “Administration” part of the questionnaire at
the “Master data” window you may open the page “Categories of animals” and for instance
choose the item “Cow”. Here category-specific data are defined like nutrient or water de-
mand. Or at the page “Water saving measures” you may choose the item “irrigation only at
night” (Bewässerung nur nachts). In the master data you may then define how many points
this measure should be attributed.
Note 1: Interviewers may only propose new Master data to the system. Data get the status
“proposed” automatically. Data will be immediately available to the Interviewer. A RISE
Administrator verifies proposed Master data and changes the status from “proposed” to
“validated” or “active”. Now the information will be available to the other RISE-users.
(iii
)
(iv)
(v)
(vi)
(i)
(ii)
(vi)

Software manual RISE 3.0
Berner Fachhochschule | Haute école spécialisée bernoise | Bern University of Applied Sciences 30
Note 2: Adding new Master data often causes an extensive research of experts in this
field. For validation purposes it is imperative to mention the source of information. Oth-
erwise the new item cannot be activated by the RISE Administrator.
Note 3: Please use the possibility to add items restrainedly, as validation process is com-
plex. Mostly there is the possibility to select a similar Master data.
(ii) At Master data please select a category (page) in which you want to add an item
Note: For this example table “Crops” has been chosen
(iii) By entering the name in the filter field, it’s possible to search for a certain category.
(iv) You may select a similar item in the list and copy it by clicking once on the according line.
Note 1: The name of the item does not appear in the language you have chosen in the be-
ginning. It appears in the language it was filled in in the database. If you would like to add
a new crop to the system you may do this in your mother tongue. As soon as the RISE Ad-
ministrator validates the information it will be translated.
Note 2: When you copy a similar item it may help finding all required information of the
new item.
(v) Make a copy in order to adapt the item
Note 1: If you are not choosing an existing item, then only the button “New” is active. With
this button you may open an empty master data form in order to define the specific data
of the new item.
Note 2: For Interviewers the button “Edit” opens the master data window in the read-only
mode.
(vi) Complete all required data for this item by double-clicking on the according item. Enter
the data.
Note 1: It is very important to fill in all fields and boxes. It is your responsibility to fill in
valid and correct data. Please fill in the source of data directly in the last field called
“Source and comments”
Note 2: You find an exact description to all fields under “i”. Please consider the correct use
of the units.
(vii) Save data and close the window
(ii)
(iii)
(iv)
(v)

Software manual RISE 3.0
Berner Fachhochschule | Haute école spécialisée bernoise | Bern University of Applied Sciences 31
Frequently asked questions FAQ
I. What can be done in case of a software problem?
Please read carefully the error message; maybe that this will help you to solve the problem.
Frequent problems are:
Validation error: You entered a non-valid value on the actual page (for example a text in-
stead of a number, a value out of the allowed range, to long string etc.). Normally the
non-valid value is marked with a red rectangle. After having corrected this value you may
continue your work.
Failure of the internet connection: If an error message appears when working in the
online-mode it’s probable that your connection to the internet has been interrupted. Do
not continue your work until you established an internet connection and data could be
saved successfully.
If the error message is not understandable for you and the above described cases do not apply
it’s recommendable to close the software and restart it.
Note: All information you entered before the error message appeared was successfully saved in
the RISE-database. Do not continue entering data when an error message appears. Otherwise this
data may be lost
II. What can I do if in a drop down selection the desired category or
precise answer is not available?
If you have to answer a question try to choose the item which most fits to reality. Whenever the
exact answer or at least a similar one cannot be found items can be suggested to the system (see
chapter 1.36). If this step does not work please contact the responsible person of the project.
Selection menus (animals, fertilizers, crops, etc.) can be extended by the RISE-administrator.
III. Why does data added by the RISE-administrator not appear in the
program? How do I get the newest version of RISE?
(vi)
(vii)

Software manual RISE 3.0
Berner Fachhochschule | Haute école spécialisée bernoise | Bern University of Applied Sciences 32
Every time when RISE is opened with a working internet connection, the software is automatically
updated. In order to see the last changes of another RISE-user or to have available data that has
been added of an administrator you have to close the software completely and start again.
Note: Depending on your settings it may be necessary to delete the browser cash to be sure that
no data is loaded from the cash.
IV. Is it possible to work with RISE without an internet connection?
Yes, it is possible to work with RISE without any internet connection. Install the software on your
computer and synchronize the data before disconnecting the internet connection (see chapter 0)
V. How can I be sure that no data are lost?
Data is automatically saved on the RISE-server when you go to the next (or previous) ques-
tion page. When working offline it will be saved on your computer, when working online
data is saved directly on the RISE-server.
Note: When an error message appears while saving data please stop to work. Try to cor-
rect all incorrect values. If this is not possible restart the software. Otherwise data may be
lost.
Changes in the administration part have to be saved manually with a click on the “save”-
button.
Log out on the home-page when finishing your work before closing the internet browser.
If you like to assure you against data loss during the synchronization process you can
make a security copy of the RISE-data folder. Open the “My Documents” folder on your
computer. Copy the folder “Rise” and rename the copied folder with “Copy of Rise”. Start
the software and synchronize your data. After a successful synchronization you should
delete the folder named “Copy of Rise”.
VI. What can be done in case of synchronization problems?
To synchronize data you always need a working internet connection. If this is not the
case, try again later or with another network.
Note that the synchronization process needs some time. Do not interrupt the process by
closing the software.
It’s better to synchronize farms and questionnaires one after each other.
If you don’t need the questionnaire data on your computer any more, you may choose the
option “Discard offline changes” to directly change to the online mode. If this option does
not work anymore you should uninstall the software and install it again (as described in
this manual).
If you don’t want to lose the offline data, please make a security copy of the RISE-data
folder. Open the “My Documents” folder on your computer. Copy the folder “Rise” and re-
name the copied folder with “Copy of Rise”. Now you can uninstall the software and install
it again (as described in this manual). Please contact the RISE-support to rescue the data
saved in the folder “Copy of Rise”.
VII. What can I do if I don’t find an answer on my question in this soft-
ware manual?
Please contact the RISE-support with the following email-address: [email protected]
Please describe your problem as detailed as possible:
What did you want to do at the moment the problem appeared?
What did you do with RISE before?
Mention the farm names, questionnaire names and your user name
If possible add a print screen of the error message to your description.
Note how we can contact you (phone, skype, etc.).

Software manual RISE 3.0
Berner Fachhochschule | Haute école spécialisée bernoise | Bern University of Applied Sciences 33
With this information you help us to quickly solve the problem and to further improve the RISE
software.
When somebody oft the RISE-support contacts you, please have your computer ready with connec-
tion to the internet. Install the Team Viewer software if possible:
http://www.teamviewer.com/de/download/index.aspx

Software manual RISE 3.0
Berner Fachhochschule | Haute école spécialisée bernoise | Bern University of Applied Sciences 34
Annex I: Create your own RISE user account
Step 1: Open the login window
(i) Click on “register now” in the lower left corner of the pop-up window
Step 2: Enter your personal user data
(ii) Choose your user name (you need this username to login to the application)
(iii) Enter your friendly name (personal name)
(iv) Select a language (and country) out of the list of available languages
(v) Enter your e-mail address.
(vi) Choose a password (it must be between 8 and 50 characters long and contain at
least one special character (e.g. @ or #), one number (e.g. 3) as well as lower and
upper case letters)
(vii) Confirm your password
(viii) Please download the two documents Privacy policy (Data protection) and the Code
of conduct. Read them carefully. If you agree in them, please tick the box “I accept
the terms of use for RISE”.
Note: Now you have created a user account. Before being able to use RISE, your user name
has to be added to the farms and projects to which you have access. This can only be
done by RISE Administrators.
(ix) If you do not agree in the terms of use for RISE do not tick the according box and
please contact the RISE support ([email protected]).

Software manual RISE 3.0
Berner Fachhochschule | Haute école spécialisée bernoise | Bern University of Applied Sciences 35
Software manual RISE 3.0
Berner Fachhochschule | Haute école spécialisée bernoise | Bern University of Applied Sciences 36
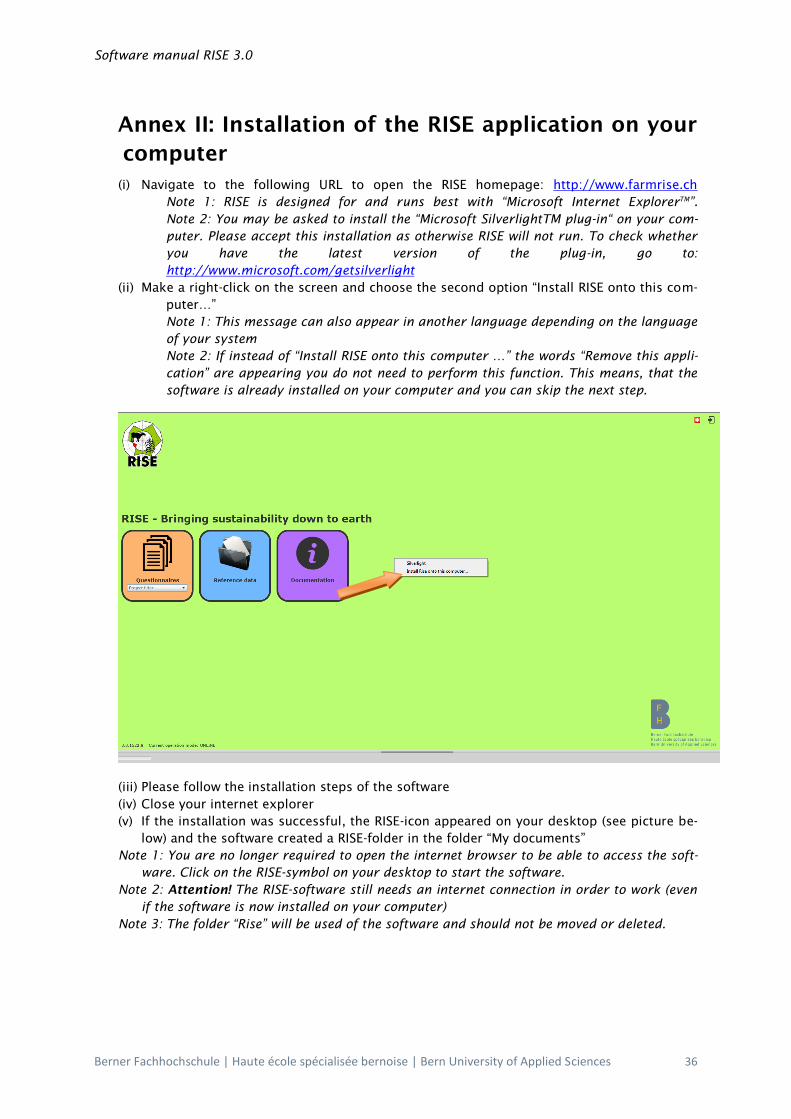
Annex II: Installation of the RISE application on your
computer
(i) Navigate to the following URL to open the RISE homepage: http://www.farmrise.ch
Note 1: RISE is designed for and runs best with “Microsoft Internet ExplorerTM
”.
Note 2: You may be asked to install the “Microsoft SilverlightTM plug-in“ on your com-
puter. Please accept this installation as otherwise RISE will not run. To check whether
you have the latest version of the plug-in, go to:
http://www.microsoft.com/getsilverlight
(ii) Make a right-click on the screen and choose the second option “Install RISE onto this com-
puter…”
Note 1: This message can also appear in another language depending on the language
of your system
Note 2: If instead of “Install RISE onto this computer …” the words “Remove this appli-
cation” are appearing you do not need to perform this function. This means, that the
software is already installed on your computer and you can skip the next step.
(iii) Please follow the installation steps of the software
(iv) Close your internet explorer
(v) If the installation was successful, the RISE-icon appeared on your desktop (see picture be-
low) and the software created a RISE-folder in the folder “My documents”
Note 1: You are no longer required to open the internet browser to be able to access the soft-
ware. Click on the RISE-symbol on your desktop to start the software.
Note 2: Attention! The RISE-software still needs an internet connection in order to work (even
if the software is now installed on your computer)
Note 3: The folder “Rise” will be used of the software and should not be moved or deleted.
Software manual RISE 3.0
Berner Fachhochschule | Haute école spécialisée bernoise | Bern University of Applied Sciences 37
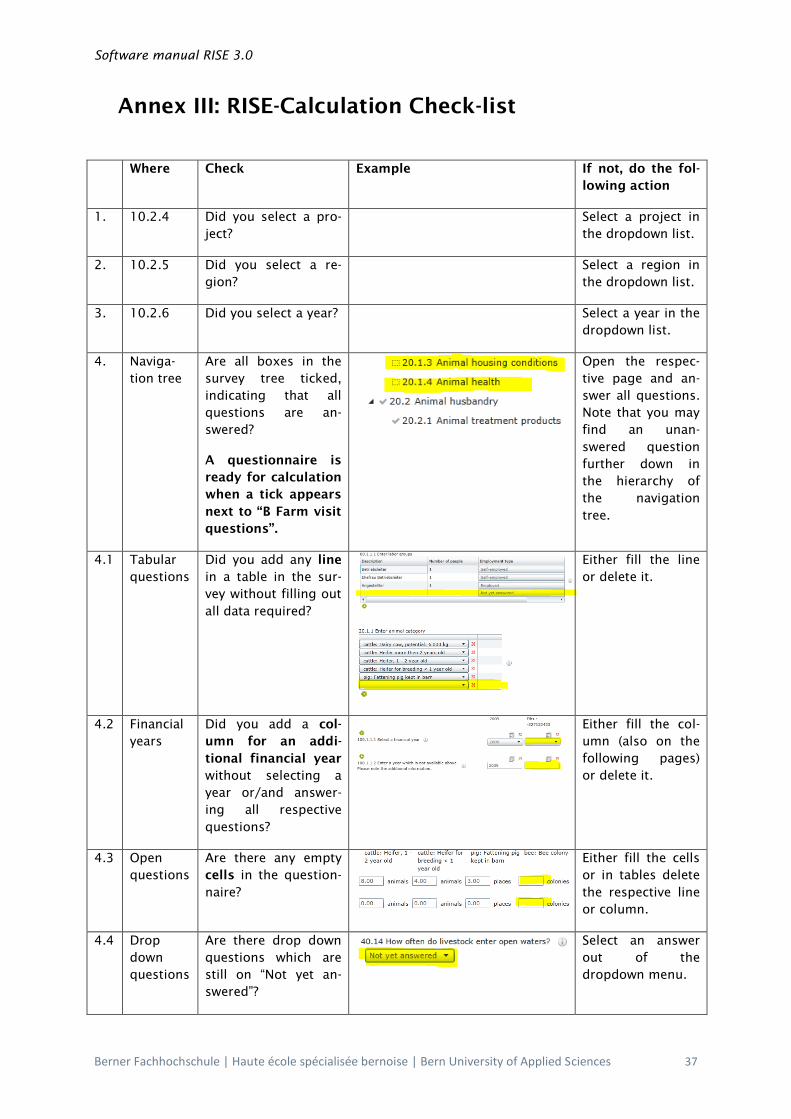
Annex III: RISE-Calculation Check-list
Where Check Example If not, do the fol-
lowing action
1. 10.2.4 Did you select a pro-
ject?
Select a project in
the dropdown list.
2. 10.2.5 Did you select a re-
gion?
Select a region in
the dropdown list.
3. 10.2.6 Did you select a year? Select a year in the
dropdown list.
4. Naviga-
tion tree
Are all boxes in the
survey tree ticked,
indicating that all
questions are an-
swered?
A questionnaire is
ready for calculation
when a tick appears
next to “B Farm visit
questions”.
Open the respec-
tive page and an-
swer all questions.
Note that you may
find an unan-
swered question
further down in
the hierarchy of
the navigation
tree.
4.1 Tabular
questions
Did you add any line
in a table in the sur-
vey without filling out
all data required?
Either fill the line
or delete it.
4.2 Financial
years
Did you add a col-
umn for an addi-
tional financial year
without selecting a
year or/and answer-
ing all respective
questions?
Either fill the col-
umn (also on the
following pages)
or delete it.
4.3 Open
questions
Are there any empty
cells in the question-
naire?
Either fill the cells
or in tables delete
the respective line
or column.
4.4 Drop
down
questions
Are there drop down
questions which are
still on “Not yet an-
swered”?
Select an answer
out of the
dropdown menu.
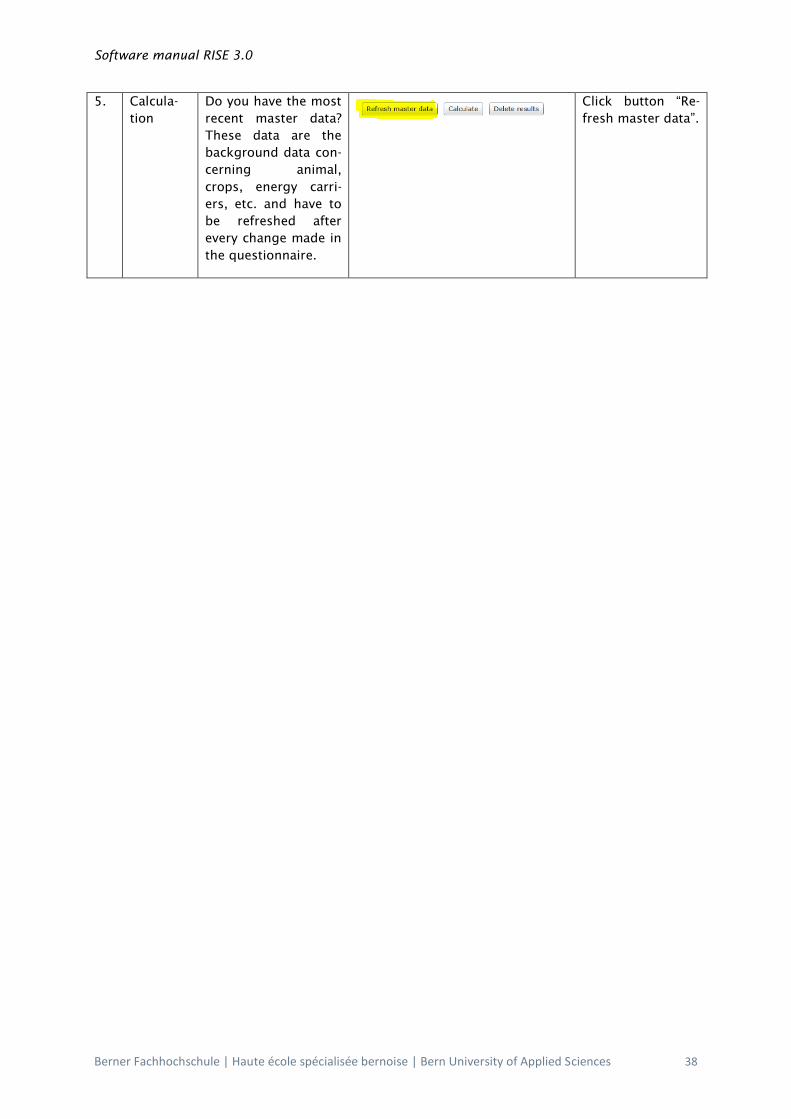
Software manual RISE 3.0
Berner Fachhochschule | Haute école spécialisée bernoise | Bern University of Applied Sciences 38
5. Calcula-
tion
Do you have the most
recent master data?
These data are the
background data con-
cerning animal,
crops, energy carri-
ers, etc. and have to
be refreshed after
every change made in
the questionnaire.
Click button “Re-
fresh master data”.