rust removal using electrolysis - saltmine.org uk removal using electrolysis ... this reduced iron...
TRANSCRIPT

Rust Removal using Electrolysis
Rust Removal using
Electrolysis
Page 1 of 38

Rust Removal using Electrolysis
Table of ContentsElectrolysis, the science behind it................................................................................ 4
What you need:.................................................................................................... 5The Setup:........................................................................................................... 6Safety Precautions:............................................................................................... 7Why you should not use stainless steel electrodes for electrolysis.................................8Rust Removal Using Carbonated Soft Drink............................................................... 9What is the method? ............................................................................................. 9
What about screws, pivots, etc that are "rusted tight"?......................................... 10Where did this method come from?.................................................................... 10What do I need? ............................................................................................. 10How long does the solution last? ....................................................................... 10What about the stainless/iron electrode?............................................................. 11How do I connect the battery charger? ............................................................... 11How do I know if it is working?.......................................................................... 11How long do I leave it? .................................................................................... 11How do I get the rust off after I remove the object? ............................................. 11My object is too big to fit. Can I clean part of it?.................................................. 11After I take it out, then what? .......................................................................... 12Will the method remove pitting? ....................................................................... 12How can I handle objects that are awkward to clean? .......................................... 12How can I dispose of the solution? .................................................................... 12Can I use metal containers? ............................................................................. 12How can I clean odd shaped objects? ................................................................. 12
Electrolytic Rust Removal ........................................................................................ 13Electrolytic Removal of Rust ..................................................................................... 14
Introduction ....................................................................................................... 14What is Rust? ..................................................................................................... 15Methods of Rust Removal..................................................................................... 15The Electrolytic Method........................................................................................ 15Important Safety Precautions................................................................................ 16Preparation of the Electrolyte Solution ................................................................... 16The Electrolytic Bath ........................................................................................... 17The Battery Charger............................................................................................ 18The Process........................................................................................................ 18Other Variants of the Electrolytic Method................................................................ 20Hydrogen Embrittlement of Steel - A Cautionary Note............................................... 21Problems with Stainless Steel Anodes..................................................................... 22
References:.................................................................................................... 22Electrolytic Rust Removal......................................................................................... 22
Important Safety Precautions................................................................................ 23What do you need to start?................................................................................... 23The Procedure..................................................................................................... 24
Page 2 of 38

Rust Removal using Electrolysis
NOTES............................................................................................................... 27Electrolysis - A Superior Cleaning Process................................................................... 28
NEWS – Warning................................................................................................. 28An electrolysis primer – Introduction...................................................................... 28Background........................................................................................................ 28What is Electrolysis?............................................................................................ 29Electrolyte.......................................................................................................... 29Ion.................................................................................................................... 29What can be cleaned?.......................................................................................... 30
Precious metals,(gold or silver) can be cleaned but;............................................. 30I can't emphasize enough that aluminum............................................................ 30
Materials Required............................................................................................... 31Safety................................................................................................................ 32Setup & Procedure............................................................................................... 33Special Cleaning Methods..................................................................................... 34
How to clean a bunch of small parts............................................................... 34Cleaning inside a tight area like a engine water jacket...................................... 35Cleaning large items.................................................................................... 35
REUSE the electrolyte.......................................................................................... 36Questions and Answers........................................................................................ 36
Page 3 of 38
Rust Removal using Electrolysis
Electrolysis, the science behind itFrom http://antique-engines.com/electrol.asp
First we'll look at the word; The word "electrolysis" can be broken into two parts: electroand lysis. 'Lysis' means to break down, or break a bond, to "tear apart". 'Electro' roughlymeans electric or electric current, electricity. So the word electrolysis is a combination oftwo terms and means to break a bond or take apart using electricity. I believe they are Latinterms, lysis coming from a Greek word meaning to "release". So it is literally breaking abond, or releasing by means of electricity - using an electric current to take somethingapart. In this case, we do want to take something apart - we want to break "rust" down andget good iron back.
Rust is a combination of iron and oxygen. In the process of electrolysis as I use it, we useelectricity to break the bond between oxygen and iron atoms. This is a very simpleexplanation, if you wish, you can find more complex details in science books, or on theInternet, etc. There is a lot more that happens than can be explained here, but these arethe basics. Atoms are partially made up of electrically charged particles - electrons with anegative charge and protons with a positive charge. It's these electric charges that causecertain atoms to want to "stick together" in certain combinations. Oxygen and the iron inthe steel stick together to form rust. Electrolysis will help to take them apart again. Atomscan lose or gain electrons. This gives them a positive or negative charge because there is nolonger a balance between the number of electrons and protons in an atom. Electrons can be"bumped" from one atom to another. The solution made with water and washing soda issimply to make a safe, simple solution that will allow the electricity to work through it andnot interfere with the process or produce chemicals that would be unsafe. Oxidation is achemical reaction where something gives up electrons. Reduction is when somethingaccepts electrons. Oxygen likes to be "reduced". When oxygen is reduced, or acceptselectrons, it makes oxide, O--. If we put oxygen together with iron metal, the iron isoxidized (gives electrons to the oxygen) and the oxygen is reduced (accepts the electronslost from iron). The result is one form of rust, ferric oxide, Fe2O3. Whenever something isoxidized, something else must be reduced. Electrons must come from somewhere(oxidation), to go somewhere (reduction). With the process of electrolysis, we are going toreverse the process to "break the bond" between metal and oxygen using electricity.
We will use metal rods called "electrodes" to help in this process. The electrodes will besubmerged in the water and washing soda solution. One electrode will be called the "anode"because it will be caused to have a positive electric charge. The anode is hooked to thepositive wire of the battery charger. The positive wire accepts electrons. If the positive wireis accepting electrons something is losing electrons (oxidizing). When 12 volts is applied tothe anode, water is oxidized at the anode surface and gives electrons up to the anode. Theproduct is oxygen. The bubbles you see coming from the anode are oxygen that resultedfrom the oxidation of water. The other electrode is called the Cathode. In our case, the partwe want to remove the rust from will be the cathode. Cathode is the word for an electrodewith a negative charge. The cathode is connected to the negative wire of the batterycharger. The negative wire supplies electrons. So something must gain electrons at the
Page 4 of 38

Rust Removal using Electrolysis
cathode (reduction). Two things are reduced at the cathode, water and the rusty iron. Thereduction of water produces hydrogen. The bubbles coming from the cathode are hydrogengas. (The fuel for the space shuttle is hydrogen and oxygen. Rust electrolysis should bedone in a well ventilated area so that explosive concentrations of hydrogen and oxygen arenot reached.) The rusty metal takes on electrons and is no longer attracted to the oxygenatoms, and the bond is broken. The rust is "reduced". If this process is done on a large scale(for example, the trailer frame shown on my pages) a lot of water is lost to "reduction" inthe process and needs to be replenished. A lot of oxygen and hydrogen are formed. Thissame process is used to keep a supply of oxygen in submarines. The hydrogen is disposed offor safety reasons.
During electrolysis the rust turns from orange to black. In most cases, the rust next to theiron is reduced to iron metal. This reduced iron will form a somewhat porous layer of newiron on the metal object being cleaned. After electrolysis the iron object will rust veryquickly unless it is protected because this porous layer of new iron has a high surface area.The rest of the rust may reduce to a variety of compounds depending on the compounds inthe original rust and the details of the electrolysis. Typically the black stuff that can berubbed off after electrolysis is a mixture of iron metal and magnetite, Fe3O4 , an oxide ofiron. Magnetite is an intermediate product in the reduction of rust to iron metal. It is theblack stuff in magnetic recording tapes.
So once your parts are cleaned or removed from the solution, you'll want to rinse and brushthem off to remove the loose iron, dry them quickly and completely, and protect them withprimer or other rust preventative.
Several years ago, and I can't recall how it happened, I came into an inexpensive and easyway to clean rust and grease, and, in some cases, paint, from your rusty cast iron and sheetmetal parts. Taking advantage of common household cleaning products, items many of ushave laying around the garage, kitchen or laundry room, and some science, you can cleanparts from a single bolt up to an entire trailer frame through a process known as"electrolysis".
What you need:• A non-conducting container - a large plastic bucket works really well.
• Battery charger - big is better, however even one able to produce 6 to 10 ampsshould do. A student recently used my site as the basis for a school project and useda computer power supply in place of battery charger.
• Sacrificial electrodes. Concrete reinforcing rod works well (re-bar) cut into lengthsabout 4" taller than your bucket or container. Do not use stainless steel! The resultsare a health hazard and illegal (more on that later)
• Arm and Hammer LAUNDRY soda, also called washing soda.
• Wire and/or cables for connecting electrodes together.
Page 5 of 38

Rust Removal using Electrolysis
• Water.
• Small lengths of small chain (used to suspend the rusty parts in solution) or someother means to suspend the part to clean into the solution.
The Setup:Using a plastic, or non-conductive bucket (not metal), mix a solution of 5 gallons water to1/3 to 1/2 cup laundry soda. Mix well so all soda is dissolved. Do not try to use other salts.You won't get better results and dangerous effects may occur. Caustic soda, for example, isfar too corrosive. Solutions of ordinary table salt can generate chlorine gas (toxic) at thepositive electrode (anode).
Clean the electrodes so they aren't too rusty - especially at the top ends - they need tomake good electrical contact with your wire or cable AND with the water. I take mine to awire wheel and give them just a real quick going over. Place electrodes in bucket aroundsides, so the clean, rust free ends stick up above the bucket. Use clamps or some means tohold them in place around the perimeter of the inside of the bucket or container so that theycannot move freely or fall into center of bucket. The electrodes must not touch the part(s) tobe cleaned, which will be suspended in center of bucket. I use small C clamps. Whateveryou use, it shouldn't be copper, and will get a bit messy if it gets into your cleaning solution.
Tie the electrodes together with wire or cables. I use copper wire twisted around the topends, and have used old jumper cables. All electrodes need to be tied together "electrically".This will become the "anode" grid. Since the cleaning process is somewhat "line of sight" it'sbest to surround the part to be cleaned to some extent with the electrodes.
Suspend part to be cleaned into bucket so it hangs in the middle, not touching bottom, andnot touching electrodes. I place a piece of re-bar across top of bucket (see photo below) andbolt a small piece of chain to my part to be cleaned, and clamp the chain on the rod so thatthe chain hangs from the rod, and suspends the part into solution below. The part to cleanthen becomes the "cathode".
Attach battery charger - place NEGATIVE LEAD (this is critical!!) on the piece that is to becleaned. Attach POSITIVE, or RED lead of charger, to electrode "grid" formed when youplaced electrodes, or rods, into bucket and tied them all together.
Make sure electrodes and part to be cleaned are not touching each other, then turn oncharger. Within seconds, you should see a lot of tiny bubbles rising from the part suspendedin the mixture. Do not do this inside, or in a closed area - those bubbles are the componentparts of water - H2O - hydrogen and oxygen. Remember the Hindenburg?
See how the rust and bubbles are attracted to the electrodes in the photo below? You willneed to clean them from time to time - they will get covered with gunk; in fact, after manyuses, they will have eroded down and need to be replaced. That is why I use re-bar - it'seasy to get, cheap, and most of all - SAFE FOR YOU and your environment! You can pourthe waste solution on the lawn and it won't hurt it. Do watch out for ornamental shrubs,which may not like iron rich soil, however. No use making your spouse mad!
Page 6 of 38

Rust Removal using Electrolysis
How large an item can you clean? Well, it's up to your imagination, your budget - because ittakes water, your time and wife's patience. Terry Lingle demonstrated this process on a verylarge scale using a tank made of plywood and lined with plastic, a DC welder for powersupply and hundreds of gallons of water. You will need to use more electrodes with largerparts and a larger "tank". The resulting photos can be seen here - along with an explanationof his setup.
How small? A student recently used the description on my web site as the basis for herscience project in school. She used a computer power supply for the power source to clean asmall part in a plastic bucket on a table. (photos coming soon)
Safety Precautions:- Make sure no spills can get to the battery charger. (electrocution potential as with anyelectric appliance)- The leads from the charger are relatively safe, but you may still get a bit of a shock if youput your hands in the solution or touch the electrodes while the charger is running. - Turn off the current before making adjustments to the setup. Just as a "spark" can cause acharging battery to explode in your face, this process produces similar gases because thisprocess splits water into hydrogen gas (at the negative electrode) and oxygen at thepositive electrode). - Hydrogen will burn explosively if ignited. All flames, cigarettes, torches, etc. must beremoved from the area, and sparks caused by touching the leads together must be avoided.The work should be performed outside or in a well ventilated area to remove these gasessafely. - Washing soda solutions are alkaline and will irritate the skin and eyes. Use eye protectionand gloves. Immediately wash off any solution spilled or splashed onto your body.
Page 7 of 38

Rust Removal using Electrolysis
Why you should not use stainless steel electrodes forelectrolysisMany people using the electrolysis method for rust reduction swear by stainless steel,stating (incorrectly) that it's not consumed, stays clean and seems safe.
Stainless steel is indeed consumed when used in the electrolysis process, although slowly.The main problem with using it is the hazardous waste it produces. Stainless steel containschromium. The electrodes, and thus the chromium is consumed, and you end up withpoisonous chromates in your electrolyte. Dumping these on the ground or down the drain isillegal. The compounds can cause severe skin problems and ultimately, cancer. Hexavalentchromate is poisonous. These compounds are not excused from hazardous waste regulationswhere household wastes are.
These compounds are bad enough that government regulations mandate "elimination ofhexavalent chromate by 2007 for corrosion protection."
Does your electrolyte turn yellow? That's a sign of chromates.
If you have been using stainless steel for the anodes (positive electrodes), wear rubber
Page 8 of 38
Rust Removal using Electrolysis
gloves when working with or near the liquids. If you need to dispose of it, allow it toevaporate into powders and dispose of the powders in sealed containers during your local"hazardous waste clean-up days".
Best bet - don't use stainless steel no matter how tempting it is.
Rust Removal Using Carbonated Soft DrinkWhen I was about 12 years old and just getting interested in engines I heard my uncleswear that he got a stuck piston out of a motorcycle he had by using bottle of Coke. It hadset out in the yard all winter and had rusted up inside. But we all know pop is sticky, waterbased and wouldn't it make a worse mess? After all, Mom always said "don't spill your pop,it will make everything sticky".
As I grew up and got interested in cars and motorcycles myself I started to hear of othersuch "urban legends" and decided, hey, maybe there is something to this. The people thatsaid it worked were quite insistent, and there sure was no proof that it did NOT work. So Idecided to investigate. (amazing what little it takes to entertain me)
So here is what I've found - many carbonated beverages will remove rust. This is becausethe gas used, carbon dioxide when mixed with water, makes carbonic acid. To make rust,the iron oxidizes - it combines with oxygen. This is why rust is also called iron oxide. Thecarbonic acid reverses this reaction - this reversal is called "reduction." Here's a betterreason - take a look at your Coke can - it has phosphoric acid as an ingredient. Phosphoricacid is the basis of Naval Jelly, a commercial product used for rust removal. Phosphoric aciddissolves iron oxide very quickly while etching metallic iron very slowly so you can leavemetal in phosphoric acid with little damage.
The downside is that all acids contribute some hydrogen to the metal structure, weakeningthe steel by hydrogen embrittlement - so always use only as much time as is absolutelynecessary to remove the rust. An advantage of phosphoric acid is that it leaves a fineprotective coating of iron phosphate. Because this coating is not thick or durable someprotection is still required. Years ago supposedly Volkswagen use a process of phosphatingmetal prior to painting as it provided a chemical protection against rust under the paintlayer.
So, spilling your Coke into your old engine wouldn't really be a bad thing if you were tryingto remove some rust.
What is the method? http ://www.stovebolt.com/techtips/rust/electrolytic_derusting.htm
Electrolysis is a technique for returning surface rust to iron. It uses the effect of an
Page 9 of 38

Rust Removal using Electrolysis
small low voltage electric current and a suitable electrolyte (solution). It has advantagesover the old standbys, like vinegar, Coke, muriatic acid, Naval Jelly, wire brushing, sandblasting etc -- These methods all remove material to remove the rust, including un-rustedsurfaces. With many, the metal is left with a "pickled" look or a characteristic color andtexture. The electrolytic method removes nothing: by returning surface rust to metallic iron,rust scale is loosened and can be easily removed. Un-rusted metal is not affected in anyway.
What about screws, pivots, etc that are "rusted tight"?
The method will frequently solve these problems, without the need for force, which canbreak things. Is it safe? The solutions used are not hazardous; the voltages and currents arelow, so there is no electrical hazard. No noxious fumes are produced. The method is selflimiting: it is impossible to over clean an object. Small amounts of hydrogen are emitted inthe electrolysis process. Good ventilation or an outdoor work site is all that is needed.
Where did this method come from?
Electrolysis is a standard technique in the artifact restoration business. I wrote this upfor the Chronicle of the Early American Industries Association a few years back. Most of thetool collectors around here use it.
What do I need?
A plastic tub; a stainless steel or iron electrode, water and washing soda (Arm &Hammer, for example) and a battery charger. About a tablespoon of soda to a gallon ofwater. If you have trouble locating the washing soda, others have reported success withbaking soda. Also household lye will work just fine. It's a tad more nasty -- always wear eyeprotection and be sure to add the lye to the water (NOT water to lye!!!) The solution isweak, and is not harmful, though you might want to wear gloves. NOTE: It is the currentthat cleans, not the solution; nothing is gained by making a more concentrated solution --DON'T!
How long does the solution last?
Forever, though the loosened rust will make it pretty disgusting after a while.Evaporation and electrolysis will deplete the water from the solution. Add water ONLY tobring the level back.
Page 10 of 38
Rust Removal using Electrolysis
What about the stainless/iron electrode?
The electrode wants to be large (within reason); if possible, larger than the objectbeing cleaned. The iron electrode works best if it "surrounds" the object to be cleaned, sincethe cleaning is "line of sight" to a certain extent. An iron electrode will be eaten away withtime. Stainless steel has the advantage (some alloys, but not all) in that it is not eatenaway. I have had good success with sheet stainless salvaged from a paper towel dispenser.It has a large surface area and is easily shaped to fit the container.
How do I connect the battery charger?
THE POLARITY IS CRUCIAL!! The iron or stainless electrode is connected to thepositive (red) terminal. The object being cleaned, to the negative(black). Submerge theobject, making sure you have good contact, which can be difficult with heavily rustedobjects. Get it backwards and your object will be relentlessly eaten away! Make connectionson a part of your electrode that protrudes out of the solution, or your clamps will eroderapidly.
How do I know if it is working?
Turn on the power. If your charger has a meter, be sure some current is flowing. Again,on heavily rusted objects, good electrical contact may be hard to make-it is essential. Multi-part objects may not have good electrical connections between them. Fine bubbles will risefrom the object when cleaning is in progress.
How long do I leave it?
The time depends on the size of the object and of the iron electrode, and on theamount of rust. You will have to test the object by trying to wipe off the rust. If it is notcompletely clean, try again. Typical cleaning time for moderately rusted objects is a fewhours. Heavily rusted objects can be left over night.
How do I get the rust off after I remove the object?
Rub the object under running water. A paper towel will help. For heavily rusted objects,a plastic pot scrubber can be used, carefully. Depending on the amount of original rust, youmay have to re-treat. The amount of mechanical action will depend on the fragility of theobject. Use your discretion.
My object is too big to fit. Can I clean part of it?
Yes. You can clean one end and then the other. Lap marks should be minimal if the
Page 11 of 38

Rust Removal using Electrolysis
cleaning was thorough.
After I take it out, then what?
The clean object will acquire surface rust very quickly, so wipe it dry and dry further ina warm oven or with a hair dryer/heat gun. You may want to apply a light oil or a coat ofwax to prevent further rusting.
Will the method remove pitting?
No. It only operates on the rust in immediate contact with un-rusted metal. What'sgone is gone. What will it look like when I am done? The surface of rusted metal is leftblack. Rusted pits are still pits. Shiny un-rusted metal is untouched.
What about nickel plating, paint, japanning and the like?
Sound plating will not be affected. Plating under which rust has penetrated will usuallybe lifted. The solution is likely to soften most paints. Test with a drop of solution in aninconspicuous place. Remove wood handles if possible before treating.
How can I handle objects that are awkward to clean?
There are lots of variants: suspending an electrode inside to clean a cavity in an object;using a sponge soaked in the electrolyte with a backing electrode to clean spots on largeobjects or things that shouldn't be submerged (like with lots of wood)
How can I dispose of the solution?
The bath will last until it gets so disgusting that you decide it is time for a fresh one.There is nothing especially nasty about it-it's mildly basic-so disposal is not a concern,except you may not want all the crud in your drains.
Can I use metal containers?
This is highly risky. Galvanized metal can introduce zinc into the solution. If you haveused lye, it will attack aluminum. You may have problems with electrical shorts, etc. Stick toplastic.
How can I clean odd shaped objects?
Page 12 of 38

Rust Removal using Electrolysis
Be ingenious. Plastic PVC pipe and eave troughs, wooden boxes with poly vapor barrier,kids wading pools, etc.
Electrolytic Rust Removal David L. Huffman, U.S.A.
http://enews.heywoodenamels.com/common/eNAMEL_rust_removal_electrolytic_method.html
The main thing you need is a battery charger (automotive type). Any source of DC current will do, thehigher the amperage, the better. In theory, a 9-volt "Wal Mart special" will do, but it would take a long timefor any larger article.
You also need a plastic container, a scrap sheet of metal, preferably stainless steel, and some bakingsoda.
Fill the bucket with water and add a handful of baking soda, about a tablespoon per gallon. Washing sodaworks well too, if you can find it.
Prepare your sheet metal anode. Stainless sheet works best (since it holds up longer), but a flattened tincan will do in a pinch.
Wire the POSITIVE to the scrap steel. This will be the anode. You'll want to keep the clamp out of thesolution, or it will eventually dissolve too.
You need to connect the article to be cleaned to the NEGATIVE side of the charger, again, keeping theclamp out of the solution. You've got to make a connection on a clean bare metal spot on the article, soyou may need to sand or grind through the rust at the point at which you connect your contact.
Put both the pieces (the article and the scrap steel anode) in the solution, as close as possible but NOTTOUCHING.
The part being cleaned will begin to bubble. After about two hours at 12 volts, six amps, you can take it outand examine it.
The part being cleaned, if originally badly rusted, will now be covered with a black powder which you canwire brush off.
Then return the article to the solution for another 6 hours and you'll see all that is left of the rust is a littlemore fine black powder, and the high spots may be getting shiny. At this point, you can take the article out,rinse it off, wire brush it some more, and then lightly oil it with linseed oil. Linseed oil is great for tools, butbe careful. . .rags soaked in it can spontaneously combust, and I've seen this happen, so better put themin the burn bin or bury them. If they're cotton, you can put them in the compost, everything in this case isorganic, just don't store them in the house or garage.
You can, of course, substitute any kind of oil you'd like, but you'll need to get that raw metal covered withsome sort of protection as soon as possible.
Page 13 of 38

Rust Removal using Electrolysis
This demonstration was employed on a large steel punch, about 1/2 inch in diameter and 5 inches long. Itwas badly rusted, but not pitted. Even pitted steel will clean. The pits will still be there, but they'll be cleanof rust. Times for smaller articles could be significantly shorter. Obviously, the less rusted a piece is, theshorter the cleaning time.
I don't think that higher concentrations of baking or washing soda will shorten the time, as it's not thesame as using an acid or alkali to clean, the soda is used only to make the water more conductive.
Electrolytic Removal of Rust by Kevin Chamberlain, Member HTPAA ( published in Tool Chest #63, February 2002)
http://www.htpaa.org.au/article-electro.php
Introduction At our last Tool Conference, there was a Panel Discussion dealing with the cleaning andrestoration of old hand tools. This is a key concern for anyone interested in collecting oldtools, since one rarely finds tools in mint condition in an original box. It is much morecommon to find tools showing the combined effects of correct usage, abuse, neglect andsimple aging. The primary question is: should cleaning and/or restoration be attempted atall?
The answers are conflicting; some aim to restore the tool to a brand-new appearance,eliminating all evidence of its life history. Others think any attempt at restoration willdestroy the character and value of an antique tool.
Most think some intervention is desirable to remedy the effects of abuse and neglect, whilestill retraining as much patina and character as possible. There is an important caveat -"when in doubt, do nothing". Cleaning and restoration of antique tools should be done in acareful and meditative mood - otherwise rash actions may cause loss of valuableinformation and/or further damage.
Removal of rust from old tools or other artifacts may or may not be a desirable goal. Insome cases (museum specimens) stabilization to prevent further deterioration may be allthat is necessary. Rust may be regarded as undesirable by tool users or collectors because itobscures identifying marks, causes seizure of moving parts, creates an unpleasant roughtexture to the touch, stains the hands and/or the workpiece, or is simply unsightly. I believerust removal is often justified, but the method chosen should not alter the surface in otherways and should result in a reasonably attractive surface appearance.
The electrolytic method of rust removal meets these aims very well and is also a gentle,cheap and adaptable method. Electrolysis is now being used by a wide range of artifactrestorers, from tool collectors to marine archaeologists.
In this article, I mainly aim to outline the practical aspects of the electrolytic method so thatmembers can try it for themselves. Several HTPAA members have been using the method
Page 14 of 38

Rust Removal using Electrolysis
for some years and find it very useful
What is Rust?
Rust arises from the surface oxidation of iron or steel in the presence of atmospheric oxygenand moisture. As the rust forms, the surface of the iron is eaten away, sometimes evenly,but often deep local pitting occurs beneath wart-like protuberances. Rust occupies morevolume than the iron it replaces, and so moving parts will tend to seize as they rust. Chemically, most red rust is hydrous ferric oxide FeO(OH). If water enters this chemicalstructure, yellow-brown limonite may form FeO(OH).nH2O. Quite often, black iron oxides are
also present usually magnetite (Fe3O4), an iron oxide which both conducts electricity and
can be magnetized. The rusting process, and the conditions which promote, inhibit orstabilize it, are all important topics which are beyond the limits of the present article.
Methods of Rust Removal
Rust usually binds strongly to the underlying iron or steel. Various methods have been usedto remove rust. Mechanical methods include the use of emery paper, sandpaper or wirebrushes (either manual or powered). More aggressive methods include sand blasting or shotblasting. Plastic bead blasting is a more recent and gentler variant. Clearly these methodswill scratch the metal surface if the abrasives are harder than the metal. Wire brushes, forexample, do not appear to scratch hard steel surfaces but they can be quite damaging tosoft iron surfaces.
Gas flames are sometimes used to dislodge rust, relying on the different expansion rates ofthe oxides and the metal in response to heat. Simple boiling in water is also used to loosenrust. Here the thousands of tiny bubbles which form and grow at the metal surface may actto mechanically dislodge the rust layer.
In industry, chemical methods of de-rusting include the use of strong acids under carefullycontrolled conditions. These acids are too dangerous for home use. Vinegar or dilutephosphoric can be used successfully at home, although the latter leaves a uniform grayappearance which some find undesirable. Acids attack the iron oxides directly, but also etchthe mental surface to some extent, generating hydrogen gas in the process.Other chemical agents include the commercial product "Corro Dip" (from Liquid EngineeringInternational Pty Ltd) and the traditional molasses solution. The molasses method usuallytakes weeks and may work because of acids formed in the molasses solution byfermentation. I have been told that iron or steel objects left too long in molasses solutionwill eventually be eaten away, supporting the idea of an acid etching progress. Howeverother chemical reactions may also be involved in this old method.
The Electrolytic Method
The electrolytic method is a cheap, gentle and effective method which causes minimalalteration to the metal surface. It may seem complex, but is actually easy to set up and use.
Page 15 of 38

Rust Removal using Electrolysis
It is quite safe, provided certain sensible precautions are taken (see below). The electrolyticmethod involves immersing the rusty object in an electrically-conducting solution of washingsoda (sodium carbonate). The negative lead (black) from a battery charger is attached tothe object, and the positive (red)lead is attached to a stee1 electrode dipping into thesolution. When the current is turned on, electrochemical reduction reactions occur at themetal/oxide interface on the object's surface. These reductions loosen the rust layer,allowing it to be easily brushed off. These reactions may involve the direct reduction of ironoxides to finely divided iron. However, it is clear from observation that a major reaction atthe negative electrode involves the production of thousands of tiny bubbles of hydrogenfrom the electrochemical reduction of water. The hydrogen may in turn react chemically withthe iron oxides, or it may simply act to physically dislodge the rust layer. Whatever themechanism, the process does not appear to cause etching or deposition on the metalsurface. Of course, removal of rust will reveal any damage to the surface (such as pitting)which has already occurred.
Important Safety Precautions
1. Since pure water is a poor conductor of electricity, a soluble salt, (called an electrolyte)has to be added to make an electrically conducting solution. The best salt to use is sodiumcarbonate (washing soda). A packet can be bought in supermarkets for a few dollars.Washing soda solutions are alkaline and will irritate the skin and (especially) the eyes.Always use eye protection and gloves and wash off any spills immediately. Do not try to useother salts - no better results will be obtained and dangerous effects may occur. Causticsoda, for example, is far too corrosive, and even strong solutions of ordinary table salt willgenerate toxic chlorine gas at the positive electrode.
2. The battery charger is attached to the mains and must be completely shielded from thesolutions which conduct electricity. Make sure no spills can touch the battery charger -especially when it is unattended. The 6/12 volt leads from the charger are relatively safe,but you may still get an unpleasant shock if you put your hands in the solution or touch theelectrodes while the current is running. Turn off the current before making adjustments tothe electrolysis bath.
3. A major reaction occurring in the bath is the splitting of water into hydrogen gas (at thenegative electrode) and oxygen at the positive electrode). Hydrogen will combineexplosively with oxygen or air if ignited. (Remember the Hindenburg!) All flames (includingcigarettes) must be removed from the area, and sparks caused by touching the leadstogether must be avoided. The work should be well ventilated to dilute and remove thesegases safely. Do not use this method in a confined, poorly ventilated area.
Preparation of the Electrolyte Solution
A sufficient concentration of washing soda is about 10 gram/liter (about 1 teaspoon perpint). The concentration may be increased somewhat but the results will not change greatly.Make sure all the crystals have dissolved before using the solution.
Page 16 of 38

Rust Removal using Electrolysis
The Electrolytic Bath
The simplest variant of this method requires a non conducting inert plastic container (plastic dish, box,bath, bin etc.). Some ingenuity is needed to find containers deep or long enough for items such as longsaw blades or leg vices. After removing any wooden handles, brass fittings, etc. from the object, sufficientwashing soda solution is added to completely submerge it. A stainless steel strip is recommended for the positive electrode or anode (e.g. a piece about 2-3" wideand long enough to emerge from the solution). Ordinary scrap iron or steel can be used, but the surfacewill quickly clog up with corrosion. Do not use copper or other metals, as these will be rapidly eaten away. The reactions at the anode involve the production of bubbles of oxygen gas from oxidation of water, plusthe direct oxidation of the metal electrode. Stainless steel is most resistant to the latter process, but evenit may show some minor pitting after a while. The anode should be brushed clean at intervals. The redlead from the battery charger should be clipped to the anode where it emerges from the solution. If this
Page 17 of 38

Rust Removal using Electrolysis
attachment clip dips under the surface, it will be eaten away. The negative lead (black) is attached to therusty object. In this case, the attachment clip may be submerged under the solution - corrosion does notoccur at the negative electrode (cathode). It is very important to have good contact at the attachmentpoint, so these should be cleaned by wire brush or emery paper. The object and the positive electrodeshould be separated by at least a few inches. If they are allowed to touch, a short circuit will occur and thebattery charger may be damaged.
The Battery Charger
Any 6 or 12-volt battery charger will work, provided it can produce a few amps of direct(DC) current. A current of about two amps at 12 volts is typical (a charger with a currentmeter is useful as it shows you what is happening). If several objects are attached inparallel, or a very large object is attached, the current may rise. Be careful not to exceedthe capacity of your charger. The current may be reduced by increasing the separationbetween the object and the anode or by diluting the solution with water. A car battery wouldalso work as a DC power source.
The Process
Once the circuit is completed, tiny bubbles will stream from both electrodes. The timerequired for effective de-rusting will vary from 30 minutes for small objects (such as augerbits) to many hours for large objects such as a leg vice. Overnight operation is common. Noharm is done by leaving the circuit on for long periods, as long as the charger does notoverheat or gases do not build up in an unventilated area. After a time the object should be
Page 18 of 38
Rust Removal using Electrolysis
rotated to avoid "shadow" effects (uneven de-rusting). If part of the object has been leftprojecting above the solution, the object should also be inverted to de-rust the exposedpart. As time passes, some of the rust will fall off and sink to the bottom of the container.When enough time has elapsed (learned mainly by experience), turn off the charger,remove the object from the bath and rinse off the electrolyte with water.
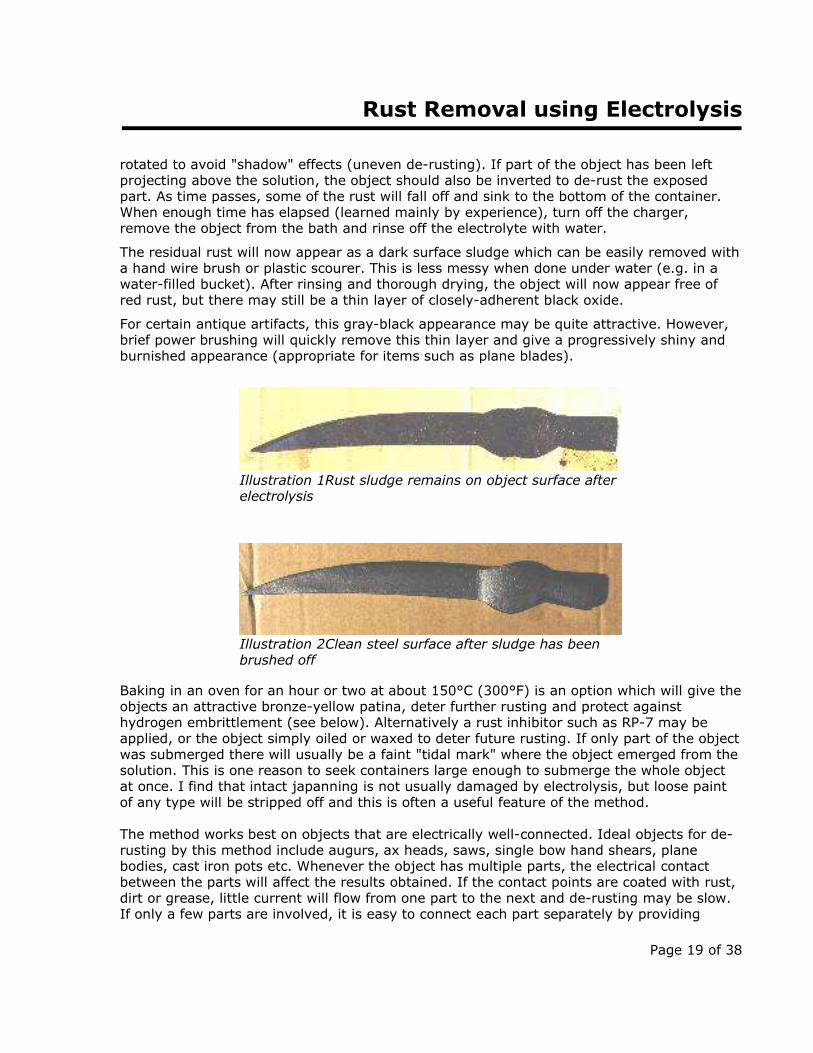
The residual rust will now appear as a dark surface sludge which can be easily removed witha hand wire brush or plastic scourer. This is less messy when done under water (e.g. in awater-filled bucket). After rinsing and thorough drying, the object will now appear free ofred rust, but there may still be a thin layer of closely-adherent black oxide.
For certain antique artifacts, this gray-black appearance may be quite attractive. However,brief power brushing will quickly remove this thin layer and give a progressively shiny andburnished appearance (appropriate for items such as plane blades).
Baking in an oven for an hour or two at about 150°C (300°F) is an option which will give theobjects an attractive bronze-yellow patina, deter further rusting and protect againsthydrogen embrittlement (see below). Alternatively a rust inhibitor such as RP-7 may beapplied, or the object simply oiled or waxed to deter future rusting. If only part of the objectwas submerged there will usually be a faint "tidal mark" where the object emerged from thesolution. This is one reason to seek containers large enough to submerge the whole objectat once. I find that intact japanning is not usually damaged by electrolysis, but loose paintof any type will be stripped off and this is often a useful feature of the method.
The method works best on objects that are electrically well-connected. Ideal objects for de-rusting by this method include augurs, ax heads, saws, single bow hand shears, planebodies, cast iron pots etc. Whenever the object has multiple parts, the electrical contactbetween the parts will affect the results obtained. If the contact points are coated with rust,dirt or grease, little current will flow from one part to the next and de-rusting may be slow.If only a few parts are involved, it is easy to connect each part separately by providing
Page 19 of 38
Illustration 1Rust sludge remains on object surface afterelectrolysis
Illustration 2Clean steel surface after sludge has beenbrushed off

Rust Removal using Electrolysis
several branches from the negative lead or use short leads to connect each part to the nextusing clean contact points.
Other Variants of the Electrolytic Method1. The bath itself may be made of stainless steel and used as the anode (positive electrode
while the rusty object is suspended in the middle of the solution without touching thecontainer. This method maximizes the size of the anode and allows current to flow to theobject from all directions - thus minimizing shadowing effects.
2. The opposite of the above. Hollow vessels such as iron pots are filled with the electrolytesolution and attached to the negative lead, while the anode is suspended in the middle ofthe solution. This allows excellent de-rusting of the inside of such pots. A similar methodhas been used to remove rusty encrustations from the inside of cannons found in sunkenships.
3. Small items may be placed on a stainless steel grid suspended in the solution andelectrically connected to the negative (black) lead. The rusty items make electricalcontact with the grid and do not need to be individually connected to the lead. Howeverthe de -rusting will proceed rather slowly unless the items have been cleaned where theytouch the grid. Small chains and other intricate objects with connected parts may be de-rusted using this technique.
Page 20 of 38
Illustration 3De-rusting the inside of an iron pot using a suspended anode
Rust Removal using Electrolysis
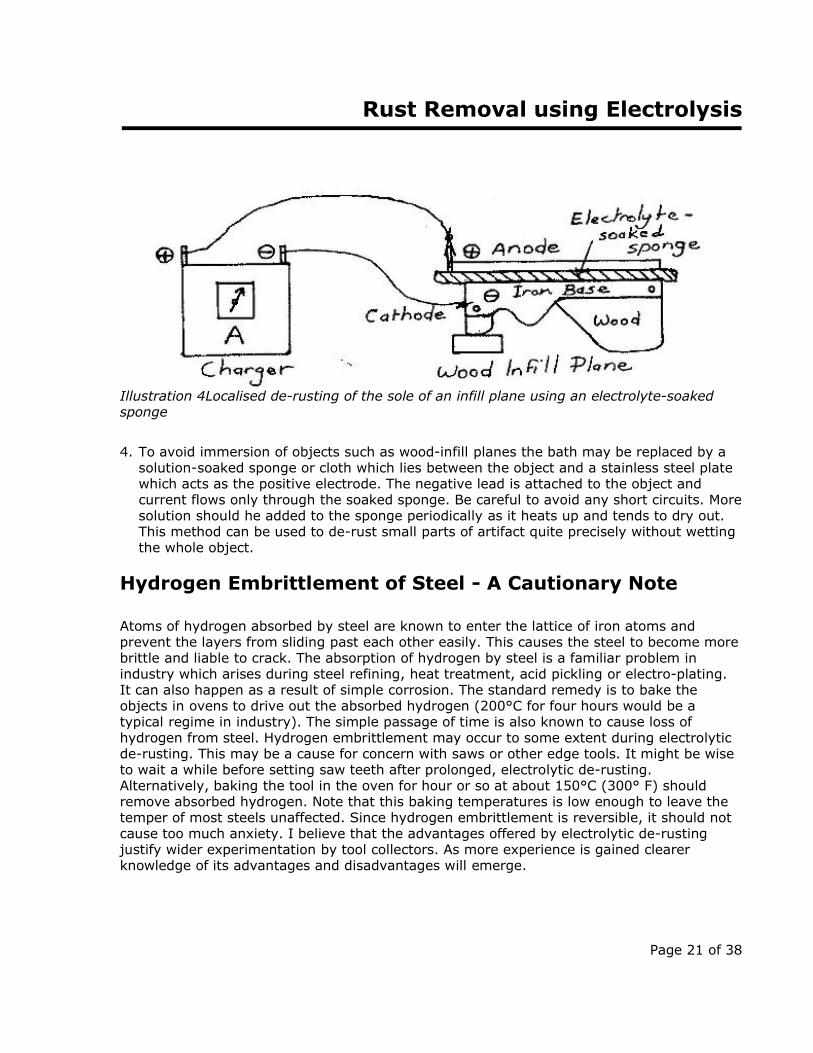
4. To avoid immersion of objects such as wood-infill planes the bath may be replaced by asolution-soaked sponge or cloth which lies between the object and a stainless steel platewhich acts as the positive electrode. The negative lead is attached to the object andcurrent flows only through the soaked sponge. Be careful to avoid any short circuits. Moresolution should he added to the sponge periodically as it heats up and tends to dry out.This method can be used to de-rust small parts of artifact quite precisely without wettingthe whole object.
Hydrogen Embrittlement of Steel - A Cautionary Note
Atoms of hydrogen absorbed by steel are known to enter the lattice of iron atoms andprevent the layers from sliding past each other easily. This causes the steel to become morebrittle and liable to crack. The absorption of hydrogen by steel is a familiar problem inindustry which arises during steel refining, heat treatment, acid pickling or electro-plating.It can also happen as a result of simple corrosion. The standard remedy is to bake theobjects in ovens to drive out the absorbed hydrogen (200°C for four hours would be atypical regime in industry). The simple passage of time is also known to cause loss ofhydrogen from steel. Hydrogen embrittlement may occur to some extent during electrolyticde-rusting. This may be a cause for concern with saws or other edge tools. It might be wiseto wait a while before setting saw teeth after prolonged, electrolytic de-rusting.Alternatively, baking the tool in the oven for hour or so at about 150°C (300° F) shouldremove absorbed hydrogen. Note that this baking temperatures is low enough to leave thetemper of most steels unaffected. Since hydrogen embrittlement is reversible, it should notcause too much anxiety. I believe that the advantages offered by electrolytic de-rustingjustify wider experimentation by tool collectors. As more experience is gained clearerknowledge of its advantages and disadvantages will emerge.
Page 21 of 38
Illustration 4Localised de-rusting of the sole of an infill plane using an electrolyte-soakedsponge

Rust Removal using Electrolysis
Problems with Stainless Steel AnodesSome thoughtful correspondents have pointed out that the use of stainless steel for thepositive electrode (anode) may have some undesirable consequences. Most stainless steelscontain high percentages of chromium and nickel which may be released into the bath asthe anode is slowly eaten away. These are likely to be released initially as soluble cationsjust as the iron is released initially as ferrous ions. However, since all three cations arebeing released into an alkaline solution, they are likely to be immediately converted toinsoluble hydroxides or oxides and form encrustations on the electrode or fall to the bottomas sediments. In this bound form the nickel and chromium are likely to be less hazardousbut nevertheless waterproof gloves should always be worn when working with the bath andthe bath sludge should be disposed of appropriately. It may be better to avoid the problementirely by using simple iron electrodes and brushing the sludge off regularly.
References:
Jane and Mark Rees. Tools. A Guide for Collectors. Published by Roy Arnold, Suffolk. 1996.p22. Nathan Lindsay. Cleaning Rusty Tools. Electrolysis Made Easy. http://rusty21.com
Ted Kinsey. The Electrolytic Rust Removal FAQ www.bhi.co.uk/hints/rust.htmFAQ Derusting with Molasis, www.steamengine.com.au/ic/faq/mollasis.html
Metal Conservation (Marine archaeology) http://nautarch.tamu.edu/class/anth605/File9.htm
Electrolytic Rust RemovalFrom http://www3.telus.net/public/aschoepp/electrolyticrust.html
If you're looking for a effective, relatively safe, and (best of all) cheap method for removingrust give electrolytic rust removal a try. I know that it sounds intimidating but it is actuallyvery simple and won't damage the underlying material. This method basically consists ofsubmerging the rusty metal in an electrically conducting solution of washing soda (alsoknown as sodium carbonate). I've been told that baking soda (sodium bicarbonate) alsoworks but I have no personal knowledge of this. The positive lead from a automotive batterycharger is connected to a steel electrode and the negative lead is connected to the piece tobe cleaned. When the charger is turned on a reaction occurs at the metal/rust interface onthe object. this loosens the rust so it may be easily brushed off. This method does notappear to damage the underlying metal in any way, it seems to only remove the rust. Ofcourse it will not improve the finish of the metal under the rust so any pitting on the metalwill remain, just the rust will be removed from it. The cleaning solution should last almostindefinitely, only add water to replace that lost by electrolysis and evaporation.
Page 22 of 38

Rust Removal using Electrolysis
Important Safety Precautions
• The cleaning solution is alkaline and will irritate the skin and your eyes. Always useeye protection and rubber gloves when working with the solution and rinse off anyspills.
• The battery charger must be completely shielded from the cleaning solution. Makesure the battery charger is in a location where you won't accidentally spill any wateror cleaning solution on it. The 6/12 volt leads from the charger are relatively safe butit is still possible to get a shock if you put your hands in the cleaning solution ortouch the electrodes while the power is on. Turning off the power to the charger willeliminate that risk.
• One of the side effects of the electrolysis is that the water will break down into itscomponents, hydrogen and oxygen. For this reason you should work in a wellventilated area and avoid any sources of ignition, ie. cigarettes, or sparks fromshorting out the battery leads.
What do you need to start?
• water • washing soda (sodium carbonate) • a battery charger (with a current meter if possible) or a car battery • steel or iron electrode (I use re-bar as it's cheap and the anode will eventually be
eaten away) • a plastic tub (slightly larger than the part to be cleaned, although it is possible to
clean a part with some of it sticking above the solution and then rotating it to cleanthe rest it may leave a small mark or discoloration which is undesirable)
Page 23 of 38
Rust Removal using Electrolysis
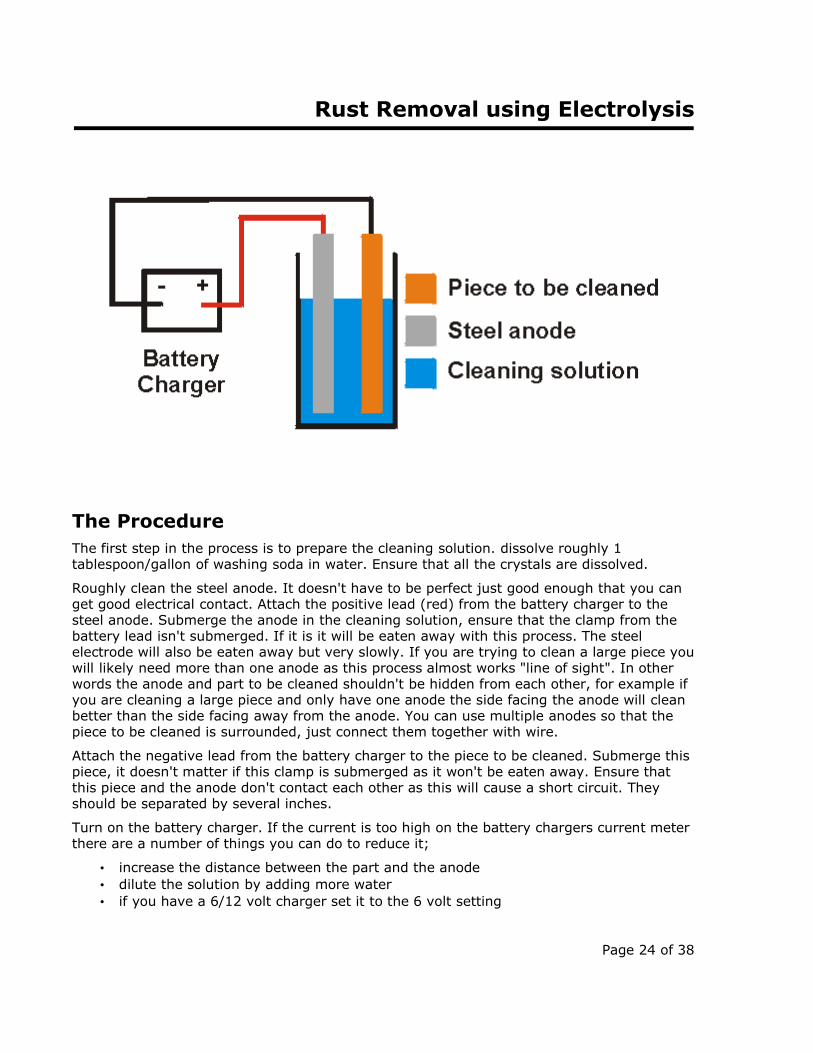
The ProcedureThe first step in the process is to prepare the cleaning solution. dissolve roughly 1tablespoon/gallon of washing soda in water. Ensure that all the crystals are dissolved.
Roughly clean the steel anode. It doesn't have to be perfect just good enough that you canget good electrical contact. Attach the positive lead (red) from the battery charger to thesteel anode. Submerge the anode in the cleaning solution, ensure that the clamp from thebattery lead isn't submerged. If it is it will be eaten away with this process. The steelelectrode will also be eaten away but very slowly. If you are trying to clean a large piece youwill likely need more than one anode as this process almost works "line of sight". In otherwords the anode and part to be cleaned shouldn't be hidden from each other, for example ifyou are cleaning a large piece and only have one anode the side facing the anode will cleanbetter than the side facing away from the anode. You can use multiple anodes so that thepiece to be cleaned is surrounded, just connect them together with wire.
Attach the negative lead from the battery charger to the piece to be cleaned. Submerge thispiece, it doesn't matter if this clamp is submerged as it won't be eaten away. Ensure thatthis piece and the anode don't contact each other as this will cause a short circuit. Theyshould be separated by several inches.
Turn on the battery charger. If the current is too high on the battery chargers current meterthere are a number of things you can do to reduce it;
• increase the distance between the part and the anode • dilute the solution by adding more water • if you have a 6/12 volt charger set it to the 6 volt setting
Page 24 of 38
Rust Removal using Electrolysis
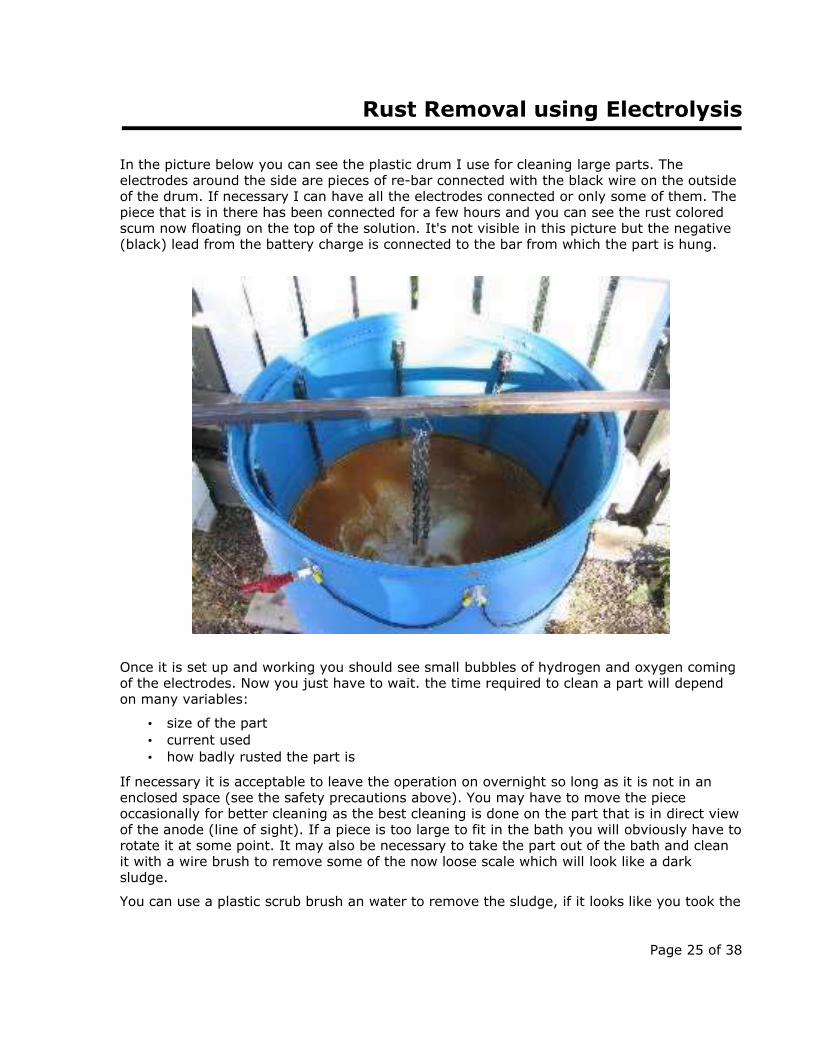
In the picture below you can see the plastic drum I use for cleaning large parts. Theelectrodes around the side are pieces of re-bar connected with the black wire on the outsideof the drum. If necessary I can have all the electrodes connected or only some of them. Thepiece that is in there has been connected for a few hours and you can see the rust coloredscum now floating on the top of the solution. It's not visible in this picture but the negative(black) lead from the battery charge is connected to the bar from which the part is hung.
Once it is set up and working you should see small bubbles of hydrogen and oxygen comingof the electrodes. Now you just have to wait. the time required to clean a part will dependon many variables:
• size of the part • current used • how badly rusted the part is
If necessary it is acceptable to leave the operation on overnight so long as it is not in anenclosed space (see the safety precautions above). You may have to move the pieceoccasionally for better cleaning as the best cleaning is done on the part that is in direct viewof the anode (line of sight). If a piece is too large to fit in the bath you will obviously have torotate it at some point. It may also be necessary to take the part out of the bath and cleanit with a wire brush to remove some of the now loose scale which will look like a darksludge.
You can use a plastic scrub brush an water to remove the sludge, if it looks like you took the
Page 25 of 38

Rust Removal using Electrolysis
piece out too soon simply put it back in the cleaning solution. Once the piece is finished itwill be a gray color. If it is an antique this may be an acceptable finish, otherwise use a wirebrush to remove the gray oxide coating. Now you have to make sure the piece is dry so thatit won't start rusting again and put some sort of rust inhibitor, wax, or oil coating.
Below are some photos of a test I did. The first shows a badly rusted disc blade. The secondpicture is after being removed from the cleaning solution. The black stuff on it is quite looseand came off easily with a wire brush. The final picture is of the completed disc blade afterwire brushing.
Page 26 of 38

Rust Removal using Electrolysis
NOTES• Sound plating should not be affected by this process but if it is loose for any reason it will
likely flake off.
• The cleaning solution may soften some paints.
• Remove wooden parts/handles before cleaning if you plan to submerge the whole part.
• The cleaning process relies on electrical contact for the cleaning. If you are cleaning apiece with more than one part (such as a pair of scissors) you must make sure that bothparts have good electrical contact with the negative lead from the charger.
• If you want to clean a piece that can't be submerged you can use a sponge soaked in thecleaning solution. Place it on the piece then an anode on top of it and make the electricalconnections as before. You will have to re-wet the sponge to ensure it doesn't dry out.
• Use your imagination for the containers. You can use whatever will safely hold your parts,such as Tupperware containers, plastic drums, vinyl eaves trough, wooden containerlined with plastic, or whatever works for your piece.
• This method may also help remove rusted screws or other fasteners.
• While I have not concerned myself with it yet there is a chance that metal cleaned thisway may be subject to hydrogen embrittlement. This can happen in many processes suchas electroplating or welding. It should not be a problem unless you are cleaning hardenedsteel such as saw blades, knives, or chisels. If you are and you intend to use the item(rather than simply displaying it) you may want to try baking the part in an oven, I've
Page 27 of 38

Rust Removal using Electrolysis
heard of using temperatures from 300°F to 440°F (150°C to 225°C) for several hours.ASTM-B633 is a standard relating to zinc plating of parts and it specifies baking at 375°F(190°C) for 3 hours within 4 hours of plating. As I haven't done this myself I can'tprovide any more information on the process other than to say that you will have towatch the temperature to ensure that you don't affect the temper of the piece.
Electrolysis - A Superior Cleaning ProcessFrom http://users.eastlink.ca/~pspencer/nsaeta/electrolysis.html
NEWS – WarningI have been made aware of the potential health problems with the use of stainless steel forthe positive electrode. The stainless breaks down and releases chromium into the liquidelectrolyte and a gas can be released (in the form of the compound hexavalent chromium)in the mist directly above the bath. Studies have shown that repeated and long termexposure to the liquid increase the risk of skin problems and repeated, long term inhalationof fumes increase the risk of lung cancer. For the most part, the users of this process arenot exposed to levels that should cause immediate concern. The studies have beenperformed on those who do this as a daily job over a long period. It is probably best not touse stainless material but if it is, wear protective gloves when working in the liquid andadequate ventilation and/or breathing protection should be used.
An electrolysis primer – IntroductionOne of the most tedious jobs we encounter while restoring old iron is the process ofremoving many layers of paint and rust as well as freeing up seized bolts and pistons. Thefollowing introduces you to a method of parts cleaning that has proved to be the mosteffective means of de-rusting and paint removal I have ever used.
BackgroundThe electrolysis process has been used by archivists for years to clean metal objects. I saw ashow where a 1700's vintage French brass cannon was cleaned to reveal the complete RoyalInsignia, and this was after 250 years in the sea. I had always expected it was tooexpensive and complex but it is not.
I can personally vouch for this process since it was used exclusively for the cleaning and un-seizing of my own engines and machinery. Anyone who has ever tried to clean up rusty iron(or any metal) will embrace this method with a passion equal to their love for the objectitself.
A specific experience with this process has been recently tested when I overhauled a Type J,twin cylinder Atlantic Marine Engine. This engine was no exception to the state in which weoften find our engines. The parts that were not covered in 10 layers of paint, were heavilyencrusted with rust and many parts (including both pistons) were seized solid. The engine is
Page 28 of 38

Rust Removal using Electrolysis
now completely apart and clean using electrolysis exclusively and without the use of rotarywire brushes, chisels, flame heat or excessive force. And it is cheap and easy to implementand is even more environmentally friendly than the use of caustic and petroleum-basedcleaners. There are no foul odors and the solution ( if you use washing soda) is not irritatingto the skin.
What is Electrolysis?For the purposes of the information contained herein, electrolysis is a process that passes anelectric current through an Electrolyte, causing the migration of the positively chargedions to the negative electrode (cathode) and the negatively charged ions to the positiveelectrode (anode).
Simply put, if you connect a power supply to a container of liquid with 2 rods immersed inthe liquid, chemical changes occur to both the rods, which must be a metal, and the liquid,(electrolyte).
The process of electrolysis is not new, in fact it is as old as electricity itself. The sameprocess occurs naturally when a metal in the environment is exposed to a reactive liquidsuch as salt. A small battery is created. Lead-acid battery of today produce power by theprocess and electroplating is performed by using electrolysis. For our purposes, we aretrying to remove paint, grease and rust from metal. Rust and corrosion is formed byelectrolysis. We will use the same method to remove it, and more.
ElectrolyteA substance, in solution with water or another liquid, which is chemically changed bypassage of electric current thought it.
The electrolyte we use and refer to is the substance you mix with water in a bucket intowhich you place an electrode and the part you wish to clean.
IonAn atom or group of atoms that carries a positive or negative electric charge as a result ofhaving lost or gained one or more electrons.
The particles of metal which travel from the part being cleaned to the electrode are in theform of ions. An atom of iron (for example), once acted upon electrically through anelectrolyte, is broken away from the base metal and becomes an ion with a negative charge.It travels through the electrically conductive electrolyte and goes to the electrode since ithas an affinity (attraction) for the positive electrode. At that point the ion will lose itsnegative charge and either stick to the electrode or drop to the bottom of the bucket. If theparticle is small and light enough, it may become part of the electrolyte solution.
Page 29 of 38

Rust Removal using Electrolysis
What can be cleaned?The greatest success has been with steel and cast iron but essentially any metal can becleaned or for that matter any electrically conductive material. But special caution is neededwith aluminum or plated items. The process removes layers of metal at a molecular leveland very slowly (if washing soda is used).
Some warnings which may not apply at this time but in the future.
"Light" metals such as aluminum, white metal or other alloys break down much quicker thansteel, cast iron or brass. I think it's because at the molecular level, there is a weaker bond,but I am not a chemist. A smooth aluminum surface that has light surface corrosion can stillbe cleaned with electrolysis, but only immerse the material for short periods (15 minutes)and clean with a soft brush. Longer periods will discolor, badly pit or even completelydissolve aluminum etc.
Also, materials with a thin or not well bonded electroplated surface may be adverselyaffected by long periods. The plated surface may actually peel away. Experimentation isrequired no matter what you are working with. Try short immersions first and graduallylengthen the periods. My main tests on heavy, thick cast iron and brass parts show thatthey can be left "cooking" in the electrolysis bath for hours, days even weeks with nonoticeable loss of metal and the brass may have some tarnish or discoloration. This iscleanable with conventional metal polish and/or a buffing wheel.
Precious metals,(gold or silver) can be cleaned but;
a) Some amount of precious metal is removed and this may be highly undesirable.(I did trya dirty gold neck chain. It worked but likely devalued it).
b) If the item is plated (brass, gold, sliver), it may peel off the plated layer and effectivelyruin it.
c) Coins and other items with fine detail can be cleaned but the delicate lines and raisedwords may be lost on badly corroded coins. If a truly vintage coin, other methods should betried first.
So in general, experimentation is required while taking notice of the cautions outlinedabove. So don't blame me if your aluminum carburetor/engine block dissolves overnight. Orif your silver-plated water jug is reduced to the original tin shell.
I can't emphasize enough that aluminum
...requires special care. The polished housing on a motorcycle engine can be pitted andetched leaving a very poor mottled surface.
Other information on what you can clean is in Questions and Answers.
Page 30 of 38

Rust Removal using Electrolysis
Materials Required
In addition to the part you are trying to clean, you need:
» A non-electrically conductive container large enough to hold the parts you want toclean, (i.e. a plastic bucket ? or for large engine parts perhaps an old (fiberglass)bathtub ???). There are other containers like a 45 gallon (about 200 liter) plastic drum thatare used for soap and other materials sold in bulk. They are sometimes available cheap orfree at recycling centers. An entire single cylinder engine could be put in one of these.
You could use a steel bucket, sink, pot etc. connected to the POSTIVE post as long as youare careful not to let the part being cleaned touch the side of the bucket (short circuit willoccur).
» A 12 volt battery or other DC power source with high current capability. A battery(in conjunction with a charger)will always give superior results. A trickle ( 4 to 12amps) battery charger can be used for small parts. A shop grade "booster" battery chargeris quite effective for even large parts. 6 volt DC works as long as the current ability is high.Higher voltage DC sources will work of course BUT then it becomes a shock hazard. (seesafety rules below).
» Electrodes to connect to the positive battery terminal. Iron, steel, or any metalcan be used. Aluminum used as the positive electrode deteriorates quickly. Iron (andmaybe brass) would last longer but requires regular cleaning. The electrode can be wire,bolts, fasteners, screening, sheet metal or thick plate.
** NEW INFO ** Stainless steel WAS previously recommended because the material Iwas using seemed to last longer and cleaned easier. BUT, as the electrode breaks down,thechromium in stainless steel becomes a compound (hexavalent chromium) which ends up inthe liquid and there is the potential for the mist from the bath to become airborne andinhaled. LONG TERM exposure to the skin has been related to skin disorders and LONGTERM inhalation of fumes has been linked to lung cancer. In addition, the chromium in theelectrolyte could be considered environmentally harmful so dumping in the ground wouldnot be a responsible thing to do. Instead, allow the liquid to evaporate and dispose of theremaining debris as you would a hazardous waste.Due to these problems, I can no longer recommend stainless steel to be used at all,especially in this very public forum.
» Water to mix with the electrolyte. Distilled water is not necessary but wouldn't hurt.
» The electrolyte (see above for more information). I used Arm and Hammer WASHINGSODA -a common laundry detergent. I have also recently had success with Arm andHammer Ultra Laundry Detergent. Main advantages here are; easy on your skin, NOTcorrosive to the part being cleaned if you happen to leave the part in the solution, no worsethan typical soap if it gets in your eyes, AND it leaves a nice soapy smell in the room. Also,the soap effectively gets rid of the putrid smell of old gasoline and oil. (great for cleaningout old gas tanks). Other soaps and detergents work fairly well and I'll leave that for you toexperiment with.
Page 31 of 38

Rust Removal using Electrolysis
Other electrolytes I have tried . Take note of the cautions mentioned
Baking Soda - Sodium Bicarbonate. It works but has much the same properties as salt inthat it is mildly corrosive once electricity is applied. I have used it only only for brief tests. Itis probably better to use it in place of washing soda than the others which follow.
Table salt- it is corrosive to metal in it own right. It also leaves a pungent chlorine smellbehind. (It is sodium chloride). Very bad for aluminum.
Sea salt- it is corrosive to metal in it own right. But it is not the same as table salt. Itactually contains many different types of dissolved minerals and salts. Some users havereported success with this. Very bad for aluminum.
Vinegar & acetic acid- Is a mild acid and has been reported to work but the smell it makes isundesirable.
Trisodium Phosphate (TSD) - Found in cleaners for heavy-duty use such as household walland exterior cleaners, driveway cleaner etc. It is more caustic than soap (harmful to the skinand eyes) so extra caution should be used. The warning on the container says"CAUTION:Contains Trisodium Phosphate. Wear rubber gloves and eye protection. Avoid eye contact orprolonged contact with skin. Wash thoroughly after handling. If eye contact occurs, flushwith water for 15 minutes. Consult physician immediately."
These work but are NOT RECOMENDED:
LYE - Sodium Hydroxide - Corrosive to metal in it's own right. Causes much moregasification of the water (LOTS of hydrogen and oxygen gas). Very hard on your skin andeven worse CAN CAUSE BLINDNESS if splashed in your eyes. Very bad for aluminum ,white metals (zinc alloys) or thinly electroplated materials.
Battery acid (sulphuric, hydrochloric, nitric) - I don't need to spell out that one for you do I?Way too hazardous.
Safety(PLEASE read it all, especially the cautions regarding safety. Review the previousinformation on the type of metals you can work with and the suggestions on the"electrolyte" to use.
THINK SAFETY!!! - There are numerous common sense safety rules.
Power and voltage - Although you are working with a low voltage 12 volt system, somepeople may be more sensitive to that voltage. An unpleasant tingle will be felt if you touchboth connectors from the battery or charger with your bare hands. More important is thehigh current capability. If you were to short circuit, the leads from the battery or charger,sparks will be created that could be a fire hazard. If you were to short circuit the leads witha coat hanger wire, a ring or necklace, it will glow bright red and cause burns and/or fire. Toreduce the chance of personal injury, make all connections to the electrolysis bath beforeturning on the power. A shock hazard is more likely if you were to use a power supplygreater than 12 volts.
Page 32 of 38

Rust Removal using Electrolysis
Electrolyte - You may be using washing soda or other soap. They will not likely hurt yourskin but splashing the soapy solution (which contains metal bits, grease and rust) in youreyes can't be good. If you use other electrolytes mentioned, they may be harmful to theskin and damaging to the eyes. Exercise caution
Gases produced - The electrolysis process splits water into it's elements, namely hydrogenand oxygen. Sparks (from the battery and connections) can ignite the hydrogen/oxygenmix. It is not enough to produce a Hindenburg-like explosion in your workshop, but it isflammable all the same so this should be done in a reasonably ventilated area and caution isadvised.
Heat produced - Once the item to be cleaned has been in the bath for awhile, the waterwill get quite warm from the current transfer and may even be too hot to touch. This is agood way to help take apart seized parts without the use of torches.
Setup & ProcedureThe example here uses a 5 gallon (20 liter) bucket. Use about 1/3 cup of washing soda in a5 gallon bucket of water and mix thoroughly. If you are using larger containers, you willonly need to add enough washing soda (or alternative electrolyte) to allow current to flowthrough the water. If you use other electrolytes, continue to add the substance until currentflows (bubbling occurs). Excessive electrolyte simply uses more current withoutsubstantially improving the speed of the de-corroding process. Slower is better. After all,your old "whatzit" has been in the woods or under the ocean for decades or centuries,...what's a few more days?
Place the iron (stainless steel no longer recommended) or other electrode (rods,plates,wire etc) in the bucket and connect the POSITIVE battery cable. There must be agood electrical connection. Clean off any rust or dirt that may impede current flow. It mightbe best to clamp the electrode to the side of the bucket to keep it in place.
Connect the NEGATIVE battery cable to the part to be cleaned and place in the bucket. .There must be a good electrical connection. Clean off any rust or dirt that may impedecurrent flow. The part could be clamped to the side of the bucket or alternatively suspendedfrom the ceiling or from a piece of wood across the bucket. Turn on the power. You willimmediately see bubbles and froth coming from the electrode and the part.
You may have to leave the part in for anywhere from several hours to several days or longerdepending on the extent of the rust and paint BUT USE GREAT CARE with aluminum orother light alloys . In any case, it is useful to occasionally check on the part and partiallyclean it as the rust and paint soften. This can be effectively done with a small hand-heldwire brush or stiff bristle brush and steel wool.
Large flakes of rust can be easily scraped off, smaller pieces will brush off in time andmolecular-sized fragments float off into the water and become part of the froth on top. Paintmay actually soften and can be peeled off in sheets, several layers at a time. This process isalso good at softening rust inside water jackets and other tight places that are often difficultto get to. In addition, electrolysis will, in time, soften the rust layer between the piston andcylinder wall making it easier to remove. The same process softens the rust between a
Page 33 of 38

Rust Removal using Electrolysis
seized bolt and its threaded hole or nut making it easier to remove without heat.
You can place several items in the bath at the same time but the more items (thus greaterelectrical surface area) there are, the more current flow is required. This also means thatthe stainless plate (if quite large) also increases the current flow. In addition, the proximityof the stainless plate (positive post ) and item to be cleaned (negative post) changes thecurrent required. The closer they are, the more current required. (just make sure they are alittle distance apart-otherwise a short circuit) When cleaning large parts, a fully charged,heavy-duty 12 volt battery will be dead in several hours . So either use a smaller electrode,increase the distance between the electrode and part or use a BIG battery and /or heavy-duty battery charger.
As mentioned above, the rate of electrolysis can be affected in numerous ways. To reducethe process, increase the distance between the electrode and the part being cleaned, reducethe concentration of the electrolyte or reduce the size of the electrode. In all case, thisincreases the resistance which decreases current flow and slows the electrolysis process.
You can use any DC power supply of any voltage. Avoid high voltage just because of theshock hazard. A battery charger will work, especially if used in conjunction with a battery.(The charger will help keep the battery "up" or if you use a shop type "booster" charger, itcan be used by itself. A 4 amp trickle charger won't do much except for small parts). Aproblem I have found with some battery chargers (if you do not have a battery included inthe circuit), is that the rectifiers that filter the AC to DC are poor. This means that some ofthe material that has been pulled off the item you are cleaning, gets reattached to the partbecause a small fraction of the current flow is reversed. While not a huge problem, the partwill not be as clean as it could be.
When you are finished cleaning the part, wash it with fresh water and dry it thoroughly overa heater or in the sun. The freshly cleaned metal will rust very quickly. It might be best toeither prime the metal or spray with a light oil or penetrating oil (like WD40) to stop flashrust from occurring. Another trick is rinse the item with COLD water and dry it as quickly aspossible. Since the item is cold, the water does not evaporate so fast. If rinsed in hot water,the water film disappears before you can dry it with a cloth or compressed air and flash rustis almost certain to occur.
Also remember that ( with iron at least) if the part you have cleaned comes out lookingbadly pitted and rounded off, electrolysis did not do it. This is what the item looked like afternatural corrosion ate into it.
Special Cleaning Methods
How to clean a bunch of small parts
If you have a lot of small parts (like a bucket of bolts), you can use a stainless steel screen(a common kitchen strainer works) shaped into a pouch or mini-bucket. Place some of theparts in the screen and immerse in the electrolyte as if it were a single part. Connect thebattery NEGATIVE to the screen. All the metal parts which touch the screen (and in turn,each other as the corrosion dissolves and the parts can electrically touch each other) arecleaned together. Use a brush to stir the parts around occasionally. This helps to remove
Page 34 of 38

Rust Removal using Electrolysis
loosened corrosion and improves the electrical contact between pieces. In time, all parts willbe mostly de-corroded. Compare this to wire brushing 100 bolts individually.
Cleaning inside a tight area like a engine water jacket
Take a small diameter plastic or rubber hose, cut numerous small holes in it and slip alength of stainless steel wire through the length of the tube. Feed this assembly into thewater jacket (or whatever you're working with) and connect the POSITIVE battery wire. Theelectrode is now inside a tight area and in close proximity to the part/area you want to cleanwithout touching it. Getting all the loosened crud out can be a challenge but vacuuming,compressed air or turning the unit upside down to dump it out works. One problem is thatthe process causes large chunks of rust to drop off inside the unit. You may need to reachinside with a screwdriver or rod to break up the rust to get it out.
For cleaning inside of cylinders or other parts, use a stainless bolt or wire supported andhanging freely within the part. This will clean inside areas that can't be normally reachedsuch as a gas tank .
Cleaning large items
The use of a drum (45 gallon) was mentioned above. These are usually big enough to placean entire small engine in (or lathe bed or wood stove etc). Surround the inside of the drumwith screen or sheet steel (stainless is better) and connect to the POSITIVE battery lead.Lower the entire engine or part into the center of the drum using an engine hoist, chainblock or suspended from the ceiling. Connect the NEGATIVE lead. Over time and with somebrushing, the whole unit will be free of rust, grease and paint before you even take it apart.This will require considerable current so a large battery charger capable of maintaining 30amps or more will be needed.
Page 35 of 38

Rust Removal using Electrolysis
REUSE the electrolyteAfter a while, the electrolyte gets quite dirty with suspended metal and dirt or grease. Ihave found (at least while using washing soda) that if you remove the electrodes, wires andparts from the electrolysis bath and leave the liquid to sit a few days, most material dropsto the bottom. Siphon off the clear liquid at the top and re-use it, perhaps add a bit moreelectrolyte and water before starting the process again. HOWEVER, some material willremain in suspension and may affect (discolor) the part you are cleaning.
Example: If you have just cleaned a lot of brass, the electrolyte gets a green hue. Cleaningsteel in this liquid may leave it with a slight brown discoloration. If this is undesirable, youwill need a fresh batch of electrolyte.
If you don't intend to reuse the electrolyte and it was not used for extensive de-greasing, itcan still be used as a soap to remove dirt and debris from metal. It is probably best not tosimply dump the liquid outside in the ground as it may contain lots of metal and grease. BUT more importantly if stainless steel was used as the positive electrode, thebreakdown of the material will leave chromium suspended in the liquid and it would beconsidered an environmental hazard. It is best to allow the electrolyte to evaporate in anycase and dispose of the debris left behind in an environmentally responsible manner. Ifstainless steel was used, it should be considered a hazardous waste.
THIS IS NOT A MIRACLE WORKER. Some good old-fashioned elbow grease will still beneeded but the effort is much-reduced.
Questions and AnswersThe instructions ( USED TO ) mention a preference for stainless steel electrodes.Why? (NOTE WELL!!! - Stainless is no longer recommended due to the potentialhealth hazards after regular/repeated exposure)
The electrode connected to the positive battery contact gains material during the process ofremoving it from the part you are cleaning. Aluminum and steel hold on to a lot of thismaterial, (rust, corrosion, iron or copper bits) and eventually create an electrical barrierwhich nearly stops the current flow through the electrolyte. Regular cleaning of this materialis needed by scraper or wire brush. Stainless steel does not allow as much material to stick,so it requires less cleaning and attention. In addition, stainless material does not breakdown fast so will outlast steel many times over. (In spite of the concerns with the use ofstainless material, I stand by the comments of the last 2 sentences if a GOOD QUALITYstainless is used). Admittedly, it is hard to know the quality of the stainless material youobtain.
Where to I get stainless steel? (NOTE!!- Stainless is not recommended any longer)
Stainless steel is available in many forms. Wire, screen, bolts and thin or thick plating.These are mostly available at hardware stores or a bolt and fastener specialty shop.Stainless screen or plate may be available through a metal working shop that builds ductingor sheet metal products. New stainless is expensive but will last years. Try a scrap metal
Page 36 of 38

Rust Removal using Electrolysis
yard for pieces of stainless. You may even find pieces of automotive trim in an auto junkyard made of stainless. It was used as door moldings and window trim.
Can I remove the chrome plating from an antique weapon (a pistol)?
Probably not. The electroplating process, if done properly, will include an acid dip to removeall dirt, rust and oxidation. The item is then plated many times over. If the chrome (or brassor silver plating) is well-adhered to the base metal, electrolysis will not have any effect onit.
Can this be used to clean an all-aluminum motorcycle or other small engine?
If caution is used, it will help to remove layers of corrosion from aluminum. But if you aretrying to free up a steel part within an aluminum casting, be warned, the aluminum will beeaten away much faster than steel. This could effectively ruin the machine. If you have noother choice, it may be worth a try.
Will brass and/or babbitt be eroded using this process?
Any solid brass or copper will not be adversely affected outside of some discoloration. Thebabbitt (lead alloy) bearings found in many old machines will deteriorate somewhat fasterthan steel but the surface will not be quickly etched. The biggest issue is how well thebabbitt was adhered to the base metal (iron or brass). If the bond is poor, the babbitt shellwill be undermined and eventually come loose. If that is the case, you should be thinking ofre-pouring the babbitt anyway.
Does the part need to be degreased before the electrolysis process? Willelectrolysis remove good paint on clean, non-rusted metal?
The part you are cleaning needs no special preparation outside of insuring a good electricalconnection. Grease falls off the part and dissolves in the soapy solution in conjunction withthe heat produced by electrolysis. Paint, even baked enamel, will eventually peel off thebase metal in single sheets.
How can I adjust the rate of the cleaning process?
Opposed to buying a very expensive scientific grade power supply to adjust the current flow,it is simpler to either a) use less washing soda to make a weaker electrolyte, b) move thepart being cleaned away from the electrode or c) add a load in series with the circuit such asa 12 volt light bulb or electric motor. In all cases, the resistance increases, the current flowdrops and the process is reduced in effectiveness.
Can a small battery trickle charger be used?
Small battery chargers in the range of 4 to 10 amps may not be suitable. This is notbecause the current is insufficient but the quality of the direct current (D.C) is not good.Ideally, you want a pure DC source as that from a battery. Battery and trickle chargers mustconvert the 120/220 volt 50/60 Hz alternating current (A.C.) from your wall socket to 12volts D.C.. The diodes (or rectifiers) which filter A.C. to D.C. are not very good in small andcheap chargers. The end result is the A.C. which gets through can cause as much materialfrom the electrode to stick to the part being cleaned as what has been removed from it.Experimentation is essential in any case.
Have you cleaned springs using this method? I am wondering if there would be any
Page 37 of 38

Rust Removal using Electrolysis
loss of tension by running the current thorough it.
Yes I have cleaned springs and they should not be affected by electrolysis. A spring wouldnormally only lose its tension through excessive heat or stress and electrolysis does not getthat hot. I expect that if the spring is quite rusty, it will already be weakened in the pittedareas where corrosion is present .
User FeedbackThe uses for this is quite broad with reports of successful use on stoves, lathes, engines andother car parts, tractors, WWI ordinance found on the sea floor and even Napoleonic -eraartifacts. Here a couple of emails
.....I am using the electrolysis cleaning method outlined on your website to clean a 13"South Bend lathe. I am completely impressed by the results I am getting. I typically leavethe parts in the tank for 24 hours. The grease disappears, the paint comes off in sheets, andthe rust is completely gone. Nothing left but bare metal! Thanks so much for creating thewebsite you did. I have found the instructions very clear. Just didn't expect the method towork so well! Thanks again for your work! Ron C. USA ...
......I collect old cast iron frying pans and electrolysis gets them clean easily and leaves anice finish. Beats the heck out of my old method of scraping, and the lye treatment that wassuggested by someone. Bob S, USA ....
......I tried it last night using a trickle charger (8amps I think), seawater, steel bolt as anode(+) and connecting the negative terminal to the aluminum part. It is scary how well thatworks. I just did some less critical parts like handles and levers. About 15 min. loosened allthe paint enough to make it a 30 sec. wire brush job. A careful inspection with themagnifying glass did show some slight pitting. I would hesitate to do this with aluminumparts that have precise tolerance surfaces like blocks or cylinder heads. Still I am extremelyimpressed. Even if I can't use this one on every part it will still save me tons of time...Henry, USA
Page 38 of 38