rx mode - cactus v6 iis quick start...tx rx compatible flash system v6 iis v6 iis sony v6 ii canon,...
TRANSCRIPT
WirelessFlash TransceiverV6 IIs
Quick Start Guide (Sony X-TTL)
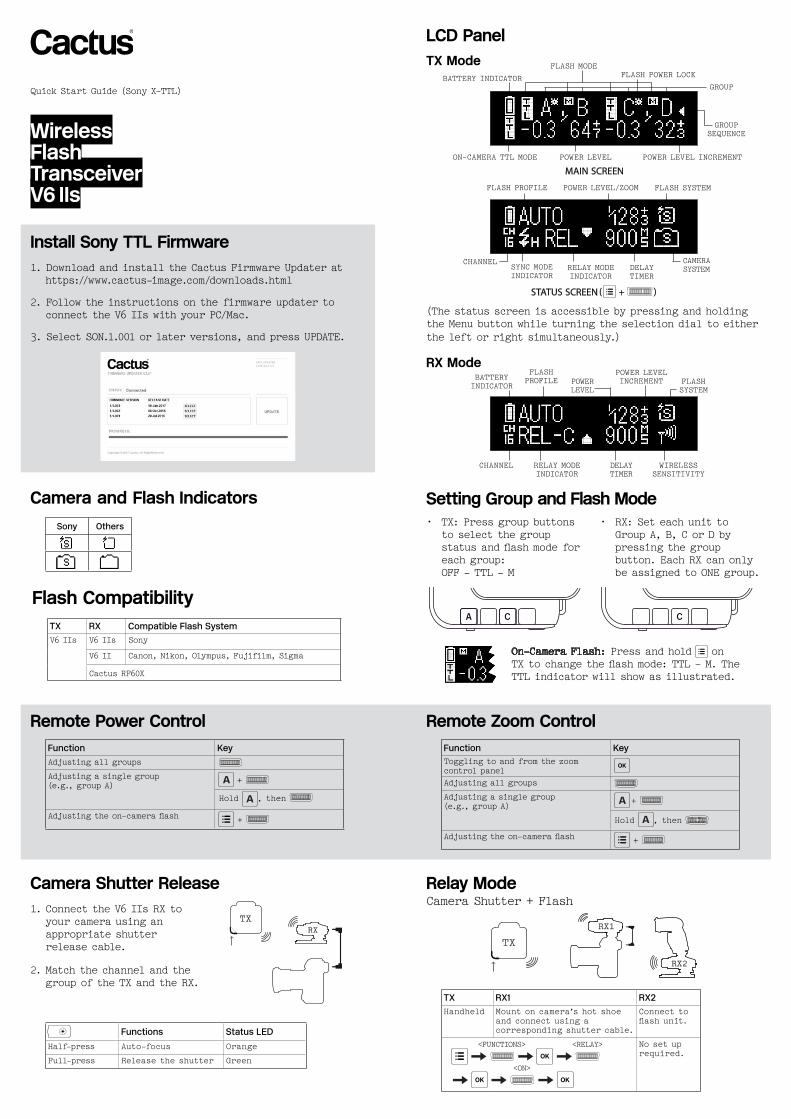
LCD Panel TX Mode
(The status screen is accessible by pressing and holding the Menu button while turning the selection dial to either the left or right simultaneously.)
RX Mode
caMera SySTeM
POWer LeVeL/ZOOMFLaSh PrOFiLe FLaSh SySTeM
Sync MODe inDicaTOr
DeLay TiMer
status sCREEN ( + )
On-caMera TTL MODe POWer LeVeL POWer LeVeL increMenT
BaTTery inDicaTOrGrOuP
MaIN sCREEN
FLaSh MODeFLaSh POWer LOck
GrOuP SeQuence
reLay MODe inDicaTOr
WireLeSS SenSiTiViTy
channeL
BaTTery inDicaTOr
FLaSh PrOFiLe
POWer LeVeL increMenTPOWer
LeVeL
DeLay TiMer
reLay MODe inDicaTOr
FLaSh SySTeM
Camera and Flash IndicatorsSony Others
Remote Power ControlFunction Keyadjusting all groups adjusting a single group (e.g., group a) +
hold , then
Adjusting the on-camera flash +
Remote Zoom ControlFunction KeyToggling to and from the zoom control panel
adjusting all groups adjusting a single group (e.g., group a) +
hold , then
Adjusting the on-camera flash +
Camera Shutter Release1. connect the V6 iis rX to
your camera using an appropriate shutter release cable.
2. Match the channel and the group of the TX and the rX.
Functions Status LEDhalf-press auto-focus Orange
Full-press release the shutter Green
RXTX
Relay Modecamera Shutter + Flash
TX RX1 RX2handheld Mount on camera’s hot shoe
and connect using a corresponding shutter cable.
connect to flash unit.
no set up required.
RX1
RX2
TX
<FuncTiOnS> <reLay>
<On>
Install Sony TTL Firmware 1. Download and install the cactus F irmware updater at https://www.cactus-image.com/downloads.html
2. Follow the instructions on the f irmware updater to connect the V6 iis with your Pc/Mac.
3. Select SOn.1.001 or later versions, and press uPDaTe.
Flash CompatibilityTX RX Compatible Flash SystemV6 iis V6 iis Sony
V6 ii canon, nikon, Olympus, Fujif ilm, Sigma
cactus rF60X
Setting Group and Flash Mode• TX: Press group buttons
to select the group status and flash mode for each group: OFF - TTL - M
• RX: Set each unit to Group a, B, c or D by pressing the group button. each rX can only be assigned to One group.
On-camera Flash: Press and hold on TX to change the flash mode: TTL - M. The TTL indicator will show as illustrated.
channeL
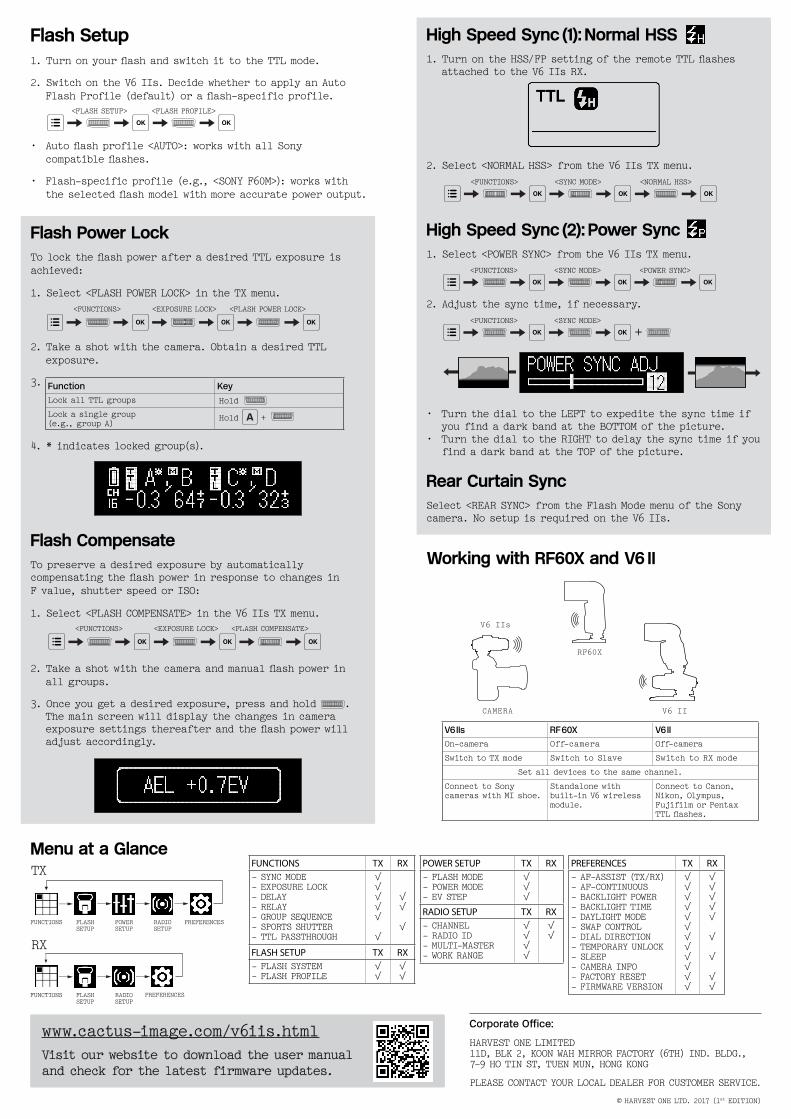
Flash Power LockTo lock the flash power after a desired TTL exposure is achieved:
1. Select <FLaSh POWer LOck> in the TX menu.
2. Take a shot with the camera. Obtain a desired TTL exposure.
3.
4. * indicates locked group(s).
<FuncTiOnS> <eXPOSure LOck> <FLaSh POWer LOck>
Function KeyLock all TTL groups hold
Lock a single group (e.g., group a)
hold +
Flash CompensateTo preserve a desired exposure by automatically compensating the flash power in response to changes in F value, shutter speed or iSO:
1. Select <FLaSh cOMPenSaTe> in the V6 iis TX menu.
2. Take a shot with the camera and manual flash power in all groups.
3. Once you get a desired exposure, press and hold . The main screen will display the changes in camera exposure settings thereafter and the flash power will adjust accordingly.
<FuncTiOnS> <eXPOSure LOck> <FLaSh cOMPenSaTe>
High Speed Sync (1): Normal HSS1. Turn on the HSS/FP setting of the remote TTL flashes
attached to the V6 iis rX.
2. Select <nOrMaL hSS> from the V6 iis TX menu.<FuncTiOnS> <Sync MODe> <nOrMaL hSS>
High Speed Sync (2): Power Sync1. Select <POWer Sync> from the V6 iis TX menu.
2. adjust the sync time, if necessary.
• Turn the dial to the LEFT to expedite the sync time if you f ind a dark band at the BOTTOM of the picture.
• Turn the dial to the RIGHT to delay the sync time if you f ind a dark band at the TOP of the picture.
<FuncTiOnS> <Sync MODe> <POWer Sync>
<FuncTiOnS> <Sync MODe>
+
Rear Curtain SyncSelect <rear Sync> from the Flash Mode menu of the Sony camera. no setup is required on the V6 iis.
Corporate Office:
harVeST One LiMiTeD11D, BLk 2, kOOn Wah MirrOr FacTOry (6Th) inD. BLDG., 7-9 hO Tin ST, Tuen Mun, hOnG kOnG
PLeaSe cOnTacT yOur LOcaL DeaLer FOr cuSTOMer SerVice.
© harVeST One LTD. 2017 (1st eDiTiOn)
Menu at a GlanceTX
rX
FLaSh SeTuP
PreFerenceS FuncTiOnS POWer SeTuP
raDiO SeTuP
FLaSh SeTuP
PreFerenceS FuncTiOnS raDiO SeTuP
Visit our website to download the user manual and check for the latest f irmware updates.
www.cactus-image.com/v6iis.html
Working with RF60X and V6 II
V6 IIs RF 60X V6 IIOn-camera Off-camera Off-camera
Switch to TX mode Switch to Slave Switch to rX mode
Set all devices to the same channel.
connect to Sony cameras with Mi shoe.
Standalone with built-in V6 wireless module.
connect to canon, nikon, Olympus, Fujif ilm or Pentax TTL flashes.
CAMERA
RF60X
V6 IIs
V6 II
Flash Setup1. Turn on your flash and switch it to the TTL mode.
2. Switch on the V6 iis. Decide whether to apply an auto Flash Prof ile (default) or a flash-specif ic prof ile.
• Auto flash prof ile <AUTO>: works with all Sony compatible flashes.
• Flash-specif ic prof ile (e.g., <SONY F60M>): works with the selected flash model with more accurate power output.
<FLaSh SeTuP> <FLaSh PrOFiLe>
FuNCtIoNs tX RX- Sync MODe- eXPOSure LOck- DeLay- reLay- GrOuP SeQuence- SPOrTS ShuTTer- TTL PaSSThrOuGh
√√√√√
√
√√
√
Flash sEtup tX RX- FLaSh SySTeM- FLaSh PrOFiLe
√√
√√
powER sEtup tX RX- FLaSh MODe- POWer MODe- eV STeP
√√√
RadIo sEtup tX RX- channeL- raDiO iD- MuLTi-MaSTer- WOrk ranGe
√√√√
√√
pREFERENCEs tX RX- aF-aSSiST (TX/rX)- aF-cOnTinuOuS- BackLiGhT POWer- BackLiGhT TiMe- DayLiGhT MODe- SWaP cOnTrOL- DiaL DirecTiOn- TeMPOrary unLOck- SLeeP- caMera inFO- FacTOry reSeT- FirMWare VerSiOn
√√√√√√√√√√√√
√√ √√√
√
√
√√