ryder online manual
TRANSCRIPT

Ryder Online Manual Page 1 of 12 Issue Date: 10/19/2018 Completed By: Carrier Support Team
Confidential and Propriety Property of Ryder
Ryder Online Manual
Tenders, Appointments and Status Updates
If this will be your first time using Ryder Online, then you will first need to request access. Go to www.ryder.com.
In the top right corner you will find “Customers, Investors, a Search Icon & and red box that says CONNECT
WITH US” click “Customers” (If Customers is not visible at the top of the screen then it will be in the menu on the
left). This will take you to “Customer Tools” page.
Scroll down to “Ryder Online” and click visit tool.
This will take you to the Customer Login in page. Click “First Time User? Enroll Now”.

Ryder Online Manual Page 2 of 12 Issue Date: 10/19/2018 Completed By: Carrier Support Team
Confidential and Propriety Property of Ryder
Creating the account
1. User ID: User’s first initial
and last name
2. Select CARRIER FOR
RYDER
3. Enter valid industry SCAC
code that user needs
visibility of in Ryder
Online. (Note: Only one
SCAC per account. Each SCAC
will require a separate ROL
account)
4. User’s first name
5. User’s middle name
6. User’s last name
7. User’s employer/carrier
name
8. Ryder customer account
name
9. Address of user’s
employer (city, state,
country, zip code)
10. Locale: Language
11. User’s email address
12. User’s telephone number
13. Select Applications:
Carrier Portal
RyderShip
Dock
Scheduler
14. Click Submit

Ryder Online Manual Page 3 of 12 Issue Date: 10/19/2018 Completed By: Carrier Support Team
Confidential and Propriety Property of Ryder
User access is usually granted within 24-72 business hours of receiving the request. You will receive a confirmation
email with the user id & password. Use the link in the email to go to Ryder Online.
Once access has been granted and you login to Ryder Online you will be asked a security question for identification
or password reset purposes.
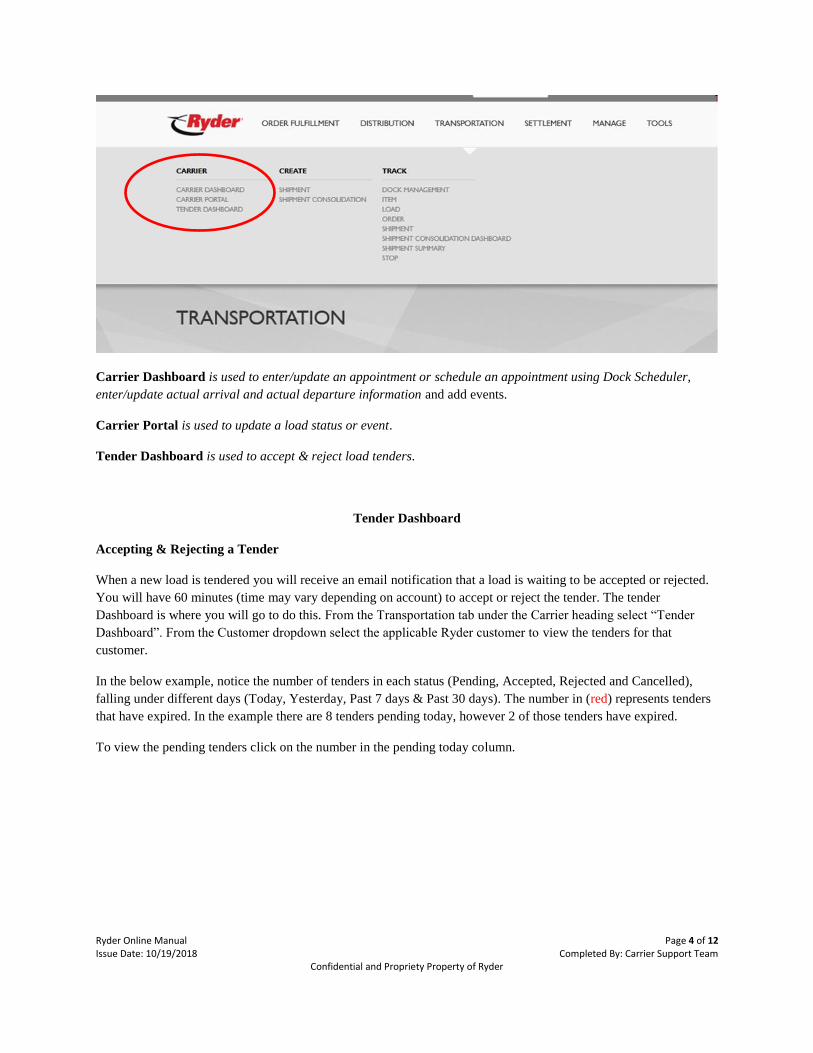
Click the Transportation button in Navigation Bar to view Carrier Applications under the Carrier Heading.
Ryder Online Manual Page 4 of 12 Issue Date: 10/19/2018 Completed By: Carrier Support Team
Confidential and Propriety Property of Ryder
Carrier Dashboard is used to enter/update an appointment or schedule an appointment using Dock Scheduler,
enter/update actual arrival and actual departure information and add events.
Carrier Portal is used to update a load status or event.
Tender Dashboard is used to accept & reject load tenders.
Tender Dashboard
Accepting & Rejecting a Tender
When a new load is tendered you will receive an email notification that a load is waiting to be accepted or rejected.
You will have 60 minutes (time may vary depending on account) to accept or reject the tender. The tender
Dashboard is where you will go to do this. From the Transportation tab under the Carrier heading select “Tender
Dashboard”. From the Customer dropdown select the applicable Ryder customer to view the tenders for that
customer.
In the below example, notice the number of tenders in each status (Pending, Accepted, Rejected and Cancelled),
falling under different days (Today, Yesterday, Past 7 days & Past 30 days). The number in (red) represents tenders
that have expired. In the example there are 8 tenders pending today, however 2 of those tenders have expired.
To view the pending tenders click on the number in the pending today column.

Ryder Online Manual Page 5 of 12 Issue Date: 10/19/2018 Completed By: Carrier Support Team
Confidential and Propriety Property of Ryder
This will take you to the Tender Summary. Here you can accept or reject a tender or click on the load number to
view additional load details before accepting or rejecting the tender.
Load numbers in red represents tenders that have already expired. Once a tender expires on the dashboard do not
accept. Reach out to the TMC team for the account to check for the loads availability.
To accept or reject a load click the blue button in the applicable column. If necessary, click the load number to view
additional details before accepting or rejecting.
Clicking on the load number will display the tender information. Always check the Ryder Account Instructions,
Load Instructions and Shipment Instructions for special instructions. At the very bottom of the tender information
screen you will have the option to “Accept & Print”, “Accept” or “Reject” the tender. You can click “Cancel” to
take no action and return to the tender summary screen.

Ryder Online Manual Page 6 of 12 Issue Date: 10/19/2018 Completed By: Carrier Support Team
Confidential and Propriety Property of Ryder
Once, you have accepted or rejected a load you should return to the tender summary screen to view any loads that
are still pending. If you wanted to go back and print the tender of a load that was previously accepted, go back to the
Tender Dashboard and click on the number in the accepted column, then click the print tender button.
Ryder Online Manual Page 7 of 12 Issue Date: 10/19/2018 Completed By: Carrier Support Team
Confidential and Propriety Property of Ryder
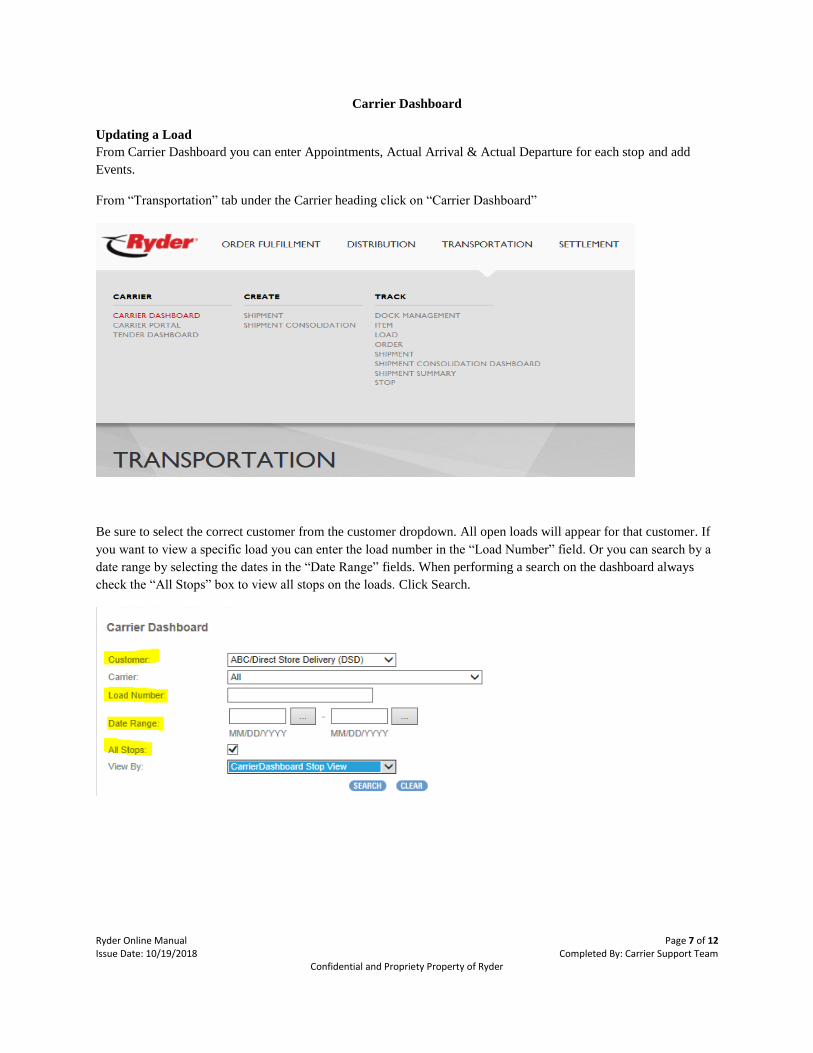
Carrier Dashboard
Updating a Load
From Carrier Dashboard you can enter Appointments, Actual Arrival & Actual Departure for each stop and add
Events.
From “Transportation” tab under the Carrier heading click on “Carrier Dashboard”
Be sure to select the correct customer from the customer dropdown. All open loads will appear for that customer. If
you want to view a specific load you can enter the load number in the “Load Number” field. Or you can search by a
date range by selecting the dates in the “Date Range” fields. When performing a search on the dashboard always
check the “All Stops” box to view all stops on the loads. Click Search.

Ryder Online Manual Page 8 of 12 Issue Date: 10/19/2018 Completed By: Carrier Support Team
Confidential and Propriety Property of Ryder
View the “Stop #” column to ensure you are updating the correct stop on the load.
Appointment Date
See the appointment date column for stop #2 in the above example.
Follow the account specific instructions for scheduling appointments. Populate the appointment date and time on the
dashboard. Click the 3 dots to access the pop-up calendar to select a date and then input appointment time using
military time. Also confirm the correct time zone is selected for the location. Click the “Save” button at the bottom
of the dashboard.
Dock Scheduler
See the appointment date column for stop #1 in the above example.
Some customer locations utilize Dock Scheduler to schedule appointments. This means you can schedule your
appointments directly in Ryder Online. Those locations will have a blue “SCHEDULE” button in the Appointment
Date column. Click the blue SCHEDULE button. In the pop-up box use the dropdown menu to select from available
dates and times. Click SCHEDULE.
If you receive a pop-up that states “No dates are available for new appointments” or any other error message, then
you will need to call the location or reach out to the TMC team for the account to get an appointment scheduled.
Actual Arrive & Actual Depart
When the driver arrives or departs a location you will need to update the actual arrival/departure. Click the 3 dots to
access the calendar and select the date. Use military time when updating times and select the correct time zone for
the location. If the driver was late or delayed in arriving, then a reason will be required. Select the applicable reason
from the Reason dropdown menu. Click the “Save” button at the bottom of the dashboard to submit the actuals.
Ryder Online Manual Page 9 of 12 Issue Date: 10/19/2018 Completed By: Carrier Support Team
Confidential and Propriety Property of Ryder
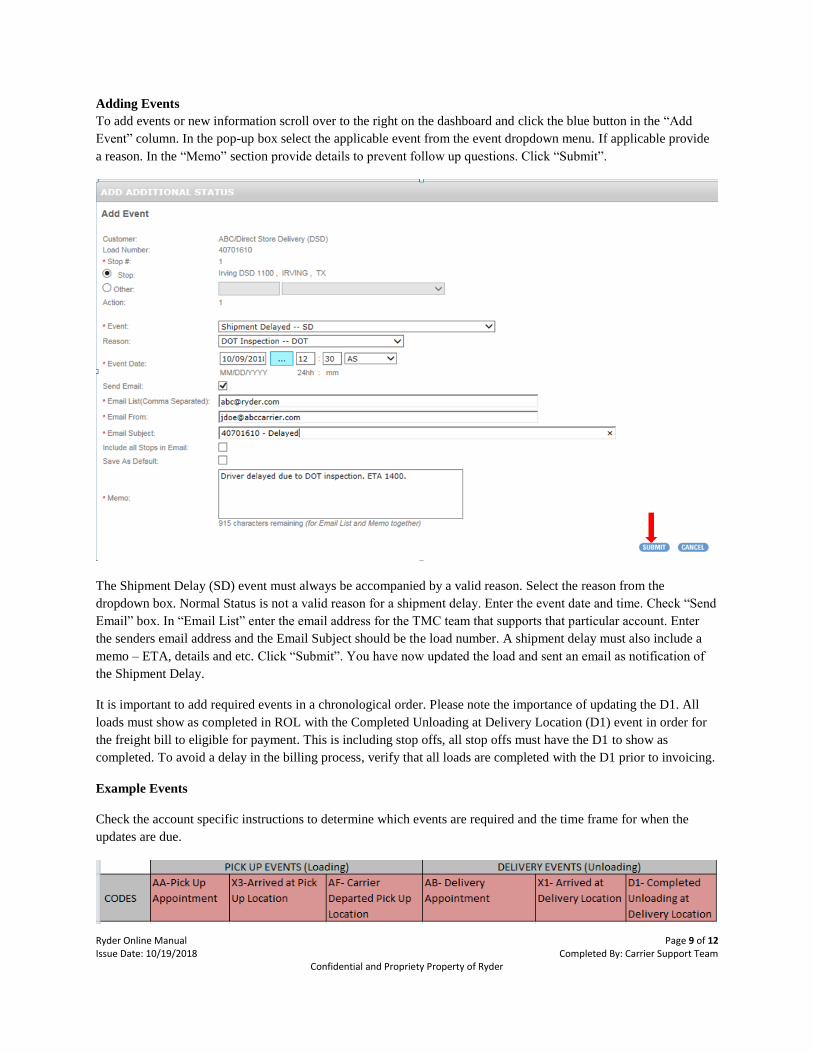
Adding Events
To add events or new information scroll over to the right on the dashboard and click the blue button in the “Add
Event” column. In the pop-up box select the applicable event from the event dropdown menu. If applicable provide
a reason. In the “Memo” section provide details to prevent follow up questions. Click “Submit”.
The Shipment Delay (SD) event must always be accompanied by a valid reason. Select the reason from the
dropdown box. Normal Status is not a valid reason for a shipment delay. Enter the event date and time. Check “Send
Email” box. In “Email List” enter the email address for the TMC team that supports that particular account. Enter
the senders email address and the Email Subject should be the load number. A shipment delay must also include a
memo – ETA, details and etc. Click “Submit”. You have now updated the load and sent an email as notification of
the Shipment Delay.
It is important to add required events in a chronological order. Please note the importance of updating the D1. All
loads must show as completed in ROL with the Completed Unloading at Delivery Location (D1) event in order for
the freight bill to eligible for payment. This is including stop offs, all stop offs must have the D1 to show as
completed. To avoid a delay in the billing process, verify that all loads are completed with the D1 prior to invoicing.
Example Events
Check the account specific instructions to determine which events are required and the time frame for when the
updates are due.

Ryder Online Manual Page 10 of 12 Issue Date: 10/19/2018 Completed By: Carrier Support Team
Confidential and Propriety Property of Ryder
Carrier Portal
Update a Load
The Carrier Portal is where you can find loads that are past due for a Pick-up and/or Delivery event, as well as loads
for Today’s Plan and Future Plan. You can update the loads in the Carrier Portal.
From the “Transportation” tab under the carrier heading click on “Carrier Portal”
Past due this is the total number of loads that require a pick up or delivery update.
Today’s plan represents loads that are scheduled for pick up or delivery for current day /24 hours.
Future loads view next day scheduled loads up to two weeks.
Select the applicable customer from the customer menu and click refresh. Numbers in red indicate the number of
loads that are past due and need to be updated. Click on the number in the applicable column to view the list of
loads. This will take you from the Dashboard to the Load Summary.

Ryder Online Manual Page 11 of 12 Issue Date: 10/19/2018 Completed By: Carrier Support Team
Confidential and Propriety Property of Ryder
Here you can view loads regardless of update status or loads that only require an update. You may enter a date range
and add additional filter criteria. The “additional filter criteria” allow you to filter by Load, BOL, PO or PRO
numbers. Click on the load number or button in the “actual pickup” or “actual delivery” column to update the load.
Input the actual dates/times for one or both stops. To save updates click the blue “Submit” button located under the
Additional Status section. To add/edit appointment information, click “Enter Appointment Information”. If the
appointment is being changed it will give you the option to edit the appointment.
Ryder Online Manual Page 12 of 12 Issue Date: 10/19/2018 Completed By: Carrier Support Team
Confidential and Propriety Property of Ryder
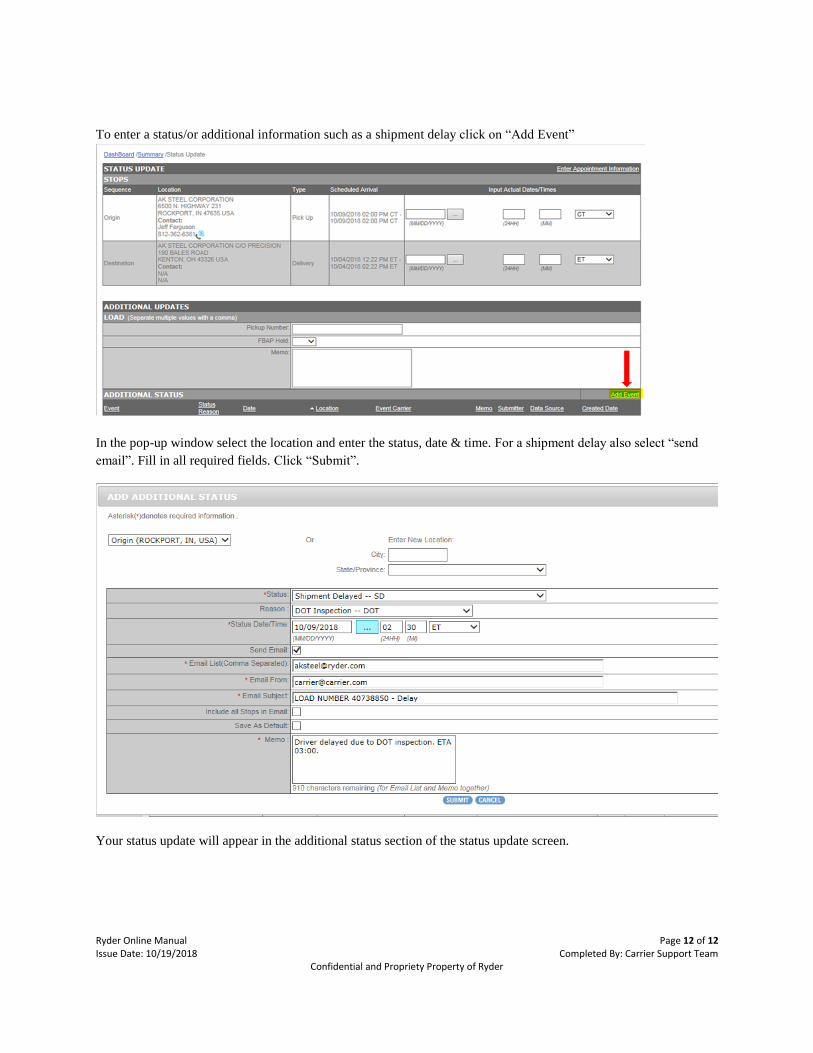
To enter a status/or additional information such as a shipment delay click on “Add Event”
In the pop-up window select the location and enter the status, date & time. For a shipment delay also select “send
email”. Fill in all required fields. Click “Submit”.
Your status update will appear in the additional status section of the status update screen.