s guide/paleomag v4... · web viewuser’s manual for the paleomagnetic analysis program v4.0...
TRANSCRIPT
User’s Manual for the Paleomagnetic Analysis Program V4.0
I. System RequirementsFor IBM-PC or compatibles:Operating System: Windows 95, Windows NT, Windows 98 or later (including Windows XP)Screen Setting: 800 600 or larger. Smaller setting will crop the Main Window. The Zijderveld/modified Zijderveld
and Stereographic/Lambert Equal-Area Projection window can be freely resized. RAM: 32 MB or larger (haven’t tried on computers with less RAM)
For Macintoshes: CANNOT run directly on Macintoshes. Will run if Virtual PC is installed on the Macintosh computer. The Virtual PC should have an operating system of Windows 95 or later. Same requirements for Screen Setting and RAM as IBM-PC compatibles.
II. New Features – Toolboxes 1. Coordinate Conversion: to convert coordinates of a single point between Spherical system (Declination, Inclination,
Intensity) and Cartesian system (North (x1), East (x2), Down (x3)) 2. Latitude Calculation: to calculate latitude from inclination, and inclination from latitude 3. Points Projection: to perform most of the tasks of the main program with a convenient Copy and Paste data input
method. You may specify line color, symbol color and size, and the size (diameter or axis length) of the projections. You can even add an eclipse around the VGP (and a circle around the mean declination and inclination of the samples, if you choose to do so). You can also print out all these projections as you specified. You are strongly encouraged to experiment with this toolbox.
III. InstallationRun the setup.exe program, and follow instructions in the pop up windows. Keep the most recent system files on your computer.
This procedure is the same for both PCs and Macintoshes running Virtual PC.
IV. UninstallationIn the Control Panel (by clicking Start>Settings>Control Panel), double click on the Add/Remove Programs icon. In the pop up
window, select the Paleomagnetic Analysis Program, and then click the Add/Remove… button.
Page 1 of 28

V. Suggestions/More InformationIf you have any suggestions or want to learn more about this program, please contact Chunfu ZHANG or Dr. James G. Ogg at
the following address: Dept. of Earth and Atmospheric Sciences, Purdue University, West Lafayette, IN 47907-1397, USA. Or e-mail us at: [email protected] or [email protected] .
Page 2 of 28

Figure 1 When the Paleomagnetic Analysis Program first start up, only the menus under File, Toolbox, and Help are available.
Page 3 of 28
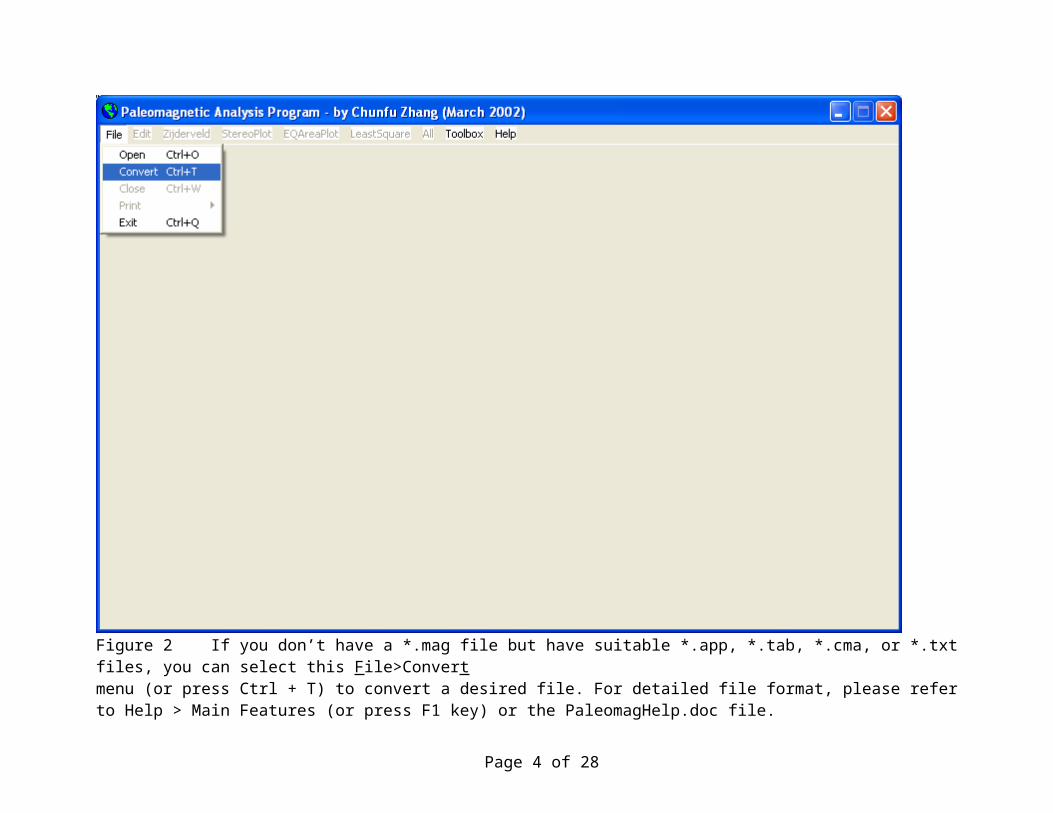
Figure 2 If you don’t have a *.mag file but have suitable *.app, *.tab, *.cma, or *.txt files, you can select this File>Convert menu (or press Ctrl + T) to convert a desired file. For detailed file format, please refer to Help > Main Features (or press F1 key) or the PaleomagHelp.doc file.
Page 4 of 28

Figure 3 This window comes up. You can select a drive from the dropdown list in the upper left window. The folders in the drive that you selected will be displayed automatically in the lower left window, and the files in the default folder will be listed in the window on the right side. You can change to another folder other than the default one by double clicking on that folder name, and the files under that folder will then be displayed in the right window. Only those files that can be converted by the Paleomagnetic Analysis Program will be listed, i.e., *.app, *.tab, *.cma, and *.txt files. Select one file and press the Convert button (or simply hit the return key, or press Alt + V), and the file you selected will be converted to a *.mag file. If you don’t want to convert any file, you can press the Cancel button to return to the main window in Figure 1. Or if you want to exit the Paleomagnetic Analysis Program, you can hit the Exit button, and the program will be terminated.
The Paleomagnetic Analysis Program will check if the corresponding *.mag file exist in that folder, and prompt you to take appropriate action.
Page 5 of 28
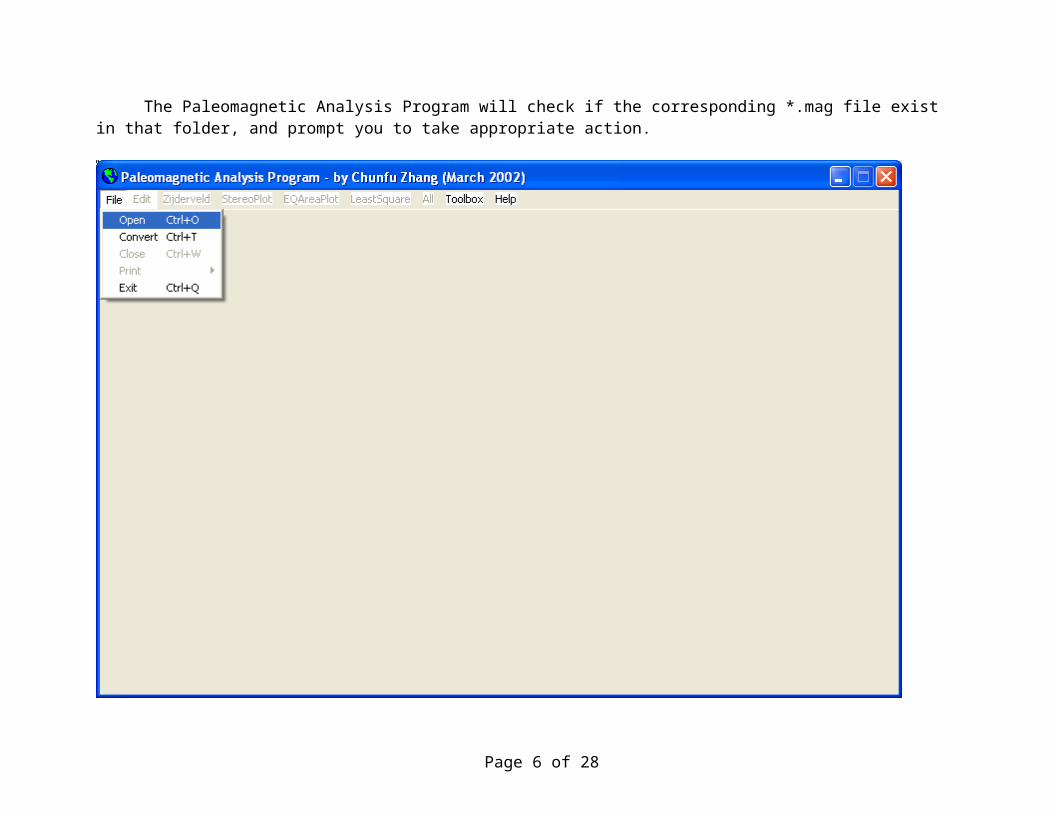
Figure 4 If you have a suitable *.mag file, you can select the File>Open menu (or press Ctrl + O) to open a file you want.
Page 6 of 28

Figure 5 This window comes up. You can select a drive from the dropdown list in the upper left window. The folders in the drive that you selected will be displayed automatically in the lower left window, and the files in the default folder will be listed in the window on the right side. You can change to another folder other than the default one by double clicking on that folder name, and the files under that folder will then be displayed in the right window. Only those files that can be opened by the Paleomagnetic Analysis Program will be listed, i.e., the *.mag files. Select one file and press the Open button (or simply hit the return key, or press Alt + O), and the file you selected will be opened. If you don’t want to open any file, you can press the Cancel button (or press Alt + C) to return to the main window in Figure 1. Or if you want to exit the Paleomagnetic Analysis Program, you can hit the Exit button (or press Alt + X), and the program will be terminated.
Page 7 of 28
Figure 6 After you convert a file or open a file, the sample names in that file will be automatically displayed in the left window.Note that all samples are defaulted to be active, and can be used in various plottings and analyses.
Page 8 of 28
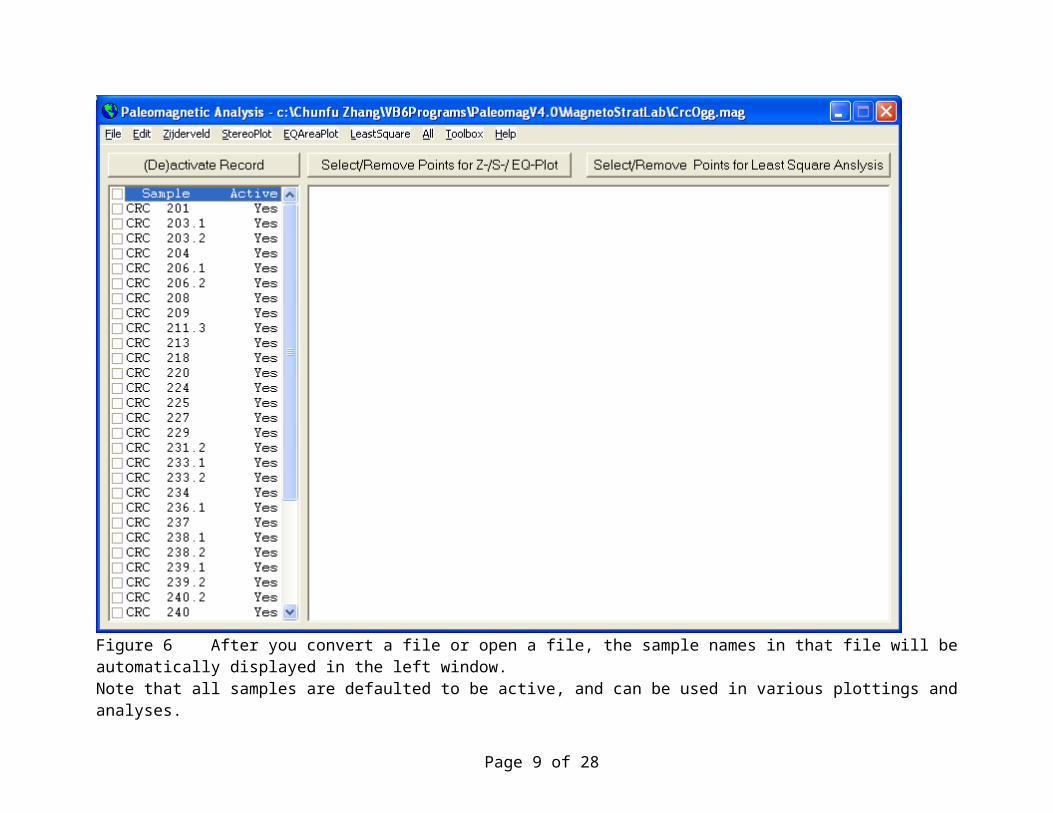
Figure 7 By clicking on the sample name, the data for that sample will be displayed in the right window. Note that all data except the Origin (ORG) are defaulted to be suitable for plotting, and none of them are selected for Least Square Analysis.
Page 9 of 28
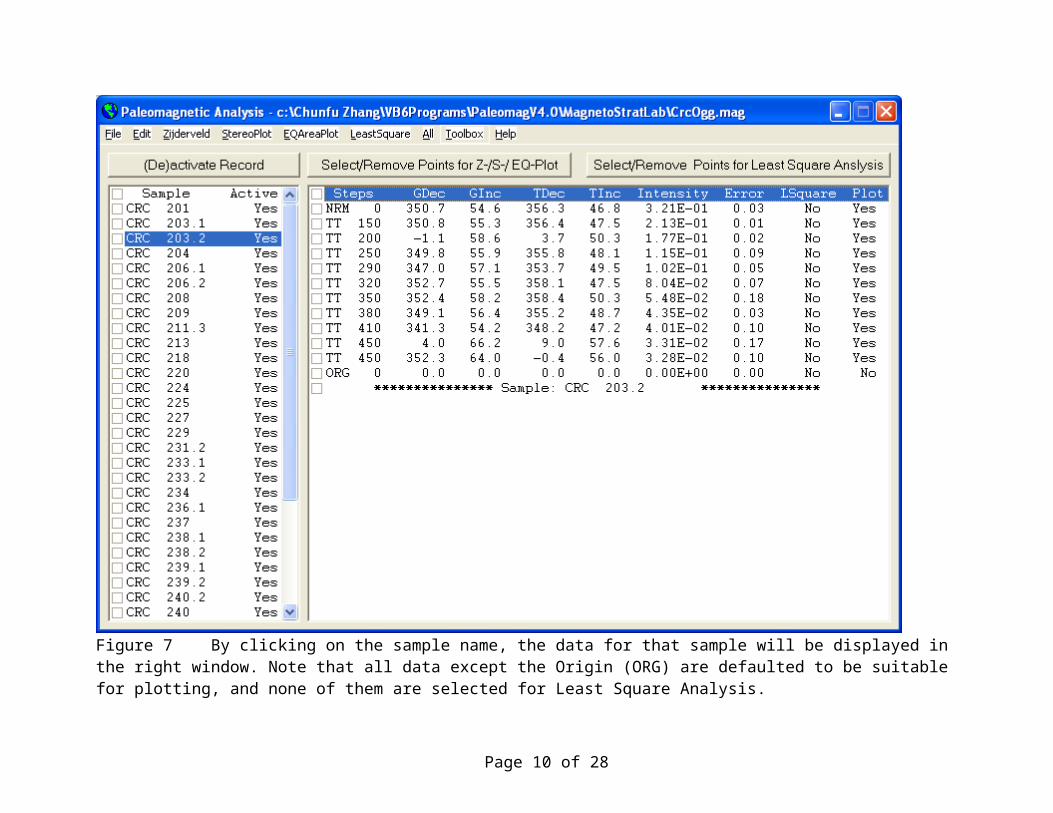
Figure 8 You can deactivate a record by Check-marking it, and then press the (De)activate Record command button. And the window display will change to Figure 9.
Page 10 of 28
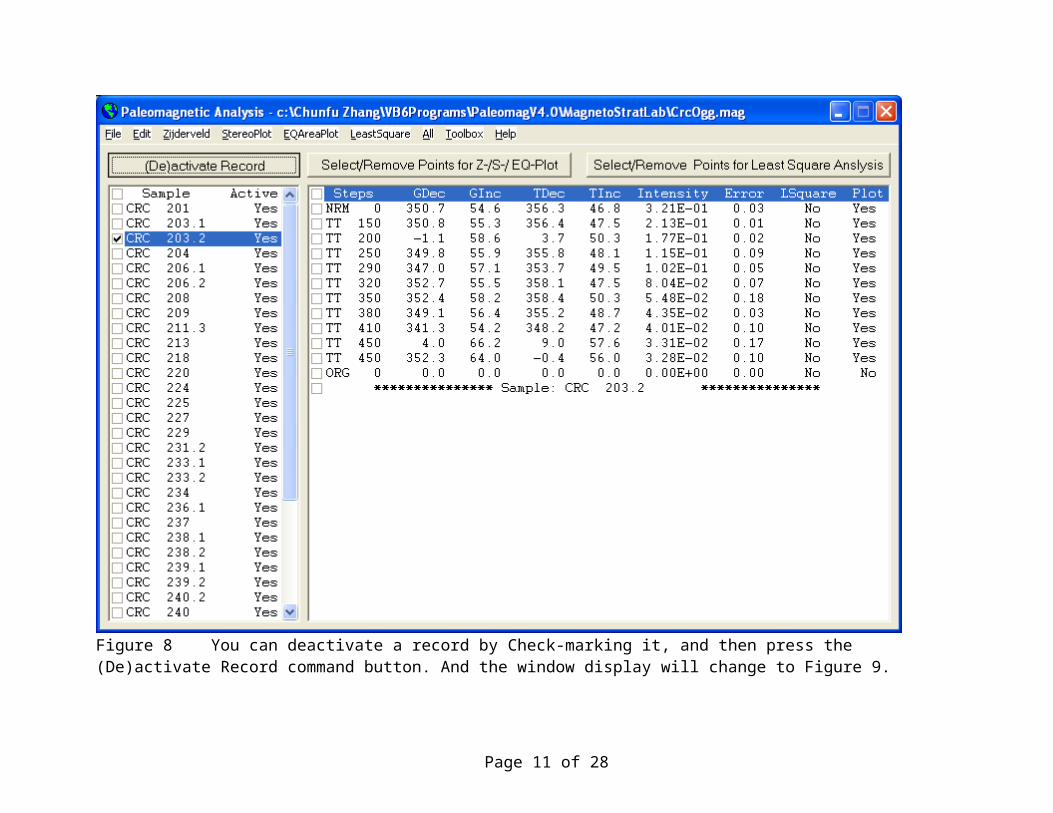
Figure 9 Notice that the Active status of Sample CRC 203.2 is changed to No. By the same procedure, you can activate this sample again.
Page 11 of 28

Figure 10 You can use the Edit>Copy menu to copy selected lines and paste them to another application, such as MS Word.The result is: *************** Sample: CRC 203.2 *************** ==========Least Square Analysis========== Label GDec GInc TDec TInc Intensity Error #Points Tied
N 349.39 56.56 355.56 48.80 6.69E-02 2.18 7 Yes
Page 12 of 28
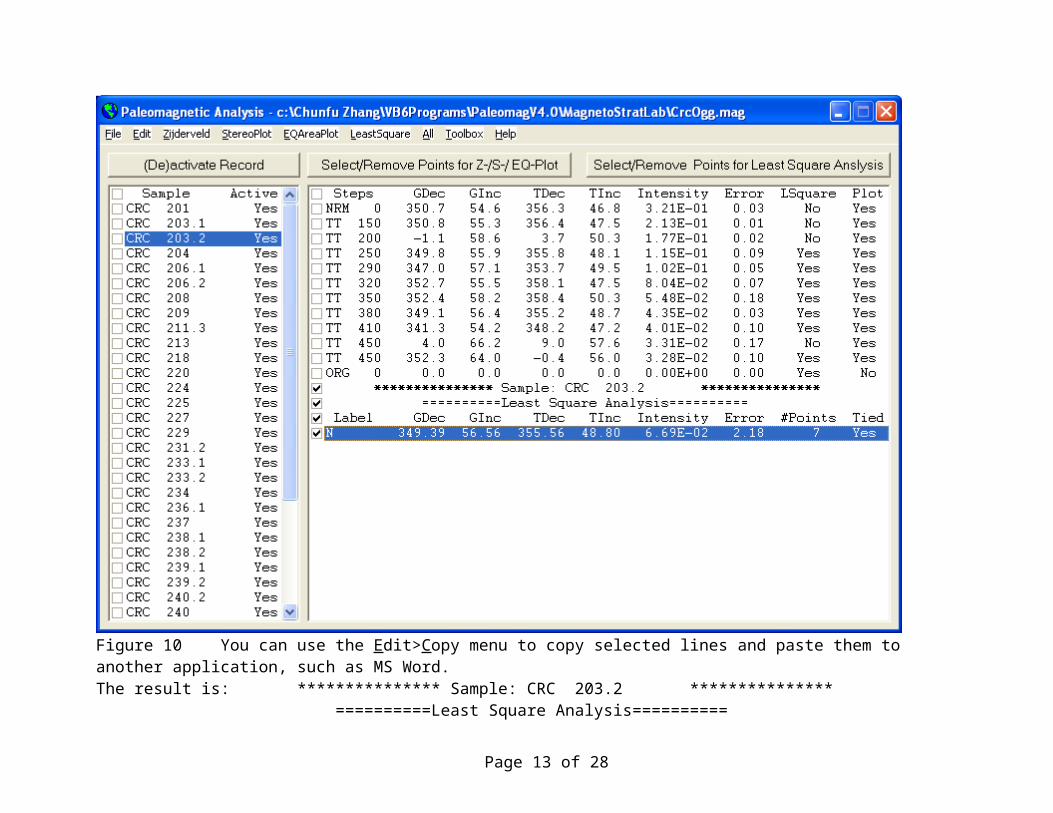
Figure 11 Under the Zijderveld menu, you can select Geographic or Tilt-Corrected data for Zijderveld projection. You can also designate a plane for projection. The default setting is projection onto the north plane (0 degree). If you want to see the true inclination angle, you can set the Projection Plane to –2 (No projection), and the angle between the horizontal and the line connecting the point and the origin is the true inclination. The Modified Z-Plot option is for plotting the North in a conventional way, i.e., the Up direction. Note that in the Zijderveld projection, the North direction is projected to the right, i.e., the conventional East direction.
Page 13 of 28
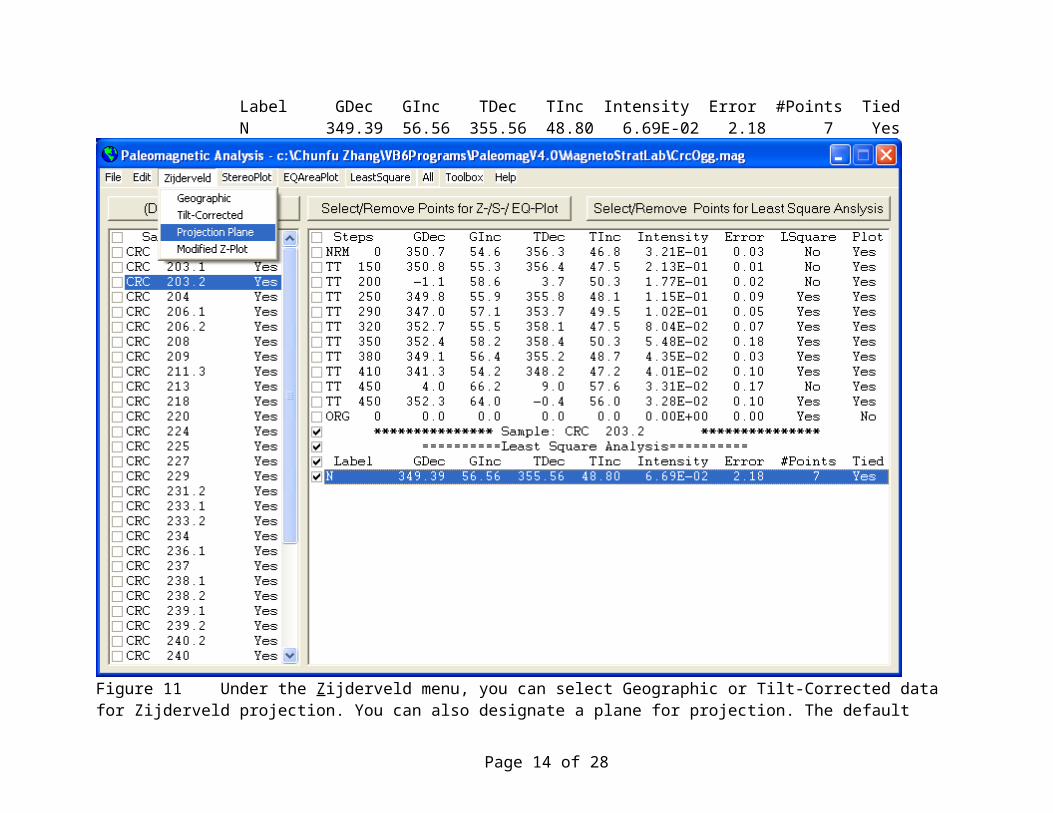
Figure 12 In the StereoPlot menu, you can select either Geographic or Tilt-Corrected data to perform equal-angle stereographic projection for the selected sample.
Page 14 of 28
Figure 13 In the EQAreaPlot menu, you can select either Geographic or Tilt-Corrected data to perform Lambert equal-area projection for the selected sample.
Page 15 of 28

Figure 14-1 This window show the Zijderveld plot using Geographic data in the left window, and the Lambert Equal-Area Projection using Tilt-corrected data in the right window for the sample CRC 203.2. You can have any combination of display. And now you can freely resize this window to fit your need (see Figure 14-2 on next page).
Page 16 of 28
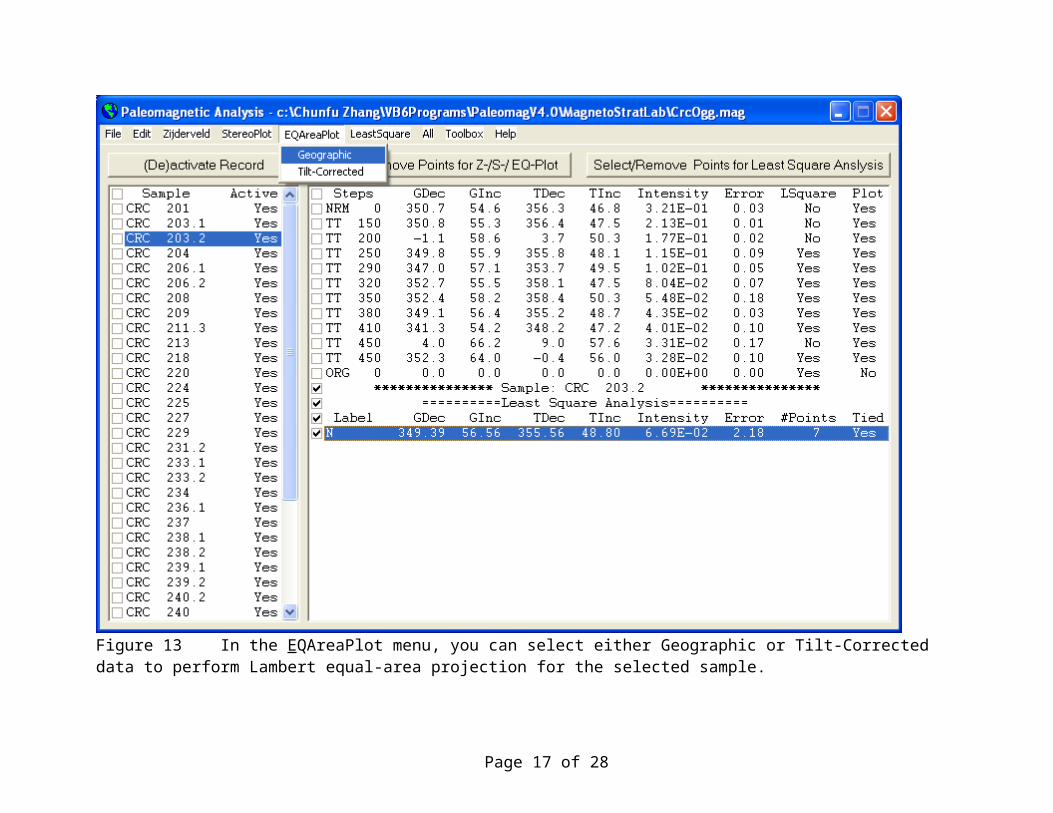
Figure 14-2 The same output window as in Figure 14-1 after resizing.
Page 17 of 28
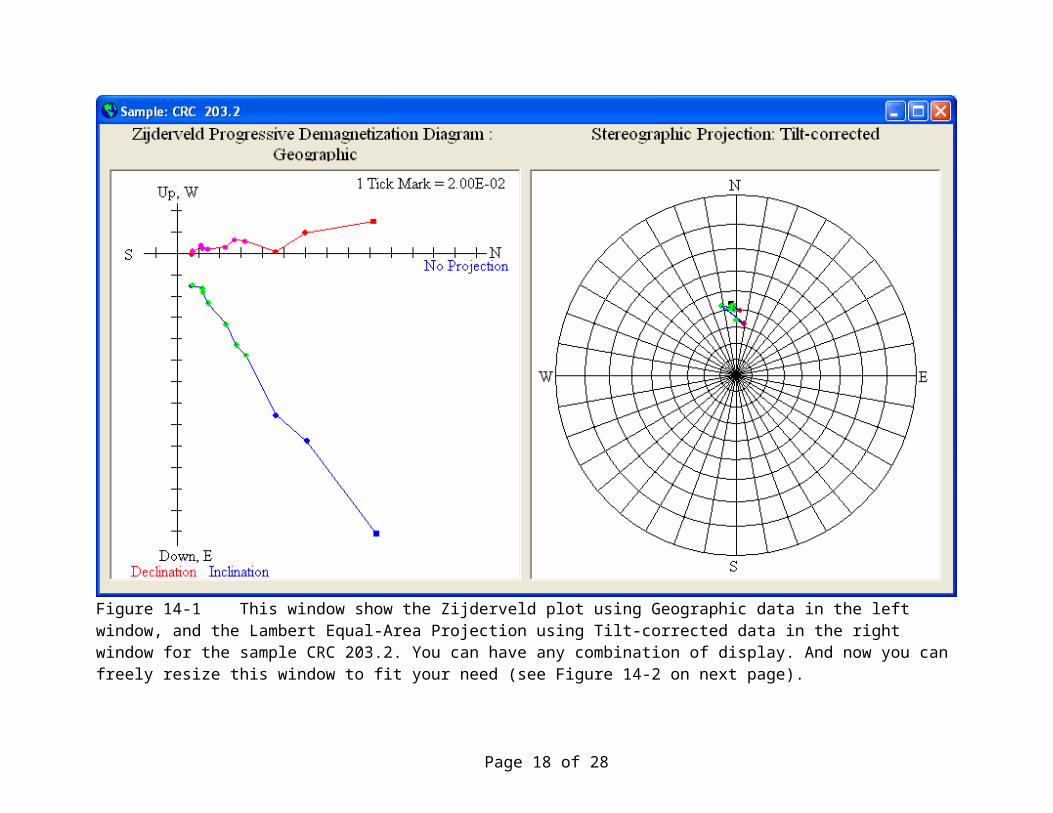
Figure 15 Under the LeastSquare menu, you can perform Least Square Analysis for a sample by first check-marking the data points you want and then click the Select/Remove Points for Least Square Analysis command button.
Page 18 of 28

Figure 16 After clicking the LeastSquare>Display All Results menu, this window pops up displaying all the Least Square Analysis results in the file and the (AF) Temperature Steps Used in Least Square Analysis (Figure 17). You can copy and paste selected contents to another application such as MS Word.
Page 19 of 28
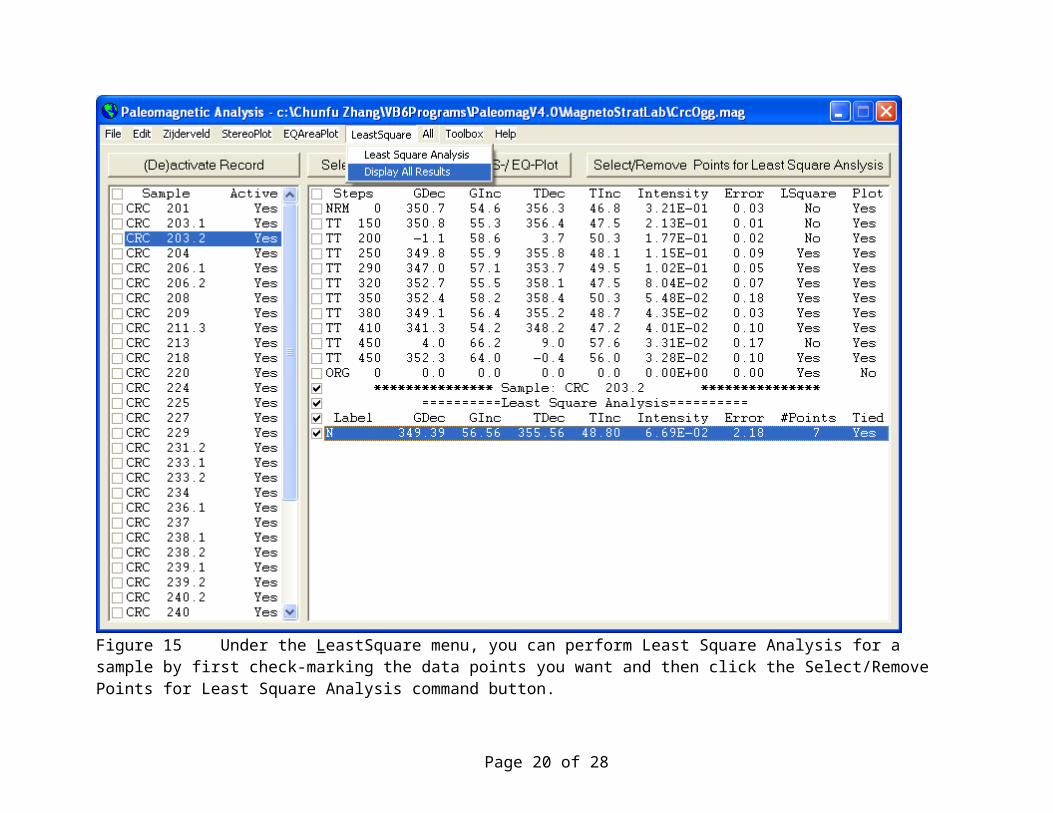
Figure 17 The lower half of the Least Square Analysis Results window, showing the (AF) Temperature Steps Used in Least Square Analysis.
Page 20 of 28

Figure 18 Under the All>StereoPlot All menu, you can select NRM Data or Least Square or Alternating Field or Arbitrary Temperature data to perform any type of plot for all samples (default: Tilt-corrected data, Lambert Equal-Area Projection).
Page 21 of 28
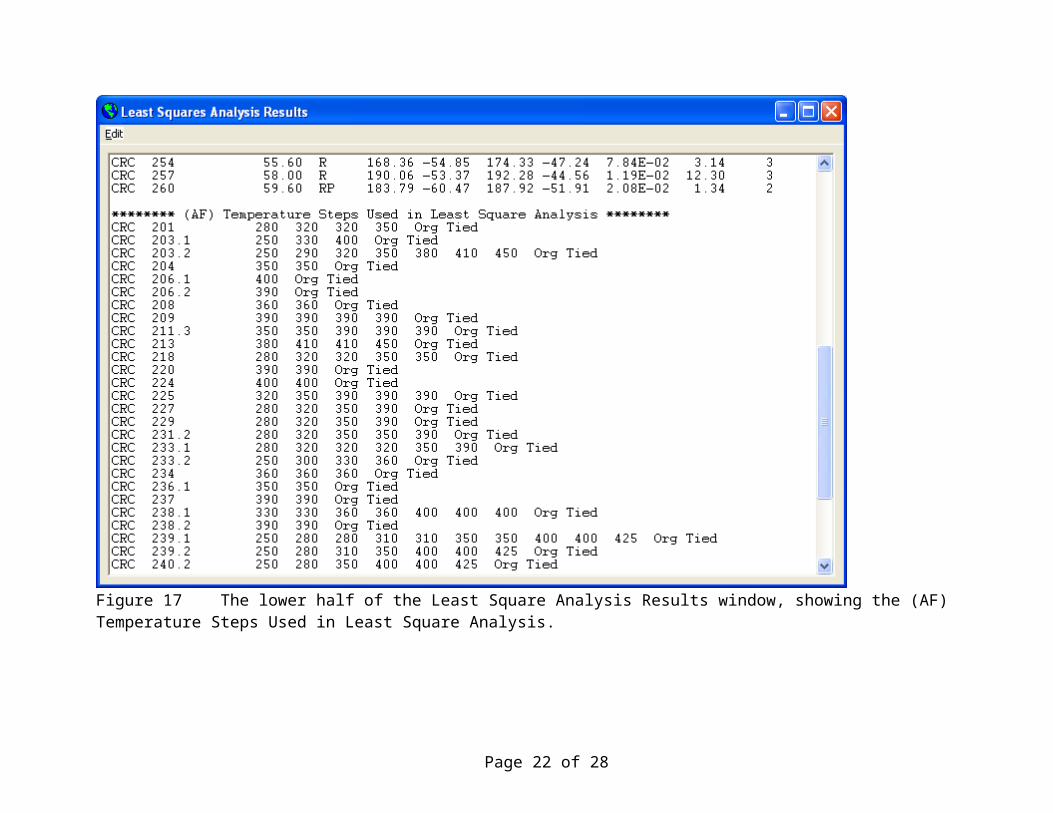
Figure 19 Under the All>Fisher Statistics menu, you can select NRM or Least Square or Alternating Field or Arbitrary Temperature data to perform Fisher Analysis for all suitable samples. Change Active or Plot setting to remove data for Fisher Analysis.
Page 22 of 28

Fig. 20 Added toolboxes in Paleomagnetic Analysis Program V4.0 as compare to the previous versions. The menu commands Toolbox > Coordinate Conversion or Toolbox > Latitude Calculation all bring up the screen shown in Figure 21. The menu command Toolbox > Points Projection will bring up the screen shown in Figure 22.
Page 23 of 28
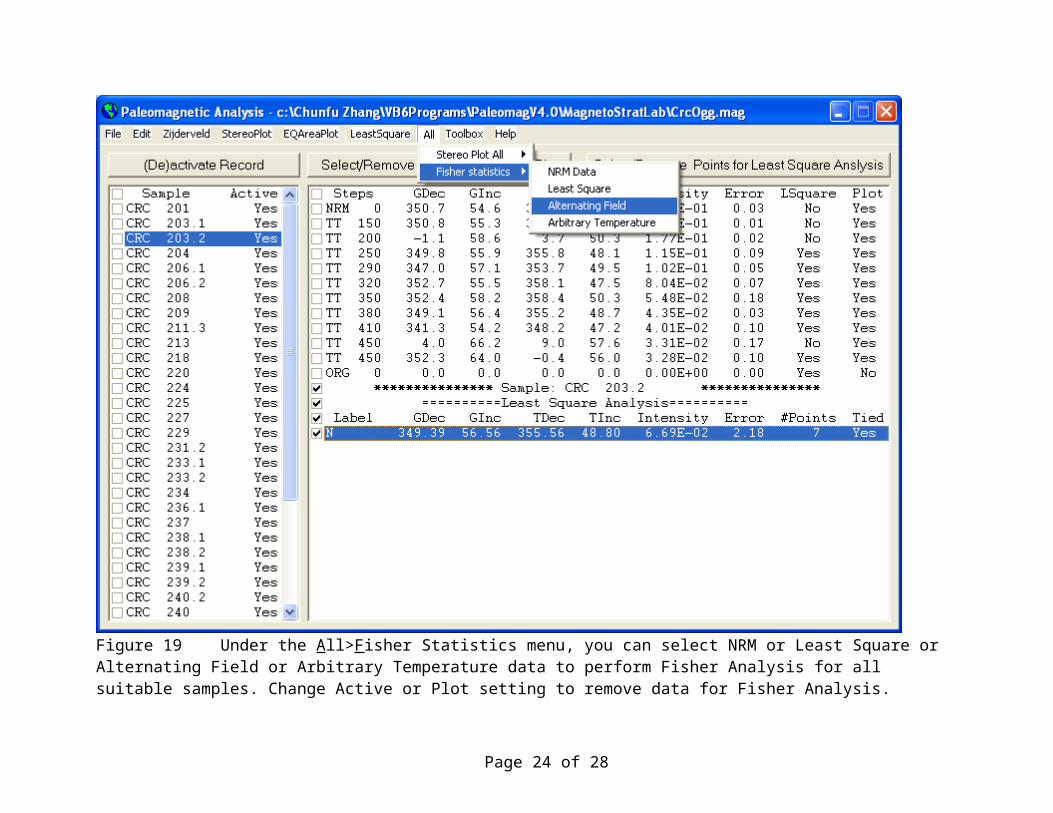
Fig. 21 Diagram showing the first toolbox which has the functions of coordinate conversion and latitude calculation.
Page 24 of 28
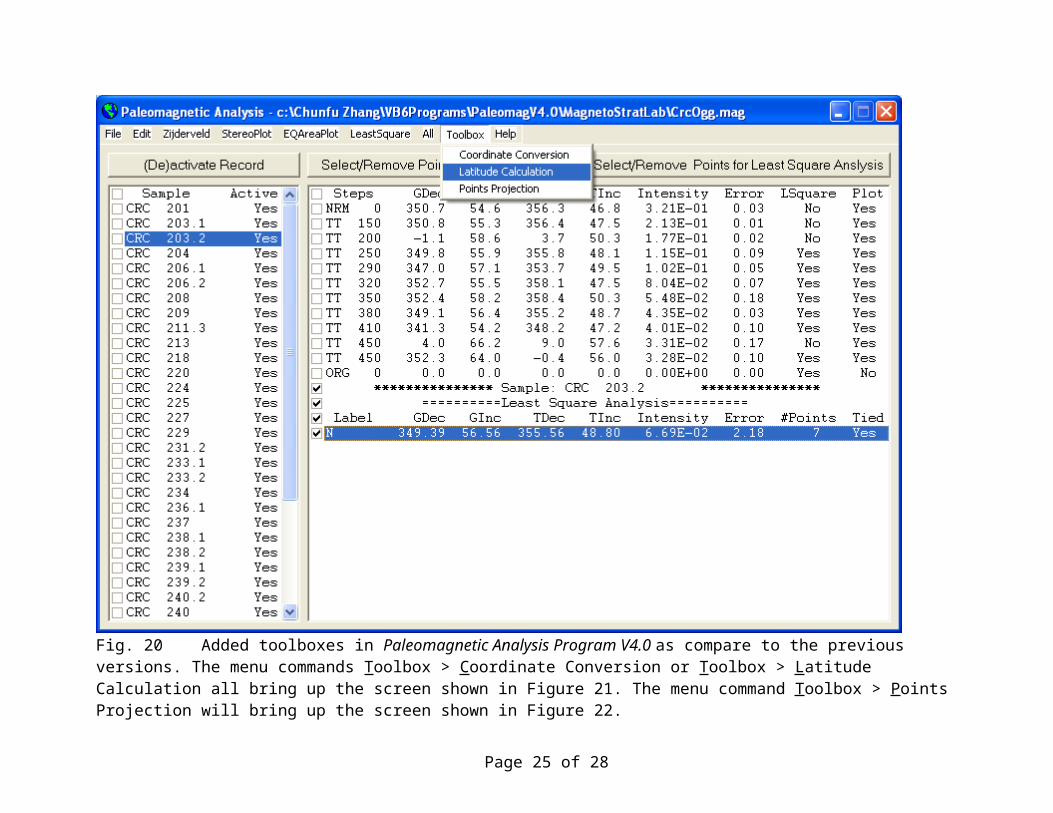
Fig. 22 Diagram showing toolbox 2. You can type or copy and paste data in the textboxes, then use the left or right arrow to convert the data. You can also change the settings for the symbol size and color, line color. This toolbox provides all the functions in the main program except the least squares analysis, but it has some added capacity of its own: projection of the VGP ellipse which can be added to the original data, and can also add the a circle around the mean direction of the samples.
Page 25 of 28

Figure 23 Under the Help menu, you can learn about the main features of this Paleomagnetic Analysis Program by selecting the Help>Main Features menu (or press the F1 key) (Figure 21).
Page 26 of 28
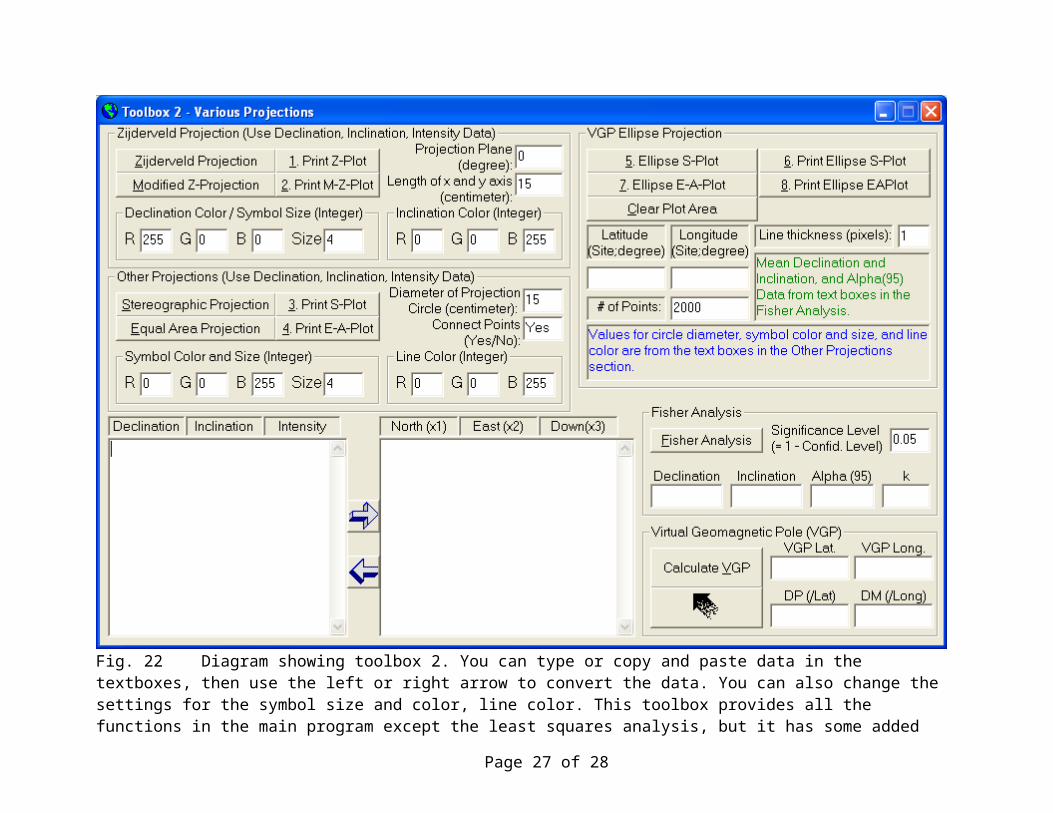
Figure 24 The Help window for the Paleomagnetic Analysis Program. You can use the Edit>Copy menu (or press Ctrl + C) to copy the selected content and paste it to another application such as MS Word.
Page 27 of 28
Figure 25 By selecting the Help>About Paleomagnetic Analysis Program (or press the F2 key, this window pops up, showing the information about the version, the author, contact information, and the revision history of this program. The previous programs (up to Version 2.10) were written in Quick Basic language. Version 3.0 is produced by completely rewriting the whole program in Microsoft Visual Basic 6.0. Some functionalities are added to this new Paleomagnetic Analysis Program, such as converting *.tab, *.cma, and *.txt files, the Edit>Copy menu for copying and pasting selected contents to another application, and the Help menu. Some bugs in the previous version have also been fixed. Version 3.1 made resizing the Zijderveld and Stereographic Projection window possible, used a different color for data used in Least Square Analysis, and added a verification procedure when converting a file to prevent losing your work if you have converted the same file and worked on it before. This Version 3.2 added some error handling instructions to make the program even more robust, made copying multiple lines of data in the main window possible, and slightly improved the appearance of the Zijderveld and Stereographic Projection window after resizing.
Page 28 of 28