s p system (sps) using sps for salary projection user …
TRANSCRIPT

SALARY PROJECTION SYSTEM (SPS)
USING SPS FOR SALARY PROJECTION
User Guide _______________________________________________________________________________________________________________________________________________________________________________________________
March 2022

- 2 -
Table of Contents TABLE OF CONTENTS............................................................................................ 2
Additional Resources 3
Logging on and browser settings 4
How to Disable Pop-Up Blockers 4
Key Navigation Features 6
Working with Filter Options 8
PREPARE POSITION FILE ....................................................................................... 8
Establish a Position File 8
View/Update Position File Information 10
Load Data from the HR Data Warehouse 12
Coping Positions from One Program to Another or Create Its Own File 13
EDIT OR UPDATE POSITION FILES & CORRECT INVALID POSITIONS ...................... 17
View Positions in Position Listing (Includes Filter) 17
Invalid Record Flags & Errors 20
Correct Invalid Positions 22
Update a Vacant Position to Clear Invalid & Project Salary 22
Correct Invalid Filled Positions 28
Delete Extra Positions 28
Update Positions to Reflect Known Changes 29
End a Currently Filled Position 31
Reclassify an Employee Keeping the Same Position Number 31
Add a New Position Copying Information from the Current Tab 33
Update Funding and Find a Position using Search 34
UPDATE GROUPS OF POSITIONS IN ONE TRANSACTION (MAKE POSITION FILE CURRENT, BULK UPDATE & EXPORT) ................................................................... 34
Make Position File Current 35
Basic Rules for the Bulk Update 35

- 3 -
Update to New Job Class 36
Update Position Funding 37
Update Non-Classified Position Salaries 38
Export/Import Records to Update Funding 39
Verify the Position File 46
RUN A PROJECTION ............................................................................................. 48
Lock a Projection File and Update Comments 50
View Projection Reports 52
DATA RELEASE FOR COMPENSATION IMPACT MODEL (CIM) ................................ 54
Release Data to OFM for CIM 55
REPORT SAMPLES ................................................................................................ 57
Additional Resources: A rates reference document can be found in the BudgetWorks Help Library. This Help library may also be accessed via the Help link in SPS. You can also contact the OFM Help Desk at [email protected] or call 360.407.9100.

- 4 -
Logging on and browser settings
Open Microsoft Edge or Google Chrome and enter the login address https://budgetlogon.ofm.wa.gov/Logon.aspx in the address bar of the browser.
Enter your login ID and password to log into BudgetWorks. If you do not have access please use the Security Request Form to request it through the OFM Helpdesk at [email protected].
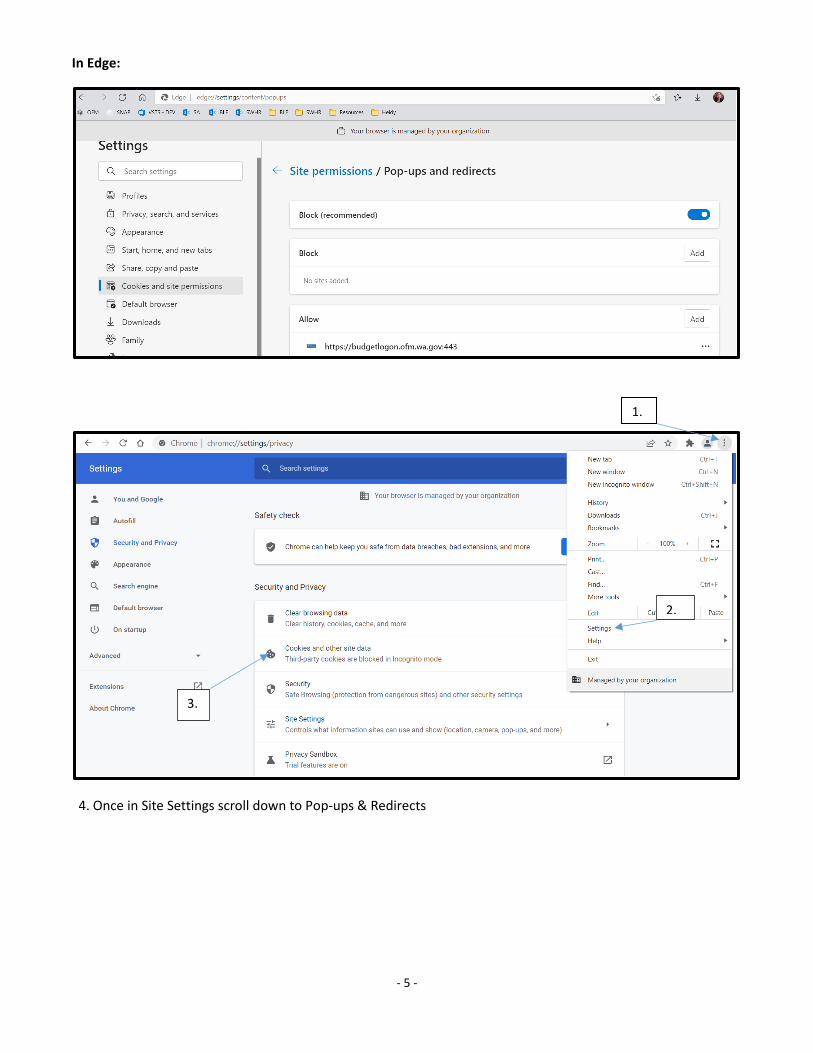
How to Disable Pop-Up Blockers
SPS has pop-up notifications and instructions, to enable pop-ups or verify pop-ups are allowed, please follow the steps below.
• Beside the address bar, select the … which will display a drop-down menu • Select Settings, this will open a new menu, on the left side select Cookies and site permissions • Scroll down to Pop-ups and redirects, beside Allow, select Add, enter the site
https://budgetlogon.ofm.wa.gov and click Add again.
- 5 -
In Edge:
4. Once in Site Settings scroll down to Pop-ups & Redirects
1.
2.
3.

- 6 -
Add site: https://budgetlogon.ofm.wa.gov , and click Add. This application will now allow pop-up notifications and instructions.
Note: Documents downloaded in Edge may appear in a new browser tab instead of a document reader such as Adobe or Excel and the following warning may appear.
Key Navigation Features
All navigation bars and selection tabs are in the same place on every page. The selection tabs run horizontally across the top of each screen, allowing for the selection of screen features and system navigation. Shortcut links on the application tab bar (3) and the breadcrumb bar (4) allow for the ability to “jump” to previously viewed pages without using the browser Back button (1).
5.

- 7 -
1. Internet browser navigation buttons. Note: The SPS application does not support the use of internet browser navigation buttons, i.e.; ‘back arrow’ and ‘forward arrow’. Avoid using these while working in SPS as these commands may cause errors and delete any unsaved work.
2. Page Header includes Application Title (Salary Projection System), Contact, Help, and Logout Link. Note: The Contact link opens the OFM Budget Staff Assignments page Budget staff agency assignments | Office of Financial Management (wa.gov), the Help link opens the BudgetWorks Help document library. Note: Please properly logout of the system when work is complete, or the application is not in use. There is a back-up timeout provision included in the system that will time out after 120 minutes of inactivity.
3. Application Tab Bar is available throughout the application and includes a tab for each major functional area including Position Files and Projections.
• The Position Files tab provides a view of available agency position files. When a position file line item is selected other functions will be available to choose from. Other functions include adding new files, updating files, viewing details, new HR Data Loads, copying/merging files, exporting, importing, running projections, releasing files, bulk updating, making the position file current, clearing the in-use flag, running reports, and deleting files.
• The Projections tab provides a view a list of the agency projection files, to update the projection file list information and run reports on those projection files.
- 8 -
4. Breadcrumb Bar serves as a trail to navigate back to any previously viewed screen in the application. The breadcrumb bar will show differences based on how the page was reached.
5. Page Menu indicates which menu items are available as selections are clicked and unclicked.
Working with Filter Options
• Using an = to signify a blank does not work in the user defined or start date criteria.
• Start date needs to be expressed as a range, to filter on only one date use the same date in both fields.
• The filter is required to reduce records down to 3,000 when running an allotment detail report.
• When filtering on the user defined field, the filter may return “blank” user defined records if the previous information was deleted. It is counting the blanks as matching the filter.
• Once a filter is set, even if the information is deleted or reset from the Filter dialog box, the position
listing will show as a filter being applied. To remove this indicator, choose the Filter/Clear Filter tab.
PREPARE POSITION FILE
Establish a Position File
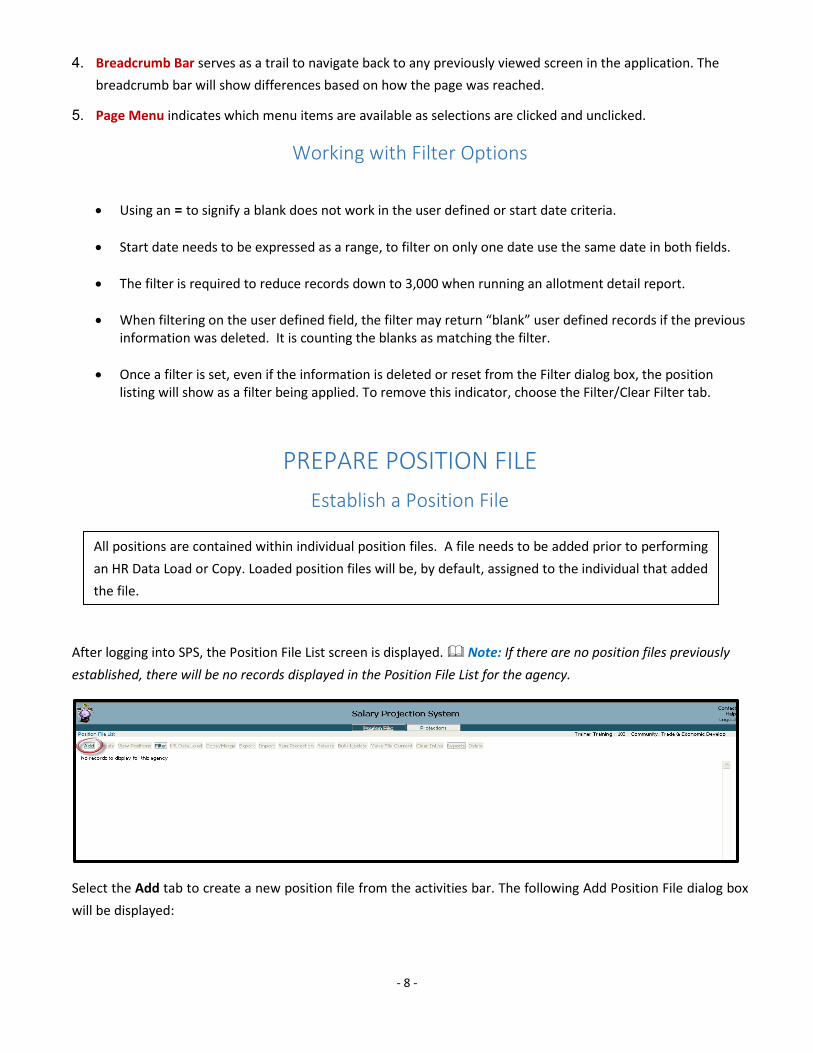
After logging into SPS, the Position File List screen is displayed. Note: If there are no position files previously established, there will be no records displayed in the Position File List for the agency.
Select the Add tab to create a new position file from the activities bar. The following Add Position File dialog box will be displayed:
All positions are contained within individual position files. A file needs to be added prior to performing an HR Data Load or Copy. Loaded position files will be, by default, assigned to the individual that added the file.

- 9 -
In the Add Position File dialog, add a three-character Position File ID and Title for this file.
Select Save to close the Add dialog box.

- 10 -
View/Update Position File Information
Activities Bar—performs actions related to a specific position file(s) or to add a new position file. This includes Update, View Positions, Filter, HR Data Load, Copy/Merge, Export, Import, Run Projection, Release, Bulk Update, Make File Current, Clear In-Use, Reports and Delete.
Add: to create a new position file, load HR data, add positions manually, or import data. Update: updates the position file title, comments, owner, funding titles biennium, operations
lock, owner lock, and the export flag. Depending on permission settings, some of these roles may not be available to everyone.
View Positions: view position information included in the position file chosen. Filter: set or clear filters that apply to the position file, reports, and projection. HR Data Load: extract HRMS data into an empty position file. Copy/Merge: copy or merge position information from one file to another. Export: (Washington State Patrol only) export funding or assignment pay information to use in
an external system. Import: import funding or assignment pay information back into the file it was exported from.
(Washington State Patrol only) Run Projection: run a projection on the position file chosen. Release: release position file information for the Compensation Impact Model (CIM), Labor
Relations Office request and to view the CIM Position Listing Report. Bulk Update: update mass information on a position file at one time. Make File Current: update position files to reflect any increments or General Salary Increases
that occurred between the salary update of the position and the current date. Clear-In Use: (for budget operations roles only) to clear the In-Use flag of a position so the
position file can be updated. Reports: run a position listing report for the selected position file. Delete tab: delete one or several position files.
1) Position File Selection: work with a particular position file or files. 2) Position File ID: displays the chosen three-character ID. 3) Position File Title: displays the chosen title. 4) Operations Lock displays a lock indicator if an operations user has locked the file. To remove this
lock, select the update tab. 5) Owner Lock: Displays a lock indicator if the owner has locked the file. To remove this lock, select the
update tab.
The Position File List screen shows view information about agency position files as well as perform various tasks with those files. Informational items include number of records, number of exceptions, file owner, extract date, etc. Functions allow (depending on security levels) to lock position files, enter file comments, change file owner, clear in-use flags, or delete unlocked position files. Each column can be sorted in ascending or descending order according to user preference.

- 11 -
6) In Use Indicator: Displays the name of the person who has the file in use (Budget Operations users can clear this by selecting the Clear In-Use tab).
7) Exported Indicator: Displays the reason of exporting as Funding or Assignment Pay for Washington State Patrol Only. (Budget Operations or the Owner can clear this through the update tab)
8) Comments Indicator: Displays any comments associated with the position file. To view, click on the check mark and to close click the check mark again. To change comments, select the update tab.
9) Owner: Displays who owns the position file. This can be changed through the update tab. 10) Record Count: Displays the total number of records in the position file that are both valid and invalid. 11) Exception Count: Displays the total number of exception records (invalid records) that will not be
included in a projection until the records are valid. 12) Funding Titles Biennium: Displays which biennium the funding titles are compared to. This can be
changed through the update tab. 13) Extract Date: Displays the date the HR Data was loaded into the position file. If the file was copied, it
will display the date of the original file. 14) Updated By: Displays the name of the user that last updated the file, hovering over the name will
display the date and time it was updated. 15) Released By: Displays the name of the user that released a position file to CIM, hovering over the
name will display the date and time it was updated.
Select the Update tab to update a position file from the activities bar.
The following Update Position File dialog box will be displayed:
Check the box to the right of Operations Lock to lock the position file and save to close. Note: A Budget Operations Lock prohibits all agency ‘Edit Access’ users from making changes to the position file. File Owners that have ‘Edit Access’ assignment may also set an Owner lock that will prohibit all ‘Edit Access’ users who are not the file owner from making changes to a position file. Users are unable to delete any files that are locked.
- 12 -
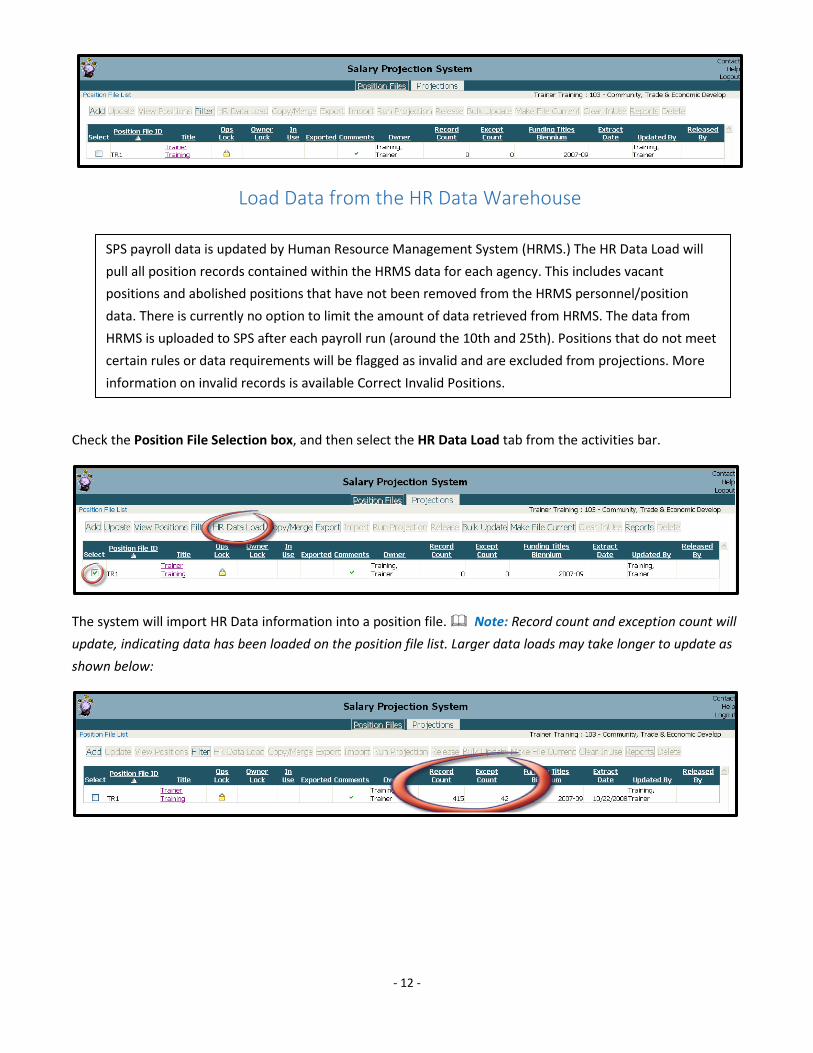
Load Data from the HR Data Warehouse
Check the Position File Selection box, and then select the HR Data Load tab from the activities bar.
The system will import HR Data information into a position file. Note: Record count and exception count will update, indicating data has been loaded on the position file list. Larger data loads may take longer to update as shown below:
SPS payroll data is updated by Human Resource Management System (HRMS.) The HR Data Load will pull all position records contained within the HRMS data for each agency. This includes vacant positions and abolished positions that have not been removed from the HRMS personnel/position data. There is currently no option to limit the amount of data retrieved from HRMS. The data from HRMS is uploaded to SPS after each payroll run (around the 10th and 25th). Positions that do not meet certain rules or data requirements will be flagged as invalid and are excluded from projections. More information on invalid records is available Correct Invalid Positions.
- 13 -
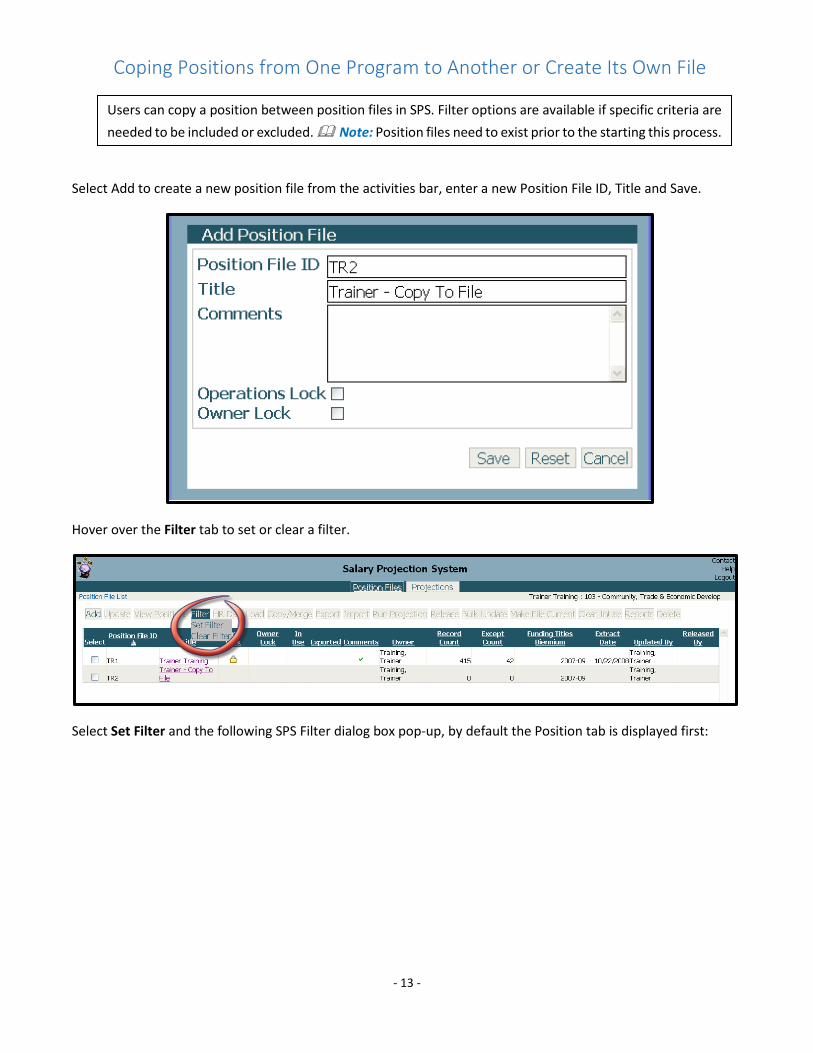
Coping Positions from One Program to Another or Create Its Own File
Select Add to create a new position file from the activities bar, enter a new Position File ID, Title and Save.
Hover over the Filter tab to set or clear a filter.
Select Set Filter and the following SPS Filter dialog box pop-up, by default the Position tab is displayed first:
Users can copy a position between position files in SPS. Filter options are available if specific criteria are needed to be included or excluded. Note: Position files need to exist prior to the starting this process.
- 14 -
Note: There are four tabs on the Filter, when applicable each criteria field will display a formatting tip, searchfunction, or free text field.
• Position: filter by specific position detail information• Account: filter by specific account coding elements• Summary: displays information on the number of records that will be affected by the filter chosen (when a
specific position file is not chosen, this information will not be available)• Hints: displays common rules used when setting a filter and availability. An example is shown for job class
and name below:o Job Class - 12* (returns all job classes that begin with 12)o Job Class - 120?1 (returns all job classes where the first three-characters are 120 and the last
character is 1 regardless of what the fourth character is)o Job Class - = (returns all job classes where the job class code is blank);o Job Class - 12000-12040 (returns all job classes within the range of 12000-12040)o Job Class - 12010, 12020, 12030 (returns all job classes matching 12010, 12020, or 12030o Name - > B (returns all records where the name is greater than the letter "b". < and <> are also
allowed)o Name – Search field requires the first 3 letters of the name as displayed followed by an asterisk. For
example: Ove* returns all records that begin with “Ove”. By default, HR data loads by Last Name,First Name.
Note: The filter can search on numerous options (e.g., Program and Job Class) but is limited by complex input.
Select the Account tab to filter on Program
- 15 -
Select the next to Pgm. Info to display a list of agency programs. Note: The programs listed are found in AFRS and match the funding titles for the biennium selected. Sub-program searches and results are available, but the highest-level search is required before the next list is available to select from (Program, Sub-Program, Activity, Sub-Activity, then Task).

- 16 -
Double click to select a Program from the list to copy and select Ok to close the Lookup dialog box and OK again to close the filter.
Check the Position File Selection box for the created position and select the Copy/Merge tab. The following Copy/Merge Position Files dialog box will be displayed as below. Note: If a filter was applied to a previous copy/merge, the dialog box will display the last filters chosen.
In the “Copy/Merge To” section of the dialog box select the to choose the second file then select Copy. Note: If the file in the “Copy/Merge To” section is empty, only the copy button will be available, if the file in the “Copy/Merge To” section has records, Merge Options will enable, and the copy button will display as Merge. Note: There are three Merge Options 1) Replace Duplicates; overwrites any duplicates found in the “To” file, 2) Keep Duplicates; retains any duplicates found in the “To” file, excluding files in the “From” file, and 3) Replace Entire File; copies the information from the “From” file and pastes it in the “To” file. Note: Duplicate files require the same position number, person name, and start date.
- 17 -
The number of positions being copied is displayed in the record count on the Position File List screen.
EDIT or UPDATE POSITION FILES & CORRECT INVALID POSITIONS View Positions in Position Listing (Includes Filter)
SPS allows users to see a listing of positions for any position file. By default, any records that have been flagged as invalid (or exceptions) will be presented to the user when loading a list of positions unless no exceptions exist. The SPS Filter can be used on the position listing to limit the number of records displayed. The list can be seen in Rows of 100, 200 or 300 which may determine how many pages are needed to see all positions.

- 18 -
To view the position listing, either select the Position File Selection box and the View Positions tab or select the Title link of the file.
Select a file from the position file list using either method described above. This will open the position list screen shown below:
1) Files: Select a position file to view as a position list. 2) Rows: Select the number of rows to display (100, 200, 300) on the position list. 3) Load: Once the Files and Rows are selected, select load to display the information in that file. 4) Status Bar: Indicates the position file listed by position file ID and title, valid or invalid records, the
count or number of records and if the file is locked, read only, has a filter applied, etc. 5) Activities bar: Perform actions related to a specific position file list. This includes Add, View Detail,
Filter, Run Projection, Search, View (In)Valid Positions, Reports, and Delete. o Add: Create a new position. o View Detail: Navigate to the position details of the selected position. o Filter: Set or clear the filter to apply to the position file list. o Run Projection: Run a projection on the position file chosen. o Search: Search by a position-by-position number or name and navigate to that position’s
detail information. o View (In)Valid Positions: Toggle between invalid and valid positions on the list.

- 19 -
o Reports: Run a position listing report. o Delete: Delete one or several positions from the position file.
6) Selection Boxes: Header and select all or deselect all. 7) Position #: Displays the number identifying the position. 8) Start Date: Displays the date the position is effective. 9) Name: Displays the name of the person holding the position. 10) Job Class: Displays the job class for the position. 11) Job Title: Displays the working title for the position. 12) Range: Displays the range for a classified position. 13) Step: Displays the step for a classified position. 14) Salary: Displays the salary for the position.
Select View Valid Positions to change the display to valid records.
Select Filter/Set Filter and select the Position tab.
Summary tab and select the Refresh
- 20 -
Select Ok to apply the filter Note: This may return an empty list for invalid or valid positions. Note: Filter on any combination of account codes or available position options (i.e., all Secretary Admin with a position start date greater than 7/1/2003 in program 010 with appropriation index 011).
Then choose the Position File loaded from HR data and load its position list by using the title hyperlink or the Position File Selection box and View Positions tab.
Clear the filter and select View Valid Positions.
Click on the header of the Job Class column to sort the list by job class. This sort option is available for all columns of the Position List.
Invalid Record Flags & Errors Flags:
• Special Pay Flag: Flags a position as special pay (typically 2 ranges higher than the regular range). If a salary matches a special pay range for a given job class upon the HR Data Load, the system will automatically flag the position as special pay.
• Salary May Exceed Band Flag: Flags positions outside of the WMS/EMS band. If the salary is beyond the band limit upon an HR Data Load, the system will automatically flag the position as salary may exceed band.
• Y-Rated Flag: Flags a position as y-rated and overwrite the salary from the salary schedule. If a position is Y-rated in HRMS, the system will automatically flag the position as y-rated. Y-rated positions do not receive periodic increases or General Salary Increases in the projection.
• Health Insurance (BD) Included Flag: Include/exclude health insurance in the projection for the position. • OASI (BA and BH) Included Flag: Include/exclude OASI in the projection for the position. • Medical Aid Industrial Insurance (BC) Included Flag: Include/exclude Medical Aid Industrial Insurance in
the projection for the position. • Paid Family Medical Leave (BK) Included Flag: Include/exclude Medical Aid Industrial Insurance in the
projection for the position.

- 21 -
• Funded Flag: Mark positions as funded or not. • Calculate Staff Months Flag: Include/exclude staff months in the projection for the position. • I-732 Indicator Flag: Marks positions as I-732. Note: When a position contains a job class that is
associated with I-732, the system will automatically flag the I-732 Indicator; however, new positions will not flag automatically.
• Backfill Indicator Flag: Marks positions that necessitate being backfilled if vacated.
Data Exception Errors (Invalid Records)
• Code” does not exist in titles tables (many variations exist) o Funding code titles must exist in the AFRS titles for the biennium associated with the position file.
Please change your codes in SPS or add the code to AFRS. Once codes are entered into AFRS they will appear in SPS immediately.
• Subobject is not valid for salary projection o Salary sub-object must exist as a Valid Salary SubObject
AA AB AC AD AE AF AG AH AJ AK AL AM AN AQ AR AS AT AU NW NZ
o Change the sub-object on these records to one of the valid options. • Position salary range is not valid for this job class per the Job Class table
o A salary range must match either the salary range or special salary range from the job class table unless the position is Y-rated. Either correct the salary range to match the job class range or enter a generic job class code “blank” in job class code for a blank salary range.
• Appointment salary does not match the salary in the State Salary Schedule o The salary must match the state salary schedule for the indicated salary range and step unless
the position is Y rated. Either correct the salary to match the state salary schedule by reselecting the range and step on position detail, enter “Y” on the Pay Code of the More Detail screen, or enter a generic job class code of “blank”.
• Salary exceeds band o The salary on the position is outside of the band limits as identified in SPS. Check “Salary May
Exceed Band” on the Position Detail to override the limit. • No valid pay scale identified
o A valid Pay Scale is required in SPS. • Job Class does not exist in Job Class table
o All positions require a valid job class for the indicated Pay Scale. Contact the OFM Help Desk at [email protected] or call 360.407.9100 if a valid job class is not available.
• Increment date must be greater than Update Date o Classified positions not at the last step require an Increment Date that is greater than the
Position Start Date or Update Date to accurately calculate increments due. • Increment date does not match increment data rules
o The State Salary Schedule identifies how many months until the next increment is due. Change the increment date to match the requirements. Positions at the last step must have an increment date in the past but not older than 1/1/1951. Positions at step A should have an increment 6

- 22 -
months after the start date. All other steps (excluding the last step) should have yearly increments. The increment date must be later than the start date and the salary update date unless the position is at the last step.
• Proration Percent of funding lines must = 100% o Proration percent of funding lines must = 100%. Adjust the funding lines to equal 100%.
• Part time % must be greater than 0 o A part-time percent of zero will result in no salary or FTE projection for the position. Change the
part-time percent or variable part-time of the position to be greater than zero • Each position funding line must contain at least a program index and expenditure authority index.
o To make a position valid you must choose at least one of the coding elements for both program index and expenditure authority index.
• Funding lines do not exist for this position o Without funding lines this position cannot be projected. Create funding lines with proration
percentages equal to 100%. • Position start date is invalid
o A position may load from HRMS into SPS without a start date. To make this position valid a start date must be entered by using copy to new effective date.
• Position salary range is not valid for this job class per the State Patrol Salary Range table o State Patrol has a special table for salary range. A position must be on this table to be valid.
Correct Invalid Positions
Verify in the status bar for viewing invalid records. Toggle the View (In)valid Positions tab as necessary to display Invalid Positions.
Update a Vacant Position to Clear Invalid & Project Salary
To View the position detail; select the Position # hyperlink or the Position File Selection box and View Detail tab.
Position records that do not meet certain business or data rules get flagged as invalid records. By default, the position list displays any invalid records found. Within the Position Detail of each record is an explanation of the error that resulted in the flag. Appendix 2 of this document contains a listing of possible errors and recommended resolutions. All vacant positions will come across as an invalid position since information vital to calculating a projection is missing. Invalid positions will not be included in any projections. It is necessary to correct all errors for positions that are needed to adequately represent projection results.

- 23 -
Identify the position that is currently vacant that should be retained for projection purposes.
Pick the first classified position (position with a salary range) with a blank Start Date and blank name. This will open the Position Details screen shown below:
Note: Vacant positions are always loaded as exception records since certain data elements are missing.
• Activities bar: Perform actions related to a specific position detail. This includes Save, Reset, Add, Run Projection, Search, Delete, and View (Hide) Invalid Data Comments. • Save: Save any changes made to the record on the active Start Date tab. • Reset: Discard any changes made before saving and put the record back to its original state.
• Add: Create a new position or record in three ways: • Add Position: Presents a blank detail screen to create all information from scratch. • Copy to New Effective Date: Adds a new start date tab capturing all the information from the active
Start Date tab allowing changes where necessary for a given position. • Copy to New Position: Presents a new start date tab capturing all the information except position
number and name from the active Start Date tab allowing changes where necessary to the new position.

- 24 -
• Run Projection: Run a projection on the position file chosen. • Search: Search for position-b- position number or name and navigate to that position’s detail
information. • Delete: Delete the entire position or a selected Start Date (effective date) tab from the position file. • View (Hide) Invalid Data comments: Toggle between seeing or hiding the original invalid data
comments that made the position invalid. • Position Number: The number assigned to the position. • Name: Name of the individual tied to the position in HRMS. • Start Date: Date the position detail information will start or started (is effective). • Start Date (new): Date the position detail information will start or started (is effective). This is available
when creating new start dates. • Pay Scale: Pay scale type and area. For example: 0001 represents 00 (Non-Represented) 01 (Standard
Progression); 0101 represents 01 (WSFE) 01 Standard Progression. • Job Class: Select a job class and job class description. • Working Title: Add a position description. There is the ability choose to use the job class description or
add a one that fits agency needs for this position. This will display on the position listing and position listing report in the job class title. Note: The Working Title will not automatically update upon selecting a job class and requires a manual add or update.
• Range: Displays the range associated with the pay scale/job class combination. • Step: Displays the steps associated with the selected range • Current Salary: Displays the salary associated with the pay scale, job class, range, and step per the state
salary schedule for classified positions. For all other positions, enter the appropriate salary for the position.
• Rate: Displays the salary unit of pay (daily, hourly, or monthly) • Bargaining Unit: Select the code and title of the bargaining unit(s) available for the agency. • Personnel Area: Select the code and title of the personnel area(s) available for the agency. • Work County: Select the work county. • Retirement: Select the code and title of the retirement plan. • Increment Date: Enter a periodic increment date or review date. Note: Only classified positions will
list an increment date. All other positions are exempt from the State Salary Schedule and do not receive increments. Review Date will be available in this case. Note: Rules for entering an increment date: The State Salary Schedule identifies how many months until the next increment is due. In general: Positions at the last step must have an increment date in the past. Positions at step A should have an increment 6 months after the start date. All other steps (excluding the last step) should have yearly increments. The increment date must be later than the start date and the salary update date unless the position is at the last step.
• End Date: End a position “as of” date. • Multiplier: Create a generic position and project for the number of multiples specified.
Note: Do not use this feature during the CIM release, each position must be created separately.
• User Defined: Enter unique agency information. • Updated Salary Date: Displays the last date the salary was updated. Note: This date is important as it
triggers a projection and if necessary, applies general salary increases and merit system increases. It assumes that as of that date, the salary amount is correct.
• Job Class Risk: Displays the Job Class Risk ID number associated with the Job Class. This field only updates when the Job Class is changed.
• SubObject: Select the Object/Subobject for the position. • % Full Time: Percentage of time a position is slated to work. • View Variable PT: Estimated work per month. This can be expressed in days, hours, or percent. • Copy to 2nd Fiscal Yr.: Copy numbers from the 1st Fiscal Year fields into the 2nd Fiscal Year Fields.

- 25 -
• Paste from Excel: Copy a selected row or column of numbers from an Excel spreadsheet into the Variable Part-Time fields. Note: Whichever field the curser is in, that will be the starting position the numbers will be pasted into (i.e., curser is in 1st Fiscal Year, Oct, that is where the first number in the selected row/column will appear; 1st Fiscal Year, July is the default starting point).
• Clear: Clear all Variable Part-Time fields. • Over Time %: Percentage of overtime a position is slated to work. • View Variable OT: Estimated overtime per month. This can be expressed in hours or percent. • Copy to 2nd Fiscal Yr.: Copy numbers from the 1st Fiscal Year fields into the 2nd Fiscal Year Fields. • Paste from Excel: Copy a selected row or column of numbers from an Excel spreadsheet into the Variable
Over-Time fields. Note: Whichever field the curser is in will be the starting position where the numbers will be pasted to (i.e., curser is in 1st Fiscal Year, Oct, that is where the first number in the selected row/column will appear; 1st Fiscal Year, July is the default starting point).
• Clear: Clear all Variable Over-Time fields. • Funding Activities Bar: Add or delete funds. • Percent: Ability to specify what percent of coding is attributable to staff months, salary, and benefits.
Note: The funding percent requires a total of 100%. • Account Coding: Ability to specify the coding associated to the position. Note: The only required
account codes from the funding grid are Pgm Index (Program Index) and EA Index (Expenditure Authority Index.)
Select Add/Copy to New Effective Date
- 26 -
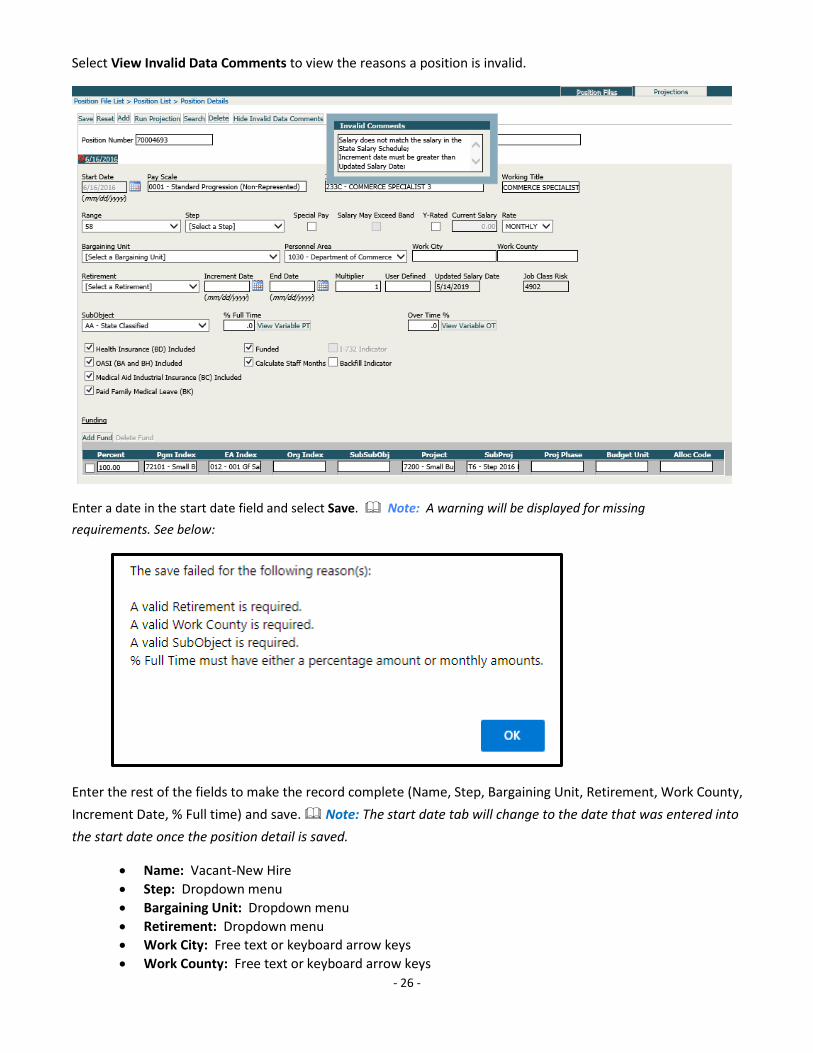
Select View Invalid Data Comments to view the reasons a position is invalid.
Enter a date in the start date field and select Save. Note: A warning will be displayed for missing requirements. See below:
Enter the rest of the fields to make the record complete (Name, Step, Bargaining Unit, Retirement, Work County, Increment Date, % Full time) and save. Note: The start date tab will change to the date that was entered into the start date once the position detail is saved.
• Name: Vacant-New Hire• Step: Dropdown menu• Bargaining Unit: Dropdown menu• Retirement: Dropdown menu• Work City: Free text or keyboard arrow keys• Work County: Free text or keyboard arrow keys

- 27 -
• Increment Date: A date that fits within the increment date rules Note: Increment rules are found in Appendix 2
• % Full time: 100.0 for a full-time position
Select the Vacant tab and Delete/Selected Effective Date to remove this tab from the position file.
- 28 -
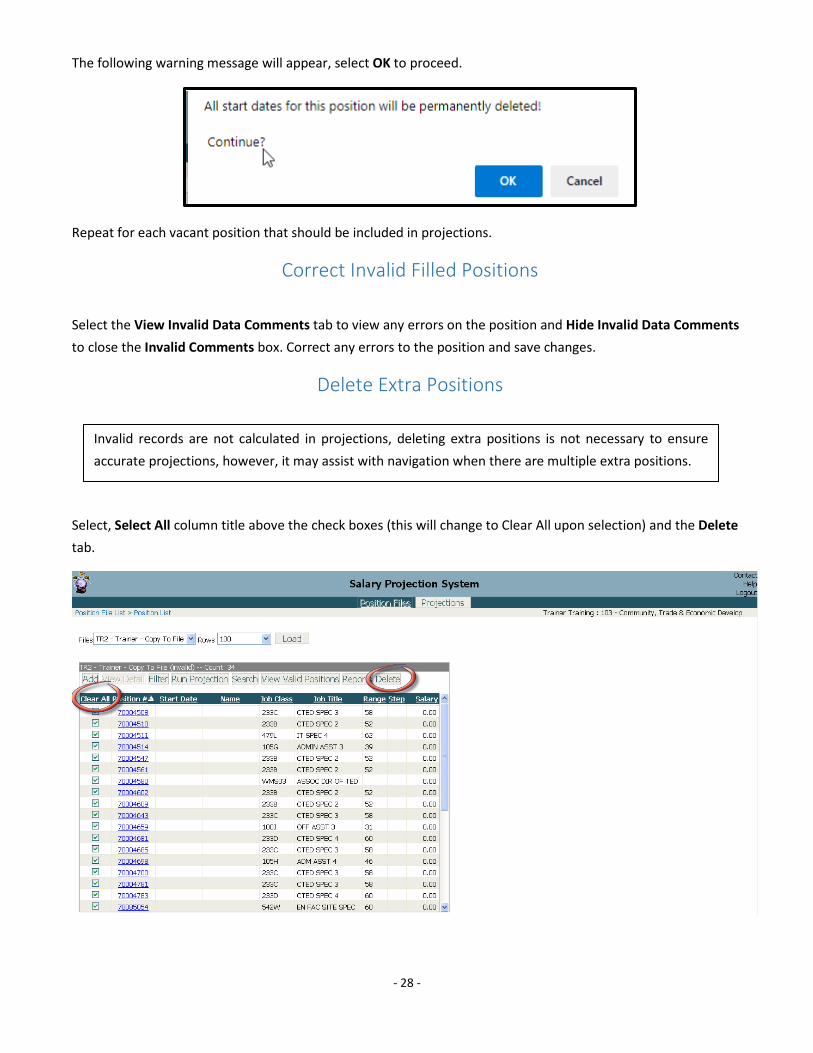
The following warning message will appear, select OK to proceed.
Repeat for each vacant position that should be included in projections.
Correct Invalid Filled Positions
Select the View Invalid Data Comments tab to view any errors on the position and Hide Invalid Data Comments to close the Invalid Comments box. Correct any errors to the position and save changes.
Delete Extra Positions
Select, Select All column title above the check boxes (this will change to Clear All upon selection) and the Delete tab.
Invalid records are not calculated in projections, deleting extra positions is not necessary to ensure accurate projections, however, it may assist with navigation when there are multiple extra positions.
- 29 -
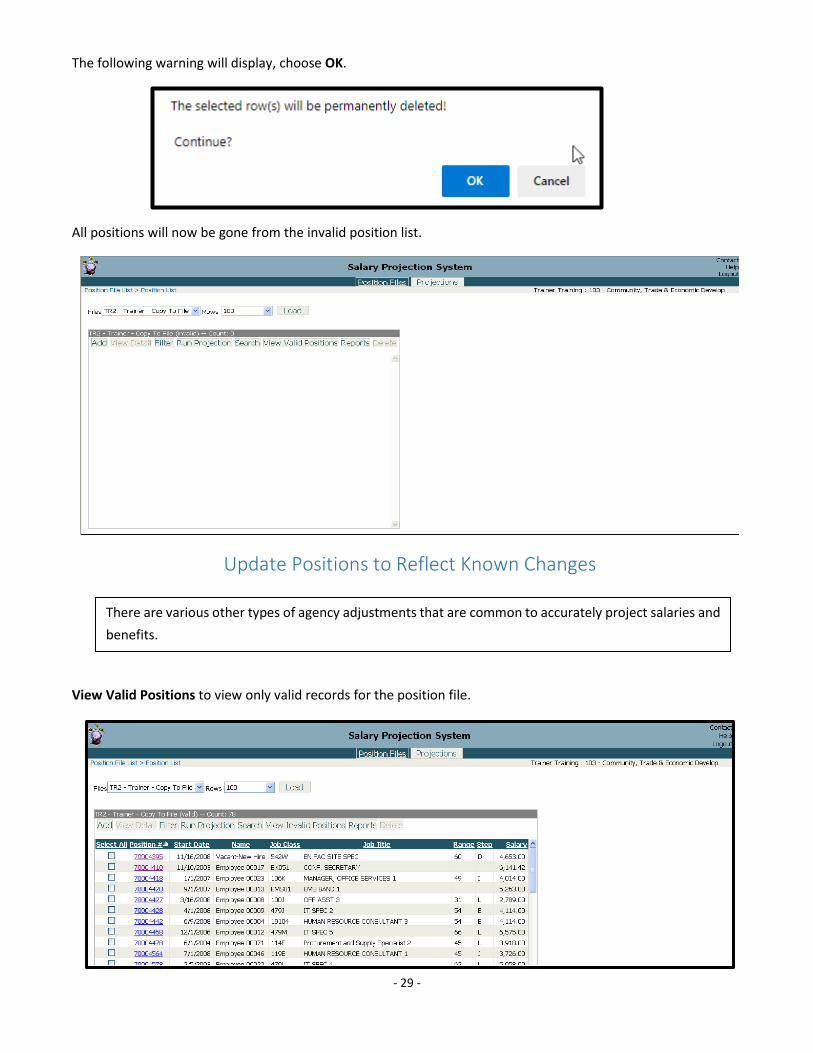
The following warning will display, choose OK.
All positions will now be gone from the invalid position list.
Update Positions to Reflect Known Changes
View Valid Positions to view only valid records for the position file.
There are various other types of agency adjustments that are common to accurately project salaries and benefits.
- 30 -
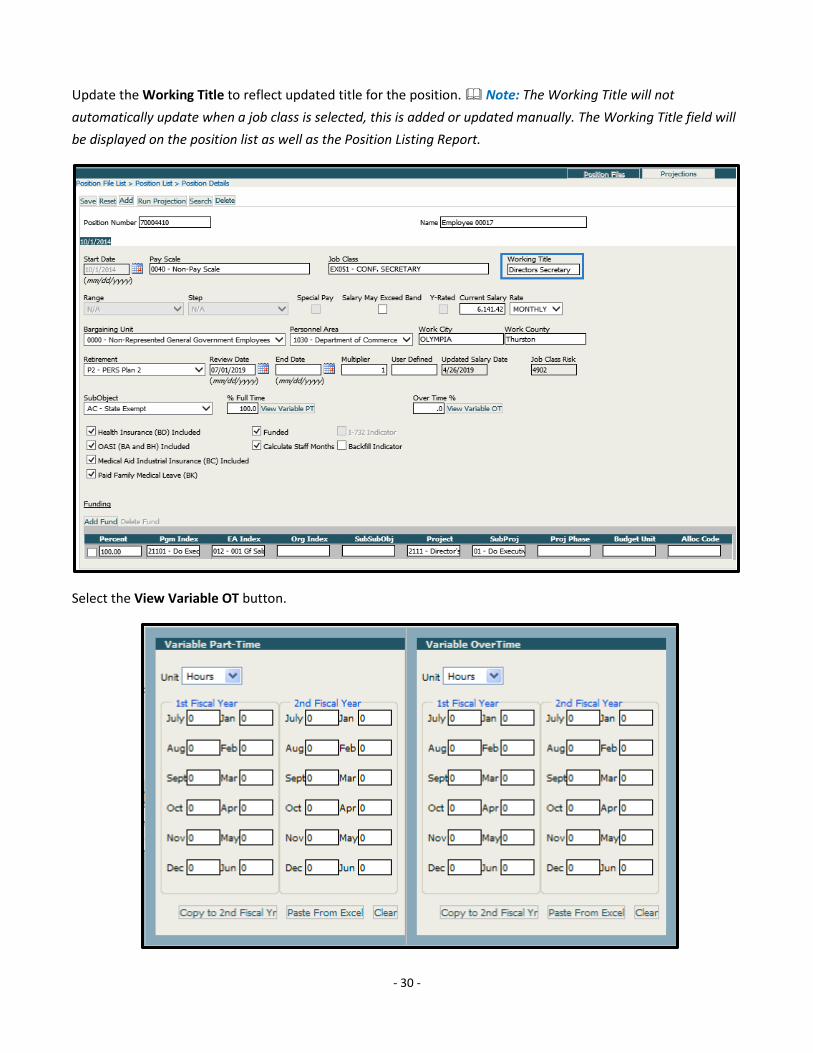
Update the Working Title to reflect updated title for the position. Note: The Working Title will not automatically update when a job class is selected, this is added or updated manually. The Working Title field will be displayed on the position list as well as the Position Listing Report.
Select the View Variable OT button.
- 31 -
Select a Unit of Percent and enter the appropriate percent of overtime in the appropriate months. Note: The Overtime field on the Position Detail screen can be used when overtime is assumed to be consistent across all months of the biennium. This information can also be copied from an excel spreadsheet. Note: Whichever field the curser is in, that will be the starting position where the numbers will be pasted to (i.e., curser is in 1st Fiscal Year, Oct. that is where the first number in the selected row/column will appear; 1st Fiscal Year, July is the default starting point).
Select the Hide Variable OT button to apply the overtime and close the box. Note: Once information is entered in the Variable OT grid an asterisk will display.
Repeat steps when selecting the Variable Part-Time button.
Change the Pgm Index (Program Index) for the position and save changes. Note: Fund coding changes can be selected by text or using the keyboard down arrow. Note: The changes listed above are assumed to be effective for all projections. If the changes need to show an ending point for a projection and a beginning point for a different projection, end the current position, and add a new start date for that position.
End a Currently Filled Position
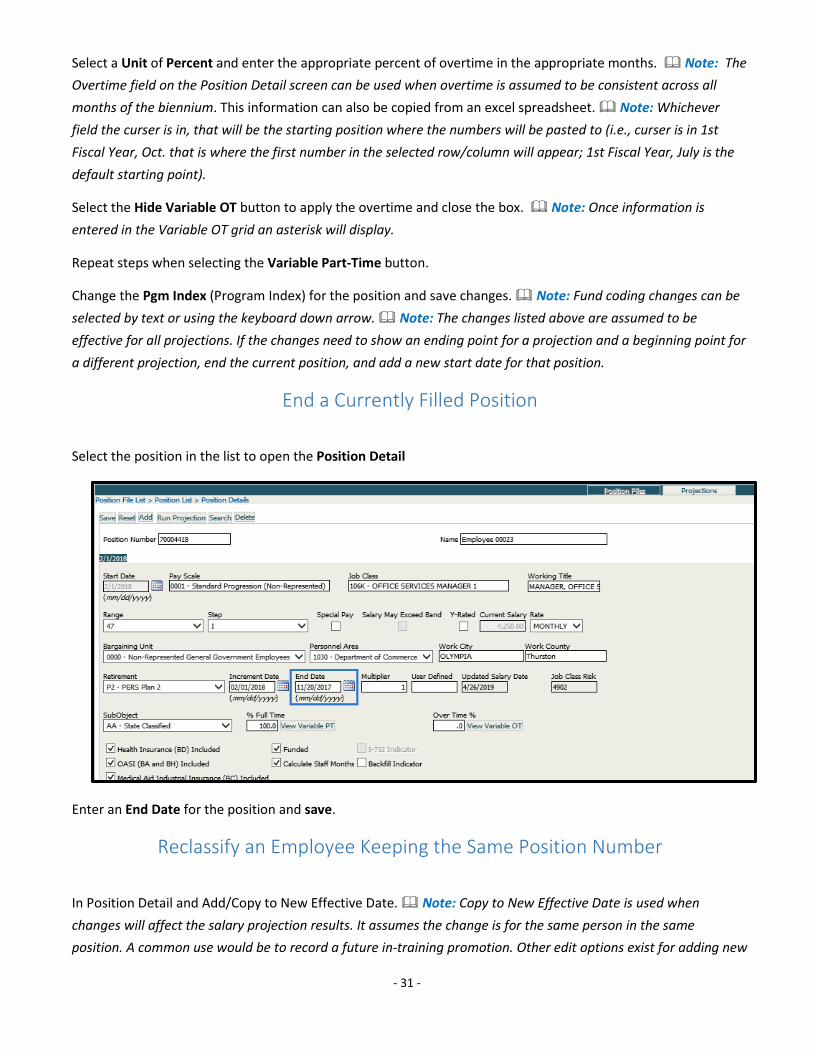
Select the position in the list to open the Position Detail
Enter an End Date for the position and save.
Reclassify an Employee Keeping the Same Position Number
In Position Detail and Add/Copy to New Effective Date. Note: Copy to New Effective Date is used when changes will affect the salary projection results. It assumes the change is for the same person in the same position. A common use would be to record a future in-training promotion. Other edit options exist for adding new
- 32 -
positions and employees. There is also an option of changing the original record if there is no reason to associate a change with a particular date.
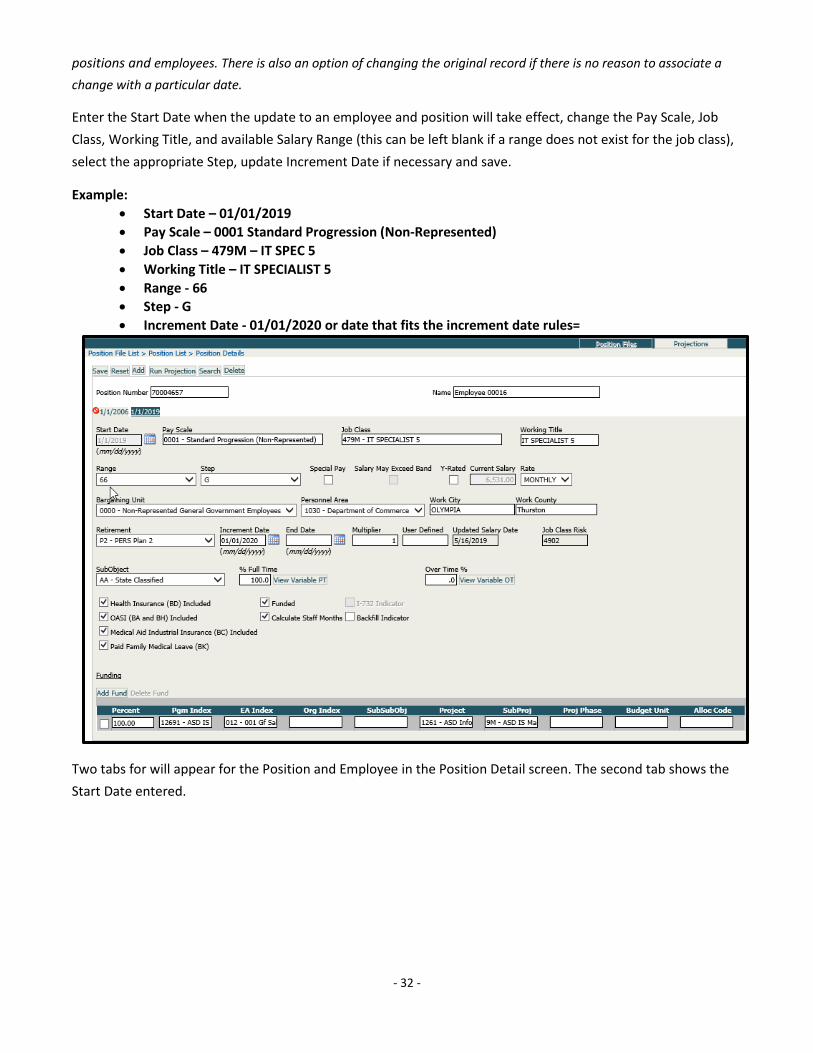
Enter the Start Date when the update to an employee and position will take effect, change the Pay Scale, Job Class, Working Title, and available Salary Range (this can be left blank if a range does not exist for the job class), select the appropriate Step, update Increment Date if necessary and save.
Example: • Start Date – 01/01/2019 • Pay Scale – 0001 Standard Progression (Non-Represented) • Job Class – 479M – IT SPEC 5 • Working Title – IT SPECIALIST 5 • Range - 66 • Step - G • Increment Date - 01/01/2020 or date that fits the increment date rules=
Two tabs for will appear for the Position and Employee in the Position Detail screen. The second tab shows the Start Date entered.

- 33 -
Verify the End Date is correct. The system should enter the day prior to the Start Date of the new instance into the original position. Adjust the End Date if applicable and save changes.
Add a New Position Copying Information from the Current Tab
Select the classified position and Add/Copy to New Position. Note: Position Listing screen has the add function, however the Copy to New Effective Date and Copy to New Position would not be available.

- 34 -
Enter the appropriate Position #, Start Date, and Name for the position and save. Update Increment Date to reflect the next increment due and save changes. Note: If the position is at the last step, the increment date update is not applicable and will not save with a future date.
Update Funding and Find a Position using Search
In the first funding row of the position, click each field available starting with Pgm Index (Program Index) and change the value to the first available in the list and change the SubObject and save. Note: SubObject is not editable in the funding grid; select SubObject from the dropdown list box above the grid. This SubObject will be used for all lines of the funding. Select the Search tab.
• Funding proration for a position must add up to 100% for saving able to save the record.
• Both program index and expenditure authority index are required for each funding line to save.Delete unnecessary rows.
If the position is not in WMS, change the Pay Scale to 0002 and the job class to WMS01. Which will open the field to enter a salary. Check the Salary May Exceed Band option to enter a salary that is above the salary band. Save changes when all information is complete.
Update Groups of Positions in One Transaction (Make Position File Current, Bulk Update & Export)
SPS contains features that allows for mass updates: 1) Make Position File Current; updates all classified positions for the current salary schedule including recent General Salary Increases and any increments due since the positions were last updated and 2) Bulk Update; filter on a set of positions and then apply one update to all filtered positions in one step.
- 34 -
Use the drop down arrow to bring up the list by Name and select the name, then hit Ok. Note: The Search brings up all valid and invalid positions. Select Add Fund to add a new line to the fund grid. Enter a new fund line using the second option available in each field. Update the proration amounts of all lines to ensure they add up to 100% by entering 50% each. If the lines do not add up to 100% when saving an error message will appear. Note: There are two rules for funding:
- 35 -
Make Position File Current
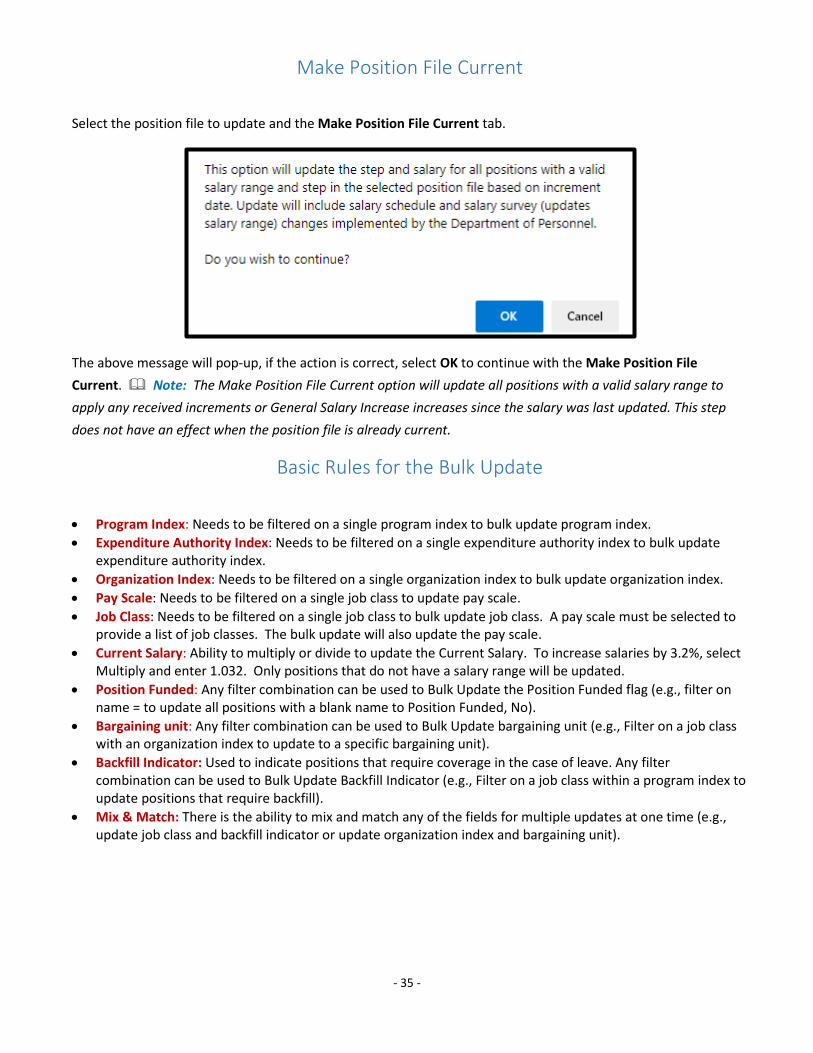
Select the position file to update and the Make Position File Current tab.
The above message will pop-up, if the action is correct, select OK to continue with the Make Position File Current. Note: The Make Position File Current option will update all positions with a valid salary range to apply any received increments or General Salary Increase increases since the salary was last updated. This step does not have an effect when the position file is already current.
Basic Rules for the Bulk Update
• Program Index: Needs to be filtered on a single program index to bulk update program index. • Expenditure Authority Index: Needs to be filtered on a single expenditure authority index to bulk update
expenditure authority index. • Organization Index: Needs to be filtered on a single organization index to bulk update organization index. • Pay Scale: Needs to be filtered on a single job class to update pay scale. • Job Class: Needs to be filtered on a single job class to bulk update job class. A pay scale must be selected to
provide a list of job classes. The bulk update will also update the pay scale. • Current Salary: Ability to multiply or divide to update the Current Salary. To increase salaries by 3.2%, select
Multiply and enter 1.032. Only positions that do not have a salary range will be updated. • Position Funded: Any filter combination can be used to Bulk Update the Position Funded flag (e.g., filter on
name = to update all positions with a blank name to Position Funded, No). • Bargaining unit: Any filter combination can be used to Bulk Update bargaining unit (e.g., Filter on a job class
with an organization index to update to a specific bargaining unit). • Backfill Indicator: Used to indicate positions that require coverage in the case of leave. Any filter
combination can be used to Bulk Update Backfill Indicator (e.g., Filter on a job class within a program index to update positions that require backfill).
• Mix & Match: There is the ability to mix and match any of the fields for multiple updates at one time (e.g., update job class and backfill indicator or update organization index and bargaining unit).

- 36 -
Update to New Job Class
Select Filter/Set Filter and select the Position tab. Enter a Job Class code to update. Then select Ok. Select the position file to update and the Bulk Update tab.
- 37 -
Select the Pay Scale and appropriate Job Class for updating the positions. Then select Ok.
Select Ok when the expected number of records for update is correct. Review the list and note that the job class has been updated. Select Filter/Clear Filter.
Note: The position filter has been updated to the updated job class. If positions had already existed with this job class these will also display on the position list. If the updated job class had a different salary range, all positions would have received this salary range and the salary would have been updated to that salary range given the positions’ current step. Positions that have ended with a date prior to today will not be updated.
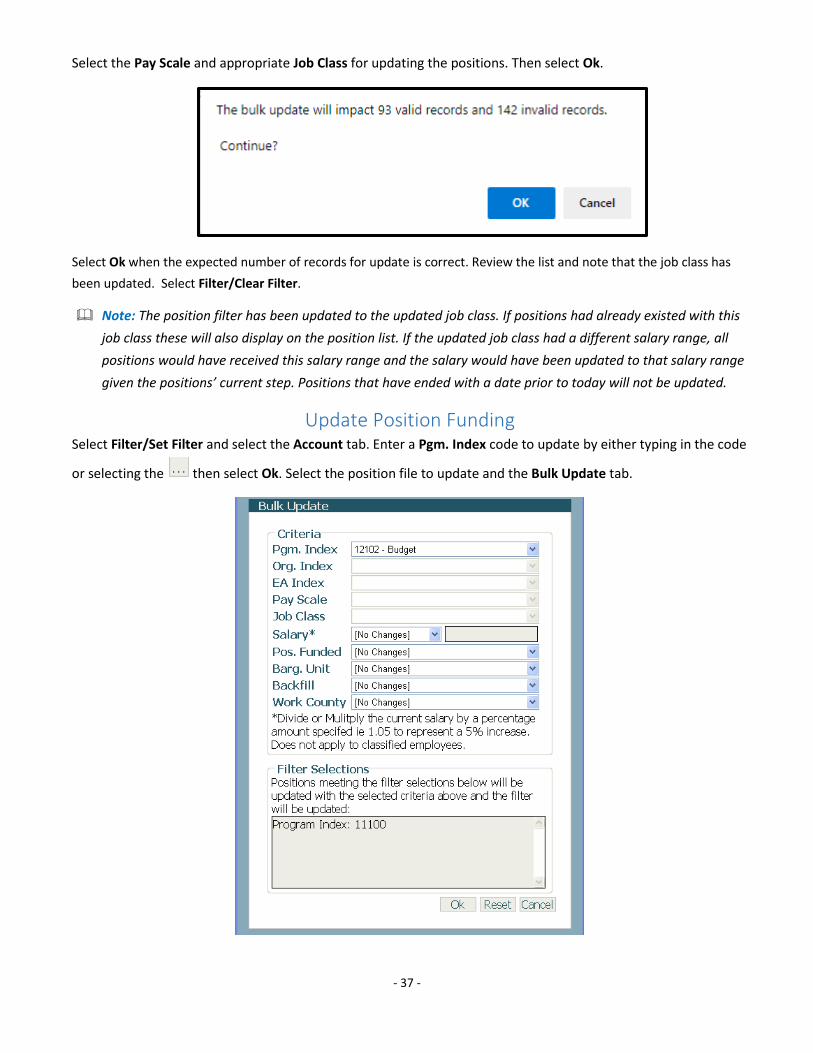
Update Position Funding Select Filter/Set Filter and select the Account tab. Enter a Pgm. Index code to update by either typing in the code
or selecting the then select Ok. Select the position file to update and the Bulk Update tab.
- 38 -
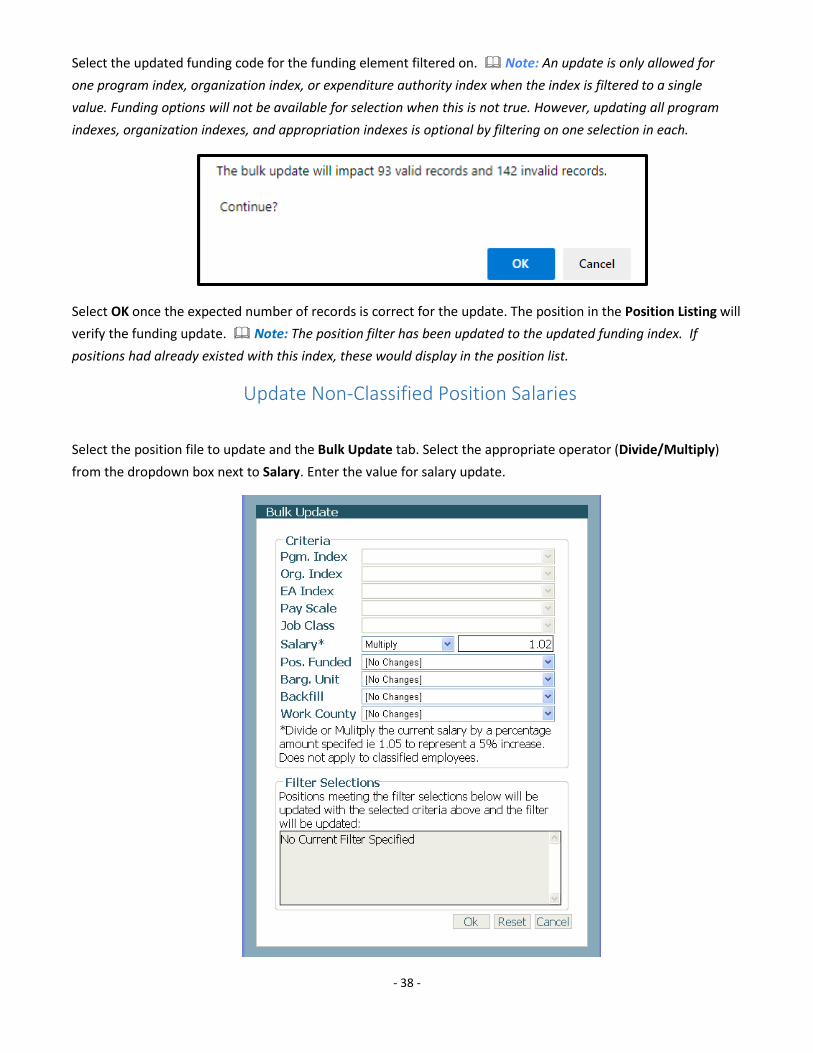
Select the updated funding code for the funding element filtered on. Note: An update is only allowed for one program index, organization index, or expenditure authority index when the index is filtered to a single value. Funding options will not be available for selection when this is not true. However, updating all program indexes, organization indexes, and appropriation indexes is optional by filtering on one selection in each.
Select OK once the expected number of records is correct for the update. The position in the Position Listing will verify the funding update. Note: The position filter has been updated to the updated funding index. If positions had already existed with this index, these would display in the position list.
Update Non-Classified Position Salaries
Select the position file to update and the Bulk Update tab. Select the appropriate operator (Divide/Multiply) from the dropdown box next to Salary. Enter the value for salary update.

- 39 -
Select OK when the expected number of records for update is confirmed. Note: The count should only include positions that match the filter criteria that do not have a salary range assigned. The position in the Position Listing will verify the salary update.
Export/Import Records to Update Funding
Select the position file to export and the Export/Funding tab. Note: Export/Assignment Pay is only available for Washington State Patrol only.
SPS allows users to export position data, update funding information, and import it back into SPS to allocate position funding. This will allow agencies that use labor distribution or cost allocation methods to update funding records outside of SPS and to have the updates reflected in SPS for allotments or CIM. Updates outside of SPS are most likely to happen in Excel but can happen in any system if a tab delimited .txt file is imported. Note: This functionality cannot be used to update position information. Position data must be updated manually, one position at a time.
- 40 -
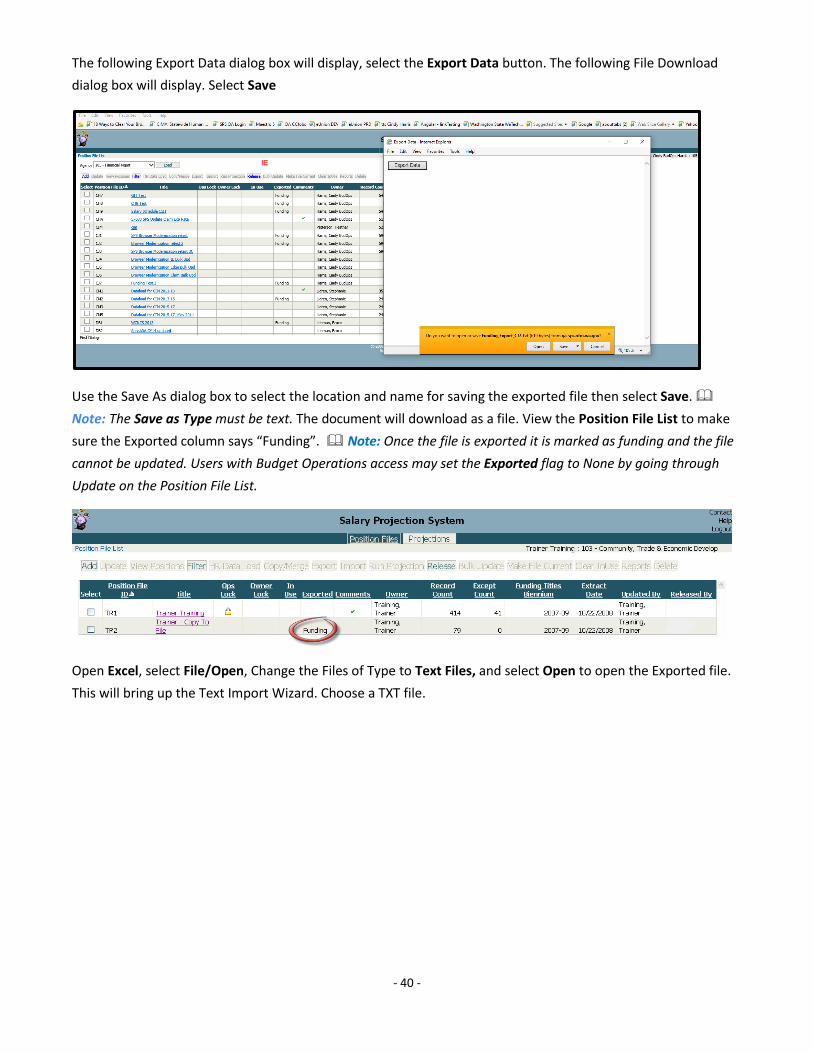
The following Export Data dialog box will display, select the Export Data button. The following File Download dialog box will display. Select Save
Use the Save As dialog box to select the location and name for saving the exported file then select Save. Note: The Save as Type must be text. The document will download as a file. View the Position File List to make sure the Exported column says “Funding”. Note: Once the file is exported it is marked as funding and the file cannot be updated. Users with Budget Operations access may set the Exported flag to None by going through Update on the Position File List.
Open Excel, select File/Open, Change the Files of Type to Text Files, and select Open to open the Exported file. This will bring up the Text Import Wizard. Choose a TXT file.

- 41 -

- 42 -
Select OK and the document will load. For each column that has data that begins with a zero, click the column then select Text under Column data format. Note: This step is critical so that data does not lose leading zeros once imported into Excel. For example, without this step, Fund 001 will be imported as Fund 1. There is a short cut of holding down the Shift key to highlight selected columns plus all columns in between.
• Position Number• Person ID• Payroll Organization• Sub-SubObject• Master Index• Appropriation Index• Program Index• Organization Index• Project• Subproject• ProejctPhase• Budget Unit• Allocation code
Select Finish once all required columns are marked as Text to open the file. With the opened file the account code funding elements on a position can be changed or additional rows in Excel to provide additional lines of funding can be created. Note: Do not use this to update position data such as job class or job class title. Note: The chart below shows the data rules and examples.
Header Datatype Example Imported? Import Validation
agency* char(3) 105 No 1. Required
2. Must match file
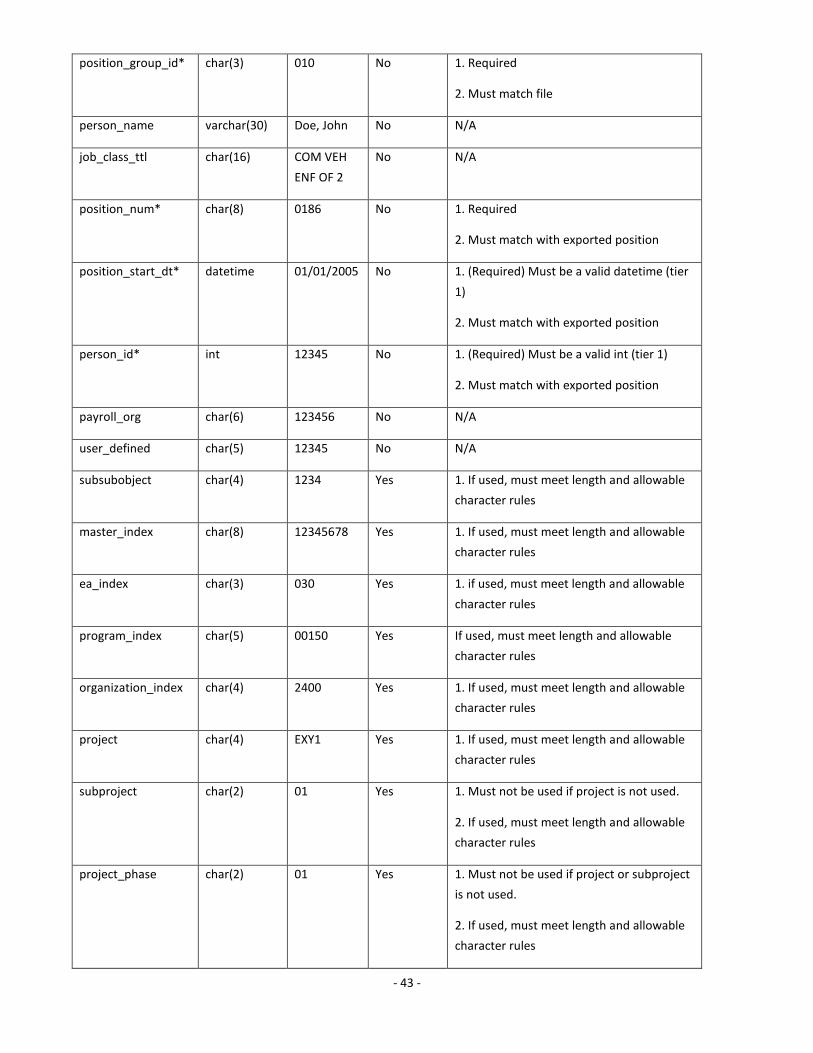
- 43 -
position_group_id* char(3) 010 No 1. Required
2. Must match file
person_name varchar(30) Doe, John No N/A
job_class_ttl char(16) COM VEH ENF OF 2
No N/A
position_num* char(8) 0186 No 1. Required
2. Must match with exported position
position_start_dt* datetime 01/01/2005 No 1. (Required) Must be a valid datetime (tier1)
2. Must match with exported position
person_id* int 12345 No 1. (Required) Must be a valid int (tier 1)
2. Must match with exported position
payroll_org char(6) 123456 No N/A
user_defined char(5) 12345 No N/A
subsubobject char(4) 1234 Yes 1. If used, must meet length and allowablecharacter rules
master_index char(8) 12345678 Yes 1. If used, must meet length and allowablecharacter rules
ea_index char(3) 030 Yes 1. if used, must meet length and allowablecharacter rules
program_index char(5) 00150 Yes If used, must meet length and allowable character rules
organization_index char(4) 2400 Yes 1. If used, must meet length and allowablecharacter rules
project char(4) EXY1 Yes 1. If used, must meet length and allowablecharacter rules
subproject char(2) 01 Yes 1. Must not be used if project is not used.
2. If used, must meet length and allowablecharacter rules
project_phase char(2) 01 Yes 1. Must not be used if project or subprojectis not used.
2. If used, must meet length and allowablecharacter rules
- 44 -
budget_unit char(3) G75 Yes 1. If used, must meet length and allowablecharacter rules
allocation_code char(4) 9999 Yes 1. If used, must meet length and allowablecharacter rules
proration_pct numeric(4,1) 100.0 Yes 1.If used, must be a valid numeric(4,1) (tier1)
Note: all validation is tier 2 except where noted.
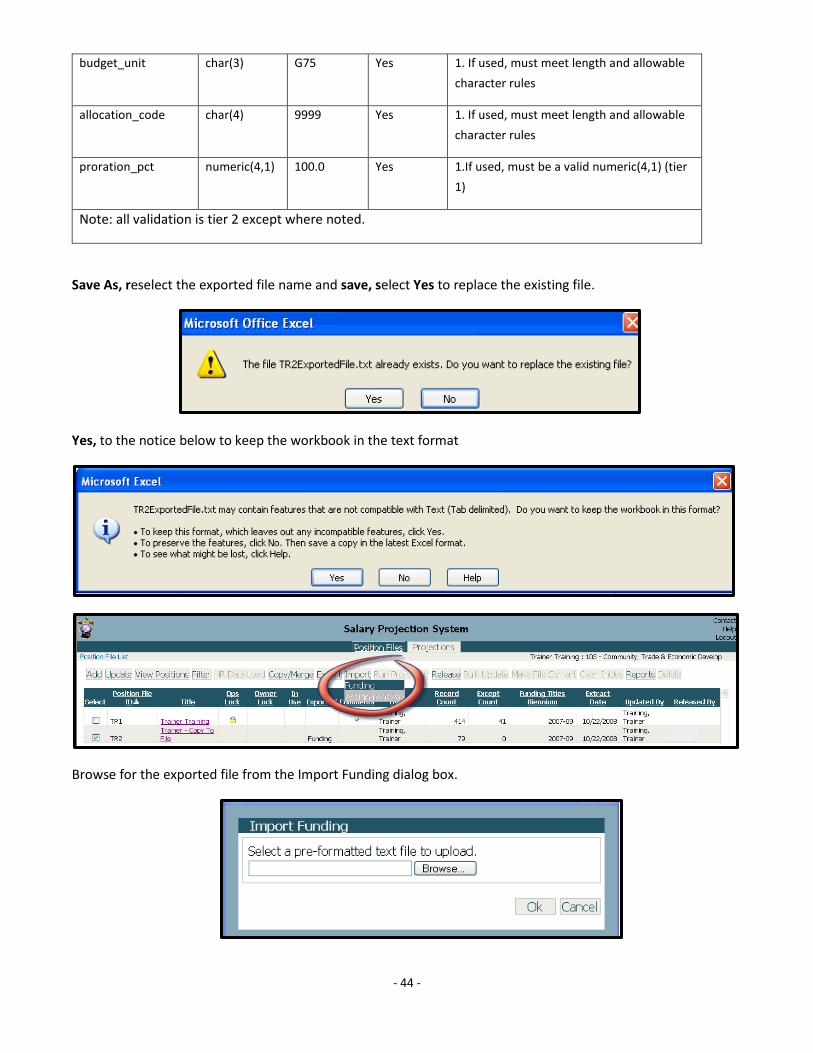
Save As, reselect the exported file name and save, select Yes to replace the existing file.
Yes, to the notice below to keep the workbook in the text format
Browse for the exported file from the Import Funding dialog box.

- 45 -
Select the file to import and select Open. Verify the file was filled in correctly in the Import Funding dialog box and select Ok.
If there are errors, a Funding Import Error Report will be received that can be printed

- 46 -
Once everything has been corrected and is in the correct format following message will display;
Verify the Position File
Select the position file to verify and the Reports/Position Listing tab. Note: Position reports will only be enabled under Position on the Application tab bar; projection reports will only be enabled under Projections on the Application tab bar.
This will display the Report Parameter Selections dialog box. Select the sort option of Position Number by clicking the Also, select a Format Option of View as PDF by clicking on the radio button in front of the option. Note: There are three format options “View as PDF” is designed for printing, “View as HTML” is available for quick navigation to a position and for export, column titles may overlap, and “HTML formatted for Export”.

- 47 -
Select Run to generate the report. Note: Only one report can be run at a time; previously generated reports will be overwritten by the new parameter selections.

- 48 -
Select the printer icon to print the report, select the X in the upper right-hand corner to close the report screen. Verify the data or route to manager for verification. If errors exist, return to the Position Listing to edit, add, or delete position records as necessary. The report includes an Invalid column to easily identify any position records that remain in the file as invalid.
RUN A PROJECTION
Select the position file to run the projection on and the Run Projection tab.
This will bring up the SPS Run Projection dialog box. Select the Projection Parameters to be included in the projection calculation. Note: Please include all four steps:
• Include increments/merit increases will apply step increases to classified employees;
• Include General Salary Increase (GSI) will look to see if a GSI adjustment has been indicated for theprojection period by the SPS administrator and apply the increase;
• Include 6767/salary survey will check for changes in the Job Class schedule for salary range in theprojection period and calculate the salary using any new salary ranges found;
• Include only positions marked “Funded” in projection results will exclude any positions that are notchecked funded.
Select the Biennium for which to project salaries.
Select the Starting Fiscal Month for the projection. Note: The display of the dropdown list box options is FM – Name (i.e., 14 – September is September of the second fiscal year). Picking a fiscal month other than 01-July will create zero amounts in preceding fiscal months.
Select an option for the Projection Results.
The process of running a projection is separate from the process of running a report, a projection will run on the entire file whether a filter is set or not.
Note: When an HTML format option is chosen, the icon will present options for exporting the report as a Crystal Report, Adobe Acrobat (PDF), Excel, Word, or Rich Text Format (RTF). It is also possible to export the report to attach to an e-mail.
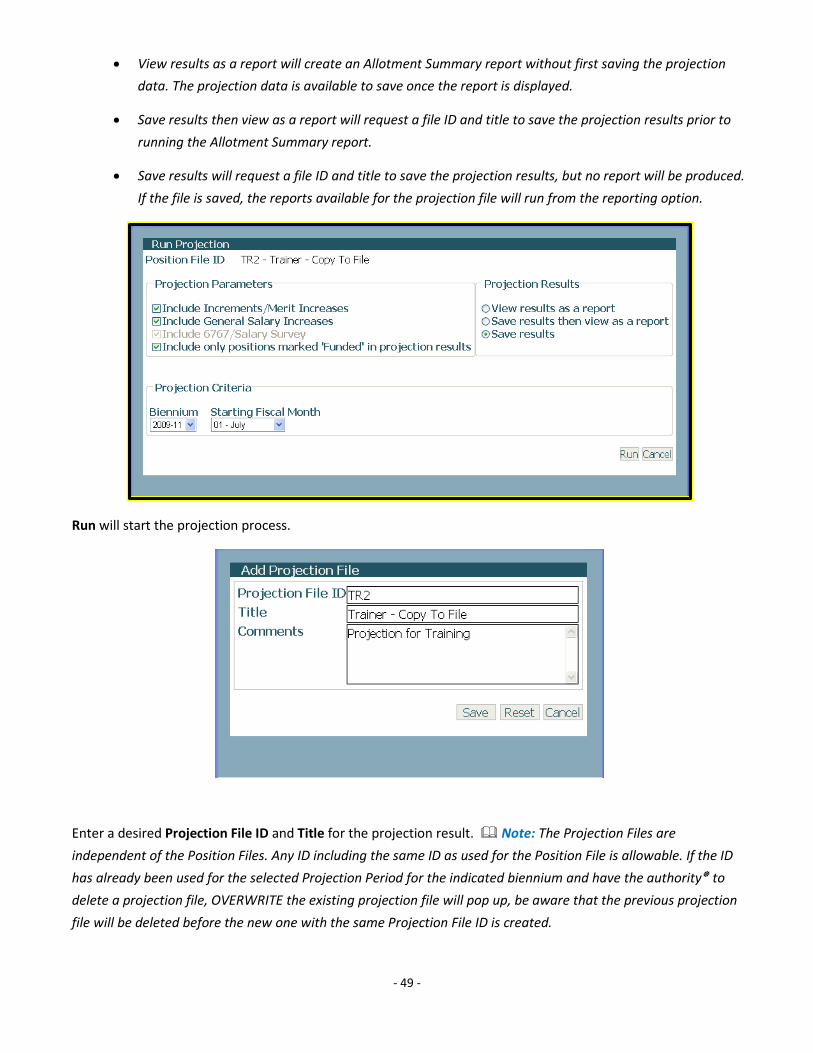
- 49 -
• View results as a report will create an Allotment Summary report without first saving the projectiondata. The projection data is available to save once the report is displayed.
• Save results then view as a report will request a file ID and title to save the projection results prior torunning the Allotment Summary report.
• Save results will request a file ID and title to save the projection results, but no report will be produced.If the file is saved, the reports available for the projection file will run from the reporting option.
Run will start the projection process.
Enter a desired Projection File ID and Title for the projection result. Note: The Projection Files are independent of the Position Files. Any ID including the same ID as used for the Position File is allowable. If the ID has already been used for the selected Projection Period for the indicated biennium and have the authority to delete a projection file, OVERWRITE the existing projection file will pop up, be aware that the previous projection file will be deleted before the new one with the same Projection File ID is created.

- 50 -
Note: Occasionally, a Run Projection failed! This message will display when a projection file with the same IDalready exists.
Edit Access users can overwrite/delete their own files, OFM Administrators and Budget Operations can overwrite/delete any file
The system will automatically default to the chosen position file ID and Title.
Note: The parameters selected to run the projection are saved with the Projection file and are available in theProjection File list as well as displayed on reports. Comments additions are available to enter information nototherwise captured.
Lock a Projection File and Update Comments
Select Projections from the Application tab bar.
1. Activities Bar: Perform actions related to a specific projection file or files. This includes Update, Filter,Reports and Delete.
The Projection File List screen is used to view information about agency projection files as well as perform various tasks with those files. Informational items include number of records, file owner, extract date, etc. Functions (depending on security levels) can lock projection files, enter file comments, or change file title. Each column can be sorted in ascending or descending order according to user preference.

- 51 -
• Update: the projection file title, comments, and operations lock depending on security permissions.• Filter: Set or clear the filter to the projection reports.• Reports: Run projection reports for a projection file chosen.• Delete: Delete one or several projection files.
2. Projection File Selection Box: Work within a particular projection file(s)3. Biennium: Indicates for which biennium the projection file was run.4. Projection File ID: Displays the chosen three-character ID.5. Projection File Title: Displays the chosen title.6. Operations Lock: Displays a lock indicator if an operations user has locked the file, remove this lock the
update tab7. Comments Indicator: Displays any comments associated with the projection file. To view click on the check
mark and to close click the check mark again, change comments in the update tab.8. Owner: Displays who owns the projection file and by hovering over the name, the date and time the
projection was run will appear.9. Record Count: The total number of records in the projection file.10. Extract Date: The date the HR Data was loaded into the position file.11. Position File ID: The three-character ID of the Position file for which the projection was run.12. Starting Fiscal Month: The chosen starting month for which the projection begins.13. Includes Increments: A check mark if increments were included in the projection.14. Includes General Increases: Displays a check mark if general salary increases were included in the projection.15. Includes 6767/Salary Survey: Displays a check mark if 6767/Salary Survey salary increases were included in
the projection. Note: By default, the 6767/Salary Survey parameter is always included, so the projectionfile list will always show this as checked.a. Includes Funded Only: Displays a check mark if Only Positions Marked Funded were included in the
projection.b. Funding Titles Biennium: Displays from which biennium the funding titles are edited against.
Select the projection file and the Update tab to change the Comments, Lock the file and save will close.
The projection results are now saved as an independent file. There are five varieties of projection reports available for reporting the results with several flexible sort options. Reports may also be filtered to limit the type of position projections included in the report.

- 52 -
View Projection Reports
Select the projection file and the Reports tab to see the available reporting options. Select the Allotment Summary report. This will display the Report Parameter Selections dialog box. Select Sort Option/Program, Subprogram and Format Option/View as PDF.
Note: Each sort option will create a report with sorting and subtotals as chosen. All summary reports will besubtotaled on Appropriation Index within the selected group. SPS groups Appropriation Index based on the firsttwo characters when defined with the same fund and appropriation type, so that related Appropriation Indexes(i.e., 011 and 012, both fund 001 and appropriation type 1) will be displayed on the same page.

- 53 -
Run to view report, this may appear in a browser tab and not in a document reader.
Select Filter/Set Filter and the Position tab.
Note: The filter allows a search on last name only. This can be a partial or full last name. The filter does not allow commas or spaces. By entering the “*” the filter will look for all names that match the letters entered here.

- 54 -
Reports/Allotment Detail tab will open Sort Option/Position Number and Format Option/View as HTML option. Note: The Allotment Detail report will show all details for each combination of position number, person, and fund code.
The report header identifies the filter set and page headers that indicates the person, position, and funding the page represents. Note: The Allotment Detail report will show anomalies in the Allotment Summary at the detail level. It is recommended to not print an Allotment Detail report for the entire agency. The details of the projection are saved in SPS with the projection file and can be reported on any time producing the same results as the initial report. Note: Filter the report down to 3,000 records to run the allotment detail report.
DATA RELEASE FOR COMPENSATION IMPACT MODEL (CIM) Check CIM Release Edit Report
Note: Do not use the next or current biennium when submitting data, the titles may not yet exist in AFRS and could make the positions invalid. For example, use the 2019-21 Funding Titles Biennium when creating the 2021-
OFM requests position data once per biennium. This data is loaded into OFM’s Compensation Impact Model (CIM) to develop scenarios to support labor relations and bargaining or determine compensation change allocations to agencies per enacted budgets. This data is collected well in advance of the biennium in which it will be used. Data submitted for CIM should reflect an estimated maintenance level of the ensuing biennium budget.

- 55 -
23 CIM file. Note: Do not use the multiplier feature on the position detail screen during the CIM release, each position must be created separately.
Prior to releasing information checking the CIM Pre-Release Edit Report will show any errors that would occur.
Select the Position File Selection box, and then select the Release/Pre-Release Edits tab from the activities bar.
This will display the Salary Projection System: Edit Report. Note: This report will show critical errors required to be fixed and warning errors to evaluate. If the warnings are not fixed, those positions will not be included in the released information. This report will run unfiltered even if a filter is set.
Release Data to OFM for CIM
When the files are ready to be released select the Position File Selection box, check the files to be released and then select the Release/Submit tab from the activities bar. The following message will display:
If there are critical errors the following message will pop-up.

- 56 -
Selecting OK will bring up the Salary Projection System: Edit Report. Once the release is complete, an e-mail will be sent out to the user.
“Agency 105 has successfully submitted their SPS position file to OFM for inclusion in the compensation data collection process for 2011-13.”
Release/CIM Position Listing report tab will view the details of the file that was released to CIM.
Note: This will display the salary applicable for that position at the beginning of the biennium released (it agesthe positions by applying any applicable increment/merit increases and general salary increases). A column thatstates if a position was released or not. This is the only place currently that released CIM information can beviewed.
Note: The release will send all valid records that do not end before the start of the ensuing biennium to theCIM database. Note: This report will display the last released information, so if this information was releasedmore than once, the released information based on the first release will be gone from the CIM Position Listingreport.

- 57 -
REPORT SAMPLES Position Listing Report by Position Number has the following sort options:
• Program Index, Position Number• Name, Program Index, Position Number
- 58 -
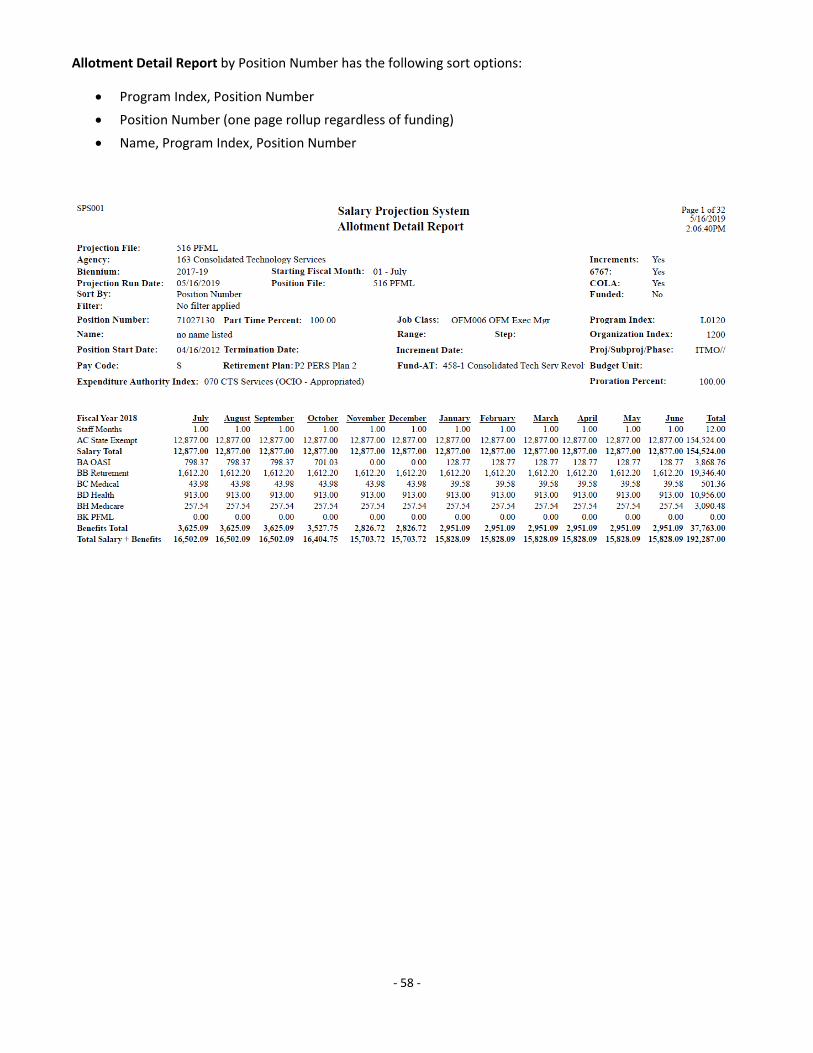
Allotment Detail Report by Position Number has the following sort options:
• Program Index, Position Number• Position Number (one page rollup regardless of funding)• Name, Program Index, Position Number

- 59 -
Allotment Summary Report by Program has the following sort options:
• Program, Subprogram• Program Index• Division• Org Index• Account, EA Type by Agency• Account, EA Type by Program• Project

- 60 -
Allotment FTE Report by Position Number has the following sort options: • Program Index, Position Number• Name, Program Index, Position Number
- 61 -
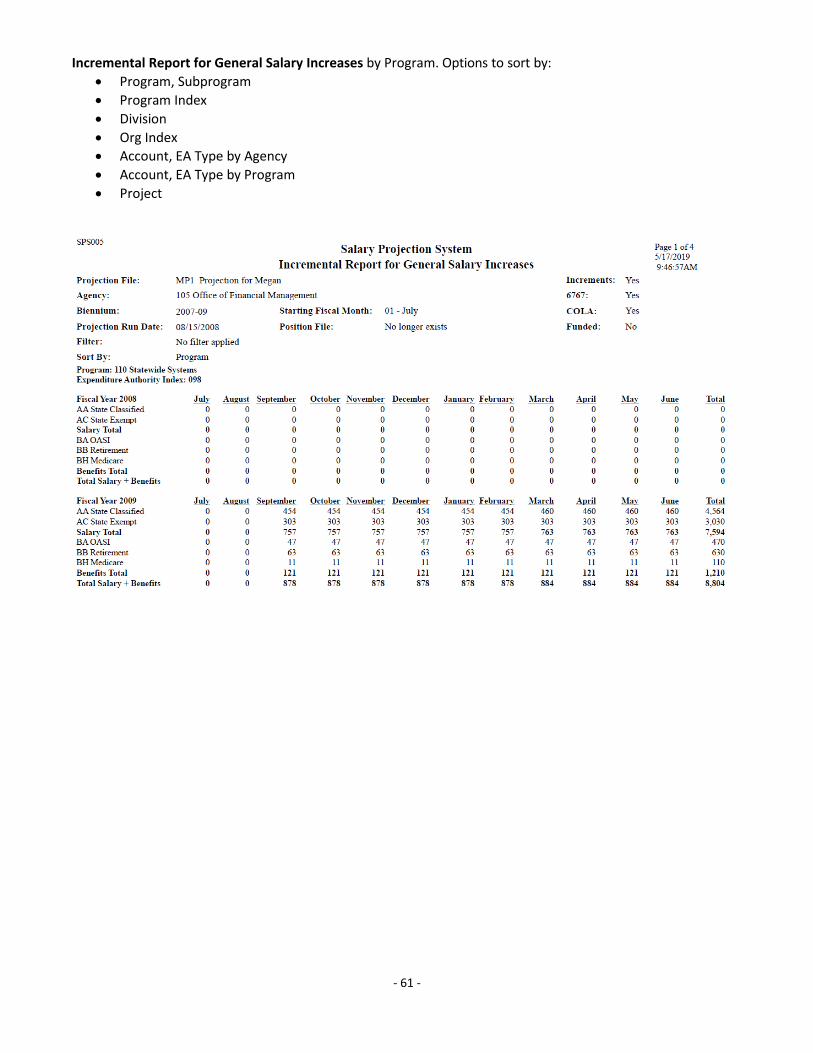
Incremental Report for General Salary Increases by Program. Options to sort by: • Program, Subprogram• Program Index• Division• Org Index• Account, EA Type by Agency• Account, EA Type by Program• Project

- 62 -
Incremental Report for Merit System (PID) Increases by Program. Options to sort by: • Program, Subprogram• Program Index• Division• Org Index• Account, EA Type by Agency• Account, EA Type by Program• Project