sa service template
DESCRIPTION
Junos Pulse Secure Access ServiceTRANSCRIPT

Junos Pulse Secure Access Service
Templates
Release
7.2
Published: 2012-05-15
Copyright © 2012, Juniper Networks, Inc.

Juniper Networks, Inc.1194 North Mathilda AvenueSunnyvale, California 94089USA408-745-2000www.juniper.net
Copyright © 2012, Juniper Networks, Inc. All rights reserved.
Juniper Networks, Junos, Steel-Belted Radius, NetScreen, and ScreenOS are registered trademarks of Juniper Networks, Inc. in the UnitedStates and other countries. The Juniper Networks Logo, the Junos logo, and JunosE are trademarks of Juniper Networks, Inc. All othertrademarks, service marks, registered trademarks, or registered service marks are the property of their respective owners.
Juniper Networks assumes no responsibility for any inaccuracies in this document. Juniper Networks reserves the right to change, modify,transfer, or otherwise revise this publication without notice.
Products made or sold by Juniper Networks or components thereof might be covered by one or more of the following patents that areowned by or licensed to Juniper Networks: U.S. Patent Nos. 5,473,599, 5,905,725, 5,909,440, 6,192,051, 6,333,650, 6,359,479, 6,406,312,6,429,706, 6,459,579, 6,493,347, 6,538,518, 6,538,899, 6,552,918, 6,567,902, 6,578,186, and 6,590,785.
Junos Pulse Secure Access Service TemplatesRelease 7.2Copyright © 2012, Juniper Networks, Inc.All rights reserved.
The information in this document is current as of the date on the title page.
YEAR 2000 NOTICE
Juniper Networks hardware and software products are Year 2000 compliant. Junos OS has no known time-related limitations through theyear 2038. However, the NTP application is known to have some difficulty in the year 2036.
ENDUSER LICENSE AGREEMENT
The Juniper Networks product that is the subject of this technical documentation consists of (or is intended for use with) Juniper Networkssoftware. Use of such software is subject to the terms and conditions of the End User License Agreement (“EULA”) posted at
http://www.juniper.net/support/eula.html. By downloading, installing or using such software, you agree to the terms and conditionsof that EULA.
Copyright © 2012, Juniper Networks, Inc.ii

Table of Contents
About the Documentation . . . . . . . . . . . . . . . . . . . . . . . . . . . . . . . . . . . . . . . . . . . . vii
Documentation and Release Notes . . . . . . . . . . . . . . . . . . . . . . . . . . . . . . . . . vii
Supported Platforms . . . . . . . . . . . . . . . . . . . . . . . . . . . . . . . . . . . . . . . . . . . . . vii
Documentation Conventions . . . . . . . . . . . . . . . . . . . . . . . . . . . . . . . . . . . . . . vii
Documentation Feedback . . . . . . . . . . . . . . . . . . . . . . . . . . . . . . . . . . . . . . . . . ix
Requesting Technical Support . . . . . . . . . . . . . . . . . . . . . . . . . . . . . . . . . . . . . . ix
Self-Help Online Tools and Resources . . . . . . . . . . . . . . . . . . . . . . . . . . . . . . . . x
Opening a Case with JTAC . . . . . . . . . . . . . . . . . . . . . . . . . . . . . . . . . . . . . . . . . x
Part 1 Overview
Chapter 1 Java Applets . . . . . . . . . . . . . . . . . . . . . . . . . . . . . . . . . . . . . . . . . . . . . . . . . . . . . . . 3
About Hosted Java Applet Templates . . . . . . . . . . . . . . . . . . . . . . . . . . . . . . . . . . . . 3
Chapter 2 Citrix . . . . . . . . . . . . . . . . . . . . . . . . . . . . . . . . . . . . . . . . . . . . . . . . . . . . . . . . . . . . . . 5
About Citrix Templates . . . . . . . . . . . . . . . . . . . . . . . . . . . . . . . . . . . . . . . . . . . . . . . 5
Part 2 Configuration
Chapter 3 Java Applets . . . . . . . . . . . . . . . . . . . . . . . . . . . . . . . . . . . . . . . . . . . . . . . . . . . . . . . 9
Configuring Hosted Java Applet Resource Profile Bookmarks . . . . . . . . . . . . . . . . . 9
Use case: Creating a Citrix JICA 9.5 Java Applet Bookmark . . . . . . . . . . . . . . . . . . . 11
Part 3 Administration
Chapter 4 Java Applets . . . . . . . . . . . . . . . . . . . . . . . . . . . . . . . . . . . . . . . . . . . . . . . . . . . . . . 17
Task Summary: Hosting Java Applets . . . . . . . . . . . . . . . . . . . . . . . . . . . . . . . . . . . 17
Uploading Java Applets to Secure Access . . . . . . . . . . . . . . . . . . . . . . . . . . . . . . . . 18
Signing Uploaded Java Applets . . . . . . . . . . . . . . . . . . . . . . . . . . . . . . . . . . . . . . . . 18
Creating HTML Pages That Reference Uploaded Java Applets . . . . . . . . . . . . . . . 19
Accessing Java Applet Bookmarks . . . . . . . . . . . . . . . . . . . . . . . . . . . . . . . . . . . . . . 19
Creating a Hosted Java Applet Resource Profile . . . . . . . . . . . . . . . . . . . . . . . . . . . 20
Creating Hosted Java Applets Bookmarks Through the User Roles Page . . . . . . . 22
Required Attributes for Uploaded Java Applets . . . . . . . . . . . . . . . . . . . . . . . . . . . 23
Required Parameters for Uploaded Java Applets . . . . . . . . . . . . . . . . . . . . . . . . . . 24
Chapter 5 Lotus iNotes . . . . . . . . . . . . . . . . . . . . . . . . . . . . . . . . . . . . . . . . . . . . . . . . . . . . . . 27
Creating Resource Profiles Using the Lotus iNotes Template . . . . . . . . . . . . . . . . . 27
Chapter 6 Microsoft OWA . . . . . . . . . . . . . . . . . . . . . . . . . . . . . . . . . . . . . . . . . . . . . . . . . . . . 31
Creating Resource Profiles Using the Microsoft OWA Template . . . . . . . . . . . . . . . 31
iiiCopyright © 2012, Juniper Networks, Inc.

Chapter 7 Citrix . . . . . . . . . . . . . . . . . . . . . . . . . . . . . . . . . . . . . . . . . . . . . . . . . . . . . . . . . . . . 35
Comparing Secure Access Access Mechanisms for Configuring Citrix . . . . . . . . . 35
Creating Resource Profiles Using Citrix Web Applications . . . . . . . . . . . . . . . . . . . 38
Chapter 8 Microsoft Sharepoint . . . . . . . . . . . . . . . . . . . . . . . . . . . . . . . . . . . . . . . . . . . . . . 43
Creating Resource Profiles Using the Microsoft Sharepoint Template . . . . . . . . . 43
Part 4 Index
Index . . . . . . . . . . . . . . . . . . . . . . . . . . . . . . . . . . . . . . . . . . . . . . . . . . . . . . . . . 49
Copyright © 2012, Juniper Networks, Inc.iv
Templates

List of Tables
About the Documentation . . . . . . . . . . . . . . . . . . . . . . . . . . . . . . . . . . . . . . . . . . vii
Table 1: Notice Icons . . . . . . . . . . . . . . . . . . . . . . . . . . . . . . . . . . . . . . . . . . . . . . . . . viii
Table 2: Text and Syntax Conventions . . . . . . . . . . . . . . . . . . . . . . . . . . . . . . . . . . . viii
Part 3 Administration
Chapter 7 Citrix . . . . . . . . . . . . . . . . . . . . . . . . . . . . . . . . . . . . . . . . . . . . . . . . . . . . . . . . . . . . 35
Table 3: Accessing the Citrix Web Interface Server usingWeb Resource Profile
Templates . . . . . . . . . . . . . . . . . . . . . . . . . . . . . . . . . . . . . . . . . . . . . . . . . . . . . 36
vCopyright © 2012, Juniper Networks, Inc.

Copyright © 2012, Juniper Networks, Inc.vi
Templates

About the Documentation
• Documentation and Release Notes on page vii
• Supported Platforms on page vii
• Documentation Conventions on page vii
• Documentation Feedback on page ix
• Requesting Technical Support on page ix
Documentation and Release Notes
To obtain the most current version of all Juniper Networks®technical documentation,
see the product documentation page on the Juniper Networks website at
http://www.juniper.net/techpubs/.
If the information in the latest release notes differs from the information in the
documentation, follow the product Release Notes.
Juniper Networks Books publishes books by Juniper Networks engineers and subject
matter experts. These books go beyond the technical documentation to explore the
nuances of network architecture, deployment, and administration. The current list can
be viewed at http://www.juniper.net/books .
Supported Platforms
For the features described in this document, the following platforms are supported:
• MAG Series
• SA Series
Documentation Conventions
Table 1 on page viii defines notice icons used in this guide.
viiCopyright © 2012, Juniper Networks, Inc.

Table 1: Notice Icons
DescriptionMeaningIcon
Indicates important features or instructions.Informational note
Indicates a situation that might result in loss of data or hardware damage.Caution
Alerts you to the risk of personal injury or death.Warning
Alerts you to the risk of personal injury from a laser.Laser warning
Table 2 on page viii defines the text and syntax conventions used in this guide.
Table 2: Text and Syntax Conventions
ExamplesDescriptionConvention
To enter configuration mode, typetheconfigure command:
user@host> configure
Represents text that you type.Bold text like this
user@host> show chassis alarms
No alarms currently active
Represents output that appears on theterminal screen.
Fixed-width text like this
• A policy term is a named structurethat defines match conditions andactions.
• JunosOSSystemBasicsConfigurationGuide
• RFC 1997,BGPCommunities Attribute
• Introduces or emphasizes importantnew terms.
• Identifies book names.
• Identifies RFC and Internet draft titles.
Italic text like this
Configure themachine’s domain name:
[edit]root@# set system domain-namedomain-name
Represents variables (options for whichyou substitute a value) in commands orconfiguration statements.
Italic text like this
• To configure a stub area, include thestub statementat the[editprotocolsospf area area-id] hierarchy level.
• The console port is labeledCONSOLE.
Represents names of configurationstatements, commands, files, anddirectories; configurationhierarchy levels;or labels on routing platformcomponents.
Text like this
stub <default-metricmetric>;Enclose optional keywords or variables.< > (angle brackets)
Copyright © 2012, Juniper Networks, Inc.viii
Templates

Table 2: Text and Syntax Conventions (continued)
ExamplesDescriptionConvention
broadcast | multicast
(string1 | string2 | string3)
Indicates a choice between themutuallyexclusive keywords or variables on eitherside of the symbol. The set of choices isoften enclosed in parentheses for clarity.
| (pipe symbol)
rsvp { # Required for dynamicMPLSonly
Indicates a comment specified on thesame lineas theconfiguration statementto which it applies.
# (pound sign)
community namemembers [community-ids ]
Enclose a variable for which you cansubstitute one or more values.
[ ] (square brackets)
[edit]routing-options {static {route default {nexthop address;retain;
}}
}
Identify a level in the configurationhierarchy.
Indention and braces ( { } )
Identifies a leaf statement at aconfiguration hierarchy level.
; (semicolon)
J-Web GUI Conventions
• In the Logical Interfaces box, selectAll Interfaces.
• To cancel the configuration, clickCancel.
Represents J-Web graphical userinterface (GUI) items you click or select.
Bold text like this
In the configuration editor hierarchy,select Protocols>Ospf.
Separates levels in a hierarchy of J-Webselections.
> (bold right angle bracket)
Documentation Feedback
We encourage you to provide feedback, comments, and suggestions so that we can
improve the documentation. You can send your comments to
[email protected], or fill out the documentation feedback form at
https://www.juniper.net/cgi-bin/docbugreport/ . If you are using e-mail, be sure to include
the following information with your comments:
• Document or topic name
• URL or page number
• Software release version (if applicable)
Requesting Technical Support
Technical product support is available through the JuniperNetworksTechnicalAssistance
Center (JTAC). If you are a customer with an active J-Care or JNASC support contract,
ixCopyright © 2012, Juniper Networks, Inc.
About the Documentation

or are covered under warranty, and need post-sales technical support, you can access
our tools and resources online or open a case with JTAC.
• JTAC policies—For a complete understanding of our JTAC procedures and policies,
review the JTAC User Guide located at
http://www.juniper.net/us/en/local/pdf/resource-guides/7100059-en.pdf .
• Product warranties—For product warranty information, visit
http://www.juniper.net/support/warranty/ .
• JTAC hours of operation—The JTAC centers have resources available 24 hours a day,
7 days a week, 365 days a year.
Self-Help Online Tools and Resources
For quick and easy problem resolution, Juniper Networks has designed an online
self-service portal called the Customer Support Center (CSC) that provides youwith the
following features:
• Find CSC offerings: http://www.juniper.net/customers/support/
• Search for known bugs: http://www2.juniper.net/kb/
• Find product documentation: http://www.juniper.net/techpubs/
• Find solutions and answer questions using our Knowledge Base: http://kb.juniper.net/
• Download the latest versions of software and review release notes:
http://www.juniper.net/customers/csc/software/
• Search technical bulletins for relevant hardware and software notifications:
https://www.juniper.net/alerts/
• Join and participate in the Juniper Networks Community Forum:
http://www.juniper.net/company/communities/
• Open a case online in the CSC Case Management tool: http://www.juniper.net/cm/
Toverify serviceentitlementbyproduct serial number, useourSerialNumberEntitlement
(SNE) Tool: https://tools.juniper.net/SerialNumberEntitlementSearch/
Opening a Casewith JTAC
You can open a case with JTAC on theWeb or by telephone.
• Use the Case Management tool in the CSC at http://www.juniper.net/cm/ .
• Call 1-888-314-JTAC (1-888-314-5822 toll-free in the USA, Canada, and Mexico).
For international or direct-dial options in countries without toll-free numbers, see
http://www.juniper.net/support/requesting-support.html .
Copyright © 2012, Juniper Networks, Inc.x
Templates

PART 1
Overview
• Java Applets on page 3
• Citrix on page 5
1Copyright © 2012, Juniper Networks, Inc.

Copyright © 2012, Juniper Networks, Inc.2
Templates

CHAPTER 1
Java Applets
• About Hosted Java Applet Templates on page 3
About Hosted Java Applet Templates
The Secure Access Java applet upload feature enables you to store the Java applets of
your choice directly on Secure Access without employing a separateWeb server to host
them.When you use this feature, you simply upload the applets to Secure Access (along
with additional files that the applets reference) and create a simpleWeb page through
Secure Access that references the files. Then, Secure Access intermediates theWeb
page and Java applet content using its Content Intermediation Engine.
For example, youmight want to use Secure Access to intermediate traffic between an
IBM AS/400 system on your network and individual 5250 terminal emulators on your
users’ computers. To configure Secure Access to intermediate this traffic, obtain the
5250 terminal emulator’s Java applet. Then you can upload this applet to Secure Access
and create a simpleWeb page that references the applet. After you create theWeb page
through Secure Access, Secure Access creates a corresponding bookmark that users can
access through their home pages.
Secure Access enables you to host Java applets usingWeb resource profile templates
(described in these topics) as well as through Terminal Services resource profiles.
The hosted Java applets feature is a standard feature on all Secure Access appliances
except theSA700. If youareusinganSA-700appliance, youmust install aCoreClientless
Access upgrade license to access the hosted Java applets feature.
RelatedDocumentation
• Task Summary: Hosting Java Applets on page 17
3Copyright © 2012, Juniper Networks, Inc.

Copyright © 2012, Juniper Networks, Inc.4
Templates

CHAPTER 2
Citrix
• About Citrix Templates on page 5
About Citrix Templates
Secure Access supports several mechanisms for intermediating traffic between a Citrix
server and client, including the Juniper Networks Citrix Terminal Services proxy, JSAM,
WSAM, VPN Tunneling, and the hosted Java applets feature.
The Citrix Web template enables you to easily configure access to a Citrix server using
the Juniper Networks Citrix Terminal Services proxy, JSAM, or WSAM. The Citrix Web
template is a resource profile that controls access to Citrix applications and configures
Citrix settings as necessary. Citrix Web templates significantly reduce your configuration
timebyconsolidatingconfigurationsettings intooneplaceandbyprepopulatingavariety
of resource policy settings for you depending on the type of Citrix setup you select. You
should use the Citrix Web template if you have the Citrix Web Interface already installed
in your environment or if you are using aWeb server to host your ICA files.
Because of their highly simplified configurations, templates are the ideal Citrix
configuration method if you want to deliver ActiveX or Java applets from a third-party
Web server through Secure Access.
CitrixWeb templates simplify your configuration by automatically detectingwhether the
Citrix Web client or the Citrix Java applet is being used and employing the appropriate
Secure Access access mechanism accordingly. For instance, if you have configured the
Citrix Web Interface to deliver a Java client, Secure Access automatically uses its Java
rewriting engine to tunnel traffic. If you have configured theCitrixWeb Interface to deliver
anActiveX client, SecureAccess uses its Citrix Terminal Services feature, JSAM, orWSAM
(depending on the option you select) to tunnel traffic.
Westrongly recommendusingCitrix templates insteadof the traditional roleand resource
policy configuration options available through Secure Access.
NOTE: JuniperNetworksdoesnotsupport savingaCitrixapplicationshortcutto thedesktopthroughSecureAccesswhenthe loopback IPaddress is runningon the client. Double-clicking this shortcut returns an error as it does not useWSAM or JSAM.
5Copyright © 2012, Juniper Networks, Inc.

RelatedDocumentation
• About Hosted Java Applet Templates on page 3
• CreatingWSAM Client Application Resource Profiles
• Creating a JSAM Application Resource Profile
• Creating Resource Profiles Using Citrix Web Applications on page 38
Copyright © 2012, Juniper Networks, Inc.6
Templates

PART 2
Configuration
• Java Applets on page 9
7Copyright © 2012, Juniper Networks, Inc.

Copyright © 2012, Juniper Networks, Inc.8
Templates

CHAPTER 3
Java Applets
• Configuring Hosted Java Applet Resource Profile Bookmarks on page 9
• Use case: Creating a Citrix JICA 9.5 Java Applet Bookmark on page 11
Configuring Hosted Java Applet Resource Profile Bookmarks
Youmust create bookmarks to your hosted Java applets to enable end users to access
the applets.
To configure hosted Java applet resource profile bookmarks:
1. SelectUsers > Resource Profiles >Web >Select Resource Profile> Bookmarks in theadmin console.
2. Click the appropriate link in the Bookmark column if you want to modify an existing
bookmark. Or, click New Bookmark to create an additional bookmark.
NOTE: Although it is generally easiest to create a resource profile sessionbookmark through the resourceprofile configurationpage, youcanchooseto create one through the user roles page as well if you have alreadycreated a resource profile.
3. Enter a nameandoptionally adescription for thebookmark. This informationdisplays
on the Secure Access home page. (By default, Secure Access names the bookmark
the same name as the corresponding resource profile.)
NOTE: We strongly recommend that you use a unique name for eachbookmark tomake it clear to users which link they are accessing.
4. Click Generate HTML to create an HTML page definition that includes references to
your Java applets. Then, fill in any required attributes and parameters.
If you are using HTML generated by Secure Access, make sure to search the HTML
code for “__PLEASE_SPECIFY__” and update the code as necessary.
You can also addmoreHTMLor JavaScript to thisWebpagedefinition. SecureAccess
rewrites all of the code that you enter in this field
9Copyright © 2012, Juniper Networks, Inc.

NOTE: Make sure to enter unique HTML in this field. If you create twobookmarks with the same HTML code, Secure Access deletes one of thebookmarks in the end-user view. You will still be able to see bothbookmarks, however, in the administrator console.
5. List thoseattributes in theMulti-ValuedUserAttributesbox if yourHTMLcodecontains
attributes that may expand tomultiple values (such as userAttr.hostname or
userAttr.ports), . When the user signs into Secure Access, Secure Access evaluates
these attributes and creates separate bookmarks as necessary based on each of the
individual values. If you use an attribute that expands to multiple values, but do not
enter that attribute in this box, Secure Access creates a single bookmark based on
the attribute’s first value.
6. Under Display options, click Bookmark opens newwindow to enable Secure Access
to automatically open theWeb resource in a new browser window. Note that this
functionality applies only to role bookmarks and not bookmarks created by users.
Next, select the following options if you want to hide UI elements from the user:
• Do not display the browser address bar—Select this option to remove the address
bar from the browser window. This feature forces all Web traffic through Secure
Accessbyprecludingusers in the specified role fromtypinganewURL in theaddress
bar, which circumvents Secure Access.
• Do not display the browser toolbar—Select this option to remove themenu and
toolbar from the browser. This feature removes all menus, browsing buttons, and
bookmarks from the browserwindow so that the user browses only through Secure
Access.
7. Under Roles, specify the roles to which you want to display the bookmark if you are
configuring the bookmark through the resource profile pages:
• ALL selected roles—Select this option to display the bookmark to all of the roles
associated with the resource profile.
• Subset of selected roles—Select this option to display the bookmark to a subset of
the roles associated with the resource profile. Then select roles from the ALL
Selected Roles list and click Add tomove them to the Subset of selected roles list.
8. Click Save Changes.
RelatedDocumentation
Defining Resource Profile Bookmarks•
• Creating Hosted Java Applets Bookmarks Through the User Roles Page on page 22
• Creating HTML Pages That Reference Uploaded Java Applets on page 19
• Required Attributes for Uploaded Java Applets on page 23
• Required Parameters for Uploaded Java Applets on page 24
Copyright © 2012, Juniper Networks, Inc.10
Templates

Use case: Creating a Citrix JICA 9.5 Java Applet Bookmark
This topic discusses how to enable access to a Citrix Metaframe server through Secure
Access using the 9.5 Java version of the Citrix ICA client (JICA).
NOTE: In addition to themethod described here, you can also use TerminalServices resource profiles to host the Java versions of Citrix ICA clients onSecure Access.
Secure Access supports several mechanisms for intermediating trafficbetween a Citrix server and client, including the Terminal Services, JSAM,WSAM, VPN Tunneling, and hosted Java applets features.
To enable the Citrix JICA 9.5 client using the Java applet upload feature:
1. Import code-signing certificates.
2. Download JICAcomponents.zip from the citrix.com downloads page.
3. Create a hosted Java applet resource profile through the Users > Resource Profiles >
Web page of the admin console. When defining the resource profile:
a. Upload the archived Citrix container file to Secure Access.
b. Whenuploading theapplet, select theUncompress jar/cabfilecheckboxbecausethe container file contains multiple jar and cab files.
c. Specify any Metaframe servers to which these applets may connect.
d. Assign the resource profile to the appropriate roles.
4. Generate theWeb page for the bookmark in the resource profile’s Bookmarks tab.
Secure Access automatically inserts all of the .jar files into the correspondingWeb
page. (JICA 95 supports only Sun JVM, so no cab files are present.) Then, specify
parameters for the Citrix client using the following examples as a guide. (Note that
the bookmark in the following example can contain references to the jar and cab files
that are in the zip file.
JICA 9.5 Applet Example
<html><head><title>jica95 Applet</title><meta http-equiv="Content-Type" content="text/html; charset=iso-8859-1"></head><!--Notes:1) << CODEBASE >> is a system value that will get replaced at the time the applet islaunched. Please do not modify this value.2) Pleasemodify the remaining values as needed.3) Pleasemake sure all attribute names/values are enclosed in double quotes.-->
11Copyright © 2012, Juniper Networks, Inc.
Chapter 3: Java Applets
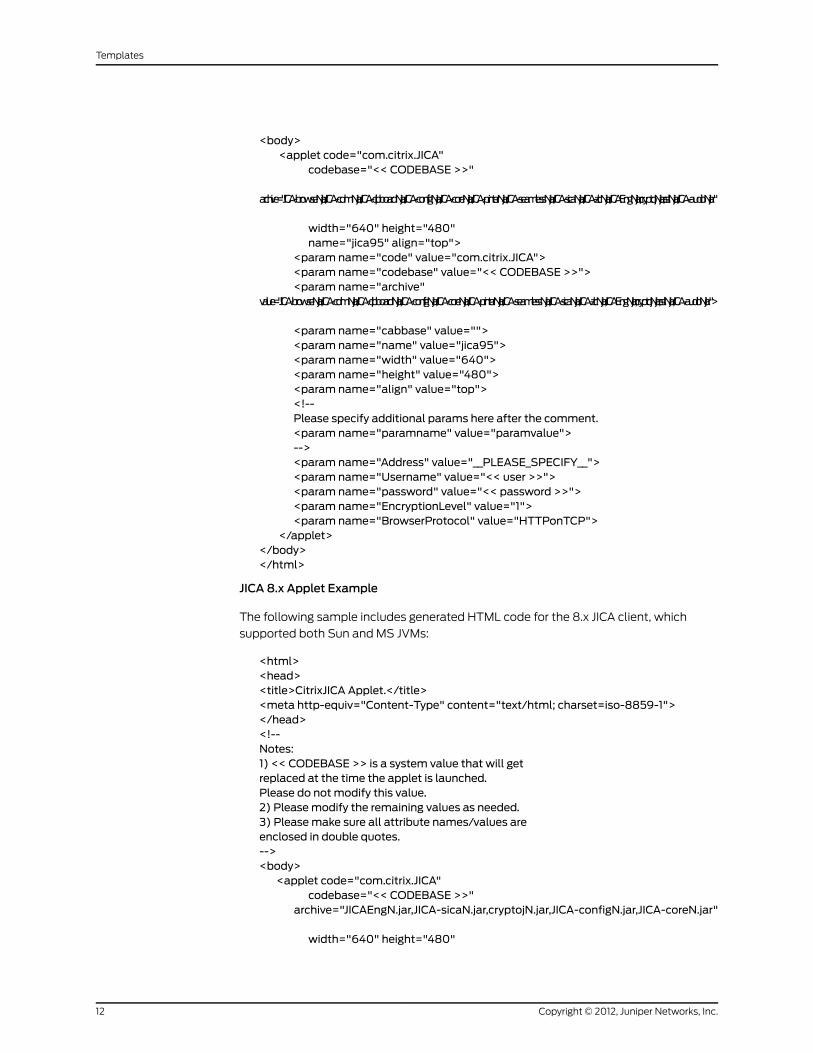
<body><applet code="com.citrix.JICA"
codebase="<< CODEBASE >>"
archive="JICA-browseN.jar,JICA-cdmN.jar,JICA-clipboardN.jar,JICA-configN.jar,JICA-coreN.jar,JICA-printerN.jar,JICA-seamlessN.jar,JICA-sicaN.jar,JICA-zlcN.jar,JICAEngN.jar,cryptojN.jar,sslN.jar,JICA-audioN.jar"
width="640" height="480"name="jica95" align="top">
<param name="code" value="com.citrix.JICA"><param name="codebase" value="<< CODEBASE >>"><param name="archive"
value="JICA-browseN.jar,JICA-cdmN.jar,JICA-clipboardN.jar,JICA-configN.jar,JICA-coreN.jar,JICA-printerN.jar,JICA-seamlessN.jar,JICA-sicaN.jar,JICA-zlcN.jar,JICAEngN.jar,cryptojN.jar,sslN.jar,JICA-audioN.jar">
<param name="cabbase" value=""><param name="name" value="jica95"><param name="width" value="640"><param name="height" value="480"><param name="align" value="top"><!--Please specify additional params here after the comment.<param name="paramname" value="paramvalue">--><param name="Address" value="__PLEASE_SPECIFY__"><param name="Username" value="<< user >>"><param name="password" value="<< password >>"><param name="EncryptionLevel" value="1"><param name="BrowserProtocol" value="HTTPonTCP">
</applet></body></html>
JICA 8.x Applet Example
The following sample includes generated HTML code for the 8.x JICA client, which
supported both Sun and MS JVMs:
<html><head><title>CitrixJICA Applet.</title><meta http-equiv="Content-Type" content="text/html; charset=iso-8859-1"></head><!--Notes:1) << CODEBASE >> is a system value that will getreplaced at the time the applet is launched.Please do not modify this value.2) Pleasemodify the remaining values as needed.3) Pleasemake sure all attribute names/values areenclosed in double quotes.--><body>
<applet code="com.citrix.JICA"codebase="<< CODEBASE >>"
archive="JICAEngN.jar,JICA-sicaN.jar,cryptojN.jar,JICA-configN.jar,JICA-coreN.jar"
width="640" height="480"
Copyright © 2012, Juniper Networks, Inc.12
Templates

name="CitrixJICA" align="top"><param name="code" value="com.citrix.JICA"><param name="codebase" value="<< CODEBASE >>"><param name="archive"
value="JICAEngN.jar,JICA-sicaN.jar,cryptojN.jar,JICA-configN.jar,JICA-coreN.jar"><param name="cabbase"
value="cryptojM.cab,JICA-configM.cab,JICAEngM.cab,JICA-sicaM.cab,JICA-coreM.cab">
<param name="name" value="CitrixJICA"><param name="width" value="640"><param name="height" value="480"><param name="align" value="top"><!--Please specify additional params here after the comment.<param name="paramname" value="paramvalue">--><param name="Address" value="__PLEASE_SPECIFY__"><param name="Username" value="<< user >>"><param name="password" value="<< password >>"><param name="EncryptionLevel" value="1"><param name="BrowserProtocol" value="HTTPonTCP"></applet>
</body></html>
RelatedDocumentation
• Accessing Java Applet Bookmarks on page 19
• Configuring Hosted Java Applet Resource Profile Bookmarks on page 9
13Copyright © 2012, Juniper Networks, Inc.
Chapter 3: Java Applets

Copyright © 2012, Juniper Networks, Inc.14
Templates

PART 3
Administration
• Java Applets on page 17
• Lotus iNotes on page 27
• Microsoft OWA on page 31
• Citrix on page 35
• Microsoft Sharepoint on page 43
15Copyright © 2012, Juniper Networks, Inc.

Copyright © 2012, Juniper Networks, Inc.16
Templates

CHAPTER 4
Java Applets
• Task Summary: Hosting Java Applets on page 17
• Uploading Java Applets to Secure Access on page 18
• Signing Uploaded Java Applets on page 18
• Creating HTML Pages That Reference Uploaded Java Applets on page 19
• Accessing Java Applet Bookmarks on page 19
• Creating a Hosted Java Applet Resource Profile on page 20
• Creating Hosted Java Applets Bookmarks Through the User Roles Page on page 22
• Required Attributes for Uploaded Java Applets on page 23
• Required Parameters for Uploaded Java Applets on page 24
Task Summary: Hosting Java Applets
The Secure Access Service Java applet upload feature enables you to store the Java
appletsof your choicedirectly on theSecureAccessServicewithoutemployingaseparate
Web server to host them.
To host Java applets on the Secure Access Service:
1. Specify which applets you want to upload, create Secure Access Service bookmarks
that reference theuploadedapplets, andspecifywhich rolescanaccess thebookmarks
using settings in the Users > Resource Profiles >Web page of the admin console.
2. (Optional.) To sign your Java applets, Select System > Configuration > Certificates >
Code-Signing Certificates in the admin console to upload the Java certificate to the
Secure Access Service. If you choose to skip this step, the user sees an untrusted
certificate warning each time he accesses the corresponding bookmark.
3. (Optional.) To improve the performance of your Java applications:
a. Select Enable Java instrumentation caching on the Maintenance > System >
Options page of the admin console. This option can improve the performance of
downloading Java applications.
b. After you finish configuring the Secure Access Service, cache your Java applet and
access it as an end user. This action eliminates the performance hit that occurs
through the intermediation engine when the first end user accesses the applet.
17Copyright © 2012, Juniper Networks, Inc.

RelatedDocumentation
Using Code-signing Certificates•
• Uploading Java Applets to Secure Access on page 18
• Signing Uploaded Java Applets on page 18
• Creating HTML Pages That Reference Uploaded Java Applets on page 19
Uploading Java Applets to Secure Access
You can use Java applets to intermediate traffic to various types of applications through
Secure Access. For example, you can upload the 3270 applet, 5250 applet, or Citrix Java
applet to Secure Access. These applets enable users to establish sessions to IBM
mainframes, AS/400s, and Citrix MetaFrame servers through terminal emulators. (Note
that toenable theCitrix Java ICAclient throughaSecureAccess session, youmustupload
multiple Citrix .jar and .cab files to Secure Access.
Secure Access enables you to upload individual .jar and .cab files or .zip, .cab, or .tar
archive files. Archive files can contain Java applets and files referenced by the applets.
Within the .zip, .cab, or .tar file, the Java appletmust reside at the top level of the archive.
You can upload any number of files to Secure Access as long as their combined size does
not exceed 100MB.
To ensure compatibility with both Sun and Microsoft Java Virtual Machines (JVMs), you
mustuploadboth .jar and .cab files toSecureAccess. (TheSun JVMuses .jar files,whereas
the Microsoft JVM uses .cab files.)
NOTE: When you upload Java applets to Secure Access, Secure Access asksyou to read a legal agreement before it finishes installing the applets. Readthis agreement carefully—it obligates you to take full responsibility for thelegality, operation, and support of the Java applets that you upload.
You canonly upload 100MBof Java applets toSecureAccess. SecureAccessdisplays the size of each applet that you upload toSecureAccess on the JavaApplets page so you can determine, if necessary, which applets you want todelete.
Uploading Java applets requires signed ActiveX or signed Java applets to beenabled within the browser to download, install, and launch the clientapplications.
RelatedDocumentation
Task Summary: Hosting Java Applets on page 17•
Signing Uploaded Java Applets
Unlike other Java applets that users can access through Secure Access, you do not have
to create a separate code-signing policy for the Java applets that you upload to Secure
Access. Secure Access automatically signs (or re-signs) them using the appropriate
Copyright © 2012, Juniper Networks, Inc.18
Templates

code-signing certificate. A code-signing certificate (also called an applet certificate) is
a typeof server-sidecertificate that re-signs Javaapplets intermediatedbySecureAccess.
Secure Access automatically signs (or resigns) your hosted Java applets with the
code-signingcertificate that you install through theSystem>Configuration>Certificates
>Code-signingCertificatespageof theadminconsole. If youdonot install a code-signing
certificate on Secure Access, Secure Access uses its self-signed applet certificate to sign
or re-sign the applets. In this case, users see an “untrusted certificate issuer” warning
whenever they access the Java applets through Secure Access.
NOTE: SecureAccess re-instrumentsandre-signsyouruploadedJavaappletswhenever you change (that is, import, renew, or delete) the correspondingcode-signing certificate on Secure Access.
RelatedDocumentation
Task Summary: Hosting Java Applets on page 17•
Creating HTML Pages That Reference Uploaded Java Applets
When uploading a Java applet to Secure Access, youmust create a simpleWeb page
that references the applet. Users can access thisWeb page through a bookmark on their
Secure Access home pages or from external Web servers.
TheWebpagemust contain a simpleHTMLpagedefinition that references the uploaded
Java applet. TheWeb page can also contain any additional HTML and JavaScript that
you choose. Secure Access can generate some of theWeb page for you, including the
HTMLpagedefinitionand the references to your Javaapplet. (Note, however, thatSecure
Access is not aware of all the applet-specific parameters that are required by your
applet—youmust find and fill these parameters in yourself.) When Secure Access
generates this HTML, it creates placeholders for any undefined values and prompts you
to fill in the necessary values.
You can create theseWeb pages through Java applet upload resource profiles.
RelatedDocumentation
Task Summary: Hosting Java Applets on page 17•
• Accessing Java Applet Bookmarks on page 19
Accessing Java Applet Bookmarks
Users can access the applets you upload to Secure Access using twomethods:
• Bookmarks on the Secure Access end-user console—When you create aWeb page
that references your uploaded Java applets, Secure Access creates a corresponding
link to theWeb page and displays that link in the Bookmarks section of the Secure
Access end-user console. Users whomap to the appropriate role can simply click the
link to access the Java applet.
19Copyright © 2012, Juniper Networks, Inc.
Chapter 4: Java Applets

• Links on external Web servers—Users can link to the Java applet bookmarks from an
external Web server by simply using the correct URLs. When the user enters a
bookmark’s URL (or clicks an external link that contains the URL), Secure Access
prompts the user to enter his Secure Access username and password. If he properly
authenticates, Secure Access allows him to access the bookmark. You can construct
theURLto the Javaappletbookmarkusing thesyntaxdescribed ineitherof the following
lines:
https://SecureAccessGateway_hostname/dana/home/launchwebapplet.cgi?bmname=bookmark
Name
https://SecureAccessGateway_hostname/dana/home/launchwebapplet.cgi?id=<resourceID>&bmname=bookmarkName
Youcandetermine the ID fora Javaappletbookmarkbyaccessing it through theSecure
Access home page and then extracting the ID from theWeb browser’s address bar.
NOTE: Although Secure Access enables you to createmultiple bookmarkswith the same name, we strongly recommend that you use a unique namefor each. If multiple bookmarks have the same name and a user accessesone of these bookmarks using a URL that includes the bmname parameter,Secure Access randomly picks which of the identically named bookmarks todisplay to the user. Also note that the bmname parameter is case-sensitive.
If you create links on external servers to Java applet bookmarks on SecureAccessandyouareusingmultiplecustomizedsign-inURLs, some restrictionsoccur.
RelatedDocumentation
Configuring Hosted Java Applet Resource Profile Bookmarks on page 9•
• Creating Hosted Java Applets Bookmarks Through the User Roles Page on page 22
Creating a Hosted Java Applet Resource Profile
To create a hosted Java applet resource profile:
1. SelectUsers > Resource Profiles >Web in the admin console.
2. ClickNewProfile.
3. SelectHosted Java Applet from the Type list.
4. Enter a unique name and optionally a description for the resource profile.
Copyright © 2012, Juniper Networks, Inc.20
Templates

5. Select the Java applet that you want to associate with the resource profile from the
Applet to use list. Or, if the applet that you want to use is not currently available in
the list, click Edit Applet. Then:
a. Click NewApplet to add an applet to this list. Or, select an existing applet and click
Replace (to replace an existing applet with a new applet) or Delete (to remove an
applet from Secure Access)
NOTE: If you replaceanexistingarchive,makesure that thenewappletarchive contains all of the necessary files for the applet to successfullylaunch and run. If the associated HTML for the applet refers to filesthat do not exist in the new archive, then the applet will not functioncorrectly.
Secure Access only allows you to delete applets that are not currentlyin use by aWeb or Terminal Services resource profile.
b. Enter a name to identify the applet in theNamebox (for newand replaced applets
only).
c. Browse to the applet that you want to upload to Secure Access. You can upload
applets (.jar or .cab files) or archives (.zip, .jar, and .tar files) that contain applets
and all of the resources that the applets need (for newand replaced applets only).
d. Select theUncompress jar/cab file check box if the file that you selected is anarchive that contains the applet (New and replaced applets only).
e. ClickOK and then click CloseWindow.
NOTE: When you select an applet in the Java Applets dialog box, youare loading third-party software onto the Juniper product. By clickingOK, you are agreeing to the following terms on behalf of yourself (aspurchaser of the equipment) or the organization that purchased theJuniper product, as applicable.
By loading third party software onto the JuniperNetworks product, youare responsible for obtaining all rights necessary for using, copying,and/or distributing such software in or with the Juniper Networksproduct. Juniper is not responsible for any liability arising from use ofsuchthirdpartysoftwareandwill notprovidesupport for suchsoftware.Theuseof third party softwaremay interferewith theproper operationof the Juniper Networks product and/or Juniper Networks software,andmay void any warranty for the Juniper Networks product and/orJuniper Networks software.
6. Use settings in the Autopolicy: Java Access Control section to enable access if your
Java applets need to make socket connections.
7. Click Save and Continue.
21Copyright © 2012, Juniper Networks, Inc.
Chapter 4: Java Applets
8. Select the roles to which the resource profile applies In the Roles tab and click Add.
The selected roles inherit the autopolicies and bookmarks created by the resource
profile. If it is not already enabled, Secure Access also automatically enables theWeb
option in the Users > User Roles > Select_Role > General > Overview page of the
admin console and the Allow Java Applets option Users > User Roles > Select_Role
>Web > Options page of the admin console for all of the roles you select.
9. Click Save Changes.
10. Create bookmarks in the Bookmarks tab.
RelatedDocumentation
Configuring Hosted Java Applet Resource Profile Bookmarks on page 9•
Creating Hosted Java Applets Bookmarks Through the User Roles Page
It is generally easiest to create a hosted Java applets bookmark through the resource
profile configuration pages, as explained in previous topic. However, you can choose to
createa resourceprofile sessionbookmark through theuser rolespageusing the following
instructions:
1. SelectUsers > Roles > Select_Role >Web > Bookmarks in the admin console.
2. ClickNewBookmark.
3. Select Pick aWeb Resource Profile from the Type list. (Secure Access does not
display this option if you have not already created a hosted Java applet resource
profile.)
4. Select an existing resource profile.
5. ClickOK. (If youhavenotalreadyassociated the selected rolewith the resourceprofile,Secure Access automatically makes the association for you. Secure Access also
enables any access control policies for the role that are required by the resource
profile.)
6. If this role is not already associated with the selected resource profile, Secure Access
displays an informational message. If you see this message, click Save Changes toadd this role to the resourceprofile’s list of rolesand toupdate theprofile’s autopolicies
as required. Then, repeat the previous steps to create the bookmark.
7. Configure the bookmark settings.
NOTE: When you create a resource profile bookmark through the userrolespage(insteadof thestandard resourceprofilespage),SecureAccessonly associates the generated bookmark with the selected role. SecureAccess does not assign the bookmark to all of the roles associated withthe selected resource profile.
RelatedDocumentation
Accessing Java Applet Bookmarks on page 19•
Copyright © 2012, Juniper Networks, Inc.22
Templates

• Configuring Hosted Java Applet Resource Profile Bookmarks on page 9
Required Attributes for Uploaded Java Applets
When you create a Java applets bookmark through Secure Access, youmust define the
followingattributesand their corresponding values. If youuse theGenerateHTML feature,
Secure Access populates some of this information for you and adds PLEASE_SPECIFY
to those attributes whose values youmust specify. When specifying attributes and their
corresponding values, use the attribute=”value” format.
NOTE: SecureAccessgeneratesparameters that it knowsare required.Note,however, thatSecureAccess isnotawareofall theapplet-specificparametersthat are required by your applet—youmust find and fill in these parametersyourself.
Attributes that are required by Secure Access include:
• code—Indicates which class file to invoke in your Java applet. Use this value to point
to your Java applet’s main function. Example:
applet code="com.citrix.JICA"
• codebase—Indicates where theWeb browser can fetch the applet. Use the
<<CODEBASE>>variable,whichpoints to the locationonSecureAccesswhereSecure
Access stores the Javaapplet.Whenenteringapath toa file, note that<<CODEBASE>>
includes a trailing slash, which means the following example works:
<img src="<<CODEBASE>>path/to/file">
This example does not work:
<img src="<<CODEBASE>>/path/to/file">
• archive—Indicates which archive file (that is, .jar, .cab, or .zip file) theWeb browser
should fetch. Example:
archive="JICAEngN.jar"
In addition to the requiredattributes listedearlier, youmayalsouse the followingoptional
attributes when creating a Java applet bookmark:
• name—Specifies a label for the Java applet. Example:
name="CitrixJICA"
• host—Specifies, for terminal sessions, theserver towhichSecureAccessshouldconnect.
• port—Specifies, for terminal sessions, theport towhichSecureAccess should connect.
• width and height—Indicates the size of the Java applet window. Example:
width="640" height="480"
• align—Indicates the Java applet window’s alignment within the browser window.
Example:
23Copyright © 2012, Juniper Networks, Inc.
Chapter 4: Java Applets

align="top"
NOTE: When defining attributes and their corresponding values, note thefollowing:
• Westrongly recommendthatyounot includeuseslibrarycabbaseparameterin the HTML, because it causes the cab file to be permanently installed ontheuser’smachine. If you later changeacab file onSecureAccess, all userswill have tomanually delete the cab files on their machines to get the newversion from Secure Access.
• We do not support applet tags that are constructed through thedocument.write function because the dynamic HTML interferes with theSecure Access parser.
• We do not support relative links to URLs, documents, or images in yourHTML. If you do, the links will break when the user tries to access themfrom the Secure Access end-user console. Instead, you should includeabsolute links. If you are linking to a document or image included in yourzip file, use the <<CODEBASE>> variable to indicate that Secure Accesscan find the file in zip archive uploaded to Secure Access. For example:
<img src="<<CODEBASE>>yourcompany_logo.gif" alt="YourCompany">
RelatedDocumentation
Required Parameters for Uploaded Java Applets on page 24•
Required Parameters for Uploaded Java Applets
When you create a Java applets bookmark through Secure Access, youmust specify
parameters and values that Secure Access should pass to the Java applet. These
parameters are completely applet-specific. When specifying parameters and their
corresponding values, use the following format:
<param name=”parameterName” value=”valueName”>
Where all of the text is literal except parameterName and valueName.
You can use Secure Access variables to pass values to the Java applet by enclosing the
variable names in double-brackets. For example, youmight choose to pass the
<<username>> and <<password>> values to the Java applet.
NOTE: When using the Java applet upload feature, if you include the<password> token within the generated HTML, it appears as cleartext if youviewthesource in thebrowserwindowthat launches theapplet.Thisbehaviorcannot be changed because Secure Access does not control how the Javaapplet processes the password. We strongly discourage the use of the<password> token in the HTML code.
Copyright © 2012, Juniper Networks, Inc.24
Templates

If you find aWeb page that contains an applet that you want to use, go to the
demonstration site and view the source on the page that runs the Java applet. Within
the source, look at the applet tag. Pick out the code attribute in the source anddetermine
if it contains any special parameters that you need to pass to the browser. Inmost cases,
youshouldbeable tocopyandpaste thecodeattributeand its correspondingparameters
directly into the HTML field for your Secure Access bookmark. Note, however, that if a
parameter references a resource on the local Web server, you cannot copy and paste
the reference into the Secure Access bookmark because Secure Access does not have
access to the otherWeb server’s local resources. When copying and pasting parameters
from another source, always check the values of the parameters.
RelatedDocumentation
• Required Attributes for Uploaded Java Applets on page 23
25Copyright © 2012, Juniper Networks, Inc.
Chapter 4: Java Applets

Copyright © 2012, Juniper Networks, Inc.26
Templates

CHAPTER 5
Lotus iNotes
• Creating Resource Profiles Using the Lotus iNotes Template on page 27
Creating Resource Profiles Using the Lotus iNotes Template
A Lotus iNotes template is a resource profile that controls access to theWeb application
and configures iNotes settings as necessary. Lotus iNotes templates significantly reduce
your configuration time by consolidating settings into one place and by prepopulating a
variety of resource policy settings for you depending on the type of setup you select.
Secure Access supports intermediating traffic to Lotus iNotes through aWeb rewriting
resource profile template, JSAM,WSAM, and VPN Tunneling. This topic describes how
to configure access using theWeb rewriting template. The prepopulated values vary
depending on the version of iNotes you select and are based on themost common
deployment of the servers.
To create a resource profile using the Lotus iNotes template:
1. SelectUsers > Resource Profiles >Web in the admin console.
2. ClickNewProfile.
3. Select the Lotus Notes version from the Type list.
4. Enter a unique nameand optionally a description for the LotusNotes resource profile.
5. Enter the URL of the Lotus iNotes resource towhich youwant to control access in the
Base URL box. Use the format: [protocol://]host[:port][/path]. Secure Access uses
the specifiedURL todefine thedefault bookmark for the Lotus iNotes resourceprofile.
Youmay enter a directory URL or a file URL.
6. Under iNotessetting, selectAllowcachingonclient to letWebbrowsers storenon-user
data, such as Javascript and CSS files, on a user’s machine. SelectMinimize cachingon client to allow Secure Access to send a cache-control:no-store header or a
cache-control:no-cache header based on the user’s Web browser and content type.
This is the same as smart caching.
The Allow caching on client option caches content that the backend iNotes server
typically caches. This caching option improves performance by using the cached
content instead of retrieving the content from the server the next time the page
displays. The Minimize caching on client option provides security by sending a
cache-control:no-storeheaderor acache-control:no-cacheheader toeither not store
27Copyright © 2012, Juniper Networks, Inc.

content or to re-validate the cached content each time it is requested. With both
cachingoption, youcanchoose toeitheralloworprevent theuploadingordownloading
of attachments.
7. Select the Prevent download of attachments check box to prohibit users fromdownloadingattachments to their systems.Select thePreventuploadofattachmentscheck box (available only for Lotus iNotes 6.5 and Lotus iNotes 7) to prevent users
from transmitting (uploading) attachments to Secure Access.
8. Select the Autopolicy: Web Access Control check box to create a policy that allowsor denies users access to theWeb resource (and all of its subdirectories) listed in the
Resource field.
a. In the Resource box, specify theWeb server or HTML page to which you want to
control access using the format: [protocol://]host[:port][/path].
b. From the Action list, select Allow to enable access to the specified resource or
Deny to block access to the specified resource.
c. Click Add.
9. Select theAutopolicy:Caching checkbox to specify the resources towhich this policyapplies in the Resource box.
NOTE: The correct caching resource policy must be configured to allowend users to open and save e-mail attachments of different documenttypes in iNotes. For example, if thecachingpolicy is set toSmart, enduserscannot save .htm or .html attachments to disk.
10. Select the Autopolicy: Web Compression check box to create a policy that specifywhich types ofWeb data Secure Access should and should not compress.
a. In the Resources field, specify the resources to which this policy applies.
b. Select one of the following options from the Action list:
• Compress—Secure Access compresses the supported content types from the
specified resource.
• Do not compress—Secure Access does not compress the supported content
types from the specified resource.
c. Click Add.
11. Select the Autopolicy: Single Sign-On check box to pass Secure Access data suchas the username and password to the Lotus iNotes application.
12. Click Save and Continue.
13. Select the roles to which the Lotus iNotes resource profile applies in the Roles tab
and click Add.
The selected roles inherit the autopolicies andbookmarks createdby the Lotus iNotes
resource profile. If it is not already enabled, Secure Access also automatically enables
Copyright © 2012, Juniper Networks, Inc.28
Templates

theWeb option in the Users > User Roles > Select Role > General > Overview page of
the admin console.
14. Click Save Changes.
15. (Optional.) In the Bookmarks tab, modify the default bookmark created by Secure
Access and/or create new ones
RelatedDocumentation
• About Hosted Java Applet Templates on page 3
• CreatingWSAM Client Application Resource Profiles
• Creating a JSAM Application Resource Profile
• Creating Resource Profiles Using Citrix Web Applications on page 38
29Copyright © 2012, Juniper Networks, Inc.
Chapter 5: Lotus iNotes

Copyright © 2012, Juniper Networks, Inc.30
Templates

CHAPTER 6
Microsoft OWA
• Creating Resource Profiles Using the Microsoft OWA Template on page 31
Creating Resource Profiles Using theMicrosoft OWATemplate
AMicrosoft OutlookWeb Access (OWA) template is a resource profile that controls
access to the application and configures OWA settings as necessary. OWA templates
significantly reduce your configuration time by consolidating configuration settings into
one place and by prepopulating a variety of resource policy settings for you depending
on the type of setup you select.
SecureAccess supports intermediating traffic toMicrosoftOWA through aWeb rewriting
resource profile template, JSAM,WSAM, and VPN Tunneling. This topic describes how
to configure access using theWeb rewriting template. The prepopulated values vary
depending on the version of OWA you select and are based on themost common
deployment of the servers.
To create a resource profile using the Microsoft OWA template:
1. SelectUsers > Resource Profiles >Web Applications/Pages in the admin console.
2. ClickNewProfile.
3. Select your Microsoft OWA version from the Type list.
4. Enter a unique name and optionally a description for the Citrix resource profile.
5. Enter the URL of the OWA resource to which you want to control access In the Base
URL box. Use the format: [protocol://]host[:port][/path]. Secure Access uses the
specified URL to define the default bookmark for the OWA resource profile. Youmay
enter a directory URL or a file URL.
31Copyright © 2012, Juniper Networks, Inc.
6. Under OWA settings select the following options,
a. (OWA 2000 andOWA 2003.) SelectAllow caching on client to letWeb browsers
store non-user data, such as Javascript and CSS files, on a user’s machine.
The Allow caching on client option caches content the backend OWA server
typically caches. This caching option improves performance by using the cached
content instead of retrieving the content from the server the next time the page
displays.
b. (OWA 2000 and OWA 2003.) SelectMinimize caching on client to allow Secure
Access to send a cache-control:no-store header or a cache-control:no-cache
header (do not store content or revalidate the cached content each time it is
requested) based on the user’s Web browser and content type. This is the same
as smart caching.
c. (OWA 2007.) SelectManaged Device to cache files. If you configure a Form post
SSO, the trustedparameter is set to4. This indicates theenduser’s device is private.
d. (OWA2007.) SelectUnmanagedDevice to not cache files. If you configure a Formpost SSO, the trusted parameter is set to 0. This indicates the end user’s device is
public.
NOTE: If it is necessary to download an attachment, the file is cachedeven though you select Unmanaged Device.
e. Select Prevent download of attachments to prohibit users from downloading
attachments to their systems.
f. Select Prevent upload of attachments to prevent users from transmitting
(uploading) attachments to Secure Access.
7. Under Autopolicy: Web Access Control, create a policy that allows or denies users
access to theWeb resource (and all of its subdirectories) listed in the Resource field.
a. Specify theWeb server or HTML page to which you want to control access in the
Resource field. Use the format: [protocol://]host[:port][/path].
b. Select Allow to enable access to the specified resource or Deny to block access
to the specified resource from the Action list.
c. Click Add.
8. Under Autopolicy: Caching, specify the resources to which this policy applies in the
Resource box.
NOTE: The correct caching resource policy must be configured to allowend users to open and save e-mail attachments of different documenttypes inOWA. For example, if the caching policy is set to Smart, end userscannot save .htm or .html attachments to disk.
Copyright © 2012, Juniper Networks, Inc.32
Templates

9. Under Autopolicy: Web Compression, create a policy that specifies which types of
Web data Secure Access should and should not compress.
a. Specify the resources to which this policy applies in the Resources box.
b. Select one of the following options from the Action list:
• Compress—Secure Access compresses the supported content types from the
specified resource.
• Do not compress—Secure Access does not compress the supported content
types from the specified resource.
c. Click Add.
10. Select the Autopolicy: Single Sign-On check box to pass Secure Access data suchas the username and password to the OWA application.
11. Click Save and Continue.
12. Select the roles to which the resource profile applies in the Roles tab and click Add.
The selected roles inherit the autopolicies and bookmarks created by the Microsoft
OWA resource profile. If it is not already enabled, Secure Access also automatically
enables theWeboption in theUsers >User Roles>Select _Role>General >Overview
page of the admin console.
13. Click Save Changes.
14. (Optional.) Modify the default bookmark created by Secure Access in the Bookmarks
tab, and/or create new ones.
RelatedDocumentation
• About Hosted Java Applet Templates on page 3
• CreatingWSAM Client Application Resource Profiles
• Creating a JSAM Application Resource Profile
• Creating Resource Profiles Using Citrix Web Applications on page 38
33Copyright © 2012, Juniper Networks, Inc.
Chapter 6: Microsoft OWA

Copyright © 2012, Juniper Networks, Inc.34
Templates

CHAPTER 7
Citrix
• Comparing Secure Access Access Mechanisms for Configuring Citrix on page 35
• Creating Resource Profiles Using Citrix Web Applications on page 38
Comparing Secure Access AccessMechanisms for Configuring Citrix
Secure Access supports several mechanisms for intermediating traffic between a Citrix
server and client, including the Citrix Terminal Services proxy, JSAM,WSAM, VPN
Tunneling, and the hosted Java applets feature.
The following table describes key differences when accessing a Citrix Metaframe Server
thought a Citrix Web Interface server. The descriptions in this table focus on configuring
Citrix Terminal Services, JSAM, andWSAM throughWeb resource profile templates
(Select Users > Resource Profiles >Web, click New Profile and select Citrix Web
interface/JICA from the Type list.)
NOTE: If you want to configure access to a Citrix Metaframe server thougha Citrix Web Interface server, youmust useWeb resource profile templates.If you want to configure access to a Citrix Metaframe server without using aCitrixWeb Interface server, youmust use a standard Citrix Terminal ServicesorWSAM resource profile or role.
35Copyright © 2012, Juniper Networks, Inc.
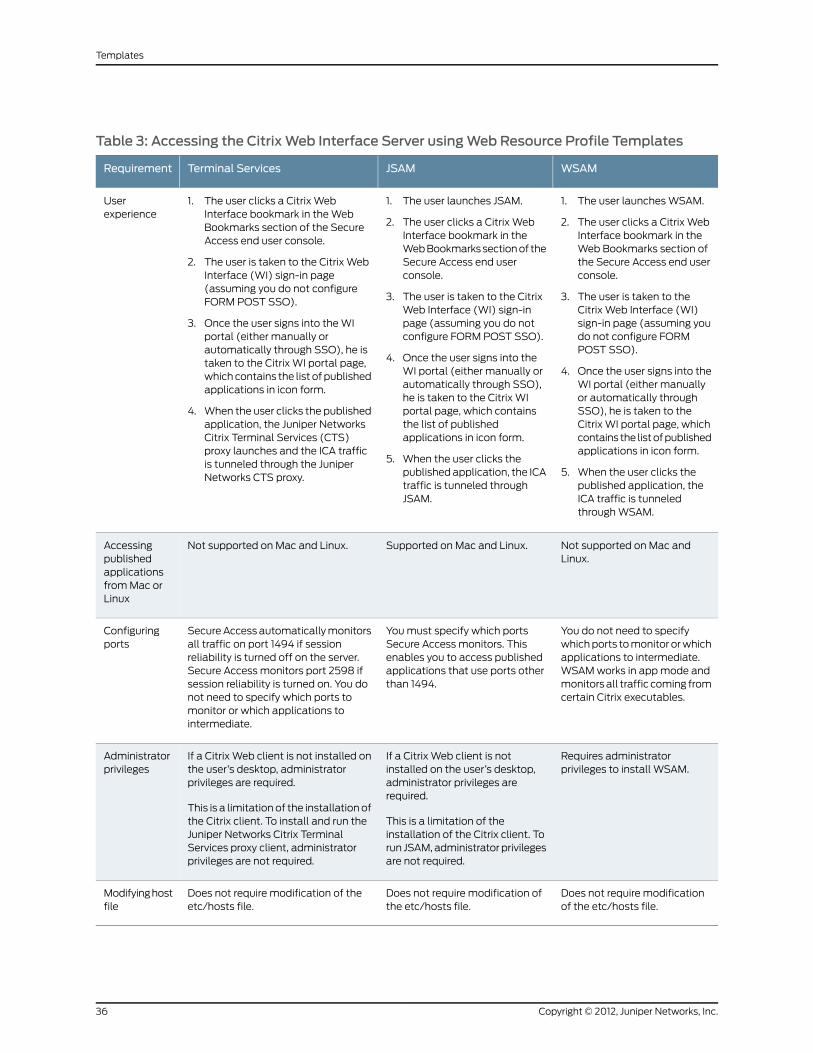
Table 3: Accessing the CitrixWeb Interface Server usingWeb Resource Profile Templates
WSAMJSAMTerminal ServicesRequirement
1. The user launchesWSAM.
2. The user clicks a Citrix WebInterface bookmark in theWeb Bookmarks section ofthe Secure Access end userconsole.
3. The user is taken to theCitrix Web Interface (WI)sign-in page (assuming youdo not configure FORMPOST SSO).
4. Once the user signs into theWI portal (either manuallyor automatically throughSSO), he is taken to theCitrix WI portal page, whichcontains the listofpublishedapplications in icon form.
5. When the user clicks thepublished application, theICA traffic is tunneledthroughWSAM.
1. The user launches JSAM.
2. The user clicks a Citrix WebInterface bookmark in theWebBookmarkssectionof theSecure Access end userconsole.
3. The user is taken to the CitrixWeb Interface (WI) sign-inpage (assuming you do notconfigure FORM POST SSO).
4. Once the user signs into theWI portal (either manually orautomatically through SSO),he is taken to the Citrix WIportal page, which containsthe list of publishedapplications in icon form.
5. When the user clicks thepublishedapplication, the ICAtraffic is tunneled throughJSAM.
1. The user clicks a Citrix WebInterface bookmark in theWebBookmarks section of the SecureAccess end user console.
2. The user is taken to the Citrix WebInterface (WI) sign-in page(assuming you do not configureFORM POST SSO).
3. Once the user signs into theWIportal (either manually orautomatically through SSO), he istaken to the Citrix WI portal page,whichcontains the list of publishedapplications in icon form.
4. When the user clicks the publishedapplication, the Juniper NetworksCitrix Terminal Services (CTS)proxy launches and the ICA trafficis tunneled through the JuniperNetworks CTS proxy.
Userexperience
Not supported on Mac andLinux.
Supported on Mac and Linux.Not supported on Mac and Linux.AccessingpublishedapplicationsfromMac orLinux
You do not need to specifywhichports tomonitor orwhichapplications to intermediate.WSAMworks in appmode andmonitorsall traffic coming fromcertain Citrix executables.
Youmust specify which portsSecure Access monitors. Thisenables you to access publishedapplications that use ports otherthan 1494.
SecureAccess automaticallymonitorsall traffic on port 1494 if sessionreliability is turned off on the server.Secure Access monitors port 2598 ifsession reliability is turned on. You donot need to specify which ports tomonitor or which applications tointermediate.
Configuringports
Requires administratorprivileges to install WSAM.
If a Citrix Web client is notinstalled on the user’s desktop,administrator privileges arerequired.
This is a limitation of theinstallation of the Citrix client. Torun JSAM,administrator privilegesare not required.
If a Citrix Web client is not installed onthe user’s desktop, administratorprivileges are required.
This is a limitation of the installation ofthe Citrix client. To install and run theJuniper Networks Citrix TerminalServices proxy client, administratorprivileges are not required.
Administratorprivileges
Does not require modificationof the etc/hosts file.
Does not require modification ofthe etc/hosts file.
Does not require modification of theetc/hosts file.
Modifyinghostfile
Copyright © 2012, Juniper Networks, Inc.36
Templates

The following table describes key differences when accessing a Citrix Metaframe Server
without using a Citrix Web Interface server. The descriptions in this table focus on
configuringCitrixTerminalServices, JSAM,andWSAMthroughstandard resourceprofiles
(Select Users > Resource Profiles > SAM or Terminal Services.)
WSAMJSAMTerminal ServicesRequirement
1. WSAM auto-launches whenthe user signs into SecureAccess or the user launchesWSAMmanually.
2. The user launches thepublished application usingstandard methods such astheWindows Start menu ora desktop icon.
1. JSAM auto-launches when theuser signs into Secure Access orthe user launches JSAMmanually.
2. The user launches the publishedapplication using standardmethods such as theWindowsStart menu or a desktop icon.
The user launches the publishedapplication by clicking thebookmark or icon in the TerminalServices section of the SecureAccess end user console.
Userexperience
Macintosh and Linux userscannot access publishedapplications from a CitrixMetaframe server.
Macintosh and Linux users canaccess published applications froma Citrix Metaframe server.
Macintosh and Linux users cannotaccesspublishedapplications froma Citrix Metaframe server.
AccessingpublishedapplicationsfromMac orLinux
Youmust specify which portsand applications Secure Accessmonitors. This enables you touse applications such as CitrixSecure Gateways (CSGs) andpublished applications that useports other than 1494.
You cannot configure Citrix as astandard application. Instead, youneed to create a custom JSAMapplication,provide theservernamesofallMetaframeservers, andspecifywhichportsSecureAccessmonitors.This enables you to use applicationssuch as Citrix Secure Gateways(CSGs) and published applicationsthat use ports other than 1494.
YoucanspecifywhichportsSecureAccess intermediates. Or, if you donot configure this information,Secure Access automaticallymonitors ports 1494 and 2598.
Adminconfiguration
Requiresadministratorprivilegesto install WSAM.
Requires administrator privileges torun JSAM because etc/hosts filemodifications are required.
If a CitrixWeb client is not installedon theuser’sdesktop,administratorprivileges are required.
This is a limitation of theinstallation of the Citrix client. Toinstall and run the JuniperNetworksCitrix Terminal Services proxyclient, administrator privileges arenot required.
Administratorprivileges
Doesnot requiremodificationofthe etc/hosts file.
Requires modification of theetc/hosts file.
Does not require modification ofthe etc/hosts file.
Modifyinghostfile
RelatedDocumentation
About Citrix Templates on page 5•
• Creating Resource Profiles Using Citrix Web Applications on page 38
37Copyright © 2012, Juniper Networks, Inc.
Chapter 7: Citrix

Creating Resource Profiles Using CitrixWeb Applications
The Citrix Web template enables you to easily configure Citrix access using the Juniper
Networks Citrix Terminal Services proxy, JSAM, or WSAM.
To create a resource profile using the Citrix template:
1. SelectUsers > Resource Profiles >Web in the admin console.
2. ClickNewProfile.
3. Select Citrix Web Interface/JICA from the Type list.
4. Enter a unique name and optionally a description for the Citrix resource profile.
5. Enter theURL of theWeb server that hosts your ICA files in theWeb Interface (NFuse)
URL field. Use the format: [protocol://]host[:port][/path]. For instance, enter the
URL of an NFuse server, theWeb interface for a Citrix Metaframe Presentation Server,
or aWeb server fromwhich Secure Access can download Citrix Java applets or Citrix
cab files. (Secure Access uses the specified URL to define the default bookmark for
the Citrix resource profile.) Youmay enter a directory URL or a file URL.
6. Specify which type of Citrix implementation you are using in your environment by
selecting one of the following options:
• Java ICAClientwithWeb Interface (NFuse)—Select this option if youhavedeployed
the Citrix Web Interface for MPS (that is, NFuse) to deliver Java ICA clients.
• Java ICA Client withoutWeb Interface (NFuse)—Select this option if you have
deployed a generic Web server to deliver Java ICA clients.
• Non-Java ICA Client withWeb Interface (NFuse)—Select this option if you have
deployed theCitrixWeb Interface forMPS(that is, NFuse) touseanyof thedifferent
clients (Java, ActiveX, local).
• Non-Java ICA Client withoutWeb Interface (NFuse)—(Read only) If you have
deployed a non-Java ICA client without the Citrix Web Interface for MPS (that is,
NFuse), you cannot create a Citrix resource profile through this template. Instead,
click the client application profile link beneath this option. The link brings you to the
Client Application Profiles page, where you can create a SAM resource profile.
7. From theWeb Interface (NFuse) version list, select which Citrix version you are using.
(Secure Access uses this value to pre-populate the Forms POST SSO values in your
single sign-on autopolicy.
8. Specify theMetaframeServers towhich youwant to control access in theMetaFrame
servers area. Then click Add. When specifying servers, you can enter wildcards or IP
ranges.
Secure Access uses the values that you enter to automatically create a corresponding
resource policy that enables access to the necessary resources:
• If you select either Java ICA Client with orwithoutWeb Interface, Secure Accesscreates a corresponding Java ACL resource policy that enables Java applets to
connect to the specified Metaframe servers.
Copyright © 2012, Juniper Networks, Inc.38
Templates

• If you selectNon-Java ICAClientwithWeb Interface, and thenyouselect ICAclientconnects overWSAM or JSAM, Secure Access creates a corresponding SAM
resource policy that enables users to access the specified Metaframe servers.
• If you selectNon-Java ICAClientwithWeb Interface, and thenyouselect ICAclientconnects over CTS, Secure Access creates corresponding Terminal Services and
Java resource policies that enable users to access the specifiedMetaframe servers.
9. (Java ICA clients only.) If you deployed Citrix using a Java ICA Client, select the Signappletswithuploadedcode-signingcertificate(s) check box to re-sign the specifiedresources using the certificate uploaded through the System > Configuration >
Certificates > Code-signing Certificates page of the admin console.
When you select this option, Secure Access uses all of the “allow” values that you
enter in the resource profile’s Web access control autopolicy to automatically create
a corresponding code-signing resource policy. Within this policy, Secure Access uses
the specifiedWeb resources to create a list of trusted servers.
10. (Non-Java ICA clients only) If you have deployed Citrix using a non-Java ICA Client
with aWeb interface, youmust use the Juniper Networks Citrix Terminal Services
proxy, Secure Application Manager, or VPN Tunneling to secure traffic to your
Metaframe servers instead of the Content Intermediation Engine.
To secure traffic through the Juniper Citrix Terminal Services proxy or the Secure
Application Manager, select one of the following options in the ICA Client Access
section:
• ICA client connects over CTS Client—Select this option to secure your Citrix traffic
through the Secure Access Citrix Terminal Services client (if your users are using
ActiveXclients)or Java rewritingengine (if your usersareusing Javaclients). (When
you select this option, Secure Access automatically enables the Terminal Services
option on the Users > User Roles > Select_Role > General > Overview page of the
admin console.)
NOTE: If you are using a third-partyWeb server such as your company’sIntranet server to deliver the ICA file, make sure the Content-Type ofthe HTTPResponse header is application/x-ica. Only then does SecureAccess automatically intermediate the ICA file and launch its CitrixTerminal Services client to tunnel the traffic.
NOTE: If you select this option, we recommend that you disable Citrixclient downloads through the Citrix Web Interface. Otherwise, userscould inadvertently start two different windows downloading twoversions of the Citrix client simultaneously–one through Secure Access(which automatically attempts to download the Citrix client if one isnot present on the user’s computer) and one through the Citrix WebInterface.
39Copyright © 2012, Juniper Networks, Inc.
Chapter 7: Citrix

• ICA client connects over WSAM—Select this option to secure traffic usingWSAM.
(When you select this option, Secure Access automatically enables the Secure
Application Manager option on the Users > User Roles > Select_Role > General >
Overview page of the admin console.)
• ICA client connects over JSAM—Select this option to secure traffic using JSAM.
Then, configure the following options:
• Number of Servers/Applications—Enter the lesser of the following two numbers:
maximum number of Citrix servers in your environment or themaximum number
of published applications that a user can open simultaneously. For instance, if
your environment contains one server and five published applications, enter 1 in
this field.Or, if your environmentcontains20serversand 10publishedapplications,
enter 10 in this field. Themaximum value this field accepts is 99.
• Citrix Ports—Specify the ports on which the Metaframe servers listen.
When you select the ICA client connects over JSAM option, Secure Access
automatically enables the Secure Application Manager option on the Users >
User Roles > Select_Role > General > Overview page of the admin console.
NOTE: YoucannotenableWSAMandJSAMfor thesamerole.Therefore,if you try to create aCitrix resource profile that uses one of these accessmechanisms (for instance, JSAM) and another profile associated withrole already uses the other accessmechanism (for instance, WSAM),Secure Access does not enable the new accessmechanism (JSAM) forthe role. Also note that you can only useWSAM or JSAM to configureaccess to one Citrix application per user role.
11. (Non-Java ICA Client withWeb Interface only.) If you want to allow users to access
local resources such as printers and drives through their CitrixWeb Interface sessions,
select the Configure access to local resources check box. Then, select from the
following options:
• Select Connect printers if you want to enable the user to print information from
the terminal server to his local printer.
• Select Connect drives if you want to enable the user to copy information from the
terminal server to his local client directories.
• Select Connect COMPorts if you want to enable communication between the
terminal server and devices on the user’s serial ports.
Copyright © 2012, Juniper Networks, Inc.40
Templates

NOTE: To control access to local resources exclusively through yourCitrix Metaframe server settings, clear the Configure access to localresources check box. When you clear the option, the Metaframe serversettings take effect. Or, if you want to selectively override CitrixMetaframeserver settings for thebookmark, select theConfigureaccessto local resources check box and then specify the local resources towhich you want to enable or disable access. Note that if you enableaccess to a local resource through Secure Access, however, you stillmust enable access to it through the Metaframe server as well.
When you enable local resources through the terminal server, each usercan only access his own local resources. For instance, user 1 cannot seeuser 2’s local directories.
12. Select the Autopolicy: Web Access Control check box to create a policy that allowsor denies users access to the resource specified in theWeb Interface (NFuse) URL
field. (By default, Secure Access automatically creates a policy for you that enables
access to the resource and all of its subdirectories.)
13. If you selectedoneof theWeb interfaceoptions above, update theSSOpolicy created
by the Citrix template. Select the Autopolicy: Single Sign-on check box. (Singlesign-on autopolicies configure Secure Access to automatically pass Secure Access
data such as usernames and passwords to the Citrix application. Secure Access
automatically adds themost commonly used values to the single sign-on autopolicy
based on the Citrix implementation you choose.)
When you select single sign-on, theWIClientInfo andWINGSession cookies are
prepopulated automatically in addition to the POST Resource and URL.
Or, if you selected the non-Web interface option, youmay optionally create your own
single sign-on autopolicy.
14. Click Save and Continue.
15. Select the roles in the Roles tab to which the Citrix resource profile applies and click
Add.
Theselected roles inherit theautopoliciesandbookmarkscreatedby theCitrix resource
profile. If it is not already enabled, Secure Access also automatically enables theWeb
option in theUsers>UserRoles>Select_Role>General>Overviewpageof theadmin
console and the Allow Java Applets option in the Users > User Roles > Select_Role >
Web > Options page of the admin console for all of the roles you select.
16. Click Save Changes.
17. (Optional.) In the Bookmarks tab, modify the default bookmark created by Secure
Access and/or create new ones.
By default, Secure Access creates a bookmark to theWeb interface (NFuse) URL
defined in theWeb Interface (NFuse) URL field and displays it to all users assigned
to the role specified in the Roles tab.
41Copyright © 2012, Juniper Networks, Inc.
Chapter 7: Citrix

RelatedDocumentation
• About Citrix Templates on page 5
• CreatingWSAM Client Application Resource Profiles
• Creating a JSAM Application Resource Profile
Copyright © 2012, Juniper Networks, Inc.42
Templates

CHAPTER 8
Microsoft Sharepoint
• Creating Resource Profiles Using the Microsoft Sharepoint Template on page 43
Creating Resource Profiles Using theMicrosoft Sharepoint Template
AMicrosoft Sharepoint template is a resource profile that controls access to the
application and configures Sharepoint settings as necessary. Microsoft Sharepoint
templates significantly reduce your configuration time by consolidating configuration
settings into one place and by pre-populating a variety of resource policy settings for you
depending on the type of setup you select.
Secure Access supports intermediating traffic to Microsoft Sharepoint through aWeb
rewriting resourceprofile template, JSAM,WSAM,andVPNTunneling.This topicdescribes
how to configure access using theWeb rewriting template.
SharePoint 2010 is supported with the following caveats:
• OfficeWeb Apps throughWindows Live is not supported
• OneNote document support is limited to only notebooks created to be stored on a
local computer and then published on SharePoint 2010.
• Office documents residing on SharePoint server cannot be opened with Microsoft
office when the server is accessed through Secure Access Service.
NOTE: In the current release, we support sending contact information fromSharepoint to yourOutlookclient through theContent IntermediationEngine(Web rewriting feature). Transferring the contact information to thebackendExchange server requiresWSAM, JSAM, or VPNTunneling. To import contactinformation into the Sharepoint server from your Outlook client, first exportyour contacts and then upload them to the Sharepoint server.
To create a resource profile using the Microsoft Sharepoint template:
1. SelectUsers > Resource Profiles >Web in the admin console.
2. ClickNewProfile.
3. SelectMicrosoft Sharepoint from the Type list.
43Copyright © 2012, Juniper Networks, Inc.

4. Enter a unique name and optionally a description for the Sharepoint resource profile.
5. Enter the URL of the Sharepoint resource to which you want to control access in the
Base URL field. Use the format: [protocol://]host[:port][/path]. Secure Access uses
the specified URL to define the default bookmark for the Sharepoint resource profile.
Youmay enter a directory URL or a file URL.
6. UnderSharepointSettings, selectAllow in-lineeditingofdocumentswithinexplorerview to allow users to modify files displayed in the explorer view.
a. Enter the URL to the Explorer View page, and then click Add. Do not enter a value
that resolves tonon-ExplorerViewURLs (suchashttp://*:*). Doing somight cause
Explorer View to not launch.
b. Order the resources in your list, if appropriate, by selecting the check box next to
an item and then using the up and down arrows to move it to the correct place in
the list.
c. Enter the number of minutes a persistent cookie resides on a user’s computer
before it expires in the Persistent cookie timeout box.
NOTE: Do not confuse this timeout option with Max. Session Length,which determines the number of minutes an active nonadministrativeuser sessionmay remain open before ending.
7. Under Autopolicy: Web Access Control, create a policy that allows or denies users
access to theWeb resource (and all of its subdirectories) listed in the Resource box.
a. Specify theWeb server or HTML page to which you want to control access in the
Resource box. Use the format: [protocol://]host[:port][/path].
b. Select Allow to enable access to the specified resource or Deny to block access
to the specified resource from the Action list.
c. Click Add.
8. (Optional.) Click ShowALL autopolicy types to create additional autopolicies thatfine-tune access to the resource. Then, create the autopolicies.
9. Click Save and Continue.
10. Select the roles to which the resource profile applies in the Roles tab, and click Add.
The selected roles inherit the autopolicies and bookmarks created by the Microsoft
Sharepoint resource profile. If it is not already enabled, Secure Access also
automatically enables theWeb option in the Users > User Roles > Select Role >
General > Overview page of the admin console.
11. Click Save Changes.
12. (Optional.) Modify the default bookmark created by Secure Access in the Bookmarks
tab or create new ones.
Copyright © 2012, Juniper Networks, Inc.44
Templates

RelatedDocumentation
• About Hosted Java Applet Templates on page 3
• CreatingWSAM Client Application Resource Profiles
• Creating a JSAM Application Resource Profile
• Creating Resource Profiles Using Citrix Web Applications on page 38
45Copyright © 2012, Juniper Networks, Inc.
Chapter 8: Microsoft Sharepoint

Copyright © 2012, Juniper Networks, Inc.46
Templates

PART 4
Index
• Index on page 49
47Copyright © 2012, Juniper Networks, Inc.

Copyright © 2012, Juniper Networks, Inc.48
Templates

Index
Symbols#, comments in configuration statements.....................ix
( ), in syntax descriptions.......................................................ix
< >, in syntax descriptions...................................................viii
[ ], in configuration statements...........................................ix
{ }, in configuration statements..........................................ix
| (pipe), in syntax descriptions............................................ix
Bbraces, in configuration statements..................................ix
brackets
angle, in syntax descriptions......................................viii
square, in configuration statements.........................ix
Ccomments, in configuration statements.........................ix
conventions
text and syntax................................................................viii
curly braces, in configuration statements.......................ix
customer support.....................................................................ix
contacting JTAC................................................................ix
Ddocumentation
comments on....................................................................ix
Ffont conventions.....................................................................viii
Mmanuals
comments on....................................................................ix
Pparentheses, in syntax descriptions..................................ix
Ssupport, technical See technical support
syntax conventions................................................................viii
Ttechnical support
contacting JTAC................................................................ix
49Copyright © 2012, Juniper Networks, Inc.

Copyright © 2012, Juniper Networks, Inc.50
Templates