safe use of machinery | worksafe
TRANSCRIPT

MAY 2014
Safe Use of Machinery
BEST PRACTICE GUIDELINES

ACKNOWLEDGEMENTS
WorkSafe New Zealand (WorkSafe NZ) would like to thank Safe Work Victoria for letting us use content and images from their publication Machinery and Equipment: An Introduction, July 2007, 1st edition. WorkSafe NZ would also like to thank the Western Australian Commission for Occupational Safety and Health and the Mining Industry Advisory Committee for letting us use content and images from their Code of Practice for Safeguarding of Plant and Machinery, 2009. Some of the text in that Code was originally published by Workplace Health and Safety Queensland and is copyright to the State of Queensland, 2006. We are reproducing it with permission.
Illustrations for Figures 30, 31 and 32 are reproduced with the permission of the Queensland Department of Justice and Attorney General (JAG). JAG owns the copyright for these illustrations.
WorkSafe NZ would like to thank Dulux NZ, Myriad Engineering Ltd and Ferndale Furniture Ltd for letting us photograph their workplace to illustrate good practice for safe use of machinery in this guideline.

This guideline is aimed at employers, engineers, designers, manufacturers and distributors of machinery. WorkSafe New Zealand has also developed a set of factsheets for specific machinery. Though relevant to employers, these factsheets are mostly aimed at operators and employees.

2
TABLE OF CONTENTS
01 INTRODUCTION
1.1 Australian Standard AS 4024 8
1.2 Using the flowcharts in the guideline 8
02 RESPONSIBILITIES AND DUTIES FOR MACHINERY
2.1 Design and manufacturing – get it right from the start 11
2.2 Duties of manufacturers and suppliers of machinery 12
2.3 Supplying machinery 12
2.4 Choosing and buying 13
2.5 Installing machinery 13
2.6 Use of machinery – the employer 14
2.7 Inspection and Maintenance 15
2.8 Modifying machinery 16
2.9 Decommisioning machinery 16
2.10 Use of machinery – the employee 16
03 IDENTIFY, ASSESS AND CONTROL HAZARDS
3.1 Hazard management 19
3.2 Identify hazards 19
3.3 Machinery hazards 20
3.4 Mechanical hazards 20
3.5 Ergonomic hazards 26
3.6 Chemicals and fumes 27
3.7 Organisational hazards 27
3.8 Electrical safety of machinery 28
3.9 Environmental and occupational health hazards 28
3.10 Other hazards 29
3.11 Operational hazards 30
04 HAZARD AND RISK ASSESSMENT
4.1 Risk assessment 33
4.2 Adequate information, knowledge and experience 34

3
05 CONTROLLING MACHINERY HAZARDS
5.1 Eliminate hazards 37
5.2 Isolate hazards 37
5.3 Minimise hazards 37
5.4 Matrix of guarding controls 38
06 ELIMINATE HAZARDS AT THE DESIGN PROCESS
6.1 Eliminate hazards through design 41
6.2 Reliability of safety functions 42
6.3 Designing for safety throughout the life cycle 42
6.4 Concept stage – health and safety in the business case 44
6.5 Construction of machinery 45
6.6 Validation and verification 45
07 GUARDING TYPES – ISOLATE
7.1 Types of guards that isolate the hazard 49
7.2 Machine guarding and ergonomics 50
08 GUARDING TYPES – MINIMISE
8.1 Power controls 53
8.2 Other guarding requirements 59
8.3 Other control measures 59
8.4 Providing information on machinery 60
8.5 Safe systems of work 61
8.6 Monitoring and reviewing effectiveness of control measures 61
8.7 Keeping documents and records 61

4
09 CHOOSING THE RIGHT GUARD
9.1 Choosing a guard 63
9.2 Basic rules for guard design 64
9.3 Guarding of operational and non-operational parts 64
9.4 Choosing the material for guards 64
9.5 Servicing and maintenance considerations 65
9.6 Guards for exposed rotating cutting machinery 65
9.7 Pulleys and drives 65
9.8 Rotating shafts and rollers 66
9.9 Conveyors (bulk handling) 66
9.10 Press brakes 67
9.11 Robotics 69
10 SAFE SYSTEMS OF WORK
10.1 Participation and consultation 74
10.2 Hazard management 74
10.3 Competency of operators and supervisors 74
10.4 Emergency procedures 74
10.5 When guarding is not an option 74
10.6 Agreement and sign-off 74
10.7 Competent personent person 75
10.8 Reviewing 75
11 APPENDICES
11.1 Definitions 77
11.2 Example of hazard checklist 79
11.3 Sample job safety analysis (JSA) 82
11.4 Summary of the AS 4024 Safety of machinery series 84
11.5 Example risk assessment process 91
11.6 Flowcharts 93
11.7 More information 98

5
TABLES
1 Matrix of guarding controls 39
2 Separation distances and gaps 51
FLOWCHARTS
1 Get it right from the start – overview of safe use of machinery guideline 9
2 Common machinery hazards 21
3 Identify operational hazards to use machinery safely 30
4 Assess hazard and risks – eliminate hazards where possible 33
5 Concept stage – health and safety in the business case 44
6 Validation and verification 46
7 Choosing a guard 63
8 Developing and maintaining a safe system of work for specific tasks 73
9 Get it right from the start – overview of safe use of machinery guideline 93
10 Common machinery hazards 93
11 Identify operational hazards to use machinery safely 94
12 Assess hazard and risks – eliminate hazards where possible 94
13 Concept stage – health and safety in the business case 95
14 Validation and verification 95
15 Choosing a guard 96
16 Developing and maintaining a safe system of work for specific tasks 97

6
FIGURES
1 Division of health and safety responsibilities during a machine’s life cycle 11
2 Summary of the duties of designers of machinery 12
3 Processes are used together to identify hazards 20
4 Examples of where operators can be injured by unguarded transmission machinery 22
5 Drawing-in hazards between counter-rotating parts 22
6 Examples of crushing hazards 22
7 Examples of impact hazards 23
8 Friction and abrasion hazards 23
9 Contact with single rotating surface 23
10 Catching on projections or in gaps 24
11 Catching between rotating and fixed parts 24
12 Shear hazards between two machine parts 25
13 Shear hazards between a machinery part and a work piece 25
14 Examples of cutting hazards 25
15 Examples of stabbing and puncture hazards by flying objects or moving parts of machinery 26
16 An example of visibility risk factor. When the top part of the machine lowers, it comes to rest on supports on each corner, so only a small area on the underneath of the top may be a hazard. 34
17 Risk assessment explains one process for assessing risks and hazards 35
18 A example risk rating table 35
19 Example of a fixed guard 49
20 Perimeter fence guard with fixed panels and interlocking access door 50
21 Food mixer with an interlocking guard 50
22 Example of a photoelectric light curtain used as a trip guard 54
23 Example of a two-hand control 54
24 Pressure-sensing mat enclosing a robot 55
25 The self-adjusting guard over the cutting wheel swings back as the cutting wheel cuts through steel 55
26 The green line shows the emergency stop cord on the rollers that act as a trip guard 56
27 Shows various types of tag-out and lock out devices that can be used 58
28 Examples of machine guards isolating various hazards 64
29 Self-adjusting guard for a drop saw 65
30 Fixed guard for a pulley and drive preventing access to transmission machinery 65
31 Fixed guard on rotating shaft or coupling 66
32 Typical guard for head and tail section of a conveyor 66
33 Press brake with fixed guards and a presence-sensing light curtain 68
34 Robot cell showing Levels 1, 2 and 3 70

INTRODUCTION
01/
IN THIS SECTION1.1 Australian Standard AS 40241.2 Using the flowcharts in the guideline

7
SECTION 01 // INTRODUCTION
The Best Practice Guidelines for the Safe Use of Machinery outlines the hazards that come with using machinery in the workplace, potential injuries and how best to control these hazards. It gives duty holders advice on how to use machinery safely and meet their duties under the Health and Safety in Employment Act 1992 (HSE Act) and the Health and Safety in Regulations 1995 (HSE Regulations). When using this guideline, consider the unique demands of your workplace and industry; there may be other hazards and risks not covered in this guideline.
> hearing loss
> ill health from hazardous chemicals or
lack of oxygen.
WorkSafe New Zealand has identified a
number of trends where employers have been
prosecuted for injuries and fatalities to staff
and contractors through using machinery.
These trends are:
> no guarding on machines at all – letting
operators reach into dangerous parts of
the machine
> guards not securely fastened and easily
removed while the machine is in use
> openings in the guards where the operator
can easily reach through to dangerous parts
> operators able to remove guards for
maintenance and not replacing them
> interlocked guards that can open while parts
are still moving or running down
> mechanisms from interlock switches can be
removed to override the guards
> single light beam safeguard devices can be
switched off
> closed limit switches which are not used,
causing interlock switches to be overridden
> interlock guards used as a shortcut to start
the machine
The HSE Act and HSE Regulations place
responsibilities on many different persons,
including machinery and plant designers,
manufacturers, suppliers, installers and
operators, employers and owners of
machinery. These people are called ‘duty
holders’. Duty holders must take all practicable
steps to make sure machinery in the workplace
is designed safely and is adequately guarded
to reduce the risk of injuries or harm.
Machinery can injure people by:
> crushing
> cutting
> shearing
> puncturing
> abrading
> burning
> tearing
> stretching.
Common injuries include:
> amputation
> crushing
> electric shock

BEST PRACTICE GUIDELINES // SAFE USE OF MACHINERY
8
> ineffective lock-out and isolation of
power systems
> supporting systems failure, such as when
pneumatic or hydraulic systems lose
pressure and allow a ram to fall.
1.1 AUSTRALIAN STANDARD AS 4024
Duty holders should use the Australian
Standard AS 4024 Safety of machinery series
as the standard that gives the current state of
knowledge for the safeguarding of machinery
and plant. It should be referred to by duty
holders as the primary standard against
which to benchmark. Employers, suppliers,
manufacturers and designers can work to
other standards, but they need to show that
they can reach the same level of safety, or
better, in the circumstances in which they
are used.
Employers must make sure anyone they
engage for advice on machine guarding
and safety is a competent person and is
experienced at working with and using
AS 4024 or equivalent or higher standards.
Based on key information from AS 4024, this
guideline advises employers and other duty
holders on managing machinery hazards. This
guideline is the key reference for what safety
looks like when using machinery.
This guideline is part of a suite of guidance for
the use of machinery. For further information
refer to WorkSafe NZ's Safe Use of Machinery
page at www.worksafe.govt.nz.
1.2 USING THE FLOWCHARTS IN THE GUIDELINE
This guideline has a series of flowcharts that
cover the key concepts around machinery
safety. The flowcharts work through the
processes for commissioning, manufacturing
or purchasing machinery and how hazards
can be eliminated at this point.
The design stage is the best time to control
the hazards associated with machinery.
Whether commissioning or designing a new
machine, or changing an existing machine
– this is the chance to get rid of significant
hazards. WorkSafe NZ recommends
eliminating hazards at the start of the
commissioning or purchase process.
The flowcharts also cover identifying hazards,
risk assessments, choosing appropriate
guarding and how to develop a safe system
of work. The aim is to create a safe working
environment and safe systems of work for
anyone working with or near machinery.
Use the individual flowcharts to scope the
design or to modify of a piece of machinery.
The key is identifying and assessing all hazards
caused by the machine and its use, which then
must be eliminated, isolated or minimised.
If you cannot eliminate or isolate them, work
through the hierarchy of guarding options
(see section 5 of this guideline) before moving
to minimising the hazard.
Minimisation includes:
> using personal protective equipment
> monitoring employee health and
the environment
> using safe operating procedures
> training
> using safe systems of work.
The flowcharts are collated together in
section 11.6 and also appear in the appropriate
section of this guideline.

9
SECTION 01 // INTRODUCTION
Flowchart 5: Building health and safety into the business case
> A thorough safety and hazard assessment
at the concept stage can eliminate many
hazards. This flowchart works through the
basics of including health and safety into a
business case.
Flowchart 6: Validation of machine safety
> This flowchart works through the process
of validation, making sure that all required
steps of the safety life cycle are tested.
Flowchart 7: Choosing a guard
> The flowchart gives the hierarchy of machine
guarding using the standard AS 4024 Safety
of Machinery series.
Flowchart 8: Developing and maintaining a safe system of work for specific tasks
> This flowchart describes the minimum
needed to put a safe system of work in place
for a specific task or set of tasks.
1.2.1 SUMMARY OF FLOWCHARTS
Flowchart 1: Get it right from the start
> This flowchart shows the overview of safe
use of machinery process. It summarises the
process and shows how each flowchart links
with the others.
Flowchart 2: Common machinery hazards
> A summary of the common
machinery hazards.
Flowchart 3: Identify operational hazards to use machinery safely
> The common operational hazards are
identified in this flowchart.
Flowchart 4: Assess hazard and risks – eliminate hazards where possible
> Flowchart 4 offers a method of assessing
the risk each hazard poses so appropriate
control measures can be developed.
Flowchart 1: Get it right from the start – overview of safe use of machinery guideline
Redesign or modify existing plant and machinery Eliminate hazards
where possible
Guarding options not available (verified by competent person)
Invo
lve
staff
, exp
erts
, hea
lth
and
saf
ety
rep
s, in
hous
e ex
per
tise
Val
idat
ion
Concept stage Define the need
What will the machine be used for?
(see Flowchart 5 and Flowchart 6)
Take into account:
> Performance > Layout > Cost > Safety specifications > Lighting > Hazards like noise and dust > Personnel > Legislation > Current state of knowledge
Consult with staff, experts, and others to decide how to eliminate any potential hazards
Identify hazards
(see Flowchart 2 and 3)
Assess Hazard And Risk assessment
(see Flowchart 4)
Isolation guards and guarding systems
(see Flowchart 7 and Appendix 11.4)
Minimise by a safe system of work.
(see Flowchart 8)
> Training staff > Personal protective equipment > Safe operating procedures
Regular review and make changes if necessary
OR
START HERE

BEST PRACTICE GUIDELINES // SAFE USE OF MACHINERY
10
Notes

02/
IN THIS SECTION2.1 Design and manufacturing – get it right from the start 2.2 Duties of manufacturers and suppliers of machinery 2.3 Supplying machinery 2.4 Choosing and buying 2.5 Installing machinery 2.6 Use of machinery – the employer2.7 Inspection and maintenance 2.8 Modifying machinery 2.9 Decommisioning machinery 2.10 Use of machinery – the employee
RESPONSIBILITIES AND DUTIES FOR MACHINERY

11
Designers, manufacturers, suppliers and employers all have responsibilities to ensure machinery is safe to use. Figure 1 shows who has health and safety responsibilities for each phase or aspect of the machine’s life cycle.
Figure 1: Division of health and safety responsibilities during a machine’s life cycle
2.1 DESIGN AND MANUFACTURING – GET IT RIGHT FROM THE START
The best time to make machinery safe is at the
design stage. Designers of machinery must
take all practical steps to ensure that what
they design does not become a hazard to
anyone building, installing, using, maintaining
or repairing it.
Designers, manufacturers and suppliers of
machinery and personal protective equipment
have legal duties; these are explained in HSE
Regulations 66 to 69.
Equipment designs should meet relevant
New Zealand and international standards.
Figure 2 summarises the designer’s
responsibilities which are to ensure machinery:
> is ergonomically sound
> has conveniently placed power controls
> will not be a source of harm
> meets relevant New Zealand and
overseas standards
> will be safe for its intended purpose during
manufacture and during its operating life
> is safe when it is decommissioned and
disposed of.
Des
ign
Man
ufac
turi
ng
Sup
ply
ing
Inst
allin
g
Choosing and buying
Use
InspectionM
aintenanceM
odificationD
ecomm
issioning
Responsibility of designers, manufacturers and suppliers Responsibility of employers
DUTIES OF DESIGNERS OF MACHINERY
SECTION 02 // RESPONSIBILITIES AND DUTIES FOR MACHINERY

BEST PRACTICE GUIDELINES // SAFE USE OF MACHINERY
12
DUTIES OF DESIGNERS OF MACHINERY
Designers should provide thorough and easy-
to-understand information and instructions
to the manufacturer about how to build the
machine so it meets the design criteria. The
designer also needs to give information on the
right way to install, operate, adjust, maintain
and repair the machine.
2.2 DUTIES OF MANUFACTURERS AND SUPPLIERS OF MACHINERY
Manufacturers and suppliers of machinery
should take all practicable steps to make sure
it is designed, manufactured and tested so it
will not harm anyone during:
> installation
> use
> repair
> dismantling
> cleaning.
Manufacturers and suppliers are responsible for:
> safety in design (eg if they cannot find the
parts specified by the designer, they must
find others of the same standard)
> building the machine to meet the design
requirements
> testing the machinery.
HSE Regulations 67 describes the duties of manufacturers and suppliers of plant.
2.3 SUPPLYING MACHINERY
Under section 18A of the HSE Act, a person
who hires, leases, sells or otherwise supplies
another person with a machine to be used in
a workplace has legal duties.
Design is ergonomically sound
Design will not be the cause of source of harm if
the following occurs
Provides information and instructions that are comprehensible
and comprehensive to manufacturers
The use for which the plant has been designed
How to install, adjust, use, clean, maintain, repair,
and dismantle the plant in accordance with the designer's instructions
Any other matters about which the manufacturer needs information from the designer in order to be able to carry out the manufacturer's duties
Power controls shall be conveniently placed Manufactured in accordance
with design
Used for the purpose for which it was designed
Installed, adjusted, used, cleaned, maintained,
repaired, and dismantled in accordance with the designer's instructions
Figure 2: Summary of the duties of designers of machinery

13
SECTION 02 // RESPONSIBILITIES AND DUTIES FOR MACHINERY
People who hire, lease or loan machinery
must find out whether it will to be used in a
workplace, and if so, how it will be used. They
must ensure that the machinery has been
designed, made and maintained to be safe
for its intended use.
People who sell or supply machinery that
can be used in a workplace must take all
practicable steps to make sure it has been
designed, made and maintained to be safe for
any known intended use or any reasonably
expected use. If a seller or supplier agrees to
install or arrange a machine, section 18A(3) of
the HSE Act says they must take all practical
steps to install or arrange the machine so it is
safe for its intended use.
Health and safety legislation requires
people to make sure others are safe at work.
It also protects people using machinery
and equipment.
2.3.1 INFORMATION FOR SUPPLIERS AND PURCHASERS/HIRERS
Manufacturers and suppliers must give
thorough and easy-to-understand instructions
on how to use the machine safely (see HSE
Regulations 67(3) & (4)). People who make
and supply protective clothing and equipment
have similar duties (see HSE Regulations
69(4) & (5)).
Any instructions must explain:
> hazards linked to the machine
> how to install the machine safely
> how to operate the machine safely
> safe ways to clean and adjust the machine
> how to maintain and repair the machine
> regular replacement of parts of the machine
that wear
> how to safely take the machine out of
service and take it apart
> any other relevant matters.
The supplier, or the purchaser or hirer, must
understand and follow the information.
2.4 CHOOSING AND BUYING
Machinery that is designed from the outset
to remove hazards should reduce costs for
employers due to less need to:
> purchase personal protective equipment
> install extraction systems for fumes
or particles
> install extra guarding.
> Buyers and hirers can include conditions
about the safety of the machinery in the
purchase contract. Examples include:
> Goods/machinery will meet all relevant
New Zealand safety laws.
> Goods/machinery will meet the following
standards: (eg AS 4024 Safety of
Machinery series).
For more information, see WorkSafe NZ’s
Position Paper for the Safe Use of Machinery.
Exceptions to section 18(A) of the HSE Act are goods that are second-hand or sold ‘as is’. ‘As is’ means without promises or warranties as to quality, durability or fitness, with the buyer carrying all risks. Buyer beware!
2.5 INSTALLING MACHINERY
The installer must thoroughly identify
and assess all hazards and determine the
machine’s limits using the latest AS 4024.1,
or other equivalent standard.
An engineer must decide what safety category
the machine falls into and what guards it
needs so it meets AS 4024. The engineer
needs relevant experience and knowledge of
machine guarding and the requirements of
AS 4024.

BEST PRACTICE GUIDELINES // SAFE USE OF MACHINERY
14
The manufacturer must validate that the
design of all safety features in control
components and control systems meet the
standards of sections 1501 and 1502 of AS
4024. If the manufacturer cannot do this,
an engineer (with relevant experience and
knowledge) must inspect the machine and
validate that it meets AS 4024.
The machinery must be installed according to
the manufacturer’s instructions. If the person
selling or supplying machinery agrees to install
it, the law says they must take all practicable
steps to install or arrange the machinery so it
is safe for its intended use (HSE Act section
18A(3)).
2.6 USE OF MACHINERY – THE EMPLOYER
Employers are responsible for the health
and safety of their employees and any other
people who can be harmed by the actions or
inactions of their employees. Employers must,
as far as practicable:
> keep workers safe from hazards at work by
identifying and managing hazards
> make sure work done is safely
> provide protective clothing and equipment
> train and supervise workers so they can
work safely
> provide an accident reporting system
and follow up on any accidents, injuries or
near misses
> develop procedures for dealing with
emergencies.
If an employer can only minimise a hazard,
they must monitor the environment and the
health of employees.
2.6.1 TRAINING AND SUPERVISION OF MACHINE OPERATORS
The employer or person in control of the
workplace must not let anyone use a machine
unless they have had training on:
> the actual and potential hazards of
the machine
> all the precautions to be taken.
> Unless the machine operator can operate the
machine safely, then the employer or person
in control should have the operator closely
supervised by someone with the skills.
Employees must be supervised and trained by a competent person (section 13 HSE Act).
When training people to use machinery, a
trainer must explain:
> how to check and adjust the machine before
starting it
> how to stop and start the machine
> how the machine works
> what the machine does
> location and operation of other controls
> actual and potential hazards and appropriate
ways to control them
> purpose of guards and other safety devices
> correct use and adjustment of guards
> correct work methods to be used
> how to recognise faults that could
cause harm
> limitations and capabilities of the machine
> emergency procedures.
Take manufacturer’s instructions into
consideration when developing training
programmes for operators.
2.6.2 SAFE USE OF MACHINERY RESPONSIBILITIES – RESTRICTIONS FOR YOUNG PEOPLE
Employers must take all practicable steps to
stop anyone under the age of 15 years old
working or helping with work with machinery.
No one under the age of 15 years old should
be in an area where:
> goods are being prepared or manufactured
for trade or sale
> construction work or forestry work is done.

15
SECTION 02 // RESPONSIBILITIES AND DUTIES FOR MACHINERY
Unless they are:
> in a public access area
> under the direct supervision of an adult
> on a guided tour of the area
> in an area only used for the sale of goods
or services.
Minimum ages in health and safety legislation:
> 12 years old for trained drivers of agricultural tractors and implements (HSE Regulation 61)
> 15 years old for most duties except those in retail or office areas (HSE Regulations 54 to 60)
> 16 years old for work between 10pm and 6am, unless special conditions apply (HSE Regulations 58 and 58F)
> 18 years old to operate amusement devices (Amusement Devices Regulations 1978 20(a)).
2.7 INSPECTION AND MAINTENANCE
The employer or principal must have an
inspection and maintenance programme
in place. This programme must ensure a
competent person regularly inspects, tests
and maintains the machine’s guards and
safety control system. This ensures the safety
system’s reliability and integrity.
When developing maintenance and repair
programmes, refer to the manufacturer’s
instructions.
Maintenance and repair programmes
should specify:
> where servicing is needed
> how much servicing is needed
> what type of servicing is needed
> how often it needs to be serviced
> who is responsible for maintaining repair and
maintenance programmes
> how defects will be fixed
> what standards are used for performance
testing and evaluation.
Programmes should be reviewed regularly
to ensure their effectiveness. Develop,
implement and maintain an accurate record
of maintenance done and maintenance
programmes.
2.7.1 CLEANING AND MAINTENANCE OF MACHINERY
Employers should take all practicable steps
to make sure any hazardous machinery has
stopped before any cleaning or maintenance is
done. HSE Regulation 17 requires employers to
make sure machinery is safe to clean, maintain
and repair. Procedures must be put in place
for these activities to be performed safely and
workers must be trained to follow them.
Isolation, tag out cards and lock-out devices
should also be used as described in section
8.1.11 of this guideline.
Any other hazard present should also have
the appropriate control applied to stop people
being harmed.
If it is essential for the cleaning, maintenance
or repair procedure that the machine stays in
operation, then employers should:
> only have power going to the part of the
machine that must be in motion
> adequately train anyone working in this
hazardous situation
> establish and follow a safe work system
> regularly review any safe work systems
> reduce the speed of any dangerous parts
to as slow as practical with reduced power/
force, or step-by-step operation with a
limited movement control device
> restrict access to and control of danger
areas to one person
> have emergency stop controls within
immediate reach

BEST PRACTICE GUIDELINES // SAFE USE OF MACHINERY
16
> use a portable inching control with E-stop or
local inching allowing full sight of controlled
elements and danger area.
Mid-position pendants are better than jogging
or inching machinery using a hold-to-run
control. The machine should run at the slowest
practical operating speed for cleaning, loading
and setting up. The inching control should
be a hold-to-run type, so the machine stops
immediately when the control is released.
Employers should maintain and keep machinery
in sound operating condition at all times. They
can manage the maintenance using:
> preventive maintenance schedules
> regular inspections
> unsafe condition reports
> ask for employee feedback.
2.8 MODIFYING MACHINERY
The manufacturer’s and designer’s instructions
should be referred to before modifying
any plant.
Modifications should be only be completed
by a competent person who has knowledge
and experience of AS 4024 and the type of
machine or plant.
Any modifications must be validated so
the design of all safety features in control
components and control systems meet the
standards of sections 1501 and 1502 of AS
4024. If the manufacturer cannot do this,
an engineer (with relevant experience and
knowledge) must inspect the machine and
validate that it meets AS 4024.
2.9 DECOMMISIONING MACHINERY
Any decommissioning and dismantling of
machinery must be undertaken as per the
manufacturer’s instructions and completed
by a competent person.
2.10 USE OF MACHINERY – THE EMPLOYEE
When using machinery an employee is
responsible for:
> their own health and safety
> not harming others through their actions
or inaction
> following any safe work procedures their
employer has in place
> identifying and reporting hazards – and
controlling them where possible
> using all guarding
> keeping their work areas clear, clean and tidy
> wearing and using all protective equipment
and clothing
> alerting their supervisor to any machinery
faults or maintenance needs
> telling their supervisor about any illness or
condition that could stop or limit their ability
to work with machinery – to keep others
safe and help supervisors allocate work.
Machine operators should:
> check that the machinery they use is in
sound working order
> report immediately any problems to
their supervisor
> use any safety devices, guards, appliances,
protective devices and any other methods
used to make the machinery safe.
Where there is a risk of entanglement with
machinery, people should:
> tie long hair back close to the head
> not wear loose clothing.
2.10.1 EMPLOYEE PARTICIPATION IN HEALTH AND SAFETY
Employees are often in the best place to know
the hazards of their job and how they could be
injured. For example, product might back up
in the machine and need clearing, which could
be hazardous if the machine is still running.

17
SECTION 02 // RESPONSIBILITIES AND DUTIES FOR MACHINERY
Everyone benefits when employees are
involved in developing health and safety
systems, and when those systems are part of
the daily life in the workplace.
The HSE Act gives employees the right to
participate in health and safety issues at
work and gives them access to information
and training.
Employees may elect a health and safety
representative for their workplace. The health
and safety representative is someone that staff
can go to and discuss any problems around
health and safety. The health and safety
representative will work with the employer to
find a solution.
In larger workplaces, employees’
representatives may be elected onto the
health and safety committee that also includes
representatives of the employer. Where
employee health and safety representatives
are elected, they are entitled to paid leave to
attend approved training courses.
If an employee has genuine concerns about
health and safety, they have the right to
refuse unsafe work (HSE Act section 28A).
This should only happen when other avenues
to deal with the problem have not been
successful. During the time the employee’s
concerns are being investigated, he or she may
need to perform other duties in the workplace.
For more information see WorkSafe NZ’s
factsheets:
> Health and safety representatives
> Employers must involve employees in
health and safety
> Employees have to help ensure and safe
and healthy workplace.

BEST PRACTICE GUIDELINES // SAFE USE OF MACHINERY
18
Notes

IDENTIFY, ASSESS AND CONTROL HAZARDS
03/
IN THIS SECTION:3.1 Hazard management 3.2 Identify hazards 3.3 Machinery hazards 3.4 Mechanical hazards 3.5 Ergonomic hazards 3.6 Chemicals and fumes 3.7 Organisational hazards 3.8 Electrical safety of machinery 3.9 Environmental and occupational health hazards 3.10 Other hazards 3.11 Operational hazards

19
Making sure hazards do not cause harm or injury is the basis of health and safety in any workplace. This section covers the basics of hazard management and the common hazards that are found when working with or near machinery.
3.1 HAZARD MANAGEMENT
Planning a safe approach to a job can
help identify the hazards of working with
machinery. The hazard management
process includes:
> hazard identification
> hazard assessment – decide if the identified
hazards are significant
> hazard control – either by eliminating,
isolating or minimising the hazard
> a safety plan or hazard register documenting
this information
> hazard monitoring, including workplace
exposure monitoring or health monitoring
of workers
> a schedule to update the safety plan.
3.2 IDENTIFY HAZARDS
The first step in the hazard management
process is to identify hazards – anything that
could injure or harm someone.
Do a workplace inspection to identify all
machinery used. Include common items that
may not normally be thought of as ‘machines’.
Also consider how other workplace items
such as chairs and heaters can affect the
use of machinery.
Sections 7–10 of the HSE Act outline the process to identify, assess and control hazards.
3.2.1 HAZARD IDENTIFICATION METHODS
Once you have identified all machinery, you
can identify their hazards.
A good hazard identification process is key
to hazard management. You can identify
hazards using:
> Physical inspections. Inspect the machinery
and assess where someone could get injured
or caught in the machinery.
> Task analysis. Identify the hazards involved
in each task. This should include what
happens when there is a blockage or the
machine needs cleaning or maintenance.
> Process analysis. Identify hazards at each
stage of the production process.
> Best practice guidelines and standards.
> Hazard and operability analysis (HAZOP).
> Accident investigation analysis. Identify
hazards and causes of harm from
investigations involving similar types
of work.
Hazard identification and management should
be completed and monitored regularly to
make sure control measures are working and
no new hazards have been introduced. See
Appendix 1 for a sample hazard checklist.
SECTION 03 // IDENTIFY, ASSESS AND CONTROL HAZARDS

BEST PRACTICE GUIDELINES // SAFE USE OF MACHINERY
20
Critically inspect each piece of machinery
and how it is used to identify where someone
could be harmed by:
> any parts (moving and stationary)
> processes
> procedures
> workplace activities
> related danger zones.
For more information see:
> the machinery factsheets on WorkSafe NZ’s
Safe Use of Machinery page at
www.worksafe.govt.nz
> Flowcharts 2 and 3 in this guideline
> Figure 3 above for an example of one
process to identify hazards.
3.3 MACHINERY HAZARDS
In this guideline hazards are split into
two categories: machanical hazards and
operational hazards. This section covers the
main hazards caused by the machinery itself.
Many pieces of machinery use force and
motion to cut, bend, join or shape materials.
This force and motion can harm people. Some
of the ways people can be hurt are covered in
this section.
Machines and machinery parts in the figures
section are unguarded to show the hazards
and danger zones. Flowchart 2 shows the most
common types of machinery hazards.
3.4 MECHANICAL HAZARDS
3.4.1 PRIME MOVERS
Prime movers are devices that turn energy into
motion to power a machine. Prime
movers include:
> water turbines
> electric generators
> electric motors
> electric rotary converters
> the head and tail race of water wheels
> motors powered by burning fuel, such as
coal, petrol or natural gas.
Every flywheel directly connected to a prime
mover and every moving part of a prime
mover should be securely guarded, unless it
is safe because of its position or construction.
It must be safe for everyone in the workplace.
Prime movers also include motors powered by
burning solid, liquid, or gas fuels such as coal,
petrol or natural gas.
List the plant in your workplace
Develop checklists and a worksheet to use when physically inspecting the workplace
Inspect the workplace and talk to people who work with plant
Record hazards identified
EXAMINE COMPANY RECORDS AND MANUFACTURERS’ INSTRUCTIONS TO SEE IF
THEY REVEAL ANY HAZARDS
Figure 3: Processes are used together to identify hazards

21
SECTION 03 // IDENTIFY, ASSESS AND CONTROL HAZARDS
3.4.2 TRANSMISSION MACHINERY
Transmission machinery takes energy from a
prime mover to the part of a machine where
it is used. Every part of any transmission
machinery should be securely fenced unless,
because of its position or construction, it is
safe. Figure 4 shows some ways operators can
be injured by this type of machinery.
Transmission machinery can include gears,
shafts, pulleys and belts, chains and sprockets,
or friction drives.
All transmission machinery should have a
device in every room or workplace to cut the
power to the machinery.
Key for arrows:
Solid red arrows = where a part of the body
could be drawn into a nip-point
White or grey arrows = movement of
machine parts
Hazard identification by:
> Task analysis > Process analysis > Physical inspection > Best practice guidelines, guides and standards > Accidents and incidents > Failure mode analysis > Maintenance records > HAZOP (Hazard and Operability Analysis)
Chemicals > Solvents > Oils and lubricants > Hydrocarbons
> Fatigue > Shiftwork > Workload > Lack of safety culture
> Noise > Dust > Fumes > Radiation > Heat > Vibration > Biological > Fibres
Ergonomics
Mechanical
Organisational
Electrical hazards
Occupational health hazards
Other hazards
Flowchart 2: Common machinery hazards
> Layout and design > Reach > Fixing > Projectiles > Lubrication > Interlocking
> Trapping > Impact > Projectiles > Entanglement > Contact > Nipping > Stability
Assess each hazard and associated risks
Develop hazard controls
> Shock > Electromagnetic > EMF radiation > Laser burn > Radio supply > Earthing > Fuse > Lightning
> Confined space > High pressure > Stored energy
START HERE

BEST PRACTICE GUIDELINES // SAFE USE OF MACHINERY
22
3.4.3 DRAWING-IN OR TRAPPING HAZARDS
Injuries can be caused when a part of the
body is drawn into a ‘nip-point’. Figure 5
shows some ways operators can be injured by
drawing in and trapping hazards, such as:
> in-running nips between two counter-
rotating parts (like meshing gears, rolling
mills, mixing rolls, press rolls)
> in-running nips between a rotating surface
and another surface moving along it
(such as a power transmission belt and its
pulley, a chain and its chain wheel, a rack
and its pinion)
> running nips between a rotating surface
and another surface moving along it where
material (like metal, paper, cable, rope) runs
onto a reel, drum or shaft
> nips between rotating and fixed parts,
which can shear, crush or abrade, such
as spoked hand-wheels, flywheels and
screw conveyors.
Figure 5: Drawing-in hazards between counter-rotating parts
3.4.4 CRUSHING HAZARDS
Figure 6 shows some ways operators can be
injured through crushing hazards that can
happen when part of the body is caught:
> between a fixed and moving part of a machine
(such as the bed and tool of a power press)
> between two moving parts of a machine (such
as the support arms of a scissor lift platform)
> between a moving part of a machine and
a fixed structure (such as a counterweight
and the floor).
Figure 4: Examples of where operators can be injured by unguarded transmission machinery
Figure 6: Examples of crushing hazards

23
SECTION 03 // IDENTIFY, ASSESS AND CONTROL HAZARDS
3.4.5 IMPACT HAZARDS
Impact hazards are caused by objects that
strike the body, but do not enter it.
Figure 7 shows some ways operators can be
injured by impact hazards. Examples include
the rotating arm of a robot, the reciprocating
bed of a metal planing machine and the arms
of a wool-scouring machine.
Impact hazards are different from crush
hazards even though the machines involved
may be the same. Impact hazards involve
the inertia of the body while crush hazards
involve trapping the body between two
machine parts or between a machine part
and a fixed structure.
3.4.6 FRICTION AND ABRASION HAZARDS
Friction burns can be caused by smooth parts
operating at high speed. Figure 8 shows some
ways operators can be injured by friction and
abrasion hazards. Examples of friction
or abrasion hazards include:
> the sides of a grinding wheel
> the belt of a belt sanding machine
> material running onto a reel or shaft
> a conveyor belt and its drums
> pulleys and fast-moving ropes or belts.
3.4.7 ENTANGLEMENT HAZARDS
Entanglement is when someone is caught in
a machine by loose items (such as clothing,
gloves, ties, jewellery, long hair, cleaning rags,
bandages or rough material being fed into
the machine).
Figures 9, 10 and 11 show some ways
operators can be injured by entanglement
with machinery. Contact that can lead to
entanglement includes:
> touching a single rotating surface (such as
plain shafting, couplings, spindles, chucks,
lead screws, mandrels or rotating work
pieces including plain bar material)
Figure 9: Contact with single rotating surface
Figure 7: Examples of impact hazards
Figure 8: Friction and abrasion hazards

BEST PRACTICE GUIDELINES // SAFE USE OF MACHINERY
24
> catching on projections or in gaps. Belt
fasteners and other projecting items (such
as keys, set screws and cotter pins) are
typical projection hazards. Fan blades,
spoked wheels (such as pulleys, sprockets,
gear wheels and flywheels), mixer and
beater arms and spiked cylinders create
gap-related hazards
> touching moving materials in motion (such
as in centrifuges, tumble driers and dough
mixers or swarf)
> reaching between counter rotating parts
(such as gear wheels, rolling mills)
> reaching between a rotating part and
another part moving along it (such as a
power transmission belt and its pulley, a
chain and chain wheel, a rack and pinion, a
conveyor belt and any of its pulleys, a rope
and its storage reel)
> reaching between rotating and fixed parts
(such as flywheels and the machinery bed,
screw or worm conveyors and their casings,
mixers, extruder screw and barrel, the edge
of an abrasive wheel, or an incorrectly
adjusted work rest).
Figure 11: Catching between rotating and fixed parts
Figure 10: Catching on projections or in gaps
3.4.8 SHEARING HAZARDS
Shearing trims or shears metal (or other
material) with a powered knife or slide.
Shear points are found where stock is inserted,
held and withdrawn. Figures 12 and 13 show
some ways operators can be injured by
shearing hazards.
Parts of the human body can be sheared:
> between two machine parts, such as:
> the table of a metal planing machine
(shaper) and its bed
> the table and blade of a guillotine or
power press
> nip-points between connecting rods or
links and rotating wheels or between parts
that move back and forth)
> between a machine part and a work piece,
such as the tool of a broaching machine and
the part being broached.

25
SECTION 03 // IDENTIFY, ASSESS AND CONTROL HAZARDS
3.4.9 CUTTING HAZARDS
Cutting hazards exist at the point where wood,
metal or other materials are cut. Figure 14
shows some ways operators can be injured by
shearing hazards.
Many kinds of tools create cutting hazards:
> band and circular saws
> boring or drilling machines
> planing and tenoning machines
> milling machines
> cutting edges of milling tools water
jet cutting
> high energy lasers
Figure 12: Shear hazards between two machine parts
Figure 14: Examples of cutting hazards
Figure 13: Shear hazards between a machinery part and a work piece
> moving sheet material in a machine
> abrasive wheels
> cutting edges of endless-band
cutting machines
> reciprocating knives and saws
> revolving cutting tools.
Cutting hazards may involve rotating,
reciprocating or sideways motion. Danger
exists at the cutting point, where a finger, arm
or body part can be injured. Flying chips or
scrap material can strike the head, particularly
in the eyes or face. The danger is worse if
the person caught cannot move away from
the cutter.
3.4.10 STABBING AND PUNCTURING HAZARDS
The human body can be pierced by flying
objects. Figure 15 shows some ways operators
can be injured by stabbing and puncturing
hazards. For example:
> a loose tool in a lathe
> broken tooling on a press
> an abrasive wheel breaking up
> swarf

BEST PRACTICE GUIDELINES // SAFE USE OF MACHINERY
26
Figure 15: Examples of stabbing and puncture hazards by flying objects or moving parts of machinery
> timber from a bench saw
> molten metal from a die-casting machine
> sparks from welding
> a bolt from an explosive powered tool
> debris thrown by rotary mowers and
hedge cutters.
The human body can also be pierced by
rapidly moving parts of machinery or pieces of
material. For example:
> the needle of a sewing machine
> the drill of a drilling machine
> the arm of a robot.
Injection of fluids through the skin can cause
tissue damage similar to stabbing.
3.5 ERGONOMIC HAZARDS
Ergonomic hazards come about through
the way the operator interacts with the
machine. Sometimes machinery is not always
designed for how an operator must use the
machine. For example, operators may have
to overreach, reach above shoulder height,
hold awkward postures, and use repetitive or
forceful movements. Having to work this way
can cause damage to nerves, muscles and
tendons.
Ergonomic hazards can cause serious harm
to operators, but they do not need to. These
hazards can be removed at the design stage.
3.5.1 MANUAL HANDLING
By considering how and when a machine
is used, you can reduce the risk of injury.
This includes:
> how well the working environment is set up
– are frequently used displays, instruments
or control panels where operators can reach
safely while keeping correct posture?
> what type of machinery is used – does the
equipment expose anyone to too much
vibration, noise or emissions or does it need
physical force to work?
> how work is organised – how much work
needs to be done? How urgent is the work?
How many breaks do operators get? How
long are the breaks?
> what physical demands are put on the
person using the machinery – is the
work repetitive? Does it require awkward
movements or postures? Does the operator
have to work in extreme temperatures?
Check whether tasks require repetitive
movement or there is a risk of musculoskeletal
injuries and gradual process disease.
More information can be found in WorkSafe
NZ’s Code of Practice for Manual Handling.

27
SECTION 03 // IDENTIFY, ASSESS AND CONTROL HAZARDS
3.5.2 LAYOUT AND DESIGN
Good layout makes any guarding better at
keeping people safe. Machines that are poorly
placed or too close together can be unsafe,
even if guarded.
When designing layout:
> avoid congestion points or worker
movements near hazardous machinery
> make sure people can use, clean
and maintain the machinery without
being harmed
> make space for any waste materials to
gather before they are cleared (they should
not clutter walkways or work areas)
> note the movements of trucks, materials
and people
> mark out walkways and create vehicle
movement areas
> mark out ‘no-go’ areas, so people can stay
away from dangerous machinery.
Check how close moving parts are to other
machinery and fixtures in buildings.
3.5.3 REACH AND GUARDING
The main point of machine guarding is to
stop workers reaching past the guard into
the machine. When deciding on the best
way to guard a machine, consider how a
worker uses and interacts with a machine
(ergonomic principles).
More information on ergonomics is in section
7.2 of this guideline.
3.6 CHEMICALS AND FUMES
Many chemicals used with machinery can
harm workers. Assess all chemicals for
hazardous health effects. Put appropriate
controls in place to stop or control people’s
exposure. In some cases, you may need to
monitor the environment or workers’ health
to make sure exposure to the chemicals is not
affecting their health.
For more information refer to the substance’s
safety data sheet, available from your supplier.
3.6.1 CONTROL OF AIRBORNE HAZARDS – VENTILATION
Protect workers at all times from inhaling
steam, fumes, dust and other airborne
contaminants in the workplace. You can
use ventilation, filtration and/or mechanical
extraction. Remove any contaminants made as
part of the work at the source.
Any mechanical extraction must pull
contaminants away from workers’ breathing
zone, not through it.
If it is not practical to completely remove or
isolate the hazardous substance, you must
minimise any risk of harm to the employee.
To minimise a hazard’s effects, an
employer can:
> monitor employees’ exposure to the hazard
> monitor employees’ health (with their
informed consent)
> provide protective clothing and equipment
(such as breathing equipment or dust
masks) and make sure they are used.
3.7 ORGANISATIONAL HAZARDS
For machine guarding to work well,
employers must:
> understand how materials move through
the site
> understand all safe operating procedures
for the machinery
> develop instructions on how to use
machinery safely, including maintenance
and cleaning
> train workers to work safely.
New technology, new machinery or changes
to machinery can introduce new hazards.
At these times, always complete a hazard
assessment and consult with workers.

BEST PRACTICE GUIDELINES // SAFE USE OF MACHINERY
28
3.7.1 FATIGUE AND SHIFT-WORK
Employers must take measures to prevent
fatigue causing harm, such as when employees
must drive or use dangerous machinery.
Employers are not responsible for anything
outside work that reduces an employee’s
ability to cope or leads to fatigue. But they
must have systems to identify and deal
with such factors when they can affect
workplace safety.
Shift-work can be hazardous because it
disrupts normal rest patterns. Employees need
enough recovery time outside work so they
can be safe and productive at work.
Along with enough sleep, breaks during work
hours are important to maintain an employee’s
physical and mental well-being. See WorkSafe
NZ’s Stress and Fatigue: Reducing Their
Impact – Advice for Employers and Employees
guide for more information.
3.8 ELECTRICAL SAFETY OF MACHINERY
The wiring and fittings of machinery
connected to the mains (or similar) must meet
all legal requirements and must be installed by
a registered electrician.
A certified, professional third party
must do all tagging and testing in line with
electrical regulations.
All portable or handheld machinery that
gets power from electricity should be used
with an isolating transformer or residual
current device, where needed. Get specific
advice from the electricity supplier on the
best device to use.
3.9 ENVIRONMENTAL AND OCCUPATIONAL HEALTH HAZARDS
When reviewing machinery for non-
mechanical hazards, consider how machinery
can affect the area around it.
A thorough hazard identification process
needs to consider the effect environmental
factors (such as lighting, heat, and cold) have
on workers when using machinery.
3.9.1 WORKING AT HEIGHT
People need a suitable work platform to
reduce the risk of falling from machinery.
Working safely at height may need:
> fixed or permanently installed
access platforms
> mobile elevating work platforms
> temporary platforms.
For more information, see WorkSafe NZ’s Best
Practice Guidelines for Working at Height in
New Zealand.
3.9.2 LIGHTING
Make sure the work area is well lit. Poor
lighting can be a hazard. Sometimes the
machine or guards can block normal lighting
so extra local light is needed. Also put local
lighting in regular maintenance areas that
are poorly lit, such as inside some electrical
compartments where electrical isolation is
needed for access.
For more information refer to AS/NZS
1680.2.4 Interior lighting – Part 24: Industrial
tasks and processes.
3.9.3 NOISE
Employers must take all practicable steps
to reduce any risk of harm to people from
machinery noise. Machinery noise should be
eliminated, or through isolation kept to a level
that does not damage hearing.
Where this is not practical, employers should
isolate people from excessive noise.
Where neither option is practical, employers
must put systems in place to make sure
people exposed to the noise are unlikely to
suffer harm.

29
SECTION 03 // IDENTIFY, ASSESS AND CONTROL HAZARDS
For more information on controlling noise,
refer to WorkSafe NZ’s Approved Code of
Practice for the Management of Noise in
the Workplace.
Noise limits for an 8-hour day, peak noise levels and protective measures are in HSE Regulation 11.
3.9.4 OPERATING SPEEDS AND DANGEROUS VIBRATION
No machine should be driven or used at
an unsafe speed. Where a designer or
manufacturer recommends a working speed
for a machine, do not go any faster.
Maintain machines so there is no dangerous
vibration when the machine is working or
when moving parts and cutters are run at idle
or full speed.
3.9.5 MACHINERY STABILITY AND SECURITY
All machinery must be secured to the floor or
other structure so that it cannot tip, become
unstable or create any other hazards, unless it
is designed to be portable.
3.9.6 WEIGHT OF GUARDING
Large machinery may need a lot of
guarding, which needs to be removed for
maintenance access. Design guards to come
off easily and be handled by one person.
Well-placed handles make removing, lifting
and handling easier and reduce the risk of
manual handling injuries.
Where practical, use cranes or other lifting
devices to move heavy guards.
3.10 OTHER HAZARDS
3.10.1 ACCESS HAZARDS
Operators and employees need safe access
into, on and around machinery. Workers
need a stable work platform that is right
for the work they need to do. The operator
should be able to keep good posture while
working. The platform must give a sure
footing, a safe working environment and
prevents falls it is at height.
When designing safe access to machinery,
think about who, what, where, when and how.
> Who will be working on or around
the machinery?
> Do people need to work in enclosed areas
where the atmosphere could be harmful
(such as pits, tanks or storage vessels)?
> What equipment or materials need to be
carried to do the job?
> Where and when is access needed to use,
maintain and clean the machine?
> How will people get safe access (such as
from a walkway, gantry, elevated work
platform, ladder)?
> What work will be carried out with
the machine?
> Will people be near or exposed to any
mechanical or non-mechanical hazards when
they access the machine?
> Has consultation occurred with employees
or contractors about how they intend to
gain access, and what equipment and work
platform or structure is best suited for the
intended task?
3.10.2 CONFINED SPACE
Larger machinery and equipment can have
enclosed areas that are difficult to get to. In
confined spaces, oxygen levels may be low
or there may be harmful levels of gas, vapour
or dust.

BEST PRACTICE GUIDELINES // SAFE USE OF MACHINERY
30
For more information, refer to the Australian
Standard AS 2865 Confined spaces.
3.10.3 HOUSEKEEPING
Mess can cause slips, trips and falls. Avoid
injuries by:
> keeping work areas, walkways and other
access paths clear and clean
> clearly marking walkways and no-go areas
> preventing spills, which can cause slips.
Design machinery and work processes to
minimise oil loss or spillage. Clean up spills as
soon as possible and avoid any oily residues
on the floor. Provide a rough anti-slip floor
where this is not practical.
3.11 OPERATIONAL HAZARDS
Flowchart 3 shows the more common
hazards associated with machine operations.
Apart from the hazards associated with
the normal running of the machine, the
flowchart also covers hazards associated
with cleaning, maintenance and repair, along
with irregular hazards.
To keep people safe during inspections,
cleaning, repairs, maintenance and
emergencies:
> use isolation procedures whenever people
need to enter the danger area around
machinery for maintenance and repair
> make sure workers understand cleaning,
repair, maintenance and emergency
procedures
Hazard identification by
> Task analysis > Process analysis > Physical inspection > Failure mode > HAZOPs > Accidents and incidents > Maintenance records > Best practice guidelines, guides and standards
Normal Operation Hazards
Operator controls
> Start > Stop > Emergency stop > Labels > Tool setting, adjusting and calibration > Usual use
> Personal protective equipment > Monitoring > Training and supervision > Safe operating procedures
> Personal protective equipment > Monitoring > Training > Safe operating procedures
Assess each hazard, who it affects, and associated risks
Develop hazard controls
Operator response
> Emergency planning and response > Breakdowns and unplanned maintenance > Blockage
> Lock-out > Interlock > De-energising > Insulation
Irregular Hazards
Cleaning
Maintenance Repair
Flowchart 3: Identify operational hazards to use machinery safely
START HERE

31
SECTION 03 // IDENTIFY, ASSESS AND CONTROL HAZARDS
> put in place a regular inspection regime
to identify any problems with machinery
and guards
> identify and assess any other hazards
specific to inspections, cleaning, repair,
maintenance and emergencies
> take special precautions when workers
cannot be seen or where there are multiple
operating switches
> if dangerous parts need to move while a
guard is open (for example: setting, fault
finding, or maintenance), use safe operating
procedures (such as speed as slow as
practical, and two-hand hold-to-run inching
controls with pendant) to minimise hazards
and the risk of injury.
HSE Regulation 17 requires employers must make sure machinery is safe to clean, maintain and repair. Procedures must be put in place for these activities and workers trained to follow them.

BEST PRACTICE GUIDELINES // SAFE USE OF MACHINERY
32
Notes

HAZARD AND RISK ASSESSMENT
04/
IN THIS SECTION:4.1 Risk assessment 4.2 Adequate information, knowledge and experience
HA
ZAR
D
AN
D R
ISK
ASSESSM
ENT

33
Hazard and risk assessment is a process to determine how significant a hazard is and what harm it could cause.
Every identified hazard must be assessed to
see if it is a significant hazard – something
that could cause serious harm. If it is a
significant hazard, it must be controlled using
the hierarchy of controls. A significant hazard
should be eliminated, if it can’t then isolated,
and if that isn’t practicable, controls should
be put in place to minimise the hazard. If it is
not a significant hazard the employer must
still take all practicable steps to ensure the
equipment is safe for employees to use.
4.1 RISK ASSESSMENT
Use flowchart 4 to work through the hazard
and risk assessment process. This is the
process to assess hazards, select controls and
to assess whether these
methods have reduced or eliminated the risk
of harm occurring.
To manage risks effectively, an assessment
of how likely a hazard is to cause harm must
occur and, if it does, how badly someone can
be hurt. This helps prioritise which hazards
need to be dealt with first.
SECTION 04 // HAZARD AND RISK ASSESSMENT
Assess the hazard for significance and assess the risk:
> Consequence (severity) > Likelihood (exposure/frequency) (see Appendix 11.5 for risk rating)
Risk probability:
> Low/Medium/High > Who is exposed to the risk?
Develop priority of actions for each hazard
Identify controls. Involve staff and use internal or external advice (engineers, health and safety consultants).
(see Flowcharts 7 and 8)
Is the hazard controlled and the risk mitigated?
Monitor and review
Review if something changes
Is the hazard controlled and the risk mitigated?
Evaluate controls through regular review and update or change if required
Keep records
Installation and commissioning
> Current state of knowledge > Guarding > Interlocks > Training > PPE > Information and signage > Procedures > Audit and review > Monitor environment and/or health > Supervision > Workplace culture > Staffing levels
Select and put in place controls
Flowchart 4: Assess hazard and risks – eliminate hazards where possible
YES
YES
NO
NO
START HERE

BEST PRACTICE GUIDELINES // SAFE USE OF MACHINERY
34
Any risk assessment should cover:
> where, which and how many workers could
be injured or harmed
> how often this is likely to occur
> how serious any injuries might be.
For example, with hazards from moving,
rotating or reciprocating machinery, first
assess how likely it is that a worker could
get caught, entangled or nipped, and then
determine how serious any injury might be.
Risk factors to consider during the risk
assessment include:
> visibility – how easy is it to see the hazard?
> orientation – for example, a feed screw that
is low and horizontal could entangle hair, ties
and jewellery. A screw in a different place or
angle would pose a different risk.
> anticipated work practices, including less
obvious ones such as:
> maintenance, inspection, repair and
cleaning practices (for example, a screw
conveyor is behind closed panels, but
when it jams, a worker may open the panel
and stick their hand in)
> infrequent or one-off tasks required
on the machine.
When assessing the risk, take into
consideration:
> whether the danger zone can be reached
> the likelihood of a worker putting fingers,
hands, arms, feet or legs into places where
they do not normally go when the machine
is running.
Key for arrows:
Solid red arrows = where a part of the body could be drawn into a nip-point
Grey arrows = movement of machine parts
4.2 ADEQUATE INFORMATION, KNOWLEDGE AND EXPERIENCE
Risk assessment is not an absolute science –
it is a ‘best estimate’ made on the basis
of available information. As such, the people
doing risk assessments need the right
information, knowledge and experience of
the work environment and work processes.
They need to talk to workers and health
and safety representatives, who can advise
on the particular hazards and risks for
different machinery.
The AS 4024 Safety of machinery series has
more information on risk assessment factors
and methodology – see AS 4024.1301 and AS
4024.1501 in particular.
Figure 16: An example of visibility risk factor. When the top part of the machine lowers, it comes to rest on supports on each corner, so only a small area on the underneath of the top may be a hazard.

35
SECTION 04 // HAZARD AND RISK ASSESSMENT
Figure 17: Risk assessment explains one process for assessing risks and hazards
Figure 18: A example risk rating table
Gather information about each hazard identified
Think about how many people are exposed to each
hazard and for how long
Use the information to assess the likelihood and
consequence of each hazard
Use the risk table to work out the risk associated with
each hazard. See the risk matrix in Appendix 11.5
LikelihoodHow likely is it that a hazardous event will
occur within the life of the machine?
See matrix in Appendix 11.5
ConsequenceWhat might be the consequences of the
hazardous event or situation?
RISK RATING TABLE
Likelihood of injury or harm to health
Consequences of injury or harm to health
Insignificantno injuries
Moderatefirst aid and/or medical treatment
Majorextensive injuries
Catastrophicfatalities
Very likely High Extreme Extreme Extreme
Likely Moderate High Extreme Extreme
Moderate Low High Extreme Extreme
Unlikely Low Moderate High Extreme
Highly unlikely (rare) Low Moderate High High
Extreme = immediate action

BEST PRACTICE GUIDELINES // SAFE USE OF MACHINERY
36
Notes

CONTROLLING MACHINERY HAZARDS
05/
IN THIS SECTION:5.1 Eliminate hazards 5.2 Isolate hazards 5.3 Minimise hazards 5.4 Matrix of guarding controls

37
Employers and principals are responsible for making sure the hazards associated with machinery are controlled in the workplace so they do not harm workers and operators.
Sections 8–10 of the HSE Act outline a
hierarchy of controls that must be used when
a significant hazard has been identified. The
hierarchy consists of three steps: eliminate,
isolate or minimise the hazard. If employers
cannot eliminate or isolate the hazard
(because it is not practicable to do so) they
must minimise it.
5.1 ELIMINATE HAZARDS
With elimination, the hazard or hazardous
work practice is removed from the workplace.
With machinery, this may involve employers
changing processes and machinery so workers
are not exposed to significant hazards.
Hazards can be eliminated at the design stage
too (see section 6 of this guideline).
5.2 ISOLATE HAZARDS
If elimination is not practicable, the significant
hazard must be isolated. This involves isolating
or separating the hazard or hazardous work
practice from those who may be harmed by
it. These usually protect everyone around the
machine (which is known as a group control).
They can be fixed guards, interlocked guards
or safe by position.
5.3 MINIMISE HAZARDS
If it is not practicable to eliminate or isolate
the hazard, then the likelihood of it causing
harm must be minimised. Minimisation
provides a framework of expected behaviours,
such as rotation of staff to reduce exposure
to a hazard, personal protective equipment or
a documented safe system of work – such as
‘lock-out – tag-out’. These types of controls
rely on extensive instruction, information,
training and supervision.
Minimising a hazard can stop injuries,
but it is the least effective option because
it relies more on human behaviour,
maintenance programmes and supervision.
In the long term, minimisation can also be
more expensive, because it needs time
and ongoing oversight by managers and
employers, and additional costs of personal
protection, eg hearing protection.
When a hazard can only be minimised,
section 10 of the HSE Act requires employers
to monitor employees’ exposure to the
hazard and monitor their health. Employers
can only monitor employee’s health with their
informed consent.
Because minimisation relies on human
behaviour, hazard management needs to
consider the actions of the people who:
> install or dismantle machines
> operate machines and equipment
> maintain or repair machines
> clean machines.
SECTION 05 // CONTROLLING MACHINERY HAZARDS

BEST PRACTICE GUIDELINES // SAFE USE OF MACHINERY
38
With changes in technology and cost of
solutions over time, measures to eliminate
and/or isolate a hazard may become
practicable. Duty holders should continue
to assess significant hazards that are being
minimised in order to determine whether
there are other methods to control them. For
example, replace with a newer machine that
eliminates or isolates the hazard.
5.3.1 AS 4024 SAFETY OF MACHINERY SERIES
Duty holders should use the AS 4024 Safety
of Machinery series as the standard that gives
the current state of knowledge in relation to
safeguarding machinery and plant. It should
be referred to by duty holders as the primary
standard against which to benchmark.
Employers, suppliers, manufacturers and
designers can work to other standards,
but they need to show that they can reach
the same level, or better, of safety in the
circumstances in which they are used.
The level of familiarity with AS 4024 will
depend on the responsibilities of the duty
holder. For instance, when buying new
machinery or hiring machinery, the employer
must make sure any machinery purchased
or hired meets AS 4024, or equivalent or
higher standards.
The employer must make sure that any
competent person they hire to give advice or
services on machine guarding or safe use of
machinery is experienced in using AS 4024,
or equivalent or higher standards.
However, an engineer maintaining and
repairing machinery and/or installing guarding
should be very familiar and experienced with
AS 4024 and be able to readily access a copy.
See Section 11.4 for a summary of the AS 4024
Safety of Machinery series.
5.4 MATRIX OF GUARDING CONTROLS
Table 1 covers options for eliminating hazards,
the types of guards and methods that isolate
workers from hazards, and examples of how
hazards can be minimised. The controls are
split into two categories, individual and group
controls. Group controls protect more than
one person, whereas individual controls can
only protect one person at a time.
If hazards can’t be eliminated, there are a
number of options to isolate operators from
machinery. When deciding which guarding
methods to use, consider practicality and
how the operator will use the machine.
Many factors determine the choice of guard.
Depending on the situation, a combination of
two or more guards may be needed to keep
workers safe.

39
SECTION 05 // CONTROLLING MACHINERY HAZARDS
HIERARCHY OF CONTROLS GROUP CONTROLS INDIVIDUAL CONTROLS
ELIMINATE
> Design or modify machine to eliminate the hazard
> Eliminate by substitution
> Eliminate human interaction (eg automate handling)
> Eliminate pinch points
> Increase clearances or remove forces
ISOLATE
> Fixed guard
> Interlock guard
> Interlock distance bars
> Failsafe interlocking
> Safe by position
MINIMISE
> Presence sensing devices
> Light curtains
> Computer warnings
> Light beacons and strobe lights
> Lock-out systems
> Two-hand controls
> Emergency stop
MINIMISE
> Safe system of work
> Signage
> Training
> Supervision
> Safe operating procedures and instructions
> Administrative controls (eg safety inspections)
> Personal protective equipment
DE
SIR
AB
LELE
SS D
ESI
RA
BLE
Table 1: Matrix of guarding controls

BEST PRACTICE GUIDELINES // SAFE USE OF MACHINERY
40
Notes

ELIMINATE HAZARDS AT THE DESIGN PROCESS
06/
IN THIS SECTION:6.1 Eliminate hazards through design 6.2 Reliability of safety functions 6.3 Designing for safety throughout the life cycle 6.4 Concept stage – health and safety in the business case 6.5 Construction of machinery 6.6 Validation and verification

41
The best time to eliminate hazards is at the machinery design stage. This section covers some of the common hazards that can be eliminated through design. The section also outlines the principles of including health and safety in the design process.
The design process usually begins with:
> the buyer or employer wanting a piece
of machinery to meet business needs
and/or modifications
> a manufacturer seeing an opportunity
to meet an industry need
> a supplier seeing a gap in the market
> a supplier looking for other products
to promote.
At this point, the designer should get advice
from safety experts, people who might use it
and engineers to help design a safe machine.
Machinery must be designed that does not
hurt anyone at any point in the process of its
manufacture, installation, use, maintenance
or repair.
Designers must consider how the
machinery can injure people working with it.
Injuries include:
> amputation and crush injuries
> workplace stress and fatigue
> manual handling injuries
> occupational illness from fumes, dust,
noise, radiation.
6.1 ELIMINATE HAZARDS THROUGH DESIGN
Common hazards that can be eliminated
through design include:
> mechanical hazards – hazards made by the
shape, relative location, mass and stability,
movement and strength of machine parts
> electrical hazards – contact with or distance
from live parts, suitability of insulation, static
electricity, heat radiation and results of
overloads or short circuits
> heat hazards – contact with high-
temperature objects or materials
> noise and vibration hazards
> radiation hazards – both ionising, for
example x-rays and gamma rays, and non-
ionising, for example electric and magnetic
fields, radio waves, microwaves, infrared,
and ultraviolet radiation
> materials and substances hazards – hazards
made, used or released by machinery or
from the construction materials
> ergonomic hazards – poor machine set-up
leading to injuries and operational errors
> maintenance hazards – when guarding
is removed or switched off for cleaning,
maintenance or access to the area around
a machine
> slips, trips and falls hazards – flooring
surface and access
> work environment hazards – environmental
conditions, such as temperature, weather
or lighting.
SECTION 06 // ELIMINATE HAZARDS AT THE DESIGN PROCESS

BEST PRACTICE GUIDELINES // SAFE USE OF MACHINERY
42
6.1.1 INHERENTLY SAFE DESIGN MEASURES
Experience shows that protective measures
built into the design are more likely to
stay effective even when well-designed
safeguarding fails, an error is made or safety
procedures are not followed.
Hazard identification is the first step in the
design process. Examples of safe design that
eliminates particular hazards rather than
relying on safeguards to prevent harm include:
> putting oil filters and grease nipples on the
opposite side of a machine to its hot parts
> placing lubrication points away from
moving parts
Avoid creating hazards by considering:
> visibility of working areas from the
control position
> shape of and spacing between components
> reducing sharp edges
> enabling effective working positions and
ease of access to controls
> limiting forces or emissions.
Find more information on inherently
safe design in AS 4024.1202 Safety of
machinery: Part 1202: General Principles –
Technical Principles.
6.1.2 STABILITY ASPECTS
When designing the machine’s
stability, consider:
> the shape of the base
> weight distribution
> dynamic forces
> vibration
> oscillations
> the surface the machine sits on
> external forces
> earthquakes
> wind loadings.
6.1.3 TECHNICAL INFORMATION
The designer must develop technical
information for the supplier and buyer from
standards, codes and calculations. The
information should cover:
> forces which may be applied to material
used in construction
> management of emissions including noise
fumes and dust
> tests and procedures to ensure continued
safe operation of the machine.
6.2 RELIABILITY OF SAFETY FUNCTIONS
The designer must consider:
> the reliability of all machinery parts
> use of safety failure modes of components
> duplication or redundancy of safety features
> automatic monitoring of faults.
The designs of safety-related parts of
control systems need to be validated by
a competent person. Validation confirms
that all steps of the safety life cycle were
implemented and verified.
Designers can find information on reducing
safety system failure through good design and
typical failure modes in AS 4024.1502 Safety of
Machinery: Part 1502: Design of Safety Related
Parts of Control Systems – Validation.
6.3 DESIGNING FOR SAFETY THROUGHOUT THE LIFE CYCLE
Different hazards exist at different
stages of a machine’s life cycle; many of
these can be reduced or removed through
thoughtful design.

43
SECTION 06 // ELIMINATE HAZARDS AT THE DESIGN PROCESS
6.3.1 MANUFACTURE
The making of machinery is the first phase
of the life cycle. Examples of removing or
controlling hazards include:
> replacing spoked gears with gears with a
solid disc, to get rid of a shear hazard
> building housing around obvious
hazards rather than having to fit guards
after manufacture.
HSE Regulation 66 describes the duties of designers of plant.
6.3.2 TRANSPORT
Moving the machine to where it will be
installed is the next important step.
An example of removing a transport hazard is
a metal lathe is to be delivered fully assembled
and is much heavier at one end. The designer
notes the chance for the lathe to slip out of its
lifting slings, so they incorporate lifting eyes
for the slings in positions that mean the lathe
can be lifted in a horizontal position.
6.3.3 INSTALLATION
Once a machine is safely delivered, it needs
to be installed.
For example, to reduce hazards during
installation, design a large machine to be
delivered in modules that are put in place by
a crane. Then installers do not need to work
at height or handle heavy items by hand.
6.3.4 COMMISSIONING
The designer can build in test points for
instruments and alarms so a machine or parts
of machinery cannot be energised by mistake.
6.3.5 OPERATION
Designers must design machinery and
plant that is safe to use. Some examples of
designing machinery for safe operation:
> consider the type of seating an operator
may use and the ease of using the controls
from the seat.
> if an operator needs to move around a
large machine, provide a portable
emergency stop button.
> give easy and safe access to areas that need
regular maintenance. Access will be needed
for cleaning, lubrication and adjustment.
Maintenance considerations include:
> routine adjustments – people should be
able to do these with the machine stopped
but without needing to remove safeguards
or take apart any of the machine
> when frequent access is needed – use
interlocked guards
> when access is difficult – consider self-
lubrication or central lubrication for parts
> positive lock-off devices to stop
the machine restarting accidentally,
particularly if a machine was shut
down in error.
6.3.6 STORAGE
Manufacturers and designers should make
sure machinery can be stored without creating
hazards or when started after inactivity. They
can include information on how to break down
the machine for safe storage.
6.3.7 DISPOSAL
People breaking down machines for scrap can
face significant hazards. These include:
> energy stored in springs and pressure devices
> hazardous substances that are part of
the machine.

BEST PRACTICE GUIDELINES // SAFE USE OF MACHINERY
44
6.4 CONCEPT STAGE – HEALTH AND SAFETY IN THE BUSINESS CASE
The concept stage of a project is the best time
to get things right. With thorough research,
planning and consultation, many hazards can
be eliminated before a machine is designed,
purchased, installed or modified.
6.4.1 HEALTH AND SAFETY IN THE BUSINESS CASE
Once the need for new machinery or a change
to existing machinery is identified, adding
health and safety into the business case will
help to assess hazards and risks. This can
also help avoid budget blow outs, unpleasant
surprises and costly retrofitting.
A thorough business plan includes at least the
following elements outlined in sections 6.4.2
to 6.4.7 of this guideline.
6.4.2 RETURN ON INVESTMENT (ROI)
A return on investment (ROI) assessment
should incorporate health and safety
implications. For example, two different
machines can get the same results. One
machine costs $10,000 more but is insulated
and does not make enough noise to damage
hearing. If the cheaper machine was
purchased, the company would have to spend
$15,000 on hearing protection and hearing
monitoring for operators.
The machine that is $10,000 more expensive
will actually save the company $5000 in safety
equipment and health checks.
6.4.3 CAPITAL EXPENDITURE (CAPEX)
Some businesses incorporate health and
safety costs in the CAPEX sign-off process.
A senior manager responsible for health
and safety ensures an assessment is done
and any risks addressed before the machine
is purchased.
Flowchart 5: Concept stage – Health and safety in the business case
Get it right at the start!
Establish the need for new plant or modifying existing plant
Develop a business case
Define machine safety specifications and operational requirements
> Legislation > Standards – AS4024 and machine specific standards (see Appendix 11.4) > WorkSafe NZ Approved Codes of > Practice (ACOP) and Guidelines > Current state of knowledge > Consultation with users, health and safety reps and internal expertise > WorkSafe NZ’s- Safe Use of Machinery page for advice on specific machinery
> Return on investment > Capital expenditure > Production/Operations input > Do I need this machine? > How often do I use it?
Identify hazards
(see Flowcharts 2 and 3)
Eliminate hazards through safe design
Complete business case with the information gathered
Business case is accepted.
Develop project plan including health and safety requirements
START HERE

45
SECTION 06 // ELIMINATE HAZARDS AT THE DESIGN PROCESS
6.4.4 LEGAL REQUIREMENTS
Anyone buying or modifying machinery to
be used in a place of work has legal duties.
The person putting together the business
case should check what laws apply to their
business. All businesses must comply with the
HSE Act and the HSE Regulations.
6.4.5 SAFETY AND OPERATIONAL STANDARDS
The business case should address health and
safety and consider the following:
> the WorkSafe NZ Position Paper on the Safe
Use of Machinery
> the AS 4024 Safety of Machinery series
> any standards relating to the equipment
(eg if there is a conveyor, refer to AS 1755
Conveyors – Safety Requirements)
> any relevant WorkSafe NZ approved codes
of practice, guidelines, guides and factsheets
> the current state of knowledge from
industry associations, manufacturers and
other sources
> involvement of health and safety
representatives, union representatives
(if applicable), operators, cleaners,
maintenance staff and engineers.
6.4.6 IDENTIFY, ASSESS AND CONTROL HAZARDS
By doing a detailed hazard identification
process before starting, hazards can be
eliminated at the design stage. Use Flowcharts
2 and 3 to identify the most common
machinery hazards.
While removing hazards is the best option,
not all hazards can be eliminated. If hazards
cannot be eliminated, consider how they can
be isolated. Flowchart 7 can help choose the
right guarding solution.
If guarding is not possible, hazards must be
minimised. Flowchart 8 covers the minimum
requirements for a safe system of work.
6.4.7 PROJECT PLAN
Once the business case is accepted, a
project plan is usually developed. Health and
safety implications and information about
hazard management should be included in
the project plan.
6.5 CONSTRUCTION OF MACHINERY
All machinery should be soundly built.
Machinery should also be built so it is free
from dangerous vibrations when in use.
This includes any cutter fitted to a machine
running at full speed or at idle.
6.6 VALIDATION AND VERIFICATION
In the flowchart 6, the left hand column
specifies steps in the process of ensuring the
safety of a machine. The right column lists
procedures carried out to test and ensure the
safety of a machine.
> Verification – did we build it right?
> Validation – did we build the right thing?
6.6.1 VALIDATION – IS IT CORRECT, SAFE AND FIT FOR PURPOSE?
Safety validation is a documented
examination of the machine and its
processes. The examination must be done
to national or international guidelines or
standards. The examination compares the
actual status of the machine or work with
what it should be.
Anyone doing a validation needs extensive
knowledge of the equipment and how it
should work. The person must be competent
to compare the machine’s safety features
and performance to the planned results
established by the safety requirement
specifications and risk assessment.

BEST PRACTICE GUIDELINES // SAFE USE OF MACHINERY
46
Validation verifies that the safety design was
put in place correctly and checks that the
machine works safely and meets the safety
requirement specifications. Depending on the
machine, validation can include:
> reviewing machine risks
> examining mechanical guarding
> examining safety-related control circuits
(eg electrical, pneumatic, hydraulic)
> examining safety-related software
> functional validation
> examining essential health and safety
requirements (eg noise, ergonomics).
6.6.2 VALIDATION STEPS
The following are some recommended steps
to take to complete the validation process.
6.6.3 RISK ASSESSMENT AFTER MODIFICATIONS AND CHANGES
This is done by the person in charge of the
validation once the risk reduction methods
have been put in place on the machine.
It should include descriptions of how the
machine was made safe to operate and any
minor hazards remaining should be noted.
If new hazards have appeared as a result of
any modifications, these must be noted and
controlled.
6.6.4 SAFETY DESIGN CONTROL AND SOFTWARE VALIDATION
Validation must also check the design of
controls and how the software functions.
Flowchart 6: Validation and verification
Identify hazards
(see Flowcharts 2 and 3)
Risk assessment
(see Flowchart 4)Post-measures
Risk assessment
Verify the following:
> safety requirement specifications > architecture/drawings > components > guarding
Software validation (if required)
Installation inspection and validation
Functional validation (test function behaviour)
Document
Safety requirement specifications
Concept and design stage
(see Flowchart 5)
Installation or modification and commission machine
Validation
SAFE USE OF MACHINERY PROCESS VERIFICATION AND/OR VAILIDATION
START HERE

47
SECTION 06 // ELIMINATE HAZARDS AT THE DESIGN PROCESS
6.6.5 INSTALLATION VALIDATION
This can include:
> physical inspection of machine
> review of guarding design
> check that reach distances meet the
ergonomics of machine guarding
requirements
> electrical inspection
> hydraulic inspection
> pneumatic inspection
> ensure components are fit for purpose
> system architecture meets the needs of
risk assessment and safety requirement
specifications
> inspection of components for things like
damage and correct mounting
> check that wiring and piping match
drawings and are labelled correctly.
6.6.6 FUNCTIONAL SAFETY VALIDATION
Each safety feature is individually tested and
validated; for example, each emergency stop
is pressed and what happens is compared to
what the safety requirement specifications say
is supposed to happen.
6.6.7 ESSENTIAL HEALTH AND SAFETY REQUIREMENTS VERIFICATION
Assess the machinery for other hazards.
Flowcharts 2 and 3 can help in this assessment.

BEST PRACTICE GUIDELINES // SAFE USE OF MACHINERY
48
Notes

GUARDING TYPES – ISOLATE
07/
IN THIS SECTION:7.1 Types of guards that isolate the hazard 7.2 Machine guarding and ergonomics

49
This section covers the types of machine guarding available and the situations where it is generally used. Depending on the situation, a combination of two or more safeguards may be needed to keep workers safe.
7.1 TYPES OF GUARDS THAT ISOLATE THE HAZARD
7.1.1 FIXED GUARDS
Fixed guards are physical barriers that
keep people out of dangerous areas during
normal use, maintenance or cleaning. The
need to adjust drive belts and transmission
chains, other machinery parts, can affect
guard design.
Fixed guards can be:
> permanent – welded into or part of the body
of the machine
> removable – but they can only be
removed when the machine is stopped
with a special tool that is not easily available
to operators. Do not use wing nuts, wedge
inserts or anything that can be undone
with the fingers.
Barriers or fences held securely in place with
fasteners or other suitable devices can stop
access to dangerous areas.
Machine guards should be made of substantial
materials (such as sheet steel, wire mesh) that
cannot be easily damaged.
7.1.2 INTERLOCKED GUARDS
Interlocked guards work by cutting power to
the machine when the guard is opened. They
are a good guard to use when a machine
needs to be accessed often.
If parts keep moving when the machine is
not working, you must use a type of guard
that cannot be opened until all parts have
stopped moving, or fit devices that stop the
machinery. Any brakes fitted to machinery
must be well maintained.
Use a suitable anti-freefall device
with interlocked rise and fall guards on
machine tools that can injure if they
freefall under gravity.
Power-operated guards should work with
a minimum of force so they do not create
a trapping hazard. Where it is not possible
to reduce the closing force of a guard, fit a
safety trip device to the leading edge of the
guard that will stop and reverse the guard if it
contacts an object, like a hand.
With barriers like fences, there is a danger
that machines can start when someone is
close to them, such as when an interlocked
door accidentally closes and the machine
re-starts. To avoid this hazard, fit devices
to stop an interlock door or gate closing
accidentally (such as a spring or gravity latch,
which need a deliberate action from someone
to close the door).
Figure 19: Example of a fixed guard
Fixed guard
SECTION 07 // GUARDING TYPES – ISOLATE

BEST PRACTICE GUIDELINES // SAFE USE OF MACHINERY
50
Interlocked guards must be designed so that
any failure or loss of power does not expose
people to danger. The design also needs to
consider the possibility of someone being
inside the area enclosed by the guard when
someone tries to start the machine.
Only after doing a risk assessment can you
know what type of safety device to install
with the guard, and the level of integrity of
the related control circuitry. If needed, more
information is available in AS 4024.1501 Safety
of Machinery: Part 1501: Design of Safety
Related Parts of Control Systems – General
Principles for Design.
7.1.3 SAFE BY POSITION
This method of hazard management relies
on putting dangerous machinery parts out
of reach of people. The problem with this
method is that people can often use ladders,
furniture or machine parts to reach the hazard.
This method needs policies and practices in
place to make sure that the protection is
not compromised.
When deciding how far away to put dangerous
machinery, also consider how maintenance
people will get access, such as by ladder,
scaffold or mobile elevating work platform.
7.1.4 TRIP GUARDS
When other guarding methods are not
practical, you can use trip guards. A trip guard
is designed to cut the power if someone
reaches into a dangerous part of a machine.
However, if this system fails, there is no
physical barrier to stop people touching
dangerous parts. All safety trip guards should
be hardwired to the machine control and
power brake systems.
7.2 MACHINE GUARDING AND ERGONOMICS
Ergonomic principles cover how a worker
uses and works with a machine. Making sure
workers cannot reach past the guarding into
the machine is a key part of machine guarding
and isolating the people from hazards.
Typical ergonomic principles include:
> the nature of operator postures
and movements
> the ease of physical operation
> the effects of noise and temperature
> the lighting environment
> the clarity and location of manual controls
> the design of dials, markings and displays.
Figure 20: Perimeter fence guard with fixed panels and interlocking access door
Figure 21: Food mixer with an interlocking guard
Perimeter fence guard
Interlocking guard
Interlocking mechanism
Emergency Stop button

51
SECTION 07 // GUARDING TYPES – ISOLATE
Reach is limited by the length of arms, fingers
and hands, legs and feet. The distance a
person can reach sets the minimum height
for some guards or the minimum distance of
barriers from the hazard.
The average size and reach of humans is used
to set design criteria. There will be some
people – the very tall or very slender – whose
size means they are not fully protected by
the standard measurements given. Protect
these people using the more restricted
measurements in the following publications:
> AS 4024.1801 Safety Distances to Prevent
Danger Zones Being Reached by the
Upper Limbs
> AS 4024.1802 Safety Distances and Safety
Gaps – Safety Distances to Prevent Danger
Zones Being Reached by the Lower Limbs.
7.2.1 DANGER ZONE SEPARATION DISTANCES
Use Table 2 above to assess the risk in
equipment and the design and positioning of
guards. The minimum separation distances are
based on people with long arms, hands and
fingers. The gaps are based on people (over 14
years old) with small fingers and hands.
The separation values are more conservative
than values calculated from the Ergonomics
of Machine Guarding Guide. Where needed,
more information is in AS 4024.1801 Safety
of Machinery: Part 1801: Safety Distances to
Prevent Danger Zones Being Reached by the
Upper Limbs.
The anthropometric data used in this standard
was based on information available when
the standard was developed. Better sources
may become available. If your workforce
is significantly different from the general
population, you may need to take your
own measurements.
If someone can fit an arm through a gap, the
hazard assessment should also consider any
smaller openings inside the machinery.
If the arm can be bent at:
> the elbow – the minimum separation
distance from the elbow to any danger
zone should be 550mm
> the wrist – the minimum separation distance
from the wrist to any danger zone should
be 230mm.
7.2.2 LOCATION OF DISTANCE GUARDS
Distance guards should be at least 1600mm
tall and at least 900mm away from the
danger zone; further or higher if there is a
projectile hazard.
If the guard is between 1000mm and 1600mm
tall, it must be at least 1500mm away from the
danger zone. No guards should be less than
1000mm high.
PART OF BODY GAP (MAXIMUM SIZE OF ANY APERTURE OR OPENINGS IN THE MACHINERY)
MINIMUM SEPARATION DISTANCE FROM DANGER ZONE
Fingertip 4mm 2mm
Finger 6mm 20mm
Arm 20mm 850mm
Arm (reaching above head) 2,700mm
Table 2: Separation distances and gaps

BEST PRACTICE GUIDELINES // SAFE USE OF MACHINERY
52
Notes

GUARDING TYPES – MINIMISE
08/
IN THIS SECTION:8.1 Power controls 8.2 Other guarding requirements 8.3 Other control measures 8.4 Providing information on machinery8.5 Safe systems of work 8.6 Monitoring and reviewing effectiveness of control measures 8.7 Keeping documents and records

53
SECTION 08 // GUARDING TYPES – MINIMISE
This section details the type of guarding and control options that will only minimise the likelihood of harm occurring. These controls should only be used if the hazard cannot be eliminated or isolated.
These guarding options generally protect
more than one person and are called group
controls. Pictures in this section show guards
in yellow and emergency stop buttons in red.
8.1 POWER CONTROLS
The power control is the device on a machine
that controls the flow of energy to the prime
mover. This energy may be:
> electricity
> hydraulic oil under pressure
> compressed gas.
The power control should be able to stop the
flow from all energy sources. Interlocks and
labels should clearly indicate where there is
more than one energy source and stop all
sources of energy to the prime movers.
HSE Regulation 66 requires that plant and power control placement are designed with ergonomic principles.
The power controls should be:
> able to open all energy sources (such as all
phases of a three-phase electrical supply)
> built and shrouded so the machine cannot
be started accidentally
> clearly identified, with labels giving
information on when and how to start
the machine
> convenient to use and placed using
sound ergonomic principles away from
dangerous parts
> fail-safe, in case the energy supply is cut
> lockable in the off position when a person
at the controls might not be able to see
staff working on the machine (refer also to
section 8.1.11 of this guideline)
> showing the direction of the movement of
the controls, which match up to the motion
of the moving parts
> unable to be locked out in the on position
> unable to indicate off position if it is in fact
in the on position.
Hydraulic controls should be either dead-
man or hold-to-run type with anti-tie down,
so that if the control is released the machine
stops moving.
When a machine’s power falls to a low level
or stops completely, exposing parts of the
machine, this can create a significant hazard
when the power is restored. The machine
should need the deliberate operation of the
power control to start the dangerous parts.
If the machine operator cannot see the whole
machine, a warning device must alert people
either visually, by sound or both before the
machine restarts.
8.1.1 PHOTOELECTRIC SAFETY DEVICES
Photoelectric safety devices use light beams
that stop machines working when the light
beam is broken. This method is often used
when fixed or interlocked mechanical guards
are not practical. However, if the system fails,
there is no physical barrier to stop people
being exposed to the hazard. Photoelectric
devices can be set to control how much
anyone can enter a restricted space, such as
a hand but not the arm, or an arm but not
the body.

BEST PRACTICE GUIDELINES // SAFE USE OF MACHINERY
54
Shrouded controls
Light beams
Guarding
Single light beams are not normally suitable
because people can reach around the light
beam and access the hazard. You can use a
number of light beams so there are no gaps
that people can reach through, around, under
or over. When any of the beams are broken,
the power is cut.
Consider carefully what distance a light
beam curtain is placed from the hazard. If
it is too close, someone can reach through
the light curtain to danger faster than the
control system can stop the machine. If the
beam is too far away, someone can stay inside
the protected area without interrupting the
light beam.
You can use extra protection (such as extra
light beams/curtains, safety mats or laser
scanners) to monitor the area inside the light
curtain. You can use photoelectric safety
devices with other types of guard to make a
safe zone where an operator has to access the
machine frequently.
As photoelectric systems can fail without visible
warning, any failure must not put a user at risk.
Photoelectric safety devices should meet
and be installed to high performance
standards, such as the International
Electrotechnical Commission standard IEC
61496 Safety of Machinery – Electro-Sensitive
Protective Equipment.
8.1.2 AUTOMATIC PUSH-AWAY GUARDS
With this type of guarding, a barrier moves
towards the user when they approach the
hazard making them step back, out of reach
of the hazard. If push-away guards are not
carefully designed and maintained then
they too can become a hazard. Users need
thorough training to safely use machinery
guarded like this.
8.1.3 TWO-HAND CONTROLS
Only use this method to isolate people from
machinery hazards as a last resort. Even when
used properly, two-hand controls only protect
the machine operator, not other people who
may be near.
Two-hand controls should:
> need to be turned on together (so people
cannot tape one control down)
> need to be held to run, so the machine stops
immediately when the control is released
> be spaced well apart and shrouded so one
arm cannot run both controls.
The rear and sides of the machine should
be guarded by fixed guards to prevent stop
access by other people.
8.1.4 PRESSURE-SENSITIVE MATS
Pressure-sensitive mats are designed to cut
the machine’s power if someone steps on
them to access a dangerous part. Only use
pressure-sensitive mats when you cannot use
physical barriers or other methods of isolating
people from hazards.
Figure 22: Example of a photoelectric light curtain used as a trip guard
Figure 23: Example of a two-hand control

55
SECTION 08 // GUARDING TYPES – MINIMISE
Pressure-sensitive mats use a number of
well-spaced electrical or fluid switches or
valves in a mat. The mat covers any entries to
a restricted space. Pressure on the mat stops
the automatic operation of the machine. You
should design the guard so no one can step
over or around it into a restricted area.
Operate and maintain pressure-sensing
safeguard systems to the manufacturers’
instructions. Keep records of any maintenance,
inspection, commissioning and alteration to a
presence-sensing system, as well as any test
results. Make sure workers and health and
safety representatives can access the records.
Because pressure-sensitive mats do not
usually show any visible sign of failure, use a
control system that shuts down the machine
if a mat fails.
8.1.5 LOCKED GUARDS AND GATES
Locking guards and gates need a responsible
person (usually a manager) to hold the key
at all times. This person must also make sure
the gate is not opened until the machine is
switched off, isolated and has stopped.
Only use locked guards and gates if after
diligent trials, there are no practical alternatives.
Senior management in association with
staff should also write, approve and monitor
any safe operating procedures and monitor
the effectiveness of the safety process as a
temporary means to minimise the hazards.
Isolation, hold cards and lock-out devices (see
section 8.1.11 of this guideline) can also be used
so a machine is not accidentally restarted.
8.1.6 ADJUSTABLE GUARDS
Adjustable guards are made up of a fixed
guard with adjustable elements that are
moved to suit each task. They can be:
> self-adjusting – guards that are forced open
by the entry of work
> distance guards – barriers that can be
moved to a safe distance from the
danger zone.
Guards that move out of the way for each
operation (automatic guards) need special
care. Hazards can be created between the
guard and:
> machine
> person
> work piece.
Staff need full training on using and adjusting
these guards. These guards are only effective
when the people use them correctly.
8.1.7 EMERGENCY STOP DEVICES
Emergency stop devices should not be the
only method used to control hazards. They are
only a backup for other control measures. They
should be red with a yellow background. Do not
use emergency stops to lock-out the machine
because the actuators can separate from the
contacts. If this happens, the control will show
the machine is off but it is actually on.
Figure 24: Pressure mat enclosing a robot
Figure 25: The self-adjusting guard over the cutting wheel swings back as the cutting wheel cuts through steel

BEST PRACTICE GUIDELINES // SAFE USE OF MACHINERY
56
Do a hazard assessment when choosing an
emergency stop device and consider:
> whether part of the machine still needs to
work in an emergency situation
> what other safety features still need to work
(such as pressure release valves)
> whether the stop introduces any
new hazards
> what level of integrity any associated
circuitry needs.
Make sure emergency stop devices:
> are prominent, and clearly and
durably marked
> are immediately accessible to each user
of the machine
> have red handles, bars or push buttons
(labelling can also be used)
> are not affected by electrical or electronic
circuit failure.
Other considerations include:
> whether stop devices should be easily seen
in contrast to their surroundings
> the best access for workers – ideally they
are near where someone can be trapped in
the machine
> the environment the machine is used
in (eg whether the device is exposed to
dust, chemicals, temperature extremes
or vibration)
> the number of emergency stop devices
needed (if the machine is large, several
devices or pull wires may be needed)
> a manual way to reset an emergency
stop device
> a regular testing routine to check the
device still works.
Badly placed emergency stop devices
may slow shutdown in an emergency and
encourage dangerous practices, such as:
> reaching across moving parts
> failing to shut down machinery when there is
a problem
> allowing one worker to start the machine
while another is in a dangerous location (like
cleaning a machine).
When there is more than one device, use a
safe procedure so machinery cannot restart
during maintenance or other temporary
situations (such as a blockage of product).
A lock-out and tag-out system is essential to
isolate the machine from a power source to
stop accidental start-up.
When servicing emergency stop devices,
actuators can separate from contacts,
meaning the machine appears to be off, but
because of the fault it is still on. This why
emergency stops are unsafe to use as a means
of lock-out.
8.1.8 COLOUR CODING
It is good practice to paint safety guard
posts or frames yellow and any mesh black
so it can be seen through more easily and
staff do not need to open the guards for
observation as much.
Figure 26: The green line shows the emergency stop cord on the rollers that act as a trip guard

57
SECTION 08 // GUARDING TYPES – MINIMISE
So workers can easily see when a guard is out
of place, it is good practice to:
> use high visibility yellow paint for the guard
that is different from the machine’s colour
> paint surfaces behind the guard a bright or
contrasting colour (like blue or red).
8.1.9 LOCK-OUT SYSTEMS AND ISOLATION PROCEDURES
Lock-out systems are used to safely isolate
machinery from its power source. They are
used when someone needs to inspect, repair,
maintain, alter or clean the machine, or
when it is to be withdrawn for assessment or
repair. The method used to isolate depends
on the type of machinery. Employers should
develop these safe operating procedures with
employees. Once a procedure has been put in
place it should be strictly obeyed.
Employers must make sure there is a
safe system to isolate all machinery from
power sources.
They must:
> have procedures to prepare a machine for
the application of isolation devices, locks
and tags
> train and instruct workers in the system so
they are competent to isolate or lock-out
and tag-out machinery
> give supervision to make sure that
isolation procedures, are followed.
Workers trained in the safe system of isolation
for machinery must make sure the system is
followed at all times.
If the machine is powered by electricity, the
employer or principal should have a qualified
electrician remove and keep the fuses. Where
other sources of power are used, the parts
that are removed to achieve isolation should
also be kept in a place where they can not be
accessed by other workers.
If access to machinery is required and it is not
practical to stop it, employer, principal or duty
holders must ensure that:
> the machine is fitted with operating controls
that allow controlled movement
> there are written procedures to be followed
for inspections, repairs, maintenance,
alteration and cleaning
> people working on the machine carry out
the work in accordance with the written
procedures.
8.1.10 COMPETENT PERSON FOR PLANNED ISOLATION
The competent person must be the key
person to:
> stop and isolate the machine
> minimise any risks associated with identified
hazards (including telling any workers who
may be affected by isolating the machine).
The competent person must make sure:
> all energy sources are de-energised and
isolated using an isolation device, and locked
out using a lock-out device
> all energy-isolating devices are activated and
all switches and valves are in the off or safe
position, to stop any attempts to activate
the machine
> stored energy is released or restrained,
including, for example, completing the
cycle of a flywheel, releasing steam and
bleeding valves
> an out-of-service tag is fixed to the machine
and danger tags are fixed to the energy
sources and operating controls
> tests are in place to de-energise and isolate
the energy sources, to make sure the
machine cannot be re-energised
> the machinery is isolated before any
inspection, repair, maintenance, alterations,
cleaning or withdrawal happens.

BEST PRACTICE GUIDELINES // SAFE USE OF MACHINERY
58
The competent person who isolated the
machinery must be the one to remove the
lock-out equipment and make the machine
operational again. A procedure should be in
place where this is not possible (such as where
work is done over a number of shifts or the
worker has gone home sick).
If the competent person cannot complete all
steps in a planned isolation, they must make
sure a competent person develops written
procedures and that these are followed by the
person doing the work.
8.1.11 ISOLATION, HOLD CARDS AND LOCK-OUT DEVICES
Chains, clasps and locks are examples of
devices that can be used to isolate machinery.
Isolation devices must be reliable and clear.
Each lock should:
> be strong enough to take physical abuse,
either intentional or unintentional
> be made of material suitable for the
environment
> have only one key and one owner who is
responsible for it.
Master or spare keys should be kept in a
designated place, away from the workplace
and under the control of an competent person.
There must be strict procedures about when
to use spare keys. They must only be used in
an emergency after thorough safety checks
are done.
Lock-out and tag-out cards should be used
together and be attached to the power
controls of isolated machinery. This reduces
the chance of someone starting the machinery
inadvertently. The cards must clearly state that
under no circumstances should the machinery
be connected to the power source or be
started until the hold card is removed by the
person named on the tag-out card. Include
advice on the tag-out card of the actual or
potential danger, where appropriate.
Lock-out devices make sure people are out
of the danger area before a machine can
be started. They are mechanical-locking
mechanisms used to physically lock machinery
controls so they cannot be used.
Use lock-out devices when people have to
work on or inside machinery and are out of
sight of other people in the workplace. Anyone
who has to work in a hazardous area should
have a lock-out device that identifies who is
protected by the device. The lock used with
these devices should be durable and must only
have one key, held by the operator.
Tag-out cards are sometimes referred to as
danger tags, restricted-use tags and warning
tags. Use a tag out card with lock-out devices
and isolation to improve staff safety.
8.2 OTHER GUARDING REQUIREMENTS
The duty holder must ensure that fences or
guards are:
> constantly maintained
> of substantial construction for their
intended purpose
> kept in position while the machinery is used.
Tag and lock Multiple locks
Valve lock and tag
Figure 27: Shows various types of tag-out and lock out devices that can be used

59
SECTION 08 // GUARDING TYPES – MINIMISE
Even when there are mechanical methods
to control hazards, other ways to minimise
risk might still be needed, such as safe
work systems or protective clothing and
equipment (see section 8.3). Do not use only
non-mechanical control measures to control
hazards. They rely on human behaviour
and need commitment management and
enforcement to work effectively.
8.3 OTHER CONTROL MEASURES
There are control measures that minimise the
risk of harm that can be used with machine
guarding. Some of these control measures are
systems and others are activity-based, such
as maintenance.
8.3.1 DEVELOPING WORK PROCEDURES
Work procedures are needed to make sure
that hazard control measures are effective.
All work procedures must:
> define responsibilities for management,
supervisors and workers
> have systems to make sure appropriate
guarding is bought and correctly installed
> explain how workers will be trained and
supervised to make sure the machinery is
only used with the guarding in place
> require workers to follow the work
procedures
> have arrangements to maintain the machine
and guards
> have a system for workers to report
malfunctions or problems with machinery
> have emergency procedures and training for
staff on what to do.
8.3.2 CONSULTATION AND COMMUNICATION
Involving workers and health and safety
representatives in hazard management is
essential. They are most likely to know about
the hazards of their work. They can help
develop measures to eliminate, isolate or
minimise hazards before an injury or incident
occurs when:
> new machinery is introduced
> changes are made to existing machinery
> changes are made to how they work.
8.3.3 TRAINING INFORMATION
Employers must train workers, supervisors
and others so they can use hazard control
measures and work safely.
8.3.4 SUPERVISION
Operators and workers must be supervised
by a competent person to make sure hazard
control measures are used correctly.
8.3.5 MAINTENANCE
Work procedures should identify any
maintenance needed to keep control
measures effective. Looking at maintenance of
control measures is an important part of the
implementation process.
So maintenance can be done safely, consider:
> the ease of accessing parts
> ensuring machinery parts are safe
to maintain
> ease of handling
> designing machinery to reduce the range
of tools and equipment needed for
maintenance.
8.3.6 PERSONAL PROTECTIVE EQUIPMENT
Employees may need personal protective
equipment when working with machinery that
makes heat, fumes, noise or other hazards.
Personal protective equipment must be
provided by the employer and maintained
and replaced when required. Standards
New Zealand have a range of guidance
relating to personal protective equipment.

BEST PRACTICE GUIDELINES // SAFE USE OF MACHINERY
60
8.3.7 FIRST AID
Every workplace should have first aiders and
first aid supplies. Employers should put first
aid provisions in place based on the types
of accidents, injuries and illnesses that could
occur in the workplace. For more information,
see WorkSafe NZ’s First Aid for Workplaces:
A Good Practice Guide.
8.4 PROVIDING INFORMATION ON MACHINERY
Employers must give staff this information in
a way workers can easily understand it – be
aware of language and literacy issues.
Employers may also need to give information
to others who enter the workplace, including
cleaners, visitors and contract staff.
This could be a machinery instruction
handbook or other written instructions
that include:
> a publication date and revision details (if the
information has been redrafted or updated)
> any transport, handling or storage
requirements, including the machine’s
dimensions, weight and lifting points
> information about installation and
connecting to a power source, including any
assembly information and power supply
requirements.
Specific information about an individual
machine should include:
> a detailed description of the machine
(including any fittings, guards or protective
safety devices)
> reference to any machinery safety standards
used in its design, including any mandatory
requirements (eg conformance declaration,
verification of design)
> details of any emissions (eg noise, fumes,
dust) the machine makes when running.
8.4.1 SPECIFIC USER INFORMATION
Written information for the user
should include:
> the machine’s intended use
> a description of the machine’s controls
(especially emergency stops)
> operating instructions, including start-up
preparations, process change-over and
shutting down
> common faults and any reset instructions
the user may need
> any guards or protective safety devices for
particular hazards
> safety sign descriptions and details
> any prohibited uses or likely misuse
> any hazards the manufacturer could
not eliminate
> any personal protective equipment that
needs to be used
> any training that is needed.
8.4.2 MACHINERY INFORMATION
A wide range of information sources can be
used to help identify hazards, including:
> employee and health and safety
representative participation and involving
those working with the machinery
> Australian, Australia/New Zealand,
New Zealand or European standards
> manufacturer’s instructions and advice
> maintenance logs of machinery
> documentation of safe work practices and
their effectiveness
> injury or incident information and
hazard alerts
> relevant reports from occupational health
and safety agencies, unions, employer and
professional bodies
> articles from health and safety journals
> safety information from safety authorities
on the Internet.

61
SECTION 08 // GUARDING TYPES – MINIMISE
8.5 SAFE SYSTEMS OF WORK
A safe system of work is a formal work
procedure developed after a systematic
examination of a task to identify all the
hazards. It defines safe ways to work so
hazards and risks are minimised. When
hazards cannot be completely eliminated
or isolated, you may need to use a safe
system of work.
An competent person must agree that a safe
system of work is the only way to control
a hazard. In this case, a competent person
is someone with current knowledge and
understanding of:
> AS 4024 and other relevant standards
> the guards and other safety devices
> how to use guards and other devices on
that type of machine.
A safe system of work should never be used
as the main hazard control without first
assessing whether the hazards can be
eliminated, or isolated with guarding, either
provided by the manufacturer or retro-fitted
to existing machinery.
Workers need extra training, more supervision
and other protective measures when using
a safe system of work. These also need to
be documented.
8.6 MONITORING AND REVIEWING EFFECTIVENESS OF CONTROL MEASURES
Once control measures are in place, they must
be regularly monitored and reviewed. To do
this, it is useful to ask the following questions.
> Have control measures been implemented
as planned?
> If control measures have not been
implemented, why not, and what is
happening in the meantime?
> Are the control measures being
used correctly?
> Are the control measures working?
> Have the control measures isolated or
minimised the risk from the hazard
as intended?
> Have the control measures made any
new hazards?
> Have the control measures made any
existing hazards worse?
In order to answer these questions, you
may need to:
> talk with workers, supervisors and any health
and safety representatives
> measure levels of exposure (eg take
noise measurements where a noise source
was identified)
> refer to manufacturers’ instructions
> monitor incident reports
> contact industry associations, unions,
government bodies or health and
safety consultants.
When deciding when to monitor and review
control measures, consider:
> the level of risk – high risk hazards need
more frequent assessments
> the type of work practices or
machinery involved
> whether new methods, tasks, equipment,
hazards, operations, procedures, rosters
or schedules have been introduced
> whether the environment has changed
> any indication that risks are not
being controlled.
8.7 KEEPING DOCUMENTS AND RECORDS
Documenting your chosen control measures
helps show you have met your legal
obligations. Keep records to track what has
been done and what is planned; effective
record-keeping can save time and money.
The level of documentation should be
appropriate for the level of risk and
control measures.

BEST PRACTICE GUIDELINES // SAFE USE OF MACHINERY
62
Notes

CHOOSING THE RIGHT GUARD
09/
IN THIS SECTION:9.1 Choosing a guard 9.2 Basic rules for guard design 9.3 Guarding of operational and non-operational parts 9.4 Choosing the material for guards 9.5 Servicing and maintenance considerations 9.6 Guards for exposed rotating cutting machinery 9.7 Pulleys and drives 9.8 Rotating shafts and rollers 9.9 Conveyors (bulk handling) 9.10 Press brakes 9.11 Robotics

63
Choosing the right guard for the machine will create a physical barrier between a worker and the dangerous parts of the machinery. When choosing guards, careful attention to design and layout, and the use of the machine, can remove many health and safety hazards and can prevent health issues and injuries occurring.
Flowchart 7 details how to make decisions
around the most appropriate guard taking
into account whether the machine parts
require access.
Sections 7–11 of the HSE Act describe a way to identify hazards, manage health and safety issues, and follow up on health and safety matters.
9.1 CHOOSING A GUARD
Machine guarding options in order
of preference:
> if access is not needed during normal
operation, maintenance or cleaning, use a
permanently attached physical barrier
> if access is needed during normal operation,
maintenance or cleaning, use an interlocked
physical barrier
Flowchart 7: Choosing a guard
SECTION 09 // CHOOSING THE RIGHT GUARD
Are hazards present? Guards not needed
Fixed guards as
> AS 4024:1601 > AS 4024.1:1801 - 1803
Use movable guard with guard locking to the appropriate category level
(see AS 4024:1501 AS 4024:1602)
Series 1: General safety requirements.
Series 2: Controls and appropriate speeds:
> Two-handed controls
Series 3: Requirements for specific machines:
> Mechanical and hydraulic power presses > Milling machines > Industrial robots
Series 4: Electro sensitive safety devices:
> Pressure sensitive devices
Is access required by operators/maintenance staff or cleaners?
Does opening the guard cause the hazard to stop before access?
Is constant access required?
Can presence sensing systems be used appropriately?
Use movable guard with interlock to the appropriate category level
(see AS 4024:1501)
Consider the environment and choose the right device, eg twohanded controls with a hold-to-run and slow speed function, and safety trip devices.
AS 4024:2601 and IEC 61496 series
If competent person verifies the machinery can’t be guarded, agree on safe systems of work
Note: the flowchart does not take other protective devices, such as two-hand controls, into account
NO
NO
NO
NO
NO
YES
YES
YES
YES
START HERE

BEST PRACTICE GUIDELINES // SAFE USE OF MACHINERY
64
> if opening the guard stops the hazard before
access, use a moveable guard with guard
locking interlock, and safety switches of an
appropriate category level. Category levels
are outlined in AS 4024 and a summary can
be found in Flowchart 7 of this guideline.
If constant access is needed:
> use a safety interlock system that meets
the appropriate rating in its failsafe control
category (a hazard and risk assessment
determines what failsafe category is needed)
> add extra protections to minimise hazards,
such as safety trip devices, accessible
emergency stops, slow speed and/or two-
hand hold-to-run control devices.
If there is no practicable way to guard a
hazard, a safe system of work must be put in
place (see section 10 of this guideline).
9.2 BASIC RULES FOR GUARD DESIGN
The basic rules for guard design are:
> use materials of suitable strength and
good quality
> use the right guard. Custom-designed is best
– poorly designed or inappropriate guards
can cause injuries
> the environment and the needs of operators
and maintenance workers affect how well a
guard works.
If a guard is used from another machine,
check carefully that it:
> is not faulty
> fits the target machine
> is strong enough for the new use
> controls the risk.
9.3 GUARDING OF OPERATIONAL AND NON-OPERATIONAL PARTS
When deciding what needs to be guarded,
look at operational and non-operational parts
of the machine. Start with obvious operational
parts such as:
> rollers – mills
> saws – circular and band saws
> drills and drill chucks
> cutters in metal working machines, including
the blades of guillotines and the tools of
power presses
> beaters.
Then consider non-operational parts such as:
> chains and sprockets
> belts and pulleys
> gears (including rack and pinion sets)
> shafts (plain or threaded)
> flywheels.
9.4 CHOOSING THE MATERIAL FOR GUARDS
There are four main considerations when
choosing material to make a guard:
> strength and durability – use of non-metallic
materials in corrosive environments
> effects on machine reliability – a solid guard
may cause the machine to overheat
Figure 28: Examples of machine guards isolating various hazards
Vee belt & pulley drive fully
enclosedShaft end
closed
Revolving shaft enclosed
Chain & sprocket drive fully enclosed

65
SECTION 09 // CHOOSING THE RIGHT GUARD
> visibility – there may be operational and
safety reasons for needing a clear view of
the danger area
> control of other hazards – eg the use of a
material that will not eject molten metal.
9.5 SERVICING AND MAINTENANCE CONSIDERATIONS
When designing guards, consider what safe
procedures are needed for their removal for
repair, clearing jams and breakdowns.
Servicing matters to consider include:
> following documented safe work
procedures, including manufacturers’
instructions
> proximity to hot or sharp parts
> cool-down or warm-up periods
> run down periods
> lock-out provisions or permission for
guard removal
> enough room to do tasks without risk of
injury or strain
> stored energy in the machine or materials
being processed
> any additional hazards from maintenance
procedures – such as testing while the
machine is unguarded (a ‘dry run’ or ‘trial
run’), working at heights, use of solvents
> maintaining or updating service records.
Maintenance considerations include:
> where servicing is needed
> how much servicing is needed
> what kind of servicing is needed
> how often servicing needs to be done.
9.6 GUARDS FOR EXPOSED ROTATING CUTTING MACHINERY
Exposed rotating cutting machinery includes:
> cut-off saws
> milling machines
> friction cutting equipment
> boring equipment.
Hazards arise from the exposed blades and
risks include cutting people or entanglement.
Guards (or visors) that move must stay close
to the work piece. The cutter’s teeth can be
exposed if the visor is:
> not attached to the fixed guard
> in a poor position
> jams in the open position.
9.7 PULLEYS AND DRIVES
Pulleys and drives are used in many machines.
Nip-points are the main hazard. They must be
guarded so no one can get entangled.
Interlocked guards are preferable for pulleys
and drives. In some cases, a hinged section
may be appropriate to access the machine
when setting it. Design and install the guard so
a tool is needed to remove and replace it.
Figure 29: Self-adjusting guard for a drop saw
Figure 30: Fixed guard for a pulley and drive preventing access to transmission machinery

BEST PRACTICE GUIDELINES // SAFE USE OF MACHINERY
66
9.8 ROTATING SHAFTS AND ROLLERS
Interlocked guards are preferable for rotating
shafts and rollers, such as:
> couplings
> spindles
> fan-shafts
> ironing rollers.
Guards should stop loose clothing and long
hair getting caught in rotating shafts. In
addition to a guard, it may be appropriate to
tell operators not to wear loose clothing (such
as long-sleeved shirts or jackets) and tie long
hair back or wear a head covering.
9.9 CONVEYORS (BULK HANDLING)
Conveyors move materials from one place
to another. Types include belt, screw and
bucket conveyors.
9.9.1 HAZARDS
The main hazards of a conveyor are the
many in-running nip-points, which can
entangle, crush and abrade people. The drive
system can also pose risks of entanglement
or abrasion.
9.9.2 CONTROL MEASURES
Fixed guards that enclose in-running nip-
points and the drive mechanism are usually
the best way to guard conveyors.
Large conveyors, such as stockpilers,
generally need both carry idlers and return
idlers guarded where they are under high
tension and accessible. This should be
done to an appropriate standard, such as
AS 1755 Conveyors – Safety Requirements,
AS 4024.3610 Conveyors – General Safety
Requirements or equivalent.
9.9.3 ELECTRICAL ISOLATION (LOCK-OUT AND TAG-OUT)
Electrical isolation safeguards (which prevent
access during most phases of machinery
life) may not be effective when hazardous
areas need to be accessed, such as during
maintenance and set-up.
Because of this, conveyors should have
appropriate drive power isolation, whether
its power source is electrical, hydraulic,
pneumatic or mechanical. A lock-out and tag-
out system should secure isolation.
9.9.4 START AND STOP CONTROLS
Each conveyor start location needs a clearly
labelled ‘stop’ control. If any part of the
conveyor operation cannot be seen from the
start control, there must be a visible or audible
signal to warn people nearby.
Figure 31: Fixed guard on rotating shaft or coupling
Figure 32: Typical guard for head and tail section of a conveyor
Note the interlocking lid that flips down & closes over the auger
Interlocking mechanism
Interlocking mechanism
Fixed Guard

67
SECTION 09 // CHOOSING THE RIGHT GUARD
9.9.5 EMERGENCY STOP CONTROLS
A lanyard-type pull-wire emergency stop is
the best emergency stop for exposed belt
conveyors where workers must access the
belt area while the conveyor is in use (such
as when placing and removing parcels at a
transport depot).
The lanyard type means wherever someone is
working on the conveyor, they can reach the
emergency stop. Emergency stop controls
should be manually reset before the conveyor
can be restarted from its normal start control.
9.9.6 ACCESS PROVISIONS
The machine design should let people
do routine adjustment and lubricate and
maintain the machine without removing
guards or much taking apart. Wherever
practical, people should be able to lubricate
and maintain the machine from outside the
danger area. If people need access to the
danger area (such as for machine setting),
use safe isolation procedures.
9.9.7 TRAINING
Make sure people working around conveyors
are trained on how to use the machinery and
are aware of the potential hazards.
9.9.8 MORE INFORMATION
AS 1755 Conveyors – Safety Requirements
and AS 4024.3610 (or equivalent) give more
information on minimum safety requirements
for the design, installation and guarding of
conveyors and conveyor systems and training.
9.10 PRESS BRAKES
A press brake is a variable stroke machine
generally limited to straight bending and
forming of material, such as sheet metal and
heavy gauge material.
9.10.1 HAZARDS
For press brakes, the main hazards are:
> the die sets mounted to the main moving
beam and table coming together to form
the product
> the work piece and the press frame coming
together in the fold-forming process.
The impact from both can have a pinching,
crushing, cutting or shearing motion, which
creates a risk to the operator of being crushed
or cut.
Drive belts on press brakes have in-running
nip points, which present a risk of
entanglement and abrasion. Hydraulic hoses
may leak or burst, causing slip hazards and
workers getting sprayed with hydraulic fluids
under pressure.
9.10.2 CONTROL MEASURES
The front dies of a press brake and its sides
and rear require guarding. Three forms of
guarding for the front of the dies on a press
brake are:
> a fixed guard
> interlocked guard
> a light or presence-sensing system.
Where workers have to hold or stabilise the
material, or need frequent access to closing
dies, presence-sensing devices may be
required to ensure safe operation. Presence-
sensing devices may be light curtains or
light beams. Automatic stops should also
be guarded and back-gauging equipment is
recommended.
Presence-sensing devices (cameras, light
curtains or light beams) may not protect the
operator in all circumstances.

BEST PRACTICE GUIDELINES // SAFE USE OF MACHINERY
68
9.10.3 SAFE SYSTEM OF WORK FOR PRESS BRAKES
On occasions it may not be possible to
perform work with the guarding system in
place. Removal of or turning off a guard
should only occur if the guard makes it
impracticable to perform close work or
jobbing and a hazard and risk assessment
is carried out by a competent person. A
safe system of work must be developed in
conjunction with the employer and operators
and approved by a competent person with
appropriate knowledge and experience of
machine safety.
In cases where guarding of any moving
parts of the plant does not eliminate risks of
entanglement, or where it is not practicable
to guard the parts, people must not operate
or pass close to the moving part unless a safe
system of work is in place to reduce the risks.
Additional training, experience and higher
levels of supervision, and other protective
measures may be required and will need
to be documented. For more information
on safe systems of work see section 10 in
this guideline.
9.10.4 CLOSED TOOL METHOD
The closed tool method of reducing the
press brake’s opening to 6mm limits the
risk of introducing a part of the body into
this hazardous zone. The distance between
the point of the upper tool and the top of
the bottom die is where the 6mm is
measured from.
Where possible, the closed tool method
should be used with a safety light curtain,
a laser beam device or a two-hand
control device.
Figure 33: Press brake with fixed guards and a presence-sensing light curtain
Guarding
Guarding
Emergency stop button
Light beams from presence sensing system
Shrouded controls

69
SECTION 09 // CHOOSING THE RIGHT GUARD
9.11 ROBOTICS
Using robots can remove the more traditional
hazards of working with machinery. They
can do high-risk work, such as in the
biotechnology field.
It is wrong to think that robotic operations are
safe just because there is little or no worker
interaction. Hazards when using robotics can
come from:
> errors during use
> ejection of materials
> trapping points
> failures and malfunctions.
Hazards can also come up during installation,
repair and maintenance. There may also be
biological, chemical or environmental hazards.
A hazard assessment should be done to
ensure workers’ safety during all phases of
the machinery’s life and use. Follow a hazard
management process (with reference to the
manufacturer’s instructions) during installation
or commissioning, testing, start-up, repair and
maintenance.
9.11.1 HAZARDS AND RISKS
Robots have inherent dangers. Some of the
hazards of industrial robot use include:
> Impact. Robots can move at high speed in
an unexpected direction either in a straight
line or circular directions. The robot can also
eject work pieces, off-cuts or molten metal.
Workers are at risk from being hit by the
robot or parts of the work.
> Trapping points. These can be made
by the robot’s movement or other
equipment – such as work carriages, pallets
or transfer mechanisms. With the robot itself,
trapping points are found on the arm of the
robot, between the arm and the column, and
between the arm and fixed objects. Workers
can be crushed by or entangled with the
robot, including being crushed between a
rapidly rotating robot arm and barriers
close by.
> Control errors. These come from faults in
the control system of the robot (such as
software, electrical interference, programme
corruption and sub-controls associated with
the electrics, hydraulics and pneumatics).
> Human error. These can happen during
programming, teaching, maintenance and
repair, working close to the robot or at
loading or unloading stations.
> Failure or malfunction. Electrics, hydraulics
and pneumatics can all create hazards when
they fail.
> Biological or chemical hazards. These can
happen when robots are used to reduce the
risks from hazardous or infectious processes.
Workers may risk inhaling or absorbing
hazardous substances. In this case, the work
process needs close attention, along with
any breakdown or emergency procedures
that may be needed – such as for spillage,
contamination or breach of the system.
> Environmental hazards. These include dust
vapours, fumes, lasers, noise, radiation and
flammable and explosive atmospheres that
can cause serious harm, such as burns and
inhaling or absorbing hazardous substances
and hearing loss.
9.11.2 CONTROL MEASURES
Industrial robots can be made safe using
one or more guarding and presence-sensing
devices. Control measures include:
> enclosing the robot
> restricting access
> turning the robot off when people are near.
Designers, manufacturers and suppliers of robotic systems have the same obligations as designers, manufacturers and suppliers of other machinery (HSE Regulations 66 and 67, and section 18A of the HSE Act).

BEST PRACTICE GUIDELINES // SAFE USE OF MACHINERY
70
Robot safety has different hazards and
precautions in each of the three levels around
a robot workstation.
1. Level 1 is the workstation perimeter,
usually a physical barrier guarded with an
interlock gate and possibly with presence-
sensing devices.
2. Level 2 is within the workstation (where the
robot moves). Here safety systems should
detect if someone is present, usually with
presence-sensing devices.
3. Level 3 is contact with the robot. A safety
system should detect a person touching the
robot and stop it moving immediately using
safety trip devices or sensors.
Fixed or distance guards at (Level 1) are
practical as long as the guard does not
interfere with the mechanism of the robot.
Someone should have to use tools to remove
the guards to enter the restricted danger
area. Guards or fences should be placed so
people cannot reach into a restricted area.
Any openings for feeding material in should be
designed to keep every part of a person away
from any hazard.
To stop trapping, any fixed barriers should be
at least 500mm from the robot work envelope
(extreme reach of the robot arm and tooling).
Design and place presence-sensing devices
(such as photoelectric curtains) to detect if
anyone enters a restricted space or danger area
(Level 2). The device must stop the automatic
operation of the robot when entry is detected.
Operation must also stop if this device fails.
Figure 34: Robot cell showing Levels 1, 2 and 3
Level 2 where the robots move
Level 1 perimeter guard
Horizontal & vertical light curtains
Level 3 in touch with the robot

71
SECTION 09 // CHOOSING THE RIGHT GUARD
You can use laser scanners or pressure-
sensitive mats as a back-up safety protection
for high-risk machinery in areas inside the
primary light curtain. This way the system
cannot restart while someone is inside the
area protected by a light curtain.
9.11.3 ADDITIONAL CONTROL MEASURES
Because robots are highly technical and
programmable, consider extra safeguards
beyond just guarding moving parts. These
include making sure:
> only competent people can access and start
the robot system
> no one can access the robot through or by
removing associated equipment, such as
conveyors, transfer systems, loading stations
or trolleys.
If people have to enter the robot cell (Level 2)
while the robot is working, the control system
should make sure the robot runs with reduced
force. The robot also needs a sensor to stop it
immediately if it hits someone.
Safe operating procedures also minimise
some of the risks of working with robotics.
A safe work system needs procedures for
entry, including who can access the robot to
do identified tasks, maintenance and repair.
Inspecting and maintaining a robot can
present different hazards from working with
the robot. Assess all hazards for risks.
Staff must be trained to control the hazards
of working with industrial robot machines.
Inadequate training can increase risks at most
stages of robot operation.
9.11.4 CONTROL SYSTEMS
Robots usually have programmable electronic
start and control systems. These should be
protected from unauthorised access, such
as by putting them in a lockable cabinet or
room. Make and place controls so people
cannot accidently start the robot. This can be
done a number of ways, including shrouding,
guarding, gating or appropriate positioning.
If people can access the robot, it must be
isolated from its power source.
For more information see AS 62061
Safety of machinery – Functional Safety
of Safety-Related Electrical, Electronic and
Programmable Electronic Control Systems.
AS 4024.3301 Safety of machinery –
Robots for industrial environments –
Safety requirements
9.11.5 MASTER SWITCHES
Robots should have master switches to cut
power to any moving part of the robot. This
can be the same device as an emergency stop.
You should be able to lock the master switch
in the isolating position so it needs to be
manually reset.

BEST PRACTICE GUIDELINES // SAFE USE OF MACHINERY
72
Notes

SAFE SYSTEMS OF WORK
10/
IN THIS SECTION:10.1 Participation and consultation10.2 Hazard management10.3 Competency of operators and supervisors10.4 Emergency procedures10.5 When guarding is not an option10.6 Agreement and sign-off10.7 Competent person10.8 Reviewing

73
In this guideline, a safe system of work means the steps which if followed, will minimise the hazard arising from doing a specific task or set of tasks, as far as practicable.
Flowchart 8: Developing and maintaining a safe system of work for specific tasks
SECTION 10 // SAFE SYSTEMS OF WORK
Identify hazards and other hazards that may occur by using a safe system of work
Human factors
> Shiftwork > Fatigue > Repetitive activities > Incentives/bonuses > Shift length and breaks
Agree on safe system of work that takes into account and controls the hazards
Safe system of work must be approved by the authorised duty holders and a competent person
Training and supervision by a competent person in place for all staff, including induction for new staff and covering people on leave
Review system’s effectiveness regularly
Take into account
> Advances in technology > Incidents or accidents > Any new hazards identified > New industry standards and guidance > Whether hazards are still controlled > Keeping records
Consultation with staff, health and safety reps and internal experts about any changes
Regular auditing and recommended changes
Emergency management
> Procedures in place for emergencies > Information and signage > Equipment accessible > Staff trained, competent and capable > Processes in place for blockages and out of the ordinary events, eg power outages
People management
> Matching the worker to the task > Training for competency > Effective supervision > Use, maintenance and replacement of personal protective equipment > Visitor management
Good work environment
> Safe layout > Enough lighting, ventilation > Comfortable temperature > Noise and fumes managed > Information and signage
No guarding options available. Verified by a competent person
Correct use of tools and plant
> Safe operating procedures > Job safety analysis > Effective and safe maintenance, cleaning programmes > Monitoring of environment and/or operator health
START HERE

BEST PRACTICE GUIDELINES // SAFE USE OF MACHINERY
74
Flowchart 8 gives details of the key factors
that should be considered when developing
a safe system of work.
Apart from assessing guarding options
for machinery, all workplaces must have
safe systems of work in place for tasks and
processes that take into account:
> hazards and controls
> human factors
> emergency management
> people management
> the work environment
> correct use of tools and plant.
10.1 PARTICIPATION AND CONSULTATION
For the safe system of work to be robust,
anyone who could come in contact with the
machine should be consulted. This includes:
> operators
> supervisors
> health and safety representatives
> maintenance staff
> in-house engineers
> any health and safety experts.
10.2 HAZARD MANAGEMENT
Before a safe system of work can be put in
place, employers must identify and assess all
hazards, such as:
> the work environment (eg layout,
lighting, ventilation)
> human factors (eg people’s capabilities, shift
work, fatigue)
> the use and maintenance of personal
protective equipment.
Then they must develop a way to control each
hazard, such as:
> safe operating procedures
> job or task safety analysis
> effective and safe maintenance
> cleaning and blockages procedures
> procedures for unexpected events, like
power outages.
10.3 COMPETENCY OF OPERATORS AND SUPERVISORS
Any operator using a safe system of work must
be competent to do the job and be supervised
by a competent person. Employers must have a
training programme in place that works for:
> new employees
> existing employees
> employees on leave when the safe system
of work was introduced.
10.4 EMERGENCY PROCEDURES
Emergency procedures must be in
place and staff trained to use them.
This includes information, signage and
emergency equipment.
10.5 WHEN GUARDING IS NOT AN OPTION
A workplace cannot opt for a safe system
of work that does not include guarding to
control a hazard, without first considering
all possible guarding controls.
10.6 AGREEMENT AND SIGN-OFF
Once agreement is reached on what a safe
system of work is for a machine, the duty
holders (employer or principal) must approve
it, along with a competent person and
document it.

75
SECTION 10 // SAFE SYSTEMS OF WORK
10.7 COMPETENT PERSON
Before designing a safe system of work, a
competent person must establish that all
possible guarding options were considered,
they must explain why none could be used, and
give advice on the residual risks that remain.
The competent person must also be consulted
and approve the safe system of work.
10.8 REVIEWING
Every safe system of work needs regular
reviewing to take into account:
> advances in technology
> incidents or accidents
> any new hazards identified
> new industry standards and guidance
> whether the hazards are still controlled
> monitoring of the environment and/or
health of operators.
Any proposed changes should involve
anyone previously consulted on the safe
system of work. The system and any changes
need testing before they are included in the
safe working system and approved by the
duty holder.

BEST PRACTICE GUIDELINES // SAFE USE OF MACHINERY
76
Notes

APPENDICES
11/
IN THIS SECTION:11.1 Definitions 11.2 Example of hazard checklist11.3 Sample job safety analysis (JSA)11.4 Summary of the AS 4024 Safety of machinery series11.5 Example risk assessment process11.6 Flowcharts11.7 More information

77
SECTION 11 // APPENDICES
11.1 DEFINITIONS
Please note some these definitions are
based on the Health and Safety in
Employment Act 1992 (HSE Act) but should
not replace legal advice.
All practicable steps is defined in the HSE Act.
Briefly, it means doing what is reasonably
able to be done in the circumstances, taking
into account:
> the severity of any injury or harm to health
that may occur
> the degree of risk or probability of that
injury or harm occurring
> how much is known about the hazard
and the ways of eliminating, reducing or
controlling it
> the availability, effectiveness and cost of the
possible safeguards.
Current state of knowledge is what is known
about the hazard or risk, including actual
or potential harm, and ways of eliminating,
isolating or minimising the risk.
Dynamic forces are forces resulting from
movement of an object, in this case movement
of a machine.
Functional validation of a machine is the
process of testing that a safety-related device
performs as the designer intended.
Group control is a control that protects more
than one person in the vicinity of the machine
in addition to the operator.
Harm
a. means illness, injury, or both; and
b. includes physical or mental harm caused by
work-related stress.
Hazard
a. means an activity, arrangement,
circumstance, event, occurrence,
phenomenon, process, situation, or
substance (whether arising or caused within
or outside a place of work) that is an actual
or potential cause or source of harm; and
b. includes
i. a situation where a person’s behaviour
may be an actual or potential cause or
source of harm to the person or another
person; and
ii. without limitation, a situation described
in subparagraph (i) resulting from
physical or mental fatigue, drugs, alcohol,
traumatic shock, or another temporary
condition that affects a person’s
behaviour.
Inching means limited motion of machinery
where dangerous parts of machinery are
exposed during cleaning, setting, adjustment
or feeding material and, depending on the
machine and industry, may include the terms
jog, crawl and pulse.
Ionising radiation is radiation with enough
energy so that during an interaction with an
atom, it can remove tightly bound electrons
from the orbit of an atom, causing the atom
to become charged or ionised. Examples are
x-rays and gamma rays.
Machine life cycle is the process beginning
with design, continuing through manufacture,
sale, transport, installation, test, use and
maintenance, ending in disassembly
and disposal.
Machinery is a collective term for machines
and their parts. A machine is considered to
be any apparatus that has interrelated parts
and is used to perform work; machines may
include an engine, motor, or other appliance
that provides mechanical energy derived
from compressed air, the combustion of fuel,
electricity, gas, gaseous products, steam,
water, wind, or any other source; and includes:
a. any plant by or to which the motion of any
machinery is transmitted; and
b. a lifting machine, a lifting vehicle, a
machine whose motive power is wholly
or partly generated by the human body,
and a tractor.

BEST PRACTICE GUIDELINES // SAFE USE OF MACHINERY
78
Non-ionising radiation is in the
electromagnetic spectrum where there is
insufficient energy to cause ionisation. It
includes electric and magnetic fields, radio
waves, microwaves, infrared, ultraviolet, and
visible radiation.
Plant includes:
a. appliance, equipment, fitting, furniture,
implement, machine, machinery, tool, and
vehicle; and
b. part of any plant, the controls of any plant,
and anything connected to any plant.
It is a general name for machinery, equipment,
appliance, implement or tool and any
component or fitting or accessory of these. It
can include things as diverse as presses in a
foundry, excavators and trucks in mining, and
photocopiers in an office. It can range from
electric drills, lifts, escalators, tractors, hand
trolleys, cranes, and other lifting gear to arc
welding gear.
Prime mover means an engine, motor, or
other appliance that provides mechanical
energy derived from steam water, wind,
electricity, gas, gaseous products, or any other
source. It includes any device which converts
stored or potential energy into movement or
mechanical energy.
Risk means a combination of probability and
the degree of possible injury or damage to
health in a hazardous situation.
Safe by position means so positioned that
any person cannot reach or gain access to the
dangerous parts.
Safety requirement specifications is the
means by which the hazards of a machine
or process are controlled to reduce risks of
harm to those working at or near the
machine or process.
Safe operating procedures are written
instructions that detail the steps that will be
performed during a given procedure; including
information about hazards and how these
hazards will be controlled.
Safe system of work means a formal
procedure which results from systematic
examination of a task in order to identify all
the hazards. It defines safe methods to ensure
that hazards are eliminated or risks minimised.
Safety life cycle refers to the safety of the
machine, its assembly, its functioning and
decommissioning at the end of its life.
Securely fenced means so guarded that
the arrangements provided ensure that the
dangerous part is no longer dangerous. There
is no longer a reasonably foreseeable risk of
injury to any person employed or working
in the place of work, even a person who is
careless or inattentive while in the vicinity of a
machine or using a machine.
Shall and must are used in this guideline in
places where there is a legal requirement to
achieve the desired result.
Should is used in this guideline as a way of
indicating a preference. It does not indicate a
mandatory requirement as other alternatives
may achieve an equivalent result.
Supplier is anyone who sells or hires
out machinery. They have a number of
legal responsibilities.
Swarf is metal removed from a workpiece
during machining. It may be in the form
of small ‘chips’, tightly curled strips, or
long ‘ribbons’.
Transmission machinery is a mechanism that
transfers movement from the prime mover
to the machine. It can be a shaft, wheel,
drum, pulley, system of fast and loose pulleys,
gearing, coupling, clutch, driving belt, chain,
rope, band or other device.
Validation is the process of confirming that
all required steps of the safety life cycle are
tested, implemented, working and verified.

79
SECTION 11 // APPENDICES
11.2 EXAMPLE OF HAZARD CHECKLIST
SAFE USE OF MACHINERY CHECKLIST
Check Present status Recommendations
Guarding requirements
Do guards stop workers touching dangerous moving parts?
Yes/No
Are guards firmly secured and not easily removable?
Yes/No
Do guards stop objects falling into the moving parts or from exploding out of the machine?
Yes/No
Do guards allow safe, comfortable and easy use of the machine?
Yes/No
Can the machine be maintained without removing the guard?
Yes/No
Can the existing guards be improved? Yes/No
Are there safe procedures in place and a way to shut down the machine if something out of the ordinary happens, like a blockage?
Yes/No
Mechanical hazards: point of operation
Is a guard on the machine at every point of operation where there is a hazard?
Yes/No
Does the guard keep the operator’s hands, fingers and body out of the danger area?
Yes/No
Have the guards been tampered with or removed?
Yes/No
Is there a more practical or better guard? Yes/No
How can point of operation hazards be removed?
Yes/No
Are the tools used for placing and removing material the right length, type and size to keep an operator’s hands out of the machine?
Yes/No
Operator controls
Are start and stop controls in easy reach of the operator?
Yes/No
If there is more than one operator station, are separate controls placed where operators can see the entire operation?
Yes/No
Are controls, including foot controls, guarded against being turned on accidentally?
Yes/No
Are controls labelled clearly with their function? Yes/No

BEST PRACTICE GUIDELINES // SAFE USE OF MACHINERY
80
Are controls similar in type and arrangement to other similar machines in the plant?
Yes/No
Are emergency stop controls easily reached and clearly identified?
Yes/No
Is the machine wired so it must be manually re-started if power is cut and then put on again?
Yes/No
Mechanical hazards: Power transmission
Are gears, sprockets, pulleys or flywheels guarded?
Yes/No
Are there any exposed belts or chain drives? Yes/No
Are there any exposed sets, key ways, collars, etc?
Yes/No
Are all hazardous moving parts guarded, including auxiliary parts?
Yes/No
Are start and stop controls in easy reach of the operator?
Yes/No
If there is more than one operator, are there separate controls?
Yes/No
Other hazards
Are other hazards like noise, fumes and vibrations identified and managed?
Yes/No
Have special guards, enclosures, or personal protective equipment been provided to protect workers from exposure to hazardous substances?
Yes/No
Have hazards associated with layout, repetitive movements and workload been identified and managed?
Yes/No
Electrical hazards
Is the machine regularly tagged and tested? If so, how often?
Yes/No
Are there loose conduit fittings? Yes/No
Is the power supply correctly fused and protected?
Yes/No
Do workers occasionally get minor shocks while using any of the machines?
Yes/No

81
SECTION 11 // APPENDICES
Training and supervision
Are operators and skilled workers trained and competent to use the guards?
Yes/No
Are production workers trained in:
> where the guards are
> how they give protection
> what hazards they protect against?
Yes/No
Are operators supervised by competent staff? Yes/No
Have workers been trained in what to do if they notice guards that are damaged, missing or inadequate?
Yes/No
Protective equipment and clothing
Is protective equipment and clothing needed? Yes/No
Is it right for the job, in good condition, kept clean and stored when not in use?
Yes/No
Is the operator dressed safely for the job (no loose-fitting clothing or jewellery)?
Yes/No
Machinery maintenance, repair and cleaning
Do technicians, engineers or operators have up-to-date instructions on the machines they service or clean?
Yes/No
Do staff or contractors lock-out machines from all energy sources before starting repairs or cleaning?
Yes/No
Is the maintenance equipment properly guarded?
Yes/No
Where several maintenance staff are working on the same machine, are multiple lock-out devices used?
Yes/No
Is the machinery properly maintained and kept clean?
Yes/No
Machinery set-up
Is all machinery securely placed and anchored to prevent tipping or other movement?
Yes/No
Is the machine laid out so it does not create hazards to operators or others in the workplace?
Yes/No
Is there enough clearance around and between machines to allow safe operation, set-up, servicing, material handling and waste removal?
Yes/No

BEST PRACTICE GUIDELINES // SAFE USE OF MACHINERY
82
11.3
SA
MP
LE J
OB
SA
FETY
AN
ALY
SIS
(JSA
)
JSA
num
ber
Dat
e JS
A t
eam
nam
es
Cle
aran
ce is
suer
Task
des
crip
tion
Rem
oval
of
gua
rdin
g f
rom
No.
1 a
nd N
o. 2
co
nvey
ors
fo
r ro
utin
e cl
eani
ng
Step
nu
mb
erSt
ep/t
ask
des
crip
tion
Pote
ntia
l haz
ard
Pote
ntia
l co
nseq
uenc
e ra
nkin
g
Like
lihoo
d
rank
ing
Ove
rall
risk
ra
ting
Con
trol
mea
sure
sR
evis
ed
risk
rat
ing
1 >Jo
b p
rep
arat
ion
>Lo
ck-o
ut n
ot
put
in
pla
ce
>N
ips
and
cut
s
>R
esid
ual g
ypsu
m
Maj
or
Like
lyE
xtre
me
>P
erm
it/J
SA/i
nduc
tio
n cu
rren
t
>In
duc
tio
n o
f co
ntra
cto
rs a
nd
emp
loye
es a
re c
urre
nt.
>C
orr
ect
per
sona
l pro
tect
ive
equi
pm
ent
to b
e w
orn
as
site
p
roce
dur
e/cl
eara
nce
cert
ifica
te.
Hig
h
2 >Is
ola
te e
qui
pm
ent
as p
er
iso
lati
on
pro
ced
ure.
>N
o. 1
co
nvey
or
lock
and
ta
g o
ff.
>N
o. 2
co
nvey
or
lock
and
ta
g o
ff.
>La
ck o
f co
mm
unic
atio
n
>N
ips
and
cut
s
>S
lips,
tri
ps
Maj
or
Mo
der
ate
Ext
rem
e >In
form
aff
ecte
d p
arti
es b
efo
re
com
men
cing
iso
lati
ons
.
>B
e aw
are
of
pin
ch p
oin
ts.
>B
e aw
are
of
slip
, tri
p h
azar
ds.
>F
ollo
w is
ola
tio
n p
roce
dur
es.
Hig
h
3 >U
sing
co
ld t
oo
ls, r
emov
e en
d g
uard
ing
as
req
uire
d.
>E
qui
pm
ent
not
corr
ectl
y is
ola
ted
>U
se o
f to
ols
>N
ips,
cut
s
>M
anua
l han
dlin
g
>R
esid
ual g
ypsu
m
Maj
or
Like
lyE
xtre
me
>E
nsur
e eq
uip
men
t co
rrec
tly
iso
late
d a
s b
efo
re c
om
men
cing
.
>U
se c
orr
ect
too
ls f
or
task
.
Hig
h
4 >C
lean
end
chu
tes
on
conv
eyo
rs a
s re
qui
red
. >A
s p
er s
tand
ard
o
per
atin
g
pro
ced
ures
5 >U
sing
co
ld t
oo
ls r
epla
ce
end
gua
rdin
g a
s re
qui
red
. >A
s p
er s
tep
3
6 >D
e-is
ola
te t
he e
qui
pm
ent
as p
er t
he is
ola
tio
n p
roce
dur
e.
>A
s p
er s
tep
2

83
SECTION 11 // APPENDICES
I have read, understand and agree to the procedure and controls documented.
Person(s) performing the work: Date:
1.
2.
3.
RISK RATING TABLE
Likelihood of injury or harm to health
Consequences of injury or harm to health
Insignificantno injuries
Moderatefirst aid and/or medical treatment
Majorextensive injuries
Catastrophicfatalities
Very likely High Extreme Extreme Extreme
Likely Moderate High Extreme Extreme
Moderate Low High Extreme Extreme
Unlikely Low Moderate High Extreme
Highly unlikely (rare) Low Moderate High High
Extreme = immediate action

BEST PRACTICE GUIDELINES // SAFE USE OF MACHINERY
84
Organisation of AS 4024
Series 2 Controls and
approach speeds
Two-handed controls
Approach speeds
Series 3 Requirements for specific machines
Mechanical power presses
Hydraulic power presses
Milling machines
Industrial robots
Series 4 Electro-sensitive safety devices
Pressure sensitive devices
Series 1 General safety requirements
Risk assessment
Design of safety related parts of control systems
Design of controls, interlocks and
guarding
Terminology and principles
Human body measurements
Safety distance and safety gaps
Indication marking and actuation
Ergonomic design of display and
control actuators
11.4 SUMMARY OF THE AS 4024 SAFETY OF MACHINERY SERIES
AS 4024 is the Australian Standard for managing machinery hazards. The standard is available in
four series. Their organisation is shown in the chart below.

85
SECTION 11 // APPENDICES
Series 1, or to use its full title – AS 4024.1, Safety of Machinery series, has 26 Parts under
the eight headings in the diagram above. The 26 Parts are European (EN) and Internationally
based (ISO) safety and design standards with some modifications to meet Australia’s safety
practices and regulations.
The series gives designers, manufacturers, suppliers, employers and users of machinery
guidelines to help reduce the risks of working with, or near machinery.
Designers, manufacturers, suppliers, employers and users of common manufacturing machinery
not listed above can find specific guidance in:
> AS 1755 Conveyors – Safety Requirements
> AS 1788 (series) Abrasive Wheels
> AS 1473 (series) Wood Processing Machinery.
People looking for more information about electro-sensitive safety devices (beyond what is in
AS 4024 Series 4) should find it in IEC 61496 (series) Electro-sensitive Protective Equipment.
AS 4024.1-2006 SAFETY OF MACHINERY INCLUDES:
SAFETY PRINCIPLES
Terminology and principles
AS 4024.1101 Terms and definitions
Gives users a set of terms and definitions that are used in other machinery safety
standards, as well as in discussions of machinery safety.
AS 4024.1201 Basic terminology and methodology
Specifies the basic terminology and methodology to be used by designers to
achieve safety of machinery.
AS 4024.1202 Technical principles
Defines the technical principles needed to design safe machinery. Does not deal
with injury to domestic animals, property or the environment.
Risk assessment
AS 4024.1301 Principles of risk assessment
Specifies principles for doing a risk assessment so the knowledge and
experience of the harm related to machinery is gathered together to help
assess risks during all phases in the life of machinery. Gives guidance on the
information needed to carry out risk assessments and a brief outline of some of
the techniques available.
AS 4024.1302 Reduction of risks to health and safety from hazardous substances emitted by
machinery – Principles and specification for machinery manufacturers
Gives principles for controlling risks to health from the emission of hazardous
substances from machinery.

BEST PRACTICE GUIDELINES // SAFE USE OF MACHINERY
86
Ergonomic principles
AS 4024.1401 Design principles – Terminology and general principles
Specifies the ergonomic design principles and terminology to be
used by designers.
DESIGN PARAMETERS
Design of safety-related parts of control systems
AS 4024.1501 General principles
Gives safety requirements and guidance on the principles to be used in the
design of the safety features of machinery control systems. Categories are
specified and the characteristics of the safety functions are described.
AS 4024.1502 Validation
Specifies the conditions and procedures to be followed for the validation by
both analysis and testing of safety functions provided and safety category
achieved by the safety-related parts of control systems using the design
rationale, including risk analysis, provided by the designer. When validating
programmable electronic systems, this standard does not give complete
requirements and needs the use of other standards such as the AS 61508 series.
Design of controls, interlocks and guarding
AS 4024.1601 Guards – General requirements for the design and construction of fixed and
moveable guards.
Specifies requirements for the design and construction of fixed and movable
guards that protect people from mechanical hazards in machinery.
AS 4024.1602 Principles for design and selection.
Specifies principles for the design and selection of interlocking devices
used with guards. The principles are independent of the energy sources used
on the machine.
AS 4024.1603 Prevention of unexpected start-up.
Gives ways to stop unexpected machine start-up to use at the design stage,
including energy isolation and dissipation. Applies to all forms of energy,
including those external to the machine, such as wind, gravity and electro-
magnetic.
AS 4024.1604 Emergency stop – Principles for design.
Explains what an emergency stop needs to do and gives the design principles,
regardless of the energy source used to control the functions. It does not apply
to hand-guided machines, hand-held portable machines or to machines where
having an emergency stop would not reduce the risk to anyone.

87
SECTION 11 // APPENDICES
ERGONOMICS
Human body measurements
AS 4024.1701 Basic human body measurements for technological design
Gives information and descriptions of anthropometric (human body)
measurements that ergonomists and designers of workplaces can use to
compare population groups.
Use this standard to help design work stations where people stand, sit or reach
controls or other items. There are pictures to help.
AS 4024.1702 Principles for determining the dimensions required for openings for whole body
access to machinery
Gives the smallest size an opening can be when someone has to go through it to
access machinery. There may be extra requirements for mobile machinery.
Use this standard to help design openings, such as for people to walk upright
through or climb via a vertical ladder. Sizes are also given for users wearing
personal protective equipment or carrying an injured person.
AS 4024.1703 Principles for determining the dimensions required for access openings
Gives minimum sizes for access openings in machinery. Additional space needs
are also given. There may be extra requirements for mobile machinery.
Use this standard to help design access openings for putting body parts into a
machine. It allows for different postures, such as standing or crouching.
AS 4024.1704 Anthropometric data
Gives the human body measurements needed to calculate the size of access
openings in machinery. The measurements come from European surveys. Use AS
4024.1701 for information on how to source human body measurements.
Safety distances and safety gaps
AS 4024.1801 Safety distances to prevent danger zones being reached by the upper limbs
Gives the minimum safety distances between a barrier and a danger zone
of a machine to stop anyone over three years old reaching the danger zone with
their arms. Only use this standard when distance alone can remove the hazard.
This standard does not protect against radiation or substances coming out of
the machine.
AS 4024.1802 Safety distances to prevent danger zones being reached by the lower limbs
Gives safety distances to keep people’s legs out of danger zones of machinery.
Only use these distances when distance alone can remove the hazard, and there
is no chance that someone can reach the hazard with their arms.
AS 4024.1803 Minimum gaps to prevent crushing of parts of the human body
Gives minimum gaps in machinery to stop parts of the body being crushed.

BEST PRACTICE GUIDELINES // SAFE USE OF MACHINERY
88
DISPLAYS, CONTROLS, ACTUATORS AND SIGNALS
Ergonomic requirements for the design of displays and control actuators
AS 4024.1901 General principles for human interaction with displays and control actuators
Gives general principles to design displays and controls so operators can use the
machine efficiently.
AS 4024.1902 Displays
Gives the ergonomic requirements for visual, audible and tactile displays
on machines. It helps you choose, design and place any displays to avoid
ergonomic hazards.
AS 4024.1903 Control actuators
Helps you design, choose and place manual control actuators to suit the needs
of the task and the operators.
Indication, marking and actuation
AS 4024.1904 Requirements for visual, auditory and tactile signs
Explains how to give safety information, using sight, sound and touch. It sets
out a system of colours, signs, markings and other ways to show hazards and
help in emergencies.
AS 4024.1905 Requirements for marking
Gives rules on markings on machines for:
> identification
> safe use
> preventing hazards from incorrect connections.
AS 4024.1906 Requirements for the location and operation of actuators
Gives the safety requirements for actuators run by hand or other body part.
It applies to both single actuators and groups of actuators.
AS 4024.1907 System of auditory and visual danger and information signals
Gives a series of danger and information signals (both sight and sound) that
indicate urgency and can be differentiated from each other. This standard does
not apply to signals covered by specific standards or conventions, such as fire
alarms, public transport or navigation signals.
POSITION OF TWO-HAND CONTROLS & SAFETY SENSORS
Two-hand control devices
AS 4024.2601 Design of controls, interlocks and guarding – Two-hand control devices –
Functional aspects and design principles
Gives the safety requirements for two-hand controls.
This standard helps you design and choose two-hand control devices, using a
risk assessment. It helps stop work-arounds and faults. It also gives standards for
two-hand control devices with a programmable electronic system.

89
SECTION 11 // APPENDICES
Safety distances and safety gaps
AS 4024.2801 Safety distances and safety gaps – Positioning of protective equipment with
respect to the approach speed of parts of the human body
Explains how to work out the minimum distances for sensing or actuating
devices of protective equipment to a danger zone. The safety distances are
based on hand or arm approach speeds and the response time of the machine.
These devices are:
a. trip devices defined in AS 4024.1201 (specifically electro-sensitive protective
equipment, pressure sensitive mats), including those used to start the
machine
b. two-hand control devices defined in AS 4024.1201.
Mechanical power presses
AS 4024.3001 Materials forming and shearing – Mechanical power presses
Gives the safety requirements and measures to design, build and supply
mechanical presses that work cold metal or material partly of cold metal. You
can use the principles in AS 4024.1 for work with hot metal and tongs, but you
might not be able to apply them fully. Read this standard with AS 4024.1 (series).
This standard also covers presses intended for work with cold metal, but are
used in a similar way to work other materials (like cardboard, plastic, rubber or
leather) and metal powder.
The requirements in this standard take account of intended use. This standard
presumes access to the press from all directions and gives the safety measures
for both the operator and other people.
This standard also applies to accessories that are vital parts of the press.
Hydraulic power presses
AS 4024.3002 Materials forming and shearing – Hydraulic power presses
Gives the safety requirements and measures for hydraulic presses that work cold
metal or material partly of cold metal. You can use the principles in AS 4024.1
for work with hot metal and tongs, but you may not be able of apply them fully.
Read this standard with AS 4024.1 (series).
This standard also covers presses intended for use with cold metal, but are
also used in a similar way to work other sheet materials (like cardboard, plastic,
rubber or leather) and metal powder.
The requirements in this standard take account of the intended use. This
standard presumes access to the press from all directions, deals with the hazards
and gives safety measures for the operator and other people.
This standard also applies to accessories that are vital to the press.

BEST PRACTICE GUIDELINES // SAFE USE OF MACHINERY
90
Milling machines (including boring machines)
AS 4024.3101 Safety of machinery – Materials cutting – Milling machines (including boring
machines) – Safety requirements
Gives the safety requirements and measures to design, build, supply, install, take
apart, transport and maintain milling and boring machines.
Robots for industrial environments
AS 4024.3301 Robots for industrial environments – Safety requirements
Gives requirements and guidelines to design, build and use industrial robots and
robot systems safely. It describes some hazards of working with robots and how
to avoid them.
While this standard does not cover non-industrial robots, the safety principles
can be used for them. Non-industrial robot applications include:
> undersea
> military and space robots
> tele-operated manipulators
> prosthetics and other aids for the physically impaired
> micro-robots (smaller than 1mm)
> surgery or healthcare
> service or consumer products.
AS 4024.4-1998 SAFEGUARDING OF MACHINERY INCLUDES:
Pressure-sensitive devices
AS 4024.4 Safeguarding of machinery – Installation and commissioning requirements
for electro-sensitive systems – Pressure-sensitive devices
Explains the requirements to install and commission pressure-sensitive fixed
mats, floors, edges and bars that will be used with plant and machinery.
You will need to adapt or extend this standard if safety devices are to be used
in other situations, such as protecting children or in exposed places with wide
temperature limits.

91
SECTION 11 // APPENDICES
11.5 EXAMPLE RISK ASSESSMENT PROCESS
The process can be used to identify hazards, assess their risks and identify controls to
implement in relation to safeguarding of machinery and plant. This risk management process
is outlined below.
1. IDENTIFY POTENTIAL HAZARDS – THESE MAY INCLUDE:
> drawing-in or trapping hazards
> entanglement hazards
> shearing hazards
> cutting hazards
> impact hazards
> crushing hazards
> stabbing and puncturing hazards
> friction and abrasion hazards
> hot or cold hazards
> ejection hazards
> other contact hazards
> noise hazards
> release of hazardous substances
> hazards related to location of the machine or plant
> hazards related to systems of work associated with the machine or plant
> concurrent hazards.
Questions to ask to identify hazards:
> Where fixed guards are provided, are they of substantial construction and secured into
position while machinery is in operation?
> Where interlocked guards are provided, do they prevent operation of the machinery when
open, and are the guards prevented from opening while the machinery is in operation?
> Where a presence-sensing system is used, does it operate as intended and stop the machinery
when light beams or sensors are interrupted?
> Do guards protect against hazards at the rear and sides of machinery?
> Are pre-operational checks conducted to ensure safety features are in working order?
> Are adequate isolation procedures provided for maintenance?
> Are manufacturers’ manuals available?
> Are machine controls protected to prevent unintentional operation, clearly marked and within
easy reach of the operator?
> Are warning signs and decals clearly visible?
> Where it is not practical to provide guarding and people are required to operate or pass close
to dangerous moving parts, is a safe system of work in place to reduce risks?

BEST PRACTICE GUIDELINES // SAFE USE OF MACHINERY
92
RISK RATING TABLE
Likelihood of injury or harm to health
Consequences of injury or harm to health
Insignificantno injuries
Moderatefirst aid and/or medical treatment
Majorextensive injuries
Catastrophicfatalities
Very likely High Extreme Extreme Extreme
Likely Moderate High Extreme Extreme
Moderate Low High Extreme Extreme
Unlikely Low Moderate High Extreme
Highly unlikely (rare) Low Moderate High High
Extreme = immediate action
> Is it practical to provide a higher level of guarding than currently provided?
> Are operators and maintenance workers adequately trained, familiar with the operation and set
up of machinery and able to demonstrate safety features?
2. ASSESS THE LEVEL OF RISK FOR IDENTIFIED HAZARDS
> Gather information about the hazard(s). Consult with relevant people, including workers.
> Work out the likelihood of an injury or harm occurring. Consider how many people are likely to
be exposed to the hazard and for how long. Take into account different situations or conditions
that might exist at the workplace and could increase risk, such as changes to operations,
inspection, cleaning, maintenance, servicing and repairs and new or inexperienced workers.
> Use the information you have gathered to assess the potential consequences of any injury or
harm occurring from the hazard(s); for example, whether people die or suffer major, minor or
negligible injuries.
> Rate the risk by using the risk rating table below to work out the level of risk associated with
each hazard.
3. CONTROL MEASURES
Once the risk has been assessed, where required, choose control measures to eliminate the risk.
See section 4 of this guideline for options to control hazards.
4. RESIDUAL RISK
The risk may then be assessed after taking into consideration how much the hazard controls will
prevent harming workers.
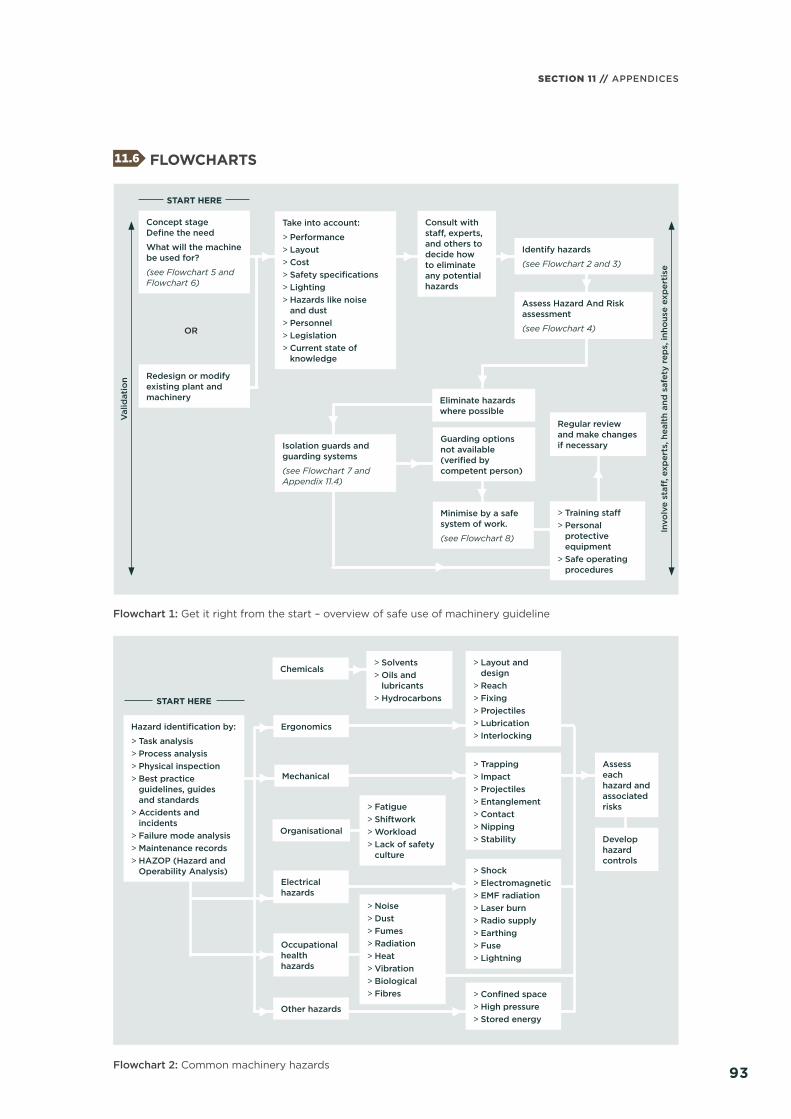
93
SECTION 11 // APPENDICES
11.6 FLOWCHARTS
Hazard identification by:
> Task analysis > Process analysis > Physical inspection > Best practice guidelines, guides and standards > Accidents and incidents > Failure mode analysis > Maintenance records > HAZOP (Hazard and Operability Analysis)
Chemicals > Solvents > Oils and lubricants > Hydrocarbons
> Fatigue > Shiftwork > Workload > Lack of safety culture
> Noise > Dust > Fumes > Radiation > Heat > Vibration > Biological > Fibres
Ergonomics
Mechanical
Organisational
Electrical hazards
Occupational health hazards
Other hazards
Flowchart 2: Common machinery hazards
> Layout and design > Reach > Fixing > Projectiles > Lubrication > Interlocking
> Trapping > Impact > Projectiles > Entanglement > Contact > Nipping > Stability
Assess each hazard and associated risks
Develop hazard controls
> Shock > Electromagnetic > EMF radiation > Laser burn > Radio supply > Earthing > Fuse > Lightning
> Confined space > High pressure > Stored energy
START HERE
Flowchart 1: Get it right from the start – overview of safe use of machinery guideline
Redesign or modify existing plant and machinery Eliminate hazards
where possible
Guarding options not available (verified by competent person)
Invo
lve
staff
, exp
erts
, hea
lth
and
saf
ety
rep
s, in
hous
e ex
per
tise
Val
idat
ion
Concept stage Define the need
What will the machine be used for?
(see Flowchart 5 and Flowchart 6)
Take into account:
> Performance > Layout > Cost > Safety specifications > Lighting > Hazards like noise and dust > Personnel > Legislation > Current state of knowledge
Consult with staff, experts, and others to decide how to eliminate any potential hazards
Identify hazards
(see Flowchart 2 and 3)
Assess Hazard And Risk assessment
(see Flowchart 4)
Isolation guards and guarding systems
(see Flowchart 7 and Appendix 11.4)
Minimise by a safe system of work.
(see Flowchart 8)
> Training staff > Personal protective equipment > Safe operating procedures
Regular review and make changes if necessary
OR
START HERE

BEST PRACTICE GUIDELINES // SAFE USE OF MACHINERY
94
Assess the hazard for significance and assess the risk:
> Consequence (severity) > Likelihood (exposure/frequency) (see Appendix 11.5 for risk rating)
Risk probability:
> Low/Medium/High > Who is exposed to the risk?
Develop priority of actions for each hazard
Identify controls. Involve staff and use internal or external advice (engineers, health and safety consultants).
(see Flowcharts 7 and 8)
Is the hazard controlled and the risk mitigated?
Monitor and review
Review if something changes
Is the hazard controlled and the risk mitigated?
Evaluate controls through regular review and update or change if required
Keep records
Installation and commissioning
> Current state of knowledge > Guarding > Interlocks > Training > PPE > Information and signage > Procedures > Audit and review > Monitor environment and/or health > Supervision > Workplace culture > Staffing levels
Select and put in place controls
Flowchart 4: Assess hazard and risks – eliminate hazards where possible
YES
YES
NO
NO
START HERE
Hazard identification by
> Task analysis > Process analysis > Physical inspection > Failure mode > HAZOPs > Accidents and incidents > Maintenance records > Best practice guidelines, guides and standards
Normal Operation Hazards
Operator controls
> Start > Stop > Emergency stop > Labels > Tool setting, adjusting and calibration > Usual use
> Personal protective equipment > Monitoring > Training and supervision > Safe operating procedures
> Personal protective equipment > Monitoring > Training > Safe operating procedures
Assess each hazard, who it affects, and associated risks
Develop hazard controls
Operator response
> Emergency planning and response > Breakdowns and unplanned maintenance > Blockage
> Lock-out > Interlock > De-energising > Insulation
Irregular Hazards
Cleaning
Maintenance Repair
Flowchart 3: Identify operational hazards to use machinery safely
START HERE

95
SECTION 11 // APPENDICES
Flowchart 6: Validation and verification
Identify hazards
(see Flowcharts 2 and 3)
Risk assessment
(see Flowchart 4)Post-measures
Risk assessment
Verify the following:
> safety requirement specifications > architecture/drawings > components > guarding
Software validation (if required)
Installation inspection and validation
Functional validation (test function behaviour)
Document
Safety requirement specifications
Concept and design stage
(see Flowchart 5)
Installation or modification and commission machine
Validation
SAFE USE OF MACHINERY PROCESS VERIFICATION AND/OR VAILIDATION
START HERE
Flowchart 5: Concept stage – Health and safety in the business case
Get it right at the start!
Establish the need for new plant or modifying existing plant
Develop a business case
Define machine safety specifications and operational requirements
> Legislation > Standards – AS4024 and machine specific standards (see Appendix 11.4) > WorkSafe NZ Approved Codes of > Practice (ACOP) and Guidelines > Current state of knowledge > Consultation with users, health and safety reps and internal expertise > WorkSafe NZ’s- Safe Use of Machinery page for advice on specific machinery
> Return on investment > Capital expenditure > Production/Operations input > Do I need this machine? > How often do I use it?
Identify hazards
(see Flowcharts 2 and 3)
Eliminate hazards through safe design
Complete business case with the information gathered
Business case is accepted.
Develop project plan including health and safety requirements
START HERE

BEST PRACTICE GUIDELINES // SAFE USE OF MACHINERY
96
Flowchart 7: Choosing a guard
Are hazards present? Guards not needed
Fixed guards as
> AS 4024:1601 > AS 4024.1:1801 - 1803
Use movable guard with guard locking to the appropriate category level
(see AS 4024:1501 AS 4024:1602)
Series 1: General safety requirements.
Series 2: Controls and appropriate speeds:
> Two-handed controls
Series 3: Requirements for specific machines:
> Mechanical and hydraulic power presses > Milling machines > Industrial robots
Series 4: Electro sensitive safety devices:
> Pressure sensitive devices
Is access required by operators/maintenance staff or cleaners?
Does opening the guard cause the hazard to stop before access?
Is constant access required?
Can presence sensing systems be used appropriately?
Use movable guard with interlock to the appropriate category level
(see AS 4024:1501)
Consider the environment and choose the right device, eg twohanded controls with a hold-to-run and slow speed function, and safety trip devices.
AS 4024:2601 and IEC 61496 series
If competent person verifies the machinery can’t be guarded, agree on safe systems of work
Note: the flowchart does not take other protective devices, such as two-hand controls, into account
NO
NO
NO
NO
NO
YES
YES
YES
YES
START HERE

97
SECTION 11 // APPENDICES
Flowchart 8: Developing and maintaining a safe system of work for specific tasks
Identify hazards and other hazards that may occur by using a safe system of work
Human factors
> Shiftwork > Fatigue > Repetitive activities > Incentives/bonuses > Shift length and breaks
Agree on safe system of work that takes into account and controls the hazards
Safe system of work must be approved by the authorised duty holders and a competent person
Training and supervision by a competent person in place for all staff, including induction for new staff and covering people on leave
Review system’s effectiveness regularly
Take into account
> Advances in technology > Incidents or accidents > Any new hazards identified > New industry standards and guidance > Whether hazards are still controlled > Keeping records
Consultation with staff, health and safety reps and internal experts about any changes
Regular auditing and recommended changes
Emergency management
> Procedures in place for emergencies > Information and signage > Equipment accessible > Staff trained, competent and capable > Processes in place for blockages and out of the ordinary events, eg power outages
People management
> Matching the worker to the task > Training for competency > Effective supervision > Use, maintenance and replacement of personal protective equipment > Visitor management
Good work environment
> Safe layout > Enough lighting, ventilation > Comfortable temperature > Noise and fumes managed > Information and signage
No guarding options available. Verified by a competent person
Correct use of tools and plant
> Safe operating procedures > Job safety analysis > Effective and safe maintenance, cleaning programmes > Monitoring of environment and/or operator health
START HERE

BEST PRACTICE GUIDELINES // SAFE USE OF MACHINERY
98
11.7 MORE INFORMATION
This list of standards is included for general guidance only, and is not inclusive of all standards.
Readers should check the latest version of a standard at the time of use.
New Zealand has performance based legislation and there is a duty on designers, manufacturers,
suppliers, importers, sellers and employers to take all practicable steps to eliminate, isolate and/
or minimise hazards. Complying with the requirements of an appropriate best practice standard
may be considered as taking all practicable steps to ensure safety of machinery and plant.
Evidence of failure to comply with the requirements of the best practice standard may be used
as evidence in proceedings for an offence under the HSE Act.
Some standards listed may be out of date and not available. The hierarchy for application
of standards are that if there is no New Zealand Standard for a subject, the first appropriate
standard to use is an Australian standard. If there is no Australian standard for the subject, the
next most relevant standards are ISO, European or British standards. If there is no such standard
available, then refer to the American, Canadian or other recognised relevant standards. The
criteria will also be which standard or guideline can provide the latest current state of knowledge
and good practices about the safety of a plant or process.
Legislation
> Electricity Act 1992
> Electricity (Safety) Regulations 2010 and Electrical Codes of Practice (ECP)
> Health and Safety in Employment Act 1992
> Health and Safety in Employment Regulations 1995
Standards
> AS 1121.4 Agricultural tractor power take-offs – Guards for power take-off (PTO) drive-shafts –
Strength and wear tests and acceptance criteria
> AS/NZS 1680.1 Interior and workplace lighting – General principles and recommendations
> AS/NZS 1680.2.4 Interior lighting – Part 24: Industrial tasks and processes.
> AS 1755 Conveyors – Safety requirements
> AS/NZS 1680.1 Interior and workplace lighting – General principles and recommendations
> AS 2865 Confined spaces
> AS 4024.1 (Series) Safety of machinery
> AS 4024.1101 Terminology – General
> AS 4024.1201 General principles – Basic terminology and methodology
> AS 4024.1202 General principles – Technical principles
> AS 4024.1301 Risk assessment – Principles of risk assessment
> AS 4024.1302 Risk assessment – Reduction of risks to health and safety from hazardous
substances emitted by machinery – Principles and specifications for machinery manufacturers
> AS 4024.1401 Safety of machinery: Part 1401: Ergonomic principles – Design principles –
Terminology and general principles

99
SECTION 11 // APPENDICES
> AS 4024.1501 Design of safety related parts of control systems – General principles
> AS 4024.1502 Design of safety related parts of control systems – Validation
> AS 4024.1601 Design of controls, interlocks and guarding – Guards – General requirements for
the design of fixed and movable guards
> AS 4024.1602 Interlocking devices associated with guards – Principles for design and selection
> AS 4024.1603 Design of controls, interlocks and guards – Prevention of unexpected start-up
> AS 4024.1701 Human body measurements – Basic human body measurements for
technological design
> AS 4024.1702 Human body measurements – Principles for determining the dimensions required
for openings for whole body access into machinery
> AS 4024.1703 Principles for determining the dimensions required for access openings
> AS 4024.1704 Human body measurements anthropometric data
> AS 4024.1801 Safety distances to prevent danger zones being reached by the upper limbs
> AS 4024.1802 Safety distances and safety gaps – Safety distances to prevent danger zones
being reached by the lower limbs
> wAS 4024.1903 Displays, controls, actuators and signals – Ergonomic requirements for the
design of displays and control actuators – Control actuators
> AS 4024.1907 Safety of machinery – Displays, controls, actuators and signals – System of
auditory and visual danger and information signals
> AS 4024.2601 Safety of machinery – Design of controls, interlocks and guarding – Two-hand
control devices – Functional aspects and design principles
> AS 4024.2801 Safety of machinery – Safety distances and safety gaps – Positioning of
protective equipment with respect to the approach speed of parts of the human body
> AS 4024.3 Safety of machinery: Part 3: Manufacturing and testing requirements for electro-
sensitive systems – Optoelectronic devices
> AS 4024.4 Safety of machinery: Part 4: Installation and commissioning requirements for
electro-sensitive systems – Pressure-sensitive devices
> AS 4024.3001 Safety of machinery – Materials forming and shearing – Mechanical
power presses
> AS 4024.3002 Safety of machinery – Materials forming and shearing – Hydraulic power presses
> AS 4024.3101 Safety of machinery – Materials cutting – Milling machines (including boring
machines) – Safety requirements
> AS 4024.3301 Safety of machinery – Robots for industrial environments – Safety requirements
> AS 4024.3610 Conveyors – Safety requirements
> AS 4024.4 Safeguarding of machinery: Part 4: Installation and commissioning requirements for
electro-sensitive systems – Pressure-sensitive devices
> AS 60204.1 Safety of machinery – Electrical equipment of machines – General requirements
> AS 62061 Safety of machinery – Functional safety of safety-related electrical, electronic and
programmable electronic control systems

BEST PRACTICE GUIDELINES // SAFE USE OF MACHINERY
100
European Standards
> IEC 61496-1 Safety of machinery – Electro-sensitive protective equipment – Part 1: General
requirements and tests
> IEC 61496-2 Safety of machinery – Electro-sensitive protective equipment – Part 2: Particular
requirements for equipment using active opto-electronic protective devices (AOPDs)
> IEC 61496-3 Safety of machinery – Electro-sensitive protective equipment – Part 3: Particular
requirements for active opto-electronic protective devices responsive to diffuse reflection
(AOPDDR)
> BS EN 1756-1 Tail lifts. Platform lifts for mounting on wheeled vehicles. Safety requirements.
Tail lifts for goods
> BS EN 1756-2 Tail lifts. Platform lifts for mounting on wheeled vehicles. Safety requirements.
Tail lifts for passengers
WORKSAFE NZ PUBLICATIONS
Approved Codes of Practice
> Approved Code of Practice for cranes
> Approved Code of Practice for operator protective structures on self-propelled mobile
mechanical plant
> Approved Code of Practice for power-operated elevating work platforms
> Approved Code of Practice for the management of noise in the workplace
> Approved Code of Practice for load-lifting rigging
> Code of Practice for manual handling
Guidelines and guides
> An introduction to the safe use of machinery
> Small business guide to the Health and Safety in Employment Act 1992
> Guidance notes for electrical interlocking for safety in industrial processes
> Ergonomics of machine guarding guide
> First aid for workplaces – A good practice guide
> Keeping safe at work – A guide for employees
> Managing health and safety – A guide for employers
> A principal’s guide to contracting to meet the Health and Safety in Employment Act 1992,
and its summary, Health and safety in contracting situations
> Management of Substances Hazardous to Health – A guide to completing an assessment
in your workplace
> Guidelines for the provision of facilities and general safety in commercial and
industrial premises
> Stress and fatigue: Reducing their impact – Advice for employers and employees
> Best Practice Guidelines for the use of elevating work platforms in the horticultural industry
> Best Practice Guidelines for working at height in New Zealand

101
SECTION 11 // APPENDICES
Factsheets
> Employers must involve staff in health and safety
> Employees have to help ensure a safe and healthy worksite
> Factsheet: Band saws
> Factsheet: Beam saws
> Factsheet: CNC Woodworking machines
> Factsheet: CNC machining centre
> Factsheet: CNC turret punch
> Factsheet: Dough brakes
> Factsheet: Dough dividers
> Factsheet: Circular saw benches
> Factsheet: General principles of machine guarding
> Factsheet: Guarding of conveyors
> Factsheet: Information, installation, operation and maintenance
> Factsheet: Fixed hand held grinders
> Factsheet: Four siders
> Factsheet: Injection blow moulding
> Factsheet: Jig saws
> Factsheet: Metal cutting shears
> Factsheet: Metal turning lathes
> Factsheet: Metalworking guillotines
> Factsheet: Mitre saws
> Factsheet: Mortisers
> Factsheet: Overhand planing
> Factsheet: Paper cutting guillotines
> Factsheet: Pendulum saws
> Factsheet: Plastics extrusion
> Factsheet: Plastics granulator
> Factsheet: Platen press
> Factsheet: Power presses
> Factsheet: Press brake machine guarding
> Factsheet: Punch & shear
> Factsheet: Radial arm saws
> Factsheet: Rise & fall saws
> Factsheet: Rotary printing press
> Factsheet: Screw conveyor
> Factsheet: Tenoners
> Factsheet: Thicknessers
> Factsheet: Three roll bending machines
> Factsheet: Vertical spindle moulder
> Health and Safety Representatives

BEST PRACTICE GUIDELINES // SAFE USE OF MACHINERY
102
Notes

103
SECTION 11 // APPENDICES
Notes

BEST PRACTICE GUIDELINES // SAFE USE OF MACHINERY
104
Notes

DISCLAIMER
WorkSafe NZ has made every effort to ensure that the information in this guideline is reliable, but we make no guarantee of its accuracy or completeness and do not accept any liability for any errors. WorkSafe NZ may change, add to, delete from or otherwise amend the contents of this guideline at any time without notice.
Except for the logos of WorkSafe NZ, this copyright work is licensed under a Creative Commons Attribution-Non-commercial 3.0 NZ licence.
To view a copy of this licence, visit http://creativecommons.org/licenses/by-nc/3.0/nz/
In essence, you are free to copy, communicate and adapt the work for non-commercial purposes, as long as you attribute the work to WorkSafe NZ and abide by the other licence terms.
MORE INFORMATION
Information, examples and answers to your questions about the topics covered here can be found on our website www.worksafe.govt.nz on the Safe use of machinery project page, or by calling us free on 0800 030 040.

WorkSafe New Zealand 56 The Terrace
PO Box 165
Wellington 6140
Phone: +64 4 897 7699
Fax: +64 4 415 4015
0800 030 040
www.worksafe.govt.nz
@WorkSafeNZ
ISBN 9780478425154 (online)
ISBN 9780478425147 (print)