salesware e-commerce installation guide
TRANSCRIPT

E-Commerce Installation Guide Version 4.4
accesso 302 Camino de la Placita
Taos, NM 87571
575.751.0633
www.accesso.com

Copyright
Copyright 2015 accesso Technology Group, plc. All rights reserved.
NOTICE: All information contained herein is the property of accesso Technology Group, plc. No part of this publication (whether in hardcopy or electronic form) may be reproduced or transmitted, in any form or by any means, electronic, mechanical, photocopying, recording, or otherwise, without the prior written consent of accesso Technology Group, plc. The software, which includes information contained in any databases, described in this document is furnished under a license agreement and may be used or copied only in accordance with the terms of that agreement.
This publication and the information herein is furnished AS IS, is subject to change without notice, and should not be construed as a commitment by accesso Technology Group, plc. accesso Technology Group, plc. assumes no responsibility or liability for any errors or inaccuracies, makes no warranty of any kind (express, implied, or statutory) with respect to this publication, and expressly disclaims any and all warranties of merchantability, fitness for particular purposes, and non-infringement of third party rights.
INTRODUCTION ........................................................................................................................................ 2
PREREQUISITES TO INSTALLATION ..................................................................................................... 2
Hosting .................................................................................................................................................................................................... 3 Basic hosting: ...................................................................................................................................................................................... 3 Advanced hosting: ............................................................................................................................................................................... 4
INSTALLING THE CORE SERVER SOFTWARE...................................................................................... 4
INSTALLING WW.DLL .............................................................................................................................. 4 Example: .................................................................................................................................................................................... 5 To install ww.dll: ........................................................................................................................................................................ 5
INSTALLING THE DEFAULT WEB PAGES ON WINDOWS SERVER 2008/2012................................... 6 To install the default pages on Windows Server 2008/2012: ........................................................................................................ 7
INSTALLING WWSERVICE ON WINDOWS SERVER 2008/2012 .......................................................... 13 To install wwService on Windows Server 2008/2012: ............................................................................................................... 14
CONFIGURATION ................................................................................................................................... 15
INSTALLING SALES HOST UTILITY ...................................................................................................... 15 Example: .................................................................................................................................................................................. 15
Recommended standard setup for Sales Host system: ......................................................................................................................... 16
CONFIGURE THE SALES HOST UTILITY .............................................................................................. 16
1

Introduction
E-Commerce module can be installed on Windows Server 2008. When installed on Windows Server 2008, IIS version 7 is used. Installation of IIS is part of the installation of the operating system. Installation of IIS 7 requires you to select certain options so that the installation works with Salesware E-Commerce module.
Each of the sections of these installation steps is labeled as one of three types:
• Sections that provide installation instructions common to installing E-Commerce module on WindowsServer 2008
• Sections that provide installation instructions specific to installing E-Commerce module on Windows Server2012
Prerequisites to installation
Verify that SalesEZ application for Pool Service has been installed at your site. Identify an E-Commerce computer on your network, preferably a server computer, running Windows Server 2008 or 2012. This computer must be able to be connected to the SiriusSQL server data, preferably be located in the server room and must be accessible through Terminal Services, VNC or some other remote access software and have IIS, Microsoft .NET Framework 4.0 and ASP.NET installed before your scheduled installation. Identify one or more computers that are connected to the network that can serve as E-Commerce salespoints. ProtoBase must be installed before your scheduled installation. Obtain your SSL certificate - your install can still be completed without this, but it is needed before your site goes live. For information on how to obtain an SSL certificate, see the Salesware E-Commerce User Guide. Obtain the following files from the accesso Siriusware Information Portal:
File Description c_ww_xxxx.exe The latest E-Commerce module executable file which contains:
• ww.dll – The compiled code for the E-Commerce module• ww_release.txt – Release notes for ww.dll• log4cplus.dll – This ww.dll works with ww.dll and
must in the same directory as ww.dll• log4cplus.dll – This ww.dll works with ww.dll and
must in the same directory as ww.dll• ptCoreSDK.dll – This .dll works with ww.dll and must
be in the same directory as ww.dll• ptCoreSDK-debug.dll – This .dll works with ww.dll
and must be in the same directory as ww.dllc_sales_xxxx.exe The latest Sales executable file c_MessengerService.exe The latest Messenger Service executable file
2
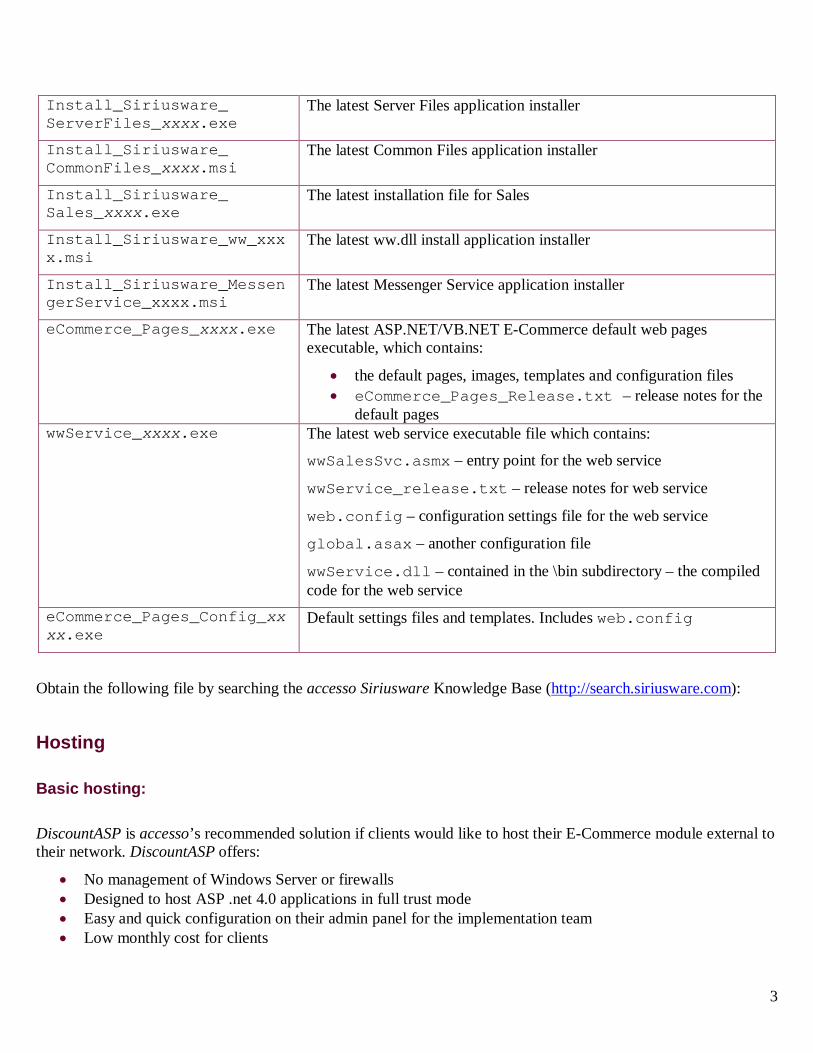
Install_Siriusware_ ServerFiles_xxxx.exe
The latest Server Files application installer
Install_Siriusware_ CommonFiles_xxxx.msi
The latest Common Files application installer
Install_Siriusware_ Sales_xxxx.exe
The latest installation file for Sales
Install_Siriusware_ww_xxxx.msi
The latest ww.dll install application installer
Install_Siriusware_MessengerService_xxxx.msi
The latest Messenger Service application installer
eCommerce_Pages_xxxx.exe The latest ASP.NET/VB.NET E-Commerce default web pagesexecutable, which contains:
• the default pages, images, templates and configuration files• eCommerce_Pages_Release.txt – release notes for the
default pageswwService_xxxx.exe The latest web service executable file which contains:
wwSalesSvc.asmx – entry point for the web service
wwService_release.txt – release notes for web service
web.config – configuration settings file for the web service
global.asax – another configuration file
wwService.dll – contained in the \bin subdirectory – the compiledcode for the web service
eCommerce_Pages_Config_xxxx.exe
Default settings files and templates. Includes web.config
Obtain the following file by searching the accesso Siriusware Knowledge Base (http://search.siriusware.com):
Hosting
Basic hosting:
DiscountASP is accesso’s recommended solution if clients would like to host their E-Commerce module external to their network. DiscountASP offers:
• No management of Windows Server or firewalls• Designed to host ASP .net 4.0 applications in full trust mode• Easy and quick configuration on their admin panel for the implementation team• Low monthly cost for clients
3

• SSL certificates also offered on the same site • Ability to handle multiple subdomains (i.e., tickets.domain.com and memberships.domain.com) • Ability to handle multiple domains by using a default document to redirect (i.e.,
tickets.domain1.com and tickets.domain2.com). Please note this may require custom billable work.
Advanced hosting:
If clients want full control and management of a Windows Server, and then a Virtual Private Server from Rack Space, Go Daddy, Network Solutions or others would work.
• Clients would need to make sure the server is managed, firewalled and patched/updated • Full control of Windows Server • Can host all .net applications through ISS • Higher monthly costs for clients • Can handle multiple domains easier through IIS(i.e., tickets.domain1.com and
tickets.domain2.com)
Installing the core server software
1. Install SQL Server as described in the Salesware Installation Guide. The .NET Framework 4.0 SP1 is installed as part of the SQL Server 2008 installation, because the .NET Framework 4.0 is required by SQL Server 2008. If you are not installing SQL Server 2008, you need to download and install the .NET Framework 4.0 as a separate step. You can download the .NET Framework 4.0 from the Microsoft web site.
2. Install Server Files application as described in the Salesware Installation Guide. 3. Install Common Files application as described in the Salesware Installation Guide.
Installing ww.dll
The ww.dll is installed as a web garden − i.e., it is pooled using an application pool in IIS. When installed on Windows Server 2008, IIS version 7 is used. If this already installed as a COM+ object, switching to use as a web garden under IIS is straight-forward. See http://portal.siriusware.com/docs/kb-pdf/Installation_and_updates/e-commerce_2010_mar_8.pdf.
Note: accesso strongly recommends that your web server not be a member of a Windows domain. Being a domain member is a potential security risk and changes the way authentication is handled. This change in authentication could make Salesware web pages not function correctly without additional configuration. However, the installation of ww.dll and wwService presented in this document support using the server computer as a domain member if so desired.
4

Important: The ww.dll and Web SalesHost (WSH) are no longer allowed to share the same salespoint ID due to complications with Max4Sale and Points4Sale limits and Real Time Inventory Tracking. The ww.dll now adds the salespoint ID that it is configured to use (from the ww_system.ini file, DefaultInfo=<operator>WEBOP</operator><salespoint>WWSP</salespoint> setting) to the sale string that is passed in for processing by WSH unless the pages have already added a salespoint ID to the sale string via the salespoint key. The salespoint ID will appear in the sale string like this.
Example: <salespoint>WWSP</salespoint>
If the salespoint ID in the sale string is the same as the salespoint ID configured for WSH, an error will occur when WSH tries to process the sale indicating that there is a conflict, and WSH will shut down. Either the salespoint ID in the sale string will need to be changed, or the salespoint ID of WSH will need to be changed and the sale resubmitted. For all future sales the salespoint IDs of ww.dll and WSH need to be unique.
To install ww.dll:1. Run the Install_Siriusware_ww_xxxx.exe file.2. Create siriusweb user for SQL Server 2008 or SQL Server 2012. (This step applies to SQL Server 2008
and 2012). Before ww.dll can communicate with the SiriusSQL database, a new database log-in, siriusweb, must be created and a script granting the new user the appropriate rights to the database must be run. This is done by checking the following two boxes during the install:
3. Select the Database Server, the SA credentials and select the database
5

4. Enter and confirm a password for this user5. Enter your ProtoBase/OCV information for credit card processing6. Run the Update ww.dll shortcut installed on the desktop
Installing the default web pages on Windows Server 2008/2012
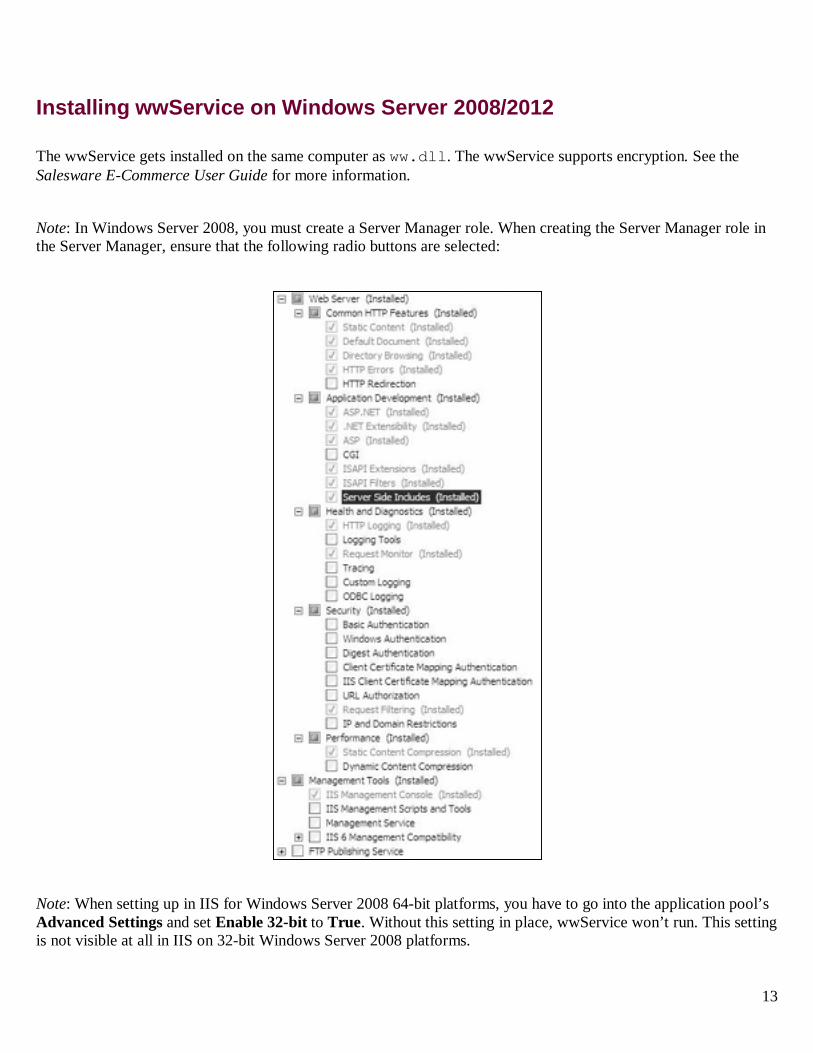
Note: In Windows Server 2008, you must create a Server Manager role. When creating the Server Manager role in the Server Manager, ensure that the following radio buttons are selected:
6
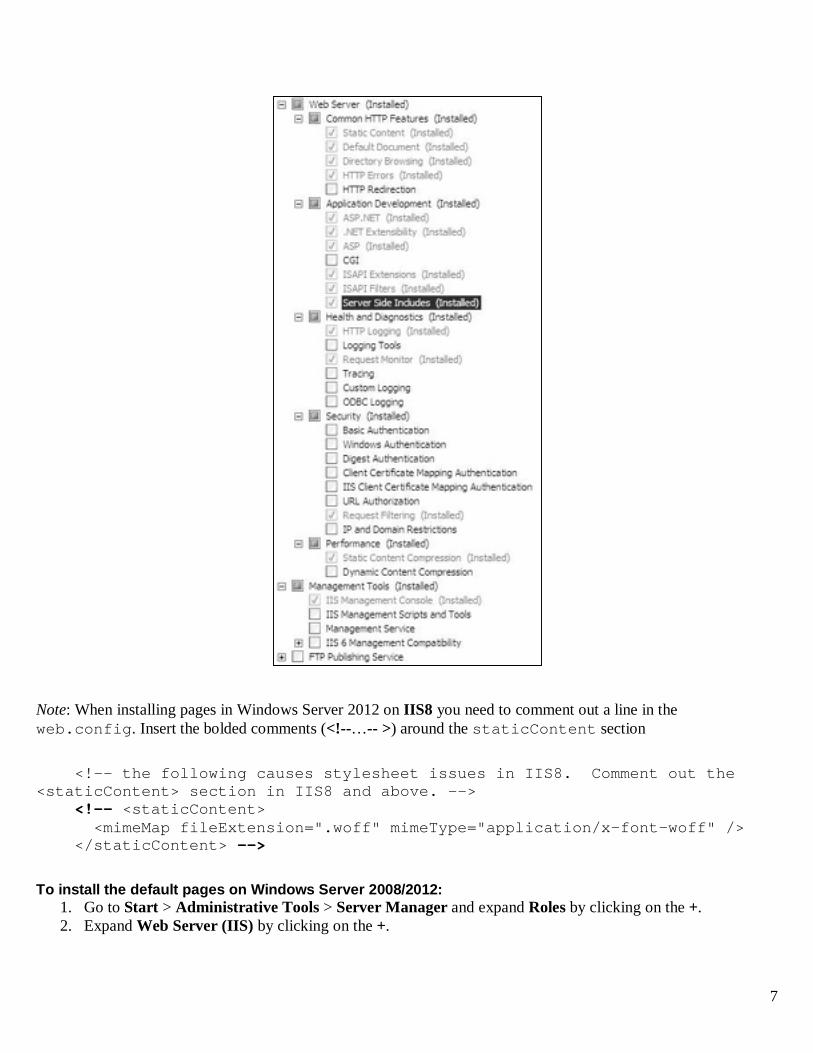
Note: When installing pages in Windows Server 2012 on IIS8 you need to comment out a line in the web.config. Insert the bolded comments (<!--…-- >) around the staticContent section <!-- the following causes stylesheet issues in IIS8. Comment out the <staticContent> section in IIS8 and above. --> <!-- <staticContent> <mimeMap fileExtension=".woff" mimeType="application/x-font-woff" /> </staticContent> --> To install the default pages on Windows Server 2008/2012:
1. Go to Start > Administrative Tools > Server Manager and expand Roles by clicking on the +. 2. Expand Web Server (IIS) by clicking on the +.
7
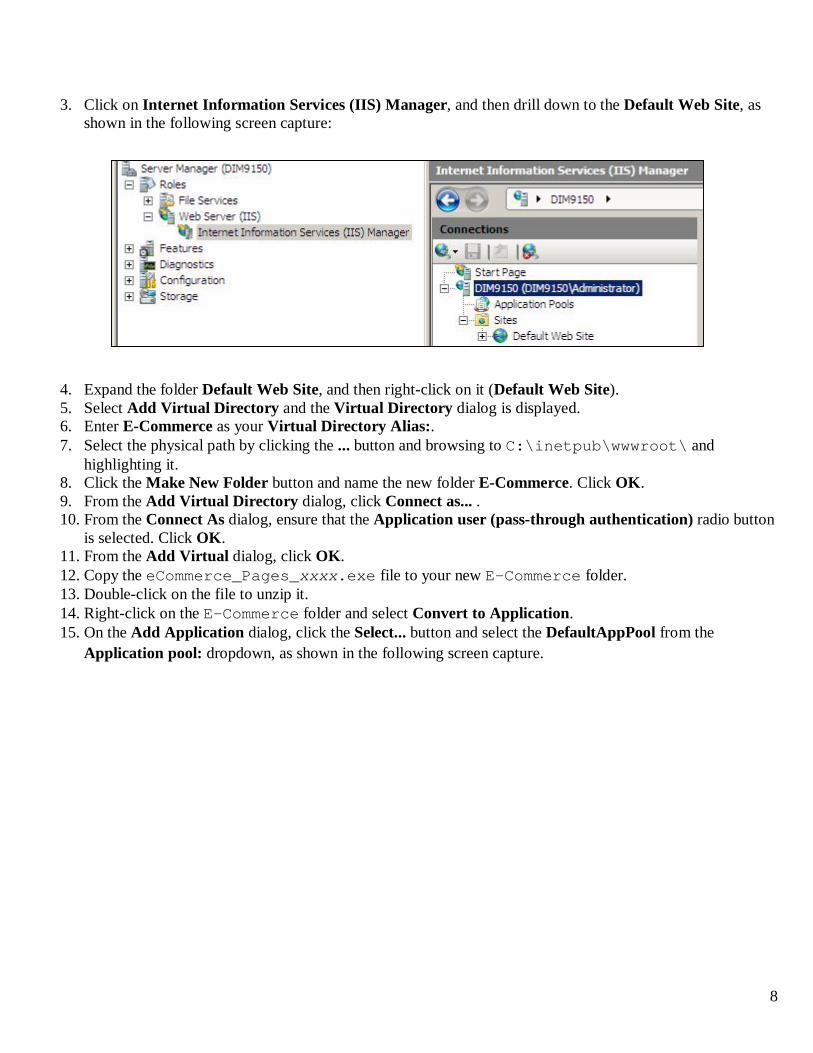
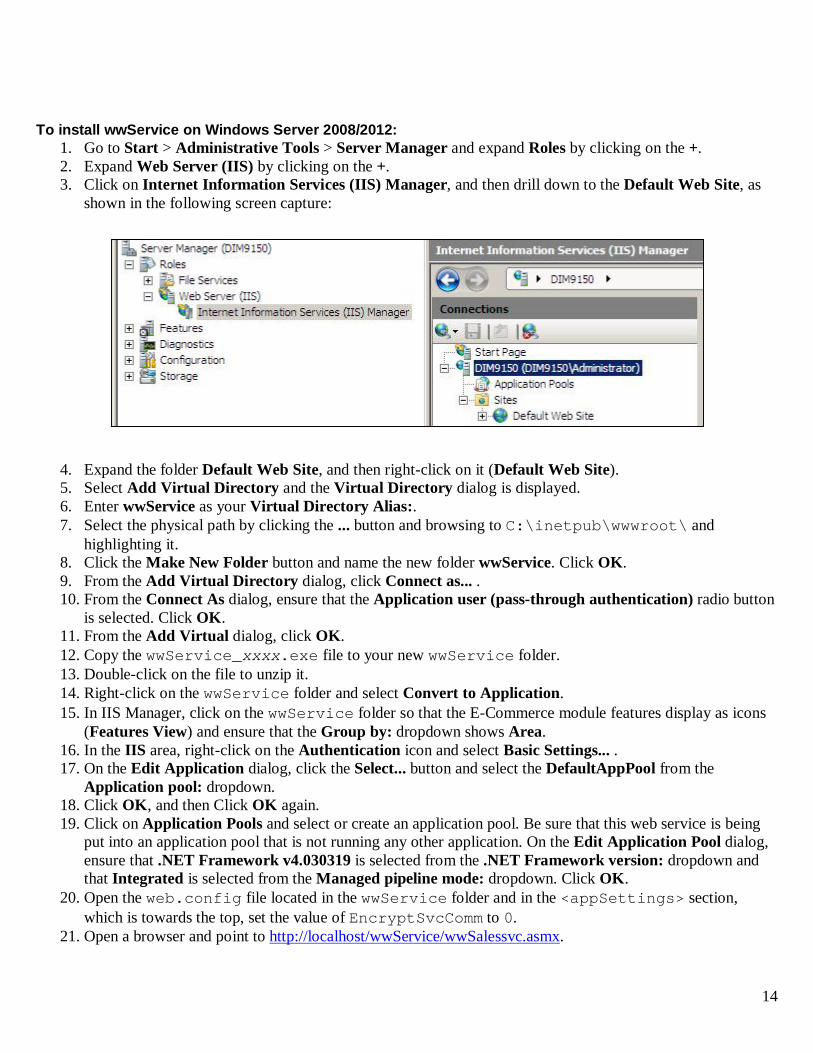
3. Click on Internet Information Services (IIS) Manager, and then drill down to the Default Web Site, as shown in the following screen capture:
4. Expand the folder Default Web Site, and then right-click on it (Default Web Site). 5. Select Add Virtual Directory and the Virtual Directory dialog is displayed. 6. Enter E-Commerce as your Virtual Directory Alias:. 7. Select the physical path by clicking the ... button and browsing to C:\inetpub\wwwroot\ and
highlighting it. 8. Click the Make New Folder button and name the new folder E-Commerce. Click OK. 9. From the Add Virtual Directory dialog, click Connect as... . 10. From the Connect As dialog, ensure that the Application user (pass-through authentication) radio button
is selected. Click OK. 11. From the Add Virtual dialog, click OK. 12. Copy the eCommerce_Pages_xxxx.exe file to your new E-Commerce folder. 13. Double-click on the file to unzip it. 14. Right-click on the E-Commerce folder and select Convert to Application. 15. On the Add Application dialog, click the Select... button and select the DefaultAppPool from the
Application pool: dropdown, as shown in the following screen capture.
8
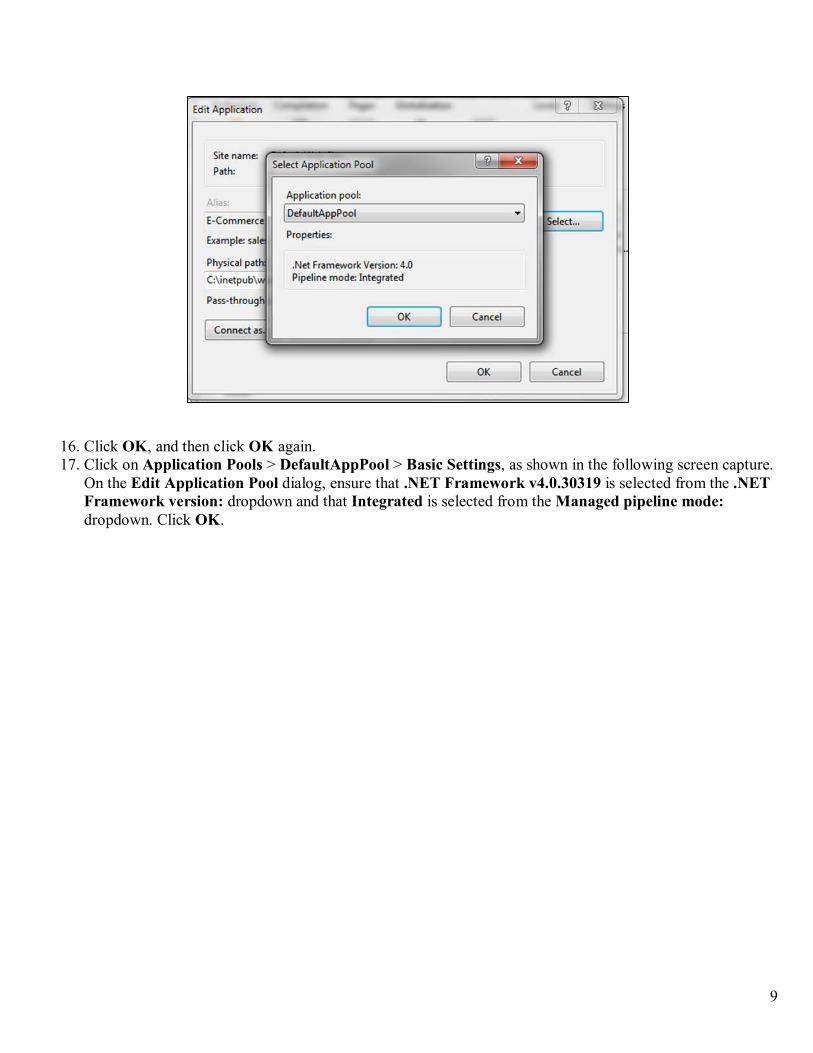
16. Click OK, and then click OK again.17. Click on Application Pools > DefaultAppPool > Basic Settings, as shown in the following screen capture.
On the Edit Application Pool dialog, ensure that .NET Framework v4.0.30319 is selected from the .NET Framework version: dropdown and that Integrated is selected from the Managed pipeline mode:dropdown. Click OK.
9

18. For the E-Commerce site, right-click on the Authentication icon again and select Edit Permissions... .19. On the E-Commerce Properties dialog, click the Security tab and verify that the IIS users account is listed
in the Group or user names list. If it is not there, add it (the username is always going to be IIS_IUSRS(<servername>\IIS_IUSRS).
20. Select the IIS user’s account. Under Permissions for IIS_IUSRS, select Read & Execute and that automatically selects List folder contents and Read. Verify that there are no write permissions selected. Click OK.
Note: When setting up in IIS for Windows Server 2008 64-bit platforms, you have to go into the application pool’s Advanced Settings and set Enable 32-bit to True. Without this setting in place, the pages won’t run. This setting is not visible at all in IIS on 32-bit Windows Server 2008 platforms.
Note: Performing an iisreset command from a command prompt is an easy way to ensure that any changes you make in IIS take effect immediately.
10

21. In the IIS area, double click on the Default Document icon. See the following screen capture.
22. In the Actions panel, click Add. On the Add Default Document dialog, enter itemlist.aspx and click OK. See the following screen capture.
23. Ensure that itemlist.aspx appears at the top of the list. 24. In the IIS area, double click on SSL Settings icon to see where you would install your SSL Certificate using
the Client Certificates radio button (if you are going to take credit cards, you need to do this). 25. Once your SSL Certificate is installed, all of the pages run under HTTPS.
11

26. Place the eCommerce_Pages_Config_xxxx.exe file into your new E-Commerce folder and double-click to unzip into the folder.
27. Copy default configuration files • Copy all files and folders from C:\Inetpub\wwwroot\E-commerce\DefaultConfig to
C:\Inetpub\wwwroot\E-commerce • Delete C:\Inetpub\.wwwroot\E-commerce\web.config • Rename web.config.default to web.config
28. Ensure the \IIS_IUSRS has Modify permissions in the following files/folders: • Folder: C\Inetpub\wwwroot\E-commerce\Images
• Remove the Read-Only check mark on this folder. • Folder: C:\Inetpub\wwwroot\E-commerce\XMLfiles
• Remove the Read-Only check mark on this folder. • Folder: C:\Inetpub\wwwroot\E-commerce\Siteconfig.config
29. If you are using IIS 8 or above, you must edit the web.config and comment out or remove the <staticContent> section or the pages will be unable to load the style sheets.
30. If your pages are installed on the same computer as ww.dll, you can start Internet Explorer and go to http://localhost/E-Commerce to display the default page itemlist.aspx. Alternatively, you can click the Browse Application link in the Actions panel, as shown in the following screen capture.
31. If your pages are installed on a separate computer from ww.dll, you need to install wwService before pointing Internet Explorer to http://localhost/E-Commerce to display the default page.
12
Installing wwService on Windows Server 2008/2012
The wwService gets installed on the same computer as ww.dll. The wwService supports encryption. See the Salesware E-Commerce User Guide for more information.
Note: In Windows Server 2008, you must create a Server Manager role. When creating the Server Manager role in the Server Manager, ensure that the following radio buttons are selected:
Note: When setting up in IIS for Windows Server 2008 64-bit platforms, you have to go into the application pool’s Advanced Settings and set Enable 32-bit to True. Without this setting in place, wwService won’t run. This setting is not visible at all in IIS on 32-bit Windows Server 2008 platforms.
13
To install wwService on Windows Server 2008/2012:
1. Go to Start > Administrative Tools > Server Manager and expand Roles by clicking on the +. 2. Expand Web Server (IIS) by clicking on the +. 3. Click on Internet Information Services (IIS) Manager, and then drill down to the Default Web Site, as
shown in the following screen capture:
4. Expand the folder Default Web Site, and then right-click on it (Default Web Site). 5. Select Add Virtual Directory and the Virtual Directory dialog is displayed. 6. Enter wwService as your Virtual Directory Alias:. 7. Select the physical path by clicking the ... button and browsing to C:\inetpub\wwwroot\ and
highlighting it. 8. Click the Make New Folder button and name the new folder wwService. Click OK. 9. From the Add Virtual Directory dialog, click Connect as... . 10. From the Connect As dialog, ensure that the Application user (pass-through authentication) radio button
is selected. Click OK. 11. From the Add Virtual dialog, click OK. 12. Copy the wwService_xxxx.exe file to your new wwService folder. 13. Double-click on the file to unzip it. 14. Right-click on the wwService folder and select Convert to Application. 15. In IIS Manager, click on the wwService folder so that the E-Commerce module features display as icons
(Features View) and ensure that the Group by: dropdown shows Area. 16. In the IIS area, right-click on the Authentication icon and select Basic Settings... . 17. On the Edit Application dialog, click the Select... button and select the DefaultAppPool from the
Application pool: dropdown. 18. Click OK, and then Click OK again. 19. Click on Application Pools and select or create an application pool. Be sure that this web service is being
put into an application pool that is not running any other application. On the Edit Application Pool dialog, ensure that .NET Framework v4.030319 is selected from the .NET Framework version: dropdown and that Integrated is selected from the Managed pipeline mode: dropdown. Click OK.
20. Open the web.config file located in the wwService folder and in the <appSettings> section, which is towards the top, set the value of EncryptSvcComm to 0.
21. Open a browser and point to http://localhost/wwService/wwSalessvc.asmx.
14
22. Click rInvoke and enter getserverinfo into the strFunc: box. 23. Click the Invoke button and you get returned something that looks like this in a separate window:
<?xml version="1.0" encoding="utf-8" ?> <anyType xmlns:q1="http://www.w3.org/2001/XMLSchema" d1p1:type="q1:string" xmlns:d1p1="http://www.w3.org/2001/XMLSchema-instance" xmlns="http://tempuri.org/wwService/wwSales">OK :<path>C:\Program Files\Siriusware\E-Commerce\</path><filename>ww.dll</filename><version>4.000r</version></anyType>
24. This is the equivalent of running the first vbs script, ww1.vbs. 25. Be sure to set the value of EncryptSvcComm to 1 in the web.config file in wwService and in E-
Commerce module when you are ready to enable encryption.
Configuration
Configuration of E-Commerce module is primarily accomplished using web.config settings and XML files. For complete descriptions of each web.config setting, see the Salesware E-Commerce Reference document. In addition, detailed configuration information related to many of the web.config settings and XML files is included in the Salesware E-Commerce User Guide.
Installing Sales Host utility
From the computer that runs as a web based salespoint, install Common Files and Sales as described in the Salesware Installation Guide. You then need to set the following .INI settings:
• In the [Salespoint] section in the Sales32c.INI file, set Interface=Web. • In the [WebInterface] section in the Sales32c.INI file, set Login=WEBOP and Pass=WEBOP.
Note: The Login and Pass you choose must match the log-in and password of the operator that you configured for the Sales Host utility in SysManager > Activities > System Lists > Operators > Operator Edit. Important: The ww.dll and Web SalesHost (WSH) are no longer allowed to share the same salespoint ID due to complications with Max4Sale and Points4Sale limits and Real Time Inventory Tracking. The ww.dll now adds the salespoint ID that it is configured to use (from the ww_system.ini file, DefaultInfo=<operator>WEBOP</operator><salespoint>WWSP</salespoint> setting) to the sale string that is passed in for processing by WSH unless the pages have already added a salespoint ID to the sale string via the salespoint key. The salespoint ID will appear in the sale string like this.
Example: <salespoint>WWSP</salespoint>
15
If the salespoint ID in the sale string is the same as the salespoint ID configured for WSH, an error will occur when WSH tries to process the sale indicating that there is a conflict, and WSH will shut down. Either the salespoint ID in the sale string will need to be changed, or the salespoint ID of WSH will need to be changed and the sale resubmitted. For all future sales the salespoint IDs of ww.dll and WSH need to be unique.
Recommended standard setup for Sales Host system:
1. The Operating System (OS) should have an auto log-in, so in the event of a shutdown, the computer logs-in automatically on restart.
2. The OS should have automatic updates turned off or it may update when you don’t want it to and shut down the Sales Host utility.
3. The Sales icon is located in the Windows StartUp folder. This allows Sales Host utility to start automatically on restart of the system
For complete information on the .INI settings that you can use with E-Commerce module, see the Salesware .INI Settings Reference document.
Configure the Sales Host utility
1. Browse to C:\Program Files\Siriusware\Sales and double-click on Sales32c.INI to open it in Notepad.
2. Make sure the following settings are in this file. Be sure to update the Login and Pass settings below to match those for your Sales Host operator:
[Salespoint] Interface=web [WebInterface] Login=WEBOP Pass=WEBOP StartPaused=FALSE Interval=1.0 Delay=15.0
The table below explains the settings that go into the [WebInterface] section of the Sales32c.INI file in more detail.
16
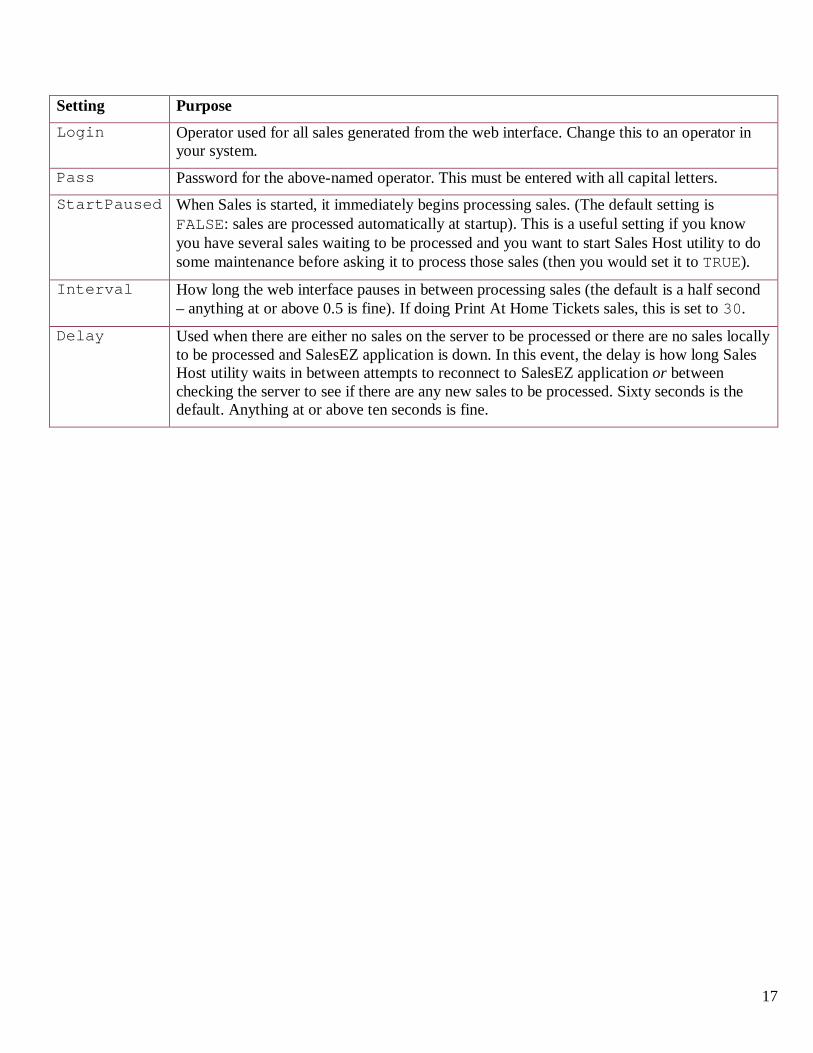
Setting Purpose Login Operator used for all sales generated from the web interface. Change this to an operator in
your system. Pass Password for the above-named operator. This must be entered with all capital letters. StartPaused When Sales is started, it immediately begins processing sales. (The default setting is
FALSE: sales are processed automatically at startup). This is a useful setting if you know you have several sales waiting to be processed and you want to start Sales Host utility to do some maintenance before asking it to process those sales (then you would set it to TRUE).
Interval How long the web interface pauses in between processing sales (the default is a half second – anything at or above 0.5 is fine). If doing Print At Home Tickets sales, this is set to 30.
Delay Used when there are either no sales on the server to be processed or there are no sales locally to be processed and SalesEZ application is down. In this event, the delay is how long Sales Host utility waits in between attempts to reconnect to SalesEZ application or between checking the server to see if there are any new sales to be processed. Sixty seconds is the default. Anything at or above ten seconds is fine.
17