sample chapter word format
TRANSCRIPT

Mastering OpenLDAP Configuring, Securing, and Integrating Directory Services
Matt Butcher
Chapter 2
"Installation and Configuration"

In this package, you will find: A Biography of the author of the book
A preview chapter from the book, Chapter 2 “Installation and Configuration”
A synopsis of the book’s content
Information on where to buy this book
About the Author Matt Butcher is the principal consultant for Aleph-Null, Inc., a systems integrator that specializes in Free and Open Source solutions. He is also a member of the Emerging Technologies Lab at Loyola University Chicago, where he is currently finishing a Ph.D. in philosophy. Matt has written two other books for Packt: Managing and Customizing OpenCms 6 Websites (ISBN: 978-1-904811-76-3), and Building Websites with OpenCms (ISBN: 1-904811-04-3). Matt has also contributed articles to leading websites like Newsforge.com, TheServerSide.com, and LinuxDevices.com.
For More Information: http://www.packtpub.com/OpenLDAP-Developers-Server-Open-Source-Linux/book

Mastering OpenLDAP The OpenLDAP directory server is a mature product that has been around (in one form or another) since 1995. All of the major Linux distributions include the OpenLDAP server, and many major applications, both, Open Source and proprietary, are directory aware, and can make use of the services provided by OpenLDAP. And yet the OpenLDAP server seems to be shrouded in mystery, known and understood only by the gurus and hackers. This book is meant not only to demystify OpenLDAP, but to give the system administrator and software developer a solid understanding of how to make use, in the practical realm, of OpenLDAP’s directory services. OpenLDAP is an Open Source server that provides network clients with directory services. The directory server can be used to store organizational information in a centralized location, and make this information available to authorized applications. Client applications can connect to OpenLDAP using the Lightweight Directory Access Protocol (LDAP). They can then search the directory and (if they have appropriate access) modify and manipulate records in the directory. LDAP servers are most frequently used to provide network-based authentication services for users. But there are many other uses for an LDAP, including using the directory as an address book, a DNS database, an organizational tool, or even as a network object store for applications. We will look at some of these uses in this book. The goal of this book is to prepare a system administrator or software developer for building a directory using OpenLDAP, and then employing this directory in the context of the network. To that end, this book will take a practical approach, emphasizing how to get things done. On occasion, we will delve into theoretical aspects of LDAP, but such discussions will only occur where understanding the theory helps us answer practical questions.
For More Information: http://www.packtpub.com/OpenLDAP-Developers-Server-Open-Source-Linux/book

What This Book Covers In Chapter 1 we look at general concepts of directory servers and LDAP, cover the history of LDAP and the lineage of the OpenLDAP server, and finish up with a technical overview of OpenLDAP. The next set of chapters focus on building directory services with OpenLDAP, and we take a close look at the OpenLDAP server in these chapters. Chapter 2 begins with the process of installing OpenLDAP on a GNU/Linux server. Once we have the server installed, we do the basic post-installation configuration necessary to have the server running. Chapter 3 covers the basic use of the OpenLDAP server. We use the OpenLDAP command-line tools to add records to our new directory, search the directory, and modify records. This chapter introduces many of the key concepts involved in working with LDAP data. Chapter 4 covers security, including handling authentication to the directory, configuring Access Control Lists (ACLs), and securing network-based directory connections with Secure Sockets Layer (SSL) and Transport Layer Security (TLS). Chapter 5 deals with advanced configuration of the OpenLDAP server. Here, we take a close look at the various backend database options and also look at performance tuning settings, as well as the recently introduced technology of directory overlays. Chapter 6 focuses on extending the directory structure by creating and implementing LDAP schemas. Schemas provide a procedure for defining new attributes and structures to extend the directory and provide records tailor-made to your needs. Chapter 7 focuses on directory replication and different ways of getting directory servers to interoperate over a network. OpenLDAP can replicate its directory contents from a master server to any number of subordinate servers. In this chapter, we set up a replication process between two servers.
For More Information: http://www.packtpub.com/OpenLDAP-Developers-Server-Open-Source-Linux/book
Chapter 8 deals with configuring other tools to interoperate with OpenLDAP. We begin with the Apache web server, using LDAP as a source of authentication and authorization. Next, we install phpLDAPadmin, a web-based program for managing directory servers. Then we look at the main features, and do some custom tuning. The appendices include a step-by-step guide to building OpenLDAP from source (Appendix A), a guide to using LDAP URLs (Appendix B), and a compendium of useful LDAP client commands (Appendix C).
For More Information: http://www.packtpub.com/OpenLDAP-Developers-Server-Open-Source-Linux/book
Installation and ConfigurationIn this chapter we will walk through the process of installing and configuring the OpenLDAP suite of tools. Here we will only cover basic configuration of the SLAPD server. This will serve as a base for subsequent chapters (particularly Chapters 4 to 7), where we will explore advanced configuration options. The specific topics that we will cover include:
Installing binary OpenLDAP packagesConfiguring the LDAP server with the slapd.conf fileVerifying the slapd.conf configuration with slaptestStarting and stopping the serverConfiguring client tools with the ldap.conf fileFetching the root DSE entry from the directory with ldapsearch
Before Getting StartedOpenLDAP is maintained by the OpenLDAP Foundation. The foundation maintains a suite of tools that we will call as OpenLDAP suite. As we saw in Chapter 1, the OpenLDAP suite includes the following classes of tools:
Daemons (slapd and slurpd)Libraries (notably libldap)Client applications (ldapsearch, ldapadd, ldapmodify, and others)Supporting utilities (slapcat, slapauth, and others)
The official OpenLDAP source distribution includes all of these in one download. Various binary versions however, may break these out into sub-packages. Commonly the suite is split into three packages: libraries, clients, and servers.
•
•
•
•
•
•
•
•
•
•
For More Information: http://www.packtpub.com/OpenLDAP-Developers-Server-Open-Source-Linux/book

Installation and Configuration
[ 24 ]
OpenLDAP compiles and runs on a wide variety of operating systems. However, the OpenLDAP project itself does not provide binary versions of their software. As a result, different vendors and operating system maintainers compile and provide their own binary versions. There are versions of OpenLDAP compiled for most UNIX variants (including Mac OS X), as well as versions for the Windows operating system. Some binary distributions even come with commercial support.
OpenLDAP Binaries for Operating SystemsIn this book, we will be using Ubuntu Linux as the operating system of choice. Ubuntu is a GNU/Linux distribution based on the venerable Debian Project. Like Debian (and the multitude of other Debian-based distributions) Ubuntu uses the Debian package format. Thus, if you are using another Debian-based distribution, the installation process should be largely familiar.
Ubuntu is a user-friendly Linux distribution. You can learn more about Ubuntu at http://www.ubuntu.com/. To learn more about the Debian Project, on which Ubuntu is based, visit http://debian.org/.
Almost every major Linux and BSD distribution includes official support for OpenLDAP. You may want to consult the documentation for your chosen distribution to find out more information on getting and installing OpenLDAP. In some cases, OpenLDAP is installed with the base operating system.
For Windows, Mac, and other variants of UNIX, the best way to find a list of available binary packages is by perusing the list of distributions maintained in the OpenLDAP Faq-O-Matic (http://www.openldap.org/faq/data/cache/108.html).
Commercial OpenLDAP DistributionIf you need a commercially supported OpenLDAP distribution, you may want to consider the offerings from Symas. Symas (http://www.symas.com/) is owned and operated by many of the same folks who contribute to the OpenLDAP suite. They provide a commercial binary version of the OpenLDAP suite, distributed as Connexitor Directory Services (CDS).
Several different CDS editions are available, with each edition tuned and optimized for specific organizational needs. Their Platinum Edition, for instance, is optimized for directories with more than 150 million records! Symas also provides LDAP training, maintenance and support services, and consulting.
For More Information: http://www.packtpub.com/OpenLDAP-Developers-Server-Open-Source-Linux/book

Chapter 2
[ 25 ]
Source Code CompilationInstead of installing a binary file, you may wish to simply compile the OpenLDAP source code yourself. This process is outlined in simple steps in Appendix A of this book.
The primary advantage of building from source code is that you will benefit from many improvements long before these revisions are made available in mainstream packages. The focus of development on the stable branch of OpenLDAP is bug fixes. Thus, building from source generally improves OpenLDAP stability.
A Quick Note on VersionsCurrently, the stable branch for OpenLDAP is 2.3 branch (2.4 is in early beta). However, some Linux distributions still use the aging 2.2 version, originally released in 2003. If the latest package for your chosen operating system is still in the 2.2 branch, you may want to consider looking for unofficial versions of 2.3 for your platform, or even compiling a custom binary (see Appendix A).
InstallationIn this section, we will walk through the process of installing on a system running Ubuntu Linux 7.04. Later, Ubuntu distributions will likely follow the same installation pattern.
DependenciesThe basic OpenLDAP configuration in Ubuntu requires a few extra libraries and packages. These are as follows:
The Berkeley Database (bdb4) version 4.2 (but not 4.3, which has stability issues): In the Ubuntu default configuration, OpenLDAP stores the directory inside a BDB database. The Berkeley Database is often simply called BDB.The OpenSSL libraries: These provide SSL and TLS security. SSL and TLS provide encryption for network connections to the directory.The Cyrus SASL library: This provides support for secure SASL authentication. The Perl programming language: This can provide custom back-end scripting.The iODBC database connectivity layer: OpenLDAP can store the directory in a relational database (RDBMS). The iODBC library is used to connect to the RDBMS.
•
•
•
•
•
For More Information: http://www.packtpub.com/OpenLDAP-Developers-Server-Open-Source-Linux/book

Installation and Configuration
[ 26 ]
OpenLDAP also relies on some standard system library packages (such as libc6) that are installed on all UNIX/Linux distributions. In its default installation, Ubuntu includes BDB, OpenSSL, and Perl. Installation of other dependencies is handled automatically by the package manager, so don't worry about manually installing any of these.
Installing OpenLDAPLike many other distributions, Ubuntu breaks OpenLDAP up into small packages. The daemons (slapd and slurpd) are packaged in the slapd package. The clients are packaged in ldap-utils, and the libraries are packaged in libldap-2.3-0. When Ubuntu 7.04 was released, OpenLDAP version 2.3.30 was provided. As security fixes are made, Ubuntu may release newer versions via online updates. While legacy 2.2.26 packages are still available, they should be avoided.
To install Ubuntu we can use the Synaptic graphical installer or any of the command-line package management utilities. For the sake of simplicity, we will use apt-get. This will download all of the necessary packages (including dependencies) from the official Ubuntu repository and install them for us. Note that installing this way will require access to the Internet (or, alternatively, to some other form of Ubuntu distribution media, such as a CD-ROM). We need to run the following command.
$ sudo apt-get install libldap-2.3-0 slapd ldap-utils
It may take a little while for the packages to download and install.
Once apt-get is done, the LDAP server and all of its clients should be installed. Next, we will begin the process of configuring the SLAPD server.
Configuring the SLAPD ServerThere are two daemons that come packaged with OpenLDAP: SLAPD server and SLURPD server. SLAPD, sometimes called the OpenLDAP server, handles client requests and directory management, while SLURPD manages replicating changes to other directories. SLURPD is now deprecated in favor of a newer, more robust replication process, and will be removed from future versions of OpenLDAP.
In the next chapter we will talk more about what these two daemons do. Right now we are only concerned with getting the SLAPD server up and running so we can start connecting to (and using) our directory.
For More Information: http://www.packtpub.com/OpenLDAP-Developers-Server-Open-Source-Linux/book

Chapter 2
[ 27 ]
SLAPD has one main configuration file and any number of auxiliary configuration files. In this section we are going to edit the main configuration file. It is called slapd.conf, and in Ubuntu's distribution it is located at /etc/ldap/ (if you built from source, the default location is /usr/local/etc/openldap/).
Use find . –type f –name slapd.conf or if the locate service is enabled, you can use locate slapd.conf.
While Ubuntu provides a good basic slapd.conf file that you can work with, if you choose, we will not use it. For our purpose, we will start with an empty file and create a slapd.conf configuration from scratch. You may want to make a backup copy of the original slapd.conf file before we begin. You can do this from a terminal by running:
$ sudo mv /etc/ldap/slapd.conf /etc/ldap/slapd.conf.orig
This will rename the file from slapd.conf to slapd.conf.orig.
By default, Ubuntu does not activate the root account. Any time you want to perform a function as the superuser, you should use sudo. However, if you need to become root (to run, for instance, several commands in sequence), you can type sudo su.
Now we are ready to create our new slapd.conf file. Open the text editor and create a basic slapd.conf file:
# slapd.conf - Configuration file for LDAP SLAPD########### Basics ###########include /etc/ldap/schema/core.schemainclude /etc/ldap/schema/cosine.schemainclude /etc/ldap/schema/inetorgperson.schema
pidfile /var/run/slapd/slapd.pidargsfile /var/run/slapd/slapd.argsloglevel none
modulepath /usr/lib/ldap# modulepath /usr/local/libexec/openldapmoduleload back_hdb
########################### Database Configuration ###########################
For More Information: http://www.packtpub.com/OpenLDAP-Developers-Server-Open-Source-Linux/book

Installation and Configuration
[ 28 ]
database hdbsuffix "dc=example,dc=com"rootdn "cn=Manager,dc=example,dc=com"rootpw secretdirectory /var/lib/ldap# directory /usr/local/var/openldap-dataindex objectClass,cn eq
######### ACLs #########access to attrs=userPassword by anonymous auth by self write by * none
access to * by self write by * none
There are three headings in the file (Basics, Database Configuration, and ACLs), and we will now see each heading in detail.
If you built from source, the paths in the above file need to be adjusted (or, alternately, you can relocate files on your file system). Look in the /usr/local portion of your file system to locate the correct location (for example, modulepath is in /usr/local/libexex/openldap/).
BasicsThe first section of the configuration file, labeled Basics, contains a variety of configuration parameters:
########### Basics ###########include /etc/ldap/schema/core.schemainclude /etc/ldap/schema/cosine.schemainclude /etc/ldap/schema/inetorgperson.schemapidfile /var/run/slapd/slapd.pidargsfile /var/run/slapd/slapd.argsloglevel none
modulepath /usr/lib/ldap# modulepath /usr/local/libexec/openldapmoduleload back_hdb
For More Information: http://www.packtpub.com/OpenLDAP-Developers-Server-Open-Source-Linux/book

Chapter 2
[ 29 ]
First note that all lines that start with a hash (#) are treated as comments, and ignored by SLAPD.
The first three functional (non-comment) lines all begin with the include directive. The include directive should always be followed by a full path to a file on the file system. When SLAPD finds the include directive it will attempt to load the indicated file. Those files will then be treated as part of the current configuration file. So, when SLAPD reads these three lines, it will try to load the three schema files (core.schema, cosine.schema, and inetorgperson.schema).
The include directive can be used to load any configuration parameters (in the next chapter, we will use it to include a file that contains ACLs). Traditionally, the schema information is stored separately from other configuration directives, and loaded (using include directives) at server startup. This improves the readability of the code and helps prevent the accidental modification of the schema information.
SchemasSchemas provide definitions of (amongst other things) the different object classes and attribute types that OpenLDAP should support. Using these, OpenLDAP can determine what entries it is allowed to store, whether any given entry is valid, and how entries should optimally be stored.
The three schemas loaded here contain the most frequently used options. core.schema contains all of the attribute and object class definitions from the LDAP v.3 specification. The cosine.schema and inteorgperson.schema files contain schema definitions for commonly used standardized extensions (see RFCs 4524 and 2798). There are a host of other schemas available with OpenLDAP, and we will look at some of those in Chapter 6.
More DirectivesAfter the schemas are included the next two directives, pidfile and argsfile, tell SLAPD where to store (and look for) files that contain information on:
The process ID for the SLAPD server processThe arguments that were passed into the slapd command at startup
Since SLAPD needs to write to these files, the user that runs slapd needs to have permissions to read from and write to these files. Since the files are removed when the SLAPD server shuts down, the user that runs slapd will also need write permissions on the directory where these files are stored (/var/run/slapd/, in this case).
•
•
For More Information: http://www.packtpub.com/OpenLDAP-Developers-Server-Open-Source-Linux/book
Installation and Configuration
[ 30 ]
Next, the loglevel directive is set to none. The loglevel directive specifies how much information SLAPD should send to the system log (by way of syslogd). The loglevel directive accepts keywords (any, none, trace, and so on), integers (0, 128, 32768), and hexidecimal numbers (0x2, 0x80, 0x100).
Setting this to none will cause SLAPD to only log critical events. In order to turn off the logging altogether, use 0. To turn on all the logging, which will generate massive amounts of logging for every request, use any. The SLAPD man page (man slapd) provides a complete list of all the supported log levels.
Module DirectivesThe last few directives in the Basics section are modulepath and moduleload. These are instructions for loading OpenLDAP modules.
A module is a special type of library that can be loaded when SLAPD starts up. Instead of compiling all of SLAPD's code into one large binary, the modules make it possible to create smaller library files for discrete functional units of LDAP code.
Typically, there are two different kinds of modules:
1. Backends: The OpenLDAP server can use different storage backends, including BDB, SQL database, flat files (in LDIF format), or even another LDAP directory server. Each of these backends can be compiled into its own module. Then, during configuration, we have the option of only loading the module (or modules) that we need.
2. Overlays: OpenLDAP includes a number of optional extensions, called overlays, which can modify behavior of the server (we will look at several overlays in the course of this book). These, too, are stored in modules.
Let's have a look at the directives we have used in our slapd.conf file:
The modulepath directive provides the full path to the directory where the modules (the compiled libraries) are stored. By default, Ubuntu puts LDAP libraries in /usr/lib/ldap. If, for some reason, you have modules stored in multiple directories you can specify a list of paths, separated by colons:
modulepath /usr/lib/ldap:/usr/local/lib/custom-ldap
The moduleload directive instructs OpenLDAP to load a particular module. The directive takes either the file name of the module to be loaded (such as back_hdb) or a full path (beginning with /) to a module file. If just the name is specified, SLAPD will look in the directories specified in modulepath. If the entire path is specified, it will attempt to load from exactly that path (it will not use modulepath at all).
•
•
For More Information: http://www.packtpub.com/OpenLDAP-Developers-Server-Open-Source-Linux/book
Chapter 2
[ 31 ]
moduleload back_hdb instructs SLAPD to load the module that provides services for storing the directory in the Hierarchical Database (HDB) backend. This is the database that we will configure in the Database Configuration section.
For now these are the only directives we need in the Basics section. There are other options though, and we will look at many of them in Chapters 4 and 5.
Database ConfigurationThe next section of our slapd.conf file is the database configuration section. This section handles the configuration of the database storage mechanisms. OpenLDAP is not limited to one database. More than one database can be used per server, where each database stores its own directory tree (or subtree). For example, a single OpenLDAP instance can serve a directory tree whose base is o=My Company,c=US from one database, and a directory tree whose root is dc=example,dc=com from a second database.
As we saw in Chapter 1, the base DN for a directory tree is made up of attribute name/attribute value pairs. For example, the DN o=My Company, c=US indicates that the organization name (o) is My Company, and its country of origin (c) is United States (whose two-letter ISO code is US). Likewise, the second DN is composed of attribute name/value pairs, this time representing domain components (dc) from the organization's registered domain name, here, the fictitious Example.Com.
We will look at this option in Chapter 5. In our simple slapd.conf file, we are defining only one database:
########################### Database Configuration ###########################database hdbsuffix "dc=example,dc=com"rootdn "cn=Manager,dc=example,dc=com"rootpw secretdirectory /var/lib/ldap# directory /usr/local/var/openldap-dataindex objectClass,cn eq
The first directive in the database configuration section is the database directive. This specifies which database backend will be used. In this case we will be using the Hierarchical Database (HDB), so we specify hdb.
•
For More Information: http://www.packtpub.com/OpenLDAP-Developers-Server-Open-Source-Linux/book

Installation and Configuration
[ 32 ]
HDB is the new generation storage mechanism for OpenLDAP. Like its predecessor, the BDB backend, HDB uses the Oracle Berkeley DB database for storage, but HDB stores entries hierarchically, a perfect fit for LDAP's tree strucutre. The old BDB backend is still supported, and you can use it by specificing bdb instead of hdb in the database directive.
The next directive, suffix, indicates which parts of the directory tree this database will hold. Basically, it indicates that this database's base will be the entry with the Distinguished Name (DN) specified in the suffix directive (dc=example,dc=com). We have discussed Distinguished Names in Chapter 1.
When the server receives a request for something in that tree (for example, cn=Matt,dc=example,dc=com), it will search in this database. The following figure gives a better idea:
LDAP Client
Return record for:cn=Matt,dc=example,dc=com
Search for:cn=Matt,dc=example,dc=com
SLAPD Server
cn=Barb cn=Davecn=Matt
dc=example,dc=com
Here, the client is searching for a specific DN, cn=Matt, dc=example, dc=com. The SLAPD server contains a directory information tree whose base DN is dc=example, dc=com.
The DN cn=Matt,dc=example,dc=com is subordinate to dc=example,dc=com. It exists in the dc=example,dc=com tree. So, SLAPD searches the dc=example,dc=com database for a record whose DN is cn=Matt,dc=example,dc=com. Once the record is found, it is returned to the client.
What will happen if a client requests the record of cn=Matt,dc=test,dc=net? Since this DN does not contain a base DN handled by this server, the server will not search for the record. Depending on the configuration, it may either send an error back to the client or redirect the client to another server that might be able to handle such a request.
Likewise, if a client tries to add a record with a base DN other than the one specified in the suffix directive, the LDAP server will refuse to add the record to the directory information tree.
For More Information: http://www.packtpub.com/OpenLDAP-Developers-Server-Open-Source-Linux/book

Chapter 2
[ 33 ]
The suffix directive in slapd.conf specifies what the base DN will be for information stored or referenced in this database. This will determine, to a large degree, what records this database will contain, search for, or allow to be added.
One database can have multiple trees (this is covered in Chapter 5).
The next two lines assign a record for the directory manager and give the manager entry a password. The rootdn directive specifies the DN that will be considered the administrator of this directory. By convention, the root DN is created by prepending cn=Manager to the base DN of the directory tree. Thus, our directory manager is cn=Manager,dc=example,dc=com. The next field, rootpw, is used to assign a password for the directory manager. Note that this is stored outside the directory rather than inside it. For example, the userPassword attribute of a record in the directory. This is to prevent the manager from being locked out of the directory.
The directory manager is a special user with special privileges. The manager's requests are not filtered through ACLs—the manager's access cannot be restricted. Furthermore, the manager has write access to all records in the directory under the specified suffix or suffixes. For that reason, the manager DN should be used for administrative tasks only and not for anything else.
Further, since the necessary fields for the manager are stored here in the slapd.conf file, there should not be a record in the directory with the manager's DN (this is recommended for best practices, though it is not explicitly prevented by SLAPD).
Since the manager's DN and password are stored in the slapd.conf file, and since the manager has access to everything in the directory, we should keep file system permissions on the slapd.conf file as restrictive as possible.
Encrypting the Manager's PasswordYou can also give rootpw an encrypted password by using the ldappasswd utility, described in the next chapter.
The directory directive indicates which directory on the file system should hold the database files. In this case the database is stored at /var/lib/ldap/.
Finally, the index directive is composed of a list of attributes that should be indexed, followed by the type of matching that the index will be used for. Our example looked like this:
index objectClass,cn eq
For More Information: http://www.packtpub.com/OpenLDAP-Developers-Server-Open-Source-Linux/book

Installation and Configuration
[ 34 ]
This means that we are creating an index that will support equality (eq) matching on the attributes objectClass and cn. When the server gets a request for all the entries with cn Rob or commonName Rob, the server can greatly expedite service by accessing the index instead of searching the entire database. However, if the request was for Rob* (note the * wildcard character), then the server would not be looking for a CN that equals "Rob*", but for any CN that starts with "Rob". In this case, the index we created would not be used.
Multiple index directives can be used, and we could support faster CN searches for queries like Rob* by splitting the index directive into two different directives:
index objectClass eqindex cn eq,sub
In the given example, an equality (eq) index is maintained for objectClass attributes, while the cn attribute is indexed for equality matches (eq) and substring matches (sub).
Certain attributes do not support all index types. The objectClass attribute, for example, does not support substring (sub) index matching. When we will look at performance tuning in Chapter 5, we will see the indexing directive more carefully.
Once you have a database created, every time you modify the index directives in slapd.conf, you should rebuild the indexes with the slapindex command-line utility. Since we have not yet put any data in the database though, we don't need to run this command now.
Now we are ready to move on to the third and final section of our configuration file.
ACLsThe last section in the slapd.conf file is the ACL section. ACLs (Access Control Lists) determine which clients can access what data, and under what conditions. In Chapter 4, we will cover ACLs in much more detail. However, it is important to have some basic ACLs configured from the beginning, so we will briefly walk through two simple ACLs:
######### ACLs #########access to attrs=userPassword by anonymous auth by self write by * none
For More Information: http://www.packtpub.com/OpenLDAP-Developers-Server-Open-Source-Linux/book
Chapter 2
[ 35 ]
access to * by self write by * none
ACLs are just fancy directives—directives with a complex syntax. They begin with the access directive, followed by a list of conditions. The conditions can span multiple lines as long as each continuation line begins with one or more white space characters (such as a tab or a space).
Line Continuations in slapd.conf fileAny directive, not just ACLs, can span multiple lines, as long as each continued line begins with a white space. For example, moduleload back_hdb can be written as: moduleload back_hdb
Let's look at the first access control in detail:
access to attrs=userPassword by anonymous auth by self write by * none
The purpose of this access control is to keep a user's password protected. Specifically, it allows anonymous users to request that the server perform an authentication comparison (during the process of logging on) on a password. Additionally, it grants a user permission to change his or her own password. Finally, it denies everyone else any access to the password. That's what this rule is supposed to do. Now, how do we get that?
Each line of code having by should be indented:
access to [resources] by [who] [type of access granted] by [who] [type of access granted] by [who] [type of access granted]
For More Information: http://www.packtpub.com/OpenLDAP-Developers-Server-Open-Source-Linux/book
Installation and Configuration
[ 36 ]
Each access directive can have one to phrase, and any number of by phrases. Our first rule has three by phrases. Let's see these in more detail:
In access to attrs=userPassword, attrs indicates that a list of one or more attributes will follow. In our case there is only one attribute: userPassword. The userPassword attribute is used to store the value of a password for an object in the directory.
While not just any object in the directory can have a userPassword, there are many objects in the directory that are not users, but can have passwords. The most frequent use of the userPassword attribute is for records that describe users.
In this access control there is no explicit mention of particular parts of the directory to which this rule applies. Given this, the ACL will be enforced for all instances of userPassword. So, the rule specifies access to the userPassword attribute. The next three phrases will indicate who has access to userPassword attributes, and what kind of access they have.Next is by anonymous auth. This phrase grants an anonymous user (one who has not yet authenticated) permission to authenticate using a password. More accurately, it indicates that when a user submits a request for authentication, the directory server is allowed to perform an authentication operation (which amounts to comparing the submitted password with the value in the userPassword attribute for the corresponding user's entry).The last part of the by phrase specifies what sort of permissions are granted to the record. The permissions level can be granted in a few ways, which is discussed in detail in Chapter 4.
For the time being, though, we will look at four keywords that can be used in ACLs to grant common permission levels:
auth: The server can perform an authentication operation using this resource.read: The client can have auth access and can also read this resource, but cannot make any changes.write: The client can have auth and read access to this resource and can also perform add, modify, and delete operations on whatever is specified by resource.none: The server should not give the client any access at all to this resource.
•
•
•
•
•
•
•
For More Information: http://www.packtpub.com/OpenLDAP-Developers-Server-Open-Source-Linux/book

Chapter 2
[ 37 ]
In Chapter 4, when we look at ACLs in depth, we will look at other keywords and explore creating finer-grained permissions levels, such as allowing write access without granting read access.
So, the second by phrase, by self write, means that once a DN (usually a user) has successfully connected and authenticated to the LDAP server, it can change the value of userPassword.
Finally, the last by phrase says by * none. The * is a wildcard that will apply to everyone. And none, as we came to know, denies any sort of access to the userPassword attribute. This rule says that everyone should be denied access to the password attribute.
This third by phrase provides a good illustration of how ACLs are applied. The ACL is evaluated in order. In the rules above, as soon as the server finds a rule that applies to the current DN, it will stop processing the ACL. Consider an example. When an anonymous user tries to authenticate (bind) with a DN and password, the server will check the ACLs to see if the DN has the right to request an authentication comparison using the userPassword attribute.
As SLAPD evaluates this ACL, it will see that the first by phrase applies; use that rule and skip the other two. But, on the other hand, if an authenticated user tries to read userPassword of another DN, the server will search by phrases until it finds one that matches. It will evaluate and skip the first two before applying the third, which denies that user the access to another record's userPassword attribute.
The Default by PhraseWhen processing an ACL, SLAPD denies access by default. This means that every access directive ends with an implicit by phrase of by * none. So, to save space, we could have omitted the last phrase from both of our ACLs.
Now that we understand the first ACL, the second should be a breeze. Let's see the second one:
access to * by self write by * none
This last ACL becomes our default rule for the directory. It can be paraphrased this way: for any object and all its attributes (to *), if the currently connected DN is the DN of this object, it can write to the object (by self write). Otherwise, the currently connected DN has no access whatsoever (by * none). In short, it lets objects write to themselves, but denies everyone else all the permissions to the object.
For More Information: http://www.packtpub.com/OpenLDAP-Developers-Server-Open-Source-Linux/book
Installation and Configuration
[ 38 ]
Restricting the ManagerIt should be noted that ACLs cannot be used to restrict the special directory manager account named in the rootdn directive.
Keep in mind that ACLs are processed sequentially. So this second rule will only apply if the earlier rule did not apply.
These access controls are very strict and will prevent directory users from getting much out of the directory. In Chapter 5 we will create some more rules which will make the directory more accessible, but for now these simple rules will suffice.
Verifying a Configuration FileWe are now done working through the configuration file. The last thing to do before we start the server is to verify that the configuration file is valid.
OpenLDAP includes a tool for testing the configuration file to make sure that it is well-formed and that the directives are all used correctly. It also checks elements of the OpenLDAP environment to ensure that the requisite files are in the correct locations. The testing tool is called slaptest and it appears as:
$ sudo slaptest -v -f /etc/ldap/slapd.conf
Since the file system permissions on slapd.conf are very restrictive, we used sudo to execute the test as the root user. The slaptest command needs to know where the slapd.conf file is. This is specified with the -f parameter followed by the path to the configuration file. We also used the -v flag to require verbose output. Since nothing was wrong with slapd.conf, only one line was printed:
config file testing succeeded
But if anything is incorrect, slaptest will provide diagnostic information. Let's look at a misconfigured slapd.conf file:
# slapd.conf - Configuration file for LDAP SLAPD########### Basics ###########include /etc/ldap/schema/core.schemainclude /etc/ldap/schema/cosine.schemainclude /etc/ldap/schema/inetorgperson.schema
pidfile /var/run/slapd/slapd.pidargsfile /var/run/slapd/slapd.argsloglevel none
For More Information: http://www.packtpub.com/OpenLDAP-Developers-Server-Open-Source-Linux/book

Chapter 2
[ 39 ]
modulepath /usr/lib/ldap# modulepath /usr/local/libexec/openldapmoduleload back_hdb
########################### Database Configuration ###########################database hdbsuffix "dc=example,dc=com"rootdn "cn=Manager,dc=example,dc=com"rootpw secretdirectory /var/lib/ldap# directory /usr/local/var/openldap-dataindex objectClass sub,eqindex cn sub,eq
######### ACLs #########access to attrs=userPassword by anonymous auth by self write by * none
access to * by self write by * none
This configuration file is a minor variation of the one we have been examining throughout this section. The problem is that the objectClass attribute cannot handle substring matches. The reason for this (explained in more detail in Chapter 6) is that the schema does not allow substring matching on the objectClass attribute.
Having made the above change, we run the slaptest command:
$ sudo slaptest -v -f slapd.conf
The following messages appear:
slapd.conf: line 48: substr index of attribute "objectClass" disallowedslaptest: bad configuration file!
As you can see this information is useful for quickly finding and fixing problems before attempting to start the server.
For More Information: http://www.packtpub.com/OpenLDAP-Developers-Server-Open-Source-Linux/book

Installation and Configuration
[ 40 ]
An Ubuntu OversightDue to a configuration oversight by Ubuntu packager maintainers, the slaptest program does not issue a warning if an unknown directive is found. As a result, a mistaken directive name may slip through the verification stage unnoticed. For example, misspelling index as idnex will not result in an error.
Testing slapd.conf with slapdThe slaptest command is actually nothing more than a symbolic link to slapd, the command used to start the server. While there are no distinct advantages to doing so, you can use the slapd program to test slapd.conf: $ slapd -T dest -f /etc/ldap/slapd.conf
Once the configuration file passes muster with the slaptest program, we are ready to start our server.
At this point, we have walked through our basic slapd.conf configuration file. This configuration will get our directory up and running, and in later chapters of this book we will cover some more advanced settings that can be included here in the configuration file.
If you are interested in reading more about configuration options for slapd.conf, you may want to take a look at the manual (man) pages. The man pages for OpenLDAP provide a thorough (though sometimes tersely worded) reference. In particular, the slapd.conf page is very useful. $ man slapd.conf
At the bottom of that page there is a list of other related manual pages, such as slapd-hdb, which lists directives specific to the HDB database.
Starting and Stopping the ServerAt this point, we have configured our slapd.conf file. We are now ready to start our server. There are two different ways to run the SLAPD server: we can either use the init script provided with the distribution, or we can run the slapd command directly. Each way has its advantages, and we will look at both here.
For More Information: http://www.packtpub.com/OpenLDAP-Developers-Server-Open-Source-Linux/book

Chapter 2
[ 41 ]
Using the Init ScriptThe OpenLDAP packages that are installed with Ubuntu include a startup script that is located, along with other service startup scripts, in the /etc/init.d/ directory. The scripts in /etc/init.d/, usually referred to as the init scripts, are used to automatically start and stop services when the system run level changes (when the system boots, halts, or reboots), and by default, OpenLDAP should be configured to start when the server boots, and stop during halts and reboots.
The ldap init script provides a convenient way to start, stop, and restart the server. You can start it (if it is not already running) with the Ubuntu invoke-rc.d command:
$ sudo invoke-rc.d slapd start
You can use the same script to stop the server. Just change start to stop:
$ sudo invoke-rc.d slapd stop
Similarly, to restart, use the restart command instead of start or stop.
The init scripts set up default parameters and pass in many system options. Some of these are stored in a separate configuration file located at /etc/default/slapd. For example, by setting the SLAPD_USER and SLAPD_GROUP variables to a particular system user ID and group ID, you can run SLAPD as a user other than the default.
The OpenLDAP server must start as root, in order to bind to the correct TCP/IP port (389 or 636 by default). Then it will switch and use the user account and group specified in the file located at /etc/default/slapd.
Ubuntu creates a special user and group, named openldap, for running SLAPD. Other distributions run SLAPD as root, which is not a good idea from a security point of view.
Other settings, such as logging settings, can also be made in this configuration file.
Running SLAPD DirectlySometimes, it is useful to start SLAPD directly from the command line. This may make it easier to see error messages when starting of the server fails, or to test configurations before making any changes to the init script or its configuration files.
To start the SLAPD server directly, simply run the slapd command:
$ sudo slapd
For More Information: http://www.packtpub.com/OpenLDAP-Developers-Server-Open-Source-Linux/book

Installation and Configuration
[ 42 ]
This will start the SLAPD server in the background.
If you compiled OpenLDAP from source, the slapd command will be at /usr/local/libexec/, which is not, by default, in $PATH. You will have to run the command using the full path: /usr/local/libexec/slapd.
The server will write its process ID to the location specified in the pidfile directive in slapd.conf. In our case, this is /var/run/slapd/slapd.pid. We can stop the server by using the standard kill command:
$ sudo kill `cat /var/run/slapd/slapd.pid`
This command first uses the cat program to print the contents of the file (which is simply the process ID of slapd). Note that the cat command is surrounded by backticks (`), not single quotes ('). The backticks tell the shell to treat the statement as a command to be executed. The process ID is then passed to the kill command, which instructs the process to shut itself down.
In cases where the slapd.pid file is not available you might find it more expedient to kill the server with this command:
$ sudo kill `pgrep slapd`
Sometimes though, it is more useful to start the command in the foreground, and set debugging information to print out in the terminal window. This can be done quite easily as well:
$ sudo slapd -d config
In the command above we use the -d flag to print logging information to the shell's standard output. This means that slapd will print information to the terminal window. The -d flag takes one parameter—the debugging level. We have specified config, which instructs the server to print verbose logging information about the processing of the configuration file.
The output looks something like this:
@(#) $OpenLDAP: slapd 2.3.24 (Jun 16 2006 23:35:48) $ mbutcher@bezer:/home/mbutcher/temp/openldap-2.3.24/servers/slapdreading config file /etc/ldap/slapd.confline 6 (include /etc/ldap/schema/core.schema)reading config file /etc/ldap/schema/core.schemaline 44 (rootdn "cn=Manager,dc=example,dc=com")line 45 (rootpw ***)
For More Information: http://www.packtpub.com/OpenLDAP-Developers-Server-Open-Source-Linux/book

Chapter 2
[ 43 ]
line 47 (directory /var/lib/ldap)line 48 (index objectClass eq)index objectClass 0x0004line 49 (index cn eq,sub,pres,approx)index cn 0x071eslapd starting
This can be one other useful way to ferret out configuration issues. The -d flag will take any of the debugging levels specified in the slapd.conf man page. I find acl useful for debugging access problems, and filter is often useful in figuring out trouble with searches.
When -d is specified the program will run in the foreground. To stop the server simply hit CTRL+C. This will stop the server and return you to a shell prompt.
Other useful command line parameters to use with slapd are -u and -g. Each takes one argument: -u takes a username and -g takes a groupname. These control the effective UID and GID (user ID and group ID) that SLAPD runs as. Once SLAPD has started and connected to the appropriate ports (which it must do as root), it will switch its UID and GID to the names specified in these parameters.
To get a list of other command line flags that we can use with slapd, refer to the man page for slapd.
In the next section, we will be using some of the OpenLDAP clients to connect to our directory. This will require that the SLAPD server be running. You can verify that slapd is running by checking if /var/run/slapd/slapd.pid exists, or by running pgrep slapd, which will display the process ID of slapd if it's running. If no process ID number is returned, slapd is not running.
Configuring the LDAP ClientsIn the last couple of sections we have focused exclusively on the SLAPD server. Now that the server is running we need to get the client configuration so that we can make test connections to the server.
Fortunately all of the OpenLDAP client programs share one common configuration file, ldap.conf, which is located in Ubuntu at /etc/ldap/ldap.conf (if you build from source, according to Appendix A, the default location for this file is /usr/local/etc/openldap/ldap.conf).
For More Information: http://www.packtpub.com/OpenLDAP-Developers-Server-Open-Source-Linux/book

Installation and Configuration
[ 44 ]
Other programs, such as those that use the OpenLDAP client libraries (like the PHP and Python LDAP APIs, may also use the ldap.conf file as a default location to retrieve basic configuration information.
Too Many ldap.conf FilesOccasionally, some Linux distributions will create two different ldap.conf files—one for OpenLDAP, and one for the PAM or NSS LDAP tools. This can lead to confusion about which ldap.conf file is used for which process. Ubuntu, however, gives the other packages distinctly named configuration files, like /etc/pam_ldap.conf.
A Basic ldap.conf FileThe purpose of the ldap.conf file is two-fold:
1. It provided a place to define certain aspects of client behavior, such as how they treat SSL/TLS certificates or whether they follow alias entries.
2. It provides the OpenLDAP clients with useful defaults. By specifying some defaults, we can reduce the number of parameters we have to pass to the OpenLDAP clients when we run them from the command line.
An alias is an entry in the directory that points to some other entry. Conceptually, it is similar to a symbolic link in a UNIX/Linux file system, or to a shortcut in Microsoft Windows.
The ldap.conf file has three different kinds of directive:
General settings, which specify things such as the default server and DN to useSASL-specific settings, which determine how the OpenLDAP clients will try to authenticate when using SASL (Simple Authentication and Security Layer) authentication mechanismsTLS-specific settings, which specify how OpenLDAP will handle connections that use SSL (Secure Sockets Layer) and TLS encryption
At this point we are only interested in the general settings. In later chapters, we will return to this file when configuring SSL/TLS and SASL.
Now, we need to look into a basic ldap.conf file. The ldap.conf file is located in the same directory as slapd.conf—/etc/ldap/ (or /usr/local/etc/openldap/ if you built from source). We will now insert the LDAP client settings into that basic ldap.conf file:
•
•
•
For More Information: http://www.packtpub.com/OpenLDAP-Developers-Server-Open-Source-Linux/book

Chapter 2
[ 45 ]
# LDAP Client Settings
URI ldap://localhostBASE dc=example,dc=comBINDDN cn=Manager,dc=example,dc=com
SIZELIMIT 0TIMELIMIT 0
Again, as with slapd.conf, lines that begin with a number sign (#) are treated as comments, and are ignored by the OpenLDAP client tools.
Next, we have directives:
The URI directive indicates which server (or servers, as this directive can take multiple URIs, separated by spaces) is to be contacted if no server is explicitly specified by the client.Since the server is running on the same machine that we are going to be running client commands from, we should set the URI to ldap://localhost. This URI specifies that the default client connection should be made using the (unencrypted) LDAP protocol over the loopback interface (127.0.0.1 or localhost). Since no port is specified it will use the default LDAP port, which is 389.The second directive is BASE. This tells the client programs where to start their search in the directory. It takes a full DN as a value. In this case we set it to the base DN of the server—to the DN of the root entry in our directory tree, so that all searches will start at the root.You may recall that when we were working on the database configuration section of slapd.conf, we set this same base DN, dc=example,dc=com, as the suffix for the database stored there. So, what we have done here is told the client to start at the same directory tree root that the server manages. This is generally the most convenient way to configure BASE in the ldap.conf file.The third directive, BINDDN, specifies the default DN that will be used when connecting to the server. In this file I have set it to the manager's DN, cn=Manager,dc=example,dc=com. While this will be very helpful when it comes to the examples in the next chapter it is not, in general, a good idea, and should never be set this way in a production environment. Usually the BINDDN default value should be set to a user that has limited privileges, or it should be omitted (in which case no default DN will be used).
•
•
•
For More Information: http://www.packtpub.com/OpenLDAP-Developers-Server-Open-Source-Linux/book

Installation and Configuration
[ 46 ]
Size and Time LimitsThe next two directives, SIZELIMIT and TIMELIMIT, indicate the upper limits on the number of records returned (SIZELIMIT) and the amount of time the client will wait for the server to respond (TIMELIMIT). Here we have set both to 0, a special value for these directives that indicates that there should be no limit.
The way that size and time limits are handled can be a little confusing. On the client side there are two ways of specifying these limits: through the ldap.conf configuration file (as we are doing here) and through command-line parameters (as we will see in the next chapter).
However, the SIZELIMIT and TIMELIMIT directives above are not exactly defaults in the usual sense of the word. They are the absolute upper limit that the client can request. With command-line arguments the client can specify lower time and size limits, and those lower numbers will be used. But if the client attempts to specify larger size or time limits, they will be ignored, and the values of SIZELIMIT and TIMELIMIT will be used instead.
But the story doesn't end here. The SLAPD server can also define size and time limits (with the limits, sizelimit and timelimit directives in slapd.conf). If a client specifies a limit higher than the server's, the server will ignore the client's limit and use its own. We will look more at setting server limits in Chapter 5.
Now we have a functioning ldap.conf file that will alleviate the need to specify these parameters on the command line.
The last thing we need to do in this chapter is to use an OpenLDAP client to test out the SLAPD server.
Testing the ServerAt this point, we have a SLAPD server configured and running, and we have an ldap.conf file that specifies many of the defaults for our tools. Now we are going to query the directory and fetch some information.
We haven't actually put any entries in our database, though. So what will we query? SLAPD does provide directory-based access to certain information, including currently-loaded schemas and subschemas, configuration information, and a special record called the root DSE. The root DSE (DSA-Specific Entry, where DSA stands for Directory Service Agent—the technical term for an LDAP server) is a special entry that provides information about the server itself. Like all other entries in an LDAP, the root DSE has a DN. Unlike all other entries, the root DSE's DN is an empty string.
For More Information: http://www.packtpub.com/OpenLDAP-Developers-Server-Open-Source-Linux/book
Chapter 2
[ 47 ]
Why use an empty string for a DN? The answer is simple: any client can connect to the server and find out about what sorts of operations the server supports, and all of this can be done without requiring the client to know anything about the directory structures hosted on the server. All it must do is perform a search with an empty DN.
The LDAPv3 Directory Information Models specification (RFC 4512) states that a root DSE with an empty DN be provided by any standards-compliant LDAP server.
The root DSE contains information about what version of the LDAP protocol the server supports, what extensions to that protocol the server supports, and other useful information that helps clients fruitfully interact with the directory.
We will search for this entry using the ldapsearch command-line client.
Because of the restrictive way in which we set up our ACLs, we will have to authenticate to the directory in order to see the root DSE. And since we have only one defined user, the directory manager, we will log in as that user and perform a search for the root DSE:
$ ldapsearch -x -W -D 'cn=Manager,dc=example,dc=com' -b "" -s base
All of the above should go on one line at a shell prompt. In order to do the search, we must specify several different parameters:
-x: This tells the server to use simple authentication (instead of the more complicated, but more secure, SASL authentication).-W: This tells the client to prompt us for an interactive password. The client will give the following prompt:
Enter LDAP Password:
-D 'cn=Manager,dc=example,dc=com': This specifies the DN that we want to use to connect to the directory. In this case, we are using the directory manager account.-b "": This sets the base DN for the search. In the ldap.conf file we set the default base to be dc=example,dc=com. But to get the root DSE, which is not under dc=example,dc=com, we need to specify an empty search base.-s base: This indicates that we want to search for just one (base) entry—the entry with the DN specified in the -b parameter (the empty DN of the root DSE).
•
•
•
•
•
For More Information: http://www.packtpub.com/OpenLDAP-Developers-Server-Open-Source-Linux/book
Installation and Configuration
[ 48 ]
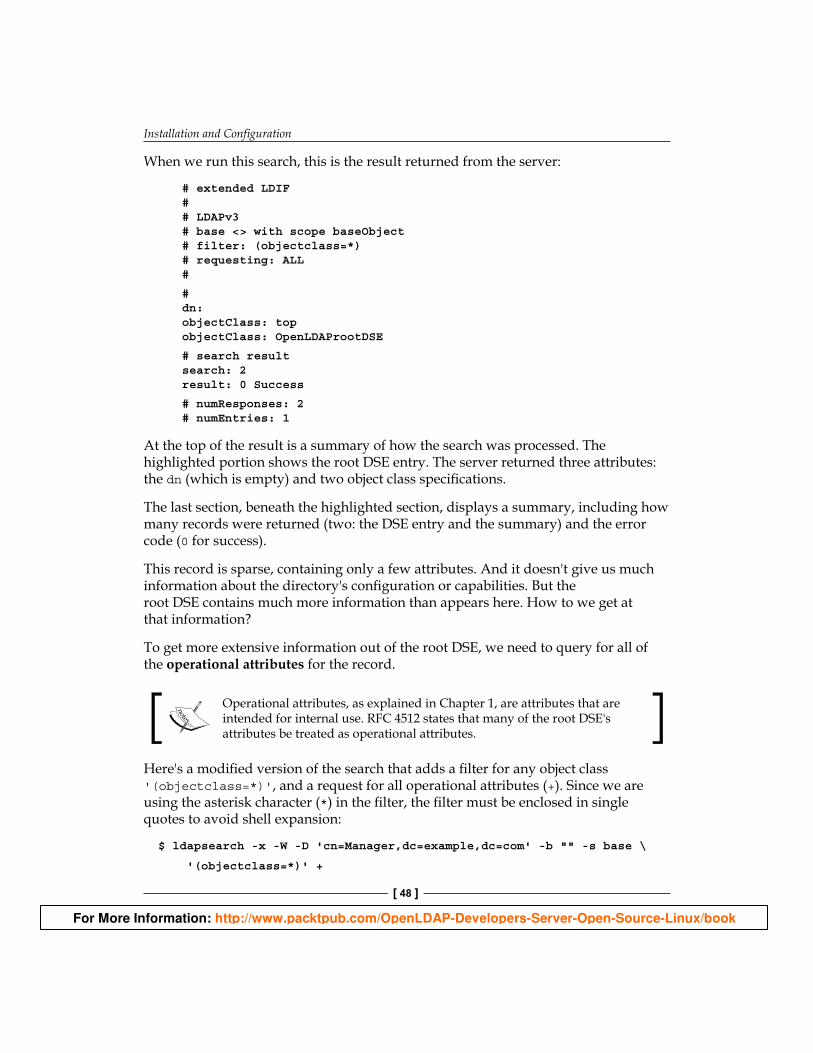
When we run this search, this is the result returned from the server:
# extended LDIF # # LDAPv3 # base <> with scope baseObject # filter: (objectclass=*) # requesting: ALL #
# dn: objectClass: top objectClass: OpenLDAProotDSE
# search result search: 2 result: 0 Success
# numResponses: 2 # numEntries: 1
At the top of the result is a summary of how the search was processed. The highlighted portion shows the root DSE entry. The server returned three attributes: the dn (which is empty) and two object class specifications.
The last section, beneath the highlighted section, displays a summary, including how many records were returned (two: the DSE entry and the summary) and the error code (0 for success).
This record is sparse, containing only a few attributes. And it doesn't give us much information about the directory's configuration or capabilities. But the root DSE contains much more information than appears here. How to we get at that information?
To get more extensive information out of the root DSE, we need to query for all of the operational attributes for the record.
Operational attributes, as explained in Chapter 1, are attributes that are intended for internal use. RFC 4512 states that many of the root DSE's attributes be treated as operational attributes.
Here's a modified version of the search that adds a filter for any object class '(objectclass=*)', and a request for all operational attributes (+). Since we are using the asterisk character (*) in the filter, the filter must be enclosed in single quotes to avoid shell expansion:
$ ldapsearch -x -W -D 'cn=Manager,dc=example,dc=com' -b "" -s base \
'(objectclass=*)' +
For More Information: http://www.packtpub.com/OpenLDAP-Developers-Server-Open-Source-Linux/book
Chapter 2
[ 49 ]
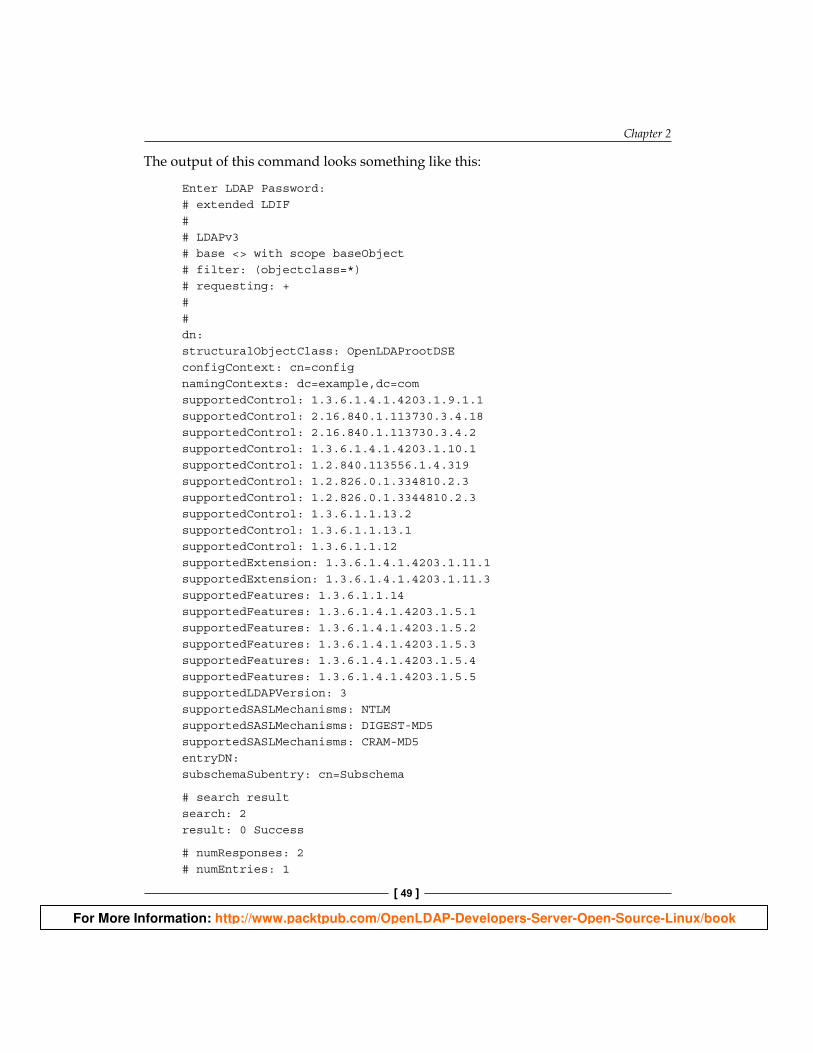
The output of this command looks something like this:
Enter LDAP Password: # extended LDIF # # LDAPv3 # base <> with scope baseObject # filter: (objectclass=*) # requesting: + # # dn: structuralObjectClass: OpenLDAProotDSE configContext: cn=config namingContexts: dc=example,dc=com supportedControl: 1.3.6.1.4.1.4203.1.9.1.1 supportedControl: 2.16.840.1.113730.3.4.18 supportedControl: 2.16.840.1.113730.3.4.2 supportedControl: 1.3.6.1.4.1.4203.1.10.1 supportedControl: 1.2.840.113556.1.4.319 supportedControl: 1.2.826.0.1.334810.2.3 supportedControl: 1.2.826.0.1.3344810.2.3 supportedControl: 1.3.6.1.1.13.2 supportedControl: 1.3.6.1.1.13.1 supportedControl: 1.3.6.1.1.12 supportedExtension: 1.3.6.1.4.1.4203.1.11.1 supportedExtension: 1.3.6.1.4.1.4203.1.11.3 supportedFeatures: 1.3.6.1.1.14 supportedFeatures: 1.3.6.1.4.1.4203.1.5.1 supportedFeatures: 1.3.6.1.4.1.4203.1.5.2 supportedFeatures: 1.3.6.1.4.1.4203.1.5.3 supportedFeatures: 1.3.6.1.4.1.4203.1.5.4 supportedFeatures: 1.3.6.1.4.1.4203.1.5.5 supportedLDAPVersion: 3 supportedSASLMechanisms: NTLM supportedSASLMechanisms: DIGEST-MD5 supportedSASLMechanisms: CRAM-MD5 entryDN: subschemaSubentry: cn=Subschema
# search result search: 2 result: 0 Success
# numResponses: 2 # numEntries: 1
For More Information: http://www.packtpub.com/OpenLDAP-Developers-Server-Open-Source-Linux/book

Installation and Configuration
[ 50 ]
Again the results above are for the same record—the root DSE record. Only now we get a much bigger record, containing all of the operational attributes for the record.
The information returned from the server this time includes lists of supported features, extensions, controls, and SASL mechanisms (most of which are not particularly human-friendly).
While many of the items in this record are not useful to us right now, some can be very useful in practice. For example, the supportedLDAPVersion attribute indicates what version of the LDAP protocol this server uses. The namingContexts attribute gives the base DN for each directory information tree hosted on this server. The supportedSASLMechanisms list tells us what sort of authentication routines can be performed when doing a SASL bind (which we will look at in detail in Chapter 4).
Some LDAP client programs will even query the root DSE and use this information to determine what kinds of operations the server will support, adjusting the client's own features to the level of service provided by the server.
What is most important about this exercise though, is that we have verified that we have successfully configured the SLAPD server, as well as the OpenLDAP clients. We have connected, authenticated (using a simple bind), and retrieved a record from the LDAP server.
SummaryThe focus of this chapter has been on installing and configuring the OpenLDAP suite of tools. We installed OpenLDAP on an Ubuntu system, and then walked through the process of authoring a slapd.conf file. Once we had created and tested slapd.conf, we turned to the ldap.conf file, which contains settings and defaults used by the OpenLDAP clients. Finally, we used ldapsearch to request the root DSE record from the directory, verifying that we had both the client and the server configured.
In the next chapter, we will walk through the OpenLDAP utilities and client applications. In the process of doing this we will add some records to our directory.
For More Information: http://www.packtpub.com/OpenLDAP-Developers-Server-Open-Source-Linux/book
Where to buy this book You can buy Mastering OpenLDAP from the Packt Publishing website: http://www.packtpub.com/OpenLDAP-Developers-Server-Open-Source-Linux/book
Free shipping to the US, UK, Europe, Australia, New Zealand and India.
Alternatively, you can buy the book from Amazon, BN.com, Computer Manuals and most internet book retailers.
www.PacktPub.com
For More Information: http://www.packtpub.com/OpenLDAP-Developers-Server-Open-Source-Linux/book