sap application notes - servoinformática, s.a. de c.v...
TRANSCRIPT
SAP Printing Application Notes #5 rev a
1
SAP Application Notes
Copyright 2001 Printronix Inc
SAP Printing Application Notes #5 rev a
2
Table of Contents Printronix ASCII/SAP DEVICE TYPES ......................................................................................................................3 Operation of the SAP R/3 Printing System ...................................................................................................................3 SAPscript Printer Drivers ..............................................................................................................................................5 Printing to an OUTPUT DEVICE.................................................................................................................................6 Creation of an OUTPUT DEVICE................................................................................................................................6 Description of Printronix ASCII/SAP DEVICE TYPES ..............................................................................................7
SAPSCRIPT DRIVER ..............................................................................................................................................7 CHARACTER SETS.................................................................................................................................................7 PRINT CONTROLS .................................................................................................................................................7 FORMATS ................................................................................................................................................................7
DEVICE INITIALIZATION.........................................................................................................................................8 How to use a Printronix ASCII/SAP DEVICE TYPE ..................................................................................................9 Appendix 1 ..................................................................................................................................................................10 PROCEDURE ONE: Test the printer outside of SAP - Print non-SAP documents in non-SAP environment..........10 PROCEDURE TWO: Install the ZPTXASC4 DEVICE TYPE to an existing SAP R/3 System................................11 PROCEDURE THREE: Verify the import of ZPTXASC4 DEVICE TYPE in the SAP R/3 System ........................18 PROCEDURE FOUR: Using the Printronix SAP DEVICE TYPE ............................................................................20
Scenario 1: Create a new Output Device in SAP for the Printronix P5000, LaserLine, or ThermaLine printer.....20 Scenario 2: Reassign an existing “Output Device” in SAP for the P5000, LaserLine, or ThermaLine printer.......24
PROCEDURE FIVE: Test the Printronix SAP Device Type......................................................................................27 Appendix 2 ..................................................................................................................................................................29 How to print an IGP/PGL label using SAP R/3 SAPscript .........................................................................................29
Define a generic Page Format (ZANY) in SPAD of SAP R/3 for any IGP/PGL label ...........................................29 Import the Layout Set Definition File .....................................................................................................................32 Create an IGP/PGL label .........................................................................................................................................36 Import an existing IGP/PGL label to SAP R/3 as Standard Text ............................................................................37 Include a Text Element to ZPTX_PGL_LS layout set ............................................................................................40 Place PGL commands in the layout set ...................................................................................................................44 Test print the IGP/PGL label ...................................................................................................................................45 Figure 38 Form:Change Windows screen ...............................................................................................................46 Troubleshooting Tips...............................................................................................................................................47
Problems with the Layout Set test print:.........................................................................................................47 Problems with printing Layout Set from the ABAP print program: ...........................................................47
Using Multiple Layout Sets .....................................................................................................................................48 Replace the IGP/PGL label variable fields with the SAP database data .................................................................49
Appendix 3 Sample PGL PROGRAMS.....................................................................................................................50 Sample IGP/PGL label program 1...........................................................................................................................50 Sample IGP/PGL label program 2...........................................................................................................................51

SAP Printing Application Notes #5 rev a
3
Printronix ASCII/SAP DEVICE TYPES
Application Notes
This document describes the SAP Compatible Printronix device types for direct ASCII integration. The Printronix ASCII/SAP device types are designed for use on the SAP R/3. The procedures outlined below pertain specifically to SAP version 3.1H or higher.
• Appendix 1 provides step-by-step instructions for printer integration using Printronix device types. The LB_PTN device type has been developed by SAP for Printronix and comes standard with SAP versions 4.6c and higher. Prior versions of SAP can use the ZPTXASC4 device type developed by Printronix in conjunction with SAP. • Appendix 2 provides step-by-step instructions for creating, formatting, and printing a sample label by utilizing the printer’s software, the Printronix Graphics Language (PGL) to create and embed Printronix-defined ASCII printer commands into SAP. • Appendix 3 provides two IGP/PGL sample label programs and the printed labels using the Printronix ThermaLine printer.
Printronix ASCII/SAP device types function entirely within the host’s SAP R/3 software system. They allow SAP system users to conveniently print SAP application documents, forms, and labels directly from their SAPscript text processing system by using Printronix Graphics Language (PGL) bar codes and its set of fixed and scalable fonts Familiarity with the SAP System Administration screens (SPAD) will be needed. We recommend reading the SAP Basis Component Printing Guide on the online SAP Help System as well as the The SAP R/3 Handbook, J. A. Hernandez, McGraw-Hill, 1997.
Operation of the SAP R/3 Printing System The SAP R/3 Printing System has a proprietary spooling system to receive, process, schedule, print, and distribute documents requested for printing by SAP users. The SAP spooling system performs two major functions: (1) formats the document according to the parameters of the DEVICE TYPE assigned to the OUTPUT DEVICE (printer) and (2) communicates the formatted output data to the spooling system of the host computer system, where the OUTPUT DEVICE is physically connected. Basically, SAP system users working on data within a SAP application module can request the printing of a displayed document in one of two ways: (1) by clicking on the print button in any SAP transaction screen that presents a standard toolbar, or (2) by choosing the Print function from the transaction’s List menu. The user is then presented with a Print Screen List, which allows the user to enter an output device name and results in the transaction generating a spool request.

SAP Printing Application Notes #5 rev a
4
The spool request starts a SAP spool work process to handle the spool request for the user-named output device, which is a printer in this case. To do that, the output device works with a System Administrator-assigned device type, which is available in a list of device types within the SAP spooling system. The device type provides all necessary spool processing information via a command translation table for the output device. As a result, the spool work process is able to translate the SAP native output control commands contained in the SAP application’s print controls into the command language of the named output device. SAP R/3 LIST OF DEVICE TYPES In SAP, a DEVICE TYPE is a printer parameter interface between an OUTPUT DEVICE and set of logical information components that define how that printer prints documents. These logical information components are a collection of printer-specific control properties. The standard SAP system “out-of-the-box” supplies an extensive list of resident DEVICE TYPES to enable printing with a variety of commercially available OUTPUT DEVICES. SAP assures that these resident DEVICE TYPES will work properly with SAP R/3. The LB_PRI device type has been designed by SAP to work with Printronix printers and comes with SAP version 4.6c and higher. In the SAP SPOOL ADMINISTRATION (SPAD) screens, SAP provides System Administrators the capability to define new DEVICE TYPES and append them to the resident list of available DEVICE TYPES. However, the creator of such a new DEVICE TYPE is responsible for its accuracy, performance, and support, not SAP. Note: Any of the resident DEVICE TYPES, regardless of origin, can be used “as is” or modified by the System Administrator. Depending on the specific SAP system environment, a DEVICE TYPE, such as ZPTXASC4, may be customized to meet OUTPUT DEVICE specific requirements. Typically, the list of resident DEVICE TYPES provides a good starting set of templates to create custom DEVICE TYPES. A simple way to create a custom DEVICE TYPE is to copy the definition and then change it as necessary to meet system OUTPUT DEVICE requirements. Modifications to the DEVICE TYPES can be made easily by using the fill-in-the-box tables in the SAP SPOOL ADMINISTRATION screens.

SAP Printing Application Notes #5 rev a
5
SAPscript Printer Drivers The SAP system provides a list of “out-of-the-box” SAPscript printer drivers, which are assigned to various DEVICE TYPES in the SAP list of available DEVICE TYPES. The purpose of these SAPscript printer drivers is to make the conversion from the output format of SAPscript to the print format of the DEVICE TYPE assigned with the OUTPUT DEVICE. The list below identifies five of the most common of the SAPscript printer drivers. Each of these SAPscript printer drivers is named in the SAP system with a unique four-character code, such as STN2. 1. HPL2: HP PCL4/PCL5 (LJ 3, 4, 5, 6) 2. POST: PostScript (Adobe) 3. PRES: Prescribe(Kyocera) 4. SWIN: Windows (SAPlpd/SAPWIN) 5. STN2: SAP Standard Line Printer Driver System Administrators who create DEVICE TYPES specify one of these SAPscript printer drivers in the Driver field of the SPAD Create Device Type screen. Note: The ZPTXASC4 Device type is intended to be used with the STN2 Printer Driver

SAP Printing Application Notes #5 rev a
6
Printing to an OUTPUT DEVICE For an SAP transaction to print a document, it must deliver an output data stream to an output device connected to the R/3 system. To prepare the data for that output stream, the SAP spooling system needs a substantial amount of information about the physical device represented by the output device. In SAP R/3, each output device is assigned a specific device type that provides for the storage of the details about the physical device and other required data within the spooling system. The information contained in each device type is organized as a collection of tables that define the attributes of a specific output device. A printer is a common example of an output device. When R/3 has multiple printers connected, it requires separate output device (printer) definitions, each of which has been assigned the proper printer-specific device type definition.
Creation of an OUTPUT DEVICE In SAP, an output device is a unique four-character system name for the physical device. This name is registered in the SAP spooling system and is specified each time a print request is made to print a document to the device. The SPAD Create Output Device screen is used to specify the output device definition, which includes the four-character output device name, the device type, and other essential system information about the physical device.

SAP Printing Application Notes #5 rev a
7
Description of Printronix ASCII/SAP DEVICE TYPES Printronix ASCII/SAP DEVICE TYPES provide SAP system users the ability to print reports, forms, and labels utilizing the bar codes, fonts, and graphics drawing that are resident in Printronix Graphics Language (PGL) firmware. PGL is available for every Printronix printer. Printronix ASCII/SAP DEVICE TYPES are registered and loaded in the Device Type Management component of the SAP Spool System as pass-through DEVICE TYPES that contain printer commands such as line feed, carriage return, and form feed. Other features of the printer, such as bar codes, fonts, logos, and drawing tools, are defined in the layout of the form or label within SAPscript. These ASCII printer commands are passed directly to the output device by the SAP Spool System. The output device, in this case the Printronix printer, will intercept, interpret, and execute the commands received from the SAP Spool System. Refer to Appendix 2 for a detailed example of creating a PGL label using the SAP R/3 SAPscript editor. Any one of the Printronix ASCII/SAP device types has the following logical components: SAPSCRIPT DRIVER This component contains the SAPscript printer driver, which converts the output format of SAPscript to the print format of the device type assigned to the output device. This driver uses the properties and attributes resident in the device type definition to translate SAPscript forms into an output data stream that can be printed by the physical printer. CHARACTER SETS This component is a collection of character sets, or code pages, that are available in the output device. The SAP spooling system uses this collection of character sets to translate SAP code values in its own system character set into an output data stream of code values understood by the output device. PRINT CONTROLS This component contains the command set of the output device and makes it possible for the SAP spooling system to translate its system print controls (used in ABAP/4 programs and SAPscript forms) into the escape sequences required by the output device. FORMATS This component determines how the output will appear on the paper and primarily specifies paper sizes, such as Letter and DINA4. It allows SAPscript forms to construct a portrait or landscape oriented layout in the printable area of the page.

SAP Printing Application Notes #5 rev a
8
DEVICE INITIALIZATION This component is a group of escape sequences used to configure the OUTPUT DEVICE for the requirements of the specific document in the print request. These configuration escape sequences, containing information such as cpi, lpi, and fonts, are sent to the printer prior to the initiation of an output data stream for the document. SAP is a registered trademark of SAP Aktiengesellschaft, Systems, Applications and Products in Data Processing, Neurottstrasse 16, 69190 Walldorf, Germany.

SAP Printing Application Notes #5 rev a
9
How to use a Printronix ASCII/SAP DEVICE TYPE Briefly, the ASCII/SAP DEVICE TYPE integration steps are: • Test the printer outside SAP R/3 to verify its printing operation. • Import the Printronix Device Type into the SAP spool system using SA38 utilities. USERS
NOTE: This step can be skipped when integrating on systems 4.6C or higher. • Create an output device for the SAP spooling system. This makes a logical connection
between the OUTPUT DEVICE, the DEVICE TYPE, and the COMMUNICATION PATH to the printer (physical device).
• Print a test document selected in a user’s SAP application transaction screen. Specify the
output device name in the Print List screen, and the list printing of the test document should take place at the printer.
Successful implementation of these steps will ensure successful printer integration.
SAP Printing Application Notes #5 rev a
10
Appendix 1
PROCEDURE ONE: Test the printer outside of SAP - Print non-SAP documents in non-SAP environment This procedure allows you to confirm that the host OS/printer attachment works properly outside of SAP. This is necessary to assure that the host operating system and the printer are correctly configured prior to creating the Printronix printer as an output device to the SAP R/3 internal spool system. SAP R/3 documentation strongly advises that the printer should be thoroughly pre-tested in printing non-SAP documents in the host OS system without SAP. Typically, the host OS could be any one of these platforms: UNIX systems, Windows or Windows NT, AS/400, or IBM mainframe platforms. • The printer emulation should already be set in PGL mode when powered ON. If it is not, set
the printer emulation to PGL from the printer's panel. Next, print the printer’s configuration from the printer’s panel to make sure that the firmware is loaded correctly and the Flash-RAM and DRAM installed memory satisfies the printer’s memory requirement.
• Save the current printer’s configuration as the POWER ON CONFIGURATION so that
whenever the printer is turned OFF and ON the same settings will be loaded into the memory. Refer to the Printronix User’s Manual for a complete procedure on how to accomplish steps 1 and 2.
• Generate a few printouts to the Printronix printers from any non-SAP applications such as
MS Word or any ASCII text editor. If no printouts were generated, check all connections to and from the printer. If all else fails, contact the Printronix Support Group to resolve it, and do not proceed any further!
If printouts are successfully generated, then check your SAP system for the Printronix LB_PRI device type, which should be available with all SAP systems 4.6c or higher. If it is available in the device type list, go directly to Procedure Four: Using the Printronix Device Type. Otherwise go to Procedure Two: Install the ZPTXASC4 device type into an existing SAP R/3 System.

SAP Printing Application Notes #5 rev a
11
PROCEDURE TWO: Install the ZPTXASC4 DEVICE TYPE to an existing SAP R/3 System
1. Printronix wrote the ZPTXASC4 ascii device type to facilitate label printing from within SAP. The ZPTXASC4 device type can be downloaded from Printronix at www.printronix.com/solutions.htm. If your R/3 system is 4.6c or higher, you can use the Printronix Label Printer device type LB_PRI designed by SAP for Printronix. It should already be on your R/3 system, and you can skip to Procedure Four.
2. Double-click the self-extracting ZPTXASC4 DEVICE TYPE file 355364.exe you have just
downloaded from the Printronix DOWNLOAD SAP DEVICE TYPES web page. Two files named as ZPTX_PGL_LS.LS and ZPTXASC4.PRI will be required during the installation of the ZPTXASC4 DEVICE TYPE. In addition, an optional sample IGP/PGL program ZSAMPLE.PGL is provided on the SAP download page. Note the path where these files are located because you will be asked to specify the path during the import process of the ZPTXASC4 DEVICE TYPE.
3. Start the SAP R/3 front-end client GUI. Log into the central instance of SAP Server with administrator rights. Type in your User name and Password at the appropriate text box. Press the <Enter> key to continue to the next screen. The screen should look very much like Figure 1 below.
Figure 1 SAP R/3 Login screen
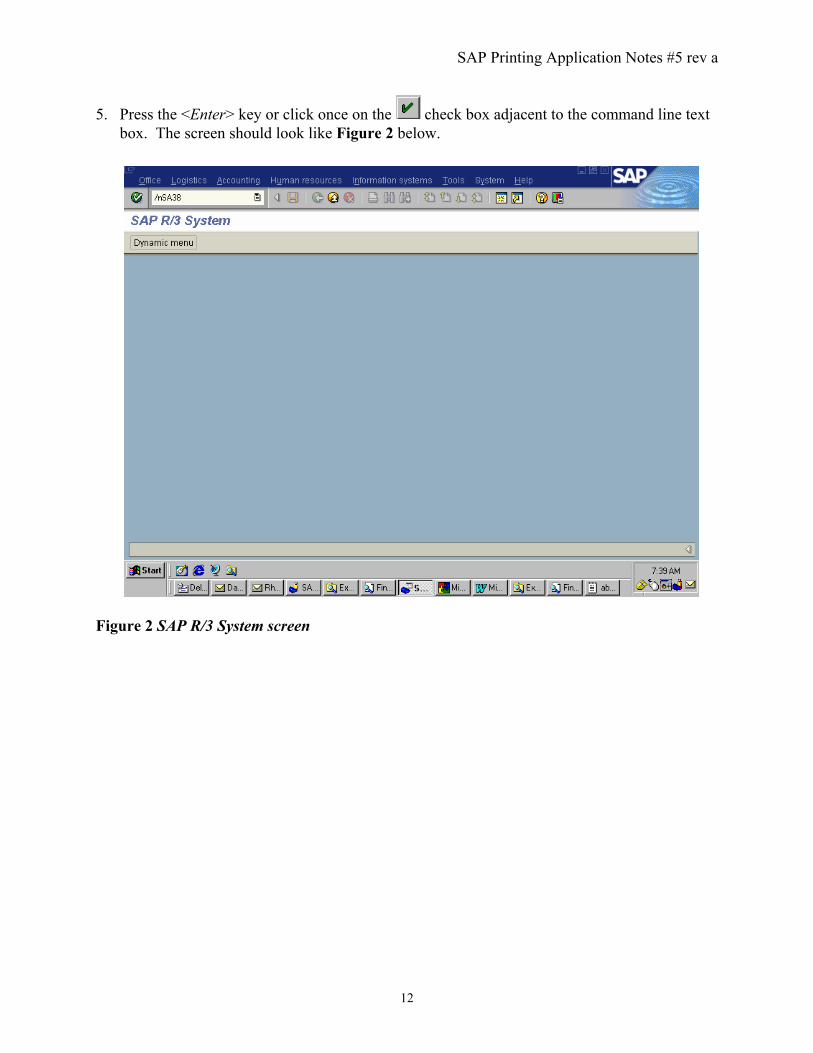
4. Start the Program Execution transaction SA38 by entering /nSA38 in the command line text
box located just below the menu bar of the SAP R/3 System screen.
SAP Printing Application Notes #5 rev a
12
5. Press the <Enter> key or click once on the check box adjacent to the command line text box. The screen should look like Figure 2 below.
Figure 2 SAP R/3 System screen
SAP Printing Application Notes #5 rev a
13
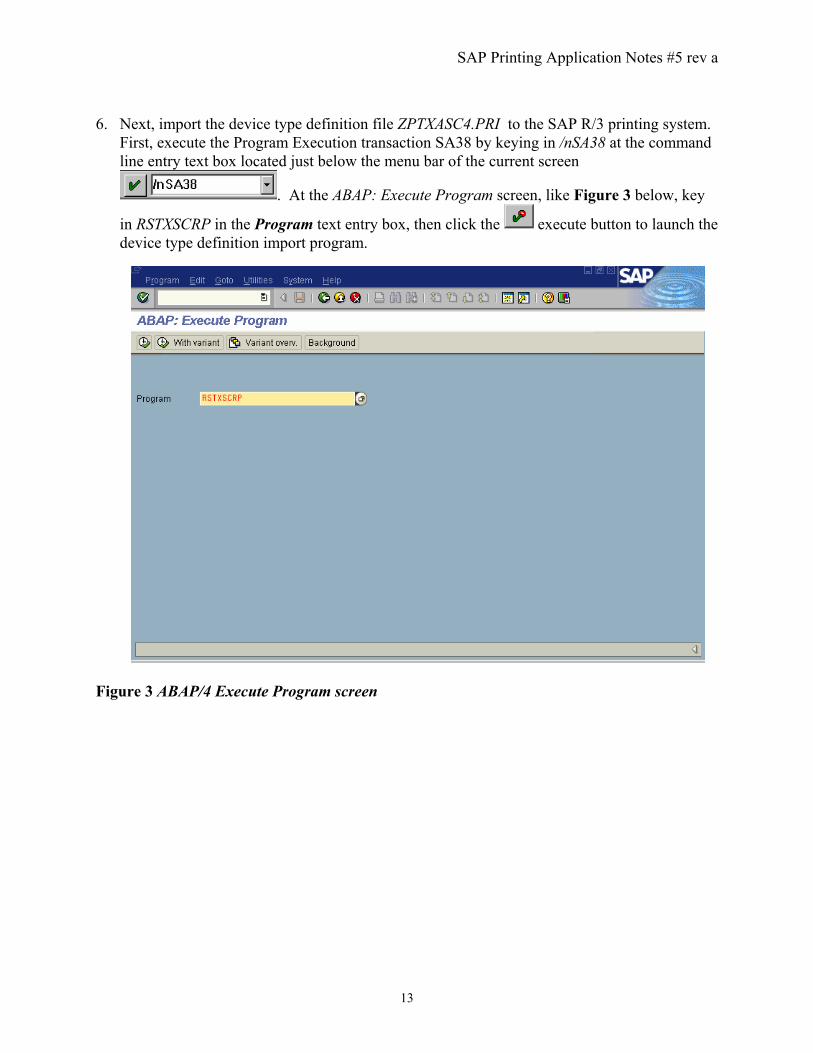
6. Next, import the device type definition file ZPTXASC4.PRI to the SAP R/3 printing system.
First, execute the Program Execution transaction SA38 by keying in /nSA38 at the command line entry text box located just below the menu bar of the current screen
. At the ABAP: Execute Program screen, like Figure 3 below, key
in RSTXSCRP in the Program text entry box, then click the execute button to launch the device type definition import program.
Figure 3 ABAP/4 Execute Program screen
SAP Printing Application Notes #5 rev a
14
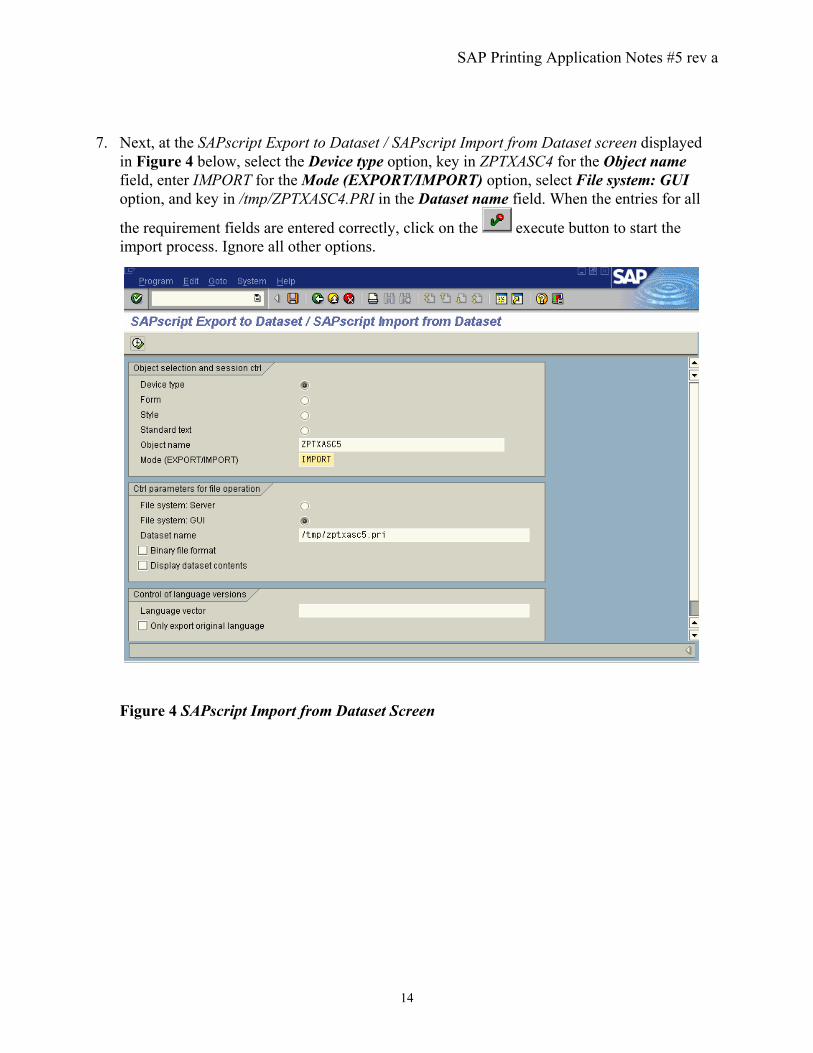
7. Next, at the SAPscript Export to Dataset / SAPscript Import from Dataset screen displayed
in Figure 4 below, select the Device type option, key in ZPTXASC4 for the Object name field, enter IMPORT for the Mode (EXPORT/IMPORT) option, select File system: GUI option, and key in /tmp/ZPTXASC4.PRI in the Dataset name field. When the entries for all
the requirement fields are entered correctly, click on the execute button to start the import process. Ignore all other options.
Figure 4 SAPscript Import from Dataset Screen

SAP Printing Application Notes #5 rev a
15
8. When making changes or defining new objects in the SAP R/3 system, an object is assigned
a request number so that the SAP R/3 system can track its profile information such as when, who, what, and how that object was created. In this case it is appropriate to request a new number since you are about to create a new printer definition object. To obtain a new request
number, simply click on the command button at the pop-up dialog Enter Change Request screen shown below in Figure 5.
Figure 5 Enter Change Request screen 9. Next, type in the description for the newly created request at the Create Request screen as
shown in Figure 6 below. Next, click the save button .
Figure 6 Create Request screen
SAP Printing Application Notes #5 rev a
16
10. Notice that a new request number is displayed in the Number field entry text box and the description of the request you entered at the Create Request screen displays just below the
request number. Next, click the enter button located at the lower left corner of the current active window.
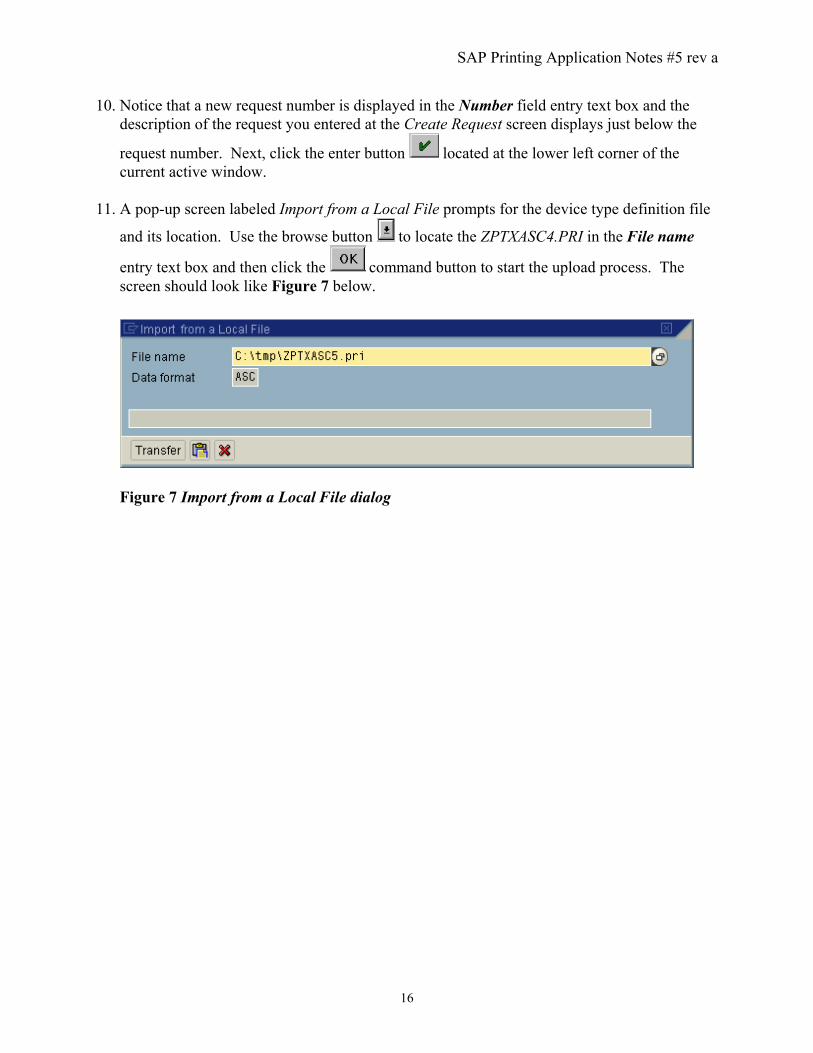
11. A pop-up screen labeled Import from a Local File prompts for the device type definition file
and its location. Use the browse button to locate the ZPTXASC4.PRI in the File name
entry text box and then click the command button to start the upload process. The screen should look like Figure 7 below.
Figure 7 Import from a Local File dialog

SAP Printing Application Notes #5 rev a
17
12. When the import process is finished, update messages display in the current active window
as shown in Figure 8 below.
Figure 8 SAPscript Export to Dataset screen

SAP Printing Application Notes #5 rev a
18
PROCEDURE THREE: Verify the import of ZPTXASC4 DEVICE TYPE in the SAP R/3 System 1. Start the Spool Administration transaction program (SPAD) by entering /nSPAD in the
command line text box located just below the menu bar of the current active window of the SAP R/3 system. Press the <Enter> key or click on the check box adjacent to the command line text box entry.
2. At the “ Spool Administration Initial Screen ” like Figure 9 below, select the Full admin menu, and then click the Device types button under the Device Types tab to generate a list of device types.
Figure 9 Spool Administration Initial Screen
SAP Printing Application Notes #5 rev a
19
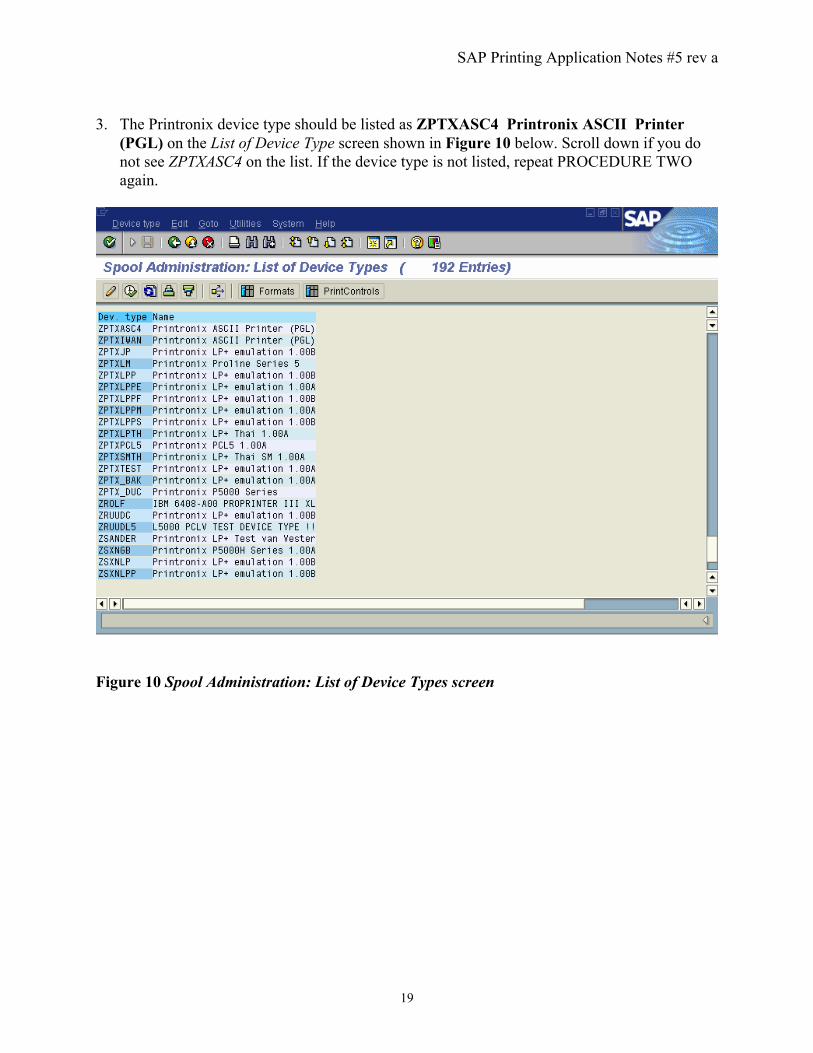
3. The Printronix device type should be listed as ZPTXASC4 Printronix ASCII Printer
(PGL) on the List of Device Type screen shown in Figure 10 below. Scroll down if you do not see ZPTXASC4 on the list. If the device type is not listed, repeat PROCEDURE TWO again.
Figure 10 Spool Administration: List of Device Types screen
SAP Printing Application Notes #5 rev a
20
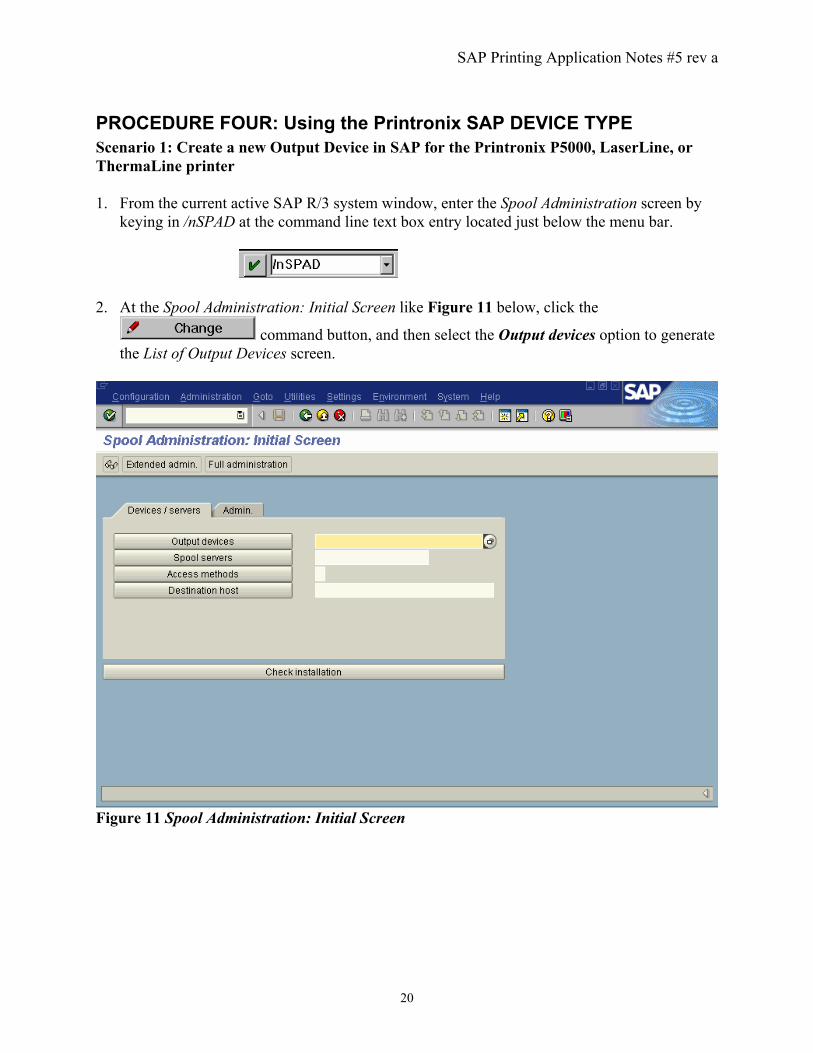
PROCEDURE FOUR: Using the Printronix SAP DEVICE TYPE Scenario 1: Create a new Output Device in SAP for the Printronix P5000, LaserLine, or ThermaLine printer 1. From the current active SAP R/3 system window, enter the Spool Administration screen by
keying in /nSPAD at the command line text box entry located just below the menu bar.
2. At the Spool Administration: Initial Screen like Figure 11 below, click the
command button, and then select the Output devices option to generate the List of Output Devices screen.
Figure 11 Spool Administration: Initial Screen

SAP Printing Application Notes #5 rev a
21
3. At the Spool Administration: List of Output Devices screen like Figure 12 below, key in
Shift F1 to enter the Create Output Device screen.
Figure 12 Spool Administration: List of Output Devices screen
SAP Printing Application Notes #5 rev a
22
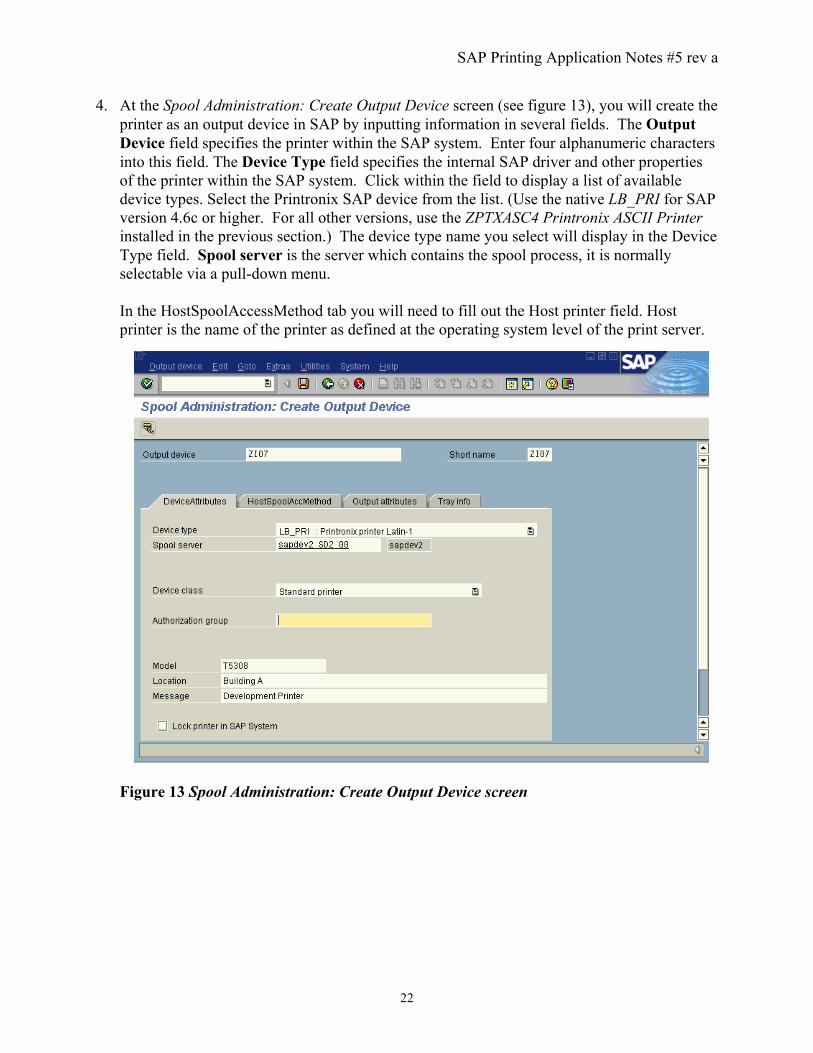
4. At the Spool Administration: Create Output Device screen (see figure 13), you will create the printer as an output device in SAP by inputting information in several fields. The Output Device field specifies the printer within the SAP system. Enter four alphanumeric characters into this field. The Device Type field specifies the internal SAP driver and other properties of the printer within the SAP system. Click within the field to display a list of available device types. Select the Printronix SAP device from the list. (Use the native LB_PRI for SAP version 4.6c or higher. For all other versions, use the ZPTXASC4 Printronix ASCII Printer installed in the previous section.) The device type name you select will display in the Device Type field. Spool server is the server which contains the spool process, it is normally selectable via a pull-down menu. In the HostSpoolAccessMethod tab you will need to fill out the Host printer field. Host printer is the name of the printer as defined at the operating system level of the print server.
Figure 13 Spool Administration: Create Output Device screen
SAP Printing Application Notes #5 rev a
23
The remaining screen fields are described below. For complete field descriptions and their available options, refer to the BC Printing Guide online help in the SAP R/3 system.
Spool Server: The name of the SAP Spooler Server. Host: The host operating system where the SAP Spooler Server is configured and installed. Host Printer: The name of the printer where it is defined in the host operating system. Device class: Do not change. Access method: Enter the following entries depending on the access method (connection method, either local or remote [illustrated below is a local connection]) between the SAP Server Spooler and the host operating system spool. LPQ format: Enter B in the entry text box. Location: Administrative information field to describe the physical location of the printer. Message: Administrative information field for SAP administrator to display the message to users.
5. When all the fields have the correct entries, save the output device definition by selecting from the menu bar Output device Save. (Note: A quicker way to save is to click on the
save button on the formatting toolbar just below the menu bar of the “Spool Administration: Create Output Device” screen.)
6. The Spool Administration: List of Output Devices screen now displays a list of the output
devices for the SAP R/3 system. Use the scroll keys to find the output device created in step four.
The P5000, LaserLine, or ThermaLine printer should now be ready for SAP document printing.
SAP Printing Application Notes #5 rev a
24
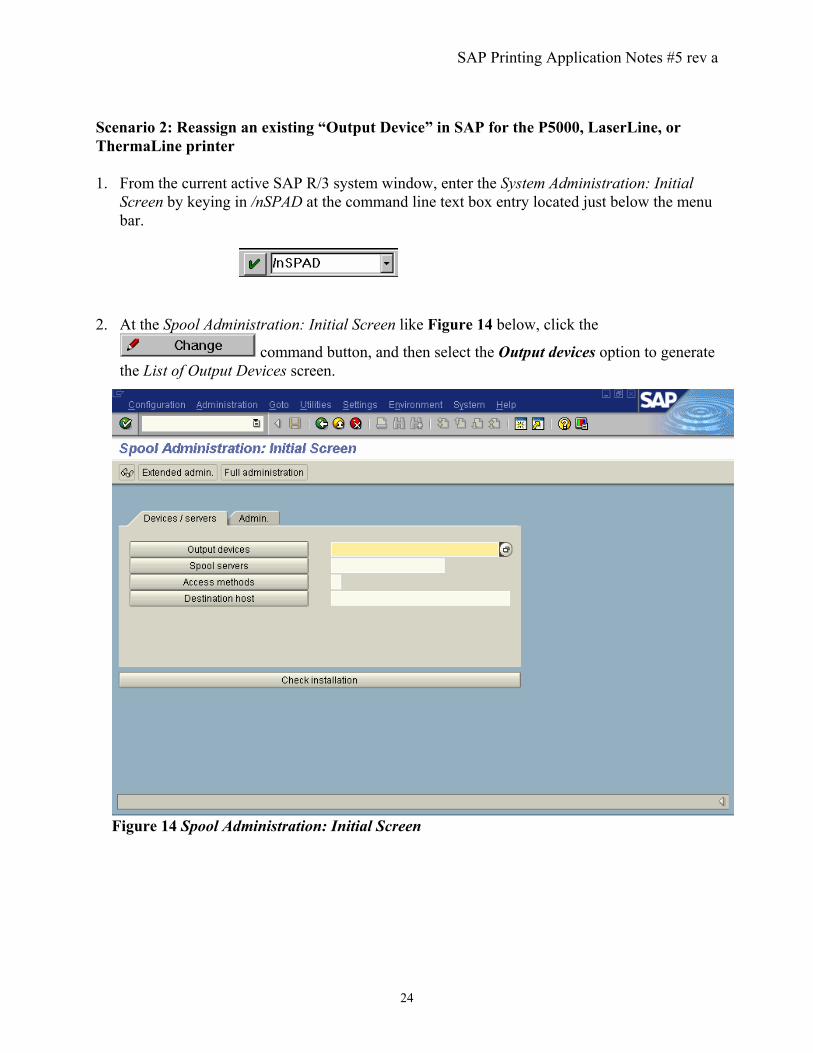
Scenario 2: Reassign an existing “Output Device” in SAP for the P5000, LaserLine, or ThermaLine printer 1. From the current active SAP R/3 system window, enter the System Administration: Initial
Screen by keying in /nSPAD at the command line text box entry located just below the menu bar.
2. At the Spool Administration: Initial Screen like Figure 14 below, click the
command button, and then select the Output devices option to generate the List of Output Devices screen.
Figure 14 Spool Administration: Initial Screen
SAP Printing Application Notes #5 rev a
25
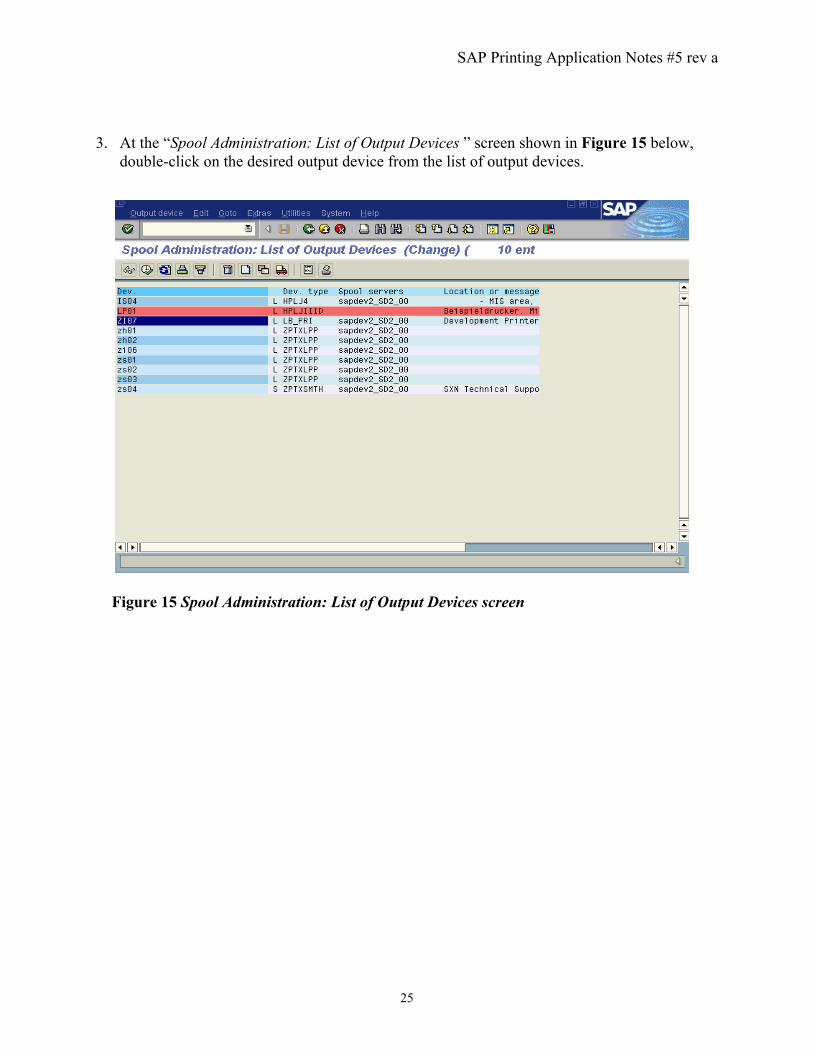
3. At the “Spool Administration: List of Output Devices ” screen shown in Figure 15 below,
double-click on the desired output device from the list of output devices.
Figure 15 Spool Administration: List of Output Devices screen

SAP Printing Application Notes #5 rev a
26
4. At the Spool Administration: Change Output Device screen (see Figure 16), click anywhere on the text entry box of the Device type field to get a list of available device types. Select the Printronix SAP device from the pick list. (Use the native LB_PRI for SAP version 4.6c or higher. For prior versions use the ZPTXASC4 Printronix ASCII Printer installed in the previous section.) The device type name displays inside the Device type text entry box.
Figure 16 Spool Administration: Change Output Device
You may wish to modify the Model, Location and Message informational fields as appropriate. Host spool access method should be set to L
5. When all the fields have the correct entries, save the output device definition by selecting
from the menu bar Output device Save. (A quicker way to save is to click on the save
button on the formatting toolbar just below the menu bar of the “Spool Administration: Change Output Device” screen.)
6. The “ Spool Administration: List of Output Devices” screen now displays a list of the output
devices for the SAP R/3 system, one of which is the one you have just modified to use the Printronix device type.
The Printronix printer should now be ready for SAP document printing.

SAP Printing Application Notes #5 rev a
27
PROCEDURE FIVE: Test the Printronix SAP Device Type 1. Many SAP transactions generate and display results in a list format at the current window.
At any given screen, a print option can be selected to print the current list to the desired
printer. To accomplish this, first key in /nSPAD in the command text entry box located just below the menu bar of the current active window of SAP R/3 system. Next select Output devices from the Spool Administration Initial screen, and a list of available output device types will display. The screen should look similar to Figure 17 below.
Figure 17 SPAD List of Output Devices screen

SAP Printing Application Notes #5 rev a
28
2. Next select from the menu bar Output device Print this list, and a Print Screen List screen
similar to the one shown in Figure 18 will display. Key in the name for the Output device field, which has been defined in section “Using the Printronix DEVICE TYPE” of this document. Check the Print immed and the Delete after print options under the Spool Control
area of the Print Screen List. Next, click on the command button to print.
Figure 18 Print Screen List 3. If there is no output from the printer, check to make sure that the printer is properly
connected and able to print non-SAP applications from the host system where the printer is connected; otherwise, contact your SAP administrator for support.

SAP Printing Application Notes #5 rev a
29
Appendix 2
How to print an IGP/PGL label using SAP R/3 SAPscript Define a generic Page Format (ZANY) in SPAD of SAP R/3 for any IGP/PGL label For successful label printing, it is necessary to define a generic page format to be used in your layout sets. 1. To create a generic (ZANY) Page Format in SAP at the current active SAP R/3 system
window enter the Spool Administration screen by keying in /nSPAD at the command line
field located just below the menu bar .
2. At the Spool Administration: Initial Screen like Figure 19, select the Page formats option under “Full admin” to get to the List Of Page Formats screen.
Figure 19 Spool Administration: Initial Screen
SAP Printing Application Notes #5 rev a
30
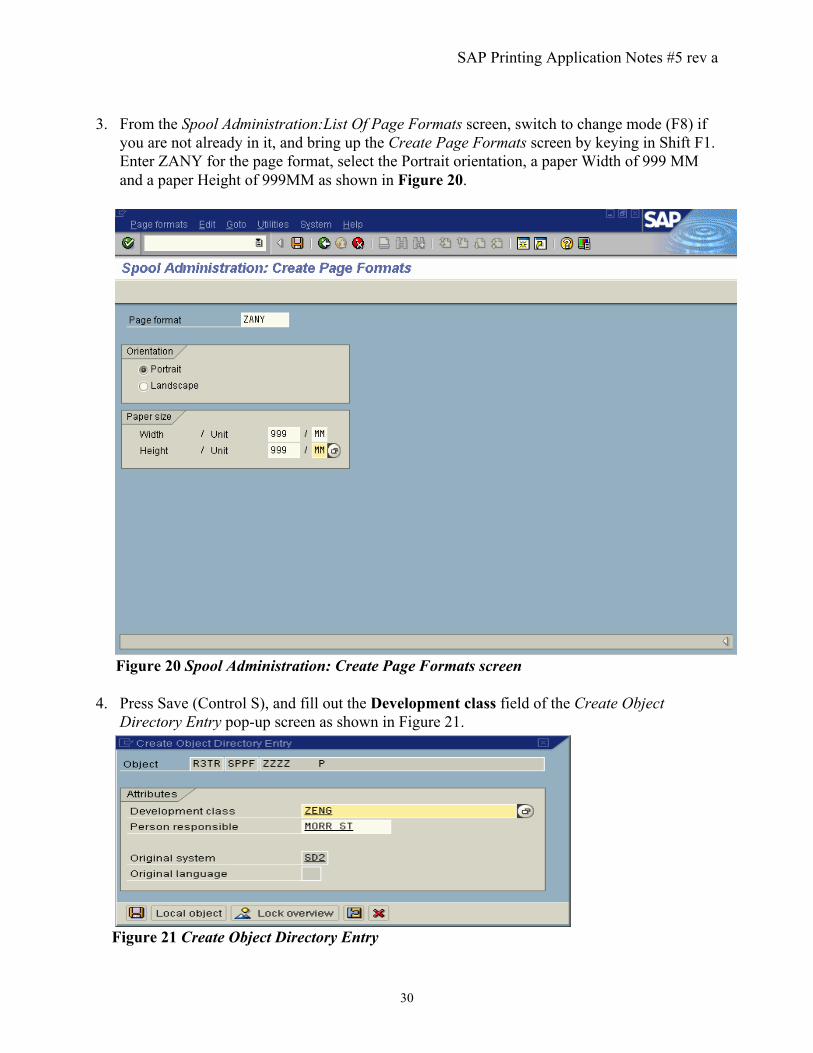
3. From the Spool Administration:List Of Page Formats screen, switch to change mode (F8) if
you are not already in it, and bring up the Create Page Formats screen by keying in Shift F1. Enter ZANY for the page format, select the Portrait orientation, a paper Width of 999 MM and a paper Height of 999MM as shown in Figure 20.
Figure 20 Spool Administration: Create Page Formats screen 4. Press Save (Control S), and fill out the Development class field of the Create Object
Directory Entry pop-up screen as shown in Figure 21.
Figure 21 Create Object Directory Entry

SAP Printing Application Notes #5 rev a
31
5. Press save again and you will be presented with a transport request prompt. Press the <Enter>key or click on the check box.
6. Return to the List of Page Formats screen as shown in Figure 22. This can be done via the
Back (F3) key. A list of available page formats will display. Verify that the ZANY page format is listed along with the other page formats by scrolling up or down the screen.
Figure 22 Spool Administration: List of Page Formats Screen Use the ZANY page format, or one like it in your layout sets used for label printing. The Sample layout set ZPTX_PGL_LS, discussed in the next section already references this page format.

SAP Printing Application Notes #5 rev a
32
Import the Layout Set Definition File 1. For those who are not familiar with how to create a layout set, Printronix has created one
which can be imported (uploaded) to your R/3 system. This section outlines the import procedure of the sample layout set definition file ZPTX_PGL_LS available from Printronix1. First, execute the Program Execution transaction SA38 by keying in /nSA38 at the command line entry text box located just below the menu bar of the current screen
. At the ABAP: Execute Program screen, similar to Figure 23 below, key in RSTXSCRP in the Program text entry box. Click the F8 execute button to launch the layout set definition import program.
Figure 23 ABAP: Execute Program Screen
1 The easiest way to acquire the sample ZPTX_PGL_LS file is to go to www.printronix.com/sapsolutions.html. The file is included in the zip file with the ZPTXASC4 device type.

SAP Printing Application Notes #5 rev a
33
2. At the next window shown in Figure 24, select the Layout set option, key in ZPTX_PGL_LS
for Object name text box, enter IMPORT for the Mode (EXPORT/IMPORT) option, select the File system: GUI option, and key in /tmp/ZPTX_PGL_LS in the Dataset name text box. When you have made the correct entries for all required fields, click on the F8 execute button to start the import process. Ignore all other options.
Figure 24 SAPscript Import from Dataset screen

SAP Printing Application Notes #5 rev a
34
3. The SAP R/3 system assigns an object a request number so that the system can track its profile as to when, who, what, and how that object was created or changed. In this case, it is appropriate to request a new number since you are about to create a new layout set definition object. To obtain a new request number, simply click on the execute command button at the pop-up dialog Create Task screen shown in Figure 25.
Figure 25 Change Task screen 4. A pop-up dialog text box labeled Import from a Local File prompts for the layout set
definition file and its location. Use the browse button to locate ZPTX_PGL_LS.LS in the
File name field and then click the command button to start the upload process. The screen should look like Figure 26 below.
Figure 26 Import from a Local File dialog

SAP Printing Application Notes #5 rev a
35
5. When the import process is finished, update messages will display in the current active
window similar to Figure 27.
Figure 27 SAPscript Export to Dataset/ Import from Dataset screen
SAP Printing Application Notes #5 rev a
36
Create an IGP/PGL label IGP/PGL (Intelligent Graphics Printing firmware for the Printronix Graphics Language) is an ASCII-based output language designed for P5000 Line Matrix, LaserLine, and ThermaLine printers. Some of the IGP/PGL graphics processing features include:
• On-Line Form and Label Generation • Selectable Bar Codes • Expanded and Compressed Character Print • Rotated Alphanumerics • Logos • Reversed Print • Automatic Increment/Decrement Capability • TIFF and PCX Raster Data File Support
Additional features are listed in the IGP/PGL Programmer’s Reference Manual for each type of printer. IGP/PGL is a robust ASCII-based printer emulation that contains many built-in mnemonic commands used specifically to generate labels and forms. To design a label or form, you can use a text editor such as EDIT under DOS or any word processing software to key in the equivalent ASCII IGP/PGL code commands. Then save the IGP/PGL codes (program) in text format (ASCII format). See Appendix 3 for a sample label and an accompanying IGP/PGL program listing. Another method to create an IGP/PGL label is to use a Label Design Software product such as Codesoft™, LabelView™, or LabelMatrix™. These programs can generate equivalent IGP/PGL code for the designed label. Most of these software packages come with a dedicated IGP/PGL driver that support the Printronix printer family. To simplify the process of creating or designing labels, all of the available label design software packages provide users with unlimited GUI (Graphical User Interface) drawing tools with drag and drop capabilities. A user simply uses the mouse along with many graphics drawing features to add or define new fonts, bar codes with variable data, boxes, and logos - without keying in a single IGP/PGL code. Once the label design section is complete, simply select the Printronix IGP/PGL printer driver and print the label with the “print to file” option. The captured output data stream (in response to a user’s print request) is now an IGP/PGL program (just like the IGP/PGL program shown in Appendix 3). All that is required is a soft copy of the IGP/PGL program file in ASCII format. Whether the IGP/PGL program file is generated directly by keying in the IGP/PGL ASCII commands, obtained from existing legacy IGP/PGL programs, or captured from one of the Label Design Software products, the label program can be imported directly into the SAP system and printed to the Printronix printer.
SAP Printing Application Notes #5 rev a
37
Import an existing IGP/PGL label to SAP R/3 as Standard Text 1. The SAP R/3 system allows you to import (upload) text files into its own Text Management
System, called the Standard Text. The Standard Text is a text editor that allows SAP front-end users to create and edit text. With an existing IGP/PGL program created either by entering the IGP/PGL codes directly or by capturing the IGP/PGL output from one of the Label Design Software packages, log into the SAP R/3 system. The logging procedure is identical to PROCEDURE ONE, steps 1 through 4 of Appendix 1 above. A sample label ZSAMPLE.PGL was provided within the self-extracting downloaded file. The following examples will use this file. If this is your first time importing a PGL label, use the sample label provided for you for your first test print.
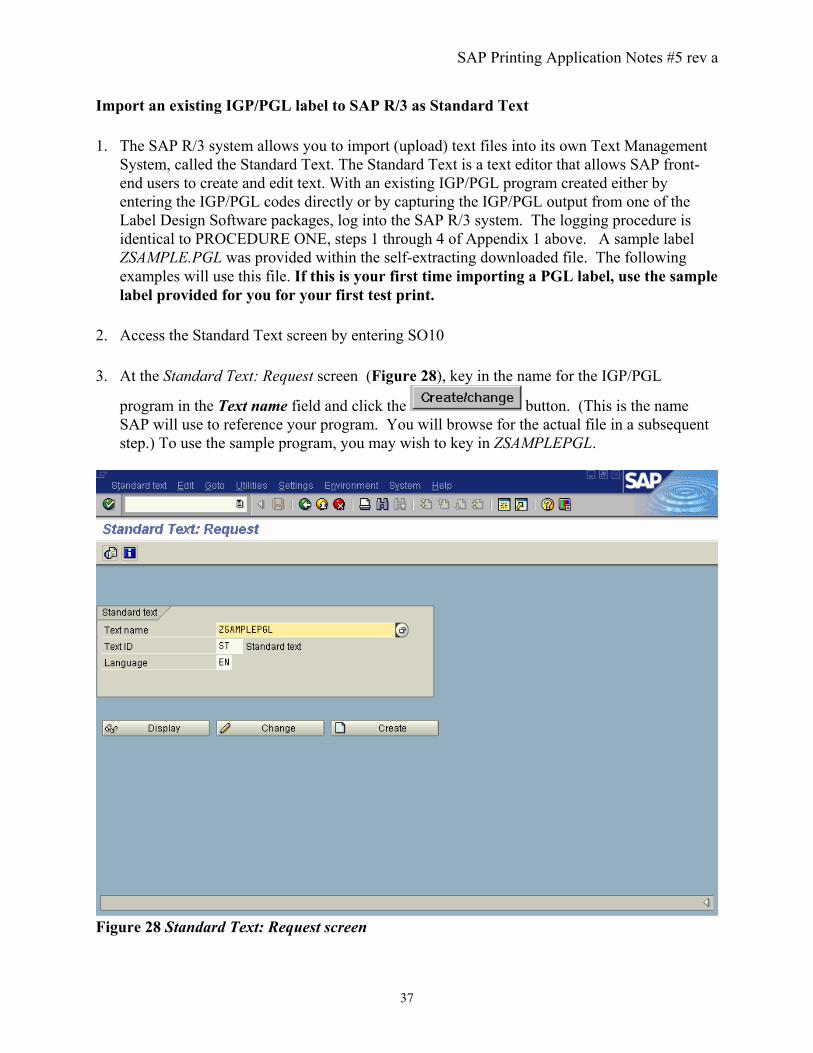
2. Access the Standard Text screen by entering SO10 3. At the Standard Text: Request screen (Figure 28), key in the name for the IGP/PGL
program in the Text name field and click the button. (This is the name SAP will use to reference your program. You will browse for the actual file in a subsequent step.) To use the sample program, you may wish to key in ZSAMPLEPGL.
Figure 28 Standard Text: Request screen

SAP Printing Application Notes #5 rev a
38
4. At the next screen (Figure 29), select Text->Upload option from the menu toolbar.
Figure 29 Change Standard Text screen 5. A pop-up dialog text box labeled Upload (Figure 30) prompts you for the format type of the
standard text file. Select ASCII and click the command button.
Figure 30 Upload dialog

SAP Printing Application Notes #5 rev a
39
6. A pop-up dialog text box (Figure 31) prompts you for the name of the IGP/PGL filename.
Click on the browse button to locate the IGP/PGL file that you created earlier in the “Create an IGP/PGL label” section of the Appendix 2. To use the sample PGL file, look for ZSAMPLE.PGL in the directory where it was un-zipped. The file name will be displayed in
the ASCII file text field. Next click on the command button to transfer the IGP/PGL codes into the Standard Text editor.
Figure 31 Import ASCII File dialog 7. The content of IGP/PGL program should be displayed in the Standard Text editor. This
indicates the successful upload of the IGP/PGL program into SAP R/3 System. Save by keying in Control S.
SAP Printing Application Notes #5 rev a
40
Include a Text Element to ZPTX_PGL_LS layout set 1. The Standard Text ZXXXXXXXX you imported earlier (see Import an existing IGP/PGL
label to SAP R/3 as Standard Text) can be the text element embedded in the ZPTX_PGL_LS layout set you uploaded (and which will be used in the following examples), or the layout set of your own creation. This embedded text is your label design. Variable data from your SAP tables will be incorporated into the label design at run time.
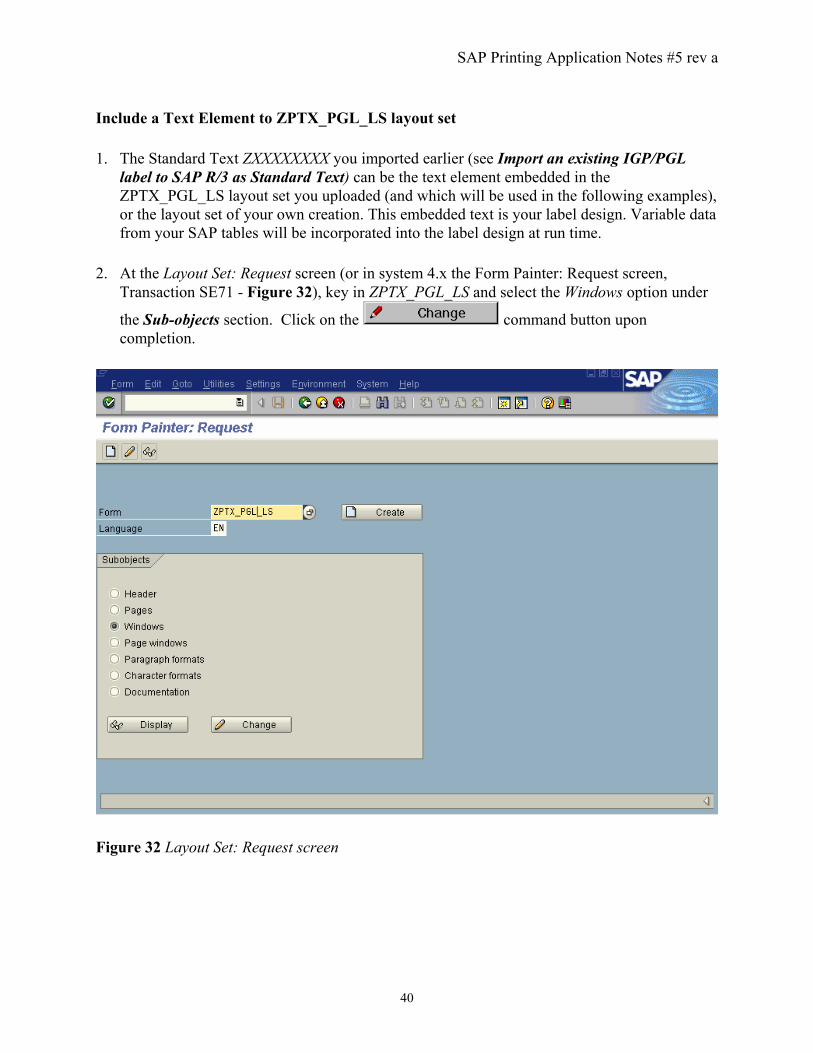
2. At the Layout Set: Request screen (or in system 4.x the Form Painter: Request screen,
Transaction SE71 - Figure 32), key in ZPTX_PGL_LS and select the Windows option under
the Sub-objects section. Click on the command button upon completion.
Figure 32 Layout Set: Request screen
SAP Printing Application Notes #5 rev a
41
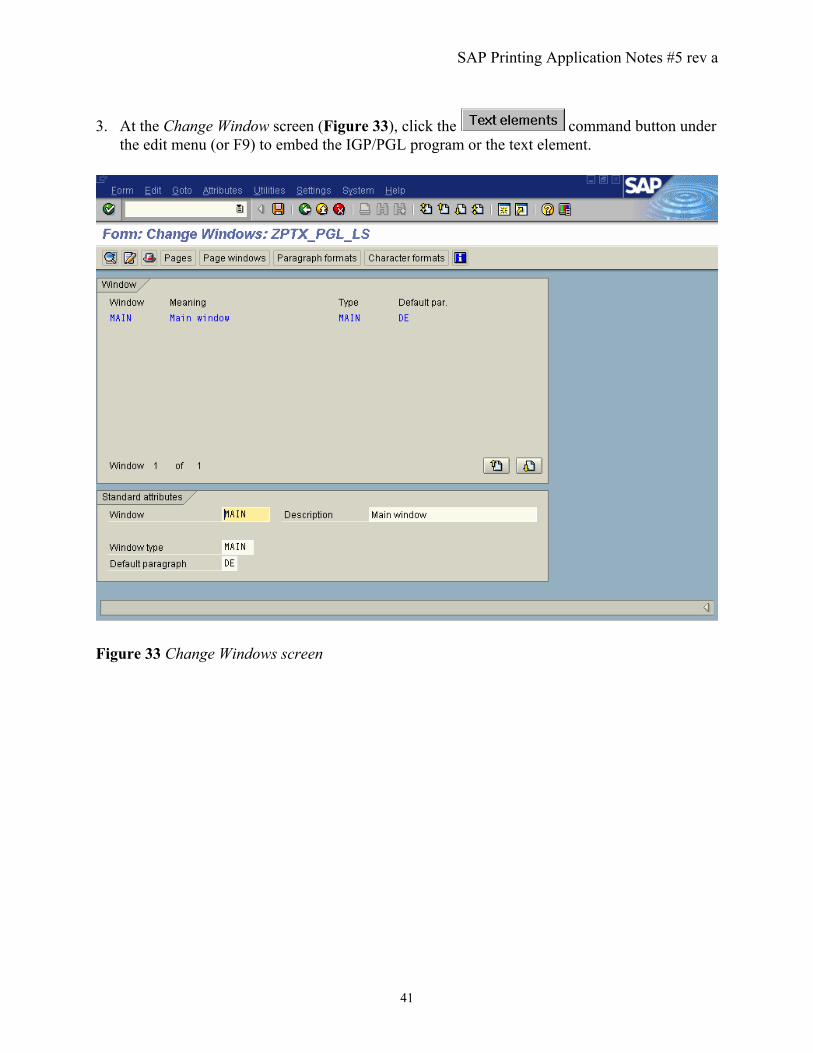
3. At the Change Window screen (Figure 33), click the command button under the edit menu (or F9) to embed the IGP/PGL program or the text element.
Figure 33 Change Windows screen

SAP Printing Application Notes #5 rev a
42
4. At the SAPscript editor in the Window MAIN screen, select Include Text Standard using
the 3.x GUI (or Insert Text Standard in the 4.x GUI) from the main menu bar (see Figure 34), or key in Control Shift F5
Figure 34 Window MAIN screen
SAP Printing Application Notes #5 rev a
43
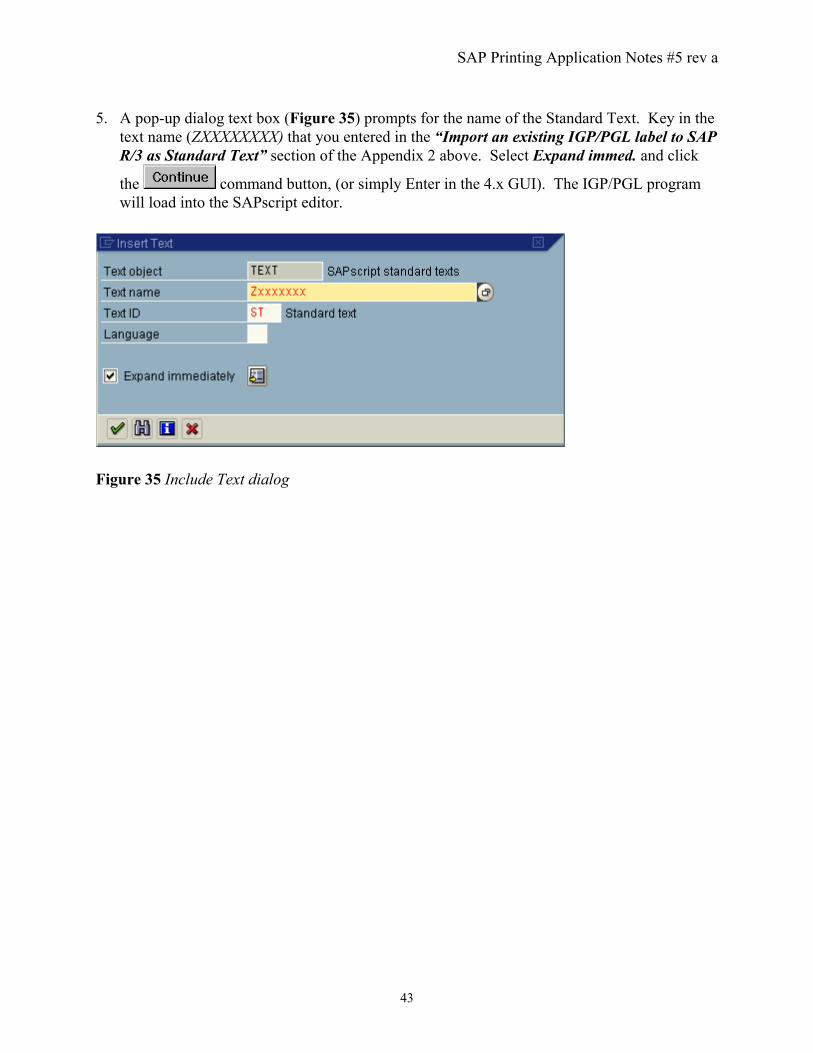
5. A pop-up dialog text box (Figure 35) prompts for the name of the Standard Text. Key in the text name (ZXXXXXXXX) that you entered in the “Import an existing IGP/PGL label to SAP R/3 as Standard Text” section of the Appendix 2 above. Select Expand immed. and click
the command button, (or simply Enter in the 4.x GUI). The IGP/PGL program will load into the SAPscript editor.
Figure 35 Include Text dialog

SAP Printing Application Notes #5 rev a
44
Place PGL commands in the layout set 1. The Window Main screen should now appear like Figure 36. The IGP/PGL program is now
in the editor, ready to be saved as part of the layout set.
Figure 36 Window MAIN screen 2. Click the button and then click the save button .

SAP Printing Application Notes #5 rev a
45
Test print the IGP/PGL label Activate the ZPTX_PGL_LS layout set before printing the label. At the screen shown below (Figure 37), select Layout set Activate (or Form-> Actvate in the 4.x GUI as shown in Figure 38). The Status field displays Active-Saved which indicates that the layout set is activated. Next select Utilities Test print. Make sure that the printer is working and an OUTPUT DEVICE has been defined for the printer. If an error occurrs with this test print, refer to the section entitled Troubleshooting Tips.
Figure 37 Layout Set: Change Header screen

SAP Printing Application Notes #5 rev a
46
Figure 38 Form:Change Windows screen
SAP Printing Application Notes #5 rev a
47
Troubleshooting Tips This set of application notes has been successfully used at many SAP installations worldwide. Sometimes, however, problems can arise due to site specific configurations or other factors. While it is not possible to anticipate every scenario, the following notes are designed to assist in troubleshooting most problems that may arise. Problems with the Layout Set test print: If the Layout set does not print, or prints with error messages, then follow the steps below 1. Ensure that the output device is using the ZPTXASC4 or LB_PRI device type. 2. Because some editors can introduce unwanted escape codes into the PGL layout set, it is necessary to rule out the possibility of a corrupted file or incorrect syntax. Upload the sample PGL program provided and ensure that it has not been modified before importing into a layout set, then try another test print. If it fixes the problem, try another editor or else double-check your PGL syntax, or call Printronix technical support. 3. If the above step does not fix the problem, it is possible the target SAP system is configured to generate one less Carriage Return, Line Feed than expected. If this is the case, download ZPTXASC3 from the Printronix web site (www.printronix.com) and install it using these same application notes. Problems with printing Layout Set from the ABAP print program: First, ensure that the layout set test print was successful. If so, and the ABAP print program is using the correct layout set and supplying the correct variables, there should not be any problems. Details of ABAP programming are beyond the scope of this document, but check the Printronix web site for availability of a sample ABAP print program using the sample PGL program as well as other tips and updates.

SAP Printing Application Notes #5 rev a
48
Using Multiple Layout Sets Sometimes, you may wish to have multiple layout sets, each with a separate PGL label design. To do so, follow the procedure below. 1) Copy the original ZPTX_PGL_LS Layout set: At the “SAP R/3 System” screen select Tools Word processing Layout set. The Layout Set:Request screen will display. Next select Utilities Copy From Client to get to the Copy Layout Sets Between Clients screen. Type ZPTX_PGL_LS in the Layout set name field. In the Target layout set field enter a name of your choice for the new layout set, ZCUSTOM_LS, for example. 2) Clear contents of the new layout set, if necessary. At the Layout Set: Request screen, select the name of the new layout set and click on the “Change” command button. Next, select the text element of the new layout set exactly as in steps 1 – 3 of the section entitled Include a Text Element to ZPTX_PGL_LS layout set). With the cursor at the first line of text (if any), click the “Select” button. Then move the cursor to the last line of text and hit the “Select” button again, followed by the “Delete” button. 3) Include a new text element (representing a new PGL program) into the new layout set using the same steps as in Import an existing IGP/PGL label to SAP/R3 as Standard Text.
SAP Printing Application Notes #5 rev a
49
Replace the IGP/PGL label variable fields with the SAP database data Often, an IGP/PGL label can be designed before the exact variable names from the ABAP print program are known. If this has been done, replace the necessary placeholder data of the PGL program with the variable names from the ABAP print program once they are known. For example, consider sample program 1 in appendix 3. The BARCODE statement creates a bar code, the symbology is code 3/9, and the value of the data is “SAP APP NOTES”. If you had a variable in an ABAP print program named, say, BC-DATA, then you could replace “SAP APP NOTES” with &”BC-DATA”&. The value of BC-DATA will now be substituted into the statement by SAP at run time.

SAP Printing Application Notes #5 rev a
50
Appendix 3 Sample PGL PROGRAMS The following PGL program is available from the Printronix web site, and should have been bundled with these application notes. Sample IGP/PGL label program 1 ~NORMAL ~CREATE;LAB;432 SCALE;DOT;203;203 FONT;FACE 92250;BOLD ON;SLANT OFF ALPHA POINT;237;97;25;26;"SAP Application Notes" POINT;391;266;25;26;"Test Page" STOP BARCODE C3/9;XRD3:3:6:6;H4.64;607;98 "SAP APP NOTES" PDF;B STOP BOX 2;103;50;1115;759 STOP BOX 2;170;84;419;710 STOP END ~EXECUTE;LAB ~NORMAL
SAP Printing Application Notes #5 rev a
51
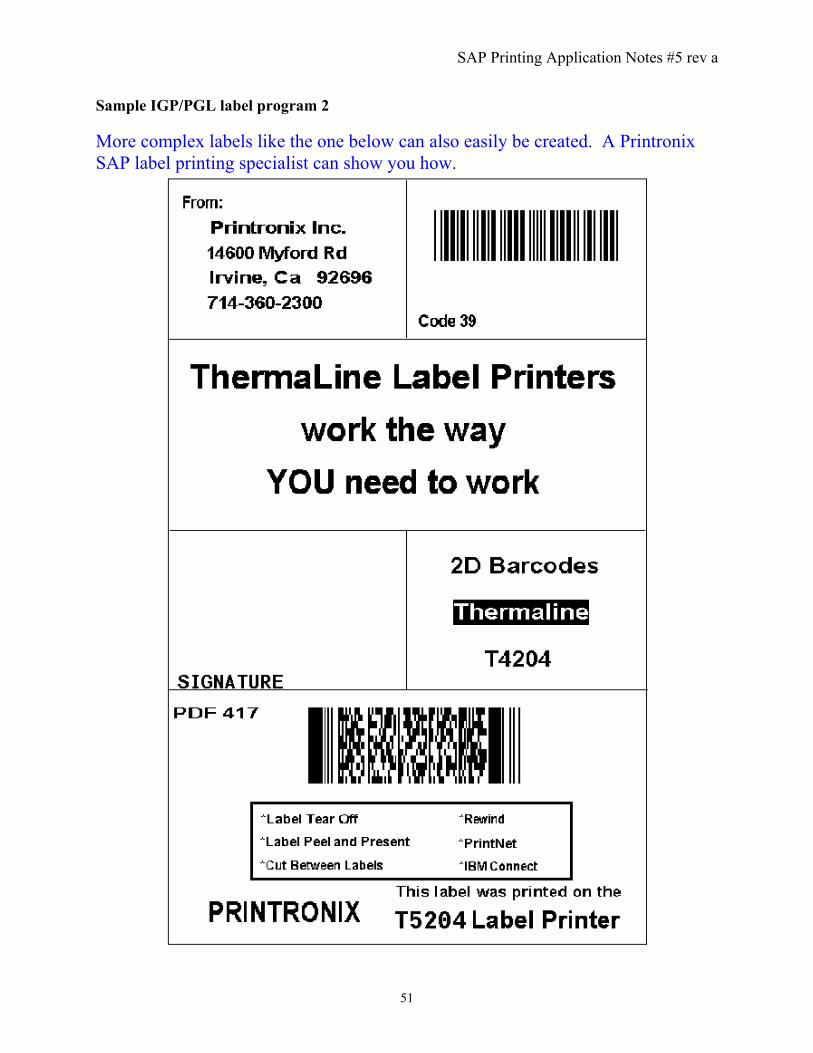
Sample IGP/PGL label program 2 More complex labels like the one below can also easily be created. A Printronix SAP label printing specialist can show you how.