sap connected goods implementation guide - sap … 1 about sap connected goods 5 main capabilities 5...
TRANSCRIPT

Configuration Guide PUBLIC
SAP Connected GoodsDocument Version: 2.0.1 – 2017-08-05
SAP Connected Goods Implementation Guide
Content
1 About SAP Connected Goods. . . . . . . . . . . . . . . . . . . . . . . . . . . . . . . . . . . . . . . . . . . . . . . . . . . . . 5Main Capabilities. . . . . . . . . . . . . . . . . . . . . . . . . . . . . . . . . . . . . . . . . . . . . . . . . . . . . . . . . . . . . . . . 5
2 Introduction. . . . . . . . . . . . . . . . . . . . . . . . . . . . . . . . . . . . . . . . . . . . . . . . . . . . . . . . . . . . . . . . . . 6
3 Implementation Prerequisites. . . . . . . . . . . . . . . . . . . . . . . . . . . . . . . . . . . . . . . . . . . . . . . . . . . . . 7
4 Discovery. . . . . . . . . . . . . . . . . . . . . . . . . . . . . . . . . . . . . . . . . . . . . . . . . . . . . . . . . . . . . . . . . . . . 84.1 Understanding Typical Connected Goods Customers. . . . . . . . . . . . . . . . . . . . . . . . . . . . . . . . . . . . . . 84.2 Understanding the Company Background. . . . . . . . . . . . . . . . . . . . . . . . . . . . . . . . . . . . . . . . . . . . . . 94.3 Defining Business Use Cases. . . . . . . . . . . . . . . . . . . . . . . . . . . . . . . . . . . . . . . . . . . . . . . . . . . . . . 10
Example Use Case: Product Consumption and Inventory Levels. . . . . . . . . . . . . . . . . . . . . . . . . . . .11Example Use Case: Consistent Product Quality. . . . . . . . . . . . . . . . . . . . . . . . . . . . . . . . . . . . . . . 11Example Use Case: Business Partner Information. . . . . . . . . . . . . . . . . . . . . . . . . . . . . . . . . . . . . .11Example Use Case: Device Location. . . . . . . . . . . . . . . . . . . . . . . . . . . . . . . . . . . . . . . . . . . . . . . 11Example Use Case: Power On/Off. . . . . . . . . . . . . . . . . . . . . . . . . . . . . . . . . . . . . . . . . . . . . . . . .12Example Use Case: Regional Preferences. . . . . . . . . . . . . . . . . . . . . . . . . . . . . . . . . . . . . . . . . . . 12
4.4 Defining Sensor Data. . . . . . . . . . . . . . . . . . . . . . . . . . . . . . . . . . . . . . . . . . . . . . . . . . . . . . . . . . . . 124.5 Defining Physical and Logical Device Types (Sensor Device). . . . . . . . . . . . . . . . . . . . . . . . . . . . . . . . 134.6 Defining Master Data Information. . . . . . . . . . . . . . . . . . . . . . . . . . . . . . . . . . . . . . . . . . . . . . . . . . . 14
5 Using IOT Services 4.0 to Create a Connectivity Channel. . . . . . . . . . . . . . . . . . . . . . . . . . . . . . . 155.1 REST API for Managing IOT Services 4.0 Information in Connected Goods Secure Store. . . . . . . . . . . . 155.2 Configuring IOT Services 4.0 Information. . . . . . . . . . . . . . . . . . . . . . . . . . . . . . . . . . . . . . . . . . . . . . 175.3 Deleting IOT Services 4.0 Information from the Connected Goods Secure Store. . . . . . . . . . . . . . . . . . 185.4 Retrieving the OAuth Token for a Device Type. . . . . . . . . . . . . . . . . . . . . . . . . . . . . . . . . . . . . . . . . . 195.5 Retrieving the OAuth Token for a Device. . . . . . . . . . . . . . . . . . . . . . . . . . . . . . . . . . . . . . . . . . . . . . 19
6 Defining a Thing Model. . . . . . . . . . . . . . . . . . . . . . . . . . . . . . . . . . . . . . . . . . . . . . . . . . . . . . . . . 206.1 Managing Device Types. . . . . . . . . . . . . . . . . . . . . . . . . . . . . . . . . . . . . . . . . . . . . . . . . . . . . . . . . . 22
Creating a Device Type with a JSON File. . . . . . . . . . . . . . . . . . . . . . . . . . . . . . . . . . . . . . . . . . . . 22Deleting a Device Type. . . . . . . . . . . . . . . . . . . . . . . . . . . . . . . . . . . . . . . . . . . . . . . . . . . . . . . . 24Defining Onboarding Fields for a Device Type. . . . . . . . . . . . . . . . . . . . . . . . . . . . . . . . . . . . . . . . 25
7 Onboarding Devices. . . . . . . . . . . . . . . . . . . . . . . . . . . . . . . . . . . . . . . . . . . . . . . . . . . . . . . . . . . .277.1 Onboarding Devices in the UI. . . . . . . . . . . . . . . . . . . . . . . . . . . . . . . . . . . . . . . . . . . . . . . . . . . . . . 27
Onboarding a Single Device. . . . . . . . . . . . . . . . . . . . . . . . . . . . . . . . . . . . . . . . . . . . . . . . . . . . . 27Onboarding Multiple Devices. . . . . . . . . . . . . . . . . . . . . . . . . . . . . . . . . . . . . . . . . . . . . . . . . . . . 27
7.2 Onboarding Devices Using the REST API. . . . . . . . . . . . . . . . . . . . . . . . . . . . . . . . . . . . . . . . . . . . . . 28
2 P U B L I CSAP Connected Goods Implementation Guide
Content

Single Device Onboarding API. . . . . . . . . . . . . . . . . . . . . . . . . . . . . . . . . . . . . . . . . . . . . . . . . . . 28Multiple Device Onboarding. . . . . . . . . . . . . . . . . . . . . . . . . . . . . . . . . . . . . . . . . . . . . . . . . . . . .29
8 Setting up Ingestion Endpoints. . . . . . . . . . . . . . . . . . . . . . . . . . . . . . . . . . . . . . . . . . . . . . . . . . . 31
9 Working With Master Data Tables. . . . . . . . . . . . . . . . . . . . . . . . . . . . . . . . . . . . . . . . . . . . . . . . . 329.1 Creating Master Data Tables. . . . . . . . . . . . . . . . . . . . . . . . . . . . . . . . . . . . . . . . . . . . . . . . . . . . . . 329.2 Importing Data into Master Data Tables. . . . . . . . . . . . . . . . . . . . . . . . . . . . . . . . . . . . . . . . . . . . . . .359.3 Importing Master Data Using an Excel File. . . . . . . . . . . . . . . . . . . . . . . . . . . . . . . . . . . . . . . . . . . . . 37
Downloading the Master Data Excel Template. . . . . . . . . . . . . . . . . . . . . . . . . . . . . . . . . . . . . . . . 37Uploading Master Data with an Excel File. . . . . . . . . . . . . . . . . . . . . . . . . . . . . . . . . . . . . . . . . . . 38Updating Master Data Records. . . . . . . . . . . . . . . . . . . . . . . . . . . . . . . . . . . . . . . . . . . . . . . . . . 38
9.4 Deleting Master Data Tables. . . . . . . . . . . . . . . . . . . . . . . . . . . . . . . . . . . . . . . . . . . . . . . . . . . . . . .39
10 Semantic Modeling. . . . . . . . . . . . . . . . . . . . . . . . . . . . . . . . . . . . . . . . . . . . . . . . . . . . . . . . . . . . 4110.1 Setting up the Semantic Model. . . . . . . . . . . . . . . . . . . . . . . . . . . . . . . . . . . . . . . . . . . . . . . . . . . . . 4210.2 Adding Ingestion Fields to the Semantic Model. . . . . . . . . . . . . . . . . . . . . . . . . . . . . . . . . . . . . . . . . .4610.3 Clearing or Resetting the Semantic Model. . . . . . . . . . . . . . . . . . . . . . . . . . . . . . . . . . . . . . . . . . . . . 4710.4 Including Enumerations for the Dynamic Fields. . . . . . . . . . . . . . . . . . . . . . . . . . . . . . . . . . . . . . . . . 47
11 Defining UI Configurations . . . . . . . . . . . . . . . . . . . . . . . . . . . . . . . . . . . . . . . . . . . . . . . . . . . . . .4911.1 Defining Visualization. . . . . . . . . . . . . . . . . . . . . . . . . . . . . . . . . . . . . . . . . . . . . . . . . . . . . . . . . . . .49
Defining Visual Filters. . . . . . . . . . . . . . . . . . . . . . . . . . . . . . . . . . . . . . . . . . . . . . . . . . . . . . . . . 49Defining Map Overlays. . . . . . . . . . . . . . . . . . . . . . . . . . . . . . . . . . . . . . . . . . . . . . . . . . . . . . . . .51Defining Smart Search and Table Columns. . . . . . . . . . . . . . . . . . . . . . . . . . . . . . . . . . . . . . . . . . 52Defining Grid Tiles. . . . . . . . . . . . . . . . . . . . . . . . . . . . . . . . . . . . . . . . . . . . . . . . . . . . . . . . . . . 54
11.2 Defining the Object Detail View. . . . . . . . . . . . . . . . . . . . . . . . . . . . . . . . . . . . . . . . . . . . . . . . . . . . . 56Defining Header Info. . . . . . . . . . . . . . . . . . . . . . . . . . . . . . . . . . . . . . . . . . . . . . . . . . . . . . . . . . 56Defining Facets. . . . . . . . . . . . . . . . . . . . . . . . . . . . . . . . . . . . . . . . . . . . . . . . . . . . . . . . . . . . . 58Defining Widgets. . . . . . . . . . . . . . . . . . . . . . . . . . . . . . . . . . . . . . . . . . . . . . . . . . . . . . . . . . . . .61Defining Sections. . . . . . . . . . . . . . . . . . . . . . . . . . . . . . . . . . . . . . . . . . . . . . . . . . . . . . . . . . . . 64
11.3 Defining Settings. . . . . . . . . . . . . . . . . . . . . . . . . . . . . . . . . . . . . . . . . . . . . . . . . . . . . . . . . . . . . . . 66Defining a Map Provider. . . . . . . . . . . . . . . . . . . . . . . . . . . . . . . . . . . . . . . . . . . . . . . . . . . . . . . 67Defining an External Map Provider. . . . . . . . . . . . . . . . . . . . . . . . . . . . . . . . . . . . . . . . . . . . . . . . 67Defining Thresholds. . . . . . . . . . . . . . . . . . . . . . . . . . . . . . . . . . . . . . . . . . . . . . . . . . . . . . . . . . 68Defining External Interfaces. . . . . . . . . . . . . . . . . . . . . . . . . . . . . . . . . . . . . . . . . . . . . . . . . . . . .69Defining Chart Settings. . . . . . . . . . . . . . . . . . . . . . . . . . . . . . . . . . . . . . . . . . . . . . . . . . . . . . . . 69Defining a Mail Server. . . . . . . . . . . . . . . . . . . . . . . . . . . . . . . . . . . . . . . . . . . . . . . . . . . . . . . . . 70Defining Default Settings. . . . . . . . . . . . . . . . . . . . . . . . . . . . . . . . . . . . . . . . . . . . . . . . . . . . . . .70
12 Defining Rule Configurations. . . . . . . . . . . . . . . . . . . . . . . . . . . . . . . . . . . . . . . . . . . . . . . . . . . . .7212.1 About the Rule Engine. . . . . . . . . . . . . . . . . . . . . . . . . . . . . . . . . . . . . . . . . . . . . . . . . . . . . . . . . . . 7212.2 Creating an Event. . . . . . . . . . . . . . . . . . . . . . . . . . . . . . . . . . . . . . . . . . . . . . . . . . . . . . . . . . . . . . 73
SAP Connected Goods Implementation GuideContent P U B L I C 3

12.3 Creating an Event from an Existing Event. . . . . . . . . . . . . . . . . . . . . . . . . . . . . . . . . . . . . . . . . . . . . . 7512.4 Deleting an Event. . . . . . . . . . . . . . . . . . . . . . . . . . . . . . . . . . . . . . . . . . . . . . . . . . . . . . . . . . . . . . .7512.5 Creating a Rule. . . . . . . . . . . . . . . . . . . . . . . . . . . . . . . . . . . . . . . . . . . . . . . . . . . . . . . . . . . . . . . . 76
Example: Creating a Rule. . . . . . . . . . . . . . . . . . . . . . . . . . . . . . . . . . . . . . . . . . . . . . . . . . . . . . . 7712.6 Rule Engine Expert Mode. . . . . . . . . . . . . . . . . . . . . . . . . . . . . . . . . . . . . . . . . . . . . . . . . . . . . . . . . 79
Creating a Rule Using a Rule Expression. . . . . . . . . . . . . . . . . . . . . . . . . . . . . . . . . . . . . . . . . . . . 79Rule Expression Reference. . . . . . . . . . . . . . . . . . . . . . . . . . . . . . . . . . . . . . . . . . . . . . . . . . . . . 82Finding the ID Value for the "event" Field. . . . . . . . . . . . . . . . . . . . . . . . . . . . . . . . . . . . . . . . . . . .92Finding the ID Value for the "deviceTypeID" Field. . . . . . . . . . . . . . . . . . . . . . . . . . . . . . . . . . . . . . 92Finding the ID Value for "field" in a Condition. . . . . . . . . . . . . . . . . . . . . . . . . . . . . . . . . . . . . . . . . 92
13 Setting up Notifications. . . . . . . . . . . . . . . . . . . . . . . . . . . . . . . . . . . . . . . . . . . . . . . . . . . . . . . . 9413.1 Setting up the Notification Service. . . . . . . . . . . . . . . . . . . . . . . . . . . . . . . . . . . . . . . . . . . . . . . . . . 9413.2 Editing Notification Templates. . . . . . . . . . . . . . . . . . . . . . . . . . . . . . . . . . . . . . . . . . . . . . . . . . . . . 9513.3 Resetting Notification Templates Using SQL. . . . . . . . . . . . . . . . . . . . . . . . . . . . . . . . . . . . . . . . . . . 9713.4 Default Notification Template Text. . . . . . . . . . . . . . . . . . . . . . . . . . . . . . . . . . . . . . . . . . . . . . . . . . 99
14 Data Ingestion Expert Mode. . . . . . . . . . . . . . . . . . . . . . . . . . . . . . . . . . . . . . . . . . . . . . . . . . . . 10414.1 Transformation Background. . . . . . . . . . . . . . . . . . . . . . . . . . . . . . . . . . . . . . . . . . . . . . . . . . . . . . 10414.2 Transformation Configuration. . . . . . . . . . . . . . . . . . . . . . . . . . . . . . . . . . . . . . . . . . . . . . . . . . . . . 104
TRANSFORMATIONS Table Reference. . . . . . . . . . . . . . . . . . . . . . . . . . . . . . . . . . . . . . . . . . . . 10514.3 Transformations: Accessing Application Master Data. . . . . . . . . . . . . . . . . . . . . . . . . . . . . . . . . . . . 106
Transporting Application Master Data to the Ingestion Pipeline. . . . . . . . . . . . . . . . . . . . . . . . . . . 107Removing Application Master Data from the Ingestion Pipeline. . . . . . . . . . . . . . . . . . . . . . . . . . . 108CACHED_TABLES Reference. . . . . . . . . . . . . . . . . . . . . . . . . . . . . . . . . . . . . . . . . . . . . . . . . . . 108
14.4 Transformations: Configuring Output Operations. . . . . . . . . . . . . . . . . . . . . . . . . . . . . . . . . . . . . . . 108
15 Application Readiness. . . . . . . . . . . . . . . . . . . . . . . . . . . . . . . . . . . . . . . . . . . . . . . . . . . . . . . . . 110
4 P U B L I CSAP Connected Goods Implementation Guide
Content
1 About SAP Connected Goods
SAP Connected Goods allows companies to centrally monitor and manage a large number of customer-facing, revenue-generating devices. It enables data-driven insights to optimize device availability, utilization, and performance, by ensuring adequate stock levels for replenishment and proper storage conditions of goods, helping enterprises reduce operational costs, increase revenue, and improve customer satisfaction. It is an Internet of Things (IoT) solution running on SAP Cloud Platform Cloud Foundry using IoT reference architecture.
Main Capabilities
SAP Connected Goods enables you to do the following:
● Maximize the value of connected devices integrated with the SAP back end● Onboard, monitor, and manage a large number of mass-market devices, including coolers, coffee makers,
vending machines, and others● Use rules, alerts, and notifications to track and respond to device data● Configure the system and user interface to meet your business needs and use cases● Reduce operational costs and increase revenue by optimizing asset availability and utilization● Improve customer satisfaction by ensuring the correct storage conditions of perishable goods● Utilize an appliance or product container as a sales and marketing platform● Analyze data and comparison trends to inform future business decisions
SAP Connected Goods Implementation GuideAbout SAP Connected Goods P U B L I C 5

2 Introduction
This guide will demonstrate implementation tasks primarily using the scenario of a connected coffeemaker. Because SAP Connected Goods supports any device type, additional scenarios are occasionally included to show other types of implementations. These scenarios are intended to help you design your own implementation.
6 P U B L I CSAP Connected Goods Implementation Guide
Introduction
3 Implementation Prerequisites
You need the following before beginning implementation of SAP Connected Goods:
1. Access to SAP IOT Application Enablement2. Python tool to convert AE JSON to SAP Connected Goods JSON (install Python 2.7 in your laptop)3. Access to SAP IOT Services 4.04. Access to SAP Connected Goods
SAP Connected Goods Implementation GuideImplementation Prerequisites P U B L I C 7

4 Discovery
The discovery process enables you to determine the best practices that will guide the full implementation process. In most cases, you can complete the discovery process without using SAP Connected Goods. Discovery enables you to understand a company's background and business model and the business cases that are relevant to SAP Connected Goods.
The following sections will describe the discovery process using a step-by-step example:
1. Understanding Typical Connected Goods Customers [page 8]2. Understanding the Company Background [page 9]3. Defining Business Use Cases [page 10]4. Defining Sensor Data [page 12]5. Defining Physical and Logical Device Types (Sensor Device) [page 13]6. Defining Master Data Information [page 14]
4.1 Understanding Typical Connected Goods Customers
Before beginning implementation, you should have a high-level understanding of the typical business models for target customers of SAP Connected Goods. SAP Connected Goods is designed particularly for customers with the following business model:
1. The customer owns mass-market devices – from a small number to thousands or millions – distributed remotely in public or private locations such as convenience stores and malls. These might include coolers, soft drink machines, vending machines, and devices of any other category.
2. A business partner for the customer has a business where the device is located, or the business partner is responsible for the location.
3. The customer has complete information about the business partner, including contact details and other business data.
4. The customer and the business partner, or the customer and a third-party distribution partner, have a detailed agreement to determine the operating conditions of each device, including exact location, working hours, working conditions, financial arrangements, inventory, and maintenance rules.
The typical requirements for a typical SAP Connected Goods customer are device monitoring and alerts based on specific rules. The following is a more detailed list of common customer requirements:
1. Live sensor data to provide visibility into the real-time working conditions of the device, including the following:○ Location of the device○ Inventory status of the device (if the device contains products)○ Real-time working conditions of the device, based on the following:
○ Power On/Off, if applicable○ KPI values (such as temperature, humidity, and so on)
8 P U B L I CSAP Connected Goods Implementation Guide
Discovery
○ Status of different parts (such as door Open/Closed, filter status Green/Red, and so on)2. Device metadata such as device ID, image, brand, and other characteristics of the device3. Device historical data for usage and other measurable values4. CRM information and other master data linked to the operation of the device (such as business partner
information, product information, and so on)5. Alerts triggered by rules and conditions based on measurable values associated with the device (for example,
the door being open more than 5 minutes, the device being off for 10 minutes, the machine location being located more than 10 feet from the normal location, or the operating temperature exceeding 35 F.)
NoteThis guide will use the fictitious company ACME Famous Coffee to provide an end-to-end example of the SAP Connected Goods implementation process.
4.2 Understanding the Company Background
As part of defining the business case, detailed research must be performed on the company background. It is expected that company information will be provided by customer representatives as well as online research.
Example: ACME Famous Coffee Company Background
ACME Famous Coffee company is a global company whose primary business is producing and selling the global top five coffee brands. ACME sells the coffee through various channels, including distributing millions of their own branded coffeemakers to business partners such as professional business offices, bars, and restaurants. ACME usually signs agreements directly or indirectly (via third party distributors) with those partners. In these agreements, the financial details are clarified and the working conditions of the coffeemakers are specified (such as location, hours of availably, maintenance schedule, brewing temperature, cleaning cycle, inventory level for milk and coffee, coffee brand, and so on).
ACME distributes three types of machines to its business partners: ACME Delight 3000, ACME Power Coffee, and ACME Coffee Express.
ACME distribute five brands of coffee: Manhattan Special, Mr. Brown Coffee, Coffee Delight, Turkish Coffee House, and Costa Coffee. Each of these brands offers caffeinated and decaffeinated coffee.
The customer operates the coffeemaker as follows:
1. Select a brand. The default selection is Manhattan Special.2. Select a drink: Cappuccino, Latte, or Coffee. The default selection is Coffee.3. Select a coffee type: Regular or Decaffeinated. The default selection is Regular.4. Select a cup size: Small or Large. The default selection is Small.
The machine provides visual indicators when it runs out of stock for the various brands, coffee types, or milk. Business partners can easily refill the machine as needed with milk, decaf, or regular coffee. The machine can be easily turned on or off as desired.
Based on current pain points, ACME Famous Coffee Company's primary issue is real-time visibility into the following:
SAP Connected Goods Implementation GuideDiscovery P U B L I C 9
● Coffee inventory level in each coffeemaker device● Product quality● Usage patterns for the device● Maintenance status● Supply Agreement compliance (such as whether the coffeemaker is in the correct location and other agreed-
upon working conditions)
ACME Famous Coffee Company's main need is for remote monitoring of its commercial coffeemakers, ensuring optimum working conditions to produce quality coffee, thus improving customer satisfaction and increasing sales.
4.3 Defining Business Use Cases
Because the customer's business use cases will impact every step of the implementation, it is critical to define these use cases before beginning the implementation process.
Having gathered company background information and established high-level pain points and needs, the next step is to identify the main personas for the application and define specific user stories and exact needs for those personas. These personas, user stories, and needs will guide the remaining implementation tasks to customize SAP Connected Goods for this customer.
Example: ACME Famous Coffee Company User Stories
This example will focus on a single main persona. The main persona will be an ACME Famous Coffee Company employee with the title of Operational Manager. The Operational Manager is responsible for ensuring that ACME commercial coffeemakers are working under optimum conditions, and has the ultimate goals of improving customer satisfaction and increasing sales. His primary need is to remotely monitor the coffeemakers.
There are six main use cases for the Operational Manager:
● Use Case 1: Product Consumption and inventory levels● Use Case 2: Consistent Product Quality● Use Case 3: Business Partner Information● Use Case 4: Device Location● Use Case 5: Power On/Off● Use Case 6: Regional Preferences
To understand a use case, it is helpful to define one or more user stories associated with the use case. A user story is written with a persona in mind and should be verified with the persona. User stories are usually written in the following format:
As a <Persona>, I need to <Action> so that <reason>.
Following user story format, this guide will define a single user story for each use case.
10 P U B L I CSAP Connected Goods Implementation Guide
Discovery
4.3.1 Example Use Case: Product Consumption and Inventory Levels
This use case is designed to allow the Operational Manager to understand coffee consumption patterns and monitor inventory level in the coffeemakers. This will ensure that an appropriate level of inventory is available at all times, thus avoiding lost sales and negative customer experiences.
The user story for this use case is:
As an Operational Manager, I need to remotely monitor stock levels and coffee consumption from ACME commercial coffeemakers so that I can initiate product shipments on time.
4.3.2 Example Use Case: Consistent Product Quality
This use case is designed to allow the Operational Manager to monitor coffee quality in the coffeemakers to ensure consistent high quality. This will improve customer experience and increase sales from repeat visits.
The user story for this use case is:
As an Operational Manager, I need to remotely monitor brew temperatures and cleaning cycles of ACME commercial coffeemakers so that I can send a field technician to service the machine if the product quality is low.
4.3.3 Example Use Case: Business Partner Information
This use case is designed to provide the Operational Manager with information about the business partners mapped to each device. This allows the Operational Manager to communicate with the business partners when necessary.
The user story for this use case is:
As an Operational Manager, I need to know business partner information, including business name, address, phone number and contact information, for each distributed ACME commercial coffeemaker, so that I can contact business partners as needed.
4.3.4 Example Use Case: Device Location
This use case is designed to provide the Operational Manager with the exact coordinates of each device, to ensure that the business partners follow the agreement regarding the device location.
The user story for this use case is:
As an Operational Manager, I need to know the exact location coordinates for each distributed ACME commercial coffeemaker, so that I can ensure that it is located in the best location for sales and that it is not missing or stolen.
SAP Connected Goods Implementation GuideDiscovery P U B L I C 11

4.3.5 Example Use Case: Power On/Off
This use case is designed to provide the Operational Manager with information about the availability of each device by determining whether each device is powered on or off. The Operational Manager can use this information to act to prevent lost sales.
The user story for this use case is:
As an Operational Manager, I need to monitor the availability to consumers of each ACME commercial coffeemaker by checking whether the machine is on or off, so I can avoid lost sales.
4.3.6 Example Use Case: Regional Preferences
This use case is designed to provide the Operational Manager with information about the regional preferences of consumers as they relate to coffee brand, cup size, and drink type, and use this information to plan shipments and compare trends.
The user story for this use case is:
As an Operational Manager, I need to know the coffee consumption preferences (coffee brand, cup size, and drink type) for each region in the country so that I can understand regional preferences, compare trends, and plan shipments accordingly.
4.4 Defining Sensor Data
This section defines the sensor data that will support the use cases defined for this customer. This step will help to identify the technical requirements for sensors and thus identify sensor vendors who can provide and install the sensors for each device.
Based on the use cases for ACME Famous Coffee Company, the following sensor data is required:
Table 1:
Type of Data Data Item Description/ Sample Value
Device Metadata Device Type Example: ACME Delight 3000, ACME Power Coffee, ACME Coffee Express
Device Image One for each coffeemaker type
Device ID Example: CF1-XXXXX, CF23-XXXXX, CF3-XXXXX
Sensor Data Transaction Date Date for each instance of brewing coffee
Transaction Time Time for each instance of brewing coffee
Power On/Off
12 P U B L I CSAP Connected Goods Implementation Guide
Discovery

Type of Data Data Item Description/ Sample Value
Connectivity On/Off
Brew Temperature Degrees Fahrenheit
Cup Size 1 for Large Cup, 2 for Small Cup
Coffee Brand (1/2/3/4/5)
1: Manhattan Special
2: Mr. Brown Coffee
3: Coffee Delight
4: Turkish Coffee House
5: Costa Coffee
Drink (1/2/3)
1: Cappuccino
2: Latte
3: Coffee
Coffee Type (Regular/ Decaf)
Cleaning Date Date of the cleaning cycle performed on this machine
Milk Inventory Level % Full
Caffeinated Coffee Inventory Level % Full
Decaffeinated Coffee Inventory Level % Full
4.5 Defining Physical and Logical Device Types (Sensor Device)
The first step in the physical device design and installation process is searching for and selecting a third-party IoT partner. This partner will understand the required sensor data to support the business use cases, define the technical specification, manufacture the required sensors, and install or work with other vendors to install the sensors for each coffeemaker.
For information about defining the logical device, see Defining a Thing Model [page 20].
SAP Connected Goods Implementation GuideDiscovery P U B L I C 13

4.6 Defining Master Data Information
This section defines the master data that will support the use cases defined for this customer. This step will help to identify the integration requirements with back-end systems (such as CRM) and with uploading new types of data as required by the use cases.
Based on the use cases for ACME Famous Coffee Company, the following master data is required:
Table 2:
Table Data Item Description/Sample Value
Business Partners BP Name
BP Type Office Building, Restaurant
BP Address
BP Geo-Coordinates Longitude/Latitude
BP Contact Info Name, E-mail, Phone
Distribution Partner
Distribution Partners DP Name
DP Address
DP Contact Info Name, E-mail, Phone
Region Region ID
Region West, East, Midwest, South
Coffee Type Type ID
Type Regular, Decaf
Coffee Drink Drink ID
Drink Cappuccino, Latte, Coffee
Coffee Brand Brand ID
Brand Manhattan Special, Mr. Brown Coffee, Coffee Delight, Turkish Coffee House, Costa Coffee
Coffee Quality Standards Standard ID
Cleaning Cycle Frequency Days
Best Brew Temperature Degrees Fahrenheit
Cleaning Cycle Frequency Days
14 P U B L I CSAP Connected Goods Implementation Guide
Discovery

5 Using IOT Services 4.0 to Create a Connectivity Channel
5.1 REST API for Managing IOT Services 4.0 Information in Connected Goods Secure Store
This section has the following prerequisites:
● An IOT Services 4.0 account has been created in HCP and a technical user has access to this account.● The user is familiar with the steps required to obtain the CSRF Token.
SAP Connected Goods provides a REST API which enables an Admin user to configure the information required for the IOT Services 4.0 integration. This includes two flags which can be used to enable or disable the use of IOT Services 4.0 in SAP Connected Goods. The API can also be used to retrieve Device Type OAuth Tokens and Device OAuth Tokens.
The information is stored in the HANA Secure Store used by SAP Connected Goods. For details about storing this information, see Configuring IOT Services 4.0 Information [page 17].
For information about deleting a value, see Deleting IOT Services 4.0 Information from the Connected Goods Secure Store [page 18]. Postman (or any other REST client) can be used to make the HTTP requests.
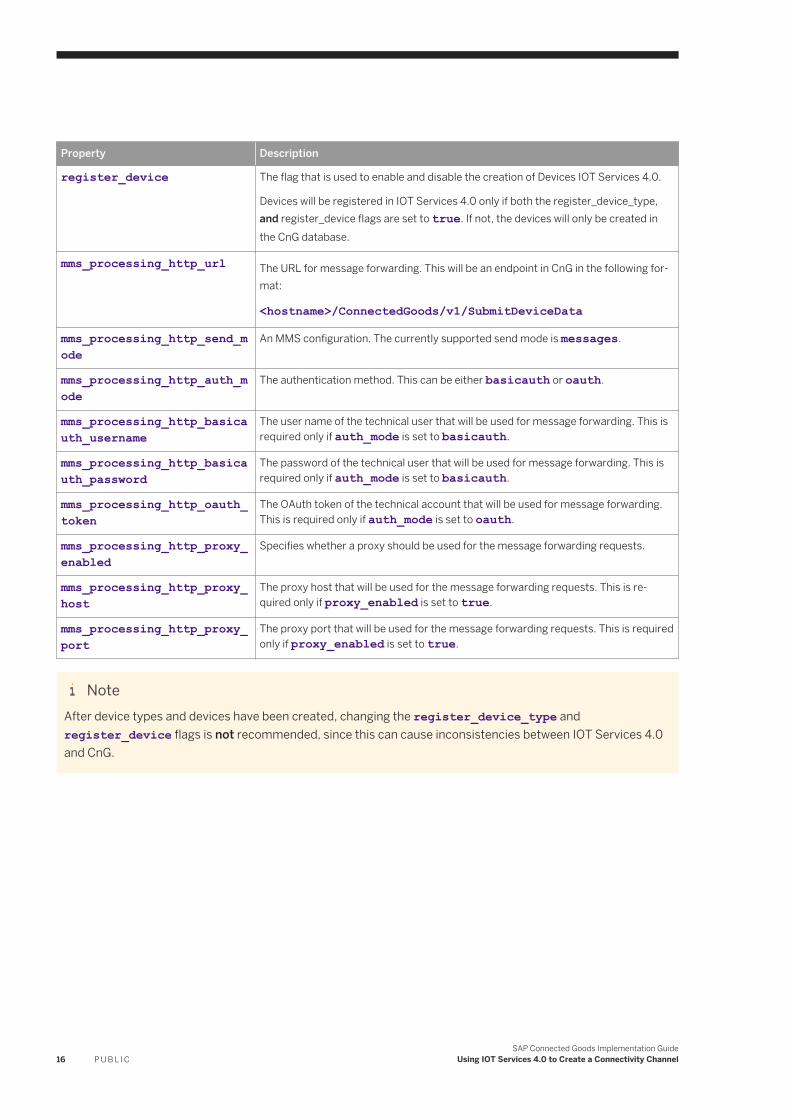
The following table provides the list of items that are currently required for the configuration of IOT Services 4.0 in Connected Goods.
Table 3:
Property Description
dms_hostname The hostname for the HCP IOT Services 4.0 Device Management Service (DMS)
mms_hostname The hostname for the HCP IOT Services 4.0 Message Management Service (MMS)
client_id The user name of the technical user used for IOT Services 4.0
client_secret The password of the technical user used for IOT Services 4.0
register_device_type The flag that is used to enable and disable the use of IOT Services 4.0 in SAP Connected Goods.
Device types/devices will be created in IOT Services 4.0 only if this flag exists and is set to true. When set to true, device types/devices will be created in IOT Services 4.0 as well as in the CnG database. If set to false, the device types/devices will only be created in the CnG database.
SAP Connected Goods Implementation GuideUsing IOT Services 4.0 to Create a Connectivity Channel P U B L I C 15
Property Description
register_device The flag that is used to enable and disable the creation of Devices IOT Services 4.0.
Devices will be registered in IOT Services 4.0 only if both the register_device_type, and register_device flags are set to true. If not, the devices will only be created in the CnG database.
mms_processing_http_url The URL for message forwarding. This will be an endpoint in CnG in the following format:
<hostname>/ConnectedGoods/v1/SubmitDeviceData
mms_processing_http_send_mode
An MMS configuration. The currently supported send mode is messages.
mms_processing_http_auth_mode
The authentication method. This can be either basicauth or oauth.
mms_processing_http_basicauth_username
The user name of the technical user that will be used for message forwarding. This is required only if auth_mode is set to basicauth.
mms_processing_http_basicauth_password
The password of the technical user that will be used for message forwarding. This is required only if auth_mode is set to basicauth.
mms_processing_http_oauth_token
The OAuth token of the technical account that will be used for message forwarding. This is required only if auth_mode is set to oauth.
mms_processing_http_proxy_enabled
Specifies whether a proxy should be used for the message forwarding requests.
mms_processing_http_proxy_host
The proxy host that will be used for the message forwarding requests. This is required only if proxy_enabled is set to true.
mms_processing_http_proxy_port
The proxy port that will be used for the message forwarding requests. This is required only if proxy_enabled is set to true.
NoteAfter device types and devices have been created, changing the register_device_type and register_device flags is not recommended, since this can cause inconsistencies between IOT Services 4.0 and CnG.
16 P U B L I CSAP Connected Goods Implementation Guide
Using IOT Services 4.0 to Create a Connectivity Channel
5.2 Configuring IOT Services 4.0 Information
Procedure
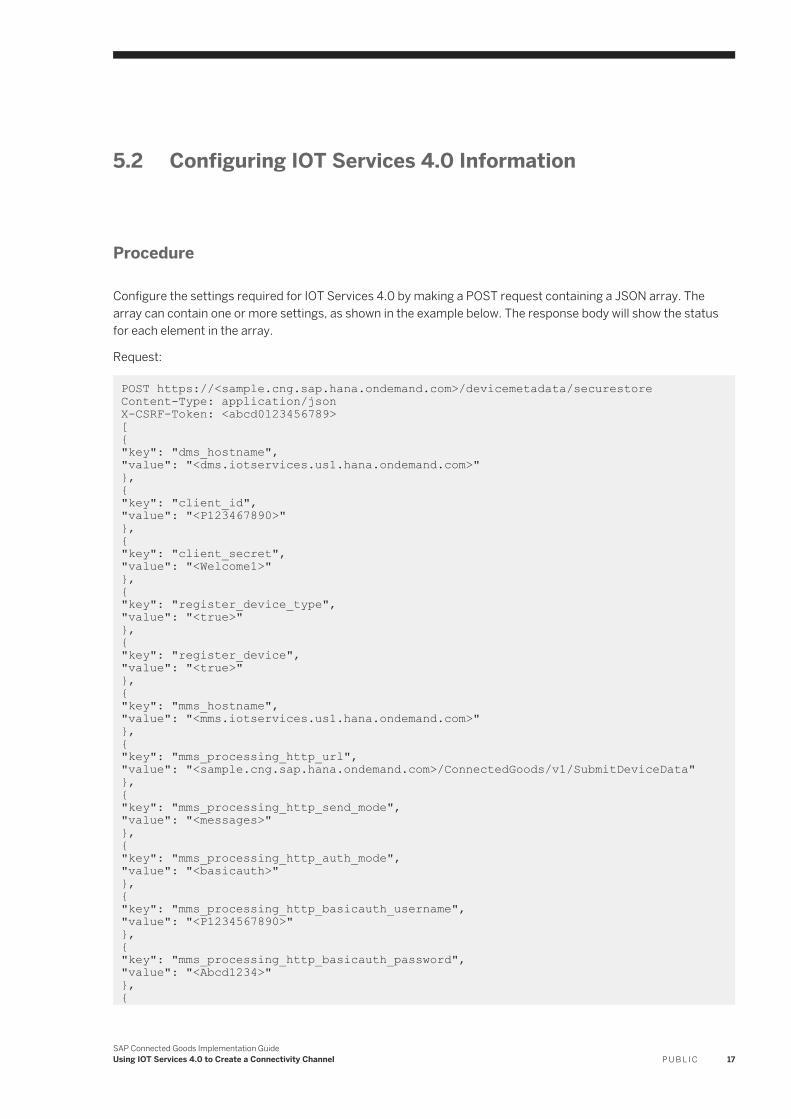
Configure the settings required for IOT Services 4.0 by making a POST request containing a JSON array. The array can contain one or more settings, as shown in the example below. The response body will show the status for each element in the array.
Request:
POST https://<sample.cng.sap.hana.ondemand.com>/devicemetadata/securestore Content-Type: application/jsonX-CSRF-Token: <abcd0123456789>[ { "key": "dms_hostname", "value": "<dms.iotservices.us1.hana.ondemand.com>" }, { "key": "client_id", "value": "<P123467890>" }, { "key": "client_secret", "value": "<Welcome1>" }, { "key": "register_device_type", "value": "<true>" }, { "key": "register_device", "value": "<true>" }, { "key": "mms_hostname", "value": "<mms.iotservices.us1.hana.ondemand.com>" }, { "key": "mms_processing_http_url", "value": "<sample.cng.sap.hana.ondemand.com>/ConnectedGoods/v1/SubmitDeviceData" }, { "key": "mms_processing_http_send_mode", "value": "<messages>" }, { "key": "mms_processing_http_auth_mode", "value": "<basicauth>" }, { "key": "mms_processing_http_basicauth_username", "value": "<P1234567890>" }, { "key": "mms_processing_http_basicauth_password", "value": "<Abcd1234>" },{
SAP Connected Goods Implementation GuideUsing IOT Services 4.0 to Create a Connectivity Channel P U B L I C 17
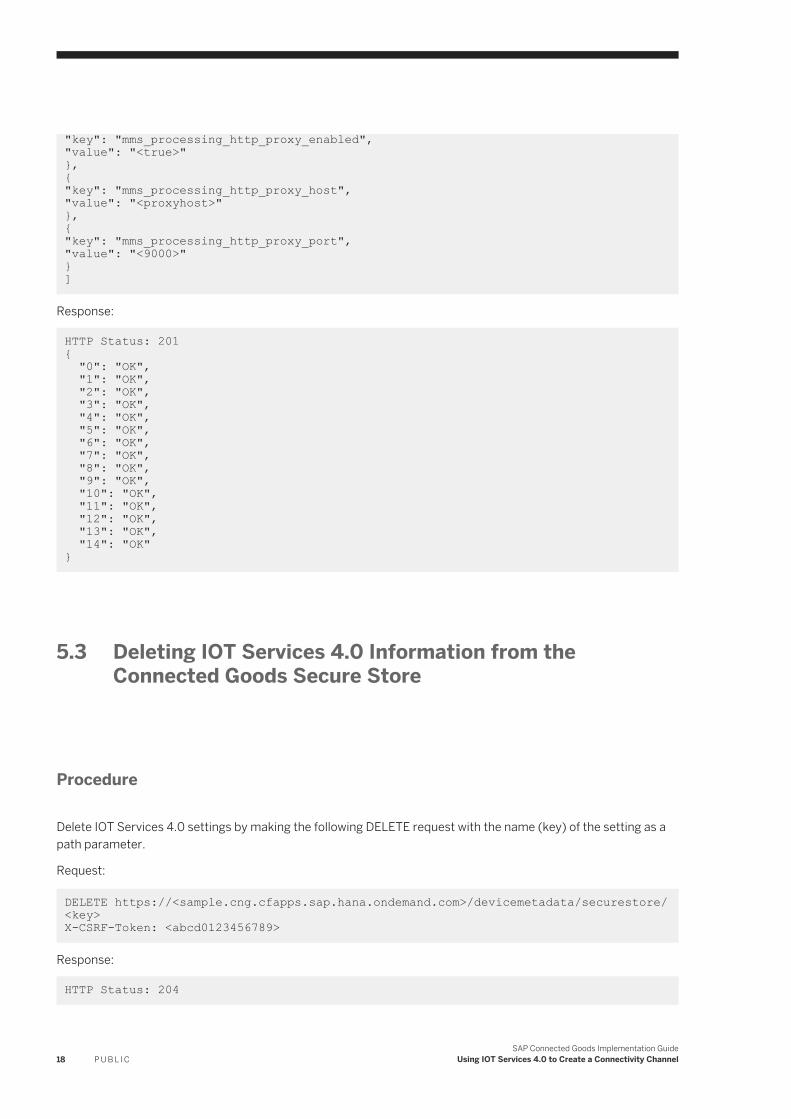
"key": "mms_processing_http_proxy_enabled", "value": "<true>" }, { "key": "mms_processing_http_proxy_host", "value": "<proxyhost>" }, { "key": "mms_processing_http_proxy_port", "value": "<9000>" }]
Response:
HTTP Status: 201 { "0": "OK", "1": "OK", "2": "OK", "3": "OK", "4": "OK", "5": "OK", "6": "OK", "7": "OK", "8": "OK", "9": "OK", "10": "OK", "11": "OK", "12": "OK", "13": "OK", "14": "OK"}
5.3 Deleting IOT Services 4.0 Information from the Connected Goods Secure Store
Procedure
Delete IOT Services 4.0 settings by making the following DELETE request with the name (key) of the setting as a path parameter.
Request:
DELETE https://<sample.cng.cfapps.sap.hana.ondemand.com>/devicemetadata/securestore/<key> X-CSRF-Token: <abcd0123456789>
Response:
HTTP Status: 204
18 P U B L I CSAP Connected Goods Implementation Guide
Using IOT Services 4.0 to Create a Connectivity Channel

5.4 Retrieving the OAuth Token for a Device Type
Procedure
Retrieve the OAuth token for a device type by making the following GET request with the Device Type GUID as a path parameter.
Request:
GET https://<sample.cng.cfapps.sap.hana.ondemand.com>/devicemetadata/securestore/deviceTypeToken/<deviceTypeGUID>
Response:
HTTP Status: 200 <oauth token for device type>
5.5 Retrieving the OAuth Token for a Device
Procedure
Retrieve the OAuth token for a device can be retrieved by making the following GET request with the Device GUID as a path parameter.
Request:
GET https://<sample.cng.cfapps.sap.hana.ondemand.com>/devicemetadata/securestore/deviceToken/<deviceGUID>
Response:
HTTP Status: 200 <oauth token for device>
SAP Connected Goods Implementation GuideUsing IOT Services 4.0 to Create a Connectivity Channel P U B L I C 19
6 Defining a Thing Model
You can model a device type either by creating a Thing Model in SAP IoT Application Enablement (AE) and exporting it as a JSON file, or by creating your own JSON file. You then upload it to SAP Connected Goods.
Procedure
Option 1: Creating a Thing Model in AE1. Create a Thing Package: In SAP IoT Application Enablement (AE), create an AE package (example:
coffeemakers).
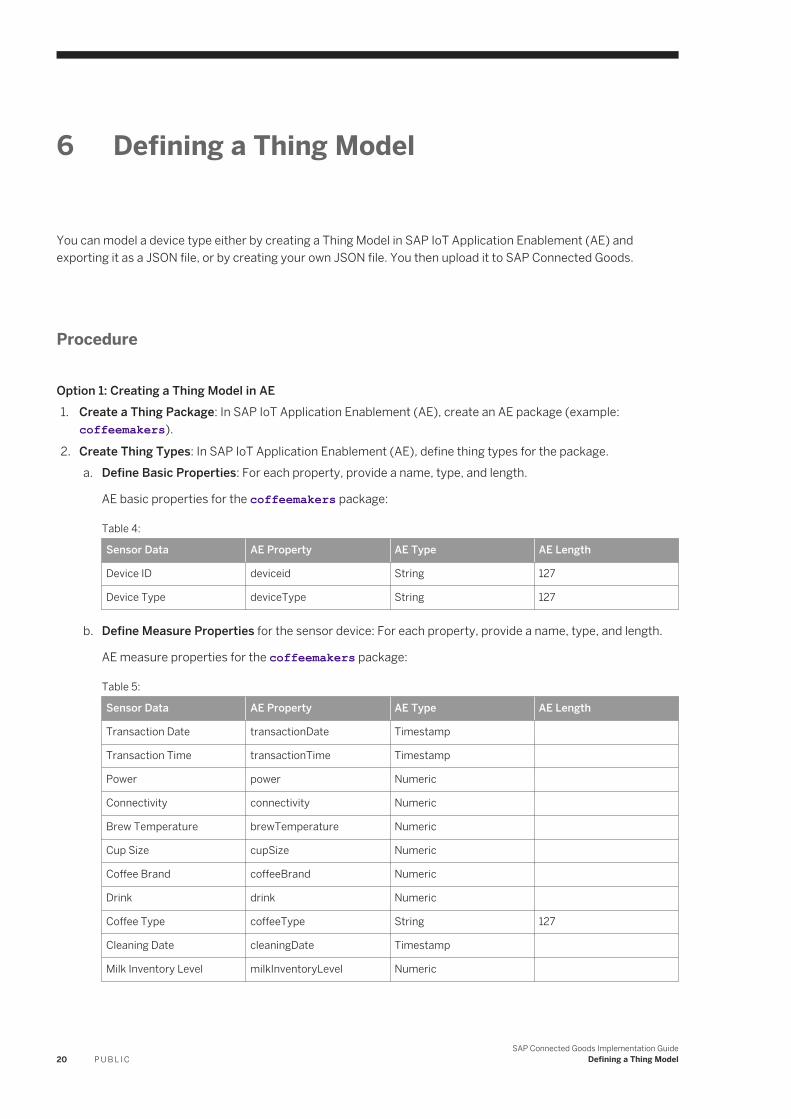
2. Create Thing Types: In SAP IoT Application Enablement (AE), define thing types for the package.a. Define Basic Properties: For each property, provide a name, type, and length.
AE basic properties for the coffeemakers package:
Table 4:
Sensor Data AE Property AE Type AE Length
Device ID deviceid String 127
Device Type deviceType String 127
b. Define Measure Properties for the sensor device: For each property, provide a name, type, and length.
AE measure properties for the coffeemakers package:
Table 5:
Sensor Data AE Property AE Type AE Length
Transaction Date transactionDate Timestamp
Transaction Time transactionTime Timestamp
Power power Numeric
Connectivity connectivity Numeric
Brew Temperature brewTemperature Numeric
Cup Size cupSize Numeric
Coffee Brand coffeeBrand Numeric
Drink drink Numeric
Coffee Type coffeeType String 127
Cleaning Date cleaningDate Timestamp
Milk Inventory Level milkInventoryLevel Numeric
20 P U B L I CSAP Connected Goods Implementation Guide
Defining a Thing Model

Sensor Data AE Property AE Type AE Length
Caffeinated Coffee Inventory Level
caffeinatedCoffeeInventoryLevel
Numeric
Decaffeinated Coffee Inventory Level
decaffeinatedCoffeeInventoryLevel
Numeric
3. Create a Thing Model: In SAP IoT Application Enabler (AE), create at least one thing model for an existing AE package. You can create an unlimited number of thing models. A thing model can contain all or a subset of the basic or measured thing types in the package.
Create a thing model named coffee_maker in the coffeemakers package. The coffee_maker model will contain the following properties:
Table 6:
Sensor Data AE Property
Device ID deviceId
Device Type deviceType
Transaction Date transactionDate
Transaction Time transactionTime
Power power
Connectivity connectivity
Brew Temperature brewTemperature
Cup Size cupSize
Coffee Brand coffeeBrand
Drink drink
Coffee Type coffeeType
Cleaning Date cleaningDate
Milk Inventory Level milkInventoryLevel
Caffeinated Coffee Inventory Level caffeinatedCoffeeInventoryLevel
Decaffeinated Coffee Inventory Level decaffeinatedCoffeeInventoryLevel
4. Download an AE File as JSON File: SAP IoT AE provides a utility to extract a package, as defined in the previous steps, as a JSON file. The JSON file will include all metadata for the package, including thing types and thing models. To extract a package, do the following:a. In a browser, enter the following URL: https://<system>/appcore-conf/
Configuration('<packagename>')
Example: https://iot-dev.sb-iot-sap.cfapps.sap.hana.ondemand.com/appcore-conf/Configuration('iot.dev.knu.sync.coffeemakers)
b. Copy and paste the content of the browser to a text file and save the file (example: ae_model.json).c. Upload the JSON file as described below.
SAP Connected Goods Implementation GuideDefining a Thing Model P U B L I C 21

NoteUse the fully qualified package name.
Option 2: Using Your Own JSON File5. Create your own device type as a JSON as described in Creating a Device Type with a JSON File [page 22]
and upload it as indicated below.Uploading the JSON File6. Do the following to upload a JSON file to SAP Connected Goods. You can upload a file in either AE JSON or
CnG JSON format.a. Log into SAP Connected Goods as a user with the Administrator role.b. In the launchpad, choose the Device Types tile.c. Choose Upload Device Types.d. Browse to and choose the <packagename>.json (if using Option 1) or the JSON file you created (if using
Option 2).e. Choose OK.
In the device types list, you see all the types defined.
6.1 Managing Device Types
You can add and delete device types that specify a group of devices that share similar properties.
6.1.1 Creating a Device Type with a JSON File
You can register device types in SAP Connected Goods by uploading a JSON file from the Device Types page. The JSON file should contain the Thing model for the device types as indicated in the example below. The JSON file can only contain device types belonging to one device category (or package). If the device category does not exist, it will be created before creating the device types. After the device types have been created, you can use the Device Type Details page to determine which custom attributes should be visible and which should be mandatory for the new device types.
The devices types (and message types) will also be registered in IOT Services 4.0 if the configuration is set up correctly and the register_device_type flag is set to true. If not, these artifacts will only be saved in the Connected Goods database. If IOT Services 4.0 have been switched on, message forwarding will also be set up for each device type/message type combination. Two additional fields, cng_deviceId and timestamp, will be created for each message type. The cng_deviceId field will be used by the ingestion layer to uniquely identify a device when sensor data is received.
For more information on configuring IOT Services 4.0, see Using IOT Services 4.0 to Create a Connectivity Channel [page 15].
22 P U B L I CSAP Connected Goods Implementation Guide
Defining a Thing Model

NoteModifying device types and message types is not supported. To modify the data for these types, delete them and re-create them.
The following table describes some key attributes of the JSON file.
Table 7:
Property Description
deviceCategoryId The device category (or package) to which the device types belong.
deviceTypesReqList The list of device types to be created for the specified device category. No action will be performed on already existing device types.
If any existing device types are omitted from this list, they will be deleted.
imageId The image URL for the device type. If specified, this will be displayed on the Device Type Details page.
deviceTypeId The name (or ID) of the device type.
deviceMessageTypes The list of message types or attributes for a device type.
basicData If set to true, the properties will be recorded as device type attributes. If set to false, the properties will be recorded as message types (sensor data or time series data).
id The unique name for the message type. The maximum length is 255 characters.
properties The list of properties for a message type or attribute. The maximum number of properties per message type is 100.
fieldName The unique name (or ID) of the message type property. Valid characters are a-z, A-Z, 0-9. No spaces are allowed. The maximum length is 30 characters.
dataType The data type of a message type or attribute. Currently supported data types are STRING, INTEGER, DECIMAL, BOOLEAN, DATETIME, TIMESTAMP, DATE, JSON.
fieldLength The field length of a message type or attribute. This field is optional. The value should be an integer value of 1 or greater.
The following request shows a sample CnG JSON payload.
Request:
PUT https://<sample.cng.sap.hana.ondemand.com>/devicemetadata/DeviceCategories/DeviceTypes Content-Type: application/jsonX-CSRF-Token: <abcd0123456789>{ "deviceCategoryId": "<Device Category 01>", "deviceCategoryDescription": "", "deviceTypesReqList": [ {
SAP Connected Goods Implementation GuideDefining a Thing Model P U B L I C 23

"imageId": "<http://www.cdn.hostname.com/images/img001.jpg>", "deviceTypeId": "<Device Type 01>", "description": "", "deviceMessageTypes": [ { "basicData": false, "id": "<Sensor Measures>", "description": "", "properties": [ { "dataType": "<DECIMAL>", "displayName": "<batteryLevel>","fieldLength": <2>, "fieldName": "<batteryLevel>" }, { "dataType": "<DECIMAL>", "displayName": "<humidity>", "fieldName": "<humidity>" } ] }, { "basicData": true, "id": "<Device Type Attributes>", "description": "", "properties": [ { "dataType": "<STRING>", "displayName": "<Serial Number>", "fieldName": "<serialNumber>" }, { "dataType": "<INTEGER>", "displayName": "<Model Number>", "fieldName": "<modelNumber>" } ] } ] } ]}
6.1.2 Deleting a Device Type
You delete a device type by omitting it from the device types list in the same PUT request described in the previous topic. The JSON file should contain the package name and the list of device types that should remain. Any device type not specified here may be deleted.
NoteThe device type can be deleted only if no devices have been onboarded for that device type.
The following is a sample request for deleting all device types for a device category.
Request:
PUT https://<sample.cng.sap.hana.ondemand.com>/devicemetadata/DeviceCategories/DeviceTypes Content-Type: application/jsonX-CSRF-Token: <abcd0123456789>
24 P U B L I CSAP Connected Goods Implementation Guide
Defining a Thing Model

{ "deviceCategoryId": "<Device Category 01>", "deviceTypesReqList": []}
Response:
HTTP Status: 201 [ { "guid": "a7e9c6da3b214bf9862422782f82593e", "deviceTypeId": "Device Type 01", "action": "Delete" }]
6.1.3 Defining Onboarding Fields for a Device Type
Define optional and required custom attributes for a device type.
Prerequisites
You have created device types by uploading a JSON file.
Context
The custom attributes you define will be displayed for selection when you onboard devices of this type. For example, you might add attributes such as deviceMaterialId and deviceSerialNumber and select them as required fields.
Procedure
1. In the launchpad, choose the Device Types tile.2. On the Device Types page, choose Edit.3. The Basic Data for Onboarding displays all the fields for this device type, as determined by the JSON file you
uploaded. Do the following:a. Choose Visible for all attributes that should be displayed as optional when onboarding a device of this
type.b. Choose Mandatory for all attributes that should be displayed as required when onboarding a device of this
type. (Visible will be automatically selected.)4. Save your changes.
SAP Connected Goods Implementation GuideDefining a Thing Model P U B L I C 25
When onboarding a device in the UI, you will have the option to display the selected fields for devices of this type. For more information, see Onboarding Devices [page 27].
26 P U B L I CSAP Connected Goods Implementation Guide
Defining a Thing Model

7 Onboarding Devices
7.1 Onboarding Devices in the UI
7.1.1 Onboarding a Single Device
Procedure
1. In the launchpad, under Administration, choose the Device Onboarding tile.2. Choose Onboard a Device.3. In the Onboard a Device window, under Select Device Type, choose the Category and the Device Type to
onboard and choose Next.4. In the Onboard a Device window, under Enter Device Details, do the following:
a. Enter the device ID in the ID field.b. You see the custom attributes that were defined for this device type during device type setup. Enter
values for all required fields (marked with a red asterisk) and for any optional fields you want to display for this device.
c. Choose Onboard.
You see the new device in the devices list. The system automatically attempts to geomatch the device and assign its location. If the automatic geomatching is unsuccessful, you can manually assign the device to a location on its Details page.
7.1.2 Onboarding Multiple Devices
Procedure
1. In the launchpad, under Administration, choose the Device Onboarding tile.2. Choose Mass Onboard Devices.3. In the Mass Onboard Devices window, under Select Device Type, choose a category and a device type and
choose Next.
SAP Connected Goods Implementation GuideOnboarding Devices P U B L I C 27
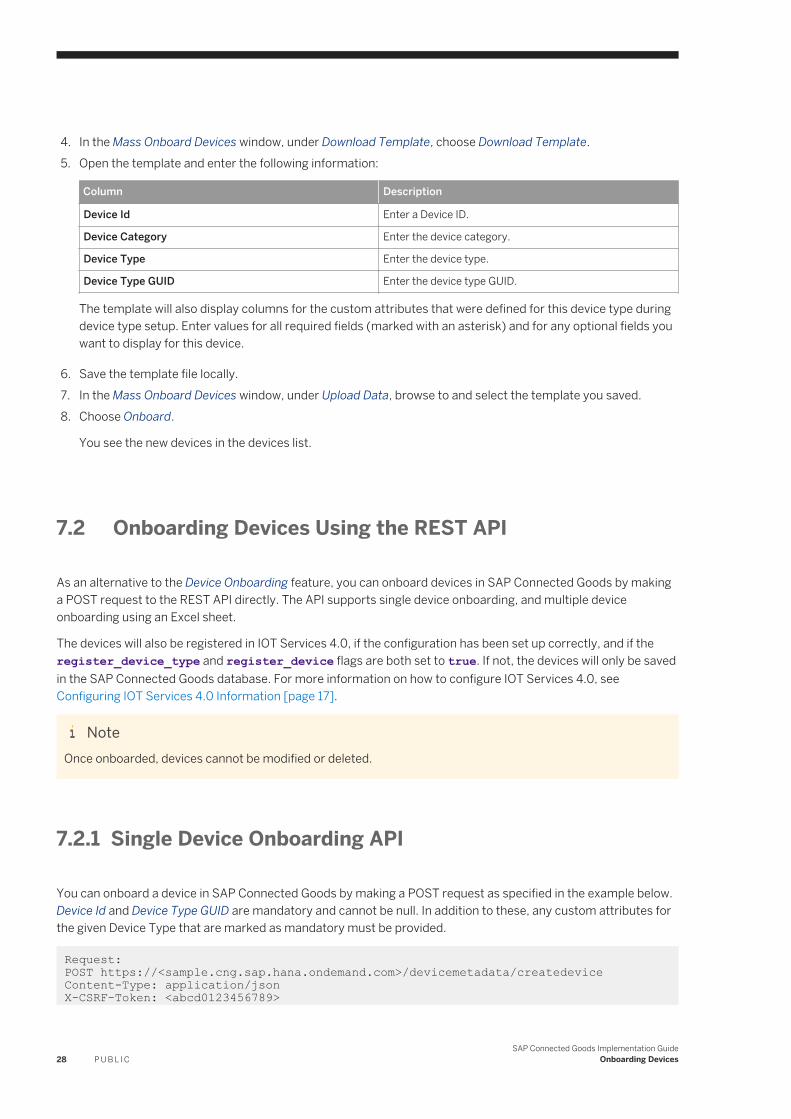
4. In the Mass Onboard Devices window, under Download Template, choose Download Template.5. Open the template and enter the following information:
Column Description
Device Id Enter a Device ID.
Device Category Enter the device category.
Device Type Enter the device type.
Device Type GUID Enter the device type GUID.
The template will also display columns for the custom attributes that were defined for this device type during device type setup. Enter values for all required fields (marked with an asterisk) and for any optional fields you want to display for this device.
6. Save the template file locally.7. In the Mass Onboard Devices window, under Upload Data, browse to and select the template you saved.8. Choose Onboard.
You see the new devices in the devices list.
7.2 Onboarding Devices Using the REST API
As an alternative to the Device Onboarding feature, you can onboard devices in SAP Connected Goods by making a POST request to the REST API directly. The API supports single device onboarding, and multiple device onboarding using an Excel sheet.
The devices will also be registered in IOT Services 4.0, if the configuration has been set up correctly, and if the register_device_type and register_device flags are both set to true. If not, the devices will only be saved in the SAP Connected Goods database. For more information on how to configure IOT Services 4.0, see Configuring IOT Services 4.0 Information [page 17].
NoteOnce onboarded, devices cannot be modified or deleted.
7.2.1 Single Device Onboarding API
You can onboard a device in SAP Connected Goods by making a POST request as specified in the example below. Device Id and Device Type GUID are mandatory and cannot be null. In addition to these, any custom attributes for the given Device Type that are marked as mandatory must be provided.
Request: POST https://<sample.cng.sap.hana.ondemand.com>/devicemetadata/createdeviceContent-Type: application/jsonX-CSRF-Token: <abcd0123456789>
28 P U B L I CSAP Connected Goods Implementation Guide
Onboarding Devices
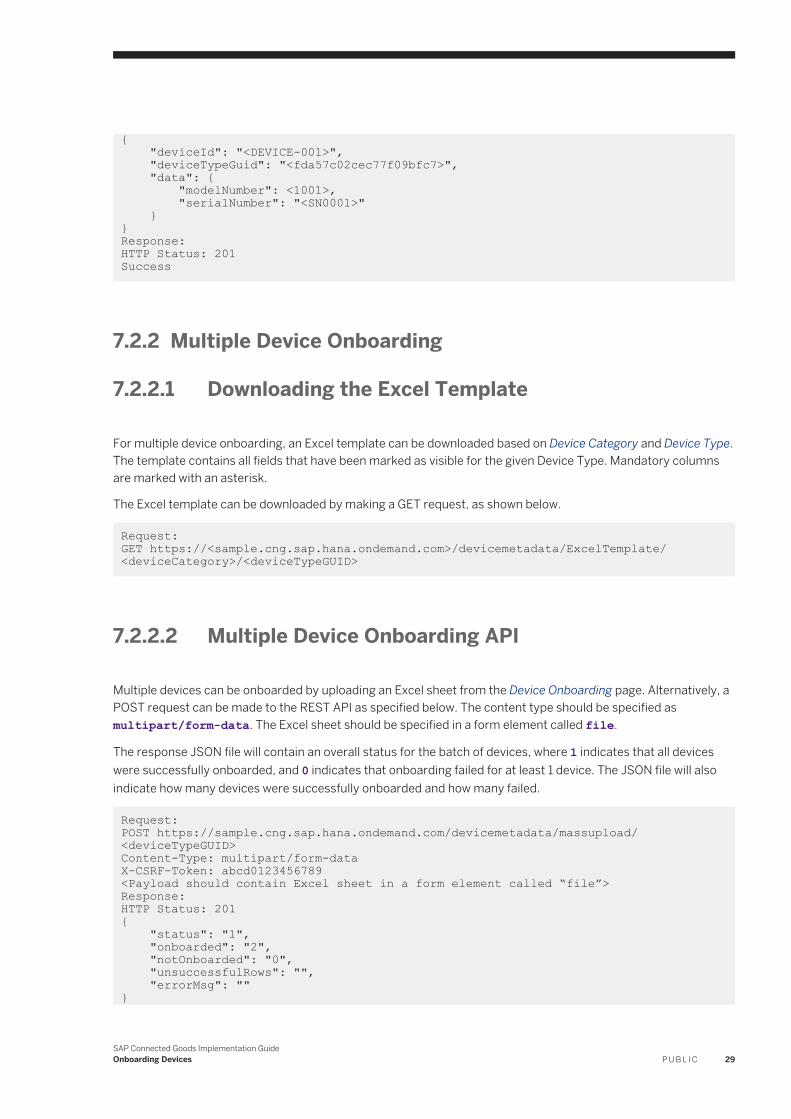
{ "deviceId": "<DEVICE-001>", "deviceTypeGuid": "<fda57c02cec77f09bfc7>", "data": { "modelNumber": <1001>, "serialNumber": "<SN0001>" }}Response:HTTP Status: 201Success
7.2.2 Multiple Device Onboarding
7.2.2.1 Downloading the Excel Template
For multiple device onboarding, an Excel template can be downloaded based on Device Category and Device Type. The template contains all fields that have been marked as visible for the given Device Type. Mandatory columns are marked with an asterisk.
The Excel template can be downloaded by making a GET request, as shown below.
Request: GET https://<sample.cng.sap.hana.ondemand.com>/devicemetadata/ExcelTemplate/<deviceCategory>/<deviceTypeGUID>
7.2.2.2 Multiple Device Onboarding API
Multiple devices can be onboarded by uploading an Excel sheet from the Device Onboarding page. Alternatively, a POST request can be made to the REST API as specified below. The content type should be specified as multipart/form-data. The Excel sheet should be specified in a form element called file.
The response JSON file will contain an overall status for the batch of devices, where 1 indicates that all devices were successfully onboarded, and 0 indicates that onboarding failed for at least 1 device. The JSON file will also indicate how many devices were successfully onboarded and how many failed.
Request: POST https://sample.cng.sap.hana.ondemand.com/devicemetadata/massupload/<deviceTypeGUID>Content-Type: multipart/form-dataX-CSRF-Token: abcd0123456789<Payload should contain Excel sheet in a form element called “file”>Response:HTTP Status: 201{ "status": "1", "onboarded": "2", "notOnboarded": "0", "unsuccessfulRows": "", "errorMsg": ""}
SAP Connected Goods Implementation GuideOnboarding Devices P U B L I C 29
30 P U B L I CSAP Connected Goods Implementation Guide
Onboarding Devices

8 Setting up Ingestion Endpoints
Prerequisites
Before setting up ingestion endpoints:
● You must be familiar with IOT Services 4.0 cockpit application features.● You must have completed the steps described in Using IOT Services 4.0 to Create a Connectivity Channel
[page 15] and Onboarding Devices [page 27].
Context
An endpoint must be set up for each device onboarded to SAP Connected Goods. This step will enable the device to ingest sensor data into SAP Connected Goods.
To set up an endpoint for each device, you use the IOT Services 4.0 cockpit.
Procedure
1. Log into the IOT Services 4.0 cockpit application. If the IOT Services 4.0 are configured correctly, all devices and device types will be available in the cockpit.
2. Ensure that you know the GUID for the device.3. Navigate to the MMS Cockpit.4. Navigate to Messaging through HTTP in Data Services.5. Set the Data Endpoint field for the device as follows. The Data Endpoint field contains the URL the device will
use to send data to SAP Connected Goods.
By default, the endpoint URL is displayed as https://<iot_cockpit_url/<GUID_HOLDER>. (An example of a GUID holder is d000-e000-v000-i000-e000.)
Replace the GUID holder portion of the URL with the actual GUID of the device.
7. Now the device is ready to ingest data into SAP Connected Goods
SAP Connected Goods Implementation GuideSetting up Ingestion Endpoints P U B L I C 31

9 Working With Master Data Tables
9.1 Creating Master Data Tables
Create the master data tables you identified during the Discovery process.
Prerequisites
Perform the following initial steps before creating master data tables:
1. Install the Postman Interceptor plugin in the browser and enable it.2. Log into SAP Connected Goods.3. In Postman, write and execute (send) the following method:
Method: GET https://iot-dev.sb-iot-sap.cfapps.sap.hana.ondemand.com Header: X-CSRF-Token: Fetch
4. The execution of the method in Step 3 will return a value for the token X-CSRF-Token for this Postman session. Make a note of this value. You will use it for this Postman session to create tables and insert metadata.
Context
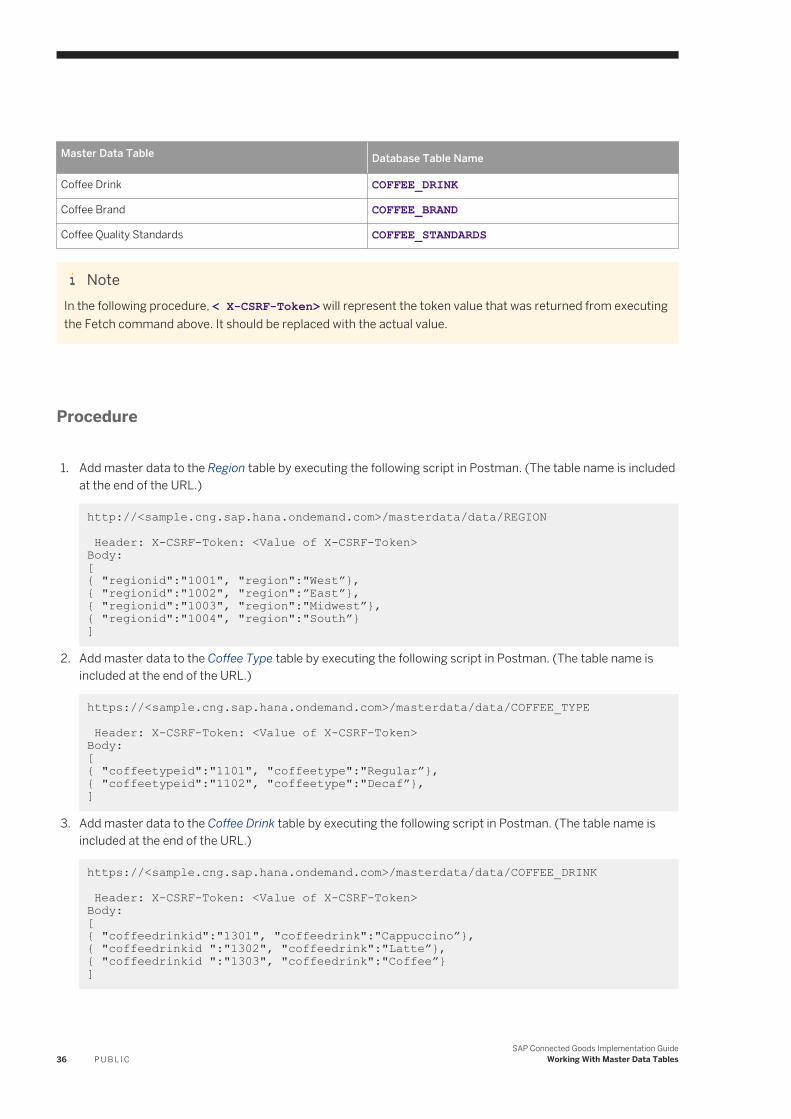
This procedure will use the coffeemaker scenario to demonstrate how to create master data tables. This scenario requires the following custom master data tables:
Table 8:
Master Data Table Database Table Name
Region REGION
Coffee Type COFFEE_TYPE
Coffee Drink COFFEE_DRINK
Coffee Brand COFFEE_BRAND
Coffee Quality Standards COFFEE_STANDARDS
32 P U B L I CSAP Connected Goods Implementation Guide
Working With Master Data Tables

NoteIn the following procedure, < X-CSRF-Token> will represent the token value that was returned from executing the Fetch command above. It should be replaced with the actual value.
Procedure
1. Create the Region table by executing the following script in Postman:
https://<sample.cng.sap.hana.ondemand.com>/masterdata/type/ Header: X-CSRF-Token: <Value of X-CSRF-Token>Body:{ "name":"REGION", "fields": [{"fieldName":"regionid","isKey":"true", "dataType":"INTEGER","length":30,"displayName":"Region ID"}, {"fieldName":"region", "dataType":"STRING","length":20,"displayName":"Region"} ]}
The Region table contains the following columns:
Table 9:
Field Name Is Key Data Type Length Display Name
regionid True INTEGER 30 Region ID
region False STRING 20 Region
2. Create the Coffee Type table by executing the following script in Postman:
https://<sample.cng.sap.hana.ondemand.com>/masterdata/type/ Header: X-CSRF-Token: <Value of X-CSRF-Token>Body:{ "name":"COFFEE_TYPE", "fields": [{"fieldName":"coffetypeid","isKey":"true", "dataType":"INTEGER","length":30,"displayName":"Type ID"}, {"fieldName":" coffetype", "dataType":"STRING","length":20,"displayName":"Coffee Type"} ]}
The Coffee Type table contains the following columns:
Table 10:
Field Name Is Key Data Type Length Display Name
coffeetypeId True INTEGER 30 Coffee Type ID
coffeetype False STRING 20 Coffee Type
SAP Connected Goods Implementation GuideWorking With Master Data Tables P U B L I C 33

3. Create the Coffee Drink table by executing the following script in Postman:
https://<sample.cng.sap.hana.ondemand.com>/masterdata/type/ Header: X-CSRF-Token: <Value of X-CSRF-Token>Body:{ "name":"COFFEE_DRINK", "fields": [{"fieldName":" coffeedrinkeId","isKey":"true", "dataType":"INTEGER","length":30,"displayName":"Drink ID"}, {"fieldName":" coffeedrinkeId", "dataType":"STRING","length":20,"displayName":"Coffee Drink"} ]}
The Coffee Drink table contains the following columns:
Table 11:
Field Name Is Key Data Type Length Display Name
coffeedrinkId True INTEGER 30 Coffee Drink ID
coffeedrink False STRING 20 Coffee Drink
4. Create the Coffee Brand table by executing the following script in Postman:
https://<sample.cng.sap.hana.ondemand.com>/masterdata/type/ Header: X-CSRF-Token: <Value of X-CSRF-Token>Body:{ "name":"COFFEE_BRAND", "fields": [{"fieldName":" coffeebrandid ","isKey":"true", "dataType":"INTEGER","length":30,"displayName":"Brand ID"}, {"fieldName":" coffeebrand ", "dataType":"STRING","length":20,"displayName":"Coffee Brand "} ]}
The Coffee Brand table contains the following columns:
Table 12:
Field Name Is Key Data Type Length Display Name
coffeebrandId True INTEGER 30 Coffee Brand ID
coffeebrand False STRING 20 Coffee Brand
5. Create the Coffee Quality Standards table by executing the following script in Postman:
https://iot-dev.sb-iot-sap.hana.ondemand.com/masterdata/masterdata/create_masterdata_type Header: X-CSRF-Token: <Value of X-CSRF-Token>Body:{ "name":"COFFEE_STANDARDS", "fields": [{"fieldName":" coffeebrandid ","isKey":"true", "dataType":"INTEGER","length":30,"displayName":"Standard ID"}, {"fieldName":" brewtemperature ", "dataType":" INTEGER","length":20,"displayName":"Brew Temperature"},
34 P U B L I CSAP Connected Goods Implementation Guide
Working With Master Data Tables

{"fieldName":" frequency ", "dataType":" INTEGER","length":20,"displayName":" Cleaning Frequency"} ]}
The Coffee Quality Standards table contains the following columns:
Table 13:
Field Name Is Key Data Type Length Display Name
standardid True INTEGER 30 Quality Standard ID
brewtemperature False STRING 20 Brew Temperature
frequency False STRING 20 Cleaning Frequency
9.2 Importing Data into Master Data Tables
Import master data into the tables you created.
Prerequisites
As with the previous procedure, perform the following initial steps before importing master data:
1. Log into SAP Connected Goods.2. In Postman, write and execute (send) the following method:
Method: GET https://iot-dev.sb-iot-sap.cfapps.sap.hana.ondemand.com Header: X-CSRF-Token: Fetch
3. The execution of the method in Step 2 will return a value for the token X-CSRF-Token for this Postman session. Make a note of this value. You will use it for this Postman session to create tables and insert metadata.
Context
In the previous procedure, you created the following custom master data tables for the coffeemaker scenario:
Table 14:
Master Data Table Database Table Name
Region REGION
Coffee Type COFFEE_TYPE
SAP Connected Goods Implementation GuideWorking With Master Data Tables P U B L I C 35
Master Data Table Database Table Name
Coffee Drink COFFEE_DRINK
Coffee Brand COFFEE_BRAND
Coffee Quality Standards COFFEE_STANDARDS
NoteIn the following procedure, < X-CSRF-Token> will represent the token value that was returned from executing the Fetch command above. It should be replaced with the actual value.
Procedure
1. Add master data to the Region table by executing the following script in Postman. (The table name is included at the end of the URL.)
http://<sample.cng.sap.hana.ondemand.com>/masterdata/data/REGION Header: X-CSRF-Token: <Value of X-CSRF-Token>Body:[{ "regionid":"1001", "region":"West”},{ "regionid":"1002", "region":”East”},{ "regionid":"1003", "region":"Midwest”},{ "regionid":"1004", "region":"South”}]
2. Add master data to the Coffee Type table by executing the following script in Postman. (The table name is included at the end of the URL.)
https://<sample.cng.sap.hana.ondemand.com>/masterdata/data/COFFEE_TYPE Header: X-CSRF-Token: <Value of X-CSRF-Token>Body:[{ "coffeetypeid":"1101", "coffeetype":"Regular”},{ "coffeetypeid":"1102", "coffeetype":"Decaf”},]
3. Add master data to the Coffee Drink table by executing the following script in Postman. (The table name is included at the end of the URL.)
https://<sample.cng.sap.hana.ondemand.com>/masterdata/data/COFFEE_DRINK Header: X-CSRF-Token: <Value of X-CSRF-Token>Body:[{ "coffeedrinkid":"1301", "coffeedrink":"Cappuccino”},{ "coffeedrinkid ":"1302", "coffeedrink":"Latte”},{ "coffeedrinkid ":"1303", "coffeedrink":"Coffee”}]
36 P U B L I CSAP Connected Goods Implementation Guide
Working With Master Data Tables
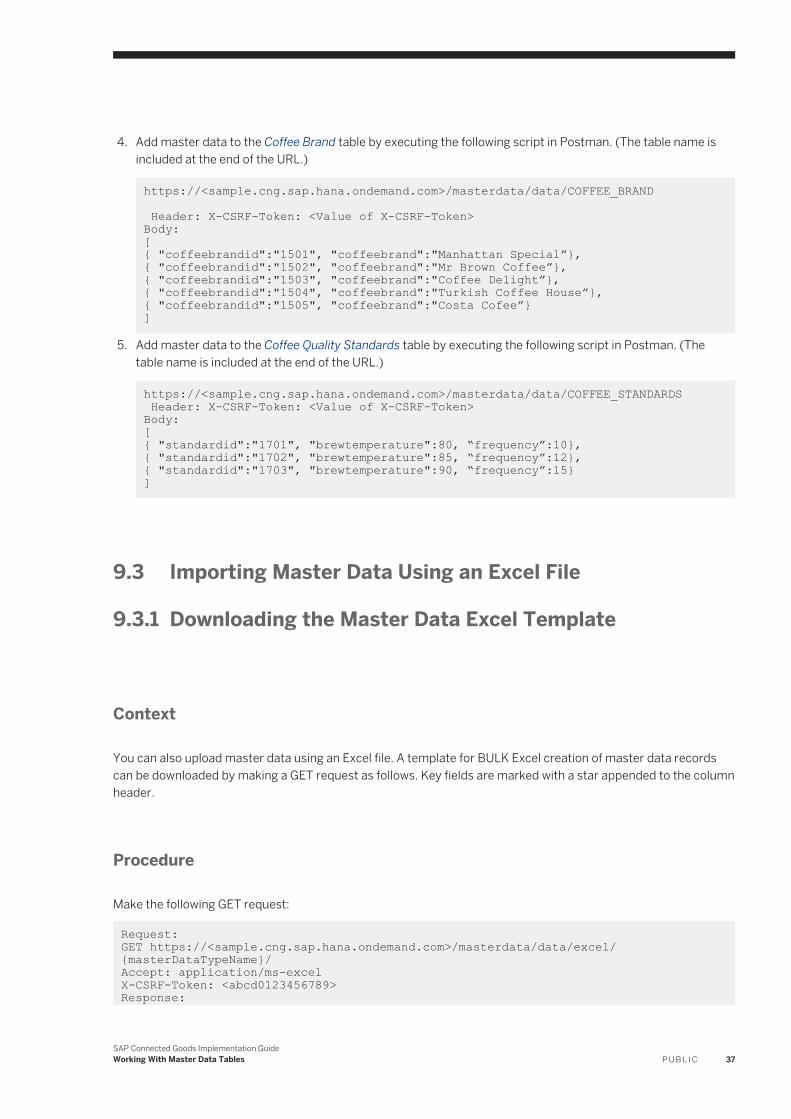
4. Add master data to the Coffee Brand table by executing the following script in Postman. (The table name is included at the end of the URL.)
https://<sample.cng.sap.hana.ondemand.com>/masterdata/data/COFFEE_BRAND Header: X-CSRF-Token: <Value of X-CSRF-Token>Body:[{ "coffeebrandid":"1501", "coffeebrand":"Manhattan Special”},{ "coffeebrandid":"1502", "coffeebrand":"Mr Brown Coffee”},{ "coffeebrandid":"1503", "coffeebrand":"Coffee Delight”},{ "coffeebrandid":"1504", "coffeebrand":"Turkish Coffee House”},{ "coffeebrandid":"1505", "coffeebrand":"Costa Cofee”}]
5. Add master data to the Coffee Quality Standards table by executing the following script in Postman. (The table name is included at the end of the URL.)
https://<sample.cng.sap.hana.ondemand.com>/masterdata/data/COFFEE_STANDARDS Header: X-CSRF-Token: <Value of X-CSRF-Token>Body:[{ "standardid":"1701", "brewtemperature":80, “frequency”:10},{ "standardid":"1702", "brewtemperature":85, “frequency”:12},{ "standardid":"1703", "brewtemperature":90, “frequency”:15}]
9.3 Importing Master Data Using an Excel File
9.3.1 Downloading the Master Data Excel Template
Context
You can also upload master data using an Excel file. A template for BULK Excel creation of master data records can be downloaded by making a GET request as follows. Key fields are marked with a star appended to the column header.
Procedure
Make the following GET request:
Request: GET https://<sample.cng.sap.hana.ondemand.com>/masterdata/data/excel/{masterDataTypeName}/Accept: application/ms-excelX-CSRF-Token: <abcd0123456789>Response:
SAP Connected Goods Implementation GuideWorking With Master Data Tables P U B L I C 37

HTTP Status: 200 – Body: Excel template file
9.3.2 Uploading Master Data with an Excel File
Context
An Excel file can be uploaded via a POST request. If a record for a given key is already present, the record will be updated.
Procedure
Make the following POST request:
Request: POST https://<sample.cng.sap.hana.ondemand.com>/masterdata/data/excel/{masterDataTypeName}/Content-Type: application/ms-excelX-CSRF-Token: <abcd0123456789>Request-Body(form-data):file="<excelFile>”Response:HTTP Status: 200 – Body: Excel template file
9.3.3 Updating Master Data Records
Context
Updating master data types is not supported, but you can update master data records by making a PUT request as follows. The master data type as URL parameter and the key column value for every JSON Object of the master data type are mandatory. All non-key columns present in the call will be updated. Note that this call is made in BULK, so an array must be at the root of the request body.
38 P U B L I CSAP Connected Goods Implementation Guide
Working With Master Data Tables

Procedure
Make the following PUT request:
Request: PUT https://<sample.cng.sap.hana.ondemand.com>/masterdata/data/{masterDataTypeName}/Content-Type: application/jsonX-CSRF-Token: <abcd0123456789>Request-Body:[ { "<vendorName>":"<vendorNameValue>", "<vendorID>":"<vendorIDValue>", [other structure properties] }, [other instances of your structure]]Response:HTTP Status: 201 – Message: Success
9.4 Deleting Master Data Tables
Delete a custom master data table and data.
Procedure
1. Delete a custom master data table making a DELETE request as Follows. The master data type name must be given present when making the call.
Request: DELETE https://<sample.cng.sap.hana.ondemand.com>/masterdata/type/{masterDataTypeName}/X-CSRF-Token: <abcd0123456789>Response:HTTP Status: 201 -Body: Success
2. Delete custom master data by making a DELETE request as follows. The master data type and the key column value for every JSON Object of the master data type are mandatory when making this call. This call is made in BULK, so an array must be at the root of the request body.
Request: DELETE https://<sample.cng.sap.hana.ondemand.com>/masterdata/data/{masterDataTypeName}/Content-Type: application/jsonX-CSRF-Token: <abcd0123456789>Request-Body:[ { "<vendorID>":"<vendorIDValue>", },{
SAP Connected Goods Implementation GuideWorking With Master Data Tables P U B L I C 39

…} [other JSON Objects with associated structure keys]]Response:HTTP Status: 201 – Message: Success
40 P U B L I CSAP Connected Goods Implementation Guide
Working With Master Data Tables
10 Semantic Modeling
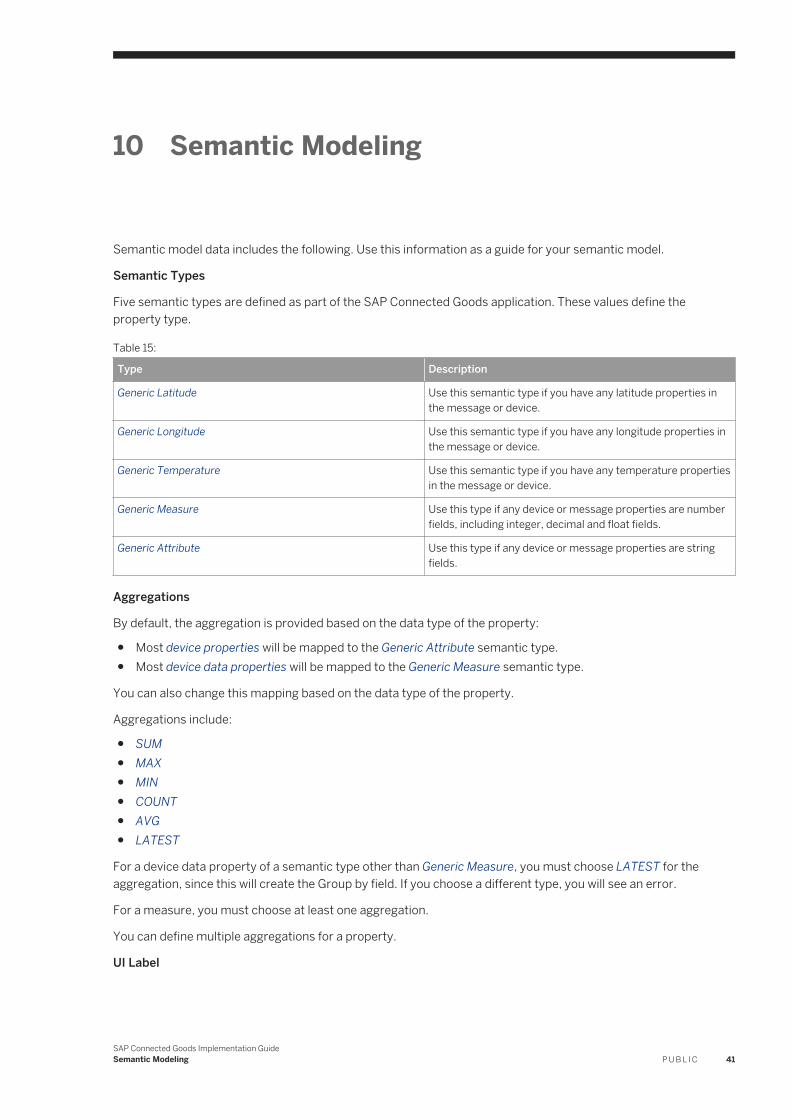
Semantic model data includes the following. Use this information as a guide for your semantic model.
Semantic Types
Five semantic types are defined as part of the SAP Connected Goods application. These values define the property type.
Table 15:
Type Description
Generic Latitude Use this semantic type if you have any latitude properties in the message or device.
Generic Longitude Use this semantic type if you have any longitude properties in the message or device.
Generic Temperature Use this semantic type if you have any temperature properties in the message or device.
Generic Measure Use this type if any device or message properties are number fields, including integer, decimal and float fields.
Generic Attribute Use this type if any device or message properties are string fields.
Aggregations
By default, the aggregation is provided based on the data type of the property:
● Most device properties will be mapped to the Generic Attribute semantic type.● Most device data properties will be mapped to the Generic Measure semantic type.
You can also change this mapping based on the data type of the property.
Aggregations include:
● SUM● MAX● MIN● COUNT● AVG● LATEST
For a device data property of a semantic type other than Generic Measure, you must choose LATEST for the aggregation, since this will create the Group by field. If you choose a different type, you will see an error.
For a measure, you must choose at least one aggregation.
You can define multiple aggregations for a property.
UI Label
SAP Connected Goods Implementation GuideSemantic Modeling P U B L I C 41

This is the display label for the user interface. Any text you enter here is displayed in the user interface at run time. For example, for a TEMPERATURE field whose UI label is Temperature, you might change the label to MyTemp. Based on the aggregations you select, at run time it will be displayed as Avg MyTemp, Sum MyTemp, etc.
Field Length
This is the display field length for the UI, in characters. For example, if Avg Temperature is the value that is populated in a table, this field specifies the length to be displayed based on the data. A Field Length value of 8 indicates that 8 characters will be displayed on the UI.
Table Name
This is the table reference that is internally mapped for the property. Options include:
● DEVICE● DEVICE_DATA● MDT_TABLE1 through MDT_TABLE5 (these tables refer to the new master data being added)
10.1 Setting up the Semantic Model
Prerequisites
Before setting up your semantic model, do the following:
● Set up an AE model to generate a JSON file.● Upload this JSON file to the SAP Connected Goods system. You will use the uploaded device properties and
message properties (KPIs, etc.) for reference.
For more information, see Defining a Thing Model [page 20].
Context
This semantic model example will follow the scenario of a cooler.
Procedure
Sync and Verify Mappings1. In the launchpad, choose the Semantics Model tile.2. On the Semantics Model page, choose Sync.
All uploaded properties are displayed in the semantic model table. All device properties are displayed in the Device table. All message properties are displayed in the Device Data table.
42 P U B L I CSAP Connected Goods Implementation Guide
Semantic Modeling

An asterisk indicates a new property that requires some action on your part.3. Choose Edit.4. Verify that every entry in the table is mapped to the appropriate semantic type, changing the default mapping
if needed. By default, the aggregations provided are AVG and LATEST.5. Save your changes.
Include Master Data6. To include master data in the semantic model, choose Master Data.
A new table is created below the External Fields mapping table. All master data tables that have been uploaded are displayed.
7. Map each master data record to either the DEVICE or DEVICE_DATA table and choose an appropriate column mapping, as follows:a. Choose Edit in the Master Data table.b. In the Attribute Value field, select the attribute of the master data record.c. Select Assign to Device or Assign to Device Data.d. Select the column in the list to map to.
NoteYou can only map an attribute to a device or device data type that is compatible with it. For example, an integer attribute such as Material ID can only be mapped to an integer field such as D_INT_ or DD_INT_. A string attribute can be mapped only to string fields such as D_STR or DD_STR.
e. For Join Type, choose rightouter.f. For Cardinality, choose 1:1.g. Choose the Delete icon for any empty rows in the Master Data table.h. Save your changes to the table.
For example, for an onboarded device with the property vendorID, this property will be included in the Device columns. When the Vendor master data is brought into the system, if the primary key of the Vendor table is vID, map the Vendor table - vID column to the Device table - vendorID column. Since the join is always on the master data, it will be a rightouter join with cardinality 1:1.All the master data attributes are added to the semantic model table. (For this example, you would see data such as vID, vendor_description, and vendor_name added to the table.) Most of this data will be assigned to the Generic Attribute semantic type. You can change these mappings as needed.
8. Choose Save again to complete the master data changes.
Check the mappings carefully if you expect the data to be visible. Data must be uploaded to the Master Data table and the corresponding column in the Device/Device Data must contain a value in order for the join to occur.
Additionally, it is recommended that you map to a column that is the primary key of the master data, in order to avoid repeated records, and to produce properly aggregated values in the UI.
Add a Calculation9. Optionally, model a new calculation in the system as follows:
a. Choose Add Calculation.b. Enter the Field Name.c. Select either Generic Attribute or Generic Measure for the Semantic Type.d. Select the Aggregation.
SAP Connected Goods Implementation GuideSemantic Modeling P U B L I C 43
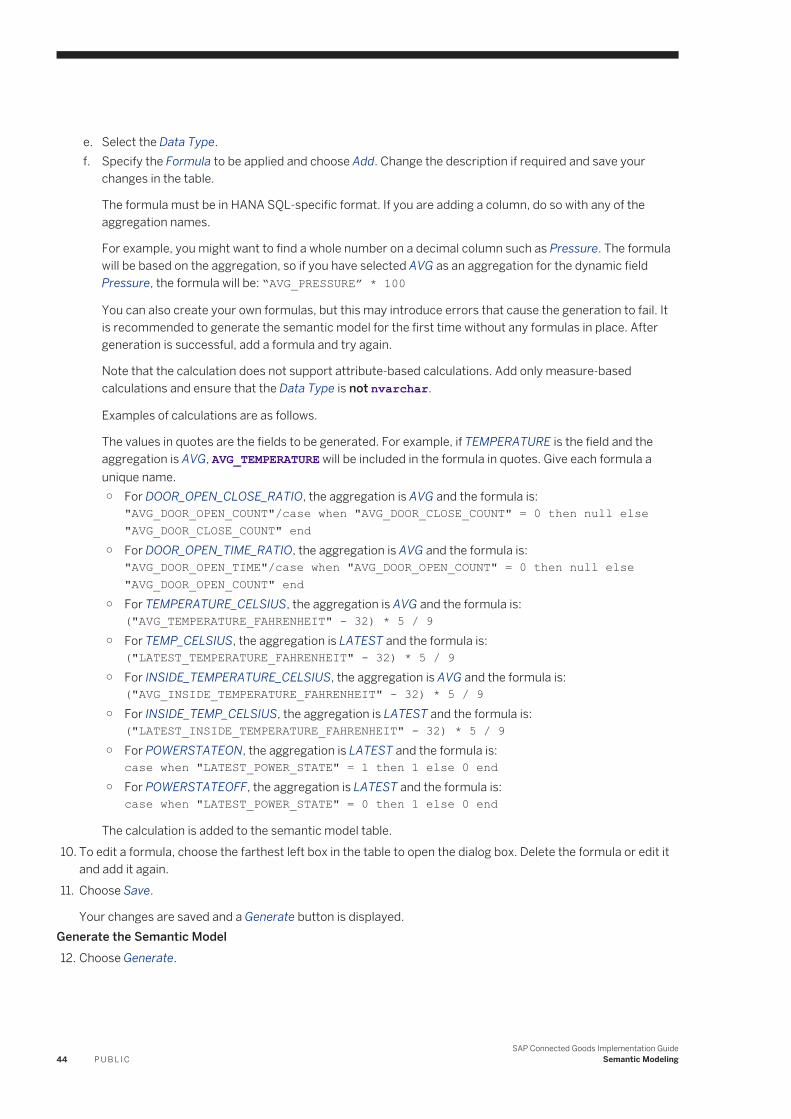
e. Select the Data Type.f. Specify the Formula to be applied and choose Add. Change the description if required and save your
changes in the table.
The formula must be in HANA SQL-specific format. If you are adding a column, do so with any of the aggregation names.
For example, you might want to find a whole number on a decimal column such as Pressure. The formula will be based on the aggregation, so if you have selected AVG as an aggregation for the dynamic field Pressure, the formula will be: “AVG_PRESSURE” * 100
You can also create your own formulas, but this may introduce errors that cause the generation to fail. It is recommended to generate the semantic model for the first time without any formulas in place. After generation is successful, add a formula and try again.
Note that the calculation does not support attribute-based calculations. Add only measure-based calculations and ensure that the Data Type is not nvarchar.
Examples of calculations are as follows.
The values in quotes are the fields to be generated. For example, if TEMPERATURE is the field and the aggregation is AVG, AVG_TEMPERATURE will be included in the formula in quotes. Give each formula a unique name.○ For DOOR_OPEN_CLOSE_RATIO, the aggregation is AVG and the formula is:
"AVG_DOOR_OPEN_COUNT"/case when "AVG_DOOR_CLOSE_COUNT" = 0 then null else "AVG_DOOR_CLOSE_COUNT" end
○ For DOOR_OPEN_TIME_RATIO, the aggregation is AVG and the formula is:"AVG_DOOR_OPEN_TIME"/case when "AVG_DOOR_OPEN_COUNT" = 0 then null else "AVG_DOOR_OPEN_COUNT" end
○ For TEMPERATURE_CELSIUS, the aggregation is AVG and the formula is:("AVG_TEMPERATURE_FAHRENHEIT" - 32) * 5 / 9
○ For TEMP_CELSIUS, the aggregation is LATEST and the formula is:("LATEST_TEMPERATURE_FAHRENHEIT" - 32) * 5 / 9
○ For INSIDE_TEMPERATURE_CELSIUS, the aggregation is AVG and the formula is:("AVG_INSIDE_TEMPERATURE_FAHRENHEIT" - 32) * 5 / 9
○ For INSIDE_TEMP_CELSIUS, the aggregation is LATEST and the formula is:("LATEST_INSIDE_TEMPERATURE_FAHRENHEIT" - 32) * 5 / 9
○ For POWERSTATEON, the aggregation is LATEST and the formula is:case when "LATEST_POWER_STATE" = 1 then 1 else 0 end
○ For POWERSTATEOFF, the aggregation is LATEST and the formula is:case when "LATEST_POWER_STATE" = 0 then 1 else 0 end
The calculation is added to the semantic model table.10. To edit a formula, choose the farthest left box in the table to open the dialog box. Delete the formula or edit it
and add it again.11. Choose Save.
Your changes are saved and a Generate button is displayed.Generate the Semantic Model12. Choose Generate.
44 P U B L I CSAP Connected Goods Implementation Guide
Semantic Modeling

This button triggers generation of the run-time artifacts. The entire scenario of the run-time artifact creation is performed at this time.
During generation, the system reads all the external field mappings you provided, as well as the aggregation for each of the fields, and builds a view around them. This view will be consumed later in the run-time UI. If the generation fails, the run-time UI will not load any of the data.
Note the following to ensure successful generation:○ There should not be any repeated column names in the semantic modeling table. For example,
TEMPERATURE should not be included twice.○ It is recommended that you prefix with some variable so that all values are unique.○ For a Generic Measure, some aggregation must be defined.○ For a Generic Attribute in the Device Data table, LATEST must be selected as the aggregation.○ Avoid formulas for first-time modeling. Once you are familiar with the generation process, try creating
formulas.○ Do not include ADDRESS, BUSINESS_PARTNER and PRODUCT in the master data. These fields are
already included in the static template for processing. However, you can bring in your own master data for processing.
The specified artifacts are created in the back end to be consumed by the UI. Generation may be immediate, or may take a minute or two. If the process completes within two minutes, you will see a message indicating whether generation was successful.
NoteIf the response exceeds two minutes, a 502 timeout error will be displayed. However, the process will continue to run in the background. To view the progress, check the logs of the connected-goods-generation application. You can view this either in the console with the Cloud Foundry plugin or in the HANA Cloud Platform cockpit.
Correctly mapping of fields to their semantic types should ensure successful generation.
Next Steps
Technical Notes
These tables must have templates stored in the GEN_ARTIFACTS table. A copy of this is also located in generation/mock/templateinserts.sql. This is all handled as part of the CSV deliverable from SAP.
GEN_ARTIFACT_ENTITIES should have the definition of the relationship between the entities and the calculation views.
If a field is enumerated, the flag must be maintained in the semantic mapping aggregation table and also have entries in enumeration table.
If any master data is deleted, the GEN_ARTIFACTS_JOIN table must be deleted with the appropriate entries. The corresponding fields must also be removed from the Semantic Mapping and Semantic Mapping Aggregations tables. Alternatively, perform a clear/reset with the API.
SAP Connected Goods Implementation GuideSemantic Modeling P U B L I C 45
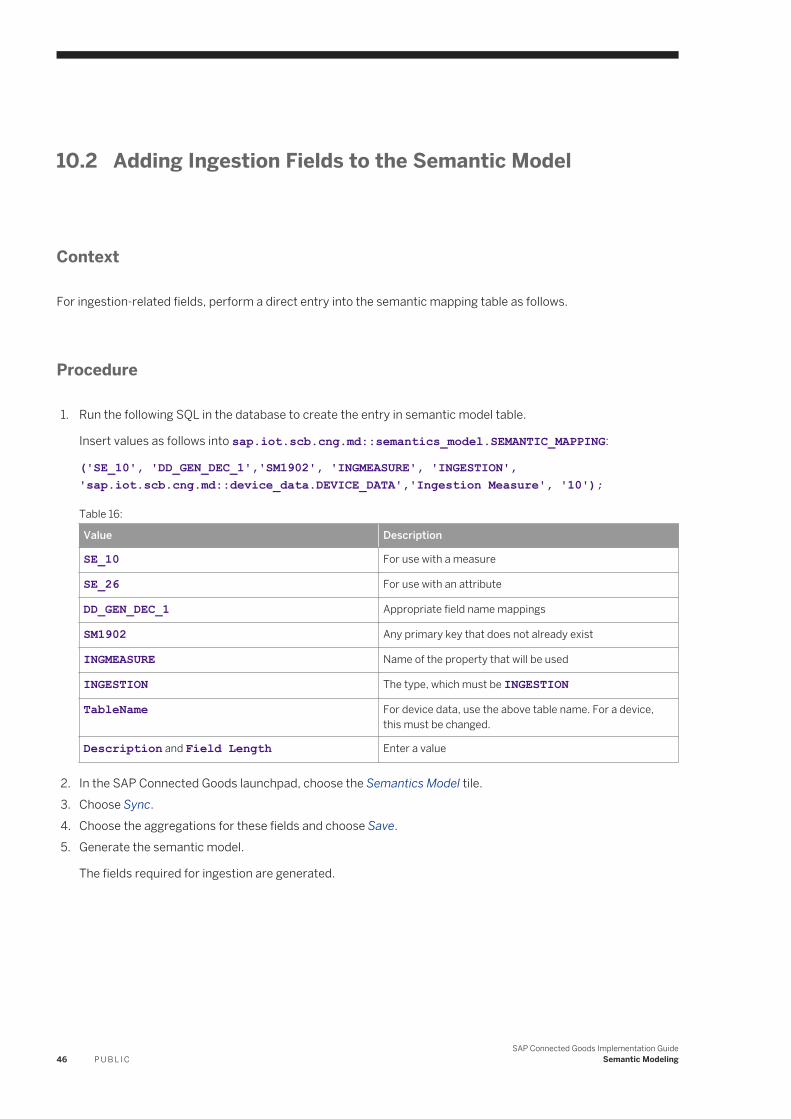
10.2 Adding Ingestion Fields to the Semantic Model
Context
For ingestion-related fields, perform a direct entry into the semantic mapping table as follows.
Procedure
1. Run the following SQL in the database to create the entry in semantic model table.
Insert values as follows into sap.iot.scb.cng.md::semantics_model.SEMANTIC_MAPPING:
('SE_10', 'DD_GEN_DEC_1','SM1902', 'INGMEASURE', 'INGESTION', 'sap.iot.scb.cng.md::device_data.DEVICE_DATA','Ingestion Measure', '10');
Table 16:
Value Description
SE_10 For use with a measure
SE_26 For use with an attribute
DD_GEN_DEC_1 Appropriate field name mappings
SM1902 Any primary key that does not already exist
INGMEASURE Name of the property that will be used
INGESTION The type, which must be INGESTION
TableName For device data, use the above table name. For a device, this must be changed.
Description and Field Length Enter a value
2. In the SAP Connected Goods launchpad, choose the Semantics Model tile.3. Choose Sync.4. Choose the aggregations for these fields and choose Save.5. Generate the semantic model.
The fields required for ingestion are generated.
46 P U B L I CSAP Connected Goods Implementation Guide
Semantic Modeling

10.3 Clearing or Resetting the Semantic Model
You can clear/reset a semantic model that you have created.
Context
You reset the semantic model using an API.
Procedure
1. Load the SAP Connected Goods application in a Google Chrome browser.2. Choose the Console tab and clear it.3. Choose the Network and clear it.4. Return to the Console tab and execute the following command. Copy the entire code snippet for CSRF.
var csrf = function() { var xmlhttp = new XMLHttpRequest(); xmlhttp.open("GET","/"); xmlhttp.setRequestHeader("Content-type", "application/json"); xmlhttp.setRequestHeader("X-CSRF-Token", "Fetch"); xmlhttp.send();}csrf();
5. Go to Network.6. Choose <tenantname>*.sap.hana.ondemand.com.
7. Choose Headers.8. In Request Headers, find and copy the CSRF token.9. Make the following call in the Console tab again, substituting the copied value for X-CSRF-Token.
var clearSemanticModel = function() { var xmlhttp = new XMLHttpRequest(); xmlhttp.open("POST","/ConnectedGoods/v1/internal/annotations/deleteSemanticModel"); xmlhttp.setRequestHeader("Content-type", "application/json"); xmlhttp.setRequestHeader("X-CSRF-Token", ""); xmlhttp.send();}clearSemanticModel()
10.4 Including Enumerations for the Dynamic Fields
Data from customers may be enumerated; that is, numeric representation of the data can have corresponding textual names (for example, 1 – On, 0 – Off). This kind of data can apply to many cases. For example, a
SAP Connected Goods Implementation GuideSemantic Modeling P U B L I C 47
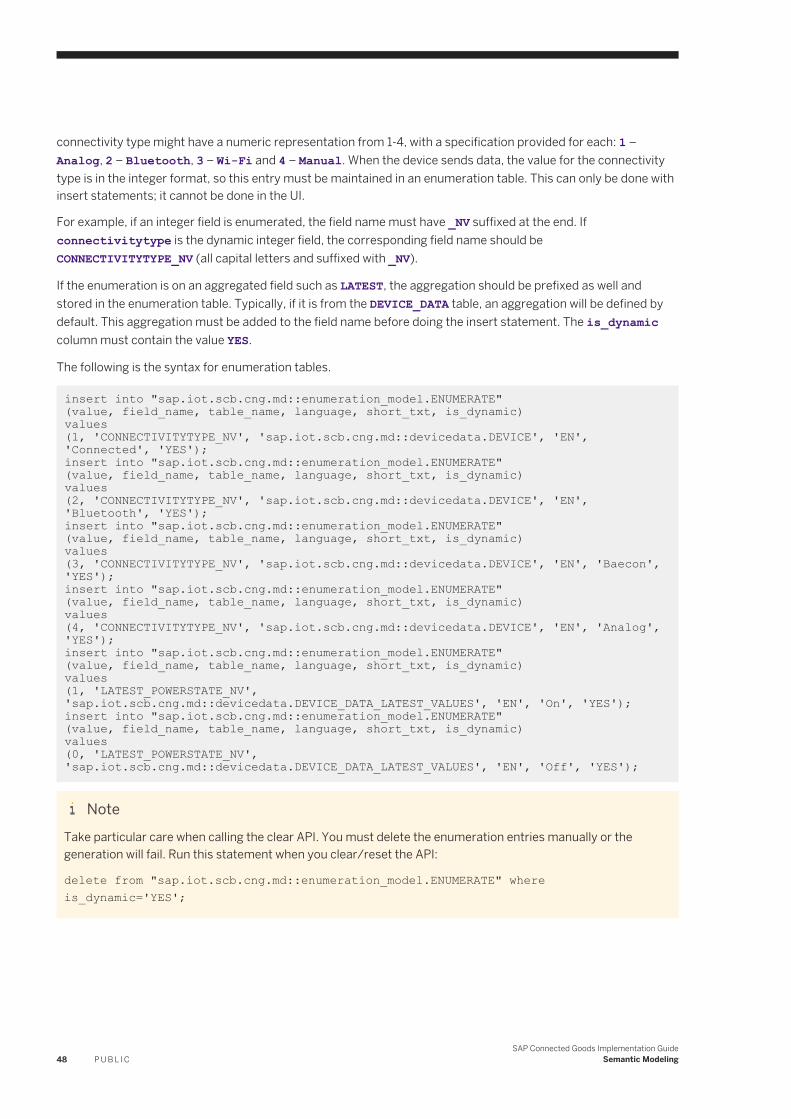
connectivity type might have a numeric representation from 1-4, with a specification provided for each: 1 – Analog, 2 – Bluetooth, 3 – Wi-Fi and 4 – Manual. When the device sends data, the value for the connectivity type is in the integer format, so this entry must be maintained in an enumeration table. This can only be done with insert statements; it cannot be done in the UI.
For example, if an integer field is enumerated, the field name must have _NV suffixed at the end. If connectivitytype is the dynamic integer field, the corresponding field name should be CONNECTIVITYTYPE_NV (all capital letters and suffixed with _NV).
If the enumeration is on an aggregated field such as LATEST, the aggregation should be prefixed as well and stored in the enumeration table. Typically, if it is from the DEVICE_DATA table, an aggregation will be defined by default. This aggregation must be added to the field name before doing the insert statement. The is_dynamic column must contain the value YES.
The following is the syntax for enumeration tables.
insert into "sap.iot.scb.cng.md::enumeration_model.ENUMERATE" (value, field_name, table_name, language, short_txt, is_dynamic)values(1, 'CONNECTIVITYTYPE_NV', 'sap.iot.scb.cng.md::devicedata.DEVICE', 'EN', 'Connected', 'YES');insert into "sap.iot.scb.cng.md::enumeration_model.ENUMERATE"(value, field_name, table_name, language, short_txt, is_dynamic)values(2, 'CONNECTIVITYTYPE_NV', 'sap.iot.scb.cng.md::devicedata.DEVICE', 'EN', 'Bluetooth', 'YES');insert into "sap.iot.scb.cng.md::enumeration_model.ENUMERATE"(value, field_name, table_name, language, short_txt, is_dynamic)values(3, 'CONNECTIVITYTYPE_NV', 'sap.iot.scb.cng.md::devicedata.DEVICE', 'EN', 'Baecon', 'YES');insert into "sap.iot.scb.cng.md::enumeration_model.ENUMERATE"(value, field_name, table_name, language, short_txt, is_dynamic)values(4, 'CONNECTIVITYTYPE_NV', 'sap.iot.scb.cng.md::devicedata.DEVICE', 'EN', 'Analog', 'YES');insert into "sap.iot.scb.cng.md::enumeration_model.ENUMERATE"(value, field_name, table_name, language, short_txt, is_dynamic)values(1, 'LATEST_POWERSTATE_NV', 'sap.iot.scb.cng.md::devicedata.DEVICE_DATA_LATEST_VALUES', 'EN', 'On', 'YES');insert into "sap.iot.scb.cng.md::enumeration_model.ENUMERATE"(value, field_name, table_name, language, short_txt, is_dynamic)values(0, 'LATEST_POWERSTATE_NV', 'sap.iot.scb.cng.md::devicedata.DEVICE_DATA_LATEST_VALUES', 'EN', 'Off', 'YES');
NoteTake particular care when calling the clear API. You must delete the enumeration entries manually or the generation will fail. Run this statement when you clear/reset the API:
delete from "sap.iot.scb.cng.md::enumeration_model.ENUMERATE" where is_dynamic='YES';
48 P U B L I CSAP Connected Goods Implementation Guide
Semantic Modeling

11 Defining UI Configurations
You use the Visualization tile to design the UI pages in your SAP Connected Goods implementation.
11.1 Defining Visualization
11.1.1 Defining Visual Filters
Use the Visual Filters tab to define the dimensions you can use to display the filters used on the device pages.
Context
Filters allow users to filter the display of device information. There are three types of visual filters: Donut, Bar and Line charts.
Procedure
1. In the launchpad, choose the Visualization tile.
SAP Connected Goods Implementation GuideDefining UI Configurations P U B L I C 49
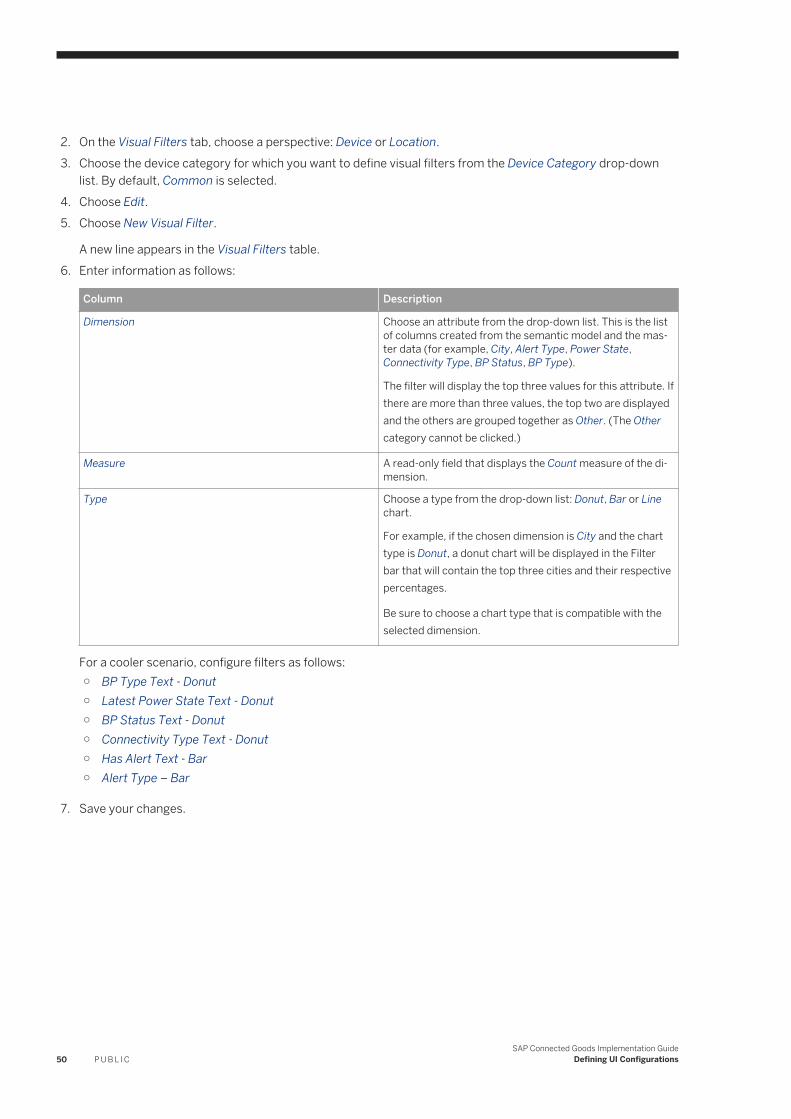
2. On the Visual Filters tab, choose a perspective: Device or Location.3. Choose the device category for which you want to define visual filters from the Device Category drop-down
list. By default, Common is selected.4. Choose Edit.5. Choose New Visual Filter.
A new line appears in the Visual Filters table.6. Enter information as follows:
Column Description
Dimension Choose an attribute from the drop-down list. This is the list of columns created from the semantic model and the master data (for example, City, Alert Type, Power State, Connectivity Type, BP Status, BP Type).
The filter will display the top three values for this attribute. If there are more than three values, the top two are displayed and the others are grouped together as Other. (The Other category cannot be clicked.)
Measure A read-only field that displays the Count measure of the dimension.
Type Choose a type from the drop-down list: Donut, Bar or Line chart.
For example, if the chosen dimension is City and the chart type is Donut, a donut chart will be displayed in the Filter bar that will contain the top three cities and their respective percentages.
Be sure to choose a chart type that is compatible with the selected dimension.
For a cooler scenario, configure filters as follows:○ BP Type Text - Donut○ Latest Power State Text - Donut○ BP Status Text - Donut○ Connectivity Type Text - Donut○ Has Alert Text - Bar○ Alert Type – Bar
7. Save your changes.
50 P U B L I CSAP Connected Goods Implementation Guide
Defining UI Configurations

11.1.2 Defining Map Overlays
Use the Map Overlays tab to configure map overlays for the Map view.
Context
Map overlays customize the content displayed on a device map. Users can choose map overlays from an icon on the Map & Table view.
Procedure
1. In the launchpad, choose the Visualization tile.2. Choose the Map Overlays tab.3. Choose the device category for which you want to define map overlays from the Device Category drop-down
list. By default, Common is selected.4. Choose Edit.5. Choose New Map Overlay.
A new line appears in the Map Overlays table.6. Enter information as follows:
Column Description
Key Select a measure to be displayed on the icons on the map. Based on the icon's size, it can display up to 6-8 characters.
For a cooler scenario, select the following: Latest Temperature Celsius, Avg Door Open Count, Avg Door Open Time.
SAP Connected Goods Implementation GuideDefining UI Configurations P U B L I C 51

Column Description
Threshold Enter a value to act as a threshold for the selected key measure. Values less than or greater than this threshold (depending on what is chosen as the Threshold Comparison) are displayed in red on the icons in the map.
Unit Enter a unit to be appended after the measure in the text (for example, min or °F).
Precision Enter the number of decimal points to be displayed in the value for the selected key.
Threshold Comparison Choose LT (Less Than) if you want values less than the value of the measure key to be displayed in red.
Choose GT (Greater Than) if you want values greater than the value of the measure key to be displayed in red.
Label Enter the label that will be displayed when this key is selected in the map overlay.
Image URL Enter the path to the icon image to display in the map overlay. The image path is: ../sap/iot/scb/cng/goods/images/<image_name>.pngReplace <image_name> with the image you want to use. Image options are: temp, emergencies, month, opentime, opebvsclose, crm, and weather.
If any other URL value is used, the default icon is displayed.
Do not choose an attribute, since attribute values are too large to be displayed on the map icons. Additionally, it is typically not useful to display an attribute value on map icons.
7. Save your changes.
11.1.3 Defining Smart Search and Table Columns
Use the Smart Search and Table Columns tab to specify the fields used for Search and the table columns displayed for devices.
Context
Smart Search is the search bar displayed above the Filter bar in the Device Overview page. You can specify the fields that are searched when this feature is used.
You can also specify the columns included in the Devices table in the Table and Map & Table views.
52 P U B L I CSAP Connected Goods Implementation Guide
Defining UI Configurations

Procedure
1. In the launchpad, choose the Visualization tile.2. Choose the Smart Search and Table Columns tab.3. Choose the device category for which you want to define search fields and table columns from the Device
Category drop-down list. By default, Common is selected.4. Choose Edit.5. For Smart Search, use the drop-down to select the attributes you want to include in the search feature. These
attributes are derived from the semantic model and master data. Measures cannot be searched and are not displayed in the list.
If you choose City, Address, Device ID, and Device Serial Number, the search text will be matched to all values in the selected columns and the search results will display the device ID, device type, and address of the device.
For a cooler scenario, select the following: Address, Device Type Description, Device ID, City, Country, Product ID Description.
6. For Table Columns, use the drop-down to select the columns you want to include in the Devices table. The width of the table is configured by the Length column in the semantic model.
For a cooler scenario, select the following: Device ID, Device Type Description, Store Name, Address, Alerts, Latest Temperature Celsius, Latest Power State Text, Latest Battery Level, Connectivity Type Text, Ext Device Type ID.
7. Save your changes.
SAP Connected Goods Implementation GuideDefining UI Configurations P U B L I C 53
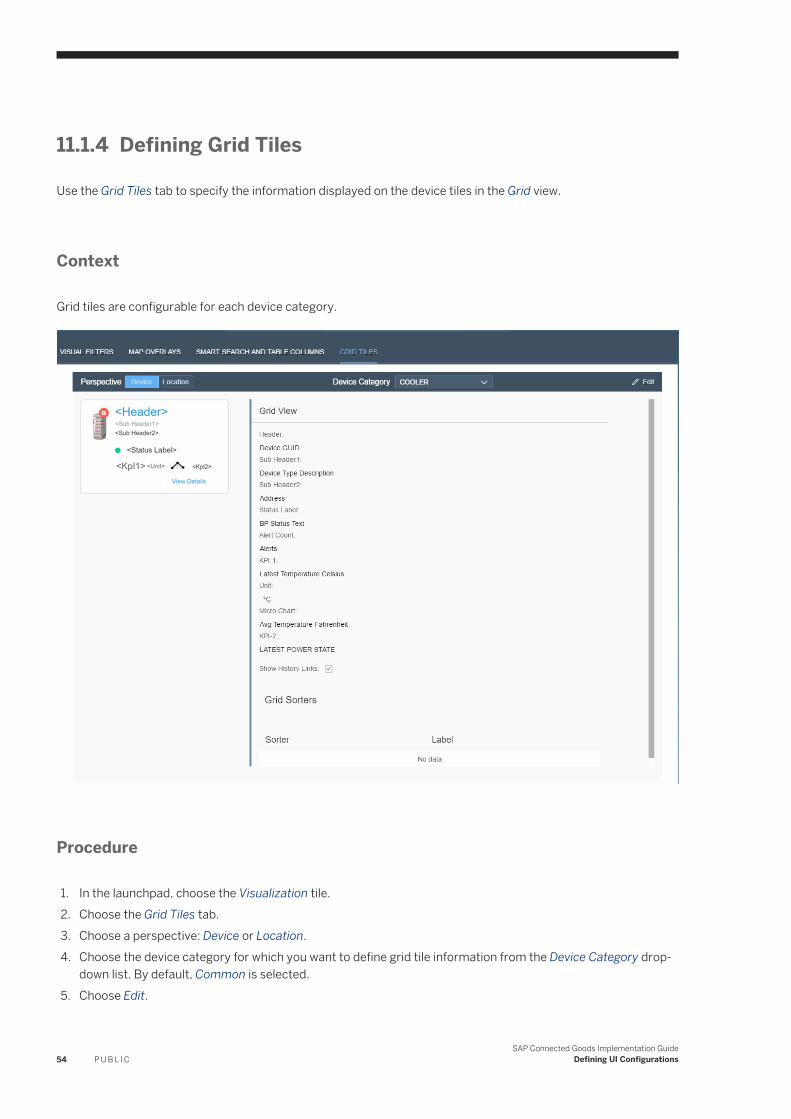
11.1.4 Defining Grid Tiles
Use the Grid Tiles tab to specify the information displayed on the device tiles in the Grid view.
Context
Grid tiles are configurable for each device category.
Procedure
1. In the launchpad, choose the Visualization tile.2. Choose the Grid Tiles tab.3. Choose a perspective: Device or Location.4. Choose the device category for which you want to define grid tile information from the Device Category drop-
down list. By default, Common is selected.5. Choose Edit.
54 P U B L I CSAP Connected Goods Implementation Guide
Defining UI Configurations

6. In the Grid View panel, make data selections for each area of the grid tile. For your reference, the sample tile in the left navigator indicates the location of each data field. Be sure to select attributes and measures exactly as indicted below or the tile will not display correctly.
Field Description
Header Select an attribute to be displayed as the header at the top of the grid tile (for example, Device ID, Serial Number, Device Description, or Material Description).
For a cooler scenario, select Device Material ID.
Sub Header1 Select an attribute to be displayed below the header (for example, Device ID).
For a cooler scenario, select Device Type Description.
Sub Header 2 Select any attribute to be displayed in the second line below the header.
For a cooler scenario, select Address.
Status Label Select an attribute to be displayed as the device status indicator (for example, Power State, BP Status, or BP Text). This label displays text and an image determined by the selected value.
For a cooler scenario, select BP Status Text. This displays the Assigned/Nearby status with an associated image.
Alert Count Select the Alerts attribute if you want the alerts count (the number of current notifications for the device) to be displayed in red on the grid tile.
For a vending machine scenario, select Out of Stock to display the number of products that are out of stock for the vending machine.
KPI-1 Select a measure for the first KPI you want to display (for example, for a cooler, you might select Average Temperature).
For a cooler scenario, select Latest Temperature.
Unit If relevant, select a unit for the selected KPI (such as °C). This is appended to the KPI value.
For a cooler scenario, select °C.
Micro Chart Choose to include a micro chart that will display the last three values of the KPI. These values are derived from device data.
For a cooler scenario, select Avg Temperature.
KPI-2 Select a measure for the second KPI you want to display. This value is made up of text and an image.
For a cooler scenario, choose Power State to display text and an image indicating whether the device is On or Off.
For a cooler scenario, select Latest Power State Text.
Show History Links Select this checkbox to display the History link in the grid tile. The user can choose this link to see the location of the device over the last few days.
For a cooler scenario, select this option.
Grid Sorters Configure the properties by which devices in the grid view can be sorted.
Choose New Sorter to add a property and configure each property as follows:
SAP Connected Goods Implementation GuideDefining UI Configurations P U B L I C 55
Field Description
○ Sorter: Choose a column from the semantic model or the master data. This can be either an attribute or a measure. For example: Device ID, Device Serial Number, Device Type, Temperature.
○ Label: Enter the string to be displayed instead of the technical name in the Sort by drop-down list.
By default, the list can be sorted by Pinned Devices, but this does not require configuration.
For a cooler scenario, choose the following sorters: Device ID, Device Type, Device Name, Alerts, Temperature (°C), Power.
7. Save your changes.
11.2 Defining the Object Detail View
Use the Object Detail Configuration tile to define the information displayed on the Object Details pages.
Context
You configure the Object Details pages with the following procedures:
Procedure
1. Defining Header Info [page 56]2. Defining Facets [page 58]3. Defining Widgets [page 61]4. Defining Sections [page 64]
11.2.1 Defining Header Info
Use the Header Info tab to define the header of the Object Details page.
Context
The Header Info tab controls the device image, title, and description displayed at the top of the page.
56 P U B L I CSAP Connected Goods Implementation Guide
Defining UI Configurations
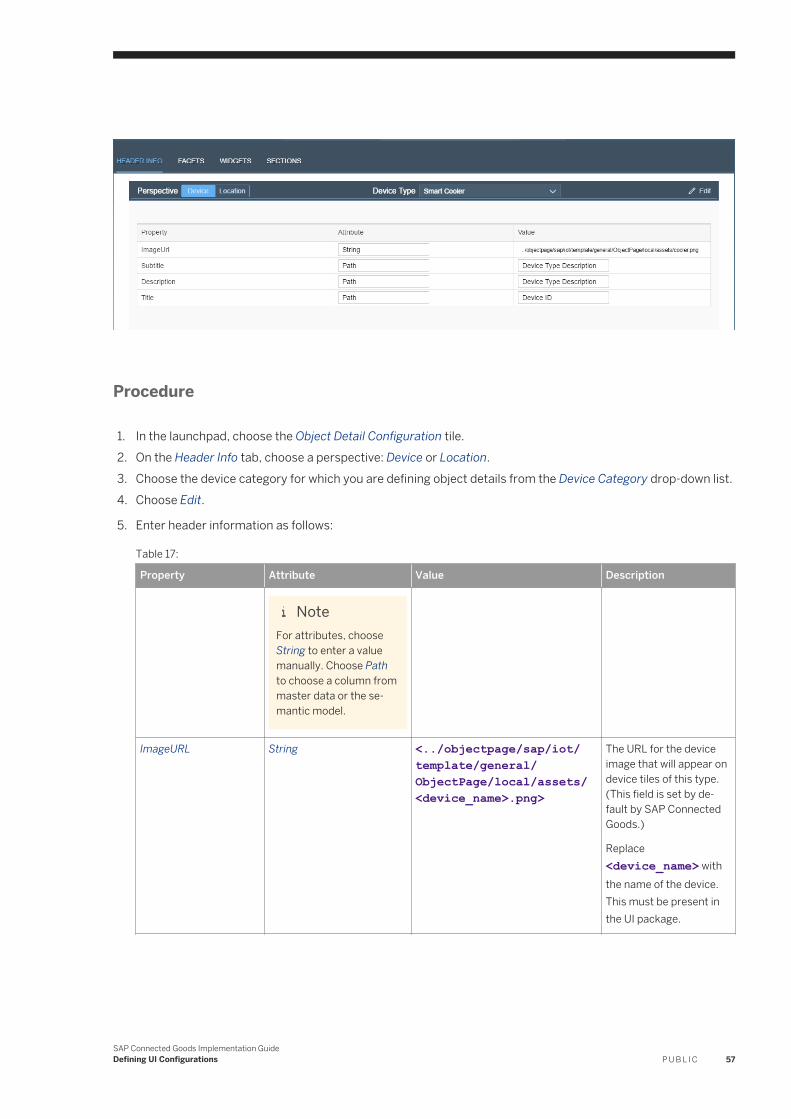
Procedure
1. In the launchpad, choose the Object Detail Configuration tile.2. On the Header Info tab, choose a perspective: Device or Location.3. Choose the device category for which you are defining object details from the Device Category drop-down list.4. Choose Edit.
5. Enter header information as follows:
Table 17:
Property Attribute Value Description
NoteFor attributes, choose String to enter a value manually. Choose Path to choose a column from master data or the semantic model.
ImageURL String <../objectpage/sap/iot/template/general/ ObjectPage/local/assets/<device_name>.png>
The URL for the device image that will appear on device tiles of this type. (This field is set by default by SAP Connected Goods.)
Replace <device_name> with the name of the device. This must be present in the UI package.
SAP Connected Goods Implementation GuideDefining UI Configurations P U B L I C 57

Property Attribute Value Description
Description Path Device Type Description Determines the description that is displayed below the title on the Object Details page.
Title Path Device ID Determines the title that appears at the top of the Object Details page.
6. Save your changes.
11.2.2 Defining Facets
Use the Facets tab to define facets of the Object Details page.
Context
The Facets tab controls the information displayed below the title on the page.
NoteThis set of procedures provides sample values. Implementation values may vary depending on the device type and scenario.
58 P U B L I CSAP Connected Goods Implementation Guide
Defining UI Configurations
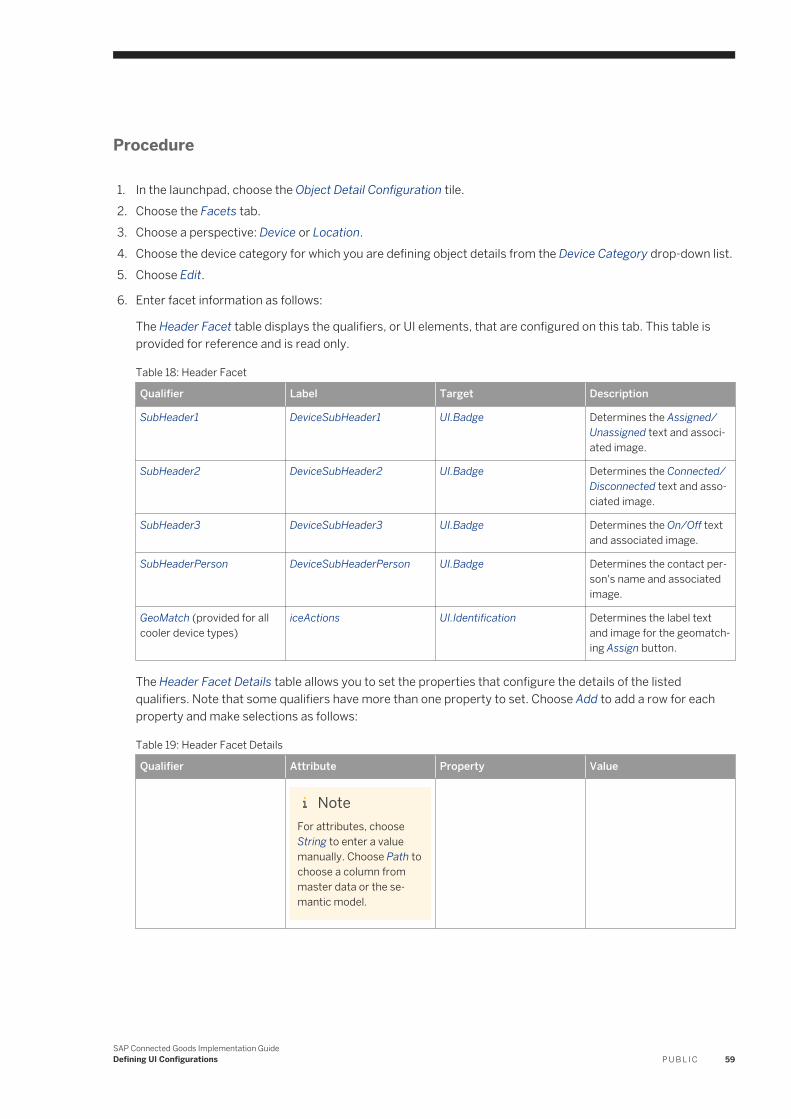
Procedure
1. In the launchpad, choose the Object Detail Configuration tile.2. Choose the Facets tab.3. Choose a perspective: Device or Location.4. Choose the device category for which you are defining object details from the Device Category drop-down list.5. Choose Edit.
6. Enter facet information as follows:
The Header Facet table displays the qualifiers, or UI elements, that are configured on this tab. This table is provided for reference and is read only.
Table 18: Header Facet
Qualifier Label Target Description
SubHeader1 DeviceSubHeader1 UI.Badge Determines the Assigned/Unassigned text and associated image.
SubHeader2 DeviceSubHeader2 UI.Badge Determines the Connected/Disconnected text and associated image.
SubHeader3 DeviceSubHeader3 UI.Badge Determines the On/Off text and associated image.
SubHeaderPerson DeviceSubHeaderPerson UI.Badge Determines the contact person's name and associated image.
GeoMatch (provided for all cooler device types)
iceActions UI.Identification Determines the label text and image for the geomatching Assign button.
The Header Facet Details table allows you to set the properties that configure the details of the listed qualifiers. Note that some qualifiers have more than one property to set. Choose Add to add a row for each property and make selections as follows:
Table 19: Header Facet Details
Qualifier Attribute Property Value
NoteFor attributes, choose String to enter a value manually. Choose Path to choose a column from master data or the semantic model.
SAP Connected Goods Implementation GuideDefining UI Configurations P U B L I C 59

Qualifier Attribute Property Value
SubHeader1 Path HeadLine
This property sets the text for this qualifier (Assigned/Unassigned).
BP Status Text
SubHeader1 Path ImageURL
This property sets the image for this qualifier (the green dot icon).
BP Status Text
SubHeader2 Path HeadLine
This property sets the text for this qualifier (On/Off).
Power Status
SubHeader2 Path ImageURL
This property sets the image for this qualifier.
Power Status
SubHeader3 Path HeadLine
This property sets the text for this qualifier.
Choose any attribute you want to be displayed as a subheader.
For example, for a cooler scenario, you might choose Connectivity Status, for which the display values are Bluetooth/Connected.
SubHeader3 Path ImageURL
This property sets the image for this qualifier.
Choose the same attribute you chose for the HeadLine property.
SubHeaderPerson Path HeadLine
This property sets the text for the first line of this qualifier (the last name of the contact, if you want it to appear first).
Employee Responsible Name 1
SubHeaderPerson Path Title
This property sets the text for the second line of this qualifier (the first name of the contact).
Employee Responsible Name 2
SubHeaderPerson String ImageURL
This property sets the image for this qualifier (the person graphic).
sap-icon://person-placeholder
60 P U B L I CSAP Connected Goods Implementation Guide
Defining UI Configurations

Qualifier Attribute Property Value
Geomatch String HeadLine
This property sets the text for this qualifier (the Assign text).
Assign
7. Save your changes.
11.2.3 Defining Widgets
Use the Widgets tab to define widgets on the Object Details page.
Context
The Widgets tab controls the store name and address, map, and list of nearby devices in the left navigator.
NoteThis set of procedures provides sample values for a smart cooler. Implementation values may vary depending on the device type and scenario.
SAP Connected Goods Implementation GuideDefining UI Configurations P U B L I C 61

Procedure
1. In the launchpad, choose the Object Detail Configuration tile.2. Choose the Widgets tab.3. Choose a perspective: Device or Location.4. Choose the device category for which you are defining object details from the Device Category drop-down list.5. Choose Edit.
6. Enter widget information as follows:
The Widget Definition table displays the qualifiers, or UI elements, that are configured on this tab. This table is provided for reference and is read only.
Table 20: Widget Definition
Qualifier Navigation Property Target Description
CoolerMap UI.Map Determines the map used for the page.
NearbyCoolerList DeviceDataCharts UI.Lineitem Determines the Nearby Coolers list for the page.
StoreInfo UI.Fieldgroup Determines the store information displayed on the page.
The Field Group & Line Item table allows you to set the properties that configure the store address and Nearby Coolers list. Note that some qualifiers have more than one property to set. Choose Add to add a row for each property and make selections as follows:
Table 21: Field Group & Line Item
Qualifier Label Value Is Image
NoteFor attributes, choose String to enter a value manually. Choose Path to choose a column from master data or the semantic model.
StoreInfo Store Name
Enter the store name (any value). This value is required but is not displayed in the UI.
Store Name
This property sets the store name.
Unselected
62 P U B L I CSAP Connected Goods Implementation Guide
Defining UI Configurations

Qualifier Label Value Is Image
StoreInfo Street
Enter the street address (any value). This value is required but is not displayed in the UI.
Address
This property sets the store address.
Unselected
NoteOrder the following properties based on the sequence in which you want them to be displayed.
NearByCoolerList Title
Enter this value exactly as shown.
Device GUID
Choose the column name for the device ID.
Unselected
NearByCoolerList Address
Enter this value exactly as shown.
Address Formatted
Choose the column name for the device address.
Unselected
NearByCoolerList ImageUrl
Enter this value exactly as shown.
This property is optional.
Device GUID
Choose the column name for the device type.
This property displays a device-type-specific image.
Selected
NearByCoolerList Distance
Enter this value exactly as shown.
Distance_m
This property displays the distance in meters.
Unselected
The Map table allows you to configure the map displayed in the left navigator. Choose Add to add a row for each property and make selections as follows:
Table 22: Map
Qualifier Property Path
CoolerMap Latitude
Sets the latitude for the device on the map.
Latitude
Choose a column that corresponds with the latitude property (for example, Latitude, Latest Latitude).
CoolerMap Longitude
Sets the longitude for the device on the map.
Longitude
Choose a column that corresponds with the longitude property (for example, Longitude, Latest Longitude).
SAP Connected Goods Implementation GuideDefining UI Configurations P U B L I C 63

Qualifier Property Path
CoolerMap Image
Displays the device image that indicates whether it is assigned, unassigned, or nearby.
BP Type Text
Determines whether the device is assigned, unassigned, or nearby.
7. Save your changes.
11.2.4 Defining Sections
Use the Sections tab to define sections on the Object Details page.
Context
The Sections tab controls the information sections in the main body of the page.
64 P U B L I CSAP Connected Goods Implementation Guide
Defining UI Configurations

NoteThis set of procedures provides sample values. Implementation values may vary depending on the device type and scenario.
Procedure
1. In the launchpad, choose the Object Detail Configuration tile.2. Choose the Sections tab.3. Choose a perspective: Device or Location.4. Choose the device category for which you are defining object details from the Device Category drop-down list.5. Choose Edit.
6. Enter section information as follows:
The Section Definition table displays the qualifiers, or UI elements, that are configured on this tab. This table is provided for reference and is read only.
Table 23: Section Definition
Qualifier Navigation Property Target Label
SectionChart1 - 4
These qualifiers configure the four charts on the page.
DeviceDataCharts UI.Chart Enter the labels to be displayed for each of the four charts (for example, On/Off Status, Average Temperature, etc.).
Notifications
This qualifier determines whether notifications are displayed on the page.
Notifications UI.Lineitem Enter the label to be displayed for notifications, such as Alerts.
DetailKpi
This qualifier determines the primary KPI that is displayed on the page.
UI.Datapoint Enter the label to be displayed for the primary KPI in the UI.
KpiMicroQualifier
This qualifier determines the mini chart that is displayed to the right of the primary KPI.
MicroChartData UI.Chart Leave this field blank.
SAP Connected Goods Implementation GuideDefining UI Configurations P U B L I C 65
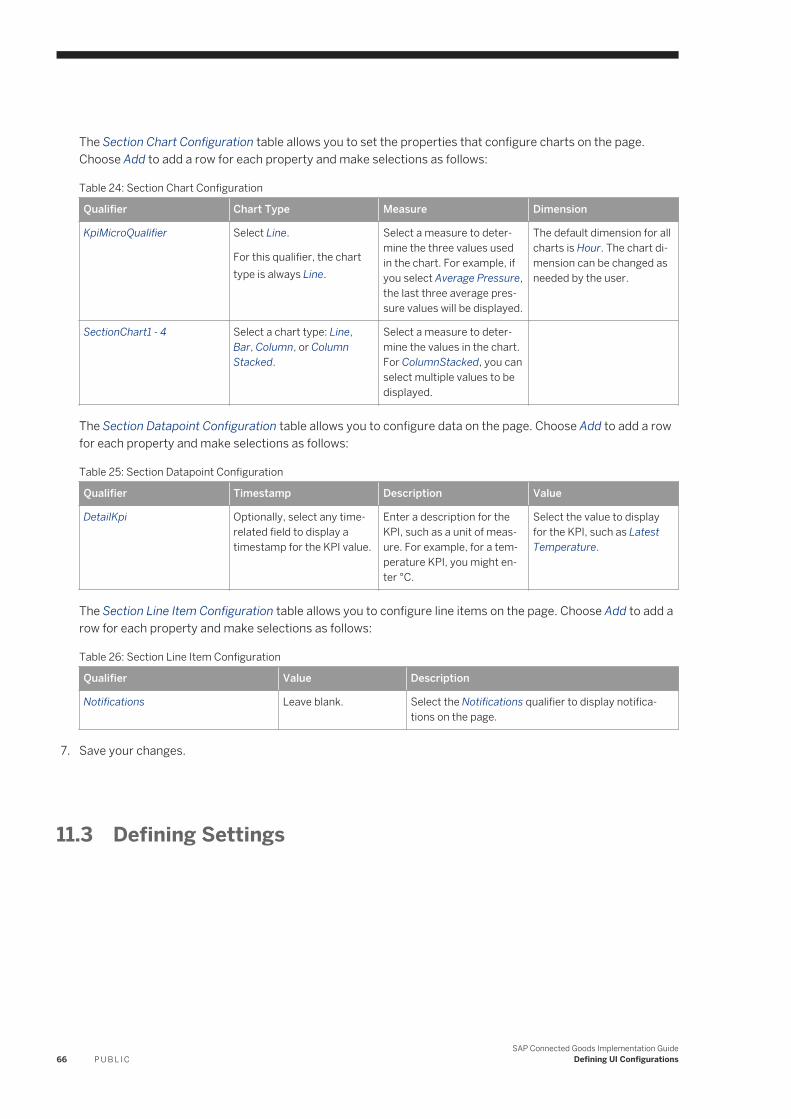
The Section Chart Configuration table allows you to set the properties that configure charts on the page. Choose Add to add a row for each property and make selections as follows:
Table 24: Section Chart Configuration
Qualifier Chart Type Measure Dimension
KpiMicroQualifier Select Line.
For this qualifier, the chart type is always Line.
Select a measure to determine the three values used in the chart. For example, if you select Average Pressure, the last three average pressure values will be displayed.
The default dimension for all charts is Hour. The chart dimension can be changed as needed by the user.
SectionChart1 - 4 Select a chart type: Line, Bar, Column, or Column Stacked.
Select a measure to determine the values in the chart. For ColumnStacked, you can select multiple values to be displayed.
The Section Datapoint Configuration table allows you to configure data on the page. Choose Add to add a row for each property and make selections as follows:
Table 25: Section Datapoint Configuration
Qualifier Timestamp Description Value
DetailKpi Optionally, select any time-related field to display a timestamp for the KPI value.
Enter a description for the KPI, such as a unit of measure. For example, for a temperature KPI, you might enter °C.
Select the value to display for the KPI, such as Latest Temperature.
The Section Line Item Configuration table allows you to configure line items on the page. Choose Add to add a row for each property and make selections as follows:
Table 26: Section Line Item Configuration
Qualifier Value Description
Notifications Leave blank. Select the Notifications qualifier to display notifications on the page.
7. Save your changes.
11.3 Defining Settings
66 P U B L I CSAP Connected Goods Implementation Guide
Defining UI Configurations

11.3.1 Defining a Map Provider
Set the map provider for the SAP Connected Goods map features.
Procedure
1. In the launchpad, choose the Settings tile and then choose the Map Settings tab.2. Choose Edit and edit the following settings as needed.
Table 27: Map Provider Details
Field Description
Map Provider Enter the name of the service to use as the map provider: Google, Bing, or Custom
Map Style Enter the style of map to display:○ Roadmap○ Satellite○ Terrain○ Hybrid
Tile URL 1 - 4 Enter one or more URLs for the provider, in the preferred order of usage. Default URLs are provided for Google and Bing.
Table 28: Map View Behavior
Field Description
Enable clustering/grouping of device Enables you to group devices on the map.
Sync map and table view content while zooming in/out Dynamically updates the table view so that only the devices displayed on the map are included in the table.
3. Save your changes.
11.3.2 Defining an External Map Provider
Set the external map provider for the SAP Connected Goods map features.
Context
This section determines the map provider that is used when you display the location of a device from the Device Details page.
SAP Connected Goods Implementation GuideDefining UI Configurations P U B L I C 67

Procedure
1. In the launchpad, choose the Settings tile and then choose the External Map Provider tab.2. Choose Edit and edit the following settings as needed.
Table 29: External Map Provider Details
Field Description
Map Provider Choose the service to use as the map provider: Google, Bing, or Custom
Map Style Choose the style of map to display:○ Roadmap○ Satellite○ Terrain○ Hybrid
External Map URL Enter the external map URL to use. A default UR is provided for Google and Bing.
3. Save your changes.
11.3.3 Defining Thresholds
Set key factors for device data.
Procedure
1. In the launchpad, choose the Settings tile and then choose the Thresholds tab.2. Choose Edit and edit the following settings as needed.
Table 30: Settings
Field Description
Distance for Geo-matching Assignment Enter the distance around a mapped device for which to display other devices on a map.
Distance for Geo-matching Nearby Status Enter the distance around a mapped device for which to display other devices in the Nearby Devices list.
Temperature Enter the target temperature for a device. A variation from this temperature will generate an alert.
Door Openings Threshold Enter the maximum number of times a device door can open without generating a notification.
Door Open Time Threshold Enter the maximum length of time a device door can be open without generating a notification.
68 P U B L I CSAP Connected Goods Implementation Guide
Defining UI Configurations

Field Description
Temperature Unit Choose to display temperature in Centigrade or Fahrenheit.
3. Save your changes.
11.3.4 Defining External Interfaces
Set APIs for accessing application data from an external device.
Procedure
1. In the launchpad, choose the Settings tile and then choose the External Interfaces tab.2. Choose Edit and edit the following settings as needed.
Table 31: APIs
Field Description
API to get Device Data Enter the URL for the API to use to get device data.
User Name/Password Enter the user name and password for this API.
API to get Device Location Enter the URL for the API to use to get a device location.
User Name/Password Enter the user name and password for this API.
3. Save your changes.
11.3.5 Defining Chart Settings
Enter Time Dimension Settings data.
Procedure
1. In the launchpad, choose the Settings tile and then choose the Chart Settings tab.2. Choose Edit and edit the following settings as needed.
Table 32: Time Dimension Settings
Field Description
Default Aggregation Select a default time increment to display in the device views.
SAP Connected Goods Implementation GuideDefining UI Configurations P U B L I C 69

Field Description
No. of Periods Enter the number of past time periods to display.
3. Save your changes.
11.3.6 Defining a Mail Server
Set mail server configuration data.
Procedure
1. In the launchpad, choose the Settings tile and then choose the Mail Server tab.2. Choose Edit and edit the following settings as needed.
Table 33: Server Configurations
Field Description
YAAS Email Send URL Enter a URL for this configuration.
YAAS Client ID Enter the client ID.
YAAS Client Secret Enter the client secret used for authentication.
Notification Service URL Enter a URL for the notification service.
YAAS Template Owner Enter the template owner.
3. Save your changes.
11.3.7 Defining Default Settings
Set the default view settings for the user.
Procedure
1. In the launchpad, choose the Settings tile and then choose the Default Settings tab.2. Choose Edit and edit the following settings as needed.
70 P U B L I CSAP Connected Goods Implementation Guide
Defining UI Configurations

Table 34:
Field Description
View Choose to display device data by default in Grid, Table, or Map form.
Preview Displays a preview of your data in the selected default view.
3. Save your changes.
SAP Connected Goods Implementation GuideDefining UI Configurations P U B L I C 71

12 Defining Rule Configurations
12.1 About the Rule Engine
The Rule Engine enables you to set up rules, based on device events, that will trigger notification events under conditions you specify.
Rules allow you to respond to complex situations that occur with your connected devices. For example, you might create rules to prepare for the following situations:
● A business operations manager might set up a rule to create a “Close Door” alert if the system detects that a cooler door has been left open for more than an hour.
● A business operations manager might create a rule to send out an email alerting the field service technician to visit a cooler if the inside temperature goes above 55 F and the door has been closed for the past 30 minutes.
You create rules based on events. Events are composed of criteria based on the information that is available in the event’s selected message type. When an event occurs, it triggers any rules that are associated with it.
Rules are made up of conditions that further refine the event criteria. Rule conditions can be based on message data, business data, and aggregators (mathematical functions). When an event is detected and a rule’s conditions are met, the rule triggers a response action. Possible responses include in-application notifications and email notifications.
To follow an example above, you might create an event with criteria that specify the temperature of a device rising above 55 degrees Fahrenheit. A rule might then trigger a notification for this event if certain additional conditions are met: for example, the device contains ice cream and the device door has been closed for 30 minutes. Notification templates are provided with the application.
You can also base rules on scheduled events at a frequency that you determine. You can specify when to check that a rule condition is met and when not to check that it is met.
To create a rule that is too complex to set up in the Custom Rule interface, you can use Expert mode to create the rule using a rule expression.
72 P U B L I CSAP Connected Goods Implementation Guide
Defining Rule Configurations

12.2 Creating an Event
Create a device event that will trigger one or more rules and their associated actions.
Procedure
1. On the launchpad, choose Event Management.2. On the Event Management page, choose Create New Event.3. In the Create New Event dialog box, enter details as follows.
Table 35:
Field Description
Event Name Enter a name for the event using a maximum of 50 characters.
Device Type From the list, choose the device type for this event.
Description Enter a description for the event using a maximum of 150 characters.
Message Type Optionally, choose a message type from the list. List options will vary based on the selected device type.
Event Type For most events, choose General. If you are creating a geofencing event, choose Geofencing.
SAP Connected Goods Implementation GuideDefining Rule Configurations P U B L I C 73
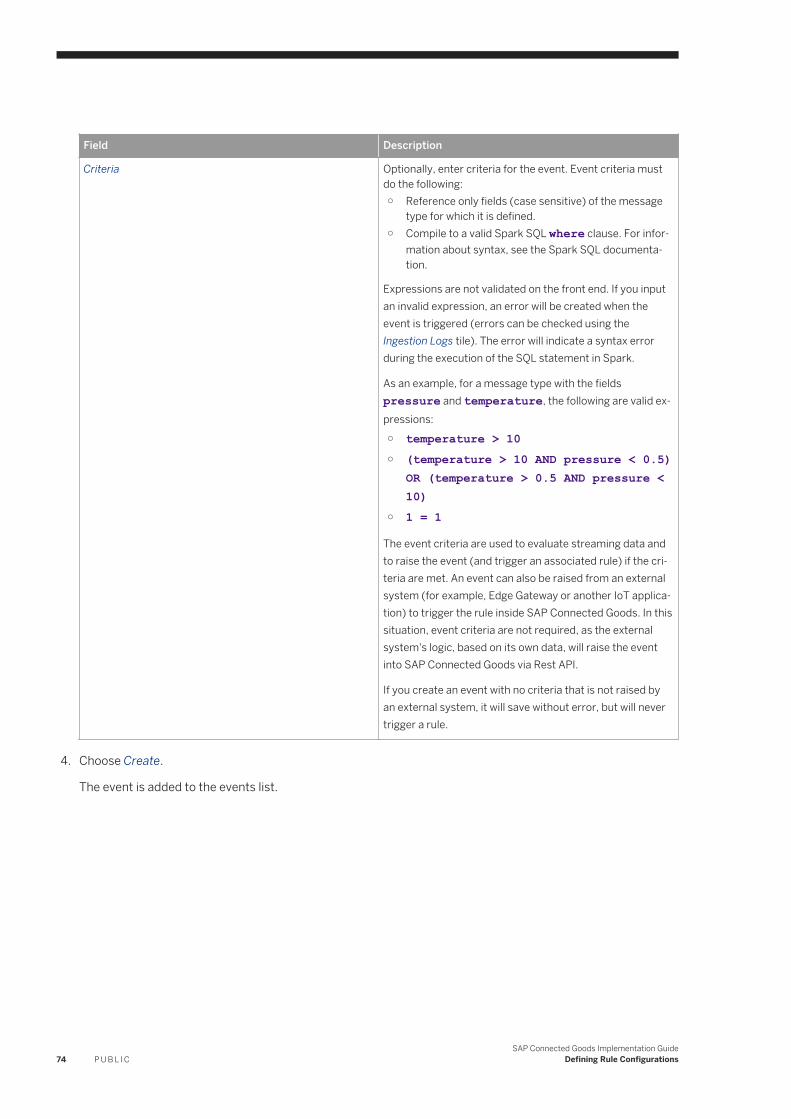
Field Description
Criteria Optionally, enter criteria for the event. Event criteria must do the following:○ Reference only fields (case sensitive) of the message
type for which it is defined.○ Compile to a valid Spark SQL where clause. For infor
mation about syntax, see the Spark SQL documentation.
Expressions are not validated on the front end. If you input an invalid expression, an error will be created when the event is triggered (errors can be checked using the Ingestion Logs tile). The error will indicate a syntax error during the execution of the SQL statement in Spark.
As an example, for a message type with the fields pressure and temperature, the following are valid expressions:
○ temperature > 10○ (temperature > 10 AND pressure < 0.5)
OR (temperature > 0.5 AND pressure < 10)
○ 1 = 1
The event criteria are used to evaluate streaming data and to raise the event (and trigger an associated rule) if the criteria are met. An event can also be raised from an external system (for example, Edge Gateway or another IoT application) to trigger the rule inside SAP Connected Goods. In this situation, event criteria are not required, as the external system's logic, based on its own data, will raise the event into SAP Connected Goods via Rest API.
If you create an event with no criteria that is not raised by an external system, it will save without error, but will never trigger a rule.
4. Choose Create.
The event is added to the events list.
74 P U B L I CSAP Connected Goods Implementation Guide
Defining Rule Configurations

12.3 Creating an Event from an Existing Event
You can base a new event on an existing event.
Procedure
1. On the launchpad, choose Event Management.2. On the Event Management page, choose the Event ID of the event to use as the basis for your new event.3. In the Edit Event dialog box, make the desired changes. See Creating an Event [page 73] for more information.4. Choose Save As....
The event is added to the events list.
12.4 Deleting an Event
Context
NoteYou can only delete events that are not linked to any existing rules.
Procedure
1. On the launchpad, choose Event Management.2. Choose the Select link and select one or more events to delete.3. Choose Delete.
The events are deleted.
SAP Connected Goods Implementation GuideDefining Rule Configurations P U B L I C 75

12.5 Creating a Rule
You can use the Rule Engine to create a rule. When a specified event occurs and the rule's conditions are met, the rule will trigger an action such as a notification.
Procedure
Create and Name the Rule1. On the launchpad, select the Rule Engine tile.2. On the Rule Engine page, choose Create New.3. Select a Device Type (for example, Smart Cooler).4. Enter a Rule Name and, optionally, a Description for the rule.
Add an Event5. Under If, use the Add Event control to select the event on which to base the rule. Only the events linked to the
selected device type are displayed. Do one of the following:
○ Select an event created in Event Management that specifies the criteria that will trigger the rule. For more information, see Creating an Event [page 73].
○ Select Scheduled Event to set up an event to check for the rule conditions at a specified time interval. You can also choose when not to check for the rule conditions (for example, on evenings or weekends).
Set up Rule Conditions6. Under If, use the Add Condition control to choose values to represent the conditions that will trigger a
notification.7. Choose Add Condition and optionally choose one or more Measures for the rule (for example, Temperature,
Power State, or Battery Level) and specify any thresholds. For example, you might choose the Temperature measure and set it to Higher than 55.
8. Choose Add Condition and optionally choose one or more Dimensions for the rule and specify its details. For example, to apply the rule only to device IDs with the prefix AA, you might choose Device ID and set it to Contains AA.
9. To create a more complex condition using an Aggregator (a mathematical calculation such as Average, Sum, etc., that is performed on a measure), do the following:a. Choose Add Condition and choose Create New under Aggregators.b. Choose Aggregate Function and choose a measure (such as Temperature) from the list.c. Enter a name in the Aggregator Name field. Do not include any spaces in the aggregator name.d. Choose a function for the aggregator: Count, Sum, Max, Min, Average, or Previous.e. Enter a time period and select a unit of measure (Seconds, Minutes, Hours, or Days).f. Save your changes.
NoteThe aggregator is saved for this rule only. If you create another rule, you will not see this aggregator in its custom aggregator list.
g. Choose Add Condition again and choose your new aggregator from the list.
76 P U B L I CSAP Connected Goods Implementation Guide
Defining Rule Configurations
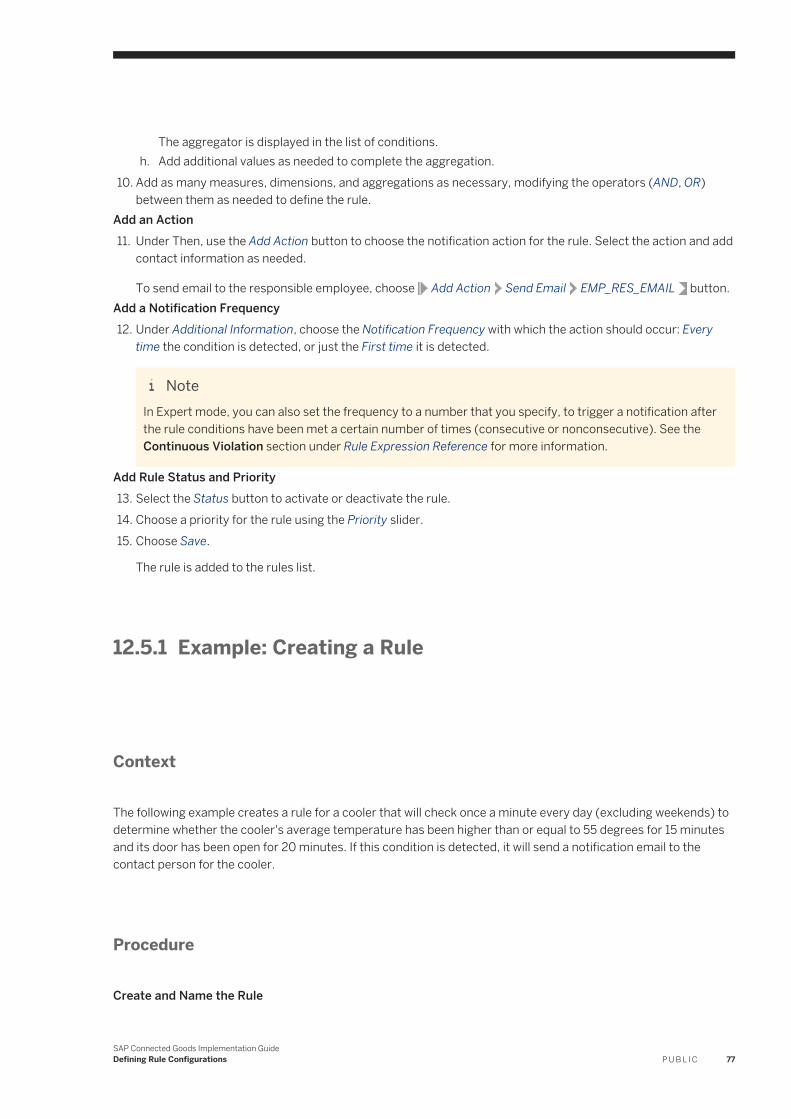
The aggregator is displayed in the list of conditions.h. Add additional values as needed to complete the aggregation.
10. Add as many measures, dimensions, and aggregations as necessary, modifying the operators (AND, OR) between them as needed to define the rule.
Add an Action11. Under Then, use the Add Action button to choose the notification action for the rule. Select the action and add
contact information as needed.
To send email to the responsible employee, choose Add Action Send Email EMP_RES_EMAIL button.Add a Notification Frequency12. Under Additional Information, choose the Notification Frequency with which the action should occur: Every
time the condition is detected, or just the First time it is detected.
NoteIn Expert mode, you can also set the frequency to a number that you specify, to trigger a notification after the rule conditions have been met a certain number of times (consecutive or nonconsecutive). See the Continuous Violation section under Rule Expression Reference for more information.
Add Rule Status and Priority13. Select the Status button to activate or deactivate the rule.14. Choose a priority for the rule using the Priority slider.15. Choose Save.
The rule is added to the rules list.
12.5.1 Example: Creating a Rule
Context
The following example creates a rule for a cooler that will check once a minute every day (excluding weekends) to determine whether the cooler's average temperature has been higher than or equal to 55 degrees for 15 minutes and its door has been open for 20 minutes. If this condition is detected, it will send a notification email to the contact person for the cooler.
Procedure
Create and Name the Rule
SAP Connected Goods Implementation GuideDefining Rule Configurations P U B L I C 77

1. On the launchpad, select the Rule Engine tile.2. On the Rule Engine page, choose Create New.3. Select Smart Cooler as the Device Type.4. Enter High Temp/Door Open as the rule name.
Add an Event5. Under If, use the Add Event control to select Scheduled Event.6. For Execute on, choose minute and 1.7. For Don't execute on, choose Saturday and Sunday.
Set up Rule Conditions8. Under If, use the Add Condition control.9. Under If, choose Add Condition and add the Door Open measure as follows:
a. Under Measures, choose Door Open Count.b. In the condition row, choose Higher than or equal to and enter 20.
10. Under If, choose Add Condition and add the Temperature-related aggregator as follows:a. Choose Add Condition and choose Create New under Aggregators.b. Choose Aggregate Function and choose Temperature from the list.c. Enter HighTemp in the Aggregator Name field. Do not include any spaces in the aggregator name.d. Choose the Average function for the aggregator.e. Enter 15 and select Minutes as the unit of measure.f. Save your changes.g. Choose Add Condition again and choose your new aggregator from the list.
The HighTemp aggregator is displayed in the list of conditions.h. In the condition row, choose Higher than or equal to and 55 to complete the aggregation..
Add an Action11. Under Then, use the Add Action button to choose the notification action for the rule. Select Send Email and
add contact information as needed.Add a Notification Frequency
78 P U B L I CSAP Connected Goods Implementation Guide
Defining Rule Configurations

12. Under Additional Information, choose Every time as the Notification Frequency.Add Rule Status and Priority13. Select On (green) for the Status to activate the rule.14. Choose High as the rule Priority.15. Choose Save.
The rule is added to the rules list.
12.6 Rule Engine Expert Mode
12.6.1 Creating a Rule Using a Rule Expression
For complex rules, you can create a rule using a rule expression.
Prerequisites
You are a developer who is familiar with the technical structure of JSON format and can formulate its structure as needed by following the CNG predefined format.
Context
Use a rule expression to create a rule that is too complex to create using the Custom Rule feature.
Procedure
1. In the launchpad, choose the Rule Engine tile.
SAP Connected Goods Implementation GuideDefining Rule Configurations P U B L I C 79
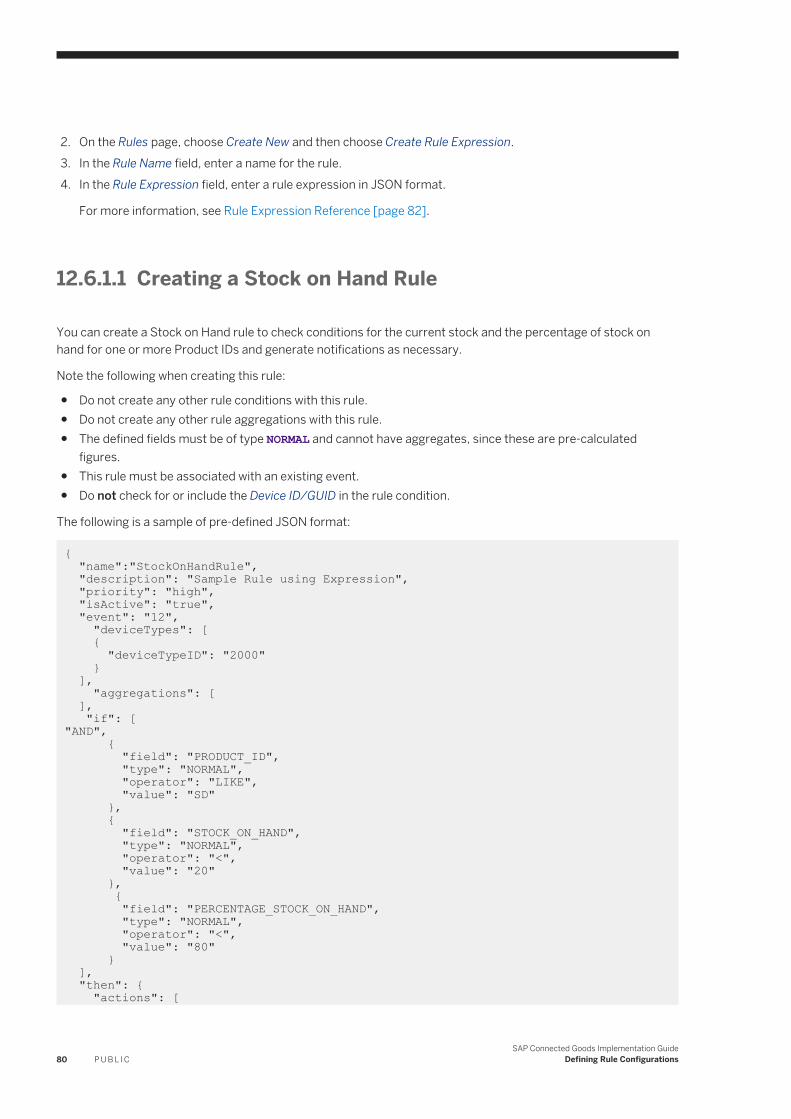
2. On the Rules page, choose Create New and then choose Create Rule Expression.3. In the Rule Name field, enter a name for the rule.4. In the Rule Expression field, enter a rule expression in JSON format.
For more information, see Rule Expression Reference [page 82].
12.6.1.1 Creating a Stock on Hand Rule
You can create a Stock on Hand rule to check conditions for the current stock and the percentage of stock on hand for one or more Product IDs and generate notifications as necessary.
Note the following when creating this rule:
● Do not create any other rule conditions with this rule.● Do not create any other rule aggregations with this rule.● The defined fields must be of type NORMAL and cannot have aggregates, since these are pre-calculated
figures.● This rule must be associated with an existing event.● Do not check for or include the Device ID/GUID in the rule condition.
The following is a sample of pre-defined JSON format:
{ "name":"StockOnHandRule", "description": "Sample Rule using Expression", "priority": "high", "isActive": "true", "event": "12", "deviceTypes": [ { "deviceTypeID": "2000" } ], "aggregations": [ ], "if": ["AND", { "field": "PRODUCT_ID", "type": "NORMAL", "operator": "LIKE", "value": "SD" }, { "field": "STOCK_ON_HAND", "type": "NORMAL", "operator": "<", "value": "20" }, { "field": "PERCENTAGE_STOCK_ON_HAND", "type": "NORMAL", "operator": "<", "value": "80" } ], "then": { "actions": [
80 P U B L I CSAP Connected Goods Implementation Guide
Defining Rule Configurations

{ "actionType": "EMAIL", "recipients": [ { "id": "xxxxxxx", "email": "abc@cdf" } ] } ], "frequency": "EVERYTIME" }}
Use the following table for allowable definitions in the JSON payload:
Table 36:
Object Description Allowed Field Definition
Allowed Type Allowed Operators
PRODUCT_ID Product ID PRODUCT_ID NORMAL =, <>, LIKE
STOCK_ON_HAND Stock on hand STOCK_ON_HAND NORMAL =, <>,>=,<=
PERCENTAGE_STOCK_ON_HAND
Percentage of stock PERCENTAGE_STOCK_ON_HAND
NORMAL =, <>,>=,<=
12.6.1.2 Creating a Time Period Check Rule
You can create a Time Period Check rule to compare the current time with a pre-defined time value. This is useful for determining whether the current time falls within a certain period.
The following is a sample of pre-defined JSON format. This rule condition will check whether the current UTC time falls outside the start and end times of the relocation period defined in the DEVICE_RELOCATION table for a particular device.
{ "name": "TimePeriodCheck", "description": "check if current time within period", "priority": "high", "isActive": "true", "event": "5", "deviceTypes": [ { "deviceTypeID": "abcdef1234" } ], "aggregations": [], "if": [ [ "OR", { "field": "CURRENT_TIME", "type": "NORMAL", "operator": "<", "value": "START_TIME;DEVICE_RELOCATION;DEVICE_ID" }, {
SAP Connected Goods Implementation GuideDefining Rule Configurations P U B L I C 81

"field": "CURRENT_TIME", "type": "NORMAL", "operator": ">", "value": "END_TIME;DEVICE_RELOCATION;DEVICE_ID" } ] ], "then": { "actions": [{ "actionType": "EMAIL", "recipients": [ { "id": "xxxxxxx", "email": "[email protected]" } ] } ], "frequency": "EVERYTIME" }}
Use the following table for allowable definitions in the JSON payload of RuleStep (defining if):
Table 37:
Object Description Allowed Field Definition
Allowed Type Allowed Operators Allowed Values
CURRENT_TIME Current UTC time CURRENT_TIME NORMAL =, <>,>=,<= See Allowed Value Format below.
Allowed Value Format
The allowed value format is as follows:
Time_Column_name;Table_name;Key_Field_Column_Name
Where:
● Time_Column_Name = The column name containing the time value within the table● Table_Name = The name of the table containing the time period information● Key_Field_Column_Name = The column name of the search by field (for example, Device ID)
For example, from the sample payload:
value: START_TIME;DEVICE_RELOCATION;DEVICE_ID
12.6.2 Rule Expression Reference
This topic provides reference information for a rule expression in JSON format.
JSON Sample Code
You create a rule expression in JSON format. The following are examples of predefined JSON.
82 P U B L I CSAP Connected Goods Implementation Guide
Defining Rule Configurations

JSON Sample for Coffeemaker Scenario
This rule specifies the following: If (MINIMUM COFEEINVENTORY within 60 second period is less than 0.10 AND (MILK_INVENTORY_LEVEL is less than 0.2 or DECAFFEINATED_COFFEE_INVENTORY_LEVEL is less than 0.1)) then send email to recipients.
{ "description": "Coffee Maker Scenario Rule using Expression", "priority": "high", "isActive": "true", "event": "1000", "deviceTypes": [ { "deviceTypeID": "1000" } ], "aggregations": [ { "name": "MINCOFEEINVENTORY", "field": "CAFFEINATED_COFFEE_INVENTORY_LEVEL", "function": "MIN", "timeDuration": "60", "timeUnit": "SECONDS" } ], "if": [ [ "AND", { "field": " MINCOFEEINVENTORY", "type": "AGG", "operator": "<", "value": "0.10" }, [ "OR", { "field": "MILK_INVENTORY_LEVEL", "type": "NORMAL", "operator": "<", "value": "0.2" }, { "field": "DECAFFEINATED_COFFEE_INVENTORY_LEVEL ", "type": "NORMAL", "operator": "<", "value": "0.1" } ] ] ], "then": { "actions": [ { "actionType": "EMAIL", "recipients": [ { "id": "i808440", "email": "[email protected]" }, { "id": "i802886", "email": "[email protected]" } ] } ],
SAP Connected Goods Implementation GuideDefining Rule Configurations P U B L I C 83

"frequency": "EVERYTIME" }}
JSON Sample for Cooler Scenario
This rule specifies the following: If (MAXIMUM TEMP > 25 within 10 second period AND (DOOR_OPEN_COUNT greater than 5 OR VEND_QUANTITY Less than 1)) then send emails to recipients.
{ "description": "Cooler Scenario Rule using Expression", "priority": "high", "isActive": "true", "event": "1000", "deviceTypes": [ { "deviceTypeID": "1000" } ], "aggregations": [ { "name": "MAXTEMP", "field": "INSIDE_TEMPERATURE", "function": "MAX", "timeDuration": "10", "timeUnit": "SECONDS" } ], "if": [ [ "AND", { "field": "MAXTEMP", "type": "AGG", "operator": ">", "value": "25" }, [ "OR", { "field": "DOOR_OPEN_COUNT", "type": "NORMAL", "operator": ">", "value": "5" }, { "field": "VEND_QUANTITY", "type": "NORMAL", "operator": "<", "value": "1" } ] ] ], "then": { "actions": [ { "actionType": "EMAIL", "recipients": [ { "id": "i808440", "email": "[email protected]" }, { "id": "i802886", "email": "[email protected]" }
84 P U B L I CSAP Connected Goods Implementation Guide
Defining Rule Configurations

] } ], "frequency": "EVERYTIME" }}
Rule Main Body: RULE
This table provides reference information for creating the main body of the rule.
Table 38:
Object Required? Description Allowed Values
description Yes Rule description No restrictions
priority Yes Rule priority low, medium, high
isActive Yes Rule status true, false
Rule will be ignored if set to false.
event Yes Rule event [page 92] Existing event ID (EVENT_ID) or schedule for schedule event type
NoteThis field is required and cannot be left empty.
run_Schedule Yes, for schedule event type only
Rule Execute on Only relevant for schedule event type.
NoteFollows Cron format. For more information, see: http://www.nncron.ru/help/EN/working/cron-format.htm
SAP Connected Goods Implementation GuideDefining Rule Configurations P U B L I C 85
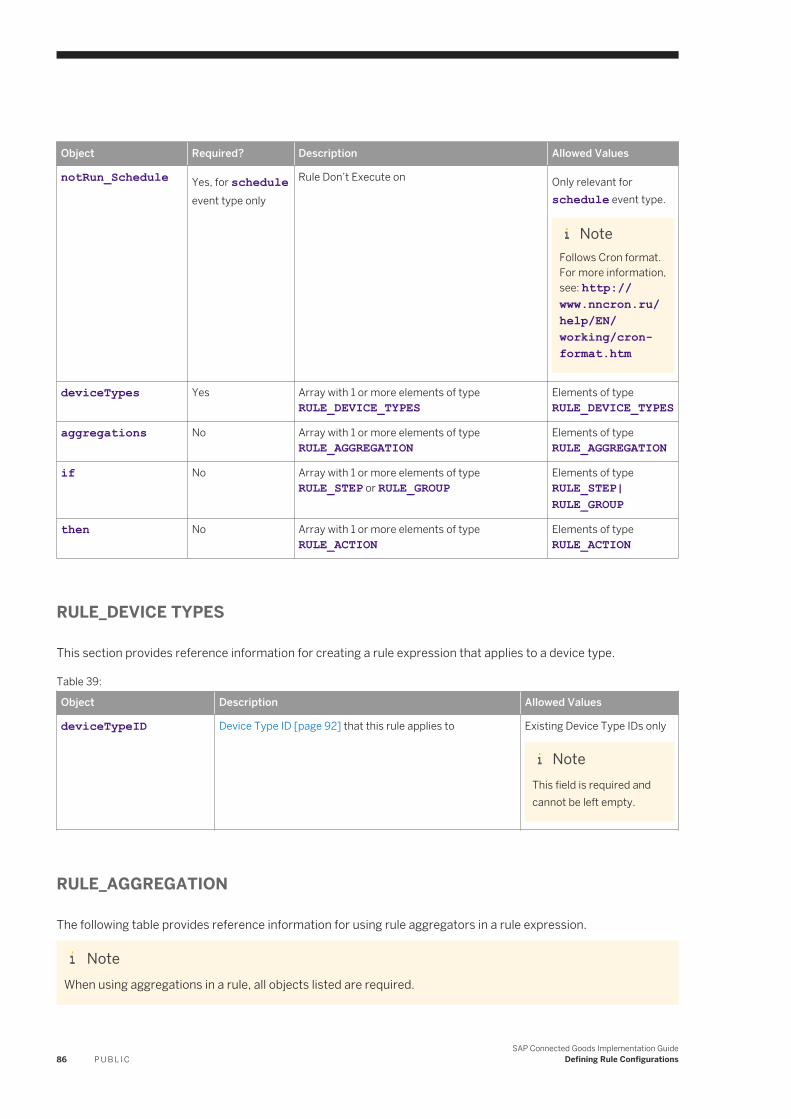
Object Required? Description Allowed Values
notRun_Schedule Yes, for schedule event type only
Rule Don’t Execute on Only relevant for schedule event type.
NoteFollows Cron format. For more information, see: http://www.nncron.ru/help/EN/working/cron-format.htm
deviceTypes Yes Array with 1 or more elements of type RULE_DEVICE_TYPES
Elements of type RULE_DEVICE_TYPES
aggregations No Array with 1 or more elements of type RULE_AGGREGATION
Elements of type RULE_AGGREGATION
if No Array with 1 or more elements of type RULE_STEP or RULE_GROUP
Elements of type RULE_STEP|RULE_GROUP
then No Array with 1 or more elements of type RULE_ACTION
Elements of type RULE_ACTION
RULE_DEVICE TYPES
This section provides reference information for creating a rule expression that applies to a device type.
Table 39:
Object Description Allowed Values
deviceTypeID Device Type ID [page 92] that this rule applies to Existing Device Type IDs only
NoteThis field is required and cannot be left empty.
RULE_AGGREGATION
The following table provides reference information for using rule aggregators in a rule expression.
NoteWhen using aggregations in a rule, all objects listed are required.
86 P U B L I CSAP Connected Goods Implementation Guide
Defining Rule Configurations

Table 40:
Object Description Allowed Values
name Aggregation name No restrictions
field Rule condition field [page 92] Existing rule field ID (FIELD_ID)
function Aggregation function MAX, SUM, AVG, MIN, PREVIOUS, COUNT
timeDuration Time duration Any numeric value
timeUnit Time unit SECONDS, MINUTES, HOURS, DAYS
RULE_STEP
The following table provides reference information for a rule expression using the if operator.
NoteWhen using rule steps in a rule, all objects listed are required.
Table 41:
Object Description Allowed Values
field Rule condition field [page 92] Existing rule field ID (FIELD_ID)
type Rule condition type NORMAL for non-aggregate condition
AGG for aggregate condition
operator Rule operator If the field is a type of STRING, only the following operators can be used:>, <, >=, <=, <>, LIKE
If the field is a type of INTEGER or DECIMAL, only the following operators can be used:>, <, >=, <=, <>
value Rule condition value No restrictions
RULE_GROUP
An array with 3 or more elements. It allows you to check for multiple conditions (door is open AND temperature is below 10°). The first element of the array must have the value "AND" or "OR" and defines how your conditions are connected. The rest of the elements can be either of type RULE_STEP or another RULE_GROUP, which allows you to nest conditions.
SAP Connected Goods Implementation GuideDefining Rule Configurations P U B L I C 87

RULE_ACTION
The following table provides reference information for a rule expression using an action.
NoteWhen using actions in a rule, include one or more of the following objects.
Table 42:
ActionType Description Sample
EMAIL Send email to specified recipients { "actionType":"EMAIL", "recipients":[ { "id":"<userid>", "email":"<email address>" } ] }
EMAIL Send email to responsible employee "then": { "actions": [ { "actionType":"EMAIL", "recipients":[ { "id":"EMP_RESPONSIBLE", "email":"EMP_RES_EMAIL" } ] } ], "frequency": "EVERYTIME" }
GEO_MATCH Execute geo-matching { "actionType": "GEO_MATCH" },
GEO_UNASSIGN Unassign a device from a previously matched location { "actionType":
"GEO_UNASSIGN" },
GEO_REVERSECODE Update the address of a device based on latitude and longitude { "actionType":
"GEO_REVERSECODE" },
88 P U B L I CSAP Connected Goods Implementation Guide
Defining Rule Configurations

ActionType Description Sample
MOVE_ALERT Send an alert if the device moves away from its assigned location { "actionType":
"MOVE_ALERT" },
EMAIL_STOREEMPL Send an email to the relevant store employee { "actionType":
"EMAIL_STOREEMPL" },
Table 43:
Object Description Allowed Values
action Array with 1 or more elements of type actionType
See the table above for allowed actionType
frequency Action frequency EVERYTIME, FIRSTTIME, NTIMECONS, NTIMENON
If NTIMECONS or NTIMENON are used for frequency, the object frequencyNumber must be specified.
frequencyNumber Number of condition checks expected An integer value. See Continuous Violation below for details.
Continuous Violation
The continuous violation feature allows you to check for a condition that has occurred a certain number of times. This condition can be checked for both consecutive occurrence and non-consecutive occurrence. For example, you might use this feature to determine whether the temperature has stayed consistently high for the last three record readings.
To use this feature, specify the following rule conditions:
"frequency": "NTIMECONS" or "NTIMENON" "frequencyNumber": "n"where n = number of condition checks "NTIMECONS" = check if condition is satisfied consecutively n times"NTIMENON" = check if condition is satisfied non-consecutively n times
The following is a sample payload for the consecutive condition check:
{ "name":"ConsecutiveRule", "description": " Consecutive condition check", "priority": "high", "isActive": "true", "event": "11", "deviceTypes": [ {
SAP Connected Goods Implementation GuideDefining Rule Configurations P U B L I C 89

"deviceTypeID": "2000" } ], "aggregations": [ ], "if": [ { "field": "SERIAL_ID", "type": "NORMAL", "operator": "LIKE", "value": "VM" } ], "then": { "actions": [ { "actionType":"EMAIL", "recipients":[ { "id":"ixxxxxx", "email":"[email protected]" } ] } ], "frequency": "NTIMECONS", "frequencyNumber": "3" }}
The following is a sample payload for the non-consecutive condition check:
{ "name":"NonConsecutiveRule", "description": "Non Consecutive condition check", "priority": "high", "isActive": "true", "event": "11", "deviceTypes": [ { "deviceTypeID": "2000" } ], "aggregations": [ ], "if": [ { "field": "SERIAL_ID", "type": "NORMAL", "operator": "LIKE", "value": "VM" } ], "then": { "actions": [ { "actionType":"EMAIL", "recipients":[ { "id":"ixxxxxx", "email":"[email protected]" } ] } ], "frequency": "NTIMENON",
90 P U B L I CSAP Connected Goods Implementation Guide
Defining Rule Configurations
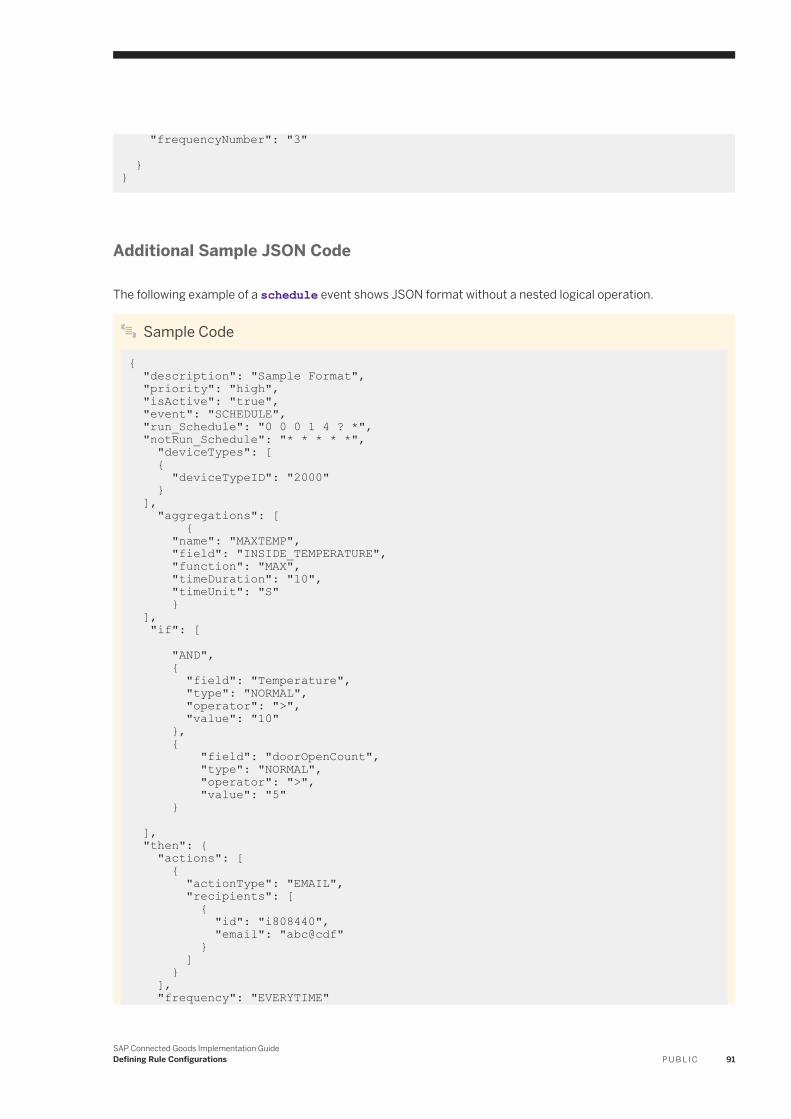
"frequencyNumber": "3" }}
Additional Sample JSON Code
The following example of a schedule event shows JSON format without a nested logical operation.
Sample Code
{ "description": "Sample Format", "priority": "high", "isActive": "true", "event": "SCHEDULE", "run_Schedule": "0 0 0 1 4 ? *", "notRun_Schedule": "* * * * *", "deviceTypes": [ { "deviceTypeID": "2000" } ], "aggregations": [ { "name": "MAXTEMP", "field": "INSIDE_TEMPERATURE", "function": "MAX", "timeDuration": "10", "timeUnit": "S" } ], "if": [ "AND", { "field": "Temperature", "type": "NORMAL", "operator": ">", "value": "10" }, { "field": "doorOpenCount", "type": "NORMAL", "operator": ">", "value": "5" } ], "then": { "actions": [ { "actionType": "EMAIL", "recipients": [ { "id": "i808440", "email": "abc@cdf" } ] } ], "frequency": "EVERYTIME"
SAP Connected Goods Implementation GuideDefining Rule Configurations P U B L I C 91

}}
12.6.3 Finding the ID Value for the "event" Field
Procedure
1. In the launchpad, choose the Event Management tile.
You see a table of events and their associated data.2. Locate the event you want to use and note the value in the Event ID column for that event.
12.6.4 Finding the ID Value for the "deviceTypeID" Field
Procedure
1. In the launchpad, choose the Device Type tile.
You see a table of device types and their associated data.2. Locate the device type you want to use and note the value in the ID column for that event.
12.6.5 Finding the ID Value for "field" in a Condition
Procedure
1. In the launchpad, choose the Device Type tile.
You see a table of device types and their associated data.2. Locate the device type you want to use and select the value in the ID column for that event.
You see the Message Types page.
92 P U B L I CSAP Connected Goods Implementation Guide
Defining Rule Configurations
3. In the Field Name column, locate and make a note of the fields you want to use.
SAP Connected Goods Implementation GuideDefining Rule Configurations P U B L I C 93

13 Setting up Notifications
13.1 Setting up the Notification Service
Context
The notification service is used in SAP Connected Goods to push notifications to end users. It provides two delivery channels for pushing notifications: they can be displayed in the Notifications panel of the UI and/or sent via email. Notifications are generated at runtime from notification templates that are configured in the notification service.
SAP Connected Goods delivers several predefined notification templates. These templates specify the delivery channel for pushing notifications and are used to generate notifications at runtime. For more information about the templates, see Editing Notification Templates [page 95].
You set up the notification service in a new SAP Connected Goods customer tenant on the SAP Cloud Platform by doing the following:
1. Set up YaaS email with the notification service for email notifications from SAP Connected Goods.2. Set up the notification origin for SAP Connected Goods with the notification service.3. Save SAP Connected Goods notification templates with the notification service.
You will only need to perform these steps once, in the specified order, as follows.
Procedure
Set up the YaaS Email Service with the Notification Service1. In the SAP Connected Goods launchpad, choose the Settings tile and choose the Mail Server tab.2. Enter the following information under Server Configuration:
Field Description/Value
YaaS Email Service URL https://api.yaas.io/hybris/email/v1/{YaaSProject}/send-async
YaaS Client ID and YaaS Client Secret Authorization credentials to use the YaaS email service
YaaS Template Owner {YaaSProject}.{YaaSProjectClient}Notification Service URL https://connected-goods-ns-java-
{TenantId}.cfapps.sap.hana.ondemand.com
3. Save your changes.
94 P U B L I CSAP Connected Goods Implementation Guide
Setting up Notifications

Set up the Notification Origin for SAP Connected Goods4. Using Postman, retrieve the oAuth token for SAP Connected Goods applications as follows:
a. Log onto Cloud Foundry, run cf env connected-goods-java-rules, and retrieve the clientid and clientsecret specified under XSUAA.
b. Use Postman to retrieve oAuth token as follows:○ Set the Authorization Type to OAuth 2.0 and select Get New Access Token to retrieve the oAuth
token.○ Set Auth URL and Access Token URL to https://
{TenantID}.authentication.sap.hana.ondemand.com/oauth/token○ Set the Client-ID and Client-Secret values from the previous step.○ Set Grant Type to Client Credential.
5. Use Postman to create the notification origin for SAP Connected Goods as follows:a. Retrieve the oAuth token generated in the previous step.b. Using the oAuth token, make a POST request to the following URL: https://
{TenantID}.cfapps.sap.hana.ondemand.com/rules/notificationtemplate/originSave SAP Connected Goods Notification Templates with the Notification Service6. Use Postman to save the SAP Connected Goods predefined notification templates with the Notification
Service by making a POST request to the following URL: http://{TenantID}.cfapps.sap.hana.ondemand.com/rules/notificationtemplate/loadtemplates
13.2 Editing Notification Templates
Context
You can edit the templates of predefined services but not introduce new services. Two types of templates are supported: Email and In-App.
Procedure
1. On the launchpad, choose the Notification Templates tile.2. In the Notification Templates table, you see the following predefined templates provided by SAP Connected
Goods:
SAP Connected Goods Implementation GuideSetting up Notifications P U B L I C 95

Table 44:
Service Type Name Last Updated by Last Updated at Action
Rules Email Rules Email Template
SAP <date> Edit
Rules In-App Rules In-App Template
SAP <date> Edit
Geofencing Email Geofencing Email Template
SAP <date> Edit
Geofencing In-App Geofencing In-App Template
SAP <date> Edit
Geomatching Email Geomatching Email Template
SAP <date> Edit
Geomatching In-App Geomatching In-App Template
SAP <date> Edit
Onboarding Email Onboarding Email Template
SAP <date> Edit
Onboarding In-App Onboarding In-App Template
SAP <date> Edit
CRM Update Email CRM Update Email Template
SAP <date> Edit
CRM Update In-App CRM Update In-App Template
SAP <date> Edit
CRM Service Request Initiation
Email CSR Initiation Email Template
SAP <date> Edit
CRM Service Request Initiation
In-App CSR Initiation In-App Template
SAP <date> Edit
CRM Service Request Update
Email CSR Update Email Template
SAP <date> Edit
CRM Service Request Update
In-App CSR Update In-App Template
SAP <date> Edit
Object Details Page Notification
Email Object Details Page Notification Email Template
SAP <date> Edit
3. Choose Edit for the template you want to edit.4. For an Email template, edit the subject and body of the template as needed. For an In-App template, edit the
text area as needed.
NoteUse only the variables provided in the sample template. Do not add new variables.
5. Choose Save. Your changes are saved and overwrite the default template. The Notification Templates table indicates when the template was last updated and by whom.
This guide provides the text of the predefined templates to allow you to revert to the original content if needed. See Default Notification Template Text [page 99] for more information.
96 P U B L I CSAP Connected Goods Implementation Guide
Setting up Notifications

You can also reset the default templates using SQL. See Resetting Notification Templates Using SQL [page 97].
13.3 Resetting Notification Templates Using SQL
Context
You can use SQL statements to reset the notification templates to their predefined text.
Procedure
1. Connect to the HANA DB instance of the customer’s SAP Connected Goods tenant using the following URL: https://dbutil-vmmt.cfapps.sap.hana.ondemand.com/
2. Run the following SQL statements:
DELETE from "sap.iot.scb.rules::mdl.RULE_NOTIFICATION_TEMPLATE"; INSERT INTO "sap.iot.scb.rules::mdl.RULE_NOTIFICATION_TEMPLATE"(GUID,TEMPLATE_OWNER,TEMPLATE_VERSION,TEMPLATE_NAME,TEMPLATE_CONSUMPTION_CHANNEL,TEMPLATE_HEADER_TEXT,TEMPLATE_BODY_TEXT,CREATED_BY,CREATED_TIME,MODIFIED_BY,MODIFIED_TIME) VALUES (100,'RULES',100,'Rules Email Notification Template','EMAIL','{T_EVENT_NAME}, {T_RULE_NAME} : {T_DEVICE_TYPE}, {T_DEVICE_ID}','Dear User This message is to inform you about a {T_PRIORITY} priority event. The rule {T_RULE_NAME} has occurred with these conditions: {T_RULE_CONDITION}. This occurred at {T_TIME} for the device {T_DEVICE_ID}. The current values for the device {T_DEVICE_ID} are as follows {T_DEVICE_DATA}. The device is located at {T_LOCATION}. Click here to see the device details: {T_DEVICE_URL}. Please take the necessary steps to resolve this issue. Kind regards SAP Connected Goods','SAP','2017-01-03T12:11:13.000Z','SAP','2017-01-03T12:11:13.000Z');INSERT INTO "sap.iot.scb.rules::mdl.RULE_NOTIFICATION_TEMPLATE"(GUID,TEMPLATE_OWNER,TEMPLATE_VERSION,TEMPLATE_NAME,TEMPLATE_CONSUMPTION_CHANNEL,TEMPLATE_HEADER_TEXT,TEMPLATE_BODY_TEXT,CREATED_BY,CREATED_TIME,MODIFIED_BY,MODIFIED_TIME) VALUES (101,'RULES',100,'Rules InApp Notification Template','INAPP',NULL,'{T_EVENT_NAME}, {T_RULE_NAME} has been detected for the device {T_DEVICE_ID}','SAP','2017-01-03T12:11:13.000Z','SAP','2017-01-03T12:11:13.000Z');INSERT INTO "sap.iot.scb.rules::mdl.RULE_NOTIFICATION_TEMPLATE"(GUID,TEMPLATE_OWNER,TEMPLATE_VERSION,TEMPLATE_NAME,TEMPLATE_CONSUMPTION_CHANNEL,TEMPLATE_HEADER_TEXT,TEMPLATE_BODY_TEXT,CREATED_BY,CREATED_TIME,MODIFIED_BY,MODIFIED_TIME) VALUES (102,'GEOMATCH',100,'GeoMatch Email Notification Template','EMAIL','Device {T_DEVICE_ID} successfully auto-mapped to location/store {T_LOCATION} : {T_STORE_NAME}','Dear User The following device has been successfully auto-mapped to a location/store by the geo-matching service in the SAP Connected Goods system: Device {T_DEVICE_ID}
SAP Connected Goods Implementation GuideSetting up Notifications P U B L I C 97

Device category: {T_DEVICE_CATEGORY_DESCRIPTION} Device type: {T_DEVICE_TYPE} Mapped to {T_LOCATION} : {T_STORE_NAME} at {T_TIME}. Click here to see device details: {T_DEVICE_URL}. Please take any necessary next steps. Kind regards SAP Connected Goods','SAP','2017-01-03T12:11:13.000Z','SAP','2017-01-03T12:11:13.000Z');INSERT INTO "sap.iot.scb.rules::mdl.RULE_NOTIFICATION_TEMPLATE"(GUID,TEMPLATE_OWNER,TEMPLATE_VERSION,TEMPLATE_NAME,TEMPLATE_CONSUMPTION_CHANNEL,TEMPLATE_HEADER_TEXT,TEMPLATE_BODY_TEXT,CREATED_BY,CREATED_TIME,MODIFIED_BY,MODIFIED_TIME) VALUES (103,'GEOMATCH',100,'GeoMatch InApp Notification Template','INAPP',NULL,'Device {T_DEVICE_ID} successfully auto-mapped to location/store {T_LOCATION} : {T_STORE_NAME}','SAP','2017-01-03T12:11:13.000Z','SAP','2017-01-03T12:11:13.000Z');INSERT INTO "sap.iot.scb.rules::mdl.RULE_NOTIFICATION_TEMPLATE"(GUID,TEMPLATE_OWNER,TEMPLATE_VERSION,TEMPLATE_NAME,TEMPLATE_CONSUMPTION_CHANNEL,TEMPLATE_HEADER_TEXT,TEMPLATE_BODY_TEXT,CREATED_BY,CREATED_TIME,MODIFIED_BY,MODIFIED_TIME) VALUES (104,'GEOFENCE',100,'GeoFence Email Notification Template','EMAIL','{T_DEVICE_CATEGORY_DESCRIPTION} {T_DEVICE_ID} exited geofence {T_GEOFENCE_ID}','Dear User {T_DEVICE_CATEGORY_DESCRIPTION} {T_DEVICE_ID} exited geofence {T_GEOFENCE_ID}. Please take the necessary steps to resolve this issue. Kind regards SAP Connected Goods','SAP','2017-01-03T12:11:13.000Z','SAP','2017-01-03T12:11:13.000Z');INSERT INTO "sap.iot.scb.rules::mdl.RULE_NOTIFICATION_TEMPLATE"(GUID,TEMPLATE_OWNER,TEMPLATE_VERSION,TEMPLATE_NAME,TEMPLATE_CONSUMPTION_CHANNEL,TEMPLATE_HEADER_TEXT,TEMPLATE_BODY_TEXT,CREATED_BY,CREATED_TIME,MODIFIED_BY,MODIFIED_TIME) VALUES (105,'GEOFENCE',100,'GeoFence InApp Notification Template','INAPP',NULL,'{T_DEVICE_CATEGORY_DESCRIPTION} {T_DEVICE_ID} exited geofence {T_GEOFENCE_ID}','SAP','2017-01-03T12:11:13.000Z','SAP','2017-01-03T12:11:13.000Z');INSERT INTO "sap.iot.scb.rules::mdl.RULE_NOTIFICATION_TEMPLATE"(GUID,TEMPLATE_OWNER,TEMPLATE_VERSION,TEMPLATE_NAME,TEMPLATE_CONSUMPTION_CHANNEL,TEMPLATE_HEADER_TEXT,TEMPLATE_BODY_TEXT,CREATED_BY,CREATED_TIME,MODIFIED_BY,MODIFIED_TIME) VALUES (106,'ONBOARD',100,'Onboard Email Notification Template','EMAIL','Device {T_DEVICE_ID} onboarded successfully at {T_TIME}','Dear UserThe following device has been onboarded successfully into the SAP Connected Goods system:Device: {T_DEVICE_ID} Device category: {T_DEVICE_CATEGORY_DESCRIPTION} Device type: {T_DEVICE_TYPE} Onboarding mechanism: via {T_ONBOARD_TYPE} mechanism at {T_TIME}Custom Device attributes/identifiers: {T_DEVICE_DATA}Click here to see device details: {T_DEVICE_URL}Please take any necessary next steps.Kind regardsSAP Connected Goods','SAP','2017-01-03T12:11:13.000Z','SAP','2017-01-03T12:11:13.000Z');INSERT INTO "sap.iot.scb.rules::mdl.RULE_NOTIFICATION_TEMPLATE"(GUID,TEMPLATE_OWNER,TEMPLATE_VERSION,TEMPLATE_NAME,TEMPLATE_CONSUMPTION_CHANNEL,TEMPLATE_HEADER_TEXT,TEMPLATE_BODY_TEXT,CREATED_BY,CREATED_TIME,MODIFIED_BY,MODIFIED_TIME) VALUES (107,'ONBOARD',100,'Onboard InApp Notification Template','INAPP',NULL,'The {T_DEVICE_TYPE} with the ID {T_DEVICE_ID} has been onboarded successfully','SAP','2017-01-03T12:11:13.000Z','SAP','2017-01-03T12:11:13.000Z');INSERT INTO "sap.iot.scb.rules::mdl.RULE_NOTIFICATION_TEMPLATE"(GUID,TEMPLATE_OWNER,TEMPLATE_VERSION,TEMPLATE_NAME,TEMPLATE_CONSUMPTION_CHANNEL,TEMPLATE_HEADER_TEXT,TEMPLATE_BODY_TEXT,CREATED_BY,CREATED_TIME,MODIFIED_BY,MODIFIED_TIME) VALUES (108,'RUNTIME_USER_MESSAGE',100,'RuntimeUserMessage Email Notification Template','EMAIL','DeviceAlert: Notification for
98 P U B L I CSAP Connected Goods Implementation Guide
Setting up Notifications
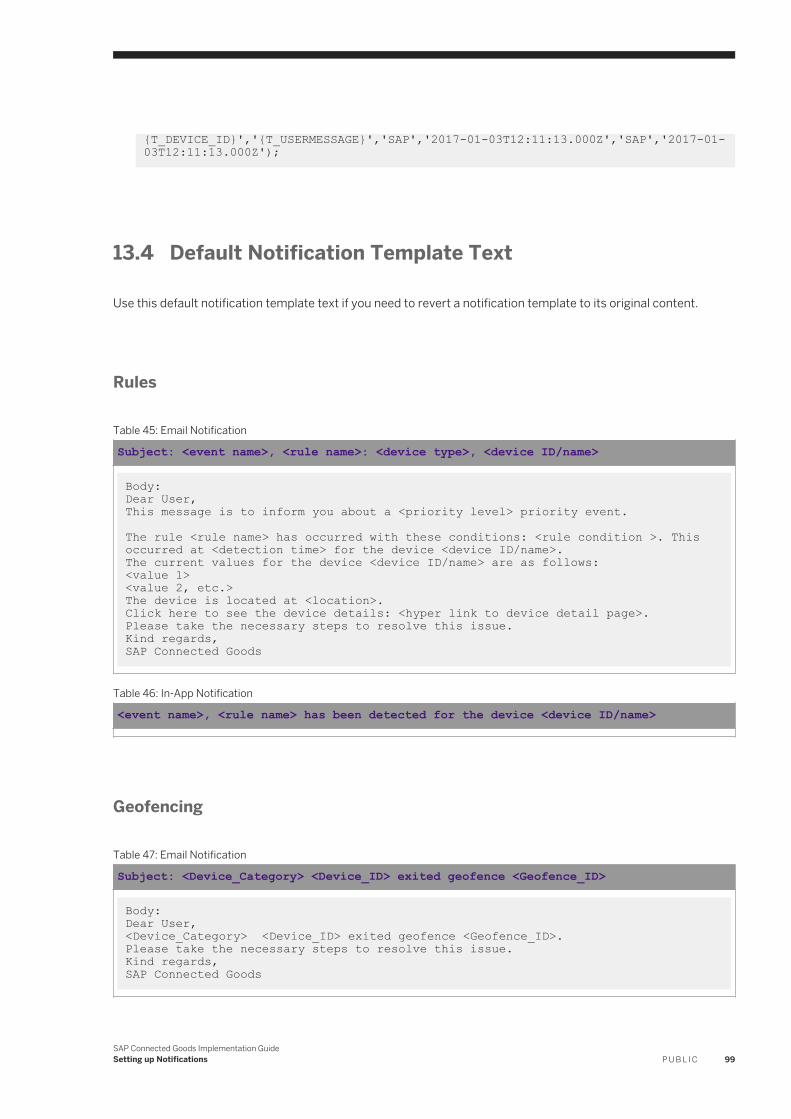
{T_DEVICE_ID}','{T_USERMESSAGE}','SAP','2017-01-03T12:11:13.000Z','SAP','2017-01-03T12:11:13.000Z');
13.4 Default Notification Template Text
Use this default notification template text if you need to revert a notification template to its original content.
Rules
Table 45: Email Notification
Subject: <event name>, <rule name>: <device type>, <device ID/name>
Body: Dear User,This message is to inform you about a <priority level> priority event. The rule <rule name> has occurred with these conditions: <rule condition >. This occurred at <detection time> for the device <device ID/name>.The current values for the device <device ID/name> are as follows:<value 1><value 2, etc.>The device is located at <location>.Click here to see the device details: <hyper link to device detail page>. Please take the necessary steps to resolve this issue.Kind regards,SAP Connected Goods
Table 46: In-App Notification
<event name>, <rule name> has been detected for the device <device ID/name>
Geofencing
Table 47: Email Notification
Subject: <Device_Category> <Device_ID> exited geofence <Geofence_ID>
Body: Dear User,<Device_Category> <Device_ID> exited geofence <Geofence_ID>.Please take the necessary steps to resolve this issue.Kind regards,SAP Connected Goods
SAP Connected Goods Implementation GuideSetting up Notifications P U B L I C 99

Table 48: In-App Notification
<Device_Category> <Device_ID> exited geofence <Geofence_ID>
Geomatching
No rules are needed for alert notifications with geomatching. The alert is generated when the geo-matching service completes the auto-mapping process.
Table 49: Email Notification
Subject: Device <Device_ID> successfully auto-mapped to location/store <location/store name>
Body: Dear User,The following device has been successfully auto-mapped to a location/store by the geo-matching service in the SAP Connected Goods system:Device <Device_ID> Device category: <device_category> Device type: <device_type> Mapped to <Location_type> : <Store name> & <store address>at <timestamp>Click here to see device details: <hyperlink to device detail page>Please take any necessary next steps.Kind regards,SAP Connected Goods
Table 50: In-App Notification
The <Device Type> with the ID <Device_ID> has been successfully auto-mapped to location/store <location/store name>.
Onboarding
No rules are needed for alert notifications with onboarding. The alert is generated when the onboarding of the device takes place.
100 P U B L I CSAP Connected Goods Implementation Guide
Setting up Notifications

Table 51: Email Notification
Subject: Device <Device_ID> onboarded successfully at <timestamp>
Body: Dear User, The following device has been onboarded successfully into the SAP Connected Goods system:Device <Device_ID> Device category: <device_category> Device type: <device_type> Onboarding mechanism: via <manual/mobile/upload> mechanismat <timestamp>Custom Device attributes/identifiers:<attribute 1 e.g. serial no><attribute 1 e.g. module no><on-boarded by / quality check done by>Click here to see device details: <hyperlink to device detail page>Please take any necessary next steps.Kind regards,SAP Connected Goods
Table 52: In-App Notification
The <Device Type> with the ID <Device_ID> has been onboarded successfully
CRM Update
The alert notification is generated when the SAP Connected Goods system updates the back-end business system.
For example, after geomatching of a cooler to a store in the SAP Connected Goods system, the mapped store/cooler data is updated in the CRM (creation of installed base with attributes and store information).
Table 53: Email Notification
Subject: SAP Connected Goods updated a <field> in the back-end CRM system
Body: Dear User,SAP Connected Goods updated the following <field> in the back-end CRM system:Field <field/attribute> Updated with <information>Kind regards,SAP Connected Goods
Table 54: In-App Notification
<field/attribute> was updated in the CRM back-end system with <information>
SAP Connected Goods Implementation GuideSetting up Notifications P U B L I C 101
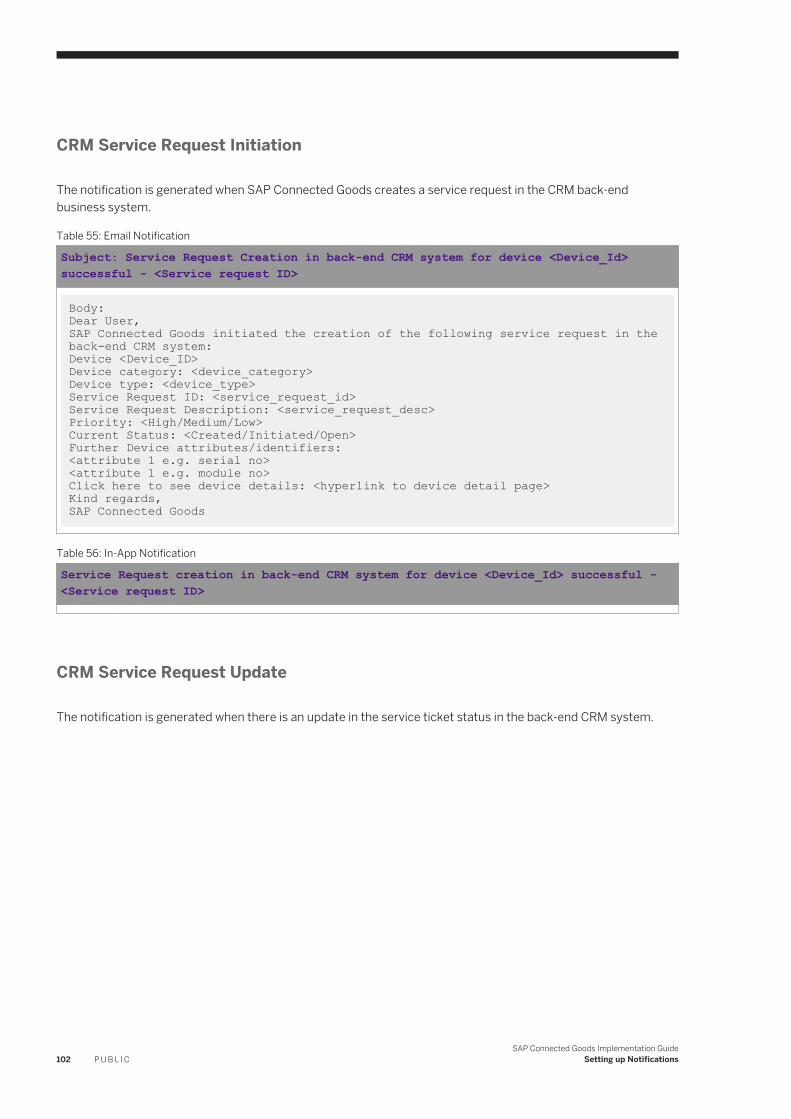
CRM Service Request Initiation
The notification is generated when SAP Connected Goods creates a service request in the CRM back-end business system.
Table 55: Email Notification
Subject: Service Request Creation in back-end CRM system for device <Device_Id> successful - <Service request ID>
Body: Dear User,SAP Connected Goods initiated the creation of the following service request in the back-end CRM system:Device <Device_ID> Device category: <device_category>Device type: <device_type> Service Request ID: <service_request_id> Service Request Description: <service_request_desc>Priority: <High/Medium/Low>Current Status: <Created/Initiated/Open>Further Device attributes/identifiers:<attribute 1 e.g. serial no><attribute 1 e.g. module no>Click here to see device details: <hyperlink to device detail page>Kind regards,SAP Connected Goods
Table 56: In-App Notification
Service Request creation in back-end CRM system for device <Device_Id> successful - <Service request ID>
CRM Service Request Update
The notification is generated when there is an update in the service ticket status in the back-end CRM system.
102 P U B L I CSAP Connected Goods Implementation Guide
Setting up Notifications

Table 57: Email Notification
Subject: Service Request - <service_request_id> in CRM : Status update <current_status>
Body: Dear User,The status related to the service request <service_request_id> was updated:Device <Device_ID> Device category: <device_category> & Device type <device_type> Service Request ID: <service_request_id> Service Request Description: <service_request_desc>Priority: <High/Medium/Low>Previous status: <old status>Updated status: <Modified/Closed>Further Device attributes/identifiers:<attribute 1 e.g. serial no><attribute 1 e.g. module no>Click here to see device details: <hyperlink to device detail page>Kind regards,SAP Connected Goods
Table 58: In-App Notification
Status for Service Request <Service request ID> for the device <Device_Id> changed to <new status> in back-end CRM system
Object Details Page Notification
This template enables you to notify a contact person directly by choosing Notify on the Object Details Page.
Table 59: Email Notification
Subject: DeviceAlert: Notification for {T_DEVICE_ID}
Body: {T_USERMESSAGE}
SAP Connected Goods Implementation GuideSetting up Notifications P U B L I C 103

14 Data Ingestion Expert Mode
This section describes how to perform data ingestion in Expert mode.
14.1 Transformation Background
By default, SAP Connected Goods creates an entry in the sap.iot.scb.cng.dataManagement::dataManagement.TRANSFORMATIONS (TRANSFORMATIONS) database table for every device type and message type combination that exists. The naming convention for these default transformations is <DEVICE TYPE NAME>__<MESSAGE TYPE NAME>_BASE. The purpose of these entries is to define the mapping of the message type fields of the ingested data to the generic SAP Connected Goods KPI database table columns. This is done primarily through an SQL statement that will be executed using Apache Spark SQL.
During data ingestion, raw message data is grouped by device type and message type and stored in temporary tables (Apache Spark SQL). The naming convention for these tables is <DEVICE TYPE NAME>__<MESSAGE TYPE NAME>_CORE. Following this, the default SAP Connected Goods transformations are executed to produce another set of temporary tables in Spark (_BASE tables). By default, _BASE tables are written to the SAP Connected Goods KPI database tables.
Depending on the requirements of your business case, you can configure additional transformations to produce and store calculated values (data enrichment) in addition to the fields of a message type. This can be done using data in the _CORE tables, _BASE tables, and optionally using SAP Connected Goods application master data. The coffeemaker scenario example does not require the configuration of additional transformations. If your business case requires this, consult the topics in this section for more information.
14.2 Transformation Configuration
Context
You can configure new transformations by adding records to the TRANSFORMATIONS database table.
104 P U B L I CSAP Connected Goods Implementation Guide
Data Ingestion Expert Mode
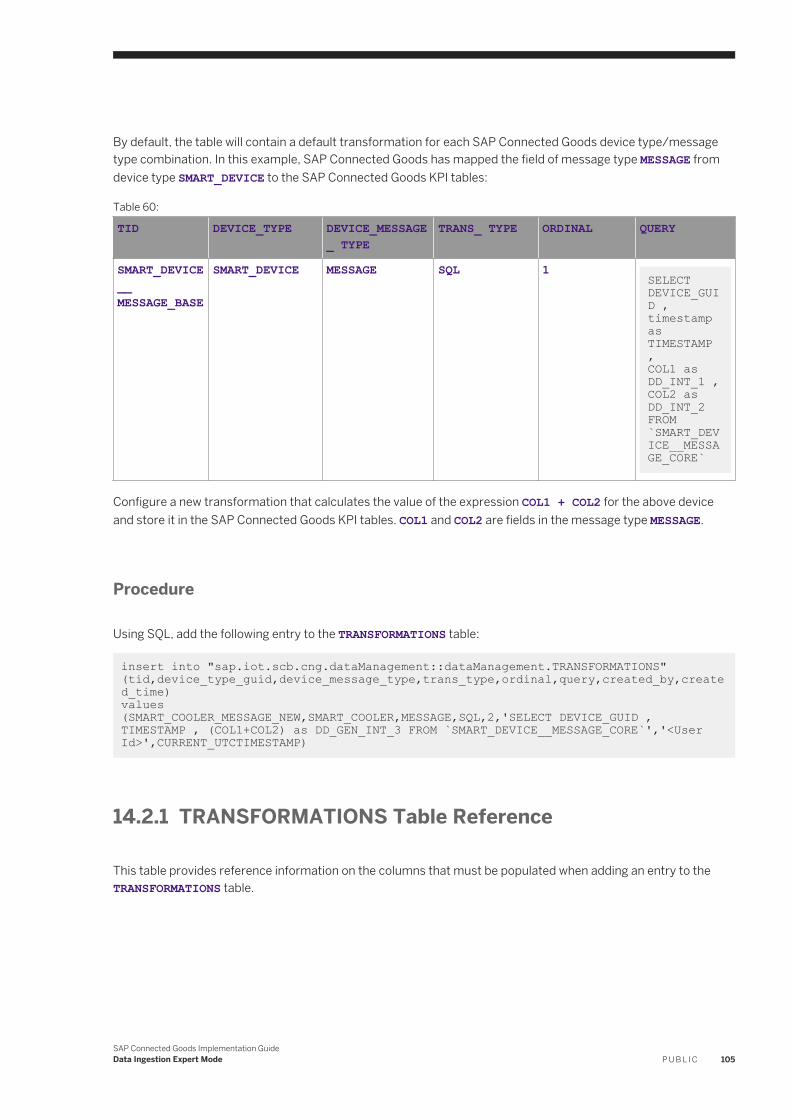
By default, the table will contain a default transformation for each SAP Connected Goods device type/message type combination. In this example, SAP Connected Goods has mapped the field of message type MESSAGE from device type SMART_DEVICE to the SAP Connected Goods KPI tables:
Table 60:
TID DEVICE_TYPE DEVICE_MESSAGE_ TYPE
TRANS_ TYPE ORDINAL QUERY
SMART_DEVICE__ MESSAGE_BASE
SMART_DEVICE MESSAGE SQL 1SELECT DEVICE_GUID , timestamp as TIMESTAMP , COL1 as DD_INT_1 , COL2 as DD_INT_2 FROM `SMART_DEVICE__MESSAGE_CORE`
Configure a new transformation that calculates the value of the expression COL1 + COL2 for the above device and store it in the SAP Connected Goods KPI tables. COL1 and COL2 are fields in the message type MESSAGE.
Procedure
Using SQL, add the following entry to the TRANSFORMATIONS table:
insert into "sap.iot.scb.cng.dataManagement::dataManagement.TRANSFORMATIONS" (tid,device_type_guid,device_message_type,trans_type,ordinal,query,created_by,created_time)values(SMART_COOLER_MESSAGE_NEW,SMART_COOLER,MESSAGE,SQL,2,'SELECT DEVICE_GUID , TIMESTAMP , (COL1+COL2) as DD_GEN_INT_3 FROM `SMART_DEVICE__MESSAGE_CORE`','<User Id>',CURRENT_UTCTIMESTAMP)
14.2.1 TRANSFORMATIONS Table Reference
This table provides reference information on the columns that must be populated when adding an entry to the TRANSFORMATIONS table.
SAP Connected Goods Implementation GuideData Ingestion Expert Mode P U B L I C 105
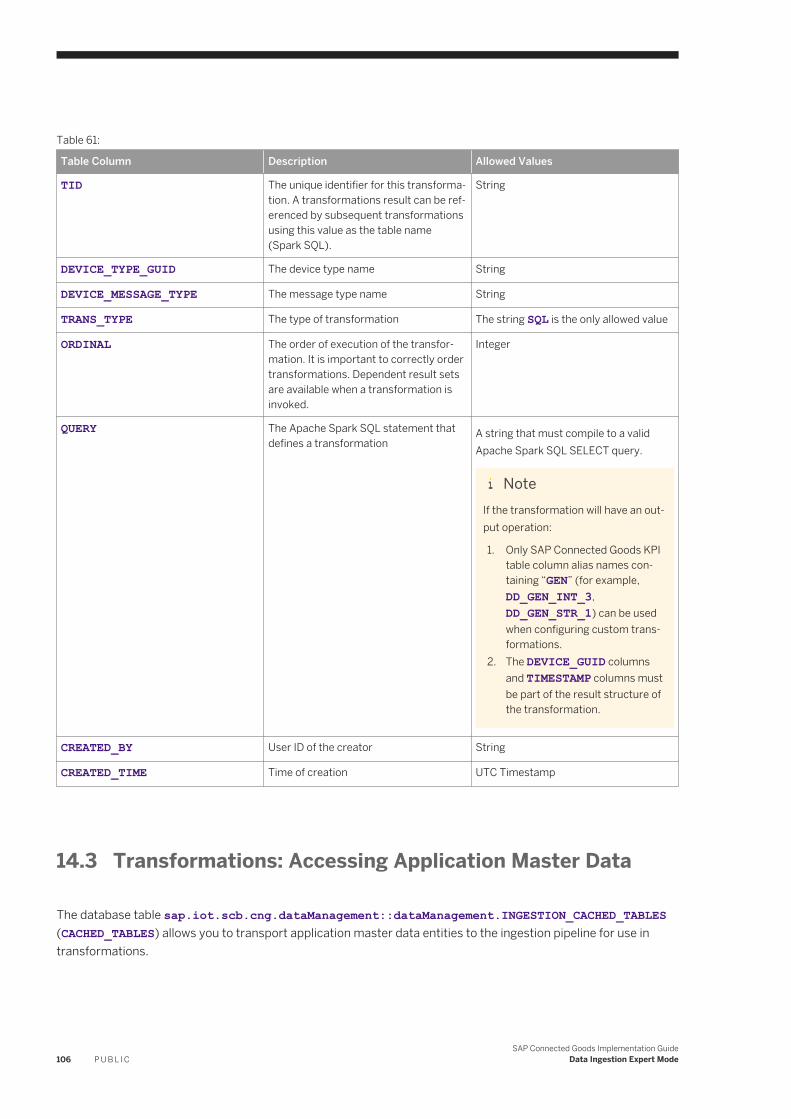
Table 61:
Table Column Description Allowed Values
TID The unique identifier for this transformation. A transformations result can be referenced by subsequent transformations using this value as the table name (Spark SQL).
String
DEVICE_TYPE_GUID The device type name String
DEVICE_MESSAGE_TYPE The message type name String
TRANS_TYPE The type of transformation The string SQL is the only allowed value
ORDINAL The order of execution of the transformation. It is important to correctly order transformations. Dependent result sets are available when a transformation is invoked.
Integer
QUERY The Apache Spark SQL statement that defines a transformation
A string that must compile to a valid Apache Spark SQL SELECT query.
NoteIf the transformation will have an output operation:
1. Only SAP Connected Goods KPI table column alias names containing “GEN” (for example, DD_GEN_INT_3, DD_GEN_STR_1) can be used when configuring custom transformations.
2. The DEVICE_GUID columns and TIMESTAMP columns must be part of the result structure of the transformation.
CREATED_BY User ID of the creator String
CREATED_TIME Time of creation UTC Timestamp
14.3 Transformations: Accessing Application Master Data
The database table sap.iot.scb.cng.dataManagement::dataManagement.INGESTION_CACHED_TABLES (CACHED_TABLES) allows you to transport application master data entities to the ingestion pipeline for use in transformations.
106 P U B L I CSAP Connected Goods Implementation Guide
Data Ingestion Expert Mode
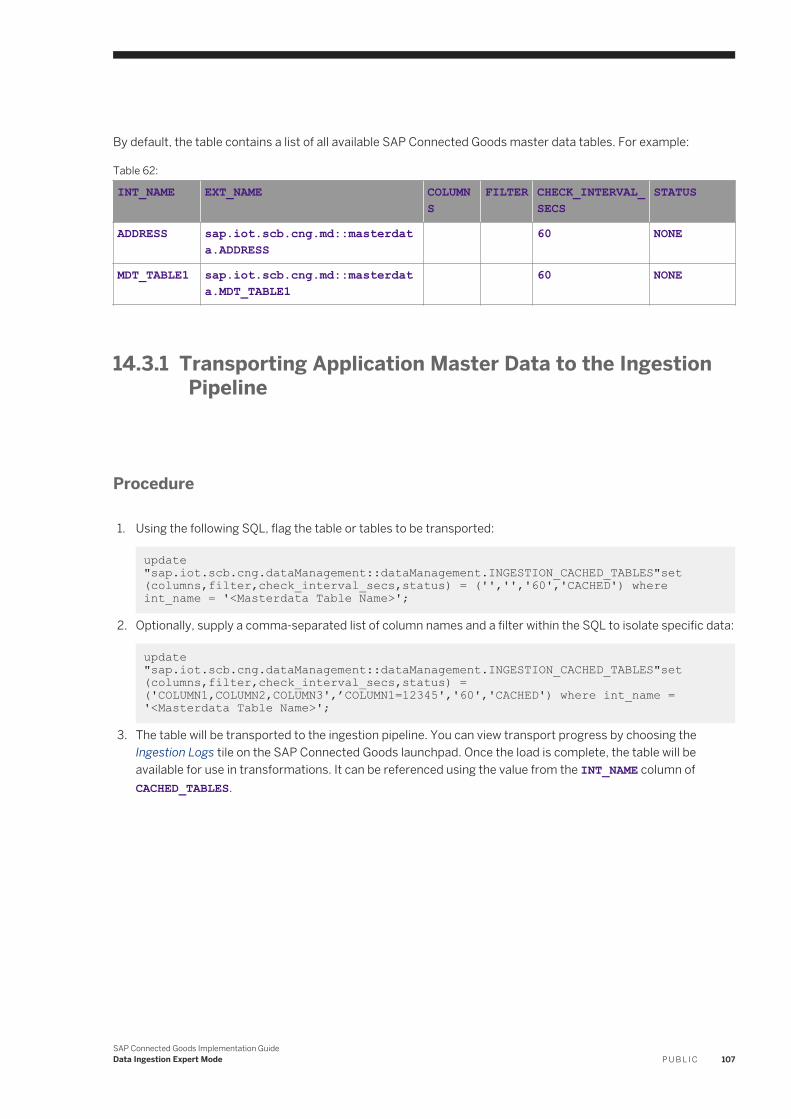
By default, the table contains a list of all available SAP Connected Goods master data tables. For example:
Table 62:
INT_NAME EXT_NAME COLUMNS
FILTER CHECK_INTERVAL_SECS
STATUS
ADDRESS sap.iot.scb.cng.md::masterdata.ADDRESS
60 NONE
MDT_TABLE1 sap.iot.scb.cng.md::masterdata.MDT_TABLE1
60 NONE
14.3.1 Transporting Application Master Data to the Ingestion Pipeline
Procedure
1. Using the following SQL, flag the table or tables to be transported:
update "sap.iot.scb.cng.dataManagement::dataManagement.INGESTION_CACHED_TABLES"set (columns,filter,check_interval_secs,status) = ('','','60','CACHED') where int_name = '<Masterdata Table Name>';
2. Optionally, supply a comma-separated list of column names and a filter within the SQL to isolate specific data:
update "sap.iot.scb.cng.dataManagement::dataManagement.INGESTION_CACHED_TABLES"set (columns,filter,check_interval_secs,status) = ('COLUMN1,COLUMN2,COLUMN3',’COLUMN1=12345','60','CACHED') where int_name = '<Masterdata Table Name>';
3. The table will be transported to the ingestion pipeline. You can view transport progress by choosing the Ingestion Logs tile on the SAP Connected Goods launchpad. Once the load is complete, the table will be available for use in transformations. It can be referenced using the value from the INT_NAME column of CACHED_TABLES.
SAP Connected Goods Implementation GuideData Ingestion Expert Mode P U B L I C 107
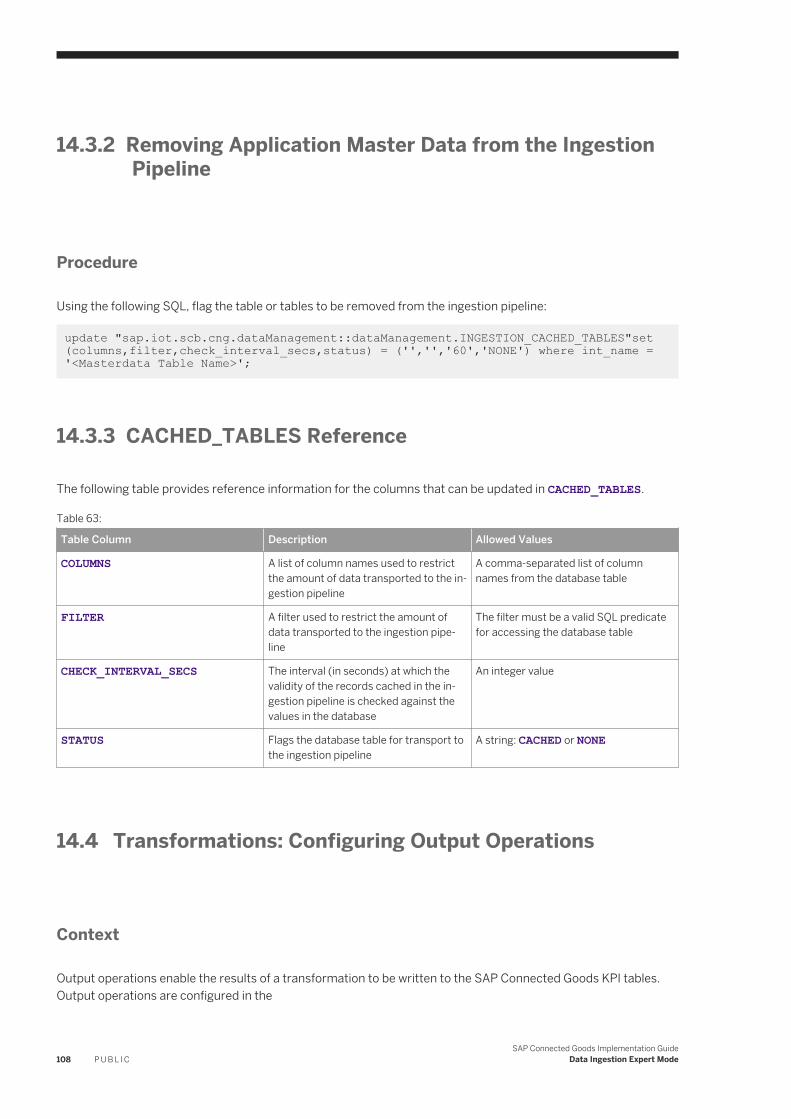
14.3.2 Removing Application Master Data from the Ingestion Pipeline
Procedure
Using the following SQL, flag the table or tables to be removed from the ingestion pipeline:
update "sap.iot.scb.cng.dataManagement::dataManagement.INGESTION_CACHED_TABLES"set (columns,filter,check_interval_secs,status) = ('','','60','NONE') where int_name = '<Masterdata Table Name>';
14.3.3 CACHED_TABLES Reference
The following table provides reference information for the columns that can be updated in CACHED_TABLES.
Table 63:
Table Column Description Allowed Values
COLUMNS A list of column names used to restrict the amount of data transported to the ingestion pipeline
A comma-separated list of column names from the database table
FILTER A filter used to restrict the amount of data transported to the ingestion pipeline
The filter must be a valid SQL predicate for accessing the database table
CHECK_INTERVAL_SECS The interval (in seconds) at which the validity of the records cached in the ingestion pipeline is checked against the values in the database
An integer value
STATUS Flags the database table for transport to the ingestion pipeline
A string: CACHED or NONE
14.4 Transformations: Configuring Output Operations
Context
Output operations enable the results of a transformation to be written to the SAP Connected Goods KPI tables. Output operations are configured in the
108 P U B L I CSAP Connected Goods Implementation Guide
Data Ingestion Expert Mode

sap.iot.scb.cng.dataManagement::dataManagement.TRANSFORMATION_OUTPUTS (OUTPUTS) database table.
You must configure the output of a transformation to the SAP Connected Goods KPI tables. The following procedure configures the outputs for the transformation SMART_DEVICE__MESSAGE_NEW that was created in the previous section.
Procedure
Using SQL, create the following two entries in the OUTPUTS database table:
insert into "sap.iot.scb.cng.dataManagement::dataManagement.TRANSFORMATION_OUTPUTS" (tid,view_name,destination,category,write_type,key) values('SMART_DEVICE__MESSAGE_NEW','sap.iot.scb.cng.md::devicedata.DEVICE_DATA','HANA','CORE','INSERT','');insert into "sap.iot.scb.cng.dataManagement::dataManagement.TRANSFORMATION_OUTPUTS"(tid,view_name,destination,category,write_type,key) values('SMART_DEVICE__MESSAGE_NEW','sap.iot.scb.cng.md::devicedata.DEVICE_DATA_LATEST_VALUES','HANA','CORE','UPSERT-NOT-NULL','DEVICE_GUID');
NoteWhen inserting rows into the OUTPUTS table, the only variable column value is the value inserted to the TID column. All other column values must be populated as indicated in the procedure above.
SAP Connected Goods Implementation GuideData Ingestion Expert Mode P U B L I C 109

15 Application Readiness
After you have completed all the procedures in this guide, SAP Connected Goods is ready to support your business use cases. See the SAP Connected Goods 3.0 User Guide for information about using the application.
110 P U B L I CSAP Connected Goods Implementation Guide
Application Readiness

Important Disclaimers and Legal Information
Coding SamplesAny software coding and/or code lines / strings ("Code") included in this documentation are only examples and are not intended to be used in a productive system environment. The Code is only intended to better explain and visualize the syntax and phrasing rules of certain coding. SAP does not warrant the correctness and completeness of the Code given herein, and SAP shall not be liable for errors or damages caused by the usage of the Code, unless damages were caused by SAP intentionally or by SAP's gross negligence.
AccessibilityThe information contained in the SAP documentation represents SAP's current view of accessibility criteria as of the date of publication; it is in no way intended to be a binding guideline on how to ensure accessibility of software products. SAP in particular disclaims any liability in relation to this document. This disclaimer, however, does not apply in cases of willful misconduct or gross negligence of SAP. Furthermore, this document does not result in any direct or indirect contractual obligations of SAP.
Gender-Neutral LanguageAs far as possible, SAP documentation is gender neutral. Depending on the context, the reader is addressed directly with "you", or a gender-neutral noun (such as "sales person" or "working days") is used. If when referring to members of both sexes, however, the third-person singular cannot be avoided or a gender-neutral noun does not exist, SAP reserves the right to use the masculine form of the noun and pronoun. This is to ensure that the documentation remains comprehensible.
Internet HyperlinksThe SAP documentation may contain hyperlinks to the Internet. These hyperlinks are intended to serve as a hint about where to find related information. SAP does not warrant the availability and correctness of this related information or the ability of this information to serve a particular purpose. SAP shall not be liable for any damages caused by the use of related information unless damages have been caused by SAP's gross negligence or willful misconduct. All links are categorized for transparency (see: http://help.sap.com/disclaimer).
SAP Connected Goods Implementation GuideImportant Disclaimers and Legal Information P U B L I C 111

go.sap.com/registration/contact.html
© 2017 SAP SE or an SAP affiliate company. All rights reserved.No part of this publication may be reproduced or transmitted in any form or for any purpose without the express permission of SAP SE or an SAP affiliate company. The information contained herein may be changed without prior notice.Some software products marketed by SAP SE and its distributors contain proprietary software components of other software vendors. National product specifications may vary.These materials are provided by SAP SE or an SAP affiliate company for informational purposes only, without representation or warranty of any kind, and SAP or its affiliated companies shall not be liable for errors or omissions with respect to the materials. The only warranties for SAP or SAP affiliate company products and services are those that are set forth in the express warranty statements accompanying such products and services, if any. Nothing herein should be construed as constituting an additional warranty.SAP and other SAP products and services mentioned herein as well as their respective logos are trademarks or registered trademarks of SAP SE (or an SAP affiliate company) in Germany and other countries. All other product and service names mentioned are the trademarks of their respective companies.Please see http://www.sap.com/corporate-en/legal/copyright/index.epx for additional trademark information and notices.